

Kurzweil FORTE SE Musician's Manual

®
SE
TRANSPOSE
KB3 DISTORTION
MASTER EQ
VARIATION
ROTARY S/F
VOLUME
1 2 3 4 5 6 7 8 9
ZONE 1 ZONE 2 ZONE 3 ZONE 4 FX1 FX2 DELAY REVERB
-24 +15
Hi
-24 +15
MID
1.4k
200Hz
7k
FREQ
-24 +15
LOW
ON/OFF
FILT/EQ 1
ZONE 1
REAL - TIME CONTROL
ASSIGNABLE SWITCHES
ON/OFF
FILT/EQ 2
ZONE 2
ON/OFF DECAY F/S
CHOR/VIB DEPTH
CHORUS / VIBRATO
B
C D
ATTACK
DECAY/REL
REL/RATE FX2 DELAY
ZONE 3
ZONE 4
PERCUSSION
E G
FX1
PITCH H/L
KB3
KEY CLICKBRAKE LOUD/SOFT
ARP ON/OFF
KB3
H
IA F
SAVE
EDIT
21 3 4 5 6 7 8 9 10
REVERB
FAVORITES
STORAGE
ACTIVE
CHANNEL
LAYER
ZONE
EXIT
PREVIOUS NEXT
MODE
PROGRAM
MULTI
GLOBAL
USER
VALUE JUMP
SOUND SELECT
CATEGORY
LEADS PADS SYNTHS
PIANO E.PIANO CLAV ORGAN
GUITAR/BASS VOICES/MISC
SPACE
PROGRAM / MULTI
PROGRAM
DEMO
INSERT
5 6 7 8
5 JKL 6 MNO 7 PQRS
13 14 15 16
-
/
DELETE
+
DEMO
DRUMS
CANCEL
STRINGS
BRASS/WINDS
ENSEMBLE HYBRID
1 2 3 4
1 2 ABC 3 DEF 4 GHI 8 TUV
9 10 11 12
0
9 WXYZ
SYNTH BASS
PERCUSSION
ENTER
PANIC
Rev. B - Written for software release v2.0 and OS 3.69.28028
Part Number 91580-002
i
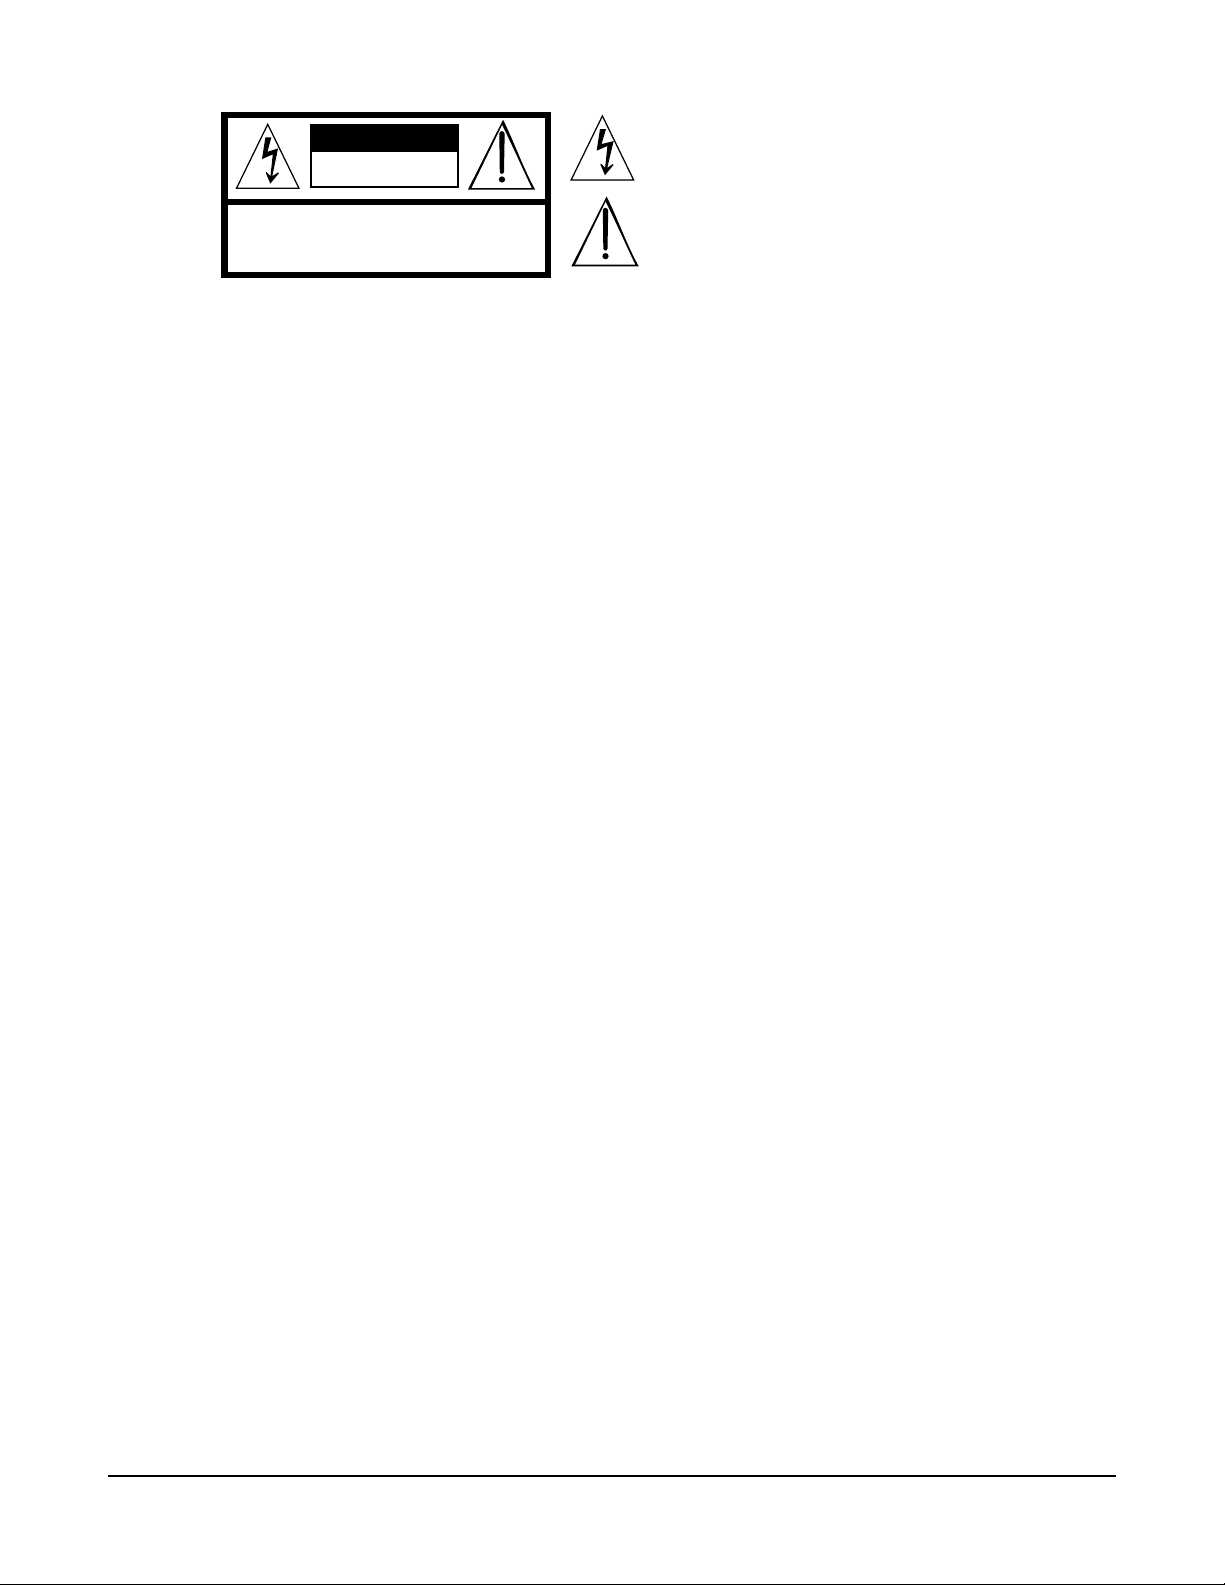
CAUTION
RISK OF ELECTRIC SHOCK
DO NOT OPEN
The lightning flash with the arrowhead symbol, within an equilateral
triangle is intended to alert the user to the presence of uninsulated
"dangerous voltage" within the product's enclosure that may be of
sufficient magnitude to constitute a risk of electric shock to persons.
CAUTION: TO REDUCE THE RISK OF ELECTRIC SHOCK,
REFER SERVICING TO QUALIFIED SERVICE PERSONNEL.
DO NOT REMOVE THE COVER.
NO USER SERVICEABLE PARTS INSIDE.
The exclamation point within an equilateral triangle is intended
to alert the user to the presence of important operating and
maintenance (servicing) instructions in the literature
accompanying the product.
IMPORTANT SAFETY & INSTALLATION INSTRUCTIONS
INSTRUCTIONS PERTAINING TO THE RISK OF FIRE ELECTRIC SHOCK , OR INJURY TO PERSONS
WARNING: When using electric products, basic precautions should
always be followed, including the following:
1. Read all the Safety and Installation Instructions and Explanation
of Graphic Symbols before using the product.
2. This product must be grounded. If it should malfunction or
break down, grounding provides a path of least resistance for
electric current to reduce the risk of electric shock. This product
is equipped with a power supply cord having an equipmentgrounding conductor and a grounding plug. The plug must be
plugged into an appropriate outlet which is properly installed and
grounded in accordance with all local codes and ordinances.
DANGER: Improper connection of the equipment-grounding
conductor can result in a risk of electric shock. Do not modify the
plug provided with the product – if it will not t the outlet, have a
proper outlet installed by a qualied electrician. Do not use an
adaptor which defeats the function of the equipment-grounding
conductor. If you are in doubt as to whether the product is properly
grounded, check with a qualied serviceman or electrician.
3. Do not use this product near water – for example, near a bathtub,
washbowl, kitchen sink, in a wet basement, or near a swimming
pool, or the like.
4. This product should only be used with a stand or cart that is
recommended by the manufacturer.
5. This product, either alone or in combination with an amplier and
speakers or headphones, may be capable of producing sound
levels that could cause permanent hearing loss. Do not operate
for a long period of time at a high volume level or a level that is
uncomfortable. If you experience any hearing loss or ringing in
the ears, you should consult an audiologist.
6. This product should be located so that its location or position
does not interfere with its proper ventilation.
7. The product should be located away from heat sources such as
radiators, heat registers, or other products that produce heat.
8. The product should be connected to a power supply only of the
type described in the operating instructions or as marked on the
product.
9. This product may be equipped with a polarized line plug (one
blade wider than the other). This is a safety feature. If you are
unable to insert the plug into the outlet, contact an electrician to
replace your obsolete outlet. Do not defeat the safety purpose of
the plug.
10. The power supply cord of the product should be unplugged
from the outlet when left unused for a long period of time. When
unplugging the power supply cord, do not pull on the cord, but
grasp it by the plug.
11. Care should be taken so that objects do not fall and liquids are
not spilled into the enclosure through openings.
12. The product should be serviced by qualied service personnel
when:
A. The power supply, power cord or plug have been damaged;
B. Objects have fallen, or liquid has been spilled into the
product;
C. The product has been exposed to rain;
D. The product does not appear to be operating normally or
exhibits a marked change in performance;
E. The product has been dropped, or the enclosure damaged.
13. Do not attempt to service the product beyond that described in
the user maintenance instructions. All other servicing should be
referred to qualied service personnel.
14. WARNING: Do not place objects on the product’s power supply
cord, or place the product in a position where anyone could trip
over, walk on, or roll anything over cords of any type. Do not
allow the product to rest on or be installed over cords of any type.
Improper installations of this type create the possibility of a re
hazard and/or personal injury.
RADIO AND TELEVISION INTERFERENCE
WARNING: Changes or modications to the instrument not expressly
approved by Young Chang could void your authority to operate the
instrument.
IMPORTANT: When connecting this product to accessories and/or
other equipment use only high quality shielded cables.
NOTE: This instrument has been tested and found to comply with the
limits for a Class B digital device, pursuant to Part 15 of the FCC Rules.
These limits are designed to provide reasonable protection against
harmful interference in a residential installation. This instrument
generates, uses, and can radiate radio frequency energy and, if not
installed and used in accordance with the instructions, may cause
harmful interference to radio communications. However, there is no
guarantee that interference will not occur in a particular installation. If
this instrument does cause harmful interference to radio or television
reception, which can be determined by turning the instrument off and
on, the user is encouraged to try to correct the interference by one or
more of the following measures:
• Reorient or relocate the receiving antenna.
SAVE THESE INSTRUCTIONS
ii
• Increase the separation between the instrument and the receiver.
• Connect the instrument into an outlet on a circuit other than the
one to which the receiver is connected.
• If necessary consult your dealer or an experienced radio/television
technician for additional suggestions.
The normal function of the product may be disturbed by strong
electromagnetic interference. If so, simply reset the product to resume
normal operation by following the instructions in the manual. If normal
function does not resume, please use the product in another location.
NOTICE
This apparatus does not exceed the Class B limits for radio noise
emissions from digital apparatus set out in the Radio Interference
Regulations of the Canadian Department of Communications.
AVIS
Le present appareil numerique n’emet pas de bruits radioelectriques
depassant les limites applicables aux appareils numeriques de la
class B prescrites dans le Reglement sur le brouillage radioelectrique
edicte par le ministere des Communications du Canada.

IMPORTANT SAFETY INSTRUCTIONS
1) Read these instructions.
2) Keep these instructions.
3) Heed all warnings.
4) Follow all instructions.
5) Do not use this apparatus near water.
6) Clean only with dry cloth.
7) Do not block any of the ventilation openings. Install in accordance with the manufacturer’s instructions.
8) Do not install near any heat sources such as radiators, heat registers, stoves, or other apparatus (including
ampliers) that produce heat.
9) Do not defeat the safety purpose of the polarized or grounding-type plug. A polarized plug has two
blades with one wider than the other. A grounding type plug has two blades and a third grounding
prong. e wide blade or the third prong are provided for your safety. If the provided plug does not t
into your outlet, consult an electrician for replacement of the obsolete outlet
10) Protect the power cord and power supply adapter from being walked on or pinched, particularly at plugs,
convenience receptacles, and the point where they exit from the apparatus.
11) Only use power adapters andattachments/accessories specied by the manufacturer.
12) Use only with a cart, stand, tripod, bracket, or table specied by the manufacturer,
or sold with the apparatus. When a cart is used, use caution when moving the cart/
apparatus combination to avoid injury from tip-over.
13) Unplug this apparatus during lightning storms or when unused for long periods of
time.
14) Refer all servicing to qualied service personnel. Servicing is required when the apparatus has been
damaged in any way, such as power-supply cord or plug is damaged, liquid has been spilled or objects
have fallen into the apparatus, the apparatus has been exposed to rain or moisture, does not operate
normally, or has been dropped.
Warning: To reduce the risk of re or electric shock, do not expose this apparatus to rain or moisture. Do not
expose this equipment to dripping or splashing and ensure that no objects lled with liquids, such as vases, are
placed on the equipment.
To completely disconnect this equipment from the AC Mains, disconnect the power supply cord plug from
the AC receptacle.
©2016 Young Chang Co., Ltd. All rights reserved. Kurzweil® is a product line of Young Chang Co., Ltd. Kurzweil®, Young Chang®, V. A. S. T.®,
and Forte SE® are trademarks of Young Chang Co., Ltd. All other trademarks and copyrights are property of their respective companies. Product
features and specications are subject to change without notice.
You may legally print up to two (2) copies of this document for personal use. Commercial use of any copies of this document is prohibited.
Young Chang Co. retains ownership of all intellectual property represented by this document.
iii

Kurzweil International Contacts
Contact the Kurzweil oce listed below to locate your local Kurzweil representative.
US Customers:
American Music & Sound
925 Broadbeck Dr #220
Newbury Park, CA 91320
Tel: 800-431-2609
Fax: 818-597-0411
Email: info@americanmusicandsound.com
www.kurzweil.com
Customers outside the US:
Young Chang Co., LTD.
178-55, Gajwa-Dong, Seo-Ku
Incheon, Korea
Post Code: 404-714
Tel: +82-32-570-1576
Fax: +82-32-576-2340
iv
support@kurzweil.com
www.facebook.com/kurzweilmusicsystems/
www.twitter.com/KurzweilMusic
www.youtube.com/user/KurzweilTutorials

Table of Contents
Table of Contents
Kurzweil International Contacts .....................................................................................iv
Introducing Forte SE ........................................................ 1-1
Main Features ............................................................................................................... 1-1
Do You Have Everything? ............................................................................................ 1-3
Keeping the Forte SE up to date ................................................................................. 1-3
Music Rack (Optional) .................................................................................................. 1-3
Getting Started .................................................................. 2-1
Before You Start… ........................................................................................................ 2-1
Setting up the Forte SE ................................................................................................ 2-1
Updating the Forte SE .................................................................................................. 2-2
Using the Forte SE ....................................................................................................... 2-2
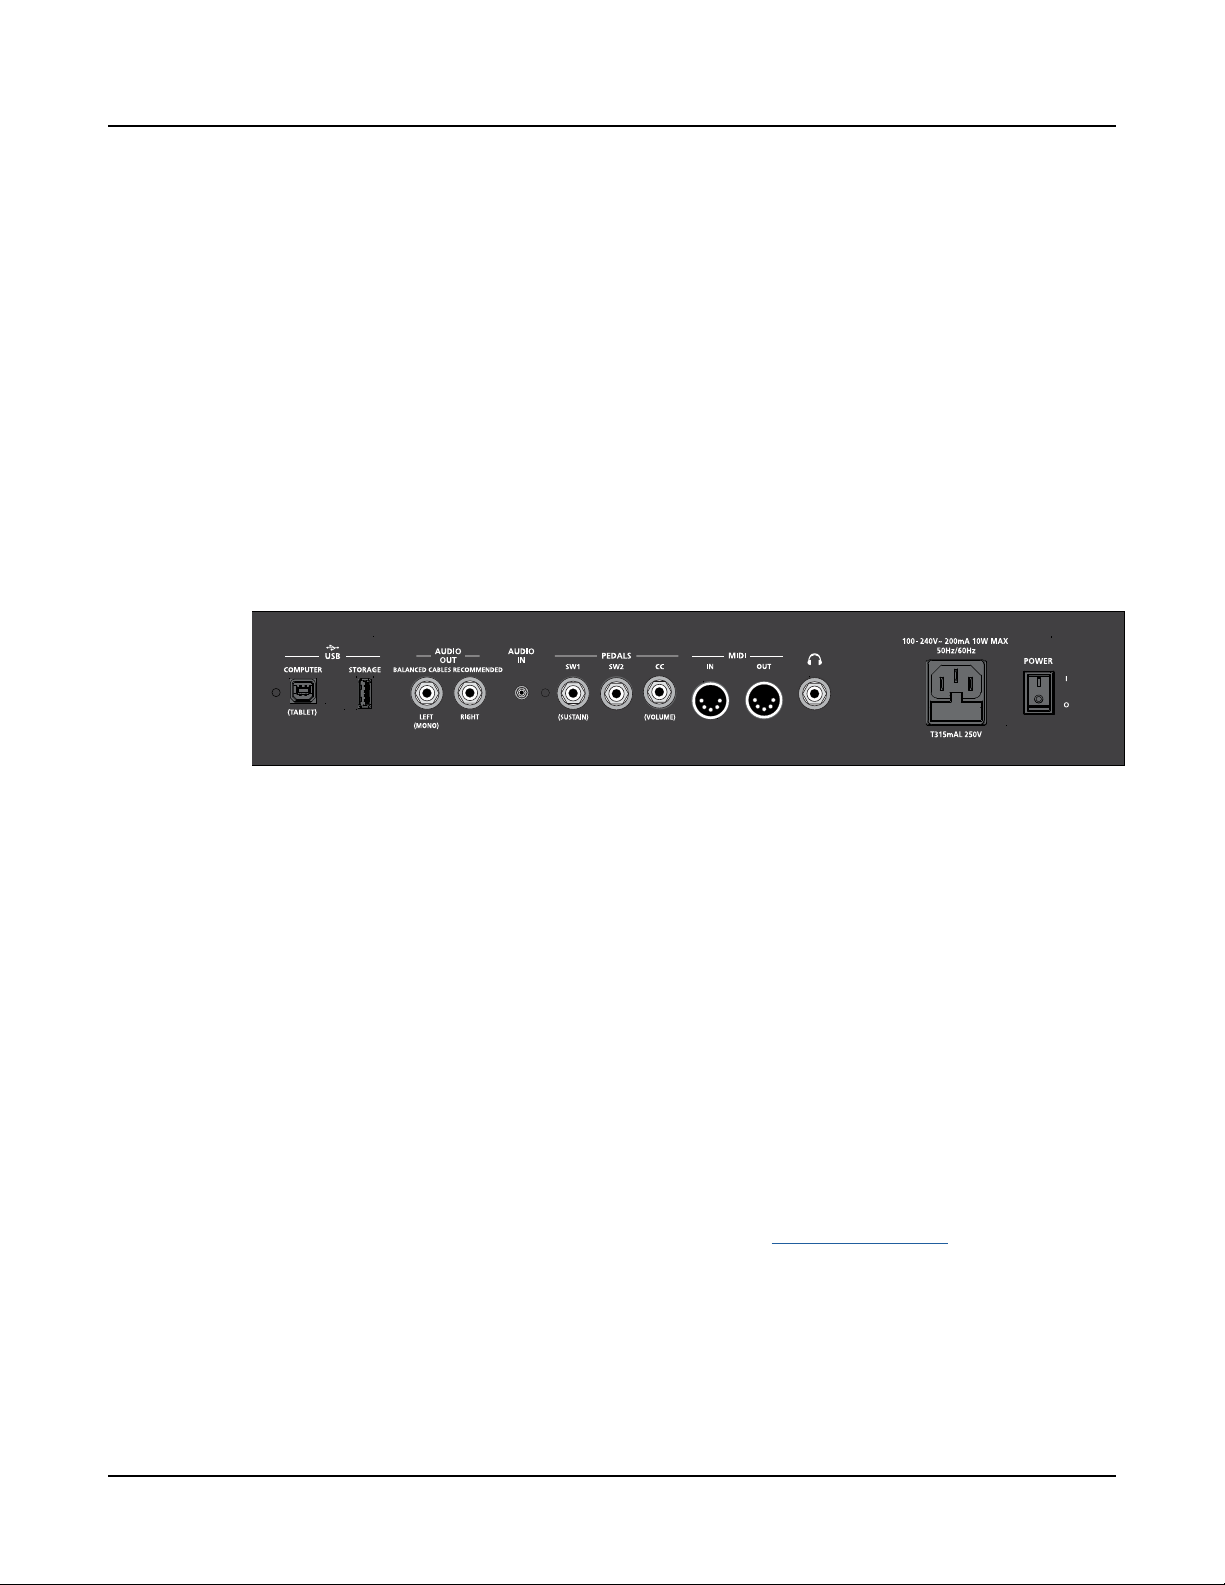
The Rear Panel.............................................................................................................. 2-3
The AC Power Jack ...................................................................................................... 2-3
The USB Ports .............................................................................................................. 2-3
The MIDI (IN and OUT) Ports ....................................................................................... 2-4
Basic MIDI Hookup ....................................................................................................... 2-4
The Pedal Jacks............................................................................................................ 2-4
The Audio (LEFT/MONO and RIGHT) Jacks .............................................................. 2-8
Connecting to Your Audio System .............................................................................. 2-8
Connecting to a Computer ....................................................................................... 2-10
Forte SE Sounds ......................................................................................................... 2-10
Features of the Forte SE .................................................. 3-1
Power Up Defaults ........................................................................................................ 3-1
The Front Panel ............................................................................................................ 3-2
Real Time Controls ....................................................................................................... 3-3
Master EQ ...................................................................................................................... 3-8
Mode Buttons ................................................................................................................ 3-9
Navigation ................................................................................................................... 3-10
TOC-i

Table of Contents
The Edit Button ........................................................................................................... 3-12
The Save Button ......................................................................................................... 3-12
Sound Select ............................................................................................................... 3-13
Double Button Presses .............................................................................................. 3-14
Terminology ...................................................................... 4-1
The Operating Modes ....................................................... 5-1
Program Mode .............................................................................................................. 5-1
Multi Mode ..................................................................................................................... 5-2
Global Mode .................................................................................................................. 5-3
Functions ...................................................................................................................... 5-4
Program Edit Mode ....................................................................................................... 5-6
Multi Edit Mode ............................................................................................................. 5-7
Program Mode .................................................................. 6-1
About Program Mode ................................................................................................... 6-1
Selecting Programs ...................................................................................................... 6-2
Transposition ................................................................................................................ 6-7
Controller Parameter Assignments ............................................................................ 6-8
Controller Conventions ................................................................................................ 6-9
The Split and Layer Functions .................................................................................. 6-10
The Arp Pages ............................................................................................................ 6-14
Save User Programs .................................................................................................. 6-14
Changing the Transmit MIDI Channel ....................................................................... 6-17
Panic ............................................................................................................................ 6-17
Program Edit Mode ........................................................... 7-1
About Program Edit Mode ........................................................................................... 7-1
Differences Between Regular and Advanced User Type .......................................... 7-1
Selecting Parameters ................................................................................................... 7-2
VAST and KB3 Programs ............................................................................................. 7-4
TOC-ii
VAST Program Structure ............................................................................................. 7-4
Editing VAST Programs ............................................................................................... 7-6
The Parameters (PARAMS) Page .............................................................................. 7-10
The Program FX (FX) Page ........................................................................................ 7-14

Table of Contents
The Layer FX (LYR_FX) Page .................................................................................... 7-16
The COMMON Page .................................................................................................... 7-17
The KEYMAP Page ..................................................................................................... 7-20
The LAYER Page ......................................................................................................... 7-25
The PITCH Page .......................................................................................................... 7-31
The AMP Page ............................................................................................................. 7-31
The Algorithm (ALG) Page ......................................................................................... 7-31
The DSP Control (DSPCTL) Page .............................................................................. 7-38
The DSP Modulation (DSPMOD) Page ...................................................................... 7-39
The OUTPUT Page ...................................................................................................... 7-40
The LFO Page ............................................................................................................. 7-44
The ASR Page ............................................................................................................. 7-46
The Function (FUN) Page ........................................................................................... 7-48
The Amplitude Envelope (AMPENV) Page ............................................................... 7-48
The Envelope 2 (ENV2) and Envelope 3 (ENV3) Pages........................................... 7-52
The Envelope Control (ENVCTL) Page ..................................................................... 7-52
The Arpeggiator Function .......................................................................................... 7-56
The Utility Soft Buttons, HELP Soft Button and Favorites Buttons Functions 7-69
Editing VAST Programs With KVA Oscillators ......................................................... 7-72
KB3 Program Structure.............................................................................................. 7-80
Editing KB3 Programs ............................................................................................... 7-82
KB3 Editor: The Parameters (PARAMS) Page ......................................................... 7-82
KB3 Editor: The Program FX (FX) Page ................................................................... 7-83
KB3 Editor: The COMMON Page .............................................................................. 7-83
KB3 Editor: The Tone Wheels (TONEWL) Page ....................................................... 7-85
KB3 Editor: The Drawbars (DRAWBR) Page ............................................................ 7-87
KB3 Editor: The PITCH Page ..................................................................................... 7-89
KB3 Editor: The AMP Page ........................................................................................ 7-89
KB3 Editor: The KEYCLICK Page ............................................................................. 7-90
KB3 Editor: The PERC1 Page .................................................................................... 7-92
KB3 Editor: The PERC2 Page .................................................................................... 7-94
KB3 Editor: The EQ Page ........................................................................................... 7-94
KB3 Editor: The OUTPUT Page ................................................................................. 7-95
TOC-iii

Table of Contents
KB3 Editor: The LFO, ASR, FUN, and ARP Pages ................................................... 7-96
The Effects Chain Editor .................................................. 8-1
The MAIN Page ............................................................................................................. 8-1
The MOD Pages ............................................................................................................ 8-2
FXLFO, FXASR, and FXFUN pages ............................................................................. 8-3
INFO page ...................................................................................................................... 8-3
The Utility Soft Buttons, HELP Soft Button and Favorites Buttons Functions 8-4
Effects Parameters ....................................................................................................... 8-5
Keymap and Sample Editing ........................................... 9-1
The Keymap Editor ....................................................................................................... 9-1
Building a Keymap ....................................................................................................... 9-9
Editing Samples .......................................................................................................... 9-10
Multi Mode ....................................................................... 10-1
About Multi Mode ....................................................................................................... 10-1
Selecting Multis .......................................................................................................... 10-2
About Zones ................................................................................................................ 10-6
Transposition .............................................................................................................. 10-6
Parameter Assignments ............................................................................................ 10-7
The Split and Layer Functions .................................................................................. 10-9
The ARP Function ..................................................................................................... 10-12
Save User Multis ....................................................................................................... 10-13
Multi Edit Mode ............................................................... 11-1
About Multi Edit Mode .................................................................................................11-1
Selecting Parameters ..................................................................................................11-2
Zone Parameters .........................................................................................................11-4
OVERVIEW Page ..........................................................................................................11-5
MAIN Page ....................................................................................................................11-6
KEYVEL (KeyVelocity) Page ..................................................................................... 11-10
BEND Page .................................................................................................................11-13
CCTLS (CCs/Continuous Controllers) Page ...........................................................11-13
SWITCH (Switches) Page ..........................................................................................11-17
Controlling Program Parameter Assignments from Multi Mode ...........................11-20
TOC-iv

Table of Contents
The Controller Destination List ................................................................................11-20
COMMON Page ..........................................................................................................11-27
ARP1 and ARP2 (Arpeggiator 1 & 2) Pages ............................................................11-28
FX Page ......................................................................................................................11-29
AUXFX 1, AUXFX 2 ....................................................................................................11-30
About Auxiliary Effects .............................................................................................11-32
Audio Input (AUD-IN) .................................................................................................11-32
The Utility Soft Buttons, HELP Soft Button and Favorites Buttons Functions 11-34
Save User Multis ........................................................................................................11-35
Global Mode .................................................................... 12-1
About Global Mode ..................................................................................................... 12-1
Selecting and Editing Parameters ............................................................................ 12-2
MAIN Page ................................................................................................................... 12-2
MAPS Page.................................................................................................................. 12-6
SONG (Song Mode) .................................................................................................... 12-9
FILE (Storage Page) ................................................................................................. 12-10
CNTRLS (Controller Overrides Page) ..................................................................... 12-18
MIDI Page .................................................................................................................. 12-20
AUD-IN (Audio Input Page) ...................................................................................... 12-23
TOOLS Page .............................................................................................................. 12-26
SAMPLE (Samples Memory Map Page) .................................................................. 12-29
Loader ........................................................................................................................ 12-30
Delete Page ............................................................................................................... 12-30
RESET ........................................................................................................................ 12-31
Song Mode and the Song Editor ................................... 13-1
Getting Started with the Sequencer .......................................................................... 13-1
Song Mode: The MAIN Page ...................................................................................... 13-1
Song Mode: The BIG Page ......................................................................................... 13-9
Song Mode: The FX Pages .......................................................................................13-11
Song Mode: The MIXER Page ...................................................................................13-11
Song Mode: The METRONOME Page ..................................................................... 13-12
Song Mode: The Filter Pages (RECFLT and PLYFLT) ........................................... 13-14
TOC-v

Table of Contents
Song Mode: The MISC Page .................................................................................... 13-16
Song Mode: The STATS Page .................................................................................. 13-17
The Song Editor ........................................................................................................ 13-18
Song Editor: The COMMON Page ........................................................................... 13-18
Song Editor: The TRACK Page ............................................................................... 13-19
Song Editor: Track Functions ................................................................................. 13-22
Song Editor: The EVENT Page ................................................................................ 13-29
System Mode .................................................................. 14-1
Run Forte SE ............................................................................................................... 14-2
System Update............................................................................................................ 14-2
Run Diagnostics ......................................................................................................... 14-7
System Reset .............................................................................................................. 14-8
System Utilities ......................................................................................................... 14-10
Troubleshooting ............................................................. 15-1
Maintenance ................................................................................................................ 15-1
Common Problems ..................................................................................................... 15-1
MIDI Problems ............................................................................................................. 15-4
Pedal Problems........................................................................................................... 15-5
If None of the Above... ................................................................................................ 15-6
MIDI Implementation ........................................................A-1
Physical Specications....................................................B-1
Programs ...........................................................................C-1
KB3 Programs...................................................................D-1
Introducing KB3 Programs .......................................................................................... D-1
Drawbars .......................................................................................................................D-2
KB3 Mode Buttons .......................................................................................................D-2
Multis .................................................................................E-1
Effects Chains ...................................................................F-1
Index ...........................................................................Index-1
vi

Chapter 1
Introducing Forte SE
Congratulations on your purchase of the Kurzweil Forte SE®!
is manual will help you get acquainted with your new instrument. Be sure to keep the
manual on hand as you continue to familiarize yourself with the features and functions of the
Forte SE.
Introducing Forte SE
Main Features
Main Features
Forte SE is Kurzweil’s latest entry in the Forte line of stage pianos. Some of the key specications
include:
• FlashPlay technology with support for 2 GB of Sound ROM
• High Denition Japanese Grand Piano and High Denition Electric Piano
• ROM sounds included from Kurzweil’s acclaimed PC3 series, KORE64 expansion,
and German D Grand EXP Grand Piano expansion
• 188 MB of user sample memory
• New Kurzweil String Resonance Simulation
• Full KB3 organ simulations with 9 sliders as drawbars
• 8 Zone MIDI Controller
1-1

Introducing Forte SE
Main Features
• Space for 1024 Factory and 1024 User Programs and Multis (16 Categories of
Programs)
• Arpeggiator with dedicated On/O button (1 per Program, up to 8 in Multi Mode)
• MP3 player audio input jack with FX
• Song Mode 16 Track MIDI sequencer
• Full 128 voices of polyphony
• Hundreds of Eects Chains
Keyboard and Controllers
e Forte SE has an 88-key fully-weighted hammer action keyboard that provides you with
a piano-like feel without adding excessive weight to the instrument. e array of physical
controllers includes:
• 9 assignable sliders
• 11 programmable switches
• A pitch wheel
• A modulation wheel
• 2 jacks on the rear panel for up to 4 optional switch pedals or 2 half damper pedals:
SW1 (Sustain) & SW2
• 1 jack on the rear panel for an optional continuous controller pedal: CC (Volume)
Pedals (Optional)
As described above, the Forte SE has three jacks on the rear panel for optional pedal
controllers. Two jacks for switch pedals, which are typically used to control two-state (i.e.,
on / o) parameters such as sustain, sostenuto, and mute Zone. e third jack is for a
continuous control (or CC) pedal typically used to control multi-state (i.e., “continuous”)
parameters such as volume or wah.
Your Kurzweil dealer stocks the following pedals:
• FS-1 Standard box-shaped switch pedal
• KFP-1 Single piano-style switch pedal
• KFP-2S Double piano-style switch pedal unit (one stereo plug)
• CC-1 Continuous pedal
1-2
Do You Have Everything?
Your Forte SE package should contain the following in addition to your instrument:
• Power adapter and cable
• Switch pedal
• USB cable (Type-A-to-Type-B)
• 4 self adhesive feet (see page 2-1)
• Forte SE Getting Started Guide
If you are missing any of these components, please contact your Kurzweil / Young Chang
dealer to get them. Don’t connect anything until you make sure the Forte SE is properly and
safely situated. If your Forte SE keyboard has been out in the cold, give it time to warm up
to room temperature before starting it, since condensation may have formed inside.
Keeping the Forte SE up to date
Introducing Forte SE
Do You Have Everything?
Be sure to check the Kurzweil Music Systems website at www.kurzweil.com for new
documentation and the latest software updates for Forte SE.
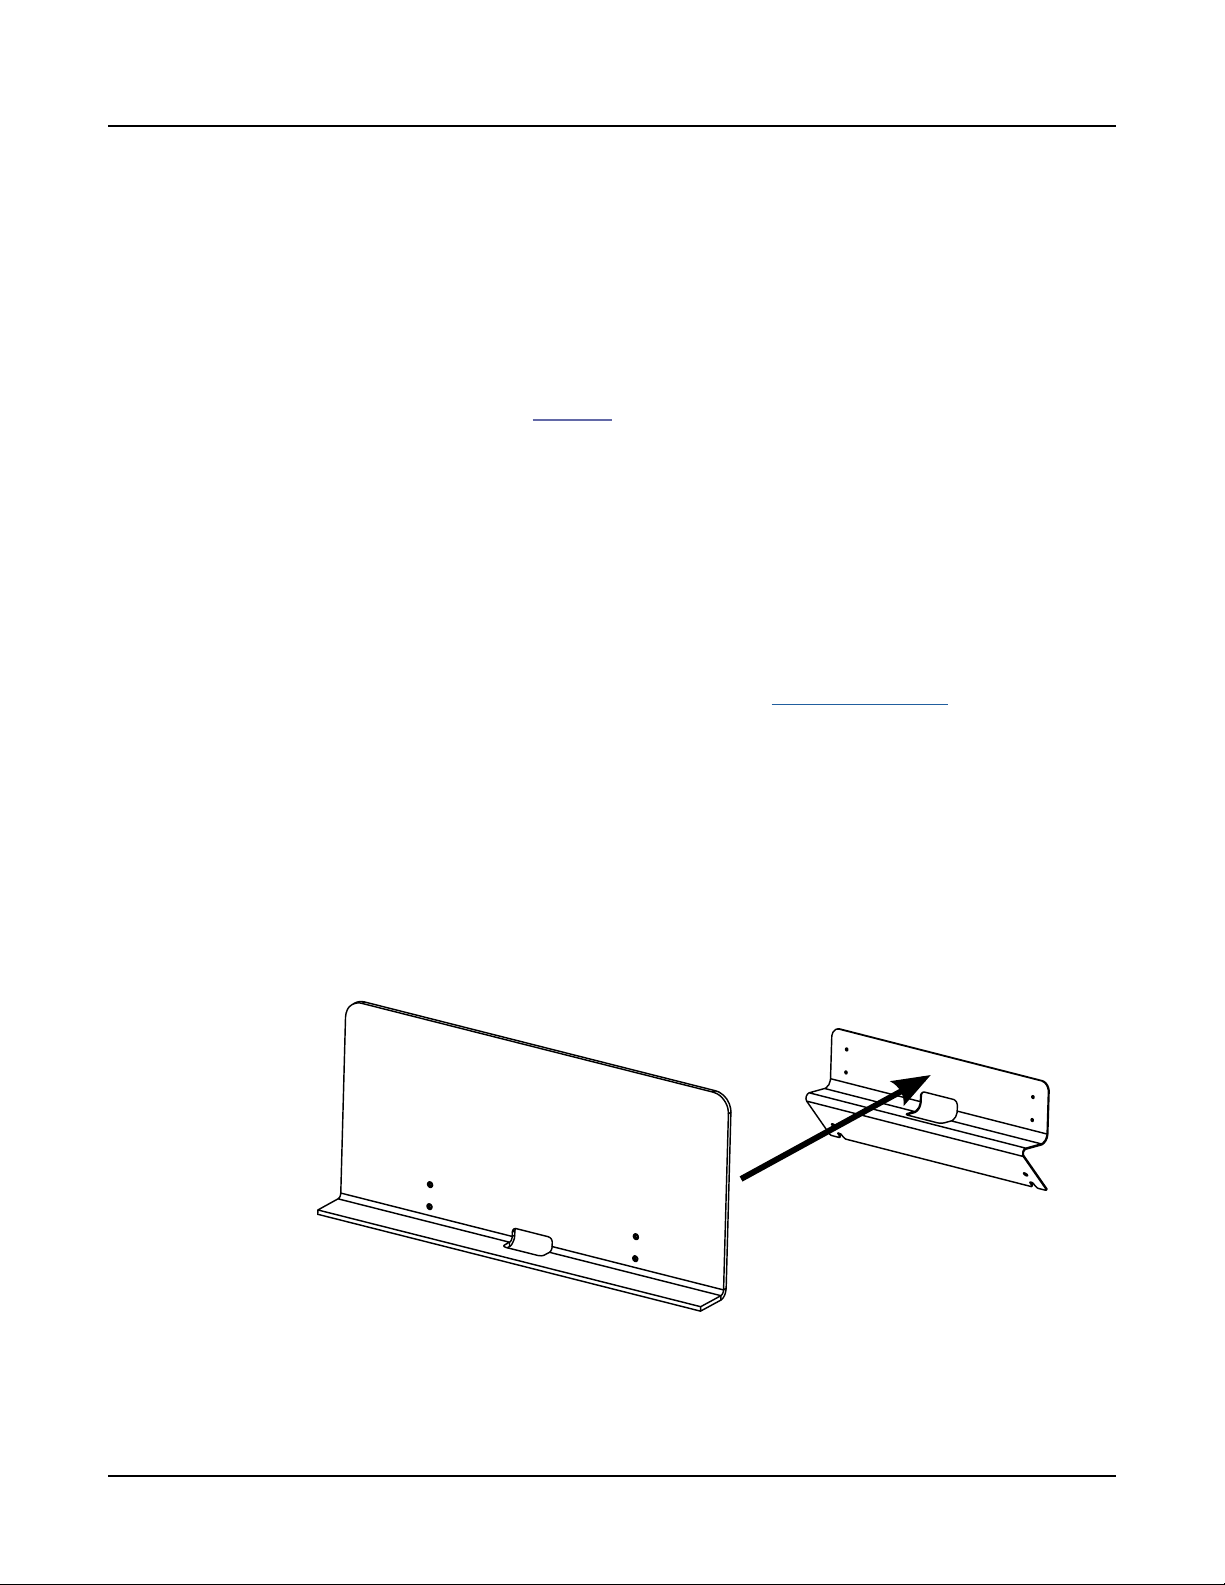
Music Rack (Optional)
e optional KMR2 Music Rack attachment is a holder for sheet music or a computer tablet
device. Contact your Kurzweil dealer for the KMR2 Music Rack.
Please refer to the instructions that come with the KMR2 on attaching the music rack to the
Forte SE.
1-3
Chapter 2
Getting Started
Before You Start…
Don’t connect anything until you make sure the Forte SE is properly and safely situated.
If your Forte SE keyboard has been out in the cold, give it time to warm up to room
temperature before starting it, since condensation may have formed inside.
Getting Started
Before You Start…
Setting up the Forte SE
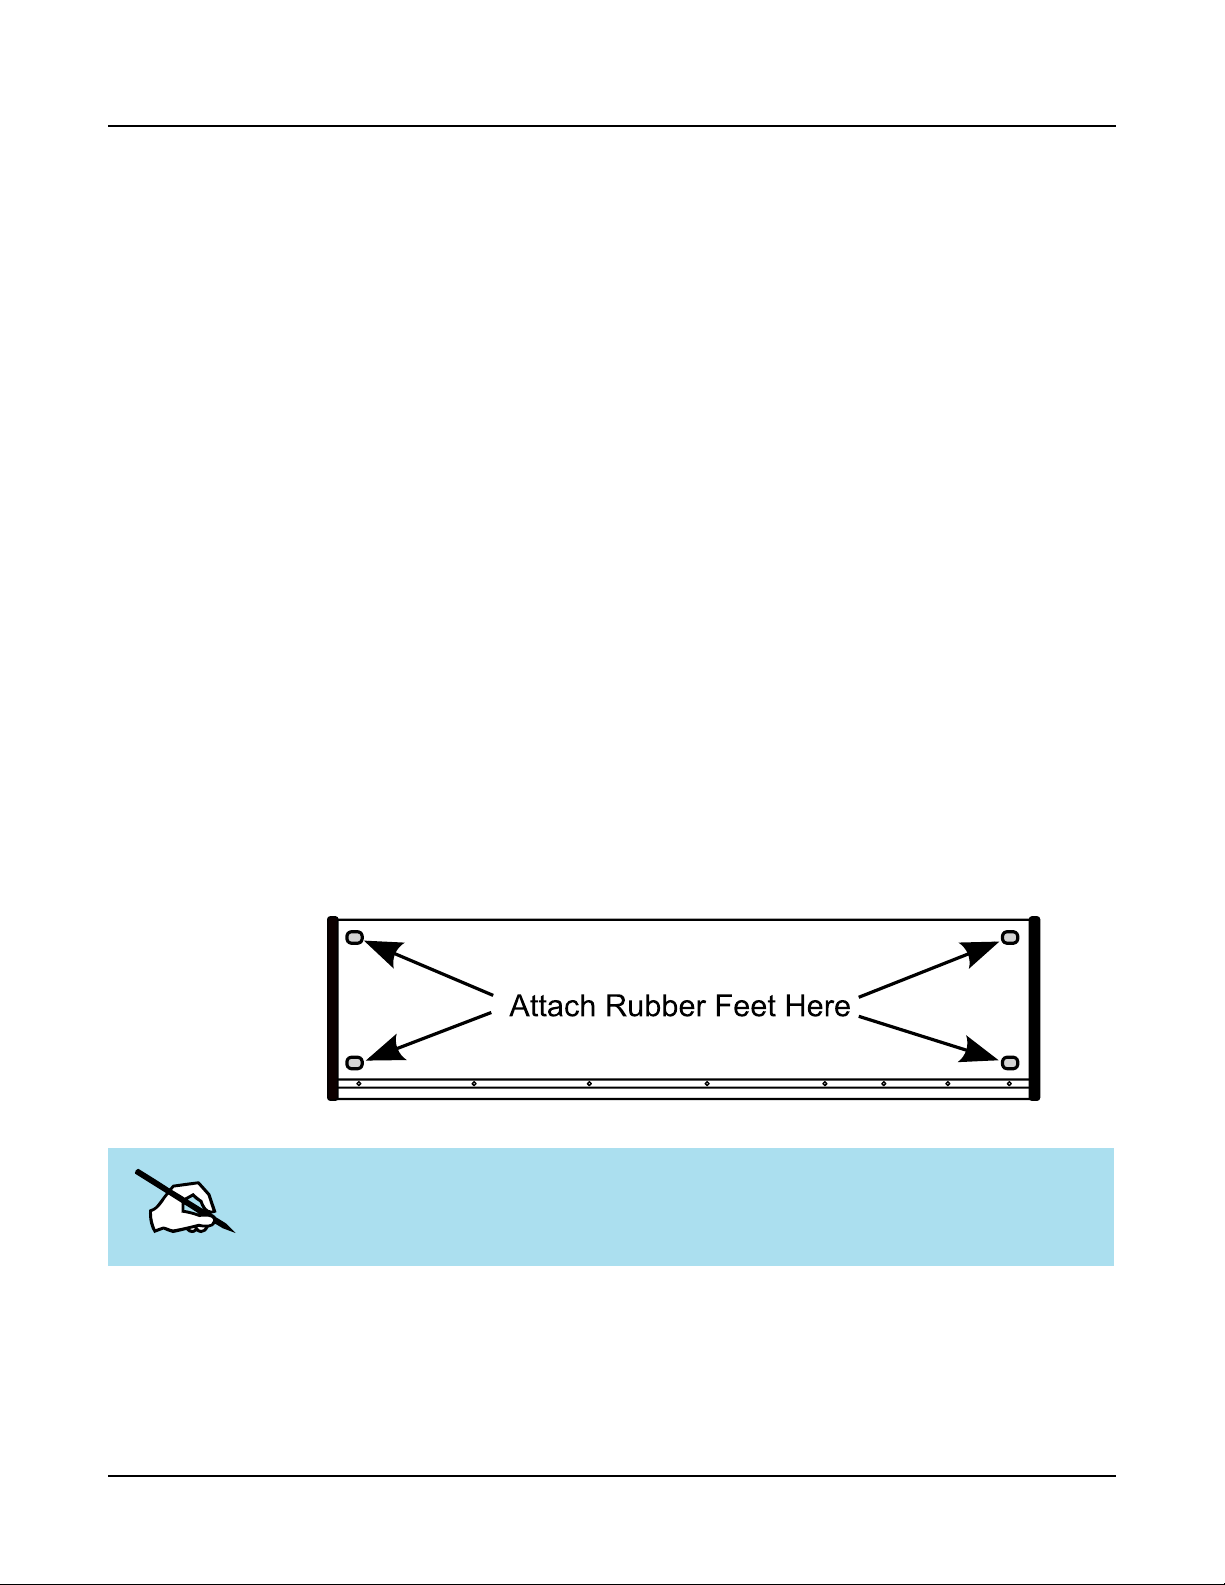
Set the keyboard on a hard, at, level surface.
Four adhesive-backed rubber feet are provided with Forte SE. Carefully turn the keyboard
over onto a soft surface, remove the paper backing from the rubber feet and attach them.
NOTE : Unless the instrument will always be used with a keyboard stand, attachment of
the rubber feet is strongly advised. Otherwise protruding screws will scratch the tabletop.
2-1
Getting Started
Updating the Forte SE
Connect the AC power cord to the Forte SE. Before plugging the cable into the power outlet,
check that the power is compatible with the Forte SE. e Forte SE runs on AC power
and works with voltages from 80-265 volts 50-60 Hz. e voltage level is detected and set
automatically by the Forte SE. If your power source does not have the standard three hole
outlet, you should take the time to install a proper grounding system. is will reduce the
risk of a shock. If your power outlet is not within these ranges it is recommended you use an
appropriate adaptor.
Plug the power cable into the wall.
Plug the Switch Pedal into the marked SW1 (Sustain) Pedal jack on the Forte SE rear panel.
Connect stereo headphones to the headphone jack on the rear panel or connect the audio
outputs to your mixer or amplier inputs using standard (1/4-inch) audio cables (use the Left
out for mono). Balanced (“TRS” or “Stereo”) cables are recommended if your mixer or amp
supports balanced inputs.
Make sure your sound system is at a safe volume level. Also make sure that the Forte SE
Master Volume slider (on the far left side of the front panel) is all the way down.
Updating the Forte SE
Please check online at www.kurzweil.com for Forte SE updates. Detailed instructions on
updating the Forte SE are available with the update package. It is important that these
instructions are followed closely for trouble free updating of the Forte SE.
Using the Forte SE
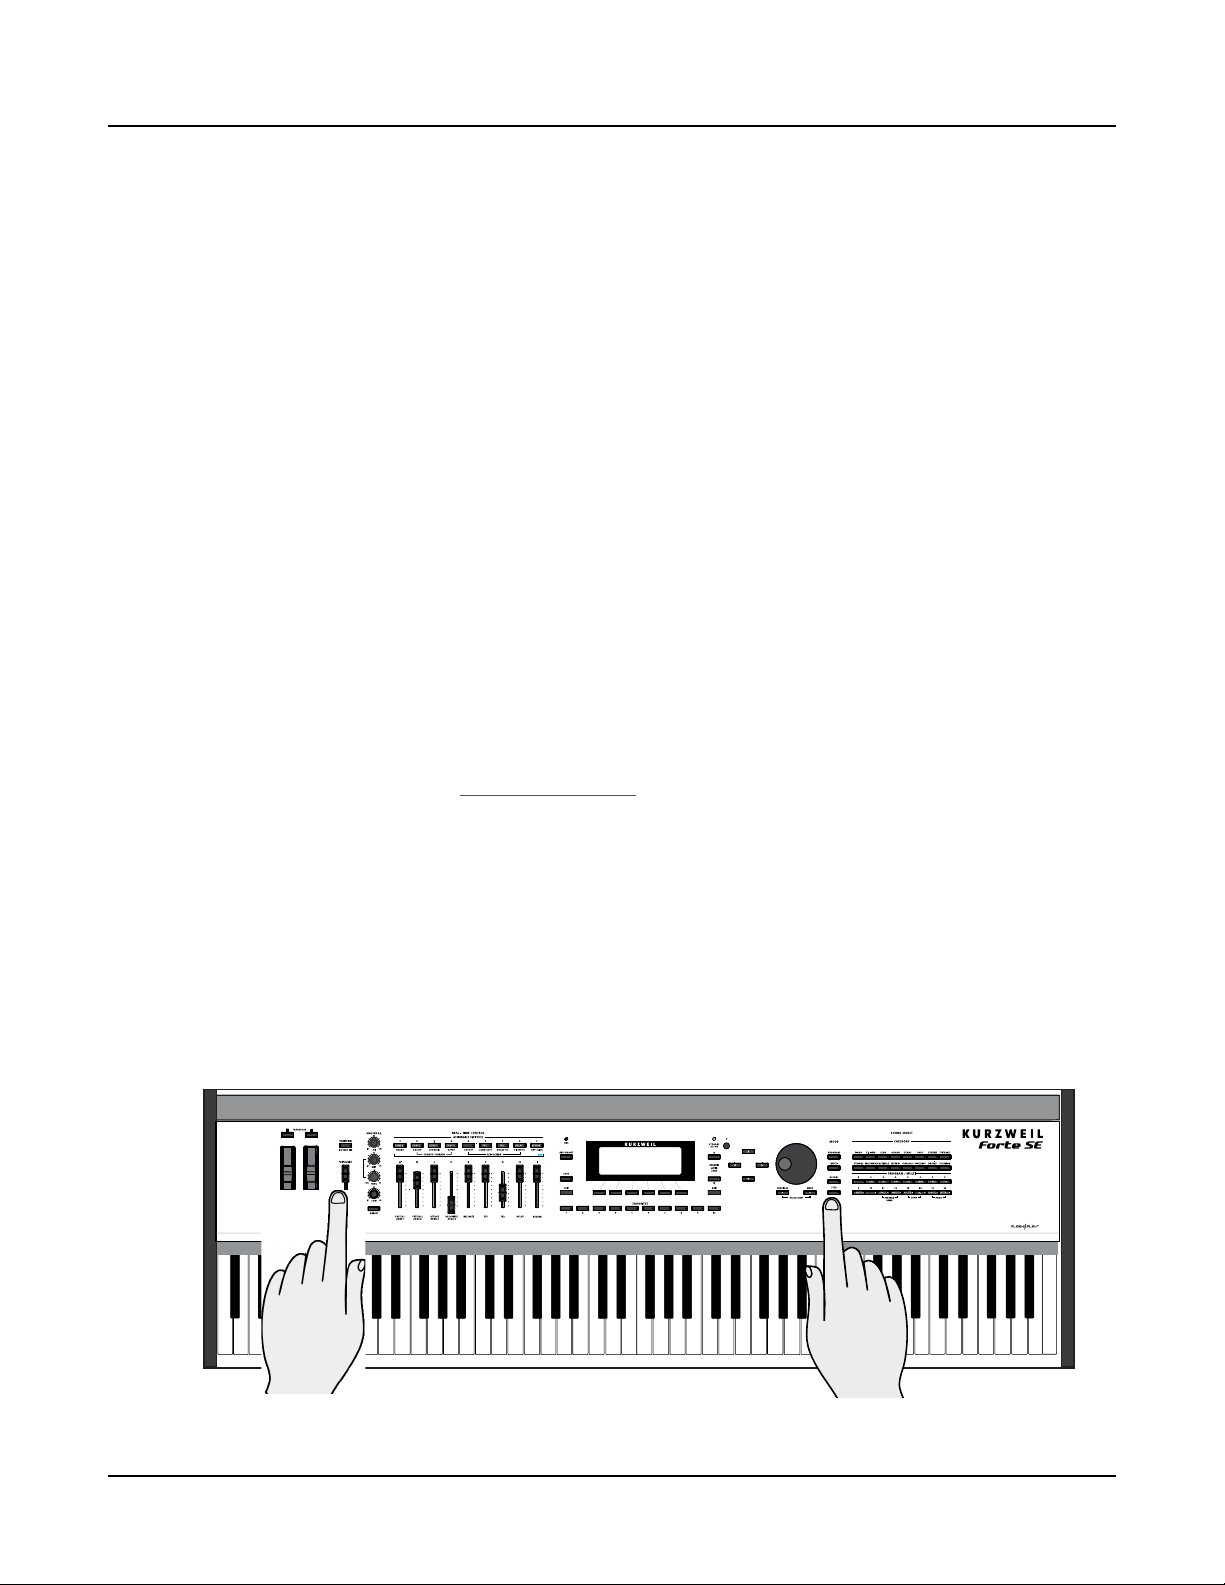
Power up the Forte SE using the power switch on the rear left side of the instrument, and
then raise the Master Volume slider, and mixer/amp volume. Your Forte SE keyboard starts
up in Program Mode by default. Press one of the buttons under the “Mode” label to the right
of the display to switch Modes.
2-22-2
Master Volume Slider
Mode select buttons
If you are connected to a mixing board and hear distortion, reduce the gain level on your
mixing board, or use the pad (a switch that decreases the input audio signal level, typically by
20dB) if it has one.
To hear the capabilities of the Forte SE, you can play the demo songs. Press the 13 & 14
Program/Multi buttons simultaneously to listen to a demo song.
In Program Mode, scroll through the Programs using the Alpha Wheel, the Previous and
Next buttons, or press a Category button to audition the sounds in the Forte SE. e Forte
SE has short demos for each of the factory Programs. To hear a Program Demo for the
current Program, press the 11 & 12 Program/Multi buttons simultaneously.
The Rear Panel
e power switch and most of the Forte SE connections are located on the rear panel.
Getting Started
The Rear Panel
The AC Power Jack
Please refer to “Setting up the Forte SE” on page 2-1.
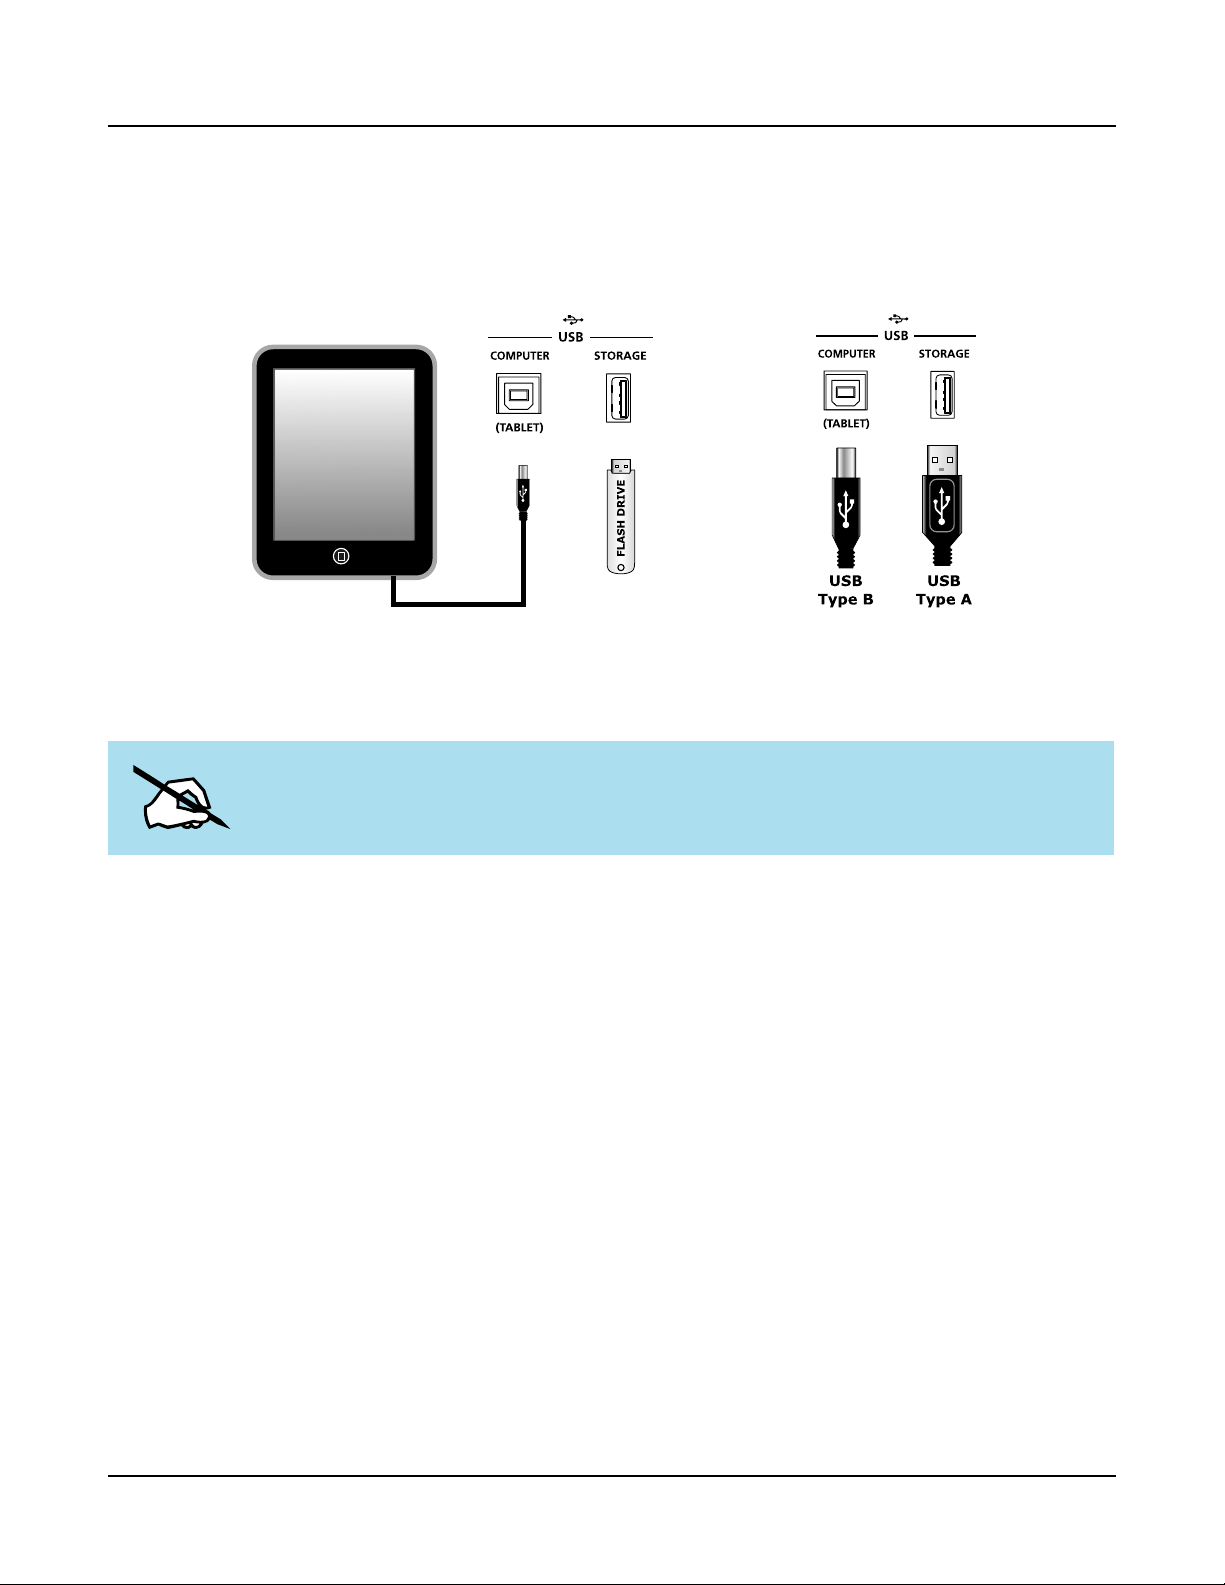
The USB Ports
Use the USB ports to connect the Forte SE to a computer/tablet in order to do the following:
• Use the Forte SE as a MIDI controller to play software instruments on a computer.
• Use a computer program to sequence multitrack songs on the Forte SE.
• Use a computer/tablet to manage the user data contents of the Forte SE.
• Update the software and sounds of the Forte SE.
• Store custom Programs and Multis on a USB ash drive.
Be sure to check the Kurzweil Music Systems website at www.kurzweil.com for new
documentation and software updates before using your new instrument.
2-32-3
Getting Started
The MIDI (IN and OUT) Ports
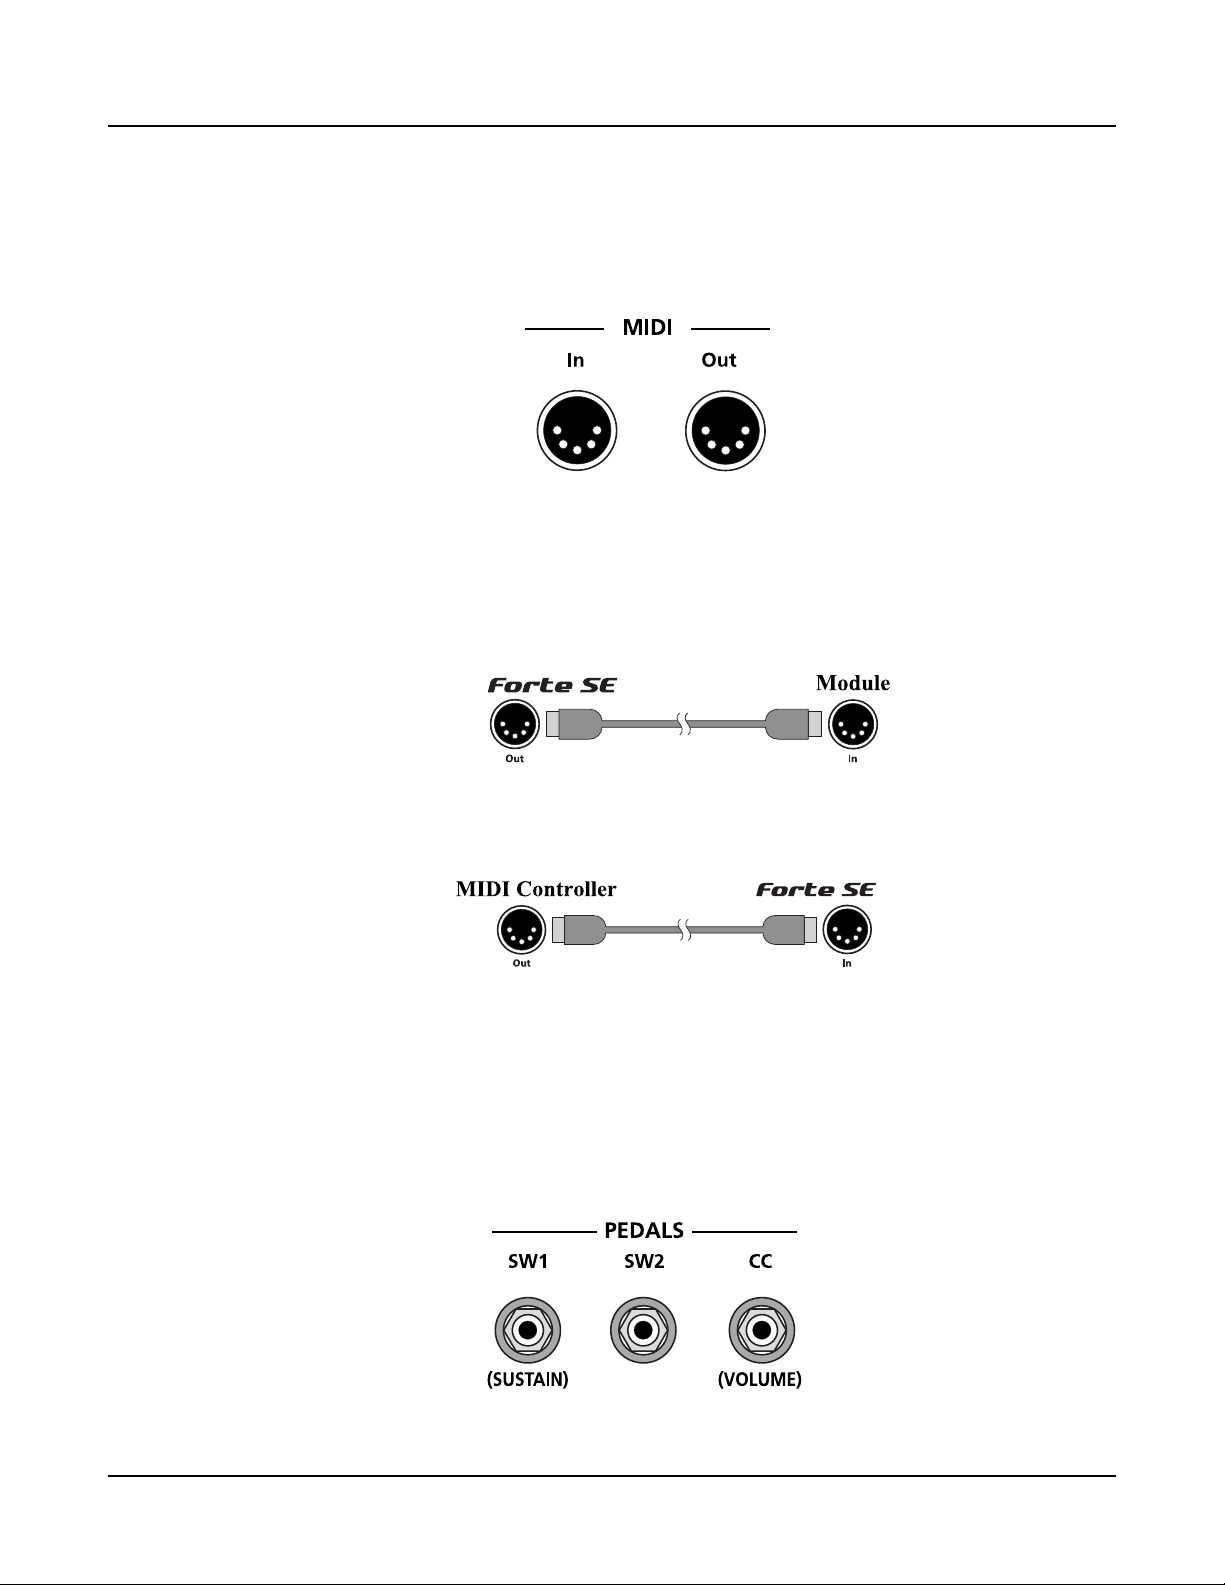
The MIDI (IN and OUT) Ports
Use the MIDI ports to communicate with other MIDI modules and controllers. e OUT
port is the MIDI transmitting port, and the IN port is the MIDI receiving port.
Basic MIDI Hookup
To use the Forte SE as a MIDI controller for another sound module, use a MIDI cable to
connect the MIDI port marked “Out” to the MIDI input port of the module that you want
to control.
To control the Forte SE using another MIDI controller, use a MIDI cable to connect the
MIDI port marked “In” to the MIDI output port of the controller that you will be using.
For other MIDI connection scenarios, please refer to the Forte SE Musicians Guide.
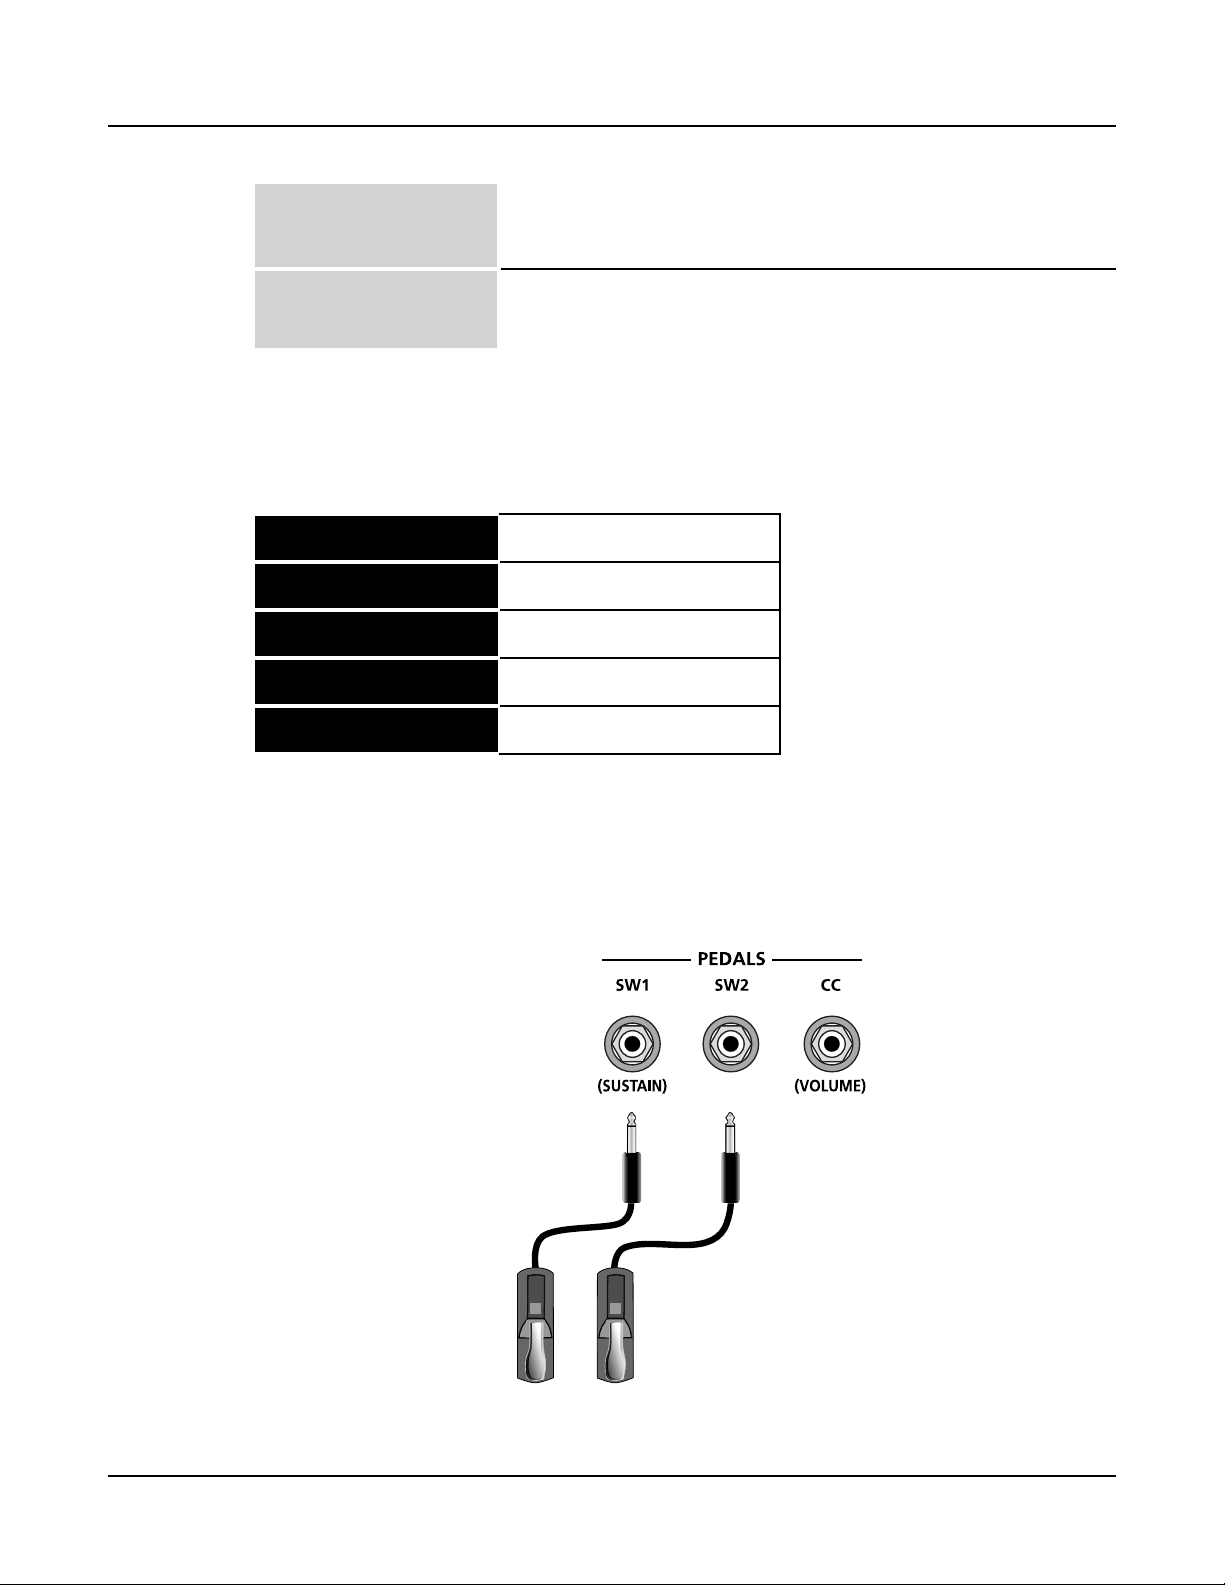
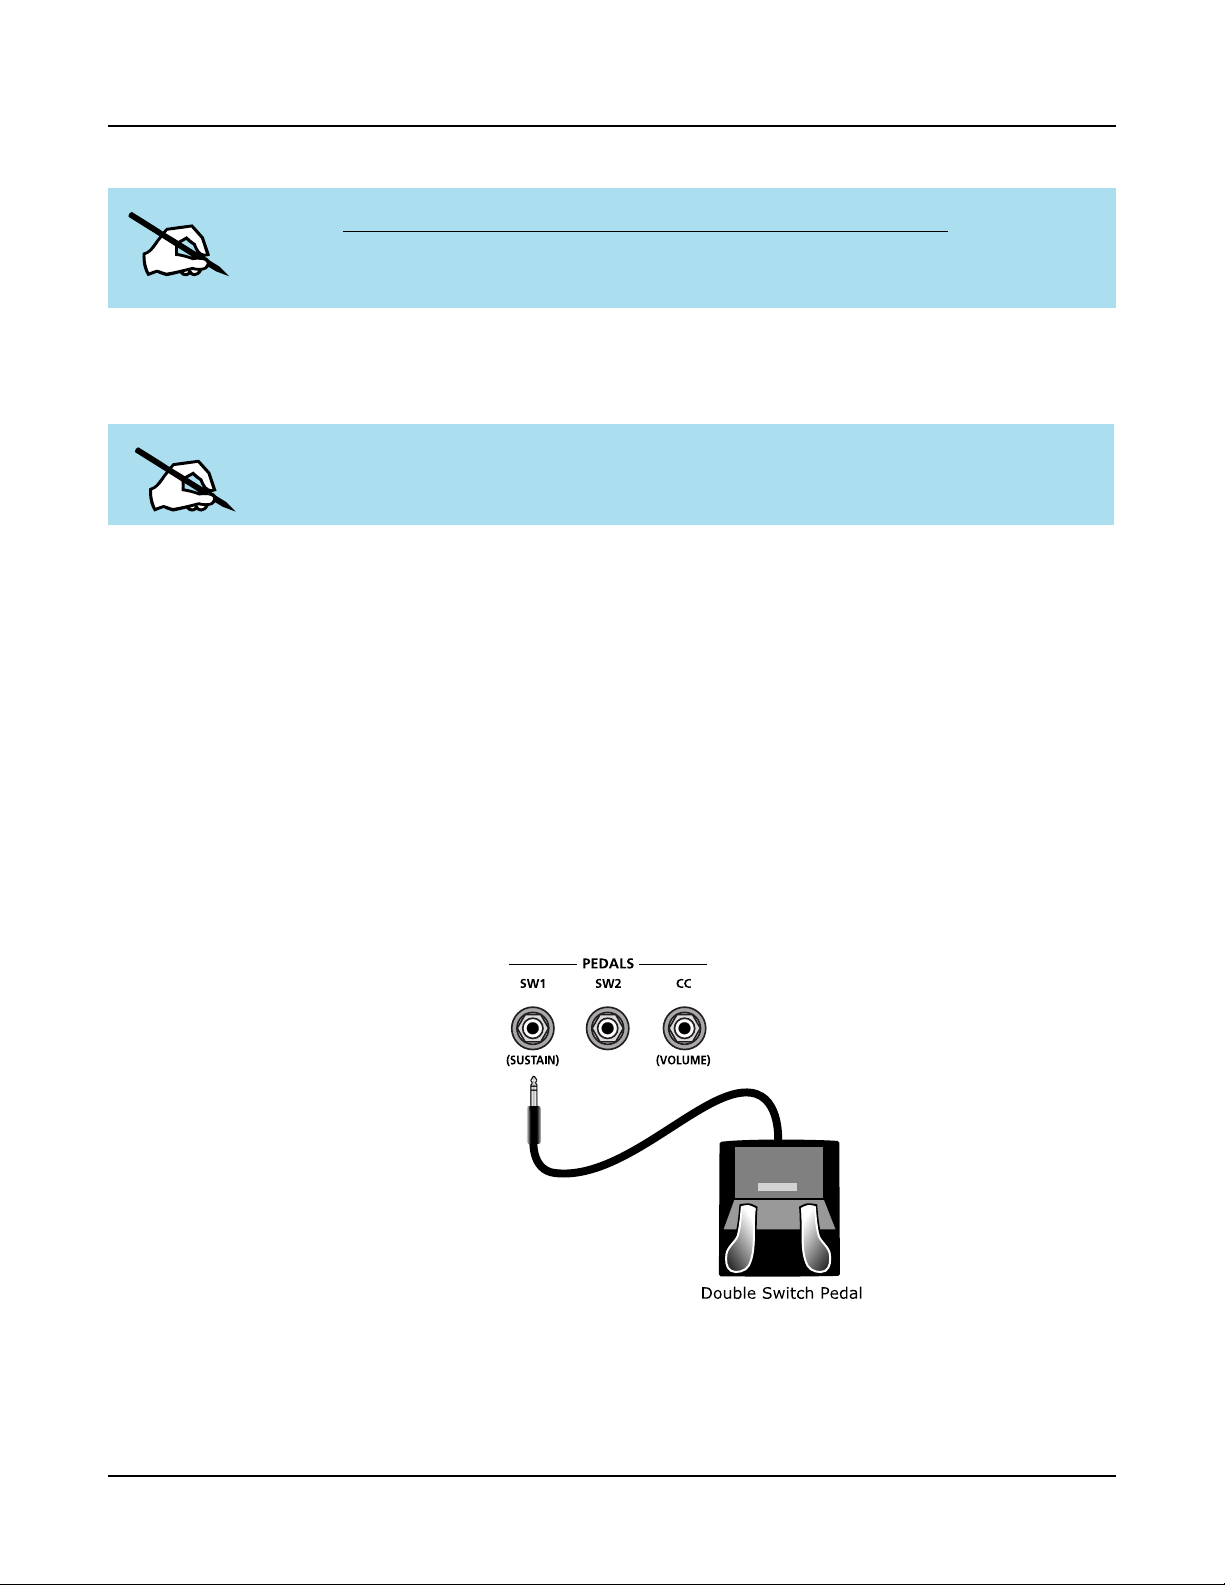
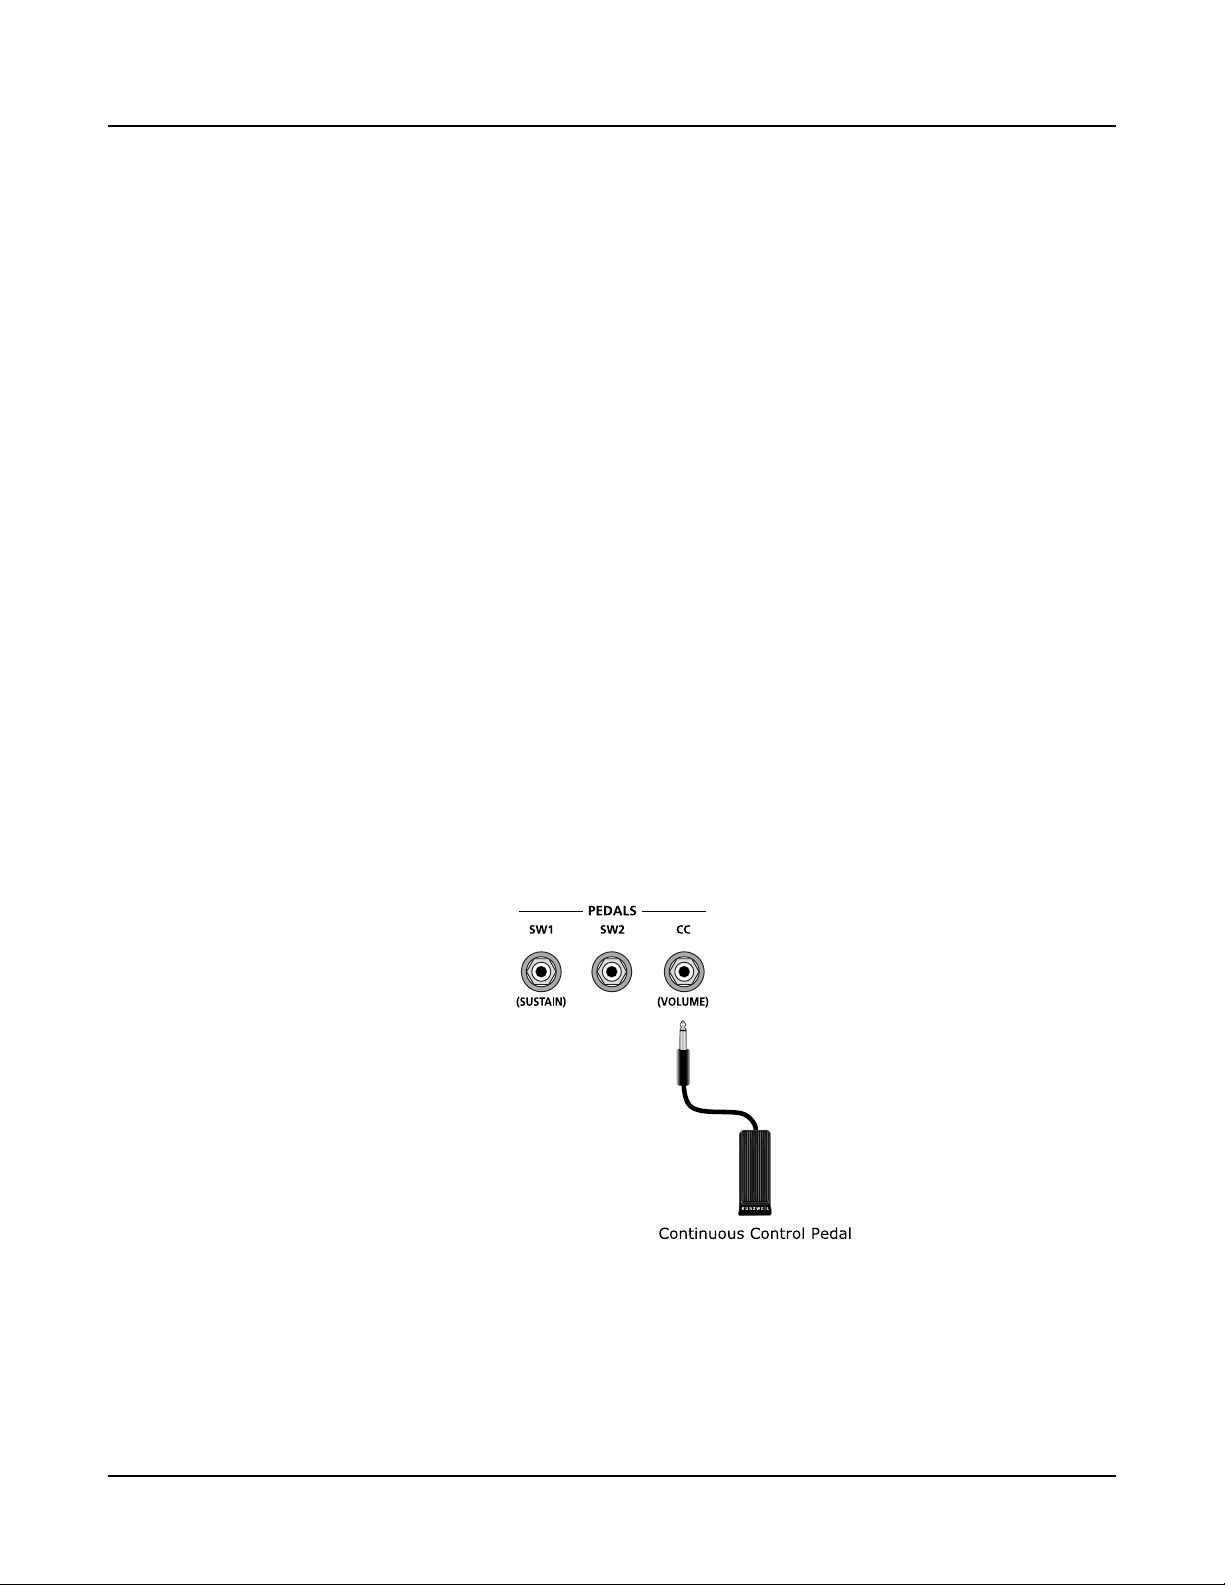
The Pedal Jacks
Use the three pedal jacks to connect controller pedals to the Forte SE.
2-4
Switch Pedals
Getting Started
The Pedal Jacks
¼ inch tip-sleeve (mono) plug or, 1/4 inch tip-ring-sleeve plug
congured as dual switches (TS and RS) or 2 terminal continuous pedal
(half-damper).
Continuous Control
(CC) Pedals
10 kΩ linear-taper potentiometer, ¼ inch tip-ring-sleeve (stereo) plug
with the wiper connected to the tip.
e default function of each pedal can be changed for all Programs and Multis by setting
a pedal override on the Global Control Overrides page in Global Mode. Pedals are also
independently assignable within each Program or each Zone of every Multi.
Here are the default control settings for the ve pedals used by Forte SE:
SW 1a Pedal
SW 1b Pedal
SW 2a Pedal
SW 2b Pedal
CC Pedal
Sustain (MIDI 64)
Sostenuto (MIDI 66)
Sostenuto (MIDI 66)
Soft (MIDI 67)
Expression (MIDI 11)
The SW1 (Sustain) and SW2 Jacks
Use the pedal jacks to connect switch pedals. A switch pedal is a physical controller typically
used to control two-state (i.e., “on / o”) parameters, such as sustain, sostenuto, soft and
Mute Zone.
2-5
Getting Started
The Pedal Jacks
NOTE : Do not step on the switch pedals when powering up the Forte SE, as the state of
the pedal is detected as part of the power up sequence.
e Forte SE SW1 and SW2 jacks can support a single or dual switch pedal on each jack, or
a single half-damper pedal on each jack.
NOTE : It is not recommended to plug CC pedals into the SW inputs. Due to the
exible switch pedal support, CC pedals may not operate as expected in these inputs.
If you are not using a Kurzweil switch pedal, make sure it’s connected before you turn on the
Forte SE. is ensures that the pedal will work properly (it might function in reverse—o
when it’s down and on when it’s up—if you turn on your Forte SE before plugging in the
pedal). Similarly, don’t press any of your switch pedals while powering up, as the Forte SE
veries each pedal’s orientation during power-up. If you’re pressing a pedal, you might cause
it to work in reverse.
Connecting a Dual Switch Pedal
You can connect a dual switch pedal with a single stereo plug, such as the Kurzweil KFP-2S,
into the SW1 Pedal and SW2 Pedal jacks. Both SW1 and SW2 can support a dual pedal
each allowing up to 4 pedals to be utilized by the Forte SE. ese are enumerated as SW1a,
SW1b, SW2a and SW2b. e Forte SE will recognize dual pedals that are wired as TS and
RS, such as the KFP-2S.
2-6
The Audio (LEFT/MONO and RIGHT) Jacks
If you’re not familiar with traditional piano technique, the sostenuto (center) pedal on a
grand piano allows one to hold chords in the bass while continuing to play the melody
without the latter notes sustaining. Any keys that are down when you depress the pedal will
sustain when you let go of the keys, but new notes played afterward will not be sustained.
Releasing the pedal puts things back to normal. Of course it can be programmed to do other
functions as well.
Connecting a Half Damper Pedal
Half Damper pedals where the wiper is connected to the tip (such as the KORG DS-1H)
can be connected to the SW1 and SW2 inputs on the rear panel. Some pedals have the wiper
connected to the ring, and these pedals will require an adaptor to work with the Forte SE.
When connected to the SW1 jack, a Half Damper pedal enables ner control of sustain than
a standard switch pedal. Half Damper control is enabled for programs in the Piano category.
Programs outside of the Piano category will respond to Half Damper pedals as if they are
standard switch pedals. Half Damper pedals can also be used to control external software and
sound modules via MIDI.
Getting Started
The CC (Volume) Jack
A continuous control pedal can be very useful for controlling volume, wah, or other eects
by foot.
e Kurzweil CC-1 continuous control pedal will work best with the Forte SE, but it is also
possible to use third-party continuous control pedals designed for synthesizers.
2-7
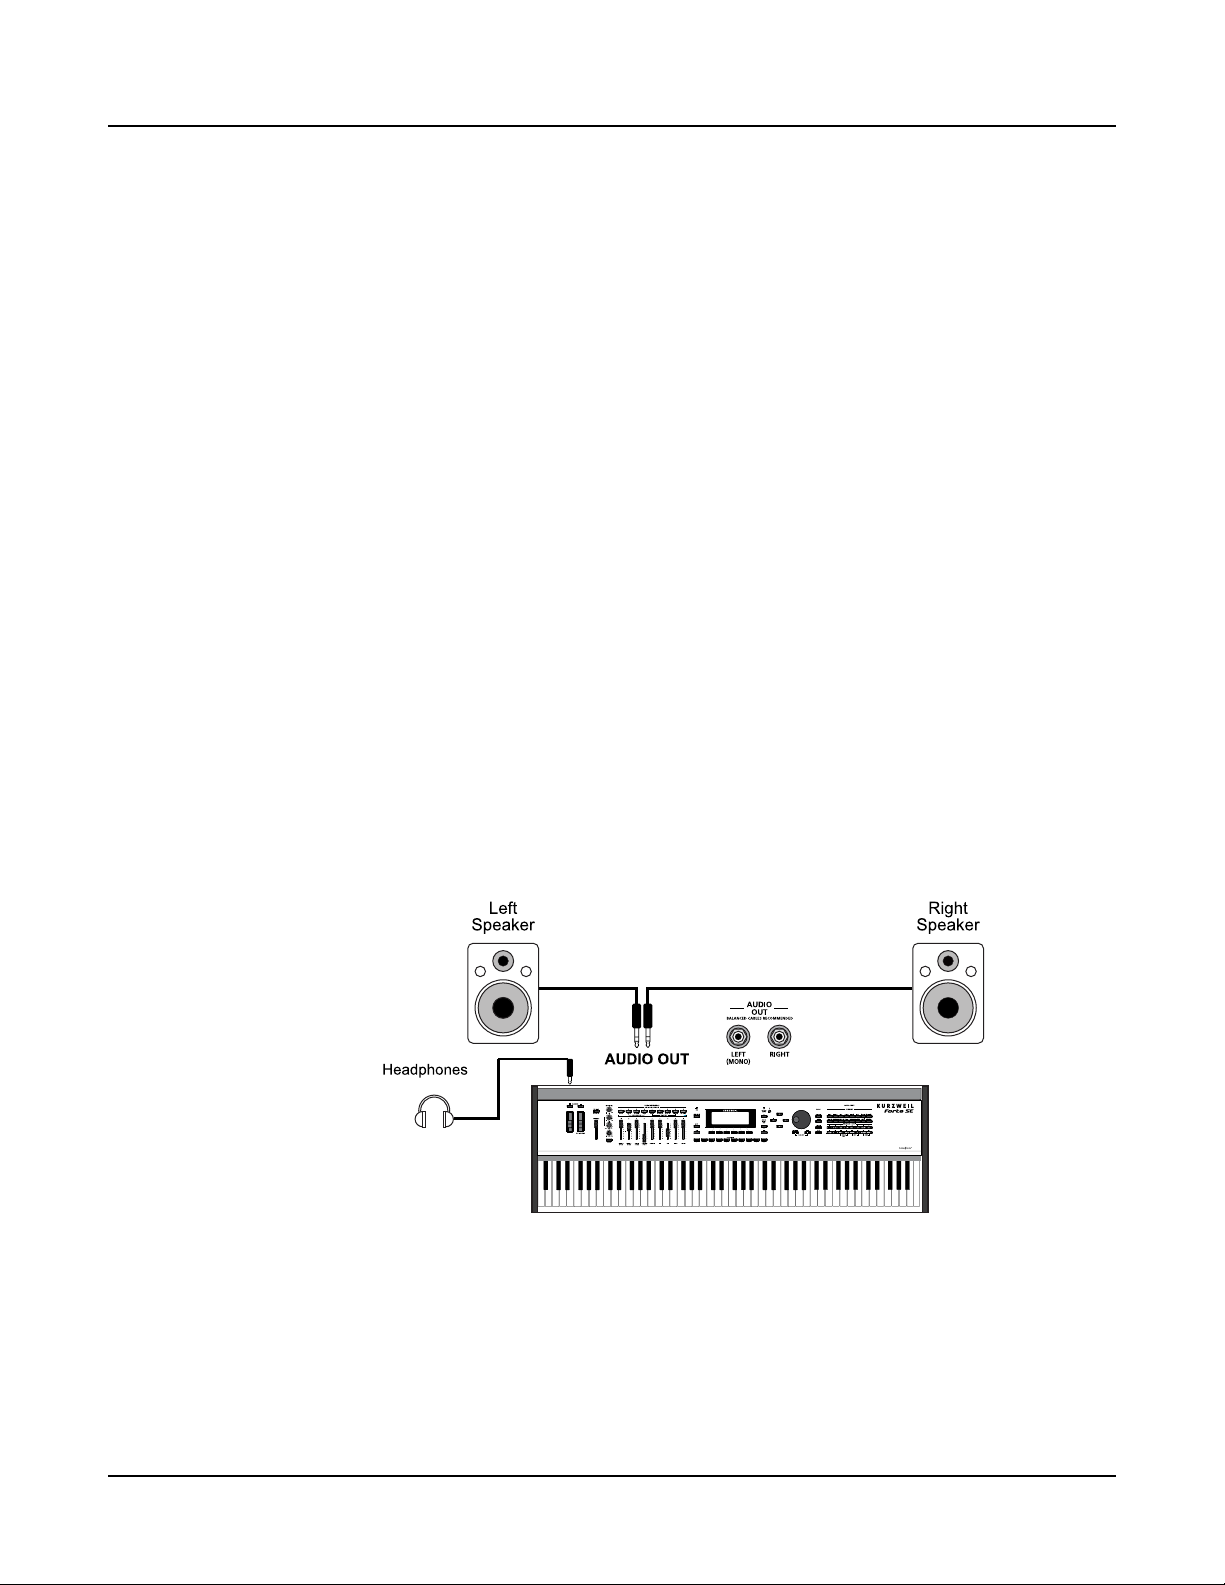
Getting Started
The Audio (LEFT/MONO and RIGHT) Jacks
The Audio (LEFT/MONO and RIGHT) Jacks
Please refer to “Connecting to Your Audio System” below.
The Headphones Jack
Use the Headphones jack located on the left rear panel of the instrument to listen to the
Forte SE on stereo headphones. You will need a 1/4-inch-to-1/8-inch adapter in order to use
headphones that have a smaller mini plug connector.
Connecting to Your Audio System
After you’ve turned down the level on your sound system, connect the Forte SE analog audio
outputs to your sound system using a pair of balanced (TRS or “stereo”) or unbalanced
(TS or “mono”) audio cables. Unbalanced cables will always work, but if you’re going into
balanced inputs, use balanced cables for a better signal-to-noise ratio and a bit more volume.
e Forte SE analog outputs are balanced.
You’ll nd two 1/4-inch balanced audio output jacks on the rear panel. Connect one end of
each audio cable to your mixing board or PA system inputs, and connect the other end to
the jacks marked Left (Mono) and Right on the rear panel of the Forte SE. If you have only
one input available, use the Forte SE’s Left (Mono) output to get the full signal in mono. Use
the jack marked Headphones to listen to Forte SE on headphones. When headphones are
plugged in, sound still comes through the Left and Right audio jacks.
2-8
Forte SE connected to powered speakers and headphones
Getting Started
Connecting to Your Audio System
AUDIO OUT
Forte SE connected to a mixer, powered speakers and headphones
2-9
Getting Started
Connecting to a Computer
Connecting to a Computer
To connect the Forte SE to a computer/tablet, simply connect the Forte SE using the
provided or compatible cable.
If you wish to use your own cable, make sure that it is a Type-A-to-Type-B USB cable (the
USB port of Forte SE being Type B). By default, the Forte SE will act as a MIDI controller
(rather than a hard drive) when connected to a computer.
NOTE : Some devices like the iPad® will require you to purchase adaptors to connect a
USB cable.
Forte SE Sounds
e Forte SE supports two types of sounds. e rst type is a Program, and these are
normally a single instrument, such as a piano, or an organ. A Program is similar to a “preset”
or “patch” on other synthesizers. Both factory and User Programs are arranged into 16
categories of 16 sounds each.
e other type of sound is the more complex Multi. A Multi is a combination of Programs
arranged as layers and splits across the keyboard. ey are similar to setups, from the
Kurzweil PC series, SP series and K2 series, and are similar to Combis or Multis from other
synthesizers. Similar to selecting Programs, the Category buttons allow you to navigate
through this list of Multis in groups of 16 Multis at a time, although Multis are not
categorized by instrument type.
e Forte SE has been designed so that it is quick and easy to select Programs and Multis
from the front panel. Use the following guide to audition the factory sounds on the Forte SE.
2-10

Selecting Programs and Multis
e Forte SE always powers up in Program Mode. If you wish to play a Multi, simply press
the Multi Button. e Multi Button will light up to show that Multi Mode is selected. To
return to Program Mode, from a dierent mode, simply press the Program button. If the
User button is illuminated, then you are in the User Bank. Press the User button to return to
the Factory Bank, and the light will go out. In the Factory Bank, press one of the Category
Buttons to change Category, and that Category button will light up. Once you are in your
desired Category, press one of the Program/Multi buttons to select the program you want.
To select another Program or Multi within the same Category, just press a Program/Multi
Button, or use the Alpha Wheel, or Next/Previous Buttons.
To select a Program or Multi in another Category, press the desired Category Button,
followed by the desired Program/Multi Button. e Alpha Wheel and Next/Previous Buttons
will select the next Category once you get to the end of the current Category. Pressing a
Category Button will select the Category Default Program/Multi (by default this is set to
the rst Program/Multi of each category). For details on changing the Category Default
Program/Multi see Choosing Category Default Programs on page 6-6 or Choosing
Category Default Multis on page 10-5.
Getting Started
Forte SE Sounds
Controllers
e Sliders, Wheels, Pedals and Buttons can control each of the factory Programs and Multis,
to produce variations to the sound. Don’t forget to try these out as you explore the factory
sounds on the Forte SE. For details on controller assignments see Controller Conventions on
page 6-9.
Favorites
e Forte SE also features Favorites Buttons to quickly recall your favorite sounds. e
Favorites buttons store a set of 10 Programs and/or Multis. To assign the currently selected
Program or Multi to a Favorites button, press and hold the desired Favorites button for a
few seconds until the display indicates that the favorite has been saved. To recall a favorite
Program or Multi, simply press the one of the Favorites buttons. e Favorites buttons will
work from whichever mode you are currently in, changing to Program Mode or Multi Mode
automatically if required.
2-11

Chapter 3
Features of the Forte SE
is chapter will help familiarize you with the features of the Forte SE. Many of these
features have both general functions and mode-specic functions. For more in-depth
descriptions of these features, refer to the chapters on the individual modes.
Power Up Defaults
Features of the Forte SE
Power Up Defaults
Powering up the Forte SE always resets the Transpose setting to 0 steps. (is is the transpose
setting controlled by the Transpose buttons above the pitch and mod wheels, or with the
“Octav-” and “Octav+” soft buttons on the Program and Multi mode main pages. is does
not apply to the Transpose parameter on the Global Mode Main page).
Other parameters can have their settings saved as power up default settings. Settings for the
following parameters can be saved as power up default settings by pressing the Exit button
while in Global Mode:
• Currently selected MIDI Channel in Program Mode.
• Currently selected Program per MIDI Channel in Program Mode.
• Currently selected Multi.
• Display View Mode.
• Master EQ On/O switch setting.
• Global Mode parameters.
3-1
Features of the Forte SE
The Front Panel
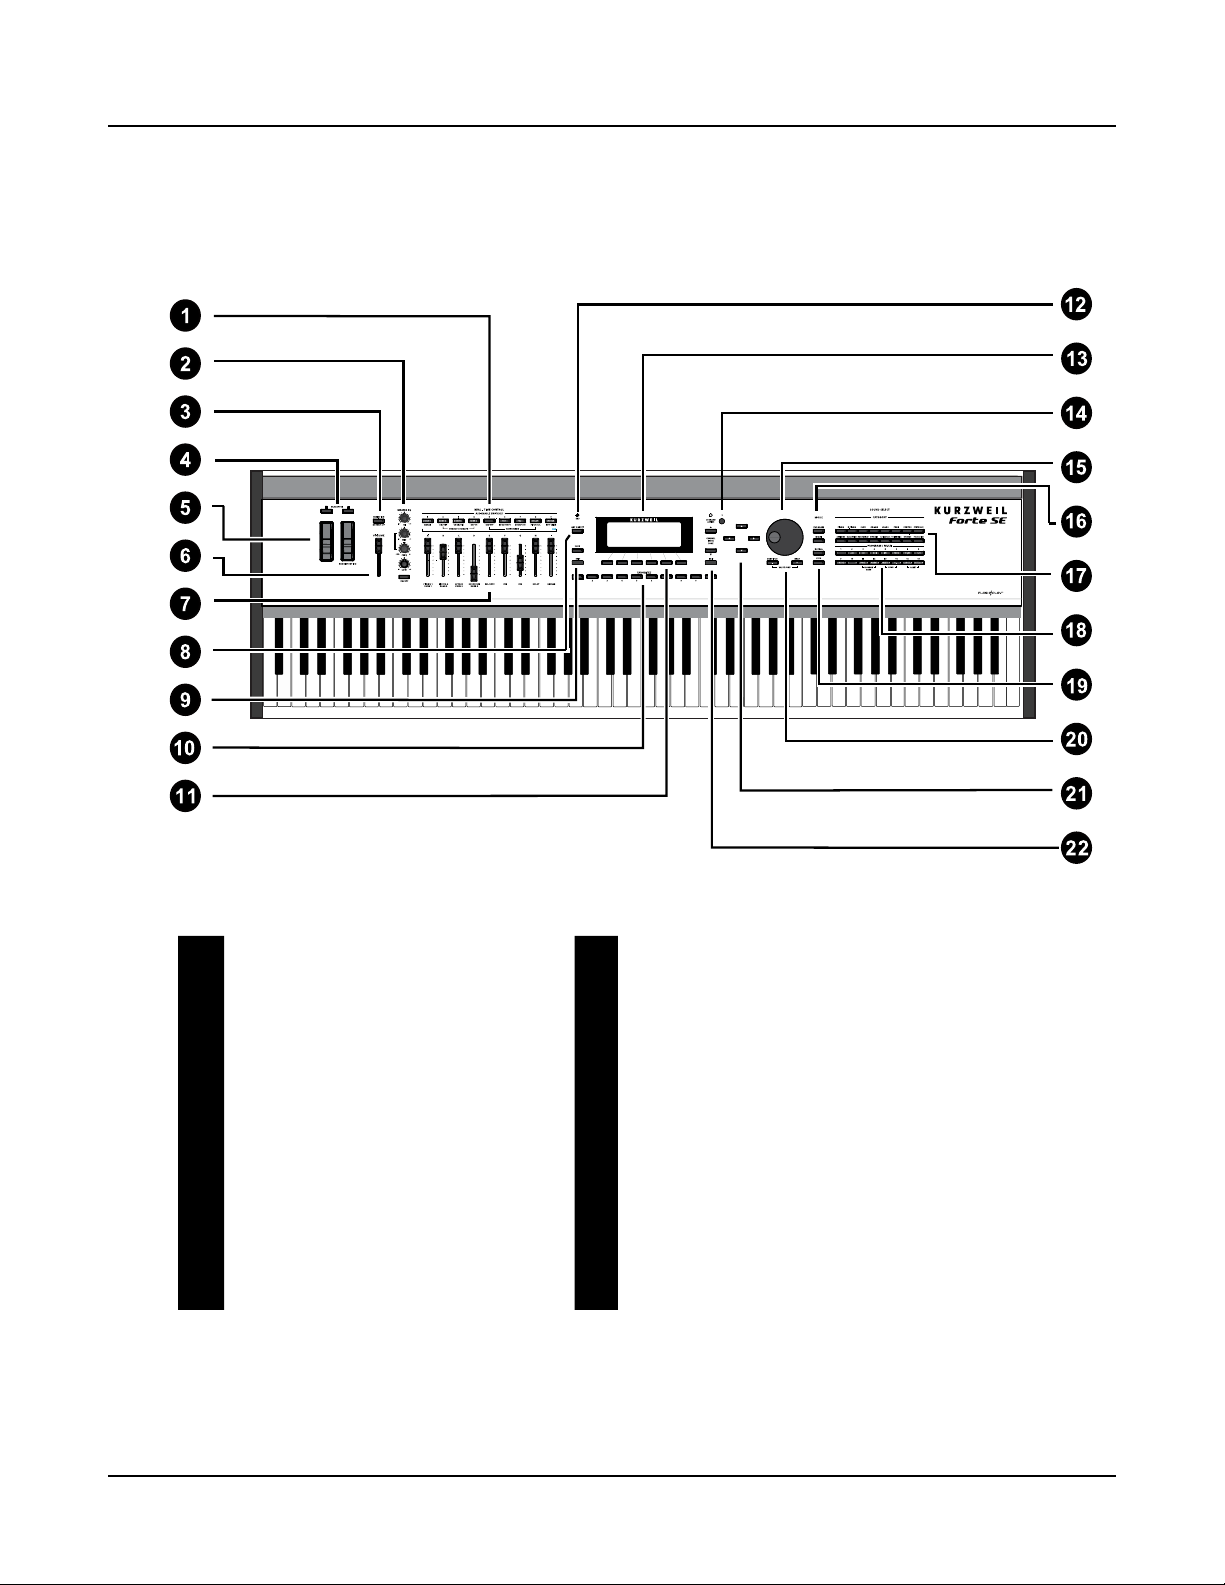
The Front Panel
All the controls for Forte SE, both musical and navigational, are on its front panel.
3-2
1 Multi-Function Switches 12 KB3 indicator light
2 Master EQ 13 LCD display
3 Variation button 14 Display contrast knob
4 Transpose buttons 15 Alpha Wheel
5 Pitch and Modulation wheels 16 Mode select buttons
6 Volume slider 17 Category buttons
7 Nine programmable sliders 18 Program/Multi buttons
8 Arpeggiator On/Off button 19 User button
9 Save and Edit buttons 20 Previous/Next buttons
10 Favorites buttons 21 Navigation buttons
11 Soft buttons 22 Channel/Layer/Zone select buttons

Real Time Controls
Sliders
Features of the Forte SE
Real Time Controls
In Program Mode, the sliders are used to control various Program parameters, typically
assigned to the functions labeled in white below each slider. Moving a slider will briey
show the assignment name in the display. If you select a KB3 organ Program the KB3 LED
will light and the nine sliders operate in a similar way to a Hammond organ, i.e. pulling the
slider towards you increases the drawbar amount. For details on controller assignments see
Controller Conventions on page 6-9. In Program mode, press the Edit button to view the
Parameters page, where you can view a list of controller assignments for the current program.
All Program Slider assignments can be changed in Program Edit Mode.
In Multi Mode, Sliders A-D default to controlling volume for Zones 1-4, while Sliders E-I
generally control synthesis parameters and eects. e sliders can also send MIDI continuous
controller messages to external MIDI equipment. All Multi Slider assignments can be
changed in Multi Edit Mode. See Controlling Program Parameter Assignments from Multi
Mode on page 11-20 to view or change slider assignments for each Zone.
3-3

Features of the Forte SE
Real Time Controls
Assignable Switches
ese nine buttons perform various functions in real time, depending upon the current
performance mode and assignment. e Switch Button LEDs illuminate when the switch is
active.
In Program Mode the switches generally control synthesis parameters and eects as labeled
in white on each switch button. If you select a KB3 organ Program the KB3 LED will light
and the buttons perform the functions labeled in blue below each switch button. For details
on controller assignments see Controller Conventions on page 6-9. In Program mode,
press the Edit button to view the Parameters page, where you can view a list of controller
assignments for the current program. All Program switch assignments can be changed in
Program Edit Mode.
In Multi Mode, the rst four switches are assigned to mute and enable Zones 1-4, while
the remaining switches generally control synthesis parameters and eects. e switches can
also send MIDI continuous controller values to external MIDI equipment. All Multi switch
assignments can be changed in Multi Edit Mode. See Switch on page 11-17 to view or change
switch assignments for each Zone.
3-4

Variation Button
e Variation button is located on the left side of the front panel, just above the Volume
slider. e Variation Button is a MIDI controller (default MIDI CC#29) that is programmed
in most Programs to modify the sound, such as adding a pad sound, changing the eects or
some other variation suited to changing with a switch.
Features of the Forte SE
Real Time Controls
For KB3 programs, the Variation Button controls the Rotary Speaker speed, switching
between slow and fast.
3-5

Features of the Forte SE
Real Time Controls
Arp On/Off Button
e Arp On/O button is set by default to turn on and o the Forte SE’s Arpeggiator. It can
also be assigned to control other parameters in Multi Edit mode.
Transpose Buttons
e Transpose buttons are located on the left side of the front panel, just above the Pitch &
Modulation Wheels. ey can be used to change the tuning of notes played on the Forte SE
keyboard in semitones (ST), also known as half steps. is is a convenient way to change
the key of a song without learning to play it in a dierent key. e Transpose buttons also
transpose MIDI notes sent to the USB and MIDI out ports.
Press the Transpose - or + buttons to transpose the Forte SE keyboard down or up by one
semitone. e top line of the display shows the current transposition value. Pressing both
Transpose - and + simultaneously will reset the transposition to 0. To transpose up and down
by octave intervals (12 ST), press the Octav- and Octav+ soft buttons underneath the display.
e maximum transposition value possible is +/–36 semitones.
e LEDs of the Transpose buttons indicate whether the current Program is transposed up
(Transpose + LED is lit) or transposed down (Transpose – LED is lit). When there is no
transposition, neither Transpose button is lit.
3-6
 Loading...