


BEDIENUNGSANWEISUNG
mit Montageanweisungen
 Instructions for use and installation instructions
 Instructions d’utilisation et avis de montage
  Gebruiksaanwijzing en montagehandleiding
EEB 61.1
3172048 ABB00
Conditions of guarantee |
Contents |
The conditions of guarantee applicable for this product are subject to those published by the representative in the relevant country. Details regarding same may be obtained from the dealer from whom the appliance was purchased. For claims under guarantee the sales receipt must be produced.
For your information...
Please read this manual carefully before using your cooker. It contains important safety advice; it explains how to use and look after your appliance so that it will provide you with many years of reliable service.
If a fault develops with your appliance, please consult chapter “What to do if trouble occurs”. You can often fix minor problems yourself, without having to call in an engineer.
Please keep this manual in a safe place and pass it on to new owners for their information and safety.
The following symbols are used in this operating manual:
[The warning triangle warns of possible health hazards. It also warns of a risk of damage to the appliance.
Φ Stands for useful hints and tips.
Your appliance at a glance . . . . . . . . . . . . . . . . . . . . . . . 18 Safety instructions . . . . . . . . . . . . . . . . . . . . . . . . . . . . . 19
Connection and operation Oven
Before using the appliance for the first time . . . . . . . . . . . 19
Disposing of the packaging and your old appliance Setting the clock
Initial cleaning
Using your oven . . . . . . . . . . . . . . . . . . . . . . . . . . . . . . . 20
General Information
Controls and displays for the oven Symbols and operating modes: Turning the oven on and off Heating-up indicator and pilot light Oven trays
Rack levels Pre-heating Roasting
Guidelines for roasting Baking
Notes on the table: “Guidelines for baking” Guidelines for baking
Defrosting without cooking Preserving
Grilling
Guidelines for grilling
The electronic minute minder with switch-off function . . . . 26
Setting the clock
Adjusting the minute minder
Cleaning and maintenance. . . . . . . . . . . . . . . . . . . . . . . . 26
For all surfaces
Removing fat and grease deposits Information about the cleaning scraper Suggestions on the use of oven sprays Enamel
Stainless steel Glass
Door sealing Knobs
Removing and refitting the oven door Removing and refitting the side racks Folding heating element down/up
What to do if trouble occurs... . . . . . . . . . . . . . . . . . . . . . 28
Replacing the oven lamp Replacing the door seal
Model identification plate . . . . . . . . . . . . . . . . . . . . . . . . 29 Installation instructions for fitter. . . . . . . . . . . . . . . . . . . . 30
Electrics
Installation dimensions Installing in a fitted kitchen unit
EEB 61.1 |
17 |
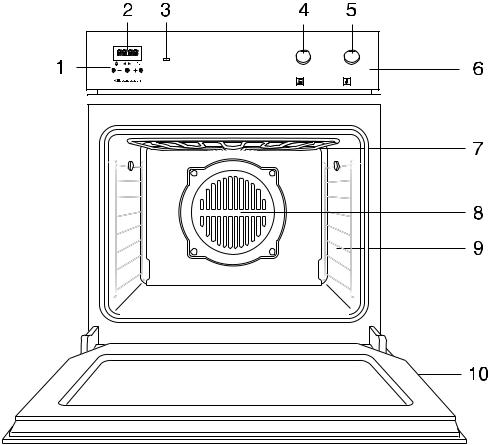
Your appliance at a glance
1 Control buttons for the minute minder
2 Display of the minute minder
3 Heating-up indicator (red)
4 Mode selector
5 Temperature control
6 Control panel
7 Fold-down grill (top heat and grill)
8 Hot air fan
9 Rack levels
10 Oven door
Accessories supplied:
Roasting grid
Baking tray (enamel)
Drip pan
Optional accessories:
Grilling rack with lifter (acc. No. 125)
Pizza stone (acc. No. 145)
Gridiron (acc. No. 124)
Roasting tray (acc. No. 441)
Enamel baking tray (acc. No. 541)
Aluminium baking tray (acc. No. 542)
18 |
EEB 61.1 |
Safety instructions
Connection and operation
■Only KÜPPERSBUSCH built-in hobs were designed and tested for use above a Küpperbusch fitted oven. No other hobs may be used.
■Fitting a mains socket, repairing and servicing the appliance are jobs that should be left to a qualified electrician according to valid safety regulations. For your own safety, do not allow anyone other than a qualified service technician to install, service or repair this appliance.
■Do not switch the appliance on until it has been installed!
■The surface of the oven becomes hot in use. Always make sure that children are kept well away!
■Make sure that trailing leads for kitchen appliances cannot become trapped in the oven door.
■Never use steam and/or pressure cleaners to clean the oven! Damage caused to your appliance by cleaning it this way can make it lethally dangerous.
■The appliance is designed solely for the preparation of food in the home.
Oven
■When carrying out repairs and replacing oven light bulbs, the cooker must be disconnected from the mains (switch off the fuse!).
■Never keep items in your oven that could be hazardous if the oven is accidentally switched on.
■Take special care when working in the hot oven and always use an oven cloth, oven gloves or similar protection.
■Be careful opening the door when the oven is hot; don’t lean over the open door straight away. Hot air and steam are released when you open the door.
■The oven door must form a good seal when closed. If the hinges or the door glass are damaged, do not use the oven until it has been repaired and checked by a service engineer.
■If the oven door is to get less hot (e.g. when you have little children in your household), the KÜPPERSBUSCH Customer service can offer you a solution.
■A damaged door seal must be replaced. Do not use the oven if the door seal is damaged.
■Always close the oven door tightly when cooking food in the oven.
■Keep food at a distance of at least 5 cm from the grill and top heat.
Before using the appliance for the first time
Disposing of the packaging and your old appliance
Please dispose of the packaging that came with your appliance in an environmentally friendly way.
If you bought your appliance in Germany, the dealer who sold it to you will take the packaging back for recycling. Recycling in this way saves on resources and cuts down on waste. Your old appliance still contains useful raw materials. Take your old appliance to a recycling collection point. Please make your old appliances unserviceable before disposing of it, to prevent it from misuse.
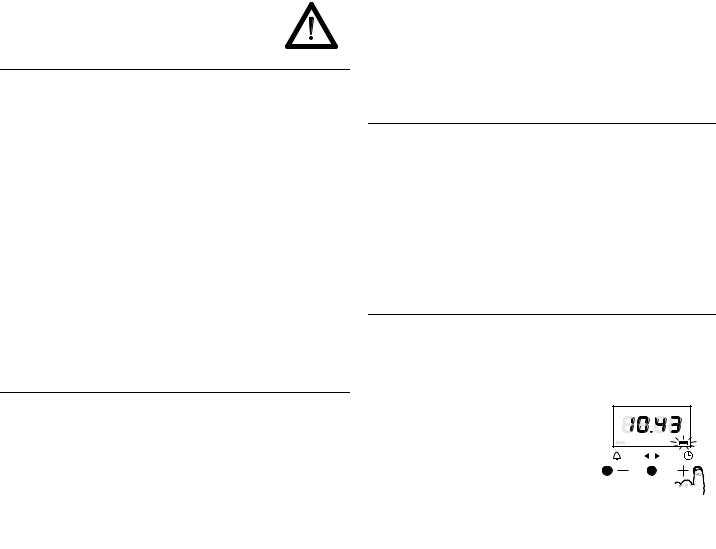
Setting the clock
Φ The oven will not function until the clock is set.
The clock must be set before the oven is used and whenever power has been disconnected to the appliance. If the clock is not set, a dash flashes in the bottom right-hand corner of the display.
– Set the desired time with the “+” and “-” keys. The clock starts after a few seconds and the flashing dash disappears.
Initial cleaning
–Remove packaging and non-essential components.
–We recommend that you clean your oven before using it for the first time. Clean the drip pan, gridiron etc. using a damp cloth and a little detergent.
–Heat the oven.
Close the oven door.
Heat up the oven with Top/Bottom heat at 250 °C for 60 minutes. Make sure that the kitchen is well ventilated during this time.
EEB 61.1 |
19 |

Using your oven
General Information
[Please note the safety instructions on page 19!
[Attention. Risk of overheating! Do not cover the bottom of the oven with aluminium foil and do not place pots or pans directly on the bottom of the
oven! This will trap heat and damage the enamel surface.
Controls and displays for the oven
A Heating-up indicator
B Mode selector
C Temperature control
Symbols and operating modes:
Symbol |
Operating |
Intended for |
|
mode |
|
|
|
|
0Off
$Top/Bottom preheating,
|
heat |
baking and roasting on one level |
# |
Cold air |
without temperature setting, for gently defrosting and |
|
convection |
cooling food. |
# |
Hot air |
with temperature setting, for roasting, baking and cooking |
|
convection |
on several levels, making preserves, pizza. |
|
|
|
* |
Grill |
grilling small portions. Position the pieces of meat in the |
|
|
centre of the gridiron. |
+ |
Large area |
grilling larger portions such as steaks, fish and sausages, |
|
grill |
but also for browning toast dishes and gratins. |
|
Large area |
baking and roasting on one level and gratins |
|
grill and |
|
|
recirculating |
|
|
air |
|
- |
Bottom heat |
prebaking very moist cake |
|
Grill and |
roasting in a pan |
|
bottom heat |
|
Turning the oven on and off
Selecting the operating mode:
– Turn the mode selector (the switch on the left) to the right.
Selecting the temperature:
–Turn the temperature selector (the switch on the right) to the right.
Turning the oven off:
– Turn both switches to the “0” position.
Heating-up indicator and pilot light
The heating-up indicator on the control panel will light up while the appliance is heating up and will go out as soon as the set temperature has been reached. It also comes on during operation when the oven is heated to maintain the temperature you want.
The pilot light lights up when you have selected an operating mode – the oven is operating.
Oven trays
Baking trays
■Lift them slightly before taking them out of the oven.
When you put them back in the oven, make sure that the sloping edge of the tray is pointing towards the oven door.
■Slide the drip pan and baking tray with the two slots right to the back of the oven.
Gridiron
■The crossbars on the racks should point towards the back of the oven (away from you).
Drip pan
For baking moist cakes and as receiver for roasting and grilling we recommend the use of the drip pan.
Grilling rack with lifter to insert in the drip pan (accessory)
■ The grilling rack is inserted in the drip pan. Its lifter allows you to remove both the tray and the drip pan together from the oven. The drip pan remains in place to catch any drips.
Splash guard roasting tray (accessory) for roasting and grilling
■The roasting tray is inserted in the drip pan and prevents the fat from splashing out of the drip pan.
Rack levels
There are 7 rack levels in the side racks. These are numbered from 1 to 7, from bottom to top.
Side racks
Rack level 1 is the lowest possible level.
20 |
EEB 61.1 |
 Loading...