

Page 1
OPERATOR'S MANUAL
U.S.A. :KUBOTATRACTORCORPORATION
WesternDivision :
CentralDivision :
NorthernDivision :
SoutheastDivision :
Canada :KUBOTACANADALTD.
France :KUBOTAEUROPES.A.S
Italy :KUBOTAEUROPES.A.SItalyBranch
Germany :KUBOTABAUMASCHINENGmbH
U.K. :KUBOTA(U.K.)LTD.
Australia :KUBOTATRACTORAUSTRALIAPTYLTD.
Malaysia :SIMEKUBOTASDN.BHD.
Philippines :KUBOTAPHILIPPINES,INC.
Taiwan :SHINTAIWANAGRICULTURALMACHINERYCO.,LTD.
Thailand :SIAMKUBOTACORPORATIONCO.,LTD.
Japan :KUBOTACorporation
3401
DelAmoBlvd.,Torrance,CA
Telephone:(
Telephone :(
Telephone :(
Telephone :(
Telephone :(
590014
Telephone:(
19-25
Telephone:(
ViaGrandi,
Telephone:(
Steinhauserstr,
Telephone:(
DormerRoad,Thame,Oxfordshire,OX
Telephone:(
25-29
Telephone:(
3
JalanSepadu25/
No.
Seksyen
Telephone:(
232
QuirinoHi㷅hway,Baesa,QuezonCity
Telephone:(
16
,Fen㷅pin㷅2ndRd,TaliaoShian㷅Kaohsiun㷅
Telephone:(
101/19-24
Pathumthani
Telephone:(
Farm&IndustrialMachineryInternationalOperationsHeadquarters
2-47
,Shikitsuhi㷅ashi1-chome,Naniwa-ku,Osaka,Japan
310)370-3370
1175
S.GuildAvc.,Lodi,CA
209)334-9910
14855
FAABlvd.,FortWorth,TX
817)571-0900
6300
atOneKubotaWay,Groveport,OH
614)835-1100
1025
NorthbrookParkway,Suwanee,GA
770)995-8855
thAvenue,Markham,Ontario,L3S4K4,Canada
905)294-7477
,RueJulesVercruysse,Z.I.BP88,
33)1-3426-3434
2920068
PermasWay,Tru㷅anina,VIC
25,40400
Moo20,NavanakornIndustrialEstate,TambonKhlon㷅nuen㷅,AmphurKhlon㷅luan㷅,
PeschieraBorrome(MI)Italy
39)02-51650377
100,66482
49)6332-4870100
44)1844-214500
61)-3-9394-4400
123
ShahAlam,Selan㷅orDarulEhsanMalaysia
60)3-736-1388
63)2-422-3500
886)7-702-2333
12120
,THAILAND
66)2-909-0300
90503
,U.S.A.
95240
76155
95101
Ar㷅enteuilCedex,France
ZweibruckenRheinlandpfalzGermany
93
UN,U.K.
3029
,Australia
TamanPerindustrianAxis,
1106
,Philippines
83107
43125
30024
,TaiwanR.O.C.
556-8601
KUBOTA
MODEL
CTL
SVL75
Compact
Tra ck
Loader
PRINTED IN JAPAN
English (Australia)
Code No. V0512-5812-4
KUBOTA Corporation 2013
©
S
V
L
7
5
1BCAAAAAP0010
READ AND SAVE THIS MANUAL
Page 2

ABBREVIATION LIST
Abbreviations Definitions
API
ASTM
AUX
CTL
DIN
EN
ISO
JIS
FOPS
MIL
OPC
OSHA
rpm
rps
ROPS
SAE
SMV
American Petroleum Institute
American Society for Testing and Materials, USA
Auxiliary
Compact Track Loader
Deutsches Institut für Normung, GERMANY
European Standard
International Standard Organization
Japanese Industry Standard
Falling Objects Protective Structure
Military Specification and Standard
Operator Presence Control
Occupational Safety and Health Administration
Revolutions Per Minute
Revolutions Per Second
Roll-Over Protective Structure
Society of Automotive Engineers, USA
Slow Moving Vehicle
SVL75
English (Australia)
AU. E. 6-7. 1. K
Page 3
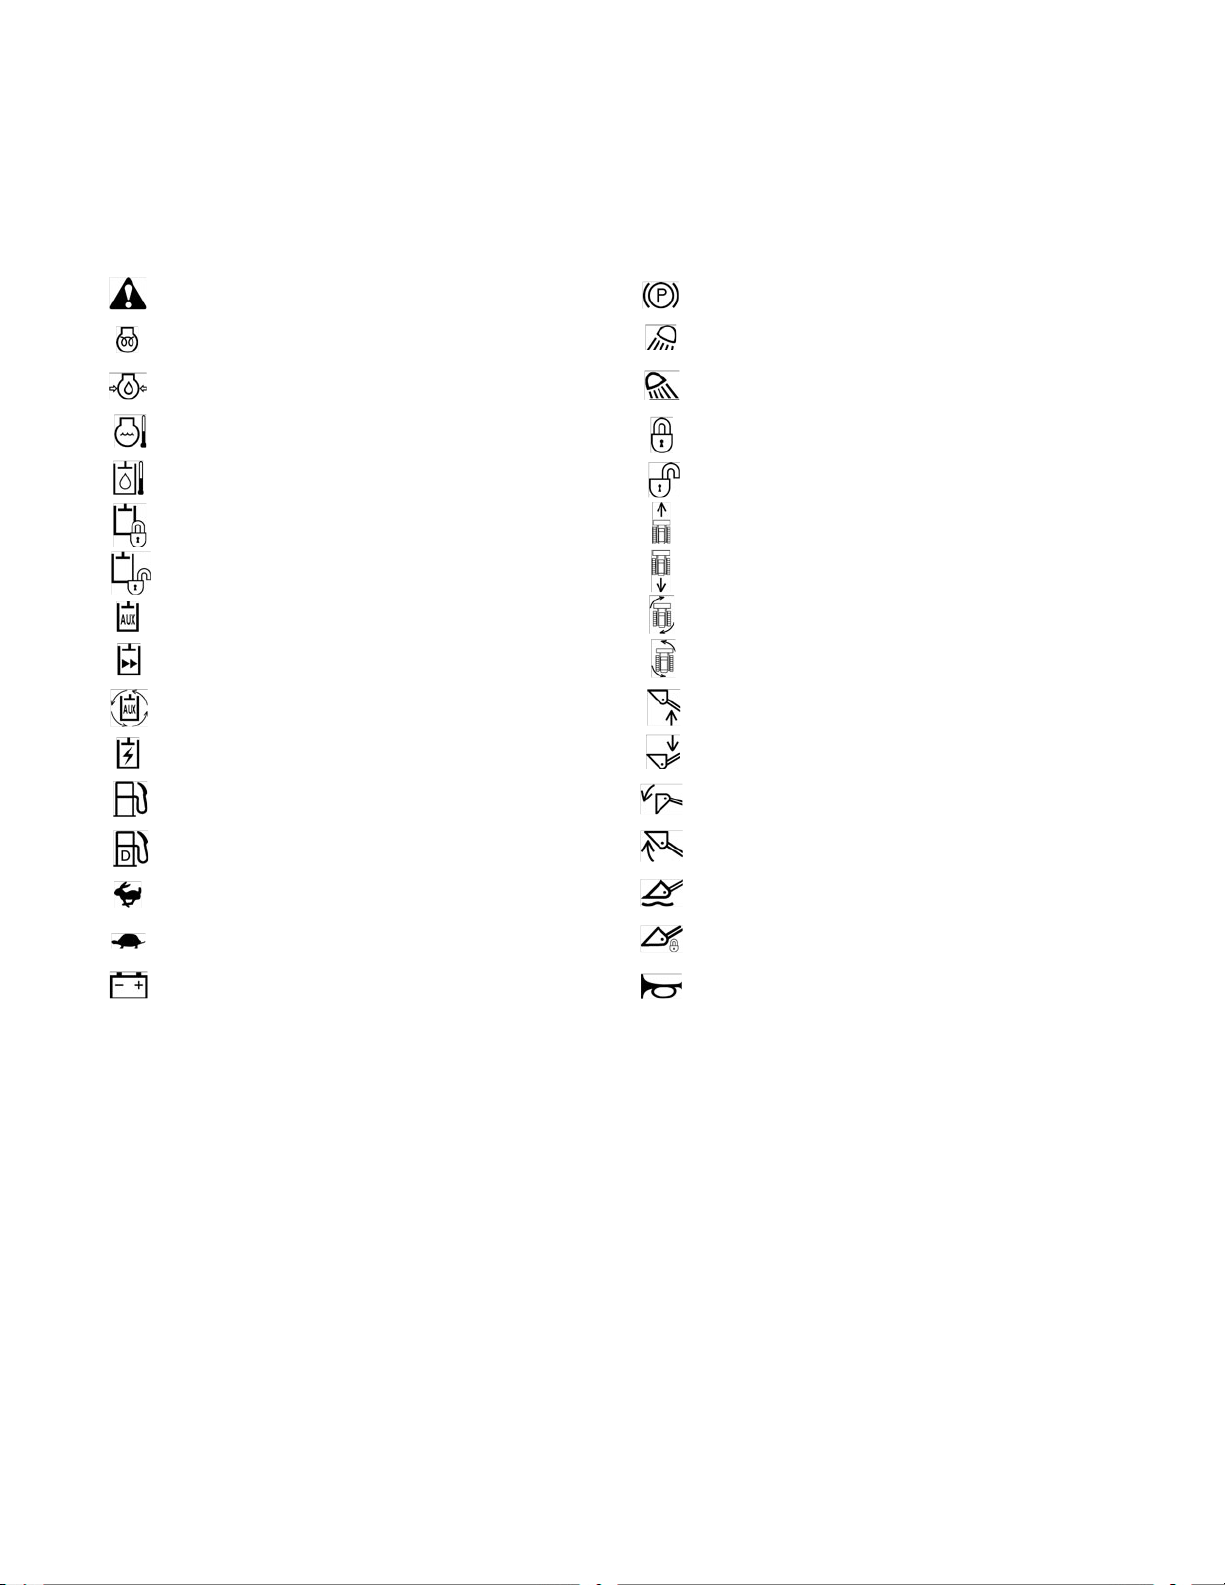
UNIVERSAL SYMBOLS
As a guide to the operation of your machine, various universal symbols have been utilized on the instruments and
controls. The symbols are shown below with an indication of their meaning.
Caution
Engine, Electrical Preheat
Engine Lubricating Oil Pressure
Coolant Temperature
Hydraulic Oil Temperature
Hydraulic Lock
Hydraulic Unlock
AUX Hydraulics
High-Flow
AUX Hold
AUX Electrical Power
Fuel
Diesel Fuel
Parking Brake
Front Working Light
Rear Working Light
Lock
Unlock
Forward
Backward
Turn Right
Turn Left
Lift Arm Raise
Lift Arm Lower
Loader Bucket, Dump
Loader Bucket, Rollback
Fast (Speed Indicator)
Slow (Speed Indicator)
Battery Charge
Loader Bucket, Float
Quick Hitch Lock
Horn
Page 4
FOREWORD
You are now the proud owner of a KUBOTA CTL. This machine is a product of
KUBOTA quality engineering and manufacturing. It is made of fine materials and
under a rigid quality control system. It will give you long, satisfactory service. To
obtain the best use of your machine, please read this manual carefully. It will help
you become familiar with the operation of the machine and contains many helpful
hints about machine maintenance. It is KUBOTA's policy to utilize as quickly as
possible every advance in our research. The immediate use of new techniques in
the manufacture of products may cause some sections of this manual to become
outdated. KUBOTA distributors and dealers will have the most up-to-date
information. Please do not hesitate to consult with them.
SAFETY FIRST
This symbol, the industry's "Safety Alert Symbol", is used throughout this manual
and on labels on the machine itself to warn of the possibility of personal injury.
Read these instructions carefully. It is essential that you read the instructions and
safety regulations before you attempt to assemble or use this unit.
DANGER :
WARNING :
CAUTION :
IMPORTANT :
NOTE : Gives helpful information.
Indicates an imminently hazardous situation which, if not
avoided, will result in death or serious injury.
Indicates a potentially hazardous situation which, if not
avoided, could result in death or serious injury.
Indicates a potentially hazardous situation which, if not
avoided, could result in minor or moderate injury.
Indicates that equipment or property damage could result if
instructions are not followed.
Page 5

CONTENTS
SAFE OPERATION ............................................................................................ -1
DEALER SERVICE...................................................................................................... 1
TECHNICAL DATA...................................................................................................... 2
DESCRIPTION OF MACHINE PARTS........................................................................ 3
INSTRUMENT PANEL AND CONTROL ELEMENTS................................................. 4
CHECKS BEFORE START ......................................................................................... 7
DAILY CHECKS....................................................................................................... 7
CHECKING THE SWITCHES .................................................................................. 7
Hydraulic Unlock Switch ...................................................................................................7
OPC Switch ......................................................................................................................7
Parking Brake Switch........................................................................................................8
AUX Port Switch ...............................................................................................................8
Working Light Switch ........................................................................................................8
Interior Lamp Switch.........................................................................................................9
Travel Speed Switch.........................................................................................................9
Horn Switch ....................................................................................................................10
AUX Port Variable Switch...............................................................................................10
AUX Hold Switch ............................................................................................................10
AUX Electrical Control Switch (Option)...........................................................................10
Float Switch ....................................................................................................................11
Starter Switch .................................................................................................................11
Hydraulic Quick Switch (Hydraulic Quick-Hitch model only)...........................................12
Wiper/Washer Switch (Closed cab model) .....................................................................12
CHECKING THE LAMPS AND INDICATORS ....................................................... 13
Fuel Gauge Indicator ......................................................................................................13
Remaining Fuel Warning Lamp ......................................................................................13
Coolant Temperature Gauge..........................................................................................13
Speed Indicator Lamp..................................................................................................... 14
Parking Lamp..................................................................................................................14
Floating Lamp.................................................................................................................14
Warning Lamp ................................................................................................................15
Glow Lamp......................................................................................................................15
Engine Oil Pressure Warning Lamp ...............................................................................15
Battery Charge Lamp...................................................................................................... 15
Hydraulic Oil Temperature Gauge..................................................................................16
Hour-Meter......................................................................................................................16
CHECKING THE SAFETY DEVICES .................................................................... 16
Emergency Exit............................................................................................................... 16
Armrests Function...........................................................................................................17
OPC Function .................................................................................................................17
Forced Lift Arms Lowering Device.................................................................................. 17
DOOR AND WINDOWS......................................................................................... 18
Opening/Closing of Cab Door (Closed cab model).........................................................18
Opening/Closing of Side Cab Window (Closed cab model) ........................................... 20
AIR-CONDITIONER............................................................................................... 20
Page 6

CONTENTS
Air Flow...........................................................................................................................20
Air Control Vent ..............................................................................................................21
Control Panel..................................................................................................................22
Operation........................................................................................................................22
OPERATION OF THE ENGINE................................................................................. 23
STARTING THE ENGINE ...................................................................................... 23
Checkpoints after Starting the Engine ............................................................................24
STARTING THE ENGINE UNDER COLD CONDITIONS...................................... 25
STOPPING THE ENGINE...................................................................................... 25
STARTING WITH AN AUXILIARY BATTERY ....................................................... 25
Observe Following Guidelines when Starting with an Auxiliary Battery..........................25
OPERATION OF THE MACHINE.............................................................................. 26
RUNNING-IN OF THE MACHINE.......................................................................... 26
Do not Work with Full Engine Rpm's or Full Loads during the First 50 Working Hours.. 26
Oil Change in the Run-in Stage......................................................................................26
STARTING ............................................................................................................. 26
Adjusting the Operator's Seat.........................................................................................27
Seat Belt .........................................................................................................................27
Armrest ........................................................................................................................... 28
DRIVING ................................................................................................................ 28
Forward and Backward Travel........................................................................................ 28
TURNING............................................................................................................... 29
Pivot Turn .......................................................................................................................29
Spin Turn ........................................................................................................................ 31
OPERATION OF THE LIFT ARMS ........................................................................ 32
Lift Arm Stopper.............................................................................................................. 33
OPERATION OF THE BUCKET ............................................................................ 34
AUXILIARY HYDRAULIC CONTROL .................................................................... 35
Auxiliary Hydraulic Control Operation............................................................................. 36
ATTACHMENT CONTROL DEVICE (OPTION) .................................................... 37
MECHANICAL QUICK-HITCH ............................................................................... 37
Attaching Attachments....................................................................................................37
Detaching Attachments................................................................................................... 39
HYDRAULIC QUICK-HITCH (OPTION)................................................................. 39
Attaching Attachments....................................................................................................39
Detaching Attachments................................................................................................... 41
IMPORTANT INFORMATION ON MACHINE OPERATION.................................. 41
Caution While Traveling..................................................................................................41
Precaution When Traveling in High Speed..................................................................... 42
Precautions for Use of Machine Near Water ..................................................................42
Precaution When Traveling on Inclines ..........................................................................42
Parking on an Incline ......................................................................................................43
Prohibited Actions...........................................................................................................43
Preventing Slippage of Rubber Tracks...........................................................................43
LIFTING THE MACHINE ........................................................................................... 44
TRANSPORTING THE MACHINE ............................................................................ 47
LOADING THE MACHINE ON A TRANSPORT VEHICLE.................................... 47
TOWING AN OPERABLE MACHINE .................................................................... 49
TOWING AN INOPERABLE MACHINE................................................................. 49
Page 7

CONTENTS
MAINTENANCE......................................................................................................... 50
MAINTENANCE INTERVALS ................................................................................ 50
OPENING AND CLOSING OF COMPONENTS .................................................... 52
Rear Door .......................................................................................................................52
Engine Hood...................................................................................................................53
Radiator and Oil Cooler ..................................................................................................53
Where to Keep Operator's Manual ................................................................................. 54
Floor Mud Outlet.............................................................................................................54
Tool Box.......................................................................................................................... 55
Tilting Up the CAB ..........................................................................................................55
DISCHARGING MUD FROM OPERATOR ROOM AND MAIN FRAME ............... 57
Operator room ................................................................................................................ 57
Radiator .......................................................................................................................... 57
Main Frame.....................................................................................................................57
DAILY CHECKS..................................................................................................... 58
Checking Coolant Level..................................................................................................58
Checking Fuel Level .......................................................................................................58
Checking Engine Oil Level.............................................................................................. 59
Checking Hydraulic Oil Level.......................................................................................... 59
Lubrication Points ...........................................................................................................60
Checking Radiator and Oil Cooler ..................................................................................60
Checking and Cleaning Engine and Electrical Wiring.....................................................60
Checking V-belt ..............................................................................................................61
Washing Whole Machine................................................................................................61
Draining Water Separator...............................................................................................61
Checking Washer Liquid................................................................................................. 61
Checking Battery Condition ............................................................................................62
REGULAR CHECKS AND MAINTENANCE WORK ................................................. 64
EVERY 50 SERVICE HOURS ............................................................................... 64
Draining the Water from the Fuel Tank...........................................................................64
Checking Track Tension ................................................................................................. 64
Inspection and Cleaning Air Cleaner Element................................................................65
Air Cleaner Element........................................................................................................66
EVERY 250 SERVICE HOURS ............................................................................. 66
Changing Engine Oil....................................................................................................... 66
Replacing Engine Oil Filter Cartridge ............................................................................. 67
Checking Radiator Hoses and Clamps...........................................................................67
Checking Fuel Line and Intake Air Line .......................................................................... 68
Adjusting V-belt Tension.................................................................................................68
Cleaning Inside of Main Frame.......................................................................................69
Replacing Air Cleaner Element.......................................................................................70
Cleaning Inner Air Filter..................................................................................................70
Cleaning Air Fresh Filter.................................................................................................70
Checking Air-Conditioner Condenser .............................................................................71
EVERY 500 SERVICE HOURS ............................................................................. 71
Replacing Fuel Filter Cartridge.......................................................................................71
Changing Drive Unit Oil (First oil change: 250 hours) ....................................................72
Changing Return Filter (First filter change: 250 hours)...................................................72
Replacing Breather Filter................................................................................................72
Replacing Hydraulic Oil Filter (First filter change: 50 hours) .......................................... 73
EVERY 1000 SERVICE HOURS ........................................................................... 73
Page 8

CONTENTS
Hydraulic Oil Change (Including Replacing Suction and Return Filter in the Hydraulic
Tank)............................................................................................................................... 73
Hydraulic Oil Check with Hydraulic Hammers ................................................................74
EVERY 1500 SERVICE HOURS ........................................................................... 75
Checking Fuel Injection Nozzle (Injection Pressure) ......................................................75
EVERY 2000 SERVICE HOURS ........................................................................... 75
Checking the Alternator and Starter Motor .....................................................................75
EVERY 3000 SERVICE HOURS ........................................................................... 75
Checking Injection Pump................................................................................................75
ANNUAL SERVICING............................................................................................ 75
Checking Air-Conditioner Pipes and Hoses....................................................................75
BIENNIAL SERVICING .......................................................................................... 75
Changing Radiator Coolant ............................................................................................ 75
Replacing Fuel Hose ...................................................................................................... 76
Replacing Intake Air Line................................................................................................ 77
Replacement of Radiator Hoses..................................................................................... 77
Replacing Air-Conditioner Pipes and Hoses...................................................................77
SERVICING AS REQUIRED.................................................................................. 78
Checking Amount of Refrigerant (gas) ...........................................................................78
OTHER ADJUSTMENTS AND REPLACEMENTS.................................................... 79
PURGING OF THE FUEL SYSTEM ...................................................................... 79
ADJUSTMENT OF TRACKS ................................................................................. 79
FUSES ................................................................................................................... 81
Replacing Fuses.............................................................................................................81
Fuse Capacities and Circuits..........................................................................................81
Electrical Outlet...............................................................................................................82
Slow Blow Fuse ..............................................................................................................82
TROUBLESHOOTING............................................................................................... 83
OPERATION UNDER COLD WEATHER CONDITIONS .......................................... 85
PREPARATION FOR OPERATION IN COLD WEATHER .................................... 85
PROCEDURE AFTER COMPLETION WORK ...................................................... 85
LONG STORAGE ...................................................................................................... 86
RECOMMENDED OILS............................................................................................. 88
APPENDICES............................................................................................................ 89
MAIN DIMENSIONS .............................................................................................. 89
Page 9
SAFE OPERATION
-1SAFE OPERATION
Careful operation is your best insurance against an
accident.
Read and understand this section carefully, before
operating the machine.
Every user, however experienced, should carefully read
and understand this section and those of the attachments
and accessories before taking the machine into operation.
The owner is obliged to inform the operators of these
instructions in detail.
Keep this manual in the storage place. (See "Where to
keep Operator's Manual" in "MAINTENANCE" section.)
1. BEFORE OPERATION
1. Know your equipment and its limitations. Read and
understand this entire manual before attempting to
start and operate the machine.
2. Obey the danger, warning and caution labels on the
machine.
3. For your safety, a ROPS/FOPS (Roll-Over Protective
Structure/Falling Objects Protective Structure) with a
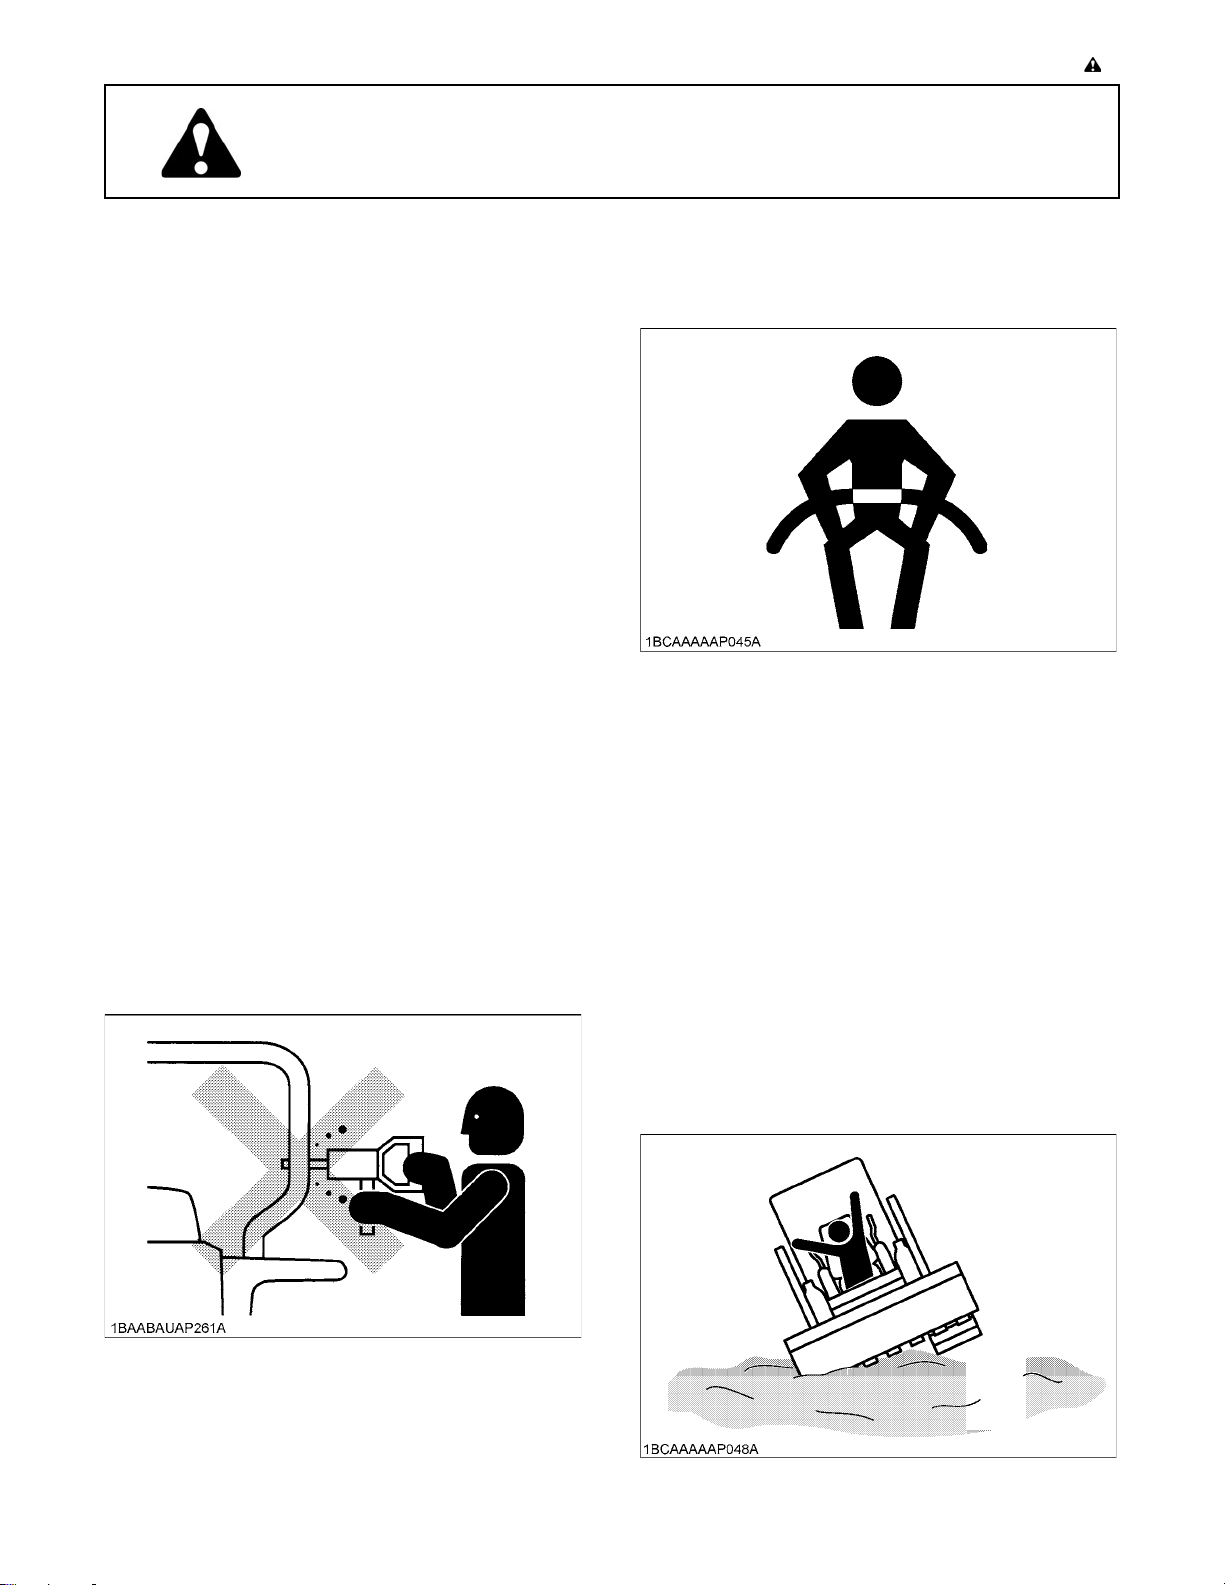
seat belt is installed by KUBOTA. Always use the seat
belt when the machine is equipped with the ROPS/
FOPS as this combination will reduce the risk of
personal injury or death, should the machine be upset.
Do not modify structural members of ROPS by
welding, drilling, bending, grinding or cutting, as this
may weaken the structure. If any component is
damaged, replace it. Do not attempt repairs. If the
ROPS is loosened or removed for any reason, make
sure all parts are reinstalled correctly. Tighten
mounting bolts to proper torque.
4. The ROPS/FOPS structure complies with ISO 3471,
ISO 3449 and OSHA regulations.
5. The seat belt must be inspected regularly and
replaced if frayed or damaged.
6. Always sit in the operator's seat when starting the
engine or operating the levers or controls.
7. Do not operate the machine while under the influence
of alcohol, medication, controlled substances or while
fatigued.
8. Check the surrounding area carefully before using the
machine or when attachments are being connected.
To avoid any danger of electrocution, never operate
the machine near power lines before confirming the
power is off and all local and national safety
regulations. Never approach a machine or load that is
contacting a power source such as power lines.
Electrocution can occur by coming into contact with a
machine that is near power lines.
9. Check for buried pipes and cables before digging.
10.Check for hidden holes, obstacles, soft underground,
and overhangs. Do not enter soft ground.
A During machine use, do not allow any persons
within the working range.
Page 10
SAFE OPERATION-2
11.Do not allow anyone to use the machine until they
have been informed of the work to be performed and
they have read and understood the operator's manual.
12.Do not wear baggy, torn or oversized clothing when
working with the machine as such clothing can get
caught in rotating parts or control elements which can
cause accidents or injuries. Wear adequate safety
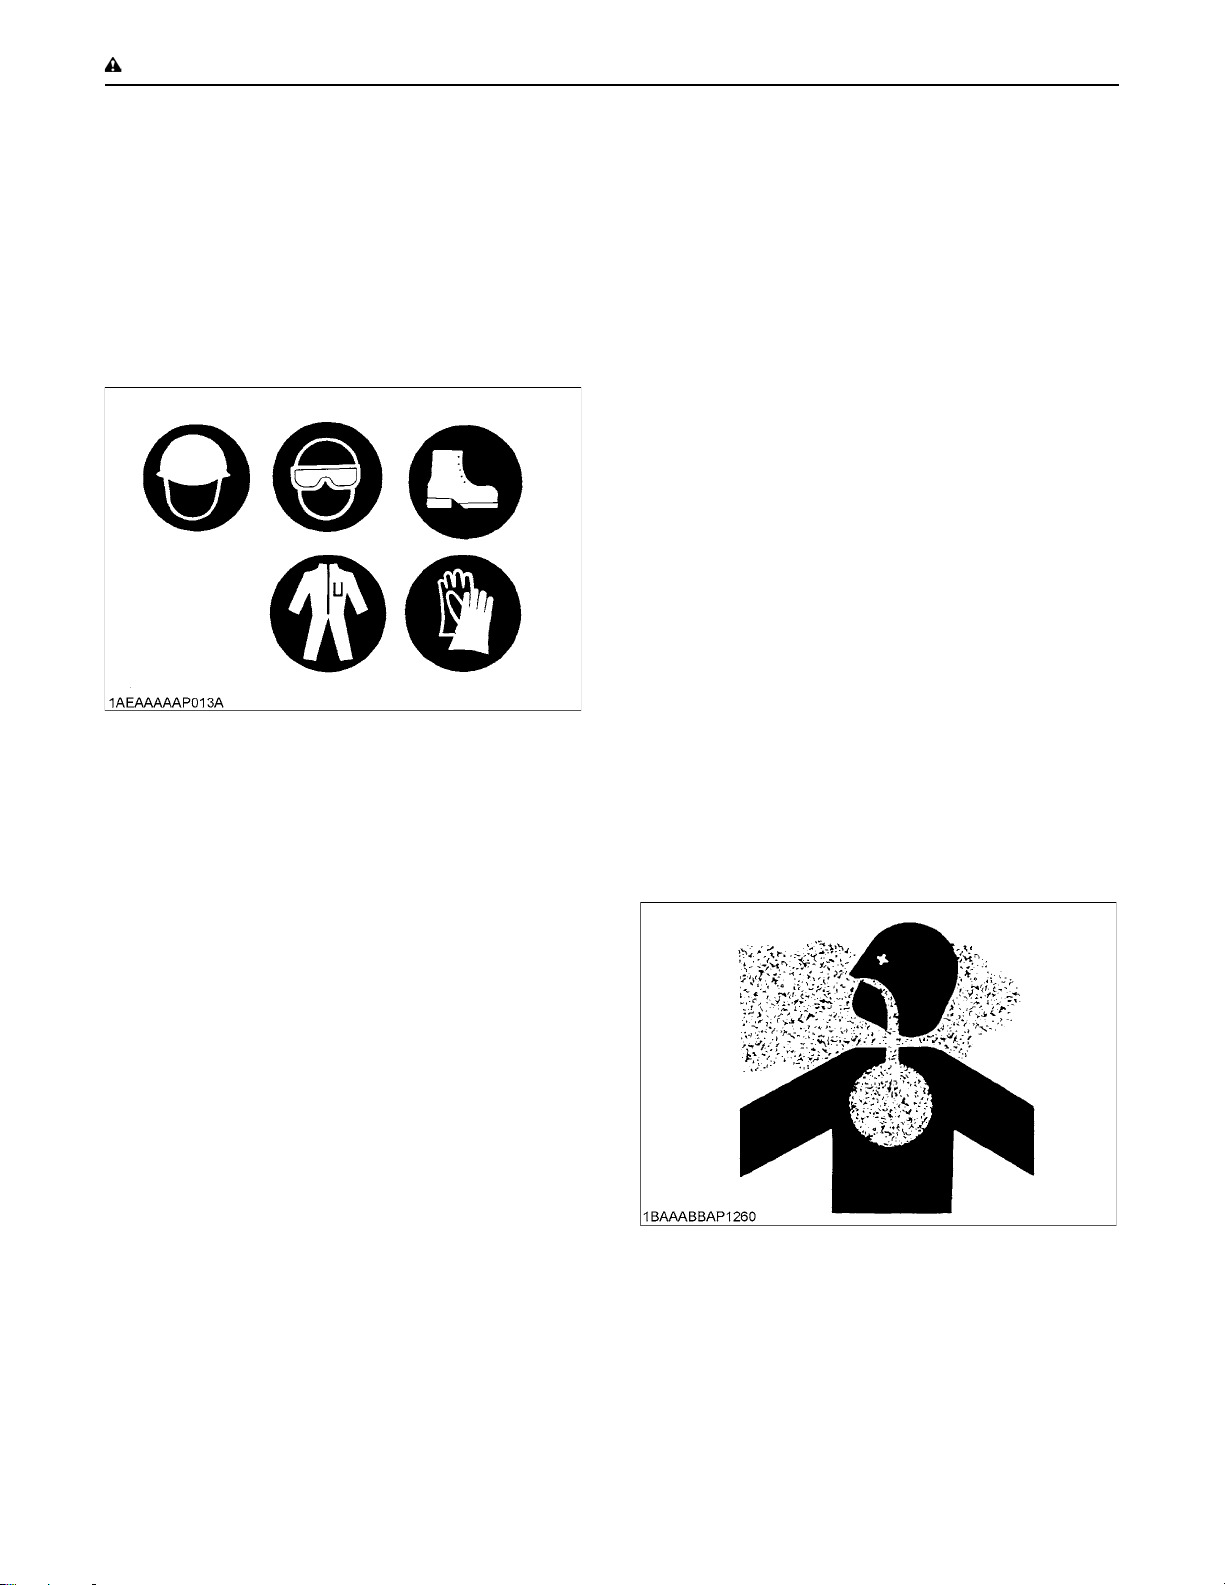
clothing, e.g. safety helmet, safety shoes, eye
protection, ear protection, working gloves, etc, as
necessary and as prescribed by law or statutes.
13.Do not allow passengers to ride on any part of the
machine at any time. The operator must remain in the
machine seat during operation.
14.Check the levers, pedals and mechanical parts for
correct adjustments and wear. Replace worn or
damaged parts immediately. Check the nuts and bolts
regularly for correct torque.
15.Keep your machine clean. Heavy soiling, grease, dust
and grass can cause fires, accidents or injuries.
16.Before starting the machine, be absolutely sure that
the machine has been filled with fuel, lubricated,
greased and undergone all necessary maintenance.
17.Do not modify the machine, otherwise it could lead to
unforeseen safety problems.
18.Make sure attachments, particularly those utilizing
quick-hitch, are securely mounted. Use only KUBOTA
authorized attachments.
2. OPERATING THE MACHINE
1. Mount and dismount the machine safely. Always face
the machine. Always use handrails and available
steps and keep yourself well balanced. Do not grab or
hold any of the control levers and switches. Do not
jump on or off the machine, whether stationary or in
motion.
2. Start and control the machine only from the operator's
seat. The operator should not lean out of his/her seat
when the engine is running.
3. Before starting the engine, make sure that the
armrests are in the "Raised" position and the control
levers are in their neutral position and the seat belt is
fastened correctly.
4. Always thoroughly check the surrounding area for any
possible conditions that could create a dangerous
situation.
A Make sure you read the operator's manual to
thoroughly understand the operating conditions
and limitations of the machine.
A To avoid damage and to prevent accidents, always
use the buddy system and have the other person,
check for clearances and other possible dangers
that may be obstructed from view.
A Never allow people to approach the vicinity of the
turning radius of the machine.
A Be cognizant of blind spots to the rear and always
check behind you before backing up.
5. Only operate the machine in well-ventilated area to
avoid poisoning from carbon monoxide, an odorless,
colorless gas that is deadly.
Page 11
-3SAFE OPERATION
6. Never remove any of the safety features on the
machine.
A Make sure all safety features, including guards,
protective devices, doors and cabin, are
functioning normally, properly secured and in good
condition. Repair and replace any lost or damaged
protective features.
A Carefully read the operator's manual in order to
understand the proper use of safety features such
as armrest, seat belt, and other equipment. Make
sure you use them properly.
A Make sure all safety features are in good operating
condition and remove only when repair is needed.
7. To avoid injury, always keep hands and body inside
the ROPS/FOPS (protective structures) whenever
operating the machine. Never try to operate machine
using control levers from outside the operator's cabin
while the machine is running.
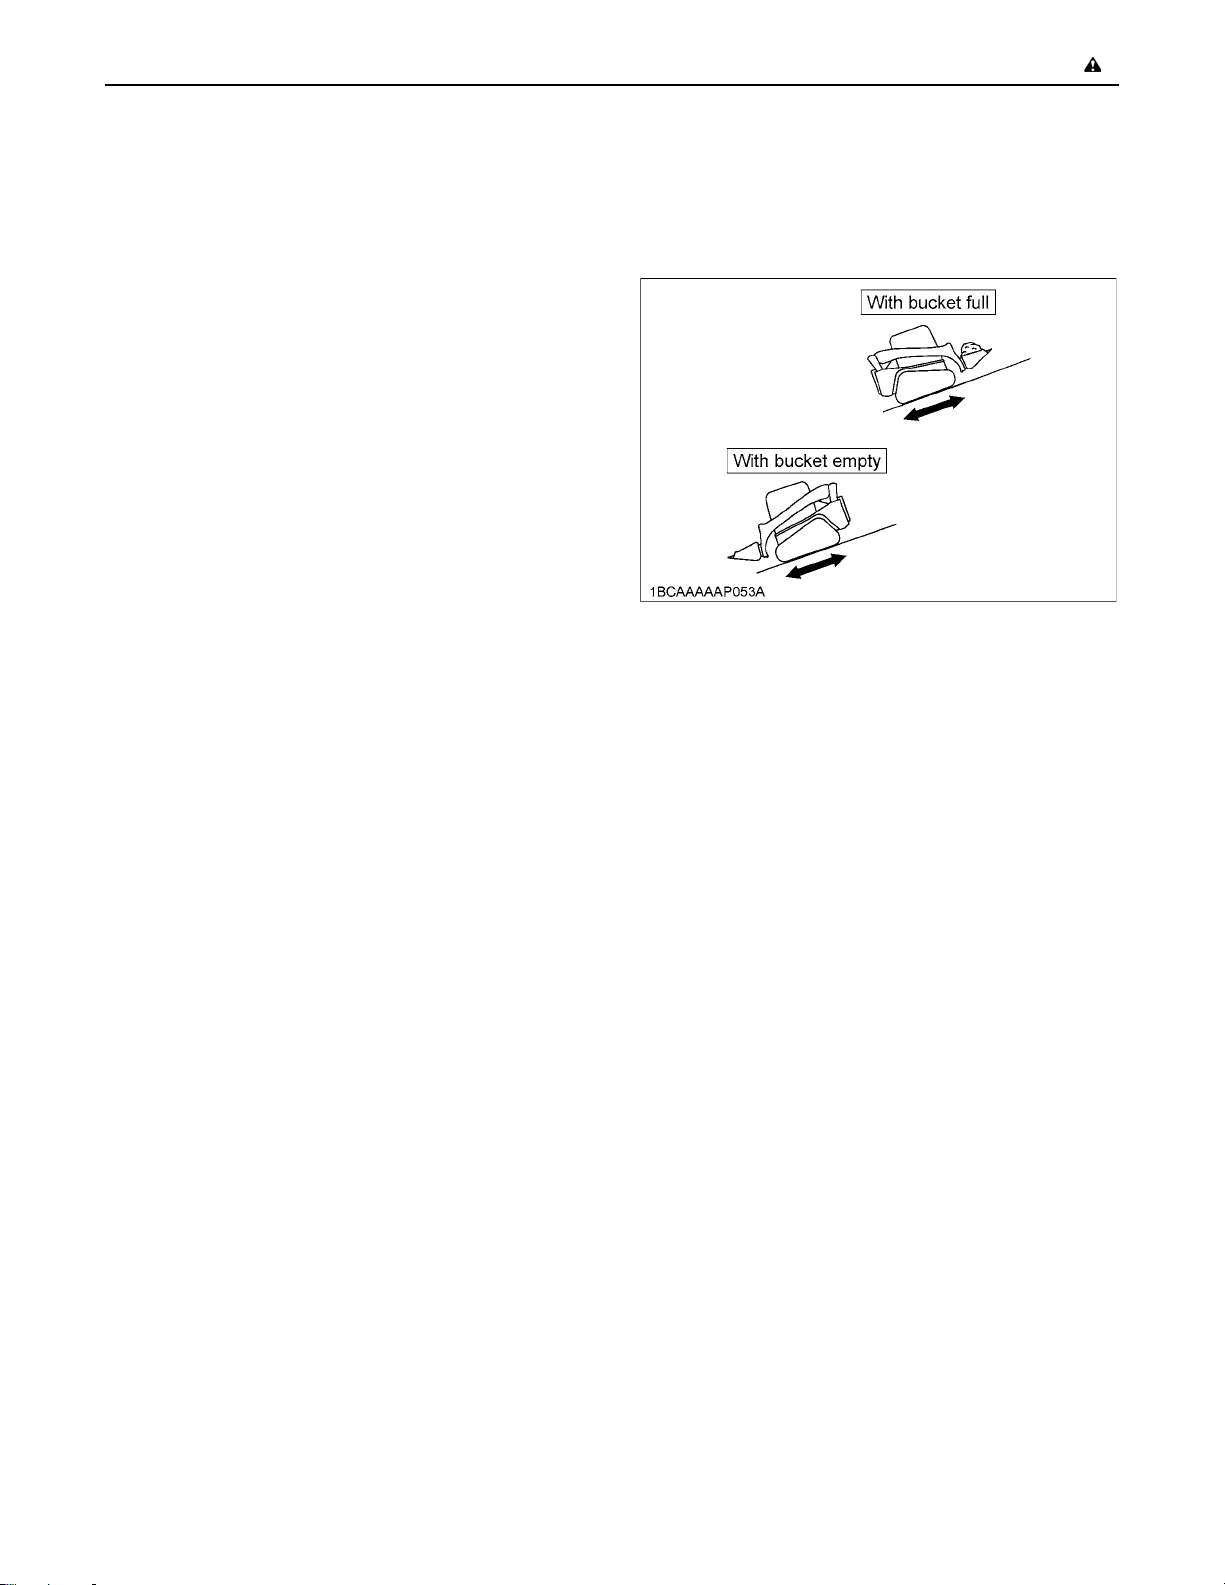
8. Always keep the heavy end of the machine up when
traveling up or down an incline to avoid any possibility
of machine rolling over.
9. Place that bucket at a distance of 20 to 30 cm from the
ground when moving up or down an incline. Be
prepared to lower the bucket to the ground in case of
emergency.
10.To avoid injury or accidents, always operate the
machine or the equipment at slow speed when going
up or down an incline by reducing the engine speed
(rpm). Place the stroke of the left control lever at half
speed or less when going down an incline. Traveling
too fast down an incline can cause the operator to lose
control of the machine.
11.Avoid stopping suddenly on an incline, which can
cause the machine to become unstable and rollover.
12.Never cross an incline horizontally or at an angle,
which can cause the machine to rollover. Approach
inclines vertically to avoid loss of control.
13.Take care when moving the machine in slippery or
unstable surfaces such as grass, fallen leaves, metal
plates, or ice, as it may skid out of control. Do not allow
the machine to be oriented diagonally to such
surfaces.
14.Watch where you are going at all times. Watch for and
avoid obstacles. Remain alert for trees, wires and
other obstructions.
15.Avoid any sudden movements while moving and
operating the machine such as stopping, starting or
turning. Do not raise armrests while the machine is in
motion as this will cause the parking brake to engage
and could cause an accident or injury.
16.Avoid driving the machine over any obstacles, which
could cause loss of control. If an obstacle cannot be
avoided, always place the bucket close to the ground
and move slowly over the obstacle. Do not approach
an obstacle at an angle, which could cause the
machine to rollover.
17.Avoid performing any work with the machine when it is
on an incline, which could cause it to become
unbalanced and rollover. Always take care when
moving the machine on an incline. Always make sure
the heavy end of the machine is facing up the incline
when moving it up or down the incline.
18.Always use caution when floating the lift arms.
A Always make sure the bucket is lowered to the
ground before floating the lift arms. Floating the lift
arms when the bucket is raised could cause an
accident or injury from the bucket falling.
A Never move forward when the lift arms are in the
"float" position.
19.Never dig or shovel at high speed, which could cause
the operator to be thrown from the operator's cabin or
cause injury from hitting something when the machine
stops suddenly. Always operate the machine at low
speed, carefully checking the area in front of the load
you will be moving.
20.Never operate the machine with the bucket raised over
the heads of people. Accident or injury may occur from
objects falling from the bucket or the bucket itself
falling.
21.Beware of material falling from the bucket. Unstable
material in the bucket such as round, cylindrical, or
stacked items could fall from the bucket, causing
injury. Always move an unstable load with the bucket
lowered.
22.Any sudden movements of the machine such as
lowering or stopping of the attachment may cause it to
recoil and rollover. Pay particular attention when the
bucket is loaded.
23.Never exceed the maximum loading capability of the
bucket or put loads off-center of the bucket, which can
cause the machine to become unstable and rollover.
Page 12
SAFE OPERATION-4
24.Never attempt to undercut a high embankment.
Always carefully check the area for conditions that
could cause the ground to cave-in.
A Never operate in areas where there is a possibility of
falling rock.
A Never attempt to operate or drive the machine on
unstable surfaces such as cliffs, shoulder of roads,
deep trenches, etc. The machine could lose stability
from unstable ground or vibration underneath, causing it to rollover or fall.
(1) Ground surfaces are especially unstable after
heavy rain or explosions.
(2) Embankments and trenches may cause instabil-
ity of the ground around the area.
25.Always operate the machine a safe, low speed,
especially in congested or closed in areas where there
is a danger of hitting or running into something. Pay
close attention to obstructions
26.Pay particular attention when passing through tunnels
or moving the machine near high walls to avoid hitting
it and causing accident or injury.
Always check height and width dimensions of the
machine against tunnels or any other narrow spaces
through which the machine is to be moved in order to
avoid accident or injury from hitting an obstruction.
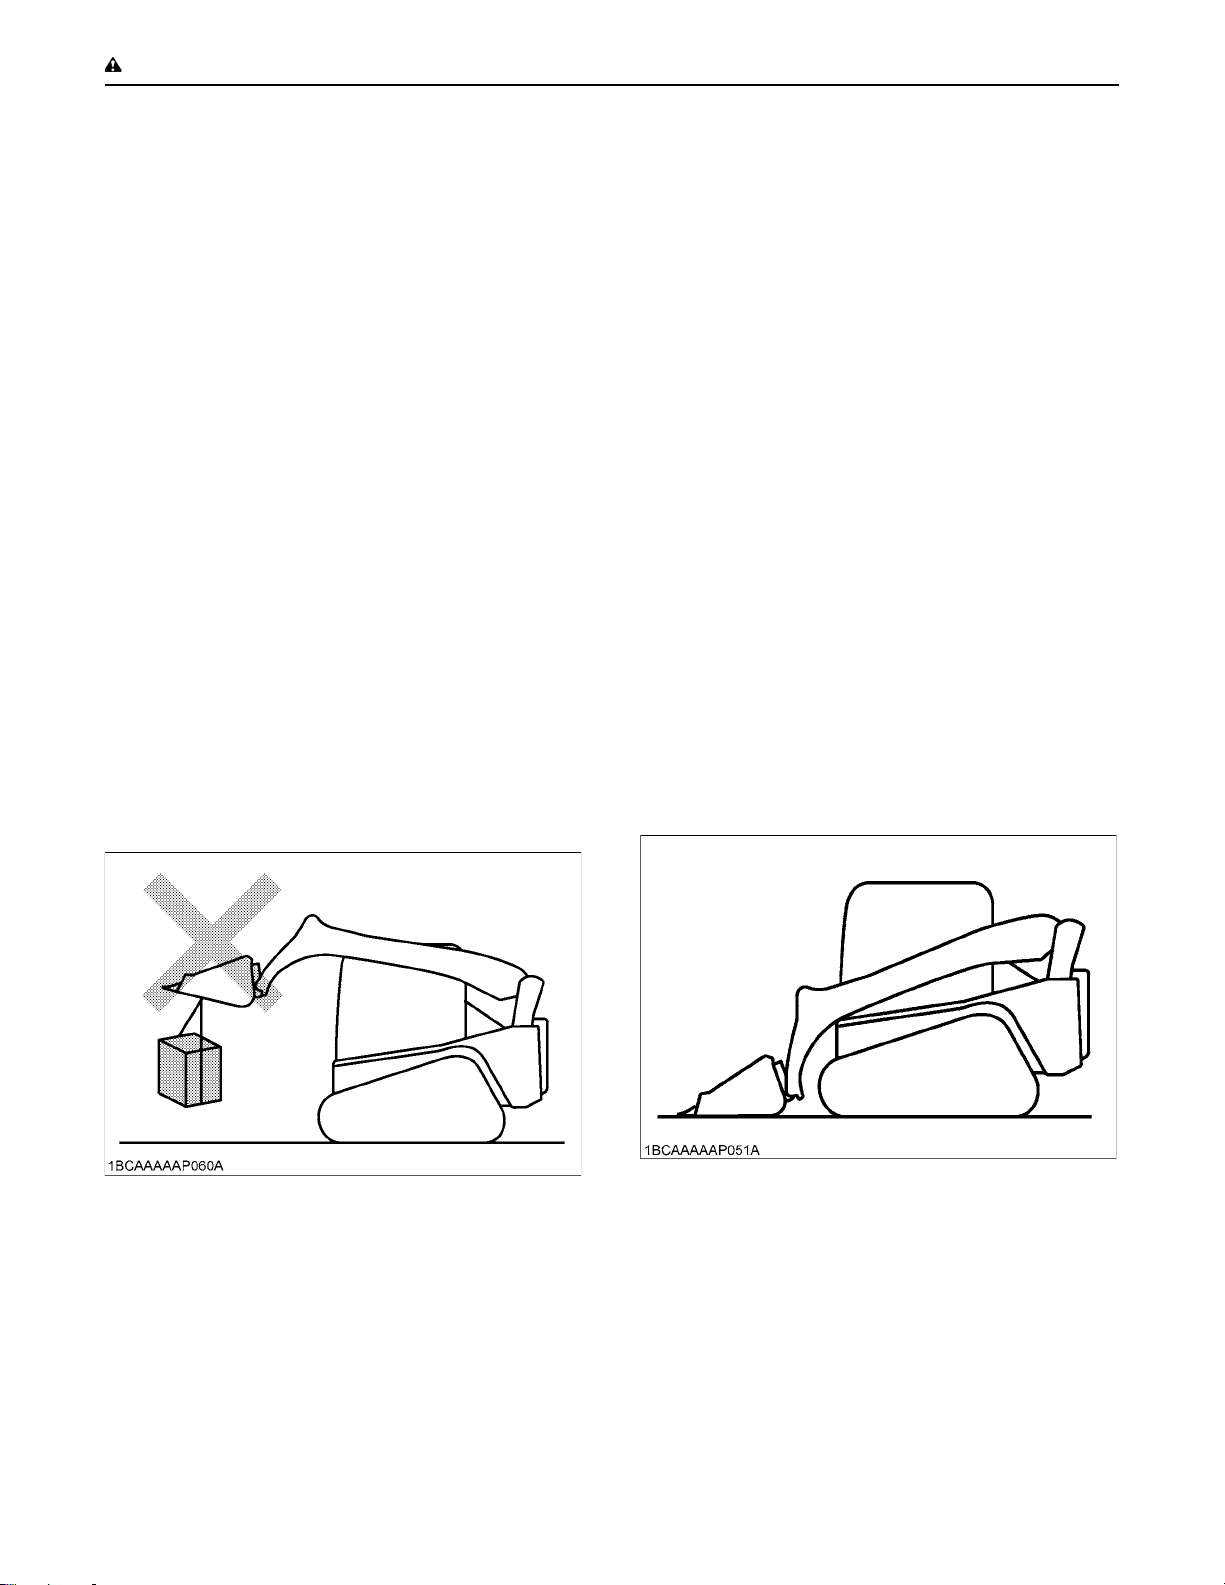
27.The machine is NOT designed for operation with
hanging loads and has no safety features for such
circumstances. Never operate in conjunction with a
crane or other such device, which could cause serious
injury.
C Safety for children
Tragedy can occur if the operator is not alert to the
presence of children. Children generally are attracted to
machines and the work they do.
1. Never assume that children will remain where you last
saw them.
2. Keep children out of the work area and under the
watchful eye of another responsible adult.
3. Be alert and shut your machine down if children enter
the work area.
4. Never carry children on your machine. There is not a
safe place for them to ride. They may fall off and be run
over or interfere with your control of the machine.
5. Never allow children to operate the machine even
under adult supervision.
6. Never allow children to play on the machine or on the
attachments.
7. Use extra caution when backing up. Look behind and
down to make sure the area is clear before moving.
3. AFTER OPERATION
Before leaving the machine:
A Park the machine on a firm, flat and level surface. If
this is not possible, block the machine securely to
prevent movement.
A Lower the attachments to the ground.
A Stop the engine.
A Remove the key.
Page 13
-5SAFE OPERATION
4. SAFE LOADING AND TRANSPORT OF
THE MACHINE
1. Observe all regulations concerning the transport of the
machine on public roads.
2. Use adequately long and robust ramps when loading
on the machine. Block the ramps and transport
appropriately. If towing is required, use proper tow
lines and attachment points. (for details, see
"LOADING THE MACHINE ON A TRANSPORT
VEHICLE" section)
3. To avoid tipping over, the heaviest end of the unit
should proceed up the ramps first, do not change the
running direction and do not swing the attachment
crosswise to the loading ramps.
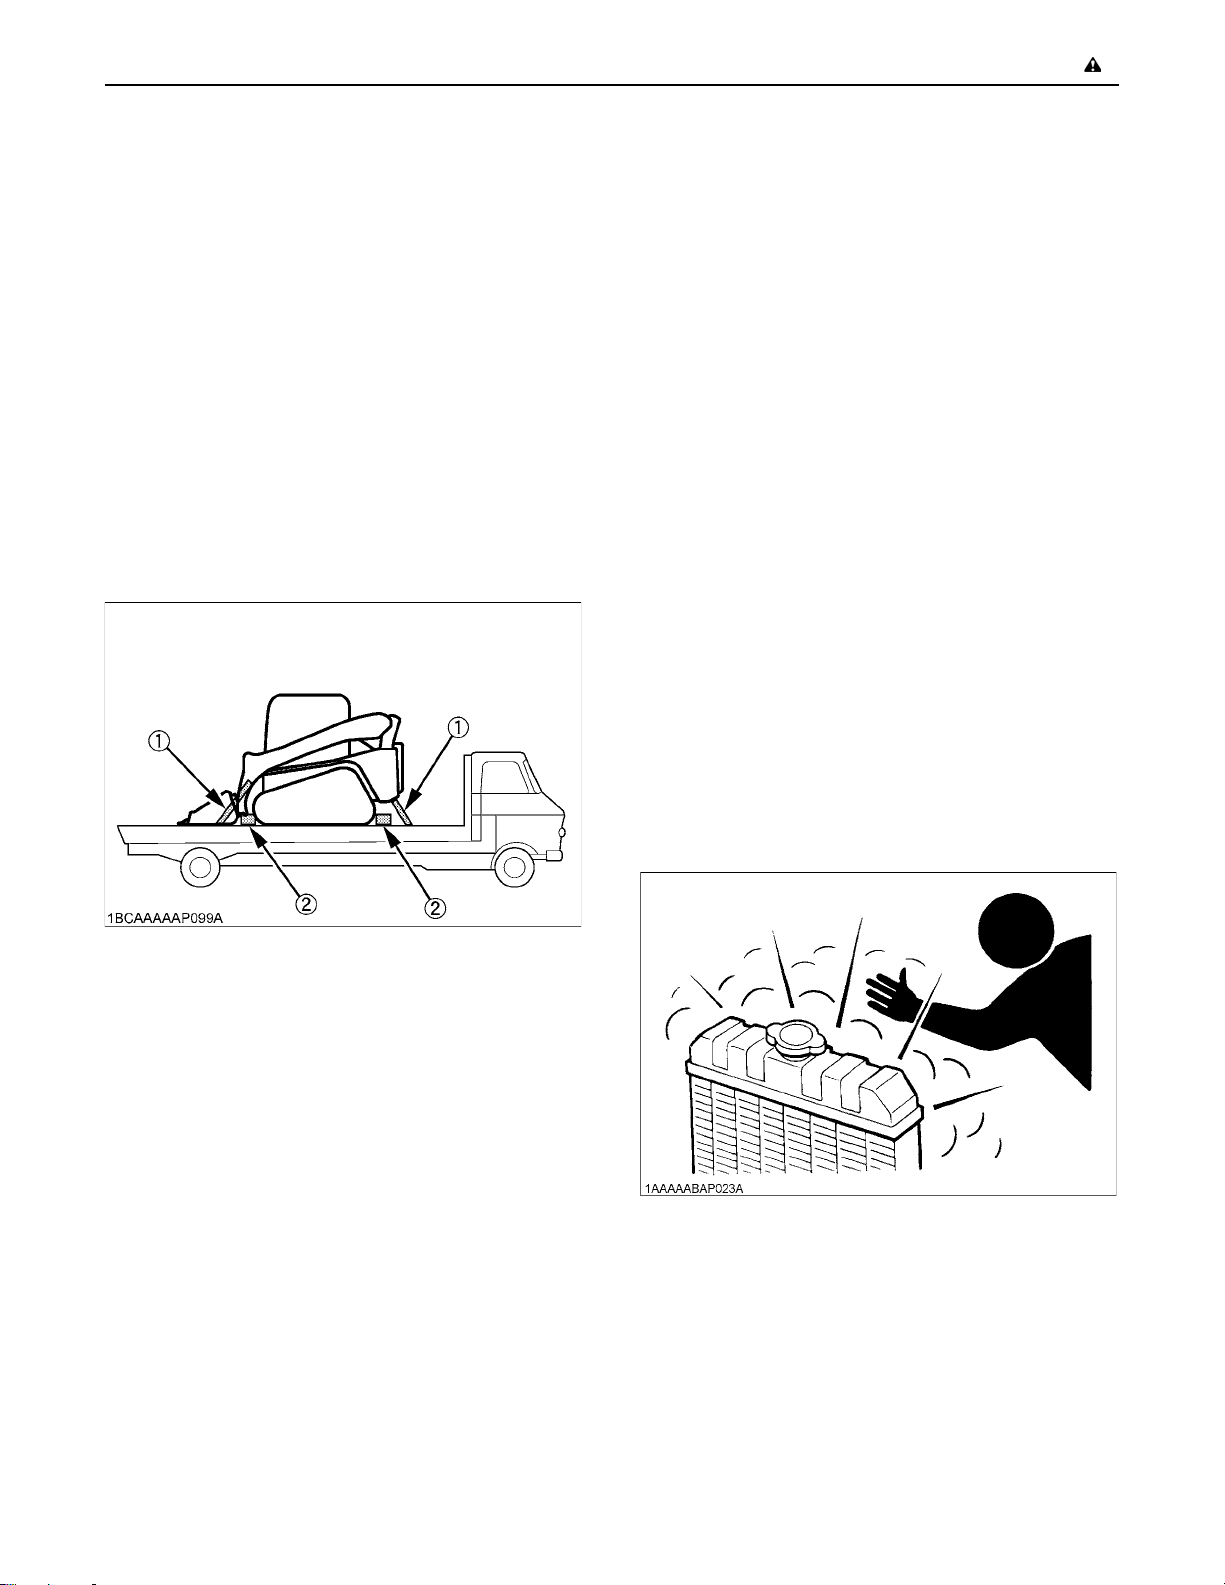
4. Lower the attachment on the loading bed and release
the pressure from the hydraulic system. After loading
the machine on the truck, secure the tracks with blocks
and tie down the machine at the appropriate locations.
5. MAINTENANCE
Before doing maintenance work on the machine, place
the machine on a firm, flat and level surface, lower the lift
arms slowly to the ground, stop the engine, remove the
key.
When dismantling hydraulic parts, make sure that the
hydraulic oil has cooled down sufficiently to avoid burns.
Start maintenance work carefully, e.g. loosen the plug
slowly so that oil will not squirt out.
1. Before working on the engine, the exhaust system, the
radiator and the hydraulic system, let the machine cool
down sufficiently.
2. Turn off the engine at all times when filling with fuel.
Avoid spilling and over-filling of fuel.
3. Smoking is prohibited while refueling or handling the
battery. Keep sparks and fire away from the fuel tank
and battery. Flammable gases escape from the
battery, especially during charging.
4. Read and follow the directions "STARTING WITH AN
AUXILIARY BATTERY" in "OPERATION OF THE
ENGINE" section, when starting with an auxiliary
battery.
5. Keep a first-aid box and extinguisher at hand at all
times.
6. Do not open the radiator cap before the radiator has
cooled down sufficiently. First loosen the cap to the
first stop and allow the system enough time to release
the remaining pressure. Then loosen the cap
completely.
(1) Chain
(2) Block
5. Avoid abrupt braking of the vehicle with the machine
loaded. Sudden braking could cause the machine to
move and could cause a serious accident.
7. To avoid short-circuiting the battery, always remove
the ground cable first and attach the positive cable
first.
8. Oil under high pressure can penetrate the skin and
may be harmful to your health if not treated
immediately.
Page 14
SAFE OPERATION-6
9. Leaking hydraulic fluid has enough pressure to
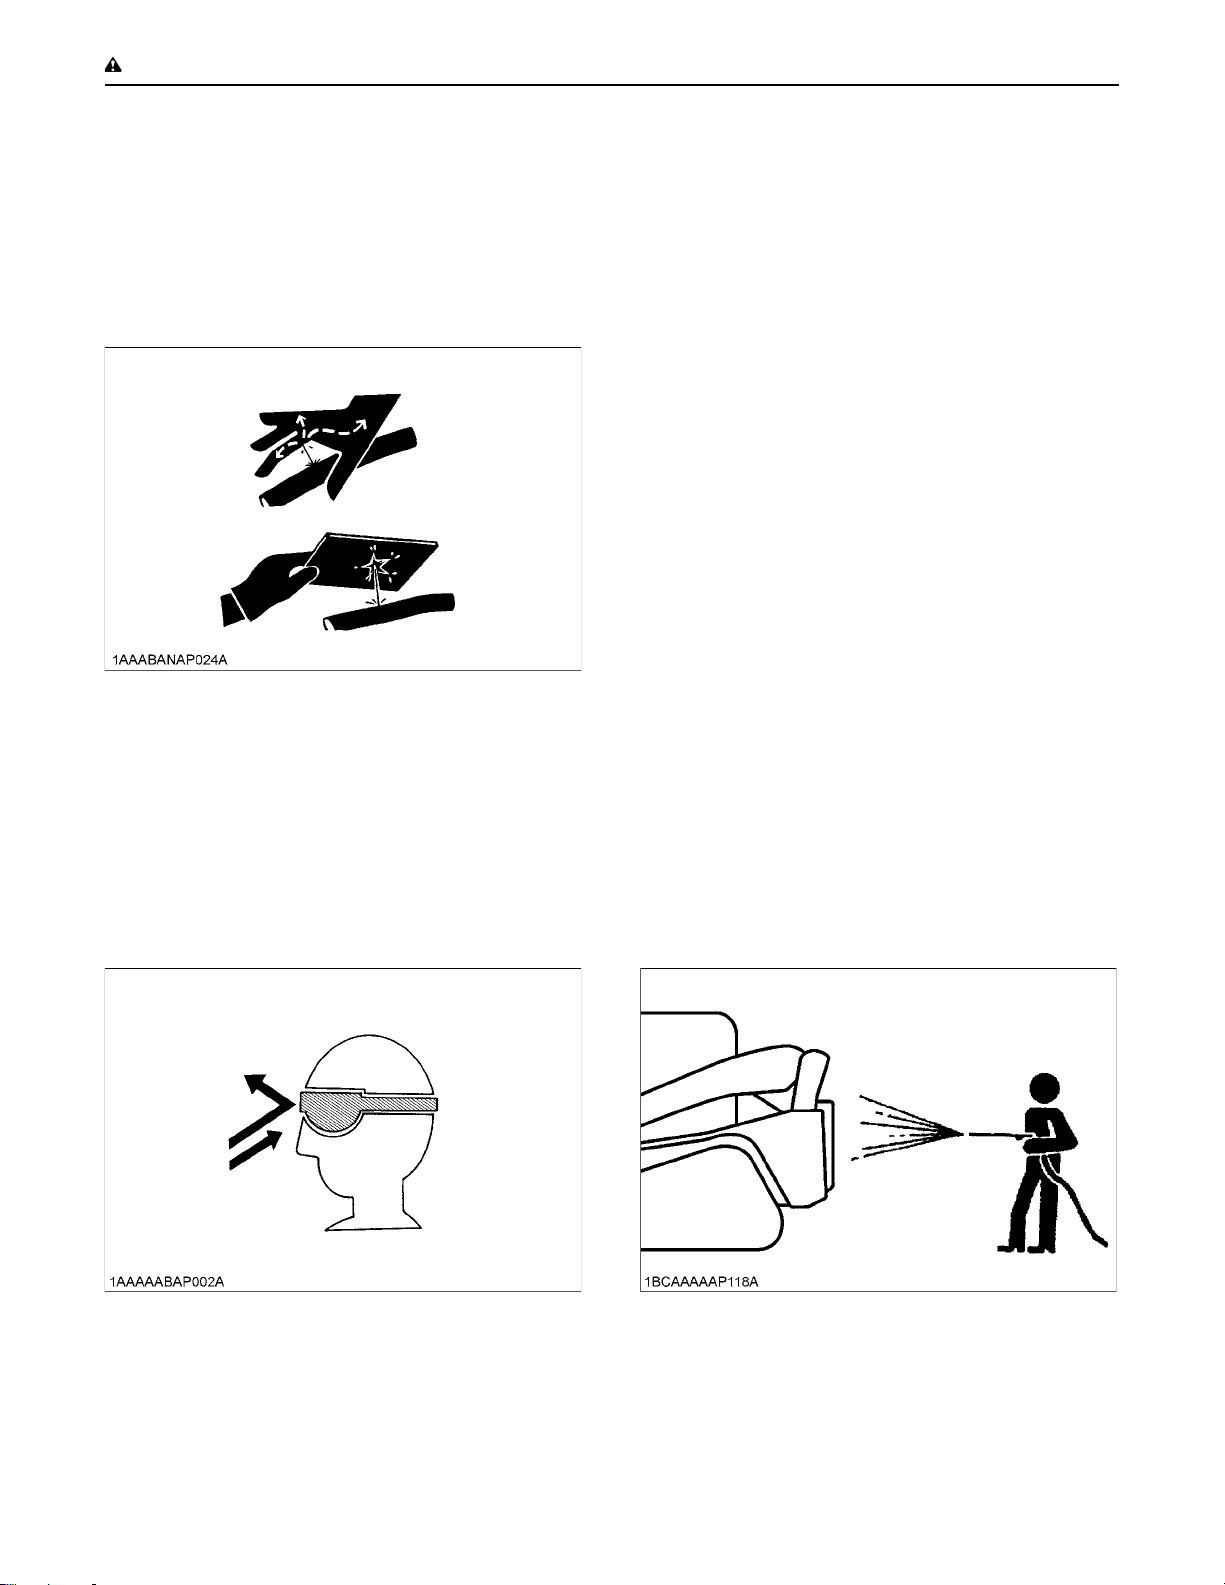
penetrate the skin and cause serious injuries.
Leakages from pinholes can be totally invisible. Do not
use hands for checking for leaks. Always use a piece
of wood or cardboard. It is strongly recommended to
use a face mask or eye protection. Should injuries
occur with leaking hydraulic fluid, contact a doctor
immediately. This fluid can cause gangrene or serious
allergic reactions.
10.To avoid environmental damage from acid and heavy
metals, dispose of the battery appropriately.
11.Observe all laws and regulations concerning the
disposal of used oil, coolants, solvents, hydraulic
fluids, battery acids and batteries.
12.To avoid fire, do not heat the hydraulic components
(tanks, pipes, hoses, cylinders) before they have been
drained and washed.
13.Use a face mask or eye protection to protect the eyes
and respiratory system against dust and other foreign
particles.
15.Do not dismantle the spring of the track tensioner. If
dismantling is necessary, contact your KUBOTA
dealer where the machine was purchased, or
competent service shop. The assembly must be done
according to the KUBOTA workshop manual (W.S.M.)
for the product involved.
16.Always attach a "DO NOT OPERATE" tag whenever
performing any kind of maintenance or repair.
17.Make sure you have the proper tools on hand. Do not
use defective or damaged tools, gauges, or other
devices. Always use tools that are appropriate for the
task to be done.
18.To prevent personal injury or death, be sure to use
explosion-proof lighting when working on, inspecting
or handling fuel, oil, coolant, battery fluid, etc. If the
explosion-proof lighting is not used and should break,
it can ignite and cause fire, injury or death.
19.Prohibit unauthorized persons from entering the work
area to prevent injury caused by debris flying off of
machine parts during grinding, welding, using a
hammer or other such tasks.
20.Make sure work area is clear and safe. Be sure to work
on a firm, level surface with adequate lighting. Work in
well-ventilated area if indoors. Make sure the area is
free from any potentially dangerous conditions such as
obstacles, slippery surfaces, etc.
21.Be sure the machine is clean and free of debris.
A Always remove debris from the machine and clean it
before performing any maintenance or repair work.
A Before using water to wash or clean the machine, stop
engine and make sure all electrical parts and devices
are covered. Any water seepage into electrical wiring
on the machine can cause a short circuit or
malfunction of controls. Never wash the battery,
sensors, connectors or operator's cabin with water or
steam.
14.Securely support the machine with stands or suitable
blocking before working underneath. For your safety,
do not work under any hydraulically supported
devices. They can settle, suddenly leak down, or be
accidentally lowered.
Page 15
-7SAFE OPERATION
22.Always make sure the engine is stopped before
performing any maintenance or repairs.
A Do not attempt to lubricate or make mechanical
adjustments while the machine is in motion or while
the engine is running even if stationary.
A If you must perform some maintenance procedures
when the engine is running, make certain one other
person is assisting by sitting in the operator's cabin
while the work is being performed elsewhere on the
machine. Always keep body clear of any moving parts
and remove any loose clothing when working near
moving parts to prevent possible injury.
A Always stay clear of moving parts. Clothing, hands or
other parts of the body can become caught in moving
parts of the machine and cause personal injury or
death.
A Make sure to avoid any rotating fans, V-belt and other
such moving parts. Never insert tools, fingers, hands,
etc. while these parts are running.
24.Make sure the raised lift arms are properly and
securely blocked.
A Make sure the lift arm stopper is properly engaged
before performing any work beneath raised lift arms.
Never attempt to do any work or move under the lift
arms when they are not properly supported.
A Keep in mind that the lift arms may fall whenever
hydraulic lines are disconnected, loosened, or
removed. Any malfunction or failure in the hydraulics
can also cause lift arms to drop.
A Always perform the necessary repairs or service
whenever the lift arm stopper becomes damaged or
malfunctioned, or part(s) are missing. Damaged or
malfunctioning lift arm stopper may cause the lift arms
to fall causing personal injury or death.
23.Be sure to place blocks around the machine and place
protection where components could fall.
A Always make sure the bucket is at the lowest possible
position or on the ground before performing any
maintenance or repairs under the machine.
A Make sure the tracks are securely blocked off.
A Whenever performing maintenance or repairs when
the lift arms are raised, always use the lift arm stopper.
A Never do any work under a machine or work on it while
it is hoisted on jack-stands or other rigid support
devices unless they are well secured and stable.
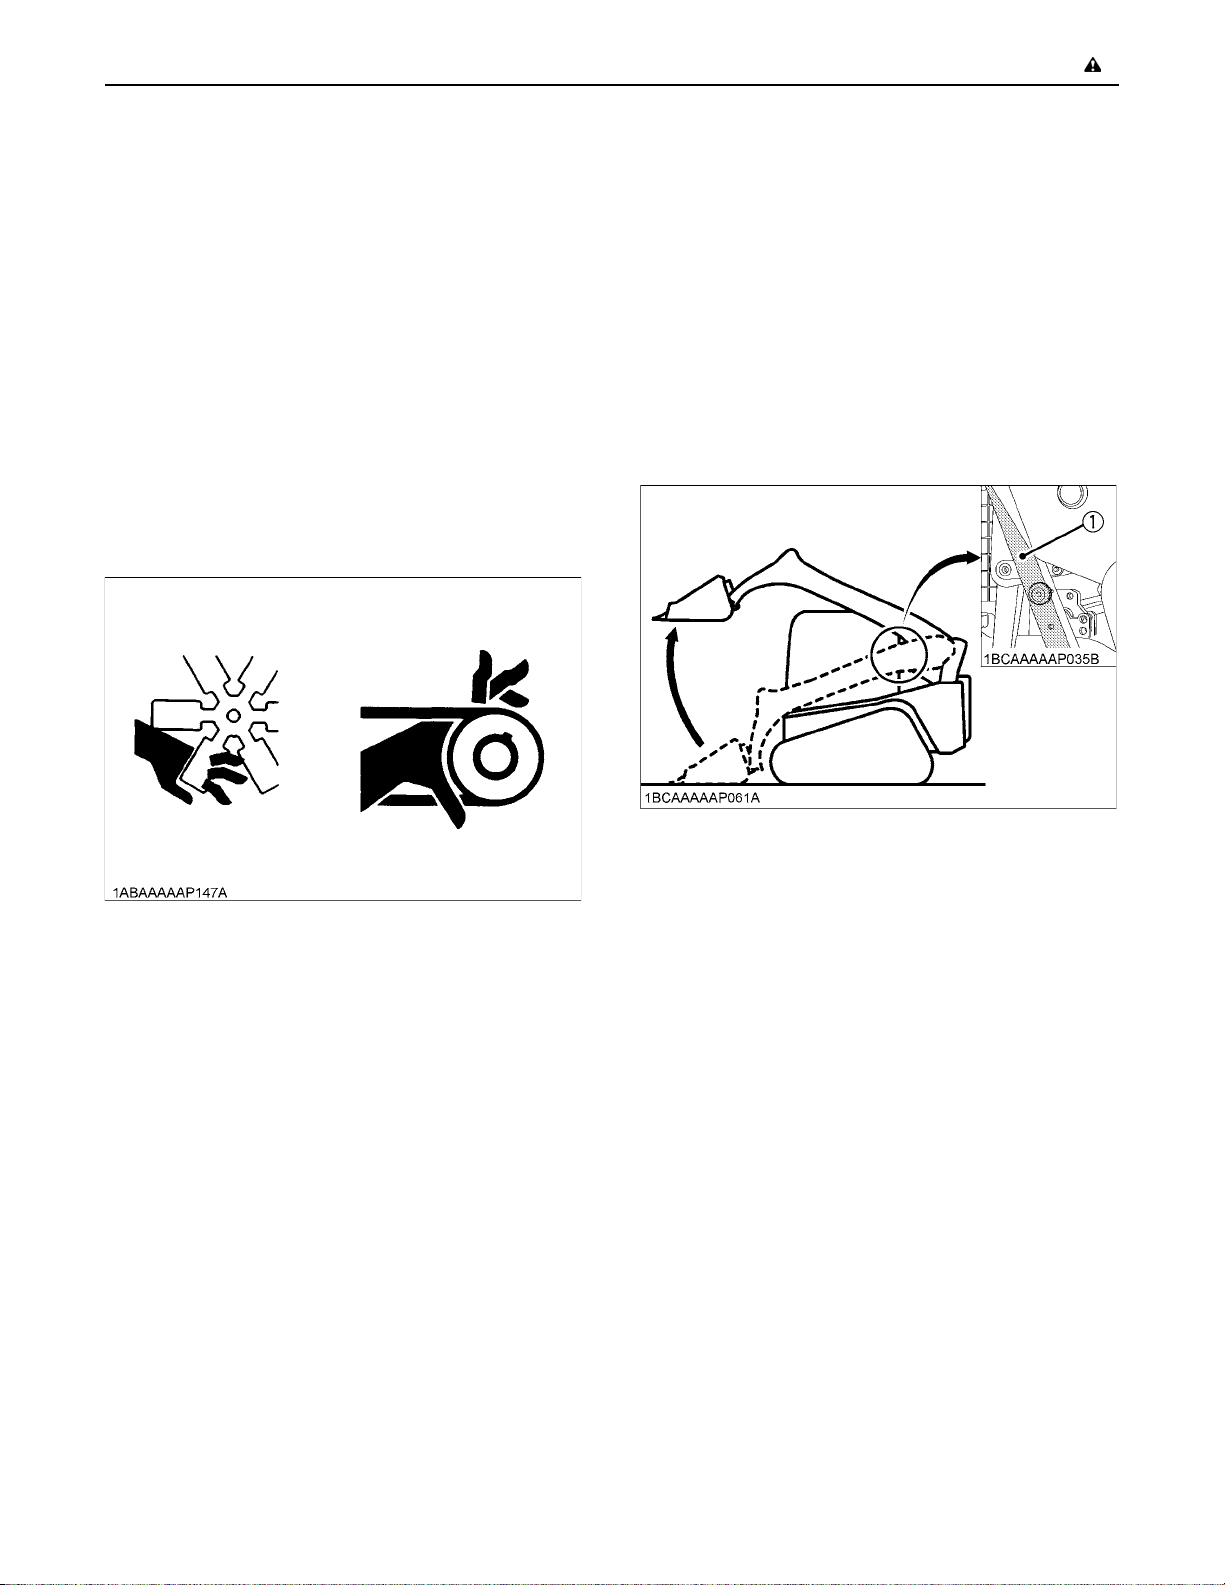
(1) Lift arm stopper
25.Always secure the rear door after opening it. Avoid
opening the rear door when the machine is on an
incline or in strong winds.
26.Precaution on tilting the cabin.
A Do not raise or lower the cabin while the engine is
running as it may move, cause the machine to become
unstable, resulting in personal injury or death. Always
lower the working parts of the machine to the ground
and stop the engine before attempting to raise or lower
the cabin.
A Make sure the cabin is properly and securely
supported with a stopper when tilted to prevent if from
falling and causing personal injury.
Page 16
SAFE OPERATION-8
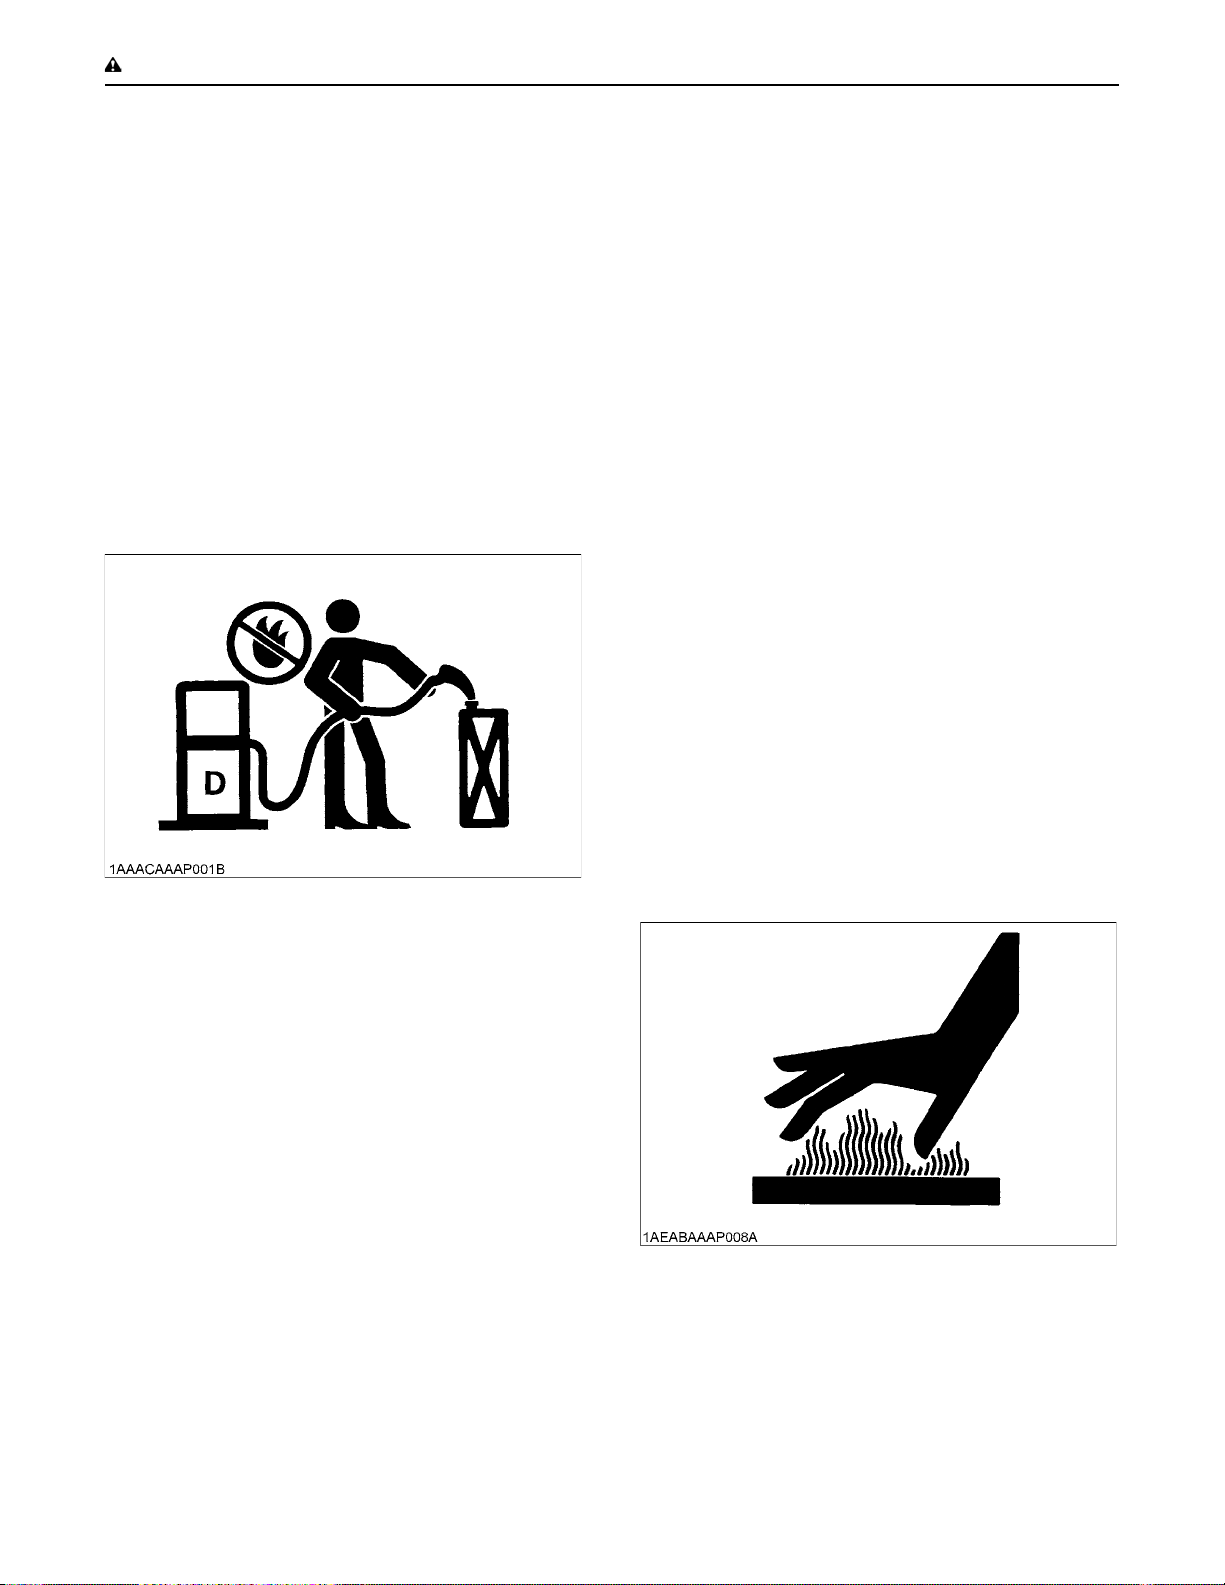
27.Use care when refueling.
A Never smoke cigarettes or permit the use of fire while
refueling or in the vicinity of refueling.
A Always make sure the engine is off and cool before
removing the fuel cap to refuel the tank. Avoid getting
fuel on any hot components.
A Keep control of the fuel filler nozzle while refueling.
A Never overfill the tank with fuel. Leave room for
thermal expansion.
A Always remove any excess or spilled fuel immediately.
A Always make sure the fuel tank cap is securely
reinstalled. Replace the cap only with a manufacturer
approved cap whenever it becomes damaged. Use of
the wrong type of cap may not allow for proper venting,
causing pressure in the tank to build up.
A Never use fuel to clean the machine.
A Always use the correct type of fuel for the machine and
the temperature in which it is being operated.
28.Hoses
A Leakage in any fuel, oil or hydraulic line can cause fire
or explosion.
A Avoid any twisting, bending or hitting of hoses that
could cause damage to the line.
A Make sure any loose connections are secure properly
before using the machine.
29.Fire prevention
Compact Track Loader and some attachments have
components that are at high temperatures under
normal operating conditions. The primary source of
high temperatures is the engine and exhaust system.
The electrical system, if damaged or incorrectly
maintained, can be a source of arcing or sparks.
The following fire prevention guidelines will help to
keep your equipment up and running efficiently and
keep the risk of fire to a minimum.
A Blow off all accumulated debris near hot engine
exhaust components such as turbocharger and
exhaust manifold as well as exhaust pipes and muffler
more frequently when working in severe conditions.
A Clean out all accumulated flammable debris such as
leaves, straw, pine needles, branches, bark, small
wood chips and any other combustible materials from
inside the machine belly pans or lower unit structures
as well as from area in proximity to the engine.
A Inspect all fuel lines and hydraulic hoses for wear or for
deterioration. Replace them immediately if they begin
to leak.
A Examine electrical wiring and connectors frequently
for damage. Repair any wires that are loose or frayed
before operating the machine. Clean all electrical
connections and tighten all electrical connections as
necessary.
A Inspect the exhaust system daily for any signs of
leakage. Check for broken pipes and muffler and also
for loose or missing bolts, nuts and clamps. If any
exhaust leaks or fractured parts are found, repairs
must be completed prior to operation.
A Always keep a multipurpose fire extinguisher on or
near the machine. Be familiar with the operation of the
fire extinguisher.
30.Take care when working around hot and pressurized
components.
A Always allow the engine to cool sufficiently before
performing any maintenance, inspection or repairs.
A Never touch any parts such as the engine, muffler,
radiator, hydraulic lines, sliding parts, etc. as they may
be very hot immediately after the machine has been
running and can cause burning. Allow these parts to
cool sufficiently before touching.
A Always use sufficient care whenever removing the
caps and plugs on the coolant, oil and hydraulic fluid
as they are hot and pressurized and can causing
burning and injury from spraying of hot fluid.
31.Make certain pressure from all of these systems is
sufficiently released before performing any
maintenance or repairs. Oil or other fluids could be
released when caps or filters are removed before the
pressure has been stabilized in the hydraulic system.
A Gradually release internal pressure build-up by
standing out of the line of any possible spray and
slowly removing plugs, screws or disconnect hoses.
Page 17
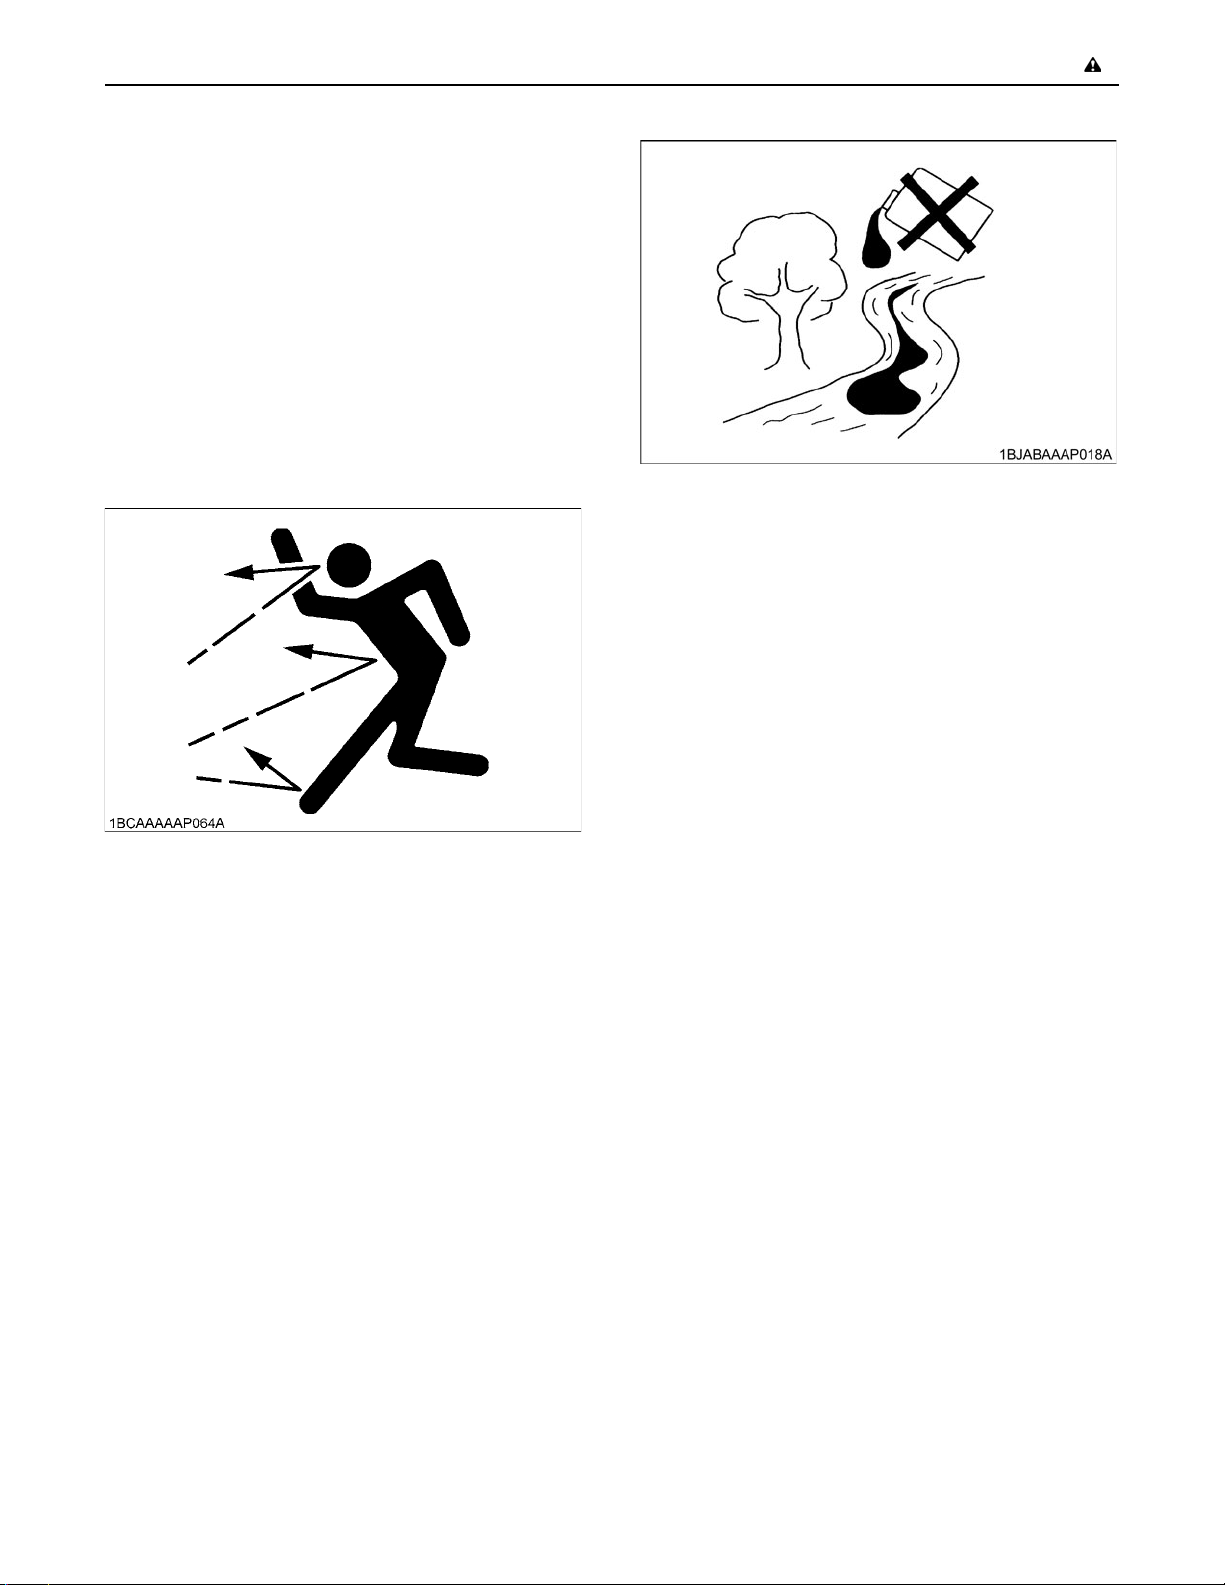
32.Always use care whenever handling grease that is
pressurized.
A Always follow the proper procedure to adjust tension.
Grease in the track adjuster is pressurized and
improper release can cause the discharge valve to fly
off, causing personal injury or death.
A Always loosen the discharge valve for the grease
slowly.
A Avoid standing in front of, or putting any parts of the
body in the line of the grease discharge valve.
A If no grease is released when discharge valve is
loosened, the machine has a malfunction. DO NOT
attempt to make any repairs yourself and contact the
nearest dealer for repairs. Any operation of the
machine under these conditions can be very
dangerous.
-9SAFE OPERATION
35.To avoid the possibility of battery explosion, do not use
or charge the refillable type battery if the fluid level is
below the LOWER (lower limit level) mark. Check the
fluid level regularly and add distilled water as required
so that the fluid level is between the UPPER and
LOWER levels.
36.To avoid sparks from an accidental short circuit,
always disconnect the battery's ground cable (-) first
and reconnect it last
33.Always carefully check the machine after performing
any maintenance or repairs. Confirm that no oil, water,
etc., is leaking from any parts that had been serviced
by carefully inspecting the parts. Gradually speed up
the engine from a low speed to higher speed to check
operation.
34.Waste material
A Always make sure any material and waste products
from the repair and maintenance of the machine are
collected into proper containers using a funnel, or
other device. Dispose of waste material properly to
avoid pollution and contamination of the environment.
A Consult local regulations and codes when disposing of
oil, fuel, engine coolant, refrigerant, solvents, filters,
batteries, and any other potentially harmful and
hazardous material or substance.
Page 18
SAFE OPERATION-10
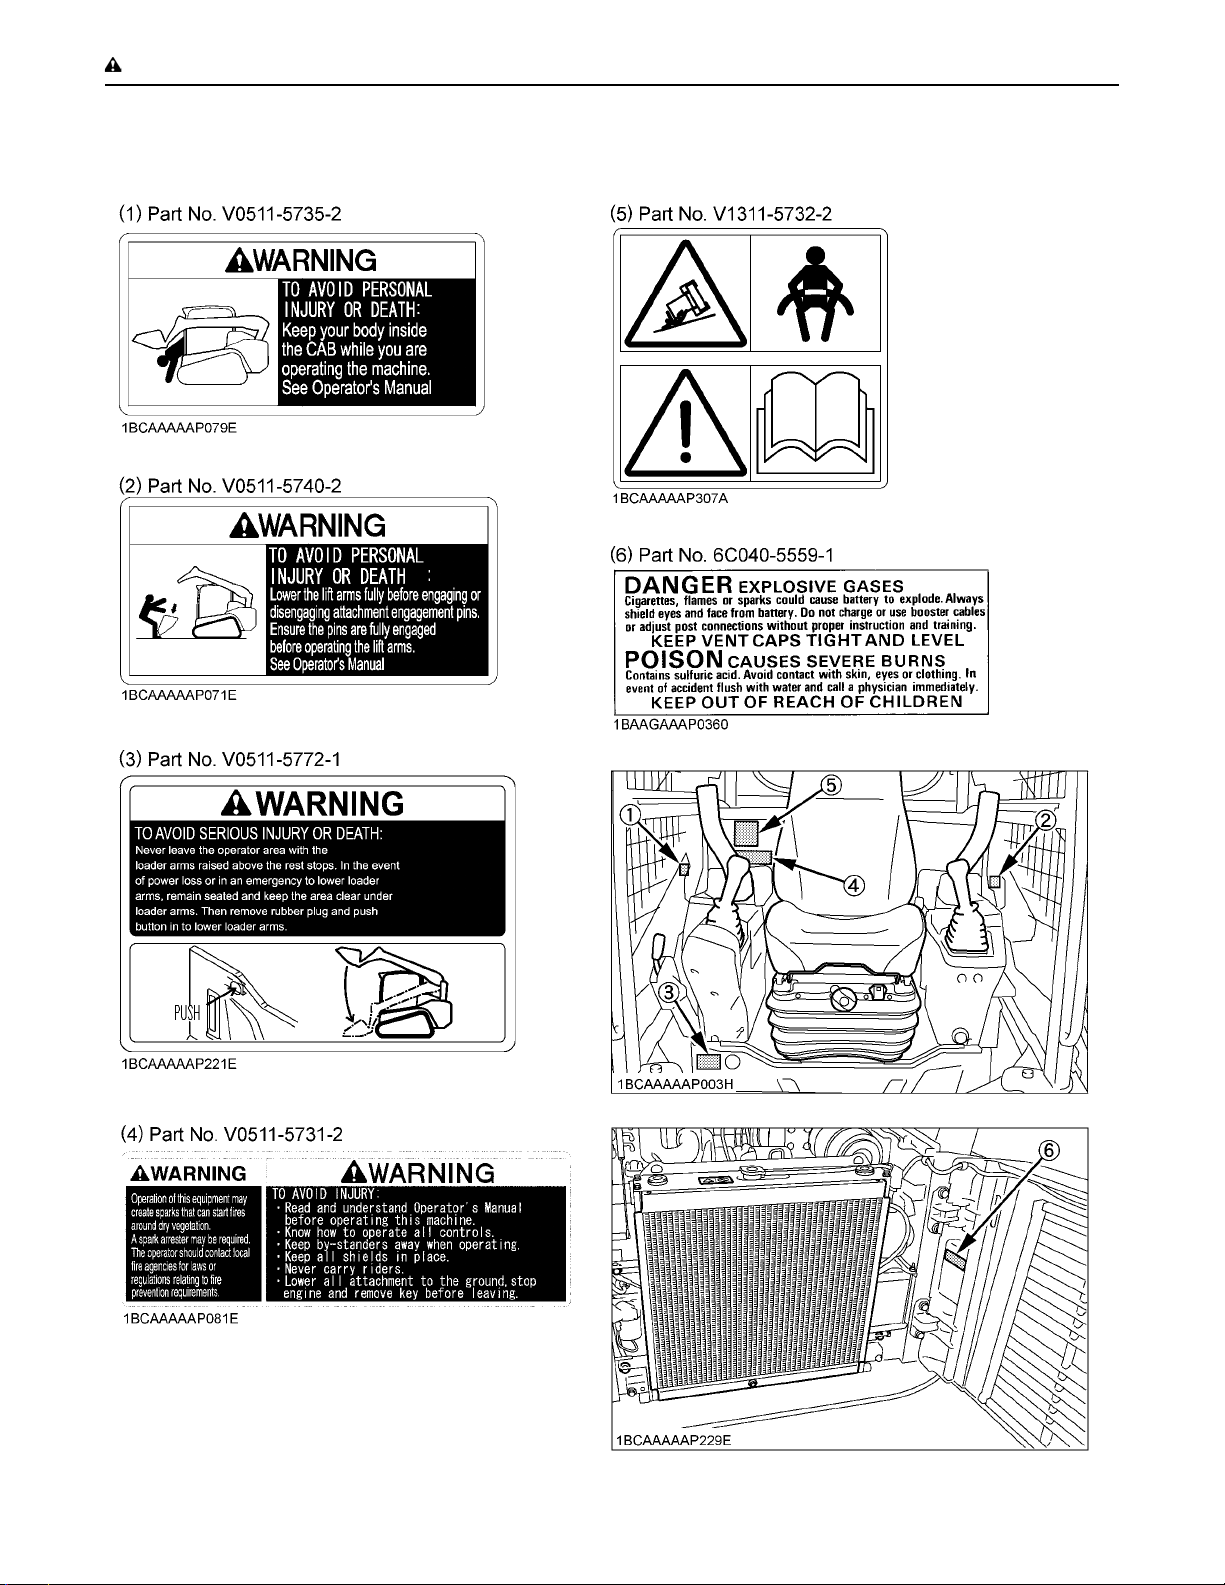
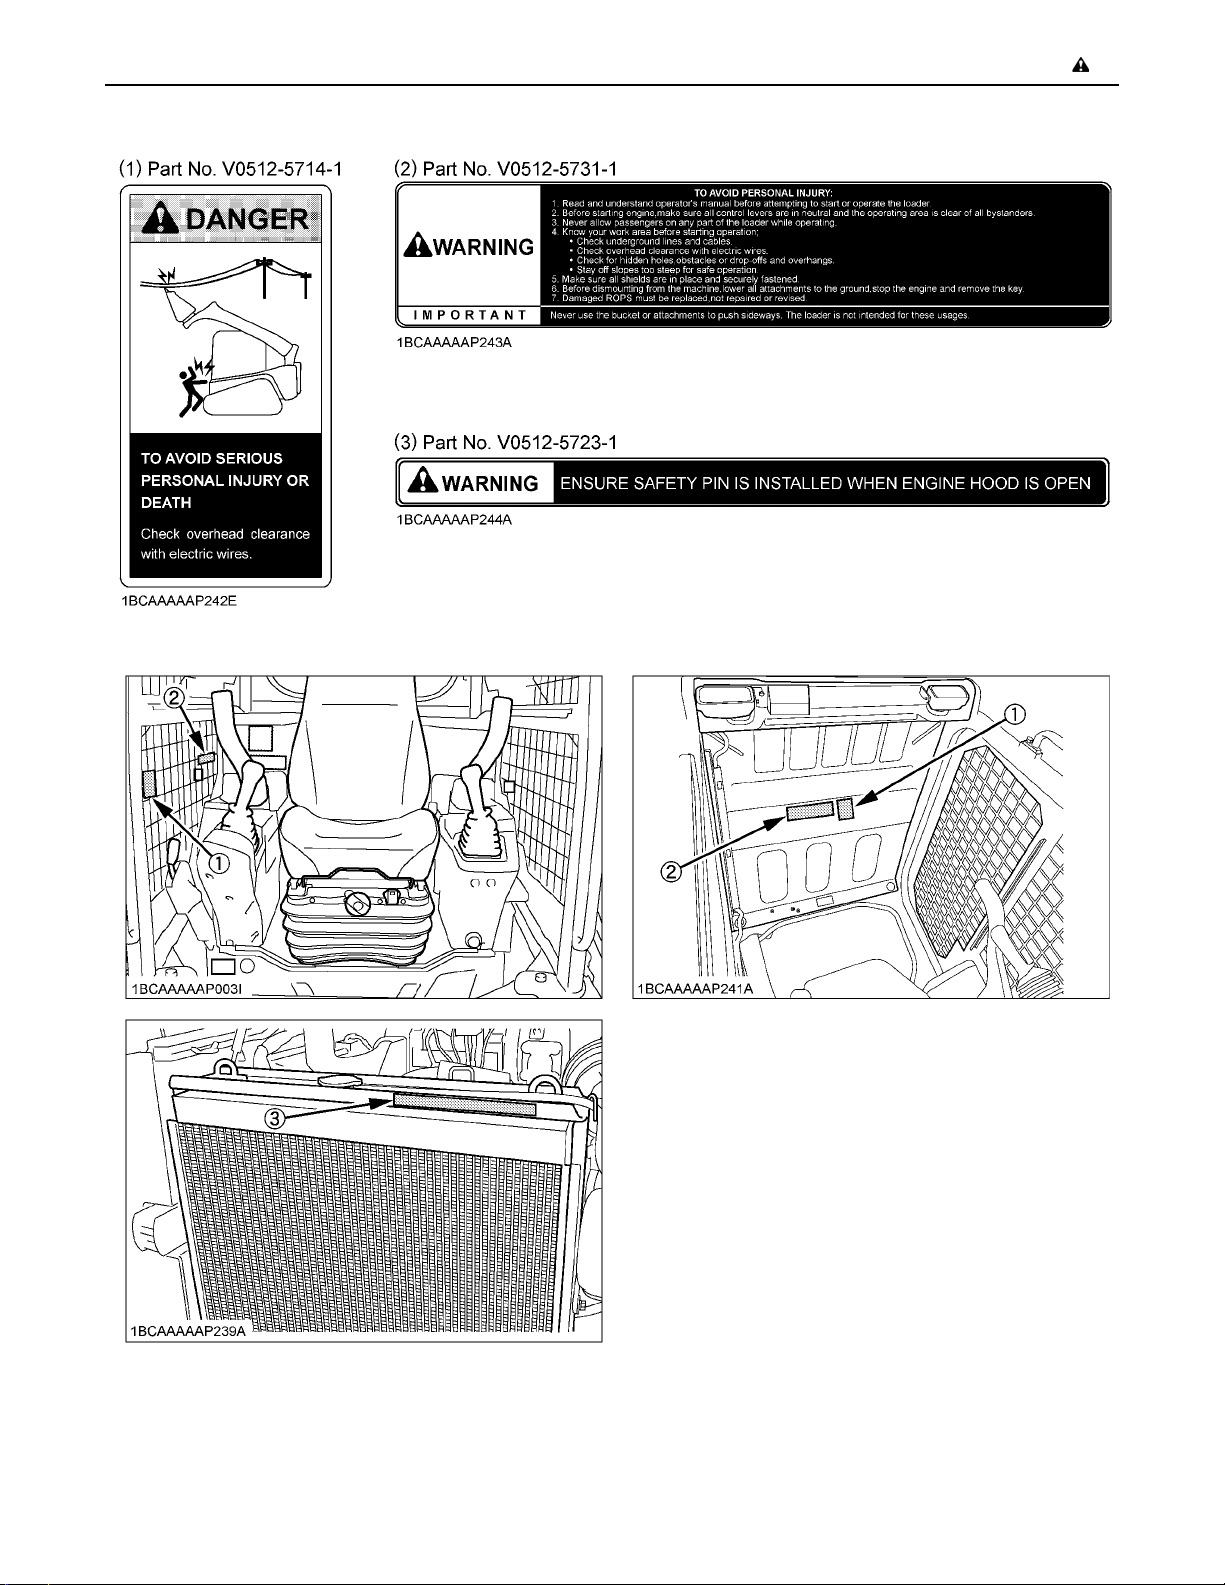
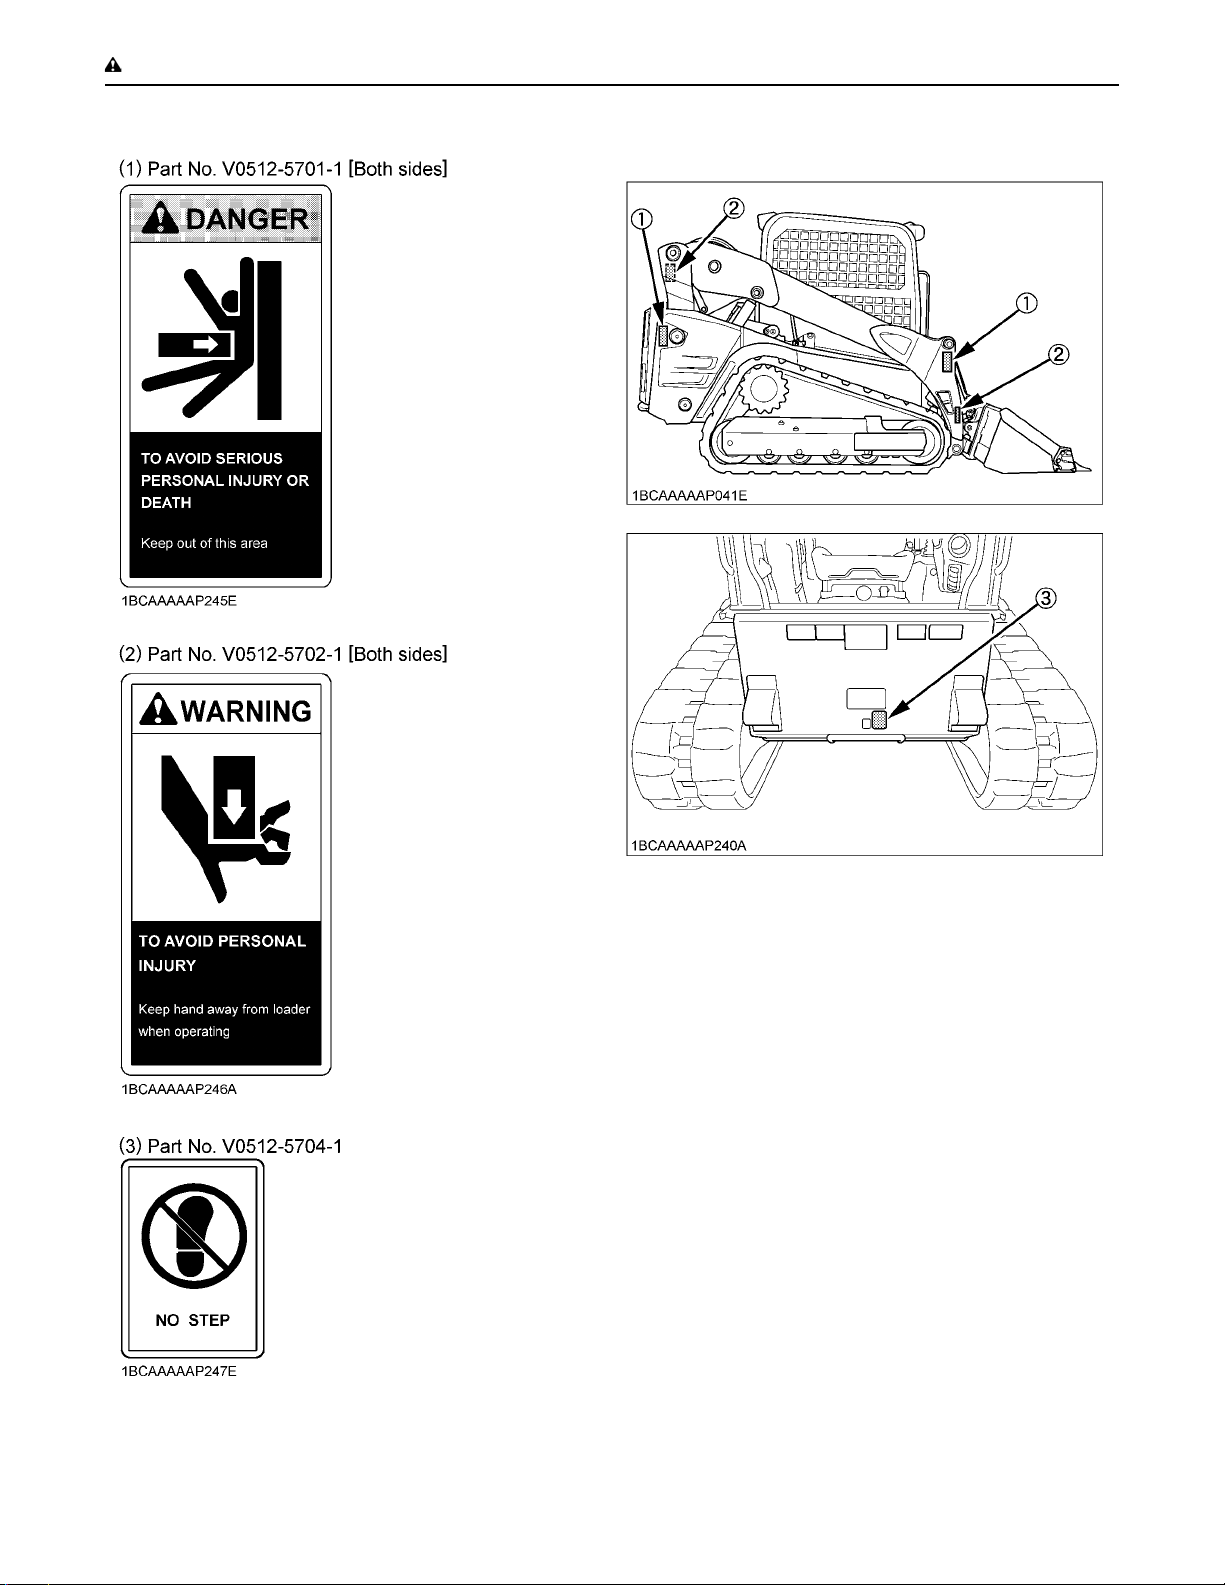
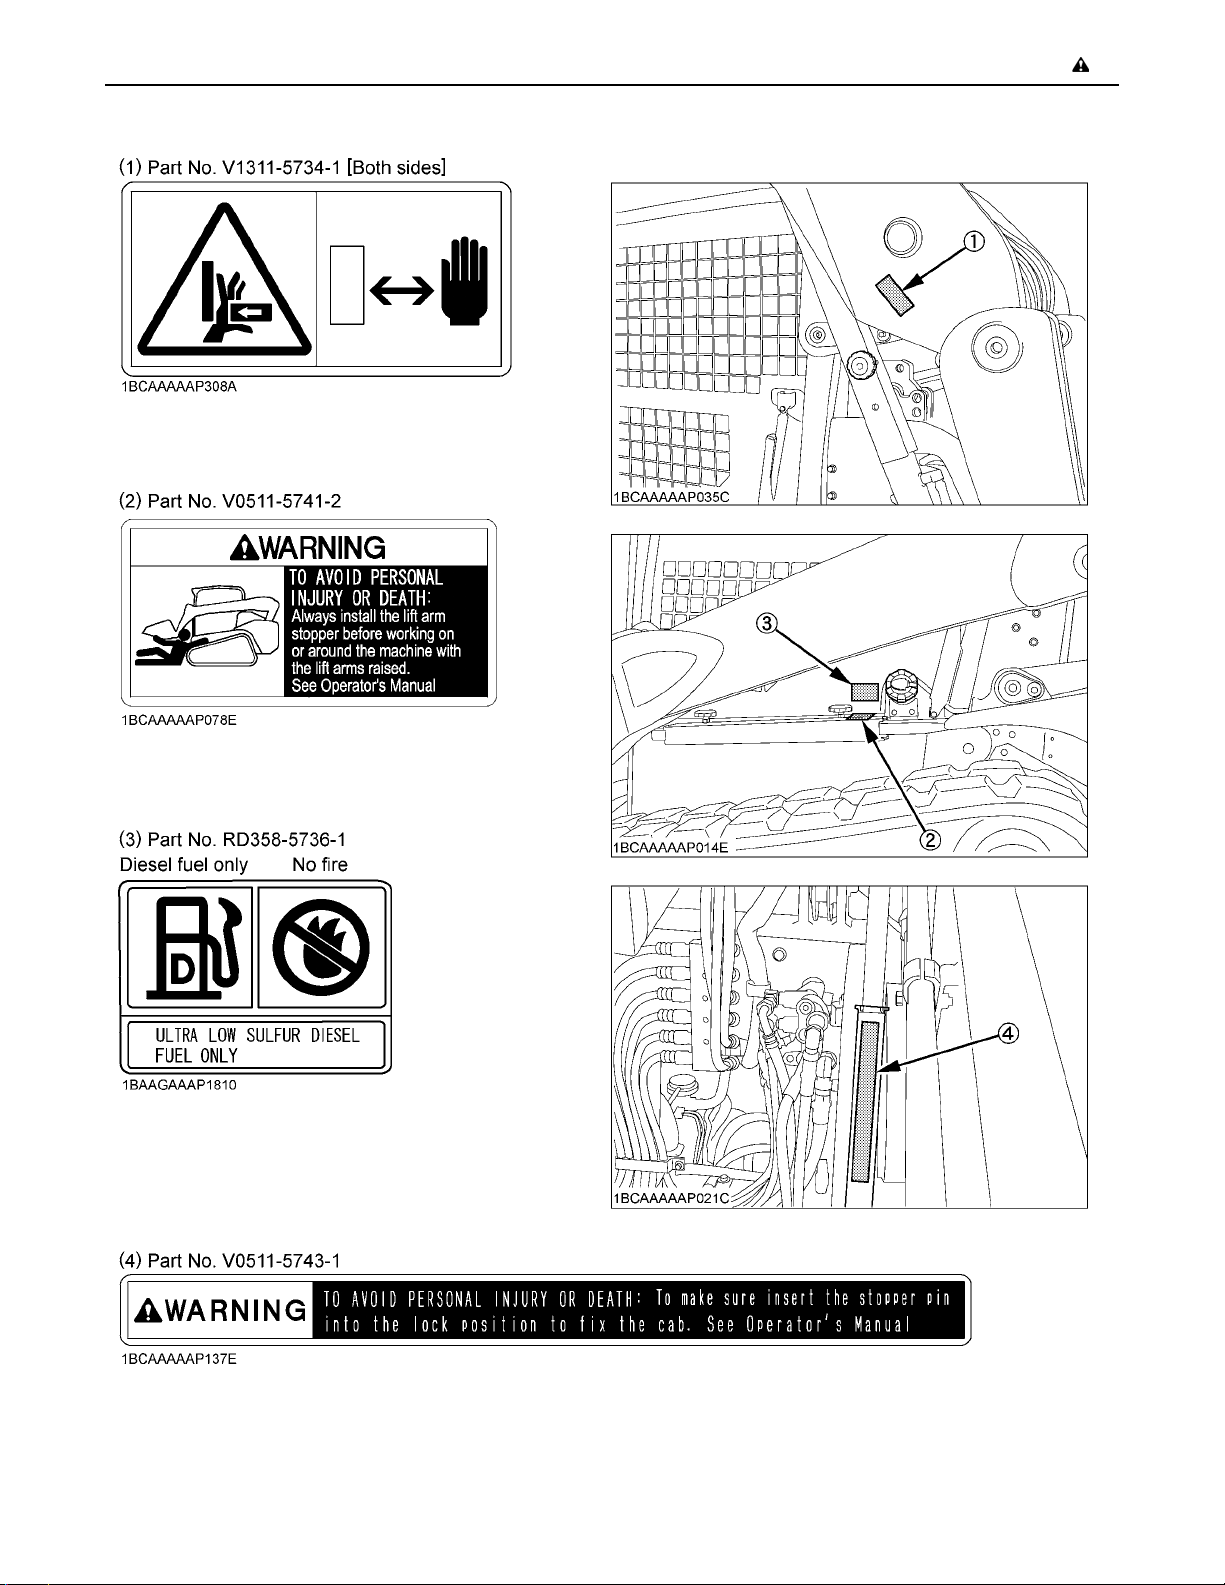
6. DANGER, WARNING AND CAUTION LABELS
Page 19
-11SAFE OPERATION
Page 20
SAFE OPERATION-12
Page 21
-13SAFE OPERATION
Page 22
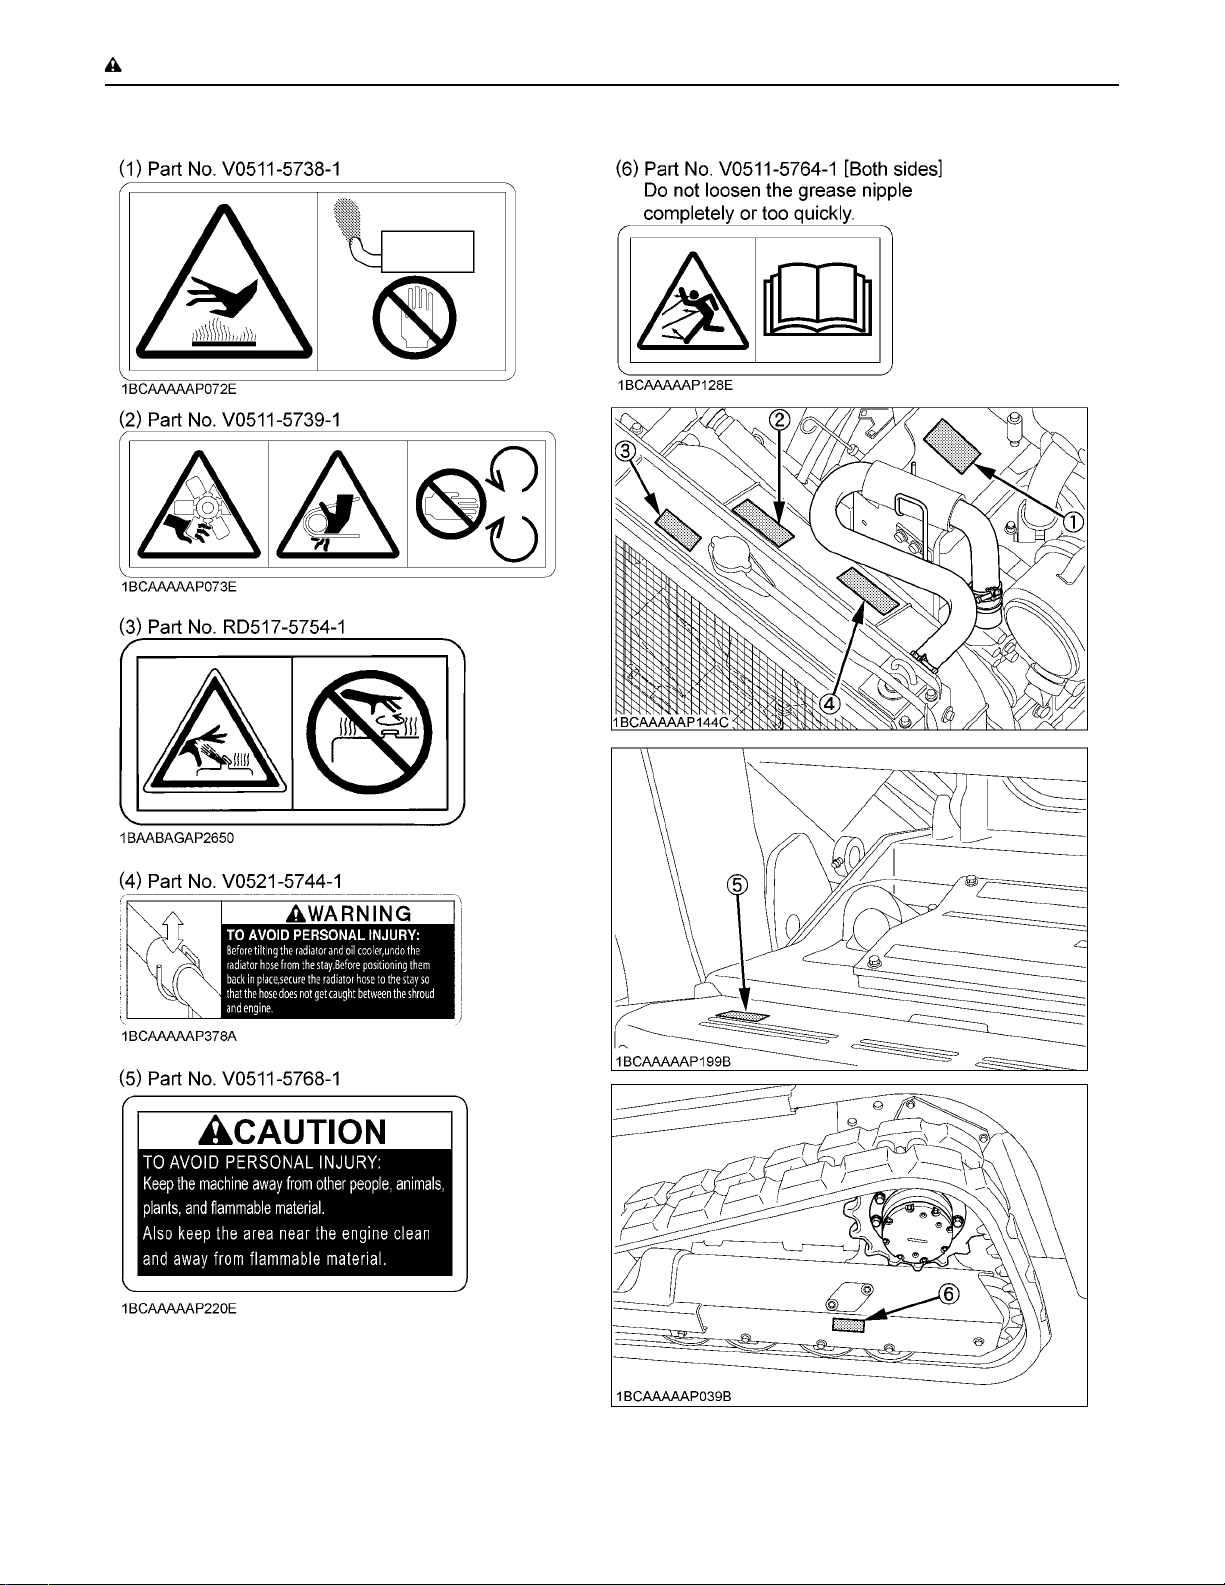
SAFE OPERATION-14
Page 23
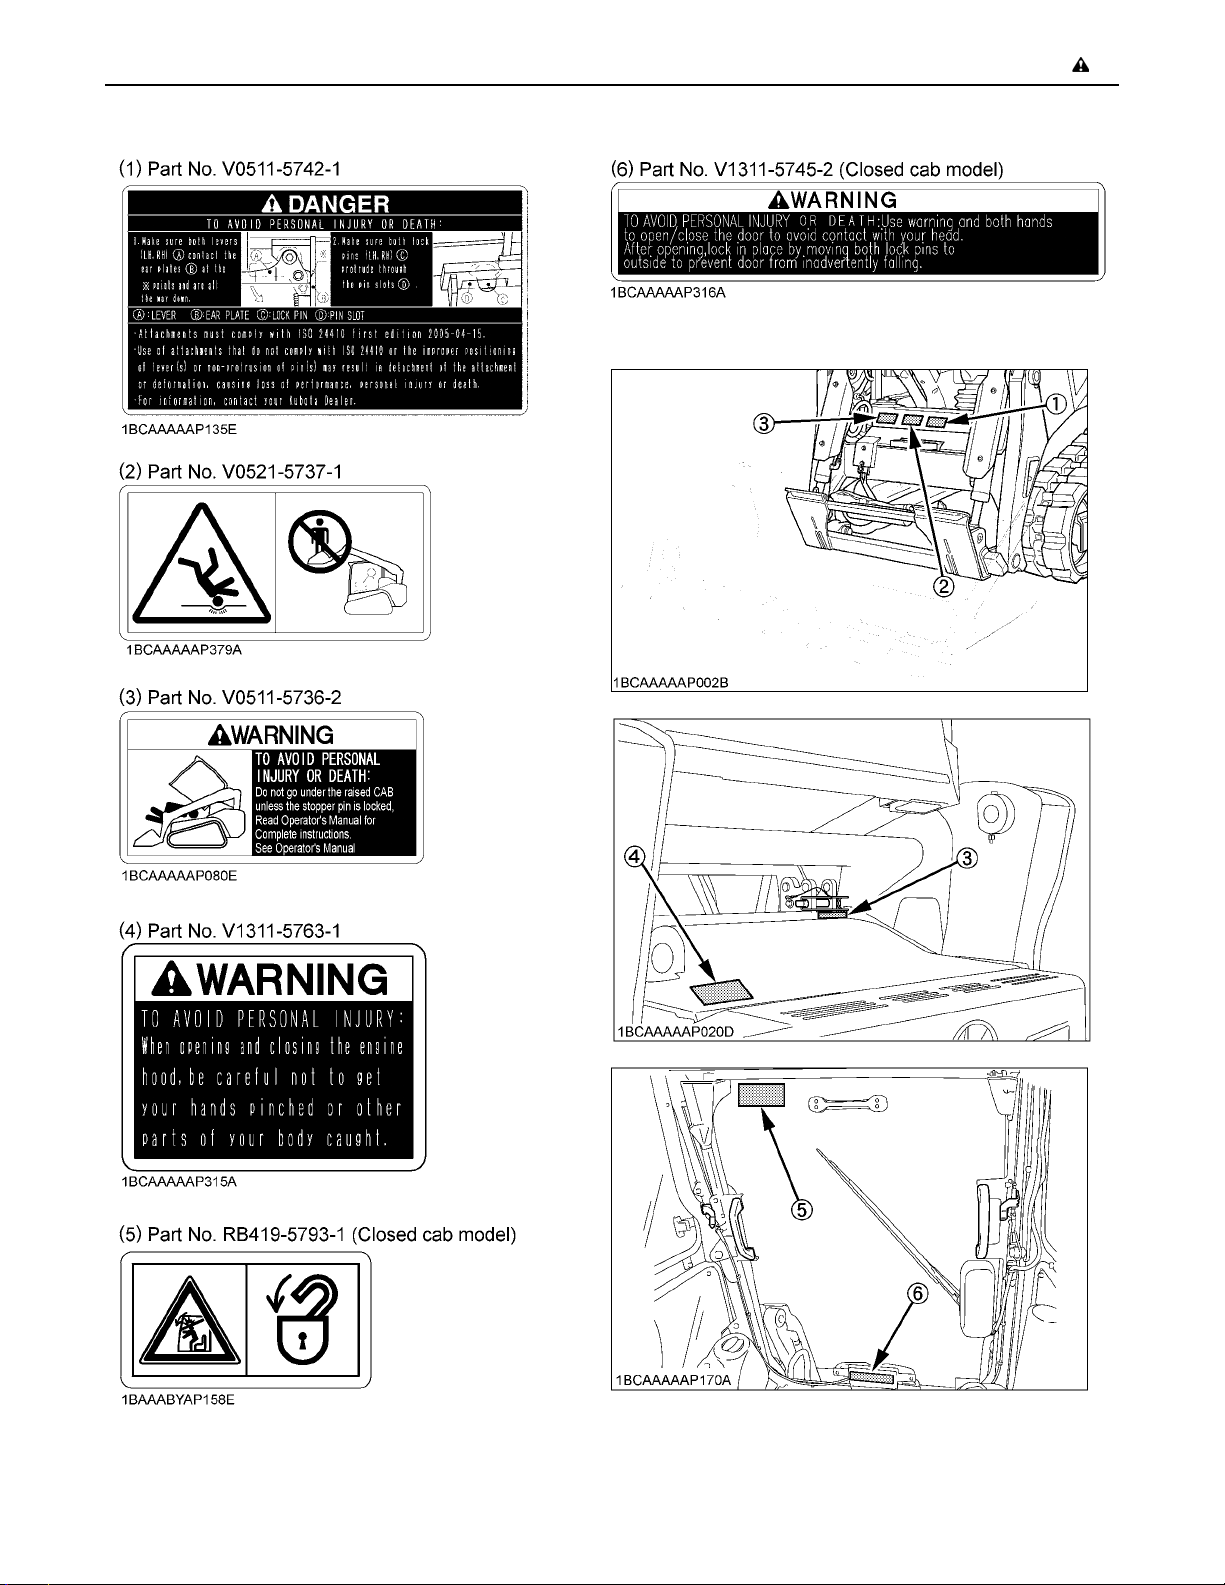
-15SAFE OPERATION
Page 24
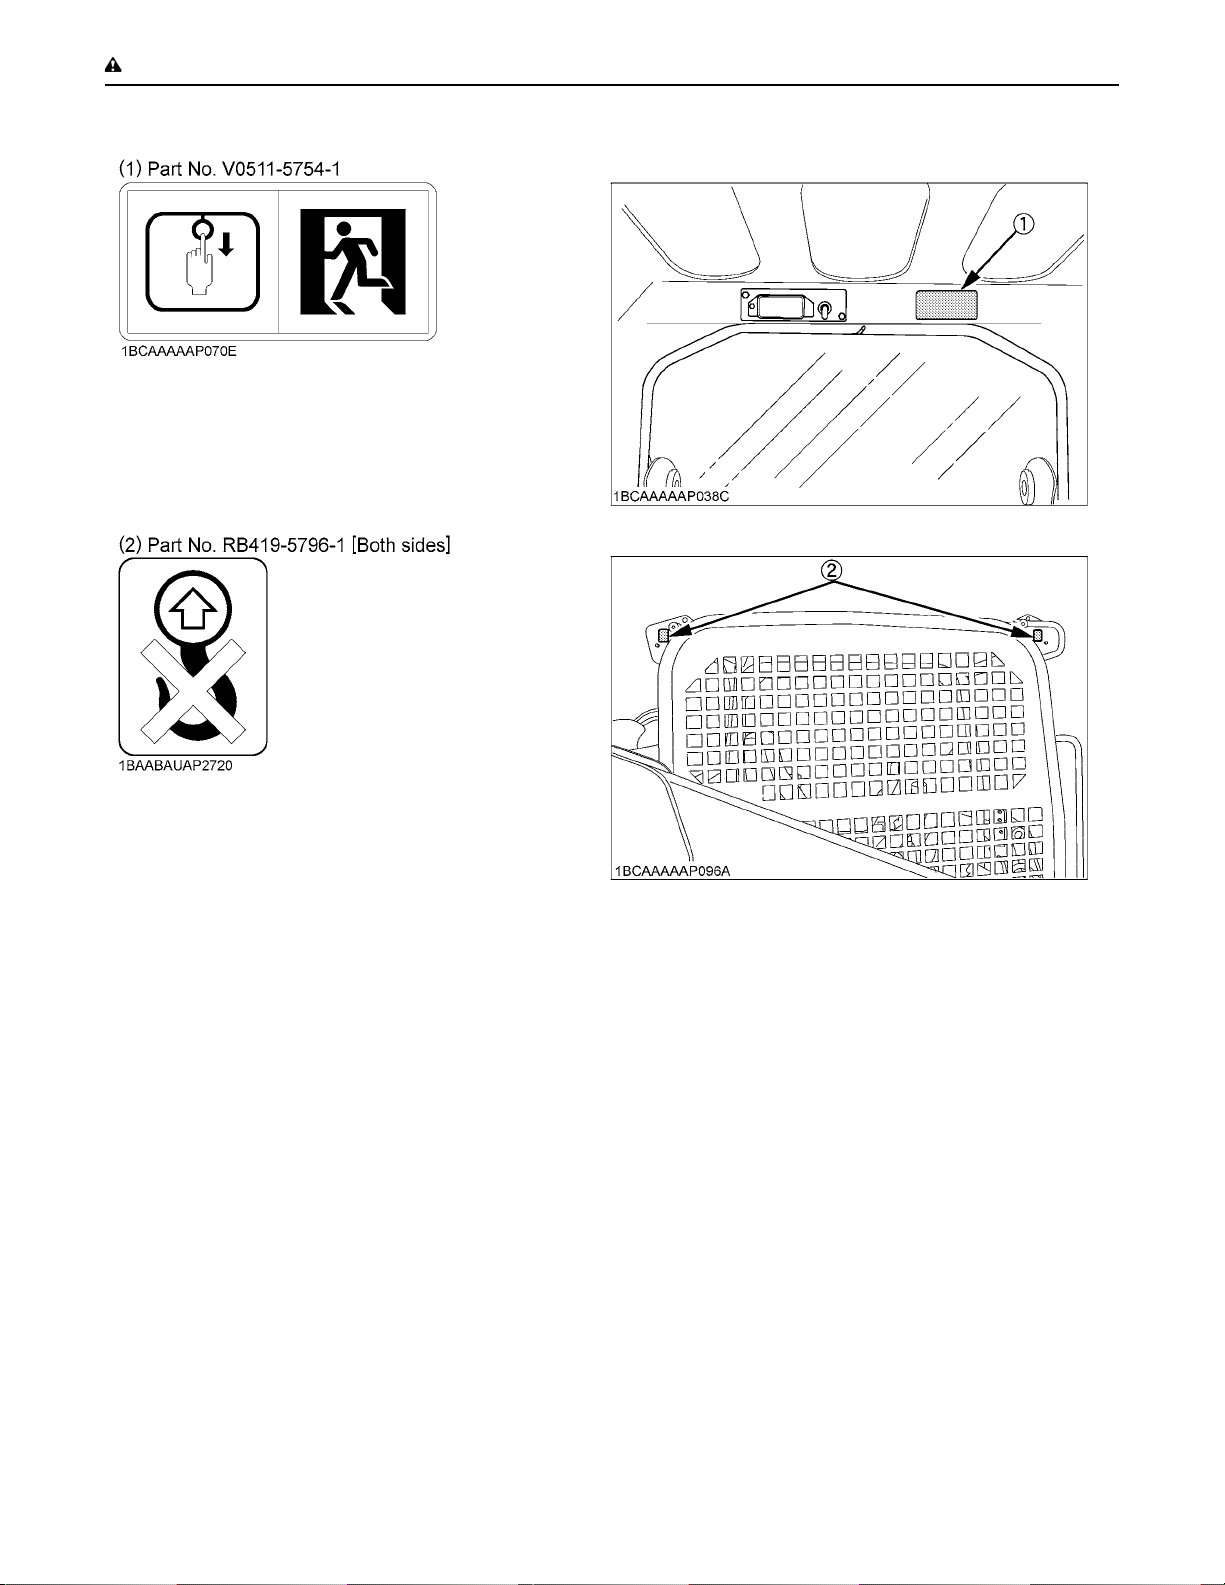
SAFE OPERATION-16
7. CARE OF DANGER, WARNING AND CAUTION LABELS
1. Keep danger, warning and caution labels clean and free from obstructing material.
2. Clean danger, warning and caution labels with soap and water, and dry with a soft cloth.
3. Replace damaged or missing danger, warning and caution labels with new labels from your KUBOTA dealer.
4. If a component with danger, warning and caution label(s) affixed is replaced with new part, make sure new label(s) is
(are) attached in the same location(s) as the replaced component.
5. Mount new danger, warning and caution labels by applying on a clean dry surface and pressing any bubbles to outside
edge.
Page 25
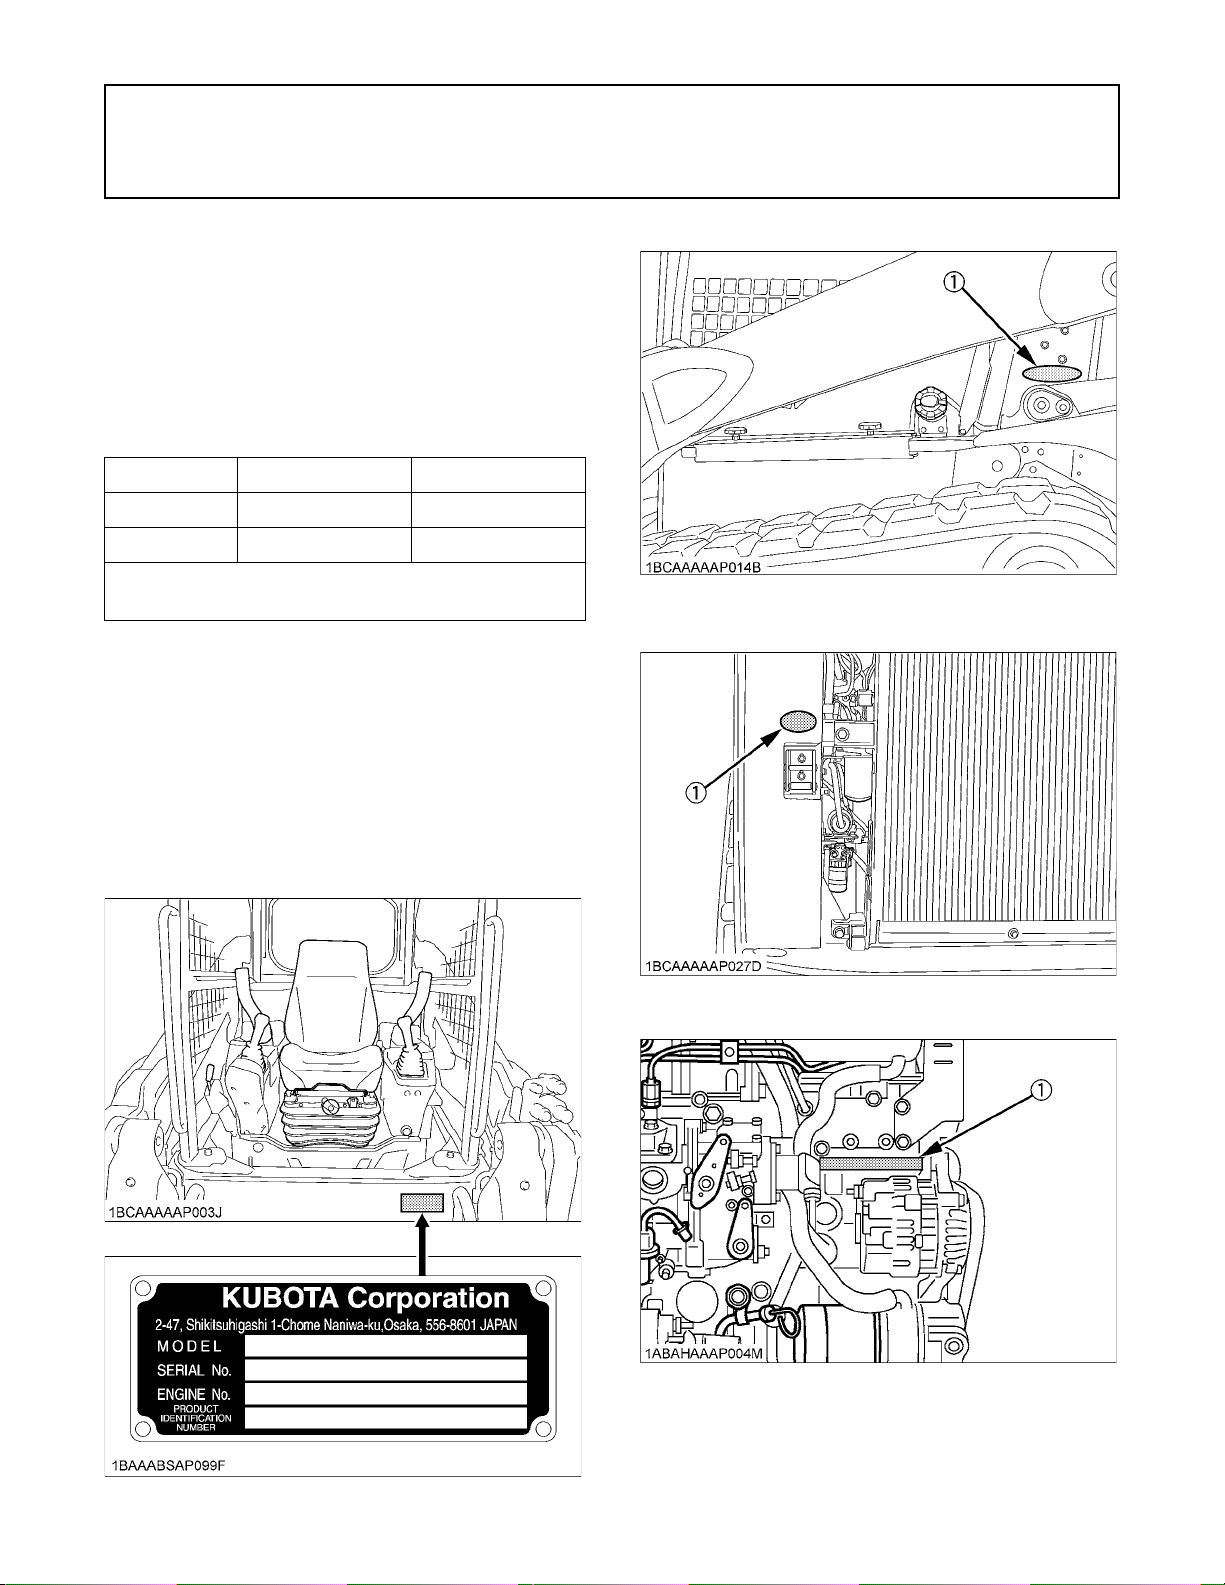
DEALER SERVICE
1DEALER SERVICE
Your KUBOTA dealer is always ready to help so that your
machine offers the best performance. After having
carefully read these instructions, you will realize that
much of the routine maintenance can be done by yourself.
Your KUBOTA dealer is responsible for servicing and the
delivery of spare parts. When ordering spare parts from
your KUBOTA dealer, always mention the serial number
of the machine and the engine.
Note these numbers right away in the supplied lines.
Model Serial No.
Machine
Engine
Dealer's name
(To be filled in through the owner)
C Warranty policy
The Product(s) described in this Operator's Manual are
designed and manufactured only for the country in which
they are initially wholesaled by Kubota or one of its
affiliated companies. Neither Kubota Corporation nor its
affiliated companies provide warranty for any Product
which is re-sold or retailed in any country other than the
country for which the Product(s) were designed or
manufactured.
[Until serial No. 12312]
(1) Machine serial No.
[From serial No. 12313]
(1) Machine serial No.
(1) Engine serial No.
Page 26
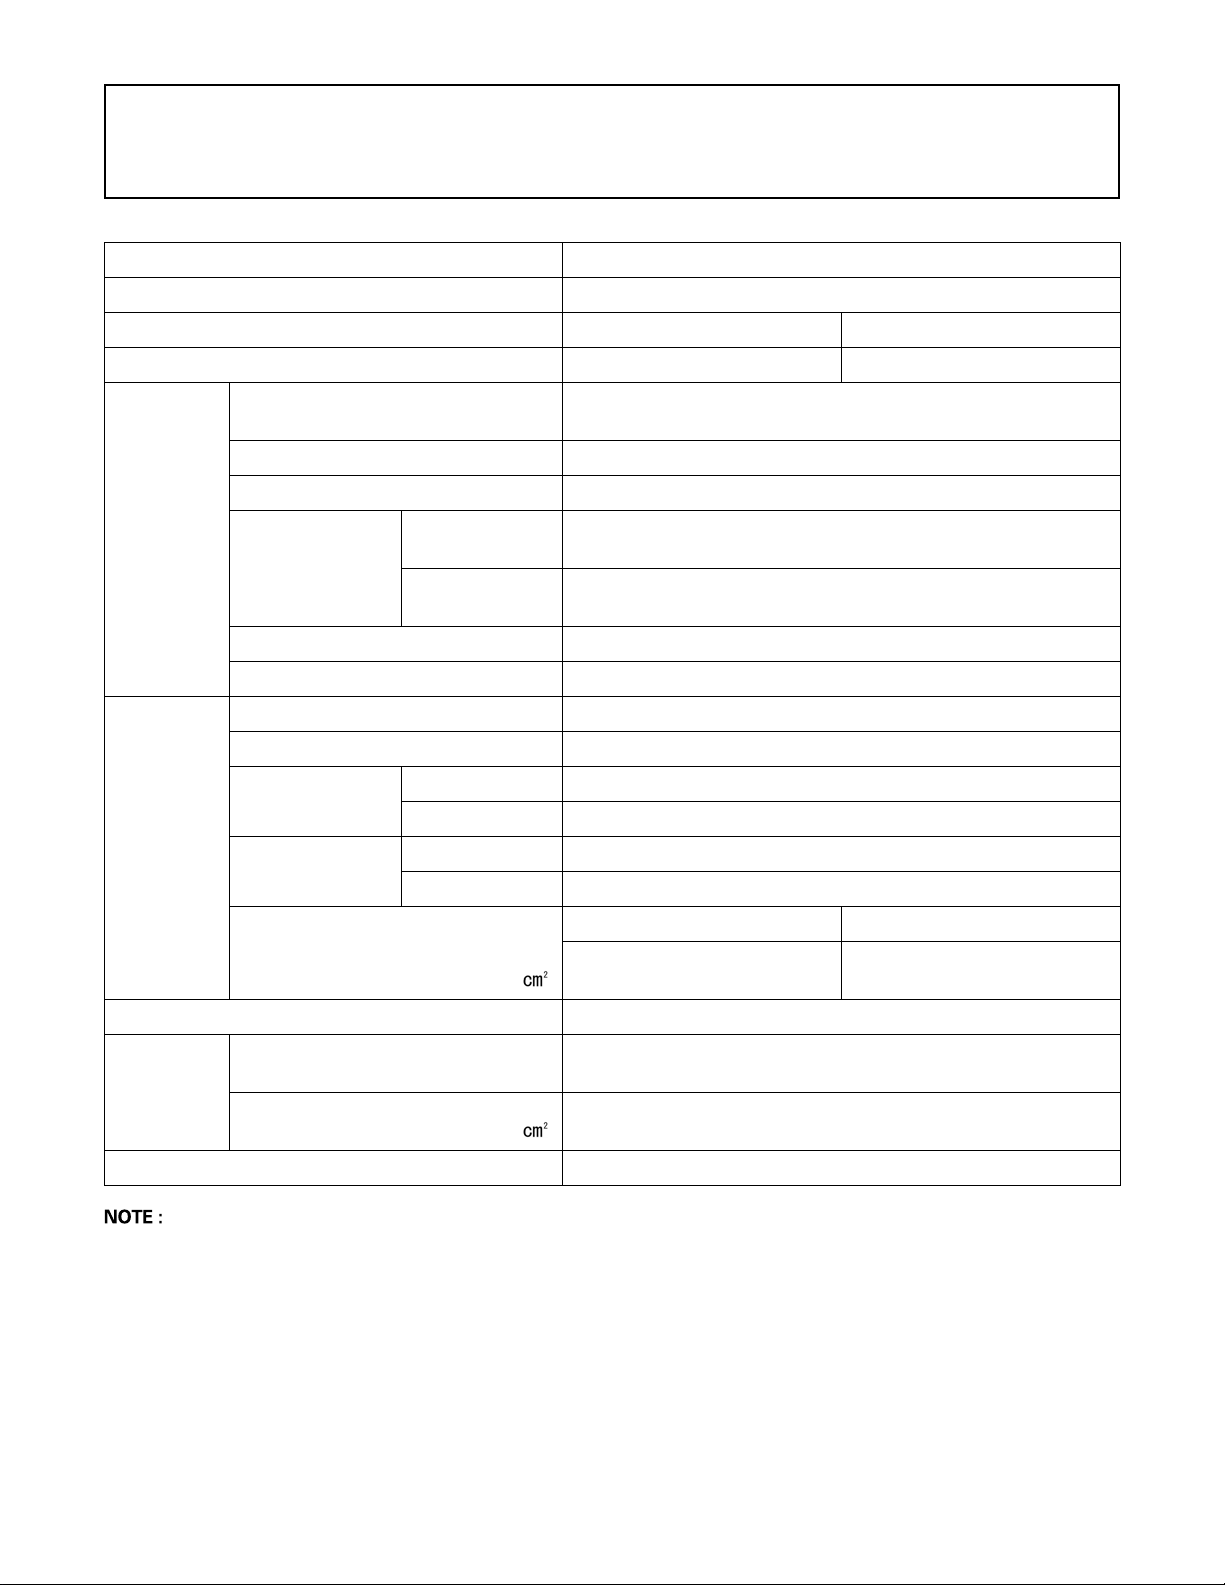
2 TECHNICAL DATA
TECHNICAL DATA
KUBOTA CTL (Compact Track Loader)
Model name SVL75
Type Open Cab Closed Cab
Operating weight (including operator's weight) kg 4100 4225
Engine
Performance
Type
Model name KUBOTA V3307DI-TE3
Total displacement cc 3331
SAE J1995 gross
kW
Engine power
SAE J1349 net
kW
Rated speed rpm 2400
Low idling speed rpm 1150
Rated operating capacity kg 1043
Tipping load kg 2980
Bucket kg 2814
Breakout force
Lift arm kg 2162
Fast km/ h 11.5
Travel speed
Slow km/h 7.5
Ground pressure (With operator) Standard track Wide track
kP a
(kgf/ )
Water cooled 4 cycle diesel engine with 4 cylinder
EPA lnterim Tier 4
55.4
51.3
39.2
(0.40)
33.0
(0.34)
Battery capacity 12V RC: 1600 min, CCA 900A
Pressure
connection
for
attachments
Fuel tank capacity L 93
A Specifications subject to change without notice.
Max.displacement (Theoretical)
L/min
Max. pressure Mpa
(kgf/ )
65.8
22.0
(224)
Page 27
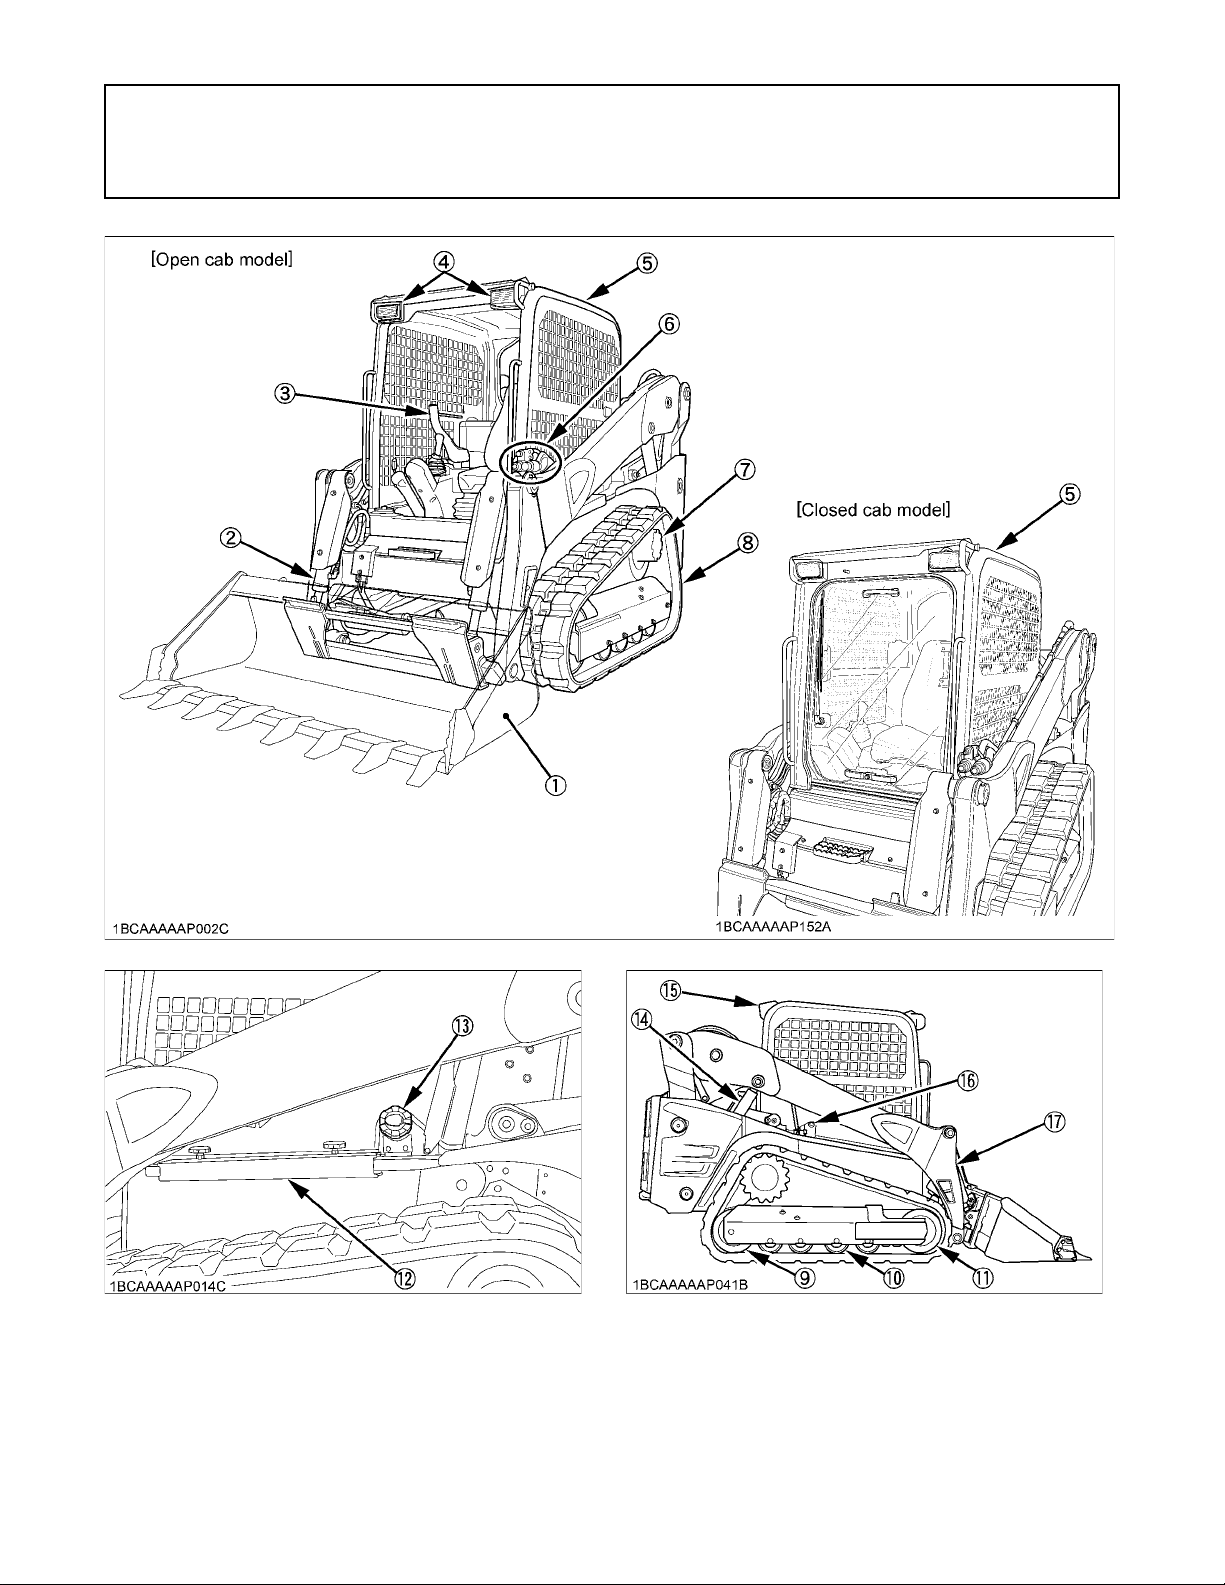
3DESCRIPTION OF MACHINE PARTS
DESCRIPTION OF MACHINE PARTS
DEPICTED CONTENTS
(1) Bucket
(2) Tilt cylinder
(3) Armrest
(4) Front working light
(5) Cab (Open cab / Closed cab)
(6) AUX supply port
(7) Drive motor
(8) Rubber track
(9) Rear idler
(10) Track roller
(11) Front idler
(12) Lift arm stopper
(13) Fuel tank cap
(14) Lift arm cylinder
(15) Rear working light
(16) Hydraulic tank cap
(17) Lift arm
Page 28
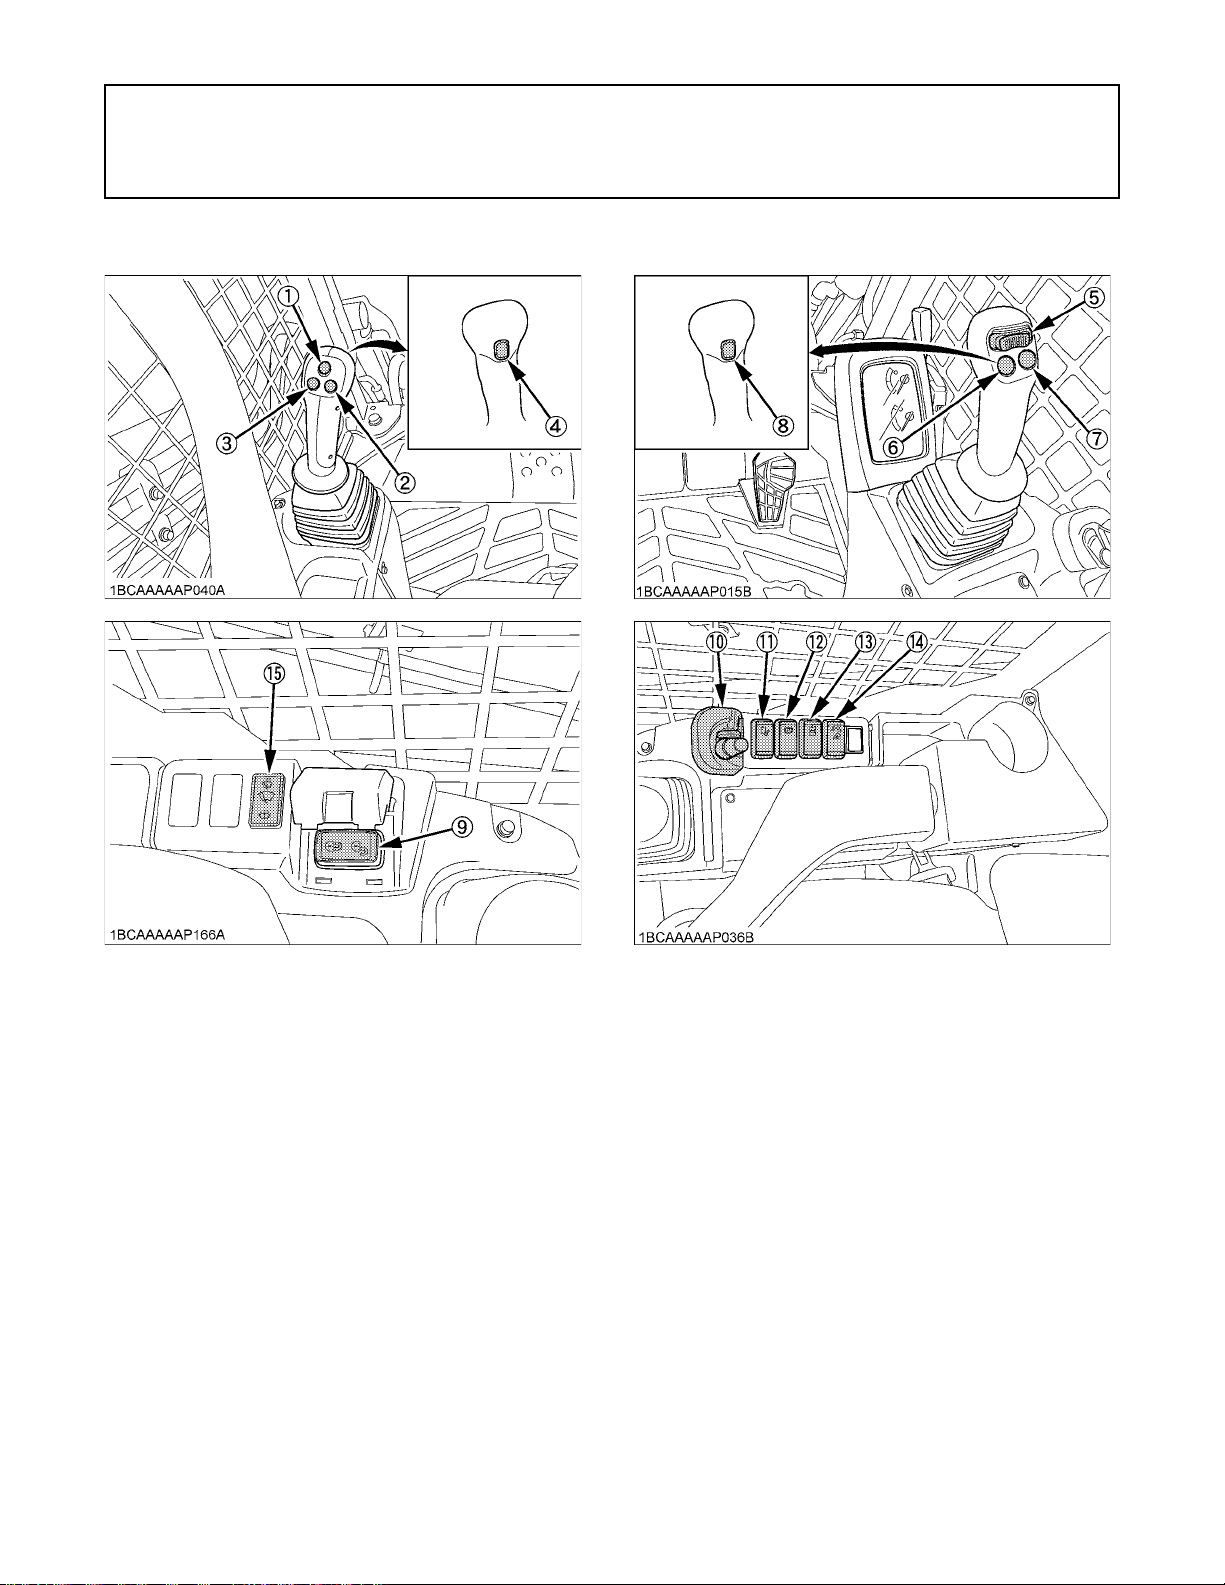
4 INSTRUMENT PANEL AND CONTROL ELEMENTS
INSTRUMENT PANEL AND CONTROL ELEMENTS
B Switch
DEPICTED CONTENTS
(1) Horn Switch
(2) AUX electrical control switch (Right)
(3) AUX electrical control switch (Left)
(4) Travel speed switch
(5) AUX port variable switch
(6) AUX hold switch (Left)
(7) AUX hold switch (Right)
(8) Float Switch
(9) Hydraulic quick-hitch switch (Hydraulic quick-hitch model only)
(10) Starter switch
(11) Hydraulic unlock switch
(12) Parking brake switch
(13) AUX port switch
(14) Working light switch
(15) Wiper / washer switch (Closed cab model)
Page 29
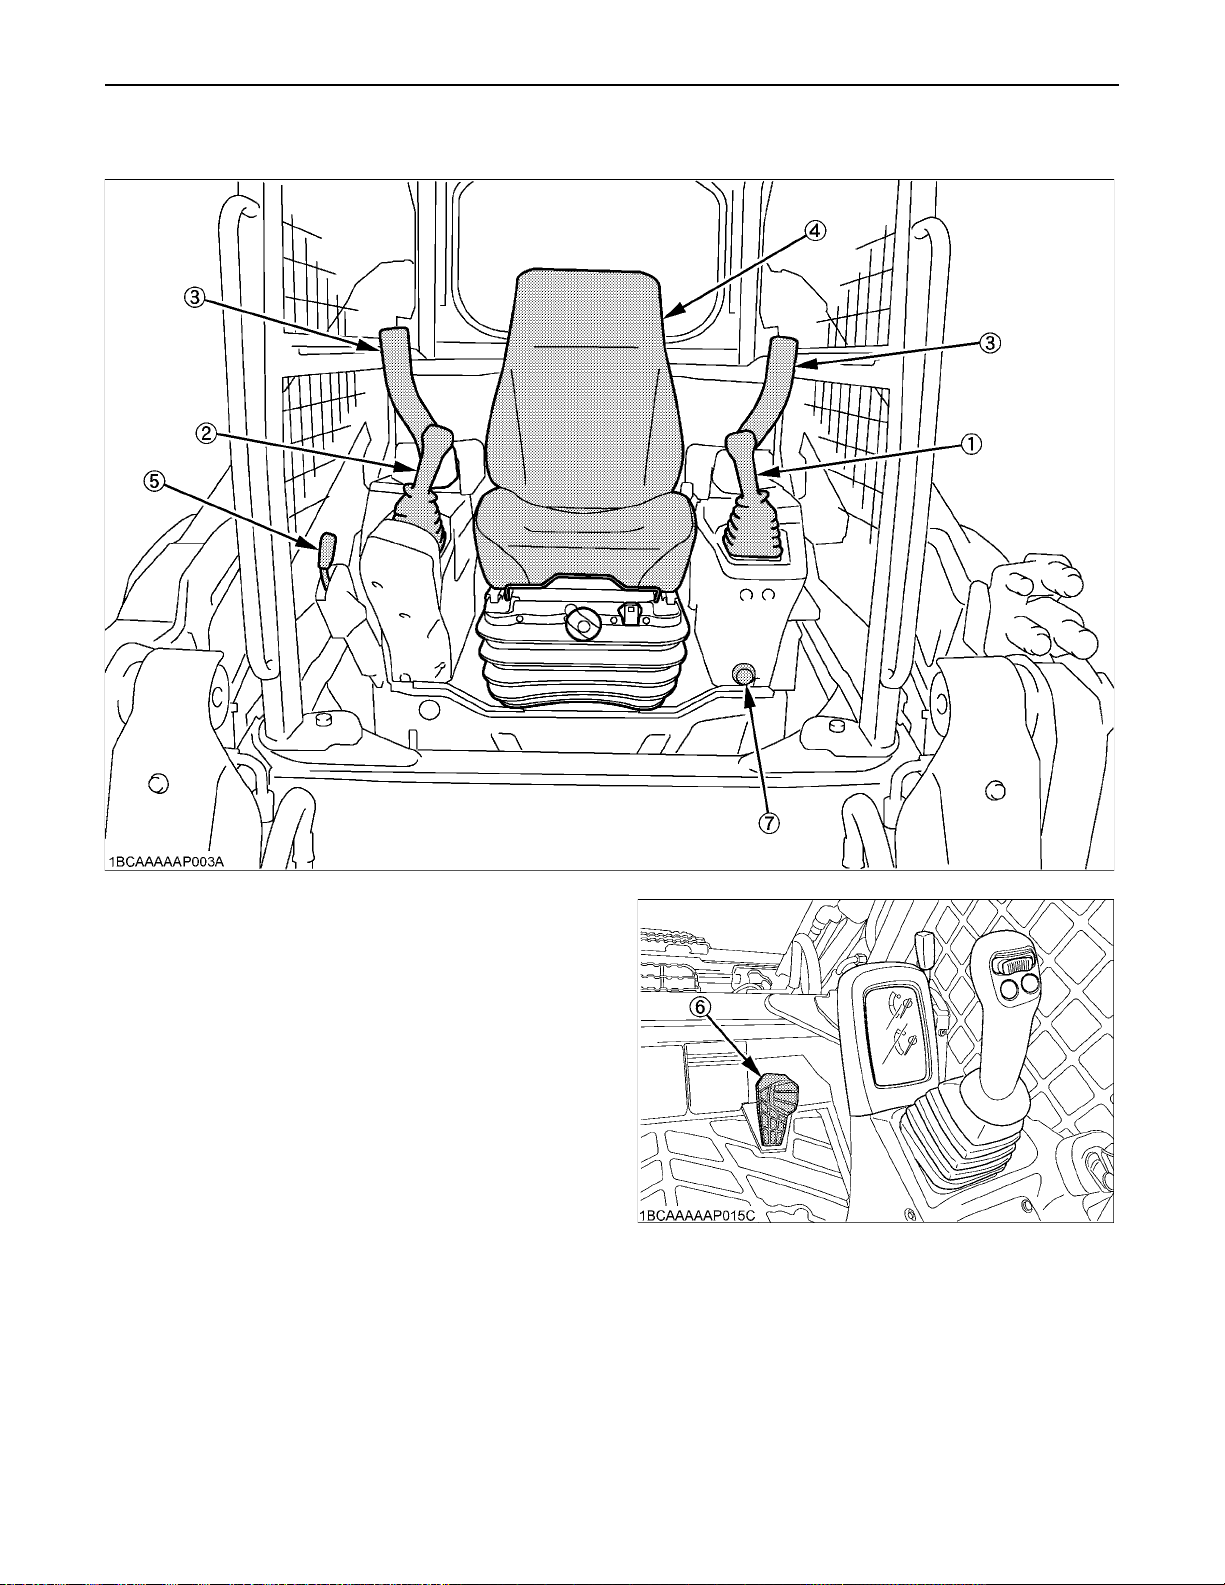
B Control Pedals, Levers and Electrical Outlet
5INSTRUMENT PANEL AND CONTROL ELEMENTS
DEPICTED CONTENTS
(1) Left control (traveling) lever
(2) Right control (front operating) lever
(3) Armrest
(4) Seat
(5) Accelerator lever
(6) Accelerator pedal
(7) Electrical outlet
Page 30
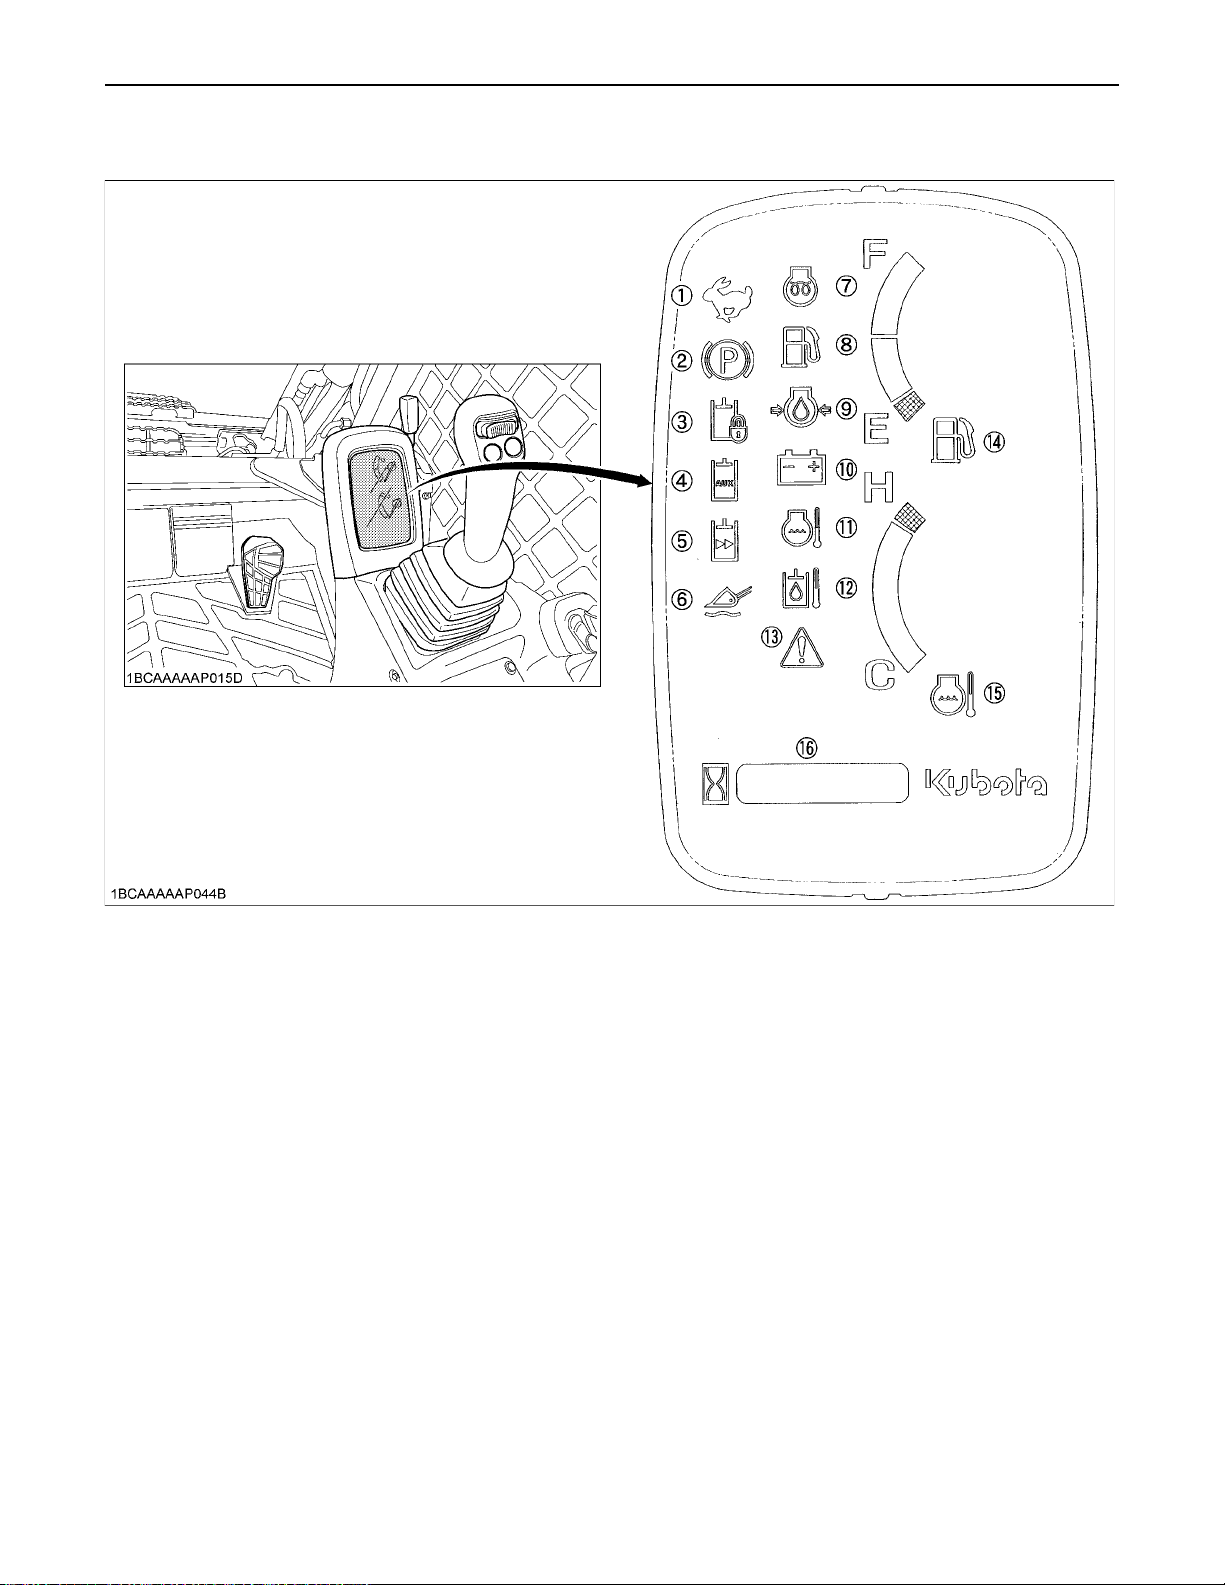
6 INSTRUMENT PANEL AND CONTROL ELEMENTS
B Instrument Panel
DEPICTED CONTENTS
(1) Speed indicator lamp
(2) Parking brake lamp
(3) Hydraulic lock lamp
(4) AUX operation lamp
(5) High-flow lamp
(6) Floating lamp
(7) Glow lamp
(8) Remaining fuel warning lamp
(9) Engine oil pressure warning lamp
(10) Battery charge lamp
(11) Coolant temperature warning lamp
(12) Hydraulic oil temperature warning lamp
(13) Warning lamp
(14) Fuel gauge indicator
(15) Coolant temperature gauge
(16) Hour-meter
Page 31
CHECKS BEFORE START
7CHECKS BEFORE START
DAILY CHECKS
In order to avoid damage, it is important to check the
condition of the machine before starting.
To avoid personal injury:
A Do maintenance work on the machine only on
level ground with the engine off and armrest in
the "Raised" position.
Checks
A Go around the machine and check for visual damage
and wear.
A Check coolant level. (See "REGULAR CHECKS AND
MAINTENANCE WORK" in "MAINTENANCE"
section.)
A Check fuel level.
A Check engine oil level.
A Check hydraulic fluid level.
A Check air cleaner for clogging.
A Check all control lamps, indicators and hour meter.
A Check the light system.
A Check the seat belt and the ROPS/FOPS safety
device.
A Check the condition of the safety and warning labels.
(See "DANGER, WARNING AND CAUTION LABELS"
in "SAFE OPERATION" section.)
CHECKING THE SWITCHES
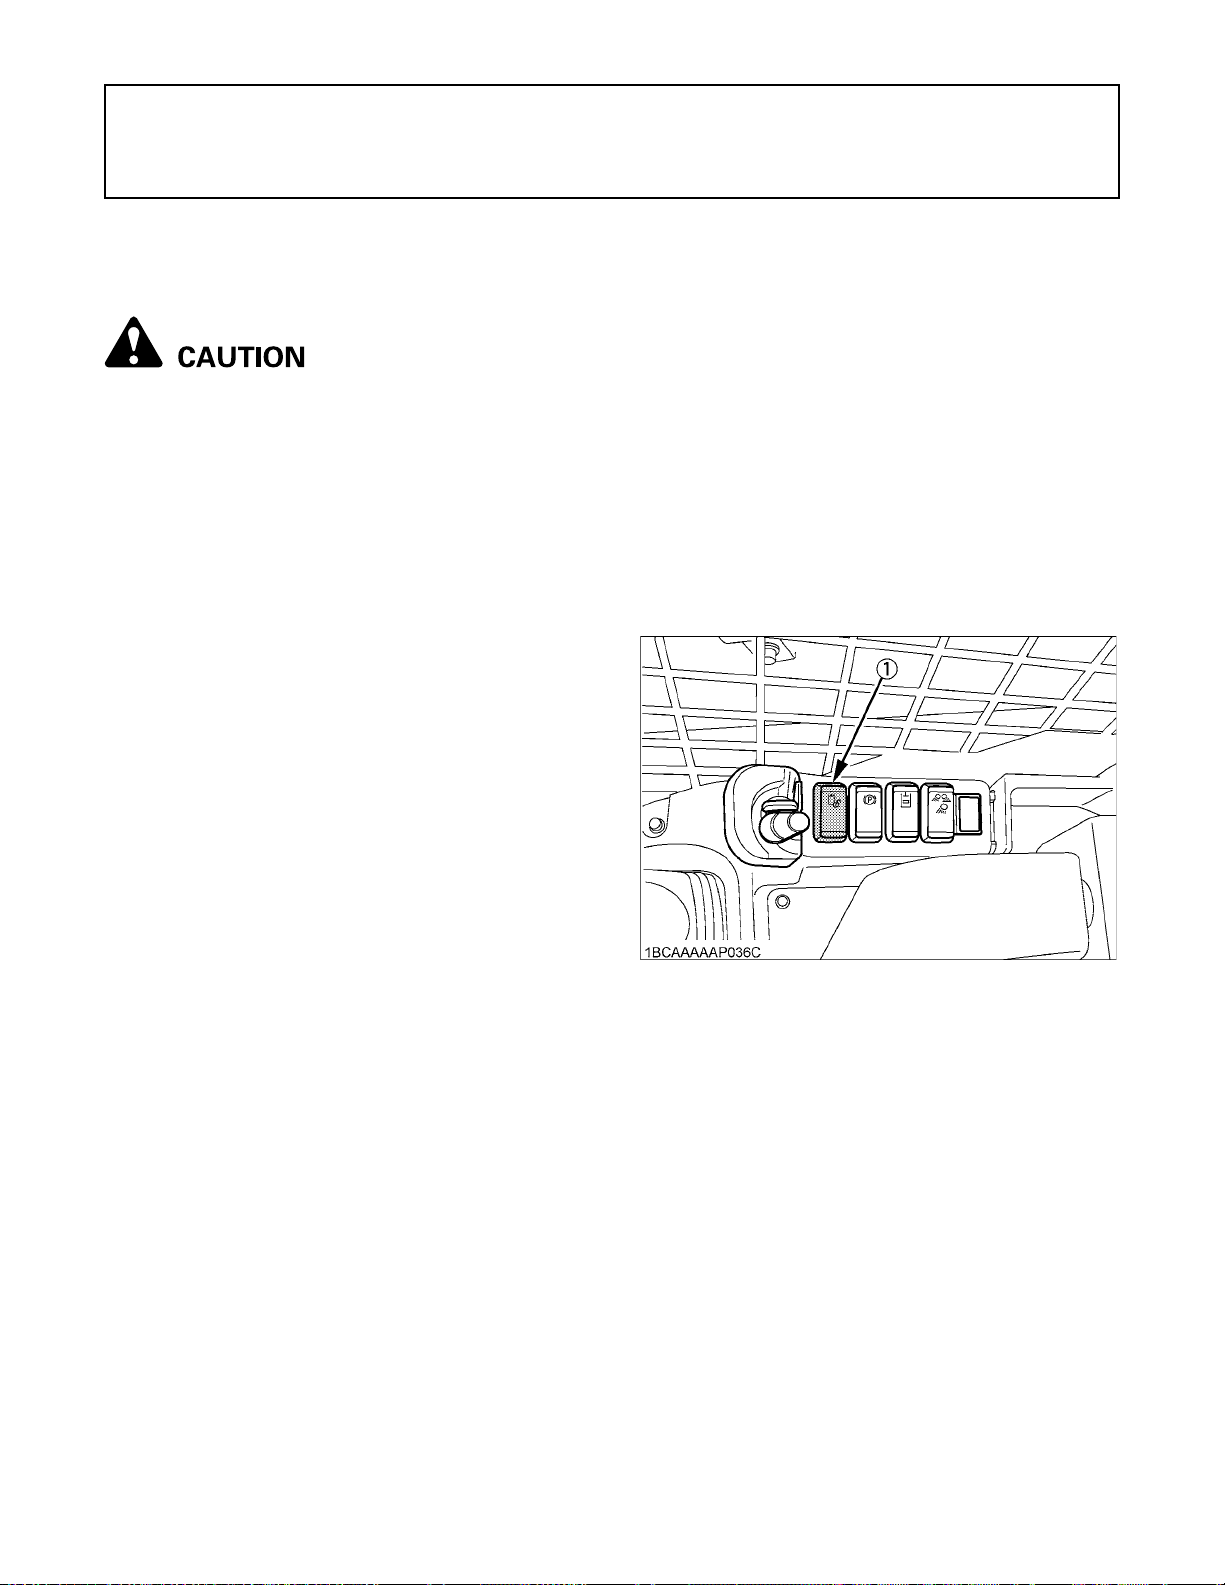
BHydraulic Unlock Switch
The hydraulic unlock switch enables the hydraulic system.
The switch is intended to get the hydraulic system
(travelling and attachments) ready for use, but does not
have the locking function.
To unlock the hydraulic system, the following
requirements are needed:
(1) The engine is running.
(2) The armrests are down.
(3) The operator is seated on the operator's seat.
When the hydraulic system has been unlocked, the
hydraulic lock lamp on the instrument panel disappears.
If any of the above conditions is not met, the hydraulic
system stays locked.
(1) Hydraulic unlock switch
BOPC Switch
This switch is used to detect the operator sitting on the
seat and to signal the hydraulic system that it can be
locked and unlocked.
When the operator sits on the seat, the OPC switch is ON,
the hydraulic system can be unlocked.
When the hydraulic system is unlocked and the operator
leaves the seat for up to 3 seconds, the OPC switch turns
off. Now the hydraulic system is locked.
Page 32
CHECKS BEFORE START8
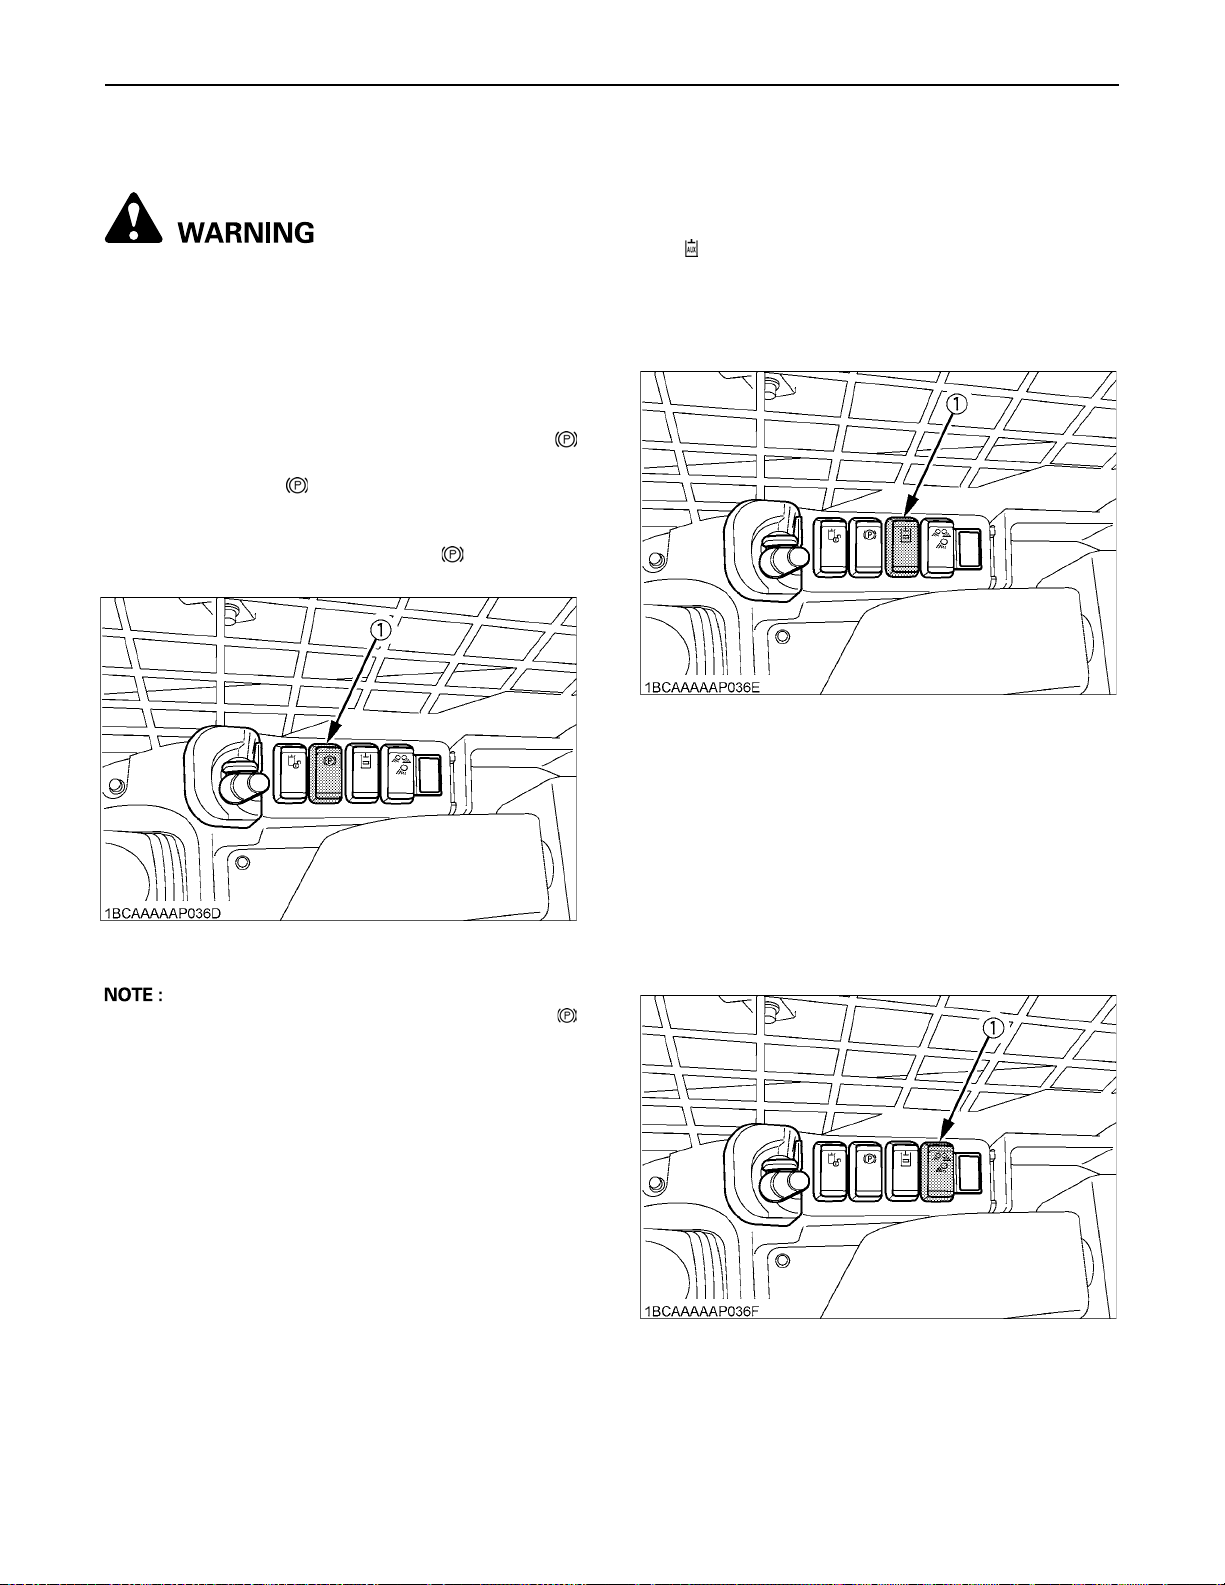
BParking Brake Switch
To avoid personal injury or death:
A When dismounting the machine or when
servicing or hauling, be sure to apply the
parking brake.
The parking brake is to be used when parking the
machine.
1. When the parking brake switch is pressed on " "
marked side (the right side), the parking brake is
applied and the " " mark on the instrument panel
appears.
2. When the switch is pressed on the left side, the
parking brake is released and the " " mark on the
instrument panel lights off.
BAUX Port Switch
This switch is used to enable the AUX port.
Press the switch once, and the AUX port is unlocked and
the " " mark on the instrument panel lights up. By
pressing the switch again, the AUX port now gets locked.
The AUX port switch can be used only when the AUX port
variable switch on the right control lever is in the neutral
position.
(1) AUX port switch
(1) Parking brake switch
A Suppose that the parking brake switch is ON (" "
marked side depressed). Even if the hydraulic system
gets unlocked, the travel system remains out of
service and the brakes are still applied.
When the hydraulic system has been locked, the travel
system gets locked too, and the brakes can get on.
BWorking Light Switch
This switch is operative with the starter key in the ON
position.
The switch has 3 positions. When positioned on your side,
the lights stay off. Move the switch to the first position to
turn on the front working light, and to the second position
to turn on both the front working lights and rear working
lights.
(1) Working light switch
Page 33
9CHECKS BEFORE START
C Night operation
To avoid personal injury:
A Visibility is reduced in darkness, therefore, in
the event, the working light alone does not
provide sufficient visibility. Prepare additional
stationary artificial lighting, observe all safety
rules and any special regulations for night
work.
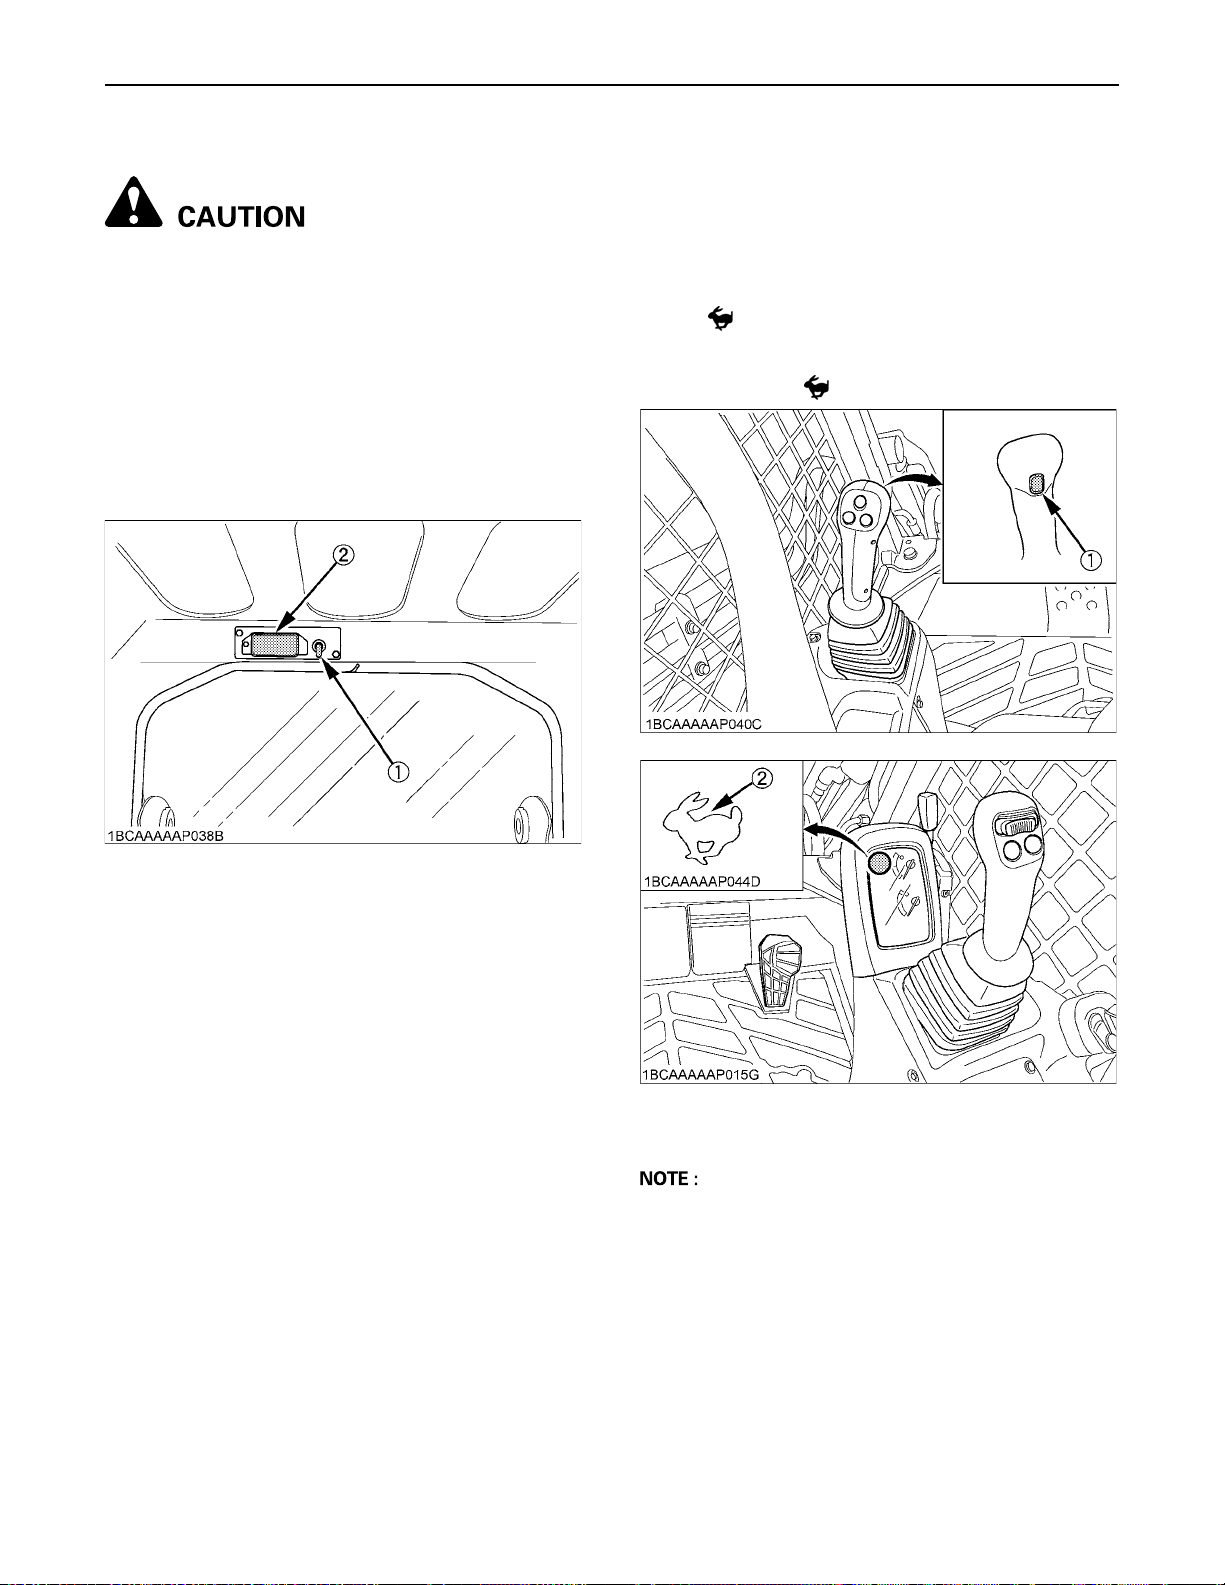
BInterior Lamp Switch
The interior lamp is operative even when the starter key is
in the "STOP" position.
BTravel Speed Switch
Travel speed will increase when this switch is pressed
down.
Switching the dual travel speed:
1. Press the travel speed switch. The buzzer beeps twice
and the travel speed changes from low to high speed.
The symbol lights up.
2. Press the travel speed switch again, and the buzzer
beeps once and the travel speed changes from high to
low speed. The symbol goes out.
(1) Interior lamp switch
(2) Interior lamp
(1) Travel speed switch
(2) Speed indicator light
A When activating the travel speed switch, it must be
pressed completely. (The switch is operative only
when the travel system is unlocked)
A Each time the travel speed switch is pressed, the
travel speed is switched between high and low speed.
Page 34
CHECKS BEFORE START10
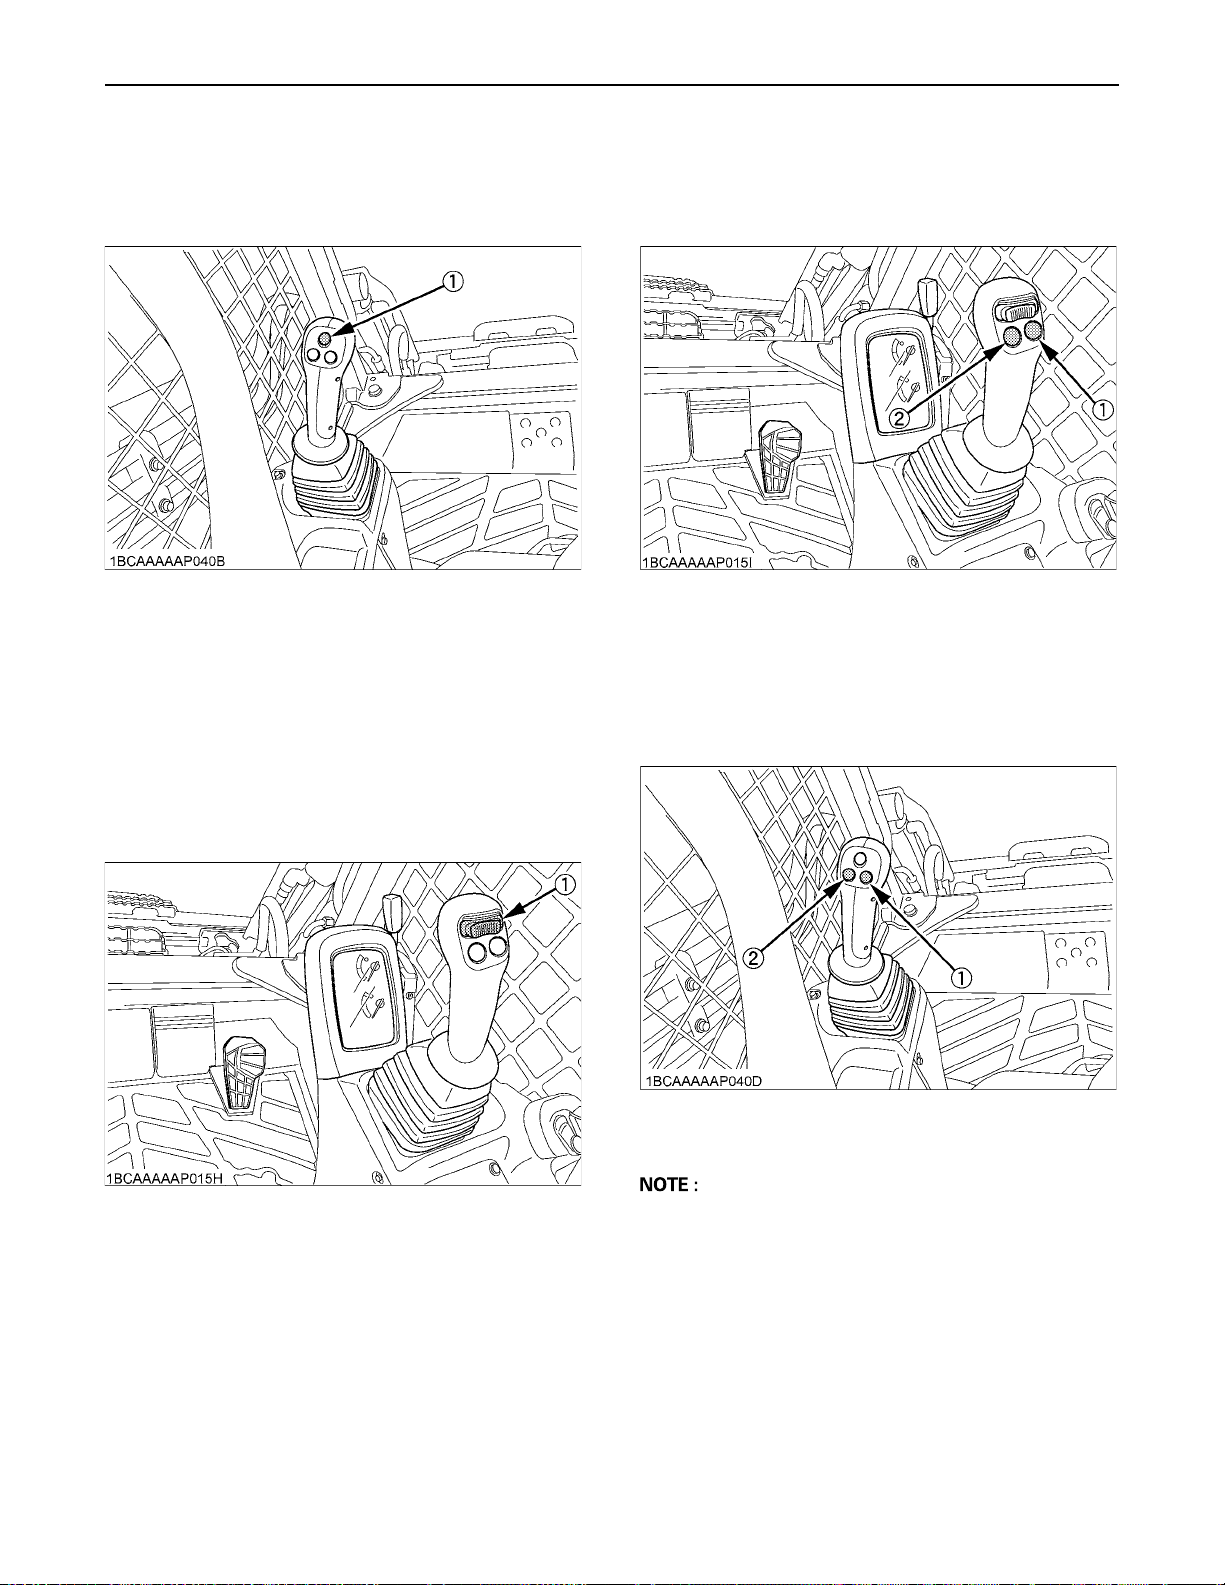
BHorn Switch
Even when the starter key is in "STOP" position, the horn
will be beeped by pressing the horn switch.
(1) Horn switch
BAUX Port Variable Switch
With the AUX port unlocked, the hydraulic oil flow rate
varies depending on the tilt angle of the switch.
Right-hand control:
The flow rate through the right-hand port (male) varies.
Left-hand control:
The flow rate through the left-hand port (female) varies.
BAUX Hold Switch
Press the right or left hold switch to maximize the flow
rate.
(1) AUX hold switch (Right)
(2) AUX hold switch (Left)
BAUX Electrical Control Switch (Option)
With the AUX port switch unlocked, this switch serves to
feed electrical power to attachments.
(1) AUX port variable switch
(1) AUX electrical control switch (Right)
(2) AUX electrical control switch (Left)
A The 14-pin coupler (option) is required for this
function.
Page 35
11CHECKS BEFORE START
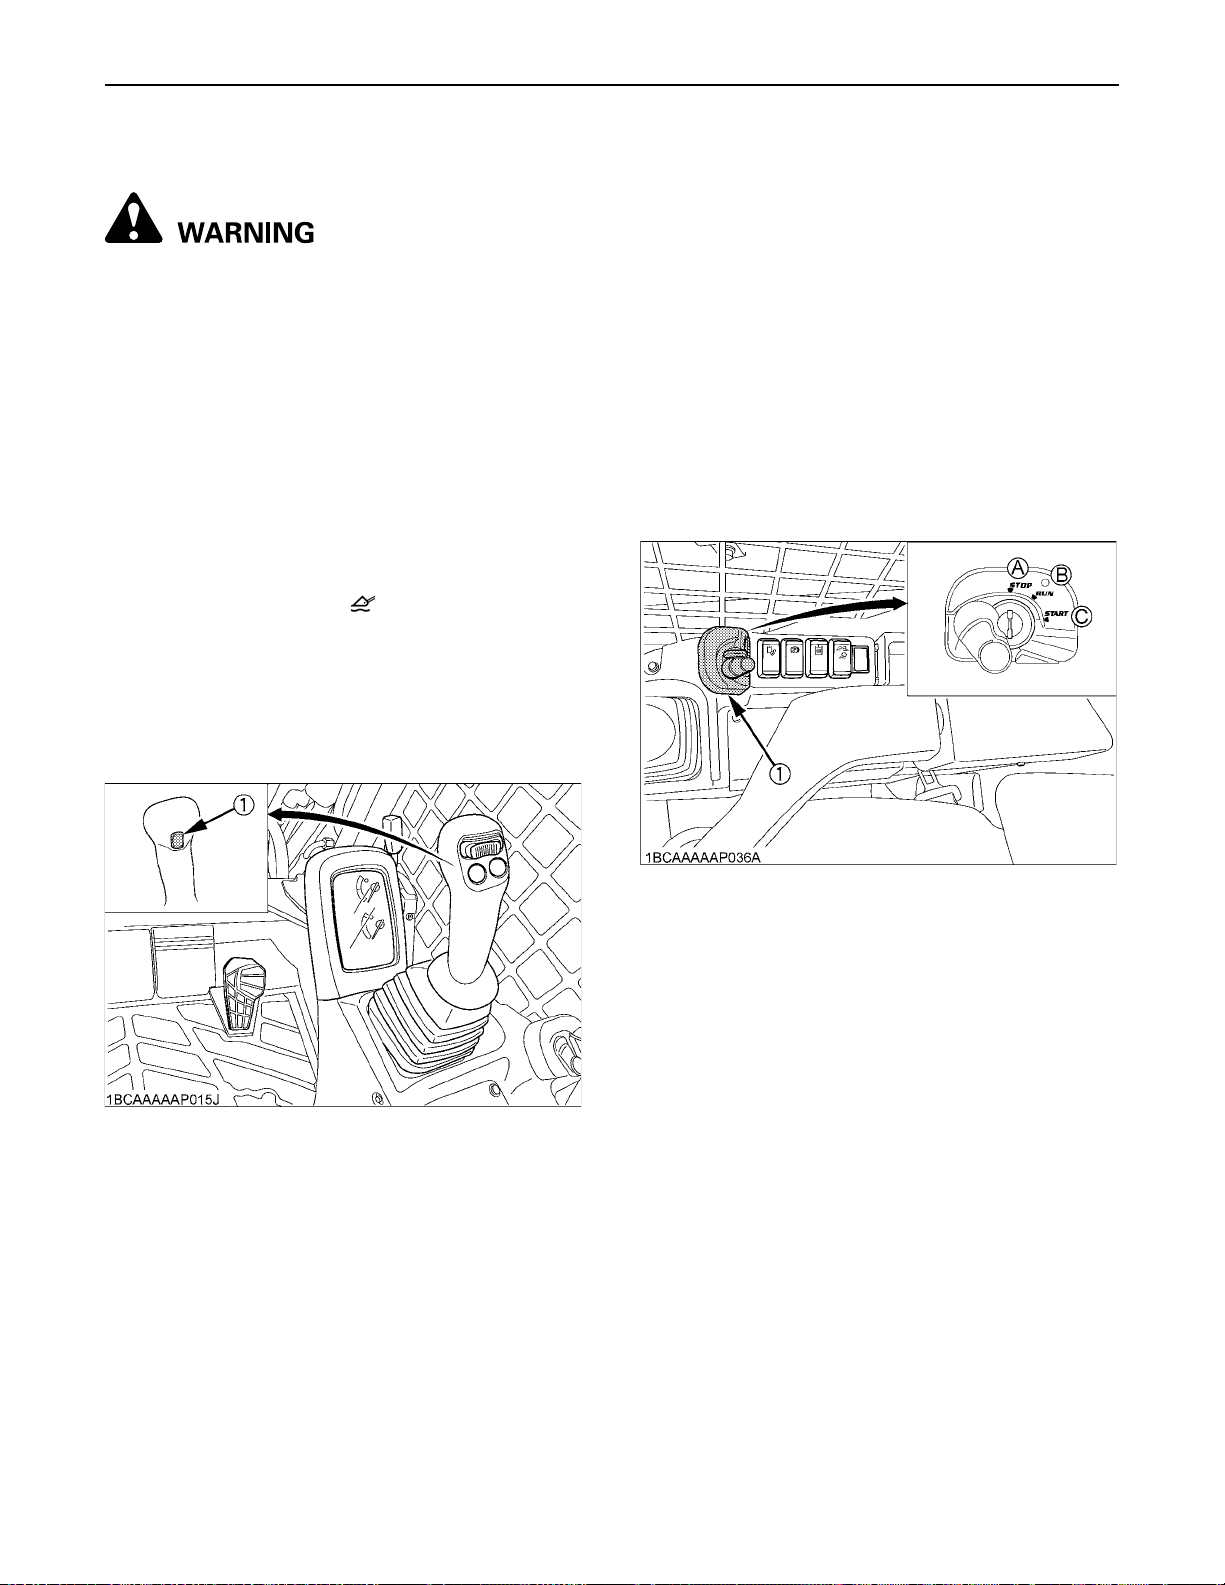
BFloat Switch
To avoid personal injury or death:
A Make sure the bucket is lowered to the ground
before putting the lift arms in the "FLOAT"
position. Putting the lift arms in the "FLOAT"
position while they are off the ground will
cause the bucket and lift arms to fall and is
extremely dangerous.
A Do not drive the machine forward with the lift
arms in the "FLOAT" position.
C Entering the float mode
While moving down the arm (tilting the right control lever
forward), press the float switch on the right control lever
and release it no later than 1 second. The float mode is
then turned on.
While in the float mode, the " " mark on the instrument
panel stays on.
C Exiting the float mode
While the machine is in the float mode,
(1) Press the float switch on the right control lever.
(2) Or move up the arm (pulling the right control lever
backward).
BStarter Switch
A [STOP]
The key can be inserted at the "STOP" position.
A [RUN]
Turn the key one click from the "STOP" position to the
"RUN" position. All the circuitry gets energized to start
preheating. The glow indicator is displayed.
To check for any lamp breakage, however, the lamp
lights up and stays on for about 1 second.
A [START]
Turn the key from the "RUN" position another click to
the "START" position. The starter motor is then
activated to get the engine started.
Release your hand from the key, and the key returns
itself to the "RUN" position. In other words, once the
engine has started, be sure to free the key.
(1) Float switch
(1) Starter switch (A) "STOP"
(B) "RUN"
(C) "START"
Page 36
CHECKS BEFORE START12
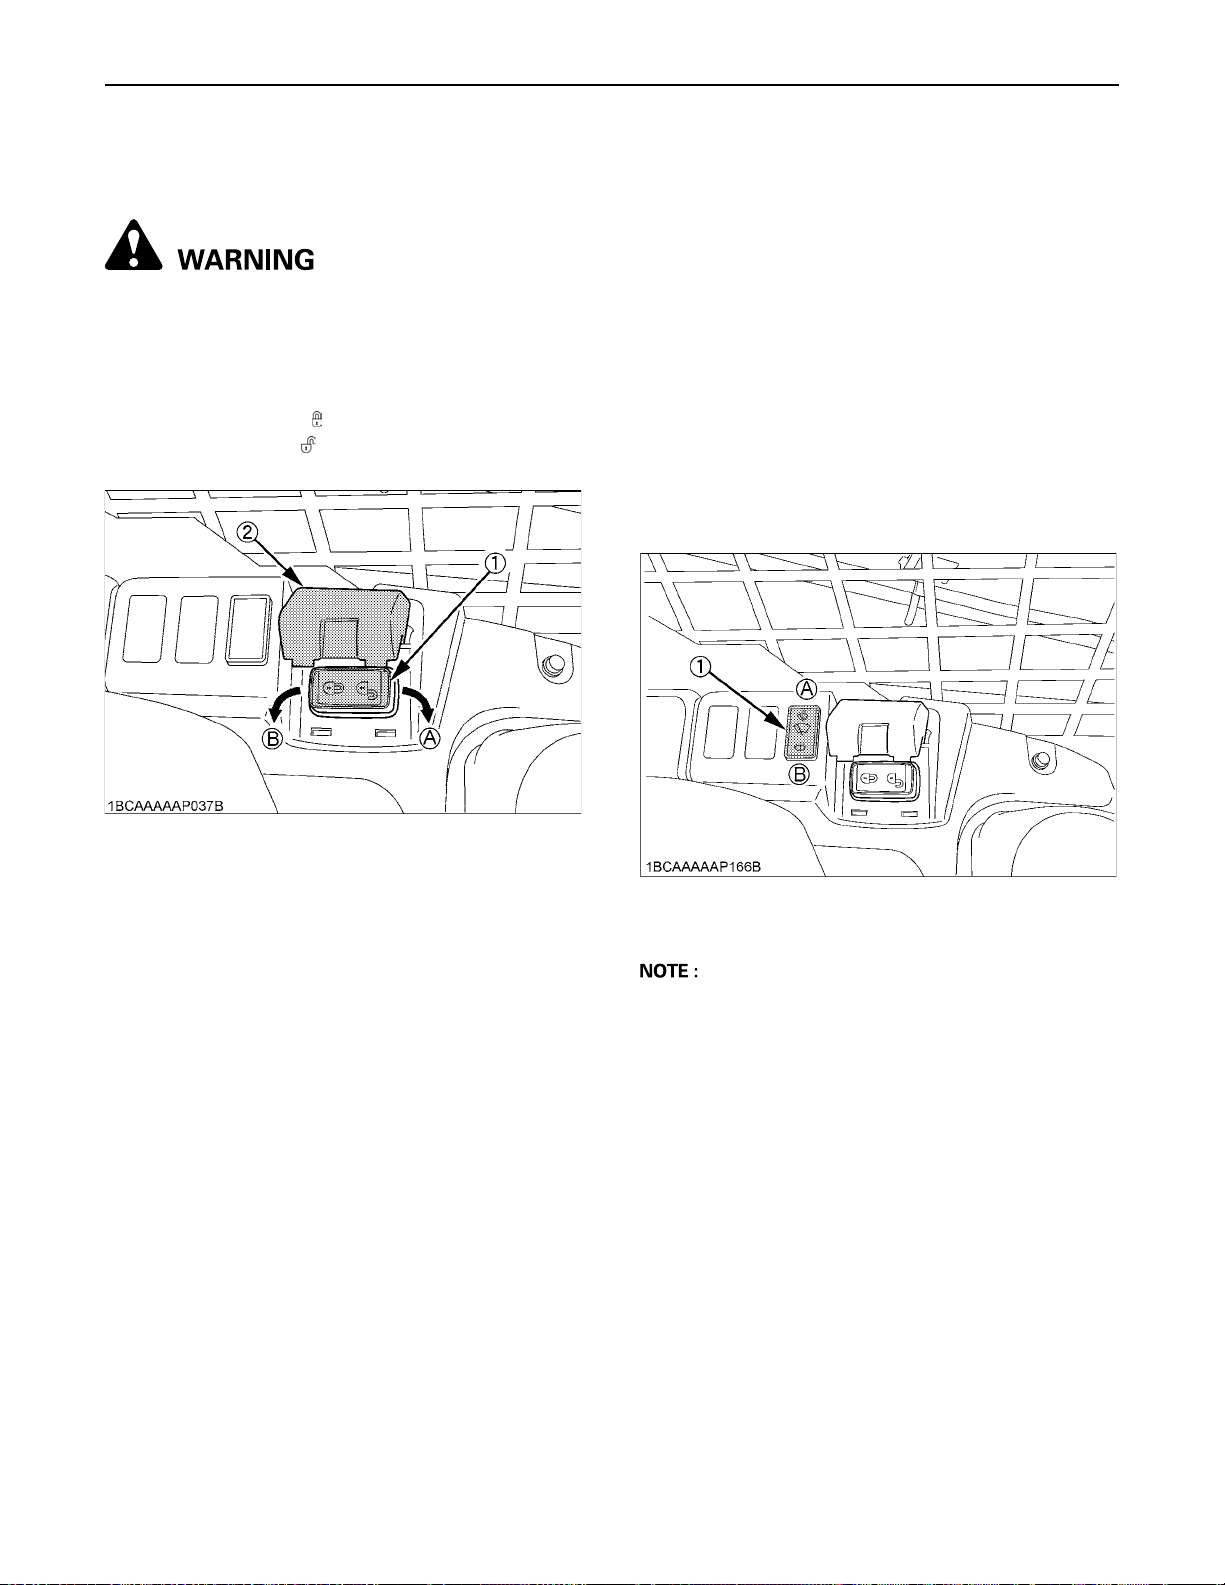
BHydraulic Quick Switch (Hydraulic Quick-
Hitch model only)
To avoid personal injury or death:
A Make sure to close the cover when not
activating the hydraulic quick-hitch.
The switch is used to attach and detach an attachment by
activating the hydraulic quick-hitch.
Move the switch to the " " (LOCK) mark to get the hitch
locked. Move it to the " " (UNLOCK) marked position to
unlock the hitch and detach the bucket, for example.
BWiper/Washer Switch (Closed cab model)
To start the wiper, move the switch to the "A" position
when the starter key is in "RUN" position. A further push
on side "A" of the switch will also activate the washer
system.
Move the switch to the "B" position to spray cleaning fluid
to the pane.
A Do not activate the washer switch (B) if the tank for the
cleaning fluid is empty; the pump can be damaged.
A Do not activate the wiper switch (A) if the window is
dry. In this case, make sure that cleaning fluid is
applied to the pane before activating the wiper.
A In freezing conditions, make sure that the wiper blade
is not frozen to the glass before switching-on. The
motor can be damaged if the wiper system is used
under such conditions.
(1) Hydraulic quick-hitch switch
(2) Cover
(A) "UNLOCK" position
(B) "LOCK" position
(1) Wiper / Washer switch (A) "Wiper"
(B) "Washer"
A Wiper and washer are operable only during engine
operation.
Page 37
13CHECKS BEFORE START
CHECKING THE LAMPS AND INDICATORS
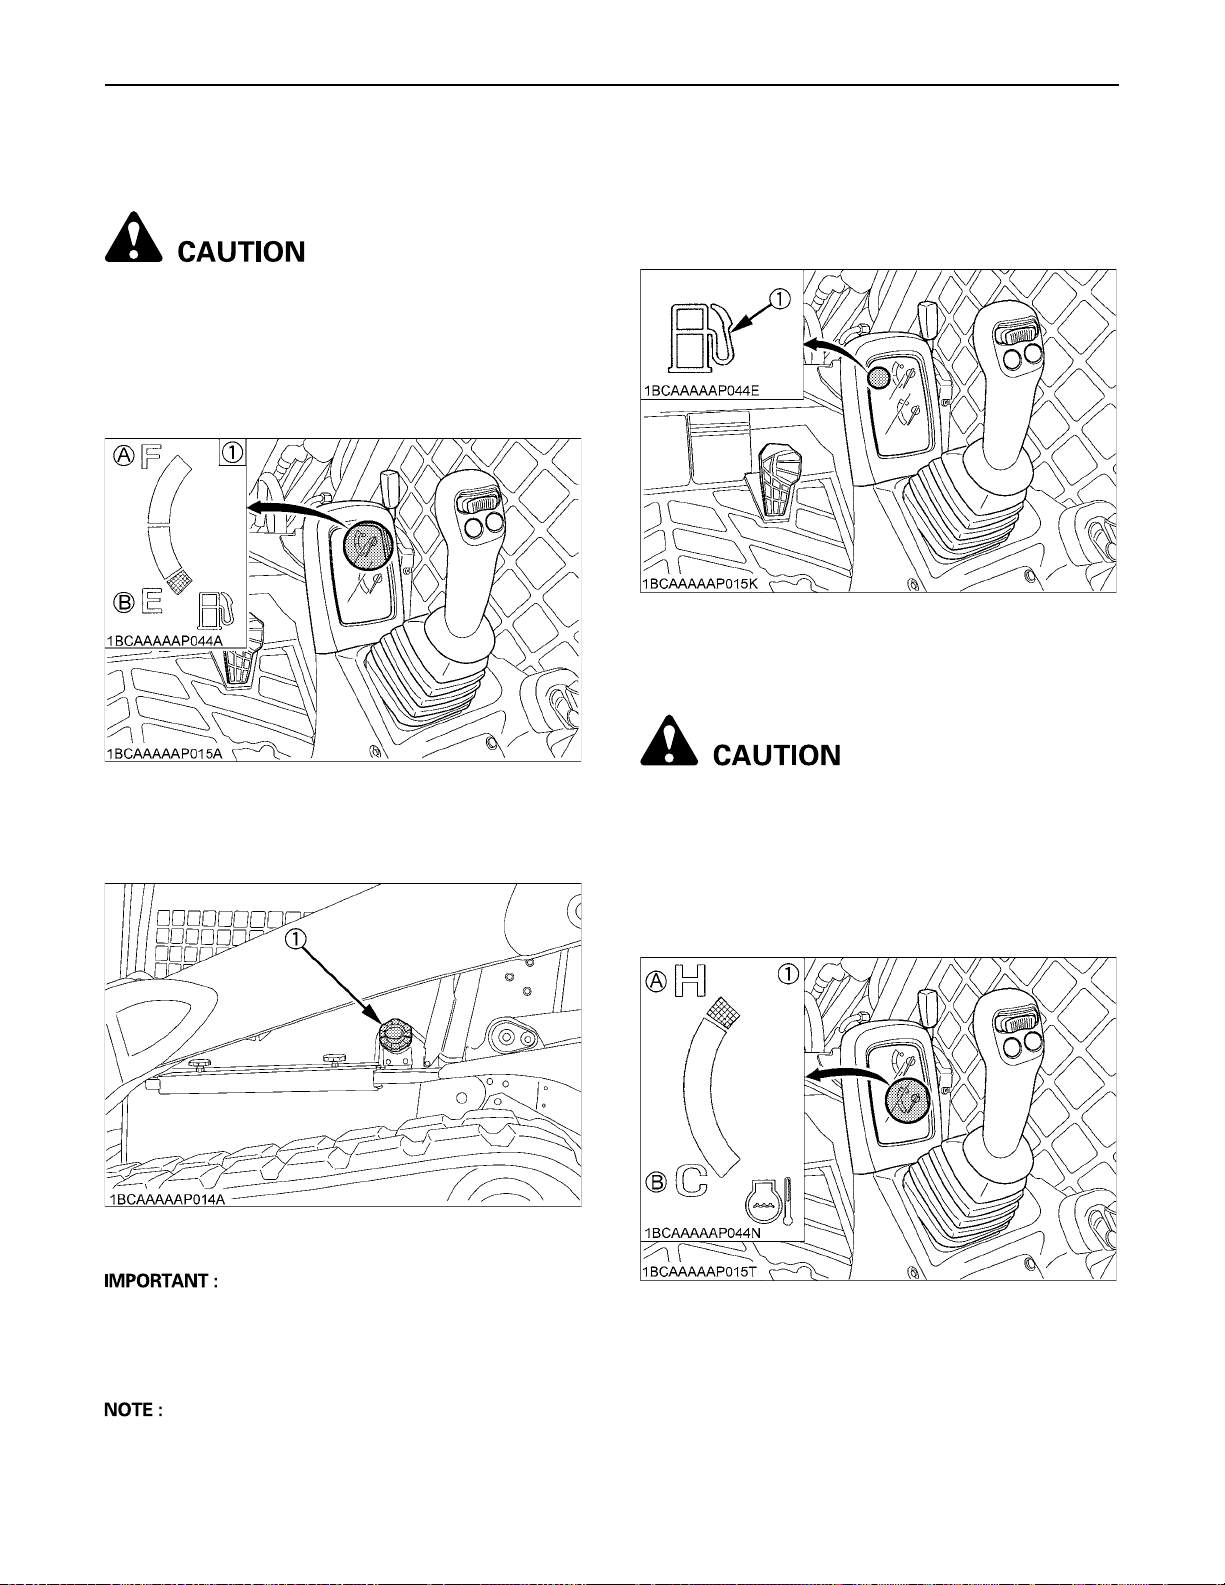
BFuel Gauge Indicator
To avoid personal injury:
A Before adding fuel, be sure to stop the engine.
A Be sure to keep open flame away from the
machine. Otherwise a fire may result.
With the starter key at the "RUN" position, the fuel
remaining in the fuel tank is indicated in the indicator.
BRemaining Fuel Warning Lamp
If the fuel in the tank goes below the prescribed level, the
warning lamp will flash.
If this should happen during operation, refuel as soon as
possible.
(1) Remaining fuel warning lamp
BCoolant Temperature Gauge
(1) Fuel gauge indicator (A) "FULL"
(B) "EMPTY"
If the fuel runs short, open the cap and refuel the tank.
(1) Cap
A If the fuel gauge indicator is near the "E", add fuel as
soon as possible. If the indicator is near "E" and the
machine runs on a slope, the engine may run out of
fuel and get interrupted.
To avoid personal injury:
A Do not open the radiator cap during or just after
operation. Hot water may gush out and scald
you. Wait for the water to cool down before
opening the cap.
With the starter key at the "RUN" position, the coolant
temperature is indicated.
(1) Coolant temperature gauge (A) "HOT"
(B) "COOL"
A To open the fuel cap, keep the starter key inserted.
Page 38
CHECKS BEFORE START14
If engine coolant rises above a specified temperature
level, the indicator starts blinking and the buzzer starts
beeping every 6 minutes for advance warning. If the
coolant temperature further rises to the critical level, the
blinking intervals become shorter and the buzzer keeps
on beeping.
When the coolant temperature has dropped below
specified temperature level or the starter key has been
moved to the "STOP" position, the warning will cease.
If the coolant temperature gauge is near "H", take the
steps below.
1. Discontinue the job.
2. Reduce engine rpm's to idle and keep it at idle for 5
minutes.
3. Stop the engine and check the following points (1)-(4).
(1) Low coolant level or leak
(2) V-belt tension
(3) Mud, dust or chaff deposits blocking the radiator
or screen
(4) Hydraulic oil leak
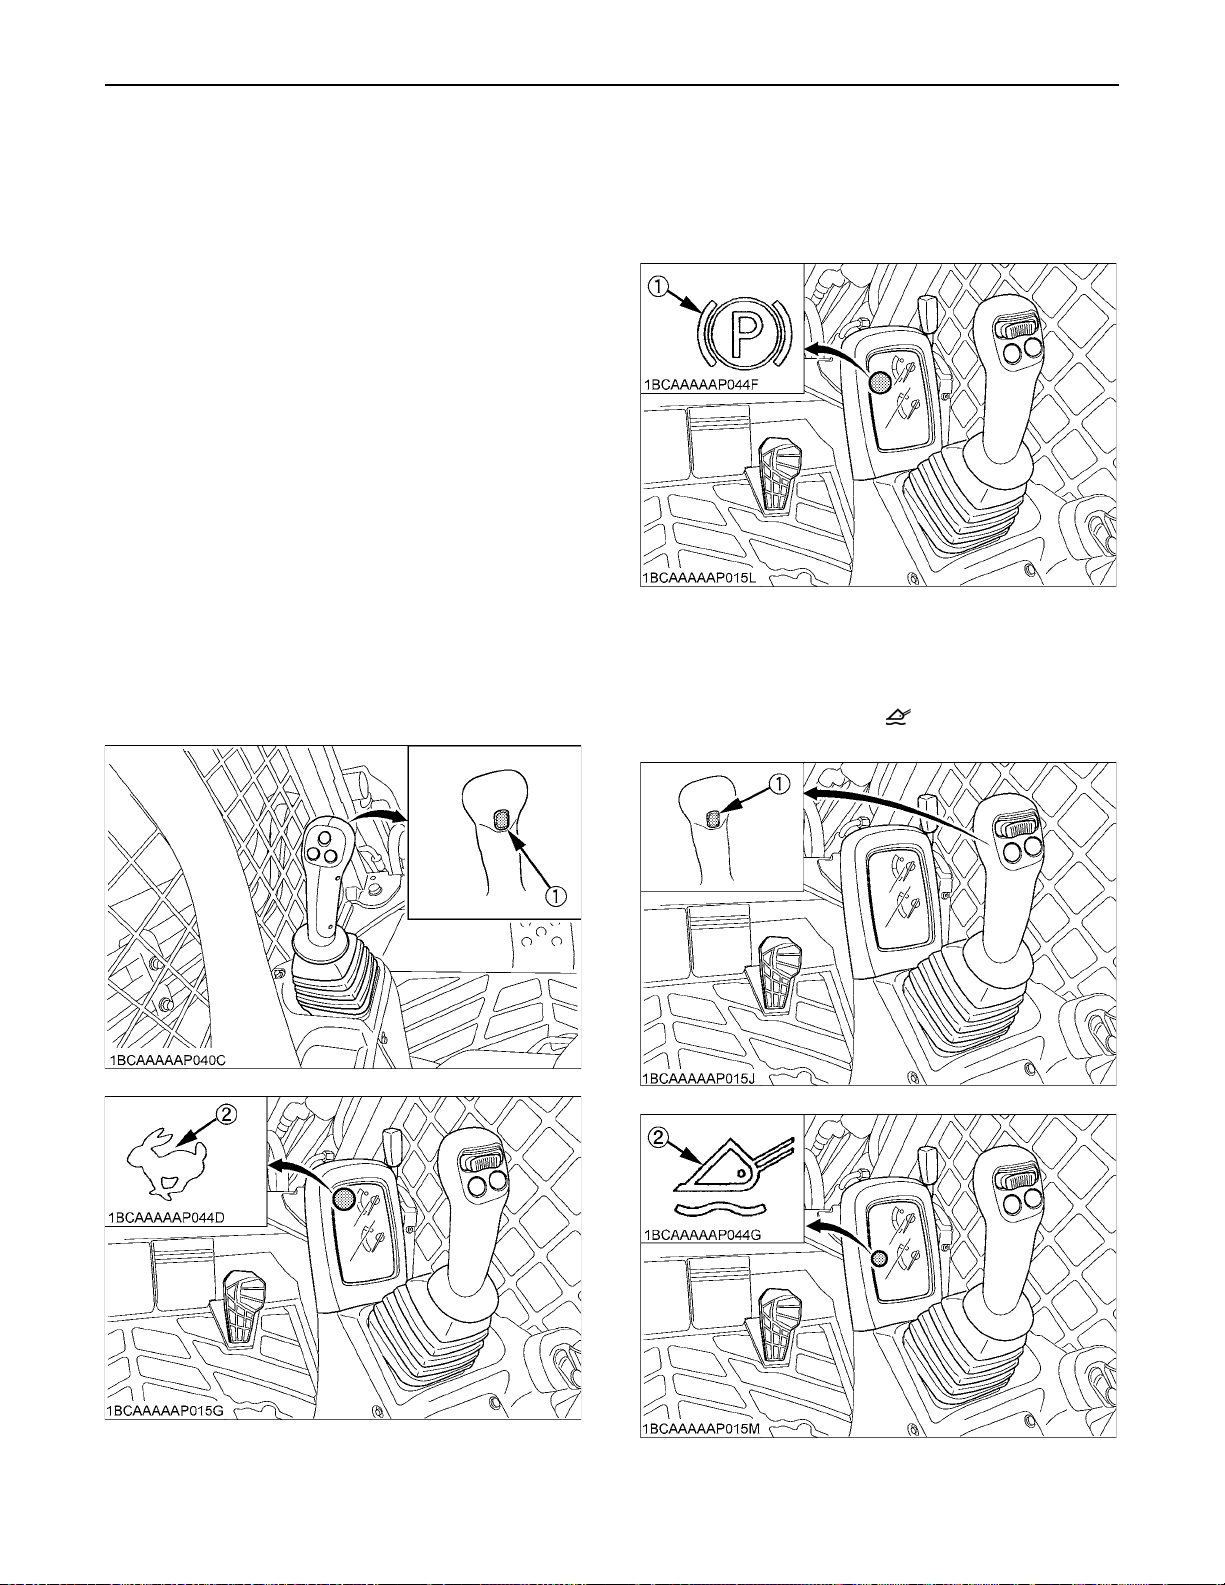
BParking Lamp
When the parking brake switch is turned on, the parking
lamp on the instrument panel turns on. (See page 8.)
(1) Parking lamp
BSpeed Indicator Lamp
This lights up and stays on when the travel speed switch
is activated to the high speed.
BFloating Lamp
While in the float mode, the " " mark on the instrument
panel stays on.
(1) Travel speed switch
(2) Speed indicator lamp
(1) Float switch
(2) Floating lamp
Page 39
15CHECKS BEFORE START
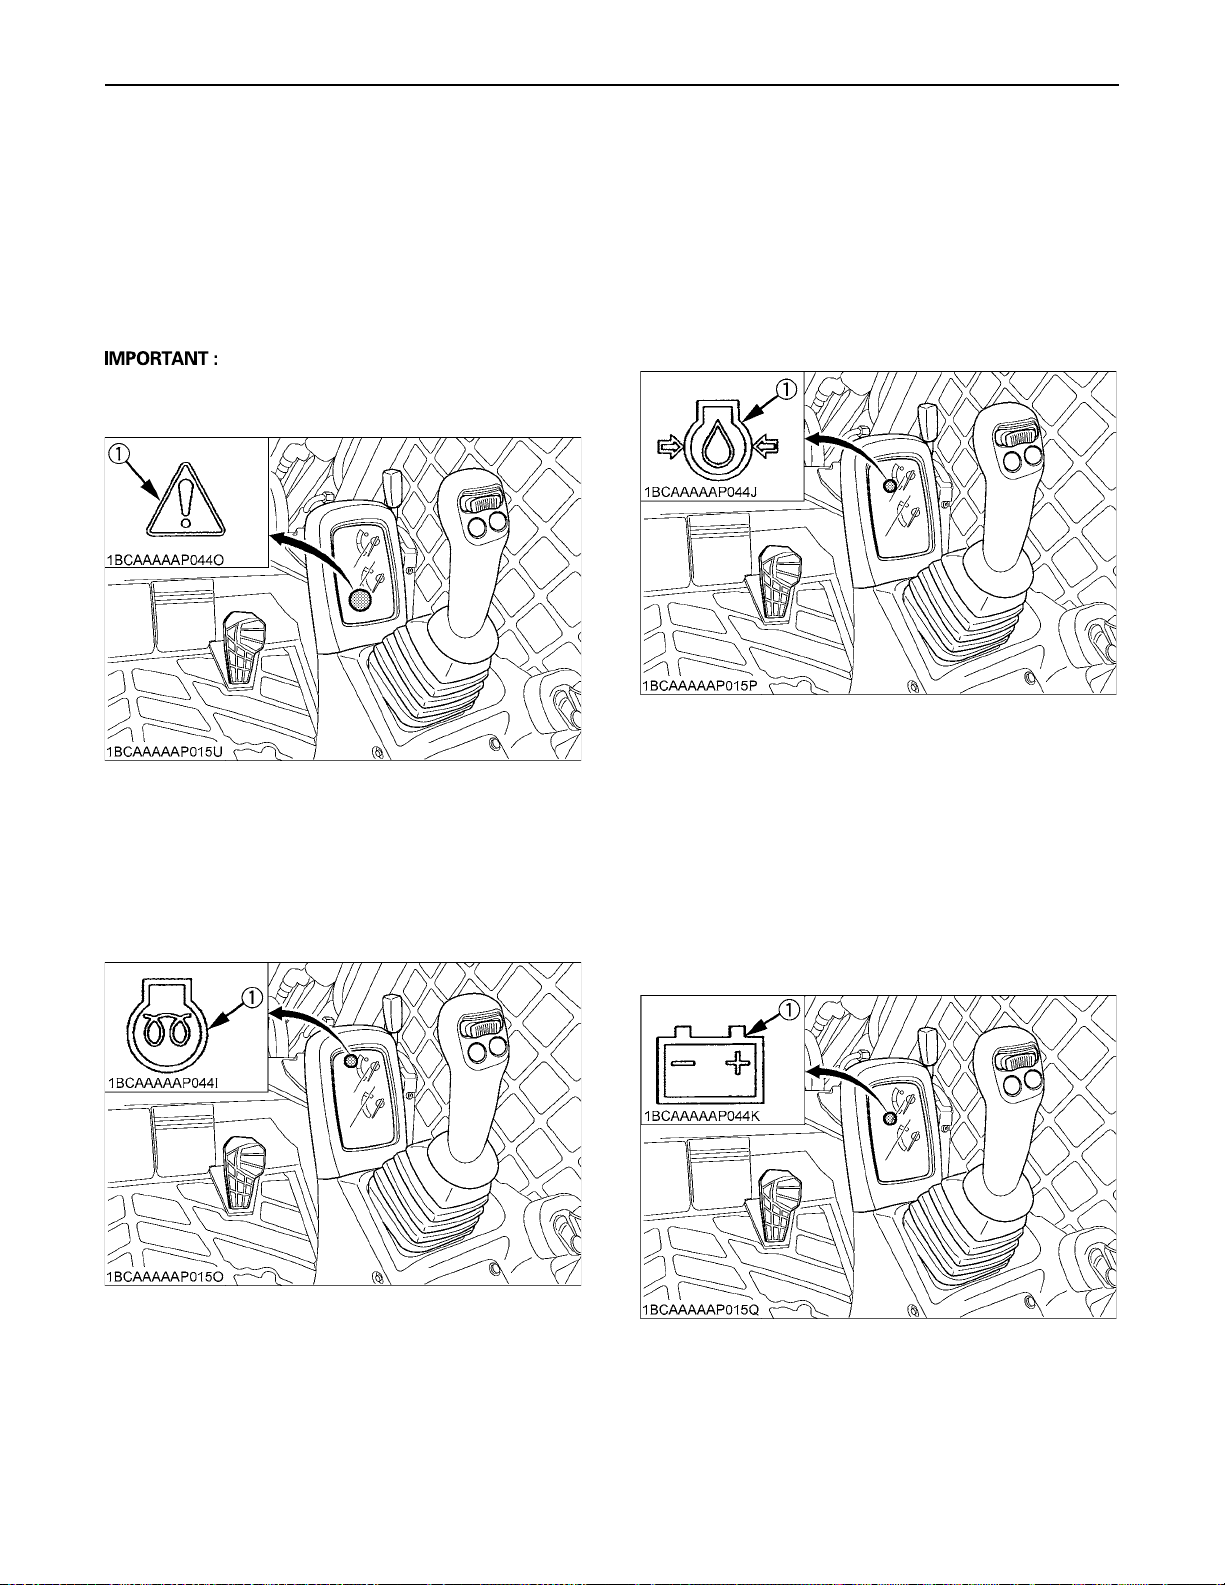
BWarning Lamp
The warning lamp is used to indicate broken wire, shortcircuit and other problems.
The lamp lights up to warn you of a detection of broken or
short-circuited hydraulic lock/unlock solenoid, AUX port
variable switch and other elements.
A If the warning lamp lights up, consult your local
KUBOTA dealer immediately.
BEngine Oil Pressure Warning Lamp
The engine oil pressure warning lamp lights up due to
failure of the lubricating system with the engine running.
When the starter key is turned in "RUN" position with the
engine off, this lamp lights up and when the engine starts,
the lamp goes out.
If the lamp stays on with the engine running, stop the
engine and check the engine oil level.
(1) Engine oil pressure lamp
(1) Warning lamp
BGlow Lamp
The glow lamp is displayed when the starter key is turned
to the "RUN" position but the engine requires preheating.
Wait until the indicator goes out, and then start the engine.
(1) Glow lamp
BBattery Charge Lamp
This battery charge lamp lights up if the charging system
fails the engine running.
When the starter key is turned in "RUN" position with the
engine off, the lamp lights up and when the engine starts,
the lamp goes out.
If the lamp stays on with the engine running, stop the
engine and check the V-belt.
(1) Battery charge lamp
Page 40
CHECKS BEFORE START16
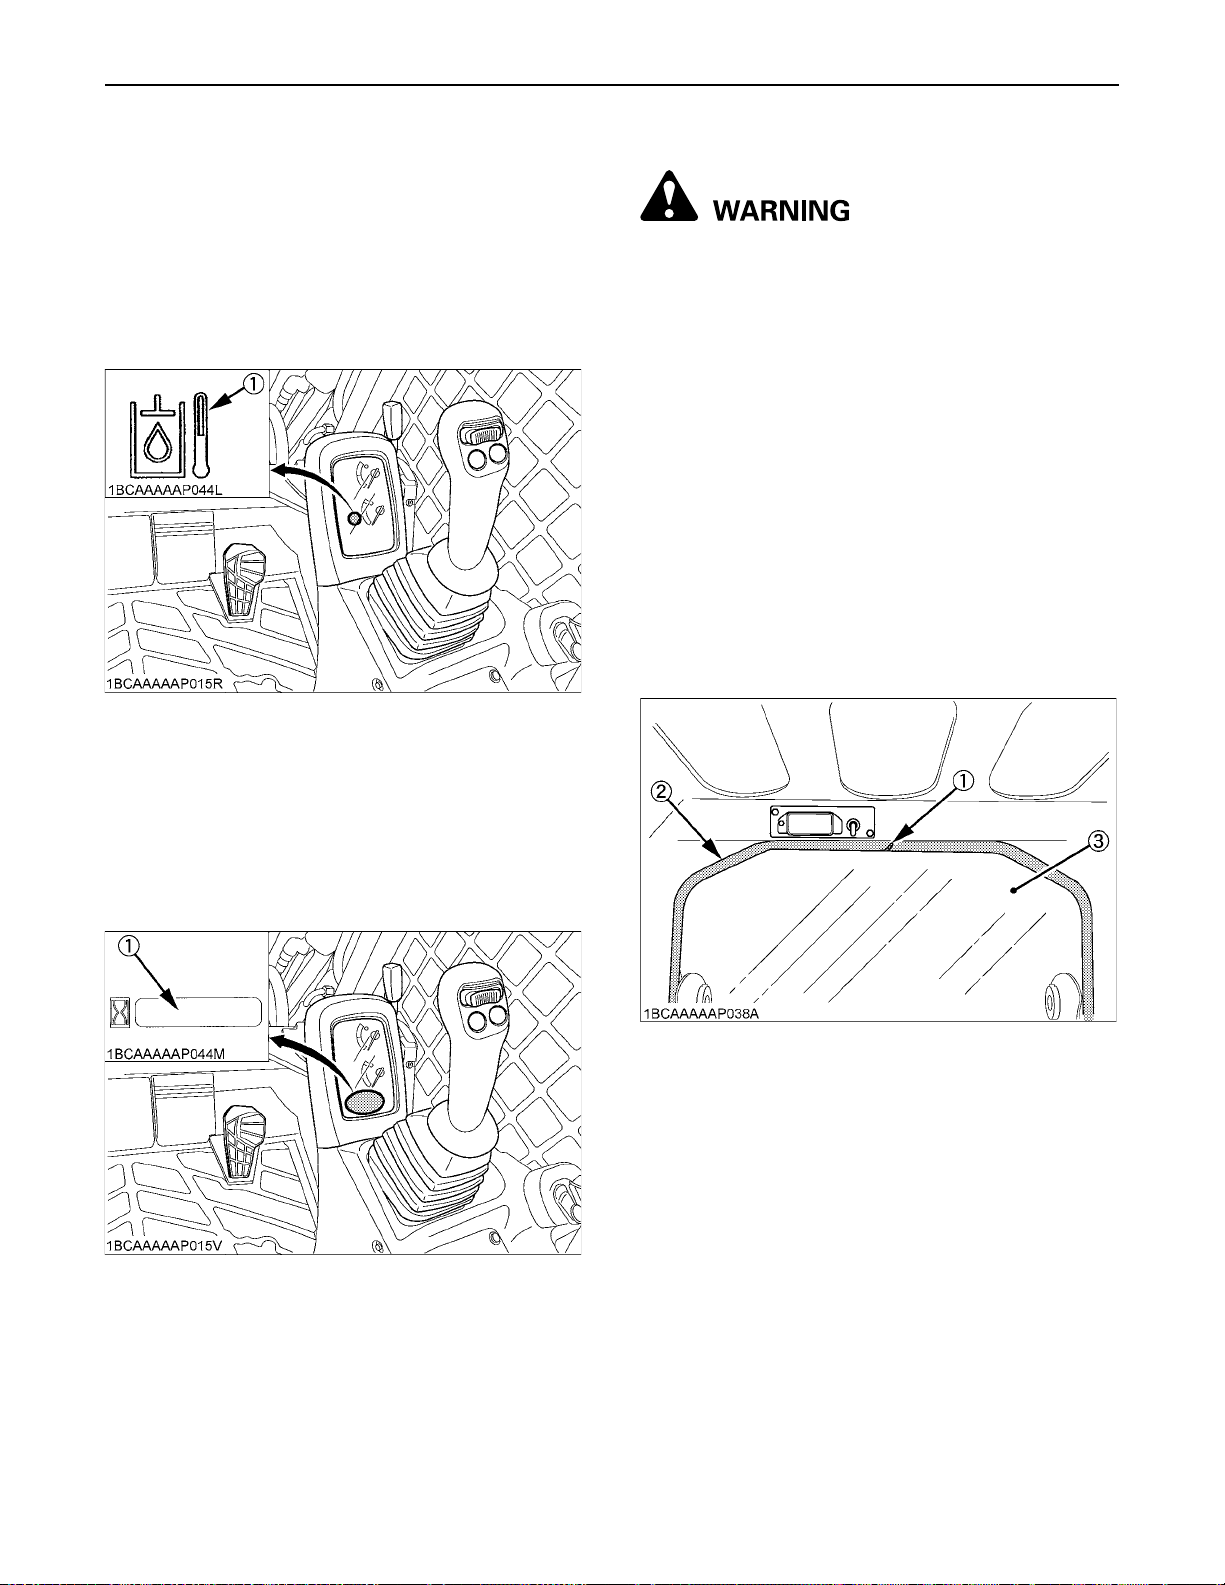
BHydraulic Oil Temperature Gauge
The lamp starts blinking and the buzzer starts beeping if
the hydraulic oil temperature has reached a specified
level.
When the oil temperature has dropped below the
specified level or the starter key is turned off, the warning
will cease.
Stop the engine and check for an unspecified level in the
hydraulic oil tank and for a hydraulic oil leak.
(1) Hydraulic oil temperature warning lamp
CHECKING THE SAFETY DEVICES
To avoid personal injury or death:
A Place the machine on a firm, flat and level
surface.
A Before starting the engine, make sure that no
one is near the machine.
BEmergency Exit
If you should become trapped in the cab, you can remove
the rear window to get out.
1. The rear window in the machine serves as the primary
alternate exit.
2. The window will need to be removed in order to use
the primary alternate exit.
3. Pull on the ring at the top of the window in order to
remove the window.
4. The ring will remove the seal that holds the window in
place.
5. When the seal is taken out, remove the window and
exit the cab.
BHour-Meter
Indicates the total operating hours of the machine.
How the indicator works
A The meter advances one hour after an hour of
operation regardless of the engine rpm.
(1) Hour-meter
(1) Ring
(2) Seal
(3) Window
Page 41
17CHECKS BEFORE START
BArmrests Function
1. Sit in the operator's seat.
2. Fasten the seat belt.
3. Start the engine.
4. Push down both the armrests.
5. Push on the hydraulic unlock switch and make sure
that the hydraulic lock lamp on the instrument panel
goes out.
6. Move the right control (front operating) lever slowly
and make sure that the lift arms and bucket move
slowly.
7. Raise the left armrest. Make sure that the hydraulic
lock lamp on the instrument panel lights up.
8. Move the right control (front operating) lever and make
sure that the lift arms and bucket do not get activated.
9. Push down the left armrest.
10.Push on the hydraulic unlock switch and make sure
that the hydraulic lock lamp on the instrument panel
goes out.
11.Raise the right armrest. Make sure that the hydraulic
lock lamp on the instrument panel lights up.
12.Move the right control (front operating) lever and make
sure that the lift arms and bucket do not get activated.
BOPC Function
BForced Lift Arms Lowering Device
1. Start the engine.
2. Move the right control (front operating) lever until the
lift arms come up to your eye level.
3. Stop the engine.
4. Slide the operator's seat all the way backward.
5. Remove the rubber cap.
6. Push the lever to make sure that the lift arms descend.
7. Release the lever to make sure that the lift arms stop
descending.
8. Place the rubber cap back to its original position.
To avoid personal injury or death :
A While checking the OPC function, you start the
engine without wearing the seat belt. After
making sure that the OPC function gets
activated as specified, be sure to fasten the
seat belt and operate the machine.
Make sure that the armrests function as specified, and
then check the OPC function.
1. Sit in the operator's seat.
2. Start the engine.
3. Push down both the armrests.
4. Push on the hydraulic unlock switch and make sure
that the hydraulic lock lamp on the instrument panel
goes out.
5. With the armrests kept down, get off the operator's
seat and make sure that the hydraulic lock lamp on the
instrument panel lights up in 3 seconds. During this
action, be careful not to touch the right control (front
operating) lever and the left control (travel operating)
lever.
(1) Rubber cap
(2) Lever
(A) "PUSH"
Page 42
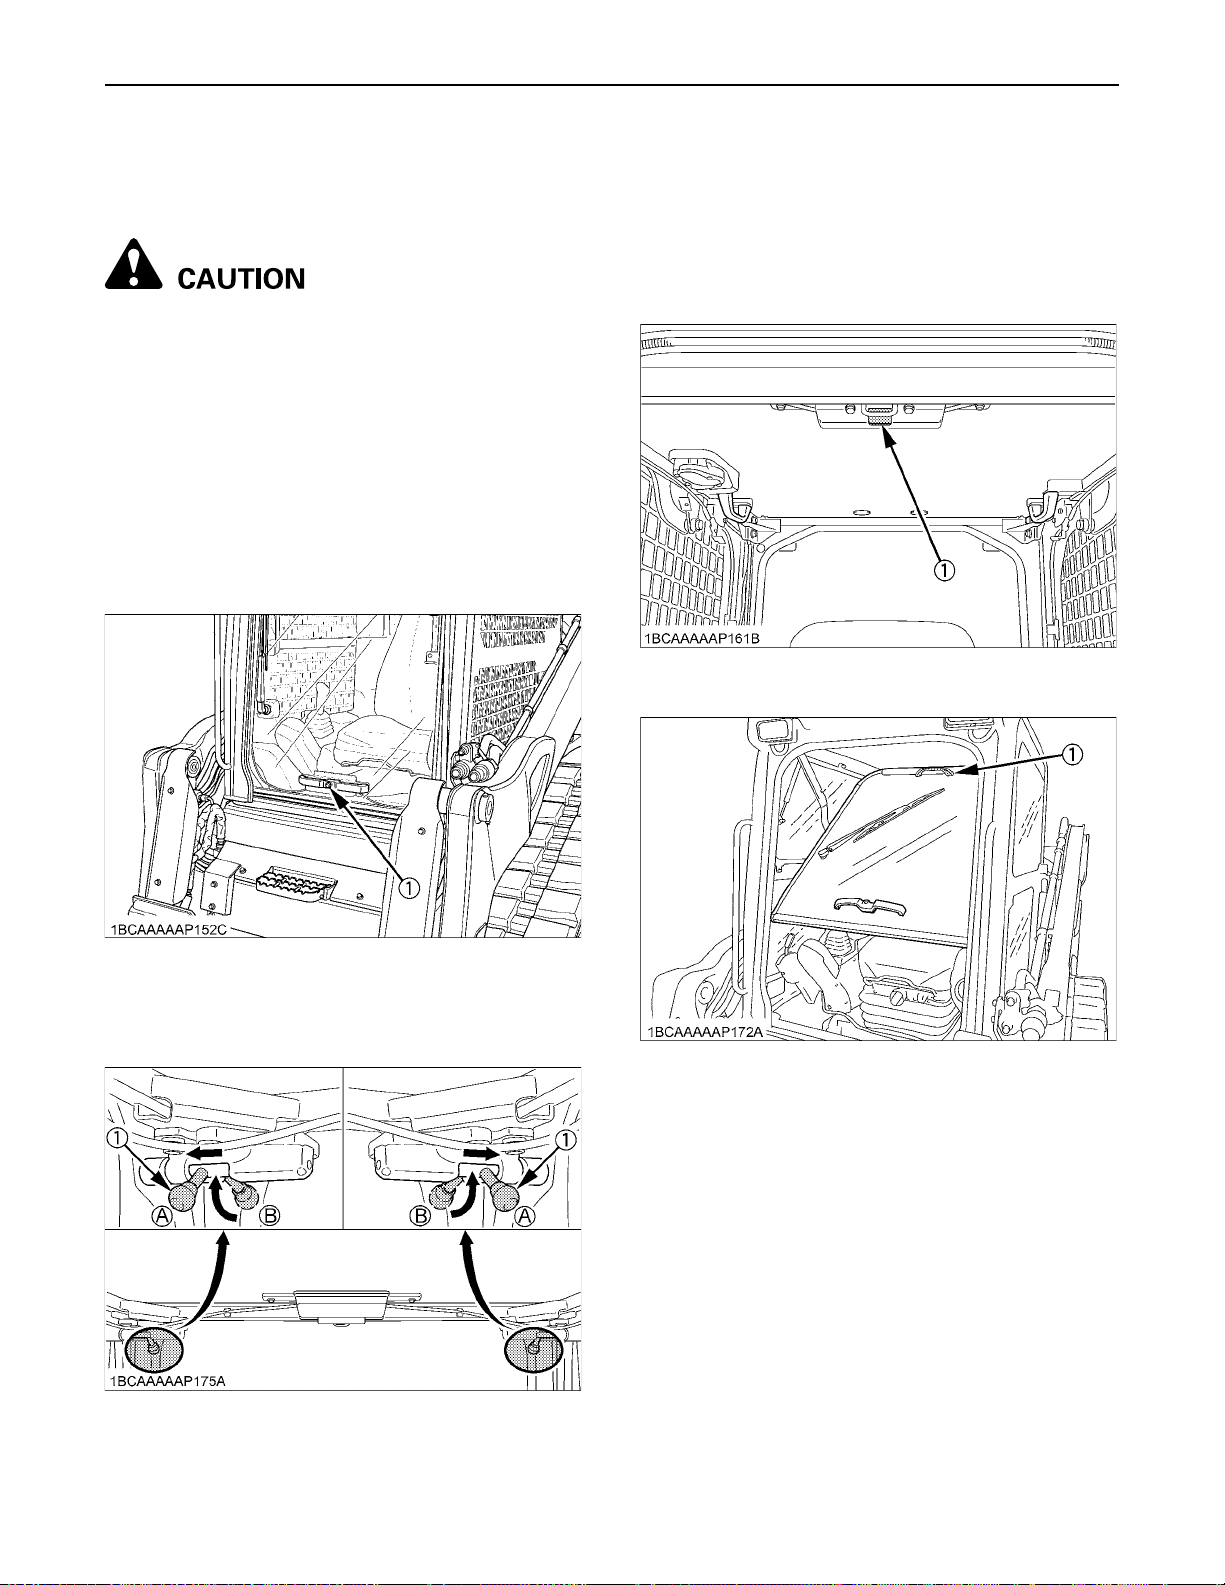
CHECKS BEFORE START18
DOOR AND WINDOWS
BOpening/Closing of Cab Door (Closed cab
model)
To avoid personal injury:
A Keep hands and feet away from the area
between cab door and cab frame. Otherwise
the operator risks serious injuries by pinching
or crushing.
A Other persons should stay away when opening
the cab door.
C To open the cab door from outside, follow the
steps below.
1. Unlock the cab door and push the button. The cab
door will open upward.
2. Push the cab door all the way up until it locks to the top
of the cab.
C To close the cab door from outside, follow the
steps below.
1. Before closing, unlock in place by moving both lock
pins to inside.
2. Push the lock lever at the bottom of the cab door and
slowly lower the cab door half way.
3. Grasp the top handle and pull it toward yourself to
latch the cab door.
(1) Lock lever (bottom)
(1) Button
3. After opening, lock in place by moving both lock pins
to outside to prevent door from inadvertently falling.
(1) Lock pin (A) "LOCK"
(B) "UNLOCK"
(1) Top handle
4. When leaving the machine, always lock the cab door.
Page 43
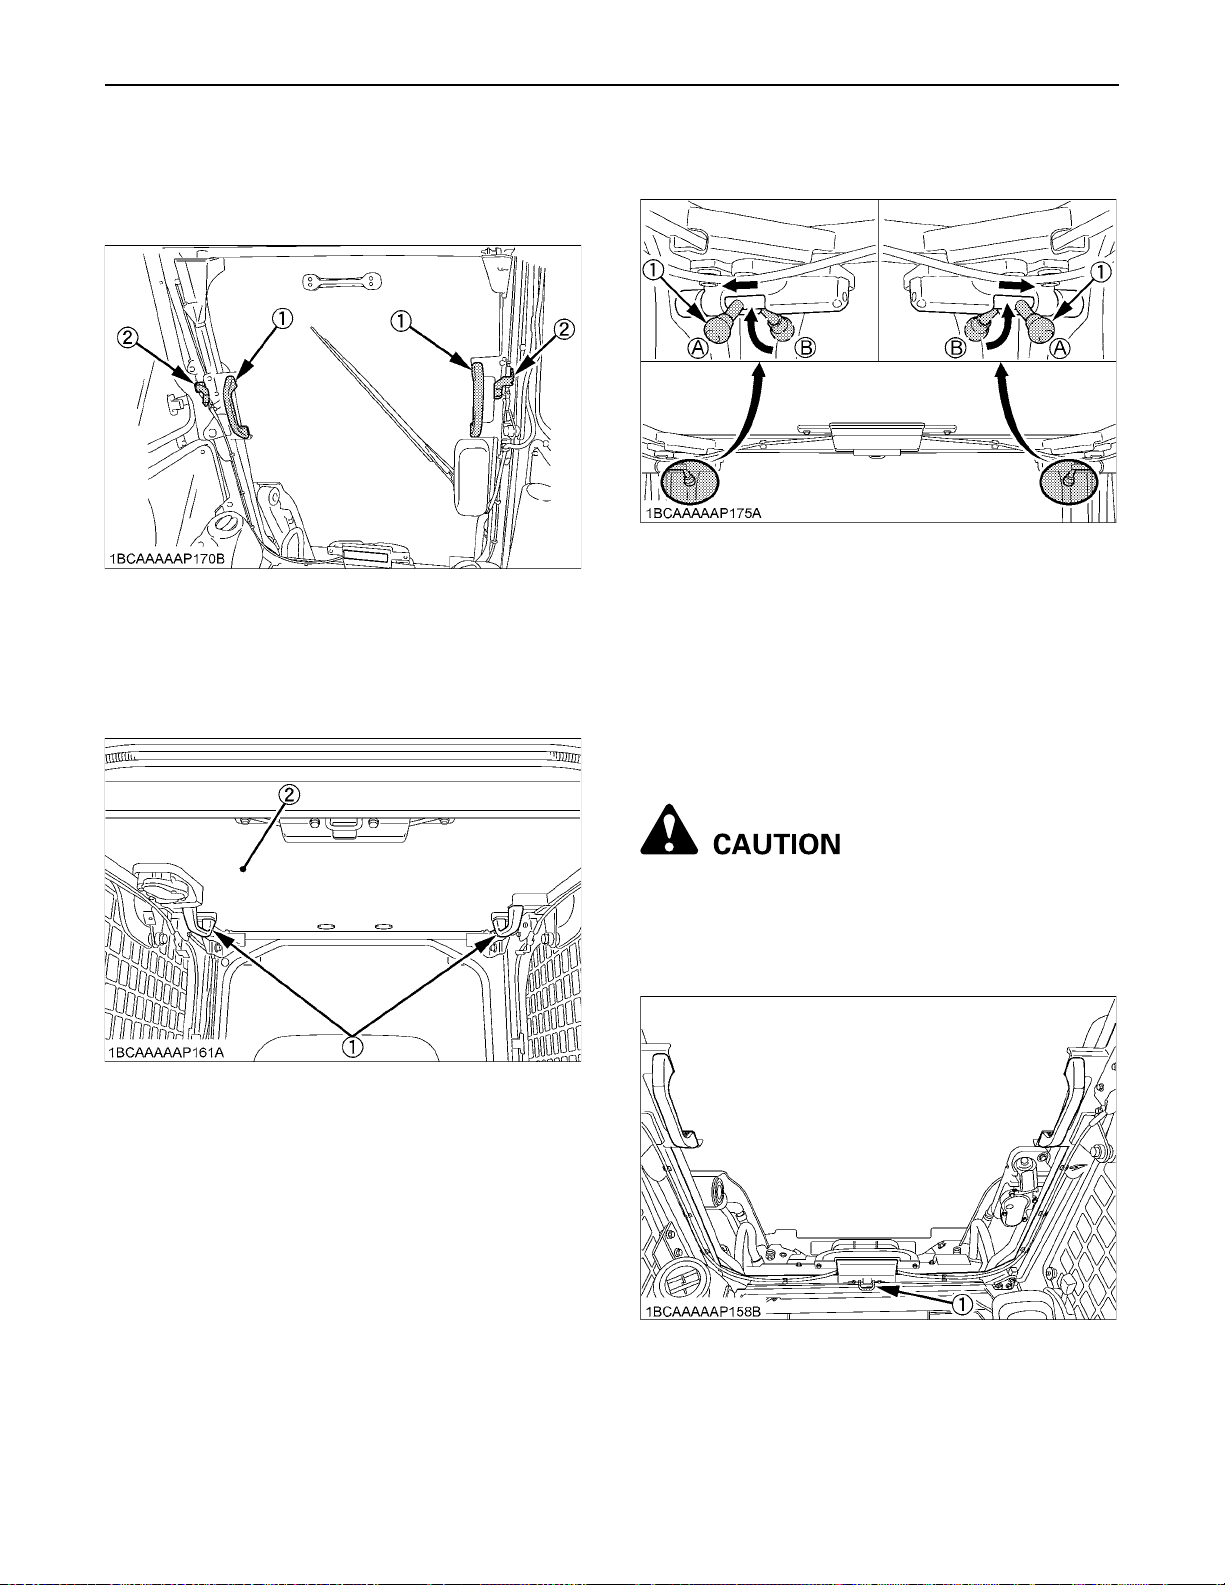
19CHECKS BEFORE START
C To open the cab door from inside, follow the steps
below.
1. Hold the handles tightly with both hands and push the
lock levers beside the handles.
(1) Handle
(2) Lock lever
2. Pull the handles slightly upward and toward yourself to
let the cab door slide inward.
3. Pull the cab door all the way to the lock at the back of
cab.
4. After opening, lock in place by moving both lock pins
to outside to prevent door from inadvertently falling.
(1) Lock pin (A) "LOCK"
(B) "UNLOCK"
C To close the cab door from inside, follow the steps
below.
1. Before closing, unlock in place by moving both lock
pins to inside.
2. Hold the handles tightly with both hands. Push the lock
levers beside the handles.
3. Pull the handles down and forward to move the cab
door from the horizontal to the vertical position.
4. Push the cab door until it latches in the door opening.
(1) Handle
(2) Cab door
To avoid personal injury :
A Do not use the lock lever at the bottom of the
cab door from inside.
A Use caution and both hands to open/close the
cab door to avoid contact with your head.
(1) Lock lever (bottom)
Page 44
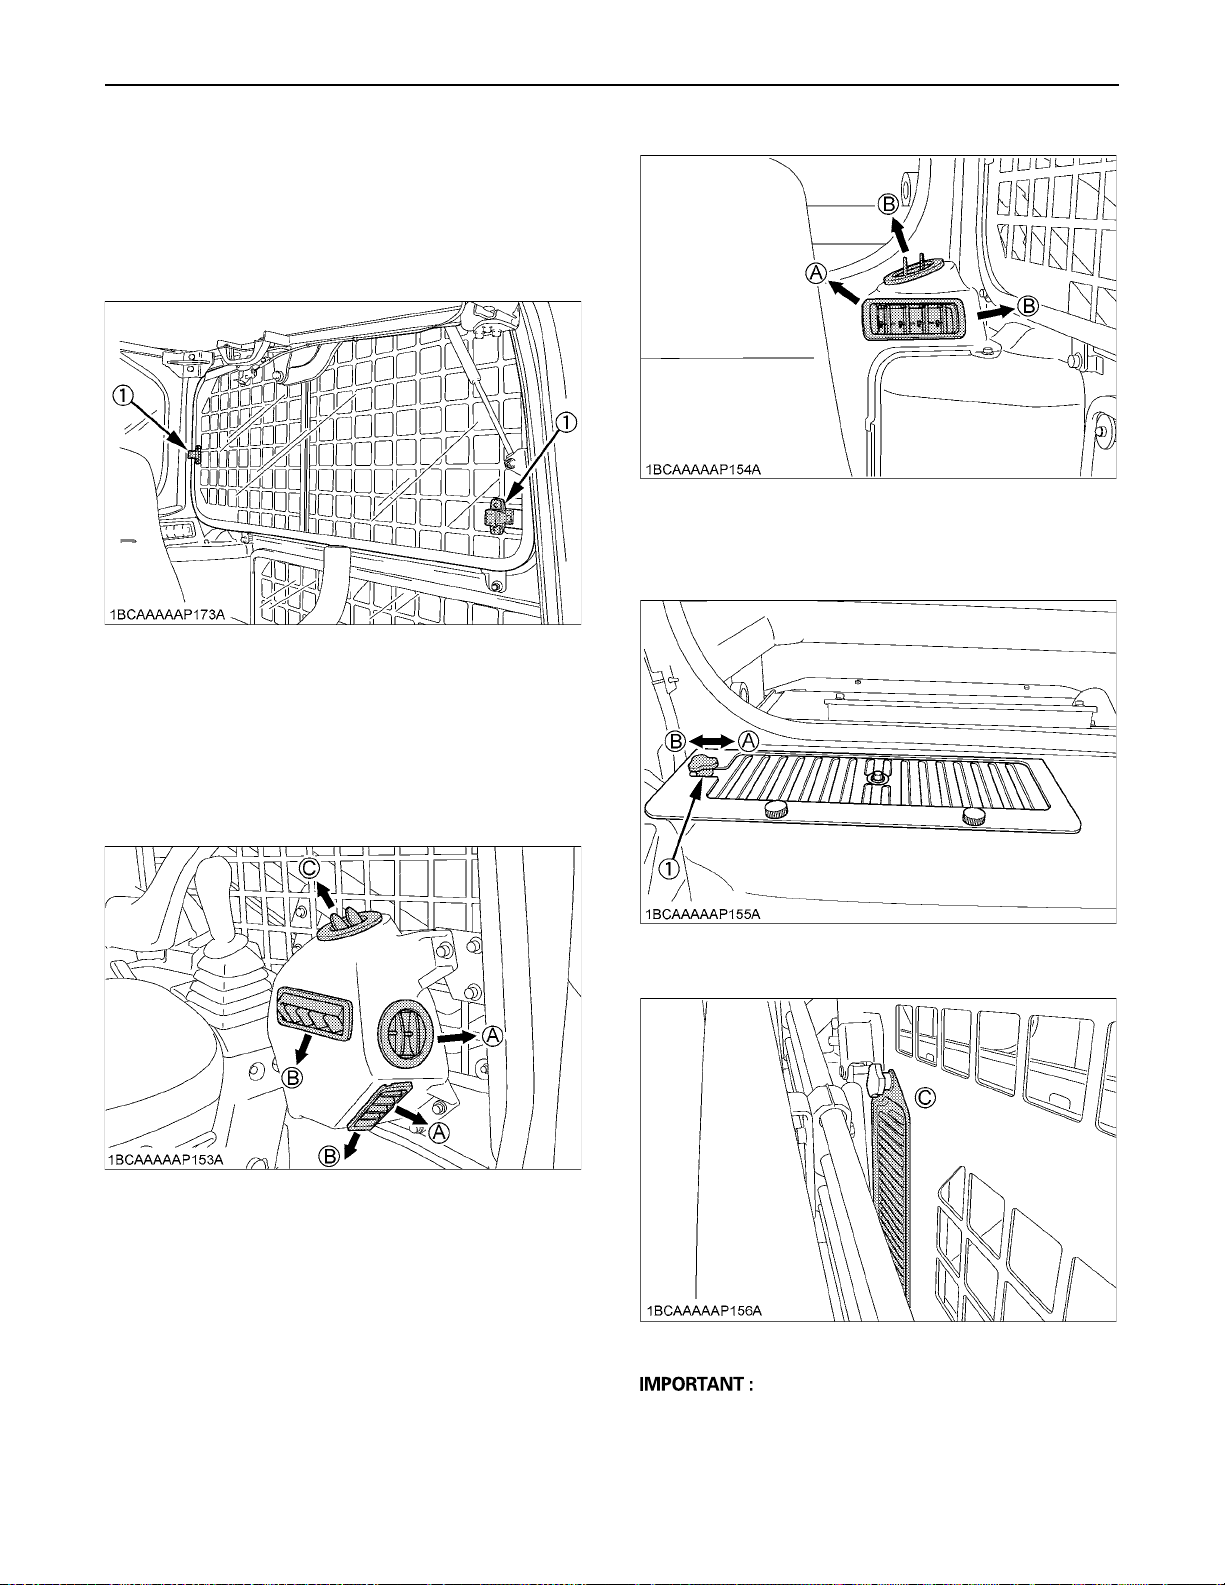
CHECKS BEFORE START20
BOpening/Closing of Side Cab Window
(Closed cab model)
1. Pull the grip to release the lock and pull side window
open to the rear or to the front.
2. To close the side window, slide it forward or backward
until the lock snaps in at the window frame.
(1) Grip
AIR-CONDITIONER
[Rear air outlet port (for cool air only)]
(A) "CHEST AREA"
(B) "WINDSHIELD"
Position the inlet selector knob to the desired position.
BAir Flow
Air flow in the cab and fresh air flow into the cab flow is
shown in the below figure. Adjust the six air outlet ports to
obtain the desired air flow.
[Front air outlet port]
(A) "WINDSHIELD"
(B) "FOOT AREA"
(C) "CHEST AREA"
(1) Inlet selector knob (A) "FRESH AIR INLET" position
(B) "INSIDE AIR RECIRCULATION" position
(C) "FRESH AIR INLET"
A Do not allow water to enter the fresh air inlet when
washing the machine.
Page 45
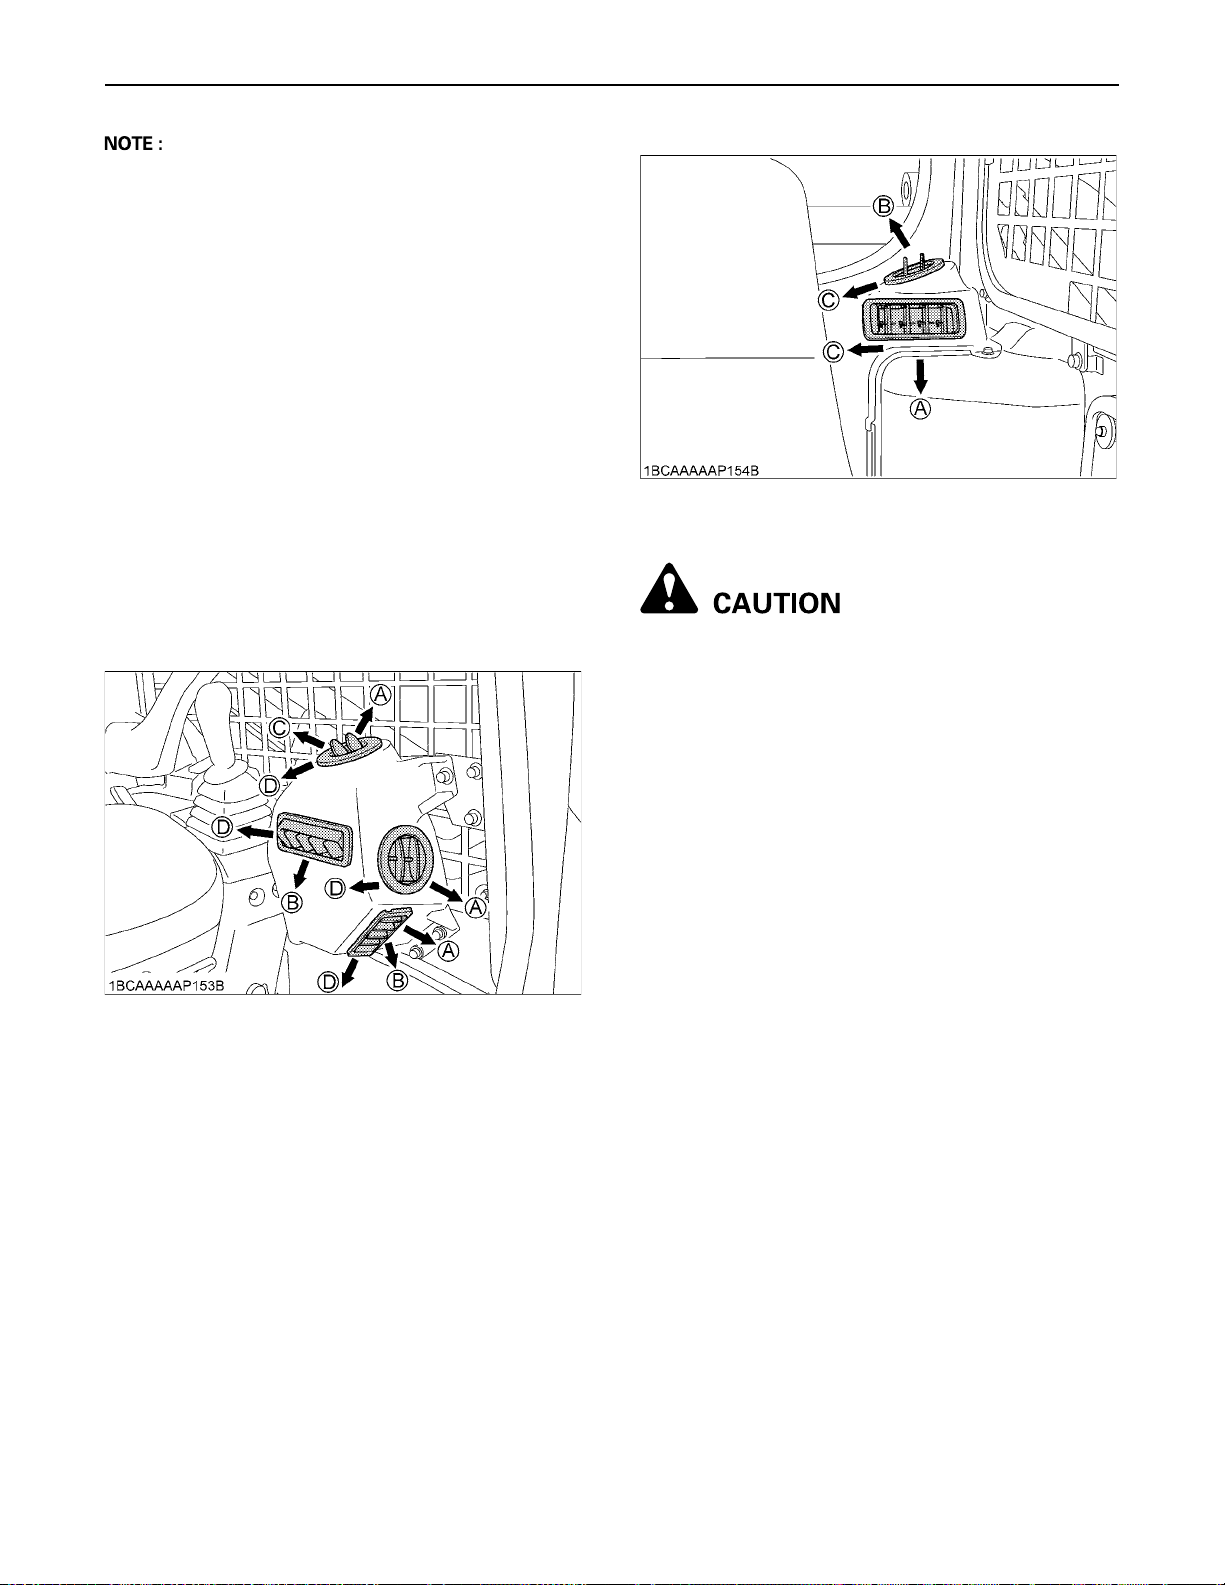
21CHECKS BEFORE START
A The rear air outlet port is for cool air only. No warm air
is blown out from here.
A When heating, do not keep the inlet selector knob at
the "INSIDE AIR RECIRCULATION" position for a
long time. The windshield easily gets foggy.
A To raise the air flow rate from the outlet ports, set the
inlet selector knob to the "INSIDE AIR
RECIRCULATION" position.
A While working in a dusty condition, keep the inlet
selector knob at the "FRESH AIR INLET" position.
This increases the pressure in the cab, which helps
prevent dust from coming into the cab.
BAir Control Vent
C Air outlet
The air outlet ports can be independently adjusted as
required.
To defrost the windshield, set the inlet selector knob to the
"FRESH AIR INLET" position and rotate the air outlet
ports toward the windshield.
[Front air outlet port]
(A) "WINDSHIELD"
(B) "FOOT AREA"
(C) "CHEST AREA"
(D) "CLOSED"
[Rear air outlet port (for cool air only)]
(A) "CHEST AREA"
(B) "WINDSHIELD"
(C) "CLOSED"
To avoid personal injury;
A Replace the air-conditioner hoses every two
years.
A Inspect daily.
Have the machine repaired immediately if any
of the following defects are discovered.
(Such defects may cause burns or injury. They
may also cause engine failure by serious
damage.)
A Scratches, cracks or swelling in air-
conditioner hoses.
A Water leaks at joints or connecting points.
A Missing or damaged air-coditioner hose
protective sleeve or grommet.
A Loose mounting bolt, damaged bracket.
A Do not touch the air-conditioner hoses or the
heater with your hand. You may get burned.
A If the window fails to defrost in extreme
conditions or becomes cloudy when
dehumidifying the cab, remove moisture with
soft cloth.
A Never block all of the air outlets, system
malfunction may occur.
Page 46
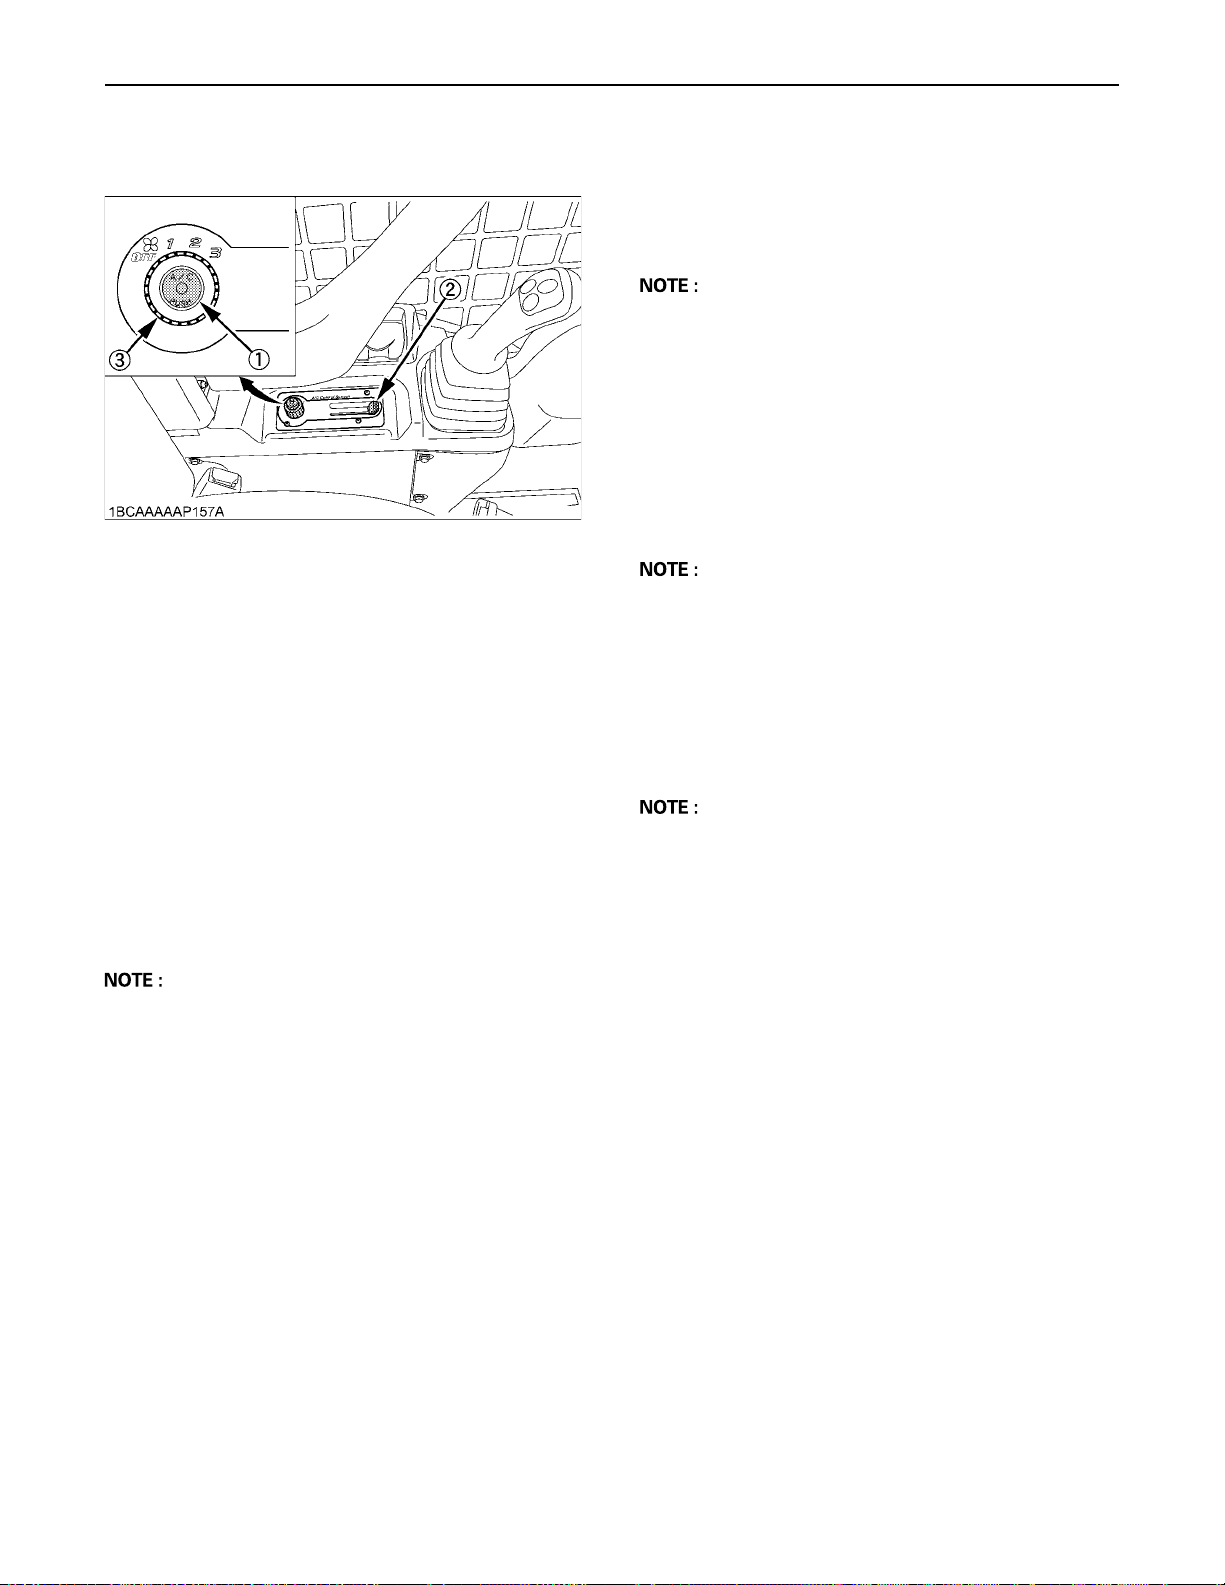
CHECKS BEFORE START22
BControl Panel
(1) Air-conditioner switch with indicator light
(2) Temperature control lever
(3) Blower switch
C Air-Conditioner Switch and Indicator Light
Push this switch to activate the air-conditioner. An
indicator light will light up when the switch is set to "ON".
Push switch again to turn air-conditioner off, in which case
the indicator light will go off.
C Temperature Control Lever
Set this lever at the desired position to obtain the desired
air temperature. Move the lever to the right to obtain
cooler air. Move it to the left to obtain warmer air.
BOperation
C Heating
1. Adjust the blower (1/2/3) switch and the temperature
control lever to achieve the desired temperature level.
A In summer when the heater is not used, keep the
temperature control lever at the "COOL" (rightmost)
position. Otherwise, hot air will raise the temperature
in the cab.
C Dehumidifying-heating
1. Press and turn on the air-conditioner switch.
2. Turn on the blower (1/2/3) switch.
3. Adjust the temperature control lever to the "COOL" or
an intermediate position to achieve the desired
temperature level.
A Be sure to close the door while the air-conditioner is
ON.
C Cooling
1. Press and turn on the air-conditioner switch.
2. Turn on the blower (1/2/3) switch.
3. Adjust the temperature control lever to the "COOL" or
an intermediate position to achieve the desired
temperature level.
A Be sure to close the door while the air-conditioner is
ON.
C Blower Switch
Air flow (fan speed) has three levels. At the "3" position,
the largest air flow is obtained.
A Air-conditioner is operable only during engine
operation.
C Defrosting or demisting
To defrost or demist the windshield, take the following
steps.
1. Open the front air outlet and direct it to the windshield.
2. Set the blower switch and the temperature control
lever to the "3" and "WARM" (leftmost) positions,
respectively.
Page 47
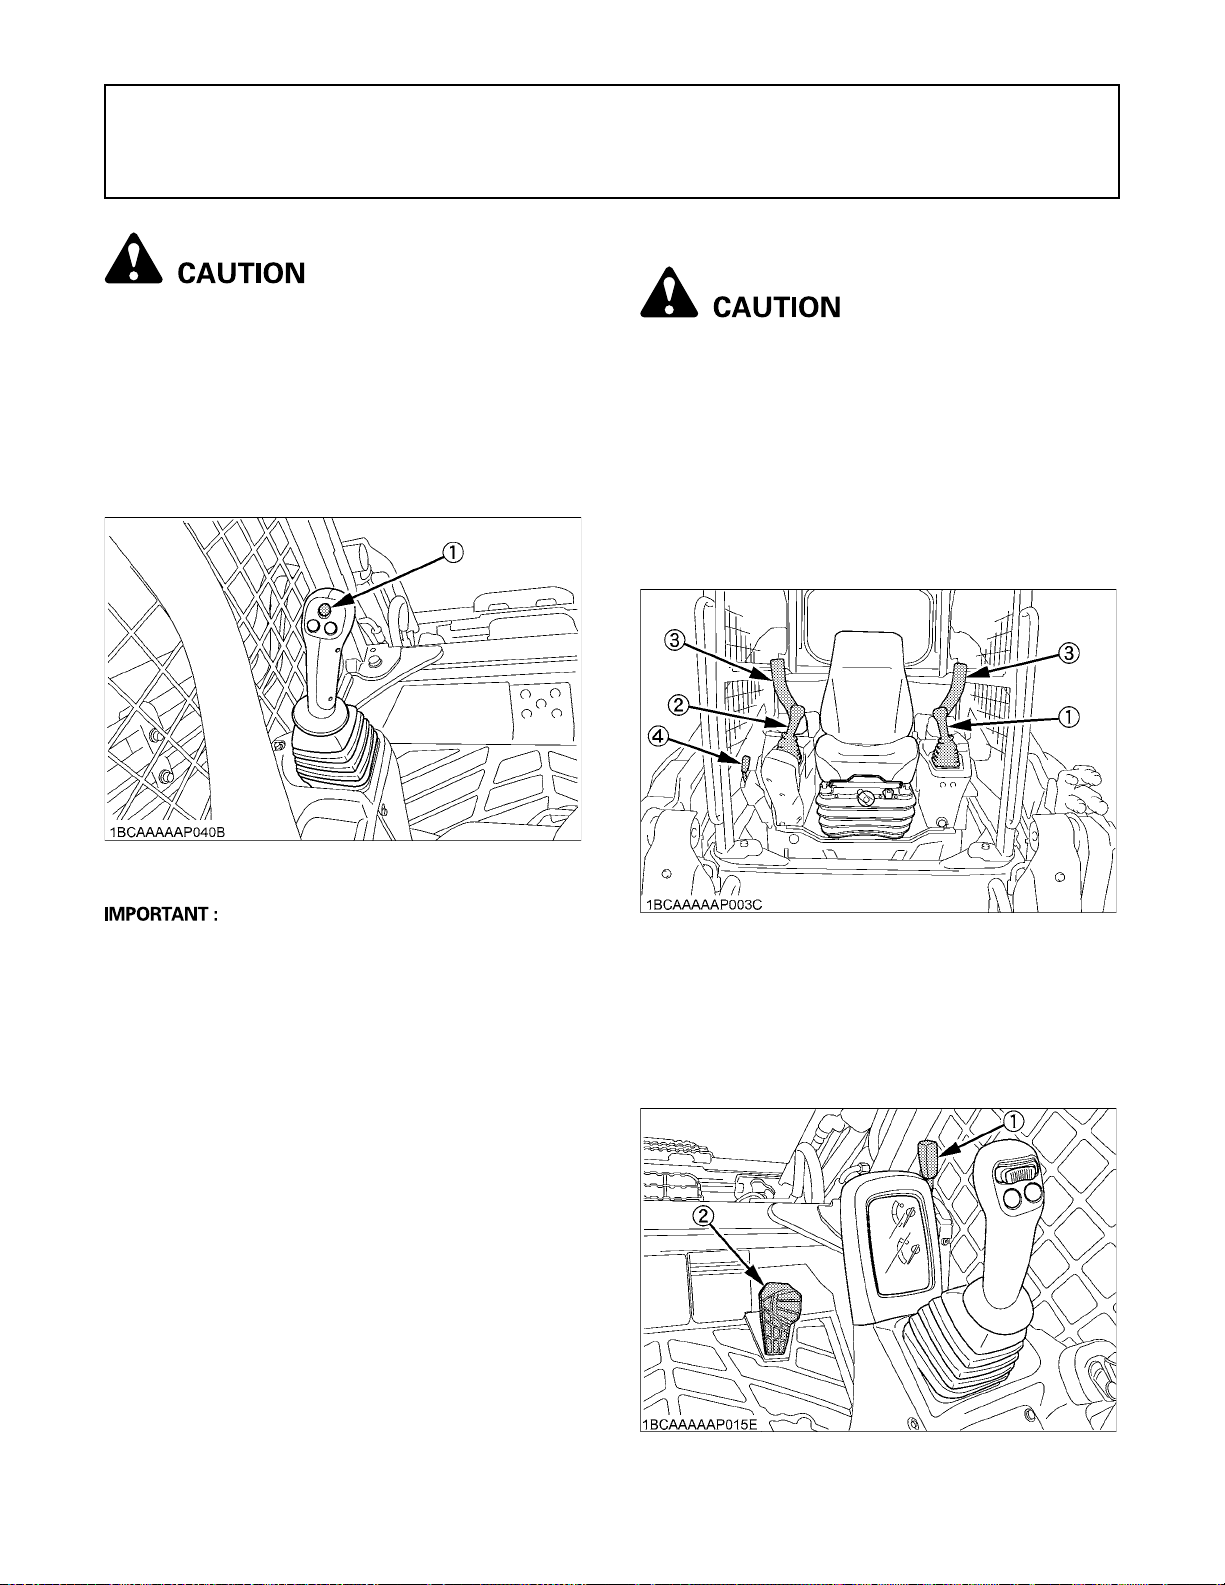
OPERATION OF THE ENGINE
STARTING THE ENGINE
To avoid personal injury:
A To avoid the danger of exhaust fume
poisoning, do not operate the machine in a
closed building without proper ventilation.
A Always start the engine from the operator's
seat. Do not start the engine while standing
next to the machine. Before starting the engine,
sound the horn to get the attention of persons
standing nearby.
To avoid personal injury:
A The operator should not depend solely on the
warning lamps, but should always conduct the
routine checks section (see "MAINTENANCE"
section).
Start the engine in the following manner:
1. Before starting the engine, make sure that the
armrests are in the "Raised" position and the control
levers are in their neutral position and the seat belt is
fastened correctly.
23OPERATION OF THE ENGINE
(1) Horn switch
A Do not use starting fluid or ether.
A In order not to overload the battery and starter, avoid
start-ups of more than 10 sec.
A When engine does not start in 10 sec., please wait 20
sec. or more, before attempting to restart.
(1) Left control (traveling) lever
(2) Right (front operating) lever
(3) Armrest
(4) Accelerator lever
2. Set the accelerator lever 1/2 way forward and keep the
accelerator pedal free.
(1) Accelerator lever
(2) Accelerator pedal
Page 48
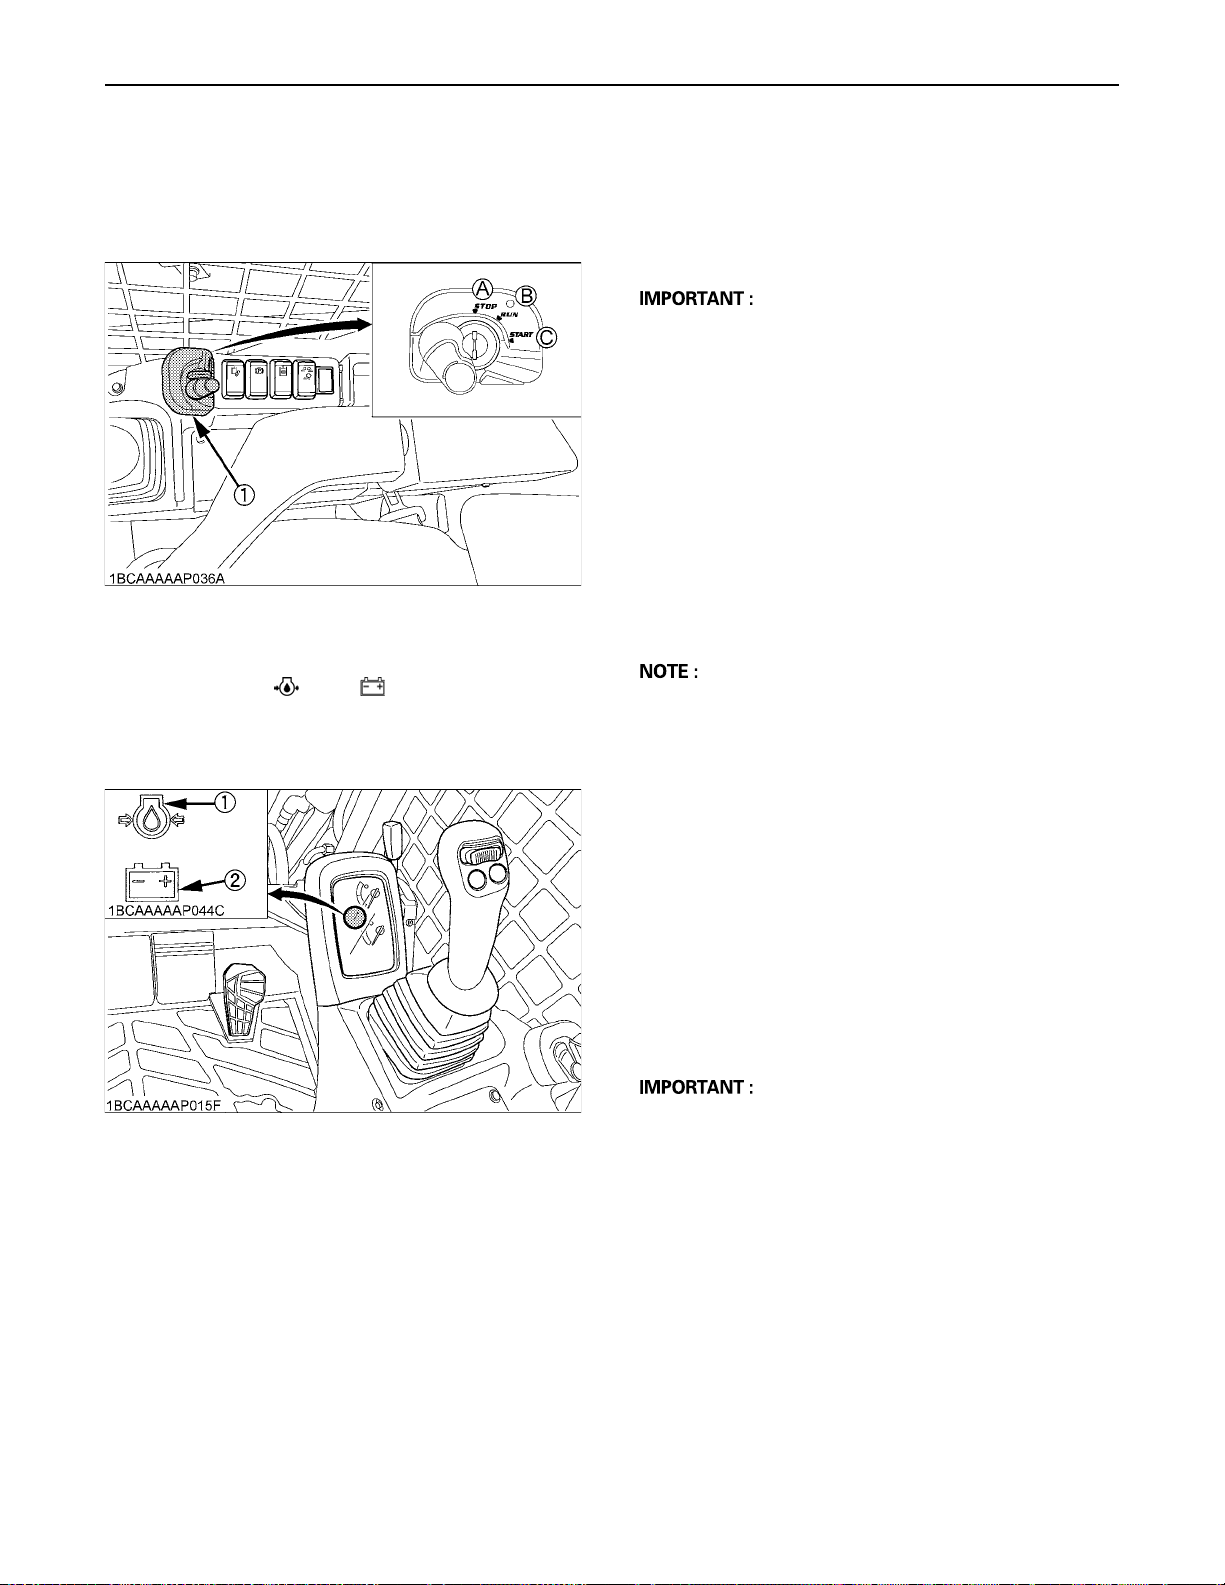
OPERATION OF THE ENGINE24
3. Insert the key into the starter switch and turn it to the
"RUN" position. The glow lamp will light up while the
engine is preheated and will go out automatically after
preheating is finished.
(1) Starter switch (A) "STOP"
(B) "RUN"
(C) "START"
4. Make sure the " " and " " marks appear on the
instrument panel.
If not, the system is malfunctioned. Contact your local
dealer.
5. Turn the key to the "START" position and release after
the engine has started.
6. Check if all warning lamps (except hydraulic lock lamp
and parking brake lamp) have gone out. Should a
warning lamp still be lit up, stop the engine then
remove the key and check for the cause.
A The starter motor consumes large current. Avoid
running it longer than 10 seconds continuously.
If the engine fails to start within 10 seconds, once set
the key to the "STOP" position, wait for 20 seconds or
longer, and repeat the above step 3 through 6.
A If the battery is dead and must be connected to
another battery with jumper cable, be sure to use a
12V battery. Never use any 24V batteries.
BCheckpoints after Starting the Engine
After starting the engine, but before starting operation,
check the following points:
1. The engine idle allows the engine lubricant to warm up
and penetrate every part of the engine.
A This idling is usually called "Warm-up".
2. Once the engine has warmed up, check:
A the "Engine oil pressure warning lamp" has gone
out.
A the "Battery charge lamp" goes out when engine
speed is increased.
A the color of the exhaust is normal and no abnormal
noises or vibrations are heard or felt.
A no fluid is leaking from pipes or hoses.
(1) Engine oil pressure warning lamp
(2) Battery charge lamp
C Should any following conditions occur, stop the
engine immediately.
A The engine rpm's increases or decreases suddenly.
A Sudden abnormal noises are heard.
A Exhaust is black.
A Warning lamp for engine oil lights up during operation.
A In these cases, the machine must be checked and
serviced by your local the KUBOTA dealer.
Page 49
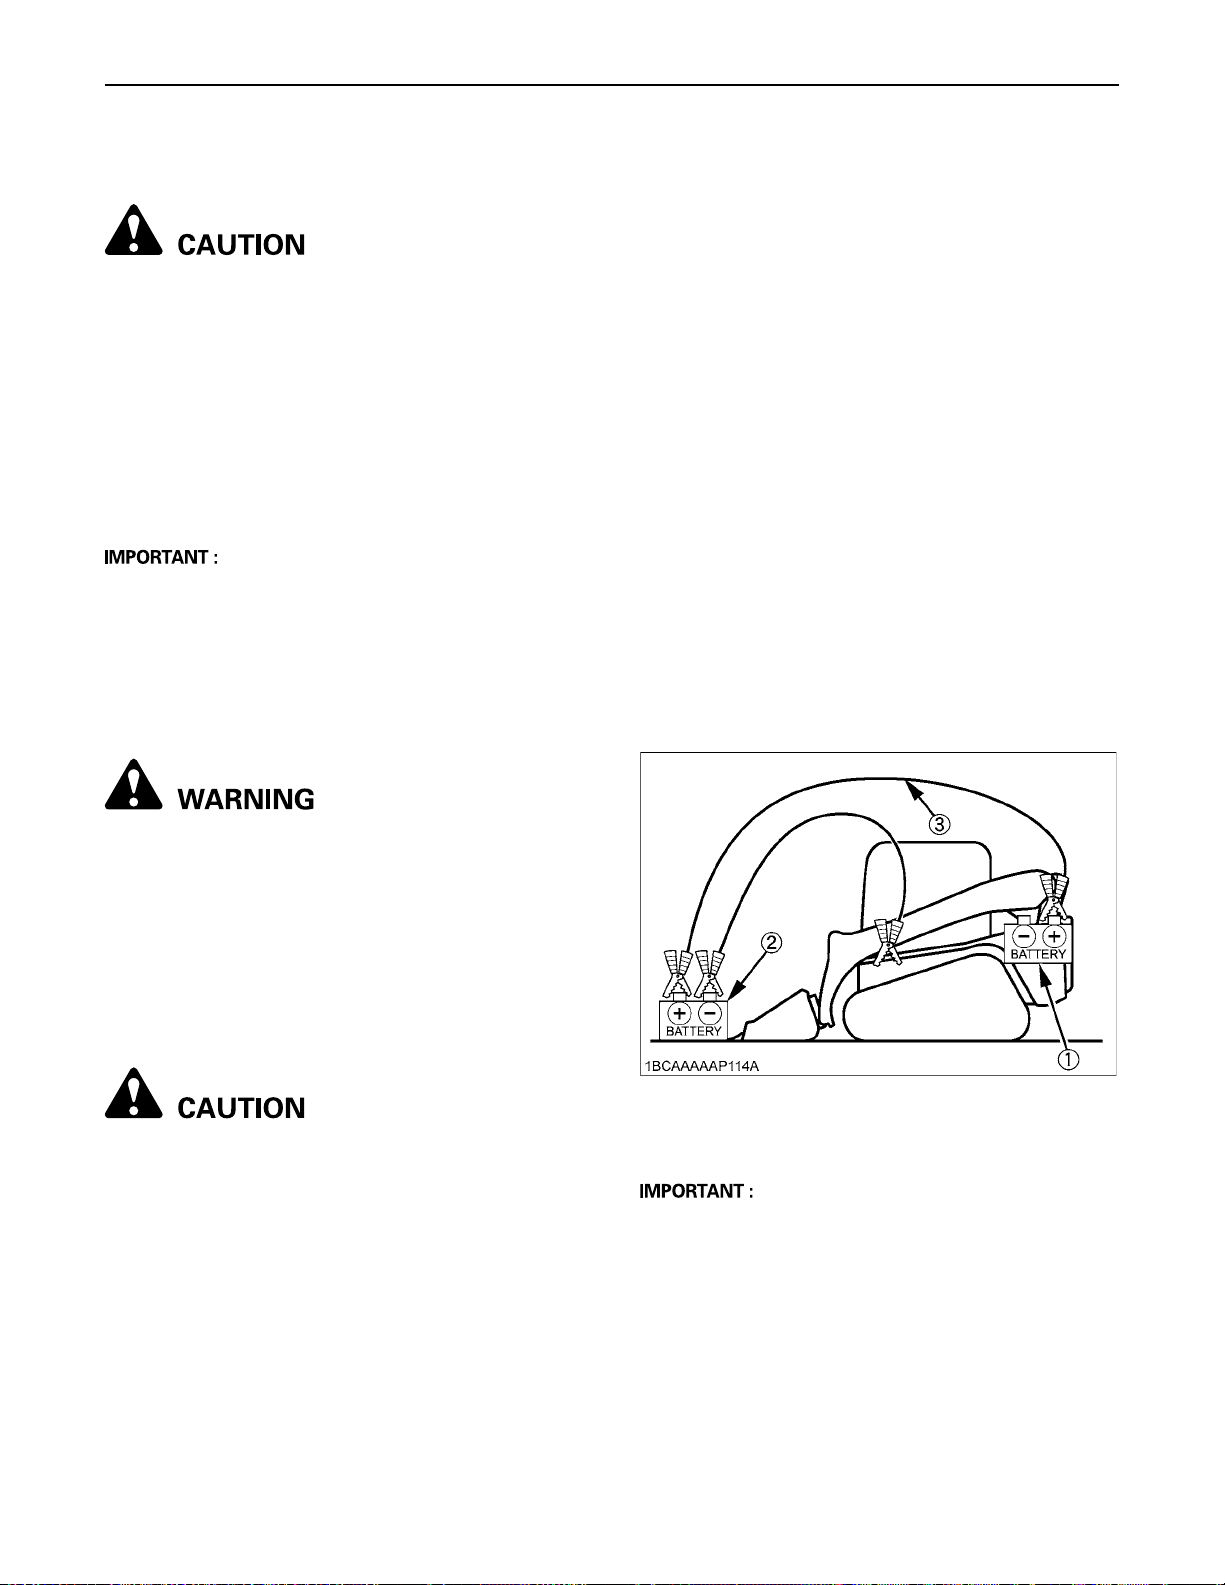
25OPERATION OF THE ENGINE
STARTING THE ENGINE UNDER COLD CONDITIONS
To avoid personal injury:
A Make sure that the armrests are in the "Raised"
position during warm up.
Start the engine in the following manner;
1. Turn the starter switch to the "RUN" position (glow
position) and hold until the indicator lamp has gone
out.
2. Move the starter switch to the "START" position; to
crank and start engine.
3. Release the starter switch after the engine has started;
it will automatically return to the "RUN " position.
A Let the engine warm up after start-up for approx. 10
minutes under no load conditions. If the hydraulic fluid
temperature is too low, the operations or the function
of the pressure sensors will be affected.
Do not operate the machine under full load before the
engine has warmed up enough.
STOPPING THE ENGINE
BObserve Following Guidelines when
Starting with an Auxiliary Battery
1. Bring the helping machine with the same battery
voltage as near as possible to the machine.
THE MACHINES MUST NOT COME IN CONTACT
WITH EACH OTHER.
2. Bring the levers and pedal of both machines in the
neutral position.
3. Wear eye protection and rubber gloves.
4. Ensure the vent caps are securely in place (if
equipped).
5. Connect the terminal of the red jumper cable with the
plus (+) terminal of the low battery and connect the
other end of the cable to the plus (+) terminal of the
auxiliary battery.
6. Connect the black negative cable to the minus (-)
terminal of the auxiliary battery.
7. Connect the other end of the black cable (coming from
the auxiliary battery) to the conductive part of the
machine frame as far away as possible from the low
battery.
8. Start the engine of the helping machine and let it run
for a while. Start the machine with the low battery.
9. Disconnect the jumper cables in the reverse
sequence.
To avoid personal injury or death:
A Do not keep the bucket or attachments in the
lifted position, as a person could accidentally
touch the levers and cause serious accidents.
A Place the machine on the flat ground.
1. After slowing the engine to idle, turn the key to "STOP"
position.
2. Remove the key.
STARTING WITH AN AUXILIARY BATTERY
To avoid personal injury:
A Battery gases can explode.
Do not smoke and keep sparks and flames
away.
A Do not start the engine with an auxiliary battery
if machine battery is frozen.
A Do not connect the black jumper cable to the
negative (-) terminal of the machine battery.
(1) Low battery
(2) Auxiliary battery
(3) Jumper cables
A This machine has a negative (-) ground 12 Volt starting
system.
A Only use the same voltage when using an auxiliary
battery.
A Using a higher voltage will cause serious damage to
the electrical system. When using an auxiliary battery,
only the compatible (same) voltage is permissible.
Page 50

26 OPERATION OF THE MACHINE
OPERATION OF THE MACHINE
RUNNING-IN OF THE MACHINE
The operation and care of the new machine influences its
life span. Your new machine has been carefully checked
and tested before leaving the factory. In spite of this, all
movable components must run-in during the first 50 work
hours. Do not work with full rpm's and full loads during this
period. It is most important to run-in your machine
properly in order to achieve its full performance and
longevity. During the running-in, the following points
should be adhered to in all cases.
BDo not Work with Full Engine Rpm's or
Full Loads during the First 50 Working
Hours
A Let the engine warm up sufficiently in the cold season.
A Do not let the engine rev-up more than necessary.
BOil Change in the Run-in Stage
The lubrication oil plays a specific and important role
during the run-in phase of the machine. The numerous
movable parts are not yet run-in, so many fine metal
particles can be generated and may cause damage and
shorten the life of many components. Pay attention to the
oil-change intervals and complete them sooner than later.
See "REGULAR CHECKS AND MAINTENANCE WORK"
section for more details on the oil-change intervals.
STARTING
To avoid personal injury or death:
A Mount the machine and dismount the machine
only at locations that have steps and/or
handholds.
Before you mount the machine, clean the steps
and the handholds.
A Start the only from the operator's seat.
Never short across the starter terminals or
across the batteries.
Shorting could damage the electrical system
by bypassing the engine neutral start system.
A Inspect the condition of the seat belt and the
mounting hardware.
Replace any parts that are worn or damaged.
Do not use a seat belt extension on a
retractable seat belt.
A Adjust the seat so that full pedal travel can be
achieved with the operator's body against back
of the seat.
A Make sure the machine is equipped with a
lighting system that is adequate for the job
conditions.
Make sure all machine lights are working
properly.
A Before you start the engine and before you
move the machine, make sure that no one is
underneath, or on, or close to the machine.
Page 51
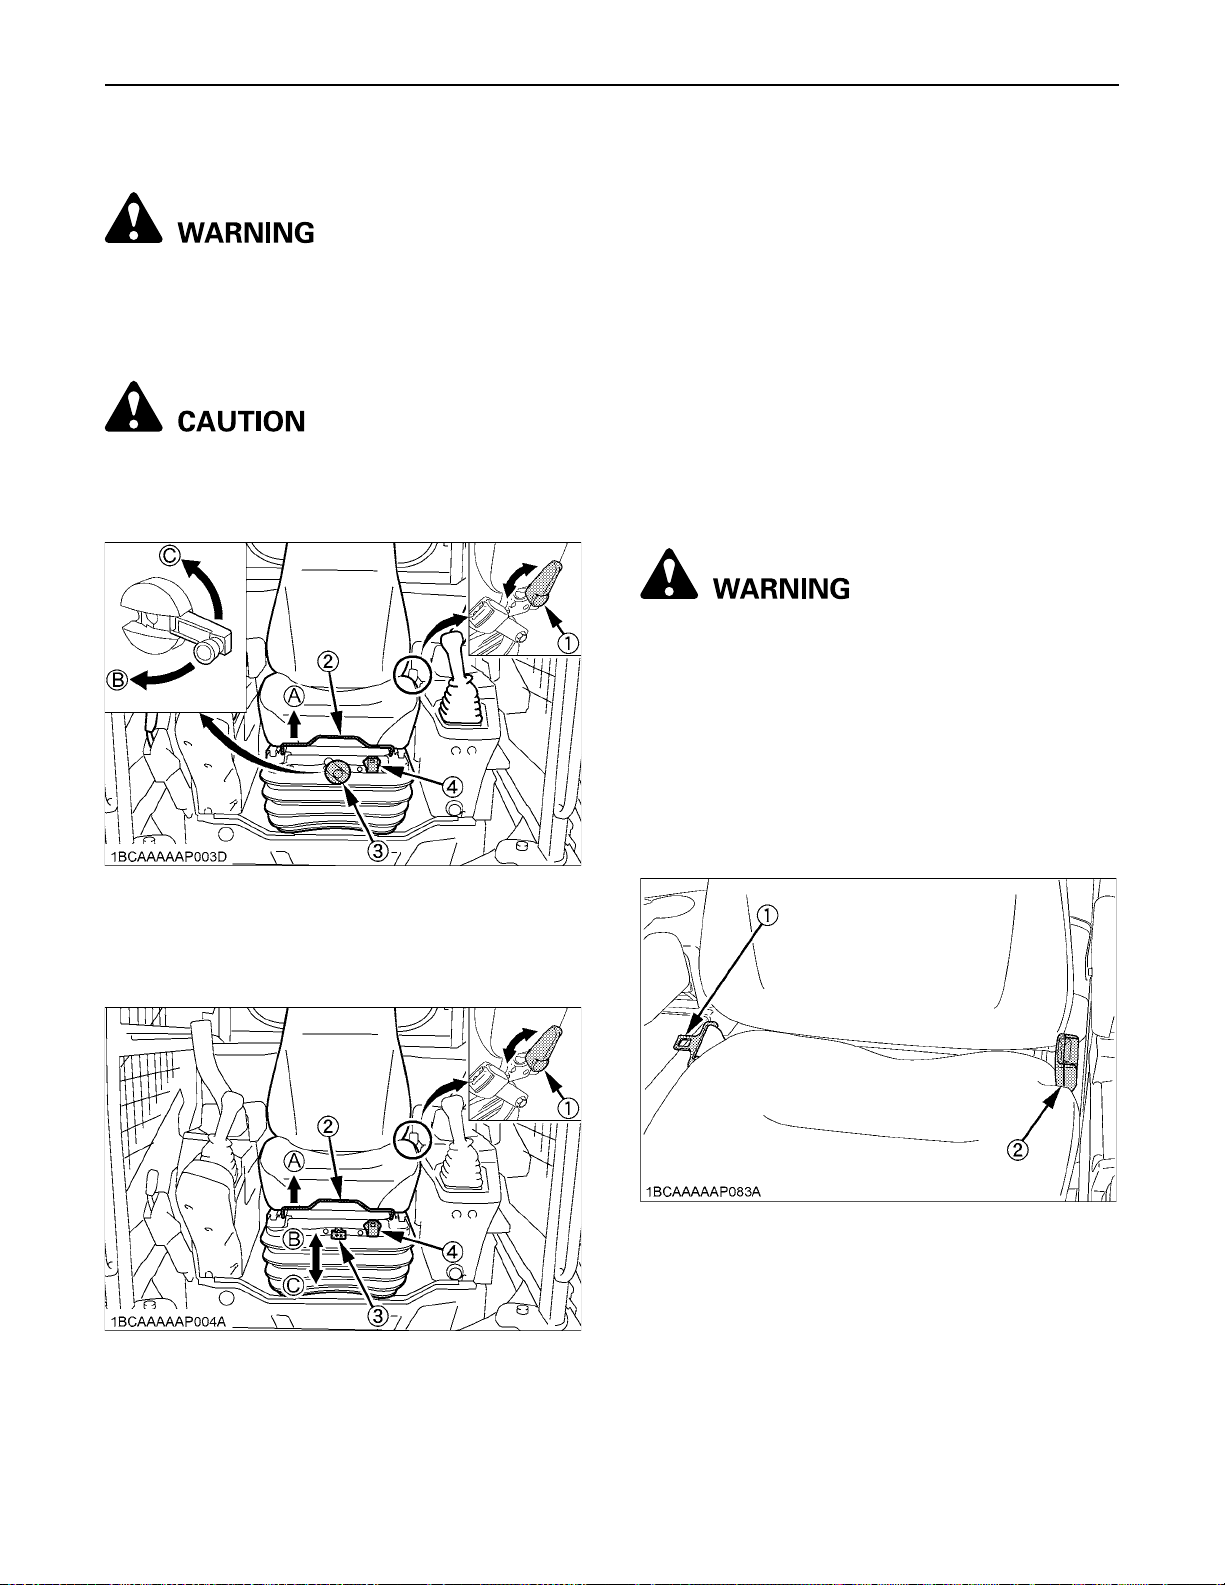
BAdjusting the Operator's Seat
27OPERATION OF THE MACHINE
C Travel adjustment
Pull the travel adjust lever in the direction of [A] and
slide the seat backward or forward, as required. The
seat will lock in position when the lever is released.
To avoid personal injury or death:
A Replace the operator's seat with the new one if
damaged and made holes. Water or dust could
penetrate the hole and it causes the erroneous
OPC switch operation.
To avoid personal injury:
A Make sure that the seat is completely secured
after each adjustment.
[Suspension seat]
(1) Backrest tilt adjust lever
(2) Travel adjust lever
(3) Weight and height adjust lever
(4) Ride indicator
(A) "UNLOCK"
(B) "TO RAISE THE SEAT"
(C) "TO LOWER THE SEAT"
C Weight and height adjustment
Turn the weight and height adjust lever to achieve the
optimum suspension setting.
Make sure the ride indicator shows green. If red,
readjust the suspension setting. Within the green band
of the ride indicator, there is 60 mm of height
adjustment for any operator.
C Tilt adjustment
Pull the backrest tilt adjust lever in the direction of [A]
and move the backrest to the desired angle.
BSeat Belt
To avoid personal injury or death:
A Always use the seat belt with a ROPS/FOPS
protection structure. Adjust the seat to the
optimal position and buckle up.
A Always fasten the seat belt securely before
starting the engine.
C Fastening the seat belt
1. Pull the seat belt from the retractable (right) side of the
seat.
2. Insert the fixture into the socket at the left side of the
seat until it clicks deep into position.
[Air-suspension seat]
(1) Backrest tilt adjust lever
(2) Travel adjust lever
(3) Weight and height adjust lever
(4) Ride indicator
(1) Seat belt
(2) Socket
(A) "UNLOCK"
(B) "TO RAISE THE SEAT"
(C) "TO LOWER THE SEAT"
Page 52
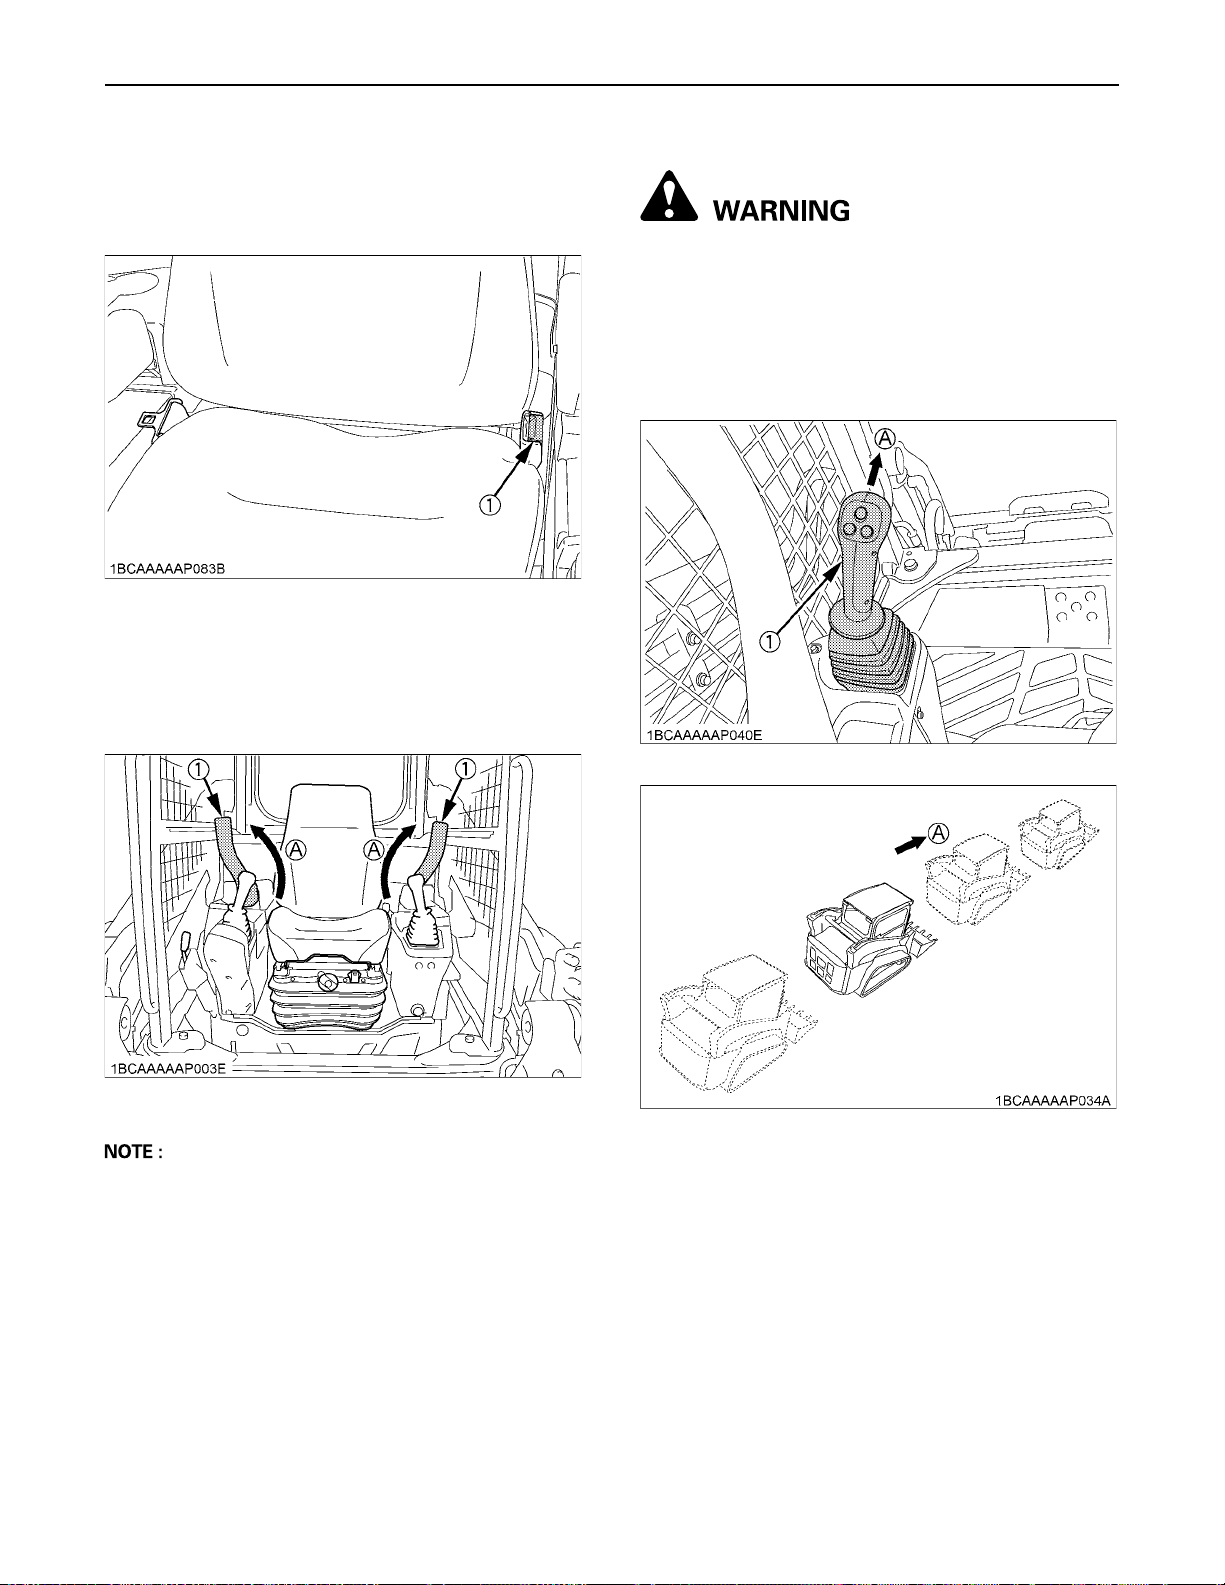
OPERATION OF THE MACHINE28
C Releasing the seat belt
1. Press the red button of the socket to release the seat
belt.
2. The seat belt reels itself and gets retracted to the right
side.
(1) Button
BArmrest
Move the armrests to the "RAISED" position to lock out
the hydraulic and electric systems.
DRIVING
To avoid personal injury or death:
A Before starting the engine, make sure that no
one is near the machine.
BForward and Backward Travel
C To move forward:
Push the left control (traveling) lever forward.
(1) Armrest (A) "RAISE"
A When the armrests are moved to the "RAISED"
position, the parking brake will engage and the
hydraulic and operation system will be locked.
Move the armrests to the "LOWERED" position and
push the hydraulic unlock switch in order to activate
the hydraulic controls.
A When you start the engine, the hydraulic lock must be
disengaged so that the hydraulic controls are
activated.
If the armrests are raised and then lowered during the
operation, you must disengage the hydraulic lock so
that the hydraulic controls are activated.
(1) Left control (traveling) lever (A) "FORWARD"
Page 53
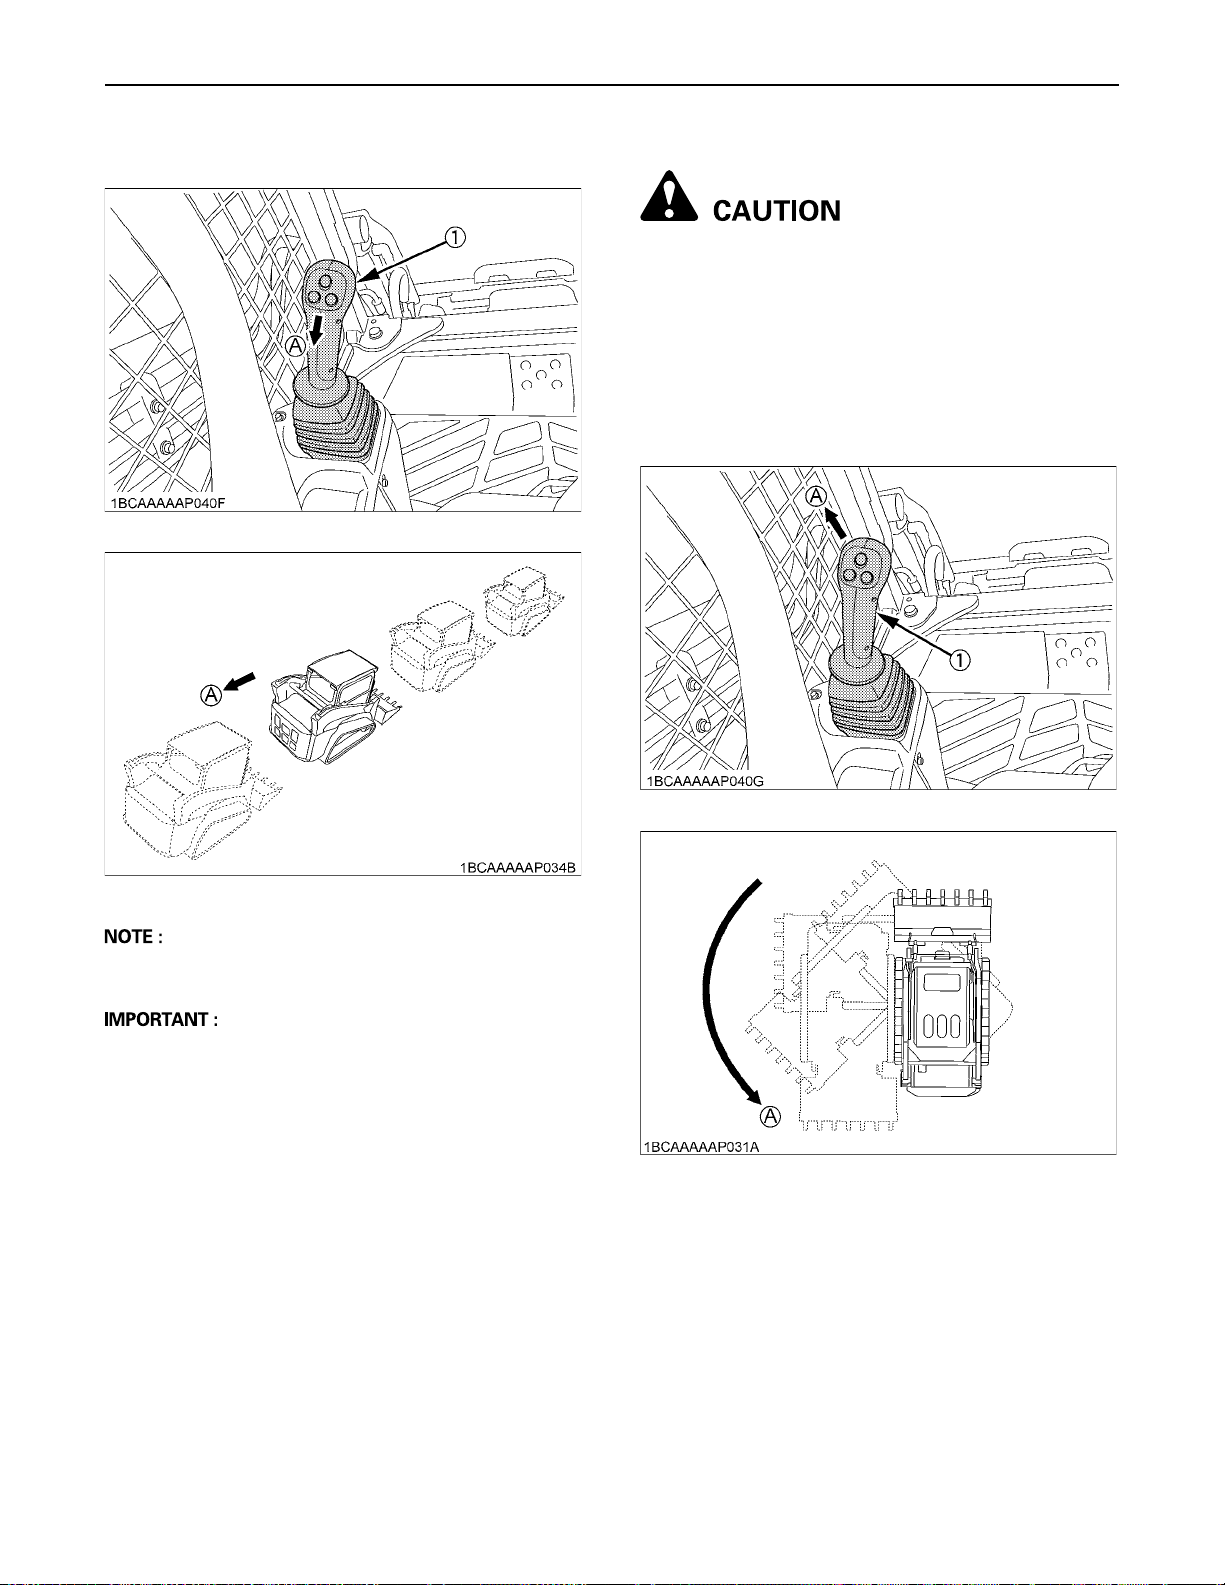
29OPERATION OF THE MACHINE
C To move backward:
Pull the left control (traveling) lever backward:
TURNING
To avoid personal injury:
A Before changing direction, beware of people in
the work area.
A Make sure the bucket or attachment is lowered
on the ground.
BPivot Turn
C To turn forward to the left:
Tilt the left control lever (traveling) forward to the left.
(1) Left control (traveling) lever (A) "BACKWARD"
A When the machine begins to travel "BACKWARD", the
reserve alarm starts sounding.
A If the hydraulic oil temperature is too low, the reserve
alarm may start sounding when switching from the
backward to the forward travel. This is not a problem.
Just make a warm-up run, and then the hydraulic oil
temperature rises, this will stop the alarm. If the alarm
still keeps sounding, contact your local dealer.
(1) Left control (traveling) lever (A) "TURN"
Page 54
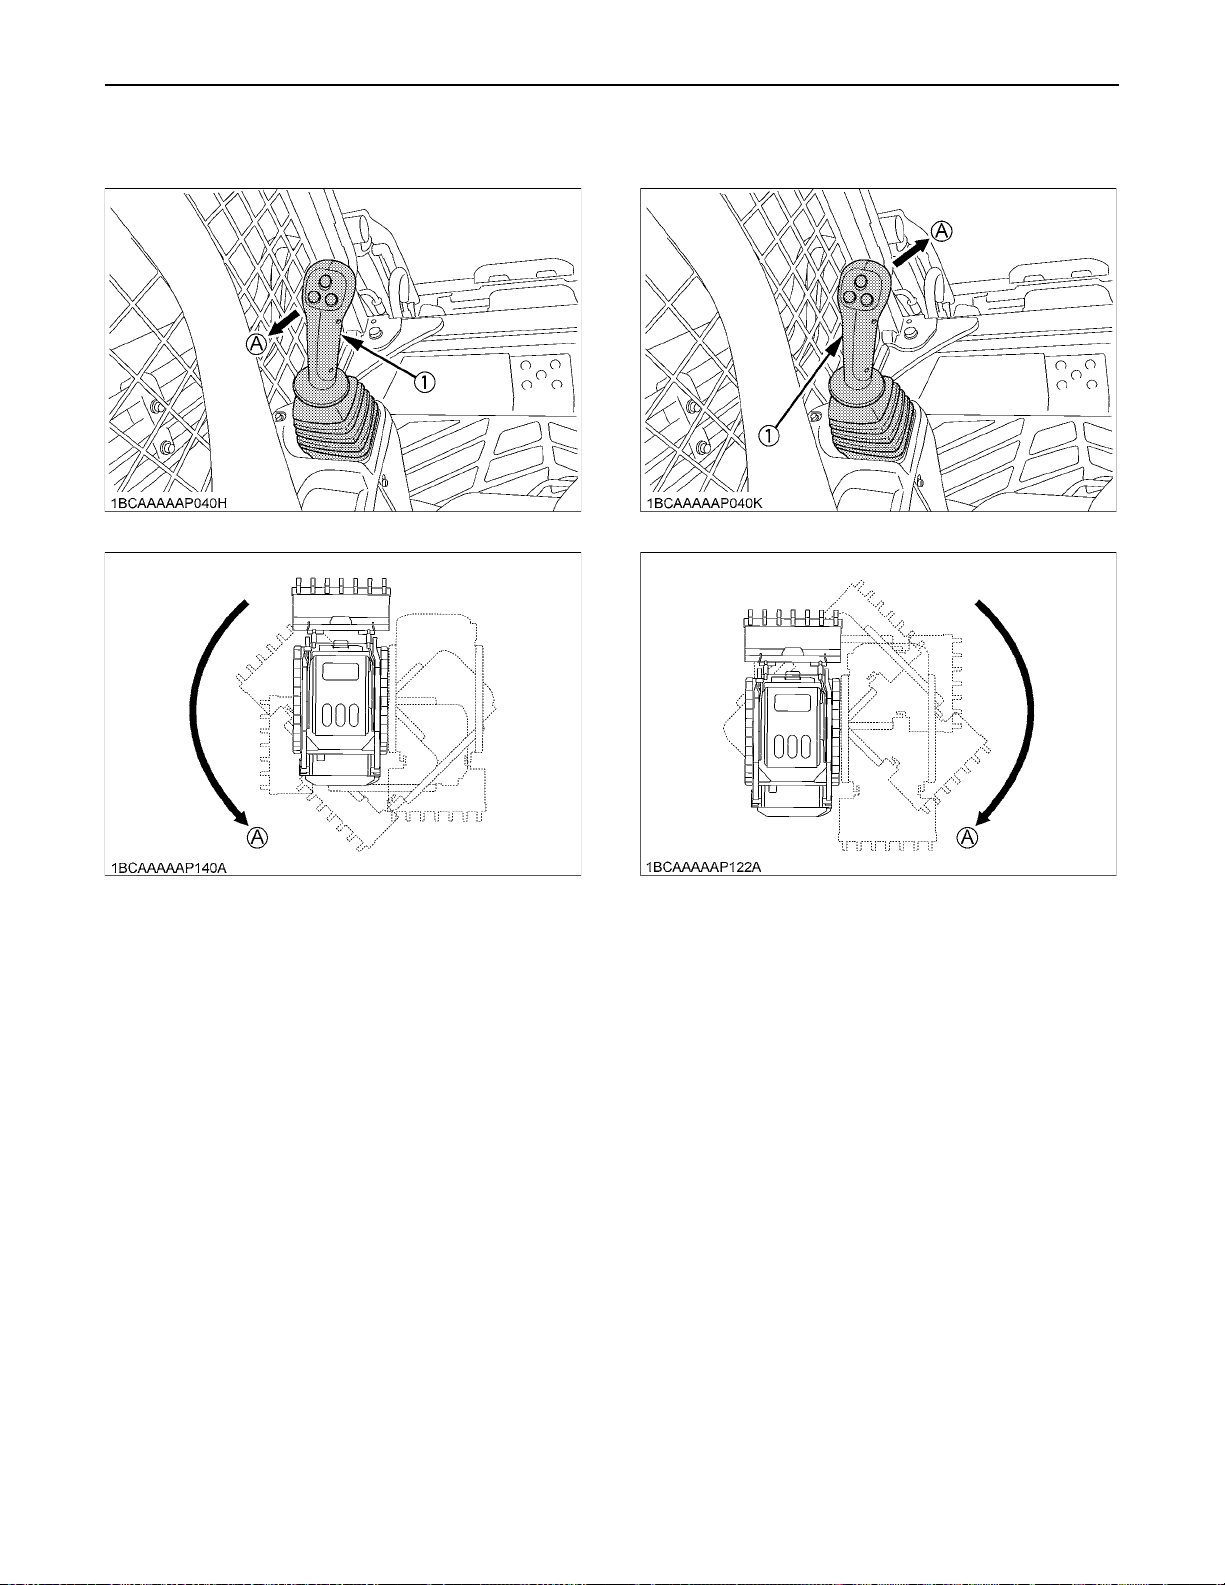
OPERATION OF THE MACHINE30
C To turn backward to the left:
Turn the left control (traveling) lever backward to the left.
C To turn forward to the right:
Tilt the left control lever (traveling) forward to the right.
(1) Left control (traveling) lever (A) "TURN" (1) Left control (traveling) lever (A) "TURN"
Page 55
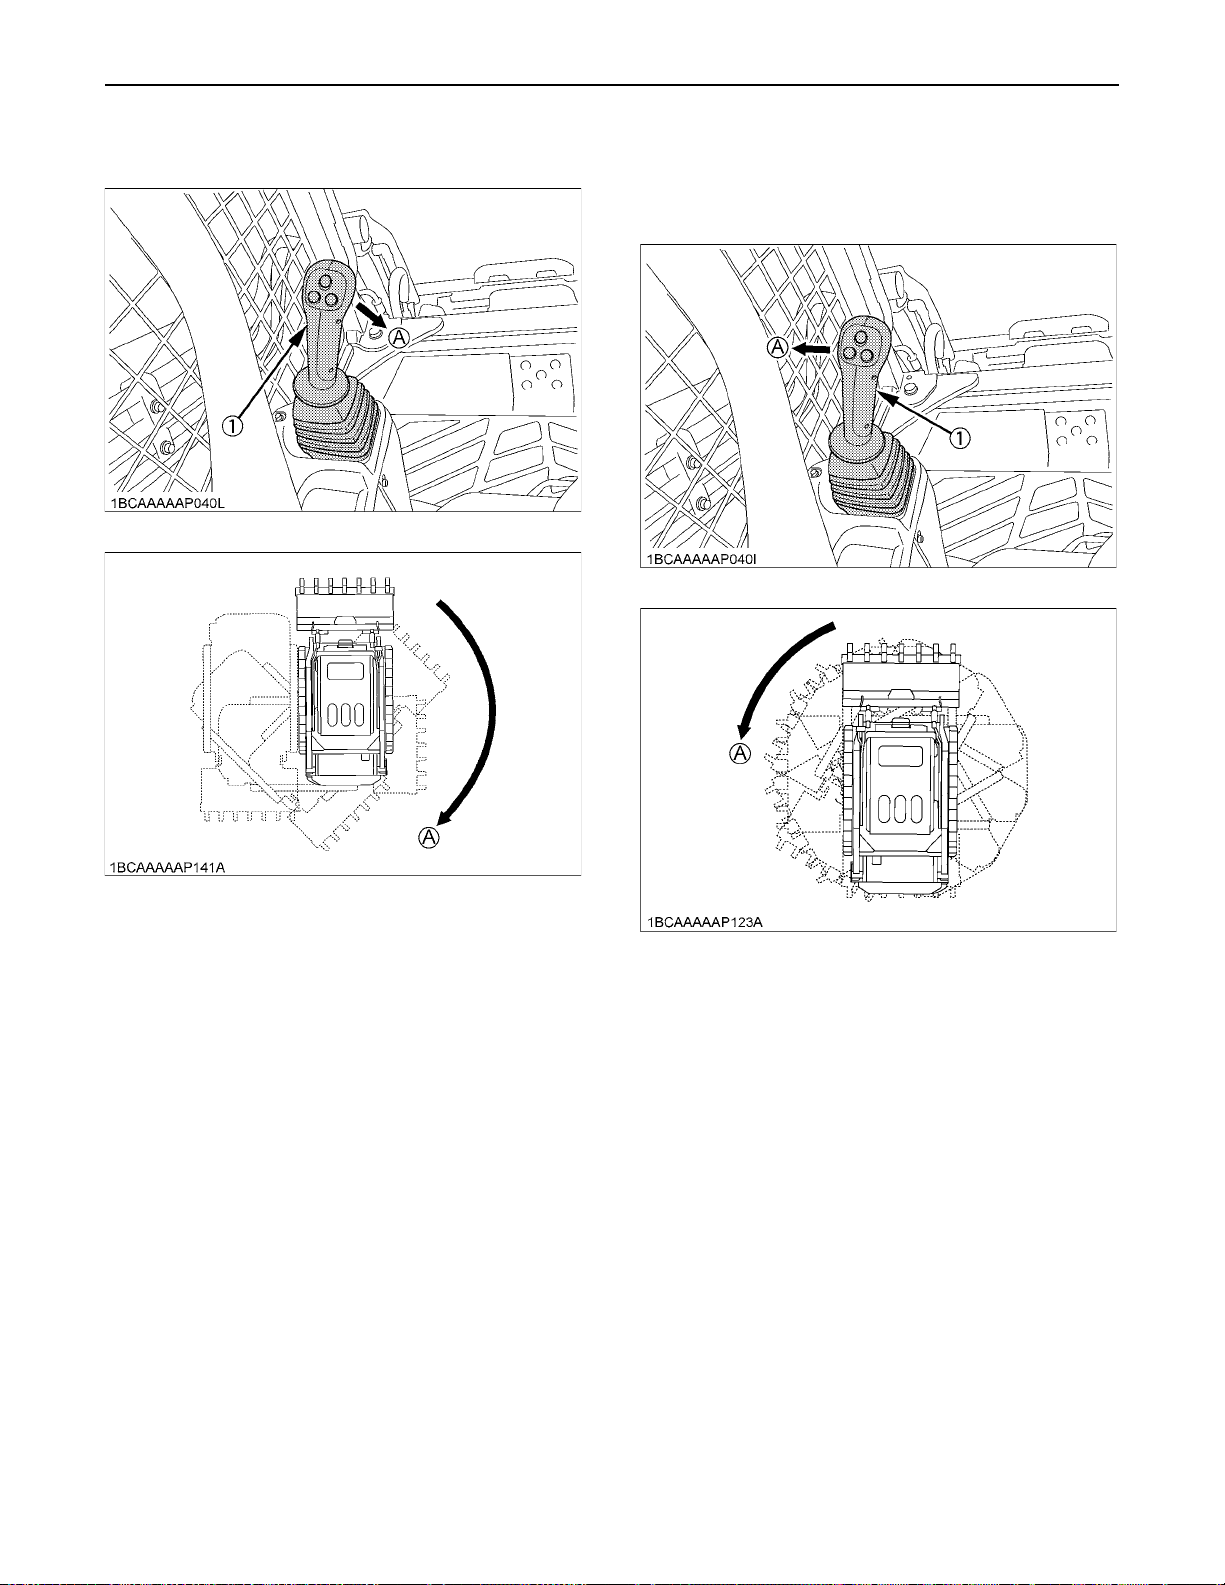
C To turn backward to the right:
Turn the left control (traveling) lever backward to the right.
31OPERATION OF THE MACHINE
BSpin Turn
C To spin left:
Tilt the left control (traveling) lever to the left.
(1) Left control (traveling) lever (A) "TURN"
(1) Left control (traveling) lever (A) "SPIN"
Page 56
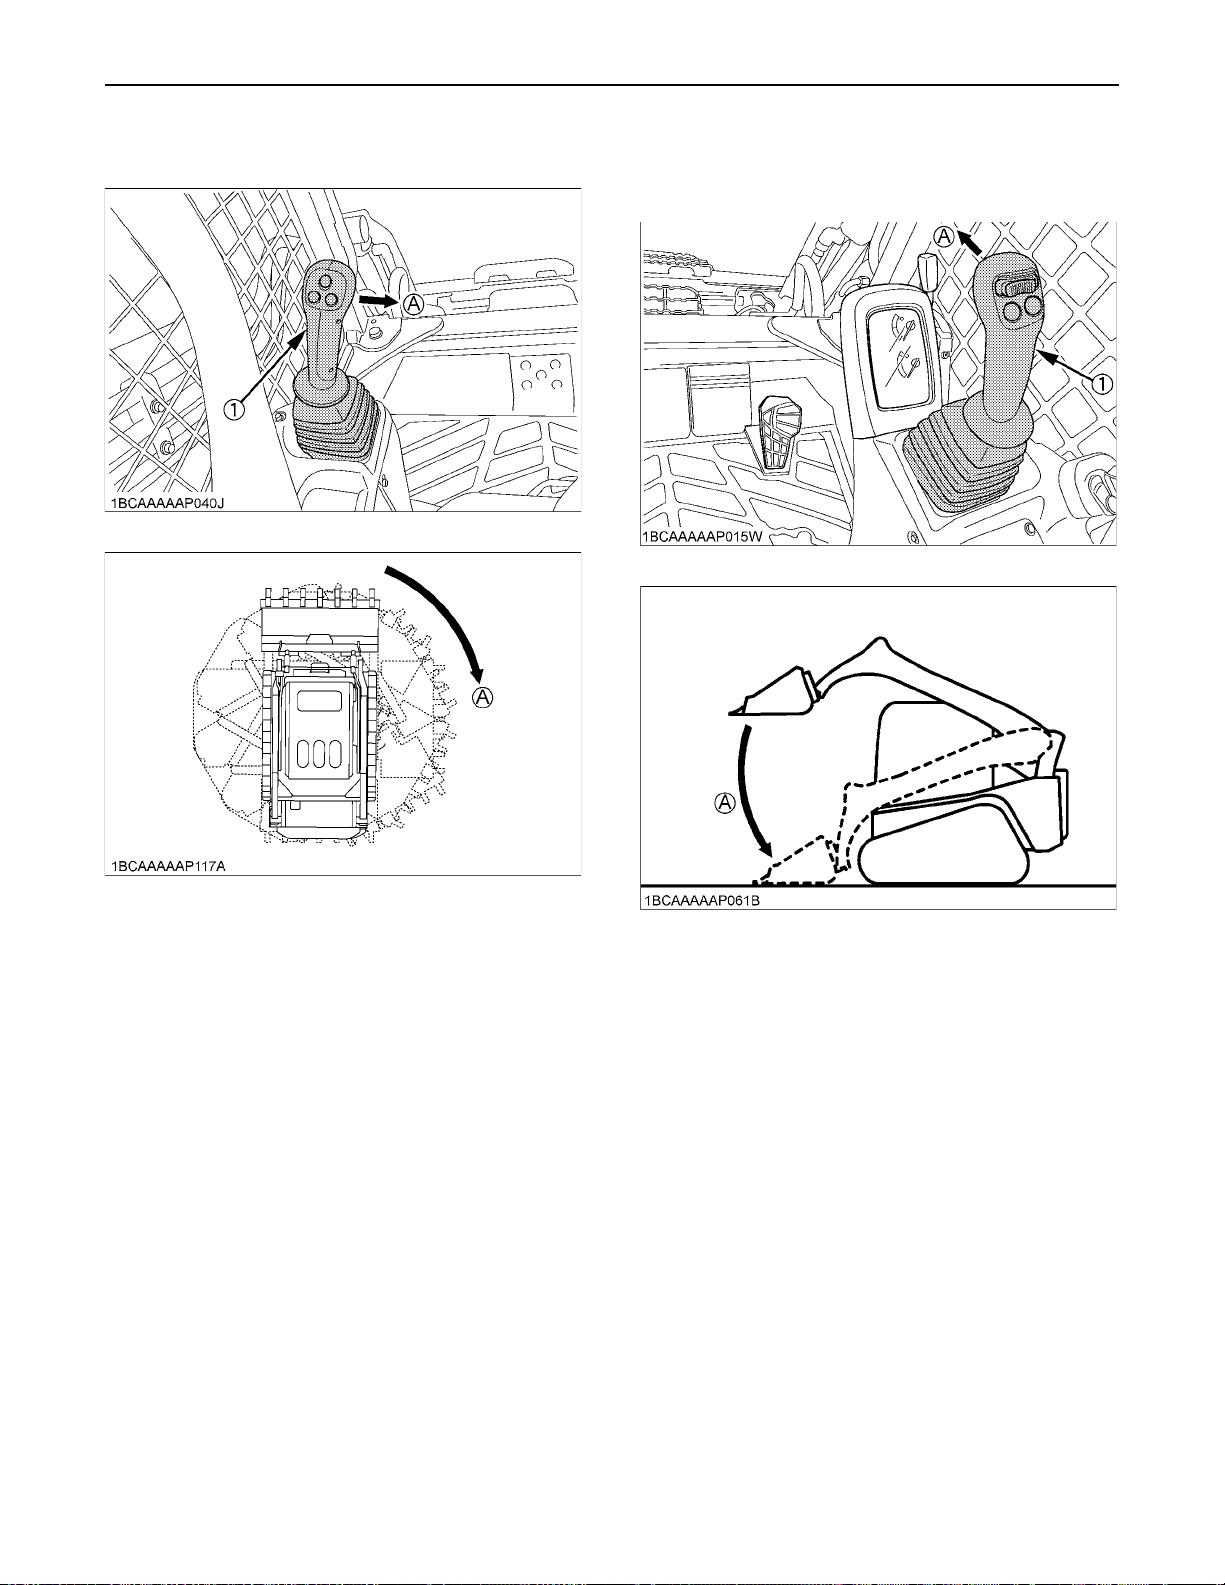
OPERATION OF THE MACHINE32
C To spin right:
Tilt the left control (traveling) lever to the right.
OPERATION OF THE LIFT ARMS
C To lower the lift arms:
Push the right control (front operating) lever forward:
(1) Left control (traveling) lever (A) "SPIN"
(1) Right control (front operating) lever (A) "LOWER"
Page 57
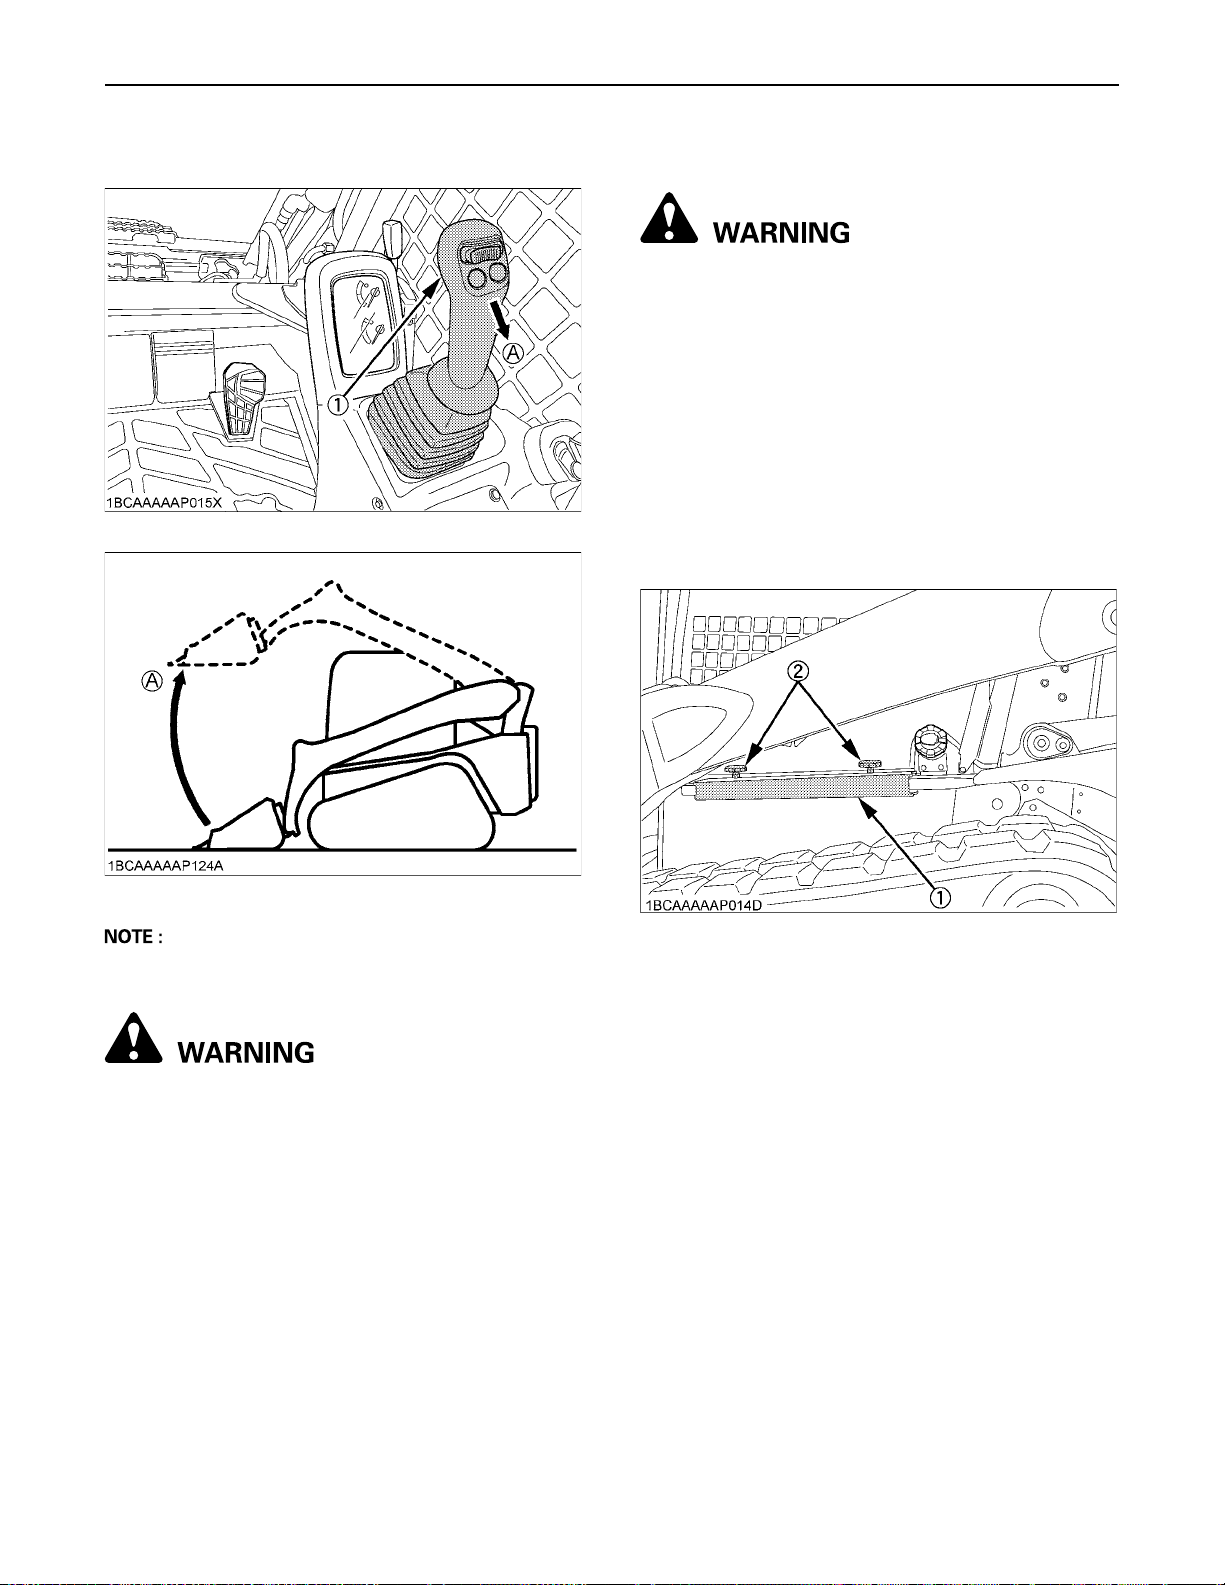
C To raise the lift arms
Pull the right control (front operating) lever backward.
33OPERATION OF THE MACHINE
BLift Arm Stopper
To avoid personal injury or death:
A Never work on a machine with the lift arms up
unless the lift arms are secured by an approved
lift arm stopper.
The lift arm stopper is used to prevent the lift arms from
falling when servicing the machine.
C Installing
1. Park the machine on level and firm ground and lower
the lift arms fully to the ground.
Remove the front attachment.
2. Stop the engine.
3. The second person should remove the lift arm stopper
from the storage position.
(1) Right control (front operating) lever (A) "RAISE"
A To stop the lift arm operation, return the right control
(front operating) lever to the neutral position.
To avoid personal injury or death:
A Do not exceed the rated operating capacity of
the unit. If loads exceed this operating
capacity, the unit can experience a hydraulic
imbalance when half or medium "lift arms
raise" and "bucket roll back" or "auxiliary
hydraulic control" commands are input
together, which can result in the lift arms
lowering slowly. If you begin to experience this
condition, either place the lift arms control in
"neutral" or input full "raise" control, and lift
arms lowering will cease.
(1) Lift arm stopper
(2) Knob bolt
4. Start the engine and set the parking brake switch to
the parking position.
5. Slowly raise the lift arms to the maximum height and
stop the engine.
Operator must stay in the operator seat with the seat
belt fastened.
6. The second person must install the lift arm stopper.
Place the top (dented) of lift arm stopper upward and
cover the rod with the stopper from front. Using one of
the knob bolts, secure the stopper in position.
Page 58
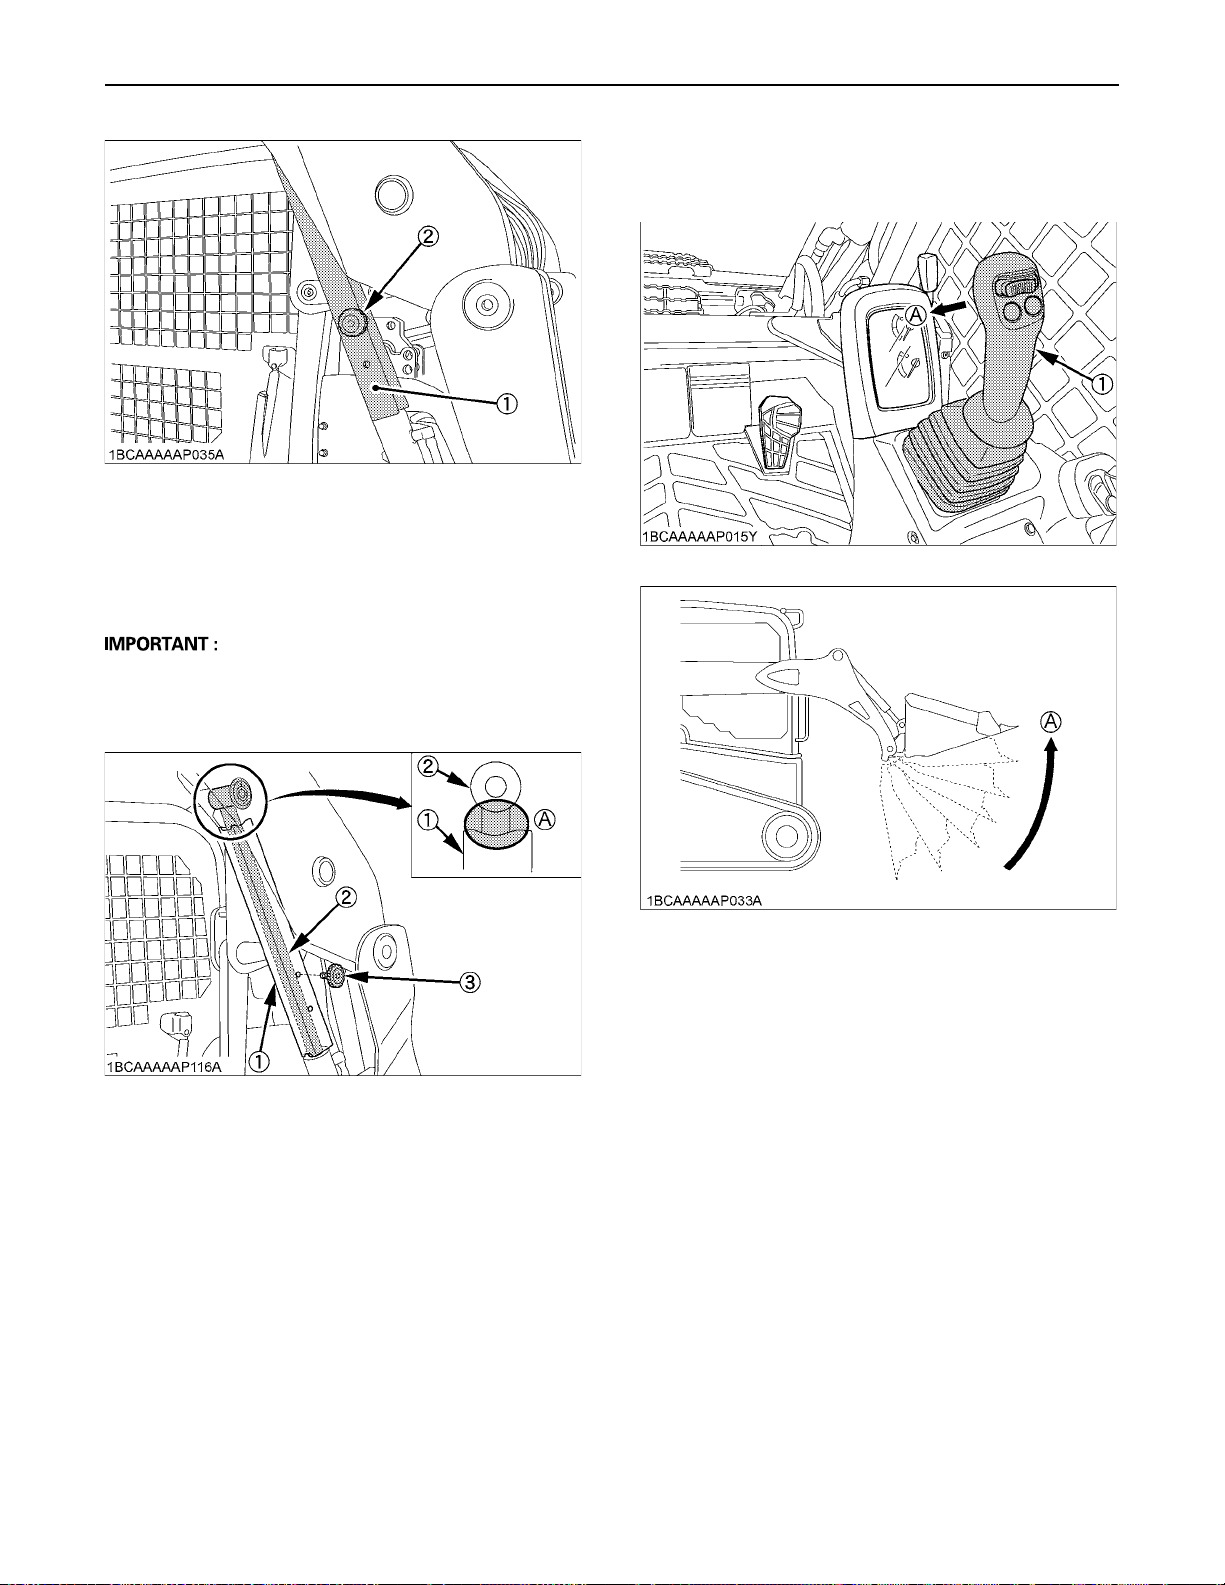
OPERATION OF THE MACHINE34
(1) Lift arm stopper
(2) Knob bolt
7. Start the engine and set the parking brake switch to
the parking position.
8. Slowly lower the lift arms against the lift arm stopper.
OPERATION OF THE BUCKET
C To roll back:
Tilt the right control (front operating) lever to the left.
A Make sure that the dent on top the lift arm stopper fits
the round part of the lift arm and that the flat bottom of
lift arm stopper fits the flat top of arm cylinder tube. No
gap is allowed in both locations.
(1) Lift arm stopper
(2) Arm cylinder tube
(3) Knob bolt
C Removing
1. The operator should be in the operator's seat with the
seat belt fastened.
2. Start the engine and set the parking brake switch to
the parking position.
3. Slowly raise the lift arms to the maximum height and
stop the engine.
4. The second person must remove the lift arm stopper.
5. Start the engine and lower the lift arms fully to the
ground and stop the engine.
6. Return the lift arm stopper to the storage position and
secure with two knob bolts.
(A) "FIT"
(1) Right control (front operating) lever (A) "ROLL BACK"
Page 59
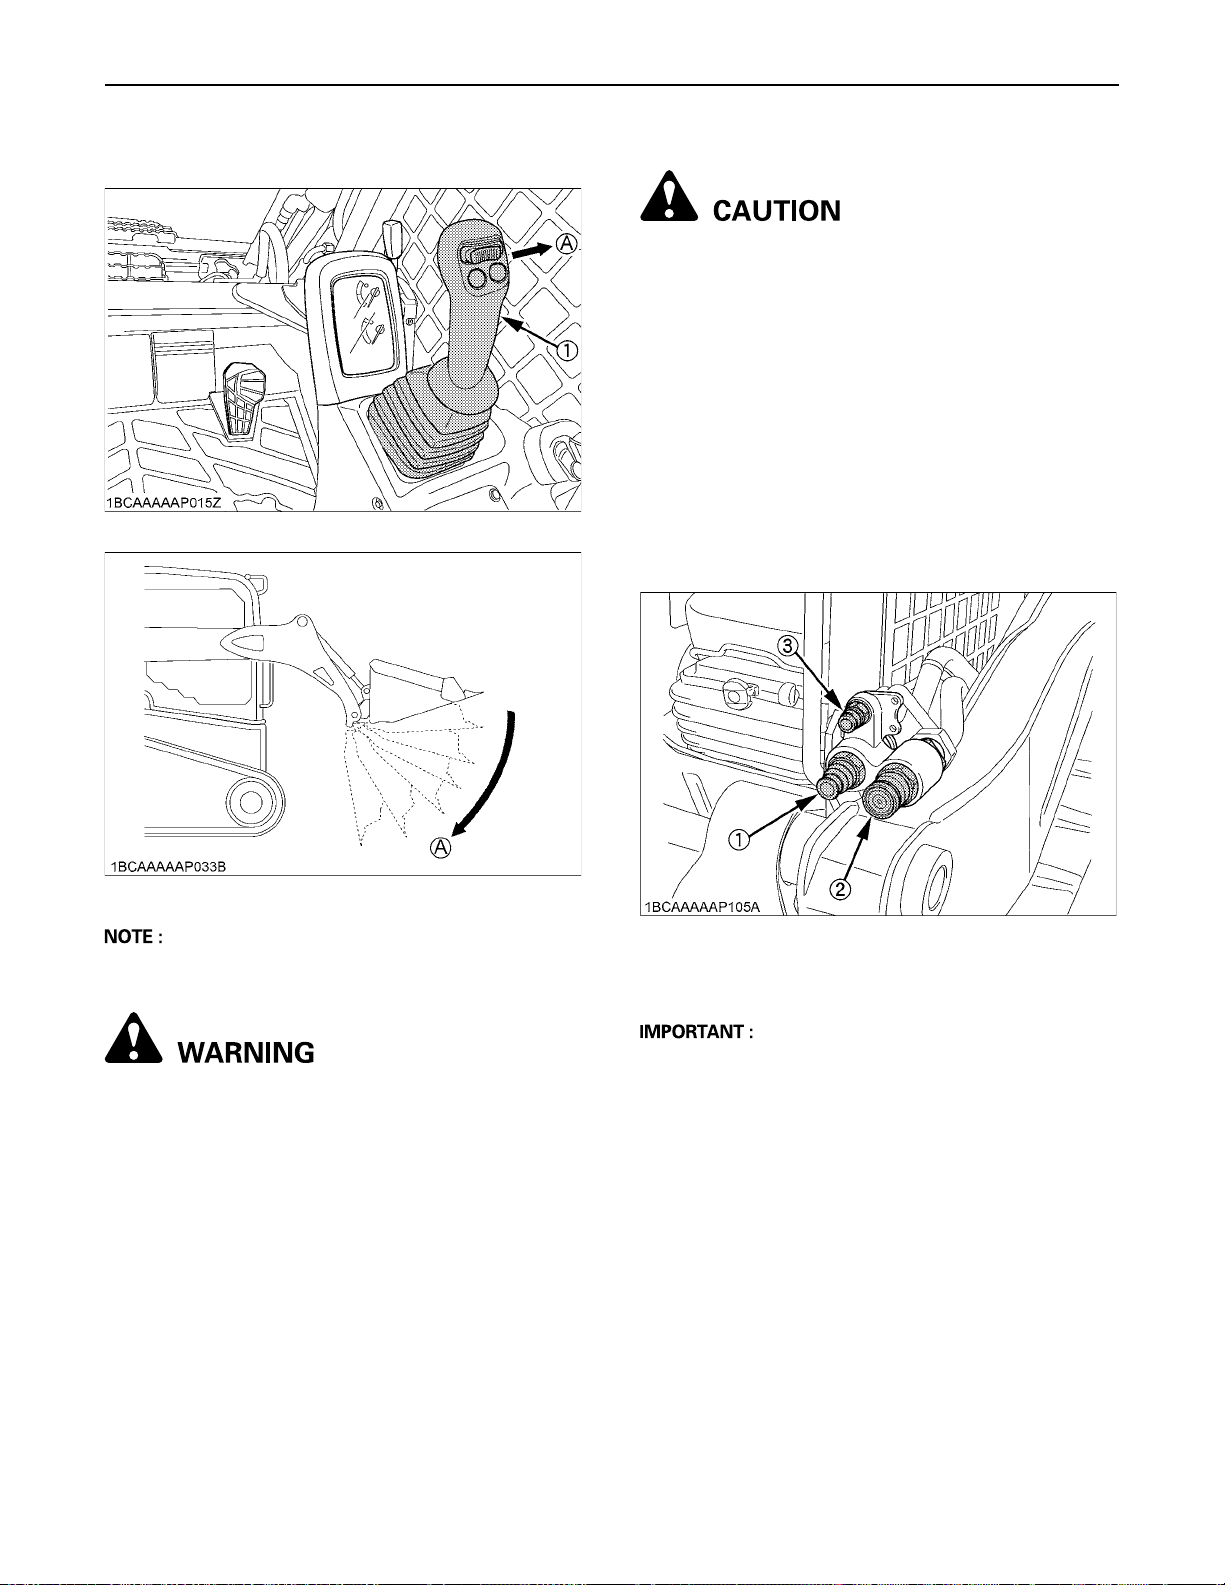
35OPERATION OF THE MACHINE
C To dump:
Tilt the right control (front operating) lever to the right.
AUXILIARY HYDRAULIC CONTROL
To avoid personal injury:
A Stop the engine and relieve pressure before
connecting or disconnecting lines.
A Do not use your hand to check for leaks.
C Connecting
1. Remove dirt or debris from the surface of both the
male and female couplers, and from the outside
diameter of the male coupler. Visually check the
couplers for corroding, cracking, damage or excessive
wear. If any of these conditions exist, the coupler must
be replaced.
2. Push the quick couplers tightly and hold for a few
seconds, the pressure is relieved automatically.
(Pressure relief system.)
3. Connect the couplers.
(1) Right control (front operating) lever (A) "DUMP"
A To stop the bucket operation, return the right control
(front operating) lever to the neutral position.
To avoid personal injury or death:
A Do not exceed the rated operating capacity of
the unit. If loads exceed this operating
capacity, the unit can experience a hydraulic
imbalance when half or medium "lift arms
raise" and "bucket roll back" or "auxiliary
hydraulic control" commands are input
together, which can result in the lift arms
lowering slowly. If you begin to experience this
condition, either place the lift arms control in
"neutral" or input full "raise" control, and lift
arms lowering will cease.
(1) Male coupler
(2) Female coupler
(3) Male case drain coupler
A Use the enough long hoses connecting the
attachment. Otherwise the couplers should be
damaged due to the frequence side load and impact to
them during working.
C Disconnecting
1. Push the quick couplers tightly and hold for a few
seconds, the pressure is relieved automatically.
(Pressure relief system)
2. Detach the couplers.
Page 60
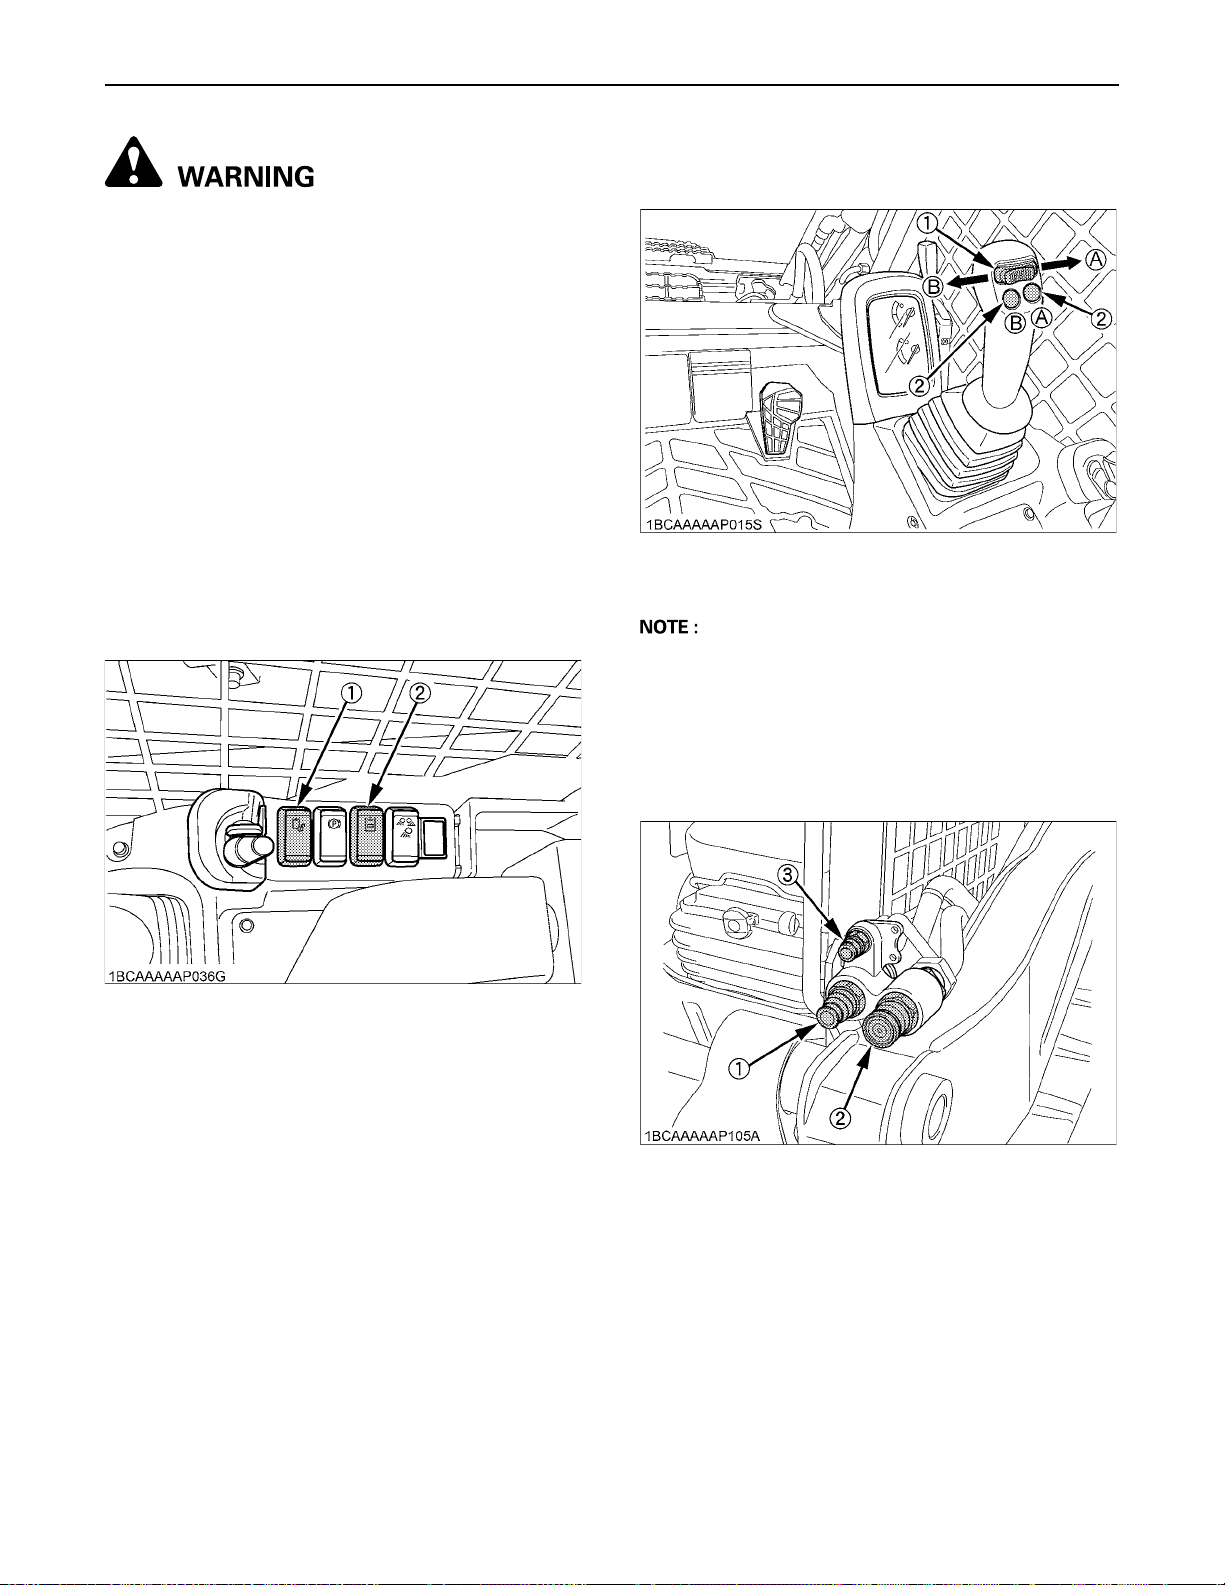
OPERATION OF THE MACHINE36
To avoid personal injury or death:
A Do not exceed the rated operating capacity of
the unit. If loads exceed this operating
capacity, the unit can experience a hydraulic
imbalance when half or medium "lift arms
raise" and "bucket roll back" or "auxiliary
hydraulic control" commands are input
together, which can result in the lift arms
lowering slowly. If you begin to experience this
condition, either place the lift arms control in
"neutral" or input full "raise" control, and lift
arms lowering will cease.
BAuxiliary Hydraulic Control Operation
1. Start the engine (refer to "OPERATION OF THE
ENGINE" and "OPERATION OF THE MACHINE"
section).
2. Press the hydraulic unlock switch.
3. Press the AUX port switch.
4. Tilt the AUX port variable switch toward Side A or
press the right AUX hold switch, and oil starts flowing
out of Male port.
(1) AUX port variable switch
(2) AUX hold switch
(A) "Male port"
(B) "Female port"
A The oil flow rate responds to the tilt of AUX port
variable switch.
A Press the AUX hold switch, and the oil continues to
flow at its highest flow rate. To interrupt it, press this
switch again.
(1) Hydraulic unlock switch.
(2) AUX port switch.
5. If the tank must be drained, depending on an
attachment in use, use the male case drain port.
(1) Male port
(2) Female port
(3) Male case drain port
Page 61
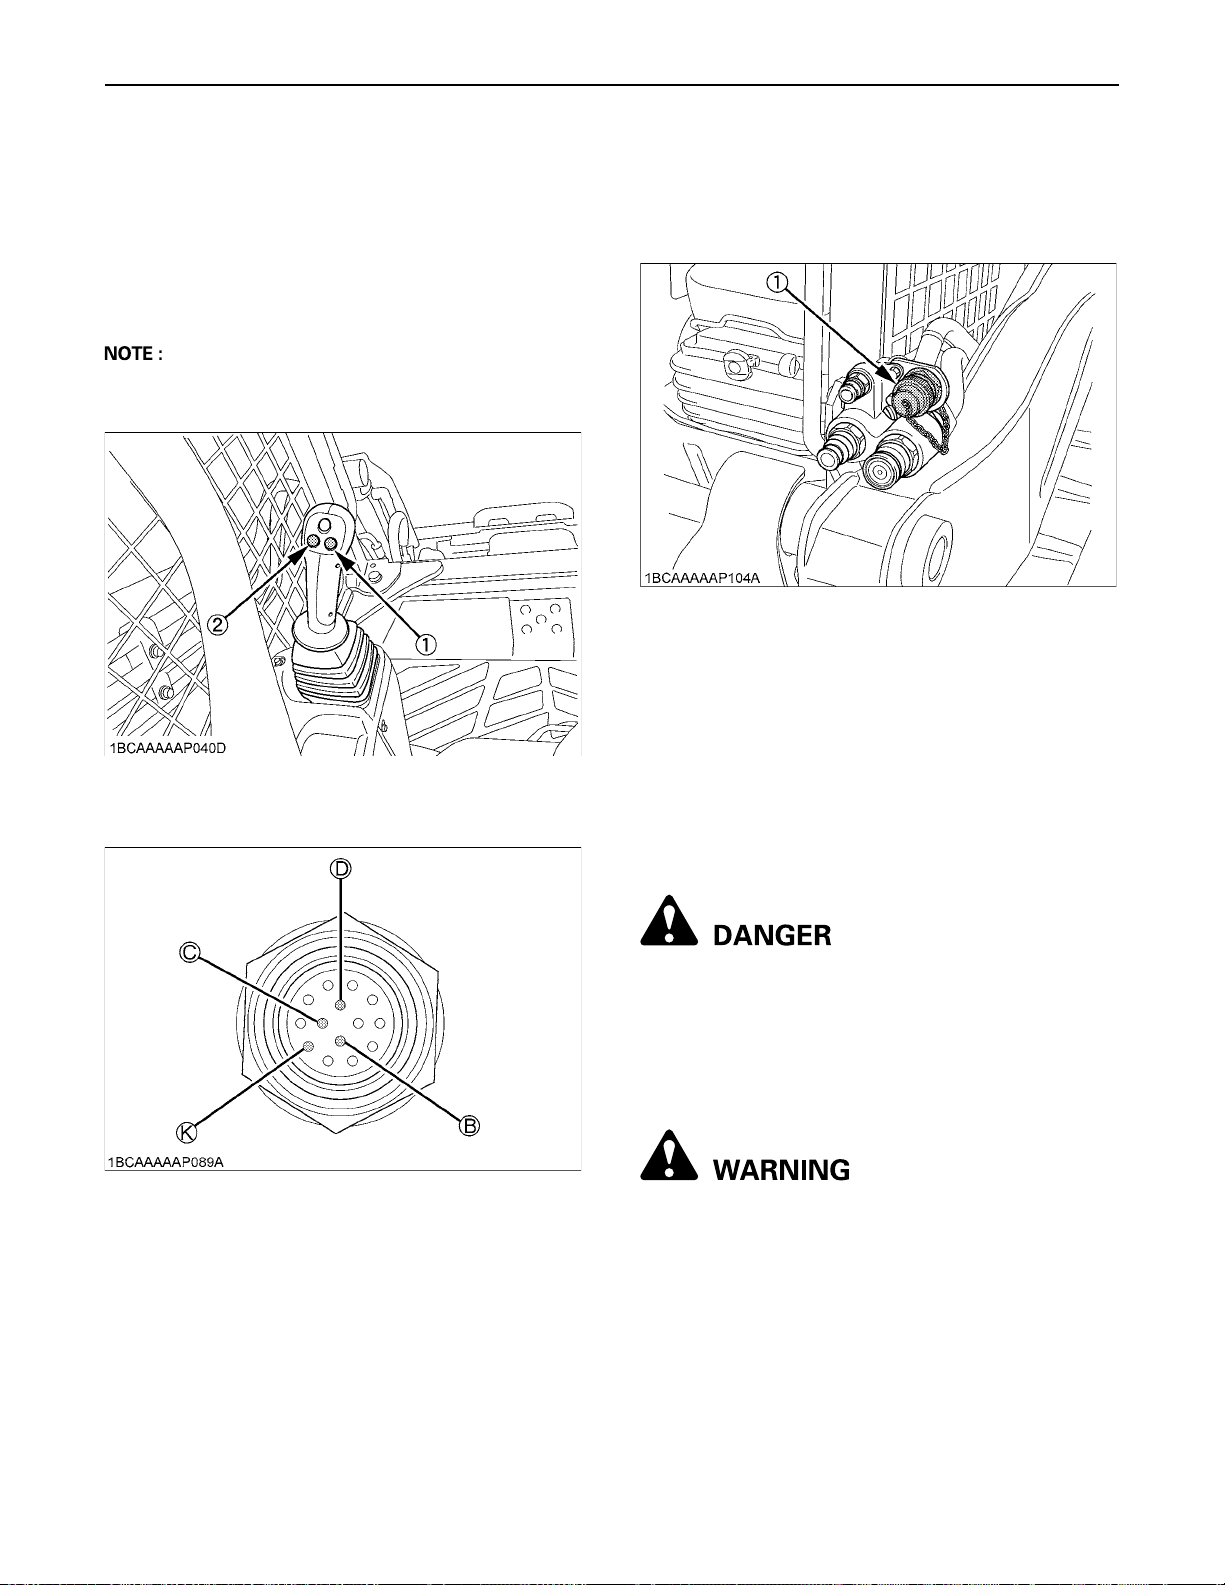
37OPERATION OF THE MACHINE
ATTACHMENT CONTROL DEVICE (OPTION)
This option is used to feed electrical power for an
attachment (to drive a valve, for instance).
With the AUX port ready for use, power can be supplied.
K: +12V and B: GND of the 14-pin coupler attached on the
arm (see below)
A The K (+12V) of the 14-pin coupler turns on when the
starter switch is in "RUN" position.
C Operation
Press the right electrical control switch of the left lever to
have "D" at +12V and the left electrical control switch to
have "C" at +12V. In this way, the valves connected with
them can be activated.
(1) 14-pin coupler
MECHANICAL QUICK-HITCH
BAttaching Attachments
This machine utilizes a quick-hitch for easy connection
(1) AUX electrical control switch (Right)
(2) AUX electrical control switch (Left)
and disconnection of various attachments.
By replacing the front attachments, this machine can be
used in agriculture, raising stock, landscaping, gardening
and snow removal as well as general civil engineering and
construction work.
To avoid personal injury or death:
A Use of attachments that do not comply with
ISO24410 or the improper positioning of
lever(s) or non-protrusion of pin(s) may result
in detachment of the attachment or
deformation, causing loss of performance,
personal injury or death.
To avoid personal injury or death:
A After doing these procedures, make sure the
attachment is securely attached to the quickhitch, or the attachment may be detached.
A When handling the control lever, you should do
it after setting the change lever to the neutral
position and the parking brake switch to the
parking position, lowering the lift arm, locking
all control levers in neutral position.
Page 62
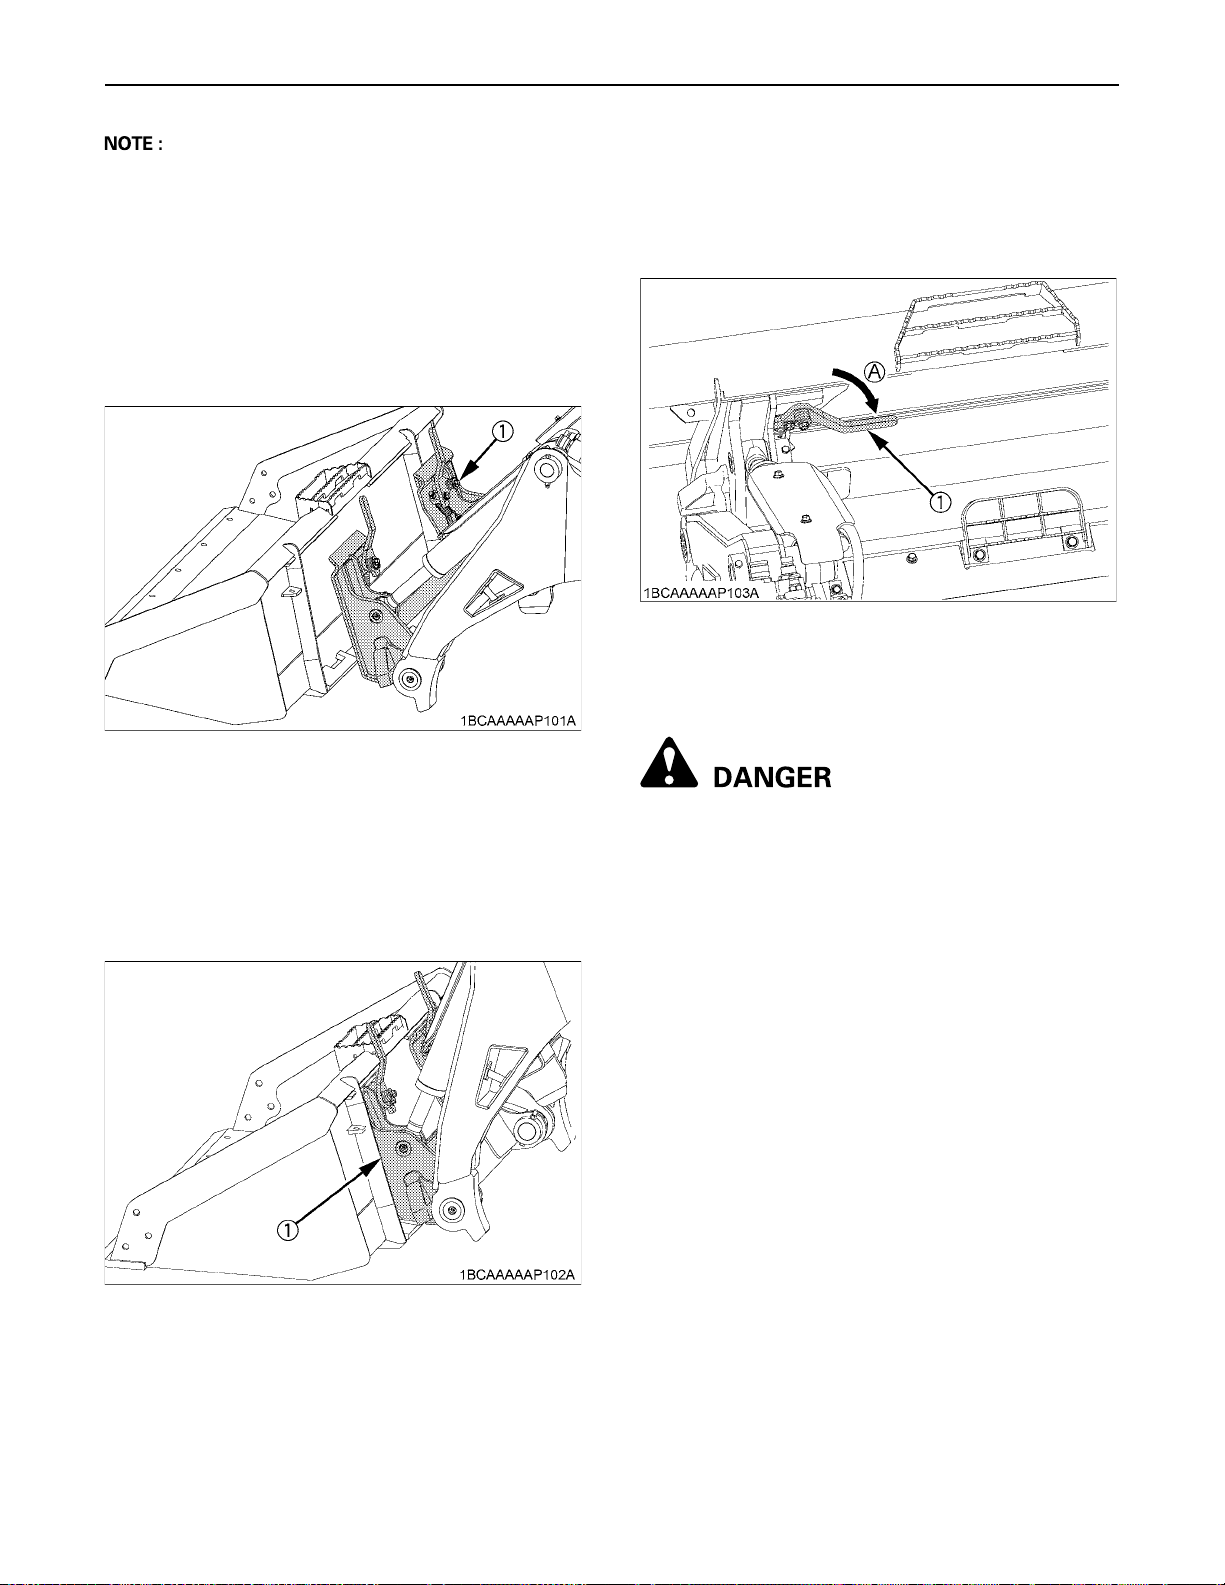
OPERATION OF THE MACHINE38
A Attachments should be located on a level, firm surface
when attaching and detaching them from the quickhitch.
1. To mount an attachment, pull the levers of the quickhitch lock pins to the "UNLOCKED" position. The
quick-hitch levers must be all the way up to ensure that
the lock pins are fully retracted.
2. Position the machine squarely in front of the
attachment and tilt the quick-hitch forward with the tilt
cylinders.
(1) Quick-hitch
5. When the attachment is properly seated in the saddle
and against the front of the quick-hitch mounting plate,
turn off the engine and set the parking brake. Push the
quick-hitch levers to the fully "LOCKED" position.
Verify both lock pins are completely engaged in the
base of the attachment.
(1) Quick-hitch lever (A) "LOCK"
6. With an attachment in place, lift the lift arms and empty
out the bucket. Tilt the bucket downwards and verify
the lock pins are fully engaged.
3. Ease the quick-hitch mounting plate into the saddle of
the attachment.
4. Roll the quick-hitch back using the tilt cylinders and
raise the lift arms slightly. The back of the attachment
should rest against the front of the quick-hitch
mounting plate and the weight of the attachment
should be supported by the lift arms.
(1) Quick-hitch
To avoid personal injury or death:
A The following engagement points are critical.
1) The lock pins of the quick-hitch have to
protrude into and through the pin slots of
the attachment on both sides.
It is critical that the pins are in good
condition and without visible signs of wear
or damage and that the operator align the
quick-hitch with the attachment to allow
the pins to go through the pin slots.
2) Both levers have to be pushed down until
the levers contact the ear plates near the
points where the pin bolt goes through the
lever (A).
3) Do not operate the machine or attachment
unless all of the above conditions are met.
Page 63
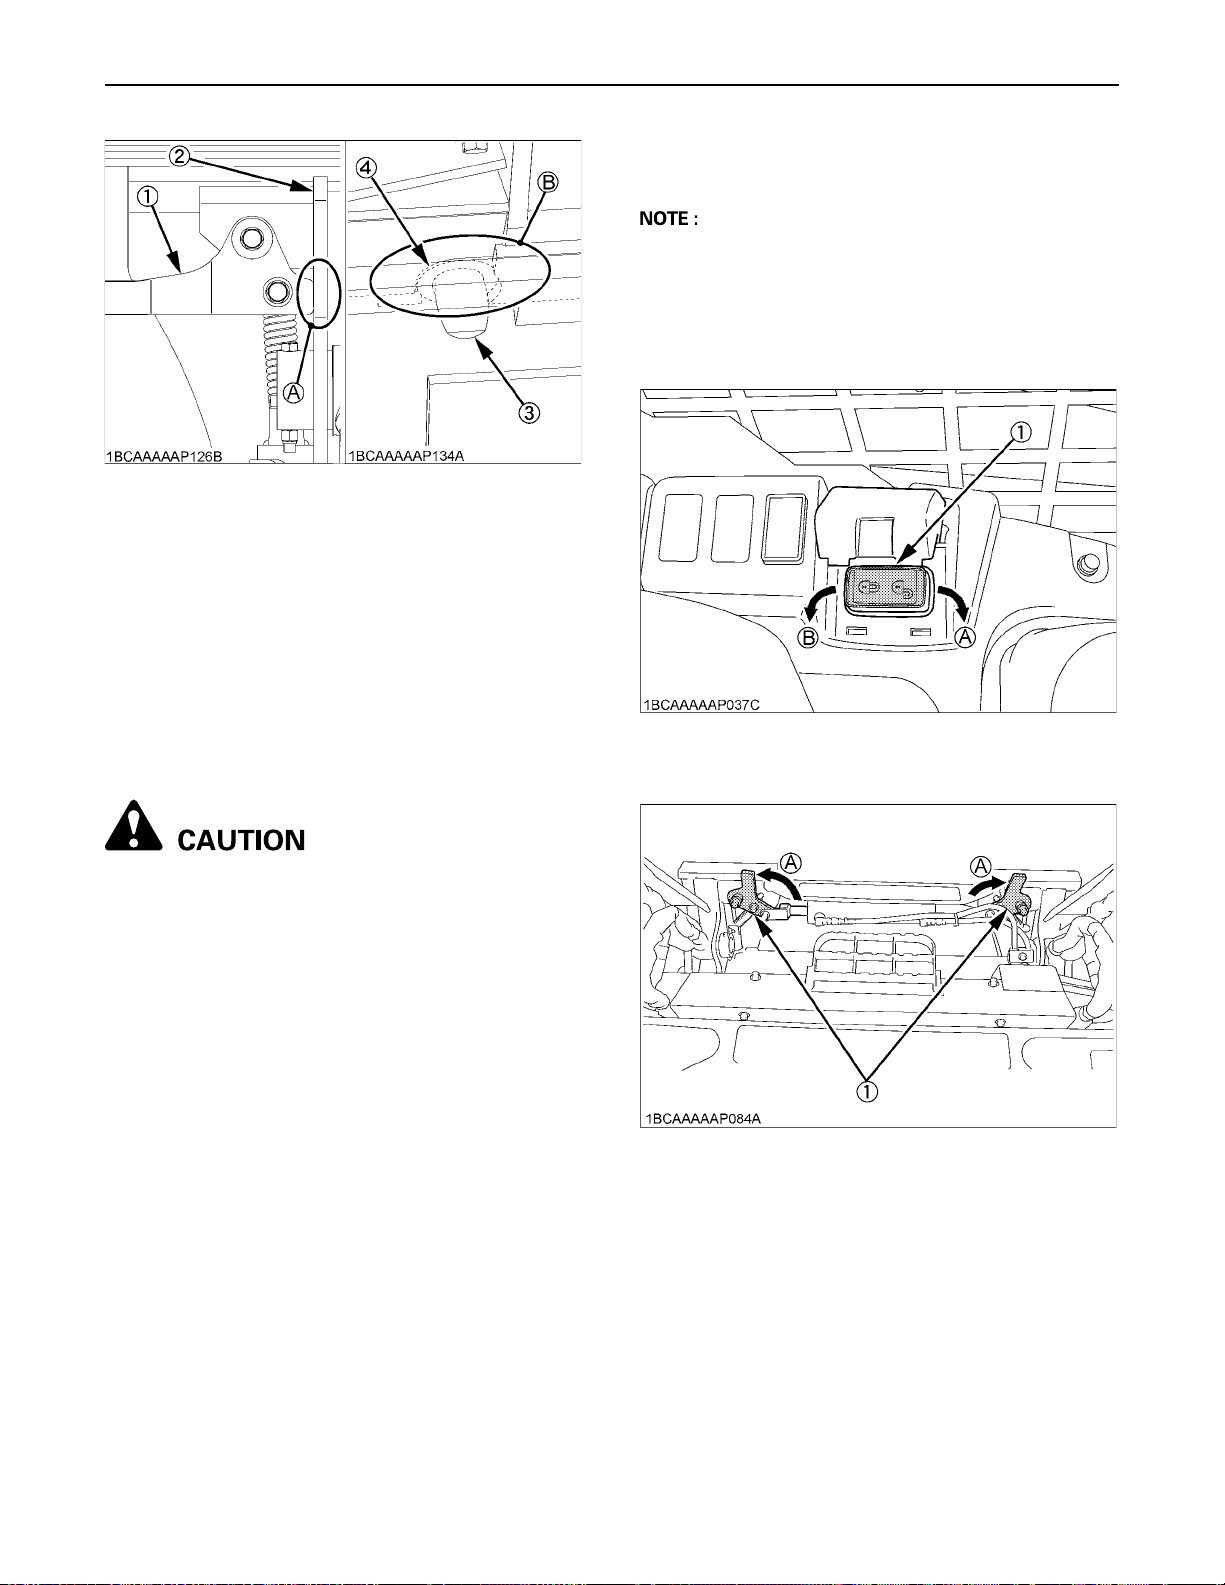
39OPERATION OF THE MACHINE
HYDRAULIC QUICK-HITCH (OPTION)
BAttaching Attachments
A Attachments should be located on a level, firm surface
when attaching and detaching them from the quickhitch.
1. Push the hydraulic quick-hitch switch in "UNLOCKED"
position and hold it to make sure the levers are up
("UNLOCKED" position).
(1) Lever
(2) Ear plate
(3) Lock pin
(4) Pin slot
7. Visually verify when pushing the quick-hitch levers into
locked position that the lock pins protrude through the
slot.
8. When attaching different attachments visually inspect
for broken or damaged pins. If broken or damaged
pins are found, replace before using. Use of broken
pins may result in detachment or deformation, causing
loss of performance, personal injury or death.
9. You are now ready to use the attachment.
To avoid personal injury or machine damage:
A Never operate or transport attachments which
are not attached completely.
A Always replace damaged hardware
immediately.
(A) "The lever contacts the ear
plate at the points."
(B) "The pin protrudes through
the slot."
BDetaching Attachments
1. Lower the attachment to ground level with the
attachment slightly in the rolled back position. Stop the
engine (the parking brake automatically engages.).
2. Disconnect the attachment's electrical harness and
hydraulic lines from the lift arms if equipped.
3. Pull the quick-hitch lever up to the unlocked position to
release the lock pins.
4. While sitting in the machine operator's seat, start the
engine and slowly move the right control (front
operating) lever to the "DUMP" position until the
attachment is pushed away from the quick-hitch.
5. Lower the lift arms so that the quick-hitch mounting
plate clears the attachment saddle.
6. Back away from the attachment slowly.
7. If an attachment is not going to be attached to the
quick-hitch immediately, push the lever of the quickhitch to the locked position to prevent damage to the
lever assembly.
(1) Hydraulic quick-hitch switch (A) "UNLOCK" position
(B) "LOCK" position
(1) Quick-hitch lever (A) "UNLOCK"
Page 64
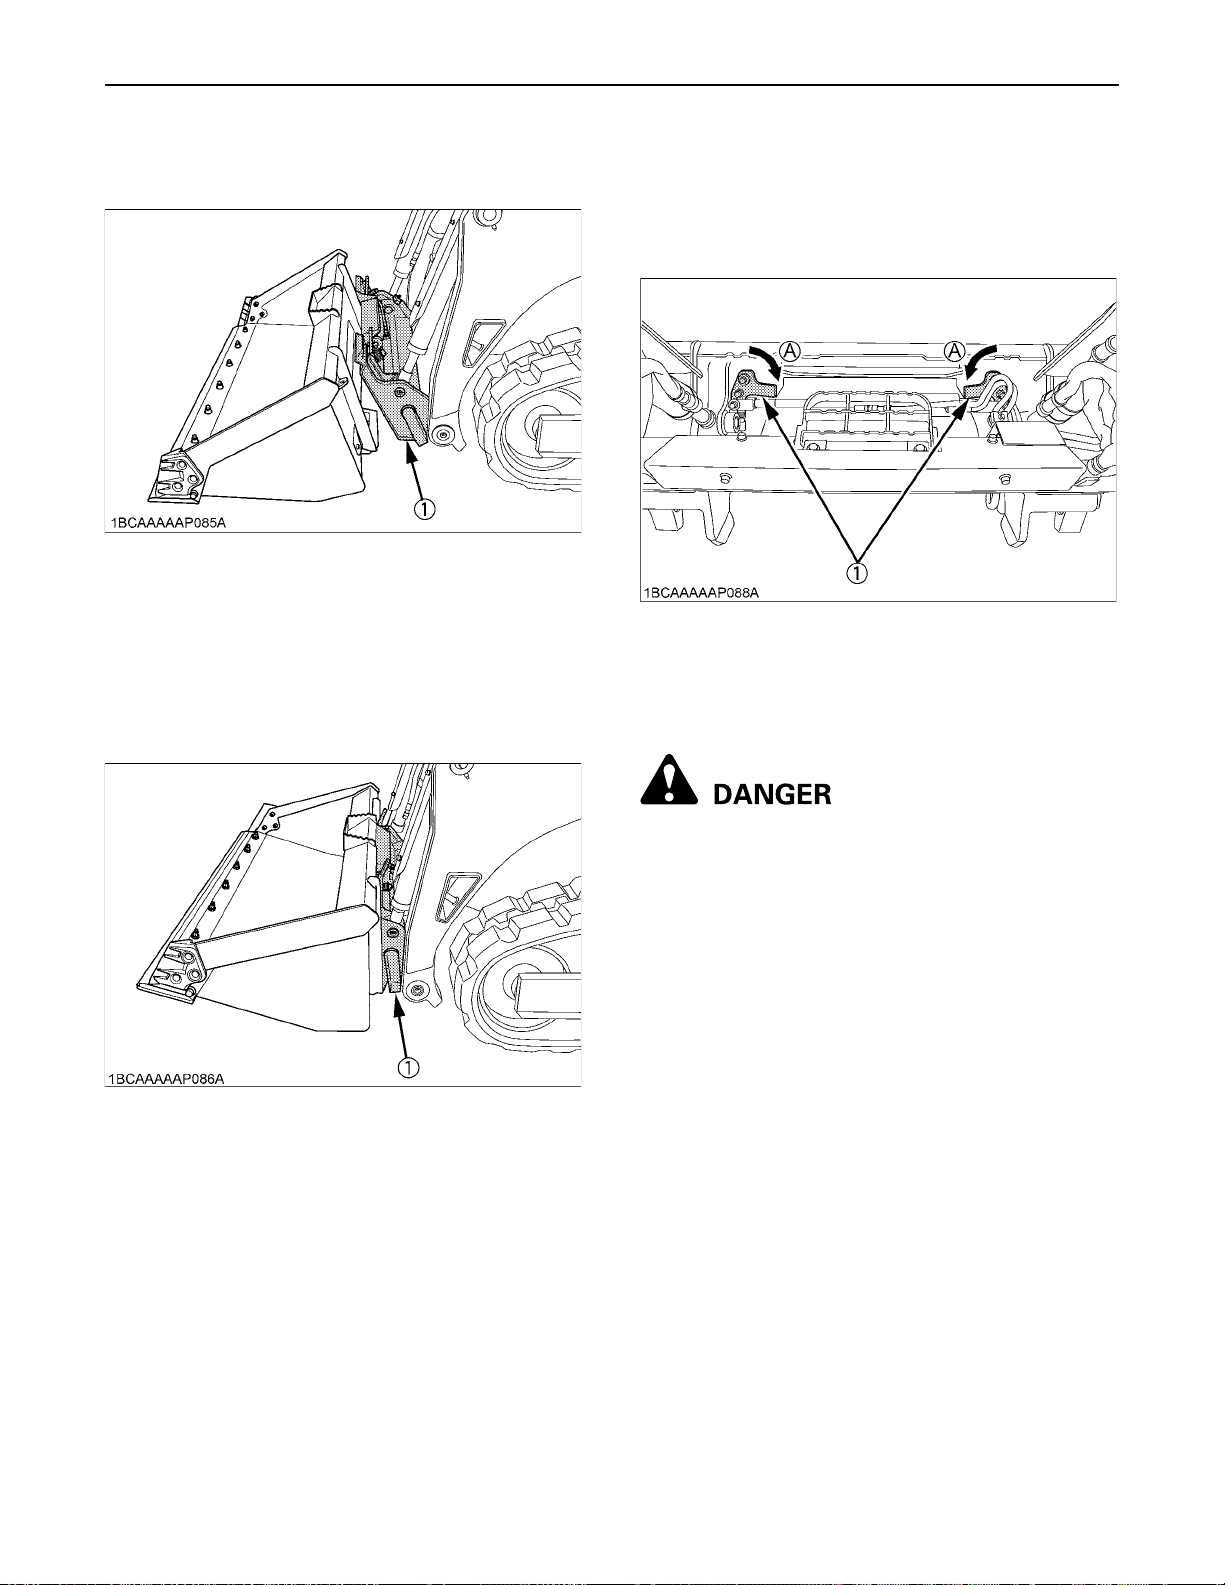
OPERATION OF THE MACHINE40
2. Position the machine squarely in front of the
attachment and tilt the quick-hitch forward with the tilt
cylinders.
(1) Quick-hitch
3. Ease the quick-hitch mounting plate into the saddle of
the attachment.
4. Roll the quick-hitch back using the tilt cylinders and
raise the lift arms slightly. The back of the attachment
should rest against the front of the quick-hitch
mounting plate and the weight of the attachment
should be supported by the lift arms.
5. When the attachment is properly seated in the saddle
and against the front of the quick-hitch mounting plate,
push and hold the hydraulic quick-hitch switch in
locked position until the levers are fully in locked
position. Verify both lock pins are completely engaged
in the base of the attachment.
(1) Quick-hitch lever (A) "LOCK"
6. With an attachment in place, lift the lift arms and empty
out the bucket. Tilt the bucket downwards and verify
the lock pins are fully engaged.
(1) Quick-hitch
To avoid personal injury or death:
A The following engagement points are critical.
1) The lock pins of the quick-hitch have to
protrude into and through the pin slots of
the attachment on both sides.
It is critical that the pins are in good
condition and without visible signs of wear
or damage and that the operator align the
quick-hitch with the attachment to allow
the pins to go through the pin slots.
2) Both levers have to be pushed down until
the levers contact the ear plates near the
points where the pin bolt goes through the
lever (A).
3) Do not operate the machine or attachment
unless all of the above conditions are met.
Page 65
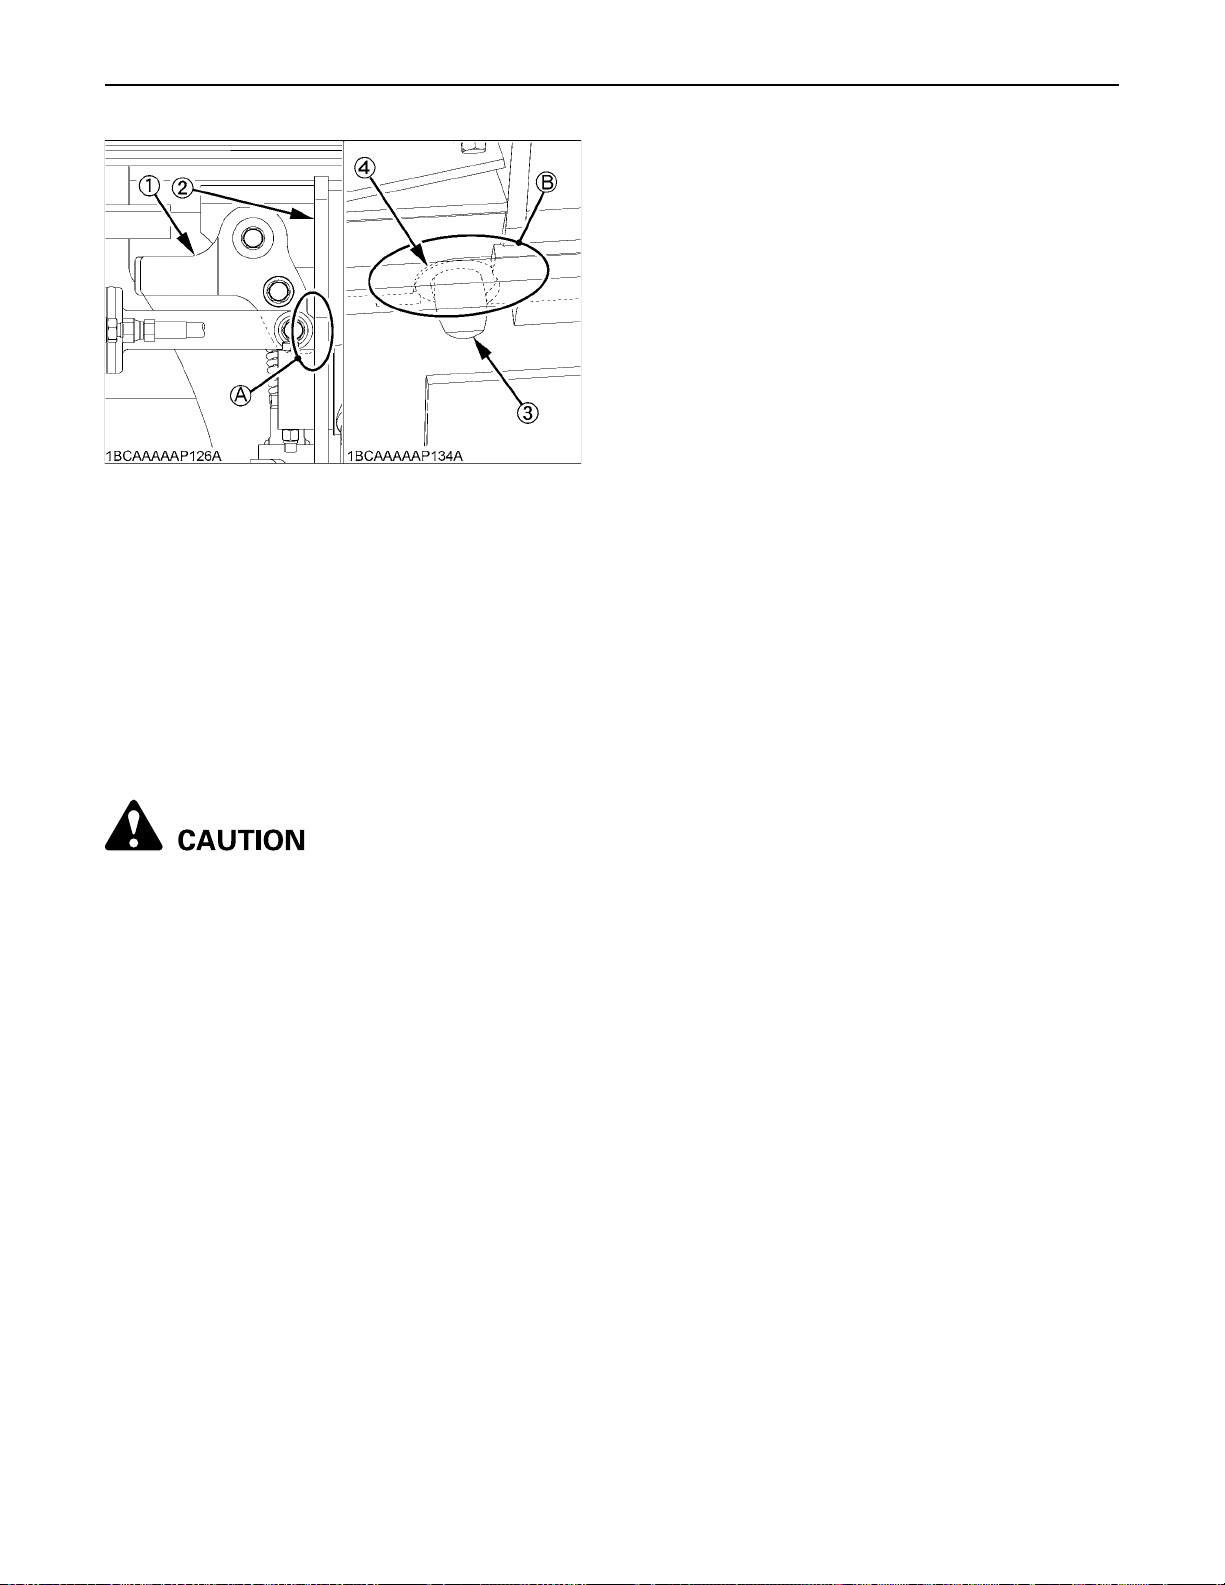
(1) Lever
(2) Ear plate
(3) Lock pin
(4) Pin slot
7. Visually verify when pushing the quick-hitch levers into
locked position that the lock pins protrude through the
slot.
8. When attaching different attachments visually inspect
for broken or damaged pins. If broken or damaged
pins are found, replace before using. Use of broken
pins may result in detachment or deformation, causing
loss of performance, personal injury or death.
9. You are now ready to use the attachment.
To avoid personal injury or machine damage:
A Never operate or transport attachments which
are not attached completely.
A Always replace damaged hardware
immediately.
(A) "The lever contacts the ear
plate at the points."
(B) "The pin protrudes through
the slot."
BDetaching Attachments
1. Lower the attachment to ground level with the
attachment slightly in the rolled back position. Stop the
engine. (The parking brake automatically engages.)
2. Disconnect the attachment's electrical harness and
hydraulic lines from the lift arms if equipped.
3. Start the engine and push the hydraulic quick-hitch
switch in "UNLOCKED" position. Hold it to make sure
the quick-hitch levers are up.
4. While sitting in the operator's seat, and slowly move
the right control (front operating) lever to the "DUMP"
position until the attachment is pushed away from the
quick-hitch.
5. Lower the lift arms so that the quick-hitch mounting
plate clears the attachment saddle.
6. Back away from the attachment slowly.
41OPERATION OF THE MACHINE
IMPORTANT INFORMATION ON MACHINE OPERATION
A Do not operate machine on loose rock or gravel (hard
or soft).
A Avoid moving machine when lift arms and bucket are
in the raised position. If you must move the machine
when they are raised, take care to travel at low speeds
in order to maintain control of the machine at all times.
A Always avoid working on an incline as the machine
can become unstable and rollover, causing serious
injury or death.
A Whenever the machine is in motion, keep the bucket
as close to the ground as possible. Never change
directions when the bucket is in the raised position.
A Always move the machine at speeds that are
appropriate to the conditions. Take particular care if
you are ever moving through areas where view may be
obstructed or when transporting hazardous material.
A Never operate the machine in the vicinity of explosive
gases. Always keep exhaust from machine away from
any combustible material.
A Never turn or spin the machine at high speed.
A Never approach an incline horizontally, which can
cause the track to slide off and cause excessive
wearing of tracks.
A Never exceed the operating capacity of the machine.
A Never use the machine to move material or perform
work that exceeds the capacity of the bucket or
attachments.
A Never use the bucket as a hammer to drive poles or
studs into the ground.
A Never attempt to dig too deeply with the bucket, which
can damage the bucket or lift arms.
A Avoid hitting the bucket against rocks or similar solid
material, which will damage the bucket or bucket
cylinder.
A Never fully extend cylinders to perform an operation.
Working while cylinders are fully extended can cause
damage from excessive force.
A Never scoop or grade areas while the tilt cylinders are
fully extended
Extremely heavy loads apply excessive traction force
to the bucket cylinders and can cause damage. Avoid
loads that are too heavy.
BCaution While Traveling
A Running over large debris (rocks, stumps, blocks, etc.)
may cause such debris to fly up and damage the
machine. Avoid such debris whenever possible.
A If obstacles cannot be avoided, travel slowly over them
with the bucket in the lowered position. Approach the
obstacles so it is at the center of the tracks.
Page 66
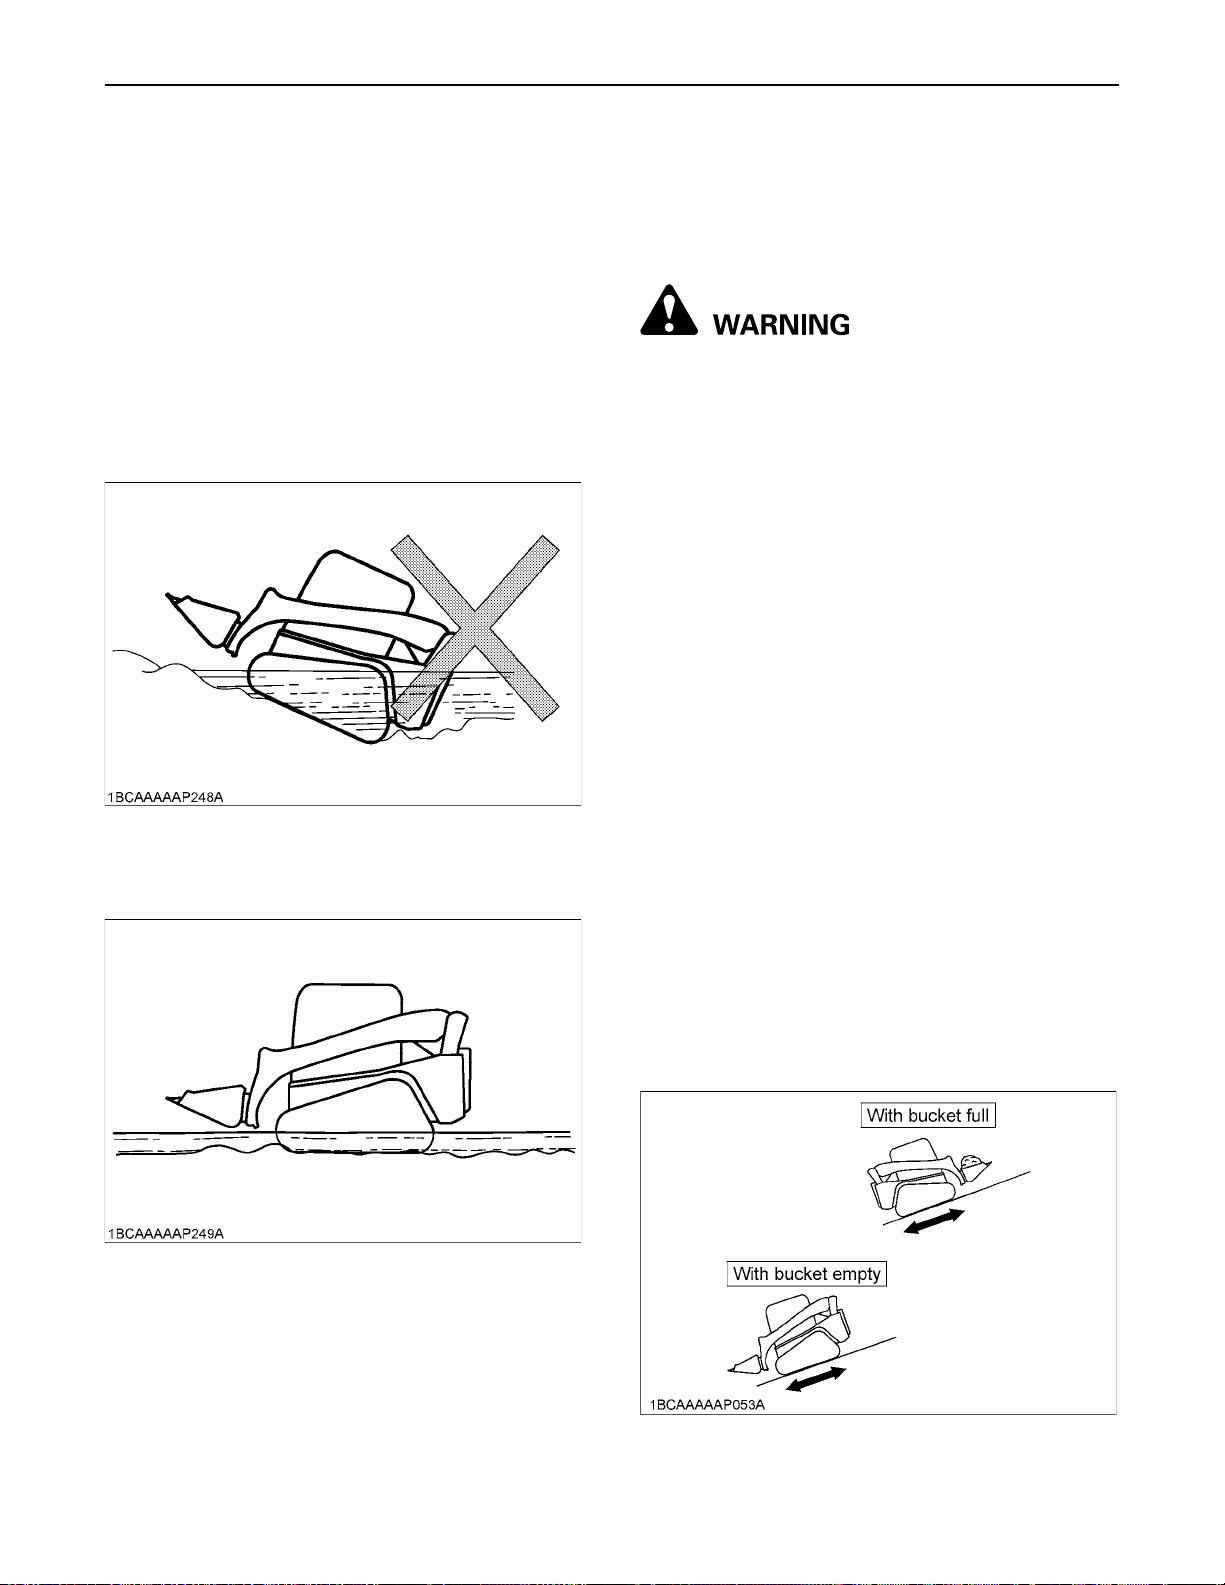
OPERATION OF THE MACHINE42
BPrecaution When Traveling in High Speed
A Whenever traveling over uneven ground surfaces,
travel at low speed. Avoid any sudden movements
with the machine such as accelerating, stopping, or
turning quickly.
BPrecautions for Use of Machine Near
Water
A Whenever working near water, pay particular attention
not to submerge any part of the machine especially the
rear where the radiator fan could be exposed to water,
damaging the parts. Always take care to keep working
machine parts out of water, especially when coming
out of a shoreline, for example, at a sharp angle.
A Permissible water depth:
Never allow the machine to become submerged in
water above the bottom of the body.
A Never allow the main body of the machine to become
submerged in water or sand. Contact your Kubota
Dealer or Service Outlet if the main body of the
machine is exposed to water.
BPrecaution When Traveling on Inclines
To avoid personal injury or death:
A Know and understand the machine capabilities
and operating conditions, and never exceed
any of these conditions. Keep in mind that poor
or difficult working conditions may reduce the
capability of the machine, requiring a reduction
in speed to maintain stability.
A Always lower the bucket to a height of 20 to 30 cm
from the ground whenever traveling on an incline.
Lower the bucket completely to the ground and stop
the machine in case of emergency.
A Always travel at low speed when moving on an incline.
Reduce the engine speed (rpm) when moving down
and incline and set the engine stroke to half or less
using the left control lever.
Traveling too fast down an incline can lead to loss of
control and accident or injury.
A Always make sure the heavy end of the machine is
facing up the incline when traveling either direction on
a hill having a gradient of 15 degrees or more.
A Whenever traveling on an incline, be careful of the
possibility of sliding sideways or rolling over.
A Never travel down an incline in reverse.
A Never approach an incline horizontally or diagonally.
Always return to a flat surface and redirect the
machine.
A Beware of unstable and slippery surfaces such as
grass, leaves, wet metal or ice. The machine can slide
very easily even on low grade inclines.
A If parts that require lubrication are exposed to water for
long periods of time, make sure they are re-lubricated
with grease to remove old grease.
A After working in the mud and in the water, make sure
that there is no invasion of the soil inside the frame.
If soil is deposited, you should clean the internal frame.
(See page 69, "Cleaning Inside of Main Frame".)
C Orientation of machine when traveling on an
incline
Page 67

A Braking is automatic with the HST system when the
left control lever is in the neutral position. Raise
armrests for parking brake.
C What to do when engine stops suddenly
A If the engine stops suddenly when moving down an
incline, put control levers into neutral, stop the
machine and then restart in the normal manner.
BParking on an Incline
A It is best to park the machine on firm, level ground
using the parking brake but if you must park the
machine on an incline, make sure you block it to
prevent any movement.
A Make sure the machine is highly visible when parking
near streets by using barriers, appropriate caution
signs, lights, etc. to avoid any accident or collision with
other vehicles.
A Always raise the armrests to the "RAISED" position
and stop the engine before leaving the operator's seat.
A Never leave the machine running unattended or with
the lift arms raised. Whenever lift arms are raised, they
MUST always be restrained using the lift arm stopper.
A Whenever leaving the machine, perform the following
procedure:
A Put control levers into neutral.
A Return the throttle lever to idle.
A Lower the bucket to the ground.
A Move armrest in the "RAISED" position.
A Turn off the engine and remove the key.
BProhibited Actions
Actions that MUST NOT be performed with the machine:
A Never move, transport material or operate the
machine in the following places:
Mud, broken stone, jagged or unstable base rock, iron
beams, iron scrapes, iron sheets, etc. Navigating,
turning and moving the machine over sharp material
may damage or break the tracks.
A Traveling on riverbeds and other areas where loose
gravel can get into the tracks, causing them to slip off
or become damaged.
A Do not use near the oceanfront where salt water can
corrode the various parts of the machine.
A Always prevent fuel, oil, salt or other chemical agents
from getting into the tracks, which can cause corrosion
to the metal track cores. If the track and its parts are
exposed to such material, immediately remove by
using water.
A Always avoid traveling on roads directly after they
have been resurfaced or other hot surfaces such fire
or metal surfaces under direct sunlight. Excessive
heat can cause irregular wear and damage to tracks.
A Do not attempt to move material where the surface is
unstable and could cause slippage in the tracks.
Unnecessary and excessive slipping of tracks will
damage and cause abnormal wearing of the tracks.
43OPERATION OF THE MACHINE
To avoid personal injury:
A Whenever operating the machine, do the
following:
1) Always avoid sudden changes in direction, or
spinning on concrete surfaces. Excessive
friction on the tracks will cause them to wear
out or become damaged.
2) Always avoid sudden impact to the tracks
such as allowing the machine to drop down or
hit objects.
3) Chemical such as salt, potassium chloride,
ammonium sulfate, potassium sulfate, triplesuper phosphate of lime, etc., can damage the
track belts. If the tracks are exposed to any of
these substances, immediately wash
thoroughly with water.
4) Avoid scraping the rubber tracks along
concrete, and other rough surfaces.
5) Take particular care when operating,
transporting material or traveling in snowy
conditions or on ice as tracks may slip.
6) Operate the machine between -20 C and
+50 C (-4 to 122 F) for proper functioning of
rubber track belts.
7) If machine must be stored for 3 months or
longer, keep it indoors, out of direct sunlight
and prevent exposure to the elements to
prevent wear on the rubber tracks.
BPreventing Slippage of Rubber Tracks
Always do the following to prevent slippage of rubber
tracks:
A Make sure tracks are kept at the proper tension. Never
change directions when there is excessive slack in the
track belts.
A When ascending an incline, never change direction at
the base of the incline.
A Always avoid operating the machine with one track on
a different surface than the other track, or with one
track partially on an incline. Make sure both tracks are
on stable, firm surfaces when in motion.
Page 68
44 LIFTING THE MACHINE
LIFTING THE MACHINE
Preparations
A Lifting chains (with hook at each end)
To avoid serious injury or death:
A The instructions for safe lifting are described
here. Read these instructions carefully before
lifting the machine. Make sure that the
operating personnel read the operator's
manual carefully before lifting.
A Select a firm level surface, lower the working
equipment to the ground, stop the engine, set arm rest
to locked position and apply parking brake switch so
the unit cannot roll.
A Do not lift loads that exceed the maximum rated
capacity of the hoist and attaching hardware.
A See specifications for attaching hardware and choose
hardware suitable for the weight, size and
configuration of the load.
A Assess the center of gravity of the load, position the
hook directly over the load and lift the load so that it
remains horizontal.
A Do not enter and do not allow others to enter the
working area under the suspended load and do not
move the load over people. The load must only be
moved in an area where the equilibrium can be
maintained.
A Always inspect the attaching hardware, including
chains, hooks and master links before each use. Do
not use any worn or damaged attaching hardware or if
the safety latch is missing.
A Do not use attaching hardware, including chains,
hooks and master links, in extreme temperature or
other environmental conditions that exceed the
manufacturer's specifications.
A Load disengagement can cause severe injury or
death. The use of a hook with a safety latch or other
master link device does not preclude inadvertent
detachment of a slack sling load from the hook or
master link. Visual verification of proper hook or
shackle engagement is required in all instances.
A Comply with all Federal, State and Local regulations
and safety standards before lifting the machine.
A Do not use the holes on the roof structure to lift the
machine.
A Make sure the lifting chains, hooks and master links
are strong enough to withstand the load being lifted.
A Be sure that the hooks used have safely latch.
A Before lifting, be sure attachments are properly
attached.
Approximate overall length: 3.43 m (135 in.), 2 pc.
Approximate overall length: 8.84 m (348 in.), 1 pc.
A Pads (to protect the machine and lifting chain)
A Master links, 2pc.
Model name SVL 75*
Model Type Open Cab Closed Cab
CTL weight ** kg 4110 4235
Recommended Chain
Working Load Limit >
2565 kg ***
Recommended Master Link
Working Load Limit >
5125 kg ***
Recommended Attachment
Hardware
Working Load Limit >
2565 kg ***
* SVL 75 Weight shown with optional 15.5 inch wide
track
** SVL weight with standard (non-hydraulic) bucket
*** Recommended chain, master link and attachment
hardware shall meet OSHA regulations and applicable
ANSI, NACM, and Federal standards
3/8” Lifting Grade 80 Alloy
Size not specified
Size not specified
Page 69
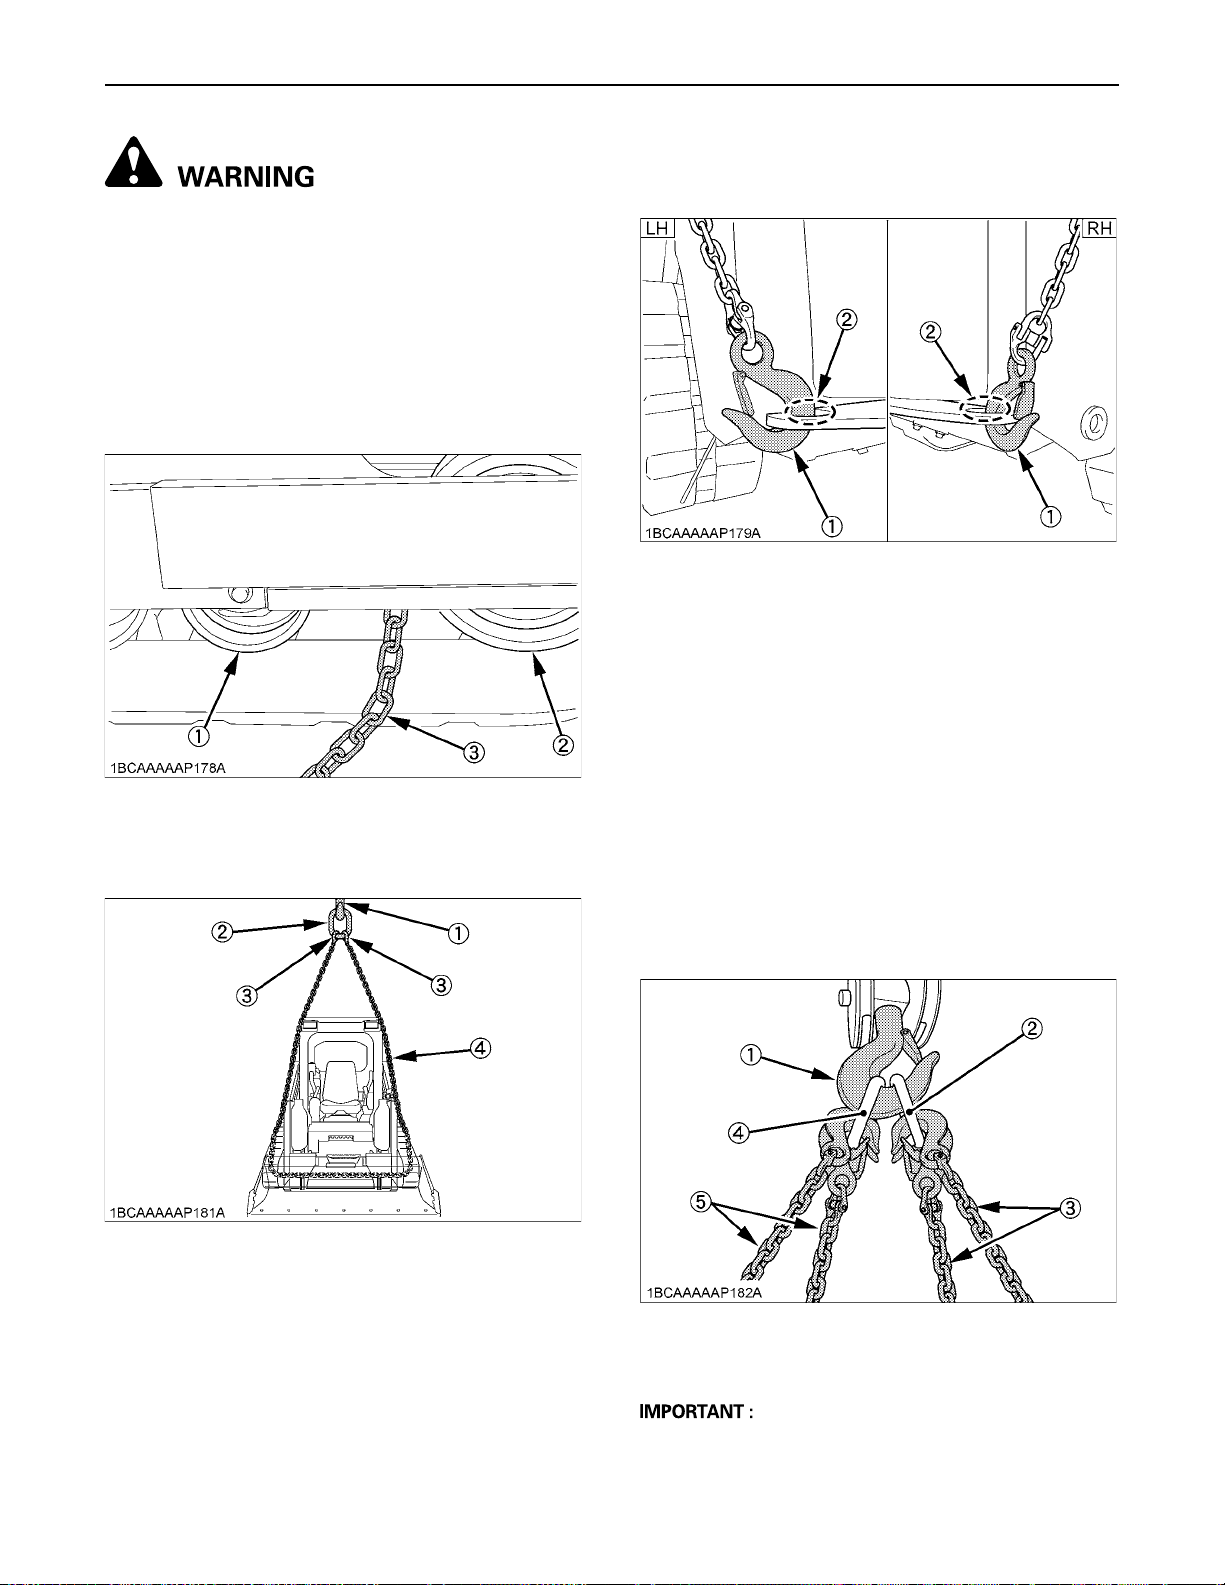
To avoid personal injury or death:
A Do not use damaged chains and lifting
hardware.
Procedure for connecting chains
(1) Chain locations and hook positions
A Front of the machine:
Pass the chain between the front idler and the
front track roller, under the machine on each
side, as shown in Fig. 1 and Fig. 2.
[Fig. 1][Chain location at front of the machine]
(1) Front track roller
(2) Front idler
(3) Front lifting chain
[Fig. 2][Front view]
45LIFTING THE MACHINE
A Hook positions at rear of the machine
Lifting fixture mount at rear corners of the machine.
[Fig. 3][Hook positions at rear of the machine]
(1) Hook
(2) Lifting fixture mount (Rear tie down point)
(2) Connection of the hook
A At the front of the machine, use the 8.84 m
chain length. Pass the lifting chain and hook
between front track roller and front idler under
machine and again between front track roller
and front idler at other side.
A Connect both hooks to front master link and
connect the master link to the hoist hook as
shown in Fig. 4.
A At the rear of the machine, use the 3.43 m
chain length. Attach one end at the rear lifting
fixture mount and attach the other hook to
master link, then connect the master link to the
hoist hook as shown in Fig. 3 and Fig. 4.
(1) Hoist hook
(2) Front master link
(3) Hook
(4) Front lifting chain
[Fig. 4][Hoist hook and master links]
(1) Hoist hook
(2) Front master link
(3) Front lifting chain
(4) Rear master link
(5) Rear lifting chain
A Be sure to pass the rear lifting chains to the sides of
the machine body as shown in Fig. 3 and Fig. 5.
Page 70
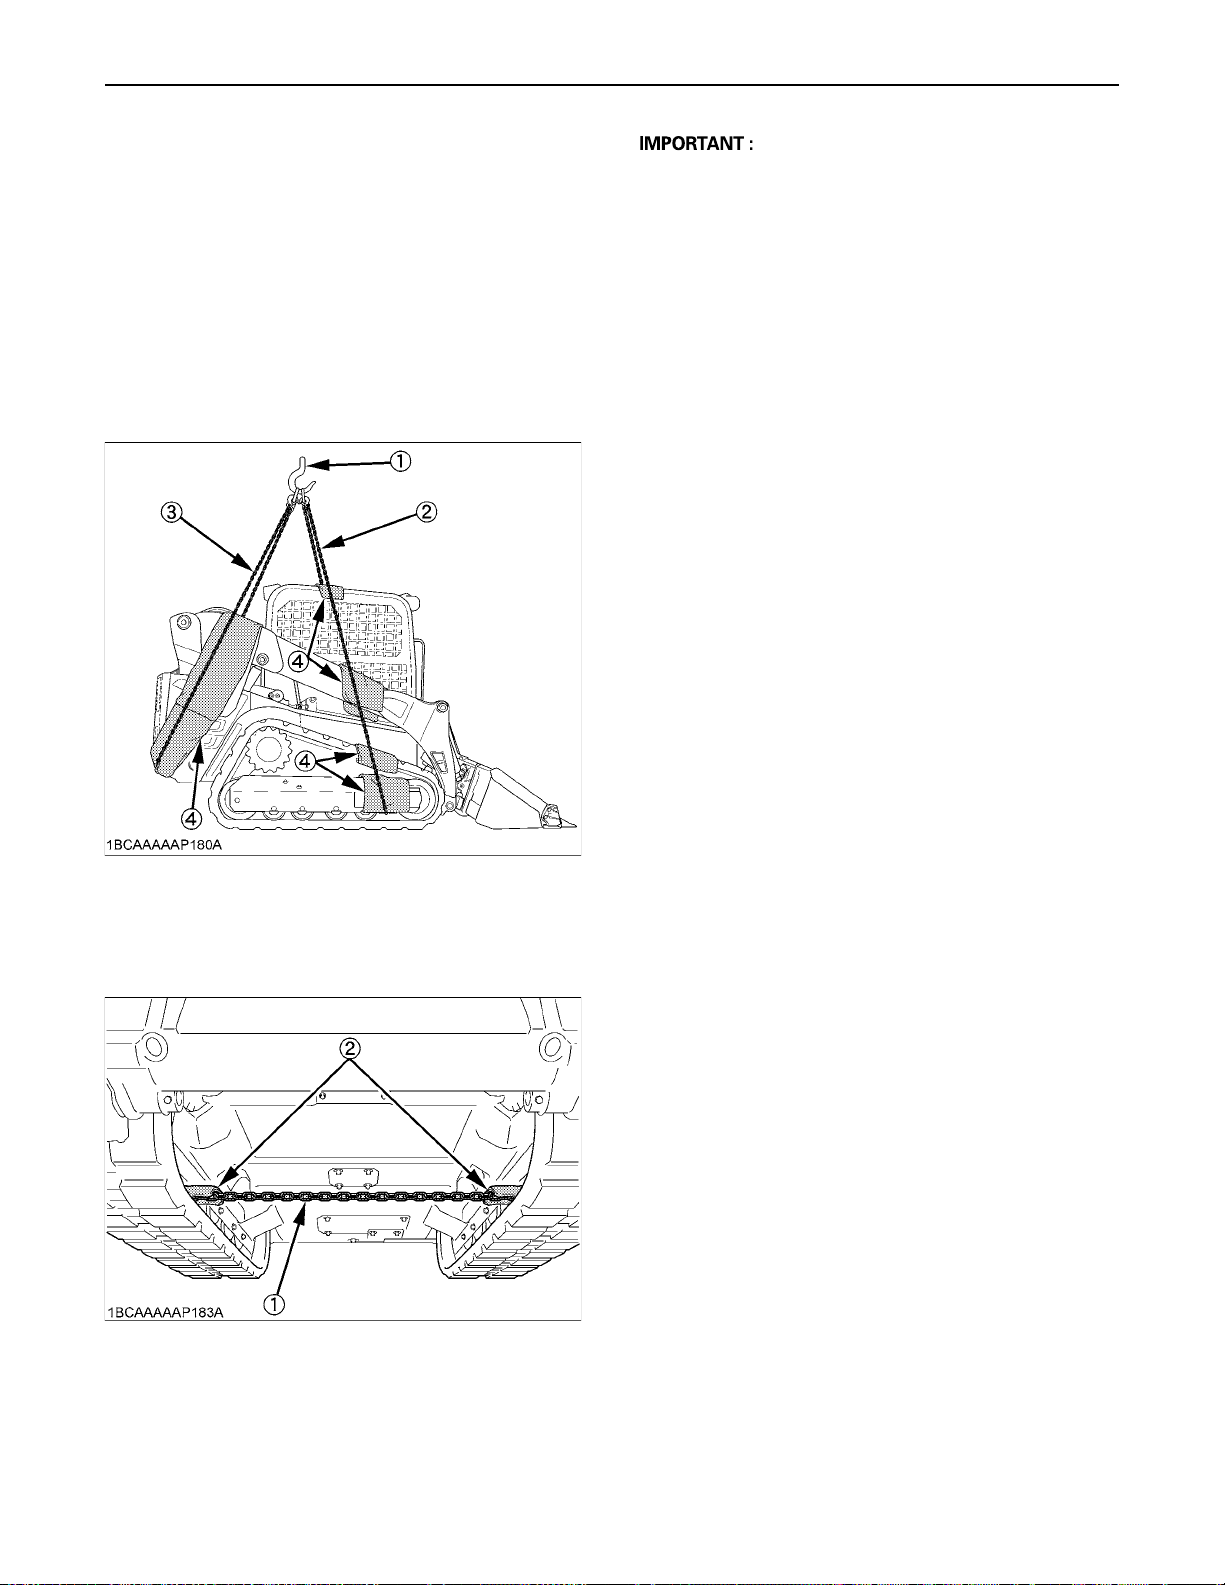
LIFTING THE MACHINE46
(3) Applying the pads
Apply the pads at locations shown in Fig. 5 and
Fig. 6, where the chains come in contact with the
machine to reduce machine and chain damage.
C Locations to apply the pads
A Cab top
A Lift arm
A Track
A Track frames
A Rear lifting chains contact locations (frame and lift
arm)
[Fig. 5][Lifting chain with pads]
A Never put yourself around the machine when lifted.
A Never lift the machine with person in operator station
or on the attachment.
(4) Before lifting, locate the hoist hook at the point
which is shown in Fig. 5 and Fig. 6.
Procedure for lifting
(1) Lift slowly and vertically.
(2) Move the machine slowly into place.
(1) Hoist hook
(2) Front lifting chain (8.84 m)
(3) Rear lifting chain (3.43 m)
(4) Pads
[Fig. 6][Front lifting chain location]
(1) Front lifting chain (8.84 m)
(2) Pads
Page 71
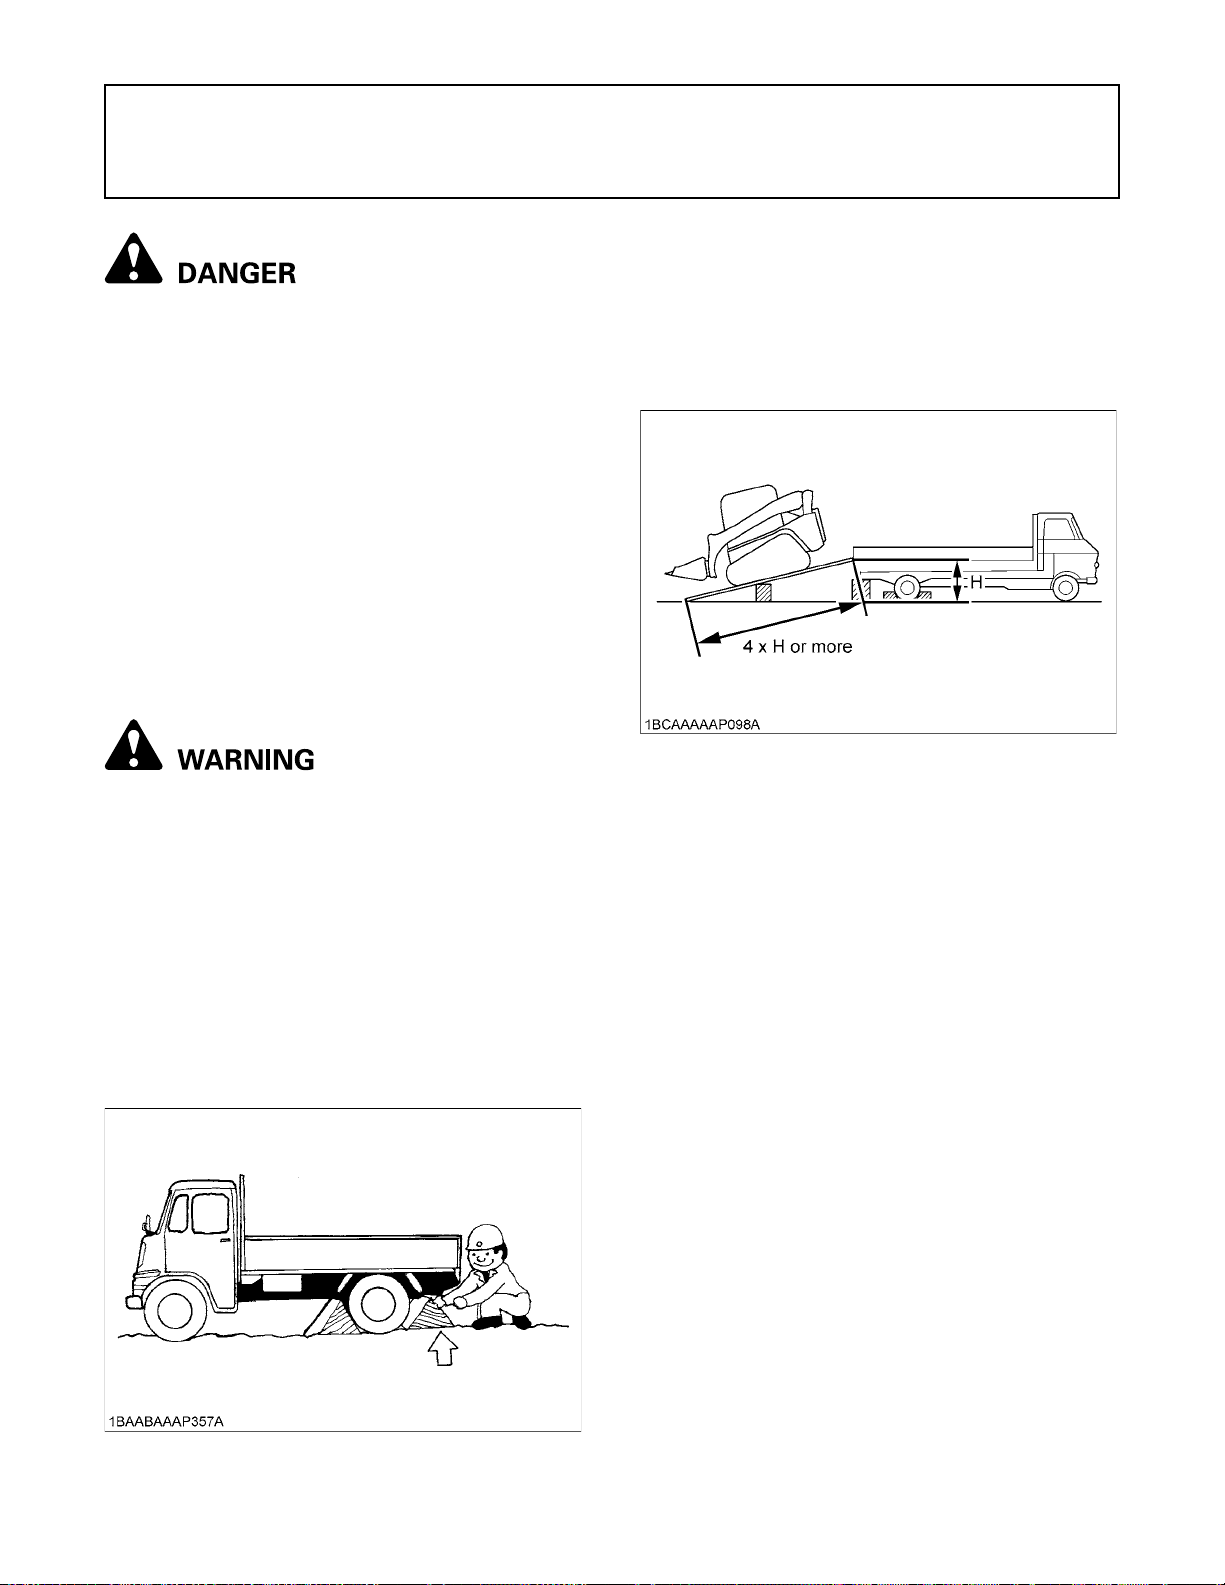
47TRANSPORTING THE MACHINE
TRANSPORTING THE MACHINE
3) Use mounting brackets to secure ramps
properly to the truck or trailer.
To avoid personal injury or death:
A Make sure the ramps load capacity is greater
than the machine and attachment weight.
A Make sure the ramps are clean, not damaged
and properly secured to the transport bed.
A Position the machine so that the heaviest end
of the machine is going up the ramps first.
A No directional changes should be made when
the machine is on the ramp. Should a change of
direction be necessary, drive off the ramp
completely and make the turn.
A When the machine reaches the point between
the ramps and the bed, move very slowly until
the machine reaches the horizontal position on
the bed.
4) Determine and use the correct length of ramps
to avoid a steep angle of approach as shown
below.
5) If necessary, support the rear end of the bed
to prevent the truck / trailer front from rising.
LOADING THE MACHINE ON A TRANSPORT VEHICLE
To avoid personal injury or death:
A When preparing to load or unload the machine,
follow the below steps;
1) Use a truck and trailer with sufficient size and
weight capacity to transport the machine with
attachment. Use of truck or trailer with an
underrated capacity can cause unpredictable
handling and loss of control. Always comply
with government transportation laws and
regulations.
2) Apply the parking brakes on the truck, and
block the drive wheels both sides as shown
below.
6) Align the machine with the ramps before
traveling on ramps and if the ramps are wet,
use caution during loading.
7) Load the machine with empty bucket or no
attachment installed, and with the rear of
machine going up the ramp first.
8) If the bucket or attachment is installed, avoid
the bucket or attachment contact with ramps
during travel.
Page 72
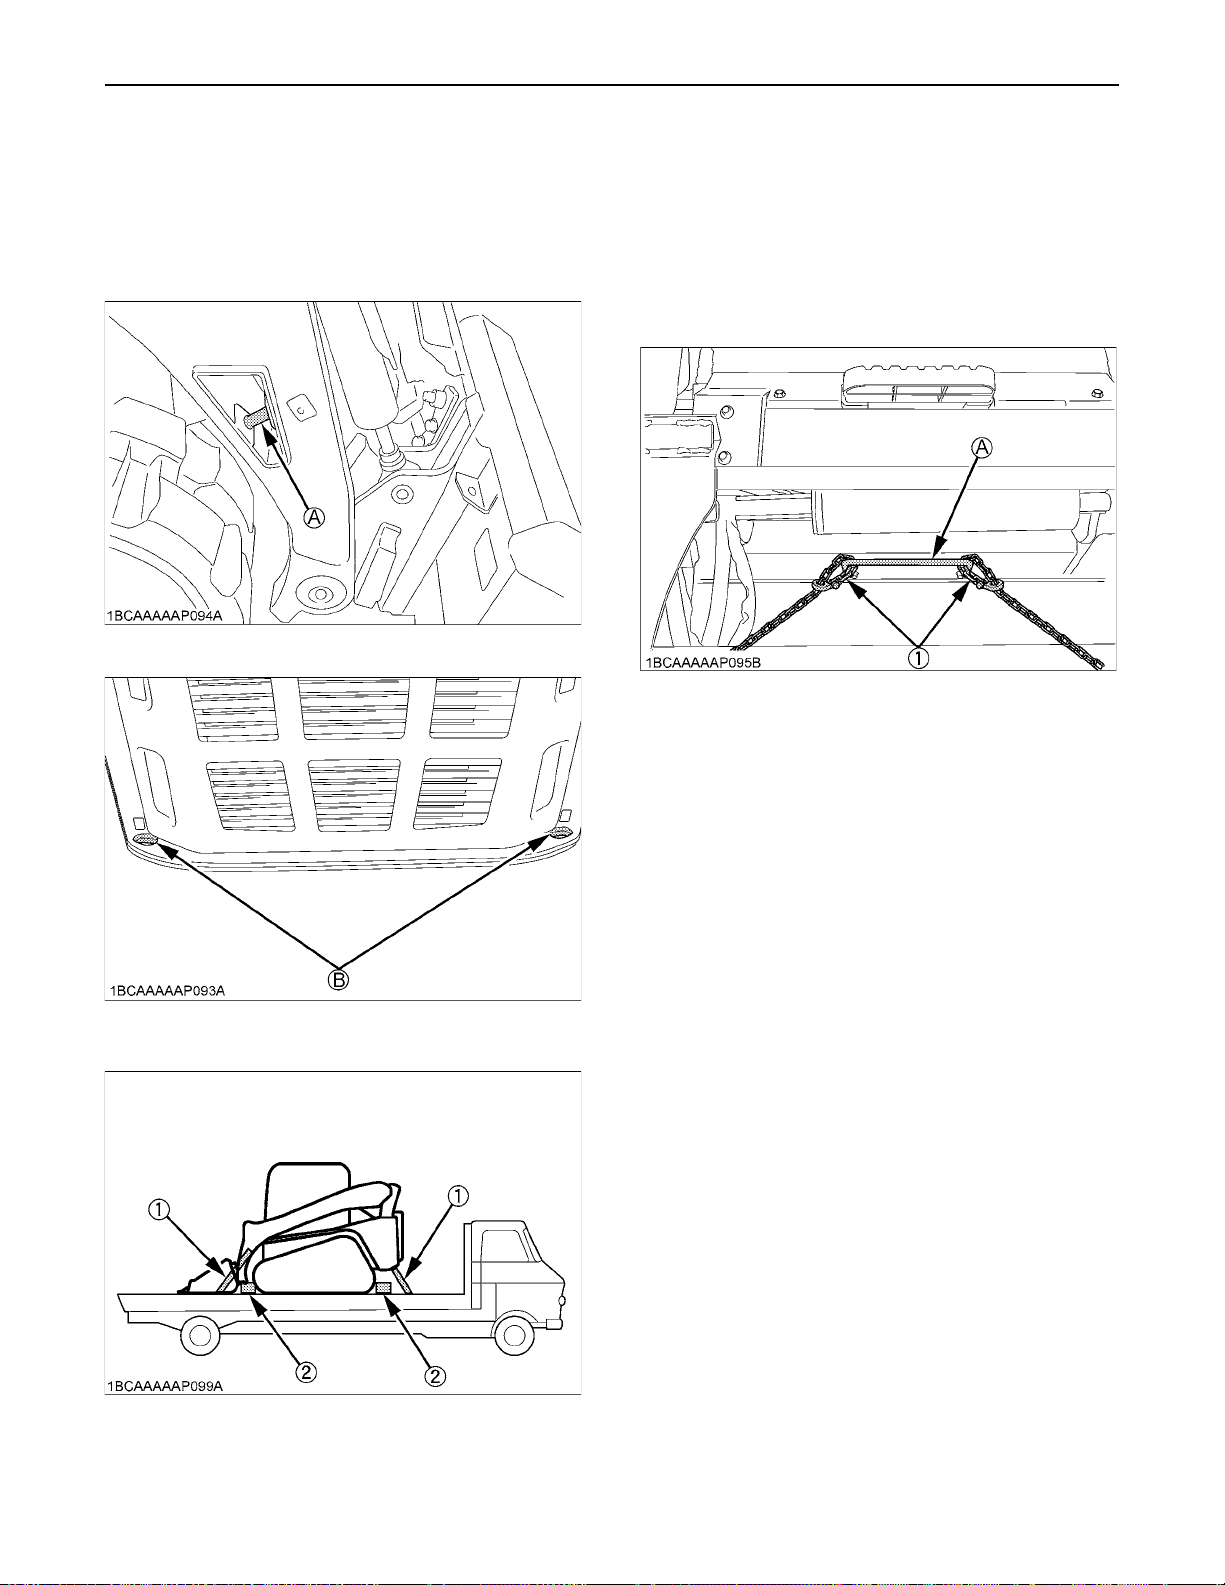
TRANSPORTING THE MACHINE48
9) Once the machine is loaded, lower the bucket
or attachment completely.
10)Stop the engine, remove the key and set the
parking brake.
11)Block the tracks and tie down the machine
using 2 tie-downs at the front and 2 tie-downs
at the rear.
(A) Front tie-down locations (both sides)
12)Depending on the attachment installed, the
loader arms may not come in contact with rest
stop; therefore it may be necessary to use the
alternate front center tie-down for securement
of the machine. Use two separate straps or
chains as shown below and secure the
attachment with a separate strap or chain.
Consult your government transportation laws
and regulations.
(1) Chain or strap (A) Alternate front tie-down
(B) Rear tie-down locations
13)When installing chains or strap from machine
tie-down location to truck or trailer tie-down
points, maintain proper angles to provide
lateral and downward securement.
(1) Chain or strap
(2) Blocks
Page 73
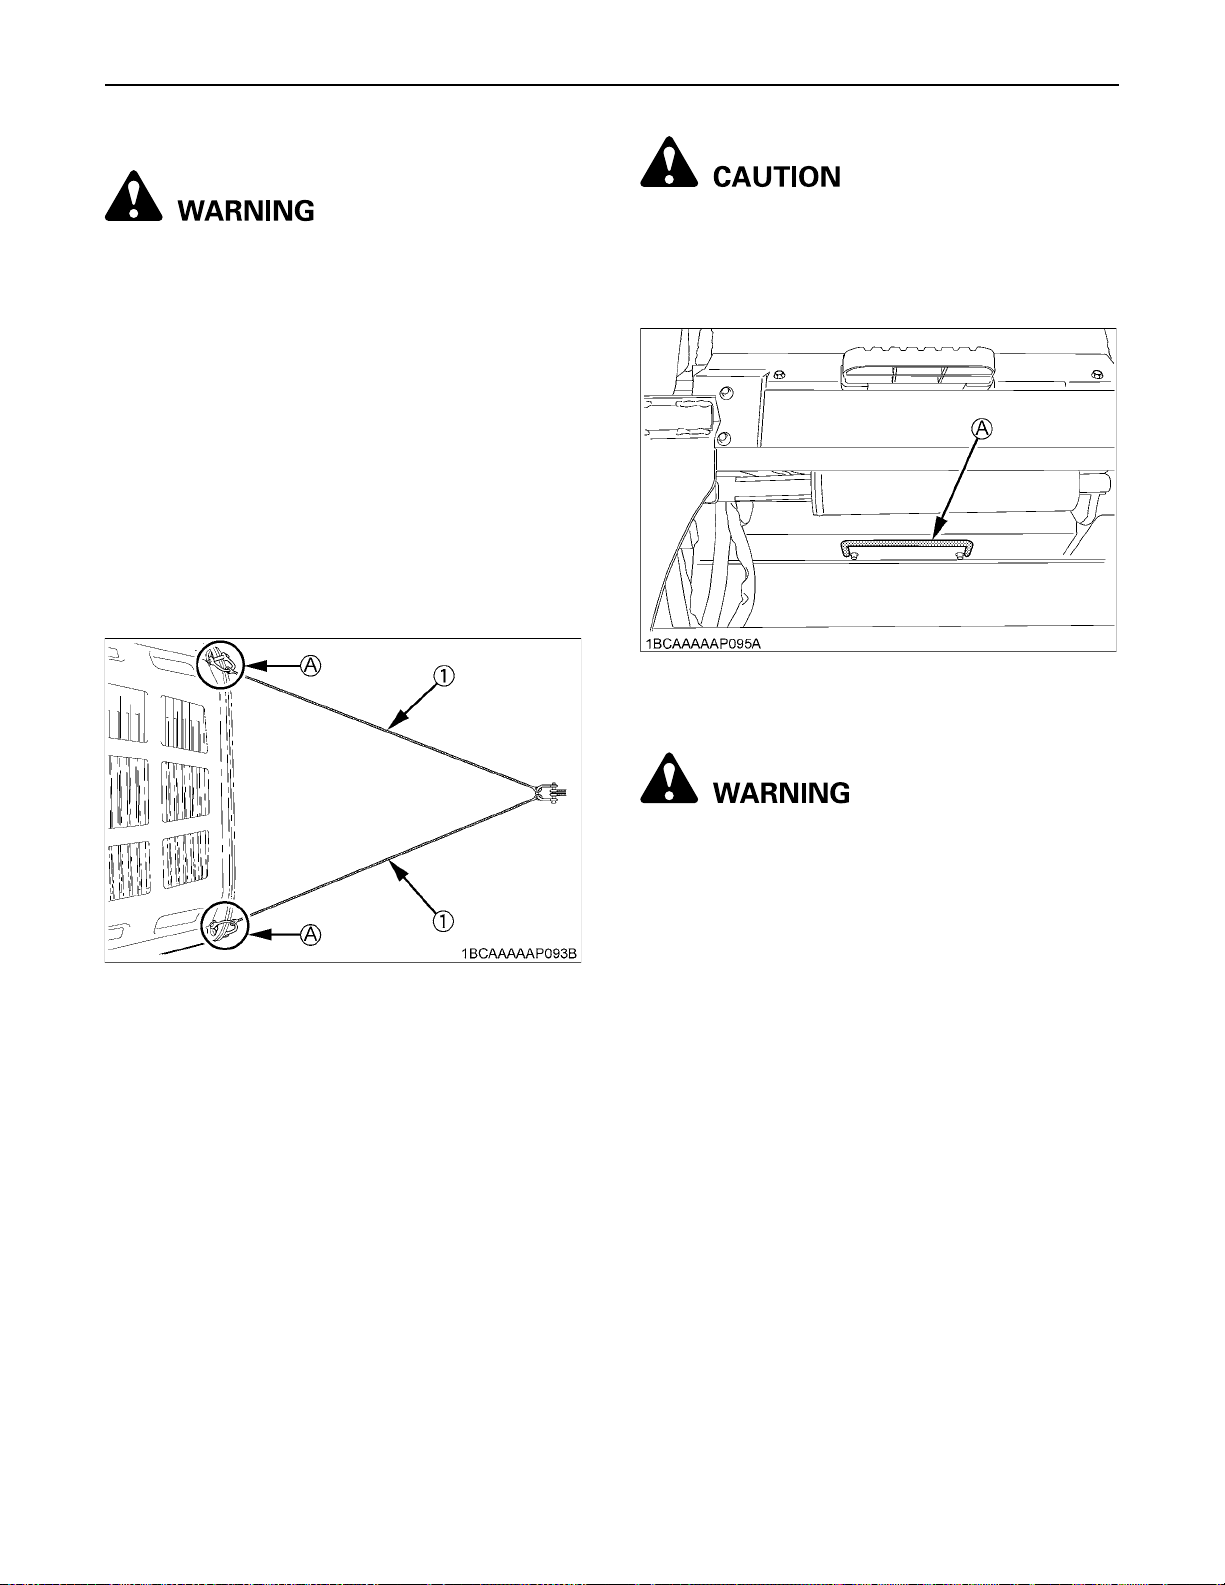
TOWING AN OPERABLE MACHINE
To avoid personal injury or death:
A Tow only from both rear tie-downs as shown
below.
A Towing is only allowed for a short distance at
walking speed.
A Use a tow chain or rope and hardware that is
rated at least 1.5 times the machine weight.
Refer to "TECHNICAL DATA" section in
operator's manual to find machine weight.
1. Attach towing hardware using both rear tow points and
to towing machine as shown below.
2. The operator must be seated in the towed machine
with seat belt connected during the recovery process
and assist when towed using machine movement in
the direction of towing.
3. Tow slowly at a walking pace with recovery machine
and towed machine, avoid abrupt loads while towing.
49TRANSPORTING THE MACHINE
To avoid personal injury :
A Do not tow this machine using the front tie-
down attachment points located on each side
of the lift arms or tie-down point at center of
machine (A).
(1) Chain or strap (A) Rear tow and tie-down points
(A) Tie-down point
TOWING AN INOPERABLE MACHINE
To avoid personal injury or death:
A Do not tow machine without disengaging
hydraulic drive system, otherwise damage to
the hydraulic drive or track system will occur.
A Follow proper procedures to disengage
hydraulic drive system before towing machine.
After disengaging hydraulic drive system, tow
the machine following the below steps.
Contact your KUBOTA dealer for more
information.
A Tow only from both rear tie-downs as shown in
the figure to the left.
A Towing is only allowed for a short distance at
walking speed.
A Use a tow chain or rope and hardware that is
rated at least 1.5 times the machine weight.
Refer to "TECHNICAL DATA" section in
operator's manual to find machine weight.
1. Attach towing hardware using both rear tow points and
to towing machine as shown in the figure to the left.
2. Tow slowly at a walking pace with recovery machine
and towed machine, avoid abrupt loads while towing.
Page 74
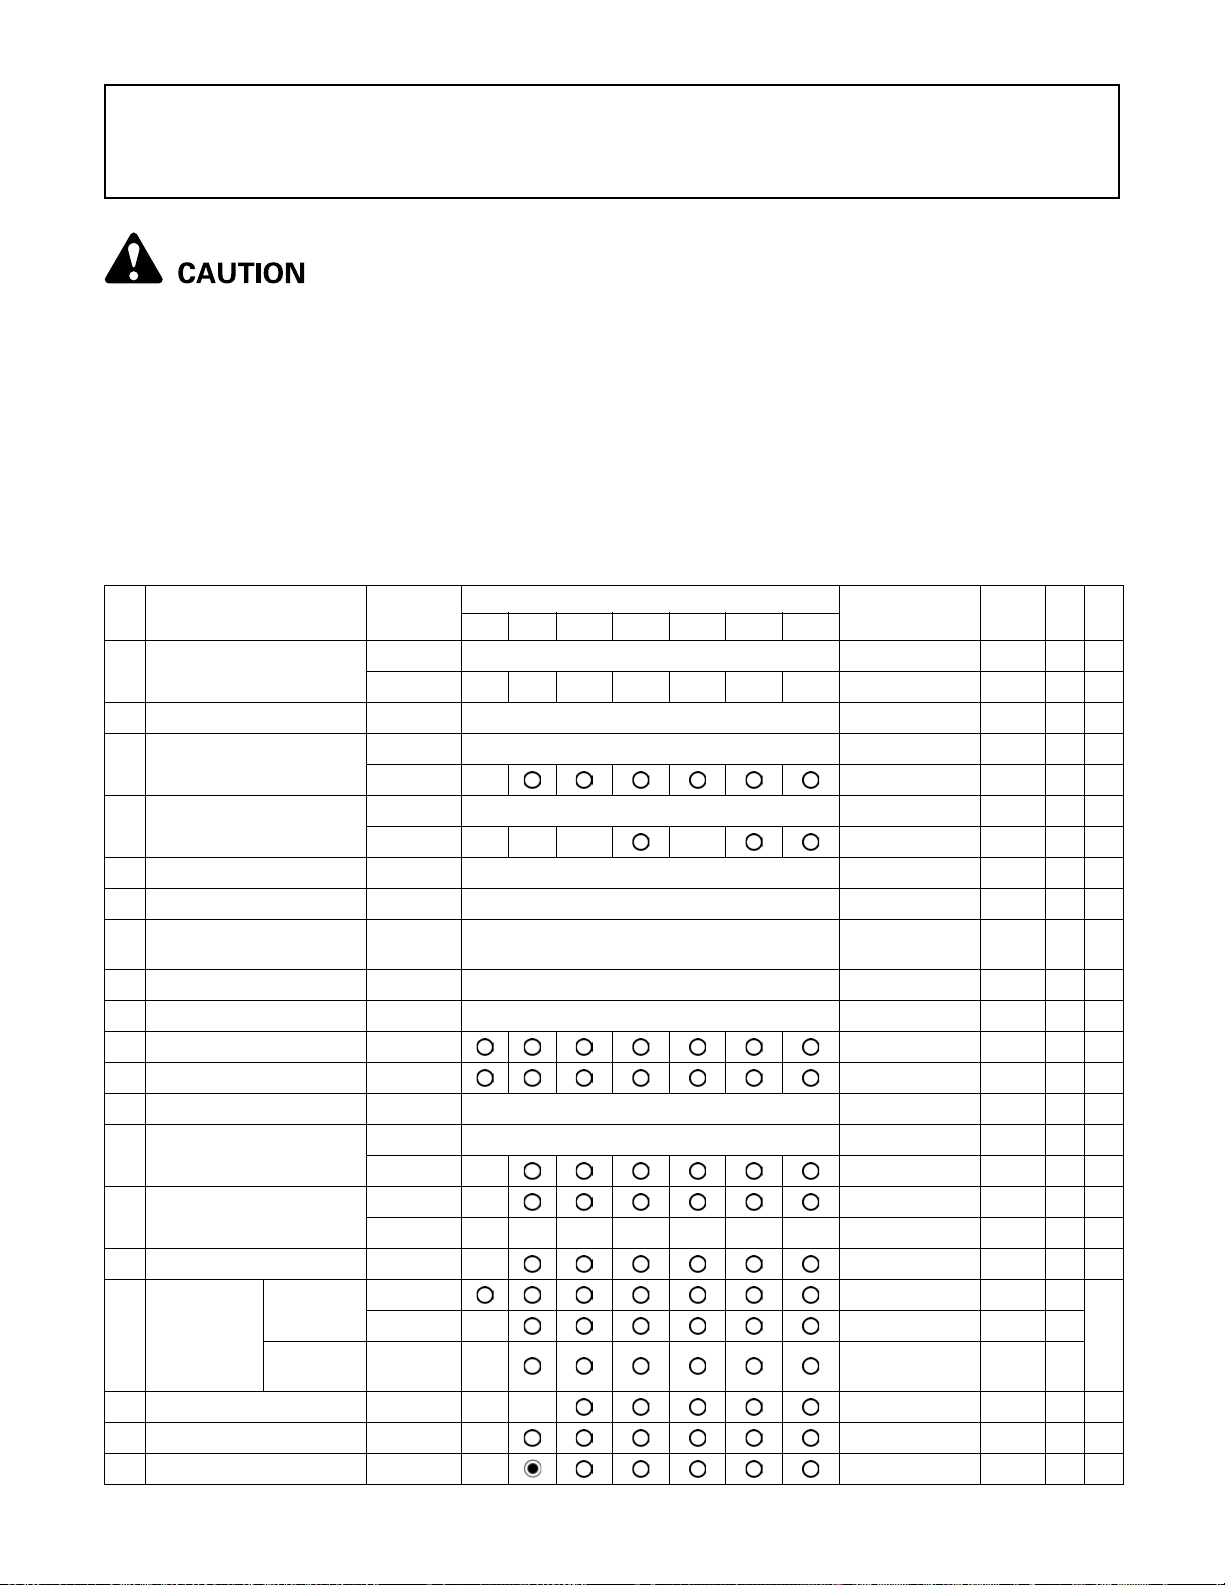
50 MAINTENANCE
MAINTENANCE
To avoid personal injury:
A Before doing maintenance work on the machine, place the machine on a firm, flat and level surface, lower
the lift arms slowly to the ground, stop the engine.
Whether the machine is properly lubricated and maintained directly determines the trouble frequency and service life of the
machine. Periodically check and maintain your machine, and you will find in the long run that the jobs can be finished earlier
and more economically.
Shown in the Service Interval Chart below are the hours indicated on the hourmeter, practically, it will be convenient to
schedule the time of inspection and maintenance according to the calendar (day, week, month) on the basis of the chart.
If the machine is used in harder-than-usual working conditions, it must be checked and maintained at shorter intervals.
MAINTENANCE INTERVALS
No. Check points Measures
1 Coolant
2 Fuel check Daily check (every 10 hrs) 58
3 Engine oil
4 Hydraulic oil
5 Greasing grease Daily check (every 10 hrs) 60
6 Radiator and oil cooler check Daily check (every 10 hrs) 60
Engine and
7
electrical wiring
8 Water separator drain Daily check (every 10 hrs) 61
9 Washer liquid check Daily check (every 10 hrs) 61
10 Fuel tank drain every 50 hrs 64
11 Track Tension check every 50 hrs 64
12 Battery condition check Daily check (every 10 hrs) 62
13 V-belt tension
14 Radiator hoses and clamps
15 Inside of main frame clean every 250 hrs 69
Outer
Air cleaner
16
element
17 Fuel filter cartridge replace every 500 hrs 71 @
18 Engine oil filter cartridge replace every 250 hrs 67
19 Drive unit oil change every 500 hrs 72
element
Inner
element
check Daily check (every 10 hrs) 58
change every 2 years 75
check Daily check (every 10 hrs) 59
change every 250 hrs 66
check Daily check (every 10 hrs) 59
change every 1000 hrs 73 *1
check Daily check (every 10 hrs) 60
check Daily check (every 10 hrs) 61
adjust every 250 hrs 68
check every 250 hrs 67
replace every 2 years 77
clean every 50 hrs 65 *2
replace every 250 hrs 70 *2
replace every 250 hrs 70 *2
50 250 500 1000 1500 2000 3000
Hour meter indicator
Interval
Ref.
page
@
Page 75
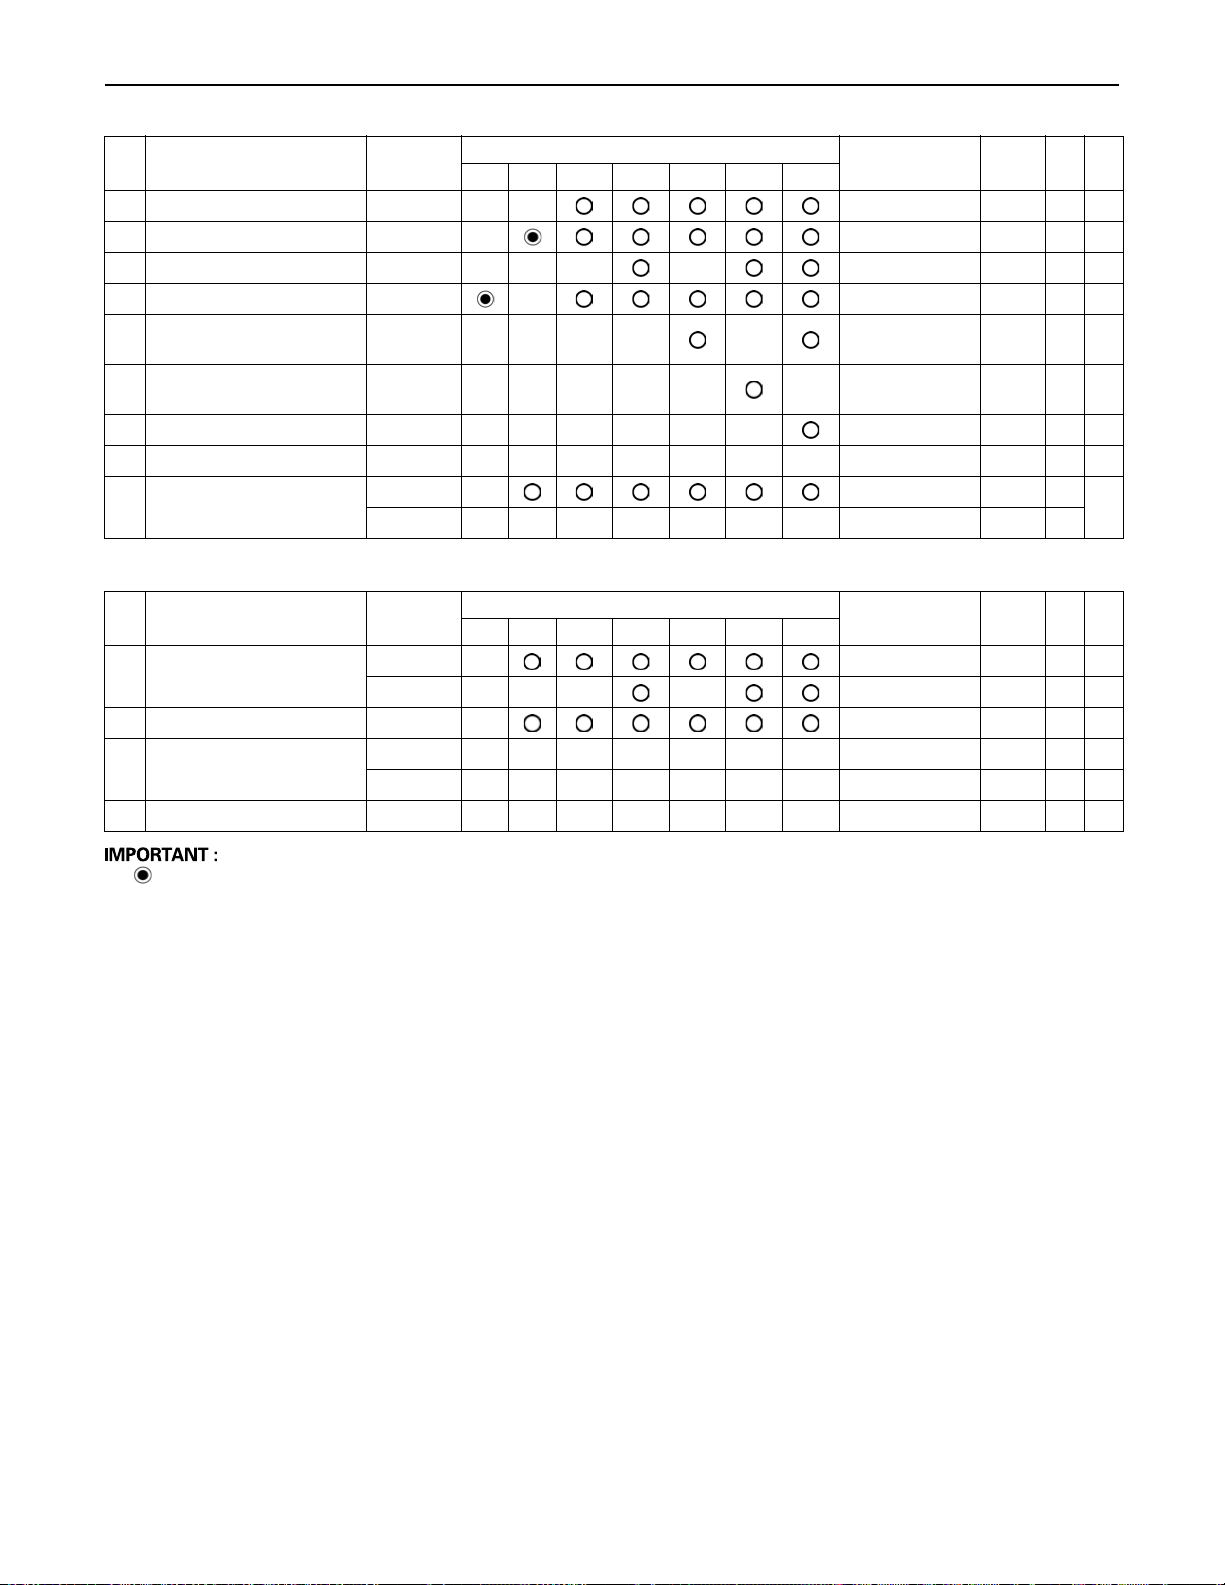
51MAINTENANCE
No. Check points Measures
20 Breather filter replace every 500 hrs 72
21 Hydraulic return filter replace every 500 hrs 73
22 Hydraulic suction filter replace every 1000 hrs 73
23 Hydraulic oil filter replace every 500 hrs 73
Fuel injection nozzle
24
injection pressure
Alternator and
25
starter motor
26 Injection pump check every 3000 hrs 75 *3 @
27 Radiator system rinse every 2 years 75
28 Fuel line and Intake air line
check every 1500 hrs 75 *3 @
check every 2000 hrs 75
check every 250 hrs 68
replace every 2 years 77 *4
50 250 500 1000 1500 2000 3000
Hour meter indicator
Interval
Ref.
page
C Air-conditioner
No. Check points Measures
1 Air filter
2 Air-conditioner condenser check every 250 hrs 71
3 Air-conditioner pipes and hose
4 Refrigerant (gas) check service as required 78
clean every 250 hrs 70 *2
replace every 1000 hrs - *2
check every 1 year 75
replace every 2 years 77
50 250 500 1000 1500 2000 3000
Hour meter indicator
Interval
Ref.
page
@
First operation
*1 When using a hydraulic hammer, change hydraulic oil and return filter according to the table on "Hydraulic Oil
Change (Including Replacing of the Suction Filter and Return Filter in the Hydraulic Tank) "EVERY 1000 SERVICE
HOURS" in "REGULAR CHECKS AND MAINTENANCE WORK" section.
*2 Clean and replace the air cleaner element more frequently if used under dusty conditions. When the filter is very
dirty from dusty conditions, replace the filter.
*3 Consult your local KUBOTA dealer for this service.
*4 Replace only if necessary.
A The items listed above (@ marked) are registered as emission related critical parts by KUBOTA in the U.S.EPA non-
road emission regulation. As the engine owner, you are responsible for the performance of the required
maintenance on the engine according to the above instruction. Please see the warranty Statement in detail.
Page 76
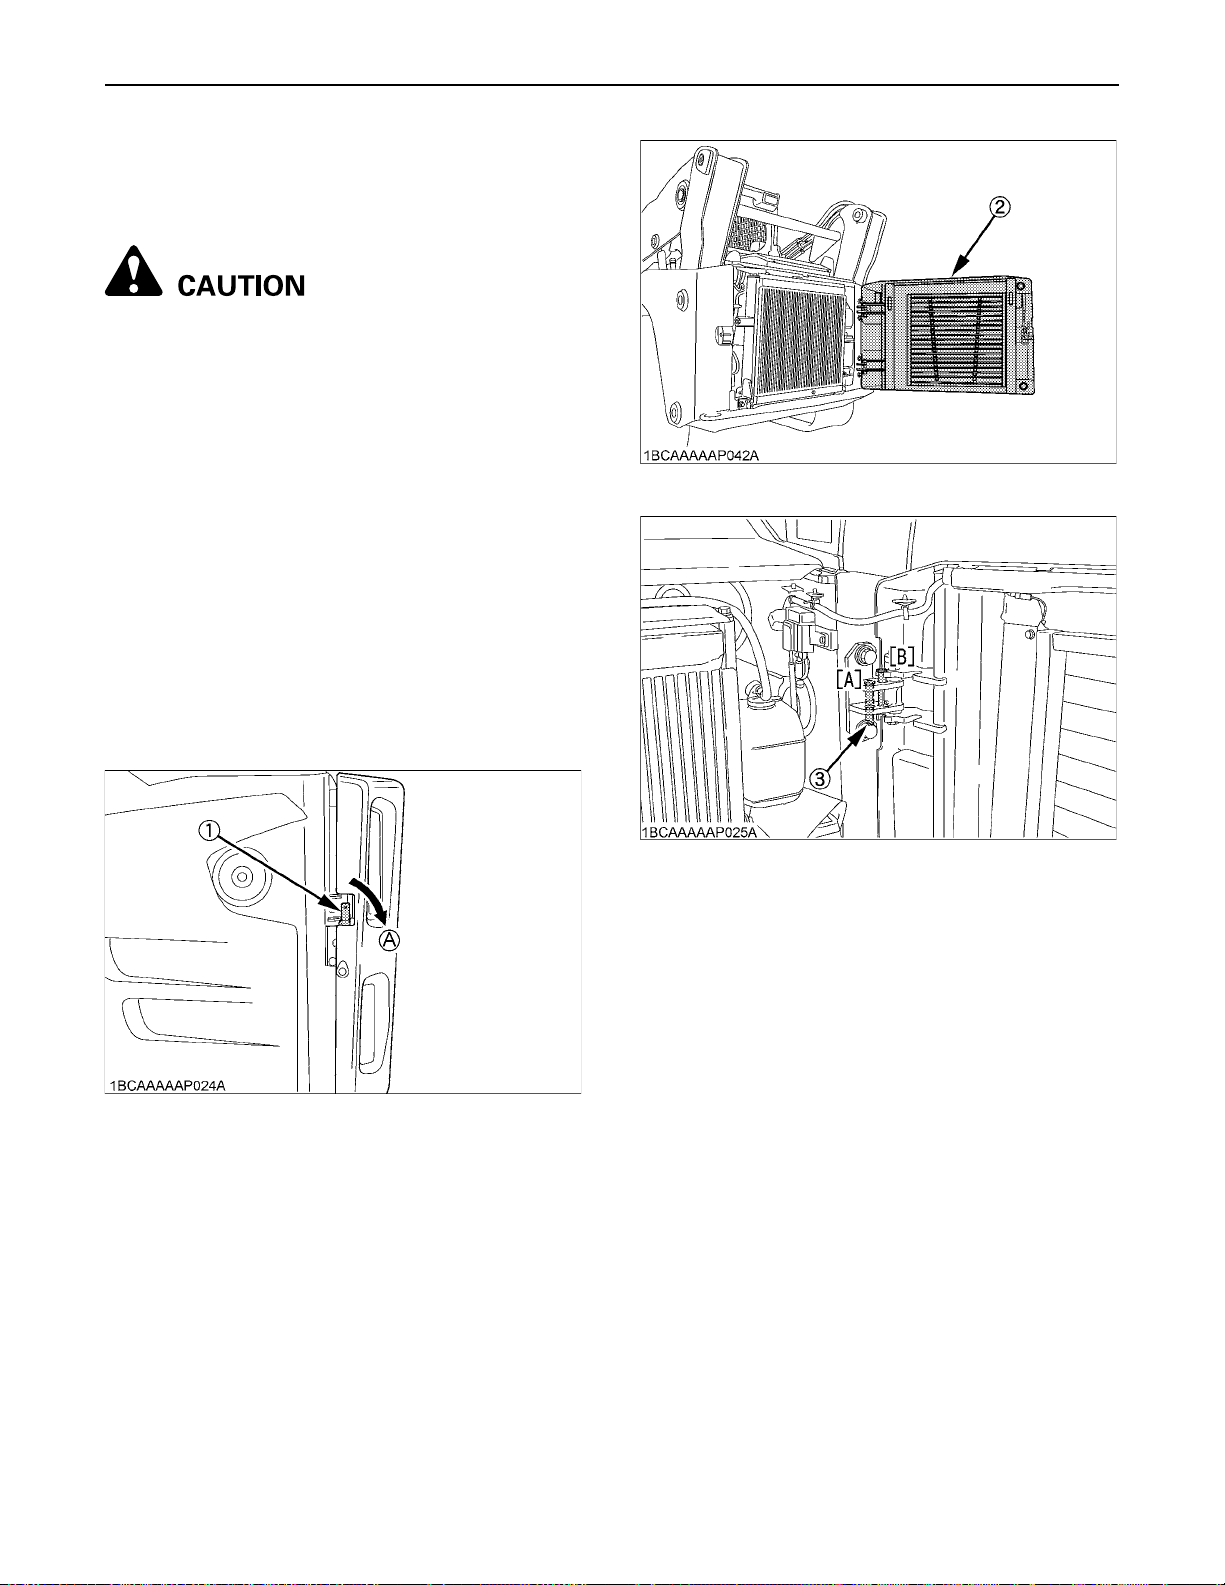
MAINTENANCE52
OPENING AND CLOSING OF COMPONENTS
BRear Door
To avoid personal injury:
A When opening the rear door, open it firmly to
the locked position.
A When opening and closing the rear door, be
careful not to get your hands or other parts of
your body caught.
C Opening
1. Pull the lever and open the rear door.
2. Insert the pin into the "LOCKED" position to fix the rear
door.
C Closing
1. Be sure to close the engine hood before closing the
rear door.
2. Support the rear door by hand, remove the pin from
the "LOCKED" position and insert it into "ORIGINAL"
position.
3. Close the rear door firmly until the lever is fully
returned.
(2) Rear door
(1) Lever (A) "PULL"
(3) Pin (A) "ORIGINAL" position
(B) "LOCKED" position
Page 77
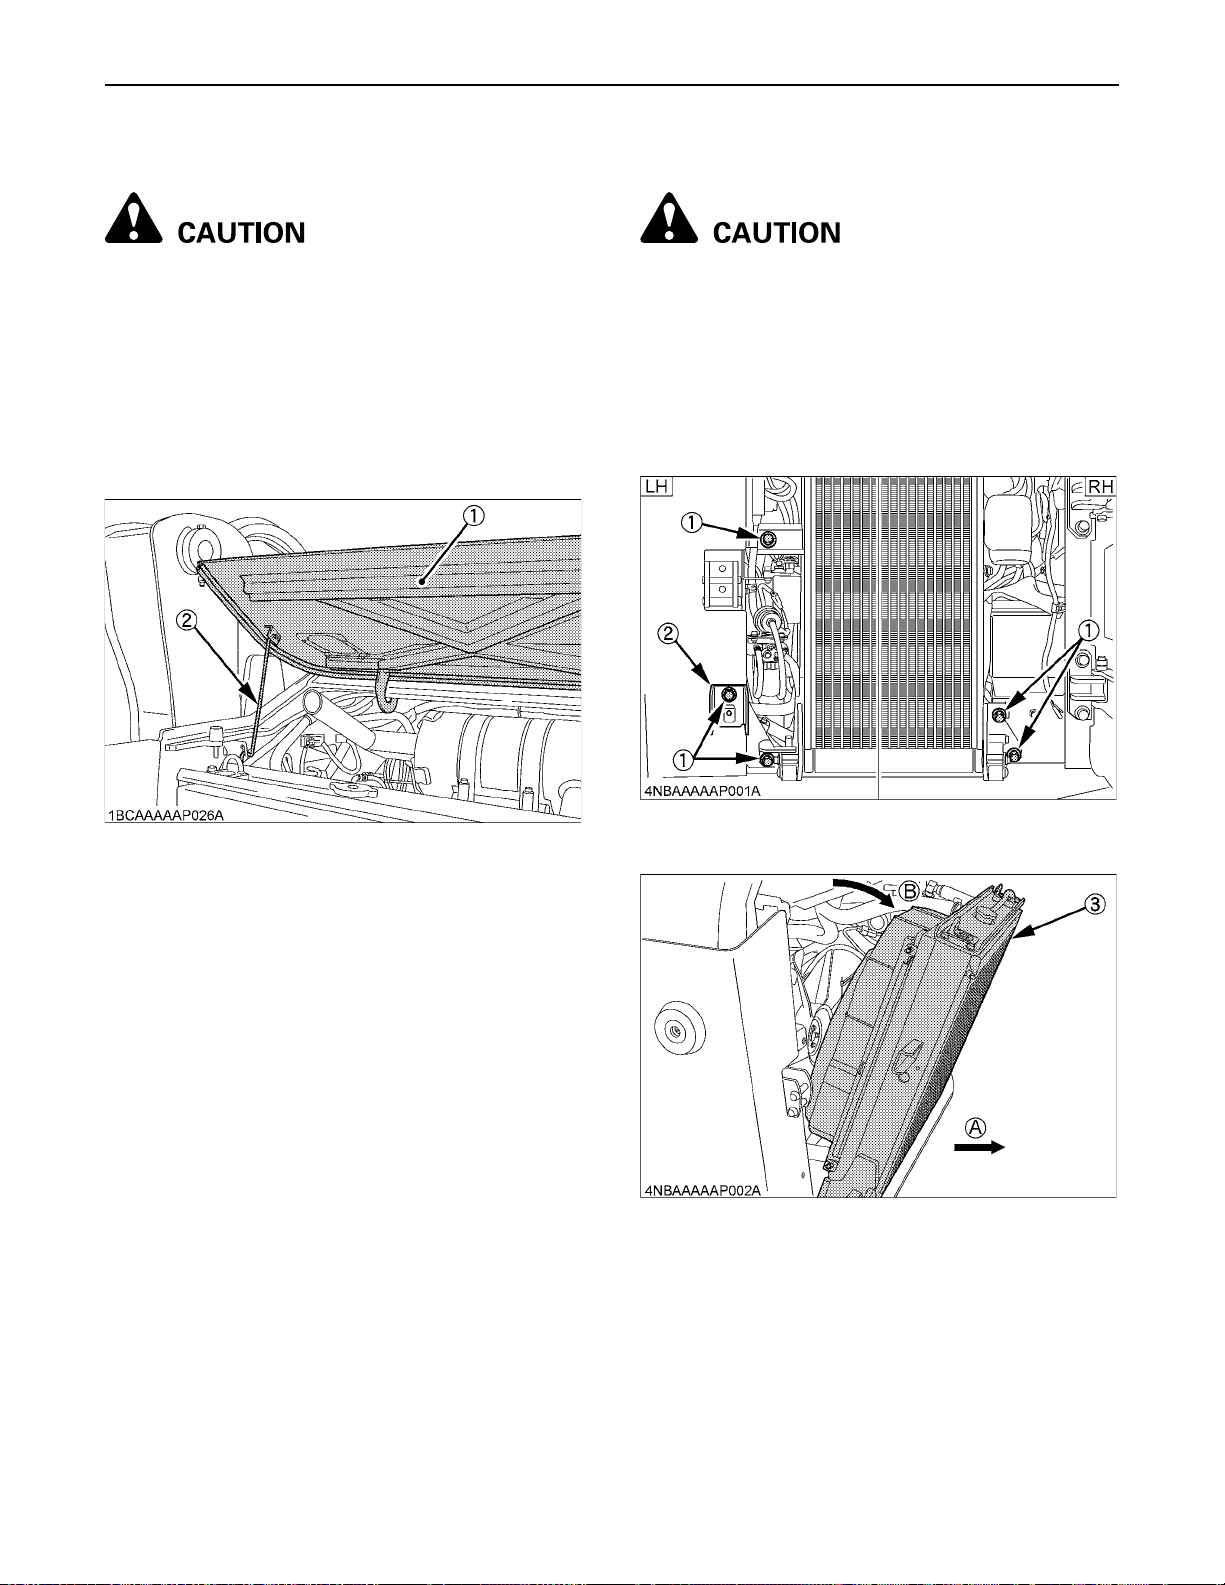
53MAINTENANCE
BEngine Hood
To avoid personal injury from contact with moving
parts:
A Never open the engine cover while the engine
is running.
A Do not touch muffler or exhaust pipes while
they are hot; Severe burns could result.
A When opening and closing the engine hood, be
careful not to get your hands pinched or other
parts of your body caught.
1. Hold up the engine hood and fix it with the stay rod.
BRadiator and Oil Cooler
To avoid personal injury:
A Always stop the engine and remove the key
before checking the radiator and oil cooler.
A Wear eye protection when cleaning with
compressed air.
1. Remove the five bolts and detach the radiator and oil
cooler tilt stopper.
At first pull the radiator and oil cooler backward (A) and
tilt it down (B).
(1) Engine hood
(2) Stay rod
(1) Bolts
(2) Radiator and oil cooler tilt stopper
(3) Radiator and oil cooler (A) "PULL BACKWARD"
(B) "TILT DOWN"
Page 78
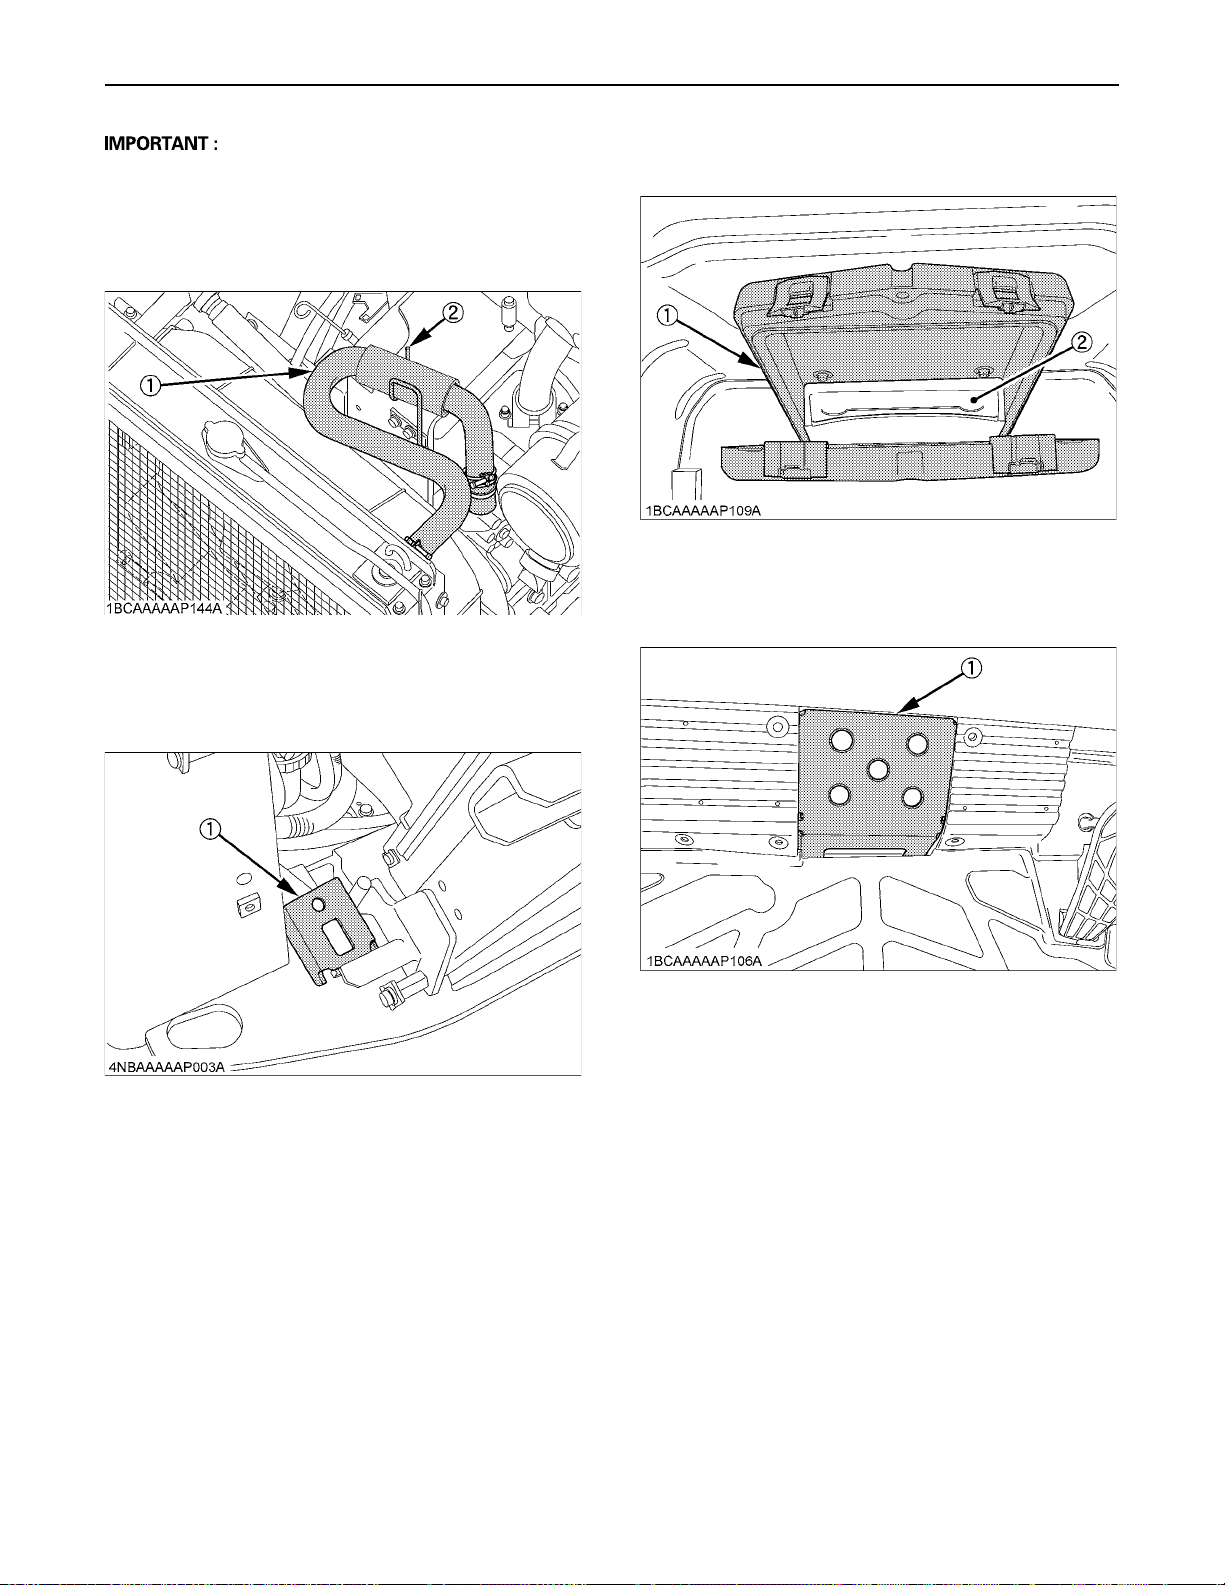
MAINTENANCE54
A Before tilting the radiator and oil cooler, undo the
radiator hose from the stay. Before positioning them
back in place, secure the radiator hose to the stay so
that the hose does not get caught between the shroud
and engine.
(1) Radiator hose
(2) Stay
2. Place the radiator and oil cooler tilt stopper to prevent
the tilted radiator and oil cooler from falling forward.
BWhere to Keep Operator's Manual
(1) Operator's manual storage box
(2) Storage space
BFloor Mud Outlet
(1) Radiator and oil cooler tilt stopper
(1) Floor mud outlet
Page 79
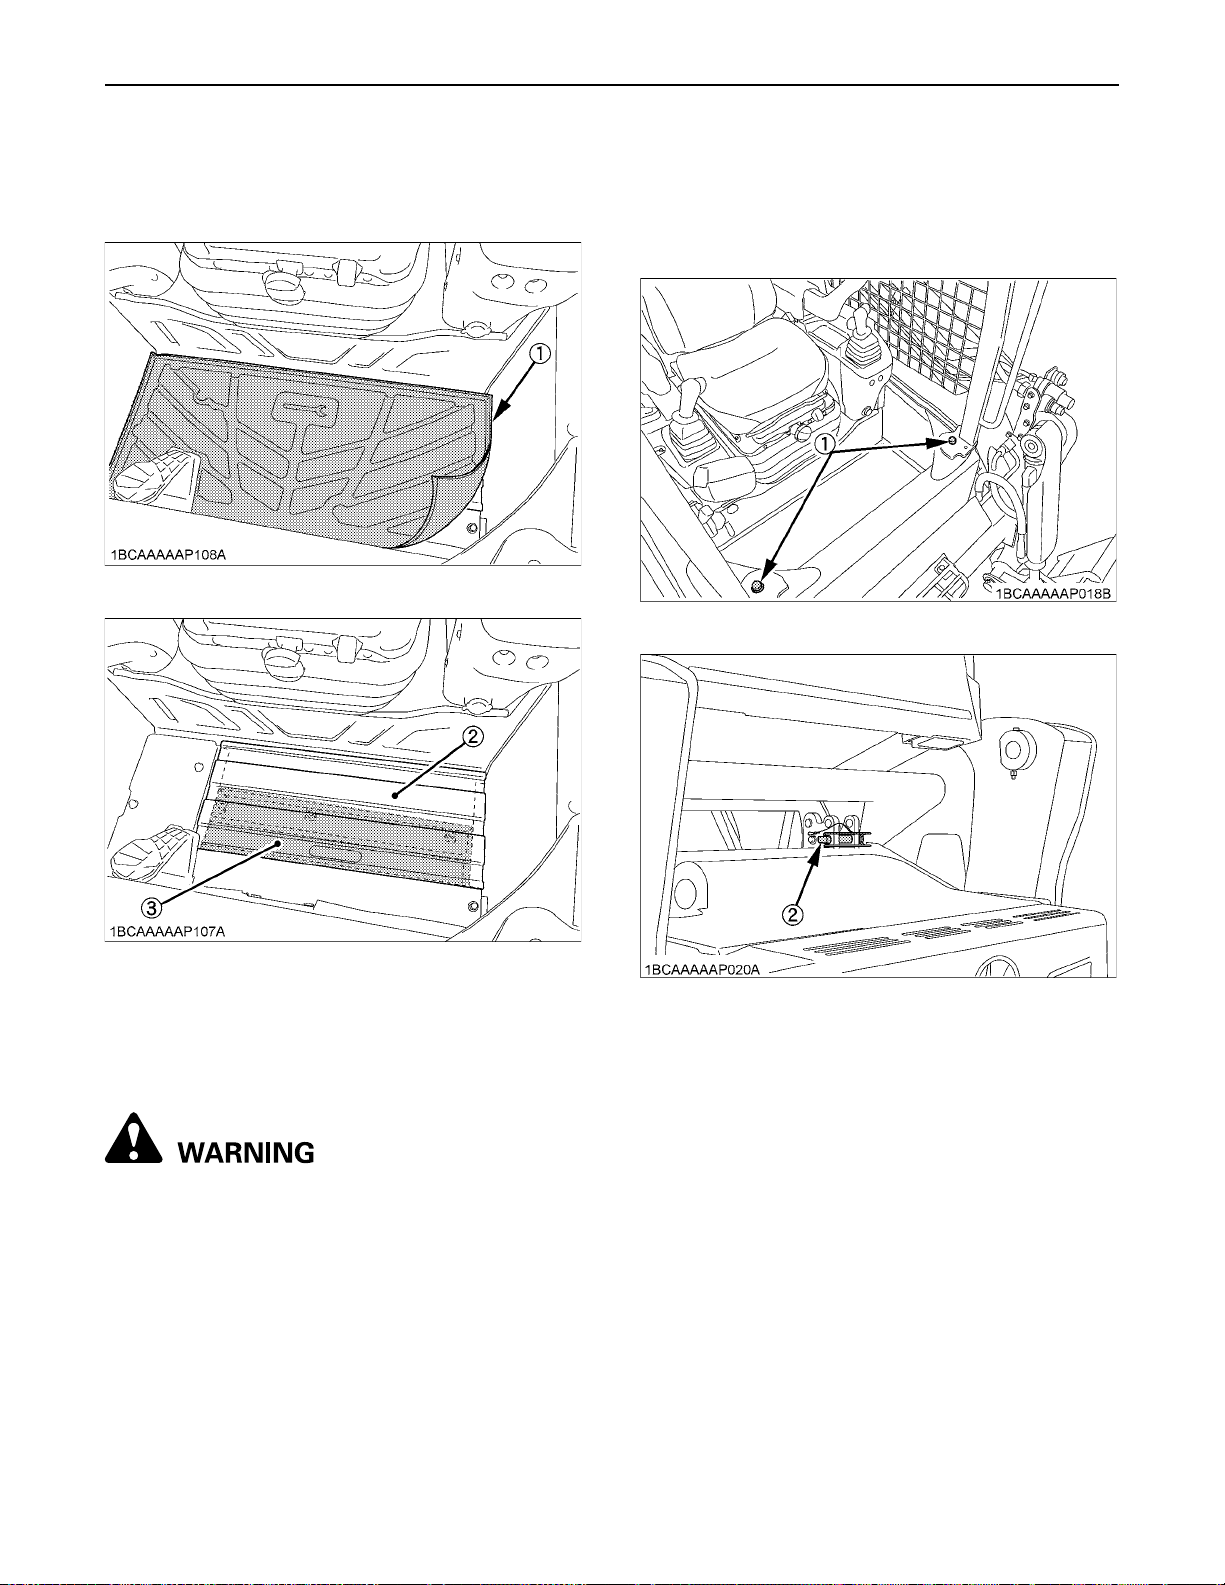
BTool Box
1. Detach the floor mat.
2. Remove the nuts and detach the cover.
(1) Floor mat
55MAINTENANCE
C Raising (Tilt up)
1. Select a firm, level surface, lower the lift arms fully to
the ground, and stop the engine.
2. Set the armrest to the "RAISED" position.
3. Remove the stopper pin from rear of the machine and
remove the lock bolts from the front of the machine.
(1) Lock bolt
(2) Cover (3) Tool storage space
BTilting Up the CAB
For inspection and maintenance, the CAB is designed so
that it can be tilted up.
To avoid personal injury or death:
A Raising or lowering the cab while the engine is
running may cause the machine to move, and
cause personal injury or death. Place the
machine on a firm, flat and level surface, lower
the lift arms slowly to the ground and stop the
engine before raising or lowering the cab.
A When the cab is tilted up, support it firmly with
the stopper pin to prevent it from falling.
A Do not enter beneath the cab, while raising or
lowering the cab.
A More than one person may be needed to tilt the
cab.
(2) Stopper pin
Page 80
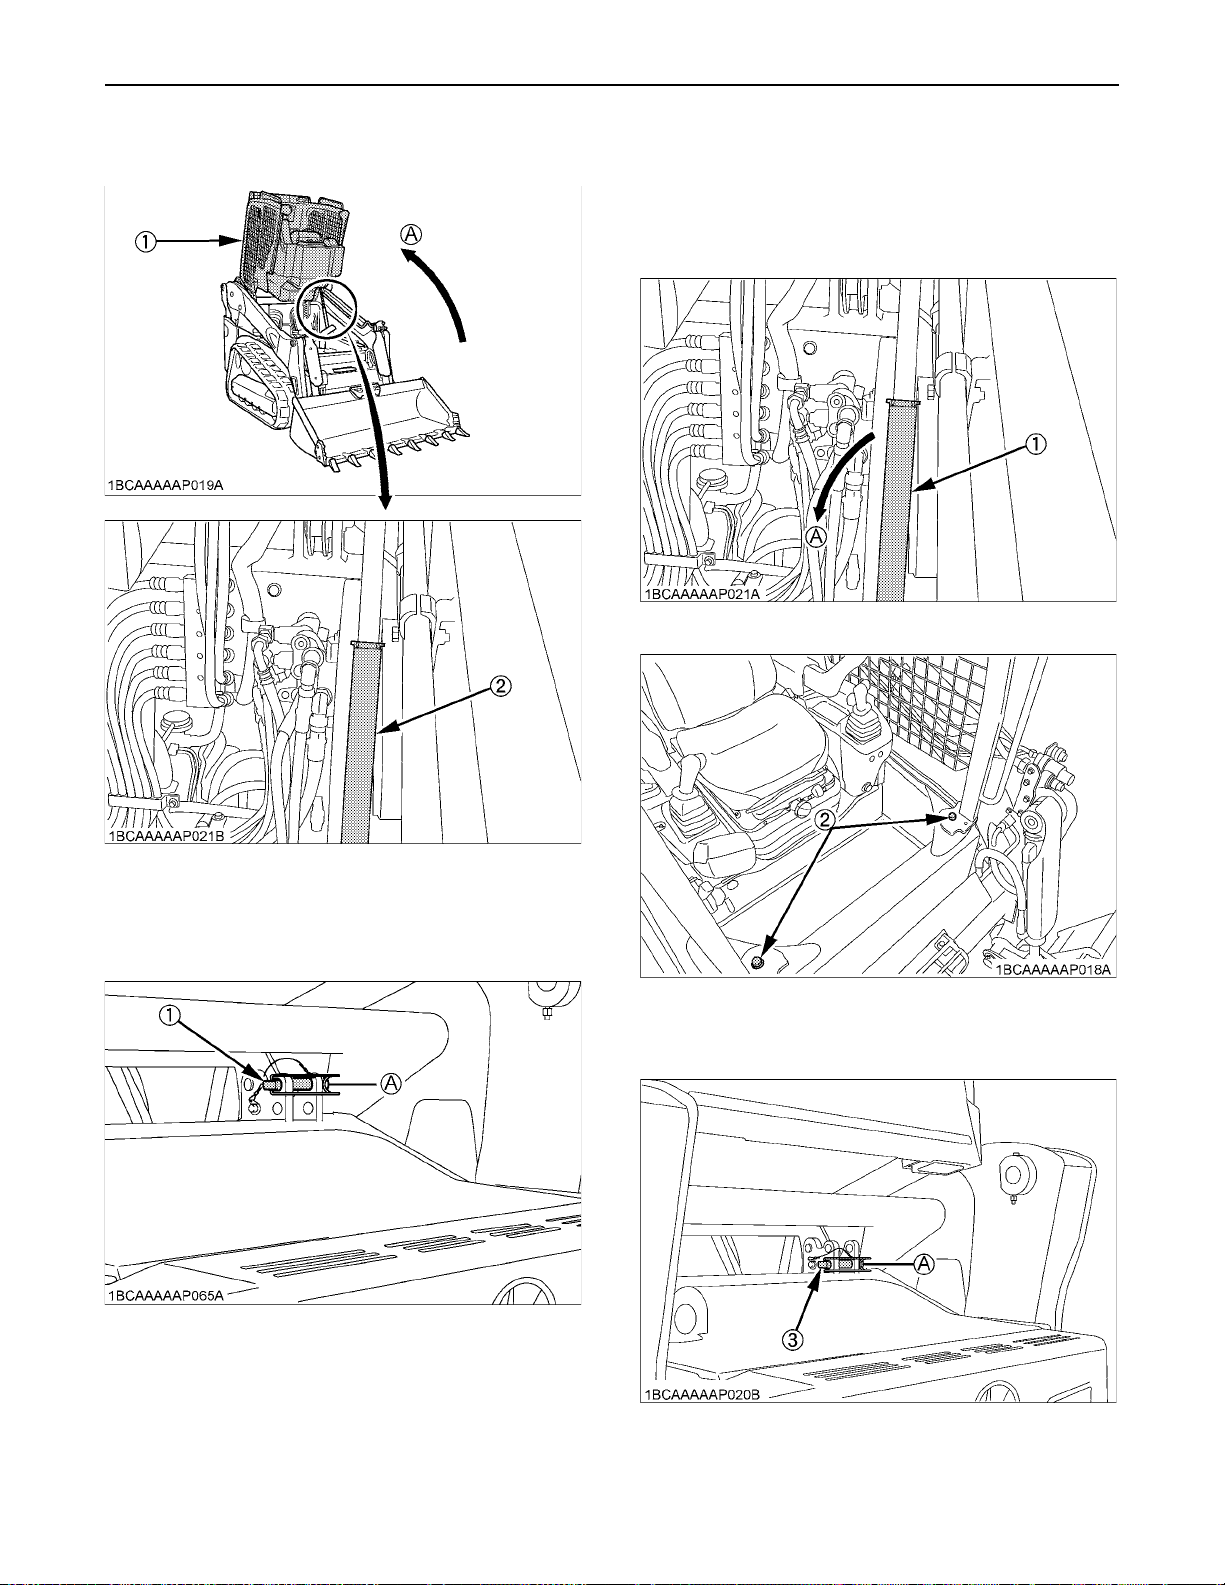
MAINTENANCE56
4. Slowly raise the cab until the cab is all the way up and
the latching mechanism engages.
C Lowering (Tilt down)
1. Remove the stopper pin.
2. Support the cab and release the latching mechanism.
3. Lower the cab slowly all the way down.
4. Tighten the lock bolts with correct tightening torque
and reinsert the stopper pin into the storage position.
(1) Latching mechanism (A) "RELEASE"
(1) Cab
(2) Latching mechanism
(A) "RAISE"
5. Insert the stopper pin into the locked position to fix the
cab.
(1) Stopper pin (A) "LOCKED" position
(2) Lock bolt
C Tightening torque:
77.5 to 90.2 N-m
(3) Stopper pin (A) "STORAGE" position
Page 81
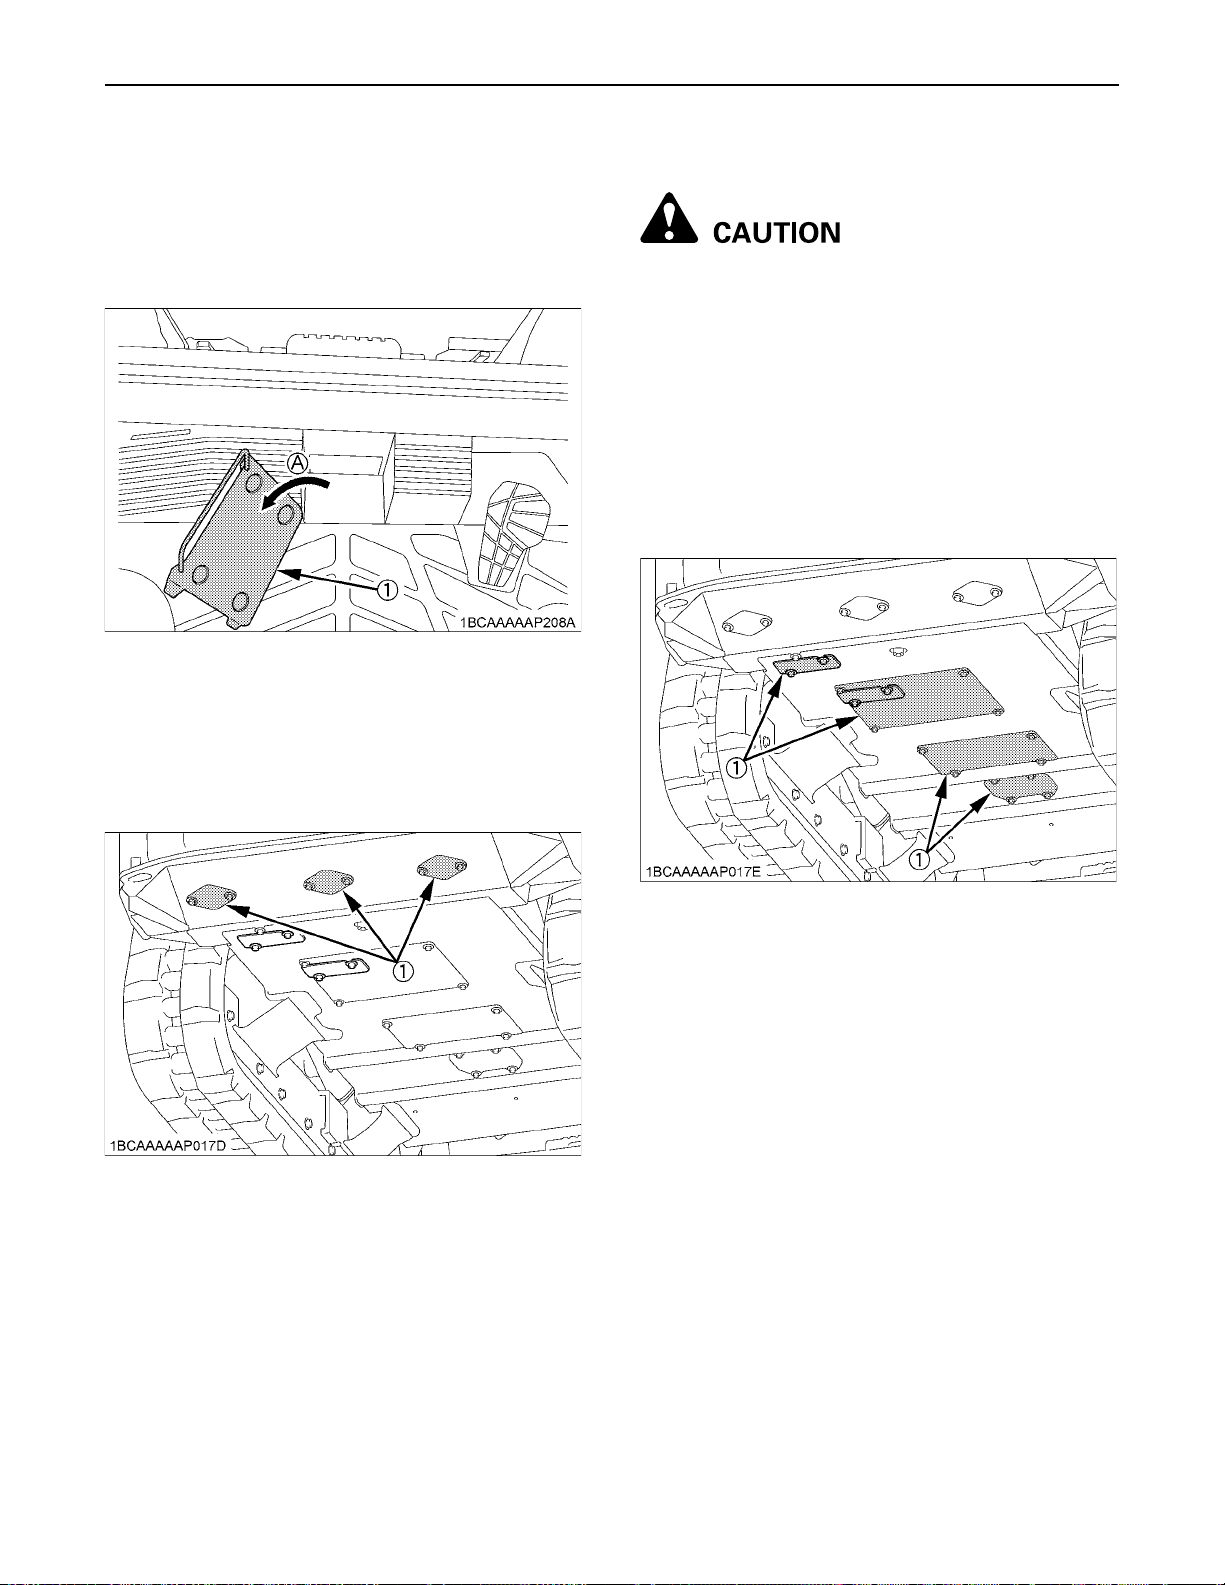
57MAINTENANCE
DISCHARGING MUD FROM OPERATOR ROOM AND MAIN FRAME
BOperator room
1. Remove the floor mud outlet.
2. Discharge mud on the floor to the hole.
(1) Floor mud outlet (A) Remove
BRadiator
If you can’t tilt the radiator because of piled-up mud,
remove the plates of the bottom of the main fame under
the radiator and discharge mud.
BMain Frame
To avoid personal injury:
A Before diving under the machine, look around
the surroundings, make sure of the safety and
remove the key.
A The plate of the bottom of the main frame gets
heavy with accumulated mud. In case it
suddenly falls, do not be under the plate and
remove with much care.
1. Tilt the CAB.
2. Open the rear door and tilt the radiator.
3. Open the plates of the bottom of the main frame.
4. Discharge mud on the main frame to the hole.
(1) Plates
(1) Plates
Page 82
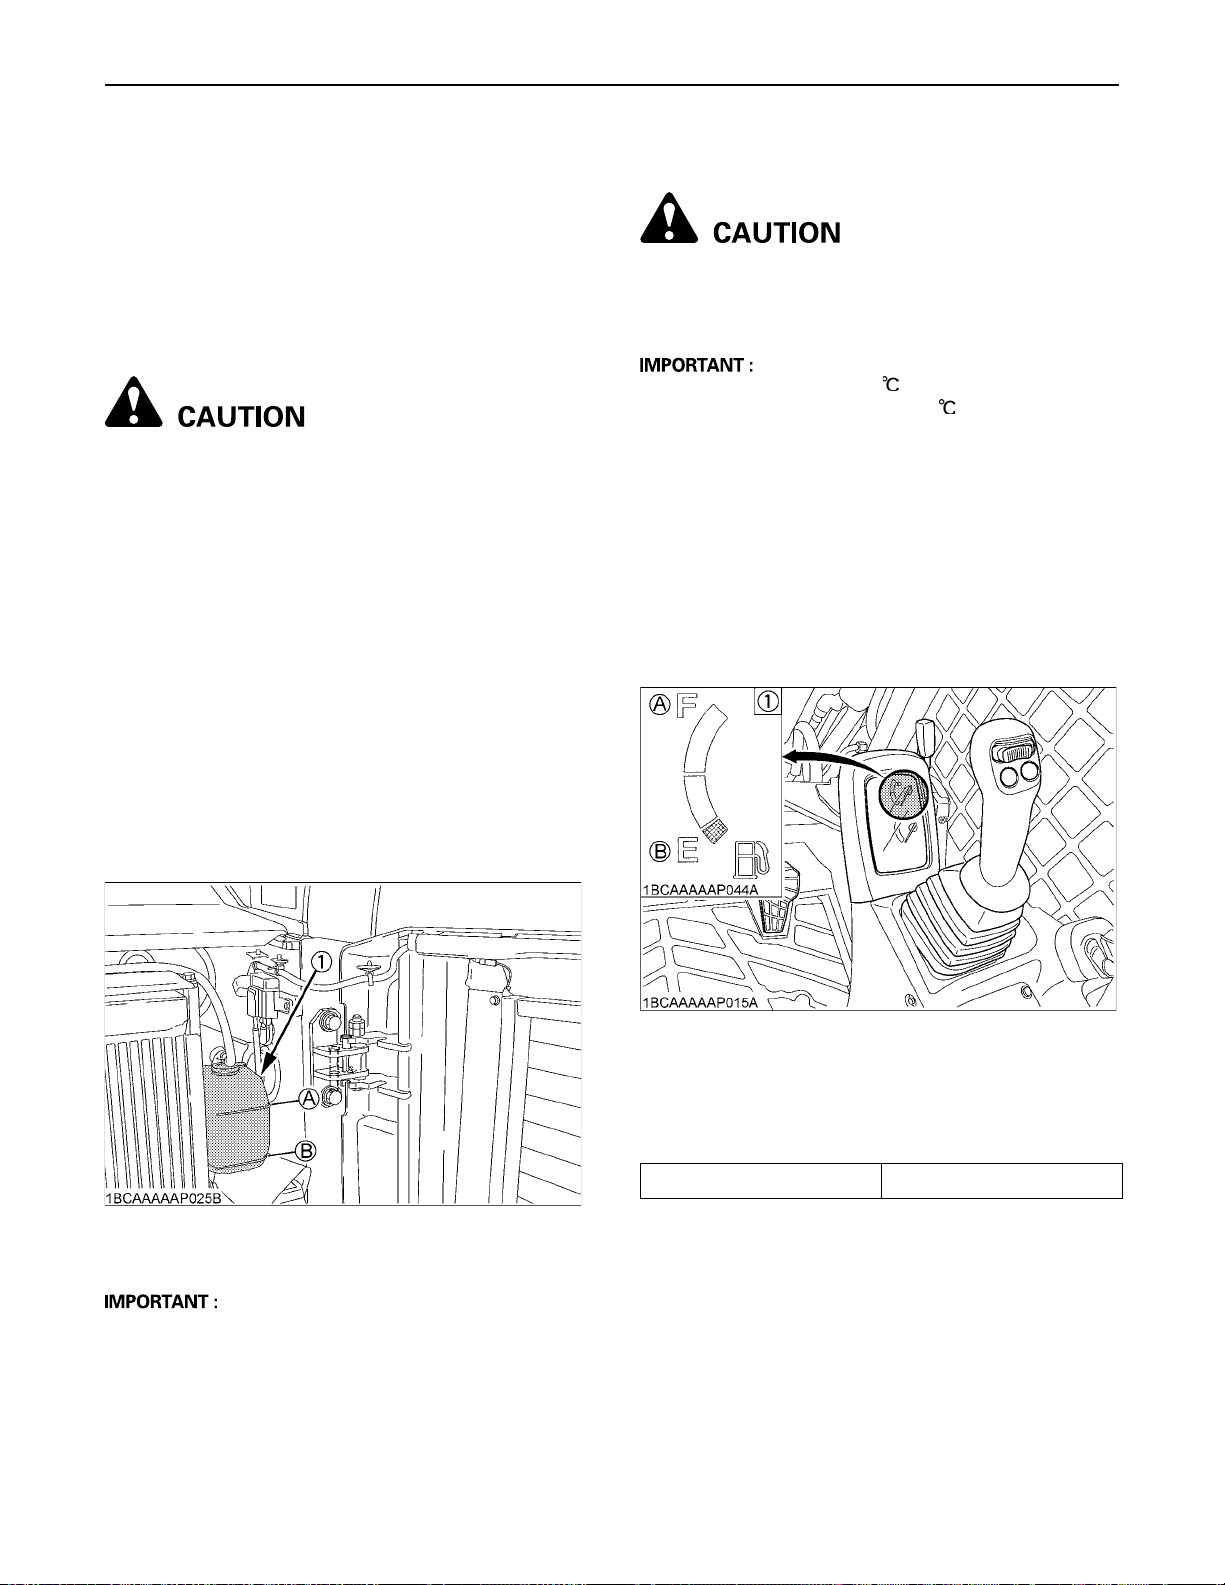
MAINTENANCE58
DAILY CHECKS
For your own safety and to assure the long life of your
machine, a careful check should be made before each
operation.
BChecking Coolant Level
For your own safety and to assure the long life of your
machine, a careful check should be made before each
operation.
To avoid personal injury:
A Place the machine on a firm, flat and level
surface, lower the lift arms slowly to the ground
and stop the engine.
A Do not open the radiator cap right after the
engine has been stopped; Serious burns can
occur from contact with escaping hot coolant
fluid.
A Check the coolant level in the recovery tank
only after the engine has cooled down.
A Remove the radiator cap only if absolutely
necessary.
1. Check to see that the coolant level is between the
"FULL" and "LOW" marks of recovery tank.
2. When the coolant level drops due to evaporation, add
water only up to the full level.
In case of leakage, add anti-freeze and water in the
specified mixing ratio up to the full level.
BChecking Fuel Level
To avoid personal injury:
A Stop the engine and remove the key before
fueling.
A Do not smoke while fueling.
A By temperatures over -5 , use No.2-D diesel fuel,
when temperatures are under -5 , use No.1-D diesel
fuel.
A Make sure that the fuel tank will not run empty. Air will
enter the fuel system, and must be purged before
restarting engine.
A See "PURGING OF THE FUEL SYSTEM" in "OTHER
ADJUSTMENTS AND REPLACEMENTS" section.
A To prevent condensation (water) accumulations in the
fuel tank, fill the fuel tank full before parking overnight.
1. Turn the starter key to the "RUN" position.
2. Check the fuel level by the fuel level indicator.
(1) Recovery tank (A) "FULL"
(B) "LOW"
A Do not fill the recovery tank over the "FULL" marking.
A Do not fill with dirty or salty water.
(1) Fuel gauge (A) "FULL"
(B) "EMPTY"
3. If necessary, open the fuel tank cap with the starter
key and fill the fuel. (See "Fuel Gauge Indicator" in
"CHECK BEFORE START" section)
Fuel tank capacity 93 L
Page 83
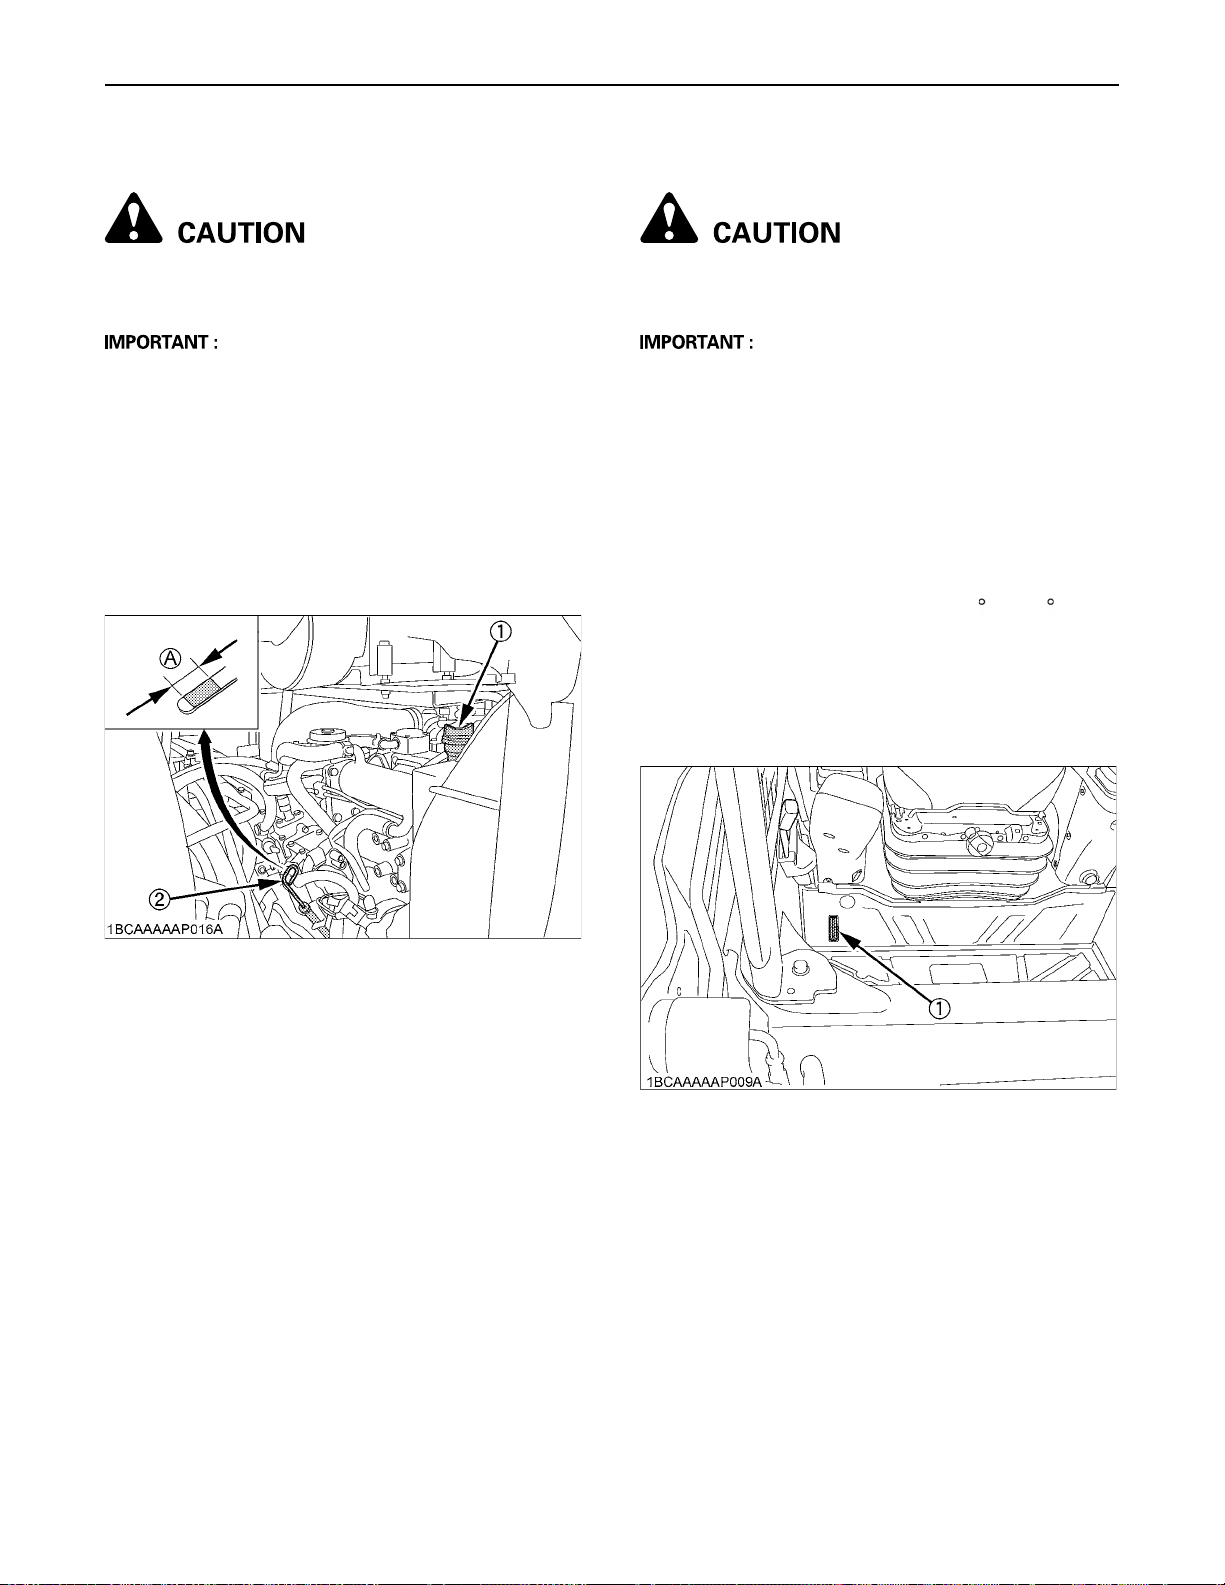
59MAINTENANCE
BChecking Engine Oil Level
To avoid personal injury:
A Stop the engine and remove the key before
checking the oil level.
A Use engine oil with the correct viscosity. (according to
the outside temperature)
A After stopping the engine and remove the key, wait five
minutes, then check oil level. (Machine must be on
level ground.)
To check the oil level, draw out the dipstick, wipe it clean,
replace it and draw it out again. Check to see that the oil
level lies between the two notches.
If the level is too low, add new oil to the prescribed level
at the oil filling port.
BChecking Hydraulic Oil Level
To avoid personal injury:
A Stop the engine and remove the key before
checking the oil level.
A Before filling oil, wipe away all sand and dust from
around the oil port. Make sure to use an identical type
of hydraulic fluid.
A The machine has been filled with hydraulic fluid before
delivery. See "RECOMMENDED OILS" section.
(Do not mix different oils.)
1. Park the machine on a firm, flat and level surface.
Lower the lift arms slowly to the ground, tilt down the
attachments and stop the engine.
2. Check the oil level as to whether it lies on the center of
the gauge at normal temperature (10 C to 30 C).
3. Enough oil is present if the oil level lies near the center
of the gauge.
4. Should the oil level be too low, fill up with oil through
the oil port before starting the engine.
This step is important for the protection of the hydraulic
system.
(1) Oil filling port
(2) Engine oil dipstick
(A) "Required oil level range"
(1) Gauge
Page 84
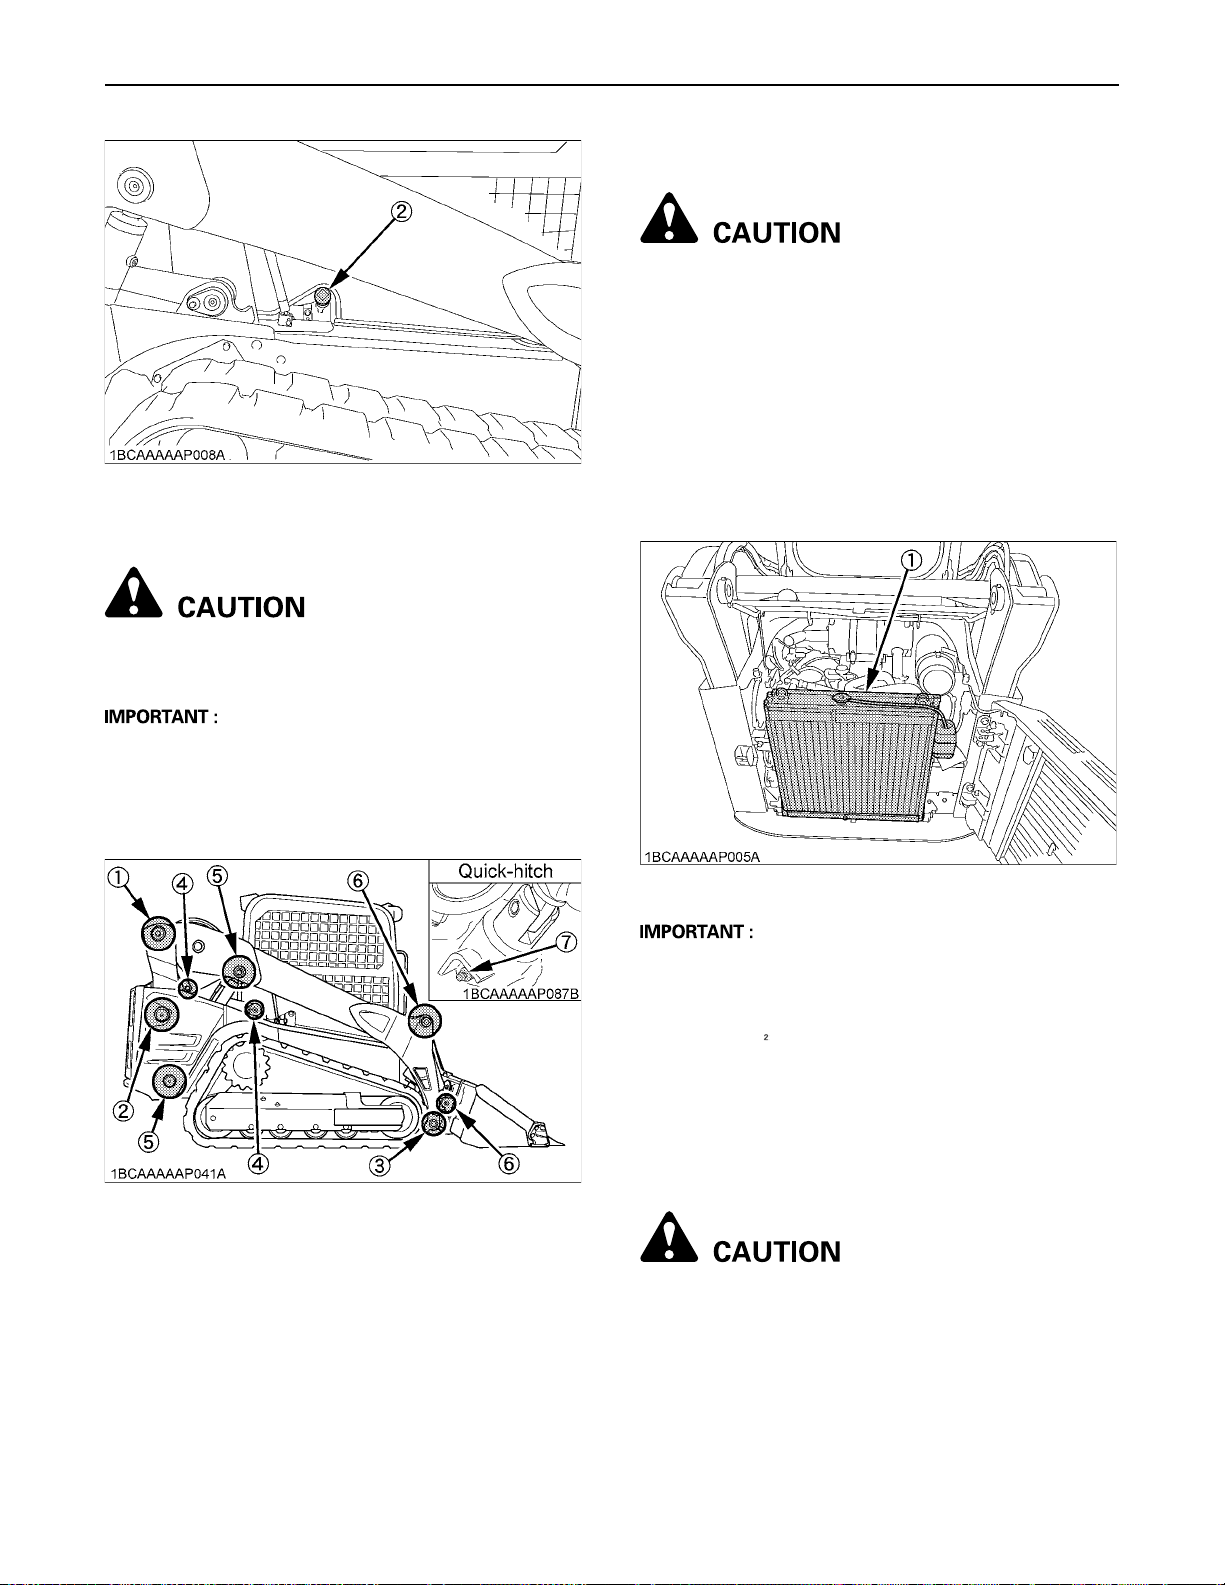
MAINTENANCE60
(2) Hydraulic tank cap (Oil filling port)
BLubrication Points
To avoid personal injury:
A First lower all attachments on the ground then
stop the engine and remove the key.
BChecking Radiator and Oil Cooler
To avoid personal injury:
A Always stop the engine and remove the key
before checking the radiator and oil cooler.
A Wear eye protection when cleaning with
compressed air.
1. Check if the fins and ribs are clogged.
If so clean with compressed air or steam.
2. Check the rubber hoses for damage and replace if
cracked or old. Check if the hose clamps are tight
enough.
A When doing loader work in water, generously grease
the following points. After ending work, grease again.
Grease the marked grease fittings (both sides) shown by
arrows in the illustration below.
1. Lift arm linkage .................................... 1 place
2. Link 1 .................................................. 1 place
3. Bucket link pin ..................................... 1 place
4. Control link .......................................... 2 places
5. Lift arm cylinder boss ........................... 2 places
6. Tilt cylinder boss ................................. 2 places
7. Quick-hitch pin .................................... 1 place
(1) Radiator and oil cooler
A Radiator and oil cooler fins and ribs must be clean in
order not to overheat the engine and allow free flow of
air through the cooling elements.
A Pressure of compressed air must be under 205 kPa
(2.1 kgf.cm )
A When cleaning the radiator and oil cooler with
compressed air, the fins can be damaged. Pay
attention not to damage the fins.
BChecking and Cleaning Engine and
Electrical Wiring
To avoid personal injury:
A Always stop the engine and remove the key
before cleaning the wiring, cables and engine.
Before starting, check whether flammable substances
have gathered on the battery, the cables and wiring, the
muffler or on the engine. Remove thoroughly.
Check the electrical circuitry for disconnections, shorts or
loose terminals.
Page 85
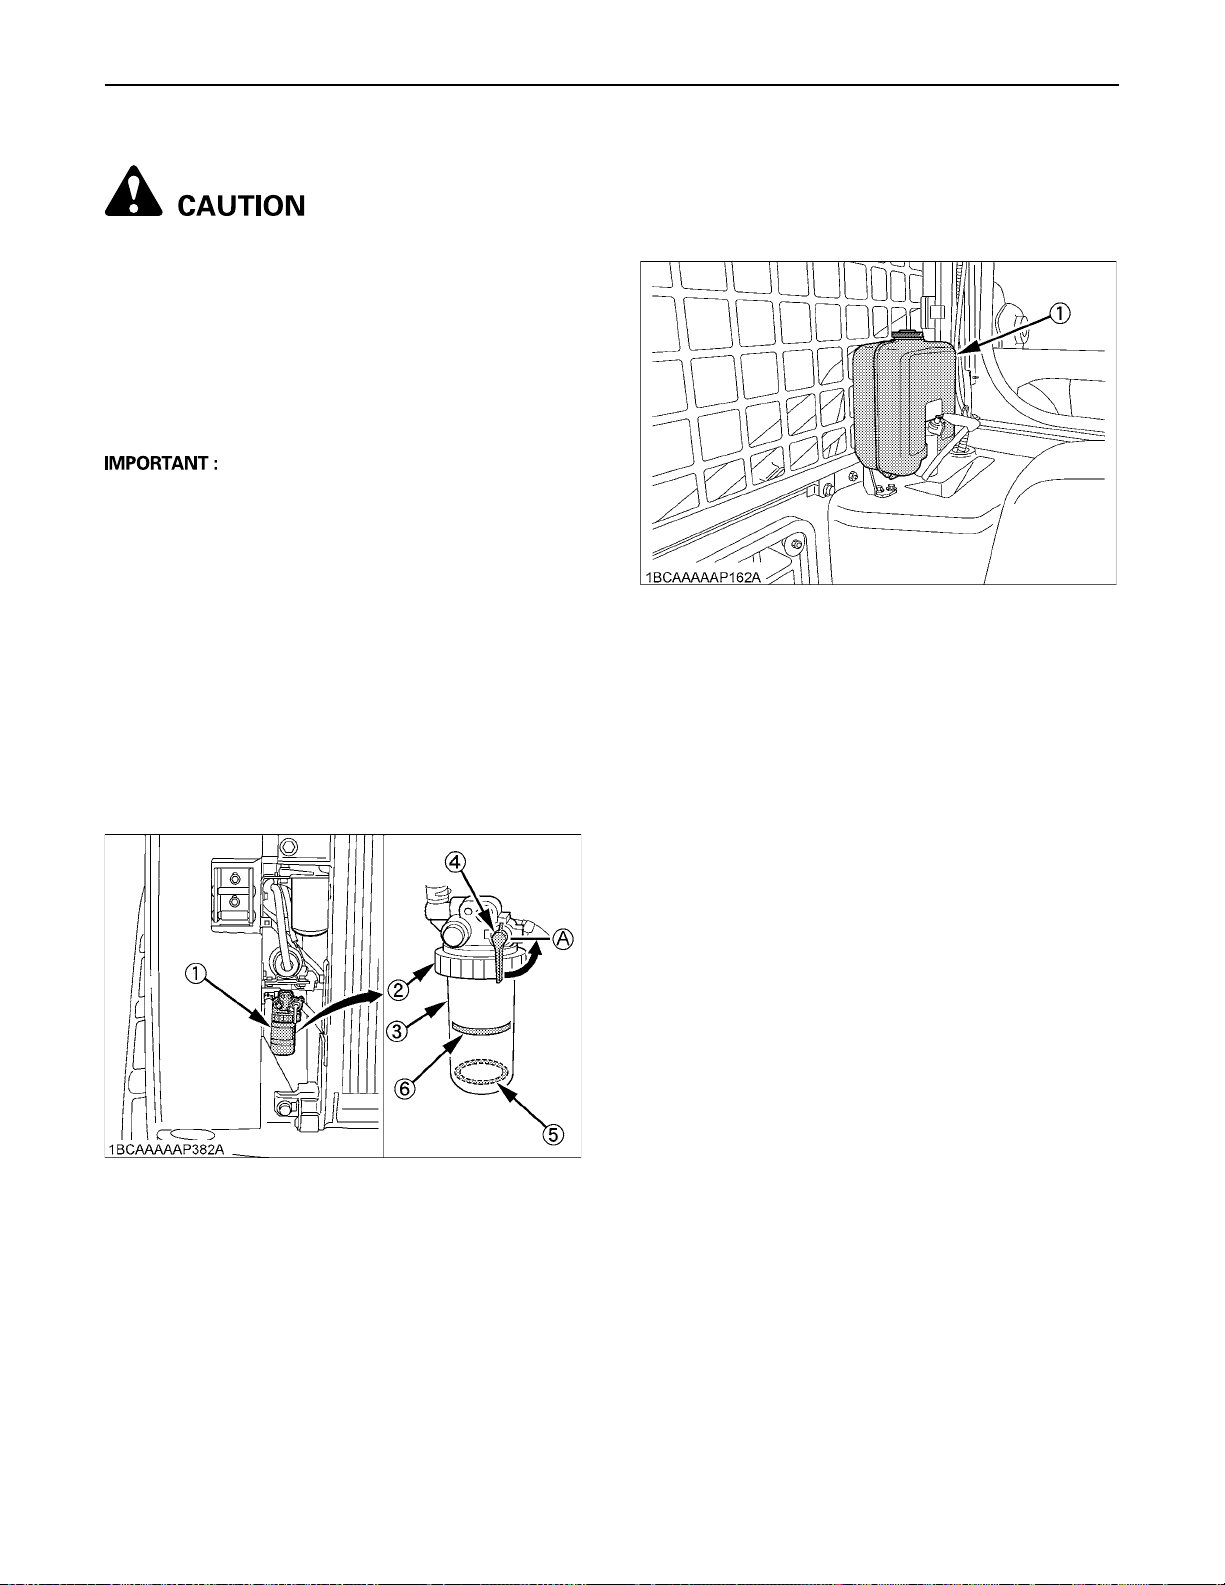
BChecking V-belt
To avoid personal injury:
A Stop the engine and remove the key before
checking the V-belt.
A Check the V-belt for cracks and proper tension.
(See "Adjusting V-belt Tension" in "REGULAR
CHECKS AND MAINTENANCE WORK"
section.)
BWashing Whole Machine
A Do not wash the machine with the engine running.
Water could enter the air cleaner and damage the
engine.
Make sure that the air cleaner is kept dry.
A Remove the mud before washing the machine.
BDraining Water Separator
1. Open the rear door.
2. When the separated water is entering the sediment
cup, the red float moves upwards.
When the float reaches the line, close the shutoffvalve so that no fuel can run out. Now loosen the ring
nut, and remove the cup and empty completely.
3. Finally, do not forget to open the shutoff-valve after the
cup has been reinstalled.
61MAINTENANCE
BChecking Washer Liquid
If the windows washer is switched on with the washer
liquid tank empty, the motor may be damaged. Always
keep the tank filled.
(1) Washer liquid tank
(1) Water separator
(2) Ring nut
(3) Cup
(4) Shutoff-valve
(5) Float
(6) Line
(A) CLOSE
Page 86
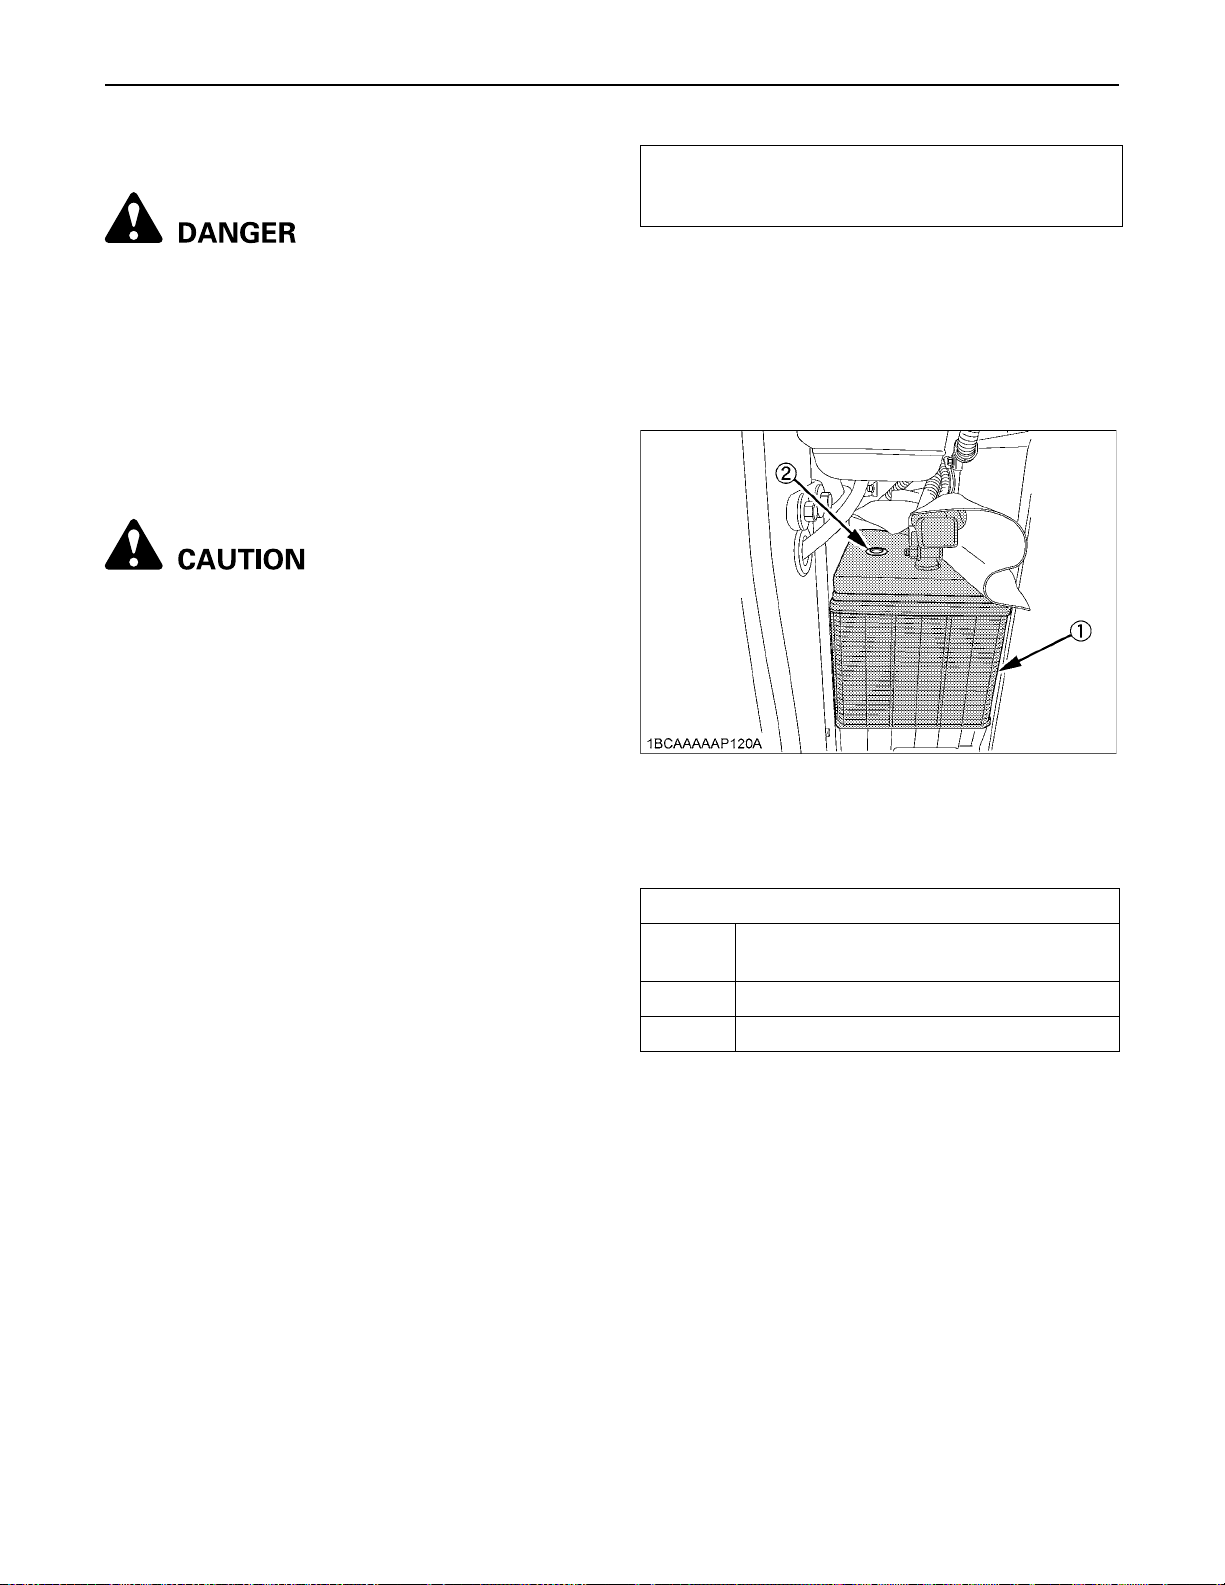
MAINTENANCE62
BChecking Battery Condition
To avoid the possibility of a battery explosion:
For refillable type battery, follow the instructions
below.
A Do not use or charge the refillable type battery
if the fluid level is below the LOWER (lower limit
level) mark. Otherwise, the battery component
parts may prematurely deteriorate, which may
shorten the battery's service life or cause an
explosion. Check the fluid level regularly and
add distilled water as required so that the fluid
level is between the UPPER and LOWER levels.
To avoid personal injury:
A Never remove the vent caps while the engine is
running.
A Keep electrolyte away from eyes, hands and
clothes. If you are spattered with it, wash it
away completely with water immediately and
get medical attention.
A Wear eye protection and rubber gloves when
working around the battery.
A Before inspection or dismounting the battery,
be sure to turn off the engine and turn the
starter switch to the "OFF" position.
A When removing the battery, always disconnect
the negative ground cable first. When installing
a battery, always connect the ground cable
last. This prevents a possible explosion caused
by sparks.
A Always wear eye protection when working with
the battery.
The factory-installed battery is of non-refillable type.
If the indicator turns white, do not quick charge the
battery but replace it with new one.
Mishandling the battery shortens the service life and adds
to maintenance costs.
The original battery is maintenance free, but needs some
servicing.
If the battery is weak, the engine will be difficult to start
and the lights will be dim. It is important to check the
battery periodically.
(1) Battery
(2) Indicator
C How to read the indicator
Check the battery condition by reading the indicator.
State of indicator display
Green
Black Needs charging battery.
Specific gravity of electrolyte and quality of
electrolyte are both in good condition.
White Needs replacing battery.
Page 87
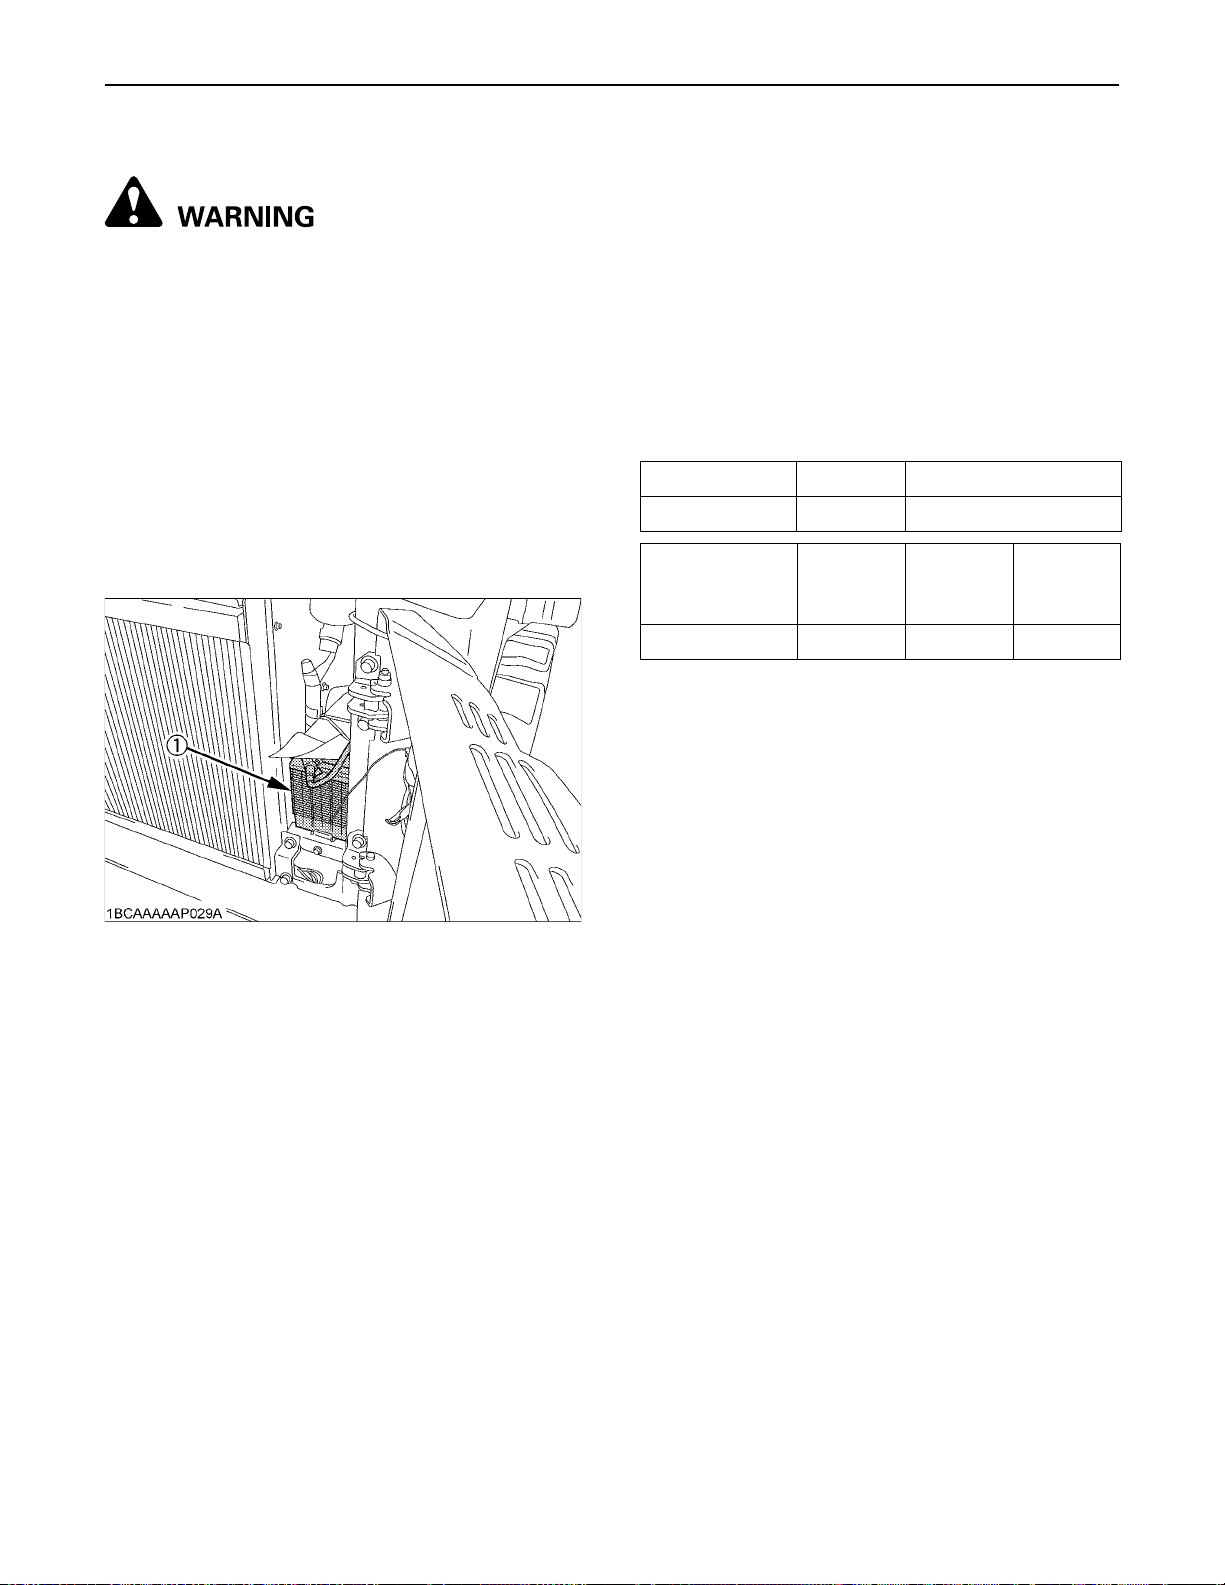
63MAINTENANCE
C Battery Charging
To avoid personal injury or death:
A When the battery is being activated, hydrogen
and oxygen gases in the battery are extremely
explosive. Keep open sparks and flames away
from the battery at all times, especially when
charging the battery.
A When charging the battery, ensure the vent
caps are securely in place. (if equipped)
A When disconnecting the cable from the battery,
start with the negative terminal first.
When connecting the cable to the battery, start
with the positive terminal first.
A Never check battery charge by placing a metal
object across the posts.
Use a voltmeter or hydrometer.
1. To slow charge the battery, connect the battery
positive terminal to the charger positive terminal and
the negative to the negative, then recharge in the
standard fashion.
2. A boost charge is only for emergencies. It will partially
charge the battery at a high rate and in a short time.
When using a boost-charged battery, it is necessary to
recharge the battery as early as possible.
Failure to do this will shorten the battery's service life.
3. The battery is charged if the indicator display turns
green from black.
4. When exchanging an old battery for a new one, a
battery of equal specification.
Battery Type Volts (V) Capacity
GP31(105E41R) 12 85.3 (at 5H.R(A.H))
Reserve
Battery Type
GP31(105E41R) 160 900 11
C Direction for Storage
1. When storing the machine for long periods of time,
remove the battery from machine, adjust the
electrolyte to the proper level and store in a dry place
out of direct sunlight.
2. The battery self-discharges while it is stored.
Recharge it once every three months in hot seasons
and once every six months in cold seasons.
Capacity
(min)
Cold
Cranking
Amps
Normal
Charging
Rate (A)
(1) Battery
Page 88
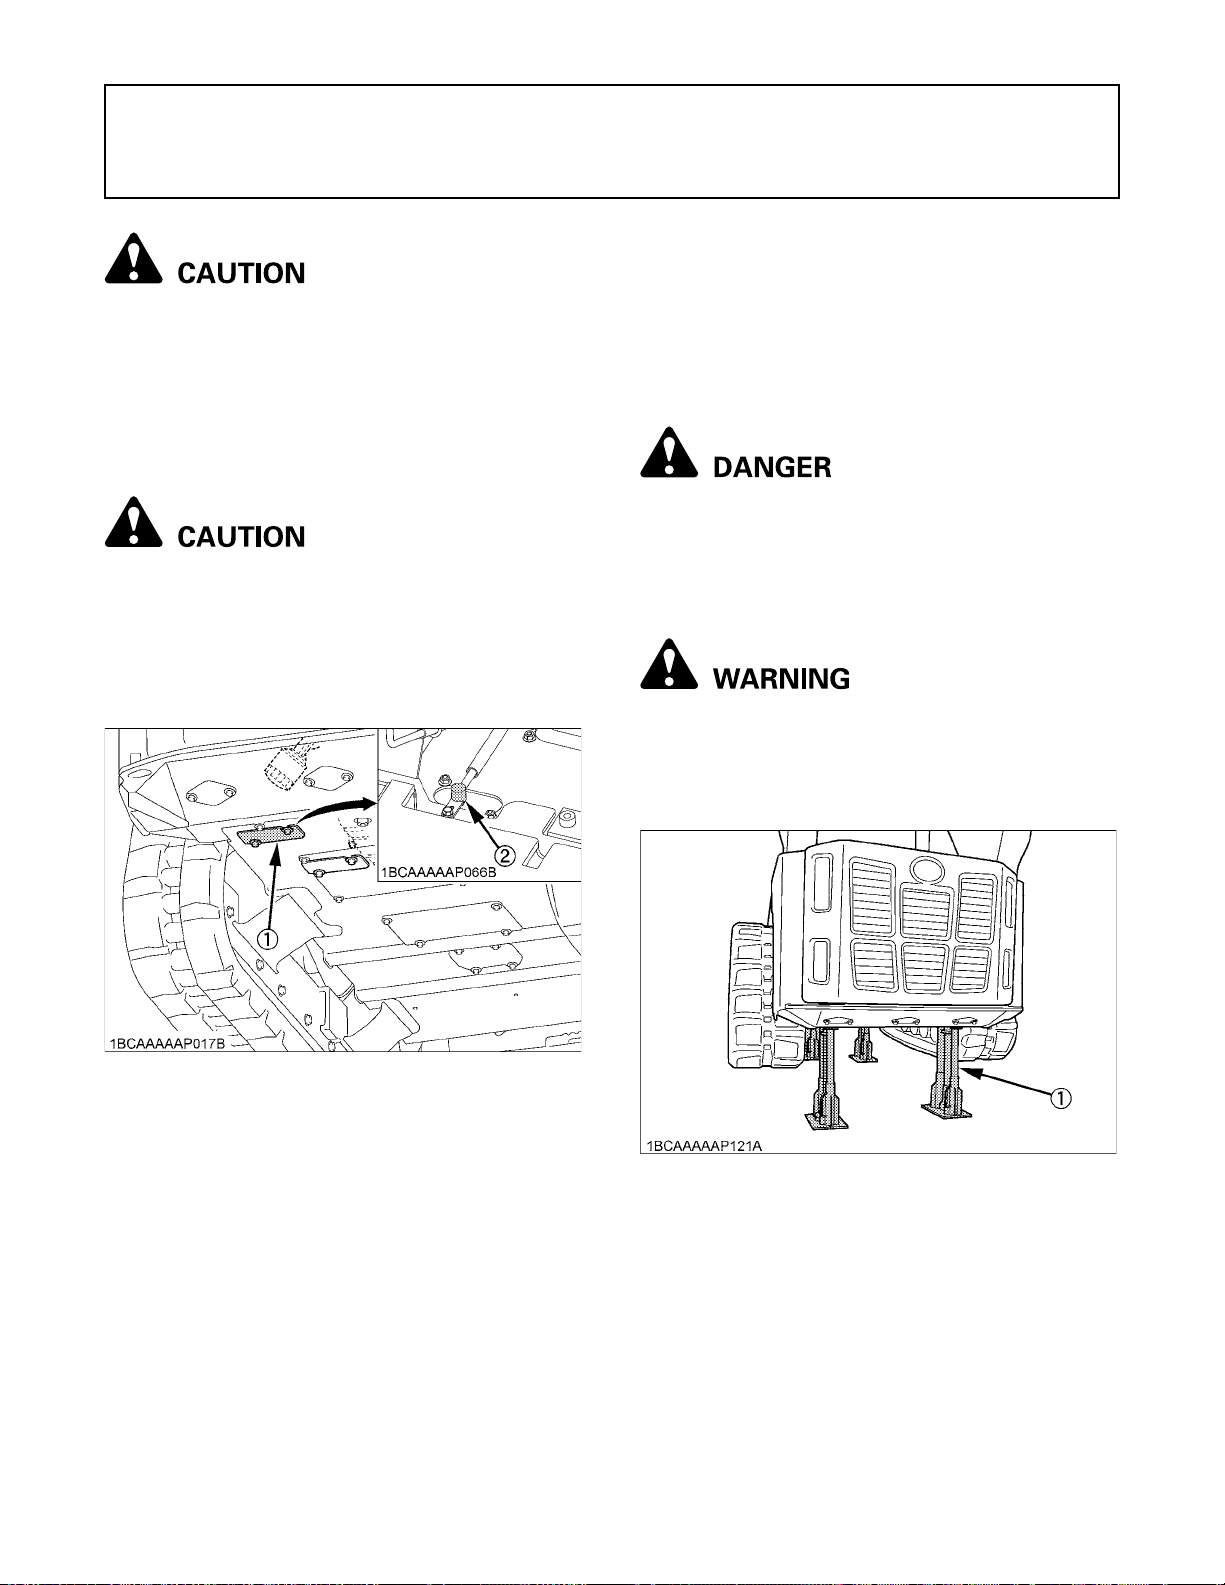
64 REGULAR CHECKS AND MAINTENANCE WORK
REGULAR CHECKS AND MAINTENANCE WORK
BChecking Track Tension
To avoid personal injury:
A Before doing maintenance work on the
machine, place the machine on a firm, flat and
level surface, lower the lift arms slowly to the
ground, stop the engine.
EVERY 50 SERVICE HOURS
1. To check the track tension, put the machine on the
jackstand. The track must be lifted from the ground as
shown. The track tension is correct if the distance (A)
(clearance between the outer end of the track roller
and the track interior surface) corresponds to the
dimension specified in the table below.
BDraining the Water from the Fuel Tank
To avoid personal injury:
A Before draining the water from the fuel tank, be
sure to stop the engine and remove the key.
A Do not smoke during inspection.
1. Open the cover.
2. Open the drain shutoff-valve.
To avoid personal injury or death:
A Do not work under the machine in this
condition.
A For your safety do not rely on hydraulically
supported devices, they may leak down and
suddenly drop or be accidentally lowered.
To avoid personal injury or death:
A When lifting the machine itself with an
attachment, place the jack stands under the
main frame to prevent the machine from
turning over.
(1) Cover
(2) Drain shutoff-valve
(1) Jack stand
Page 89
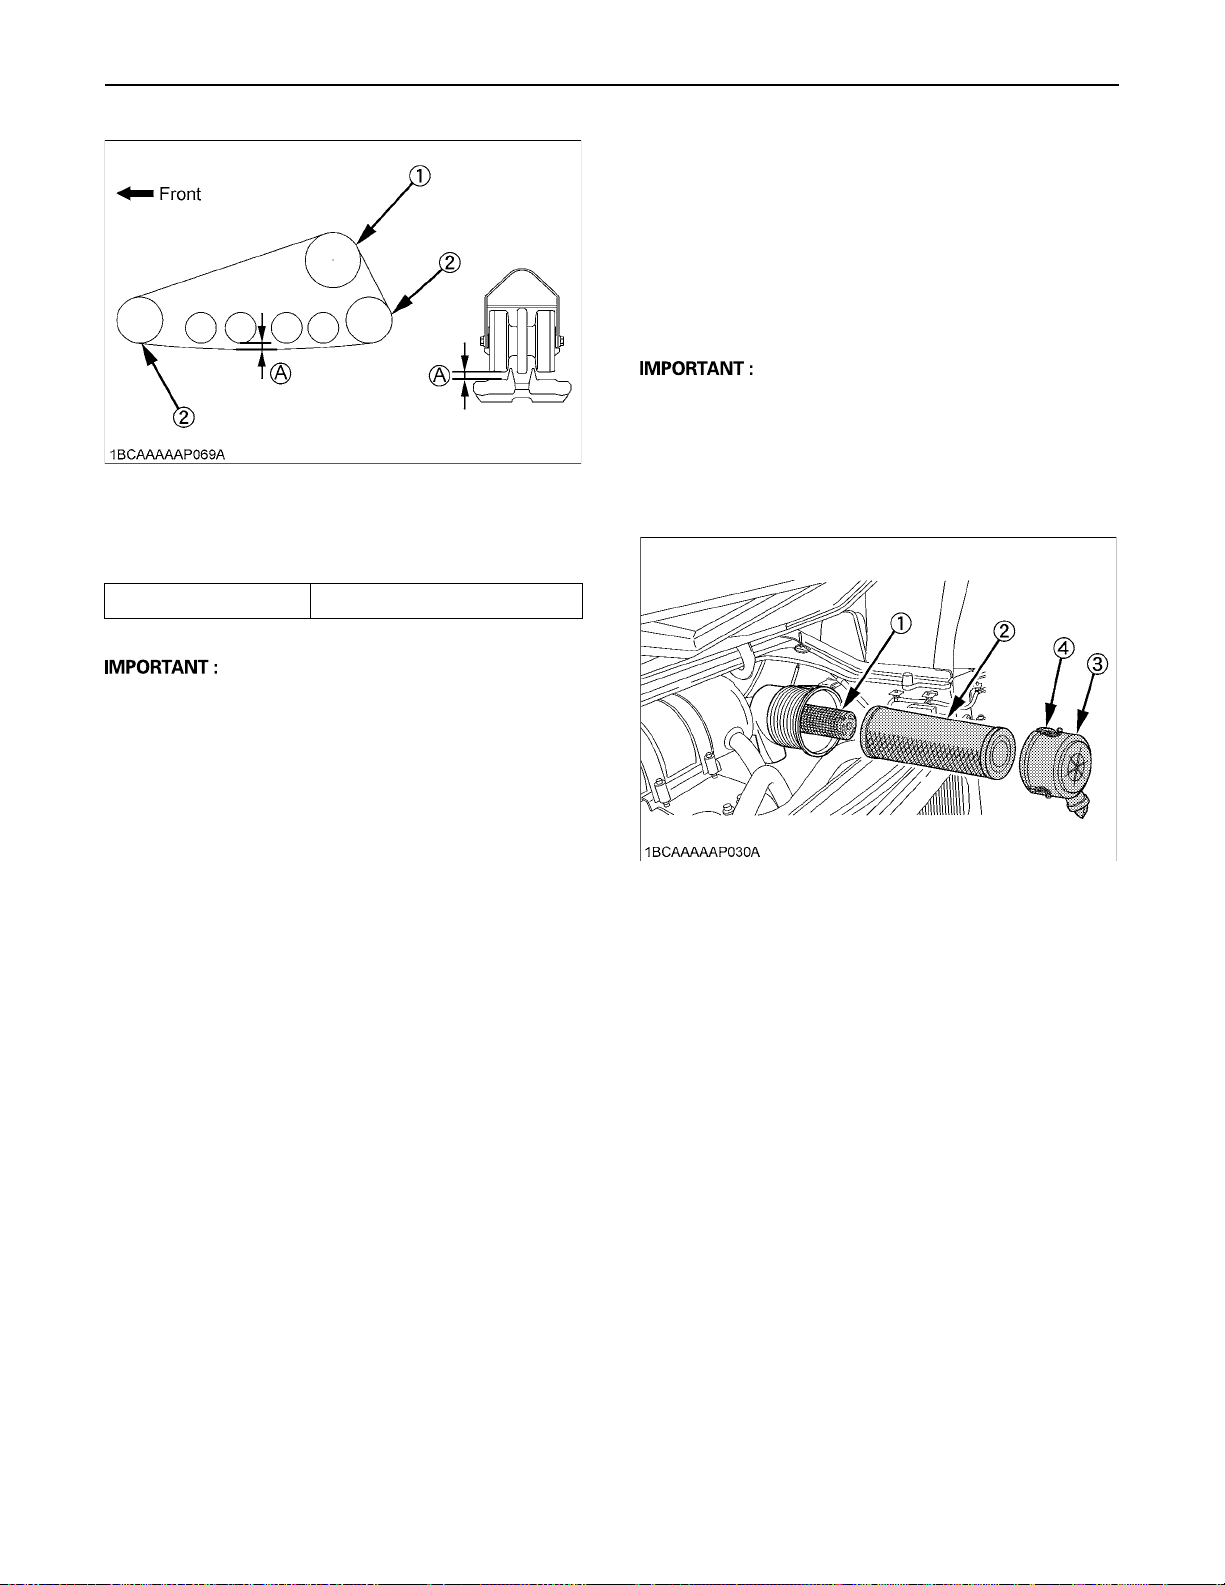
(1) Drive sprocket
(2) Idler
2. If necessary, adjust the tension.
(A) 20 to 30 mm
65REGULAR CHECKS AND MAINTENANCE WORK
BInspection and Cleaning Air Cleaner
Element
Open the rear door and remove the dust-cover. Take out
only outer element, clean the element, case interior and
reassemble. During reassembly, take care to install the
dust-cover so that its TOP mark (arrow) faces up-wards.
Do not remove the inner element.
A Should the machine be used in extremely dusty areas,
the air cleaner element must be inspected and
cleaned more frequently than in the specified
maintenance periods.
A The air cleaner has a dry element, keep free from oil.
A Do not run the engine without the air cleaner.
A Make sure that no obstacles, such as stones are
caught in the track. Remove such obstacles before
adjusting the track tension. (See "ADJUSTMENT OF
TRACKS" in "OTHER ADJUSTMENTS AND
REPLACEMENTS" section.)
(1) Inner element
(2) Outer element
(3) Dust-cover
(4) Clamps
Page 90
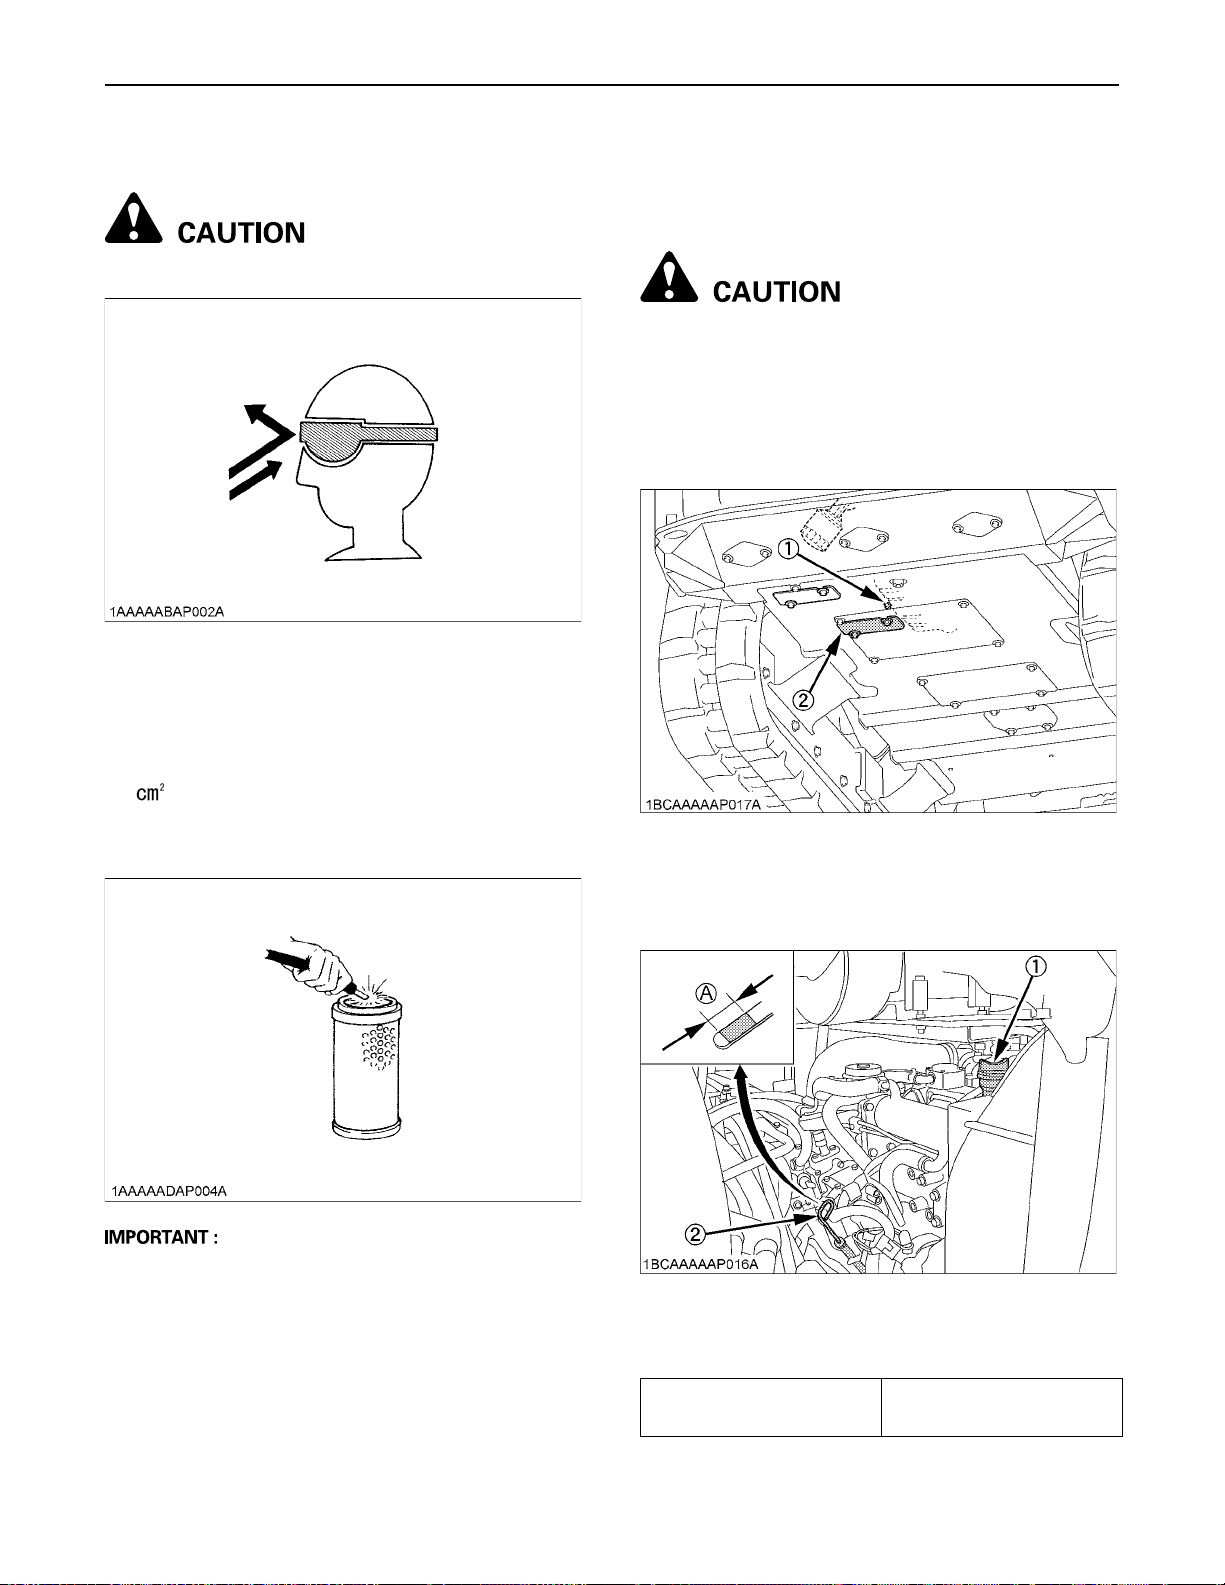
REGULAR CHECKS AND MAINTENANCE WORK66
BAir Cleaner Element
To avoid personal injury:
A Wear eye protection.
The quickest and safest method of maintenance is the
exchange of the element. Furthermore there are different
methods of cleaning the element.
EVERY 250 SERVICE HOURS
Do all 50 hour servicing at the same time.
BChanging Engine Oil
To avoid personal injury:
A First stop the engine then remove the key and
wait long enough for the oil to cool down.
1. Remove the under cover on the bottom of the frame.
2. Remove the drain plug on the underside of the engine
and drain all oil.
3. Re-tighten the drain plug, and attach the under cover.
C Cleaning with compressed air
Pressure of compressed air must be under 205 kPa (2.1
kgf/ ), and the element should be blown clean from the
inside to the outside until the dust deposits are noticeably
reduced.
A If the air suction is still inadequate, or the color of the
exhaust gases is abnormal even after the cleaning, the
air cleaner element must be replaced.
(1) Drain plug
(2) Under cover
4. Fill up with new oil through the filling port to the
specified level.
(1) Oil filling port
(2) Engine oil dipstick
(A) Required oil level range
Engine oil volumes
(with engine oil filter)
10L
Page 91
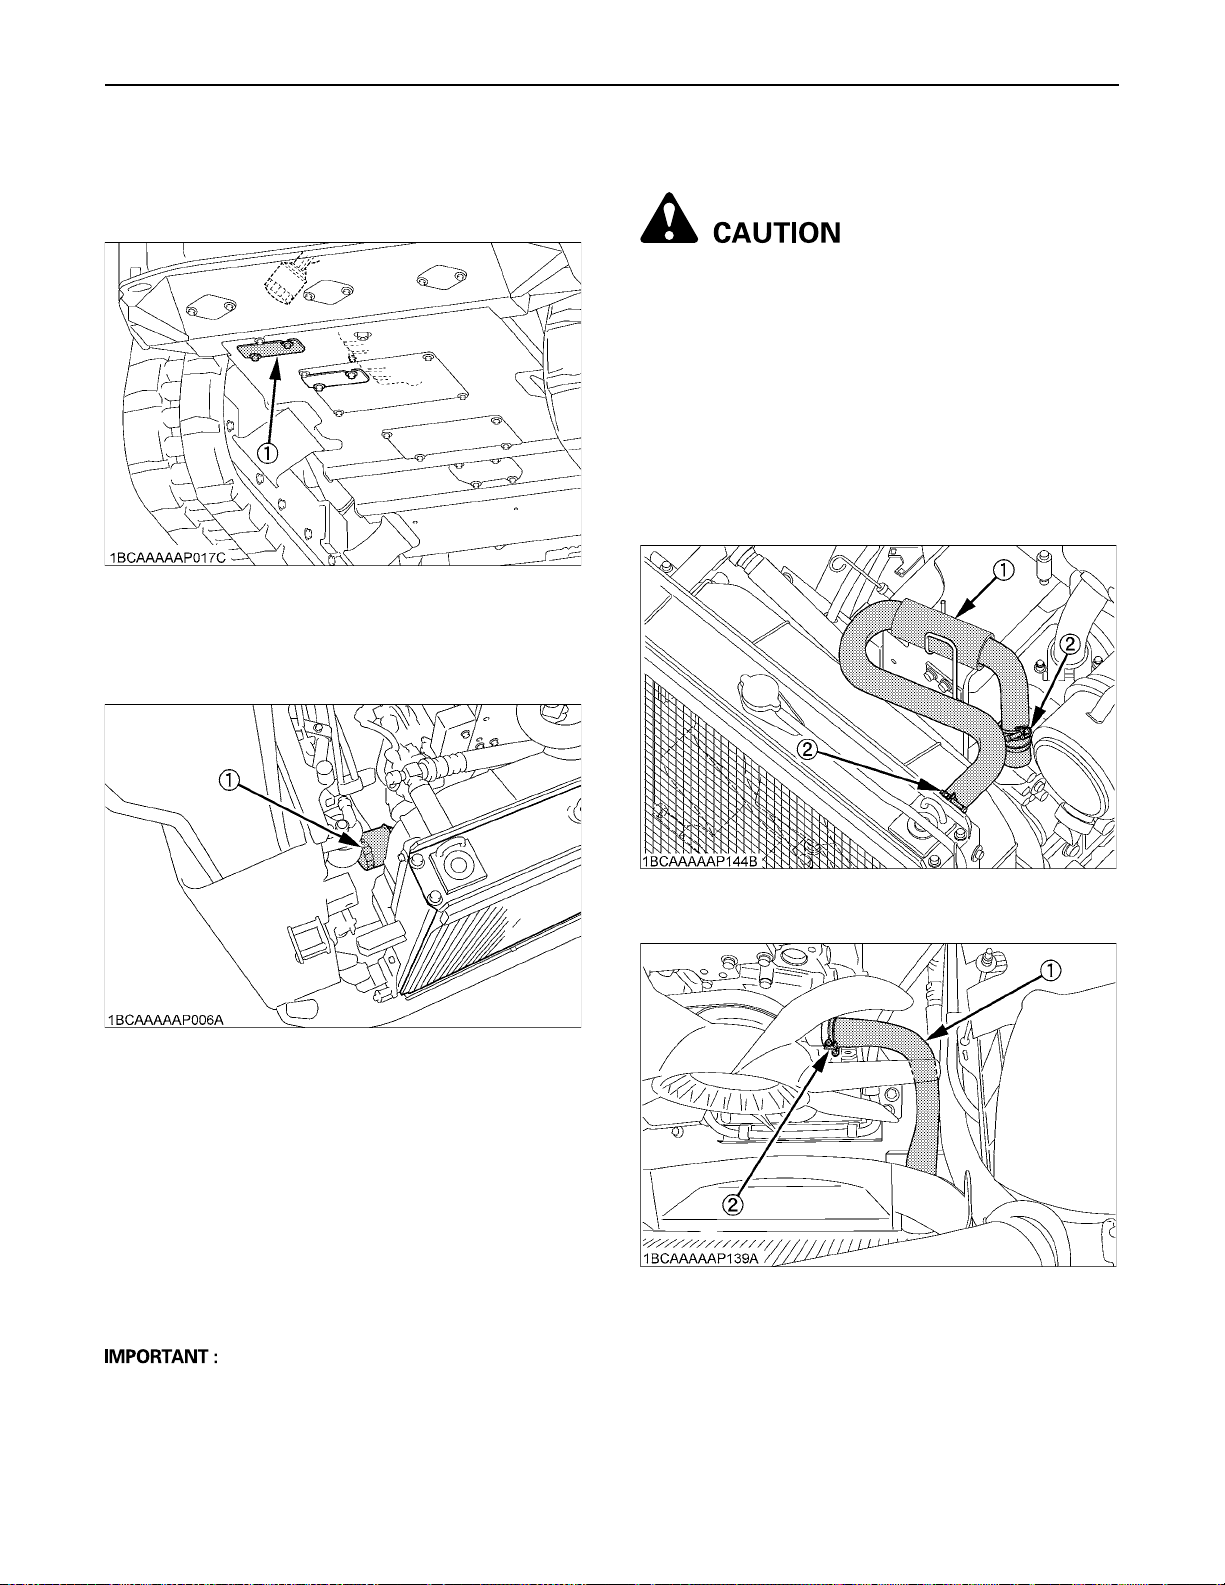
67REGULAR CHECKS AND MAINTENANCE WORK
BReplacing Engine Oil Filter Cartridge
1. Remove the under cover on the bottom of the frame (to
drain the spilled oil from the engine oil filter cartridge).
(1) Under cover
2. Replace the oil filter cartridge at the same time as
doing the engine oil change.
3. Remove the cartridge with the filter wrench.
BChecking Radiator Hoses and Clamps
To avoid personal injury:
A Wait long enough for the radiator coolant to
cool down.
Check the water hoses for proper connection. This check
should be carried out every 250 hours or every 6 months,
whichever comes first.
1. Should the hose clamps become loose or water leaks,
tighten the hose clamps properly.
2. Should the radiator hoses become swollen, aged or
cracked, they must be replaced and the hose clamps
tightened again properly.
(1) Oil filter cartridge
4. Oil the O-ring of the new oil filter cartridge lightly. Then
tighten the oil filter cartridge by hand.
5. Fill engine oil to the specified level.
6. Let the engine run for approx. 5 min. and make sure
that the engine oil indicator lamp does not light up.
Then stop the engine and remove the key.
7. The engine oil level is reduced by the amount of the
filter capacity after the engine is started. It is necessary
to add oil.
8. Attach the under cover.
A Always check the oil level after having exchanged the
filter.
(1) Radiator hose
(2) Hose clamps
(1) Radiator hose
(2) Hose clamps
Page 92
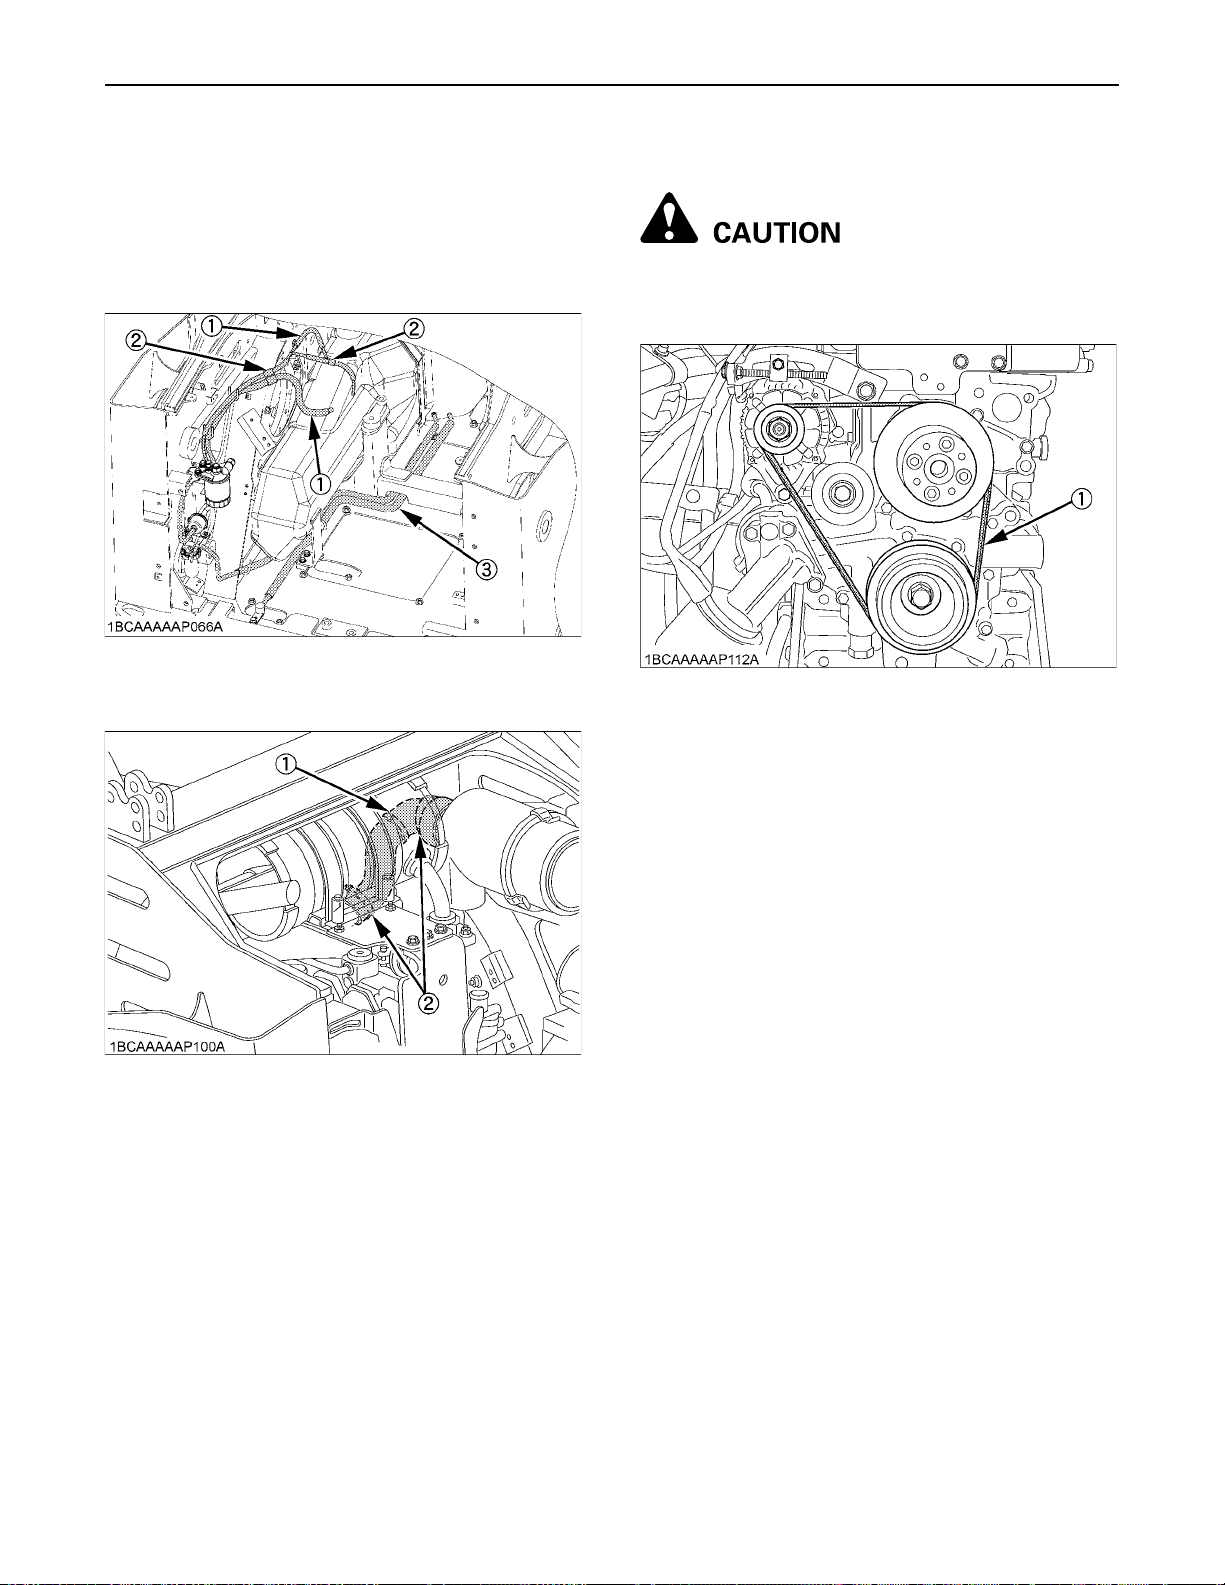
REGULAR CHECKS AND MAINTENANCE WORK68
BChecking Fuel Line and Intake Air Line
1. Check to see that all lines and hose clamps are
tightened and not damaged.
2. If hoses and clamps are found worn or damaged,
replace or repair them at once.
(1) Fuel lines
(2) Clamp bands
(3) Fuel drain line
BAdjusting V-belt Tension
To avoid personal injury:
A First stop the engine and remove the key.
A After servicing, make sure to replace the belt
cover in its original position.
(1) V-belt
(1) Hose
(2) Hose clamps
Page 93
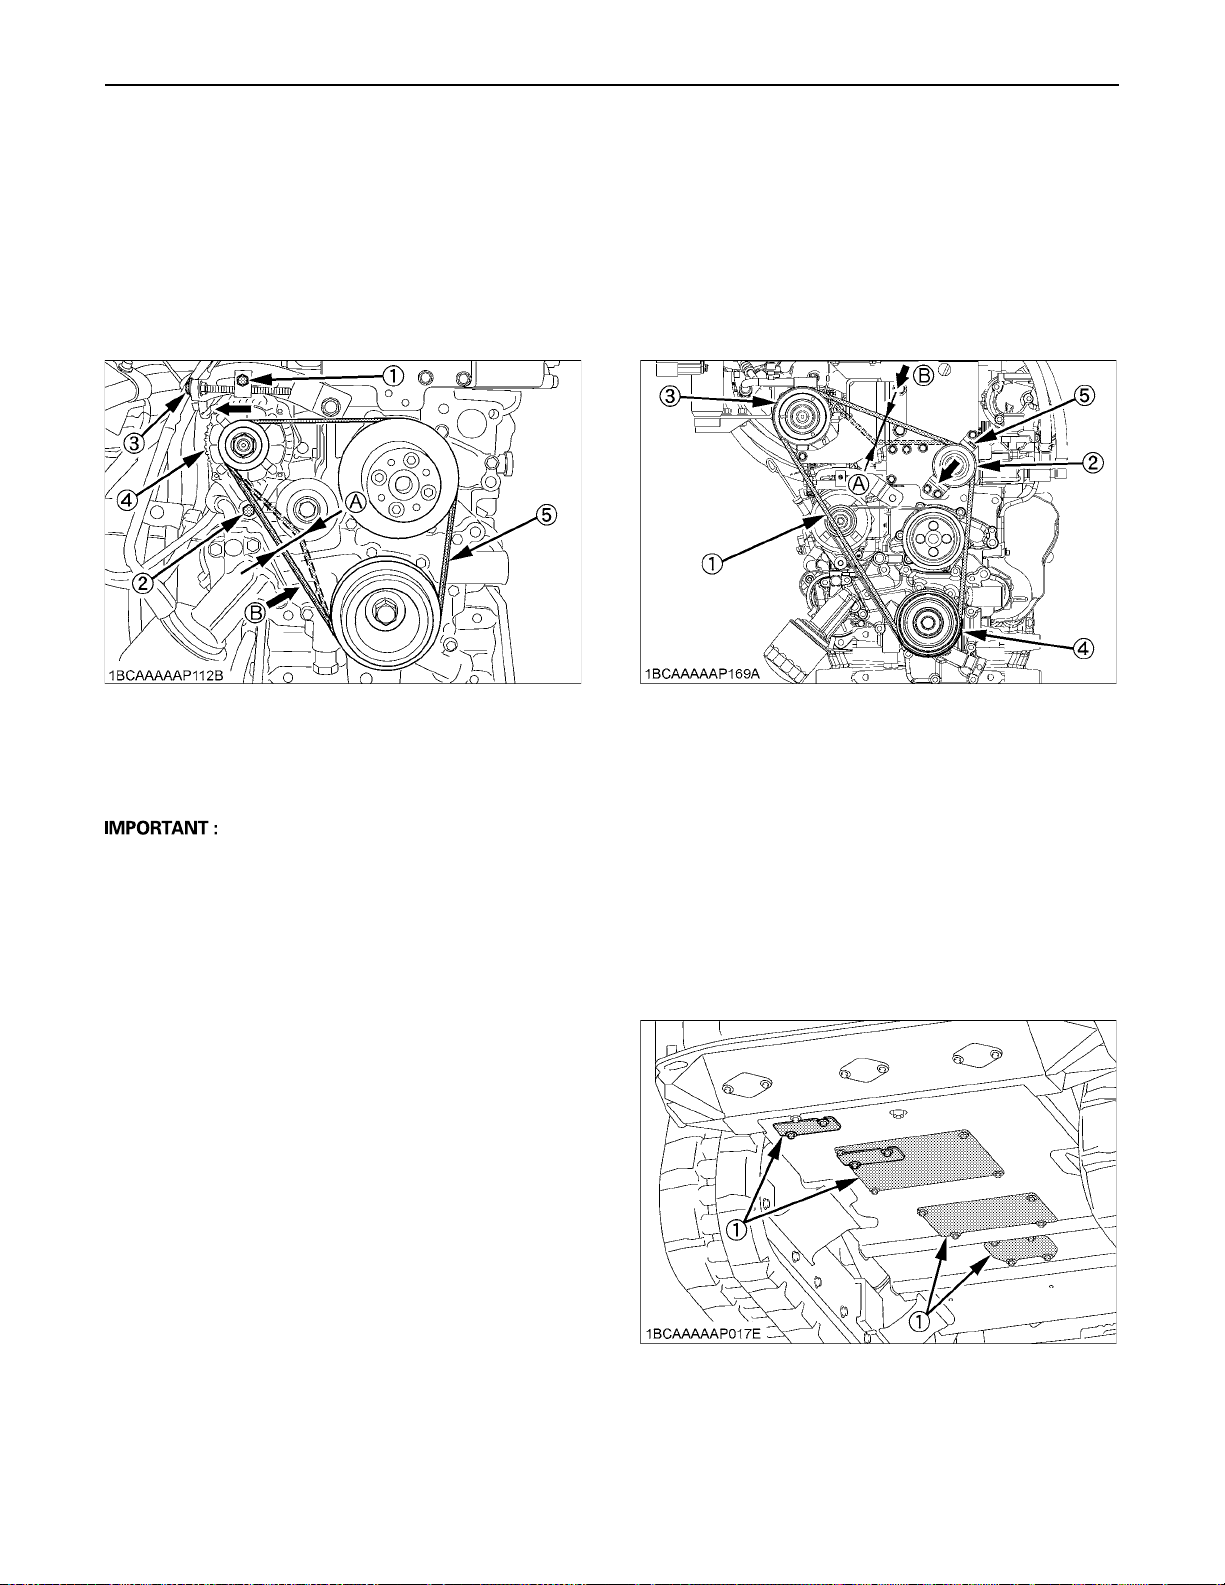
69REGULAR CHECKS AND MAINTENANCE WORK
C Checking and adjustment of the V-belt tension
1. Press the V-belt (5) down in the middle, with a force of
approx. 50 to 60 N. The belt tension is correct if it
deflects about 4.0 to 5.0 mm. If otherwise, loosen bolt
(1), (2) and (3) and shift the alternator (4) in the
direction shown by the arrow.
After adjustment of the V-belt tension, tighten all the
bolts.
2. Replace the V-belt if worn out, cracked or torn.
(1) Bolt
(2) Bolt
(3) Adjuster bolt
(4) Alternator
(5) V-belt
(A) about 4.0 to 5.0 mm
(B) approx. 50 to 60 N
C Checking and adjustment of the air-conditioner
belt tension [Closed cab model]
1. Press the air-conditioner belt down in the middle, with
a force of approx. 50 to 60 N. The belt tension is
correct if it deflects about 7 to 9 mm. If otherwise,
loosen bolt of the tension pulley and shift the tension
pulley in the direction shown by the arrow.
2. Replace the air-conditioner belt if worn out, cracked or
torn.
(1) Air-conditioner belt
(2) Tension pulley
(3) Air-conditioner compressor
(4) Pulley
(5) Bolt
(A) about 7 to 9 mm
(B) approx. 50 to 60 N
A If the engine is run with a loose V-belt, the belt could
slip and cause insufficient battery charging. Check Vbelt tension regularly.
A Should the V-belt break or jump off, the indicator light
for battery charge will light up. Stop the engine and
remove the key immediately.
BCleaning Inside of Main Frame
If mud, leaves or any debris are accumulated inside of
main frame, it may cause any parts damaged.
Remove mud, leaves and any debris from the inside of the
frame.
Refer to page 57 for detail procedure.
(1) Plate
Page 94
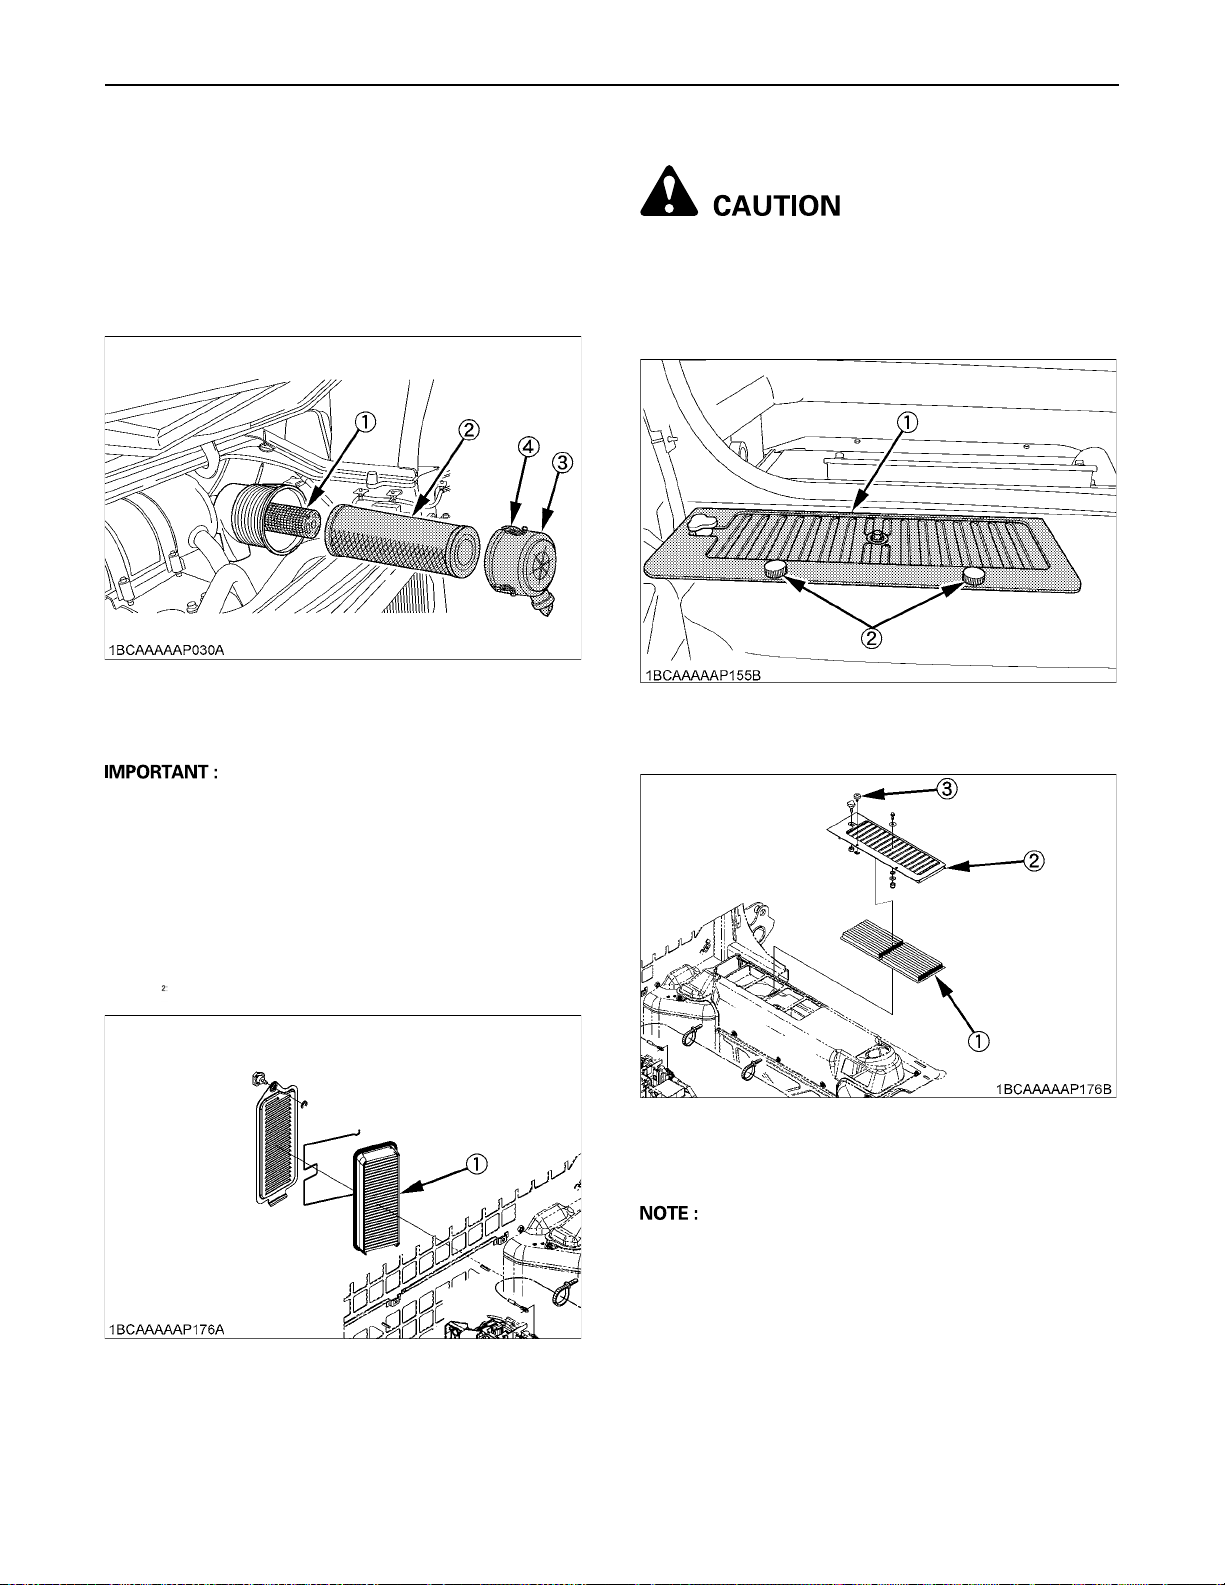
REGULAR CHECKS AND MAINTENANCE WORK70
BReplacing Air Cleaner Element
Open the rear door and engine hood. Remove the dustcover. Remove and replace the outer element and inner
element with new elements.
When reassembling, install the dust-cover so that its TOP
mark (arrow) faces up-wards.
BCleaning Air Fresh Filter
To avoid personal injury:
A When removing and attaching the filter, apply
parking brake, stop the engine and remove the
key.
Remove the thumbscrews and pull out filter.
(1) Inner element
(2) Outer element
(3) Dust-cover
(4) Clamps
A Shorten the replacement period if the machine is used
in dusty or sandy areas.
BCleaning Inner Air Filter
Remove the inner filter, and blow air from the direction
opposite to the filter's normal air flow.
Pressure of compressed air must be under 205 kPa (2.1
kgf/cm ).
(1) Cover
(2) Thumbscrew
(1) Fresh air filter
(2) Cover
(3) Thumbscrew
A Attach the filter and cover as the illustration above.
(1) Inner air filter
Page 95
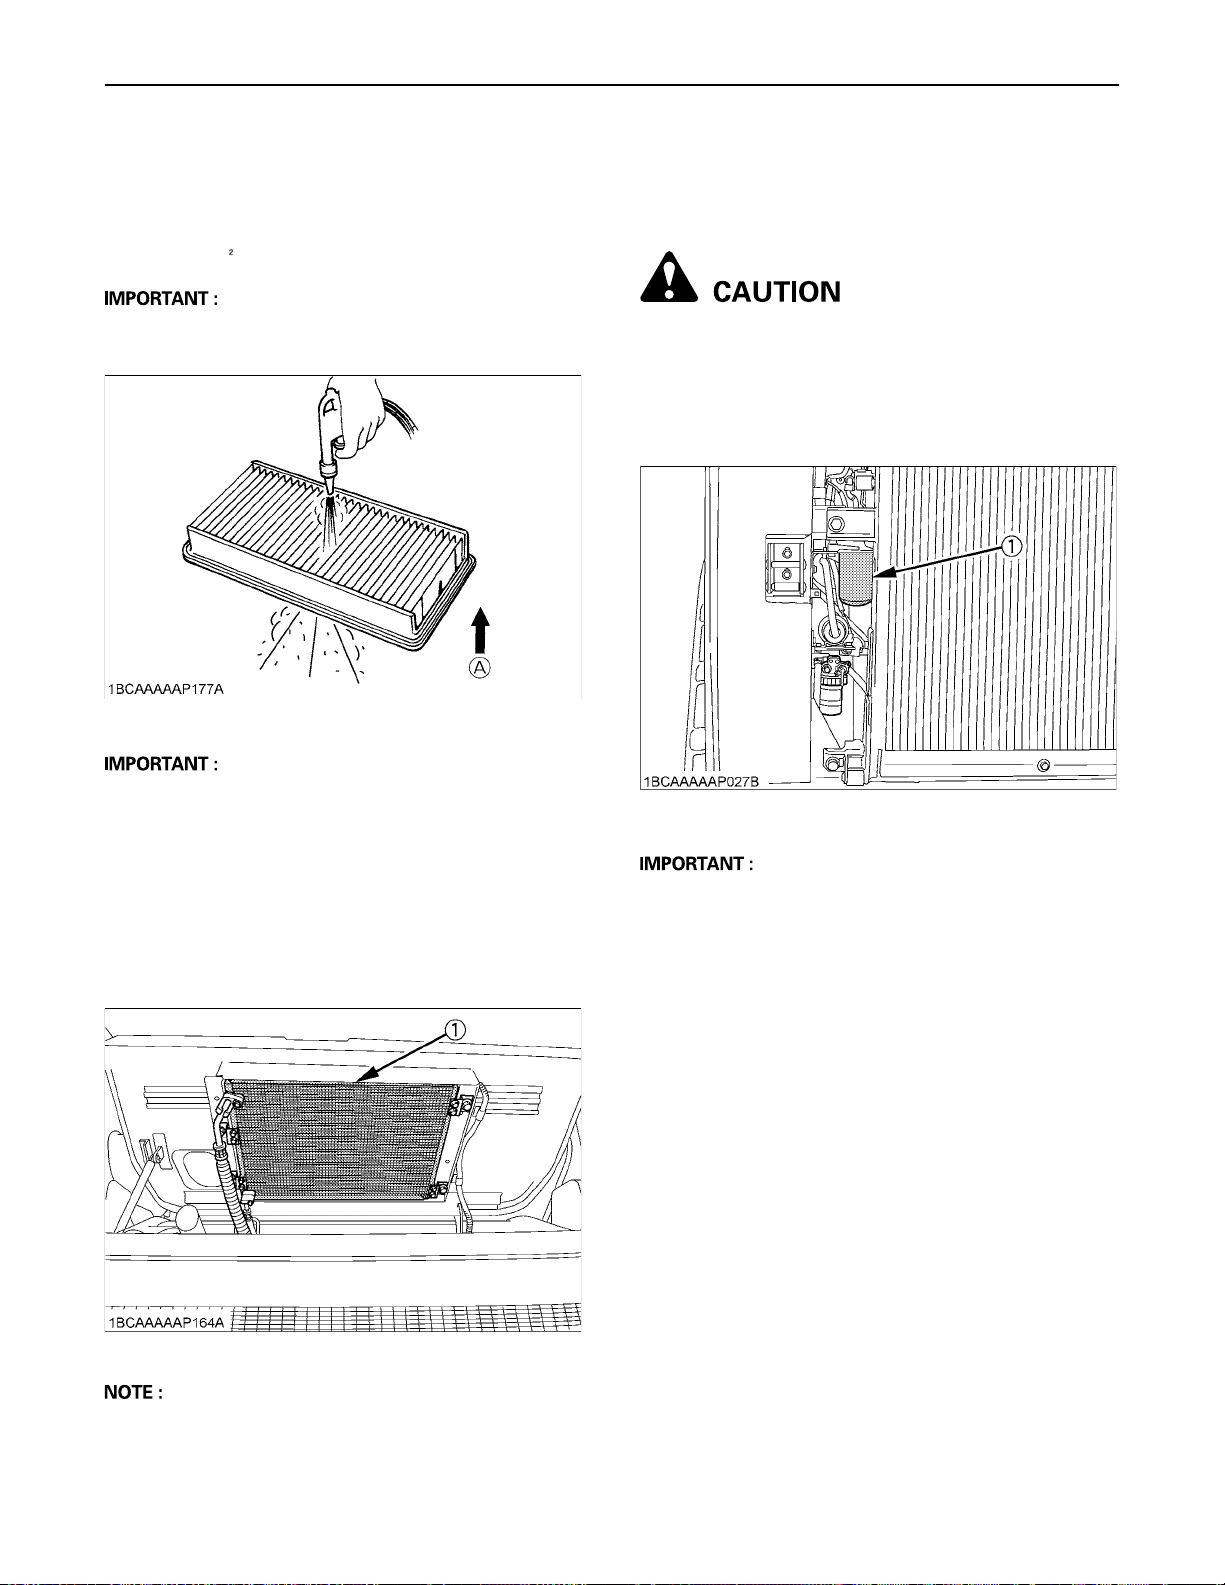
71REGULAR CHECKS AND MAINTENANCE WORK
C Cleaning the air filter
A Normal use
Blow air from the opposite direction to the filter's
normal air flow.
Pressure of compressed air must be under 205 kPa
(2.1 kgf/cm ).
A Do not hit the filter. If the filter becomes deformed, dust
may enter into the air-conditioner, which may cause
damage and malfunction.
(A) "AIR CONDITIONER AIRFLOW"
EVERY 500 SERVICE HOURS
Do all 50 and 250 hour servicing at the same time.
BReplacing Fuel Filter Cartridge
To avoid personal injury:
A Keep fire away.
1. Tilt the radiator.
2. Remove the filter cartridge with the filter wrench.
3. Apply a small amount of fuel on the gascket of the
replacement filter and by hand tighten it.
A Do not use gasoline, thinner or similar chemicals to
clean the filter as damage to the filter may occur.
A It may also cause an unpleasant odor in the Cab when
the system is used next.
BChecking Air-Conditioner Condenser
Check air-conditioner condenser to be sure it is clean from
debris.
(1) Air-conditioner condenser
(1) Fuel filter cartridge
A After exchange of the filter, the fuel system must be
purged of air.
A Air flow from the outside to the inside so debris would
accumulate on the outside. Outside cover might have
to be removed to help clean.
Page 96
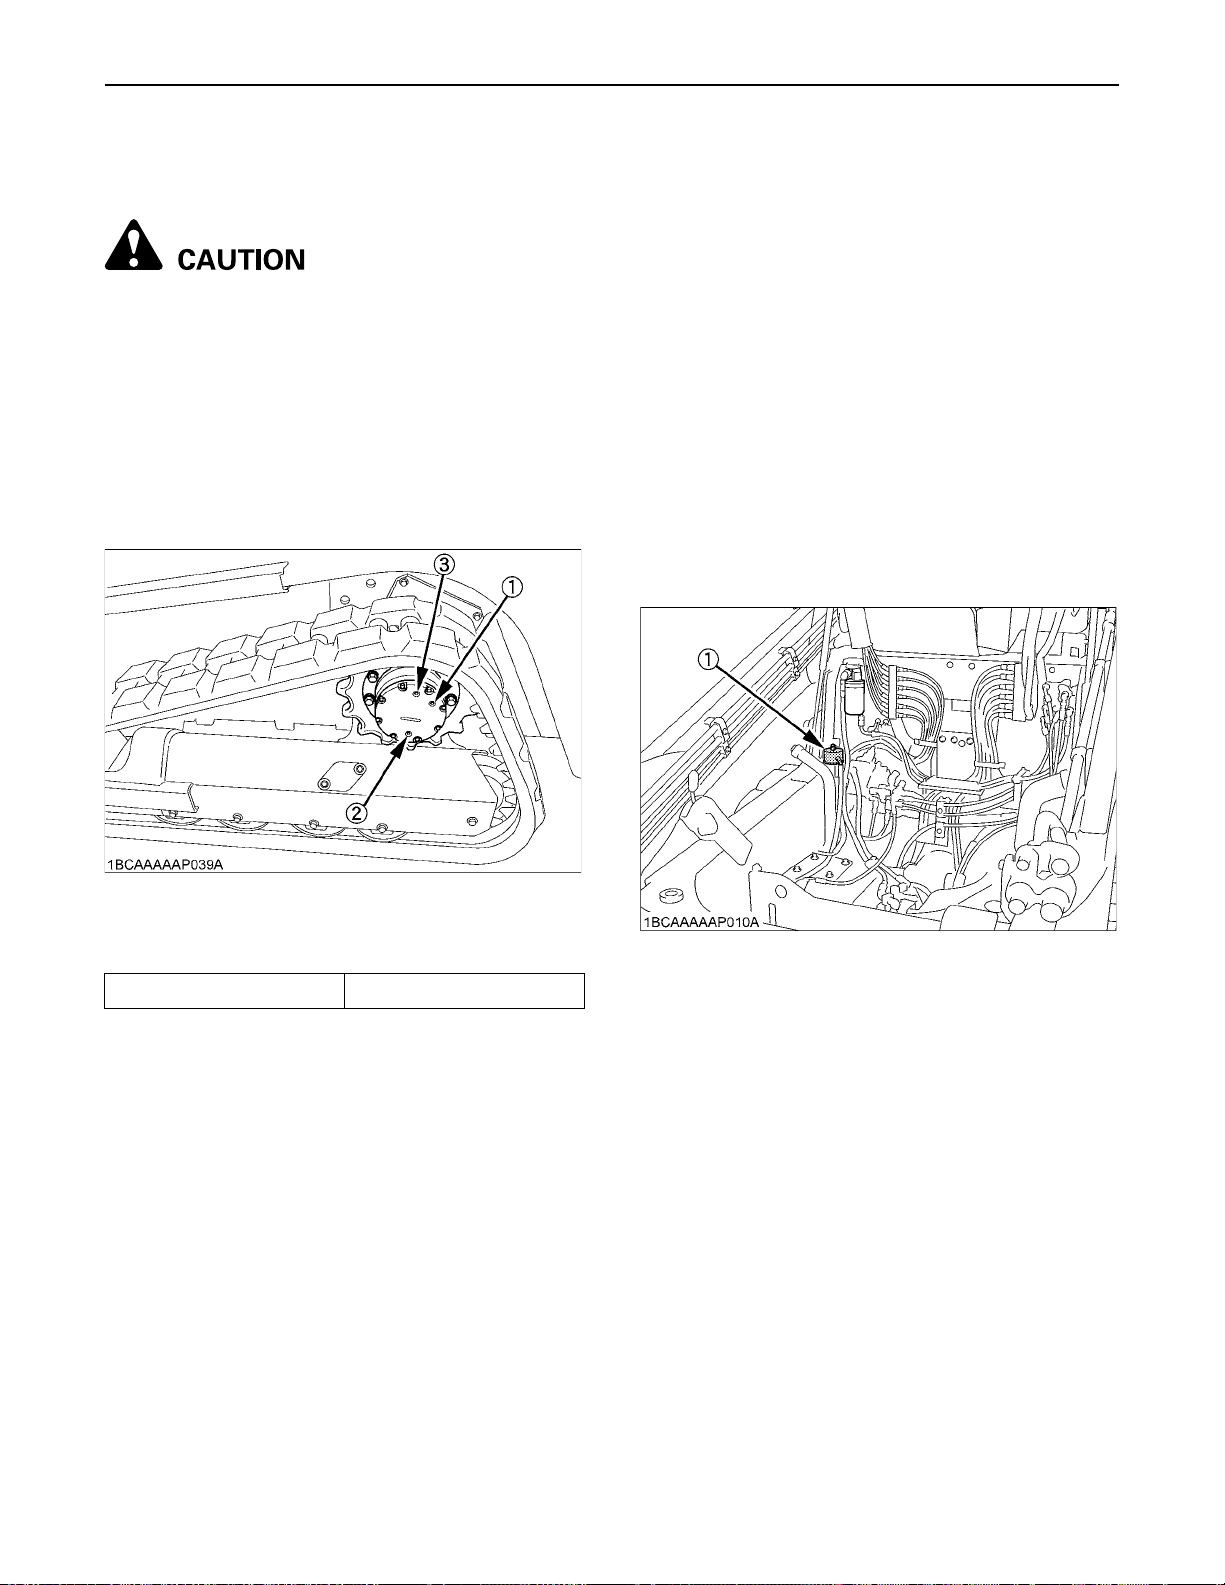
REGULAR CHECKS AND MAINTENANCE WORK72
BChanging Drive Unit Oil (First oil change:
250 hours)
To avoid personal injury:
A Lower the lift arms to the ground, stop the
engine and remove the key before undertaking
the oil change.
1. Rotate the track so that the drain plug of the drive unit
is in the bottom position.
2. Remove the drain plug to let the oil run out. Screw in
and tighten the drain plug again and fill with gear oil
through the oil filling port.
3. Fill oil until it overflows out of the oil check port.
4. Use prescribed gear oil SAE 90.
BChanging Return Filter (First filter change:
250 hours)
See "Hydraulic Oil Change (Including Replacing of the
Suction and Return Filter in the Hydraulic Tank)" in
"EVERY 1000 SERVICE HOURS" in "REGULAR
CHECKS AND MAINTENANCE WORK" section.
BReplacing Breather Filter
The breather filter for the hydraulic tank is located above
the hydraulic tank
1. Raise the cab. (See "Tilting Up the CAB" in "OPENING
AND CLOSING OF COMPONENTS" in
"MAINTENANCE" section for detail.)
2. Open the cap of the filter cover.
3. Remove the breather filter and replace with the new
one.
4. Tighten the cap of the filter cover.
(1) Oil filling port
(2) Drain plug
(3) Oil filling port
Gear oil volume approx. 1.0 L
(1) Breather filter
Page 97
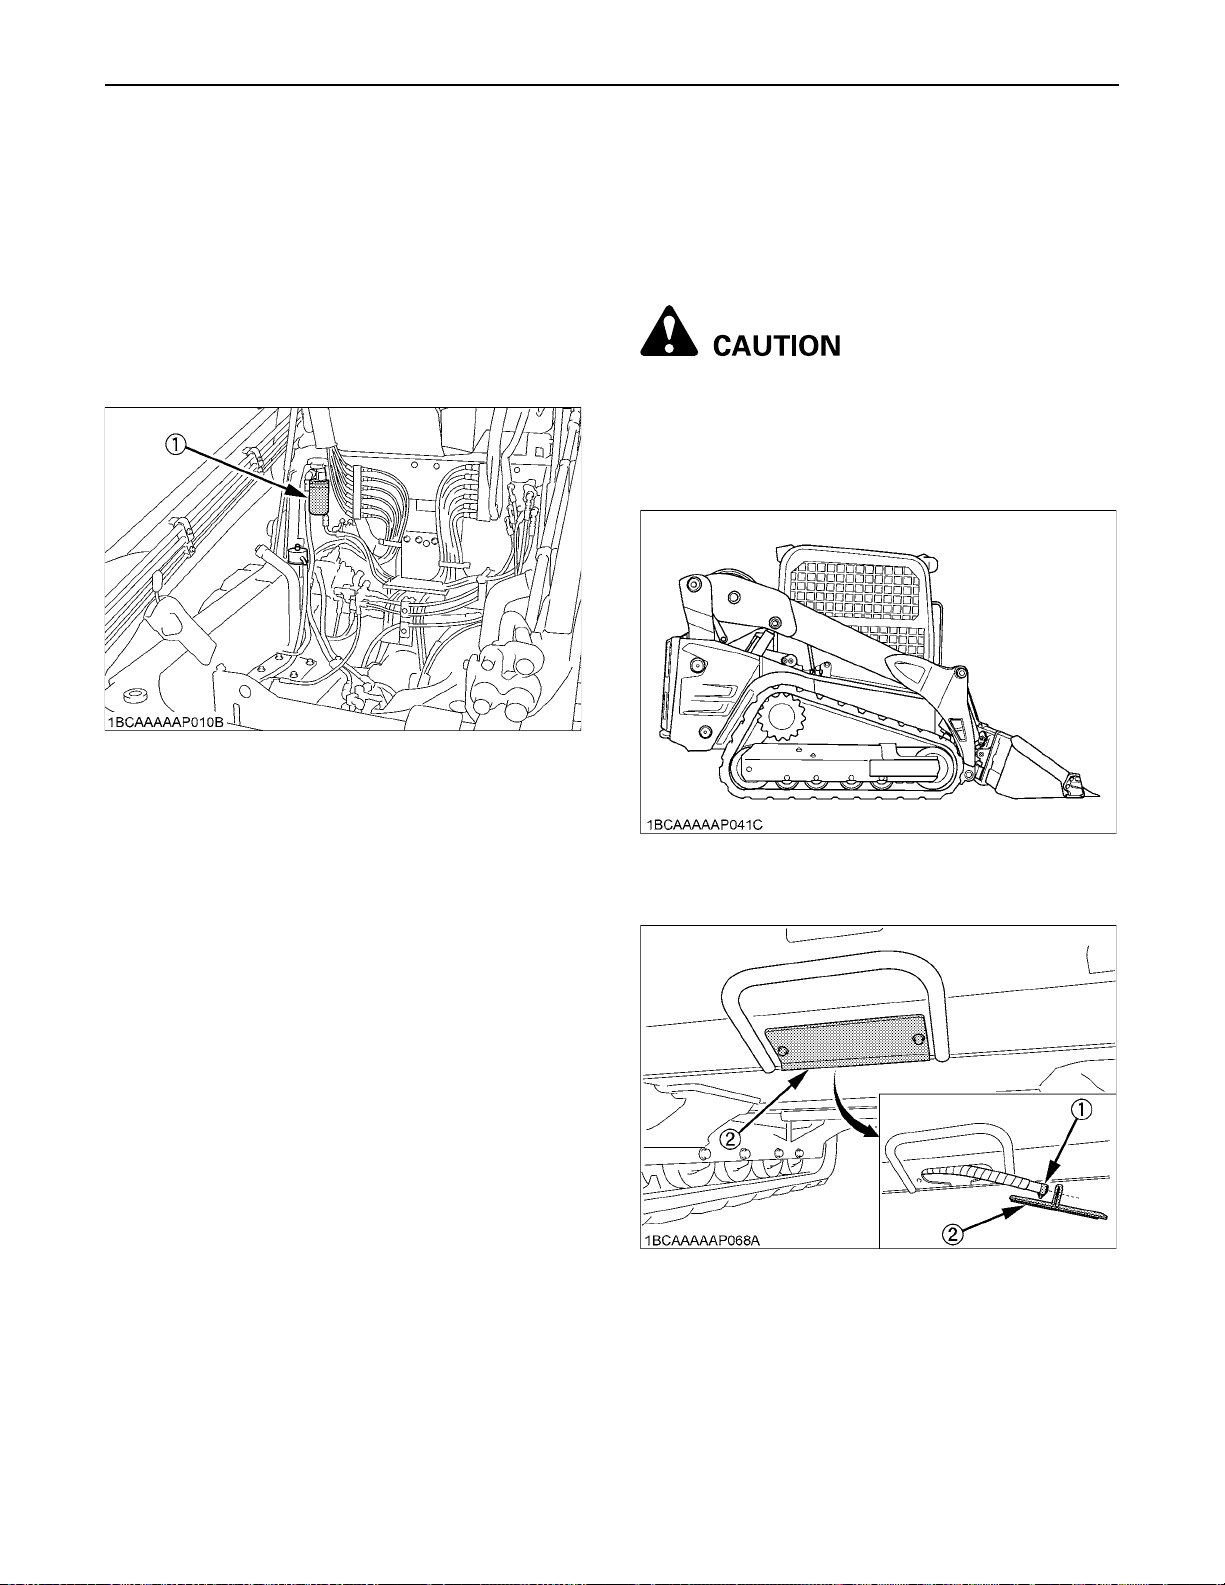
73REGULAR CHECKS AND MAINTENANCE WORK
BReplacing Hydraulic Oil Filter (First filter
change: 50 hours)
1. Raise the cab. (See "Tilting the CAB" in "OPENING
AND CLOSING OF PARTS" in "MAINTENANCE"
section for detail.)
2. Remove the hydraulic oil filter with the wrench and
Replace with the new one.
3. Oil the O-ring of the new hydraulic filter cartridge
lightly.
Then tighten the hydraulic filter cartridge by hand.
EVERY 1000 SERVICE HOURS
Do all 50, 250 and 500 hour servicing at the same time.
BHydraulic Oil Change (Including
Replacing Suction and Return Filter in the
Hydraulic Tank)
To avoid personal injury:
A Wait long enough for the hydraulic fluid to cool
down. Then change the hydraulic fluid.
1. Park the machine on a firm, flat and level surface.
Lower the lift arms to the ground and stop the engine.
(1) Hydraulic oil filter
2. Remove the cover with drain plug in front of the
machine and drain the oil.
(1) Drain plug
(2) Cover
Page 98
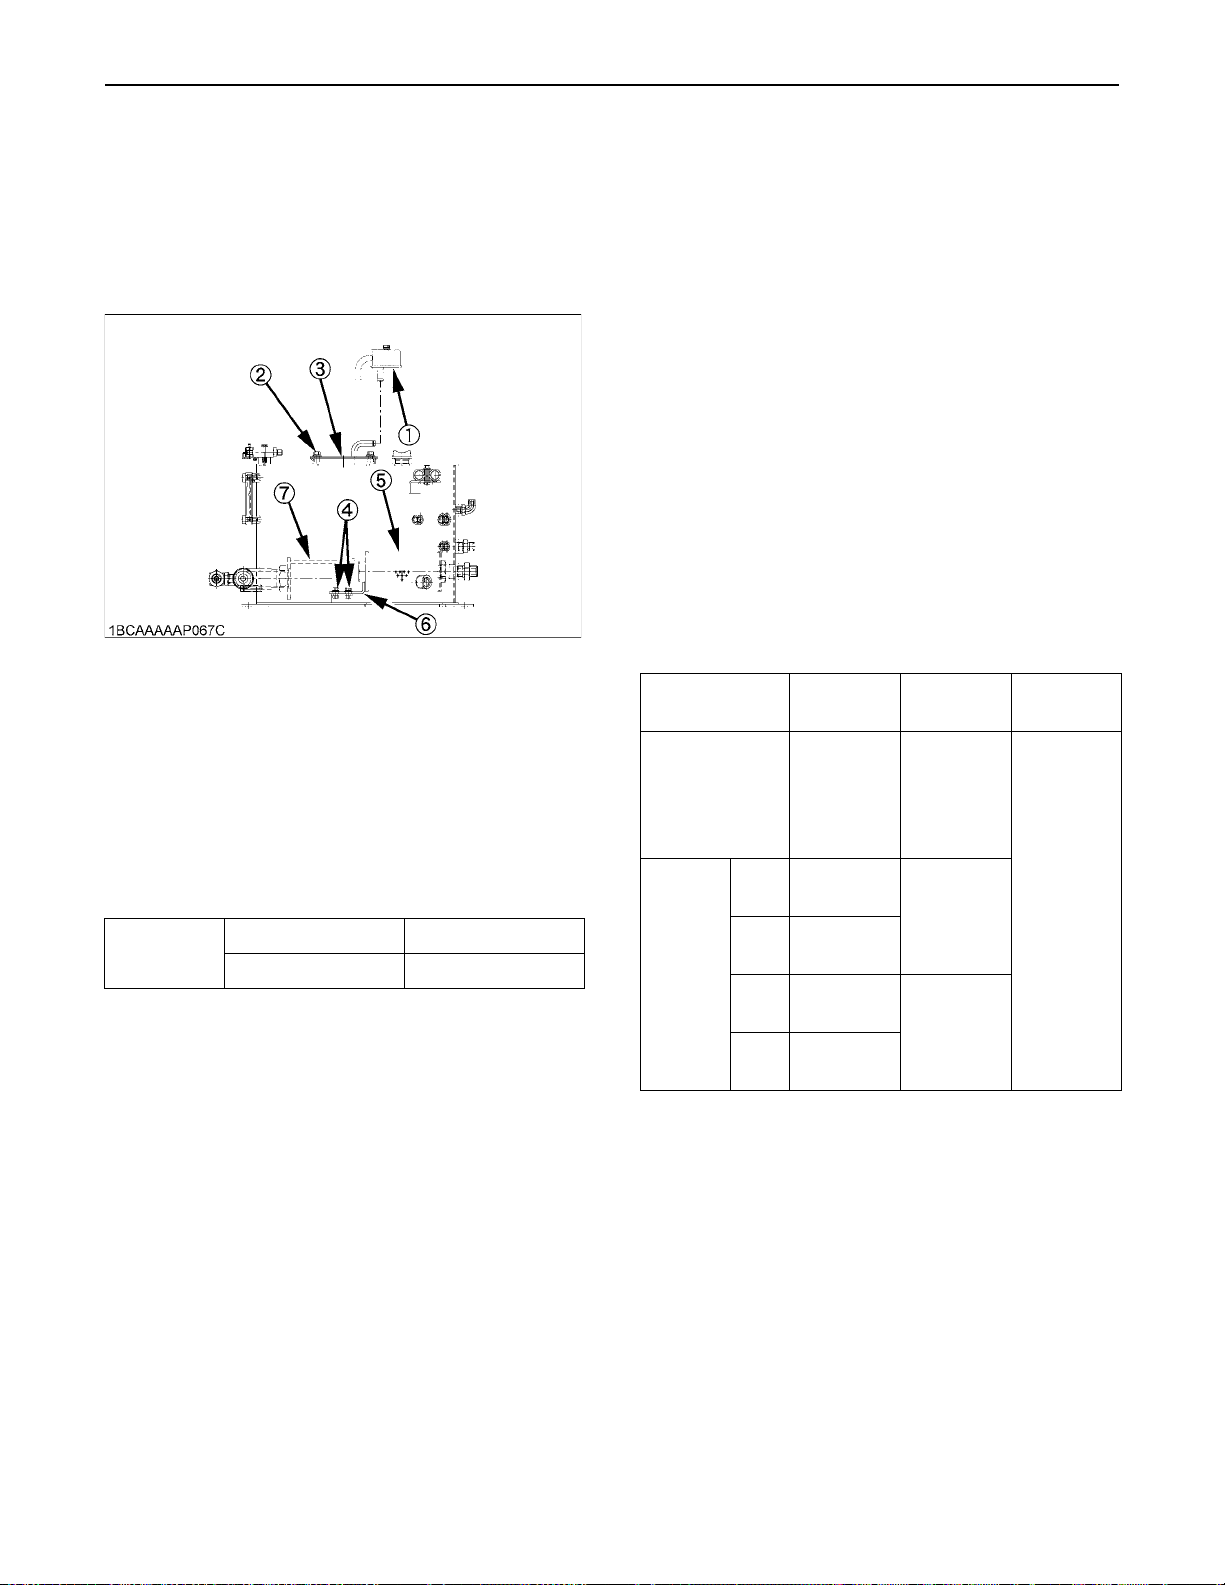
REGULAR CHECKS AND MAINTENANCE WORK74
3. Loosen the bolt and remove the tank cover.
4. Remove the suction filter. Replace the filter with new
one.
5. Loosen the set bolt first and then remove the return
filter. Replace the filter with new one.
6. Install the hydraulic cover.
7. Retighten the drain plug.
(1) Breather filter
(2) Bolt
(3) Cover
(4) Set bolt
8. Fill oil through the oil filling opening on the top side of
the tank pipe.
9. Let the engine run and operate the lift arm, bucket.
Then lower the lift arms slowly to the ground, stop the
engine.
10.Fill oil again up to the center of the gauge.
Hydraulic
oil volumes
Hydraulic tank 35 L
Whole oil volumes 60 L
11.Tighten the oil filling plug.
(5) Return filter
(6) Filter stopper
(7) Suction filter
BHydraulic Oil Check with Hydraulic
Hammers
The hydraulic oil change after 1000 operating hours in the
operator's manual is based on normal work. Following
inspection measures are valid when hydraulic hammers
are used:
1. Changing and filling up of hydraulic oil
(1) The hydraulic oil must be changed more often
when hammers are used because the machine is
subject to harder conditions than normal work.
(2) Use only the recommended oils mentioned in the
operator's manual when changing or filling with
oil.
(3) When adding oil, do not mix oils of different
makes.
2. Changing the return filter and oil
(1) The filter must be changed more often because of
contamination resulting from the frequent
assembly and disassembly of the hoses.
(2) Use the correct replacement filter.
(3) Oil change according to operating hours.
Normal work
Hammer
work
portion
more
20%
40%
60%
Hydraulic
oil
every 1000
Hrs.
every 800
Hrs.
every 400
Hrs.
every 300
Hrs.
every 200
Hrs.
Return
filter
every 500
Hrs.
(250 Hrs.
after first
operation)
every 300
Hrs.
every 100
Hrs.
Suction
Filter
every 1000
Hrs.
Page 99

75REGULAR CHECKS AND MAINTENANCE WORK
EVERY 1500 SERVICE HOURS
Do all 50, 250 and 500 hour servicing at the same time.
BChecking Fuel Injection Nozzle (Injection
Pressure)
Consult your local KUBOTA Dealer for this service.
EVERY 2000 SERVICE HOURS
Do all 50, 250, 500 and 1000 hour servicing at the same
time.
BChecking the Alternator and Starter Motor
A Contact your KUBOTA dealer for details.
EVERY 3000 SERVICE HOURS
Do all 50, 250, 500, 1000 and 1500 hour servicing at the
same time.
BChecking Injection Pump
Consult your local KUBOTA Dealer for this service.
ANNUAL SERVICING
BChecking Air-Conditioner Pipes and
Hoses
BIENNIAL SERVICING
BChanging Radiator Coolant
To avoid personal injury:
A When using anti-freeze, use protective clothing
such as rubber gloves (Anti-freeze contains
poison.).
A If anti-freeze has been swallowed, seek medical
attention at once.
A When anti-freeze comes in contact with the
skin or clothing, wash it off immediately.
A Do not mix different types of Anti-freeze. The
mixture can produce a chemical reaction
causing harmful substances or vapors.
A Anti-freeze is extremely flammable and
explosive under certain conditions. Keep fire
and children away from anti-freeze.
A When draining fluids from the engine, collect
such with a some container underneath the
engine body.
A Do not pour waste onto the grounds, down a
drain, or into any water source.
A Also, observe the relevant environmental
protection regulations when disposing of antifreeze.
A Anti-freeze if swallowed is poisonous to
people, animals and birds.
To avoid personal injury:
A Do not touch the air-conditioner hoses or the
heater with your hand. You may get burned.
1. Check to see that all lines and hose clamps are tight
and not damaged.
2. If hoses and clamps are found worn or damaged,
replace or repair them at once. (Consult your local
KUBOTA Dealer for this service.)
Page 100
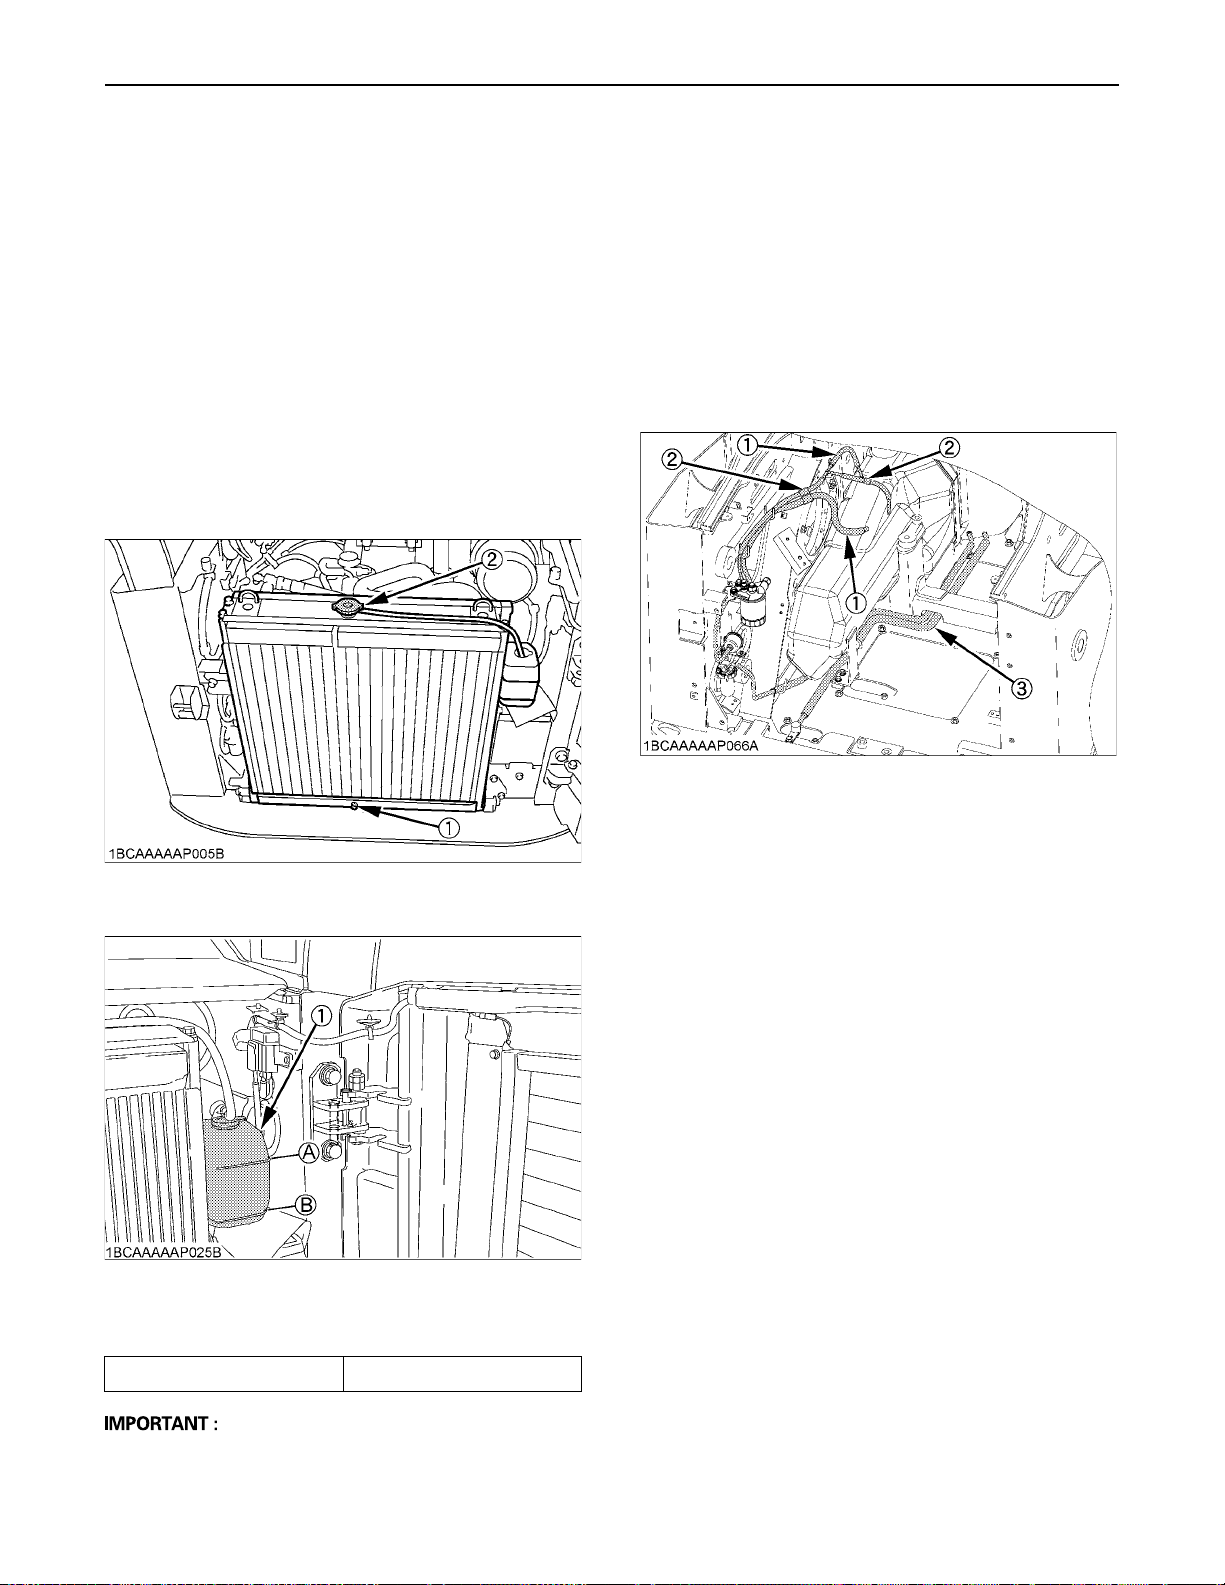
REGULAR CHECKS AND MAINTENANCE WORK76
Park the machine on a firm, flat and level surface, lower
the lift arms to the ground and stop the engine then
remove the key and wait until it has cooled down
completely.
1. Tilt the radiator.
2. Open the drain plug on the bottom of the radiator and
drain coolant completely, Should a recovery tank be
equipped, disconnect the line from the tank floor and
then open the drain shutoff-valve.
3. To clean, rinse the radiator with water.
4. Close the drain plug and fill the radiator and the
recovery tank with coolant fluid. Let the engine idle for
about 5 min., stop the engine and remove the key.
5. Check the coolant level of recovery tank and add the
coolant if necessary.
6. The machine has been shipped filled with 50% antifreeze solution.
A To fill the radiator system and the recovery tank, use
fresh water and anti-freeze fluid.
A When the anti-freeze is mixed with water, the anti-
freeze mixing ratio must be less than 50%.
A Tighten the radiator cap properly. If the cap is loosely
or not properly fitted, overheating of the engine can
result due to coolant fluid loss.
BReplacing Fuel Hose
Replace the hoses and clamps.
(See "Checking Fuel and Intake Air Line" in EVERY 250
SERVICE HOURS" section.)
(1) Drain plug
(2) Radiator cap
(1) Recovery tank (A) "FULL"
(B) "LOW"
(1) Fuel lines
(2) Clamp bands
(3) Fuel drain line
Cooling water 11 L
A Do not operate the engine without coolant.
 Loading...