

Page 1
USER MANUAL
www.dolce-gusto.com
Page 2
TABLE OF CONTENTS
1. SAFETYPRECAUTIONS 4
2. MACHINE OVERVIEW 6
3. KEY FEATURES 7
3. 1 INTUITIVE LED CONTROLRING 7
3. 2 HOWTOSTARTTHEMACHINE 7
3. 3 COLD MODE 8
4. BEVERAGE EXAMPLES 9
5. RECOMMENDATIONSFORSAFEUSE 10
6. FIRSTUSERINSING 11
7. PREPARINGABEVERAGE 12
7. 1 ONE CAPSULE (E. G. LUNGO) 12
7. 2 TWO CAPSULES (E. G. CAPPUCCINO) 13
8. CLEANING 15
9. DESCALINGATLEASTEVERY3–4 MONTHS 16
10. TROUBLESHOOTING 18
10. 1 ORANGEDESCALINGINDICATORLIGHTTURNSON 18
10. 2 NO LIQUID COMES OUT – NO WATER? 18
10. 3 NOLIQUIDCOMESOUT – CAPSULEBLOCKED? 19
2
Page 3
TABLE OF CONTENTS
10. 4 NOLIQUIDCOMESOUT– INJECTORBLOCKED? 19
10. 5 VARIOUS 20
3
Page 4

1. SAFETYPRECAUTIONS
Read all instructions and keep these safety instructions. Any type of
misuse of the appliance may result in a potential injury.
In case of any inappropriate use or failure to comply with the
instructions, the manufacturer acceptsno responsibility and the
guarantee may not apply.
The guarantee doesnotcoverappliancesthat do not work or do not
work properly because they have not been maintained and/or descaled.
INTENDED USE
1.
Thisappliance is intended to be used in household only. It is not
intended to be usedin following applications, and the guarantee will
notapply for:
– staffkitchen areasin shops, offices andother working
environments;
– farm houses;
– by clients in hotels, motelsand other residential type
environments;
– bed and breakfasttype environments;
2.
Your appliance is intended for domestic use inside the home only at
analtitude below 3400m.
ELECTRICAL POWER SUPPLY
3.
Connectthe appliance to a mainspower socket with an earth
connection only. Mainsvoltage must be the same as the detailson
the rating plate. The use of incorrect connection will negate the
guarantee and may be hazardous.
4.
To protectagainst fire, electric shock and injury to personsdo not
immerse the power cord, plugs or the appliance in water or other
liquid. Avoid spillage on the plug. Never touch the power cord with
wethands. Do not overfill the water tank.
5.
In case of an emergency remove the plug from the mains power
socket immediately.
6.
Unplug from the mains power socket when notin use.
7.
To disconnect, remove the plug from the mains power socket. Do not
unplug by pulling the cord.
8.
Do notlet the cord hang over the edge of a table or counter, or touch
hotsurfaces or sharp edges. Do notallow the cord to dangle (risk of
tripping up). Never touch the cord with wet hands.
9.
Do notoperate any appliance with a damaged cord or plug. If the
power cord is damaged, it must be replaced by the manufacturer, its
service agentor similarly qualified persons in order to avoid a
hazard. Do notoperate any appliance thatmalfunctionsor has been
damaged in any manner. Unplug cord immediately. Return the
damaged appliance to the nearest authorised service facility
designated by the NESCAFÉ®DolceGusto®hotline.
10.
If the mains power socket does not match the plugon the appliance,
have the plugreplaced with a suitable type by aftersalesservice
centres designated by the NESCAFÉ®DolceGusto®hotline.
CONDITIONSOFUSE
11.
Alwaysuse the appliance on a flat, stable, heatresistant
surface away from sources of heator water splashes.
12.
Do notuse the appliance withoutthe drip tray and drip grid,
except whena very tall mugis used. Do notuse the appliance
for hot water preparation.
13.
Never turn the machine upside down.
14.
The use of accessory attachmentsnot recommended by the
appliance manufacturer may resultin fire, electric shock or
injury to persons.
15.
Do notplace on or near a hot gasor electric burner, or in a
heated oven.
16.
Do notputfingers under the outlet during beverage
preparation.
17.
Do nottouch the injector of the machine head.
18.
Never carry the appliance by the extraction head.
19.
The capsule holder is equipped witha permanentmagnet.
Avoid placing the capsule holder near appliances andobjects
that can be damaged by magnetism, e.g. creditcards, USB
drives and other data devices, video tapes, television and
computer monitors with picture tubes, mechanical clocks,
hearing aids and loudspeakers.
20.
Do notturnoffthe appliance during the descaling process.
Rinse the water tank and clean the appliance to avoidany
residual descaling agent.
21.
If away for prolonged periods, on holiday, etc. the appliance
mustbe emptied, cleaned and unplugged. Rinse before reuse.
Operate the rinse cycle before re-using your appliance.
22.
We recommend usingthe NESCAFÉ®DolceGusto®capsules
designed and tested for the NESCAFÉ®DolceGusto®machine.
They were designed to interacttogether – the interaction
provides the in-cup quality thatNESCAFÉ®DolceGusto®is
knownfor. Each capsule is designedto prepare a perfect cup,
and cannot be reused.
23.
Do notremove hot capsules by hand. Always use capsule
holder handle to dispose of used capsules.
24.
Alwaysinsertthe capsule holder in the machine to prepare a
beverage. The appliance will not work if the capsule holder is
notinserted. Do not pull out the capsule holder before the
indicator stopsblinking.
25.
Machines equipped with a locking handle: Scalding may occur
if the locking handle is opened duringthe brewingcycles. Do
notpull up the locking handle before the lightson the machine
stop flashing.
26.
For health reasons, alwaysfill the water tank with fresh
drinking water.
27.
After use of the appliance always remove the capsule and
clean the capsule holder. Empty andclean the drip tray and
capsule bindaily. Food allergy sufferers mustrinse the
appliance according to cleaning procedure.
4
Page 5
28.
The heating elementsurface is subjectto residual heatafter use and
plastic housingsmay feel warm to touch several minutes upon use.
29.
Patientswithpacemakers or defibrillators: Do not hold the capsule
holder directly over the pacemaker or defibrillator.
30.
The appliance shall notbe placed in a cabinetwhen in use.
CHILDREN
31.
Keep the appliance and itscord outof reach of children aged less
than 8 years. Children shall not play with the appliance.
32.
Thisappliance canbe used by children aged from 8 yearsand above
and persons with reduced physical, sensory or mental capabilitiesor
lack of experience and knowledge if they have been given
supervision or instructionconcerning use of the appliance in a safe
way andifthey understand the hazardsinvolved.
33.
Thisappliance is notintended for use by children or personswith
reduced physical, sensory or mental capabilities, or lack of
experience and knowledge, unless they have been given supervision
or instruction concerninguse of the appliance by a person
responsible for their safety. Personswho have a limited or no
understandingof the operation anduse of this appliance mustfirst
readand fully understand the contentsof the user manual, and
where appropriate seek additional guidance on its operation and use
from the personresponsible for their safety.
34.
Children should be supervised to ensure thatthey do notplay with
the appliance.
35.
Cleaning and user maintenance shall notbe made by children
unless they are older than8 and supervised by an adult.
36.
Children should notuse the appliance as a toy.
RECYCLING
41.
Packaging is made of recyclable materials. Contact your local
council / authority for further informationon recycling
programs. Your appliance contains valuable materials which
can be recovered or recycled.
EUROPEAN MARKETS ONLY: Think ofthe environment!
Your appliance containsvaluable materials which
can be recovered or recycled.
Leave it ata local civic waste collectionpoint or at
anapproved service centre, where itwill be
disposed of properly. European Directive 2012/19/EU
on Waste Electrical and Electronic Equipment
(WEEE), stipulates thatused household appliances
mustnot be disposed of in normal unsorted
municipal waste. Old appliances mustbe collected
separately to optimise the sorting andrecycling of
their parts and to reduce the impact on human
health andthe environment.
MAINTENANCE
37.
Unplug from the mains power socket before cleaning. Allow to cool
before putting on or taking offparts, before cleaning the appliance.
Never clean wet or immerse appliance in any fluid. Never clean the
appliance with running water. Never use detergents to clean the
appliance. Cleanthe appliance only usingsoftsponges/brushes. The
water tank should be cleaned witha cleanfood-safe brush.
38.
Any operation, cleaningand care other than normal use must be
undertaken by after-salesservice centres designated by the
NESCAFÉ®DolceGusto®hotline. Do notdismantle appliance and do
notputanything into openings.
39.
To reduce the risk of fire or electric shock, do notremove the cover.
No user serviceable partsinside. Repair should be done by
authorized service personnel only!
40.
For additional guidance on how to use the appliance, refer to the
user manual on www.dolce-gusto.com or call the
NESCAFÉ®DolceGusto®hotline number.
5
Page 6
1 2 6
9
4 5
3
7 8
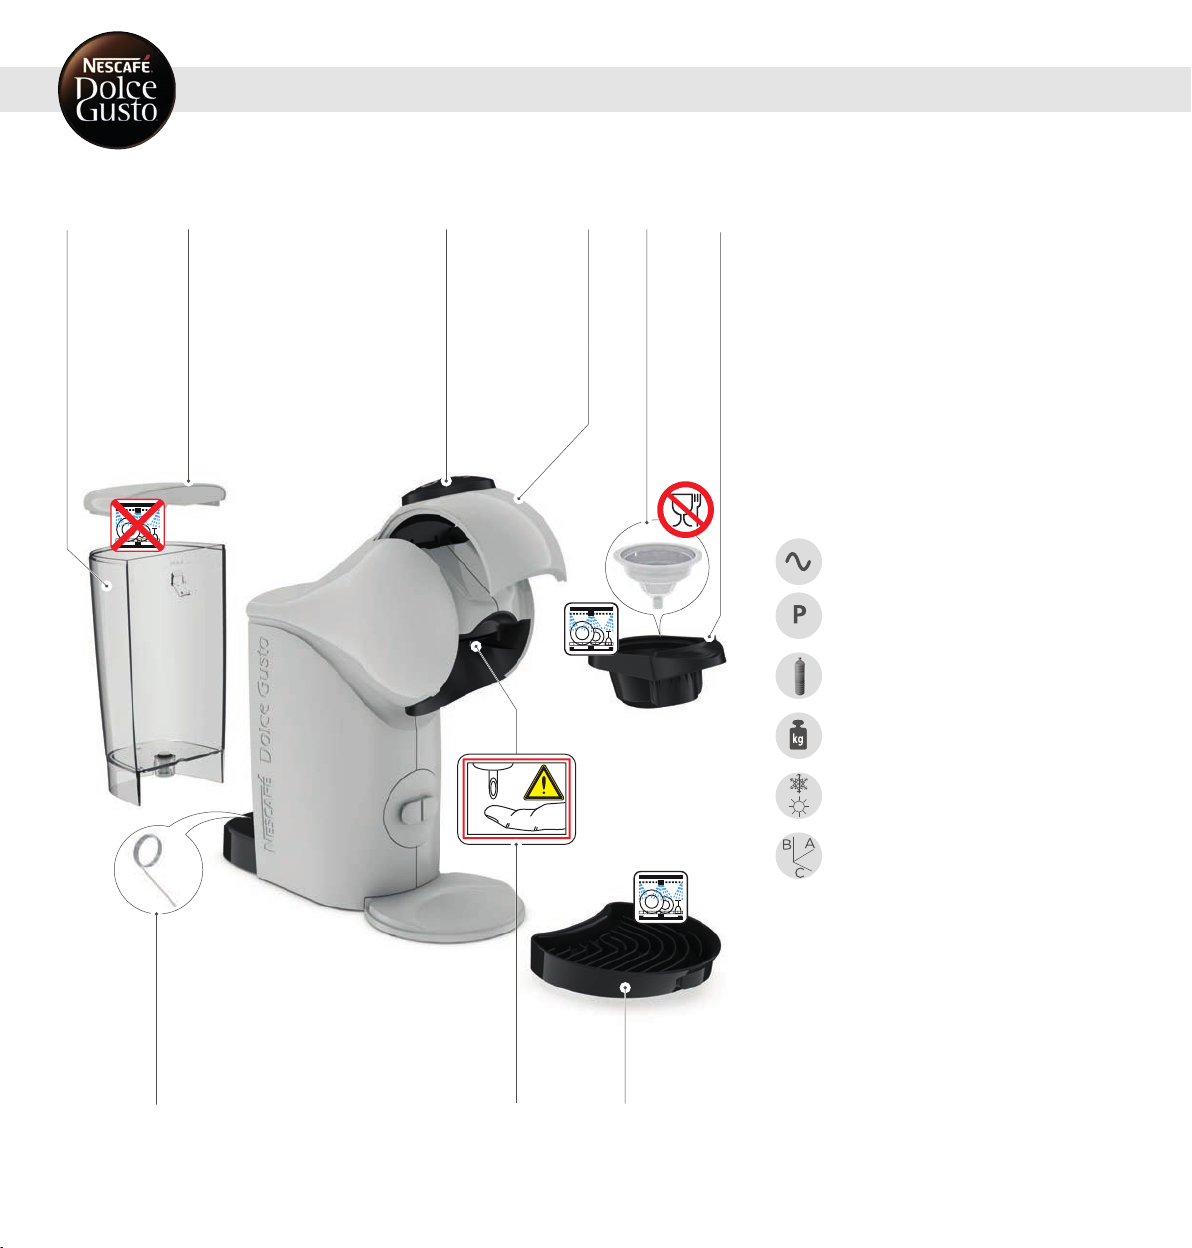
2. MACHINE OVERVIEW
1.
Water tank
2.
Water tank cover
3.
INTUITIVE LED CONTROLRING
4.
Locking handle
5.
Rinsing tool
6.
Capsule holder
7.
Cleaning needle
8.
Injector
9.
Drip tray
ECONOMY MODE:
After 1 minute of non-usage upon an extraction.
5 minutes upon switch-on if no extraction.
Please be aware that the appliance is still using
electricity whilst in eco-mode (0.45 Wh).
TECHNICAL DATA
GB / IE
220–240 V, 50/60 Hz, 1340–1600 W
max. 15 bar
0.8 L
~2 kg
5–45°C
41–113°F
A = 11.21 cm
B = 27.32 cm
C = 28.65 cm
6
Page 7

3. KEY FEATURES
1 2
3
5
4
6
3. 1 INTUITIVE LED CONTROLRING
1.
Control ring
Select the volume for the beverage preparation
2.
Descaling indicator
The machine needs to be descaled after 300
extractions
3.
XL function
Prepare an ex tra large cup
4.
HOT AND COLD SELECTION
The beverage temperature can be set (2 predefined
settings):
Cold Hot
Cold, but the water temperature is still too high
5.
Start/Stop button
Start/Stop the beverage preparation
6.
Volume display
Shows the extraction progress by moving down from
the selected volume until completion
3. 2 HOWTOSTARTTHEMACHINE
1
Ensure to use the correct mains voltage as givenin 2.
"MACHINEOVERVIEW" on page6. Connectthe power plugto
the mains power socket.
2
Press any buttonor rotate the control ringto start the
machine.
3
The machine can also be switched on by opening the
locking handle.
7
Page 8

3. KEY FEATURES
10 s
3. 3 COLD MODE
1
OptionA: The machine is switched off.
OptionB: The machine is switchedoff.
1
Press thetemperature selection buttonto startthe machine
in cold mode. A cold beverage canbe prepared
immediately.
1
Open the lockinghandle. The machine switches on
automatically. Press the temperature selectionbutton
within10seconds after starting the machine tochange to
coldmode (blue). A coldbeverage can be prepared
immediately.
2
The cold mode mustonly be used withdedicated
coldproducts, e. g. Cappuccino Ice.
3
OptionC: A hotbeverage hasbeenpreparedor the cold
mode was not selected within 10 seconds after startingthe
machine. Press the temperature selectionbuttonto go into
coldmode. The temperature selection button will blink blue
to indicate that the machine needs to cool down.
To accelerate the cooling, selectlevel 7 on the volume
display. Press the start/stopbutton. Machine starts rinsing.
The volume display bar movesdownuntil it disappears.
8
Empty the container. The temperature selectionbuttonis
steady blue to indicate thatthe machine is cooleddownand
a cold beverage can be prepared.
Page 9

4. BEVERAGE EXAMPLES
300 ml
Adjust the driptray Choose hot orcold
ESPRESSO
GRANDE/AMERICANO
MORNING CUP
CAPPUCCINO
CAPPUCCINO ICE
OneCap sule
TwoCap sules
TwoCap sules
TwoCap sules
9
Page 10

5. RECOMMENDATIONSFORSAFEUSE
Never addhotwater to the water tank!
For rinsing andbeverage preparationuse only
drinking water.
Do nottouchthe plug with wet hands. Do nottouch
the machine with wet hands!
Always keep the machine upright! After finishingthe preparation, the temperature
Never usea wet sponge. Only use a softdamp
cloth tocleanthe topof the machine.
selectionbuttonand the volume display lightblink
for upto 8 seconds. During that time do notopen
the locking handle! After that, the temperature
selectionbuttonlights steadily.
Do nottouchthe usedcapsule after the beverage
preparation!Hot surface, risk of burns!
Never touchthe injector withthe finger! Do notusethe rinsingtool for tea or hotwater
preparation.
10
IF LEFT UNUSEDFOR MORETHAN2 DAYS: Empty
the water tank,rinse it, refill itwithfreshdrinking
water and insert it into the machine. Before reuse
rinse machine accordingto instructions in 8.
"CLEANING" on page15, beginningwithstep 4 to
step 8.
Page 11

6. FIRSTUSERINSING
1
Fill the water tank with freshdrinking water. Insert it back
into the machine. Remove the drip tray.
4
Use the control ringand select level 7 on the volume
display (highest bar).
2
Open the lockinghandle. Putthe rinsing tool into the
capsule holder. Insertthe capsule holder into the machine.
Place a largeempty container underneaththe coffee outlet.
5
Press thestart/stop button. Machine starts rinsing.
3
Close the lockinghandle.
6
The temperature selectionbuttonandthe volume display
lightblink for upto 8 seconds.
7
Press thestart/stop button. Machine starts rinsing. Wait
until the machine stops automatically. The temperature
selectionbuttonand the volume display lightblink for upto
8 seconds.
8
Open the lockinghandle. Pull out the capsule holder.
Remove the rinsing tool. Reinsert the capsule holder.
11
9
Empty the container. Fill the water tank withfreshdrinking
water. Insert the water tank into the machine. Reinsertthe
driptray. The machine is ready to be used.
Page 12

7. PREPARINGABEVERAGE
7. 1 ONE CAPSULE (E. G. LUNGO)
1
2
3
Adjust thedrip tray position. Place the cup withthe correct
cup size on thedrip tray. See "BEVERAGE EXAMPLES" or
package. Check if the water tank contains enoughfresh
drinking water.
4
Use the control ringto setthe volume in accordance with
the number of bars shownon the capsule or selectthe
desired volume to your own taste. Choose XL beverage for
anextra big cup.Waitaround 1.5 min if you wantto prepare
a secondextrabigcup.
7
Open the lockinghandle. The machine switches on
automatically. The temperature selectionbuttonblinks
while the machine is heating upfor approximately 40
seconds. Afterwards, the temperature selectionbutton
lights steady red. The machine is ready to be used.
5
Press thestart/stop button. The beverage preparation
starts. Do not openthe locking handle during the extraction.
Waituntil the extraction stops. The machine stops the
preparationautomatically. The extraction can be stopped at
any time manually by pressingthe start/stopbutton.
8
Make sure the rinsingtool is notinside. Insert the capsule
in the capsule holder. Insert it back into the machine. Close
the locking handle.
6
After finishingthe preparation, the temperature selection
buttonandthe volumedisplay lightblink for upto 8
seconds. Duringthattime do notopen the locking handle!
9
After the extraction is finished open the locking handle.
Remove the cupfrom the driptray.
Pull out the capsule holder. Remove the usedcapsule. Put
the usedcapsule in the dustbin.
12
Rinse bothsides of the capsule holder with freshdrinking
water. Dry the capsule holder. Insertit back into the
machine. Enjoy your beverage!
Page 13

7. PREPARINGABEVERAGE
7. 2 TWO CAPSULES (E. G. CAPPUCCINO)
1
2
3
Adjust thedrip tray position. Place the cup withthe correct
cup size on thedrip tray. See "BEVERAGE EXAMPLES" or
package. Check if the water tank contains enoughfresh
drinking water.
4
Use the control ringto setthe volume in accordance with
the number of bars shownon the capsule or selectthe
desired volume to your own taste. Choose XL beverage for
anextra big cup.Waitaround 1.5 min if you wantto prepare
a secondextrabigcup.
7
Open the lockinghandle. The machine switches on
automatically. The temperature selectionbuttonblinks
while the machine is heating upfor approximately 40
seconds. Afterwards, the temperature selectionbutton
lights steady red. The machine is ready to be used.
5
Press thestart/stop button. The beverage preparation
starts. Do not openthe locking handle during the extraction.
Waituntil the extraction stops. The machine stops the
preparationautomatically. The extraction can be stopped at
any time manually by pressingthe start/stopbutton.
8
Make sure the rinsingtool is notinside. Insert the first
capsule in the capsule holder. Insertit back into the
machine. Close the lockinghandle.
6
After finishingthe preparation, the temperature selection
buttonandthe volumedisplay lightblink for upto 8
seconds. Duringthattime do notopen the locking handle!
9
Open the lockinghandle. Pull out the capsule holder. Remove
the usedcapsule. Putthe usedcapsule in the dustbin.
Insert the second capsule in the capsule holder. Insertit
back into the machine. Close the lockinghandle.
13
Use the control ringto setthe volume in accordance with
the number of bars shownon the capsule or selectthe
desired volume to your own taste.
Page 14

7. PREPARINGABEVERAGE
7. 2 TWO CAPSULES (E. G. CAPPUCCINO)
10
11
12
Press thestart/stop button. The beverage preparation
starts. Do not openthe locking handle during the extraction.
Waituntil the extraction stops. The machine stops the
preparationautomatically. The extraction can be stopped at
any time manually by pressingthe start/stopbutton.
13
Pull out the capsule holder. Remove the usedcapsule. Put
the usedcapsule in the dustbin.
After finishingthe preparation, the temperature selection
buttonandthe volumedisplay lightblink for upto 8
seconds. Duringthattime do notopen the locking handle!
14
Rinse bothsides of the capsule holder with freshdrinking
water. Dry the capsule holder. Insertit back into the
machine. Enjoy your beverage!
Whenthe indicator lightis steady greenopenthe locking
handle. Remove the cupfromthedrip tray.
14
Page 15

8. CLEANING
1
Rinse and cleanthe water tank. Use a clean food-safe brush
andwashing-upliquidas needed. Afterwards refill with
freshdrinking water andinsertit into the machine. The
water tankis not dishwasher proof!
4
Open the lockinghandle. Putthe rinsing tool into the
capsule holder. Insertthe capsule holder into the machine.
Close the lockinghandle. Remove the driptray. Place a
large empty container underneaththe coffee outlet.
2
Rinse the driptray and the rinsingtool with freshdrinking
water. Clean the drip tray with a cleanfood-safe brush.
Alternatively washthe driptray in the dishwasher.
5
Use the control ringand select level 7 on the volume
display (highest bar). Press the start/stop button. Machine
starts rinsing.
3
Cleanboth sides of the capsule holder withwashing-up
liquidand fresh drinkingwater. Alternatively wash in the
dishwasher. Dry it afterwards. Cleanthe headof the
machine around the injector with a clean softdamp cloth.
6
Empty andclean the container. Warning: Hot water! Handle
with care!
7
Open the lockinghandle. Pull out the capsule holder.
Remove the rinsing tool. Keepit in a safe place for later
cleaningor descaling. If any, remove the water from the
water tank.
8
Switchoffthe machine. Unplugthe power plug!Clean the
machine with a softdamp cloth. Dry it afterwards witha
soft dry cloth.
15
Page 16

www.dolce-gusto.com
0.5 L
9. DESCALINGATLEASTEVERY3–4 MONTHS
Use NESCAFÉ®DolceGusto®liquid
descaler. To order, call the
NESCAFÉ®DolceGusto®hotline or goon
the NESCAFÉ®DolceGusto®website.
1
If the orange descalingindicator lightturns on, or the
beverage comes outslower thanusual (evenin droplets), or
if it is cooler than usual, the machine has to be descaled.
4
Do notusevinegar for descaling! Avoid contactof the descaling liquid with
any partof the machine.
2
If any, remove the water from the water tank. Mix 0.5 liter
of fresh drinkingwater withthe descaler in a measuring
cup. Pour the descaling solutioninto thewater tank and
insert the water tank into the machine.
5
Do notunplugthe machine duringdescaling!
3
Open the lockinghandle. Putthe rinsing tool into the
capsule holder. Insertthe capsule holder into the machine.
Close the lockinghandle. Placea large empty container
underneath the coffee outlet.
6
To enter the descaling mode, selectXL and turnthe control
ringfour times clockwise untilthe descalingLED starts
blinking.
Press thestart/stop button. The machine starts descaling.
The volume display bar movesfrom the topdownto the 4
level. The machine descales withhotwater in start-stop
operation. The machine stops descalingonce the water tank
is empty.
16
To allow a better descalingefficiency, the machine is on
th
hold approximately 2 minutes. The volume display bar
moves downuntil it disappears.
Page 17

9. DESCALINGATLEASTEVERY3–4 MONTHS
7
The volume display bar flashes (4thlevel).
10
The descalingindicator turns off, the temperature selection
blinks andturns steady red once the machine is ready to
use.
8
Empty andclean the container. Rinse and cleanthe water
tank. Use a cleanfood-safe brush andwashing-up liquidas
needed. Refill the water tank withfreshdrinking water and
insert it into the machine. Place thecontainer underneath
the beverage outlet.
11
Remove the container. Empty andcleanthe container. Pull
out the capsule holder. Remove the rinsingtool. Keepit in a
safe place for later cleaning or descaling. Rinse bothsides
of the capsule holder with freshdrinking water. Reinsert
the capsule holder.
9
Press thestart/stop button. The machine rinses
continuously withhotwater. The volume display bar moves
down until it disappears. The machine stops rinsingonce
the water tank is empty.
12
Cleanthe machine witha softdampcloth. Dry it afterwards
with a soft dry cloth.
17
Page 18

10. TROUBLESHOOTING
10. 1 ORANGEDESCALINGINDICATORLIGHTTURNSON
1
The orange descaling indicator light turns on.
This means thatthe machine needs to be descaled. To do
so, please follow the descaling instructions. See 9.
"DESCALINGATLEASTEVERY3–4 MONTHS"on page16.
10. 2 NO LIQUID COMES OUT – NO WATER?
1
The beverage preparation stops partway duringthe
delivery or does notstart atall. The volume display flashes
atthe current level. No liquidcomes out:The water tank
may be empty.
Check if the water tank contains enough freshdrinking
water. If not, refill withfreshdrinkingwater and pressthe
start/stopbuttonto continuethepreparation. In case there
is still no liquid comingoutcheck 10.3"NO LIQUID COMES
OUT – CAPSULE BLOCKED?".
18
Page 19

10. TROUBLESHOOTING
10. 3 NOLIQUIDCOMESOUT – CAPSULEBLOCKED?
1
2
No liquidcomes out: The capsule may be blockedandunder
pressure.
3
Try to operate the machine without capsule. If the water
flows, it shows thatthe issue waswiththe capsule. Just
use a differentcapsule. If not, follow with 10.4 "NOLIQUID
COMESOUT-INJECTORBLOCKED?".
Always keep the machine upright! To stopthe preparation,
press the start/stop buttonagain. Do not unplugthe
machine!
10. 4 NOLIQUIDCOMESOUT– INJECTORBLOCKED?
1
Do notdrink the coffee!Openthe locking handle. The
machine releases pressure. Remove the capsule holder.
Putthe usedcapsule in the dustbin.
2
No liquidcomes out: The injector may be blocked andunder
pressure.
Ensure thedrip tray is empty. Takeoutthecleaning needle.
Keep theneedle out ofreach of children!
19
Remove the capsuleholder. Openthe locking handle.Clean
the injector with the cleaning needle. Follow instructions in
9. "DESCALINGATLEASTEVERY3–4MONTHS" on page16.
Page 20

10. TROUBLESHOOTING
www.dolce-gusto.com
10. 5 VARIOUS
1
2
The machine cannotbe switched on.
The beverage is splashingoutof the coffee outlet.
Check if the power plugis correctly pluggedinto a mains
power socket. If yes, check your electricity supply.
1
Press thestart/stop buttonto stop the preparation. Pull out
the capsule holder. Put the usedcapsule in the dustbin.
1
If the machine still cannot be switchedon, call the
NESCAFÉ®DolceGusto®hotline. For thehotline numbers
see "Machine Hotlines".
2
Cleanthe capsule holder. Insert a new capsule in the
capsule holder and insert it back intomachine.
If the beverage comesoutslower than usual (even in
droplets), or if it is cooler thanusual the machine has to be
descaled.
To do so, please follow the descalinginstructions. See 9.
"DESCALINGATLEASTEVERY3–4 MONTHS"on page16.
20
Page 21

10. TROUBLESHOOTING
10. 5 VARIOUS
1
2
The temperature selectionbuttonblinks fast.
Water accumulates underneath or aroundthe machine.
Clear water leaks aroundthe capsule holder duringthe
beverage preparation.
Check if capsule is blocked, see 10.3.
"NOLIQUIDCOMESOUT – CAPSULEBLOCKED?" on page19.
Unplugthe power plugandwait 20 minutes. Afterwards,
insert the power pluginto the mains power socketand
switch the machine on.
1
Unplugthe power plug!
1
If the temperature selection buttonstill flashes fastcall the
NESCAFÉ®DolceGusto®hotline. For thehotline numbers
see lastpage.
2
Call the NESCAFÉ®DolceGusto®hotline or goon the
NESCAFÉ®DolceGusto®website. For the hotline numbers
see lastpage.
Water is splashing out of the coffee outletduringrinsing or
descaling.
Putthe rinsing tool into the capsule holder. Insert the
capsule holder into the machine.
21
Page 22

0800 999 81 00
AR
0800 7762233
BR
1 888 809 9267
CA
0800 86 00 85
CH
800 213 006
CL
01800-05-15566
CO
0-800-542-5444
CR
(809) 508-5100
DO
1800 637-853 (1800 NESTLE)
EC
1-800-299-0019
GT
800-2220-6666
HN
800 365 2348
MX
1-800-4000
NI
800-0000
PA
80010210
PE
0800-112121
PY
(868) 663-6832
TT
1-800-745-3391
US
0800-2122
UY
0800 365 23 48
AT
0800 93217
BE
0 700 10 330
BG
800 135 135
CZ
0800 365 23 48
DE
80 300 100
DK
6 177 441
EE
900 10 21 21
ES
0800 0 6161
FI
0 800 97 07 80
FR
0800 707 6066
GB
210 6371000
GR
0800 600 604
HR
06 40 214 200
HU
00800 6378 5385
IE
800365234
IT
8-800-080-2880
KZ
8 700 55 200
LT
8002 3183
LU
67508056
LV
080 100 52 54
MA
0800 00 200
MK
80074114
MT
0800-3652348
NL
800 80 730
NO
0800 174 902
PL
800 200 153
PT
0 800 8 637 853
RO
0800 135 135
SK
0800 000 100
SR
020-299200
SV
0800 211 02 18
TR
4 44 31 60
0 800 50 30 10
UA
0842 640 10
AL
1800 466 975
AU
0800 365 234
NZ
800348786
AE
0800 202 42
BA
4006304868
CN
(852) 21798999
HK
0800 182 1028
ID
1-700-50-20-54
IL
+96265902997
JO
0120-879-816
JP
080-234-0070
KR
+965 22286847
KW
+9614548593
LB
020 269 902
ME
Middle East: +97143634100
1800 88 3633
MY
898-0061
PH
0800-62282
PK
+97444587615
QA
8-800-700-79-79
RU
8008971971
SA
1 800 836 7009
SG
080 45 05
SI
1-800-295588
TH
0-2657-8601
0800-000-338
TW
1800 6699
VN
086 009 6116
ZA
+27 11 514 6116
HOTLINES
www.dolce-gusto.com
8020004983
 Loading...