

Page 1
L
K
J
E
M P O N
C
D
G
B
A
F
H
I
www.krups.com
06
16
05
Page 2
1
2
3
11
12
= = =
4
7
5
8
10
6
9
13
14
15
16
06
16
05
Page 3
English
Description
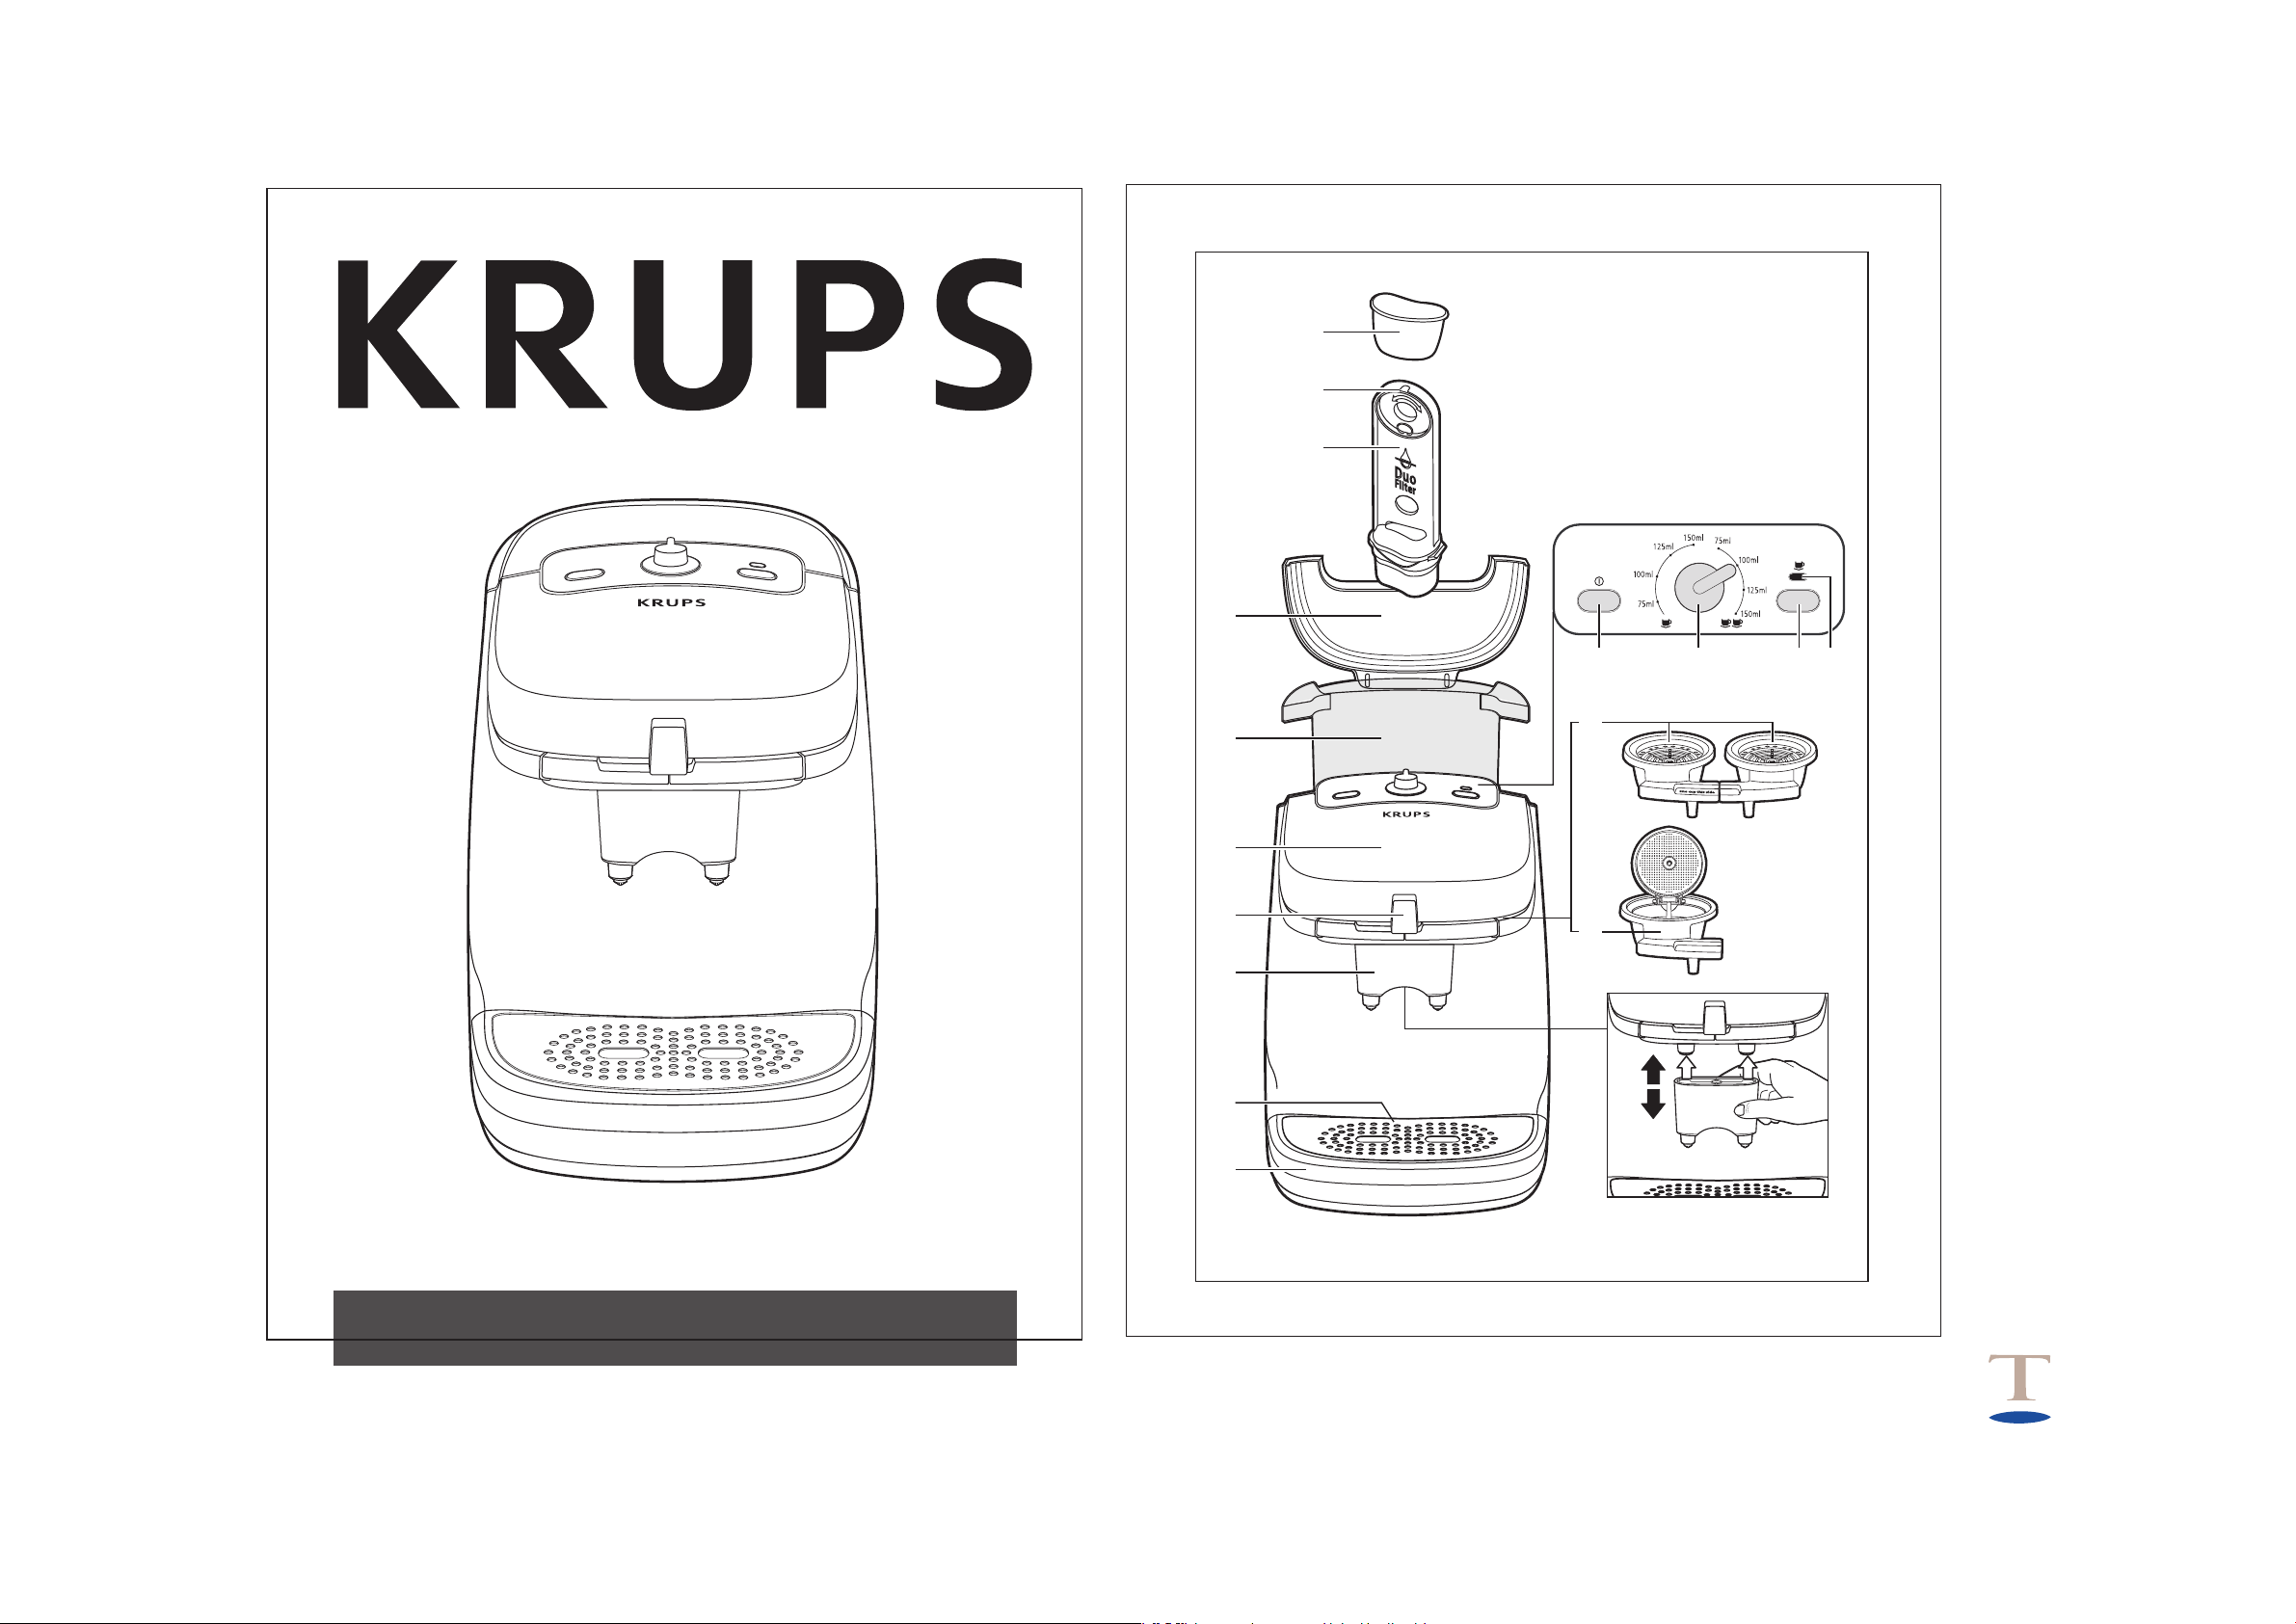
A Drip tray
B Drip tray grid
C Upper lid
D Lid lock
E Water tank lid
F Water tank
G Removable nozzles accessory
H Pod holder (one on the left and one on
the right)
I Filter holder for ground coffee
J Water filter support*
K Water filter operating indicator*
L Water filter (Duo Filter)*
M On / off switch
N Indicator light
O Cycle button
P Volume selection
* Depending on model
Safety recommendations
•Read the instructions for use carefully
before using your appliance for the first
time: use that does not conform to the
instructions will release Krups from all
responsibility.
•Do not leave the appliance within the reach
of unsupervised children. This appliance
should only be used by young children or
the handicapped under supervision.
•Before plugging in the appliance, check that
the rated voltage of your appliance corresponds to that of your mains supply and that
the plug is connected to a socket with an
earth connection.
Any connection error renders the
warranty invalid.
•This product has been designed for
domestic use only. Any commercial use,
inappropriate use or failure to comply with
the instructions, the manufacturer accepts
no responsibility and the guarantee will not
apply.
•Do not use the appliance for other purposes
than that for which it was designed.
•Do not touch the hot surfaces. Use the
handles or buttons.
•Place on a flat, stable, heat-resistant work
surface away from water splashes and any
sources of heat.
•Unplug the appliance as soon as you have
finished using it and when cleaning it.
•Let the appliance cool down before fitting or
removing parts, cleaning or storing it.
•Do not use the appliance if it is not working
correctly or if it has been damaged. In this
case, contact a KRUPS approved service
centre.
•Do not place it on or near to a gas burner or
electric hot plate or near a hot oven.
•Before unplugging the appliance, check that
it is not switched on (indicator light (N) off).
•Do not pour liquids other than water and
the descaling solution specified in these
instructions into the tank.
•Do not operate the appliance without water.
•Make sure that the upper lid is properly
locked before starting the brewing cycle.
•Do not unlock the upper lid while coffee is
being prepared.
•Any servicing other than cleaning and
normal user maintenance should be carried
out by a KRUPS approved service centre.
•Do not use the appliance if the power cord
or the plug is damaged. To avoid any
danger, you must have the power cord
replaced by a KRUPS approved centre.
•Do not place the appliance, the power cord
or the plug in water or any other liquid.
•Do not leave the power cord hanging within
the reach of children.
•The power cord should never be near or in
contact with the hot parts of the appliance,
near a heat source or over a sharp corner.
•For your safety, only use Krups accessories
and spare parts corresponding to your
appliance.
•Never remove the plug from the wall socket
by pulling on the cord.
•All appliances are subject to stringent quality
control procedures. These include "actual
use" tests on randomly selected appliances
(accounting for any slight signs of use).
11
Oslo-anglais.p65 17/01/06, 17:1111
Page 4

Stop using the appliance if it operates
incorrectly. Call an authorised Service Dealer.
At the end of your appliance's useful life,
please dispose of it in an appropriate manner.
Before first use
•Operate the appliance without coffee the
first time.
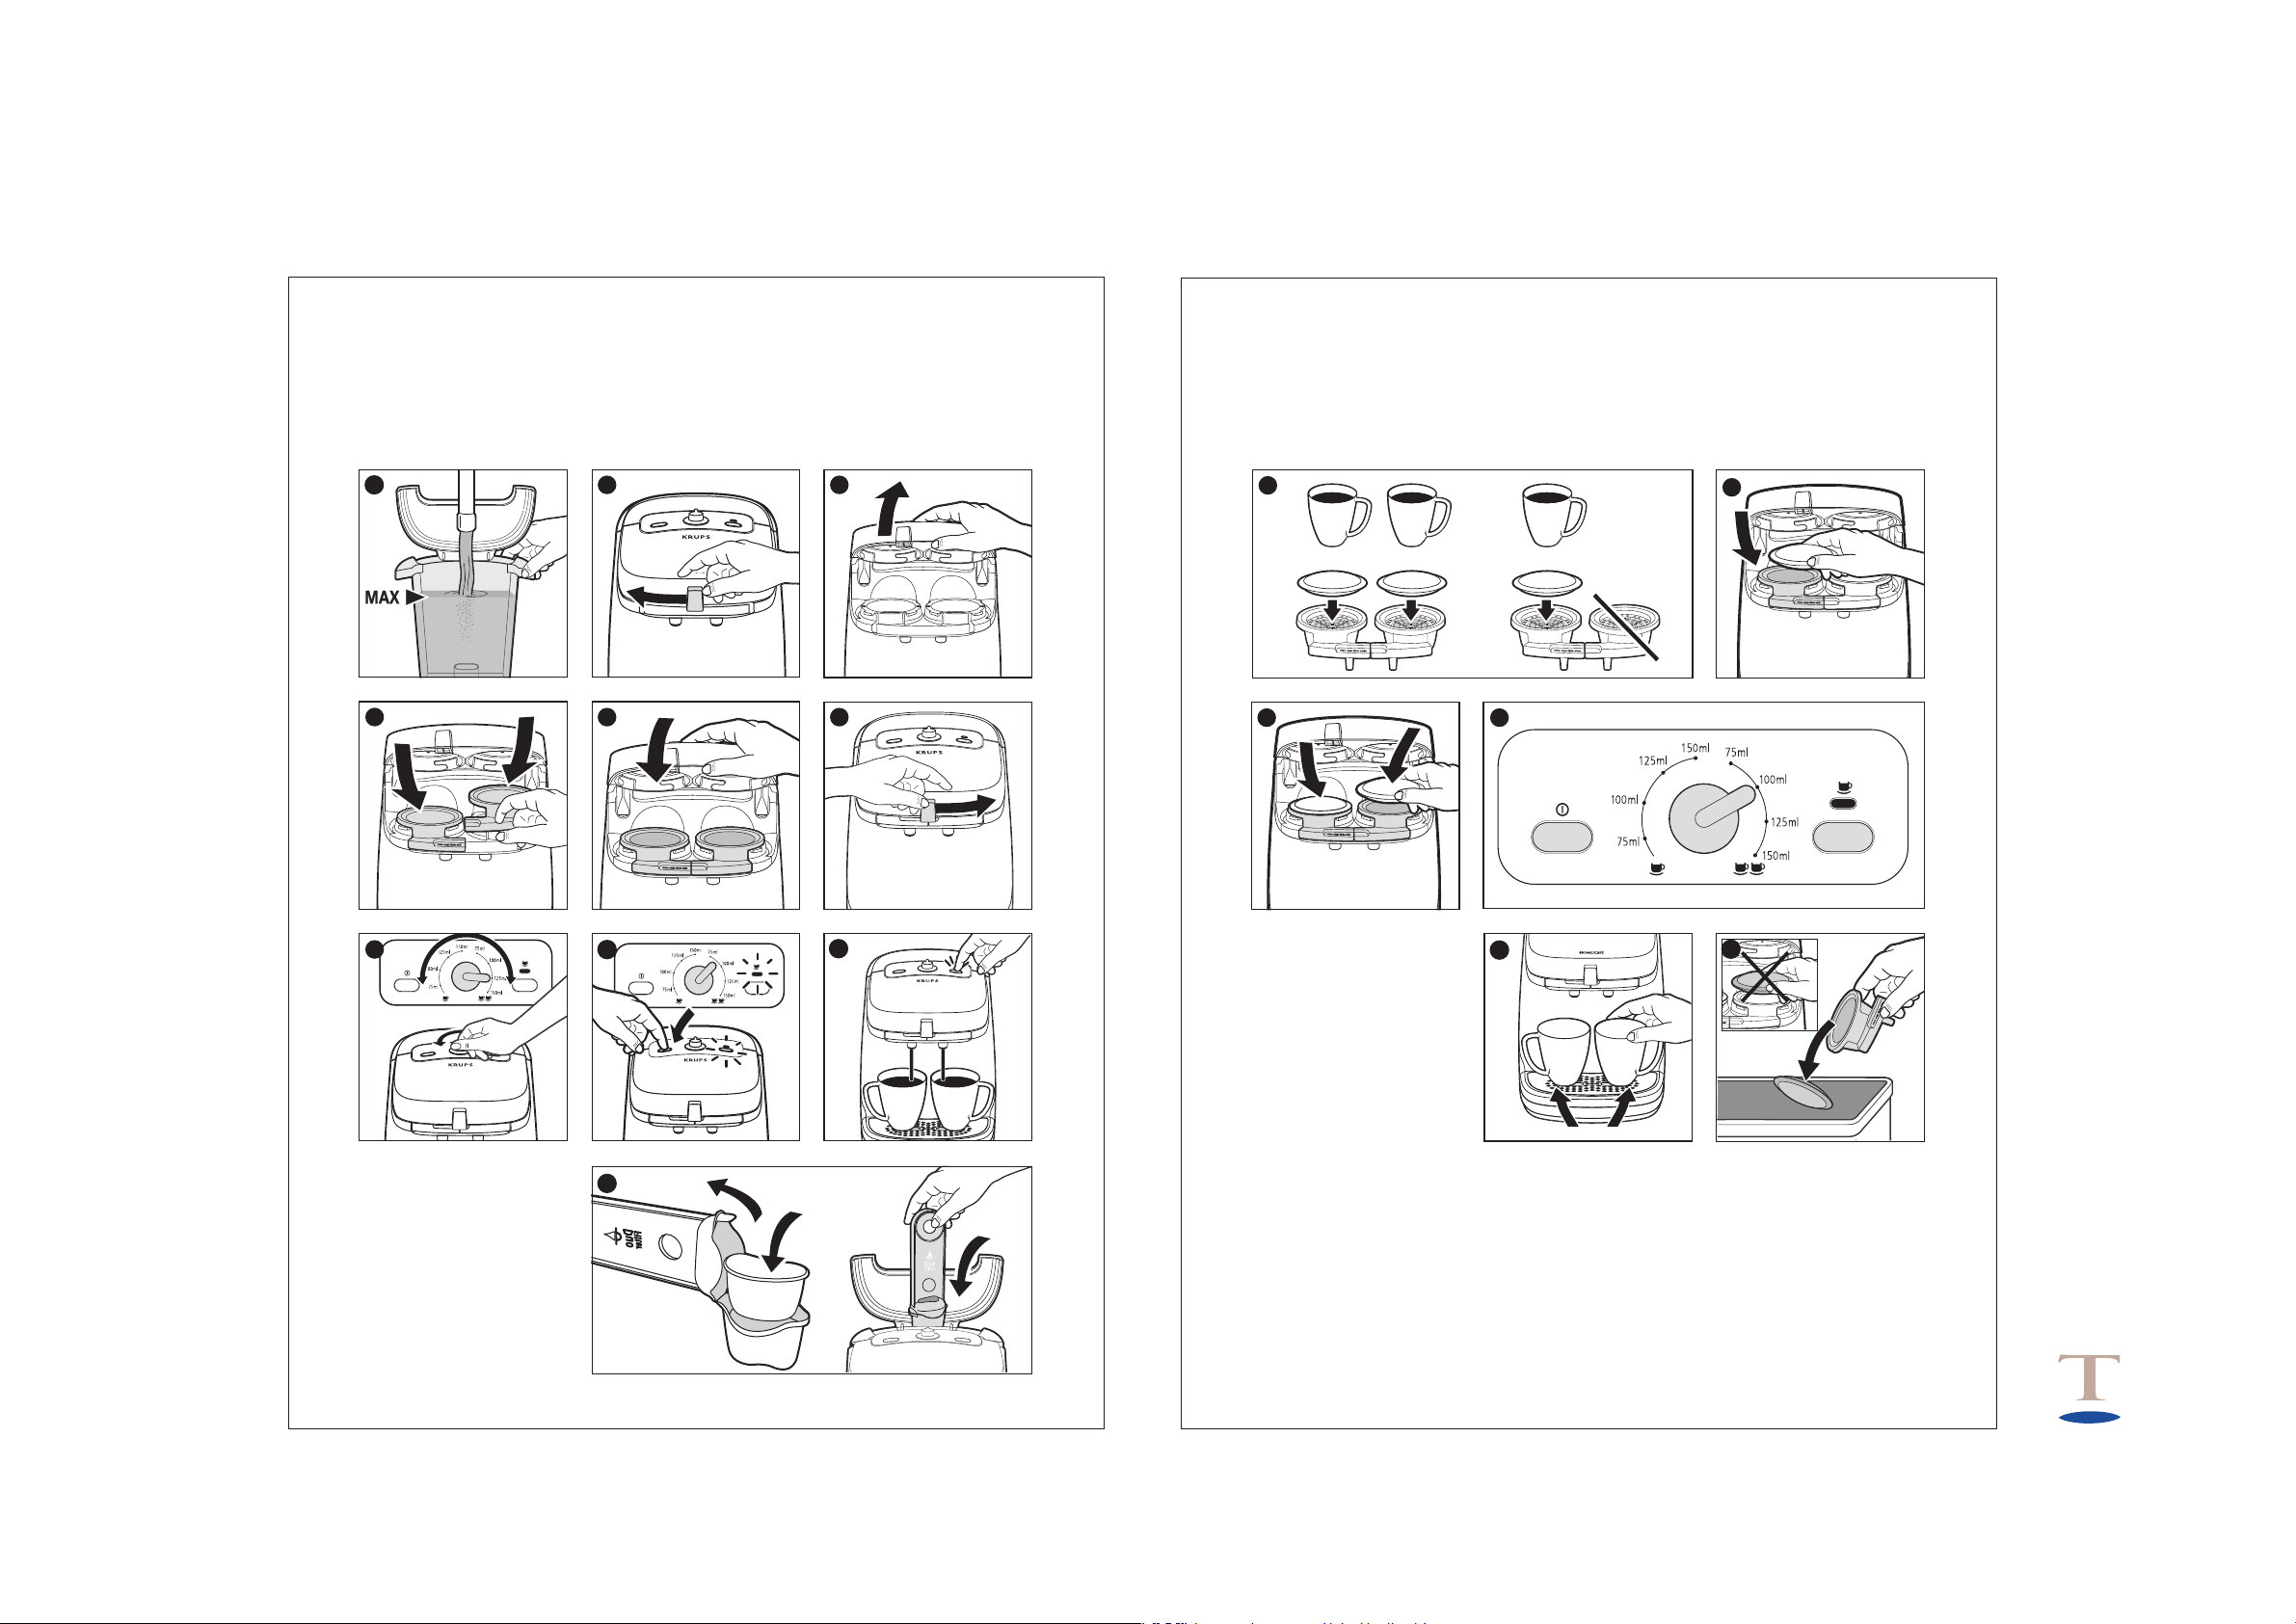
•Fill the tank (F) with cold water up to the
“max” limit. (1)
•Unlock the upper lid (C) using the lock
button (D). (2)
•Lift the lid. (3)
•Position the 2 pod holders (H) without
adding any pods. (4)
This appliance is designed to operate with all
of the soft pods available on the market.
•Close the lid (C). (5)
•Draw the lid lock (D) fully across. (6)
•Place two cups on the drip tray grid (B).
•Turn the volume selector (P) to the “2 x
125-ml cups” position. (7)
•Press the on / off switch (M). (8)
The indicator light (N) blinks slowly during
preheating, then remains lit when the
appliance is ready to operate.
•Press the cycle button (O). (9)
The indicator light blinks and the cycle begins.
The cups are filled with hot water, which
rinses the system. Discard the hot water. The
appliance is now ready to operate.
The brewing cycle may be interrupted at any
time by pressing the cycle button (O). The
cycle is interrupted and the appliance
immediately goes into the steam phase
(purge). At the end of this phase, the indicator
light remains steady.
If the appliance is stopped during the brewing
cycle using the on / off switch (M), there is no
steam phase (purge).
Immediately clean the brewing heads located
under the lid and the seals using a damp
cloth, then rinse the pod holders with a large
quantity of water.
If the quantity of coffee desired is altered
during the brewing cycle using the selector
(P), the new quantity is brewed.
Your pod coffee maker may be equipped
with a Duo Filter filter
• The “Duo Filter” is a dual action antichlorine and anti-scaling filter.
The filter’s anti-chlorine action allows the
most subtle flavours of the coffee to be
released. The level of chlorine in tap water
very often prevents the flavour of the coffee
from fully developing.
The anti-scaling action means that descaling
operations are less frequent.
The components of the “Duo Filter” (nonpolluting plant-based active charcoal and antiscaling resin) comply with existing food
legislation. Its treatment with silver salts acts
as a bacteriostat for the protection of the
consumer. This filter has been successfully
tested by recognised laboratories.
The “Duo Filter” can be disposed of with
household waste.
•Remove the “Duo Filter” (L) from its plastic
bag. Rinse it under tap water for 1 minute.
•Lift the lid (E) of the tank (F) and remove the
water filter support (J).
•Pivot the lower part of the support and
insert the filter in its housing. (10)
•Replace the filter support in the coffee
maker: your coffee maker is ready for use.
Note: An rotating indicator (K) is located on
the upper part of the filter support to remind
you when to change the “Duo Filter” (L):
position the number indicating the month
when the “Duo Filter” is next to be changed
opposite the indicator.
For example: If you insert the “Duo Filter” (L)
in January (1), you should change it in March
(3) or in May (5) depending on the hardness
of the water in your area: position the number
3 or 5 opposite the indicator.
Important:
•The “Duo Filter” should only be used with
drinking water.
•The absence of the filter does not prevent
the coffee maker from operating.
•Rinse the “Duo Filter” under running water
if the coffee maker has not been used for
over a month.
•It is recommended not to leave the “Duo
Filter” in place for more than 5 months.
12
Oslo-anglais p65 17/01/06, 17:1112
Page 5

Duo Filter Cycles Time
Soft water 300 5 months
Hard water 200 3 months
Your pod coffee maker comes with an
accessory (G) that optimises the height
under the cup, for greater comfort of use.
This accessory is removable: it may be
unclipped by pulling it gently downwards,
allowing you to place a mug or cup on the
drip tray grid.
Preparing a coffee
Do not use ground coffee in the pod holders.
These may accommodate all soft pods
available on the market.
Ground coffee may only be used in the
ground coffee holder (I).
•Fill the tank with cold drinking water up to
the desired level. (1) (Never put milk or any
other liquids other than water into the tank.)
•Press the on / off switch (M) to switch on the
appliance. (8) The indicator light blinks while
the appliance is heating up. It remains
steady when the appliance is ready for use.
•Unlock the upper lid (C) by sliding the lock
(D) to the left. (2)
•Lift the lid. (3)
To make just one cup of coffee, use the
left-hand pod holder.
To make two cups of coffee, use both pod
holders. (11)
At the end of the brewing cycle, a steam
purge cleans the appliance. It is thus
normal for steam to be given off.
If the brewing cycle is interrupted, check
that there is water in the tank.
WITH PODS
•Place the pod or pods with the flattest
surface facing upwards, in the pod holder.
(12) (13)
•Close the lid (C). (5)
•Draw the lid lock (D) fully across. (6)
•Choose the quantity of coffee that you wish
to obtain (75, 100, 125 or 150 ml), by
turning the selector to the desired position
(selector on the left-hand side for one cup,
or on the right-hand side for two cups). (14)
Note: when using 2 cups, you can obtain two
different types of coffee (normal and
decaffeinated, for example) in a single cycle,
by using different pods. However, the quantity
obtained will be the same for each cup.
•Place the cup or cups on the drip tray. (15)
•Press the cycle button (O) to begin brewing.
The indicator light blinks during the cycle.
(9)
•When the cycle has finished, remove the
pod holder(s) and discard the pod(s). (16)
Important: Never open the upper lid
when the indicator light is blinking
(during the brewing cycle).
The appliance automatically turns itself off
when it has not been used for an hour.
WITH GROUND COFFEE
•Take the ground coffee holder (I), open its lid
and fill it with filter coffee, without tamping
it down. Close the lid; it should not have to
be forced.
•Place the ground coffee holder on the lefthand side.
•Close the lid (C). (5)
•Draw the lid lock (D) fully across. (6)
•Choose the quantity of coffee that you wish
to obtain (75, 100, 125 or 150 ml), by
turning the selector to the desired position
(selector on the left-hand side).
•Place the cup or cups on the drip tray. (15)
•Press the cycle button (O) to begin brewing.
The indicator light blinks during the cycle.
(9)
Once the cycle has finished, the indicator light
remains steadily lit and the appliance is ready
for the next cycle.
At the end of the brewing cycle, a steam
purge cleans the appliance. It is thus
normal for steam to be given off.
If the brewing cycle is interrupted, check
that there is water in the tank.
Oslo-anglais p65 17/01/06, 17:1113
13
Page 6

Cleaning
Accessories
•Run a cycle without any pods to rinse the
appliance.
•Unplug the appliance.
•Do not clean the appliance when it is hot.
•Clean with a damp cloth or sponge.
•Never place the appliance in water or under
running water.
•The tray (A) and the removable nozzles
accessory (G) are dishwasher safe.
Descaling
•Switch off the appliance before descaling it.
•Remove the water filter support and discard
the Duo filter (L).
•It is recommended to use KRUPS descaling
solution (ref.: F054) in a minimum of 500 ml
of water.
•Pour the solution into the tank (F) and
remove the pod holders from the appliance.
•Place a large container on the drip tray.
•Press the cycle button (O) for at least
5 seconds, with the appliance remaining
switched off; the indicator light blinks
slowly. The solution runs through the system
and will be expelled intermittently.
The cycle automatically stops when the tank is
empty. The indicator light goes out.
After descaling, rinse the appliance by running
two cycles of 2 x 125-ml cups with clean
water.
(Rinse the water tank before preparing
coffee.)
Never pour descaling agent directly into the
tank.
If the appliance is used twice a day, descale
the appliance every 3 months.
If the appliance is equipped with a Duo
Filter filtration system, it is usually
necessary to descale the appliance every
4 to 5 months.
Caution: do not leave the descaling
solution within the reach of children.
The warranty does not cover appliances
that are not operating properly because
they have not been descaled.
14
Accessories are available from most Krups
retailers.
•Duo Filter water filter cartridges – pack of 2:
Reference no. F472
•Descaling solution – pack of 2: Reference
no. F054
Troubleshooting
PROBLEM SOLUTION
The brewing cycle stops The water tank is empty and the
and the indicator light cycle is interrupted.
blinks rapidly during the Fill the tank. Press the cycle button
brewing cycle: to start a new cycle. Once the
desired quantity of coffee has been
reached, press the button once
more to interrupt the cycle.
The circuit is blocked: wait until the
appliance has cooled down
completely, then open the upper
lid (C).
- Check whether the pod holders
are blocked. Clean them if need
be.
- Otherwise, descale the appliance.
There is a lot of steam Descale the appliance.
during the brewing cycle:
The tank does not empty The appliance is heavily scaled;
itself during the descaling repeat the descaling cycle.
cycle:
The lid does not unlock: Do not apply force to unlock the
lid, wait until the appliance has
cooled down completely and try
again. It is sometimes necessary to
wait 24 hours before being able to
unlock the lid.
The drinks are not hot: Descale the appliance.
There is a power cut Wait until the appliance has cooled
during the preparation: down completely.
Discard the pods, clean the pod
holders and the brewing heads,
then run a cycle of 2 x 125-ml cups
without coffee to rinse the
appliance.
Leaks during the Check whether the lid is properly
preparation: locked.
Oslo-anglais p65 17/01/06, 17:1114
Page 7

Check whether the pods are
correctly positioned in the filter
holders.
Wipe the seals around the brewing
heads.
The coffee is not evenly This may be caused by the use of
distributed between the 2 different types of pods.
two cups: Descale the appliance.
Check whether the filter holders
are blocked.
HELPLINE:
If you have any product problems or queries,
please contact our Customer Relations Team
first for expert help and advice:
0845 602 1454 - UK
(01) 4751947 - Ireland
or consult our website - www.krups.co.uk
Environment protection
first !
i Your appliance contains valuable materials
which can be recovered or recycled.
Ü Leave it at a local civic waste collection
point.
Oslo-anglais p65 17/01/06, 17:1115
15
 Loading...