

Page 1
C1 C2
NC00122252 - Réalisation : Espace Graphique
ALGERIA HOTLINE: 213-41 28 18 53
ARGENTINA HOTLINE: 8 006 660 104
ARMENIA HOTLINE: (010) 55-76-07
AUSTRALIA HOTLINE: 297 487 944
OSTERREICH HOTLINE: 01 866 70 299 00
BELGIQUE/BELGIE HOTLINE: 32 70 23 31 59
BELARUS HOTLINE: 172 239 290
BOSNA I HERCEGOVINA HOTLINE: Info-linija za potrošače 033 551 220
BRASIL HOTLINE: 8 007 257 877
BULGARIA HOTLINE: 887 044 850
CANADA HOTLINE: 1-800-418-3325
CHILE HOTLINE: +56 2 232 77 22
COLOMBIA HOTLINE: 18000919288
CROATIA HOTLINE: 01 30 15 294
CZECH REPUBLIC HOTLINE: 731 010 111
DANMARK HOTLINE: 44 663 155
DEUTSCHLAND (Germany) HOTLINE: 212 387 400
ESTONIA HOTLINE: 58 003 777
FINALAND HOTLINE: 622 94 20
FRANCE-HORS DOM-TOM HOTLINE: 09 74 50 10 61
FRANCE DOM-TOM HOTLINE: 09 74 50 10 61
GREECE HOTLINE: 2106371251
HONG KONG HOTLINE: 852 81 308 998
HUNGARY HOTLINE: (1) 8018434
INDONESIA HOTLINE: +62 21 5793 6881
ITALIA HOTLINE: 199207701
JAPAN HOTLINE: 0570-077772
KAZAKHSTAN HOTLINE: 727 378 39 39
KOREA HOTLINE: 1588-1588
LATVIA HOTLINE: 67162007
LITHUANIA HOTLINE: 64 708 888
MACEDONIA HOTLINE: (0)2 20 50 022
MALAYSIA HOTLINE: 6 565 508 900
MEXICO HOTLINE: (01800) 505 45 00
MOLDOVA HOTLINE: (22) 929249
NEDERLAND HOTLINE: 0318 58 24 24
NEW ZEALAND HOTLINE: 800 700 711
NORGE (NORWAY) HOTLINE: 44 663 155
PERU HOTLINE: 5 114 414 455
POLAND HOTLINE: 0 801 300 420 koszt jak za połączenie lokalne
PORTUGAL HOTLINE: 808 284 735
REPUBLIC OF IRELAND HOTLINE: (01) 677 4003
ROMANIA HOTLINE: 0 21 316 87 84
RUSSIA HOTLINE: 495 213 32 28
SERBIA HOTLINE: 060 0 732 000
SINGAPORE HOTLINE: 6 565 508 900
SLOVAKIA HOTLINE: 233 595 224
SPAIN HOTLINE: 0902 31 23 00
SVERIGE HOTLINE: 08 594 213 30
SUISSE HOTLINE: 044 837 18 40
TAIWAN HOTLINE: 27 234 488
THAILAND HOTLINE: 27 234 488
TURKEY HOTLINE: 216 444 40 50
USA HOTLINE: 800-526-5377
UKRAINE HOTLINE: 044 492 06 59
U.K. HOTLINE: 0845 330 6460
VENEZUELA HOTLINE: 0800-7268724
VIETNAM HOTLINE: +84-8 3821 6395
www.krups.com
KH442
www.krups.com
D
E
E
N
F
R
N
L
E
S
I
T
P
T
D
A
F
I
N
O
S
V
e
b
c
d
f
a
h
g
i
KR_TOASTER_PRELUDE_EO_NC00122252_Mise en page 29/04/14 14:05 PageC1
Page 2
Förpackningen består enbart av material som inte är skadligt för miljön. Kassera den enligt
gällande återvinningsregler.
Följ gällande regler i din kommun för kassering av apparaten.
Skydda vår miljö!
Apparaten innehåller material som går att återvinna.
Lämna den på en återvinningsstation eller till ett godkänt servicecenter.
KASSERING AV FÖRPACKNINGSMATERIAL OCH APPARAT
PROBLEM LÖSNING
Brödrosten startar inte. Kontrollera att kontakten är ansluten.
Om brödrosten fortfarande inte startar, ta den till en serviceverkstad
som rekommenderas av KRUPS.
Brödet fastnar i
brödrosten.
Dra ur kontakten och låt brödrosten svalna. Ta försiktigt ut brödet. Var
uppmärksam på att inte skada värmeelementen när brödet tas ur.
Använd aldrig ett metallföremål för att ta ur brödet.
Brödet är för mycket eller
inte tillräckligt rostat.
Kontrollera att rätt rostningsgrad valts. Välj en lägre nivå om brödet är
för mycket rostat, eller en högre nivå om brödet inte är tillräckligt rostat.
Kontrollera att inte någon av funktionerna upptining eller uppvärmning
valts.
Brödet kommer upp
nästan omedelbart, utan
att ha rostats.
Kontrollera att handtaget tryckts ner till bottenläget. Kontrollera också
att inte uppvärmning valts.
Om brödet fortfarande inte Si le pain ne reste toujours pas dans le grillepain, ta den till en serviceverkstad som rekommenderas av KRUPS.
Det ryker från brödrosten. Rostningsgraden kan vara satt för hög. Tryck på STOP-knappen för att
avbryta rostningen och ta ut elkontakten.
Sladden är skadad. Skadad sladd skall bytas ut av en serviceverkstad som rekommenderas
av KRUPS.
PROBLEMLÖSNING
37
SV
x3
1
2
fig. 3
fig. 1
fig. 4
fig. 5
fig. 6
fig. 2
fig. 7
fig. 12
fig. 9
fig. 10
fig. 8
fig. 11
2
1
auto
KR_TOASTER_PRELUDE_EO_NC00122252_Mise en page 29/04/14 14:05 PageC4
Page 3
5
ACHTUNG: Die Sicherheitshinweise sind Teil des Gerätes. Bitte lesen Sie die Anweisungen
und Sicherheitshinweise vor der Inbetriebnahme des Gerätes aufmerksam durch.
Bewahren Sie sie auf, damit Sie sie bei Bedarf schnell zur Hand nehmen können.
n Entfernen Sie sowohl innen als auch außen am Gerät die gesamte Verpackung und die
verschiedenen Zubehörteile.
n Stellen Sie die Länge des Stromkabels durch Aufrollen unter dem Sockel ein. Klemmen Sie das
Stromkabel in der Nut fest (Abb. 1).
n Schließen Sie den Toaster an.
n Um eventuell vorhandene Fertigungsrückstände zu beseitigen, sollte der Toaster vor dem Erstgebrauch
1-2 mal auf höchster Röstgradeinstellung ohne Toastbrot betrieben werden (Raum lüften).
n Toastscheiben in den Toaster geben (Abb. 2).
Keine zu großen und zu dicken Scheiben verwenden. Der Toast darf nicht im Schacht eingeklemmt
sein.
n Stellen Sie den gewünschten Bräunungsgrad ein (Abb. 3).
n Wählen Sie zwischen den 6 verschiedenen Bräunungsstufen aus. Stellen Sie dementsprechend den
Röstgradeinsteller ein:
Position 1 = schwach geröstet
Position 6 = sehr stark geröstet
n Erst-Einstellung ausprobieren, da der Röstgrad abhängig vom Toastbrot und dessen Feuchtegehalt
ist. Bei Graubrot generell eine höhere Röstgradeinstellung wählen als bei Weißbrot. Stellen Sie den
Röstgradeinsteller auf eine niedrigere Stufe, wenn Sie z.B. nur eine Scheibe Brot rösten möchten.
Wichtig:
Trockenere Brotscheiben oder schon einmal getoastetes Brot bräunt schneller und kann sich
unter Umständen entzünden. Deshalb niedrigere Röstgradeinstellung wählen und Gerät
nicht unbeaufsichtigt lassen.
n Absenktaste ganz herunterdrücken (Abb. 4).
Das Gerät geht an und die STOPP-Taste leuchtet auf. Der Hebel rastet nur dann ein, wenn der
Toaster angeschlossen ist.
n Nach Beendigung des Toastvorgangs wird der Toast automatisch angehoben und das Gerät
ausgeschaltet (Abb. 5).
n Nehmen Sie das Brot heraus. Sie können den Einschaltregler benutzen, indem Sie ihn bis zum
Anschlag anheben. Mit dieser Funktion kann das Brot leichter herausgenommen werden.
n Zum Unterbrechen des aktuellen Toastvorgangs drücken Sie die Stopp-Taste (Abb. 6).
Hinweis:
Sollte sich eine Brotscheibe im Röstschacht verklemmt haben, Netzstecker ziehen, Gerät
abkühlen lassen und dann die Toastscheibe vorsichtig lösen ohne die Heizelemente zu
berühren.
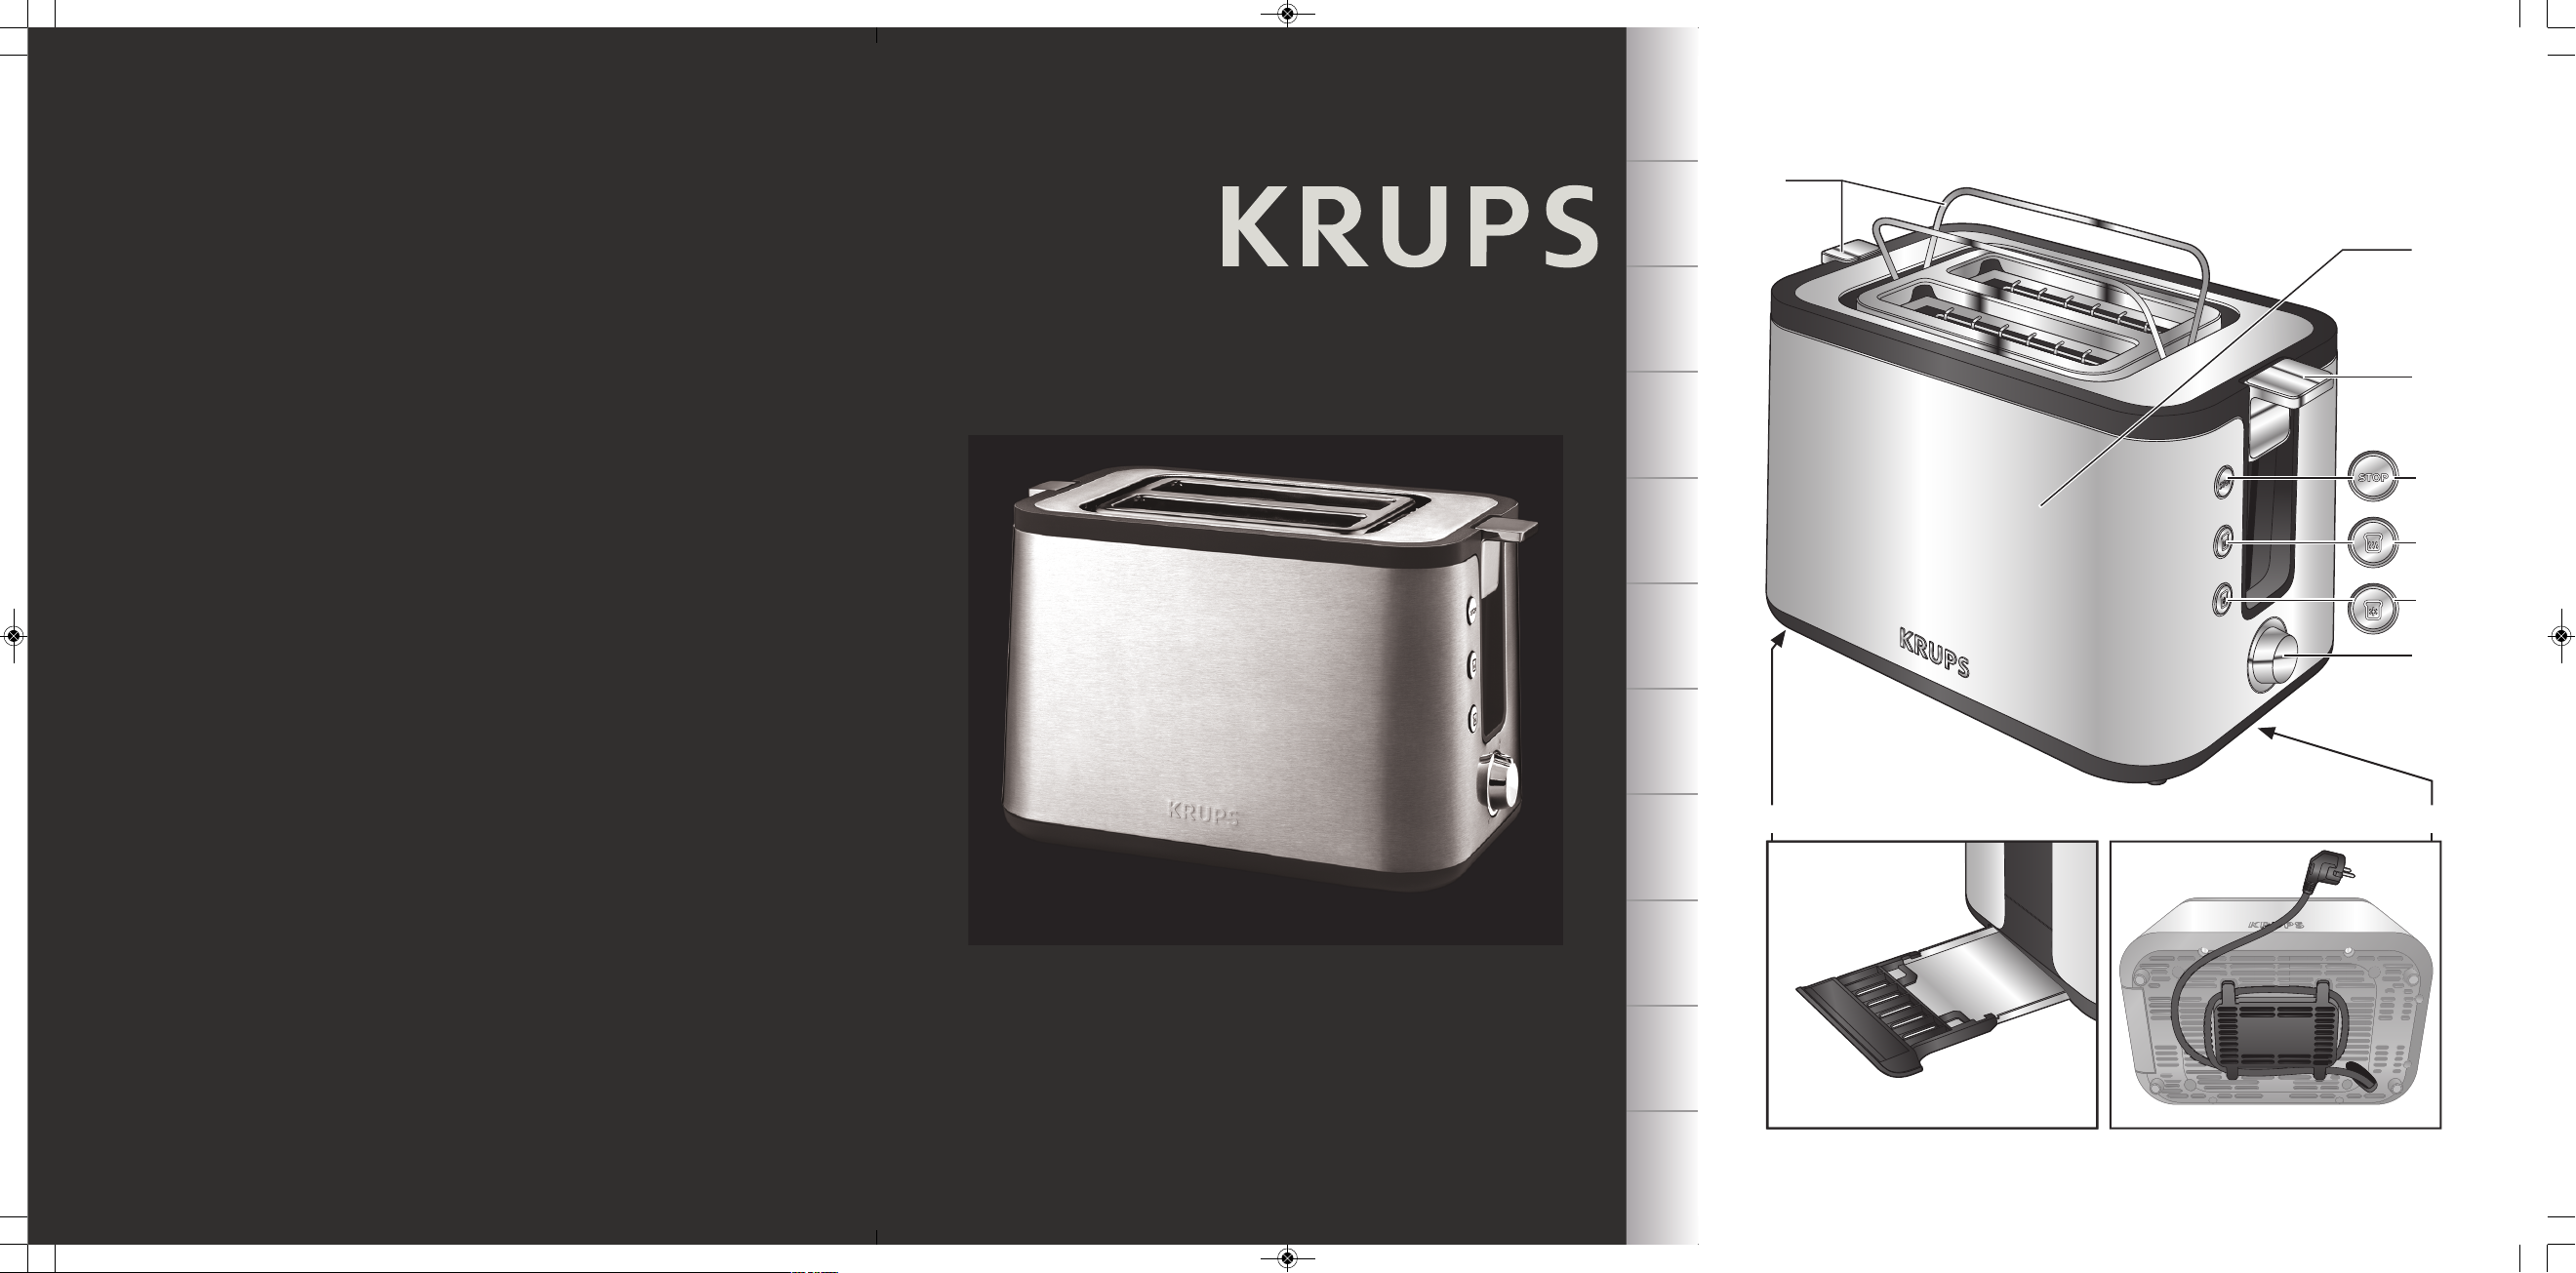
BESCHREIBUNG
a Wärmeschutzmantel
b Krümelschublade
c Kabelaufwicklung
d Absenktaste
e Brötchenlift
f Röstgradeinsteller
g Auftau-Funktion
h Aufback-Funktion
i Stopp-Taste
VOR DEM ERSTEN GEBRAUCH
INBETRIEBNAHME
DE
KR_TOASTER_PRELUDE_EO_NC00122252_Mise en page 29/04/14 14:06 Page5
Page 4
6
Brötchenlift
n Heben Sie den Brötchenaufsatz an, indem Sie den entsprechenden Hebel für die
Brötchenaufwärmfunktion (e) herunterdrücken (Abb. 7).
n Legen Sie die Brötchen auf den Aufsatz und drücken Sie den Einschaltregler bis zum Einrasten
herunter. Gehen Sie nicht über die Position 2 hinaus. Schalten Sie das Gerät ein (Abb. 8).
n Bitte beachten Sie beim Aufwärmen von Brötchen, dass sich die Brötchen und der Brötchenaufsatz
in der richtigen Position befinden (Abb. 9). Legen Sie die Brötchen zum Aufwärmen nicht direkt auf
den Toaster. Verwenden Sie den Brötchenaufsatz (e).
n Um ein besseres Ergebnis zu erhalten, empfiehlt es sich, die Brötchen umzudrehen und den
Toastvorgang zu wiederholen.
n Nach dem Gebrauch senken Sie den Brötchenaufsatz ab, indem Sie den Hebel für die
Brötchenaufwärmfunktion anheben.
n Der Brötchenlift sollte nicht länger als 10 Minuten benutzt werden.
Auftau-Funktion
n Der Toaster ist mit einer vorprogrammierten Auftau-Funktion ausgestattet: Das Toasten von
tiefgekühltem Brot dauert länger als das Toasten von nicht tiefgekühltem Brot.
n Legen Sie eine oder zwei tiefgekühlte Brotscheiben oder Toasts in den Toaster (Abb. 10).
n Stellen Sie den gewünschten Bräunungsgrad ein und drücken Sie den Hebel herunter (siehe
Abschnitt „BETRIEBSMODUS“).
n Drücken Sie die Taste „ “ (Abb. 10).
n Die Tasten „DECONGELATION“ (Auftau-Taste) und „STOP“ leuchten auf.
Aufback-Funktion
n Der Toaster ist mit einer vorprogrammierten Aufback-Funktion ausgestattet, um Brotscheiben oder
Toasts aufzuwärmen, ohne sie stärker zu rösten.
n Die Aufbackdauer ist automatisch, unabhängig von der Stellung des Einstellknopfs (etwa 30
Sekunden).
n Legen Sie die Brotscheiben oder Toasts in den Toaster und drücken Sie den Hebel herunter.
n Drücken Sie die Taste „ “ (Abb. 11).
n Die Tasten „RECHAUFFAGE“ (Aufback-Taste) und „STOP“ leuchten auf.
n Vor dem Herausziehen der Krümelschublade den Toaster mindestens 10 Minuten, nach
Beendigung des letzten Toastvorgangs, abkühlen lassen.
n Vor der Reinigung Netzstecker ziehen.
n Er wird durch Herunterdrücken abgenommen, ohne metallische Teile zu berühren. Führen Sie diesen
Schritt regelmäßig durch (Abb. 12).
n Gerät nicht ins Wasser tauchen.
n Verwenden Sie nie einen Scheuerschwamm zum Reinigen des Toasters. Reinigen Sie ihn mit einem
feuchten Tuch und wischen Sie ihn mit einem weichen, trockenen Tuch ab, um ihn zum Glänzen zu
bringen.
n Ziehen Sie die Krümelschublade heraus, und entfernen Sie die Krümel (Abb. 12).
n Wischen Sie die Krümelschublade mit einem feuchten Tuch ab und setzen Sie es wieder ein.
n Verwenden Sie den Toaster nie ohne die Krümelschublade.
ZUSÄTZLICHE AUSSTATTUNG
REINIGEN
KR_TOASTER_PRELUDE_EO_NC00122252_Mise en page 29/04/14 14:06 Page6
Page 5
7
DE
Die Verpackung besteht ausschließlich aus umweltfreundlichen Materialien, die den örtlichen
Recyclestellen übergeben werden sollten. Entsorgungsmöglichkeiten für das ausgediente
Gerät erfahren Sie bei Ihrer Gemeindebzw. Stadtverwaltung.
Denken Sie an den Schutz der Umwelt!
Ihr Gerät enthält zahlreiche wiederverwertbare oder recycelbare Materialien.
Entsorgen Sie Ihr Gerät deshalb umweltgerecht bei einer Sammelstelle Ihrer Stadt oder
Gemeinde.
ENTSORGUNG
PROBLEM LÖSUNG
Der Toaster funktioniert
nicht.
Prüfen Sie, ob der Stecker richtig in der Steckdose steckt.
Wenn der Toaster immer noch nicht funktioniert, bringen Sie ihn zu
einem zugelassenen Kundendienstcenter von KRUPS.
Das Brot bleibt im Toaster
stecken.
Trennen Sie das Gerät von der Stromversorgung und lassen Sie es
abkühlen. Nehmen Sie das Brot vorsichtig heraus. Achten Sie darauf,
die Heizelemente beim Herausnehmen des Brotes nicht zu
beschädigen. Verwenden Sie nie einen Gegenstand aus Metall, um das
Brot herauszunehmen.
Das Brot ist zu stark oder
zu schwach gebräunt.
Prüfen Sie den eingestellten Bräunungsgrad. Stellen Sie den
Bräunungsgrad schwächer ein, wenn das Brot zu stark getoastet ist,
oder stärker, wenn das Brot nicht stark genug getoastet ist.
Vergewissern Sie sich, dass die Auftau- oder Aufback-Tasten nicht
betätigt wurden.
Das Brot kommt fast
sofort wieder heraus,
ohne dass es getoastet
wurde.
Der Hebel muss bis zum Anschlag heruntergedrückt werden. Prüfen
Sie, dass die Aufback-Taste nicht betätigt wurde.
Wenn das Brot immer noch nicht im Toaster bleibt, bringen Sie das
Gerät zu einem zugelassenen Kundendienstcenter von KRUPS.
Aus dem Toaster kommt
Rauch.
Der Bräunungsgrad ist möglicherweise zu stark eingestellt. Drücken Sie
die STOPP-Taste, um den Toastzyklus abzubrechen, und trennen Sie
das Gerät von der Stromversorgung.
Das Kabel ist beschädigt. Wenn das Kabel des Geräts beschädigt ist, muss es in einem
zugelassenen Kundendienstcenter von KRUPS ausgetauscht werden.
FEHLERBEHEBUNG
KR_TOASTER_PRELUDE_EO_NC00122252_Mise en page 29/04/14 14:06 Page7
Page 6
8
CAUTION: the safety precautions are part of the appliance. Read them carefully before
using your new appliance for the first time. Keep them in a place where you can find and
refer to them later on.
n Remove all packaging and other accessories inside as well as outside the appliance.
n Unwind the cord from under the toaster (Fig. 1).
n Plug the toaster into the wall socket.
n Turn the dial to the maximum browning setting without inserting any bread, then press the lever
down. Repeat the toasting sequence twice to remove the "new" smell.
n Insert the slices of bread (Fig. 2).
Do not use slices which are too large or too thick, as they must not be allowed to stick in the
toasting well.
n Select the desired toasting setting (Fig. 3).
n Choose between 6 different degrees of browning by setting the selector to the appropriate position:
Position 1 = lightly toasted
Position 6 = very well toasted
n When first using, try out the toasting setting, as the result depends upon the type of bread and the
degree of moisture.
Generally speaking, a higher temperature is required for breads other than white. Turn the toasting
grade selector to a lower number if, for example, only one slice of bread is being toasted.
Caution:
Relatively dry slices of bread, or bread that has already been toasted once, will brown much
more quickly and may under certain circumstances catch fire. Therefore set the heat control
to a lower setting and do not leave the toaster unattended.
n Fully depress the lowering lever, which will then lock into position (Fig. 4).
The appliance will begin to operate and the STOP button will illuminate. The handle will only lock if
the toaster is plugged in.
n After completion of the toasting operation, the toast will automatically be raised and the appliance
will switch itself off (Fig. 5).
n Remove the bread. To make it easier to remove the bread you can lift the lowering lever as far as it
will go.
n To stop the toaster when toasting is underway, press the “stop” button (Fig. 6).
Note:
Should a slice of bread become trapped in the toasting well, unplug the power cord, let the
appliance cool down and then carefully free the toast without touching the heating elements.
DESCRIPTION
a Heat insulated casing
b Crumb tray
c Cord storage
d Lowering lever
e Bun warmer
f Toaster browning setting
g Defrost button
h Reheat button
i Stop button
BEFORE FIRST USE
USING THE TOASTER
KR_TOASTER_PRELUDE_EO_NC00122252_Mise en page 29/04/14 14:06 Page8
Page 7
9
Bun Warmer
n Raise the bun warmer by pressing the handle on the corresponding bun warmer function (e) (Fig.
7).
n Position the rolls on the shelves and press on the lowering lever until it locks automatically. Do not
go beyond position 2. Start the appliance (Fig. 8).
n Please take care for rolls rewarming function that the rolls and the lift have to be in the right position
(Fig. 9). Do not put any pastries directly on the toaster to reheat them. Use the bun warmer instead
(e).
n To improve the results, turn the rolls over and repeat the toasting operation.
n After use, lower the bun warmer by raising the handle on the bun warmer feature.
n The bun warmer should not be used for longer than 10 minutes.
Defrost feature
n The toaster has a pre-programmed defrosting feature. Toasting frozen bread takes longer than
toasting bread which is not frozen.
n Insert one or two frozen slices of bread or toast in the toaster (Fig. 10).
n Select the desired toasting level and lower the handle (please see the "OPERATING MODE”
paragraph).
n Press the ” ” button (Fig. 10).
n The "DEFROST" and "STOP" buttons will illuminate.
Reheat feature
n The toaster has a pre-programmed feature to reheat pieces of bread or toast without toasting them
too much.
n The reheating time is automatic, regardless of the position of the setting button (roughly 30
seconds).
n Insert the pieces of bread or toast in the toaster and lower the handle.
n Press the ” ” button (Fig. 11).
n The “REHEAT” and “STOP” buttons will illuminate.
n Before pulling out the crumb tray, allow the toaster to cool for at least ten minutes after
completion of the preceding toasting operation.
n Before commencing the cleaning operation, pull out the mains plug.
n It can be removed by pressing above, avoid all contact with metal parts. Clean the toaster regularly
(Fig. 12).
n Never immerse the appliance in water or put it under running water.
n Never use an abrasive sponge to clean the toaster. Clean it with a damp cloth and wipe it with a soft,
dry cloth in order to make it shine.
n Remove the crumb tray by pressing above and remove the crumbs (Fig. 12).
n Wipe using a damp cloth then return the crumb tray to its place.
n Never use the toaster without the crumb tray.
CLEANING
ADDITIONAL ACCESSORIES
EN
KR_TOASTER_PRELUDE_EO_NC00122252_Mise en page 29/04/14 14:06 Page9
Page 8
10
The packaging comprises exclusively environmentally-friendly materials which should be
disposed of according to the local recycling arrangements.
Disposal methods for the appliance itself can be found by enquiry at the appropriate
department of the local authority in your area.
Environment protection first !
Your appliance contains a lot of recoverable or recyclable material.
When disposing of it, take it to a local civic waste collection point.
DISPOSAL
PROBLEM SOLUTION
The toaster does not work. Ensure the plug is properly connected to the socket.
If the toaster is still not working, take it to an approved KRUPS service
centre.
The bread is stuck in the
appliance.
Unplug the appliance and leave it to cool. Remove the bread carefully.
Be careful not to damage the heating elements when removing the
bread. Never use a metallic object to remove the bread.
The bread is too brown or
not brown enough.
Check the setting level selected. Select a lower level if your bread is too
brown, or a higher level if it is not brown enough.
Ensure the freezing or reheating buttons have not been selected.
The bread pops out
almost immediately and is
not toasted.
Ensure the handle has been lowered to the bottom. Also check that the
reheating button was not selected.
If the bread still does not stay in the toaster, bring your appliance to an
approved KRUPS service centre.
Smoke is coming out of
the toaster.
It is possible that the toasting level selected is too high. Press the STOP
button to stop the toasting cycle and unplug the appliance.
The cord is damaged. If the cord on the appliance is damaged, it must be replaced in an
approved KRUPS service centre.
REPAIR SERVICE
KR_TOASTER_PRELUDE_EO_NC00122252_Mise en page 29/04/14 14:06 Page10
Page 9

AVERTISSEMENT : Les consignes de sécurité font partie de l’appareil. Veuillez les lire
attentivement avant d'utiliser votre nouvel appareil. Gardez-les dans un endroit où vous
pourrez les retrouver et vous y référer ultérieurement.
n Enlevez tous les emballages, autocollants ou accessoires divers à l’intérieur comme à l’extérieur du
grille pain.
n Réglez la longueur du cordon en l’enroulant sous le socle. Coincez le cordon dans l’encoche (Fig. 1).
n Branchez le grille pain.
n Mettez une ou deux fois le grille-pain en marche sur le niveau 6 afin d'éliminer l'odeur du neuf. Cette
opération doit être réalisée à vide (sans pain) dans une pièce ventilée.
n Placez les toasts ou les tranches de pain dans le grille-pain (Fig. 2).
N'insérez pas des tranches trop grandes ou trop épaisses : la tranche ne doit pas rester coincée
dans la fente.
n Sélectionnez le niveau de dorage désiré (Fig. 3).
Choisissez entre 6 degrés de dorage différents en sélectionnant la position souhaitée :
Position 1 = légèrement grillé
Position 6 = très grillé
n L'intensité du dorage augmente en même temps que les chiffres du sélecteur. Pour le pain complet,
mettez le bouton de réglage sur un temps de dorage plus long que pour le pain blanc.
Positionnez le bouton de réglage sur un chiffre inférieur si, par exemple, vous souhaitez griller
seulement une tranche de pain.
Important:
Les morceaux de pain sec ou qui auraient été déjà grillés, brunissent plus rapidement et
peuvent même, le cas échéant brûler. Il est donc recommandé de choisir un niveau de dorage
inférieur pour ce type de pain et de ne pas laisser l'appareil fonctionner sans surveillance.
n Descendez le levier de mise en marche jusqu'à ce qu'il soit automatiquement bloqué (Fig. 4).
L'appareil fonctionne et la touche STOP s'allume. Le levier ne peut être bloqué que si le grille pain
est branché.
n Le pain est ejecté automatiquement et l'appareil s’arrête une fois que le niveau de dorage
préalablement sélectionné est atteint (Fig. 5).
n Retirez le pain. Vous pouvez utiliser la commande de mise en marche en la remontant au maximum.
Cette fonction permet de faciliter le retrait du pain.
n Pour interrompre le fonctionnement de grillage en cours appuyez sur le bouton “stop” (Fig. 6).
Attention:
Si une tranche de pain reste bloquée dans l'appareil, débranchez immédiatement, laissez
refroidir quelques minutes et dégagez le pain délicatement, sans toucher les éléments
chauffants.
DESCRIPTION
a Revêtement parois froides
b Tiroir ramasse-miettes
c Rangement cordon
d Commande de mise en marche
e Chauffe-petits pains
f Bouton de réglage
g Fonction décongelation
h Fonction réchauffage
i Bouton stop
AVANT LA PREMIERE UTILISATION
MODE D'UTILISATION
FR
11
KR_TOASTER_PRELUDE_EO_NC00122252_Mise en page 29/04/14 14:06 Page11
Page 10

12
Chauffe-petits pains
n Relevez le chauffe-petits pains en appuyant sur le levier de la fonction chauffe petits pains
correspondant (e) (Fig. 7).
n Placez les petits pains sur les supports et appuyez sur la commande de mise en marche jusqu’à ce
qu’elle soit automatiquement bloquée. Ne dépassez pas la position 2. Mettez l'appareil en marche
(Fig. 8).
n Pour cette fonction, faites attention à ce que les deux supports et les petits pains soient dans la
bonne position (Fig. 9). Ne posez pas les viennoiseries directement sur le grille pain pour les
réchauffer. Utilisez le chauffe petits pains (e).
n Pour obtenir de meilleurs résultats, retournez les petits pains et répétez l'opération de dorage.
n Après utilisation, abaissez le chauffe-petits pains en soulevant le levier de la fonction Chauffe petits
pains.
n Le chauffe-petits pains ne doit pas être utilisé plus de 10 minutes.
Fonction décongélation
n Le grille-pain est doté d’une fonction préprogrammée de décongélation : griller du pain congelé
prend plus de temps que griller du pain non congelé.
n Insérez une ou deux tranches de pain ou des toasts congelés dans le grille-pain (Fig. 10).
n Sélectionnez le niveau de grillage désiré et descendez le levier (voir le paragraphe « MODE
D’UTILISATION »).
n Appuyez sur la touche ” ” (Fig. 10).
n Les touches « DECONGELATION » et "STOP" s'allument.
Fonction réchauffage
n Le grille-pain est doté d’une fonction préprogrammée pour réchauffer des tranches de pain ou des
toasts sans les griller davantage.
n Le temps de réchauffage est automatique quelque soit la position du bouton de réglage (environ 30
secondes).
n Insérez les tranches de pain ou les toasts dans le grille-pain et descendez le levier.
n Appuyez sur la touche ” ” (Fig. 11).
n Les touches « RECHAUFFAGE » et "STOP" s'allument.
n Avant de sortir le tiroir ramasse-miettes, laissez l'appareil refroidir au moins 10 minutes
après la dernière utilisation.
n Avant de nettoyer le grille-pain, assurez-vous qu'il ne soit pas branché.
n Le nettoyage est facile et rapide grâce au tiroir ramasse-miettes. Il s'enlève en appuyant dessus et
évite tout contact avec les parties métalliques. Réalisez cette opération régulièrement (Fig. 12).
n Ne plongez jamais l'appareil dans l'eau pour le nettoyer.
n N'utilisez jamais une éponge abrasive pour nettoyer le grille-pain. Nettoyez-le avec un chiffon humide
et essuyez-le avec un chiffon doux et sec pour le faire briller.
n Retirez le tiroir ramasse-miettes en appuyant dessus et enlevez les miettes (Fig. 12).
n Essuyez à l'aide d'un chiffon humide puis remettez le tiroir ramasse-miettes en place.
n N'utilisez jamais le grille-pain sans le tiroir ramasse-miettes.
FONCTIONS POSSIBLES
NETTOYAGE
KR_TOASTER_PRELUDE_EO_NC00122252_Mise en page 29/04/14 14:06 Page12
Page 11
13
L'emballage comprend exclusivement des matériaux sans danger pour l'environnement,
pouvant être jetés conformément aux dispositions de recyclage en vigueur. Pour la mise au
rebut de l'appareil, se renseigner auprès du service approprié de votre commune.
Participons à la protection de l’environnement !
Votre appareil contient de nombreux matériaux valorisables ou recyclables.
Confiez celui-ci dans un point de collecte ou à défaut dans un centre de service agréé pour
que son traitement soit effectué.
ELIMINATION DES MATÉRIAUX D'EMBALLAGE ET DE L'APPAREIL
PROBLÈME SOLUTION
Le grille pain ne fonctionne
pas.
Assurez vous que la fiche est bien branchée dans la prise.
Si le grille pain ne fonctionne toujours pas, apportez le dans un centre
service KRUPS agrée.
Le pain reste coincé dans
l’appareil.
Débranchez l’appareil et laissez-le refroidir. Retirez le pain avec précaution. Faites attention de ne pas endommager les éléments chauffants
lorsque vous retirez le pain. N’utilisez jamais un objet métallique pour
retirer le pain.
Le pain est trop ou pas
assez grillé.
Vérifiez le niveau de réglage sélectionné. Sélectionnez un niveau plus
faible si votre pain est trop grillé, ou un niveau plus élevé s’il ne l’est pas
assez.
Assurez-vous que les touches décongélation ou réchauffage n’ont pas
été sélectionnées.
Le pain ressort
presqu’immédiatement
sans être grillé.
Assurez-vous de bien descendre le levier jusqu’au bout. Vérifiez aussi
que la touche réchauffage n’a pas été sélectionnée.
Si le pain ne reste toujours pas dans le grille-pain, apportez votre
appareil dans un centre service KRUPS agrée.
De la fumée s’échappe du
grille-pain.
Il est possible que le niveau de grillage sélectionné soit trop élevé.
Appuyez sur la touche STOP pour interrompre le cycle de grillage et
débranchez l'appareil.
Le cordon est
endommagé.
Si le cordon de l’appareil est endommagé, il doit être remplacé dans un
centre service KRUPS agrée.
DEPANNAGE
FR
KR_TOASTER_PRELUDE_EO_NC00122252_Mise en page 29/04/14 14:06 Page13
Page 12

GEVAAR: De veiligheidsvoorschriften worden bij het apparaat geleverd. Lees deze
voorschriften aandachtig door voordat u uw nieuw apparaat voor het eerst gebruikt. Bewaar
ze op een veilige plek, zodat u ze later als referentie kunt inzien.
n Verwijder het verpakkingsmateriaal en de accessoires aan de buiten- en binnenkant van het
apparaat.
n Stel de lengte van het snoer af door het onder het voetstuk op te rollen. Zet het snoer vast in de
inkeping (Fig. 1).
n Steek de stekker van het broodrooster in het stopcontact.
n Zet het broodrooster, voordat u het in gebruik neemt, eerst 1 of 2 keer aan zonder brood in het
rooster (ventileer de ruimte).
n Doe de te roosteren sneetjes brood in het broodrooster (Fig. 2).
Duw niet te dikke boterhammen in de sleuven, daar het geroosterde brood anders niet vrij omhoog
kan springen.
n Selecteer de gewenste bruiningsgraad (Fig. 3).
Kies een van de 6 bruiningsgraden door de keuzeknop op de juiste stand te zetten:
Stand 1 = licht geroosterd
Stand 6 = donker geroosterd
n Probeer de instelling een keer uit. De bruiningsgraad is mede afhankelijk van het soort brood en de
vochtigheid ervan. Bij bruin brood moet u in het algemeen een hogere bruiningsgraad instellen dan
bij wit brood. Draai de keuzeknop naar een lagere stand indien u bijvoorbeeld maar één snee brood
roostert.
Belangrijk:
Brood dat wat droger of al eerder geroosterd is, wordt sneller bruin en kan in bepaalde omstandigheden verbranden. Zet het broodrooster op een lagere stand en blijf bij het broodrooster staan wanneer u brood roostert.
n Duw de broodlift volledig naar beneden tot hij vasthaakt (Fig. 4).
Het apparaat werkt en de STOP-knop licht op. De hendel kan alleen geblokkeerd worden als het
broodrooster op de netstroom aangesloten is.
n Het brood springt aan het eind van de roostertijd automatisch omhoog. Het broodrooster schakelt
dan uit (Fig. 5).
n Haal het brood uit het broodrooster. U kunt hiervoor de startknop op maximum zetten. Met deze
functie kunt u het brood gemakkelijker uit het broodrooster nemen.
n Wilt u het roosteren onderbreken, druk dan op de knop “stop” (Fig. 6).
BESCHRIJVING
a Behuizing apparaat
b Kruimellade
c Snoeropbergruimte
d Broodlift
e Broodjes-opzetrekje
f Instelling bruiningsgraad
g Ontdooifunctie
h Opwarmfunctie
i Stopknop
VOOR HET EERSTE GEBRUIK
GEBRUIK
14
KR_TOASTER_PRELUDE_EO_NC00122252_Mise en page 29/04/14 14:06 Page14
Page 13

15
Let op:
Indien het brood in de sleuf klem zit, trek de stekker dan uit het stopcontact en laat het
broodrooster afkoelen. Maak het brood dan voorzichtig los. Kom niet aan het
verwarmingselement!
Broodjes-opzetrekje
n Zet het broodjesopzetrekje overeind door op de hendel te drukken van de overeenstemmende
functie broodjes opwarmen (e) (Fig. 7).
n Leg de broodjes op het rekje en druk op de startknop tot deze automatisch blokkeert. Ga niet hoger
dan stand 2. Zet het apparaat aan (Fig. 8).
n Als u deze functie gebruikt moet u ervoor zorgen dat de twee houders en de kleine broodjes goed
zijn geplaatst (Fig. 9). Leg broodjes nooit rechtstreeks op het broodrooster om ze op te warmen.
Gebruik het broodjesopzetrekje (e).
n Voor het beste resultaat draait u de broodjes een keer om en roostert u ook de andere kant.
n Laat het broodjesopzetrekje na gebruik weer zakken door de hendel van de functie broodjes
opwarmen omhoog te trekken.
n Gebruik het broodjes-opzetrekje niet langer dan 10 minuten achter elkaar.
Ontdooifunctie
n Het broodrooster heeft een voorgeprogrammeerde ontdooifunctie: bevroren brood roosteren vergt
meer tijd.
n Duw één of twee sneetjes bevroren brood of toast in het broodrooster (Fig. 10).
n Kies de gewenste bruiningsgraad en druk de hendel naar beneden (zie paragraaf
"GEBRUIKSAANWIJZING").
n Druk op de knop " " (Fig. 10).
n De knoppen "ONTDOOIEN" en "STOP" lichten op.
Opwarmfunctie
n Het broodrooster heeft een voorgeprogrammeerde opwarmfunctie voor het opwarmen van sneetjes
brood of toast zonder ze te roosteren.
n De opwarmtijd wordt automatisch bepaald, ongeacht de stand van de regelknop (ongeveer 30
seconden).
n Duw de sneetjes brood of toast in het broodrooster en druk de hendel naar beneden.
n Druk op de knop " " (Fig. 11).
n De knoppen "OPWARMEN" en "STOP" lichten op.
n Laat het broodrooster minimaal 10 minuten afkoelen alvorens u de kruimellade uittrekt.
n Trek de stekker uit het stopcontact.
n De lade kan worden verwijderd door erop te drukken en komt niet in contact met de metalen
onderdelen. Doe dit regelmatig (Fig. 12).
n Dompel het broodrooster nooit onder in water. Houd het ook niet onder de kraan.
n Gebruik nooit een schuurspons om het broodrooster schoon te maken. Maak hem schoon met een
vochtige doek en droog hem af met een zachte en droge doek voor een mooie glans.
n Haal de kruimellade uit het broodrooster door erop te drukken en verwijder de kruimels (Fig. 12).
n Veeg schoon met een vochtige doek. Schuif de kruimellade daarna weer in het broodrooster.
n Gebruik het broodrooster nooit zonder de kruimellade.
EXTRA ACCESSOIRES
SCHOONMAKEN
NL
KR_TOASTER_PRELUDE_EO_NC00122252_Mise en page 29/04/14 14:06 Page15
Page 14

16
De verpakking van KRUPS huishoudelijke apparaten is gemaakt van milieu vriendelijke
materialen en kan in overeenstemming met de gemeentelijke bepalingen omtrent
afvalverwerking verwerkt worden. Uw gemeente kan u eveneens informatie verschaffen
omtrent de wijze waarop u zich van uw oude, defecte huishoudelijke apparaten kunt ontdoen.
Wees zuinig op het milieu!
Uw apparaat bevat talrijke materialen die hergebruikt of gerecycled kunnen worden.
Breng het naar een daarvoor bestemd verzamelpunt of indien dit niet mogelijk is naar een
erkend service center zodat het apparaat verwerkt kan worden.
AFVALVERWERKING
PROBLEEM OPLOSSING
Het broodrooster werkt
niet.
Controleer of de stekker goed in het stopcontact zit.
Werkt het broodrooster nog steeds niet, breng hem dan naar een
erkend servicecentrum van KRUPS.
Het brood zit geblokkeerd
in het broodrooster.
Trek de stekker uit het stopcontact en laat het apparaat afkoelen. Haal
het brood er voorzichtig uit. Zorg ervoor dat u de
verwarmingselementen niet beschadigt wanneer u het brood eruit haalt.
Gebruik nooit een metalen voorwerp om het brood eruit te halen.
Het brood is te veel of niet
genoeg geroosterd.
Controleer de gekozen bruiningsgraad. Kies een lagere graad als uw
brood te veel geroosterd is, of een hogere graad als het niet genoeg
geroosterd is.
Controleer of de knop ontdooien of opwarmen niet ingedrukt is.
Het brood komt bijna
onmiddellijk weer uit het
broodrooster en is niet
geroosterd.
Zorg ervoor dat u de hendel helemaal naar beneden duwt. Controleer
ook of de knop opwarmen niet is ingedrukt.
Blijft het brood nog steeds niet in het broodrooster, breng het apparaat
dan naar een erkend servicecentrum van KRUPS.
Er komt rook uit het
broodrooster.
De gekozen bruiningsgraad is mogelijk te hoog. Druk op de knop STOP
om het roosteren te onderbreken en trek de stekker uit het stopcontact.
Het snoer is beschadigd. Als het snoer van het apparaat beschadigd is, moet het in een erkend
servicecentrum van KRUPS worden vervangen.
PROBLEMEN OPLOSSEN
KR_TOASTER_PRELUDE_EO_NC00122252_Mise en page 29/04/14 14:06 Page16
Page 15

PRECAUCIÓN: Las precauciones de seguridad forman parte del aparato. Léalas
detenidamente antes de usar su nuevo aparato por primera vez. Guárdelas en un lugar de
facil acceso para futuras consultas.
n Retire todos los envases, etiquetas y accesorios que hay tanto dentro como fuera del aparato.
n Ajuste la longitud del cable enrollándolo en la base. Acople el cable en la ranura (Fig. 1).
n Conecte la tostadora.
n Antes del primer uso poner en marcha la tostadora una o dos veces sobre nivel 6 a fin de eliminar
el olor a nuevo. Esta operación debe realizarse en vacío (sin pan) en un lugar ventilado.
n Colocar las tostadas o rebanadas de pan en la tostadora (Fig. 2).
No insertar nunca rebanadas demasiado grandes o anchos. La rebanada no debe quedar atrancada
en la apertura.
n Seleccione el nivel de tostado deseado (Fig. 3).
Elegir entre 6 grados de dorado distintos y seleccionar la posición deseada.
Posición 1: ligeramente tostado.
Posición 6: muy tostado.
n La intensidad del dorado aumenta al mismo tiempo que el número del selector. Para un pan integral,
colocar el botón de ajuste en un tiempo de dorado más largo que para el pan blanco. Ubicar el
botón de ajuste en una cifra inferior si, por ejemplo, solo se desea tostar una rebanada de pan.
Importante:
Los trozos de pan seco o que ya fueron tostados, se queman más rápidamente y, en
ocasiones, también pueden quemarse. Por ende se recomienda elegir un nivel de dorado
inferior para este tipo de pan y de no dejar que el aparato funcione sin vigilancia.
n Después de encender el aparato, colocar el mando de puesta en marcha hasta que quede
automáticamente bloqueado (Fig. 4).
El aparato funciona y el botón STOP se enciende. La palanca solo puede bloquearse si la tostadora
está conectada.
n El pan es eyectado automáticamente y el aparato se detiene una vez que el nivel de dorado
seleccionado previamente ha sido alcanzado (Fig. 5).
n Retire el pan. Puede utilizar el mando de puesta en marcha subiéndolo al máximo. Esta función
ayuda a extraer el pan.
n Para interrumpir el funcionamiento de tostado en curso pulse el botón “stop” (Fig. 6).
Atención:
Si una rebanada de pan queda bloqueada en el aparato, desconectarlo de inmediato, dejarlo
enfriar unos minutos y retirar el pan delicadamente, sin tocar los elementos que calientan.
DESCRIPCIÓN
a Revestimiento de paredes frías
b Cajón corredizo para migas
c Almacenamiento del cable
d Botón de puesta en marcha
e Calentador para pancitos
f Botón de ajuste
g Función descongelar
h Función calentar
i Botón stop
PRIMER USO
MODO DE EMPLEO
17
ES
KR_TOASTER_PRELUDE_EO_NC00122252_Mise en page 29/04/14 14:06 Page17
Page 16

18
Calentador para pancitos
n Suba el calentador de panecillos presionando sobre la palanca de la función panecillos
correspondiente (e) (Fig. 7).
n Ponga los panecillos sobre los soportes y pulse el mando de puesta en marcha hasta que se
bloquee automáticamente. No supere la posición 2. Ponga el aparato en marcha (Fig. 8).
n Para esta función hay que prestar atención que los dos soportes y los pancitos estén bien
colocados (Fig. 9). No ponga la bollería directamente en la tostadora para calentarla. Utilice el
calentador de panecillos (e).
n Para obtener mejores resultados, girar los pancitos y repetir la operación de dorado.
n Después del uso, baje el calentador de panecillos levantando la palanca de la función calentador de
panecillos.
n No se puede utilizar a los calentadores para pancitos por más de 10 minutos.
Función descongelar
n La tostadora incluye una función preprogramada de descongelación: tostar pan congelado lleva
más tiempo que tostar pan no congelado.
n Introduzca una o dos rebanadas de pan o tostadas congeladas en la tostadora (Fig. 10).
n Seleccione el nivel de tostado deseado y baje la palanca (véase el apartado «MODO DE USO»).
n Pulse el botón ” ” (Fig. 10).
n Los botones «DESCONGELAR» y "STOP" se encienden.
Función calentar
n La tostadora incluye una función preprogramada para calentar rebanadas de pan o tostadas sin
dorarlas más.
n El tiempo de calentamiento es automático con independencia de la posición de ajuste (unos 30
segundos).
n Introduzca las rebanadas de pan o las tostadas en la tostadora y baje la palanca.
n Pulse el botón ” ” (Fig. 11).
n Los botones «CALENTAR» y "STOP" se encienden.
n Antes de sacar el cajón corredizo para migas, dejar que el aparato se enfríe por lo menos
10 minutos después del último uso.
n Antes de limpiar la tostadora, asegurarse de que no esté conectada.
n La limpieza es fácil y rápida gracias al cajón corredizo. Se retira presionando encima y evita
cualquier contacto con las partes metálicas. Realice esta operación regularmente (Fig. 12).
n No sumergir el aparato en agua para limpiarlo.
n Nunca utilice una esponja abrasiva para limpiar la tostadora. Límpiela con un paño húmedo y
séquela con un paño suave y seco para sacarle brillo.
n Retire la bandeja recogemigas presionando encima y quite las migas (Fig. 12).
n Séquela con un paño húmedo y luego coloque la bandeja recogemigas de nuevo en su lugar.
n Nunca utilice la tostadora sin la bandeja recogemigas.
LIMPIEZA
FUNCIONES POSIBLES
KR_TOASTER_PRELUDE_EO_NC00122252_Mise en page 29/04/14 14:06 Page18
Page 17

19
El embalaje incluye únicamente materiales sin riesgo para el medio ambiente, que se pueden
desechar de conformidad con las disposiciones de reciclaje vigentes.
Para desechar el aparato, infórmese en el servicio técnico autorizado de su comunidad.
¡Colaboremos con la protección del medio ambiente!
Su aparato contiene un gran número de materiales aprovechables o reciclables.
Lleve el aparato a un punto de recogida o deséchelo en un Centro de Servicio Autorizado
para su procesamiento.
ELIMINACIÓN DE LOS MATERIALES DE EMBALAJE Y DEL APARATO
PROBLEMA SOLUCIÓN
La tostadora no funciona. Compruebe que el enchufe está bien conectado a la clavija.
Si la tostadora sigue sin funcionar, llévela a un centro de reparación
KRUPS autorizado.
El pan se queda atascado
en el aparato.
Desconecte el aparato y deje que se enfríe. Retire el pan con cuidado.
Procure no dañar los elementos calefactores cuando retira el pan.
Nunca utilice un objeto metálico para retirar el pan.
El pan está demasiado o
poco tostado.
Compruebe el nivel de ajuste seleccionado. Seleccione un nivel inferior
si su pan está demasiado tostado, o un nivel superior si el pan está
poco tostado.
Compruebe que los botones descongelar y calentar no están
seleccionados.
El pan salta casi de
inmediato sin tostar.
Asegúrese de bajar bien la palanca hasta el tope. Compruebe también
que no se ha seleccionado el botón calentar.
Si no consigue que el pan permanezca en la tostadora, llévela a un
centro de reparación KRUPS autorizado.
La tostadora desprende
humo.
Tal vez el nivel de tostado seleccionado sea demasiado elevado. Pulse
el botón STOP para interrumpir el ciclo de tostado y desconecte el
aparato.
El cable está dañado. Si el cable del aparato está dañado, debe ser sustituido en un centro
de reparación KRUPS autorizado.
REPARACIÓN
ES
KR_TOASTER_PRELUDE_EO_NC00122252_Mise en page 29/04/14 14:06 Page19
Page 18

ATTENZIONE: Le precauzioni di sicurezza fanno parte dell’apparecchio. Leggere
attentamente le precauzioni di sicurezza prima di usare l’apparecchio per la prima volta.
Conservale in un posto dove possano essere trovate e consultate in seguito.
n Togliere tutti gli imballi, adesivi o accessori vari sia all’interno che all’esterno dell’apparecchio.
n Regolare la lunghezza del cavo di alimentazione avvolgendolo sotto la base. Bloccare il cavo
nell'apposita scanalatura (Fig. 1).
n Accendere il tostapane.
n Prima del primo utilizzo, avviare il tostapane per una o due volte al livello 6, per eliminare l’odore
iniziale. Questa operazione deve essere effettuata a vuoto (senza pane) in un ambiente ventilato.
n Inserire i toast o le fette di pane nel tostapane (Fig. 2).
Non inserire fette troppo grandi o troppo spesse: la fetta non deve rimanere incastrata nella fessura.
n Selezionare il livello di tostatura desiderato (Fig. 3).
È possibile scegliere tra 6 gradi di doratura, impostando il termostato sulla posizione desiderata:
Posizione 1 = leggermente tostato
Posizione 6 = molto tostato
n L'intensità della doratura cresce con l’aumentare del numero sul termostato. Per il pane integrale,
aumentare il livello di doratura rispetto al pane bianco. Posizionare il termostato su un livello inferiore
se, ad esempio, si desidera tostare solo una fetta di pane.
Importante!
I pezzi di pane secco o fette già tostate si abbrustoliscono più rapidamente e potrebbero
anche bruciare. Si raccomanda quindi di selezionare un livello di doratura inferiore per
questo tipo di pane e di non lasciare l’apparecchio in funzione senza sorveglianza.
n Dopo aver collegato l’apparecchio, abbassare la leva di avviamento fino al suo blocco automatico
(Fig. 4). L'apparecchio inizierà a funzionare e si illuminerà il tasto STOP. La leva non può essere
bloccata quando il tostapane è acceso.
n Al raggiungimento del livello di doratura impostato, il pane viene espulso automaticamente e
l’apparecchio si spegne (Fig. 5).
n Estrarre il pane. È possibile utilizzare il comando di avvio impostandolo al livello massimo. Questa
funzione agevola l'estrazione del pane.
n Per interrompere la funzione di tostatura in corso premere il tasto “stop” (Fig. 6).
Attenzione!
Se una fetta di pane rimane incastrata nella fessura, scollegare immediatamente
l’apparecchio dall’alimentazione, lasciare che si raffreddi per qualche minuto ed estrarre il
pane delicatamente, senza toccare gli elementi riscaldanti.
DESCRIZIONE
a Rivestimento isolante
b Vassoio raccoglibriciole
c Custodia del cavo di alimentazione
d Leva di avviamento
e Griglia per panini
f Termostato
d Funzione scongelamento
e Funzione riscaldamento
f Tasto stop
PRIMO UTILIZZO
FUNZIONAMENTO
20
KR_TOASTER_PRELUDE_EO_NC00122252_Mise en page 29/04/14 14:06 Page20
Page 19

21
Supporto per panini
n Estrarre lo scalda panini/brioches premendo la leva corrispondente alla funzione "scalda
panini/brioches" (e) (Fig. 7).
n Disporre i panini/le brioches sui supporti e premere il tasto di accensione fino a quando non rimarrà
automaticamente bloccato. Non superare la posizione 2. Accendere l'apparecchio (Fig. 8).
n Durante l’uso della griglia per panini, verificare che i due supporti e i panini siano posizionati
correttamente (Fig. 9). Non collocare le brioches direttamente sul tostapane per riscaldarle.
Utilizzare lo scalda panini/brioches (e).
n Per ottenere i migliori risultati, voltare i panini e ripetere l’operazione di doratura.
n Dopo l'utilizzo, abbassare lo scalda panini/brioches sollevando la leva corrispondente alla funzione
Scalda panini/brioches.
n La griglia per panini non deve essere utilizzata per più di 10 minuti.
Funzione scongelamento
n Il tostapane ha una funzione pre-programmata di scongelamento: per tostare del pane congelato
occorre molto più tempo che tostare del pane non congelato.
n Inserire una o due fette di pane o di toast congelate nel tostapane (Fig. 10).
n Impostare il livello di tostatura desiderato e abbassare la leva (vedere il paragrafo "ISTRUZIONI
PER L'USO").
n Premere il tasto ” ” (Fig. 10).
n I tasti "SCONGELAMENTO" e "STOP" si accendono.
Funzione riscaldamento
n Il tostapane è dotato di una funzione pre-programmata per riscaldare le fette di pane o di toast senza
tostarle troppo.
n Il tempo di riscaldamento è automatico, indipendentemente dalla posizione del selettore del grado
di tostatura (30 secondi circa).
n Inserire le fette di pane o i toast nel tostapane e abbassare la leva.
n Premere il tasto ” ” (Fig. 11).
n I tasti "RISCALDAMENTO" e "STOP" si accendono.
n Prima di estrarre il vassoio raccoglibriciole, lasciare che l’apparecchio si raffreddi per
almeno 10 minuti dopo l’uso.
n Prima di pulire il tostapane, verificare che non sia collegato all’alimentazione.
n La pulizia è facile e rapida grazie al vassoio raccoglibriciole. Il vassoio raccogli briciole si estrae
esercitando pressione verso il basso e non entra in contatto con le parti metalliche. Eseguire
regolarmente questa operazione (Fig. 12).
n Durante la pulizia, non immergere mai l’apparecchio in acqua.
n Non utilizzare mai una spugna abrasiva per pulire il tostapane. Pulire il tostapane con un panno
umido e asciugarlo con un panno asciutto e morbido per lucidarlo.
n Estrarre il vassoio raccogli briciole esercitando pressione verso il basso e rimuovere le briciole (Fig.
12).
n Pulirlo con un panno umido, quindi riposizionarlo.
n Non utilizzare mai il tostapane senza il vassoio raccogli briciole.
PULIZIA
FUNZIONALITÀ AGGIUNTIVE
IT
KR_TOASTER_PRELUDE_EO_NC00122252_Mise en page 29/04/14 14:06 Page21
Page 20

L'imballaggio comprende esclusivamente materiali non dannosi per l’ambiente che possono
essere smaltiti conformemente alle norme di riciclaggio in vigore.
Per lo smaltimento dell’apparecchio rivolgersi al dipartimento apposito del proprio comune.
Salvaguardia dell’ambiente
Questo apparecchio contiene numerosi materiali riutilizzabili o riciclabili.
Portarlo in un punto di raccolta o, in sua mancanza, in un centro di assistenza autorizzato
affinché possa essere riciclato.
SMALTIMENTO DELL’APPARECCHIO E DEI MATERIALI D’IMBALLAGGIO
PROBLEMA SOLUZIONE
Il tostapane non funziona. Verificare che la spina sia completamente inserita nella presa di
corrente.
Se il tostapane ancora non funziona, contattare il centro assistenza
KRUPS autorizzato.
Il pane resta incastrato
all'interno
dell'apparecchio.
Scollegare l'apparecchio e lasciarlo raffreddare. Estrarre il pane con
cautela. Fare attenzione a non danneggiare gli elementi riscaldanti
durante l'estrazione del pane. Non utilizzare mai un oggetto metallico
per estrarre il pane.
Il pane è eccessivamente
tostato o non
sufficientemente tostato.
Verificare il livello del selettore del grado di tostatura selezionato.
Selezionare il livello più basso se il pane è eccessivamente tostato o il
livello massimo se non è sufficientemente tostato.
Verificare che i tasti di scongelamento o di riscaldamento non siano stati
selezionati.
Il pane esce quasi subito
senza essere tostato.
Assicurarsi di abbassare completamente la leva. Verificare anche che il
tasto riscaldamento non sia stato selezionato.
Se il pane non rimane nel tostapane, portare il tostapane presso un
centro assistenza KRUPS autorizzato.
Esce del fumo dal
tostapane.
È possibile che il livello di tostatura selezionato sia troppo alto. Premere
il tasto STOP per arrestare il ciclo di tostatura e spegnere
l'apparecchio.
ll cavo di alimentazione è
danneggiato.
Se il cavo di alimentazione è danneggiato occorrerà sostituirlo presso
un centro di assistenza KRUPS autorizzato.
RISOLUZIONE DEI PROBLEMI
22
KR_TOASTER_PRELUDE_EO_NC00122252_Mise en page 29/04/14 14:06 Page22
Page 21

23
PT
CUIDADO: as medidas de segurança fazem parte integrante do aparelho. Leia-as
atentamente antes de utilizar o novo aparelho pela primeira vez. Guarde-as para futuras
utilizações.
n Retirar todo o material de embalagem, autocolantes ou outros acessórios, tanto no interior, como no
exterior do aparelho.
n Ajuste o comprimento do cabo enrolando-o por baixo da base. Prenda o cabo na ranhura (Fig. 1).
n Ligue a torradeira à corrente.
n Antes da primeira utilização colocar uma ou duas vezes em funcionamento a torradeira no nível 6
para eliminar o cheiro a novo. Esta operação deve ser realizada em vazio (sem pão) numa divisão
com ventilação.
n Colocar as tostas ou as fatias de pão na torradeira (Fig. 2).
Não inserir fatias muito grandes, nem muito grossas: A fatia não deve ficar presa na ranhura.
n Selecione o nível de tostagem pretendido (Fig. 3).
Escolher entre 6 graus diferentes de tostagem seleccionando a posição pretendida:
Posição 1 = ligeiramente torrado
Posição 6 = muito torrado
n A intensidade da tostagem aumenta de acordo com os números do selector. Para pão integral,
definir o botão de regulação para um tempo de tostagem mais longo do que para pão branco.
Posicionar o botão de regulação num número inferior se, por exemplo, pretender torrar apenas uma
fatia de pão.
Importante:
Os pedaços de pão seco ou que já tiverem sido torrados, escurecem mais depressa e podem
mesmo, se for o caso, queimar. Recomenda-se por isso a escolha de um nível de tostagem
inferior para este tipo de pão e evitar deixar o aparelho a funcionar sem vigilância.
n Após ter ligado o aparelho, deslocar o comando de colocação em funcionamento até que o mesmo
fique automaticamente bloqueado (Fig. 4).
O aparelho funciona e a tecla STOP acende-se. A alavanca só prende se a torradeira estiver ligada
à corrente.
n O pão é ejectado automaticamente e o aparelho pára quando o nível de tostagem seleccionado
previamente for atingido (Fig. 5).
n Retire o pão. Pode utilizar o comando de elevação extra. Esta função facilita a extração do pão.
n Para interromper o funcionamento de tostagem em curso, prima o botão “stop” (Fig. 6).
Atenção:
Se uma fatia de pão ficar presa no aparelho, desligar imediatamente, deixar arrefecer
durante alguns minutos e retirar o pão delicadamente, sem tocar nos elementos de
aquecimento.
DESCRIÇÃO
a Revestimento de paredes frias
b Gaveta de recolha de migalhas
c Arrumação do cabo
d Comando de colocação em funcionamento
e Aquece-pãezinhos
f Botão de regulação
g Função descongelação
h Função aquecimento
i Botão stop
PRIMEIRA UTILIZAÇÃO
MODO DE UTILIZAÇÃO
KR_TOASTER_PRELUDE_EO_NC00122252_Mise en page 29/04/14 14:06 Page23
Page 22

Aquece-pãezinhos
n Levante o suporte de aquecimento de pãezinhos premindo a alavanca da função aquecedor de
pãezinhos correspondente (e) (Fig. 6).
n Coloque os pãezinhos sobre o suporte e prima o comando de ativação até que fique
automaticamente bloqueado. Não ultrapasse a posição 2. Coloque o aparelho em funcionamento
(Fig. 8).
n Para esta função tenha o cuidado de garantir que os dois suportes e os pãezinhos estão na posição
correcta (Fig. 9). Não coloque bolos ou doces de pastelaria diretamente sobre a torradeira para os
aquecer. Utilize o suporte de aquecimento de pãezinhos (e).
n Para obter melhores resultados, virar os pãezinhos e repetir a operação de tostagem. Após a
utilização, baixar o aquece-pãezinhos rebatendo os dois suportes.
n Após a utilização, baixe o suporte de aquecimento de pãezinhos ao levantar a alavanca da função
Aquecedor de pãezinhos.
n O aquece-pãezinhos não deve ser utilizado durante mais de 10 minutos.
Função descongelação
n A torradeira está equipada com uma função pré-programada de descongelação: torrar pão
congelado demora mais tempo do que torrar pão não congelado.
n Insira uma ou duas fatias de pão ou tostas congeladas na torradeira (Fig. 10).
n Selecione o nível de tostagem desejado e baixe a alavanca (ver o parágrafo «MODO DE
UTILIZAÇÃO»).
n Prima a tecla ” ” (Fig. 10).
n As teclas «DESCONGELAÇÃO» e "STOP" acendem-se.
Função aquecimento
n A torradeira está dotada de uma função pré-programada para aquecer fatias de pão ou tostas sem
as torrar mais.
n O tempo de aquecimento é automático seja qual for a posição do botão de ajuste (cerca de 30
segundos).
n Insira as fatias de pão ou as tostas na torradeira e baixe a alavanca.
n Prima a tecla ” ” (Fig. 11).
n As teclas «AQUECIMENTO» e "STOP" acendem-se.
n Antes de retirar a gaveta de recolha de migalhas, deixar o aparelho arrefecer no mínimo
10 minutos após a última utilização.
n Antes de limpar a torradeira, garantir que não está ligada.
n A limpeza é fácil e rápida graças à gaveta de recolha de migalhas. É possível retirar a gaveta
pressionando-a, evitando-se qualquer contacto com as partes metálicas. Realize esta operação
regularmente (Fig. 12).
n Nunca colocar o aparelho dentro de água para o limpar.
n Não utilize, de modo algum, uma esponja abrasiva para limpar a torradeira. Limpe-a com um pano
húmido e seque-a com um pano macio e seco para a deixar brilhante.
n Retire a gaveta de recolha de migalhas com uma pressão e elimine as migalhas (Fig. 12).
n Limpe com um pano húmido e volte a colocar a gaveta de recolha de migalhas no seu
compartimento.
n Não utilize, de modo algum, a torradeira sem a gaveta de recolha de migalhas.
LIMPEZA
FUNÇÕES POSSÍVEIS
24
KR_TOASTER_PRELUDE_EO_NC00122252_Mise en page 29/04/14 14:06 Page24
Page 23

25
A embalagem é composta exclusivamente por materiais sem perigo para o ambiente, que
podem ser eliminados em conformidade com as disposições de reciclagem em vigor.
Para a eliminação do aparelho, informe-se junto do serviço adequado da sua freguesia.
Protecção do ambiente em primeiro lugar!
O seu aparelho contém inúmeros materiais que podem ser recuperados ou reciclados.
Entregue-o num ponto de recolha para possibilitar o seu tratamento.
ELIMINAÇÃO DOS MATERIAIS DE EMBALAGEM E DO APARELHO
PROBLEMA SOLUÇÃO
A torradeira não funciona. Certifique-se de que a ficha de alimentação está ligada.
Se a torradeira continuar a não funcionar, leve-a para um Serviço de
Assistência Técnica KRUPS autorizado.
O pão fica encravado no
aparelho.
Desligue o aparelho da corrente e deixe-o arrefecer. Retire o pão
cuidadosamente. Tenha o cuidado de não danificar as resistências ao
retirar o pão. Não use, de modo algum, um objeto metálico para retirar
o pão.
O pão está demasiado ou
insuficientemente tostado.
Verifique o nível de ajuste selecionado. Selecione um nível mais baixo
se o seu pão estiver demasiado tostado ou um nível mais alto se ele não
estiver suficientemente tostado.
Certifique-se de que as teclas descongelação ou aquecimento não
foram selecionadas.
O pão sai quase
imediatamente sem estar
tostado.
Certifique-se de que baixa a alavanca até ao fundo. Verifique também
que a tecla aquecimento não foi selecionada.
Se o pão continuar a não se manter na torradeira, leve o seu aparelho
a um Serviço de Assistência Técnica KRUPS autorizado.
Sai fumo da torradeira. É possível que o nível de tostagem selecionado seja demasiado alto.
Prima a tecla STOP para interromper o ciclo de tostagem e desligue o
aparelho da corrente.
O cabo está danificado. Se o cabo do aparelho estiver danificado, deve ser substituído num
Serviço de Assistência Técnica KRUPS autorizado.
RESOLUÇÃO DE PROBLEMAS
PT
KR_TOASTER_PRELUDE_EO_NC00122252_Mise en page 29/04/14 14:06 Page25
Page 24

26
ADVARSEL: Sikkerhedsanvisningerne er en del af apparatet. Læs dem omhyggeligt inden
det nye apparat tages i brug første gang. Opbevar dem et sted, hvor du senere kan finde og
bruge dem.
n Fjern al emballage og alt tilbehør både indvendigt og udvendigt i/på apparatet.
n Ledningens længde justeres ved at rulle den sammen under soklen. Sæt ledningen ind i hakket (Fig.
1).
n Tilslut brødristeren.
n Før første brug tændes brødristeren en eller to gange på niveau 6, for at fjerne lugten af nyt apparat.
Dette skal gøres, når brødristeren er tom (uden brød) i et ventileret lokale.
n Anbring toast- eller brødskiverne i brødristeren (Fig. 2).
Brug ikke skiver, der er for store eller for tykke: Skiven må ikke sidde fast i åbningen.
n Vælg den ønskede risteindstilling (Fig. 3).
Du kan vælge mellem 6 forskellige ristningsgrader ved at indstille den ønskede position:
Position 1 = let ristet
Position 6 = kraftigt ristet
n Graden af ristning øges i takt med tallene på vælgeren. Ved fuldkornsbrød sættes
indstillingsknappen til en længere ristning end ved hvidt brød. Sæt indstillingsknappen på et lavere
tal, hvis du f.eks. kun vil riste en enkelt skive brød.
Vigtigt:
Stykker af tørt brød, som allerede har været ristet, bliver hurtigere brune og kan endda blive
brændt. Det anbefales derfor at vælge en lavere ristningsgrad til denne type brød, og ikke
bruge apparatet uden opsyn.
n Efter at have tilsluttet apparatet trykkes startknappen ned, indtil den automatisk blokerer (Fig. 4).
Apparatet er tændt, og knappen "STOP" lyser. Håndtaget kan kun fastlåses, hvis brødristeren er
tilsluttet.
n Brødet udskydes automatisk og apparatet slukkes, når den valgte ristningsgrad er nået (Fig. 5).
n Tag brødet op.
n Tag brødet ud. Du kan bruge startknappen ved at løfte den så langt op som muligt. Denne funktion
gør det lettere at tage brødet ud.
n For at stoppe den ristning, der er i gang, skal du trykke på knappen "STOP" (Fig. 6).
Vigtigt:
Hvis en skive brød er blokeret i apparatet, skal det straks afbrydes og køle af i nogle minutter,
inden brødet forsigtigt tages ud uden at røre ved varmeelementerne.
BESKRIVELSE
a Beklædning af kolde sidepaneler
b Krummeskuffe
c Ledningsholder
d Startknap
e Opvarmning af små brød
f Indstillingsknap
g Optøningsfunktion
h Opvarmningsfunktion
i Stopknap
FØRSTE BRUG
BRUGSANVISNING
KR_TOASTER_PRELUDE_EO_NC00122252_Mise en page 29/04/14 14:06 Page26
Page 25

Opvarmning af små brød
n Løft anordningen til opvarmning af flute ved at trykke på det tilhørende håndtag (e) (Fig. 7).
n Læg flutene på holderne, og tryk på startknappen, indtil den låser automatisk. Du må ikke overskride
positionen 2. Sæt apparatet i gang (Fig. 8).
n Sørg for, at de to bøjler og de små brød er anbragt i den rigtige position (Fig. 9), når du benytter
denne funktion. Læg ikke wienerbrød direkte på brødristeren for at varme det. Brug anordningen til
opvarmning af flute (e).
n Vend de små brød under ristningen, for at få det bedste resultat. Efter brugen drejes de to bøjler ned
igen.
n Efter brug skal du sænke anordningen til opvarmning af flute ved at løfte i håndtaget til anordningen
til opvarmning af flute.
n Funktionen til opvarmning af små brød må ikke bruges i mere end 10 minutter.
Funktionen optøning
n Brødristeren har en forprogrammeret optøningsfunktion: Det tager længere tid at riste et frossent
brød end at riste et brød, der ikke er frossent.
n Læg en eller to skiver brød eller frosne toastbrød i brødristeren (Fig. 10).
n Vælg den ønskede risteindstilling, og sænk håndtaget (se afsnittet "BRUGSANVISNING").
n Tryk på knappen " " (Fig. 10).
n Knapperne "OPTØNING" og "STOP" lyser.
Funktionen opvarmning
n Brødristeren har en forprogrammeret opvarmningsfunktion til brødskiver eller toastbrød, uden at
disse ristes yderligere.
n Lige meget hvilken position indstillingsknappen står på, er opvarmningstiden automatisk (ca. 30
sekunder).
n Læg brødskiverne eller toastbrødet i brødristeren, og sænk håndtaget.
n Tryk på knappen " " (Fig. 11).
n Knapperne "OPVARMNING" og "STOP" lyser.
n Før krummeskuffen tages ud, skal apparatet køle af i mindst 10 minutter efter den sidste
brug.
n Før rengøring af brødristeren skal den afbrydes fra stikkontakten.
n Rengøring foretages nemt og hurtigt takket være krummeskuffen. Den afbrydes ved at trykke ovenpå
den, og du skal undgå enhver kontakt med metaldelene. Foretag denne handling jævnligt (Fig. 12).
n Nedsænk aldrig apparatet i vand for at rengøre det.
n Brug aldrig en skuresvamp til rengøring af brødristeren. Rengør brødristeren med en fugtig klud, og
tør efter med en blød og tør klud for at få den til at skinne.
n Fjern krummebakken ved at trykke ovenpå den, og fjern krummerne (Fig. 12).
n Tør efter med en fugtig klud, og sæt derefter krummebakken på plads igen.
n Brug aldrig brødristeren uden krummebakken.
MULIGE FUNKTIONER
RENGØRING
27
DA
KR_TOASTER_PRELUDE_EO_NC00122252_Mise en page 29/04/14 14:06 Page27
Page 26

Emballagen består udelukkende af materialer, som ikke er miljøfarlige, og som kan kasseres i
henhold til de gældende genbrugsbestemmelser.
Når apparatet skal bortskaffes, skal De gøre dette under hensyntagen til Deres kommunes
regler og forskrifter.
Hjælp med at skåne miljøet!
Dette apparat indeholder mange materialer, der kan genanvendes eller genbruges.
Apparatet afleveres på en godkendt genbrugsstation, eller i en serviceafdeling, for at sikre
aflevering til genbrug.
BORTSKAFFELSE AF EMBALLAGE OG APPARATET
PROBLEM LØSNING
Brødristeren fungerer ikke. Kontrollér, at ledningen er korrekt tilsluttet til stikket.
Hvis brødristeren stadigvæk ikke fungerer, skal den repareres på et
autoriseret KRUPS-serviceværksted.
Brødet sidder fast i
brødristeren.
Tag brødristerens stik ud af stikkontakten, og lad brødristeren køle af.
Tag forsigtigt brødet ud. Sørg for ikke at beskadige varmeelementerne,
når du tager brødet ud. Brug aldrig en metalgenstand til at fjerne brødet.
Mit brød er ristet for meget
eller for lidt.
Kontrollér det valgte indstillingsniveau. Vælg en lavere indstilling, hvis dit
brød er ristet for meget, eller en højere indstilling, hvis det ikke er ristet
tilstrækkeligt.
Kontrollér, at knapperne "OPTØNING" eller "OPVARMNING" ikke er
valgt.
Brødet kommer op igen
næsten med det samme,
uden at det er ristet.
Sørg for at sænke håndtaget helt ned. Kontrollér også, at knappen
"OPVARMNING" ikke er valgt.
Hvis brødet stadigvæk ikke bliver i brødristeren, skal brødristeren
repareres på et autoriseret KRUPS-serviceværksted.
Der kommer røg ud af
brødristeren.
Det er muligt, at den valgte risteindstilling er for høj. Tryk på knappen
"STOP" for at stoppe ristningen, og tag stikket ud af stikkontakten.
Ledningen er beskadiget. Hvis brødristerens ledning er beskadiget, skal den udskiftes af et
godkendt KRUPS-servicecenter.
FEJLFINDING
28
KR_TOASTER_PRELUDE_EO_NC00122252_Mise en page 29/04/14 14:06 Page28
Page 27

29
HUOMIO: Turvaohjeet ovat osa laitetta. Lue ne huolellisesti, ennen kuin käytät laitetta
ensimmäisen kerran. Säilytä ohjeita paikassa, josta löydät ne, jotta voit tutustua niihin
myöhemmin.
n Poista kaikki pakkausmateriaalit tai lisätarvikkeet laitteen sisä- ja ulkopuolelta.
n Säädä johdon pituus kiertämällä se alustan alle. Lukitse johto koloon (kuva 1).
n Kytke leivänpaahdin sähköverkkoon.
n Ennen ensimmäistä käyttökertaa käynnistä leivänpaahdin pari kertaa tasolla 6, jotta uuden laitteen
tuoksu katoaa. Tämä täytyy tehdä tyhjänä (ilman leipää) ilmastoidussa huoneessa.
n Aseta paahtoleivät tai leipäpalat leivänpaahtimeen (kuva 2).
Älä laita paahtimeen liian isoja tai paksuja viipaleita: viipale ei saa jäädä jumiin paahtoaukkoon.
n Valitse haluamasi paahtoaste (kuva 3).
Voit valita 6 eri paahtotason väliltä käyttämällä paahtoasteen säädintä:
Asento 1 = kevyt paahto
Asento 6 = voimakas paahto
n Paahtoasteen voimakkuus kasvaa, mitä suuremman numeron valitset säätimellä. Paahtaessasi
täysjyväleipää säädä paahtoasteen säädin korkeammalle paahtotasolle kuin paahtaessasi vaaleaa
leipää. Aseta säädin pienemmälle tasolle, jos esimerkiksi haluat paahtaa vain yhden leipäviipaleen.
Tärkeää:
Kuivat, jo paahdetut leipäviipaleet paahtuvat nopeammin ja voivat jopa joissakin tapauksissa
palaa. On suositeltavaa valita alhaisempi paahtotaso tämän tyyppiselle leivälle ja olla
jättämättä käynnissä olevaa laitetta ilman valvontaa.
n Kun olet käynnistänyt laitteen, paina käynnistysvipua, kunnes se pysyy alhaalla (kuva 4).
Laite käynnistyy ja keskeytyspainikkeeseen syttyy valo. Käynnistyskytkin lukkiutuu vain laitteen
ollessa kytkettynä sähköverkkoon.
n Paahdettu leipä ponnahtaa ylös automaattisesti, ja laite sammuu, kun ennalta valittu paahtotaso on
saavutettu (kuva 5).
n Poista leipä. Voit käyttää apuna käynnistyskytkintä nostamalla sitä niin paljon kuin mahdollista. Tämä
helpottaa leivän poistamista.
n Jos haluat keskeyttää käynnissä olevan paahdon, paina keskeytyspainiketta (kuva 6).
Huomio!
Jos leipäviipale jää jumiin laitteeseen, kytke laite välittömästi irti sähköverkosta, anna sen
jäähtyä muutaman minuutin ajan ja poista leipä varovasti koskematta kuumenevia osia.
KUVAUS
a Kylmä kuoripinnoite
b Murutarjotin
c Virtajohdon säilytystila
d Käynnistysvipu
e Sämpylöiden lämmitysteline
f Paahtoasteen säädin
g Sulatustoiminto
h Uudelleenlämmitystoiminto
i Keskeytyspainike
ENSIMMÄINEN KÄYTTÖ
KÄYTTÖOHJEET
FI
KR_TOASTER_PRELUDE_EO_NC00122252_Mise en page 29/04/14 14:06 Page29
Page 28

Sämpylöiden lämmitysteline
n Nosta sämpyläteline ylös painamalla sämpylätelineen painiketta (e) (kuva 7).
n Aseta sämpylät telineen päälle ja paina käynnistyskytkintä, kunnes se lukkiutuu automaattisesti. Älä
ylitä paahtoastetta 2. Käynnistä laite (kuva 8).
n Varmista käyttäessäsi tätä toimintoa, että molemmat tuet ja sämpylät ovat oikeassa asennossa
(kuva 9). Älä laita sämpylöitä tms. lämpenemään suoraan leivänpaahtimen päälle. Käytä
sämpylätelinettä (e).
n Saat paremman lopputuloksen, kun käännät sämpylät ja paahdat ne toiseltakin puolelta. Käytön
jälkeen laske sämpylätuet kääntämällä ne alaspäin.
n Laske sämpyläteline käytön jälkeen alas nostamalla sämpylätelineen painike ylös.
n Sämpylöiden lämmitystelinettä ei saa käyttää 10 minuuttia pidempään.
Sulatustoiminto
n Leivänpaahtimessa on esiohjelmoitu sulatustoiminto: pakastetun leivän paahtaminen vie enemmän
aikaa kuin pakastamattoman leivän paahtaminen.
n Laita yksi tai kaksi pakastettua leipä- tai paahtoleipäviipaletta leivänpaahtimeen (kuva 10).
n Valitse haluamasi paahtotaso ja paina kytkin ala-asentoon (ks. luku KÄYTTÖOHJE).
n Paina -painiketta (kuva 10).
n Sulatus- ja keskeytyspainikkeisiin syttyy valo.
Uudelleenlämmitystoiminto
n Leivänpaahtimessa on esiohjelmoitu toiminto, jolla leipä- ja paahtoleipäviipaleet lämmitetään niitä
paahtamatta.
n Lämmitysaika on automaattinen ja paahtoasteen valitsimen asennosta riippumaton (noin 30
sekuntia).
n Laita leipä- tai paahtoleipäviipaleet leivänpaahtimeen ja paina kytkin ala-asentoon.
n Paina -painiketta (kuva 11).
n Uudelleenlämmitys- ja keskeytyspainikkeisiin syttyy valo.
n Ennen kuin poistat murutarjottimen, anna laitteen jäähtyä vähintään 10 minuuttia
viimeisen käytön jälkeen.
n Ennen leivänpaahtimen puhdistamista varmista, että se ei ole kytkettynä sähköverkkoon.
n Puhdistus on helppoa ja nopeaa murutarjottimen ansiosta. Murutarjottimen saa irti sitä painamalla.
Varo koskemasta metalliosia. Toista puhdistus säännöllisesti (kuva12).
n Älä koskaan upota laitetta veteen sen puhdistamiseksi.
n Älä koskaan käytä teräsvillaa leivänpaahtimen puhdistamiseen. Puhdista se kostealla liinalla ja kiillota
se pyyhkimällä sitä pehmeällä ja kuivalla liinalla.
n Irrota murutarjotin painamalla sitä ja poista leivänmurut (kuva 12).
n Pyyhi kostealla liinalla ja laita se takaisin paikoilleen.
n Älä koskaan käytä leivänpaahdinta ilman murutarjotinta.
LISÄTOIMINNOT
PUHDISTUS
30
KR_TOASTER_PRELUDE_EO_NC00122252_Mise en page 29/04/14 14:06 Page30
Page 29

31
Pakkausmateriaali sisältää vain ympäristölle vaarattomia materiaaleja, jotka voidaan hävittää
voimassa olevien kierrätysnormien mukaisesti.
Ota selvää laitteen hävittämisestä kotikuntasi asianmukaisesta palvelusta.
Pidä huolta ympäristöstäsi!
Laitteesi sisältää useita arvokkaita ja kierrätettäviä materiaaleja.
Vie laite jätteidenkeräyspisteeseen sen asianmukaista käsittelyä varten.
LAITTEEN JA PAKKAUSMATERIAALIN HÄVITTÄMINEN.
ONGELMA RATKAISU
Leivänpaahdin ei toimi. Varmista, että pistoke on kytketty pistorasiaan.
Jos leivänpaahdin ei edelleenkään toimi, vie se valtuutettuun KRUPShuoltopalveluun.
Leipä jää laitteeseen
jumiin.
Irrota laite sähköverkosta ja anna sen jäähtyä. Poista leipä varovasti.
Varo, ettet vahingoita lämpeneviä osia leipää poistaessasi. Älä koskaan
käytä metalliesinettä leivän poistamiseen.
Leipä palaa tai se jää
paahtumatta.
Tarkista valittu paahtoaste. Valitse matalampi aste, jos leipä palaa ja
korkeampi aste, jos se ei paahdu tarpeeksi.
Tarkista, että sulatus- tai uudelleenlämmityspainike ei ole valittuna.
Leipä nousee ylös lähes
välittömästi ja se ei ole
paahtunut.
Varmista, että painat kytkimen pohjaan asti. Varmista myös, että
uudelleenlämmityspainike ei ole valittuna.
Jos leipä ei edelleenkään pysy leivänpaahtimessa, vie laite valtuutettuun
KRUPS-huoltopalveluun.
Leivänpaahtimesta nousee
savua.
Valittu paahtoaste on mahdollisesti liian korkea. Paina
keskeytyspainiketta keskeyttääksesi paahdon ja kytke laite irti
sähköverkosta.
Sähköjohto on
vahingoittunut.
Jos laitteen sähköjohto on vahingoittunut, se täytyy vaihtaa valtuutetussa
KRUPS-huoltopalvelussa.
VIANETSINTÄ
FI
KR_TOASTER_PRELUDE_EO_NC00122252_Mise en page 29/04/14 14:06 Page31
Page 30

32
OBS: Sikkerhetsinstruksene er å anse som en del av apparatet. Les dem nøye før du bruker
apparatet for første gang. Oppbevar dem på et lett tilgjengelig sted for senere bruk.
n Fjern all emballasje og annet på innsiden og utsiden av apparatet.
n Reguler lengden på strømledningen ved å vikle den under sokkelen. Fest ledningen i innsnittet
(Fig. 1).
n Koble til brødristeren.
n Før første gangs bruk, bør brødristeren startes en eller to ganger på nivå 6 for å eliminere lukten av
ny rister. Dette skal gjøres med tom brødrister (uten brød) i et ventilert rom.
n Legg skiver av brød i brødristeren (Fig. 2).
Ikke legg i for store eller tykke skiver; skiven skal ikke bli sittende fast i sprekken.
n Velg ønsket ristenivå (Fig. 3).
Velg mellom 6 forskjellige bruningsnivåer ved å sette i ønsket posisjon:
Posisjon 1 = lett ristet
Posisjon 6 = kraftig ristet
n Intensiteten av bruningen øker med tallet på knappen. For grovbrød må knappen settes på et
bruningsnivå høyere enn for hvitt brød. Sett knappen på et lavere nivå hvis man for eksempel bare
ønsker å riste én skive.
Viktig:
Skiver av tørt brød eller som allerede har blitt ristet, vil brunes raskere og kan til og med bli
brent. Vi anbefaler at du bruker et lavere bruningsnivå for denne typen brød og ikke lar
apparatet fungere uten oppsyn.
n Før apparatet kobles til, må startknappen settes slik at den automatisk stopper (Fig. 4).
Apparatet fungerer og STOP-tasten lyser. Spaken kan kun blokkeres dersom brødristeren er koblet
til.
n Brødet støtes automatisk ut og apparatet stopper når det forhåndsvalgte bruningsnivået er
oppnådd (Fig. 5).
n Ta ut brødet. Du kan bruke på-betjeningen ved å føre den så langt opp som mulig. Denne funksjonen
gjør det enklere å ta ut brødet.
n For å avbryte risting som pågår, trykk på knappen “stop” (Fig. 6).
Advarsel:
Hvis en brødskive sitter fast i apparatet, må det kobles fra umiddelbart. La det kjøle seg ned
i noen minutter før brødet frigjøres forsiktig uten å berøre varmeelementene.
BESKRIVELSE
a Belegg med kalde sider
b Skuff for oppsamling av smuler
c Rydding av ledningen
d Startknapp
e Oppvarming av rundstykker
f Reguleringsknapp
d Opptiningsfunksjon
e Gjenoppvarmingsfunksjon
f Stoppknapp
FØRSTE GANGS BRUK
BRUKSMÅTE
KR_TOASTER_PRELUDE_EO_NC00122252_Mise en page 29/04/14 14:06 Page32
Page 31

Varme opp rundstykker
n Løft opp rundstykkevarmeren ved å trykke på det tilsvarende håndtaket for rundstykkervarmer (e)
(Fig. 7).
n Plasser rundstykkene på holderne, og trykk på på-betjeningen helt til denne blokkeres automatisk.
Skyv ikke forbi posisjon 2. Skru på apparatet (Fig. 8).
n For denne funksjonen er det viktig at støttene og rundstykkene er i riktig posisjon (Fig. 9).
Bakverk/gjærbakst må ikke legges på brødristeren for gjenoppvarming. Bruk rundstykkevarmeren til
dette (e).
n For et bedre resultat, snu rundstykkene og gjenta ristingen. Etter bruk senkes de to støttene for
oppvarming av rundstykker.
n Etter bruk, før ned rundstykkevarmeren ved å løfte i håndtaket for rundstykkevarmefunksjonen.
n Oppvarming av rundstykker må ikke brukes i mer enn 10 minutter.
Opptiningsfunksjon
n Brødristeren er utstyrt med en funksjon med forhåndsprogrammering av opptining. Det tar lengre tid
å riste frossent brød enn brød som ikke er frossent.
n Legg inn en eller to skiver ristet brød/toast i brødristeren (Fig. 10).
n Velg ønsket ristenivå og skyv ned håndtaket (se avsnittet «BRUKSFUNKSJON»).
n Trykk på tasten ” ” (Fig. 10).
n Tastene «OPPTINING» og "STOP" lyser.
Gjenoppvarmingsfunksjon
n Brødristeren er utstyrt med en funksjon med forhåndsprogrammering for oppvarming av brødskiver,
uten at disse blir mer ristet.
n Gjenoppvarmingstiden er automatisk uansett reguleringsknappens posisjon (ca. 30 sekunder).
n Legg brødskivene inn i brødristeren, og før ned håndtaket.
n Trykk på tasten ” ” (Fig. 11).
n Tastene «GJENOPPVARMING» og "STOP" lyser.
n La apparatet kjøle seg ned i minst 10 minutter etter siste bruk før skuffen for
oppsamling av smuler trekkes ut.
n Kontroller at brødristeren ikke er koblet til før rengjøring.
n Rengjøringen er enkel og hurtig takket være skuffen som samler opp smuler. Den fjernes ved at man
trykker på den. Unngå all kontakt med metalldeler. Dette skal gjøres regelmessig (Fig. 12).
n Apparatet må aldri senkes ned i vann for rengjøring.
n Man må aldri bruke slipende svamper for å rengjøre brødristeren. Rengjør den med en fuktig klut og
tørk av med en myk, tørr klut slik at den skinner.
n Ta ut smuleskuffen ved å trykke på den, og fjern smulene (Fig. 12).
n Tørk over med en fuktig klut, og sett smuleskuffen tilbake på plass.
n Man må aldri bruke brødristeren dersom smuleskuffen ikke er på plass.
MULIGE FUNKSJONER
RENGJØRING
33
NO
KR_TOASTER_PRELUDE_EO_NC00122252_Mise en page 29/04/14 14:06 Page33
Page 32

Emballasjen er utelukkende laget av miljøvennlige materialer og kan kastes i henhold til
gjeldende resirkuleringsordninger.
Ta kontakt med den aktuelle avdelingen i kommunen din for riktig avhending av apparatet.
Tenk miljø!
Apparatet inneholder mange materialer som kan gjenvinnes eller resirkuleres.
Ta det med til et returpunkt for å sikre riktig behandling.
AVHENDING AV MATERIALENE I APPARATETS EMBALLASJE.
PROBLEM LØSNING
Brødristeren fungerer ikke. Påse at støpselet er satt inn i kontakten.
Dersom brødristeren fortsatt ikke virker, lever den inn til et godkjent
KRUPS-servicesenter.
Brødet sitter fast i
apparatet.
Koble fra apparatet og la det kjøle seg ned. Ta brødet forsiktig ut. Påse
at ingen varmeelementer blir skadet når du tar ut brødet. Bruk aldri
gjenstander i metall for å ta ut brødet.
Brødet er for mye eller for
lite ristet.
Sjekk det valgte reguleringsnivået. Velg et lavere nivå dersom brødet er
for mye ristet, eller et høyere nivå dersom det ikke er nok ristet.
Påse at tastene opptining eller gjenoppvarming ikke har blitt valgt.
Brødet kommer ut igjen
nesten med en gang, uten
å være ristet.
Påse at håndtaket har blitt ført helt ned. Sjekk også at tasten for
gjenoppvarming ikke har blitt valgt.
Dersom brødet fortsetter med å sprette ut av brødristeren, lever den inn
til et godkjent KRUPS-servicesenter.
Det ryker fra brødristeren. Det er mulig at ristenivået er for høyt. Trykk på STOP-tasten for å avbryte
ristesyklusen og koble fra apparatet.
Ledningen er skadet. Dersom ledningen er skadet, må den skiftes ut i et godkjent KRUPS-
servicesenter.
PROBLEMSØKING
34
KR_TOASTER_PRELUDE_EO_NC00122252_Mise en page 29/04/14 14:06 Page34
Page 33

35
SV
OBSERVERA: Säkerhetsföreskrifterna är en del av apparaten. Läs dem noggrant innan du
använder apparaten för första gången. Förvara dem så att de är lätta att hitta och kan
användas igen.
n Ta bort allt förpackningsmaterial och tillbehör som finns inuti och utanpå apparaten.
n Reglera sladdens längd genom att rulla in den under sockeln. Kläm fast sladden i springan (Fig. 1).
n Anslut brödrosten till eluttaget.
n Sätt på brödrosten på nivå 6 ett par gånger innan du använder den första gången. Då slipper du den
lukt som ibland kan förekoma i helt nya apparater. Detta skall göras med tom brödrost (utan bröd)
och i väl ventilerad lokal.
n Lägg i brödskivorna som ska rostas i brödrosten (Fig. 2).
Skivorna får inte vara för stora eller för tjocka: de ska inte fastna.
n Välj önskad rostningsgrad (Fig. 3).
Välj mellan 6 olika lägen:
Läge 1 = lätt rostat
Läge 6 = hårt rostat
n Värmen ändras när du vrider på vredet. Grovt bröd kan behöva rostas längre än vitt bröd. Ställ in
vredet på ett snäpp under det du brukar, om du t.ex. bara ska rosta en enda skiva.
Viktigt!
Torrt bröd och bröd som redan rostats en gång blir snabbare rostat, och kan i värsta fall till
och med brännas vid. Vi rekommenderar därför att man väljer ett lägre rostningsläge för den
sortens bröd och att man övervakar rostningen.
n När du satt i kontakten i vägguttaget ska du dra ner startknappen tills den fastnar (Fig. 4).
Brödrosten startar och STOP-knappen lyser. Handtaget kan endast blockeras när elkontakten är
ansluten.
n Brödet kommer upp automatiskt och apparaten stoppas när det förinställda rostningsläget uppnåtts
(Fig. 5).
n Ta ut brödet. Startkontrollen kan användas för detta genom att skruvas upp maximalt. Detta gör det
lättare att ta ut brödet.
n För att avbryta pågående rostning, tryck på knappen“stop” (Fig. 6).
Obs!
Gör så här om brödskiva fastnar i apparaten: dra omedelbart ur kontakten, låt apparaten
svalna några minuter och ta sedan försiktigt upp brödskivan, utan att röra värmeledningarna
i apparaten.
BESKRIVNING
a Sval ytbeläggning
b Smulbricka
c Sladdförvaring
d Startknapp
e Hållare för frallor
f Reglage
g Upptining
h Uppvärmning
i Stopp
FÖRSTA ANVÄNDNINGSTILLFÄLLET
BRUKSANVISNING
KR_TOASTER_PRELUDE_EO_NC00122252_Mise en page 29/04/14 14:06 Page35
Page 34

Värma frallor
n Ta upp frall-värmaren genom att trycka på motsvarande handtag (e) (Fig. 7).
n Placera frallorna på stället och tryck på startkontrollen tills den blockeras. Överskrid inte läge 2.
Starta brödrosten (Fig. 8).
n Kontrollera att stöden och frallorna är korrekt placerade (Fig. 9). Placera inte kaffebröd ovanpå
brödrosten för att värma det. Använd frall-värmaren (e).
n Bäst resultat får du om du vänder på frallorna och rostar en gång till. När du är klar sänker du stöden
genom att vrida dem nedåt.
n Efter användning, sänk ner frall-värmaren genom att höja handtaget för frall-värmaren.
n Stödet för frallor får inte användas mer än 10 minuter i taget.
Upptining
n Brödrosten har en förinställd funktion för upptining: att rosta fryst bröd tar längre tid än att rosta tinat
bröd.
n Placera eller två skivor fryst bröd i brödrosten (Fig. 10).
n Välj önskad rostningsgrad och tryck ner handtaget (se kapitlet "ANVÄNDNINGSBESKRIVNING").
n Tryck på knappen ” ” (Fig. 10).
n Knapparna "UPPTINING" och "STOP" tänds.
Uppvärmning
n Brödrosten har en förinställd funktion för uppvärmning av brödskivor utan att rosta dem.
n Tiden är alltid ungefär 30 sekunder oavsett i vilket läge kontrollen ställts.
n Placera brödskivorna i brödrosten och tryck ner handtaget.
n Tryck på knappen ” ” (Fig. 11).
n Knapparna "UPPVÄRMNING" och "STOP" tänds.
n Låt apparaten svalna i minst 10 minuter efter senaste användningen innan du drar ut
smulbrickan.
n Kontrollera att kontakten inte sitter i vägguttaget innan du ska rengöra brödrosten.
n Det går snabbt och enkelt att göra ren brödrosten tack vare smulbrickan som enkelt kan dras ut. Den
kan avlägsnas om den trycks ner; undvik all kontakt med metalldelar. Gör detta regelbundet (Fig.
12).
n Apparaten får inte rengöras i vatten.
n Använd enbart mjuka borstar och trasor för att rengöra brödrosten. Rengör med en fuktig trasa och
torka med en mjuk och torr trasa för att återfå lystern.
n Dra ut smulbrickan genom att trycka på den och avlägsna smulorna (Fig. 12).
n Torka med en fuktig trasa och sätt sedan tillbaka smulbrickan på sin plats.
n Använd aldrig brödrosten utan smulbrickan.
MÖJLIGA ANVÄNDNINGSOMRÅDEN
RENGÖRING
36
KR_TOASTER_PRELUDE_EO_NC00122252_Mise en page 29/04/14 14:06 Page36
 Loading...