

Page 1

ORCHESTRO Instructions for use
Page 2

Contents
Description 5
Operating controls and indicators 5
Safety recommendations 6
Limits for use 6
Configuration of the appliance 7
1. Adjustment and memorisation of water hardness 7
2. Setting the appliance to switch itself off automatically 9
Preparing the appliance before first use 10
1. Filling the water tank 10
2. Filling the heating circuit 11
3. Rinsing the circuit 12
Preparation of an espresso coffee 12
1. Using coffee beans 12
2. Using ground coffee 13
3.«Personalised» setting of the quantity of coffee 14
4. Stopping the flow of coffee 14
Using steam 14
1. Preparing steam 15
2. Preparing frothy milk for cappuccino 16
3. Heating liquids 16
4. Cancelling the steam function and returning to the
preparation of an espresso coffee or hot water 17
Preparation of hot water 17
Emptying the coffee collector and the tank 17
Turning off the appliance 18
Cleaning and maintenance 18
1. Cleaning and maintenance 18
- The body of the appliance 18
- The detachable parts 18
- The steam nozzle 18
- Frothing aid 19
2. Programme for cleaning the internal circuits 19
3. Descaling 21
4. Purging the heating circuit 24
Compartment for storing the power cord 24
Practical advice 25
Problems,causes, solutions 26
Suppressing the «5000 espresso coffees» signal 27
Transporting the appliance 27
Accessories 27
Disposal of the packaging materials and of the appliance 27
KRUPS
3
Page 3
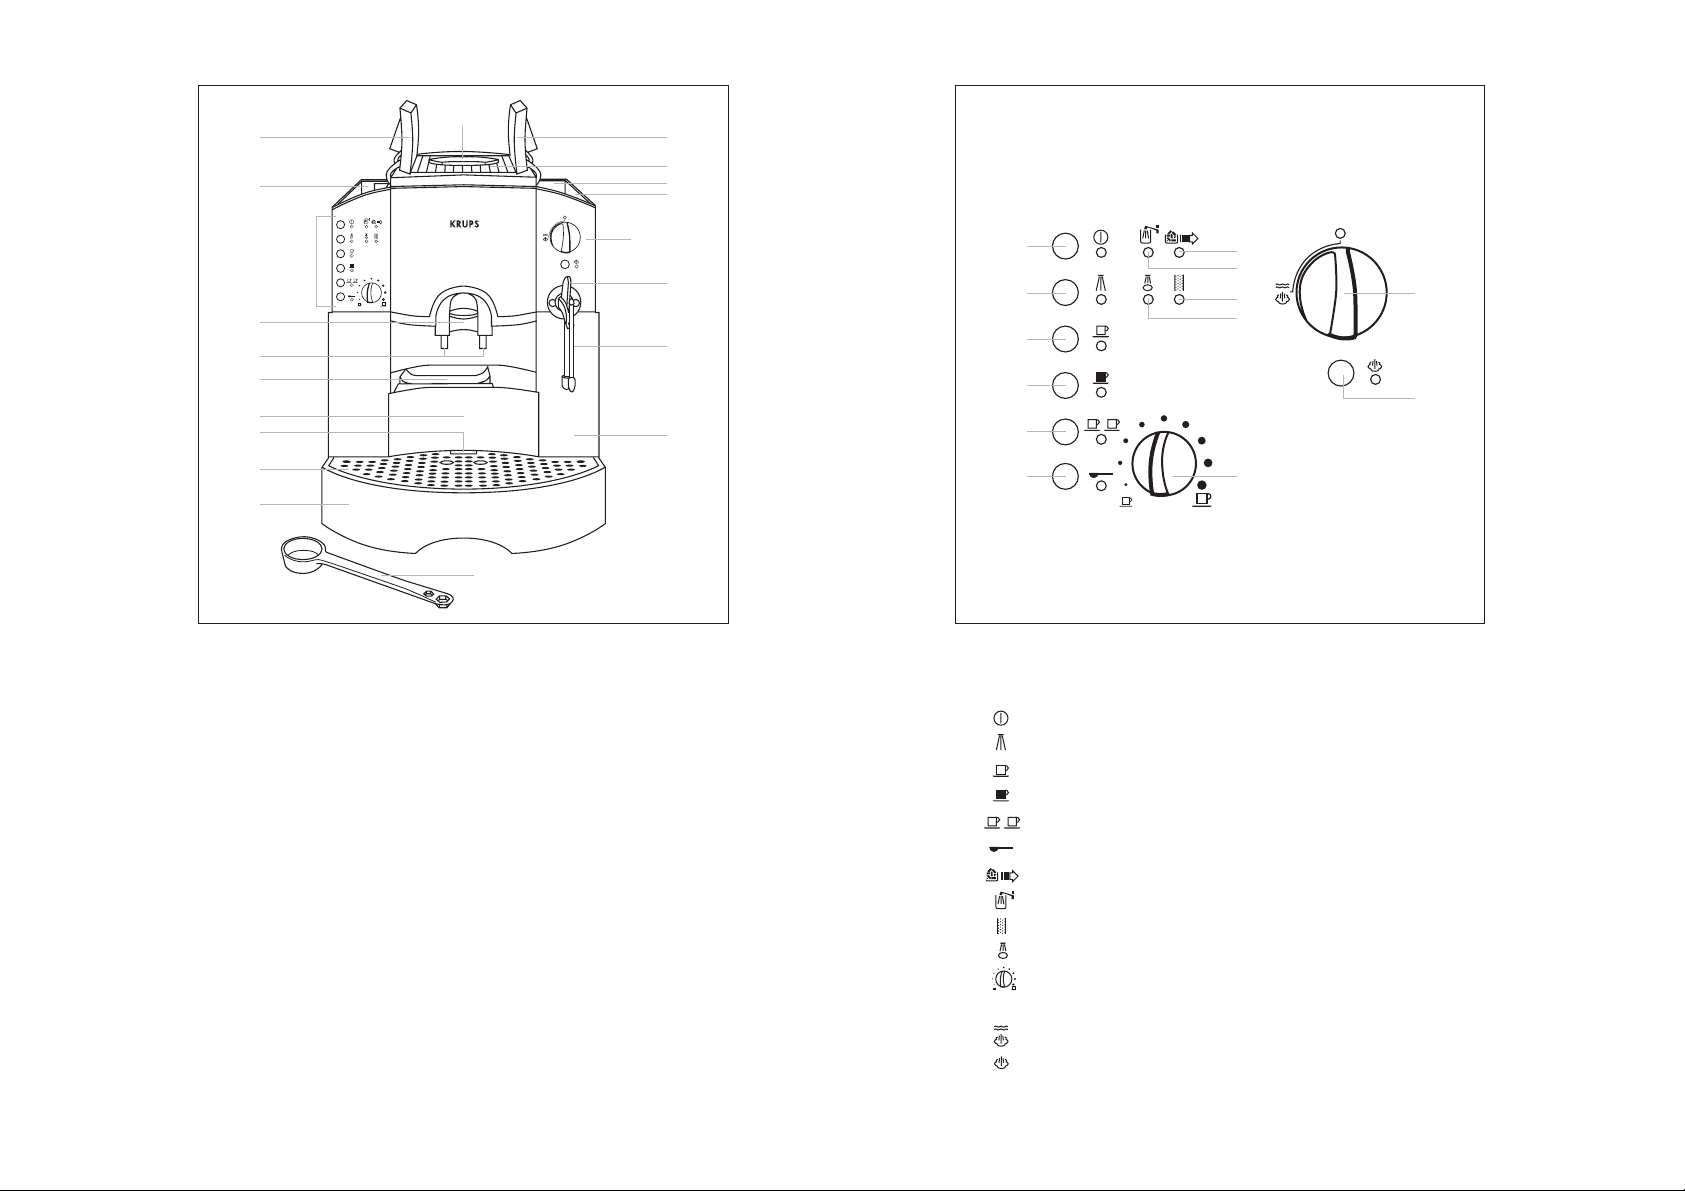
j
i
h
k
l
m
n
B1 B2
B1
g
f
e
d
c
b
a
r
Krups Orchestro
Appliance parts
a.Drip tray
b.Drip tray grid
c. Full indicator
d. Coffee collector compartment
e. Used ground coffee holder
f. Coffee outlets
g. Height adjust for coffee outlets
h.Water tank
i.Water tank lid
j. Channel for ground coffee (2 spoons max)
k. Coffee-bean compartment lid
l. Cup rest
m.Grinding fineness adjuster
n. Coffee-bean compartment
o. Steam nozzle
p. For thing aid
q.Power cord and storage compar tment
r. Measuring spoon
B2
a
o
b
g
h
i
l
j
p
q
c
d
m
e
fk
Operating controls and indicators
B1
a.:«on/off» control and indicator light
b.:«rinse» control and indicator light
c.:«1 normal cup» control and indicator light
d.:«1 full-flavoured cup» control and indicator light
e.:«2 normal cups» control and indicator light
f.:«ground coffee» control and indicator light
g.:«empty collector» indicator light
h.:«fill water tank» indicator light
i.:«descale» indicator light
j.:«clean» indicator light
k.:dial to control cup fill level
B2
l.:steam/hot water selector
m.:«steam» pre-selection button with indicator light
KRUPS KRUPS
4 5
Page 4
Safety recommendations
•Please read the following instr uctions carefully before using this appliance:
•Only plug in the appliance to a socket which is earthed. Check that the voltage
rating indicated on the information plate on the appliance matches that of your
household electrical wiring system.
•Be careful never to place the appliance on a hot surface such as a hotplate and
never use it close to a naked flame.
•Unplug the appliance immediately if you notice anything wrong whatsoever
while the coffee is running through and before any cleaning.
•Do not pull on the power cord to remove the plug from the socket.
•Do not allow the power cord to hang down over the edge of a table
or worktop.
•Do not rest your hand or the power cord on the hot par ts of the appliance .
•Never immer se the appliance , the cord or the electrical plug in water or in
any other liquid.
•Keep the appliance out of reach of children.
•Do not use the appliance if the power cord or the appliance itself is damaged.
•If the electr ical cord or its connection to the appliance are damaged, stop using
the appliance at once. It must be either repaired or replaced by an approved
KRUPS centre or by a qualified technician.
•Always refer to the instructions before descaling the appliance.
•Protect the appliance from humidity and from frost.
•Only use the appliance indoor s.
•Do not use the appliance if it is not wor king cor rectly or if it has been damaged.
If this happens contact our helpline:
0845 330 6460 – UK or (01) 4751947 – Ireland.
•Except for cleaning, any work on the appliance must be carr ied out by an
approved KRUPS ser vice centre .
•For your own safety,use only accessories and consumables approved by
KRUPS for your appliance.
m
Configuration of the appliance
1.Adjustment and memorisation of water hardness
Before using the appliance for the first time or after noticing any change in the
hardness of the water, the appliance should be adapted to the appropriate water
hardness. To find out the hardness of the water,you should contact your water
company or determine it using the tester stick supplied with the appliance.
• Immerse the stick in cold water for one second. Shake off the drops of water
and determine the hardness from the pink zones.
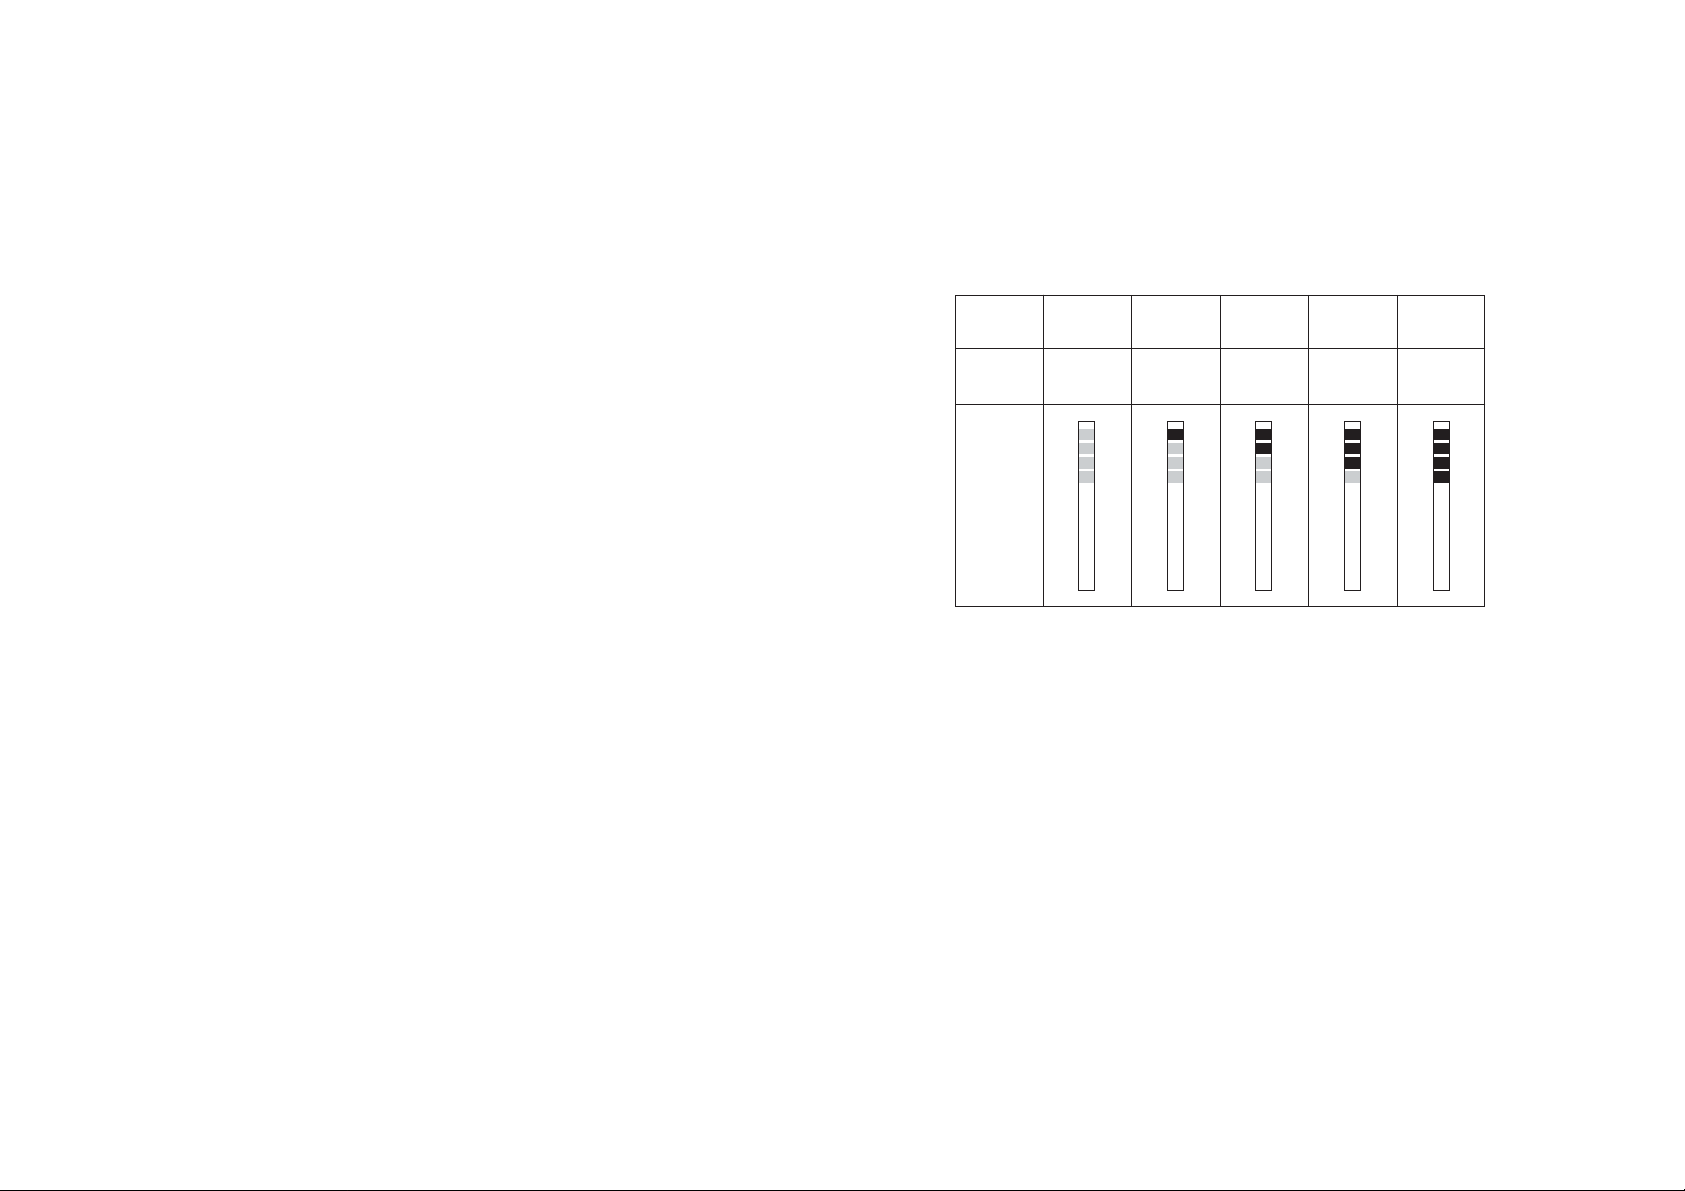
Degree of 01234
hardness Very soft Soft
Hardness of up to up to up to up to >3.7
water mol/m
Test stick
3
0.7 1.24 2.5 3.7
Averagely hard
Hard Very hard
Limits for Use
The model «KRUPS Orchestro 889» must be used only for the preparation
of espresso coffee, for frothing milk, heating water and re-heating liquids.This
appliance is designed for domestic use only. Any commercial use, inappropriate
use or failure to comply with the instructions, KRUPS accepts no responsibility
and the guarantee will not apply.
KRUPS KRUPS
6 7
Page 5
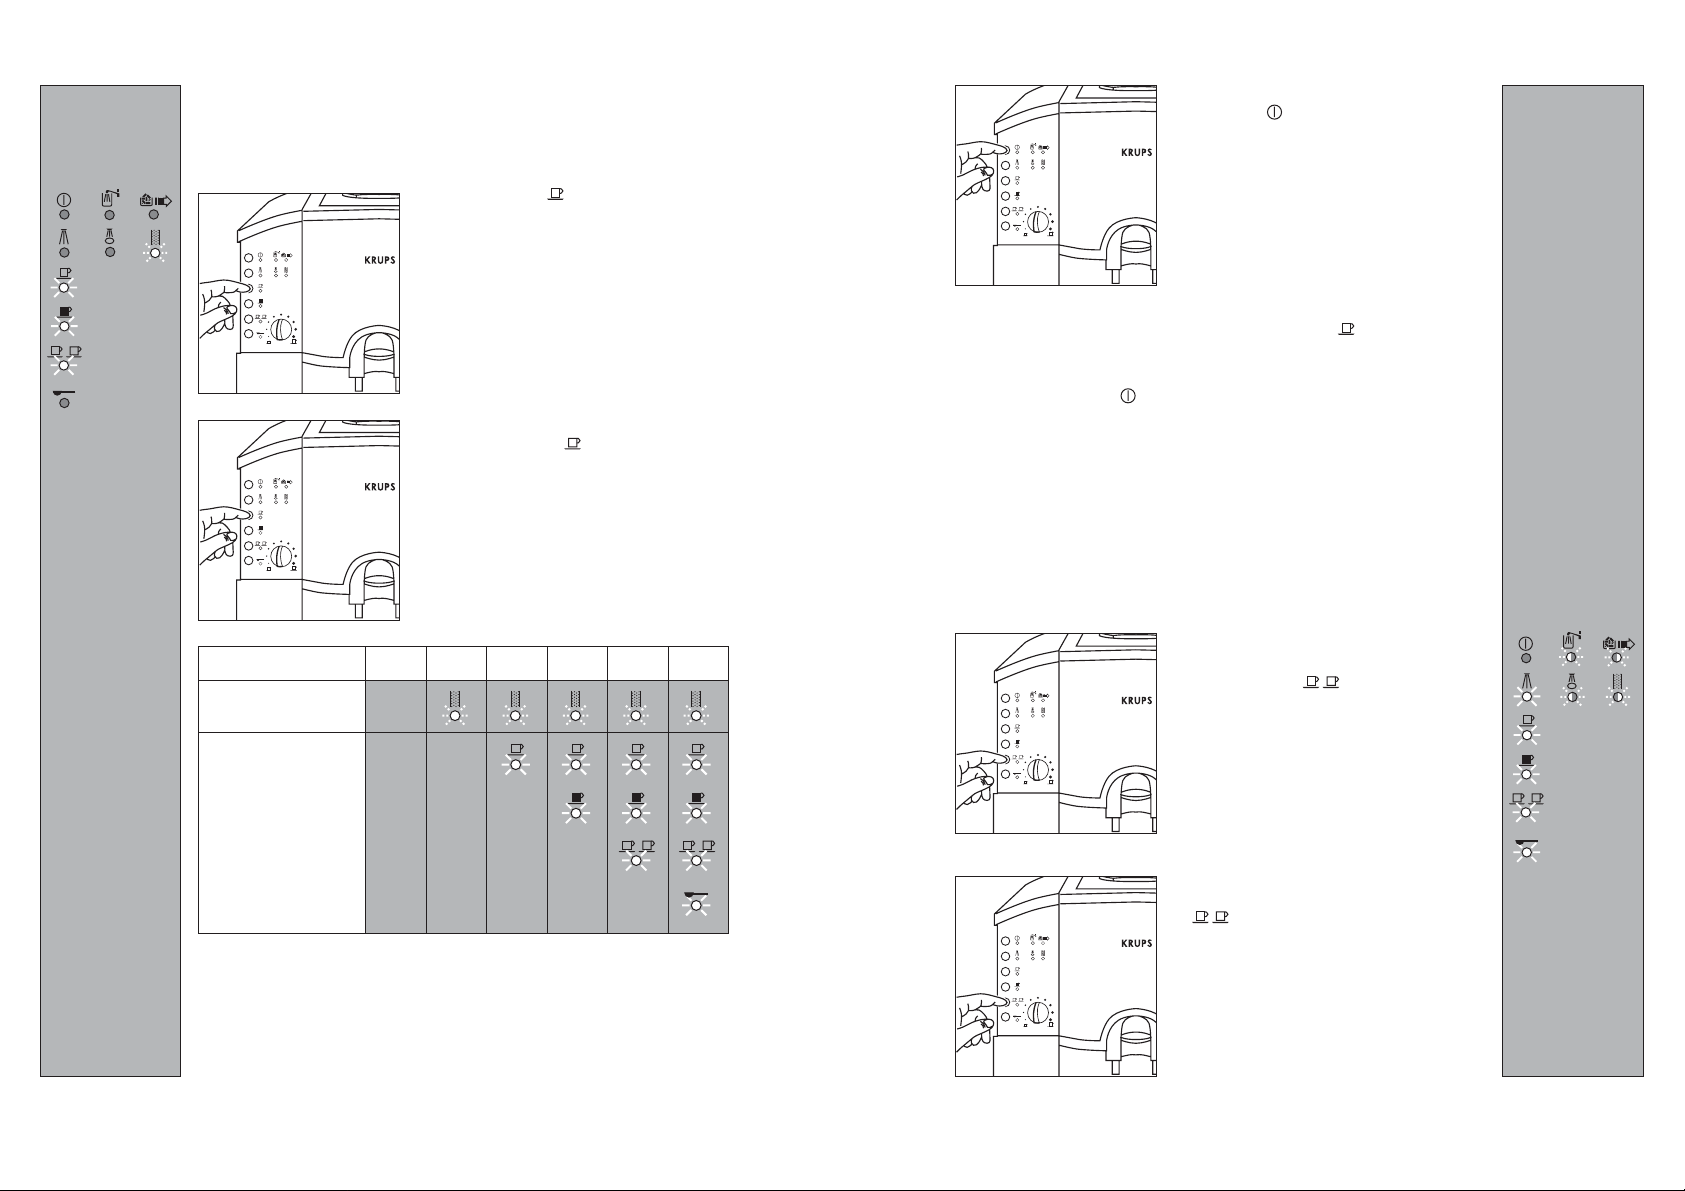
You have now determined the hardness of your water between 0 and 4.
The level of hardness has been pre-set at the factory to «3».To modify this,
proceed as follows:-
• Plug in the appliance but do not switch it on.
1
• Press the control for about 3 seconds
(1) until the indicator lights come on.
• The level 3 setting is indicated by the
flashing of the «descale» indicator and
the fact that the indicators «1 normal cup»,
«1 full-flavoured cup» and «2 normal
cups» come on.
2
• Set the level of hardness of your water by
pressing the control the number of times
necessary (2) (see table below).
The desired level of hardness will be indicated
by the number corresponding to the lighting
of the indicator lights «1 normal cup»,
«1 full-favoured cup», «2 normal cups»,
«ground coffee».
Level of hardness 01 234
Setting indicator light Comes
Indicator lights Flashes
corresponding to the
level of hardness
On
3
• Record the level of hardness by pressing
the control (3).
If the hardness setting is not recorded within
30 seconds, the indicator lights go out and the
preceding hardness setting recorded remains in
the memory.The memor isation of this setting
remains valid even if there is a power cut.
•To check the level of hardness,press again on the control for about 3
seconds. The lighting of the var ious indicator lights corresponds to the level
of hardness chosen (see table).
•Then press the control .
2. Setting the appliance to switch itself off automatically
You can:
• Set the appliance to switch itself off automatically after 1 hour,3 hours or 5 hours.
All appliances are pre-set at the factory to 5 hours.
After first use and depending on the setting entered, the electrical power to the
appliance will be cut off automatically.
Proceed as follows:
4
• Plug in the appliance to the mains but do
not switch it on.
• Press the control for about 3 seconds
(4) until the indicator lights come on.
The pre-setting of 5 hour s is indicated by the
flashing of the indicator lights «fill tank»,
«clean», «empty collector», «descale»
and the lighting of the indicator lights «rinse»,
«1 normal cup», «1 full-flavoured cup»,
«2 normal cups» and «ground coffee».
Indicator LightsIndicator Lights
5
• Set the appliance to switch itself off
automatically by pressing the control
, the necessary number of times (5)
(see table on next page).
The time selected is indicated by the lighting of
the indicator lights «rinse», «1 normal cup»,
«1 full-flavoured cup», «2 normal cups»
and «ground coffee».
KRUPS KRUPS
8 9
Page 6

Time Cancel hour hours hours
Setting indicator light Comes
Indicator light Flashes
corresponds to the
time selected
6
On
• Record the time by pressing (6).
13 5
If the time setting is not recorded within 30
seconds, the indicator lights go out and the
previously recorded time remains in the
memory.
The memorisation of this setting remains valid
even if there is a power cut.
•To check the switch-off time, press the control again for about 3 seconds.
The lighting of the various indicator lights corresponds to the time selected
(see table).
•Then press the control .
Preparing the appliance before first use
•Remove the protective film from the drip tray grid.
•Remove the strip of paper from the coffee bean compartment.
1. Filling the water tank
• Open the lid of the water tank and remove
the tank (7).
•Pour in cold drinking water at least until
the float in the tank reaches the upper level
(8). For constant use, it is advisable to fill the
tank up to the «MAX» level.
• Replace the water tank, pressing fir mly so
that the valve on the base allows water to
flow through.
• Close the lid of the water tank.
8
Notes:
Do not fill the tank with hot water, mineral water,milk or any other liquid.
If the water tank is not in place or not filled sufficiently, the indicator light
«fill water tank» will come on and the appliance will not oper ate .
The indicator light «fill water tank» comes on before the tank is completely
empty so as not to interrupt the prepar ation in progress.
2. Filling the heating circuit
9
• Place a container beneath the steam nozzle.
• Make sure that the steam/hot water selector
is in the position .
• Press the control for one second (9).
The indicator lights «on/off» and «steam»
start to flash.
•Turn the steam/hot water selector to the
10b10a
position (10a).
The pump supplies water to the heating circuit
and the indicator light «on/off» comes on.
The flow of water stops automatically.
• Return the selector to the position
(10b) and remove the container.
Indicator Lights
7
KRUPS KRUPS
10 11
Page 7

11
Once the operating temperature has been reached, the indicator lights «on/off»
and «rinse» come on.
•Place a container beneath the coffee outlets then press the control (11).
Rinsing stops automatically after two or three seconds.
3. Rinsing the circuit
Rinsing is required when you first use the
appliance, e
witched on
s
if the correct operating temperature has not
been reached.
• If necessary,tur n on the appliance by pressing
the control for 1 second.The «on/off»
indicator light flashes while the appliance
is heating.
very time the appliance is
, if the temperature is too low or
Preparation of an espresso coffee
You have now set up your appliance.At the end of rinsing the following indicator
lights come on: «rinse», «1 normal cup», «1 full-flavoured cup»,
«2 normal cups» and «ground coffee».
Setting the quantity per cup
12
You can adjust the quantity of espresso coffee
per cup using the “cup full” adjustment dial
(12).
Setting = normal espresso
Setting = large espresso
Turn the dial to the desired position before
preparing an espresso.
Note! The dial can be used to adjust the quantity during the preparation
of the espresso coffee (see page 14 – point 3).
1. Using coffee beans
Filling the compartment with coffee beans
13
• Open the lid.
• Put the coffee beans into the compartment
(not more than 250g) (13).
Warning! Make sure that no foreign matter, such as the tiny stones
mixed in with the coffee beans,gets into the compartment.
Any damage due to foreign bodies having entered the coffee
bean compartment is excluded from the guar antee .
•Reclose the lid.
You can now start:
• Place one or two cups under the coffee
outlets.You can raise or lower the outlets
according to the size of your cups (14).
• Press the control selected or or
(14).
Note! It is not possible to make two
cups of full-flavoured coffee
at once.
14
15
Note! The setting can only be altered during gr inding.
Note! To obtain the best result, a stop time is marked in the flow
of the coffee.
2. Using ground coffee
16
The mill will grind the necessar y quantity of
ground coffee.
All appliances are set at the factory to an
average setting.
You can adjust the degree of fineness of
grinding desired (15) using the adjustment dial
situated inside the coffee bean compartment.
• Clockwise = coarser ground coffee
• Anticlockwise = finer ground coffee
A fine setting is preferable for lightly roasted
beans and a coarse setting for dark roasted
beans.
• Open the lid of the ground coffee channel
and pour in not more than one or two
measure of ground coffee using the
measuring spoon (16).
1 measure = 1 cup
2 measures = 2 cups
Indicator LightsIndicator Lights
Warning! Never use frozen coffee beans.
KRUPS KRUPS
12 13
Page 8

Warning! Never put more than two measures into the ground coffee
channel. The channel is not a store for ground coffee. Nor
should you ever pour in less than one measure, otherwise the
preparation of the espresso will stop automatically.Use only
ground coffee beans and not powdered coffee or instant
granules.
•
17a
17b
3.«Personalised» setting of the quantity of coffee
To make a «personalised» setting for a particular cup:
•Turn the knob (k) to (large espresso).
•Press button or .
•Once the level of liquid desired is almost reached, turn the dial (k) following
the various graduations until the flow stops.
You now know the position to use for your cup.
The quantity for two cups is always automatically double the quantity for one cup.
4. Stopping the flow of coffee
If you wish to stop the flow of coffee press one of the following controls:
,,, or .
The operation will stop and the used coffee is automatically ejected into the
coffee collector.
Press the control (17a).The indicator light
«ground coffee» flashes and the indicator
lights «1 normal cup» and «2 normal
cups» come on.
• Press the control or according to
your own choice (17b).
You can cancel any accidental pressing of the
control
Place a container under the coffee outlets
because rinsing will be performed automatically.
by pressing the controls or
Using Steam
1.Preparing steam
Steam is used to froth the milk to whip up a cappuccino and also to heat liquids.
As the production of steam requires a high temperature, the appliance allows for a
preheating phase for steam.
Indicator LightsIndicator Lights
• Press the preselection for steam button
18
for about one second (18).
The indicator light «steam» flashes.
Once the preheating phase is complete, the
«steam» indicator light stays on and you can
now start producing steam.
It is possible that a little water may run out of the steam nozzle before each
production of steam. To get rid of this water, proceed as follows:
• Place a container under the steam nozzle
.
2.Preparing frothy milk for cappuccino
A cappuccino comprises one third coffee, one third milk and one third milk froth.
•Fill a lar ge cup 1/3 with espresso coffee.
•For best results, place the frothing aid on
the tip of the steam nozzle.
Note! The frothing aid must be used
only for frothing milk.
•Pour about 100ml of very fresh cold milk into a narrow jug with a maximum
capacity of 0.5l and which will fit beneath the steam nozzle of the appliance.
Note! The milk and its jug must be well chilled.
•Select steam mode (see «1. Preparing steam»).
•Hold the jug containing the milk under the jet of steam in such a way that the tip
of the nozzle is completely immersed in the liquid.
19
and turn the steam/hot water selector to
the position (19).
• As soon as steam comes out of the nozzle,
return the selector to the position and
remove the container.
KRUPS KRUPS
14 15
Page 9

•Turn the steam/hot water selector to the
21
position (21).
• Hold the jug while the froth is produced and
make sure the nozzle does not touch the
bottom of the container so as not to prevent
the passage of the steam.
• Once the froth has been obtained, reset the
steam/hot water selector to the position
and remove the jug.Add the milk and the
milk froth to the coffee.
•Clean the frothing aid and the steam nozzle using a damp cloth immediately
after frothing milk.
•To remove any remaining trace of milk from the steam nozzle, place a container
under the nozzle and turn the steam/hot water selector to the position for a
few seconds.
3. Heating liquids
• Remove the frothing aid.
22
• Press the steam preselection button
(22).
The «steam» indicator light starts to flash.
When preheating is finished,the «steam»
indicator light will stay on and you can now
start to produce steam.
• Hold the container containing the liquid under
the steam nozzle and immerse the nozzle in
the liquid. Turn the steam/hot water selector
to position (23).
23
• When the liquid is hot enough, reset the
selector to the position and remove
the container.
• Clean the steam nozzle using a damp cloth
immediately after heating any liquid.
• To remove any remaining trace of liquid from
the steam nozzle, place a container under the
nozzle and turn the steam/hot water selector
to the position for a few seconds.
4. Cancelling the steam function and returning to the preparation of
an espresso coffee or hot water.
You can cancel the steam production function in two ways:
• After the appliance has produced the steam,turn the steam/hot water selector
to the position .After about ten minutes, the steam production function is
deactivated and the «on/off» and «steam» indicator lights will flash as the
appliance cools down.Then run water through the heating system - See P17.
Or
•Should you wish to prepare an espresso coffee immediately after the appliance
has been producing steam:
•Turn the steam/hot water selector to the position and cancel the preselection
of steam by pressing the steam preselection button .
•The «on/off» and «steam» indicator lights flash
Do not wait for the appliance to cool down naturally, run some water through the
heating system:-
Running water through the heating system
•Place a container under the steam nozzle .
•Turn the steam/hot water selector to the position .
First steam then hot water will come out of the steam nozzle.
The flow of water will stop automatically after a few seconds.
•Retur n the steam/hot water selector to the position .
The indicator lights «on/off», «rinse», «1 normal cup», «1 full-flavoured
cup», «2 normal cups» and «ground coffee» will come on.You can now
prepare an espresso coffee in the usual way.
Preparation of hot water
This appliance can be used to produce hot water for making instant drinks, tea etc.
•Place a cup under the steam nozzle and tur n the steam/hot water selector to
the position .
•Once the cup contains enough hot water,reset the selector to the position .
Emptying the coffee collector and the tank
The coffee collector collects the used ground
coffee and the tray collects any remaining water.
• If the indicator light «empty collector»
comes on, slightly lift the tray and remove it
(24).
• Empty and clean the coffee collector and
the tray,wait 10 seconds before replacing.
The indicator light «empty collector»
24
flashes if the tray is not pressed home or
is incorrectly installed.
Indicator LightsIndicator Lights
KRUPS KRUPS
16 17
Page 10

Note! When the indicator light «empty
collector» is on or flashing, the
appliance will not operate.
• Empty the tray when the full indicator reaches
the marking (25).
Note! If you remove the tray and the
coffee collector before the indicator light
«empty collector» comes on, always
25
empty both these parts.
Turning off the appliance
• Place the container under the coffee outlets and press the control .
A rinse is done automatically after the appliance is turned off.
Note! The rinse is also performed when the appliance switches itself
off automatically.
Cleaning and maintenance
1. Cleaning and maintenance
•Unplug the appliance before cleaning it and allow it to cool down.
•Do not use any cleaning tools or products which might scratch or cor rode
the appliance.
•Never place the appliance nor any of its components in a dishwasher.
- The steam nozzle:
Warning! The nozzle may still be burning hot. Take care not to burn
yourself. Do not remove or replace the nozzle if it is still hot.
• Clean the nozzle using a damp cloth.
27
• If the head of the nozzle is obstructed:
• Unblock it using a fine needle or unscrew it,
turning clockwise, using the key situated on
the handle of the measuring spoon (27).
•Run it under hot water.Screw it back on
anti-clockwise, using the key.
- Frothing aid:
•To clean the frothing aid separate par ts A
a
b
b
28
and C from the metal tube B (28).
• Rinse the three parts in hot water.
• If the little aspiration hole in par t A is
blocked,clean it using a fine needle.
Indicator LightsIndicator Lights
- The body of the appliance:
•Clean the exter ior and inter ior using a damp cloth.
- The detachable par ts:
26
KRUPS KRUPS
18 19
• Clean the tray, the coffee collector,the drip
tray grid with hot water and washing-up
liquid (26).
• Rinse carefully using fresh water.
2.Programme for cleaning the internal circuits
As soon as the indicator light «clean» comes on, you should clean the circuits.
The cleaning programme takes about 15 minutes.
Note! The indicator light comes on after 250 preparations of
espresso or after 180 rinses.
You can continue to use the appliance, but it is advisable to
run the programme as soon as possible.
Warning! Use only KRUPS cleaning tablets. No liability can be accepted
for any damage arising from the use of other brand of tablets.
You can obtain cleaning tablets from the KRUPS authorised
dealer - 0121 200 2740
Proceed as follows:
•Plug in the appliance but do not tur n it on.
The steam/hot water selector must be in the position .
•Fill the water tank.The cleaning programme needs about 1.25 litres of water :
the tank must therefore be 2/3 full. Replace the tank on the appliance.
Page 11

29
30
31
•Remove and empty the tray and the coffee collector.Put these par ts back
in position.
The «ground coffee» indicator light flashes.
•Press again on the control .The cleaning programme continues.
After approx 5 mins the «empty collector» indicator light comes on again.
After emptying the tray,press the control to continue the cleaning programme.
After approx 2 mins the «empty collector» indicator light comes on yet again.
Empty the tray and the collector and then put them back.
A rinse cycle is necessar y to complete the cleaning progr amme .The «rinse»
indicator light comes on.
•Press the control . After rinsing, the cleaning programme is finished and all
the indicator lights go out.
•Remove the tray and the coffee collector.Clean these par ts in hot water and
washing-up liquid. Rinse and dry the parts then replace them.
• Start the cleaning progr amme by pressing the
control for about 3 seconds (29).
The indicator lights «on/off», «empty
collector» and «clean» are lit.
• Empty the tray and the coffee collector then
replace them.
The indicator light «on/off» and «clean» are
on and the «ground coffee» indicator light
flashes.
• Open the lid of the channel for ground coffee
and drop in a KRUPS cleaning tablet. Leave
the lid open throughout the cleaning
programme (30).
• Press the control (31) again.
At intervals, the pump dr aws in water,and then
ejects it into the tank via the coffee outlets.
During these operations, the «clean» indicator
light flashes.
After a few moments,(approx 7 mins) the
operation stops and the «empty collector»
indicator light comes on, and the «clean»
indicator light is lit.
Indicator LightsIndicator Lights
Note! If, when the programme starts, there is not enough water in
the tank, you will be warned of this by the fact that the «fill
water tank» indicator light comes on.
Add water to the tank and cleaning will continue automatically.
If the tray is not in place you will be warned of this by the
flashing of the «empty collector» indicator light. Put back
the tray for the cleaning programme to continue automatically.
If you activate the steam/not water selector by mistake,you
will be warned of this by the flashing of the «on/off» and
«steam» indicator lights. Return the selector to the position
for the cleaning programme to continue automatically.
If you press the control during cleaning or if there is a
power cut,the cleaning programme has to be started again
right from the beginning. If this happens, another cleaning
tablet will be needed.
3. Descaling
As soon as the «descale» indicator light comes on, you should perform the
descaling procedure.The descaling programme takes about 35 minutes.
Note! You can continue to use the appliance, but you should descale
it as soon as possible.
Warning! Use only KRUPS descaling products, citr ic acid or tartaric acid.
No liability can be accepted for any damage to the appliance
caused by the use of other products.Descaling products are
available from KRUPS authorised ser vice dealer –
0121 200 2740.
You must never, under any circumstances, use classic
amidosulphonic acid or other products containing this acid as
you risk damaging the appliance.Take care to check the
composition of the descaling products which you intend to use.
Proceed as follows:
The appliance must be plugged in,but do not switch it on.
The steam/hot water selector must be in the position .
•Fill the water tank with precisely 1/2 litre of warm water and dissolve
4 tablespoons (approx 40g) of the descaling product or a sachet of KRUPS
descaler. Replace the water tank.
KRUPS KRUPS
20 21
Page 12

32
When the steam circuit has been descaled, (after approx 10 mins) the «empty
collector» indicator light comes on.
•Empty the container
•Take out and empty (if necessary) the tray and the coffee collector.
Wait for 10 seconds and replace these par ts on the appliance .
The «on/off» and «steam» indicator lights flash and the «descale» indicator
light is constant.
•Turn the steam/hot water selector to the position .
•The descaling continues and the descaling solution is ejected at intervals into
the used ground coffee holder (this takes about 15 mins).
•The «descale» indicator light flashes.
• When the «fill water tank» and «empty collector» indicator lights come on,
remove the drip tray and coffee collector compartment, empty it and replace it
on the appliance for the descaling to continue. You must repeat this operation
until the «fill water tank» indicator light comes on.You can now continue
descaling.
Note! If the tank has been filled with more than 1/2 litre of water,the
«fill water tank» indicator light will not come on. Only the
«empty collector» indicator light is lit.
•Rinse the water tank thoroughly.
•Fill it with fresh water (at least 1 litre, i.e over half full) and replace it on the
appliance.
•Remove the tray,empty it and replace it.
• Start the desclaing progr amme by pressing
the control for about 3 seconds (32).
The «on/off», «empty collector» and
«descale» indicator lights are lit.
• Empty the tray and the coffee collector and
replace them on the appliance.
The «on/off» and «steam» indicator lights
flash and the «descale» indicator light is lit.
•Place a container with a capacity of at least
300 ml under the steam nozzle .
•Turn the steam/hot water selector to the
33
position (33).
The descaling solution is pumped at regular
intervals (stops and starts for approx 10 mins)
and ejected via the steam nozzle.
The «descale» indicator light flashes.
Note! Do not interrupt this cycle .
Wait until the «empty
collector» light comes on.
Indicator LightsIndicator Lights
The «on/off» and «steam» indicator lights flash and the «descale» indicator
light is lit.
• Place a container with a capacity of at least 300ml under the steam nozzle.
• Turn the steam/hot water selector to the position .
•Water is pumped at intervals and ejected via the steam nozzle.The «descale»
indicator light flashes (this takes approx 3 mins).
•When the «empty collector» indicator light comes on, empty the container.
Remove and empty the drip tray and the coffee collector. Replace these par ts on
the appliance.
The «on/off» and «steam» indicator lights flash and the «descale» indicator
light is lit.
•Turn the steam/hot water selector to the position .
•The descaling continues and water is ejected into the used ground coffee holder.
The «descale» indicator light flashes (this takes about 3 mins).
•When the «empty collector» indicator light comes on, empty the drip tr ay
and coffee collector and replace them.
The «on/off» and «rinse» indicator lights come on.
•Press the control .
•After r insing, all the indicator lights go out.
•Remove the tray from the coffee collector.Clean these par ts in hot water and
washing-up liquid. Rinse and dry the parts and replace them on the appliance.
Note! If, when the programme star ts, there is not enough water in the
tank, you will be warned of this by the «fill water tank» indicator
light coming on.Add water to the tank and the descaling will
continue automatically.
If the tray is not in position, you will be warned of this by the
flashing of the «empty collector» indicator light. Replace the tray
for the descaling programme to continue automatically.
If you activate the steam/hot water selector by mistake,you will be
warned of this by the flashing of the «on/off» and «steam»
indicator lights. Return the selector to the position for the
descaling programme to continue automatically.
If you press the control during descaling or if there is a power
cut, the descaling programme has to be started again right
from the beginning.
Note! Do not interrupt the descaling cycle at any time . Be patient.
KRUPS KRUPS
22 23
Page 13

Indicator Lights
4. Purging the heating circuit
You must purge the heating circuit if there is a risk of frost (when transporting the
appliance, etc).
34
• Plug in the appliance but do not turn it on.
• Place a container under the steam nozzle
and turn the steam/hot water selector to
the position .
• Then press the steam preselection control
for about 3 seconds (34).
During the purge, the indicator light «steam»
and the «on/off» indicator lights flash.As soon
as these indicator lights go out, turn the
steam/hot water selector to the position .
Practical Advice
Indicator lights Causes Solutions
Indicators glow
Indicators glow
The appliance is ready to Press the steam control.
produce steam.
The water tank is not properly in Replace the tank and fill the
place or has been removed during heating circuit.
preparation of espresso coffee.
Steam has just been produced. Fill the heating circuit – Page 10.
The steam/hot water selector is not
in the correct position. to the position .
Turn the steam/hot water selector
Compartment for storing the power cord
The unused length of the cord can be stored in
35
the compartment situated at the back on the
appliance (35).
Indicators glow
Indicators glow
Indicators glow
Indicators glow
Indicators glow
The indicator
lights flash one
after another.
5000 espressos have been Turn off the indicator light or take
prepared. the appliance to the KRUPS
authorised service dealer for
maintenance.
There is not enough water in Add water to the tank.
the tank.
The float in the tank is defective Rinse the tank and, if necessary,
or blocked. descale.
The coffee collector is full. Empty the coffee collector.
The tray has been replaced too Wait for 10 seconds then replace
soon after having been emptied. the tray.
The indicator light «empty the Empty the coffee collector when
collector» appears to ear ly. the appliance is turned off.
The tray is not correctly positioned. Position the tray correctly.
The appliance is too cold Turn off the appliance, unplug it,
(less than 10ºC). plug in again and turn on the
appliance one hour later.
Various causes. Turn off the appliance , unplug it,
plug in again and turn on the
appliance one hour later.
Take the appliance to the KRUPS
authorised service dealer.
24 25
KRUPSKRUPS
Page 14

Problems,causes, solutions
Problems Causes Solutions
The espresso coffee is not The cups are too cold. Preheat the cups with hot water.
hot enough.
Only part of the espresso coffee There is not enough ground coffee. Use the correct quantity of
is running through. ground coffee.
The coffee bean compartment is Add coffee beans.
empty.
Supressing the
«5000 espressos or coffees» signal
When the appliance has prepared 5000 espresso coffees, the «on/off», «fill water tank»,
«empty the collector», «clean» and «descale» indicators flash for about 8 seconds
when the appliance is started.
After 5000 espresso coffees we advise you to contact the KRUPS authorised ser vice dealer
to have the appliance inspected.
If you do not wish to have this inspection performed,you can cancel the flashing of these
indicators:
•With the appliance off,but plugged in, press the control for about 3 seconds.The 5 red
indicator lights will then flash for 3 seconds and the appliance will go off.
There is not enough froth on The milk is not suitable:either out Change the milk. Use only very
the milk. of date,wrong fat content, or fresh, cold milk.
too hot.
The nozzle is blocked. Clean the steam nozzle.
The air aspiration hole of the Clean the frothing aid.
frothing aid is blocked.
The grinder makes a lot of noise. Presence of foreign bodies in If after making several espressos,
the grinder. the grinder makes even more
noise, take the appliance to the
KRUPS authorised ser vice dealer.
Continue to use the appliance but
only with ready-ground coffee.
The tray and the coffee collector Power cut or plug inserted Plug in at the mains and put in
cannot be put back in place. incor rectly. place the tray and the support for
the coffee collector only.Turn on
the appliance and put the coffee
collector in place.
The cleaning programme refuses Steam has just been produced. Fill the heating circuit – Page 11.
to start.
If you have any problems or queries, call our helpline:-
0845 330 6460 - UK or (01) 4751947 - Ireland
Website: www.perfect-coffee.com
Transporting the appliance
•Retain and use the original packaging to transport the appliance .
•Before transporting the appliance, always purge all the water from the heating circuit.
Accessories
Cleaning tablets Ref. F 055 0010
Descaling Kit Ref. F 054 0010
• 2 sachets of descaler
• 1 «water hardness» test stick
You can obtain these accessories from the authorised KRUPS ser vice dealer - 0121 200 2740
Disposal of the packaging materials and
of the appliance
The packaging consists solely of materials which are not hazardous to the environment,
and which can be disposed of in accordance with the recycling provisions in force.
To dispose of the appliance, you can obtain information from the appropr iate department
of your local authority.
KRUPS
27
Page 15

KRUPS
PO Box 467,Slough, Berkshire, SL3 8WD.
 Loading...