

Krups EA 80, ESPRESSERIA AUTOMATIC, EA 82, ESPRESSERIA AUTOMATIC PREMIUM Use And Maintenance
Page 1
KRUPS
DEUTSCH
ESPRESSERIA AUTOMATIC
SERIE EA 80xx
ENGLISH
FRANCAIS
NEDERLANDS
DANSK
SVENSKA
www.krups.com
NORSK
SUOMI
ITALIANO
Page 2

12
11
10
13
14
15
16
17
18
19
9
8
20
21
7
22
12 34 5 6
23
Page 3
KRUPS
DEUTSCH
ESPRESSERIA AUTOMATIC
SERIE EA 80XX
ENGLISH
FRANCAIS
NEDERLANDS
DANSK
SVENSKA
Bedienung und Wartung
NORSK
SUOMI
1
ITALIANO
Page 4

KRUPS Espresseria Automatic
Wichtig
!
Bitte lesen Sie diese Anleitung und bewahren Sie sie auf.
Beachten und befolgen Sie die Sicherheitshinweise.
Hersteller
SAS Groupe SEB Moulinex
Rue Saint- Léonard
F-53104 Mayenne
Frankreich
2
Bedienung und Wartung / SERIE EA 80xx
Page 5

KRUPS Espresseria Automatic
Inhalt
1 Wichtige Hinweise zu Produkt und Anleitung . . . . . . . . . . . . . . . . . . . . . . .5
1.1 Das Produkt: Espresseria Automatic . . . . . . . . . . . . . . . . . . . . . . . . . . . . . . . . . . . . . . . . . .5
1.2 Wegweiser für diese Anleitung . . . . . . . . . . . . . . . . . . . . . . . . . . . . . . . . . . . . . . . . . . . . . . . . . .5
1.3 Sicherheitshinweise . . . . . . . . . . . . . . . . . . . . . . . . . . . . . . . . . . . . . . . . . . . . . . . . . . . . . . . . . . . . . . . . .6
1.4 Bestimmungsgemäße Verwendung . . . . . . . . . . . . . . . . . . . . . . . . . . . . . . . . . . . . . . . . . . . .8
1.5 Lieferumfang . . . . . . . . . . . . . . . . . . . . . . . . . . . . . . . . . . . . . . . . . . . . . . . . . . . . . . . . . . . . . . . . . . . . . . . . . . .8
1. 6 Wer ks ko ntr oll e . . . . . . . . . . . . . . . . . . . . . . . . . . . . . . . . . . . . . . . . . . . . . . . . . . . . . . . . . . . . . . . . . . . . . . . .8
2 Geräte- und Funktions-Übersicht der Espresseria Automatic .9
2.1 Die Bedienteile des Gerätes . . . . . . . . . . . . . . . . . . . . . . . . . . . . . . . . . . . . . . . . . . . . . . . . . . . . .9
2.2 Displayanzeigen und Bedienprinzip . . . . . . . . . . . . . . . . . . . . . . . . . . . . . . . . . . . . . . . . . .10
3 Inbetriebnahme der Espresseria Automatic . . . . . . . . . . . . . . . . . . . . . . . .11
3.1 Vor der ersten Verwendung . . . . . . . . . . . . . . . . . . . . . . . . . . . . . . . . . . . . . . . . . . . . . . . . . . . .11
3.2 Das Gerät vorbereiten . . . . . . . . . . . . . . . . . . . . . . . . . . . . . . . . . . . . . . . . . . . . . . . . . . . . . . . . . . . .13
3.3 Grundeinstellung . . . . . . . . . . . . . . . . . . . . . . . . . . . . . . . . . . . . . . . . . . . . . . . . . . . . . . . . . . . . . . . . . . .1 4
3.4 Spülen des Kaffeekreislaufs . . . . . . . . . . . . . . . . . . . . . . . . . . . . . . . . . . . . . . . . . . . . . . . . . . . .15
3.5 Das Mahlwerk einstellen . . . . . . . . . . . . . . . . . . . . . . . . . . . . . . . . . . . . . . . . . . . . . . . . . . . . . . . . .16
3.6 Die Menüs . . . . . . . . . . . . . . . . . . . . . . . . . . . . . . . . . . . . . . . . . . . . . . . . . . . . . . . . . . . . . . . . . . . . . . . . . . . .1 6
4 Bedienung . . . . . . . . . . . . . . . . . . . . . . . . . . . . . . . . . . . . . . . . . . . . . . . . . . . . . . . . . . . . . . . . . . . . . . .20
4.1 Das Gerät einschalten . . . . . . . . . . . . . . . . . . . . . . . . . . . . . . . . . . . . . . . . . . . . . . . . . . . . . . . . . . . .20
4.2 Einen Espresso oder Kaffee zubereiten . . . . . . . . . . . . . . . . . . . . . . . . . . . . . . . . . . . .21
4.3 Einen Cappuccino zubereiten . . . . . . . . . . . . . . . . . . . . . . . . . . . . . . . . . . . . . . . . . . . . . . . . .2 2
4.4 Verwendung des Auto-Cappuccino Set (optional) . . . . . . . . . . . . . . . . . . . . .23
4.5 Funktion 2 Tassen . . . . . . . . . . . . . . . . . . . . . . . . . . . . . . . . . . . . . . . . . . . . . . . . . . . . . . . . . . . . . . . . .25
4.6 Heißes Wasser zubereiten . . . . . . . . . . . . . . . . . . . . . . . . . . . . . . . . . . . . . . . . . . . . . . . . . . . . . .26
5 Wartung und Reinigung . . . . . . . . . . . . . . . . . . . . . . . . . . . . . . . . . . . . . . . . . . . . . . . . . . . .27
5.1 Regelmäßige Wartungstätigkeiten . . . . . . . . . . . . . . . . . . . . . . . . . . . . . . . . . . . . . . . . . . .27
5.2 Das Reinigungsprogramm . . . . . . . . . . . . . . . . . . . . . . . . . . . . . . . . . . . . . . . . . . . . . . . . . . . . . .2 8
5.3 Das Entkalkungsprogramm . . . . . . . . . . . . . . . . . . . . . . . . . . . . . . . . . . . . . . . . . . . . . . . . . . . . .30
6 Fehlerliste . . . . . . . . . . . . . . . . . . . . . . . . . . . . . . . . . . . . . . . . . . . . . . . . . . . . . . . . . . . . . . . . . . . . . . . .32
7 Technische Daten . . . . . . . . . . . . . . . . . . . . . . . . . . . . . . . . . . . . . . . . . . . . . . . . . . . . . . . . . . . . . .35
8 Transport . . . . . . . . . . . . . . . . . . . . . . . . . . . . . . . . . . . . . . . . . . . . . . . . . . . . . . . . . . . . . . . . . . . . . . . . . .35
9 Entsorgung . . . . . . . . . . . . . . . . . . . . . . . . . . . . . . . . . . . . . . . . . . . . . . . . . . . . . . . . . . . . . . . . . . . . . .35
10 Service . . . . . . . . . . . . . . . . . . . . . . . . . . . . . . . . . . . . . . . . . . . . . . . . . . . . . . . . . . . . . . . . . . . . . . . . . . .3 6
11 Index . . . . . . . . . . . . . . . . . . . . . . . . . . . . . . . . . . . . . . . . . . . . . . . . . . . . . . . . . . . . . . . . . . . . . . . . . . . . . .3 6
Bedienung und Wartung / SERIE EA 80xx
DEUTSCH
ENGLISH
FRANCAIS
NEDERLANDS
DANSK
SVENSKA
NORSK
SUOMI
3
ITALIANO
Page 6

KRUPS Espresseria Automatic
KRUPS Espresseria Automatic
4
Bedienung und Wartung / SERIE EA 80xx
Page 7

KRUPS Espresseria Automatic
!!!
1 Wichtige Hinweise zu Produkt und Anleitung
In diesem Handbuch finden Sie alle wichtigen Informationen zur Inbetriebnahme, Bedienung und Wartung Ihrer Kaffee-/Espressomaschine. Außerdem erhalten Sie Informationen sowie wichtige Hinweise zu Ihrer Sicherheit.
Lesen Sie die Bedienungsanleitung vor dem ersten Gebrauch Ihres Geräts sorgfältig
durch und bewahren Sie sie gut auf. Bei unsachgemäßer Verwendung übernimmt
Krups keine Haftung.
1.1 Das Produkt: Espresseria Automatic
Mit Ihrer Kaffee-/Espressomaschine können Sie zu Hause jederzeit einen Espresso
oder Lungo, Ristretto oder Cappuccino wie im Café genießen. Das Thermoblock System, die 15 Bar-Pumpe und die Verwendung ausschließlich frisch gemahlener Kaffeebohnen schenken Ihnen bestes Aroma und eine herrlich dicke, goldfarbene Crema,
die durch das natürliche Öl der Kaffeebohnen erzeugt wird. Der Espresso hat mehr
Aroma als ein herkömmlicher Filterkaffee. Trotz seines ausgeprägteren, intensiven und
länger anhaltenden Geschmacks enthält der Espresso pro Tasse etwa 20 mg weniger
Koffein als Filterkaffee. Dies liegt an der kürzeren Brühdauer.
Dank der großen Bedienungsfreundlichkeit, der Sichtbarkeit aller Behälter sowie der
automatischen Reinigungs- und Entkalkungsprogramme bietet Ihnen die Espresseria
Automatic einen hohen Verwendungskomfort.
1.2 Wegweiser für diese Anleitung
Verwendete Signalworte und Symbole
DEUTSCH
ENGLISH
FRANCAIS
NEDERLANDS
DANSK
Symbol
!
i
Signalwort Bedeutung
Warnung vor möglichen schweren bis töd-
Gefahr
Warnung
Vorsicht
Wichtig
Hinweis
Info
Tipp
Bedienung und Wartung / SERIE EA 80xx
lichen Verletzungen von Personen.
Das Blitz-Symbol warnt vor Gefahren
durch elektrischen Strom.
Warnung vor möglichen leichten Verletzungen von Personen.
Warnung vor möglichen Defekten bzw.
möglicher Beschädigung oder Zerstörung
des Gerätes.
Hier wird ein für die Funktion wichtiger
oder allgemeiner Hinweis gegeben.
Hier erhalten Sie eine nähere Information
oder einen Tipp zur Bedienung.
SVENSKA
NORSK
SUOMI
5
ITALIANO
Page 8

KRUPS Espresseria Automatic
!
1.3 Sicherheitshinweise
Gefahr: Die folgenden Sicherheits- und Gefahren-Hinweise dienen zu Ihrem
Schutz, dem Schutz Dritter sowie dem Schutz des Gerätes. Sie sollten sie deshalb
bitte unbedingt beachten.
Betriebsumgebung
• Das Gerät, das Netzkabel bzw. der
Netzstecker darf nicht mit Feuchtigkeit
bzw. Flüssigkeiten in Berührung kommen.
Bei Kontakt elektrisch leitfähiger Teile mit
Feuchtigkeit bzw. Wasser besteht Lebensgefahr durch elektrischen Strom!
Das Gerät ist nur für trockene Innenräume geeignet.
• Lassen Sie das Gerät bei Wechsel
von kalten zu warmen Umgebungen
vor der Inbetriebnahme einige Stunden
temperieren, sonst können Schäden
durch Kondenswasser auftreten.
• Vermeiden Sie Umgebungen mit
direkter Sonneneinstrahlung, starker
Hitze, Kälte, Feuchtigkeit, Frost oder
Nässe.
• Stellen Sie das Gerät nicht auf
heiße Flächen (z. B. Herdplatten) oder
in die Nähe von offenem Feuer.
Stromversorgung
Gefahr: Bei Nichtbeachten besteht
Lebensgefahr durch elektrischen Strom!
• Vergewissern Sie sich, dass die
Spannung der Elektroinstallation mit der
auf dem Typenschild des Geräts angegebenen Versorgungsspannung übereinstimmt.
Schließen Sie das Gerät nur an eine
geerdete Netzsteckdose an.
Netzspannung: 220-240V~ / 50Hz.
• Die Netzsteckdose sollte frei zugänglich
sein, damit Sie im Störungsfall oder z. B.
wenn ein Gewitter aufzieht, den
Netzstecker ziehen können.
Zum Schutz des Gerätes sollten Sie
den Netzstecker im Falle eines Gewitters
aus der Steckdose ziehen. Ziehen Sie
dabei immer am Netzstecker, nicht am
Kabel.
• Ziehen Sie bei Fehlfunktionen oder
nicht korrektem Funktionsablauf während
des Brühvorgangs sofort den Netzstecker aus der Steckdose.
Ziehen Sie den Netzstecker aus der
Steckdose, wenn das Gerät längere
Zeit nicht benutzt wird.
• Verwenden Sie das Gerät nicht, wenn
das Netzkabel beschädigt ist. Bei
Verwendung eines beschädigten
Netzkabels oder unsachgemäßer
Reparatur bestehen Gefahren durch
elektrischen Strom, wie Stromschlag,
Brand oder Kurzschluss. Außerdem
erlischt der Gewährleistungs-Anspruch.
Lassen Sie das defekte Netzkabel
unbedingt vom KRUPS-Kundendienst
austauschen.
• Lassen Sie das Netzkabel nicht
vom Rand eines Tisches oder einer
Arbeitsplatte herunterhängen. Lassen
Sie das Netzkabel niemals in die Nähe
von oder in Berührung mit den heißen
Teilen des Gerätes kommen oder herunterhängen.
• Wir raten von der Verwendung von
Mehrfachsteckdosen oder Verlängerungskabeln ab.
• Bei fehlerhaftem Anschluss erlischt die
Garantie.
6
Bedienung und Wartung / SERIE EA 80xx
Page 9

KRUPS Espresseria Automatic
Kinder
• Stellen Sie das Gerät außerhalb der
direkten Reichweite von Kindern auf.
• Dieses Gerät ist nicht dafür bestimmt,
durch Personen (einschließlich Kindern)
mit eingeschränkten physischen,
sensorischen oder geistigen Fähigkeiten
oder mangels Erfahrung und/oder man-
Das Gerät
• Füllen Sie kein Wasser in den
Kaffeebohnenbehälter oder unter die
Wartungsklappe, da dies zu
Beschädigungen bzw. Überlaufen der
Komponenten führt.
• Mit Ausnahme der Reinigung und der
Entkalkung gemäß den Hinweisen in
dieser Anleitung dürfen alle Eingriffe am
Gerät nur vom KRUPS-Kundendienst
vorgenommen werden.
• Zu Ihrer eigenen Sicherheit sollten Sie
nur Zubehör und Ersatzteile von KRUPS
verwenden, da diese optimal auf Ihr
Gerät abgestimmt und zugelassen sind.
• Schalten Sie das Gerät aus, wenn Sie
für längere Zeit den betreffenden Raum
bzw. das Haus verlassen, da sich das
Gerät im Fehlerfall überhitzen kann und
es dadurch zu einem Brand kommen
kann.
gels Wissen benutzt zu werden, es sei
denn, sie werden durch eine für ihre Sicherheit zuständige Person beaufsichtigt
oder erhielten von ihr Anweisungen, wie
das Gerät zu benutzen ist. Kinder sollten
beaufsichtigt werden, um sicherzustellen,
dass sie nicht mit dem Gerät spielen.
• Das Gerät nicht öffnen. Vorsicht,
Lebensgefahr durch elektrischen
Strom! Außerdem erlischt die
Gewährleistung bei unbefugtem Öffnen
des Gerätes. Verwenden Sie das Gerät
nicht, wenn es nicht fehlerfrei funktioniert,
hingefallen ist, undicht oder anderweitig
beschädigt ist. In diesem Fall empfehlen
wir Ihnen, das Gerät vom KRUPSKundendienst kontrollieren zu lassen
(siehe Adressenliste im
KRUPS-Serviceheft).
• Aus Sicherheits- und
Zulassungsgründen (CE) ist das
eigenmächtige Umbauen und/oder
Verändern des Gerätes nicht gestattet,
da ausschließlich geprüfte Geräte eine
Zulassung erhalten und im Schadensfall
jegliche Haftung durch den Hersteller
entfällt.
DEUTSCH
ENGLISH
FRANCAIS
NEDERLANDS
DANSK
SVENSKA
Bedienung und Wartung
• Bei Fehlfunktionen oder unklaren
Betriebszuständen sollten Sie das Gerät
überprüfen und die Fehlfunktion beheben
(s. Kap. 6 „Fehlerliste“) bzw. beheben
lassen. Wenn ein gefahrloser Betrieb
nicht mehr gegeben ist, ziehen Sie
den Netzstecker aus der Steckdose.
• Befolgen Sie für das Entkalken des
Geräts stets die Hinweise dieser Anleitung.
Bedienung und Wartung / SERIE EA 80xx
Ziehen Sie vor Reinigungs- oder
Wartungsarbeiten den Netzstecker aus
der Steckdose.
• Wenn das Gerät nicht entkalkt,
gereinigt oder regelmäßig gewartet wird
oder Fremdkörper im Mahlwerk
vorhanden sind, kann die Garantie nicht
zum Tragen kommen.
NORSK
SUOMI
7
ITALIANO
Page 10

KRUPS Espresseria Automatic
1.4 Bestimmungsgemäße Verwendung
Die Kaffee-/Espressomaschine
Espresseria Automatic darf nur für die
Zubereitung von Espressos oder Kaffee,
zum Aufschäumen von Milch und Erhitzen
von Flüssigkeiten verwendet werden.
Das Gerät ist ausschließlich für den
privaten Gebrauch in geschlossenen
Räumen bestimmt.
Die Kaffee-/Espressomaschine
Espresseria Automatic ist nicht für einen
kommerziellen oder professionellen
1.5 Lieferumfang
Prüfen Sie den Lieferumfang Ihres
Gerätes.
Sollte ein Teil fehlen, kontaktieren Sie
umgehend unsere Hotline (s. Kap. 10).
Folgende Teile sind im Lieferumfang
enthalten:
• Espresseria Automatic
• Auto-Cappuccino Set XS 6000
(optional, je nach Modell), bestehend aus:
- Milchbehälter
- Spezialdüse
- Verbindungsschlauch
- Edelstahl-Röhre
• Filterpatrone Claris - Aqua Filter F088
(KRUPS ref F088 optional),
Starter Set, bestehend aus:
Gebrauch bestimmt.
Eine andere Verwendung als hier
beschrieben ist nicht bestimmungsgemäß
und kann Verletzungen von Personen
sowie Sachbeschädigungen und die
Beschädigung oder Zerstörung des
Gerätes zur Folge haben (s. Kap. 1.3
„Sicherheitshinweise“).
- Filterpatrone
- Einschraubhilfe
• Servicepackung, bestehend aus:
- 1 Päckchen KRUPS-Entkalker
( KRUPS - ref F054)
- 2 Reinigungstabletten
( KRUPS - ref XS3000)
- Teststäbchen zur Bestimmung
der Wasserhärte
- Draht zur Reinigung der
Dampfdüse
- Verzeichnis der Servicestellen
- Garantieerklärung
• Anleitung
1.6 Werkskontrolle
Alle Geräte werden einer strengen
Kontrolle unterzogen. Mit einer beliebigen
Auswahl an Geräten werden praktische
8
Bedienung und Wartung / SERIE EA 80xx
Benutzungstests durchgeführt, was
eventuell vorhandene Spuren der
Benutzung erklärt.
Page 11

KRUPS Espresseria Automatic
2 Geräte- und Funktions-Übersicht der Espresseria Automatic
Hier erhalten Sie zunächst einen
Überblick über die Bedienteile und
Anzeigeelemente des Espresseria
Automatic.
Die Bezeichnungen sowie die kurzen
Beschreibungen zur Funktion lassen
Sie mit dem Gerät vertraut werden und
dienen als Verständnishilfe beim Lesen
dieser Anleitung.
Die Bedienteile sind mit Ziffern
gekennzeichnet, auf die in dieser
Anleitung Bezug genommen wird.
Entsprechende Verweise in Klammern
beziehen sich auf die Ausklappseite.
Klappen Sie diese Seite aus, damit Sie
die Bezeichnungen immer im Blick
haben.
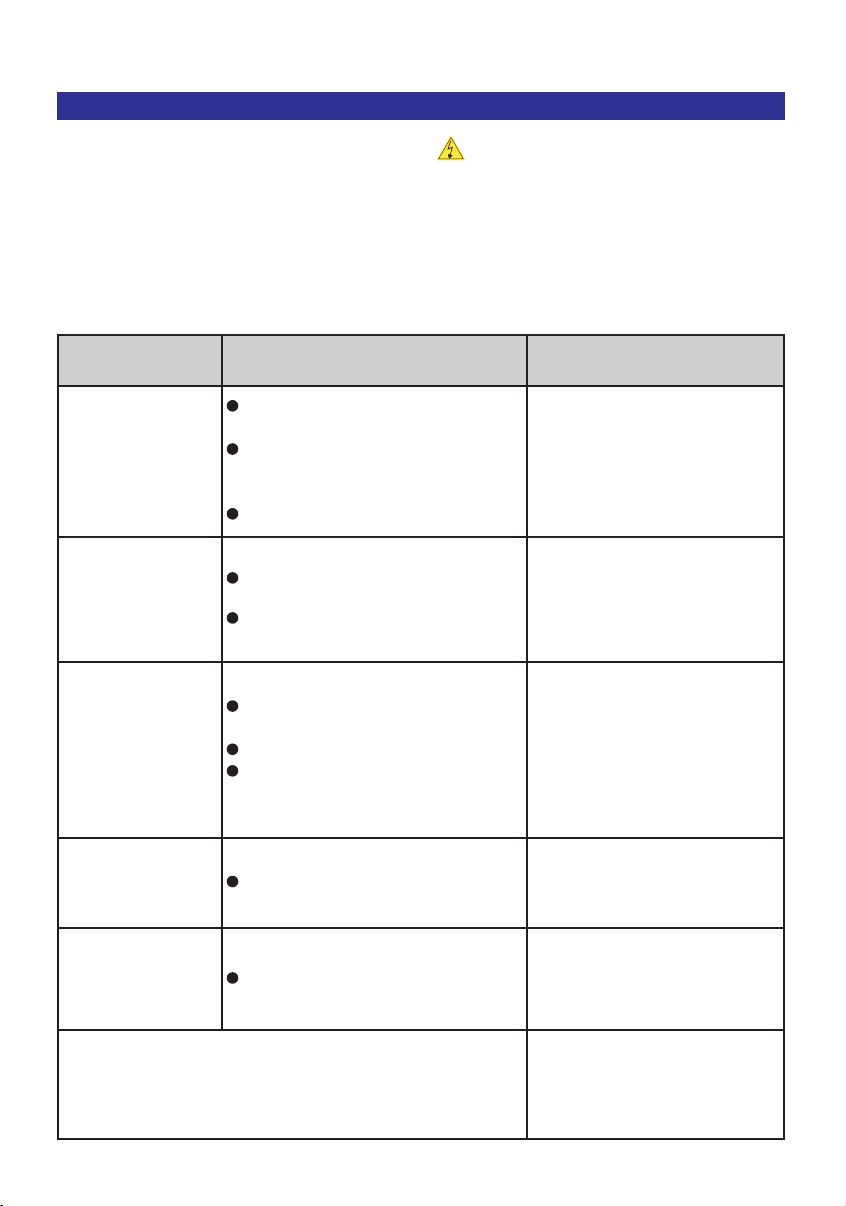
2.1 Die Bedienteile des Gerätes
Die Ausklappseite enthält eine Ansicht des Gerätes. Klappen Sie die Seite aus. Nachfolgend geben wir Ihnen eine Kurzbeschreibung der Bedienteile:
Pos.
1
2
3
4
5
Bezeichnung Funktion
Netzstrom-Taste mit Betriebs-LED
Programm-Taste
Drehknopf Menüs auswählen bzw. Einstellwerte verändern
OK-Taste
Dampftaste Dampfabgabe aktivieren oder deaktivieren
Gerät ein-/ausschalten
Im Betrieb leuchtet die LED
Display-Menüauswahl aufrufen / im Menü zum
Getränkewahlmenü zurückkehren
Menüauswahl bestätigen oder Funktionen bzw.
Vorgänge starten
DEUTSCH
ENGLISH
FRANCAIS
NEDERLANDS
DANSK
6
7
8
9
10
11
12
13
14
15
16
Heißwassertaste Heißwasserabgabe aktivieren oder deaktivieren
Kaffeesatzbehälter Nimmt das verbrauchte Kaffeemehl auf
Reinigungsschieber Reinigt das Gerät innen von Kaffeesatz
Wartungsanleitung
“Service Guide“
Wassertank
Griff / Wassertankdeckel Zum Entnehmen des Wassertanks
Deckel/ Kaffeebohnenbehälter
Verstellknopf
Mahlwerk Mahlt die Kaffeebohnen
Kaffeebohnenbehälter Nimmt die Kaffeebohnen auf (max. 275 g)
Reinigungsschacht Nimmt die Reinigungspastille auf
Enthält eine Kurzbeschreibung der Servicearbeiten
und ein internationales Hotlineverzeichnis
Enthält das Wasser für die Getränkezubereitung
und die Spülvorgänge
Verschließt den Kaffeebohnenbehälter
Mahlstärke des Mahlwerks stufenlos einstellen:
von fein über mittel bis grob
Bedienung und Wartung / SERIE EA 80xx
SVENSKA
NORSK
SUOMI
9
ITALIANO
Page 12
KRUPS Espresseria Automatic
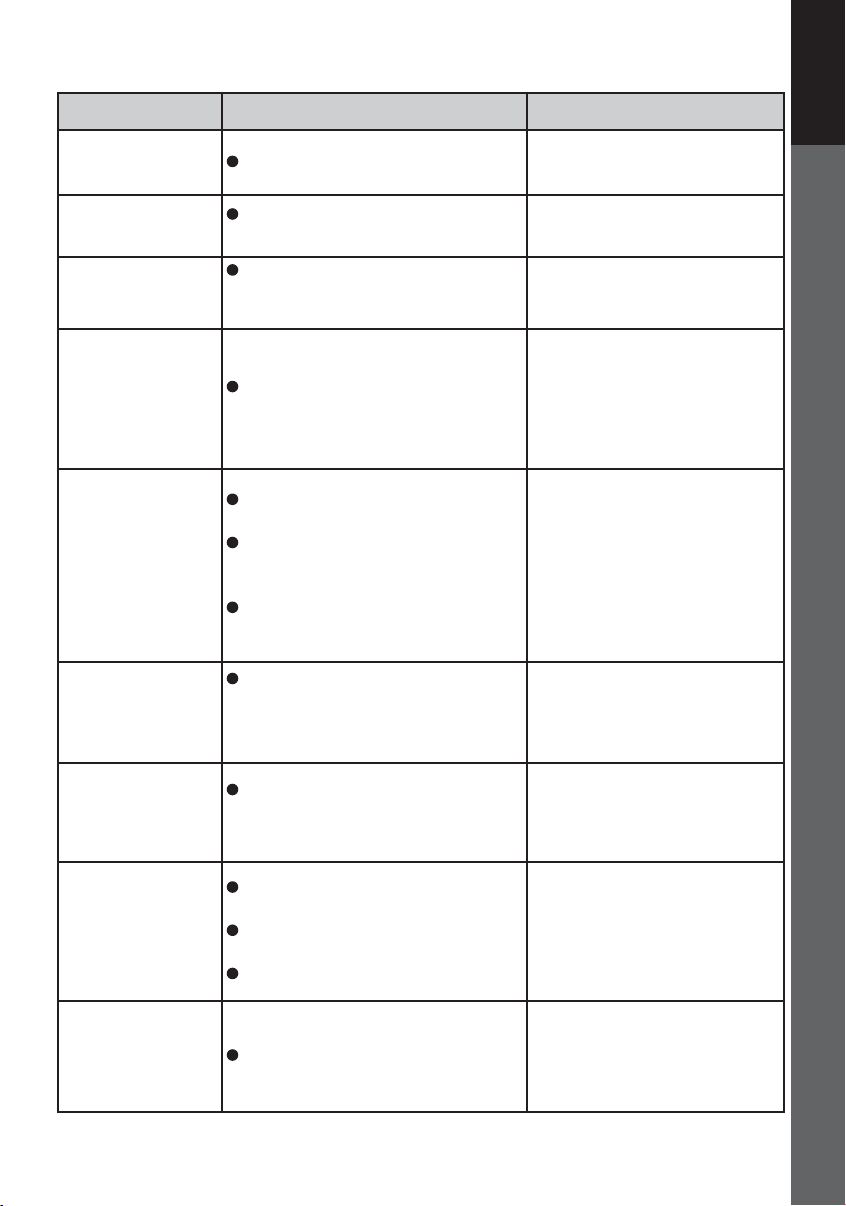
Pos.
17
18
19
20
21
22
23
Tab. 1: Die Elemente des Bedienfeldes und des Kaffeebohnenbehälters des Espresseria Automatic
Bezeichnung Funktion
Wartungsklappe
und Tassenablage
Display Menü-, Bedien- sowie Wartungsanzeigen
Bedienfeld Enthält die Bedientasten und den Drehknopf
Kaffeeauslauf mit Griff Auslauf der zubereiteten Getränke
Dampfdüse
Wasserstandsanzeige Mechanische Überlaufwarnung
Abtropfbehälter mit
Rost
Öffnung: nimmt die Reinigungstablette auf
Ablage: beheizt für dort abgestellte Tassen
Abgabe von heißem Wasser oder Dampfabgabe
zum Milchaufschäumen
Nimmt verschüttetes sowie vom Gerät abgegebenes
Wasser auf
2.2 Displayanzeigen und Bedienprinzip
Am Display werden die Menüs und alle
Auswahlmöglichkeiten und Meldungen
des Gerätes angezeigt. Bei
verschiedenen Funktionen werden
Handlungsschritte am Display bildlich
gezeigt, z. B. dass Sie beim Spülvorgang
Die einstellbaren Funktionen bzw. Werte erscheinen in Textfeldern.
Ein Pfeil unter oder über einem Textfeld zeigt an,
in welche Richtung Sie den Drehknopf (3) bewegen können, um weitere Optionen anzuwählen:
Pfeil unten: Drehknopf nach rechts drehen
Pfeil oben: Drehknopf nach links drehen.
Das angewählte Feld wird durch eine Umrandung
gekennzeichnet.
ein Gefäß unter den Kaffeeauslauf stellen
sollen.
Die Menüs werden im Kapitel 3.6
erläutert.
Die folgende Übersicht zeigt Ihnen
das grundlegende Bedienprinzip.
Wählen Sie die gewünschte Funktion mit dem
Drehknopf aus (=Textfeld wird durch Umrandung
gekennzeichnet).
Drücken Sie die OK-Taste (4), um die Funktion
einzustellen bzw. zu starten.
Blinkende Werte mit dem Drehknopf wie ge-
wünscht einstellen und mit der OK-Taste
bestätigen.
!
Wichtig: Achten Sie stets auf die Anzeigen am Display, besonders vor Drücken der OK-Taste bzw.
dem Starten von Vorgängen!
10
Bedienung und Wartung / SERIE EA 80xx
Page 13

KRUPS Espresseria Automatic
3 Inbetriebnahme der Espresseria Automatic
Gefahr: Schließen Sie das Gerät nur an eine geerdete 230V-Netzsteckdose an.
Andernfalls besteht Lebensgefahr durch elektrischen Strom! Beachten Sie die Sicherheitshinweise (s. Kap. 1.3).
Das Gerät aufstellen
Wählen Sie einen ebenen, stabilen
Aufstellort, der eine ausreichende
Belüftung gewährleistet. Dies ist wichtig,
da das Gerät Wärme entwickelt.
3.1 Vor der ersten Verwendung
Vor der ersten Verwendung ermitteln Sie
die Wasserhärte Ihres Trinkwassers, um
das Gerät darauf einzustellen. Nehmen
Sie diese Einstellung auch vor, wenn Sie
das Gerät später an einem anderen
Ort mit anderen Wasserhärtewerten
betreiben oder bei einer Änderung der
Werte Ihres Trinkwassers.
Die Wasserhärte ermitteln Sie mit Hilfe
des im Lieferumfang enthaltenen Teststäbchens oder fragen Sie bei Ihrem
Wasserversorgungsunternehmen nach.
Messen der Wasserhärte
Tauchen Sie das Teststäbchen kurz in
ein Glas Ihres Trinkwassers.
Warten Sie 1 Minute, bevor Sie den
Härtebereich ablesen.
Die roten Testfelder markieren den Härtebereich: kein rotes Feld = HB 0, ein rotes Feld =
HB 1 usw. (s. Abb.).
01234
DEUTSCH
ENGLISH
FRANCAIS
NEDERLANDS
DANSK
Den ermittelten Härtebereich (0 bis 4)
benötigen Sie für die Grundeinstellung
in Kap. 3.3 im Untermenü „Wasserhärte“
wie in der Tabelle angegeben:
Härtegrad HB 0 HB 1 HB 2 HB 3 HB 4
° dH
° e
° f
Geräte-
Einstellung
Tab. 2: Die Bereiche der Wasserhärte für die Grundeinstellung des Gerätes (Kap. 3.3)
< 3° > 4° > 7° > 14° > 21°
< 3,75° > 5° > 8,75° > 17,5° > 26,25°
< 5,4° > 7,2° > 12,6° > 25,2° > 37,8°
0 1 2 3 4
Bedienung und Wartung / SERIE EA 80xx
SVENSKA
NORSK
SUOMI
11
ITALIANO
Page 14

KRUPS Espresseria Automatic
Filterpatrone einsetzen (optional)
Im Lieferumfang ist ein Test-Set der Filterpatrone Krups Aqua Filter System F088
enthalten.
Dieser Filter verbessert den Geschmack
des Trinkwassers durch eine kalkentfernende Substanz sowie Aktivkohle, die
Chlor, Verunreinigungen, Blei, Kupfer,
Entnehmen Sie die Filterpatrone und
die Einschraubhilfe aus der Verpackung
und setzen Sie die Einschraubhilfe zusammen (s. Abb.).
Stellen Sie durch Drehen des grauen
Rings am oberen Ende des Filters den
aktuellen Monat (links in der Aussparung)
ein (s. Abb, Pos. 1).
Den Monat für den Filterwechsel sehen
Sie rechts in der Aussparung (s. Abb,
Pos. 2).
Pestizide etc. im Wasser reduziert (Reduzierung der Karbonathärte um bis zu
75%*, Chlor bis zu 85%*, Blei bis zu
90%*, Kupfer bis zu 95%*, Aluminium bis
zu 67%*). Mineralstoffe und Spurenelemente bleiben erhalten.
* Angabe des Herstellers
Verbinden Sie die Einschraubhilfe wie
gezeigt mit der Filterpatrone.
Schrauben Sie die Filterpatrone in das
Gewinde am Boden des Wassertanks:
1. Setzen Sie die Filterpatrone in das
Gewinde.
2. Schrauben Sie die Filterpatrone ein.
Ziehen Sie die Einschraubhilfe von der
Filterpatrone ab.
!
Hinweis: Die Filterpatrone muss
nach Durchlauf von etwa 50 Litern
Wasser oder mindestens alle 2 Monate
durch eine neue ersetzt werden.
Im Menü „Produktinfos/Filter“ können
Sie unter „Wechsel“ einsehen, in wie
vielen Tagen oder nach wie viel Litern
der nächste Filterwechsel durchzuführen
ist.
12
Bedienung und Wartung / SERIE EA 80xx
Page 15

KRUPS Espresseria Automatic
!
Programm-Einstellungen für die Filterpatrone
Bestätigen Sie die Frage im Einstellungsmenü „Filter“, ob Sie einen Filter verwenden mit „Ja“ bzw. „OK“. Optional können
Sie dieses Programm auch im Menü
„Wartung / Filter / Einsetzen“ aufrufen.
Stellen Sie einen Behälter unter die
Dampfdüse, der etwa 0,5 Liter Wasser
aufnehmen kann, da das Programm die
Filterpatrone mit Wasser füllt und dabei
eine größere Menge Wasser über die
Dampfdüse abgegeben wird. Nach diesem Vorgang verlangt das Programm die
Einstellung des aktuellen Datums, damit
Sie rechtzeitig durch das Programm auf
den Austausch der Filterpatrone hingewiesen werden können (nach 2 Monaten
oder 50 Litern Wasserdurchlauf).
3.2 Das Gerät vorbereiten
Führen Sie die nachfolgend beschriebenen Schritte durch, bevor Sie das
Gerät einschalten.
Vorsicht: Wassertank (10): Kein
heißes Wasser, Mineralwasser sowie
keine Milch oder sonstige Flüssigkeiten in
den Wassertank füllen, da sonst das
Gerät beschädigt werden kann.
Kaffeebohnenbehälter (15): Niemals
gemahlenen Kaffee oder z. B. Wasser
einfüllen, da dies zu Schäden am Mahlwerk führt. Achten Sie auch auf Fremdkörper (z. B. kleine Steine) im
Bohnenkaffee, da diese das Mahlwerk
beschädigen können (Garantieausschluss!).
Abtropfbehälter (23): Kontrollieren Sie
den korrekten Sitz, um Verbrühungen
durch Ausfluss von heißem Wasser zu
vermeiden!
DEUTSCH
ENGLISH
FRANCAIS
NEDERLANDS
DANSK
Entnehmen Sie den Wassertank (10) und
füllen Sie ihn mit kaltem Wasser.
i
Tipp: Alternativ können Sie den Wassertank
mit einem geeigneten Gefäß nach Öffnen des
Deckels befüllen, ohne ihn zu entnehmen.
Setzen Sie ihn wieder ein und schließen
Sie den Deckel.
Öffnen Sie den Deckel (12) des Kaffee-
bohnenbehälters (15) und befüllen Sie ihn
mit Kaffeebohnen (max. 275 g).
Schließen Sie den Deckel des Kaffeeboh-
nenbehälters.
Bedienung und Wartung / SERIE EA 80xx
!
Wichtig: Beachten Sie die maximale
Füllhöhe (Markierung „Max“) des
Wassertanks.
!
Hinweis: Wenn der Wassertank
nicht eingesetzt oder nicht ausreichend
gefüllt ist (Minimum = Markierung
„Calc“) erscheint beim Einschalten des
Gerätes der Hinweis „Wassertank füllen“
und die Zubereitung eines
Espressos/Kaffees ist nicht möglich.
SVENSKA
NORSK
SUOMI
13
ITALIANO
Page 16
KRUPS Espresseria Automatic
3.3 Grundeinstellung
Bei der ersten Verwendung werden Sie
vom Programm aufgefordert, verschiedene Einstellungen vorzunehmen.
Einstellungen vornehmen
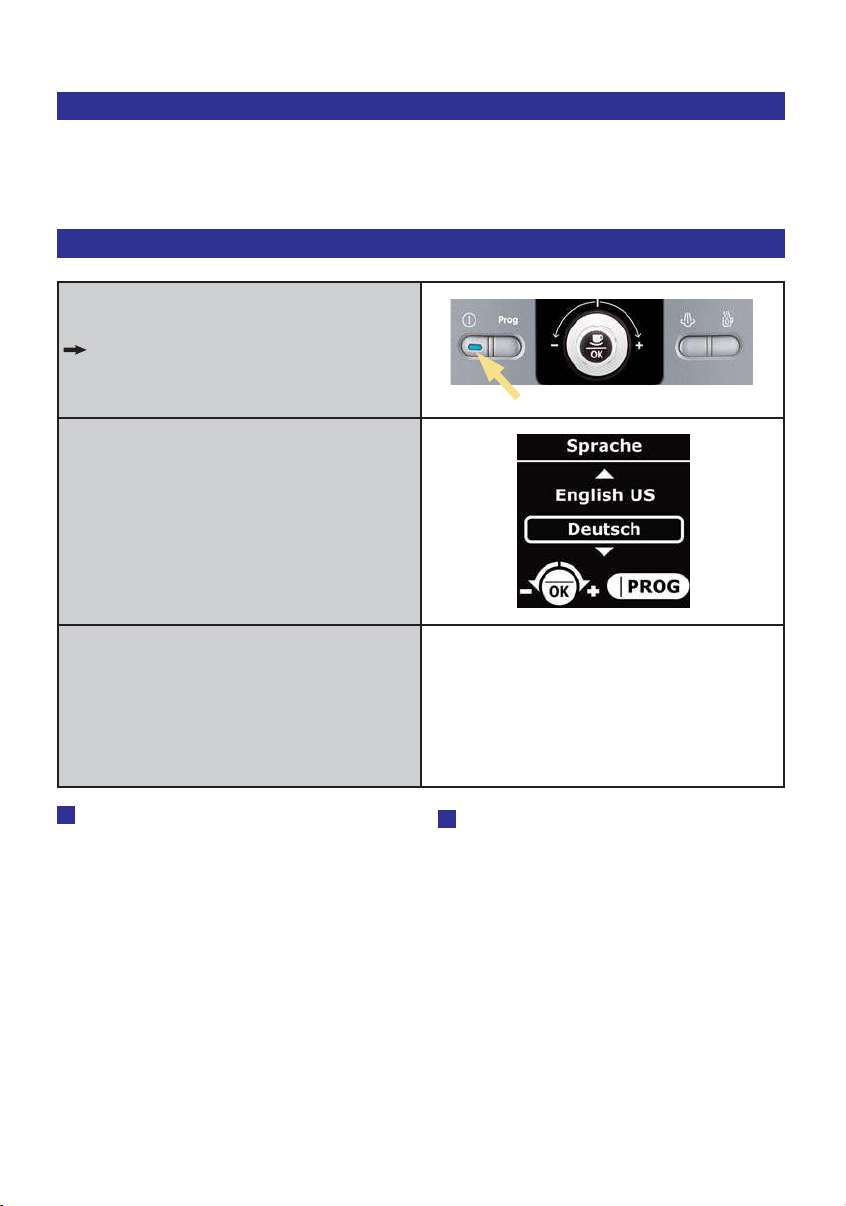
Das Gerät einschalten: drücken Sie
die Netzstrom-Taste (1).
Es wird ein Begrüßungstext angezeigt.
Danach erscheint das Einstellmenü
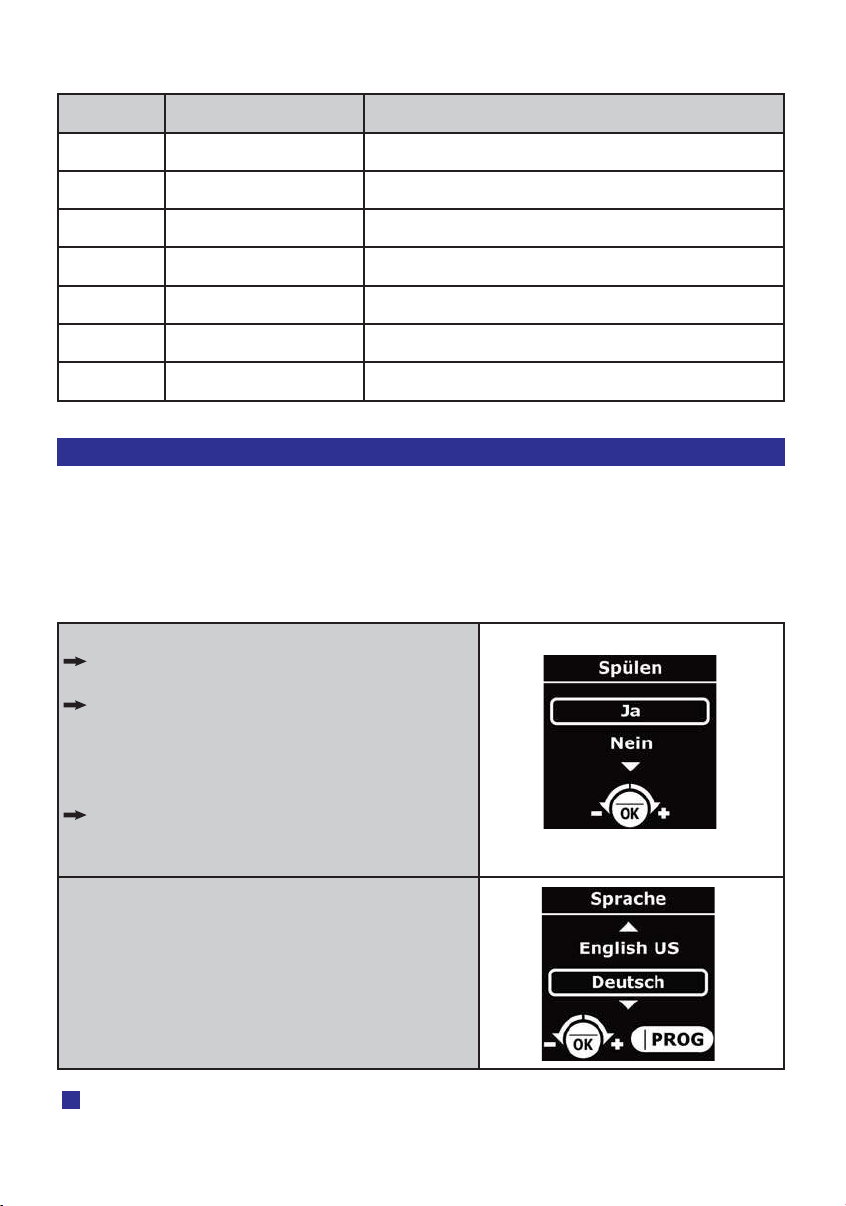
„Sprache“.
Wählen Sie mit dem Drehknopf die
gewünschte Displaysprache und bestätigen Sie die Wahl durch Drücken
der OK-Taste.
Gehen Sie gemäß den Anzeigen am
Display vor.
Nehmen Sie die weiteren Einstellungen
gemäß den Anzeigen am Display vor.
Beachten Sie bezüglich der Parameter die
Erläuterungen im Kapitel 3.6, Abschnitt:
Menü „Einstellungen“.
!
Hinweis: Wenn das Gerät vom
Stromnetz getrennt wurde oder nach
einem Stromausfall müssen Sie die
Uhrzeit und das Datum erneut eingeben
bzw. die Einstellungen bestätigen.
Anschließend führt das Gerät einen
automatischen Test durch.
14
Bedienung und Wartung / SERIE EA 80xx
!
Wichtig: Stellen Sie sicher, dass
alle Deckel und die Wartungsklappe
geschlossen sowie alle Gerätekomponenten korrekt installiert sind, bevor Sie
mit der Zubereitung eines Getränks
beginnen.
Page 17
KRUPS Espresseria Automatic
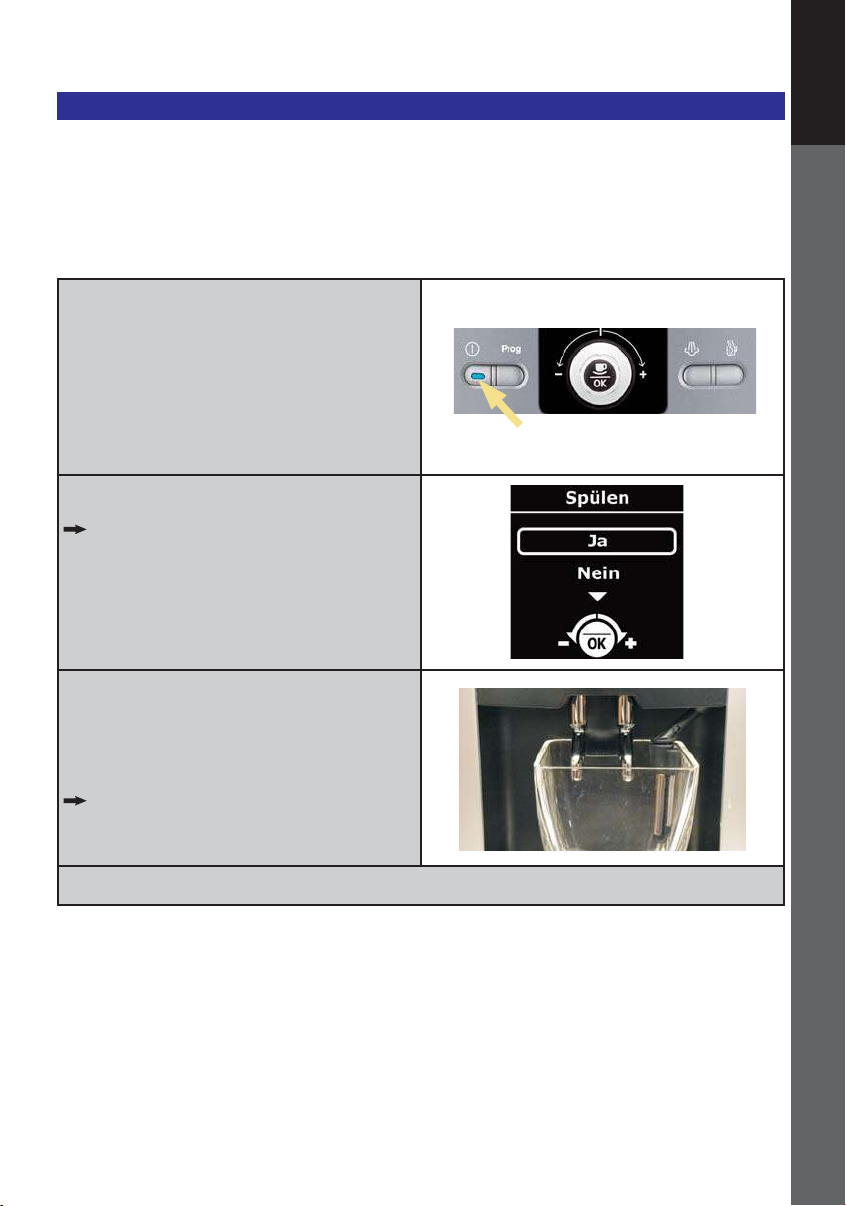
3.4 Spülen des Kaffeekreislaufs
Wenn das Gerät einige Tage oder länger
nicht verwendet wurde, sollten Sie eine
Spülung durchführen.
Sie können diese Spülung nach Einschal-
Drücken Sie die Netzstrom-Taste (1).
Am Display erscheint eine Begrüßung
und der Hinweis, dass das Gerät aufheizt.
Nach einigen Sekunden erscheint
die Abfrage am Display, ob das Gerät
einen Spülvorgang durchführen soll.
DEUTSCH
ten des Gerätes vornehmen oder den
Spülvorgang jederzeit über das Menü
„Wartung / Spülen“ aktivieren.
ENGLISH
FRANCAIS
NEDERLANDS
DANSK
Stellen Sie ein ausreichend großes
Gefäß unter die Kaffeeausläufe, wählen
Sie „Ja“ mit dem Drehknopf und drücken
Sie „OK“.
Der Spülvorgang startet. Er stoppt automatisch nach Abgabe von ca. 40 ml.
Die Displayanzeige wechselt zum Getränkemenü.
Bedienung und Wartung / SERIE EA 80xx
SVENSKA
NORSK
SUOMI
15
ITALIANO
Page 18

KRUPS Espresseria Automatic
!
3.5 Das Mahlwerk einstellen
Sie können die Mahlstärke des Mahlwerks stufenlos einstellen. Je feiner die
Maschine die Kaffeebohnen mahlt, desto
intensiver wird das Aroma. Auch wird der
Kaffee cremiger, wenn das Kaffeemehl
feiner gemahlen wird.
Vorsicht: Drehen Sie den Verstell-
knopf (13) nur während des Mahlvorgangs, andernfalls kann das Mahlwerk
beschädigt werden. Drehen Sie nie gewaltsam am Verstellknopf! Stellen Sie die
Mahlstärke bei der nächsten Zubereitung
eines Getränks ein, während die Kaffeebohnen gemahlen werden.
Bedeutung der Positionen des Verstellknopfes
Feineres Kaffeemehl
Mittleres Kaffeemehl
Gröberes Kaffeemehl
3.6 Die Menüs
Die Menüs der Espresseria Automatic
enthalten eine Fülle von Funktionen und Einstellmöglichkeiten, womit Sie Ihr Gerät komfortabel auf den bestmöglichen Betrieb
einstellen können.
Funktion der Menüauswahl
Drücken Sie im Getränkeauswahlmenü
die Programm-Taste (2).
Die Menü-Übersicht wird angezeigt.
i
Info: Mehrfaches Drücken wechselt
zwischen dem Getränkeauswahlmenü und
der Menü-Übersicht. Wenn Sie die Programm-Taste in einem Menü oder Untermenü drücken, wird die Menüfunktion
abgebrochen und das Programm wechselt
zurück zum Getränkeauswahlmenü.
16
Bedienung und Wartung / SERIE EA 80xx
Durch Drücken der Programm-Taste (2) rufen
Sie die Menü-Übersicht auf, oder wechseln
zum Getränkeauswahlmenü zurück.
Das Bedienprinzip ist in Kap. 2.2 erläutert.
Page 19

KRUPS Espresseria Automatic
In der Hauptebene stehen folgende Menüs zur Verfügung:
Menü Funktion
Wartung
Einstellungen
Produktinfos
Demo Modus
Exit
Pflege- und Wartungsfunktionen
Grundeinstellungen des Gerätes
Zeigt Informationen zu durchgeführten Vorgängen
Startet verschiedene Programme
Präsentationsmodus ein- bzw. ausschalten
Menü-Übersicht beenden
Im folgenden finden Sie Details zu den Einstellungen und Funktionen der Untermenüs.
Menü „Wartung“
Untermenü Funktion
Spülen
Reinigung
Filter
Exit
Startet einen Spüldurchlauf
!
Wichtig: Vor Drücken der OK-Taste Tasse unterstellen!
Startet das Reinigungsprogramm
Zugriff auf den Filtermodus
Untermenü-Übersicht beenden
DEUTSCH
ENGLISH
FRANCAIS
NEDERLANDS
DANSK
Menü „Einstellungen“
Untermenü Funktion
Sprache
Kontrast
Datum
Uhrzeit
Auto-off
Auto-on
Maßeinheit
Wasserhärte
Die gewünschte Displaysprache auswählen
Stellen Sie den optimalen Kontrast mit dem Drehknopf ein und
bestätigen Sie durch Drücken der OK-Taste.
Das Datum einstellen, Tag, Monat und Jahr, jeweils 2-stellig
!
Wichtig: Bei Verwendung einer Antikalk-Filterpatrone muss in jedem Fall
das Datum eingestellt werden.
1. Schritt: Das Zeitformat wählen: 24-Stundenanzeige (24 H)
oder 12-Stundenanzeige (AM / PM)
2. Schritt: Die Uhrzeit einstellen
Dauer bis zum automatischen Ausschalten des Gerätes einstellbar von 30 Minuten bis 4 Stunden (in 30-Minuten- Schritten)
Uhrzeit für das automatische Vorheizen des Gerätes wählen
Wahl der Maßeinheit für die jeweils abgegebene Getränkemenge, einstellbar: ml
oder oz
Gerät auf die Wasserhärte einstellen, Stufe 0 bis 4 (Kap. 3.1)
Bedienung und Wartung / SERIE EA 80xx
SVENSKA
NORSK
SUOMI
17
ITALIANO
Page 20
KRUPS Espresseria Automatic
Untermenü Funktion
Kaffeetemperatur
Exit
Es sind drei Temperaturstufen für Ihren Espresso oder Kaffee
einstellbar, wobei Stufe 3 am heißesten ist.
Untermenü-Übersicht beenden.
Menü „Produktinfos“
Untermenü Funktion
Kaffeezyklen
Heißwasserzyklen
Dampfzyklen
Spülen
Reinigung
- Letzte
- Nächste
- Reinigen
- Exit
Entkalkung
- Letzte
- Nächste
- Exit
Zeigt die Gesamtanzahl der von der Maschine ausgeführten Kaffeezyklen an.
Zeigt die Gesamtanzahl der von der Maschine ausgeführten Heißwasserzyklen an.
Zeigt die Gesamtanzahl der von der Maschine ausgeführten Dampfzyklen an.
Zeigt die Gesamtanzahl der von der Maschine ausgeführten Spülungen an.
Aufruf der folgenden Untermenüs.
Anzahl der seit der letzten Reinigung zubereiteten Kaffees.
Anzahl der Kaffees, die Sie bis zur nächsten Reinigung noch zubereiten können.
Startet das Reinigungsprogramm.
Reinigungsmenü beenden.
Aufruf der folgenden Untermenüs.
Anzahl der seit der letzten Entkalkung zubereiteten Heißwasser und Dampfzy-
klen.
Anzahl der Heißwasser und Dampfzyklen, die Sie bis zur nächsten Entkalkung
noch zubereiten können.
Entkalkungsmenü beenden.
!
Hinweis: Die Optionen „Letzter“ und „Nächster“ sind nur verfügbar, wenn zuvor der Filter
gemäß dem Programm unter Produktinfos/Filter/Einsetzen eingesetzt wurde.
Filter
- Letzter
- Nächster
- Einsetzen
- Exit
Exit
18
Aufruf der folgenden Untermenüs.
Zeigt das Datum des letzten Filterwechsels an und die seitdem gefilterte Wassermenge.
Zeigt das Fälligkeitsdatum des nächsten Filterwechsels an und die bis dahin zu
filternde Wassermenge.
Startet das Verfahren für den Filterwechsel.
Filtermenü beenden.
Untermenü-Übersicht beenden.
Bedienung und Wartung / SERIE EA 80xx
Page 21
KRUPS Espresseria Automatic
Menü „Demo Modus“
Untermenü Funktion
Den Präsentationsmodus einschalten
Aktivieren
Deaktivieren
Exit
In diesem Modus werden im Getränkeauswahlmodus automatisch
die verschiedenen Menüs sowie den Zugriff auf diese gezeigt.
Den Präsentationsmodus ausschalten
Untermenü-Übersicht beenden.
Getränkeauswahlmenü
Untermenü Funktion
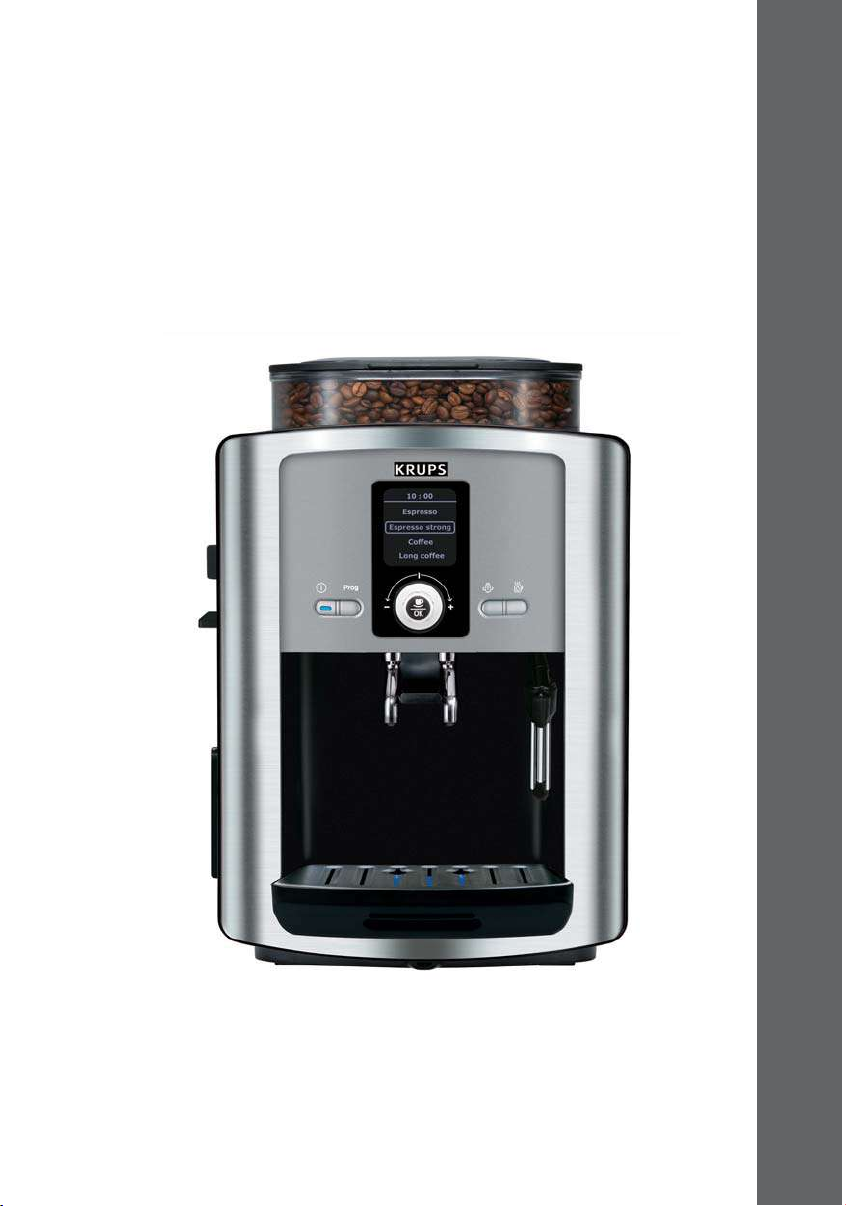
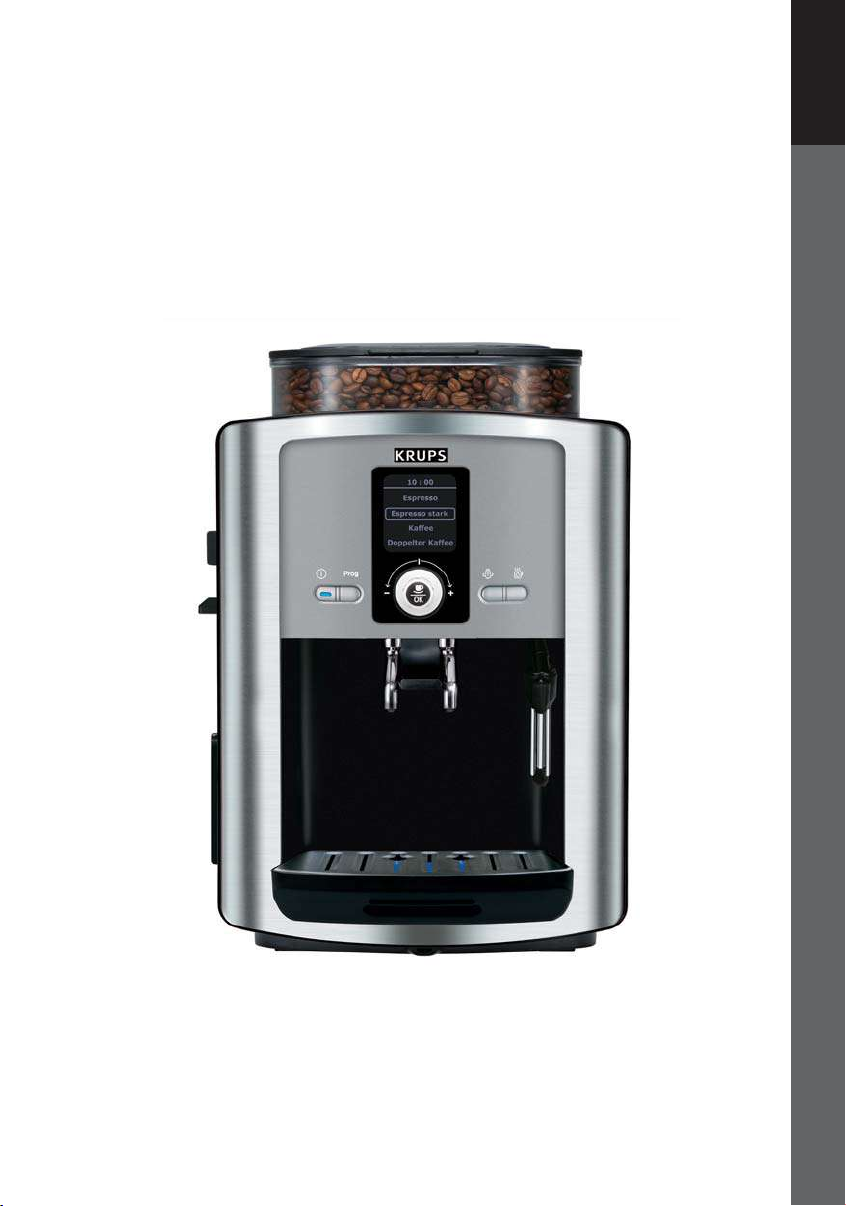
Espresso
Espresso stark
Kaffee
Doppelter Kaffee
Normalen Espresso zubereiten
Starken Espresso zubereiten
Normalen Kaffee zubereiten
Doppelten Kaffee zubereiten
DEUTSCH
ENGLISH
FRANCAIS
NEDERLANDS
DANSK
Bedienung und Wartung / SERIE EA 80xx
SVENSKA
NORSK
SUOMI
19
ITALIANO
Page 22

KRUPS Espresseria Automatic
!
4 Bedienung
Wenn Sie die nachfolgenden Hinweise
beachten, werden Sie beste Ergebnisse
erzielen. Es sind eventuell mehrere
Versuche nötig, bis Sie die Ihrem
Geschmack entsprechende Mischung
und Röstung der Kaffeebohnen
herausgefunden haben.
Auch die Qualität des verwendeten
Wassers ist ein ausschlaggebender
Faktor für den Geschmack Ihres Kaffees.
Stellen Sie sicher, dass das Wasser
frisch und relativ kalt aus dem
Wasserhahn kommt, und dass es nicht
nach Chlor riecht.
Verwenden Sie kein abgestandenes
Wasser.
Der Kaffeeauslauf
Der Kaffeeauslauf ist höhenverstellbar.
Stellen Sie ihn nach oben, um höhere
Die Dampfdüse
Die Dampfdüse lässt sich nach links bzw.
rechts verschieben und etwas nach vorne
Der Abtropfbehälter
Vorsicht: Ihr Gerät ist ausschließlich
für die Verwendung von Kaffeebohnen
bestimmt.
Beim ersten Zubereiten, nach längerem
Nichtgebrauch des Gerätes oder nach
einem Wartungsvorgang entweichen ggf.
etwas Dampf und heißes Wasser aus der
Dampfdüse.
Halten Sie daher genügend Abstand
zur Dampfdüse und stellen Sie
eine Tasse unter die Ausläufe, denn es
besteht Verbrühungsgefahr durch heißes
Spritzwasser sowie heißen Dampf.
Nachfolgend eine kurze Beschreibung
der wichtigsten Bedienelemente:
Tassen leichter unterstellen oder
entnehmen zu können.
neigen, so dass Sie eine Tasse darunter
leichter entnehmen können.
In diesem Behälter sammelt sich vom
Gerät verbrauchtes oder bei der
Zubereitung verschüttetes Wasser.
4.1 Das Gerät einschalten
Drücken Sie die Netzstrom-Taste (1).
Es erscheint eine Begrüßung und der
Hinweis, dass das Gerät aufheizt.
Danach erscheint die Abfrage nach
einem Spülvorgang.
20
Bedienung und Wartung / SERIE EA 80xx
Das Gerät meldet, wenn der Behälter
geleert werden muss. Daneben gibt es
eine mechanische Anzeige (22).
!
Hinweis: Wenn das Gerät einige
Tage nicht verwendet wurde, sollten Sie
eine Spülung durchführen.
Page 23

KRUPS Espresseria Automatic
Führen Sie bei Bedarf eine Spülung
durch (s. Kap. 3.4) oder bestätigen Sie
die Auswahl „Nein“ mit „OK“.
Die Displayanzeige wechselt zum
Getränkemenü.
Wenn Sie einen Espresso oder Kaffee zubereiten möchten, lesen Sie weiter in Kap.
4.2, für einen Cappuccino lesen Sie weiter
in Kap. 4.3.
4.2 Einen Espresso oder Kaffee zubereiten
Sie können die Wassermenge für einen
Espresso zwischen 20 und 70 ml
einstellen, für einen Kaffee ist die Dosis
zwischen 80 und 120 ml, für einen
doppelten Kaffee zwischen 120 (2x60)
ml und 240 (2x120) ml. Die
Wassertemperatur können Sie im Menü
„Einstellungen / Kaffeetemperatur“ Ihren
Wünschen anpassen. Bei der
Espressozubereitung können Sie
zwischen zwei Stärken auswählen:
“normal” oder “stark”.
Zubereitung eines Espressos oder Kaffees
Stellen Sie eine Tasse unter den Kaf-
feeauslauf (20). Dessen Position lässt
sich leicht durch Verschieben nach oben
bzw. unten an die jeweilige Tasse
anpassen.
DEUTSCH
ENGLISH
FRANCAIS
NEDERLANDS
DANSK
Wählen Sie das gewünschte Getränk mit
dem Drehknopf. „OK“ drücken.
Während des Mahl- und Heizvorgangs
wird die zuletzt eingestellte Wassermenge
am Display angezeigt.
Prüfen Sie die eingestellte Wassermenge
und verändern Sie die Einstellung ggf. mit
dem Drehknopf (3).
Nach Abschluss des Heizvorgangs
startet die Abgabe des Getränks.
Warten Sie, bis die Abgabe beendet ist
und die Meldung „ist fertig“ angezeigt
wird. Entnehmen Sie die Tasse.
1. Wählen
2. Drücken
!
Hinweis: Wenn die Tasse zu voll wird oder
Sie aus anderen Gründen die Abgabe
stoppen möchten, drücken Sie eine beliebige Taste. Mit dem Drehknopf können Sie
die Abgabemenge während des Auslaufs
reduzieren.
Den Wassertank nicht vor Ende des Zyklus entnehmen (d.h.15 Sek nach Beendigung
des Kaffeedurchlaufs).
Bedienung und Wartung / SERIE EA 80xx
SVENSKA
NORSK
SUOMI
21
ITALIANO
Page 24

KRUPS Espresseria Automatic
4.3 Einen Cappuccino zubereiten
Der Cappuccino basiert auf dem
Espresso, der mit Milchschaum gemischt
wird. Der Kenner bereitet zuerst den
Milchschaum zu und gibt dann den
Espresso hinzu, weil der Espresso
bereits nach kurzer Zeit sein einzigartiges
Aroma verliert. Das Mischungsverhältnis
beträgt 1:1, wobei Sie dies natürlich
variieren können, je nach Geschmack.
Milchschaum mit Dampf zubereiten
Drücken Sie die Dampftaste (5).
Das Gerät heizt auf. Am Display wird dann
die Aufforderung angezeigt, ein Gefäß
unter die Dampfdüse zu stellen.
Stellen Sie einen halb mit kalter Milch (6
bis 10° C) gefüllten Behälter bzw. eine
Cappuccinotasse unter die Dampfdüse
(21) und drücken Sie die Dampftaste.
Sobald der Dampf abgegeben wird, wird
die Restzeit der Dampfabgabe in Sekunden angezeigt. Sie haben nun folgende
Optionen:
A) Sie können mit dem Drehknopf die angezeigte Zeit verlängern oder verkürzen
und warten, bis die Schaumabgabe automatisch stoppt.
B) Dampfabgabe jederzeit beenden:
Drücken Sie die Dampftaste.
Wir empfehlen, teilentrahmte Milch zu
verwenden.
!
Tipp: Verwenden Sie zur Zubereitung
eine Cappuccino-Tasse, da diese
bei größerem Volumen nicht so hoch ist
und sich somit leichter unter der
Dampfdüse entnehmen lässt.
!
Hinweis: Wenn die Spitze der Dampfdüse
nicht bis in die Milch reicht, heben Sie die
Tasse etwas an und halten sie während des
Aufschäumvorgangs fest.
!
Wichtig: Die Abgabe stoppt nach Drücken
der Dampftaste nicht sofort. Drücken Sie
die Taste rechtzeitig, um ein Überlaufen zu
verhindern.
Entnehmen Sie die Cappuccinotasse und
stellen Sie diese unter den Kaffeeauslauf
(20).
Geben Sie einen Espresso / Kaffee dazu,
wie in Kap. 4.2 beschrieben, je nachdem,
welches Getränk Sie zubereiten möchten.
Entnehmen Sie die Tasse und geben Sie
nach Belieben etwas Zucker oder Schokostreusel dazu.
22
Bedienung und Wartung / SERIE EA 80xx
!
Wichtig: Reinigen Sie die entnommene
Dampfdüse umgehend unter fließendemWasser (s. Kap. 5.1). Setzen Sie diese anschließend wieder ein, stellen Sie ein
Gefäß unter und drücken Sie die Dampftaste, um die Düse innen von Milchresten
zu reinigen. Lassen Sie den Dampf etwa 10
Sekunden entweichen.
Page 25

KRUPS Espresseria Automatic
4.4 Verwendung des Auto-Cappuccino Set (optional)
Das Auto-Cappuccino Set XS 6000
erleichtert die Zubereitung von
Cappuccino oder Café Latte
(Milchkaffee) mit Ihrer Espresseria
Automatic.
Das Set besteht aus einem Milchbehälter
aus gebürstetem Edelstahl, einem
Steigröhrchen, einem
Verbindungsschlauch
sowie einer Spezialdüse.
Das Auto-Cappuccino Set zusammenbauen und installieren
Stecken Sie das Edelstahlröhrchen durch
die Gummidichtung in den Milchbehälter.
Es sollte bis kurz über den Behälterboden
reichen.
Die Spezialdüse stellen Sie wie folgt auf
das jeweilige Getränk ein: Drehen Sie das
Mittelteil um 180°, so dass die Bezeichnung des gewünschten Getränks nach
vorne weist.
Cappuccino Café Latte
DEUTSCH
ENGLISH
FRANCAIS
NEDERLANDS
DANSK
Spezialdüse installieren:
A) Die Dampfdüse (21) abziehen und
B) dort die Spezialdüse aufstecken.
Füllen Sie den Milchbehälter mit kalter
Milch (6 - 10°C.).
Verbinden Sie die Spezialdüse und
die Edelstahl-Röhre mit dem Verbindungsschlauch.
Bedienung und Wartung / SERIE EA 80xx
SVENSKA
NORSK
SUOMI
23
ITALIANO
Page 26

KRUPS Espresseria Automatic
Cappuccino oder Café Latte zubereiten mit dem Auto-Cappuccino Set
Drücken Sie die Dampftaste (5).
Das Gerät heizt auf.
Am Display erscheint dann die Aufforderung, ein Gefäß unter die Dampfdüse zu
stellen.
Stellen Sie eine Cappuccinotasse unter
die Spezialdüse und drücken Sie die
Dampftaste.
Sobald die Dampfabgabe startet, wird die
Restzeit in Sekunden angezeigt. Sie können nun...
A) ... mit dem Drehknopf die angezeigte
Zeit verlängern / verkürzen und/oder warten, bis die Schaumabgabe stoppt.
B) ... die Dampfabgabe jederzeit beenden:
Drücken Sie die Dampftaste.
!
Wichtig: Die Schaumabgabe stoppt nicht
sofort, wenn Sie die Dampftaste drücken.
Brechen Sie den Vorgang daher rechtzeitig
ab, da sonst die Tasse überlaufen könnte.
Entnehmen Sie die Cappuccinotasse und
stellen Sie sie unter den Kaffeeauslauf.
Geben Sie einen Espresso dazu, wie in
Kap. 4.2 beschrieben.
Entnehmen Sie die Tasse und geben Sie
nach Belieben Zucker oder Schokostreusel dazu.
Wir empfehlen die unmittelbare Reinigung
der Spezialdüse nach jeder Verwendung.
Wenn die Reinigung nicht sofort erfolgt,
lässt sich die angetrocknete Milch später
schwerer entfernen.
Zerlegen Sie die Düse (s. Abb.) und reinigen Sie die Teile mit einer kleinen Spülbürste und ggf. etwas Spülmittel. Die
kleine Öffnung (s. Kreis) ggf. mit dem Reinigungsdraht (s. Lieferumfang) säubern.
24
Bedienung und Wartung / SERIE EA 80xx
!
Hinweis: Für einen Café Latte drehen Sie
das Mittelteil der Spezialdüse um 180° (s.
oben).
Page 27

KRUPS Espresseria Automatic
4.5 Funktion 2 Tassen
Sie können zwei Tassen eines gewünschten Getränks zubereiten, also die
doppelte eingestellte Menge.
Stellen Sie zwei Tassen unter den Kaf-
feeauslauf und regulieren Sie ggf. dessen
Position.
Wählen Sie das gewünschte Getränk mit
dem Drehknopf (3). Drücken Sie nun
schnell hintereinander zwei Mal auf „OK“.
Eine Anzeige teilt Ihnen mit, dass Sie zwei
Tassen angefordert haben.
!
Hinweis: Sie können die Funktion
durch Drücken einer Taste während des
Kaffeeauslaufs abbrechen.
DEUTSCH
Die Maschine führt die Abgabe der jeweiligen Zyklen hintereinander durch.
ENGLISH
FRANCAIS
NEDERLANDS
2 x drücken
DANSK
Warten Sie, bis beide Brühvorgänge ab-
geschlossen sind und entnehmen Sie
dann die Tassen.
!
Hinweis: Vor Beginn eines 2-Tassen-
Zyklus kann das Ausleeren des Kaffeesatzbehälters verlangt werden. Nach der
Ausführung der notwendigen Schritte
führt sich der 2-Tassen-Zyklus automatisch aus.
Bedienung und Wartung / SERIE EA 80xx
i
Info: Für die Funktion "Doppelter Kaf-
fee" ist ein zusätzlicher Doppelzyklus
nicht möglich.
SVENSKA
NORSK
SUOMI
25
ITALIANO
Page 28

KRUPS Espresseria Automatic
4.6 Heißes Wasser zubereiten
Ihr Gerät stellt Ihnen auch die Möglichkeit
zur Verfügung, heißes Wasser zu entnehmen, z. B. um einen zu starken Kaffee
Drücken Sie im Getränkeauswahlmenü
die Heißwassertaste (6).
Am Display erscheint die Aufforderung, ein
Gefäß unter die Dampfdüse zu stellen.
Stellen Sie ein Gefäß unter.
Drücken Sie erneut die Heißwassertaste
und stellen Sie die gewünschte Wassermenge mit dem Drehknopf ein.
!
Hinweis: Sie können die Wasserab-
gabe jederzeit durch Drücken einer beliebigen Taste abbrechen.
etwas zu verdünnen. Die maximale Abgabe je Zyklus beträgt 300 ml.
1. Drücken
2. Wählen
26
Bedienung und Wartung / SERIE EA 80xx
Page 29

KRUPS Espresseria Automatic
5 Wartung und Reinigung
Gefahr: Bei Berührung elektrisch
leitfähiger Teile mit Wasser besteht Lebensgefahr durch elektrischen Strom!
Ziehen Sie den Netzstecker des Gerätes,
bevor Sie Reinigungsarbeiten
durchführen und lassen Sie das Gerät
vorher abkühlen.
Leeren Sie den Abtropfbehälter aus,
bevor Sie das Gerät transportieren oder
5.1 Regelmäßige Wartungstätigkeiten
Folgende Komponenten des Gerätes
müssen regelmäßig gewartet werden:
Der Kaffeesatzbehälter (7): Der Behälter nimmt das verbrauchte Kaffeemehl
auf. Am Display erscheint eine Anzeige,
wenn der Behälter geleert werden muss.
Dies ist nach etwa 9 Kaffees der Fall. Gelegentlich sollten Sie den Behälter unter
fließendem Wasser reinigen.
Anschließend gut trocknen.
!
Wichtig: Leeren Sie den Kaffeesatz-
behälter immer vollständig aus, um ein
Überlaufen zu vermeiden. Wenn dieser
danach nicht korrekt eingesetzt wurde,
bleibt die Displayanzeige.
Wird der Behälter nach weniger als 6 Sekunden wieder eingesetzt, müssen Sie
die Leerung mit „OK“ bestätigen. Solange die Displaymeldung angezeigt wird,
ist keine Zubereitung möglich.
Der Reinigungsschieber (8): Mit dem
Schieber entfernen Sie Kaffeesatzreste
im Gerät. Ziehen Sie den Schieber heraus, bevor Sie den Kaffeesatzbehälter
ausleeren. Bei stärkeren Verschmutzungen waschen Sie ihn unter fließendem
Wasser und trocknen ihn dann.
Der Abtropfbehälter (23): Der Behälter
nimmt verbrauchtes Wasser sowie evtl.
bei der Zubereitung verschüttetes Wasser auf. Das Display zeigt an, wenn der
Bedienung und Wartung / SERIE EA 80xx
neigen, da andernfalls das Wasser oder
Reinigungs- bzw. Entkalkungsflüssigkeit
ausläuft.
i
Tipp: Da bei Reinigung oder Entkal-
kung der Dampfdüse das entweichende
Wasser ggf. stark spritzt, legen
Sie ein Papiertuch über den
Auffangbehälter und die Dampfdüse.
Behälter geleert werden muss. Außerdem
hat das Gerät eine mechanische
Wasserstandsanzeige (22). Reinigen
Sie den Behälter bei Verschmutzung
unter fließendem Wasser.
Kaffeekreislauf: Die Leitungen des
Kaffeekreislaufs sollten gespült werden,
wenn das Gerät einige Tage nicht benutzt
wurde.
Das Programm fragt nach jedem Einschalten, ob Sie eine Spülung möchten
(Spülvorgang s. Kap. 3.4).
Die Dampfdüse (21): nach mehrfacher
Verwendung gründlich reinigen: Nehmen
Sie die Dampfdüse ab und reinigen Sie
diese unter fließendem Wasser. Die Düse
kann dazu zerlegt werden (s. Abb.). Verwenden Sie eine Spülbürste und etwas
Spülmittel.
Trocknen Sie die Teile und stellen Sie
sicher, dass die Luftöffnungen frei sind.
Zur Beseitigung von Verstopfungen ist
im Lieferumfang ein Reinigungsdraht
enthalten.
27
DEUTSCH
ENGLISH
FRANCAIS
NEDERLANDS
DANSK
SVENSKA
NORSK
SUOMI
ITALIANO
Page 30

KRUPS Espresseria Automatic
!
!
!
5.2 Das Reinigungsprogramm
Das Programm Ihres Gerätes weist Sie
mit einer Displayanzeige darauf hin, wenn
das Reinigungsprogramm durchgeführt
werden muss. Dies ist nach etwa 360
Zubereitungen der Fall.
Zur Durchführung benötigen Sie ein
Gefäß mit einem Fassungsvermögen von
0,6 Litern, das unter den Kaffeeauslauf
passt und eine KRUPS-Reinigungspastille (XS 3000).
Das automatische Reinigungsprogramm
umfasst 3 Phasen: ein Reinigungszyklus
und zwei Spülzyklen. Das Programm
dauert etwa 20 Minuten.
i
Info: Sie können unabhängig von der
Gerätemeldung jederzeit im Menü „Wartung / Reinigung“ einen solchen Reinigungsdurchlauf starten.
tieansprüche zu wahren, ist es unbedingt
notwendig, einen Reinigungszyklus
durchzuführen, sobald dies von der Maschine angezeigt wird. Halten Sie sich
dabei genau an die beschriebene Vorgehensweise.
nicht sofort ausführen, sollten allerdings
das Reinigungsprogramm zeitnah durchführen und ausschließlich die KRUPSReinigungspastillen (XS 3000)
verwenden, da es andernfalls zu Schäden
am Gerät kommen kann, die von der Garantie ausgeschlossen sind. Die Reinigungspastillen erhalten Sie beim
KRUPS-Kundendienst.
Durchführen des Reinigungsprogramms
Halten Sie ein Gefäß mit mind. 0,6 Litern
Fassungsvermögen bereit.
Vorsicht: Schützen Sie Ihre Arbeitsplatte
gegen evtl. Verschütten der Reinigungslösung, besonders wenn diese aus Marmor,
Stein oder Holz ist. Legen Sie den Bereich
unter dem Abtropfbehälter ausreichend
mit z. B. Papiertüchern aus.
Vorsicht: Um sämtliche Garan-
Vorsicht: Sie müssen den Vorgang
Wenn die Anzeige „Reinigung notwendig
...“ erscheint, drücken Sie die ProgrammTaste (2), um zum Reinigungs-Menü zu
wechseln.
Starten Sie das Reinigungsprogramm
durch Auswahl von „beginnen“ und
Drücken auf „OK“ und folgen Sie genau
den Anweisungen am Display.
Sie werden aufgefordert, die „Klappe“ zu
öffnen.
Öffnen Sie die Wartungsklappe (17).
Geben Sie die Reinigungspastille in die
Reinigungsöffnung (16).
!
Wichtig: Führen Sie das Programm voll-
ständig durch.
28
Bedienung und Wartung / SERIE EA 80xx
Page 31

KRUPS Espresseria Automatic
!
!
!
Hinweis: Das Programm arbeitet mit Un-
terbrechungen. Warten Sie unbedingt, bis
es vollständig beendet ist (nach etwa 20
Minuten).
Das Programm zeigt am Display an, wenn es beendet ist.
Vorsicht: Wenn das Programm
durch einen Stromausfall oder durch versehentliches Ausschalten des Gerätes
abgebrochen wird, muss es neu gestartet
und vollständig ausgeführt werden.
Vorsicht: Vermeiden Sie den Kontakt mit
der auslaufenden Reinigungsflüssigkeit, da
diese gesundheitsschädliche Substanzen enthält.
Die Pastillen von Kindern fernhalten!
Dazu ist auch eine neue Reinigungspastille zu verwenden. Die vollständige
Durchführung ist nötig, um den Wasserkreislauf zu spülen und die gesundheitsschädlichen Reste des Reinigungsmittels
zu entfernen.
DEUTSCH
ENGLISH
FRANCAIS
NEDERLANDS
DANSK
SVENSKA
NORSK
SUOMI
Bedienung und Wartung / SERIE EA 80xx
29
ITALIANO
Page 32

KRUPS Espresseria Automatic
!
!
!
5.3 Das Entkalkungsprogramm
Das Programm Ihres Gerätes weist Sie
mit einer Displayanzeige darauf hin, wenn
eine Entkalkung durch das Entkalkungsprogramm erforderlich ist. Dies wird bei
sehr kalkhaltigem Wasser häufiger nötig
sein, als bei weichem Wasser.
Zur Durchführung benötigen Sie ein
Gefäß mit einem Fassungsvermögen von
0,6 Litern, das unter Kaffeeauslauf und
Dampfdüse passt und einen Beutel (40
g) KRUPS-Entkalker (F 054). Alternativ
können Sie Zitronen- oder Weinsäure zur
Entkalkung verwenden.
Das automatische Entkalkungsprogramm
umfasst 3 Phasen: ein Entkalkungszyklus
und zwei Spülzyklen. Das Programm
dauert etwa 22 Minuten.
Vorsicht: Um sämtliche Garantieansprüche zu wahren, ist es unbedingt
notwendig, einen Entkalkungszyklus
durchzuführen, sobald dies von der Ma-
schine angezeigt wird. Halten Sie sich
dabei genau an die beschriebene Vorgehensweise.
nicht sofort ausführen, sollten das Entkalkungsprogramm allerdings zeitnah
durchführen und ausschließlich den
KRUPS-Entkalker (F 054) verwenden, da
es andernfalls zu Schäden am Gerät
kommen kann, die von der Garantie ausgeschlossen sind. Den Entkalker erhalten
Sie beim KRUPS-Kundendienst. Verwenden Sie keinesfalls herkömmliche Amidosulfonsäure oder Produkte, die diese
Säure enthalten.
Durchführen des Entkalkungsprogramms
Vorsicht: Sie müssen den Vorgang
Stellen Sie ein Gefäß mit mind. 0,6 Litern
Fassungsvermögen unter die Kaffeeausläufe und die Dampfdüse.
Vorsicht: Schützen Sie Ihre Arbeitsplatte
gegen evtl. Verschütten der Entkalkungslösung, besonders wenn diese aus Marmor,
Stein oder Holz ist. Legen Sie den Bereich
unter dem Abtropfbehälter ausreichend
mit z. B. Papiertüchern aus.
Wenn die Anzeige „Entkalkung notwen-
dig...“ erscheint, drücken Sie die Programm-Taste (2), um zum EntkalkungsMenü zu wechseln.
Entfernen Sie den Krups Aqua Filter
F088, wenn vorhanden, vor der Entkalkung und füllen Sie den Wasserbehälter
bis zur Markierung Calc (0,5l) mit lauwarmen Wasser.
Starten Sie das Entkalkungsprogramm-
durch Auswahl von „beginnen“ undDrücken auf „OK“.
30
Bedienung und Wartung / SERIE EA 80xx
Page 33
KRUPS Espresseria Automatic
!
!
!
Folgen Sie genau den Anweisungen am
Display.
Sie werden aufgefordert, den Entkalker im
Wasserbehälter aufzulösen.
Rühren Sie das Wasser im Wasserbehäl-
ter mit einem langstieligen Löffel oder
Kochlöffel durch oder entnehmen Sie den
Wasserbehälter und kippen Sie ihn vorsichtig nach rechts und links, bis der
Entkalker gelöst ist.
Führen Sie das Programm vollständig
durch.
!
Hinweis: Das Programm arbeitet mit
Unterbrechungen. Warten Sie unbedingt,
bis es vollständig beendet ist (nach etwa
22 Minuten).
Das Programm zeigt am Display an, wenn es beendet ist.
Vorsicht: Wenn das Programm
durch einen Stromausfall oder durch
versehentliches Ausschalten des Gerätes
abgebrochen wird, muss es neu
gestartet und vollständig ausgeführt
werden.
Vorsicht: Vermeiden Sie den
Kontakt mit der auslaufenden Entkalkungsflüssigkeit, da diese aggressive Substanzen ent-
hält. Den Entkalker von Kindern fernhalten!
Dazu ist auch die Zugabe von neuem
Entkalker notwendig. Dies ist nötig, um
den Wasserkreislauf zu spülen und die
gesundheitsschädlichen Reste des
Entkalkungsmittels zu entfernen.
DEUTSCH
ENGLISH
FRANCAIS
NEDERLANDS
DANSK
Allgemeine Hinweise
Reinigen Sie den Reinigungsschieber
(8), den Abtropfbehälter (23) und den
Kaffeesatzbehälter (7) unter fließendem Wasser. Verwenden Sie ggf. etwas
Spülmittel.
Spülen Sie den Wassertank (10) mit
klarem Wasser aus.
Reinigen Sie das Gehäuse des Gerätes
sowie die Komponenten und Zubehörteile mit einem leicht feuchten Tuch.
Bedienung und Wartung / SERIE EA 80xx
Verwenden Sie keine scharfen Reinigungs-bzw. Scheuermittel.
Vorsicht: Diese Teile sind nicht spül-
maschinengeeignet.
SVENSKA
NORSK
SUOMI
31
ITALIANO
Page 34
KRUPS Espresseria Automatic
6 Fehlerliste
Wenn beim Betrieb Ihres Gerätes Störungen auftreten, versuchen Sie zunächst, das Problem anhand dieser
Fehlerliste zu beheben. Wenn dies nicht
zur Lösung des Problems führt, wenden
Sie sich an unsere Hotline (s. Kap. 10).
Problem/Fehler Mögliche Ursache(n) Abhilfe
Gefahr: Lassen Sie Reparaturen am
Netzkabel bzw. am 230V-Stromnetz nur
von einer qualifizierten Fachkraf durchführen. Andernfalls besteht Lebensgefahr
durch elektrischen Strom! Nehmen Sie
das Gerät bei sichtbaren Beschädigungen nicht in Betrieb!
Das Gerät schaltet
sich nach Drücken
der Netzstrom-Taste
nicht ein.
Der Espresso oder
der Kaffee ist nicht
heiß genug.
Der Kaffee ist zu
dünn oder hat zu
wenig Aroma.
Der Kaffee läuft zu
langsam durch.
Der Kaffee hat zu
wenig Crema.
Stromausfall oder defekte Haussi-
cherung
Der Netzstecker sitzt nicht korrekt in
der Steckdose oder die 230V-Netzsteckdose ist defekt.
Das Gerät ist defekt.
Die Kaffeetemperatur ist zu
niedrig eingestellt.
Die Kaffeetasse ist kalt.
Zu wenig Kaffee im Kaffeebohnenbehälter (15).
Die Mahlstärke ist zu grob.
Die zubereitete Kaffeemenge
ist zu hoch.
Die Mahlstärke ist zu fein.
Die Mahlstärke ist zu grob.
Überprüfen Sie die Haushaltssi-
cherungen.
Korrigieren Sie den Sitz des
Netzsteckers oder lassen Sie die
Steckdose instand setzen.
Lassen Sie das Gerät von qualifiziertem Fachpersonal überprüfen.
Prüfen Sie die Kaffeetemperatur im Menü „Einstellungen“.
Spülen Sie die Tasse vor
der Zubereitung mit heißem
Wasser.
Füllen Sie Kaffeebohnen
nach.
Mahlstärke mit dem Verstellknopf (13) reduzieren.
Reduzieren Sie die Kaffeemenge mit dem Drehknopf (3).
Die Mahlstärke mit dem
Verstellknopf (13) erhöhen.
Die Mahlstärke mit dem
Verstellknopf (13) reduzieren.
Sie haben versehentlich gemahlenen Kaffee in den
Kaffeebohnenbehälter gefüllt.
32
Bedienung und Wartung / SERIE EA 80xx
Saugen Sie den Kaffee
mit einem Staubsauger aus
dem Behälter ab.
Page 35
KRUPS Espresseria Automatic
Problem/Fehler Mögliche Ursache(n) Abhilfe
Aus einer Röhre des
Kaffeeauslaufs (20)
läuft kein Kaffee
Die Kaffeemühle
gibt anormale Geräusche von sich.
Der Verstellknopf für
die Mahlstärke (13)
lässt sich schwer drehen.
Aus der Dampfdüse
(21) tritt kein Dampf
aus.
Sie erhalten nicht
genügend Milchschaum.
Der Milchschaum ist
nicht fein genug.
Die Röhre ist verstopft
Es befindet sich ein Fremdkörper
im Mahlwerk.
Haben Sie den Verstellknopf
außerhalb des Mahlvorgangs
gedreht?
Die Düse oder die Düsenhalterung
ist verstopft.
Beobachten Sie, ob Dampf
aus der Dampfdüse austritt.
Prüfen Sie, ob die kleine Öffnung
für den Lufteintritt im oberen
Teil der Düse verstopft ist.
Behälter und Milch nicht kühl
genug.
Prüfen Sie, ob die zwei Enden der
kleinen Edelstahlröhre an der Verbindungsstelle der Dampfdüse korrekt zusammengesteckt sind.
Reinigen Sie die Röhre mit dem
Reinigungsdraht oder einem
Zahnstocher.
Wenden Sie sich an die
Verbraucherabteilung von
KRUPS.
Den Verstellknopf nur
während des Mahlvorgangs
drehen.
Nehmen Sie die Dampfdüse
von der Halterung ab und reinigen Sie beides mit dem Reinigungsdraht.
Entfernen Sie den Krups Aqua
Filter F088 kurzzeitig.
Reinigen Sie die Dampfdüse
mit dem Reinigungsdraht.
Reinigen Sie die Öffnung
und trocknen Sie evtl. Wasserspuren.
Behälter und Milch vor der Zubereitung kühlen.
Wir empfehlen den Gebrauch
halbfetter Milch aus einer frisch
angebrochenen Flasche.
Korrigieren Sie die Position
der Edelstahlröhre.
DEUTSCH
ENGLISH
FRANCAIS
NEDERLANDS
DANSK
Das Auto-Cappuccino Set (nicht alle
Modelle) saugt die
Milch nicht an.
Nach dem Füllen
des Wassertanks
(10) bleibt die Aufforderung am Display, diesen zu
füllen.
Das Reinigungsoder das Entkalkungsprogramm
startet nicht.
Prüfen Sie, ob die Zubehörteile
korrekt zusammengesteckt sind und ob
sie ggf. verstopft sind.
Der Wassertank ist nicht
korrekt eingesetzt.
Der Schwimmer am Boden
des Tanks ist nicht frei.
Der Wassertank ist verkalkt.
Programmfehler.
Stecken Sie die Teile
korrekt zusammen und
reinigen Sie sie bei Verstopfung.
Korrigieren Sie die
Position des Wassertanks.
Spülen Sie den Wassertank
mit Wasser aus und
führen Sie ggf. eine Entkalkung
durch.
Netzstecker ziehen,
wieder einstecken und das
Gerät wieder in Betrieb
nehmen. Wiederholen Sie
den Programmstart.
Bedienung und Wartung / SERIE EA 80xx
SVENSKA
NORSK
SUOMI
33
ITALIANO
Page 36

KRUPS Espresseria Automatic
!
Problem/Fehler Mögliche Ursache(n) Abhilfe
Nach dem Leeren
des Kaffeesatzbehälters (7) bleibt die
Aufforderung am
Display, diesen zu
leeren.
Nach der Reinigung
des Reinigungsschiebers (8) bleibt
die Aufforderung am
Display, diesen zureinigen.
Während eines
Programmzyklus
wurde der Strom
unterbrochen.
Unter dem Gerät
sammelt sich Wasser.
Es erscheint eine
Anzeige am Display:
„Fehler Nr. xxx“.
Der Kaffeesatzbehälter ist
nicht korrekt eingesetzt.
Der Kaffeesatzbehälter wurde
zu schnell eingesetzt.
Der Reinigungsschieber ist
nicht korrekt eingesetzt.
Der Reinigungsschieber
wurde zu schnell eingesetzt.
Der Abtropfbehälter (23) ist nicht
korrekt eingesetzt oder läuft über.
Programmfehler.
Korrigieren Sie die
Position des Kaffeesatzbehälters.
Warten Sie generell mindestens
6 Sekunden, bevor Sie den geleerten Behälter wieder einsetzen.
Korrigieren Sie die Position
des Reinigungsschiebers.
Warten Sie generell mindestens 8 Sekunden, bevor Sie den
Reinigungsschieber wieder einsetzen.
Das Gerät stellt sich nach
erneutem Einschalten automatisch wieder ein.
Prüfen Sie den Sitz des
Abtropfbehälters und leeren
Sie ihn ggf. aus.
Ziehen Sie den Netzstecker,
entfernen Sie gegebenenfalls
auch den Krups Aqua Filter
F088 und warten Sie 20 Sekunden, dann nehmen Sie das
Gerät wieder in Betrieb.
Sollte der Fehler weiterhin
angezeigt werden, notieren
Sie die Fehlernummer und
wenden sich an den Kundendienst von KRUPS.
i
Tipp: Störungen des Programms lassen sich häufig beheben, indem Sie das
Gerät ausschalten und nach etwa 1 Minute wieder einschalten.
Vorsicht: Keine Manipulationen am Gerät vornehmen!
34
Bedienung und Wartung / SERIE EA 80xx
Page 37
KRUPS Espresseria Automatic
!
7 Technische Daten
Gerät: Espresseria Automatic
Stromversorgung: 220-240V~ / 50 Hz
Leistungsaufnahme: Betrieb: 1450 W
Standby: < 1 W
Fassungsvermögen: Wassertank: 1,8 l
Kaffeebohnenbehälter: 275 g
Pumpendruck: 15 bar
Lagerung und Betrieb: In trockenen Innenräumen (frostfrei)
Abmessungen (B x H x T): 24,5 x 36,5 x 33,0 cm
Gewicht: 7, 3 kg
Technische Änderungen vorbehalten.
8 Transport
Bewahren Sie die Original-Verpackung
auf, um das Gerät zu transportieren.
Leeren Sie den Abtropfbehälter (23),
wenn Sie das Gerät zu einem anderen
Standort tragen und leeren Sie alle
Behälter, wenn das Gerät zum Transport
verpackt wird.
Vorsicht: Wenn das Gerät beim
Transport ohne Verpackung zu Boden
gefallen ist, sollte es zu einer autorisierten Servicestelle zur Prüfung gebracht
werden. Andernfalls bestehen bei Defekten Gefahren durch Brand sowie Gefahren durch elektrischen Strom.
9 Entsorgung
Das Symbol auf dem
Produkt oder seiner
Verpackung weist darauf hin,
dass das Produkt nicht über
den normalen Hausmüll entsorgt werden
darf. Benutzer sind verpflichtet, die
Altgeräte an einer Rücknahmestelle für
Elektro- und Elektronik-Altgeräte abzugeben.
Die getrennte Sammlung und
ordnungsgemäße Entsorgung Ihrer
Altgeräte trägt zur Erhaltung der natürlichen Ressourcen bei und garantiert
eine Wiederverwertung, die die Gesund-
heit des Menschen schützt und die
Umwelt schont. Informationen, wo Sie
Rücknahmestellen für Ihre Altgeräte
finden, erhalten Sie bei Ihrer Stadtverwaltung, den örtlichen MüllentsorgungsBetrieben oder im Geschäft, in
dem Sie das Gerät erworben haben.
i
Info: Ihr Gerät enthält wertvolle
Rohstoffe, die wieder verwertet werden
können.
DEUTSCH
ENGLISH
FRANCAIS
NEDERLANDS
DANSK
SVENSKA
NORSK
SUOMI
Bedienung und Wartung / SERIE EA 80xx
35
ITALIANO
Page 38

KRUPS Espresseria Automatic
10 Service
Bei Fragen oder Problemen kontaktieren Sie bitte unsere gebührenfreie Hotline:
D: Tel. 0800 - 980 00 00
Öffnungszeiten: Mo. - Fr. von 08:00 - 18:00 Uhr und Sa.von 9:00 - 14:00 Uhr
A: Tel. 0800 - 225 225
Öffnungszeiten: Mo. - Fr. von 08:00 - 18:00 Uhr und Sa.von 9:00 - 14:00 Uhr
B: Tel. 070 - 223 159
Öffnungszeiten: Mo. - Fr. von 09.00 - 12.00 Uhr und von 13:00 - 17:00 Uhr
Fr. von 09.00 - 12.00 Uhr
CH: Tel. 0800 - 37 77 37
Öffnungszeiten: Mo. - Fr. von 08:00 - 18:00 Uhr
FR: Tel. 0810 61 10 61
Öffnungszeiten: Mo. - Do von 08:30 - 18:30 Uhr, Fr. von 08:30 - 17:00 Uhr
GB: Tel. 0845 330 6460
ROI: Tel. (01) 677 4003
NL: Tel. 0318 58 24 24
Öffnungszeiten: Mo. - Do von 08:30 - 16:30 Uhr, Fr. von 08:30 - 16:00 Uhr
Fr 08.30-12.15 / 13.00-14.45 Uhr
DK: Tel. 44 66 31 55
Öffnungszeiten: Mo. - Do von 08:30 - 16:30 Uhr, Fr. von 08:30 - 16:00 Uhr
SV: Tel. 08 594 213 30
Öffnungszeiten: Mo. - Do von 08:30 - 16:30 Uhr, Fr. von 08:30 - 16:00 Uhr
NO: Tel. 815 09 567
Öffnungszeiten: Mo. - Do von 08:30 - 16:30 Uhr, Fr. von 08:30 - 16:00 Uhr
FI: Tel. 09 6229 420
11 Index
Auto-Cappuccino Set.............................23
Bedienprinzip...........................................10
Bedienteile..................................................9
Bedienung.................................................20
Bestimmungsgemäße Verwendung ..........8
Café Latte zubereiten ............................24
Cappuccino zubereiten .........................22
Dampfdüse.........................................20, 22
- reinigen.............................................22, 27
Displayanzeigen......................................10
Entkalkungsprogramm..........................30
Entsorgung ...............................................35
Espresso zubereiten ..............................21
Fehlerliste.................................................32
Filterpatrone einsetzen ........................12
Funktion 2 Tassen...................................25
Funktionsübersicht...................................9
Gerät einschalten....................................20
Gerät vorbereiten....................................13
Geräte-Übersicht.......................................9
Grundeinstellung ....................................14
Heißes Wasser zubereiten ...................26
Inbetriebnahme.......................................11
Kaffee zubereiten...................................21
36
Bedienung und Wartung / SERIE EA 80xx
Bedienung und Wartung / SERIE EA 80xx
Lieferumfang ..............................................8
Mahlwerk einstellen...............................16
Menü "Getränkeauswahl".....................19
Menü „Demo Modus“ ............................19
Menü „Einstellungen“ ...........................17
Menü „Produktinfos“.............................18
Menü „Wartung“......................................17
Menüauswahl...........................................16
Produkt-Info ...............................................5
Reinigung............................................27, 31
Reinigungsprogramm............................28
Service .......................................................36
Sicherheitshinweise.................................6
Signalworte ................................................5
Spezialdüse..............................................23
- reinigen ...................................................24
Spülen........................................................15
Symbole.......................................................5
Technische Daten....................................35
Transport ...................................................35
Wartung.....................................................27
Wasserhärte .............................................11
Wegweiser...................................................5
Page 39

KRUPS
DEUTSCH
ESPRESSERIA AUTOMATIC
SERIE EA 80XX
ENGLISH
FRANCAIS
NEDERLANDS
DANSK
SVENSKA
Use and maintenance
NORSK
SUOMI
ITALIANO
Page 40

KRUPS Espresseria Automatic
Important
!
Read these instructions carefully and keep them.
Please follow the safety guidelines.
Manufacturer
SAS Groupe SEB Moulinex
Rue Saint-Léonard
53104 Mayenne
France
2
Use and maintenance / SERIE EA 80xx
Page 41

KRUPS Espresseria Automatic
Contents
1 Important information on the appliance and instructions . . . . . . . . . .5
1. 1 Yo ur Au tom at ic Es pre ss er ia . . . . . . . . . . . . . . . . . . . . . . . . . . . . . . . . . . . . . . . . . . . . . . . . . . . . . .5
1.2 Guide to the symbols used in the instructions . . . . . . . . . . . . . . . . . . . . . . . . . . . . .5
1.3 Safety guidelines . . . . . . . . . . . . . . . . . . . . . . . . . . . . . . . . . . . . . . . . . . . . . . . . . . . . . . . . . . . . . . . . . . . . .6
1.4 Correct use . . . . . . . . . . . . . . . . . . . . . . . . . . . . . . . . . . . . . . . . . . . . . . . . . . . . . . . . . . . . . . . . . . . . . . . . . . . .8
1.5 Products supplied with your machine . . . . . . . . . . . . . . . . . . . . . . . . . . . . . . . . . . . . . . . . .8
1.6 Factory check . . . . . . . . . . . . . . . . . . . . . . . . . . . . . . . . . . . . . . . . . . . . . . . . . . . . . . . . . . . . . . . . . . . . . . . . . .8
2 Overall view of your Automatic Espresseria
and its operation . . . . . . . . . . . . . . . . . . . . . . . . . . . . . . . . . . . . . . . . . . . . . . . . . . . . . . . . . . . . . . . . . . .9
2.1 Controls of the appliance . . . . . . . . . . . . . . . . . . . . . . . . . . . . . . . . . . . . . . . . . . . . . . . . . . . . . . . . . .9
2.2 Screen and operation . . . . . . . . . . . . . . . . . . . . . . . . . . . . . . . . . . . . . . . . . . . . . . . . . . . . . . . . . . . .10
3 First use of your Automatic Espresseria . . . . . . . . . . . . . . . . . . . . . . . . . . . . .11
3.1 Before first use (optional) . . . . . . . . . . . . . . . . . . . . . . . . . . . . . . . . . . . . . . . . . . . . . . . . . . . . . . .11
3.2 Preparing the appliance . . . . . . . . . . . . . . . . . . . . . . . . . . . . . . . . . . . . . . . . . . . . . . . . . . . . . . . . .13
3.3 Initial settings . . . . . . . . . . . . . . . . . . . . . . . . . . . . . . . . . . . . . . . . . . . . . . . . . . . . . . . . . . . . . . . . . . . . . . . .1 4
3.4 Rinsing the coffee circuit . . . . . . . . . . . . . . . . . . . . . . . . . . . . . . . . . . . . . . . . . . . . . . . . . . . . . . . .15
3.5 Setting the grinder . . . . . . . . . . . . . . . . . . . . . . . . . . . . . . . . . . . . . . . . . . . . . . . . . . . . . . . . . . . . . . . . .1 6
3.6 The menus . . . . . . . . . . . . . . . . . . . . . . . . . . . . . . . . . . . . . . . . . . . . . . . . . . . . . . . . . . . . . . . . . . . . . . . . . . . .16
4 Use . . . . . . . . . . . . . . . . . . . . . . . . . . . . . . . . . . . . . . . . . . . . . . . . . . . . . . . . . . . . . . . . . . . . . . . . . . . . . . . . . .20
4.1 Switching on the appliance . . . . . . . . . . . . . . . . . . . . . . . . . . . . . . . . . . . . . . . . . . . . . . . . . . . . .20
4.2 Preparing an espresso or a coffee . . . . . . . . . . . . . . . . . . . . . . . . . . . . . . . . . . . . . . . . . . .21
4.3 Preparing a cappuccino . . . . . . . . . . . . . . . . . . . . . . . . . . . . . . . . . . . . . . . . . . . . . . . . . . . . . . . . .22
4.4 Using the auto-cappuccino accessory (optional) . . . . . . . . . . . . . . . . . . . . . . .23
4.5 2-cup function . . . . . . . . . . . . . . . . . . . . . . . . . . . . . . . . . . . . . . . . . . . . . . . . . . . . . . . . . . . . . . . . . . . . . . .25
4.6 Preparation of hot water . . . . . . . . . . . . . . . . . . . . . . . . . . . . . . . . . . . . . . . . . . . . . . . . . . . . . . . . .26
5 Maintenance and cleaning . . . . . . . . . . . . . . . . . . . . . . . . . . . . . . . . . . . . . . . . . . . . . . . .27
5.1 Regular maintenance . . . . . . . . . . . . . . . . . . . . . . . . . . . . . . . . . . . . . . . . . . . . . . . . . . . . . . . . . . . . .27
5.2 The cleaning programme . . . . . . . . . . . . . . . . . . . . . . . . . . . . . . . . . . . . . . . . . . . . . . . . . . . . . . . .28
5.3 The descaling programme . . . . . . . . . . . . . . . . . . . . . . . . . . . . . . . . . . . . . . . . . . . . . . . . . . . . . .3 0
6 Troubleshooting . . . . . . . . . . . . . . . . . . . . . . . . . . . . . . . . . . . . . . . . . . . . . . . . . . . . . . . . . . . . . . .32
7 Technical data . . . . . . . . . . . . . . . . . . . . . . . . . . . . . . . . . . . . . . . . . . . . . . . . . . . . . . . . . . . . . . . . . .35
8 Transport . . . . . . . . . . . . . . . . . . . . . . . . . . . . . . . . . . . . . . . . . . . . . . . . . . . . . . . . . . . . . . . . . . . . . . . . . .35
9 Dis pos al of wa st e . . . . . . . . . . . . . . . . . . . . . . . . . . . . . . . . . . . . . . . . . . . . . . . . . . . . . . . . . . . .35
10 Service . . . . . . . . . . . . . . . . . . . . . . . . . . . . . . . . . . . . . . . . . . . . . . . . . . . . . . . . . . . . . . . . . . . . . . . . . . .3 6
11 Index . . . . . . . . . . . . . . . . . . . . . . . . . . . . . . . . . . . . . . . . . . . . . . . . . . . . . . . . . . . . . . . . . . . . . . . . . . . . . .3 6
Use and maintenance / SERIE EA 80xx
DEUTSCH
ENGLISH
FRANCAIS
NEDERLANDS
DANSK
SVENSKA
NORSK
SUOMI
3
ITALIANO
Page 42

KRUPS Espresseria Automatic
4
Use and maintenance / SERIE EA 80xx
Page 43

KRUPS Espresseria Automatic
!
!
!
1 Important information on the appliance and instructions
You will find in this manual all of the important information concerning the preparation, use and maintenance of your automatic espresso/coffee maker. Important safety guidelines are also included.
Read these instructions carefully before using the appliance for the first time and
keep them: Krups may not be held responsible for any incorrect use.
1.1 Your Automatic Espresseria
Espresso or lungo, ristretto or cappuccino, your automatic espresso/coffee
maker has been designed to allow you to taste the same coffee at home as in
a coffee bar at any time of the day. With its Thermoblock System, 15 bar
pump and using only freshly ground coffee, your Automatic Espresseria will
allow you to make a full flavoured drink, topped with a deliciously thick, golden
froth, a product that comes from the natural oil of the coffee beans. Espresso
coffee has a richer aroma than a normal, filter coffee. In spite of its stronger
taste, stronger initially and longer lasting, espresso coffee in fact contains less
caffeine than filter coffee (approximately 20 mg less per cup). This is due to
the shorter percolation.
With its simplicity of use, the visibility of its tank/holder and its automatic cleaning and descaling programmes, your Automatic Espresseria will prove very
easy to use.
1.2 Guide to the symbols used in the instructions
Symbols and associated words used in these instructions
DEUTSCH
ENGLISH
FRANCAIS
NEDERLANDS
DANSK
Symbol
!
i
Associated word Meaning
Warning against risks of serious or fatal
Danger
Warning
Caution
Important
to Note
Tip
Use and maintenance / SERIE EA 80xx
injuries.
The lightning bolt symbol warns against
electrical dangers.
Warning against risks of slight injuries.
Warning against the risk of incorrect operation, damage or destruction of the appliance..
General or important note on the operation of the appliance.
Detailed information or advice on the use
of the appliance.
SVENSKA
NORSK
SUOMI
5
ITALIANO
Page 44

KRUPS Espresseria Automatic
!
1.3 Safety guidelines
Danger : These safety guidelines are intended to protect you and other persons
and the appliance. They must therefore be respected.
Conditions of use
• The appliance, the power cord and the
mains plug must not be brought into
contact with humidity or liquids. Any
contact of the conductive parts of the
appliance with humidity or water may
lead to fatal injuries due to the presence
of electricity! This appliance must only be
used indoors in dry areas.
• In the case of a change in the ambient
temperature, from cold to hot, wait for a
few hours before using your machine so
that it is not damaged by condensation.
• Avoid leaving the appliance in direct
sunlight, exposed to heat, cold, frost or
humidity.
• Do not place the appliance on a hot
surface such as a hob or close to a
naked flame, in order to avoid any risks of
fire !
Electrical power supply
Danger : Failing to respect these
guidelines may lead to fatal injuries due
to electricity !
• Check that the supply voltage marked
on the rating plate of the appliance is the
same as that of your electrical supply.
Only connect the appliance to an earthed
mains socket.
Voltage : 220-240V~/50 Hz.
• Ensure that the mains socket is easily
accessible so that the appliance may be
unplugged easily in the event of any
failure or a thunderstorm for example.
For the safety of the appliance, unplug it
from the socket during thunderstorms.
Do not pull the power cord but the plug
itself to unplug it
• Unplug it from the mains socket
immediately if any operational failure
occurs or if there is a problem with the
percolation.
Unplug the appliance when it is not to be
used for a long period.
• Do not use the appliance if the power
cord is damaged. Using a damaged
power cord or having your appliance
repaired incorrectly means that there is a
risk of electrical shock, fire or shortcircuit. Furthermore, the guarantee on the
appliance will be invalidated in such
conditions. The power cord must be
replaced by a Krups' Approved AfterSales Service Centre.
• Do not let the power cord dangle over
the edge of a table or a work top. Do not
leave the power cord close to or in
contact with the hot parts of the
appliance.
• We do not recommend the use of
extensions or multi-adapter plugs.
• Any incorrect connection invalidates the
guarantee.
6
Use and maintenance / SERIE EA 80xx
Page 45

KRUPS Espresseria Automatic
Children
• Keep the appliance out of the reach of
children.
• This appliance must not be used by
children or by persons with diminished
physical, mental or sensorial capacities
or lacking experience or knowledge. They
must be watched or be instructed by a
The appliance
• Do not pour water into the coffee bean
holder and/or under the maintenance
cover, as this may cause overflows.
• Except for cleaning and descaling as
described in the procedures in the
instructions for the appliance, all work on
the appliance must be carried out by a
KRUPS' Approved After-Sales Service
Centre.
• For your safety, only use KRUPS
approved accessories and consumables
for your appliance.
• Unplug the appliance when leaving the
room or the home for prolonged periods,
as in the event of a failure the appliance
may overheat and cause a fire.
• WARNING - Do not open the
appliance as there is a high risk of fatal
injury due to electricity! Any unauthorised
responsible person to ensure that they
can use the appliance in complete safety.
• Children must be watched by a
responsible person to ensure that they
do not use the appliance as a toy.
opening of the appliance invalidates the
guarantee. Do not use the appliance if it
is not operating correctly, if it has been
dropped, if it is leaking or if it has been
damaged. In this case, we recommend
having the appliance checked by a
KRUPS' Approved After-Sales Service
Centre (see list in the KRUPS service
handbook).
• For safety and approval (CE) reasons,
any transformation or modification of the
appliance, carried out by an individual, is
prohibited as only tested appliances have
been approved and the manufacturer is
absolved of all responsibility in the event
of damage.
DEUTSCH
ENGLISH
FRANCAIS
NEDERLANDS
DANSK
SVENSKA
Use and maintenance
• In the event of a problem or incorrect
operation, check the appliance and try to
resolve the problem (see chapter 6
Troubleshooting) or have the appliance
repaired if the problem persists. When
the appliance cannot operate without risk
of danger, unplug it from the mains
socket.
• Always refer to the instructions in this
manual for the descaling of the
Use and maintenance / SERIE EA 80xx
appliance. Unplug from the socket before
any cleaning or maintenance operation.
• In the case of descaling, cleaning or
regular maintenance not being carried
out or if there is a foreign particle in the
grinder, this is not covered by the
product guarantee (see separate
document).
NORSK
SUOMI
7
ITALIANO
Page 46

KRUPS Espresseria Automatic
1.4 Correct use
This Automatic Espresseria
espresso/coffee machine is only to be
used to prepare espresso or coffee, to
froth milk and heat liquids.
manufacturer accepts no responsibility
and the guarantee will not apply.
Any use other than that described in this
manual does not comply with these
recommendations and may lead to
This product has been designed only for
domestic use in the home. Any
commercial use, inappropriate use or
failure to comply with the instructions, the
injuries and damage to equipment as well
as damage or destruction of the
appliance (see point 1.3 "Safety
guidelines").
1.5 Products supplied with the machine
Check the products supplied with the
machine.
If any parts are missing, contact our hotline (see chapter 10).
Parts supplied :
• Automatic Espresseria
• XS 6000 auto-cappuccino accessory
(optional, depending on models),
including :
- Milk jug
- Special nozzle
- Connector tube
- Stainless steel tube
Starter set, including :
- Filter cartridge
- Cartridge fitting accessory
• Maintenance kit, including :
- 1 descaling sachet
(KRUPS – ref F054)
- 2 cleaning tablets
(KRUPS – ref XS3000)
- Stick for testing the water hardness
- Cleaning wire for the steam nozzle
- Directory of KRUPS' Approved AfterSales Service Centres
- Guarantee document
• Instructions for use
• Claris – Aqua Filter System cartridge
(Krups – ref F088 – optional)
1.6 Factory check
All of the appliances are subjected to
strict quality control. Random operating
8
Use and maintenance / SERIE EA 80xx
tests are carried out on appliances,
which may leave traces of use.
Page 47
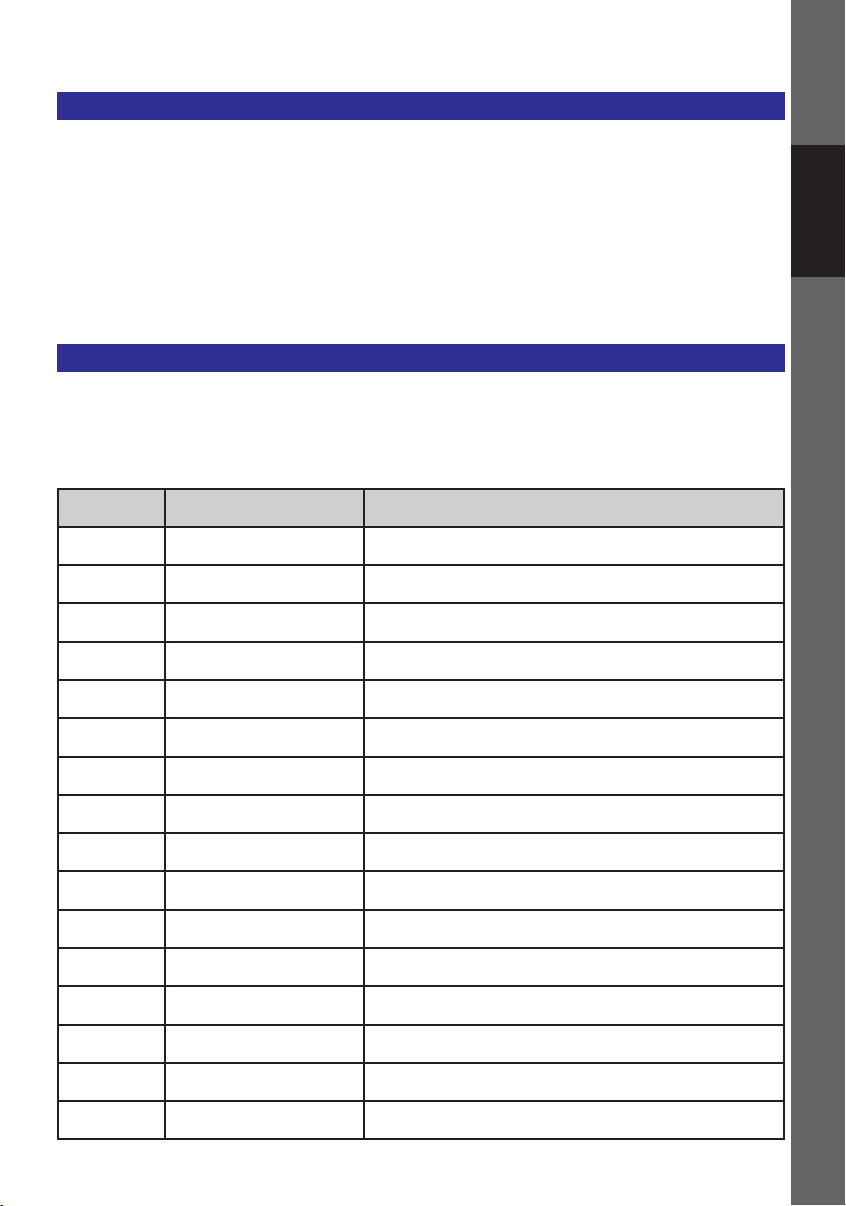
KRUPS Espresseria Automatic
2 Overall view of your Automatic Espresseria and its operation
All of the controls and displays of your
Automatic Espresseria are presented
below.
Each function is briefly described, to help
you understand the instructions and
familiarise yourself with the appliance.
The controls of the machine are
associated to numbers referred to in
these instructions. The corresponding
references in brackets refer to the foldout page.
We recommend that you fold out this
page so that you have the picture of the
appliance in front of you at all times.
2.1 The controls of the appliance
The fold-out page shows a photo of the appliance. Fold out this page. The various
controls of the appliance are listed below along with a brief description of them :
N°
1
2
3
4
5
Identification Function
ON/OFF button and indicator light
Programme button
Knob Used to select a menu and increase or reduce values.
OK button
Steam button Used to activate or deactivate steam production.
Switches the appliance on and off.
The indicator light is lit when in operation.
Used to display the menu selection page/from the menu, to return to
the drink selection menu.
Used to validate a choice of menu or start a function or procedure.
DEUTSCH
ENGLISH
FRANCAIS
NEDERLANDS
DANSK
6
7
8
9
10
11
12
13
14
15
16
Hot water button Used to activate or deactivate hot water production.
Used coffee collector Collects the used coffee.
Cleaning drawer
"Service Guide" maintenance instructions
Water tank Contains the water used to make drinks and rinse.
Water tank cover handle Used to remove the water tank.
Coffee bean holder lid Holds the coffee beans.
Setting button
Grinder Grinds the coffee beans.
Coffee bean holder Holds the coffee beans (max. 275 g).
Cleaning tablet opening Holds the cleaning tablet.
Used to get rid of any used coffee deposits from inside the
appliance.
Brief description for the maintenance of the machine and a
list of the hotline numbers worldwide.
Used to set the grinding fineness of the coffee beans: fine,
medium or coarse grind.
Use and maintenance / SERIE EA 80xx
SVENSKA
NORSK
SUOMI
9
ITALIANO
Page 48

KRUPS Espresseria Automatic
N°
17
18
19
20
21
22
23
Table 1: The control panel and the coffee bean holder of the Automatic Espresseria
Identification Function
Maintenance cover with cup
grid
Screen
Control panel Includes the setting button and knob
Coffee tube and handle The drink flows from here.
Steam nozzle Production of hot water or steam to froth milk.
Water level gauges Mechanical device to prevent overflows.
Grid and drip tray
Cover open: to receive the cleaning tablets.
Cover closed: warms the cups stood on it.
Displays the menus, commands and maintenance instructions.
Collects the water from the appliance and drips during preparations.
2.2 Screen display and operation
The screen displays the menus and the
options and messages of the appliance.
For the various functions, the steps are
shown in images on the screen, for
The functions and/or values that can be modified
are displayed in the text zones.
An arrow above or below a text zone indicates in
which direction the knob (3) may be turned to select other options :
Arrow pointing downwards : turn the knob to the
right.
Arrow pointing upwards : turn the knob to the left
The selected zone appears with a circle around it.
example having to place a recipient under
the coffee tube when rinsing. The menus
are defined in point 3.6. The use of the
menus is described below.
Using the knob, select the chosen function (= the
text zone appears with a circle around it).
Press the OK button (4) to validate the function
and/or start.
The flashing values may be set using the knob and
then validated using the OK button.
!
Important : Pay attention to the screen display, especially before pressing the OK button and/or star-
ting operations !
10
Use and maintenance / SERIE EA 80xx
Page 49

KRUPS Espresseria Automatic
3 First use of your Automatic Espresseria
Danger : Connect the appliance to a mains socket of 230 V that is earthed.
Failure to do so means that you run the risk of fatal injury due to electricity!
Respect the safety guidelines (see point 1.3).
Installing the appliance
Place your machine on a stable, flat, heatresistant surface. Ensure that the location
chosen is sufficiently ventilated as the
appliance gives off heat.
3.1 Before using for the first time
Before using the appliance for the first
time, check the hardness of your water
so that you can adapt the appliance to
suit. This operation is also to be carried
out when you use your machine in a
place where the hardness of the water is
different or if you notice a difference in
the hardness of the water.
To check the water hardness, use the
stick supplied with your machine or
contact your local water authority.
Measuring the water hardness
Fill a glass of water and immerse the stick in it
for several seconds.
Wait for a minute before reading the water hard-
ness.
The red zones on the stick indicate the degree
of hardness: no red zone = class 0, One red
zone = class 1, etc. (see illustration).
01234
DEUTSCH
ENGLISH
FRANCAIS
NEDERLANDS
DANSK
The hardness class observed (from 0 to 4) will
be requested during the initial set up of the machine described in point 3.3 in the "water hardness" sub-menu. Use the data in the table below
for this purpose :
Degree of
hardness
° dH
° e
° f
Setting the
appliance
Table 2: The water hardness classes for the initial setting of the appliance (point 3.3).
Class 0 Class 1 Class 2 Class 3 Class 4
< 3° > 4° > 7° > 14° > 21°
< 3,75° > 5° > 8,75° > 17,5° > 26,25°
< 5,4° > 7,2° > 12,6° > 25,2° > 37,8°
0 1 2 3 4
Use and maintenance / SERIE EA 80xx
SVENSKA
NORSK
SUOMI
11
ITALIANO
Page 50

KRUPS Espresseria Automatic
Installing the filter cartridge (optional)
The Krups Aqua Filter System F088 cartridge improves the taste of your water. It
is made of an anti-scale substance like
activated carbon, which reduces chlorine,
impurities, lead, copper, pesticides, etc.
present in water (Reduction of the carbonate hardness of up to 75%*, chlorine up
Remove the filter cartridge and the car-
tridge fitting accessory from the packaging and assemble the cartridge fitting
accessory as illustrated.
Set the month when the cartridge is fitted
(position 1 on the illustration, left side figure in the opening) by turning the grey
ring located on the upper end of the filter.
The month that the filter is to be replaced
is indicated on the right side in the opening (position 2 on the illustration).
to 85%*, lead up to 90%*, copper up to
95%*, aluminium up to 67%*). Minerals
and trace elements are conserved.
* Measures provided by the manufacturer
Attach the cartridge fitting accessory to
the filter cartridge as shown in the illustration.
Screw the filter cartridge into the screw
thread at the bottom of the water tank :
1. Place the filter cartridge into the
thread.
2. Screw in the cartridge.
Remove the cartridge fitting accessory
from the filter cartridge.
!
Note : the filter cartridge has to be repla-
ced approximately every 50 litres of water
or at least every 2 months.
Your machine tells you how many days or
litres before you need to change the cartridge: go to the "Product information/Filter" menu, then select "Replacement".
12
Use and maintenance / SERIE EA 80xx
Page 51

KRUPS Espresseria Automatic
!
Programme settings when using the filter cartridge
If you use a filter cartridge, in the "Filter"
settings menu, answer the question with
"Yes" or "OK". This programme can also
be accessed by going to "Product Info"
then selecting "Filter" and "Installer" or
by going to "Maintenance / Filter / Exit".
Place a recipient with a capacity of
around 0.5 litres under the steam nozzle
as the programme fills the water filter cartridge and a greater quantity of water is
therefore dispensed from the steam nozzle. 1 message on the screen then invites
you to set the date that the filter is fitted
so that the programme can advise when
to change the filter (in 2 months or after
50 litres of water).
3.2 Preparing the appliance
Before switching on the appliance, carry
out the following steps.
Caution : Water tank (10) : Do not
fill the tank with hot water, mineral water,
milk or any other liquid as this could damage the appliance.
Coffee bean holder (15) : Do not put
ground coffee or water into the coffee
bean holder as the grinder could be da-
maged. Ensure that no foreign particles
(e.g. small stones in the coffee beans)
get into the holder as they could damage
the grinder (not covered by the guarantee!).
Drip tray (23) : To avoid the risk of burns
due to hot water splashing, check that
the drip tray is fitted correctly !
DEUTSCH
ENGLISH
FRANCAIS
NEDERLANDS
DANSK
Remove the water tank (10) and fill it with
cold water.
i
Tip : You can fill the tank without removing it:
open the lid and pour in the water using a suitable recipient.
Fit it and close the lid.
Open the lid (12) of the coffee bean hol-
der (15) and fill it with coffee beans (max.
275 g).
Close the lid of the coffee bean holder.
Use and maintenance / SERIE EA 80xx
!
Important : Respect the maximum
filling level (reference "Max") of the
water tank.
!
Note : If, when the appliance is switched
on, the water tank is missing or does not
contain enough water (under the reference "Calc"), the message "Fill the tank"
will be displayed and it will not be possible to prepare espresso or coffee.
SVENSKA
NORSK
SUOMI
13
ITALIANO
Page 52
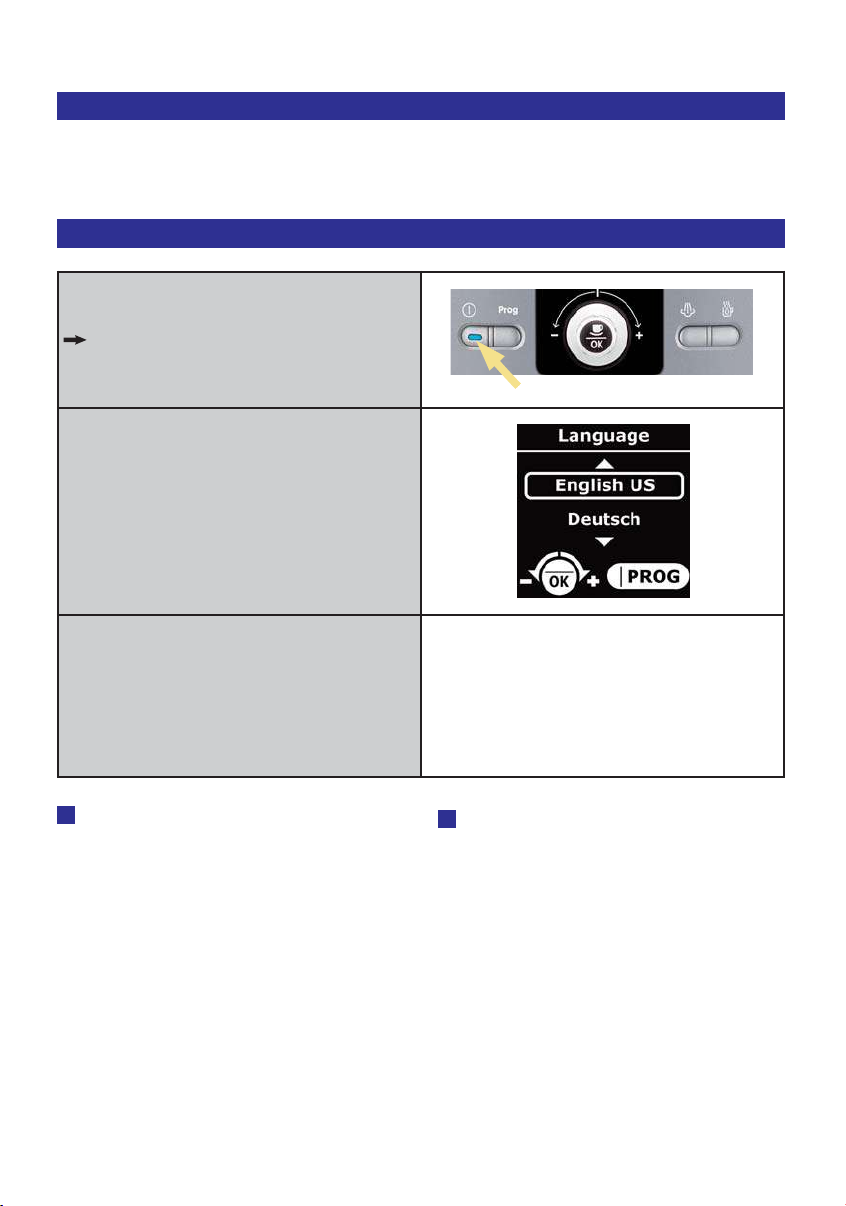
KRUPS Espresseria Automatic
3.3 Initial settings
When using the machine for the first
time, you will be asked to confirm several
Confirming the settings
Switch on the appliance by pressing the
ON/OFF button (1).
A welcome message is displayed on the
screen, followed by the "Language" setting menu.
Using the knob, select a language for the
display and validate your choice by pressing the OK button.
settings. Follow the instructions displayed on the screen.
Make the other settings by following the
indications on the screen. For the parameters, follow the explanations provided in
point 3.6, "Settings" menu.
!
Note : If you unplug your appliance or
following a power cut, you will be asked
to save certain parameters again, such as
the time and the date or to confirm settings. The appliance will then run an automatic test.
14
Use and maintenance / SERIE EA 80xx
!
Important : Ensure that all of the
lids and the maintenance flap are closed
and that all parts of the machine are fitted
correctly before starting to prepare a
drink.
Page 53
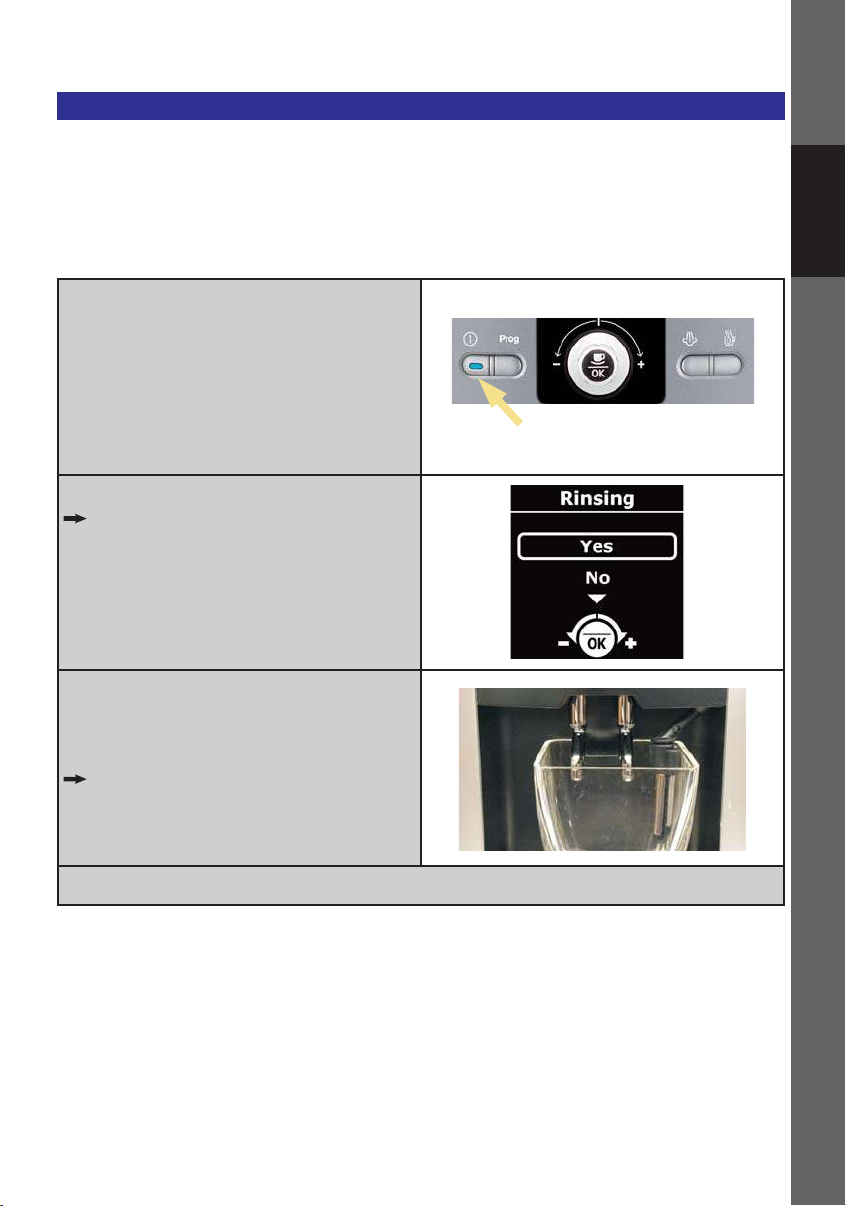
KRUPS Espresseria Automatic
3.4 Rinsing the coffee circuit
After several days without being used,
you need to rinse the coffee circuit. You
may rinse after switching on the ap-
Press the ON/OFF button (1).
A welcome message is displayed on the
screen, then another warning that the appliance is preheating. A few seconds later,
a question will appear on the screen asking if the appliance needs to be rinsed or
not.
DEUTSCH
pliance or at any time, via the "Maintenance" menu and by selecting "Rinsing".
ENGLISH
FRANCAIS
NEDERLANDS
DANSK
Place a sufficiently large recipient under
the coffee tubes, then select "Yes" with
the knob and confirm by pressing OK.
The rinsing procedure starts and stops automatically, after around 40 ml have passed through.
The drink selection menu is then displayed on the screen.
Use and maintenance / SERIE EA 80xx
SVENSKA
NORSK
SUOMI
15
ITALIANO
Page 54

KRUPS Espresseria Automatic
3.5 Setting the grinder
You can set the grinding fineness of the
grinder. The finer the grinder setting for
the coffee, the stronger the aroma of the
coffee will be, and the coffee will also be
creamier.
Meaning of the setting knob positions
Fine grind
Medium grind
Coarse grind
3.6 The menus
The menus of your Automatic Espresseria
contain a number of different functions and
settings, with which you can set your appliance for optimum performance.
Caution : Only turn the knob (13)
during grinding so as to avoid damaging
the grinder.
Do not force the grinder setting knob !
Set the grinding fineness for the next
drink preparation, while the coffee beans
are being ground.
Press the Programme button (2) to display
the menus preview on the screen or to return
to the drink selection menu. The operating
principle is explained in point 2.2 of these instructions.
Operation of menu selection
When you are in the drink selection menu,
press the Programme button (2)
The menu preview is displayed on the
screen.
i
Info : Pressing the Programme button
several times allows you to change from
the drink selection menu to the menu preview. When you press the programme button in a menu or a sub -menu, the menu
function is interrupted and you return to
the drink selection menu.
16
Use and maintenance / SERIE EA 80xx
Page 55

KRUPS Espresseria Automatic
Here are the menus proposed at the main level :
Menu Function
Maintenance
Settings
Product Info
Demo mode
Exit
Cleaning and maintenance functions.
Initial settings of the appliance.
Provides access to information on the procedures carried out.
Can be used to start various programmes.
Activates or deactivates the presentation mode.
End of the menu preview.
The settings and functions of the sub-menus are detailed below.
"Maintenance" Menu
Sub-menu Function
Rinsing
Cleaning
Filter
Exit
Allows a rinsing cycle to be launched.
!
Important : Position the cups before pressing the OK button !
Allows the cleaning programme to be launched.
Access to the filter mode.
End of the preview of the sub-menus.
DEUTSCH
ENGLISH
FRANCAIS
NEDERLANDS
DANSK
"Settings" Menu
Sub-menu Function
Language
Screen contrast
Date
Clock
Auto-off
Auto-on
Unit of measurement
Water hardness
Allows the display language to be selected.
Set the optimum screen contrast with the knob and validate by pressing the OK
button.
Allows the date to be set, i.e. day, month, year (2 figures for each).
!
Important : If you use an anti-scale filter cartridge, you must set the date.
1st step: select the clock format: 24 hour or 12 hour display (AM/PM).
2nd step: Set the time.
You can select the length of time after which your appliance switches off automatically. From 30 min. to 4 hours, in steps of 30 minutes.
You can automatically start the preheating of your appliance at a given time.
You can select the unit of measurement for the drinks made: ml or oz.
You can set the hardness of your water between 0 and 4 (point 3.1).
Use and maintenance / SERIE EA 80xx
SVENSKA
NORSK
SUOMI
17
ITALIANO
Page 56

KRUPS Espresseria Automatic
Sub-menu Function
Coffee temperature
Exit
You can adjust the temperature of your coffee or espresso to 3 levels, where
level 3 is the hottest temperature.
End of the preview of the sub-menus.
Menu "Product info"
Sub-menu Function
Coffee cycles
Hot water cycles
Steam cycles
Rinsing
Cleaning
- Last
- Next
- Clean
- Exit
Descaling
- Last
- Next
Displays the total number of coffee cycles carried out by the machine.
Displays the total number of hot water cycles carried out by the machine.
Displays the total number of steam cycles carried out by the machine.
Displays the total number of rinsing operations carried out by the machine.
Access to the following sub-menus.
Number of coffees prepared since the last cleaning.
Number of coffees that can be made before next cleaning.
Starts the cleaning programme.
End of Cleaning menu.
Access to the following sub-menus.
Number of hot water or steam cycles made since the last descaling.
Number of hot water or steam cycles that can be made before next descaling.
- Exit
!
Note : The "Last" and "Next" options are only accessible if you have fitted a filter before-
hand, accessible via Product info/Filter/Install.
Filter
- Last
- Next
- Install
- Exit
Sortie
18
End of the Descaling menu.
Access to the following sub-menus.
Displays the date when the filter was last changed and the quantity of water filtered since then.
Displays the date when the filter needs to be changed and the quantity of water
that may be filtered until then.
Starts the filter replacement procedure.
End of the Filter menu.
End of the preview of the sub-menus.
Use and maintenance / SERIE EA 80xx
Page 57

KRUPS Espresseria Automatic
"Demo mode" Menu
Sub-menu Function
Allows the presentation mode to be launched.
Activate
Deactivate
Exit
When this mode is activated, the various menus and their access are automatically displayed in the drink selection menu.
Allows the presentation mode to be deactivated..
End of the preview of the sub-menus.
Drink selection menu
Sub-menu Function
Espresso
Espresso strong
Coffee
Long coffee
Prepares a normal espresso.
Prepares a strong espresso.
Prepares a normal coffee.
Prepares a long coffee.
DEUTSCH
ENGLISH
FRANCAIS
NEDERLANDS
DANSK
Use and maintenance / SERIE EA 80xx
SVENSKA
NORSK
SUOMI
19
ITALIANO
Page 58

KRUPS Espresseria Automatic
!
4 Use
Respecting the instructions below will
ensure good results. Several tests will
probably be required to find the mix and
roasting of the coffee beans to your
taste.
The quality of the water used is also a
factor in the taste of your coffee. Ensure
that the water is fresh from the tap, that it
is cold and that it does not smell of
chlorine.
Do not use stagnant water.
The coffee outlet
The height of the coffee outlet is
adjustable. Raise it to fit or remove taller
The steam nozzle
Caution : Your appliance is only des-
igned to use coffee beans. When preparing your first coffee, after several days
without using the machine or after carrying out maintenance, a little steam or
hot water will come out of the steam nozzle. Keep at a safe distance from the
steam nozzle and place a cup underneath
the outlets to avoid any risk of burns or
splashes with the steam or hot water. The
main commands are described below :
cups more easily.
The steam nozzle can be moved to the
left or right and tilted forward slightly,
The drip tray
This tray collects the water used by the
appliance or spilled during preparation.
The machine warns against this by means
4.1 Switching on the appliance
Press the ON/OFF button (1).
A welcome message is displayed on the
screen, then another warning that the appliance is preheating.
Next a question will appear on the screen
asking if the appliance needs to be rinsed
or not.
20
Use and maintenance / SERIE EA 80xx
which allows the cup underneath to be
removed more easily.
of a mechanical float system (22) when
the tray needs to be emptied.
!
Note : If the machine has not been used
for several days, it must be rinsed.
Page 59

KRUPS Espresseria Automatic
If required, rinse it (see point 3.4) or vali-
date the "No" proposition by pressing
"OK".
The screen then displays the drink selection menu.
If you want to prepare an espresso or a
coffee, read the instructions in point
4.2. To prepare a cappuccino, refer to
point 4.3.
4.2 Preparation of an espresso or a coffee
You can set the quantity of water
required for an espresso between 20 and
70 ml, for a coffee between 80 and 120
ml and for a large coffee between 120
(2x60) ml and 240 (2x120) ml.
To set the water temperature as desired,
go to the "Settings" menu and select
"Coffee temperature". For the espresso
function, you can choose between two
strengths: "standard" or "strong".
Preparation of an espresso or a coffee
Place a cup underneath the coffee tube
(20). You can raise or lower the coffee
tube to suit the cup.
DEUTSCH
ENGLISH
FRANCAIS
NEDERLANDS
DANSK
Select your drink using the knob and vali-
date with the "OK" button.
The screen displays the last volume of
water selected during the grinding or heating procedure.
Check the volume of water saved and mo-
dify if required using the knob (3).
Once the heating cycle is complete, the
machine starts to pour the drink.
Wait for the end of the dispensing and the
message "Drink ready" to be displayed on
the screen before removing the cup.
1. Select
2. Validate
!
Note : To stop the drink being dispensed,
because the cup is full or any other reason,
press the button of your choice. To stop the
drink being dispensed, because the cup is
full or any other reason by turning the knob.
Caution: DO NOT REMOVE THE HOLDER BEFORE THE END OF THE CYCLE
(i.e. 15 seconds after the coffee has started to be dispensed).
Use and maintenance / SERIE EA 80xx
SVENSKA
NORSK
SUOMI
21
ITALIANO
Page 60
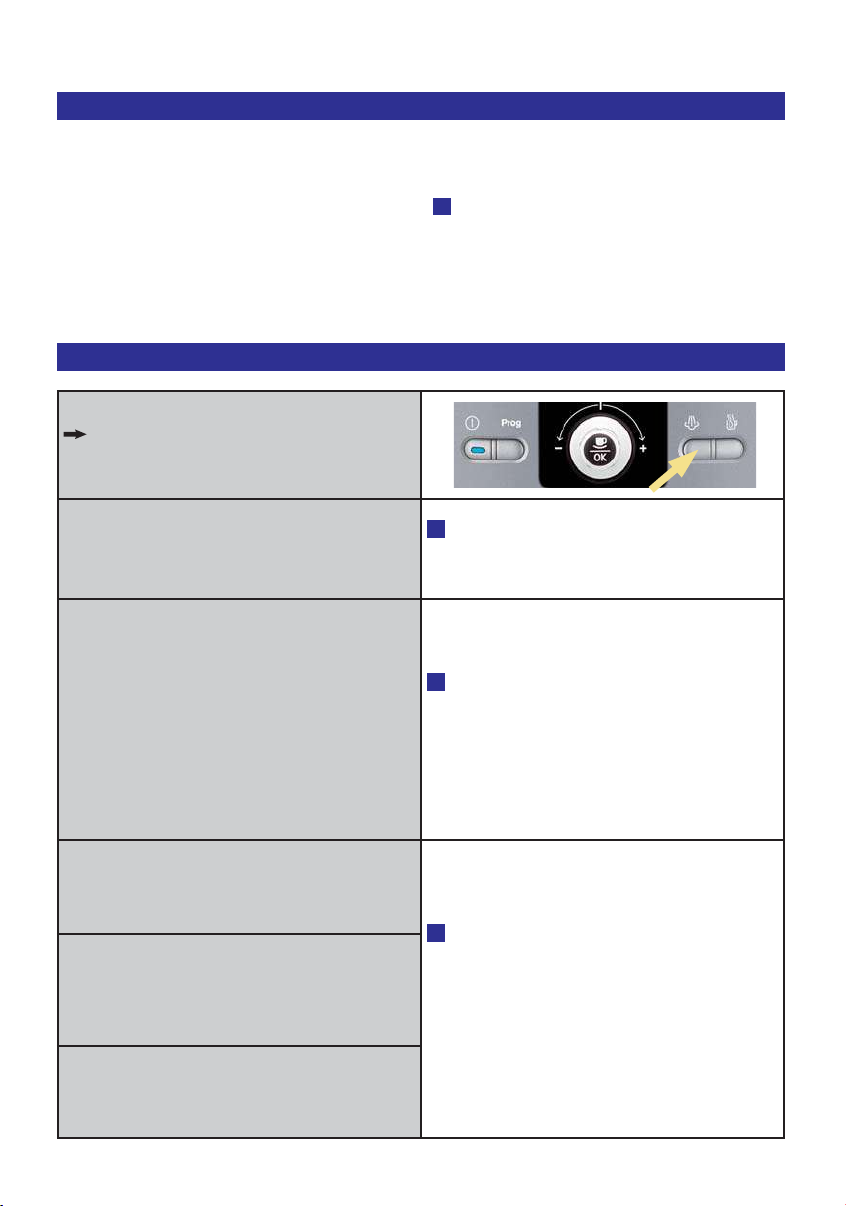
KRUPS Espresseria Automatic
4.3 Preparation of a cappuccino
Cappuccino is a drink prepared with an
espresso and frothed milk. Cappuccino
lovers prepare the frothed milk first and
then add the espresso as the espresso
loses its exceptional aroma very quickly.
The proportion of frothed milk to the
espresso is the same but of course you
can adapt it to your own taste. We
Preparation of frothed milk with steam
Press the Steam button (5).
The machine preheats. A message then invites you to place a recipient under the
steam nozzle.
Place a recipient or a cappuccino cup fil-
led halfway with fresh cold milk (6 to
10°C) underneath the steam nozzle (21)
and press the Steam button.
As soon as steam production is started,
the remaining production time is displayed
in seconds on the screen. Two options are
available :
A) You can increase or reduce the time
displayed with the knob and wait until the
steam production stops automatically.
B) You can stop the steam production at
any time by pressing the Steam button.
recommend that you use very fresh semiskimmed milk.
!
Tip : Preferably use a cappuccino cup
as it is not as high and can contain a
large volume; it is therefore easier to remove it from the steam nozzle.
!
Note : If the end of the steam nozzle does
not reach the milk, raise the cup until the
frothing is complete.
!
Important : the production of steam does
not stop immediately after pressing the
Steam button.
Press the button early enough to avoid
overflows.
Remove the cappuccino cup and place it
underneath the coffee tube (20).
Add an espresso or a coffee depending
on the drink you wish to prepare following
the instructions described in point 4.2.
Remove the cup and add a little sugar or
chocolate shavings to your taste.
22
Use and maintenance / SERIE EA 80xx
!
Important : Remove the nozzle and pass it
underneath running water immediately (see
point 5.1). Fit it again and place a recipient
underneath and press the Steam button in
order to remove any residues of milk from
the inside. Let the steam flow for at least
10 seconds.
Page 61
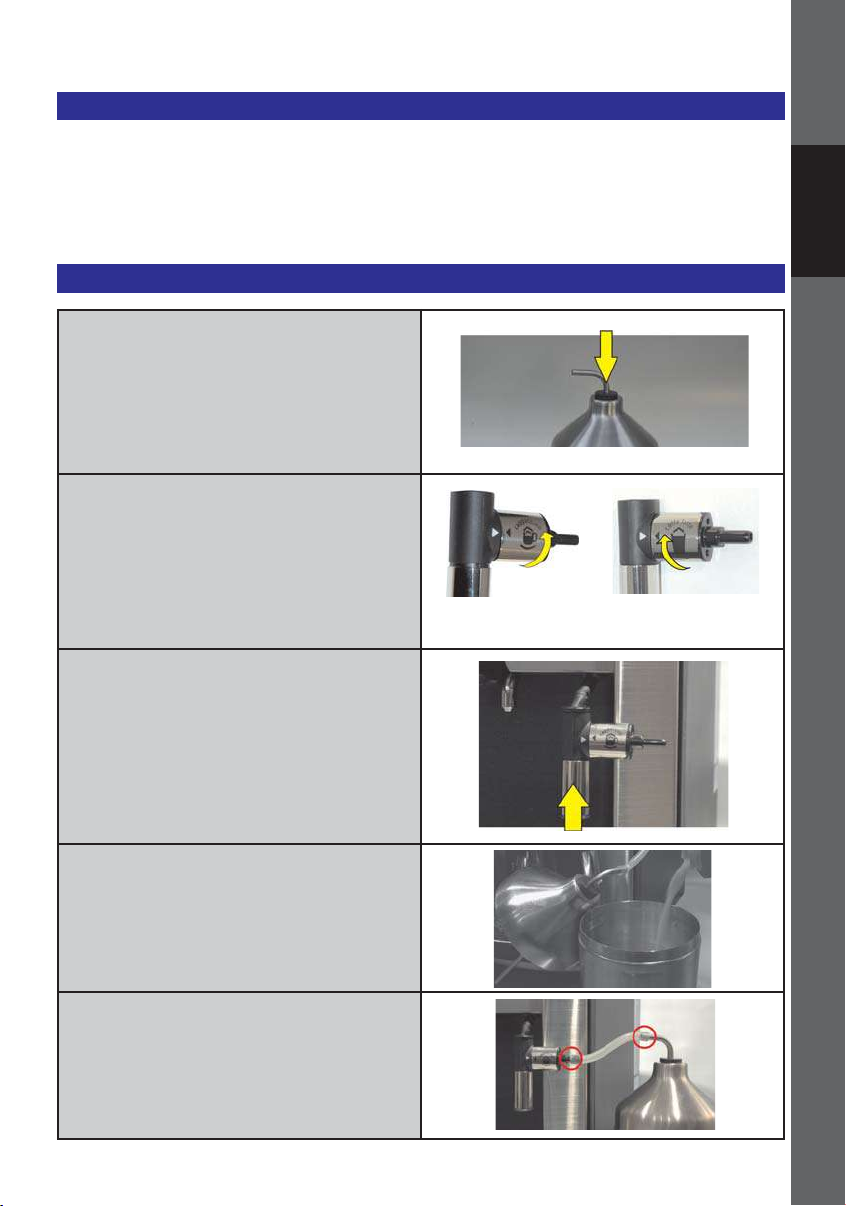
KRUPS Espresseria Automatic
4.4 Using the auto-cappuccino accessory (optional)
The XS 6000 auto-cappuccino
accessory facilitates the preparation of a
cappuccino or caffe latte (white coffee)
with your Automatic Espresseria. The
accessory includes a brushed stainless
steel milk jug, a riser tube and a
connector tube, and a special nozzle.
Assembly and fitting of the auto-cappuccino accessory
Insert the stainless steel tube into the
rubber seal of the milk jug. It should reach
down almost to the bottom of the jug.
Set the special nozzle as follows for each
drink :
Turn the central section 180° so that the
drink symbol chosen is at the front.
Cappuccino Café Latte
DEUTSCH
ENGLISH
FRANCAIS
NEDERLANDS
DANSK
Fit the special nozzle :
A) remove the steam nozzle (21) and
B) replace it with the special nozzle.
Fill the milk jug with cold milk (6 – 10°C).
Connect the special nozzle and the stain-
less steel tube using the connector tube.
Use and maintenance / SERIE EA 80xx
SVENSKA
NORSK
SUOMI
23
ITALIANO
Page 62

KRUPS Espresseria Automatic
Preparation of a cappuccino or a caffe latte with the auto-cappuccino accessory
Press the Steam button (5).
The machine preheats. A message invites
you to place a recipient underneath the
steam nozzle.
Place a cappuccino cup underneath the
special nozzle and press the Steam button.
As soon as steam production is started,
the remaining production time is displayed
in seconds on the screen. Two options are
available :
A) You can increase or reduce the time
displayed with the knob and wait until the
steam production stops automatically.
B) You can stop the steam production at
any time by pressing the Steam button.
!
Important : the production of steam does
not stop immediately after pressing the
Steam button.
Press the button early enough to avoid
overflows.
Remove the cappuccino cup and place it
underneath coffee outlet.
Add an espresso following the instruc-
tions described in point 4.2.
Remove the cup and add a little sugar or
chocolate shavings to your taste.
We recommend cleaning the special noz-
zle immediately after every use to avoid
milk drying inside.
Remove the nozzle (see illustration) and
clean the parts with a small brush and
washing up liquid if required.
If required, unblock the small opening (circled on the illustration) with the cleaning
wire (supplied with your machine).
24
Use and maintenance / SERIE EA 80xx
!
Note : To prepare a caffe latte, turn the
central section of the special nozzle 180°
(see above).
Page 63

KRUPS Espresseria Automatic
4.5 Two cup function
Your appliance allows you to prepare 2
cups, which is to say twice the quantity
of the selected drink.
Place two cups underneath the coffee
tubes and adjust their height to suit the
cups.
Select your drink with the knob (3).
Then validate by pressing the OK button
twice quickly.
A message indicates that you have asked
for two cups.
!
Note : You may interrupt the function
by pressing any button while the coffee is
being poured.
The machine automatically continues with
a second coffee preparation cycle.
Press twice
DEUTSCH
ENGLISH
FRANCAIS
NEDERLANDS
DANSK
Wait until the two percolation cycles are
complete before removing the cups.
!
Note : When using the 2-cup func-
tion, at the start of the cycle, the used
coffee collector may need to be emptied.
Once the necessary actions have been
carried out, the 2-cup cycle is carried out
automatically.
Use and maintenance / SERIE EA 80xx
i
Info : For "Large coffee" drinks, the 2-
cup function is not available.
SVENSKA
NORSK
SUOMI
25
ITALIANO
Page 64

KRUPS Espresseria Automatic
4.6 Preparation of hot water
With your machine, you can also prepare
hot water, for example to dilute coffee
that is too strong. The maximum quantity
When the screen displays the drink selec-
tion menu, press the Hot water button (6).
A message will invite you to place a recipient underneath the steam nozzle.
Place a recipient underneath the steam
nozzle.
Press the hot water button again and se-
lect the quantity of hot water desired
using the knob.
!
Note : You may interrupt the hot water
production at any time by pressing any
button.
of hot water per cycle is limited to
300 ml.
1. Press
2. Select
26
Use and maintenance / SERIE EA 80xx
Page 65

KRUPS Espresseria Automatic
5 Maintenance and cleaning
Danger : Any contact of the conduc-
tive parts of the appliance with humidity
or water may lead to fatal injuries due to
the presence of electricity!
Before cleaning your machine, unplug it
from the mains socket and leave it to cool
down.
Before moving or tilting the appliance,
5.1 Regular maintenance
Certain parts of your machine require regular maintenance :
The used coffee collector (7) : the
used coffee collector collects the used
coffee. On the screen, a message indicates when the collector needs to be
emptied. In general it needs to be emptied after preparing 9 coffees. From time
to time, pass the collector under running
water to clean it. Dry it thoroughly.
!
Important : Ensure that the used cof-
fee collector is completely emptied to
avoid any overflow. If the collector is not
fitted correctly, the warning message will
remain on the screen. If the used coffee
collector is fitted in less than 6 seconds,
the appliance will ask for confirmation,
using the OK button, that it has been
emptied. No preparations can be made
until the message is cleared.
The cleaning drawer (8) : this drawer
is used to eliminate any deposits of used
coffee from the appliance. Remove the
cleaning drawer before emptying the
used coffee collector. If the drawer is
very dirty, pass it under running water
then dry it.
The drip tray (23) : the drip tray collects
the used water as well as water spilt du-
Use and maintenance / SERIE EA 80xx
ensure that the drip tray is empty to avoid
water or the cleaning or descaling product from being spilt.
i
Tip : When cleaning or descaling the
steam nozzle, water may be splashed
quite forcefully. Place a paper towel on
the drip tray and the steam nozzle.
ring preparations. A message on the
screen indicates when the tray needs to
be emptied. The appliance also has a mechanical water gauge (22). If the tray is
dirty, clean it by passing it under running
water.
Coffee circuit : the coffee circuit pipes
must be rinsed if the appliance has not
been used for several days.
Every time that the appliance is switched
on, a message on the screen asks if you
wish to rinse it (rinsing procedure, see
point 3.4).
Ensure that the steam nozzle (21) is
cleaned thoroughly after several uses: remove it and pass it under running water.
It may be removed for cleaning (see illustration). Use a rinsing brush and a little
washing up liquid. Dry all parts thoroughly and ensure that the air inlets are
not blocked. Use the cleaning wire supplied with your machine to unblock the
holes if necessary.
27
DEUTSCH
ENGLISH
FRANCAIS
NEDERLANDS
DANSK
SVENSKA
NORSK
SUOMI
ITALIANO
Page 66

KRUPS Espresseria Automatic
!
!
!
5.2 The cleaning programme
A message on the screen indicates when
a cleaning programme needs to be carried out on the appliance. Cleaning is required around every 360 preparations.
To run this cleaning programme, you will
need a recipient with a capacity of at
least 0.6 litres and that can fit underneath
the coffee tube, and a KRUPS cleaning
tablet (XS 3000).
The automatic cleaning programme has 3
phases: one cleaning cycle and two rinsing cycles. The programme lasts around
20 minutes.
i
Info : You may run this programme at
any time and independently of the warning message via the "Maintenance"
menu and by selecting "Cleaning".
Running the cleaning programme
Ensure you have a recipient with a mini-
mum capacity of 0.6 litres.
Caution : Protect your work tops from
any splashes of cleaning solution, especially if they are made of marble, stone or
wood.
Protect the surface below the drip tray, for
example with paper towels.
Caution : To respect the guarantee
conditions, the cleaning cycle must be
carried out when the appliance requests
it.
Caution : You are not obliged to
carry out the cleaning programme immediately when the appliance requests it,
but it must be carried out reasonably
soon. Only use KRUPS cleaning tablets
(XS 3000) otherwise the guarantee will
not cover any material damaged caused
by the use of other brands of tablets.
Cleaning tablets are available from your
KRUPS After Sales Service Centre.
When the message "Cleaning required" is
displayed on the screen, press the Programme button (2), to display the Cleaning menu.
To run the cleaning programme, select the
"Start" option and validate with the OK
button. Then follow the instructions on the
screen.
A message will invite you to open the
"cover".
Open the maintenance cover (17). Insert
the cleaning tablet into the opening (16).
!
Important : Run the cleaning programme
right to the end.
28
Use and maintenance / SERIE EA 80xx
Page 67

KRUPS Espresseria Automatic
!
!
!
Note : the cleaning programme operates
discontinuously. It is essential that you
wait until it is completely finished (after
around 20 min.).
A message on the screen indicates when the programme is finished.
Caution : If the cleaning programme
is interrupted by a power cut or accidental unplugging of the machine, it must be
started again from the beginning. A new
Caution : Avoid any contact with the
cleaning liquid that runs from the machine, as
it contains substances that are bad for your
health.
Keep the tablets out of the reach of children !
cleaning tablet will be required in this
case. The programme must be started
again completely in order to rinse the
water circuit and eliminate any traces of
harmful cleaning products.
DEUTSCH
ENGLISH
FRANCAIS
NEDERLANDS
DANSK
SVENSKA
NORSK
SUOMI
Use and maintenance / SERIE EA 80xx
29
ITALIANO
Page 68

KRUPS Espresseria Automatic
!
!
!
5.3 The descaling programme
A message on the screen will indicate
when a descaling programme needs to
be run for the appliance. The frequency
of this programme depends on the quality of the water used, the harder the
water, the more often the appliance has
to be descaled.
To run the descaling programme, you will
need a recipient with a capacity of at
least 0.6 litres that may be placed underneath the coffee tube and the steam nozzle, and a KRUPS descaling sachet
(F 054) (40 g). You may also use citric
acid or tartaric acid.
The automatic descaling programme has
3 phases: one descaling cycle and two
rinsing cycles. The programme lasts approximately 22 minutes.
Caution : To respect the guarantee
conditions, the descaling cycle must be
run when the appliance requests it.
Caution : You are not obliged to
carry out the descaling programme immediately when the appliance requests it,
but it must be carried out reasonably
soon. Only use KRUPS descaler (F 054)
otherwise the guarantee will not cover
any material damaged caused by the use
of other brands of tablets. Descaling products are available from your KRUPS
After Sales Service Centre. Under no circumstances must traditional amidosulphonic acid or other products containing
this acid be used.
Running the descaling programme
Place a recipient with a capacity of at least
0.6 litres underneath the coffee tube and the
steam nozzle.
Caution : Protect your work tops from any
splashes of descaling solution, especially if
they are made of marble, stone or wood.
Protect the surface below the drip tray, for
example with paper towels.
When the message "Descaling required" is
displayed on the screen, press the Programme button (2), to display the Descaling
menu.
If you use the Krups Aqua Filter System
F088 filter cartridge, remove it before the
descaling operation and fill the water tank up
to the Calc line (0.5 l) with warm water.
30
Use and maintenance / SERIE EA 80xx
Page 69

KRUPS Espresseria Automatic
!
!
!
To run the descaling programme, select the
"Start" option and validate with the OK button. Then follow the instructions on the
screen.
A message will invite you to pour the
contents of the descaling sachet into the
water tank.
Use a large spoon with a long handle to
mix the water in the tank or remove the
water tank and carefully shake it from left
to right until the descaler is dissolved.
Run the descaling programme right to the
end.
!
Note : The pump operates intermit-
tently. It is essential that you wait until the
descaling programme is completely finished (after around 22 min).
A message on the screen will indicate when the programme is finished.
Caution : If the descaling programme is interrupted by a power cut or
accidental unplugging of the machine, it
must be started again from the begin-
Caution : Avoid any contact with the
descaling liquid that runs from the machine, as
it contains substances that are bad for your
health.
Keep the descaler out of the reach of children !
ning. A new descaling sachet will be required in this case. The programme must
be started again completely in order to
rinse the water circuit and eliminate any
traces of harmful descaling products.
DEUTSCH
ENGLISH
FRANCAIS
NEDERLANDS
DANSK
SVENSKA
General maintenance guidelines
Rinse the cleaning drawer (8), the drip
tray (23) and the used coffee collector
(7) under running water. Use washing up
liquid if required.
Rinse the water tank (10) in clean water.
Clean the body of the appliance and its
Use and maintenance / SERIE EA 80xx
parts and accessories with a damp cloth.
Do not use corrosive or abrasive cleaning
products.
Caution : these accessories are not
dishwasher proof.
31
NORSK
SUOMI
ITALIANO
Page 70
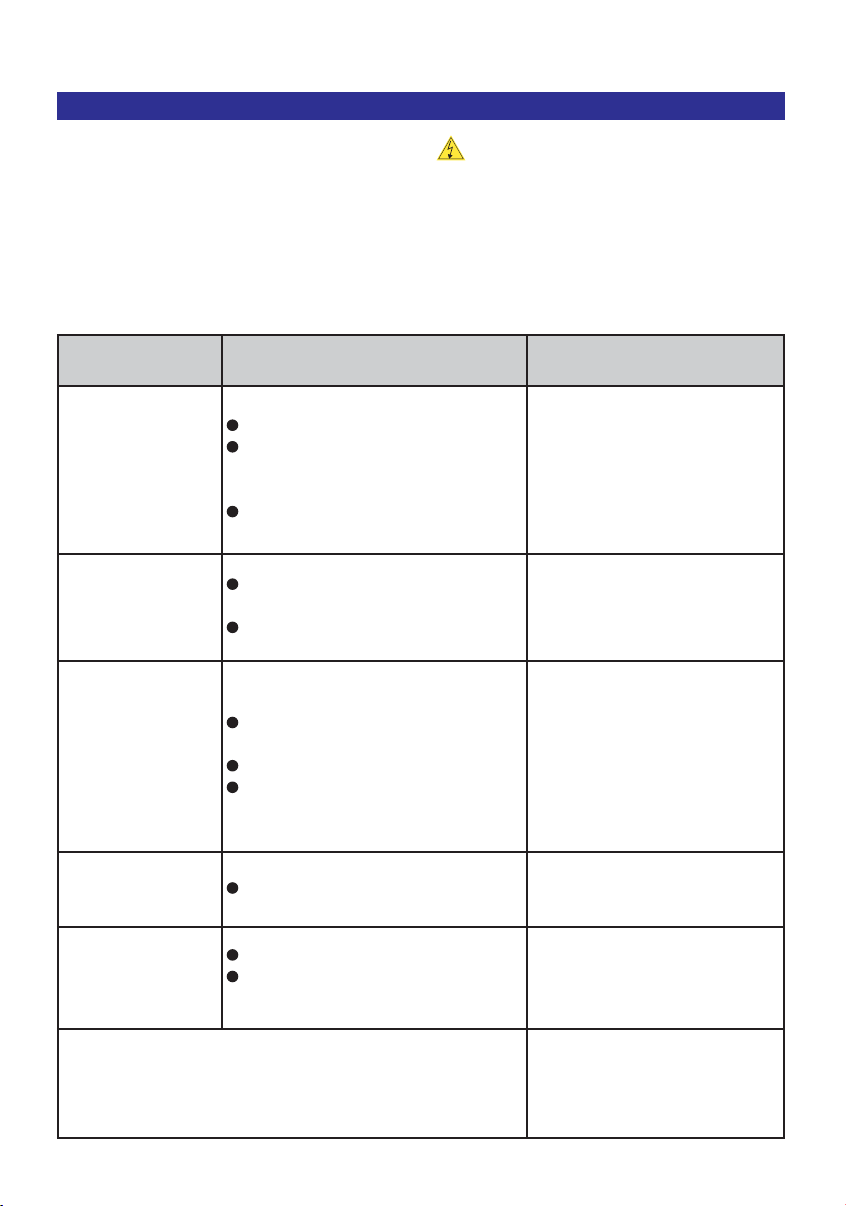
KRUPS Espresseria Automatic
6 Troubleshooting
If your machine is not operating correctly,
try to resolve it by referring to this troubleshooting guide. If the problems persist
in spite of this, contact our hotline (see
chapter 10).
is authorised to carry out repairs on the
power cord and the 230 V electrical system. Failure to respect this exposes you
to fatal injuries due to the presence of
electricity !
Do not use an appliance that is visibly damaged !
Problem Probable causes Corrective actions
Danger : Only a qualified technician
Check the fuses of your electri-
cal installation.
Check that the plug is correctly
inserted into the socket or have
the socket repaired.
Have the appliance checked by
a qualified technician.
Check the temperature of the
coffee in the "Settings" menu.
Warm the cup by rinsing it
with hot water before starting
the preparation.
Add coffee beans to the holder.
Use the grinder setting button
(13) to obtain a finer grind.
Reduce the quantity of coffee
using the knob (3).
The appliance does
not switch on when
the ON/OFF button
is pressed.
The espresso or coffee is not hot enough.
The coffee is too
lightly coloured or
too weak.
Power failure or blown fuse.
The mains plug is not pushed into
the mains socket correctly or the mains
socket is faulty.
The appliance is faulty.
The temperature of the coffee is not
set high enough.
The coffee cup is cold.
There is not enough coffee in the
coffee bean holder (15).
The coffee is too coarse.
Too much coffee is prepared.
The coffee dispenses too slowly.
The coffee is not
creamy.
You have accidentally used ground coffee instead of coffee
beans.
32
The coffee is too fine.
The coffee is too coarse.
The coffee is not fresh.
.
Use and maintenance / SERIE EA 80xx
Use the grinder setting button
(13) to obtain a coarser grind.
Use the grinder setting button
(13) to obtain a finer grind.
Use fresher coffee beans.
Suck out the coffee in the coffee bean holder with your vacuum cleaner.
Page 71

KRUPS Espresseria Automatic
Problem Probable causes Corrective actions
The coffee does not
come out of the coffee tube (20).
The coffee grinder
makes a strange
noise.
The grinder setting
button (13) is difficult to turn.
No steam comes
out of the steam
nozzle (21).
There is not enough
frothed milk.
The tube is blocked.
Foreign particles are inside the grin-
der.
Has the grinder setting button been
moved when grinding was not taking
place ?
The nozzle or the nozzle support is
blocked.
Check that steam is coming out of
the nozzle.
Check if the small air inlet in the
upper part of the nozzle is blocked.
The recipient and milk are not cold
enough.
The milk is not fresh enough.
Unblock the tube with the clea-
ning wire or a toothpick.
Contact KRUPS Customer
Service.
Only turn the setting button
during grinding.
Remove the steam nozzle
from its support and unblock
these two parts using the cleaning wire.
Temporarily remove the Claris
cartridge.
Unblock the steam nozzle with
the cleaning wire.
Unblock the inlet, dry it and if
necessary rinse it with water.
Make sure the recipient and
milk are cold before frothing.
We recommend using very
fresh pasteurised or UHT milk.
DEUTSCH
ENGLISH
FRANCAIS
NEDERLANDS
DANSK
The frothed milk is
not thick enough.
The auto-cappuccino accessory (optional) does not
suck up the milk.
After filling the water
tank (10), the warning message remains displayed on
the screen.
The cleaning or descaling programme
will not start.
Check if the two ends of the small
stainless steel tube are connected to
the steam nozzle.
Check that the accessories are
connected correctly to one another
and that they are not blocked.
The water tank is not fitted correctly.
The float at the bottom of the tank
does not move freely.
The water tank is scaled.
Programme error.
Correct the position of the
stainless steel tube.
Connect the accessories correctly to one another and unblock them if needed.
Fit the water tank correctly.
Rinse the water tank under
water and descale if required.
Unplug the appliance then
plug it back in and switch it on.
Restart the programme.
Use and maintenance / SERIE EA 80xx
SVENSKA
NORSK
SUOMI
33
ITALIANO
Page 72

KRUPS Espresseria Automatic
!
Problem Probable causes Corrective actions
After emptying the
used coffee collector (7), the warning
message remains
displayed on the
screen.
After cleaning the
cleaning drawer (8),
the warning message remains displayed on the
screen.
A power cut occurs
during the cycle.
There is water underneath the appliance.
A "Fault n° xxx" message appears on the
screen.
The used coffee collector is not fit-
ted correctly.
The used coffee collector has been
refitted too quickly.
The cleaning drawer is not fitted
correctly.
The cleaning drawer has been refit-
ted too quickly.
The drip tray (23) is not correctly fit-
ted or is overflowing.
Programme error.
Refit the used coffee collector
correctly.
In general wait for at least 6 seconds before refitting the empty
collector.
Refit the cleaning drawer correctly.
In general wait for at least 6
seconds before refitting the drawer.
The appliance is automatically
reinitialised when it is switched
back on.
Check that the drip tray has
been fitted correctly and empty it
if required.
Unplug the appliance for 20
seconds, remove the Claris cartridge if fitted then plug in the
appliance.
If the message is still displayed,
write down the fault number and
contact the KRUPS Customer
Service.
i
Tip : Programming problems are often resolved by unplugging the appliance for about one
minute and then plugging it in again.
Caution : Do not carry out any work yourself on the appliance !
34
Use and maintenance / SERIE EA 80xx
Page 73

KRUPS Espresseria Automatic
!
7 Technical data
Appliance : Automatic Espresseria
Electrical power supply : 220-240V~ / 50 Hz
Energy consumption : In operation : 1450 W
In stand-by : < 1 W
Capacity : Réservoir d’eau : 1,8 l
Réservoir à café en grains : 275 g
Pump pressure : 15 bar
Storage and use : indoors, in a dry place (free from frost)
Dimensions : 24,5 x 36,5 x 33,0 cm
Weight : 7, 3 kg
Under reserve of technical modifications.
8 Transport
Keep the original packaging to transport
the appliance. Empty the drip tray (23),
when moving the appliance and empty all
tanks when packing the appliance for
transport.
Caution : If the appliance is dropped without its packaging during transport, it is preferable to take it to an After
Sales Service centre to have it checked
and avoid any risk of fire or electrical danger.
9 Disposal of waste
The symbol on the appliance or
its packaging indicates that this
product may not be processed
as household waste. Therefore it
must be taken to a waste collection centre for the recycling of electrical
and electronic equipment.
By sorting waste and disposing of old
equipment correctly, you are helping to
preserve the natural resources and preventing damaging consequences for the
environment and people’s health.
To obtain more information on the waste
collection site, please contact your local
council, local waste collection authorities
or your retailer.
i
Info : Your appliance contains many
materials that may be recycled or recovered.
DEUTSCH
ENGLISH
FRANCAIS
NEDERLANDS
DANSK
SVENSKA
NORSK
SUOMI
Use and maintenance / SERIE EA 80xx
35
ITALIANO
Page 74

10 Service
For all questions or problems, please contact our hotline on the following numbers :
DE : Tél. 0800 - 980 00 00
Times : Monday to Friday from 8 am to 6 pm and Saturday from 9 am to 2 pm
A : Tel. 0800 - 225 225
Times : Monday to Friday from 8 am to 6 pm and Saturday from 9 am to 2 pm
BE : Tel. 070 - 233 159
Times : Monday to Thursday: 9-12:30 am and 1-5 pm and Friday from 9-12 am
FR : Tel. 0810 61 10 61
Times : Monday to Thursday from 8:30 to 18:30 and Friday from 8:30 to 5 pm
CH : Tel. 0800 - 37 77 37
Times : Monday to Friday from 8-12 am and from 1-5 pm
GB : Tel. 0845 330 6460
ROI : Tel. (01) 677 4003
NL : Tel. 0318 58 24 24
Times : Monday to Thursday : 08:30-12:15 am / 1-4:45 pm and Friday : 08:30-12:15 am / 1-2:45 pm
DK : Tel. 44 66 31 55
Times : Monday to Thursday from 8:30 am to 4:30 pm and Friday from 8:30 to 4 pm
SV : Tel. 08 594 213 30
Times : Monday to Thursday from 8:30 am to 4:30 pm and Friday from 8:30 to 4 pm
NO : Tel. 815 09 567
Times : Monday to Thursday from 8:30 am to 4:30 pm and Friday from 8:30 to 4 pm
FI : Tel. 09 6229 420
Times : Monday to Thursday from 8:30 am to 4:30 pm and Friday from 8:30 to 4 pm
11 Index
Auto-cappuccino accessory .................23
Choice of menus .....................................16
Controls .......................................................9
Cleaning ..............................................27, 31
Cleaning programme .............................28
Cleaning the steam nozzle............22, 27
Cleaning the special nozzle ......................24
Correct use..................................................8
Display .......................................................10
Descaling programme ...........................30
Disposal of waste ...................................35
Drink selection menu.............................19
Demo Mode menu ..................................19
First use.....................................................11
Fitting the filter cartridge ....................12
Guide ............................................................5
Initial settings..........................................14
Maintenance.............................................27
Maintenance menu.................................17
Operation ..................................................10
Overall view of operation........................9
Overall view of the appliance ...............9
Products supplied with the appliance ..8
Product info ...............................................5
36
Use and maintenance / SERIE EA 80xx
Product Info menu..................................18
Preparation of the appliance ..............13
Preparation of a coffee .........................21
Preparation of an espresso ................21
Preparation of a caffe latte..................24
Preparation of a cappuccino................22
Preparation of hot water .....................26
Rinsing.......................................................15
Safety guidelines .....................................6
Steam nozzle ...................................20, 22
Special nozzle ........................................23
Setting the grinder .................................16
Settings menu..........................................17
Service .......................................................36
Symbols ......................................................5
Switching on the appliance..................20
Technical data ..........................................35
Troubleshooting ......................................32
Transport ..................................................35
Use .............................................................20
Warning words...........................................5
Water hardness .......................................11
2-cup function..........................................25
Page 75

KRUPS
DEUTSCH
ESPRESSERIA AUTOMATIC
SERIE EA 80XX
ENGLISH
FRANCAIS
NEDERLANDS
DANSK
SVENSKA
Utilisation et entretien
NORSK
SUOMI
ITALIANO
Page 76

KRUPS Espresseria Automatic
Important
!
Lisez attentivement ce mode d’emploi et conservez-le.
Veuillez respecter les consignes de sécurité.
Fabricant
SAS Groupe SEB Moulinex
Rue Saint-Léonard
F-53104 Mayenne
France
2
Utilisation et entretien / SERIE EA 80xx
Page 77

KRUPS Espresseria Automatic
Sommaire
1 Informations importantes sur le produit et le mode d’emploi . . . . .5
1.1 Votre Espresseria Automatic . . . . . . . . . . . . . . . . . . . . . . . . . . . . . . . . . . . . . . . . . . . . . . . . . . . . .5
1.2 Guide des symboles du mode d’emploi . . . . . . . . . . . . . . . . . . . . . . . . . . . . . . . . . . . . . .5
1.3 Consignes de sécurité . . . . . . . . . . . . . . . . . . . . . . . . . . . . . . . . . . . . . . . . . . . . . . . . . . . . . . . . . . . .6
1.4 Utilisation conforme . . . . . . . . . . . . . . . . . . . . . . . . . . . . . . . . . . . . . . . . . . . . . . . . . . . . . . . . . . . . . . . .8
1.5 Produits fournis avec votre machine . . . . . . . . . . . . . . . . . . . . . . . . . . . . . . . . . . . . . . . . . .8
1. 6 C ont rôl e u sin e . . . . . . . . . . . . . . . . . . . . . . . . . . . . . . . . . . . . . . . . . . . . . . . . . . . . . . . . . . . . . . . . . . . . . . . . .8
2 Vue d’ensemble de votre Espresseria Automatic et de son
fonctionnement . . . . . . . . . . . . . . . . . . . . . . . . . . . . . . . . . . . . . . . . . . . . . . . . . . . . . . . . . . . . . . . . . . . .9
2.1 Les éléments de commande de l’appareil . . . . . . . . . . . . . . . . . . . . . . . . . . . . . . . . . . .9
2.2 Indications à l'écran et principe d’utilisation . . . . . . . . . . . . . . . . . . . . . . . . . . . . .10
3 Mise en service de votre Espresseria Automatic . . . . . . . . . . . . . . . . .11
3.1 Avant la première utilisation . . . . . . . . . . . . . . . . . . . . . . . . . . . . . . . . . . . . . . . . . . . . . . . . . . .11
3.2 Préparation de l’appareil . . . . . . . . . . . . . . . . . . . . . . . . . . . . . . . . . . . . . . . . . . . . . . . . . . . . . . . . .13
3.3 Réglage initial . . . . . . . . . . . . . . . . . . . . . . . . . . . . . . . . . . . . . . . . . . . . . . . . . . . . . . . . . . . . . . . . . . . . . . .14
3.4 Rinçage du circuit café . . . . . . . . . . . . . . . . . . . . . . . . . . . . . . . . . . . . . . . . . . . . . . . . . . . . . . . . . .15
3.5 Réglage du broyeur . . . . . . . . . . . . . . . . . . . . . . . . . . . . . . . . . . . . . . . . . . . . . . . . . . . . . . . . . . . . . .16
3.6 Les menus . . . . . . . . . . . . . . . . . . . . . . . . . . . . . . . . . . . . . . . . . . . . . . . . . . . . . . . . . . . . . . . . . . . . . . . . . . . .16
4 Utilisation . . . . . . . . . . . . . . . . . . . . . . . . . . . . . . . . . . . . . . . . . . . . . . . . . . . . . . . . . . . . . . . . . . . . . . . .2 0
4. 1 M ise so us ten si on de l’ ap pa rei l . . . . . . . . . . . . . . . . . . . . . . . . . . . . . . . . . . . . . . . . . . . . . . .2 0
4.2 Préparation d’un espresso ou d’un café . . . . . . . . . . . . . . . . . . . . . . . . . . . . . . . . . . .21
4.3 Préparation d’un cappuccino . . . . . . . . . . . . . . . . . . . . . . . . . . . . . . . . . . . . . . . . . . . . . . . . . .22
4.4 Utilisation de l’accessoire auto-cappuccino (en option) . . . . . . . . . . . . . .23
4.5 Fonction 2 tasses . . . . . . . . . . . . . . . . . . . . . . . . . . . . . . . . . . . . . . . . . . . . . . . . . . . . . . . . . . . . . . . . . .25
4.6 Préparation de l’eau chaude . . . . . . . . . . . . . . . . . . . . . . . . . . . . . . . . . . . . . . . . . . . . . . . . . . .2 6
5 Entretien et nettoyage . . . . . . . . . . . . . . . . . . . . . . . . . . . . . . . . . . . . . . . . . . . . . . . . . . . . . .27
5.1 Entretien régulier . . . . . . . . . . . . . . . . . . . . . . . . . . . . . . . . . . . . . . . . . . . . . . . . . . . . . . . . . . . . . . . . . . .27
5.2 Le programme de nettoyage . . . . . . . . . . . . . . . . . . . . . . . . . . . . . . . . . . . . . . . . . . . . . . . . . . .28
5.3 Le programme de détartrage . . . . . . . . . . . . . . . . . . . . . . . . . . . . . . . . . . . . . . . . . . . . . . . . . .30
6 Liste des dysfonctionnements . . . . . . . . . . . . . . . . . . . . . . . . . . . . . . . . . . . . . . . . . . .32
7 Données techniques . . . . . . . . . . . . . . . . . . . . . . . . . . . . . . . . . . . . . . . . . . . . . . . . . . . . . . . . .35
8 Transport . . . . . . . . . . . . . . . . . . . . . . . . . . . . . . . . . . . . . . . . . . . . . . . . . . . . . . . . . . . . . . . . . . . . . . . . . .35
9 Élimination des déchets . . . . . . . . . . . . . . . . . . . . . . . . . . . . . . . . . . . . . . . . . . . . . . . . . . .35
10 Service . . . . . . . . . . . . . . . . . . . . . . . . . . . . . . . . . . . . . . . . . . . . . . . . . . . . . . . . . . . . . . . . . . . . . . . . . . .3 6
11 Index . . . . . . . . . . . . . . . . . . . . . . . . . . . . . . . . . . . . . . . . . . . . . . . . . . . . . . . . . . . . . . . . . . . . . . . . . . . . . .3 6
Utilisation et entretien / SERIE EA 80xx
DEUTSCH
ENGLISH
FRANCAIS
NEDERLANDS
DANSK
SVENSKA
NORSK
SUOMI
3
ITALIANO
Page 78

KRUPS Espresseria Automatic
4
Utilisation et entretien / SERIE EA 80xx
Page 79

KRUPS Espresseria Automatic
!!!
1 Informations importantes sur le produit et le mode d’emploi
Vous trouverez dans ce manuel toutes les informations importantes concernant la mise en
service, l’utilisation et l’entretien de votre machine à café/espresso automatique. Figurent
également dans ce mode d’emploi d’importantes consignes de sécurité.
Lisez attentivement le mode d’emploi avant la première utilisation de l’appareil et conservezle : une utilisation non conforme dégagerait Krups de toute responsabilité.
1.1 Votre Espresseria Automatic
Espresso ou lungo, ristretto ou cappuccino, votre machine à café/espresso automatique a été conçue pour vous permettre de savourer à la maison la même qualité
qu’au bistrot, quelque soit le moment où vous le préparerez. Grâce à son Thermoblock System, sa pompe 15 bars et parce qu’elle travaille exclusivement à partir de
café en grains fraîchement moulus, votre Espresseria Automatic vous permettra d’obtenir une boisson contenant un maximum d’arômes, recouverte d’une magnifique
crème épaisse et dorée, un produit provenant de l’huile naturelle des grains de café.
Le café espresso est plus riche en arôme qu’un café filtre classique. Malgré son goût
plus prononcé, très présent en bouche et plus persistant, l’espresso contient en fait
moins de caféine que le café filtre (environ 20 mg de moins par tasse). Cela est dû à
une durée de percolation plus courte.
Grâce à sa grande simplicité de manipulation, la visibilité de tous ses réservoirs ainsi
que ses programmes automatiques de nettoyage et de détartrage, votre Espresseria
Automatic vous apportera un grand confort d’utilisation.
1.2 Guide des symboles du mode d’emploi
Symboles et mots associés utilisés dans ce mode d’emploi
DEUTSCH
ENGLISH
FRANCAIS
NEDERLANDS
DANSK
Symbole
!
i
Mot associé Signification
Mise en garde contre des risques de blessures corporelles graves ou mortelles.
Danger
Avertissement
Attention
Important
Remarque
Info
Conseil
Utilisation et entretien / SERIE EA 80xx
Le symbole de l’éclair met en garde contre
des dangers liés à la présence de l’électricité.
Mise en garde contre des risques de blessures corporelles légères.
Mise en garde contre la survenue éventuelle de dysfonctionnements, de dommages ou la destruction de l'appareil.
Remarque générale ou importante pour le
fonctionnement de l’appareil.
Conseil ou information détaillée concernant l’utilisation de l’appareil.
SVENSKA
NORSK
SUOMI
5
ITALIANO
Page 80

KRUPS Espresseria Automatic
!
1.3 Consignes de sécurité
Danger : Ces consignes de sécurité sont destinées à vous protéger, vous, les
tiers et l’appareil. Elles doivent donc être impérativement respectées.
Conditions d’utilisation
• Ne laissez jamais tremper l'appareil, le
fil ou la prise électrique dans l'eau ou
dans un autre liquide. Tout contact des
pièces conductrices de l’appareil avec
de l’humidité ou de l’eau peut entraîner
des blessures mortelles en raison de la
présence d’électricité ! Cet appareil ne
doit être utilisé qu’à l’intérieur et dans
des locaux secs.
• En cas de changement de température
de l’air ambiant, du froid au chaud,
patientez quelques heures avant de
mettre en marche votre appareil afin qu’il
ne soit pas endommagé par l’eau de
condensation.
• Évitez de placer l’appareil à la lumière
directe du soleil, dans un endroit exposé
à la chaleur, au froid, au gel ou à
l’humidité.
• Veillez à ne pas poser l’appareil sur une
surface chaude telle qu’une plaque
chauffante ou à proximité d'une flamme
nue, afin d'éviter tout risque d'incendie !
Alimentation électrique
Danger : Le non-respect de ces
consignes peut entraîner des blessures
mortelles liées à l’électricité !
• Vérifiez que la tension d’alimentation
indiquée sur la plaque signalétique de
l’appareil correspond bien à celle de
votre installation électrique. Branchez
l’appareil uniquement sur une prise
secteur reliée à la terre.
Tension : 220-240V~ / 50Hz.
• Assurez-vous que la prise secteur est
facilement accessible afin de pouvoir
facilement débrancher la fiche en cas de
dysfonctionnement ou par exemple lors
d’un orage.
Pour la sécurité de votre appareil, retirez
la prise secteur en cas d’orage. Ne tirez
pas sur le câble d'alimentation pour
retirer la prise secteur.
• Retirez immédiatement la prise secteur
si vous constatez une anomalie
quelconque pendant le fonctionnement
ou si la percolation ne se déroule pas
correctement.
Débranchez l’appareil dès que vous
cessez de l’utiliser pendant une longue
période et lorsque vous le nettoyez.
• N'utilisez pas l'appareil si le câble
d'alimentation ou l'appareil lui-même est
endommagé. Si le câble d’alimentation
ou la fiche sont endommagés, n’utilisez
pas l’appareil afin d’éviter tout danger,
faites obligatoirement remplacer le câble
d’alimentation par un centre agréé
KRUPS.
• Ne laissez pas le câble d’alimentation
pendre du bord d’une table ou d’un plan
de travail. Ne laissez pas votre main ou le
câble d’alimentation sur les parties
chaudes de l’appareil.
• L’emploi de prises multiples ou de
rallonges est déconseillé.
• Toute erreur de branchement annule la
garantie.
6
Utilisation et entretien / SERIE EA 80xx
Page 81

KRUPS Espresseria Automatic
Enfants
• Tenez l’appareil hors de portée des
enfants.
• Cet appareil n’est pas prévu pour être
utilisé par des personnes (y compris les
enfants) dont les capacités physiques,
sensorielles ou mentales sont réduites,
ou des personnes dénuées d’expérience
ou de connaissance, sauf si elles ont pu
L’appareil
• Ne mettez pas d’eau dans le réservoir à
café en grains et/ou sous la trappe
d’entretien, car cela peut endommager
ou faire déborder les composants.
• Excepté pour le nettoyage et le
détartrage selon les procédures du mode
d’emploi de l’appareil, toute intervention
sur l’appareil doit être effectuée par un
centre agréé KRUPS.
• Pour votre sécurité, n’utilisez que des
accessoires et consommables agréés
KRUPS pour votre appareil car ils sont
parfaitement adaptés à votre appareil.
• Débranchez l’appareil lorsque vous
quittez la pièce ou la maison pour une
période prolongée, car en cas de
dysfonctionnement l’appareil peut
chauffer excessivement et causer un
incendie.
• N’ouvrez jamais l’appareil. Attention,
danger de mort dû au courant
électrique ! Toute ouverture non autorisée
de l’appareil annule la garantie. N’utilisez
pas l’appareil s’il ne fonctionne pas
bénéficier, par l’intermédiaire d’une
personne responsable de leur sécurité,
d’une surveillance ou d’instructions
préalables concernant l’utilisation de
l’appareil.
• Il convient de surveiller les enfants pour
s'assurer qu'ils ne jouent pas avec
l'appareil.
correctement ou s’il a subi un dommage.
Dans un tel cas, il est conseillé de faire
examiner l’appareil par un centre agréé
KRUPS (consultez la liste dans le livret
Service KRUPS).
• Pour des raisons de sécurité et
d’homologation (CE), toute
transformation ou modification de
l’appareil, réalisée à titre individuel, est
interdite car seuls les appareils testés
sont homologués et le fabricant décline
toute responsabilité en cas de dommage.
• Faites attention à l’orientation de la
buse Vapeur pour éviter tout risque de
brûlure.
• Lors de la première utilisation, après
une procédure de nettoyage ou de
détartrage ou après une longue période
sans utilisation, de la vapeur et de l’eau
chaude peuvent s’écouler de la buse
vapeur. Orientez la buse vers l’intérieur
de la machine pour éviter tout risque de
brûlures.
DEUTSCH
ENGLISH
FRANCAIS
NEDERLANDS
DANSK
SVENSKA
Utilisation et entretien
• En cas de dysfonctionnement ou de
mauvais état de marche, vérifiez l’appareil
et essayez de résoudre le problème (voir
chapitre 6 « liste des
dysfonctionnements) ou faites réparer
l’appareil si le dysfonctionnement
persiste. Lorsque l’appareil ne peut plus
fonctionner sans constituer un danger,
retirez la fiche secteur de la prise.
• Reportez-vous toujours aux instructions
pour le détartrage de l'appareil.
Utilisation et entretien / SERIE EA 80xx
Débranchez la fiche secteur avant
d'entreprendre toute opération de
nettoyage ou d’entretien.
• En cas d’absence de détartrage, de
nettoyage ou d’entretien régulier ou suite
à la présence de corps étranger dans le
broyeur, la garantie de votre appareil (voir
document séparé) ne pourra être prise
en compte.
NORSK
SUOMI
7
ITALIANO
Page 82

KRUPS Espresseria Automatic
1.4 Utilisation conforme
Cette machine à café/espresso
Espresseria Automatic ne doit être
utilisée que pour la préparation
d’espressos ou de cafés, pour faire
mousser le lait et chauffer des liquides.
Cet appareil est exclusivement réservé à
un usage domestique à l’intérieur de la
maison.
Cette machine à café/espresso
professionnelle.
Une utilisation autre que celle décrite
dans le présent manuel n'est pas
conforme aux prescriptions et peut
engendrer des blessures corporelles et
des dommages matériels ainsi que la
détérioration ou la destruction de
l'appareil (voir point 1.3 « Consignes de
sécurité »).
Espresseria Automatic n’est pas conçue
pour une utilisation commerciale ou
1.5 Produits fournis avec votre machine
Vérifiez les produits fournis avec votre
machine.
S’il manque une pièce, contactez directement notre hotline (voir chapitre 10).
Pièces fournies :
• Espresseria Automatic
• Accessoire auto-cappuccino XS 6000
(en option, selon le modèle),
composé de :
- Pot à lait
- Buse spéciale
- Tuyau de raccordement
- Tube en inox
• Cartouche Claris – Aqua Filter System
(Krups – ref F088 – en option)
Set de départ, composé de :
- Cartouche filtrante
- Accessoire de vissage
• Pochette d’entretien, composée de :
- 1 sachet de détartrant
(KRUPS – ref F054)
- 2 pastilles de nettoyage
(KRUPS – ref XS3000)
- Bâtonnet de détermination de la dureté
de l'eau
- Fil de nettoyage de la buse vapeur
- Répertoire des centres de Service
Après-Vente KRUPS
- Document de garantie
• Mode d’emploi
1.6 Contrôle usine
Tous les appareils sont soumis à un
contrôle qualité sévère. Des essais
d’utilisation pratiques sont faits avec des
8
Utilisation et entretien / SERIE EA 80xx
appareils pris au hasard, ce qui explique
d’éventuelles traces d’utilisation.
Page 83

KRUPS Espresseria Automatic
2 Vue d’ensemble de votre Espresseria Automatic et de son fonctionne
L'ensemble des éléments de commande
et d'affichage de votre Espresseria
Automatic vont vous être présentés cidessous.
Chaque fonction fera l'objet d'une courte
description ce qui vous aidera à
comprendre le présent mode d’emploi et
à vous familiariser avec l'appareil.
machine sont associés à des numéros
auxquels il est fait référence dans ce
mode d'emploi. Les références
correspondantes entre parenthèses
renvoient à la page dépliante.
Nous vous conseillons de dépliez cette
page afin d’avoir l’appareil en
permanence sous les yeux.
ment
Les éléments de commande de la
2.1 Les éléments de commande de l’appareil
La page dépliante représente une photo de l'appareil. Dépliez cette page. Les différents éléments de commande de l’appareil sont mentionnés ci-dessous ainsi qu’une
brève description de ceux-ci :
N°
1
2
3
4
5
Identification Fonction
Touche et témoin lumineux
Marche/Arrêt
Touche Programme
Bouton rotatif
Touche OK
Touche Vapeur Permet d’activer ou de désactiver la production de vapeur.
Mise sous et hors tension de l’appareil.
Le témoin lumineux est allumé en fonctionnement.
Permet d’afficher à l’écran la page de choix des menus / depuis le
menu, permet de retourner au menu de sélection des boissons.
Permet de sélectionner un menu et d’augmenter ou de diminuer des valeurs.
Permet de valider un choix de menu ou de lancer une fonction
ou une procédure.
DEUTSCH
ENGLISH
FRANCAIS
NEDERLANDS
DANSK
6
7
8
9
10
11
12
13
14
15
16
Touche Eau chaude Permet d’activer ou de désactiver la production d’eau chaude.
Collecteur de marc de café Reçoit la mouture usagée.
Tiroir de nettoyage
Notice d’entretien
« Guide Service »
Réservoir d'eau Contient l’eau destinée à préparer les boissons et au rinçage.
Poignée du couvercle du réservoir d'eau
Couvercle de réservoir à
café en grains
Bouton de réglage
Broyeur Broie les grains de café.
Réservoir à café en grains Reçoit les grains de café (max. 275 g).
Goulotte de nettoyage Reçoit la pastille de nettoyage.
Permet d’éliminer l’éventuel dépôt de marc de café à l’intérieur de l’appareil.
Bref descriptif de l’entretien de la machine et liste des numéros de hotline dans le monde entier.
Permet de retirer le réservoir d’eau.
Referme le réservoir à café en grains.
Permet de régler le degré de finesse du broyage des grains
de café : mouture fine, moyenne ou grosse.
Utilisation et entretien / SERIE EA 80xx
SVENSKA
NORSK
SUOMI
9
ITALIANO
Page 84

KRUPS Espresseria Automatic
N°
17
18
19
20
21
22
23
Tab. 1 : Les éléments du panneau de commande et du réservoir à café en grains de l’Espresseria Automatic
Identification Fonction
Trappe d'entretien avec grille
repose-tasses
Ecran
Panneau de commande Comprend les touches de commande et le bouton rotatif.
Sortie café avec poignée Ecoulement de la boisson préparée.
Buse vapeur
Flotteurs de niveau d'eau Dispositif mécanique contre les débordements.
Grille et bac récolte-gouttes
Trappe ouverte : reçoit les pastilles de nettoyage.
Trappe fermée : permet de réchauffer les tasses reposant sur celle-ci.
Affichage des menus, des indications de commande et d’entretien.
Production d’eau chaude ou de vapeur pour faire mousser le
lait.
Permet de récupérer l’eau qui s’écoule de l’appareil et renversée pendant les préparations.
2.2 Indications à l'écran et principe d’utilisation
L’écran affiche les menus ainsi que les
options et messages de l’appareil. Pour
les différentes fonctions, les étapes de
manipulation sont représentées en image
à l’écran, par exemple le fait que vous
Les fonctions et/ou valeurs réglables s’affichent
dans les zones de texte.
Une flèche située au dessus ou en dessous d’une
zone de texte vous indique dans quel sens vous
pouvez tourner le bouton rotatif (3) pour sélectionner d’autres options :
Flèche vers le bas : tournez le bouton rotatif vers
la droite.
Flèche vers le haut : tournez le bouton rotatif vers
la gauche.
La zone choisie est entourée.
deviez placer un récipient sous la sortie
café lors de la procédure de rinçage. Les
menus sont définis au point 3.6. Le
principe d’utilisation des menus vous est
présenté ci-dessous.
A l’aide du bouton rotatif, sélectionnez la fonction
de votre choix (=la zone de texte est entourée).
Appuyez sur la touche OK (4) afin de valider la
fonction et/ou de la démarrer.
Vous pouvez régler les valeurs clignotantes avec
le bouton rotatif et valider ensuite avec la touche
OK.
!
Important : Faites attention aux indications qui s'affichent à l'écran, en particulier avant d'appuyer sur
la touche OK et/ou le lancement des procédures !
10
Utilisation et entretien / SERIE EA 80xx
Page 85

KRUPS Espresseria Automatic
3 Mise en service de votre Espresseria Automatic
Danger : Branchez l’appareil à une prise secteur de 230 V, reliée à la terre.
Dans le cas contraire, vous vous exposez à un danger de mort dû à l’électricité !
Respectez les consignes de sécurité (voir point 1.3).
Installation de l’appareil
Placez votre machine sur une surface
stable et plane. Assurez-vous que
l’endroit choisi est suffisamment aéré car
l'appareil dégage de la chaleur.
3.1 Avant la première utilisation
Avant d’utiliser l’appareil pour la première
fois, déterminez la dureté de votre eau
afin de pouvoir adapter l'appareil à la dureté constatée. Vous veillerez à également effectuer cette opération lorsque
vous utiliserez votre machine dans un lieu
dont la dureté de l’eau est différente ou si
vous constatez un changement de la dureté de votre eau. Pour connaître la dureté de l’eau, utilisez le bâtonnet livré
avec votre machine ou adressez-vous à
votre compagnie des eaux.
Mesure de la dureté de l’eau
Remplissez un verre dʼeau et plongez-y le bâ-
tonnet quelques secondes.
Attendez une minute avant de lire le niveau de
dureté de lʼeau.
Les zones rouges sur le bâtonnet indiquent la
classe de dureté : pas de zone rouge= classe 0,
une zone rouge = classe 1, etc. (voir illustration).
La classe de dureté constatée (de 0 à 4) vous
sera demandée lors du réglage initial de la machine présenté au point 3.3 dans le sous-menu
« Dureté de lʼeau ». Pour ce faire, utilisez les
données figurant dans le tableau ci-dessous :
01234
DEUTSCH
ENGLISH
FRANCAIS
NEDERLANDS
DANSK
SVENSKA
Degré de
dureté
° dH
° e
° f
Réglage de
l’appareil
Tab. 2 : Les classes de dureté de l'eau pour le réglage initial de l'appareil (point 3.3)
Classe 0 Classe 1 Classe 2 Classe 3 Classe 4
< 3° > 4° > 7° > 14° > 21°
< 3,75° > 5° > 8,75° > 17,5° > 26,25°
< 5,4° > 7,2° > 12,6° > 25,2° > 37,8°
0 1 2 3 4
Utilisation et entretien / SERIE EA 80xx
NORSK
SUOMI
11
ITALIANO
Page 86

KRUPS Espresseria Automatic
Installation de la cartouche filtrante (en option)
La cartouche Krups Aqua Filter System
F088 permet d'améliorer le goût de votre
eau. Elle est composée d’une substance
anti-calcaire comme le charbon actif, qui
réduit chlore, impuretés, plomb, cuivre,
pesticides, etc. présents dans l’eau
(Réduction de la dureté en carbonate
Retirez la cartouche filtrante et l’acces-
soire de vissage de leur emballage et assemblez l'accessoire de vissage, tel
qu'illustré.
Réglez le mois de mise en place de la
cartouche (position 1 sur l’illustration,
chiffre à gauche dans l’ouverture) en tournant la bague grise située sur l’extrémité
supérieure du filtre.
Le mois de remplacement de la cartouche
est indiqué à droite dans l’ouverture (position 2 sur l’illustration).
jusqu’à 75 %*, du chlore jusqu’à 85 %*,
du plomb jusqu’à 90 %*, du cuivre
jusqu’à 95 %*, de l’aluminium jusqu’à
67 %*). Les minéraux et oligo-éléments
sont préservés.
* Indications fournies par le fabricant
Fixez l’accessoire de vissage à la car-
touche filtrante comme indiqué sur l’illustration.
Vissez la cartouche filtrante au fond du ré-
servoir d’eau :
1. Placez la cartouche filtrante
2. Vissez la cartouche.
Retirez l’accessoire de vissage de la car-
touche filtrante.
!
Remarque : La cartouche filtrante néces-
site d’être remplacée tous les 50 litres
d’eau environ ou tous les 2 mois au minimum. Votre machine vous indique dans
combien de jours ou combien de litres
vous devrez procéder au remplacement de
la cartouche : allez dans le menu « Infos
Produit /Filtre », puis sélectionnez « Remplacement ».
12
Utilisation et entretien / SERIE EA 80xx
Page 87

KRUPS Espresseria Automatic
!
Réglages du programme en cas d’utilisation de la cartouche filtrante
Si vous utilisez une cartouche filtrante,
dans le menu de réglage « Filtre », répondez à la question posée par « Oui » ou
« OK ». Ce programme est également accessible en allant dans « Infos Produit »
puis en sélectionnant « Filtre » et « Installer » ou en allant dans "Entretien / Filtre /
Sortie". Placez un récipient d’une contenance de 0,5 litre environ sous la buse
vapeur car le programme remplit la cartouche filtrante d’eau et une plus grande
quantité d’eau est donc évacuée de la
buse vapeur. Un message à l’écran vous
invite ensuite à régler la date de mise en
place du filtre afin que le programme
puisse vous indiquer en temps voulu
quand changer le filtre (dans 2 mois ou
après le passage de 50 litres d’eau).
3.2 Préparation de l’appareil
Avant de mettre l’appareil sous tension,
effectuez les étapes décrites ci-dessous.
Attention : Réservoir d’eau (10) :
Ne pas remplir le réservoir d’eau chaude,
d’eau minérale, de lait ou de tout autre liquide car cela pourrait endommager l’appareil.
Réservoir à café en grains (15) : Ne
jamais mettre de café moulu ou d’eau
dans le réservoir à café en grains car le
broyeur risquerait d'être endommagé. Assurez-vous qu’aucun corps étranger (par
ex. des petits cailloux présents dans le
café en grains) ne pénètre dans le réservoir car cela risquerait d’endommager le
broyeur (exclusion de la garantie !).
Bac récolte-gouttes (23) : Pour éviter
les risques de brûlures dues aux projections d'eau chaude, vérifiez que le bac récolte-gouttes est correctement disposé !
DEUTSCH
ENGLISH
FRANCAIS
NEDERLANDS
DANSK
Retirez le réservoir d’eau (10) et remplis-
sez-le d’eau froide.
i
Conseil : Vous pouvez remplir le réservoir
sans avoir à le retirer : ouvrez le couvercle et
versez l’eau à l’aide d’un récipient adapté.
Remettez-le en place et refermez le couvercle.
Ouvrez le couvercle (12) du réservoir à
café en grains (15) et remplissez-le de
grains de café (max. 275 g).
Refermez le couvercle du réservoir à café
en grains.
Utilisation et entretien / SERIE EA 80xx
!
Important : Respectez le niveau de
remplissage maximum (repère « Max »)
du réservoir d’eau.
!
Remarque : Si, lors de la mise sous ten-
sion de l’appareil, le réservoir d’eau est
absent ou insuffisamment rempli (sous le
repère « Calc »), le message « Remplir le
réservoir » s’affiche et la préparation de
l’espresso ou du café est momentanément impossible.
SVENSKA
NORSK
SUOMI
13
ITALIANO
Page 88

KRUPS Espresseria Automatic
3.3 Réglage initial
Lors de la première utilisation de la machine, il vous est demandé d’effectuer di-
Réalisation des réglages
Mettez l'appareil sous tension en appuyant
sur la touche Marche/Arrêt (1).
Un message de bienvenue apparaît à
l’écran, puis le menu de réglage
« Langue ».
A l’aide du bouton rotatif, sélectionnez
une langue d’affichage et validez votre
choix en appuyant sur la touche OK.
vers réglages. Suivez les indications qui
s’affichent à l’écran.
Effectuez les autres réglages en suivant
les indications à l’écran. En ce qui
concerne les paramètres, respectez les
explications données au point 3.6, menu
« Réglages ».
!
Remarque : Si vous débranchez
votre appareil ou après une panne de
courant, il vous sera demandé d'enregistrer à nouveau certains paramètres tels
que l'heure et la date ou de confirmer les
réglages. L'appareil procèdera ensuite à
un test automatique.
14
Utilisation et entretien / SERIE EA 80xx
!
Important : Assurez-vous que tous
les couvercles et que la trappe d'entretien sont bien fermés et que tous les
composants de la machine sont correctement installés avant de démarrer la préparation d’une boisson.
Page 89
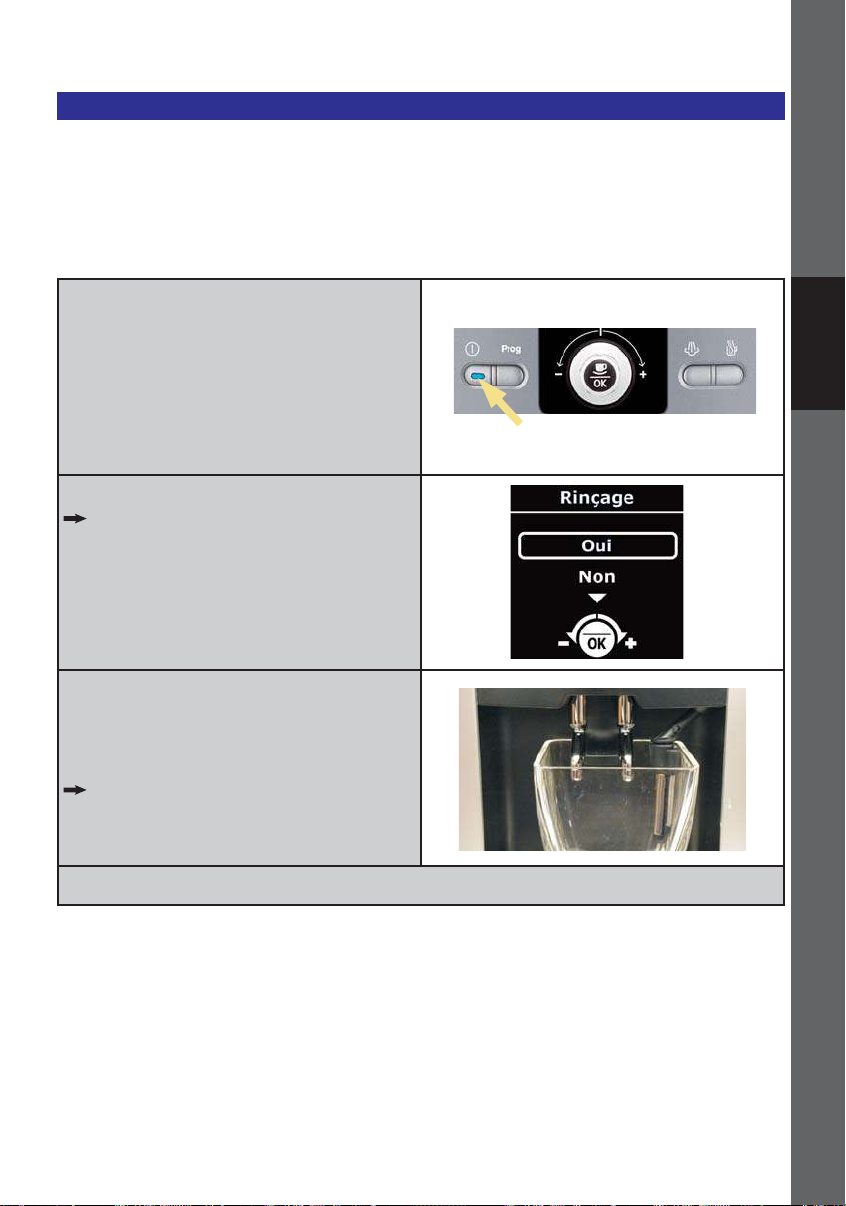
KRUPS Espresseria Automatic
3.4 Rinçage du circuit café
Après plusieurs jours sans utilisation,
vous devez effectuer un rinçage du circuit café. Vous pouvez effectuer un rinçage après la mise sous tension de
Appuyez sur la touche Marche/Arrêt (1).
Un message de bienvenue s’affiche à
l’écran, puis un autre avertissant du préchauffage de l’appareil. Quelques secondes plus tard, il vous est demandé à
l’écran si l’appareil doit effectuer un rinçage ou non.
DEUTSCH
l’appareil ou à tout moment, en allant
dans le menu « Entretien » et en sélectionnant « Rinçage ».
ENGLISH
FRANCAIS
NEDERLANDS
DANSK
Placez un récipient suffisamment grand
sous les sorties café, puis sélectionnez
« Oui » à l’aide du bouton rotatif et validez
en appuyant sur la touche OK.
La procédure de rinçage commence et
s’arrêtera automatiquement après
l’écoulement de 40 ml environ.
A l'écran s'affiche ensuite le menu de sélection des boissons.
Utilisation et entretien / SERIE EA 80xx
SVENSKA
NORSK
SUOMI
15
ITALIANO
Page 90

KRUPS Espresseria Automatic
3.5 Réglage du broyeur
Vous pouvez régler la finesse de broyage
du broyeur. Plus le réglage du broyeur à
café est fin, plus l'arôme du café sera
prononcé, et par ailleurs plus le café sera
crémeux.
Attention : Ne tournez le bouton de
réglage (13) que pendant le broyage afin
de ne pas endommager le broyeur.
Veillez à ne jamais forcer sur le bouton de
réglage de la finesse de broyage !
Réglez la finesse de broyage de la prochaine préparation de boisson, pendant
que les grains de café sont moulus.
Signification des positions du bouton de réglage
Mouture plus fine
Mouture moyenne
Mouture plus grosse
3.6 Les menus
Les menus de votre Espresseria Automatic
sont composés d’une multitude de fonctions
et de possibilités de réglage, grâce auxquelles vous pourrez confortablement régler
votre appareil et ainsi obtenir un fonctionnement optimal.
Appuyez sur la touche Programme (2) pour
afficher à l’écran l’aperçu des menus ou pour
retourner au menu de sélection des boissons.
Le principe d’utilisation est expliqué au point
2.2 de ce mode d’emploi.
Fonctionnement du choix des menus
Lorsque vous êtes dans le menu de sélec-
tion des boissons, appuyez sur la touche
Programme (2).
L’aperçu des menus s’affiche à l’écran.
i
Info : Plusieurs pressions sur la touche
Programme permettent de passer du
menu de sélection des boissons à
l’aperçu des menus. Lorsque vous appuyez sur la touche programme dans un
menu ou un sous-menu, la fonction menu
est interrompue et vous revenez au menu
de sélection des boissons.
16
Utilisation et entretien / SERIE EA 80xx
Page 91

KRUPS Espresseria Automatic
Voici les menus proposés au niveau principal :
Menu Fonction
Entretien
Réglages
Infos Produit
Mode démo
Sortie
Fonctions de nettoyage et d’entretien
Réglages initiaux de l’appareil
Permet d’accéder aux informations concernant les procédures effectuées
Permet de lancer divers programmes
Activation ou désactivation du mode de présentation
Fin de l’aperçu des menus
Les réglages et fonctions des sous-menus sont détaillés ci-dessous.
Menu « Entretien »
Sous-menu Fonction
Rinçage
Nettoyage
Filtre
Permet de lancer un cycle de rinçage.
!
Important : Placez les tasses avant d'appuyer sur la touche OK !
Permet de lancer le programme de nettoyage.
Accès au mode filtre.
DEUTSCH
ENGLISH
FRANCAIS
NEDERLANDS
DANSK
Sortie
Fin de l’aperçu des sous-menus.
Menu « Réglages »
Sous-menu Fonction
Langue
Contraste écran
Date
Horloge
Auto-off
Auto-on
Unité de mesure
Dureté eau
Permet de sélectionner la langue d’affichage de votre choix.
Réglez le contraste optimal de l’écran avec le bouton rotatif et validez en ap-
puyant sur la touche OK.
Permet de régler la date, à savoir jour, mois, année (2 chiffres à chaque fois).
!
Important : Si vous utilisez une cartouche filtrante antitartre, il vous sera
obligatoirement demandé de régler la date.
1ère étape : choisissez le format horaire : affichage sur 24 heures ou sur 12
heures (AM/PM).
2ème étape : réglez l’heure.
Vous pouvez choisir la durée après laquelle votre appareil s’arrêtera automatiquement. De 30 min. à 4 heures, par tranches de 30 minutes.
Vous pouvez lancer automatiquement le préchauffage de votre appareil à une
heure choisie.
Vous pouvez choisir l’unité de mesure pour les boissons réalisées : ml ou oz.
Vous pouvez régler la dureté de votre eau entre 0 et 4 (point 3.1).
Utilisation et entretien / SERIE EA 80xx
SVENSKA
NORSK
SUOMI
17
ITALIANO
Page 92
KRUPS Espresseria Automatic
Sous-menu Fonction
Température café
Sortie
Vous pouvez ajuster la température de votre café ou espresso sur 3 niveaux, le
niveau 3 étant le niveau de température le plus chaud.
Fin de l’aperçu des sous-menus.
Menu « Infos Produit »
Sous-menu Fonction
Cycles café
Cycles eau chaude
Cycles vapeur
Rinçage
Nettoyage
- Dernier
- Prochain
- Nettoyer
- Sortie
Détartrage
- Dernier
- Prochain
Affiche le nombre total de cycles de café effectués par la machine.
Affiche le nombre total de cycles d’eau chaude effectués par la machine.
Affiche le nombre total de cycles de vapeur effectués par la machine.
Affiche le nombre total de rinçages effectués par la machine.
Accès aux sous-menus suivants.
Nombre de cafés préparés depuis le dernier nettoyage.
Nombre de cafés réalisables avant le prochain nettoyage.
Lance le programme de nettoyage.
Fin du menu Nettoyage.
Accès aux sous-menus suivants.
Nombre de cycles vapeur ou eau chaude réalisés depuis le dernier détartrage.
Nombre de cycles vapeur ou eau chaude réalisables avant le prochain détartrage.
- Sortie
!
Remarque : Les options « Dernier » et « Prochain » ne sont accessibles que si vous avez
installé un filtre auparavant, accessible sous Infos Produit/Filtre/Installer.
Filtre
- Dernier
- Prochain
- Installer
- Sortie
Sortie
18
Fin du menu Détartrage.
Accès aux sous-menus suivants.
Affiche la date du dernier changement de filtre et la quantité d’eau filtrée depuis.
Affiche la date du prochain changement de filtre et la quantité d’eau à filtrer
jusqu’à cette date.
Lance la procédure de remplacement du filtre.
Fin du menu Filtre.
Fin de l’aperçu des sous-menus.
Utilisation et entretien / SERIE EA 80xx
Page 93

KRUPS Espresseria Automatic
Menu « Mode démo »
Sous-menu Fonction
Permet de lancer le mode de présentation.
Activer
Désactiver
Sortie
Lorsque ce mode est activé, les différents menus et leur accès s’affichent automatiquement dans le menu de sélection des boissons.
Permet de désactiver le mode de présentation.
Fin de l’aperçu des sous-menus.
Menu de sélection des boissons
Sous-menu Fonction
Espresso
Espresso fort
Café
Café long
Préparer un espresso normal.
Préparer un espresso fort.
Préparer un café normal.
Préparer un café long.
DEUTSCH
ENGLISH
FRANCAIS
NEDERLANDS
DANSK
Utilisation et entretien / SERIE EA 80xx
SVENSKA
NORSK
SUOMI
19
ITALIANO
Page 94

KRUPS Espresseria Automatic
!
4 Utilisation
Le respect des instructions ci-dessous
vous garantira de très bons résultats.
Plusieurs essais seront certainement
nécessaires avant de trouver le mélange
et la torréfaction du café en grains
correspondant à votre goût.
La qualité de l’eau utilisée est également
un facteur déterminant pour le goût de
votre café. Assurez-vous que l’eau est
fraîchement sortie du robinet, qu’elle est
froide et qu’elle ne sent pas le chlore.
N'utilisez pas d'eau stagnante.
La sortie café
La sortie café est réglable en hauteur.
Remontez-la pour pouvoir placer ou
La buse vapeur
La buse vapeur peut se déplacer vers la
gauche et vers la droite et s’incliner
Le bac récolte-gouttes
Attention : Votre appareil est exclusi-
vement destiné à l’utilisation de café en
grains. Lors de la préparation de votre
premier café, après plusieurs jours sans
utilisation de la machine, ou après une
procédure d’entretien, un peu de vapeur
ou d’eau chaude sort de la buse vapeur.
Tenez-vous à une distance suffisante de
la buse vapeur et placez une tasse sous
les sorties afin d’éviter tout risque de brûlures ou d’éclaboussures avec la vapeur
ou l'eau chaude. Les principales commandes sont brièvement décrites ci-dessous :
retirer plus facilement des tasses plus
hautes.
légèrement vers l’avant ce qui facilite le
retrait de la tasse placée en dessous.
Ce bac permet de récupérer l'eau utilisée
par l'appareil ou renversée lors de la
préparation. La machine vous prévient
4.1 Mise sous tension de l’appareil
Appuyez sur la touche Marche/Arrêt (1).
Un message de bienvenue s’affiche à
l’écran, puis un autre avertissant du préchauffage de l’appareil.Apparaît ensuite la
question concernant la procédure de rinçage.
20
Utilisation et entretien / SERIE EA 80xx
grâce à un système de flotteur
mécanique (22) quand le bac doit être
vidé.
!
Remarque : Si la machine n’a pas été uti-
lisée pendant plusieurs jours, vous devez
effectuer un rinçage.
Page 95

KRUPS Espresseria Automatic
Si besoin, procédez à un rinçage (voir
point 3.4) ou validez la proposition
« Non » en appuyant sur « OK ».
L’écran affiche ensuite le menu de sélection des boissons.
Si vous souhaitez préparer un espresso ou
un café, lisez les instructions données au
point 4.2. Pour préparer un cappuccino,
reportez-vous au point 4.3.
4.2 Préparation d’un espresso ou d’un café
Vous pouvez régler la quantité d’eau pour
un espresso entre 20 et 70 ml, pour un
café entre 80 et 120 ml et pour un café
long entre 120 (2x60) ml et 240 (2x120)
ml. Pour régler la température de l'eau
selon vos souhaits, allez dans le menu
« Réglages » et sélectionnez
« Température café ». Pour la fonction
espresso, vous avez le choix entre deux
forces : « standard » ou « corsé ».
Préparation d’un espresso ou d’un café
Mettez une tasse sous la sortie café (20).
Vous pouvez abaisser ou remonter la sortie café en fonction de la taille de la tasse.
DEUTSCH
ENGLISH
FRANCAIS
NEDERLANDS
DANSK
Sélectionnez votre boisson avec le bou-
ton rotatif et validez avec la touche
« OK ».
L’écran affiche le dernier volume d’eau sélectionné pendant la procédure de
broyage ou de chauffage.
Vérifiez le volume d'eau enregistré et ajus-
tez-le, si vous le souhaitez, grâce au bouton rotatif (3).
Une fois le chauffage terminé, la machine
commence l’écoulement de la boisson.
Attendez la fin de l'écoulement et l'affi-
chage à l'écran du message « Boisson
prête » pour retirer la tasse.
1. Sélectionnez
2. Validez
!
Remarque : Pour arrêter l’écoulement de
la boisson parce que la tasse est pleine ou
pour toute autre raison, appuyez sur la
touche de votre choix. Vous pouvez diminuer le volume d’eau pendant l’écoulement
en tournant le bouton rotatif.
Attention : NE PAS RETIRER LE RESERVOIR AVANT LA FIN DU CYCLE (c’est-àdire 15 secondes après la fin de l’écoulement du café).
Utilisation et entretien / SERIE EA 80xx
SVENSKA
NORSK
SUOMI
21
ITALIANO
Page 96

KRUPS Espresseria Automatic
4.3 Préparation d’un capuccino
Le cappuccino est une boisson préparée
avec un espresso et de la mousse de lait.
l'adapter selon votre goût. Nous vous
conseillons d’utiliser du lait demi-écrémé.
Les amateurs de cappuccino préparent
tout d’abord la mousse de lait et y
ajoutent ensuite l’espresso car l’espresso
perd très rapidement son arôme
d’exception. La proportion de mousse de
lait par rapport à celle de l’espresso est
!
Conseil : Utilisez de préférence une
tasse à cappuccino car celle-ci est moins
haute et peut contenir un grand volume; il
est donc plus facile de la retirer de la
buse vapeur.
la même mais vous pouvez naturellement
Préparation de la mousse de lait avec la vapeur
Appuyez sur la touche Vapeur (5).
La machine est en préchauffage. Un message vous invite ensuite à placer un récipient sous la buse vapeur.
Placez un récipient ou une tasse à cap-
puccino rempli(e) à moitié de lait froid (6 à
10°C) sous la buse vapeur (21) et appuyez sur la touche Vapeur.
Dès le démarrage de la production de va-
peur, le temps de production restant s’affiche en secondes à l’écran. Deux options
s’offrent alors à vous :
A) Vous pouvez augmenter ou diminuer le
temps affiché à l’aide du bouton rotatif et
attendre que la production de vapeur s'arrête automatiquement.
B) Vous pouvez interrompre à tout moment la production de vapeur en appuyant
sur la touche Vapeur.
!
Remarque : Si l’extrémité de la buse va-
peur n'entre pas en contact avec le lait,
soulevez légèrement la tasse jusqu'à la fin
du moussage.
!
Important : La production de vapeur ne
s’arrête pas immédiatement après avoir appuyé sur la touche Vapeur.
Appuyez sur la touche suffisamment tôt
pour éviter tout débordement.
Retirez la tasse à cappuccino et placez-la
sous la sortie café (20).
Ajoutez par dessus un espresso ou un
café suivant la boisson que vous souhaitez
préparer en suivant les instructions décrites au point 4.2.
Retirez la tasse et ajoutez-y un peu de
sucre ou de copeaux de chocolat selon
vos envies.
22
Utilisation et entretien / SERIE EA 80xx
!
Important : Retirez la buse et passez-la
immédiatement sous l’eau (voir point 5.1).
Remettez-la en place, placez un récipient
en dessous et appuyez sur la touche Vapeur afin de retirer les résidus de lait qui
sont à l’intérieur. Laissez la vapeur s’échapper au moins 10 secondes.
Page 97

KRUPS Espresseria Automatic
4.4 Utilisation de l’accessoire auto-cappuccino (en option)
L’accessoire auto-cappuccino XS 6000
facilite la préparation d’un cappuccino ou
d’un caffe latte (café au lait) avec votre
Espresseria Automatic. L’accessoire est
composé d’un pot à lait en inox brossé,
d’un tuyau montant et d’un tuyau de
raccordement, ainsi que d’une buse
spéciale.
Assemblage et installation de l’accessoire auto-cappuccino
Insérez le tube en inox dans le joint en
caoutchouc du pot à lait. Il doit descendre
presque jusqu’au fond du pot.
Réglez comme suit la buse spéciale pour
chaque boisson :
Tournez la partie centrale de 180° afin que
le symbole de la boisson choisie figure sur
le devant.
Cappuccino Café Latte
DEUTSCH
ENGLISH
FRANCAIS
NEDERLANDS
DANSK
Installez la buse spéciale :
A) retirez la buse vapeur (21) et
B) remplacez-la par la buse spéciale.
Remplissez le pot à lait avec du lait froid
(6 - 10°C).
Reliez la buse spéciale et le tube en inox
grâce au tuyau de raccordement.
Utilisation et entretien / SERIE EA 80xx
SVENSKA
NORSK
SUOMI
23
ITALIANO
Page 98

KRUPS Espresseria Automatic
Préparation d'un cappuccino ou d’un caffe latte avec l’accessoire auto-cappuccino
Appuyez sur la touche Vapeur (5).
La machine est en préchauffage.
Un message vous invite ensuite à placer
un récipient sous la buse vapeur.
Placez une tasse à cappuccino sous la
buse spéciale et appuyez sur la touche
vapeur.
Dès le démarrage de la production de va-
peur, le temps de production restant s’affiche en secondes à l’écran. Vous pouvez …
A) ... augmenter ou diminuer le temps affiché à l’aide du bouton rotatif et/ou attendre que la production de mousse s'arrête.
B) ... interrompre à tout moment la production
de vapeur en appuyant sur la touche Vapeur.
!
Important : La production de mousse ne
s’arrête pas immédiatement après avoir appuyé sur la touche Vapeur.
Appuyez suffisamment tôt sur la touche
pour éviter tout débordement.
Retirez la tasse à cappuccino et placez-la
sous la sortie café.
Ajoutez par dessus un espresso en sui-
vant les instructions décrites au point 4.2.
Retirez la tasse et ajoutez-y un peu de
sucre ou de copeaux de chocolat selon
vos envies.
Nous vous conseillons de nettoyer la buse
spéciale immédiatement après chaque utilisation afin d’éviter que le lait ne sèche à
l’intérieur.
Démontez la buse (voir illustration) et nettoyez les pièces à l’aide d’une petite
brosse et le cas échéant avec un peu de
liquide vaisselle.
Si nécessaire, débouchez le petit orifice
(entouré sur l’illustration) avec le fil de nettoyage (fourni avec votre machine).
24
Utilisation et entretien / SERIE EA 80xx
!
Remarque : Pour préparer un caffe latte,
tournez la partie centrale de la buse spéciale à 180° (voir ci-dessus).
Page 99

KRUPS Espresseria Automatic
4.5 Fonction 2 tasses
Votre appareil vous permet de préparer
deux tasses de boisson, c’est-à-dire deux
fois la quantité de la boisson choisie.
Mettez deux tasses sous les sorties café
et ajustez la hauteur de celles-ci en fonction des tasses.
Sélectionnez votre boisson avec le bouton
rotatif (3).
Validez ensuite avec une double pression
rapide sur la touche OK.
Un message vous indique que vous avez
demandé deux tasses.
!
Remarque : Vous pouvez interrompre
la fonction en appuyant sur n’importe
quelle touche pendant l’écoulement du
café.
La machine enchaînera automatiquement
2 cycles de préparation de café.
Appuyez 2 fois
DEUTSCH
ENGLISH
FRANCAIS
NEDERLANDS
DANSK
Attendez que les deux cycles de percola-
tion soient terminés avant de retirer les
tasses.
Remarque : En fonction 2 tasses, au
début du cycle un vidage du collecteur
de marc de café peut être demandé. Une
fois les actions nécessaires effectuées, le
cycle de 2 tasses se fait à la suite automatiquement.
Utilisation et entretien / SERIE EA 80xx
!!
Remarque : Pour la boisson “Café
long”, la fonction 2 tasses n’est pas possible.
SVENSKA
NORSK
SUOMI
25
ITALIANO
Page 100
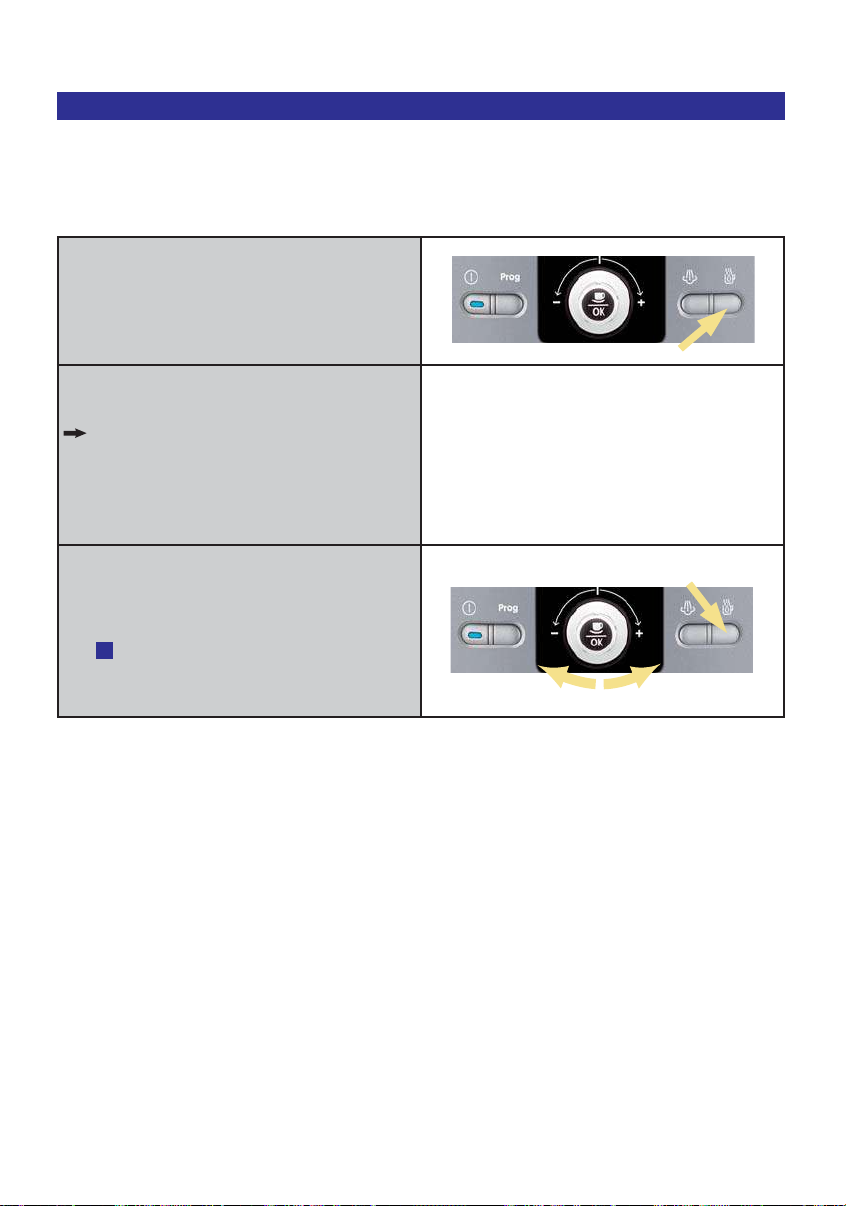
KRUPS Espresseria Automatic
4.6 Préparation de l’eau chaude
Grâce à votre machine, vous pouvez également préparer de l’eau chaude, par
exemple pour rallonger un café trop fort.
Alors que l’écran affiche le menu de sélec-
tion des boissons, appuyez sur la touche
Eau chaude (6).
Un message vous invite à placer un récipient sous la buse vapeur.
Placez un récipient sous la buse vapeur.
Appuyez à nouveau sur la touche Eau
chaude et sélectionnez la quantité d’eau
chaude souhaitée à l’aide du bouton rotatif.
!
Remarque : Vous pouvez interrompre
à tout moment la production d’eau chaude
en appuyant sur n’importe quelle touche.
La quantité maximale d’eau chaude par
cycle est limitée à 300 ml.
1. Appuyez
2. Sélectionnez
26
Utilisation et entretien / SERIE EA 80xx
 Loading...