

Page 1
KRUPS
lock
Page 2
I
e
l.:P
:. .. '-""
-
-
~
0
e -
..:- "-
-; :. _:::-
~
t-_:; ~\""':-;'.-
~~
0
~
~
t
. -
~
FNP1/FNP2
Page 3
c
a
KRUPS
~
d
e
92
9
J
91
h.
h1
a e>e>~'"'e~ ~ ~~e>
e
e>e>e>e>e::¥e>:J:::;e
e e> e>.§'ee~e> e> e
e ee>it!" e>eeee
e
f1
~
f
k
Page 4
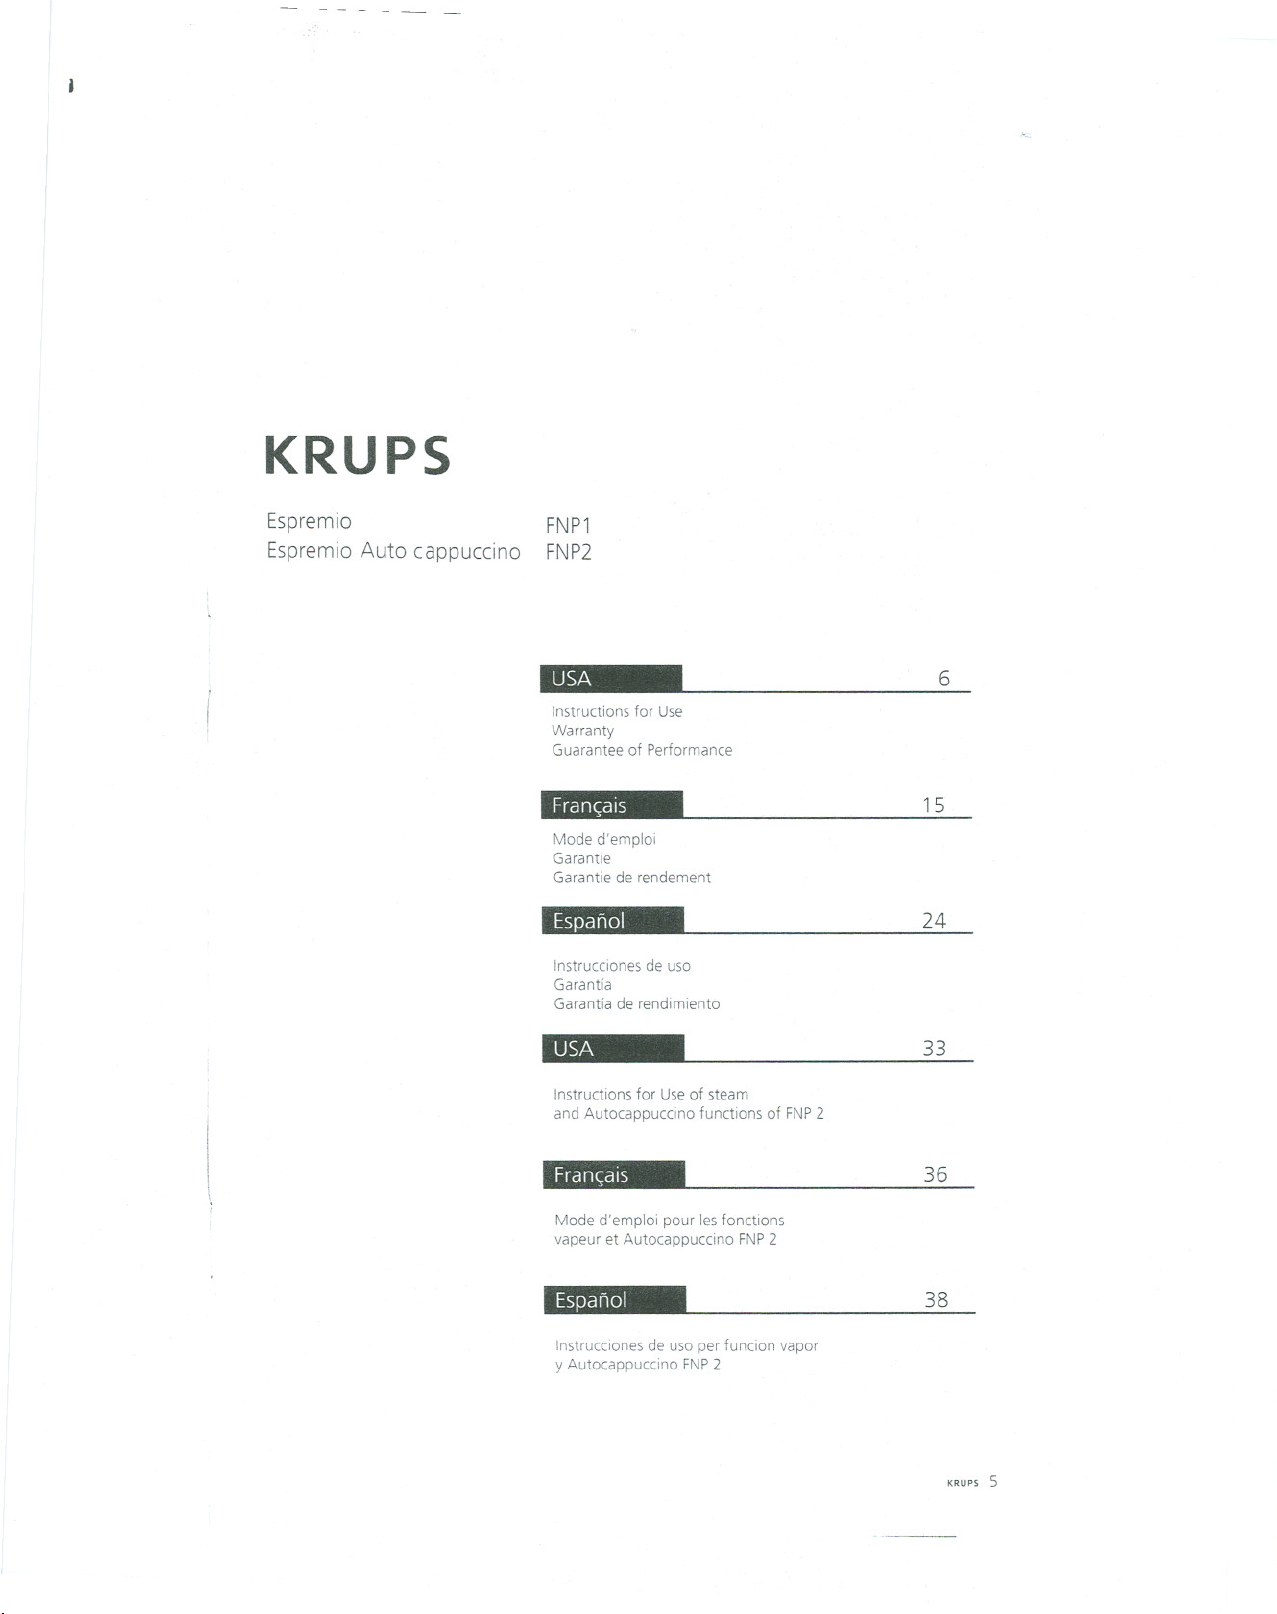
KRUPS
Espremio
Espremio Auto cappuccino
FNP1
FNP2
Instructions for Use
Warranty
Guarantee of Performance
Fran~ais
Mode d'emploi
Garantle
Garantiede rendement
Espanol
Instrucciones de uso
Garantfa
Garantia de rendimiento
Instructions for Use of steam
and Autocappuccino functions of FNP 2
6
15
24
33
Fran~ais
Mode d'emploi pour les fonctions
vapeur et Autocappuccino FNP2
Espanol
Instrucciones de uso per funcion vapor
y Autocappuccino FNP2
36
38
KRUPS5
Page 5
u----
.
- - --- - - - -
I!m
IMPORTANT SAFEGUARDS
When using electrical appliances, basic safety precautions should
always be followed to reduce the risk of fire, electric shock and/or
injury to persons, including the following:
-Read all instructions.
-Do not touch hot surfaces. Use handles or knobs.
-To protect against fire, electric shock and injury to persons, do not
immerse cord, plugs, or appliance in water or other liquid.
-Close supervision is necessary when any appliance is used by or
near children.
-Unplug from outlet when not in use and before cleaning. Allow to
cool before putting on or taking off parts, and before cleaning the
appliance.
-Do not operate any appliance with a damaged cord or plug or
after the appliance malfunctions, or has been damaged in any
manner. Return appliance to your nearest authorized KRUPS
Service Center for examination, repair or adjustment (see
Guarantee of Performance).
-The use of accessory attachments not recommended by KRUPS
may result infire, electric shock or injury to persons.
-Do not use outdoors.
-Do not let cord hang over edge of table or counter, or touch hot
surfaces.
-Do not place on or near a hot gas or electric burner, or in a heated
oven.
-To disconnect, turn switch to "OFF",then remove plug from wall
outlet.
-Do not use appliance for other than intended use.
-Use extreme caution when dispensing hot steam.
SAVE THESE INSTRUCTIONS
6 KRUPS
Page 6

u
u_-- ------
.
CAUTION
-This appliance is for household use only. Any servicing other than
routine cleaning and user maintenance should be performed by
authorized KRUPSservice personnel only (see Guarantee of
Performance).
-Do not immerse base in water.
-To reduce the risk of fire or electric shock, do not remove the base
of the machine. There are no user serviceable parts inside. Repairs
should be performed by authorized KRUPSservice personnel only.
SPECIAL CORD SET INSTRUCTIONS
Regarding your Cord Set:
A. A short power-supply cord is to be provided to reduce risks
resulting from becoming entangled in or tripping over a longer
cord.
B. Longer extension cords are available and may be used if care is
exercised in their use.
e. If a long extension cord is used, (1) the marked electrical rating
of the extension cord should be at least as great as the electrical
rating of the appliance, (2) the longer cord should be arranged
so that it will not drape over the counter top or table top where
it can be pulled on by children or tripped over.
D.This appliance has a polarized plug (one blade is wider than the
other). To reduce the risk of electric shock, this plug is intended
to fit into a polarized outlet only one way. Ifthe plug does not
fit fully in the outlet, reverse the plug. If it still does not fit,
contact a qualified electrician. Do not attempt to modify the
plug in any way.
KRUPS7
Page 7

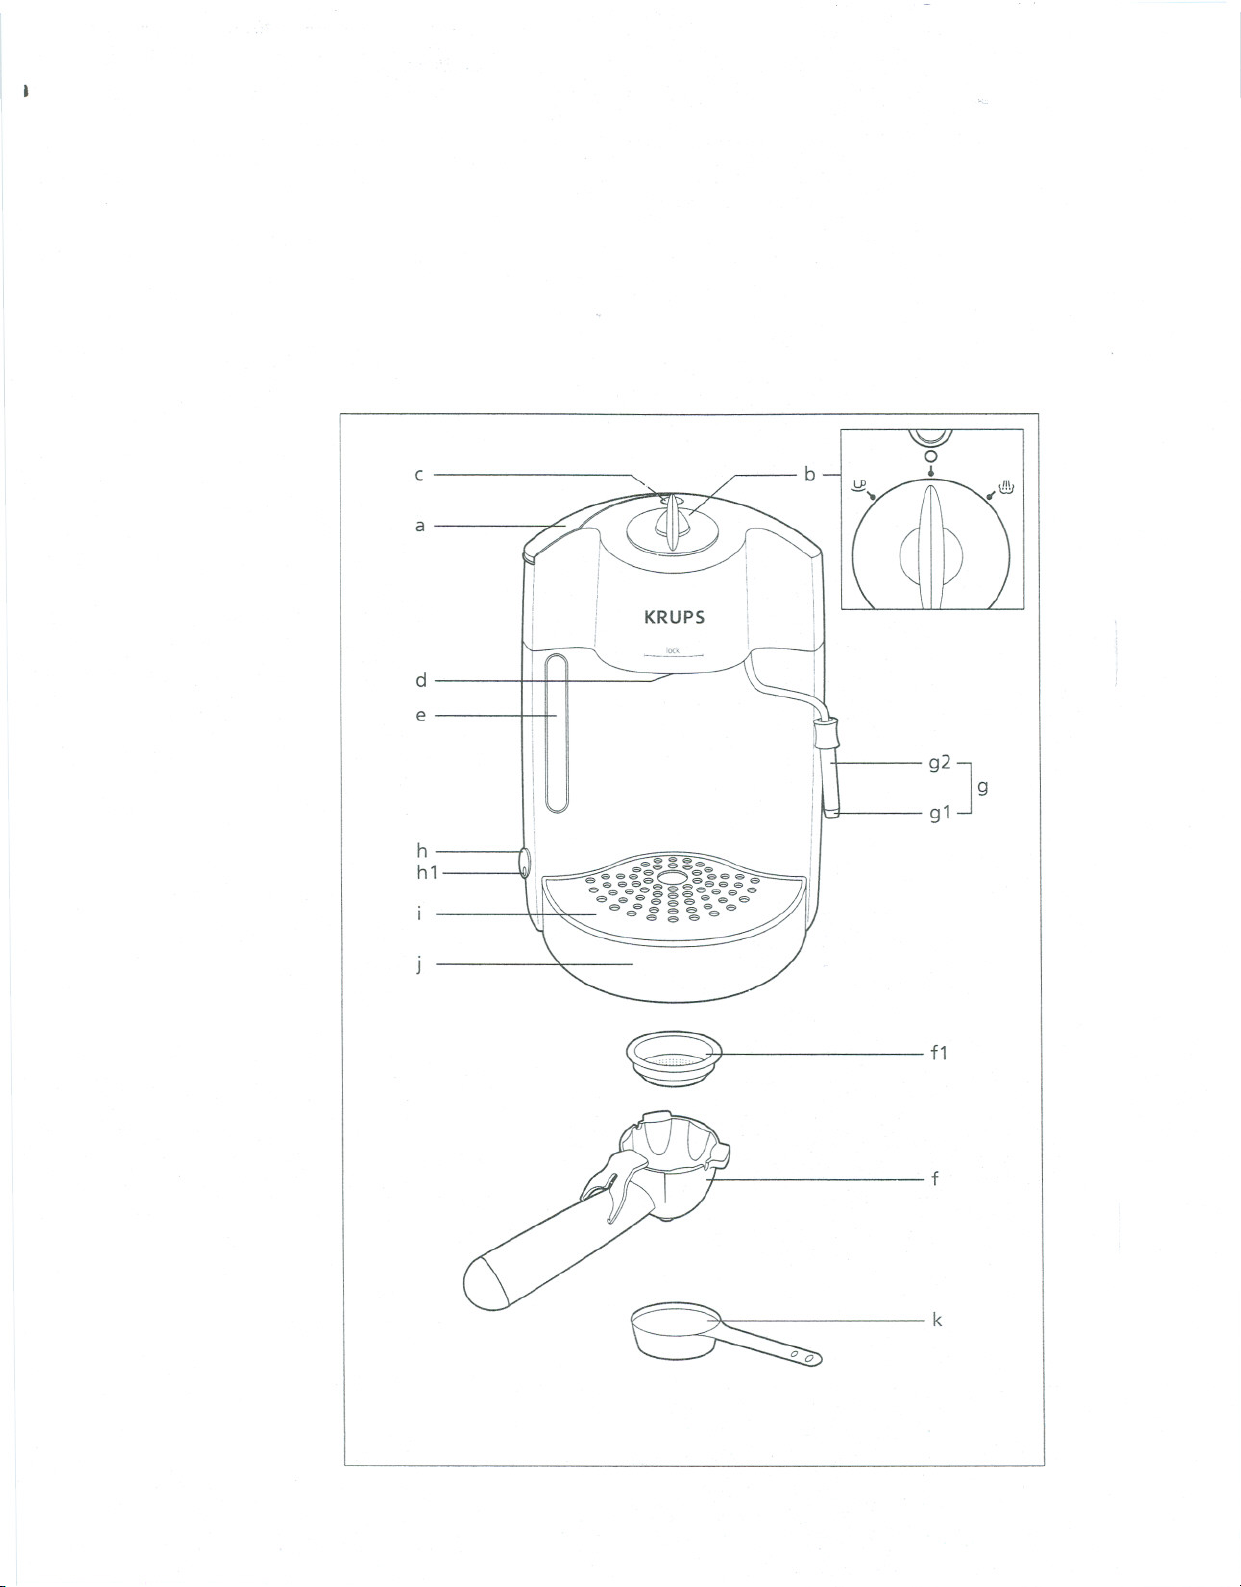
Description
a
Lid+ water tank
b
Functionselector
c
Temperature control indicator light
Percolationhead
d
Levelindicator of water
e
Filterholder
f
f1
filterfor one cup (ground coffee)
Steam nozzle for heating liquids
g
tip
gl
slidingpart
g2
h
On/Off switchwithincludedlamp
h1
operating indicator light
Grid
Driptray
j
k
Measuring spoon
Safety recommendations..
.Read the instructions for use carefully
before using your appliance for the first
time: any use which does not conform
to these instructions will absolve KRUPS
from any liability.
.Never leave the appliance within the
reach of small children. The use of this
appliance by young children or disabled
persons must always be under close
supervision.
.Check that the voltage rating of your
appliance matches that of your household
electrical wiring system.
Any connection error will render the
guarantee null and void.
. Do not allow the power cord to hang down
within reach of children.
. Do not remove the filter holder containing
the coffee grounds while water is running
through, as the appliance ISthen under
pressure,
. Do not use the appliance when the drip tray
and the grid arenot in place.
. Neverunplug the appliance by pulling on
the cord.
. Make surethe filter holder ISwell tightened
before starting to make coffee. Resetthe
8 KRUPS
"~
selector to 0 before loosening the filter
holder.
. All the appliances made by KRUPSare
subjected to strict 100 % inspection.
Practicalusertests are performed with a
number of appliances taken at random,
explains any traces of utilization.
which
Espresso~'(pffee'
Espresso coffee is richer In flavor and stronger
than ordinary coffee. It is traditionally drunk
from small espresso cups which have been
pre-heated, Hot water and pressure combine
to passed through ground coffee in order to
obtain this delicious black, foamy coffee,
which has an invigorating effect
You can always recognize genuine espresso
because of its characteristic flavor and rich,
delicious foam (crema). This
both high pressure and your favorite espresso
coffee (which has been well roasted and
correctly ground). If you are unable to
purchase ground
grinder to grind the beans. The coffee must
not be ground «too fine». It should be slightly
grainy. If it is too fine, you run the
blocking the grids of the percolation head and
the filter.
To guarantee
good espresso, it is necessary to use fresh,
clean,
cold water-free of chlorine or other
impurities that can ruin the taste of your
coffee.
espresso coffee, use a coffee
complete success In making a
. Clean the water heating system with one or
two tanks of clean water, asfollows:
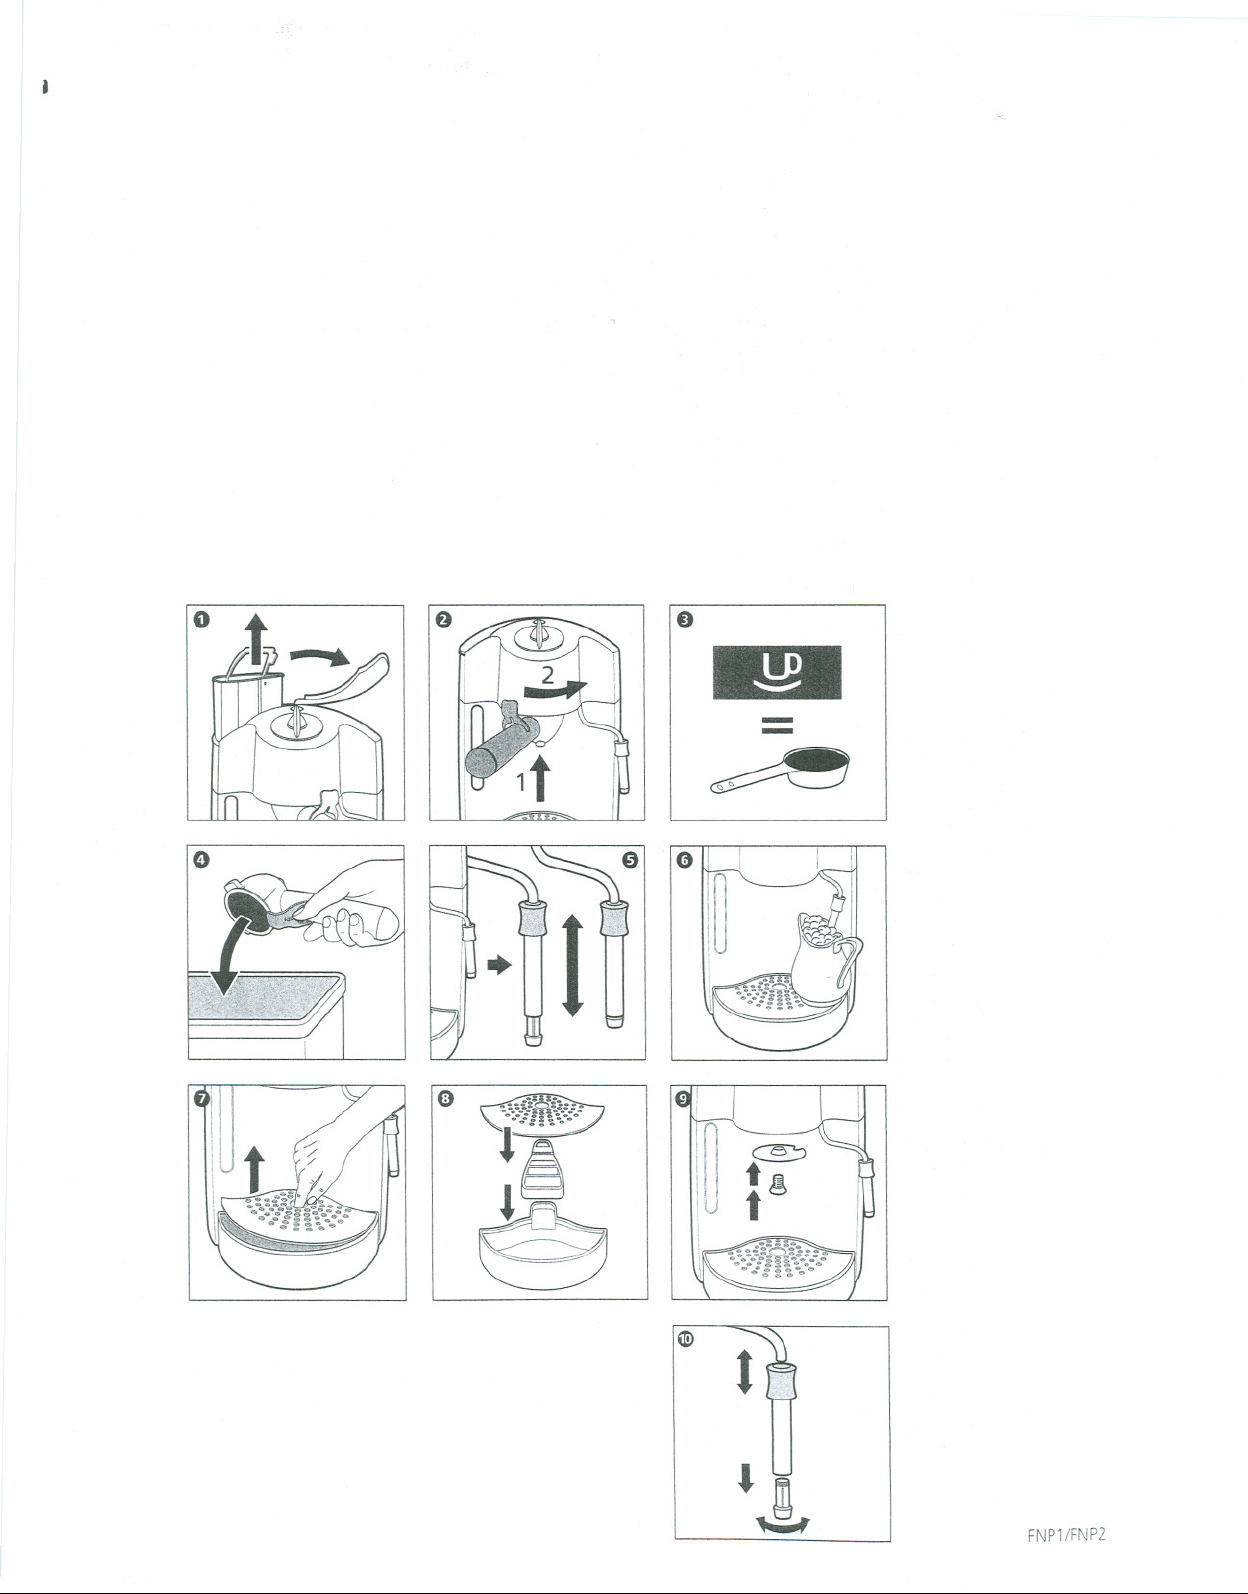
. Open the lid, lift out the tank and fill it with
water (1)
. Replace the tank, positioning it firmly in such
a way that the connecting valve situated
beneath the tank opens, and closethe lid.
. Plug in the appliance.
. Set the «on/off» switch (h) . The Indicator
light (h1) will come on.
. Placethe filter in the filter holder without
any coffee. Then fit the assemblyonto the
percolation head. To position the filter
however requires
risk of
Page 8
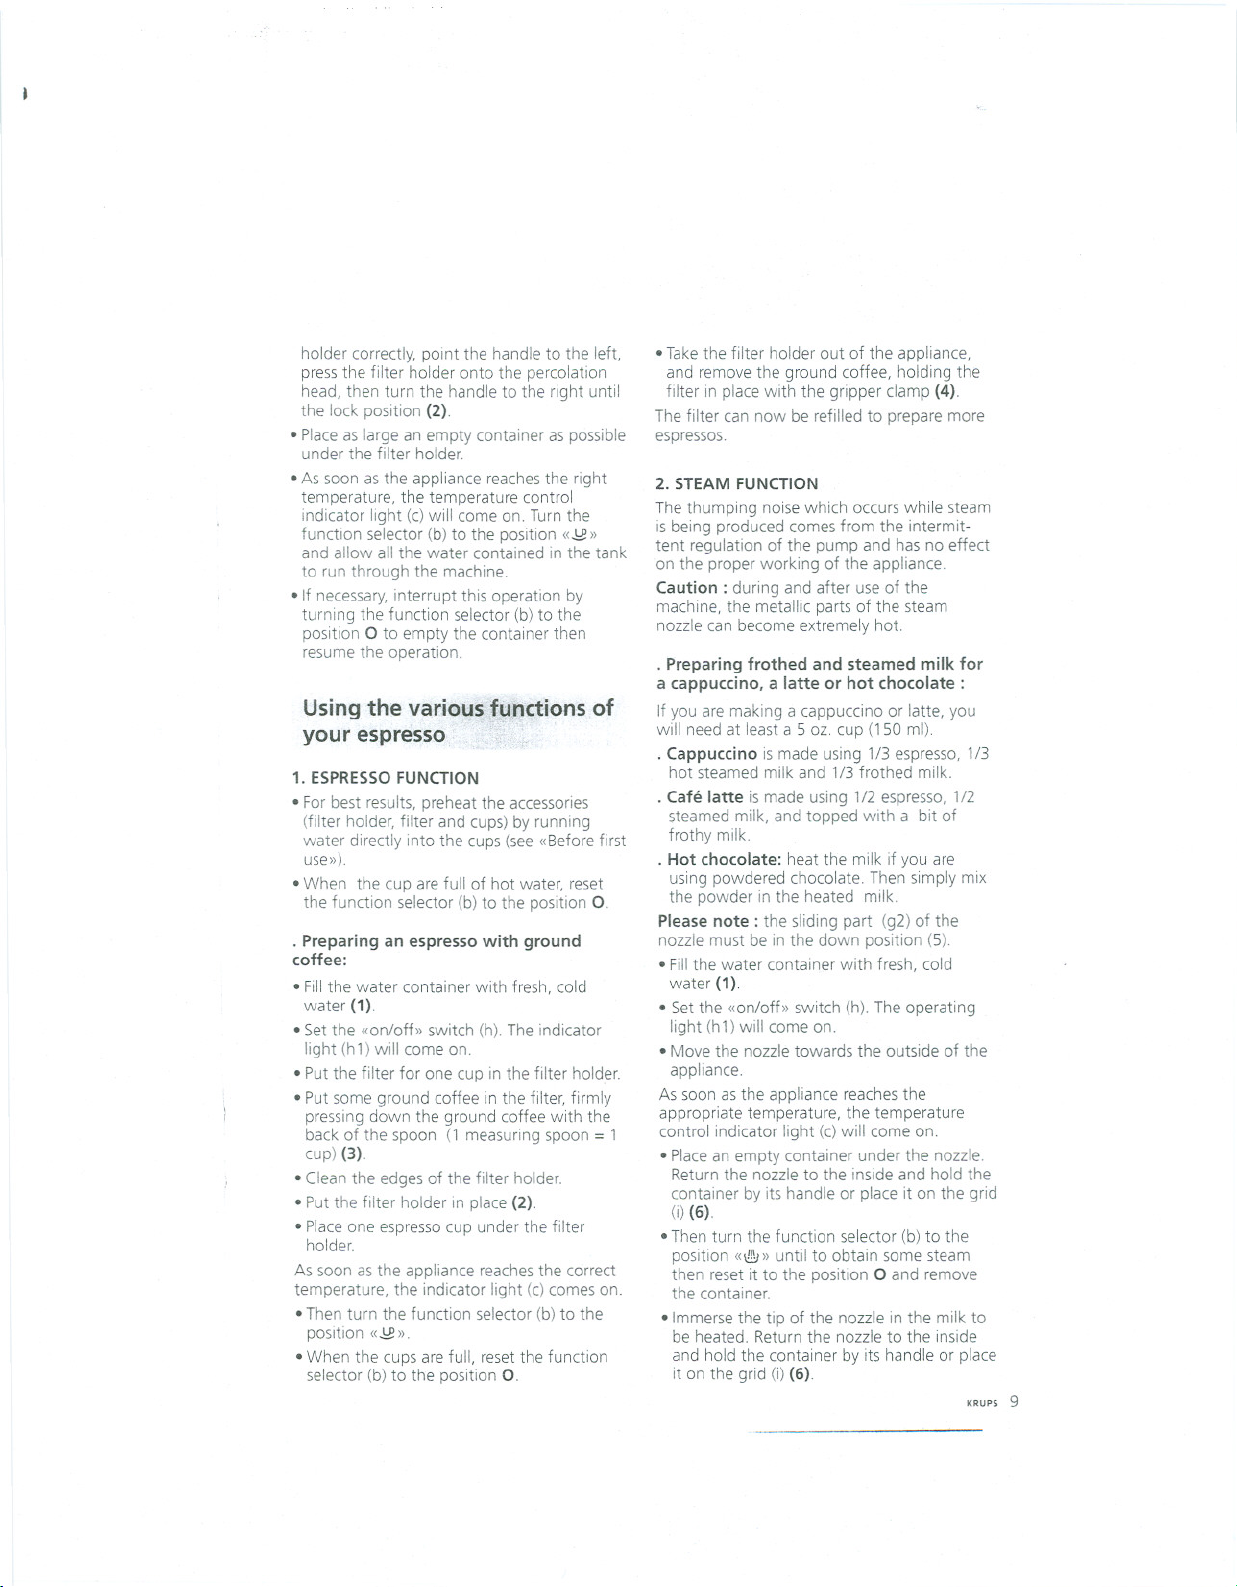
holder correctly, point the handle to the left,
pressthe filter holder onto the percolation
head, then turn the handle to the right until
the lock position (2).
.Placeaslarge an empty container aspossible
under the filter holder.
.Assoon asthe appliance reachesthe right
temperature, the temperature control
indicator light (c) will come on. Turn the
function selector (b) to the position «.!:B»
and allow all the water contained in the tank
to run through the machine.
.Ifnecessary,interrupt this operation by
turning the function selector (b) to the
position 0 to empty the container then
resumethe operation.
Using the various;.fui;1ctionsof
your espresso~i.
1. ESPRESSOFUNCTION
c'1!'8J
.Forbest results, preheat the accessories
(filter holder, filter and cups)by running
water directly into the cups (see«Before first
use»).
.When the cup are full of hot water, reset
the function selector (b) to the position O.
. Preparing an espresso with ground
coffee:
.Fillthe water container with fresh, cold
water (1).
.Setthe «on/off» switch (h). The indicator
light (hl) will come on.
.Putthe filter for one cup in the filter holder.
.Putsome ground coffee in the filter, firmly
pressing down the ground coffee with the
back of the spoon (1 measuring spoon = 1
cup) (3).
. Cleantheedgesofthefilterholder.
.Putthe filter holder in place (2).
.Placeone espressocup under the filter
holder.
As soon asthe appliance reachesthe correct
temperature, the indicator light (c)comes on.
.Then turn the function selector (b) to the
position «.!:B».
. Whenthecupsarefull,resetthefunction
selector (b) to the position O.
.Takethe filter holder out of the appliance,
and remove the ground coffee, holding the
filter in placewith the gripper clamp (4).
The filter can now be refilled to prepare more
espressos.
2. STEAM FUNCTION
The thumping noise which occurs while steam
is being produced comesfrom the intermit-
tent regulation of the pump and hasno effect
on the proper working of the appliance.
Caution: during and after use of the
machine, the metallic parts of the steam
nozzle can become extremely hot.
. Preparing frothed and steamed milk for
a cappuccino. a latte or hot chocolate:
If you are making a cappuccino or latte, you
will need at least a 5oz. cup (150 ml).
. Cappuccino ISmade using 1/3 espresso,1/3
hot steamed milk and 1/3 frothed milk.
. Cafe latte is made using 1/2 espresso,1/2
steamed milk, and topped with a bit of
frothy milk.
. Hot chocolate: heat the milk if you are
using powdered chocolate. Then simply mix
the powder in the heated milk.
Please note: the sliding part (g2) of the
nozzle must be in the down position (5).
.Fillthe water container with fresh, cold
water (1)
.Setthe «on/off» switch (h).The operating
light (h1) will come on.
.Move the nozzle towards the outside of the
appliance.
As soon as the appliance reachesthe
appropriate temperature, the temperature
control indicator light (c)will come on.
.Placean empty container under the nozzle.
Return the nozzle to the inside and hold the
container by its handle or place it on the grid
(i) (6)
. Then turn the function selector (b) to the
position «I!!.\J»until to obtain some steam
then reset it to the position 0 and remove
the container.
.Immerse the tip of the nozzle in the milk to
be heated. Returnthe nozzle to the inside
and hold the container by its handle or place
it on the grid (i) (6)
KRUPS9
Page 9

t
As soon as the appliance reaches the
appropriate temperature, the temperature
control indicator light (c) will come on.
0 Then turn the function selector (b)to the
position «6» until the milk is frothed
enough, then reset it to the position 0 and
remove the container.
0 Dothe cleaning operation Inorder to
prevent the nozzle from becoming blocked:
place an empty container under the nozzle.
then turn the function selector (b) to .the
position «6» again dUring few seconds.
. turn the function selector (b) to the position
O.
clean the nozzle with a damp cloth.
0 Forthoroughcleaningofthe nozzle,please
refer to the paragraph «Maintenance».
. Heating water (for tea, for example) or
thick liquids (soup, for example)
Please note: the slidingpart (g2)of the
nozzle must be inthe raised position (5).
0 Fillthe water container with fresh, cold
water (1).
0 Set the «on/off» switch (h).The indicator
light (hl) comes on.
0 Movethe nozzletowardsthe outsideofthe
appliance.
Assoon as the appliance reaches the
appropriate temperature, the temperature
control indicator light (c)willcome on.
0 Placean empty container under the nozzle.
Return the nozzleto the insideand hold the
container by its handle or place it on the grid
(I)(6)
0 Thenturn the function selector (b)to the
position «6» untilto obtain some steam
then reset itto the position 0 and remove
the container.
0 Immersethe tip of the nozzle in the liquidto
be heated. Return the nozzle to the inside
and hold the container by ItS handle or place
It on the grid (I)(6)
Assoon as the appliance reaches the
appropriate temperature, the temperature
control Indicatorlight (c)willcome on.
0 Thenturn the function selector (b)to the
position «6» untilthe liquidishot enough,
then reset it to the position 0 and remove
the container.
10 KRUPS
0 Forliquidsother than water, do the cleaning
operation in order to prevent the nozzle
from becoming blocked:
place an empty container under the nozzle.
. then turn the function selector (b)to the
position «6» again during few seconds.
. turn the function selector (b) to the position
O.
. clean the nozzle with a damp cloth.
0 Forthorough cleaning of the nozzle, please
refer to the paragraph «Maintenance»
Notes
Ifyou wish to make an espresso
immediately after steam, the appliance
must first cool down until it reaches the right
temperature for extraction.
0 To do this, insert an empty filter holder (no
coffee) in the machine and position a
suitable container beneath it Then turn the
function selector (b) to the position «~».
0 Letthe water run through until the Indicator
light (c)goes out Then, turn the function
selector (b) to the position 0
After this, the machine is now ready once
more to make an espresso (see paragraph
«espresso function)}).
Please note: when the appliance is running,
and also afterwards, the nozzlewillbe very
hot Allowtime for the appliance to cool
down to prevent scalding or burning.
Maintenance
0 Unplugthe appliance and allow Itto cool.
0 Never wash the accessories for your espresso
in the dishwasher.
0 Clean the body of the appliance with a
damp cloth.
After use, the water tank must be emptied.
. The drip tray (j)
0 Each time an espresso ISprepared, the drip
tray fills with water. This ISperfectly normal.
To prevent any overflow, remove the grid (7)
and empty the drip tray regularly.
0 Ifnecessary,clean the drip tray and the grid
with water and a littlenon-abrasive
washing-up liquid, rinse and dry.When
replacing, return the plastic blocksituated at
the back of the tray (8)
Page 10
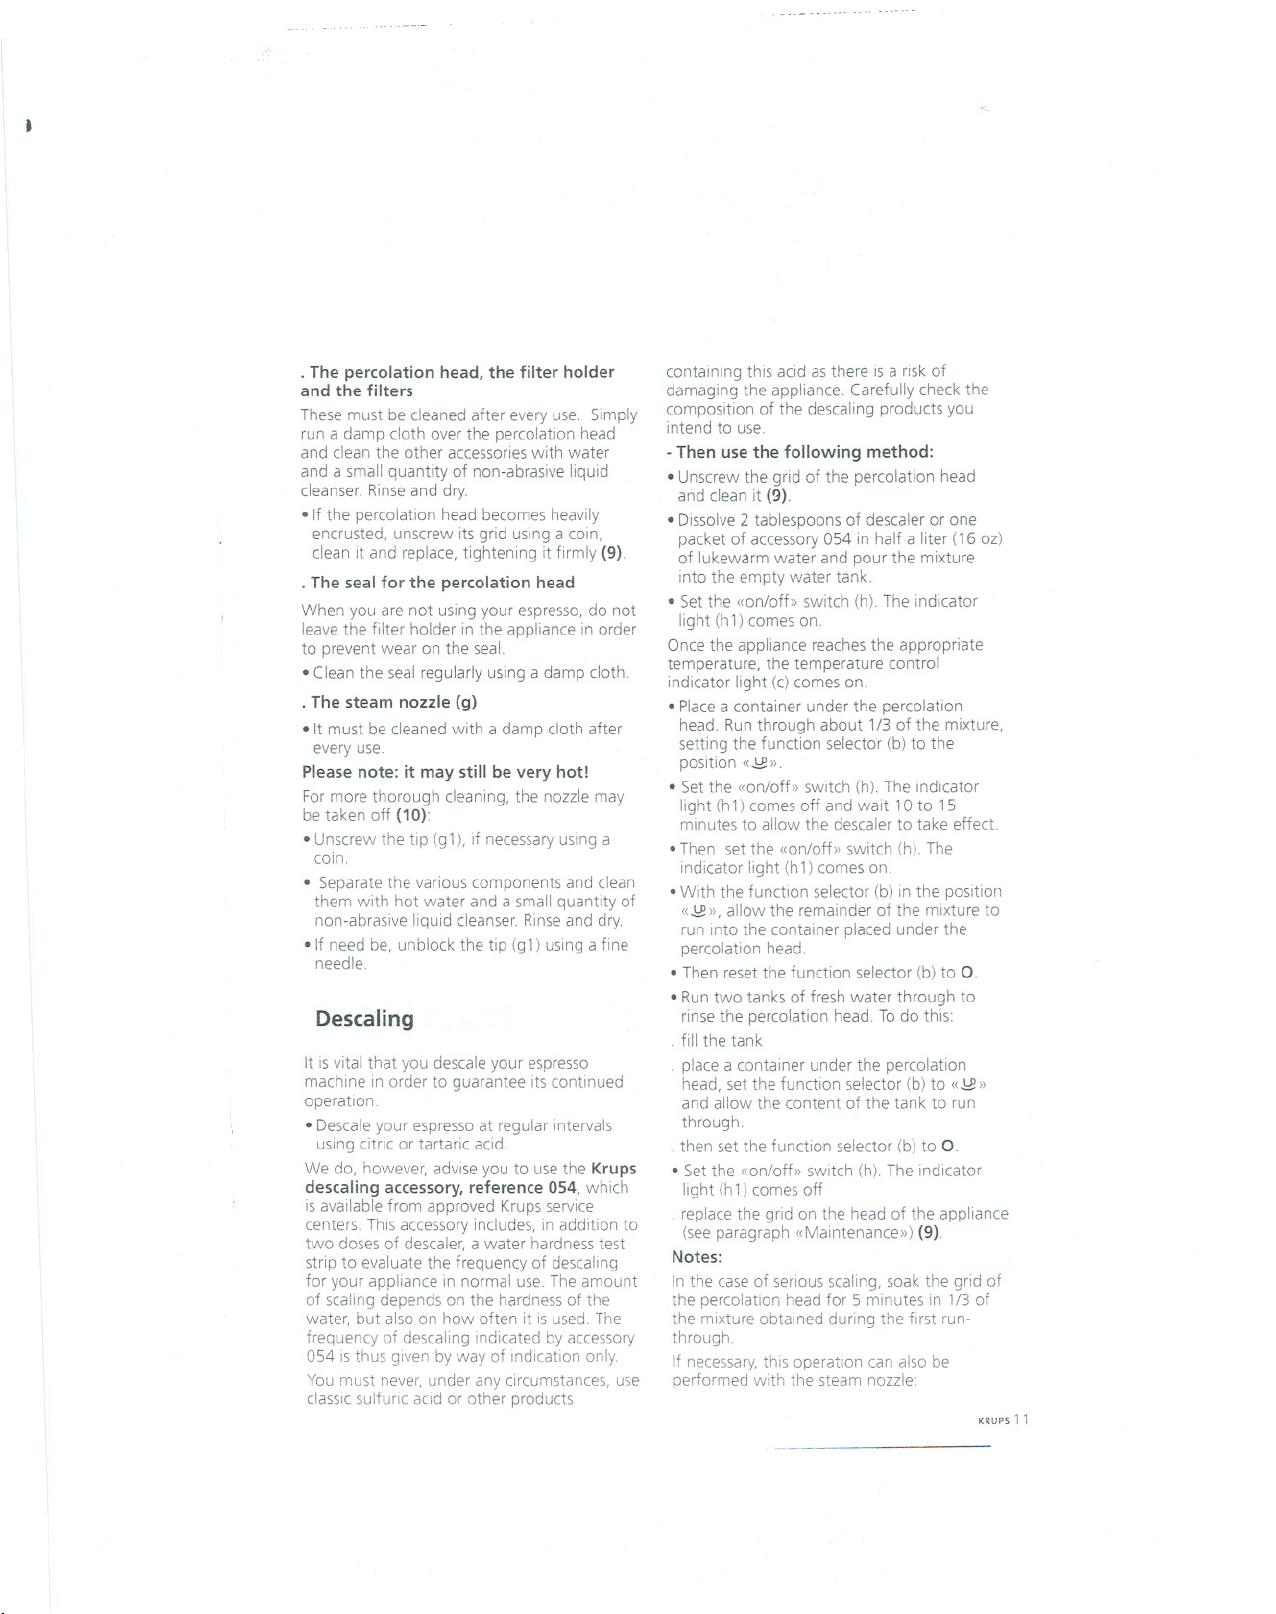
. The percolation head, the filter holder
and the filters
These must be cleaned after everyuse. Simply
run a damp cloth over the percolation head
and clean the other accessories with water
and a smallquantityof non-abrasiveliquid
cleanser. Rinseand dry.
0 Ifthe percolationheadbecomesheavily
encrusted, unscrew its grid using a coin,
clean it and replace, tightening it firmly(9).
0 The seal for the percolation head
When you are not using your espresso, do not
leave the filter holder in the appliance in order
to prevent wear on the seal.
0 Cleanthe sealregularlyusinga dampcloth.
0 The steam nozzle (g)
0 Itmustbe cleanedwitha dampclothafter
everyuse.
Please note: it may still be very hot!
Formore thorough cleaning, the nozzle may
be taken off (10):
0 Unscrewthe tip (g1), if necessary using a
coin.
0 Separate the various components and clean
them with hot water and a small quantity of
non-abrasive liquid cleanser. Rinse and dry.
olf need be, unblock the tip (gl) using a fine
needle.
Descaling
It is vital that you descale your espresso
machine in order to guarantee its continued
operation
0 Descaleyour espresso at regular intervals
uSing citric or tartaric acid.
We do, however, advise you to use the Krups
descaling accessory, reference 054, which
is available from approved Krups service
centers. This accessory includes, in addition to
two doses of descaler, a water hardness test
strip to evaluate the frequency of descaling
for your appliance in normal use The amount
of scaling depends on the hardness of the
water, but also on how often it is used. The
frequency of descaling indicated by accessory
054 is thus given by way of Indication only.
You must never, under any circumstances, use
classic sulfuric acid or other products
containing this acid as there isa riskof
damaging the appliance. Carefullycheck the
composition of the descaling products you
intend to use.
- Then use the following method:
0 Unscrewthe grid of the percolation head
and clean it (9).
0 Dissolve2 tablespoons of descaler or one
packet of accessory 054 in half a liter (16 oz)
of lukewarm water and pour the mixture
into the empty water tank.
0 Set the «on/off» switch (h). The indicator
light (h1) comes on.
Once the appliance reaches the appropriate
temperature, the temperature control
indicator light (c) comes on.
0 Placea container under the percolation
head. Run through about 1/3 of the mixture,
setting the function selector (b) to the
position <dE».
0 Set the «on/off» switch (h).The indicator
light (h1) comes off and wait 10 to 15
minutes to allow the descaler to take effect.
.Then set the «on/off» switch (h). The
indicator light (h1) comes on.
0 With the function selector (b) in the position
<dE», allow the remainder of the mixture to
run into the container placed under the
percolation head.
0 Then reset the function selector (b) to O.
0 Runtwo tanks of fresh water through to
rinse the percolation head. To do this:
. fillthe tank
. place a container under the percolation
head, set the function selector (b) to <dE»
and allow the content of the tank to run
through.
. then set the function selector (b) to O.
0 Set the «on/off» switch (h). The indicator
light (h1) comes off
. replacethe gridon the head of the appliance
(see paragraph «Maintenance») (9).
Notes:
In the case of serious scaling, soak the grid of
the percolation head for 5 minutes in 1/3 of
the mixture obtained during the first run-
through.
If necessary, this operation can also be
performed with the steam nozzle:
KRUPS11
Page 11
.Todo this, dismantle the nozzle as instructed
inthe paragraph «Maintenance» and soak
the scaled parts for 5 minutes in 1/3 of the
mixture obtained during the first run-
through. Rinsethe variousparts thoroughly
before replacing them
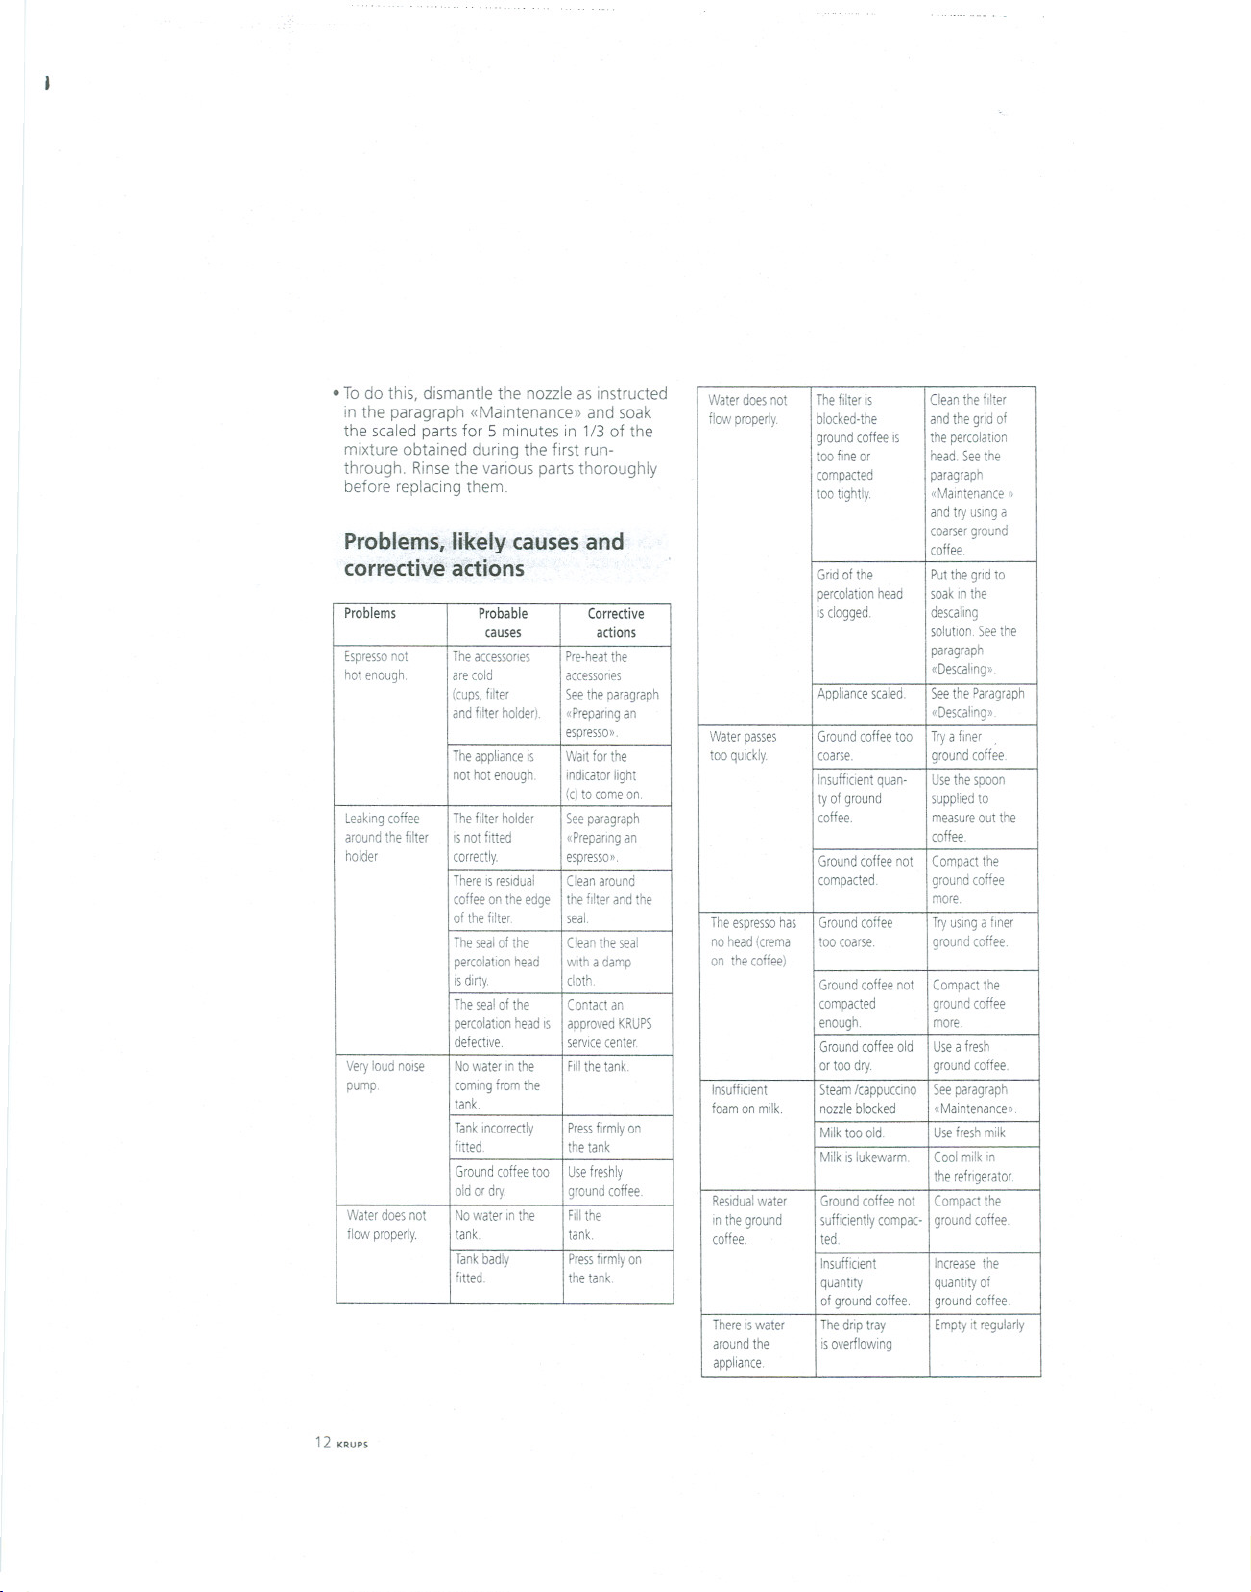
Problems,likely causes and
corrective actions
Problems Probable Corrective
Espressonot
hotenough
Leakingcoffee
aroundthefilter isnotfitted
holder
Veryloudnoise
pump. comingfromthe
Waterdoesnot Nowaterinthe Fillthe
flowproperly.
causes actions
Theaccessories
arecold accessories
(cups.filter Seetheparagraph
andfilterholder).
Theapplianceis
nothotenough. indicatorlight
Thefilterholder
correctly.
ThereISresidual Cleanaround
coffeeontheedge
ofthefilter
Thesealofthe
percolationhead withadamp
isdirty.
Thesealofthe Contactan
percolationheadIS
defective servicecenter
Nowaterinthe Fillthetank.
tank.
Tankincorrectly Pressfirmlyon
fitted. thetank
Groundcoffeetoo
oldordry. groundcoffee
tank. tank
Tankbadly Pressfirmlyon
fitted. thetank
Pre-heatthe
«Preparingan
espresso».
Waitforthe
(c)tocomeon.
Seeparagraph
«Preparingan
espresso».
thefilterandthe
seal.
Cleantheseal
cloth
approvedKRUPS
Usefreshly
Waterdoesnot Thefilteris Cleanthefilter
flowproperly.
Waterpasses
tooqUickly.
Theespressohas
nohead(crema
on thecoffee)
Insufficient
foamonmilk.
Residualwater
intheground
coffee. ted.
Thereiswater
aroundthe
appliance
blocked-the
groundcoffeeis thepercolation
toofineor head.Seethe
compacted
tootightly.
Gridofthe
percolationhead
isclogged descaling
Appliancescaled SeetheParagraph
Groundcoffeetoo
coarse.
Insufficientquan-
tyofground
coffee. measureoutthe
Groundcoffeenot
compacted. groundcoffee
Groundcoffee
toocoarse.
Groundcoffeenot
compacted groundcoffee
enough.
Groundcoffeeold Useafresh
ortoodry. groundcoffee.
Steam!cappuccino
nozzleblocked
Milktooold. Usefreshmilk
Milkislukewarm. CoolmilkIn
Groundcoffeenot
sufficientlycompac- groundcoffee
Insufficient
quantity quantityof
ofgroundcoffee. groundcoffee
Thedriptray Emptyit regularly
isoverflowing
andthegridof
paragraph
«Maintenance)}
andtryuSinga
coarserground
coffee.
Putthegildto
soakinthe
solution.Seethe
paragraph
«Descaling»
«Descaling».
Tryafiner
groundcoffee
Usethespoon
suppliedto
coffee
Compactthe
more.
Tryusingafiner
groundcoffee.
Compactthe
more
Seeparagraph
«Maintenance»
therefrigerator
Compactthe
Increasethe
12KRUPS
Page 12
Limited.,ODeYear;Warr:anty
Your KRUPS# FNP1IScovered by the
following warranty:
If within one yearfrom date of purchase this
KRUPSproduct fails to function becauseof
defects in materials or workmanship, KRUPS
North America will, at its option, repair or
replace the unit without charge, provided the
owner has a proof of date of purchase.
Thiswarranty will be void if malfunction was
caused by damage to the product by accident,
misuse, use on frequency or voltage other
than marked on the product and/or described
in the instructions, abuse including tampering,
damage in transit, or usefor commercial
purposes. This warranty gives you specific
legal rights, and you may also have other
rights which may vary from state to state.
KRUPS13
Page 13

-n ------
GUARANTEE OF PERFORMANCE
Thisfine KRUPSproduct is manufactured accordingto a rigidcode
of quality standards, and, with minimum care, should give years of
service. However, should the need arise for repairs or for
replacement parts within or after the warranty period, please call
our CONSUMER SERVICE DEPARTMENT:
USA: (800) 526-5377
24-hours a day, 7 days a week
Canada: (905) 669-0114
Monday-Friday 8:00 a.m - 4:30 p.m
You will be provided with specific instruction on how to get your
product repaired.
The department will also be able to answer any general product
questions you may have.
Beforecallingthe ConsumerServiceDepartment, please havethe
type number of your KRUPSappliance available.
You must have this information before calling our Consumer
Service Department so that we may better answer your questions.
The type number can be located by looking at the bottom of your
appliance.
This product is Type #FNP1
Any general correspondence can be addressed to:
USA:
KRUPSNorth America, Inc.
P.O.Box 3900
Peoria, IL61612
Canada: KRUPS Service
20 Caldari Rd
Concord, Ontario
L4K4N8
14KRUPS
Page 14
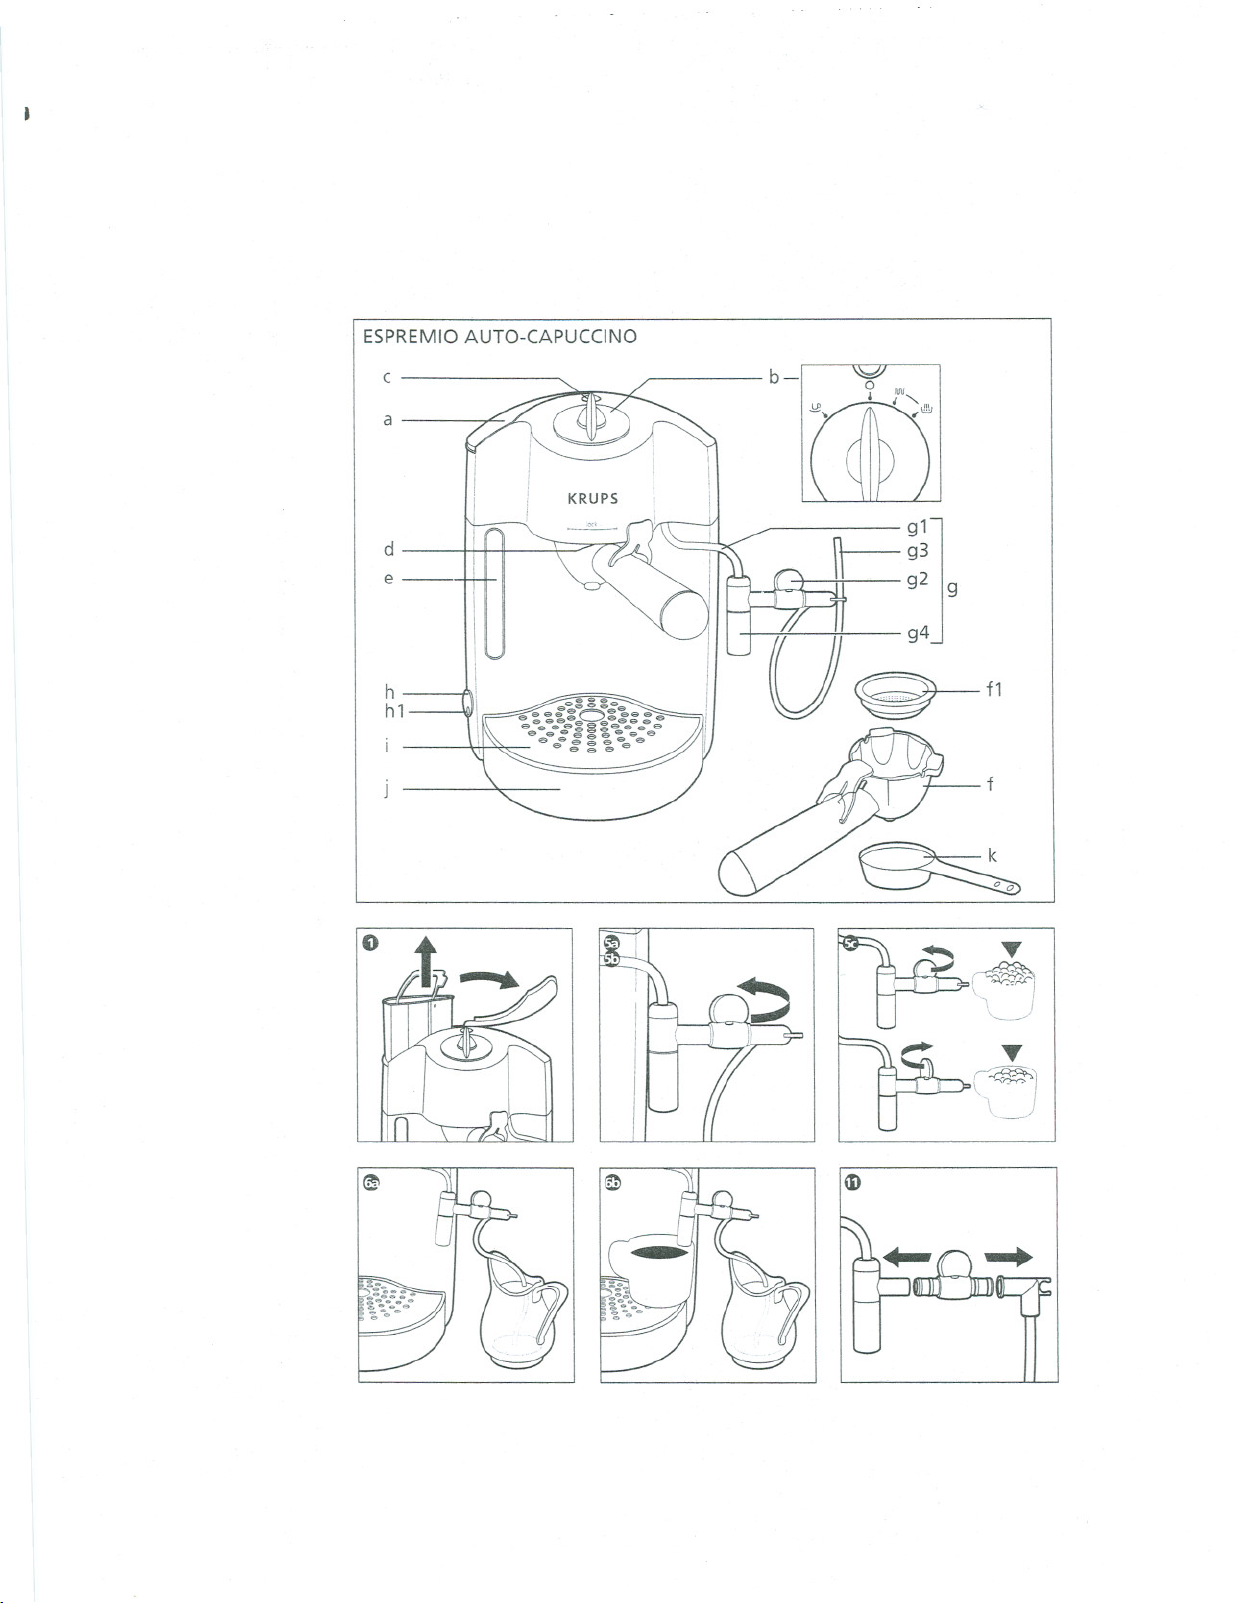
ESPREMIOAUTO-CAPUCCINO
G
c
a
d
e-
h
hl
b-
9
f
~
V'
~
T
I~I
\\~
~
a.
Page 15

Em
Description
a Lid+ water tank
b Function selector
c
Temperature control indicator light
d
Percolationhead
e
Levelindicator of water
f
Filterholder
f1
filter for one cup (ground coffee)
g
Auto cappuccino accessory
steam tube
g1
dial
g2
flexibletube
g3
outlet nozzle
g4
h
On /Off switch
h1
operating indicator light
i
Grid
j Driptray
k
Measuring spoon
Instructionsfor steam function
and Auto cappuccinouse and
maintenance
1. STEAM FUNCTION
The thumping noise which occurs while steam
is being produced comes from the intermit-
tent regulation of the pump and has no effect
on the proper working of the appliance,
Caution: during and after use of the
machine, the metallicparts of the steam
nozzle can become extremelyhot
.Preparing frothed and steamed milk for
a cappuccino. a latte or hot chocolate:
The steam function together with the Krups
auto cappuccino accessory makes it easy to
obtain milkwith varyingamounts of froth for
making a cappuccino, a latte or hot chocolate.
These liquidsare drawn inthrough the flexible
tube (g3) and heated with the aid of steam
before coming out viathe outlet nozzle (g4)
of the auto cappuccino accessory(g).
Ifthe flexibletube (g3) is immersed directlyin
a carton of milk,a single cup isenough to
prepare a cappuccino or a latte. Youcan
adjust the amount of froth of the milkby
using the dial(g2) of the auto cappuccino
accessory(g),
It ISbest to use fresh, skim or low-fat milk,not
boiled, and wellchilled(kept in the
refrigerator),Thecontainermustalsobe cold
for optimal results (do not run the container
under hot water before frothing the milk)
We recommend that youclean the auto
cappuccino accessory immediatelyafter use,
Ifyou are making a cappuccino or latte, you
willneed at least a 5 oz, cup (150 ml),
. Cappuccino ismade using 1/3 espresso, 1/3
hot steamed milkand 1/3 frothed milk,
. Cafe latte ismade using 1/2 espresso, 1/2
steamed milk,and topped with a bit of frothy
milk.
. Hot chocolate: immerse the flexibletube
directlyinto the carton if the chocolate milkis
ready-made, or heat the milkifyou are using
powdered chocolate. Then simplymixthe
powder inthe heated milk.
2. AUTOCAPPUCCINO
- Using the auto cappuccino accessory (g):
.Fill the water container with fresh, cold
water (1)
.If the unit is not already turned on, set the
on/off switch (h). The operating light (h1)
will come on.
.Turnthe selector (b)to the setting « IVU».
.Open the dial (g2) to obtain a fine smooth
froth (5a).
.Slightlyclosethe dial (g2)to obtain a less
frothy milk(5b).
.the qualityof the froth depends on the
opening or the closingof the dial (g2) (5c).
.Immersethe flexibletube (g3) in the milkto
be heated. The tube must touch the bottom
of the container (6a).
.Placea cup one third filledwith freshly-
made espresso (6b) under the outlet nozzle
(g4).
Once the appliance reaches the correct
temperature, the temperature control
indicator light (c)comes on.
34
KRUPS
Page 16

.
.Turn the selector (b) to the setting « \!!lJ».Hot
frothy milk will come out of the outlet
nozzle.
.Once you have obtained the desired
quantity of frothy milk,turn the selector (b)
to the 0 setting.
.After use, remove the flexible tube (g3)
from the container and clean the auto
cappuccino accessory.
- Cleaning the auto cappuccino accessory
(g) :
After each use, we recommend that you rinse
the auto cappuccino accessoryin the
following manner:
.Turn the selector (b) to the position « MI».
. Open the dial (g2).
. Immerse the flexible tube (g3) into a glass of
water. (The minimum quantity necessary is
3,5 ounces/1 00 ml)
.Place an empty container below the outlet
nozzle (g4).
Once the appliance reaches the correct
temperature, the temperature control light(c)
willcome on.
.Then turn the selector (b) to the setting
«I!"J».
.When all the water has run through the auto
cappuccino accessory (g), turn the selector
(b)to the 0 position.
.After use, remove the flexible tube (g3) from
the glass.
.Once this operation is completed, clean the
outlet nozzle (g4) with a damp cloth.
We recommend that you regularly dismantle
the auto cappuccino accessory (g) and clean it
with water, a little non-abrasive dishwashing
liquid and a small brush. Rinse and dry before
reassembling it (11).
Be careful to mount the flexible tube (g3)
the right way: engage the straight cut end
into the auto cappuccino accessory (g).
Following these maintenance gUidelines will
keep your appliance in optimal working
condition and help you to produce great
tasting beverages time after time.
KOUPS35
 Loading...