

Page 1
VS-44UHDA Enhanced Quick Start (P/N: 2900-300641QS REV 1)
P/N:
2 9 0 0 - 3 0 0 6 4 1 QS
Rev:
1
Scan for full manual
VS-44UHDA Quick Start Guide
This guide helps you install and use your VS-44UHDA for the first time.
Go to www.kramerav.com/downloads/VS-44UHDA to download the latest user manual and check if
firmware upgrades are available.
VS-44UHDA 4x4 UHD Matrix Switcher
1 Quick start guide
1 Set of rack ears
1 Power cord
4 Rubber feet
#
Feature
Function
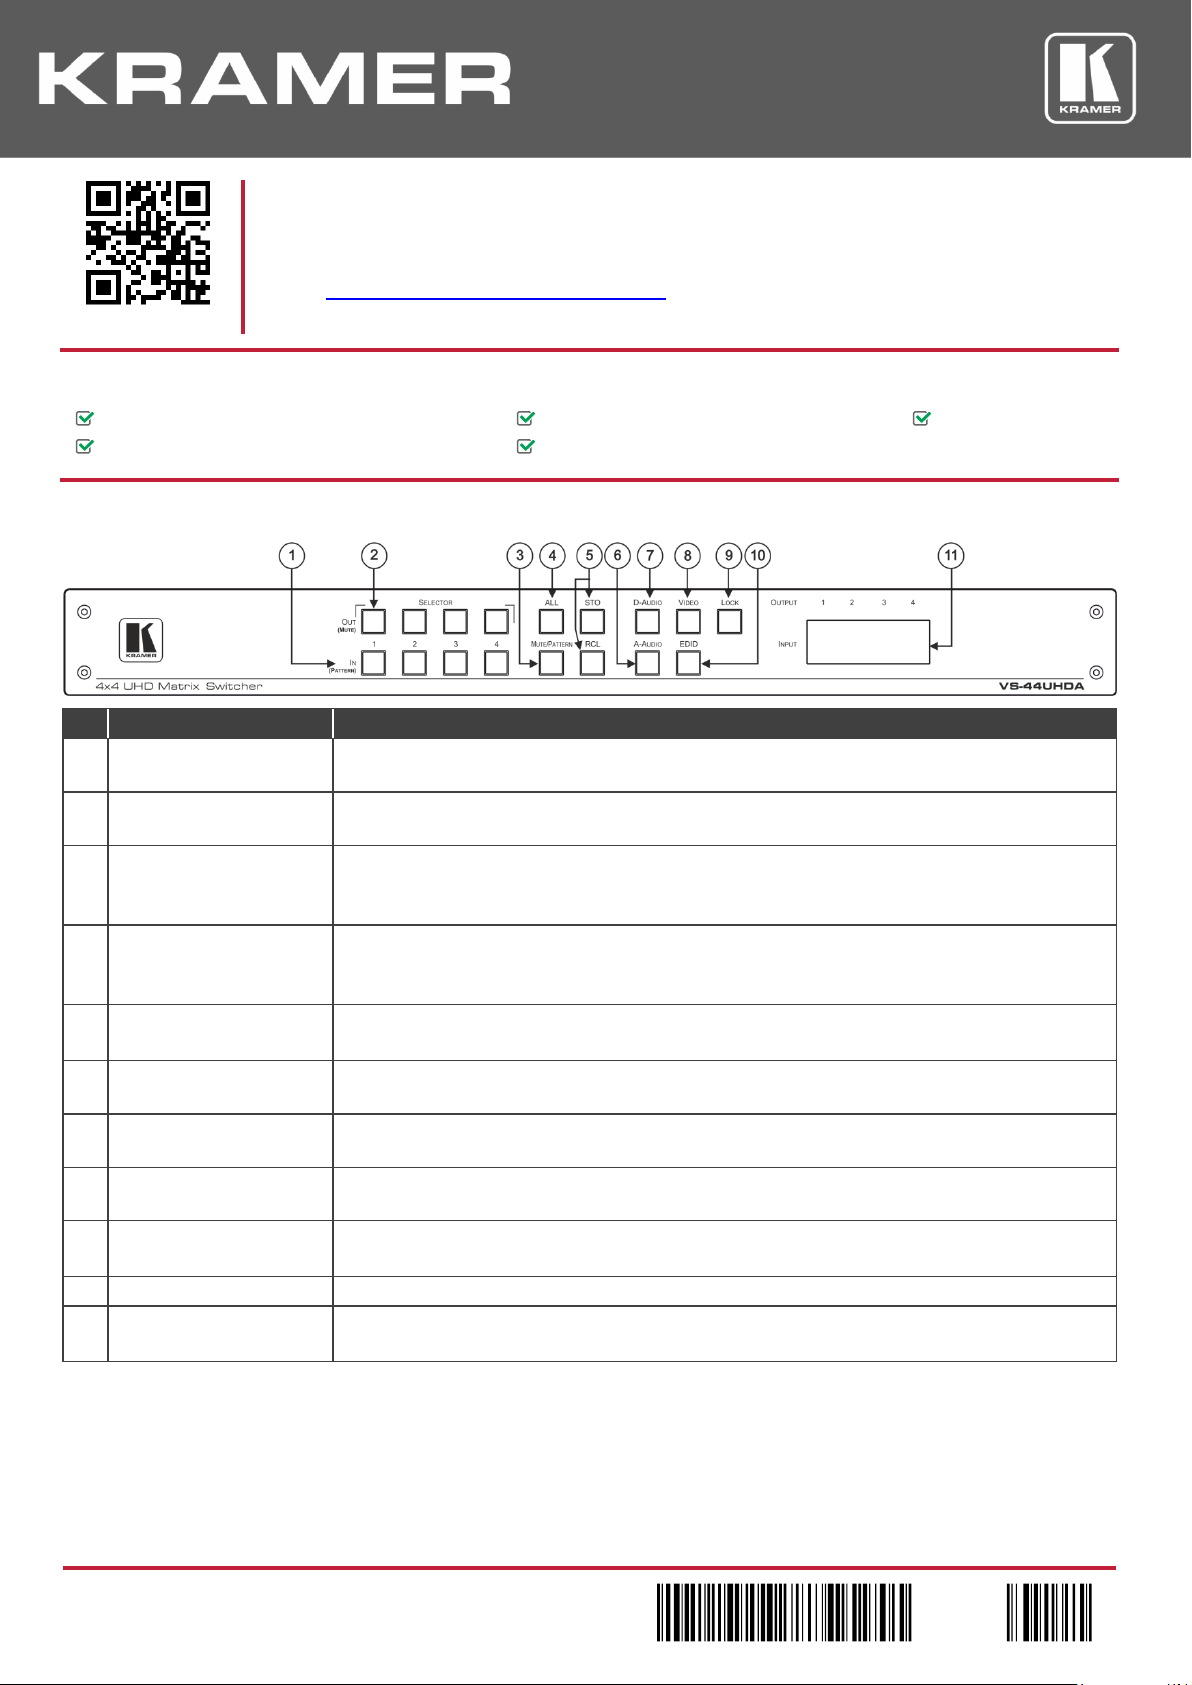
1
IN (PATTERN)
SELECTOR Buttons
Press to select the input (1 to 4) to switch after selecting an output (also used for storing machine
setups in the STO-RCL modes and for selecting a pattern in the Pattern mode).
2
OUT (MUTE) SELECTOR
Buttons
Press to select an output (1 to 4) to which the input is routed. Also used for storing machine presets.
3
MUTE/PATTERN Button
Press to view the current pattern status and select the output/s to which a pattern is routed.
Press to mute audio or video on a selected output when D-AUDIO/A-AUDIO, and/or VIDEO buttons
are pressed (lit).
4
ALL Button
Press to perform an action on all outputs (for example setting Mute mode, Pattern mode and so on).
For switching, press ALL and then a specific IN button to route the selected input to all outputs.
For example, press ALL and then IN 2 to route input 2 to all the outputs.
5
STO and RCL Buttons
Press STO to store the current switching setting to a preset button.
Press RCL to recall the switching setting from a preset button.
6
A-AUDIO Button
Press to enable analog audio routing. When pressed together with VIDEO, the analog audio is routed
together with the video signal.
7
D-AUDIO Button
Press to enable digital audio routing. When pressed together with VIDEO, the digital audio is routed
together with the video signal.
8
VIDEO Button
Press to select video inputs. When pressed together with D-AUDIO/A-AUDIO, video is switched
together with audio.
9
LOCK Button
Press and hold to toggle locking/releasing of the front panel buttons.
Press to save the following setups: HDCP (On/Off), ARC, Fast Switch and Switch mode.
10
EDID Button
Press to capture the EDID.
11
OUTPUT/INPUT
7-segment LED Display
Displays the selected inputs switched to the outputs (marked above each input).
Step 1: Check what’s in the box
Step 2: Get to know your VS-44UHDA
Page 2
#
Feature
Function
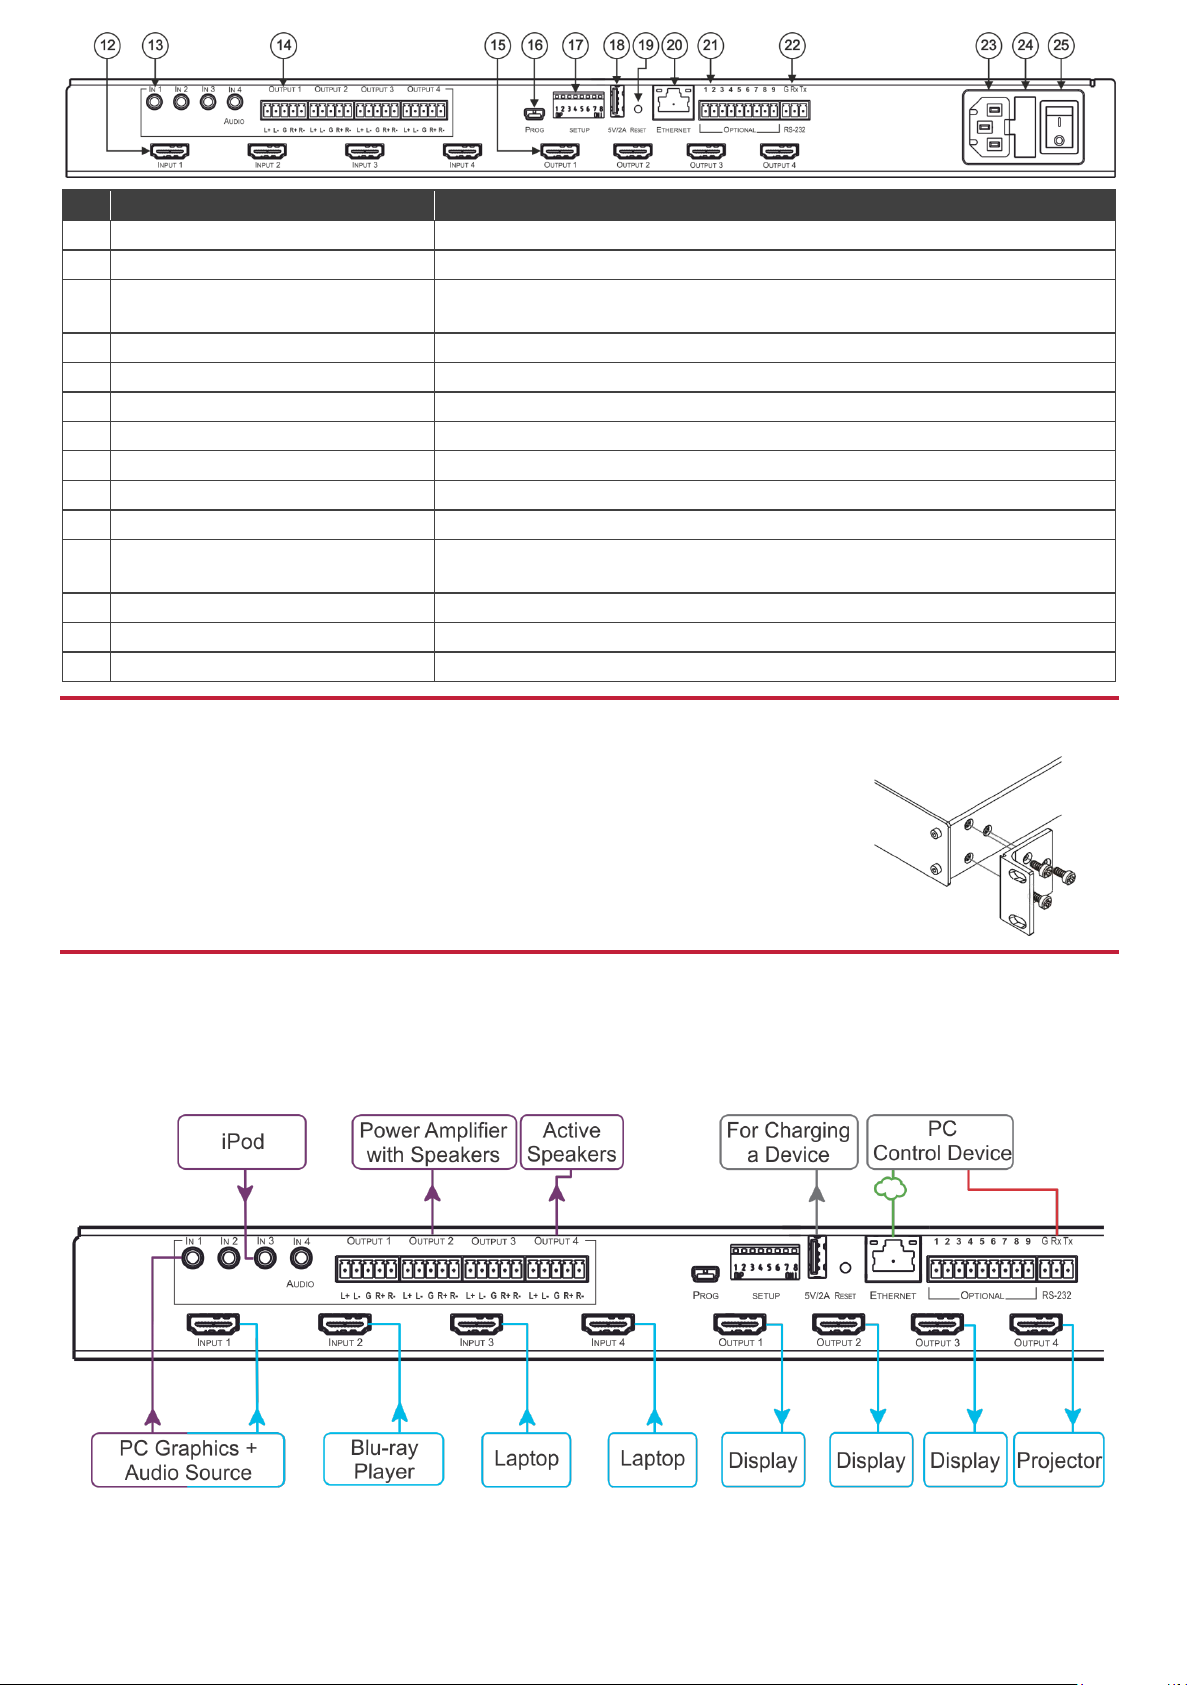
12
INPUT HDMI Connector
Connect to HDMI source (from 1 to 4).
13
AUDIO IN on 3.5 Mini Jack Connectors
Connect to unbalanced stereo analog audio sources (from 1 to 4).
14
AUDIO OUTPUT on 5-pin Terminal
Block Connectors
Connect to balanced stereo analog audio acceptor (see pinout below), from 1 to 4.
15
OUTPUT HDMI Connectors
Connect to HDMI acceptors (from 1 to 4).
16
PROG Mini USB Port
Use for firmware upgrade or communication (connecting to a PC or a serial controller).
17
SETUP DIP-Switches
N/A
18
5V/2A USB Port
Use to charge a device.
19
RESET Button
Press and hold while powering the device to reset IP settings to factory default values.
20
ETHERNET RJ-45 Port
Connect to your LAN.
21
OPTIONAL Terminal Block Connectors
N/A
22
RS-232 3-pin Terminal Block
Connectors
Connect to a PC or a serial controller.
23
Mains Power Connector
Connect to the mains power.
24
Mains Power Fuse
Fuse for protecting the device.
25
Mains Power Switch
Switch for turning the device on or off.
To rack mount the machine, attach both ear brackets (by removing the three screws from each side of
the machine and replacing those screws through the ear brackets) or place the machine on a table.
Step 3: Install the VS-44UHDA
Step 4: Connect the inputs and outputs
Always switch OFF the power on each device before connecting it to your VS-44UHDA. For best results, we recommend that you
always use Kramer high-performance cables to connect AV equipment to the VS-44UHDA.
Page 3
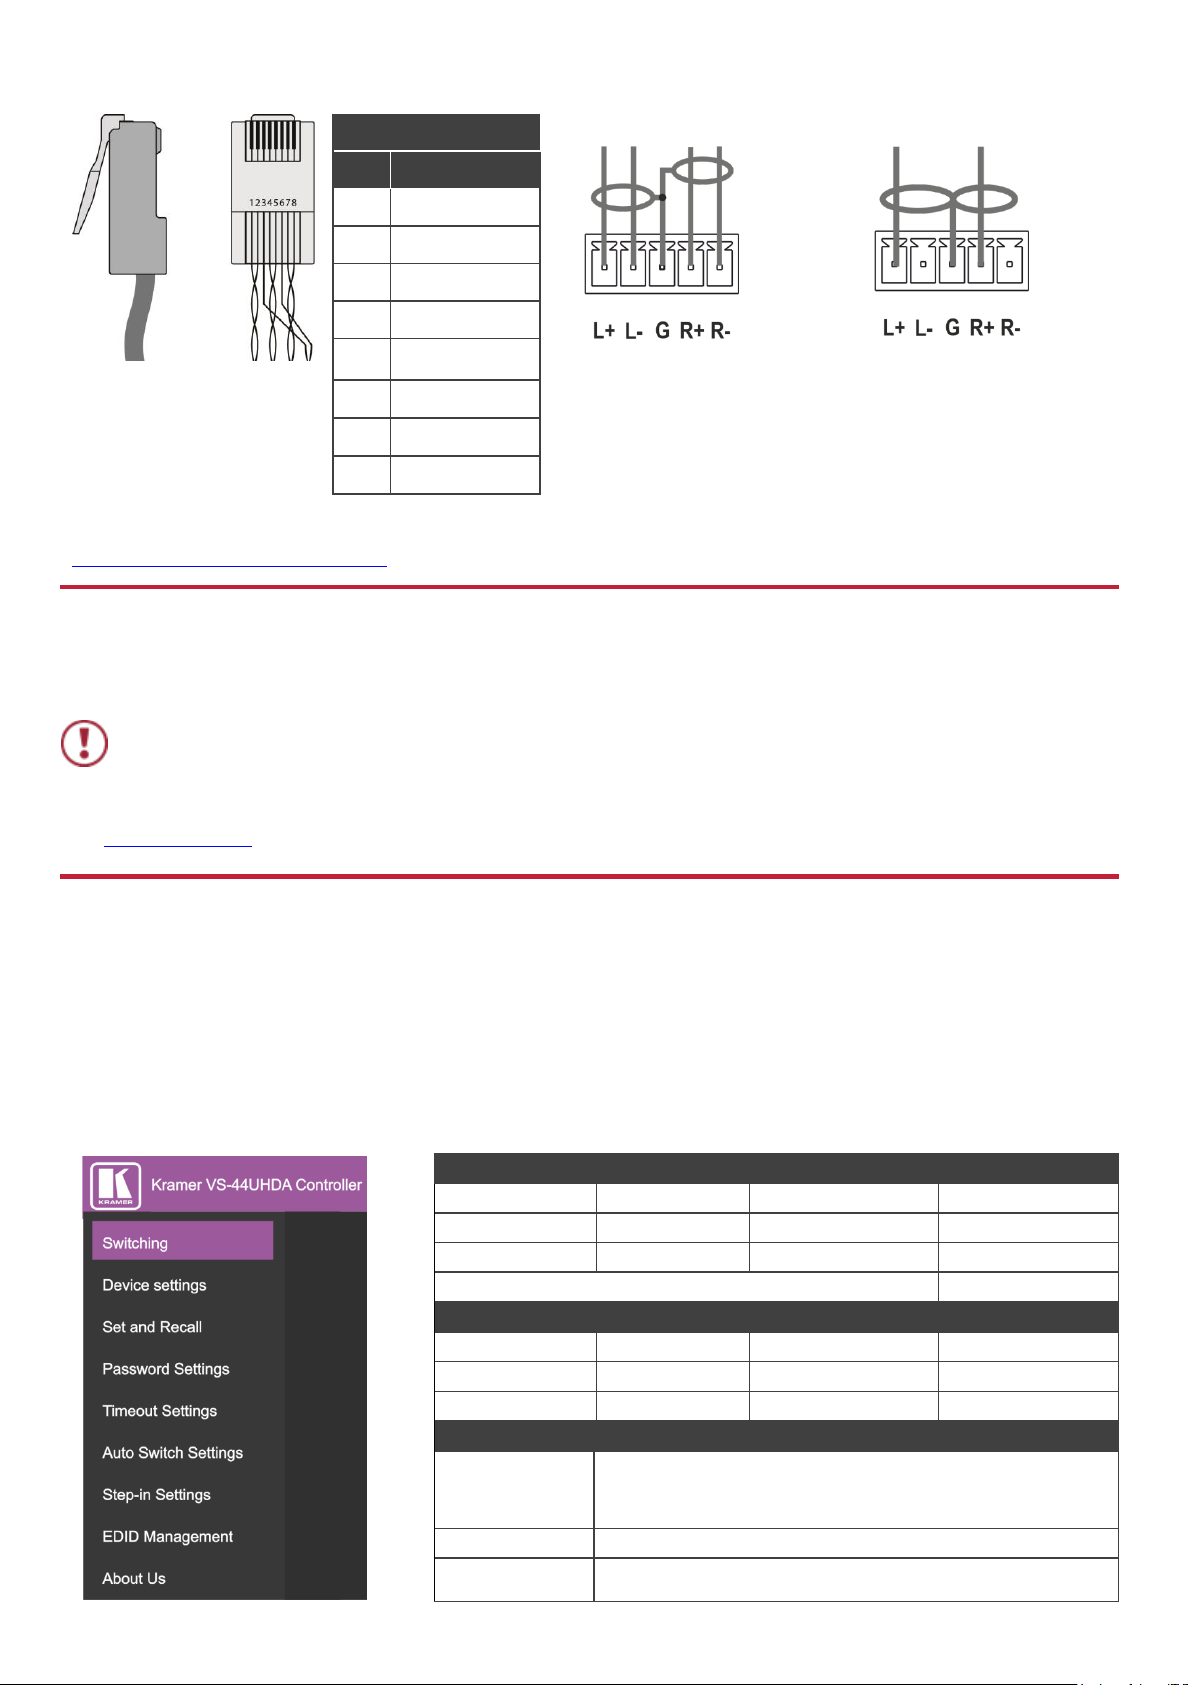
RJ-45 pinout:
Connect the audio output:
For the Ethernet connector, see the wiring diagram below:
To a balanced stereo audio
acceptor:
To a unbalanced stereo
audio acceptor:
PIN EIA /TIA 568B
PIN
Wire Color
1
Orange / White
2
Orange
3
Green / White
4
Blue
5
Blue / White
6
Green
7
Brown / White
8
Brown
For optimum range and performance use the recommended
Kramer cables available at
www.kramerav.com/product/VS-44UHDA.
Caution:
There are no operator serviceable parts inside the unit.
Warning:
Use only the power cord that is supplied with the unit.
Warning:
Do not open the unit. High voltages can cause electrical shock! Servicing by qualified
personnel only.
Warning:
Disconnect the power and unplug the unit from the wall before installing.
Web pages:
RS-232/Ethernet
Baud Rate:
115,200
Parity:
None
Data Bits:
8
Command Format:
ASCII Protocol 3000
Stop Bits:
1
Example (Route input 1 to output 1):
#VID1> 1<cr>
Ethernet Parameters
IP Address:
192.168.1.39
Default TCP Port #:
5000
Subnet mask:
255.255.0.0
Default UDP Port #:
50000
Default gateway:
192.168.0.1
Full Factory Reset
OSD:
Front panel buttons: power off the device, press and hold the
LOCK, EDID and STO buttons simultaneously for 3 seconds while
powering the device, and then release.
Protocol 3000:
“#factory” command.
Web Pages:
In the Device Settings page, click Reset.
Step 5: Connect the power
Connect the power cord to VS-44UHDA and plug it into the mains electricity.
Safety Instructions
See www.KramerAV.com for updated safety information.
Step 6: Operate the VS-44UHDA
Via the front panel buttons:
The 7-segment display shows the status of the VS-44UHDA during normal operation and displays the device information.
Use the front panel buttons as follows:
To switch an input to an output, press an output button and then an input button to switch to that output.
Press ALL to route a selected input to all the outputs.
Page 4
Switch an input to an output via front panel buttons
Use the front panel buttons for the following switching modes:
Press VIDEO to switch the video signal of a selected input to the selected output.
Press D-AUDIO (HDMI embedded audio signal) to switch the digital audio signal of a selected input to the selected output.
Press A-AUDIO (analog signal on 3.5mm mini jack) to switch the analog audio signal of a selected input to the selected
output.
Press VIDEO + D-AUDIO simultaneously to switch the video and digital audio signals of a selected input to the selected
output.
Press VIDEO + A-AUDIO simultaneously to switch the video and analog audio signals of a selected input to the selected
output.
Press MUTE/PATTERN to switch the pattern signal of a selected input to the selected output.
Press D-AUDIO + A-AUDIO and then an input button to set that input source to ARC.
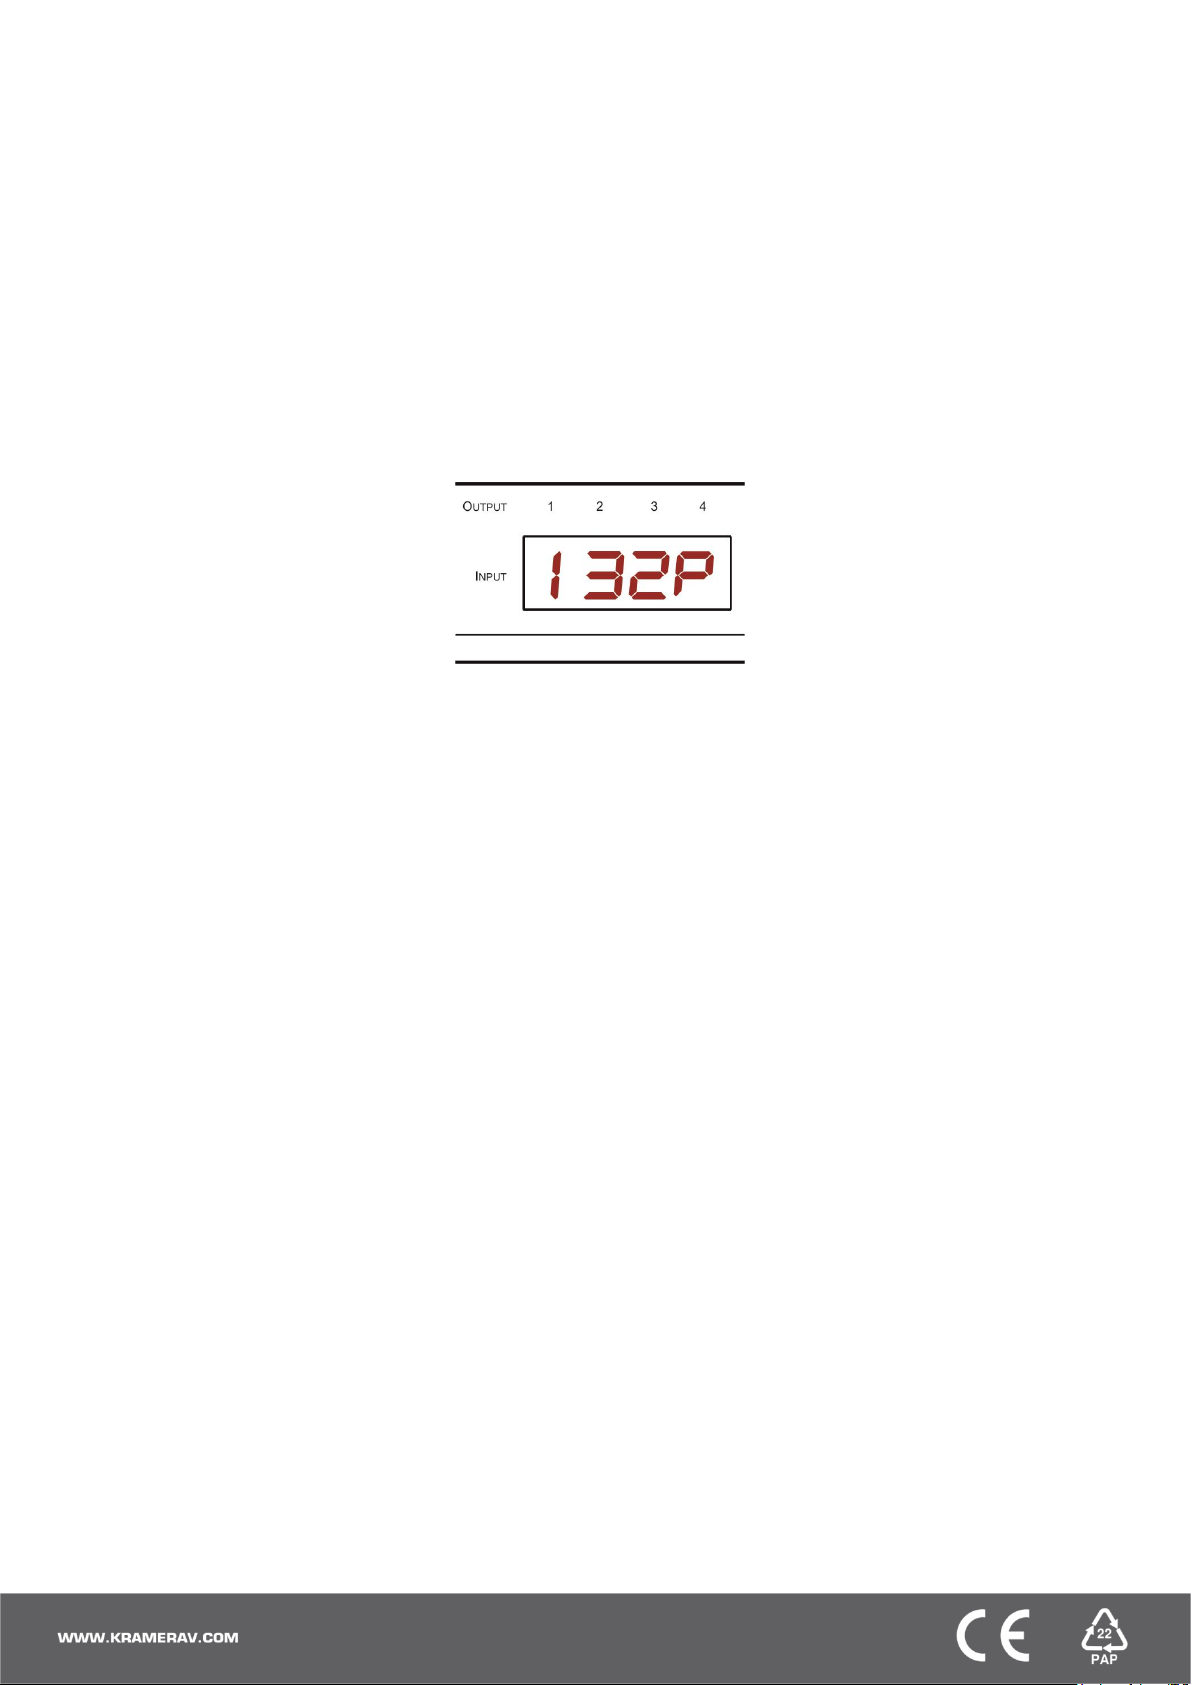
7-segment display example
When in Video mode, the 7-segment display shows the input-output status:
In this example: Input 1 is routed to output 1, input 3 is routed to output 2, input 2 is routed to output 3 and a pattern is routed to
output 4.
Read the EDID via the front panel buttons
To read the EDID from the output:
1. Press EDID+STO.
The EDID and STO button LEDs light. The 7-segment display shows the current EDID status.
2. Press one or more input buttons or press ALL, the corresponding 7-segment LEDs flash.
3. Press an output button that is connected to a display. The 7-segment LEDs show the output number from which the EDID is
read.
4. Press EDID. Wait approx. 5 seconds. The EDID of the display is copied to the input port/s and the device exits EDID mode.
To read the default EDID:
1. Press EDID+STO.
The EDID and STO button LEDs light. The 7-segment display shows the current EDID status.
2. Press one or more input buttons or press ALL, the corresponding 7-segment LEDs flash.
3. Press MUTE/PATTERN. The 7-segment LED flashes and shows “d”.
4. Press EDID. Wait approx. 5 seconds. The default EDID is copied to the input port/s and the device exits EDID mode.
Use the VS-44UHDA Web pages
Switching: Set input and output parameters (HDCP support, switching speed, and so on), select switching modes, set test patterns,
perform switching operations, and so on.
Device Settings: View device parameters (model, name, serial number, and so on), set network parameters, perform firmware
upgrade, and reset to factory defaults.
Password Settings: Set password for Admin.
Timeout Settings: Set the timeout per output when no signal is detected.
Auto Switch Settings: Set switch mode (manual, last connected, or priority), select the ports included in the last connected mode,
set the priority order.
Step-in Settings: Control Step-in devices that are connected to the inputs. Select a device (that is connected to a VS-44UHDA
input), set the input signal type, and set the outputs to which the input signal is switched when the Step-in button is pressed (on the
Step-in device).
EDID Management: Set the default EDID or read the EDID from an output or file to one or more of the inputs.
 Loading...