

Page 1

Update Guide
Manuel de la mise à jour
ERGÄNZUNG ZUM PROGRAMMIERHANDBUCH
o[W Abv¥KCh
1JGFE
Page 2
Update Guide
In conjunction with the
the following additions and changes to the Parameter Guide.
TRINITY series
operating system update, please make
On page 101 change the first line of “5–1f: Track” to read as follows.
Selects the track whose musical data you wish to record or edit (or which will be
the copy destination).
On page 101 change the first line of “5–1g: Start Measure/End Measure”
to read as follows.
Specify the range of measures to be recorded or edited (or which will be the
copy destination).
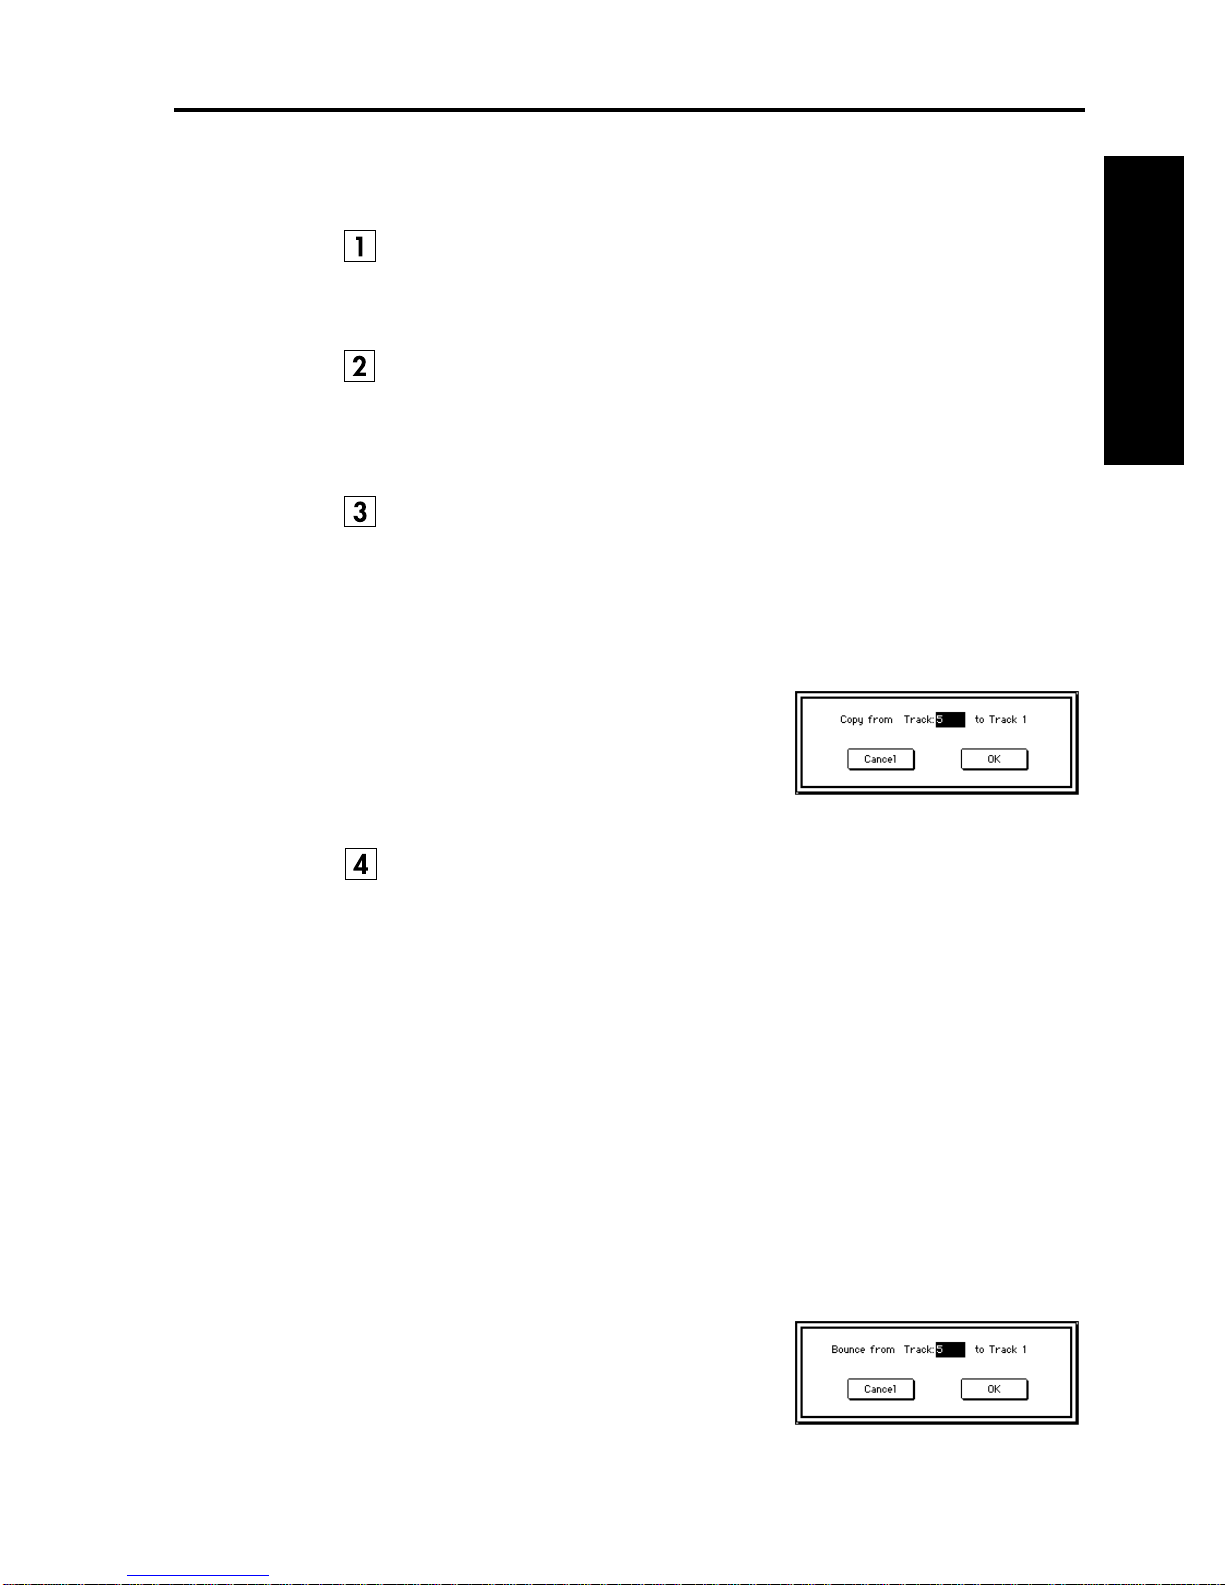
On page 107 change “5–1E: Copy Track” to read as follows.
The musical data of the track specified in the dialog box will be copied to the
track specified in the tab 1 page.
Be aware that when you execute the Copy Track command, the musical data
that was in the copy destination track will be lost.
1
In the tab 1 page, specify the copy destination track.
2
When this command is selected, the dialog
box shown at right will appear.
3
Specify the copy source track.
4
To execute the Copy Track command, press
the
OK button
ing, press the
. To cancel without execut-
Cancel button
.
Update Guide
On page 107 change “5–1F: Bounce Track” to read as follows.
All musical data of the track specified in the tab 1 page and the track specified in
the dialog box will be combined and placed in the track specified in the tab 1
page.
Be aware that when you execute the Bounce Track command, the data will be
affected as follows:
• The combined musical data will be placed in the track specified in the tab 1
page, and all musical data of the track specified in the dialog box will be
erased.
• Track settings (program and MIDI channel, etc.) will be those of the bounce
destination track.
• If the track specified in the tab 1 page and the track specified in the dialog box
contain identical control data in the identical location, incorrect operation
may occur following the execution of this command. Before bouncing, use
“5–1C: Event Edit” or “5–1M: Erase Control Data” etc. to erase the control
data from one of the tracks.
1
In the tab 1 page, specify the bound destination track.
2
When this command is selected, the dialog
box shown at right will appear.
3
Specify the bounce source track.
4
To execute the Bounce Track command,
press the
executing, press the
OK button
. To cancel without
Cancel button
.
1
Page 3
Update Guide
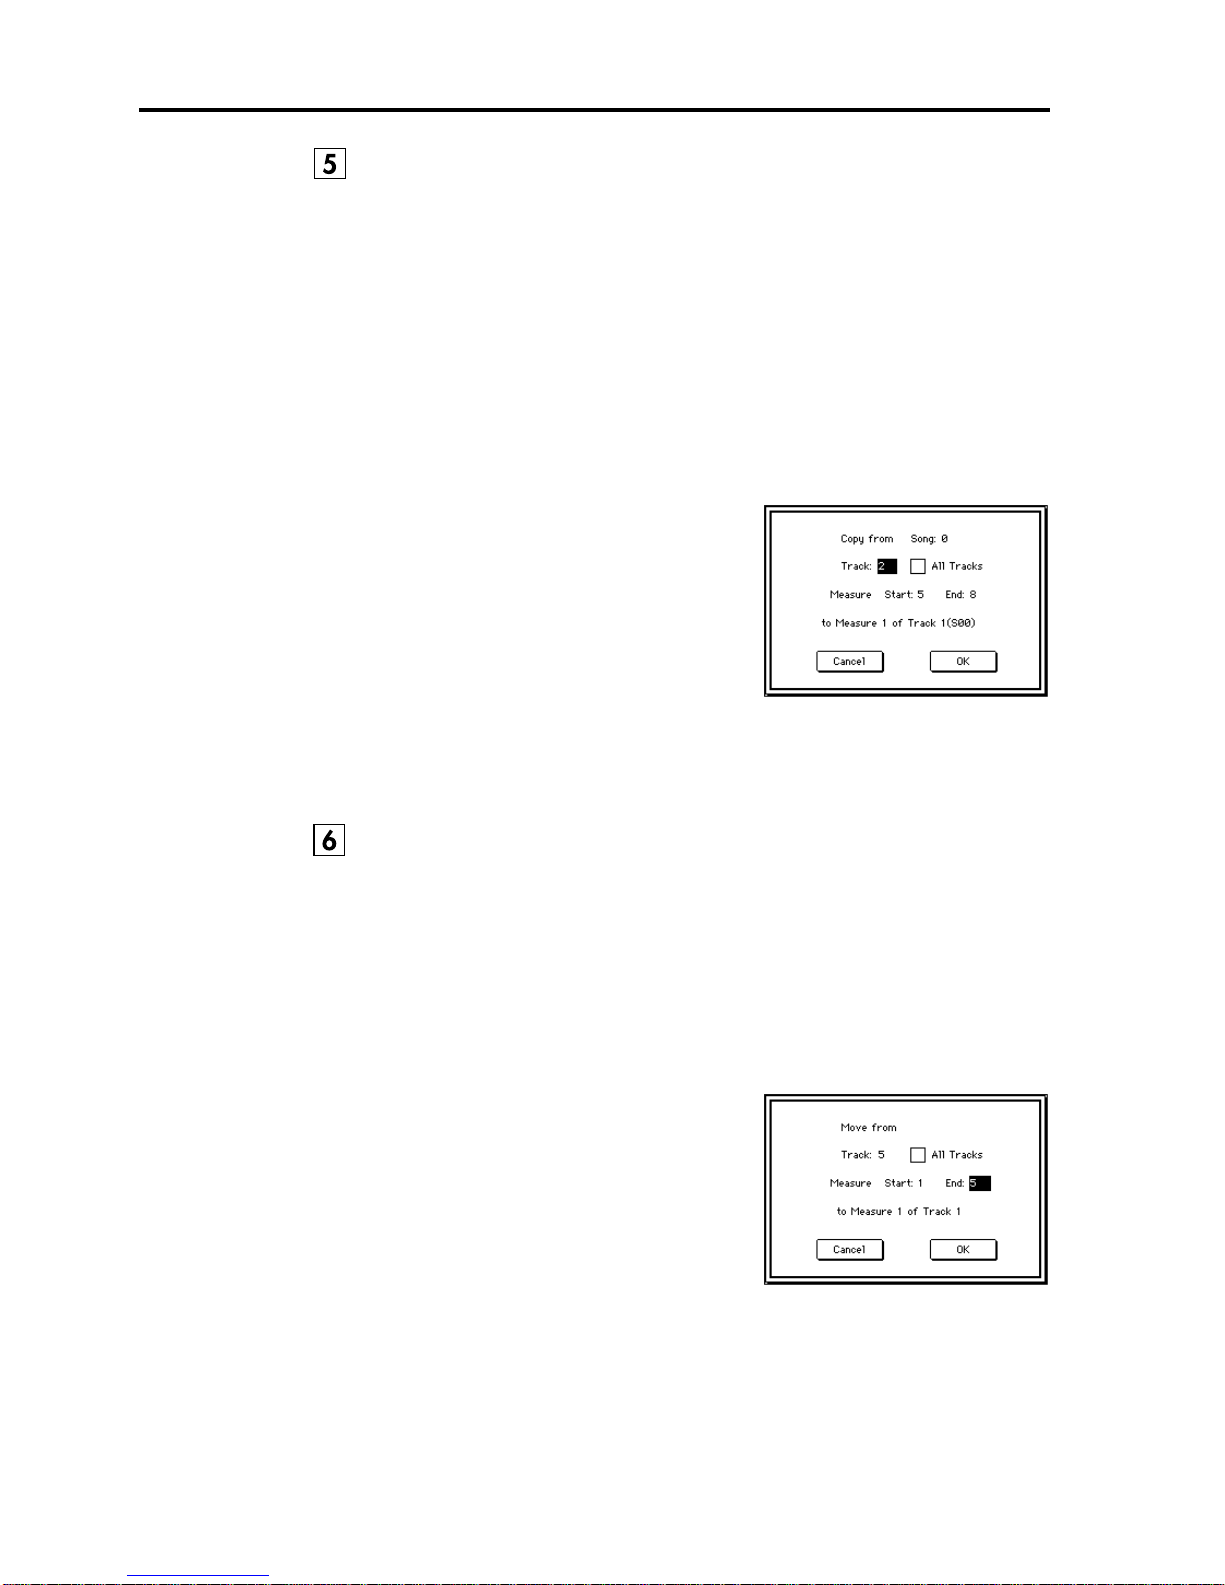
On page 109, change “5–1J: Copy Measure” to read as follows.
Measures of musical data from the track specified in the dialog box will be copied to the measures that were specified in the tab 1 page.
When the Copy Measure operation is executed, musical data will be copied to
the measures specified in the tab 1 page, allowing you to easily create repetitive
musical sections such as refrains within a song. Be aware than when the Copy
Measure operation is executed, the musical data will change as follows:
• If measures containing no musical data are copied, the copy destination measures will be blank.
• Musical data in the copy destination will be erased, and overwritten by the
data that is copied.
• Musical data that is copied will playback according to the time signature of
the copy destination.
1
In the tab 1 page, specify the copy destination track and Start Measure.
2
When this command is selected, the dialog
box shown at right will appear.
3
Specify the copy source track. If you wish
to copy the musical data of all tracks
including the master track,
Tracks.
4
Specify the desired first and last measure of
the copy source track.
5
To execute the Copy Measure command, press the
without executing, press the
check
All
Cancel button
OK button
.
. To cancel
On page 110, change “5–1K: Move Measure” to read as follows.
Measures of musical data in the track specified in the dialog box will be moved
to the measure specified in the tab 1 page.
Be aware that when the Move Measure operation is executed, the musical data
will change as follows:
• Data following the move source measures will be moved forward to fill the
gap.
• Data following the move destination will be moved backward to make room.
1
In the tab 1 page, specify the track and Start Measure of the move destination.
2
When this command is selected, the dialog
box shown at right will appear.
3
Specify the move source track. If you wish
to move the musical data of all tracks
including the master track,
Tracks.
4
Specify the desired first and last measure of
the move source track.
5
To execute the Move Measure command,
press the
executing, press the
OK button
Cancel button
check
All
. To cancel without
.
2
Page 4

Update Guide
On page 117, change “6–1F: Copy Pattern” to read as follows.
The musical data of the pattern specified in the dialog box will be copied to the
pattern specified in the tab 1 page.
In the built-in sequencer of the
specific song, but this Copy Pattern command allows a pattern to be used by a
different song.
1
In the tab 1 page, select the copy destination pattern.
2
When you select this command, the dialog
box at right will appear.
3
Specify the copy source song and pattern.
4
To execute the Copy Pattern operation
press the
executing press the
OK button
. To cancel without
Cancel button
TRINITY series
.
, patterns are attached to a
On page 117, change “6–1G: Bounce Pattern” to read as follows.
The musical data of the pattern specified in the dialog box and of the pattern
specified in the tab 1 page will be combined, and placed in the pattern specified
in the tab 1 page.
Be aware that executing the Bounce Pattern operation will affect the musical
data as follows:
• The combined musical data will be placed in the pattern specified in the tab 1
page, but unlike the Bounce Track operation, the musical data of the pattern
specified in the dialog box will not be erased.
• The time signature and length after the Bounce operation will follow the settings of the pattern specified on the tab 1 page.
1
In the tab 1 page, specify the bounce destination pattern.
2
When you select this command, the dialog
box at right will appear.
3
Specify the bounce source song and pattern.
To execute the Bounce Pattern operation
4
press the
executing press the
OK button
. To cancel without
Cancel button
.
On page 150, add the following as step 5 of “c: If a .PCG file or program
file is opened, and a Bank file inside it is selected.”
On a
5
TRINITY
TRI
option installed, the dialog box shown
at right will appear when you attempt to
load a PCG file containing 128 bank S programs. Use the radio buttons to select the
set of programs that you wish to load, and
press the
To return to the previous display, press the
that does not have the
OK button
to load the programs.
PBS-
Cancel button
.
3
Page 5

Update Guide
On page 151, add the following as step 4 of “h: If a .PCG file is opened
and a Drumkit file is selected.”
4
On a
TRINITY
TRI
option installed, the dialog box shown
at right will appear when you attempt to
load a PCG file containing 24 drum kit programs.
Use the radio buttons to select the set of
drum kits that you wish to load, and press
the
OK button
To return to the previous display, press the
that does not have the
to load the drum kits.
PBS-
Cancel button
.
On page 153, the “1–2B: Save All” operation now allows you to save
specified individual banks of Programs and Combinations. Change the
explanation and procedure to read as follows:
All combinations, programs, drum kits, global parameters, and songs in internal
memory will be saved to disk as a .PCG file or .SNG file (‘
dle diagram on p.149). Programs and combinations of the banks you specify will
be saved. However, this command can be used only when the current directory
is a DOS directory.
1
When this command is selected, the
dialog box at right will appear.
2
Press the text edit button to access the
text entry dialog box, and specify the
filename (
3
Check the
items that you wish to save.
☞
Basic Guide, page 6).
check
boxes for the data
a
’ and ‘k’ of the mid-
Combinations consist of programs,
and some programs use a drum kit as
their sound source.
As necessary, when saving combinations you should also save the programs
used by those combinations, and when saving programs you should also
save the drum kits used by those programs.
To save the data press the
4
ton
.
OK button
. To cancel saving, press the
Cancel but-
4
Page 6

Update Guide
On page 153, the “1–2C: Save Combi/Prog” operation now allows you
to save specified individual banks of Programs and Combinations.
Change the explanation and procedure to read as follows:
All combinations, programs, and drum kits from internal memory, in addition
to the global parameters, will be saved to disk as a .PCG file (diagram ‘
page 149). You can specify the program and combination banks that will be
saved.
This command is valid only if the current directory is a DOS directory.
When this command is selected, the
1
dialog box at right will appear.
2
Press the text edit button to access the
text entry dialog box, and specify the
filename (
3
Check the check boxes for the data
items that you wish to save.
Combinations consist of programs,
and some programs use a drum kit as
their sound source.
As necessary, when saving combinations you should also save the programs
used by those combinations, and when saving programs you should also
save the drum kits used by those programs.
4
To save the data press the
ton
☞
Basic Guide, page 6).
OK button
.
. To cancel saving, press the
a
’ on
Cancel but-
Add the following messages to “Messages” on pages 160, 162 and 163.
A
Audio tracks were skipped
Situation:
On a
TRINITY series
option, you attempted to load a file that included an audio track, and
the data was loaded without the audio track.
instrument which does not have the
HDR-TRI
N
No items were selected
Situation:
In the Save All or Save Combi/Prog dialog box, no check boxes wer e
checked.
T
There is no readable data
Situation:
On a
TRINITY series
option, you attempted to load a file which contained only banks C
and D.
instrument which does not have the
PBS-TRI
5
Page 7

Update Guide
6
 Loading...