

Page 1

5E
Page 2

About the TRINITY’s manuals
About the TRINITY’s manuals
How the TRINITY’s manuals are organized and how to
use them
This page explains the contents of each manual, and how to use them. First you should read the
Basic Guide
These manuals assume that you have a basic knowledge of synthesizers and MIDI.
* In the TRINITY’s manuals, parameter names, values are merely examples and may not always match the
Basic Guide
“
STEP 1
tion, and how each mode operates.
“
STEP 2
and convenient performance functions).
“
STEP 3
Other information on troubleshooting and MIDI is also provided.
☛
After you finish reading
operation. To take full advantage of the TRINITY, you will need to thoroughly understand the
contents of the B
to learn for yourself how the sounds change.
, and learn the basic ideas and procedures that you need to know.
The
TRINITY’s manuals
V3 proX
. If the Solo synthesizer option is installed in your instrument, read any references to
“bank M” as “bank S.”
actual display you are working on.
” explains each item on the front and rear panels, how to make connections, basic opera-
” explains the basics of playing the
” explains the basics you need to know before editing your own sounds.
asic Guide
discusses the
STEP 2
, and then get plenty of hands-on experience, operating the TRINITY
TRINITY, TRINITY V3, TRINITY V3 pro
, read
TRINITY
STEP 3
(selecting sounds, playing the demo songs,
as necessary. The
Basic Guide
, and
explains the basics of
TRINITY
Parameter Guide
The Parameter Guide explains the operation, settings, and points that you need to be aware of for
each parameter, organized by the tab pages of each mode.
☛
Refer to this guide when an unfamiliar parameter appears, or when you want to learn about the
functions of the
TRINITY series
in more detail.
Effect Guide
For each of the effects, this guidebook explains the parameter settings and points that you need to
be aware of.
☛
Refer to the Effect Guide when an unfamiliar parameter appears, or when you want to learn about
the function of the selected effect in more detail.
MOSS-TRI DSP Synthesizer Guide
This explains the setting and operation of the
TRINITY V3 pro
and
TRINITY V3 proX
bank M
, organized by each tab page.
program parameters on the
Solo Synthesizer Guide
This explains the setting and operation of the
TRINITY V3 pro
and
TRINITY V3 proX
bank S
, organized by each tab page.
program parameters on the
Voice Name List, Voice Name List for V3
This contains name lists of the preloaded (factory preset) combinations, programs, multi-samples,
and drum samples.
☛
Refer to these lists when you wish to see a list of the preloaded sounds.
TRINITY V3,
TRINITY V3,
i
Page 3

Table of Contents
STEP 1
Table of Contents
1. Main features of the TRINITY series
ACCESS. . . . . . . . . . . . . . . . . . . . . . . . . . . . . . . . . . . . . . . . . . . . . . . . . . . . . . . . . . . . . . . . .1
MOSS . . . . . . . . . . . . . . . . . . . . . . . . . . . . . . . . . . . . . . . . . . . . . . . . . . . . . . . . . . . . . . . . . . .1
Touch View. . . . . . . . . . . . . . . . . . . . . . . . . . . . . . . . . . . . . . . . . . . . . . . . . . . . . . . . . . . . . .1
Expansion potential. . . . . . . . . . . . . . . . . . . . . . . . . . . . . . . . . . . . . . . . . . . . . . . . . . . . . . .1
256 (320) programs and 256 combinations. . . . . . . . . . . . . . . . . . . . . . . . . . . . . . . . . . . .2
Flexible parameters to get the sound you want . . . . . . . . . . . . . . . . . . . . . . . . . . . . . . .2
Drum kits that support a diverse array of rhythm styles . . . . . . . . . . . . . . . . . . . . . . .2
A rich array of controllers for expressive performance . . . . . . . . . . . . . . . . . . . . . . . . .2
High-capacity sequencer. . . . . . . . . . . . . . . . . . . . . . . . . . . . . . . . . . . . . . . . . . . . . . . . . . .2
Digital multi-effect units. . . . . . . . . . . . . . . . . . . . . . . . . . . . . . . . . . . . . . . . . . . . . . . . . . .2
2. Connections
Audio connections. . . . . . . . . . . . . . . . . . . . . . . . . . . . . . . . . . . . . . . . . . . . . . . . . . . . . . . .3
Pedal connections. . . . . . . . . . . . . . . . . . . . . . . . . . . . . . . . . . . . . . . . . . . . . . . . . . . . . . . . .4
MIDI connections. . . . . . . . . . . . . . . . . . . . . . . . . . . . . . . . . . . . . . . . . . . . . . . . . . . . . . . . .4
3. Front and rear panel
Front panel . . . . . . . . . . . . . . . . . . . . . . . . . . . . . . . . . . . . . . . . . . . . . . . . . . . . . . . . . . . . . .5
Rear panel . . . . . . . . . . . . . . . . . . . . . . . . . . . . . . . . . . . . . . . . . . . . . . . . . . . . . . . . . . . . . . .5
. . . . . . . . . . . . . . . . . . . . . . . . . . . . . . . . . . . . . . . . . . . . . . . . . . . . . . . . . . . .3
. . . . . . . . . . . . . . . . . . . . . . . . . . . . . . . . . . . . . . . . . . . . . . . . . . .5
4. Basic operation of the touch view display
LCD screen buttons . . . . . . . . . . . . . . . . . . . . . . . . . . . . . . . . . . . . . . . . . . . . . . . . . . . . . . .6
Selecting modes . . . . . . . . . . . . . . . . . . . . . . . . . . . . . . . . . . . . . . . . . . . . . . . . . . . . . . . . . .7
Selecting pages . . . . . . . . . . . . . . . . . . . . . . . . . . . . . . . . . . . . . . . . . . . . . . . . . . . . . . . . . . .7
5. Setting a parameter
VALUE controllers. . . . . . . . . . . . . . . . . . . . . . . . . . . . . . . . . . . . . . . . . . . . . . . . . . . . .8
[COMPARE] key . . . . . . . . . . . . . . . . . . . . . . . . . . . . . . . . . . . . . . . . . . . . . . . . . . . . . .8
[BANK] key. . . . . . . . . . . . . . . . . . . . . . . . . . . . . . . . . . . . . . . . . . . . . . . . . . . . . . . . . . .9
Keyboard input. . . . . . . . . . . . . . . . . . . . . . . . . . . . . . . . . . . . . . . . . . . . . . . . . . . . . . . .9
Pedal input . . . . . . . . . . . . . . . . . . . . . . . . . . . . . . . . . . . . . . . . . . . . . . . . . . . . . . . . . . .9
. . . . . . . . . . . . . . . . . . . . . . . . . . . . . . . . . . . . . . . . . . . . . . . . . . . .8
. . . . . . . . . . . . . . . . . . . . . . . . . . . . . . . . . . . . .1
. . . . . . . . . . . . . . . . . . . . . . . . . . . . . .6
STEP 2
1. Listening to the demo songs
Play back the second demo song. . . . . . . . . . . . . . . . . . . . . . . . . . . . . . . . . . . . . . . . . . .12
Play back a song at a time. . . . . . . . . . . . . . . . . . . . . . . . . . . . . . . . . . . . . . . . . . . . . . . . .12
2. Select and play a program
Selecting a program using the front panel switches. . . . . . . . . . . . . . . . . . . . . . . . . . .13
Selecting a program using a connected assignable foot switch . . . . . . . . . . . . . . . . .14
Selecting a program using incoming MIDI Program Changes. . . . . . . . . . . . . . . . . .14
3. Select and play a combination
Selecting a combination using the front panel switches . . . . . . . . . . . . . . . . . . . . . . .15
Selecting a combination using a connected assignable foot switch . . . . . . . . . . . . . .16
Selecting a combination using incoming MIDI Program Changes . . . . . . . . . . . . . .16
4. About the performance functions
Control from the keyboard . . . . . . . . . . . . . . . . . . . . . . . . . . . . . . . . . . . . . . . . . . . . .17
Control from the Joy Stick, Ribbon Controller, SW 1/2,
and VALUE slider . . . . . . . . . . . . . . . . . . . . . . . . . . . . . . . . . . . . . . . . . . . . . . . . . . . .17
. . . . . . . . . . . . . . . . . . . . . . . . . . . . . . . . . . . . . . . . . . .11
. . . . . . . . . . . . . . . . . . . . . . . . . . . . . . . . . . . . . . . . . . . .13
. . . . . . . . . . . . . . . . . . . . . . . . . . . . . . . . . . . . . . . .15
. . . . . . . . . . . . . . . . . . . . . . . . . . . . . . . . . . . . . .17
ii
Page 4

Table of Contents
Control from the pedals . . . . . . . . . . . . . . . . . . . . . . . . . . . . . . . . . . . . . . . . . . . . . . . . . .18
STEP 3
5. Tuning
6. Transposing
7. Easy editing in Program Play mode
8. Easy editing in Combination Play mode
9. Writing a program or combination
Write using a page menu command . . . . . . . . . . . . . . . . . . . . . . . . . . . . . . . . . . . . . . . .24
Write using the [REC/WRITE] key. . . . . . . . . . . . . . . . . . . . . . . . . . . . . . . . . . . . . . . . .24
10. Restoring the factory preset sounds
11. Selecting by category
Program Play mode . . . . . . . . . . . . . . . . . . . . . . . . . . . . . . . . . . . . . . . . . . . . . . . . . . . . . .26
Combination Play mode . . . . . . . . . . . . . . . . . . . . . . . . . . . . . . . . . . . . . . . . . . . . . . . . . .26
Sequencer mode . . . . . . . . . . . . . . . . . . . . . . . . . . . . . . . . . . . . . . . . . . . . . . . . . . . . . . . . .26
1. Program Play mode
Selecting a program . . . . . . . . . . . . . . . . . . . . . . . . . . . . . . . . . . . . . . . . . . . . . . . . . . . . . .27
Editing with the performance editor. . . . . . . . . . . . . . . . . . . . . . . . . . . . . . . . . . . . . . . .27
2. Program Edit mode
How a program is organized . . . . . . . . . . . . . . . . . . . . . . . . . . . . . . . . . . . . . . . . . . . . . .28
The elements of sound. . . . . . . . . . . . . . . . . . . . . . . . . . . . . . . . . . . . . . . . . . . . . . . . . . . .28
Basic program editing . . . . . . . . . . . . . . . . . . . . . . . . . . . . . . . . . . . . . . . . . . . . . . . . . . . .30
. . . . . . . . . . . . . . . . . . . . . . . . . . . . . . . . . . . . . . . . . . . . . . . . . . . . . . . . . . . . . . . . .19
. . . . . . . . . . . . . . . . . . . . . . . . . . . . . . . . . . . . . . . . . . . . . . . . . . . . . . . . . . .20
. . . . . . . . . . . . . . . . . . . . . . . . . . . . . . . . . . .21
. . . . . . . . . . . . . . . . . . . . . . . . . . . . . . .22
. . . . . . . . . . . . . . . . . . . . . . . . . . . . . . . . . . . .23
. . . . . . . . . . . . . . . . . . . . . . . . . . . . . . . . . .25
. . . . . . . . . . . . . . . . . . . . . . . . . . . . . . . . . . . . . . . . . . . . . . . .26
. . . . . . . . . . . . . . . . . . . . . . . . . . . . . . . . . . . . . . . . . . . . . . . . . . .27
. . . . . . . . . . . . . . . . . . . . . . . . . . . . . . . . . . . . . . . . . . . . . . . . . . . .28
How the TRINITY’s sound is produced . . . . . . . . . . . . . . . . . . . . . . . . . . . . . . . . . .28
EGs and LFOs . . . . . . . . . . . . . . . . . . . . . . . . . . . . . . . . . . . . . . . . . . . . . . . . . . . . . . . .29
Amplifier settings. . . . . . . . . . . . . . . . . . . . . . . . . . . . . . . . . . . . . . . . . . . . . . . . . . . . .30
Filter settings. . . . . . . . . . . . . . . . . . . . . . . . . . . . . . . . . . . . . . . . . . . . . . . . . . . . . . . . .31
Oscillator settings . . . . . . . . . . . . . . . . . . . . . . . . . . . . . . . . . . . . . . . . . . . . . . . . . . . . .32
Adjusting the modulation. . . . . . . . . . . . . . . . . . . . . . . . . . . . . . . . . . . . . . . . . . . . . .33
About alternate modulation . . . . . . . . . . . . . . . . . . . . . . . . . . . . . . . . . . . . . . . . . . . .33
About dynamic modulation . . . . . . . . . . . . . . . . . . . . . . . . . . . . . . . . . . . . . . . . . . . .33
About oscillator modes . . . . . . . . . . . . . . . . . . . . . . . . . . . . . . . . . . . . . . . . . . . . . . . .34
About program parameters . . . . . . . . . . . . . . . . . . . . . . . . . . . . . . . . . . . . . . . . . . . .35
3. Combination Play mode
Selecting a combination. . . . . . . . . . . . . . . . . . . . . . . . . . . . . . . . . . . . . . . . . . . . . . . . . . .36
Ways to select the program for each timbre. . . . . . . . . . . . . . . . . . . . . . . . . . . . . . . . . .36
Selecting the timbre program on the unit. . . . . . . . . . . . . . . . . . . . . . . . . . . . . . . . . . . .36
Layer, split, and velocity switch . . . . . . . . . . . . . . . . . . . . . . . . . . . . . . . . . . . . . . . . . . .37
Adjusting the volume . . . . . . . . . . . . . . . . . . . . . . . . . . . . . . . . . . . . . . . . . . . . . . . . . . . .37
4. Combination Edit mode
How a combination is organized. . . . . . . . . . . . . . . . . . . . . . . . . . . . . . . . . . . . . . . . . . .38
Basic combination editing. . . . . . . . . . . . . . . . . . . . . . . . . . . . . . . . . . . . . . . . . . . . . . . . .38
Volume settings . . . . . . . . . . . . . . . . . . . . . . . . . . . . . . . . . . . . . . . . . . . . . . . . . . . . . .38
Key zone settings . . . . . . . . . . . . . . . . . . . . . . . . . . . . . . . . . . . . . . . . . . . . . . . . . . . . .38
Velocity zone settings . . . . . . . . . . . . . . . . . . . . . . . . . . . . . . . . . . . . . . . . . . . . . . . . .39
Other settings in Combination Edit mode . . . . . . . . . . . . . . . . . . . . . . . . . . . . . . . .40
iii
. . . . . . . . . . . . . . . . . . . . . . . . . . . . . . . . . . . . . . . . . . . . . . .36
. . . . . . . . . . . . . . . . . . . . . . . . . . . . . . . . . . . . . . . . . . . . . . . .38
Page 5

Table of Contents
5. Sequencer mode
About the TRINITY’s sequencer . . . . . . . . . . . . . . . . . . . . . . . . . . . . . . . . . . . . . . . . . . .41
How a song is organized . . . . . . . . . . . . . . . . . . . . . . . . . . . . . . . . . . . . . . . . . . . . . . . . .41
About patterns . . . . . . . . . . . . . . . . . . . . . . . . . . . . . . . . . . . . . . . . . . . . . . . . . . . . . . . . . .42
How song data is stored on a floppy disk . . . . . . . . . . . . . . . . . . . . . . . . . . . . . . . . . . .42
How the TRINITY uses MIDI. . . . . . . . . . . . . . . . . . . . . . . . . . . . . . . . . . . . . . . . . . . . . .42
About recording. . . . . . . . . . . . . . . . . . . . . . . . . . . . . . . . . . . . . . . . . . . . . . . . . . . . . . . . .43
Song realtime recording procedure. . . . . . . . . . . . . . . . . . . . . . . . . . . . . . . . . . . . . . . . .44
Preparations for recording . . . . . . . . . . . . . . . . . . . . . . . . . . . . . . . . . . . . . . . . . . . . .44
Overwrite recording . . . . . . . . . . . . . . . . . . . . . . . . . . . . . . . . . . . . . . . . . . . . . . . . . .44
Overdub recording. . . . . . . . . . . . . . . . . . . . . . . . . . . . . . . . . . . . . . . . . . . . . . . . . . . .45
Auto punch-in recording. . . . . . . . . . . . . . . . . . . . . . . . . . . . . . . . . . . . . . . . . . . . . . .45
Manual punch-in recording . . . . . . . . . . . . . . . . . . . . . . . . . . . . . . . . . . . . . . . . . . . .45
Loop recording . . . . . . . . . . . . . . . . . . . . . . . . . . . . . . . . . . . . . . . . . . . . . . . . . . . . . . .46
Pattern recording procedure . . . . . . . . . . . . . . . . . . . . . . . . . . . . . . . . . . . . . . . . . . . . . . 47
Pattern realtime recording . . . . . . . . . . . . . . . . . . . . . . . . . . . . . . . . . . . . . . . . . . . . .47
Song playback. . . . . . . . . . . . . . . . . . . . . . . . . . . . . . . . . . . . . . . . . . . . . . . . . . . . . . . .47
6. About the effects
Insert effect settings. . . . . . . . . . . . . . . . . . . . . . . . . . . . . . . . . . . . . . . . . . . . . . . . . . . . . .48
Program . . . . . . . . . . . . . . . . . . . . . . . . . . . . . . . . . . . . . . . . . . . . . . . . . . . . . . . . . . . . .48
Combination . . . . . . . . . . . . . . . . . . . . . . . . . . . . . . . . . . . . . . . . . . . . . . . . . . . . . . . . .49
Song . . . . . . . . . . . . . . . . . . . . . . . . . . . . . . . . . . . . . . . . . . . . . . . . . . . . . . . . . . . . . . . .49
Master effect settings. . . . . . . . . . . . . . . . . . . . . . . . . . . . . . . . . . . . . . . . . . . . . . . . . . . . .49
Send and pan settings . . . . . . . . . . . . . . . . . . . . . . . . . . . . . . . . . . . . . . . . . . . . . . . . .50
7. Global mode
About memory protect . . . . . . . . . . . . . . . . . . . . . . . . . . . . . . . . . . . . . . . . . . . . . . . . . . .51
Drum kit editing. . . . . . . . . . . . . . . . . . . . . . . . . . . . . . . . . . . . . . . . . . . . . . . . . . . . . . . . .51
. . . . . . . . . . . . . . . . . . . . . . . . . . . . . . . . . . . . . . . . . . . . . . . . . . . . . .41
. . . . . . . . . . . . . . . . . . . . . . . . . . . . . . . . . . . . . . . . . . . . . . . . . . . . . .48
. . . . . . . . . . . . . . . . . . . . . . . . . . . . . . . . . . . . . . . . . . . . . . . . . . . . . . . . . .51
8. Disk mode
Types of floppy disks . . . . . . . . . . . . . . . . . . . . . . . . . . . . . . . . . . . . . . . . . . . . . . . . . . . .53
Floppy disk handling . . . . . . . . . . . . . . . . . . . . . . . . . . . . . . . . . . . . . . . . . . . . . . . . . . . .53
Floppy disk write protect . . . . . . . . . . . . . . . . . . . . . . . . . . . . . . . . . . . . . . . . . . . . . . . . .53
Inserting a floppy disk . . . . . . . . . . . . . . . . . . . . . . . . . . . . . . . . . . . . . . . . . . . . . . . . . . .53
Removing a floppy disk . . . . . . . . . . . . . . . . . . . . . . . . . . . . . . . . . . . . . . . . . . . . . . . . . .54
Cleaning the disk drive head . . . . . . . . . . . . . . . . . . . . . . . . . . . . . . . . . . . . . . . . . . . . . .54
Files, directories, and icons. . . . . . . . . . . . . . . . . . . . . . . . . . . . . . . . . . . . . . . . . . . . . . . .54
Formatting a floppy disk . . . . . . . . . . . . . . . . . . . . . . . . . . . . . . . . . . . . . . . . . . . . . . . . .55
9. Saving data
Writing to internal memory . . . . . . . . . . . . . . . . . . . . . . . . . . . . . . . . . . . . . . . . . . . . . . .56
Saving to floppy disk. . . . . . . . . . . . . . . . . . . . . . . . . . . . . . . . . . . . . . . . . . . . . . . . . . . . .56
MIDI data dump . . . . . . . . . . . . . . . . . . . . . . . . . . . . . . . . . . . . . . . . . . . . . . . . . . . . . . . .57
10. MIDI applications
Connections with MIDI devices and/or a computer . . . . . . . . . . . . . . . . . . . . . . . . . .58
Global mode settings. . . . . . . . . . . . . . . . . . . . . . . . . . . . . . . . . . . . . . . . . . . . . . . . . . . . .60
Position settings . . . . . . . . . . . . . . . . . . . . . . . . . . . . . . . . . . . . . . . . . . . . . . . . . . . . . .60
About MIDI. . . . . . . . . . . . . . . . . . . . . . . . . . . . . . . . . . . . . . . . . . . . . . . . . . . . . . . . . . . . .61
MIDI channels. . . . . . . . . . . . . . . . . . . . . . . . . . . . . . . . . . . . . . . . . . . . . . . . . . . . . . . .61
Note on/off . . . . . . . . . . . . . . . . . . . . . . . . . . . . . . . . . . . . . . . . . . . . . . . . . . . . . . . . . .61
Selecting a program . . . . . . . . . . . . . . . . . . . . . . . . . . . . . . . . . . . . . . . . . . . . . . . . . . .62
Selecting a combination. . . . . . . . . . . . . . . . . . . . . . . . . . . . . . . . . . . . . . . . . . . . . . . .62
Controlling the timbres of a combination. . . . . . . . . . . . . . . . . . . . . . . . . . . . . . . . .62
Controlling each track of a song. . . . . . . . . . . . . . . . . . . . . . . . . . . . . . . . . . . . . . . . .62
Bank Select messages. . . . . . . . . . . . . . . . . . . . . . . . . . . . . . . . . . . . . . . . . . . . . . . . . .62
Sustain pedal. . . . . . . . . . . . . . . . . . . . . . . . . . . . . . . . . . . . . . . . . . . . . . . . . . . . . . . . .62
Aftertouch . . . . . . . . . . . . . . . . . . . . . . . . . . . . . . . . . . . . . . . . . . . . . . . . . . . . . . . . . . .63
. . . . . . . . . . . . . . . . . . . . . . . . . . . . . . . . . . . . . . . . . . . . . . . . . . . . . . . . . . . . .53
. . . . . . . . . . . . . . . . . . . . . . . . . . . . . . . . . . . . . . . . . . . . . . . . . . . . . . . . . . .56
. . . . . . . . . . . . . . . . . . . . . . . . . . . . . . . . . . . . . . . . . . . . . . . . . . . .58
iv
Page 6

Table of Contents
Using pitch bend. . . . . . . . . . . . . . . . . . . . . . . . . . . . . . . . . . . . . . . . . . . . . . . . . . . . . .63
Adjusting the volume . . . . . . . . . . . . . . . . . . . . . . . . . . . . . . . . . . . . . . . . . . . . . . . . .63
Applying vibrato (oscillator LFO) . . . . . . . . . . . . . . . . . . . . . . . . . . . . . . . . . . . . . . .63
Applying wah-wah (filter LFO) . . . . . . . . . . . . . . . . . . . . . . . . . . . . . . . . . . . . . . . . .63
Adjusting the stereo location (pan) . . . . . . . . . . . . . . . . . . . . . . . . . . . . . . . . . . . . . .64
Effect send levels (send 1,2) . . . . . . . . . . . . . . . . . . . . . . . . . . . . . . . . . . . . . . . . . . . .64
Turning effects on/off . . . . . . . . . . . . . . . . . . . . . . . . . . . . . . . . . . . . . . . . . . . . . . . . .64
Effect dynamic modulation. . . . . . . . . . . . . . . . . . . . . . . . . . . . . . . . . . . . . . . . . . . . .64
Adjusting the tone color . . . . . . . . . . . . . . . . . . . . . . . . . . . . . . . . . . . . . . . . . . . . . . .65
Adjusting the attack time . . . . . . . . . . . . . . . . . . . . . . . . . . . . . . . . . . . . . . . . . . . . . .65
Adjusting the release time. . . . . . . . . . . . . . . . . . . . . . . . . . . . . . . . . . . . . . . . . . . . . .65
Editing with RPN messages . . . . . . . . . . . . . . . . . . . . . . . . . . . . . . . . . . . . . . . . . . . .65
Tuning . . . . . . . . . . . . . . . . . . . . . . . . . . . . . . . . . . . . . . . . . . . . . . . . . . . . . . . . . . . . . .66
Transposing. . . . . . . . . . . . . . . . . . . . . . . . . . . . . . . . . . . . . . . . . . . . . . . . . . . . . . . . . .66
Setting the pitch bend range . . . . . . . . . . . . . . . . . . . . . . . . . . . . . . . . . . . . . . . . . . . .66
If a note does not stop . . . . . . . . . . . . . . . . . . . . . . . . . . . . . . . . . . . . . . . . . . . . . . . . .66
Turning off all notes of a channel. . . . . . . . . . . . . . . . . . . . . . . . . . . . . . . . . . . . . . . .66
Resetting all controllers of a channel. . . . . . . . . . . . . . . . . . . . . . . . . . . . . . . . . . . . .66
About system exclusive messages . . . . . . . . . . . . . . . . . . . . . . . . . . . . . . . . . . . . . . .67
Transmitting sound data settings (Data Dump) . . . . . . . . . . . . . . . . . . . . . . . . . . .67
Editing sounds, etc. . . . . . . . . . . . . . . . . . . . . . . . . . . . . . . . . . . . . . . . . . . . . . . . . . . .67
About performance editing. . . . . . . . . . . . . . . . . . . . . . . . . . . . . . . . . . . . . . . . . . . . .68
Connecting the TRINITY to an external device for use as a multi-timbral
tone generator . . . . . . . . . . . . . . . . . . . . . . . . . . . . . . . . . . . . . . . . . . . . . . . . . . . . . . . .68
Synchronizing the sequencer playback. . . . . . . . . . . . . . . . . . . . . . . . . . . . . . . . . . .68
Recording playback data from an external sequencer . . . . . . . . . . . . . . . . . . . . . .69
About GM . . . . . . . . . . . . . . . . . . . . . . . . . . . . . . . . . . . . . . . . . . . . . . . . . . . . . . . . . . .69
About Standard MIDI Files. . . . . . . . . . . . . . . . . . . . . . . . . . . . . . . . . . . . . . . . . . . . .69
11. When you want to…
Playback the TRINITY to control other MIDI equipment . . . . . . . . . . . . . . . . . . . . . .70
Receive Program Change and Bank Select messages in Combination Play mode to
select combinations and timbre programs . . . . . . . . . . . . . . . . . . . . . . . . . . . . . . . . . . .70
Connect a computer etc. and use it to store TRINITY series sound data and
settings. . . . . . . . . . . . . . . . . . . . . . . . . . . . . . . . . . . . . . . . . . . . . . . . . . . . . . . . . . . . . . . . .70
Edit parameters via MIDI . . . . . . . . . . . . . . . . . . . . . . . . . . . . . . . . . . . . . . . . . . . . . . . . .71
Use the TRINITY’s sequencer to control connected MIDI equipment. . . . . . . . . . . .71
Use the TRINITY as a multi-timbral tone generator played by a connected
sequencer. . . . . . . . . . . . . . . . . . . . . . . . . . . . . . . . . . . . . . . . . . . . . . . . . . . . . . . . . . . . . . .71
Tune the TRINITY . . . . . . . . . . . . . . . . . . . . . . . . . . . . . . . . . . . . . . . . . . . . . . . . . . . . . . .71
Restore the factory sounds and settings . . . . . . . . . . . . . . . . . . . . . . . . . . . . . . . . . . . . .72
Adjust the contrast of the LCD screen . . . . . . . . . . . . . . . . . . . . . . . . . . . . . . . . . . . . . .72
Use a pedal switch to select programs or combinations . . . . . . . . . . . . . . . . . . . . . . .72
Adjust the way that velocity affects the sound . . . . . . . . . . . . . . . . . . . . . . . . . . . . . . .72
Simultaneously play two or more programs . . . . . . . . . . . . . . . . . . . . . . . . . . . . . . . . .72
Play different sounds in the left and right hands . . . . . . . . . . . . . . . . . . . . . . . . . . . . .73
Change the sound. . . . . . . . . . . . . . . . . . . . . . . . . . . . . . . . . . . . . . . . . . . . . . . . . . . . . . . .73
Save a sound that you create . . . . . . . . . . . . . . . . . . . . . . . . . . . . . . . . . . . . . . . . . . . . . .73
Use the TRINITY as a MIDI data filer. . . . . . . . . . . . . . . . . . . . . . . . . . . . . . . . . . . . . . .73
Playback a GM Score (GM music data). . . . . . . . . . . . . . . . . . . . . . . . . . . . . . . . . . . . . .74
12. Troubleshooting
. . . . . . . . . . . . . . . . . . . . . . . . . . . . . . . . . . . . . . . . . . . . . . . . .70
. . . . . . . . . . . . . . . . . . . . . . . . . . . . . . . . . . . . . . . . . . . . . . . . . . . . . .75
v
Page 7

STEP 1
1. Main features of the TRINITY series
ACCESS
All models of the TRINITY series feature the ACCESS (Advanced Control Combined Synthesis
System), a PCM tone generation system that allows sound to be created completely in the digital
domain.
The tone generator has 24 Mbytes of PCM ROM, containing 375 multisamples and 258 drum samples recorded at a sampling frequency of 48 kHz. The multi-mode filter section provides four
types of filters (High Pass, Low Pass, Band Pass, and Band Reject) with resonance, for creative
flexibility.
The effect section provides 100 Insert Effects including effects such as equalizer, limiter, and
exciter which modify the tone or dynamics, effects such as amp simulation and rotary speaker
which bring out the tonal characteristics typical of certain instruments, and colorful effects such as
ring modulator, vocoder, and pitch shifter.
The effect section also provides a total of 14 Master Effects that can be selected for a modulationtype master effect and for a reverb-type master effect, with adjustable sends and returns. All processing is done in the digital domain for the highest sound quality.
STEP 1
MOSS
The TRINITY V3 , TRINITY V3 pro , and TRINITY V3 proX also feature the MOSS (Multi Oscillator Synthesis System).
The oscillators including Analog Simulation, VPM (Variable Phase Modulation) and Physical
Modeling allow especially expressive and powerful solo parts and synth bass parts. 64 sounds
using the MOSS tone generator are included in program bank M. (On the
can be added by installing the MOSS-TRI option.)
Touch View
The TRINITY series is a revolutionary leap in operability and ease of use, thanks to its Touch-
View Graphical User Interface
dot LCD screen. More information can be displayed in the large LCD, so that parameter settings
can be viewed at a glance for much easier editing.
Expansion potential
The TRINITY series offers a wide variety of options, from the MOSS-TRI option to a SCSI inter-
face
. Depending on the model, the number of preset programs and combinations and installed
functions will differ, but any model can be upgraded simply by installing options. When the
MOSS-TRI option is installed in the TRINITY , the program banks will be expanded and you will
be able to access 64 sounds produced by the DSP-based MOSS tone generator.
Previous music workstations were not able to record audio data such as vocals or guitar. However
when the
you might record backing tracks on the internal MIDI sequencer, and record vocals on the HDRTRI option to complete a composition with vocals. This data can be backed up to DAT via the S/P
DIF option for the HDR-TRI option.
The PCM capacity can be expanded by installing the
ple data can be read into flash ROM, and used as a sound source. Program/Combination banks C
and D will be added, each providing an additional 128 program and combination areas. If the
MOSS-TRI option is installed, bank M will contain additional 64 program areas.
HDR-TRI option is installed, the TRINITY can record audio data as well. For example
TRINITY , this capability
, which allows operation by touching directly on a large 320 x 240
Playback Sampler/Flash ROM option . Sam-
1
Page 8

1. Main features of the TRINITY series
256 (320) programs and 256 combinations
The TRINITY contains 128 programs in each bank A and B (a total of 256). (If the MOSS-TRI
option is installed, the 64 programs of bank M are also available.) On the
V3 pro
and TRINITY V3 proX , banks A and B each contain 128 programs, and bank M contains
64 programs (a total of 320). This wide variety of programs provides you with unlimited sonic
possibilities.
The
TRINITY series provides 256 Combinations, each of which consist of program assignments
for up to 8 timbres. This is a particularly powerful feature for live performance. Key Zone and
V elocity Zone settings can be made to layer and/or split pr ograms across the keyboar d in any way
you desire.
Flexible parameters to get the sound you want
The programs of the TRINITY provide a large number of editing parameters that allow you to
adjust any detail of the sound, with a wide range of parameter values. For example, when making
the filtering settings that are so important in determining the character of the sound, even a singleoscillator program allows you to use two filters, each independently settable to one of four different filter types.
Drum kits that support a diverse array of rhythm styles
The TRINITY series provides 258 highly usable drum and percussion samples. You can create 12
separate drum kits, each with a different
wide variety of performance possibilities are provided, and you can even assign two drum samples to a single key and switch between the two using velocity. Of course you can also modify filter and amp settings, and also use effects to further process the sound.
TRINITY V3 , TRINITY
drum sample assigned to each note of the keyboard. A
A rich array of controllers for expressive performance
The Alternate Modulation featured on the TRINITY series lets you flexibly assign a control
source for each control destination. This allows you to modulate certain parameters of the oscillator, filter, or amp etc.) using an assigned controller. The
effects allows you to modulate effect parameters using an assigned controller. The available controllers include not only joystick, ribbon controller, assignable footswitch, and assignable foot
pedal, but also velocity, aftertouch, and even internal parameters such as note number and sound
envelope.
Dynamic Modulation provided for the
High-capacity sequencer
Up to 20 songs can be created with a total capacity of 80,000 notes, using 16 timbres, 16 tracks, a
tempo track, and q
Recording can be performed in any way you wish; six methods of realtime recording (overwrite
recording, overdub recording, auto punch-in recording, manual punch-in recording, loop recording), and also two non-realtime methods (step recording and event edit) are available.
Modulation
source.
/192 timing resolution. The sequencer is Standard MIDI File compatible.
Alternate
and Dynamic modulation can be applied using the recorded tempo as a modulation
Digital multi-effect units
The TRINITY series features completely new professional quality effects that have been designed
as an integral part of the instrument, giving you the kind of control not possible with a stand alone
effects processor. 100 types of
Insert Effects include effects such as equalizer, limiter, and exciter which modify the tone or
dynamics, effects such as amp simulation and rotary speaker which bring out the tonal characteristics typical of certain instruments, and colorful effects such as ring modulator , vocoder, and pitch
shifter.
The Master Effects let you select separate effects for a modulation-type master effect and for a
reverb-type master effect, each with an adjustable send and return.
Insert Effects and 14 types of Master Effects are provided. The
2
Page 9
2. Connections
Audio connections
Other tone generator module
VOLUME
100
PHONES
OUTPUT
Mixer
COMBI PROG BANK
+10 +1
PAGE+
MIDI
EDIT GLOBAL
POWER
PAGE-
-10 -1
MULTI
INPUT
OUTPUT
Powered monitor, etc.
INPUT
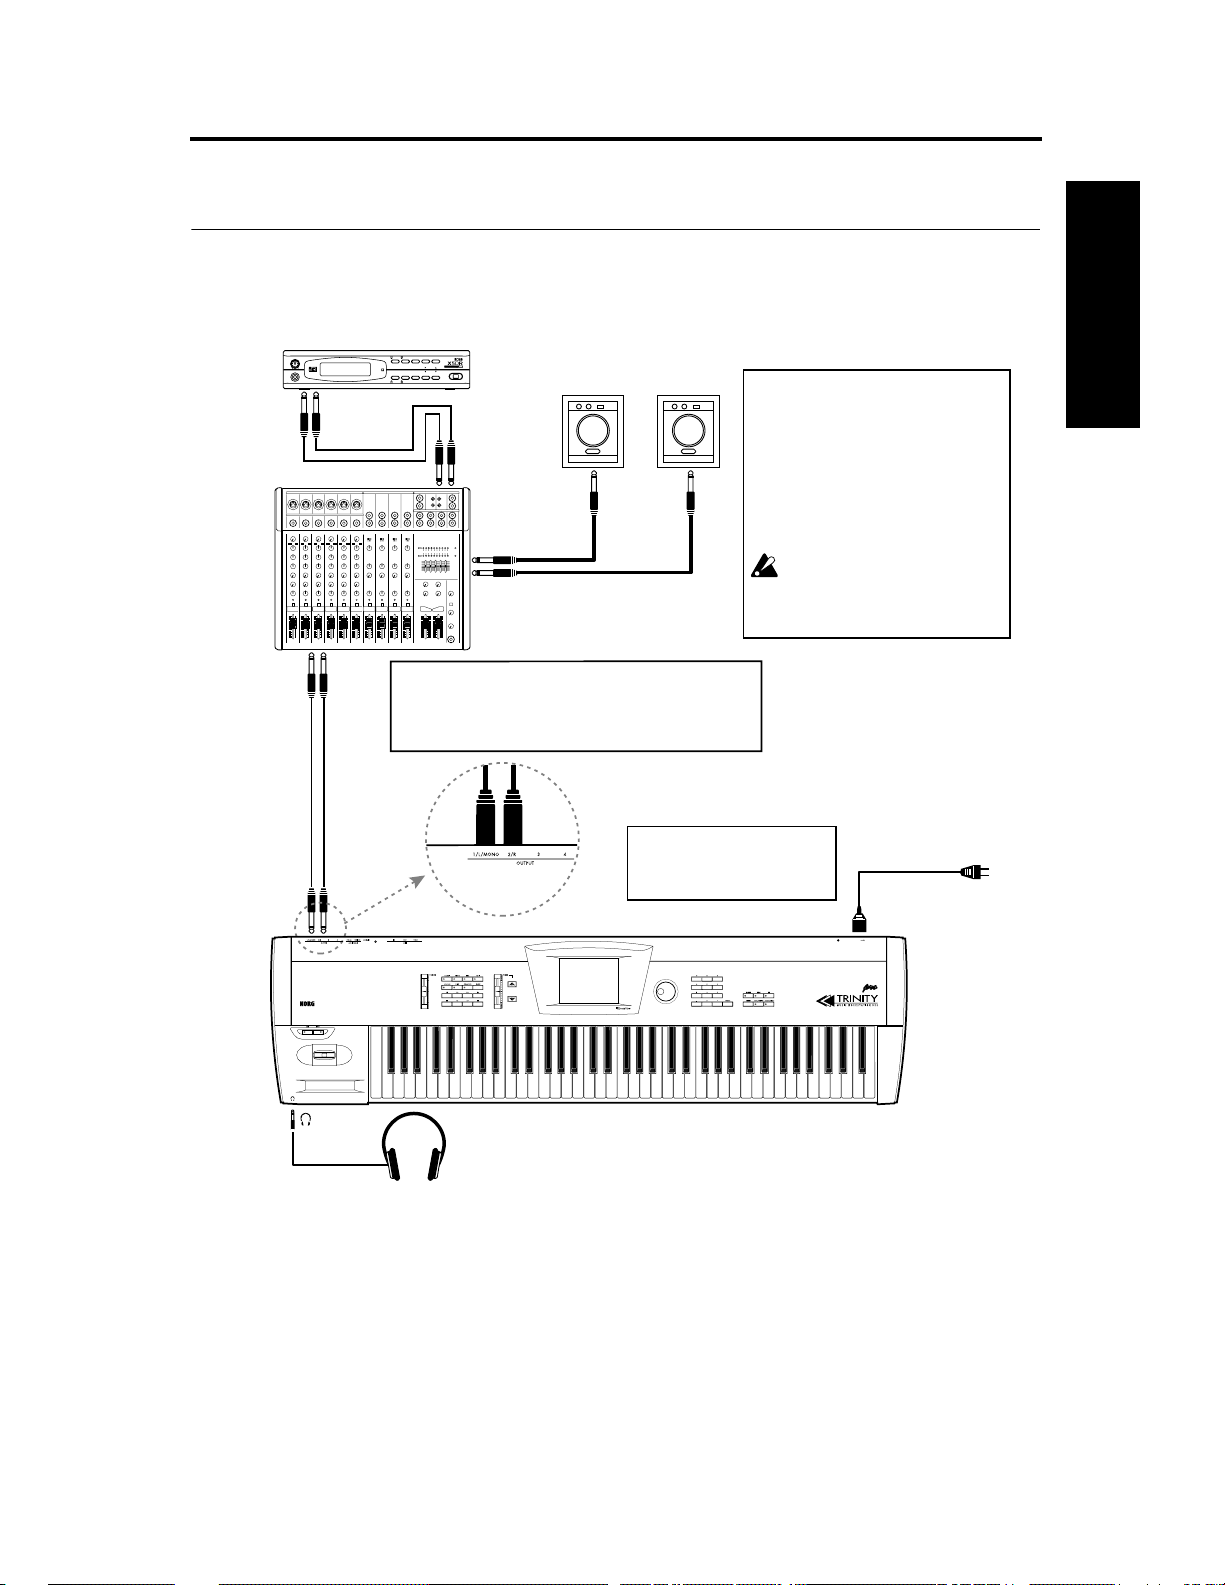
2. Connections
< Connections with a powered monitor/stereo amp >
In order to faithfully reproduce the sound of the
TRINITY series, we recommend that you use a
powered monitor system (a speaker with a
built-in amp, such as the separately sold PROGRAM-15). If you connect the TRINITY to a
stereo audio amp or to a stereo cassette radio
that has external input jacks, make connections to the jacks which are marked LINE IN,
AUX IN, or “external input” etc.
If you have connected a stereo audio
amp, be aware that playing the TRINITY
at high volumes can damage your
speakers. Be careful not to raise the volume to an excessive level.
STEP 1
INPUT
OUTPUT
PHONES
< Mixer connections >
Connect the OUTPUT jacks to the INPUT jacks of your mixer. In
order to take advantage of the TRINITY’s high quality sound, we
recommend that you make connections in stereo if possible. If you
make connections in mono, use only the 1/L/MONO jack.
< AC power connections >
Use the included AC power cable to
connect the AC power inlet to an AC
outlet.
Headphones
To an AC outlet
Power cable (included)
3
Page 10
2. Connections
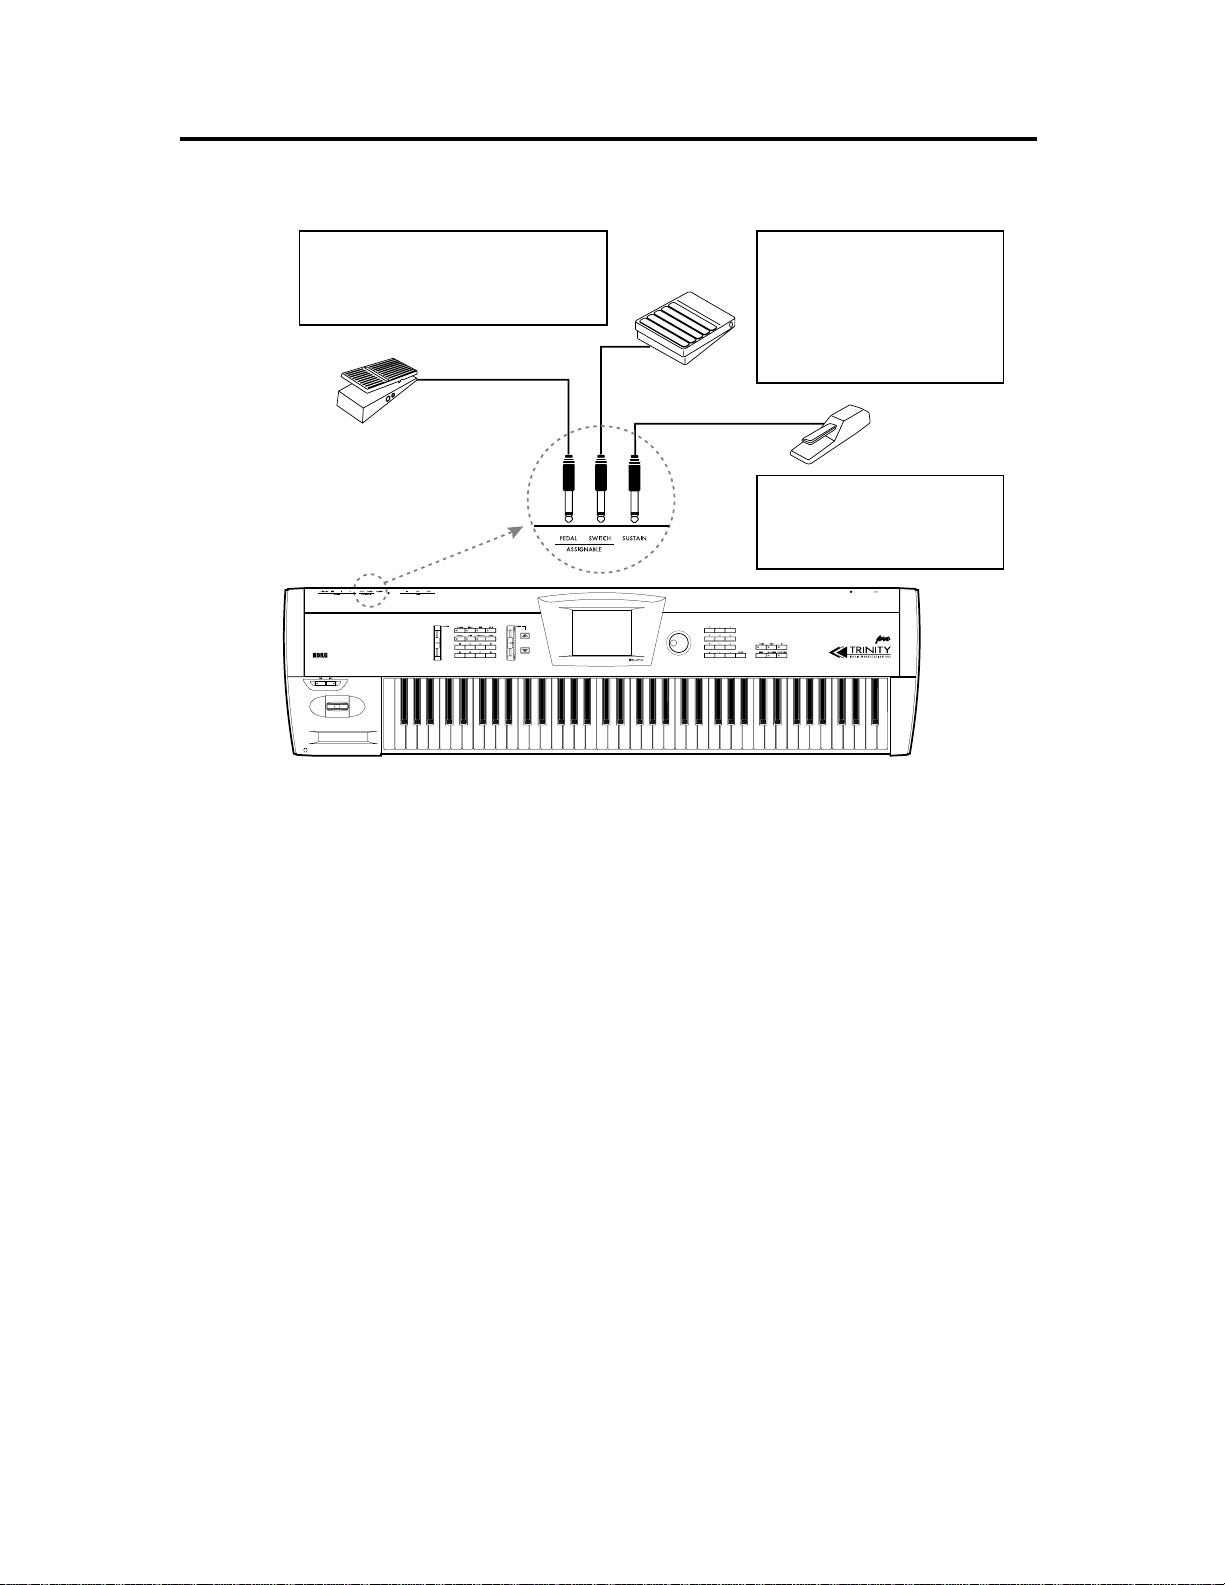
Pedal connections
< Foot pedal connections >
Be sure to use an EXP-2 or XVP-10 as the foot pedal.
The function that is assigned to the pedal will be determined by the P1 Foot Pedal settings in Global mode
☞ Parameter Guide, p.134).
(
EXP-2, XVP-10
PS-1, etc.
< Foot switch pedal connections >
Connect an on/off type foot switch to the
switch jack. The function that is assigned to
the foot switch will be determined by the
Foot Switch settings in Global mode (
Parameter Guide, p.134). The polarity of
the switch pedal can be set by the P1 Foot
Switch Polarity setting (
Guide, p.134).
Sustain pedal (DS-1, etc.)
< Sustain pedal connections >
The polarity of the sustain pedal can be set
by the Sustain Pedal Polarity setting in
Global mode P1 (
p.134).
☞ Parameter
☞ Parameter Guide,
☞
MIDI connections
The TRINITY can be connected by MIDI cables to other MIDI devices (MIDI tone generators,
MIDI sequencers, computers, etc.) so that these MIDI devices can play the TRINITY’s tone generator, or be played from the TRINITY’s keyboard. For details refer to “10. MIDI applications”
( ☞
page 58 in this manual).
If you wish to control the TRINITY from an external MIDI device, connect the MIDI OUT of the
external device to the MIDI IN of the TRINITY. (For example, when you wish to play the TRINITY’s tone generator from a sequencer .) However to make MIDI connections with a computer, you
will need a MIDI interface.
If you wish to use the TRINITY’s keyboard and controllers (joystick etc.) to control an external
MIDI device, connect the MIDI OUT of the TRINITY to the MIDI IN of the external device. (For
example, when you wish to record your playing on the TRINITY into an external sequencer or
computer.)
By using the MIDI THRU connector, you can “daisy-chain” several MIDI devices. However, it is a
good idea to daisy-chain no more than 2 or 3 MIDI devices in this way. If you need to connect a
larger number of MIDI devices, use a MIDI patch bay.
4
Page 11
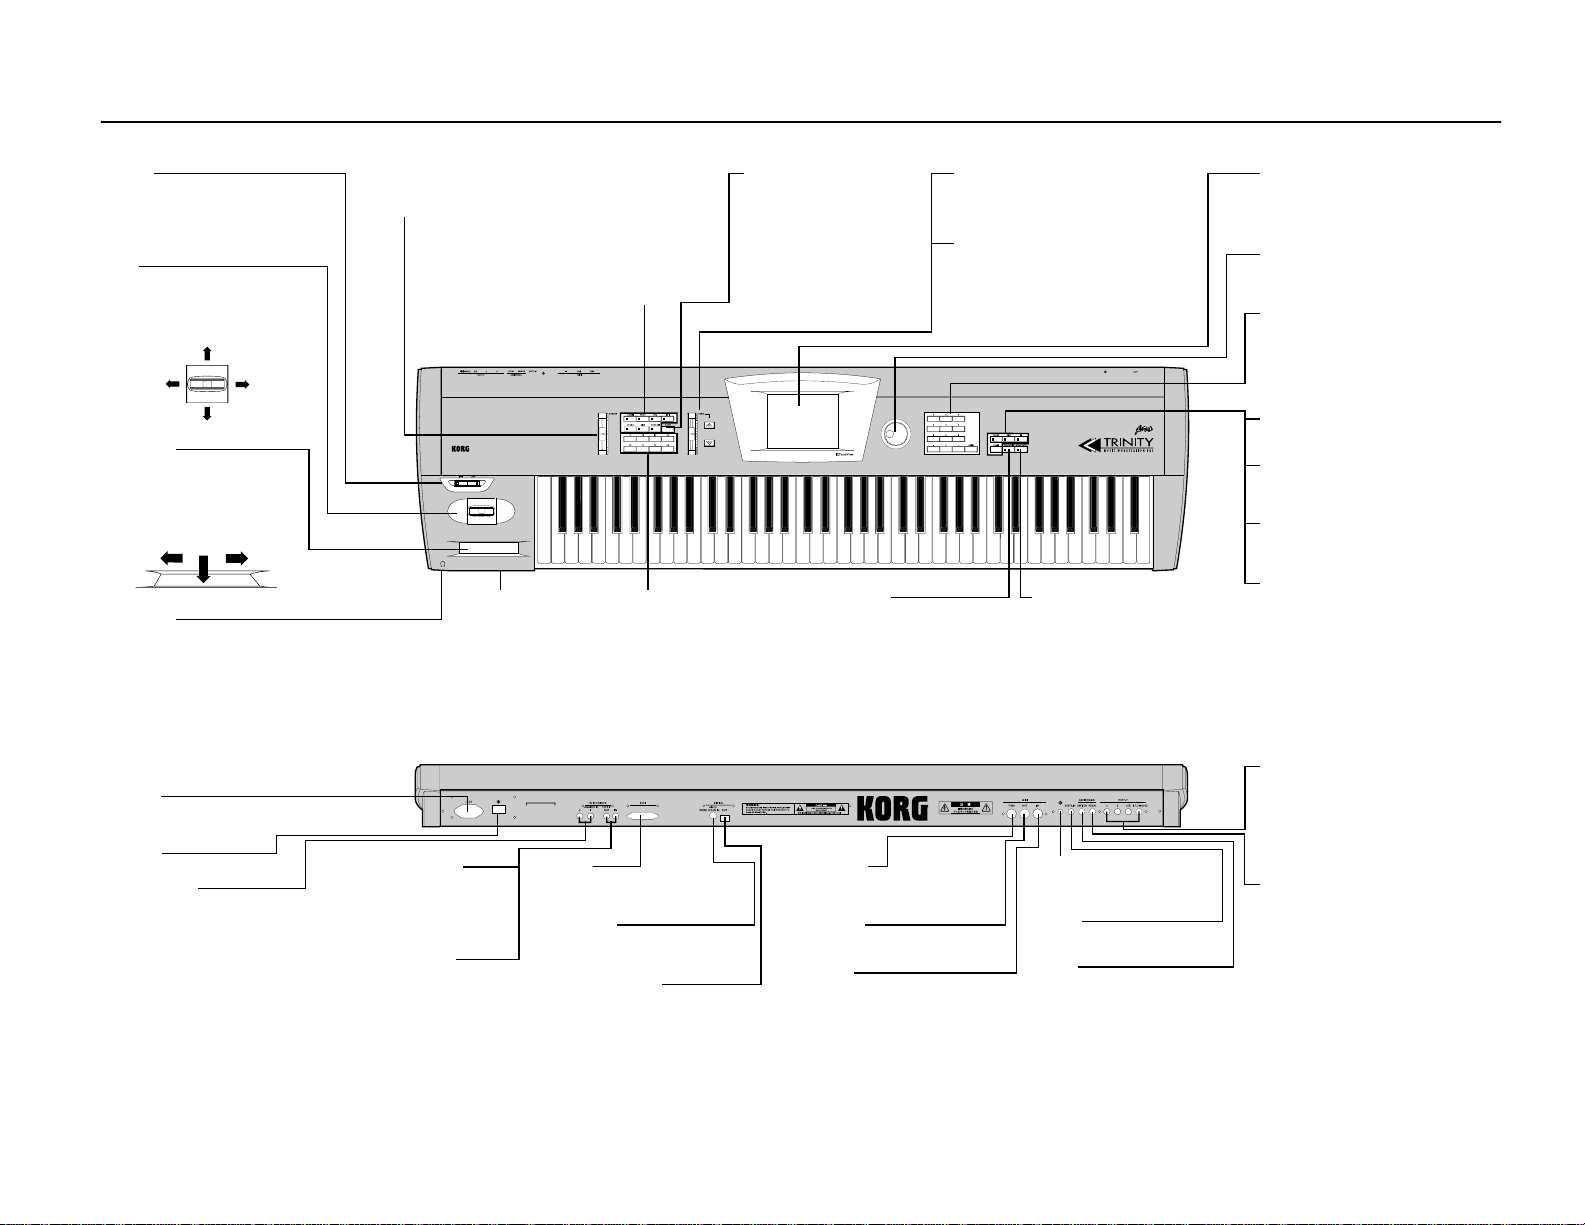
3. Front and rear panel
Front panel
SW1/SW2
These switches control (on/off or lock/unlock) the
functions assigned to them in Program Edit mode
(☞Parameter Guide, page 7). To activate the
assigned function, press the switch (the LED will
light), and to de-activate the function press the
switch once again (the LED will go out).
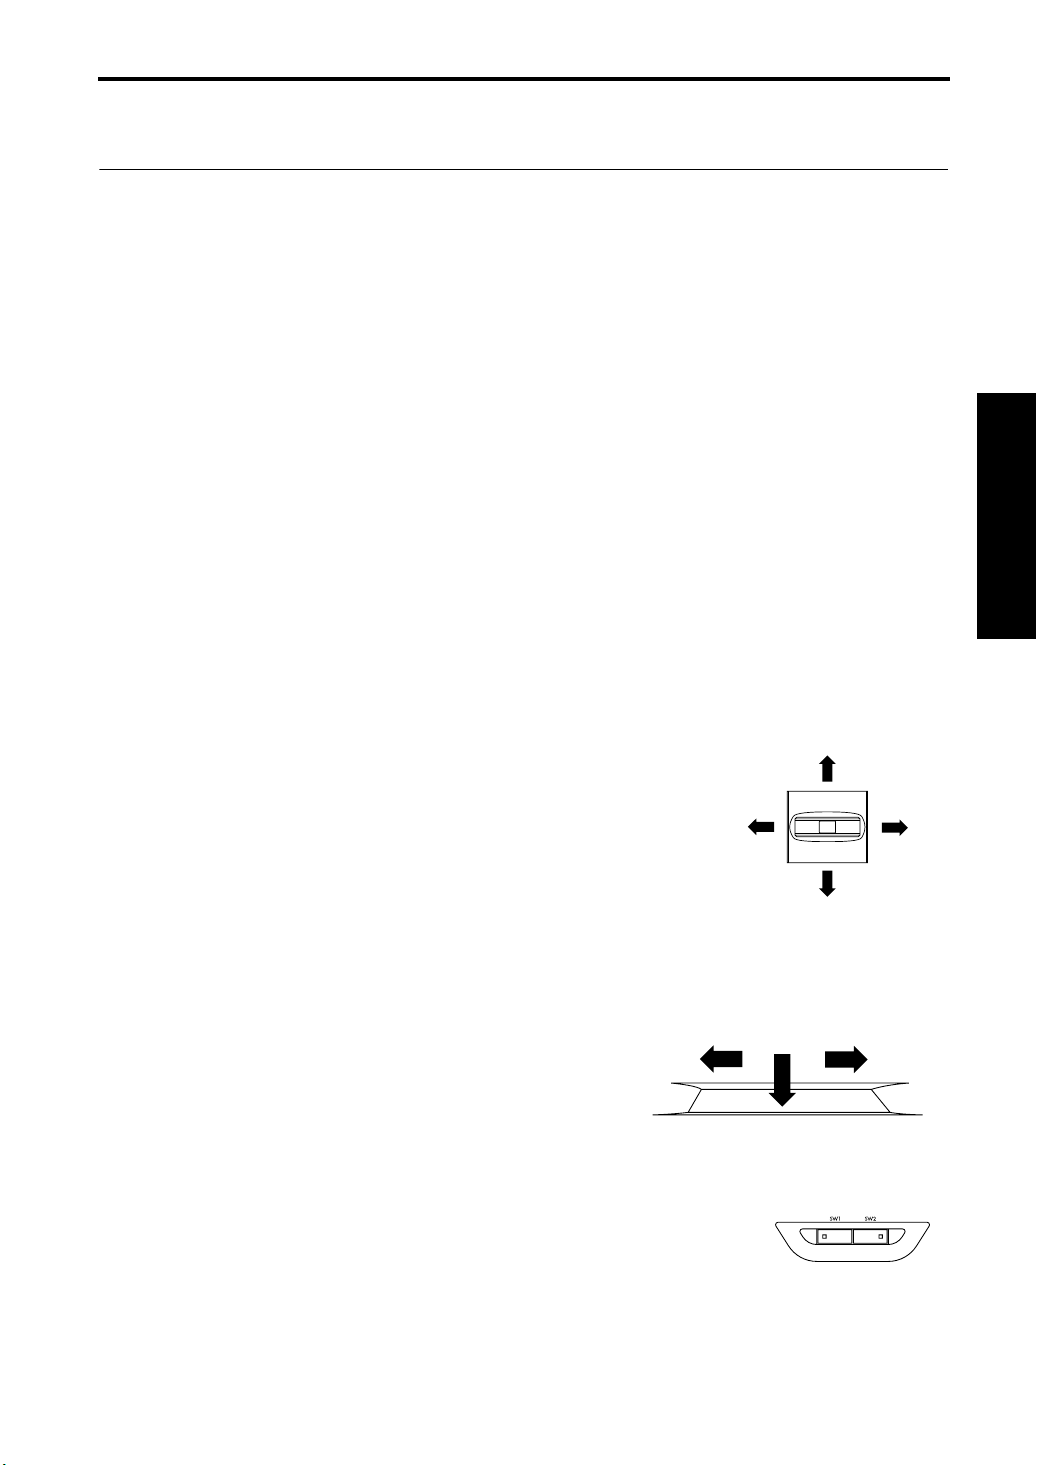
Joystick
Use this to control the pitch and modulation. As
shown in the diagram below, it can be moved in
two axes; up/down, and left/right (+Y, –Y, –X, +X).
The functions of the joystick are determined by
settings in Program Edit mode.
+Y
–X
Ribbon controller
Use this to control the pitch or modulation. As
shown in the following diagram, it provides control
in the left/right direction (X) and also responds to
downward pressure (Z). The functions of the ribbon controller are determined by settings in Program Edit mode.
Headphone jack
A set of headphones can be connected here
(phone plug), for stereo monitoring. (The sound is
identical to that of the 1/L/MONO and 2/R output
jacks.)
+X
–Y
Z
XX
[VOLUME] slider
This adjusts the volume of the
output jacks (1/L/MONO, 2/R)
and the headphone jack.
Floppy disk drive
This disk drive uses 3.5 inch
2DD and 2HD floppy disks.
It allows you to save edited
data, or to load factory preset data or SMF data.
Mode key ([COMBI] key/[PROG] key/[SEQ]
key/[EDIT] key/[GLOBAL] key/[DISK] key)
These keys enter the respective mode. When
you press a key , its LED will light, and y ou will
enter the selected mode (
manual).
[COMPARE] key
Use this key when you wish to compare the
sound of an edited program or combination
with the un-edited sound (
manual).
☞page 7 in this
☞page 8 in this
Page keys ([P1] key — [P8] key)
Use these keys to select pages in each mode.
The selected page is indicated in the upper
line of each LCD display, as P1, P2,...
(
☞page 7 in this manual).
In this manual, the displays that appear when
you press a [P1] or [P2] key etc. are referred
to as the “page 1 display,” “page 2 display”,
etc.
[BANK] key
This key selects banks. The memory
banks that are available on the TRINITY
series will depend on the model, and on
what options have been installed. For
details refer to page 9 in this manual.
[REC/WRITE] key
In Sequencer mode, pressing this key will
make the LED light, and sequencer recording
will begin.
In Program Play mode or Program Edit mode,
pressing this key will write settings into the
currently selected Program number.
In Combination Play mode or Combination
Edit mode, pressing key will write settings into
the currently selected Combination number.
[VALUE] slider
This is one of the VALUE controllers used to set parameter values. The slider will set the value of the selected
parameter (☞page 8 in this manual). It can also be used
as a modulation source (
▲] key/[▼] key
[
This pair of keys is one of the VALUE controllers used to
set parameter values, and will set the value of the
selected parameter (
☞page 18 in this manual).
☞page 8 in this manual).
[START/STOP] key
Use this key to playback or stop the
sequencer (the LED is lit during playback). It
is also used to record or stop recording on the
sequencer.
LCD screen
The LCD screen of the TRINITY is a touch-sensitive panel.
It not only displays the parameters of each mode, but also
allows you to select parameters and move to other displays.
For details on LCD screen operations, refer to page 6 of this
manual.
VALUE dial
This is one of the VALUE controllers used to set parameter
values, and will set the value of the selected parameter
(☞page 8 in this manual).
VALUE Enter keys (numeric keys, [ENTER] key, [–] key, [.] key)
This set of keys is one of the VALUE controllers used to set
parameter values, and will set the value of the selected
☞page 8 in this manual). After using the
parameter (
numeric keys 0—9, the [–] key, and the [.] key to input a
value, press the [ENTER] key to finalize the value. The [.]
key allows you to enter a number with decimal point.
The [–] key allows you to enter negative numbers.
[PAUSE] key
Use this key to temporarily halt sequencer playback (the
LED will light). Press it once again to cancel pause.
[REW] key
Use this key to rewind the sequencer playback. When you
press the key, the LED will light and the sequence will be
rewound. (This will not operate during recording.)
[FF] key
Use this key to fast-forward the sequencer playback. When
you press the key, the LED will light and the sequence will
fast-forward. (This will not operate during recording.)
[RESET] key
Use this key to reset the playback position and various settings of the sequencer to the beginning of the song. Press
this key when the sequencer is stopped.
You can also press this key if, for some reason, a note
“hangs” (the sound does not stop).
Rear panel
AC connector
Connect the included AC power cable to this jack.
After connecting the power cable to the TRINITY,
plug the other end into an AC outlet.
Power switch
This turns the power on/off.
ANALOG IN 1, 2 jacks
These jacks are for recording to the hard disk
recorder. When a microphone or line level input is
connected here, you can record audio such as
vocals or guitar into the audio track of the
sequencer.
This is available only on models with an optional
HDR-TRI installed.
DIGITAL OUT jack (S/PDIF format)
This jack outputs the audio signal from the
hard disk recorder. Digital audio equipment
such as a DAT recorder can be connected
here.
This is available only on models with an
optional HDR-TRI installed.
DIGITAL IN jack (S/PDIF format)
This jack inputs an audio signal for recording
on the hard disk recorder. You can record high
quality audio with a sampling rate of 48kHz on
the audio track.
This is available only on models with an
optional HDR-TRI installed.
SCSI connector
A SCSI cable can be used to connect a SCSI device
(hard disk, etc.) here. This is available only on models
with an optional SCSI-TRI installed.
WORD CLOCK IN jack
This jack inputs the system clock. This is available only
on models with an optional HDR-TRI or DI-TRI
installed.
DIGITAL OUT (Digital I/F format)
This jack outputs the same audio signal as the OUTPUT jacks (1/L/MONO, 2/R, 3, 4). A Digital I/F compatible cable can be used to connect this to a Digital I/F
compatible device (mixer, amp, recorder, etc.).
This is available only on models that have an optional
DI-TRI installed.
MIDI THRU connector
This connector re-transmits MIDI data received at the
MIDI IN connector. Use it when you wish to mak e MIDI
connections to multiple devices.
MIDI OUT connector
This connector transmits MIDI data. Use it when you
wish to control other MIDI devices from the TRINITY.
MIDI IN connector
This connector receives MIDI data. Use it when you
wish to play the TRINITY’s tone generator from an
external MIDI device.
Contrast knob
This adjusts the contrast of the LCD screen. The
contrast of the screen will need to be adjusted
depending on the angle at which you view it.
SUSTAIN jack
A separately sold Korg damper pedal such as
the DS-1 can be connected here.
SWITCH jack
A separately sold on/off type foot switch such as
the Korg PS-1 foot switch can be connected
here.
The function of the foot switch can be set in Glo-
☞Parameter Guide, page 134),
bal mode (
allowing you to use it to select programs or combinations, or to start/stop the sequencer, etc.
OUTPUT jacks (1/L/MONO, 2/R, 3, 4)
Connect these jacks to the input jacks of your amp/mixer
system. If you will be using the TRINITY in stereo, connect
the 1/L/MONO and 2/R jacks. If in mono, connect the 1/L/
MONO jack.
The output from 3 and 4 will depend on the master effect
settings, so check these settings before using outputs 3 and
4. You cannot adjust the volume level of outputs 3 and 4
using the VOLUME slider.
PEDAL jack
A separately sold Korg EXP-2 or XVP-10 expression pedal
can be connected here. The function of the pedal can be set
in Global mode (
you to use it to adjust the volume or control the sequencer
tempo, etc.
☞Parameter Guide, page 134), allowing
5
Page 12
4. Basic operation of the touch view display
LCD screen buttons
In the touch view system of the TRINITY series , you can press buttons displayed in the touch panel LCD to select display pages, adjust parameter values, rename or write programs or combinations, or perform many other
operations.
Some of the buttons displayed in the LCD will perform their function at the
moment that they are pressed, and others when they are pressed and
released. Buttons which operate when you press and release them always
work by themselves. (If you move your finger away from the button to
another location before releasing it, the function will not operate.)
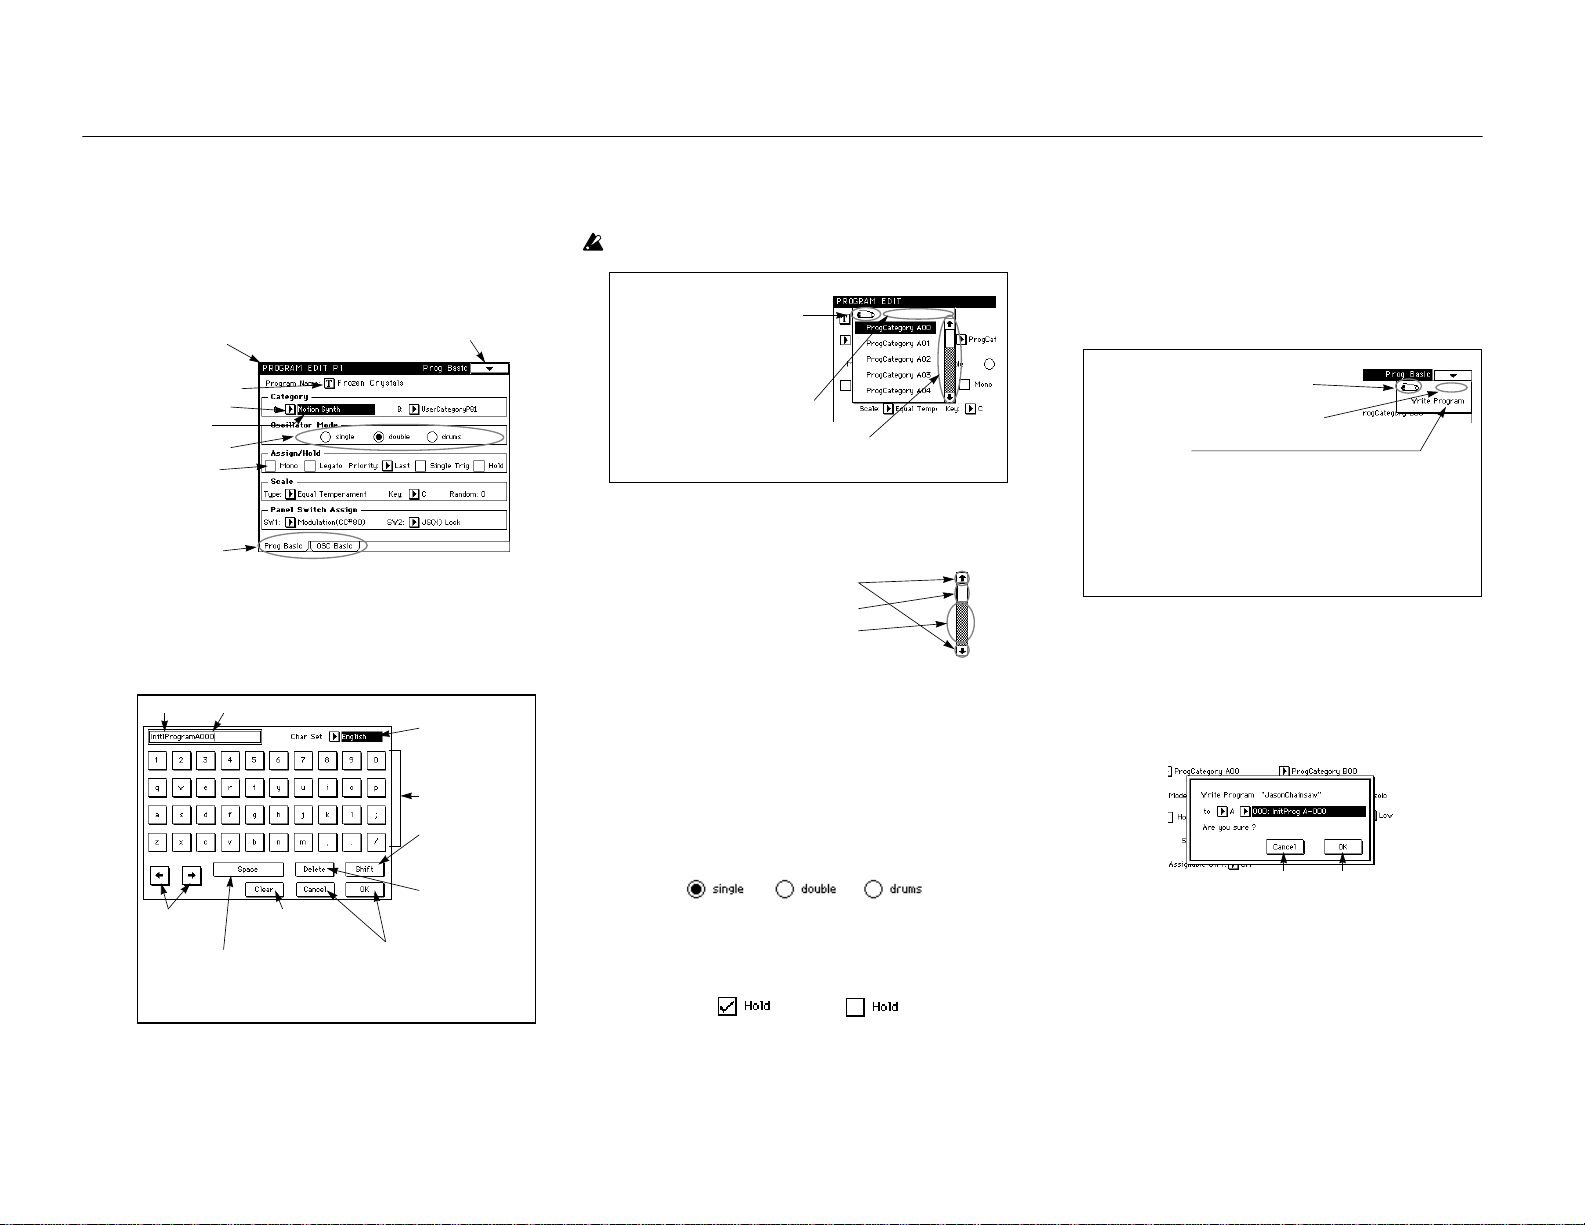
a: Current Mode/Current Pages/Current Tab Name h: Page Menu Button
b: Text Edit Button
c: Popup Button
d: Edit Cell
e: Radio Button
f: Check Box
g: Tab Button
a: Current Mode/Current Page/Current Tab Name
This area indicates the currently selected page of the mode.
b: Text Edit Button
When this button is pressed and released, a dialog box of the text editing dis-
play
will appear. In this display you can edit text (for a program name, com-
bination name, or song name, etc.).
Text Cursor
Cursor button
Move the cursor
to left or right in
the text.
Space button
Insert a space at the cursor location.
Clear button
This button deletes all
characters in the text.
To close the dialog box, press the Cancel/OK button.
Cancel/OK buttons
If you are satisfied with the edited text,
press the OK button. If you want to exit
without applying your changes, press
the Cancel button.
The text editing display
Character Set button
The character set can be
selected from English or
symbols.
Character buttons
Shift button
Switch between upper case
and lower case characters
(this button will lock).
Delete button
Delete the character
located at the left of the
cursor.
c: Popup button
When this button is pressed, a popup menu will appear. Popup menus contain a list of parameter values that you can select. To input the desired value,
touch the desired value in the popup menu. In the Parameter Guide, this is
referred to as “
While a popup menu is displayed, using the VALUE controllers ( ☞
this manual) will close the popup menu.
Pin
This locks/unlocks the popup menu display.
When locked, the safety pin will be closed, and
the popup menu will remain displayed even
after you select a parameter value.
When unlocked, the safety pin will be open,
and the popup menu will close when you select
a parameter value.
You can press here and (when the border changes
to a dashed line) drag the popup menu to another
location.
If the popup menu display is unlocked, touching a location outside the popup menu will close it.
selecting a parameter value.”
Popup menu
Scroll bar *
* Scroll bar
Use the scroll bar to view parameter values that the display is too small to
show at once.
Touch here to scroll up or down.
Drag this up or down to scroll to the desired location.
Touch here to scroll to the location you press.
d: Edit cell
When you touch a parameter on the LCD screen, the parameter or parameter
value will be displayed in inverse video. This area is referred to as the “edit
cell,” and is what will be affected by your editing.
Modify the value of the edit cell using the VALUE contr ollers ( ☞
manual), or the popup keys in the LCD screen.
In the Parameter Guide, the action of touching a parameter so that it is displayed in inverse video is referred to as “
selecting a parameter.”
page 8 in this
e: Radio buttons
You can make a selection by pressing and releasing one of these buttons.
These buttons are used to select one of several mutually exclusive choices.
f: Check box
Each time you press and release a check box, a check mark will appear or disappear. If the box is
checked
, the parameter will not function.
checked , the parameter will function. If the box is un-
Checked Un-checked
page 8 in
g: Tab buttons
By pressing and releasing a tab button, you can view a different tab page.
In the Basic Guide and Parameter Guide, the tab buttons are referred to from
left to right as “tab button 1,” “tab button 2,” etc. The display pages that
appear when you press these buttons are referred to as “tab 1 page,” “tab 2
page,” etc.
h: Page menu button
When this button is pressed and released, page menu commands will be displayed.
The page menu commands that appear will depend on the page from which
the page menu is selected. In the Parameter Guide, the action of pressing a
page menu command to select it is referred to as “
Pin
This locks/unlocks the page menu display. For details
refer to “c: Popup button.”
By touching this area and (when the border changes to a
dashed line) dragging it, you can move the page menu.
Page menu command
Some page menu commands are “execute commands” and others are “check commands.”
Check commands
When you press and release the command, a check mark will be displayed at the left of the
command.
Execute command
When you press and release the command, a dialog box* will appear.
Short-cut for selecting a command
Pressing one of the [P1]–[P8] keys while holding down the [ENTER] key will select one of
eight commands on the corresponding page screen.
If the page menu display is unlocked, pressing a location outside the page menu will close it.
selecting a command.”
Page menu
* Dialog box
The dialog box that appears will depend on the execute command that you
selected. When selecting a program or combination number in a dialog box,
use the VALUE controllers ( ☞
Sometimes a text edit key will appear. For all dialog boxes, follow the messages displayed in the dialog box.
To execute, press the
cel button
. (These buttons activate the corresponding operation when you
press and release them.)
page 8 in this manual) to input the number.
OK button . To cancel without executing, press the Can-
Cancel button OK button
To close the dialog box, press the Cancel or OK button.
i: Other operations
For some parameters (pan and volume in Combination Play mode, etc.), a
knob or slider will popup. The value of these parameters can be set either by
operations in the popup display, or using the VALUE controllers to input the
value of the parameter displayed in inverse video.
If a slider pops up, press and hold down the knob of the slider, and drag your
finger to move the slider up or down. If a (rotary) knob pops up, press and
hold down the position marker line of the knob, and drag your finger to
rotate the knob.
When you take your finger off the popup window, it will close.
6
Page 13
4. Basic operation of the touch view display
Selecting modes
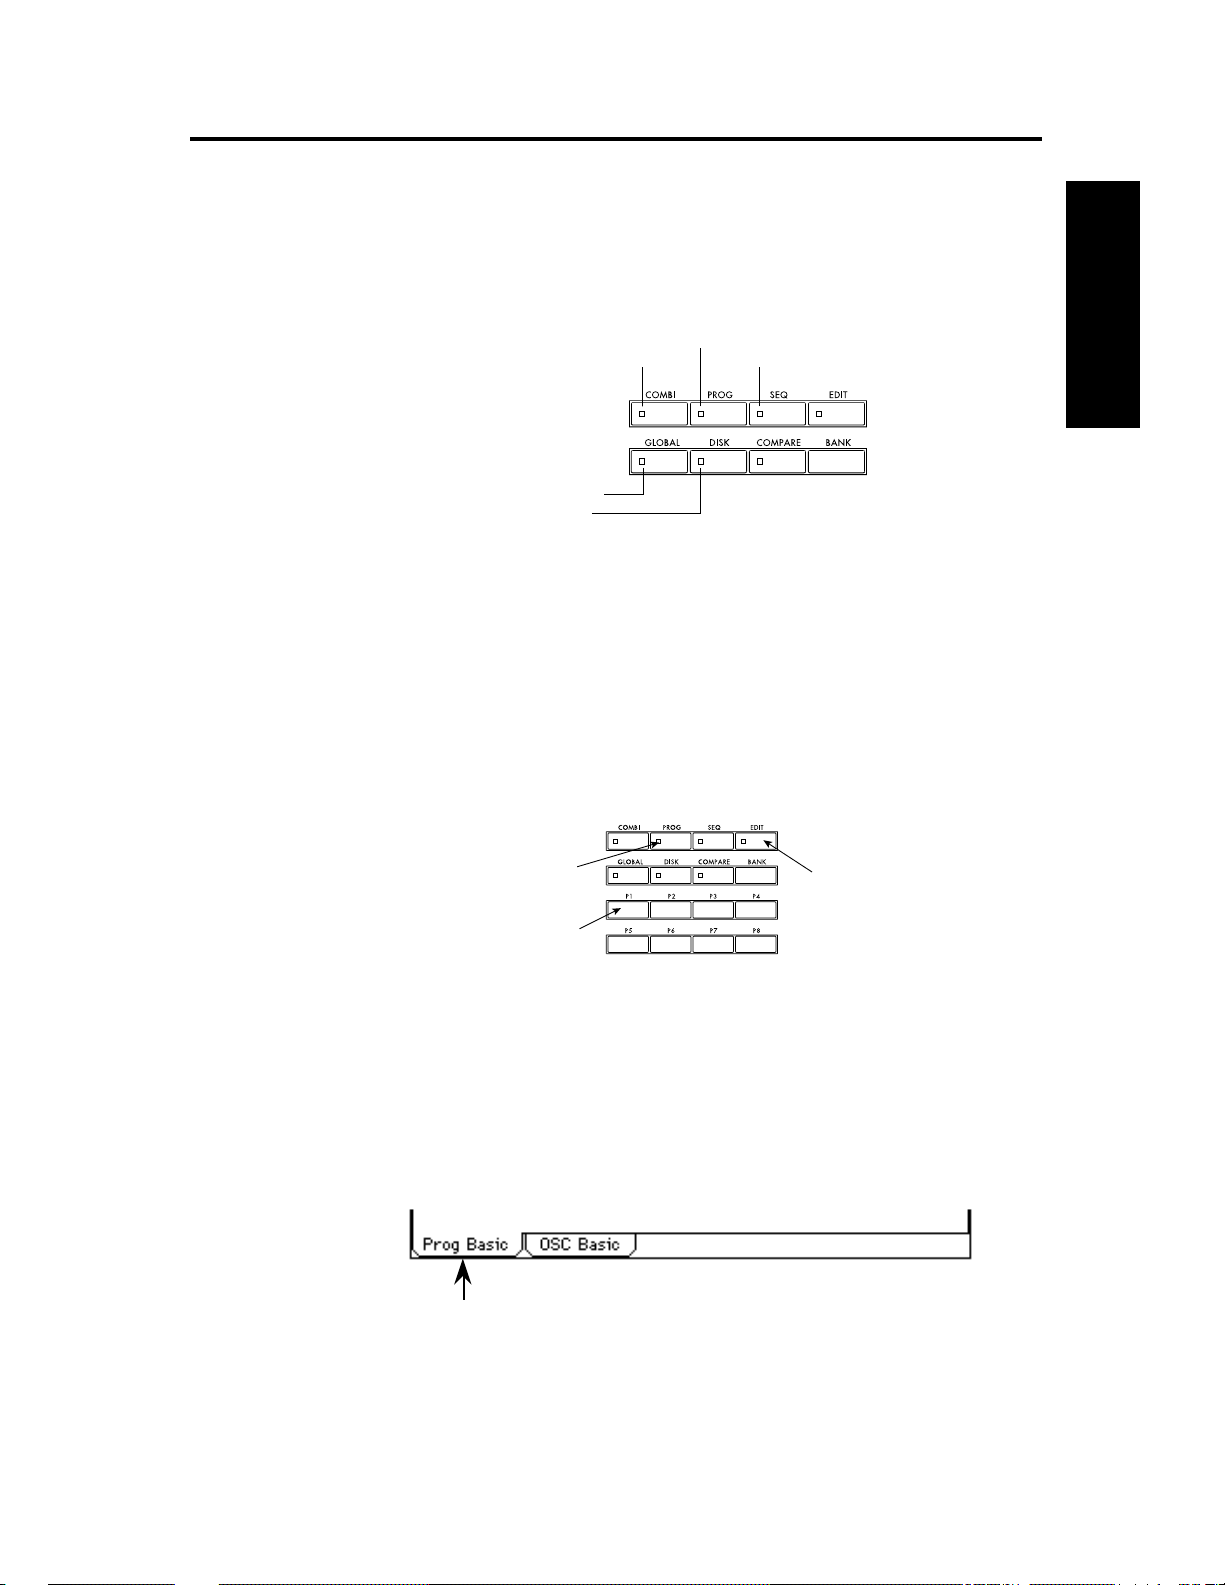
The TRINITY has 7 modes. Press one of the mode keys [PROG] – [DISK] on the front panel to
enter the respective mode. When the
Combination Play mode.
For details on each mode, refer to STEP 3 on page 27 of this manual.
Combination Play mode
Combination Edit mode **
Global mode
Disk mode
* To enter Program Edit mode, press the [PROG] key and then press the [EDIT] key.
** To enter Combination Edit mode, press the [COMBI] key and then press the [EDIT] key.
power is turned on , the TRINITY will automatically be in
Program Play mode
Program Edit mode *
Sequencer mode
STEP 1
Selecting pages
The functions of the TRINITY are organized by mode, and the parameters of each mode are organized into pages.
The parameters in a page are further organized into up to seven groups, with a
(similar to the tabs of a file cabinet). To select the desired group of parameters, first use the page
buttons on the front panel to select the page, and then touch the tab for the desired tab page.
In the following example, we will select the LCD screen shown on the page at left in the explanation for “LCD screen buttons.”
1
Press the [PROG] mode key.
2
Press the [EDIT] mode key.
3
Press the [P1] page key.
The page 1 display will appear.
Some modes such as Program Play mode or Combination Play mode have only 1 page (i.e., there
are no other pages).
4
Press the tab 1 button (Prog Basic) located at the bottom of the page 1 display.
Tab page 1 will appear.
In some pages such as Combination Edit P2, page tabs are not displayed (i.e., there are no tab
pages).
tab for each group
1
3
2
4
7
Page 14
5. Setting a parameter
5. Setting a parameter
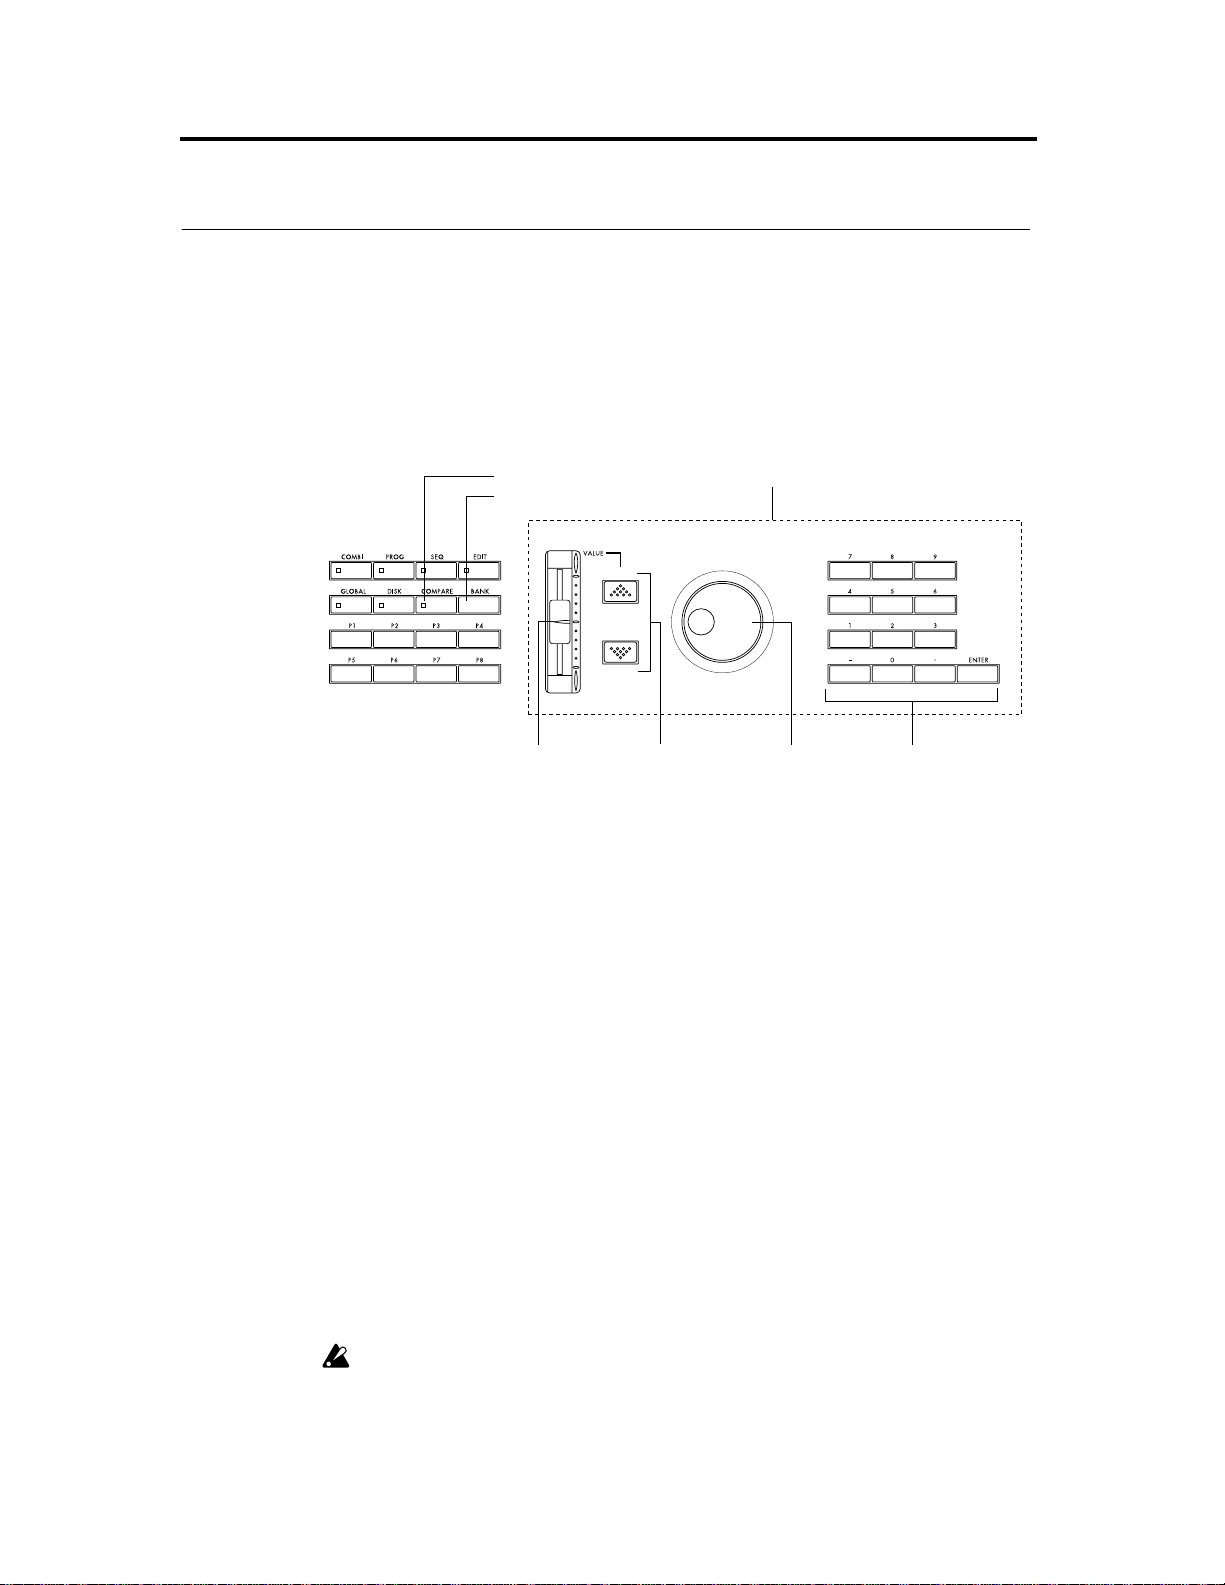
The parameter value in an edit cell can be set using four types of VALUE controllers ; the VALUE
slider, the [ ▲
key and [COMPARE] key are also used.
In addition, popup buttons will sometimes bring up a popup menu that allows you to specify a
value, or a value may sometimes be input from the
“... button” is one of the objects on the LCD. On the other hand, “... key”, “... dial”, and “... slider”
are located on the front panel. When this manual instructs you to “press the ... button,” operate the
button on the LCD, and when the manual instructs you to “press the ... key,” operate the corresponding key on the front panel.
][ ▼ ] keys, the VALUE dial, and the VALUE ENTER keys. In some cases, the [BANK]
keyboard or from a pedal .
VALUE controllers
VALUE slider
Use this to make large changes in the value.
In Program Play mode and Combination Play mode, this slider can also be used as a controller
that controls alternate modulation or dynamic modulation.
[
▲
][
▼
] keys
Use these to make fine adjustments to the value.
VALUE dial
Use this to make large changes in the value.
[COMPARE] key
[BANK] key
VALUE controllers
VALUE dial VALUE ENTER keys[▲][▼] keysVALUE slider
VALUE ENTER keys
Use these to enter a specific value for a parameter. Use the numeric keys to input the number, and
press the [ENTER] key to finalize the parameter value. To specify a decimal point press the [.] key.
To specify a negative number press the [–] key. The [–] key can also be used to switch the sign of
the parameter value.
[COMPARE] key
This key is used to compare the sound of an edited program or combination with the un-edited
sound (i.e., the settings written into memory).
While editing a program or combination, pressing this key will cause the LED to light, and the settings that were last written into that program number or combination number will be recalled.
Press the key again and the LED will go out, and the settings that you are editing will reappear.
If you edit the settings that are recalled by the [COMPARE] key (i.e., the written settings), the LED
will go out and it will not be possible to return to the settings you were editing before pressing the
[COMPARE] key.
8
Page 15
[BANK] key
Press this key to select the bank of the combination or program.
The banks that are available will depend on the model of TRINITY that you have, on whether the
Playback Sampler/Flash ROM option is installed, and whether the MOSS-TRI option is
installed.
TRINITY
TRINITY V3
TRINITY V3 pro
TRINITY V3 proX
5. Setting a parameter
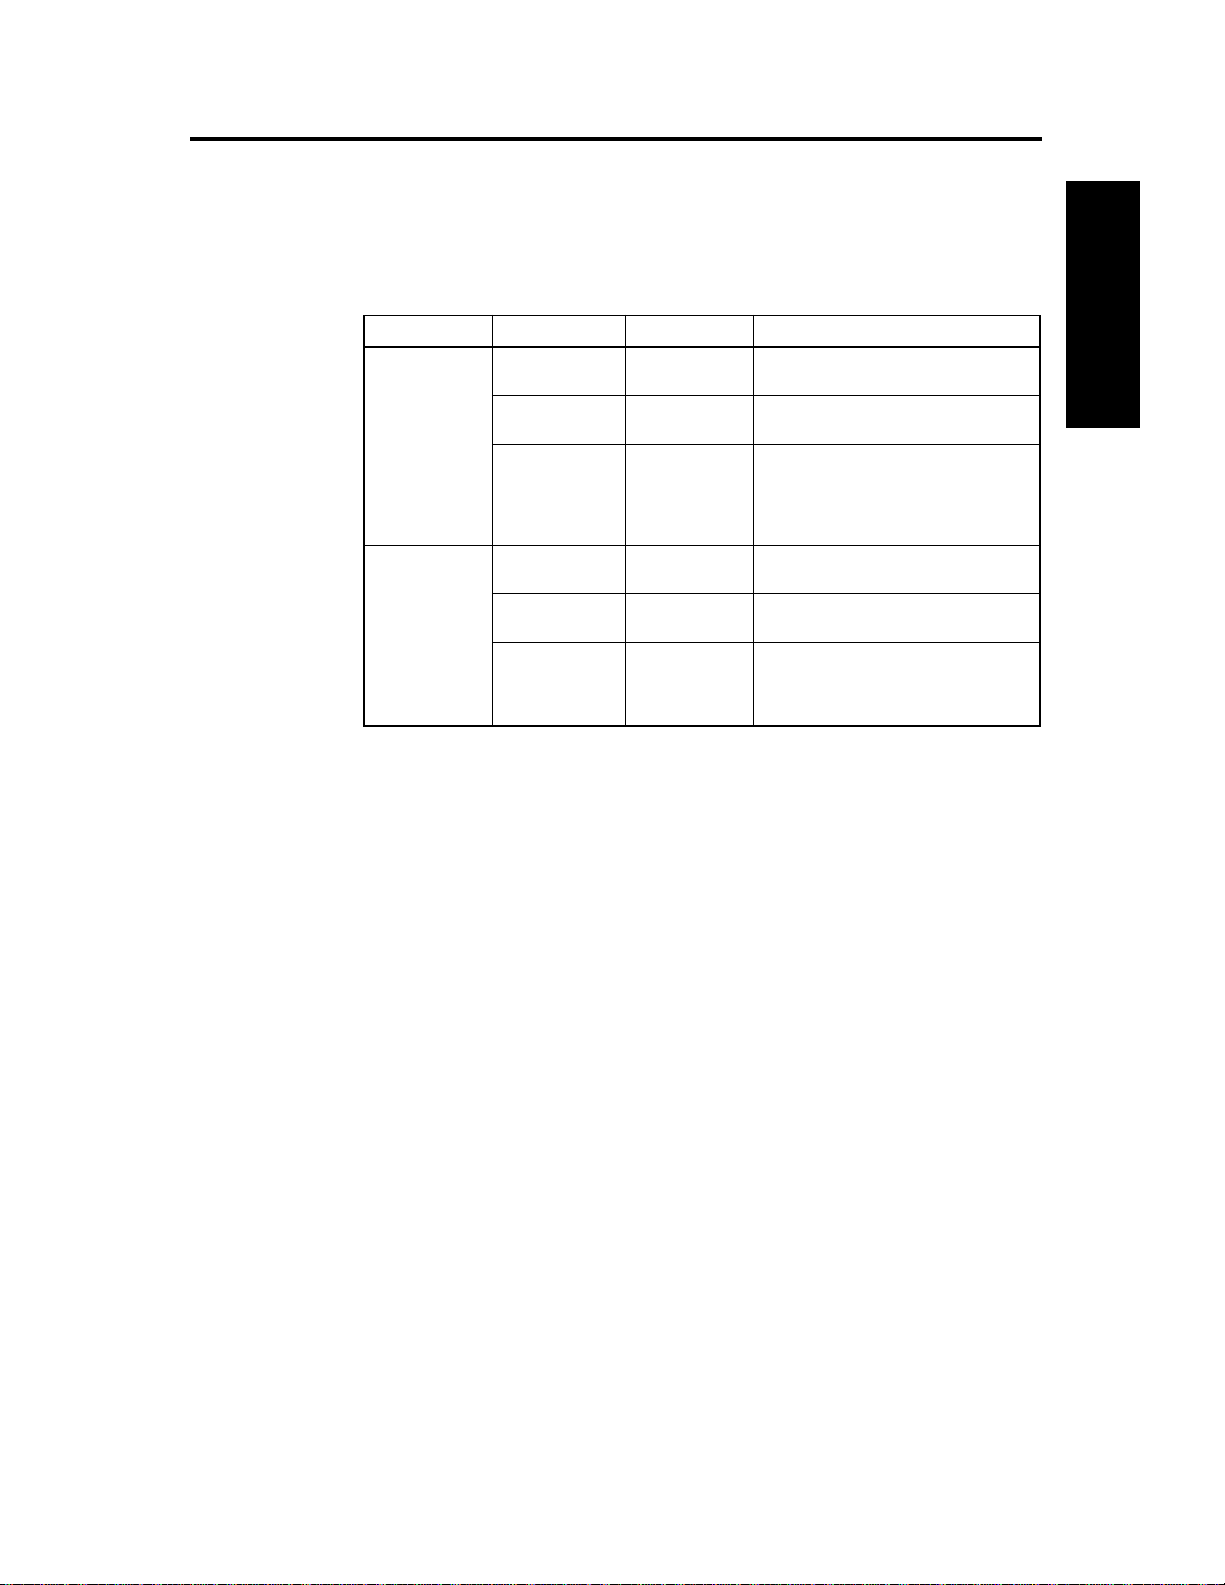
Model Programs Combinations Remarks
Bank A (0…127)
Bank B (0…127)
Bank C (0…127)
Bank D (0…127)
Bank M (0…127)*
Bank A (0…127)
Bank B (0…127)
Bank C (0…127)
Bank D (0…127)
Bank M (0…127)*
Bank A (0…127)
Bank B (0…127)
Bank C (0…127)
Bank D (0…127)
Bank A (0…127)
Bank B (0…127)
Bank C (0…127)
Bank D (0…127)
standard specifications
added when the Playback Sampler/Flash
ROM option is installed
0...63: added when the MOSS-TRI
option is installed
64...127: added when the MOSS-TRI
option + the Playback Sampler/
Flash ROM option are installed
standard specifications
added when the Playback Sampler/Flash
ROM option is installed
0...63: standard specifications
64...127: added when the Playback Sampler/Flash ROM option is
installed
STEP 1
Keyboard input
You can use the keyboard to enter a note name or a velocity value.
Hold down the [ENTER] key and press the note that you want to specify, and the note or velocity
that you play will be input as the value.
When the P5 Drumkit page of Global mode is displayed, pressing a key on the keyboard will
recall the settings assigned to that key.
Pedal input
If in Global mode P1 you have set the function of the assignable foot pedal to Data Entry , the connected foot pedal will operate in the same way as the VALUE slider, and you can use the pedal to
set parameter values.
9
Page 16

5. Setting a parameter
10
Page 17
STEP 2
i
1. Listening to the demo songs
1
On the TRINITY V3, TRINITY V3 pro, or TRINITY V3 proX, insert the included “TFD-00P-V3” floppy
disk into the disk drive. On the TRINITY, insert the included “TFD-00P” into the disk drive.
For details on how to insert a disk, refer to “8. Disk mode” on page 53 of this manual.
2
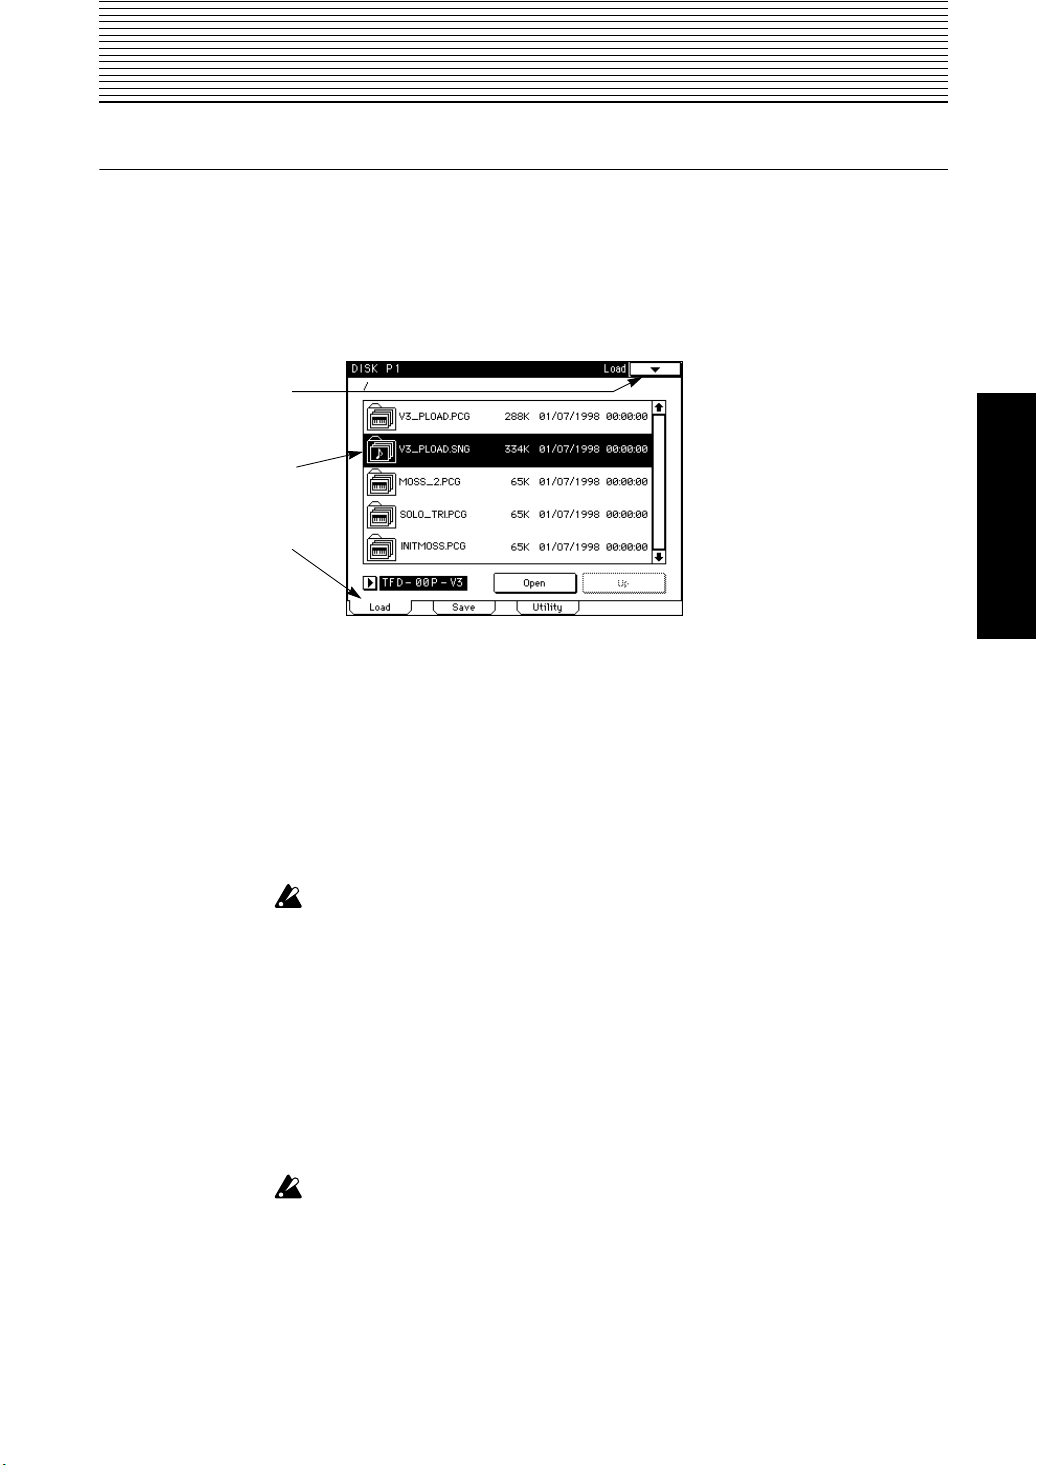
Press the [DISK] key.
You will enter Disk mode.
3
Press the tab 1 button (Load).
The Load tab page will appear, showing the file information.
PostScript error (undef
4
On the TRINITY V3, TRINITY V3 pro, or TRINITY V3 proX, select “V3_PLOAD.SNG.” On the TRINITY,
select “PRELOAD1.SNG.”
The information will be highlighted.
These .SNG files contain data for demo playback.
5
Press the page menu button.
The menu commands will be displayed.
6
Press the page menu command Load Selected.
A dialog box will appear.
7
Press the check box so that it is checked.
If this is checked, loading a .SNG file will simultaneously cause the .PCG file (program, combination, and global data) required to play the songs to be loaded as well.
When you load a .PCG or .SNG file, the program, combination, global, and song data in
internal memory will be overwritten.
If you want to preserve the program, combination, global data, or song data, save it to a
floppy disk (
8
Press the OK button.
9
Press the [START/STOP] key.
The TRINITY will automatically enter Sequencer mode, and the demo song will begin playing
back.
To stop demo playback during the song, press the
If you wish to load a different .SNG file that is on the same floppy disk, select the desired
file
in the Load screen of step 4, and press the page menu command
The .PCG file necessary for loading the selected .SNG file has already been loaded, so in step
press the
When the power is turned off, all song data including the demo songs will be lost. Be sure to
save important song data to a floppy disk before you turn the power off (
manual).
☞
OK button
page 56 in this manual).
[START/STOP] key
without checking the box. Then press the
once again.
Load Selected
[START/STOP] key
☞
page 56 in this
.
.
.SNG
6
STEP 2
11
Page 18
1. Listening to the demo songs
Play back the second demo song
Stop demo song playback, and use the following
procedure.
1
In the Sequencer mode page 1 display, press Song.
2
Press the numeric key 1, and press the ENTER key.
The second song will be selected.
3
Press the [START/STOP] key on the front panel.
The second song will playback.
T o stop demo playback during the song, pr ess the
[START/STOP] key
Play back a song at a time
Here’s how to play back song 1. After song 1 is played back, song 2 will be ready for playback.
1
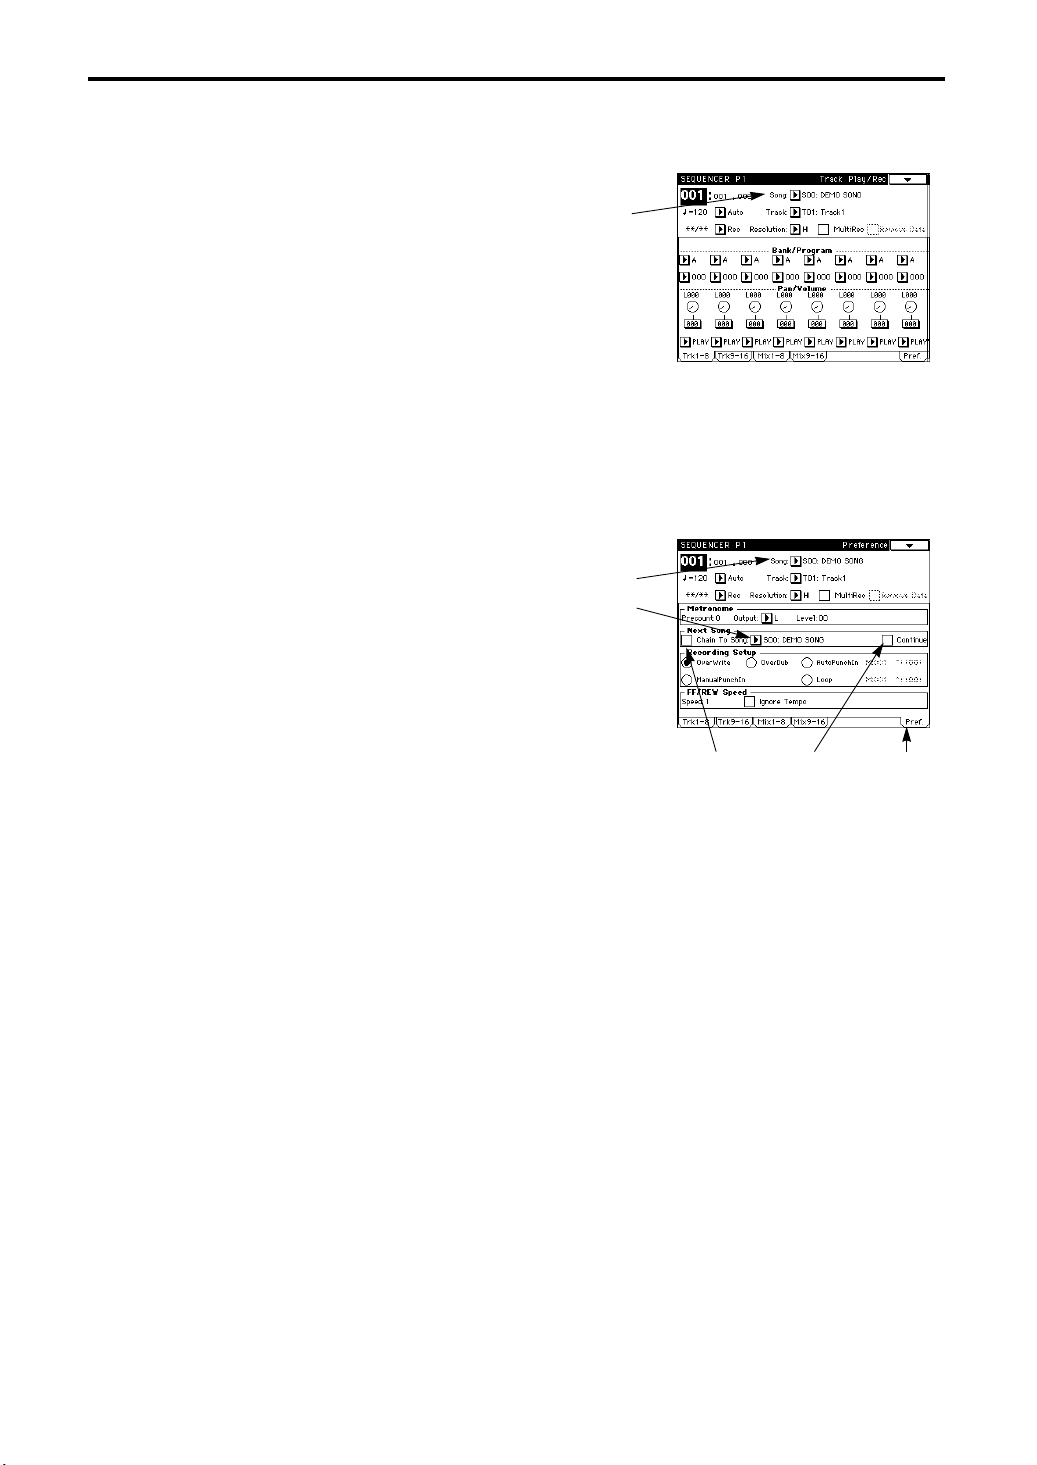
In the Sequencer mode page 1 display, press tab 7 button (Pref.).
The Preference tab page will appear.
2
Press Song.
The popup menu will appear.
3
Press numeric key 0, and press the [ENTER] key.
The first song will be selected.
You can also select this by pressing the first song
in the popup menu.
You can also select song 1 by using other VALUE
controllers (
4
Press the song edit cell that appears under Next
Song.
5
Press numeric key 1, and press the [ENTER] key.
The second song will be selected.
6
Check the Chain To Song box.
The first and second songs will be connected.
7
Un-check the Continue box.
With this setting, pressing the [START/STOP] key will cause the first song to start, and playback
will stop before the second song begins. When you press the [START/STOP] key once again, the
second song will begin playing.
If this box is checked, when you press the [START/STOP] key, the first and second songs will be
played back consecutively.
8
Press the [START/STOP] key.
To stop playback during the song, press the
When song 1 is finished, playback will stop automatically.
once again.
☞
page 8 in this manual).
1
2
4
[START/STOP] key
6 7 1
once again.
12
Page 19
2. Select and play a program
2. Select and play a program
The programs that are available on the
Playback Sampler/flash ROM option and/or the MOSS-TRI option are installed (
manual).
For the factory preset program names, refer to the separate
There are three ways to select programs.
TRINITY
will depend on the model, and on whether the
Voice Name List
☞
booklet.
Selecting a program using the front panel switches
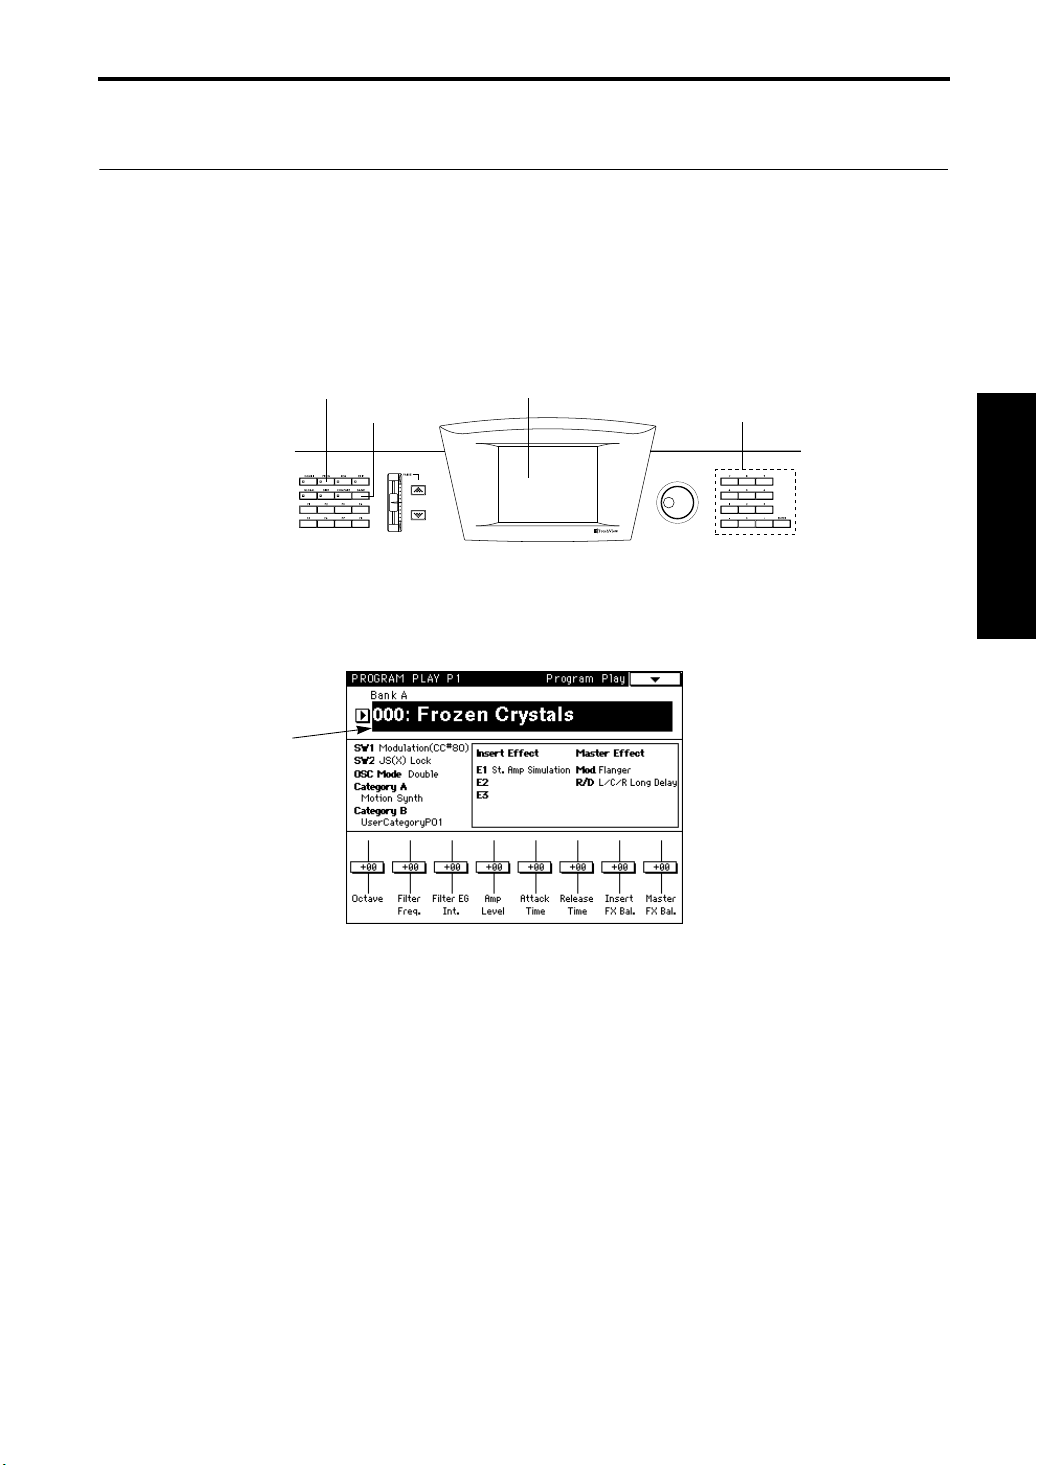
1Select the mode
2Select the bank
1
Press the [PROG] key.
You will enter Program Play mode.
2
Press the program name.
The display will invert.
3
3Select the program edit cell
4Select the program number
page 9 in this
STEP 2
3
Press the [BANK] key several times to select the bank.
4
Use the numeric keys to input the program number, and press the [ENTER] key.
Alternatively, you can use the VALUE controller to make your selection.
You can also use the
using Select By Category in the page menu (
popup buttons to select programs. Programs can be selected by category
☞
page 26 in this manual).
13
Page 20
2. Select and play a program
Selecting a program using a connected assignable foot
switch
1
Connect an assignable foot switch (an on/off type switch such as the separately sold Korg PS-1) to
the rear panel SWITCH jack.
2
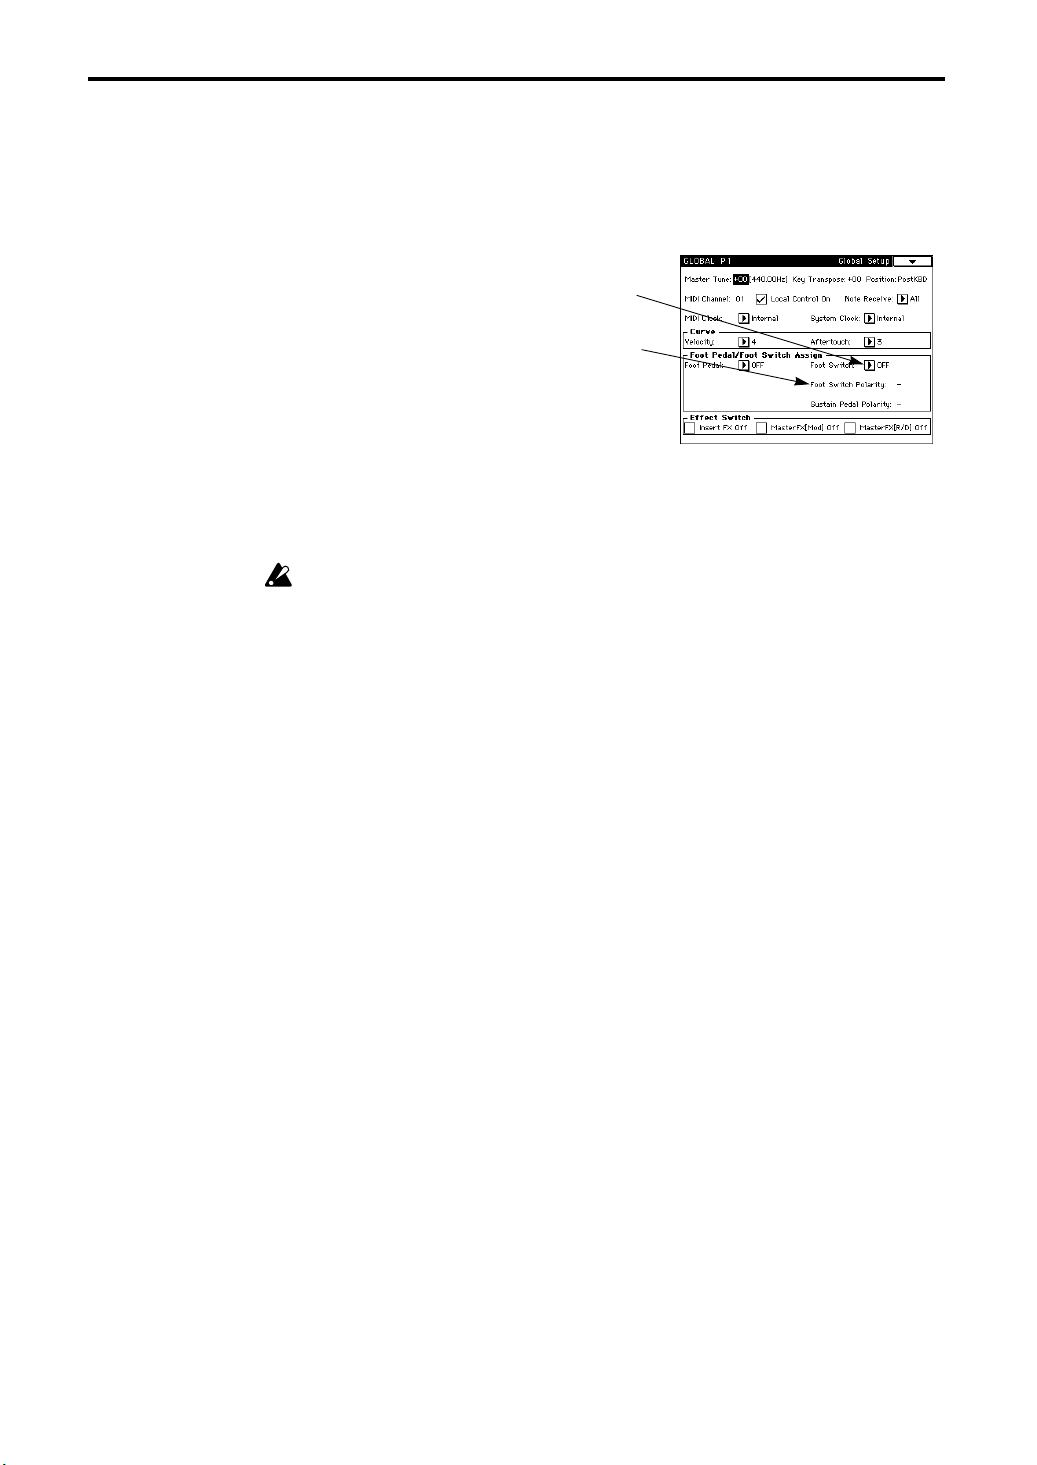
Press the [GLOBAL] key.
You will enter Global mode.
3
Press the [P1] key.
The page 1 display will appear.
4
Press the Foot Switch popup button.
The popup menu will appear.
5
In the popup menu, press Program Up or Program
Down.
If
ber will be selected each time you press the foot
switch.
If
the foot switch.
6
Set the Foot Switch Polarity to match the polarity of the pedal that is connected.
If a Korg PS-1 pedal switch is connected, set this to “–”.
7
Press the [PROG] key.
You will enter Program Play mode.
8
Use the assignable foot switch to select programs.
4
6
Program Up
Program Down
Unless the polarity setting matches, the pedal will not function correctly.
is selected, the next program num-
is selected, the previous program number will be selected each time you press
Selecting a program using incoming MIDI Program
Changes
When the TRINITY receives a Bank Select or Program Change message on the channel that
matches its own Global MIDI channel setting, the program will change.
For details refer to “10. MIDI applications” on page 58 in this manual.
14
Page 21

3. Select and play a combination
3. Select and play a combination
The combinations that are available on the
pler/flash ROM option is installed (
For the factory preset combination names, refer to the separate
There are three ways to select combinations.
TRINITY
☞
page 9 in this manual).
will depend on whether the Playback Sam-
Voice Name List
booklet.
Selecting a combination using the front panel switches
1Select the mode
2Select the bank
1
Press the [COMBI] key.
You will enter Combination Play mode.
2
Press the combination name.
The display will invert.
3
3Select the combination edit cell
4Select the combination number
STEP 2
3
Press the [BANK] key to select the bank.
4
Use the numeric keys to input the combination number, and press the [ENTER] key.
Alternatively, you can use the VALUE controller to make your selection.
You can also use the
category
using Select By Category in the page menu (☞page 26 in this manual).
popup buttons to select combinations. Combinations can be selected by
15
Page 22
3. Select and play a combination
Selecting a combination using a connected assignable
foot switch
1
Connect an assignable foot switch (an on/off type switch such as the separately sold Korg PS-1) to
the rear panel SWITCH jack.
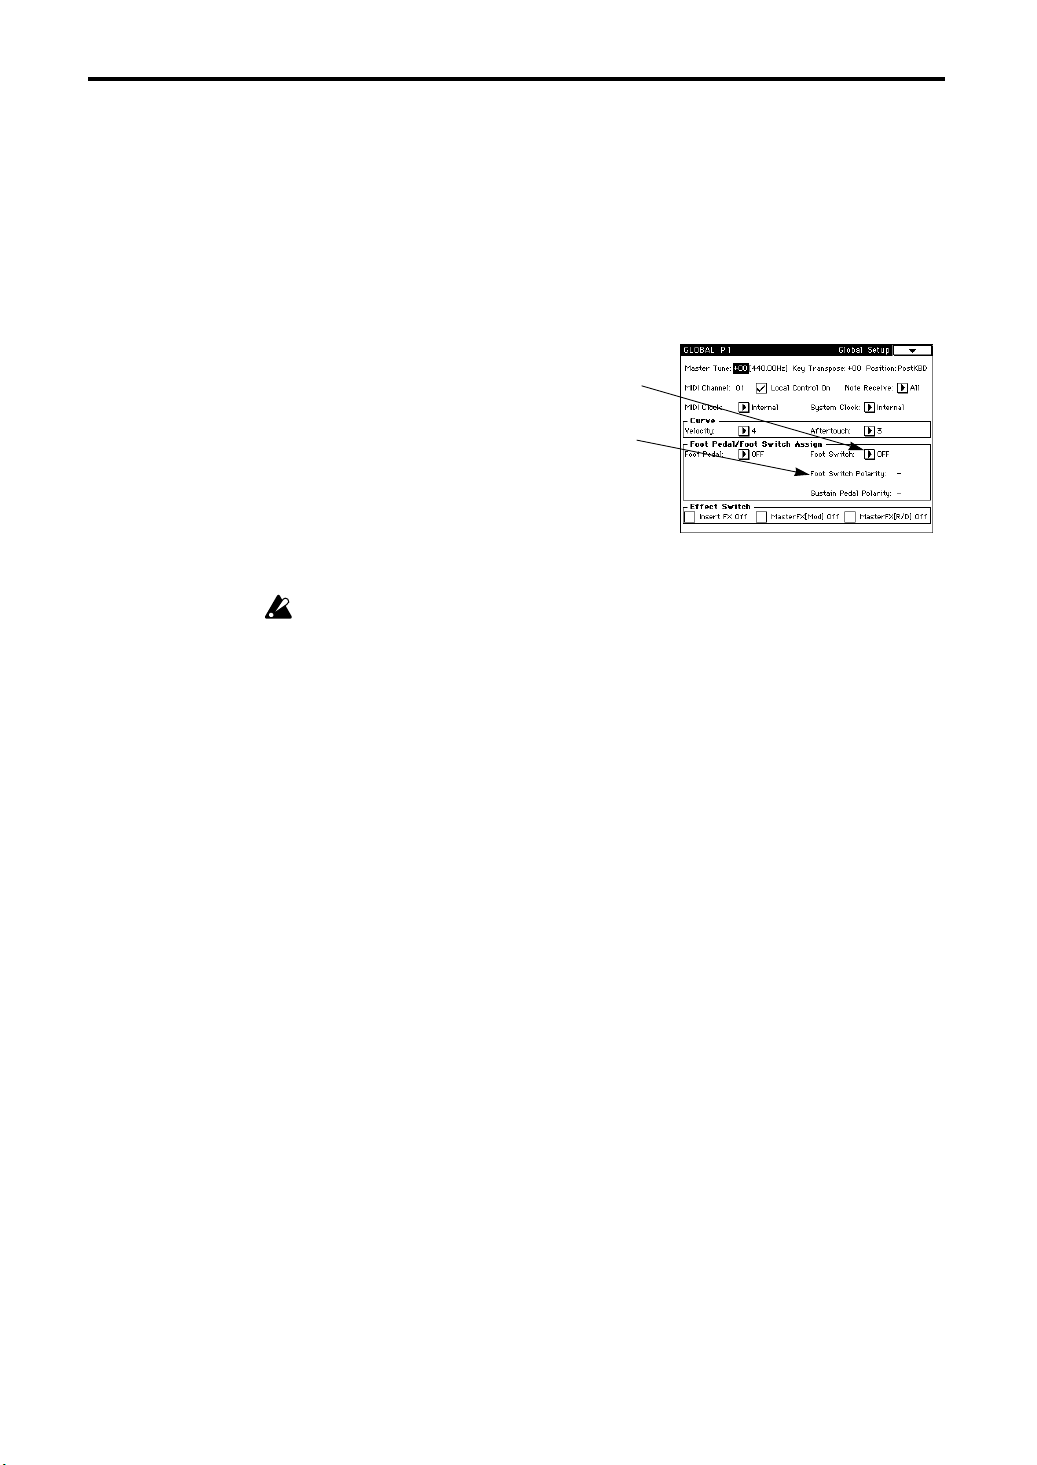
2
Press the [GLOBAL] key.
You will enter Global mode.
3
Press the [P1] key.
The page 1 display will appear.
4
Press the Foot Switch popup button.
The popup menu will appear.
5
In the popup menu, press Program Up or Program
Down.
If
Program Up
number will be selected each time you press the
foot switch.
If
Program Down
nation number will be selected each time you
press the foot switch.
6
Set the Foot Switch Polarity to match the polarity of the pedal that is connected.
If a Korg PS-1 pedal switch is connected, set this to “–”.
Unless the polarity setting matches, the pedal will not function correctly.
7
Press the [COMBI] key.
You will enter Combination Play mode.
8
Use the assignable foot switch to select combinations.
4
is selected, the next combination
6
is selected, the previous combi-
Selecting a combination using incoming MIDI Program
Changes
When the TRINITY receives a Bank Select or Program Change message on the channel that
matches its own Global MIDI channel setting, the combination will change.
It is also possible to select the program for each timbre in this way.
For details refer to “10. MIDI applications” on page 58 in this manual.
16
Page 23
4. About the performance functions
4. About the performance functions
The pitch, tone, volume, and effects of the TRINITY can be controlled by controllers (joystick, ribbon controller, connected pedals, etc.) and by the way in which you play the keyboard. These
means of control are referred to as “performance functions.” In the various Edit modes, you can
specify the amount of control for each parameter of the oscillator, filter, and amp sections, and
select dynamic modulation sources for alternate modulation or effects.
Control from the keyboard
Velocity
The force with which you play the keyboard can control the sound. Normally, velocity is used to
control volume, EG speed, or sensitivity, etc.
After Touch
Pressure applied to the keyboard after playing a note can control the sound. Normally, aftertouch
is used to control volume, tone (cutoff frequency), or LFO sensitivity, etc.
Note Number
The note number (location on the keyboard) can affect the sound. Normally, note number is used
to control volume, tone (cutoff frequency), or LFO sensitivity, etc.
Control from the Joy Stick, Ribbon Controller, SW 1/2, and
VALUE slider
STEP 2
Joy Stick
JS(+X): An effect can be applied by moving the joystick
toward the right.
Normally this is used to control pitch.
JS(–X): An effect can be applied by moving the joystick toward
the left.
Normally this is used to control pitch.
JS(+Y): An effect can be applied by moving the joystick away
from you.
Normally this is used to control oscillator LFO (vibrato).
JS(–Y): An effect can be applied by moving the joystick toward you.
Normally this is used to control filter LFO (wah-wah).
–X
+Y
–Y
Ribbon Controller
Ribbon (X): An effect can be applied by moving
your finger to the left or right on the ribbon controller. Normally this is used to control pitch. The
pitch will be normal at the center of the ribbon
controller.
Ribbon (Z): An effect can be applied by pressing
down on the ribbon controller.
Z
XX
SW1, SW2
The function of SW1 and SW2 on the front panel can be selected in
Program Edit mode P1 “1–1: Prog Basic”, in Combination Edit mode
P4 “4–1: Filter”, or in Sequencer mode P4 “4–1(2): Filter.” This setting
allows SW1 and SW2 to be used to lock (hold) various controllers (joystick, ribbon controller, etc.) or to turn on/off effects or portamento
(the LED will light when the switch is on).
These functions can be assigned independently for each program, combination, and song. In other
words, the functions that are assigned to SW1 and SW2 will depend on the currently selected program, combination or song.
+X
17
Page 24

4. About the performance functions
For details on the function assigned to SW1 and SW2 for each of the factory preset programs and
combinations, refer to the separate Voice Name List booklet.
VALUE slider
You can use this slider as an alternate modulation source or effect dynamic modulation source
(controller) when a program number is selected in Program Play mode, or when a combination is
selected in Combination Play mode.
Control from the pedals
Assignable Foot Pedal
An effect can be applied by operating an assignable foot pedal (Korg EXP-2 or XVP-10) connected
to the rear panel PEDAL jack.
The function of the foot pedal can be set in Global mode P1 “1–1: Global Setup” (☞Parameter
Guide, page 129). This setting allows the foot pedal to control volume, a parameter value, or
tempo (when in Sequencer mode) etc. Or you can assign the pedal to control alternate modulation
or effect dynamic modulation.
Assignable Foot Switch
An effect can be applied by operating an assignable foot switch (Korg PS-1 etc.) connected to the
rear panel SWITCH jack.
The function of the foot switch can be set in Global mode P1 “1–1: Global Setup” (☞Parameter
Guide, page 129). This setting allows the connected foot switch to select programs or combinations, to start/stop the sequencer, or to punch in/out when recording on the sequencer. Or you
can assign the switch to control alternate modulation or effect dynamic modulation.
18
Page 25
5. Tuning
As an example, here’s how to set the tuning to 442 Hz.
1 Press the [GLOBAL] key.
You will enter Global mode.
2 Press the [P1] key.
You will enter page 1.
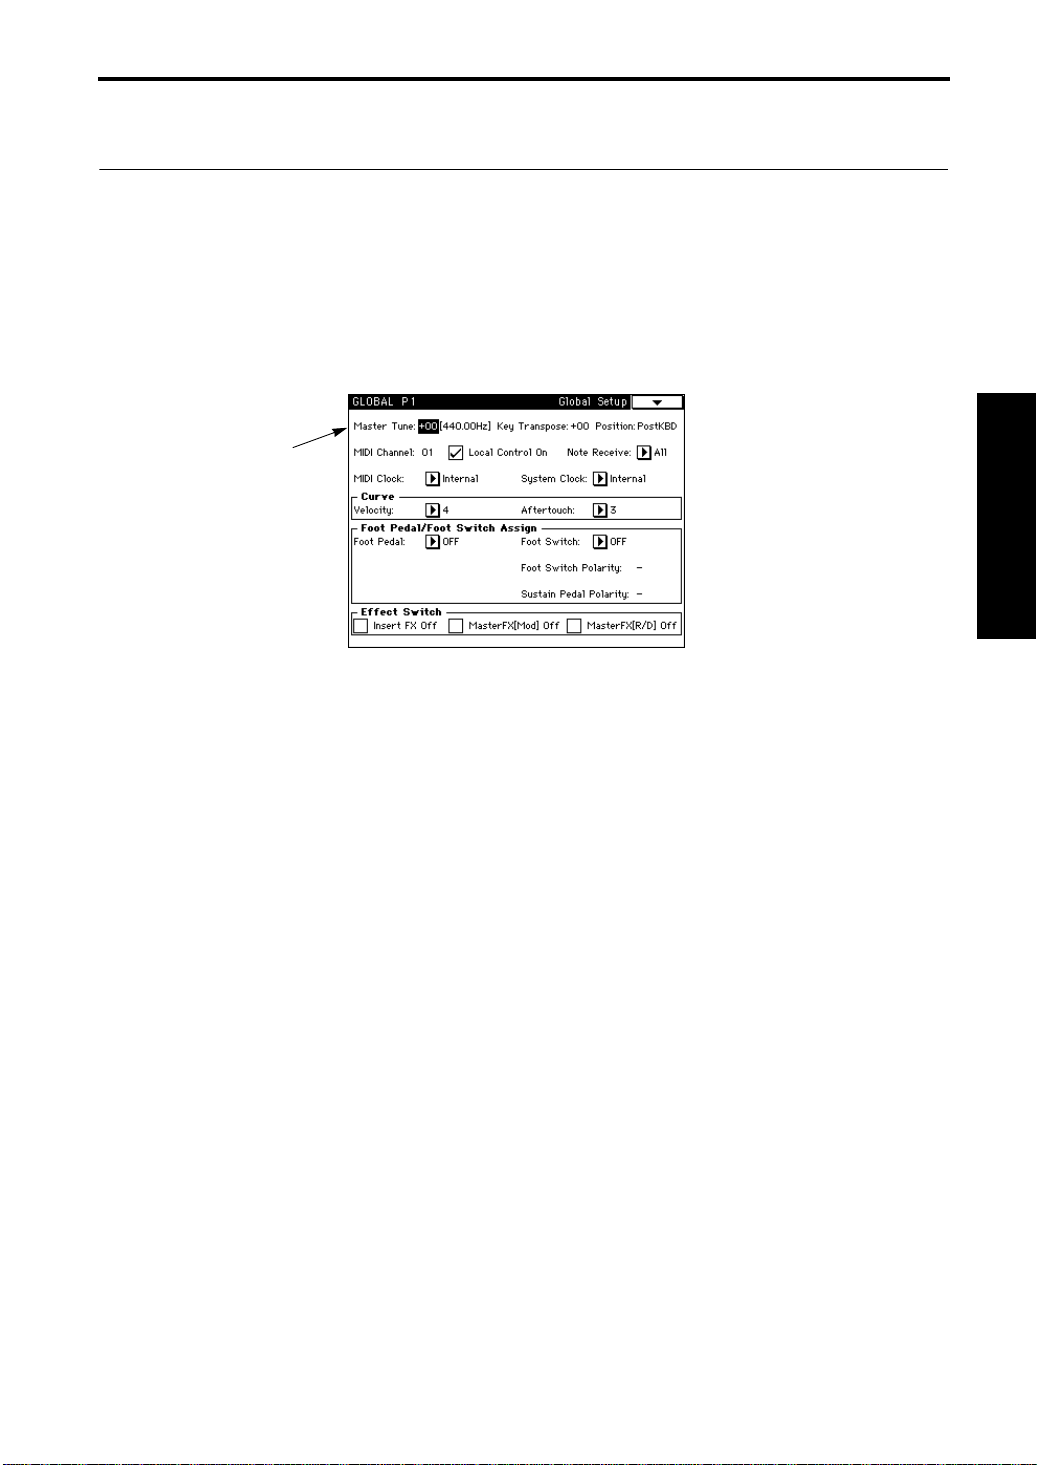
3 Press Master Tune.
The parameter value will be selected (the value at the right of Master Tune will be inverted).
This value indicates the pitch of A4 in cents based on 440Hz as a value of “0.”
3
5. Tuning
STEP 2
4 Press the numeric key 8, and press the [ENTER] key.
Set this parameter to a value that is closest 442Hz (+08) while looking at the frequency (Hz) indication.
You can also set the parameter value using other VALUE controllers.
The setting can be adjusted in steps of 1 cent (it is also displayed as Hz). One cent is an extremely
fine unit of pitch, and a difference of ±3 cents or so is probably not noticeable.
19
Page 26

6. Transposing
6. Transposing
Shifting the pitch is known as “transposing.” As an example, here’s how to raise the pitch a whole
tone.
1 Press the [GLOBAL] key.
You will enter Global mode.
2 Press the [P1] key.
You will enter page 1.
3 Press Key Transpose.
The parameter will be selected (the value at the right of Key Transpose will be inverted).
3
4 Press the numeric key 2, and press the [ENTER] key.
You can also set the parameter value using other VALUE controllers.
The setting is in units of a semitone.
20
Page 27

7. Easy editing in Program Play mode
7. Easy editing in Program Play mode
A certain amount of knowledge is necessary in order to edit parameters in Program Edit mode.
However the TRINITY series allows you to use the 8 sliders displayed in the LCD in Program
Play mode to modify the sound in several useful ways.
When these sliders are operated, the corresponding parameters of Program Edit mode will be
edited. Since this capability allows you to edit program parameters without having to enter Program Edit mode, these sliders are referred to as the “performance editor.”
Adjusts the balance
between the Dry
(unprocessed) and
Wet (processed)
sound of the master
effects.
Sets the octave.
Adjusts the tone of
the program.
Adjusts the way that
the program’s tone
changes over time.
Sets the overall volume
of the entire program.
The settings that you modify in this way using the performance editor will be lost if you select
another program. If you wish to preserve your edits, use the Write operation (☞page 23 in this
manual).
Adjusts the length of
the attack (the time
over which the sound
rises).
Adjusts the balance between
the Dry (unprocessed) and Wet
(processed) sound of the insert
effects.
Adjusts the length of the release (the time
over which the sound fades).
STEP 2
21
Page 28

8. Easy editing in Combination Play mode
8. Easy editing in Combination Play mode
In Combination Play mode, you can change the program assigned to each timbre of the combination, and adjust the volume and pan for each timbre. As an example, here’s how to adjust the volume of a timbre.
1 Press the [COMBI] key.
You will enter Combination Play mode. When the TRINITY’s power is turned on, it will automatically be in Combination Play mode.
2 Press the combination name.
The combination name will be inverted.
2
5
3 Press the [Bank] key to select a bank. 4 Select any combination using the VALUE controller. 5 Press the Volume slider of a timbre, and graphic of a slider will popup.
When you release your finger, the popup display will disappear.
Continue pressing, and move your finger to the slider handle. Move your finger up or down to set
the value (the slider will follow). If you release your finger from the graphic, the popup display
will disappear. If the slider value remains inverted after the popup display disappears, you can
use the VALUE controllers to set the value.
If you wish to raise (or lower) the volume of all timbres while maintaining the volume balance
between timbres, press the Hold Balance check box (located to the right of Volume), and adjust the
volume of any timbre.
If you turn off the power or select another combination before writing the edited timbre, the edits
will be lost. If you wish to preserve your edits, use the Write operation (☞page 23 in this manual).
22
Page 29

9. Writing a program or combination
9. Writing a program or combination
A program or combination that you have modified by adjusting parameters with the performance
editor or in any Edit mode can be saved into internal memory. This procedure is referred to as
Writing a program or combination into memory. Program or combination data can not only be
written into the internal memory of the TRINITY, but also stored on a floppy disk or on an external MIDI device Refer to “9. Saving data” on page 56 for more information.
< About the edit buffer >
When you select a program or combination in Program Play mode or Combination Play mode,
the program or combination data is copied from internal memory into a location known as the
“edit buffer.” Adjustments that you make to parameters in Program Edit mode and Combina-
tion Edit mode affect the data in the edit buffer.
If you wish to save the data that has been modified in this way, you must write it into memory .
When you write the data, the contents of the edit buffer are written into the program number
or combination number memory of the specified bank.
If you select another program or combination without writing, the newly selected program or
combination will be called into the edit buffer, and your edits will be lost.
Your editing affects the data in the edit buffer. The
programs and combinations that are being played
use the data in the edit buffer.
Edit Buffer
Edit
STEP 2
When you write, the program or
combination settings are saved into
internal memory.
Write
Select
When you select a program or combination, the
data is copied from internal memory into the edit
buffer.
Internal Memory
Program
Program
Program
Program
Program
BankA 0...127
BankA 1...127
BankA 1...127
BankA 1...127
BankA 1...127
There are two ways to write programs and combinations, as explained below. Before you write,
turn off the Protect setting in Global mode (☞page 51 in this manual).
Combination
Combination
Combination
Combination
BankA 0...127
BankA 1...127
BankA 1...127
BankA 1...127
23
Page 30

9. Writing a program or combination
Write using a page menu command
In Program Play mode, press the page menu command Update Program, and follow the instructions in the dialog box to write the data. In Combination Play mode, press the page menu command Update Combination, and write the data by following the instructions in the dialog box.
This will write the data to the currently selected program or combination number.
In Program Edit mode, press the page menu command W rite Program, and follow the instructions
in the dialog box to write the data. In Combination Edit mode, press the page menu command
Write Combination, and write the data by following the instructions in the dialog box. This
allows you to specify the program or combination number to which the data will be written.
The following example shows how to write the program in the Write Program dialog box.
1 Press the [PROG] key, then the [EDIT] key, and then the [P1] key.
You will enter Program Edit mode page 1.
2 In the LCD screen, press the first tab button (Prog
Basic).
The Prog Basic display will appear.
3 Press the Program Name text edit button, and
modify the program name. Press the OK button.
4 Press the page menu button.
The page menu commands will be displayed.
5 Press the Write Program page menu command.
A dialog box will appear.
3
4
2
Writing source program
(the currently selected program)
Writing destination bank
Writing destination program
For this example, the writing destination bank
and program are the same as the writing source
6 Press the OK button.
The display will ask “Are you sure?,” so press the OK button once again to execute the Write operation.
If you wish to modify the Write destination, specify the desired Bank and Program.
To modify the program name, press the Write Program text edit button.
Write using the [REC/WRITE] key
Regardless of whether you are in Play mode or Edit mode, this method writes the data into the
currently selected program or combination number. (This is the same as when the page menu
command Update Program or Update Combination is used to write the data.)
Here is the procedure for modifying and writing a program.
1 Follow steps 1 – 3 of “Write using a page menu command” to modify the program name.
2 Press the [REC/WRITE] key located on the front panel.
A dialog box will appear.
3 Press the OK button.
The write operation will be executed.
24
Page 31

10. Restoring the factory preset sounds
i
10. Restoring the factory preset sounds
The factory preset sounds are referred to as the “pre-loaded” data. Here’s how to load the preloaded data.
1 On the TRINITY V3, TRINITY V3 pro, or TRINITY V3 proX, insert the included “TFD-00P-V3” floppy
disk into the disk drive. On the TRINITY, insert the included “TFD-00P” into the disk drive.
For details refer to “8. Disk mode” (☞page 53 in this manual).
2 Press the [DISK] key.
You will enter Disk mode.
3 Press the first tab button.
The Load display will show file information.
PostScript error (undef
STEP 2
4 On the TRINITY V3, TRINITY V3 pro, or TRINITY V3 proX, select “V3_PLOAD.PCG.” On the TRINITY,
select “PRELOAD1.PCG.”
The display will be inverted.
These .PCG files contain program, combination, and global data.
5 Press the page menu button.
The page menu commands will appear.
6 Press the Load Selected page menu command.
A dialog box will appear.
7 If you wish to load the .SNG file (demo playback data) at the same time, press the check box to
check it.
If this box is checked, the .SNG file of the same name as the .PCG file will be loaded as well.
When a .PCG or .SNG file is loaded, the programs, combinations, and global data, and song
data that is currently in memory will be rewritten.
If you want to preserve the program, combination, global, and song data, save it to a floppy
disk (☞page 56 in this manual).
8 Press the OK button.
25
Page 32

11. Selecting by category
Program Play mode
1 Use the radio buttons to select the searching conditions.
2 Select categories A and/or B according to the selection of step 1.
3 Select the desired program from the programs that match the conditions.
4 If you wish to finalize your selection, press the OK button. If not, press the Cancel button.
Combination Play mode
1 Use the radio buttons to select the searching conditions.
2 Select categories A and/or B according to the selection of step 1.
3 Select the desired combination from the combinations that match the conditions.
4 If you wish to finalize your selection, press the OK button. If not, press the Cancel button.
11. Selecting by category
Programs can be selected by category only when 1–1b: Program Number/Program Name is
selected.
When A is selected, only programs belonging to the category specified in A will be selected.
When B is selected, only programs belonging to the category specified in B will be selected.
When A and B is selected, programs belonging to both of the categories specified in A and B will
be selected.
When A or B is selected, programs belonging to either of the categories specified in A or B will be
selected.
Combinations can be selected by category only when 1–1b: Combination/Combination Name is
selected. Programs for each timbre can be selected by category only when 1–1c: Bank/Program is
selected.
When A is selected, only combinations belonging to the category specified in A will be selected.
When B is selected, only combinations belonging to the category specified in B will be selected.
When A and B is selected, combinations belonging to both of the categories specified in A and B
will be selected.
When A or B is selected, combinations belonging to either of the categories specified in A or B will
be selected.
26
Sequencer mode
Programs can be selected by category when the Program or Bank for each track is selected.
1 Use the radio buttons to select the searching conditions.
When A is selected, only programs belonging to the category specified in A will be selected.
When B is selected, only programs belonging to the category specified in B will be selected.
When A and B is selected, programs belonging to both of the categories specified in A and B will
be selected.
When A or B is selected, programs belonging to either of the categories specified in A or B will be
selected.
2 Select categories A and/or B according to the selection of step 1.
3 Select the desired program from the programs that match the conditions.
4 If you wish to finalize your selection, press the OK button. If not, press the Cancel button.
Page 33

STEP 3
1. Program Play mode
Press the front panel
performance editor to adjust the sound. If you wish to save the changes you make with the performance editor, turn off the memory protect setting in Global mode (
use the program write operation (
[PROG] key
to enter this mode. Here you can select programs, and use the
☞
page 23 in this manual).
Selecting a program
Programs can be selected in the following three ways. For each procedure, r efer to the appr opriate
page. The programs that are available will depend on the model of your TRINITY, and on whether
the Playback Sampler/flash ROM option and/or the MOSS-TRI option is installed (
this manual).
• selecting a program using the front panel keys (
• Selecting a program using a connected switch (
• Selecting a program using incoming MIDI Program Change messages (
ual)
For the factory preset program names, refer to the separate
☞
☞
page 14 in this manual)
Editing with the performance editor
The performance editor allows you to adjust the main parameters of Program Edit mode. For
details refer to “7. Easy editing in Program Play mode” on page 21 of this manual, and “1–1: Program Play” on page 1 of the separate Parameter Guide.
☞
page 51 in this manual), and
page 13 in this manual)
Voice Name List
☞
page 9 in
☞
page 62 in this man-
booklet.
27
STEP 3
Page 34

2. Program Edit mode
2. Program Edit mode
To enter this mode, press the front panel
Here you can make changes to the pitch, tone, volume, and other aspects of the program selected
in Program Play mode. If you wish to save the changes you make, be sure to write the program
into memory (
☞
page 23 in this manual).
For bank M programs, refer to the MOSS-TRI owner’s manual.
< Editing a program >
The process of modifying the sound by adjusting the parameters that make up a program is
referred to as “editing.” Program editing is done in Program Edit mode.
You can edit programs using the performance editor. Also, in Program Edit mode you have
access to a large number of parameters for detailed editing, providing a wide range of control
over the sound. Since it may be difficult to understand at once how all the parameters work
together to affect the sound, it is a good idea to make adjustments to the parameters of the preset programs in order to learn how each parameter works.
How a program is organized
The following diagram shows how a program is organized. The characters in the lower part of
each box (e.g., P2–5) indicate the screen page in which the corresponding parameters are found.
Prog Basic
(P1-1)
OSC1 P. Mod
(P2-1)
OSC1 LFO
(P2-2)
OSC Basic
(P1-2)
OSC1/2 EG
(P2-5)
Filter1 Fc Mod
(P3-2)
Filter1 LFO
(P4-2)
Filter1 A/B
(P3-1)
Filter1 EG
(P4-1)
[PROG] key
Amp1
(P5-1)
Amp1 EG
(P5-2)
OSC1
OSC2
and then the
Insert Fx
(P7)
[EDIT] key
Master Fx
(P8)
.
3
4
1/L/MONO
2/R
28
The elements of sound
How the TRINITY’s sound is produced
Sound consists of three main elements; pitch, tone, and volume. On the
lator, filter, and amplifier that make up each program correspond to these three elements. Thus, if
you want to adjust the pitch, adjust the settings of the oscillator. To adjust the tone, adjust the filter.
And to adjust the volume, adjust the amplifier setting.
Oscillator
Pitch and basic
tone color
Oscillator: adjusting the pitch
The
TRINITY series
as a “
multi-sample
samples are provided, including instrumental sounds such as piano, and also waveforms unique
to synthesizers. Each multi-sample is actually a small piece of recorded sound, and thus determines the basic character of the final sound, whether it will be “guitar-like” or “piano-like,” etc.
Oscillator settings are made in Program Edit mode P1 and P2.
provides two oscillators. For each, you can select the waveform (referred to
”) that will be the basis for the final sound, and set the pitch. A variety of multi-
Filter
Tone color
Amplifier
Volume
TRINITY series
, the oscil-
Page 35

2. Program Edit mode
Filter: adjusting the tone color
The sound of the multi-sample selected for the oscillator can be affected by the filter by using it to
diminish or emphasize certain portions of the sound.
On the
TRINITY series
, there are two filters for each oscillator, and you can specify how the two
filters will work together. You can also select a Low Pass, High Pass, Band Pass, or Band Reject fil-
ter type for each filter.
Filter settings are made in Program Edit mode P3 and P4.
The degree to which the filter affects the sound can be made to change over time, using the Filter
EG.
For a Low Pass Filter
Level
Overtones included in the
original multi-sample
Frequency (pitch)
Level
Filter
Characteristics of the filter
The overtones of this
area are diminished
Overtones after
passing through the
filter
Frequency (pitch)
Amplifier: adjusting the volume
The “volume” of a program does not refer to the overall volume, but rather to the way in which
the volume of the program changes over time (refer to the following paragraphs, EG).
For example, the volume of a piano note becomes loud at the instant that a note is played, and
then gradually diminishes. The volume of an organ remains constant as long as the note is held.
The volume of a violin or a wind instrument will change in response to how it is played (the force
of bowing or the amount of breath).
Amplifier settings are made in Program Edit mode P5.
Volume
Piano
Volume gradually diminishes
Time
EGs and LFOs
EG (envelope generator) and LFO (low frequency oscillator) settings can apply time-varying
changes to the oscillator, filter, or amplifier.
EG (Envelope Generator): settings for changes over time
The
TRINITY series
allow you to specify how the pitch, tone, and volume will change over time.
For example the volume adjustments made by the amplifier are actually determined by how the
Amplifier EG changes the volume over time.
LFO (Low Frequency Oscillator): settings for cyclic changes
The
TRINITY series
specify how the pitch and tone will change over time. The settings of the Oscillator LFO create
cyclic changes in pitch (vibrato), and the settings of the Filter LFO create cyclic changes in tone
(wah-wah).
provides an Oscillator EG, Filter EG, and Amplifier EG, that respectively
provides an Oscillator LFO and a Filter LFO, that respectively allow you to
Volume
Organ
Volume remains constant
while key is pressed
STEP 3
Time
29
Page 36

2. Program Edit mode
Basic program editing
Amplifier settings
Select the program that you wish to edit in Program Play mode (☞page 13 in this manual), and
enter Program Edit mode to edit it.
After making these edits, you can go ahead on your own, and call up various preset programs and
edit them as you review the basic structure of a program (
end up with a sound that you don’t like, you can always load the factory preset data back into
memory (
The best way to gain an understanding of what the parameters do is to go ahead and edit them. As
you continue editing sounds, you will soon come to understand how a synthesizer works, and the
function of each parameter.
When a note is played on an instrument such as a piano or an organ, the sound immediately
reaches its maximum volume. However on string instruments such as a violin, the volume usually
increases more gradually.
The time from when a note is played until it reaches its maximum volume is called the Attack
Time.
A note played on a piano gradually decays even if you continue holding down the key. A note on
an organ continues at the same volume as long as you hold down the key. In this way, the time
over which the sound diminishes differs between instruments. This decrease of the volume level
is called “
When you release your hands from the piano keyboard (Note Off), you will hear some reverberation. This is called “
In this example, let’s adjust the attack time of a piano sound.
The attack time of a sound is adjusted in Program Edit mode P5, in the second tab screen (Amp
EG), by the parameters Level and Time.
1
Press the [PROG] key to enter Program Play mode.
2
Use the [BANK] key and the VALUE controllers to select bank A, 001: Acoustic Piano.
If bank A does not contain 001: Acoustic Piano, use the procedure described in “Restoring the factory preset data” (
before continuing.
3
Press the [EDIT] key.
You will enter Program Edit mode.
4
Press the [P5] key.
Page 5 will appear.
5
Press the second tab button in the display (Amp 1
EG).
The Amp 1 EG display will appear.
6
Select LEVEL, and specify the value, using the
VALUE controller. Here, set the following value for
each parameter:
Start Level: 00, Attack Level: 99, Break Point
Level: 50, Sustain Level: 80
7
Select the Time parameters using the VALUE controllers to set the value for each parameter.
Set the following values here:
Attack Time: 20, Decay Time: 30, Slope Time: 50, Release Time: 30
8
Use the VALUE controllers to modify the values.
While repeatedly playing a note on the keyboard, adjust the Attack Time value and notice how the
sound changes. With higher settings the sound starts more gradually. With a setting of about 50,
the piano sound has become more like a cello. In this way, the character of a sound can be dramatically changed simply by adjusting the attack.
While repeatedly playing notes on the keyboard, adjust the Decay Time value and notice how the
sound decays.
While repeatedly playing notes on the keyboard, adjust the Release Time value and notice how
the sound changes.
☞
page 25 in this manual) to restore the original sounds.
decay
.”
release
.”
☞
page 25 in this manual) to load the PRELOAD1.PCG file or P_LOAD1.PCG
☞
page 28 in this manual). Even if you
6
7
5
30
Page 37

Filter settings
Here we are going to adjust the tonal color.
There are sometimes significant differences in tone between instruments in the same family, such
as the french horn with its mellow sound and a trumpet with its bright sound. When creating
sounds on a synthesizer, this is also an important aspect that determines the character of the
sound.
When several programs are sounding simultaneously in Combination Play mode, or when you
are playing the TRINITY together with other instruments in a band, there may be times when the
sound of a program is too muted and does not stand out sufficiently, or conversely, times when it
stands out too much. When playing sounds on a synthesizer, it is important to consider the role
that each sound plays in the ensemble, and adjust the tone color accordingly. This is done by the
Filter.
The filter is the section that processes the waveform generated by the oscillator. The tone color can
be greatly modified by the filter.
On the
TRINITY series
filter so that a wide variety of sounds can be created.
1
Press the [PROG] key.
You will enter Program Play mode.
2
Use the [BANK] key and the VALUE controllers to select bank A, 086: 30303 Mega Bass.
If bank A does not contain 086: 30303 Mega Bass, use “Restoring the factory preset sounds”
(
☞
page 25 in this manual) to load the PRELOAD1.PCG file or the P_LOAD1.PCG file, and then
select it.
3
Press the [EDIT] key.
You will enter Program Edit mode.
4
Press the [P3] key.
Page 3 will appear.
5
Press the first tab button (Filter 1 A/B).
The first tab page (Filter 1 A/B) will appear.
6
For the Routing parameter, select “single.”
7
Press Type.
The display will be inverted.
2. Program Edit mode
, each oscillator has two filters, and different settings can be made for each
6
7
5
8
Change the selected filter type.
The following four types of filters can be selected. Select various types of filters, and notice the
effect that each one has on the sound.
However since many other parameters in addition to the filter also affect the tone of a program,
modifying the filter settings may not significantly change the tone for some programs.
Low Pass
This filter allows the low frequency components of the sound to pass, and cuts the high frequencies. This is the most common type of filter. As the high overtones are cut, a bright sound will
become darker.
High Pass
This filter allows the high frequency components of the sound to pass, and cuts the low frequencies. Use this filter when you want to make the sound thinner. However if this is applied excessively, the volume will be greatly diminished.
Band Pass
This filter allows a specific frequency range (band) to pass, and cuts the rest of the fr equencies. Use
this filter when you want to emphasize a specific portion of the sound.
Band Reject
This filter cuts a specific frequency range (band), and allows the rest of the frequencies to pass.
This produces a uniquely characteristic sound.
STEP 3
31
Page 38

2. Program Edit mode
9
Adjust the Frequency and Resonance parameters.
Adjust the Frequency parameter to change the
cutoff frequency. With filter types other than
Low Pass, higher settings will result in a
brighter sound, and lower settings will result
in a darker sound.
As the value of the Resonance parameter is
increased with filter types other than Band
Reject, the frequencies in the area of the cutoff
frequency will be emphasized as shown in the
diagrams, producing a more characteristic
sound.
Although the effect of adjusting these parameters will depend on the selected filter type,
you will notice that the Frequency and Resonance settings can create major changes in the
tone color.
Low Pass
High Pass
Band Pass
Band Reject
Level
Level
Level
Level
< Filter routing >
On the TRINITY series, the way in which the two filters are connected is referred to as the “routing.” The filters can be routed in one
of the following four ways.
parallel: Filter 1 A and filter 1 (2) B are connected in parallel.
serial: Filter 1 (2) A and filter 1 (2) B are connected in series.
single: Only filter 1 (2) A is used.
thru: No filter is used.
< Filter EG and Amplifier EG >
When the Filter EG is used to control the cutoff frequency, the tone will change over time.
However the volume changes produced by the Amplifier EG will affect the way that changes
in tone are heard.
For example, the character of the sound will differ greatly depending on whether the volume
or the tone rises first. If the tone rises first, the sound will appear milder, like a string instrument. If the volume rises first, the sound will appear more distinctive, like a brass instrument.
As you edit, make adjustments to both the Filter EG and the Amplifier EG.
Oscillator settings
Here we are going to modify the multi-sample (the basic waveform).
The “multi-sample” is the waveform (a PCM recording) that is the core of the program.
The
TRINITY series
as piano and guitar, to synthesizer sounds and special effects.
Multi-samples are selected in Program Edit mode P1, in the second tab page (Osc Basic).
Y ou can clearly hear the r esult of changing the multisample for any program, but for this example
let’s select a piano-type program and try changing the multisample.
1
Perform steps 1 – 3 of the procedure “Amplifier settings” on page 30 of this manual.
2
Press the [P1] key.
Page 1 will appear.
3
In the LCD screen, press the second tab button (OSC
Basic).
The OSC Basic display will appear.
4
Press the parameter that you wish to change; Multisample High or Multisample Low.
The parameter value display will be inverted.
5
Use the VALUE controllers to select a different multisample.
Parallel
Filter 1A
Filter 1B
Serial
Filter 1A Filter 1B
Single
Filter 1A
Thru
Filter 1B
Filter 1A Filter 1B
provides 375 types of multi-samples, ranging from instrumental sounds such
4
32
Page 39

Even if you change the multisample of a program, the parameter settings of that program will
remain at the values appropriate for the previous multisample. (For example on a piano-type program, the Amplifier EG will be set to create a piano-type envelope, producing a rapid attack and a
gradual decay.) You can adjust the filter or amplifier parameter values as needed.
Adjusting the modulation
Effects such as vibrato and wah-wah can be produced by modulating the pitch or filter cutoff frequency. Vibrato is produced by using the Oscillator LFO to modulate the pitch, and wah-wah is
produced by modulating the cutoff frequency. These effects are fr equently used as you play to add
life to the sound.
On the
TRINITY series
example when applying vibrato, you can make settings (to the Offset parameter) so that the
vibrato will modulate the pitch only in the upward direction, in the way that vibrato occurs on a
guitar. For details refer to page 16 of the Parameter Guide, “2–2a: Waveform/Freq/Offset.”
In addition to these types of modulation, the
that allows you to specify the source, and Dynamic Modulation that allows you to control effects.
, you can make very detailed settings for these types of modulation. For
About alternate modulation
Alternate Modulation is a type of modulation that allows you to control the sound.
The AMS (Alternate Modulation Source) can be selected from the controllers that you physically
operate (such as the joystick or the ribbon controller), or types of MIDI message that are received,
or internal control sources such as the Oscillator EG or Filter LFO.
Since the
this type of control is called “
The Intensity setting determines the degree (the depth or speed) to which AMS will control alternate modulation.
Control combinations that are frequently used on synthesizers (such as using the joystick or ribbon controller to change the pitch) are provided as special parameters separately from alternate
modulation (Ribbon (X), JS(+X), and JS(–X) of Program Edit mode P2, first tab page (OSC1 P.Mod),
third tab page (OSC2 P.Mod), etc.).
The
types of alternate modulation to control 14 parameters. In double mode you can use 14 types of
alternate modulation to control 27 parameters (the Oscillator EG is common to both oscillators 1
and 2).
26 different AMS selections ar e available. (However, not all sources can be selected for some types
of modulation.)
Refer to “8. Appendix” on page 157 of the Parameter Guide for more information about 14 Alternate Modulation and 26 AMS.
TRINITY series
TRINITY series
allows you to make settings so that the modulator can be modulated,
alternate modulation
provides 14 choices for alternate modulation. In single mode you can use 14
TRINITY series
.”
2. Program Edit mode
also provides Alternate Modulation
STEP 3
< Tips for using alternate modulation >
When making settings for alternate modulation, it is important to first decide what results you
want, then what type of modulation is necessary, and finally the location of the parameter (in
the oscillator, filter, or amplifier) that must be controlled. Then select a source, and (specify the
modulation if necessary) set the Intensity.
Here’s an example. If you are using a guitar-type sound and want it to sound like it’s on the
edge of feedback when you move the joystick away from you, make settings so that the joystick controls filter modulation.
About dynamic modulation
The balance of the “
the effect) is referred to as the “effect balance.”
On the
TRINITY series
ulation etc. can be controlled while you play, providing a great deal of expressive possibilities during a performance. The ability to control effect parameters in this way is referred to as “
modulation
The dynamic modulation source (Src) is the source that will control dynamic modulation of the
effect. The dynamic modulation source can be selected from the controllers that you physically
dry
” sound (un-processed by the effect) and the “
certain effect parameters such as the effect balance and the speed of mod-
.”
wet
” sound (processed by
dynamic
33
Page 40

2. Program Edit mode
About oscillator modes
operate (such as the joystick or the ribbon controller), or from types of MIDI messages that are
received.
The amount (Amt) setting determines the degree (speed or depth) to which the dynamic modulation source will control the effect parameter. This corresponds to the Intensity setting of alternate
modulation.
The programs of the
as determined by the setting of Program Edit mode P1, tab page 1 (Prog Basic) parameter Oscillator Mode.
A single mode program will produce one type of sound for each note. Up to 32 notes can be
played simultaneously.
A
double mode
ate richer sounds, or to create special sonorities by causing the two sounds to appear at slightly
different times. Up to 16 notes can be played simultaneously.
A
drum mode
to play percussion sounds from the keyboard.
In double mode, playing a single note will use two sounds. This means that while 32 simultaneous
notes can be played using a single mode program, only 16 simultaneous notes can be played using
a double mode program.
TRINITY series
program will produce two types of sounds for each note. This allows you to cre-
program allows you to select one of the drum kits that you create in Global mode,
can be either
Single mode, Double mode
, or
Drum mode
< Double mode and detuning >
The pitch of the two sounds produced by a double mode program can be adjusted independently. By setting the two sounds to a slightly different pitch, you can give the sound greater
depth. If the two oscillators are producing similar types of sounds, this is even more effective.
Make this setting in Program Edit mode P1, tab page 2 (OSC Basic).
,
< Keyboard dynamics and expression >
In order to make your playing more musically expressive, you can make settings so that the
force (velocity) with which you play notes will affect the volume or tone.
To make keyboard dynamics affect the volume, make settings in Amp Modulation-Velocity in
Program Edit mode P5 tab page 1 (Amp 1 Mod), and for a double mode program, in tab pages
1 and 3 (Amp 2 Mod). There you can also specify how the volume balance of the two oscillators will change (velocity crossfade) according to velocity.
T o make keyboard dynamics affect the tone, make settings in Filter EG-Velocity To A/B in Program Edit mode P3 tab page 2 (Filter 1 Mod), and for a double mode program, in tab pages 2
and 4 (Filter 2 Mod).
You can also use velocity to switch between two multi-samples for each oscillator. It is also
possible to make Oscillator 2 produce sound only when the actual velocity exceeds the velocity setting.
Make these settings in Program Edit mode P1, tab page 2 (OSC Basic).
< Keyboard tracking >
Keyboard tracking refers to the way in which the position of the note on the keyboard can
affect the volume or tone. This is used mainly to maintain an appropriate balance of volume or
tone for a program that will be played on a wide range of notes.
If you are layering two sounds in a double mode program, you can make settings to fade
between the two sounds as you play across the keyboard (positional crossfade).
Make these settings in Amp Modulation-Keyboard Track in Program Edit mode P5, tab page 1
(Amp 1 Mod) and tab page 3 (Amp 2 Mod).
< Double mode and combinations >
If you wish to layer sounds, you can either create a double mode program in Program Edit
mode, or use Combination Edit mode to layer existing programs.
Creating a double mode program in Program Edit mode is the most suitable method when
you wish to create a detailed sound, such as skewing the attack time of two string sounds, or
changing their durations.
Combination Edit mode is most suitable when you want to layer the sounds of many different
instruments, such as piano and strings, or when you want to layer the sounds of many instru-
34
Page 41

About program parameters
Some parameters of a program determine the type of change or effect that will occur in the sound
(such as EG and LFO, etc.), and other parameters determine the depth of this change or effect.
Even if you edit the parameters that determine the type of change or effect, this will make absolutely no difference in the sound if the parameters that determine the depth (Intensity) of the
change or effect are set at 0.
Similarly, you will not get the results you intend unless you are aware of the parameter for which
you are adjusting the depth of effect.
On the TRINITY series, the parameters that determine the type of effect are in different pages
than the parameters that determine the depth of the effect.
The following three pages contain parameters that determine the depth of the effect.
• Page 2 tab 1 (3) “OSC 1 (2) P. Mod”
• Page 3 tab 2 (4) “Filter 1 (2) Mod”
• Page 5 tab 1 (3) “Amp 1 (2) Mod”
2. Program Edit mode
35
STEP 3
Page 42
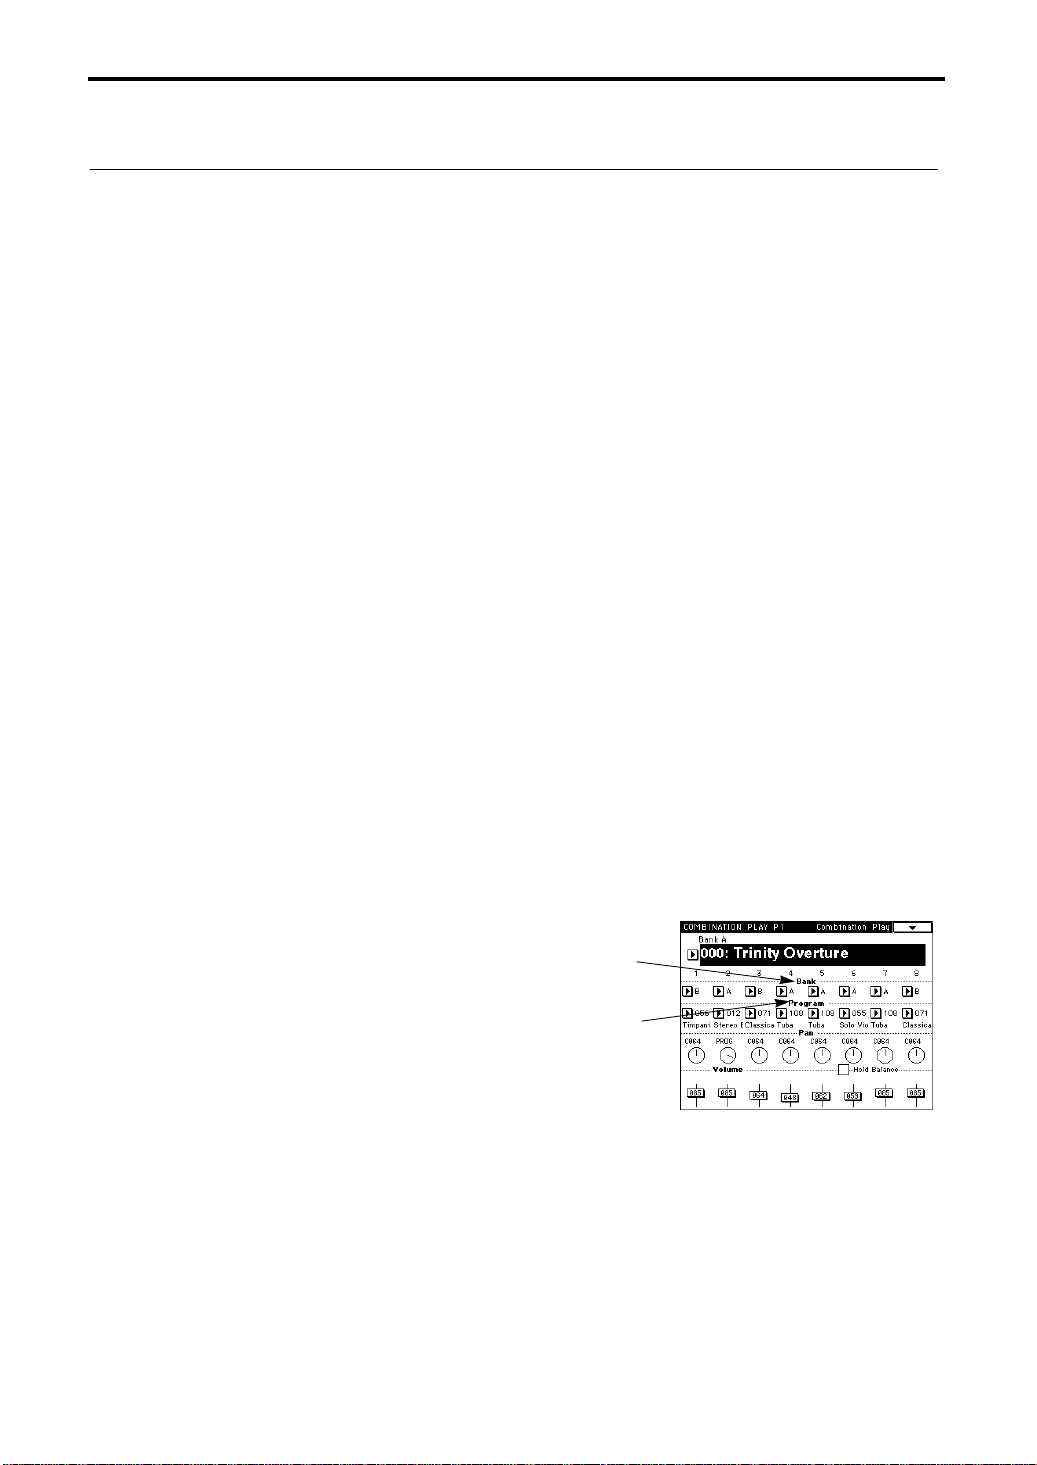
3. Combination Play mode
Selecting a combination
Ways to select the program for each timbre
3. Combination Play mode
Press the front panel [COMBI] key to enter this mode. When the power is turned on, this mode
will automatically be selected.
Here you can select combinations, and specify the program, pan, and volume setting for each timbre of the combination.
To save a combination that you have edited, turn off the memory protect setting in Global mode
(☞page 51 in this manual) and write the combination into memory (☞page 23 in this manual).
A combination can be selected in the three ways listed below. For the procedure, refer to the page
given.
The combinations that can be selected will depend on whether the Playback Sampler/flash ROM
option is installed (☞page 9 in this manual).
For the factory preset combination names, refer to the separate Voice Name List booklet.
• A combination can be selected from the front panel (☞page 15 in this manual)
• A combination can be selected by a connected assignable switch (☞page 16 in this manual)
• A combination can be selected by an incoming MIDI Program Change message (☞page 62 in
this manual)
There are two ways to select the timbre program (the program used by each timbre) in the combination.
The programs that can be selected will depend on the model that you have, and on whether the
Playback Sampler/flash ROM option and/or the MOSS-TRI option has been installed (☞page 9 in
this manual).
For the factory preset program names, refer to the separate Voice Name List booklet.
• A program can be selected from the front panel (☞page 9 in this manual)
• A program can be selected by an incoming MIDI Program Change message (☞page 62 in this
manual)
36
Selecting the timbre program on the unit
1 Press the Bank button for a timbre.
The display will be inverted.
2 Use the [▲]/[▼] keys to select the bank.
You can select the bank using VALUE controllers
other than the numeric keys and ENTER.
3 Press program of the same timbre.
The display will be inverted.
4 Use the VALUE controllers to select the program.
The program used by a timbre can also be selected
in Combination Edit mode P1, tab page 1 (Combi
Basic).
1
3
Page 43

Layer, split, and velocity switch
In a combination, you can use keyboard position or velocity to change the program that will
sound. The program assigned to a timbre can be sounded in three ways; layer, split, or velocity
switch. The types used in the preset combinations are given in the separate Voice Name List book-
let.
T o use these types, first set all timbr es’ MIDI channels to match the Global MIDI Channel. You can
set the timbres’ MIDI channels in P1 tab page 1 of Combination Edit mode.
Layer
A setting that causes two or more programs to sound simultaneously when a note is played is
referred to as a Layer.
A combination which is not playing a layer can be changed into a layer-type combination by making settings in Combination Edit mode P3, tab page 1 (Key Zone) so that the note ranges of different timbres sounded will overlap. For details refer to page 38 in this manual, “Key Zone settings.”
Split
A setting that causes different programs to sound in different areas of the keyboard is referred to
as a Keyboard Split.
A combination which is not a split-type combination can be made into a split-type combination by
making settings in Combination Edit mode P3, tab page 1 (Key Zone) so that the note ranges of
different timbres sounded will not overlap. For details refer to “Key zone settings” on page 38 in
this manual.
Velocity Switch
A setting that causes different programs to be sounded by notes of different velocities (playing
strengths) is referred to as a Velocity Switch.
A combination which does not use velocity switching can be made to use it by making settings in
Combination Edit mode P3, tab page 2 (Velocity Zone) to specify the velocity range of different
timbres in which a program will sound. For details refer to “Velocity zone settings” on page 39 in
this manual.
Layer
Split
Program A Program B
Program B
Program A
3. Combination Play mode
Two or more programs can be
played simultaneously (layered).
Different programs can be played
in different areas of the keyboard.
STEP 3
Velocity Switch
On the TRINITY series you can use up to 8 timbres, each playing a different program. This allows
you to combine layer, split, and velocity switch settings in the same combination to create very
complex setups.
The TRINITY series allow you to specify the slope amount (the degree of diminishing sound) for
the Key Zone and Velocity Zone settings.
Adjusting the volume
The volume of timbres 1—8 is adjusted by Combination Play mode Volume, and the Combination
Edit mode P1, tab page 2 (Tunb Oaran2) parameter Volume. The volume setting made in Combination Play mode and Combination Edit mode are the same setting, and modifying one will set
the other to the same value. The volume balance of the timbres is an important part of creating a
tonal balance, and will affect the overall character of the combination.
Program B
Program A
Playing strength
Different programs can be played
by notes of different strengths.
37
Page 44

4. Combination Edit mode
How a combination is organized
4. Combination Edit mode
To enter this mode, press the front panel [COMBI] key and then the [EDIT] key.
Here you can make settings for the combination selected in Combination Play mode. For each timbre you can select the program, adjust pan and volume settings, and specify the key zone and
velocity zone. You can also name the combination and set the effects for it.
If you want to save the combination you have modified, be sure to use the Combination Write
command (☞page 23 in this manual).
A combination is organized as follows. The alpha-numeric characters in the lower part of each box
(P1...P8) refer to the page in which the relevant parameters are edited.
Timbre1
Program
Timbre2
Timbre8
Program
.
.
.
.
.
Program
Insert Fx
(P7)
Master Fx
(P8)
3
4
1/L/MONO
2/R
(P1...P6)
Basic combination editing
A “combination” allows up to 8 programs to be sounded simultaneously. A combination consists
of eight “timbres,” with a program assigned (and various other settings made) for each timbre.
The process of selecting the program that each timbre will play, specifying the keyboard range in
which each program will play, and making other related settings is called “combination editing.”
In order to understand how the parameters of a combination work together, it is useful to modify
the parameters of one of the pre-loaded combinations, and listen to the results of your changes.
The following pages explain basic combination editing.
Volume settings
The volume of timbres 1–8 is adjusted in Combination Play mode Volume, and Combination Edit
mode P1, tab page 2 (Timb Param2) Volume.
The volume settings made in Combination Play mode and in Combination Edit mode are the
same parameter; adjusting one volume setting will affect the other setting.
The volume balance of the timbres is an important part of creating a tonal balance, and will affect
the overall character of the combination.
Key zone settings
Y ou can specify the area of the keyboard in which each timbre of the combination will sound. The
keyboard area in which a timbre will sound is called the Key Zone.
By setting each timbre to an appropriate key zone, you can create layer-type and/or split-type
combinations.
T o determine the key zone for each timbre, you will set the Top Key and the Bottom Key to specify
the upper and lower limit of the notes which will play that timbre.
For example, the following diagram shows how the key zones of timbres 1–3 have been set to create a combination that is both layered and split. Timbr es 2 and 3 ar e layer ed. Timbre 1 and timbres
2 and 3 are split at the B3 and C4 notes.
38
Page 45

4. Combination Edit mode
To create a combination like the one shown above, select the programs for timbres 1–3 in Combination Play mode or in Combination Edit mode P1, tab page 1 (Timb Param 1).
Select a piano program for timbre 1.
Select a brass program for timbre 2.
Select a string program for timbre 3.
(Refer to the separate Voice Name List booklet.)
Timbre 3
Timbre 2
Timbre 1
Be sure to match all timbres’ MIDI channels with the Global MIDI Channel. You can use the Timbre’s MIDI Channel in P1 tab page 1.
Then in Combination Edit mode P3 tab page 1 (Key Zone), set the Top Key and Bottom Key
parameters.
For timbre 1, set the Top Key to G9 and the Bottom key to C4.
For timbres 2 and 3, set the Top Key to B3 and the Bottom Key to C–1.
If at this time you set the Top Slope and Bottom Slope parameters of three timbres so that the
sounds of timbre 1 and part of timbres 2 and 3 will overlap and change the volume level, you can
avoid a sudden change in sound at the boundary between B3 and C4.
In Combination Play mode, it is not possible to change the program for a Timbr e whose Combination Edit mode P1 tab page 1 (Timb Param1) parameter Timbre Mode is turned OFF.
Strings
Brass
Piano
C–1 C4 G9B3
Velocity zone settings
For each timbre in a combination, you can specify the range of note velocities that will sound the
timbre. The range of note velocities that will sound a timbre is called the Velocity Zone.
By setting the velocity zone, you can create a combination in which a program will be sounded
only by notes played with a certain range of strength. By making different velocity zone settings
for two or more timbres, you can create velocity switch-type combinations.
The upper limit and lower limit of the velocity zone of each timbre is determined by the Top Vel
and the Bottom Vel setting.
For example in the diagram below, the velocity zones of timbres 1 and 2 have been set to create a
velocity switch-type combination in which keyboard velocity switches between two sounds.
Timbre 1
Timbre 2
To create a combination like the one shown above, first select the program for timbres 1 and 2 of
the combination, either in Combination Play mode, or in Combination Edit mode P1 tab page 1
(Timb Param 1).
Select a brass program for timbre 1.
Select a strings program for timbre 2.
(Refer to the separate Voice Name List booklet.)
Be sure to match all timbres’ MIDI channels with the Global MIDI Channel. You can use the Timbre’s MIDI Channel in P1 tab page 1.
Then in Combination Edit mode P3 tab page 2 (Vel Zone), set the Top Vel and Bottom Vel parameters.
For timbre 1, set the Top Vel to 127 and the Bottom Vel to 64.
For timbre 2, set the Top Vel to 63 and the Bottom Vel to 1.
If at this time you set the T op Slope and Bottom Slope parameters of two timbres so that part of the
sounds will overlap and change the volume level, you can avoid a sudden change in sound at the
boundary between velocity 63 and 64.
In Combination Play mode, it is not possible to change the program for a Timbr e whose Combination Edit mode P1 tab page 1 (Timb Param1) parameter Timbre Mode is turned OFF.
Brass
Strings
STEP 3
Velocity
39
Page 46

4. Combination Edit mode
Other settings in Combination Edit mode
In addition to the settings discussed here, Combination Edit mode allows you to adjust the pitch
for each timbre (Transpose and Detune), and adjust pan position and send levels. You can also
specify the MIDI channel for each timbre, and specify whether MIDI messages will be received or
not.
40
Page 47

5. Sequencer mode
To enter Sequencer mode, press the front panel [SEQ] key.
Here you can use the sequencer to playback or record songs, and edit recorded data. You can also
record and edit patterns.
Before editing sequencer song data, you must first turn off the protect setting in Global mode
(☞page 51 in this manual).
About the TRINITY’s sequencer
• Up to 20 songs can be created.
• Each song can have its own patterns (up to 100).
• Up to 80,000 events (notes, etc.) can be used.
• There are 16 tracks for music data, and a master track to control these tracks (time signature,
tempo, etc.).
• Up to 999 measures can be used.
• Timing resolution is q /192.
• Effect settings can be made for each song.
• Up to 8 insert effects can process the audio output of individual tracks, and two master effects
can process the overall audio output.
• You can name songs as well as patterns and tracks.
• You can save the created songs in a special format, and transmit them using MIDI Data Dump
messages.
• Song data that you create can be saved to floppy disk as Standard MIDI File data.
• Musical data saved in Standard MIDI File format can be loaded and played back by the TRIN-
ITY’s sequencer.
• When the Track Status is set to EXT or BOTH, the TRINITY’s sequencer can play external tone
generators.
• When the Track Status is set to INT or BOTH, an external sequencer can play the TRINITY’s
multi-timbral tone generator.
• You can use various recording methods such as Realtime Recording which records your per-
formance just as you play it, or Step Recording which allows you to “type in” the musical data.
• You can perform various editing operations (event editing etc.) on the musical data that you
recorded.
• Combination settings can be copied to a song.
• If the separately sold HDR-TRI option is installed, audio such as vocals or guitar can be digi-
tally recorded on an audio track.
• For playback or recording, desired tracks can be muted.
• Alternate Modulation or Dynamic Modulation can be made to follow tempo changes.
• You can fast-forward or rewind while listening to the sound.
5. Sequencer mode
STEP 3
How a song is organized
Each song consists of initial settings with which the song begins, and the playback data of the
song itself.
The 16 sequence data tracks, the audio tracks of the hard disk recorder, the control tracks for the
hard disk recorder, and the master track are also organized into initial settings and the playback
data.
The audio tracks are available only if the HDR-TRI option is installed.
Track Initial settings Playback data
Tracks 1–16
Audio tracks 1–4 audio data
Control tracks for audio tracks 1–4 volume, pan, etc. volume, pan, etc.
Master track time signature, tempo time signature tempo
program numbers, volume, pan, etc.
program change, note on/off, bender,
pattern no., etc.
41
Page 48

5. Sequencer mode
About patterns
How song data is stored on a floppy disk
Each song in the TRINITY’s sequencer can have up to 100 of its own patterns.
Phrases that are used repeatedly in a song can be recorded as patterns. If these patterns ar e placed
in a track, the pattern data will be called up and played back whenever the song reaches that location.
If a song contains repeated phrases or rhythms, you can save memory by recording the phrase or
rhythm as a pattern, rather than actually recording it in each location where you want it to playback.
When using patterns, you need to be aware that when you modify a pattern, the playback will be
affected for all locations that use that pattern. Pattern lengths can be in multiples of a measure.
Each pattern contains playback data for a single track. It is not possible to create patterns that are
played back by two or more tracks (multi-track patterns).
There are two types of song data that the TRINITY is able to load from disk and play back.
One is song data that has been saved in the TRINITY’s own format. This data cannot be loaded by
other devices, but since all details of the settings and playback will be reproduced with complete
accuracy, you should use this format to save data that will be played back on a TRINITY series
instrument.
The other type is Standard MIDI File data. With this type of data, the reproduction will not be
quite as accurate as with the TRINITY’s own format (although for most purposes there will be no
problem), but the data can be played back by any SMF-compatible device.
Song data is saved to and loaded from floppy disk in Disk mode. For details refer to “9. Saving
data” on page 56 of this manual.
How the TRINITY uses MIDI
The sequencer of the TRINITY can control and be controlled by external MIDI devices in the following ways.
MIDI Clock setting in Global mode
This setting determines whether the TRINITY will be the master (the controlling device) or the
slave (the controlled device).
When the TRINITY is connected to an external sequencer, and you want to perform start/stop
and tempo control from the TRINITY, set the MIDI Clock setting to Internal.
If you want to use the external sequencer to control the TRINITY, set the MIDI Clock setting to
External.
For details refer to Parameter Guide page 132 “1–1d: MIDI Clock/System Clock.”
Track Status of each track
You can specify whether data played back by the TRINITY’s sequencer or received via MIDI will
sound the TRINITY’s internal tone generator, or will sound an external tone generator.
To sound the internal tone generator, set the Track Status to INT.
To sound external tone generators, set the Track Status to EXT.
With a setting of BOTH, both the internal and external tone generators will sound.
For details refer to Parameter Guide page 90 “2–1c: Track Status.”
Keyboard and controller data transmission
When the keyboard and controllers of the TRINITY are operated, keyboard and controller data
will be transmitted on the MIDI channel specified for the current track (selected in Sequencer
mode “1–1d: Track”).
42
Page 49

About recording
Recording is the process of storing musical actions (notes that are played on the keyboard, controllers that are moved, etc.) into memory. The TRINITY series provides the following recording
methods.
Realtime recording
In this method of recording, notes you play on the keyboard and controller movements etc. are
recorded just as they are performed — i.e., in realtime.
Usually, this is done one track at a time, and this is referred to as Single-track Recording.
It is also possible to simultaneously record two or more channels of data on separate tracks, and
this is referred to as Multi-track Recording. This method allows you to playback existing
sequence data on an external sequencer, and record it in realtime to the TRINITY’s sequencer. For
details refer to “Realtime recording” step
There are five ways to do realtime recording, as listed below.
< Overwrite recording >
In this method of recording, musical data is recorded onto a track. Normally, you will use this
method to record, and then use other realtime recording methods or event editing to modify
the data that was recorded.
If you use overwrite recording on a track that was previously recorded, the previous data will
be replaced by the new data.
< Overdub recording >
In this method of recording, musical data is added to the existing data in a track. When you
use overdub recording on a previously recorded track, the newly recorded data will be added
to the previously recorded data.
5. Sequencer mode
5 (☞page 44 in this manual).
< Auto punch-in recording >
Recordings will overwrite the existing data.
In this method of recording, you specify beforehand the area in which recording will take
place. Then when you playback the song, recording will begin automatically when the specified area is reached.
< Manual punch-in recording >
Recordings will overwrite the existing data.
In this method of recording, you can playback a song and then press the [REC] key or the
pedal switch during playback to start/stop recording.
< Loop recording >
Recordings will be added to the existing data.
This method allows recording to be repeated over a specified area, with each pass being added
to the previously recorded data.
Step recording
This is a non-realtime recording method in which only note on/off data can be recorded. Note
pitches are specified by pressing the keyboard, and the timing, length of each note, and velocity
are determined by the settings on the LCD screen.
Pattern recording
This allows you to record a pattern in a way similar to when track recording a song.
Event editing, etc.
Step Recording allows you to record only note data, but you can perform non-realtime recording
of other types of data using Event Edit or the Create Control Data command.
Event editing is a function provided for the purpose of modifying previously recorded data, but
also allows you to insert program changes or switch operations.
Create Control Data is a command that allows you to create and insert a succession of gradually
changing controller data. This can be used to input controller data such as pitch bend or aftertouch.
STEP 3
43
Page 50

5. Sequencer mode
Song realtime recording procedure
Preparations for recording
Before you record, make track settings. The settings of steps 1 – 9 are made in Sequencer mode P1
tab pages 1–7.
1 In Sequencer mode, press the [P1] key.
The page 1 display (Track Play/Rec) will appear.
2 Press Song. 3 Use the numeric keys to input the song number that
you wish to record, and press the [ENTER] key.
If you select a song number that you will be
recording for the first time, the Create New Song
dialog box will appear.
Press the OK button.
2
4
6
7
8
9
5
4 Press Track to specify the track that you wish to
record.
5 In Program, select the program for the track that you wish to record.
If necessary, make settings for Pan and Volume.
If necessary, set the effect send levels in Send 1, 2 of tab pages 3 and 4.
6 Set Metronome to Rec, and then press the [REC/WRITE] key.
The metronome will begin sounding.
This will cause the metronome to sound. If you do not hear it, adjust the pre-count and output
level settings in tab page 7 (Pref.) Metronome.
7 Set Tempo to Manual. 8 While you listen to the metronome, set a tempo of q. 9 Use Meter and specify the time signature.
If necessary, press Resolution and make realtime quantize settings.
Check the Multi Rec box for multi-channel recording.
In this case, tracks with a Track PLAY/MUTE/REC setting of REC will record MIDI messages
whose channel matches their own MIDI channel setting. (The setting of
want to use multi-channel recording, refer to the explanation of Multi Rec in Parameter Guide
page 78, “1–1e: Meter/Metronome/Resolution/Multi Rec/Remove Data.”
4 will be ignored.) If you
44
Overwrite recording
If you are recording the song for the first time, use this method to record.
1 Make the preparations described in “Preparations for recording.” (above). 2 Press tab button 7 (Pref.).
The Preference display will appear.
3 In Recording Setup, select OverWrite.
Overwrite recording mode will be selected.
4 In Location, specify the location at which recording
will begin.
If you are recording a song for the first time, you
cannot change the location. Skip to Step
5.
5 Press the [REC/WRITE] key, then press the [START/
STOP] key.
Recording will begin. Play the keyboard and operate the controllers (joystick, etc.), and the data will
be recorded.
6 Press the [START/STOP] key.
Recording will end, and you will return to the location where recording began.
If you press the [PAUSE] key instead of the [START/STOP] key, recording will be temporarily
halted. Recording will resume when you press the [PAUSE] key once again. When you finish
recording, press the [START/STOP] key.
4
3
Page 51

Overdub recording
1 Make the preparations described in “Preparations
for recording.” (☞page 44 in this manual).
2 Press tab button 7 (Pref.).
The Preference display will appear.
3 In Recording Setup, select OverDub.
Overdub recording mode will be selected.
4 For the rest of the procedure, refer to steps 4 – 6 of
the Overwrite recording procedure (☞page 44 in
this manual).
Auto punch-in recording
1 Make the preparations described in “Preparations
for recording.” (☞page 44 in this manual).
2 Press tab button 7 (Pref.).
The Preference display will appear.
3 In Recording Setup, select AutoPunchIn.
Auto punch-in recording mode will be selected.
4 Use M (Measure), and specify the area in which
recording will take place.
5 In Location, specify a location several measures
before the place where recording will begin.
6 Press the [REC/WRITE] key, then press the [START/STOP] key.
Playback will start.
When the area specified in step
the controllers (joystick etc.), and the data will be recorded.
When the location specified in step
7 Press the [START/STOP] key.
Playback will stop, and you will return to the location specified in step
4 is reached, recording will begin. Play the keyboard and/or use
4 ends, recording will end. (Playback will continue.)
5. Sequencer mode
3
5
3
4
5.
Manual punch-in recording
1 Make the preparations described in “Preparations
for recording.” (☞page 44 in this manual).
2 Press tab button 7 (Pref.).
The Preference display will appear.
3 In Recording Setup, select ManualPunchIn.
Manual punch-in recording mode will be
selected.
4 In Location, specify a location several measures
before the area that you wish to re-record.
5 Press the [START/STOP] key.
Playback will start.
6 At the location where you wish to begin recording, press the [REC/WRITE] key.
Recording will begin. Play the keyboard and/or use the controllers (joystick, etc.), and the data
will be recorded.
7 At the location where you wish to stop recording, press the [REC/WRITE] key.
Recording will end. (Playback will continue.)
Instead of pressing the [REC/WRITE] key in steps
pedal switch to which the Punch In/Out function has been assigned. This setting is made in Global mode.
8 Press the [START/STOP] key.
Playback will end, and you will return to the location specified in step
4
3
6 and 7, it is also possible to use an assignable
STEP 3
4.
45
Page 52

5. Sequencer mode
Loop recording
1 Make the preparations described in “Preparations
for recording.” (☞page 44 in this manual).
It should be noted that you cannot perform multitrack recording. Uncheck the MultiRec check box
in step
5.
5
2 Press tab button 7 (Pref.).
The Preference display will appear.
3 In Recording Setup, select Loop.
Loop recording mode will be selected.
3
4
4 Use M (Measure) to specify the area in which recording will take place.
5 For Location, specify a location several measures before the area that you wish to record.
6 Press the [REC/WRITE] key, then press the [START/STOP] key.
Playback will start.
When the area specified in step
the controllers (joystick, etc.), and the data will be recorded.
When the end of the specified area is reached, you will return to the beginning of the area, and
recording will continue. The data newly recorded on each pass will be added to the previously
recorded data.
If you press the [REC/WRITE] key during loop recording, all data will be erased from the track
currently being selected for the interval that you continue pressing the [REC/WRITE] key.
If the Remove Data box in tab page 1 (2) is checked, you can erase specific data. During loop
recording, hold down a note (key) that you wish to erase, and all occurrences of the specified note
will be erased from the area that is played back while you continue holding the note.
In the same way, pitch bend data can be erased by holding the joystick tilted in the X (horizontal)
direction, or aftertouch data can be erased by maintaining pressure on the keyboard.
To resume recording data, un-check the Remove Data box.
4 is reached, recording will begin. Play the keyboard and/or use
7 Press the [START/STOP] key.
Playback will stop, and you will return to the location specified in step
If Loop Recording is selected, the playback will be looped even during normal playback.
5.
46
Page 53

Pattern recording procedure
Pattern realtime recording
Pattern realtime recording allows you to repeatedly playback a pattern of a specified length, and
continue adding recorded data to it.
1 In Sequencer mode, press the [P6] key, and press the tab 1 button (Pattern Edit).
Tab page 1 (Pattern Edit) will be displayed.
2 Press Pattern. 3 Use the VALUE controllers to input the pattern num-
ber that you wish to record.
4 If necessary, set the Metronome and Resolution. 5 Press the page menu button.
The page menu commands will appear.
6 Press the page menu command Pattern Parameter.
A dialog box will appear.
7 Set the length of the pattern in Length, and the time signature in Meter. 8 Press the OK button.
This completes preparations for the pattern you will record.
9 Press the [REC/WRITE] key, then press the [START/STOP] key.
Pattern recording will begin. Play the keyboard and/or operate controllers such as the joystick,
and the data will be recorded.
When recording reaches the end of the pattern, you will return to the beginning of the pattern and
recording will continue.
The data recorded in each pass will be added to the data previously recorded in the pattern.
During pattern recording, you can press the [REC/WRITE] key or check the Remove Data box to
erase undesired data. For details refer to Loop Recording step
0 Press the [START/STOP] key.
Pattern recording will end.
5. Sequencer mode
2
4
5
1
6 (☞page 46 in this manual).
Song playback
In order to playback song data on the sequencer, the song data must first be loaded (from disk) or
dumped (via MIDI) into memory. Data can be loaded from floppy disk in Disk mode, and a song
data dump can be received in Global mode.
Once song data has been loaded, it will remain in memory until the power is turned off. Be sure to
save important song data to floppy disk, or dump it to an external MIDI data storage device. If
you turn the power off before saving your song data, it cannot be recovered.
To load or dump data, use the following procedure.
1 Press the [SEQ] key.
You will enter Sequencer mode.
2 In “1–1b: Song,” select a song. 3 Press the [START/STOP] key.
The song that was selected in step
4 To stop playback, press the [START/STOP] key during playback.
If you press the [START/STOP] key once again, playback will resume from the location where it
was stopped.
5 To return to the beginning of the song, press the [RESET] key while playback is stopped.
2 will begin playback.
STEP 3
47
Page 54

6. About the effects
6. About the effects
Effects allow you to modify the sound in various ways, or simulate an acoustic environment.
The digital multi-effects provided on the TRINITY series allow you to select from a wide variety
of different effects.
Effects for which dynamic modulation can be specified allow you to control effect parameters
while you play using any desired control source.
The TRINITY series has two types of effects; Insert Effects and Master Effects. You can choose
from 100 types of insert effects, and from 14 types of master effects.
< Insert Effects and Master Effects >
Insert effects are used to help create the sound of specific programs. Effects such as overdrive,
equalizer, wah, and compressor are provided.
Master effects are used to create the overall acoustical ambiance of a performance space (rever berance). Effects such as ensemble, delay, and reverb are provided.
< Effect routing >
On the TRINITY series, effects can be connected in parallel or in series. The way in which
effects are connected is referred to as the effect routing.
The number of effects that can be connected will depend on the mode.
< Effect grouping >
In Combination mode and in a sequencer song, one insert effect can be used by two or more
timbres or tracks.
Effect grouping refers to the way in which two or more timbres (tracks) can be made into a
group that shares the insert effect of a specific timbre (track). This timbre (track) is referred to
as the grouping source.
48
< Effect size >
Each of the insert effects of the TRINITY series has an effect size of either 1, 2 or 4. The number of effects that can be used will depend on the effect sizes. (The separate Effect Guide lists
effects by their size.)
The total of the effect sizes that can be used will depend on the mode.
Insert effect settings
Regardless of the mode you are in, insert effect settings are made in P7.
Program
Effect routing for a program is set in Program Edit mode P7, tab 1 (Insert Effects), and the various
effect parameters are set in tab pages 2 and following (Effect Parameter).
The effects that can be used by a single-mode or double-mode program must have a total effect
size of 4 or less, and up to 3 effects can be connected in series.
The effects that can be used by a drum-mode program must have a total effect size of 4 or less, and
up to 4 effects can be connected in series or in parallel. The way in which the drum sample settings
will be sent to each effect can be specified by the Global mode P5 (Drumkit) parameter Insert Fx;
for each key, you can specify an insert effect (1–4) to which the sound will be sent.
Insert effect settings are also made in Program Edit mode P7, tab page 1 parameters Pan, Width,
and Send 1 and 2 (for signals after the Insert Effects).
Pan sets the stereo location, Width sets the width of the insert effects, and Send 1 and 2 determine
the send levels (input levels) to the master effects.
If the output of the insert effect is stereo, the Program Edit mode P7 Width parameter will adjust
the width of the effect. If you want to allow the oscillator pan setting (Program Edit mode P5) or
drum kit pan setting (Global mode P5) to be effective, set Program Edit mode P7 Pan to 64, and
Width to 127.
T o bypass the insert effects, turn the ef fect OFF. If you are not using insert effects, set the ef fect size
to 0.
Page 55

Combination
Since the insert effect settings for each program are ignored by combinations, you will need to
make new insert effect settings.
Make effect grouping settings in Combination Edit mode P7 tab page 1 (Effect Grouping) FX Size,
and make effect routing settings in tab page 2 (Insert Effects). Then set the parameters of each
effect in tab pages 3 and following (Effect Parameter).
The effects that can be used by a combination must have a total effect size of 8 or less for all timbres. Up to 3 effects can be connected in series for a timbre. (For a drum-mode program, up to 4
effects in series or in parallel.)
It is recommended that you make a group of timbres that use similar effects, and specify an insert
effect for the group. If you want to use a program’s insert effect settings in a combination, use the
page menu command Copy Insert Effect. In this case, set the effect size of the timbre to a setting
equal to or greater than the effect being copied.
Insert effect settings are also made in Combination Edit mode P7, tab page 2 parameters Pan,
Width, and Send 1 and 2 (for signals after the Insert Effects).
Pan sets the stereo location, Width sets the width of the insert effects, and Send 1 and 2 determine
the send levels (input levels) to the master effects.
T o bypass the insert effects, turn the ef fect OFF. If you are not using insert effects, set the ef fect size
to 0.
Song
Since the insert effect settings for each program are ignored by songs, you will need to make new
insert effect settings.
Make effect grouping settings in Sequence mode P7 tab page 1 and 2 (Effect Grouping) FX Size,
and make effect routing settings in tab page 3 (Insert Effects). Then set the parameters of each
effect in tab pages4 and following (Effect Parameter).
The effects that can be used by a song must have a total effect size of 8 or less for all tracks. It is recommended that you make a group of timbres that use similar effects, and specify an insert effect
for the group.
Width settings and Pan settings after the Insert Effects are made in Sequencer mode P7, tab pages
3. At this time, setting the Pan and Width parameters to PRG allows you to specify the Pan and
Width for each program.
Pan sets the stereo image, and width sets the width of the insert effects.
T o bypass the insert effects, turn the ef fect OFF. If you are not using insert effects, set the ef fect size
to 0.
6. About the effects
STEP 3
Master effect settings
The master effects are common to all modes, and are set in P8 tab page 1 (Master Effects). The
parameters of each effect are set in tab pages 2 and following (Effect Parameter).
The modulation-type effect [E1] and the reverb/delay-type effect [E2] (both are mono in, stereo
out) can be connected in either parallel or series.
Checking the box on the left of the LCD screen will route the right channel of the modulation
effect directly to the reverb/delay effect in serial.
In P8 tab page 1 of each mode, you can also set Pan 1 and 2 (after [E1], [E2]), Return 1 and 2, Low
Gain, and High Gain.
Pan 3 and 4 specifies the stereo position for the output jacks 3 and 4. Return 1 and 2 set the return
level (the output level of the effect sound) to the output jacks 1/L/MONO and 2/R. Low Gain and
High Gain adjust equalization. For details on send levels and pan, refer to “Send and pan settings”
on page 50.
If insert effects as well as master effects are being used, output jacks 1/L/MONO and 2/R will
output the sound with insert effects and master effects applied. Output jacks 3 and 4 will output
the sound with only master effects applied.
If you do not want the master effects to be applied to the sound that is output from output jacks 3
and 4 (for example when outputting a metronome sound), turn master effects OFF. However in
this case, master effects will not be applied to the output of the 1/L/MONO and 2/R output jacks
either.
To bypass the master effects, turn the effect OFF.
49
Page 56

6. About the effects
Send and pan settings
The parameters that determine the send level and pan to the master effects will differ depending
on whether insert effects are used (effect size greater than 0) or unused (effect size 0).
If insert effects are used
Effects are bypassed when Effect On/Off is set to Off.
For a program, set the send levels using Send 1 and Send 2 in the Program Edit mode P7 tab page
1. Set the pan using Pan in the Program Edit mode P5 tab page 1 (2) and P7 tab page 1.
However the send levels and pan of a drum-mode program are set in the two locations of Global
mode P5 (Drumkit) and Program Edit mode P7 tab page 1.
For a combination, set the send levels using Send 1 and Send 2 in the Combination Edit mode P7
(tab page 2). Set the pan using Pan in P1 (tab page 2) and P7 (tab page 2).
For a song, set the send levels using Send 1 and Send 2 in the Sequencer mode P1 (tab pages 3 and
4). Set the pan using Pan in P1 (tab page 1 (2)) and P7 (tab page 2).
If insert effects are not used
For a program, the send levels and pan are set by the Program Edit mode P5 Send 1 and 2 and Pan
parameters.
For a combination, the send levels and pan are set by the Combination Edit mode P1 (tab 2) Send
1, Send 2, and Pan parameters (pan can also be set in Combination Play mode).
For a song, set the send levels in Sequencer mode P1 (tab 3 and 4) Send 1 and Send 2. Set the pan
using the P1 (tab 1 and 2) Pan parameter.
50
Page 57

7. Global mode
Press the front panel [GLOBAL] key to enter this mode.
About memory protect
The TRINITY provides memory protect settings (accessed in Global mode) that can help prevent
accidental overwriting and loss of program, combination, or song data.
Turn protect off when you wish to write a program or combination, or record a song.
1 Press the [GLOBAL] key.
You will enter Global mode.
2 Press the [P2] key.
The page 2 display will appear.
3 Press the check box for Protect Program, Protect Combination, or Protect Song.
If a box is checked, memory will be protected.
If a box is un-checked, memory will be un-protected (protect is turned off).
If Protect Song is checked to turn it on, the internal sequence data will be write-protected. However, it will be lost when the power is turned off. Be sure to save important song data to a floppy
disk or to an external MIDI device.
Drum kit editing
A drum kit is a collection of settings that specify a drum sample (PCM waveform data) and pitch
and level settings for each of the 88 keys.
The TRINITY series provides 12 drum kits.
A drum kit that you edit in Global mode will sound with the parameter settings of the program
that is currently selected in Program Play mode.
In order for the drum kit you are editing to sound the same later, it must be used with the same
program. This means that after you select a drum kit program in Program Play mode and edit the
drum kit in Global mode, you must go to Program Edit mode and select the drum kit that you
edited as the sound source for that program.
Be aware that editing a drum kit will affect all programs that use that drum kit as their sound
source.
7. Global mode
STEP 3
< Multi-sample programs and drum kit programs >
Programs which use a multi-sample as their sound source are referred to as multi-sample programs, and programs which use a drum kit as their sound source are referred to as drum kit
programs.
< About program parameters >
Just as melodic instruments such as piano, organ, trumpet and strings differ in the way they
are played from percussion instruments such as drums or timpani, multi-sample programs
and drum kit programs use different program parameter settings.
Since it is difficult to change the parameters of a multi-sample program to settings suitable for
a drum kit program, it is best to select a drum kit program in Program Play mode before editing a drum kit in Global mode.
Refer to the separate Voice Name List booklet, and select a drum kit program marked by .
1 Press the [GLOBAL] key.
You will enter Global mode.
2 Press the [P5] key.
Page 5 (Drumkit) will be displayed.
d
51
Page 58

7. Global mode
3 Select Drumkit.
The display will be inverted.
5
7
4 Use the VALUE controller to select the drum kit that you wish to edit. 5 Press Key.
The display will be inverted.
6 Use the VALUE controller to select the note number that you wish to edit.
The settings for that note number will be displayed in the lower part of the LCD. (You can also
select the note number by pressing the ENTER key and playing the note on the keyboard.)
7 Set the parameters for the selected note number.
If you wish to switch between High and Low Drumsamples using velocity, select the desired High
Drumsample and Low Drumsample, and set the BottomVel to 64 (for most people, a note played
with medium force). With this setting, a strongly played note will sound the High Drumsample,
and a softly played note will sound the Low Drumsample.
If you want to sound only one drum sample, set the BottomVel to 1 and select the High Drumsample. With this setting, the High Drumsample will be sounded regardless of the velocity.
The Ex parameter is used when you wish to group several drum samples together to prevent them
from sounding simultaneously. For example since it is impossible for a real drum set to simultaneously produce both a closed hi-hat sound and an open hi-hat sound, you might specify the
same Ex number for the key playing a closed hi-hat and the key playing an open hi-hat sample.
This would prevent the unnatural effect that would occur if these two sounds were played
together.
When you un-check the Assign box, you cannot assign the drum sample and Ex settings to the
key. When you play the key on the keyboard, the sound of the key to the right will be produced a
semitone lower in pitch.
8 As necessary, repeat steps 5 – 7 to create the drum kit.
Since the edited settings are kept in memory as you make them, there is no need to use the Write
operation.
52
Page 59

8. Disk mode
Press the front panel [DISK] key to enter this mode.
Types of floppy disks
The TRINITY can use MS-DOS format 3.5 inch 2DD and 2HD disks. When formatted by the
TRINITY, a 2DD disk will have a capacity of 720 Kbytes (9 sectors/track) and a 2HD disk will
have a capacity of 1440 Kbytes (18 sectors/track).
Floppy disk handling
When handling floppy disks, please observe the following points. If the surface of the magnetic
disk becomes dirty or scratched, loading or saving data on that disk may become impossible.
• Never open the shutter or touch the surface of the magnetic disk.
• Never transport the TRINITY with a floppy disk inserted in the disk drive. Vibration may cause
the heads of the disk drive to scratch the disk, rendering it unusable.
• Never allow a floppy disk to come near a device that produces a magnetic field (television,
computer, computer display, speaker, power transformer, etc.). Doing so may erase any data
recorded on the disk.
• Avoid using or storing floppy disks in locations of high temperature or humidity, in direct sun-
light, or in excessively dusty or dirty locations.
• Do not place other objects on top of a floppy disk.
• After using a floppy disk, replace it in its case.
8. Disk mode
Floppy disk write protect
Floppy disks have a write protect tab that prevents data from being accidentally erased. To “write
protect” the floppy disk (so that data cannot be written or erased), slide the tab to expose the hole.
Slide back the tab to close the hole when you are formatting a floppy disk or saving data on the
disk.
Write protect: lower the tab to open the hole
Inserting a floppy disk
Insert the floppy disk into the disk drive with the label facing up. Push the disk into the drive
until it snaps into place with a click.
Forcing the disk into the drive will cause malfunctions. Insert the disk carefully, and be sure it
enters the drive straight.
Busy indicator
Write permit: raise the tab to close the hole
Eject button
STEP 3
53
Page 60

8. Disk mode
Removing a floppy disk
T o r emove a floppy disk from the disk drive, make sure that the busy indicator located at the side
of the disk drive is unlit, and also make sure that the LCD does not display a message such as
“Loading” or “Saving.” Then press the eject button to remove the disk.
Never remove a floppy disk from the disk drive when the busy indicator is lit. Otherwise, the
internal memory and/or data on the floppy disk may be destroyed.
Busy indicator
Cleaning the disk drive head
If the heads of the disk drive are dirty, errors can occur during saving and loading. The heads of
the disk drive should be cleaned regularly. To clean the heads, use a wet-type 3.5 inch double
sided head cleaning disk. Using a single sided cleaning disk will damage the drive.
Files, directories, and icons
The TRINITY organizes files on disk in a hierarchical structure. The contents of a file (whether it is
a file or a directory, and if a file, what it contains) are indicated not only by its name, but also
graphically in the LCD by an icon. The icon indicates by its shape whether an item is a file or a
directory.
File Directory
In this manual, we refer to items recognizable as a file by MS-DOS as a “DOS file,” and items recognizable as a directory as a “DOS directory.”
The TRINITY distinguishes between types of DOS files by the filename extension of the DOS file.
DOS files with filename extensions other than those shown below will be considered to be Stan-
dard MIDI Files.
Eject button
54
Extension Type
.PCG Program/Combination/Drum kit/Global parameters .SNG Song
.MID Standard MIDI File .EXL MIDI Exclusive data
When data is saved by the TRINITY, one of these four extensions will be automatically added to
the filename, as appropriate for the type of data in the file.
DOS files with any extension other than these four types are considered an undefined file and the
TRINITY will try to load them as a Standard MIDI File. Therefore, do not change these extensions
on a computer.
The files used by the TRINITY have the following structure.
Since .PCG files and .SNG files can be opened and their contents handled separately, they are
Page 61

shown as directory icons in the display.
8. Disk mode
Pre-defined files
DOS file
.PCG file All program
.SNG file
.MID file
.EXL file
DOS file DOS directory
All combination 1 Combination
All drum kit 1 drum kit
bank
1 song
Formatting a floppy disk
Here’s how to format a 3.5 inch floppy disk on the TRINITY. You can also format a disk using an
MS-DOS computer.
When you format a floppy disk, all data on that floppy disk will be lost. Before you format a disk,
make sure that it does not contain important data.
1 Insert the disk that you wish to format into the disk drive. 2 Press tab button 3 (Utility).
The Utility display will appear.
3 Press the page menu button.
The page menu commands will appear.
4 Press the page menu command Format.
A dialog box will appear.
5 Use the text edit button to assign a volume label (a name for the disk).
You can use upper case letters, numbers, and underscore (_) for a volume label.
When you finish assigning the volume label, you will return to the Format Disk dialog box.
6 Press the OK button.
The message “Are you sure?” appears. Press the OK button again, and the floppy disk will be formatted. (The indicator will blink.)
At this time the LCD screen shows “Now Formatting...”
This will require approximately 1 minute 30 seconds, or about two minutes for a 2HD floppy disk.
When formatting is completed, the display will go back to the Utility screen.
Never attempt to remove a floppy disk while it is being formatted.
1 program1 program Bank
1 Combination
Global parameters
Track
1 pattern
STEP 3
55
Page 62

9. Saving data
Writing to internal memory
Saving to floppy disk
9. Saving data
There are three ways in which data such as programs, combinations, drum kits, and sequencer
songs can be saved; writing to internal memory, saving to floppy disk, and MIDI data dump.
Sound data such as programs and combinations can be written into internal memory. For the procedure, refer to page 23 in this manual.
Global settings (settings that affect the entire TRINITY, including drum kit settings) are preserved
in internal memory without the need to use the Write operation.
Sequencer song data that you record will be lost when you turn the power off, so you will need to
either save it to disk or on an external MIDI device.
The types of data that can be saved to floppy disk are; programs, combinations, drum kits, global
parameters, sequencer songs, Standard MIDI File data, and MIDI exclusive data.
The procedure given below shows how to save the program, combination, drum kit, global
parameter, and sequencer song data from internal memory to a floppy disk.
1 Insert a formatted floppy disk into the disk drive.
Page 55 of this manual explains how to format a floppy disk.
2 Press the [DISK] key.
You will enter Disk mode.
3 Press tab key 2 (Save).
The Save display will appear.
4 Press the page menu button.
The page menu commands will appear.
5 Press the page menu command Save All.
A dialog box will appear.
6 Use the text edit button to assign a save destination filename.
The characters that can be used in a filename are; uppercase letters, numerals, and “_” (the underscore character).
When you finish specifying the filename, you will return to the Save dialog box.
7 Press the OK button.
Program, combination, drum kit, and global parameter data in the TRINITY’s internal memory
will be saved as a .PCG file on the floppy disk. Sequencer song data will be saved as a .SNG file.
Saving this data will require at least 20 seconds, and the total time required will depend on the
amount of song data.
When all the data has been saved, the display will go back to the “Save” screen.
If an identically-named file already exists on the floppy disk, you will be asked whether or not you
wish to overwrite the existing file. If it is okay to overwrite, press the OK button. If not, press the
Cancel button.
56
In addition to the Save All command, you can also use the page menu commands Save
Combi/Prog (to save only program and combination data) or Save Song (to save only
sequencer song data). Select the page menu command for the type of data that you wish to
save. However, you cannot save a single Program or a single Combination.
For details refer to “1–2: Save” on page 153 of the Parameter Guide.
Page 63

MIDI data dump
MIDI data dump refers to the process of transmitting the settings of the TRINITY’s internal memory as MIDI exclusive data to a connected MIDI device such as a computer, data filer, or another
TRINITY series instrument.
Here’s how to transmit the program, combination, drum kit, global data, and sequencer song data
from internal memory as a data dump.
1 Connect the TRINITY to a device which is able to receive a MIDI data dump (a data filer, computer,
sequencer, or another TRINITY series instrument, etc.).
If you are transmitting data to another TRINITY series instrument, set the same Global MIDI
channel for both instruments.
2 Press the [GLOBAL] key.
You will enter Global mode.
3 Press the [P2] key.
The page 2 display will appear.
4 Press the page menu button.
The page menu commands will appear.
5 Press the page menu command Dump All.
A dialog box will appear.
6 Press the OK button.
The program, combination, drum kit, global parameter data, and sequencer song data in internal
memory will be transmitted as a data dump.
While a data dump is in progress, be careful not to touch the switches or controls of the TRINITY.
9. Saving data
In addition to the Dump All command, you can also use other page menu commands such as
Dump Program (which dumps program data), Dump Combination (which dumps combina-
tion data), and Dump Song (which dumps only sequencer song data). Select the page menu
command for the type of data that you wish to dump.
For details refer to “2–1: Filter, Protect & Data Dump” on page 136 of the Parameter Guide.
STEP 3
57
Page 64

10. MIDI applications
Connections with MIDI devices and/or a computer
10. MIDI applications
< Connecting a MIDI keyboard/Sequencer/Computer >
Connect the MIDI IN connector to the MIDI OUT connector of the external MIDI
device.
This will allow the TRINITY to be controlled by the external MIDI device (e.g., so
that the TRINITY can be played from an external keyboard, or produce sound under the control of an external sequencer). However in order to connect a computer, you will need a MIDI interface for your computer.
MIDI tone generator/
Sequencer/Computer
< Connecting a MIDI tone generator/
Sequencer/Computer >
Connect the MIDI OUT connector to the MIDI IN connector of the external MIDI device.
This will allow the TRINITY to control the external
MIDI device (e.g., so that the external tone generator
will sound together with the TRINITY, or to allow you
to record on an external MIDI sequencer from the
TRINITY’s keyboard). However in order to connect a
computer, you will need a MIDI interface for your
computer.
Power cable (included)
< AC power connections >
Connect the included power cable to
the AC inlet, and connect the other
end to an AC outlet.
To an AC outlet
< Connecting a powered monitor/
Stereo amp >
For powered monitors, use a speaker system with a
built-in amplifier (such as the separately sold PM-
15). If you are using a stereo amp etc., connect the
output of the TRINITY to the stereo amp connectors which are marked LINE IN or AUX IN or “external input.”
However in some cases it will be more appropriate
to connect the powered monitors to other equipment,
so make connections as dictated by your setup.
If you connect the TRINITY to your stereo
audio amp, be aware that excessive volumes
can damage your speakers. Be careful to
Headphones
avoid excessive volumes.
MIDI OUT
Connector
MIDI keyboard/
Sequencer/
Computer
MIDI IN
Connector
OUTPUT
INPUT
Powered monitor speakers, etc.
58
Page 65

10. MIDI applications
The settings in Global mode will depend on the type of connections and on how you are using the
TRINITY.
< Echo Back and Local Control settings >
If you are recording on an external sequencer while listening to the sequencer playback (i.e., if
you are using the TRINITY both as the keyboard for input and as the tone generator for playback), connect the MIDI IN connector of the TRINITY to the MIDI OUT connector of the external sequencer, and the MIDI IN connector of the external sequencer to the MIDI OUT
connector of the TRINITY.
In this situation, if the Echo Back setting of the sequencer or computer is ON (so that data
received at MIDI IN is re-transmitted from MIDI OUT), you should set the Local Control setting of the TRINITY to OFF (to break the internal connection between the keyboard and the
tone generator).
When you play the keyboard, the musical data will be transmitted to the sequencer or computer, and will then be echoed back to play the tone generator of the TRINITY. Turning the
Local Control setting OFF prevents the TRINITY’s tone generator from sounding each note
twice; once in response to its own keyboard, and a second time in response to the message echoed back from the sequencer.
To turn the TRINITY’s Local Control setting OFF, the Global mode P1 Local Control On check
box should be pressed so that it is un-checked (☞Parameter Guide, page 131).
If you are using the TRINITY by itself, leave Local Control ON. If this is OFF, playing the key-
59
STEP 3
Page 66

10. MIDI applications
Global mode settings
Position settings
On the TRINITY series, you can transpose the pitch, and adjust the way in which velocity and
aftertouch affect the sound. These settings are made in Global mode P1 Position.
Position settings will also significantly affect the way in which MIDI data is transmitted.
For details refer to Parameter Guide page 129 “1–1b: Position.”
When using an external keyboard or sequencer to control the TRINITY (i.e., when using the
TRINITY as a tone generator), select Pre TG.
When using the TRINITY as a master keyboard to control other tone generators, select Post KBD.
When you wish to send MIDI data that includes the Global mode settings:
Set the Position parameter to Post KBD.
The Transpose, velocity, and aftertouch settings will be applied immediately after the keyboard.
Y ou can obtain the effect similar to when the player changes the pitch or velocity. The internal tone
generator will reflect the settings, and the MIDI data to be transmitted will also change according
to the settings.
Transpose=0, Velocity curve=4, and Aftertouch curve=3 will be used for the received data.
When you wish to receive MIDI data that includes the settings:
Set the Position parameter to Pre TG.
The Transpose, velocity, and aftertouch settings will be applied immediately before the tone generator. You can obtain the effect similar to when the pitch, velocity, or aftertouch setting of the tone
generator is changed. The internal tone generator will reflect the settings, and the received MIDI
data will also change according to the settings.
Transpose=0, Velocity curve=4, and Aftertouch curve=3 will be used for the data to be transmitted.
60
Page 67

About MIDI
MIDI channels
Similarly to the way in which a television set operates, the data of a channel can be received when
the receiving device is set to the same channel as the transmitting device. However the way in
which channels are handled differs in each mode.
● In Program Play mode, all data is transmitted and received on the Global MIDI channel.
* The Global MIDI channel is the channel used for transmitting and receiving messages that
correspond to a single action on the TRINITY, such as the keyboard, master effects, or exclusive data. On the TRINITY, the Global MIDI channel is set in Global mode P1.
● In Combination Play mode, combination selections, master effect control, and exclusive data
are transmitted and received on the Global MIDI channel.
When using incoming data to control timbres (select programs, play, adjust volume, etc.) whose
Timbre Mode is set to INT, the MIDI channel specified for each timbre in (Combination Edit
mode P1) is used.
When you play the TRINITY’s keyboard or operate controllers such as the joystick, messages
will be transmitted on the Global MIDI channel, and also simultaneously transmitted on the
MIDI channel of timbres whose Timbre Mode is set to EXT.
● In Sequencer mode, master effect control, and exclusive data are transmitted and received on
the Global MIDI channel.
When using MIDI data to control tracks (by selecting programs, playing notes, setting the volume, etc.) whose Track Status is INT or BOTH, or when transmitting the playback data of
tracks whose Track Status is EXT or BOTH, the MIDI channel specified for each track will be
used (this is specified in Sequencer mode P2).
When you play the keyboard or operate the controllers of the TRINITY, data will be transmitted
on the MIDI channel specified for the track that is currently selected in Sequencer mode.
10. MIDI applications
Note on/off
When you press a note on the keyboard, a MIDI message will be transmitted conveying the keyboard location that you pressed (the note number) and the force with which you pressed the key
(velocity) as a Note On message [9n, kk, vv] (‘n’ is the channel, ‘kk’ is the note number, and’vv’ is
the velocity).
When you release the note, a MIDI Note Off message (8n, kk, vv) will be transmitted. However
there are very few instruments that transmit or receive Note Off velocity. The TRINITY does not
transmit or receive Note Off velocity.
Each time you play the keyboard, the TRINITY will normally transmit a Note On or Note Off
message on the Global MIDI channel, but this will depend on the mode.
Transmission
• In Program Play mode, data from the keyboard will be transmitted only on the Global MIDI
channel.
• In Combination Play mode, data from the keyboard will be transmitted on the Global MIDI
channel, and also on the channels specified for timbres whose Timbre Mode is EXT.
• In Sequence mode, data from the keyboard will be transmitted on the MIDI channel of the cur-
rently selected track.
When the sequencer is playing, Note On/Off data will be transmitted for tracks whose Track
Status is either EXT or BOTH.
Reception
• In Program Play mode, only the Note On/Off data that matches the Global MIDI channel will
be received.
• In Combination Play mode, only the Note On/Off data that matches the channel setting of a
timbre whose Timbre Mode is INT will be received.
• In Sequncer mode, only the Note On/Off data that matches the channel setting of a track
whose Track Status is INT or BOTH will be received.
STEP 3
61
Page 68

10. MIDI applications
Selecting a program
A sound (program) can be selected using MIDI Program Change messages [Cn, pp] (‘pp’ is the
program number that specifies one of 128 programs).
Bank Select messages [Bn, 00, mm](control change #00) and [Bn, 20, bb] (control change #32) (‘mm
is the bank number MSB, ‘bb’ is the bank number LSB, together selecting one of 16384 possible
banks) can be used in conjunction with Program Change messages to select programs from other
banks.
The TRINITY is able to switch program banks in response to a Bank Select message, but the Bank
Select message alone is not sufficient to change the program or bank; the change will take effect
when the next Program Change message is received.
In Program Play mode, the program will change when a Program Change message is received on
the Global MIDI channel. (The program will not change if the TRINITY is in Program Edit mode.)
The program used by each timbre in a combination, or the program used by each track of a song
can be selected by incoming Program Change and Bank Select messages on the channel of the corresponding timbre or track.
For a combination, you can turn Program Change reception on/off for each timbre. For a song,
you can turn Program Change reception on/off for each track.
Program Change reception for the entire TRINITY can be turned on/of f by the Global mode MIDI
Filter setting, and as necessary, you can also turn on/off (enable or disable) selection of combinations by incoming data, or reception and transmission of Bank Select messages.
• If the Enable Combination Change box is un-checked, incoming Program Change messages in
Combination Play mode will not select combinations even if they are received on the Global
MIDI channel.
• If the Enable Bank Select box is un-checked, incoming Bank Select messages will be ignored.
When the TRINITY is being controlled by an external device, this allows you to prevent the
TRINITY’s banks from being changed in an unwanted way (e.g., when the external device handles bank selection in a way different than the TRINITY).
In this case, Bank Select messages will not be transmitted either.
Selecting a combination
In the same way as for programs, combinations can also be selected by incoming MIDI Program
Change and Bank Select messages.
In Combination Play mode, Program Change and Bank Select messages whose channel matches
the Global MIDI channel will select combinations.
Incoming messages on channels other than the Global MIDI channel will select the program for
timbres that have a matching channel setting and a Timbre Mode setting of INT.
Controlling the timbres of a combination
Each timbre in a combination can be independently controlled in many ways, as discussed in the
following sections; “Bank Select messages” — “Effect send levels (Send 1,2),” “Adjusting the tone
color” — “Setting the pitch bend range,” “Turning off all notes of a channel,” and “Resetting all
controllers of a channel.”
Controlling each track of a song
Each track of a song can be controlled in the same way as each timbre of a combination.
Bank Select messages
Refer to “Selecting a program.”
Sustain pedal
A sustain pedal connected to the TRINITY can be operated to turn the Damper on/off. At the
same time, a MIDI Hold message [Bn, 40, vv] (control change #64; ‘vv’ is 127 [7FH] for ON, or 00
for OFF) will also be transmitted.
If the TRINITY receives this message, the Damper will be turned off for’vv’ values of 63 [3FH] or
lower, and turned on for’vv’ values of 64 [40H] or above.
T ransmission and reception of this message can be turned on/of f for each timbr e in a combination.
62
Page 69

Aftertouch
If you play a note on the TRINITY and then press down harder on the keyboard, an aftertouch
effect will be applied. At the same time, MIDI Aftertouch messages [Dn, vv] (‘vv’ = value) will also
be transmitted.
If the TRINITY receives these messages, the aftertouch effect will be applied.
In the Global mode MIDI Filter, overall transmission and reception can be turned on or off. In a
combination, you can specify this individually for each timbre.
There is another type of aftertouch, Polyphonic Key Pressure [An, kk, vv] (‘kk’ = note number, ‘vv’
= value), which applies an effect independently for each note. This message can be received by the
TRINITY as an alternate modulation source, but cannot be transmitted by the keyboard of the
TRINITY. If you wish to use these messages, you will have to use another device to transmit them
or record them on a sequencer. The aftertouch referred to in this manual is Channel Aftertouch.
Using pitch bend
When you move the TRINITY’s joystick in the X direction (to the left or right), pitch bend will be
applied. At the same time, MIDI Pitch Bend messages [En, bb, mm] (‘bb’ = lower byte of the value,
’mm’ = upper byte of the value; a total of 16384 levels, with center value at 8192 [‘bb’ and ’mm’ =
00H, 40H]) will be transmitted.
If the TRINITY receives these messages, pitch bend will be applied. The range (depth) of the
resulting pitch bend can also be set via MIDI (see “Changing the pitch bend range”).
Adjusting the volume
When the function of the assignable pedal is set to “volume” and an expression pedal connected
to the assignable pedal jack is operated, the volume of the TRINITY will be adjusted. At the same
time, MIDI Volume messages [Bn, 07, vv] (control change #07: ‘vv’ = value) will be transmitted.
If the TRINITY receives these messages, the volume will be adjusted. The volume of the TRINITY
is determined by the product of the value of the Volume message and the value of the Expression
message [Bn, 0B, vv] (control change #11: ‘vv’ = value). This means that if the volume does not
increase sufficiently in response to Volume messages, or if there is no sound, transmit a MIDI
Expression message to the TRINITY to reset the Expression value to 127.
● When you select a combination, Volume messages will be transmitted from each timbre whose
Timbre Mode is EXT.
● When you select a song, or press the [RESET] key, Volume messages will be transmitted from
each track whose Track Status is EXT or BOTH.
At this time, the internal volume value will be set to the starting value, and the expression
value will be reset to the maximum value.
● The volume of each track of a sequencer song can be controlled independently. Use Volume
messages to set the initial volume (i.e., as part of the starting settings), and use Expression messages to create changes in volume that are part of the musical data (i.e., as the song progresses).
If you use Event Editing etc. to insert Volume messages into the middle of a track (V olume messages are normally not used within the body of the song), the subsequent portion of that track
may not playback at the intended volume.
By using the Universal Exclusive message Master Volume (refer to “About system exclusive messages”), you can adjust the overall volume without changing the balance between timbres or
tracks.
10. MIDI applications
STEP 3
Applying vibrato (oscillator LFO)
When you move the joystick of the TRINITY in the +Y direction (away from you), vibrato will be
applied. At the same time, MIDI Modulation 1 Depth messages [Bn, 01, vv] (control change #01:
‘vv’ = value) will be transmitted.
If the TRINITY receives these messages, vibrato will be applied.
Applying wah-wah (filter LFO)
When you move the joystick of the TRINITY in the –Y direction (toward you), wah-wah will be
applied. At the same time, MIDI Modulation 2 Depth messages [Bn, 02, vv] (control change #02:
‘vv’ = value) will be transmitted.
If the TRINITY receives these messages, wah-wah will be applied. However the way in which this
message is used will differ between manufacturers (e.g., used for Breath Controller, etc.).
63
Page 70

10. MIDI applications
Adjusting the stereo location (pan)
Effect send levels (send 1,2)
The oscillators, timbres, and tracks of the TRINITY series can be sent to outputs L and R, and
effect sends 1 and 2 (1 and 2 are the effect inputs). The Pan setting determines how the sound is
divided between outputs L and R. (The effect send settings determine the levels sent to 1 and 2.)
Panning for timbres and tracks can be set by MIDI Pan messages [Bn, 0A, vv] (control change #10:
‘vv’ = value, where 00 is left, 64 is center, and 127 is right). If the Pan setting is OFF or PRG, these
messages will not be received.
If a Pan message is received while a note is sounding, the stereo location of the sound will not
change immediately. The new location will apply from the next-played note.
The oscillators, timbres, and tracks of the TRINITY series can be sent to outputs L and R, and
effect sends 1 and 2 (1 and 2 are the effect inputs). The Send 1 and Send 2 settings determine the
levels of the sound sent to 1 and 2. (The Pan settings determine how the sound is divided between
outputs L and R.)
For timbres and tracks, the Send 1 level can be set by MIDI Effect 3 Level messages [Bn, 5B, vv]
(control change #93: ‘vv = value), and the Send 2 level can be set by MIDI Effect 1 Level messages
[Bn, 5D, vv] (control change #91: ‘vv = value). If Send 1 and 2 are set to PRG, these messages will
not be received.
These messages are defined merely for use in adjusting effect levels, so when they are sent to other
instruments, they will not necessarily have the same result.
If these messages are received while a note is sounding, the change in effect send level will not
occur immediately, but will take effect from the next played note.
Turning effects on/off
Independently from the program, combination, and song settings, Global mode P1 allows you to
turn insert effects and master effects E1 (modulation-type) and E2 (reverb/delay-type) on/off. At
the same time, MIDI Effect 2 Level messages [Bn, 5C, vv] (control change #92: ‘vv’ = value, where
00 is OFF and 127 is ON) (for Insert Effects), MIDI Effect 4 Level messages [Bn, 5E, vv] (control
change #94: for master effect E1), and MIDI Effect 5 Level messages [Bn, 5F, vv] (control change
#95: for master effect E2) will be transmitted.
These messages are defined merely for use in turning effects on/off, so when they ar e sent to other
instruments, they will not necessarily have the same result.
These messages are transmitted and received on the Global MIDI channel, and when a message is
received, the respective effect will be turned on/off (‘vv’ of 00 is OFF, and ‘vv’ of 1 or greater is
ON).
These messages can control insert effects only if the effect is ON. (It is not possible to turn on an
effect that is initially off.)
Effect dynamic modulation
Effects can be controlled by selecting a dynamic modulation source and operating that source.
Most of the modulation sources are common to the alternate modulation sources, but MIDI control 1 and 2 are only for dynamic modulation.
● If the assignable pedal function is set to Effect Control 1, the pedal will control the effect whose
modulation source is set to MIDI Control 1. At the same time, MIDI Effect Control 1 messages
[Bn, 0C, vv] (control change #12: ‘vv’ = value) will be transmitted.
When this message is received, the effect whose modulation source is set to MIDI Control 1 will
be controlled.
This message is received for the master effects on the Global MIDI channel.
● The modulation source MIDI Control 2 corresponds to the MIDI Effect Control 2 message [Bn,
0D, vv] (control change #13), and can be used in the same way as Effect Control 1.
In Program Play mode, insert effects can be controlled on the Global MIDI channel. In Combination Play mode, they can be controlled on the MIDI channel of each timbre. In Sequencer mode,
they can be controlled on the MIDI channel of each track.
64
Page 71

Adjusting the tone color
When a MIDI Brightness message [Bn, 4A, vv] (control change #74: ‘vv’ = value) is received, the
tone color will change. For a ‘vv’ value of 64 [40H], there will be no change in the tone. For lower
values the sound will become darker, and for higher values the sound will become brighter (if a
low pass filter is being used).
Since this message edits the cutoff frequency parameter of filters 1A, 1B, 2A, and 2B (in the same
way as Filter Freq in Performance Edit), you can use the Write operation to save the edited sound
into internal memory. (The Write operation can be performed using the panel keys of the TRINITY, or by using the exclusive message Program Write Request.
Since this message has come into use only recently, it may not be implemented on some models of
MIDI synthesizers.
Adjusting the attack time
When a MIDI Attack Time message [Bn, 49, vv] (control change #73: ‘vv’ = value) is received, the
attack time will change. For a value of 64 [40H] there will be no change in the attack time. For
lower values the attack will become faster, and for higher values the attack will become slower.
(However, if the attack time has been set to any value other than 0, sometimes attack may not be
applied.
Since this message edits the attack times of the two Amp EGs (in the same way as Attack Time in
Performance Edit), you can use the Write operation to save the edited sound into internal memory.
Since this message has come into use only recently, it may not be implemented on some models of
MIDI synthesizers.
10. MIDI applications
Adjusting the release time
When a MIDI Release Time message [Bn, 48, vv] (control change #72: ‘vv’ = value) is r eceived, the
release time will change. For a value of 64 [40H] there will be no change in the release time. For
lower values the release will become faster, and for higher values the release will become slower.
Since this message edits the release times of the two Filter EGs and the two Amp EGs (in the same
way as Release Time in Performance Edit), you can use the Write operation to save the edited
sound into internal memory.
Since this message has come into use only recently, it may not be implemented on some models of
MIDI synthesizers.
Editing with RPN messages
RPN (Registered Parameter Number) messages allow settings to be made in the same way for
instruments of different manufacturers. (NRPN (Non-registered Parameter Number) messages
and exclusive messages can be freely used by each instrument manufacturer.)
Editing procedure is as follows.
1 Use RPN (LSB) [Bn, 64, rr] and RPN (MSB) [Bn, 65, mm] messages (control changes #100 and #101:
‘rr’, ‘mm’ = parameter number lower and upper bytes) to specify the parameter.
2 Use Data Entry (MSB) [Bn, 06, mm] and Data Entry (LSB) messages [Bn, 26, vv] (control changes #06
and #38) to specify the value. (‘mm’ and ‘vv’ are the upper and lower bytes, allowing a total of
16384 steps.)
3 You can also use Data Increment [Bn, 60, 00] (control change #96: value fixed at 00) and Data Dec-
rement [Bn, 61, 00] (control change #97: value fixed at 00) messages to increase or decrease the
value in steps of 1.
The TRINITY series receives three types of RPN; tuning, transpose, and changing the pitch bend
range.
STEP 3
65
Page 72

10. MIDI applications
Tuning
Transposing
Setting the pitch bend range
In Sequencer mode, you can use RPN messages to adjust the tuning of each track. In other modes,
you can use RPN messages on the Global MIDI channel to adjust the master tuning parameter of
Global mode P1. The procedure is as follows.
1 Select RPN 01.
Transmit [Bn, 64, 01, 65, 00] (control change #100 with a value of 01, and #101 with a value of 00).
2 Use Data Entry messages to adjust the value.
Make settings using [Bn, 06, mm, 26, vv] (control change #06 and #38). A value of 8192 [mm, vv =
40H, 00H] is normal pitch. A value of 0 is –100 cents, and a value of 16383 [mm, vv = 7FH, 7FH] is
+100 cents.
Only in Sequencer mode, you can use RPN messages to set the transposition for each track. The
procedure is as follows.
1 Select RPN 02.
Transmit [Bn, 64, 02, 65, 00] (control change #100 with a value of 02, and #101 with a value of 00).
2 Use Data Entry messages to adjust the value. Normally, however, only the upper byte can be set.
Make settings using [Bn, 06, mm] (control change #06). A value of 8192 [mm = 64 = 40H] is normal
pitch. A value of 6656 (mm = 52 = 34H) is –12 semitones, and a value of 9728 (mm = 88 = 58H) is
+12 semitones.
Only in Sequencer mode, you can use RPN messages to adjust the pitch bend range for each track.
The procedure is as follows.
1 Select RPN 00.
Transmit [Bn, 64, 00, 65, 00] (control change #100 with a value of 00, and #101 with a value of 00).
2 Use Data Entry messages to adjust the value. Normally, however, only the upper byte can be set.
Make settings using [Bn, 06, mm] (control change #06). A value of 00 (mm = 00) sets a pitch bend
range of 0. A value of 1536 (mm = 12 = 0CH) sets a pitch bend range of +12 semitones (1 octave).
The TRINITY series allows negative values to be set as well, but only positive values can be set
using RPN messages.
66
If a note does not stop
If for some reason a note “sticks” (i.e., continues to sound without stopping), pressing the [RESET]
key or moving to a different mode will normally solve the problem. If the note was played via
MIDI, disconnecting the MIDI cable will stop the note.
MIDI transmits a message known as Active Sensing [FE] at regular intervals. This allows a device
that receives this message to know that an external MIDI device is connected. If no MIDI messages
are received for a certain length of time, the receiving device will decide that the connection has
been broken, and will turn off notes and reset controller values that were received via MIDI.
Turning off all notes of a channel
When a MIDI All Note Off message [Bn, 7B, 00] (control change #123, data of 00) is received, all
notes currently sounding on that channel will be turned off (as though you had released them on
the keyboard).
MIDI All Sound Off message [Bn, 78, 00] (control change #120, data of 00) will stop all sound
being produced on that channel. While an All Note Off message allows note decays to r emain, the
All Sound Off message will stop the sound immediately.
These messages are only for use in emergency situations, and are not used while you play, etc.
Resetting all controllers of a channel
When a MIDI Reset All Controller message [Bn, 79, 00] (control change #121, data of 00) is
received, the values will be reset for all controllers currently being used on that channel.
Page 73

About system exclusive messages
Manufacturers are free to use system exclusive messages in any way they please. Thus, these messages are used mainly to transmit and receive sound data or editing data for parameters that are
unique to a given model of instruments.
On the TRINITY series, the system exclusive message format is [F0, 42, 3n, 3B, ff, ..., F7] (n: Global
MIDI channel, ff: function code [message type]).
However some exclusive messages are defined to have a specific purpose common to all manufacturers. These are called universal system exclusive messages.
The TRINITY series uses the following four universal system exclusive messages.
● When an Inquiry Message Request message [F0, 7E, nn, 06, 01, F7] is received, the TRINITY
will respond with an Inquiry Message [F0, 7E, nn, 06, 02, (nine bytes), F7] that means “I am a
Korg TRINITY series, system version…”.
● A Master Volume message [F0, 7F, nn, 04, 01, vv, mm, F7] (vv: lower byte of value, mm: upper
byte of value; together expressing 16384 steps) can adjust the overall volume while preserving
the volume balance between timbres of a combination, or between tracks of a song.
● A Master Balance message [F0, 7F, nn, 04, 02, vv, mm, F7] (vv: lower byte of value, mm: upper
byte of value; together expressing 16384 steps, where 8192 is the initial setting, and lower values will move increasingly to the left) can adjust the overall pan position while preserving the
relative pan position between timbres in a combination or between tracks in a song.
For details on the above messages, refer to MIDI Implementation (☞Parameter Guide, page 165–
183).
Transmitting sound data settings (Data Dump)
Program, combination, drum kit, sequencer, and global settings can be transmitted as MIDI exclusive messages. Transmitting such settings as an exclusive message is referred to as a Data Dump.
When a data dump is performed, the sound or setting data can be stored on an external device, or
can rewrite the settings of another TRINITY series instrument.
There are three types of data dumps, as follows.
● The Global mode Data Dump operation (page menu command) can be used to dump various
internal memory data.
When a TRINITY series instrument receives this data, its internal memory will be directly
overwritten, so there will be no need to use the Write operation.
● When you select a combination in Combination Play mode while the Global mode P2 Enable
Exclusive is checked, data for one combination will be transmitted. When you move from Program Play mode to Program Edit mode, data for one program will be transmitted. These
dumps transmit the current data (the data in the edit buffer) of the combination or program
that is selected at that time.
When a TRINITY series instrument receives this data, the data will be received into the edit
buffer, so if you want to save it in internal memory, you will need to use the Write operation.
● While the Global mode P2 Enable Exclusive parameter is checked, the above two types of data
dumps can also be transmitted in response to a Dump Request message.
These messages are transmitted and received on the Global MIDI channel.
10. MIDI applications
STEP 3
Editing sounds, etc.
By using MIDI exclusive messages and data dumps, you can rewrite all programs or individual
programs. By using Parameter Change or Drumkit Parameter Change messages, you can edit
individual parameters as follows.
Using parameter changes
• In Program Play mode, you can edit the 8 performance editor parameters.
• In Program Edit mode, you can edit any parameter except for the program name.
• In Combination Edit mode, you can edit any parameter except for the combination name.
Using drumkit parameter changes
• In Global mode, you can edit only the drum kit.
Since Global parameters (other than drum kit parameters) or sequencer song data cannot be
edited individually, this data is transferred using a data dump.
First, check the Global mode P2 Enable Exclusive setting so that the Exclusive data can be trans-
67
Page 74

10. MIDI applications
About performance editing
mitted/received. When you then change modes on the TRINITY, a Mode Change will be trans-
mitted. When you change programs or combinations, data for one program or one combination
will be transmitted together with the Program Change message. When you edit individual parameters, Parameter Change or Drumkit Parameter Change messages will be transmitted.
When these messages are received, the same edit will be performed as occurred on the transmitting TRINITY.
When MIDI exclusive data is received and has been processed, a Data Load Completed message
will be transmitted. The controlling master device should not transmit the next data until it
receives this message (or until sufficient time has elapsed).
Data dumps of all programs or all combinations in the internal memory that you execute in Global
mode are sent directly into the internal memory of the receiving device, so there is no need to use
the Write operation. However data dumps of 1 program or 1 combination in the edit buffer, (or
parameter change edits) affect only the data in the edit buffer, and will not be stored in internal
memory unless you write the data. If you re-select the program or combination, this data will be
lost.
To write data, you can either press the [REC/WRITE] key, or use a MIDI exclusive Program Write
message or Combination Write message.
The Performance Editor allows you to edit main parameters while still remaining in Program Play
mode. While the Global mode P2 Enable Exclusive is checked and the unit is ready for transmission/reception of the Exclusive data, when you use the Performance Editor, exclusive parameter
change messages will be transmitted at the same time that the sound changes.
When these messages are received, performance editing will take place on the receiving device as
well. After editing, you can write the data to store it in internal memory or on a floppy disk.
These messages are transmitted and received on the Global MIDI channel.
Connecting the TRINITY to an external device for use as a
multi-timbral tone generator
The TRINITY can be connected to an external device and played as a multi-timbral tone generator
in the following ways.
● MIDI messages from the external device will play a combination. (The TRINITY will function
as an 8 timbre tone generator.) The overall settings of the TRINITY (programs, levels, effects,
etc.) can be selected by using Program Change messages to select combinations.
● MIDI messages from the external device can play a song. (The TRINITY will function as a 16
timbre tone generator .) However if the Clock Sour ce is INT, it will not be possible to select overall settings.
● MIDI Clock messages from the external device can be used to control playback of the TRIN-
ITY’s sequencer (set the Clock Source of the TRINITY’s sequencer to EXT). (Refer to “Synchronizing the sequencer playback.”) The overall settings of the TRINITY can be selected by using
Song Select messages to select songs.
Synchronizing the sequencer playback
In Sequencer mode, the TRINITY’s sequencer can playback in synchronization with external
devices. The Global mode Clock Source setting will determine whether the TRINITY will be the
master (the controlling device) or the slave (the controlled device).
● If the P1 MIDI Clock parameter in Global mode is set to Internal, the TRINITY will be the mas-
ter.
Playback data from the TRINITY will playback and control the internal tone generator. Tracks
for which the T rack Status is EXT or BOTH will transmit their data via MIDI, so that tone gener ators or synthesizers connected to MIDI OUT will also play. Since exclusive data cannot be
recorded on the TRINITY’s sequencer, you will need to use a data dump if the slave device is
another TRINITY. If the slave device is a different model, use the data filter function of Disk
mode.
● If the P1 MIDI Clock parameter in Global mode is set to External, the TRINITY will be the
slave.
It will no longer be possible to control the TRINITY’s own sequencer from the front panel; it
will be controlled by the external device connected to MIDI IN. When the external sequencer is
68
Page 75

10. MIDI applications
played back, the TRINITY’s sequencer will synchronize to the clock of the external sequencer,
so you will need to set the time signature and starting measures of the two sequencers to match
beforehand. Even if the MIDI Clock is set to External so that the sequencer is controlled from
outside, tracks whose Track Status is EXT or BOTH will still transmit their data.
Recording playback data from an external sequencer
There are two ways in which you can playback an external sequencer and record its playback data
on the TRINITY’s sequencer.
● Set the P1 MIDI Clock in Global mode to Internal. Begin recording on the TRINITY, and then
start playback on the external sequencer to record MIDI messages “asynchronously.”
The playback data sent via MIDI will simply be recorded just as it arrives, so the song can be
later played back correctly by the TRINITY’s sequencer , but ther e will be no measur e divisions,
and it will be difficult to edit the data later.
● Set the P1 MIDI Clock in Global mode to External. In this method, the time at which recording
begins and the tempo etc. are determined by the external sequencer. Since recording will take
place in synchronization, measure divisions will be maintained. (However you will still need to
set the time signature before recording.) However tempo changes that occur during playback
will not be recorded, so you will have to insert tempo change data later . This method is used for
normal multitrack recording.
About GM
If a synthesizer is GM compatible, you can use any programs or voices regardless of the manufacturer or model. Refer to “Playback a GM Score (GM music data)” on page 74 for more information
on playing back a gm score.
About Standard MIDI Files
Standard MIDI File (SMF) is a disk data format that makes it possible to exchange sequencer playback data on floppy disk, regardless of the manufacturer or model of instrument that created the
data. Each song occupies one file. On the TRINITY, you can select either format 0 or format 1
when saving a Standard MIDI File in Disk mode.
● When data saved by the TRINITY in format 1 is loaded into another device, the track assign-
ments may be “skewed” from the original tracks. This is due to the fact that tracks which contain no playback data are omitted, and other tracks move up to take their place. It has no effect
on the playback.
● When data saved by another device in format 1 is loaded into the TRINITY, the track assign-
ments may be “skewed” from the original tracks. This is due to the fact that tracks which contain no playback data are omitted, and other tracks moved up to take their place. It has no effect
on the playback.
Sequence data that is saved in the TRINITY’s own format will contain patterns and mor e detailed
settings that are not included in a Standard MIDI File. When exchanging sequence data between
different instruments of the TRINITY series, it is recommended that you save sequence data in
the TRINITY series format.
STEP 3
69
Page 76

11. When you want to…
Playback the TRINITY to control other MIDI equipment
Receive Program Change and Bank Select messages in
Combination Play mode to select combinations and timbre programs
11. When you want to…
The MIDI messages transmitted by the TRINITY’s keyboard or contr ollers (joystick, etc.) can play
external tone generators, or record data on external sequencers.
The MIDI data that is transmitted by the TRINITY depends on the mode.
In Program Play mode, all data will be transmitted on the Global MIDI channel.
In Combination Play mode, all data will be transmitted on the Global MIDI channel, and in addi-
tion, timbres whose Timbre Mode setting (settable independently for each timbre) is set to EXT
(External) will simultaneously transmit data according to their own settings (transpose and MIDI
channel settings). For each type of data, you can specify whether it will or will not be transmitted.
In Sequencer mode, all data will be transmitted on the channel selected for each track in P1 (for
tracks whose T rack Status is set to either EXT or BOTH). (Data transmitted during sequencer playback will be discussed later.)
When a Program Change or Bank Select message is received on the Global MIDI channel, the combination will change. Messages on other MIDI channels will select programs for timbres (whose
Timbre Mode is INT) within the combination whose channel matches the channel of the incoming
message. This reception status can be changed as follows.
If in Global mode the Combination Change setting is un-checked (the above paragraph assumed
that it was checked), the combination will not change even if Program Change and Bank Change
messages are received on the Global MIDI channel. Instead, any timbres with a matching MIDI
channel (and a Timbre Mode setting of INT) will change programs.
You can specify for each timbre in a combination whether or not it will receive Program Change
and Bank Select messages. For example if two timbres (on the same MIDI channel) are set to different programs, two different sounds will be play for each note, but if a Program Change is
received they will both change to the same program. However if you set one of these timbres so
that it will not receive Program Changes, only the other timbre will change programs.
This setting is made in Combination Edit mode P4.
70
Connect a computer etc. and use it to store TRINITY series
sound data and settings
This can be done using MIDI Data Dump.
Various types of sound data and settings can be transmitted and received using a MIDI exclusive
data dump.
The following types of data can be dumped: program, combination, drumkit, some global parameters, and song data. You can transmit all the data at once, in banks, or in individual units.
Data dump transmissions are performed in Global mode.
When you change a combination, data of that combination will be transmitted. When you enter
Program Edit mode or use the Performance Editor, data of that program will be transmitted.
Data dumps can be received only if the Global mode Enable Exclusive setting is checked. However data dumps can be received whether or not this setting is checked as long as you are in the
data dump transmission page (Global mode P2 page menu).
Data dumps are transmitted and received on the Global MIDI channel.
Page 77

11. When you want to…
Edit parameters via MIDI
You can edit the parameters of the TRINITY using Parameter Change exclusive messages.
If Global mode Enable Exclusive is checked, parameter change messages will be transmitted when
you edit in Combination Edit mode or Program Edit mode, or when you use the performance editor.
Parameter Change messages contain the number of the parameter, and the curr ent value. Another
TRINITY series instrument that receives these messages (if it is receiving exclusive data) will perform the corresponding edit on its own data.
Since edits are performed on the data in the edit buffer, they are not stored into internal memory
unless you write the data. Data can be written in the usual way by either using the [REC/WRITE]
key or a writing command, or by using a Write Request exclusive message.
If the Global mode Enable Exclusive setting is checked, editing a drumkit in Global mode P5 will
cause Drum Parameter Change messages to be transmitted. These are essentially the same as
Parameter Change messages, but the changes will be saved in internal memory without the need
for the Write operation.
Use the TRINITY’s sequencer to control connected MIDI
equipment
Musical data recorded on the TRINITY’s sequencer can play the internal tone generator, and can
in addition play external tone generators or be recorded on external sequencers.
Tracks whose Track Status is set to EXT or BOTH will transmit the data recorded on them via
MIDI. Of this data, external tone generators will receive (and play) the data whose channels match
their own MIDI channel setting.
You can also control an external sequencer (start/stop and tempo, etc.) from the TRINITY.
When an external sequencer set to operate on an external clock receives this control data, it will
playback its recorded data.
Use the TRINITY as a multi-timbral tone generator played
by a connected sequencer
MIDI messages transmitted from an external sequencer can play the TRINITY as a multi-timbral
tone generator.
Tracks whose Track Status is INT or BOTH will sound in response to incoming MIDI data whose
channel matches their own. This means that musical data containing multiple parts each on their
own MIDI channel can play the TRINITY as a multi-timbral tone generator.
An external sequencer can also control the TRINITY’s internal sequencer (start/stop and tempo,
etc.).
When the Global mode MIDI Clock setting is External, the internal tempo setting will be ignored,
and the recorded sequence data of the internal sequencer will playback in synchronization with
control messages received from outside.
Tune the TRINITY
Use the Global mode Master Tune setting.
1 Press the [GLOBAL] key to enter Global mode. 2 Press the [P1] key. 3 Select Master Tune. 4 Use the VALUE controllers to set the value.
The setting is made in units of a cent, and the Hz setting (the frequency of A4) will also be displayed.
71
STEP 3
Page 78

11. When you want to…
Restore the factory sounds and settings
Adjust the contrast of the LCD screen
Use a pedal switch to select programs or combinations
In Disk mode, load the preload data from the included floppy disk.
1 Insert the included floppy disk into the disk drive. 2 Press the [DISK] key to enter Disk mode. 3 Press the tab 1 button (Load). 4 Select “PRELOAD1.PCG” or “PRELOAD1.SNG”. 5 Press the page menu button. 6 Select Load Selected. 7 Check the check box. (This will cause both sound data and playback data to be loaded.) 8 Press the OK button, and data loading will begin. 9 In a half a minute or so, loading will end, and the display will indicate Completed.
Press the OK button to exit the page menu.
Use the rear panel contrast knob to adjust the contrast.
1 Connect a pedal switch to the rear panel. 2 Press the [GLOBAL] key to enter Global mode. 3 Press the [P1] key. 4 In Foot Pedal/Foot Switch Assign, select Foot Switch. 5 Select either Program Up or Program Down. 6 Move to Program Play mode or Combination Play mode. 7 Each time you press the pedal switch, the program or combination will change.
* If the polarity of the switch pedal is incorrect, change the Foot Switch Polarity setting located
below Foot Switch.
72
Adjust the way that velocity affects the sound
1 Press the [GLOBAL] key to enter Global mode. 2 Press the [P1] key. 3 In Curve, select Velocity. 4 Specify the velocity curve.
4 is standard. For lower numbers, the sound will not change unless you play strongly. For
higher numbers, the sound will change significantly even if you play normally. 7 and 8 are stable for medium-strength notes.
* This setting affects the operation of the entire instrument.
* Each program has parameters that adjust the change produced by velocity (playing
strength). Editing these will affect the way in which the change occurs. These settings are
made in Program Edit mode, and can be made independently and in detail.
Simultaneously play two or more programs
A combination allows you to simultaneously play two or more programs in a variety of ways.
Here’s how to make settings for a “layer.”
1 Press the [COMBI] key, and then press the [EDIT] key to enter Combination Edit mode. 2 Press the [P1] key. 3 Press the tab 1 button (Timb Param 1). 4 Select a timbre on which you will play one of the desired programs, and select the bank and
program number for that program.
5 In the same page, set Timb Mode to INT, and set the MIDI channel to Gch (Global MIDI chan-
nel).
6 Press the tab 2 button (Timb Param 2) and adjust the Volume in that page. As necessary, adjust
Pan, Send 1, and Send 2 as well.
7 Press the [P3] key. 8 Press the tab 1 button (Key Zone), and set the Top Key to G9, the Bottom Key to C–1, and the
Top Slope and Bottom Slope to 0.
Page 79

11. When you want to…
9 Press the tab 2 button (Vel Zone), and set the Top Vel to 127, the Bottom Vel to 1, and the Top
Slope and Bottom Slope to 0.
0 As desired, make other settings for the timbre.
A Repeat steps 4 – 0 to make settings for other timbres, for as many programs as you want to
play together.
B Play the keyboard, and the programs that you specified here will sound simultaneously.
Play different sounds in the left and right hands
A combination allows you to simultaneously play two or more programs in a variety of ways.
Here’s how to make settings for a “split.”
The procedure is the same for the previous section on “Simultaneously play two or more programs,” but in step
to divide the different sounds (the upper limit and lower limit for which each program will
sound). Set the Top Slope and Bottom Slope to 0.
8 , set the Top Key and Bottom Key to the keyboard location where you want
Change the sound
In Program Edit mode you can edit the various parameters to change the sound or create your
own sounds. For details refer to the Parameter Guide.
You can also make simple edits in Program Play mode, without having to enter Program Edit
mode. In Program Play mode, the eight sliders displayed in the lower half of the screen are
assigned to major parameters used to adjust the sound. By adjusting these you can change the
sound in various ways, and this is an easy way to adjust the tone. When you finish editing the
sound, use the Write operation to save the data into memory.
Save a sound that you create
An edited program (sound) will be lost if you select a different program or turn the power off. If
you wish to keep an edited program or combination, you must write it into internal memory.
There are two ways to write data.
One is to select Update Program (Combination) from the page menu of Program Play mode or
Combination Play mode, so that the edited data will be written into the currently selected program number or combination number.
The other is to select Write Pr ogram (Combination) from the page menu of Program Edit mode or
Combination Edit mode, and write the data into the specified program number or combination
number.
You can also press the [REC/WRITE] key to write a program or combination. This will write the
data into the currently selected program number or combination number. Before you can write
data, you must un-check the Global mode P2 setting Protect Program or Protect Combination.
Use the TRINITY as a MIDI data filer
MIDI exclusive data can be received from an external device and saved on a floppy disk (the Data
Filter function). This is done by selecting the Disk mode P1 menu page item Save Exclusive.
STEP 3
73
Page 80

11. When you want to…
Playback a GM Score (GM music data)
The TRINITY is not GM compatible, but can playback a GM score if you load the appropriate
sound data and sequencer reset data from the included floppy disk.
From the included floppy disk, load GENERAL.PCG and GENERAL.SNG. Since the two files
have the same filename, checking the check box in the loading display will cause them to be
loaded together.
When this data is loaded, program bank A will contain sounds in the same arrangement as GM,
program bank B will contain the same drum sounds as GM, the global settings will be initialized
appropriately for GM, and sequencer song0 will be initialized for GM. This completes the preparations.
There are two ways to playback a GM score. One way is to load a GM score that was saved as SMF
data into the TRINITY and play it back using the internal sequencer. The other way is to use an
external sequencer to play back the GM data for performance on the TRINITY. In either case, use
song0 of Sequencer mode.
Each time a song finishes playing back, press the [RESET] key to initialize the settings of each
track.
74
Page 81

12. Troubleshooting
Problem Action
Power does not come on when the power
switch is pressed.
Power is on but nothing appears in the LCD. • Is the rear panel CONTRAST knob adjusted?
Can’t input data correctly using touch-view
operation.
No sound.
Some keys produce sound, others do not.
Sound does not stop.
Can’t control via MIDI.
Can’t write programs or combinations. • Is the Global mode P2 Protect setting un-checked?
Playing the keyboard does not produce the
specified drum sound.
In Combination Play mode, can’t use MIDI
Program Changes to select combinations.
In Combination Play mode, can’t use MIDI
Program Changes to select programs.
In Combination Play mode, certain keys pro-
duce no sound.
Can’t select the screen pages for Oscillator 2,
Filter 2, or Amp 2.
The selected song does not playback.
Can’t record on the sequencer.
Can’t format a floppy disk.
Can’t save data to a floppy disk.
Can’t load data from a floppy disk.
• Is the power cable connected to an AC outlet?
• Did your finger move between the time when you pressed the button and when you
released the button?
• Are you using your fingertip to operate the touch-view panel?
• Is the sensitivity of the touch panel adjusted correctly? (Use the Global mode P1
page menu command to make adjustments.)
• Are connections made correctly to your amp, mixer, or headphones?
• Is your amp or mixer turned on and set correctly?
• Is the volume raised?
• Is the Global mode P1 Local Control On setting checked?
• In Program Play mode, does the MIDI channel of the data being transmitted from an
external device match the Global MIDI channel of the TRINITY?
• Are you playing keys that produce no sound because of their Split settings (keyboard assignments)?
• Is the Global mode P1 Note Receive parameter set to All?
• Is the Program Edit mode P1 Hold setting un-checked?
• Is the Global mode P1 Sustain Pedal Polarity setting correct?
• For an oscillator whose amp EG Sustain Level is set above 0, is the Delay Time set
to other than Key Off? (Program Edit mode P1–2)
• Are the MIDI cables connected correctly?
• Are settings made so that the MIDI data is being received on the same channel on
which the transmitting device is sending it?
• Is the Global mode P2 Filter setting checked?
• Is the Global mode P1 Key Transpose setting at +00?
• Is the Octave set to 8'?
• Is the Enable Combination Change setting checked in Global mode P2 Filter?
• Is the Enable Program Change setting checked in Global mode P2 Filter?
• Are the key zone parameters in Combination Edit P3 set to produce key splits?
• Is the currently selected program set to double mode?
• Does the song contain playback data?
• Is the Global mode P1 MIDI Clock setting set to Internal?
• If you are using an external clock source, is MIDI Clock set to External, and the
external device correctly transmitting MIDI Clock messages?
• Are the Sequencer mode P2–2(3) Track Status settings set to either INT or BOTH?
• Is the Global mode P2 Protect setting Protect Song un-checked?
• Is the remaining amount of memory at 0%?
• Is the floppy disk a 3.5 inch 2DD or 2HD?
• Is the floppy disk inserted correctly?
• Is the write protect tab of the floppy disk covering the hole in the “write permit” posi-
tion?
• Is the floppy disk inserted correctly?
• Is the floppy disk formatted?
• Is the write protect tab of the floppy disk covering the hold in the “write permit” posi-
tion?
• Is the floppy disk inserted correctly?
• Does the floppy disk contain data?
• Is the Global mode P2 Protect setting un-checked for the type of data that you wish
to load?
12. Troubleshooting
STEP 3
75
 Loading...