

Page 1

MAN0010144
User Manual
1E
Page 2

The lightning flash with arrowhead
symbol within an equilateral triangle, is intended to alert the user to
the presence of uninsulated “dangerous voltage” within the prod-
uct’s enclosure that may be of sufficient magnitude to constitute a risk of electric
shock to persons.
Le symbole d’éclair dans un triangle équi latéral
est destiné à avertir l’utilisateur de la présence
d’une tension dangereuse non isolée au sein du
produit. Cette tension est suffisante pour constituer un risque d’électrocution.
Der Blitz in einem gleichwinkligen Dreieck bedeutet, dass das Gerät nicht isolierte Spannungen
erzeugt, die einen Stromschlag verursachen können.
La freccia all’interno di un triangolo equilatero avverte l’utente che all’interno del prodotto
sono presenti elementi “con tensione elettrica
pericolosa”, dall’intensità sufficiente a indurre
uno shock elettrico alle persone.
El símbolo del rayo significa que existen voltajes peligrosos y sin aislar en el interior de la
unidad, que pueden ser de magnitud suficiente
para constituir un riesgo de electrocución para
las personas.
在等边三角形内带箭头的闪电标志旨在提醒用户,
产品的机壳内存在无绝缘的“危险电压”,足以对
人身构成触电危险。
Das Ausrufezeichen in einem gleichwinkligen Dreieck soll den Anwender auf wichtige
Bedienhinweise aufmerksam machen, die in der
beiliegenden Dokumentation enthalten sind.
Il punto esclamativo all’interno di un triangolo equilatero avverte l’utente della presenza di
importanti istruzioni relative al funzionamento
e alla manutenzione nella documentazione che
accompagna il prodotto.
El signo de admiración indica al usuario que existen instrucciones de funcionamiento y mantenimiento importantes en el manual que acompaña
al producto.
在等边三角形内带惊叹号的标志是提醒用户,设备
附带的文件资料内有重要的操作和维护说明。
This symbol is intended to identify
Class II equipment with functional
earthing (grounding).
Ce symbole désigne du matériel de
classe II à double isolation (fonction-
nelle et matérielle).
Dieses Symbol weist auf ein Gerät der Schutzklasse II mit Funktionserde hin.
Questo simbolo identifica i dispositivi di Classe II
predisposti con la messa a terra.
Este símbolo se utiliza para identificar equipo
Class II que dispone de toma de tierra funcional.
左边标志识别带功能性接地的等级II设备。
この記号は、機能接地接続を備えているクラスⅡ機
器で あることを示 すも ので す。
The exclamation point within an
equilateral triangle is intended to
alert the user to the presence of im-
portant operating and maintenance
(servicing) instructions in the litera-
ture accompanying the product.
Le point d’exclamation dans un triangle équilatéral avertit l’utilisateur de la présence d’importantes consignes de manipulation ou d’entretien
dans la documentation accompagnant ce produit.
Page 3

Important safety instructions
1. Read these instructions.
2. Keep these instructions.
3. Heed all warnings.
4. Follow all instructions.
5. Do not use this apparatus near water.
6. Clean only with dry cloth.
7. Do not block any ventilation openings. Install
in accordance with the manufacturer’s instructions.
8. Do not install near any heat sources such as
radiators, heat registers, stoves, or other apparatus (including amplifiers) that produce
heat.
9. Do not defeat the safety purpose of the po-
larized or grounding-type plug. A polarized
plug has two blades with one wider than the
other. A grounding type plug has two blades
and a third grounding prong. The wide blade
or the third prong are provided for your safety. If the provided plug does not fit into your
outlet, consult an electrician for replacement
of the obsolete outlet.
10. Protect the power cord from being walked on
or pinched particularly at plugs, convenience
receptacles, and the point where they exit
from the apparatus.
11. Only use attachments/accessories specified
by the manufacturer.
12. Use only with the cart, stand, tripod, brack-
et, or table specified by the manufacturer, or
sold with the apparatus. When a cart is used,
use caution when moving the cart/apparatus
combination to avoid injury from tip-over.
▪ The ventilation should not be impeded by
covering the ventilation openings with items,
such as newspapers, table-cloths, curtains,
etc.
▪ No naked flame sources, such as lighted can-
dles, should be placed on the apparatus.
▪ Do not install this equipment in a confined
space such as a box for the conveyance or
similar unit.
▪ WARNING – This apparatus shall be connect-
ed to a mains socket outlet with a protective
earthing connection.
▪ Turning off the standby switch does not com-
pletely isolate this product from the power
line, so remove the plug from the socket if
not using it for extended periods of time,
or before cleaning. Please ensure that the
mains plug or appliance couple remains
readily accessible.
▪ Mains powered apparatus shall not be ex-
posed to dripping or splashing and that no
objects filled with liquids, such as vases, shall
be placed on the apparatus.
▪ Install this product near the wall socket and
keep the power plug easily accessible.
▪ The marking plate is located at the bottom
of the instrument. The model number, serial
number, power requirements, etc., are located on this plate.
13. Unplug this apparatus during lightning
storms or when unused for long periods of
time.
14. Refer all servicing to qualified service per-
sonnel. Servicing is required when the apparatus has been damaged in any way, such as
power-supply cord or plug is damaged, liquid
has been spilled or objects have fallen into
the apparatus, the apparatus has been exposed to rain or moisture, does not operate
normally, or has been dropped.
Serial number
Please record the model number, serial number, and date of purchase below. Keep this
manual, as use these information as a record
of your purchase.
Model ________________________________
Serial No. _____________________________
Purchase Date ________________________
Page 4

IMPORTANT NOTICE TO CONSUMERS
This product has been manufactured according to strict specifications and voltage requirements that are applicable in the country
in which it is intended that this product should
be used. If you have purchased this product
via the internet, through mail order, and/or
via a telephone sale, you must verify that this
product is intended to be used in the country
in which you reside.
WARNING: Use of this product in any country
other than that for which it is intended could
be dangerous and could invalidate the manufacturer’s or distributor’s warranty.
Please also retain your receipt as proof of
purchase otherwise your product may be disqualified from the manufacturer’s or distributor’s warranty.
NOTICE REGARDING DISPOSAL (EU ONLY)
If this symbol is shown on the product,
manual, battery, or package, you must
dispose of it in the correct manner to
avoid harm to human health or damage to the environment. Contact your
local administrative body for details
on the correct disposal method. If
the battery contains heavy metals in
excess of the regulated amount, a chemical
symbol is displayed below the symbol on the
battery or battery package.
In case of electromagnetic radiations a temporary deterioration of the quality of audio
performances may occur. A deterioration
that might arise can be a sound signal emitted. This will stop when the electromagnetic
disturbance ceases.
THE FCC REGULATION WARNING (FOR USA)
This equipment has been tested and found
to comply with the limits for a Class B digital device, pursuant to Part 15 of the FCC
Rules. These limits are designed to provide
reasonable protection against harmful interference in a residential installation. This
equipment generates, uses, and can radiate
radio frequency energy and, if not installed
and used in accordance with the instructions,
may cause harmful interference to radio communications. However, there is no guarantee
that interference will not occur in a particular installation. If this equipment does cause
harmful interference to radio or television reception, which can be determined by turning
the equipment off and on, the user is encouraged to try to correct the interference by one
or more of the following measures:
• Reorient or relocate the receiving antenna.
• Increase the separation between the equipment and receiver.
• Connect the equipment into an outlet on a
circuit different from that to which the receiver is connected.
• Consult the dealer or an experienced radio/
TV technician for help.
If items such as cables are included with this
equipment, you must use those included
items.
Unauthorized changes or modification to this
system can void the user’s authority to operate this equipment.
DECLARATION OF CONFORMITY (FOR USA)
Responsible Party: KORG USA INC.
Address: 316 SOUTH SERVICE ROAD, MELVILLE
Telephone: 1-631-390-6500
Equipment Type: STAGE VINTAGE PIANO
Model: SV2-73, SV2-73S, SV2-88, SV2-88S
This device complies with Part 15 of FCC Rules.
Operation is subject to the following two conditions: (1) This device may not cause harmful
interference, and (2) this device must accept
any interference received, including interference that may cause undesired operation.
PERCHLORATE (CALIFORNIA, USA ONLY)
Perchlorate Material – special handling may
apply. See
perchlorate
www.dtsc.ca.gov/hazardouswaste/
Page 5

|iii
Table of Contents
THE PIANO ......................................................... 1
Introduction ........................................................3
Welcome aboard! .......................................................3
Before starting to play… .................................................3
Main Features ..........................................................5
Real eXperience ........................................................8
Valve Reactor Technology ...............................................9
Controls and connections ............................................10
Front panel ........................................................... 10
Rear panel .............................................................11
Making the connections ................................................ 13
Turning the SV‑2 on .................................................15
Turning the power on and off ........................................... 15
Adjusting the master volume ........................................... 16
Listening to the demos ................................................. 17
English
Playing the sounds ..................................................18
What do we mean by ‘sound’? ........................................... 18
Factory and favorite sounds ............................................ 18
Selecting the factory sounds ........................................... 19
Selecting the favorite sounds ...........................................20
The sounds ........................................................... 21
Using the effects ...................................................26
The effects ...........................................................26
Editing the effects .....................................................27
Saving or resetting the changes ......................................32
Recalling the original settings ...........................................32
Switching to a different sound or effect while editing ......................32
Saving the changes to a sound ..........................................32
Advanced settings ................................................. 34
The advanced settings buttons ..........................................34
Page 6

iv|
Adjusting the master tune ..............................................34
Transposing ..........................................................35
Choosing a tuning curve ................................................36
Adjusting the program levels ...........................................37
Changing the split point ................................................37
Changing the touch sensitivity ..........................................38
Choosing a MIDI channel ...............................................39
The Local Off .........................................................40
Don’t panic! ...........................................................40
Calibrating the pedals .................................................. 41
Locking the control panel ..............................................42
Factory restore of all settings ...........................................42
Checking the operating system version ..................................43
THE EDITOR ...................................................... 45
Welcome to the Editor! ............................................. 46
What you can do with the Editor .........................................46
Installing the software ..............................................47
The software that comes with your SV-2 .................................47
System Requirements ..................................................47
Installing the KORG USB-MIDI Driver .....................................47
Installing the SV-2 Editor ...............................................48
Running SV‑2 Editor ................................................53
Connecting your SV-2 via USB ..........................................53
Turning your SV-2 on ..................................................53
Launching SV-2 Editor .................................................53
Getting to know the SV‑2 Editor ......................................55
Main screen ...........................................................55
Menus ................................................................55
Sound name ..........................................................56
Compare button .......................................................56
Pages ................................................................56
Side drawer ...........................................................57
Knobs ................................................................58
Page 7

|v
Editing workflow ....................................................59
Side drawer ....................................................... 60
Sounds, Favorite and Tuning Curve lists ..................................60
List commands ........................................................62
Sound page ....................................................... 64
The Basic section ......................................................66
EQ section ............................................................69
Pedals section ........................................................69
Touch control section ..................................................70
Tuning Curve section .................................................. 71
FX page ...........................................................73
The effect chain .......................................................74
Equalizer section ......................................................75
Pre FX section ........................................................76
Amplifier section ...................................................... 81
Cabinet section .......................................................86
Modulation Effects section ............................................. 91
Ambient Effects section ................................................95
Total FX section ......................................................100
English
Global page .......................................................102
Master Tune and Transpose ............................................103
MIDI ................................................................104
Pedal calibration .....................................................106
Factory Restore ......................................................108
Info .................................................................108
Backup page ......................................................109
The Backup tools ......................................................110
Creating and editing a backup set .......................................112
Copying data from a backup set to the internal memory ...................113
Mixing data from two or more backup sets ...............................113
Changing the order of the favorite sounds ................................114
Menu ............................................................. 115
File menu .............................................................115
Edit menu ............................................................116
Page 8

vi|
Option menu ..........................................................118
About menu ..........................................................119
Keyboard shortcuts ...................................................120
APPENDIX ........................................................ 121
Programs .........................................................122
Saved settings ....................................................125
Troubleshooting ...................................................126
Specifications .....................................................127
Page 9

|1
THE PIANO
English
Page 10

2| The Piano
Precautions
Automatic power‑off
To avoid wasting power, and to extend the life of
the valve, SV-2 will by default automatically enter standby mode after two hours of non-active
use (playing, pressing buttons or moving knobs).
Please save any edited data before taking a prolonged pause.
Replacing the valve
Valves, like light bulbs, have a indeterminate
lifespan. When the valve fails, please contact
an Authorized KORG Service Center to replace it. DO NOT TRY TO REPLACE THE VALVE
YOURSELF, as you risk seriously damaging the
instrument and risk receiving an electric shock.
In addition, this action will void the warranty.
Data handling
Data in memory may sometimes be lost due to
improper use. Be sure to save important data
to the supplied Editor/Librarian software. KORG
will not be responsible for damages caused by
data loss.
Cleaning
If the exterior becomes dirty, wipe it with a
clean, dry cloth. Do not use liquid cleaners such
as benzene or thinner, or cleaning compounds
or flammable polishes.
Trademarks
Acrobat and PDF are registered trademarks of
Adobe Systems Incorporated. Mac and iOS are
registered trademarks of Apple, Inc. Android is a
trademark of Google Inc. MS-DOS and Windows are
registered trademarks of Microsoft Corporation.
All other trademarks or registered trademarks
are the property of their respective holders.
Disclaimer
The information contained in this manual have
been carefully revised and checked through.
Due to our constant efforts to improve our products, the specifications might differ to those
in the manual. KORG is not responsible for any
differences found between the specifications
and the contents of the instruction manual – all
specifications being subject to change without
prior notice.
Liability
KORG products are manufactured under strict
specifications and voltages required by each
country. These products are warranted by the
KORG distributor only in each country. Any
KORG product not sold with a warranty card or
carrying a serial number disqualifies the product sold from the manufacturer’s/distributor’s
warranty and liability. This requirement is for
your own protection and safety.
Service and user’s assistance
For service, please contact your nearest
Authorized KORG Service Center. For more information on KORG products, and to find software and accessories for your keyboard, please
contact your local Authorized KORG distributor.
For up-to-date information, please point your
web browser to our web site.
Keep your keyboard up‑to‑date
Your instrument can be constantly updated as
new versions of the operating system are released by KORG. You can download the operating system from our web site. Please, read the
instructions supplied with the operating system.
Page 11

Introduction |3
Introduction
Welcome aboard!
Many thanks, and congratulation on purchasing the KORG SV-2 Stage
Vintage Piano. We’re sure it’ll give you countless hours of great vintage piano and keyboard tones that will feel as good as they sound!
To maximize your chances of enjoying a long and happy relationship with
your SV-2, please read this manual at least once, and (as they say), “use the
product as directed”. Keep the manual for future reference after you’ve read
it; you’ll want to re-read it later at some point to pick up cool tips you may
have missed the first time around.
This guide refers to both the 88- and 73-keys versions of the SV-2, and to the
versions with and without integrated speakers. There is no other difference
between the four instruments, apart for the keybed length, the speakers
(and the weight!).
English
Before starting to play…
What’s in the box
After you buy your SV-2, please check all the following items are included in
the package. If some of them are missing, immediately contact your KORG
dealer.
▪ SV-2 Stage Vintage Piano
▪ Quick Guide
▪ Music stand
▪ KORG DS-2H damper pedal (supporting half-pedalling)
▪ Standard IEC AC power cable
Page 12

4| The Piano
What you can download
Point your web browser to our web site (www.korg.com), to download the
SV-2 Editor software, a MIDI driver, up-to-date software, various support materials.
What you can add
After having purchased SV-2, you might want to add these other fine options:
▪ The elegant KORG ST-SV1 keyboard stand, recommended for safety and
comfort, perfectly matching your piano design.
▪ One of the sturdy pedals and footswitches from the KORG catalogue, like the
DS-1H damper, the PS-1 and PS-3 footswitches, the EXP-2 foot controller, the
XVP-10 or XVP-20 volume/expression pedals.
▪ Our practical and robust CB-SV carrying bag.
Contacts
Your KORG dealers not only deliver this instrument, but also carry hardware
and software accessories, as well as useful information on how to use these
products. Ask them for any help you should eventually need.
Our international web site is www.korg.com. A list of all KORG Distributors
can be found in our dedicated web page (www.korg.com/us/corporate/dis-
tributors/).
Page 13

Main Features
Introduction |5
Wide range of vintage sounds
▪ SV-2 is a grand piano and vintage keyboard instrument, mixed with a vin‑
tage instrument amplifier, stompbox and studio effects simulator. It is a
toolbox full of classical and vintage keyboard sounds, a full database of attic
keyboard instruments for the performing musician.
▪ SV-2 has a wide range of sounds, including four concert grand pianos, vin-
tage electric pianos, synthesizers, upright pianos, as well as historic keyboard instruments like the harpsichord and the pipe organ. Sounds can be
modified to your taste and saved into the sixty-four “Favorite” memories.
Ease of use, pleasure to play
▪ Selecting sounds is as easy as using a knob to select the base sound, and
one for a variation of the base sound. And editing sounds (in realtime!) is just
a matter of turning a couple of knobs.
▪ The high-quality, realistic KORG RH3 keyboard (made in Japan) features four
zones with different weights. This gives you the same realism and feeling as
a grand piano keyboard. You can choose from eight different touch curves
to adjust how the sound will respond to your keyboard playing dynamics.
▪ Up to three layered timbres per sound, or a split letting you play up to two
timbres with your right hand and one with the left, lets you play like the perfect one man band.
▪ When the amplifier simulator is not involved, there is smooth transitioning
from a sound to another.
English
▪ Eight alternative tuning curves allow for precise tuning of vintage instru-
ments and grand piano alike.
▪ The transpose function lets you change the pitch of the instrument, and the
master tune function allows you to make fine tune adjustments.
The same pedals of a grand piano, and more
▪ The damper pedal simulates the natural string resonance and noises found
in the pedal of an acoustic piano; it also lets you vary the amount of the effect by how far you press down on it (“half‑pedal” function).
▪ The SV-2 provides connections for the same three pedals as a grand piano.
Also, you can use the pedals to control volume, rotary slow/fast change, or
the wah effect. Pedals are automatically assigned to controlling the right
effect without any additional programming.
Page 14

6| The Piano
High‑quality vintage effects
▪ The SV-2 features Valve Reactor technology that uses an actual valve to
create the sound of an authentic tube power amp, delivering the response
and tone of classic amps.
▪ The SV-2 uses sophisticated modeling technology to create classic amp, cab-
inet, and effect sounds. You can experiment by mixing them, and create an
amazing range of sounds, many of which have never been heard before.
▪ Since high‑quality effects are built in, the SV-2 is all you need to create a
completely finished sound. You can choose one type for each pedal, amp
model, modulation and reverb/echo/delay effect, and use these sections simultaneously.
▪ The SV-2 provides control switches that let you do things like set the delay
time via TAP TEMPO, switch effects on/off, or switch the speed of a rotary
speaker… again, must-have features for live performance.
Easy connection
▪ Featuring an USB digital interface and MIDI IN and OUT connectors, the SV-2
offers you plenty of potential and numerous options to expand your system.
The USB port also carries MIDI data, so that you can connect the SV-2 directly to your personal computer with a single cable and without the need of a
dedicated MIDI interface. A dedicated KORG USB MIDI Driver (for Windows;
Mac directly supported) is freely available for full use of the SV-2’s MIDI features, and can be downloaded from our web site.
▪ The Local Off button immediately configures your
board for working with a sequencer, a DAW or a notation software.
SV-2 as a master key-
Enhanced editing
▪ While integrated editing is kept to a minimum for maximum ease of use, so-
phisticated editing is available by using the SV‑2 Editor (that can be downloaded from our web site).
▪ Thanks to SV-2 Editor, you can access to lot of additional timbres that could
not fit the control panel. Make your own sounds with your preferred programs!
▪ SV-2 Editor gives you access to a plethora of parameters that are not avail-
able on the control panel. You can layer different timbres, set the split, calibrate the pedals and program other global parameters in the easiest way.
▪ By using this software, you can create multiple collections of sounds to be
loaded before different shows. And you can also create huge libraries of
favorite sounds, that can be exchanged with other users.
Page 15

Introduction |7
Listen the natural way
▪ The amplification system integrated in the “S” models has been jointly de-
veloped by KORG and K-array, a renowned manufacturer of unique audio
solutions.
▪ The sound of the super high-fidelity integrated speakers is clear and detailed
even at the lowest volume level, for the pleasure of the late-night rehearsing
musician. On the opposite side of the dynamic range, the passive radiator
can deliver the most powerful sound.
English
Page 16

8| The Piano
Real eXperience
Are You eXperienced?
The SV-2 sounds feature KORG’s Real eXperience technology, giving unprecedented realism and detail to sounds. While existing sampling techniques
have resembled an audio snapshot, our technology is more of a hologram,
accurately reproducing every dimensional detail of the sound. Grand piano,
electric piano and clavi’s are all sampled with the hammer and natural release sound, to preserve the natural imaging of the sound. Different dynamic
levels are captured to extend the instrument’s expressive vocabulary.
Take for example the grand piano. The SV-2 uses the sound of the key being
released and the hammer returning, as well as the damper resonance of the
strings to create all of the subtle shadings that create a superior instrument
sound. This attention to detail defines the sound of the new SV-2, providing
an instrument that can interpret every nuance of touch into a meaningful
musical gesture.
This technique applies to all other sounds as well. For example, electric pianos, clavi’s and organs are reproduced in complete realism, and do not
sound synthetic and deprived of any life-like quality. These sounds react under your fingers exactly as the real instrument, and results in a more impressive performance when playing on stage.
Page 17

Introduction |9
Valve Reactor Technology
The Power (amp) and the Glory!
The Valve Reactor circuitry in the SV-2 has been tuned-up especially for
live performance. Since conventional modeling effects for line recording
are not used directly with a speaker, they do not include a power amp
circuit, output transformer, or speaker. In other words, they only have a
preamp circuit.
A real valve amp sound, however, is produced not just by the preamp,
but also by the tone and distortion of the power amp, and by the constant changes in impedance that are created by the power amp driving
the speakers. The SV-2 contains an actual low-wattage valve power amp
circuit, a virtual output transformer that uses solid-state components to
simulate an output transformer, and a dummy speaker circuit that simulates the varying impedance of a real speaker. This means that although
it’s low-power, the SV-2 has the same circuit structure of an actual allvalve amp.
This is great when playing live, because the sound arriving to the main
mixer is the same of a real analogue amp captured by high-quality mics.
English
Page 18
10| The Piano
Controls and connections
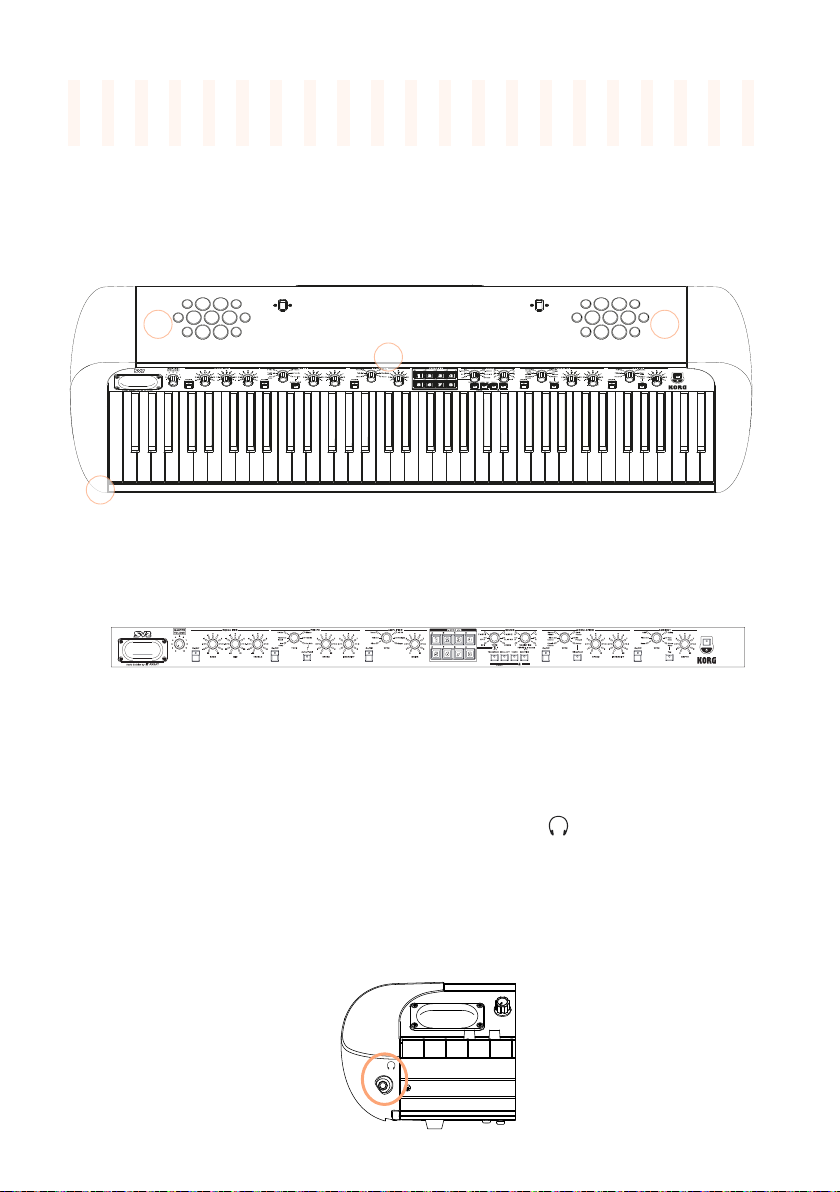
Front panel
The front panel is where you access your SV-2 controls.
2
2
1
3
1 Control panel
This strip contains the buttons, knobs and the other controls of the piano.
The functions are explained in detail later in this manual.
2 Speakers (only SV2-73S and SV2-88S)
In the models with integrated speakers, this is where the sound comes from.
3 HEADPHONES jack (stereo)
Connect a pair of headphones to this connector ( ). You can use headphones with an impedance of 16-200 Ohms (50 Ohms suggested). When
connecting the headphones, the integrated speakers are automatically deactivated.
Adjust the output level with the MASTER VOLUME knob.
HI N T: Use a headphone splitter to connect more than one pair of headphones.
Page 19

Rear panel
Controls and connections |11
The back panel is where you can find most of the connections.
2
1
3 4 5 6 7 8
1 AC IN POWER connector
Connect the included IEC power cable here.
2 MUSIC STAND holes
A music stand comes standard with your SV-2. Insert its legs into these two
dedicated holes.
English
3 USB DEVICE connector
Use this connector to connect a computer for sequencing (this doubles the
MIDI ports), or for using the SV-2 Editor software for fine editing. Before
using this connector, please install on your Windows PC the KORG USB-MIDI
Driver (the relevant instructions are provided together with the MIDI Driver,
that can be downloaded from our web site).
4 SPEAKERS ON/OFF switch (only models with integrated speakers)
Use this switch to turn the integrated speakers on or off.
5 PEDAL jacks (DAMPER, 1, 2)
Connect the supplied KORG DS-2H pedal, or the optional DS-1H, to the
DAMPER jack. This jack always operates as a damper pedal.
Page 20

12| The Piano
Connect a footswitch (like the optional KORG PS-1 or PS-3) to the PEDAL 1
jack. The footswitch can operate as a sostenuto pedal, or as a rotary slow/
fast switch (when the rotary effect is selected).
Connect a footswitch (like the optional KORG PS-1 or PS-3) or a volume/
expression pedal (like the optional KORG XVP-10, XVP-20, or EXP-2) to the
PEDAL 2 jack. The footswitch operates as a soft pedal. The volume/expression pedal operates as a volume control (this is the default setting) or as a
wah filter control (when the wah effect is selected). To control the wah effect
turn the Auto/Pedal LED on in the PRE FX section (Pedal mode).
While the KORG DS-2H pedal comes already calibrated, the volume/expression pedal usually requires calibration to make use of the full range of values.
Calibration can also be used to choose a footswitch polarity. To calibrate the
pedals (and set their polarity), see “Calibrating the pedals” on page 41.
6 MIDI connectors (IN, OUT)
By using MIDI you can control the SV-2 from a sequencer, or control an external MIDI device from the SV-2. When using the SV-2 to control an external
MIDI device, or to record into a sequencer, press the LOCAL OFF button to
turn its LED on; this disconnects the keyboard from the internal sounds (but
not from MIDI).
MIDI OUT transmits MIDI data. Use it when you want to control a connected
external MIDI device or computer. Use a standard MIDI cable to connect it to
the MIDI IN connector of the other device.
MIDI IN receives MIDI data. Use it when you want to control the SV-2 from a
connected external MIDI device or computer. Use a standard MIDI cable to
connect it to the MIDI OUT connector of the other device.
7 INPUT jacks (L/MONO, R/MONO)
Connect a line-level source, like a keyboard/synthesizer, a CD or audio player, to these jacks. For mono connections, use either of them.
8 OUTPUT jacks (L/MONO, R/MONO)
These are analog output jacks, available either in 1/4” unbalanced jacks, or
XLR balanced jacks. Either use the unbalanced 1/4” jacks for shorter run, or
the XLR balanced jacks for longer runs, like when playing on stage. In any
case, they are perfect replica the one of the other.
If you need mono output, connect either of the MONO 1/4” jacks. XLR jacks
cannot be used for mono output.
HI N T: XLR balanced outputs are recommended whenever possible.
WARNING: If you connect the XLR jacks to a mixer or similar device, be sure to turn
off the phantom power of that device. The SV-2 might be damaged if you fail to do so.
Page 21

Making the connections
Controls and connections |13
In this section you will learn how to connect your SV-2 to an audio amplification system, to the pedals and to MIDI devices.
1 Turn both your SV-2 and all connected devices off.
NOTE: You must turn off the power of all your equipment before you make connec-
tions. If you ignore this warning, you may damage your speaker system!
2 If you’re connecting the SV-2 to a mixer or speaker system, connect the
OUTPUT jack(s) to the line input jack(s) of your mixer/recorder or speaker
system.
If you’re making connections in mono, use any of the MONO OUTPUT jacks.
However, to take the fullest advantage of the SV-2’s sound, we strongly recommend that you use stereo connections.
3 If you’re listening through headphones, connect your headphones to the
HEADPHONES ( ) jack.
The integrated speakers will automatically turn off. Signal from the OUTPUT
jack(s) will still be heard even if headphones are plugged in. If you only want
to hear signal from headphones you should turn off or lower down any equipment the SV-2 is connected to.
4 Turn the MASTER VOLUME knob on the front panel of the SV-2 all the way
to the left, setting the volume to ‘0’.
5 Plug the supplied IEC AC power cable into the SV-2’s rear panel AC power
inlet, and plug the other end into an AC wall socket.
6 Connect the pedals to the relevant PEDAL connectors on the rear panel.
English
7 Connect the MIDI or USB cable to your SV-2 and to the other device.
8 Plug any external CD/audio player or synthesizer into the rear panel INPUT
jacks.
9 Turn on the POWER switch to power up the SV-2.
10 Turn on the power switch of your mixer or speaker system.
11 To adjust the volume, turn up the volume controls on your mixer or speakers,
and use the SV-2’s front panel MASTER VOLUME knob to adjust the volume
to a desired level.
Page 22

14| The Piano
AC IN
Mixer, recorder, etc.
Audio
interface
Powered monitors
Headphones
INPUT/LINE IN INPUT/LINE IN
PHONES
Audio system
VOX
Amplifier
Footswitch 1
(Soft pedal)
(Sostenuto
Footswitch 2
pedal)
pedal
Volume/
OUTPUT INPUT AUX/LINE IN INPUT/LINE IN
Expression
CD/audio player, etc.
OUTPUT
MIDI
IN OUT
(only SV2-73S
and SV2-88S)
USB cable
(supplied)
Damper pedal
USB
Synthesizer, etc.
Computer
Power
Page 23

Turning the SV-2 on |15
Turning the SV-2 on
Turning the power on and off
1 Connect the included IEC power cable to the POWER connector on the back
of the instrument.
2 Connect the power plug to an AC power outlet.
3 Press and release the POWER switch in the control panel to turn the instru-
ment on. The valve will light up and start warming up. After a few seconds,
the instrument will turn on.
English
The SV-2 contains a 12AX7 (ECC83) valve (“vacuum tube”).
WARNING: The valve cover or the valve may break if either is subjected to impact. If
the valve cover breaks, please have it replaced. Failure to replace a damaged valve
cover may lead to the valve itself becoming damaged.
NOTE: When you turn on your KORG SV-2, you may notice a brief flash in the tube.
This is a characteristic of certain tubes we use and if it occurs, it only happens when
your SV-2 is turned on and the tube is not yet warm. This does not affect the performance of either the tube or the SV-2.
4 To turn the instrument off, keep the POWER switch pressed for about one
second.
Page 24

16| The Piano
Automatic power off
With the factory settings, this instrument will automatically power off after two hours of inactivity to save power. To avoid power-off and reset the
countdown, play the keyboard or use any button or knob on the control panel
(apart for the MASTER VOLUME knob; pedals and MIDI message will not
reset the countdown as well).
To avoid losing your changes, please save any edited data before taking a
prolonged pause.
If desired, you can turn this function off (or on again), by following these
instructions:
1 Press the FUNCTION button. Its LED, and one of the LEDs around the SPEED
knob (in the PRE FX section) will start blinking.
2 Use the SPEED knob to enable/disable the Auto Power-Off.
SPEED knob value Auto Power-Off status
0 Disabled
10 Enabled
3 Press the FUNCTION button again to save your choice and return to the
normal operations.
Adjusting the master volume
You can set the overall volume of the SV-2.
▪ Turn the MASTER VOLUME knob clockwise to increase the volume, count-
er-clockwise to decrease it.
This knob controls the overall volume of the instrument, both of the integrated speakers, the LEFT and RIGHT outputs, and the HEADOPHONES jack.
WARNING: Always keep the volume at a comfortable level. Excessive volume may
cause permanent hearing damage.
Page 25

Listening to the demos
Turning the SV-2 on |17
Listen to the built-in demo songs to appreciate the power of the SV-2. There
are several demo songs to choose from.
1 Press the TRANSPOSE and LOCAL OFF buttons together. Their LEDs will
start blinking.
2 At this point, if you wait a few seconds all the demo songs will be played back.
3 Otherwise, you can select one of the available demo songs. There is one
demo for each of the factory sounds.
▪ Use the TYPE and VARIATIO N knobs in the SOUND section to select a demo
song.
▪ You can press the VARIATION knob, to make its LED turn green, and listen to
a second bank of demo songs. Press the VARIATI O N knob again to turn its
LED orange again, and return to the first bank.
You can select any demo even after the automatic playback has started.
4 Adjust the listening volume with the MASTER VOLUME knob.
5 Stop the demo by pressing the TRANSPOSE and LOCAL OFF buttons again.
English
Page 26

18| The Piano
Main, Layers 1, 2
Playing the sounds
What do we mean by ‘sound’?
In SV-2, a sound is a ‘timbre’ or a set of timbres that can be heard when you
play the keyboard. Each sound can be made of up to three ‘programs’, each
one with a different timbre or a set of accessory ‘noises’, like the mechanics
of the keyboard, hammer-slap, etc. One or two layers can be added to the
main program, and be heard as a second or third timbre mixing with the
main timbre. Take for example the case of the universally known “piano plus
strings” sound: there are a program of piano, one of piano noises, one of
strings.
Main, Layers 1, 2
There are sounds where the keyboard is split in two halves, with one or two
programs on the right half. The third program is moved to the left half, and
can be used to play an accompaniment (an upright bass, a synth pad, or the
like).
Split
Main, Layer (1)
Factory and favorite sounds
SV-2 has 72 factory sounds, and every one of these sounds can be “cus-
tom tweaked” using just the knobs on the front panel. You can then save
the changes into the 64 FAVORITES locations of favorite sounds. (More de-
tailed editing can be performed using the SV-2 Editor software).
Please note that, in general, going from one sound to another happens with
a smooth transition, so that you can keep the notes pressed and hear the
new sound only at the next note change. However, if one of the sounds has
the amplification section turned on and makes use of the valve, this is not
possible.
Page 27
Selecting the factory sounds
Playing the sounds |19
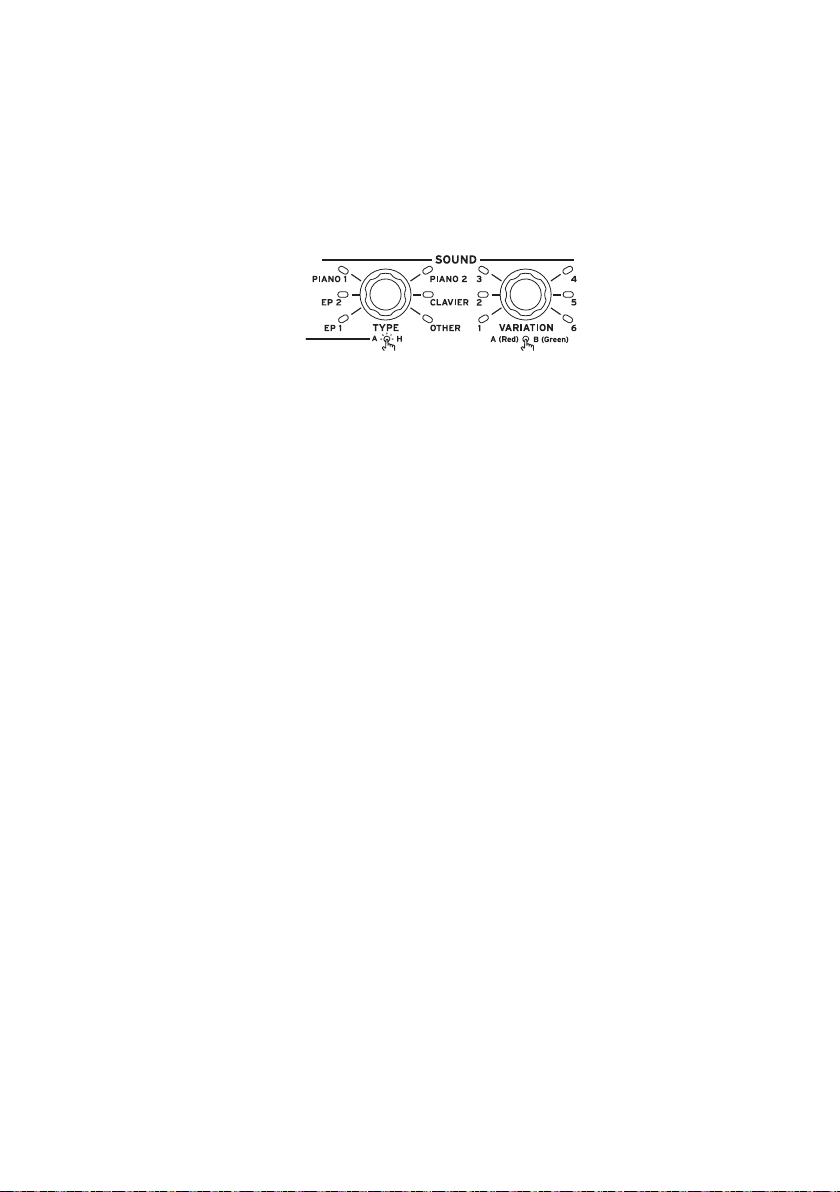
How to select a sound
The SOUND section is where you can select the factory sounds.
1 Use the TYPE knob of the SOUND section to select a base type of sound
(one of six).
2 Use the VAR I AT I ON knob of the SOUND section to select one of the varia-
tions of the base sound (one of six). Notice that the LED next to the knobs
lights up to show the selected sound and variation.
3 Press the VARIATIO N knob to select the second bank of variations (the LED
color will change to green). Use the same VARIATIO N knob to select one of
the variations in the second bank (one of six).
4 When you want to return to the first bank of variations, press the VA R I AT I ON
knob again (the LED color will return orange again).
English
Page 28

20| The Piano
Selecting the favorite sounds
How to select a favorite sound
The FAVORITES section is where you can select the favorite sounds, con-
taining your own custom sounds.
1 To select a favorite sound in the current bank, press the corresponding
FAVORITES (1‑8) button.
If you want to see which bank is selected, press the TYPE knob and see
which FAVORITES (A‑H) button is blinking. Press it again to exit from the
bank select mode (or wait until it turn off).
2 To select a favorite in a different bank, press the TYPE knob. The current-
ly selected bank is shown by the FAVORITES (A‑H) button that is blinking.
Press the FAVORITES (A‑H) button corresponding to the bank to be select-
ed. Then press the FAVORITES (1‑8) button corresponding to the favorite to
be selected.
How to return to the latest selected factory sound
After having selected a favorite sound, you can select a factory sound again,
by using the procedure seen above.
However, you can immediately jump to the latest selected factory sound.
Press the VARIATI O N knob in the SOUND section to select it.
Page 29

The sounds
Playing the sounds |21
The following table contains the names and a brief description of each of the
included sounds.
When the name of the sound is a straight one (like “MK I Suitcase”) it is a
simple sound extended to the full keyboard. When it has an ‘&’ in the middle
(like “FM Piano & Pad”), it is made of a main program an one or two layers.
When it has a ‘/’ in the middle (like “Pad/Mini Lead”), the keyboard is splitted
between different programs.
Factory sounds
You can select a factory sound from an external MIDI device by sending to
SV-2 a Control Change #00 message with a value of 0, a Control Change #32
message with a value of 0, then a Program Change (PC) message to select
the sound.
Sound Var PC Notes
EP 1 (Vintage)
MK I Suitcase A1 0 Two versions of the iconic MK I, a must-have for any
MK I Stage B1 6
MK II Suitcase A2 1 Two flavors of the magnificent MK II, in the portable
MK II Stage B2 7
MK V Stage A3 2 The MK V Stage (the only one that went in produc-
MK V Bright B3 8
Dyno EP A4 3 The typical Dyno Piano sound, perfect for ballads in
Dyno EP Bright B4 9
Wurly A5 4 The standard punchy sound of Wurly metal reeds. The
Wurly Classic B5 10
Wurly Dark A6 5 A darker and a brighter version of the Wurly.
Wurly Bright B6 11
EP 2 (Various)
FM Piano 1 A1 12 The FM electric piano sound that made the ’80s. As
FM Piano 3 B1 18
FM Piano 2 A2 13
FM Piano & Pad B2 19 The FM piano + layered pad is another staple of the
keyboard player.
and the heavier versions.
tion), well known for its bell-like sound.
the soft version, ready for a solo in the bright one.
pop sound of the ’60s and the ’70s.
heard in countless records at the beginning of the
digital music age.
era.
English
Page 30

22| The Piano
Sound Var PC Notes
Pianet T A3 14 The Pianet, the German electro-mechanical vintage
Pianet N B3 20
Hybrid Piano A4 15 Hybrid combinations of pianos, to explore new piano
Hybrid Tine B4 21
Wurly & Strings A5 16 Different combinations of electric pianos and strings.
FM & Strings B5 22
MK II & Pad A6 17 Different combinations of electric pianos and pads.
FM & Pad B6 23
Piano 1 (Acoustic)
German Grand A1 24 The king of the acoustic pianos — the German grand so
German Classic B1 30
Italian Grand A2 25 The Italian grand piano, a finest choice for the classi-
Italian Bright B2 31
Japanese Grand A3 26 Another must-have — a Japanese grand, preferred by
Japanese Bright B3 32
Austrian Grand A4 27 The Austrian emperor’s grand — a milestone for classi-
Austrian Classic B4 33
Japanese Upright A5 28 A big Japanese upright piano, with a very resonant
Upright Bright B5 34 An intimate, yet bright piano sound, frequently used
German Upright A6 29 This is the distinctive, mellower sound of a German
Rock Piano B6 35 An aggressive upright for rock and rockabilly tunes.
Piano 2 (Various)
Electric Grand A1 36 Electro-acoustic piano produced in the ’70s, with a
German Mono B1 42 A mono version of the German grand.
KORG M1 Piano A2 37 The KORG piano heritage. From the popular M1 synth
KORG SG-1D B2 43
Digital Piano A3 38 An innovative, accurate and expressive piano sound,
Electra Piano B3 44 A popular electronic piano from the ’70s, used by
keys. The euro version of the electric piano.
soundscapes.
Choose between reeds and FM.
Again, choose between tines and FM.
universally beloved by classical, jazz and pop pianists.
cal and jazz repertoire.
many classical, jazz and pop artists.
cal programs, and the preferred by some jazz artists.
sound.
by popular pop bands.
upright piano.
unique mellow sound very popular within gigging musicians.
workstation that made an era, and from our pioneeristic SG-1D digital piano.
created in the late ’80s with a popular digital keyboard/synthesizer.
many famous classic rock and prog-rock musicians.
Page 31

Playing the sounds |23
Sound Var PC Notes
Tack Piano A4 39 Tack and Honky-Tonk pianos, to enjoy rag-time and
Honky-Tonk B4 45
Piano & Strings A5 40 Layered piano and strings or pad. Perfect for evoca-
Piano & Pad B5 46
Piano & Synth A6 41 Layers of piano and synth or brass. Two mixes calling
Piano & Brass B6 47
Clavier
Clav AC A1 48 The classic electric clavichord, two flavors with mics
Clav AD B1 54
Clav BC A2 49 Two different configurations of the Clavi registers,
Clav BD B2 55
Harpsichord A3 50 Back to late-Renaissance and Baroque with the grand-
Harpsichord Oct. B3 56
Perc. Organ A4 51 True classic electro-mechanical organ emulation, with
Rock Organ B4 57
Jazz Organ A5 52 Jazz registration of the classic electro-mechanical
Vox Organ B5 58 A perfect emulation of “Connie”, the VOX Continental
Church Organ A6 53 The full power of a majestic pipe organ.
Pipe Organ B6 59 Softer and emotional registrations of a pipe organ, for
Other
Full Strings A1 60 Two different flavors of classical strings sounds.
Classic Strings B1 66
Tape S trings A2 61 The synthetic Mello strings from the ’70s.
Strings & Voices B2 67 Real strings with added voices.
Warm Pad A3 62 Dark and bright version of the typical synth pads.
Bright Pad B3 68
Orchestra A4 63 A powerful orchestral Tutti.
Pizzicato & Glock B4 69 Pizzicato orchestral strings and glockenspiel.
Brass A5 64 A real brass section.
Synth Brass B5 70 The synth brass counterpart.
Pad/Mini Lead A6 65 Two solo synths playing on top of a soft synth pad.
Pad/SynthLead B6 71
stride genres.
tive ambient music.
back to the age of the fusion jazz.
in phase.
with mics in reversed phase and an edgier sound.
pa of the piano. Standard 8” and 8”+4” double octave
registrations.
percussion, in a clean and a distorted version.
organ.
transistor organ.
the more meditative moments.
English
Page 32

24| The Piano
Favorite sounds
You can select a favorite sound from an external MIDI device by sending to
SV-2 a Control Change #00 message with a value of 0, a Control Change #32
message with a value of 64, then a Program Change (PC) message to select
the sound.
Sound Pos PC
Demo Shop
German Grand A1 0
Italian Grand A2 1
EP MK II A3 2
Wurly A4 3
Clav A5 4
FM Piano A6 5
Piano & Strings A7 6
Bass/EP A8 7
Piano
German Grand B1 8
Italian Grand B2 9
Japanese Grand B3 10
Austrian Grand B4 11
Japan Upright B5 12
German Upright B6 13
Rock Piano B7 14
Tack Piano B8 15
Electric Pno
EP MK I C1 16
EP MK II C2 17
EP MK V C3 18
Dyno EP C4 19
Wurly Amp C5 20
Wurly Tremolo C6 21
FM Piano C7 22
Hybrid EP C8 23
Sound Pos PC
Claviers
Clav AC D1 24
Clav BC D2 25
Perc. Organ D3 26
Jazz Organ D4 27
Church Organ D5 28
KORG M1 Piano D6 29
Electric Grand D7 31
Harpsichord D8 32
Layer
Piano & Strings E1 32
Piano & Pad E2 33
Piano & EP E3 34
Piano & Vibes E4 35
MK II & Pad E5 36
Strings & Pad E6 37
Piano & FM E7 38
FM & Strings E8 39
Split
Ac. Bass/Piano F1 40
El. Bass/Piano&Str F2 41
Fretless/EP F3 42
Slap/EP F4 43
Slap/Clav F5 44
EP Bass/Vox Organ F6 45
Jazz Piano Trio F7 46
Organ Dual Manual F8 47
Page 33

Playing the sounds |25
Sound Pos PC
Other
Full Strings G1 48
Strings Octave G2 49
Orchestra Tutti G3 50
Brass G4 51
Warm Pad G5 52
Synth Brass G6 53
Pad/SynLead G7 54
Synth Bass G8 55
Sound Pos PC
Legacy SV1
SV1 Grand Piano 1 H1 56
SV1 Grand Piano 2 H2 57
SV1 Tine EP Amp H3 58
SV1 Reed EP1 H4 59
SV1 Clav AC H5 60
SV1 Clk.Tonewheel H6 61
SV1 Full Strings H7 62
SV1 Synth Brass H8 63
English
Page 34

26| The Piano
Using the effects
The effects
You can select the various effects and amp models by turning the corresponding TYPE knobs. You can change the effect settings by using the
DEPTH, INTENSITY, SPEED, DRIVE knobs. If you press the knob, the original
value of the parameter will be recalled. Deeper editing can be done through
the SV-2 Editor software.
Effects and the amp simulation can also be turned on or off by pressing the
corresponding On/Off button. Changes can be saved, together with a sound,
into one of the FAVORITES locations.
We will experiment with the effects, by going from the beginning of the effect
chain, where the most mind-boggling stompbox effects are located, to the
end, with the creamiest, most reassuring touch-up effects are contained. Just
consider this effect chain as the effect chain of a classic instrument amplifier.
SIGNAL ROUTING
SOUND
PRE AMP
VOLUME VOLUME POWER
MODULATION AMBIENT TOTAL FX
NOTE: With some of the effects, the name of the actual parameter you will be editing may
differ from what is printed on the piano panel. The name that appears in the SV-2 Editor
is the real name, as reported in the following tables. E.g., with the Pre FX Compressor, the
SPEED and INTENSITY knobs control the Sensitivity and Level parameters respectively.
POWER AMP
EQ PRE FX
CABINET NR
VALVE
AT T.
PROGR
LVL
Stereo Limiter
Stereo Mastering Limiter
OUTPUTS
Page 35

Using the effects |27
Editing the effects
Equalizer
Use the three knobs of the EQUALIZER section to access the three-band
equalizer and adjust the overall tonal characteristics of the sound coming
from the SV-2. To reset an EQ band to the original value, press the corresponding knob.
1 Use the three EQUALIZER knobs to adjust the low, mid and high frequencies.
2 After having changed a knob position, you can return to the original settings
by pressing the corresponding knob.
WARNING: Extreme EQ settings may produce a very loud signal.
English
Pre FX
The SV-2 includes a stompbox simulator, that recreates the sound of a pedal
effect inserted before the amplifier’s input. Use the PRE FX section to select
one of the six pedal effect models the SV-2 offers. Pedal effects are connected before the amp.
1 Use the TYPE knob of the PRE FX section to select a different stompbox
effect (compressor, booster, U-Vibe, vibrato, tremolo or wah).
2 You can change the speed of the modulation of the U-Vibe or tremolo ef-
fects by using the SPEED knob, and the intensity of the modulation by using
Page 36

28| The Piano
the INTENSITY knob. To return to the original settings, press the SPEED or
INTENSITY knob.
NOTE: The booster stompbox may produce a very loud signal.
3 If the wah effect is selected, the Auto/Pedal can be used. When the button’s
LED is off (Auto mode), the wah effect’s filter is set automatically depending
on the sound and playing dynamics. When on (Pedal mode), you can control
the filter with an expression pedal connected to the PEDAL 2 connector; if
no pedal is connected, the wah is set to a fixed frequency.
NOTE: Before using an expression pedal to control the wah, it is advisable to calibrate
it. See “Calibrating the pedals” on page 41.
PRE FX type SPEED knob INTENSITY knob
Red Comp Sens Level
Treble B o ost Drive Level
U-Vibe Speed Depth
Vibrato Type Mix
Tremolo Speed Depth
VOX Wah Manual Wah Type (V-847, V-848)
NOTE: The Manual Wah control only works when the Auto/Pedal button is in Pedal mode.
Amplifier
With the AMPLIFIER section you can select the model of amp (including
cabinet). This lets you select from six types of classic amp models, including
the legendary VOX AC30. Each amp model also includes a cabinet simulator
that can be edited with the SV-2 Editor.
1 Use the TYPE knob of the AMPLIFIER section to select a different amplifier.
The operating mode of the preamp and power amp, the response of the tone
controls, and their placement within the circuit will change depending on the
type of amp you select here, precisely replicating the exact gain and tonal
character of the original amp. The all-important power amp stage (class A
Page 37

Using the effects |29
or AB) and negative-feedback circuit (or lack thereof) are also carefully simulated.
2 You can change the preamp’s volume (therefore, its overdrive saturation)
by using the DRIVE knob. To return to the original setting, press the DRIVE
knob.
NOTE: Extreme DRIVE settings may cause unwanted distortion. If this happens, low-
er its setting.
AMPLIFIER type DRIVE knob
Clean PreVol
Twi n PreVol
Tweed PreVol
AC30 PreVol
Boutique PreVol
Organ Drive
Modulation
English
In the MODULATION section you can select a modulation effect. This selects
one of six modulation effect models. Effects are placed after the amp and
cabinet model.
1 Use the TYPE knob of the MODULATION section to select a different modu-
lating effect (chorus, phaser, flanger or rotary speaker).
2 You can change the speed of the modulation (or horn rotation) by using the
SPEED knob, and the intensity (or horn acceleration) by using the INTENSITY
knob. To return to the original settings, press the SPEED or INTENSITY knob.
3 If the rotary effect is selected, use the Slow/Fast button to change the ro-
tor’s speed.
Page 38

30| The Piano
HI N T: If you select the rotary effect, and a footswitch pedal is connected to the
PEDAL 1 jack on the back of the instrument, you can use the pedal to switch the rotor
speed between the SLOW and FAST settings.
MODULATION type SPEED knob INTENSITY knob
Classic Chorus Speed Depth
Black Chorus Speed Intensity
Orange Phaser Speed Depth
Small Phaser Speed Color (type 1, 2)
MX Flanger Speed Depth
Rotary Horn Speed Horn Accel
Ambient
The AMBIENT section is whereyou can select a reverb, delay or echo effect.
This selects one of four reverb, one echo, or one delay effect models. Effects
are placed after the amp and cabinet model, and after the modulation effect.
1 Use the TYPE knob of the AMBIENT section to select a different reverb,
echo or delay effect.
2 Use the DEPTH knob to adjust the effect’s intensity. To reset it to the original
value, press the DEPTH knob.
3 If the stereo delay effect is selected, input its time by “tapping” it four times
on the TAP button. The LED flashes at tempo, so that you can understand
visually if the tempo is right. If the tempo was not entered correctly, the LED
does not flash.
Page 39

Using the effects |31
AMBIENT type DEPTH knob
Room Mix
Plate Mix
Hall Mix
Spring Mix
Tape Echo Mix
Stereo Delay Mix
Turning the effects on/off via MIDI
You can turn the effects on or off from an external MIDI device by sending
to SV-2 a Control Change message. The following table shows the MIDI messages corresponding to each effect, and the value corresponding to the On
and Off status.
Effect CC# Value
On Off
Equalizer 102
Pre FX 103
Amplifier 104
Modulation 105
Ambient 106
127 0
English
Page 40

32| The Piano
Saving or resetting the changes
Recalling the original settings
Each time you move a knob, its value is changed. Press the same knob to
recall the original value for the corresponding parameter.
To recall the default value of a parameter, select the effect type again to
reset all its parameters.
To recall all the default parameters, select the sound again, and all the effects and parameters will be reset.
Switching to a different sound or effect while editing
When selecting a different effect in a section, all changes to the previous
effect are preserved. You can return to the edited effect, and all changes
will still be there. (In case you want to return to the original value, press the
corresponding parameter’s knob).
On the contrary, when you select a different factory or favorite sound, all
parameters are reset and changes are lost.
Saving the changes to a sound
If you like the sound you just created by exploring through the knob positions, save it as a favorite sound.
1 Press the TYPE knob to see which bank of favorites sounds is selected.
The currently selected bank is shown by the FAVORITES (A‑H) button that
is blinking.
2 If you want to select a different bank, press the FAVORITES (A‑H) button
corresponding to the bank to be selected.
3 Keep pressed the FAVORITES (1‑8) button corresponding to the favorite
where you want to save your settings, until its LED starts blinking.
Page 41

Saving or resetting the changes |33
4 Press the same button again, to confirm saving.
If you do not want to save the changes, just wait a few seconds until the button’s LED turns off, without pressing any button.
HI N T: Use the favorite banks to organize the sounds in separate sets, for example a
different set for a particular style or show.
NOTE: The favorite sound is written over the previous contents of that location. The
favorite sound that was in that location will be erased.
NOTE: If you switch to a different sound or turn off the power without storing the
sound and effects you edited, your changes will be lost.
English
Page 42

34| The Piano
Advanced settings
The advanced settings buttons
The group of buttons named TRANSPOSE, LOCAL OFF, TOUCH and
FUNCTION give access to a series of advanced features that you may need
to adapt the piano to your habits.
Adjusting the master tune
You can fine tune the instrument, to adapt to another instrument that cannot be tuned.
1 Press the FUNCTION button.
After you press this button, its LED starts blinking. Also, one of the LEDs
around the INTENSITY knob in the PRE FX section starts blinking.
2 Use the INTENSITY knob to edit master tuning. By default, the SV-2 is tuned
to the standard Western tuning (A = 440Hz). Use the INTENSITY knob to
change this, by lowering or raising the pitch. The LEDs around the knob show
the nearest value of the pitch detuning.
3 To reset tuning to the original A = 440Hz, press the INTENSITY knob.
Page 43

Transposing
-12
C3
0 +12
C5
Advanced settings |35
In some cases, a song may be written in a difficult key (e.g., many black keys),
or you may wish to shift the pitch to match another instrument or vocalist. In
such cases, you can transpose (shift the pitch) so that you can use an easier
fingering, or use the same familiar fingering to play at a different pitch. This
is called the Transpose function.
For example if you transpose upward by one semitone, playing the notes
shown at the lower left will produce the pitches shown at the right.
Turning transposition on or off
1 Press the TRANSPOSE button to turn the transposition on. If a transposition
has already been set, the LED of this button will turn on, otherwise it will
remain dark.
2 Press the TRANSPOSE button again to turn transposition off. The LED will
go dark.
Setting the transposition interval
English
1 Keep the TRANSPOSE button pressed for about one second, until its LED
starts blinking.
2 Press the note corresponding to the desired transposition. Transposition will
be activated, and the LED will stay on.
Page 44

36| The Piano
Key Effect
C3 – B3 12 – 1 semitones below
C4 (Middle C) Standard pitch
C#4 – C5 1 – 12 semitones higher
If no note is played after some seconds, the transpose programming will end.
3 Press the TRANSPOSE button again to turn transposition off. The LED will
turn off.
NOTE: When the instrument is turned off, transposing is reset.
Choosing a tuning curve
You can choose a tuning curve, to adapt it to the instrument.
1 Press the FUNCTION button.
After you press this button, its LED starts blinking. Also, the LED of one of
the eight FAVORITES button starts blinking.
2 Use the FAVORITES buttons to select a different tuning curve:
Favorite # Tuning Curve
1 Equal
2 Grand Piano 1 Stretch
3 Grand Piano 2 Stretch
4 Electric Piano Stretch
5 Electric Grand Stretch
6 Upright Stretch
7 User #1
8 User #2
NOTE: Curves User #1 and User #2 can only be programmed by using the SV-2 Editor.
NOTE: The tuning curve is memorized when saving a favorite sound.
Page 45

Adjusting the program levels
Advanced settings |37
Some Sounds can be made of up to three programs, whose volume level you
can adjusts as you like.
1 Press the FUNCTION button.
After you press this button, one of the LEDs around each of the knobs in the
EQUALIZER section starts blinking. If a program is in mute, no LED can be
seen around the corresponding knob.
2 Use the knobs to edit the program levels. The LEDs around the knob show
the nearest value of the program’s volume.
3 By pressing a knob, the original value will be recalled. If you want to recall
the original value, select the same factory or favorite sound again.
4 By keeping a knob pressed for about one second, the corresponding pro-
gram is turned on or off (muted).
NOTE: The program levels are memorized when saving a favorite sound.
Changing the split point
You can change the split point, that is the note where the keyboard is divided
between different timbres. When you save the changes into a favorite sound,
the split is saved with it.
Please note that you can switch from a layered to a splitted sound, and vice
versa, by using the SV-2 Editor.
English
1 Keep the LOCAL OFF button pressed for about one second, until its LED
starts blinking.
2 Press the note corresponding to the desired split point. The split point will be
changed, and the LED will turn off.
If no note is played after some seconds, the split programming will end.
NOTE: The split point is memorized when saving a favorite sound.
Page 46

38| The Piano
ong
No
loudness
Changing the touch sensitivity
The keyboard sensitivity, or touch, can be programmed.
1 Press the TOUCH button.
After you press this button, its LED starts blinking. Also, the FAVO RITE button corresponding to the selected touch curve starts blinking.
2 Press the FAVOR I T E button corresponding to the desired touch curve.
3 Press the TOUCH button to confirm and return to the normal operations.
Favorite # Touch Curve Note
1 Normal Normal piano touch.
2 Soft 1 Loud notes can be produced even by playing lightly.
3 Soft 2
4 Medium 1 Loud notes can be produced by playing normally.
5 Medium 2
6 Hard 1 Loud notes can be produced only by playing very hard.
7 Hard 2
8 Fixed Fixed dynamic. Use the SV-2 Editor to choose the desired
dynamic level.
This is the diagram of the touch curves:
Strong
( )
te
NOTE: The touch sensitivity is memorized when saving a favorite sound.
Soft
Normal/Medium
Soft
Playing strength
Hard
Str
Page 47

Choosing a MIDI channel
C4
116
Advanced settings |39
Choose a MIDI channel over which the SV-2 can transmit and receive data to
another instrument or a computer.
1 Press the FUNCTION button.
2 After you press this button, its LED starts blinking. Press one of the notes
from C6 and D#7 to choose a transmit/receive MIDI channel:
C6
Note Channel Note Channel Note Channel Note Channel
C6 1 E6 5 G#6 9 C7 13
C#6 2 F6 6 A6 10 C#7 14
D6 3 F#6 7 A#6 11 D7 15
D#6 4 G6 8 B6 12 D#7 16
3 When you are done editing the above settings, press the FUNCTION button
to exit.
English
Page 48

40| The Piano
The Local Off
You can turn the Local Off function on or off.
▪ Press the LOCAL OFF button to turn its LED on.
When you turn the LED of this button on, the keyboard is disconnected from
the internal sounds. By playing the keyboard, you cannot hear any sound
from the internal tone generator. However, notes continue to be sent to the
MIDI OUT port (or the USB port), and can be received by a computer.
The computer sends them back again to the SV-2’s MIDI IN port (or the USB
port), and then to the internal tone generator. This routing allows you to record and play at the same time, without duplicate notes.
▪ Press the LOCAL OFF button to turn its LED off.
When you turn the LED of this button off, the keyboard can play the internal
sounds.
NOTE: When the instrument is turned off, local off is reset.
Don’t panic!
In case MIDI notes remain stuck for problems in MIDI communication, keep
the EQUALIZER’s section On/Off button pressed until the stuck notes are
silenced. This is commonly called the MIDI Panic function.
Page 49

Calibrating the pedals
Advanced settings |41
You can calibrate the pedals connected to the DAMPER, PEDAL 1 and PEDAL
2 connectors in the back panel. By calibrating a pedal, you let the SV-2 understand its polarity and the full range of values sent.
1 Connect all pedals to be calibrated to the SV-2. Remember that DAMPER
expects the included KORG DS-2H damper pedal (or, as an alternative, the
optional DS-1H, or any footswitch pedal), PEDAL 1 expects a footswitch pedal, and PEDAL 2 can be used to connect either a footswitch or a volume/
expression pedal.
2 Set any volume/expression-type pedal to its lowest setting.
3 Turn the SV-2 off.
4 Keep the Auto/Pedal button pressed, and turn the SV-2 on.
5 When the Auto/Pedal LED starts to flash, release the button.
If you do nothing in the next few seconds, the Auto/Pedal LED will turn off,
and the SV-2 will complete the start-up sequence.
6 While the Auto/Pedal LED is flashing, press the button again. SV-2 enters
calibration mode.
7 Now calibrate PEDAL 1 (a footswitch). Completely depress the pedal, then
release it. When you have finished calibrating the pedal connected to the
PEDAL 1 jack, FAVORITES button #1 will turn on.
8 Then, calibrate PEDAL 2. The procedure is different, depending on the use
of a footswitch or a volume/expression pedal:
English
▪ If you connected a footswitch, completely depress it, then release it.
▪ If you connected a volume/expression pedal, push it all the way forward to
its maximum position.
When you have finished calibrating the pedal connected to the PEDAL 2
jack, FAVORITES button #2 will turn on.
9 Finally calibrate the DAMPER pedal. Completely depress the pedal, then
release it. When you have finished calibrating the pedal connected to the
DAMPER jack, FAVORITES button #3 will turn on.
10 When finished calibrating:
▪ If you calibrated all three pedals connected, SV-2 automatically exits calibra-
tion mode and continue the start-up sequence.
▪ If you calibrated only one or two pedals, press the Auto/Pedal button again
to exit calibration mode and continue the start-up sequence.
Page 50

42| The Piano
Locking the control panel
We have shown you how to change the sounds and effects. Now we will tell
you how to prevent to make any change! This can be useful if you want to
avoid inadvertently changing the settings while playing.
1 Press the TOUCH and FUNCTION buttons together to lock the control panel.
Their LEDs will start blinking.
The only controls that will remain accessible are the MASTER VOLUME knob
and the POWER switch.
2 Press either the TOUCH or FUNCTION button to unlock the control panel.
NOTE: When the instrument is turned off, locking is reset.
Factory restore of all settings
After making several changes, you might want to restore the original, factory status of the SV-2 (including the favorite sounds and global settings):
1 Turn the instrument off.
2 Keep the FUNCTION button pressed.
3 Without releasing the FUNCTION button, turn the instrument on.
4 When its LED starts flashing, release the FUNCTION button.
5 Press the FUNCTION button again to confirm the restore operation.
6 At the end, all settings will be reset.
Page 51

Advanced settings |43
Checking the operating system version
You may want to check the operating system version, to see if you have the
latest version installed.
1 Turn the SV-2 on.
2 When the instrument is on, press the SPEED and INTENSITY knobs in the
PRE FX section.
The operating system version is always given in the format “x.y.z”, for example “1.0.0” for major release 1, minor revision 0, patch (fix) 0.
The number shown around the SPEED knob gives you the first part (x), the
number shown around the INTENSITY knob gives you the second part (y),
while the number shown around the DRIVE knob in the AMPLIFIER section
gives you the third part (z) of the operating system version number.
The following example shows OS v1.0.0:
English
Page 52

44| The Piano
Page 53

|45
THE EDITOR
English
Page 54

46| The Editor
Welcome to the Editor!
What you can do with the Editor
The KORG SV-2 Editor for the SV-2 Stage Vintage Piano is where you can
create your own sounds. While we were very careful in keeping the editing
capabilities of the piano itself at a minimum, to make it clean and easy to
use, we don’t want to prevent you from accessing the most advanced editing
functions ‘under the hood’. Enter the SV-2 Editor: a graphic user interface
for your SV-2, providing full access to all parameters.
When finished editing, your sounds and favorite settings can be written to
the SV-2 or to a file on your computer. The SV-2 Editor file format is the same
in Windows and Mac, so you can effortlessly transfer the files between these
platforms. The SV-2 Editor is a useful librarian for managing all your sounds
and settings.
So, by using the SV-2 Editor you can comfortably view and edit all sound
parameters and general settings of your SV-2. With it, you can:
▪ edit existing sounds (starting from factory or favorites)
▪ edit the global settings, including the tuning curves
▪ create your own sets, each one for a different show
▪ create libraries of sounds, to be exchanged with other SV-2 users
▪ load additional libraries supplied by KORG or other vendors
▪ combine sounds from different libraries
▪ change the order of the favorite sounds
▪ replace sounds you don’t plan to use, with others you like better
Page 55

Installing the software |47
Installing the software
The software that comes with your SV-2
Before you start using the SV-2 Editor, you are asked to install some software in your computer. Nothing to worry about! The installers themselves
are self-explanatory, and no malicious data is installed. Your computer will
continue to work as well as before, and our software will live peacefully side
by side with all other software in your computer.
This software can be updated as new versions are released by KORG. You
can download the new versions from our web site (www.korg.com). Please
note that the SV-2 Editor and the piano’s program lists should be kept in line.
If a message warns they aren’t, please update the editor.
System Requirements
To install the SV-2 Editor, you need a personal computer meeting the following specifications:
English
▪ PC running under Microsoft® Windows® 7/8/10 (either 32 or 64 bit).
▪ Mac running under macOS Sierra 10.12.6 (or higher). Older versions of macOS
may be compatible, but are not officially supported.
▪ Minimum video resolution of 1024 x 768 pixels.
For the latest information on OS support, please see our dedicated web page
(https://www.korg.com/support/os/).
Installing the KORG USB-MIDI Driver
Before installing the SV-2 Editor, you must install on your Windows PC the
KORG USB-MIDI Driver, that you can download from our web site (www.korg.
com). Please refer to the instructions you can find with the software.
Page 56

48| The Editor
Installing the SV-2 Editor
To install SV-2 Editor, please follow these simple steps. (Please note that
while the screenshots may vary, the installer is functionally the same on
Windows and the Mac).
Installing the software
1 Download the SV-2 Editor Installer from our web site (www.korg.com), and
launch it.
2 The computer asks your authorization for installing new software.
On Windows, click Yes to confirm.
Page 57

Installing the software |49
On the Mac, enter your Mac username and password, and click OK to confirm.
3 A welcome dialog appears. Click Next > to continue, or Cancel to exit.
English
Page 58

50| The Editor
4 A dialog appears, showing you the destination directory (folder) for the
SV-2 Editor application. Click Browse to choose a different location, or
Next > to confirm and continue.
5 In Windows, choose a location where to place the SV-2 Editor’s icon in the
Windows menu.
Page 59

Installing the software |51
6 If you click Cancel to stop the installation procedure, a warning appears.
Click Exit to stop the installation, or Continue to resume and continue.
7 After you click Next >, the needed files are installed. A progress bar shows
the process going on.
8 In Windows, you are then asked if you want to create an icon on the desktop.
Click Next > to confirm.
English
Page 60

52| The Editor
9 When done, a confirmation dialog appears. You can click Finish to exit the
installer.
Updating the software
When a new version of the software is released, just run the installer, and let
it update the files. The procedure is completely automatic.
Page 61

Running SV-2 Editor |53
Running SV-2 Editor
Connecting your SV-2 via USB
Before using the SV-2 Editor, you must connect your SV-2 to a personal computer via a standard USB cable.
Please note that not all USB hubs are compatible with SV-2. In case you experience troubles when connecting the piano to your computer, remove the
hub and directly connect the piano to an USB port of your computer.
Turning your SV-2 on
For all the features of the SV-2 Editor to work, the SV-2 must be connected
and turned on before you run the software. Otherwise, only the Backup page
will be available to manage your backup sets.
The computer or the SV-2 may enter sleep mode while using the editor, and
connection between them may be interrupted. In this case, please wake
them, then exit and relaunch SV-2 Editor. You may set your computer and
SV-2 so that they don’t go to sleep while working with the SV-2 Editor.
English
Also, please note that your computer might exit from sleep mode when you
turn the SV-2 on. This is a normal behavior, since the USB port is sensing the
SV-2 returning to an active state.
Launching SV-2 Editor
Locate the application’s icon into your hard drive, and double click it.
Page 62

54| The Editor
When you launch SV-2 Editor, the content of the SV-2’s memory is transferred to the Editor. Please wait a few seconds for the transfer to complete.
NOTE: An error message might warn you that the programs in the piano and the ones
in the editor do not match. In this case, please update the SV-2 Editor.
Page 63

Getting to know the SV-2 Editor |55
Getting to know the SV-2
Editor
Main screen
When you run the SV-2 Editor, you can see the main screen, as in the following illustration.
English
The layout is very clean, and you can easily identify the various logical sections described below.
Menus
Use menus from the top menubar to find commands to manage your data on
disk, transmit data to the SV-2, or set the application’s preferences. These
are explained later in this manual.
Page 64

56| The Editor
Sound name
The name of the selected sound always appears in the top center of the
editor.
Compare button
You can use the Compare button to listen to the original sound, to compare
it with the edited sound.
▪ When no parameter has been edited, the button is dimmed and
therefore not available.
▪ When one or more parameters have been edited, the button be-
comes solid and available. SV-2 can detect the status of a parameter. If you move the knobs to the original value of the parameters, the
button is dimmed again and not available.
▪ If you click the button to momentarily recall the original set-
tings, the button starts flashing. In this situation, you can listen
to the original sound, and any editing is prevented. Click the Compare button
again to return to the edited sound.
Pages
There are four pages to choose from, and you access them by using the corresponding tabs on top of the editing area. The parameters they contain are
explained later in this manual.
The pages are:
▪ The Sound page, where you can edit the selected sound. Here you can select
the programs, adjust their volume and equalization, layer or split them on
the keyboard.
▪ The FX page, where you can edit the effects in the sound.
Page 65

Getting to know the SV-2 Editor |57
▪ The Global page, where you can edit the global settings.
▪ The Backup page, where you can exchange data with your SV-2, as well as
manage libraries of sounds.
NOTE: Only the Backup page will be available if the SV-2 is not turned on or connect-
ed.
Side drawer
All editing happens on the selected sound or tuning curve. Please select it
in the lists appearing in the side drawer you can access on the right of the
screen.
English
Page 66

58| The Editor
Knob not available on the
Knobs
Use the knobs to edit the value of the corresponding parameter. Click a knob,
then drag up to increase the value, down to decrease it.
When a knob is selected, it becomes orange. While in this status, you can
also use the Up or Right, and the Down or Left arrows in your computer’s
keyboard to change the value with more precision.
Double click a knob to recall the default value of the corresponding parameter. This is like pressing a knob on the SV-2’s control panel.
When a knob in the editor replicates a knob on the control panel of the SV-2,
a red dot appears over it.
Replicates a control
panel’s knob
NOTE: The name of a parameter may be different than the name of the real knob on
the SV-2’s control panel.
control panel
Page 67

Editing workflow
Editing workflow |59
While it is very easy to understand how to use the SV-2 Editor, and you are
free to use the editing procedures that you prefer the best, please carefully
follow these steps to connect the SV-2 to a computer and to transfer data
between them.
1 Connect your SV-2 to your computer using an USB cable.
2 Turn the SV-2 on.
3 Launch the SV-2 Editor, and wait for the content of the SV-2’s memory to be
transferred into the Editor, and appear in the side drawer.
Also, you can load data saved on disk (this might be data you edited in the
past, or that you download from the web).
4 Go to the Sound, FX or Global page and edit your data.
Changes are immediately mirrored to the SV-2, so that you can listen to them
when playing the keyboard. However, they are not saved into the SV-2 memory.
5 Click the Write Favorite button in the side drawer to save the changes into
the SV-2’s memory.
6 If you want to create a backup set with all the edited data, click the Backup
All Data button in the side drawer.
A Save dialog appears. Enter a name for the new backup set, choose a place
where to save it in the disk, then confirm.
7 Exit from the SV-2 Editor.
English
8 If you want, disconnect the USB cable.
9 Enjoy your new sounds!
Page 68

60| The Editor
Side drawer
The side drawer mirrors the internal memory of the SV-2. This is like the
Sound and Favorite s sections of the SV-2’s control panel, with the addition
of a list of the available Tuning Curves.
Sounds, Favorite and Tuning Curve lists
These lists are where you can select a factory or favorite sound, or a tuning
curve to edit. Also, you can access commands to save the current changes to
the SV-2’s user memory after editing.
Selecting a list
Click the relevant label on top of the drawer to view the corresponding list.
Page 69

Side drawer |61
Making the side drawer appear or disappear
To make the drawer appear or disappear, click the small arrow next to the
top left side of the drawer:
Selecting an item in the list
When a list is shown, click an item to select it.
If you type the first letter of an item, it will be selected in the list. Type the
letter again, and the next item whose name begins with that same letter will
be selected.
For example, type ‘W’, and the first occurrence of ‘Wurly’ will be selected.
Type it again, and the next occurrence (say, ‘Wurly Dark’) will be selected.
English
When selecting a different sound…
Depending on the preferences you have set, when you choose a different
sound, and there are unsaved changes, a message may warn you that changes will be lost:
Click Yes to delete the changes and select a different sound, No to cancel
and review your changes.
NOTE: You can make this dialog appear or not, by checking the “don’t ask again”
checkbox. Also, you can set this behavior in the Preferences (see page 118).
Page 70

62| The Editor
List commands
At the bottom of the side drawer there are two buttons, you can use to save
your changes to the SV-2 internal memory or to the computer disk.
Write Favorite
Click this button to save the changes you made to the current sound (the one
selected in the list) into a favorite location inside the SV-2’s memory.
NOTE: You can only save into favorite locations; factory locations are always pro-
tected.
1 Click this command. The Write Favorite dialog appears:
2 Type a Name for the favorite sound.
3 Use the Write To pop-up menu to choose a target location where to save the
favorite sound.
4 Click OK to confirm saving, or Cancel to cancel saving.
WARNING: If confirming, the data at the target location will be overwritten.
Page 71

Side drawer |63
Backup All Data
Click this button to get all data from the SV-2’s memory, and save them to
disk as a backup set (a file with the *.sv2 extension). This is useful to preserve
all edited sounds on your computer’s disk for archival and future use.
1 Click this command. A Save dialog appears:
English
2 Assign a File Name to the new backup set.
3 Choose a location where to save it.
4 Click Save to confirm, or Cancel to exit without saving.
Page 72

64| The Editor
Sound page
The Sound page is where you can edit the selected sound, by turning programs on or off, adjusting the volume, equalizing them and settings the pedals.
The edited sound can be saved as a favorite sound inside the SV-2’s memory,
by clicking the Write Favorite button in the side drawer (see “Write Favorite”
on page 62).
Page 73

Sound page |65
Main, Layers 1, 2
Activating or deactivating the programs
Use the On button on the left of the program area to activate or deactivate
each one of the programs.
Joining or splitting the keyboard
Use the buttons in the Mode section to join or split the keyboard.
English
▪ Choose Layer to get up to three programs along the full keyboard.
Main, Layers 1, 2
▪ Choose Split to divide the keyboard at the split point, with one program on
the left and up to two on the right hand.
Split
When the split is activated, you can use the Note menu to choose the point
where the keyboard is divided.
Main, Layer (1)
Page 74

66| The Editor
The Basic section
You can choose a program for each of the three components of a sound. A
program is a basic timbre, that alone or together with other one or two programs makes a sound.
Choosing a program
To select a program, click the name of the assigned program (in the example: “MK I Suitcase”) to open the program list.
The Program List is shown as a tree view. Choose one of the Categories,
then one of the Sub‑Categories inside it, then one of the Programs.
We also included a Legacy sub-category, containing the sounds of our old
SV-1 that we didn’t include in the factory banks. This is useful to create
sounds you loved in SV-1 and we didn’t include.
Page 75

Sound page |67
You can search a program by typing its name (or part of it) in the Search
field over the browser. All the matching results will appear in the Search
Results list. Click one of the items in the list to select it.
When a program has been selected, click OK to confirm selection (or Cancel
to exit without selecting anything). Alternatively, you can double-click the
program name to immediately select it, and make the list automatically disappear.
For a list of all the programs, see “Programs” on page 122.
English
Adjusting the program’s volume
Use the Volume knob to adjust the program’s volume.
Parameter Values Notes
Volume 0…127 Adjusts the program volume.
Adjusting the octave and detuning
Use the Octave knob to set the octave, and the Detune knob to fine tune the
program in cents.
Parameter Values Notes
Octave -3…3 Transposes the program one or more octaves up
Detune -64…63 Detunes the program up or down. -64 is one
or down.
quarter tone down, 63 is one quarter tone up.
Page 76

68| The Editor
Bypassing the effects
While editing a sound, you may want to listen to the program dry, without
any effect applied. Also, you may want the program to be left dry in the
sound (for example, the piano’s mechanical noises).
If so, click on the FX Bypass button to turn it on. This will exclude all the
effects shown in the FX page from the program.
Page 77

EQ section
Sound page |69
Here you can adjust and turn the equalization on or off for the program. Use
the On switch to turn equalization on/off.
Use the equalization knobs to adjust the tone color of the program.
HI N T: You can add a more detailed equalizer as an effect for the whole sound in the
FX page. Contrary to this one, that one will be applied to all the programs at the same
time.
Parameter Values Notes
Bass -18…18 Adjusts the bass frequencies gain.
Middle -18…18 Adjusts the middle frequencies gain.
Treble -18…18 Adjusts the treble frequencies gain.
Pedals section
English
Here you can turn the pedals on or off for the program.
Page 78

70| The Editor
Touch control section
The keyboard sensitivity, or touch, can be programmed for the sound as a
whole. Use the TOUCH knob to select one of the touch curves.
Setting Touch Curve Note
N Normal Normal piano touch.
S1 Soft 1 Loud notes can be produced even by playing lightly.
S2 Soft 2
M1 Medium 1 Loud notes can be produced by playing normally.
M2 Medium 2
H1 Hard 1 Loud notes can be produced only by playing very hard.
H2 Hard 2
F Fixed Fixed dynamic value. See below how to set it.
The selected touch curve can be saved into each favorite sound inside the
SV-2’s memory, by clicking the Write Favorite button in the side drawer.
Setting the fixed touch value
When the Fixed curve is selected, you can enter the fixed value in the field
that becomes active over the knob.
Page 79

Tuning Curve section
Sound page |71
SV-2 comes with several preset tuning curves, that you can apply to your
sound as an alternative to the standard Equal tuning. Alternative tuning
curves reproduce the original tuning chosen by the original keyboard manufacturers, to better suit the sound of their instruments.
Selecting a tuning curve
You can select a tuning curve from the pop-up menu on the left of the keyboard diagram:
The selected tuning curve can be saved into each favorite sound inside the
SV-2’s memory, by clicking the Write Favorite button in the side drawer.
Note: When editing a tuning curve, you edit the exact note selected. Editing is not
reflected to all the other octaves.
1 Touch the name of the selected tuning curve to open the pop-up menu.
2 Choose one of the available curves.
English
Tuning Curve Note
Equal Temperament Equal tuning, the standard scale for modern Western music. It is
G.Piano 1 Stretch Simulates the ‘stretched’ tuning of an acoustic or electric pia-
G.Piano 2 Stretch
E.Piano Stretch
Electric Grand
Upright Stretch
User 1/2 Custom scales made by the user. We may have already pro-
made of 12 identical semitones.
no. Basically an equal tuning, the lowest notes are slightly lower,
while the highest notes are slightly higher than the standard.
grammed them, to give you a starting point.
Page 80

72| The Editor
Editing a User tuning curve
You can edit each tuning curve, and save the edited curve into either of the
two available User locations. User tuning curves can then be reached from
the Curve list in the side drawer.
1 Select a tuning curve to edit from the pop-up menu on the left of the key-
board diagram (as seen above).
2 Click a key to be edited on the keyboard (or choose it from the Note pop-up
menu).
3 Use the Tune knob to change the note tuning. The note variation is made
in cents with this knob, and the resulting pitch is shown in Hertz (Hz) In the
Frequency field.
4 Repeat the above for each note you want to edit.
5 Click the Store button to save the changes. The Save Tuning Curve dialog
appears:
Choose a User location, and assign it a name. Then click OK to confirm saving, or Cancel to exit the save procedure without saving.
At the end, the new tuning curve will appear in the Curve list in the side
drawer.
6 If you want to delete all the changes and return to the Equal Temperament,
click the Reset button.
Page 81

FX page
FX page |73
The FX page contains parameters for all the effects applied to the sounds
as a whole. This is like the various effect sections on the control panel of the
SV-2. However, more parameters are available in the Editor.
The edited effects can be saved into each favorite sound inside the SV-2’s
memory, by clicking the Write Favorite button in the side drawer (see “Write
Favorite” on page 62).
English
Page 82

74 | The Editor
The effect chain
The EQ and pedal (“stompbox”) effect are placed before the amp model and
cabinet, and the modulation and ambient (reverb/echo/delay) are placed after the cabinet model. Finally, a limiter takes care of dynamics.
Modulation, delay, echo and reverb effects are placed after the amp module,
since they are effects that are usually added after capturing the signal from
the cabinet with the microphones.
SIGNAL ROUTING
SOUND
PRE AMP
VOLUME VOLUME POWER
MODULATION AMBIENT TOTAL FX
POWER AMP
EQ PRE FX
CABINET NR
VALVE
AT T.
PROGR
LVL
Stereo Limiter
Stereo Mastering Limiter
OUTPUTS
The effect chain cannot be modified. However, each section can be individually turned on or off. Use the On button next to each effect to turn the
corresponding section on or off.
All the effects are applied to the sound as a whole, including all the programs
whose FX Bypass switch is set to off in the Sound page.
Page 83

Equalizer section
FX page |75
This is an EQ with fully parametric mids, placed before the Pre FX. This equalizer is applied to all the programs of the sound.
Parameter Values Notes
Bass -18…18 [dB] Adjusts the bass frequencies gain.
Middle Freq 50 Hz…10.0 kHz Sets the frequency of the middle band.
Middle Q 0.5…10.0 Sets the bandwidth of the middle band. The high-
er the value, the narrower the band becomes.
Middle (Gain) -18…18 [dB] Adjusts the middle frequencies gain.
Treble -18…18 [dB] Adjusts the treble frequencies gain.
English
Page 84

76| The Editor
Pre FX section
The Pre FX is placed before the amp.
Choosing a Pre FX pedal effect
Click the name of the selected Pre FX effect, then choose a different item
from the list.
Red Compressor
Gotta play a clean chordal passage that needs to be nice, smooth and even?
Then, look no further: Compressor is the pedal for you. Modeled on a red
compressor pedal that is hugely popular due to the clean sound it can produce. Perfect for pop and funk music.
Parameters Values Notes
Sens 0…99 Adjusts the sensitivity of the compressor (i.e. when its
Level 0…100 Adjusts the output level. Usually, this is used to compen-
Attack 0…99 Adjusts the speed needed for the compressor to kick in.
“smoothing” effect kicks in). The amount of compression
will increase the more you turn this control up.
sate for the gain loss caused by compression.
Faster speeds might chop the beginning of notes out.
Page 85

FX page |77
Treeble Boost
This effect is modeled after the VOX VBM-1, one of the highest rated boost/
overdrive effects ever, designed to achieve the famous “guitar orchestra”
effect. This effect was able to provide a transparent boost to your signal, or a
harmonically rich overdrive that’s great on organs. What you end up with is a
bigger, more focused rendition of your original sound. Its three controls have
a very broad range, and this makes the unit capable of providing a variety of
overdriven sounds.
Parameters Values Notes
Drive 0…99 Adjusts the amount of distortion (boost). At the min-
imum setting, the sound is very clean and has a great
headroom.
Level 0…100 Adjusts the output level.
Tone 0…99 Adjusts the tone.
English
U‑Vibe
Modeled on the Uni-Vibe, the most famous chorus/vibrato pedal effect unit.
This effect simulates a rotating speaker and produces a wonderfully seductive and “watery” tone. Interestingly enough, the guy responsible for this
great pedal is also responsible for the birth of the remarkable Valve Reactor
Technology used in your SV-2.
Page 86

78| The Editor
Parameters Values Notes
Speed 1.00…10.00 Hz Adjusts the speed of the U-Vibe effect.
Depth 0…100 Adjusts the depth of the U-Vibe effect.
Mix 0…100 Adjusts the mix between the direct sound and the
effect. ‘0’ is no effect, ‘50’ is chorus, and ‘100’ is vibrato.
Vibrato
This effect simulates the chorus and vibrato circuitry (also called the Vibrato
Scanner) of a vintage organ. When the Preset mode is selected, the knobs
have no effect, and you can use the Type knob to select the type of vibrato
or chorus. When the Custom mode is selected, you can use the Depth and
Speed knobs to create either of these sounds, for an even broader range of
possibilities than the original unit! The Mix knob allows you to create vibrato
(pitch modulation) by outputting just the effect sound.
Parameters Values Notes
Mode Preset, Custom Selects either preset or custom settings.
Typ e V1, C1, V2, C2,
V3, C3
Vib/Ch Mix 0…100 When in Custom mode, sets the mix level between
Depth 0…100 When in Custom mode, adjusts the modulation depth.
Speed 0.02...20.00 Hz When in Custom mode, adjusts the modulation speed.
Mix 0…100 When in Custom mode, adjusts the mix between the
Selects the effect type when in Preset mode. V1/V2/
V3 are variations of vibrato, and C1/C2/C3 are variations of chorus (modeled after the original Vibrato
Scanner).
Vibrato and Chorus.
direct signal and the effect.
Page 87

FX page |79
Tremolo
This models the popular tremolo circuit that’s built into the Twin amp model.
The Spread setting lets you produce a panning effect that spreads to the left
and the right.
Parameters Values Notes
Speed 0.10...10.00 Hz Adjusts the tremolo speed.
Depth 0…100 Adjusts the tremolo depth.
Spread 0…100 Adjusts the left/right spaciousness.
Mix 0…100 Adjusts the mix between the direct signal and the
effect.
English
VOX Wah
This effect is modeled on two legendary VOX wah pedals: the V847 and the
V848 Clyde McCoy model. Thanks to their unique “throaty” tone, these are
the only wah pedals many professionals will consider stepping on. When
used wisely, this pedal can either make your melody lines cry like a baby or
howl like a man possessed!
Page 88

80| The Editor
Parameters Valu es Notes
Close 0…99 Adjusts the tone when the wah pedal is closed.
Open 0…99 Adjusts the tone when the wah pedal is open.
Manual 0…99 Adjusts the openness (position) of the wah when in Pedal
Model V847, V848 Selects either V847 or V848 Clyde McCoy model as the
Auto Sens 0…100 Sensitivity of the wah when in Auto mode.
mode.
wah type.
NOTE: The Manual wah control only works when the Auto/Pedal button is in Pedal
mode on the control panel.
NOTE: When this effect is selected, you can control the wah with an expression pedal
connected to the PEDAL 2 jack.
USEFUL TONE HINT: A great tonal trick that’s employed by many players, including
some who are household names, is to find a “sweet spot” within the range of their
wah pedal and then leave it there. This is often called stuck‑wah and, when used
tastefully, can be very effective as it produces a very distinctive sound that will cut
through any mix.
Page 89

Amplifier section
FX page |81
It wasn’t easy to select the amps to model, since, there’s a plethora of great
sounding amps to choose from. After countless hours of searching, discussing and listening sessions, we came out with a top list. As you’re about to
discover, the ones we went with are not only the cream of the crop but also
offer up the widest possible array of the greatest tones.
The operating mode of the preamp and power amp, the response of the tone
controls, and their placement within the circuit will change depending on the
type of amp you select here, precisely replicating the exact gain and tonal
character of the original amp. The all-important power amp stage (class A
or AB) and negative-feedback circuit (or lack thereof) are also carefully simulated.
About the Gain and Volume knobs
Before the amp, the program’s Volume controls in the Sound page let you
balance each program against the other(s), and adjust the amount of signal
reaching the pre-amp. These controls contribute to the amount of drive in
the pre-amp.
The amp models provide two knobs that affect the volume (or gain): Pre
Volume and Amp Volume. Each control has its own specific job, and the
sound of a particular amp model can vary over an amazingly wide range just
depending on the settings of these knobs. We have made the relationship
between preamp and power amp work as in the original amps.
With the Pre Volume control, low settings will tend to produce more of a
preamp distortion, while high settings will add the distinctive distortion and
warmth of the Valve Reactor. The Amp Volume control will instead adjust
the amp’s output. The Power Attenuator in the cabinet section is placed
between the output of your amp and the input of your speaker cabinet, and
will prevent unwanted distortion at the cones.
English
The Total FX’s Gain or Out Ceiling control, in the FX page, control the level
of the sound, and allows you to balance all your sounds to each other in the
instrument.
NOTE: Setting the Pre Volume to high levels will result in heavy distortion, so be
careful with this knob!
Page 90

82| The Editor
Tube Ta lk
Brits call ‘em valves while their US cousins call ‘em tubes… as the saying
goes: England and America are merely two countries divided by a common
language! Anyway, call ‘em what you will, these wondrous glass bottles lie
at the tonal heart of each of our models. As all the amps we’ve modelled
hail from one of the two countries just mentioned, in honour of their heritage, the descriptions of all English amps will employ the words “valve” and
“valves”, while the American ones will be tubular!
QUESTION: What’s the difference between an ECC83 preamp valve and
a 12AX7 preamp tube?
ANSWER: Nothing! They’re the same exact thing – namely the most popular preamp tube in ampland. ECC83 is the British name, 12AX7 (a.k.a.
7025) is the American.
Power Amp Accuracy
What happens in the power stage of any good tube amp is of paramount
importance to the way the amp sounds, feels and behaves. The way the
power amp operates (Class A or Class AB), the power tubes used (EL84s,
EL34s, 6L6s, 6V6s), the exact nature of the negative feedback loop circuitry
(if one even exists) and how the power stage interacts (a relationship called
damping) with the speaker(s) it is driving – all these things play a vital role in
the creation of tone.
That is why we have fitted your SV-2 with our patented Valve Reactor
Technology – a modeling breakthrough that is unique to VOX (a member
of the KORG family) and infuses our critically acclaimed Valvetronix range
of amps with life and feel. This revolutionary technology emulates a tube
power-amp by using real tubes in a real tube amp circuit and ensures that
all the important bases inherent in a tube amp are faithfully and accurately
covered. For example: if you choose amp model AC30 – an amp with a Class
A power stage, EL84 output tubes and no negative feedback, that’s exactly
what your Valve Reactor power amp reconfigures itself to be.
This all said, let’s take a look at each of our amp models…
Page 91

FX page |83
Choosing an Amp model
Click the name of the selected Amp model, then choose the desired item
from the list.
Clean
The Clean’s clean sound is very tight “n” twangy, with a deep, taut, piano-like
bass. When pushed hard the bass tends to crumble. The original amp doesn’t
have a Presence control but does have a Bright switch. The Presence control on your SV-2 emulates this switch when “off” and “on,” plus all points
in-between!
English
Parameters Values Notes
Pre Vol 0…100 The degree of distortion is determined by the level of
Amp Vol 0…100
Bass 0…100 Adjusts the bass frequencies.
Middle 0…100 Adjusts the middle frequencies.
Treble 0…100 Adjusts the treble frequencies.
Presence 0…100 Boosts the upper frequencies above the normal treble
input signal and the setting of Pre Volume. Raising the
Pre Volume setting will cause the entire volume level to
increase. Use the Amp Volume parameter to adjust the
volume level.
control range for added high-end.
Page 92

84| The Editor
Twin
This was a blackface guitar amplifier made in Southern California during the
early ’60s. Its high-wattage into 2 x 12” speakers earned it a shimmering
tone. This amp’s medium output and powerful sound was a favorite in rock,
blues, jazz or country clubs.
Original’s tube compliment: 4 x 12AX7, 2 x 12AT7 in the preamp, solid state
rectifier, 4 x 6L6 tubes in the power amp.
For illustration and parameter’s description, please refer to Clean.
Tweed
This is the amp that started it all. With its smooth, fat distortion and harmonically rich clean tones, coming from 40 Watt and 2 x 12” speakers, this quickly became a favorite of the greatest bands of the ’60s. It is what you can call
“the classic tone”. Its nickname came from the use of lacquered tweed fronted with vintage brown/gold grille cloth, that gave it that sophisticated look.
Original’s tube compliment: 4 x 12AX7 in the preamp, 2 x 5U4 rectifier tube,
2 x GT6L6 tubes in the power amp.
For illustration and parameter’s description, please refer to Clean.
AC30
This amp is based on the Normal channel of a 1959 30 Watt, 2x12, AC30. The
AC30’s Normal channel boasts the bare minimum of knobs.
NOTE: The Presence parameter becomes Tone Cut in the AC30 model. It works in
reverse, by cutting the high frequencies.
Original’s valve compliment: 4 x ECC83s, 1 x ECC82 in the preamp, 1 x GZ34
rectifier, 4 x EL84s in the power amp.
For illustration and parameter’s description, please refer to Clean.
Boutique
For this model, we styled the Overdrive channel of a very expensive, handwired, custom preamp made by a renowned Californian builder. Its beautifully deep and rounded low-end, delightfully transient midrange attack and
sweet treble, with an harmonically rich overdrive, the lushest clean tone,
woody attack and blooming sustain, make it an instant pleasure to play.
Original’s tube compliment: 2 x 12AX7s in the preamp, 1 x 12AX7s rectifier, 4
x EL34s (or 6L6s) in the power amp.
For illustration and parameter’s description, please refer to Clean.
Page 93

FX page |85
Organ
This is a detailed model of the amp of a classic tone-wheel organ. With the
addition of the 3-band EQ, this amp simulation will allow you to create a very
versatile distortion. This amp model is especially suitable for organ sounds.
You can select one of two amp models, or a direct line out from the organ’s
preamp. Typ e 1 is a standard powered amp for organ, producing a warm, fat
tone. Type 2 yields a less colored tone, with more high frequencies than Type
1. Pre Amp is the sound of a direct line out from the organ, without the amp
gain (but with all the other controls).
HI N T: When the Organ amp is select, you should choose Bypass as the cabinet. This
would prevent to have at the same time the organ’s own cabinet and a guitar cabinet.
However, you are free to experiment with any combination.
Parameters Values Notes
Am p Ty p e Type 1,
Type 2,
Pre Amp
Amp Gain 0…100 This adjusts the gain when Amp Type is set to Type 1 or
Bass -10…10 Adjusts the bass frequencies.
Middle -10…10 Adjusts the middle frequencies.
Treble -10…10 Adjusts the treble frequencies.
Output Level 0…100 Amp’s output level.
Mix Adjusts the mix between the direct signal and the effect.
Type of amp model. Pre Amp bypasses the amp gain.
Type 2. It does not apply if the Amp Type is set to Pre Amp.
If an Expression pedal is connected to the PEDAL 2 con-
nector, you can use it to control the amount of overdrive
and distortion. With higher Amp Gain values, you can
reach heavy distortion; with Amp Gain = 0, the amp will
always remain clean.
You can make the sound less aggressive by lowering the
amp’s sound in the mix.
English
Page 94

86| The Editor
Cabinet section
Now let’s look at the cabinet models. Please note that these will be automatically recalled when selecting an amp model from the SV-2 front panel. This
is the only place where you can edit the amp/cabinet combo!
Cabinet and speaker accuracy
There’s not much point in having incredibly accurate amp models if the
speaker cabinet models on offer aren’t of the same exacting standards. As
you may know, in real life, the output stage of a tube amp works in close
harmony with the varying impedance curve of the speaker(s) it is driving.
This intimate and vital relationship plays a major role in producing the warm,
punchy sound and pleasing feel that we all know and love.
In a nutshell, modeling a speaker cabinet is not just a case of frequency response, but is a combination of frequency response, transient response (how
a speaker reacts to the strength of how a note is played), and the all-important interaction of the amps output to the speaker’s impedance curve.
In addition, other vitally important factors that have to be taken into account
when modeling a cabinet are the actual physical dimensions of the enclosure
(cabinet), the unique tonality of said enclosure (which will be affected by
both the type and thickness of the wood it is made of) and whether it boasts
an open, semi-open or closed-back design.
Special circuitry and unique modeling technology ensures that all of these
factors are well taken care of in the cabinet models built into your SV-2.
Page 95

FX page |87
Choosing a Cabinet model
Click the name of the selected Cabinet model, then choose a different item
from the list.
Tweed – 1x12
This speaker is the other half of our Tweed amp. As the name suggests it is a
single 12” speaker, uses an Alnico magnet and made in the USA by one of the
US’s revered names in vintage loudspeakers.
English
Parameters Values Notes
Power Att 0…100 This is a power attenuator, and sets the level of the power
NR Sens 0…100 Adjusts the noise reduction level.
amp. Changing it also influences the sound’s character.
Tweed – 4x10
Keeping with the US made Alnico magnet speakers, this cabinet partnered
our Twin amp. It is an open backed cab using four 10” 8 Ohm speakers, wired
in parallel for a total of 2 Ohms impedance. Although originally intended for
bass guitar, this speaker rocks for many different styles.
For illustration and parameter’s description, please refer to Tweed – 1x12.
Page 96

88| The Editor
Black – 2x10
Although we did not model the amp that goes exactly with this cabinet, we
loved the tone of this mid-60s Fullerton, California made open backed 2x10”
35 Watt combo featuring ceramic magnets (of US origin). Great for blues,
jazz and country.
For illustration and parameter’s description, please refer to Tweed – 1x12.
Black – 2x12
Like the above, we did not model the amp that goes exactly with this cabinet,
but we loved it very much and included it. Featuring two 12” ceramic magnet
speakers, again made in USA in the mid ’60s. They are 8 Ohm units wired in
parallel for a 4 Ohm total load. These speakers have been featured on countless recordings of many styles of music, but very predominantly country and
blues based rock.
For illustration and parameter’s description, please refer to Tweed – 1x12.
AC15 – 1x12
This is a 1x12” open backed combo using the famed VOX Blue Alnico speaker,
manufactured by Celestion in Ipswich, England. The one we used was a modern re-issue that was housed in the VOX AC15TB combo. This speaker, which
is 8 Ohms impedance, 15 Watts power handling, is amazingly full-bodied for
a 1x12 open back cab, and, of course, helps bring the famous VOX chime to
the forefront.
For illustration and parameter’s description, please refer to Tweed – 1x12.
AC30 – 2x12
Obviously, double the power – double the speakers. 2x12” VOX Blue Alnicos,
wired in series for 16 Ohms, adds even more of that great VOX tone. This
time we modelled some great sounding originals from way back in the ’60s.
As speakers get old their tone changes, so this configuration adds a different
slant on how these speakers sound.
For illustration and parameter’s description, please refer to Tweed – 1x12.
Page 97

FX page |89
AD412 – 4x12
This cabinet is one of VOX’s latest products. The cabinet itself features custom designed Celestion speakers using Neodymium magnets, one of the
first, if not the first, cabinet to use this technology. It also uses some special
cabinet acoustic design technology that is also a first for VOX and 4x12s in
general.
For illustration and parameter’s description, please refer to Tweed – 1x12.
UK H30 – 4x12
This is an older, heavy-duty cabinet (with 30 Watt speakers, from the late
’60s) made by the same famous UK amp company as the UK T75 4x12.
Many of these cabinets have been used on countless classic rock recordings
throughout the past.
For illustration and parameter’s description, please refer to Tweed – 1x12.
UK T75 – 4x12
This 4x12” model is of a famous, UK built, black box loaded with modern, 75
Watt British speakers. Normally seen stacked, this is probably the biggest
selling guitar cabinet ever and is eminently suitable for most rock styles.
English
For illustration and parameter’s description, please refer to Tweed – 1x12.
US V30 – 4x12
This black beast of a cabinet hails from a home in California, but it uses four
UK made “Vintage” named speakers. It is renowned for its deep bass and
high-end detail.
For illustration and parameter’s description, please refer to Tweed – 1x12.
Bypass
When the cabinet is bypassed, no cabinet simulation can be heard. This
should be selected when using the Organ amplifier, that will use the Rotary
Speaker model’s own cabinet (found in the Modulation section).
Page 98

90| The Editor
What goes with what?
Basically, with your SV-2 you can mix any amp model to any cabinet model,
and create many varied tones. But to give you a starting point, here is a listing of historically accurate matches:
AMP MODEL HISTORICALLY ACCURATE CABINET MODEL
Clean Black – 2x12
Twi n Tweed – 4x10
Tweed Tweed – 1x12
VOX AC30 AC30 – 2x12
Boutique US V30 – 4x12, or UK T75 – 4x12
Organ Bypass (uses the Rotary Speaker’s cabinet)
Due to the flexibility of your SV-2, mixing and matching all of the amp and
cabinet models can be done with the turn of a switch, without any risk of
blowing the speakers up. This capability can lead to some very interesting
combinations.
Page 99

Modulation Effects section
FX page |91
This section enables you to add a modulation effect after the miked cabinet.
You can choose one of six types.
Choosing a Modulation effect
Click the name of the selected Modulation model, then choose a different
item from the list.
Classic Chorus
This models a chorus unit best-known for being built into a guitar amp, but
also available as a stompbox. When in Mono mode it is a vibrato, when in
Stereo mode it is a chorus. You can use the Speed and Depth knobs for an
even broader range of possibilities than the original unit!
English
Parameters Values Notes
Speed 0.10…10.00 Hz Adjusts the modulation speed.
Depth 0…100 Adjusts the modulation depth.
Manual 0…99 Adjusts the center frequency of the sweep. If Depth
Mode Mono, Stereo Selects the output mode. When in stereo mode, the
is set to 100, Manual will not function.
effect is panned right, and the dry sound panned left.
Page 100

92| The Editor
Black Chorus
This stereo chorus + pitch modulator & flanger was originally intended for
use with guitars, but many keyboard-players have discovered it, especially to
give an extra “touch” on electric pianos.
Parameters Values Notes
Speed 0.10…10.00 [Hz] Adjusts the modulation speed.
Intensity 0…99 Adjusts the modulation intensity.
Typ e Chorus, Pitch
Mod, Flanger
Width 0…100 Adjusts the width. It does not work when in mono
Mode Mono, Stereo Selects the output mode.
Chooses the type of effect.
mode.
Orange Phaser
This device has been a favorite into many recordings. This is useful to add
sparkle, animate chord passages, and widen and fatten the sound.
Parameters Values Notes
Speed 0.10…10.00 Hz Adjusts the modulation speed.
Depth 0…100 Adjusts the modulation depth.
Manual 0…99 Adjusts the center frequency of the sweep. If Depth
Resonance 0…100 Adjusts the phaser’s resonance, changing the height
is set to 100, Manual will not function.
and sharpness of the phaser’s frequency response
peaks.
 Loading...