

Page 1

ST-SV1-BK
MAN0010110
Assembly instructions
Instructions de montage
Zusammenbauanleitung
Istruzioni per il montaggio
组装说明
スタンドの 組 み立 て 方
FEIGJC4
Page 2

2|
Thank you very much for purchasing the KORG ST-SV1-BK Stand! Please follow the assembly instruction very carefully, to avoid damage and personal
injury. This stand can be used with various KORG instruments; please check
your instrument’s user manual for information about compatibilty.
Merci d’avoir choisi un pied KORG ST-SV1-BK! Veuillez suivre scrupuleusement les instructions d’assemblage pour éviter tout dommage et blessure.
Ce pied convient pour plusieurs instruments KORG; veuillez vérifier dans le
mode d’emploi de votre instrument si ce pied peut être utilisé.
Vielen Dank für Ihre Entscheidung zu einem KORG ST-SV1-BK Ständer! Bitte
befolgen Sie alle Montagehinweise, um Schäden und Verletzungen zu vermeiden. Dieser Ständer eignet sich für mehrere Instrumente von KORG.
Bitte schauen Sie in der Bedienungsanleitung Ihres Instruments nach, ob
der Ständer verwendet werden kann.
Grazie per avere acquistato il supporto KORG ST-SV1-BK! Vi preghiamo di
seguire molto attentamente le istruzioni di montaggio, per evitare danni al
supporto o rischiare di farvi male. Questo supporto può essere usato con
diversi strumenti KORG. Vi preghiamo di consultare il manuale dello strumento per verificarne la compatibilità e per le istruzioni di montaggio.
非常感谢您购买KORG ST-SV1-BK支架!请仔细阅读以下组装说明,以免造成损坏和人
身伤害。这个支架可与多种KORG乐器一起使用;请查阅您的乐器用户手册,了解有关兼
容性信息。
このたびは、コルグSV-1専用スタンドST-S V1をお買い上げいただきまして、誠にあ
りがとうございます。
Page 3

|3
Precautions before assembly
Before you begin to assemble the stand, please keep the following in mind:
▪ To assemble the stand, two people are needed. Failing to do so may damage
the instrument and cause injury.
▪ When placing the instrument on the stand, be careful not to pinch your
hands.
▪ Be sure to follow the steps in order, and make sure that the parts are assem-
bled in the correct orientation and position.
▪ Do not apply weight to the edge of the instrument before tightening the
screws, otherwise the instrument may fall down.
Précautions avant le montage
Pour monter le support, tenez compte des instructions suivantes.
▪ Pour monter le support, il faut être à deux. Faute de quoi, vous risquez d’en-
dommager l’instrument et de vous blesser.
▪ Lorsque vous placez l’instrument sur le support, veillez à ne pas vous coin-
cer les mains.
▪ Effectuez les opérations dans l’ordre préconisé et veillez à monter les pièces
au bon endroit et dans le bon sens.
▪ N’exercez aucune pression sur le bord de l’instrument avant de serrer les vis
car vous risquez de faire tomber l’instrument.
Hinweise zum Zusammenbau
Bitte lesen Sie sich vor dem Zusammenbau des Ständers folgende Punkte
durch:
▪ Für den Zusammenbau werden zwei Personen benötigt. Sonst könnte
das Instrument nämlich beschädigt werden und/oder Sie verletzen.
▪ Achten Sie beim Zusammenbau des Ständers darauf, dass Sie sich nicht
die Finger quetschen.
▪ Verwenden Sie jederzeit die richtigen Teile und bauen Sie sie den
Anweisungen entsprechend ein.
▪ Legen Sie keine schweren Gegenstände usw. auf die Instrumenten-
vorderseite, solange nicht alle Schrauben festgedreht sind. Sonst kippt
das Instrument eventuell vom Ständer.
Page 4

4|
Precauzioni prima del montaggio
Prima di iniziare a montare il supporto, vi preghiamo di osservare le seguenti
precauzioni:
▪ Per il montaggio occorrono due persone. Eseguire il montaggio da soli
può causare danni allo strumento o alla persona stessa.
▪ Quando lo strumento viene posizionato sul supporto, fate attenzione a
non schiacciarvi le dita.
▪ Assicuratevi di montare le parti nell’orientamento giusto, e seguite le
istruzioni nell’ordine dato.
▪ Non esercitate pressione sui bordi dello strumento prima di stringere le
viti, o potreste farlo cadere.
组装前的注意事项
▪ 在您开始组装该支架前,请记住以下事项:
▪ 组装该支架需要两个人,不这么做的话有可能损坏乐器和造成人身伤害。
▪ 在 将 乐 器 放 置 到 支 架 上 时 ,小 心 不 要 夹 到 手 。
▪ 请务必遵循步骤的顺序,并确保以正确的方向和位置组装零部件。
▪ 拧紧螺丝前,不要在乐器边缘施加重量,否则可能会使乐器翻倒。
安全上のご注意
ご使用になる前に必ずお読みください
ここに記載した注意事項は、製品を安全に正しくご使用いただき、あなたや他の方々
への危害や損害を未然に防ぐためのものです。注意事項は誤った取り扱いで生じる危
害や損害の大きさ、または切迫の程度によって、内容を「警告」、「注意」の2つに分けて
います。これらは、あなたや他の方々の安全や機器の保全に関わる重要な内容ですの
で、よく理解した上で必ずお守りください。
火災・感電・人身障害の危険を防止するには
以下の指示を守ってください
警告
この注意事項を無視した取り扱いをすると、死亡や重傷を負う可能性が予想されます
・本製品を分解したり改造したりしない。
Page 5

|5
・本紙に書かれている「スタンドの組み立て方」に従って、確実に設置す
る。
本製品が転倒または破損して、お客様がけがをする恐れがあります。
注意
この注意事項を無視した取り扱いをすると、傷害を負う可能性または物理的損害が発
生する可能性があります
・ネジなどに必要以上の力を加えない。
本製品が破損する恐れがあります。
・不安定な場所に置かない。
本製品が転倒してお客様がけがをしたり、本製品が破損する恐れがあり
ます。
・本製品の上に乗ったり、重いものをのせたりしない。
本製品が転倒してお客様がけがをしたり、本製品が破損する恐れがあり
ます。
・本製品の隙間に指などを入れない。
お客様がけがをしたり、本製品が破損する恐れがあります。
・本製品に前後方向から無理な力を加えない。
本製品が転倒してお客様がけがをしたり、本製品が破損する恐れがあり
ます。
・高さを調整する場合は、本製品から製品などを降ろした状態で確実に行
う。
本製品の上に物を載せたまま高さを調整すると、手を挟んだり、本製品
が転倒してお客様がけがをする恐れがあります。
組み立て時の注意
正しく安全に組み立てるためには、次の項目に気をつけて作業してください。
・必ず2人以上で組み立ててください。
・製品をスタンドに置くときは、手を挟まないように注意してください。
・部品の種類や向きを間違わないように注意し、手順通りに組み立ててください。
・製品をスタンドに固定する前に、製品に力を加えないでください。力を加えた
ときに製品が落下することがあります。
・あらかじめ、17mmのスパナを用意してください。
Page 6
6|
Assembly instructions / Instructions de montage /
Zusammenbau des Ständers / Procedura di assemblaggio / 组装
说明 / 組み立て方法
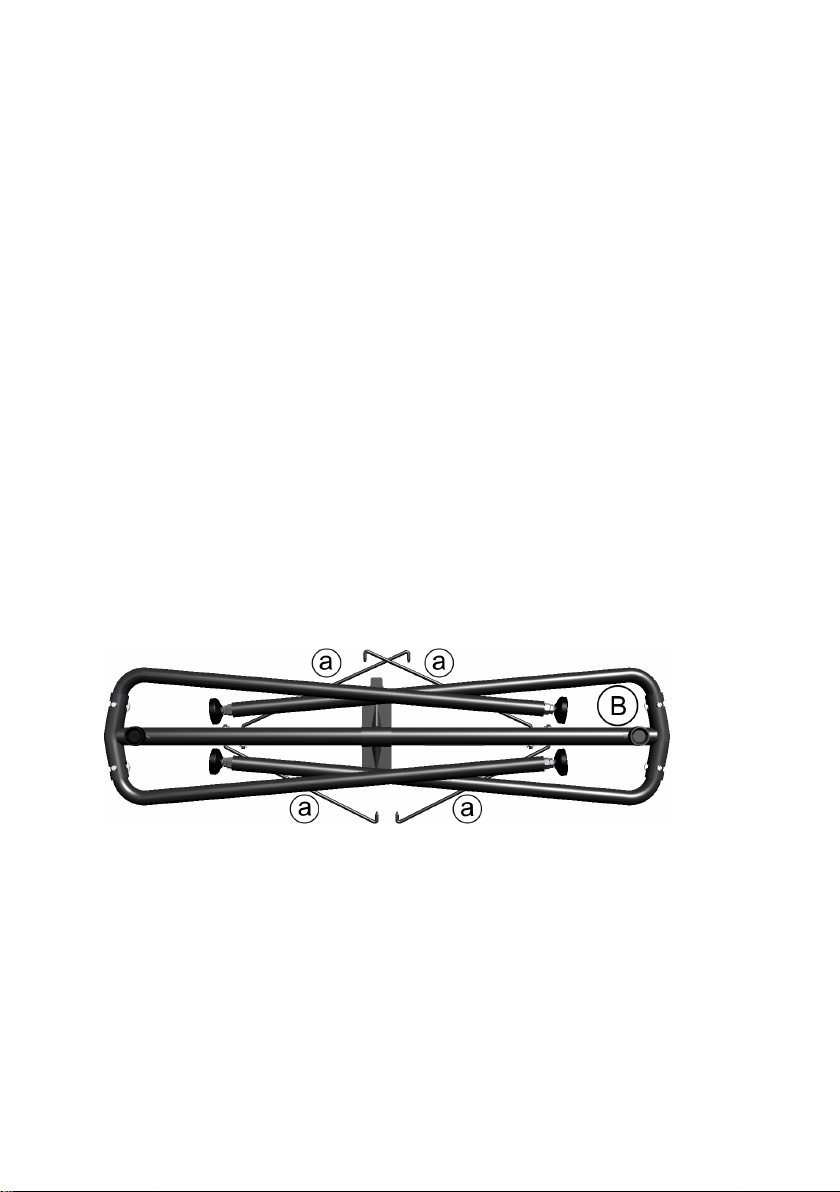
1 Open the packing carton and take out the contents. Remove the stand (B)
from the package by grabbing it by the four brackets (a). Lay it on the ground,
with the legs on top (see illustration).
Ouvrez le carton d’emballage et retirez-en le contenu. Retirez le support (B)
de l’emballage en le tenant par les quatre tiges de maintien (a). Déposez-le
sur le sol en plaçant les pieds vers le haut (voyez l’illustration).
Öffnen Sie den Lieferkarton und entnehmen Sie seinen Inhalt. Halten Sie
den Ständer (B) an den vier Halterungen (a) fest und holen Sie ihn aus der
Verpackung. Legen Sie ihn mit den Beinen nach oben auf die Erde (siehe
Abbildung).
Aprite lo scatolone di imballaggio, ed estraetene il contenuto. Prendete il
supporto (B) tenendolo per le quattro staffe (a). Posizionatelo a terra, con le
gambe rivolte verso l’alto (vedi figura).
打开包装纸箱取出物品。抓住支架(B)的四个托架(a),从包装内取出。将它放在地上,支
腿 在 上( 见 图 示 )。
梱包箱を開けて、スタンドを取り出します。脚が上になるように、平らな安定した場
所へ置きます。箱から取り出すときは、ブラケット(a)を持たないようにしてください。
2 Remove the protective sheet, and keep it in a safe place for future use.
Retirez le film de protection, et conservez-lui dans un endroit sûr pour un
usage ultérieur.
Entfernen Sie den Kratzschutz. Am besten bewahren Sie den Kratzschutz an
einem sicheren Ort auf, weil Sie sie später eventuell noch einmal brauchen.
Rimuovete il foglio protettivo, e riponetelo in un luogo sicuro per un futuro
riutilizzo.
去除保护罩,将它保存在一个安全的地方,以备将来使用。
Page 7

|7
保護シートを取り外してください。このシートは移送時の再梱包時に使えるよう保管
しておいてください。
3 Slightly lift the stand, and push the spring bolt (b) located under the tubing.
Soulevez légèrement le support et poussez le boulon à ressort (b) situé sous
la tubulure.
Heben Sie den Ständer leicht an und drücken Sie auf die Federschraube (b)
an der Rohrunterseite.
Sollevate leggermente il supporto, ed azionate il bullone a molla (b) situato
sotto il tubolare.
略微 抬起 支架,推一下位于管子下面的弹簧销(b)。
スタンドを少し持ち上げて、下にあるノブ(b)を引っ張ります。
このノブは「かんぬき」の役割をしており、ノブを引っ張ると、かんぬきがはずれた状
態になります。
4 Once the spring bolt has been extended, raise the leg (c), until you hear a
‘click’. At this point, the spring bolt (c) is automatically retracted, and the leg
is fixed in place. Please repeat the same procedure for all four legs.
Quand le boulon à ressort s’est étiré, relevez le pied (c) jusqu’au déclic. Le
boulon à ressort (b) se rétracte alors automatiquement et bloque le pied.
Répétez ces opérations pour les quatre pieds.
Nach Lösen der Federschraube können Sie das Bein (c) so weit anheben,
bis Sie ein Klicken hören. Die Federschraube (b) klickt automatisch fest und
arretiert so das Bein. Wiederholen Sie diesen Schritt für die übrigen Beine.
Page 8

8|
Una volta sganciato il bullone a molla, aprite e distendete la gamba (c), fino
a sentire uno scatto. A questo punto il bullone a molla (b) è agganciato in
posizione e la gamba è bloccata. Ripetete l’operazione per tutte e quattro
le gambe.
弹簧销弹开后,拉起支腿(c),直到您听到一声“咔哒”声响。这时,弹簧销(c)会自动缩
回,支腿固定到位。请在所有四个支腿上重复同样的程序。
脚(c)をゆっくりと広げます(脚を動かし始めたら、手順3のノブから手を離しても構
いません)。
脚を広げると、ボルト(b)が引っ込んで固定されます。同様に他の脚も広げます。
5 Lift the bracket (a), and insert it into the corresponding hole (e) in the leg (c).
Repeat the same procedure for all four legs.
Warning: Be careful not to pinch your fingers between the leg and the brack-
et!
Soulevez la tige de maintien (a) et insérez-la dans l’orifice correspondant (e)
du pied (c). Répétez ces opérations pour les quatre pieds.
Page 9

|9
Avertissement: Veillez à ne pas vous coincer les doigts entre le pied et la
tige!
Heben Sie die Stützhalterung (a) hoch und schieben Sie sie in die entsprechende Bohrung (e) des Beins (c). Wiederholen Sie dies für die übrigen Beine.
Warnung: Seien Sie vorsichtig, um sich nicht die Finger zwischen der
Halterung und dem Bein einzuklemmen!
Sollevate la staffa (a), ed inseritela nel foro apposito (e) nella gamba (c).
Ripetete l’operazione per tutte e quattro le gambe.
Attenzione: Fate attenzione a non incastrarvi le dita tra la gamba e la staffa!
抬起托架(a),将它插入支腿(c)上相应的孔(e)内。在所有四个支腿上重复同样的程序。
警告:应注意不要让手指夹在支腿和托架之间!
ブラケット(a)の先を、脚(c)の穴(e)に入れます。他の脚も同様にしてください。
注意:ブラケットの先を穴に入れるときは、指を挟まないように注意してください。
Page 10

10|
6 Turn the stand (B) upside down, so that the feet are laying on the floor. Place
the concave side of the bracket (f) toward you.
Retournez le support (B): les pieds doivent reposer sur le sol. Placez la partie
concave de la traverse (f) vers vous.
Drehen Sie den Ständer (B) um, so dass die Beine den Boden berühren. Die
konkave Seite der Halterung (f) muss zu Ihnen hin zeigen.
Rovesciate il supporto (B), in modo che i piedi poggino a terra. Posizionate la
parte concava della staffa (f) verso di voi.
将支架(B)翻转过来,让支脚站在地面上。使托架(f)的凹面一侧朝向您。
スタンド(B)を裏返し、プレートの凹部分(f)が手前になるように置きます。
7 Adjust the height of the feet (g), by turning them by hand and leveling the
stand on each side, even if it is not completely even. We suggest you prevent
the nut (h) from turning with the help of the supplied 11/16” wrench (i). After
adjusting each of the feet, make sure that the nut (h) touches the leg’s border.
Réglez la hauteur des pieds (g) en les tournant à la main afin que le support
soit de niveau. Pour éviter que l’écrou (g) ne tourne, maintenez-le avec la clé
de serrage de 17mm (i) fournie. Après avoir réglé chaque pied, veillez à ce
que l’écrou (h) soit contre le tube du pied.
Stellen Sie die Höhe der Füße (g) mit der Hand so ein, dass der Ständer
komplett horizontal steht. Am besten halten Sie die Mutter (h) mit dem
17mm-Schlüssel (i) fest. Überprüfen Sie nach der Höhenkorrektur, ob die
Mutter (h) den Rand des Ständerbeins berührt.
Regolate l’altezza dei piedini (g) ruotandoli a mano per livellare ed adattare
il supporto a qualsiasi superficie, anche sconnessa. È consigliabile tenere
fermo il dado (h) con la chiave di serraggio da 17 (i) fornita di serie. Dopo la
regolazione, riportate il dado (h) a toccare il bordo della gamba.
Page 11

|11
用手转动支脚(g),调整它们的高度,平衡支架各侧,即使它们并不完全平衡。我们建议
您用随附的11/16” 扳手(i)帮忙,防止螺母(h)转动。调整各支脚后,确保螺母(h)与支腿的
边缘接触。
脚の先(g)を手で回して、スタンドの高さを微調整します。
4つの脚と床がしっかり接触して、ぐらつかないようにします。その後、17mmのスパ
ナ(i )でナット( i)を締め、ナットを脚元へ上げます。これによって、脚の先がゆるみに
くくなくなります。
8 Using two people, lift the instrument (A), and attach it to the ST-SV1-BK
stand (B). While one person prevents the instrument from falling down, the
other should make the small rubber foot (k) under the instrument line-up to
the concave side of the bracket (f), and the screw (l) under the instrument
with the space left on the side of the convex side of the bracket (m).
Align the holes (n) under the instrument to match the screws (o) of the stand.
Warning: During this step, do not apply weight to the instrument, otherwise
it may fall down.
A deux, soulevez l’instrument (A) et fixez-le au support ST-SV1-BK (B). Tandis
qu’une des deux personnes empêche l’instrument de tomber, l’autre aligne
le petit pied en caoutchouc (k) sous l’instrument avec la partie concave de
la traverse (f) et la vis (l) sous l’instrument avec l’espace latéral de la partie
convexe de la traverse (m).
Alignez les orifices (n) pratiqués sous l’instrument avec les vis (o) du support.
Avertissement: Durant cette opération, n’appuyez pas sur l’instrument car
il risque de tomber.
Page 12

12|
Heben Sie das Instrument (A) zu zweit hoch und befestigen Sie es
am ST-SV1-BK Ständer (B). Während eine Person sicherstellt, dass das
Instrument nicht vom Ständer fallen kann, muss die andere den Gummifuß
(k) an der Unterseite in die Halterung (f) schieben. Die Schraube (l) an
der
Instrumentenunterseite muss sich in der Öffnung links des konvexen
Halterungsteils (m) befinden.
Ordnen Sie die Bohrungen (n) an der
Instrumentenunterseite über den
Schrauben des Ständers (o) an.
Warnung: Lehnen Sie sich nicht auf das
Instrument, weil es momentan noch
vom Ständer kippen könnte.
In due persone, prendete lo strumento (A), e posizionatelo sul supporto STSV1-BK (B). Mentre una persona tiene lo strumento, l’altra deve far combaciare il gommino (k) sotto lo strumento con la parte concava della staffa (f),
e la vite (l) sotto lo strumento con lo spazio lasciato ad un lato della parte
convessa della staffa (m).
Fate combaciare i fori (n) sotto lo strumento con le viti (o) del supporto.
Attenzione: In questa fase non appoggiatevi allo strumento, che potrebbe
cadere.
由 两 个人一 起,抬 起 乐 器 ( A ),将它 装 到 S T - S V 1 - B K 支 架 ( B) 上 。由一 个人 扶 住 乐 器 防止它
跌落,而另一个人则应确保乐器底部的小橡皮脚(k)与托架的凹面侧(f)以及乐器底部的
螺丝(l)对齐,在托架的凸面侧(m)留出空间。将乐器底部的孔(n)与支架的螺丝(o)对齐。
警告:进行这一步骤时,不要在乐器上用力,否则乐器可能会跌落。
2人でSV-1(A)を持って、スタンド(B)へのせます。
1人はSV -1が落下しないように支えます。そしてもう1人は、SV-1の底の中央手前に
あるゴム脚(k)を、プレートの手前にある凹部分( f)に合わせるようにします。このと
きプレートの凸部分(m)に、製品のネジ頭(l)が当たらないように注意してください。
ST-SV1の左右にあるネジ( o)を、SV-1の底面にあるネジ穴( n)に合わせ、ネジをしっ
かり締めて固定します。
注 意:SV-1( A)をスタンドの上へのせるときは、指を挟まないように十分注意してく
ださい。
注 意:スタンドに固定していないときは、SV-1に体重をかけないようにしてください。
ST-SV1に必要以上の重みがかかると、本機が落下してお客様がけがを負ったり製品
が損傷する恐れがあります。
Page 13

|13
1
A
2
B
n
o
B
A
o
2
1
Page 14

14|
9 If the instrument and the stand are correctly aligned, the screws (o) should
fit into the threaded nuts of the holes (n). If this does not happen, align the
instrument and stand again. Once the screws are inside the threaded nuts,
tighten them to attach the instrument to the stand.
Quand l’instrument et le support sont correctement alignés, les vis (o)
s’adaptent dans le filetage des orifices (n). Si ce n’est pas le cas, réalignez
l’instrument et le support. Une fois que les vis sont engagées dans le filetage
des orifices, serrez-les pour fixer l’instrument au support.
Wenn sich das
Instrument an den richtigen Stellen befindet, rutschen die
Schrauben (o) in die Gewinde (n). Solange das nicht der Fall ist, müssen Sie
das
Instrument leicht auf dem Ständer verschieben, um seine Position zu
korrigieren. Wenn sich alle Schrauben in den Gewinden befinden, dürfen Sie
sie festdrehen.
Se lo strumento e il supporto sono correttamente allineati, le viti (o) dovrebbero entrare nelle bussole filettate dei fori (n). Se questo non accade, allineate correttamente strumento e supporto. Una volta che le viti siano entrate
nelle bussole, tiratele per fissare strumento e supporto.
如果乐器和支架正确对齐,螺丝(o)应能拧入孔(n)内螺母的螺纹。如果不行,重新对齐乐
器和支架。等螺丝进入螺母螺牙,拧紧它们,使乐器固定到支 架上。
ST-SV1のネジ(o)とSV-1底面の穴(n)とが、しっかり固定されていることを確認して
ください。
ネジが固定されると、カチッという音がします。固定されていない場合は、再度ネジで、
SV-1の底面とをしっかり締めて固定してください。
10 Be sure all screw are tightened, and all brackets correctly inserted.
Veillez à serrer convenablement toutes les vis et à installer toutes les tiges
de maintien.
Drehen Sie alle Schrauben komplett fest und überprüfen Sie, ob die
Stützhalterungen ordnungsgemäß angebracht sind.
Assicuratevi che tutte le viti siano tirate e le staffe correttamente inserite.
确保拧紧所有螺丝,并且所有托架都插入正确。
ST-SV1のすべてのネジが締められているか、ブラケットの先が脚に正しく入ってい
るか、全体的にぐらつかないかを確認してください。
Page 15

11 Place the instrument in the location where it will be played.
Amenez l’instrument à sa place.
|15
Stellen Sie die
Instrumenteinheit an den gewünschten Ort.
Posizionate lo strumento dove vorrete suonarlo.
将乐 器放置到演奏 的 位 置。
これで組み立ては完成です。設置場所を移動しなければならないときは、「組み立ての
チェック」を参照して、安全に行ってください。
Disassembly / Démontage / Abbau / Smontaggio / 拆卸 / 分解
If you need to packup the instrument, reverse the assembly order by which
the instrument was attached to the stand and the stand was assembled. For
improved protection, we suggest you also replace the protective sheet (see
step 2). Please use the included loop fastener tapes (x) to secure the stand
legs (a, c) during transport and avoid any damage.
Si vous devez emballer le instrument, inversez la séquence d’installation de
l’instrument sur le support et de montage du support. Pour une protection
optimale, nous vous conseillons d’utiliser le film de protection (voyez l’étape
2). Utilisez les bandes de serrage (x) fournies pour bloquer les pieds (a, c)
durant le transport et ainsi éviter des dommages.
Vor dem (regelmäßigen) Transport des
erwähnten Zusammenbauschritte in umgekehrter Reihenfolge absolvieren. Für einen optimalen Schutz sollten Sie auch den Kratzschutz (siehe
Schritt 2) wieder anbringen. Verwenden Sie beim Transport die beiliegenden
Befestigungsstreifen (x) zum Arretieren der Ständerbeine (a, c), um Schäden
zu vermeiden.
Instruments müssen Sie die oben
Per smontare strumento e supporto, seguite le istruzioni di montaggio al
contrario. Per una maggior protezione, suggeriamo di rimettere al suo posto
anche il foglio protettivo (vedi passo 2). Usate le fascette di velcro (x) fornite
di serie per bloccare le gambe del supporto (a, c) durante il trasporto, in
modo da evitare possibili danni.
如果您需要打包乐器,按照支架随附的说明书,逆反支架的组装顺序。为提高保护效
果,我们建议您也重新放上防护罩(见第2步)。运输途中,请使用随附的环扣带(x)固定
支架腿(a、c),避免任何损害。
スタンドを分解するときは、組み立て手順の逆の順番で行ってください。スタンドを
移送する場合は、スタンドの脚(a、c)の保護のため、ファースナー・テープ(x)を使っ
Page 16

16|
て固定した上で、手順2で使用した保護シートを使ってください。
Precautions after assembly
Use caution when transporting the instrument
Remove the instrument from its stand, and transport them separately. Please
use the included loop fastener tapes to secure the stand legs during transport and avoid any damage. After transportation, refer to these instructions
and re-assemble the instrument and stand.
Loosening of the screws
After assembly, the various screws and bolts of the stand may loosen as time
goes by, causing the stand to wobble. If this occurs, re-tighten the screws.
Précautions après le montage
Soyez prudent lors du transport de l’instrument
Démontez le support de l’instrument et transportez-les séparément. Utilisez
les bandes de serrage fournies pour bloquer les pieds durant le transport
et ainsi éviter des dommages. Après le transport, remontez le support de
l’instrument en suivant les instructions données ici.
Desserrage des vis
Après le montage, les vis et les boulons du support peuvent se desserrer
avec le temps et rendre le support instable. Dans ce cas, resserrez-les.
Page 17

Kontrolle nach dem Zusammenbau
Vorsicht beim Transport des Instruments
|17
Entnehmen Sie das
transportieren Sie beide separat. Verwenden Sie beim Transport die beiliegenden Befestigungsstreifen zum Arretieren der Ständerbeine, um Schäden
zu vermeiden. Bringen Sie das
wie oben beschrieben am Ständer an.
Lösen der Schrauben
Selbst nach dem ordnungsgemäßen Zusammenbau ist es durchaus denkbar, dass sich die Schrauben und Muttern nach und nach lösen, so dass die
Ständereinheit zu wackeln beginnt. Dann müssen die Schrauben wieder festgedreht werden.
Instrumentengehäuse von der Ständereinheit und
Instrument am neuen Aufstellungsort wieder
Precauzioni dopo il montaggio
Attenzione durante il trasporto
Separate lo strumento dal supporto, e trasportate le due parti separatamente. Usate le fascette di velcro fornite di serie per bloccare le gambe del supporto durante il trasporto, in modo da evitare possibili danni. Dopo il trasporto, consultate le istruzioni per riunire lo strumento al supporto.
Allentamento delle viti
Dopo il montaggio, con il passar del tempo le viti del supporto potrebbero
allentarsi, facendolo oscillare. Se questo dovesse verificarsi, stringete nuovamente tutte le viti.
组装后的注意事项
搬运乐器时要特别小心
从支架上卸下乐器,将它们分开搬运。运输途中,请使用随附的环扣带固定支架腿,避
免任何损害。运输完成后,按照这些说明重新组装乐器和支架。
螺丝松动
组装后,支架上的各个螺丝和螺栓可能会随时间而松动,导致支架摇晃不稳。如果是
这样的话,重新拧紧螺丝。
Page 18

18|
組み 立 て後のチェック
移動時の注意
設置場所を移動するときは、製品をスタンドから取り外し、別々に移動してください。
ネジの緩み
組み立ててしばらくするとネジが緩むことがあります。スタンドがぐらつくときは、
すべてのネジが緩んでないかを確認してください。
Page 19

Page 20

ST-SV1-BK
Address
MAN0010110
KORG Italy SpA
Via Cagiata, 85
I-60027 Osimo (An)
Italy
Web
www.korg.com
© KORG Italy 2016. All rights reserved PART NUMBER: MAN0010110
 Loading...