

Page 1
EasyStart
• 88 key RH2 (Real Weighted Hammer Action
2) keyboard. Different degrees of resistance
from top to bottom. Velocity sensitive with 6
touch curves for custom response.
• TouchView Graphical user interface.
• 412 on-board sounds (Including 16 drum
kits) 64-note polyphony. Split and Layer
functions.
• Two digital effect processors. (37 effect
types including reverb, chorus and delay)
SP-500 Main Features
• 218 Pro Rhythm Styles, each with up to six
accompaniment parts; plus 2 Fill-Ins,
2 Intros, 2 Endings, and 4 variations per style.
• 40,000 note / 8 track sequencer with 100
song memory.
• On-screen “HELP” feature
• Stereo Inputs/Outputs and dual headphone
jacks.
• Stylish design
• Weights just over 42 lbs.
EasyStart CONTENTS
Overview of several important features
Listening to the demo songs
Selecting and playing Programs / Layer, Split, Play Piano Mode
Applying Effects to a sound
Using the Accompaniment features
Recording a performance
Recording with with an Accompaniment
Important Owner’s Manual references
2
2
3
4
4
5
5
5
Page 2

SP-500 EasyStart
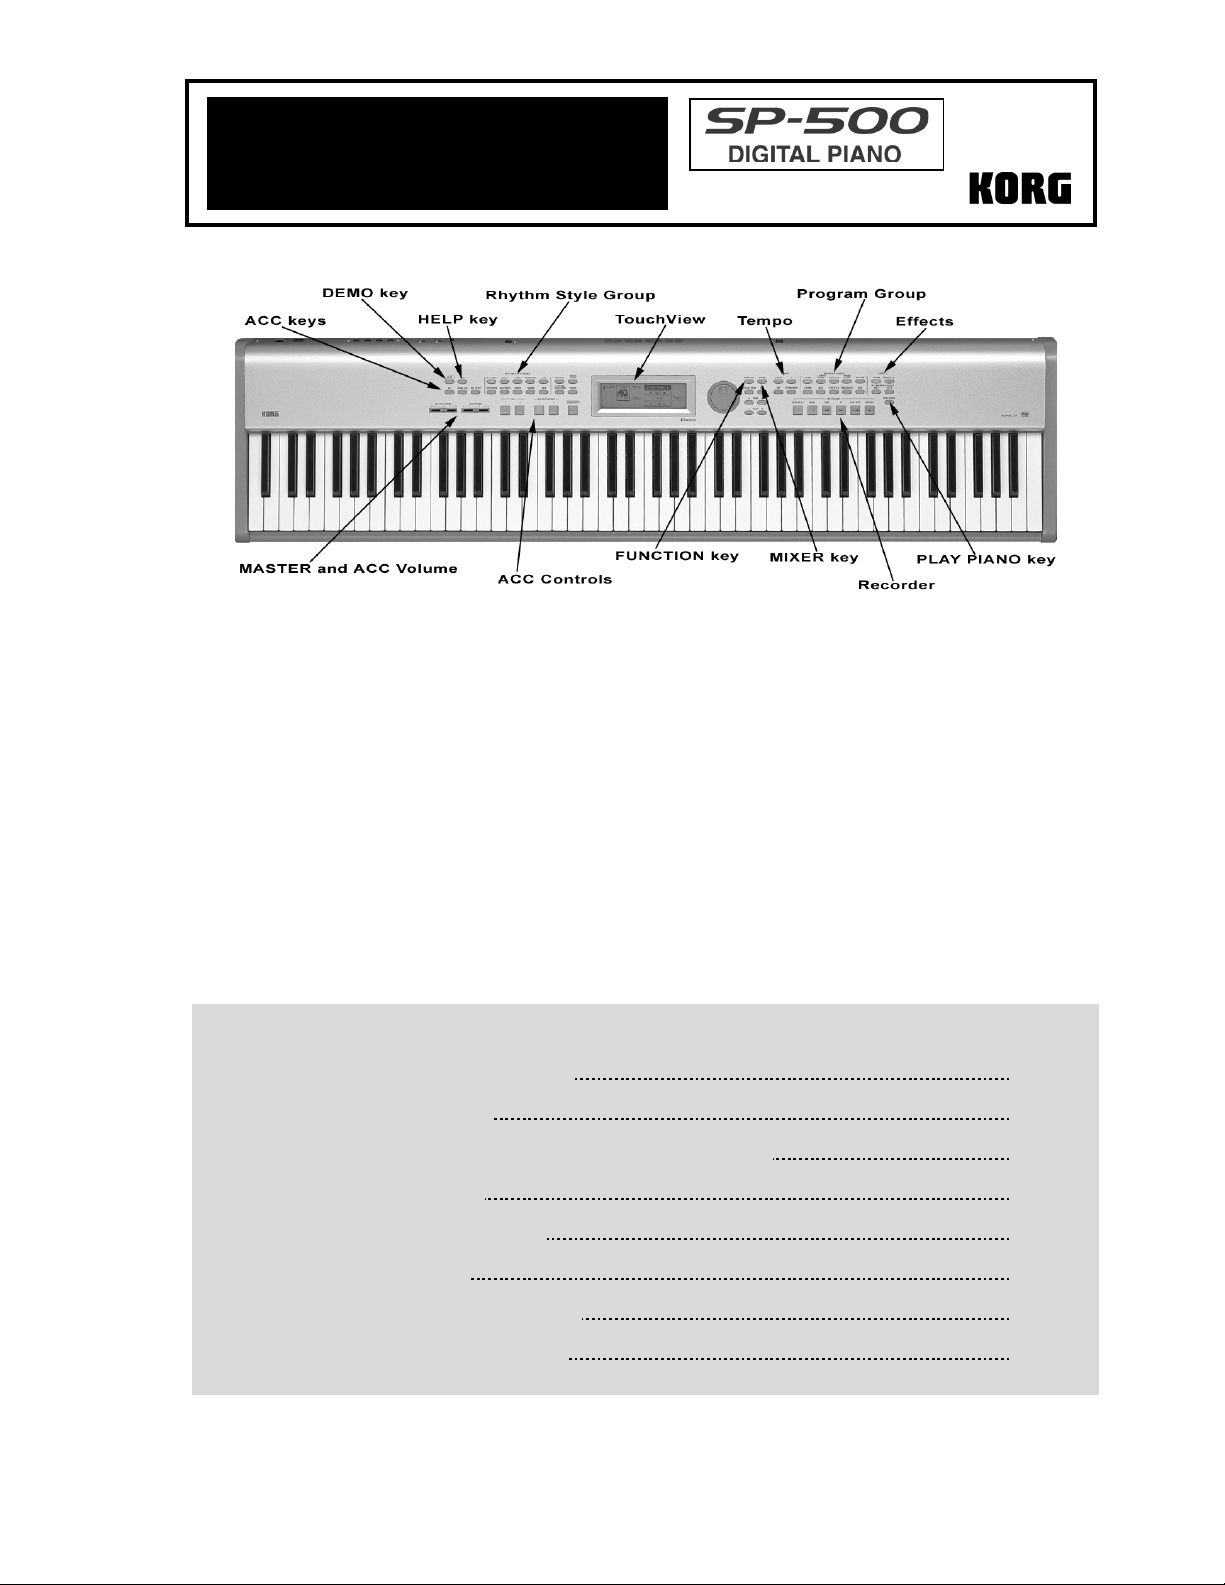
Overview of several important features
HELP – The SP-500 has a Help function! Press the [HELP] key and the “Help” page appears on the TouchView screen. Touch one
of the help item “cells” (Introduction, Demo, Program, etc.) to learn about the selected topic in English or Japanese.
TOUCH – Press the [TOUCH] key and the “Touch” screen will appear on the screen. You can select one of the six settings to
match your playing style by touching the radio buttons on the TouchView screen.
ENSEMBLE – Press the [ENSEMBLE] key while playing along with an accompaniment to add harmony to the notes you play
(above the split point). There are ten ensemble types to choose from. (See page 42 of the Owner’s Manual)
FUNCTION – press the [FUNCTION] key to enter the Function pages. Here you can make adjustments to the pitch of the keyboard,
transpose and select one of ten temperaments (Tunings) plus create four user scales, make settings for the damper pedal and
assignable footswitch, restore factory settings and more!
TAP – Tap the [TAP] key at the desired tempo to set the playback or accompaniment tempo. Cool!
PLAY PIANO - The PLAY PIANO function is like a “PANIC” button - a fast way to revert the SP-500 to a full-range Piano. Press
the [PLAY PIANO] key and viola! This feature turns off the Split and Layer functions, sets the octave to “0” and sets the program to
Grand Piano 1.
Listening to the Demo Songs
The SP-500 contains twenty-four piano demo songs, nine style demo songs and nine sound demo songs.
1. Press the [DEMO] key. The “Demo” page will appear on the TouchView screen.
2. Press any of the flashing RHYTHM STYLE GROUP or PROGRAM GROUP keys. A demo song in the selected “Demo
Group’ will begin playing
selected “Demo Group” or counterclockwise to hear the previous song in the group
songs, touch the Piano “Demo Group” radio button on the TouchView screen
[PAUSE] key.
3. Use the “Play Mode” radio buttons on the screen to select playback of One song or All songs within the currently selected
demo group.
4. Press the [PLAY/STOP] key to stop playback. Press the [DEMO] key or the [EXIT] to exit demo mode and return to the
main page.
Ä
Ä Rotate the DIAL (Follow the light) once clockwise to advance to the next song within the
ÄÄ
Ä
Ä To hear one of the Piano demo
ÄÄ
Ä
Ä To pause the playback, press the
ÄÄ
! For information on practicing with the demo songs, and changing the keyboard sound during a demo performance, see
page 20-21 of the Owner’s Manual.
2
Page 3

SP-500 EasyStart
Selecting and playing Programs
The 412 sounds (Programs) of the SP-500 are organized in ten groups (PIANO, E. PIANO/ORGAN, etc.). The SP-500 allows
you to combine two programs together (LAYER) or select different programs for the lower and upper ranges of the keyboard
(SPLIT) as well as play individual sounds.
1. Press the [DISPLAY HOLD] key to turn on the DISPLAY HOLD function. This will keep selected screens from closing
automatically after several seconds.
2. Press one of the PROGRAM GROUP keys to select a program from that group
Ä
name of any displayed program to select it
Ä Use the [<-PAGE->] keys to select the next page within that program group.
ÄÄ
The page # is displayed in the top center of the screen. (Prog. 1/5 or 2/3 etc.)
Ä
Ä On the TouchView screen, touch the
ÄÄ
Ä
Ä You can also use the DIAL or the
ÄÄ
[-Value +] keys to advance through all the programs in a selected group.
3. Programs within the currently selected group can be selected in several ways from the main page. Press [EXIT] to return
to the main page:
• Touch “6Upp15” on the TouchView screen to scroll up or down through the programs in the group.
• Touch the program name on the screen
Ä
Ä Use the DIAL or the [–VALUE+] keys.
ÄÄ
• Touch the instrument icon on the screen. A popup screen will appear showing a list of programs within the group.
! For more information on creating a custom USER Group of programs, see page 34 of the Owner’s Manual.
Combining (Layering) programs:
1. With [DISPLAY HOLD] on, press the [LAYER] key. The “Layer” page will appear on the screen.
2. Touch the “Upp1” program name cell
Ä
GROUP key
Ä Touch one of the program names on the TouchView screen ÄÄÄÄ Press [EXIT].
ÄÄ
3. Touch the “Upp2” program name cell
[EXIT].
Ä
Ä Select a piano sound as the “Upp1” sound by pressing the [PIANO] PROGRAM
ÄÄ
Ä
Ä Press the [STRINGS] PROGRAM GROUP key ÄÄÄÄ Select a string sound ÄÄÄÄ Press
ÄÄ
4. You can adjust the volume of the two sounds by touching the “Vol” cell on the TouchView screen and rotating the DIAL.
You can adjust the pitch (from –2 to +2 octaves) of each sound in the layer by touching the “Octave” cell “6” or “5” or by
rotating the DIAL.
The Split Function:
1. Press the [SPLIT] key. The “Split” page will appear on the screen.
2. Set the Split Point by touching the “Point” cell on the screen (The Split Point defaults to G3)
Ä
Ä Rotate the DIAL ÄÄÄÄ You can
ÄÄ
also set the Split Point by holding down the [SPLIT] key while pressing the desired note on the keyboard.
! The sound selection, octave and volume settings can be set individually, in the same way as LAYER mode.
The PLAY PIANO Function:
The PLAY PIANO feature is a fast way to return the SP-500 to the initial piano setting. Simply press the [PLAY PIANO] key. This
button turns off the Split and Layer functions, sets the octave to “0” and sets the program to Grand Piano 1.
3
Page 4

SP-500 EasyStart
Applying Effects to a sound
1. With [DISPLAY HOLD] on, press the [REVERB] key so it is lit
types. Touch the “Balance” cell and rotate the DIAL to adjust the amount of reverb applied to the sound (Dry/Wet Mix)
Ä
Ä Rotate the DIAL to select one of the thirteen Reverb
ÄÄ
2. Press the [CHORUS etc.] key
Ä
Ä Rotate the DIAL to select one of the twenty-four modulation and distortion effects. Touch
ÄÄ
the “Balance” cell and rotate the DIAL to adjust the effect level.
! See pages 29-30 of the Owner’s Manual for a list and explanation of Effect types.
Using the Accompaniment section
The SP-500 contains 217 “Rhythm Styles” organized into ten groups (8/16 BEAT, DANCE, LATIN, etc.). Each ‘Rhythm Style’
consists of six parts (tracks), four variations, two Intro/endings, and two fills. When using the Accompaniment feature, you can simply
play a chord on the keyboard, and accompaniment parts appropriate for that chord and style will be added automatically. Let’s try it:
1. Press the [ACC] key so it is lit
on the screen (See page 42 of the Owner’s Manual for explanations of chord input methods)
and select Var+ using the DIAL
group by using the [<-PAGE->] keys and touching the style name on the screen
2. Play a chord on the keyboard below the split point (G3 is the default). The chord name is displayed in the lower left corner
of the screen. When you press the [START/STOP] key, the accompaniment will start with an INTRO (indicated by the lit
INTRO/ENDING [1] key) then lead into “Variation 1” of the selected style.
Ä
Ä select “Fingered 1” as the chord input method by touching the “Fingered 1” radio button
ÄÄ
Ä
Ä Touch the “After Fill1” cell
ÄÄ
Ä
ÄPress one of the RHYTHM STYLE GROUP keys ÄÄÄÄ Select a “rhythm style” from the
ÄÄ
Ä
Ä Press [EXIT].
ÄÄ
3. Adjust the tempo by pressing the TEMPO [DOWN] or [UP] keys or “tap” the tempo by pressing the [TAP] key at the
desired tempo. (The tempo is displayed in the upper left corner of the screen)
Ä
Ä Play along with the accompaniment! While
ÄÄ
playing, add a Fill by pressing the FILL [1] key. Each time FILL [1] is pressed, the Accompaniment will advance to the next
Ä
Variation after the Fill has played
ÄPress [START/STOP] to stop t he accompaniment or Press the INTRO/ENDING [1] or
ÄÄ
[2] key to play an ending.
4. Press the [MIXER] key. The “Mixer” page will appear on the screen. Here you can adjust the volume of the
accompaniment parts by touching the “Vol” cell for each part and rotating the DIAL. You can also mute (Silence) a part by
touching the check box to the left of the Part name.
! When you select a Rhythm Style with the [SINGLE TOUCH] key on, a sound and automatic accompaniment settings
suitable for that style will automatically be selected. When the [SMALL ACC] key is on, the accompaniment will have fewer
parts (The Acc1 and Acc3 parts will automatically be muted).
! For more in-depth information on the Accompaniment features, including creating custom Rhythm Styles, see pages 37-
48 of the Owner’s Manual.
4
Page 5

SP-500 EasyStart
Recording a Song
The SP-500 Recorder allows you to record, edit and save your performance with or without the accompaniment. (Up to eight tracks
can be recorded including the accompaniment). Let’s start by recording a performance without using the accompaniment.
1. Make sure the Accompaniment is off by pressing the [ACC] key (So it is not lit)
The “Rec 1/3” page will appear on the screen. Press one of the PROGRAM GROUP keys to select a program for
recording. On the TouchView screen, touch the name of any displayed program to select it.
Ä Press the RECORDER [RECORD] key.
2. Press the [METRONOME] key
signature radio button and
Ä set the time signature and tempo for your performance by touching the desired time
rotate the DIAL to set the tempo. Press the [PLAY/STOP] key to begin recording (There will be
a two measure count- in). When finished, press [PLAY/STOP].
3. Press the [METRONOME] key to turn off the metronome (The metronome will still sound for the two measure count-in).
Now let’s record a second part. Press the [PAGE ►
to Rec.
Ä
ÄSelect a program for recording Ä Press the [PLAY/STOP] key to begin recording. When finished, press
ÄÄ
] key to select the “Rec 2/3” page Ä
ÄTouch the “Track 1”cell and set it
ÄÄ
[PLAY/STOP]. You can repeat the process for tracks 2-5 for a total of six tracks.
4. To name your song press the [PAGE ►
] key and select the “Rec 3/3” page Ä
Ä Touch the “Song Name” cell ÄÄÄÄ Rotate the
ÄÄ
DIAL to select characters and touch the “Set” cell to select and advance to the next character. When done, press the
“Return” cell. Your named song will be saved to internal memory. To delete a song, touch the “Memory Utility” cell
Rotate the DIAL to select the song you wish to delete and touch the “Delete” cell. When prompted “Are you Sure?” touch
“OK”
! If you wish to record additional material on a previously recorded track (overdub), touch the “Recording mode” cell on
the “Rec 2/3” page and select “OVDB”. When set to “OVWR” (Overwrite), the newly recorded data will replace the
previously recorded data.
Recording using the Accompaniment:
1. Make sure the Accompaniment is on by pressing the [ACC] key (So it is lit)
keys
Ä
Ä Select a “rhythm style” from the group by using the [<-PAGE->] keys and touching the style name on the screen Ä
ÄÄ
Press the RECORDER [RECORD] key. The “Rec 1/3” page will appear on the screen. Make sure that the “KBD,”
“Control,” and “Chord” track buttons on the screen are set to “Rec.”
Ä
select a program for the right hand melody
Ä Press the [PLAY/STOP] key to begin recording. When finished, press
ÄÄ
[PLAY/STOP].
Ä
Ä Press one of the RHYTHM STYLE GROUP
ÄÄ
Ä
Ä Press one of the PROGRAM GROUP keys to
ÄÄ
! For more in-depth information on recording and editing a song, see pages 49-61 of the Owner’s Manual.
Ä
ÄÄ
Important Owner’s Manual References
Restoring the Factory Settings page 67
Using the SP-500 as a Multi-Timbral tone generator/Synchronizing to an external sequencer
Selecting a temperament/Creating your own temperament
Creating a custom rhythm style
Editing recorded data
List of detected chords
Troubleshooting
5
pages 70-71
pages 64-65
pages 46-48
page 57-61
page 84
page 73
 Loading...