

Page 1

Digital Piano
Piano Numérique
Digital-Piano
Pianoforte Digitale
User’s manual
Mode d’emploi
Bedienungseinleitung
Manuale d’istruzioni
ENGLISH
FRANÇAIS
DEUTSCH
ITALIANO
Page 2

Page 3

English
User’s Manual
Français
Mode d’emploi
Deutsch
Bedienungseinleitung
Italiano
Manuale di istruzioni
Page 4

Page 5

Digital Piano
User’s Manual
Page 6
PRECAUTIONS
Location
Using the unit in the following locations can
result in a malfunction.
• In direct sunlight
• Locations of extreme temperature or humidity
• Excessively dusty or dirty locations
• Locations of excessive vibration
Power supply
Please connect the designated AC adapter to an
AC outlet of the correct voltage. Do not connect it
to an AC outlet of voltage other than that for
which your unit is intended.
Interference with other electrical devices
This product contains a microcomputer. Radios
and televisions placed nearby may experience
reception interference. Operate this unit at a suitable distance from radios and televisions.
Handling
To avoid breakage, do not apply excessive force
to the switches or controls.
Care
If the exterior becomes dirty, wipe it with a clean,
dry cloth. Do not use liquid cleaners such as benzene or thinner, or cleaning compounds or flammable polishes.
Keep this manual
After reading this manual, please keep it for later
reference.
Keeping foreign matter out of your equipment
• Never set any container with liquid in it near
this equipment. if liquid gets into the equipment, it could cause a breakdown, fire, or electrical shock.
• Be careful not to let metal objects get into the
equipment. If something does slip into the
equipment, unplug the AC adapter from the
wall outlet. Then contact your nearest Korg
dealer or the store where the equipment was
purchased.
CE MARK FOR EUROPEAN HARMONIZED STANDARDS
The CE mark that is attached to our company’s
products of AC mains operated apparatus until
December 31, 1996 means it conforms to the
EMC Directive (89/336/EEC) and to the CE mark
Directive (93/68/EEC).
The CE mark that is attached after January 1,
1997 means it conforms to the EMC Directive
(89/336/EEC), to the CE mark Directive (93/68/
EEC) and to the Low Voltage Directive (73/23/
EEC).
In addition, the CE mark that is attached to our
company’s products of Battery operated apparatus
means it conforms to the EMC Directive (89/336/
EEC) and to the CE mark Directive (93/68/EEC).
THE FCC REGULATION WARNING
(FOR THE U.S.A. ONLY)
This equipment has been tested and found to
comply with the limits for a Class B digital
device, pursuant to Part 15 of the FCC Rules.
These limits are designed to provide reasonable
protection against harmful interference in a residential installation. This equipment generates,
uses, and can radiate radio frequency energy and,
if not installed and used in accordance with the
instructions, may cause harmful interference to
radio communications. However, there is no guarantee that interference will not occur in a particular installation. If this equipment does cause
harmful interference to radio or television reception, which can be determined by turning the
equipment off and on, the user is encouraged to
try to correct the interference by one or more of
the following measures:
• Reorient or relocate the receiving antenna.
• Increase the separation between the equipment and receiver.
• Connect the equipment into an outlet on a circuit different from that to which the receiver is
connected.
• Consult the dealer or an experienced radio/TV
technician for help.
4
Page 7

Unauthorized changes or modification to this system can void the user’s authority to operate this
equipment.
DISCLAIMER
The information contained in this manual has
been carefully revised and checked through. Due
to our constant efforts to improve our products,
the specifications might differ to those in the manual. Korg is not responsible for any eventual differences found between the specifications and the
contents of the instruction manual - the specifications being subject to change without prior notice
WARRANTY
KORG products are manufactured according to
the strictest electrical and mechanical regulations
that exist in various countries of the world. These
products are warranted by the KORG distributor
only in each country. Any KORG product that is
not sold with the manufacturer’s or distributor’s
warranty, or without a serial number, cannot benefit from servicing under the warranty. This regulation is for the consumer’s own protection.
ASSISTANCE AND SERVICE FOR
MUSICIANS
For repairs, contact your nearest Authorized
KORG Service Center. For more information on
KORG products, and to find software and accessories for your piano, please contact your local
Authorized KORG distributor.
KORG ON THE INTERNET
Home page Korg Inc.: “http://www.korg.co.jp”
Home page Korg USA: “http://www.korg.com”
Home page Korg Italy: “http://www.korg.it”
DATA RESET
When the instrument is turned off, all parameters
are reset.
© 2002 Korg Italy Spa. Printed in Italy.
5
Page 8

CONTENTS
Introduction . . . . . . . . . . . . . . . . . . . . . . . . . . . . . . . . . . . . . . . . . . . . . . . . . . . . . . . . . .7
Main features . . . . . . . . . . . . . . . . . . . . . . . . . . . . . . . . . . . . . . . . . . . . . . . . . . . . . . . . . . . . . . . .7
1 Panels . . . . . . . . . . . . . . . . . . . . . . . . . . . . . . . . . . . . . . . . . . . . . . . . . . . . . . . . . . . . . .9
Front panel . . . . . . . . . . . . . . . . . . . . . . . . . . . . . . . . . . . . . . . . . . . . . . . . . . . . . . . . . . . . . . . . . . 9
Rear panel . . . . . . . . . . . . . . . . . . . . . . . . . . . . . . . . . . . . . . . . . . . . . . . . . . . . . . . . . . . . . . . . .10
2 Before you begin . . . . . . . . . . . . . . . . . . . . . . . . . . . . . . . . . . . . . . . . . . . . . . . . . . . . .12
Connecting to an external amplification system . . . . . . . . . . . . . . . . . . . . . . . . . . . . . . . . . . . .12
Using the headphones . . . . . . . . . . . . . . . . . . . . . . . . . . . . . . . . . . . . . . . . . . . . . . . . . . . . . . . . 12
Connecting external sources . . . . . . . . . . . . . . . . . . . . . . . . . . . . . . . . . . . . . . . . . . . . . . . . . . .13
Turning the instrument on . . . . . . . . . . . . . . . . . . . . . . . . . . . . . . . . . . . . . . . . . . . . . . . . . . . . .13
Turning the internal speakers on or off . . . . . . . . . . . . . . . . . . . . . . . . . . . . . . . . . . . . . . . . . . .13
Adjusting the volume . . . . . . . . . . . . . . . . . . . . . . . . . . . . . . . . . . . . . . . . . . . . . . . . . . . . . . . .13
Listening to the Demo . . . . . . . . . . . . . . . . . . . . . . . . . . . . . . . . . . . . . . . . . . . . . . . . . . . . . . . .13
3 Basic functions . . . . . . . . . . . . . . . . . . . . . . . . . . . . . . . . . . . . . . . . . . . . . . . . . . . . . .16
Playing a single sound (Single mode) . . . . . . . . . . . . . . . . . . . . . . . . . . . . . . . . . . . . . . . . . . . .16
Playing two sounds at the same time (Layer mode) . . . . . . . . . . . . . . . . . . . . . . . . . . . . . . . . .16
Choosing the reverb and the chorus . . . . . . . . . . . . . . . . . . . . . . . . . . . . . . . . . . . . . . . . . . . . .17
The damper pedal . . . . . . . . . . . . . . . . . . . . . . . . . . . . . . . . . . . . . . . . . . . . . . . . . . . . . . . . . . .18
The metronome . . . . . . . . . . . . . . . . . . . . . . . . . . . . . . . . . . . . . . . . . . . . . . . . . . . . . . . . . . . . .18
4 Other functions . . . . . . . . . . . . . . . . . . . . . . . . . . . . . . . . . . . . . . . . . . . . . . . . . . . . . .21
Touch settings . . . . . . . . . . . . . . . . . . . . . . . . . . . . . . . . . . . . . . . . . . . . . . . . . . . . . . . . . . . . . .21
Transpose . . . . . . . . . . . . . . . . . . . . . . . . . . . . . . . . . . . . . . . . . . . . . . . . . . . . . . . . . . . . . . . . . .22
Fine tuning . . . . . . . . . . . . . . . . . . . . . . . . . . . . . . . . . . . . . . . . . . . . . . . . . . . . . . . . . . . . . . . . . 22
Selecting a temperament . . . . . . . . . . . . . . . . . . . . . . . . . . . . . . . . . . . . . . . . . . . . . . . . . . . . . .23
5 MIDI . . . . . . . . . . . . . . . . . . . . . . . . . . . . . . . . . . . . . . . . . . . . . . . . . . . . . . . . . . . . . .25
What is MIDI? . . . . . . . . . . . . . . . . . . . . . . . . . . . . . . . . . . . . . . . . . . . . . . . . . . . . . . . . . . . . . .25
What can you do with MIDI? . . . . . . . . . . . . . . . . . . . . . . . . . . . . . . . . . . . . . . . . . . . . . . . . . .25
Connections . . . . . . . . . . . . . . . . . . . . . . . . . . . . . . . . . . . . . . . . . . . . . . . . . . . . . . . . . . . . . . . .25
Standard MIDI settings . . . . . . . . . . . . . . . . . . . . . . . . . . . . . . . . . . . . . . . . . . . . . . . . . . . . . . .26
Selecting the transmission channel . . . . . . . . . . . . . . . . . . . . . . . . . . . . . . . . . . . . . . . . . . . . . .26
Using the SP-300 as a multitimbral tone generator . . . . . . . . . . . . . . . . . . . . . . . . . . . . . . . . . .27
Local On/Off . . . . . . . . . . . . . . . . . . . . . . . . . . . . . . . . . . . . . . . . . . . . . . . . . . . . . . . . . . . . . . .27
Program Change . . . . . . . . . . . . . . . . . . . . . . . . . . . . . . . . . . . . . . . . . . . . . . . . . . . . . . . . . . . .28
Control Change . . . . . . . . . . . . . . . . . . . . . . . . . . . . . . . . . . . . . . . . . . . . . . . . . . . . . . . . . . . . .30
MIDI Data Dump . . . . . . . . . . . . . . . . . . . . . . . . . . . . . . . . . . . . . . . . . . . . . . . . . . . . . . . . . . .30
6 Appendix . . . . . . . . . . . . . . . . . . . . . . . . . . . . . . . . . . . . . . . . . . . . . . . . . . . . . . . . . . .33
Troubleshooting . . . . . . . . . . . . . . . . . . . . . . . . . . . . . . . . . . . . . . . . . . . . . . . . . . . . . . . . . . . . .33
Polyphony . . . . . . . . . . . . . . . . . . . . . . . . . . . . . . . . . . . . . . . . . . . . . . . . . . . . . . . . . . . . . . . . . 33
Technical specifications . . . . . . . . . . . . . . . . . . . . . . . . . . . . . . . . . . . . . . . . . . . . . . . . . . . . . .34
Control panel shortcuts . . . . . . . . . . . . . . . . . . . . . . . . . . . . . . . . . . . . . . . . . . . . . . . .35
Control panel and keyboard . . . . . . . . . . . . . . . . . . . . . . . . . . . . . . . . . . . . . . . . . . . .35
MIDI Implementation Chart . . . . . . . . . . . . . . . . . . . . . . . . . . . . . . . . . . . . . . . . . . . .141
6
Contents
Page 9

Main features
INTRODUCTION
Introduction
Wide range of sounds.
including a Stereo Concert Grand Piano. You can use the Layer function to simultaneously play two sounds.
Effects.
ambience of a concert hall (Reverb) and add richness to the sound (Chorus).
Damper pedal simulation.
Damper or Forte pedal of an acoustic piano. On an acoustic piano, when you press
this pedal, the pads (dampers) that stop the vibrations of the strings are lifted.
Metronome.
tempo, and volume, and even use a bell sound as the accent.
Touch control.
sound will respond to your keyboard playing dynamics.
Temperaments.
select two alternative classical temperaments (Kirnberger and Werckmeister) for
historically accurate performance of classical music. When selecting an acoustic
piano sound, the typical Stretched Tuning is automatically selected.
Adjustable pitch.
and the Pitch Control function allows you to make fine tune adjustments.
MIDI capabilities.
allows music data to be transferred between musical instruments and computers.
MIDI allows two or more devices to control or be controlled by each other, and also
allows you to use the SP-300 as a 16-part multitimbral tone generator.
The SP-300 provides built-in digital effects that can simulate the natural
The built-in metronome allows you to select the time signature,
You can choose from three different settings to adjust how the
In addition to the Equal temperament, the SP-300 allows you to
Thirty different and expressive high-quality sounds,
The Damper pedal on the SP-300 corresponds to the
The Transpose function lets you change the pitch of the piano,
The SP-300 supports the MIDI protocol, the standard that
Introduction
7
Page 10

Powerful integrated amplification.
SP-300 includes a powerful, 15 + 15 Watt
amplier, with two 10cm speakers in Bass Reflex box.
Audio inputs.
The audio inputs allows you to directly connect an external mono or
stereo audio source, without the need of a mixer.
Two sets of heaphones.
You can connect two stereo headphones, to play with
your teacher or another musician.
8
Introduction
Page 11
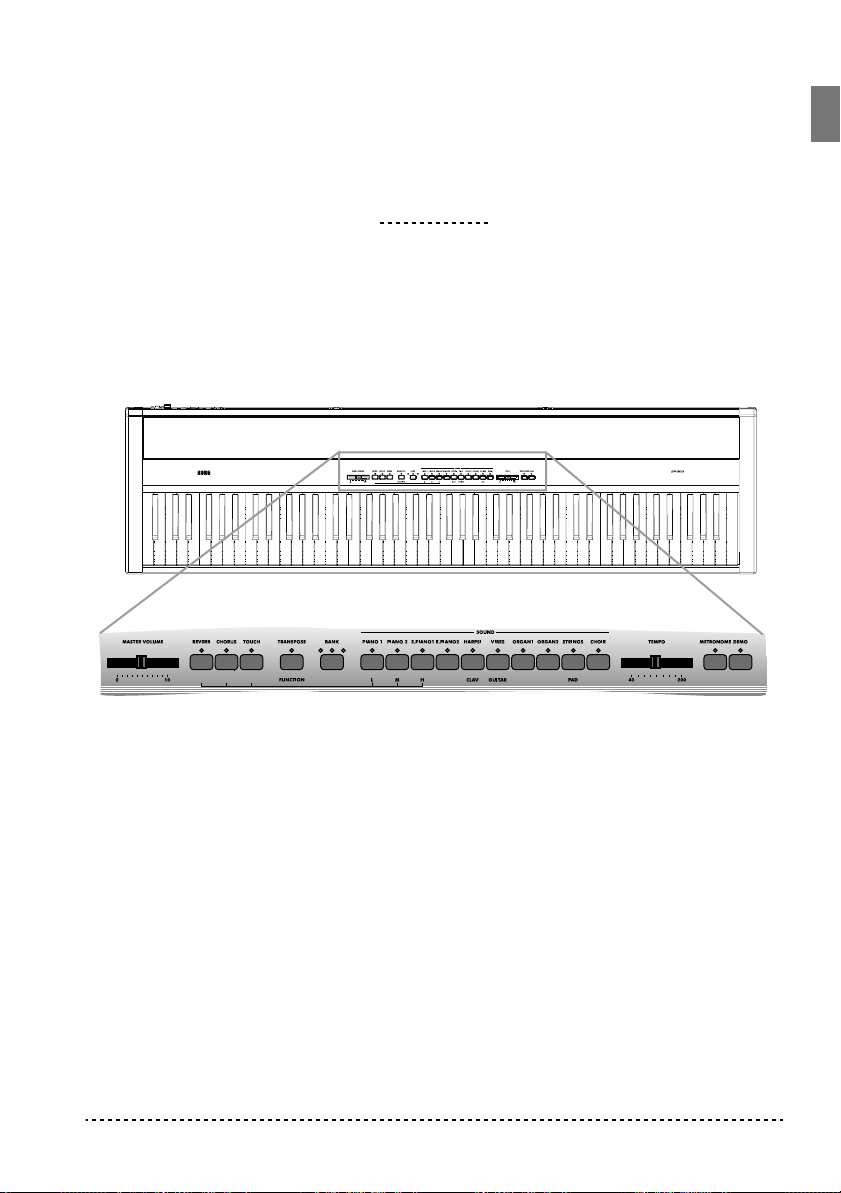
Front panel
22
111122
44
333344
55
55
66
66
CHAPTER
1
Panels
77
77
8888999900
00
11
11
MASTER VOLUME slider:
connectors.
22
22
REVERB button:
33
33
CHORUS button:
44
44
TOUCH button:
55
55
TRANSPOSE/FUNCTION button:
modify the transpose and fine tuning functions, to program the MIDI parameters
and to carry on other adjustments.
Note:
When the instrument is turned off, all parameters are reset.
66
66
BANK button:
77
77
SOUND SELECTION buttons:
You can press two buttons at the same time, to play two sounds at the same time on
Panels
Turns the reverb on/off. This adds ambience to the sound.
Turns the chorus on/off. This makes the sound richer.
Lets you select the keyboard sensitivity.
Selects one of the 3 available banks of sounds.
Adjusts the volume for the Output and the Phones
Multifunction button to be used in order to
Press a button to select a sound (Single mode).
9
Page 12
the keyboard (Layer mode).
88
88
TEMPO slider:
99
99
METRONOME button:
00
00
DEMO button:
songs with the sound selection buttons (see number 7 above).
Adjusts the metronome tempo.
Turns the metronome click on/off.
Turns the demo mode on/off, to listen to the demo songs. Select the
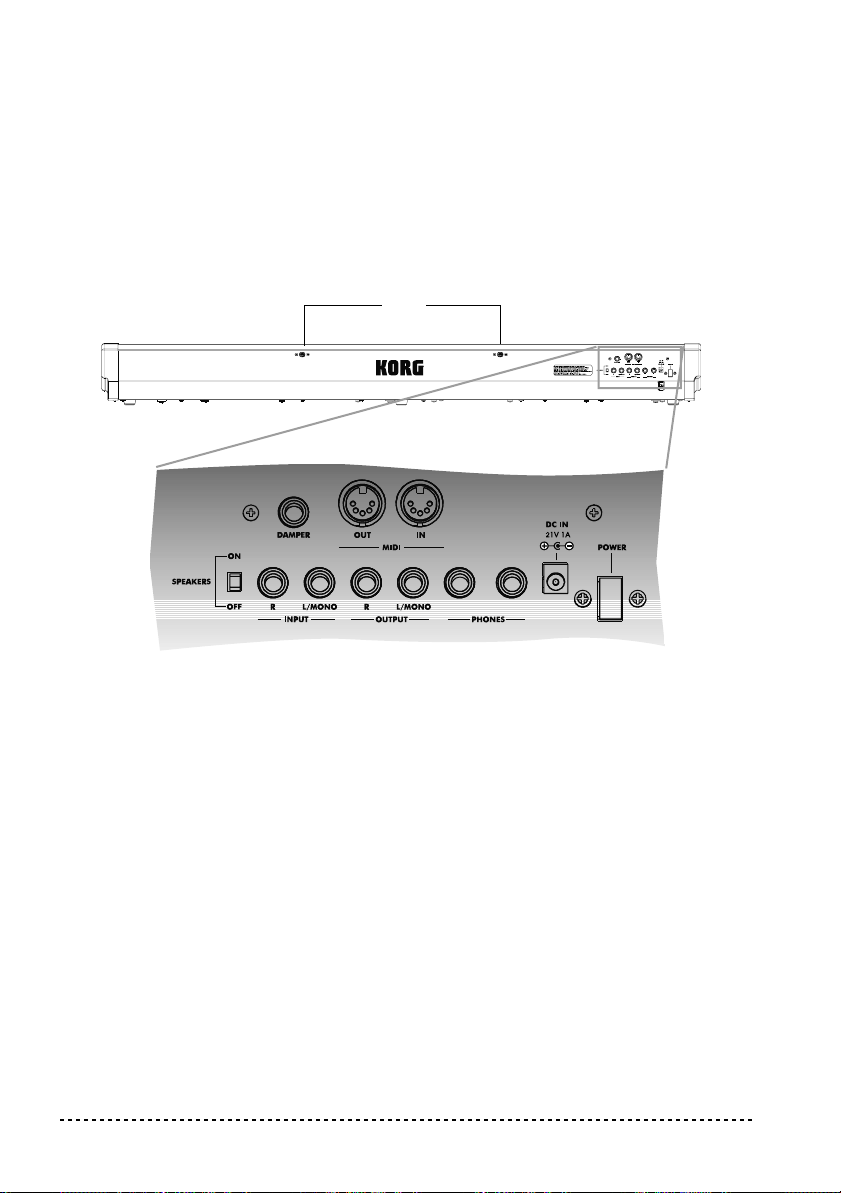
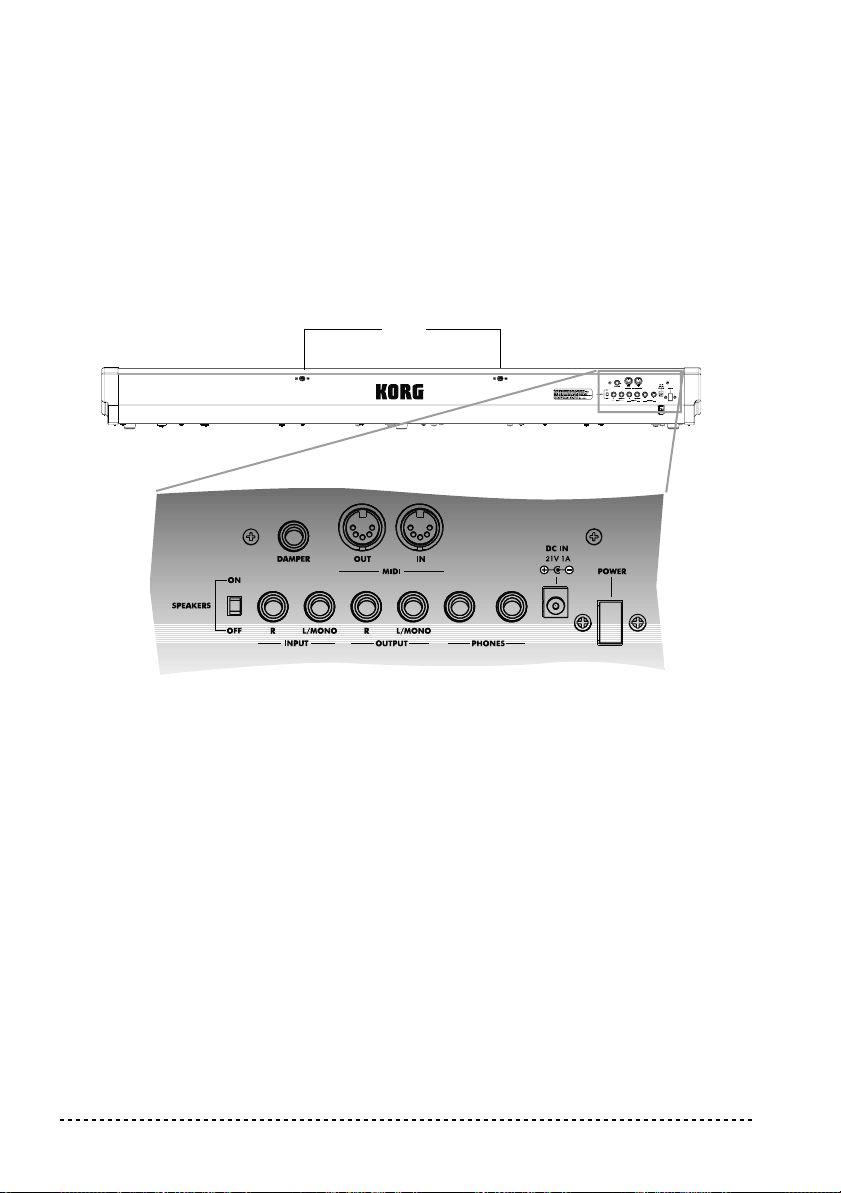
Rear panel
11
11
33
33
22
22
55
55
11
11
Music stand holes:
the first times you use the music stand, you will need to apply some force to insert or
remove it. Later, the rubbery plastic material of which the holes are made will adapt
to the music stand, making the operation easier to carry on.
22
22
SPEAKERS ON/OFF switch:
off.
33
33
DAMPER connector:
44
44
MIDI (IN, OUT) connectors:
devices (sequencer, keyboards, etc.). OUT: Data output (to be connected to the
MIDI IN connector of another MIDI device). IN: Data input (to be connected to the
MIDI OUT connector of another MIDI device).
55
55
INPUT (L/MONO, R) connectors:
external audio source, such as a CD/tape player, a mixer, or another keyboard.
Insert the music stand into these two holes.
Connect the supplied pedal to this connector.
44
44
66
66
Use this switch to turn the internal speakers on or
Connectors that are used to connect other MIDI
Audio inputs. Connect to these connectors an
77
77
88
88
99
99
Please note that,
10
Chapter 1
Page 13

Warning:
66
66
OUTPUT (L/MONO, R) connectors:
Avoid connecting the output of a power amplifier to these inputs!.
Audio outputs. Connect these connectors to
an external amplifying system. (With a hi-fi system use the AUX or TAPE connectors, not the PHONO connector). To amplify the SP-300 in mono, connect the single L/MONO connector. Use the MASTER VOLUME slider to set the output
volume.
77
77
PHONES connector:
88
88
DC IN 21V 1A connector:
99
99
POWER switch:
Connect one or two pairs of headphones to these jacks.
Connect the supplied AC adapter to this connector.
On/off switch.
Panels
11
Page 14
CHAPTER
2
Before you begin
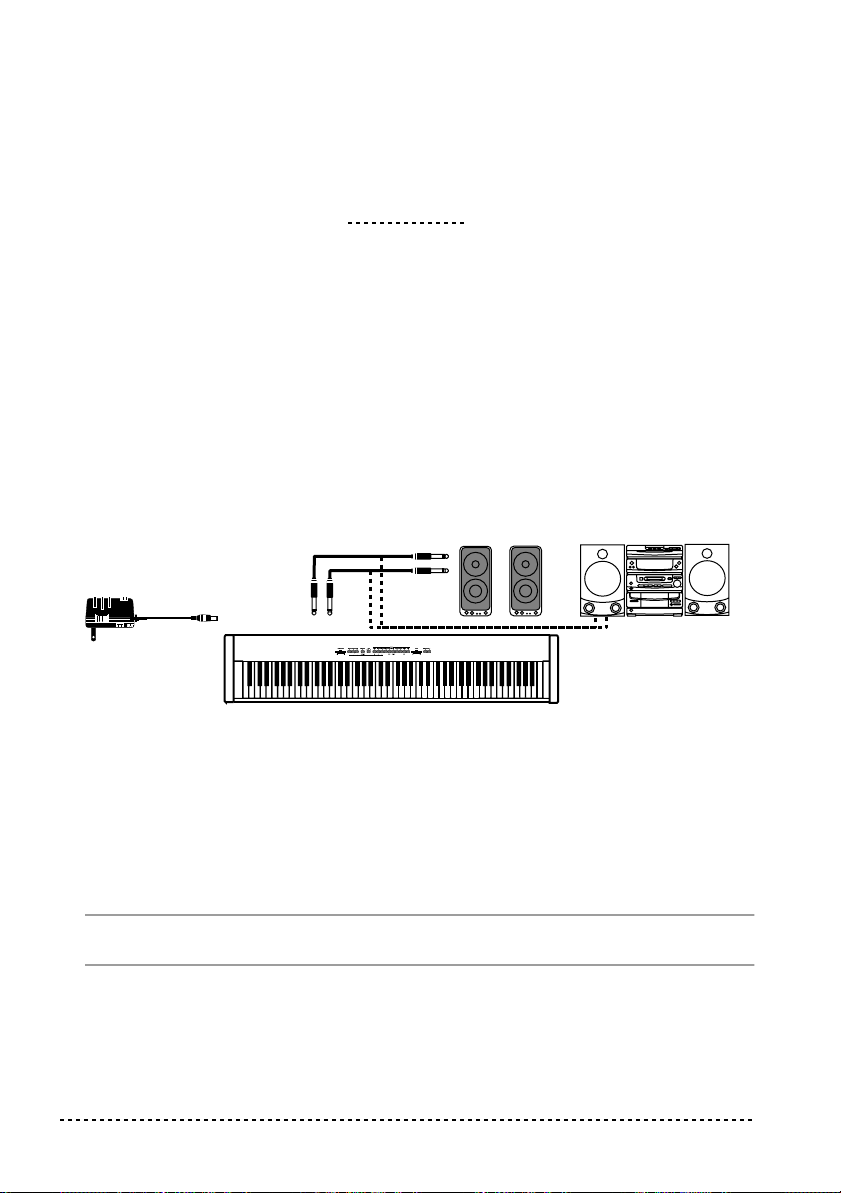
Connecting to an external amplification system
Use the OUTPUT connectors, if you like to connect your SP-300 to a high-quality
mixer, stereo hi-fi, or a couple of acti ve monitors. When using a stereo hi-fi, connect
the OUTPUTs to the AUX or TAPE inputs (never use the PHONO inputs). For
mono amplification, connect only the L/MONO output.
Mini conponent/
stereo, etc.
AUX IN
to an AC outlet
DC IN
12 V
L/MONO
OUTPUT
Powered
monitors, etc.
R
Using the headphones
For playing or practicing during night hours, or when you don’t want to be heard by
others in the same room, connect one or two pairs of high-quality headphones (32
impedance suggested) to the appropriate connectors on the rear panel. These connectors are standard 1/4” phone jacks. If your headphones have a mini-jack adapter,
grasp the adapter when plugging in or out the headphones.
Warning:
tening at high volumes.
When using headphones, protect your hearing by avoiding extended lis-
Ω
12
Chapter 2
Page 15

Connecting external sources
Connect any other electronic musical instrument, a mixer’s output, or a CD/tape
player, to the INPUTS on the back of the instrument. These inputs expect a linelevel signal. To connect a microphone, you need a dedicated microphone preamplifier or a mixer.
Warning:
Avoid connecting the output of a power amplifier to these inputs!.
Turning the instrument on
Insert the DC plug of the supplied AC adapter into the DC inlet of the SP-300, and
then connect the AC plug to a wall socket; then press the POWER switch. When the
instrument is on, the LEDs on the control panel will light up. To turn the instrument
off, press the POWER switch again.
Note:
When the instrument is turned off, all parameters are reset.
Turning the internal speakers on or off
Whether you prefer listening to the internal speakers or to an external amplification
system, you can turn the internal speakeers on or off. Use the SPEAKER ON/OFF
switch on the back panel to turn them on or off.
Adjusting the volume
Move the MASTER VOLUME slider towards the right to increase the volume;
towards the left to decrease the volume. The maximum is “10”; the minimum
(silence) is “0”. This control adjusts the output level of the headphones, the internal
speakers and of the OUTPUTs. It does not control the input level of the audio
source connected to the INPUTs.
Note:
It is always better to start with a low volume and then increase gradually.
Listening to the Demo
The SP-300 contains 30 pre-recorded demo songs. Listen to them to experience the
rich sound and expressive potential of this instrument.
Listen to all songs at once.
mand.
Press the DEMO button (or keep the TRANSPOSE/FUNCTION button pressed,
1
and press E1 on the keyboard). The sound selection buttons LED will blink sequen-
Before you begin
You can listen to all demo songs with a single com-
13
Page 16

tially from left to right. After a few seconds, playback will begin. All demo songs
will be played back. After the last song, the playback will begin again from the first
song.
During playback, you can press a sound selection button to repeat just the current
2
bank of ten demo songs. (There are three banks of ten demo songs each: 1-10, 1120, 21-30).
For example, if you press the CHOIR button while song number 1 is playing, song
number 10 will immediately start playing, and the playback will cycle from song 1
through song 10.
3
Press the DEMO button to stop the playback and exit the demo mode.
Listen to a specified song.
First of all, you must select one of the three demo song banks.
1
You can select just one demo song to be played back.
• To select the first bank (1-10), press the DEMO button once. The LEDs will
blink sequentially, from left to right.
• To select the second bank (11-20), press the DEMO button a second time. All
LEDs will blink at the same time.
• To select the third bank (21-30), press the DEMO button a third time. Adjacent
LEDs will blink alternatively
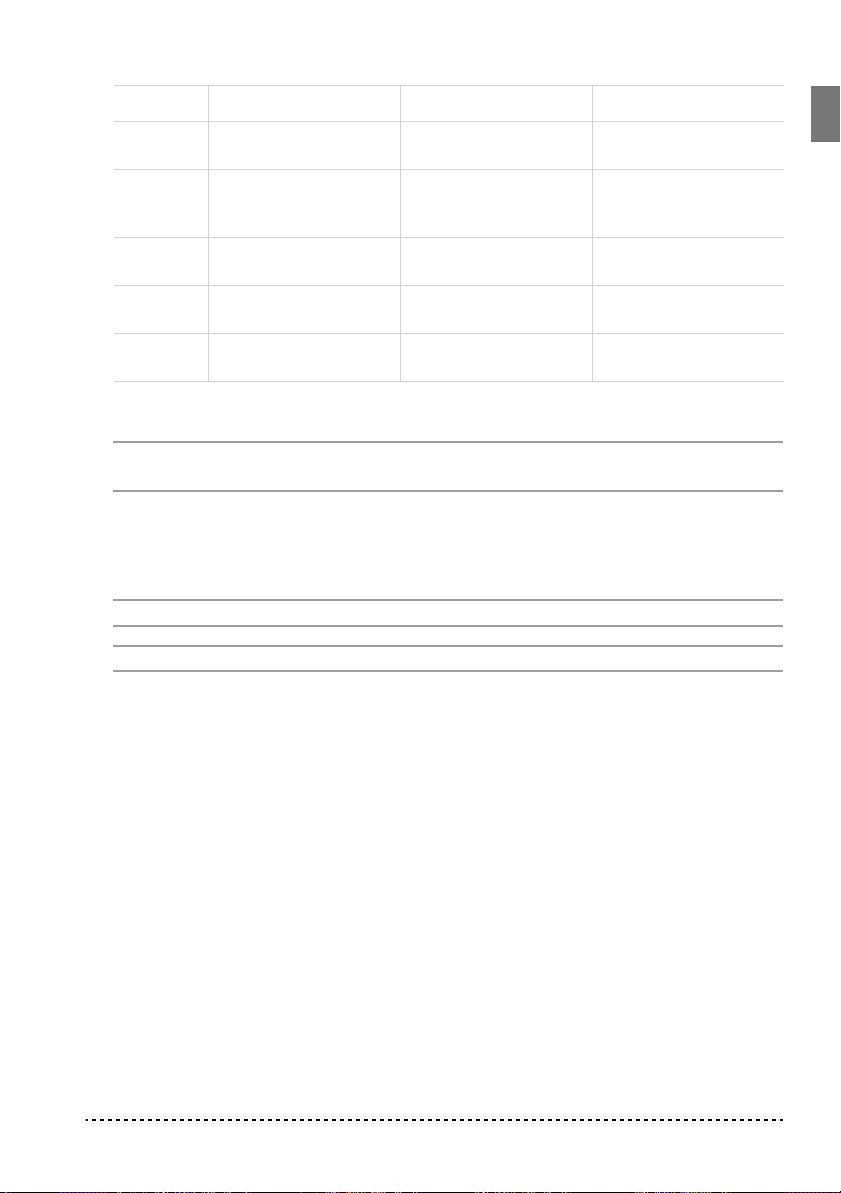
2
Press one of the sound selection buttons to select the corresponding song in the
selected bank. The LED on the selected demo button will stay on, while the other
LEDs will turn off.
After the end of the selected song, all the songs of the selected bank will be played
back in cycle.
Button Bank 1 (1-10) Bank 2 (11-20) Bank 3 (21-30)
PIANO 1 F. Mendelssohn-Bar-
tholdy: Prelude Op .104a,
no.2
PIANO 2 F. Chopin: Nocturne
Op.9, no.2
E.PIANO 1 C.A. Debussy: Clair de
lune
E.PIANO 2 Korg Original (M. Tem-
pia): Lullaby for a Little
Star
HARPSI
/CLAV
L. van Beethoven: Für
Elise
Korg Original (M. Tempia): Reflection
S. Joplin: The Entertainer
Korg Original (M. Tempia): Jumper
Korg Original (M. Tempia): All the Ones You
Don’t Know
J.S. Bach: Italian Concert
C.A. Debussy:
Arabesque no.1
J.S. Bach: Two-voice
invention no.13
F. Chopin: FantasieImpromptu Op.66
J.S. Bach: Prelude in C
major (from Das Wohltemeperierte Klavier)
Korg Original (M. Tempia): Rubber Bob
14
Chapter 2
Page 17
Button Bank 1 (1-10) Bank 2 (11-20) Bank 3 (21-30)
VIBES
/GUITAR
ORGAN 1 W.A. Mozart: A la turque
ORGAN 2 F. Chopin: Valse no.6 in
STRINGS
/PAD
CHOIR Korg Original (M. Tem-
3
Press the DEMO button to stop the playback and exit the demo mode.
Note:
F. Chopin: Etude Op.10,
no.3
(from the Sonata in Amajor K.331)
D-major Op.64, no.1
Korg Original (M. Tem-
pia): Old Feather Blues
pia): Noise of time
Korg Original (M. Tempia): Jazz in Spain
Korg Original (M. Tempia): Cool “B”
F. Mendelssohn-Bartholdy: Wedding March
J.S. Bach: Air on the G
string
Korg Original (M. Tempia): V oice Texture
R. Schumann: Traumarei, Op.15, no.7
F. Mendelssohn-Bartholdy: Spring Song,
Op.62, no.6
Korg Original (M. Tempia): Sunflowers
P.D. Paradisi: Toccata in
A major
Korg Original (M. Tempia): Wet Raccoon Rag
During the demo playback you can’t use the sound selection buttons to select
sounds, or the REVERB and CHORUS buttons.
Adjusting the tempo of the demo songs.
Use the TEMPO slider to change the
tempo of the selected demo song. Normally, the playback tempo of the demo song
will not match the markings of the TEMPO slider.
Note:
You can’t use the metronome during the demo playback.
Note:
When a demo is selected, its original tempo is recalled.
Before you begin
15
Page 18

CHAPTER
3
Basic functions
Playing a single sound (Single mode)
You can select a sound from the thirty sounds supplied with the instrument.
Press one of the sound selection buttons in order to select a sound. The LED on the
1
button you pressed will light.
2
Use the BANK button to select one of the three available banks (1-10, 11-20, 21-
30). Pressed a first time it selects Bank 2; pressed a second time it selects Bank 3;
pressed a third time it selects Bank 1 again.
Button Bank 1 # Bank 2 # Bank 3 #
PIANO 1 Grand Piano 1 2 Bright Piano 2 Grand Piano 2 1
PIANO 2 Classic Piano 2 Honky-Tonky 2 E.Grand Piano 1
E.PIANO 1 Stage E.Piano 1 Club E.Piano 2 Thin E.Piano 2
E.PIANO 2 Digital E.Piano 1 60’s E.Piano 1 Vintage E.Piano 2
HARPSI/CLAV Harpsichord 1 Clav. 1 Wah Clav. 1
VIBES/GUITAR Vibraphone 1 Marimba 1 Acoustic Guitar 1
ORGAN 1 Jazz Organ 1 2 Jazz Organ 2 2 Jazz Organ 3 2
ORGAN 2 Church Organ 1 3 Church Organ 2 1 Church Organ 3 1
STRINGS/PAD Strings 1 Slow Strings 2 Warm Pad 2
CHOIR Choir Hoo 1 Choir Doo 2 Choir Pad 2
(#) These columns show the number of oscillators per voice used by each sound
Playing two sounds at the same time (Layer mode)
You can play two sounds at the same time on the keyboard. This is called the Layer
mode.
16
Chapter 3
Page 19

Note:
When selecting the Layer mode, the total number of voices that can play at
the same time is reduced, depending on the total number of oscillators used by the
selected sounds.
Note:
You can’t select two sounds included under the same button.
Press one of the sound selection buttons in order to select the first sound. The LED
1
on the button you pressed will light. Use the BANK button to select a sound in one
of the other banks.
2
Press another sound selection button to select the second sound. The LED on the
button you pressed will light. Use the BANK button to select a sound in one of the
other banks.
Press both buttons at the same time to select the sounds. Both LEDs will light.
3
Note:
Steps 1 and 2 are not required, if the right banks are already selected.
Returning to the Single mode.
To return to the Single mode, just press a single
sound selection button.
Adjusting the volume of sounds in Layer mode.
To adjust the balance
between the sounds in Layer mode, hold down the button of the sound whose level
you wish to decrease, and repeatedly press the button of the sound whose level you
wish to raise.
Note:
This setting will be memorized even after turning the Layer mode off, but
will be lost when turning the instrument off. To save these settings, save them using
the Data Dump function (see “MIDI Data Dump” on page 30).
Choosing the reverb and the chorus
The SP-300 has two effects: reverb and chorus. The reverb simulates the sound
reverberation in a room, while the chorus simulates a modulating effect that makes
the sounds richer. The effect settings will be remembered even when selecting a different sound.
Note:
Effect settings made in Single mode are memorized even when selecting the
Layer mode, but no change made in Layer mode will be preserved.
When the instrument is turned on, the effect settings are reset to the factory settings.
To save these settings, save them using the Data Dump function (see “MIDI Data
Dump” on page 30).
Basic functions
17
Page 20

1
Hold down the REVERB or CHORUS button, and press either the PIANO 1/L,
PIANO 2/M, or E.PIANO1/H sound selection button to select the reverb or chorus
depth.
Button Reverb depth Chorus depth
PIANO 1/L Light reverb Light chorus
PIANO 2/M Normal reverb Normal chorus
E.PIANO 1/H Deep reverb Deep chorus
To check the currently selected reverb or chorus depth, hold down the REVERB or
2
CHORUS button, and look at which of the above LEDs is turned on.
To turn the reverb or chorus off, press the REVERB or CHORUS button. The LED
3
on the button will turn off.
The damper pedal
The supplied pedal can be used as a damper pedal. If you connect to the DAMPER
jack a Korg DS1H pedal (optional), you can use the half-pedalling, with a gradual
resonance effect depending on the depth of the pedal pressure.
In Layer mode, you can select the sound(s) to apply the pedal to.
Note:
When the instrument is turned on, the pedal settings are reset. To save these
settings, save them using the Data Dump function (see “MIDI Data Dump” on
page 30).
Hold the TRANSPOSE/FUNCTION button, and press the damper pedal. Each time
1
you press the pedal, the LED on the sound selection button(s) where the damper
pedal is active will light.
2
When the pedal is assigned to the desired sound(s), release the TRANSPOSE/
FUNCTION button.
The metronome
The SP-300 incorporates a metronome, with which you can set the tempo during
practice.
Starting and stopping the metronome.
make the metronome start or stop. When turning on, the metronome is set according
to the slider position, but you can adjust it with the procedure described below. After
having listened to the demo, the tempo will be that of the last demo that had been
listened to.
18
Press the METRONOME button to
Chapter 3
Page 21
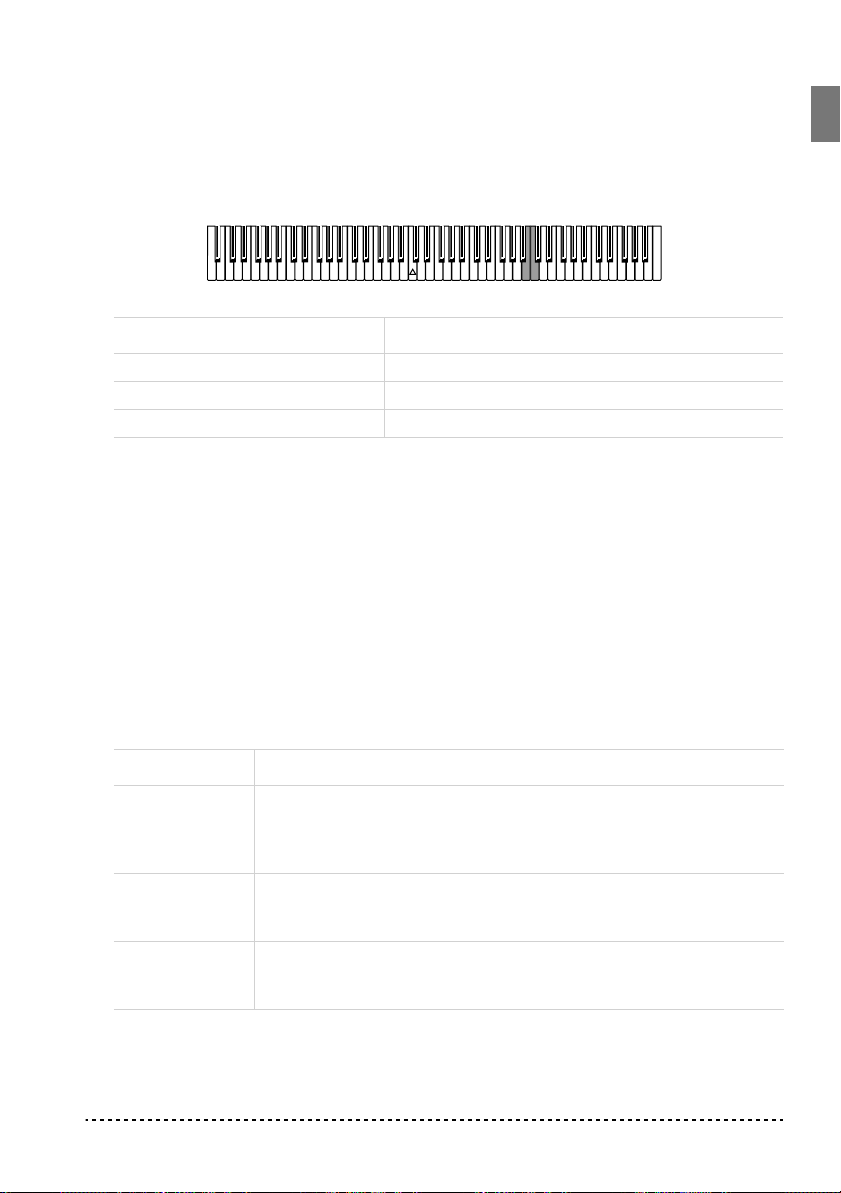
Adjusting the metronome volume. While the metronome is playing, keep the
METRONOME button pressed and repeatedly press the STRINGS/PAD button (or
the B5 key) to lower the v olume, or the CHOIR button (or the C6 key) to raise it. To
reset the volume, simultaneously press the STRINGS/PAD and CHOIR buttons (or
the B5 and C6 keys on the keyboard) while holding the METRONOME button.
Key Effect Key Effect
B5 Lower volume C6 Higher volume
Adjusting the tempo using the TEMPO slider. Use the TEMPO slider to adjust
the tempo. The range is = 40 ~ 200.
Numeric tempo input. In some cases, you may require an exact tempo (like 127
BPM). It is possible to enter a precise tempo, using the numeric input.
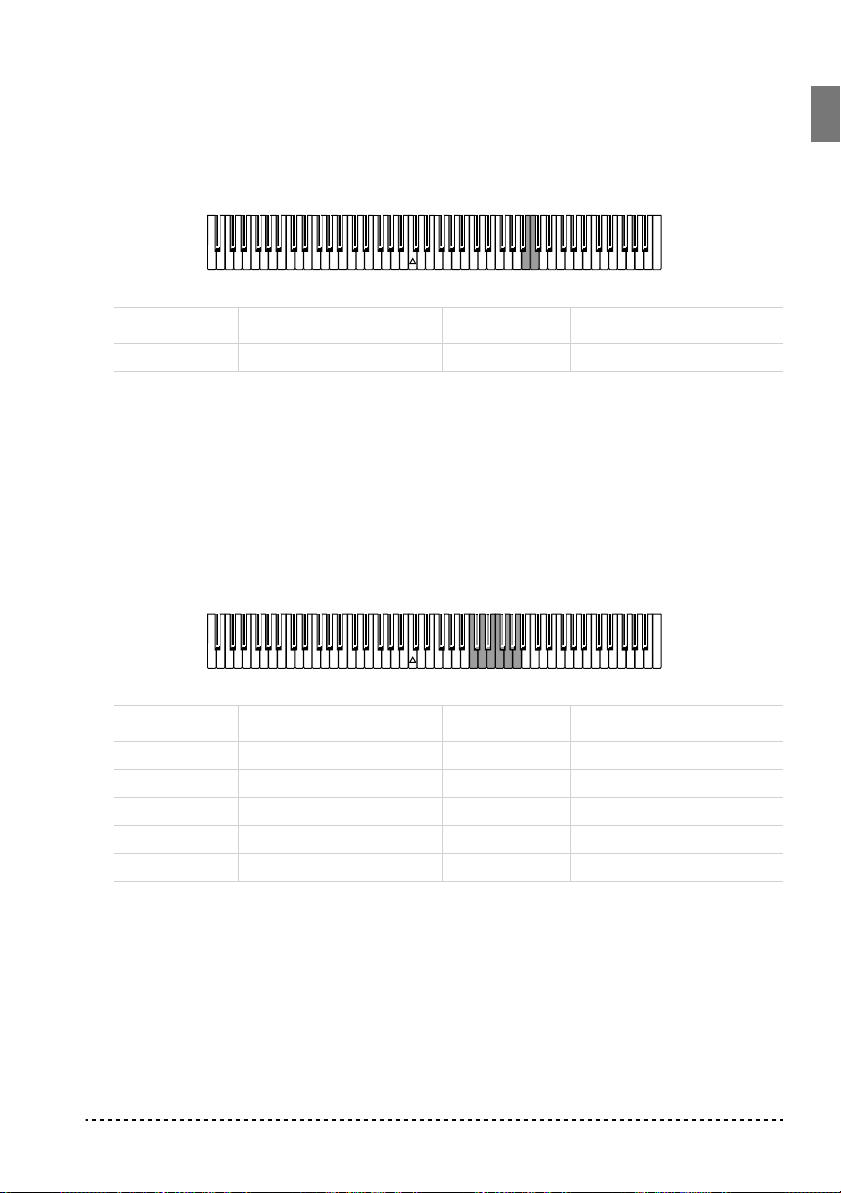
1 Hold down the METRONOME button.
2 Use the keyboard to input the three-digit tempo value (insert a “0” before a two-
number value).
Key Number Key Number
C5 0 C#5 1
D5 2 D#5 3
E5 4 F5 5
F#5 6 G5 7
G#5 8 A5 9
For example, to select a tempo value of 168, keep the METRONOME button
pressed, then press C#5 (1), F#5 (6), G#5 (8). To select a tempo value of 85, keep
the METRONOME button pressed, then press C5 (0), G#5 (8), F5 (5).
Basic functions 19
Page 22

Selecting the time signature. You can add an accent to the first beat of a mea-
sure.
Button Time signature
PIANO 1 2 movements (2/4, 2/8...)
PIANO 2 3 movements (3/4, 3/8...)
E.PIANO 1 4 movements (4/4, 4/8...)
E.PIANO 2 6 movements (6/4, 6/8...)
1 While the metronome is working, keep the METRONOME button pressed and
press the button that corresponds to the time signature you wish to use (see table
above). The first movement of the measure will be accented.
2 To deactivate the accent, keep the METRONOME button pressed and press the
sound selection button whose LED is lit.
Note: When the instrument is turned on, the accent is automatically disabled.
Selecting a bell for the accent. The accented beat can be changed to a bell
sound.
1 While the metronome is playing, hold down the METRONOME button, then press
the VIBES/GUITAR sound selection button. The LED on the button will light, and a
bell sound will be heard on the first beat of the bar.
2 To return to the normal accent, hold down the METRONOME button and press the
HARPSI/CLAV sound selection button to switch on the LED on the HARPSI/
CLAV button.
Note: When the instrument is turned on, the bell is automatically disabled.
20 Chapter 3
Page 23
Touch settings
CHAPTER
4
Other functions
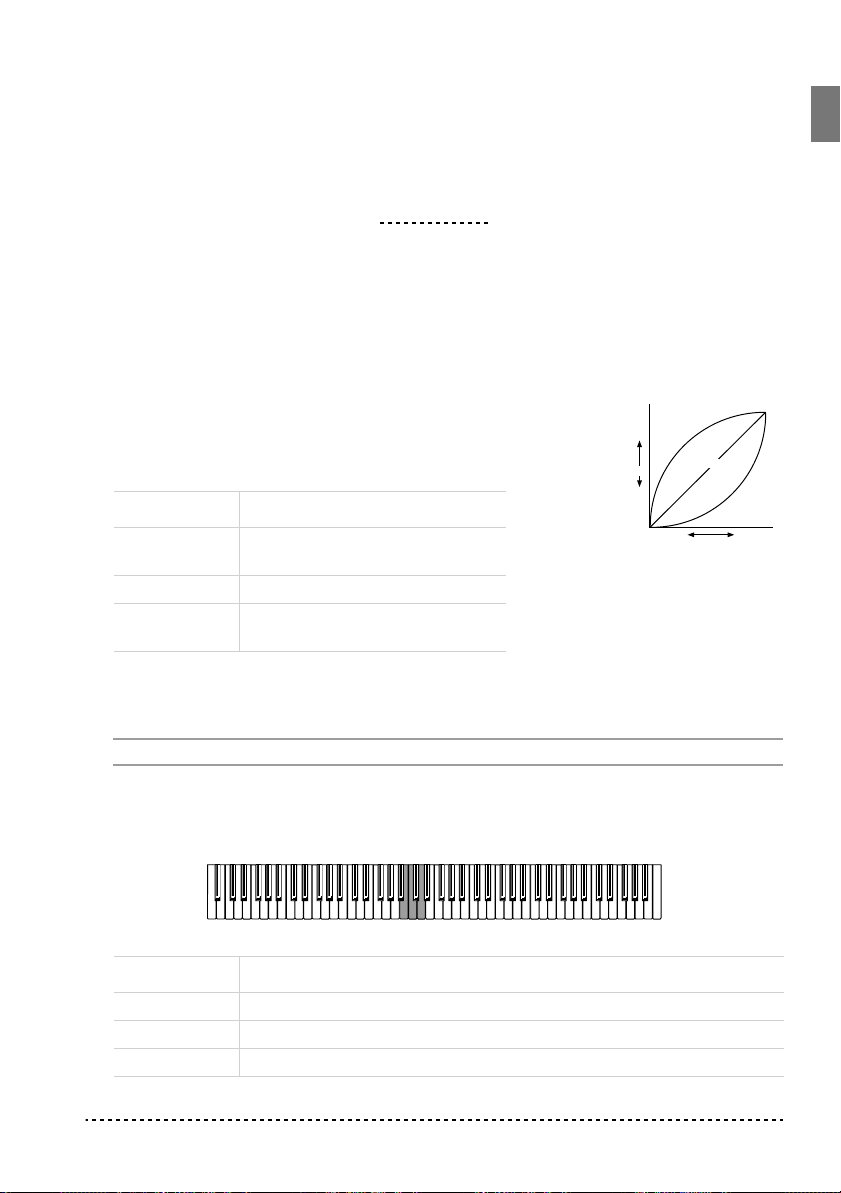
The keyboard sensitivity, or touch, can be programmed.
Keep the TOUCH button pressed, and press the appropriate
button to select one of the available touch settings.
Button Touch sensitivity
PIANO 1/L Light. Loud notes can be produced
Strong
( )
Note
loudness
Soft
( )
Soft
Playing strength
Light
Standard
Heavy
Strong
even by playing lightly.
PIANO 2/M Normal. Normal piano touch.
E.PIANO 1/H Heavy. Loud notes can be pro-
duced only by playing very hard.
To check the currently selected setting, hold down the TOUCH button, and look at
which of the above LEDs is turned on.
Note: When the instrument is turned on, the touch setting is reset to Normal.
Alternatively, you can use the TRANSPOSE/FUNCTION button and the keyboard.
Hold the TRANSPOSE/FUNCTION button, and press the key on keyboard that
corresponds to the touch setting you wish to carry out (see table).
Key Touch sensitivity
B3 Light. Loud notes can be produced even by playing lightly.
C4 Normal. Normal piano touch.
D4 Heavy. Loud notes can be produced only by playing very hard.
Other functions 21
Page 24
Transpose
In some cases, a song may be written in a difficult key (e.g., many black keys), or
you may wish to shift the pitch to match another instrument or vocalist. In such
cases, you can transpose (shift the pitch) so that you can use an easier fingering, or
use the same familiar fingering to play at a different pitch. This is called the Transpose function.
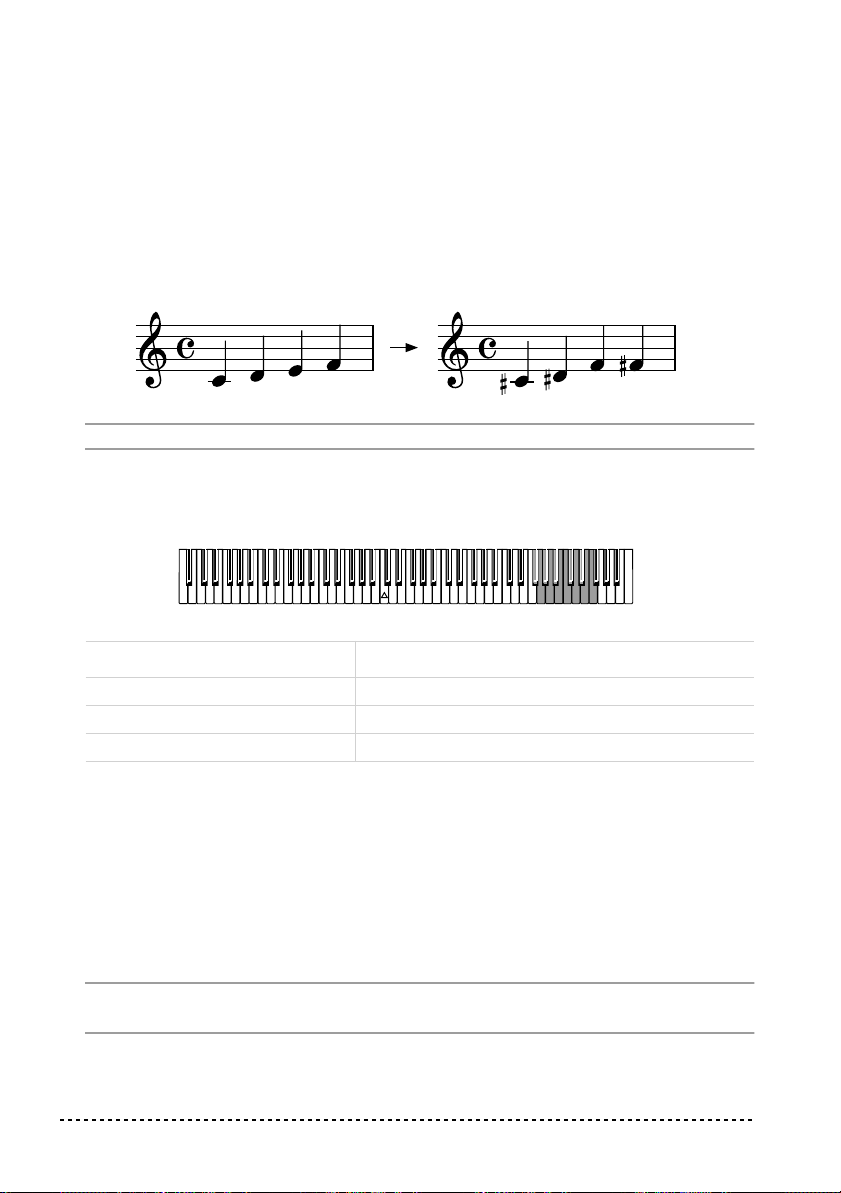
For example if you transpose upward by one semitone, playing the notes shown at
the lower left will produce the pitches shown at the right.
Note: When the instrument is turned on, the transposing is reset.
1 Hold the TRANSPOSE/FUNCTION button, and press the key on keyboard that
corresponds to the transpose you wish to carry out (see table). The TRANSPOSE/
FUNTION LED will remain lit up, to indicate that the transpose function is active.
Key Effect
F#6 — B6 6 — 1 semitones below
C7 Standard pitch
C#7 — F7 1 — 5 semitones higher
2 To get back to standard pitch, hold the TRANSPOSE/FUNCTION button and press
the C7 key. The TRANSPOSE/FUNCTION LED will turn off.
Fine tuning
In order to adapt the SP-300 pitch to that of another instrument, you can adjust the
pitch in steps of 0.5 Hz over a range of A4 = 427.5 ~ 452.5 Hz. The standard tuning
is A4 = 440 Hz.
Note: The pitch will go back to standard level (A4 = 440 Hz) when the instrument is
turned off, then on again.
22 Chapter 4
Page 25
1 Hold the TRANSPOSE/FUNCTION button, and press the corresponding key to
change the pitch. Each time the B5 or C6 key is pressed, the pitch will be raised or
lowered by 0.5 Hz.
2 To get back to standard pitch, hold the TRANSPOSE/FUNCTION button and press
the B5 and C6 buttons at the same time.
Key Fine tuning
B5 Lowers the pitch by 0.5 Hz
B5+C6 Standard pitch (A4 = 440 Hz)
C6 Raises the pitch by 0.5 Hz
Selecting a temperament
There are numerous classical compositions that were composed using temperaments that differ from the “equal temperament” commonly used today.In order to
reproduce the original sound of such compositions, the SP-300 provides Kirnberger
and Werckmeister classical temperaments, in addition to the equal temperament,
allowing you to select from a total of three temperaments.
To select one of the available temperaments, hold down the TOUCH button, then
press the button corresponding to the desired temperament. To return to the equal
tuning hold down the TOUCH button, then press the sound selection button whose
LED is lit.
Button Temperament
HARPSI/CLAV Werckmeister. This is the Werckmeister III scale invented by Andreas
Werckmeister, the German organist and music theoretician. This scale
was created in the later Baroque period to allow relatively free transposition.
VIBES/GUITAR Kirnberger. This is the Kirnberger III scale invented by Johann Phillip
Kirnberger in the early 18th century, and is used mainly for tuning harpsichords.
Both LEDs
turned off
Other functions 23
Equal temperament. Nearly all keyboard instruments today use equal
temperament. This temperament spaces all semitones at equal distances, and allows identical scales to be played in any key.
Page 26

To check the currently selected temperament, hold down the TOUCH button, and
look at which of the above LEDs is turned on.
Note: When the power is turned on, the equal temperament will be automatically
selected.
About stretched tuning. In order to produce the most natural resonance, PIANO
1 and PIANO 2 sounds use a “stretched tuning” that makes the notes of the lower
range slightly flatter than equal temperament, and the upper range slightly sharper.
This is how an acoustic piano is normally tuned by professional tuners.
24 Chapter 4
Page 27

CHAPTER
5
MIDI
What is MIDI?
MIDI, is the abbreviation of Musical Instrument Digital Interface. It is an international standard that was created to connect and transfer data between electronic
musical instruments, computers and other devices.
What can you do with MIDI?
Thanks to MIDI, you can use the SP-300 to control other instruments, use other
instruments to control the SP-300, and use a sequencer to create complex musical
pieces.
When you use the SP-300 keyboard or pedal, or select a sound, the notes, pedal activation and change in sound are transmitted to another instrument, or are recorded by
a sequencer.
Connections
Always connect the MIDI OUT connector of the instrument to the MIDI IN connector of another instrument. Never connect two connectors of the same instrument to
each other.
Connect the MIDI OUT connector of the transmitting (master) device to the MIDI
IN connector of the receiving (slave) device.
To connect the SP-300 to a computer, you need a MIDI interface for the computer,
sequencing or musical notation software, and two standard MIDI cables. Connect
MIDI 25
Page 28
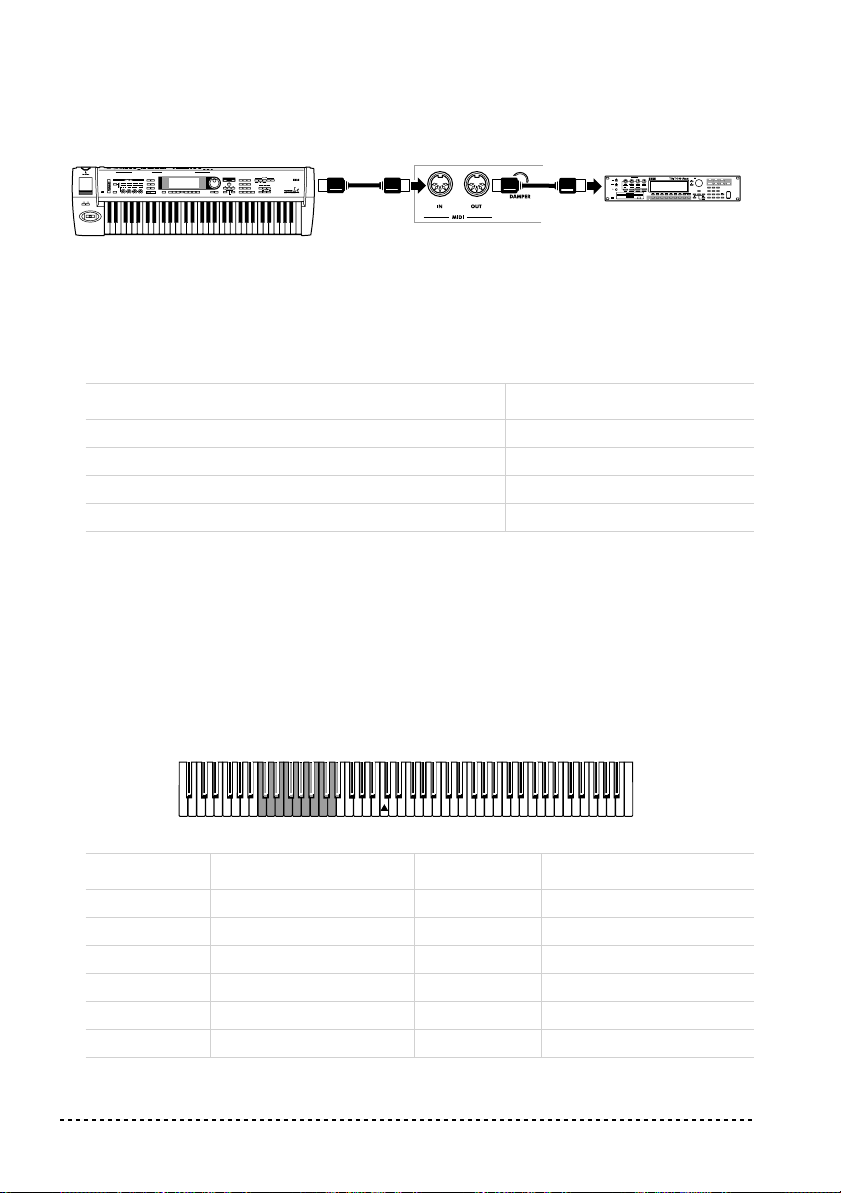
the SP-300 MIDI OUT connector to the MIDI IN connector of the computer. Connect the SP-300 MIDI IN connector to the MIDI OUT connector of the computer.
MIDI keyboard
MIDI OUT
SP-300 rear panel
MIDI IN
MIDI sound module
Standard MIDI settings
When turning the instrument on, the MIDI parameters of the SP-300 are programmed as follows:
Parameter Setting
Transmission channel 1
Reception channel(s) All 16 (1-16)
Local ON
Omni ON
Selecting the transmission channel
The standard MIDI has 16 separate channels available for transmission and reception of data. SP-300 always receives on all 16 channels, and transmits on a single
channel. To transmit data from the SP-300, you need to choose which of the 16
channels you wish to transmit data on.
Hold down the TRANSPOSE/FUNCTION button, and press the note in the range
C2–D#3 corresponding to the desired MIDI channel.
Key Channel Key Channel
C2 1 C#2 2
D2 3 D#2 4
E2 5 F2 6
F#2 7 G2 8
G#2 9 A2 10
A#2 11 B2 12
26 Chapter 5
Page 29

Key Channel Key Channel
C3 13 C#3 14
D3 15 D#3 16
Note: When the power is turned on, channel 1 will automatically be selected.
Note: By default, channel 10 will automatically be assigned to the metronome
sound (notes D#5-E5).
Note: In Layer mode, the second sound transmits on the following channel. For
example, if you select channel 7, the first sound will transmit on channel 7, while
the second sound will transmit on channel 8. If you select channel 16, the first sound
will transmit on channel 16, while the second sound will transmit on channel 1
(cycling back to the first channel).
Using the SP-300 as a multitimbral tone generator
When SP-300 is controlled from an external MIDI device, it can work as a 16-part
multitimbral tone generator. You can select a different sound on each of the 16 MIDI
channels.
1 Use a MIDI cable to connect the SP-300's MIDI IN to the MIDI OUT of a
sequencer etc.
2 Transmit MIDI data from the connected sequencer (or other device). See “Program
Change” on page 28 for instructions on how to select a sound using the MIDI Program Change message. Program Change reception should be activated on the SP-
300.
Read the other devices user’s manual for details on sending Program Change mes-
sages.
Local On/Off
Local is the parameter that allows you to establish whether the keyboard has to play
the internal sounds and transmit MIDI data at the same time (Local On), or whether
it just has to transmit MIDI data and not play the internal sound (Local Off).
Local Off should be chosen when you wish to use the SP-300 as a mute keyboard,
to play another instrument. It should be chosen also when SP-300 is connected to a
sequencer via its MIDI IN and MIDI OUT connectors. This will avoid the notes to
be played twice, by the keyboard and by the sequencer, producing an annoying
“echo” effect.
MIDI 27
Page 30

Normally, you will choose Local On (automatically selected when turning the SP300 on), so that playing the keyboard will produce sound.
Hold down the TRANSPOSE/FUNCTION button, and press the PIANO 1 sound
selection button. The Local setting will alternate to On/Off each time you press this
button.
Local status PIANO 1 LED status
Local On Lit
Local Off Dark
Note: When the power is turned on, the Local will be automatically set to On.
Program Change
The sound of the SP-300 can be selected via MIDI, by sending a Program Change
message on the channel where you wish to assign the sound. The table enlists the
Program Change numbers (numbering from 0-29; if the transmitting device uses
numbers from 1-30, you will need to increment the number by one).
Transmitting Program Change messages. You can send a MIDI Program
Change message to a MIDI device connected to the SP-300 MIDI OUT, to change
its sound. When selecting one of the internal sounds of the SP-300 by using the
sound selection buttons, a MIDI Program Change number will be transmitted, as
shown in the table below.
Receiving Program Change messages. When a Program Change message is
received from an external device, the corresponding internal sound will be selected
on the SP-300, as shown in the following table. Only Program Change (PC) numbers in the range 0–29 have effect on the SP-300, while other numbers (30-127) are
ignored.
PC# Button Bank Sound
0
PIANO 1
1 2 Bright Piano
2 3 Grand Piano 2
3
PIANO 2
4 2 Honky-Tonky
5 3 E.Grand Piano
28 Chapter 5
1 Grand Piano 1
1 Classic Grand Piano
Page 31

PC# Button Bank Sound
6
E.PIANO 1
7 2 Club E.Piano
8 3 Thin E.Piano
9
E.PIANO 2
10 2 60’s E.Piano
11 3 Vintage E.Piano
12
HARPSI/CLAV
13 2 Clav.
14 3 Wah Clav.
15
VIBES/GUITAR
16 2 Marimba
17 3 Acoustic Guitar
18
ORGAN1
19 2 Jazz Organ 2
20 3 Jazz Organ 3
21
ORGAN2
22 2 Church Organ 2
23 3 Church Organ 3
24
STRINGS/PAD
25 2 Slow Strings
26 3 Warm Pad
27
CHOIR
28 2 Choir Doo
29 3 Choir Pad
1 Stage E.Piano
1 Digital E.Piano
1 Harpsichord
1 Vibraphone
1 Jazz Organ 1
1 Church Organ 1
1 Strings
1 Choir Hoo
Program Change enable/disable. To transmit and receive this kind of data, you
must enable Program Change messages transmission and reception. Otherwise, you
can disable Program Changes data.
MIDI 29
Page 32

Hold down the TRANSPOSE/FUNCTION button, and press the PIANO 2 sound
selection button. Each time you press the switch, the setting will alternate between
Enabled and Disabled.
Program Change status PIANO 2 LED status
Enable Lit
Cancel Dark
Note: When the power is turned on, program changes will be enabled for all MIDI
channels.
Control Change
When you operate the damper pedal, adjust the balance in Layer mode, or make
other adjustments on the control panel, a Control Change message is sent to a connected external MIDI device. At the same time, SP-300 can receive a Control
Change message from an external MIDI device connected to its MIDI IN, to control
the damper pedal, volume adjustment, and other data.
Control Change enable/disable. To transmit and receive this kind of data, you
must enable Control Change messages transmission and reception. Otherwise, you
can disable Control Changes data.
Hold down the TRANSPOSE/FUNCTION button, and press the E.PIANO 1 sound
selection button. Each time you press this button, the setting will alternate between
Enabled and Disabled.
Control Change status E.PIANO 1 LED status
Enabled Lit
Disabled Dark
Note: When the power is turned on, Control Change messages will be enabled on
all MIDI channels.
MIDI Data Dump
You can save the current sound settings (Single or Layer mode) on an external MIDI
storage device, like a sequencer or a MIDI data filer. You can later reload these data
into the SP-300, to restore a saved set of data.
30 Chapter 5
Page 33

Warning: To avoid loosing data, read carefully read the owner's manual of your
MIDI data filer.
Hint: To avoid any trouble, don’t forget to deactivate System Exclusive data reception on the connected device.
The following table shows which data are saved with the Data Dump.
Category Data
Single mode Reverb and chorus settings (on/off status, send level)
Layer mode Reverb and chorus settings (on/off status, send level),
balance between sounds, damper pedal on/off status
for each sound.
Saving data to the data filer. Here is how to save the data of the SP-300.
1 Use a MIDI cable to connect the SP-300 MIDI OUT to the MIDI IN of the data
filer.
2 Prepare the data filer to receive MIDI data.
3 On the SP-300, hold down the TRANSPOSE/FUNCTION button, and press the
VIBES/GUITAR sound selection button. The LEDs of the TRANSPOSE/FUNCTION and VIBES/GUITAR buttons will blink, indicating that the SP-300 is ready to
transmit the data dump.
4 Press the TOUCH button. The data dump will begin, and the sound setting data will
be transmitted to the data filer.
During a data dump operation, the SP-300 will not produce sound, and no other
function will work. When the data dump is completed, you will return to normal
playing condition.
You may cancel a data dump operation before the data dump begins, by pressing the
TRANSPOSE/FUNCTION or VIBES/GUITAR button.
Loading data from the data filer. You can load into the SP-300 data you previ-
ously saved on a data filer.
1 Use a MIDI cable to connect the MIDI IN of the SP-300 to the MIDI OUT of the
data filer.
2 On the SP-300, hold down the TRANSPOSE/FUNCTION button and press the
VIBES/GUITAR sound selection button. The LEDs of the TRANSPOSE/FUNCTION and VIBES/GUITAR buttons will blink, and the SP-300 will wait to receive
the data dump.
MIDI 31
Page 34

3 Set the data filer to send the sound setting data that were previously saved from the
SP-300. Please read the data filer owner’s manual for details on data transmission.
The SP-300 will receive the data.
When the data dump is finished, the SP-300 will return to the same status it was
before the data dump.
During a data dump operation, the SP-300 will not produce sound, and no other
function will work.
You may cancel a data dump operation before the data dump begins, by pressing the
TRANSPOSE/FUNCTION or VIBES/GUITAR button.
32 Chapter 5
Page 35

CHAPTER
6
Appendix
Troubleshooting
If during use any of the following problems should occur, carefully examine the
instrument to see if you can find out what the problem is, and try resolving it by following the suggestions below. If the instrument will still not function properly refer
to your dealer or to an Authorized Korg Service Center.
Problem Possible remedy Page
The instrument
will not turn on.
No sound. (1) Make sure that the volume is not set on 0. If it is, bring it up to
Check that the AC adapter is correctly connected to the piano and
the outlet.
an adequate level.
(2) Make sure that the internal speakers are not turned off. 13
(3) Make sure that the MIDI Local function is not set on OFF. If it
is, set it to ON (or turn the instrument off and then on again).
11
13
27
Polyphony
The SP-300 contains sampled sounds, which have been recorded, analyzed and processed from the actual sounds of the original musical instruments. These sounds
usually consist of one or more different samples reproduced by pressing a key. Each
sample is played back by a single oscillator. Sounds using just one oscillator have a
full polyphony of max. 60 voices, while sounds using two oscillators have a limited
polyphony of max. 30 notes. Sounds using more oscillators have a more limited
polyphony. When the number of notes exceeds the limit of the sound, some notes
will be stopped, so that the new ones can be heard.
Furthermore, when playing in Layer mode with more than two notes, the max.
polyphony depends on how many oscillators are used in total. Using the REVERB,
CHORUS further reduces the polyphony, respectively, by 10 and 3 notes.
Appendix 33
Page 36

Please refer to the table on page 16 for more information about the number of oscillators used by each sound.
Technical specifications
Specifications SP-300
Keyboard 88 notes, velocity sensitive, with hammer-action simulation
Touch selection Light, Normal, Heavy
Tuning Transpose, Fine tuning, Temperament (Equal, Kirnberger,
Werckmeister)
Sound generation Stereo PCM System
Polyphony 60 notes (max). The use of 2-oscillator sounds, the Layer
mode and/or the reverb or chorus reduces the maximum
number of simultaneous notes.
Sounds 30 sounds in ROM
Effects Reverb, Chorus (3 levels each)
Demo 30 incorporated demos
Metronome Tempo, Time signature, Accent and Volume controls
Pedal Damper (included). Half-pedalling supported with Korg DS1H
(optional).
Connections Audio output (OUTPUT L/MONO, R), Audio input (INPUT L/
MONO, R), Headphones, MIDI (IN, OUT), Damper
Controls Power s witch, Speak ers s witch, Master Volume, Reverb, Cho-
rus, Touch, Transpose/Function, Bank, Sound selectors,
Tempo, Metronome, Demo
Amplification 2 × 15 Watt amplifier, 2 × 10cm speakers in Bass Reflex box
Power supply DC21V, 1A, center negative barrel, AC adapter (included)
Power consumption 21 Watt
Dimensions (W x D x H) 51.1 × 13.5 × 5.2 inch (1300 × 343.8 × 132.5 mm), excluding
music stand
Weight 55.1 lbs (25 kg)
Accessories DC12V, 500mA, center negative barrel, AC adapter; Damper
Pedal; Music stand (all included)
Options DS 1H - Damper Pedal with half-pedal control, Piano stand
Sounds processed with INFINITY™.
Korg reserves the right to change the specifications without notice.
34 Chapter 6
Page 37

ORGAN 1 ORGAN 2 STRINGS/PAD CHOIR
Transpose
C7 = Standard
F#6…B6 = -6…-1 st.
C#7…F7 = +1…+5 st.
VIBES/GUITAR
Control panel shortcuts
PIANO 1 PIANO2 E.PIANO 1 E.PIANO 2 HARPSI/CLAV
…while pressing this one
Keep this button pressed…
REVERB Depth = Low Depth = Medium Depth = High
CHORUS Depth = Low Depth = Medium Depth = High
TOUCH Light Normal Heavy Werckmeister Kirnberger
Crl.Change Rx/Tx Data Dump
Prg.Change Rx/Tx
METRONOME Time: 2/4 Time: 3/4 Time: 4/4 Time: 6/4 Accent Bell sound Metro Vol. Dec. Metro Vol. Inc.
TRANSPOSE/FUNCTION Local On/Off
Control panel and keyboard
The following diagram shows the various functions you can access by holding the METRONOME or TRANSPOSE/
C6 = Increase (+)
B5 = Decrease (-)
Metronome V olume
(Press both for Reset)
A5 = 9
Numeric Tempo Input
C5 = 0 C#5 = 1 D5 = 2
F#5 = 6 G5 = 7 G#5 = 8
D#5 = 3 E5 = 4 F5 = 5
METRONOME
FUNCTION button down, while pressing one of the notes on the keyboard.
Tuning
C6 = Up (+)
B5 = Down (-)
B3 = Light
C4 = Normal
Touch Setting
…
C2 = Ch 01
MIDI Channels
Demo Start
/FUNCTION
TRANSPOSE
for Reset)
(Press both
D4 = Heavy
D#3 = Ch 16
Control panel shortcuts 35
Page 38

36
Page 39

Piano numérique
Mode d’emploi
Page 40
PRECAUTIONS
Position de l’instrument
L’instrument ne doit jamais être installé :
• Aux rayons directs du soleil
• Dans des milieux extrêmement froids ou
humides
• Dans des milieux particulièrement sales ou
poussiéreux
• Dans des milieux soumis à de fortes vibrations
Alimentation
Brancher l’adaptateur AC fourni à une prise secteur
ayant un voltage adapté. Ne jamais brancher l’instrument à une prise secteur dont le voltage est différent de celui pour lequel l’appareil est prédisposé.
Interférences avec d’autres dispositifs électriques
Cet instrument est doté d’un micro-ordinateur.
Des appareils tels que radios ou postes de télévision peuvent interférer sur son fonctionnement. Il
faut donc l’installer à une distance appropriée de
tels appareils.
Manipulation
Ne jamais appliquer une force excessive aux
interrupteurs ou aux contrôles car ceci peut les
endommager.
Nettoyage
Si le boîtier de l’appareil est sale, le nettoyer à
l’aide d’un chiffon sec. Ne jamais utiliser des
détergents liquides tels que mazout ou alcool, ou
abrasifs ou détergents inflammables.
Conserver ce mode d’emploi
Après l’avoir lu, conserver le mode d’emploi pour
de futures références.
Ne jamais introduire dans l’appareil des objets
ou des choses
En aucun cas l’instrument ne doit être en contact avec des liquides. Si un liquide pénètre
dans l’instrument, il y a danger de panne de
courant, de feu, voire d’électrocution.
• Ne jamais introduire des objets métalliques
dans l’instrument. Si de tels objets pénètrent
dans l’instrument, déconnecter l’adaptateur
AC de la prise secteur et contacter le revendeur Korg ou le magasin le plus proche.
MARQUE CE POUR L’HARMONISA-
TION DES STANDARDS EUROPEENS
La marque CE est apposée depuis le 31 décembre
1996 sur nos produits qui utilisent la tension AC,
conformément à la Directive EMC (89/336/CEE)
et à la Directive sur la marque CE (93/68/CEE).
La marque CE apposée depuis le 1
indique la conformité aux Directives EMC (89/
336/CEE), sur la marque CE (93/68/CEE) et à la
Directive concernant la Basse Tension (73/23/
EEC).
De même, la marque CE apposée sur nos appareils faisant appel à l’alimentation sur piles indique la conformité à la Directive EMC (89/336/
CEE) et à la Directive sur la marque CE (93/68/
EEC).
er
janvier 1997
THE FCC REGULATION WARNING
(FOR THE U.S.A. ONLY)
This equipment has been tested and found to
comply with the limits for a Class B digital
device, pursuant to Part 15 of the FCC Rules.
These limits are designed to provide reasonable
protection against harmful interference in a residential installation. This equipment generates,
uses, and can radiate radio frequency energy and,
if not installed and used in accordance with the
instructions, may cause harmful interference to
radio communications. However, there is no guarantee that interference will not occur in a particular installation. If this equipment does cause
harmful interference to radio or television reception, which can be determined by turning the
equipment off and on, the user is encouraged to
try to correct the interference by one or more of
the following measures:
• Reorient or relocate the receiving antenna.
• Increase the separation between the equipment and receiver.
• Connect the equipment into an outlet on a circuit different from that to which the receiver is
connected.
38
Page 41

• Consult the dealer or an experienced radio/TV
technician for help.
Unauthorized changes or modification to this system can void the user’s authority to operate this
equipment.
CANADA
THIS APPARATUS DOES NOT EXCEED THE
“CLASS B” LIMITS FOR RADIO NOISE EMISSIONS FROM DIGITAL APPARATUS SET OUT
IN THE RADIO INTERFERENCE REGULATION OF THE CANADIAN DEPARTMENT OF
COMMUNICATIONS.
LE PRESENT APPAREIL NUMERIQUE
N’EMET PAS DE BRUIT RADIOELECTRIQUE
DEPASSANT LES LIMITES APPLICABLES
AUX APPAREILS NUMERIQUES DE LA
“CLASSE B” PRESCRITES DANS LE REGLEMENT SUR LE BROUILLAGE RADIOELECTRIQUE EDICTE PAR LE MINISTERE DES
COMMUNICATIONS DU CANAD A.
RECLAMATIONS
Les informations contenues dans cette publication
ont été soigneusement préparées et vérifiées. Vu
notre continuel engagement à l’amélioration de
nos produits, il se peut que des spécifications
soient différentes de celles détaillées dans le
mode d’emploi. Korg décline toute responsabilité
envers les éventuelles différences qui peuvent se
présenter entre les spécifications et la description
détaillée dans le mode d’emploi - les spécifications sont sujettes à modifications sans préavis.
SERVICE ET ASSISTANCE AU MUSICIEN
Contactez le Service d’Assistance Agréé KORG
le plus proche. Le revendeur Agréé KORG est à
votre disposition pour toute ultérieure information
concernant les produits, les logiciels et les accessoires pour piano.
KORG SUR INTERNET
Accueil Korg Inc. : www.korg.co.jp
Accueil Korg France : www.korgfr.net
Accueil Korg Canada : www.jamindustries.com
Accueil Korg USA : www.korg.com
Accueil Korg Italy : www.korg.it
RETABLISSEMENT DES DONNEES
Lors de la mise hors tension de l’instrument, tous
les paramètres se rétablissent à leur valeur
d’usine.
GARANTIE
Les produits KORG sont fabriqués conformément
aux plus rigoureuses spécifications en vigueur
dans chaque pays. Ces produits sont garantis par
le distributeur KORG dans le pays où ils ont été
vendus. Le fabricant/distributeur décline toute
responsabilité ou garantie envers tout produit
KORG vendu démuni de garantie ou de numéro
de série. Ceci afin de mieux garantir la protection
et la sécurité de l’acheteur.
© 2002 Korg Italy Spa. Imprimé en Italie
39
Page 42

SOMMAIRE
Introduction . . . . . . . . . . . . . . . . . . . . . . . . . . . . . . . . . . . . . . . . . . . . . . . . . . . . . . . . .41
Caractéristiques principales . . . . . . . . . . . . . . . . . . . . . . . . . . . . . . . . . . . . . . . . . . . . . . . . . . . .41
1 Faces avant et arrière . . . . . . . . . . . . . . . . . . . . . . . . . . . . . . . . . . . . . . . . . . . . . . . . .43
Face avant . . . . . . . . . . . . . . . . . . . . . . . . . . . . . . . . . . . . . . . . . . . . . . . . . . . . . . . . . . . . . . . . .43
Face arrière . . . . . . . . . . . . . . . . . . . . . . . . . . . . . . . . . . . . . . . . . . . . . . . . . . . . . . . . . . . . . . . .44
2 A lire en premier . . . . . . . . . . . . . . . . . . . . . . . . . . . . . . . . . . . . . . . . . . . . . . . . . . . . .46
Branchement à un système d’amplification externe . . . . . . . . . . . . . . . . . . . . . . . . . . . . . . . . .46
Utiliser les casques . . . . . . . . . . . . . . . . . . . . . . . . . . . . . . . . . . . . . . . . . . . . . . . . . . . . . . . . . .46
Branchement de sources externes . . . . . . . . . . . . . . . . . . . . . . . . . . . . . . . . . . . . . . . . . . . . . . .47
Mettre l’instrument sous tension . . . . . . . . . . . . . . . . . . . . . . . . . . . . . . . . . . . . . . . . . . . . . . . .47
Régler le volume . . . . . . . . . . . . . . . . . . . . . . . . . . . . . . . . . . . . . . . . . . . . . . . . . . . . . . . . . . . .47
Reproduire les Morceaux de Démonstration . . . . . . . . . . . . . . . . . . . . . . . . . . . . . . . . . . . . . . .47
3 Fonctions de base . . . . . . . . . . . . . . . . . . . . . . . . . . . . . . . . . . . . . . . . . . . . . . . . . . . .50
Jouer un timbre (mode Single) . . . . . . . . . . . . . . . . . . . . . . . . . . . . . . . . . . . . . . . . . . . . . . . . .50
Jouer deux timbres à la fois (mode Layer) . . . . . . . . . . . . . . . . . . . . . . . . . . . . . . . . . . . . . . . .50
Choisir les effets de réverbération et de chorus . . . . . . . . . . . . . . . . . . . . . . . . . . . . . . . . . . . . .51
La pédale de résonance (damper) . . . . . . . . . . . . . . . . . . . . . . . . . . . . . . . . . . . . . . . . . . . . . . .52
Le métronome . . . . . . . . . . . . . . . . . . . . . . . . . . . . . . . . . . . . . . . . . . . . . . . . . . . . . . . . . . . . . .52
4 Fonctions diverses . . . . . . . . . . . . . . . . . . . . . . . . . . . . . . . . . . . . . . . . . . . . . . . . . . .55
Réglage du toucher . . . . . . . . . . . . . . . . . . . . . . . . . . . . . . . . . . . . . . . . . . . . . . . . . . . . . . . . . .55
Fonction Transpose . . . . . . . . . . . . . . . . . . . . . . . . . . . . . . . . . . . . . . . . . . . . . . . . . . . . . . . . . .56
Accordage fin . . . . . . . . . . . . . . . . . . . . . . . . . . . . . . . . . . . . . . . . . . . . . . . . . . . . . . . . . . . . . .57
Sélectionner un tempérament . . . . . . . . . . . . . . . . . . . . . . . . . . . . . . . . . . . . . . . . . . . . . . . . . .57
5 MIDI . . . . . . . . . . . . . . . . . . . . . . . . . . . . . . . . . . . . . . . . . . . . . . . . . . . . . . . . . . . . . .59
Le MIDI, qu’est-ce que c’est ? . . . . . . . . . . . . . . . . . . . . . . . . . . . . . . . . . . . . . . . . . . . . . . . . .59
Que peut-on faire avec le MIDI? . . . . . . . . . . . . . . . . . . . . . . . . . . . . . . . . . . . . . . . . . . . . . . . .59
Connexions . . . . . . . . . . . . . . . . . . . . . . . . . . . . . . . . . . . . . . . . . . . . . . . . . . . . . . . . . . . . . . . .59
Réglages MIDI standards . . . . . . . . . . . . . . . . . . . . . . . . . . . . . . . . . . . . . . . . . . . . . . . . . . . . .60
Sélectionner le canal de transmission . . . . . . . . . . . . . . . . . . . . . . . . . . . . . . . . . . . . . . . . . . . .60
Utiliser le SP-300 en tant que générateur de sons multimbres . . . . . . . . . . . . . . . . . . . . . . . . .61
Local On/Off . . . . . . . . . . . . . . . . . . . . . . . . . . . . . . . . . . . . . . . . . . . . . . . . . . . . . . . . . . . . . . .61
Program Change . . . . . . . . . . . . . . . . . . . . . . . . . . . . . . . . . . . . . . . . . . . . . . . . . . . . . . . . . . . .62
Control Change . . . . . . . . . . . . . . . . . . . . . . . . . . . . . . . . . . . . . . . . . . . . . . . . . . . . . . . . . . . . .64
MIDI Data Dump . . . . . . . . . . . . . . . . . . . . . . . . . . . . . . . . . . . . . . . . . . . . . . . . . . . . . . . . . . .65
6 Appendice . . . . . . . . . . . . . . . . . . . . . . . . . . . . . . . . . . . . . . . . . . . . . . . . . . . . . . . . . .67
Problèmes et solutions . . . . . . . . . . . . . . . . . . . . . . . . . . . . . . . . . . . . . . . . . . . . . . . . . . . . . . . .67
Polyphonie . . . . . . . . . . . . . . . . . . . . . . . . . . . . . . . . . . . . . . . . . . . . . . . . . . . . . . . . . . . . . . . . .67
Spécifications techniques . . . . . . . . . . . . . . . . . . . . . . . . . . . . . . . . . . . . . . . . . . . . . . . . . . . . .69
Détails du tableau de commande . . . . . . . . . . . . . . . . . . . . . . . . . . . . . . . . . . . . . . . .70
Tableau de commande et clavier . . . . . . . . . . . . . . . . . . . . . . . . . . . . . . . . . . . . . . . .70
MIDI Implementation Chart . . . . . . . . . . . . . . . . . . . . . . . . . . . . . . . . . . . . . . . . . . . .141
40 SOMMAIRE
Page 43

INTRODUCTION
Introduction
Caractéristiques principales
Vaste gamme de timbres. Trente timbres différents, d’excellente qualité, y inclut
un timbre “Stereo Concert Grand Piano”. La fonction Layer permet de jouer deux
timbres ensemble.
Effets. Le SP-300 est doté d’effets numériques qui simulent une salle de concert
(Reverb) et étoffent le timbre (Chorus).
Pédale de résonance Damper. La pédale Damper du SP-300 correspond à la
pédale de résonance ou “Forte” d’un piano acoustique. Lorsqu’on exerce une pression sur cette pédale du piano acoustique, les étouffoirs qui limitent les vibrations
des cordes sont soulevés.
Métronome. Le métronome incorporé permet de sélectionner la métrique du
tempo, le tempo, le volume et, éventuellement, d’utiliser une clochette pour mettre
l’accent.
Contrôle du Toucher. Trois différents réglages de dynamique sont disponibles
pour la réponse du clavier au toucher.
Tempéraments. Le SP-300 joue le tempérament Egal (Equal), ainsi que deux
autres tempéraments classiques (Kirnberger et Werckmeister) pour une attentive
reproduction historique de la musique classique. En sélectionnant un timbre de
piano acoustique, le typique “Stretched Tuning” (cordes pincées) correspondant est
automatiquement choisi.
Réglage de la hauteur. La fonction Transpose permet de modifier la hauteur du
timbre, tandis que la fonction Pitch Control permet d’effectuer un accordage fin.
Caractéristiques MIDI. Le SP-300 supporte le protocole MIDI, c’est à dire un
protocole standard qui permet d’échanger des données musicales entre instruments
Introduction 41
Page 44

musicaux et ordinateurs. Le protocole MIDI permet à deux dispositifs (ou plus) de
piloter ou d’être pilotés l’un l’autre ; le SP-300 peut ainsi fonctionner comme un
générateur sonore à 16 parties multitimbres.
Amplification de puissance intégrée. Le SP-300 est intégré d’un amplificateur
de puissance de 15 + 15 Watts et de deux haut-parleurs de 10 cm en boîte Bass
Reflex.
Bornes d’entrée “Audio”. Via les bornes d’entrée audio, vous pouvez directe-
ment brancher une source audio externe, mono ou stéréo, sans passer par une table
de mixage.
Deux paires de casques. Vous pouvez brancher deux casques stéréos et ainsi
jouer avec votre professeur ou un autre musicien.
42 Introduction
Page 45

Face avant
111122
22
CHAPITRE
1
Faces avant et arrière
55
44
333344
55
66
66
77
77
8888999900
00
11
11
Curseur MASTER VOLUME : Règle le volume des bornes Output et Phones.
22
22
Bouton REVERB : Active/coupe l’effet de réverbération. Etoffe le son.
33
33
Bouton CHORUS : Active/coupe l’effet de Chorus. Enrichit le son.
44
44
Bouton TOUCH : Sélectionne la courbe de dynamique du toucher du clavier.
55
55
Bouton TRANSPOSE/FUNCTION : Bouton multifunctions que l’on utilise pour
modifier la transposition et l’accordage fin, pour programmer les paramètres MIDI
et effectuer d’autres réglages.
Note : Lors de la mise hors tension de l’instrument, les paramètres se rétablissent à
leur valeur d’usine.
66
66
Bouton BANK : Sélectionne l’une des 3 banques de timbres disponibles.
77
77
Boutons de sélection des timbres (SOUND SELECTION) : Appuyez sur l’un des
boutons pour jouer le timbre indiqué (mode Single). Appuyez simultanément sur
Faces avant et arrière 43
Page 46
deux boutons pour jouer deux timbres (mode Layer).
88
88
Curseur TEMPO : Règle le tempo du métronome.
99
99
Bouton METRONOME : Active/coupe le clic du métronome.
00
00
DEMO: Active/coupe le mode Demo, pour reproduire les morceaux de démonstration. Pour sélectionner les morceaux, appuyez sur les boutons de sélection des timbres (voir poste 7).
Face arrière
11
11
33
33
22
22
55
55
11
11
Pupitre : Introduire le pupitre dans les deux perçages prévus. La première fois que
vous utilisez le pupitre, il faut e xercer une certaine force pour l’introduire ou l’enlever. Successivement, les trous en plastique s’adapteront au pupitre et les opérations
seront facilitées.
22
22
Interrupteur SPEAKERS ON/OFF : Cet interrupteur permet de couper ou d’activer les haut-parleurs internes.
33
33
DAMPER: Connecter la pédale fournie à cette borne.
44
44
Bornes MIDI (IN, OUT) : Bornes pour connecter des dispositifs tels que séquenceurs, claviers, etc. OUT : Sortie des données (à connecter à la borne MIDI IN d’un
autre dispositif MIDI). IN : Entrée de données (à connecter la borne MIDI OUT
d’un autre dispositif MIDI).
55
55
Bornes INPUT (L/MONO, R) : Entrées Audio. Via ces bornes, vous pouvez bran-
44
44
66
66
77
77
88
88
99
99
44 Chapitre 1
Page 47

cher une source audio externe, par exemple un reproducteur CD, une table de
mixage ou un autre clavier.
Attention : Il ne faut jamais brancher à ces bornes la sortie d’un amplificateur de
puissance !
66
66
Bornes OUTPUT (L/MONO, R) : Sorties Audio. Un système d’amplification
externe peut être branché à ces bornes. (Avec un système hi-fi, utilisez les bornes
AUX ou TAPE et non pas la borne PHONO). Pour amplifier votre SP-300 en mono,
branchez-vous à la borne individuelle L/MONO. Pour réglez le volume de sortie,
utilisez le curseur MASTER VOLUME.
77
77
Borne PHONES : Permet de brancher un ou deux casques.
88
88
Borne DC IN 21V 1A: Pour connecter l’adaptateur AC fourni.
99
99
Interrupteur POWER : Interrupteur de mise sous/hors tension de l’instrument.
Faces avant et arrière 45
Page 48

CHAPITRE
2
A lire en premier
Branchement à un système d’amplification externe
Utilisez les bornes OUTPUT pour brancher une table de mixage de qualité élevée,
un hi-fi stéréo ou une paire de retours de scène à votre SP-300. Si vous utilisez un
hi-fi stéréo, branchez les bornes OUTPUT de l’appareil aux bornes d’entrée AUX
ou TAPE de votre SP-300 (ne jamais utiliser les entrées PHONO). Si l’amplification
est en mono, utilisez uniquement la borne de sortie L/MONO.
Cha ne st r o
hi-fi, etc.
AUX IN
A la prise secteur
DC IN
12 V
L/MONO
OUTPUT
Haut-parleurs
amplifi s, etc.
R
Utiliser les casques
Pour jouer ou s’exercer la nuit, ou pour ne pas déranger d’autres personnes présentes dans la même pièce, vous pouvez utiliser un ou deux casques de qualité élevée
(on conseille une impédance de 32Ω) en les branchant aux bornes prévues en face
arrière. Le standard de ces bornes est de 1/4”. Si la prise de votre casque présente un
adaptateur mini, lorsque vous branchez/débranchez le casque, ne tirez pas sur le
cordon : prenez en main l’adaptateur et tirez-le.
Attention : Pour protéger l’ouïe, on déconseille une écoute prolongée à volume
élevé avec le casque.
46 Chapitre 2
Page 49

Branchement de sources externes
Vous pouvez brancher aux bornes d’entrée “INPUTS”, prévues en face arrière,
n’importe quel autre instrument musical électronique, la sortie d’une table de
mixage ou un reproducteur CD. Ces bornes répondent à un niveau de signal de
ligne. Pour brancher un microphone, vous devez vous procurer un microphone préamplifié dédié ou une table de mixage.
Attention : Il ne faut jamais brancher à ces bornes la sortie d’un amplificateur de
puissance !.
Mettre l’instrument sous tension
Introduire la fiche DC de l’adaptateur AC fourni dans la borne DC du SP-300 et
ensuite connecter la fiche AC à la prise secteur ; appuyer sur l’interrupteur POWER.
Lorsque l’instrument est sous tension, les témoins du tableau de commande s’allument. Pour mettre l’instrument hors tension, appuyer de nouveau sur POWER.
Note : Lors de la mise hors tension de l’instrument, les paramètres se rétablissent
aux valeurs d’usine.
Régler le volume
Déplacez le curseur MASTER VOLUME vers la droite pour augmenter le volume ;
vers la gauche pour le diminuer. La valeur maximum est “10” ; celle minimum
(silence) est “0”. Ce contrôle règle le niveau de sortie des casques, des haut-parleurs
internes et des bornes OUTPUT. Il ne règle pas le niveau d’entrée d’une source
audio branchée aux bornes INPUT.
Note : On conseille de toujours commencer à jouer à faible volume et de l’augmenter par la suite.
Reproduire les Morceaux de Démonstration
30 morceaux de démonstration sont stockés dans le SP-300. Reproduisez-les pour
écouter les riches timbres et le potentiel d’expression sonore de votre instrument.
Reproduire tous les morceaux. Il suffit d’une seule commande pour reproduire
tous les morceaux.
1 Appuyez sur le bouton DEMO (ou enfoncez le bouton TRANSPOSE/FUNCTION
et appuyez sur la note E1 du clavier). Les témoins des boutons de sélection des timbres clignotent en séquence de gauche à droite. Après quelques secondes, la repro-
A lire en premier 47
Page 50

duction commence. Tous les morceaux de démonstration sont reproduits. A la fin du
dernier morceau, la reproduction recommence depuis le premier.
2 Pendant la reproduction, appuyez sur l’un des boutons de sélection des timbres pour
répéter uniquement les dix morceaux de démonstration de la banque en cours. (Il y a
trois banques de dix morceaux de démonstration chacune : 1-10, 11-20, 21-30).
Par exemple, si vous appuyez sur le bouton CHOIR pendant la reproduction du
morceau 1, le morceau 10 est immédiatement reproduit et ensuite le cycle recommence de 1 à 10.
3 Appuyez sur DEMO pour arrêter la reproduction et quitter le mode de démonstra-
tion.
Reproduire un morceau individuel. Vous pouvez sélectionner un morceau spé-
cifique et le reproduire.
1 D’abord, vous devez sélectionner l’une des trois banques de timbres disponibles.
• Pour sélectionner la première banque (1-10), appuyez une fois sur le bouton
DEMO. Les témoins clignotent l’un après l’autre, de gauche à droite.
• Pour sélectionner la deuxième banque (11-20), appuyez de nouveau sur le bouton DEMO. Tous les témoins clignotent simultanément.
• Pour sélectionner la troisième banque (21-30), appuyez une troisième fois sur le
bouton DEMO. Les témoins adjacents clignotent de manière alternée.
2 Appuyez sur le bouton de sélection des timbres correspondant à la banque sélec-
tionnée. Le témoin du bouton de démonstration sélectionné reste allumé, tandis que
les autres s’éteignent.
A la fin de la reproduction du morceau sélectionné, tous les morceaux de la banque
sélectionnée seront reproduits en cycle.
Bouton Banque1 (1-10) Banque 2 (11-20) Banque 3 (21-30)
PIANO 1 F. Mendelssohn-Bar-
tholdy: Prelude Op .104a,
no.2
PIANO 2 F. Chopin: Nocturne
Op.9, no.2
E.PIANO 1 C.A. Debussy: Clair de
lune
E.PIANO 2 Korg Original (M. Tem-
pia): Lullaby for a Little
Star
48 Chapitre 2
Korg Original (M. Tempia): Reflection
S. Joplin: The Entertainer
Korg Original (M. Tempia): Jumper
Korg Original (M. Tempia): All the Ones You
Don’t Know
C.A. Debussy:
Arabesque no.1
J.S. Bach: Two-voice
invention no.13
F. Chopin: FantasieImpromptu Op.66
J.S. Bach: Prelude in C
major (from Das Wohltemeperierte Klavier)
Page 51
Bouton Banque1 (1-10) Banque 2 (11-20) Banque 3 (21-30)
HARPSI
/CLAV
VIBES
/GUITAR
ORGAN 1 W.A. Mozart: A la turque
ORGAN 2
L. van Beethoven: Für
Elise
F. Chopin: Etude Op.10,
no.3
(from the Sonata in Amajor K.331)
F. Chopin: Valse
no.6 in D-major
J.S. Bach: Italian Concert
Korg Original (M. Tempia): Jazz in Spain
Korg Original (M. Tempia): Cool “B”
F. Mendelssohn-Bartholdy: Wedding March
Korg Original (M. Tempia): Rubber Bob
R. Schumann: Traumarei, Op.15, no.7
F. Mendelssohn-Bartholdy: Spring Song,
Op.62, no.6
Korg Original (M. Tempia): Sunflowers
Op.64, no.1
STRINGS
/PAD
CHOIR Korg Original (M. Tem-
3 Appuyez sur DEMO pour arrêter la reproduction et quitter le mode de démonstra-
Korg Original (M. Tempia): Old Feather Blues
pia): Noise of time
J.S. Bach: Air on the G
string
Korg Original (M. Tempia): V oice Texture
P.D. Paradisi: Toccata in
A major
Korg Original (M. Tempia): Wet Raccoon Rag
tion.
Note : Pendant la reproduction des morceaux de démonstration, vous ne pouvez pas
sélectionner un timbre en appuyant sur les boutons de sélection des timbres ou sur
les boutons REVERB et CHORUS.
Régler le tempo des morceaux de démonstration. A l’aide du curseur
TEMPO, vous pouvez modifier le tempo du morceau de démonstration sélectionné.
Normalement, le tempo de reproduction des morceaux de démonstration n’est pas
influencé par les positions du curseur TEMPO.
Note : Vous ne pouvez pas utiliser le métronome pendant la reproduction d’un morceau de démonstration.
Note : Lorsqu’un morceau de démonstration est sélectionné, c’est son tempo original qui est reproduit.
A lire en premier 49
Page 52

CHAPITRE
3
Fonctions de base
Jouer un timbre (mode Single)
Sélectionner l’un des trente timbres à disposition.
1 Appuyez sur l’un des boutons de sélection des timbres. Le témoin du bouton
enfoncé s’allume.
2 Appuyez sur le bouton BANK pour sélectionner l’une des trois banques disponibles
(1-10, 11-20, 21-30). En appuyant une fois sur ce bouton, c’est la Banque 2 qui est
sélectionnée ; en l’appuyant deux fois, c’est la Banque 3 qui est sélectionnée ; en
l’appuyant trois fois, c’est la Banque 1 qui est de nouveau sélectionnée.
Bouton Banque 1 # Banque 2 # Banque 3 #
PIANO 1 Grand Piano 1 2 Bright Piano 2 Grand Piano 2 1
PIANO 2 Classic Piano 2 Honky-Tonky 2 E.Grand Piano 1
E.PIANO 1 Stage E.Piano 1 Club E.Piano 2 Thin E.Piano 2
E.PIANO 2 Digital E.Piano 1 60’s E.Piano 1 Vintage E.Piano 2
HARPSI/CLAV Harpsichord 1 Clav. 1 Wah Clav. 1
VIBES/GUITAR Vibraphone 1 Marimba 1 Acoustic Guitar 1
ORGAN 1 Jazz Organ 1 2 Jazz Organ 2 2 Jazz Organ 3 2
ORGAN 2 Church Organ 1 3 Church Organ 2 1 Church Organ 3 1
STRINGS/PAD Strings 1 Slow Strings 2 Warm Pad 2
CHOIR Choir Hoo 1 Choir Doo 2 Choir Pad 2
(#) Cette colonne détaille le nombre d’oscillateurs par voix exploités par chaque timbre
Jouer deux timbres à la fois (mode Layer)
Vous pouvez jouer deux timbres ensemble sur le clavier. C’est le mode Layer.
50 Chapitre 3
Page 53

Note : Lorsque le mode Layer est sélectionné, le nombre total de voix pouvant jouer
simultanément est réduit, en fonction du nombre total d’oscillateurs exploités par
les timbres sélectionnés.
Note : Deux timbres prévus sous le même bouton ne peuvent pas être sélectionnés
simultanément.
1 Appuyez sur l’un des boutons de sélection des timbres pour sélectionner le premier
timbre. Le témoin du bouton enfoncé s’allume. Appuyez sur le bouton BANK pour
sélectionner un timbre dans une autre banque.
2 Appuyez sur un autre bouton de sélection des timbres pour sélectionner le second
timbre. Le témoin du bouton enfoncé s’allume. Appuyez sur le bouton BANK pour
sélectionner un timbre dans une autre banque.
3 Appuyez sur les deux boutons en même temps pour sélectionner les timbres. Les
deux témoins s’allument.
Note : Les opérations des postes 1 et 2 ne sont pas nécessaires si la bonne banque
est sélectionnée.
Rétablir le mode Single. Pour rétablir le mode Single, il suffit d’appuyer sur un
seul bouton de sélection des timbres.
Régler le volume des timbres en mode Layer. Pour régler le balancement des
timbres en mode Layer, maintenez enfoncé le bouton du timbre duquel vous souhaitez diminuer le niveau et appuyez autant de fois que nécessaire sur le bouton du timbre duquel vous souhaitez augmenter le volume.
Note : Ce réglage reste mémorisé même lorsque vous coupez le mode Layer, mais
s’annule lors de la mise hors tension de l’instrument. Pour mémoriser ces réglages,
il faut les sauvegarder par le biais de la fonction Data Dump (voir “MIDI Data
Dump” on page 65).
Choisir les effets de réverbération et de chorus
Le SP-300 est doté de deux effets : réverbération et chorus. La réverbération simule
la réflexion du son dans une salle, tandis que le chorus simule un effet modulant qui
étoffe le son. Les réglages de l’effet sont mémorisés même lorsque vous sélectionnez un timbre différent.
Note : Les réglages des effets effectués en mode Single restent mémorisés même si
vous sélectionnez le mode Layer, mais aucune des modifications effectuées en
mode Layer ne sera mémorisée.
Fonctions de base 51
Page 54

Lors de la mise hors tension de l’instrument, les réglages des effets se rétablissent à
leur valeur d’usine. Pour mémoriser ces réglages, il faut les sauvegarder par le biais
de la fonction Data Dump (voir “MIDI Data Dump” on page 65).
1 Enfoncez le bouton REVERB ou CHORUS et appuyez sur l’un des boutons de
sélection des timbres PIANO 1/L, PIANO 2/M ou E.PIANO1/H pour sélectionner
la profondeur de l’effet de réverbération ou de chorus.
Bouton Profondeur de la réverbération Profondeur du chorus
PIANO 1/L Réverbération faible Chorus faible
PIANO 2/M Réverbération normale Chorus normal
E.PIANO 1/H Réverbération profonde Chorus profond
2 Pour vérifier la profondeur de la réverbération ou du chorus en cours, enfoncez le
bouton REVERB ou CHORUS et regardez quel témoins s’allume.
3 Pour couper l’effet de réverbération ou de chorus, appuyez sur le bouton REVERB
ou CHORUS. Le témoin du bouton s’éteint.
La pédale de résonance (damper)
La pédale fournie peut être utilisée en tant que pédale d’étouffement. En connectant
à la borne DAMPER une pédale Korg DS1H (en option), la fonction mi-pédale est
disponible, permettant d’appliquer une résonance graduelle, en fonction de la pression exercée sur la pédale.
En mode Layer, vous sélectionnez le(s) timbre(s) auxquels la pédale est affectée.
Note : Lors de la mise sous tension de l’instrument, les réglages de la pédale se réta-
blissent à leur valeur d’usine. Pour mémoriser ces réglages, les sauvegarder par le
biais de la fonction Data Dump (voir “MIDI Data Dump” on page 65).
1 Enfoncez le bouton TRANSPOSE/FUNCTION et appuyez sur la pédale d’étouffe-
ment. Chaque fois que vous appuyez sur la pédale, le témoin du bouton de sélection
des timbres sur lequel la pédale est activée s’allume.
2 Lorsque la pédale est ainsi affectée au(x) timbre(s) désiré(s), relâchez le bouton
TRANSPOSE/FUNCTION.
Le métronome
Le SP-300 est doté d’un métronome qui vous permet de régler le tempo lorsque
vous vous exercez.
52 Chapitre 3
Page 55

Lancer et arrêter le métronome. Appuyez sur METRONOME pour lancer le
métronome ou l’arrêter. Lors de la mise sous tension de l’instrument, le métronome
est réglé en fonction de la position du curseur, mais vous pouvez le régler à votre
gré en procédant comme expliqué successivement. Si vous reproduisez un morceau
de démonstration, le tempo en cours correspondra au dernier morceau de démonstration reproduit.
Régler le volume du métronome. Lorsque le métronome est activé, enfoncez le
bouton METRONOME et appuyez plusieurs fois sur STRINGS/PAD (ou sur la touche Si5) pour diminuer le volume, sur CHOIR (ou sur la touche Do6) pour l’augmenter. Pour rétablir le v olume à ses v aleurs d’usine, appuyez simultanément sur les
deux boutons STRINGS/PAD et CHOIR (ou sur les touches Si5 et Do6 du clavier)
tout en maintenant enfoncé le bouton METRONOME.
Touche Effet Touche Effet
Si5 Volume faible Do6 Volume élevé
Régler le tempo par le biais du curseur TEMPO. Le curseur TEMPO permet
de régler le tempo dans une plage de = 40 ~ 200.
Saisie numérique du tempo. Parfois, le tempo doit être très précis (par exemple
127 BPM). Vous pouvez saisir un tempo exact via l’entrée digitale.
1 Maintenez enfoncé le bouton METRONOME.
2 Appuyez sur les touches du clavier pour saisir la valeur du tempo sur trois chiffres
(insérer “0” avant une valeur à deux chiffres).
Touche Numéro Touche Numéro
Do5 0 Do#5 1
Ré52 Ré#5 3
Mi5 4 Fa5 5
Fa#5 6 Sol5 7
Sol#5 8 La5 9
Fonctions de base 53
Page 56

Par exemple, pour saisir la valeur 168, enfoncez le bouton METRONOME et
appuyez sur Do#5 (1), Fa#5 (6), Sol#5 (8). Pour saisir une valeur de 85, enfoncez le
bouton METRONOME et appuyez sur Do5 (0), Sol#5 (8), Fa5 (5).
Sélectionner la “time signature”. Cette fonction permet d’accentuer le premier
battement de la mesure.
Bouton Métrique (Time signature)
PIANO 1 2 mouvements (2/4, 2/8...)
PIANO 2 3 mouvements (3/4, 3/8...)
E.PIANO 1 4 mouvements (4/4, 4/8...)
E.PIANO 2 6 mouvements (6/4, 6/8...)
1 Avec le métronome activé, enfoncez le bouton METRONOME et appuyez sur le
bouton correspondant à la time signature désirée (voir tableau précédent). Le premier mouvement de la mesure sera accentué.
2 Pour couper l’accent, enfoncez le bouton METRONOME et appuyez sur le bouton
de sélection des timbres dont le témoin est allumé.
Note : Lors de la mise hors tension de l’instrument, l’accent est automatiquement
désactivé.
Sélectionner une clochette pour l’accent. Le battement accentué peut être
remplacé par le son d’une clochette.
1 Avec le métronome activé, enfoncez le bouton METRONOME et appuyez sur le
bouton de sélection des timbres VIBES/GUITAR. Le témoin de ce bouton s’allume
et une clochette résonne sur le premier battement de la mesure.
2 Pour rétablir l’accent normal, enfoncez le bouton METRONOME et appuyez sur le
bouton de sélection des timbres HARPSI/CLAV pour allumer le témoin du bouton
HARPSI/CLAV.
Note : Lors de la mise hors tension de l’instrument, la clochette est automatiquement désactivée.
54 Chapitre 3
Page 57

Fonctions diverses
Réglage du toucher
CHAPITRE
4
Vous pouvez régler la sensibilité du clavier ou réponse au
toucher. Maintenez enfoncé le bouton TOUCH et appuyez
sur le bouton correspondant au réglage de dynamique souhaité.
Bouton Toucher
PIANO 1/L Léger. Les notes graves sont reproduites
même en appliquant un toucher léger.
PIANO 2/M Normal. Toucher normal d’un piano.
E.PIANO 1/H Lourd. Les notes graves ne sont reproduites
que si l’on joue très fort.
Strong
( )
Note
loudness
Soft
( )
Soft
Playing strength
Light
Standard
Heavy
Strong
Pour vérifier le réglage en cours, enfoncez le bouton TOUCH et regardez lequel des
témoins s’allume.
Note : Lors de la mise sous tension de l’instrument, le toucher est réglé à Normal.
Vous pouvez également utiliser le bouton TRANSPOSE/FUNCTION et le clavier.
Enfoncez le bouton TRANSPOSE/FUNCTION et appuyez sur la touche du clavier
correspondante au réglage désiré (voir tableau).
Bouton Toucher
Si3 Léger. Les notes graves sont reproduites même en appliquant un toucher
léger.
Fonctions diverses 55
Page 58

Bouton Toucher
Do4 Normal. Toucher normal d’un piano.
Ré4 Lourd. Les notes graves ne sont reproduites que si l’on joue très fort.
Fonction T ranspose
Parfois, la clé d’écriture d’un morceau est particulièrement difficile (par ex. beaucoup de bémols) ou vous désirez modifier la hauteur pour insérer un autre instrument ou voix. Dans ce cas, vous pouvez transposer (décaler, modifier la hauteur) de
manière à faciliter le jeu ou jouer avec une hauteur différente. C’est la fonction
“Transpose”.
Par exemple, si vous transposez les notes d’un demi-ton vers l’aiguë, lorsque vous
jouerez les notes illustrées à gauche, elles seront reproduites à la hauteur représentée à droite.
Note : Lors de la mise sous tension de l’instrument, la transposition est réglée à ses
valeurs d’usine.
1 Appuyez sur TRANSPOSE/FUNCTION. Sur le clavier, appuyez sur la touche cor-
respondante à la transposition souhaitée (voir tableau). Le témoin de TRANSPOSE/
FUNTION reste allumé en indiquant que la fonction de transposition est activée.
Touche Effet
Fa#6 — Si6 6 — 1 demi-tons plus graves
Do7 Accordage standard
Do#7 — Fa7 1 — 5 demi-tons plus aigus
2 Pour rétablir la hauteur standard, enfoncez le bouton TRANSPOSE/FUNCTION et
appuyez sur la touche Do7. Le témoin de TRANSPOSE/FUNCTION s’éteint.
56 Chapitre 4
Page 59

Accordage fin
Pour adapter la hauteur de votre SP-300 à celle d’un autre instrument, vous pouvez
la régler par pas de 0.5 Hz, dans la plage La4 = 427.5 ~ 452.5 Hz. L’accordage standard correspond à La4 = 440 Hz.
Note : La hauteur est rétablie à l’accordage standard (La4 = 440 Hz) lors de la mise
hors tension et de nouveau sous tension de l’instrument.
1 Appuyez sur TRANSPOSE/FUNCTION et appuyez sur la touche correspondante à
la hauteur à modifier. Chaque fois que vous appuyez sur Si5 ou sur Do6, la hauteur
augmentera ou diminuera de 0.5 Hz.
2 Pour rétablir l’accordage standard, maintenez enfoncé le bouton TRANSPOSE/
FUNCTION et appuyez sur les deux touches Si5 et Do6 simultanément.
Touche Accordage fin
Si5 Diminue la hauteur de 0.5 Hz
Si5+Do6 Hauteur normale (La4 = 440 Hz)
Do6 Augmente la hauteur de 0.5 Hz
Sélectionner un tempérament
La plupart des compositions classiques utilisent des tempéraments différents du
“tempérament égal” utilisé de nos jours. Afin de reproduire les timbres originaux de
ces compositions, votre SP-300 est doté des tempéraments classiques Kirnberger et
W erckmeister, outre le tempérament égal. Il y a donc trois tempéraments à votre disposition.
Pour en sélectionner un, enfoncez le bouton TOUCH et ensuite appuyez sur le bouton correspondant au tempérament souhaité. Pour rétablir le tempérament égal,
enfoncez le bouton TOUCH et appuyez sur le bouton de sélection des timbres dont
le témoin est allumé.
Bouton Tempérament
HARPSI/CLAV Werckmeister. C’est la gamme Werckmeister III inventée par Andreas
Werckmeister, un organiste et théoricien musical allemand. Gamme du
bas baroque/classique.
Fonctions diverses 57
Page 60

Bouton Tempérament
VIBES/GUITAR Kirnberger. C’est la gamme Kirnberger III inventée par Johann Phillip Kir-
nberger au début du XVIII
Les deux
témoins éteints
Tempérament égal. C’est la gamme normalement utilisée de nos jours
dans le monde occidental, caractérisée par un intervalle égal entre tous
les 12 demi-tons.
è
siècle, pour clavecins.
Pour vérifier le tempérament en cours, maintenez enfoncé le bouton TOUCH et
regardez lequel des témoins s’allume.
Note : L’instrument se prédispose automatiquement avec le tempérament égal
sélectionné lors de la mise sous tension.
Strechted T uning (cordes “pincées”). Afin de reproduire la résonance la plus
naturelle, les timbres PIANO 1 et PIANO 2 utilisent la technique des “cordes pincées” : les notes graves seront légèrement plus altérées vers la grave que dans le
tempérament égal, tandis que celles plus aiguës seront légèrement plus altérées vers
l’aiguë. C’est ainsi que les accordeurs professionnels règlent normalement les pianos acoustiques.
58 Chapitre 4
Page 61

CHAPITRE
5
MIDI
Le MIDI, qu’est-ce que c’est ?
MIDI est l’abréviation de Musical Instrument Digital Interface (interface numérique
pour instruments musicaux). C’est un standard international conçu pour connecter
et transférer des données entre instruments musicaux électroniques, ordinateurs et
dispositifs divers.
Que peut-on faire avec le MIDI?
Le MIDI vous permet d’utiliser votre SP-300 pour piloter d’autres instruments ou
d’utiliser d’autres instruments pour piloter votre SP-300, ainsi que d’utiliser un
séquenceur pour composer des morceaux musicaux complexes.
Lorsque vous jouez sur le clavier de votre SP-300, ou vous appuyez sur la pédale,
ou vous sélectionnez un timbre, les notes, l’activation de la pédale et le changement
de timbres sont transmis à l’instrument connecté ou enregistré par le séquenceur.
Connexions
Il faut toujours connecter la borne MIDI OUT de l’instrument à la borne MIDI IN
d’un autre instrument. Ne jamais connecter deux bornes du même instrument entre
elles.
Connectez la borne MIDI OUT du dispositif transmetteur (master-maître) à la borne
MIDI IN du dispositif récepteur (slave-esclave).
Pour connecter votre SP-300 à un ordinateur, ce dernier doit être doté d’une interface MIDI, d’un logiciel de “sequecing” ou de notation musicale et de deux câbles
MIDI standards. Connectez la borne MIDI OUT de votre SP-300 à la borne MIDI
MIDI 59
Page 62

IN de l’ordinateur. Connectez la borne MIDI IN de votre SP-300 à la borne MIDI
OUT de l’ordinateur.
MIDI keyboard
MIDI OUT
SP-300 rear panel
MIDI IN
MIDI sound module
Réglages MIDI standards
Lors de la mise sous tension de l’instrument, les paramètres MIDI de votre SP-300
sont réglés comme suit :
Paramètre Réglage
Canal de transmission 1
Canaux de réception Tous les 16 (1-16)
Local ON
Omni ON
Sélectionner le canal de transmission
Le standard MIDI prévoit la transmission et la réception des données sur 16 canaux
séparés. Votre SP-300 reçoit sur les 16 canaux et transmet sur un seul canal. Pour
transmettre des données depuis votre SP-300, vous devez sélectionnez le canal de
transmission.
Maintenez enfoncé le bouton TRANSPOSE/FUNCTION et appuyez sur une touche, dans la plage de notes Do2–Ré#3, correspondante au canal MIDI souhaité.
Touche Canal Touche Canal
Do2 1 Do#2 2
Ré23 Ré24
Mi2 5 Fa2 6
Fa#2 7 Sol2 8
Sol#2 9 La2 10
La#2 11 Si2 12
60 Chapitre 5
Page 63

Touche Canal Touche Canal
Do3 13 Do#3 14
Ré315 Ré#3 16
Note : lors de la mise sous tension, l’instrument se prédispose automatiquement
avec le canal 1 sélectionné.
Note : D’usine, le canal 10 est automatiquement affecté au métronome (notes Ré#5Mi5).
Note : En mode Layer, le second timbre est transmis sur le canal successif. Par
exemple, si vous choisissez le canal 7, le premier timbre est transmis sur le canal 7,
tandis que le second sur le canal 8. Si vous choisissez le canal 16, le second timbre
est transmis sur le canal 1 (retour en cycle au premier canal).
Utiliser le SP-300 en tant que générateur de sons multimbres
Si le SP-300 est piloté par un dispositif MIDI externe, il peut fonctionner en tant
que générateur de sons à 16 parties. Vous pouvez sélectionner un timbre différent
sur chacun des 16 canaux MIDI.
1 Utilisez un câble MIDI pour connecter la borne MIDI IN de votre SP-300 à la borne
MIDI OUT d’un séquenceur, etc.
2 Transmettez les données MIDI depuis le séquenceur connecté (ou autre dispositif).
Voir les instructions détaillées relatives à la sélection d’un timbre via un message de
Changement de Program dans le chapitre “Program Change” on page 62. La
réception de “Program Change” (changement de Program) s’active sur votre SP-
300.
Voir le mode d’emploi du dispositif connecté pour des informations détaillées relati-
vement à l’envoi des messages de Changement de Program (Program Change).
Local On/Off
Local est un paramètre vous permettant de déterminer si le clavier doit jouer ses
sons internes et transmettre simultanément les données MIDI (Local On) ou transmettre uniquement les données MIDI, sans jouer ses sons internes (Local Off).
Local Off est utile si votre SP-300 doit fonctionner en tant que clavier étouffé et
donc pour jouer d’un autre instrument. Ce paramètre peut être sélectionné même si
le SP-300 est connecté à un séquenceur via ses bornes MIDI IN et MIDI OUT.
MIDI 61
Page 64

Ainsi, les notes ne seront pas jouées deux fois, c’est à dire par le clavier et par le
séquenceur, car cela produit un ennuyeux effet d’“écho”.
Normalement, c’est Local On qui est automatiquement sélectionné lors de la mise
sous tension de votre SP-300 ; le clavier reproduit donc les sons.
Maintenez enfoncé le bouton TRANSPOSE/FUNCTION et appuyez sur le bouton
de sélection des timbres [PIANO 1]. Le réglage de Local s’alterne de On à Off chaque fois que vous appuyez sur ce bouton.
Etat de Local Etat du témoin de PIANO 1
Local On Allumé
Local Off Eteint
Note : Lors de la mise sous tension de l’instrument, le paramètre Local est automatiquement réglé à On.
Program Change
Vous pouvez sélectionner les timbres de votre SP-300 via MIDI, en envoyant un
message de Program Change (Changement de Program) sur le canal auquel vous
voulez affecter ce timbre. Le tableau liste les numéros de Program Change (numérotation de 0 à 29 ; si le dispositif qui transmet utilise la numérotation de 1 à 30, vous
devez augmenter d’un la valeur du numéro).
Transmission des messages de Program Change. Vous pouvez envoyer un
message de Program Change MIDI à un dispositif MIDI connecté à la borne MIDI
OUT de votre SP-300 MIDI OUT, pour changer ses timbres. Si vous sélectionnez
l’un des sons internes du SP-300 en appuyant sur l’un des boutons de sélection des
timbres, un numéro de Program Change MIDI sera transmis, comme indiqué dans
le tableau.
Réception des messages de Program Change. Lorsque vous recevez un mes-
sage de Program Change transmis par un dispositif externe, le son interne correspondant sera sélectionné sur votre SP-300, comme indiqué dans le tableau.
62 Chapitre 5
Page 65

Uniquement les numéros de Program Change (PC) compris dans la plage 0–29 sont
reconnus par le SP-300, tandis que les autres numéros (30-127) sont ignorés.
PC# Bouton Banque Timbre
0
PIANO 1
1 2 Bright Piano
2 3 Grand Piano 2
3
PIANO 2
4 2 Honky-Tonky
5 3 E.Grand Piano
6
E.PIANO 1
7 2 Club E.Piano
8 3 Thin E.Piano
9
E.PIANO 2
10 2 60’s E.Piano
11 3 Vintage E.Piano
12
HARPSI/CLAV
13 2 Clav.
14 3 Wah Clav.
15
VIBES/GUITAR
16 2 Marimba
17 3 Acoustic Guitar
18
ORGAN1
19 2 Jazz Organ 2
20 3 Jazz Organ 3
21
ORGAN2
22 2 Church Organ 2
23 3 Church Organ 3
24
STRINGS/PAD
25 2 Slow Strings
26 3 Warm Pad
27
CHOIR
28 2 Choir Doo
29 3 Choir Pad
1 Grand Piano 1
1 Classic Grand Piano
1 Stage E.Piano
1 Digital E.Piano
1 Harpsichord
1 Vibraphone
1 Jazz Organ 1
1 Church Organ 1
1 Strings
1 Choir Hoo
MIDI 63
Page 66

Activer/couper Program Change. Pour transmettre et recevoir ce type de don-
nées, vous devez activer la transmission et la réception des messages de Program
Change. Sinon, vous devez couper les données de Program Changes.
Maintenez enfoncé le bouton TRANSPOSE/FUNCTION et appuyez sur le bouton
de sélection des timbres PIANO 2. Chaque fois que vous appuierez sur ce bouton,
les messages de Program Change seront activés/coupés.
Etat de Program Change Etat du témoin de PIANO 2
Activé Allumé
Coupé Eteint
Note : Lors de la mise sous tension de l’instrument, les messages de Program
Change sont activés sur tous les canaux MIDI.
Control Change
Lorsque vous appuyez sur la pédale Damper, ou que vous réglez le balancement en
mode Layer, ou que vous effectuez un réglage sur le tableau de commande, un message de Control Change (Changement de Contrôle) est envoyé au dispositif MIDI
externe connecté. De même, votre SP-300 reçoit les messages de Control Change
transmis par un dispositif MIDI connecté à sa borne MIDI IN, qui pilote ainsi la
pédale Damper, le réglage du volume et des réglages divers.
Activer/couper les messages de Control Change. Pour transmettre et recevoir
ce type de données, vous devez activer la transmission et la réception des messages
de Control Change. Sinon, vous devez couper les données de Control Change.
Maintenez enfoncé le bouton TRANSPOSE/FUNCTION et appuyez sur le bouton
de sélection des timbres E.PIANO 1. Chaque fois que vous appuierez sur ce bouton,
les messages de Control Change seront activés/coupés.
Etat de Control Change Etat du témoin de E.PIANO 1
Activé Allumé
Coupé Eteint
Note : Lors de la mise sous tension de l’instrument, les messages de Control
Change sont activés sur tous les canaux MIDI.
64 Chapitre 5
Page 67

MIDI Data Dump
Vous pouvez sauvegarder les réglages des timbres en cours (mode Single ou Layer)
sur un dispositif MIDI externe de sauvegarde, tel un séquenceur ou un MIDI “data
filer” (dispositif de stockage). Successivement, vous pourrez ainsi recharger sur
votre SP-300 ces données.
Attention : Pour éviter la perte de données, lire attentivement le mode d’emploi du
MIDI “data filer”.
Astuce : Pour éviter tout inconvénient, rappelez-vous de couper la réception des
données en “System Exclusive” sur le dispositif connecté.
Le tableau suivant liste les données sauvegardées via la fonction Data Dump.
Catégorie Données
Mode Single Réglages des effets de Réverbération et de Chorus
(état on/off, niveau d’envoi)
Mode Layer Réglages des effets de Réverbération et de Chorus
(état on/off, niveau d’env oi), balancement des timbres,
état on/off de la pédale Damper pour chaque timbre.
Sauvegarder les données sur un “data filer”. Pour sauvegarder les données de
votre SP-300, procédez comme suit :
1 A l’aide d’un câble MIDI, connectez la borne MIDI OUT de votre SP-300 à la
borne MIDI IN du “data filer”.
2 Prédisposez le “data filer” à la réception des données MIDI.
3 Sur le SP-300, maintenez enfoncé le bouton TRANSPOSE/FUNCTION et appuyez
sur le bouton de sélection des timbres VIBES/GUITAR. Les témoins des boutons
TRANSPOSE/FUNCTION et VIBES/GUITAR clignotent, en indiquant ainsi que le
SP-300 est prêt au transfert de données.
4 Appuyez sur le bouton TOUCH. Le transfert de données commence et les réglages
des timbres sont transmis au “data filer”.
Pendant l’opération de “data dump”, le SP-300 est coupé et vous ne pouvez procé-
der à aucune autre opération. Lorsque le transfert de données est complété, le clavier se prédispose de nouveau à son fonctionnement normal.
Pour annuler une opération de transfert de données avant qu’elle ne commence,
appuyez sur le bouton TRANSPOSE/FUNCTION ou VIBES/GUITAR.
MIDI 65
Page 68

Charger des données sauvegardées sur un “data filer”. Les données précé-
demment sauvegardées sur un “data filer” peuvent être rechar gées sur votre SP-300.
1 A l’aide d’un câble MIDI, connectez la borne MIDI IN de votre SP-300 à la borne
MIDI OUT du “data filer”.
2 Sur le SP-300, maintenez enfoncé le bouton TRANSPOSE/FUNCTION et appuyez
sur le bouton de sélection de timbres VIBES/GUITAR. Les témoins des boutons
TRANSPOSE/FUNCTION et VIBES/GUITAR clignotent, en indiquant ainsi que le
SP-300 est prêt à la réception du transfert de données.
3 Prédisposez le “data filer” à retransmettre les réglages de timbres précédemment
sauvegardés. Voir les informations détaillées relativement à la transmission de données sur le mode d’emploi du “data filer”.
Le SP-300 reçoit les données.
Lorsque l’opération de “data dump” est terminée, votre SP-300 se rétablit à l’état
précédent à la réception des données.
Pendant l’opération de “data dump”, le SP-300 est coupé et vous ne pouvez procé-
der à aucune autre opération. Lorsque la réception de données est complétée, le
témoin du bouton TOUCH s’éteint et l’instrument se rétablit à son fonctionnement
normal.
Pour annuler une opération de réception de données avant qu’elle ne commence,
appuyez sur le bouton TRANSPOSE/FUNCTION ou VIBES/GUITAR.
66 Chapitre 5
Page 69

CHAPITRE
6
Appendice
Problèmes et solutions
Si lors de l’utilisation vous détectez les problèmes décrits, examinez l’instrument
pour comprendre le problème et essayez de le résoudre en recourant aux conseils
proposés. Si l’instrument continue à ne pas fonctionner correctement, adressez-vous
à votre revendeur de confiance ou au Centre d’Assistance Agréé Korg le plus proche.
Problème Possible solution Page
L’instrument ne
s’active pas lors
de la mise sous
tension.
L’instrument
n’émet aucun
son.
Vérifiez que l’adaptateur AC est correctement connecté au piano
et à la prise secteur.
(1) Contrôlez que le réglage du volume n’est pas à 0. Dans cette
éventualité, réglez-le à un niveau approprié.
(2) Contrôlez que la fonction MIDI Local n’est pas réglée à OFF,
sinon réglez-la à ON (ou mettre hors tension et de nouveau sous
tension l’instrument).
45
47
61
Polyphonie
Votre SP-300 contient des sons échantillonnés, qui ont été enregistrés, analysés et
traités à partir de sons actuels d’instruments musicaux originaux. Ces sons consistent généralement d’un ou de plusieurs échantillons différents reproduits en
appuyant sur une touche. Chaque échantillon est reproduit par un oscillateur individuel. La polyphonie des sons qui n’utilisent qu’un seul oscillateur est totale, c’est à
dire qu’elle est composée au maximum de 60 voix, tandis que la polyphonie des
sons qui utilisent deux oscillateurs est limitée à 30 notes maximum. Plus les sons
utilisent d’oscillateurs, plus la polyphonie est limitée. Lorsque le nombre de notes
Appendice 67
Page 70

excède la limite du son, certaines notes sont “stoppées” et les nouvelles notes ne
sont pas reproduites.
Par conséquent, en jouant plus de deux notes en mode Layer, la polyphonie maximum dépend du nombre d’oscillateurs utilisés au total. Si en plus vous appliquez un
REVERB ou un CHORUS, la polyphonie est ultérieurement réduite, respectiv ement
de 10 et de 3 notes.
Voir les informations détaillées du nombre d’oscillateurs de chaque son dans le
tableau à page 50.
68 Chapitre 6
Page 71

Spécifications techniques
Spécifications SP-300
Clavier 88 notes lestées, sensibles à la dynamique du toucher, avec
simulation de marteau
Réglage du toucher Léger, Normal, Lourd
Accordage Transposition, Accordage fin, Tempérament (Egal, Kirnber-
ger, Werc kmeister)
Génération de sons Stereo PCM System
Polyphonie 60 notes (max). L’utilisation de timbres à 2 oscillateurs, du
mode Layer et/ou des effets de réverbération ou chorus
réduit le nombre maximum de notes jouées simultanément.
Timbres 30 timbres en ROM
Effets Réverbération, Chorus (chacun avec 3 niveaux)
Démo 30 morceaux de démonstration incorporés
Métronome Réglages du Tempo, de la Time signature (métrique), de
l’Accent et du Volume
Pédales Damper (fournie). Mi-pédale avec Korg DS1H (en option).
Connexions Sorties Audio (OUTPUT L/MONO, R), Entrées Audio (INPUT
L/MONO, R), Casques, MIDI (IN, OUT), Damper
Contrôles Interrupteur, Speakers, Master Volume, Reverb, Chorus,
Touch, Transpose/Function, Bank, sélecteurs de timbres,
Tempo, Métronome, Démo
Alimentation DC21V, 1A, pôle négatif au centre, adaptateur AC (fourni)
Consommation 21 Watts
Dimensions (L x P x H) 1300 × 343,8 × 132,5 mm (51.1 × 13.5 × 5.2 inch), pupitre
exclu
Poids 25 kg (55.1 lbs)
Accessoires DC12V, 500mA, pôle négatif au centre, adaptateur AC ;
Pédale Damper ; Pupitre (tous fournis)
Options DS 1H - Pédale Damper avec mi-pédale de contrôle, Piano
stand
Sons élaborés avec INFINITY™.
Korg se réserve le droit de modifier les spécifications sans préavis.
Appendice 69
Page 72

ORGAN 1 ORGAN 2 STRINGS/PAD CHOIR
Transpose
C7 = Standard
F#6…B6 = -6…-1 st.
C#7…F7 = +1…+5 st.
VIBES/GUITAR
Crl.Change Rx/Tx Data Dump
Détails du tableau de commande
PIANO 1 PIANO2 E.PIANO 1 E.PIANO 2 HARPSI/CLAV
…pendant que vous appuyez sur celui-ci
Maintenez ce bouton enfoncé…
REVERB Prof = Grave Prof = Moyen Prof = Aigu
CHORUS Prof = Grave Prof = Moyen Prof = Aigu
METRONOME Tempo: 2/4 Tempo: 3/4 Tempo: 4/4 Tempo: 6/4 Accent Bell sound Metro Vol. Dec. Metro Vol. Inc.
TOUCH Léger Normal Lourd Werckmeister Kirnberger
Prg.Change Rx/Tx
TRANSPOSE/FUNCTION Local On/Off
Tableau de commande et clavier
B5 = Decrease (-)
Metronome V olume
(Press both for Reset)
Numeric Tempo Input
C5 = 0 C#5 = 1 D5 = 2
D#5 = 3 E5 = 4 F5 = 5
METRONOME
Le diagramme suivant indique les diverses fonctions accessibles en maintenant enfoncé le bouton METRONOME ou
TRANSPOSE/FUNCTION et en appuyant sur l'une des touches du clavier.
C6 = Increase (+)
A5 = 9
F#5 = 6 G5 = 7 G#5 = 8
Tuning
C6 = Up (+)
B5 = Down (-)
B3 = Light
C4 = Normal
Touch Setting
…
C2 = Ch 01
MIDI Channels
Demo Start
/FUNCTION
TRANSPOSE
for Reset)
(Press both
D4 = Heavy
D#3 = Ch 16
70
Page 73

Digital-Piano
Bedienungsanleitung
Page 74

VORSICHTSMASSNAHMEN
Aufstellungsort
Bei Benutzung des Instruments an folgenden
Orten kann es zu Funktionsstörungen kommen.
• In direktem Sonnenlicht
• bei hohen Temperaturen oder hoher Luftfeuchtigkeit
• in sehr staubigen oder schmutzigen Räumen
• bei starken Vibrationen
Stromversorgung
Schließen Sie den Wechselstromstecker des
Instruments an eine WS-Steckdose mit der richtigen Spannung an. Schließen Sie das Instrument
keinesfalls an eine WS-Steckdose mit einer anderen als der angegebenen Spannung an.
Interferenzen mit anderen elektrischen Geräten
Das Instrument ist mit einem Computer ausgestattet. In der Nähe des Instruments befindliche
Radio- und Fernsehgeräte können Empfangsstörungen erleiden. Stellen Sie das Instrument deshalb in einem gewissen Abstand von diesen
Geräten auf.
Handhabung
Zur Vermeidung von Beschädigungen sind Schalter und Regler des Instruments ohne übertriebenen Kraftaufwand zu bedienen.
Pflege
Wenn die Außenseite des Instruments schmutzig
ist, wischen Sie sie mit einem trockenen, sauberen
Tuch ab. Verwenden Sie weder Flüssigreiniger
wie Benzin oder Verdünner, noch Reinigungsoder brennbare Poliermittel.
Aufbewahrung des Handbuches
Nach Durchlesen des Handbuches ist dieses sorgfältig aufzubewahren, um jederzeit eingesehen
werden zu können.
Vermeidung von Fremdkörpern im Instrument
• Stellen Sie keine Behältnisse mit Flüssigkeiten auf dem Instrument ab. Eindringende Flüs-
sigkeiten können einen Geräteausfall, Brand
oder Stromschlag verursachen.
• Achten Sie darauf, dass keine Metallgegenstände ins Innere des Instruments geraten.
Sollte dies dennoch einmal geschehen, ziehen
Sie sofort den Stecker aus der Steckdose und
wenden Sie sich an Ihren Korg Händler, bei
dem Sie das Instrument gekauft haben.
CE-ZEICHEN ZUR VEREINHEITLICHUNG DER EUROPÄISCHEN
STANDARDS
Das bis 31. Dezember 1996 vergebene CE-Zeichen, das unsere mit Wechselstrom betriebenen
Produkte tragen, zeigt an, dass diese Instrumente
der EMC Richtlinie (89/336/EWG) und der CEZeichen-Richtlinie (93/68/EEC) entsprechen.
Das nach dem 1. Januar 1997 vergebene CE-Zeichen zeigt an, dass die Instrumente der EMC
Richtlinie (89/336/EEC), der CE-Zeichen-Richt-
linie (93/68/EEC) und der Niederspan
richtlinie (73/23/EEC) entsprechen
Das CE-Zeichen auf unserern batteriegespeisten
Instrumenten zeigt an, dass diese der EMC Richtlinie (89/336/EEC) und der CE-Zeichen-Richtlinie (93/68/EEC) entsprechen.
nungs-
HAFTUNGSAUSSCHLUSS
Die im vorliegenden Handbuch enthaltenen Informationen wurden mit großer Sorgfalt geprüft und
überarbeitet. Aufgrund des Bemühens, unsere
Produkte ständig zu verbessern, können die technischen Daten jedoch von den Beschreibungen
des Handbuches abweichen. Korg ist nicht v erantwortlich für eventuelle Abweichungen zwischen
den technischen Daten und den im Handbuch enthaltenen Beschreibungen. Technische Daten können jederzeit ohne Vorankündigung geändert
werden.
HAFTUNG
Alle KORG Produkte werden entsprechend den in
den verschiedenen Ländern geltenden Spezifikationen und erforderlichen Spannungen hergestellt. Sie unterliegen den Garantiebestimmungen
der KORG Vertriebsfirmen in den einzelnen Län-
72
Page 75

dern. KORG Produkte, die ohne Garantiekarte
und Seriennummer verkauft wurden, sind von
Garantieleistungen und Haftungsansprüchen
durch den Hersteller/Händler ausgeschlossen.
Diese Vorschrift dient zu Ihrer eigenen Sicherheit.
SERVICE UND KUNDENDIENSTLEISTUNGEN FÜR MUSIKER
Wenden Sie sich zwecks Kundendienstleistungen
bitte an das nächste KORG Kundendienstzentrum. Ausführliche Informationen über KORG
Produkte sowie über Software und Zubehör für
Ihr Klavier erhalten Sie bei Ihrem KORG Händler.
KORG IM INTERNET
Home page Korg Deutschland.: www.korg.de
Home page Korg Inc.: www.korg.co.jp
Home page Korg USA: www.korg.com
Home page Korg Italy: www.korg.it
DATEN-RESET
Wenn das Instrument ausgeschaltet wird, werden
alle Parameter zurückgesetzt.
© 2002 Korg Italy Spa. Printed in Italy.
73
Page 76

INHALTSVERZEICHNIS
Einführung . . . . . . . . . . . . . . . . . . . . . . . . . . . . . . . . . . . . . . . . . . . . . . . . . . . . . . . . . .75
Hauptfunktionen . . . . . . . . . . . . . . . . . . . . . . . . . . . . . . . . . . . . . . . . . . . . . . . . . . . . . . . . . . . .75
1 Paneele . . . . . . . . . . . . . . . . . . . . . . . . . . . . . . . . . . . . . . . . . . . . . . . . . . . . . . . . . . . .77
Vorderseite . . . . . . . . . . . . . . . . . . . . . . . . . . . . . . . . . . . . . . . . . . . . . . . . . . . . . . . . . . . . . . . .77
Rückseite . . . . . . . . . . . . . . . . . . . . . . . . . . . . . . . . . . . . . . . . . . . . . . . . . . . . . . . . . . . . . . . . . .78
2 Bevor Sie beginnen . . . . . . . . . . . . . . . . . . . . . . . . . . . . . . . . . . . . . . . . . . . . . . . . . . .80
Anschluss an einen externen Verstärker . . . . . . . . . . . . . . . . . . . . . . . . . . . . . . . . . . . . . . . . . .80
Verwendung der Kopfhörer . . . . . . . . . . . . . . . . . . . . . . . . . . . . . . . . . . . . . . . . . . . . . . . . . . . .80
Anschluss von externen Quellen . . . . . . . . . . . . . . . . . . . . . . . . . . . . . . . . . . . . . . . . . . . . . . . .81
Instrument einschalten . . . . . . . . . . . . . . . . . . . . . . . . . . . . . . . . . . . . . . . . . . . . . . . . . . . . . . . . 81
Lautstärke einstellen . . . . . . . . . . . . . . . . . . . . . . . . . . . . . . . . . . . . . . . . . . . . . . . . . . . . . . . . .81
Demos abspielen . . . . . . . . . . . . . . . . . . . . . . . . . . . . . . . . . . . . . . . . . . . . . . . . . . . . . . . . . . . .81
3 Basisfunktionen . . . . . . . . . . . . . . . . . . . . . . . . . . . . . . . . . . . . . . . . . . . . . . . . . . . . . .84
Mit nur einem Klang spielen (Single Modus) . . . . . . . . . . . . . . . . . . . . . . . . . . . . . . . . . . . . . .84
Mit zwei Klängen gleichzeitig spielen (Layer Modus) . . . . . . . . . . . . . . . . . . . . . . . . . . . . . . .84
Hall- und Chorus-Effekt wählen . . . . . . . . . . . . . . . . . . . . . . . . . . . . . . . . . . . . . . . . . . . . . . . .85
Das Damper Pedal . . . . . . . . . . . . . . . . . . . . . . . . . . . . . . . . . . . . . . . . . . . . . . . . . . . . . . . . . . .86
Das Metronom . . . . . . . . . . . . . . . . . . . . . . . . . . . . . . . . . . . . . . . . . . . . . . . . . . . . . . . . . . . . . .87
4 Weitere Funktionen . . . . . . . . . . . . . . . . . . . . . . . . . . . . . . . . . . . . . . . . . . . . . . . . . . .90
Einstellung des Anschlags . . . . . . . . . . . . . . . . . . . . . . . . . . . . . . . . . . . . . . . . . . . . . . . . . . . . .90
Transponierung . . . . . . . . . . . . . . . . . . . . . . . . . . . . . . . . . . . . . . . . . . . . . . . . . . . . . . . . . . . . . 91
Feinstimmung . . . . . . . . . . . . . . . . . . . . . . . . . . . . . . . . . . . . . . . . . . . . . . . . . . . . . . . . . . . . . .92
Temperierung selektieren . . . . . . . . . . . . . . . . . . . . . . . . . . . . . . . . . . . . . . . . . . . . . . . . . . . . .92
5 MIDI . . . . . . . . . . . . . . . . . . . . . . . . . . . . . . . . . . . . . . . . . . . . . . . . . . . . . . . . . . . . . .94
Was ist MIDI? . . . . . . . . . . . . . . . . . . . . . . . . . . . . . . . . . . . . . . . . . . . . . . . . . . . . . . . . . . . . . .94
Was leistet MIDI? . . . . . . . . . . . . . . . . . . . . . . . . . . . . . . . . . . . . . . . . . . . . . . . . . . . . . . . . . . .94
Anschlüsse . . . . . . . . . . . . . . . . . . . . . . . . . . . . . . . . . . . . . . . . . . . . . . . . . . . . . . . . . . . . . . . . .94
Standard MIDI Einstellungen . . . . . . . . . . . . . . . . . . . . . . . . . . . . . . . . . . . . . . . . . . . . . . . . . .95
Übertragungskanal selektieren . . . . . . . . . . . . . . . . . . . . . . . . . . . . . . . . . . . . . . . . . . . . . . . . .95
SP-300 als multitimbraler Tongenerator . . . . . . . . . . . . . . . . . . . . . . . . . . . . . . . . . . . . . . . . . .96
Local On/Off . . . . . . . . . . . . . . . . . . . . . . . . . . . . . . . . . . . . . . . . . . . . . . . . . . . . . . . . . . . . . . .96
Program Change . . . . . . . . . . . . . . . . . . . . . . . . . . . . . . . . . . . . . . . . . . . . . . . . . . . . . . . . . . . .97
Control Change . . . . . . . . . . . . . . . . . . . . . . . . . . . . . . . . . . . . . . . . . . . . . . . . . . . . . . . . . . . . .99
MIDI Data Dump . . . . . . . . . . . . . . . . . . . . . . . . . . . . . . . . . . . . . . . . . . . . . . . . . . . . . . . . . .100
6 Anhang . . . . . . . . . . . . . . . . . . . . . . . . . . . . . . . . . . . . . . . . . . . . . . . . . . . . . . . . . . .102
Fehlerbeseitigung . . . . . . . . . . . . . . . . . . . . . . . . . . . . . . . . . . . . . . . . . . . . . . . . . . . . . . . . . .102
Polyphonie . . . . . . . . . . . . . . . . . . . . . . . . . . . . . . . . . . . . . . . . . . . . . . . . . . . . . . . . . . . . . . . .102
Technische Daten . . . . . . . . . . . . . . . . . . . . . . . . . . . . . . . . . . . . . . . . . . . . . . . . . . . . . . . . . .104
Bedienfeld-Kurzbefehle . . . . . . . . . . . . . . . . . . . . . . . . . . . . . . . . . . . . . . . . . . . . . . .105
Bedienfeld und Tastatur . . . . . . . . . . . . . . . . . . . . . . . . . . . . . . . . . . . . . . . . . . . . . .105
MIDI Implementation Chart . . . . . . . . . . . . . . . . . . . . . . . . . . . . . . . . . . . . . . . . . . . .141
74 Inhaltsverzeichnis
Page 77

Hauptfunktionen
EINFÜHRUNG
Einführung
Großer Klangbereich.
schließlich ein Stereo-Konzertflügelklang. Sie können die Layer Funktion zum gleichzeitigen Spielen von zwei Klängen nutzen.
Effekte.
Konzerthalle (Re verb) nachahmen und den Klang voller machen (Chorus).
Damper Pedal-Simulation.
Forte-Pedal eines akustischen Klaviers. Wenn Sie bei einem akustischen Klavier dieses Pedal
drücken, werden die Dämpfer (Dampers), die die Vibrationen der Saiten unterbrechen, angehoben.
Metronom.
die Lautstärke einstellen und darüber hinaus einen Glockenton zur Akzentuierung einsetzen.
Anschlagsteuerung.
festlegen, wie der Klang sich mit der Anschlagstärke verändern soll.
Temperierungen.
klassische Stimmungen (Kirnberger und Werckmeister) zur historisch korrekten Wiedergabe
klassischer Stücke. Wenn Sie einen akustischen Klavierklang wählen, wird automatisch die
typisch gedehnte Temperierung selektiert.
Einstellbare T onhöhe.
ändern, während die Pitch Control Funktion zur Feinabstimmung dient.
MIDI-Funktionen.
Musikdaten zwischen Musikinstrumenten und Computern ausgetauscht werden können Mit
MIDI können zwei oder mehr Instrumente gesteuert werden oder zur Steuerung eingesetzt
werden; das SP-300 kann als 16-Part multitimbraler Tongenerator eingesetzt werden.
Das SP-300 besitzt eingebaute, digitale Effekte, die die Klangeigenschaften einer
Beim eingebauten Metronom können Sie die Taktunterteilung, das Tempo und
Dreißig verschiedene, ausdruckstarke Hochqualitätsklänge ein-
Das Damper-Pedal des SP-300 entspricht dem Damper- oder
Sie können drei verschiedene Einstellungen wählen, mit denen Sie
Neben der wohltemperierten Stimmung besitzt das SP-300 zwei weitere
Die Transpose Funktion ermöglicht es, die Tonhöhe des Klaviers zu
Das SP-300 unterstützt das MIDI Protokoll, ein Standard, mit welchem
Einführung 75
Page 78

Leistungsstarke integrierte Verstärkeranlage. Das SP-300 besitzt einen leis-
tungsstarken, 15 + 15 Watt Verstärker mit zwei Bass Reflex Lautsprechern.
Audio Ausgänge. Über die Audio-Ausgänge ist ein direkter Anschluss an eine
externe Mono- oder Stereo Audioquelle ohne Verwendung eines Mixers möglich.
Zwei Kopfhörerpaare. Sie können zwei Stereokopfhörer anschließen, um zusam-
men mit Ihrem Lehrer oder einem anderen Musiker zu spielen.
76 EINFÜHRUNG
Page 79

Vorderseite
111122
22
44
333344
55
55
66
66
KAPITEL
1
Paneele
77
77
8888999900
00
11
11
MASTER VOLUME Schieberegler: Regelt die Lautstärke an den Ausgängen und
Kopfhörerbuchsen.
22
22
REVERB Taster: Schaltet den Halleffekt ein oder aus. Verleiht dem Klang einen
Raumeffekt.
33
33
CHORUS Taster: Schaltet den Choruseffekt ein oder aus. Damit erhält der Klang
mehr Fülle.
44
44
TOUCH Taster: Dient zur Einstellung der Anschlagdynamik.
55
55
TRANSPOSE/FUNCTION Taster: Multifunktionstaste zur Änderung der Transponier- und Feinstimmungsfunktionen, zur Programmierung der MIDI-Parameter
sowie zur Ausführung weiterer Einstellungen.
Anmerkung: Wenn das Instrument ausgeschaltet wird, werden alle Parameter wieder zurückgesetzt.
Paneele 77
Page 80

66
66
BANK Taster: Selektiert eine der 3 verfügbaren Klangbänke.
77
77
SOUND SELECTION Taster: Drücken Sie einen Taster zur Selektion eines
Klangs (Single Modus). Sie können auch zwei Taster gleichzeitig drücken, wenn
Sie zwei Klänge zur selben Zeit auf der Tastatur spielen wollen (Layer Modus).
88
88
TEMPO Schieberegler: Dient zur Regelung des Metronom Tempos.
99
99
METRONOME Taster: Schaltet das Ticken des Metronoms ein oder aus.
00
00
DEMO Taster: Schaltet den Demo Modus zum Abspielen der Demo Songs ein
oder aus. Selektieren Sie den gewünschten Song mit den Sound Selection Tastern
(siehe Nummer 7 oben).
Rückseite
11
11
33
33
22
22
55
55
11
11
Löcher für Notenständer: Stecken Sie den Notenständer in diese beiden Löcher
ein. Beachten Sie bitte, dass zum Einstecken und Herausziehen des Notenständers
anfangs etwas Kraft erforderlic h ist. Im Laufe der Zeit weitet sich das Kunststoffmaterial, mit dem die Löcher ausgekleidet sind, so dass der Vorgang erleichtert wird.
22
22
SPEAKERS ON/OFF Schalter: Mit diesem Schalter können Sie die internen
Lautsprecher ein- oder aus-schalten.
33
33
DAMPER Buchse: Schließen Sie das mitgelieferte Pedal an diese Buchse an.
44
44
MIDI (IN, OUT) Buchsen: Buchsen für den Anschluss anderer MIDI Geräte
(Sequenzer, Keyboards usw.). OUT: Datenausgang (muss an die MIDI IN Buchse
44
44
66
66
77
77
88
88
99
99
78 Kapitel 1
Page 81

des anderen MIDI Geräts angeschlossen werden). IN: Dateneingang (muss an die
MIDI OUT Buchse des anderen MIDI Geräts angeschlossen werden).
55
55
INPUT (L/MONO, R) Buchsen: Audio-Eingänge. Schließen Sie an diese Buchsen
externe Audioquellen wie CD-Player, Kassettenrecorder, Mixer oder ein anderes
Keyboard an.
Warnung: Schließen Sie keinesfalls den Ausgang eines Leistungsverstärkers an
diese Eingänge an!.
66
66
OUTPUT (L/MONO, R) Buchsen: Audio-Ausgänge. Schließen Sie an diese
Buchsen eine externe Verstärkeranlage an. (Für HiFi-Systeme ist nicht die PHONEBuchse, sondern die AUX oder TAPE Buchsen zu verwenden). Zur MonoVerstärkung des SP-300 ist die Einzelbuchse L/MONO zu benutzen. Mit dem
MASTER VOLUME Schieberegler wird die Ausgangslautstärke reguliert.
77
77
PHONES Buchsen: Schließen Sie an diese Buchsen ein oder zwei Paar Kopfhörer
an.
88
88
DC IN 21V 1A-Buchse: Schließen Sie den mitgelieferten Wechselstrom-Adapter
an diese Buchse an.
99
99
POWER Schalter: dient zum Ein- und Ausschalten des Instruments.
Paneele 79
Page 82

KAPITEL
2
Bevor Sie beginnen
Anschluss an einen externen Verstärker
Zur Verstärkung schließen Sie die OUTPUT Ausgänge Ihres SP-300 an einen hochwertigen Mixer, eine Stereo-HiFi-Anlage oder aktive Bühnenlautsprecher an.
Wenn Sie ein Stereo-HiFi benutzen, schließen Sie die OUTPUT Ausgänge an die
AUX oder TAPE Eingänge an (benutzen Sie keinesfalls die PHONO Eingänge). Zur
Mono-Verstärkung sind nur die L/MONO Ausgänge anzuschließen.
Mini conponent/
stereo, etc.
AUX IN
to an AC outlet
DC IN
12 V
L/MONO
OUTPUT
Powered
monitors, etc.
R
Verwendung der Kopfhörer
Wenn Sie zu späten Stunden spielen oder üben wollen oder wenn Sie von anderen,
im Raum anwesenden Personen nicht gehört werden wollen, schließen Sie ein oder
zwei Paar hochwertige Qualitätskopfhörer (empfohlen wird eine Impedanz von
32Ω) an die entsprechenden Buchsen auf der Rückseite des Instruments an. Es handelt sich um 1/4” Standard-Kopfhörerbuchsen. Wenn Sie Kopfhörer mit Minibuchsen-Adapter besitzen, ziehen Sie den Adapter ab, wenn Sie diese Kopfhörer einoder ausstecken.
Warnung: Wenn Sie Kopfhörer benutzen, sollten Sie sich nicht zu lange hohen
Lautstärken aussetzen.
80 Kapitel 2
Page 83

Anschluss von externen Quellen
Sie können jedes beliebige andere elektronische Musikinstrument, einen MixerAugang, CD-Player oder Kassettenrecorder an die die INPUTS Eingänge auf der
Rückseite des Instruments anschließen. Diese Eingänge benötigen ein Leitungspegel-Signal. Zum Anschluss eines Mikrophons ist ein entsprechender MikrophonVorverstärker oder ein Mixer erforderlich.
Warnung: Schließen Sie keinesfalls den Ausgang eines Leistungsverstärkers an
diese Eingänge an!.
Instrument einschalten
Stecken Sie den Gleichstromstecker des mitgelieferten Ws-Adapters in die GsBuchse des SP-300. Schließen Sie dann den Ws-Stecker in die Wandsteckdose ein
und drücken Sie den POWER Schalter. Wenn das Instrument eingeschaltet ist,
leuchten die LEDs des Bedienfeldes auf. Zum Ausschalten des Instruments drücken
Sie erneut den POWER Schalter.
Anmerkung: Beim Ausschalten des Instruments werden alle Parameter zurückgesetzt.
Lautstärke einstellen
Schieben Sie den MASTER VOLUME Schieberegler nach rechts, um die
Lautstärke zu erhöhen bzw . nach links, um die Lautstärke zu v ermindern. Der Maximalwert beträgt “10”, der Minimalwert (stumm) “0”. Mit diesem Regler wird der
Ausgangspegel der Kopfhörer, der internen Lautsprecher und der OUTPUT Ausgänge einge-stellt. Der Eingangspegel der an die INPUT-Eingänge angeschlossenen
Audioquellen kann hiermit nicht reguliert werden.
Anmerkung: Es empfiehlt sich, bei geringer Lautstärke zu beginnen und diese
dann allmählich zu erhöhen.
Demos abspielen
Das SP-300 enthält 30 werkseitig aufgenommene Demosongs. Spielen Sie die
Songs ab, um einen Eindruck von der Klangfülle und den Ausdrucksmöglichkeiten
Ihres Instruments zu erhalten.
Alle Songs auf einmal abspielen. Mit einem einfachen Befehl können Sie alle
Demosongs hintereinander abspielen.
Bevor Sie beginnen 81
Page 84

1 Drücken Sie den DEMO Taster (oder halten Sie den TRANSPOSE/FUNCTION
Taster gedrückt und drücken Sie gleichzeitig die Notentaste E1). Die LEDs der
Klangauswahltaster blinken nacheinander von links nach rechts. Nach wenigen
Sekunden beginnt die Wiedergabe. Nach dem letzten Song wird erneut der erste
Song abgespielt.
2 Während der Wiedergabe können Sie einen Klangauswahltaster drücken, um nur
die W iedergabe der zehn in der aktuellen Bank vorhandenen Demosongs zu wiederholen. (Es gibt drei Bänke mit je zehn Demosongs: 1-10, 11-20, 21-30).
Wenn Sie beispielsweise den CHOIR Taster drücken, während Song Nummer 1
abgespielt wird, wird sofort darauf Song Nummer 10 gespielt und die Wiedergabe
erfolgt zyklisch von Nummer 1 bis Nummer 10.
3 Drücken Sie nochmals den DEMO Taster, um die Wiedergabe zu unterbrechen und
den Demo Modus zu verlassen.
Einen bestimmten Song abspielen. Sie können auch einen ganz bestimmten
Song wählen, den Sie abspielen möchten.
1 Hierzu müssen Sie zuerst eine der drei Demosong Bänke wählen.
• Zur Selektion der ersten Bank (1-10) drücken Sie einmal den DEMO Taster.
Daraufhin blinken die LEDs hintereinander von links nach rechts.
• Zur Selektion der zweiten Bank (11-20) drücken Sie den DEMO Taster ein
zweites Mal. Nun blinken alle LEDs gleichzeitig.
• Zur Selektion der dritten Bank (21-30) drücken Sie den DEMO Taster ein drittes
Mal. Nun blinken abwechselnd die nebeneinander liegenden LEDs.
2 Drücken Sie einen der Klangauswahltaster zur Selektion des gewünschten Song in
der gewählten Bank. Die LED des selektierten Demosong leuchtet, während sich
die übrigen LEDs ausschalten.
Nach Beendigung der Wiedergabe des selektierten Song werden alle übrigen Songs
der selektierten Bank zyklisch abgespielt.
Taster Bank 1 (1-10) Bank 2 (11-20) Bank 3 (21-30)
PIANO 1 F. Mendelssohn-Bar-
tholdy: Prelude Op .104a,
no.2
PIANO 2 F. Chopin: Nocturne
Op.9, no.2
E.PIANO 1 C.A. Debussy: Clair de
lune
82 Kapitel 2
Korg Original (M. Tempia): Reflection
S. Joplin: The Entertainer
Korg Original (M. Tempia): Jumper
C.A. Debussy:
Arabesque no.1
J.S. Bach: Two-voice
invention no.13
F. Chopin: FantasieImpromptu Op.66
Page 85
Taster Bank 1 (1-10) Bank 2 (11-20) Bank 3 (21-30)
E.PIANO 2 Korg Original (M. Tem-
pia): Lullaby for a Little
Star
HARPSI
/CLAV
VIBES
/GUITAR
ORGAN 1 W.A. Mozart: A la tur-
ORGAN 2 F. Chopin: Valse no.6 in
STRINGS
/PAD
CHOIR Korg Original (M. Tem-
L. van Beethoven: Für
Elise
F. Chopin: Etude Op.10,
no.3
que (from the Sonata in
A-major K.331)
D-major Op.64, no.1
Korg Original (M. Tem-
pia): Old Feather Blues
pia): Noise of time
Korg Original (M. Tempia): All the Ones You
Don’t Know
J.S. Bach: Italian Concert
Korg Original (M. Tempia): Jazz in Spain
Korg Original (M. Tempia): Cool “B”
F. Mendelssohn-Bartholdy: Wedding March
J.S. Bach: Air on the G
string
Korg Original (M. Tempia): V oice Texture
J.S. Bach: Prelude in C
major (from Das Wohltemeperierte Klavier)
Korg Original (M. Tempia): Rubber Bob
R. Schumann: Traumarei, Op.15, no.7
F. Mendelssohn-Bartholdy: Spring Song,
Op.62, no.6
Korg Original (M. Tempia): Sunflowers
P.D. Paradisi: Toccata in
A major
Korg Original (M. Tempia): Wet Raccoon Rag
3 Drücken Sie den DEMO Taster, um die Wiedergabe zu unterbrechen und den Demo
Modus zu verlassen.
Anmerkung: Während der Wiedergabe der Demosongs ist es nicht möglich, die
Klangauswahltaster zur Auswahl der Klänge sowie die Taster REVERB und CHORUS zu betätigen.
Regelung des Tempo der Demosongs. Wenn Sie das Tempo des selektierten
Demosong ändern wollen, betätigen Sie den TEMPO Schieberegler. Normalerweise
entspricht das Tempo des Demosong nicht den Markierungen des TEMPO Schiebereglers.
Anmerkung: Während der Wiedergabe der Demosongs kann das Metronom nicht
eingesetzt werden.
Anmerkung: Bei Selektion eines Demosongs wird dessen ursprüngliches Tempo
ausgerufen,
Bevor Sie beginnen 83
Page 86

KAPITEL
3
Basisfunktionen
Mit nur einem Klang spielen (Single Modus)
Sie können einen der dreißig im Instrument enthaltenen Klänge auswählen.
1 Drücken Sie einen der Klangauswahltaster, um einen Klang zu selektieren. Die
LED des Tasters schaltet sich ein.
2 Mit dem BANK Taster selektieren Sie eine der drei verfügbaren Bänke (1-10, 11-
20, 21-30). Bei einmaligen Drücken wird Bank 2, beim zweiten Drücken Bank 3
und beim dritten Drücken erneut Bank 1 selektiert.
Taster Bank 1 # Bank 2 # Bank 3 #
PIANO 1 Grand Piano 1 2 Bright Piano 2 Grand Piano 2 1
PIANO 2 Classic Piano 2 Honky-Tonky 2 E.Grand Piano 1
E.PIANO 1 Stage E.Piano 1 Club E.Piano 2 Thin E.Piano 2
E.PIANO 2 Digital E.Piano 1 60’s E.Piano 1 Vintage E.Piano 2
HARPSI/CLAV Harpsichord 1 Clav. 1 Wah Clav. 1
VIBES/GUITAR Vibraphone 1 Marimba 1 Acoustic Guitar 1
ORGAN 1 Jazz Organ 1 2 Jazz Organ 2 2 Jazz Organ 3 2
ORGAN 2 Church Organ 1 3 Church Organ 2 1 Church Organ 3 1
STRINGS/PAD Strings 1 Slow Strings 2 Warm Pad 2
CHOIR Choir Hoo 1 Choir Doo 2 Choir Pad 2
(#) In diesen Spalten ist die Anzahl der Oszillatoren pro Stimme angegeben, die von den ein-
zelnen Klängen benutzt werden.
Mit zwei Klängen gleichzeitig spielen (Layer Modus)
Sie können mit zwei Klängen gleichzeitig auf der Tastatur spielen. Diese Spielweise
wird Layer Modus genannt.
84 Kapitel 3
Page 87

Anmerkung: Wenn Sie den Layer Modus selektieren, ist die Anzahl der Stimmen,
die gleichzeitig spielen können, herabgesetzt. Dies hängt von der Gesamtzahl der
vom selektierten Klang benutzten Oszillatoren ab.
Anmerkung: Es ist nicht möglich, zwei Klänge zu selektieren, die vom gleichen
Taster angesteuert werden.
1 Drücken Sie einen der Klangauswahltaster, um den ersten Klang zu selektieren. Die
LED des gedrückten Tasters schaltet sich ein. Benutzen Sie den BANK Taster, um
einen Klang in einer anderen Bank zu selektieren.
2 Drücken Sie einen anderen Klangauswahltaster, um den zweiten Klang zu selektie-
ren. Die LED des gedrückten Tasters schaltet sich ein. Benutzen Sie den BANK
Taster, um einen Klang in einer anderen Bank zu selektieren.
3 Drücken Sie beide Taster gleichzeitig, um die Klänge zu selektieren. Beide LEDs
schalten sich ein.
Anmerkung: Die Schritte 1 und 2 sind nicht erforderlich, wenn bereits die richtige
Bank selektiert ist.
Zum Single Modus zurückkehren. Um zum Single Modus zurückzukehren,
drücken Sie einfach einen beliebigen Klangauswahltaster.
Lautstärke der Klänge im Layer Modus regeln. Um die Lautstärke der Klänge
im Layer Modus untereinander abzustimmen, halten Sie den Taster des Klanges
gedrückt, dessen Lautstärke Sie vermindern wollen und drücken Sie mehrmals den
Taster des Klanges, der lauter erklingen soll.
Anmerkung: Diese Einstellung bleibt auch nach Ausschalten des Layer Modus
gespeichert, wird bei Ausschalten des Instruments jedoch gelöscht. Wenn Sie diese
Einstellungen erhalten wollen, müssen sie mit der Data Dump Funktion gespeichert
werden (siehe “MIDI Data Dump” on page 100).
Hall- und Chorus-Effekt wählen
Das SP-300 besitzt zwei Effekte: Hall und Chorus. Der Halleffekt ahmt die Klangeigenschaften eines Raumes nach, während Chorus einen Modulationseffekt nachahmt, der den Klang voller macht. Diese Effekteinstellungen bleiben auch dann
erhalten, wenn ein anderer Klang selektiert wird.
Anmerkung: Effekteinstellungen, die im Single Modus vorgenommen werden,
bleiben auch im Layer Modus erhalten. Änderungen, die im Layer Modus vorgenommen werden, werden jedoch nicht gespeichert.
Basisfunktionen 85
Page 88

Wenn das Instrument ausgeschaltet wird, werden die Effekte wieder auf die werkseitigen Einstellungen zurückgesetzt. Wenn Sie wollen, dass Ihre Einstellungen
erhalten bleiben, müssen Sie diese mit der Data Dump Funktion speichern (siehe
“MIDI Data Dump” on page 100).
1 Halten Sie den Taster REVERB oder CHOR US gedrückt und drücken Sie gleichzei-
tig einen der Klangauswahltaster PIANO 1/L, PIANO 2/M oder E.PIANO1/H, um
die Intensität des Hall-oder Chorus-Effekts einzustellen.
Taster Hall-Intensität Chorus-Intensität
PIANO 1/L Leichter Hall Leichter Chorus
PIANO 2/M Normaler Hall Normaler Chorus
E.PIANO 1/H Starker Hall Starker Chorus
2 Zur Überprüfung der Intensität des selektierten Hall- oder Chorus-Effekts, halten
Sie den REVERB oder CHORUS Taster gedrückt, um zu sehen, welche der oben
genannten LEDs eingeschaltet ist.
3 Zum Ausschalten des Hall- oder Chorus-Effekts drücken Sie den REVERB oder
CHORUS Taster. Die LED des Tasters schaltet sich aus.
Das Damper Pedal
Das mitgelieferte Damper-Pedal kann wie ein Lautstärkepedal benutzt werden.
Wenn ein Korg DS1H Pedal (Option) an die DAMPER Buchse anschließen, können
Sie das Half-Damper-Effekt nutzen, wobei je nach aufgebrachtem Druck ein gradueller Resonanzeffekt erzielt wird.
Im Layer Modus können Sie den Klang bzw. die Klänge selektieren, die dem Pedal
zugewiesen werden sollen.
Anmerkung: Wenn das Instrument ausgeschaltet wird, wird das Pedal wieder auf
die werkseitigen Einstellungen zurückgesetzt. Wenn Sie wollen, dass Ihre Einstellungen erhalten bleiben, müssen Sie diese mit der Data Dump Funktion speichern
(see “MIDI Data Dump” on page 100).
1 Halten Sie den TRANSPOSE/FUNCTION Taster gedrückt und drücken Sie gleich-
zeitig das Damper-Pedal. Bei jeder Betätigung des Pedals leuchtet die LED des/der
Klangauswahltaster(s) auf, auf den das Pedal wirkt.
2 Wenn das Pedal dem/den gewünschten Klang/Klängen zugewiesen ist, können Sie
den TRANSPOSE/FUNCTION T aster loslassen.
86 Kapitel 3
Page 89

Das Metronom
Das SP-300 besitzt ein eingebautes Metronom, mit dem das Tempo beim Üben vorgegeben werden kann.
Metronom starten und stoppen. Drücken Sie den METRONOME Taster, um
das Metronom zu starten oder zu stoppen. Beim Einschalten ist das Metronom entsprechend der Schieberegler-Position eingestellt. Sie können diese Einstellung
jedoch in der nachstehend beschriebenen Weise verändern. Nach dem Abspielen der
Demosongs bleibt das Tempo des zuletzt abgespielten Demos eingestellt.
Metronom-Lautstärke einstellen. Drücken Sie den METRONOME Taster, wäh-
rend das Metronom in Funktion ist. Drücken Sie dann mehrmals den STRINGS/
PAD Taster (oder die Taste B5), um die Lautstärke zu vermindern, bzw. CHOIR
(oder die Taste C6), um sie zu erhöhen. Um zur ursprünglichen Lautstärke zurückzukehren, drücken Sie gleichzeitig die beiden Taster STRINGS/PAD und CHOIR
(oder die Tasten B5 und C6), während Sie den METRONOME Taster gedrückt halten.
Notentaste Effekt Notentaste Effekt
B5 geringere Lautstärke C6 höhere Lautstärke
Tempo mit Hilfe des TEMPO Schieberegler regulieren. Benutzen Sie den
TEMPO Schieberegler, um das Tempo zu verändern. Das Tempo kann im Bereich
= 40 ~ 200 verändert werden.
Numerische T empoeingabe. In manchen Fällen ist eine exakte Tempoeinstellung
(beispielsweise 127 BPM) erforderlich. Sie können das gewünschte Tempo mit
Hilfe der numerischen Eingabe ganz exakt einstellen..
1 Halten Sie den METRONOME Taster gedrückt.
Basisfunktionen 87
Page 90

2 Benutzen Sie die Tastatur, um den dreistelligen Tempowert einzugeben (bei zwei-
stelligen Werten ist eine “0” voranzustellen).
Taste Nummer Taste Nummer
C5 0 C#5 1
D5 2 D#5 3
E5 4 F5 5
F#5 6 G5 7
G#5 8 A5 9
Um beispielsweise den Tempowert 168 einzustellen, halten Sie den METRONOME
Taster gedrückt und drücken Sie gleichzeitig die Tasten C#5 (1), F#5 (6), G#5 (8).
Zur Einstellung des Tempowertes 85 halten Sie den METR ONOME Taster gedrückt
und drücken gleichzeitig die Tasten C5 (0), G#5 (8), F5 (5).
Taktunterteilung selektieren. Sie können den ersten Taktschlag betonen.
Taster Taktunterteilung
PIANO 1 2 Viertelnoten (2/4, 2/8...)
PIANO 2 3 Viertelnoten (3/4, 3/8...)
E.PIANO 1 4 Viertelnoten (4/4, 4/8...)
E.PIANO 2 6 Viertelnoten (6/4, 6/8...)
1 Halten Sie den METRONOME Taster bei laufendem Metronom gedrückt und drük-
ken Sie gleichzeitig den Taster, der der gewünschten Taktunterteilung entspricht
(siehe Tabelle oben). Nun wird die erste Viertelnote des Taktes betont.
2 Zur Deaktivierung der Betonung halten Sie den METRONOME Taster gedrückt
und drücken gleichzeitig den Klangauswahltaster, dessen LED leuchtet.
Anmerkung: Beim Ausschalten des Instruments wird automatisch die Betonung
deaktiviert.
Glockenton für die Betonung selektieren. Der betonte Taktschlag kann auch in
einen Glockenton verwandelt werden.
88 Kapitel 3
Page 91

1 Halten Sie den METRONOME Taster bei laufendem Metronom gedrückt und drük-
ken Sie gleichzeitig den VIBES/GUITAR Klangauswahltaster. Die LED des Tasters
leuchtet auf und ein Glockenklang ertönt bei jeder ersten Viertelnote eines Taktes.
2 Um wieder zur normalen Betonung zurückzukehren, halten Sie den METRONOME
Taster gedrückt und drücken gleichzeitig den HARPSI/CLAV Klangauswahltaster,
so dass sich die LED des HARPSI/CLAV Tasters einschaltet.
Anmerkung: Beim Ausschalten des Instruments wird automatisch die Betonung
deaktiviert.
Basisfunktionen 89
Page 92
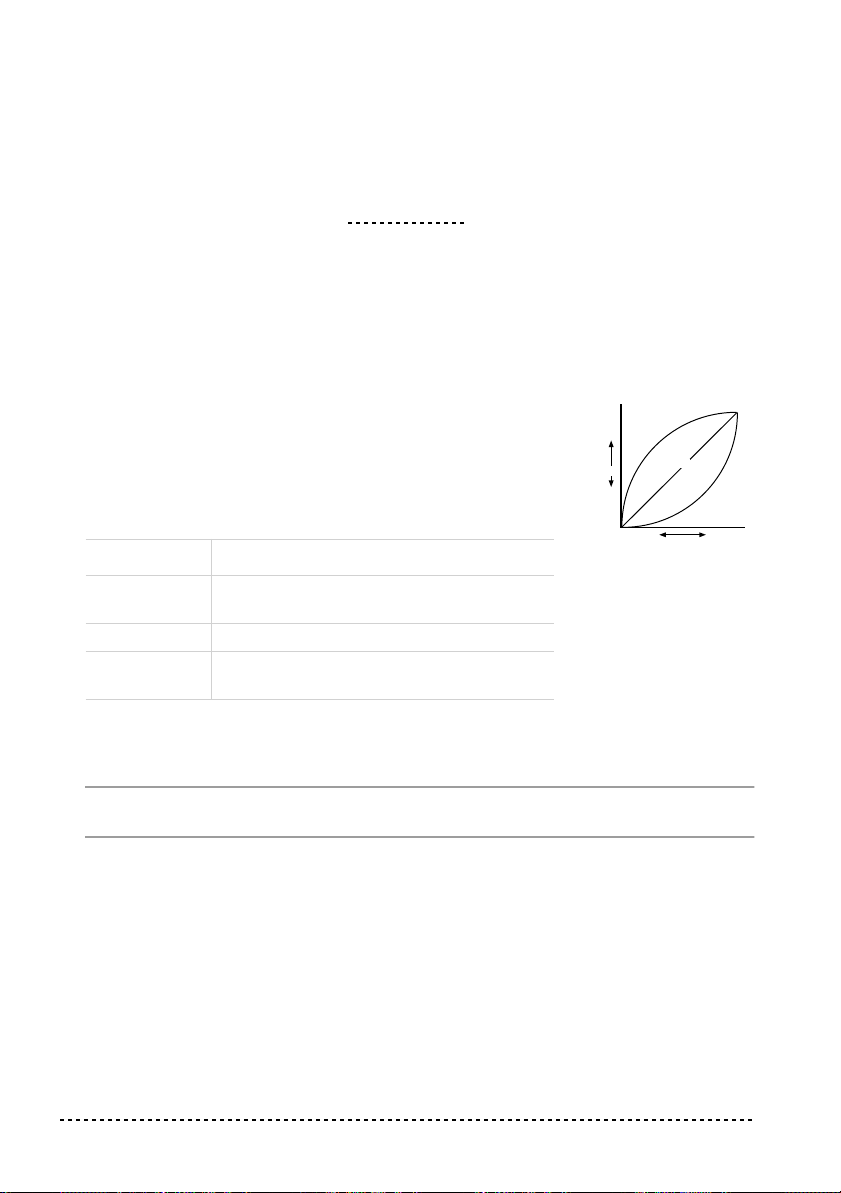
Weitere Funktionen
Einstellung des Anschlags
KAPITEL
4
Die Anschlagempfindlichkeit der Tastatur kann unterschiedlich eingestellt werden. Halten Sie den TOUCH
Taster gedrückt und drücken Sie gleichzeitig den entsprechenden Taster zur Einstellung der gewünschten Anschlagempfindlichkeit.
Taster Anschlagempfindlichkeit
PIANO 1/L Leicht. Selbst bei leichtem Anschlag können
laute Noten gespielt werden.
PIANO 2/M Normal. Normaler Klavieranschlag.
E.PIANO 1/H Schwer. Nur bei sehr starkem Anschlag wer-
den laute Noten gespielt.
Strong
( )
Note
loudness
Soft
( )
Soft
Playing strength
Light
Standard
Heavy
Strong
Um die jeweilige Einstellung zu überprüfen, halten Sie den TOUCH Taster gedrückt
und kontrollieren, welche der obigen LEDs eingeschaltet ist.
Anmerkung: Beim Ausschalten des Instruments wird wieder die normale
Anschlagempfindlichkeit eingestellt.
Alternativ können auch TRANSPOSE/FUNCTION Taster und Tastatur benutzt
werden. TRANSPOSE/FUNCTION Taster gedrückt halten und gleichzeitig die
Notentaste drücken, die der gewünschten Einstellung entspricht (siehe Tabelle).
90 Kapitel 4
Page 93

Taste Anschlagempfindlichkeit
B3 Leicht. Selbst bei leichtem Anschlag können laute Noten gespielt werden.
C4 Normal. Normaler Klavieranschlag.
D4 Schwer. Nur bei sehr starkem Anschlag werden laute Noten gespielt.
Transponierung
Bisweilen kommt es vor, dass Stücke in einer schwierig zu spielenden Tonart
geschrieben sind (z.B. mit vielen schwarzen Tasten) oder die Tonhöhe zur Abstimmung auf ein anderes Instrument oder einen Sänger verändert werden muss. In diesen Fällen können Sie transponieren (Tonhöhe verändern), um die Fingerläufe zu
vereinfachen oder mit denselben Fingerläufen in einer anderen Tonhöhe zu spielen.
Diese Funktion wird Transpo-nierung genannt.
Wenn Sie beispielsweise um einen Halbton nach oben transponieren, erklingen
beim Spielen der links unten angezeigten Noten die rechts angezeigten Tonhöhen.
Anmerkung: Beim Ausschalten des Instruments wird die Transponierung wieder
aufgehoben.
1 Halten Sie den TRANSPOSE/FUNCTION Taster gedrückt und drücken Sie gleich-
zeitig die der gewünschten Transponierung entsprechende Taste auf der Tastatur
(siehe Tabelle). Die LED des TRANSPOSE/FUNTION Tasters leuchtet und zeigt
dadurch an, dass die Transponierfunktion aktiviert wurde.
Note Effekt
F#6 — B6 6 — 1 Halbtöne nach unten
Weitere Funktionen 91
Page 94

Note Effekt
C7 Standardstimmung
C#7 — F7 1 — 5 Halbtöne nach oben
2 Um zur Standardstimmung zurückzukehren, drücken Sie den TRANSPOSE/
FUNCTION Taster und schlagen gleichzeitig die Taste C7 an. Die LED des
TRANSPOSE/FUNCTION T asters erlischt.
Feinstimmung
Um die Stimmung des SP-300 der eines anderen Instruments anzupassen, können
Sie die Stimmung in Intervallen von 0.5 Hz im Bereich von A4 = 427.5 ~ 452.5 Hz
einstellen. Die Standardstimmung ist A4 = 440 Hz.
Anmerkung: Beim Aus- und erneuten Einschalten des Instruments wird automatisch wieder die Standardstimmung (A4 = 440 Hz) eingestellt.
1 Drücken Sie den TRANSPOSE/FUNCTION Taster.
2 Schlagen Sie die entsprechende Notentaste zur Veränderung der Stimmung an. Bei
jedem Drücken der Taste B5 oder C6 wird die Stimmung um 0.5 Hz höher oder tiefer.
3 Um erneut die Standardstimmung einzustellen, halten Sie den TRANSPOSE/
FUNCTION Taster gedrückt und drücken gleichzeitig die Tasten B5 und C6.
Note Feinstimmung
B5 Stimmung wird um 0.5 Hz tiefer
B5+C6 Standardstimmung (A4 = 440 Hz)
C6 Stimmung wird um 0.5 Hz höher
Temperierung selektieren
Zahlreiche klassische Stücke wurden in anderen Stimmungen komponiert als der
heute gebräuchlichen wohltemperierten Stimmung. Um den ursprünglichen Klang
dieser Kompositionen originalgetreu wiedergeben zu können, bietet das SP-300
neben der wohltemperierten Stimmung auch die klassischen Stimmungen Kirnber-
92 Kapitel 4
Page 95

ger und Werckmeister, so dass Sie aus insgesamt drei Stimmungen die jeweils am
besten geeignete auswählen können.
Zur Einstellung der gewünschten Stimmung halten Sie den TOUCH Taster gedrückt
und drücken gleichzeitig den Taster, der der zu selektierenden Stimmung entspricht.
Um zur wohltemperierten Stimmung zurückzukehren halten Sie den TOUCH Taster
gedrückt und drücken gleichzeitig den Klangauswahltaster, dessen LED eingeschaltet ist.
Taster Temperament
HARPSI/CLAV Werckmeister . Die Stimmung Werckmeister III wurde von dem deutschen
Organisten und Musikgelehrten Andreas Werckmeister entwickelt. Sie
entstand in der Zeit des Spätbarocks zur Ermöglichung relativ freier
Transponierungen.
VIBES/GUITAR Kirnberger. Die Stimmung Kirnberger III wurde von Johann Phillip Kirn-
berger zu Beginn des 18. Jahrhunderts entwickelt und wird v orzugs weise
für Cembalos verwendet.
Beide LEDs sind
ausgeschaltet
Wohltemperierten Stimmung. Beinahe alle modernen Tasteninstrumente
basieren auf dieser Stimmung. Die Halbtöne sind vollkommen gleichmäßig voneinander entfernt.
Um die eingestellte Stimmung überprüfen zu können, halten Sie den TOUCH Taster
gedrückt und kontrollieren, welche der obigen LEDs aufleuchtet.
Anmerkung: Beim Ausschalten des Instruments wird automatisch wieder die
wohltemperierten Stimmung eingestellt.
Zum Thema “gedehnte Stimmung”. Zur Erzielung möglichst natürlicher Reso-
nanzen wird bei den Klängen PIANO 1 und PIANO 2 eine “gedehnte Stimmung”
verwendet, um die Noten in den tiefen Bereichen etwas dunkler und in den hohen
Bereichen heller klingen zu lassen. Akustische Kla viere werden von professionellen
Klavierstimmern normalerweise auf diese Weise gestimmt.
Weitere Funktionen 93
Page 96

KAPITEL
5
MIDI
Was ist MIDI?
MIDI ist die Abkürzung für Musical Instrument Digital Interface. Dies ist ein inter-
nationaler Standard für die Verbindung und die Datenübertragung zwischen elektronischen Instrumenten, Computern und anderen Geräten.
Was leistet MIDI?
Dank MIDI können Sie das SP-300 zur Steuerung anderer Instrumente, oder umgekehrt, andere Instrumente zur Steuerung des SP-300 einsetzen und einen Sequenzer
zur Kreation komplexer Musikstücke benutzen.
Wenn Sie die Tastatur oder das Pedal des SP-300 benutzen oder einen Klang selektieren, werden die Noten, die Pedalaktivierung und die Klangänderungen an ein
anderes Instrument übertragen oder von einem Sequenzer aufgenommen.
Anschlüsse
Schließen Sie stets die MIDI OUT Buchse des Instruments an die MIDI IN Buchse
des anderen Instruments an. Verbinden Sie keinesfalls die beiden Buchsen desselben Instruments miteinander.
Schließen Sie die MIDI OUT Buchse des übertragenden Instruments (Master) an
die MIDI IN Buchse des empfangenden Instruments (Slave) an.
Um das SP-300 an einen Computer anzuschließen, benötigen Sie eine MIDI
Schnittstelle am Computer, Software für Sequencing oder Notenaufzeichnung
sowie zwei Standard MIDI Kabel. Schließen Sie die MIDI OUT Buchse des SP-300
94 Kapitel 5
Page 97
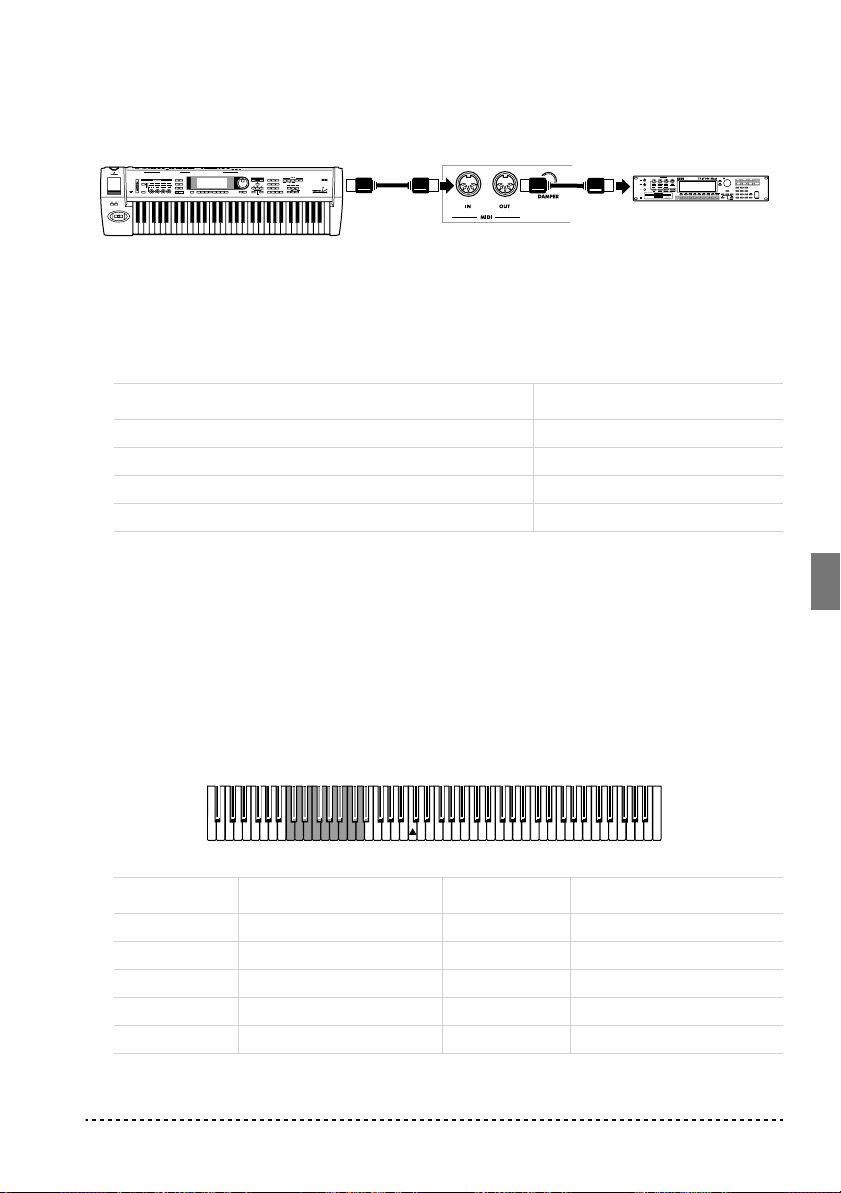
an die MIDI IN Buchse des Computers und die MIDI IN Buchse des SP-300 an die
MIDI OUT Buchse des Computers an.
MIDI keyboard
MIDI OUT
SP-300 rear panel
MIDI IN
MIDI sound module
Standard MIDI Einstellungen
Beim Einschalten des Instruments sind die MIDI Parameter des SP-300 wie folgt
programmiert:
Parameter Einstellung
Übertragungskanal 1
Empfangskanal/kanäle Alle 16 (1-16)
Local ON
Omni ON
Übertragungskanal selektieren
Bei Standard MIDI stehen 16 Kanäle für die Übertragung und den Empfang von
Daten zur Verfügung. Das SP-300 empfängt immer auf allen 16 Kanälen und überträgt auf nur einem Kanal. Um Daten vom SP-300 zu übertragen, müssen Sie
zunächst festlegen, welcher der 16 Kanäle hierfür vorgesehen sein soll.
Halten Sie den TRANSPOSE/FUNCTION Taster gedrückt und drücken gleichzeitig die Notentaste im Bereich zwischen C2 und D#3, die dem vorgesehenen MIDI
Kanal entspricht.
Notentaste Kanal Notentaste Kanal
C2 1 C#2 2
D2 3 D#2 4
E2 5 F2 6
F#2 7 G2 8
G#2 9 A2 10
MIDI 95
Page 98

Notentaste Kanal Notentaste Kanal
A#2 11 B2 12
C3 13 C#3 14
D3 15 D#3 16
Anmerkung: Beim Einschalten des Instruments ist automatisch Kanal 1 eingestellt.
Anmerkung: Als Default-Einstellung wird der Kanal 10 automatisch dem Metro-
nom-Klang zugewiesen (Noten D#5-E5).
Anmerkung: Im Layer Modus wird der zweite Klang jeweils auf dem nächsthöhe-
ren Kanal übertragen. Wenn Sie beispielsweise Kanal 7 selektieren, wird der erste
Klang auf Kanal 7, der zweite Klang hingegen auf Kanal 8 übertragen. Wenn Sie
Kanal 16 selektieren, wird der erste Klang auf Kanal 16, der zweite Klang hingegen
auf Kanal 1 übertragen (nach 16 kehrt der Zähler auf 1 zurück).
SP-300 als multitimbraler Tongenerator
Wenn das SP-300 von einem externen MIDI-Gerät gesteuert wird, kann es als multitimbraler Tongenerator verwendet werden. Sie können auf jedem der 16 MIDI
Kanäle einen anderen Klang wählen.
1 Schließen Sie die MIDI In Buchse des SP-300 mit einem MIDI Kabel an die MIDI
OUT Buchse eines Sequenzers o.ä. an.
2 Übertragen Sie MIDI Daten vom angeschlossenen Sequenzer (oder einem anderen
Gerät). Detaillierte Anweisungen zur Selektion der Klänge unter Verwendung der
MIDI Program Change Befehle finden Sie unter “Program Change” on page 97.
Das SP-300 muss natürlich für den Empfang von Program Change Befehlen aktiviert werden.
Informationen zum Senden von Program Change Befehlen finden Sie in der Bedienungsanleitung des angeschlossenen Geräts.
Local On/Off
Local ist der Parameter, mit dem Sie festle gen, ob das Klavier gleichzeitig die internen Klänge spielen und MIDI Daten übertragen soll (Local On) oder ob es nur
MIDI Daten übertragen, die internen Klänge aber nicht spielen soll (Local Off).
Selektieren Sie Local Off, wenn das SP-300 als stummes Keyboard verwendet werden soll, das auf einem anderen Instrument spielt. Diese Einstellung sollte auch
dann gewählt werden, wenn das SP-300 über seine MIDI IN und MIDI OUT Buch-
96 Kapitel 5
Page 99

sen an einen Sequenzer angeschlossen ist. Auf diese Weise vermeiden Sie, dass
bestimmte Noten zweimal, d.h. sowohl vom Keyboard als auch vom Sequenzer
gespielt werden und einen unangenehmen Echoeffekt erzeugen.
Normalerweise wählen Sie die Einstellung Local On (wird automatisch beim Einschalten des Instruments eingestellt), so dass beim Spielen des Keyboards der entsprechende Klang zu hören ist.
Halten Sie den TRANSPOSE/FUNCTION Taster gedrückt und drücken Sie gleichzeitig den [PIANO 1] Klangauswahltaster. Die Local Einstellung wechselt bei
jedem Tastendruck zwischen On und Off.
Local Status PIANO 1 LED Status
Local On eingeschaltet
Local Off ausgeschaltet
Anmerkung: Beim Einschalten des Instruments ist der Local Parameter automatisch auf On eingestellt.
Program Change
Der Klang des SP-300 kann über MIDI selektiert werden, indem ein Program
Change Befehl auf dem Kanal gesendet wird, dem der Klang zugewiesen werden
soll. In der untenstehenden Tabelle finden Sie alle Program Change Nummern (zwischen 0 und 29; wenn das übertragende Gerät Nummern zwischen 1 und 30 verwendet, muss die Nummer jeweils um eine Einheit erhöht werden).
Program Change Befehle übertragen. Sie können einen MIDI Program Change
Befehl an ein MIDI Gerät übertragen, das an die MIDI OUT Buchse des SP-300
angeschlossen ist, um dessen Klang zu ändern. Wenn Sie einen der internen Klänge
des SP-300 mit den Klangauswahltastern selektieren, wird eine entsprechende
MIDI Program Change Nummer übertragen, wie aus der nachstehenden Tabelle zu
ersehen ist.
Program Change Befehle empfangen. Wenn ein Program Change Befehl von
einem externen Gerät empfangen wird, wird auf dem SP-300 der entsprechende
interne Klang selektiert, wie aus der nachstehenden Tabelle zu ersehen ist. Nur Pro-
MIDI 97
Page 100

gram Change (PC) Nummern zwischen 0 und 29 werden vom SP-300 berücksichtigt.
PC# Taster Bank Klang
0
PIANO 1
1 2 Bright Piano
2 3 Grand Piano 2
3
PIANO 2
4 2 Honky-Tonky
5 3 E.Grand Piano
6
E.PIANO 1
7 2 Club E.Piano
8 3 Thin E.Piano
9
E.PIANO 2
10 2 60’s E.Piano
11 3 Vintage E.Piano
12
HARPSI/CLAV
13 2 Clav.
14 3 Wah Clav.
15
VIBES/GUITAR
16 2 Marimba
17 3 Acoustic Guitar
18
ORGAN1
19 2 Jazz Organ 2
20 3 Jazz Organ 3
21
ORGAN2
22 2 Church Organ 2
23 3 Church Organ 3
24
STRINGS/PAD
25 2 Slow Strings
26 3 Warm Pad
27
CHOIR
28 2 Choir Doo
29 3 Choir Pad
1 Grand Piano 1
1 Classic Grand Piano
1 Stage E.Piano
1 Digital E.Piano
1 Harpsichord
1 Vibraphone
1 Jazz Organ 1
1 Church Organ 1
1 Strings
1 Choir Hoo
98 Kapitel 5
 Loading...