

Page 1
0570-666-569
Owner’s Manual
取扱説明書
Manuel d’utilisation
Bedienungsanleitung
Manual de usuario
Thank you for purchasing the KORG KONNECT.
To ensure trouble-free enjoyment, please carefully read this manual and use the product correctly. In addition, be su re to store this ma nual in a safe place for future reference.
Merci d’avoir choisi la KORG KONNECT.
Pour une sûreté et un plaisir d’utilisation maximum, lisez attentivement ce manuel et
suivez toutes ses consignes d’utilisation. Veillez en outre à conserver ce manuel en lieu
sûr afin de pouvoir le consulter ultérieurement.
Vielen Dank, dass Sie sich für einen KORG KONNECT entschied en haben.
Um möglichst lange Spaß an Ihrem neuen Gerät zu haben, lesen Sie diese Anleitung
aufmerksam und verwenden Sie das Gerät entsprechend. Bewahren Sie diese Anleitung
an einem sicheren Ort auf, um auch später darin nachschlagen zu können.
Gracias por comprar la KORG KONNECT.
Para poder disfrutar de ella sin problemas, lea este manual atentamente y utilice el producto correctamente. Además, es importante que guarde este manual en un lugar seguro
para futuras consultas.
このたびは、コルグKONNE CTをお買い上げいただきまして、誠にありが
とうございます。
本機を末永くご愛用いただくためにも、取扱説明書をよくお読みになって正しい方法
でご使用ください。また、取扱説明書は大切に保存してください。
This product has been manufactured according to strict specications and voltage requirements that
are applicable in the country in which it is intended that this product should be used. If you have
purchased this product via the internet, through mail order, and/or via a telephone sale, you must
verify that this product is intended to be used in the country in which you reside.
WARNING: Use of this product in any country other than that for which it is intended could be
dangerous and could invalidate the manufacturer’s or distributor’s warranty.
Please also retain your receipt as proof of purchase otherwise your product may be disqualied
from the manufacturer’s or distributor’s warranty.
IMPORTANT NOTICE TO CONSUMERS
REMARQUE IMPORTANTE POUR LES CLIENTS
Ce produit a été fabriqué suivant des spécications s évères et des besoin s en ten sion applicables
dans le pays où ce produit doit être utilisé. Si vous avez acheté ce produit via l’internet, par vente
par correspondance ou/et vente par téléphone, vous devez vérier que ce produit est bien utilisable
dans le pays où vous résidez.
ATTENTION: L’utilisation de ce produit dans un pays autre que celui pour lequel il a été conçu
peut être dangereuse et a nnulera la garantie du fabricant ou du distributeur. Conservez bien votre
récépissé qui est la preuve de votre achat, faute de quoi votre produit ne risque de ne plus être
couvert par la garantie du fabricant ou du distributeur.
WICHTIGER HINWEIS FÜR KUNDEN
Dieses Produkt wurde unter strenger Beachtu ng von Spezi kationen und Spannungsanforderungen
hergestellt, die im Bestimmungsland gelten. Wenn Sie dieses Produkt über das Internet, per Postversand und/oder mit telefonischer Bestellung gekauft haben, müssen Sie bestätigen, dass dieses
odukt für Ihr Wohngebiet ausgelegt ist.
Pr
WARNUNG: Verwendung die ses Produkts i n einem andere n Land als dem, f ür das es best immt ist,
verwendet wird, kann gefährlich sein und die Garantie des Herstellers oder Importeurs hinfällig
lassen werden. Bie bewahren Sie diese Quiung als Kaueleg auf, da andernfalls das Produkt
von der Garantie des Herstellers oder Importeurs ausgeschlossen werden kann.
NOTA IMPORTANTE PARA EL CONSUMIDOR
Este producto ha sido fabricado de acuerdo a estrictas especicaciones y requer imientos
de voltaje aplicables en el país para el cual está destinado. Si ha comprado este producto
por internet, a través de correo, y/o venta telefónica, debe usted vericar que el uso de este
producto está destinado al país en el cual reside.
AVISO: El uso de este producto en un país distinto al cual está destinado podría resultar
peligroso y podría invalidar la garantía del fabricante o distribuidor.
Por favor guarde su recibo como prueba de compra ya que de otro modo el producto puede
verse privado de la garantía del fabricante o distribuidor.
EFGSJ 1
保証規定(必ずお読みください)
本保証書は、保証期間中に本製品を保証するもので、付属品類(ヘッドホンなど)は保
証の対象になりません。保証期間内に本製品が故障した場合は、保証規定によって無
償修理いたします。
1. 本保証書の有効期間はお買い上げ日より1か年です。
2. 次の修理等は保証期間内であっても有償となります。
・ 消耗部品(電池、スピーカー、真空管、フェーダーなど)の交換。
・ お取扱い方法が不適当のために生じた故障。
・ 天災(火災、浸水等)によって生じた故障。
・ 故障の原因が本製品以外の他の機器にある場合。
・ 不当な改造、調整、部品交換などにより生じた故障または損傷。
・ 保証書にお買い上げ日、販売店名が未記入の場合、または字句が書き替えられて
いる場合。
・ 本保証書の提示がない場合。
尚、当社が修理した部分が再度故障した場合は、保証期間外であっても、修理した
日より3ケ月以内に限り無償修理いたします。
3. 本保証書は日本国内においてのみ有効です。
This warranty is valid only in Japan.
4. お客様が保証期間中に移転された場合でも、保証は引き続きお使いいただけます。
詳しくは、お客様相談窓口までお問い合わせください。
5. 修理、運送費用が製品の価格より高くなることがありますので、あらかじめお客様
相談窓口へご相談ください。発送にかかる費用は、お客様の負担とさせていただき
ます。
6. 修理中の代替品、商品の貸し出し等は、いかなる場合においても一切行っておりま
せん。
本製品の故障、または使用上生じたお客様の直接、間接の損害につきましては、弊社は
一切の責任を負いかねますのでご了承ください。
本保証書は、保証規定により無償修理をお約束するためのもので、これよりお客
様の法律上の権利を制限するものではありません。
■お願い
1. 保証書に販売年月日等の記入がない場合は無効となります。記入できないときは、
お買い上げ年月日を証明できる領収書等と一緒に保管してください。
2. 保証書は再発行致しませんので、紛失しないように大切に保管してください。
アフターサービス
修理および商品のお取り扱いについてのご質問、ご相談は、お客様
相談窓口へお問い合わせください。
お客様相談窓口
PHS等一部の電話ではご利用できません。固定電話または携帯
電話からおかけください。
受付時間 月曜~金曜 10:00 ~ 17:00 (祝祭日、窓口休業日を除く)
● サービス・センター :〒168-0073 東京都杉並区下高井戸1-18-16 2F
コルグ KONNECT
本保証書は、上記の保証規定により無償修理をお約束するものです。
お買上げ日 年 月 日
販売店名
■ワイヤレス(無線)についての注意事項
本製品の使用周波数は2.4GHz帯です。この周波数帯では、電子レンジなどの産業・科学・医療
用機器のほか、工場の製造ラインなどで使用されている移動体識別用の構内無線局(免許を要す
る無線局)や、特定小電力無線局(免許を要しない無線局)、アマチュア無線局(免許を要する無線
局)が運用されています。(以下「他の無線局」と呼ぶ)
他の無線機器との電波干渉を防止するために、下記事項に注意してご使用ください。
本製品を使用する前に、近くで「他の無線局」が運用されていないことを確認してください。
1.
また重大な影響を及ぼす恐れのある場所(医療機器のそば、航空機内など)では使用しないで
ください。
2. 万一、本製品と「他の無線局」の間で電波干渉の事例が発生した場合には、速やかに使用を停
止した上で、混信回避のための処置(例えば使用場所の変更など)を行ってください。
不明な点、その他お困りのことが起きたときは、弊社の「お客様相談窓口」へお問い合わせくだ
3.
さい。
* BluetoothはBluetooth SIG, Inc.の登録商標です。
- 1 -
保証書
Published 04/2017 Printed in China
Page 2
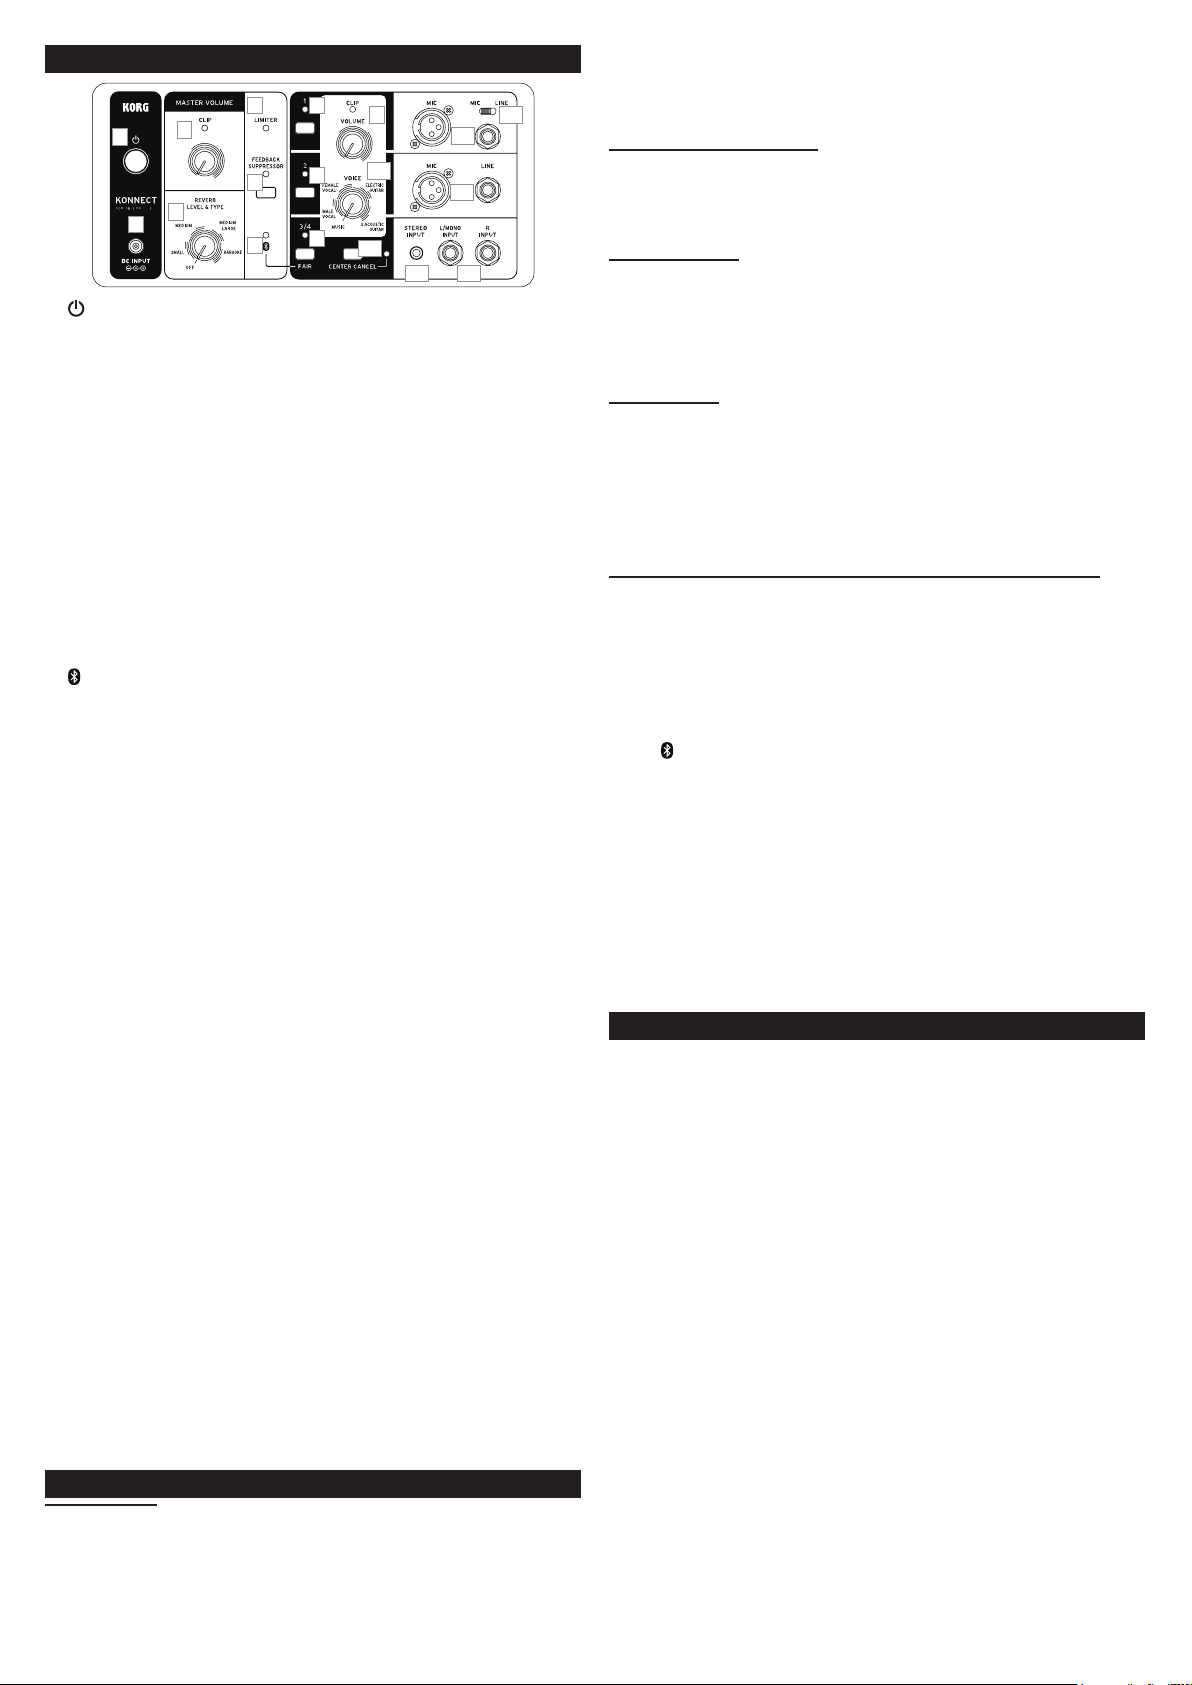
Part names and functions
5
1
3
6
4
2
7
1 (Power) button, LED
The power will turn on (the LED will light) or off when the button is pressed.
2 DC INPUT jack
The included AC adapter is connected here.
3 MASTER VOLUME knob, CLIP LED
Adjusts the volume of the KONNECT. Raising the volume too high may cause the
sound outputted from the speaker to sound unnaturally distorted, and the CLIP
LED may light. If this happens, adjust your settings again while lowering the
volume on each channel, until the CLIP LEDs go dark.
4 REVERB LEVEL & TYPE knob
The reverb type and effect depth can be adjusted, according to the position of this
knob. When this knob is fully turned to the left, the reverb will be turned off.
5 LIMITER LED
This LED lights when the limiter is in operation.
6 FEEDBACK SUPPRESSOR button, LED
This switches the FEEDBACK SUPPRESSOR on (the LED will light) or off. Turning
this on will cause feedback to be suppressed.
7
(Bluetooth) pairing LED
This LED li g hts wh en the KON N ECT is connecte d to an ext er nal dev ice via Blue tooth.
(Refer to “Connecting to the KONNECT App via Bluetooth”.)
8 Channel selection buttons and LEDs
Selects the channel that will be controlled by the cha nnel VOLUME, VOICE knobs.
The LED for the selected channel will light.
Tip: When playing back music f rom an external device connected via Bluetooth, input chan
nels 3 and 4 (3/4) are used.
9
VOLUME knob, CLIP LED
This adjusts the volume of the channel that was s elected using the cha nnel selection
buttons. Raising the volume too high may cause the sound from the speaker to be
unnatural ly distorted (the CLIP LED may light). If th is happens, adjust your se ttings
again while lowering the volume on the devices on each channel, until the CLIP
LEDs go dark.
10 VOICE knob
The voice type and effect depth can be adjusted, according to the position of this knob.
Tip: “Voices” mean the optimal equalizer settings that match the characteristics of each
device being connected.
11 CENTER CANCEL button and LED
This switches center cancel on (the LED will light) or off for channels 3/4. When
center cancel is switched on, the volume for only the vocals or guitar sounds in
music played on iPhones and other devices that are connected to the KONNECT
can be decreased.
12 MIC/LINE switch
When this is switched to MIC, the MIC/LINE input jack for channel 1 will be used
as a microphone input jack.
13 MIC and MIC/LINE input jack for channel 1
Use this input for dynamic mics or LINE output level devices.
14 MIC and LINE input jack for channel 2
Use this input for dynamic mics and LINE output level devices.
15 STEREO INPUT jack for channels 3/4
Use this jack to input a stereo LINE output level device, such as a music player, into
channels 3/4.
16 L/MONO INPUT and R INPUT jack for channels 3/4
Use these jacks for inputting the L and R signals from a LINE output level device.
(When using just the L/MONO INPUT jack, channel 3/4 will operate as a single
channel in monaural mode.)
8
9
12
13
10
8
14
8
11
16
15
Setup
Connections
1 Turn the MASTER VOLUME knob on the KONNECT to the minimum position.
2 Connect the included AC adapter to the DC INPUT jack, and then plug the AC
adapter into an AC outlet.
Only use the spec ified AC adapter. Using any ot her AC adapter may cause mal functions.
3 Connect your external device(s) into the channel input jacks.
4 Press the Power button to turn on the KONNECT.
Tip: To turn off the KONNECT, press the Power button again.
5 Slowly turn the VOLUME and MASTER VOLUME knobs to adjust the volume.
Auto power-off function
The KONNECT has an auto power-off function. With this function, the unit automatically enters standby mode if there is no operation or input for approximately 20
mi
nutes. To return to normal mode, operate one of the knobs or buttons on the KON-
NECT, or use the KONNECT App to turn the power on again.
REVERB TYPE
SMALL This reverb setting simulates a small room, such as a home studio.
MEDIUM This reverb setting simulates a medium-sized room, such as a live
music club.
LARGE This reverb setting simulates a large room, such a concert hall.
KARAOKE This is the optimal setting for singing karaoke.
VOICE TYPE
MALE VOICE This is the optimal setting for male vocals or speech.
FEMALE VOICE This is the optimal setting for female vocals or speech.
ELECTRIC GUITAR
S. ACOUSTIC GUITAR This is the optimal setting for steel-stringed acoustic guitars.
MUSIC This is the optimal setting for listening to music in your own home.
Tip: You can use the KONNECT App to select up to 11 different voice types.
This is the optimal setting for electric guitars.
Connecting to the KONNECT App via Bluetooth (Pairing)
Tip: While the unit is paired with the KONNECT App, all functions on the KONNECT
panel except for MASTER VOLUME will be disabled.
Tip: For points of caution and detailed methods of operation when pairing, refer to the KON-
NECT App download website, or the “Help Center” located in the app itself.
1
While the KONNECT is on, hold down the c hannel selection but ton for chan nel
3/4.
2 The
3
-
4 When pairing is complete, the LED will light, and you will be able to control
5 When an analog device is connected to channels 3/4, the playback from
(Bluetooth) pairing LED will blink, and the KONNECT will enter Blue-
tooth pairing standby mode.
Following the settings on your external device for Bluetooth connection, select
“KONNECT” as the connection point.
the various operations and play back music on the KONNECT from the app.
Tip: For more information on which devices and OS versions that the KONNECT App is
compatible with, refer to the download website for the app, and the “Help Center” lo
cated in the app itself.
the analog device wil l be given priority. When play ing back on a Bluetoot h
device, disconnect the cable from the analog device to the KONNECT.
Specications
Number of REVERB types: 4
Number of VOICE types: 5 (11 when using the KONNECT App)
Number of scene memory programs (only when using the app): 3
Input jack: Channel 1 MIC/LINE input jack (XLR-3-32 type [balanced], 4.7 kΩ,
Channel 2 LINE input jack (XLR-3-32 type [balanced], 4.7 kΩ,
Channels 3/4 L/MONO INPUT jack (6.3 mm monaural phone jack
STEREO INPUT jack (3.5 mm stereo mini phone jack
Speakers: 6.5-inches and 1-inch x 2 (16.5 cm and 2.5 cm x 2)
Power Source: AC adapter
Dimensions (W x D x H): 445 x 230 x 230 mm / 17.52 x 9.06 x 9.06 inches
Weight: 5.6 kg / 12.35 lbs.
Accessories: AC adapter , Owners Manual
Optional Item: Carrier bag, Stand (KORG ST-S80)
* Appearance and specifications of this product are subject to change without notice.
specified level -43 dBV or 6.3 mm monaural phone jack
[unbalanced], 1MΩ, specified level: -26 dBV)
specified level -43 dBV and 6.3 mm monaural phone jack
[unbalanced], 1MΩ, specified level: -26 dBV)
[unbalanced], 1MΩ, specified level: -26 dBV)
R INPUT jack (6.3 mm monaural phone jack [unbalanced],
1
Ω, specified level: -26 dBV)
M
[unbalanced], 10kΩ, specified level: -10 dBV)
-
- 2 -
Page 3

Precautions
Précautions
Location
Using the unit in the following locations can result in a malfunction:
• In direct sunlight
• Locations of extreme temperature or humidity
• Excessively dusty or dirty locations
• Locations of excessive vibration
• Close to magnetic elds
Power supply
Please con nect the desig nated AC adapter to an AC outlet of the c orrect voltage. Do not
connect it to an AC outlet of voltage other than that for which your unit is intended.
Interference with other electrical devices
Radios a nd televisions place d nearby may experie nce reception i nterference. Op erate
this unit at a suitable distance from radios and televisions.
Handling
To avoid breakage, do not apply excessive force to the switches or controls.
Care
If the ex terior becomes d irty, wipe it with a cle an, dry clot h. Do not use liquid c leaners
such as benzene or thinner, or cleaning compounds or ammable polishes.
Keep this manual
After reading this manual, please keep it for later reference.
Keeping foreign matter out of your equipment
Never set any container with liquid in it near this equipment. If liquid gets into the
equipment, it could cause a breakdown, re, or electrical shock.
Be caref ul not to let metal objects get into the equipment. If somet hing does slip into
the equ ipment, unplug the AC adapter from t he wall outlet. T hen contact your ne arest
Korg dealer or the store where the equipment was purchased.
* Bluetooth is a registered trademark of Bluetooth SIG, Inc.
* All product names and company names are the trademarks or registered trademarks
of their respective owners.
This equipment complies with FCC radiation exposure limits set forth for an uncontrolle d environment a nd meets the FCC radio fr equency (RF) Exposur e Guidelines. Th is
uipment ha s very low levels of RF ene rgy that it deemed to c omply without maximu m
eq
permissive exposure evaluation (MPE).
This transmier must not
be co-located or operated
in conjunction with any
other antenna or trans
mier.
NOTE: Thi s equipment has b een tested a nd found to comply wit h the limit s for a Class B dig ital device,
pursuant to Part 15 of the FCC Rules. These limits are designed to provide reasonable protection
against harmful interference in a residential installation. This equipment generates, uses, and can
radiate rad io frequenc y energy and, i f not insta lled and used i n accordance w ith the in structio ns, may
cause harmful interference to radio communications. However, there is no guarantee that interfer
ence will not occur in a particular installation. If this equipment does cause harmful interference
radio or television reception, which can be deter mined by turning the equipment o and on,
to
the user is encouraged to try to correct the interference by one or more of the following measures:
• Reorient or relocate the receiving antenna.
• Increase the separation between the equipment and receiver.
• Connect the equipment into an outlet on a circuit dierent from that to which the
receiver is connected.
• Consult the dealer or an experienced radio/TV technician for help.
If items such as cables are included with this equipment, you must use those included items.
Unauthori zed changes or modication to this system can void t he user’s author ity to operate this
equipment.
Notice regarding disposal (EU only)
If this symbol is shown on the prod-
uct, manual, baery, or package, you
st dispo se of it in the corr ect man-
mu
ner to avoid har m to human healt h or
mage to the environment.
da
Contact your local administrative
body for details on the correct dis
posal met hod. If the baery contains
he
lated amount, a chemical symbol is displayed
be
package.
avy metals in excess of the regu-
low the symbol on the baery or baery
Use only AC adapters listed in the user instructions.
For USA, Canada, Japan For EU, AUS
Brand: DYS
Model: DYS602-200325W
Input: 100-240Vac 50/60Hz 1.5A
Output: 20.0Vdc 3.25A
European Union Directives Conformance Statement
Korg Inc. hereby declares t hat the product meets the requirements of Directive 2014/53/EC.
-
u can view the Declaration of Conformity (DoC) to Di-
Yo
rective 2014/53/EC in the Owner’s Manual of this product
sted on the Korg website (www.korg.com).
po
THE FCC REGULATION WARNING (for USA)
This de vice complies wit h Industry Ca nada licence
- exempt RSS st andard(s). Operation is s ubject to the
following two conditions: (1) this device may not
cause interference, and (2) this device must accept
any interference, including interference that may
cause undesired operation of the device.
This equipment complies with IC radiation expo
sure limits set forth for an uncontrolled environ-
ment and meets RSS-102 of the IC radio fre quency
R
F) Exposure rules. This equipment has very low
(
levels of RF e nergy that it de emed to comply without
maximum permissive exposure evaluation (MPE).
Brand: GPE
Model: GPE072D-240300W
Input: 100-240Vac 50/60Hz 1.8A
Output: 24.0Vdc 3A
Emplacement
L’ut ilisation de c et instr ument dans le s endroits suiva nts peut en entr aîner le mauvai s fonctionn ement.
• En plein soleil
• Endroits très chauds ou très humides
• Endroits sales ou fort poussiéreux
• Endroits soumis à de fortes vibrations
• A proximité de champs magnétiques
Alimentation
Branche z l’adapt ateur secte ur mention né à une prise s ecteur de ten sion appropriée. Evite z de brancher
l’adaptateur à une prise de courant dont la tension ne correspond pas à celle pour laquelle l’appareil
est conçu.
Interférences avec d’autres appareils électriques
Les postes de radio et de télévision situés à proximité peuvent par conséquent sourir d’interférences
à la réception. Veuillez dès lors faire fonct ionner cet appareil à une dista nce raisonnable de postes
de radio et de télévision.
Maniement
Pour éviter de le s endommager, manip ulez les comma ndes et les boutons de ce t instrum ent avec soin.
Entretien
Lorsque l’instrument se salit, neoyez-le avec un chion propre et sec. Ne vous servez pas d’agents de
neoyage liquides tels que du benzène ou du di luant, voire des produ its inammables.
Conservez ce manuel
Après avoir lu ce manuel, veuillez le conserver soig neusement pour toute référence ultérieure.
Evitez toute intrusion d’objets ou de liquide
Ne placez jamais de réc ipient contenant du liquide près de l’instrument. Si le liqu ide se renverse ou
coule, il risque de provoquer des dommages, un court-circuit ou une électrocution.
Veillez à ne pas laisser tomber des objets métalliques dans le boîtier (trombones, par ex.). Si cela se
produit, débranchez l’alimentation de la prise de courant et contactez votre revendeur korg le plus
proche ou la surface où vous avez acheté l’instrument.
* Bluetooth est une marque déposée de Bluetooth SIG, Inc.
* Tous les noms de produits et de sociétés sont des marques commerciales ou déposées de
leur détenteur respectif.
Cet équipement est conforme aux limites d’exposit ion aux rayonnements
oncées p our un envir onnement non
én
contrôlé et respecte les règles d’exposition aux fréquences radioélectriques
R
F) CNR-102 de l’IC. Cet équipeme nt
(
émet une énergie RF très faible qui est
considérée conforme sans évaluation
de l’exposition maximale autorisée.
Le présent appareil est conforme aux CNR
d’Industrie Canada applicables aux appareils
radio exempts de licence. L’exploitation est
autorisée aux deux conditions suivantes : (1)
l’appareil ne doit pas produire de brouillage,
et (2) l’utilisateur de l’appareil doit accepter
tout brouillage radioélectrique subi, même si
le brou il lag e est s usc ept ible d’en c omp rom er e
le fonctionnement.
Déclaration de conformité aux directives de l’Union européenne
Korg Inc. déclare par la présente que le produit est conforme aux exigences de la directive 2014/53/CE.
Vous pouvez consulter la Déclaration de conformité (DoC) à la directive 2014/53/CE dans le mode
d’emploi de ce produit, disponible sur le site Internet de Korg (www.korg.com).
Note concernant les dispositions (Seulement EU)
Si ce symbole apparait sur le produit, le manuel, les piles ou les packs de piles, cela signi-
e que vous devez le recycler d’une manière correcte an de prévenir les dommages pour
santé hu maine et les dom mages potentie ls pour l’environn ement. Contactez vo tre admi-
la
nistration locale pour de plus amples renseignements concernant la bonne méthode de
cyclage. Si la pile contient des métaux lourds au-delà du seuil réglementé, un symbole
re
-
chimique est aché en dessous du symbole de la poubelle barrée d’une croix sur la pile
ou le pack de piles.
N’utilisez que des adaptateurs secteur répertoriés dans les instructions
d’utilisation.
Pour USA, Canada, Japon Pour UE, AUS
marque de fabrique: DYS
maquee: DYS602-200325W
d’entrée: 100-240Vac 50/60Hz 1.5A
sortie: 20.0Vdc 3.25A
marque de fabrique: GPE
maquee: GPE072D-240300W
d’entrée: 100-240Vac 50/60Hz 1.8A
sortie: 24.0Vdc 3A
Vorsichtsmaßnahmen
Aufstellungsort
Vermeiden Sie das Aufstellen des Geräts an Orten, an denen
• es direkter Son neneinstrahlung ausgeset ist;
-
• hohe Feuchtigkeit oder Extremtemperaturen auftreten können;
• Staub oder Schmu in großen Mengen vorhanden sind;
• das Gerät Erschüerungen ausgeset sein kann.
• in der Nähe eines Magnetfeldes.
Stromversorgung
Schließen Sie das optionale Neteil nur an eine geeignete Steckdose an. Verbinden Sie es
niemals mit einer Steckdose einer anderen Spannung.
Störeinüsse auf andere Elektrogeräte
Dieser kann bei in der Nähe aufgestellten Rund-funkempfängern oder Fernsehgeräten Empfangsstörungen hervorrufen. Betreiben Sie solche Geräte nur in einem geeigneten Abstand
n diesem Erzeugnis.
vo
- 3 -
Page 4

Bedienung
Vermeiden Sie bei der Bedienung von Schaltern und Reglern unangemessenen Kraftaufwand.
Reinigung
Bei auftretender Verschmuung können Sie das Gehäuse mit einem trockenen, sauberen Tuch
abwischen. Verwenden Sie keinerlei Flüssigreiniger wie beispielsweise Reinigungsbenzin,
Verdünnungs- oder Spülmiel. Verwenden Sie n iemals brennbare Rei niger.
Bedienungsanleitung
Bewahren Sie diese Bedienungsanleitung gut auf, falls Sie sie später noch einmal benötigen.
Flüssigkeiten und Fremdkörper
Stellen Si e niemals Behä ltnisse m it Flüssigkeiten in de r Nähe des Ge räts auf. Wenn Flüssigke it
in das Gerät gelangt, können Beschädigung des Geräts, Feuer oder ein elek-trischer Schlag
die Folge sein.
Beachten Sie, daß keinerlei Fremdkörper in das Gerät gelangen. Sollte ein Fremdkörper in
das Gerät gelangt sein, so tren nen Sie es sofort vom Ne. Wenden Sie sich dann an Ihren
Korg-Fachhändler.
* Bluetooth ist ein eingetragenes Markenzeichen der Bluetooth SIG, Inc.
* Alle Produkt- und Firmennamen sind Warenzeichen oder eingetragene Warenzeichen
der betreenden Eigent ümer.
Entsprechungserklärung für die Richtlinien der europäischen Union
Korg Inc. erklärt hiermit, dass dieses Gerät die Anforderungen der Richt lin ie 1999/5/
EC erfüllt.
Diese Entsprechungserklärung (DoC) f ür die 1999/5/EC-Richtl inie nden Sie in der Bedienungsanleitung dieses Geräts auf der Korg-Webpage (www.korg.com).
Hinweis zur Entsorgung (Nur EU)
Wenn Sie das Sym bol mit der „durchgek reuzten Mül ltonne“ auf Ih rem Produkt,
der dazugehörigen Bedienungsanleit ung, der Baerie oder der Verpackung
sehen, mü ssen Sie das Produ kt in der vorgeschr iebenen Art u nd Weise entsorgen um Sc häden an der mensc hlichen Gesundh eit und der Umwelt zu vermeiden. Baerien oder Akkus, die Schadstoe enthalten, sind auch mit dem Symbol eine r durchg ekreuzten Mül ltonne geken nzeichne t. In der Nähe zum Mül l-
tonnensymbol bendet sich die c hemische Bezeichnung des Schadstoes.
Precauciones
Ubicación
El uso de la unidad en las siguientes ubicaciones puede dar como resultado un mal
funcionamiento:
• Expuesto a la luz directa del sol
• Zonas de extremada temperatura o humedad
• Zonas con exceso de suciedad o polvo
• Zonas con excesiva vibración
• Cercano a campos magnéticos
Fuente de alimentación
Por favor, conecte el adaptador de corriente designado a una toma de corriente con el
voltaje adecuado. No lo conecte a u na toma de corriente con voltaje diferente al indicado.
Interferencias con otros aparatos
Las radios y te levisores sit uados cerca pueden exp erimentar i nterferencia s en la recepción .
Opere este dispositivo a una distancia prudencial de radios y televisores.
Manejo
Para evitar una rotura, no aplique excesiva fuerza a los conmutadores o controles.
Cuidado
Si exterior se ensucia, límpiese con un trapo seco. No use líquidos limpiadores como
disolvente, ni compuestos inamables.
Guarde este manual
Después de leer este manual, guárdelo para futuras consultas.
Mantenga los elementos externos alejados del equipo
Nunca coloque ningún recipiente con líquido cerca de este equipo, podría causar un
cortocircuito, fuero o descarga eléctrica. Cuide de que no caiga ningún objeto metálico
dentro del equipo.
* Bluetooth es una marca registrada de Bluetooth SIG, Inc.
* Todos los nombres de productos y compañías son marcas
comerciales o marcas registradas de sus respectivos propietarios.
Declaración de Conformidad con las Directivas de la Unión Europea
Por la presente, Korg Inc. declara que este producto cumple con los requisitos de la
Directiva 1999/5/EC.
Puede consultar la Declaración de Conformidad (DoC) con la Directiva 1999/5/EC en
el Manual del Usuario de este producto, disponible en el sitio web de Korg (www. korg.com).
Nota respecto a residuos y deshechos (solo UE)
Si aparece el símbolo del cubo de basura tachado sobre un producto, su manual de
usuario, la batería, o el embalaje de cualquiera de éstos, sign ica que c uando tire
dichos a rtículos a l a basura, ha de hacerlo e n acuerdo con la norm ativa vigente de la
Unión Europ ea para preveni r daños a la salud públ ica y al medioam biente. Le roga
mo s qu e se po nga en con tac to co n su o c ina o mi ni st eri o de medio a mbi ent e par a má s
det
alles. S i la batería conti ene metales pe sados por encim a del límite per mitido, habrá
un símb olo de un material qu ímico, debajo del sí mbolo del cubo de basur a tachado.
安全上のご注意
ご使用になる前に必ずお読みください
ここに記載した注意事項は、製品を安全に正しくご使用いただき、あなたや他の方々への危害や
損害を未然に防ぐためのものです。注意事項は誤った取り扱いで生じる危害や損害の大きさ、
または切迫の程度によって、内容を「警告」、「注意」の2つに分けています。これらは、あなたや
他の方々の安全や機器の保全に関わる重要な内容ですので、よく理解した上で必ずお守りくだ
さい。
図記号の例
記号は、注意(危険、警告を含む)を示しています。記号の中には、具体的な注意内容
が描かれています。左の図は「一般的な注意、警告、危険」を表しています。
記号は、禁止(してはいけないこと)を示しています。記号の中には、具体的な
注意内容が描かれることがあります。左の図は「分解禁止」を表しています。
記号は、強制(必ず行うこと)を示しています。記号の中には、具体的な注意内容が描か
れることがあります。左の図は「電源プラグをコンセントから抜くこと」を表しています。
・ ACアダプターのプラグは、必ずAC100Vの電源コンセントに差し込む。
・ ACアダプターのプラグにほこりが付着している場合は、ほこりを拭き取る。
感電やショートの恐れがあります。
本製品はコンセントの近くに設置し、ACアダプターのプラグへ容易に手が届くようにする。
・
・
次のような場合には、直ちに電源を切ってACアダプターのプラグをコンセントから抜く。
○
ACアダプターが破損したとき
○
製品に異常や故障が生じたとき
修理が必要なときは、コルグお客様相談窓口へ依頼してください。
・ 本製品を分解したり改造したりしない。
・ 修理、部品の交換などで、取扱説明書に書かれていること以外は絶対にしない。
・ ACアダプターのコードを無理に曲げたり、発熱する機器に近づけない。また、ACアダ
プターのコードの上に重いものをのせない。
コードが破損し、感電や火災の原因になります。
・ 大音量や不快な程度の音量で長時間使用しない。
大音量で長時間使用すると、難聴になる可能性があります。万一、聴力低下や耳鳴りを
感じたら、専門の医師に相談してください。
・ 本製品に異物(燃えやすいもの、硬貨、針金など)を入れない。
・ 温度が極端に高い場所(直射日光の当たる場所、暖房機器の近く、発熱する機器の上など)
で使用や保管はしない。
・ 振動の多い場所で使用や保管はしない。 ・ ホコリの多い場所で使用や保管はしない。
・ 風呂場、シャワー室で使用や保管はしない。
・ 雨天時の野外のように、湿気の多い場所や水滴のかかる場所で、使用や保管はしない。
・ 本製品の上に、花瓶のような液体が入ったものを置かない。
・ 本製品に液体をこぼさない。
・ 濡れた手で本製品を使用しない。
・ 正常な通気が妨げられない所に設置して使用する。
・ ラジオ、テレビ、電子機器などから十分に離して使用する。
ラジオやテレビ等に接近して使用すると、本製品が雑音を受けて誤動作する場合があり
ます。また、ラジオ、テレビ等に雑音が入ることがあります。
本製品をテレビ等の横に設置すると、本製品の磁場によってテレビ等の故障の原因にな
ることがあります。
・ 外装のお手入れは、乾いた柔らかい布を使って軽く拭く。
・ ACアダプターをコンセントから抜き差しするときは、必ずプラグを持つ。
・ 長時間使用しないときは、電池の液漏れを防ぐために電池を抜く。
・ 電池は幼児の手の届かないところへ保管する。
・ 長時間使用しないときは、ACアダプターをコンセントから抜く。
・ 指定のAC アダプター以外は使用しない。
・ 他の電気機器の電源コードと一緒にタコ足配線をしない。
本製品の定格消費電力に合ったコンセントに接続してください。
・ 電池を過度の熱源(日光、火など)にさらさない。
・ スイッチやツマミなどに必要以上の力を加えない。
故障の原因になります。
・ 外装のお手入れに、ベンジンやシンナー系の液体、コンパウンド質、強燃性のポリッ
シャーは使用しない。
・ 不安定な場所に置かない。
本製品が落下してお客様がけがをしたり、本製品が破損する恐れがあります。
・ 本製品の上に乗ったり、重いものをのせたりしない。
本製品が落下または損傷してお客様がけがをしたり、本製品が破損する恐れがあります。
-
・ 本製品の隙間に指などを入れない。
お客様がけがをしたり、本製品が損傷する恐れがあります。
*すべての製品名および会社名は、各社の商標または登録商標です。
火災・感電・人身障害の危険を防止するには
以下の指示を守ってください
警告
注意
この注意事項を無視した取り扱いをすると、
死亡や重傷を負う可能性があります。
○
異物が内部に入ったとき
この注意事項を無視した取り扱いをすると、傷害を負う可
能性または物理的損害が発生する可能性があります。
- 4 -
Page 5

Noms des éléments et fonctions
5
1
3
6
4
2
7
1 Bouton et témoin d’alimentation
Appuyez sur ce bouton pour mettre le système sous tension (le témoin s’allume) ou
hors tension (le témoin s’éteint).
2 Prise DC INPUT
Branchez l’adaptateur secteur fourni à cette prise.
3 Commande MASTER VOLUME, témoin CLIP
Règle le volume du KONNECT. Soyez prudent quand vous réglez le volume, car une
hausse trop forte du niveau peut causer de la distorsion sur le son sortant des haut-
parleurs. Dans ce cas, le témoin CLIP s’allume. Si vous rencontrez ce problème, ajustez
les réglage s en baissant le niveau de chaque canal, de s orte que les témoin s CLIP restent
éteints.
4 Commande REVERB LEVEL & TYPE
La position de cette commande détermine simultanément le type de réverbération et
l’intensité de l’effet. Pour coupe r la réverbération, tour nez cette comm ande à fond à gauche.
5 Témoin LIMITER
Ce témoin s’allume quand le limiteur est actif.
6 Bouton et témoin FEEDBACK SUPPRESSOR
Ce bouton active et coupe la fonction FEEDBACK SUPPRESSOR (le témoin s’allume
quand la fonction est active). Quand elle est active, cette fonction élimine l’effet Larsen.
7 Témoin d’appairage
Ce témoin s’allume quand le KONNECT est relié à un dispositif externe via une
co n n exion Blu e toot h. (Vo yez la sect ion “Con nex ion à l’appl ication KON NEC T App vi a
Bluetooth”.)
8 Boutons et témoins de sélection de canal
Ces boutons p ermettent de séle ctionner le ca nal contrôlé via les comma ndes VOLUME,
VOICE de canal. Le témoin du canal sélectionné s´allume.
Astuce: Quand vous lisez de la musique avec un dispositif externe connecté via Bluetooth, les
canaux d’entrée 3 et 4 (3/4) sont utilisés.
9 Commande VOLUME, témoin CLIP
Règle le volume du canal sélectionné avec les boutons de sélection de canal. Soyez
prudent qua nd vous réglez le volume, car une hausse trop forte du niveau peut causer
de la distorsion sur le son des haut-parleurs (le témoin CLIP pourrait alors s’allumer).
Si vous rencontrez ce problème, ajustez les réglages en baissant le niveau sur le dispositif connecté à chaque canal, de sorte que les témoins CLIP restent éteints.
10 Commande VOICE
La position de cette commande détermine simultanément le type de voix et l’intensité de l’effet.
Astuce: Le terme “voix” désigne les réglages d’égalisation optimum adaptés à chaque dispositif
connecté.
11 Bouton et témoin CENTER CANCEL
Ce bouton act ive (le témoin s’allume) ou coupe la fonction d’atténuation Center Ca ncel
pour les canaux 3/4. Quand elle est active, la fonction Center Cancel permet d’atténuer
uniquement le son du chant ou des guitares de la source lue sur un iPhone ou d’autres
dispositifs connectés au KONNECT.
12 Sélecteur MIC/LINE
Quand ce sélecteur est placé sur la position MIC, la prise d’entrée MIC/LINE du canal
1 permet de connecter un microphone.
13 Prises d’entrée MIC et MIC/LINE du canal 1
Utilisez cette entrée pour connecter un micro dynamique ou un dispositif de niveau
de sortie ligne.
14 Prises d’entrée MIC et LINE du canal 2
Utilisez cette entrée pour connecter un micro dynamique et un dispositif de niveau
de sortie ligne.
15 Prise d’entrée STEREO INPUT des canaux 3/4
Utilisez cette entrée pour connecter un dispositif stéréo de niveau de sortie ligne, tel
qu’un lecteur audio, aux canaux 3/4.
16 Prises d’entrée L/MONO INPUT et R INPUT des canaux 3/4
Utilisez ces prises d’entrée pour connecter les sorties L et R d’un dispositif stéréo de
niveau de sort ie ligne. (Si vous utilis ez uniquement la pri se d’entrée L/MONO INPUT,
les canaux 3/4 fonctionnent en mode mono.)
(Bluetooth)
8
9
12
13
10
8
14
8
11
16
15
Préparatifs
Connexions
1 Réglez la commande MASTER VOLUME du KONNECT sur le minimum.
2 Branchez l’adaptateur secteur fourni à la prise DC INPUT et reliez son autre fiche
à une prise de courant de tension appropriée.
Utilisez uniquement l’adaptateur secteur spécifié. L’utilisation de tout autre adaptateur secteur pourrait causer des dysfonctionnements.
3 Branchez le ou les dispositifs externes aux prises d’entrée.
4 Appuyez sur le bouton d’alimentation pour mettre le KONNECT sous tension.
Astuce: Pour mettre le KONNECT hors tension, appuyez à n ouveau sur le bouton d’alimentation.
5 Réglez le volume en tournant lentement les commandes VOLUME et MASTER
VOLUME.
Fonction de coupure automatique de l’alimentation
Le KONNECT est doté d’une fonction de coupure automatique de l’alimentation.
L’appareil active automatiquement son mode de veille si aucune commande n’est actionnée et si aucun signal n’est reçu pendant environ 20 minutes. Pour retourner en
m
de normal, actionnez une commande ou un bouton du KONNECT, ou utilisez
o
l’application KONNECT App pour mettre à nouveau l’appareil sous tension.
REVERB TYPE
SMALL Ce type de réverbération recrée l’acoustique d’une petite pièce, comme un
MEDIUM Ce type de réverbération recrée l’acoustique d’une salle de taille moyenne,
LARGE Ce type de réverbération recrée l’acoustique d’une vaste salle, comme une
KARAOKE Ce type est idéal pour les applications de karaoké.
home studio.
comme un café-concert.
salle de concert.
VOICE TYPE
MALE VOICE Ce type est idéal pour une voix d’homme (chant et narration).
FEMALE VOICE Ce type est idéal pour une voix de femme (chant et narration).
ELECTRIC GUITAR
S. ACOUSTIC GUITAR Ce type est idéal pour une guitare acoustique à cordes en acier.
MUSIC
Ce type est idéal pour la guitare électrique.
Ce type est idéal pour écouter de la musique chez vous.
Astuce: L’application KONNECT App permet de choisir parmi 11 types différents de voix.
Connexion à l’application KONNECT App via Bluetooth (appairage)
Astuce: Quand l’appareil est appairé avec l’application KONNECT App, toutes les commandes du
panneau avant du KONNECT -sauf la commande MASTER VOLUME- sont désactivées.
Astuce: Pour une description détaillée de l’utilisation de l’appareil en mode appairé et des consignes
de sécurité, voyez le site de téléchargement de l’application KONN ECT App ou l’aide (“Help
Center”) disponible dans l’application même.
1 Quand le KONNECT est sous tension, maintenez enfoncé le bouton de sélection
du canal 3/4.
2 Le témoin d’appair age
d’attente d’appairage Bluetooth.
3 Réglez les paramètres de con nexion Bluetoot h sur le disposit if externe e t sélection-
nez “KONNECT” comme point de connexion.
4 Quand l’appairage est actif, le témoin s’allume et vous pouvez commander les
fonctions du KONNECT et contrôler la lecture avec l’application KONNECT.
Astuce: Pour plus d’informations sur les dispositifs et versions des systèmes compatibles avec
l’application KONNECT App, voyez le site de téléchargement de l’application KONNECT App ou l’aide (“Help Center”) disponible dans l’application même.
5 Dan s le cas d’un dispo sitif analogique con necté aux ca naux 3/4, la pr iorité de lect ure
est accordée à ce dispositif. Si vous lisez une source Bluetooth, débranchez le câble
reliant le dispositif analogique au KONNECT.
(Bluetoo th) cligno te alors et le KONNE CT active son mode
Fiche technique
Types de réverbération : 4
Types de voix : 5 (11 quand l’application KONNECT App est utilisée)
Mémoires de scène (uniquement quand l’application est utilisée) : 3
Prises d’entrée : Canal 1 Prise MIC/LINE (de type XLR-3-32 [symétrique], 4,7 kΩ,
Canal 2 Prise d’entrée LINE (de type XLR-3-32 [symétrique], 4,7 kΩ,
Canaux 3/4 Prise d’entrée L/MONO INPUT (jack mono de 6,3 mm
Prise d’entrée STEREO INPUT (minijack stéréo de 3,5 mm
Haut-parleurs : 6,5 pouces et 1 pouce x 2 (16,5 cm et 2,5 cm x 2)
Alimentation: Adaptateur secteur
Dimensions (L x P x H): 445 x 230 x 230 mm
Poids: 5,6 kg
Accessories: Adaptateur secteu , Manuel d’utilisation
Option: Sacoche de transport, Pied d’enceinte: ST-S80 (KORG)
* Les caractéristiques et l’aspect du produit sont susceptibles d’être modifiés sans avis
préalable en vue d’une amélioration..
niveau nominal de -43 dBV ou prise jack mono de 6,3 mm
[asymétrique], 1MΩ, niveau nominal : -26 dBV)
niveau nominal de -43 dBV et jack mono de 6,3 mm
[asymétrique], 1MΩ, niveau nominal : -26 dBV)
[asymétrique], 1MΩ, niveau nominal : -26 dBV)
Prise d’entrée R INPUT (jack mono de 6,3 mm [asymétrique],
1MΩ, niveau nominal : -26 dBV)
[asymétrique], 10kΩ, niveau nominal : -10 dBV)
- 5 -
Page 6

Bedienelemente und Funktionen
5
1
3
6
4
2
7
1 Einschalttaste, LED
Das Gerät wird durch Drücken dieser Taste eingeschaltet (LED leuchtet).
2 Netzteilbuchse (DC INPUT)
Schließen Sie hier das beiliegende Netzteil an.
3 MASTER VOLUME-Regler, CLIP-LED
Regelt die Lautstärke des KONNECT. Bei zu hohen Lautstärken ka n n die Wiedergabe
durch die Lautsprecher unnatürlich verzerrt klingen, wobei die CLIP-LED aufleuch-
tet. Ist dies der Fall, regeln Sie die Lautstärke jedes Kanals so lange herunter, bis die
CLIP LEDs erlöschen.
4 REVERB LEVEL- & TYPE-Regler
Je nach Position des Reglers werden Typ und Effekttiefe des Halls geregelt. Wird
dieser Regler ganz nach links gedreht, ist der Hall abgeschaltet.
5 LIMITER-LED
LED leuchtet bei Betrieb des Limiters.
6 FEEDBACK SUPPRESSOR-Taste, LED
Zum Einschalten des FEEDBACK SUPRRESSOR (LED leuchtet), der unerwünschte
Rückkopplungen zu vermeiden hilft.
(Bluetooth) Pairing-LED
7
LED leuchtet, wenn das KONNECT über Bluetooth mit einem externen Gerät verbunden ist. (Siehe „Bluetooth-Verbindung mit KONNECT-APP [working title]“)
8 Kanalwahltasten und LEDs
Wählt den Kanal, auf den sich VOLUME- und VOICE-Regler auswirken. Die LED des
entsprechenden Kanals leuchtet.
Tipp: Für die Wiedergabe von Musik eines über Bluetooth verbundenen externen Geräts wer-
den die Eingangskanäle 3 und 4 (3/4) verwendet.
9 VOLUME-Regler, CLIP-LED
Regelt die Lautstärke des mit den Kanalwahltasten gewählten Kanals. Bei zu hohen
Lautstärken kann die Wiedergabe durch die Lautsprecher unnatürlich verzerrt klingen, wobei die CLIP-LED aufleuchtet. Ist dies der Fall, regeln Sie die Lautstärke der
Geräte an jedem Kanal so lange herunter, bis die CLIP LEDs erlöschen.
10 VOICE-Regler
Je nach Position des Reglers werden Voicing-Typ und Effekttiefe geregelt.
Tipp:
Mit „Voicing“ sind die optimalen, zur Charakteristik des jeweiligen angeschlossenen
Geräts passenden EQ-Einstellungen gemeint.
11 CENTER CANCEL-Taste und LED
Schaltet die Mittenabsenkung für die Kanäle 3/4 ein (LED leuchtet) oder aus. Bei aktivier ter Mittenabsenkung wird die Lautstärke von St immen oder Gitarr ensounds bei
der Musikwiedergabe über an das KONNECT angeschlossene iPhones oder andere
Geräte abgesenkt.
12 MIC/LINE-Schalter
Steht dieser Schalter auf MIC, dient die MIC/LINE-Eingangsbuchse von Kanal 1 als
Mikrofoneingang.
13 MIC- und MIC/LINE Eingangsbuchse für Kanal 1
Eingang für dynamische Mikrofone oder Geräte mit LINE-Ausgangspegel.
14 MIC- und MIC/LINE Eingangsbuchse für Kanal 2
Eingang für dynamische Mikrofone oder Geräte mit LINE-Ausgangspegel.
15 STEREO INPUT-Buchse für Kanäle 3/4
Eingang zum An schluss eines Stereoge räts mit LINE-Ausgangspegel (z. B. Audioplay-
er) an die Kanäle 3/4.
16 L/MONO INPUT- und R INPUT-Buchse für Kanäle 3/4
Eingänge zum An schluss der L- und R-Sig nale eines Geräts m it LINE-Ausgangs pegel.
(Wird nur die L/MONO INPUT-Buchse belegt, arbeitet Kanal 3/4 wie ein Monokanal.)
8
9
12
13
10
8
14
8
11
16
15
Inbetriebnahme
Anschlüsse
1 Drehen Sie den MASTER VOLUME-Regler des KONNECT bis zum Anschlag
herunter.
2 Verbinden Sie das im Lieferumfang enthaltene Netzteil mit der DC20V-Buchse
und stecken Sie dann den Netzstecker in eine Steckdose.
Verwenden Sie ausschließlich das hierfür vorgesehene Netzteil. Die Verwendung
eines anderen Netzteils kann Störungen verursachen.
3 Schließen Sie ein oder mehrere externe Gräte an die Kanaleingangsbuchsen an.
4 Drücken Sie die Einschalttaste, um das KONNECT einzuschalten.
Tipp: Zum Ausschalten des KONNECT drücken Sie die Einschalttaste erneut.
5 Regeln Sie vorsichtig die Lautstärke mit den VOLUME- und MASTER VOLUME-
Reglern.
Energiesparfunktion
Das KONNECT besitzt eine Energiesparfunktion. Diese Funktion schaltet das Gerät automatisch aus, wenn ca. 20 Minuten lang keine Betätigung erfolgt oder kein Eingangssignal anliegt. Zum Wiedereinschalten reicht es, einen beliebigen Regler oder Taste des
KONNECT zu bedienen - alter nativ können Sie hierz u auch die KONNECT App verwenden.
REVERB-TYP
SMALL Diese Reverb-Einstellung si muliert einen k leinen Raum, z. B. ein Heimst u-
MEDIUM Diese Reverb-Einstellung simuliert einen mittelgroßen Raum, z. B. einen
LARGE Diese Reverb-Einstellung simuliert einen großen Raum, z. B. einen Kon-
KARAOKE Optimale Einstellung zum Karaoke singen.
dio.
Club für Livemusik.
zertsaal.
VOICE-TYP
MALE VOICE Optimale Einstellung für männlichen Gesang oder Sprache.
FEMALE VOICE Optimale Einstellung für weiblichen Gesang oder Sprache.
ELECTRIC GUITAR Optimale Einstellung für E-Gitarren.
S. ACOUSTIC GUITAR Optimale Einstellung für akustische Gitarren mit
MUSIC
Tipp: Mit der KONNECT App können Sie bis zu 11 unterschiedliche Voicing-Typen auswählen.
Stahlsaiten.
Optimale Einstellung zum Hören von Musik in Ihrem Zuhause.
Verbindung zur KONNECT App über Bluetooth (Pairing)
Tipp: Solange das Gerät mit der KONNECT App gekoppelt ist , werden alle Funktionen auf dem
Bedienfeld des KONNECT außer MASTER VOLUME deaktiviert.
Tipp: Genauere Hinweise zum Vorgehen beim Pairing finden Sie auf der Download Website der
KONNECT App bzw. im „Help Center“ der App selbst.
1 Schalten Sie das KONNECT ein und halten Sie die Auswahltaste für Kanal 3/4
gedrückt.
2 Die
3 Öff nen Sie an Ihrem exte rnen Gerät die Bluetooth-Verbindungseinst ellungen und
4 Nach erfolgtem Pairing leuchtet die LED und Sie können das KONNECT über die
5 Falls ein analoges Gerät an die Kanäle 3/4 angeschlossen ist, hat die Wiedergabe
(Bluetooth) Pairing-LED blinkt und das KONNECT fährt in den Bluetooth-
Pairing-Bereitschaftsmodus.
wählen Sie „KONNECT“ als Verbindungsziel.
App steuern und damit Musik wiedergeben.
Tipp: Weitere Hinweise zu mit der KONNECT App kompatiblen Geräten und Betriebssyste-
men finde n Sie in der Download-Website d er App sowie im „Help Center “ der App selbst.
des ana logen Geräts Vorra ng. Bei Wiedergabe über ein Bluetoot h-Gerät sol lten Sie
zuvor das analoge Gerät vom KONNECT trennen.
Technische Daten
Anzahl der REVERB-Typen: 4
Anzahl der VOICE-Typen: 5 (11 bei Verwendung der KONNECT App)
Anzahl der Scene-memory-Programme (nur bei Verwendung der App): 3
Eingänge: Kanal 1 MIC/LINE Eingang: (XLR-3-32-Buchse [symmetrisch],
Kanal 2 LINE Eingang (XLR-3-32-Buchse [symmetrisch],
Kanäle 3/4 L/MONO-INPUT-Eingang (6,3 mm Mono-Klinkenbuchse
STEREO INPUT-Eingang (3,5 mm Stereo-Miniklinkenbuch-
Lautsprecher: 6,5 Zoll und 1 Zoll x 2 (16,5 cm und 2,5 cm x 2)
Stromversorgung: Netzteil
Abmessungen (B x T x H): 445 x 230 x 230 mm
Gewicht: 5,6 kg
Lieferumfang: Netzteil, Bedienungsanleitung
Sonderzubehör: Tragetasche, Lautsprecherstativ (KORG ST-S80)
* Änderungen der technischen Daten und des Designs ohne vorherige Ankündigung
vorbehalten.
4,7 kΩ, spezifizierter Pegel: -43 dBV oder
6,3 mm Mono-Klinkenbuchse [unsymmetrisch], 1 MΩ,
spezifizierter Pegel: -26 dBV)
4,7 kΩ, spezifizierter Pegel: -43 dBV und
6,3 mm Mono-Klinkenbuchse [unsymmetrisch], 1 MΩ,
spezifizierter Pegel: -26 dBV)
[unsymmetrisch], 1 MΩ, spezifizierter Pegel: -26 dBV)
R INPUT-Eingang (6,3 mm Mono-Klinkenbuchse [unsymmetrisch], 1 MΩ, spezifizierter Pegel: -26 dBV)
se [unsymmetrisch], 10 kΩ, spezifizierter Pegel: -10 dBV)
- 6 -
Page 7

Nombres y funciones de las partes
5
1
3
6
4
2
7
1 Botón y led (encendido)
El KONNECT se encenderá (el led se iluminará) o se apagará al pulsar el botón.
2 Conector DC INPUT
Aquí se conecta el adaptador de corriente incluido.
3 Mando MASTER VOLUME, led CLIP
Ajusta el volumen del KONNECT. Si se sube el volumen demasiado, el sonido que sale
por los altavoces puede sonar distorsionado de forma no natural y puede iluminarse
el led CLIP. Si esto ocurre, vuelva a hacer los ajustes de nuevo bajando el volumen de
cada canal hasta que el led CLIP se apague.
4 Mando REVERB LEVEL & TYPE
Según la posición en que se ajuste, con este mando se selecciona el tipo de reverberación y la intensidad del efecto. Si se gira del todo hacia la izquierda, se desactiva la
reverberación.
5 Led LIMITER
Este led se ilumina cuando entra en funcionamiento el limitador.
6 Botón y led FEEDBACK SUPPRESSOR
Este botón activa (el led se iluminará) o se desactiva el supresor de realimentación. Su
activación permite suprimir la realimentación (acoples).
7 Led de emparejamiento
Este led se ilumina cuando el KONNECT se conecta a un dispositivo externo a través
de Bluetooth. Consulte “Conexión a la App KONNECT a través de Bluetooth (emparejamiento)”.
8 Botones y leds de selección de canales
Seleccionan el canal que va a ser controlado por los mandos de canal VOLUME y
VOICE. El led del canal seleccionado se iluminará.
Nota: Cuando se reproduce música desd e un dispositivo ext erno conectado a través de Bluetooth,
se utilizan los canales de entrada 3 y 4 (3/4).
9 Mando VOLUME, led CLIP
Este mando ajusta el volumen del canal que se haya seleccionado con los botones de
selección de canal. Si se sube el volumen demasiado, puede hacer que el sonido que
sale por los altavoces suene distorsionado de forma no natural (puede iluminarse el
led CLIP). Si esto ocurre, vuelva a hacer los ajustes de nuevo bajando el volumen de
los dispositivos de cada canal hasta que el led CLIP se apague.
10 Mando VOICE
Según la posición en que se ajuste, con este mando se selecciona el tipo de voz y la
intensidad del efecto.
Nota:
Las “voces” son ajustes óptimos del ecualizador que resultan idóneos para las caracterís-
ticas de cada dispositivo conectado.
11 Botón y led CENTER CANCEL
Este botón activa (el led se iluminará) o desactiva la función de cancelación central
para los canales 3/4. Cuando se activa la cancelación central, se puede disminuir el
volumen solo de las voces o las guitarras en la música reproducida en un iPhone u
otros dispositivos conectados al KONNECT.
12 Conmutador MIC/LINE
Cuando se pone en MIC, el jack de entrada MIC/LINE del canal 1 se utiliza como jack
de entrada de micrófono.
13 Entradas MIC (XLR) y MIC/LINE (jack) de entrada para el canal 1
Estas entradas se utilizan para micrófonos dinámicos (MIC) o dispositivos con salida
de nivel de línea (LINE).
14 Entradas MIC (XLR) y LINE (jack) para el canal 2
Estas entradas se utilizan para micrófonos dinámicos (MIC) y dispositivos con salida
de nivel de línea (LINE).
15 Entrada STEREO INPUT para los canales 3/4
Este minijack se utili za para introduci r dispositivos con sa lida estéreo de nivel de lí nea,
como por ejemplo reproductores de música, en los canales 3/4.
16 Entradas L/MONO INPUT y R INPUT para los canales 3/4
Estos jacks se utilizan para introducir las señales del canal izquierdo (L) y del canal
derecho (R) de un dispositivo con salida de nivel de línea. (Cuando utilice solo el jack
L/MONO INPUT, los cana les 3/4 f uncionarán c omo un canal ún ico en modo monoaural.)
(Bluetooth)
8
9
12
13
10
8
14
8
11
16
15
Conguración
Conexiones
1 Gire el ma ndo MASTER VOLUME de l KONNEC T y póngalo en la posición mí nima.
2 Conec te el adaptador de cor riente incluido al conector D C INPUT y, a continuación,
enchufe el adaptador a una toma de corriente.
Utilice solamente el adaptador de corriente especificado. Si utiliza otro adaptador de
corriente diferente puede causar una avería.
3 Conecte el dispositivo o dispositivos externos a las entradas de los canales.
4 Pulse el botón de encendido para encender el KONNECT.
Nota: Para apagar el KONNECT, vuelva a pulsar el botón de encendido otra vez.
5 Gire lentamente los mandos VOLUME y MASTER VOLUME para ajustar el volu-
men.
Función de apagado automático
El KONNECT tiene una función de apagado automático. Con esta función, la unidad
entra automáticamente en modo de espera si no se lleva a cabo ninguna acción ni hay
entrada de sonido durante aproximadamente 20 minutos. Para volver al modo de funcio-
namiento normal, accione uno de los mandos o botones del KONNECT o utilice la App
KONNECT para volver a encender la unidad.
TIPO DE REVERBERACIÓN (REVERB)
SMALL Este ajuste de reverberación simula una habitación pequeña, como puede
MEDIUM Este ajuste de reverberación simula una sala de tamaño medio, como pue-
LARGE Este ajuste de reverberación simula una sala grande, como puede ser una
KARAOKE Este es el ajuste idóneo para cantar karaoke.
ser un estudio doméstico.
de ser un club de música en vivo.
sala de conciertos.
TIPO DE VOZ (VOICE)
MALE VOICE Este es el ajuste idóneo c uando cantan o hablan voces mascu linas.
FEMALE VOICE Este es el ajuste idóneo cuando cantan o hablan voces femeninas.
ELECTRIC GUITAR
S. ACOUSTIC GUITAR Este es el ajuste idóneo para g uitarras acústicas co n cuerdas de acero.
MUSIC
Nota: Puede utilizar la App KONNECT para seleccionar hasta 11 tipos de voces diferentes.
Este es el ajuste idóneo para guitarras eléctricas.
Este es el ajuste idóneo para escuchar música en casa.
Conexión a la App KONNECT a través de Bluetooth (emparejamiento)
Nota: Mientras la unidad está emparejada con la App KONNECT, todas las funciones del panel
del KONNECT están desactivadas excepto MASTER VOLUME.
Nota: En el sitio web de descarga de la App KONNECT o en el centro de ayuda (Help Center) que
contiene la propia app, encontrará información sobre cuestiones a tener en cuenta y detalles
operativos al proceder al emparejamiento.
1 Con el KONNECT encendido, mantenga pulsado el botón de selección de canal
para los canales 3/4.
2 El led de emparejamiento
modo de espera de emparejamiento Bluetooth.
3 Siga los ajustes del dispositivo externo para la conexión Bluetooth y seleccione
“KONNECT” como punto de conexión.
4 Una vez terminado el emparejamiento, se iluminará el led y podrá controlar las
diversas operaciones y reproducir música en el KONNECT desde la app.
Nota: Para más información sobre qué dispositivos y versiones de sistemas operativos son
compatibles con la App KONNECT, consulte el sitio web de descarga de la app y el
centro de ayuda (Help Center) que contiene la propia app.
5 Cuando se conecta un dispositivo analógico a los canales 3/4, la reproducción des-
de dicho dispositivo analógico tendrá prioridad. Cuando reproduzca en un dispositivo Bluet ooth, descone cte el cable que va del dis positivo ana lógico al KONNEC T.
(Bluetooth) parpadeará y el KONNECT entrará en el
Especicaciones
Número de tipos de reverberación (REVERB): 4
Número de tipos de voces (VOICE): 5 (11 con la App KONNECT)
Número de programas de memorias de escena (solo con la app): 3
Entradas: Canal 1 Entradas MIC/LINE (conector XLR-3-32 [balanceado], 4,7 kΩ,
Canal 2 Entrada LINE (conector XLR-3-32 [balanceado], 4,7 kΩ, nivel
Canales 3/4 Entrada L/MONO INPUT (jack monoaural de 6,3 mm [sin
entrada STEREO INPUT (minijack estéreo de 3,5 mm [sin
Altavoces: 6,5 pulgadas y 1 pulgada x 2 (16,5 cm y 2,5 cm x 2)
Fuente de alimentación: Adaptador de CA
Dimensiones (anch. x prof. x alt.): 445 x 230 x 230 mm
Peso: 5,6 kg
Accesorios: Adaptador de CA, Manual de usuario
Artículo opcional Caso que lleva, Pedestal de altavoces (KORG ST-S80)
* Las especificaciones y el aspecto están sujetos a cambios sin previo aviso por mejora.
- 7 -
nivel especificado: -43 dBV, o jack monoaural de 6,3 mm [sin
balancear], 1 MΩ, nivel especificado: -26 dBV)
especificado: -43 dBV, y jack monoaural de 6,3 mm [sin
balancear], 1 MΩ, nivel especificado: -26 dBV)
balancear], 1 MΩ, nivel especificado: -26 dBV);
Entrada R INPUT (jack monoaural de 6,3 mm [sin balancear],
1 MΩ, nivel especificado: -26 dBV);
balancear], 10 kΩ, nivel especificado: -10 dBV)
Page 8

各部の名称と機能
5
1
3
6
4
2
7
1
(電源)ボタン、LED
ボタンを押すたびに電源のオン(LEDが点灯)、オフを繰り返します。
2
DC INPUT端子
付属のACアダプターを接続します。
3
MASTER VOLUMEノブ、CLIP LED
本機の音量を調節します。音量を上げ過ぎると、スピーカーからの出力が不自然
に歪んでCLIP LE Dが点灯することがあります。その場合は、各チャンネルのボ
リュームを下げながら、CLIP LEDが消灯するように再度セッティングを行ってく
ださい。
4
REVERB LEVEL & TYPEノブ
ノブの位置によって、リバーブのタイプの切り替えと効果の深さなどを調節しま
す。ノブを左に回しきると、リバーブがオフになります
5
LIMITER LED
LIMITERの動作時に点灯します。
6
FEEDBACK SUPPRESSORボタン、LED
FEEDBACK SUPPRESSORのオン(LEDが点灯)、オフを切り替えます。オンに
するとフィードバックを抑制することができます。
7
(Bluetooth)ペアリングLED
外部機器とBluetooth接続がされた状態のときに点灯します(「BluetoothでKONNECT Appと接続する」参照)。
8
チャンネル選択ボタン、LED
VO LUMEノブ、VO I CEノブの操作対象となるチャンネルを選択します。このと
き選択されたチャンネルのLEDが点灯します。
Tip:
Blue too thで接続された外部機器から音楽を再生する場合は、チャンネル
3/4に入力されます。
9
VOLUMEノブ、CLIP LED
チャンネル選択ボタンで選択されたチャンネルのボリュームを調節します。ボ
リュームを上げ過ぎると、スピーカーの音が不自然に歪むこと(CLIP LEDが点灯)
があります。その場合は、チャンネルに入力された機器のボリュームを下げなが
らCLIP LEDが消灯になるよう再度セッティングを行ってください。
10
VOICEノブ
ノブの位置によって、VOICEのタイプの切り替えと効果の深さなどを調節します。
Tip:
VOIC Eとは、接続される楽器の特性に合わせた最適なイコライザーのセッ
ティングです。
11
CENTER CANCELボタン、LED
チャンネル3/4のセンター・キャンセルのオン(LEDが点灯)/オフを切り替えます。
オンにすることで接続されたiPhone等から流れる音楽のボーカルやギターの音の
みを小さくする効果があります。
12
MIC/LINE切り替えスイッチ
MIC側に切り替えることで、チャンネル1のMI C/ LINE入力端子をマイク入力端子
として使用できます。
13
チャンネル1用MIC、MIC/LINE入力端子
ダイナミック・マイク、またはLINE出力レベルの機器を入力します。
14
チャンネル2用MIC、LINE入力端子
ダイナミック・マイク、およびLINE出力レベルの機器を入力します。
15
チャンネル3/4用STEREO INPUT端子
チャンネル3/4にミュージック・プレイヤー等、ステレオLINE出力レベルの機器を
入力します。
16
チャンネル3/4用L/MONO INPUT端子、R INPUT端子
チャンネル3/4にL INE出力レベルLとRの機器を入力します(Lのみに入力した場
合、チャンネル3/4は1つのモノラル・チャンネルとして動作します)。
8
9
12
13
10
8
14
8
11
16
15
セットアップ
接続
1
本機のMASTER VOLUMEノブを最小レベルに設定します。
2
付属のACアダプターをDC INPUT端子に接続し、ACアダプターのプラグをコン
セントに接続します。
ACアダプターは、必ず指定のものを使用してください。指定以外のACアダプター
を使用した場合、故障の原因となります。
3
各チャンネルの入力端子に外部機器を接続します。
4
POWERボタンを押して、電源を入れます。
Tip:
電源を切るときは、再度POWERボタンを押します。
5
各チャンネルのVOLUMEおよびMASTER VOLUMEノブをゆっくりと回して、
音量を調節します。
オート・パワー・オフ機能
本機にはオート・パワー・オフ機能が搭載されています。これは、操作しない状態や入
力のない状態が約20分続くと、自動的にスタンバイ状態となる機能です。通常状態へ
復帰するには本体のノブやボタンを操作するか、“KONNECTアプリ(仮)”で電源を入
れ直してください。
REVERB TYPEについて
SMALL:ホームスタジオのような小規模な部屋の残響音設定。
MEDIUM:ライブハウスのような中規模な部屋の残響音設定。
LARGE:コンサート・ホールのような大規模な部屋の残響音設定。
KARAOKE:カラオケを歌う時に最適な設定。
VOICE TYPEについて
MALE VOICE:男性のボーカルやスピーチに最適な設定。
FEMALE VOICE:女性のボーカルやスピーチに最適な設定。
ELECTRIC GUITAR:エレキギターに最適な設定。
S. ACOUSTIC GUITAR:スチール・アコースティック・ギターに最適な設定。
MUSIC:自宅で音楽を聞くのに最適な設定。
Tip:
“ KONNECTアプリ(仮)”を使用するとVOICE TYPEが最大11タイプまで選択
できるようになります。
BluetoothでKONNECTアプリと接続する(ペアリング)
Tip:
“KONNECTアプリ(仮)”とのペアリングを行うとMASTER VOLUME以外の
パネル操作がすべて無効となります。
Tip:
ペアリングに関する注意や詳細な操作方法は“KONNECTアプリ(仮)”のダウン
ロード・サイトおよび、アプリ本体内の「Help Center」を参照してください。
1
本体を起動させた状態でチャンネル3/4のチャンネル選択ボタンを長押しします。
2
(Bluetooth)ペアリングLEDが点滅し、本体がBluetoothペアリングの待機状
態となります。
3
Bluetooth接続を行う外部デバイスのBluetooth接続設定に従い、接続先として
“KONNECT”を選択します。
4
ペアリングが完了するとLEDが点灯し、アプリから本体の各種操作やオーディオ
再生が可能となります。
Tip:
KONNECTアプリの対応機種およびOSは、アプリのダウンロード・サイト
および、アプリ本体内の「Help Center」を参照してください。
5
チャンネル3/4にアナログ機器を接続した状態では、アナログ機器の再生が優先さ
れます。Bl u e toot h機器を再生する際には、アナログ機器と本体を接続するケー
ブルを外してください。
仕様
REBERBタイプ数: 4
VOICEタイプ数: 5(KONNECTアプリ使用時は11)
シーン・メモリー数(アプリ使用時のみ): 3
入力端子:チャンネル1 MIC/LINE入力端子(XLR-3-32タイプ[バランス]、
4.7kΩ、規定レベル-43dBVまたは、6.3mmモノラル・
フォーン・ジャック[アンバランス]、
1MΩ、規定レベル-26dBV)
チャンネル2 LINE入力端子(XLR-3-32タイプ[バランス]、4.7kΩ、
ジャック[アンバランス]、1MΩ、規定レベル-26dBV)
チャンネル3/4 L/MONO INPUT端子(6.3mmモノラル・フォーン・
ジャック[アンバランス]、1MΩ、規定レベル-26dBV)
R INPUT端子(6.3mmモノラル・フォーン・ジャック
[アンバランス]、1MΩ、規定レベル-26dBV)
STEREO INPUT端子(3.5mmステレオ・ミニ・
フォーン・ジャック[アンバランス]、10kΩ、
規定レベル-10dBV)
スピーカー: 6.5インチ + 1インチ x 2(16.5cm+2.5cm×2)
電 源: ACアダプター
外形寸法(W×D×H): 445×230×230mm
質 量: 5.6kg
付属品: ACアダプター、取扱説明書
オプション(別売): キャリーバッグ、スタンド(KORG ST-S80)
* 仕様および外観は、改良のため予告なく変更する場合があります。
規定レベル-43dBVおよび、6.3mmモノラル・フォーン・
- 8 -
 Loading...