

Page 1

DS-DAC-100
DS-DAC-100m
DS-DAC-10
Owner's Manual
Advanced Guide
Before you connect this device
You must select driver seings in order to use the DS-DAC-100, DS-DAC-100m, or DSDAC-10.
To ensure that you can select these setti ngs smoothly, do not connect the DS-DAC100/100m/10 to your computer before you have installed the driver.
Carefully read the section entitled “Installing the driver,” and download and install the
driver before you connect the DS-DAC-100/100m/10 to your computer.
Contents
Introduction ------------------------------------------------------------ 2
Features ------------------------------------------------------------- 2
Operating requirements ----------------------------------------- 2
Installing the driver ------------------------------------------------- 3
Downloading the driver ------------------------------------------ 3
Driver installation procedure ----------------------------------- 4
Control panel settings --------------------------------------------- 9
Operation --------------------------------------------------------------11
Front and rear panels -------------------------------------------11
Preparations -------------------------------------------------------12
Playback using AudioGate (Windows) ---------------------13
Playback using AudioGate (Mac OS) -----------------------15
Troubleshooting -----------------------------------------------------16
Specications --------------------------------------------------------19
2013 KORG INC.
©
4015-2 Yanokuchi, Inagi-city, Tokyo 206-0812 Japan
1
Page 2

Introduction
Features
The DS-DAC-100, DS-DAC-100m, and DS-DAC-10 are USB DAC units that support 1-bit
DSD native playback* on Windows (ASIO) or Mac (Core Audio).
By using it in conjunction with the “AudioGate” audio format conversion application, you
can enjoy native playback of high-quality 1-bit DSD sound.
* For both Windows (ASIO) and Mac, 1-bit DSD native playback is supported only when
using the Korg USB Audio Device Driver.
Supported input sample rates
PCM 44.1 kHz–192 kHz, 1-bit DSD 2.8224 MHz, 5.6448 MHz
Supported device drivers
DirectSound, ASIO, WASAPI, CoreAudio
Operating requirements
Windows
Operating system:
Microso Windows 7 (32 bit, 64 bit), Microso Windows 8 (32 bit, 64 bit)
CPU: Intel Pentium III 1 GHz or beer (Core 2 Duo 2.66 GHz or beer is
recommended if using AudioGate for DSD output)
RAM: 256 MB or more (512 MB or more is recommended)
Mac OS
Operating system: Mac OS X version 10.6 or later
CPU: Intel Mac
RAM: 1 GB or more
2
Page 3

Installing the driver
Use the KORG AudioGate and DS-DAC Setup program to install the driver and AudioGate.
Downloading the driver
The DS-DAC-10 driver soware is common to the
DAC-10.
1
Access the following AudioGate 3 download page.
hp://www.korg.com/products/audio/audiogate3/page_6.php/
2
Choose the KORG AudioGate and DS-DAC driver Setup, and press either the Windows or Mac version of download buon to download the setup program.
3
If you’re using Windows, decompress the downloaded .zip le. If you’re using Mac OS,
open the .dmg le. In the “KORG AudioGate and DS-DAC Setup” folder, run Setup.
The KORG AudioGate and DS-DAC Setup panel appears.
4
Click “Install DS-DAC Driver” to install the driver (refer to “Driver installation procedure” on page 4).
5
If you want to install AudioGate, click “Install AudioGate” in the KORG AudioGate
and DS-DAC Setup panel.
Carefully read the “About activating AudioGate” message that is displayed during installation, and complete the installation.
6
Click “Finish” to exit the setup program
.
DS-DAC-100
, DS-DAC-100m, and the DS-
3
Page 4
Driver installation procedure
Do not connect the DS-DAC-100/100m/10 to your computer before you’ve nished in-
stalling the driver. If you’ve already connected it, disconnect it; then reconnect it aer
you’ve nished installing the driver.
Windows 7/8 users
The installation screens shown on your computer may differ somewhat depending on
your Windows version and system, but the procedure is the same. The explanation that
follows will show typical screens in Windows 7.
If, during installation, a message appeared to conrm whether or not to continue the installation, click [Install].
1
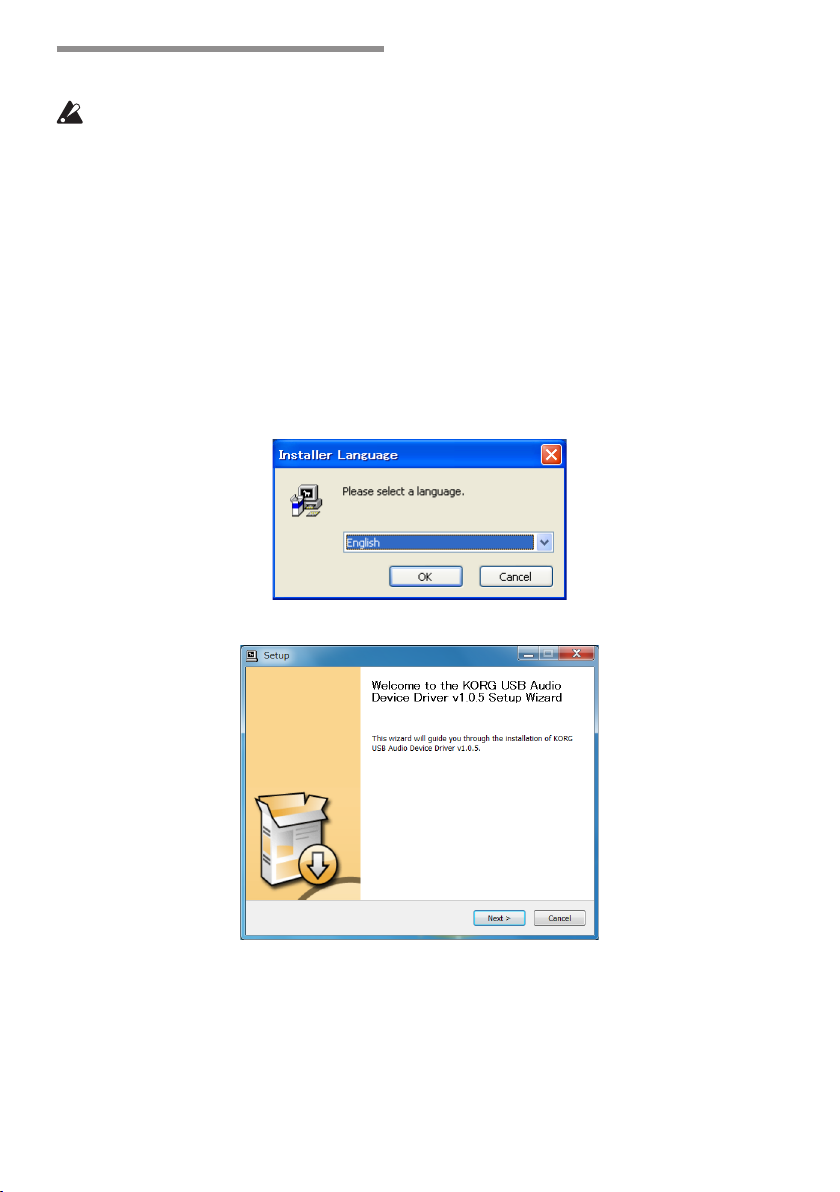
In the KORG AudioGate and DS-DAC Setup panel that you downloaded, click “Install
DS-DAC Driver” to start the installer. In the language selection menu, choose English;
click [OK].
2
The following dialog box will appear; click [Next >].
4
Page 5

3
Note the location of the installation and the required space needed, and then click [Install].
Installation will begin.
4
When installation has completed and the screen indicates “Preinstallation was successful. Click Next to continue,” click [Next >].
5
Preparations for installation are now complete. Click [Finish] to exit the installer.
5
Page 6
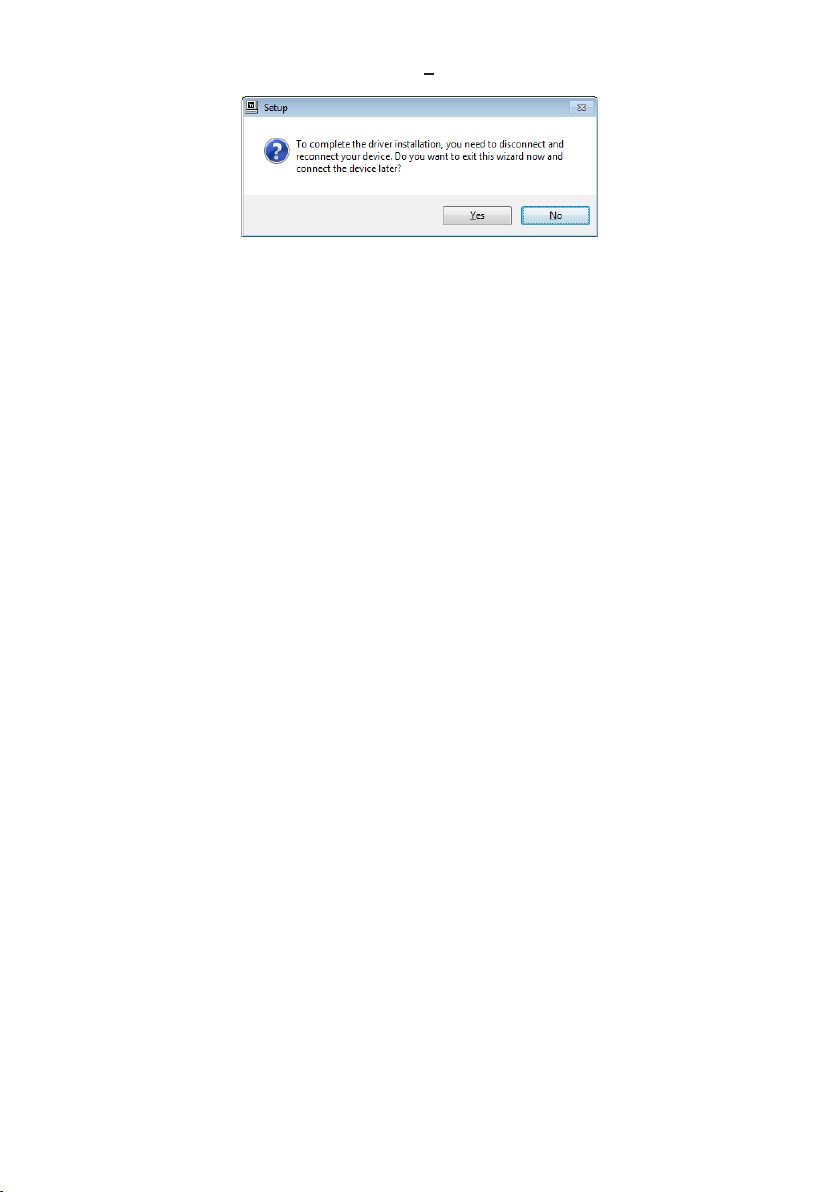
6
The following message will appear; click [Yes].
7
Connect the DS-DAC-100/100m/10 to your computer.
Wait until Windows displays the message “The device driver soware was installed
correctly” twice.
6
Page 7
Mac OS users
1
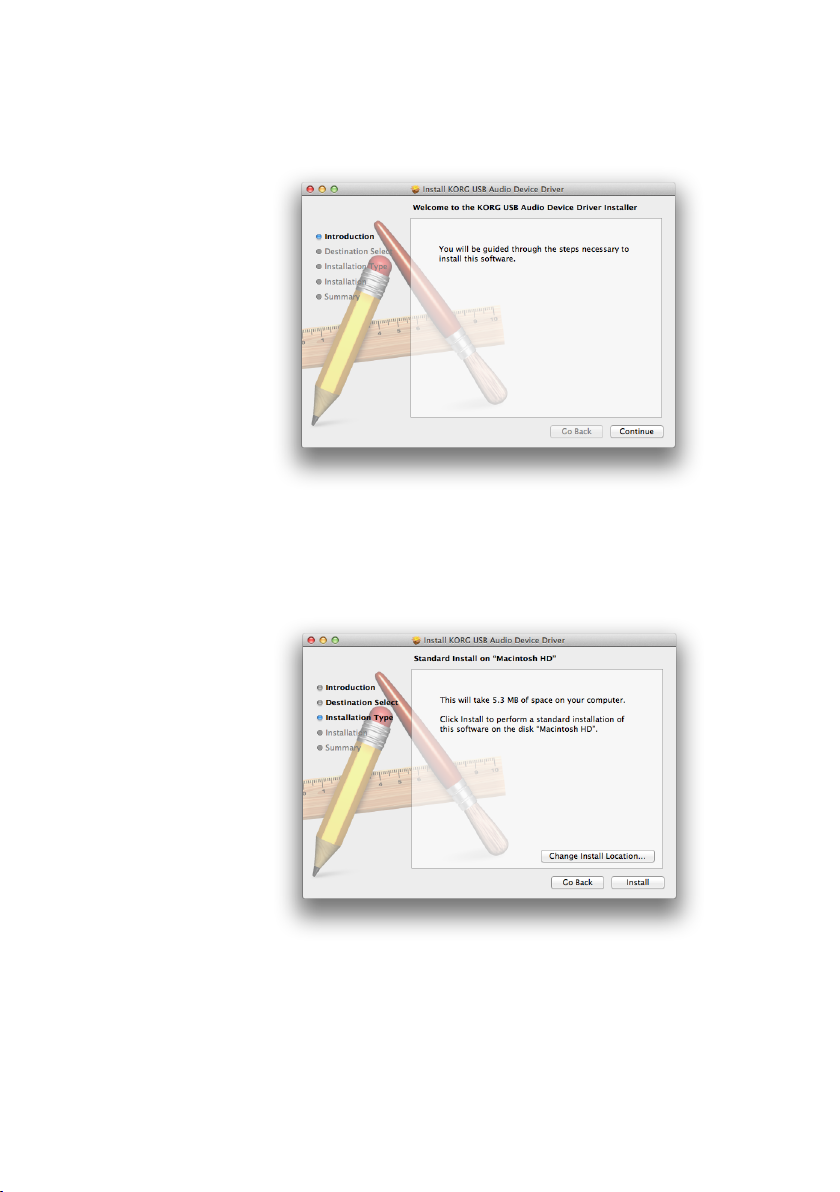
In the KORG AudioGate and DS-DAC Setup panel that you downloaded, click “Install
DS-DAC Driver” to start the installer. The following dialog box will appear; click [Continue].
2
Depending on the version of the operating system, a screen allowing you to select the
“Installation Destination” may appear at this point; if so, leave the default installation
destination unchanged, and simply click [Continue].
3
When the following dialog box appears, click [Install].
4
A dialog box saying “To allow ‘Installer’ to make changes, enter your password.” will
appear. Enter the password and click [OK].
7
Page 8

5
A dialog box will indicate “Aer this soware has been installed, it will be necessary
to restart your computer. OK to install now?” Click [Continue Installation].
6
Installation will begin, and a progress bar will appear.
7
When the screen indicates “Installation has completed successfully,” click [Restart] to
close the installer.
8
Your computer will restart. Aer it has restarted, connect the DS-DAC-100/100m/10 to
your computer.
8
Page 9

Control panel settings
The Mac version of the control panel does not allow you to directly change the Mode
or the Sample Rate. You can make these changes via AudioGate or from the audio settings of your Mac.
The Control panel is common to the DS-DAC-100, DS-DAC-100m, and the DS-DAC-10.
Click the following: Windows start menu → All Programs → Korg → USB Audio Device
→
USB Audio Device Control Panel. The control panel shown below will appear.
In the Driver tab, set the Mode, Sample Rate, Streaming Buer Size, and ASIO Buer Size.
If you frequently experience clicks or noise during playback, you may be able to im-
prove the situation by lowering the output sample rate or increasing the buer size.
Increasing the buer size will increase the latency*, and decreasing the buer size
will decrease the latency.
* The delay that is involved in processing the data.
Mode
This switches between PCM and DSD modes.
Use DSD mode with soware such as AudioGate that supports DSD output in ASIO.
For details on DSD playback, see the manual of the soware that you’re using.
Sample Rate
This species the sample rate.
When Mode is DSD: Choose 2.8224 MHz or 5.6448 MHz.
When Mode is PCM: Choose 44.1 kHz, 48 kHz, 88.2 kHz, 96 kHz, 176.4 kHz, or 192 kHz.
9
Page 10

Streaming Buer Size
This selects the size of the streaming buer.
Choose Minimum, Extra Small, Small, Large, Extra Large, or Safe. Minimum is the
smallest size, and Safe is the largest. Normally you should leave this set to the maximum (Safe).
ASIO Buer Size
This selects the size of the ASIO buer.
Choose Minimum, Small, Large, or Maximum. Minimum is the smallest size, and Maximum is the largest. Normally you should leave this set to Maximum.
In the Version tab, you can check the driver version and update the rmware
Firmware updating is done using a dedicated application. The most recent system le for
rmware updating can be downloaded to your computer from hp://www.korg.com/products/audio/audiogate3/.
For the update procedure, refer to the release notes which are bundled together with the
rmware.
10
Page 11

Front and rear panels
XLR Analog
Headphone volume
Power indicator
USB port
Sample rate/
DS-DAC-100
Operation
Headphone
output jack
Headphone
volume Knob
DS-DAC-100m
Headphone
output jack
Power indicator
DS-DAC-10
Power indicator
Sample rate
indicators
Headphone volume
indicators
Headphone volume
USB port
USB port
output jacks
RCA Analog
output jacks
Analog
output jack
Headphone
output jack
Sample rate
indicators
Digital
output jack
11
Analog
output jacks
Page 12

Preparations
When the driver installation process has been completed, connect the
to your computer and prepare to listen to audio les on your computer.
Use the included USB cable to connect the unit to your computer and to verify that it’s
working.
DS-DAC-100/100m/10
DS-DAC-100/100m/10
The
need an AC adaptor or any other external power supply.
Whenever possible, connect this unit directly to a USB port on your computer. If you
cannot avoid using a USB hub, you should use a USB hub that has its own power supply. A bus-powered USB hub may be unable to supply enough electrical power.
1
If you want to listen through headphones, connect your headphones to the headphone
output jack.
2
If you want to connect an amp and speakers for listening, connect the analog output
jacks of the DS-DAC-100/100m/10 to your system using the appropriate cables.
• DS-DAC-100: RCA or XLR
• DS-DAC-100m: 3.5 mm stereo-mini
• DS-DAC-10: RCA
The DS-DAC-10 does have a digital output jack, but the output from that jack is
only available for PCM playback; there will be no output from this jack during
DSD playback.
3
Check the USB connection. If there is a valid connection between your computer and
the DS-DAC-100 (or the DS-DAC-100m or DS-DAC-10), the power indicator and one of
the sample rate indicators will light up.
operates on bus power supplied via the USB port; it does not
12
Page 13

Playback using AudioGate (Windows)
DSD native playback via ASIO
1
Use the AudioGate and DS-DAC Setup program to install AudioGate (refer to “Installing the driver” on page 3).
2
Connect the DS-DAC-100/100m/10 to your computer, and then start AudioGate.
If you start AudioGate without the DS-DAC-100/100m/10 connected, license verication will be completed when you connect the DS-DAC-100/100m/10.
3
From the menu, choose [Edit]-[Preferences...], and click the [Audio Devices] tab.
4
In [Driver Type], choose “ASIO.”
5
In [Driver Name], choose “Korg USB Audio Device Driver.”
6
Set [Sample Rate] to “Auto” or to “5.6 MHz” or “2.8 MHz.”
7
Add DSDIFF, DSF, or WSD les to the song list by dragging them in.
8
Click the play buon in AudioGate to play the audio.
9
If you're listening through headphones, you can adjust the volume by turning the
headphone volume knob (or by pressing the buons) of the DS-DAC-100 (or the DSDAC-100m or DS-DAC-10).
If you added WAV or FLAC les to the song list in step 7, they will be converted for
playback to the sample rate that you selected in step 6.
13
Page 14

Playback via DirectSound or WASAPI
1
Use the AudioGate and DS-DAC Setup program to install AudioGate (refer to “Installing the driver” on page 3).
2
Connect the DS-DAC-100/100m/10 to your computer, and then start AudioGate.
If you start AudioGate without the DS-DAC-100/100m/10 connected, license verication will be completed when you connect the DS-DAC-100/100m/10.
3
From the menu, choose [Edit]-[Preferences...], and click the [Audio Devices] tab.
4
In [Driver Type], choose “DirectSound” or “WASAPI.”
5
In [Driver Name], choose “KORG USB Audio Device Output L/R (KORG WDM Audio
Device).”
6
Choose the [Sample Rate].
7
Click the play buon in AudioGate to play the audio.
8
If you’re listening through headphones, you can adjust the volume by turning the
headphone volume knob (or by pressing the buons) of the DS-DAC-100 (or the DSDAC-100m or DS-DAC-10).
14
Page 15

Playback using AudioGate (Mac OS)
DSD native playback via Core Audio
1
Use the AudioGate and DS-DAC Setup program to install AudioGate (refer to “Installing the driver” on page 3).
2
Connect the DS-DAC-100/100m/10 to your computer, and then start AudioGate.
If you start AudioGate without the DS-DAC-100/100m/10 connected, license verication will be completed when you connect the DS-DAC-100/100m/10.
3
From the menu, choose Mac, [AudioGate]-[Preferences...], and click the [Audio Devices]
tab.
4
In [Driver Type], make sure that “Core Audio” is selected.
5
In [Driver Name], choose “Korg USB Audio Device Driver.”
6
Set [Sample Rate] to “Auto” or to “5.6 MHz” or “2.8 MHz.”
7
Add DSDIFF, DSF, or WSD les to the song list by dragging them in.
8
Click the play buon in AudioGate to play the audio.
9
If you’re listening through headphones, you can adjust the volume by turning the
headphone volume knob (or by pressing the buons) of the DS-DAC-100 (or the DSDAC-100m or DS-DAC-10).
If you added WAV or FLAC les to the song list in step 7, they will be converted for
playback to the sample rate that you selected in step 6.
15
Page 16

Troubleshooting
The latest information is provided on the Web.
Please refer to hp://www.korg.com/products/audio/audiogate3/.
The power won’t turn on, the device is not recognized by computer, or the
operation is unstable
• Which USB cable are you using?
Use the included USB cable.
Some commercially available USB cables only support Full Speed. If you provide your
own cable, be sure that it supports USB 2.0 High Speed.
• Are you using a USB hub?
If the DS-DAC-100/100m/10 is connected via a bus-powered USB hub, there might be
insucient power for the DS-DAC-100/100m/10 to power-on, or operation might be unstable.
In this case, connect the DS-DAC-100/100m/10 directly to a USB port on the computer
itself without going through a USB hub, or use a self-powered hub that supports USB 2.0
High Speed.
• Could the USB cable be broken?
• Is your computer’s USB port working correctly?
No sound is coming from the DS-DAC-100/100m/10
• Check whether the DS-DAC-100/100m/10 is correctly recognized in the Korg DS-DAC-10
Control Panel.
Windows users
Open the Windows Start menu → All Programs → Korg → USB Audio Device → USB
Audio Device Control Panel.
If the Driver and Firmware versions are displayed as -.-.- in the Version tab, the DSDAC-100/100m/10 has not been correctly recognized. Disconnect the USB cable, then
reconnect it and check this indication again.
Mac OS X users
In the Applications → Korg → USB Audio Device folder, open KorgDSDAC10ControlPanel.app.
If the Driver and Firmware versions are displayed as -.-.- in the Version tab, the DSDAC-100/100m/10 has not been correctly recognized. Disconnect the USB cable, then
reconnect it and check this indication again.
• In some cases, the sample rate indicators of the DS-DAC-100 (or the DS-DAC-100m or
DS-DAC-10) will indicate an error.
→
Refer to the section “Multiple sample rate indicators are lit.”
16
Page 17

Multiple sample rate indicators are lit
• Three indicators are lit (48 kHz, 96 kHz, 192 kHz)
The unit is requesting a rmware update. From the download page, download the “DSDAC-10 rmware,” and perform the update as described in the PDF within the folder.
• Other
A system error has occurred. Disconnect the USB cable, and then reconnect it to turn
the power on again. If doing this several times does not solve the problem, contact your
local Korg distributor.
Can’t select DSD mode
• Is the installed version of AudioGate 2.3 or later for Windows, or 2.3.2 or later for Mac?
AudioGate v2.2 and earlier do not support 1-bit DSD direct output.
Update AudioGate to v2.3 (Mac: 2.3.2) or later.
• In some cases, the sample rate indicators of the DS-DAC-100 (or the DS-DAC-100m or
DS-DAC-10) will indicate an error.
→
Refer to the section “Multiple sample rate indicators are lit.”
Switching the sample rate takes time, or is not possible
Such problems may occur depending on your Windows system.
Try the following.
• Click Start menu → All Programs → Korg → USB Audio Device → USB Audio Device
Control Panel to open the Korg DS-DAC-10 Control Panel. In the Driver tab, try decreasing the Streaming Buer size or ASIO Buer Size one step at a time until performance
improves.
• As the Windows “default device,” specify something other than “Korg USB Audio Device Driver.”
Sound is interrupted/Noise is heard
• During realtime conversion playback using AudioGate
In order to perform all realtime conversion processing at “high quality,” the system
performance must be equivalent to a Core 2 Duo 2.66 GHz or beer. The CPU processing load will be particularly high for conversion playback to 5.6 MHz. In such cases,
you can export the data beforehand to create a DSD le for playback, or use the “low
load” seing.
• When using a laptop computer
Even if the CPU performance is high, noise may occur if power-saving seings are enabled. Change the power plan in “Power Options” of the “Control Panel,” and also turn
o any other power saving plan that is specic to your computer.
17
Page 18

• When using ASIO playback on Windows
Click Start menu → All Programs → Korg → USB Audio Device → USB Audio Device
Control Panel to open the Korg DS-DAC-10 Control Panel. In the Driver tab, adjust the
Streaming Buer size and ASIO Buer Size to make them larger.
• When using the DS-DAC-100/100m/10 as the system default sound device in Windows
Click Start menu → All Programs → Korg → USB Audio Device → USB Audio Device
Control Panel to open the Korg DS-DAC-10 Control Panel. In the Driver tab, set the
Mode to PCM.
• The sample rate of the audio device is set to Auto.
You may hear a slight click if the sample rate of the audio device is set to Auto, or when
you change the sample rate manually, but this is not a malfunction.
• The DS-DAC-100/100m/10 is connected to a USB 3.0 port.
We recommend that you connect the DS-DAC-100/100m/10 to a USB 2.0 port.
• Could you be using or running a large number of soware programs simultaneously?
• Hiss is heard from the headphone output.
Are you using headphones whose output impedance is 16 ohms or greater?
You might hear a faint hiss when using some high-eciency low-impedance earphones.
18
Page 19

Specications
DS-DAC-100
Audio interface
Number of channels
Input formats
(USB)
Host interface USB2.0 (High Speed)
Audio drivers ASIO2.1, WDM, Core Audio
General
Indicators Power indicator x 2 (LED), sample rate indicators x 8 (LED)
Power supply/
Power consumption
Dimensions
(W x D x H)
Weight 862 g/1.90 lbs.
Main spec.
Frequency response 10 Hz–20 kHz ±1 dB (fs=44.1 kHz/48 kHz)
S/N 105 dB (TYP.) 20 Hz–20 kHz, IHF-A
THD+N 0.005% (TYP.) 20 Hz–20 kHz
Connectors
LINE OUT L/R
Form RCA (Unbalanced)/XLR-3-32 type (Balanced)
Load impedance 10 k ohms or greater
Rated/Maximum level
PHONES
Form 6.3 mm stereo phone jack
Load impedance 16 ohms or greater
Maximum output 85 mW + 85 mW @32 Ω
USB (device)
Form/Format Type B/USB 2.0 compliant High Speed
Supported OS Windows 7 or later, Mac OS X 10.6 or later
Included items USB cable, spike mount x 3
2 channels
DSD: 2.8224 MHz/5.6448 MHz, 1 bit
PCM: 44.1 kHz/48 kHz/88.2 kHz/96 kHz/176.4 kHz/192 kHz, 16 bit/24 bit
USB bus power (5 V 500 mA)/2.5 W
207 x 160 x 60 mm/8.15 x 6.30 x 2.36 inches
(including protrusions)
10 Hz–40 kHz ±1 dB
-6 dBV/+6 dBV
• Specications and appearance are subject to change without notice for improvement.
19
Page 20

DS-DAC-100m
Audio interface
Number of channels
Input formats
(USB)
Host interface USB2.0 (High Speed)
Audio drivers ASIO2.1, WDM, Core Audio
General
Indicators Power indicator (LED),
Power supply/
Power consumption
Dimensions
(W x D x H)
Weight 175 g/6.17 oz.
Main spec.
Frequency response 10 Hz–20 kHz ±1 dB (fs=44.1 kHz/48 kHz)
S/N 105 dB (TYP.) 20 Hz–20 kHz, IHF-A
THD+N 0.005% (TYP.) 20 Hz–20 kHz
Connectors
LINE OUT L/R
Form 3.5 mm stereo mini phone jack
Load impedance 10 k-ohms or greater
Rated/maximum level
PHONES
Form 3.5 mm stereo mini phone jack
Load impedance 16 ohms or greater
Maximum output 85 mW + 85 mW @32 Ω
USB (device)
Form/Format Type mini B/USB 2.0 compliant High Speed
Supported OS Windows 7 or later, Mac OS X 10.6 or later
Included items USB cable
2 channels
DSD: 2.8224 MHz/5.6448 MHz, 1 bit
PCM: 44.1 kHz/48 kHz/88.2 kHz/96 kHz/176.4 kHz/192 kHz, 16 bit/24 bit
sample rate/headphone volume indicators x 8 (LED)
USB bus power (5 V 500 mA)/2.5 W
92 x 129 x 20 mm/3.62 x 5.08 x 0.79 inches
(including protrusions)
10 Hz–40 kHz ±1 dB
-6 dBV/+6 dBV
• Specications and appearance are subject to change without notice for improvement
20
Page 21

DS-DAC-10
Audio interface
Number of channels
Input formats
(USB)
Output formats
(S/P DIF)
Host interface USB2.0 (High Speed)
Audio drivers ASIO2.1, WDM, Core Audio
General
Indicators Power indicator (LED), sample rate indicators x 8 (LED)
Power supply/
Power consumption
Dimensions
(W x D x H)
Weight 530 g/1.17 lbs.
Main spec.
Frequency response 10 Hz–20 kHz ±1 dB (fs=44.1 kHz/48 kHz)
S/N 105 dB (TYP.) 20 Hz–20 kHz, IHF-A
THD+N 0.005% (TYP.) 20 Hz–20 kHz
Connectors
LINE OUT L/R
Form RCA phone jacks
Load impedance 10 k-ohms or greater
Rated/maximum level
PHONES
Form 6.3 mm stereo phone jack
Load impedance 16 ohms or greater
Maximum output 85 mW + 85 mW @32 Ω
DIGITAL OUT (coaxial)
Form/Format
USB (device)
Form/Format Type B/USB 2.0 compliant High Speed
Supported OS Windows 7 or later, Mac OS X 10.6 or later
Included items USB cable
2 channels
DSD: 2.8224 MHz/5.6448 MHz, 1 bit
PCM: 44.1 kHz/48 kHz/88.2 kHz/96 kHz/176.4 kHz/192 kHz, 16 bit/24 bit
PCM: 44.1 kHz/48 kHz/88.2 kHz/96 kHz/176.4 kHz/192 kHz, 16 bit/24 bit
USB bus power (5 V 500 mA)/2.5 W
120 x 150 x 48 mm/4.72 x 5.91 x 1.89 inches
(including protrusions)
10 Hz–40 kHz ±1 dB
-6 dBV/+6 dBV
RCA phone jack/IEC60958 *Valid only for PCM
• Specications and appearance are subject to change without notice for improvement.
21
 Loading...