

Korg CA-50 Owner's Manual

Owner’s Manual (¬p.2)
Manuel d’utilisation (¬p.6)
Bedienungsanleitung (¬s.10)
Manual de usuario (¬p.14)
取扱説明書
Thank you for purchasing the Korg CA-50 CHROMATIC TUNER. To help you get the most out of your new instrument,
please read this manual carefully.
Merci d’avoir choisi la ACCORDEUR CHROMATIQUE CA-50
de Korg. An de pouvoir exploiter au mieux toutes les possibilités oertes par l’instrument, veuillez lire attentivement
ce manuel.
Vielen Dank, dass Sie sich für ein CA-50 CHROMATISCHES
STIMMGERÄT von Korg entschieden haben. Bitte lesen Sie
sich diese Anleitung vollstädig durch, um bei der Bedienung alles richtig zu machen.
Gracias por comprar el afinador para enchufar CA-50 AFINADOR CROMÁTICO de Korg. Por favor, lea este manual
atentamente y guárdelo para futuras consultas.
このたびは、コルグ クロマチック・チューナー CA-50をお
買い上げいただきまして、まことにありがとうございます。
本製品を末永くご愛用いただくためにも、取扱説明書をよ
くお読みになって、正しい方法でご使用ください。
(¬p.18)
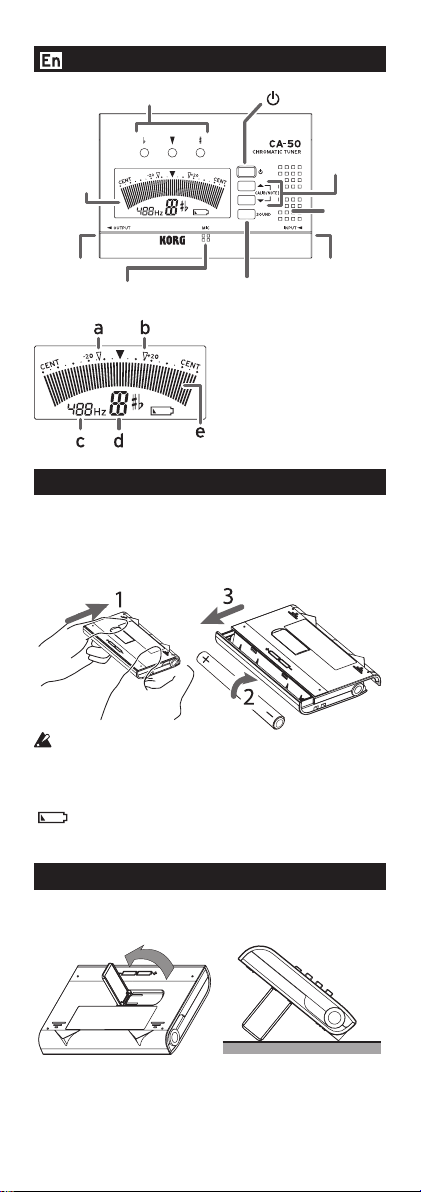
Parts of the CA-50
OUTPUT jack
Internal mic SOUND button
button
Tuning guide
(Power) button
CALIB/NOTE
Display
a.
Pure major third indicator
b.
Pure minor third indicator
c.
Reference pitch display
d.
NoteName
e.
Meter
▲,▼
Speaker
INPUT jack
Installing the batteries
Slide o the back cover of the CA-50 to open the battery
compartment. Making sure to observe the correct polarity,
insert the batteries, and then slide the back cover to close
the battery compartment.
If the unit malfunctions and you are unable to correct
the problem by turning the power off and on several
times, remove the batteries and then reinstall them.
When the batteries becomes depleted, a battery indicator
) will appear on the display. Immediately replace the
(
battery with a new one.
Using the stand
You can use the stand provided on the back of the CA-50 to
tilt it back at an angle for easy viewing.
-2-

Tuning procedure
Meter mode
In this mode the VU style meter shown in the display is
used to tune your instrument.
1.
Connect the tuner. The connection method will depend
on the type of instrument you’re connecting.
When tuning an acoustic instrument
If you’re using the internal mic, don’t connect anything.
If you’re using a separately sold Korg CM-200 contact
mic, connect the CM-200’s plug to the CA-50’s INPUT
jack.
When tuning an instrument that has a pickup
Use a commercially available cable with mono plugs.
Connect your instrument to the CA-50’s INPUT jack by
using the cable.
You can’t use the internal mic if a plug is inserted in
the INPUT jack.
When using the OUTPUT jack
To connect to the CA-50’s OUTPUT jack, use a commercially available cable with mono plugs. Connect your
instrument to the CA-50’s INPUT jack, and then connect
your amp to the OUTPUT jack. The sound of your instrument will be sent from the CA-50’s OUTPUT jack to your
amp, allowing you to tune or perform while the CA-50
remains connected.
Never disconnect the plug from the INPUT jack while
the OUTPUT jack is connected to your amp. When
you disconnect the plug, the internal mic will be used
automatically. If sound is received by the internal mic
at this time, acoustic feedback will occur, possibly
damaging your amp.
Turn o the power of all devices before you make any
connections to avoid damaging your equipment.
The INPUT and OUTPUT jacks are mono. Stereo (TRS)
cables will not work.
2.
Press the (power) button to turn on the CA-50.
When the CA-50 is turned on, the previously specified
reference pitch is indicated.
When the power is on for 20 minutes without use, the
tuner will automatically turn o to conserve battery life
(Auto power-o).
3.
If you wish to change the reference pitch (calibration),
press the CALIB/NOTE
justed in 1 Hz steps over a range of 410 Hz-480 Hz.(*)
4.
Play a single note on your instrument, and the name of
the nearest note will appear in the display. Tune your instrument so that the correct note name is shown in the
display.
or button. This can be ad-
-3-
5.
Tune your instrument so that the VU style meter moves
” position (center) and the center tuning guide
to the “
LED is lit. The left indicator of the tuning guide will light
if your instrument is at, and the right indicator will light
if your instrument is sharp.
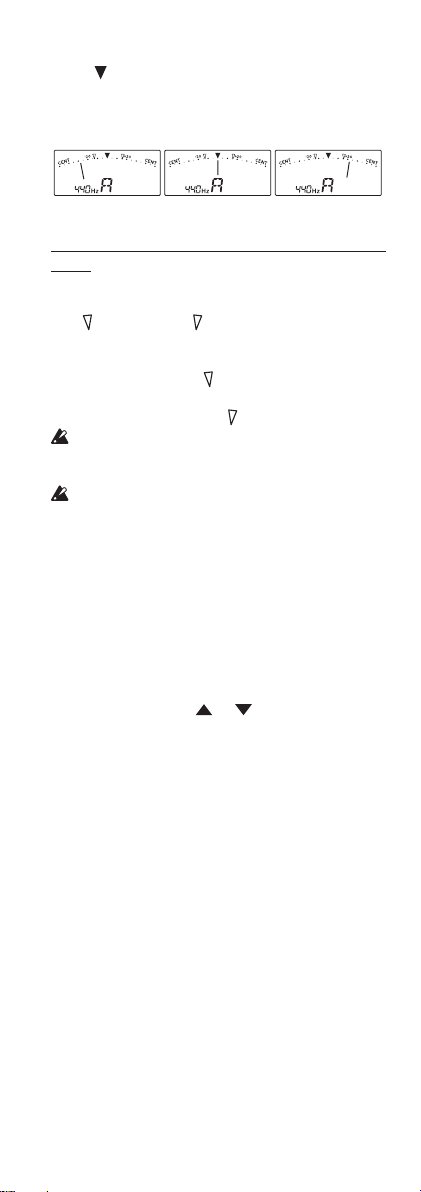
The pitch is at. In tune. The pitch is sharp.
Tuning to a just major third above or a minor third
above
If you want to tune a pure major third above or a pure
minor third above a certain note, make the meter indi-
“ (-13.7 cents) or “ “ (+15.6 cents).
cate “
For example if you want to tune a major third above the
A (0 cents) note, set the note name display to C#, and
make the meter indicate “
nor third above A (0cent), set the note name display to C,
and make the meter indicate “
If you’re using the internal mic, place your instrument
as close as possible to the mic so that extraneous
sound is not picked up while tuning.
Even if the pitch is within the range of detection, it
may not be possible to detect the pitch of an instrumental sound that contains large numbers of overtones or a sound that has a rapid decay.
“. Or if you want to tune a mi-
“.
Sound Out mode
In this mode you can tune while listening to a reference
tone.
1.
Follow steps 2-3 outlined in “Meter mode.“
2.
Press the SOUND button to enter Sound Out mode.
The reference tone is output from the speakers.
3.
Press the CALIB/NOTE or button to select the
note. The output reference tone changes as follows.
♭
µ B µ C (C5) µ C (C4) µ C♯ µ D µ E♭ µ E µ F µ F♯
A µ B
♯
µ A µ...
G µ G
µ
Tune your instrument to match the reference tone.
4.
If the SOUND button is pressed again, output of the reference tone stops, and the CA-50 returns to Meter mode.
-4-

Specications
Tuning: 12 note equal temperament
Detection range:
A0 (27.5Hz)–C8 (4186.01Hz) : Sine wave
Reference tone:
C4 (261.63Hz) – C5 (523.25Hz) : one octave
Tuning modes:
Meter mode, Sound Out mode
Calibration range:
A4 = 410 Hz – 480 Hz (1Hz steps)
Detection accuracy:
±1 cent
Sound accuracy:
±1.5 cent
Connection jack:
INPUT jack (1/4” monaural phone jack, unbal-
anced), OUTPUT jack (1/4” monaural phone jack,
unbalanced)
Dynamic speaker (ø21 mm)
Speaker:
Power supply:
two AAA batteries (3V)
Battery life:
Approximately 135 hours (Meter mode, A4 con-
tinuous input, zinc-carbon batteries)
Dimensions (W x D x H):
100 mm x 67 mm x 17 mm / 3.94” x 2.64” x 0.67”
Weight: 81 g / 2.86 oz (including the battery)
Included items:
Quick Start Guide, two AAA batteries
* The Calibration and Sound Out mode settings are re-
membered even when the power is turned o. However,
these settings will be initialized if the batteries are replaced.
Default settings : Calibration = 440 Hz
Sound Out mode = A
• Specificationsandappearancearesubject tochange
without notice for improvement.
-5-
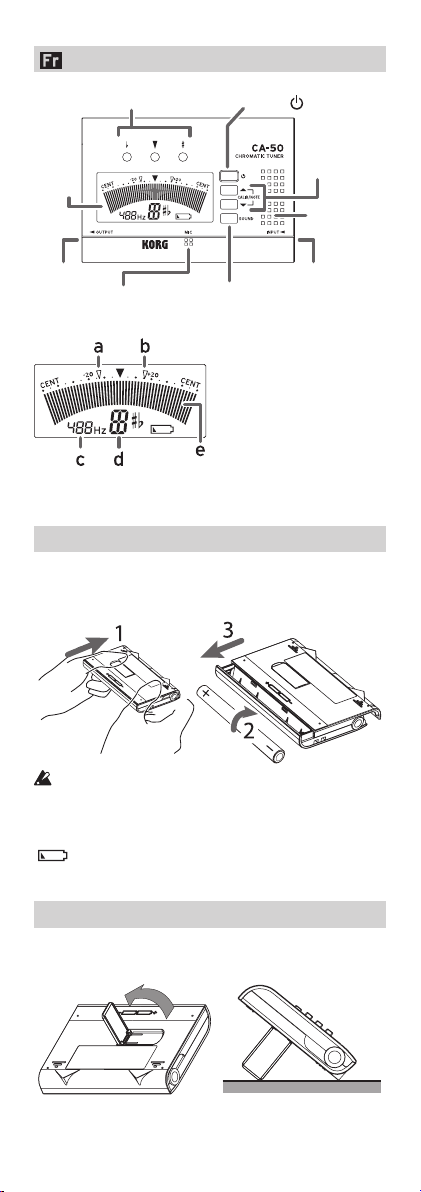
Parties du CA-50
Prise OUTPUT
Achage
Micro incorporé Bouton SOUND
▼
Témoin du guide d'accordage
Bouton (alimentation)
Boutons
CALIB/NOTE▲,
Haut-Parleur
Prise INPUT
a.
Témoin de tierce majeure
pure
b.
Témoin de tierce mineure
pure
c.
Affichage de la hauteur
de référence
d.
nom de la note
e.
indicateur d’accordage
Installation des piles
Glissez le couvercle au dos du CA-50 pour accéder au compartiment à piles. Insérez les piles en respectant la polarité
indiquée, puis remettez le couvercle en place.
Si l’appareil ne fonctionne pas et si vous ne parvenez
pas à résoudre le problème en le mettant plusieurs fois
sous et hors tension, retirez les piles puis réinsérez-les.
Quand la pile commence à s’épuiser, l’indicateur de pile
) s’allume. Remplacez la pile sans tarder, en veillant à
(
utiliser une pile neuve.
Utiliser le pied
Vous pouvez placer le CA-50 en position verticale en déployant le pied situé à l’arrière de l’appareil.
-6-

Méthode d’accordage
Mode Indicateur (Meter)
En mode Indicateur, l’indicateur de style VU aché sur l’afchage est utilisé pour accorder votre instrument.
1.
Raccordez l’accordeur. La méthode utilisée dépendra du
type d’instrument raccordé.
Pour accorder un instrument acoustique
Si vous utilisez le micro incorporé, ne branchez rien. Si
vous utilisez un microphone de contact Korg CM-200
vendu séparément, raccordez le CM-200 à la prise INPUT
du CA-50.
Pour accorder un instrument avec micro
Utilisez un câble à ches mono disponible dans le commerce. Branchez votre instrument à la prise INPUT du
CA-50 à l’aide du câble.
Vous ne pouvez pas utiliser le micro incorporé si une
che est insérée dans la prise INPUT.
Pour utiliser la prise OUTPUT
Reliez l’ampli à la prise OUTPUT du CA-50 avec un câble
à ches mono disponible dans le commerce.
Raccordez votre instrument à la prise INPUT du CA-50,
puis raccordez votre amplificateur à la prise OUTPUT.
Utilisez un câble avec ches monophonique disponible
dans le commerce. Le son de votre instrument sera envoyé de la prise OUTPUT du CA-50 à votre amplicateur,
vous permettant ainsi d’accorder ou de jouer alors que
le CA-50 reste raccordé.
Ne débranchez jamais la che de la prise INPUT alors
que la prise OUTPUT est raccordée à votre ampli.
Quand vous débranchez la che, le microphone interne entre automatiquement en fonction. Si un son
est reçu par le microphone interne à ce moment, un
eet Larsen se produira, et votre amplicateur risque
d’être endommagé.
Mettez tous les appareils hors tension avant d’eectuer
les raccordements pour éviter d’endommager votre matériel.
Les prises INPUT et OUTPUT sont monophoniques. Les
câbles stéréo (TRS) ne fonctionneront pas.
2.
Appuyez sur le bouton (alimentation) pour activer le
CA-50.
À la mise sous tension, le CA-50 indique la dernière hauteur de référence dénie. Si vous n’utilisez pas l’appareil
pendant 20 minutes, il s’éteindra automatiquement an
d’économiser les piles (Mise hors tension automatique).
3.
Pour changer la hauteur de référence (calibrage), appuyez sur le bouton CALIB/NOTE
procéder au réglage par pas d’1Hz sur une portée allant
de 410Hz à 480Hz (*).
ou . Vous pouvez
-7-
 Loading...