

Page 1
DIGITAL PIANO
ENGLISH
MAN0010006
2E
User’s Manual
Page 2

Page 3
IMPORTANT SAFETY INSTRUCTIONS
• Read these instructions.
• Keep these instructions.
• Heed all warnings.
• Follow all instructions.
• Do not use this apparatus near water.
• Mains powered apparatus shall not be exposed to dripping or
splashing and that no objects filled with liquids, such as vases,
shall be placed on the apparatus.
• Clean only with dry cloth.
• Do not block any ventilation openings, install in accordance
with the manufacturer’s instructions.
• Do not install near any heat sources such as radiators, heat registers, stoves, or other apparatus (including amplifiers) that produce heat.
• Do not defeat the safety purpose of the polarized or grounding-type plug. A polarized plug has two blades with one wider
than the other. A grounding type plug has two blades and a
third grounding prong. The wide blade or the third prong are
provided for your safety. If the provided plug does not fit into
your outlet, consult an electrician for replacement of the obsolete outlet. (for U.S.A. and Canada)
• Protect the power cord from being walked on or pinched particularly at plugs, convenience receptacles, and the point where
they exit from the apparatus.
• Only use attachments/accessories specified by the manufacturer.
• Unplug this apparatus during lightning storms or when unused
for long periods of time.
• Turning off the power switch does not completely isolate this
product from the power line so remove the plug from the
socket if not using it for extended periods of time, or before
cleaning. Please ensure that the mains plug or appliance couple
remains readily accessible.
• Refer all servicing to qualified service personnel. Servicing is
required when the apparatus has been damaged in any way,
such as power-supply cord or plug is damaged, liquid has been
spilled or objects have fallen into the apparatus, the apparatus
has been exposed to rain or moisture, does not operate normally, or has been dropped.
• Do not install this equipment on the far position from wall outlet and/or convenience receptacle.
• Do not install this equipment in a confined space such as a box
for the conveyance or similar unit.
• Use only with the cart, stand, tripod, bracket, or table specified
by the manufacturer, or sold with the apparatus. When a cart is
used, use caution when moving the cart/apparatus combination
to avoid injury from tip-over.
The lightning flash with arrowhead symbol
within an equilateral triangle, is intended to
alert the user to the presence of uninsulated
“dangerous voltage” within the product’s
enclosure that may be of sufficient magnitude to constitute a risk of electric shock to
persons.
The exclamation point within an equilateral
triangle is intended to alert the user to the
presence of important operating and maintenance (servicing) instructions in the literature
accompanying the product.
THE FCC REGULATION WARNING (FOR U.S.A.)
This equipment has been tested and found to comply with the limits
for a Class B digital device, pursuant to Part 15 of the FCC Rules. These
limits are designed to provide reasonable protection against harmful
interference in a residential installation. This equipment generates,
uses, and can radiate radio frequency energy and, if not installed and
used in accordance with the instructions, may cause harmful
interference to radio communications. However, there is no
guarantee that interference will not occur in a particular installation.
If this equipment does cause harmful interference to radio or
television reception, which can be determined by turning the
equipment off and on, the user is encouraged to try to correct the
interference by one or more of the following measures:
• Reorient or relocate the receiving antenna.
• Increase the separation between the equipment and receiver.
• Connect the equipment into an outlet on a circuit different from
that to which the receiver is connected.
• Consult the dealer or an experienced radio/TV technician for help.
Unauthorized changes or modification to this system can void the
user’s authority to operate this equipment.
CE MARK FOR EUROPEAN HARMONIZED STANDARDS
CE mark which is attached to our company’s products of AC mains
operated apparatus until December 31, 1996 means it conforms to
EMC Directive (89/336/EEC) and CE mark Directive (93/68/EEC).
And, CE mark which is attached after January 1, 1997 means it
conforms to EMC Directive (89/336/EEC), CE mark Directive (93/68/
EEC) and Low Voltage Directive (73/23/EEC).
Also, CE mark which is attached to our company’s products of Battery
operated apparatus means it conforms to EMC Directive (89/336/EEC)
and CE mark Directive (93/68/EEC).
IMPORTANT NOTICE TO CONSUMERS
This product has been manufactured according to strict specifications
and voltage requirements that are applicable in the country in which
it is intended that this product should be used. If you have purchased
this product via the internet, through mail order, and/or via a
telephone sale, you must verify that this product is intended to be
used in the country in which you reside.
WARNING: Use of this product in any country other than that for
which it is intended could be dangerous and could invalidate the
manufacturer's or distributor's warranty.
Please also retain your receipt as proof of purchase otherwise your
product may be disqualified from the manufacturer's or distributor's
warranty.
Page 4

EXAMPLE SCREENS
Some pages of the manuals show LCD screens along with an explanation of
functions and operations. All sound names, parameter names, and values are
merely examples and may not always match the actual display you are working on.
CLEANING THE DISPLAY
Use a soft cotton cloth to clean the screen. Some materials, such as paper
towels, could cause scratches and damage it. Computer wipes are also suggested, provided they are specifically designed for LCD screens.
Do not spray any liquids on the LCD screen directly. Always apply the solution to your cloth first, then clean the screen.
TRADEMARKS
Macintosh is a registered trademark of Apple Computer, Inc. MS-DOS and
Windows are registered trademarks of Microsoft Corporation. All other
trademarks or registered trademarks are the property of their respective
holders.
DISCLAIMER
The information contained in this manual has been carefully revised and
checked through. Due to our constant efforts to improve our products, the
specifications might differ to those in the manual. Korg is not responsible for
any eventual differences found between the specifications and the contents
of the instruction manual - the specifications being subject to change without prior notice
WARRANTY
KORG products are manufactured according to the strictest electrical and
mechanical regulations that exist in various countries of the world. These
products are warranted by the KORG distributor only in each country. Any
KORG product that is not sold with the manufacturer’s or distributor’s warranty, or without a serial number, cannot benefit from servicing under the
warranty. This regulation is for the consumer’s own protection.
DATA RESET
When the instrument is turned off, any unsaved parameters or songs are
reset.
UPDATING THE SOFTWARE
The system software of your C-720 can be updated. From time to time, Korg
might release new versions including bug fixes and new features. Please
check our website for more information.
LIABILITY
Korg products are manufactured under strict specifications and voltages
required by each country. These products are warranted by the Korg distributor only in each country. Any Korg product not sold with a warranty card
or carrying a serial number disqualifies the product sold from the manufacturer's/distributor's warranty and liability. This requirement is for your own
protection and safety.
ASSISTANCE AND SERVICE FOR MUSICIANS
For repairs, contact your nearest Authorized KORG Service Center. For more
information on KORG products, and to find software and accessories for
your piano, please contact your local Authorized KORG distributor.
KORG ON THE INTERNET
Korg Inc.: www.korg.co.jp
Korg USA: www.korg.com
Korg UK: www.korg.co.uk
Korg Canada: www.korgcanada.com
Korg Italy: www.korgpa.com
© 2006 Korg Inc. Printed in Italy.
Page 5

Contents
>
Introduction . . . . . . . . . . . . . . . . . . . . . . . . . . . . . . . . . . . . . . . . 4
Main features . . . . . . . . . . . . . . . . . . . . . . . . . . . . . . . . . . . . . . . . . . . . . . 4
Control panel . . . . . . . . . . . . . . . . . . . . . . . . . . . . . . . . . . . . . . . 6
Connections . . . . . . . . . . . . . . . . . . . . . . . . . . . . . . . . . . . . . . . . 8
Connecting to external audio devices . . . . . . . . . . . . . . . . . . . . . . . . . . 9
Before you begin . . . . . . . . . . . . . . . . . . . . . . . . . . . . . . . . . . . 10
Open the key cover . . . . . . . . . . . . . . . . . . . . . . . . . . . . . . . . . . . . . . . . 10
Turning the instrument on . . . . . . . . . . . . . . . . . . . . . . . . . . . . . . . . . . 10
Using the music stand . . . . . . . . . . . . . . . . . . . . . . . . . . . . . . . . . . . . . . 10
Adjusting the volume . . . . . . . . . . . . . . . . . . . . . . . . . . . . . . . . . . . . . .11
Using the headphones . . . . . . . . . . . . . . . . . . . . . . . . . . . . . . . . . . . . . . 11
Listening to the Demo . . . . . . . . . . . . . . . . . . . . . . . . . . . . . . . . . . . . . . 11
Basic functions . . . . . . . . . . . . . . . . . . . . . . . . . . . . . . . . . . . . . 13
Playing a single sound (Single mode) . . . . . . . . . . . . . . . . . . . . . . . . . 13
Playing two sounds at the same time (Layer mode) . . . . . . . . . . . . . . 14
Playing different sounds with your l.h. and r.h. (Split mode) . . . . . . 15
Using the pedals . . . . . . . . . . . . . . . . . . . . . . . . . . . . . . . . . . . . . . . . . . . 16
Transposing . . . . . . . . . . . . . . . . . . . . . . . . . . . . . . . . . . . . . . . . . . . . . . 16
Changing the brilliance . . . . . . . . . . . . . . . . . . . . . . . . . . . . . . . . . . . . . 17
Turning the effects on/off . . . . . . . . . . . . . . . . . . . . . . . . . . . . . . . . . . .17
Using performances . . . . . . . . . . . . . . . . . . . . . . . . . . . . . . . . . 18
Choosing performances . . . . . . . . . . . . . . . . . . . . . . . . . . . . . . . . . . . .18
Changing the sounds assigned to a performance . . . . . . . . . . . . . . . .19
Editing a performance . . . . . . . . . . . . . . . . . . . . . . . . . . . . . . . . . . . . . . 19
The metronome . . . . . . . . . . . . . . . . . . . . . . . . . . . . . . . . . . . . 20
Starting and stopping the metronome, adjusting the tempo . . . . . . . 20
Tempo and time signature display . . . . . . . . . . . . . . . . . . . . . . . . . . . . 20
Adjusting the tempo . . . . . . . . . . . . . . . . . . . . . . . . . . . . . . . . . . . . . . . 20
Choosing a time signature . . . . . . . . . . . . . . . . . . . . . . . . . . . . . . . . . .21
Drum patterns . . . . . . . . . . . . . . . . . . . . . . . . . . . . . . . . . . . . . . . . . . . . 21
Adjusting the metronome level . . . . . . . . . . . . . . . . . . . . . . . . . . . . . .22
Adjusting the drum pattern’s reverb . . . . . . . . . . . . . . . . . . . . . . . . . . 22
Selecting the accent . . . . . . . . . . . . . . . . . . . . . . . . . . . . . . . . . . . . . . . . 22
Saving the metronome settings . . . . . . . . . . . . . . . . . . . . . . . . . . . . . .22
Playing back a song . . . . . . . . . . . . . . . . . . . . . . . . . . . . . . . . . 23
Accessing the Song Play mode . . . . . . . . . . . . . . . . . . . . . . . . . . . . . . . 23
How to select a song . . . . . . . . . . . . . . . . . . . . . . . . . . . . . . . . . . . . . . . 23
How to start playback . . . . . . . . . . . . . . . . . . . . . . . . . . . . . . . . . . . . . . 24
Starting from a different measure . . . . . . . . . . . . . . . . . . . . . . . . . . . .24
Muting/unmuting a recorder’s part . . . . . . . . . . . . . . . . . . . . . . . . . . . 25
Changing the song’s tempo . . . . . . . . . . . . . . . . . . . . . . . . . . . . . . . . .25
Play along with the song . . . . . . . . . . . . . . . . . . . . . . . . . . . . . . . . . . . .25
Cycle Play . . . . . . . . . . . . . . . . . . . . . . . . . . . . . . . . . . . . . . . . . . . . . . . .26
Recording a song . . . . . . . . . . . . . . . . . . . . . . . . . . . . . . . . . . . 27
Quick recording procedure . . . . . . . . . . . . . . . . . . . . . . . . . . . . . . . . . 27
Step 1: Entering the Record mode . . . . . . . . . . . . . . . . . . . . . . . . . . . . 27
Step 2: Selecting sounds . . . . . . . . . . . . . . . . . . . . . . . . . . . . . . . . . . . .28
Step 3: Setting the record options . . . . . . . . . . . . . . . . . . . . . . . . . . . .29
Step 4: Setting the time signature and tempo . . . . . . . . . . . . . . . . . . . 30
Step 5: Recording . . . . . . . . . . . . . . . . . . . . . . . . . . . . . . . . . . . . . . . . . . 30
Step 6: Second-pass recording . . . . . . . . . . . . . . . . . . . . . . . . . . . . . . . 31
Changing sounds to a recorded song . . . . . . . . . . . . . . . . . . . . . . . . . . 31
Changing tempo to a recorded song . . . . . . . . . . . . . . . . . . . . . . . . . . 32
Pedal Punch recording . . . . . . . . . . . . . . . . . . . . . . . . . . . . . . . . . . . . . 32
Auto Punch recording . . . . . . . . . . . . . . . . . . . . . . . . . . . . . . . . . . . . . . 32
Saving the song . . . . . . . . . . . . . . . . . . . . . . . . . . . . . . . . . . . . . . . . . . .33
Editing a song . . . . . . . . . . . . . . . . . . . . . . . . . . . . . . . . . . . . . 34
Setting Cycle Play . . . . . . . . . . . . . . . . . . . . . . . . . . . . . . . . . . . . . . . . . . 34
Erasing a track . . . . . . . . . . . . . . . . . . . . . . . . . . . . . . . . . . . . . . . . . . . . 34
Cutting measures at the end of the song . . . . . . . . . . . . . . . . . . . . . . .35
Quantizing the song . . . . . . . . . . . . . . . . . . . . . . . . . . . . . . . . . . . . . . .35
Transposing the song . . . . . . . . . . . . . . . . . . . . . . . . . . . . . . . . . . . . . .36
Deleting the song . . . . . . . . . . . . . . . . . . . . . . . . . . . . . . . . . . . . . . . . . . 36
Saving the song after editing . . . . . . . . . . . . . . . . . . . . . . . . . . . . . . . . . 36
Editing sounds and performances . . . . . . . . . . . . . . . . . . . . . 38
Accessing the Sound edit mode . . . . . . . . . . . . . . . . . . . . . . . . . . . . . 38
Exit from the Sound edit mode . . . . . . . . . . . . . . . . . . . . . . . . . . . . . . 38
Saving a sound . . . . . . . . . . . . . . . . . . . . . . . . . . . . . . . . . . . . . . . . . . . 38
Saving a performance . . . . . . . . . . . . . . . . . . . . . . . . . . . . . . . . . . . . . . 39
Setting the volume . . . . . . . . . . . . . . . . . . . . . . . . . . . . . . . . . . . . . . . . 40
Adjusting the panning . . . . . . . . . . . . . . . . . . . . . . . . . . . . . . . . . . . . . 40
Adjusting the effects . . . . . . . . . . . . . . . . . . . . . . . . . . . . . . . . . . . . . . . 41
Setting the reverb effect . . . . . . . . . . . . . . . . . . . . . . . . . . . . . . . . . . . . 41
Setting the chorus or modulation effect . . . . . . . . . . . . . . . . . . . . . . . 42
Setting the insert effects . . . . . . . . . . . . . . . . . . . . . . . . . . . . . . . . . . . . 42
Setting the octave transposition . . . . . . . . . . . . . . . . . . . . . . . . . . . . . 43
Adjusting the fine tune . . . . . . . . . . . . . . . . . . . . . . . . . . . . . . . . . . . . 44
Programming the pedals . . . . . . . . . . . . . . . . . . . . . . . . . . . . . . . . . . . 44
Selecting a scale . . . . . . . . . . . . . . . . . . . . . . . . . . . . . . . . . . . . . . . . . . . 45
Resetting the current sound and performance . . . . . . . . . . . . . . . . . 46
Global settings . . . . . . . . . . . . . . . . . . . . . . . . . . . . . . . . . . . . . 47
Touch settings . . . . . . . . . . . . . . . . . . . . . . . . . . . . . . . . . . . . . . . . . . . . 47
Turning the internal speakers on or off . . . . . . . . . . . . . . . . . . . . . . . 47
Master tuning . . . . . . . . . . . . . . . . . . . . . . . . . . . . . . . . . . . . . . . . . . . . 48
Brilliance . . . . . . . . . . . . . . . . . . . . . . . . . . . . . . . . . . . . . . . . . . . . . . . . 48
Default split point . . . . . . . . . . . . . . . . . . . . . . . . . . . . . . . . . . . . . . . . 48
Assigning functions to the pedals . . . . . . . . . . . . . . . . . . . . . . . . . . . . 49
Quarter Tone (SubScale realtime programming) . . . . . . . . . . . . . . . 50
Fast Play . . . . . . . . . . . . . . . . . . . . . . . . . . . . . . . . . . . . . . . . . . . . . . . . 50
Mute Level . . . . . . . . . . . . . . . . . . . . . . . . . . . . . . . . . . . . . . . . . . . . . . . 50
Turning the keyboard on or off (Local Control) . . . . . . . . . . . . . . . . 51
MIDI Clock . . . . . . . . . . . . . . . . . . . . . . . . . . . . . . . . . . . . . . . . . . . . . . 51
MIDI IN Channels . . . . . . . . . . . . . . . . . . . . . . . . . . . . . . . . . . . . . . . . 51
MIDI OUT Channels . . . . . . . . . . . . . . . . . . . . . . . . . . . . . . . . . . . . . . 52
MIDI Filters . . . . . . . . . . . . . . . . . . . . . . . . . . . . . . . . . . . . . . . . . . . . . 53
Data transfer via the USB port . . . . . . . . . . . . . . . . . . . . . . . . . . . . . . 53
Erasing songs from the User Song album . . . . . . . . . . . . . . . . . . . . . 54
General Reset . . . . . . . . . . . . . . . . . . . . . . . . . . . . . . . . . . . . . . . . . . . . 55
System version number . . . . . . . . . . . . . . . . . . . . . . . . . . . . . . . . . . . . 55
MIDI . . . . . . . . . . . . . . . . . . . . . . . . . . . . . . . . . . . . . . . . . . . . . 56
What is MIDI? . . . . . . . . . . . . . . . . . . . . . . . . . . . . . . . . . . . . . . . . . . . 56
What is MIDI Over USB? . . . . . . . . . . . . . . . . . . . . . . . . . . . . . . . . . . 56
What can you do with MIDI? . . . . . . . . . . . . . . . . . . . . . . . . . . . . . . . 56
MIDI connections . . . . . . . . . . . . . . . . . . . . . . . . . . . . . . . . . . . . . . . . 56
Standard MIDI settings . . . . . . . . . . . . . . . . . . . . . . . . . . . . . . . . . . . . 57
Using the C-720 as a multitimbral tone generator . . . . . . . . . . . . . . 57
Program Change . . . . . . . . . . . . . . . . . . . . . . . . . . . . . . . . . . . . . . . . . . 57
Control Change . . . . . . . . . . . . . . . . . . . . . . . . . . . . . . . . . . . . . . . . . . 58
Installing the Korg USB MIDI Driver . . . . . . . . . . . . . . . . . . . . 59
Connecting the C-720 to a personal computer . . . . . . . . . . . . . . . . . 59
KORG USB-MIDI Driver system requirements . . . . . . . . . . . . . . . . 59
Please note before use . . . . . . . . . . . . . . . . . . . . . . . . . . . . . . . . . . . . . 59
Windows: Installing the KORG USB-MIDI Driver . . . . . . . . . . . . . 60
Mac OS X: Installing KORG USB-MIDI Driver . . . . . . . . . . . . . . . . 60
Assembling the stand . . . . . . . . . . . . . . . . . . . . . . . . . . . . . . . 61
Cautions for assembly . . . . . . . . . . . . . . . . . . . . . . . . . . . . . . . . . . . . . 61
Assembling procedure . . . . . . . . . . . . . . . . . . . . . . . . . . . . . . . . . . . . . 62
Check after assembly . . . . . . . . . . . . . . . . . . . . . . . . . . . . . . . . . . . . . . 67
Caution . . . . . . . . . . . . . . . . . . . . . . . . . . . . . . . . . . . . . . . . . . . . . . . . . 67
Appendix . . . . . . . . . . . . . . . . . . . . . . . . . . . . . . . . . . . . . . . . . 68
Sounds . . . . . . . . . . . . . . . . . . . . . . . . . . . . . . . . . . . . . . . . . . . . . . . . . . 68
Performances . . . . . . . . . . . . . . . . . . . . . . . . . . . . . . . . . . . . . . . . . . . . 70
Effects . . . . . . . . . . . . . . . . . . . . . . . . . . . . . . . . . . . . . . . . . . . . . . . . . . 71
Songs . . . . . . . . . . . . . . . . . . . . . . . . . . . . . . . . . . . . . . . . . . . . . . . . . . . 72
Error messages . . . . . . . . . . . . . . . . . . . . . . . . . . . . . . . . . . . . . . . . . . . 74
Troubleshooting . . . . . . . . . . . . . . . . . . . . . . . . . . . . . . . . . . . . . . . . . . 75
Polyphony . . . . . . . . . . . . . . . . . . . . . . . . . . . . . . . . . . . . . . . . . . . . . . . 75
Technical specifications . . . . . . . . . . . . . . . . . . . . . . . . . . . . . . 76
MIDI Implementation Chart . . . . . . . . . . . . . . . . . . . . . . . . . . 77
3
Page 6

Introduction
> Main features
Introduction
Main features
Wide range of sounds
Forty different and expressive high-quality sounds, including
a Stereo Concert Grand Piano. You can use the Layer and Split
functions to simultaneously play a combination of two
sounds. Sounds and sound combinations can be freely modified.
Performances
Sound combination can also be saved into performances, giving you an additional set of 30 timbres (3 banks of 10 performances). Performances also store a custom split point, for
custom combinations of sounds over the keyboard.
Four zones keyboard
The new high-quality, realistic Korg RH3 keyboard features
four zones with different weights. This gives you the same realism and feeling as a grand piano keyboard.
Touch control
You can choose from nine different settings to adjust how the
sound will respond to your keyboard playing dynamics.
Pedal effects
The C-720 provides the same three pedals as a grand piano,
controlling the soft, sostenuto, and damper functions respectively. The damper pedal simulates the natural string resonances and noises of an acoustic piano, by means of the
innovative Korg EPx (Piano eXperience) technology. Both the
damper and soft pedals let you vary the amount of the effect by
how far you press down on them (“half-pedal” function). In
addition, pedals can be freely assigned to other functions, like
starting the recorder or changing the speed of the rotary speaker.
Piano eXperience (or EPx) effects are particularly evident in
sounds like GrandPiano, BriteGrand and MelloPiano.
One-hundred eighty-five songs
The C-720 includes a huge library of songs, based on famous
pieces and lesson books. These songs are perfectly suitable for
piano lessons, being recorded into two separate parts (left
hand on Part 1, right hand on Part 2) that you can easily turn
off and play on the keyboard. In addition, you can change the
metronome’s tempo and let a defined passage play in cycle.
SongBook included
The SongBook album is also included as a printed music book
– a great resource for practicing and playing along with your
preferred tunes.
Onboard recorder
A multi-track, easy-to-use onboard recorder, lets you record
your own songs, or read Standard MIDI Files that you can
transfer via the integrated USB port from an external computer.
Metronome
The built-in metronome allows you to select the time signature, tempo, and volume, and use a bell sound as the accent. It
can even give you a drum accompaniment in a musical style of
your choice (drum patterns).
Data transfer via USB
When connected to a personal computer via the USB port, the
C-720’s internal memory can be seen as a USB disk. This way,
you can backup your data, or transfer files between the C-720
and the personal computer.
Piano eXperience
While existing piano sampling techniques have resembled an
audio snapshot, our new “Piano eXperience” technology is
more of a hologram, accurately reproducing every dimensional detail of the sound. All piano sampling for the C-720 is done
in stereo to preserve the natural imaging of the sound. Different dynamic levels are captured to extend the instrument's expressive vocabulary.
Going even further, the C-720 uses the sound of the key being
released and the hammer returning, as well as the sympathetic
damper resonance of the strings to create all of the subtle shadings that create a superior instrument sound. This attention to
detail defines the sound of the new C-720, providing an instrument that can interpret every nuance of touch into a meaningful musical gesture.
4
MIDI capabilities
The C-720 supports the MIDI protocol, the standard that allows music data to be transferred between musical instruments and computers. MIDI allows two or more devices to
control or be controlled by each other, and also allows you to
use the C-720 as a 16-part multitimbral tone generator.
MIDI over USB
The USB port also carries MIDI data, so that you can connect
the C-720 directly to your personal computer with a single cable and without the need of a dedicated MIDI interface. A dedicated KORG USB MIDI Driver is freely available for full use
of the C-720’s MIDI features.
Page 7

Introduction
> Main features
Temperaments
In addition to the Equal temperament, the C-720 allows you to
select nine alternative temperaments, for historically accurate
performance of classical music, or experimenting. When selecting an acoustic piano sound, the typical Stretched Tuning
is automatically selected.
Adjustable pitch
The Transpose function lets you change the pitch of the piano,
and the Master Tuning function allows you to make fine tune
adjustments.
Effects
The C-720 provides built-in digital effects that can simulate
the natural ambience of a concert hall (reverb) and add richness to the sound (chorus). In addition, each sound includes
an insert effect (delay, phaser, equalizer, rotary speaker,
etc…), that is specially suited to each particular sound.
Powerful integrated amplification
The C-720 includes a powerful, 2 × 35 Watt, plus 2 × 12 Watt
double stereo amplifier, with two woofers in closed box and
two dome tweeters. This gives the most authentic sound reproduction, together with enough volume to deliver the full
power of an acoustic piano.
Two sets of headphones
You can connect two stereo headphones, to play with your
teacher or another musician. Connecting a headphone set automatically disconnects the speakers, so there is no risk to disturb others when practicing by night.
5
Page 8
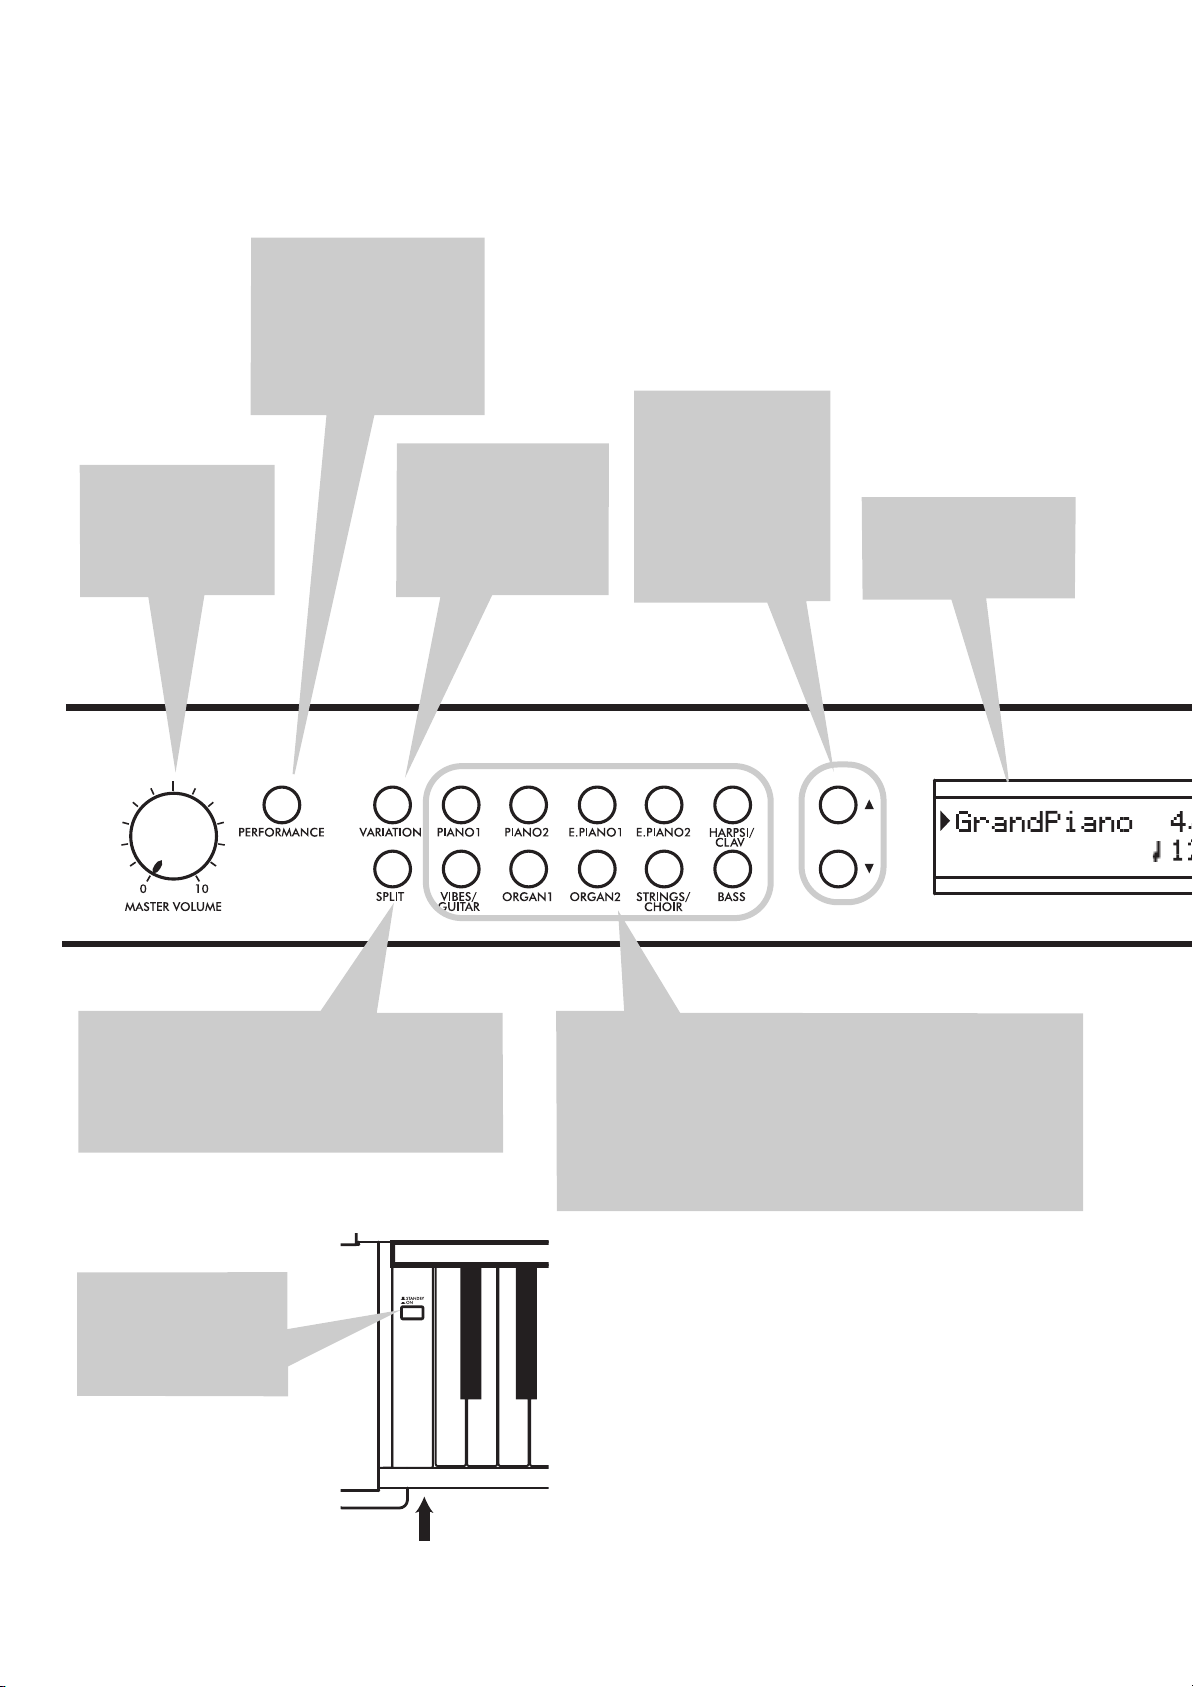
Control panel
>
Control panel
PERFORMANCE button:
Enters/exits Performance
mode. While in this mode,
the sound selection buttons
are used to choose performances instead of single
sounds. See page 18.
MASTER VOLUME
knob:
Adjusts the volume for the speakers,
the Output and the
Phones connectors
VARIATION button:
Selects one of the available variations of the currently selected sound, or
one of the three performance banks.
/
tons: Move the cursor
in the display, from
one parameter to the
following or the previous one. The cursor is
indicated by a point-
ing arrow (
a parameter’s name.
(Scroll) but-
) next to
Display:
Shows the various sound names and
parameters.
SPLIT button:
Split mode, a sound is assigned to your right hand,
and a different one to the left hand. Keep it pressed
and play a note on the keyboard to choose a different split point. See page 15.
POWER switch:
switch. When in the
Standbay position, the
piano is turned off.
Turns Split mode on or off. When in
On/Off
Power LED
6
SOUND SELECTION buttons:
gle mode). You can press two buttons at the same time, to play
two sounds at the same time on the keyboard (Layer mode). Press
SPLIT to play a sound with your right hand, and a different one
with your left hand (Split mode). See page 13.
When the PERFORMANCE indicator is turned on (Performance
mode), these buttons allow for selection of performances. See
page 18.
Press a button to select a sound (Sin-
Page 9
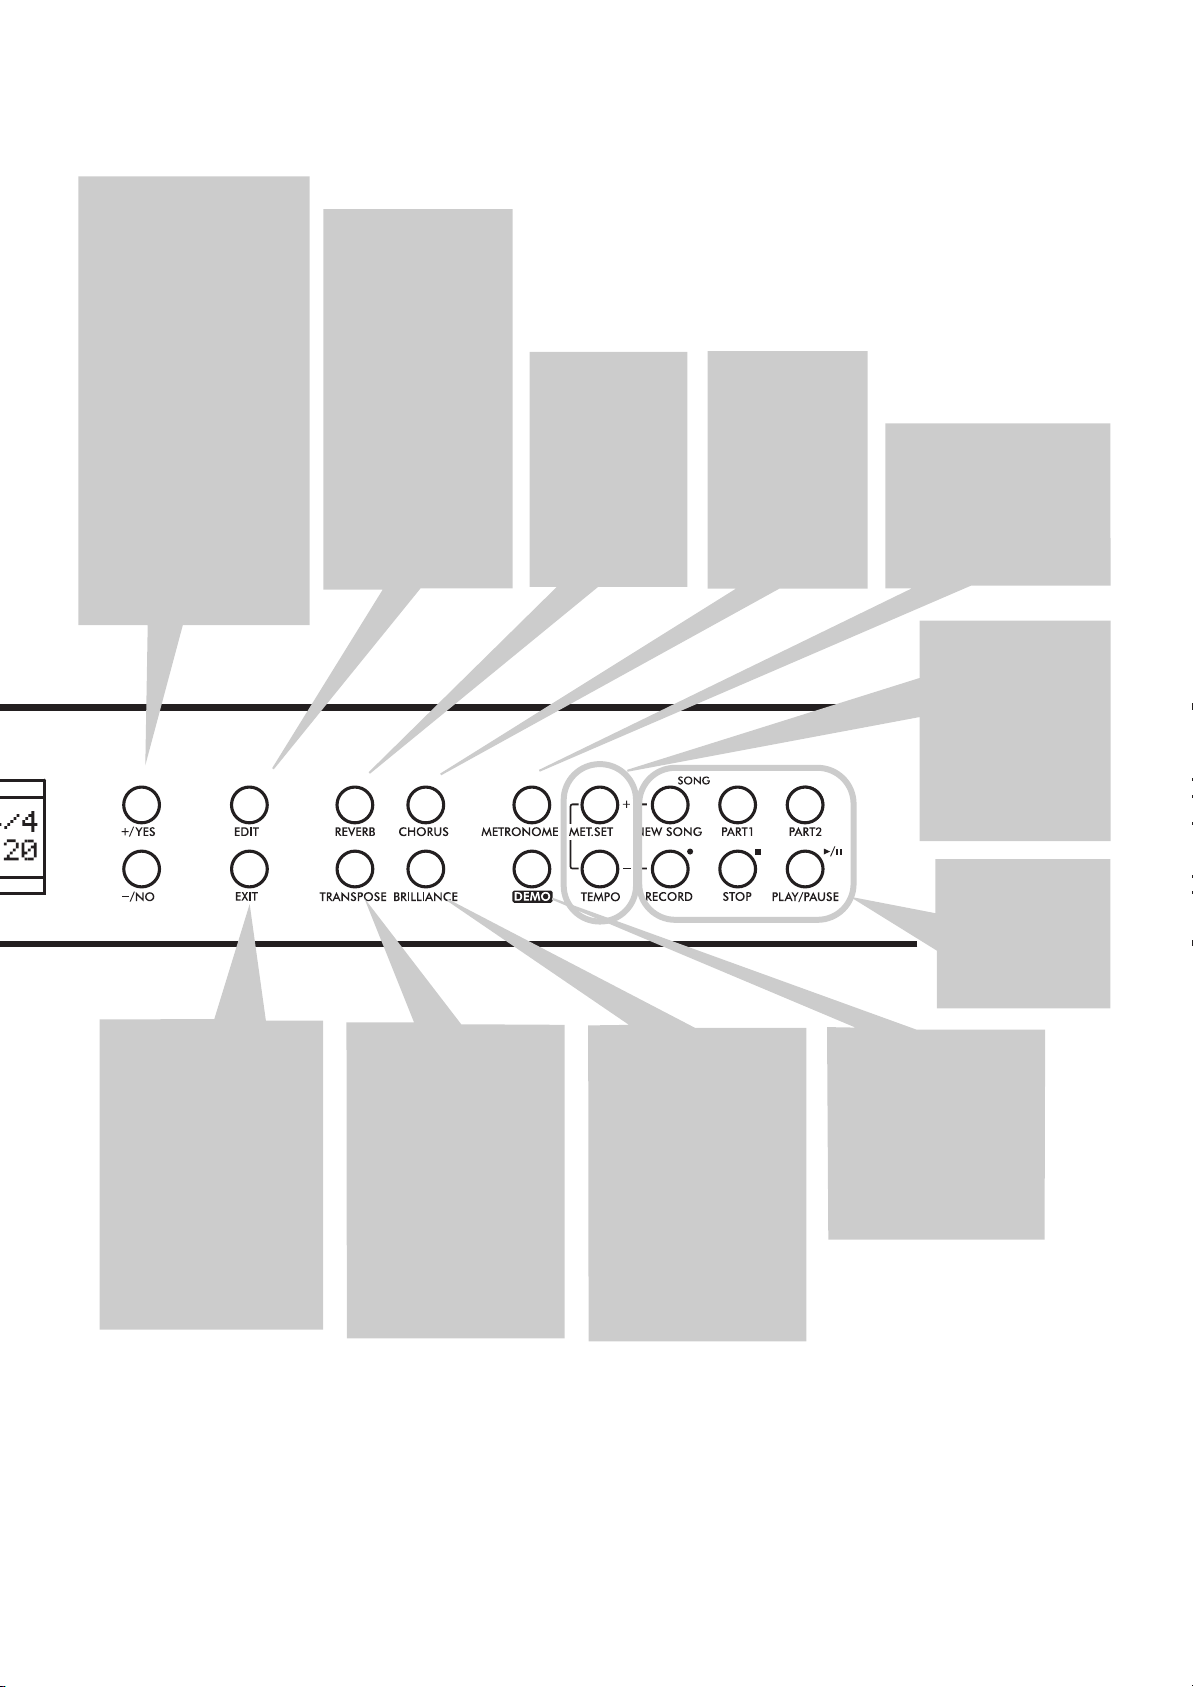
+/YES / -/NO (Value) buttons:
Change the value of
the parameters appearing
in the display. The editable
parameter is shown by the
cursor (
left, or (when editing text)
with the character/cipher in
edit flashing. By keeping
them pressed, the values
start changing automatically, first slowly, then
slightly faster. By pressing
them together, the parameter is reset to its default
value.
While in the Main page,
these buttons can be used
to select a different variation of the current sound.
) placed on its
EDIT button:
to access the Edit
mode relevant to the
current type of data
selected in the display. Four Edit modes
are available: Sound
(see page 38), Performance (see page 38),
Song (see page 34)
and Global (see
page 47). Global edit
mode can be
accessed by keeping
the EDIT button
pressed for more
than one second).
Press it
REVERB button:
Turns the reverb
on/off. This adds
ambience to the
sound. Keep it
pressed for more
than one second
to access the
Reverb edit page
(see page 17).
CHORUS button:
Turns the chorus
on/off. This makes
the sound richer.
Keep it pressed
for more than
one second to
access the Chorus
edit page (see
page 17).
Control panel
METRONOME button:
Turns the metronome click
on/off. The tempo and
time signature depend on
the chosen values, or the
selected song (see
page 20).
TEMPO/MET.SET buttons:
Adjust the metronome tempo. The +
button makes it
faster, while the –
button makes it
slower. Pressed
together, they give
access to metronome
editing. See page 20.
>
EXIT button:
exit Edit mode, or to
return to the Main page
from other pages. When
exiting from the Edit
mode, the Save procedure will be recalled.
When a drum pattern is
assigned to the Metronome, and it is running,
this button doubles as a
Fill In control (see
page 21, page 30).
Press it to
TRANSPOSE button:
Press this button to
open the Transpose
page and change the
master transpose value.
When the indicator is
turned on, transposition is active. Changes
made after pressing this
button are not saved to
memory, and are reset
when turning the
instrument off. See
page 16.
BRILLIANCE button:
Press this button to
open the Brilliance
page and change the
brilliance value. When
the indicator is turned
on, a brilliance variation is active. Changes
made after pressing this
button are not saved to
memory, and are reset
when turning the
instrument off. See
page 17.
RECORDER buttons:
Control the
playback or recording of the songs.
See page 23,
page 27.
DEMO button:
the Demo mode on/off,
to listen to the demo
songs. Select the songs
with the sound selection buttons (see
page 11). You can play
together with the demo
songs.
Turns
7
Page 10
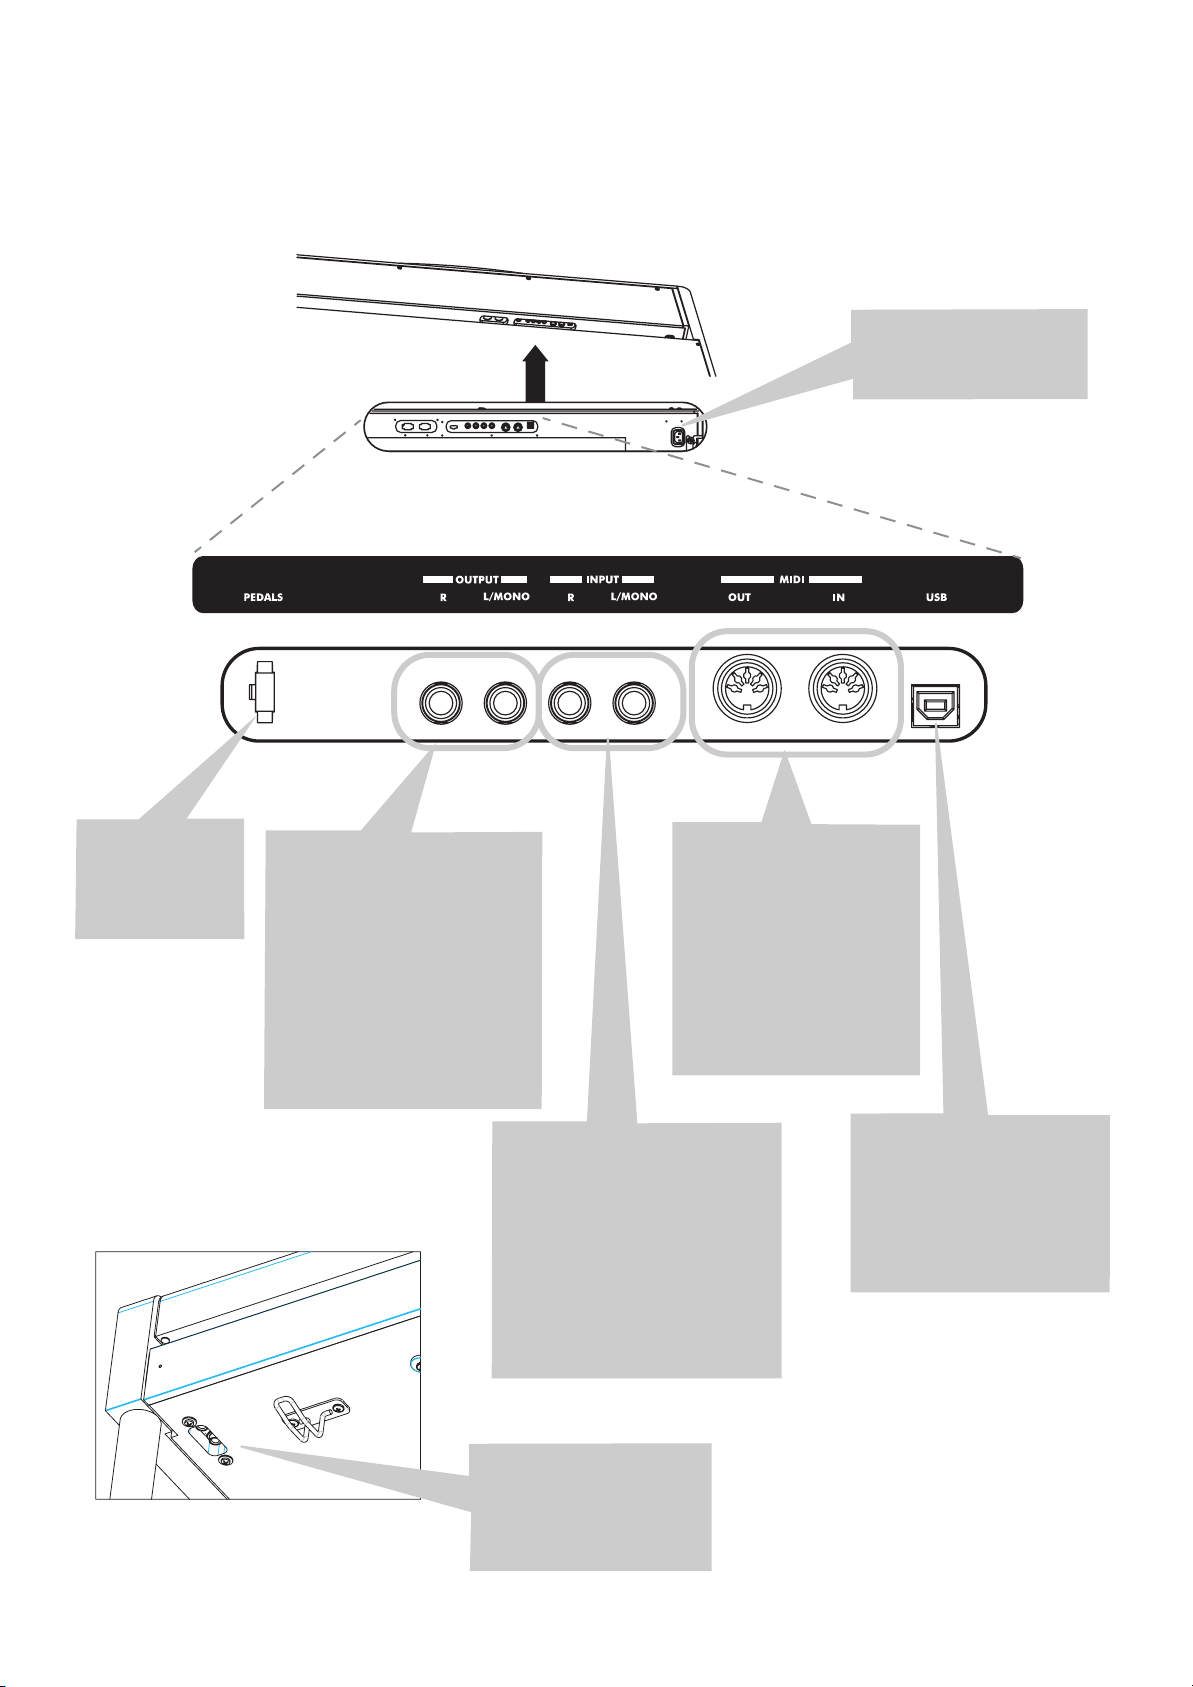
Connections
>
Connections
Pedals connector:
Connect the
supplied pedals
to this connector.
OUTPUT (L/MONO, R) connectors:
Audio outputs. Connect
these connectors to an external
amplifying system. (With a hi-fi
system use the LINE, AUX, CD or
TAPE connectors, not the
PHONO connector). To amplify
the C-720 in mono, connect the
single L/MONO connector. Use
the MASTER VOLUME knob to
set the output volume.
MAINS socket:
the power cord to this
connector.
MIDI (OUT, IN) connectors:
Connectors that are used to
connect other MIDI devices
(sequencer, keyboards, etc.).
OUT: Data output (to be
connected to the MIDI IN
connector of another MIDI
device). IN: Data input (to be
connected to the MIDI OUT
connector of another MIDI
device).
Connect
8
Headphone Hook
INPUT (L/MONO, R) connectors:
Line audio inputs. Connect to
these connectors an external
audio source, such as a CD, MP3
or tape player, or another keyboard. To connect a microphone,
you need an external microphone
preamplifier or a mixer.
Warning:
output of a power amplifier to
these inputs!
PHONES connectors:
nect one or two pairs of
headphones to these jacks.
The integrated speakers
will turn off.
Avoid connecting the
Con-
USB connector:
USB 1.1-compliant, standard
connector. Connects to a personal computer (PC or Mac).
Can be used for data transfer
(see page 53), or USB Over
MIDI use (see page 56).
Type B (slave),
Page 11
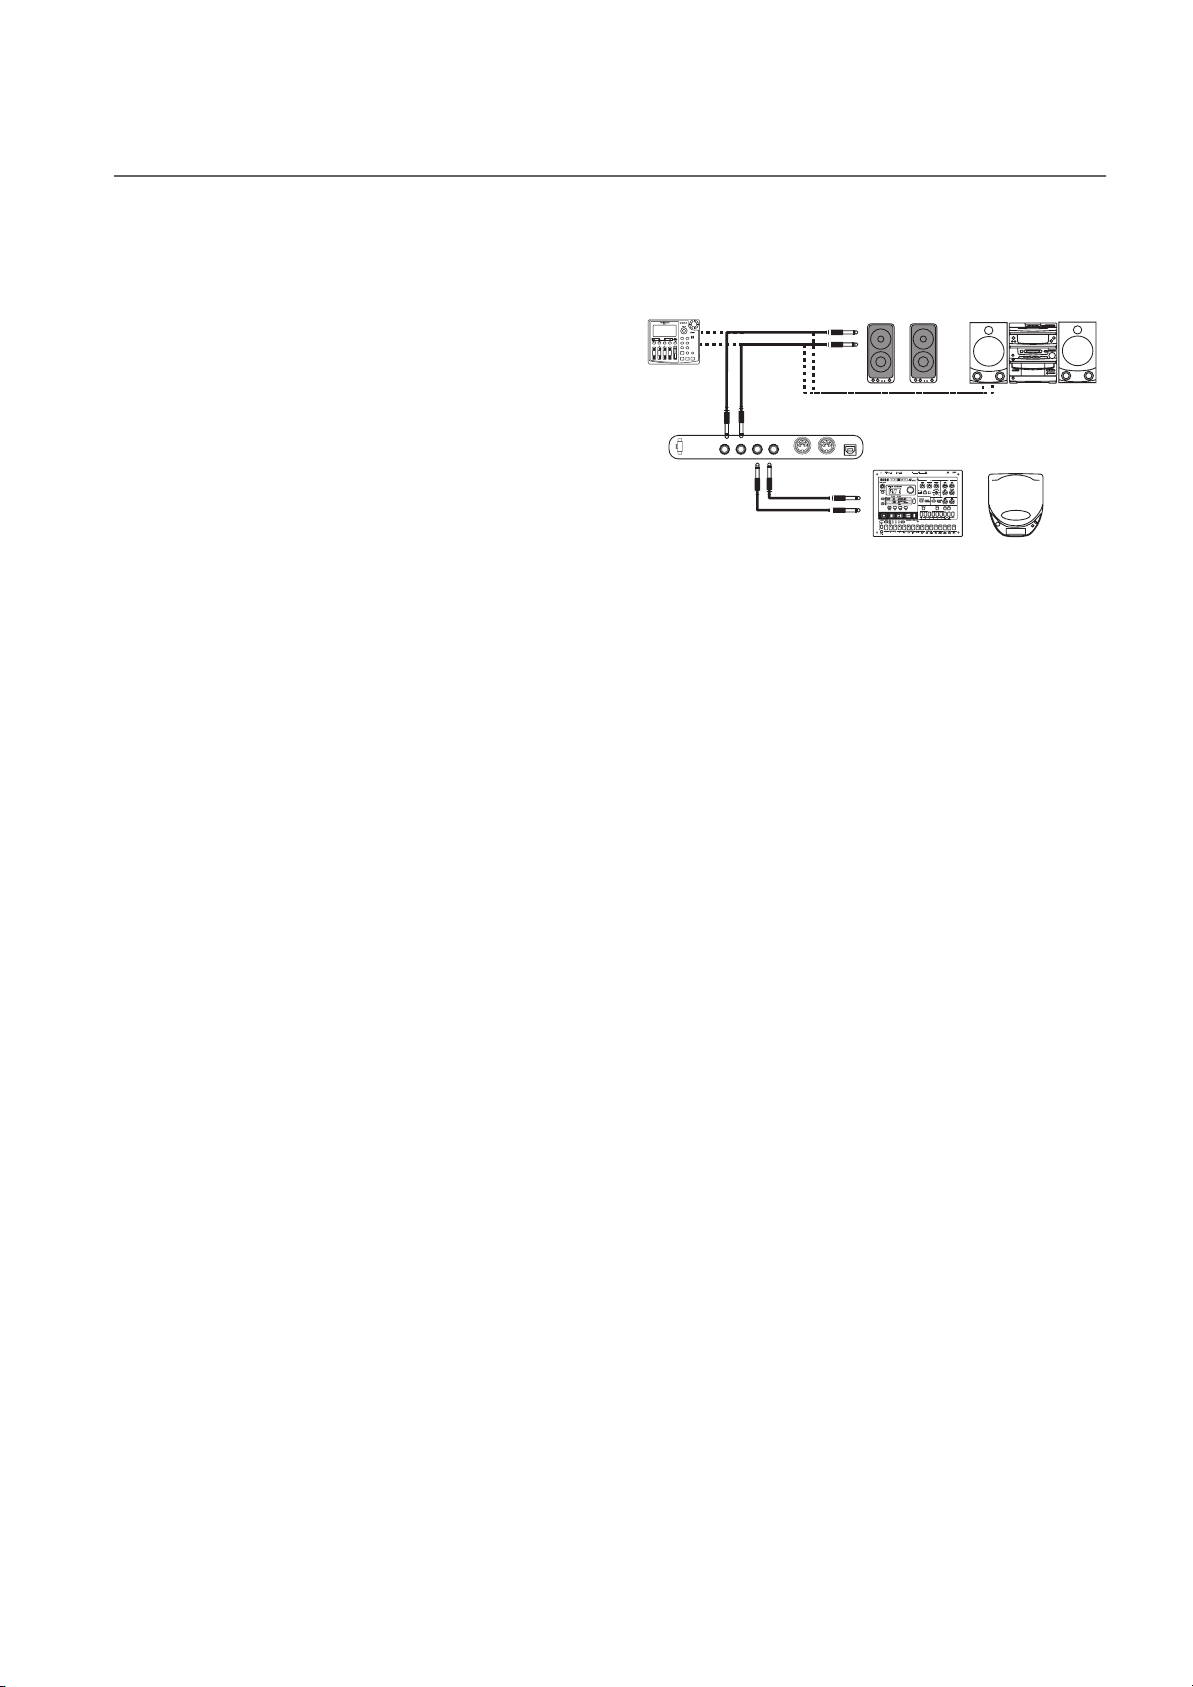
Connecting to external audio devices
Connections
> Connecting to external audio devices
Connecting to an external amplification system
Use the OUTPUT connectors, if you like to connect your C720 to a high-quality mixer, stereo hi-fi, or a couple of active
monitors. When using a stereo hi-fi, connect the OUTPUTs to
the LINE, AUX, CD or TAPE inputs (never use the PHONO
inputs). For mono amplification, connect only the L/MONO
output.
Connecting other audio devices to the C-720
Use the INPUT connectors, to connect a computer, mixer,
drum machine, synthesizer, MP3 or tape player, to your C720, and hear their sound run through its speakers. For mono
amplification, connect only the L/MONO output.
nect the output of a power amplifier!
L/MONO
R
AUX IN
OUTPUT
INPUT
Do not con-
9
Page 12
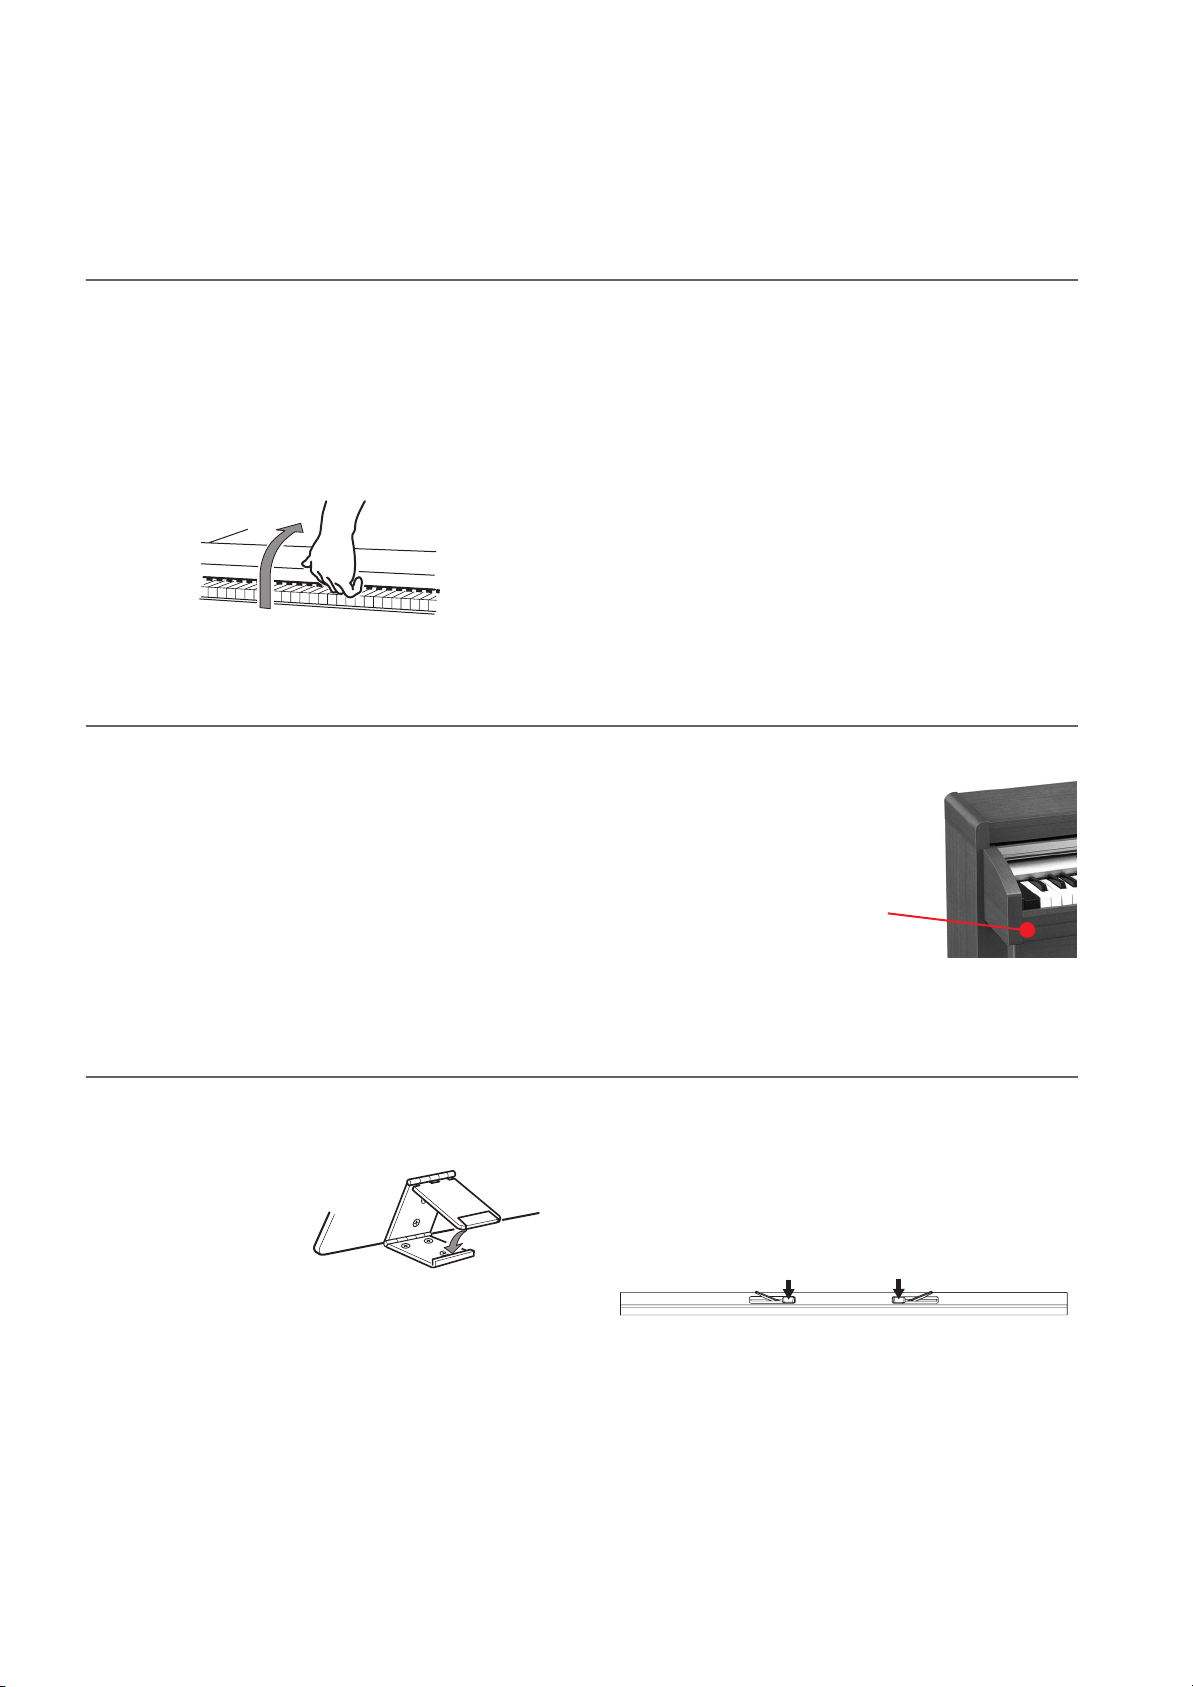
Before you begin
> Open the key cover
Before you begin
Open the key cover
Gently lift the center of the sliding key cover by the indented
portion, and support it while you slide it carefully and fully
into the C-720. Before you open the key cover, make sure that
no foreign objects such as papers or coins are on the top of the
key cover itself, otherwise, these objects may fall into the instrument.
Turning the instrument on
Connect the supplied power cord to the dedicated socket under the rear of the instrument. Then, plug it into a wall socket.
You don’t need to worry about the local voltage, since the C720 uses a universal power adapter.
After having connected the power cable, press the POWER
switch. When the instrument is turned on, the buttons on the
control panel and the display will light up. Also, an LED on the
front of the instrument, also visible when the key cover is
closed, will light up.
To close the key cover, gently lift the center by the indented
portion, and slide it forward. The cover has a soft-landing
mechinism, that makes closing it safer.
Note:
Be careful not to pinch your fingers or hand while open-
ing or closing the key cover.
Note:
The key cover may be damaged if you use excessive force
when opening or closing it.
To turn the instrument off, press the
POWER switch
again.
Power LED
Using the music stand
Opening and closing the music stand
Tilt the music stand upright, and use the two
stoppers located on the
rear to hold the music
stand in place.
To lower the music stand,
release the stoppers and rest the music stand on the flat top.
10
Using the score holders
To keep a music book open, use the two score holders in front
of the music stand. Push on the shorter side to make them slide
up. Push on the longer side to make them slide down.
apply excessive strength or weight to the holders, or you will
risk to break them.
Do not
Page 13
Adjusting the volume
DEMO:GrandPiano1
Bk1 Press Sound
DEMO:-----------
Bk1 Press Sound
Before you begin
> Adjusting the volume
Rotate the MASTER VOLUME knob towards the right to increase the volume; towards the left to decrease the volume. The
maximum value is “10”; the minimum (silence) is “0”. This
control adjusts the output level of the headphones, the internal
speakers and of the OUTPUTs.
Using the headphones
For playing or practicing during night hours, or when you
don’t want to be heard by others in the same room, connect
one or two pairs of high-quality headphones (32
suggested) to the appropriate PHONES connectors. These
connectors are standard 1/4” phone jacks. If your headphones
Ω
impedance
Listening to the Demo
The C-720 contains 20 pre-recorded demo songs. Listen to
them to experience the rich sound and expressive potential of
this instrument. Here is a list of the available demo songs:
It does not control the volume of an audio device connected to
the INPUT connectors. Use the audio device’s own controls to
set its volume.
It is always better to start with a low volume and then increase
gradually.
have a mini-jack adapter, grasp the adapter when plugging in
or out the headphones.
Warning:
avoiding extended listening at high volumes.
Note:
hones to the dedicated hook under the piano.
When using headphones, protect your hearing by
When not using them, you can append your headpho-
to the demo song currently in play will turn on. The name
of the song will be shown in the display:
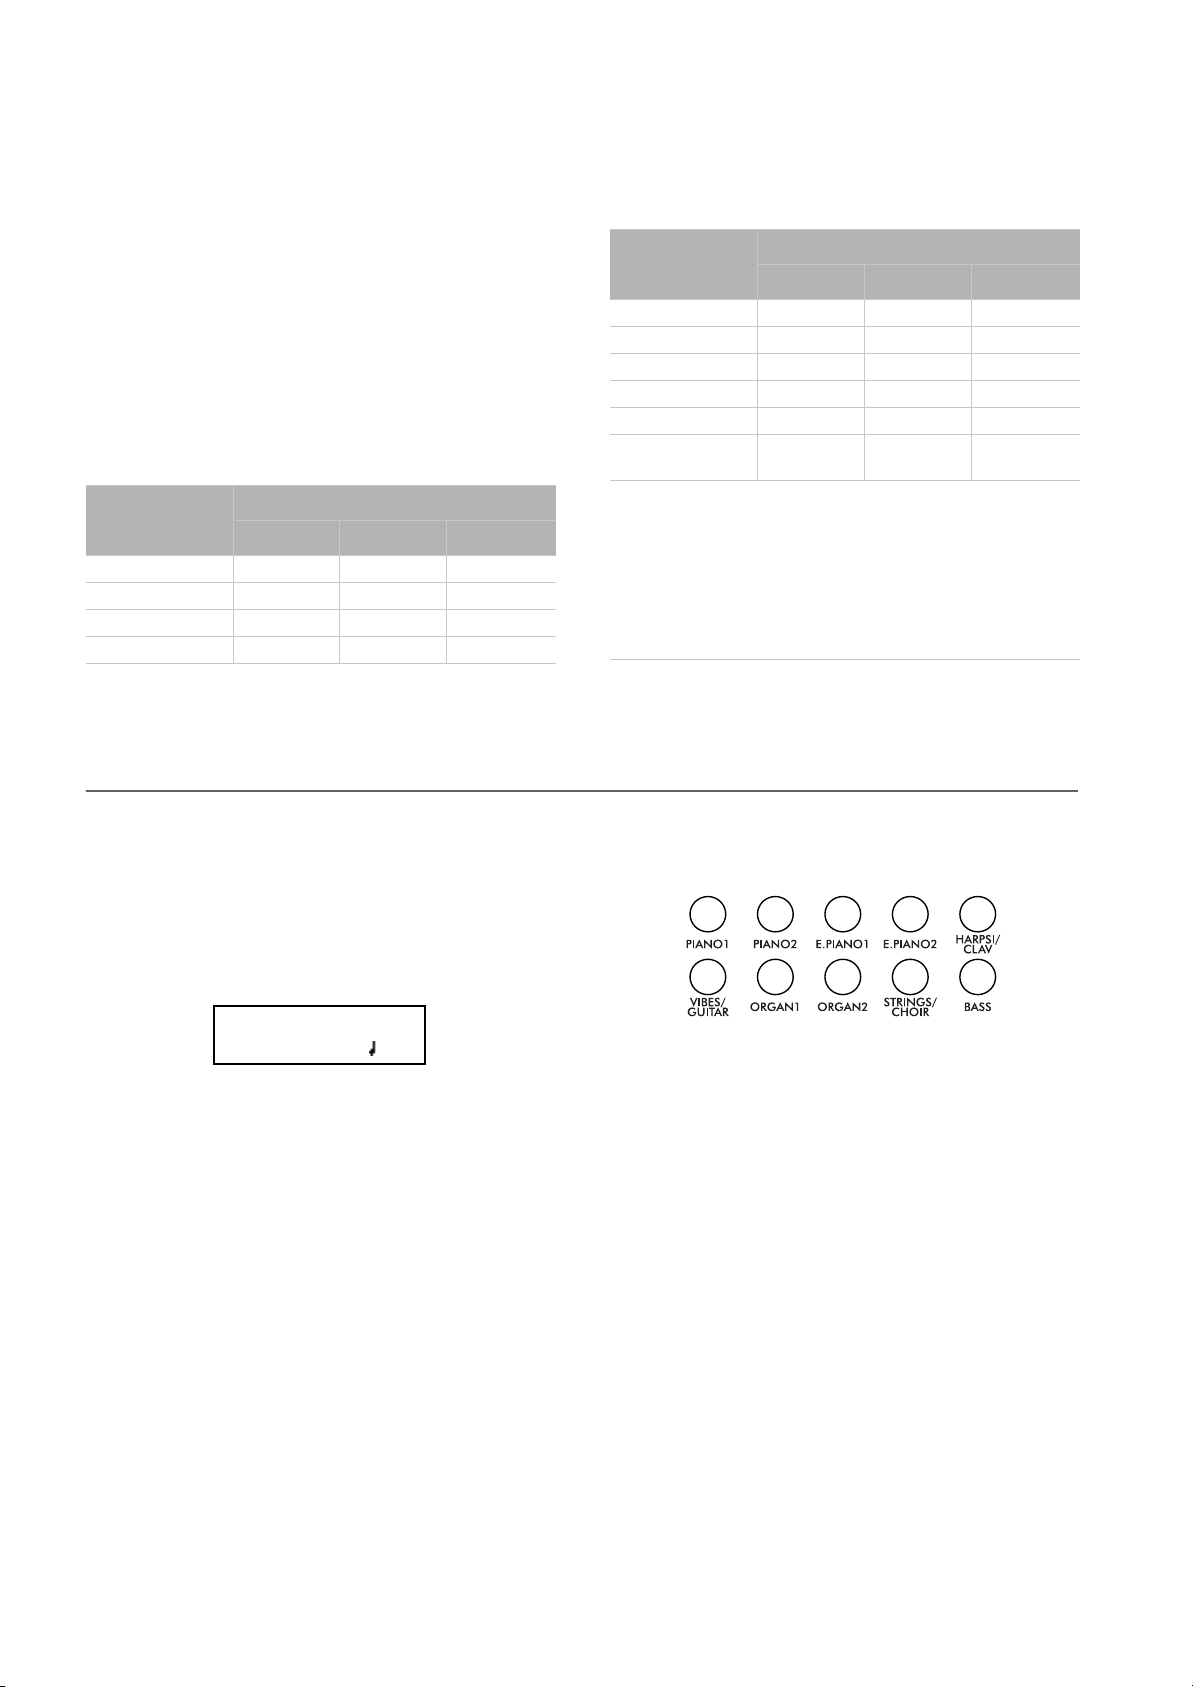
Button Bank 1 (1-10) Bank 2 (11-20)
PIANO 1 GrandPiano1 GrandPiano2
PIANO 2 Honky-Tonk Piano Pad
E.PIANO 1 El. Piano 1 El. Piano 2
E.PIANO 2 Digi Piano Vintage EP
HARPSI/CLAV Harpsichord Clav.
VIBES/GUITAR Vibes Ac. Guitar
ORGAN 1 Jazz Organ1 Jazz Organ2
ORGAN 2 Full Pipe Pipe Flute
STRING/CHOIR Strings Choir
BASS Ac. Bass El. Bass
During the demo playback you can’t use any other buttons.
However, you can still play the keyboard to play along with the
demo songs.
Listen to all songs at once
You can listen to all demo songs with a single command.
1.
Press the DEMO button. The sound selection indicators
will blink sequentially from left to right. The Demo page
will appear in the display:
DEMO:-----------
Bk1 Press Sound
2.
Wait some seconds, without pressing any button. The first
demo song will begin to play. The indicator corresponding
All demo songs will be played back one after the other.
After the last song, the playback will begin again from the
first song.
3.
To pause the current song, press the PLAY/PAUSE button.
Press it again to restart playback from the same position.
4. To stop the playback and exit the demo mode, press the
DEMO or the EXIT button.
Listen to a specified song
You can select just one demo song to be played back.
1. First of all, you must select one of the demo song banks.
• To select the first bank (Bk1, songs 1-10), press the DEMO
button once. The indicators will blink sequentially, from
left to right. The Demo page will appear in the display:
• To select the second bank (Bk2, songs 11-20), press the +/
YES button.
• To return to the first bank, press the -/NO button.
2. Press one of the sound selection buttons to select the cor-
responding demo song in the selected bank. The demo is
based on the sound associated with the button. The indicator on the selected demo button will stay on, while the
other indicators will turn off.
11
Page 14

Before you begin > Listening to the Demo
3. After the end of the selected song, all the songs will be
played back in cycle.
4. If you want to select a different song, press one of the
sound selection buttons.
5. To pause the current song, press the PLAY/PAUSE button.
Press it again to restart playback from the same position.
6. To stop the current song without exiting from the Demo
mode, press STOP. Choose a different song and wait for it
to start playing back.
7. To stop the playback and exit the demo mode, press the
DEMO or EXIT button.
12
Page 15
Basic functions
GrandPiano 4/4
120
Main sound
GrandPiano 4/4
120
Sound name
Playing a single sound (Single mode)
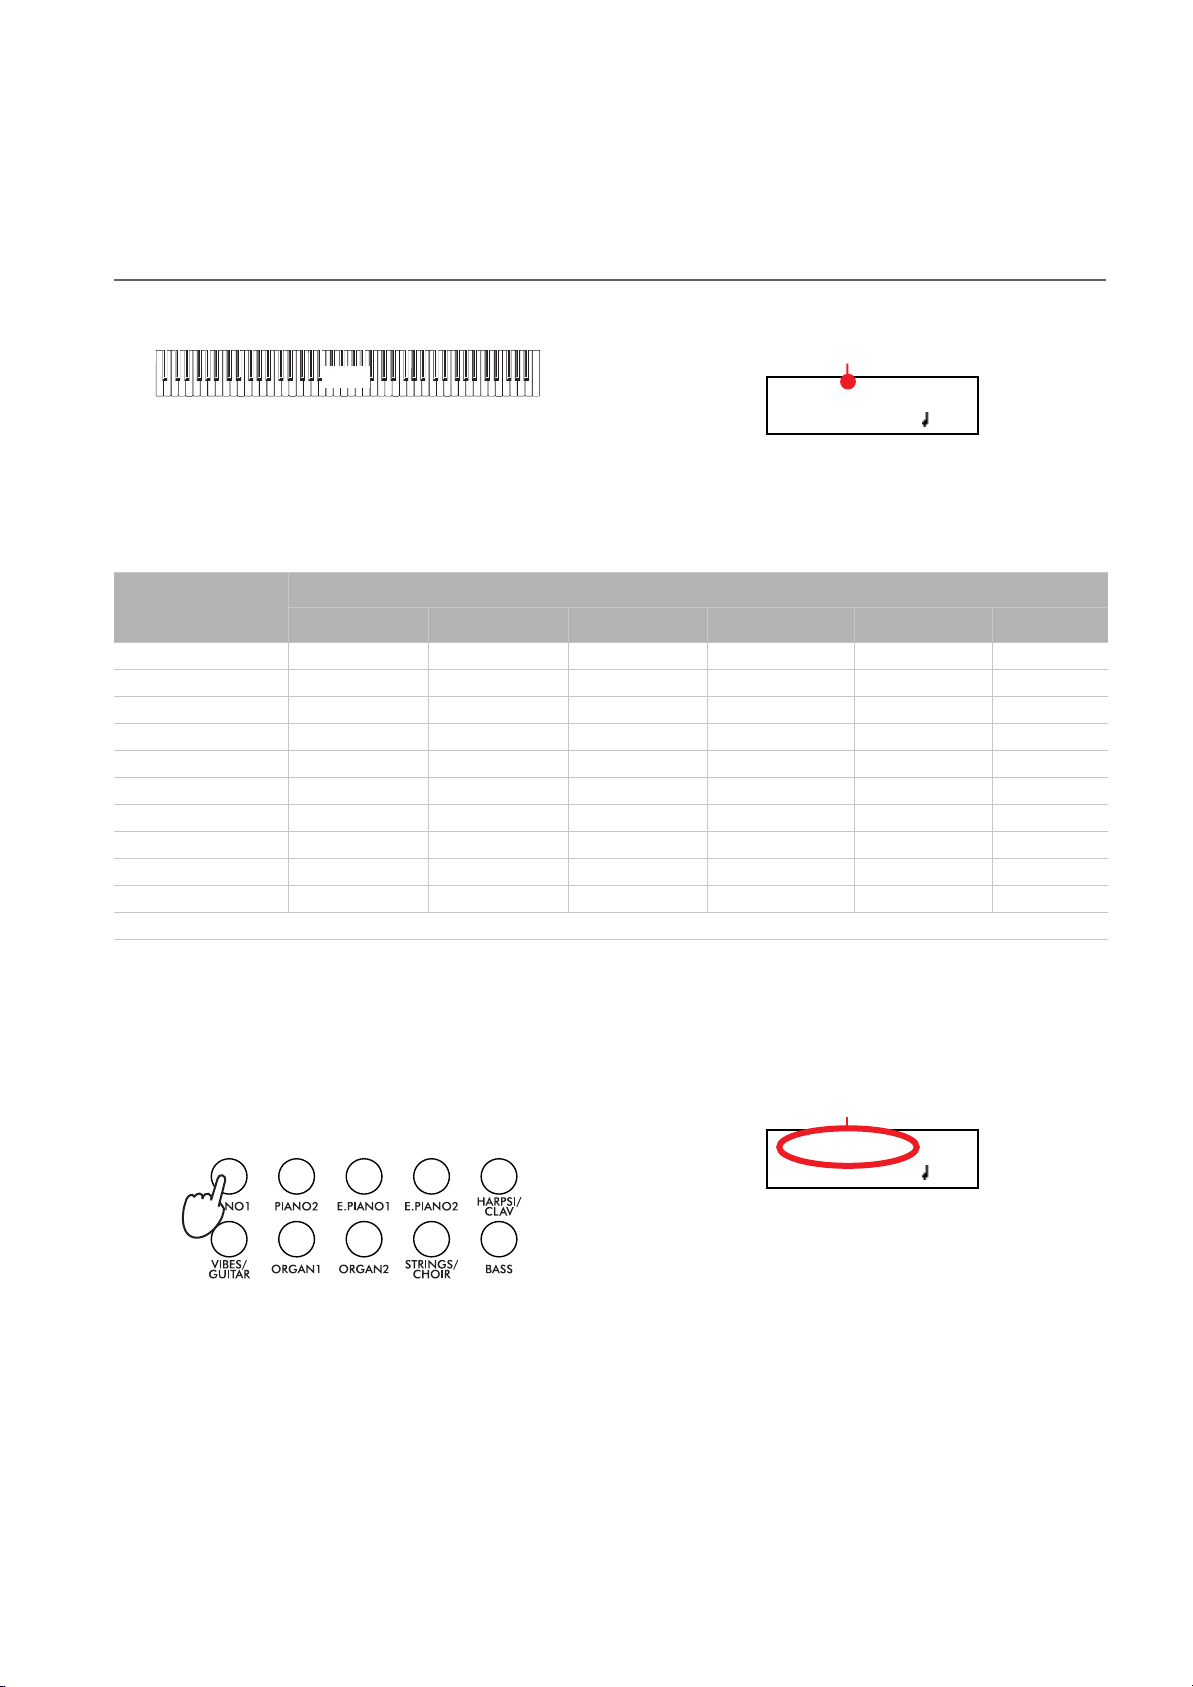
When you turn the instrument on, it is in Single mode.
Main
The single Grand Piano sound is selected, and plays over the
full keyboard. Its name is shown in the display:
You can replace it with any of the 40 sounds supplied with the
instrument. See the list of sounds in the following table (more
details on each sound are on page 68):
Basic functions > Playing a single sound (Single mode)
Button
Var. 1 Var. 2 Var. 3 Var. 4 Var. 5 Var. 6
PIANO 1 GrandPiano* BriteGrand* Rock Piano Piano&Str.
PIANO 2 Honky-Tonk MelloGrand* Piano&Pad Elec.Grand M1 Piano
E.PIANO 1 Tine EP 1 SuitTineEP DynoTineEP Tine EP 2
E.PIANO 2 Dig. EP 1 Dig. EP 2 Reed EP TremReedEP
HARPSI/CLAV Harpsi 8' Harpsi 16' Clav Synth Clav
VIBES/GUITAR Vibes 1 Vibes 2 Nylon Gtr.
ORGAN1 Jazz Organ Perc.Org.1 Perc.Org.2
ORGAN2 Church Org Pipe Flute Pipe Tutti
STRINGS/CHOIR Strings Slow Str. String Pad Choir ScatVoices Vocal Pad
BASS Ac. Bass El. Bass Fretless B Bass&Ride
* Note: The EPx effects are not available when you are in Layer mode.
Sound
Selecting a sound
You can use the sound selection buttons to select a different
sound.
The indicator on the button you pressed will light. The
name of the selected sound will appear in the display:
1. Press one of the sound selection buttons in order to select
a sound type.
12345
678910
2. Use the VARIATION button to select one of the available
variations of the base sound (see table above). When the
last variation has been selected, press it again to select the
base sound again.
As an alternative, use the +/YES button to scroll the sound
variation list forward; the -/NO button to scroll it backwards.
13
Page 16
Basic functions > Playing two sounds at the same time (Layer mode)
M:90
L:127
Main sound’s volume
Layer sound’s volume
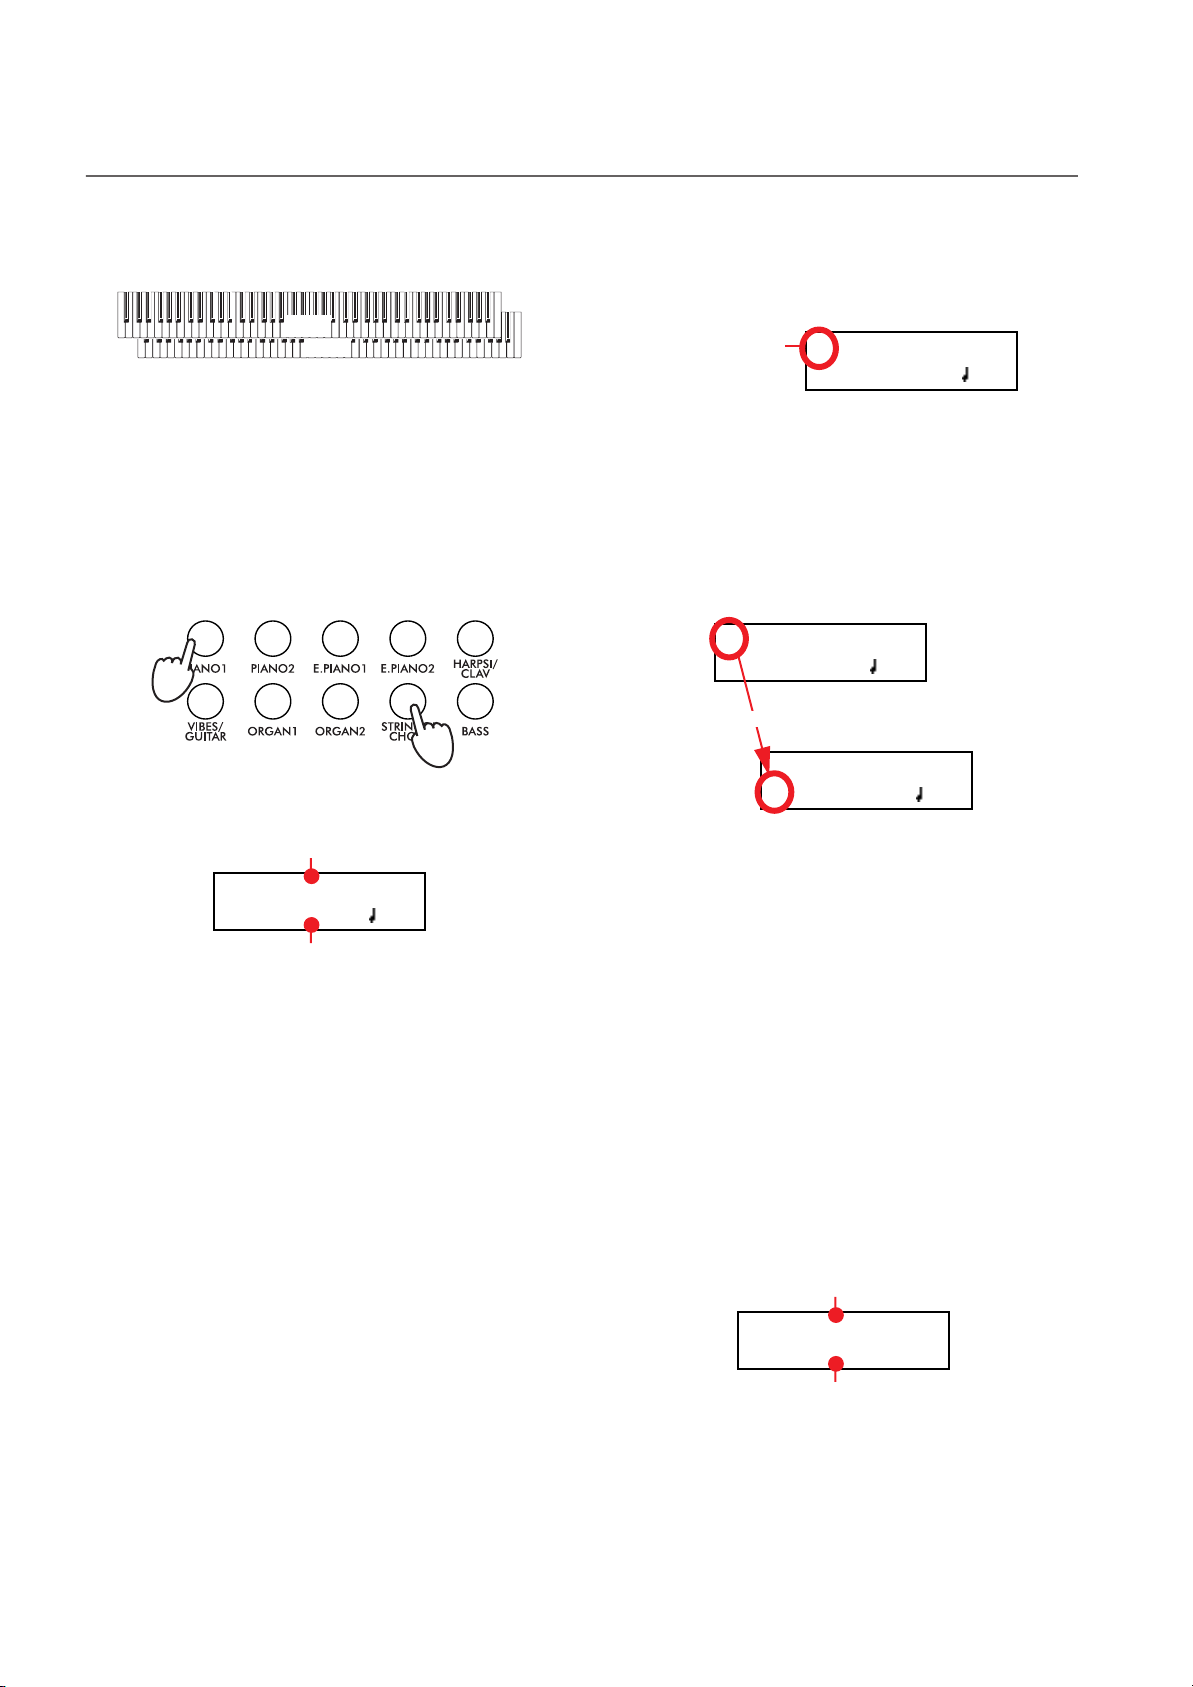
Playing two sounds at the same time (Layer mode)
You can play two sounds at the same time on the keyboard. It
is like having two “overlapping” sounds. This is called the Layer mode.
Main
Layer
Keep in mind that, when in Layer mode, the total number of
voices that you can play at the same time is reduced, depending on the total number of oscillators used by the selected
sounds.
Entering the Layer mode
To access Layer mode from any other mode, press together
two sound selection buttons. The lowest-numbered sound in
the following diagram will be the Main sound, while the highest-numbered sound will be the Layer sound:
12345
678910
The name of the two sounds will appear in the display:
Main sound
GrandPiano 4/4
Strings 120
Layer sound
Exit from the Layer mode
To exit Layer mode, press a single sound selection button, or
the SPLIT button. You will return to the Single mode, with a
single sound playing on the keyboard, or to the Split mode,
with a sound on the left and one on the right of the split point.
Selecting a different pair of sounds
To select different sounds, press a different pair of sound selection buttons. The last selected variation of the sounds corresponding to the new buttons will be selected.
Selecting a variation of the Main sound
You can select a variation of the current Main sound.
1. Be sure the cursor is in the first line of the display. If it isn’t,
use the SCROLL
Cursor
button to move it there:
GrandPiano 4/4
Strings 120
2. Use the VARIATION button to select a different sound
variation. As an alternative, use the +/YES and -/NO buttons to choose a different sound variation.
Selecting a variation of the Layer sound
You can select a variation of the current Layer sound.
1. Use the SCROLL
er sound.
button to move the cursor to the Lay-
GrandPiano 4/4
Strings 120
Scroll
GrandPiano 4/4
Strings 120
2. Use the VARIATION button to select a different sound
variation. As an alternative, use the +/YES and -/NO buttons to choose a different sound variation.
3. If you desire so, use the SCROLL
cursor back to the Main sound.
Balancing layered sounds
You can adjust the sound’s volume balance.
• Keep the Main sound button pressed, to increase its volume and (after the maximum value has been reached)
decrease the volume of the Layer sound. Release the button when done.
• Keep the Layer sound button pressed, to increase its volume and (after the maximum value has been reached)
decrease the volume of the Main sound. Release the button when done.
While the volume is changing, a meter is shown in the display:
buttons to move the
14
Page 17

Basic functions > Playing different sounds with your left and right hand (Split mode)
Playing different sounds with your left and right hand (Split mode)
You can play a sound with your right hand (the Main sound),
and a different one with the left hand (the Left sound). This is
called the Split mode.
Split Point
Left
Main
Entering the Split mode
To access Split mode from any other mode, press the SPLIT
button. The Main sound of the Single or Layer mode will be assigned to the right half of the keyboard (Main area, shown in
the first line of the display), and a Bass sound will be assigned
to the left half of the keyboard (Left area, shown in the second
line of the display).
Main sound
GrandPiano 4/4
Ac.Bass 120
Left sound
While the Ac.Bass sound will be chosen as the Left sound the
first time you enter Split mode, the last selected sound will be
assigned if you return to Split mode later.
Exit from the Split mode
To exit Split mode, press the SPLIT button again to return to
the Single mode, or press two sound selection buttons together
to enter Layer mode.
Choosing a different split point
If the selected split point is too high or too low, you can choose
a different one. Please note that you can set a default split
point, to have it ready each time you turn the instrument on
(see “Default split point” on page 48).
1. Keep the SPLIT button pressed. The current split point is
shown in the display while you keep the button pressed.
SplitPoint: F#3
2. Play a note to set a different split point.
3. Release the SPLIT button.
Selecting a different Main sound
You can select a different Main sound after accessing the Split
mode. Use the sound selection buttons as you would do to select a sound in Single mode.
Selecting a variation of the Main sound
You can select a variation of the Main sound after accessing the
Split mode.
1. Be sure the cursor is in the first line of the display. If it isn’t,
use the SCROLL
button to move it there:
Cursor
GrandPiano 4/4
Ac.Bass 120
2. Use the VARIATION button to select a different sound
variation. As an alternative, use the +/YES and -/NO buttons to choose a different sound variation.
Selecting a different Left sound
You can select a different Left sound after accessing the Split
mode.
1. Keep the SPLIT button pressed. The indicator of the Left
sound lights up.
2. Use the sound selection buttons to select a different sound.
3. Release the SPLIT button.
As an alternative, use the display controls:
1. Use the SCROLL
sound.
buttons to move the cursor to the Left
GrandPiano 4/4
Ac.Bass 120
Scroll
GrandPiano 4/4
Ac.Bass 12
2. Use the sound selection buttons as you would do to select
a sound in Single mode.
3. Use the
sound.
buttons to move the cursor back to the Main
Selecting a variation of the Left sound
You can select a variation of the Left sound after accessing the
Split mode.
1. Keep the SPLIT button pressed. The indicator of the Left
sound lights up.
2. Use the VARIATION button to select a different sound
variation.
3. Release the SPLIT button.
15
Page 18
Basic functions > Using the pedals
M:108
L:127
Main sound’s volume
Left sound’s volume
As an alternative, use the display controls:
1. Use the SCROLL
sound.
buttons to move the cursor to the Left
GrandPiano 4/4
Ac.Bass 120
Scroll
GrandPiano 4/4
Ac.Bass 12
2. Use the VARIATION button to select a different sound
variation. As an alternative, use the +/YES and -/NO buttons to choose a different sound variation.
3. If you want, use the SCROLL
sor back to the Main sound.
buttons to move the cur-
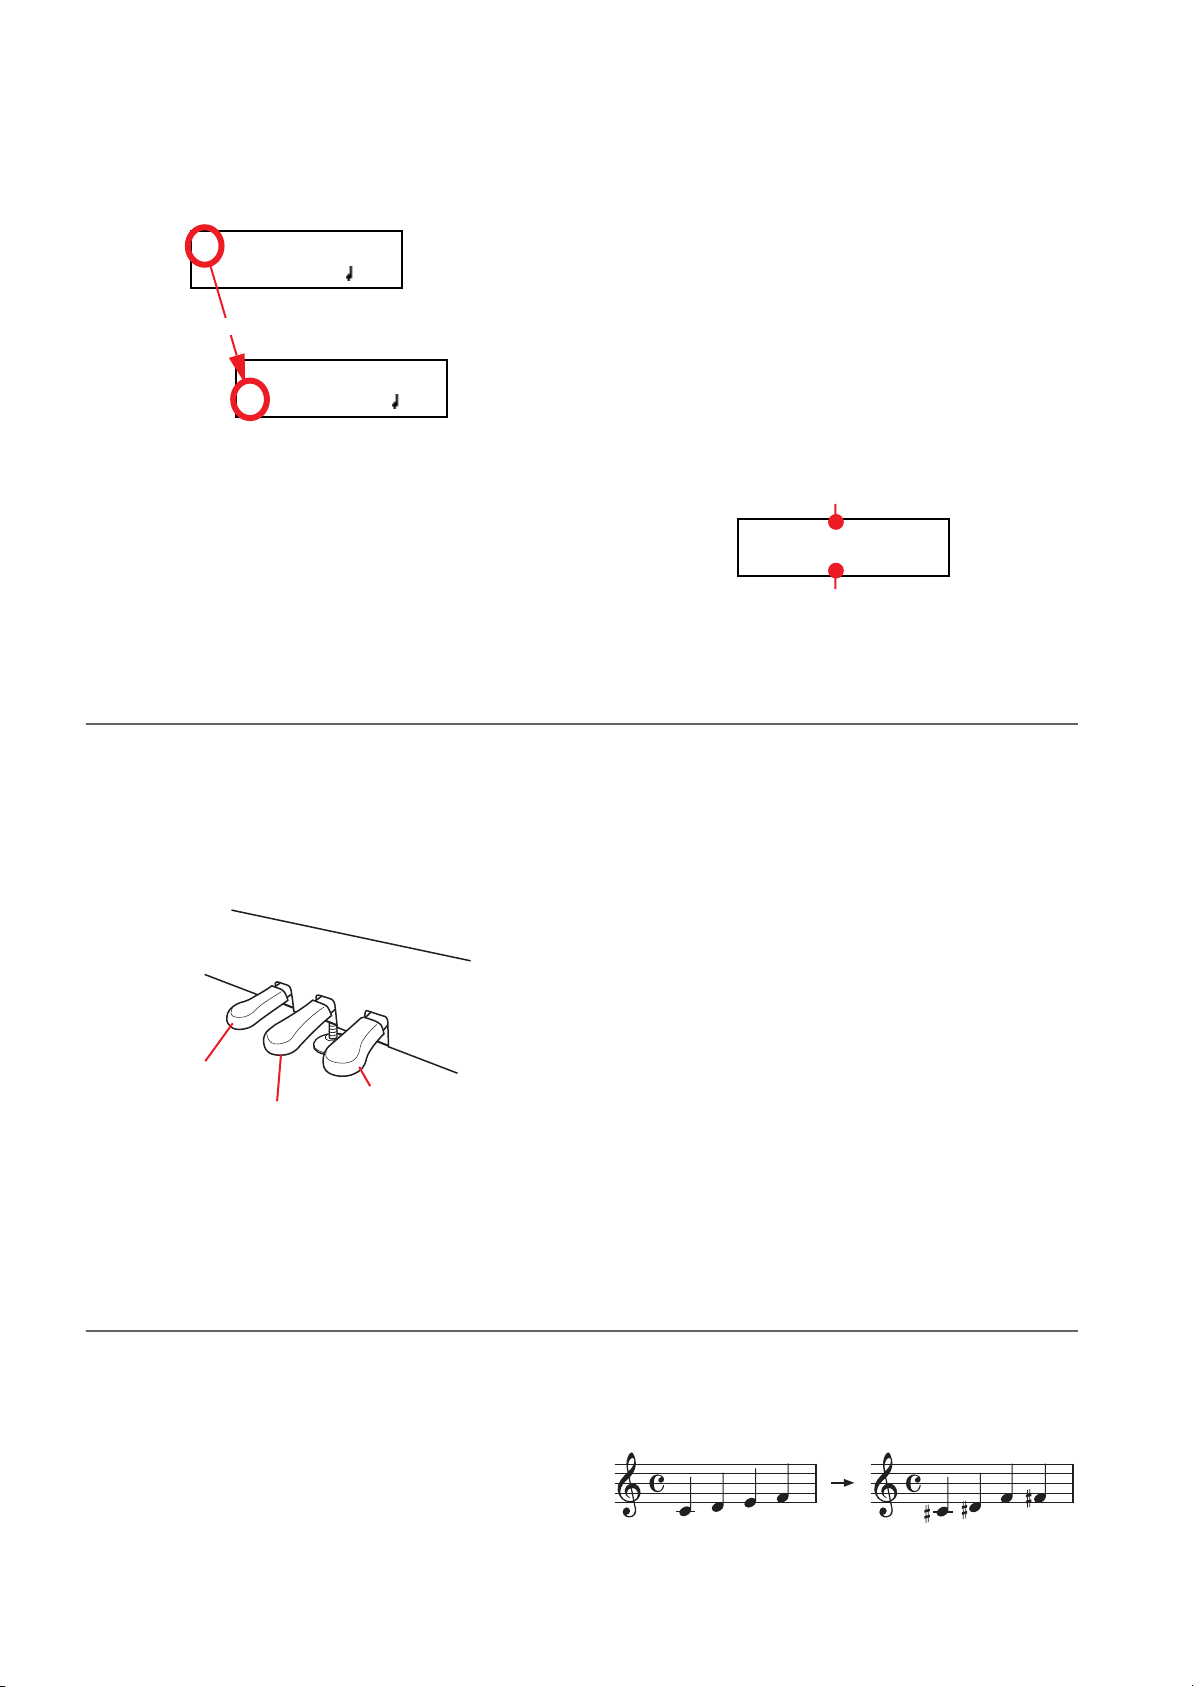
Using the pedals
Balancing sounds in Split mode
You can adjust the sound’s volume balance.
• Keep the Main sound button (the one whose indicator is
turned on) pressed, to increase its volume and (after the
maximum value has been reached) decrease the volume of
the Left sound. Release the button when done.
• Keep the SPLIT button pressed, or press the SCROLL
button to move the cursor to the second line of the display. The indicator of the Left sound lights up. Then, keep
the Left sound button pressed, to increase its volume and
(after the maximum value has been reached) decrease the
volume of the Main sound. Release the button when done.
While the volume is changing, a meter is shown in the display:
The C-720 has three assignable pedals, usually acting as damper, sostenuto, and soft. However, you can assign the pedals different functions (see page 44 for sound-level assignment, or
page 49 for global programming).
With the default settings, you can use these pedals to add expression to your playing, as on a traditional piano.
3
2
1
Soft
Sostenuto
Damper
(1) Damper pedal
The damper pedal simulates the natural string resonances of
an acoustic piano. Pressing this pedal will sustain the sound,
Transposing
producing a richly resonant decay. You can control the damper’s depth by how far down you press on the pedal (“half-pedaling”).
Sounds like GrandPiano, BriteGrand and MelloGrand also
trigger EPx effects while in Single and Split mode. However,
these effects are not available when you are in Layer mode.
(2) Sostenuto pedal
Pressing this pedal will apply the damper effect only to the
notes that are already being held down on the keyboard, and
will sustain only those notes. The damper effect will not be applied to any additional notes that you play while holding down
the Sostenuto pedal (apart for the notes already held).
(3) Soft pedal
Pressing this pedal will make the tone softer. You can control
the soft effect depth by how far down you press on the pedal
(“half-pedaling”)
In some cases, a song may be written in a difficult key (e.g.,
many black keys), or you may wish to shift the pitch to match
another instrument or vocalist. In such cases, you can transpose (shift the pitch) so that you can use an easier fingering, or
use the same familiar fingering to play at a different pitch. This
is called the Transpose function.
16
For example if you transpose upward by one semitone, playing
the notes shown at the lower left will produce the pitches
shown at the right.
Page 19
Basic functions > Changing the brilliance
Note: When the instrument is turned on, transposing is reset.
1. Press the TRANSPOSE button to show the Transpose dis-
play:
Transpose
+02 semitones
Transpose value
If you do no changes, just wait some seconds for the page
to automatically disappear. Otherwise, you can exit from
this page by pressing the EXIT button.
Changing the brilliance
Brilliance is the sound’s brightness, that may be affected by the
sound of the room the piano is placed into. For example, a
heavy carpeted room sounds duller than a room containing
less carpeting or furniture. You can set an overall increase or
decrease of brilliance for all sounds.
This is the same parameter you can change in the Brilliance
page of the Global mode (see page 48). However, contrary to
the changes you can make in the Global mode, the changes
made with this button cannot be memorized, and are reset
when turning the instrument off.
Note: When the instrument is turned on, brilliance set in this
page is reset. (Brilliance may have permanently been set in Global mode, see page 48).
1. Press the BRILLIANCE button to show the Brilliance dis-
play:
2. Use the +/YES and -/NO buttons to change the transpose
value in steps of one semitone, within a range of ±11 semitones. When a transposition is active, the indicator turns
on.
3. Press the EXIT button to exit from this page.
4. Press the TRANSPOSE button again to turn transposition
off. The indicator will turn off.
5. Press the TRANSPOSE button if you want to turn transpo-
sition on again, with the last value selected. The indicator
will turn on again. Wait some seconds for the page to disappear, or press the EXIT button to exit immediately.
If you do no changes, just wait some seconds for the page
to automatically disappear. Otherwise, you can exit from
this page by pressing the EXIT button.
2. Use the +/YES and -/NO buttons to change the brilliance
value. When a brilliance change is active, the indicator
turns on.
3. Press the EXIT button to exit from this page.
4. Press the BRILLIANCE button again to turn brilliance
changes off. The indicator will turn off.
5. Press the BRILLIANCE button if you want to turn bril-
liance on again, with the last value selected. The indicator
will turn on again. Wait some seconds for the page to disappear, or press the EXIT button to exit immediately.
Brilliance
Bright
Brilliance setting
Turning the effects on/off
The C-720 has two global effects (reverb and chorus), in addition to an insert effect for each sound (see diagram on
page 41). The reverb simulates the sound reverberation in a
room, while the chorus simulates a modulating effect that
makes the sounds richer.
The insert effect is part of the sound itself, and should remain
on to avoid a dramatic change in timbre. On the contrary, you
can turn the reverb and chorus on/off as you like, by using the
REVERB and CHORUS buttons on the control panel.
However, selecting a different sound will reset the status of the
buttons, since it is saved with the sound itself. To permanently
change the effect’s status, edit the sound by keeping one of
these buttons pressed for a couple seconds. See page 41 for
more details.
17
Page 20
Using performances > Choosing performances
Using performances
Performances are registrations of sound combinations. Instead of selecting single sounds, or a combination of sounds,
you simply select a performance. A performance then recalls
one or two sounds, each one with their own settings, plus the
memorized split point (if the sounds are in Split mode).
There are 30 performances (10 groups
× 3 banks each). Each
group corresponds to one of the numbered sound select buttons (1 ~ 10). You can then choose one of the three banks inside the selected group by using the VARIATION button
(more details are on page 70).
Button
Bank 1 Bank 2 Bank 3
1 (PIANO 1) Split&Layr Digital EP* Baroque*
2 (PIANO 2) Grand&Ride PaddedTine* Harpsi-Ch*
3 (E.PIANO 1) Grand&Ebas R&B EPno* Harpsi-Org*
4 (E.PIANO 2) PnoStrings* EP Choir* Church Mix*
Performance
Choosing performances
Button
Performance
Bank 1 Bank 2 Bank 3
5 (HARPSI/CLAV) EGrand Pad* EP&NoFret Guitar Pad*
6 (VIBES/GUITAR) Piano Pad* Scat&Bass GrandPiano
7 (ORGAN1) Pno Choirs* Vibes&Bass BriteGrand
8 (ORGAN2) Pno Guitar* Bass&Guitr MelloGrand
9 (STRINGS/CHOIR) Piano BX3* Org&Bass 1 2 Pianists
10 (BASS) DualManual Org&Bass 2 PnoEXp-
DEMO**
* Note: These performances, with sounds set in Layer mode, do
not use EPx effects.
** Note: Performance 30 (PnoExpDEMO) is designed to demonstrate our “Piano eXperience” technology, by exaggerating the
amount of key-off/hammer return portion of the Grand Piano
sound; it is not intended to be a play-able timbre. Normally,
these additional Piano eXperience sounds are not perceived as
separate elements, but together with the other sample layers,
they are a vital part of the realism and the authentic piano tone.
Here is how to choose a performance.
Note: While in Performance mode, you cannot switch between
Single, Layer and Split modes. However, if you select a performance with two sounds in Split, the SPLIT indicator will turn on.
1. Press the PERFORMANCE button to enter Performance
mode. The indicator turns on, and the latest selected performance is recalled.
Perf.01 4/4
Split&Layr 120
2. Use the sound selection buttons to select a different group
of performance.
12345
678910
3. If needed, use the VARIATION button to select a different
performance inside the same group. There are three performances for each group of performances.
As an alternative, use the +/YES and -/NO buttons to
choose a different performance inside the selected group.
4. Press the PERFORMANCE button again to exit Perfor-
mance mode. The previous sound or combination of
sounds will be recalled. The indicator will turn off.
18
Page 21
Using performances > Changing the sounds assigned to a performance
Changing the sounds assigned to a performance
You can change the sound or sounds assigned to the current
performance, without the need of accessing the Edit mode.
Note: You cannot change performance sounds while in Performance Edit mode.
Note: The EPx effects are not available when you are in Layer
mode.
1. While you are in the Main page of the Performance mode,
press both SCROLL
(or sounds) assigned to the performance are shown in the
display:
/ buttons together. The sound
Main sound
Piano&Str.
2. If there are two sounds, use the SCROLL
to move the cursor to the sound you want to change.
3. Use the +/YES and -/NO button to choose a different
sound.
4. Press the EXIT button to exit from the above page. If you
chose a different performance, changes are lost.
5. To save the changes use one of the save procedures ex-
plained in “Saving a performance” on page 39.
/ buttons
Ac. Bass
Layer/Left sound
Editing a performance
You can edit any performance according to your taste. You can also save any combination of sounds over an existing performance.
See “Editing sounds and performances” on page 38.
19
Page 22
The metronome > Starting and stopping the metronome, adjusting the tempo
GrandPiano 4-4
Strings 120
4/4 drum pattern selected
01-Prelude 1
M: 1 4/4 120
Song’s tempo
Song’s time signature
The metronome
The C-720 incorporates a metronome, with which you can beat the tempo during practice or song recording. The metronome can
beat ordinary times, or drum patterns.
Starting and stopping the metronome, adjusting the tempo
Use the METRONOME button to start and stop the metronome.
1. Press the METRONOME button to make the metronome
start (the indicator on the button turns on).
Tempo and time signature display
The metronome’s tempo and time signature are always shown
in the Main page:
Metronome’s time signature
GrandPiano 4/4
Strings 120
Metronome’s tempo
The metronome’s tempo and time signature also appear in
Performance mode:
Metronome’s time signature
Perf 01 4/4
Split&Layr 120
2. Press the METRONOME button again to stop it (the indi-
cator turns off).
hyphen (–) (see page 21 for information o how to select drum
patterns):
When listening to a song, the tempo and time signature are
those of the current song. You can use the TEMPO buttons to
adjust the tempo while the song plays. On the contrary, the
time signature cannot be modified after recording:
When a drum pattern is selected as the time signature, the separator between the fraction’s numerator and denominator is a
Adjusting the tempo
When turning the metronome on for the first time, while in
the Main page, the default tempo of 120 BPM (beats per
minute) is chosen. You can adjust it by using the TEMPO buttons.
20
Metronome’s tempo
(Please remember you can exit from the Song Play page and
return to the Main page by pressing the EXIT button.)
When turning it on from the Song Play (page 23) or Record
page (see page 27), the tempo is that of the current song. You
can adjust it by using the TEMPO buttons.
The last change is preserved, until you don’t choose a different
song and start playing it back.
Page 23
Choosing a time signature
The metronome > Choosing a time signature
When turning the metronome on from the Main page, the default time signature of 4/4 is chosen, but you can adjust it by
accessing the Metronome page (as shown below).
Note: If the PLAY/PAUSE button is flashing, you cannot change
the time signature.
Note: If you enter editing later, you might see a different edit
page instead of the first one. Use the SCROLL button to
reach it.
1. Press the TEMPO + and TEMPO – (or MET.SET) buttons
together. The first Metronome page, Metro TS/Tempo,
will appear, with the Time Signature parameter selected:
Metro TS/Tempo 1
4/4 120
Drum patterns
Instead of an ordinary time signature (4/4, 3/4, etc…), a drum
pattern can be assigned to the metronome. This will give you
the sense you are playing together with a real drum player. You
can also record a drum pattern into a song.
Note: Contrary to ordinary metronome “clicks”, drum pattern
notes can also be recorded by the internal recorder. They can
also be transmitted via MIDI, so you can record them on an external sequencer, or make them play with an external instrument (see “MIDI” on page 56).
Drum patterns are in the second half of the time signature list.
While the list is selected, either scroll to it, or press both the +/
YES and -/NO buttons together, to quick jump to the drum
patterns. Press these buttons together again to quick jump to
the ordinary time signatures (4/4 selected).
Drum patterns
8 Beat 1 Ballroom 2 Bossa 1 Swing 2
8 Beat 2 Ballroom 3 Bossa 2 Swing 3
8 Beat 3 Slow 6/8 Samba Slow Waltz 1
16 Beat 1 Funk 1 Cha Cha Slow Waltz 2
16 Beat 2 Funk 2 Salsa Waltz
2. Use the +/YES and -/NO buttons to select a time signature.
Ordinary times are at the beginning, while drum patterns
are at the end. You can quick jump from the one to the
other by pressing the +/YES and -/NO button together.
Ordinary times
1/2 ~ 16/2 1/4 ~ 16/4 1/8 ~ 16/8
3. Press the EXIT button to return to the Main page.
Drum patterns
16 Beat 3 Rock Mambo Foxtrot
Ballad 1 Rock 6/8 Tango March
Ballad 2 Dance Rhumba
Ballad 3 Beguine Gospel
Ballroom 1 Unplugged
Latin
Swing 1
Here is how to use the drum patterns:
1. While in the Main page, press the METRONOME button
to start the metronome. A Count In is heard, then the
drum pattern begins.
2. While in the Main page (either with a sound or a perfor-
mance selected), or in the Record page, press EXIT (or a
pedal with the Fill In function assigned, see page 49). A Fill
In is played, then a variation of the base drum pattern start
playing.
3. Press EXIT (or the pedal) again. A second Fill In is played,
then the base drum pattern returns playing.
4. Press the METRONOME button to stop the metronome.
21
Page 24
The metronome > Adjusting the metronome level
Metro Lev/Rev 2
Lv:100 Rv:64
Metro Lev/Rev 2
Lv:100
Rv:64
Metro Settings 4
Save? (Yes/No)
Adjusting the metronome level
You can adjust the metronome’s level, in relation to the overall
instrument’s volume.
2. Press the SCROLL
1. Press the TEMPO/MET.SET buttons together. The first
Metronome page should appear.
3. Use the +/YES and -/NO buttons to change the metro-
4. Press the EXIT button to return to the Main page.
Adjusting the drum pattern’s reverb
You can add a reverb effect to the drum patterns.
Note: Reverb does not apply to the metronome click (i.e., when
an ordinary time signatures is chosen).
1. Press the TEMPO/MET.SET buttons together.
2. If you are not there, use the SCROLL
3. Use the +/YES and -/NO buttons to change the metro-
4. Press the EXIT button to return to the Main page.
button to go to the second Metronome page, Metro Lev/Rev. The Lv (Level) parameter will
be selected:
nome’s volume.
/ buttons to se-
lect the Rv (Reverb) parameter:
nome’s reverb.
Selecting the accent
The accented beat of the ordinary times signatures can be
changed to a marcato or bell sound.
Note: The accent does not apply to drum patterns.
1. Press the TEMPO/MET.SET buttons together.
2. If you are not there, use the SCROLL
to the Metro Accent page:
Metro Accent 3
Bell
/ buttons to go
Saving the metronome settings
Metronome settings can be saved, so that they are not reset to
the default values when turning the instrument off. This procedure saves time signature, volume setting, reverb setting, accent. On the contrary, tempo settings are always reset.
1. Press the TEMPO/MET.SET buttons together. The first
Metronome page appears.
3. Use the +/YES and -/NO buttons to turn the bell on or off,
and choose one of the available accent options.
Option Meaning
Off No accent
Marcato The first beat is played louder
Bell The first beat is played by a bell sound
4. Press the EXIT button to return to the Main page.
2. Press the SCROLL
fourth Metronome page. The Metro Settings Save parameter will be selected:
button four times, to go to the
22
3. Press +/YES to confirm saving, or -/NO to cancel saving.
You are automatically kept back to the Main page.
Page 25
Playing back a song
Playing back a song > Accessing the Song Play mode
The C-720 incorporates a multitrack recorder, with which you
can record and play back songs. Since you can turn off a single
part (say, the left hand), and leave another part playing (say,
the right hand), this can be very useful for practicing.
Together with the C-720 come a huge number of classical
songs (185), with which you can play along for practicing or
for enjoying your preferred tunes. Songs are organized in “albums”, that include famous lesson books (Beyer, Burgmüller),
a collection of famous songs, and all the pieces included in the
supplied SongBook.
The recorder can also read 16-track songs in the Standard
MIDI Files (SMF) format, that can be created on a computer
or easily found on the market or in the public domain. Please
note that, while the C-720 complies with General MIDI (GM)
sound mapping, it does not include all GM sounds. For a detailed list of sounds, see page 68.
Accessing the Song Play mode
After you press the SONG button, the Song Play page appears: To return to the Main page, just press one of the sound selec-
Song name
01-Prelude 1
M:--- 4/4 120
Current measure
Tempo
Time signature
tion buttons to select a sound, or press the EXIT button. The
selected song will still be active, but you will no longer see its
name in the display, until you press the SONG button again.
How to select a song
To play a song, you must first select it from an album. Songs
are contained into a permanent memory, and are preserved
when turning the instrument off.
1. If you are in the Main page, press the SONG button twice.
If you are already in Song Play mode, press the SONG button once to access the Song Selection page:
Album:SongBook
01-Prelude 1
2. Use the +/YES and -/NO buttons to select one of the avail-
able songs inside the selected album. If the name is longer
than the display, it will scroll up to the end, then returns to
the beginning.
3. To select a different album, use the SCROLL
move the cursor to the first line of the display:
Album:SongBook
01-Prelude 1
Scroll
Album:SongBook
01-Prelude 1
Album
Song
button to
As an alternative, you can use the first six sound select
buttons to choose an album. See table on the next page.
4. Use the +/YES and -/NO buttons to select one of the avail-
able albums. Various song albums are available (see
page 72 for a detailed list of the included songs):
Album Content
UserSong Songs created using the internal
SongBook All the songs of the supplied
Classics A collection of famous classical
Beyer A The “Preparatory School, Op. 101”
Beyer B (5) HARPSI/
Burgmlr Burgmüller’s “25 Easy and Pro-
recorder, or created with an external sequencer and then transferred to the C-720 via a USB
connection (see page 53)
SongBook
pieces
lesson book by Ferdinand Beyer,
splitted in two separate parts (A
and B)
gressive Studies, Op. 100” lesson
book
Correspondin
g sound
button
(1) PIANO 1
(2) PIANO 2
(3) E.PIANO 1
(4) E.PIANO 2
CLAV
(6) VIBES/
GUITAR
23
Page 26

Playing back a song > How to start playback
01-Prelude 1
M:--- 4/4 120
01-Prelude 1
M:--- 4/4 120
5. After having selected an album, use the SCROLL
ton to move the cursor to the song name again, then
choose a different song:
Album:SongBook
but-
01-Prelude 1
Scroll
Album:SongBook
01-Prelude 1
How to start playback
After having selected a
song, you can play it
back.
Note: During playback,
song parts can be sent out
via MIDI. Song parts are
the following: Part 1, Part 2, and Drum (this latter is active only
if a drum patterns is playing).
6. Press the PLAY/PAUSE button to start playback and re-
turn to the Song Play page, or the EXIT button to just return to the Song Play page, without starting the song.
1. Press PLAY/PAUSE to start playing the song. The indica-
tor on the button turns on.
2. Press PLAY/PAUSE again to stop the song at the current
position. The indicator on the button starts flashing.
3. Press PLAY/PAUSE again to resume playback. The indica-
tor on the button stays on steadily.
4. Press STOP to stop the song. The indicator on the PLAY/
PAUSE button turns off. The song returns to the beginning (measure “---”).
Starting from a different measure
You can start playback from a measure different than the first
one.
Note: When releasing the +YES or -/NO button, you may hear
the EPx effects, due to Damper data recorded in the song.
1. While in the Song Play page, the M (Measure) parameter
is selected. Use the +/YES and -/NO buttons to choose a
different measure (+/YES is sometimes called Fast Forward, while -/NO is called Rewind):
2. Press the PLAY/PAUSE button to start playback from the
selected measure.
24
Page 27

Muting/unmuting a recorder’s part
Playing back a song > Muting/unmuting a recorder’s part
During playback, you can mute or unmute a recorder’s part.
Muting is useful to play a part on the keyboard, while letting
the recorder to continue playing the other.
Depending on the settings made in Global mode (see “Mute
Level” on page 50), muting may completely silence the part, or
just attenuate it. Attenuation is very useful for practicing, since
it lets you play over a part that you can still hear at a very soft
level.
Note: The part’s status is automatically restored when you
choose a different song (it is turned on if there are notes, or
turned off if the part is empty).
Changing the song’s tempo
Each song contains its own tempo. You can, however, change
it during playback, for example to make it easier playing along
with the song.
1. Use the TEMPO + button to increase the tempo and make
the song play faster.
1. Press the PART 1 or
PART 2 button, depending on the part
you want to mute
(usually, Part 1 = left
hand, Part 2 = right
hand. This may be different with songs imported via USB).
The muted part’s indicator turns off.
At this point, you can play the muted part on the keyboard.
2. Press the same button again, to unmute the part and let its
indicator turn on again.
2. Use the TEMPO - button to decrease the tempo and make
the song play slower.
3. Press both the +/YES and -/NO buttons at the same time
to recall the original tempo of the song.
Play along with the song
During playback, you can play along with the song. The latest
selected sounds are still active on the keyboard. You can select
different sounds, as seen before. When you press a sound selection button, the Main page appears. Press the SONG button
to return to the Song Play page.
When selecting different sounds, their effects are also recalled.
Be careful, since this can dramatically affect the song’s overall
sound. When selecting a different song, the song’s effects are
selected again.
25
Page 28

Playing back a song > Cycle Play
Cycle Play 1
On S:1 E:1
Cycle Play 1
Off
Cycle Play
When practicing, you can choose a passage to be repeated
again and again. This way, you can try it until it is perfect. This
is called the Cycle Play function.
Note: When the Cycle Play is activated, the Fast Play function no
longer works (see page 50).
Note: If you enter editing later, you might see a different edit
page instead of the first one. Use the SCROLL button to
reach it.
1. While in Song Play mode, press the EDIT button. The first
page of the Song Edit mode, Cycle Play, will appear.
Cycle Play 1
Off
2. Press the +/YES button to turn the Cycle Play mode on.
The S (Start Measure) and E (End Measure) parameters
will appear:
Cycle Play 1
On S:1 E:99
Start Measure
3. Press the SCROLL
sure) parameter, and use the +/YES and -/NO buttons to
choose the measure where the cycle will be starting. Keep
them pressed to scroll faster.
Cycle Play 1
On
End Measure
button to select the S (Start Mea-
S:1 E:1
5. Press the EXIT button to return to the Song Play page.
You’ll notice the Cycle Play icon appearing on the top right
corner of the display, indicating the function has been activated:
01-Prelude 1
M:--- 4/4 120
This icon will stay steadily on when cycle measures are
playing back. It will flash when measures located before or
after the cycle measures are playing (for example, it will
flash if measure 2 or 16 is playing back, when the cycle is
delimited by measures 4 and 12).
Cycle Play icon
6. Press PLAY/PAUSE to start playing. The song will cycle be-
tween the chosen starting and ending points.
During playback, you can press the PLAY/PAUSE button
to pause the song, or restart it from the current point. You
can press the STOP button to stop the song and go back to
the Cycle’s Start Measure.
Note: If the S (Start Measure) parameter has a value other
than 1, the song will be set to pause even if you press STOP.
Turning the Cycle Play off
The Cycle Play will continue until you don’t select a different
song, or turn the instrument off. Otherwise, you can manually
turn it off.
1. While in Song Play mode, press the EDIT button. The first
page of the Song Edit mode should appear.
By default, the “S” parameter corresponds to the first measure.
4. Press the SCROLL
sure) parameter, and use the +/YES and -/NO buttons to
choose the measure where the cycle will be ending. Keep
them pressed to scroll faster.
button to select the E (Ending Mea-
Cycle Play 1
On S:1
E:1
2. Press the -/NO button to turn the Cycle Play mode off.
3. Press the EXIT button to return to the Song Play page. The
Cycle Play icon on the top right corner of the display will
be gone.
26
Page 29

Recording a song
Metro TS/Tempo 1
4/4 120
Time Signature
Song Modified
Save? (Yes/No)
Recording a song > Quick recording procedure
You can use the onboard recorder to create a song composed
of up to three parts (left hand, right hand, drum). This song
can then be played back on the C-720, or transferred to a computer (see “Data transfer via the USB port” on page 53) and
played back on any other sequencer (see “MIDI” on page 56).
User-created songs are first contained in a temporary, nonpermanent memory, and are to be saved into a special album
called the User Song album. You must save a song into this album, before turning the instrument off or choosing a different
song.
Quick recording procedure
Recording a song on the C-720 is very easy. Here is a short procedure. More detailed procedures follow, starting from “Step
1: Entering the Record mode”.
1. Select the preferred sound, sound combination or perfor-
mance.
2. Press the SONG and RECORD buttons together to access
Record mode with a new, empty song.
Record:Untitled
M:--- 4/4 120
3. Use the TEMPO buttons to set the tempo.
When you try to select a different song while a new or modified song has not yet been saved, you are asked whether you
want to save it or not (the “Song Modified” message appears).
If you press the +/YES button you are kept to the Save Song
page. See “Saving the song” on page 33 for more information.
Note: A song is recorded into a temporary memory, that is lost
when the instrument is turned off. To preserve a new or modified song, save it into the User Song album before turning the
instrument off. See “Saving the song” on page 33.
4. Press the TEMPO/MET.SET buttons together to open the
Metro TS/Tempo page. Select the time signature, then
press the EXIT button to exit.
5. Either play the keyboard, press the PLAY/PAUSE button,
or (if you chose a drum pattern as the time signature) the
METRONOME button to start recording.
6. Play freely.
7. Press the STOP or RECORD button to stop recording.
Step 1: Entering the Record mode
Entering Record mode with a new, blank song
To enter record with a new, empty song with default settings,
press the SONG and RECORD buttons at the same time (the
recorder must not be playing).
Waltz
M:--- 3/4 120
SONG +
RECORD
Blank song name
Record:Untitled
M:--- 4/4 120
If you try to access Record mode while a new or modified song
has not been saved, you are asked whether you want to save it
or not:
If you press the +/YES button you are kept to the Save Song
page. See “Saving the song” on page 33 for more information.
Entering Record mode with an existing user song
You can enter recording with the current User song (i.e., a
song contained in the UserSong album), to add more notes
(Overdub recording) or add an additional part to. You can
even record an existing part again (Overwrite recording).
27
Page 30

Recording a song > Step 2: Selecting sounds
To record over an existing song, select the song and press the
RECORD button.
Existing song name
Record:Michelle
M:--- 4/4 120
Step 2: Selecting sounds
When you enter Record mode with a new, empty song, the
sounds that were selected for playing on the keyboard are also
selected for recording. If you enter recording on a part already
recorded, the sound previously used to record that part is selected again. If you are not happy with them, you can still select
different sounds now.
Note: Sounds also carry their own effects. By choosing a sound,
you also choose its associated effects.
Use the sound selection buttons to select different sounds for
recording. You can also select a different mode (e.g., switching
from Single to Split) during recording.
When you enter Record on a
new, empty song, both recorder’s parts are ready for
recording (actually, if you
play something on the keyboard, recording begins).
Therefore, everything you
play on the keyboard will be
recorded to the song. Depending on the current
mode (Single, Layer or
Split), one or both parts will
be recorded.
Each sound is recorded into a separate recorder’s part. Normally, the Main sound goes to Part 2, while the Layer or Left
sound go to Part 1 (see diagram).
You can change this, for example if you don’t want to record
the Layer sound, or if you want to record the Main sound into
Part 1 instead of Part 2. To change a part’s status, repeatedly
press the corresponding PART button:
Layer/Left sound Main sound
SINGLE Mode
Main PART 2
LAYER / SPLIT Mode
Main PART 2
Layer/Left PART 1
Please remember that you can only access Record mode on
User songs. Songs contained in albums other than UserSong
cannot be modified.
Exit from the Record mode
To exit from the Record mode, press the RECORD button
again (or the STOP button, to end the Record session). The
RECORD indicator will turn off.
Here is what the indicators’ status mean:
Part 1/2 status Meaning
On The part already contains data. It may happen
when you are recording over an existing song,
or doing second-pass recording. During recording, you will hear this part, but not record over
it.
Off The part does not contain data or is in mute,
and is not enabled for recording.
Flashing The part is enabled for recording. If you are
recording in Overdub mode, new data will be
added to the old data (if any). If you are
recording in Overwrite mode, new data will
replace the old data.
What if I record a Layer or Split on a single part?
When only a single part is enabled for recording, only the
Main sound will be recorded. The Layer or Left sound will be
ignored.
Example 1: Recording a single sound
When you enter recording with a single sound on a new, empty song, both PART indicators will be flashing. You don’t need
to do anything else. Go on with actual recording, and your
sound will be recorded over Part 2. When recording is finished, the PART 1 indicator will turn off, and the PART 2 indicator will stay steadily on.
Example 2: Recording a single sound into Part 1
When you enter recording with a single sound on a new, empty song, both PART indicators will be flashing. Press the PART
2 button to turn its indicator off. At this point, you can go on
with actual recording over Part 1.
Example 3: Recording first with a single sound
then both
When you enter recording a single sound on a new, empty
song, both PART indicators will be flashing. This means both
sounds will be recorded. Go on with actual recording in Single
mode, then switch to the Layer or Split mode (by respectively
pressing two sound selection buttons, or pressing the SPLIT
button). The Main sound will be recorded over Part 2, while the Layer or Left sound will go to Part 1.
28
Page 31

Recording a song > Step 3: Setting the record options
Tempo Record 3
Auto
Example 4: Recording each hand of a piano piece in two separate parts
In this case, enter recording in Single mode, and press the
PART 1 button to turn its indicator off. Only the PART 2 in-
Step 3: Setting the record options
Before starting to record, you can set some options.
Note: The Pedal Punch and Auto Punch functions will not work
on an empty song. At least one track must already be recorded.
1. While the RECORD indicator is lit, press the EDIT button
to access the Record Option pages. The first page is the
Record Mode option page:
Record Mode 1
Overwrite
Use the +/YES and -/NO buttons to choose a recording
mode.
Recording mode Meaning
Overdub Notes are added to a previous recording
Overvwrite Notes replace any older recording (every-
Pedal Punch Lets you use a pedal to enter recording on
Pnc (Auto Punch) Lets you set a start and end measure for
2. Press SCROLL
Quantize value. This is the quantize that happens during
recording:
Use the +/YES and -/NO buttons to change the quantize
value, indicated as a musical figure. “Off” means free
rhythm, with no quantization.
thing is deleted)
the fly (see “Pedal Punch recording” on
page 32)
recording (see “Auto Punch recording” on
page 32)
to go to the second page, and set the
Quantize 2
Off
dicator will continue flashing. Go on recording your right
hand.
When done, start recording your left hand, with the PART 1
indicator flashing, and the PART 2 indicator steadily on. This
way, you will be recording your left hand to Part 1, while Part
2 will be playing back the recorded right hand.
Quantization is a
way of correcting
timing errors; notes
Off
1/16
played too soon or
too late are moved
1/8
to the nearest axis
of a rhythmic
“grid”, set with this parameter, thus playing perfectly in
time. For example, when you select 1/16, all notes are
moved to the nearest 1/16 division. When you select 1/8,
all notes are moved to the nearest 1/8 division.
Beware that choosing too low a value will over-correct,
and make everything sound mechanical.
3. Press SCROLL
to go to the third page, and set the Tem-
po Record mode:
Use the +/YES and -/NO buttons to change the mode.
There are three options:
Tempo Record mode Meaning
Manual The latest manual tempo setting (made
Auto The recorder plays back all recorded
Record All tempo changes made during record-
using the TEMPO buttons) is considered
the current tempo value. No tempo
change events will be recorded. This is
very useful to record the song much
slower than its actual tempo
tempo events. No tempo change events
are recorded
ing will be recorded
Off
1/32 =
Quantize values
1/24 = 3 1/16 = 1/12 = 3 1/8 =
4. If done, press the EXIT button to return to the Record
page.
29
Page 32

Recording a song > Step 4: Setting the time signature and tempo
Step 4: Setting the time signature and tempo
Before starting to record, tempo and time signature are those
you last selected with the TEMPO and MET.SET buttons. You
can however choose a different tempo and time signature.
Note: After having started recording a song, you can no longer
change its time signature. However, you can append a second
section with a different time signature (see “Step 6: Secondpass recording” on page 31, step 6).
Note: You can record a drum pattern only during the first pass.
You will not be able to add or change it later. However, you can
append a second section using a drum pattern (see “Step 6: Second-pass recording” on page 31, step 6).
1. If you wish to set a different time signature at the begin-
ning of the song, press the TEMPO/MET. SET buttons together to access the Metro TS/Tempo page:
Metro TS/Tempo 1
4/4 120
Step 5: Recording
After you have entered the Record mode, chosen the part(s) to
be recorded, and having set the various options, you can start
recording.
A: Recording with no metronome
Here is how to record freely, without using the metronome.
1. Press the PLAY/PAUSE button to start recording. The in-
dicator on the PLAY/PAUSE button will turn on. As an alternative, you can play a note on the keyboard, or press the
pedal assigned as the Play/Pause function.
To start with a pick-up measure (or anacrusis), start with
the PLAY/PAUSE button, then wait until the desired beat
is playing. Assuming the Fast Play option has been left on,
the initial pause will be ignored during playback (see “Fast
Play” on page 50).
2. Press STOP to stop recording. As an alternative, press the
RECORD button, or the pedal assigned as the Stop function. The indicator on the RECORD button turns off. The
song returns to the beginning.
B: Recording with the metronome
Here is how to record, if you chose an ordinary time signature.
1. Press the METRONOME button to hear the click before
starting to record.
2. Press the PLAY/PAUSE button to start recording. The in-
dicator on the PLAY/PAUSE button will turn on. As an alternative, you can play a note on the keyboard, or press the
pedal assigned as the Play/Pause function.
To start with a pick-up measure (or anacrusis), start with
the PLAY/PAUSE button, then wait until the desired beat
is playing. Assuming the Fast Play option has been left on,
Use the +/YES and -/NO buttons to choose a time signature. You can select either an ordinary time signature (4/4,
3/4 and the like), or a drum pattern (8 Beat, Jazz,
Waltz…). In case you choose a drum pattern, it will be
recorded with the song as the Drum part, and sent out via
MIDI.
2. If done, press the EXIT button to return to the Record
page.
3. If you wish to set a different starting tempo, use the TEM-
PO buttons to change the tempo value.
Record:Untitled
M:001 4/4 120
Tempo
the initial pause will be ignored during playback (see “Fast
Play” on page 50).
3. Press STOP to stop recording. As an alternative, press the
RECORD button, or the pedal assigned as the Stop function. The indicator on the RECORD button turns off. The
song returns to the beginning.
C: Recording with a drum pattern
Recording with a drum pattern is a bit different, since you
must decide how to start the drum pattern.
1. Use one of the following ways to start recording:
• If you want to start with a keyboard-only intro, and start
the drum pattern at a measure other than the first one,
press the PLAY/PAUSE button. As an alternative, you can
play a note on the keyboard, or press the pedal assigned as
the Play/Pause function. When it is time to start the drum
pattern, press the METRONOME button, and wait until
the next measure for the drum pattern to actually start (it
will start with a 1-measure intro).
• If you want to immediately start with a drum pattern,
press the METRONOME button to start recording. A 1measure intro will play, then the regular pattern will start
playing.
An Intro will be played back before the main pattern of
the drum pattern begins.
2. During recording, you can press the EXIT button to trigger
a Fill In, break the rhythm, and go to a variation of the basic pattern. Press it again to play a different Fill In, and return to the basic pattern.
30
Page 33

Recording a song > Step 6: Second-pass recording
4/4 3/4
First-pass recording
Second-pass recording
3. Press STOP to stop recording. As an alternative, press the
RECORD button, or the pedal assigned as the Stop func-
Step 6: Second-pass recording
After the first recording, you can start recording again over the
same song, to add parts or notes.
1. Press the RECORD button again. Its indicator will turn on.
The Record page will appear again:
Record:Untitled
M:--- 4/4 120
2. If needed, set the Record options again (see page 29). You
can choose Overdub to add notes, Overwrite to replace
notes (up to the point where you stop recording), or one
of the Punch options to record over a passage.
3. Choose the part to be recorded. When you enter Record
mode again, the indicator of the recorded part will be
turned on, the other off. Press a PART button to make its
indicator start flashing, and record over that part(s).
4. If needed, select a different sound or sound combination.
Please remember that if you record in Layer or Split mode
over a single recorder’s part, only the Main sound will be
recorded.
When you record over an already recorded part, the sound
is the same as the previous recording. However, you can
select a different sound.
5. If needed, change the tempo with the TEMPO buttons. If
the Tempo Record option (see page 29) has been activated,
any tempo change will be recorded.
tion. The indicator on the RECORD button turns off. The
song returns to the beginning.
Note: After 999 measures, the record automatically ends.
6. You cannot change the
time signature (or drum
pattern) chosen during
the first recording pass.
However, if you are starting to record from the end
of the song (you can move there by assigning the highest
possible value to the M, Measure, parameter), you can
choose a different time signature (or a drum pattern) for a
new section to be appended at the end of the current section. This is useful to create a song with different time signatures, or with a drum pattern starting to play at a section
following the first one (see diagram).
7. Choose a measure to start recording from. You can start
recording from a measure other than the first one, by
changing the M (Measure) parameter before starting the
recorder.
Record:Untitled
M:001 4/4 120
+/YES
Record:Untitled
M:099 4/4 120
8. Start recording.
9. When done, press the STOP or RECORD button to stop
recording.
Changing sounds to a recorded song
If you are not happy with the sounds used for recording, it is
easy to replace them with different sounds.
Note: When you choose different sounds, effects are also
changed. Each sound, sound combination or performance also
includes its own set of effects.
1. Press the RECORD button to access recording again.
2. Be sure you are at the beginning of the song (measure
shown as “---”):
Record:Untitled
M:--- 4/4 120
3. Make the PART 1 and/or PART 2 indicator flash, depend-
ing on the part(s) you want to change the sound to.
4. Choose a different sound (or sounds). If you are editing a
single part, and you select a Layer or Split sound combination, only the Main sound will be considered.
5. Press RECORD to exit song recording.
31
Page 34

Recording a song > Changing tempo to a recorded song
Record:Untitled
M:001 4/4 120
Changing tempo to a recorded song
If you are not happy with the tempo used for recording (may
you recorded with a slower tempo), it is easy to adjust it after
recording.
Note: After having started recording a song, you can no longer
change its time signature. However, you can append a second
section with a different time signature (see “Step 6: Secondpass recording” on page 31, step 6).
1. Press the RECORD button to access recording again.
Pedal Punch recording
With Pedal Punch recording, you can use a pedal to start and
stop recording.
Note: The Pedal Punch function will not work on an empty
song. At least one track must already have been recorded.
Warning: The Pedal Punch function overwrites existing notes.
1. Be sure a pedal is assigned the Pedal Punch function (see
“Assigning functions to the pedals” on page 49).
2. Be sure to choose the Pedal Punch recording mode (see
“Step 3: Setting the record options” on page 29):
Record Mode 1
Pedal Punch
2. Be sure you are at the beginning of the song (measure
shown as “---”):
3. Be sure neither the PART 1 or PART 2 indicator is flashing.
4. Use the TEMPO buttons to adjust the tempo.
5. Press PLAY/PAUSE to start the song. Just let a few beats
play.
6. Press STOP or RECORD to exit song recording.
3. Press the EXIT button to return to the Record page.
4. Make the PART 1 and/or PART 2 indicator flash, depend-
ing on the part(s) you want to record.
5. Press PLAY/STOP to start the recorder. The song will be
heard.
6. When it is time to start recording, press the pedal set to the
“Pedal Punch” function, and start recording.
7. When finished, press the pedal again to end recording. The
recorder stops.
Auto Punch recording
With Auto Punch recording, you can set the start and stop recording points, so that recording automatically begins and
ends at the defined measures.
Note: The Auto Punch function will not work on an empty song.
At least one track must already be recorded.
Warning: The Auto Punch function overwrites existing notes.
1. Be sure to choose the Pnc (Auto Punch) recording mode
(see “Step 3: Setting the record options” on page 29):
Record Mode 1
Pnc S:001 E:001
Start Measure
End Measure
2. Use the SCROLL
S (Start Measure) or E (End Measure) parameters, and use
the +/YES and -/NO buttons to choose the start and end
recording measures.
/ buttons to move the cursor to the
3. Press the EXIT button to return to the Record page.
4. Make the PART 1 and/or PART 2 indicator flash, depend-
ing on the part(s) you want to record.
5. Press PLAY/STOP to start the recorder. Recording will au-
tomatically begin at the “Start” position, and stop at the
“End” position.
6. When finished, press STOP to end recording.
32
Page 35

Saving the song
Song Modified
Save? (Yes/No)
Save Song
Untitled Save?
Recording a song > Saving the song
After recording, the song is stored into a temporary, non-permanent memory. To preserve it from deletion when turning
the instrument off or choosing a different song, you must save
it into the User Song album. There are several ways to do it.
By choosing the Save Song command
You can select the Save Song command at any moment. The
Save Song page also allows you to assign or modify the name
of the song, and save all the changes.
1. After having pressed the EDIT button while in Song Play
mode, use the SCROLL
edit page:
Save Song 7
Untitled Save?
Flashing character
button to go to the Save Song
2. Use the SCROLL buttons to select the character to be edit-
ed (it will start flashing). Use the +/YES and -/NO buttons
to change it. Press the SCROLL
insert a new character, or the +/YES and -/NO buttons together to delete the character at the cursor’s position.
! #$%&‘ ( ) +, - 0123456789; =@
ABCDE F GHI J KL MNOP QR S T UVWXYZ [ ] ^ _ `
abc def ghi j k l mnopqr s t uv wxyz{}
Note: The first character is a blank space. When saving, it will be
automatically removed if added to the beginning or end of the
name.
You can give the song a long name (as explained below). If
it will not fit the display, it will scroll entirely when it is
selected. When saved, the “.MID” extension will be automatically added to the file name.
When you reach the end of the name, a flashing asterisk
(*) appears:
Save Song 7
MyName* Save?
Flashing asterisk
At this point, you can either use the +/YES and -/NO buttons to choose a new character, or press SCROLL
moves the cursor to the Save command:
/ buttons together to
to
3. Press the +/YES button to save the song into the User Song
album, or the -/NO button to return to the Song Play
mode, without saving the song. As an alternative, you can
press EXIT to exit without saving, or to continue recording
the current song.
4. The “Are you sure?” message appears. Press +/YES to con-
firm, -/NO to cancel and exit.
At the end, the Song Play display will appear again, and
you will be able to choose a different song for playing.
By choosing to record a new song
You can press the SONG + RECORD button combination to
start recording a new song. If an unsaved song is still in memory, the Song Modified page will appear (see below).
By choosing a different song
If you try to choose a different song, while the current one has
been recorded or modified and has not yet been saved, you are
prompted to save it.
1. Press the SONG button to select a different song. If the
current song has been recorded or edited, but not yet been
saved, the “Song Modified” message will appear.
2. Press the -/NO button to delete the song or abandon the
changes to a previously saved song. Or press EXIT to return to the current song without saving. Otherwise, press
the +/YES button to make the Save Song page appear:
3. From here on, the save procedure is the same seen above.
How I delete a Song from the UserSong album?
To delete a song from memory after having saved it, use the
procedure described in “Erasing songs from the User Song album” on page 54.
Save Song 7
MyName
Save?
33
Page 36

Editing a song > Setting Cycle Play
Editing a song
After having been recorded, a user-created song can be edited, and then saved again in the User Song album. Please note that songs contained in albums other than UserSong cannot be edited. The only Edit function that can be accessed with these songs is the Cycle Play.
Setting Cycle Play
Cycle Play allows you to repeat a passage during play, to practice with it over and over.
Note: If you enter editing later, you might see a different edit
page instead of the first one. Use the SCROLL button to
reach it.
1. While in Song Play mode, press the EDIT button. The first
page of the Song Edit mode will appear. This is the Cycle
Erasing a track
You can erase a single or all song tracks, to start recording
them again, or just remove them from the song (for example,
the voice track you want to sing live).
1. After having pressed the EDIT button, use the SCROLL
button to go to the Erase Track edit page:
Erase Track 2
All Exec?
2. Use the +/YES and -/NO buttons to select one of the fol-
lowing tracks:
Play mode, whose use has been seen above (see “Cycle
Play” on page 26):
Cycle Play 1
On S:001 E:001
Start Measure
End Measure
2. Press the EXIT button to return to the Main page and start
practicing.
3. Press the SCROLL
Exec command.
button to move the cursor to the
4. Press +/YES to start erasing. The “Are you sure?” message
appears. Press +/YES to confirm, -/NO to cancel and keep
the track.
5. Press the EXIT button to return to the Main page and save
the changes (see “Saving the song after editing” on page 36),
or the SCROLL
low).
button to go to the next edit page (see be-
Option Meaning
All All tracks – this results in an empty song
Tr01 (P2), Tr02 (P1) Respectively, Recorder Parts 2 (Track 1)
Tr 10 (Dr) Drum part (Track 10)
Tr03 ~ 09, 11 ~ 16 Tracks 3 ~ 9, 11 ~ 16 (Extra tracks)
and 1 (Track 2)
34
Page 37

Editing a song > Cutting measures at the end of the song
Cutting measures at the end of the song
You can cut measures at the end of the song. For example, you
could have recorded a long section, and then you erased it. After recording a shorter section, you ended up with a series of
empty measures at the end of the song. With this function, you
can cut them away.
1. After having pressed the EDIT button while in Song Play
mode, use the SCROLL
sures edit page:
Cut Measures 3
From: 99 Exec?
button to go to the Cut Mea-
Quantizing the song
Quantize allows you to correct any timing error after recording (see page 29 for more information). With this function, all
parts (including the Drum part) will be quantized.
1. After having pressed the EDIT button while in Song Play
mode, use the SCROLL
edit page:
Quantize 4
Q:1/16 Exec?
2. Choose one of the quantization options (from 1/32 to 1/8).
A “b ~ f” character added after the value means swing-
button to go to the Quantize
2. Choose a measure where you want to start cutting. The
value ranges from 1, to the last measure of the song.
3. Press the SCROLL
Exec command.
button to move the cursor to the
4. Press +/YES to start cutting. The “Are you sure?” message
appears. Press +/YES to confirm, -/NO to cancel and keep
the measures.
5. Press the EXIT button to return to the Main page and save
the changes (see “Saving the song after editing” on page 36),
or the SCROLL
low).
quantization (i.e., correction with a ‘human’ feel). Triplets
are intermediate-values (12, 24).
1/4 =
1/8a = 1/12 = 3 1/16a = 1/24 = 3 1/32 =
3. Press the SCROLL
Exec command.
button to go to the next edit page (see be-
Quantize values
b ~ f = swing
button to move the cursor to the
4. Press +/YES to start quantization. The “Are you sure?”
message appears. Press +/YES to confirm quantization, -/
NO to cancel and keep the original value.
5. Press the EXIT button to return to the Main page and save
the changes (see “Saving the song after editing” on page 36),
or the SCROLL
low).
button to go to the next edit page (see be-
35
Page 38

Editing a song > Transposing the song
Transposing the song
You can transpose the entire song, to make it match a different
key.
1. After having pressed the EDIT button while in Song Play
mode, use the SCROLL
edit page:
Transpose 5
V:+00 Exec?
button to go to the Transpose
2. Choose a transposition value (in semitones).
Value Meaning
-127 127 semitones lower
+00 No transposition
+127 127 semitones higher
Deleting the song
The Delete Song command allows you to delete the whole song
from memory, resulting in an empty song. This is the same as
choosing the New Song command from the control panel (see
page 33).
1. After having pressed the EDIT button while in Song Play
Exec?
button to go to the Delete Song
mode, use the SCROLL
edit page:
Delete Song 6
3. Press the SCROLL
Exec command.
button to move the cursor to the
4. Press +/YES to start transposing. The “Are you sure?” mes-
sage appears. Press +/YES to confirm, -/NO to cancel and
keep the original value.
5. Press the EXIT button to return to the Main page and save
the changes (see “Saving the song after editing” on page 36),
or the SCROLL
low).
button to go to the next edit page (see be-
2. Press +/YES to execute the command, or -/NO to cancel,
and exit from the Song Edit mode.
If you press +/YES, the “Are you sure?” message appears.
Press +/YES to confirm, or -/NO to cancel.
3. Press the EXIT button to return to the Main page and save
the changes (see “Saving the song after editing” on page 36),
or the SCROLL
below).
button to go to the next edit page (see
Saving the song after editing
With the Save Song page you can assign or modify the name of
the edited song, and save all changes.
1. After having pressed the EDIT button while in Song Play
mode, use the SCROLL
edit page:
Save Song 7
Untitled Save?
Flashing character
2. Use the SCROLL buttons to select the character to be edit-
ed (it will start flashing). Use the +/YES and -/NO buttons
to change it. Press the SCROLL
36
button to go to the Save Song
/ buttons together to
insert a new character, or the +/YES and -/NO buttons together to delete the character at the cursor’s position.
! #$%&‘ ( ) +, - 0123456789; =@
ABCDEF GHI J KL MNOPQRS T UVWXYZ [ ] ^_ `
abc def ghi j k l mnopqr s t uv wxy z { }
Note: The first character is a blank space. When saving, it will be
automatically removed if added to the beginning or end of the
name.
You can give the song a long name (as explained below). If
it will not fit the display, it will scroll entirely when it is
selected. When saved, the “.MID” extension will be automatically added to the file name.
Page 39

Editing a song > Saving the song after editing
When you reach the end of the name, a flashing asterisk
(*) appears:
Save Song 7
MyName* Save?
Flashing asterisk
At this point, you can either use the +/YES and -/NO buttons to choose a new character, or press SCROLL
moves the cursor to the Save command:
to
Save Song 7
MyName
Save?
3. Press the +/YES button to save the song into the User Song
album, or the -/NO button to return to the Song Play
mode, without saving the song. As an alternative, you can
press EXIT to exit without saving, or to continue recording
the current song.
4. The “Are you sure?” message appears. Press +/YES to con-
firm, -/NO to cancel and exit.
At the end, the Song Play display will appear again, and
you will be able to choose a different song for playing.
37
Page 40

Editing sounds and performances > Accessing the Sound edit mode
Editing sounds and performances
The Sound edit mode is where you can edit sounds or performances. Edit parameters are exactly the same in both cases, but
performances also memorize the split point (if the sounds are
in Split mode).
Single sounds and sound
combinations can be programmed in different ways.
For example, when you
press the PIANO button,
the Piano volume can be set
to the maximum. If you
press the PIANO and
STRINGS buttons together,
SOUNDS
40 x Main r.h / both
(n) Main + Layer
40 x Left l.h.
Accessing the Sound edit mode
To access the Sound edit mode, choose a sound, sound combination or performance, then press EDIT.
During editing, the Layer/Left parameters can only be accessed
when you are in Layer or Split mode. If you are in Sound
to turn the Layer mode on, the Piano volume could be lowered, to mix it with the Strings sound. It is like having a different sound when the Piano is playing alone, and when it is
playing in layer with a String sound.
Left sounds are exactly the same as Main sounds. When you
are in Split mode, it is like having two different Main sounds
assigned to each of your hand.
There are 40 Main sounds, 40 Left sounds, plus a variable
number of Layer combinations. There is space for any kind of
sound combination you wish to add to your sonic palette.
mode, you can switch mode at any time during editing. If you
are in Performance mode, you cannot switch mode. However,
if you select a performance with two sounds in Split, the SPLIT
indicator will light.
Exit from the Sound edit mode
After having edited some parameter, press EXIT to exit the
Sound edit mode. If nothing was modified, you immediately
exit. If something was modified, the Sound Modified message
will appear:
Sound Modified
Save? (Yes/No)
Saving a sound
If you make some changes during editing, when you press
EXIT to exit the Sound edit mode, you are prompted to save
your sound. See above.
Press +/YES to save, -/NO (or EXIT) to cancel. If you choose
to cancel, all changes will be deleted when choosing a different
sound. If you choose to save, the edited sound replaces the older sound.
38
Page 41

Saving a performance
Are you sure?
Editing sounds and performances > Saving a performance
There are three ways to save a performance. Please find them
below.
After editing a sound
1. If you entered Sound edit mode with the PERFORMANCE
indicator turned off (Sound mode), after modifying something and pressing EXIT, the Sound Modified page (seen
above) will appear:
Sound Modified
Save? (Yes/No)
While in this page, the PERFORMANCE indicator will
start flashing.
PERFORMANCE button and LED indicator
2. Press the PERFORMANCE button to save the current
sound or sound combination into a performance. After
you press the button, the Performance Name page appears:
6. Use the sound selection buttons (including the VARIA-
TION button) to select the location where you want to
save your performance.
12345
678910
Here is the table of the Performance’s locations:
Performance #
Button
Bank 1 Bank 2 Bank 3
1 (PIANO 1) 01 11 21
2 (PIANO 2) 02 12 22
3 (E.PIANO 1) 03 13 23
4 (E.PIANO 2) 04 14 24
5 (HARPSI/CLAV) 05 15 25
6 (VIBES/GUITAR) 06 16 26
7 (ORGAN1) 07 17 27
8 (ORGAN2) 08 18 28
9 (STRINGS/CHOIR) 09 19 29
10 (BASS) 10 20 30
Performance Name
JazzCombo To
Flashing character
3. If you want, edit the performance name. A performance’s
name can be up to 10 characters long.
Use the SCROLL buttons to select the character to be
edited (it is flashing). Use the +/YES and -/NO buttons to
change it. Press the SCROLL
/ buttons together to
insert a new character, or the +/YES and -/NO buttons
together to delete the character at the cursor’s position.
4. When you reach the end of the name, pressing SCROLL
moves the cursor to the To command:
Performance Name
JazzCombo
To
5. Press the +/YES button to go to the Save To Performance
page:
Save To: Perf 01
JazzCombo
Save?
7. The location number appears in the top right corner of the
display, while the name of the performance already stored
at that location appears in the lower left corner:
Target location number
Save To: Perf.01
Split&Lay
Name of the performance at the
target location
Save?
8. Press the +/YES button to save the performance into the
selected location, or the EXIT button to return to the Main
page without saving, with the last performance still selected. If you press +/YES, the “Are you sure?” message appears.
Press +/YES to confirm, -/NO to cancel.
39
Page 42

Editing sounds and performances > Setting the volume
Volume 1
M:127
L:120
Pan 2
M:R07
L:L07
After editing a performance
1. If you entered Sound edit mode with the PERFORMANCE
indicator turned on (Performance mode), after modifying
something and pressing EXIT, the Perf Modified page will
appear:
Perf.Modified
Save? (Yes/No)
2. While this page is shown, press the +/YES button to save
the changes into a performance. After you press the but-
Setting the volume
Use this page to set each sound’s volume.
Note: If you return to editing later, you might see a different
edit page instead of the first one. Use the SCROLL
reach it.
1. After having pressed the EDIT button, the Volume page
will appear:
Volume 1
M:127 L:120
2. While the Main (M) part is selected, use the +/YES and -/
NO buttons to select a different value.
Value Meaning
0 Minimum – no sound
127 Maximum – very loud
button to
ton, the Save To Performance page (seen above) will appear. You will be able to save the current sound or sound
combination into a performance. (See procedure above.)
By pressing the Performance button
While in the Main page, keep the PERFORMANCE button
pressed. The Performance Name page (seen above) will appear. You will be able to save the current sound or sound combination into a performance. (See procedure above.)
3. If you are in Layer or Split mode, press the SCROLL
button to select the L (Layer/Left) parameter (only available in Layer or Split mode):
4. While the Layer/Left (L) part is selected, use the +/YES and
-/NO buttons to select a different value.
5. Press the EXIT button to return to the Main page and save
the changes (see “Exit from the Sound edit mode” on
page 38), or the SCROLL
page (see below).
button to go to the next edit
Adjusting the panning
Panning is the position of each part in the stereo front (or
“panorama”).
1. After having pressed the EDIT button, use the SCROLL
button to go to the Pan edit page, with the M (Main) parameter selected:
Pan 2
M:R07 L:L07
While the Main (M) part is selected, use the +/YES and -/
NO buttons to select a different value.
Value Meaning
L64 Hard Left
C00 Center
R63 Hard Right
2. If you are in Layer or Split mode, press SCROLL
to go to select the L (Layer/Left) parameter (only available
in Layer or Split mode):
again
3. While the Layer/Left (L) part is selected, use the +/YES and
-/NO buttons to select a different value.
4. Press the EXIT button to return to the Main page and save
the changes (see “Exit from the Sound edit mode” on
page 38), or the SCROLL
page (see below).
button to go to the next edit
40
Page 43

Editing sounds and performances > Adjusting the effects
'U\
Reverb Send 4
M:127 L:100
Reverb Send 4
M:127
L:100
Adjusting the effects
The C-720 is equipped with three types of effects: The following diagram shows the effect’s routing:
:HW'U\
:HW
&KRUXV6HQG
5HYHUE6HQG
&KRUXV
5HYHUE
Effect Meaning
IFX (Insert Effect) The sound pass entirely through this effect.
This is used for effects being part of the
sound itself, like the phaser of the rotary
speaker. There is a separate IFX for each of
the sounds.
Rev (Reverb) This effect adds ambience to the sounds. In
Layer or Split mode, there is a single reverb
for all selected sounds.
Ch (Chorus) This effect adds modulation to the sounds.
In Layer or Split mode, there is a single chorus for all selected sounds.
0DLQ6RXQG
/D\HU/HIW6RXQG
,);
,);
&KRUXV6HQG
5HYHUE6HQG
Use the following parameters to select the reverb, chorus and
insert effects, and adjust how much of the sound must be processed.
Setting the reverb effect
Reverb adds ambience to the sound. Either you are in Single,
Layer or Split mode, a single reverb effect is available for both
sounds (see diagram). A different amount of reverb can be applied to each sound, thanks to the Reverb Send parameter (see
below).
1. After having pressed the EDIT button, use the SCROLL
button to go to the Reverb Type edit page, with the reverb
type selected:
Reverb Type 3
Hall 1 On
Use the +/YES and -/NO buttons to select a different reverb.
See below the list of available reverb effects (a more detailed
list is on page 71).
Reverb
Hall 1 Hall 2 Hall 3
Wet Plate Dry Plate
Room 1 Room 2 Bright Room
2. Press SCROLL
again to select the Reverb On/Off pa-
rameter:
Reverb Type 3
Hall 1
On
Use the +/YES and -/NO buttons to turn reverb on or off.
This corresponds to the status of the REVERB indicator.
3. Press SCROLL
to go to the Reverb Send edit page, with
the M (Main) parameter selected:
Use the +/YES and -/NO buttons to set the amount of
reverb applied to the Main sound (0 ~ 127).
4. If you are in Layer or Split mode, press SCROLL
again
to select the L (Layer/Left) parameter:
Use the +/YES and -/NO buttons to set the amount of
reverb applied to the Layer/Left sound (0 ~ 127).
5. Press the EXIT button to return to the Main page and save
the changes (see “Exit from the Sound edit mode” on
page 38), or the SCROLL
page (see below).
button to go to the next edit
41
Page 44

Editing sounds and performances > Setting the chorus or modulation effect
Chorus Send 6
M:127 L:Off
Chorus Send 6
M:127
L:Off
IFX M/L Type 7
LoGain
Phaser
Setting the chorus or modulation effect
The chorus or modulation effect adds depth to the sound. Either you are in Single, Layer or Split mode, a single chorus effect is available for both sounds (see diagram above). A
different amount of chorus can be applied to each sound,
thanks to the Chorus Send parameter (see below).
1. After having pressed the EDIT button, use the SCROLL
button to go to the Chorus Type edit page, with the chorus
type selected:
Chorus Type 5
Chorus Off
Use the +/YES and -/NO buttons to select a different chorus effect. See below the list of available chorus-type
effects (a more detailed list is on page 71).
Chorus
Chorus Harm. Chorus Chorus Delay
Ensemble Flanger Tremolo
2. Press SCROLL
rameter:
again to select the Chorus On/Off pa-
Chorus Type 5
Chorus
Off
Use the +/YES and -/NO buttons to turn the chorus on or
off. This corresponds to the status of the CHORUS indicator.
3. Press SCROLL
the M (Main) parameter selected:
Use the +/YES and -/NO buttons to set the amount of
chorus applied to the Main sound (0 ~ 127).
4. If you are in Layer or Split mode, press SCROLL
to select the L (Layer/Left) parameter:
Use the +/YES and -/NO buttons to set the amount of
chorus applied to the Layer/Left sound (0 ~ 127).
to go to the Chorus Send edit page, with
again
5. Press the EXIT button to return to the Main page and save
the changes (see “Exit from the Sound edit mode” on
page 38), or the SCROLL
page (see below).
button to go to the next edit
Setting the insert effects
In addition to the reverb and chorus effects, common to both
sounds in Layer and Split mode, an insert effect (IFX) is available for each sound (see diagram above). The insert effect
strongly modifies the sound, and is to be considered as part of
the sound itself.
1. After having pressed the EDIT button, use the SCROLL
button to go to the IFX Type edit page, with the IFX assigned to the Main sound selected:
IFX M/L Type 7
EQ1 Phaser
Use the +/YES and -/NO buttons to select a different
effect. “Off” means no effect. See below the list of available
IFX effects (a more detailed list is on page 71).
IFX
LoGain HiGain HLGain MdGain
Echo1 Echo2 Echo3
Dly4th Dly3/4 Dly8th
Pan Trem. Phaser Rotary
AmpSim Comp. Limit. Excit.
Wah PhaTrm AmpTrm CmpAmp
OD-Wah WahAmp
2. If you are in Layer or Split mode, press SCROLL
to select the IFX assigned to the Layer/Left sound:
Use the +/YES and -/NO buttons to select a different
effect.
again
42
Page 45

Editing sounds and performances > Setting the octave transposition
IFX Wet/Dry 8
M:W099
L:D020
Octave 9
M:+02
L:+00
Press the SCROLL button to go to the IFX Wet/Dry
edit page, with the M (Main) parameter selected:
IFX Wet/Dry 8
M:W099 L:D020
Use the +/YES and -/NO buttons to set the amount of IFX
applied to the Main sound.
Value Meaning
–Wet Wet, i.e., maximum effect applied. Negative
W-99 ~ W-51 Mostly wet, with negative value.
D-50 ~ D-01 Mostly dry, i.e., minimum effect applied. Nega-
Dry Dry, i.e., with no effect at all.
D001 ~ D050 Mostly dry, i.e., minimum effect applied.
W051 ~ W099 Mostly wet.
Wet Wet, i.e., maximum effect applied.
(inverted) phase.
tive (inverted) phase.
This is the diagram of the mix betweeen Wet and Dry settings:
100%
100%
Dry
0%
Dry
3. If you are in Layer or Split mode, press SCROLL
100%
Wet
Wet
again
to select the L (Layer/Left) parameter:
Use the +/YES and -/NO buttons to set the amount of IFX
applied to the Layer/Left sound.
4. Press the EXIT button to return to the Main page and save
the changes (see “Exit from the Sound edit mode” on
page 38), or the SCROLL
page (see below).
button to go to the next edit
Setting the octave transposition
Here you can set the individual octave transposition for the
Main and the Layer/Left sounds.
1. After having pressed the EDIT button, use the SCROLL
button to go to the Octave edit page, with the M (Main)
parameter selected:
Octave 9
M:+02 L:+00
Use the +/YES and -/NO buttons to change the octave
transposition, within a range of ±4 octaves.
Value Meaning
-04 ~ -01 Four to one octave lower
+00 No transposition
+01 ~ +04 One to four octave higher
2. If you are in Layer or Split mode, press SCROLL
again
to select the L (Layer/Left) parameter:
Use the +/YES and -/NO buttons to change the octave
transposition.
3. Press the EXIT button to return to the Main page and save
the changes (see “Exit from the Sound edit mode” on
page 38), or the SCROLL
page (see below).
button to go to the next edit
43
Page 46

Editing sounds and performances > Adjusting the fine tune
Fine Tune 10
M:+00
L:+00
Adjusting the fine tune
You can fine tune the Main and the Layer sounds (in Layer
mode), so that there is some “beating” between them.
1. After having pressed the EDIT button, use the SCROLL
button to go to the Fine Tune edit page:
Fine Tune 10
M:+00 L:+00
Use the +/YES and -/NO buttons to adjust fine tune for
the Main sound, within a range of ±99 cents (1 cent = 1/
100 of a semitone).
Value Meaning
-99 ~ -01 Ninety-nine to one cent lower
+00 No transposition
+01 ~ +99 One to 99 cents higher
Programming the pedals
By default, the three pedals act (from right to left) as damper,
sostenuto and soft. You can freely reassign them according to
your need or preference. You can either assign them to the
sounds by these pages, or globally (see page 49). Global programming override these settings.
Hint: Use sound programming to assign sound effects, like
damper, rotary speaker speed and glide; use global program-
2. If you are in Layer or Split mode, press SCROLL
to select the L (Layer/Left) parameter:
Use the +/YES and -/NO buttons to change the fine tune
of the Layer/Left sound.
again
3. Press the EXIT button to return to the Main page and save
the changes (see “Exit from the Sound edit mode” on
page 38), or the SCROLL
page (see below).
ming to assign global controls, like drum pattern, recorder and
quarter tone control.
Note: When a function other than Sound is assigned to a pedal
in Global edit, therefore overriding sound programming, a (G)
abbreviation appears in the following pedal assignment pages.
1. After having pressed the EDIT button, use the SCROLL
button to show the Pedal assignment page for the pedal
you wish to reprogram:
button to go to the next edit
3
Pedal 3 (G) 13
M:Soft L:Off
2. Use the SCROLL buttons to move the cursor to the M
(Main) or L (Layer/Left) parameter. Use the +/YES and -/
NO buttons to choose the required function.
You can assign different functions to the Main and Layer/
Left sounds, depending on the type of sound. This allows
for a great flexibility in pedal assignment. Some examples:
• A Grand Piano is the Main sound, and a String Ensemble
is the Layer sound. Pedal 1 triggers the Damper effect for
the Piano sound only (it is Off for the Layer sound),
Pedal 2 (G) 12
M:Sost L:Off
2
1
Pedal 1 (G) 11
M:Damper L:Off
allowing for long, held Piano notes. At the same time,
Pedal 3 triggers the Soft effect for both sounds.
• A Grand Piano is the Main sound, and an Acoustic Bass is
the Left sound. The Damper effect is assigned to the Main
sound on Pedal 1 (it is Off for the Left sound), while the
Glide effect is assigned to the Left sound on Pedal 3 (it is
Off for the Main sound). When you want Piano notes to
be held, press the rightmost pedal (#1) as in a traditional
piano; when you want the Bass to glide, press the leftmost
pedal (#3). You can use both pedals at the same time.
44
Page 47

Editing sounds and performances > Selecting a scale
SubScale Sw. 15
M:On L:Off
SubScale Sw. 15
M:On
L:Off
Here are the effects that can be assigned to the pedals in
Sound edit mode:
Setting Function
Off The pedal does not affect the sound
Damper Damper pedal
Sost. (Sostenuto) Sostenuto pedal
Soft Soft pedal
Glide Glide function. When the pedal is
Rotary Rotary Speaker control, typical of electro-
depressed, the sound “glides” slightly
toward the lower pitch. Try it on the
Ac.Guitar sound (left pedal).
mechanical organs. Try it on the Percussion
Organ 1 & 2 sounds (left pedal).
Selecting a scale
There are numerous classical compositions that were composed using scales (or “temperaments”) that differ from the
“equal temperament” commonly used today. In order to reproduce the original sound of such compositions, the C-720
provides other classical scales, in addition to the equal temperament. In addition, scales to play ethnic and experimental music are given.
You can assign the alternative temperament, or “sub scale”, to
both sounds, or just one of them. The other sound will continue playing using the equal temperament (or, in some cases, the
stretch one).
1. Press SCROLL
2. Use the +/YES and -/NO buttons to select one of the avail-
able scales, chosen among the following ones:
Scale Meaning
Equal Temp. Nearly all keyboard instruments today use
Pure Major Major chords in the selected key are perfectly
Pure Minor Minor chords in the selected key are perfected
Arabic An arabic scale, with the E and B notes tuned a
Pythagorean Pythagorean scale, based on the music theo-
Werckmeister This is the Werckmeister III scale invented by
to go to the SubScale Type edit page:
SubScale Type 14
Kirnberger
equal temperament. This temperament spaces
all semitones at equal distances, and allows
identical scales to be played in any key.
tuned.
tuned.
quarter tone lower.
ries of the great Greek philosopher and matematician. It is most suitable for melodies.
Andreas Werckmeister, the German organist
and music theoretician. This scale was created
in the later Baroque period to allow relatively
free transposition.
3. Press the EXIT button to return to the Main page and save
the changes (see “Exit from the Sound edit mode” on
page 38), or the SCROLL
button to go to the next edit
page (see below).
Scale Meaning
Kirnberger This is the Kirnberger III scale invented by
Slendro Scale of the Indonesian Gamelan. The octave is
Pelog Scale of the Indonesian Gamelan. The octave is
Stretched Simulates the “stretched” tuning of an acous-
3. Press SCROLL
Johann Phillip Kirnberger in the early 18th
century, and is used mainly for tuning harpsichords.
divided in 5 notes (C, D, F, G, A). The remaining
notes are tuned as in the Equal tuning.
divided in 7 notes (all white keys). The black
keys are tuned as in the Equal tuning.
tic piano. Basically an equal tuning, the lowest
notes are slightly lower, while the highest
notes are slightly higher than the standard.
This scale is automatically recalled when selecting the GrandPiano, BriteGrand and MelloPiano sounds.
to go to the SubScale Switch edit page,
with the M (Main) parameter selected:
4. Use the +/YES and -/NO button to turn the sub scale on or
off for the Main sound. If it is off, the sound will continue
playing using the equal temperament.
5. Press SCROLL
to select the L (Layer/Left) parameter:
6. Use the +/YES and -/NO button to turn the sub scale on or
off or the Layer/Left sound. If it is off, the sound will continue playing using the equal temperament.
7. Press the EXIT button to return to the Main page and save
the changes (see “Exit from the Sound edit mode” on
page 38), or the SCROLL
page (see below).
button to go to the next edit
45
Page 48

Editing sounds and performances > Resetting the current sound and performance
Resetting the current sound and performance
Any custom programming of the current sound, sound combination or performance, can be reset to the original values.
Hint: To reset all data, use the dedicated function in Global
mode (see “General Reset” on page 55).
1. After having pressed the EDIT button, use the SCROLL
button to show the Reset Sound/Performance page:
Reset Snd/Prf 16
Exec?
2. Press +/YES to start resetting. The “Are you sure?” message
appears. Press +/YES to confirm resetting, -/NO to cancel
and leave your custom data untouched.
If you choose to reset, the current performance, sound or
sound combination is reset to the factory values.
46
Page 49

Global settings
Global Modified
Save? (Yes/No)
Speaker 2
On
Global settings > Touch settings
Global edit is where you can edit some general parameters, not
tied to the single sounds or songs.
Accessing Global edit
Keep the EDIT button pressed for more than one second, to
access the Global edit mode.
Touch settings
The keyboard sensitivity, or touch, can be programmed.
1. After having kept the EDIT button pressed, use the
SCROLL
2. Use the +/YES and -/NO button to change sensitivity. The
following table lists the available touch settings.
Setting Touch sensitivity
Fixed Fixed dynamic = 100.
Soft 1~3 Loud notes can be produced even by playing
Medium 1~2 Normal piano touch.
Hard 1~3 Loud notes can be produced only by playing
button to show the Touch Sensitivity page:
Touch Sens. 1
Medium 2
lightly.
very hard.
Exit from the Global edit mode
After having edited some parameter, press EXIT to exit the
Global mode. If nothing was modified, you exit immediately.
If something was modified, the Save page will appear:
Press +/YES to save, -/NO to cancel.
This is the diagram of the touch curves:
Strong
( )
Soft
Note
loudness
Medium
Soft
Hard
Playing strength
Strong
Soft
()
3. Press the EXIT button to return to the Main or Song Play
page and save the changes (see “Exit from the Global edit
mode” on page 47), or the SCROLL
next edit page (see below).
button to go to the
Turning the internal speakers on or off
Whether you prefer listening to the internal speakers or to an
external amplification system, you can turn the internal speakers on or off.
Note: The speakers are automatically turned on when the instrument is turned on again.
Hint: You can also turn the speaker off, by inserting a jack in
the headphone connectors.
1. After having kept the EDIT button pressed, use the
SCROLL
button to show the Speaker page:
2. Use the +/YES and -/NO button to turn the internal speak-
ers on or off.
3. Press the EXIT button to return to the Main or Song Play
page, or the SCROLL
(see below).
button to go to the next edit page
47
Page 50

Global settings > Master tuning
Split Point 5
F#3
Master tuning
In order to adapt the C-720 pitch to that of another instrument, you can adjust the pitch. Standard tuning is A4 = 440
Hz.
Note: If you enter editing later, you might see a different edit
page instead of the first one. Use the SCROLL button to
reach it.
1. After having kept the EDIT button pressed, the Master
Tune page will appear:
Master Tune 3
440.0 Hz
Brilliance
Brilliance is the sound’s brightness. You can set an overall increase or decrease of brilliance.
This is the same parameter you can change with the BRILLIANCE button (see page 17). However, contrary to the button, these changes can be memorized, and are preserved even
when turning the instrument off.
Note: Brilliance changes can be recorded into a song. If you later change them again, values recorded in the song are left unchanged.
1. After having kept the EDIT button pressed, use the
SCROLL
ternative, press the BRILLIANCE button to immediately
access the Brilliance page:
button to show the Brilliance page. As an al-
Brilliance 4
Normal
2. Use the +/YES and -/NO button to select a different tun-
ing.
Setting Tuning
415 ~ -439.5 Lower tuning. The lowest value corresponds to
440 Standard tuning
440.5 ~ 465 Higher tuning. The highest value corresponds to
about -100 cents (one semitone) from the standard tuning.
about +100 cents (one semitone) over the standard tuning.
3. Press the EXIT button to return to the Main or Song Play
page and save the changes (see “Exit from the Global edit
mode” on page 47), or the SCROLL
next edit page (see below).
After having chosen a brilliance value different than Normal, the BRILLIANCE indicator will turn on.
button to go to the
2. Use the +/YES and -/NO button to change the brilliance.
The following table lists the available settings.
Setting Brilliance
Very Mellow, Mellow The sound becomes darker.
Normal Normal tone.
Bright, Very Bright The sound becomes brighter.
3. Press the EXIT button to return to the Main or Song Play
page and save the changes (see “Exit from the Global edit
mode” on page 47), or the SCROLL
next edit page (see below).
button to go to the
Default split point
You can set a default split point, that will be automatically recalled each time you press the SPLIT button when playing
sounds.
Note: The split point may be different from the default split
point, if you change it after turning the instrument on. Also, it
may vary when choosing a performance with two sounds in
Split mode. The last selected split point remains selected, until
you turn the instrument off.
48
1. After having kept the EDIT button pressed, use the
SCROLL
button to show the Split Point page:
2. Use the +/YES and -/NO button to change the split point.
When you change this value, if you are in Split mode the
current split point is also changed.
3. Press the EXIT button to return to the Main or Song Play
page and save the changes (see “Exit from the Global edit
mode” on page 47), or the SCROLL
next edit page (see below).
button to go to the
Page 51

Assigning functions to the pedals
Global settings > Assigning functions to the pedals
By default, the three pedals act as (from right to left) damper,
sostenuto and soft. You can freely reassign them according to
your need or preference. You can either assign them to the
sounds (see page 44), or globally by these pages. Global programming override sound settings.
Hint: Use sound programming to assign sound effects, like
damper, rotary speaker velocity and glide; use global program-
3
Pedal 3 Glob. 8
Sound
2. Use the +/YES and -/NO button to choose the assigned
function.
Setting Function
Sound The pedal is programmed by the selected
Fill In The pedal triggers as the Fill In command
Quarter Tone The pedal activates the Quarter Tone func-
Transpose Up Each time the pedal is pressed, the master
sound, sound combination or performance
(see “Programming the pedals” on
page 44).
for the drum pattern (see “Drum patterns”
on page 21).
tion. When this function is turned on, you
can detune some notes in realtime, to make
custom scales. See “Quarter Tone (SubScale
realtime programming)” below.
transpose is raised by one semitone.
Pedal 2 Glob. 7
Sound
ming to assign global controls, like drum pattern, recorder and
quarter tone control.
Note: When a function other than Sound is assigned to a pedal,
therefore overriding sound programming, a (G) abbreviation
appears in the pedal assignment pages in Sound Edit mode.
1. After having kept the EDIT button pressed, use the
SCROLL
the pedal you wish to reprogram:
2
1
Setting Function
Transpose Down Each time the pedal is pressed, the master
Play/Pause The pedal duplicates the PLAY/PAUSE but-
Stop The pedal duplicates the STOP button’s
Pedal Punch This is used for Pedal Punch recording. This
button to show the Pedal assignment page for
Pedal 1 Glob. 6
Sound
transpose is lowered by one semitone.
ton’s function.
function.
function is detailed on page 32.
3. Press the EXIT button to return to the Main or Song Play
page and save the changes (see “Exit from the Global edit
mode” on page 47), or the SCROLL
next edit page (see below).
button to go to the
49
Page 52

Global settings > Quarter Tone (SubScale realtime programming)
Fast Play 9
On
Quarter Tone (SubScale realtime programming)
The Quarter Tone function allows you to program a custom
scale in realtime, for example those sudden scale change typical of Arabic music. Changes are not saved anywhere (they are
only used in realtime), so the scale is easily “wiped-out” when
selecting a different sound or performance, or when pressing
the Quarter Tone pedal again.
Note: Quarter Tone can only be used if the SubScale has been
activated for the Main and/or Layer/Left sounds in Sound edit
mode (see “SubScale Switch” on page 45).
You can assign the “Quarter Tone” function to any of the pedals.
1. Assign the Quarter Tone function to one of the pedals, as
seen above.
Fast Play
When you record a song with the onboard recorder, or read a
Standard MIDI File from an external sequencer, one or more
empty beats can exist at the beginning of the song. However,
when the Fast Play function is activated, all empty beats are
skipped, making the song playback immediately begin from
the first note. If setup data are contained inside these empty
beats, they are read faster.
2. Keep the Quarter Tone pedal pressed. The keyboard will
not play at this time. Press the notes you want to lower a
quarter tone.
3. Release the Quarter Tone pedal.
4. Play with your new scale. Notes you pressed on step 2 are
now lowered of a quartertone.
5. To reset the original scale, press and release the Quarter
Tone pedal again, without playing any note. All pitches
will be reset, and the scale selected by the sound or performance will be recalled (see “Selecting a scale” on page 45).
As an alterative, you can reset the Quarter Tone settings by
choosing a different sound or performance.
1. After having kept the EDIT button pressed, use the
SCROLL
button to show the Fast Play page:
2. Use the +/YES and -/NO button to turn the Fast Play func-
tion on or off.
3. Press the EXIT button to return to the Main or Song Play
page and save the changes (see “Exit from the Global edit
mode” on page 47), or the SCROLL
next edit page (see below).
button to go to the
Mute Level
Muting is useful with piano lessons, when you may want to
play one or both song parts to play them on the keyboard. You
mute a part by pressing the corresponding PART button while
in Song Play mode.
In this page, you can choose either the mute completely silences a part, or just attenuates it.
1. After having kept the EDIT button pressed, use the
SCROLL
button to show the Mute Level page:
Mute Level 10
Volume: 0
2. Use the +/YES and -/NO button to choose the mute level.
Setting Perceived level
0 Silence
1 ~ 30 Soft
31 ~ 60 Medium
61 ~ 90 Loud
3. Press the EXIT button to return to the Main or Song Play
page and save the changes (see “Exit from the Global edit
mode” on page 47), or the SCROLL
next edit page (see below).
button to go to the
50
Page 53

Global settings > Turning the keyboard on or off (Local Control)
Local Control 11
On
MIDI IN Ch. 13
Ch:1 Track 1
MIDI IN Ch. 13
Ch:1
Track1
Turning the keyboard on or off (Local Control)
Local is the parameter that allows you to establish whether the
keyboard has to play the internal sounds and transmit MIDI
data at the same time (Local On), or whether it just has to
transmit MIDI data and not play the internal sound (Local
Off).
Local Off should be chosen when you wish to use the C-720 as
a mute keyboard, to play another instrument via the MIDI
OUT port. It should also be chosen when C-720 is connected
to an external sequencer via its MIDI IN and MIDI OUT connectors. This will avoid the notes to be played twice, by the
keyboard and by the sequencer, producing an annoying
“echo” effect.
Normally, you will choose Local On (automatically selected
when turning the C-720 on), so that playing the keyboard will
produce sound.
MIDI Clock
MIDI Clock allows for synchronization of two MIDI devices,
for example the internal recorder of the C-720, and an external
sequencer.
Note: When the power is turned on, the MIDI Clock will be automatically set to Internal.
1. After having kept the EDIT button pressed, use the
SCROLL
button to show the MIDI Clock page:
MIDI Clock 12
External MIDI
Note: When the power is turned on, the Local will be automatically set to On.
1. After having kept the EDIT button pressed, use the
SCROLL
button to show the Local Control page:
2. Use the +/YES and -/NO button to turn the function on or
off.
3. Press the EXIT button to return to the Main or Song Play
page, or the SCROLL
(see below).
button to go to the next edit page
2. Use the +/YES and -/NO button to choose the source of
the clock message.
Setting MIDI Clock
Internal The MIDI Clock is generated by the C-720 itself.
External MIDI The MIDI Clock is received from an external
External USB The MIDI Clock is received from an external
The message is also sent to the MIDI OUT and
USB ports.
MIDI device connected to the C-720’s MIDI IN
port.
device connected to the C-720’s USB port.
MIDI IN Channels
When C-720 is controlled from an external MIDI device, it can
work as a 16-part multitimbral tone generator. You can select
a different sound on each of the 16 MIDI channels. These
channels are not accessible from the control panel, and are
separate from the Main, Layer/Left, Recorder Part 1 and Part
2, and Drum tracks. Therefore, you can continue playing with
the piano while MIDI data are received from an external MIDI
device.
Note: MIDI data is received both from the MIDI IN port, and the
USB port at the same time. For more information about MIDI
Over USB, see “What is MIDI Over USB?” on page 56.
3. Press the EXIT button to return to the Main or Song Play
page, or the SCROLL
(see below).
button to go to the next edit page
1. After having kept the EDIT button pressed, use the
SCROLL
button to show the MIDI IN Channels page:
2. Use the +/YES and -/NO button to choose one of the 16
available channels (Ch) to be programmed.
3. Press the SCROLL
signed track.
button to move the cursor to the as-
51
Page 54

Global settings > MIDI OUT Channels
MIDI IN Ch. 13
Ch:01 Tr01
MIDI OUT Ch. 14
Ch:1 Main
4. Use the +/YES and -/NO buttons to choose a different
track. Here is a list of the available tracks for each of the
MIDI IN channels:
Tracks Meaning
Off No data received on the selected channel. This is
Track 1~16 One of the 16 tracks of the C-720.
Global Global track. All notes and pedal controls
useful when an external sequencer is sending
data to two (or more) different devices. Turn off
all channels you want to reserve to the other
device(s).
(damper, sostenuto, soft) received via the MIDI IN
are considered as if they came from the integrated keyboard and pedals. The split point (if
any) is considered.
MIDI OUT Channels
The standard MIDI has 16 separate channels available for
transmission and reception of data. C-720 can transmit on six
channels at the same time. To transmit data from the C-720,
you need to choose which of the 16 MIDI channels you wish
to transmit data on, and which track they are assigned to.
Note: MIDI data is sent both to the MIDI OUT port, and the USB
port at the same time. For more information about MIDI Over
USB, see “What is MIDI Over USB?” on page 56.
1. After having kept the EDIT button pressed, use the
SCROLL
page:
2. Use the +/YES and -/NO button to choose one of the 16
available channels (Ch) to be programmed.
3. Press the SCROLL
signed track.
button to show the MIDI OUT Channels
MIDI OUT Ch. 14
Ch:1 Main
button to move the cursor to the as-
5. Press the SCROLL
button to move the cursor to the
channel again.
6. Use the +/YES and -/NO button to choose another chan-
nel to be programmed, and repeat the above procedure.
7. Press the EXIT button to return to the Main or Song Play
page and save the changes (see “Exit from the Global edit
mode” on page 47), or the SCROLL
button to go to the
next edit page (see below).
4. Use the +/YES and -/NO buttons to choose a track trans-
mitting on the selected channel. Here is a list of the available tracks for each of the MIDI OUT channels:
Tracks Meaning
Off No data sent on the selected channel. This is useful
Main Main sound
Layer Layer sound (when in Layer mode)
Left Left Sound (when in Split mode)
Part 1, 2 Recorder part 1 or 2
Drum Drum (when a drum pattern is selected)
5. Press the SCROLL
channel again.
when you want to play notes on the piano alone,
without sending them to another MIDI device connected to the C-720’s MIDI OUT port.
button to move the cursor to the
52
MIDI OUT Ch. 14
Ch:1
Main
6. Use the +/YES and -/NO button to choose another chan-
nel to be programmed, and repeat the above procedure.
7. Press the EXIT button to return to the Main or Song Play
page and save the changes (see “Exit from the Global edit
mode” on page 47), or the SCROLL
next edit page (see below).
button to go to the
Page 55

MIDI Filters
MIDI Filters 15
Flt:CC
Off
USB Connect 16
Enable?
USB Connect 16
Disable?
Global settings > MIDI Filters
When you choose a sound, operate the damper pedal, adjust
the level balance in Layer mode, or make other adjustments on
the control panel, a MIDI message is sent to a connected external MIDI (and/or USB) device. At the same time, C-720 can
receive a MIDI message from an external MIDI (and/or USB)
device connected to its MIDI IN (or USB port), to control the
sounds, damper pedal, volume adjustment, and other data.
You can choose to deactivate (i.e., “filter”) these data selectively, to avoid unwanted changes or mixing data generated by external devices and internal controls. Also, you could want to
avoid sending MIDI data to an external MIDI device, for example Program Change message selecting unwanted sounds
on a different musical instrument.
1. After having kept the EDIT button pressed, use the
SCROLL
button to show the MIDI Filters page:
MIDI Filters 15
Flt:CC Off
2. Use the +/YES and -/NO buttons to choose one of the fil-
ters to be programmed. Here is a list of the available filters:
Filter Meaning
CC Control Changes messages, e.g., pedal, modulation,
PC Program Change messages, i.e., the messages sent to
PB Pitch Bend
SysEx System Exclusive, e.g., the messages used to program
3. Press the SCROLL
volume, pan, etc.
select a sound.
effect parameters.
button to move the cursor to the sta-
tus of the selected filter:
4. Use the +/YES and -/NO buttons to change the filter’s sta-
tus. On means that the corresponding data is filtered (not
sent or received), Off means that it is not filtered (it is sent
and received).
5. Press the EXIT button to return to the Main or Song Play
page and save the changes (see “Exit from the Global edit
mode” on page 47), or the SCROLL
next edit page (see below).
button to go to the
Data transfer via the USB port
The USB is a high-speed data port installed on most modern
computers. You can use it to transfer data from the internal
memory of the C-720, to a computer and vice-versa. Before
you do this, you must enable USB connection for data transfer.
Note: While data transfer is active, no MIDI over USB communication is allowed.
Windows ME, 2000, XP, and Mac OS 9.0.4 to OS X, are supported with no need for special drivers. To use the C-720 with
Windows 98SE you need the dedicated KORG Driver, a special
software that you can freely download from our website.
Warning: Since activating the USB port for data transfer automatically deactivates MIDI over USB, exit from any MIDI
software on your personal computer before turning the USB
Connect function on. Failing to do so could damage the C720’s internal memory data.
Warning: When you turn the USB connection off, the C-720
will be reinitialized and all unsaved data in the instrument’s
memory will be deleted. Save any unsaved sound, performance, song, or global setting, before activating the USB
connection.
1. First of all, connect the C-720 to a personal computer via a
standard USB cable. Make sure that the connector is oriented correctly, and insert it all the way into the jack.
MIDI IN
2. Then, turn USB Data Connect on on the C-720, to let the
computer see its internal memory as a USB disk.
After having kept the EDIT button pressed, use the
SCROLL
button to show the USB Connect page:
3. Press the +/YES button to activate data connection. The
Disable command will appear in the display.
Warning: Do not press the -/NO button while transferring
data, or you could damage the C-720’s memory content,
and cause malfunctioning on your personal computer
53
Page 56

Global settings > Erasing songs from the User Song album
USB Connect 16
Enable?
At this point, the C-720 should appear on your computer’s desktop or disk window as an external USB drive,
with the name KORG SSD (i.e., KORG Solid State Disk,
the technical name of the internal permanent memory).
Windows
Mac OS X
4. Move files to or from the C-720 and the personal comput-
er as you would with any other USB drive. When moving
files, consider the following:
Warning: Do not turn the C-720 off before disconnecting it
from the personal computer. Doing so, could damage the C720’s memory content, and cause malfunctioning on your
personal computer.
Data inside the C-720’s memory are organized in four
folders (also called ‘sub-directories’). Each folder contains
a different type of data created by yourself. The different
data is explained in the following table.
Folder Content
Global Global settings, Metronome settings
Perform Performances
Preset Modified sounds and sound combinations
UserSong Your personal songs, i.e., songs you created with
the internal recorder, or created with an external
sequencer. You can copy from the computer to this
folder songs in Standard MIDI File format (files
with the “.MID” extension). To select the correct
sounds on the C-720, imported songs must comply
with the General MIDI (GM) standard. Not all GM
sounds can be played, since C-720 includes only a
subset of the GM standard.
This is the diagram of the data::
5. After data transfer is completed, remove the KORG SSD
icon from the computer desktop. Please refer to your computer’s documentation for any care on ejecting/removing
USB storage devices. However, here is what you should
commonly do:
• On a Windows PC: Right-click the KORG SSD icon displayed in the right side of your computer’s taskbar. In the
menu that appears, left-click “Stop USB disk driver (drive
name).” Make sure that a message indicating that the
“USB disk may be disconnected safely” is displayed. At
this point, the C-720 should have been automatically disconnected from your personal computer, and the Enable
command should appear again in the C-720’s display,
meaning connection has been deactivated.
• On a Mac: Drag the KORG SSD icon over the Eject icon
on the Dock (Mac OS 9: drag it to the trashcan on the
desktop), and wait until the icon disappears. When it is no
longer shown, go to the C-720 and press the -/NO button
to deactivate data connection. The C-720 will be reinitialized, and the Enable command will appear in the display
again, meaning connection has been deactivated.
6. When the Enable command appears in the display again,
the USB connection has been safely turned off.
7. Press the EXIT button to return to the Main or Song Play
page, or the SCROLL
(see below).
button to go to the next edit page
Erasing songs from the User Song album
You can erase a song from the User Song album. On the contrary, songs of the other albums cannot be erased.
Note: You can erase a song from the User Song album also via
an external computer, by means of the USB data connection
(see above).
1. After having kept the EDIT button pressed, use the
SCROLL
54
button to show the Erase Song page:
Erase Song 17
Prelude Exec?
2. Use the +/YES and -/NO buttons to choose the song of the
User Song album you wish to delete. If the name is longer
than the display, it will scroll up to the end, then return to
the beginning.
3. Press the SCROLL
button to move the cursor to the
Exec command.
4. Press +/YES to start deletion. The “Are you sure?” message
appears. Press +/YES to confirm deletion, -/NO to cancel
and keep the song.
5. Press the EXIT button to return to the Main or Song Play
page, or the SCROLL
(see below).
button to go to the next edit page
Page 57

General Reset
Global settings > General Reset
You can reset all memory data to the original factory settings.
This includes sounds, sound combinations, performances,
global data.
Warning: The general reset will delete all your user data, like
custom performances, Layer sound balancing and global data!
Backup this data to a personal computer before doing a general reset. User Songs will not be deleted.
1. After having kept the EDIT button pressed, use the
SCROLL
button to show the General Reset page:
General Reset 18
Exec? (Yes/No)
System version number
You can see the operating system’s version number while in
Global mode. Press both the SCROLL
and +/YES buttons
2. Press +/YES to start the reset procedure (or -/NO or EXIT
to cancel and exit). The “Are you sure?” message appears.
Press +/YES again to confirm reset, -/NO to cancel and
leave your custom data untouched.
If you choose to reset, the instrument is reset, and all data
are restored to the original values. Please do not turn the
instrument off during reset.
together. The version number will appear in the display. Press
EXIT to close the message.
55
Page 58

MIDI > What is MIDI?
MIDI
What is MIDI?
MIDI, is the abbreviation of Musical Instrument Digital Interface. It is an international standard that was created to connect and
transfer data between electronic musical instruments, computers and other devices.
What is MIDI Over USB?
You can let the C-720 communicate MIDI data with a computer using the USB port instead of the MIDI ports. This way,
you can connect your C-720 to a personal computer without
the need of a dedicated MIDI interface.
Most C-720 MIDI features can be used on a Windows XP or
Mac OS X computer with no need of special software. Howev-
What can you do with MIDI?
Thanks to MIDI, you can use the C-720 to control other instruments, use other instruments to control the C-720, and
use a sequencer to create complex musical pieces.
MIDI connections
Always connect the MIDI OUT connector of the instrument to
the MIDI IN connector of another instrument. Never connect
two connectors of the same instrument to each other.
Connect the MIDI OUT connector of the transmitting (master) device to the MIDI IN connector of the receiving (slave)
device.
MIDI IN
MIDI sound module
C-520 bottom
MIDI OUT
MIDI keyboard
er, for full and easy use of all MIDI features, we suggest you to
install the “KORG USB MIDI Driver”, a special software that
you can find in the CD that comes with your C-720. Relevant
instructions come with the software itself. See “Installing the
Korg USB MIDI Driver” on page 59.
When you use the C-720 keyboard or pedal, or select a sound,
the notes, pedal activation and change in sound are transmitted to another instrument, or are recorded by an external sequencer.
the computer. Connect the C-720 MIDI IN connector to the
MIDI OUT connector of the computer.
MIDI
OUT
MIDI
IN
To connect the C-720 to a computer using the MIDI ports, you
need a MIDI interface for the computer, sequencing or musical notation software, and two standard MIDI cables. Connect
the C-720 MIDI OUT connector to the MIDI IN connector of
56
MIDI IN
MIDI OUT
Page 59

Standard MIDI settings
MIDI > Standard MIDI settings
When turning the instrument on, the default MIDI factory
settings of the C-720 are programmed as follows:
Parameter Setting
Transmission channels (see “MIDI OUT
Channels” on page 52)
01 = Main sound
02 = Layer sound
03 = Left sound
04 = Recorder Part 1
05 = Recorder Part 2
10 = Drum
Parameter Setting
Reception channel(s) (see “MIDI IN
Channels” on page 51)
Local (see “Turning the keyboard on or
off (Local Control)” on page 51)
Using the C-720 as a multitimbral tone generator
When C-720 is controlled from an external MIDI device, it can
work as a 16-part multitimbral tone generator. You can select
a different sound on each of the 16 MIDI channels.
Note: Sounds on the C-720 are set as in the General MIDI (GM)
standard. However, not all sounds of the standard are available.
1. Use a MIDI cable to connect the C-720’s MIDI IN to the
MIDI OUT of a sequencer etc. As an alternative, connect
the C-720 to a personal computer through the USB port
(see “Installing the Korg USB MIDI Driver” on page 59).
2. Transmit MIDI data from the connected sequencer (or
other device). See “Program Change” on page 57 for instructions on how to select a sound using the MIDI Program Change message. Program Change reception must
be activated on the C-720 (it is by default).
Read the other devices user’s manual for details on sending Program Change messages.
All 16 tracks (1-16)
On
Program Change
The sounds of the C-720 can be selected via MIDI, by sending
a Program Change message on the channel where you wish to
assign the sound. The “Sounds” table on page 68 lists the Program Change numbers corresponding to each C-720 sound.
Transmitting Program Change messages
You can send a MIDI Program Change message to a MIDI device connected to the C-720 MIDI OUT (or USB port), to
change its sound. When selecting one of the internal sounds of
the C-720 by using the sound selection buttons, a MIDI Program Change number will be transmitted on the sound’s
MIDI channel. Program Change numbers are shown in the table on page 68.
Receiving Program Change messages
When a Program Change message is received from an external
device on a MIDI channel, the corresponding internal sound
will be selected on the C-720 for that MIDI channel. Program
Change numbers are shown in the table on page 68.
Program Change enable/disable
The C-720 usually receives Program Change data. If you don’t
want to receive (or transmit) them, use the Filter function.
Please remember that to enable full remote program switching, both the PC and CC filters must be turned off, to allow
transmission of Program Change and Bank Select messages.
See “MIDI Filters” on page 53.
57
Page 60

MIDI > Control Change
Control Change
When you operate the damper pedal, adjust the balance in
Layer mode, or make other adjustments on the control panel,
a Control Change message is sent to a connected external
MIDI device. At the same time, C-720 can receive a Control
Change message from an external MIDI device connected to
its MIDI IN, to control the damper pedal, volume adjustment,
and other data.
Control Change enable/disable
The C-720 usually receives Control Change data. If you don’t
want to receive (or transmit) them, use the Filter function. See
“MIDI Filters” on page 53.
58
Page 61

Installing the Korg USB MIDI Driver > Connecting the C-720 to a personal computer
Installing the Korg USB MIDI Driver
The USB port can be used to transfer MIDI data between the
C-720 and a personal computer (this is called the MIDI Over
USB function). This is useful when your computer is not fitted
with a MIDI interface.
USB can be used in parallel with the MIDI ports. For example,
you can connect your C-720 to a sequencer running on your
computer, and at the same time control another MIDI instrument connected to the MIDI ports of the piano.
Connecting the C-720 this ways makes it, at the same time, a
MIDI input device, a controller, and a sound generator.
Connecting the C-720 to a personal computer
Please install the KORG USB-MIDI Driver, before connecting
the C-720 to a personal computer. Be sure your personal com-
puter meets the requirement shown on “KORG USB-MIDI
Driver system requirements” below.
KORG USB-MIDI Driver system requirements
Windows
Computer: A computer with an USB port, that satisfies the requirements of Microsoft Windows XP.
Operating system: Microsoft Windows XP Home Edition /
Professional / x64 Edition (a driver for the x64 Edition is in
beta release.)
Macintosh
Computer: An Apple Macintosh with an USB port that satisfies the requirements of Mac OS X.
Operating system: Mac OS X version 10.3 or later.
Please note before use
Copyright to all software included in this product is the property of Korg Inc.
The license agreement for this software is provided separately.
You must read this license agreement before you install this
software. Your installation of this software will be taken to indicate your acceptance of this agreement.
59
Page 62

Installing the Korg USB MIDI Driver > Windows: Installing the KORG USB-MIDI Driver
Windows: Installing the KORG USB-MIDI Driver
Please connect the C-720 to the computer via an USB cable
only after having installed the KORG USB-MIDI Driver Tools.
Warning: C-720 cannot use the KORG MIDI Data Filer at the
same time.
Note: You must install a separate driver for each USB port you
will use.
1. Insert the included CD-ROM into your CD-ROM drive.
Normally, the “Digital Piano Application Installer” will
start up automatically.
If your computer is set so that the installer does not run
automatically, double-click “KorgSetup.exe” on the CDROM.
2. Please follow the installation instructions appearing on-
screen.
3. Restart the computer, and turn on the C-720. Connect the
C-720 to the computer via an USB cable.
4. Select the following command from the task bar to open
the installation instructions:
Start > all programs > KORG > KORG USB-MIDI Driver
Tools > Installation manual
5. Select the following command from the task bar to open
the installation program:
Start > all programs > KORG > KORG USB-MIDI Driver
Tools > Install KORG USB-MIDI Device
6. Please follow the installation instructions appearing on-
screen to install the KORG USB-MIDI Driver.
Driver’s ports
After installation, the following ports will be shown in you
MIDI application (e.g., sequencer) among the other MIDI devices:
C720 KEYBOARD: This allows for reception of MIDI messages from the C-720 (keyboard and controller’s data) to the
MIDI application running on the computer.
C720 SOUND: This allows for transmission of MIDI messages
from the MIDI application running on the computer, to the
internal tone generator of the C-720.
Mac OS X: Installing KORG USB-MIDI Driver
1. Insert the included CD-ROM into your CD-ROM drive.
2. Please double click on the “KORG USB-MIDI Driver.pkg”
in the “KORG USB-MIDI Driver” folder inside the CDROM, to run the installer. Install it according to the instructions appearing on-screen.
Driver’s ports
After installation, the following ports will be shown in you
MIDI application (e.g., sequencer) among the other MIDI devices:
C720 KEYBOARD: This allows for reception of MIDI messages from the C-720 (keyboard and controller’s data) to the
MIDI application running on the Mac.
C720 SOUND: This allows for transmission of MIDI messages
from the MIDI application running on the Mac, to the internal
tone generator of the C-720.
60
Page 63

Assembling the stand
Cautions for assembly
Assembling the stand > Cautions for assembly
• When placing the piano on the stand, be careful not to
pinch your hands.
• Be sure that the correct parts are assembled in the correct
orientation and position, and follow the steps in order.
• Do not apply weight to the front edge of the piano before
tightening the screws, otherwise the piano may fall down.
61
Page 64

Assembling the stand > Assembling procedure
Assembling procedure
1. Open the packing carton and take out the contents. Check
that all of the following items are available.
A
B
D
C
List of parts
A Pedal “beam” × 1
B Front bar × 1
C Left side panel × 1
D Right side panel × 1
E Speaker box × 1
F C-720 × 1
G Rear panel × 1
a Screws M4x10 TC × 14
b Screws M4x20 TC × 5
c Screws M6x20 TBL × 4
d Screws 4x15 TFR × 10
e Protective cardboard sheets × 2
NB: You will need a cross-point (Phillips #2) screwdriver
for assembly.
E
2. With the finished surface (woodgrain) facing forward to-
ward the pedals, attach the pedal beam (A) to the front bar
F
G
(B), by inserting the four bolts on the front of the pedal
beam (A) into the corresponding holes in the front bar (B).
Fasten the two pieces using two screws (a).
B
a
a
A
62
4 x c
14 x a
2 x e
5 x b
10 x d
Page 65

Assembling the stand > Assembling procedure
3. Lay the left side panel (C) on one of the protective card-
board sheets (e), and fasten to it the pedal beam and front
bar assembly.
A
B
C
bolts of the pedal beam into the corresponding holes of the
right side panel (D).
D
Warning: Be careful not to scratch the wooden surface of
the side panels.
4. Fix the left leg to the pedal beam and front bar assembly
with three screws (a).
a
a
a
5. With the stand assembly still in the same position, attach
the right side panel (D) by inserting the remaining four
6. Fasten the right side panel with three screws (a).
a
a
a
7. Turn the stand assembly up, making the two feet firmly lay
on the floor.
63
Page 66

Assembling the stand > Assembling procedure
8. In two people, lay the speaker box (E) over the front bar
(B), making it fill the space between the left and right side
panels. Turn it up, until it touches the metal fittings on the
side panels.
E
B
10.Then fasten the speaker box (E) to the right side panel (D)
with the remaining three screws (a).
a
a
a
Warning: Be careful not to let the speaker box fall down,
or you will damage it.
9. While one of the people keeps it in position, fasten the
speaker box (E) to the left side panel (C) using three screws
(a).
a
a
11.Finally, fasten the speaker box (E) to the front bar (B) with
the five screws (b).
b
b
b
b
b
12.Fold the two protective cardboard sheets (e), so that they
are transformed into safety hoods for the side panels.
I
e
II
e
64
a
Page 67

Assembling the stand > Assembling procedure
13.Apply the hoods (e) to the rounded sides of the side pan-
els.
e
14.Attach the instrument. Warning: The side panels are easily
scratched; please use caution.
Lift the instrument with both hands, being careful to
keep them not closer than 70mm from both ends of the
piano to avoid pinching. Position the screw heads pro-
truding from the inside of the left and right side panels, so
that they are aligned with the grooves at the left and right
ends of the instrument. and gently lower the instrument
onto the stand. If the instrument is aligned correctly, the
screws on the inside of the side panels will fit firmly into
the grooves.
Warning: Carefully lower the left and right ends of the
instrument evenly, keeping the instrument at level, and
being careful not to pinch your hand or drop the instrument. Lifting only one side is very dangerous and may
also damage the metal fixtures of the instrument itself.
You must raise or lower both left and right ends of the
instrument simultaneously, keeping the instrument at
level.
You can perform this step more easily if you use your body
to apply pressure to the side panel of the stand while sliding the instrument onto the stand.
F
Make sure that there are no uneven gaps between the top
surface of the instrument and the top of the side panels.
If you notice any unsightly gap, make adjustments by
loosening the screws (a) that fasten the side panels to the
pedal beam, front bar and speaker box.
If there is a very noticeable gap between the instrument
and the side panels of the stand, or if the gap is uneven, it
may be that the instrument was not placed correctly on
the stand. If so, lift up the entire instrument and place it
correctly on the stand.
15.Finally, remove the cardboard hoods and save them in a
safe place for future use. After removing the hoods, the
bolts on top of the metal columns of the stand will fit the
corresponding holes under the piano.
remove
Warning: Be very careful not to pinch your fingers
between the piano and the stand.
65
Page 68

Assembling the stand > Assembling procedure
16.Fasten the C-720 to the stand, by inserting two screws (c)
into the metal fittings of the right side panel.
c
c
18.Connect the cable of the left and right speakers, to the cor-
responding connectors under the piano. Unfasten the pedal cable you will find in the front bar (B), and connect it to
the corresponding connector under the piano.
Right Speaker
Left Speaker
Pedals
17.Insert the remaining two screws (c) into the metal fittings
of the left side panel.
c
c
19.With the finished surface (woodgrain) facing forward, at-
tach the rear panel (G) on the back of the instrument, using the ten screws for wood (d).
d
d
d
d
G
d
d
d
d
d
d
66
Page 69

Assembling the stand > Check after assembly
20.Loosen the pedal adjuster, and adjust it so that it is in firm
contact with the floor.
Check after assembly
[•] Are any parts left over?
If any parts are left over, check the diagrams to see where
they should be used.
Note: Unless the adjuster is in firm contact with the floor,
the pedal will wobble, possibly causing malfunctions.
[•] Make sure that all screws are tight.
Caution
Caution when transporting the instrument
Remove the piano from its stand, and transport them separately. After transportation, refer to these instructions and reassemble the piano and stand.
Screw loosening
After assembly, the various screws and bolts of the stand may
loosen as time goes by, causing the stand to wobble. If this occurs, re-tighten the screws.
Disassembly
If you need to packup the piano, reverse the assembly order by
which the piano was attached to the stand and the stand was
assembled. After disassembly, save the screws and other parts
so that no parts are lost.
67
Page 70

Appendix > Sounds
Appendix
Sounds
Var. Name CC 0 CC32 PC* Osc. Description
PIANO 1
1 GrandPiano**
2 BriteGrand**
3 Rock Piano
4 Piano&Str.
PIANO 2
1 Honky-Tonk
2 MelloGrand**
3 Piano&Pad
4 Elec.Grand
5 M1 Piano
E. PIANO 1
1 Tine EP 1
2 SuitTineEP
3 DynoTineEP
4 Tine EP 2
E. PIANO 2
1 Dig. EP 1
2 Dig. EP 2
3 Reed EP
4 TremReedEP
HARPSI/CLAV
1 Harpsi 8
2 Harpsi 16
3 Clav
4 Synth Clav
VIBES/GUITAR
1 Vibes 1
2 Vibes 2
3 Nylon Gtr.
121 0 0 4 Samples recorded from a gorgeous-sounding concert grand piano. It also includes
four dynamic levels, sustain samples, and key-off samples, plus other EPx effects. Perfect for classical compositions as well as any other style that requires an accurate
acoustic piano sound.
121 0 1 4 As the above, but slightly more open-sounding.
121 1 1 2 Bright, spacious and clean piano. Excellent for pop or rock music.
121 2 0 4 A mix of warm piano and full, lush strings.
121 0 3 2 Classic, detuned saloon-piano.
121 1 0 4 Warm, slightly dark-sounding piano. Mostly good for classical music.
121 3 0 4 A mix of warm piano and warm, synthetic pads.
121 0 2 2 An electronic piano sound, typical of the late 70s. Extremely dynamic, with varying
timbre according to keyboard dynamics. Good for pop and funky music.
121 1 2 2 The classic, ringing sound of the Korg M1 sampled piano, so often heard in pop music
during the late 80s.
121 0 4 4 The most classic electric piano using hammer-struck metallic tines. It is extremely
dynamic, producing a soft tone when played lightly, or an aggressive tone when
played hard.
121 1 4 2 As the above, but warmer and with the addition of a phaser effect.
121 2 4 2 This electric piano has a very wide dynamic range, and is particularly suited to funky
music.
121 4 4 2 As Tine EP1, but with a tremolo effect.
121 0 5 2 An electronic piano sound created by means of the FM synthesis, extremely popular
during the mid 80s. Wide dynamic range. It is particularly suited to pop music of the
age.
121 1 5 2 As the above, but slightly brighter.
121 3 4 1 An electric piano sound, often heard in pop music.
121 5 4 1 As the above, but with a tremolo effect.
121 0 6 3 This is the classic instrument for baroque music. Harpsichord uses plucked strings, so
there is no touch response.
121 1 6 4 As the above, but with the addition of a register one octave lower.
121 0 7 2 The clavinet sound. This is often heard in funk and soul music. The leftmost pedal is
used to trigger glide down.
121 1 7 3 A synth-generated clavinet sound. The leftmost pedal is used to trigger glide down.
121 0 11 2 A sampled orchestral vibraphone with a great dynamic range.
121 1 11 2 As the above, but with no tremolo.
121 0 24 2 A gorgeous, full-sounding nylon-strings guitar. The leftmost pedal is used to trigger
glide down.
68
Page 71

Var. Name CC 0 CC32 PC* Osc. Description
ORGAN 1
1 Jazz Organ
2 Perc.Org.1
3 Perc.Org.2
ORGAN 2
1 Church Org
2 Pipe Flute
3 Pipe Tutti
STRINGS/CHOIR
1 Strings
2 Slow Str.
3 String Pad
4 Choir
1 ScatVoices
2 Vocal Pad
BASS
1 Ac. Bass
2 El. Bass
3 Fretless B
4 Bass&Ride
DRUM KITS (Selected only by Drum Patterns or via MIDI)
1 Standard Kit
2 Jazz Kit
3 Brush Kit
121 0 16 4 An aggressive tonewheel electric organ, often heard in jazz and rock music. The
rotary effect is sampled right at the source. The leftmost pedal is used to switch
between fast (pedal up) and slow (pedal down) rotary speaker, with several degrees in
the middle (half pedal).
121 0 17 3 As the above, but with the rotary speaker applied as a generated effect, and a more
transparent sound. The leftmost pedal is used to switch between rotary speaker fast
and slow (press for switch).
121 1 17 3 A variation of the above. The leftmost pedal is used to switch between rotary speaker
fast and slow (press for switch).
121 0 19 4 A grandious, Tutti pipe organ, with a lot of sampled reverb. Great for sacred music
from the Baroque to the late Romantic age.
121 0 20 3 A recitativo-like pipe organ, with a particularly emotional blend of Flute and Vox
Humana.
121 1 19 2 A slightly softer Tutti, especially suited for Baroque music.
121 0 48 3 A large strings ensemble sampled in stereo, with a realistic
natural reverb. Very dynamic and expressive.
121 0 49 2 Emotive, cinematic strings with a slower attack. Great for movie soundtracks.
121 0 50 2 Sampled strings with a synthetic quality. They are particularly suited for layers.
121 0 52 2 A large mixed choir, with natural reverb.
121 0 53 2 A synthetic choir, with a lot of breath.
121 0 54 2 Lush, warm pad with a vocal heritage. Great for layers.
121 0 32 2 Upright acoustic bass, with a round, full-bodied sound. The ideal Left Hand in Jazz
and Latin music.
121 0 33 2 A fingered electric bass, with a full, round sound.
121 0 35 1 A mellow, singing fretless bass.
121 1 32 3 The same acoustic bass as above, but with the addition of a ride cymbal for single-
handed Jazz accompaniments.
120 0 0 1/2
***
120 0 32 1/2
***
120 0 40 1/2
***
Appendix > Sounds
Legend:
Var.: Variation. CC0: Bank Select MSB. CC32: Bank Select LSB. PC: Program Change Number. Numbering is from 0-54; if the transmitting
device uses numbers from 1-55, you will need to increment the number by one. Osc: Number of oscillators used by the sound.
Notes:
* Program Change numbers comply with the General MIDI standard. However, only listed numbers have effect on the C-720, while other
numbers are ignored.
** The GrandPiano, BriteGrand and MelloGrand sounds lose the EPx features when in Layer. This will help save polyphony.
*** 1 oscillator in case of mono drum samples, 2 oscillators in case of stereo drum samples.
69
Page 72

Appendix > Performances
Performances
# Btn Name Sounds / Timbres Mode Remarks
Bank 1
1 1 Split&Layr Piano&Str., Ac. Bass Split
2 2 Grand&Ride GrandPiano, Bass&Ride Split
3 3 Grand&Ebas GrandPiano, El. Bass Split
4 4 PnoStrings GrandPiano, String Pad Layer
5 5 EGrand Pad Elec.Grand, String Pad Layer
6 6 Piano Pad Piano&Pad, String Pad Layer
7 7 Pno Choirs GrandPiano, Vocal Pad Layer
8 8 Pno Guitar Piano&Str., Nylon Gtr. Layer
9 9 Piano BX3 BriteGrand, Perc.Org.2 Layer
10 10 DualManual Perc.Org.2, Jazz Organ Layer
Bank 2
11 1 Digital EP GrandPiano, Dig. EP 1 Layer
12 2 PaddedTine Tine EP 1, Vocal Pad Layer
13 3 R&B EPno DynoTineEP, TremReedEP Layer
14 4 EP Choir Tine EP 1, Vocal Pad Layer
15 5 EP&NoFret Tine EP 2, Fretless B Split
16 6 Scat&Bass ScatVoices, Bass&Ride Split
17 7 Vibes&Bass Vibes 1, Bass&Ride Split
18 8 Bass&Guitr Nylon Gtr., Ac. Bass Split
19 9 Org&Bass 1 Perc.Org.1, Ac. Bass Split
20 10 Org&Bass 2 Jazz Organ, Ac. Bass Split
Bank 3
21 1 Baroque Harpsi 8, Strings Layer
22 2 Harpsi-Ch Harpsi 8, Choir Layer
23 3 Harpsi-Org Harpsi 8, Pipe Tutti Layer
24 4 Church Mix Church Org, Choir Layer
25 5 Guitar Pad Nylon Gtr., Slow Str. Layer
26 6 GrandPiano GrandPiano Single Stereo sound. No EPx for increased polyphony
27 7 BriteGrand BriteGrand Single
28 8 MelloGrand MelloGrand Single
29 9 2 Pianists GrandPiano, GrandPiano Split The same piano sound is assigned to the two halves of the keyboard,
30 10 PnoEXpDEMO** GrandPiano Single GrandPiano demo with enhanced PnoExp effects
simulating two separate pianos on the same keyboard. Useful when
both the teacher and student are playing on the piano at the same
time.
Legend:
Btn: Button. Bank: Select it with the VARIATION button.
Notes:
* These performances, with sounds set in Layer mode, do not use EPx effects.
** Performance 30 (PnoExpDEMO) is designed to demonstrate our “Piano eXperience” technology, by exaggerating the amount of key-off/
hammer return portion of the Grand Piano sound; it is not intended to be a play-able timbre. Normally, these additional Piano eXperience
sounds are not perceived as separate elements, but together with the other sample layers, they are a vital part of the realism and the
authentic piano tone.
70
Page 73

Effects
Reverb Description / Beschreibung Chorus Description
Hall 1 Reverb (Smooth Hall) Chorus Chorus
Hall 2 Reverb (Smooth Hall) Harm.Chor. Harmonic Chorus
Hall 3 Reverb (Smooth Hall) Chorus Dly Chorus Delay
Wet Plate Reverb (Wet Plate) Ensemble Ensemble
Dry Plate Reverb (Dry Plate) Flanger Flanger
Room 1 Reverb (Room) Tremolo Tremolo
Room 2 Reverb (Room)
BrightRoom Reverb (Bright Room)
IFX Description IFX Description
EQ Single FX
LoGain Low Boost Pan Auto Pan
HiGain Hi Boost Trem. Tremolo
HLGain Hi-Lo Boost Phaser Phaser
MdGain Mid Boost Rotary Rotary Speaker
Delay AmpSim Amp Simulator
Echo 1 Short Delay Comp. Compressor
Echo 2 Medium Delay Limit. Stereo Limiter
Echo 3 Long Delay Excit. Exciter
Dly4th Midi BPM Sync (quarters) Wah Wah
Dly3/4 Midi BPM Sync (quarters/triplets)
Dly8th Midi BPM Sync (eights) PhaTrm Phaser / Tremolo
Double FX
AmpTrm Amp Simulator / Tremolo
CmpAmp Compressor / Amp Simulator
OD-Wah Overdrive / Wah
WahAmp Wah / Amp Simulator
Appendix > Effects
71
Page 74

Appendix > Songs
Songs
Album: SongBook
# Title Composer # Title Composer
1 Prelude 1 (The Well-Tempered
Clavier, Book 1)
2 Invention No.1 J.S.Bach 18 Arabesque No.1 C.Debussy
3 Jesu, Joy of Man’s Desiring J.S.Bach 19 Prelude (Suite Bergamasque) C.Debussy
4 Sonata K.545 W.A.Mozart 20 Golliwog's Cake walk C.Debussy
5 Turkish March (Sonata K.331) W.A.Mozart 21 Claire de lune (Suite Bergamasque) C.Debussy
6 For Elise L.v.Beethoven 22 Waltz No.6 Db-major Op.64-1 F.Chopin
7 Piano Sonate Op.13-2 L.v.Beethoven 23 Waltz No.7 E-minor Op.64-2 F.Chopin
8 A Maiden’s Prayer T.Badarzewska 24 Nocturne Op.9-2 F.Chopin
9 Arabesque Op.100-2 F.Burgmuller 25 Mazurka Op.7-1 F.Chopin
10 La styrienne Op.100-14 F.Burgmuller 26 Fantasie-Impromptu Op.66 F.Chopin
11 La chevaleresque Op.100-25 F.Burgmuller 27 Etude Op.10-3 F.Chopin
12 Springs Song Op.62-6 F.Mendelssohn 28 Etude Op.10-5 F.Chopin
13 Traumerei Op.15-7 R.Schumann 29 Promenade (Tableaux d’une
14 Heidenroslein G.Lange 30 Gymnopedie No.1 E.Satie
15 Spinning Song A.Ellmenreich 31 Je Te Veux E.Satie
16 Dolly’s Dreaming and Awakening T.Oesten 32 Salut d’Amour E.Elgar
Album: Classics
J.S.Bach 17 La fille aux cheveux de lin C.Debussy
M.P.Moussorgsky
exposition)
# Title Composer # Title Composer
1 Frohlicher Landmann R.Schumann 12 Moments Musicaux Op.94-3 F.P.Schubert
2 La Violette Op.99-1 R.Streabbog 13 Jagerlied Op.19-3 F.Mendelssohn
3 Menuett G dur BWV.Anh.114 J.S.Bach 14 Von fremden Landern und Menschen
4 Gavotte J.S.Bach 15 Etudes de Mecanisme, Op.849-No.1 Carl Czerny
5 3 Sonatinen 1 C-dur Op.20-1 Fr.Kuhlau 16 Wiener Marsch Carl Czerny
6 6 Sonatinen 1 C-dur Op.55-1 Fr.Kuhlau 17 The New Doll Op.39-9 P.I.Tchaikovsky
7 Sonatine C-dur Op.36-1 M.Clementi 18 Sonata K331, 1st Mov. Theme W.A.Mozart
8 Piano Sonate Op.49-2-1 L.v.Beethoven 19 Anitras Tanz Op.46 No.3 Greig
9 Piano Sonate Op.27-2-1 L.v.Beethoven 20 Blumenlied (“Flower Song”) G.Lange
10 Menuett G-dur Op.10 L.v.Beethoven 21 Tango (Espana) I.Albeniz
11 Andante J.Haydn 22 Libestraume Nr.3 F.Liszt
Album: Beyer A – Ferdinand Beyer: Preparatory School, Op.101 / La scuola preparatoria, Op.101
# Title Note # Title Note
1 Thema, Var. 1 ~ 12 Part 1: Teacher
2 Thema, Var. 1 ~ 8
Album: Beyer B – Ferdinand Beyer: Preparatory School, Op.101 / La scuola preparatoria, Op.101
Part 2: Student
(Kinderszenen)
3
Study 3 ~ 53 Student only
…
53
# Title Note
54
Study 54 ~ 106
…
106
R.Schumann
72
Page 75

Album: Burgmüller – F.J.F. Burgmüller: 25 Easy and Progressive Studies, Op.100 / 25 Studi Facili e Progressivi, Op.100
# Title Composer # Title Composer
1 La candeur F.Burgmüller 14 La Styrienne F.Burgmüller
2 L’Arabesque 15 Ballade
3 La pastorale 16 Douce plainte
4 La petite reunion 17 La babillarde
5 Innocence 18 Inquietude
6 Progres 19 Ave Maria
7 Le courant limpide 20 La tarentelle
8 La gracieuse 21 L’harmonie des anges
9 La chasse 22 Barcarolle
10 Tendre fleur 23 Le retour
11 La bergeronnette 24 L’hirondelle
12 L’adieu 25 La chevaleresque
13 Consolation
Page 76

Appendix > Error messages
Error messages
Write Protect
While saving a song, you are trying to write over a write-protected file. The song has been previously copied from a PC,
and it had the write-protect attribute turned on while on the
computer’s disk. Change name to the song before repeating
the save operation.
Out of Memoy
The song is too long, and the memory has been filled out.
When the maximum memory capability has been reached, recording is automatically stopped. Press EXIT to close this message.
Maximum song length reached
A song can’t exceed 999 measures in length. When you reach
that limit, the recorder is automatically stopped. Please note
that recording can end earlier, if there is not enough memory
for all 999 measures to be recorded.
Loading Song Error
The song could not be loaded, for problems in file integrity,
excessive file size, or other errors.
Record Mode Not Allowed
You are trying to access recording on a protected song (i.e., all
the songs contained in albums different than UserSong). This
is not possible.
Song Modified
Save?
A new or modified song exists in memory, and has not yet
been saved. Press +/YES to save it, or -NO to cancel and abandon all changes. In this latter case, the song in memory will be
lost.
Sound Modified
Save?
The current sound or sound combination has been modified.
Press +/YES to save it, or -NO to cancel and abandon all
changes.
Perf. Modified
Save?
The current performance has been modified. Press +/YES to
save it, or -NO to cancel and abandon all changes.
USB Working Wait please
Disconnecting the C-720 from the computer cannot be done
yet, since the computer is still working on the files. This may
happen when you press Enable, and then immediately after
Disable. Wait a little for the USB operation to complete.
Memory Full
The internal storage memory (the one preserved when turning
the instrument off, and seen when connecting the C-720 via
USB) is full, so you cannot save the song. To free some space,
you can either delete some songs by connecting the C-720 via
USB, or using the dedicated internal function (see “Erasing
songs from the User Song album” on page 54).
Invalid Name
Your song’s name is still blank (i.e., no characters were inserted, or all characters were deleted). Assign a name to the song,
and try saving again.
Song Exists Execute
The song already exists in the internal storage memory. If you
press +/YES the older version is deleted and replaced by the
new one. If you press -/NO or EXIT saving is canceled, and the
older version is preserved.
Globals Modified
Save?
Global settings have been modified. Press +/YES to save it, or
-NO to cancel and abandon all changes.
Save Global Failure
There was an error during save. Global settings have not been
saved.
Save Preset Failure
There was an error during save. The sound or sound combination has not been saved (a preset is the common technical
name for sounds and sound combinations).
Save Midi Failure
There was an error during save. Midi settings have not been
saved.
General Reset Wait Please
You are resetting the internal data.
General Reset / nn%
This message shown the percentage of data being reset. Warning: Do not turn the instrument off while this message is in the
display.
74
Page 77

Appendix > Troubleshooting
Troubleshooting
If during use any of the following problems should occur,
carefully examine the instrument to see if you can find out
what the problem is, and try resolving it by following the suggestions below. If the instrument will still not function properly refer to your dealer or to an Authorized Korg Service
Center.
Problem Possible remedy Page
The instrument
will not turn on.
No sound. (1) Make sure that the volume is not
Check that the AC adapter is correctly
connected to the piano and the outlet.
set on 0. If it is, bring it up to an adequate level.
(2) Make sure there is not a jack
plugged into one of the PHONES connectors. This would turn the internal
speakers off. if so, unplug the jack.
(3) Make sure that the MIDI Local
function is not set on OFF. If it is, set it
to ON (or turn the instrument off and
then on again).
10
10
11
51
Polyphony
The C-720 contains sampled sounds, which have been recorded, analyzed and processed from the actual sounds of the original musical instruments. These sounds usually consist of one
or more different samples reproduced by pressing a key. Each
sample is played back by a single oscillator. Sounds using just
one oscillator have a full polyphony of max. 62 voices, while
sounds using two oscillators have a limited polyphony of max.
31 notes. Sounds using more oscillators have a more limited
polyphony. When the number of notes exceeds the limit of the
sound, some notes will be stopped, so that the new ones can be
heard.
Furthermore, when playing in Layer mode with more than two
notes, the max. polyphony depends on how many oscillators
are used in total.
Please refer to the table on page 68 for more information
about the number of oscillators used by each sound.
75
Page 78

Technical specifications > Polyphony
Technical specifications
Specifications C-720
Keyboard 88 key, Graded Hammer Action (RH3)
Touch selection Eight velocity curves, plus fixed
Key cover Wooden, soft-landing sliding key cover
Tuning Transpose, Fine tuning, 10 Temperaments + Quarter Tone
Sound generation Piano eXperience stereo sampling
Polyphony 62 notes (max). The use of 2- (or more) oscillator sounds and the Layer mode reduces the maximum number of
Modes Single, Layer, Split, Performance (30)
Sounds 40 types; (7 Acoustic Pianos, Honky-Tonk, Electric Grand, 8 Electric Pianos, 2 Harpsichords, 2 Clavs, 2 Vibra-
Effects 8 Reverb types, 6 Chorus types
Demo 205 songs — 20 demo songs; 185 classical songs with separate R.H. and L.H. parts
Metronome Tempo, Time Signature, Accent (Standard, Bell), Volume controls, Drum patterns
Recorder 2 parts, 45,000 notes per song
Pedals Damper (supports half-pedaling), Soft (supports half-pedaling), Sostenuto
Connections Audio output (OUTPUT L/MONO, R), Audio input (INPUT L/MONO, R), 2 × Headphones, MIDI (IN, OUT), Pedals,
Controls Power switch, Master Volume, Performance, Variation, Split, Sound selectors, Scroll, Value (Yes/No), Edit, Exit,
Display 2 line × 16 character backlit LCD
Amplification Bi-amplfied — 2 × 35 Watt (woofers), 2 × 12 Watt (tweeters)
Speakers 2 × 16cm woofers in closed boxes, 2 × dome tweeters
Power supply 120 ~ 240 V, 50/60 Hz
Consumption 65 Watt
Dimensions (W x D x H) 55.94" × 18.50" × 35.43" inch (1421 × 470 × 900 mm), including stand; with music stand folded down
Weight 182.98 lbs. (83 kg), including stand
Color and grain Realwood Wenge
Music stand With score holder
Included accessories AC power cable; Song Book, CD-ROM with KORG USB-MIDI Driver for Windows XP and Mac OS X
simultaneous notes.
phones, Acoustic Guitar, 3 Jazz Organs, 3 Church Organs, 3 Strings, 3 Choirs, 4 Basses.)
24 Insert types including Tremolo, Delay, Rotary Speaker, Equalizer, etc.
Brilliance (5 settings)
Controls: Record, Play/Pause, Stop, Part 1 On/Off, Part 2 On/Off.
Functions: Cycle, Erase Track, Quantize, Transpose, Delete Song,
Rename Song.
All freely assignable
USB (supports Ms Windows XP, Apple Mac OS X 10.2 or later)
Reverb, Chorus, Transpose, Brilliance, Demo, Metronome, Tempo, Recorder
Sounds processed with INFINITY™.
Korg reserves the right to change the specifications without notice.
76
Page 79

MIDI Implementation Chart > Polyphony
KORG C-720
Version 1.0 - Jul. 16, 2006
MIDI Implementation Chart
Function Transmitted Recognized Remarks
Basic Channel Default 1–16 1–16 Memorized
Changed 1–16 1–16
Mode Default 3
Messages X X
Altered ****************
Note
Number:
Velocity Note On O 9n, V=1–127 O 9n, V=1–127
Aftertouch Poly (Key) O O Recorded though the Global channel *1
Pitch Bend O O *1
Control
Change
Program
Change
System Exclusive O O *5
System
Common
System
Real Time
Aux
Messages
Notes *1: Only recorder data are transmitted.
Mode 1:OMNI ON, POLY
Mode 3:OMNI OFF, POLY
True Voice **************** 0–127
Note Off X V=64 X
Mono (Channel) O O *1
0, 32 O O Bank Select (MSB, LSB) *2
1, 2 O O Modulations *1, 2
6 O O Data Entry MSB *1, 2
38 O O Data Entry LSB *2
7 O O Volume *2
11 O O Expression *1, 2
10, 91, 93 O O Panpot, Reverb Send, Chorus Send *2
64, 66, 67 O O Damper, Sostenuto, Soft *2
65, 5 O O Portamento On/Off, Portamento Time *1, 2
71, 72, 73 O O Resonance, EG time (Release, Attack) *1, 2, 3
74 O O Brightness *2, 3
75, 76, 77, 78 O O Decay Time, Vibrato Rate, Depth, Delay *1, 2, 3
98, 99 O O NRPN (LSB, MSB) *1, 2
100, 101 O O RPN (LSB, MSB) *1, 2, 4
120, 121 X O All sounds off, Reset all controllers *2
True # **************** 0–127
Song Position X X
Song Select X X
Tune X X
Clock O O
Commands O O
Local On/Off X O
All Notes Off X O (123–127)
Active Sense O O
Reset X X
*2: Sent and received when MIDI Filter is set to Off in Global mode.
*3: Received, but not recorded by the onboard Recorder.
*4: LSB, MSB = 01,00: Fine Tune.
*5: Includes Inquiry and GM Mode On.
0–127 0–127 0 – 120 in the case of piano sounds
O O Transmitted/recognized numbers: *2
Mode 2:OMNI ON, MONO
Mode 4:OMNI OFF, MONO
0-7, 11, 16, 17, 19, 20, 24, 32, 33, 35, 48-50, 52-54
O: Yes
X: No
77
Page 80

Page 81

Page 82

Address
KORG ITALY Spa
Via Cagiata, 85
I-60027 Osimo (An)
Italy
Web servers
www.korgpa.com
www.korg.co.jp
www.korg.com
www.korg.co.uk
www.korgcanada.com
www.korgfr.net
www.korg.de
www.korg.it
www.letusa.es
© KORG Italy 2006. All rights reserved PART NUMBER: MAN0010006
 Loading...