

Page 1

Contents
AI Synthesis System
CONCERT
KORG DIGITAL PIANO
C-350
C-150
OWER'S AAANUAL
IMPORTANT SAFETY INSTRUCTIONS
Before You Begin
Features.........................................................................3
The Backup Battery........................................................3
Introduction......................................................... 4
1. Layout.......................................................................4
2. Preparing to play......................................................8
Plug in the power cable
Open the key cover
Turn on the power
Adjust the volume....................................................8
When using headphones
When using the Music Stand
3. Listening to the demo songs
Piaying
2. Selecting Voice Modes
3. Add various effects.................................................10
4. Using Pedals...........................................................11
5. Using the Built-In Metronome
6. Touch Contorol.......................................................13
7. Transpose Function
8. Tune Function
9. Changing Temperaments
...............................................................
Select the voice
...........................................................
...........................................
..................................................
...................................................
.........................................
......................................................
...........................................
................................................
........................................................
.............................
...................................
....................................
...............................
.......................................
2
3
8
8
8
8
8
9
10
10
10
12
14
15
15
Using the Recorder
1. Recording
2. Playing Back
3. Deleting Your Recorded Data.................................17
4. Reading the Memory Usage Gauge
Connections with other devices........................... 18
1. Connecting a synthesizer or audio device
2. Connecting MIDI device
3. Connections with a computer (C-350 only)
Data...................................................................24
1. Korg MiDi Driver installation and setup
2. Assembling the Stand
3. MIDI Implementation Chart...................................32
iSB
M
D)
5
Thank you for purchasing the Korg Digital
Piano Concert C-350/150. To ensure long,
trouble-free operation, please read this
manual carefully.
4. Troubleshooting.....................................................33
5. Specifications.........................................................33
6. Index
7. MIDI/TRANSPOSE Switch
......................................................................
............................................
...............................................................
...........................................................
.......................
.............
........................................
............
................
............................................
.......................................
16
16
16
17
18
18
22
24
30
34
35
oan
© ©
Page 2
IMPORTANTSAFETYINSTRUCnONS
WAJRNING—When using electric products, basic precautions
should always be followed, including ihe following.
1. Read all the instructions before using the product
2. Do not use this product near water — for example, near a bath
tub, washbowl, kitchen sink, in a wet basement, or near a swim
ming pool, or the like.
3. This product should be used only with a cart or .stand that is
recommended by the manufacturer.
4. This product either alone or in combination with an amplifier
and headphones or speakers, may be capable of producing
sound levels that could cause permanent hearing loss. Do not
operate for a long period of time at high volume level or at a
level that is uncomfortable. If you experience any hearing loss
or ringing in the ears, you should consult an audiologist.
5. The product should be located so that its location or position
does not interfere with its proper ventilation.
6. The product should be located away from heat sources such
as radiators, heat registers, or other products that produce heat.
7. The product should be connected to a power supply only of
the type described in the operating instructioas or as marked
on the product,
8. This product may be equipped with a polarized line plug {one
blade wider than the other). This is a safety feature. If you are
unable to insert the plug into the outlet, contact an electrician
to replace your obsolete outlet. Do not defeat the safety pur
pose of the plug.
9. The power-supply cord of the product should be unplugged;
from the outlet when left unused for a long period of time.
10. Care should be taken so that objects do not fall and liquids are
not spilled onto the enclosure through openings,
11. The product should be serviced by qualified service person
nel when:
A. The power-supply cord or the plug has been damaged; or
B. Objects have fallen, or liquid has been spilled into the prod
uct; or
C. The product has been exposed to rain; or
D. The product does not appear to operate normally or ex
hibits a marked change in performance; or
E. The product has been dropped, or the enclosure damaged.
12. Do not attempt to service the product beyond that described
in the user-maintenance instructions. All other servicing should
be referred to qualified service personnel,
SAVE THESE INSTRUCTIONS
1 CAUTION
A
A
\ A Vi S : RISQUE OE CHOC ÉLECTRÍQUE-HE PAS OUVHÍH |
WARNING:
TO REDUCe THE RISK OF RRE OR ELECrmtC SHOCK DO MOT
EXPOSE THIS PRODUCT TO RAIN OR MOISTURE.
The lightning flash with arrowhead symbol,
within an equilateral triangle, is intended to alert
the user to the presence of uninsulated "danger
ous voltage" within the product's enclosure that
may be of sufficient magnitude to constitute a risk
of electric shock.
The exclamation point within an equilateral tri
angle is intended to alert the user to the presence
of important operating and maintenance (servic
ing) instructions in the literature accoiripanying
the product.
1 RISK OF ELECTRIC SHOCK I / |\
OONOTOPFN / * \
CAITTION
TO PREVENT ELECTRIC SHOCK, MATCH WIDE BLADE OF
PLUG TO WIDE SLOT, FULLY INSERT.
MENTION - POUR ÉVITER LES CHOCS É1ECTRIQUES
INTRODUIRE LA LAME LA PLUS LARGE DE LA HCHE DANS
LA BORNE CORRESPONDANTE DE LA PRISE ET POUSSER
JUSQU'AU FOND.
THE FCC REGULATiON WARNING
'This equipment has been tested ^d found to comply with the
limits for a Class B digital device, pursuant to Part 15 of the
FCC Rules. These limits are designed to provide reasonable
protection against harmful interference in a residential instal
lation. This equipment generates, uses, and can radiate radio
frequency energy and, if not installed and used in accordance
with the instructions, may cause harmful interference to radio
communications. However, there is no guarantee that inter
ference will not occur in a particular installation. If this equip
ment does cause harmful interference to radio or television
reception, which can be determined by turning tlie equipment
off and on, the user is encouraged to try to correct the interfer
ence by one or more of the following measures;
Reorient or relocate die receiving antenna.
Increase the separation between the equipment and receiver.
Connect the equipment into an outlet on a circuit different from
that to which the receiver is connected.
Consult the dealer or an experienced radio/TV technician for
help.
Unauthorized changes or modification to this system can void
the user's authority to operate this equipment.
CE mark for European Harmonized Standards
CE mark which is attached to our company's products of AC
mains operated apparatus until December 31,1996 means it
conforms to EMC Directive (89/336/EEC) and CE mark Di
rective (93/68/EEC).
And, CE mark which is attached after January 1,1997 means it
conforms to EMC Directive (89/336/EEC), CE mark Directive
(93/68/EEC) and Low Voltage Directive (73/23/EEC).
Also, CE mark which is attached to our company's products
of Battery operated apparatus means it conforms to EMC Di
rective (89/336/EEC) and CE mark Directive (93/68/EEC).
IMPORTANT NOTICE FOR THE UNITED
KINGDOM
As the colours of the wores in the mains lead of this apparatus
may not correspond with the coloured markings identifying
the terminals in your plug, proceed as follows:
• the wire which is coloured blue must be comiected to the
terrrdnai which is marked with the letter N or coloured black.
• the wire which is coloured brown must be connected to the
terminal which is marked with the letter L or coloured red.
• Do not connect the wire to earth terminal of a three-pin plug.
Page 3

Before You Begin
Location
To prevent damage to the instrument electronics, do not use
or store it for extended periods where it may be exposed to:
■ direct sunlight ■ extreme temperature or humidity
■ sand or dust ■ excessive vibration
Power Supply
9 Only connect the instrument to electrical outlets match
ing Üie specifications on the name plate at the rear of ttie unit.
Note: If necessary, add the appropriate step-up or stepdown transformer. Connecting to the wrong polarity or
voltage can irreparably damage the instrument
9 To help prevent noise and poor sound quality, avoid con
necting the instrument to the same electrical circuit as mo
tors or large appliances.
9
For the same reasons, never overload the electrical circuit
with too many extension cords.
9
Always start with the volume at a low level and gradu
ally increase it-especially when the instrument is con
nected to external equipment.
Interference
To minimize the risk of radio-frequency interference:
9
Keep the instrument away from fluorescent light fixtures
and other sources of radio-frequency noise that may dis
rupt operation of the instrument’s main microprocessor.
9
Never use the instrument in the immediate vicinity of a
radio, television set, or similar equipment, as the equip
ment may pick up radio-frequency noise from the micro
processor.
9
If operation becomes erratic or unpredictable or the in
strument fails to respond, reset the micro-processor by
turning off the instrument, waiting a few seconds and
then turning it on again.
Rear Connections
Only use jacks and connectors matching the corresponding
connectors available at the rear of the instrument.
Handling
9
Never apply excessive force to keys, switches, terminals
and other components.
9
Avoid dropping the instrument.
Treatment of the Stand
If you use the stand for long periods of time, the screws may
become loose. For safety, retighten the screws if you notice
significant shaking during use or if you move the stand to
another place (see "Assembling the stand").
Cleaning
9
Wipe the exterior of the instrument with a clean, dry cloth
to remove dust and dirt,
9
Never use harsh cleanser, organic solvents, or flammable
polishes.
Foreign Objects
9
Do not place vases or beverage containers on the instru
ment. Liquid spills may cause fire or electrical shock, as
well as cause permanent damage to the instrument.
9
Care should be taken so that metal objects such as pins
and coins do not fall into the enclosure through openings
between keys.
if any of the above has occurred, turn off the power, un
plug the power cord from the outlet and contact your
dealer or a KORG service center.
Warranty
Have your warranty card validated at the place of purchase
and keep it in a safe place until the warranty period expires.
Manual
This manual is your guide to using the instrument properly
and effectively. Keep it in a safe place.
Features
Six voices
The piano’s "AP Synthesis System" produces six realistic voices:
concert piano, electric piano, harpsichord, vibes, organ, and
strings.
Digital effects
Set the reverberation effects to simulate a large concert hall. Add
modulation effects to obtain a wider sound.
Voice combinations
Use the LAYER mode to play two different voices at the same
time.
Pedal effects
Damper, sostenuto, and soft pedals work in the same was as the
corresponding pedals on an acoustic piano.
Only C-350: The damper pedal on the C-350 includes a reso
nance feature that simulates the resonance effect of an acoustic
damper pedal
Built-in metronome
Use the metronome to set both meter and tempo. Metronome
volume is adjustable, and you can select a bell sound for the
accented beat.
Recorder
Use the piano's built-in recorder to record and play back your
performances.
Touch control
The piano offers three levels of keyboard response. Select the
level by pressing the appropriate TOUCH key combination.
Premodem temperaments
in addition to the modem Equal temperament (tuning), your
piano also offers the premodem Kimberger and Werckmeister
temperaments. Select either of these temperaments to accurately
reproduce the sound of a premodem keyboard instrument.
Transposition and tuning
Use the transposition function to transpose any key into any
other. Use the tuning function to make fine adjustments in pitch.
MIDI
Your piano comes equipped with the industry-standard "Musi
cal instmment Digital Interface." You can use MIDI to connect
your piano to computers and other electronic instruments. Your
piano can drive and be driven by external devices. The piano’s
"MIDI Muitivoice function" allows external input to drive up to
four of the piano’s voices at the same time.
The Backup Battery
Your piano’s backup battery enables the memory to retain re
corder data and various settings even while the piano's power is
off. If the [TRANSPOSE/FUNCTION] lamp begins blinking
when you switch on the piano, it is time to change the battery.
For instructions, refer to your nearest service center or dealer.
To switch the lamp off, press the [TRANSPOSE/FUNCTION]
switch.
Page 4
Introduction
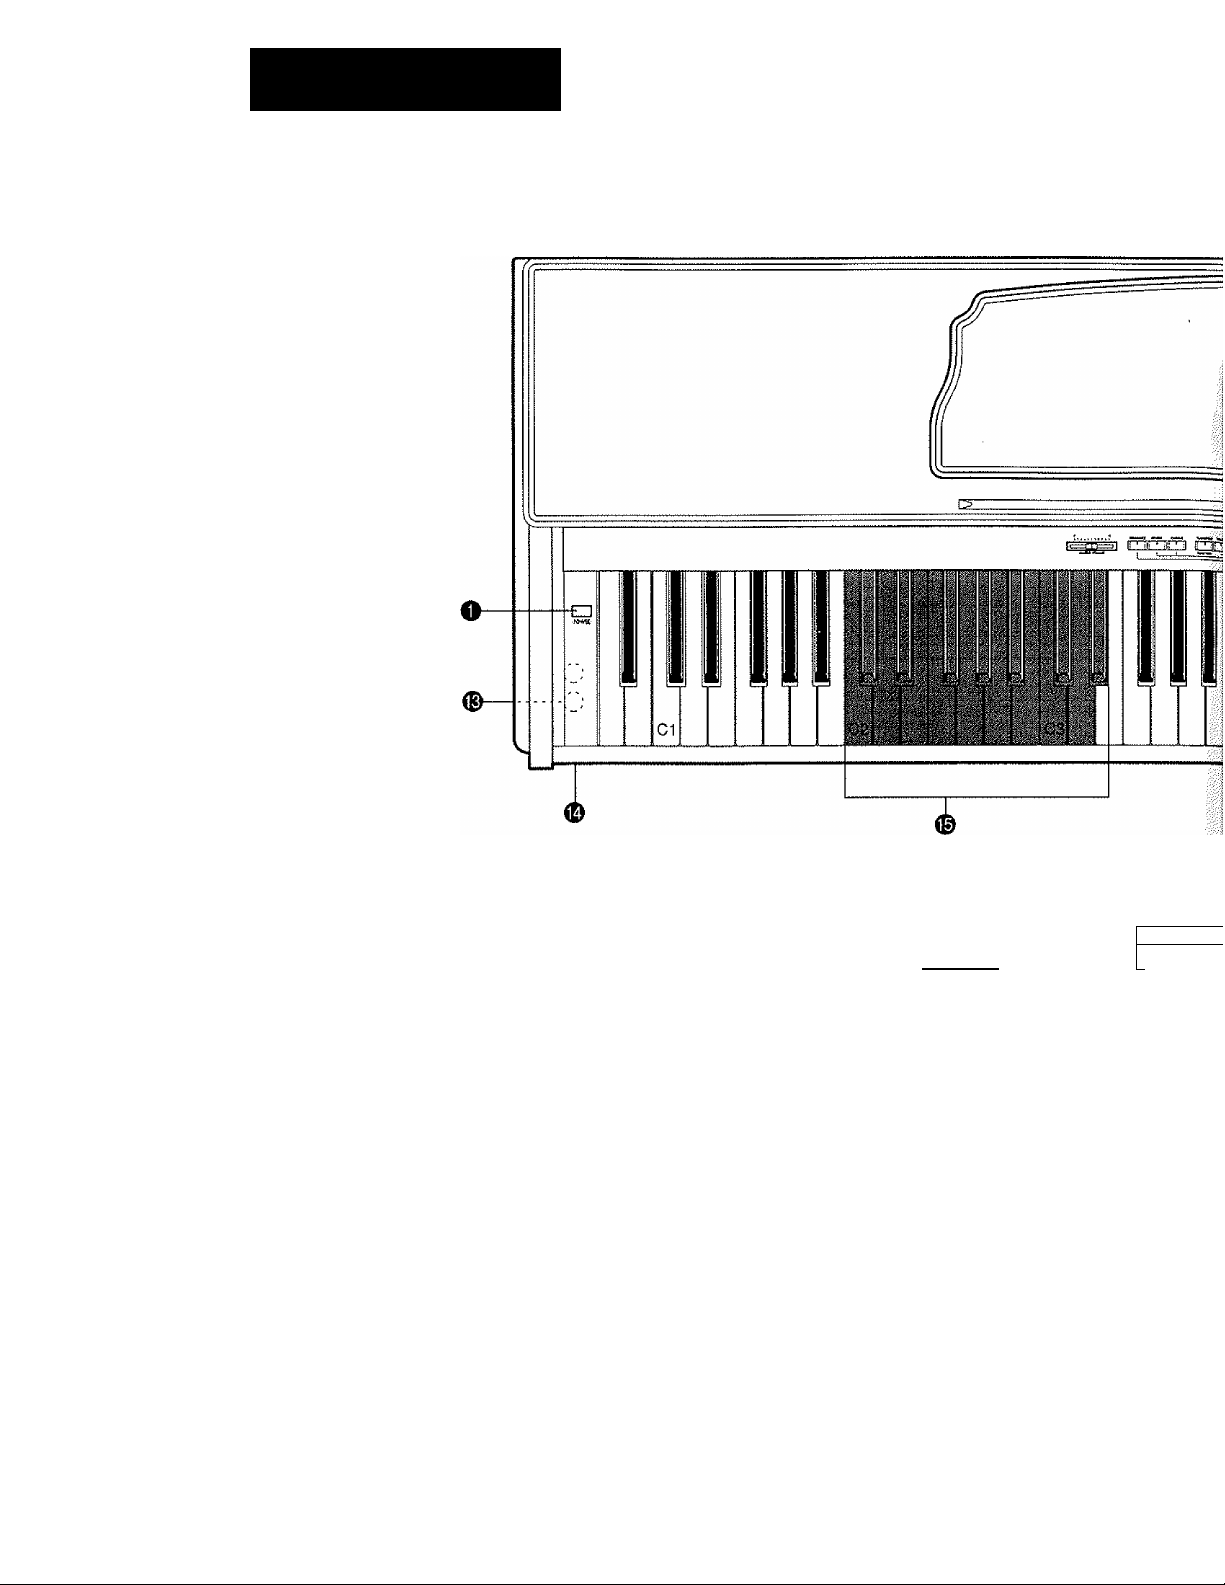
1. Layout
C-350
I I ! I M 3 1 I M
MASTER VOLUME
O [POWER] switch
Use this switch to turn the piano’s power on or off.(page 8 )
o [MASTER VOLUME] slider
Move the slider right or left to adjust the volume,(page 8 )
e [BRILLIANCE] switch
Set the "brilliance" of the instrument’s sound.(page 10)
o [REVERB] switch
Adds reverb.(page 11 )
0 [CHORUS] switch
Adds a chorus effect.(page 11 )
o [TRANSPOSE/FUNCTION] switch
This is a multipurpose switch: use it to transpose the
key (page 14), to implement MIDI settings (page 19), or
to make various other settings.(page 34)
^ ^ ^ ^ ^
?
BRrLLlANCE REVERB CHORUS l3iANSPOSE TOUCH
aaEH frniin
PIANO E.KW
il "
“ LICKT — STANDJ
- DEPTH ]
- MEUOW—NC^
o [TOUCH] switch
Press this switch to select the keyboad response.(page 13)
o [VOICE SELECTOR] switches
Press one of these switches to select the voice.(page 10)
Use LAYER mode to play two voices at once.(page 10)
@ [TEMPO] control slider
Move this slider to set the tempo for the metronome or
for recorder play back,(page 12)
® [METRONOME] switch
Press this switch to turn the metronome on or off.(page 12)
O [RECORDER] switches
Use these switches to control recording and playback,
(page 16)
WM
-----
DEPTH
Page 5
I. Layout
ViHS ORGAN STftfNOS
—0 nn ET
I , 1120, , j , ioo METROSiOMe
U—T)
STARI/STOP RECOBG
r^lirn
© [DEMO] swifch
Press this switch to plays the built-in demo songs.(page 9)
(D HEADPHONE jacks (on the underside of the piano)
© POWER indicator
© MIDI-channel selection keys
© Tuning Area
Use these keys to set MIDI channels.
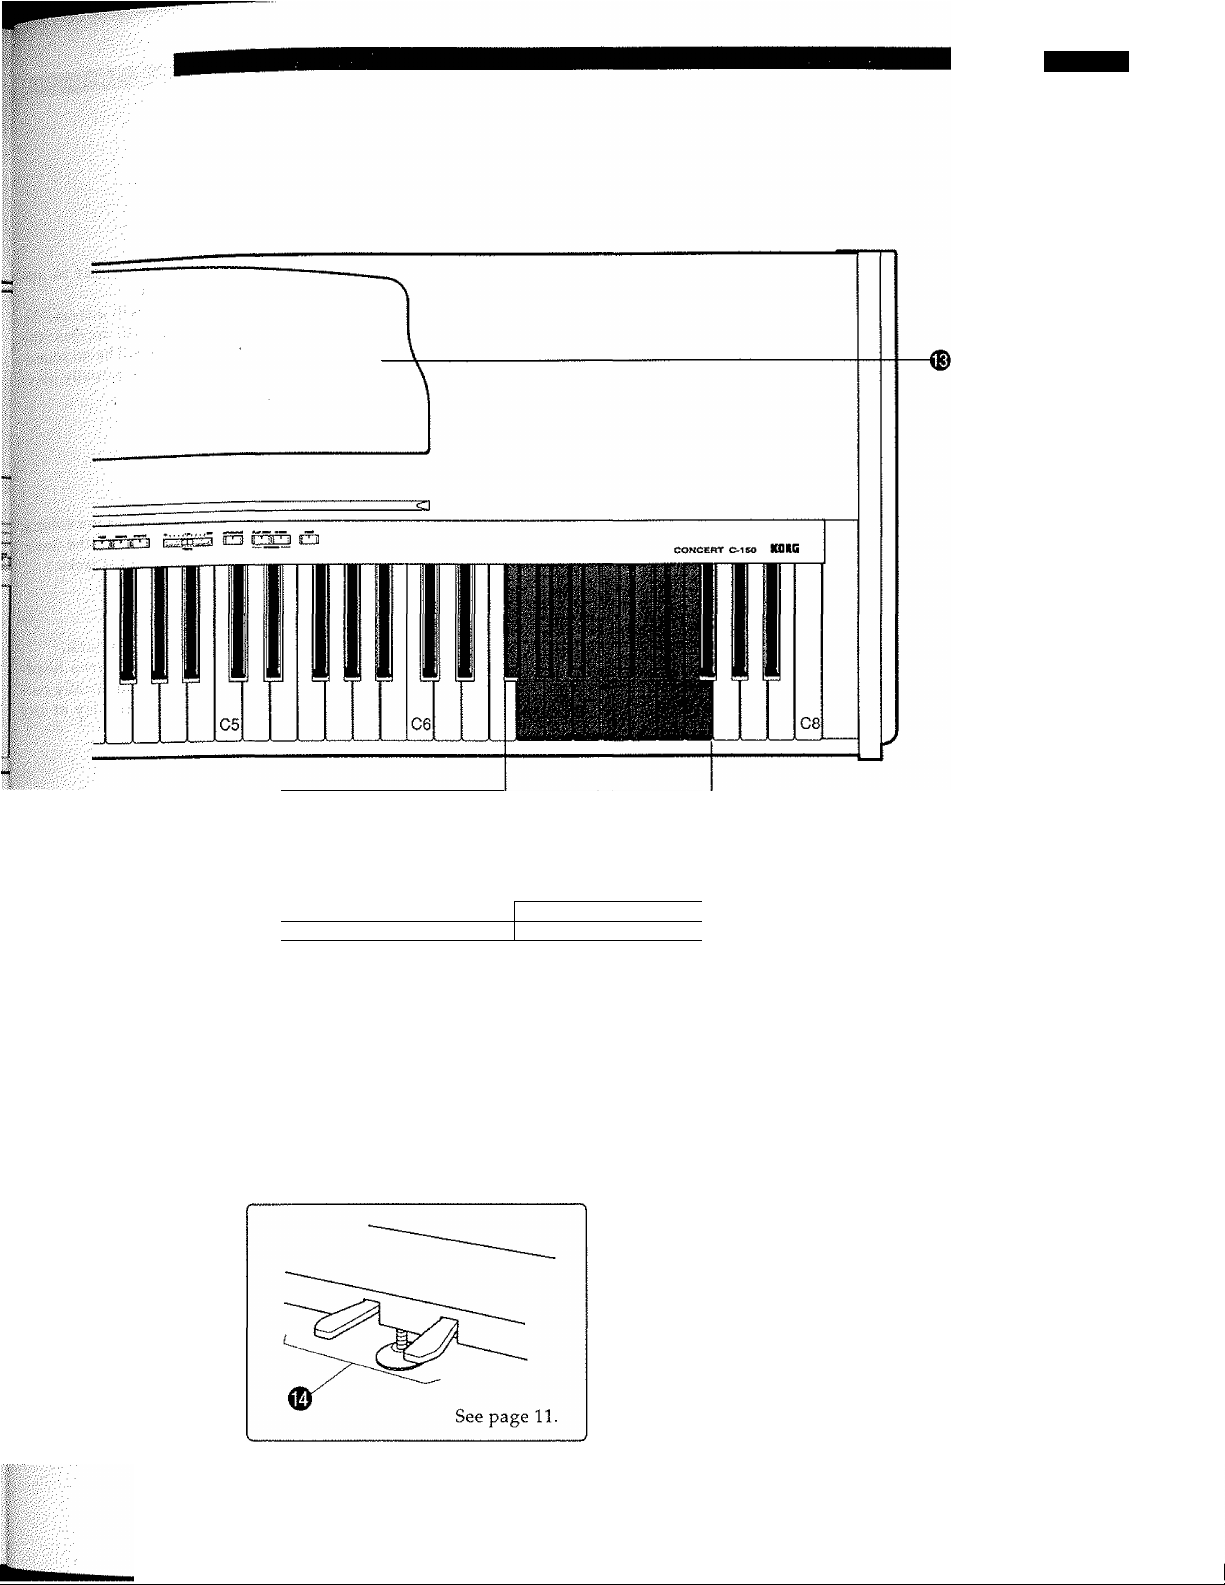
© Music Stand
© Pedals
Page 6
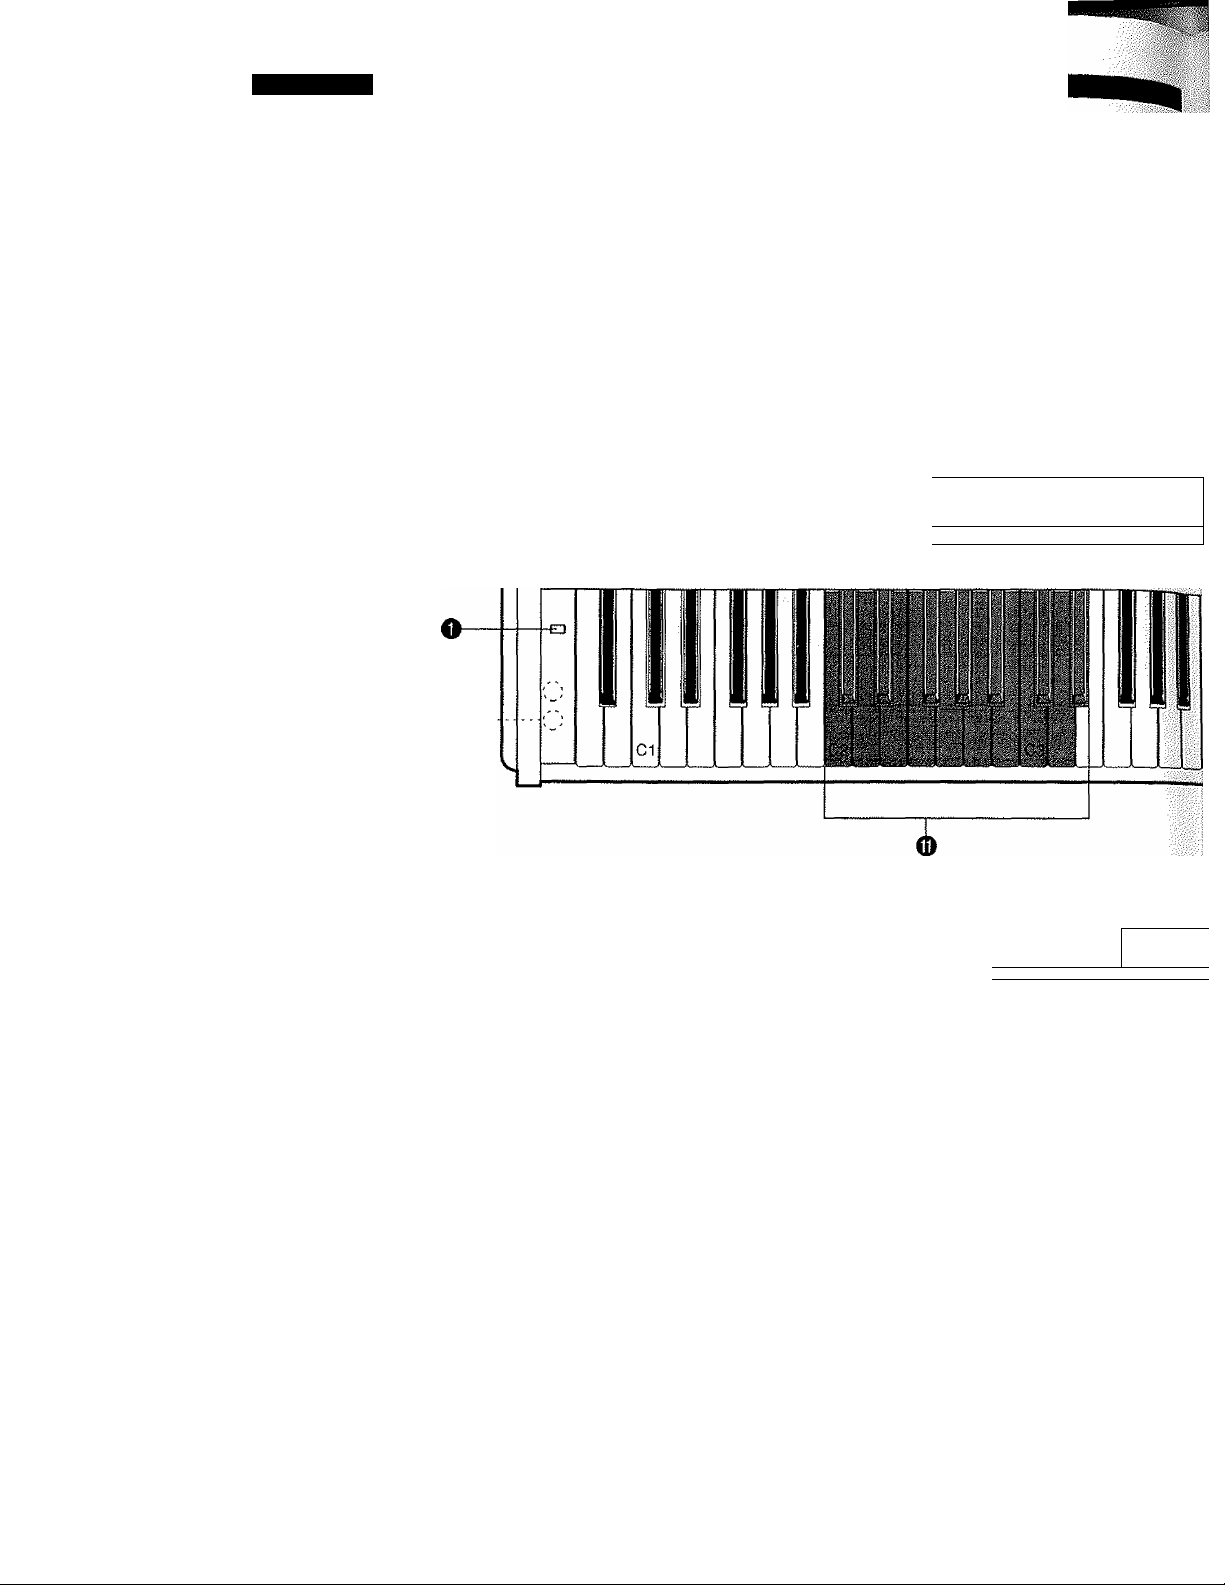
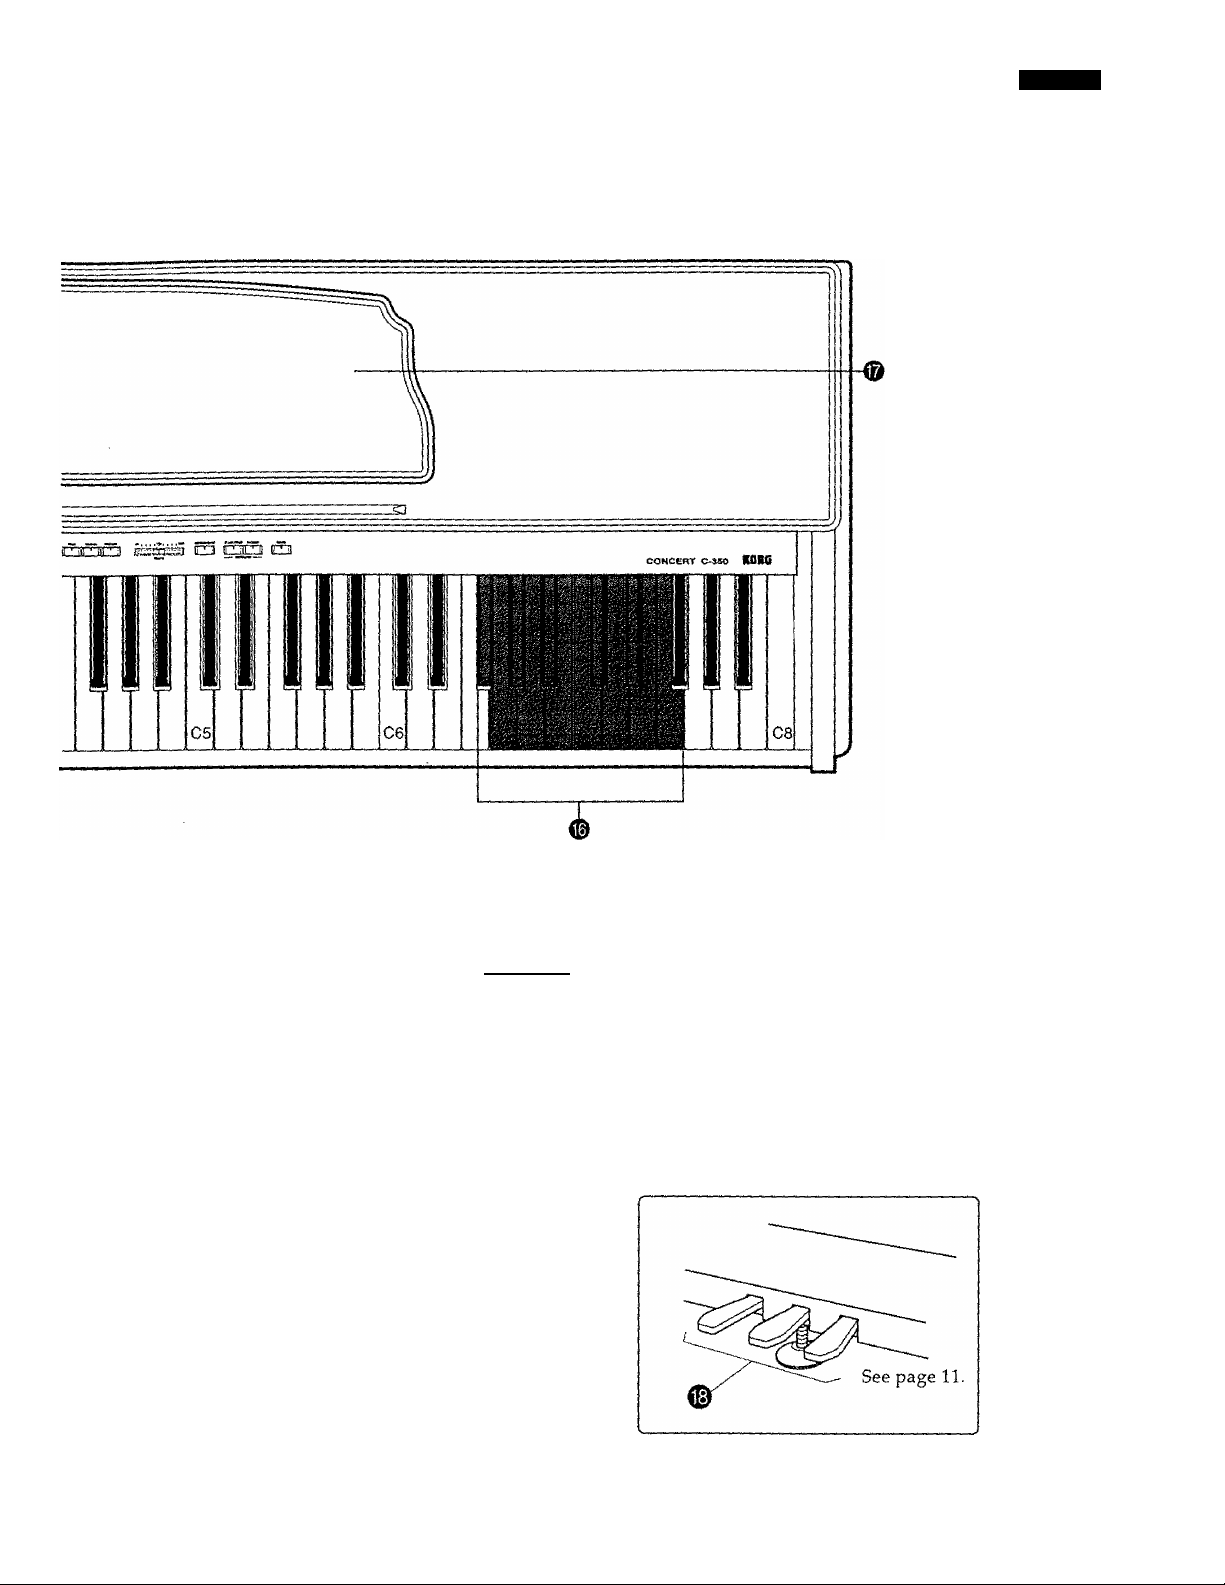
Introduction
C-150
0
--------
O [POWER] switch
Use this switch to turn the piano's power on or off.(page 8)
Q [MASTER VOLUME] slider
Move the slider right or left to adjust the volume,(page 8)
e [TRANSPOSE/FUNCTION] switch
This is a multipurpose switch: use it to transpose the
key (page 14), to implement MIDI settings (page 19), or
to make various other settings.(page 34)
t M M I M I M
?
voiws
I.S
TRANSK>St TOUCH
nn
? ?
FUNCTION ^
--------------—
----------------------------
PIAMO
imT
------
UCHT—STWiWi
0 [TEMPO] control slider
Move this slider to set the tempo for the metronome or:
for recorder play back.(page 12)
0 [METRONOME] switch
Press this switch to turn the metronome on or off.(page 11)
o [RECORDER] switches
Use these switches to control recording and
playback.(page 16)
ite.
O [TOUCH] switch
Press this switch to select the keyboad response.(page 13)
0 [VOICE SELECTOR] switches
Press one of these switches to select the voice.(page 10)
Use LAYER mode to play two voices at once.(page 10)
0 [DEMO] switch
Press this switch to plays the built-in demo songs.(page 9)
® HEADPHONE jacks [on the underside of the piano)
<D MIDl'channel selection keys
Use these keys to set MIDI channels.
Page 7
1. Layout
VlííS OeCAN STRINGS
“TTl((
.......
ET-nn—tr-T
0 Tuning Area
Music Stand
(ft Pedals
i
? ?
AO J 1 , 1 120 ( 1 [ J 200 METÍONOME START/STOP RECORD [ DEMO
llt^=LiJ=3li |( “ li
TEMfO
T , ?
II" iiii “ il im
See page 18 f<
-.■.#^..-Vi!v-. ,Lv. iw.' ..'. .■ .
.
.............
^ Ul^lS on t^T p3H6l> "
:, L's
''¿ffi
.*■ ^I'Í ■-.V .'...',.ví^’h-
Xl^‘-ix
i)t
'’.■iiiiitfu '/-y.-X
.'■*■i-íí.ci'iiiv.í/w■■■{6^ =
7
Page 8
Introduction
2. Preparing to play
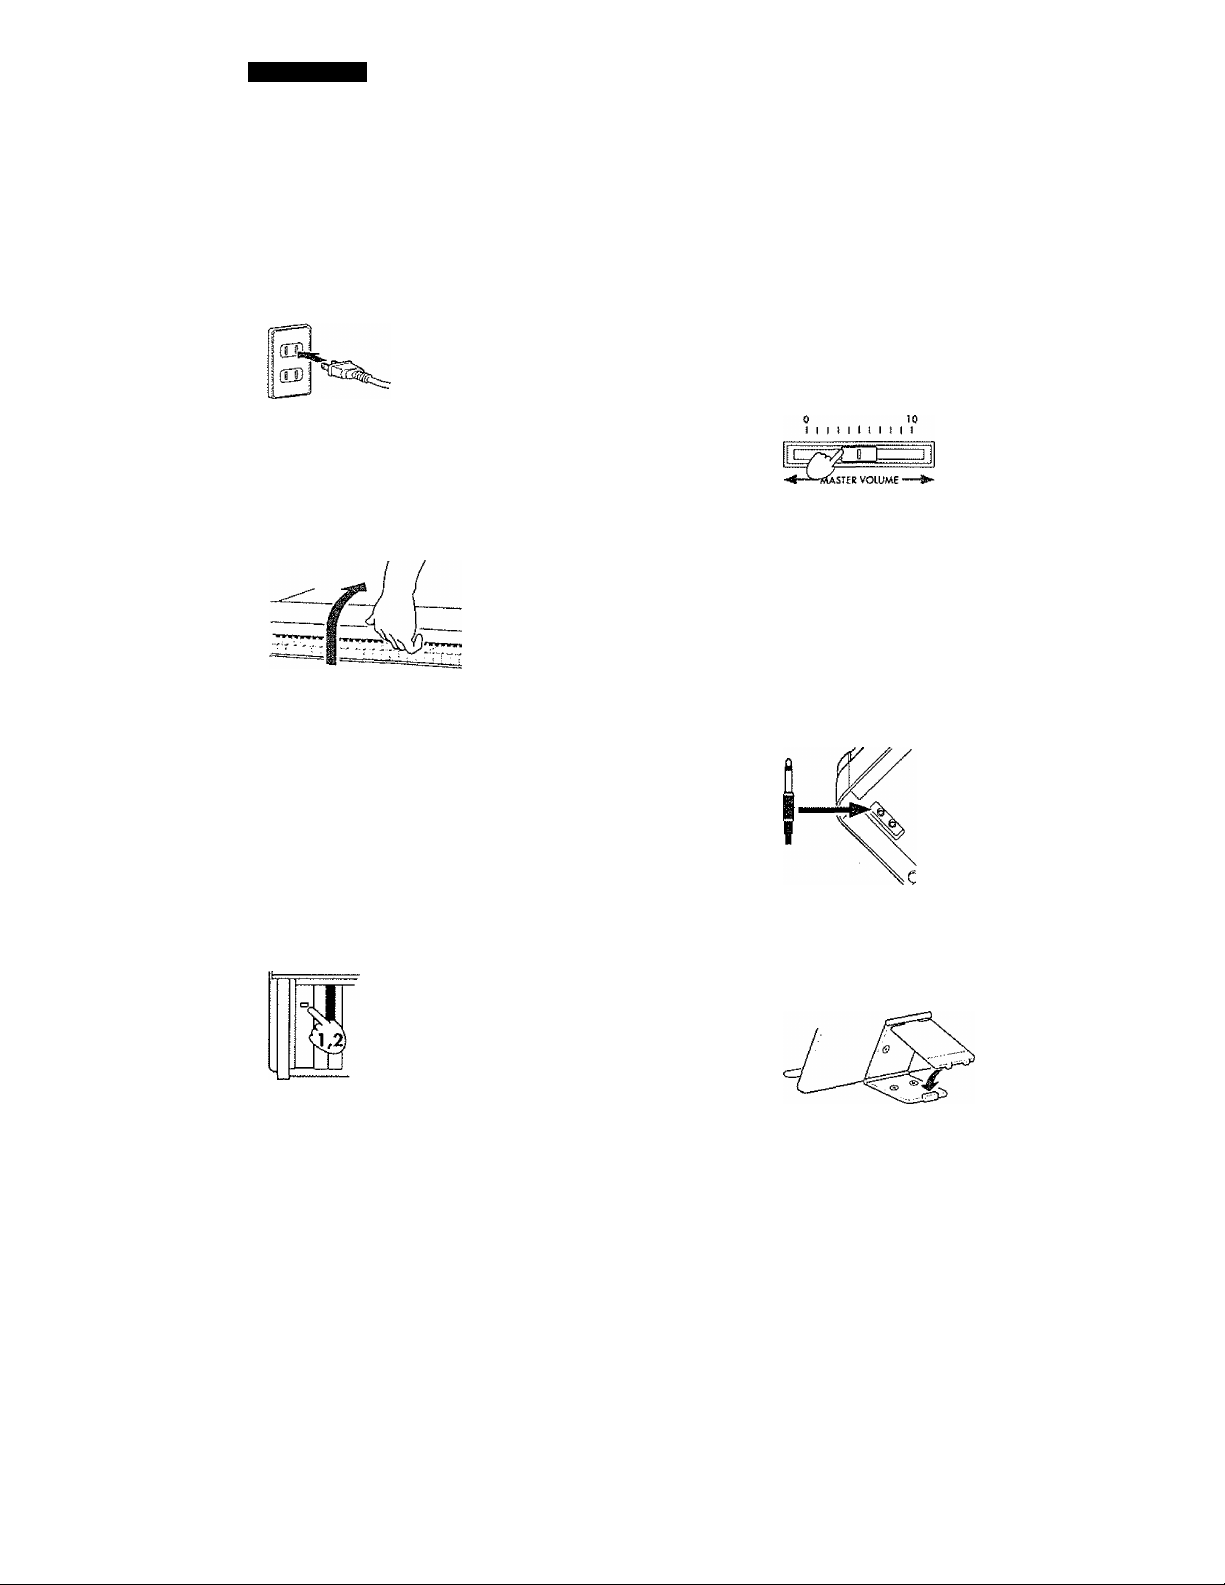
O Plug in the power cable
Plug the power cable into an AC outlet.
Be sure to use an AC outlet of the correct voltagt
for your instrument.
AC Local Voltage
@ Open the key cover (C-350 only)
Lightly lift the center of the edge, and gently
slide the cover away from you.
To close the key cover, lightly grasp the center
of the edge, and slide it toward you.
When opening or dosing the key cover, be careful
Note:
not to pinch your fingers.
Applying excessive force, or opening and dosing the
Note:
cover roughly may cause malfunction.
Note: Always check that there is nothing on top of the
cover before opening it. Any coins, paper, or other
small objects left on the cover may slide into the unit
when the cover is opened.
O Adjust the volume
Raise the [MASTER VOLUME] slider to ap
proximately the middle position.
Moving the slider toward the right will increase the
volume. Moving it toward the left will decrease the
volume. With a setting of "0" there will be no sound.
Adjust an appropriate volume while actually play
ing the instrument.
The [MASTER VOLUME] slider controls the volume
that is output from the built-in speakers, the head
phone jack, and the rear panel OUTPUT jacks.
When using headphones
Insert the headphone's plug into the jack.
You can connect up to two sets of stereo head
phones. Headphone connection automatically cuts
off the internal speakers, so you can play at any
volume without disturbing others.
0 Turn on the power
Press the [POWER] switch to turn on the power.
When the power is turned on, the POWER indica
tor located on the left front will light. (C-350 only)
To turn the power off, press the [POWER] switch
once again.
When the power is off, the POWER indicator located
on the left front will be off. (C-350 only)
When using the Music Stond
To prop up the music stand, pull out the flaps
and fit them into the base, forming a triangle.
8
Page 9
3. Listening to the demo songs
Ì
Ëë
Wë:-
3. Listening to the demo songs
The piano includes 12 built-in demo songs: six in
bank A and six in bank B. Listening to these demos
will give you a good idea of the expressive possibili
ties offered by this instrument.
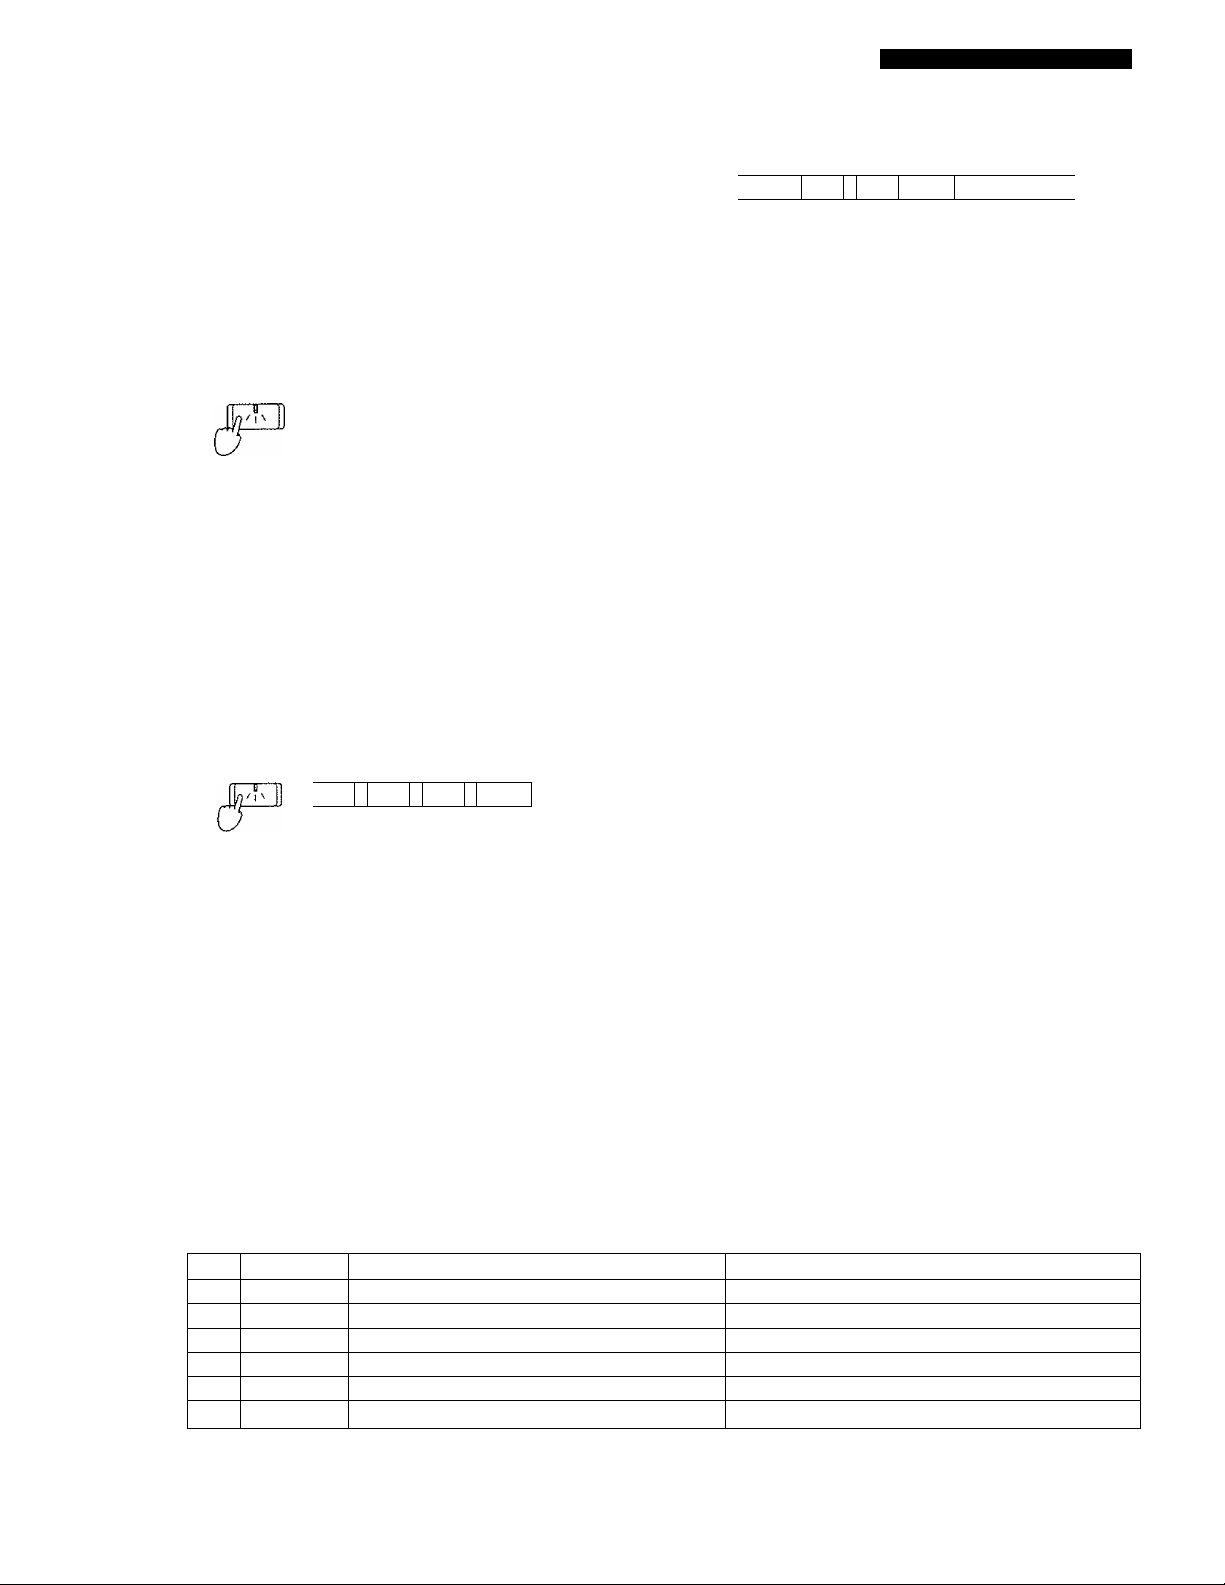
1 Set the piano into DEMO mode.
Press the [DEMO] switch.
DEMO
The piano enters DEMO mode and bank A is se
lected. The [VOICE SELECTOR] lamps come on se
quentially, then all come on at once, and then the
lamp pattern repeats.
If you wish to play a demo from bank A, proceed to
Step 3. If you wish to change to bank B, go on to
Step 2.
Change to bank B.
Press the [DEMO] switch again to switch to
bankB.
PIANO e, PIANO KARPSI VtBES
.u.
][
][
~0(
STRiNGS
1—ll~r
PIANO E, PIANO HARPSI VIBES
CDf
j
' u
][
1 “
Press one ot the selectors to
choose a demo.
ORGAN STRINGS
111 " 111 ‘ II
When the piano reaches the end of the demo, it au
tomatically advances to the next demo in the same
bank. Playback then proceeds endlessly, cycling
from one demo to the next.
Starting by [START/STOP] switch.
To start endless playback of all 12 demos,
beginning from the first demo of track A,
press the [START/STOP] switch.
SHTART/STOP RECORD
While demo playback is in progress, you can switch
to a different demo (within the currently active
bank) by pressing the corresponding [VOICE SE
LECTOR]. If you press the [STRINGS] switch while
the piano is playing the first demo in bank A, the
piano immediately switches to the sixth demo in
bank A. Once you have pressed the selector, play
back proceeds endlessly within the same bank only.
The [VOICE SELECTOR] lamp pattern changes: all
the lamps are now blinking. You can now proceed
to step 3 to select a demo from bank B.
you can exit from DEMO mode by pressing the
[DEMO] switch once again.
Note: You cannot use the voice selectors to change voices
while DEMO mode is selected. The metronome func
tion and tempo-adjustment feature are also disabled.
3 Select a demo.
■ Selecting by [VOICE SELECTOR].
To start playback of a specific demo, press the
corresponding [VOICE SELECTOR]. (The
table below shows the demo assignments for
each bank.)
VOICE
1
PIANO
2
E.PIANO
3
HARPSI J.S.Bach/ltalian Concert BWV971
4
VIBES
5
ORGAN F.Mendelssohn/Wedding March
6
STRING
F.Chopin/Scherzo No.2 Bb-minor Op.31
KORG Originai/The Harp of Wind
N.RIMSKY-Korsakov/The Flight of The Bumble Bee
J.S.Bach/Air on the G siring
A BANK
4 Stopping the playback.
You can stop playback by pressing the
[START/STOP] switch, or by pressing the
[VOICE SELECTOR] corresponding to the
currently playing song. The bank display
returns to its previous state.
Exiting from DEMO mode.
To exit the mode while demo playback is in
progress, press the [DEMO] switch once.
To exit the mode while demo playback is
slopped, press the [DEMO] switch either once
(if bank B is currently selected) or twice (if
bank A is currently selected).
B BANK
L.v.Beethoven/For Elise
F.Mendelssohn/Springs Song Op.62-6
F.Chopin/Valse No.6 Db-major Op,64-1
W.A.Mozart/Sonate K.331
F.Burgmulier/“La chevaleresque" Op.100-25
A.EIImenreich/Spinng Song
Page 10
Playing
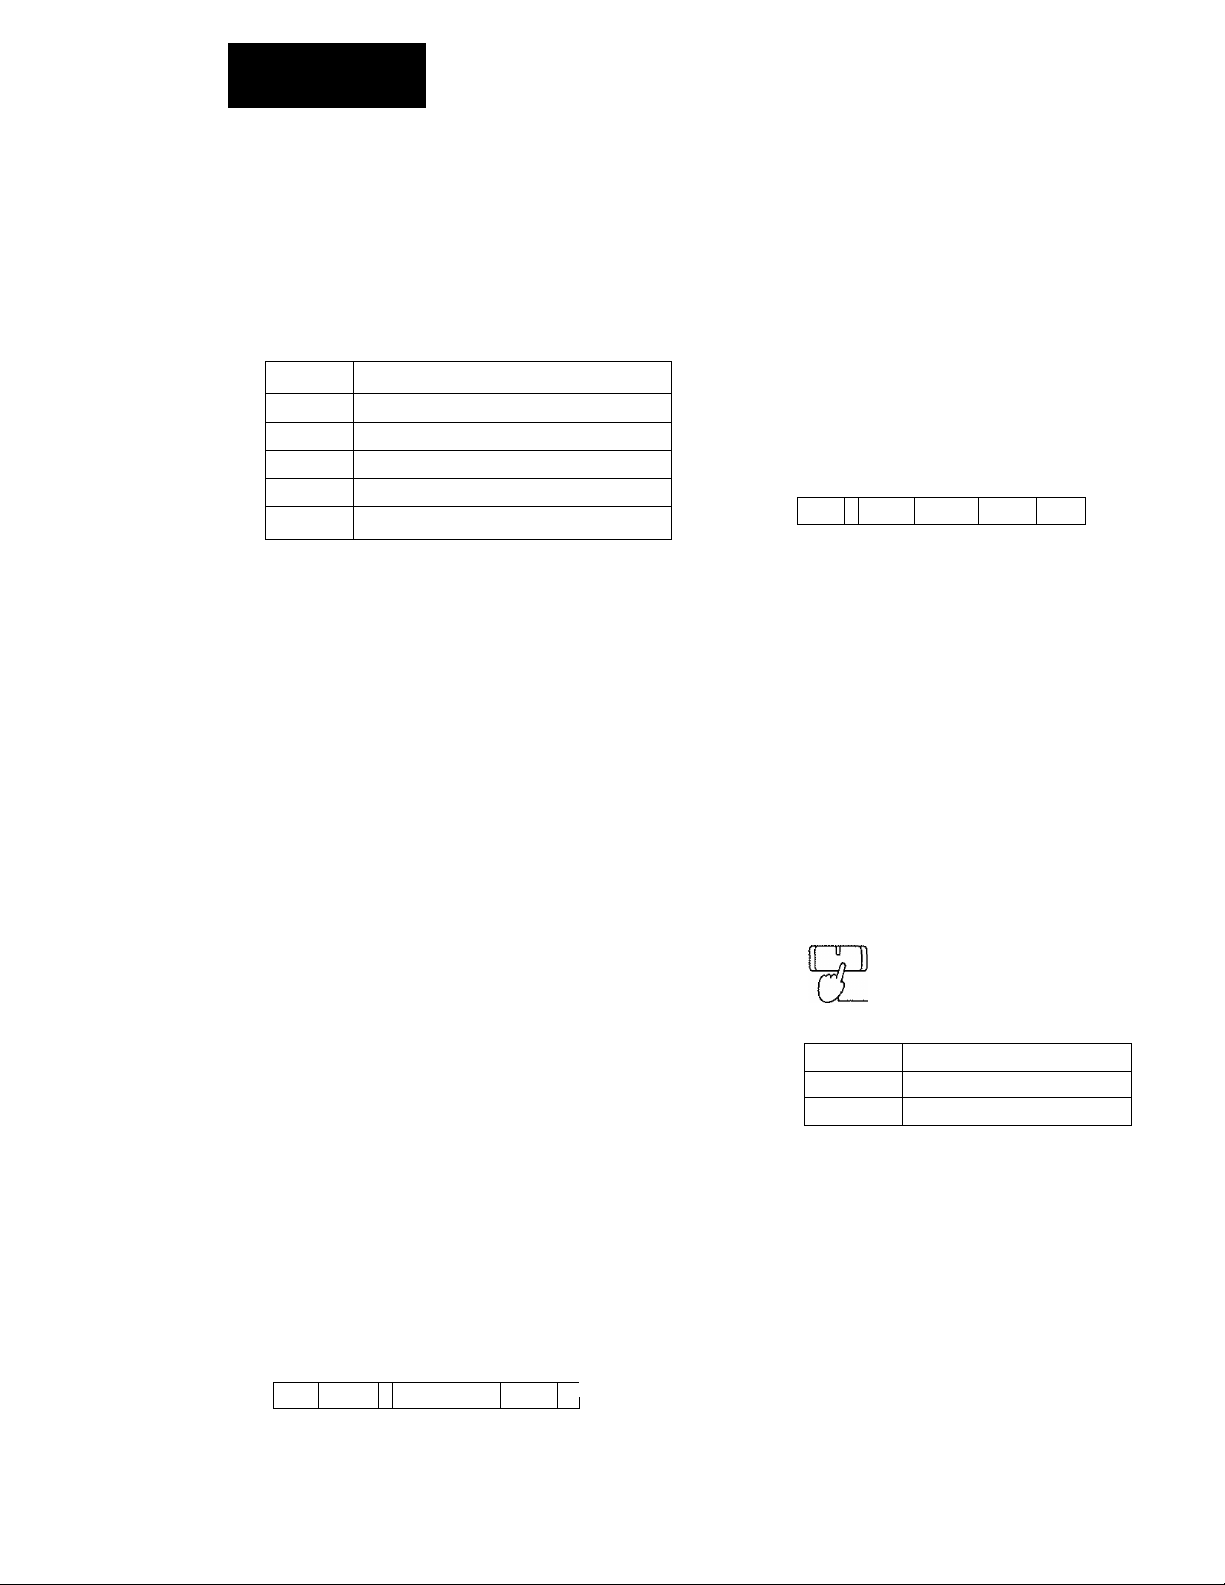
1. Select the voice
Press a [VOICE SELECTOR] to choose the voice.
PfANO E.PIANO HARPSi VISES ORGAN STRINGS
ogaaaaE
PIANO Bright acoustic grand piano.
E.PIANO
HARPSI Traditional harpsichord.
VIBES Jazz vibraphone.
ORGAN Pipe organ sound.
STRINGS
By using LAYER mode, you can set the piano to play
two voices at once. In LAYER mode, the piano plays
both voices over the entire range of the keyboard.
Synthesized electric piano.
String section.
Sounds processed with INFINITY
oo
¡NRNiTY
2. Selecting Voice Modes
Adjusting the relative volume
Since the LAYER mode both use two voices, you may
wish to adjust the relative loudness of the voice:
Q Switch to the LAYER mode, if not already there.
Hoid down the [VOICE SELECTOR] corre
sponding to the voice that you wish to make
softer.
B
Make the other voice louder by pressing the cor
responding [VOICE SELECTOR] as often as nec
essary to achieve the desired balance.
Example: When Selecting PIANO and STRINGS.
PIANO
E.RIANO HARPSI VIBES
'J''
“^1
](
'^While repeatedly pressing this Hold down this switch to make
switch to make this voice louder, this voice softer.
Note: Any changes that you make affect only the current
voice. The new volume balance settings remain in
effect through all subsequent voice changes until
you change them. Even after turning the unit off,
the volume balance settings in memory,
31:
ORGAN
”0
3. Add various effects (C-350 only)
The piano offers two voice modes: SINGLE and
LAYER.
SINGLE This, the normal performance mode, uses one
sound over the entire range of the keyboard.
LAYER This mode simultaneously uses two voices over
the entire range of the keyboard.
Note: The LED indicators in the switches light to indicate
which voice or voices are currently in use.
SINGLE
Press a [VOICE SELECTOR] and every note
across the range of the keyboard will sound the
selected voice (for example, PIANO).
B
LAYER
Hold down one [VOICE SELECTOR] and press
another and every note over the range of the key
board will sound both selected voices (for ex
ample, PIANO and STRINGS).
Since the LAYER mode uses two voices , a maxi
mum of 16 notes (or 10, if the PIANO voice is se
lected), instead of the normal 32, can be played at a
given time.
PIANO
.....
D"
E.PIANO
joil:
HARPSI VIBES
^ illi “■■■
I
ORGAN
d i:
—IT
Setting the Brilliance
To set the brilliance, hold down the [BRIL
LIANCE] switch and press [PIANO], [E. PI
ANO], or [HARPSI] switch.
BRItUANCE
■ MEllOW — NORMAL
PIANO
E.PIANO
HARPSI
You can check the current setting simply by hold
ing down the [BRILLIANCE] switch. The lamp cor
responding to the current setting (the lamp on the
[PIANO], [E. PIANO] or [HARPSi] switch) lights up
while the switch is held down.
MELLOW
NORMAL
BRIGHT
E,PIANO HARPSI
------
BRIGHT
To Cancel the LAYER mode, simply select a differ
ent voice.
10
Page 11
4. Using Pedals
Adding a Reverb Effect
The reverb effect produces the echoing acoustics char
acteristic of a large room or concert hall. The C-350
offers you three different reverb depths.
To set the reverb effect for the selected voice,
hold down the [REVERB] switch and press [PI
ANO], [E. PIANO], or [HARFSI] switch.
REVERB
E, PI A NO HARPS I
dCIDlI
■DEPTH 2----DEPTHS
DEPTH1 produces light reverb.
DEPTH2
DEPTHS
You can check the current setting by holding down
the [REVERB] switch. The lamp corresponding to
the current reverb setting {the lamp on the [PIANO],
[E. PIANO] or [HARPSI] switch) lights up while the
switch is held down.
To turn reverb off, press the [REVERB] switch so
that the lamp on the switch goes off.
Adding a Chorus Effect
The chorus effect adds thickness and undulation to
the sound.
To set the chorus effect for the selected voice,
hold down the [CHORUS] switch and press [PI
ANO], [E. PIANO], or [HARPSI] switch.
CHORUS
DEPTH1
DEPTH2 produces a moderate chorus effect.
DEPTHS
You can check the current setting by holding down
the [CHORUS] switch. The selector lamp corre
sponding to the current chorus setting (the lamp on
the [PIANO], [E. PIANO] or [HARPSI] switch) lights
up while the switch is held down.
To turn the chorus effect off, press the [CHORUS]
switch so that the lamp on the switch goes off.
Note: You can set BRILLIANCE, REVERB, and CHORUS
effects separately for each voice. The .piano memo
rizes the settings, and automatically restores them
each time you select the voice.
Note: The piano retains all of these settings (the brilliance
setting, the reverb and chorus ON/OFF settings, and
the reverb and chorus depth settings) for each voice
even while power is off.
produces moderate reverb.
produces deep reverb.
PIANO E.PtANO HARPS!
a(
DEPTH 1
---
T
DEPTH 2
-----
DEPTHS
produces a light chorus effect.
produces a deep chorus effect.
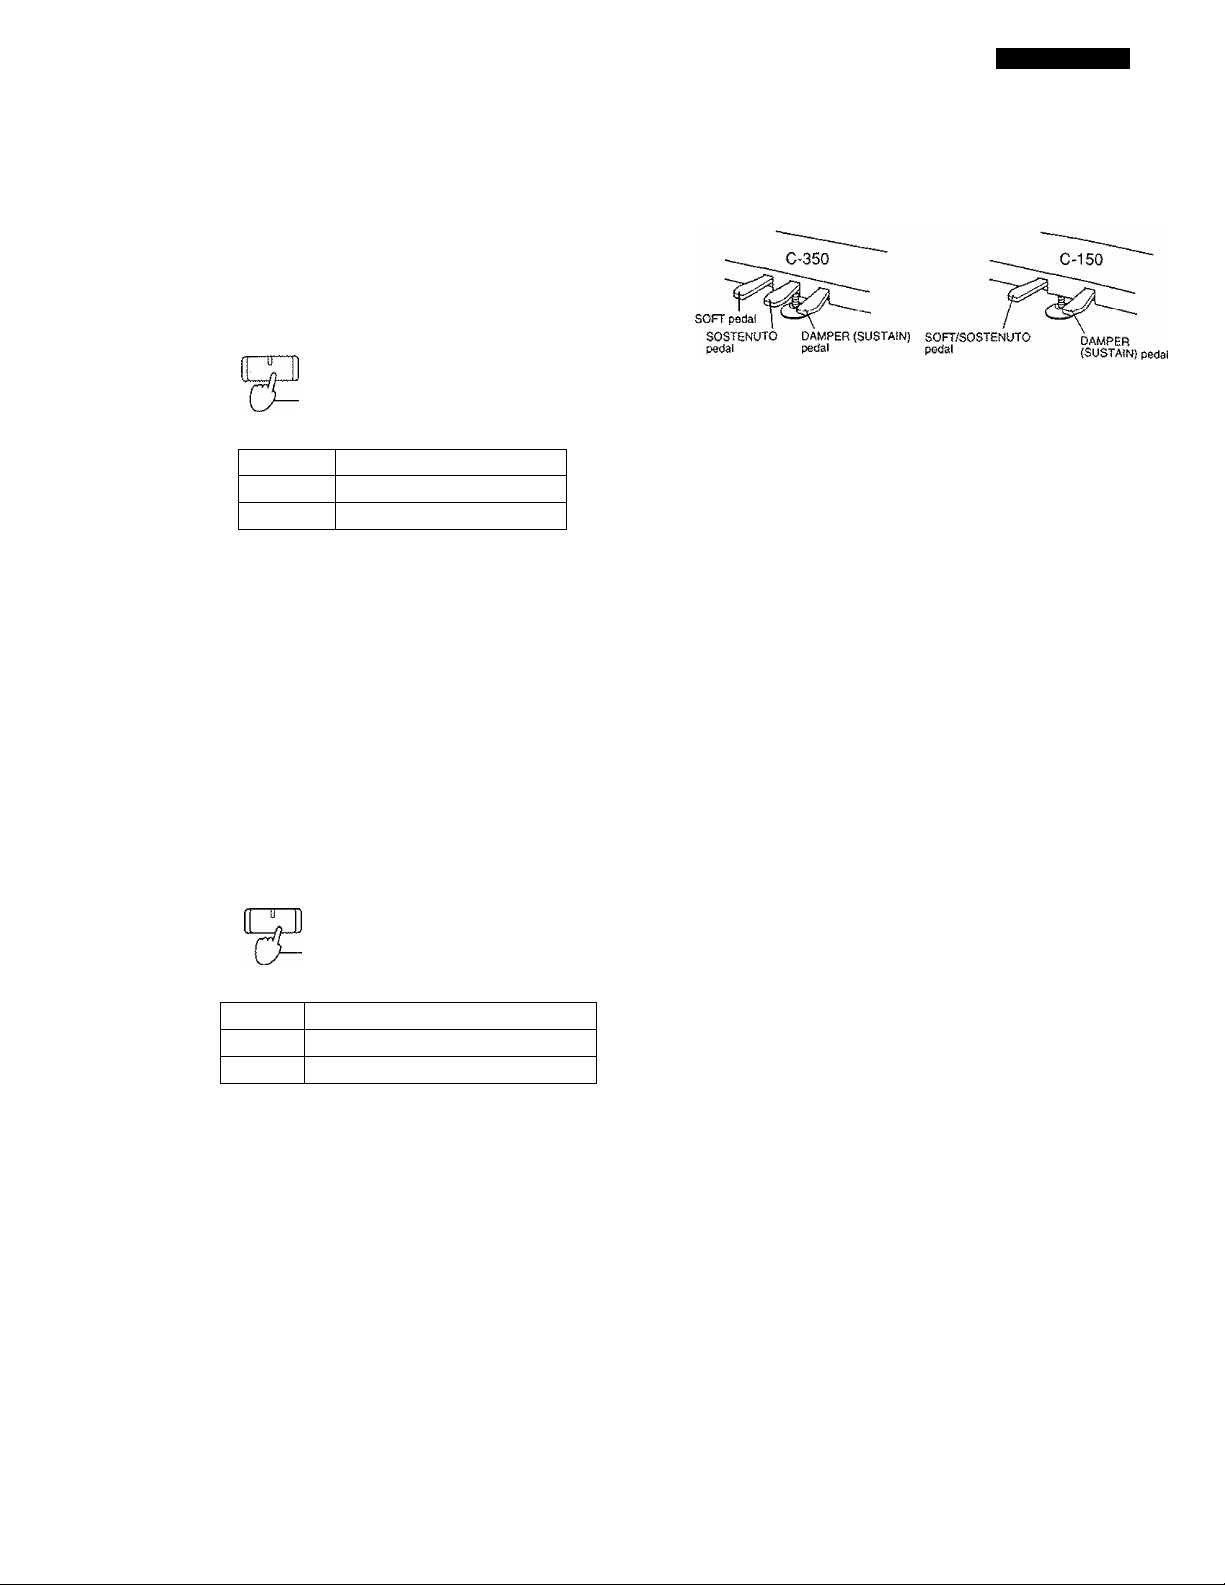
4. Using Pedals
The left pedal on the C-150 can function as either a
soft pedal or a sostenuto pedal.
DAMPER
This pedal simulates the effect of a damper pedal on
an acoustic piano. When the pedal is depressed on an
acoustic piano, small felts, called dampers, are lifted
from the strings. This allows all strings to vibrate,
whether the key for those strings has been struck or
not. When the pedal is released, strings vibrating
without keys depressed are damped.
(C-350 only)
If the Surround parameter is set to "Off", pressing the
damper pedal produces an effect that simulates the
sound of an acoustic piano's resonating strings, when
the PIANO voice is selected.
SOFT
This pedal simulates the effect of a soft pedal on an
acoustic piano. When the pedal is depressed on an
acoustic piano, the sound produced is softer, as the
hammers strike one fewer string per key,
SOSTENUTO
This pedal simulates the effect of a sostenuto pedal
on an acoustic piano. When this pedal is depressed
on an acoustic piano, dampers for keys depressed
when the pedal is depressed are suspended above the
strings until the pedal is released. This allows certain
strings to vibrate freely while other strings are struck
and damped by depressing and releasing keys.
Ì1
Page 12

Playing
I
Selecting the Function of the Left Pedal
(C-150 only)
To change the pedaTs function, hold down the
[TRANSPOSE/FUNCTION] switch and step
down on the pedal.
TRANSPOSE
H—n
The function switches between "soft" and "soste
nuto" each time you do this.
Note: no special indication is provided to show the pedal's
current function. If necessary, try switching the
function back and forth and comparing the differ
ence in the sound produced by using the pedal.
Note; This setting remains in memory even after the power
has been switched off.
M Using the Pedals with LAYER Mode
in the LAYER mode, the pedals may be used with
just one voice or with both. To change between three
possible pedal settings:
Hold down the [TRANSPOSE/FUNCTiONJ
switch.
D
Press the damper pedal.
5. Using the Built-In Metronome
The instrument has a built-in metronome. It is capable
of accenting particular beats, or groups of beats. This
feature allows the metronome to keep time in differ
ent meters.
Note: The metronome sounds through the built-in speak
ers and headphones.
METRONOME
Pressing this switch alternately starts and stops
the metronome.
I I I ’ I t ! 1
Adjusting the relative volume
Press and release the [METRONOME] switch to
start the metronome.
To make the metronome louder, hold down the
[METRONOME] switch and press the [RECORD]
switch repeatedly.
To make the metronome softer, hold down the
[METRONOME] switch and press the [START/
STOP] switch repeatedly.
i i I I ' i 1 I t
METRONOME START/STOP RECORD
Depress !he
damper pedal.
Note: The changes will cycle with each press of the pedal,
(See illustration.)
One
Voice
/
Other
Voice
Note; The LED indicators in the [VOICE selector] switches
light to indicate the voice or voices that use the ped
als.
Note: The individual pedal settings for the LAYER mode
remain in effect through all subsequent mode
changes until you turn off the instrument. When the
instrument is turned on, the pedals always start with
the BOTH setting for the LAYER mode.
C-150
Both
softer louder
TEMPO
Use the [TEMPO] control slider to adjust the
tempo.
The available range is ;=40"200.
Note; The [TEMPO] control slider also adjusts the RE-;
CORDER tempo.
12
Page 13

■
6, Touch Contorol
Pattern Selector Switches
With the metronome running, hold down the
[METRONOME] switch and press the [VOICE
I
SELECTOR] corresponding to the desired meter.
3 b&at
HAkPSi VfBiS
li
./IV
ID
' n ‘
4 beat 6 beat
a
|l r:r-:TrTT~~^ il
E PIANO
PIAMO
—0—
i(i Ji
2 l>03l
When you press a selector, its lights up, and the
metronome being accenting the first beat of each
measure.
Canceling the meter
To cancel the meter accentuation, hold down the
[METRONOME] switch and press the lighted
[VOICE SELECTOR]. The metronome switches
to an unaccented beat.
Note; When the piano is turned on, the metronome is set
to the unaccented beat pattern.
Selecting the accent sound
You can select whether or not to use a bell sound
for the accented beat. To make the setting, switch
the metronome on, then hold down [METRO
NOME] switch and press the [STRINGS] switch
to turn the bell on, or the [ORGAN] switch to turn
it off.
ai
Turn beil off
ORGAN STRINGS
i.1 '■
o
Turn bel! on
1 I I r t“ i I I 1
METdONOME
METRONOME
6. Touch Control
The instrument allows for the selection of a variety
of touch responses that range from LIGHT to HEAVY.
Setting the keyboard response
To select the touch, hold down the [TOUCH]
switch and press [PIANO], [E. PIANO], or
[HARPSI] switch.
Note: The lamp on the [TOUCH] switch comes on if the
touch is set to LIGHT or HEAVY, and goes off if the
touch is set to STANDARD.
Note: Whenever the power is turned on, STANDARD is
automatically selected.
E.PIANO
—STANDARD
PIANO-LIGHT
Response is similar to acoustic piano.
While holding down the [TOUCH]
switch, [E.PIANO] lamp on.
Weak
----------------
0) Sinking force {127)
¥• Strong
Light action — normal striking force
produces strong sound .
While holding down the [TOUCH]
switch, [PIANO] lamp on.
Striktng force 027)
Strong
Heavy action — norma! striking force
produces weak sound.
While holding down the [TOUCH]
switch, [E.PIANO] lamp on.
Weak ^
..............
{!) Striking force Î127)
Skong
13
Page 14
Playing
7, Trdiispose Function
The TRANSPOSE function changes the genera! key
of the instrument shifting the pitch up or down in
semitones. The range of transposition is up a perfect
fourth (5 semitones) and down a tri-tone (6
semitones). This function eliminates the need to
change fingering when changing keys—making it
easy to transpose to match a vocalist's range.
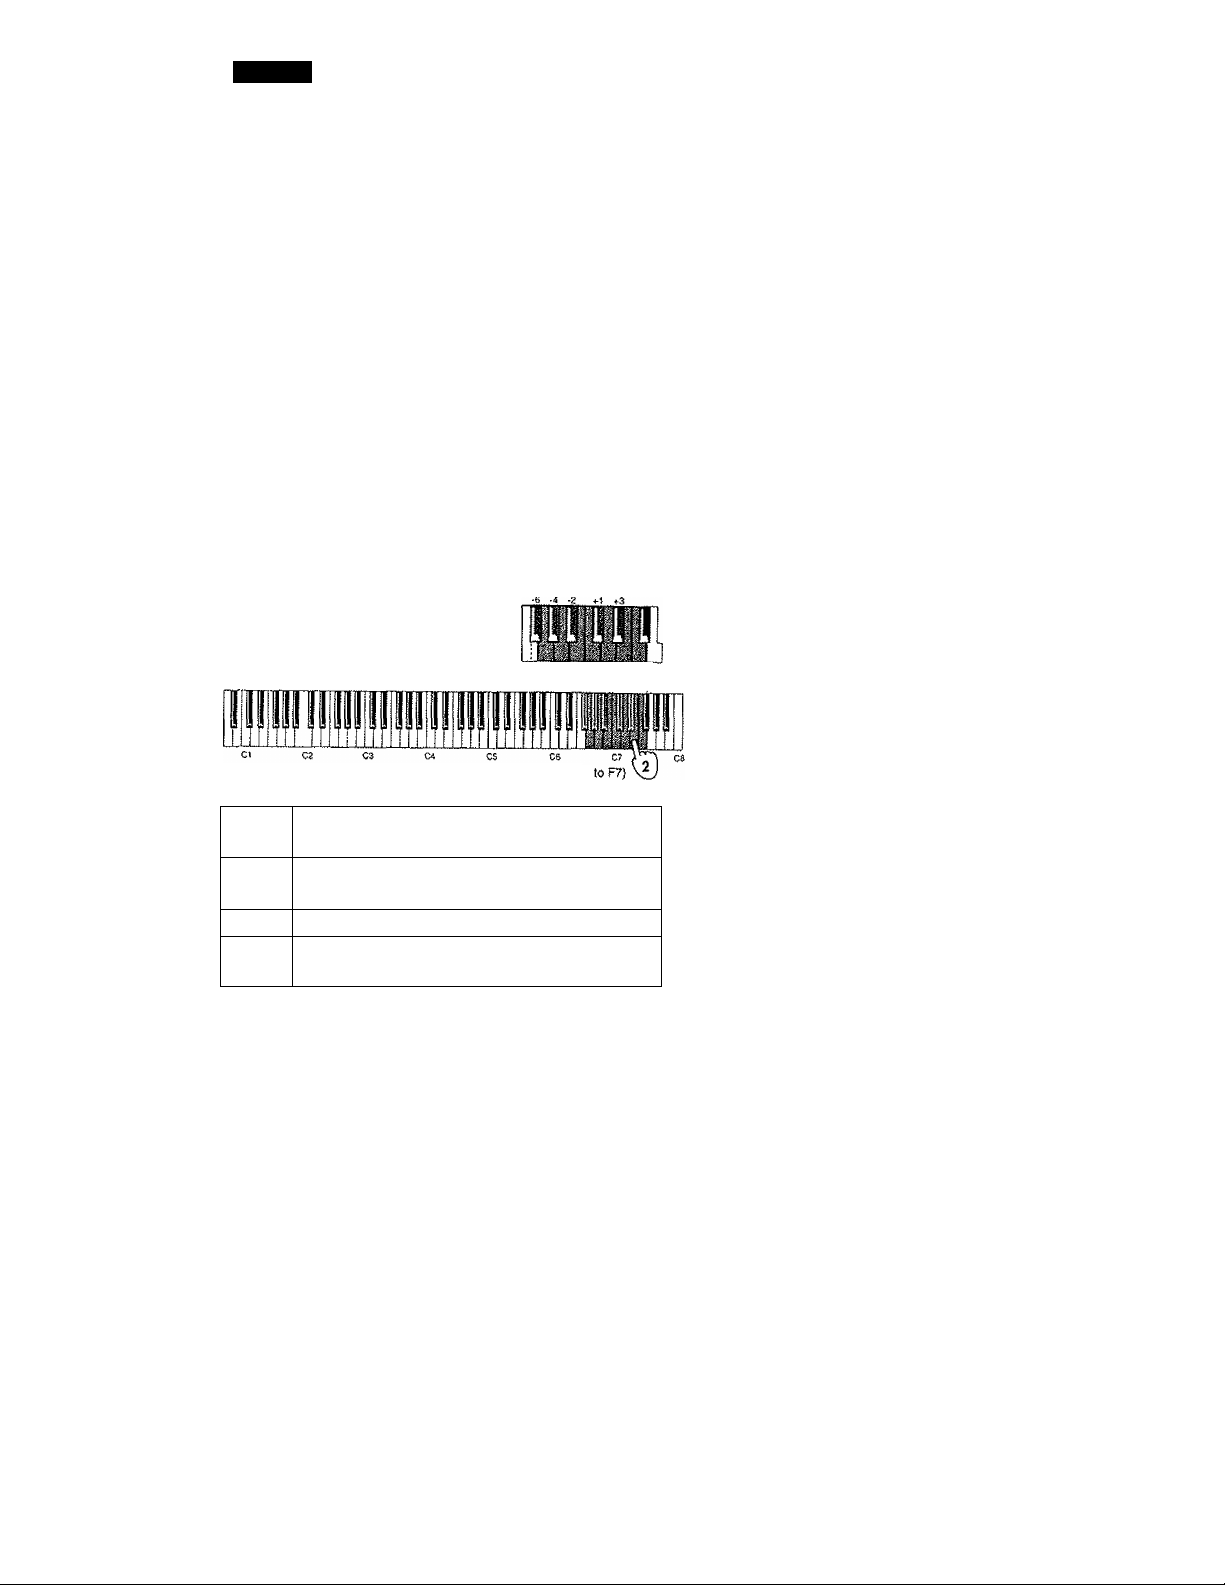
To transpose the keyboard
Hold down the ITRANSPOSE/FUNCTION]
switch .
Press a key between F#6 and F7 to select the in
terval of transposition.
TRANSPOSE
X
Press a key to seiect
the transposition interval.
S -3 -1 0 +2 +4 +s I
ft!
■ Canceling
To cancel the transposition and restore the origi
na! key (C), While holding down the [TRANS-
■
Note. The transposition setting is automatically lost when
POSE/FUNCTION] switch, press C7.
you switch the power off.
Press one of the transposition-setting keys (keys P#6
F7 key
Transpose up five semitones. Key C7 produces
the note normally associated with Key F7.
I
C7
No transposition
:
F#6
Transpose down six semitones, Key C7 produces
the note normally associated with Key F#6.
Note; The difference between the selected key and C7 be
comes the new interval of transposition. Selecting a
key below C7 transposes the key downward. Select
ing a key above C7 transposes the key upward.
Note: The LED indicator in the fTRANSPOSE/FUNC-
TION] switch remains lit while the keyboard is in
any key other than the original.
Example: Transposing up one half-step
While holding down the [TRANSPOSE/FUNCTION] switch, press C#7. This transposes the
pitch of the instrument so that a piece played in
the key of C will sound as if it is played in C#.
Example: Transposing down one whole-step
While holding down the [TRANSPOSE/FUNCTION] switch, press A#6. This transposes the
pitch of the instrument so that a piece played in
the key of G will sound as if it is played in F.
14
Page 15

9. Changing Temperaments
8. Tune Function
The TUNE function, which uses much smaller incre
ments of pitch, called cents, provides the ability to
fine-tune the instrument to another instrument. The
range is 50 cents on either side of the standard pitch.
To raise the pitch
Hold down [TOUCH] switch and press
[RECORD] switch as many times as necessary.
Each press raises the pitch by about 1 cent.
TOUCH
START/STOP RECORD
U
To lower the pitch
Hold down [TOUCH] switch and press [START/
STOP] switch as many times as necessary.
Each press drops the pitch by about 1 cent.
TOUCH
START/STOP RECORD
raa
9. Changing Temperaments
In recent history, musical instruments have used a
tuning system, or temperament, that divides an oc
tave (for example, C4 to C5) into 12 equal steps, called
half-steps or semitones. Before the 19th century, how
ever, musical instruments made use of many differ
ent temperaments that were based on scales with dif
ferent sized semitones.
The C-350/C-150 voices can be assigned to an alter
nate temperament for realistic performance of early
music. The two alternate temperaments are:
• Kirnberger
# Werckmeister
Selecting the temperament
Hold down [TOUCH] switch and press either
[ORGAN] or [STRINGS] switch.
TOUCH
ORGAN STRINGS
“U
Werckmeister
Kirnberger
Note: One step is approximately 1 cent. The value can be
changed over a range of ±50 cents. (1 cent is 1/100
of a semitone.)
To return to original tuning
Hold down [TOUCH] switch and press
[RECORD] switch and [START/STOP] switch at
the same time to return to the normal tuning
(A4=440Hz).
START/5TOP RECORD
Note: The tuning remains in memory even after the power
has been switched off.
ORGAN
Werckmeister
While holding down the
[TOUCH] switch, [ORGAN]
lamp on.
STRINGS
Kirnberger While holding down the
[TOUCH] switch, [ORGAN]
lamp on.
To return to equal temperament, hold down [TOUCH]
switch and press the same [voice selector] again (ei
ther [ORGAN] or [STRINGS]) so that the lamp on the
selector goes off.
Note: The temperament setting remains in effect through
all subsequent use of the instrument until you
change it or turn it off. When the power is turned
on, the instrument begins with the Equal Tempera
ment setting.
Note: To obtain a more realistic piano sound, equal tem
perament in the PIANO voice is not exactly equal
— the lower ranges are slightly lowered in pitch,
and the higher ranges slightly raised. The effect approximates the "stretch tuning" technique used on
acoustic pianos.
15
Page 16

Using the Recorder
1. Recording
Press a [VOICE SELECTOR] to select a voice.
HARPS!
E.PtANO
' U"
IQ ](
Press the [RECORD] switch.
The lamp on the [RECORD] switch comes on, and
recording standby.
The RECORD lamp comes on,
START/STOP RECORD
IT
CIE
---------
RECORDER
To begin recording, do any of the following: (a)
press [START/STOP] switch, (b) strike a note on
the keyboard, or (c) press down on a pedal.
START/STOP RECORD
The START/STOP lamp comes on
if you begin by pressing [START/STOP]switch, the
piano counts out a two-bar lead-in before starting
actual recording. If you being by pressing a pedal
or key, recording starts immediately.
While recording is in progress, the [START/STOP]
lamp remains on.
Note; The piano records any voice changes that you make
while recording is in progress. Note, however, that
the piano does not store the initial voice used for
the recording {the voice you selected at Step 1
above). Before playing the recording back, you
should select this voice manually.
To stop recording, press the [START/STOP]
switch.
To pause at the present position, press the [START/
STOP] switch briefly. The recording pauses and the
[START/STOP] lamp begins to blink.
To return the recorder to its start position, hold the
[START/STOP] switch for longer than one second.
The recorder returns and the [START/STOP] lamp
goes out.
START/STOP
Note:
Press the switch briefly
Ti—n
the recorder pauses at its
current position, and the
[START/STOP] lamp
begins btinking.
the piano can record data for one song. If you begin
recording again from the beginning, the new data
will overwrite the existing data.
VIBES
START/STOP
ORGAN
STRINGS
□
Q
Hold the switch down:
the recorder returns to
its start position, and the
(START/STOP) lamp
goes out.
il Restarting playback from the beginning
To stop the replay and start over from the beginning,
depress [START/STOP] switch for longer than one
second to return the recorder to its start position. Then
repeat the recording procedure starting from step 1
bn the previous page.
■ Continuing from where you left off
if you paused the recorder (as described in step 4
above), you can resume by pressing the [RECORD]
switch and then the [START/STOP] switch. If you re
turned the recorder to its start position, play back
your recording to its end, press [RECORD] switch,
then [START/STOP] switch.
Note: Any voice changes made in the newly recorded ma
terial will be ignored when the material is played
back. The voice selection made in the original or first
recording of the song will be in effect for playback
of the entire song, including the appended material.
Note: Using the [START/STOP] switch to stop in the
middle of playback and switch to recording will
sometimes cause the newly recorded material to
begin at a slightly different place from where play
back was stopped.
Note; When cueing a track for re-recording, the data for
the remainder of the track will be lost. The remain
der of the track, to the end, must be re-recorded.
Whaf the [START/STOP] lamp means...
Lamp is ON
Lamp is BUNKING
Lamp is OFF
Recording or playback is in
progress.
Recorder is paused at the middle
or end of a recording.
Recording is at the start position.
2. Playing Back
■ Playback
Check the recorder position
START/STOP
n—tr
Hold the switch down: the
recorder returns to its start
position, and the [START/STOP]
lamp goes out.
If the [START/STOP] lamp is blinking, the recorder
is paused at the middle or end off the recording. If
you want to start playback from the beginning, hold
down the [START/STOP] switch for at least one sec
ond (until the lamp goes out).
b
16
Page 17

Press the [START/STOP] switch to start the
playback.
START/SrOP RECORD
Note: The LED indicator inside the [START/STOP] switch
8
S
START/STOP
T3—n
Note:
lights to indicate that the recorder is playing back.
Use the [TEMPO] slider to adjust the speed of
playback; left for slower, right for faster. Tempo
adjustmeirt does not affect the pitch.
Press the [START/STOP] switch to stop the play
back.
Press the switch briefly;
the recorder pauses at
its current position, and
the (START/STOP}
lamp begins blinking.
When ail the recorded data has been played, the
[START/STOP] lamp starts blinking.
START/STOP
Hold the switch down:
the recorder returns to
its start position, and the
(START/STOP) lamp
goes out.
4. Reading the Memory Usatge Gauge
4. Reading the Memory Usage
Gouge
Hold down both the [RECORD] switch and the
[TRANSPOSE/FUNCTION] switch.
The [VOICE SELECTOR] lamps act as a bar graph,
lighting up to indicate the amount of data that you
have recorded. The number of unlit lamps indicates
the amount of recording space remaining.
TRANSPOSE
ORGAN STRINGS
[i [2K 120
indicates amount of recorded data.
u—
■ Repeating Playback
This feature lets you set the piano so that it plays your
recorded song over and over again, in an endless loop.
To start repeated playback, simply press the
[TRANSPOSE/FUNCTION] switch while play
back is in progress, so that the switch's lamp
begins blinking.
To stop the playback (and cancel repetitive-playback
mode), press [START/STOP] switch.
3. Deleting Your Recorded Data
While playback of the recording is in progress,
hold down the [TRANSPOSE/FUNCTION]
switch and press the [START/STOP] switch. The
lamps on these two switches begins blinking,
indicating that piano is standing by to delete the
data.
START/STOP
n—tr
If you decide that you really do not want to delete
the data, press the [TRANSPOSE/FUNCTION]
switch again to cancel the deletion.
Note: The [RECORD] lamp begins blinking when remain
ing memory falls below 10% of the total recording
memorybwhen there is space for less than 400 addi
tional notes or when the number of recorded mea
sures is 990 {since maximum recordable length is
999 measures). You can retain your recorded data
by saving it to a data filer. {See page 21.)
To complete the deletion, press [START/STOP]
switch.
17
Page 18

Connections w/ffi other dev^ices
1. Connecting a synthesizer or
audio device
INPUT (L/MONO, R):
These jacks are for connecting audio signals from syn
thesizers, drum machines, and other equipment to the
instrument's built-in speakers.
Note; Adjust the volume of the connected instrument from
that instrument’s controls.
OUTPUT (L/MONO, R):
These jacks are for connecting the instrument to the
AUX (or LINE) IN jacks on mixers, tape recorders, or
home audio systems for routing output to a different
speaker system, for example.
Note: The VOLUME slider on the front panel controls the
output level
MIDi (IN/OUT);
These DIN connectors accept optional MIDI cables
for connecting the instrument to synthesizers, se
quencers, and other MIDI devices. In addition, the
connectors are for exchanging performance and other
types of data.
2. Connecting MIDI device
■ What is MIDI
MIDI, or the '^Musical Instrument Digital Interface,"
is the internationally recognized standard for con
necting and passing data among electronic musical
instruments, computers, and other electronic equip
ment.
■ What can MIDI do?
MIDI enables you to drive other instruments from the
C-350/C-150, to drive the C-350/C-150 from other
instruments or devices, and to store performance data
to external media. Using MIDI, you can play the C350/C-150 and have all your keyboard action, pedal
action. And voice selections reproduced on an exter
nal instrument. Or you can go the other way, using
an external MIDI keyboard or sequencer to control
the C-350/C-150. You can copy data from the C-350/
C-150 recorder to an external data filer, and recall the
data later when you want to replay it. And there are
various other functions available to you as well.
PC (TO HOSTl (C-350 only):
Used to connect the piano to a PC. See page 22 for
more information.
PC/MIDl switch (C-350 only}:
Selects use of either the MIDI connectors or the PC
(TO HOST) connector.
Note: Never change the PC/MIDi setting while power is
ON. Always switch off power before changing the
setting.
Note: Never try to use the PC (TO HOST) connector and
the MIDI connectors at the same time, if the switch
is set to PC, use PC (TO HOST) only; if it is set to
MIDI, then use MIDI connectors only. Using the in
correct connector may cause the connected device
to malfunction.
Rear Panel
C-150
C-350
é a ©
o o
© ©
©
------
©°
____/
■ Connection
Connection is made by special MIDI cables. These
cables connect into the MIDI terminals provided oh
all MIDI devices. There are two terminal types, as
described below. The terminals on the C-350/C-150
are located on the rear panel.
Note: (C-350 only) Be sure to use MIDI cables when using
the MIDI feature (when the PC/MIDI switch is set
to MIDI).
Note: (C-350 only) Remember that you should switch the
power off before changing the PC/MIDI switch to
the MIDI side. Set the switch, then turn the power
back on.
MIDI IN
Receives MIDI data from an externa! keyboard, se
quencer, or other MIDI device. The received data
drives the C-350/C-150, causing it to produce sound.
A MIDI cable runs from this terminal to the MIDI
OUT terminal on the external device.
MIDI OUT
Transmits MIDI data to an external device. A MIDI:
\
cable runs from this terminal to the MIDI IN termi
nal on the external device. Use this terminal when
you want your playing on the C-350/C-150 keyboard
to drive the sound of an external keyboard, or when .
you want to record it into a sequencer or other com
puterized device.
18
Page 19

2. Connecting MIDI device
■ Changing the LOCAL ON/OFF Setting
The LOCAL ON/OFF setting allows you to use the
instrument as a "silent"' MIDI controller. When LO
CAL is set to OFF, the instrument's internal voices
will not sound-only the sounds of the connected MIDI
devices will be heard.
Note: When the power is turned on, the instrument de
faults to LOCAL Mode ON.
W20E sotxvJ foócf-jl
■ MIDI Default Values
When the power is turned on, the instrument defaults
to the following MIDI settings.
MIDI transmission channel
1
MIDI receiving channel 1
LOCAL ON
PROGRAM CHANGE ON
CONTROL CHANGE ON
■ Changing the MIDI Transmit Channel
The MIDI standard provides 16 separate channels for
the transmission of performance data. MIDI master
keyboards (controllers) can therefore control up to 16
individual slaves (or groups of slaves acting in uni
son) by sending channel messages. Performance data
messages always include a channel number. Each
device on the network reads all messages, but only
responds to messages that match the connected
instrument's MIDI receive channel.
Selecting o MIDI channel
To change the MIDI transmit channel, hold
down the [TRANSPOSE/FUNCTION] switch
and press the appropriate key between C2 and
D#3.
14 16
8 10 12 13 15
Note: When the power is turned on, the instrument is set
up to transmit on channel 1.
Switching lOCAl on or off
To change the setting, hold down the [TRANS
POSE/FUNCTION] switch and press the [PI
ANO] switch.
PIANO lamp off
PIANO lamp on
LOCAL ON
LOCAL OFF
■ Sending PROGRAM CHANGE Requests
A PROGRAM CHANGE request is a channel message
that asks devices on that channel to change the sound
that they are playing.
Note; The definition of "program" varies widely between
MIDI devices. To verify terminology, consult the
manual for the device being controlled.
Using [VOICE SELECTOR]
When the [VOICE SELECTOR] is used to select the
voices for the Single and Layer modes, MIDI Program
Numbers 0 to 20 are transmitted using the format
shown in the table on page .
Note: The above procedure always transmits a PROGRAM
CHANGE request, regardless of the PROGRAM
CHANGE CANCEL setting. {See "inhibiting PRO
GRAM CHANGE Requests" below.)
inhibiting PROGRAM CHANGE Requests
When the PROGRAM CHANGE function is set to
OFF, all incoming and outgoing PROGRAM
CHANGE messages are ignored.
Note: This function does not affect selection of internal
voices from the front panel [VOICE SELECTOR]
switches.
To change the setting, hold down the TRANS
POSE/FUNCTION switch and press the
E.PIANO switch.
E.PIANO lamp off
E.PIANO lamp on
Note: You can disable the Program Change function inde
pendently for each MIDI channel (channels 1 to 16).
The piano remembers the setting for each channel
(so long as power remains on), and reinvokes the
setting each time you come back to that channel.
Note: When the power is turned on, the C-350/C-150 al
ways starts with the PROGRAM CHANGE function
ON.
PROGRAM CHANGE ON
PROGRAM CHANGE OFF
19
Page 20

Connections with other devices
Receipt of program change request
When the piano receives a program change request
from an external device, it changes the voice setting
as indicated below. pC#: Program change number
Voice Mode
SINGLE
LAYER
PC#
0
1
2
3
4
5
6
7 PIANO+HARPSI
8
9
10
11 E.PIANO+HARPSI
12 E.PIANO-hVIBES
13
14 E.PIANO+STRINGS
15
16
17 HARPSI+STRINGS
18
19 VIBES+STRiNGS
20 ORGAN+STRINGS
Voice
PIANO
E.PIANO
HARPS!
ViBES
ORGAN
STRINGS
PIANO+E.PIANO
PIANO+VIBES
PIANO+ORGAN
PIANO+STRiNGS
E.PIANO+ORGAN
HARPSI+VIBES
HARPSI+ORGAN
VIBES+ORGAN
■ MIDI Multivoice Function
The C-350/C-150 can receive data from up to four
MIDI channels at once: the MIDI channel you have
selected, plus the next three channels in succession.
This means that you can use an external sequencer to
drive up to four of the piano’s voices at the same time.
When you are using this multivoice function, the se
lected channel drives the selected voice (the voice
selected by the [VOICE SELECTOR]), while the next
three channels drive the PIANO, E.PIANO, and
HARPS! voices, respectively. If you have set the MIDI
channel to 1, for example, the data coming in on chan
nel 1 drives the selected voice, while channel 2 drives
the PIANO voice, channel 3 the E.PIANO voice, and
channel 4 the HARPSI voice. The following table
shows the voice/channel correspondence for all MIDI
channel settings.
C-3 SO /C -15 0,
MIDI Channel
Voi ce se lec te d b v
VOI CE SE LE CT OR
PIANO 2
E.PIANO 3
HARPSI
2 3 4 5
1
2 3 4 5 6
1
4
3
4
5 6
5 6 7 8
4
5 6 7
If the C-350/C-150 receives a program change request
during multivoice operation, the selected voice
changes accordingly. (See page 19.)
7
7
6
7
8
9 10 11
8
10 11 12
9
8 9
10
8 9 1 0 11
9 1 0 11
12
13
11
12 13 14
12 13 14
12
13 14 15 16
13 14
14
15 16 X
15 16 X
16
15
16
15
X
X
X
X
Note: Prograrn change numbers 21 to 127 are ignored,
M Inhibiting CONTROL CHANGE Requests
When the CONTROL CHANGE function is set to
OFF, all incoming and outgoing CONTROL
CHANGE messages are ignored, including those gen
erated by the pedals.
Enabling and disabling control changes
To switch the function on or off, hold down the
[TRANSPOSE/FUNCTION] switch and press
the [HARPSI] switch.
HARPSI lamp off
HARPSI lamp on CONTROL CHANGE OFF
When the power is turned on, the instrument always
begins with the CONTROL CHANGE function ON.
Note: You can disable the Control Change function inde
pendently for each MIDI channel {channels 1 to 16).
The piano remembers the setting for each channel
(so long as power remains on), and reinvokes the
setting each time you come back to that channel.
Note: Do not press down the pedal when switching this
function ON and OFF.
Note: External control changes are effective for both voices
in the LAYER mode regardless of the individual in
ternal pedal settings. (Refer to the section "Using
the Pedals with LAYER Mode".)
CONTROL CHANGE ON
M Synchronizing with External MIDI devices
The built-in recorder of the instrument is capable of
synchronizing with a drum machine, sequencer or
other external MIDI devices. To use the C-350/C-150
as the master keyboard (controlling device) and the
external device as the slave (controlled device), con- :
nect the MIDI OLIT jack on the piano to the MIDI IN
jack on the external device with a MIDI cable. (To :
change the MIDI clock setting on external devices,
refer to the manual for each device.)
Note: To start and stop the synchronized play with exter
nal devices, use the [START/STOP] switch on the C-350/ :
C-150.
Note: The MIDI clock (timing data) sent from the C-350/ ;
C-150 will follow changes made with the [TEMPO) con
trol slider.
20
Page 21

2. Connecting MtDi device
ir
'e
n.
to
e.
e-
ce
xt
id
DI
n-
■ es
od
)le
DI
n
X
X
X
test
ice
ce$
e of
r or
•150
the
:onI IN
(To
.ces,
xter-
■ 350/
350/ :
M Using the MIDI Data Dump Function
The MIDI DATA DUMP function is used to copy data
from the built-in recorder to a MIDI data filer, a de
vice used for storing MIDI data.
Note; The term "MIDI data filer" applies to both hardware
and software devices,
A common data filer application is backing up data
— in other words, copying the current recorder data
to the filer so that you can always get the original
data back after editing or deleting the data in the re
corder. For further details, consult the manual in
cluded with your data filer.
Saving Data to the Data Filer
Connect the MIDI OUT jack on the piano to the MIDI
IN jack on the external device with a MIDI cable.
n
Set the data filer to receive data.
Note: Consult the manual included with the data filer for
the necessary procedures.
Hold down the [TRANSPOSE/FUNCTION]
switch and press the [STRINGS! switch to start
transmission.
The [TRANSPOSE/FUNCTION] and [STRINGS]
lamps begin blinking, indicating that the piano is
ready to transmit.
Press [START/STOP] switch to begin transmis
sion.
The [START/STOP] lamp blinks to indicate that
transmission is in progress. When the data dump is
finished, the lamp goes off and the piano returns to
normal operating mode.
loading Data from the Data Filer
Connect the MIDI OUT jack on the external device
to the MIDI IN jack on the piano with a MID I c a bl e.
n
Turn on the power of both units.
The [TRANSPOSE/FUNCTION] and [STRINGS]
lamps begin blinking, indicating that the piano is
ready to receive.
Note: The piano keyboard and panel will remain inopera
tive until the transmission is complete.
Note: Changes made in the pedal settings cannot be stored
in the data filer. (Refer to the section, "Using the
Pedals with LAYER Mode".)
Set up the data filer to transmit the previouslystored piano data.
a
Note; As there is considerable variation between data fil
ers, consult the manual included with the data filer
for additional procedures.
Wait for the data filer to indicate the end of the
transmission. (Never interrupt either the piano
or the data filer while they are working, since
such interruptions can cause errors in data trans
mission.)
Set the data filer to transmit the stored piano data.
Consult the data filer's operation manual for instruc
tions.
The piano's [RECORD] lamp blinks to indicate that
data reception is in progress. When reception is fin
ished, the lamp goes off and the piano returns to
normal operating mode.
21
Page 22

Connections with other devices
3. Connections with o computer
(C-350 only)
A special PC Ï/F connection cable can be used to con
nect the C-350 to a computer. This allows the com
puter to play the C-350, or keyboard playing on the
C-350 to be recorded on the computer-the same op
erations can be done using MIDI as discussed on the
previous pages.
The C-350 supports direct connection to IBM-PC com
patibles and Apple Macintosh machines. Connection
is made through a dedicated interface cable running
from the PC (TO HOST) connector. To enable this fea
ture, you must set the PC/MIDI switch (located on
the piano's rear panel) to the PC side.
Note: Never change the PC/MIDi switch setting while
power is ON. Always turn off the power before
changing the setting.
Note: Never try to use the PC (TO HOST) connector and
the MIDI connectors at the same time. If the switch
is set to PC, use PC (TO HOST) only; if it is set to
MIDI, then use MIDI connectors only. Using the in
correct connector may cause the connected device
to malfunction.
Note: Be sure to use the appropriate PC interface cable
when using direct PC communication (when the
PC/MIDI switch is set to MIDI).
IBM PC (compatibles):
Connection kit AG-OOIB (connection cable, "Korg MIDI
Driver" software) *sold separately
However, applications which are not Windowscompatible
cannot be used with this method of connection unless they
specifically support the C-350.
Apple Macintosh series:
Connection kit AG-002B (connection cable, "Korg MIDI
Driver" software) *sold separately
Connection with an IBM PC (compatible) via the
AG-OOIB
Use a special PC I/F cable (AG-OOIB) * sold sepa
rately to connect the serial port (COM port) of
the IBM PC (compatible) to the PC (TO HOST)
connector of the C-350.
if the serial port of your computer uses a 25 pin con
nector, you will need a 9 pin -25 pin conversion
adapter. *sold separately
Hold down the [TRANSPOSE/MIDi] switch,
and press the [VIBESj switch to set the baud rate
to "38.4kbps".
If you are using Windows, install the KORG MIDI
Driver, For installation, refer to page 24,
Note: You cannot change the baud rate while the PC/MIDI
switch is set to the MIDI side, (the baud rate is fixed
at 31,25 kbps.) Be sure that the switch is set to the
PC side before trying to change the baud rate.
Note: If you set the baud rate to 38.4 kbps but then change
the PC/MIDI switch to the MIDI side and turn the
power on, the baud rate automatically resets to 31.25
kbps. After returning the switch to the PC side, you
will need to change the setting back to 38.4 kbps.
Connection wirti an Apple Macintosh via the AG002B
Use a special PC 1/F cable (AG-002B * sold sepa
rately) to connect the modem port or printer port
of the Apple Macintosh to the PC (TO HOST)
connector of the C-350.
Hold down the [TRANSPOSE/MIDI] switch,i
and press the [STRINGS] switch to set the baud
rate to "31.25kbps".
If you will be using korg MIDI Driver, refer to page
25.
Note: You cannot change the baud rate while the PC/MIDD
switch is set to the MIDI side, (the baud rate is fixed ;
at 31.25 kbps.) Be sure that the switch is set to the
PC side before trying to change the baud rate.
PC (TO HOST) connector
This connector allows the C-350 to be controlled from
the computer, and MIDI message to be transmitted to
the computer. Use a PC I/F cable appropriate for your
computer to connect the PC (TO HOST) of the C-350
to your computer.
Apple Uactosh
JO
ìl^SSSSSsSBSui '
IBM PC icompalible)
22
Page 23

Connections
Page 24

Data
1. Korg MIDI Driver installation
4. Select [Sound, video, and game controllers] and
click the [Next >] button.
and setup
The Korg MIDI Driver software is included with the
optional AG-OOIB and AG-002B. If the application (se
quencer) you are using on your IBM PC (compatible)
is compatible with Windows, using the Korg MIDI
Driver will allow the C-350 connected to the serial
port to be handled as a MIDI device. If the applica
tion (sequencer) you are using on your Apple
Macintosh is compatible with the Apple MIDI Man
ager, using the Korg MIDI driver will allow the C~
350 connected to the serial port to exchange data with
the Macintosh,
Installing tfie Korg MIDI Driver into Windov/s 95
Note: If the processing speed of your computer is not fast
enough, data from MIDI IN may not be received cor
rectly.
In the task bar, click the [Start] button. Click the
1,
[Control Panel] item located in [Settings].
Aifcl
StiiclihB iMnt lointul
M Jlilinclbn adapict!
OlK« devicei
% PCMCIA socket
Ports (COMtLPTj
^ Ponlo
^SCSI conirolefs
*S System devtces ^
rB*Ut
Click [Have Disk].
5.
A dialog box will appear, allowing you to specify
the drive and directory.
Add Hdrdtvare WisArd
:: Ctdc of >0Ut tWdWH» ism i
Marxiaciuar.
mm IV
AitichLabi «1; Ad Lib Goid Compfllijie [0PL3|
Com paq .ij :
De^live Ldbi
DSPGioiip '.-.'i
ESS TechfWtotiyJriC. -'jiv
Inlal........................
.......iZl-
2.
In the control panel, double-click the [Hardware]
icon, and the hardware wizard will start up. Click
the [Next >] button.
In reply to the question "Automatically detect
3.
new hardware?" be sure to select [No], and click
the [Next >] button.
Add New Wizard
■ Sjtt* hwrJwwi i iw »iioUif haw j
V/»ybwj<5e<«ii. ./ .
tha oaiw* ««titioi iorih» aavb* wd iw(<to
*6 wiwe» ahw.
;; fcd your i«(*Mra7 ii
. n X« (RwoBWModtMj
<vS2
<S<^k 1 Ksrf > 1 Cone^
6. Insert the floppy disk included with the AG-001 B
into the floppy disk drive of your computer. If.
you have inserted it into drive A, type "A;\" (or
"B;\" if using drive B), and click the [OK] but
ton.
7. Click the [OK] button and then dick [Finish].
;i CiiSi S» ScuTid, vidM ini5 aams «««fiAsi (hat twfeiwt yw
; Aod then oSefc Ofc if Arrii !d»i« ¥ifiiah' «¿daiyov f»««; efck Ofc T fit i
sfwwk ooiy ¥iM wi» (ourrf w d« ifvriatitiai tW:.
Hods!«; :
B200DBB®i
OK
■
24
Page 25

7. KotQ MIDI Driver installation and setup
Perform the setup foliowing the procedure of
8.
"'Setting up the Korg MIDI Driver (Windows)"
(page 24), and click the [OK] button.
( P'^ l/F C'f
■ Serial Port
C None
i^COMl
CCÜM2
r COM3
г COMÍ
Г”ÌP<iepof*d0fit Synth 1 MtD! Out
9, Be sure to restart so that the driver will take effect.
: ■ Synth Out Mccsagoi ■ ■
D Piogtum ChangeP' Ptogtam Change
Г" Lonttol Change P" Control Change
Г* ñ«nk SftSetif P Bank Select
Г" ГЬлппв! Ptujuite
E” Го1у Key PressureP Poly Key PrCiiUIC
f~ tKClusive
'MIOI Out Menage*
P Channel Pretture
p Ejtcluiivc
Ир
...............
Modifying fhe Korg MIDI Driver setup for Win
dows 95
1. In the control panel, double-click the [Multime
dia] icon, and the Multimedia Properties dialog
box will appear.
.
.................
Wufcime<i*Drrv«t
<l.i! Autk DiWMt
В ^ ttIDI Oevcei and irLiliumtnl'
' ^ M«ef Devicet
■ A Line trpiyi Devices
[Ё ^ WedeContro) De^'ici
Г*; Й VidceCorro(«TOft Codecs
E*; Audo CclfTlp^:e^tton Codecs
■ ^ VkieoCeOii^cDew;er
ifr Joy tick Device t
2. Click the [Advanced] tab located in the upper
right.
3. Click [4] for [MIDI Device and instruments] (the
display will change to [“]), and click [Korg PC 1/
FMIDI Port].
4. Click the [Properties] button.
The properties of the Korg PC I/F MIDI Port will
appear.
5. Click the [Settings] button.
Follow the procedure of "Setting up the Korg MIDI
Driver (Windows)"(page 24), and click the [OK] but
ton.
If you have modified the settings, restart Windows,
: I CDM.1«
__
_
...
I*
_
Mgiiiiii
:
ЙШ1
25
Page 26

installing tfie Korg MIDI Driver into Windov/s 3.1
Note; If the processing speed of your computer is not fast
enough, data from MIDI IN may not be received cor
rect iy.
1. in the control panel, double-click the Drivers
icon.
KORG PC l/F Driver 1.0
■ Serial Port
O Nona
® COM!
O comí;
O COM3
OC0M4
D l,ndependent Synth Í MIDI Out
"Sjmlh Out Mottagoi"
H Program Change
H Control Change
M Bank Select
H Channel Prêt tute
H Poly Key Preitufe
H Eiclutive
‘MIDI Out Mettaget
0 Program Change
lEI Control Change
^ Bank Select
S Channel Pt enure
0 Poly Key Prerrute
^ Exctuiive
Settings Help
m 4
Plintilî
¡Installs, removes, &nd configures drivers
Cofcn
Fûriî
Irtlçfnaliiînai
Contro! Panel
s
Desklop
Mouse
Pods
Oiîto/Time 3$6 Er^hartcedSBSSB
2. Click the [Add] button.
inrtalted Olivet*
Timet
[MP] MIDI Sequencei
[MCI] Sound
I S«tu[t.,, I
Help
3. From the list of drivers, select [Unlisted or Up
dated Driver] and click the [OK] button.
y*t of Oiiveti
Unlisted ot Updated Dtivet
MIDI Meppet
Timer
CMCI] CD Audio
¡MCI] MIDI Settuencet
IMCtI Sound
j Cancel I
4. Insert the disk included with the AG-OOIB into
the floppy disk drive of your computer. If you
insert it into drive A, type in "A:\" (or "BA'" if
using drive B), and click the [OK] button.
Instati Driver
In test the disk with the until led,
updated, or vendor-provided driver in:
m
OK
Cancel I
After setup, remove the disk and select [Restart
Now] to make the driver take effect.
Sysirïm Siïtimg Change
The KORG PC l/F Driver dtivci hat been added. For
the new ditvet to take effect, you muil <|u>t and
teilatl Windawt.
t Retían How
I Hon'l
] L
Setting up the Korg MIDI Driver (Windows)
1. Double-click the driver icon located in the control
panel, select [Korg PC/IF Driver], and dick the set i
button to access the setup window.
!t.l.MAIIia.liw!Mt,
'Serial Port
O None
® COMI
O COM2
O COM3
O COM4
O [ndependent Synth / MIDI Gut [Cancei^
Set the Serial Port setting to the serial port that is ;
2.
~5jrn(h Out Mettag«!"
Ptogtdt» Change
CoriUol Change
Battk Select
Channel Pretiure
Pol)! Key Pfetsixe
Exclusive
'MIDI Out Hestagex
Program Change
S Control Change
S Bonk Select
S Chanr>el Preiture
¡Si Poly Key Prcjiure
^ Exchittve
connected to the C-350 [COMl]~[COM4].
If you wish to use the serial port for another pur
pose after installing the Korg MIDI Driver, either
delete the driver or select [None] to defeat the
driver.
When the C-350 is connected, [independent Synth/ ;
3.
MIDI Out] is not used, so do not check this item.
If you check it, operation will be incorrect.
[MIDI Out Messages] allows you to select the mes
4.
sages that will be transmitted to the C-350.
When you have finished making your selections,-
5.
dick the [OK] button. If you wish to cancel, click ;
[Cancel].
H,etp
Select Korg PC/IF Driver, and click [OK]. The
setup window will appear. Now perform the
setup as explained in the following section "Set
ting up the Korg MIDI Driver (Windows)".
2Ó
Page 27

1, Korg MIDI Driver instaUation and setup
Installing tfie Korg MIDI Driver into the Macintosh
Note; In order to use the Korg MIDI Driver, Apple MIDI Man
ager and PatchBay must already be installed. Use the
Apple MIDI Manager and PatchBay that are included
with the MIDI application that you are using. They are
not included with the AG-002B,
When the Korg MIDI Driver is used, the ^'Modern
MIDI Out/Port settings"' dialog box allows you to
specify the MIDI channels and types of messages that
will be sent to the C-350. If you do not require this
function, you can simply use the Apple MIDI Driver
without using the Korg MIDI Driver. When using the
Apple MIDI Driver or when using a MIDI applica
tion (sequencer) which does not use the Apple MIDI
Driver, refer to page 26 .
Copy the Korg MIDI Driver from the disk in
1.
cluded with the AG-002B into the system folder
of the start-up drive.
é Fiie Edit Itiew Esiiel Special
2. If the system folder contains the Apple MIDI
Driver, either delete it or move it to another
folder. Be careful not to delete or move the Apple
MIDI Manager.
* The Korg MIDI Driver includes the functions of
the Apple MID! Driver.
3. From the Special menu, choose "Restart".
Setting up the Korg MIDI Driver (Macintosh)
1. Start up PatchBay.
If installation has been performed correctly, the
Korg MIDI Driver icon will appear in the PatchBay
window when PatchBay is started up, as shown be
low. (The Modem/Printer port displays may be dif
ferent, depending on your setup.)
Ttrno Poll MIDI In Port MIDI Out Port
Pater
|Bgg gg
Con reeled Pert
Modem Port
Printer Port
2. In PatchBay, double-click the Korg MIDI Driver
icon.
A setup dialog box will appear.
pM Ver l.O.B
1 About... i
FilterTime Code In:
Out port setting:
Out port setting:
3.
Check Port Enabled for the port to which the C-
KORG MIDI Driver Settings -
Port Enabled:
interface Type:
Time Code In:
Time Code Out: none
0 □
1 MHz
none 'T } none
0 0
3E
MIDI Out... )
ih Out.. Ì
1 1 MHz
1 none
{ Si.inthCut.. 1
]
(All Notes Off)
350 is connected, and select (1 MHz] as the Inter
face Type.
(Since the C-350 does not contain a Korg PC IF, do
not select [Korg PC IF].)
Ü
-i
4. Click the [Out Port Setting] button.
The following dialog box will appear. Here you can
select the MIDI channels/messages that will be out
put to each port. Only the channels/messages which
are checked will be output.
Modem MIDI Out Port setting
Eneùle MID! Ch, Enaùle MIDI Status
S2
E13
^4
0 6
07
08
09
0 to
0 1 1
0 12
0 13
0 14
0 15
0 16
0 Program Change
0 Control Change
0 Bank Select
0 Channel Pressure
0Po!y Key Pressure
0 Exclusive
Cancel
)1
27
Page 28

5. After making settings, dick the [OK] button.
6. Start up your MIDI application (sequencer), and
drag with the mouse from the Out Port <1 sym
bol of the MIDI application to connect it to the
MIDI Out of the MIDI Driver.
• For details on using PatchBay, refer to the expla
nation contained in "About PatchBay..." in the "
" menu.
If you wish to use the Apple MIDI Driver, start up
PatchBay (after first deleting or moving the Korg
MIDI Driver if it is in the system folder), doubie-dick
the Apple MIDI Driver icon, check Enabled for the
port to which the C-350 is connected, set the Inter
face Type to [I MHz], and close the dialog box. In the
PatchBay, drag with the mouse from the Out Port <1
symbol of the MIDI application (sequencer) to con
nect it to MIDI Out.
If you are using a MIDI application (sequencer) which
does not use the Apple MIDI Manager, select the Port
to which the C-350 is connected, and set the Clock
setting to [1 MHz].
About the MIDI File Translator included with the
AG-002
Most commercially available Standard MIDI File
(SMF) song files are saved in MS-DOS format. The
MIDI File Translator included with the.AG-002B is a
translator program for Apple File Exchange that con
verts MS-DOS SMF song files into a form that
Macintosh MIDI applications can recognize as SMF
files.
1. Put the MIDI File Translator into the Apple File
Exchange folder.
Using PC Exchange to convert SMF data
If Apple File Exchange is not included with youri
Macintosh system, you can use PC Exchange to con-^
vert MS-DOS format SMF song files so that they can ;
be recognized by the Macintosh. >
1. In the control panel, open PC Exchange. i
The PC Exchange control panel will appear. |
2. Click the [Add...] button, |
The [Specify application for DOS extension] window|
will appear.
3. Input "MID" for the DOS extension item.
MS-DOS uses a filename extension consisting of a|
period and three characters to distinguish different!
types of files. It is usual to assign an extension of
".MID" to SMF files, |
4. From the list that appears in the lower part of the
dialog box, select a MIDI application (sequencer)l
that can use SMF data. |
The icon selected for the application item will ap
pear. 1
Now select a MIDI application (sequencer) that cani
use SMF data, and that software will be able to open
SMF song files.
5. From the [Document type] popup menu choose
[MIDI] and dick the [OK] button.
The item added to the PC Exchange window will be
displayed, and has been registered.
Now you can insert an MS-DOS SMF disk into the
disk drive and use it as is. I
* For details refer to the explanation of "MacintoshI
PC Exchange."
I
I
-I
I
MIDI File Translator
2. Double-click Apple File Exchange to start it up.
3. Insert the MS-DOS disk that you wish to convert
into the floppy disk drive.
A window such as the following will appear. Be sure
to start up Apple File Exchange before inserting the
MS-DOS format disk into the disk drive.
4. Select the song that you wish to convert.
5. Click the "<<Convert<<" (or ">>Convert>>")
button.
The conversion will begin. When the bar graph
reaches 100% the conversion is complete. The con
verted file will appear in the box at the left.
6. Exit Apple File Exchange.
28
Page 29

29
Page 30

2« Assembling the Stand
Use the following procedure to assemble your ST-350
or ST-150. The assembly procedure for both models
is the same; the only external difference is the num
ber of pedals. The illustrations below are based on
the appearance of the ST-350 (three pedals).
Caution
Two or more people are required to assemble the
piano unit.
When attaching the piano to the stand, be careful
not to let go of it.
Make sure you do not mistaken the type or direc
tion of each part. Follow the assembly procedures
carefully during assembly.
If too much force is applied to the front before fas
tening it with the mounting screws, the piano
could fall off the stand.
O
You will need a Phillips head screw driver to
tighten the screws.
For assembly, you must place the back of the »
stand on a smooth surface such as the floor, as
shown in the diagram below. Assemble the Side |
Panel (Left) (T) and the Side Panel (Right) (5) to |
the Pedal Box (|) using the 4 assembly screws |
Pull out the Pedal Cord.
Screw the Adjuster © into the Pedal
Box (3) until it is all the way in.
Attach 3 Screws (7) in the Pedal Box
4.
partially tightening them.
as shown.
2, Open the box and take out the parts.
Make sure ail the parts shown below are included
in the box.
Piano
r~T
Side Panei
(Left) ®
Assembly Screws ® x 4
(M6X50)
Screws @ X 10
(W3.SX1$)
Rear Panel ®
Pedal Box @
Packed in a vinyl bag
Adjuster (D
Piano Mounting
Screws ® X 2
(M6X14)
Side Panel
Cord Holder ® x 1
Do not tighten the screws until
Assemble the Rear Panel (4). j
5.
Tighten the Screws (7) from the previous step into]
the bottom of the Rear Panel (4). Fasten the Side]
Panels to the Rear Panel (T) using the 6 Screws (7)1
Use the last 1 remaining Screw to attach the Cord]
Holder (9).
Install the Rear Panel with
the decorator surface facing
toward the front.
Insert the Rear
Fasten the piano cord
with the Cord Holders (|).
Panel ^
30
Page 31

2. Assembling the Stand
|C4
6. Attach the Piano.
Rest the piano on the rear of the side panel tops,
lift it up slightly and slide it toward the front of
the side panels.
The rubber feet on the bottom of the piano will
make contact with the brackets on the side pan
els and cause it to stop.
Fasten the two piano mounting screws (8) to the
bottom of the piano.
floor, the Pedáis wilt be unstable
and the sound may be affected.
7. Connect the pedal cord and fasten it in place.
The top of the rear panel is
open to improve the acoustics
Plug the connector at the
end of the pedal cord into
the PEDAL jack located on
the piano's lower board. Be
sure that the connector is
oriented correctiy.
Fasten the pedal cord
with the cord holder.
Post-assembly Check
Are there any parts left over?
□
If there are any parts remaining, check each of
the part positions shown in the illustration to find
where they are missing from.
□
Check the mounting screws for any looseness.
Itil:
Caution
Cautions when Moving
Please disconnect the piano from the stand and move
them separately. After moving, reconnect according
to these instructions. Also, be careful of the follow
ing points when moving the piano.
• Wind up the power cord in a small bundle. If it
is left to dangle, the cord could catch on some
other object and be cut, and could cause short cir
cuits or other damage.
• Be careful that the pedal cord doesn’t catch on a
door knob or other object during moving.
Loose Screws After
if period of time passes after assembly, the screws
holding the parts of the stand together may become
loose, causing the stand to wobble. If this happen,
re-tighten each screw.
Disossembly
To disassemble the piano and the stand assembly, fol
low the assembly procedure in reverse order. After
disassembly, keep the screws and other parts so that
they do not get lost.
To disconnect the pedal cord, pull on the cord con
nector while pressing the little tab (O) on the con
nector. Do not exert too much force on the cord, since
it could break.
3Ì
Page 32

Page 33

■
■
5, Specification
4. Trouble Shooting
If the following problems develop during normal op
eration of the instrument follow the suggestions below
and check the unit to identify and correct the problem.
If the instrument still does not function properly, con
sult your dealer or a KORG service center.
Power dose not turn on
• Is the power cable connected to an AC outlet?
•Is the power switch on?
If the problem is still not resolved, contact a Korg dealer.
No sound
•Is the [MASTER VOLUME] slider of the C-350/150
raised?
•Is the headphone jack in use?
•Make sure that the Local setting is ON.
Sound does not change
•Turn off the [DEMO] switch.
Sound is interrupted
•The sounds of the C-350/C-150 are produced by
samples (recordings) of original instrumental
sounds. For some sounds, pressing a note will play
one sample, and for other sounds, two samples. The
[PIANO] sound use two samples. When this sound
is selected, the maximum number of notes which can
be played simultaneously will be 16, including notes
held by the damper pedal. For other sounds, the
maximum number of simultaneous notes will be 32.
If you are using a Layer to play two sounds simul
taneously, the maximum number of simultaneous
notes will depend on whether the sounds use one
or two samples. For example, the maximum num
ber of simultaneous notes is 10 if you are playing
the PIANO voice in combination with some other
voice.
The pitch or tone of a piano sound appears in
correct in a particular range.
♦The piano sounds on this instrument have been cre
ated with the intent of reproducing the actual
sounds of a piano as faithfully as possible.
•This means that in some pitch ranges, it may sound
as though overtones are emphasized differently, or
that a certain pitch or range sounds incorrect, but
this is not a malfunction.
Pedal does not work correctly
•Has the pedal connector been disconnected?
Sostenuto pedal effect does not work
• Has the pedal connector been disconnected?
• If model C-150: Check the pedal setting.
Cannot record
•Is there sufficient free space in the recorder?
Does not respond to transmitted MID! data
•Make sure that all MIDI cables are connected
correctly.
•Make sure that the C-350/150 is receiving data on
the same channel as the transmitting device is
using.
5. Specification
Keyboard 88 keys (AO—C8)
Voices
Polyphony
Effect (C-350 only)
Recorder
Keyboard modes
Controls
Pedal controls
Connections
Main amplifier 20W X 2
Speakers
Power supply
Power consumption
Dimensions
Weight {with stand)
Option C-350: AG-001 B, AG-002B(Conneciion kit)
*May decrease depending on sounds or layers.
Specifications and finish are subject to change without notice
for purpose of product enhancement.
• Apple Macintosh, MIDI Manager, MIDI Driver, and PatchBay
are registered trademarks and trademarks of Apple Computer
Corporation, USA.
• IBM is a registered trademark of IBM Corporation, USA.
• MIDI Player is a registered trademark of Passport Designs
Corporation.
• MS-DOS and Windows are registered trademarks and trade
marks of Microsoft Corporation, USA.
Six voices: Piano, Electric piano
Harpsichord, Vibraphone, Organ
Strings
32/16*
Brilliance, Reverb, Chorus
Maximum 4,000 notes: Tempo, Met
ronome, Record, Start/Stop, Repeat
Single, Layer
Volume, Power, TRANSPOSE/
FUNCTION, TOUCH, VOICE SE
LECTOR, TEMPO, METRONOME
DEMO, PC/MIDI (C-350 only)
C-350: Damper, Soft, Sostenuto
C-150: Damper, Soft/Sostenuto
Headphones (x2), INPUT (DMONO
R). OUTPUT (L/MONO, R). MIDI
(IN OUT), PC (TO HOST [C-350
only])
16cm X 2
AC, Local Voltage
65W
C-350: 1379(W) x 445(D) x 849{H)mm
C-150:1359(W) x 443(D) x 804(H)mm
C-350: 45.9kg, C-150: 39.7kg
C-150:
Page 34

6. Index
A
accent sound ........................................................................13
&
Backup Battery ................................................................... 3
baud rate
Brilliance ............................................................................. 10
.............................................................................
22
c
Chorus Effect .......................................................................11
Connections..........................................................................18
MIDI device.............................................................18
computer................................................................... 22
CONTROL CHANGE
D
damper pedal
Data Dump
demo songs ....................................................................... 9
E
effects ...................................................................................10
.......
..........................................................................
Brilliance..................................................................10
Chorus Effect
Reverb Effect........................................................ 11
H
headphones............................................................................ 8
K
key cover ................................................................................8
keyboard response
Korg MIDI Driver ......................................................... 24
Macintosh.................................................................27
Windows 3.1............................................................26
Windows 95
L
LAYER .................................................................................10
LOCAL ON/OFF.................................................................19
M
Macintosh .............................................................................27
Master Volume.......................................................................8
METRONOME ....................................................................12
accent sound
Pattern Selector.......................................................13
TEMPO
relative volume
Memory..................................................................................17
MIDI.......................................................................................18
MIDI channel ...................................................................... 19
MIDI File Translator .........................................................28
.......................................................
............................................................... 11
..........................................................
.............................................................
.............................................................
............................................................
.....................................................................
.......................................................
20
21
11
13
24
13
12
12
Multivoice ............................................................................20
Music Stand ..........................................................................8
Pattern Selector ..................................................................13
pedals
....................................................................................
damper pedal...........................................................11
soft pedal
sostenuto pedal....................................................... 11
soft/sostenuto pedal...............................................11
PC Exchange .......................................................................28
Playing Back........................................................................16
power .................................................................................... 8
PROGRAM CHANGE
Recording
Memory..........................................................................17 '
Playing Back
Repeating Playback
Reverb Effect
SINGLE ................................................................................10
soft pedal .............................................................................11
sostenuto pedal
soft/sostenuto pedal
stretch tuning ......................................................................15
synchronizing.......................................................................20
.................................................................
.......................................................
............................................................................
...........................................................
...............................................
.....................................................................
......
......................................................... 11
........
.............................................. 11
11
11
19
16
16
17
11
T
Temperaments
TEMPO .................................................................................12
Touch Control .................................................................. 13
transpose ..............................................................................14
Tune ......................................................................................15
Voice Modes........................................................................10
LAYER.....................................................................10
SINGLE
relative volume.......................................................10
....................................................................
....................................................................
15
W
lO;
34
Page 35

,
-----
C-350-
fliatiANCE «VERB CHORUS
Baa
Press the appropriate switch while
hoWing dcwn the TRANSPOSE
/FUNCTION switch
Press the appropriate switch
while holding down the
METRONOME switch
TRANSPOSE TOUCH
OLocAL
OnADff ■
(pagaia)
02 Beats 03 Beats
/(page 13)'/; (page 13) ■
■ 0—
. OPROGRAM .CHANGE CCONTROL CHANGE 038.4kbps i i':/' 031.25kbps
Cant0i€naìjfe
(pago 19)
PJANO
□ D
E.PÍANO
HARPSI VJBES
D
-----
CanceCEnable .
(page ¿'p)...vó;-v:.'j-;.;':-:
■■V,' OA^Beata'
ORGAN
STRINGS
G
PC l/F baud rate
' (C-3SÓ only) (page 22)
;..06Beiife ; : ,• PÀ nomat ¿tidti'ngV'OA' teli sound ;
(page 13) scHind j /'
U
till 'Í'') 1 I
■Pppp :j TThV'acceritisdurid'ipa!^ ià). 1 ;
(page 20,21)
START/STOP RECORD
TT
QDefeting ■ ! ' , OthdSca^ arttount
ydti f r ecorded ' of' rewded data. '. ' (
data'.(page 17);.: (p'age,-17) ,
OSoftar
OLoudsi,
Metronome Volume
Ad)ustment{págg;i2)^
(¡37
mmmt
CO
T7
O
CO
m
CO
co
Cn
Press the appropriate switch
while holding down the
TOUCH switch
Press the appropriate switch
while holding down the
BRILLIANCE switch
Press the appropriate switch
white holding down the
REVERB switch
Press the appropriate switch
while holding down the
CHORUS switch
■ ;DUGHT(; -V'OSWDABD
1. '. Touch Control (page 13) O'-.-. (
tas
OmeIlow
];■ ■ ■ ■ ./( 0 : BRILLIANCE (page IQ) 1
f:iS
O0EPTH1
CDEPTH1
1 CHORUS (page 11) j
Cl (24)*
Sets the MID! channel (page 19)
S. ODEPTH2 .-r:SS.-: ODEPTH3
'Is::
■ ODEPTH2 ■ S^^i'-O;,- 0DSPTH3,
2 4 7 B 11 14 16
1 (C2) ~ 16 (D#3)
DHEAVY
ONORMAl OSRiGHT
rii; ■ REVERB (page 11) -O''-^.í
.';OW0rcftirneisl0r Ot<teb'or$or''
■ Cla^ical temperaments' ,■
(page 15) ppyj P.-r'y'-]
while holding down the
/FUNCTION switch
Only C-350
Press the soWsostenuto
pedal while holding dcwn
the TRANSPOSE
/FUNCTION switch
■ 6 -4 -2 +1 +3
—6 (F#6) — -F5 (F7) semitones ■ M(of Mote Mumber
Sets the Traspose Function (page 14)
Press the damper pedal
TRANSPOSE
■ ■ O'icani ' - 0+lcertt.-
I Tune function (page.1^
Dut!ng.’'lay9f.'‘-ptay,'. .
'seteptS'Wiiich voice the'
idá'ííipar pedali^fates
.pn.'iCa'nseiect^er
vffl'cs Of botíi .voices.)
(page 12)
'Setect'.eHhst'doSt or;v
sostenuto.
(page 12)
On!yC-150
C3( IC 8r
DAMPER pedal
SOFT/SOSTENUTO pedal
DAMPER pedal
Page 36

NOTICE
KORG products are manufactured under strict specifications and voitages required by
each country. These products are warranted by the KORG distributor only in each
country. Any KORG product not sold with a warranty card or carrying a serial number
disqualifies the product sold from the manufacturer's/distributor's warranty and
liability. This requirement is for your own protection and safety.
DRSC ■ OWNERS riRNURL C150/C
OTY. 0001 SN.
■1
KARIl KORG INC
ImRv ImWI 15 - 12. Shimotakaido
1QQR (innrï IMn
DQMC350
0001
1 ' chôme, Suginami-ku, Tokyo, Japan.
1002 GH Printed in
 Loading...