

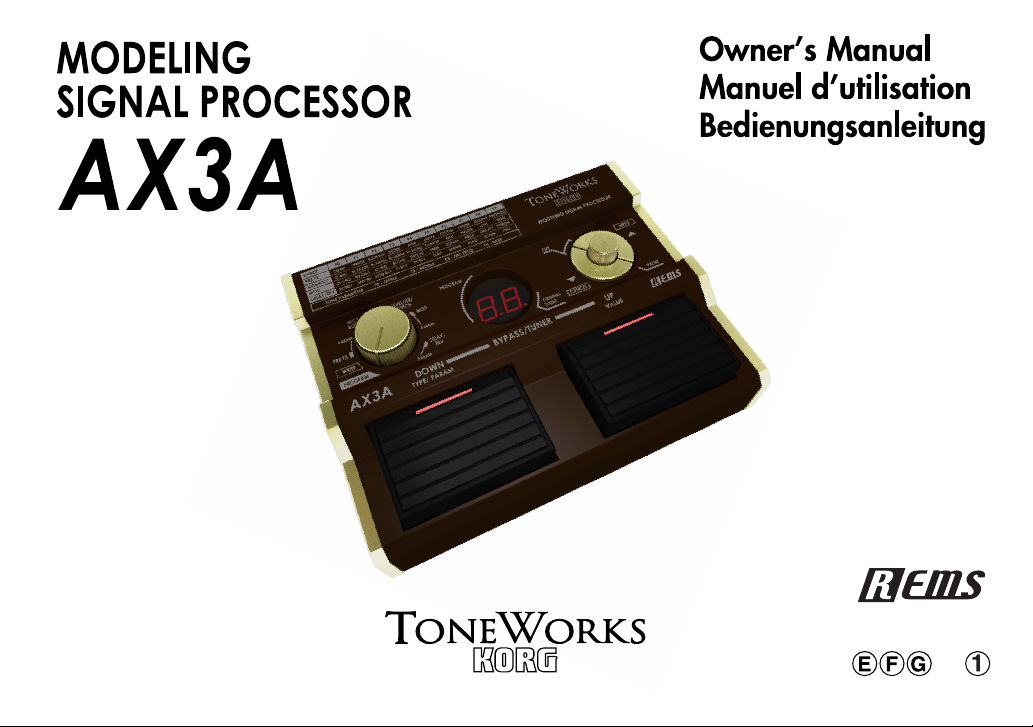
Page 1
Page 2

Page 3
Table of Contents
Precautions ................................................................ 4
Introduction ............................................................... 5
Welcome!......................................................................... 5
Main features ................................................................... 5
Front and rear panel .................................................. 5
Front panel.......................................................................5
Rear panel .......................................................................6
Setup ......................................................................... 6
Installing batteries .............................................................6
Basic connections..............................................................7
Example of a connection to a guitar amp............................7
Example of a connection to a mixer or recorder .................. 7
Program mode........................................................... 7
Selecting a program..........................................................8
Creating your sound (Edit mode) ................................. 8
Signal flow ....................................................................... 8
Selecting effects and adjusting the main parameters ............ 8
Selecting and adjusting sub-parameters and [TONE] param-
eters ................................................................................9
Saving a program (Write mode) ........................................ 9
Checking the values saved in a program (Original Value) .. 10
Bypass and Mute ..................................................... 10
Bypassing the AX3A ....................................................... 10
Muting the AX3A ............................................................ 10
Tuner ....................................................................... 10
Tuning procedure ............................................................ 10
Adjusting the tuner calibration ......................................... 11
Restoring the factory preset programs....................... 11
Troubleshooting ........................................................ 11
Specifications ........................................................... 12
Page 4

Precautions
Location
Using the unit in the following locations can result in a malfunction.
• In direct sunlight
• Locations of extreme temperature or humidity
• Excessively dusty or dirty locations
• Locations of excessive vibration
• Close to magnetic fields
Power supply
Please connect the designated AC adapter to an AC outlet of the correct
voltage. Do not connect it to an AC outlet of voltage other than that for which
your unit is intended.
Interference with other electrical devices
Radios and televisions placed nearby may e xperience reception interference.
Operate this unit at a suitable distance from radios and televisions.
Handling
To avoid breakage, do not apply excessive force to the switches or controls.
Care
If the exterior becomes dirty, wipe it with a clean, dry cloth. Do not use liquid
cleaners such as benzene or thinner, or cleaning compounds or flammable
polishes.
Keep this manual
After reading this manual, please keep it for later reference.
Keeping foreign matter out of your equipment
Never set any container with liquid in it near this equipment. If liquid gets into
the equipment, it could cause a breakdown, fire, or electrical shock.
Be careful not to let metal objects get into the equipment. If something does slip
into the equipment, unplug the AC adapter from the wall outlet. Then contact y our
nearest Korg dealer or the store where the equipment was purchased.
THE FCC REGULATION WARNING (for U.S.A.)
This equipment has been tested and found to comply with the limits for a Class
B digital device, pursuant to Part 15 of the FCC Rules. These limits are designed to provide reasonable protection against harmful interference in a residential installation. This equipment generates, uses, and can r adiate radio frequency energy and, if not installed and used in accordance with the instruc-
4
tions, may cause harmful interference to radio communications. Howe ver , there
is no guarantee that interference will not occur in a particular installation. If this
equipment does cause harmful interference to radio or television reception,
which can be determined by turning the equipment off and on, the user is
encouraged to try to correct the interference by one or more of the following
measures:
• Reorient or relocate the receiving antenna.
• Increase the separation between the equipment and receiver.
• Connect the equipment into an outlet on a circuit different from that to
which the receiver is connected.
• Consult the dealer or an experienced radio/TV technician for help.
Unauthorized changes or modification to this system can void the user’s
authority to operate this equipment.
CE mark for European Harmonized Standards
CE mark which is attached to our company’s products of AC mains operated
apparatus until December 31, 1996 means it conforms to EMC Directive (89/
336/EEC) and CE mark Directive (93/68/EEC).
And, CE mark which is attached after January 1, 1997 means it conforms to
EMC Directive (89/336/EEC), CE mark Directive (93/68/EEC) and Low Voltage Directive (73/23/EEC).
Also, CE mark which is attached to our company’s products of Battery operated apparatus means it conforms to EMC Directive (89/336/EEC) and CE
mark Directive (93/68/EEC).
IMPORTANT NOTICE TO CONSUMERS
This product has been manufactured according to strict specifications and
voltage requirements that are applicable in the country in which it is intended
that this product should be used. If you have purchased this product via the
internet, through mail order, and/or via a telephone sale, you must verify that
this product is intended to be used in the country in which you reside.
WARNING: Use of this product in any country other than that for which it is
intended could be dangerous and could invalidate the manufacturer’s or
distributor’s warranty.
Please also retain your receipt as proof of purchase otherwise your product
may be disqualified from the manufacturer’s or distributor’s warranty.
Company names, product names, and names of formats etc. are the trademarks or registered trademarks of their respective owners.
* Company names, product names, and names of formats etc. are the trade-
marks or registered trademarks of their respective owners.
Page 5
Introduction
Welcome!
Thank you for adding the T ONEW ORKS AX3A Modeling Signal Processor to your r ig. Whether you’re playing live or in the studio, or practicing
with headphones, the AX3A will give you countless hours of great sounds!
To ensure a long and trouble-free relationship with your AX3A, please
read this manual carefully, and use it as directed. When you’ve finished
reading this manual, please keep it for future reference.
Main features
❑ Detailed and powerful modeling sounds delivered by Korg’s
modeling technology.
What is
is Korg’s proprietary sound modeling technology which digitally simulates a wide range of factors that affect the sound, including the
sound-producing mechanism of acoustic, electric, and electronic instruments, the body and cabinet resonances of these sounds, their
acoustical sound field, the electrical and electronic response of the
mics and speakers that propagate, these sounds, and even electronic circuit components such as vacuum tubes and transistors.
❑ 43 different modeling effect variations are built-in, and you can use
up to seven different effects simultaneously (including noise reduction and notch filter).
❑ All parameters of the effects in the five effect categories (pre-effect,
mic & body, tone, modulation, delay/reverb) can be fully edited.
❑ Use these modeling effects to create your own sounds and store
them in internal memory as one of 40 user programs. In addition, 40
more programs are provided as presets for immediate use.
❑ The built-in notch filter lets you eliminate unwanted acoustic feed-
back.
?
(Resonant Structure and Electronic circuit Modeling System)
AX3A Owner’s manual
❑ Connect an optional Korg EXP-2 foot controller or XVP-10 expres-
sion/volume pedal, and use it as a wah pedal or volume pedal.
❑ The delay sound is preserved when you switch between programs
that have the same delay type and TIME parameter [P1] setting. Similarly, the reverberation is preserved when switching between programs that have the same reverb type.
❑ A built-in auto chromatic tuner lets you tune while bypassed or muted.
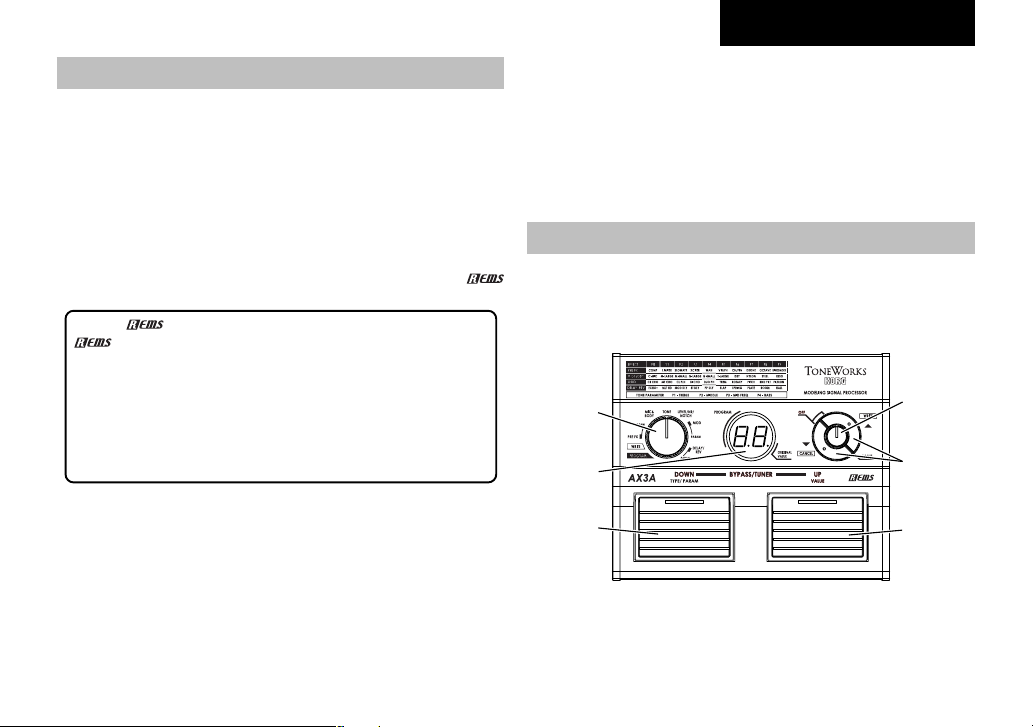
Front and rear panel
This section explains the switches and connectors on the AX3A’s front
and rear panels.
Front panel
1
2
6
1. Function selector
The operation of the up/down buttons and value knob will depend on the
mode that’s chosen by this selector. You’re in Program mode when this
selector is at the [PROGRAM] position, Write mode when at the [WRITE]
4
3
5
5
Page 6

position, and Edit mode when at the [PRE FX]–[DELAY/REV-PARAM]
positions.
2. Program/Value display
In Edit mode, this display indicates the effect type (F0–F9, LE, nr, nF),
the parameter (P1–P4) or its setting (value).
In Write mode or Program mode, the display indicates the prog ram number. When BYPASS/MUTE is active, the display indicates the name of
the note you’re tuning.
3. [▲(WRITE)], [▼(CANCEL)] buttons
In Effect mode, use these buttons to switch effect types or parameters.
By pressing the two buttons simultaneously, you can turn each effect
on/off. In Write mode, use these buttons to write a program.
In Program mode, you can press these buttons to increment or decrement the program number in steps of 10. When you’re using the tuner,
use these buttons to adjust the calibration setting.
4. Value knob
In Edit mode, use this knob to adjust the value of a parameter. In Write
mode, you can use this knob to specify the writing-destination for the
program. In Program mode, this knob acts as the master volume.
5. Program Up switch
In Program mode, use this to select programs. The program number will
increase each time you press the switch. In Edit mode, press this to
make the parameter value appear in the program/value display. In this
case, the LED above the pedal will light, indicating that the program/
value display is showing the value of the effect parameter.
6. Program Down switch
In Program mode, use this to select programs. The program number will
decrease each time you press the switch. In Edit mode, press this to
make the effect or parameter type appear in the program/value display.
In this case, the LED above the pedal will light, indicating that the program/value display is showing the type of effect or parameter.
6
Rear panel
1234
1. Input jack
Connect your guitar to this jack.
2. Output jack
Connect this jack to your guitar amp or headphones.
3. Pedal jack
You can connect an optional Korg EXP-2 foot controller or XVP-10 expression/volume pedal to this jack.
A pedal connected here will function as a wah pedal if you’ re using W AH
in [PRE FX], or as a volume pedal otherwise.
4. Power supply
~DC9V
You can connect an optional AC adapter to this jack.
Setup
Installing batteries
Page 7
1.
Slide the cover of the battery case in the direction of the arrow, and
open the cover.
Insert four separately sold AA-size alkaline batteries, being sure to
observe the correct polarity (“+” and “-” markings), and close the
battery case.
2.
When using batteries, the power will turn on when you insert a guitar
cable into the AX3A’s INPUT jac k. While the power is on, the display
will indicate the program number or other information.
The power will turn off when you remove the cable from the INPUT jack.
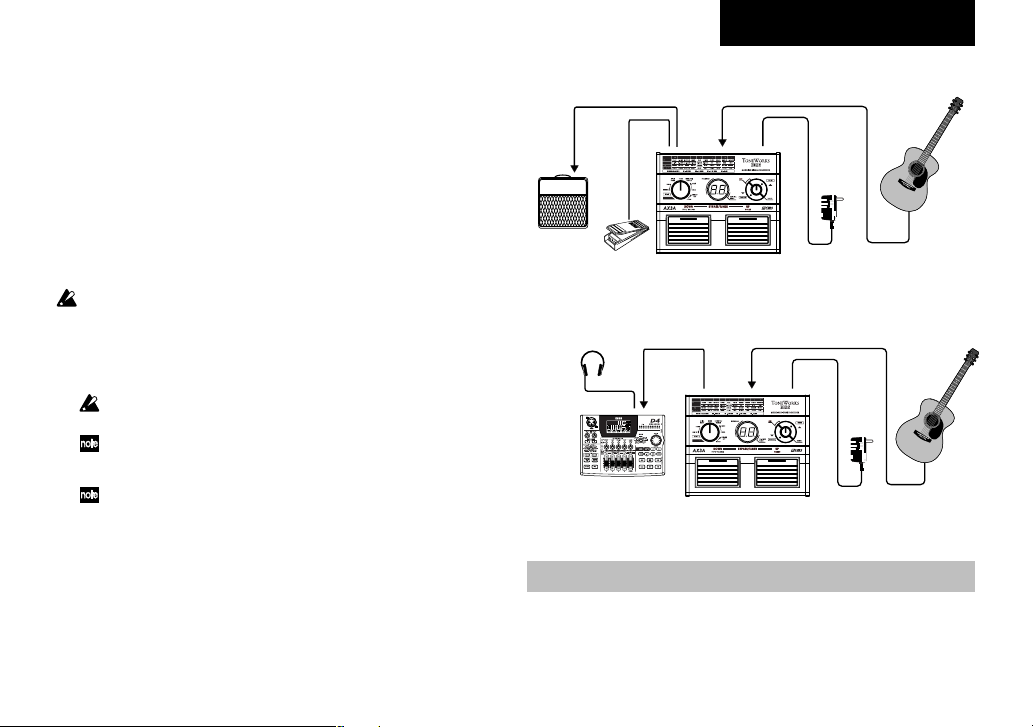
Basic connections
Be sure to make all connections with the power turned off. If you fail to
use caution when making connections, you could damage your guitar
amp or speaker system, or cause malfunctions.
1.
Use a cable to connect the AX3A’s OUTPUT jack to your guitar
amp,mixer or recorder.
When making connections or turning on the power, lower the v olume
of your amp or mixer so that you don’t hear noise
If you’re using headphones, plug them into the OUTPUT jack.
2.
Connect your guitar to the rear panel INPUT jack.
If you’re using batteries, this will turn the power on.
3.
If you’re using the optional AC adapter, connect it to the rear panel
DC9V power supply jack, and then plug the adapter into an AC outlet to turn the power on.
4.
Raise the volume of your amp or mixer to the appropriate volume.
AX3A Owner’s manual
Example of a connection to a guitar amp
Guitar
Input
Guitar amp
Pedal
PEDAL
OUTPUT
AX3A
INPUT
DC9V
AC adaptor
to an AC outlet
Example of a connection to a mixer or recorder
Headphones
Digital recorder
DC9V
INPUT
OUTPUT
InputPhones
AC adaptor
AX3A
to an AC outlet
Guitar
Program mode
Settings for each effect are collectively called a “program.”
The AX3A has 80 programs which 40 (01–40) of them are rewritable.
Programs 41–80 contain preset programs for immediate use.
7
Page 8
In Program mode you can instantly switch between sounds by pressing
the Program Up/Down switches to change programs.
To enter Program mode, set the function selector to [PROGRAM]. (The
LEDs in the upper part of the Program Up/Down switches will light.)
Selecting a program
1.
Make sure that the function selector is set to [PROGRAM].
In Program mode, the LEDs of both the Program Up and Program
Down switches will be lit.
When you turn on the power, you’ll be in Program mode regardless
of the position of the function selector.
2.
Turn the value knob to adjust the master volume.
If you've connected the AX3A to a guitar amp, set the master v olume
to 50.
3.
Press the Program Up or Program Down switch to select a prog ram.
The program/value display shows the number of the program you
selected.
Creating your sound (Edit mode)
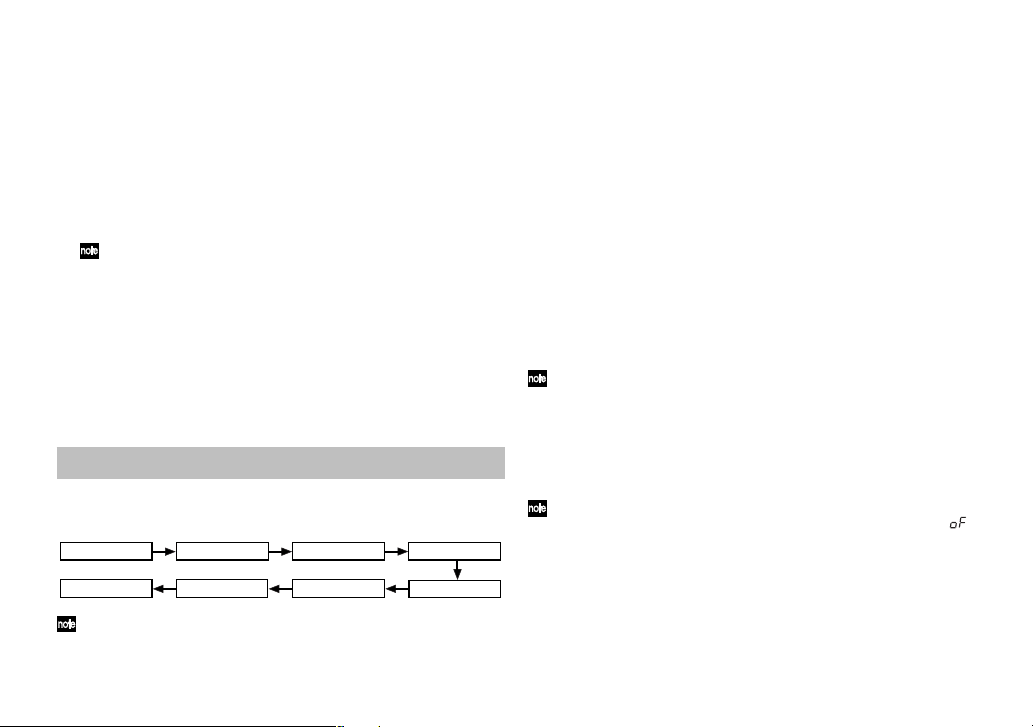
Signal flow
PRE FX
DELAY/REVERB
VOLUME PEDAL is available only if a pedal is connected to the PEDAL
jack.
8
MIC&BODY
MOD
TONE
VOLUME PEDAL
NR
NOTCH
Edit mode is when the function selector is in one of the [PRE FX]–[DELAY/REV PARAM] positions.
You can change the effect type for each category ([PRE FX], [DRIVE/
AMP], [LEVEL/NR/NOTCH], [MOD], [DELA Y/REV]), and edit the par ameters to create your sound.
Selecting effects and adjusting the main parameters
[PRE FX], [MIC&BODY],[MOD], [DELAY/REV ]
To select the effect you want to use in each of the categories [PRE FX],
[MIC&BODY], [MOD], and [DELAY/REV], set the function selector to the
appropriate position and use the [▲][▼] buttons.
The program/value display will indicate a value of F0–F9, and the LED
at the top of the Program Down switch will light to indicate that the program/value display is showing the effect type .If the function select knob
is set to [TONE], the P1-P4 values are displayed.
The effect list printed on the panel tells you the effect type that is selected.
You can turn the value knob to adjust the “main” parameter for the selected effect. At this time the prog ram/value displa y will indicate the value
of the parameter, and the LED at the top of the Program Up switch will
light to indicate that the program/value display is showing the par ameter
value.
To switch [TONE] on/off, press both of the [▲][▼] switches simultaneously.
The parameter type or value is shown if this is switched on, and an “ ”
indication if this is off.
■ Quick guide
When you select an effect, the AX3A automatically sets the parameters
of that effect to their most effective values. In other words, you can create great sounds just by choosing an effect for each of the categories
PRE FX, MIC&BODY, MOD, and DELAY/REV, without having to make
detailed parameter settings.
Page 9

By adjusting the main parameters, you can tweak your sound to what
you have in mind.
Selecting and adjusting sub-parameters and [TONE] parameters
[PRE FX-PARAM], [TONE], [MOD-PARAM], [DELAY/REV-PARAM]
Here's how to edit the sub-parameters for the effect selected in [PRE
FX], [MOD], and [DELAY/REV], as well as the parameters for [TONE].
When you press the [▲] or [▼] buttons, the program/value display will
indicate a value of P1–P4, and the LED at the top of the Program Down
switch will light to indicate that the program/value display is sho wing the
parameter type.
For the sub-parameters that correspond to P1–P4, refer to p.44 “Appendices”.
Now you can use the value knob to adjust each sub-parameter to your
taste.
At this time, the program/value display indicates the v alue of the parameter, and the LED at the top of the Program Up switch will light to indicate that the program/value display is showing the parameter value.
If an effect other than [TONE] is turned off, the program/value display
will indicate “
that category. If you want to edit the parameters of that effect, simulta-
neously press both [▲] and [▼] buttons to turn the effect on.
■ Quick guide
When you want to make adjustments to the sound of the effect you've
selected, you should start by adjusting the main parameter, and then
adjust the P1 sub-parameter. In most cases, adjusting these two par ameters will give you the sound you want. ([TONE] is an exception to this.)
[LEVEL/NR/NOTCH]
Select this position when you want to select or adjust the program le vel,
noise reduction, or notch filter. Then press the [▲] or [▼] buttons to
” when you turn the function select knob to [PARAM] for
AX3A Owner’s manual
cycle the display through LE (prog ram level), nr (NR sensitivity), and nF
(notch filter). Use the value knob to adjust each parameter.
LE: Use the value knob to adjust the program level (0–10). A setting of
7.0 is the standard value. Some effect settings may cause clipping.
If this occurs, lower the program level.
nr: Adjust the noise reduction sensitivity (0–10) so that you don’t hear
noise (hiss) when you’re not playing your guitar.
Depending on the guitar you’re using, notes may be cut off if you
raise the noise reduction value excessively. Adjust this so notes ring
out naturally.
nF: This adjusts the notch filter (oF, 1-63) that reduces acoustic feed-
back. Turn the knob to set the cutoff frequency at which acoustic
feedback will be reduced. The notch filter will be off if you turn the
knob all the way to the left. Turn the knob toward the right to move
the cutoff frequency from low to high, and find the point at which the
acoustic feedback is occurring.
Effect/parameter type and parameter value display
When you press the Program Down switch in Edit mode, the program/
value display will indicate the effect type or parameter type (F0–F9, P1–
P4). When y ou press the Program Up switch, the program/value display
will indicate the parameter value. This gives you a convenient way to
check the current settings.
Saving a program (Write mode)
Here’s how to save (write) a sound that you’ve created.
If you switch to a different program in Program mode or turn off the power
without writing your settings into memory, the changes you made will be lost.
1.
Set the function selector to [WRITE].
2.
Press the [▲(WRITE)] button. The program number will blink.
9
Page 10
3.
Use the value knob or the Program Up/Down switches to select the
program in which you want to save your settings.
4.
Press the [▲(WRITE)] button once again. The progr am will be saved,
and the program/value display will indicate “
The newly saved program will overwrite (i.e., replace) the existing
settings, so that the previous program in that location will be lost.
If you decide not to save the new progr am, press the [CANCEL] b utton to cancel the operation.
” briefly.
Muting the AX3A
Simultaneously press and hold down the Program Up and Program Down
switches for about one second and the output will be muted. At this time,
the program/value display will indicate “
When bypassed or muted, the Auto Chromatic Tuner will be active. To
cancel the bypass or mute function, press the Program Up or Program
Down switch (this will not change the program).
In the bypassed state, the value knob acts as the master volume.
”.
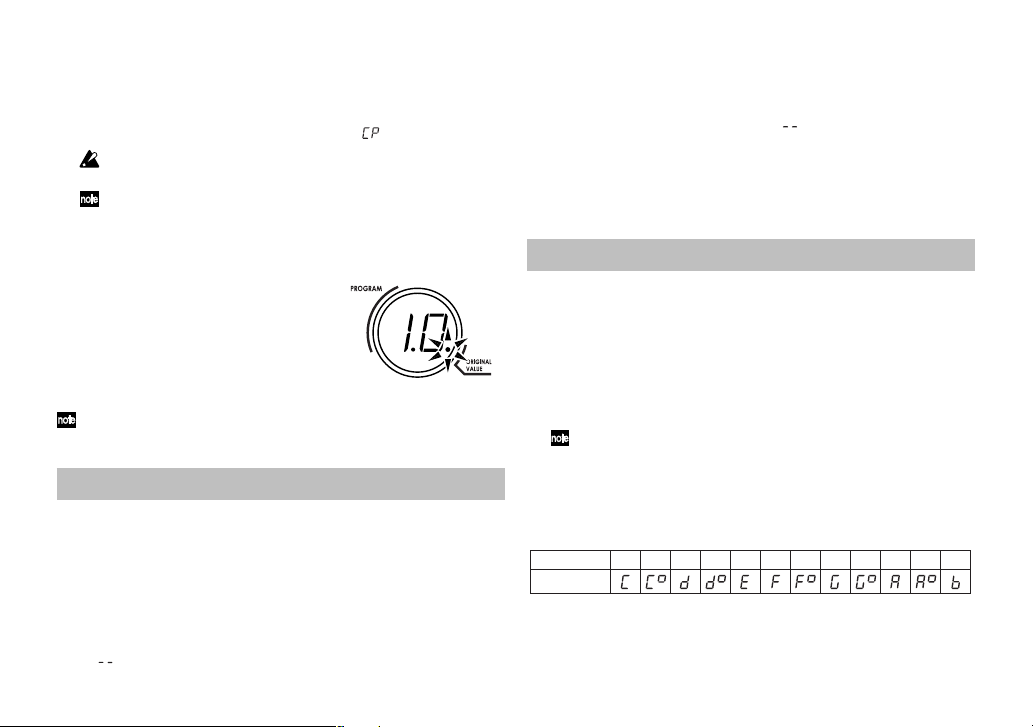
Checking the values saved in a program (Original Value)
The Original Value LED in the program/
value display lets you check the parameter
values of a saved program.
When you use the knob or switches to
modify the value of a parameter, the Original Value LED will light when that value
matches the value that’s already been sav ed
in the program (i.e., the original value).
In Program mode, the Original Value LED will light if the values of all
parameters match the values that are saved in the program.
Bypass and Mute
Bypass (which turns off all effects including noise reduction) and Mute
(which mutes the AX3As output) are convenient functions for use while
you’re adjusting your guitar amp, tuning during a live performance, or
switching guitars. Here’s how to use Bypass or Mute.
Bypassing the AX3A
Simultaneously press the Program Up and Program Down switches; all
effects will be bypassed. At this time, the program/v alue displa y will indicate “
”.
10
Tuner
The AX3A has a built-in Auto Chromatic Tuner.
You can calibrate the reference pitch (the note “A”) of the tuner in a
range of A438 Hz–A445 Hz.
Tuning procedure
1.
The Auto Chromatic Tuner will be activated when the AX3A is bypassed or muted.
If you want to tune silently , such as during a live perf ormance, simply
mute the AX3A.
2.
Play a note on your guitar and the program/value display will indicate the name of the closest note.
Note names are indicated as follows.
Note name
Display
3.
If your guitar is sharp (pitch too high), the Program Up switch LED
will blink. If y our guitar is flat (pitch too low), the Program Do wn switch
LED will blink. In either case, more rapid blinking indicates that your
CC#DD#EFF#GG# AA#B
Page 11

guitar is farther from the correct pitch.
When in tune, both the Program Up and Down LEDs will light.
AX3A Owner’s manual
Never turn off the power while reloading.
Adjusting the tuner calibration
When you turn on the power, the built-in tuner is set to a reference pitch
of A 440 Hz (concert pitch). You can calibrate this reference pitch in a
range of 438 Hz–445 Hz. You can use the [▲]/[▼] buttons to calibrate
this in the range of 438 Hz–445 Hz. When doing so, the program/value
display will indicate a value of 38–45.
When you turn off the power, the calibration adjustment you made will
be discarded and the AX3A will automatically be set to 440 Hz.
Restoring the factory preset programs
Here’s how to restore (reload) the AX3A’ s programs bac k to f actory preset programs.
When you execute this operation, all the progr ams you created and stored
inside the AX3A will be erased, and replaced by the factory programs.
1.
While holding down both the Program Up and Down switches as
well as the [▼(CANCEL)] button, turn on the power. The program/
value display will indicate “
the Program Up/Down switches will blink. Take your hand off both
switches and the button you had been pressing.
2.
If you decide to cancel the reload operation at this point, press the
[▼(CANCEL)] button.
3.
If you wish to reload the factory settings press the [▲(WRITE)] button. The program/value display will indicate “
begin. When reloading is completed, the program/value display will
indicate “
”, and the AX3A will automatically enter Program mode .
”, and the LEDs in the upper part of
” and reloading will
Troubleshooting
If you suspect a malfunction, please check the following points. If this
does not resolve the problem, please contact a nearby dealer.
1. Power does not turn on
❑ Have the batteries have run down? When the batteries run low,
the display will blink “
batteries as soon as possible. If batteries become unusable, remove them immediately . Lea ving drained batteries in the unit can
cause malfunctions (such as battery leakage). You should also
remove the batteries if you won’t be using the AX3A for an extended time.
❑ Have you have inserted a stereo cable into the INPUT jack?
When operating the AX3A on batteries, the power will not turn
on if you insert a stereo cable. Be sure to use a mono cable.
❑ Is the AC adapter connected to the rear panel DC9V jack?
❑ Is the AC adapter plugged into an AC outlet?
❑ Could the AC adapter be damaged?
2. No sound
❑ Is the volume of your guitar turned down?
❑ Is your guitar cable connected correctly?
❑ Is your guitar cable broken?
❑ Are the TONE or PROGRAM LEVEL (LEVEL/NR/NOTCH) pa-
rameters be turned to a low value?
❑ Is the volume turned down for another effect?
❑ If an expression pedal is connected, is it turned down?
❑ Is the Mute function activated? Refer to “Bypass and Mute” (p .10)
and cancel the Mute function.
”. We recommend that you replace the
11
Page 12

❑ Is the master volume turned down? Set the function selector to
[PROGRAM], and turn the value knob to adjust the master volume.
3. Effects don’t apply
❑ Could an effect be bypassed?
❑ Is the modulation “DEPTH” or the delay/re verb “MIX” set to a low
value?
❑ Could the [MIC&BODY] DEPTH be set to 0?
❑ Is the AX3A in Bypass mode? Refer to “Bypass and Mute” (p .10)
and cancel the Bypass function.
4.
High frequencies are distorted when using [MIC&BODY]
❑ Depending on the guitar you're using, the high frequencies may
distort if the [TONE] TREBLE or XCITER effect parameter values are raised excessively. If this occurs, lower the settings.
5.
Sound connected to the guitar amp is distorted, or sounds
wrong
❑ Could the [TONE] values or the PROGRAM LEVEL (LEVEL/NR/
NOTCH) be excessively high?
Specifications
Number of effects: Pre-effect types: 10
Number of programs: 80 (40 user/40 preset)
Audio input: INPUT (mono)
Audio output: OUTPUT (stereo)
Signal processing: A/D conversion: 24 bit
Sampling frequency: 31.25 kHz
Tuner: Detection range : C1–E6
Calibration: A=438–445 Hz
Power supply: Four alkaline AA batteries (continuous use
Dimensions (W ✕ D ✕ H): 178 ✕ 142 ✕ 43 mm /
Weight: 340 g / 11.99 oz.
Included items: Owner’s manual
Options (separately sold):
* Specifications and appearance are subject to change without notice for improve-
ment.
Mic&Body Model types: 10
Tone: 1
Notch Filter: 1
Modulation Effect types: 10
Delay Effect types: 5
Reverb Effect types: 5
Noise Reduction: 1
D/A conversion: 24-bit
of eight hours) or DC9V (separately sold)
AC adapter
7.0 ✕ 5.6 ✕ 1.7 inches
DC9V AC adapter
EXP-2 foot controller
XVP-10 expression/volume pedal
12
Page 13

Sommaire
Précautions.............................................................. 14
Introduction ............................................................. 15
Bienvenue! .....................................................................15
Caractéristiques principales ............................................15
Panneau Avant et Arrière......................................... 15
Panneau Avant............................................................... 15
Panneau Arrière.............................................................16
Configuration .......................................................... 17
Installation des piles ....................................................... 17
Raccordements ............................................................... 17
Exemple de branchement à un ampli guitare ...................17
Exemple de branchement à une console de mixage ou d’un
enregistreur.................................................................... 18
Jouer (Mode Programme)......................................... 18
Selectionner un programme ............................................18
Créez votre son (Mode Edit) ..................................... 18
Flux du Signal ................................................................ 18
Selectionner les effets et adjuster les paramètres principaux....
Sélection et réglage des sous-paramètres et des paramètres
[TONE] .......................................................................... 19
Sauvegarde d’un programme(Write mode)...................... 20
Vérifiez les valeurs sauvées dans un programme (Valeur
originale) ....................................................................... 20
Bypass et Mute ........................................................ 20
Bypasser l’AX3A ............................................................20
Muter l’AX3A.................................................................20
Accordeur................................................................ 21
Procédure pour l’accord ................................................. 21
Ajustez le calibrage de l’accord ...................................... 21
Retour aux réglages d’usine .................................... 21
Troubles de fonctionnement...................................... 21
Caractéristiques ....................................................... 22
18
Page 14

Précautions
Emplacement
L’utilisation de cet instrument dans les endroits suivants peut en entraîner le
mauvais fonctionnement.
• En plein soleil
• Endroits très chauds ou très humides
• Endroits sales ou fort poussiéreux
• Endroits soumis à de fortes vibrations
•A proximité de champs magnétiques
Alimentation
Veuillez brancher l’adaptateur secteur spécifié sur une prise secteur à la tension appropriée. Ne branchez pas l’adaptateur sur une prise de courant dont
la tension ne correspond pas à celle pour laquelle l’appareil a été conçu.
Interférences avec d’autres appareils électriques
Les postes de radio et de télévision situés à proximité peuvent souffrir
d’interférences à la réception. Faites fonctionner cet appareil à une distance
raisonnable des postes de radio et de télévision.
Maniement
Pour éviter de les endommager , manipulez les commandes et les boutons de
cet instrument sans appliquer de force excessive.
Entretien
Lorsque l’extérieur est sale, essuyez-le avec un chiffon propre et sec. Ne
vous servez pas d’agents de nettoyage liquides comme du benzène ou du
diluant, des produits de nettoyage ou des vernis inflammables.
Conservez ce manuel
Après avoir lu ce manuel, veuillez le conserver soigneusement pour référence
ultérieure.
Évitez toute intrusion d’objets ou de liquide
Ne placez jamais de récipient contenant du liquide près de l’instrument. Si le
liquide pénètre dans l’appareil, il risque de provoquer des dommages, un
incendie ou une électrocution.
Veillez à ne pas laisser tomber d’objets métalliques dans le boîtier . Si cela se
produisait, débranchez l’adaptateur secteur de la prise de courant et contactez
votre revendeur Korg le plus proche ou le magasin où vous avez acheté
l’instrument.
Marque CE pour les normes européennes harmonisées
La marque CE apposée sur tous les produits de notre firme fonctionnant
sur secteur jusqu’au 31 décembre 1996 signifie que ces appareils répondent
à la Directive EMC (89/336/CEE) et à la Directive concernant la marque
CE (93/68/CEE).
La marque CE apposée après le 1 janvier 1997 signifie que ces appareils
sont conformes à la Directive EMC (89/336/CEE), à la Directive concernant
la marque CE (93/68/CEE) ainsi qu’à la Directive Basse Tension (73/23/
CEE).
La marque CE apposée sur tous les produits de notre firme fonctionnant
sur piles signifie que ces appareils répondent à la Directive EMC (89/336/
CEE) et à la Directive concernant la marque CE (93/68/CEE).
REMARQUE IMPORTANTE POUR LES CLIENTS
Ce produit a été fabriqué suivant des spécifications sévères et des besoins
en tension applicables dans le pays où ce produit doit être utilisé. Si vous
avez acheté ce produit sur internet, par correspondance ou/et au téléphone,
vous devez vérifier que ce produit est bien utilisable dans votre pays de
résidence.
ATTENTION: L’utilisation de ce produit dans un pays autre que celui pour
lequel il a été conçu peut être dangereuse et annulera la garantie du
fabricant ou du distributeur.
Veuillez aussi conserver votre récépissé qui est la preuve de votre achat,
faute de quoi votre produit risque de ne plus être couvert par la garantie du
fabricant ou du distributeur.
* Les noms de societes, nomsm de produits et noms de formats, etc. dans
ce manuel sont des marques de fabrique ou des mar-ques deposees de
leurs proprietaires respectifs.
14
Page 15

Introduction
Bienvenue!
Merci d’avoir choisi l’AX3A. pour garantir un fonctionnement sans
problèmes, veuillez lire attentivement ce manuel et utiliser l’appareil
comme expliqué. Quand vous aurez fini de lire le manuel, conservez-le
de façon à pouvoir vous y reporter par la suite.
Caractéristiques principales
❑ Production des sons modélisés puissants et précis grâce à la
technologie de modélisation “REMS” de Korg
Qu’est-ce que la technologie
Le système
circuit Modeling System) constitue une technique de modelage du
son déposée par Korg qui reproduit avec précision le caractère
complexe et la nature tant des instruments acoustiques qu’électriques
ainsi que des circuits électroniques dans des environnements réels.
Le
des sons y compris des corps d’instruments, des haut-parleurs et des
enceintes des champs acoustiques, des microphones, des tubes à
vide, des transistors, etc.
❑ 43 variations d’effets, vous pouv ez utiliser jusqu’à six effets diff érents
simultanément (y compris la réduction de bruit).
❑ Tous les paramètres des effets dans les cinq catégories d'effets (pre-
effect, mic & body, tone, modulation, delay/reverb) peuvent être
entièrement édités.
❑ Utilisez les effets de modélisation pour créer vos propres sonorités et
vous pouvez ensuite les sauvegarder sous forme de programme. La
mémoire interne peut contenir jusqu’à 40 programmes utilisateurs et
40 programmes prédéfinis.
(de l’anglais Resonant Structure and Electronic
ém ule une vaste gamme des caractéristiques de génération
?
AX3A Manuel d’utilisation
❑ Le filtre Notch intégré vous permet d’éliminer la rétroaction acoustique
indésirable.
❑ Si vous raccordez la pédale optionnelle Korg EXP-2 ou XVP-10, v ous pouvez
utiliser celle-ci comme pédale wah-wah ou comme pédale de volume.
❑ L’éffet de retard “DELAY” peut être conservé lorsque vous passez
d’un programme à un autre dès lors que le type de Delay et les
réglages du paramètre [P1] TME sont semblables. L’effet de “Reverb” peut aussi être conservé lorsque vous passez d’un prog ramme
à un autre comportant le même type de réverbération.
❑ Un accordeur chromatique automatique intégré vous permettant
d’accorder votre guitare en désactivant tous les effets ou en silence .
Panneau Avant et Arrière
Ce chapitre a pour but de présenter les différents touches et commandes
situés sur les panneaux avant et arrière de l’AX3A.
Panneau Avant
1
2
6
4
3
5
15
Page 16

1. Sélecteur de fonction
La fonction de ce potentiomètre dépendra du mode sélectionné par le
sélecteur. V ous êtes en mode Prog ramme lorsque le sélecteur est sur la
position (PROGRAM), en mode d’écriture lorsque le sélecteur est sur la
position (WRITE) et en mode d’édition lorsque le sélecteur est sur la
position [PRE FX]–[DELAY/REV-PARAM].
2. Program/Value display
En mode d’édition, l’afficheur indique le type d’effet (F0–F9, LE, nr, nF),
les paramètres (P1–P4) ou la configuration (value). Dans le mode Write
ou Program, l’afficheur indique le numéro de programme. Lorsque la
fonction BYP ASS/MUTE est activ ée, l’afficheur indique le nom de la note
pour l’accordage.
3. Boutons [▲(WRITE)], [▼(CANCEL)]
Dans le mode Effect, utilisez ces boutons pour commuter les types d’effet
ou les paramètres. En pressant simultanément les deux boutons, vous
pouvez activer ou désactiver les eff ets . Dans le mode Write, utilisez ces
boutons pour enregistrer un programme. Dans le mode Program, vous
pouvez presser ces boutons pour incrémenter ou décrémenter le
programme par pas de 10. lorsque v ous utilisez l’accordeur, ces boutons
ajustent la calibration de l’accord.
En mode d’édition, utilisez le potentiomètre pour ajuster la valeur du
paramètre. Dans le mode WRITE, v ous pouvez utiliser ce potentiomètre
pour spécifier la destination de mémoire d’écritures pour la mémorisation
du programme. Dans le mode Program, ce potentiomètre a la fonction
de master volume.
4. Value knob
Dans le mode Edit, utilisez ce potentiomètre pour ajuster la valeur d’un
paramètre. Dans le mode Write, v ous pouvez employ er ce potentiomètre
pour indiquer la destination de l’écriture du programme. En mode
Programme, ce potentiomètre a la fonction de master volume.
5. Commutateur Program Up
Dans le mode Programme, utilisez ce commutateur pour sélectionner
un programme. Le n uméro de programme augmentera chaque fois que
vous appuierez sur ce commutateur. En mode Edit, appuyer sur ce
commutateur
fera apparaître sur l’afficheur Program/Value la v aleur du paramètre du
programme. Dans ce cas , la diode au-dessus du commutateur s’allumera,
indiquant que l’afficheur Program/Value montre la valeur du paramètre
d’effet.
6. Commutateur Program Down
Dans le mode Programme, utilisez ce commutateur pour sélectionner
un programme. Le numéro de programme diminuera chaque fois que
vous appuierez sur ce commutateur. En mode Edit, appuyer sur ce
commutateur fera apparaître sur l’afficheur Program/Value le type d’effet
du programme. Dans ce cas, la diode au-dessus du switch s’allumera,
indiquant que l’afficheur Program/Value montre le type ou le paramètre
d’effet.
Panneau Arrière
1234
1. Prise INPUT
Raccordez votre guitare à cette prise.
2. Prise OUTPUT
Raccordez cette prise à votre amplificateur de guitare.
16
Page 17

AX3A Manuel d’utilisation
3. Prise pour pédale d’expression
Si vous souhaitez utiliser une pédale d’expression au pied pour commander le volume ou le Wah-Wah, vous pouvez connecter une pédale
Korg optionnelle EXP-2 ou XVP-10 sur cette prise.
4. Prise d’alimentation secteur
~DC9V
L’adaptateur secteur vendu séparément peut être branché sur cette prise.
Configuration
Installation des piles
1.
Pour ouvrir le logement des piles, appuyez légèrement sur l’onglet
situé près de la flèche et soulevez le couvercle. Intallez quatre piles
alcalines (vendues séparément) en respectant la polarité et refermez
le couvercle.
2.
Si l’appareil est allimenté sur piles, il se mettra sous tension lorsque
vous brancherez un câble jack monosur cette prise INPUT. L’écran
s’allume quand l’appareil est sous tension. L’AX3A se metse met
hors tension lorsque vous débranchez le câble jack de la prise INPUT.
Raccordements
Mettre les appareils que vous souhaitez raccorder hors tension et baissez
toutes les commandes de volume.
1.
Connectez un câble jack sur la prise OUTPUT de l’AX3A à un
amplificateur, mixeur ou enregistreur.
Reglez le volume de l'ampli, de la console de mixage etc. sur le
minimum afin d'eviter que les bruits de mise sous tension
n'endommagent les enceintes.
Pour utiliser un casque, branchez-le a la prise jack OUTPUT.
2.
Raccordez votre guitare à la prise INPUT.
Si l’appareil est allimenté sur piles, il se mettra sous tension.
3.
Si vous utilisez l’adaptateur secteur (KA181) vendu séparément,
branchez l’adaptateur secteur sur une prise secteur. L’appareil se
mettra sous tension.
4.
Lorsque les raccordement sont terminés, mettez l’appareil raccordé
sous tension et réglez le volume.
Exemple de branchement à un ampli guitare
Guitare
Entrée
Ampli guitare
pédale
PEDAL
OUTPUT
AX3A
INPUT
DC9V
Bloc d'alimentation
secteur á connecter
sur le secteur
17
Page 18

Exemple de branchement à une console de mixage ou d’un enregistreur
Ecouteurs
DC9V
INPUT
OUTPUT
EntréeCasque
Guitare
Quand vous allumez l’appareil, vous serez en mode Programme
suivant la position du selecteur de fonctions.
2.
Tournez le bouton de valeur pour ajuster le volume général.
Si vous connectez l'AX3A à un amplificateur pour guitare, réglez le
volume général à 50.
3.
Appuyez sur le commutateur Program Up ou Down pour sélectionner un
programme.
L’afficheur Program/Value indiquera le numéro du programme.
Enregistreur numérique
AX3A
Bloc d'alimentation
secteur á connecter
sur le secteur
Jouer (Mode Programme)
Les réglages de chaque effet est communément appelés programme.
L’ AX3A possède 80 programmes. Les programmes 01–40 sont
réinscriptibles. Les programmes 41–80 contiennent des programmes
présélectionnés pour une utilisation immédiate.
En mode Programme vous pouvez immédiatement passer d'un son à l'autre
en appuyant sur les pédales de changement de programme up/down.
En mode Programme vous pouvez immédiatement passer d'un son à
l'autre en appuyant sur les commutateurs Program Up/Down.
Pour entrer dans le mode Programme, réglez le sélecteur de fonction
sur [PROGRAM]. (Les diodes au-dessus des commutateurs Program
Up/Down s’allumeront )
Selectionner un programme
1.
Veillez à ce que le sélecteur de fonction soit réglé sur [PROGRAM].
En mode Programme, Les diodes au-dessus des commutateurs Program Up/Down seront allumées.
18
Créez votre son (Mode Edit)
Flux du Signal
PRE FX
DELAY/REVERB
VOLUME PEDAL est utilisable uniquement si une pédale est connecté à
l’entrée PEDAL.
Le mode Edit est quand le sélecteur de fonction est en position [PRE
FX]–[DELAY/REV PARAM].
Vous pouvez changer de type d’eff ets pour chaque catégorie([PRE FX],
[MIC&BODY], [TONE], [LEVEL/NR/NOTCH], [MOD], [DELAY/REV]), et
éditer les paramètres pour créer votre son en détail.
Selectionner les effets et adjuster les paramètres principaux
[PRE FX], [MIC&BODY], [MOD], [DELAY/REV]
Pour sélectionner les effets souhaités, dans chaque catégorie [PRE FX],
[MIC&BODY], [MOD], et [DELAY/REV], Réglez le sélecteur de fonction
sur la position appropriée, et utilisez le bouton [▲][▼].
MIC&BODY
MOD
TONE
VOLUME PEDAL
NR
NOTCH
Page 19

L’afficheur Program/Value indiquera une valeur F0–F9 et la diode au
dessus du commutateur Program Down s’allumera, indiquant que
l’afficheur Program/Value montre le type d’effet.
La liste d’effets imprimée sur le panneau avant vous indique le type d’eff et
sélectionné.
Vous pouvez tourner le bouton Value pour régler le paramètre principal
pour l’effet sélectionné. L’afficheur Program/Value indiquera alors la valeur
du paramètre et la diode au dessus du commutateur Program Up s’allumera,
indiquant que l’afficheur Program/Value montre la valeur du paramètre.
Pour désactiver l’effet sélectionné, pressez simultanément les boutons
[▲] et [▼] . Quand l’effet est actif, le type d’effet est indiqué et quand il
est inactif, l’écran affiche“
”.
■ Guide rapide
Quand vous sélectionnez un effet, l’AX3A sélectionne automatiquement
les paramètres de cet effet à leurs valeurs optimales. En d’autres termes,
vous pouvez créer des gros sons juste en choisissant un effet dans
chaque catégorie PRE FX, MIC&BODY, MOD , et DELAY/REV, sans avoir
besoisn de régler des paramètres détaillés.
En ajustant les paramètres principaux, vous pouvez amener votre son
au plus prêt de ce que vous pensez.
Sélection et réglage des sous-paramètres et des paramètres [TONE]
[PRE FX-PARAM], [TONE], [MOD-PARAM], [DELAY/REV-PARAM]
Vous trouverez ici des explications sur la façon d’éditer les sousparamètres pour l'effet sélectionné dans [PRE FX], [MOD] et [DELAY/
REV], ainsi que les paramètres pour [TONE].
Si vous appuyez sur les touches [▲] ou [▼], l’afficheur Program/Value
indiquera une valeur P1–P4, et la diode au dessus du commutateur
Program Down s’allumera, indiquant que l’afficheur Program/Value
montre le type de paramètre.
AX3A Manuel d’utilisation
Pour les sous paramètres correspondant à P1–P4, referez vous à “Appendices”.
Maintenand, vous pouvez utiliser le bouton de valeur pour ajuster chaque
sous paramètre.
L’afficheur program/value indiquera alors la valeur du paramètre et la
diode au dessus du commutateur Program Up s’allumera, indiquant que
l’afficheur Program/Value montre la valeur du paramètre.
Pour activer/désactiver [T ONE], appuy ez simultanément sur les touches
[▲][▼]. Le type ou la valeur du paramètre sera affiché si l’effet est activ é
et l’indication “
Si un effet autre que [TONE] est désactivé , l’affichage de programme/valeur
indiquera “
pour cette catégorie. Si v ous v oulez éditer les par amètres de chaque effet,
pressez simultanément les boutons [▲] et [▼] pour réactiver l’effet.
■ Guide rapide
Si vous souhaitez modifier le son de l'effet sélectionné, vous pouvez
commencer par régler le paramètre principal, puis régler le sousparamètre P1. Dans la plupart des cas, régler ces deux paramètres vous
permettra d'obtenir le son voulu. ([TONE] est une exception à la règle.)
[LEVEL/NR/NOTCH]
Sélectionnez cette position quand vous souhaitez sélectionner ou régler
le niveau de programme, la réduction de bruit ou le filtre Notch. Pressez
les switchs [▲] ou [▼]pour amener l’écran à LE (program lev el), nr (NR
sensitivity), et nF (notch filter). utilisez le bouton de valeur pour ajuster
chaque paramètre.
LE: utilisez le bouton de valeur pour ajuster le niveau de programme
(0–10). 7.0 est la valeur standard. En cas de distorsion dans le son,
diminuez le volume de l’effet.
nr: Adjustez la réduction de bruit (0–10)afin de ne pas entendre de
bruit quand vous ne jouez pas de guitare.
Selon la guitare que vous utilisez, le son peut être interrompu et des
notes peuvent être retardées si vous réglez la réduction de bruit trop fort.
” apparaîtra s’il est désactivé.
” quand vous règlerez le sélecteur de fonction sur [PARAM]
19
Page 20

nF: Ce bouton permet de régler le filtre Notch (oF, 1-63) de réduction
de la rétroaction acoustique. Tournez le bouton pour spécifier la
fréquence de coupure minimisant la rétroaction acoustique. Le filtre
Notch sera désactivé si vous tournez le bouton complètement à
gauche. Tournez ce bouton vers la droite pour déplacer la fréquence
de coupure vers le haut et trouver le point où la rétroaction
acoustique survient.
Types de paramètres d’effets et écran de valeur
Si vous appuyez sur le commutateur Program Down en mode Edit,
l’afficheur Program/Value indiquera le type d’effet ou le type de
paramètre.(F0–F9, P1–P4). Si vous appuyez sur le commutateur Program Up, l’afficheur program/value indiquera la valeur du paramètre.
Vous pourrez ainsi facilement vérifier les réglages actuels.
Sauvegarde d’un programme(Write mode)
Voici comment sauver un son programmé.
Si vous sortez du programme édité ou si vous eteignez l’appareil sans
sauvegarder, les réglages que vous avez effectué seront effacés.
1.
Réglez le selecteur de fonction sur [WRITE].
2.
Pressez sur le bouton [▲(WRITE)]. Le numéro du programme va clignoter.
3.
Utilisez le bouton Value ou les commutateurs Program Up/Down pour
sélectionner le programme dont v ous souhaitez sauvegarder les réglages .
4
. Pressez le bouton [s(WRITE)] de nouveau. Le programme sera
sauvé, et l’écran indiquera brievement “
Le nouveau programme écrase l’ancien.
Si vous décidez de ne pas sauvegarder le nouveau programme , pressez
le bouton [CANCEL] pour arrêter l’opération.
”.
Vérifiez les valeurs sauvées dans un programme (Valeur originale)
20
La Led de valeur originale de l’écran program/
value vous permet de vérifier la valeur du
programme sauvegardé.
Quand vous utilisez des boutons ou switchs pour
modifier la valeur des paramètres, la Led de
valeur originale s’allumera quand la valeur
atteindra celle du programme d’origine.
Dans le mode programme, cette Led s’éclairera quand les valeurs de
tous les paramètres atteindront celles sauvées dans le programme.
Bypass et Mute
Bypass (désactive tous les effets y compris la réduction de bruit) et
Mute sont des fonctions très pratiques quand vous voulez ajuster votre
ampli, accorder votre guitare, ou changer de guitare. Voici comment
utiliser ces deux fonction.
Bypasser l’AX3A
Pressez simultanément les switchs Program Up et Program Do wn ;tous
les effets seront desactivés. A ce moment, l’écran indiquera “
Muter l’AX3A
Quand l’AX3A est en bypass ou mute, l’accordeur chromatique
automatique sera activé. Pour les désactiver, pressez les switchs Program Up ou Program Down (celà ne changera pas le programme).
Quand vous appuyez simultanément sur les commutateurs Program Up/
Down en mode Edit pendant environ une seconde le son sera coupé.
L’afficheur Program/Value indiquera “
Quand l’AX3A est contourné ou sa sortie coupée, l’accordeur
chromatique automatique est activé. Pour désactiver ces fonctions
appuyez sur le commutateur Program Up ou Down (le programme ne
changera pas).
Quand les effets sont contournés, le bouton VALUE fonctionne comme
commande de volume générale.
”.
”.
Page 21

AX3A Manuel d’utilisation
Accordeur
L’ AX3A possède un accordeur chromatique automatique.
Vous pouvez ajuster le pitch de référence entre A438 Hz–A445 Hz.
Procédure pour l’accord
1.
L’accordeur chromatique automatique est activé quand l’ AX3A est
en position Bypass ou Mute.
Si vous voulez accorder sans produire de sons, comme par exemple lors
d’un concert, vous voudrez probablement mettre l’AX3A en position Mute.
2.
Jouez une note avec votre guitare. L’écran program/value indiquera
le nom de la note la plus proche.
Le nom des notes est indiqué comme suit:
nom des notes
Affichage
3.
Si votre guitare est trop haute, la diode Program Up clignotera. Si
votre guitare est trop basse, la diode Program Down clignoter a. Dans
les deux cas, un clignotement plus rapide indiquera que votre guitare
s’éloigne de la note juste.
Quand l’accord est parfait, les Leds Program Up et Down clignotent
simultanément.
Ajustez le calibrage de l’accord
Quand vous allumez l’AX3A, l’accordeur interne est réglé sur la note de
référence (le LA) à 440Hz. Vous pouv ez ajustez cette note de réf érence
dans une échelle comprise entre 438 Hz et 445 Hz.
Quand l’accordeur est actif, vous pouvez utiliser les boutons [▲][▼] pour
ajuster la note de référence dans une échelle comprise entre 438 Hz–
445 Hz. En faisant ainsi, l’écran program/value indiquera une valeur
comprise entre 38–45.
Quand vous éteignez l’appareil, l’ajustement du pitch que vous aurez
effectué sera éffacé. Le réglage à 440 Hz sera systématiquement rappelé .
CC#DD#EFF#GG# AA#B
Retour aux réglages d’usine
Voici comment retrouver les réglages d’usine de l’AX3A’s ainsi que les
programmes d’origine.
Quand vous excecutez cette fonction, tous les programmes que vous
aurez créés seront effacés et remplacés par les programmes d’usine.
1.
Tout en maintenant simultanément enfoncés les commutateurs Program Up/Down et la touche [▼(CANCEL)], mettez l’appareil sous
tension. L’afficheur Program/Value indiquera "
dessus des commutateurs Program Up/Down clignoteront. Relâchez
la pression sur les commutateurs et la touche.
2.
Si vous ne voulez pas de cette opération, pressez sur le bouton
[▼(CANCEL)].
3.
Pressez le bouton [▲(WRITE)]. L’écran program/value indiquera
” et le chargement va commencer. Quand il sera complet, l’écran
“
indiquera “
”, et l’AX3A entrera automatiquement dans le mode program.
Ne jamais éteindre l’appareil quand il se recharge.
", et les diodes au-
Troubles de fonctionnement
Avant de suspecter une panne, veuillez s’il vous plait vérifier les points
suivants. Si vous n’arrivez pas malgré tout à résoudre le problème,
contactez votre revendeur.
1Pas d’allumage
❑ Les piles ne sont elles pas trop faibles? Quand la capacité des
piles diminue, l’écran va clignoter “
de changer les piles dès que possible. Si les piles sont vides,
ôtez les immédiatement. Laisser des piles usagées dans l’appareil
peut causer des disfonctionnements (coulage par ex emple). Vous
devez ôter les piles si vous ne de vez pas utiliser l’AX3A pour une
longue periode.
”. Nous recommandons
21
Page 22

❑ Avez vous branché un câble stéréo dans l’entrée de l’appareil?
Quand il est utilisé sur piles, l’alimentation n’est pas désactivée
quand un cable stéréo est branché. Veillez à n’utilioser que des
câbles monos.
❑ Est ce que l’adaptateur secteur est compatible?
❑ Est ce qu’il est bien connecté à la prise alimentation?
❑ Peut-il être en panne?
2Pas de son
❑ Vérifiez le volume de sortie de votre guitare.
❑ Le câble de votre guitare électrique est-il bien connecté?
❑ Votre câble n’est-il pas coupé?
❑ Est ce que les paramètres TONE ou PROGRAM LEVEL (LEVEL/
NR/NOTCH) ne sont pas réglés à un niveau trop bas?
❑ Si une pédale d’expression a été branchée, est ce qu’elle
fonctionne?
❑ Est ce que la fonction Mute est activée? Référez vous à la rubrique
“Bypass et Mute” et réactivez là.
❑ Le volume principal n’est-il pas coupé ? Sélectionnez le bouton
de fonction [PROGRAM], puis ajustez le volume.
3. Les Effets ne s’appliquent pas
❑ Est-ce que l’effet n’est pas bypassé?
❑ Est ce que les modulation “DEPTH” ou le delay/reverb “MIX” ne
sont pas réglés à un niveau trop faible?
❑ Est-ce que la profondeur de [MIC&BODY] peut être réglée sur 0 ?
❑ L’AX3A n’est-il pas en mode Bypass? Référez vous à la rubrique
“Bypass et Mute” et annules la fonction Mute.
4.
Les hautes fréquences sont déformées quand vous utilisez
[MIC&BODY]
❑ En fonction de la guitare utilisée, les hautes fréquences peuvent
être déformées si les valeurs des paramètre des effets [TONE]
TREBLE ou XCITER sont trop élevées. Dans ce cas, diminuez
leur réglage.
22
5.
Le son de votre ampli est saturé ou le son est mauvais.
❑ Les valeurs de [TONE] ou le niveau de programme (LEVEL/NR/
NOTCH) sont-ils trop élevés ?
❑ Est ce que le réglage de volume TONE du PROGRAM LEVEL
(LEVEL/NR/CAB) [LEVEL] n’est pas dosé de manière excessive?
Caractéristiques
Nombre d’effets: Types Pre-effect: 10
Nombre de programmes: 80 (40 utilisateurs/40 presélectionnés)
Entrée Audio : ENTREE (Casque Mono)
Sortie Audio : SORTIE (Casque Stéréo)
Processeur de Signal: Conversion A/D: 24 bit
Fréquence
d’échantillonnage: 31.25 kHz
Accordeur: Echelle : C1–E6
Calibration: A=438–445 Hz
Alimentation: 4 piles alcalines AA (utilisation 8 heures
Dimensions (L ✕ P ✕ H): 178 mm ✕ 142 mm ✕ 43 mm
Poids: 340 g
Articles inclus: Owner’s manual
Options : Adaptateur
* Les Spécifications et l’apparence de l’appareil peuvent être modifiés sans préavis.
Types Mic&Body Model: 10
Type Tonel: 1
Type Notch Filter: 1
Types Modulation Effect: 10
Types Delay Effect: 5
Types Reverb Effect: 5
Noise Reduction: 1
Conversion D/A: 24 bit
en continu) ou Adaptateur
secteuroptionnel DC9V.
DC9V AC
Contrôleur au pied EXP-2
Pédale d’experssion/Volume XVP-10
Page 23

Inhalt
Vorsichtsmaßregeln ................................................. 24
Einleitung ................................................................ 25
Willkommen! .................................................................25
Funktionen .....................................................................25
Bedienoberfläche und Rückseite ............................... 25
Bedienfeld...................................................................... 25
Rückseite........................................................................26
Vorbereitung............................................................ 27
Einlegen der Batterien..................................................... 27
Grundlegende Verbindungen..........................................27
Anschlussbeispiel — Gitarrenverstärker...........................27
Anschlussbeispiel — Mischpult/Recorder......................... 27
Spielen (Program-Modus)......................................... 28
Anwahl eines Speichers .................................................. 28
Programmieren eigener Sounds (Edit-Modus) ........... 28
Signalfluss......................................................................28
Effektanwahl und Einstellen der Hauptparameter .............28
Wählen und Einstellen von Zusatzparametern und [TONE]-
Parametern ....................................................................29
Speichern eines Sounds (Write-Modus) ........................... 30
Kontrolle der gespeicherten Einstellungen (Originalwerte) ...
Effektumgehung und Stummschaltung ...................... 30
Umgehen des AX3A ....................................................... 30
Stummschalten des AX3A ...............................................30
Stimmfunktion (Tuner) .............................................. 30
Arbeitsweise für das Stimmen ......................................... 30
Einstellen der Kammertonfrequenz ..................................31
Wiederherstellen der Werksdaten ............................ 31
Fehlersuche ............................................................. 31
Technische Daten ..................................................... 32
30
Page 24

Vorsichtsmaßregeln
Verwendungsort
Bei Verwendung des Geräts an den folgenden Orten kann eine Fehlfunktion
auftreten.
• Im direkten Sonnenlicht
• An Orten mit extremer Temperatur oder Luftfeuchtigkeit
• An sehr staubigen oder schmutzigen Orten
• An Orten mit starker Vibration
• In der Nähe von Magnetfeldern
Stromversorgung
Schließen Sie das spezielle Netzteil an eine Netzsteckdose mit der richtigen
Netzspannung an. Schließen Sie es nicht an eine Steckdose mit einer anderen
Spannung als der für das Gerät geeigneten an.
Störungen mit anderen elektrischen Geräten
In der Nähe aufgestellte Radio- oder Fernsehgeräte können
Empfangsstörungen aufweisen. Betreiben Sie dieses Gerät immer in einem
geeigneten Abstand von Radio- oder Fernsehgeräten.
Behandlung
Um Beschädigungen zu vermeiden, betätigen Sie Schalter oder
Bedienungselement nicht mit Gewalt.
Pflege
Wenn das Äußere schmutzig wird, mit einem sauberen, trockenen Lappen
abwischen. Verwenden Sie keine flüchtigen organischen Lösungsmittel wird
Benzol, Terpentin, Reinigungslösungen oder entflammbare Poliermittel.
Die Anleitung aufbewahren
Nach dem Lesen dieser Anleitung bewahren Sie sie bitte zum Nachschlagen
auf.
Fremdkörper aus dem Gerät halten
Stellen Sie niemals Behälter mit Flüssigkeiten in der Nähe des Geräts ab.
Wenn Flüssigkeit in das Gerät eindringt, kann ein Geräteausfall, Brand oder
elektrischer Schlag verursacht werden.
Achten Sie darauf, keine Metallobjekte in das Gerät kommen zu lassen. Falls
ein Gegenstand in das Gerät eindringt, ziehen Sie das Netzteil von der
Steckdose ab. Dann wenden Sie sich an Ihren K org-F achhändler oder an des
Geschäft, in dem das Gerät gekauft wurde.
CE-Kennzeichen für europäische harmonisierte Standards
Das CE-Kennzeichen, dass an den mit Netzstrom betriebenen Produkten
unserer Firma, hergestellt bis zum 31. Dezember 1996, angebracht ist,
zeigt an, dass das betreffende Gerät mit der EMV -Richtlinie (89/336/EWG)
und der CE-Kennzeichen-Richtlinie (93/68/EWG) übereinstimmt.
Das nach dem 1. Januar 1997 angebrachte CE-Kennzeichen weist auf
Übereinstimmung mit der EMV-Richtlinie (89/336/EWG), CE-K ennzeichenRichtlinie (93/68/EWG) und Niederspannungsrichtlinie (73/23/EWG) hin.
Außerdem zeigt das CE-Kennzeichen, dass an den mit Batteriestrom
betriebenen Produkten unserer Firma angebracht ist, an dass das
betreffende Gerät mit der EMV-Richtlinie (89/336/EWG) und der CEKennzeichen-Richtlinie (93/68/EWG) übereinstimmt.
WICHTIGER HINWEIS FÜR KUNDEN
Dieses Produkt wurde unter strenger Beachtung von Spezifikationen und
Spannungsanforderungen hergestellt, die im Bestimmungsland gelten.
Wenn Sie dieses Produkt über das Internet, per Postversand und/oder mit
telefonischer Bestellung gekauft haben, müssen Sie bestätigen, dass dieses
Produkt für Ihr Wohngebiet ausgelegt ist.
WARNUNG: V erw endung dieses Produkts in einem anderen Land als dem,
für das es bestimmt ist, verwendet wird, kann gefährlich sein und die
Garantie des Herstellers oder Importeurs hinfällig lassen werden.
Bitte bewahren Sie diese Quittung als Kaufbeleg auf, da andernfalls das
Produkt von der Garantie des Herstellers oder Importeurs ausgeschlossen
werden kann.
* Die ubrigen in dieser Bedienungsanleitung erwahnten Firmen-, Produkt-,
Formatnamen usw. sind Warenzeichen oder eingetra-gene Warenzeichen
der rechtlichen Eigentumer und werden ausdrucklich anerkannt.
24
Page 25

Einleitung
Willkommen!
Vielen Dank für deine Entscheidung zu einem AX3A ModelingSignalprozessor der TONEWORKS-Serie. Wir sind uns ziemlich sicher,
dass du damit Stunden lang in Sound-Orgien schwelgen wirst – sei es
live, im Studio, oder beim Üben mit einem Kopfhörer!
Um über Jahre hinweg Freude an deinem neuen AX3A zu haben und
es richtig zu bedienen, musst du dir diese Bedienungsanleitung
vollständig durchlesen. Bewahre sie an einem Ort auf, wo du sie bei
Bedarf wieder findest.
Funktionen
❑ Hochwertige Sounds dank Modeling-Technologie von Korg
Was ist
ist eine von Korg entwickelte Klangformungstechnologie, die den
komplexen Charakter und das Verhalten von akustischen und
elektrischen Instrumenten wie auch elektronischen Schaltungen in
realen Umgebungen präzise nachbildet.
von Klangerzeugungscharakteristiken: Instrumentenkörper/-gehäuse,
Lautsprecher und Boxen, akustische Umgebungen, Vakuumröhren,
Transistoren, usw.
❑ Du kannst bis zu 6 der 43 internen Effekte gleichzeitig verwenden
(darunter auch Rauschunterdrückung).
❑ Alle Parameter für die Effekte in den fünf Eff ektkategorien (Pre-Effekt,
Mikrofon- und Körper-Modeling, Ton, Modulation Delay/Reverb)
können komplett bearbeitet werden.
❑ Eigene Sounds kannst du in 40 User-Speichern sichern. Außerdem
stehen dir 40 erstklassige Preset-Speicher zur V erfügung, mit denen
du sofort loslegen kannst.
?
(Resonant Structure and Electronic Circuit Modeling System)
simuliert eine Vielzahl
AX3A Bedienungsanleitung
❑ Der eingebaute Kammfilter erlaubt es, akustische Rückkopplung zu
beseitigen.
❑ Mit einem optionalen Korg-Schweller (EXP-2 oder XVP-10) kannst
du wahlweise den Wah-Effekt bedienen oder die Lautstärke
einstellen.
❑ Beim Wechseln zwischen Programmen, die den gleichen Delay-Typ
und TIME-Parameter ([P1]-Einstellung) verwenden, reißt das Delay
nicht ab. Das gleiche gilt für Programme mit gleichem Reverb-Typ:
Auch hier klingt der Hall natürlich aus.
❑ Bei Anwahl des Bypass-Modus’ bzw . beim Stummschalten des Geräts
wird automatisch die autochromatische Stimmfunktion aktiviert.
Bedienoberfläche und Rückseite
Hier werden die Bedienelemente der Vorderseite und die Anschlüsse
auf der Rückseite des AX3A vorgestellt.
Bedienfeld
1
2
6
4
3
5
25
Page 26

1. Funktionswahlschalter
Die Funktion der Up/Down-T aster und des Eingaberads richten sich nach
dem hier eingestellten Modus. Stelle den Schalter auf [PROGRAM], um
den Program-Modus zu wählen oder auf [WRITE], um Einstellungen zu
speichern. Zum Editieren wählst du eine der Positionen
[PRE FX]~[DELAY/REV-PARAM].
2. Speicher-/Werte-Display
Im Edit-Modus werden hier der Effekttyp (F0~F9, LE, nr, nF), der Parameter (Px1~P4) und sein aktueller Wert angezeigt.
Im Write- und Program-Modus wird die Programmnummer im Display
angezeigt. W enn du BYPASS/MUTE aktivierst, erscheint beim Stimmen
der Notenname im Display.
3. [▲(WRITE)]-/ [▼(C ANCEL)]-Taster
Im Effekt-Modus kannst du mit diesen Tastern Effekttypen bzw. Parameter wählen.
Drücke beide Taster gleichzeitig, um einen Effekt ein-/auszuschalten.
Im Write-Modus dienen diese Taster zum Speichern von Programmen.
Im Program-Modus kannst du diese Taster betätigen, um
Programmspeicher in 10er-Schritten zu wählen. Und bei aktiver
Stimmfunktion dienen sie zum Einstellen der Kammertonfrequenz.
4. Eingaberad
Im Edit-Modus kannst du mit diesem Rad die Parameterwerte einstellen.
Im Write-Modus wählst du damit den Zielspeicher. Im Program-Modus
kannst du hiermit die Gesamtlautstärke regeln.
5. Program Up-Schalter
Im Program-Modus kann hiermit der benötigte Speicher gewählt werden. Bei
wiederholtem Drücken dieses Schalters wird die jeweils nächste
Speichernummer gewählt. Im Edit-Modus rufst du hiermit den Parameterw ert
im Speicher-/Werte-Display auf. Dann leuchtet die Diode über dem Schalter,
damit du weißt, dass das Speicher-Display momentan P arameterwerte anzeigt.
6. Program Down-Schalter
Im Program-Modus kann hiermit der benötigte Speicher gewählt werden.
Bei wiederholtem Drücken dieses Schalters wird der jeweils
vorangehende Speicher gewählt. Im Edit-Modus kannst du ihn betätigen,
damit der Parametertyp im Speicher-/Werte-Display angezeigt wird. Dann
leuchtet die Diode über dem Schalter, damit du weißt, dass das SpeicherDisplay momentan den Effekt- oder Parametertyp anzeigt.
Rückseite
1234
1. INPUT-Buchse
Hier musst du deine Gitarre anschließen.
2. OUTPUT-Buchse
Hier kannst du deinen Gitarrenverstärker oder Kopfhörer anschließen.
3. PEDAL-Anschluss
Hier kannst du ein optionales Korg-Schwellpedal (EXP-2 oder XVP-10)
anschließen.
Wenn du es als Wah-Pedal nutzen möchtest, musst du unter [PRE FX]
„WAH“ einstellen. Ansonsten fungiert es als Volumenpedal.
4. Stromversorgung
~DC9V
Hier kann ein AC-Netzteil (Sonderzubehör) angeschlossen werden.
26
Page 27

Vorbereitung
Einlegen der Batterien
1.
Öffne das Batteriefach, indem du die Abdeckung in Pfeilrichtung
schiebst.
Lege vier AA-Alkalibatterien (nicht im Lieferumfang) ein. Achte dabei
auf die richtige „+“/„–“-Polarität. Danach musst du das Batteriefach
wieder schließen.
2.
Wenn du das AX3A mit Batterien betreibst, schaltet es sich
automatisch ein, sobald du eine Mono-Klinke in die INPUT-Buchse
steckst. Dann werden im Display die Speichernummer bzw. andere
Informationen angezeigt.
Ziehe die Klinke aus der INPUT -Buchse , um das Gerät auszuschalten.
Grundlegende V erbindungen
Schalte alle Geräte vor Herstellen der Anschlüsse aus. Andernfalls
könntest du deinen Verstärker oder die Lautsprecher beschädigen bzw.
Betriebsstörungen verursachen.
1.
Verbinde die OUTPUT-Buchse des AX3A über ein Audiokabel mit
dem Eingang des Mischpults/Recorders oder Verstärkers.
Vor Herstellen der Verbindung musst du die Lautstärke des anderen
Geräts auf den Mindestwert stellen.
AX3A Bedienungsanleitung
Wenn du mit einem Kopfhörer arbeiten möchtest, musst du ihn an
die OUTPUT-Buchse anschließen.
2.
Verbinde die Gitarre mit der INPUT-Buchse auf der Rückseite.
Damit schaltest du im Batteriebetrieb das Gerät ein.
3.
Ein (optionales) AC-Netzteil musst du zuerst mit der DC9V-Buchse
auf der Rückseite und danach mit einer Steckdose verbinden.
4.
Jetzt kannst du auf dem V erstärker (Mix er) die Lautstärke einstellen.
Anschlussbeispiel — Gitarrenverstärker
Gitarre
Gitarren-
verstärker
Eingang
Pedal
PEDAL
OUTPUT
AX3A
INPUT
DC9V
AC-Netzteil
(zu einer Steckdose)
Anschlussbeispiel — Mischpult/Recorder
Kopfhörer
Digitales Aufnahmegerät
DC9V
INPUT
OUTPUT
EingangPhones(Kopfhörer)
AC-Netzteil
AX3A
(zu einer Steckdose)
Gitarre
27
Page 28

Spielen (Program-Modus)
Die Einstellungen eines gespeicherten Sounds nennen wir „Program“.
Das AX3A bietet 80 solcher Speicher. In den Speichern 01~40 kannst
du eigene Einstellungen sichern. Die Speicher 41~80 enthalten „Presets“, die dir auf die Sprünge helfen sollen.
Im Programm-Modus kann sofort zwischen Sounds umgeschaltet
werden, die Programm höher/niedriger Pedale gedrückt wird, um
Programme umzuschalten.
Im Programm-Modus kann sofort zwischen Sounds umgeschaltet
werden, der Program Up/Down-Schalter gedrückt wird, um Programme
umzuschalten.
Um den Program-Modus aufzurufen, musst du den Funktionswahlschalter
auf [PROGRAM] stellen. (Die Dioden über den Up/Do wn-Schaltern leuchten.)
Anwahl eines Speichers
1.
Aktiviere den Program-Modus.
Stelle den Funktionswahlschalter auf [PROGRAM].
Wenn die Dioden des Program Up- und Program Down-Schalters
leuchten, ist der Program-Modus aktiv.
Unmittelbar nach dem Einschalten wird der Program-Modus
automatisch gewählt.
2.
Stelle mit dem Eingaberad die Lautstärke ein.
Wenn Sie das AX3A an einen Gitarren Verstärker angeschlossen
haben,dann stellen Sie das Master Volume auf 50.
3.
Drücke den Program Up- oder Program Down-Schalter, um einen
Speicher zu wählen.
Das Speicher-/Werte-Display zeigt die Nummer des gewählten
Speichers an.
Programmieren eigener Sounds (Edit-Modus
)
Signalfluss
PRE FX
DELAY/REVERB
„VOLUME PEDAL“ ist nur belegt, wenn man ein Pedal an die PEDALBuchse anschließt.
Bei Anwahl einer Einstellung [PRE FX]~[DELAY/REV P ARAM] wird der
Edit-Modus aktiviert.
Jeder Kategorie kann dann ein anderer Effekttyp zugeordnet werden
([PRE FX], [MIC&BODY], [TONE], [LEVEL/NR/NOTCH], [MOD], [DELAY/REV]). Außerdem lassen sich mehrere Effektpar ameter abwandeln.
MIC&BODY
MOD
TONE
VOLUME PEDAL
NR
NOTCH
Effektanwahl und Einstellen der Hauptparameter
[PRE FX], [MIC&BODY], [MOD], [DELAY/REV]
Um für die Kategorie [PRE FX], [MIC&BODY], [MOD] oder [DELAY/REV]
einen anderen Effekt zu wählen, musst du den Funktionswahlschalter
auf den zutreffenden Eintrag stellen und die Taster [▲][▼] verwenden.
Im Speicher-/Werte-Display erscheint dann eine Angabe wie F0~F9, und
die Diode über dem Program Down-Schalter leuchtet, damit du weißt,
dass das Speicher-Display momentan den Effekttyp anzeigt.
Die verfügbaren Effekte findest du auf der Frontplatte.
Mit dem Eingaberad kannst du den „Hauptparameter“ des gewählten
Effekts beeinflussen. Im Speicher-/Werte-Display erscheint dann der
Parameterwert, und die Diode über dem Program Up-Schalter leuchtet,
damit du weißt, dass das Speicher-Display momentan einen Wert
anzeigt.
28
Page 29

Um den gewählten Effekt auszuschalten, musst du die Taster [▲] und
[▼] simultan drücken. Wenn der Effekt aktiv ist, wird der Typ angezeigt.
Ist er hingegen aus, so wird „
“ angezeigt.
■ Praxis
Bei Anwahl eines Effekts lädt das AX3A immer die Idealeinstellungen
für dessen Parameter. Du kannst also schon erstklassige Sounds
erzielen, indem du einfach für jede Kategorie (PRE FX, MIC&BODY,
MOD und DELAY/REV) einen anderen Effekt wählst.
Über die Hauptparameter kannst du dann den Feinschliff vornehmen.
Wählen und Einstellen von Zusatzparametern und [TONE]-Parametern
[PRE FX-PARAM], [TONE], [MOD-PARAM], [DELAY/REV-PARAM]
So werden die Zusatzparameter für den in [PRE FX], [MOD] und [DELAY/REV] gewählten Effekt bearbeitet, ebenso wie die Parameter für
[TONE].
Bei Betätigen des [▲]- oder [▼]-Tasters erscheinen im Speicher-/W erteDisplay die Parameterbez eichnungen P1~P5. Die Diode über dem Program Down-Schalter leuchtet, damit du weißt, dass das Speicher-Display momentan den Parametertyp anzeigt.
Mit welchen Zusatzparametern P1~P4 jeweils belegt sind, erfährst du
im „Appendices“ auf S.44.
Jetzt kannst du die Zusatzparameter mit dem Eingaberad einstellen.
Im Speicher-/Werte-Display erscheint der Parameterwert, und die Diode über dem Program Up-Schalter leuchtet, damit du weißt, dass das
Speicher-Display momentan einen Wert anzeigt.
Zum Ein-/Ausschalten von [TONE] drücke beide Schalter [ ▲][▼] gleichzeitig.
Der Parametertyp oder -wert wird angezeigt, wenn dieser Schalter aktiviert
ist, und die Anzeige „
Wenn ein anderer Effekt als [TONE] ausgeschaltet ist, z eigt das Speicher/Werte-Display „
Kategorie auf [P ARAM] gestellt wird. Drücke dann den [s]- und [t]-Taster ,
um den Effekt zu aktivieren.
“ erscheint, wenn er deaktiviert ist.
“ an, wenn der Funktionswahlschalter für diese
AX3A Bedienungsanleitung
■ Praxis
Wenn du Einstellungen am Klang der gewählten Eff ekte vornehmen willst,
musst du zuerst die Hauptparameter einstellen, und dann den
Zusatzparameter P1. In den meisten F ällen wird durch Einstellung dieser
beiden Parameter der gewünschte Sound erhalten. ([TONE] ist eine
Ausnahme von dieser Regel.)
[LEVEL/NR/NOTCH]
Wähle diese Position, w enn der Programmpegel, die Rauschunterdrückung
der der Kammfilter eingestellt werden soll. Drücke den [s]- oder [t]-Taster
wiederholt, um der Reihe nach „LE“ (Programmpegel), „nr“
(Empfindlichkeit der Rauschunterdrückung) und „nF“ (Box en) zu wählen.
Mit dem Eingaberad kannst du die Parameterwerte einstellen.
LE: Einstellen des Programmpegels (0~10). Der normale Wert lautet
„5.0“). Bei bestimmten Effekteinstellungen tritt unschöne Verzerrung
auf, die man durch Verringern dieses Wertes wieder in den Griff
bekommt.
nr: Stelle die Empfindlichkeit der Rauschunterdrückung (0~10) so ein,
dass kein Rauschen hörbar ist, wenn du nicht auf der Gitarre spielst.
Bei bestimmten Gitarren werden lang gehaltene Noten eventuell zu
früh ausgeblendet. Wähle dann einen kleineren Wert. Wähle immer
eine für dich „stressfreie“ Einstellung.
nF: Dies stellt den Kammfilter (oF, 1-63) ein, der die akustische
Rückkopplung verringert.
Drehe den Knopf, um die Schwellenfrequenz einzustellen, bei der die
akustische Rückkopplung verringert wird. Der Kammfilter wird
ausgeschaltet, wenn du den Regler ganz nach links stellst. Drehe den
Regler ganz nach rechts, um die Kammfilterfrequenz von niedrig auf
hoch zu stellen, und suche den Punkt auf, bei dem Rückkopplung auftritt.
Anzeige von Effekt-/Parametertyp und Wert
Wenn du im Edit-Modus den Program Down-Schalter drückst, wird im
Speicher-/Werte-Display der Effekt- bzw. Parametertyp angezeigt
29
Page 30

(F0~F9, P1~P4). Drücke den Program Up-Schalter, damit der
Parameterwert angezeigt wird. Praktisch für schnelle Kontrollen…
Speichern eines Sounds (Write-Modus)
Wenn du mit einem Sound zufrieden bist, kannst du ihn wie folgt speichern.
Wenn du allerdings vorher einen anderen Speicher wählst bzw . das Gerät
ausschaltest, werden deine Einstellungen wieder gelöscht!
1.
Stelle den Funktionswahlschalter auf [WRITE].
2.
Drücke den [▲(WRITE)]-Taster. Jetzt blinkt die Speichernummer.
3.
Wähle mit dem Einstellrad oder den Program Up/Down-Schaltern
den gewünschten Speicherplatz.
4.
Drücke den [▲(WRITE)]-Taster erneut. Deine Einstellung wird
gespeichert und im Speicher-/Werte-Display wird kurz „
angezeigt.
Beim Speichern ersetzt die neue V ersion den vorigen Sound. Letzterer
geht also verloren.
Wenn du das nicht möchtest, kannst du den Vorgang noch mit dem
[CANCEL]-Taster abbrechen.
Kontrolle der gespeicherten Einstellungen (Originalwerte)
Anhand der „Original Value“-Diode des
Speicher-/Werte-Displays kannst du bequem
die gespeicherten Werte kontrollieren.
Sobald du beim Editieren den gespeicherten
Wert erreichst, leuchtet die Diode.
Im Program-Modus leuchtet diese Diode, wenn alle Parameter den
gespeicherten Einstellungen entsprechen.
30
Effektumgehung und Stummschaltung
Zum Einstellen des V erstärkers, beim Stimmen bzw . Wechseln der Gitarre
usw. kannst du das Gerät stummschalten oder die Effekte (inkl.
Rauschunterdrückung) umgehen. Das funktioniert folgendermaßen.
Umgehen des AX3A
Betätige Program Up und Program Down gleichzeitig: Alle Effekte w erden
umgangen. Im Speicher-/Werte-Display erscheint „
“.
Stummschalten des AX3A
Halte die Program Up- und Program Down-Schalter ±1 Sekunde
gedrückt, um die Ausgabe stummzuschalten. Im Speicher-/Werte-Display erscheint „
Wenn du die Effekte umgehst oder das Gerät stummschaltest, wird der
“
autochromatische Tuner aktiviert. Um diese Modi wieder aufzuheben,
musst du lediglich den Program Up- oder Program Down-Schalter
betätigen (der Speicher wird dadurch nicht umgeschaltet).
Im Umgehungsstatus fungiert der Value-Regler als Hauptlautstärk eregler.
“.
Stimmfunktion (Tuner)
Das AX3A enthält eine autochromatische Stimmfunktion („Tuner“).
Die Kammertonfrequenz der Note „A“ kann im Bereich 438~445Hz
geändert werden.
Arbeitsweise für das Stimmen
1.
Im Bypass- und Mute-Modus (Stummschaltung) wird der Tuner des
AX3A automatisch aktiviert.
Bei einem Auftritt empfiehlt es sich, das AX3A stummzuschalten,
um das Publikum nicht mit deinen „Stimmkünsten“ zu nerven.
Page 31

2.
Spiele eine Note auf der Gitarre. Im Speicher-/Werte-Display
erscheint der Name der erkannten Note.
Die Notennamen werden folgendermaßen angezeigt:
Notenname
Anzeige
3.
Wenn deine Gitarre zu hoch gestimmt ist, blinkt die Diode des Program Up-Schalters. Ist sie zu tief gestimmt, so blinkt die Diode des
Program Down-Schalters. Je schneller eine Diode blinkt, umso weiter
bist du von der richtigen Tonhöhe entfernt.
Wenn beide Dioden (Program Up & Down) konstant leuchten, ist die
Stimmung perfekt.
CC#DD#EFF#GG# AA#B
Einstellen der Kammertonfrequenz
Beim Einschalten wird als Kammertonfrequenz (Referenz) automatisch
A= 440Hz gewählt. Der Tuner lässt sich im Bereich 438Hz~445Hz
kalibrieren.
Hierfür muss die Stimmfunktion aktiv sein. Dann kannst du mit den
[▲][▼]-Tastern die Kammertonfrequenz wählen (438Hz~445Hz). Die im
Speicher-Display angezeigten Werte lauten dabei 38~45.
Die Kalibrierung geht beim Ausschalten des Geräts verloren. Beim
nächsten Einschalten wird automatisch wieder 440Hz gewählt.
Wiederherstellen der Werksdaten
Mit folgendem Verfahren kannst du dein AX3A auf die Werksvorgaben
zurückstellen.
Achtung: Dabei gehen alle selbst programmierten Sounds verloren. Das
AX3A ist dann wieder „taufrisch“.
AX3A Bedienungsanleitung
1.
Halte den Program Up- und den Down-Schalter sowie den
[▼(CANCEL)]-Taster gedrückt, während du das Gerät einschaltest.
Im Speicher-/Werte-Display erscheint „
den Program Up/Down-Schaltern blinken. Gib die Schalter und den
Taster wieder frei.
2.
Wenn du es dir im letzten Moment doch noch anders überlegst, musst
du den [▼(CANCEL)]-Taster drücken.
3.
Drücke den [▲(WRITE)]-T aster . Im Speicher-/Werte-Display erscheint
“ und die Werksdaten werden geladen. Wenn alle Daten
„
vorliegen, erscheint „
in den Program-Modus.
Schalte das Gerät niemals aus, solange die Wiederherstellung der
Werksdaten noch läuft.
“, Danach wechselt das AX3A automatisch
“ und die Dioden über
Fehlersuche
Wenn du den Eindruck hast, dass etwas nicht nach Plan läuft, solltest
du zuerst folgende Punkte überprüfen. W enn sich dadurch das Prob lem
nicht beheben lässt, wenden Sie sich an Ihren Fachhändler.
1. Das Gerät kann nicht eingeschaltet werden
❑ Sind die Batterien erschöpft? Wenn sich die Batteriespannung
dem Ende zuneigt, blinkt im Display die Meldung „
musst du umgehend neue Batterien einlegen. Entferne leere
Batterien immer sofort aus dem Gerät. Tust du das nämlich nicht,
so kommt es zu Betriebsstörungen (z.B. durch Auslaufen der
Batterieflüssigkeit). Entferne die Batterien außerdem, wenn du
das AX3A längere Zeit nicht verwenden möchtest.
❑ Steckt vielleicht eine Stereo-Klinke in der INPUT-Buchse?
Wenn du das AX3A mit Batterien betreibst, schaltet es sich bei
Anschließen einer Stereo-Klinke nicht ein. Schau also nochmal
nach, ob du auch wirklich ein Monokabel verwendest.
“. Dann
31
Page 32

❑ Hast du das AC-Netzteil an die DC9V-Buchse auf der Rückseite
angeschlossen?
❑ Hast du das Netzteil an eine geeignete Steckdose ange-
schlossen?
❑ Ist das Netzteil eventuell beschädigt?
2. Nix zu hören
❑ Hast du die Lautstärke deiner Gitarre ganz zurückgenommen?
❑ Ist das Gitarrenkabel richtig angeschlossen?
❑ Ist das Gitarrenkabel eventuell defekt?
❑ Hast du unter TONE oder PROGRAM LEVEL (PROGRAM
LEVEL) zu niedrige Parameterwerte eingestellt?
❑ Hast du die Lautstärke eines externen Effekts heruntergedreht?
❑ Hast du ein Schwellpedal angeschlossen, das gerade hoch-
geklappt ist?
❑ Hast du die Stummschaltung aktiviert? Schalte diese Funktion
wieder aus, siehe „Effektumgehung und Stummschaltung“ (S.30).
❑ Hast du die Gesamtlautstärke auf den Mindestwert gestellt? Stelle
den Funktionswahlschalter auf [PROGRAM] und wähle mit dem
Einstellrad eine höhere Gesamtlautstärke.
3. Ein Effekt streikt
❑ Wird der Effekt umgangen?
❑ Hast du Modulation „DEPTH“ bzw. Dela y/Rev erb „MIX“ auf einen
kleinen Wert gestellt?
❑ Kann es sein, dass [MIC&BODY] DEPTH auf 0 gestellt ist?
❑ Hast du die Effektumgehung des AX3A aktiviert (Bypass)?
Schalte sie wieder aus, siehe „Effektumgehung und Stummschaltung“ (S.30).
4. Hohe Frequenzen werden bei V erwendung von [MIC&BOD Y]
verzerrt
❑ Je nach der verwendeten Gitarre können die hohen Frequenzen
verzerrt werden, wenn die Parameterwerte [TONE] TREBLE oder
XCITER zu stark angehoben sind. In diesem Fall verringere die
32
Einstellung.
5. Der Gitarrenverstärker gibt unschöne Verzerrung aus oder
klingt „komisch“
❑ Sind möglicherweise die Werte von [TONE] oder von PR OGRAM
LEVEL (LEVEL/NR/NOTCH) übertrieben hoch eingestellt?
Technische Daten
Anzahl der Effekte: Pre-Effekt-Typen: 10
Anzahl der Programmspeicher:80 (40 User/40 Preset)
Audio-Eingabe: INPUT-Buchse (Mono-Klinke)
Audio-Ausgabe: OUTPUT-Buchse (Stereo-Klinke)
Signalverarbeitung: A/D-Wandlung: 24 Bit
Sampling-Frequenz: 31.25 kHz
Stimmfunktion: Erkennungsbereich: C1~E6
Kammertonfrequenz: A=438~445 Hz
Stromversorgung: 4x AA-Alkalibatterien (8 Stunden
Abmessungen (B ✕ T ✕ H): 178 mm ✕ 142 mm ✕ 43 mm
Gewicht: 340 g
Lieferumfang: Bedienungsanleitung
Sonderzubehör:
* Anderungen der technischen Daten und des Designs ohne vorherige Ankündigung
vorbehalten.
Mic&Body-Modelle: 10
Ton: 1
Notch: 1
Modulationseffekte: 10
Delay-Effekte: 5
Reverb-Effekte: 5
Rauschunterdrückung: 1
D/A-Wandlung: 24 Bit
Dauerbetrieb) oder AC-Netzteil (Sonderzubehör)
AC-Netzteil
EXP-2 Schwellpedal
XVP-10 Schwell-/Volumenpedal
Page 33

Appendices
PRE FX
F0 COMP SENS 1...10 - - - - - - - F1 LIMITER RATIO 0...10 THRESHOLD 1...10 LEVEL 0...10 ATTACK 0...10 - F2 SLOWATK ATTACK 0...10 - - - - - - - F3 XCITER FREQ 1...10 EFFECT 0...10 TYPE 1,2 - - - F4 WAH MANUAL 1...10 RESO 0...10 OPEN 1...10 TRIM 1...10 - F5 VIB/PH SPEED 1...10 DEPTH 0...10 TYPE U1,U2,or,b MANUAL 1...10 - F6 CH/FLN SPEED 1...10 DEPTH 0...10 RESO 0...10 MANUAL 1...10 - F7 DRONE KEY A...G' MIX 0...10 RESO 1...10 - - - F8 OCTAVE EFFECT 0...10 DIRECT 0...10 - - - - - F9 RINGMOD OSCFREQ 0...10 EFFECT 0...10 DIRECT 0...10 FILTER 1...10 - -
MIC&BODY
F0 C-MIC DEPTH 0...10
F1 M-LARGE DEPTH 0...10
F2 M-SMALL DEPTH 0...10
F3 G-LARGE DEPTH 0...10
F4 G-SMALL DEPTH 0...10
F5 T-LARGE DEPTH 0...10
F6 DRY DEPTH 0...10
F7 NYLON DEPTH 0...10
F8 STEEL DEPTH 0...10
F9 RESO DEPTH 0...10
Main Parameter P1 P2 P3 P4
Main Parameter
44
Page 34

TONE
TREBLE -15...15 MIDDLE -15...15 MID FREQ 1...10 BASS -15...15
P1 P2 P3 P4
LEVEL/NR/NOTCH
PROGRAM LEVEL 0...10 NR SENS 0...10 NOTCH oF,1...63
MOD
F0 CL CHO SPEED 1...10 DEPTH 0...10 MANUAL 1...10 MODE 1,2,3 - F1 MT CHO SPEED 1...10 DEPTH 0...10 TIME 0...10 MIX 0...10 - F2 CL FLN SPEED 1...10 RESO 0...10 DEPTH 0...10 MANUAL 1...10 MIX 0...10
F3 BI CHO SPEED1 1...10 SPEED2 1...10 DEPTH 0...10 RESO 0...10 MODE 1,2,3,4
F4 DUO PH SPEED1 1...10 SPEED2 1...10 DEPTH 0...10 RESO 0...10 MODE 1,2,3,4,5
F5 TREM SPEED 1...10 DEPTH 0...10 SPREAD 0...10 LEVEL 1...10 - F6 ROTARY SPEED 1...10 DEPTH 0...10 - - - - - F7 PITCH PITCH -12...12 EFFECT 0...10 DIRECT 0...10 FINE -15...15 TRACKING 1...10
F8 RND FILT SPEED 1...10 MIX 0...10 RESO 0...10 MANUAL 1...10 DEPTH 0...10
F9 FILTRON SENS/POL 0...10,-0...-10 ATTACK 1...10 RESO 0...10 MANUAL 1...10 DEPTH 0...10
DELAY/REVERB
F0 ECHO+ MIX 0...10 TIME 0...10 FEEDBACK 0...10 TONE 1...10
F1 MLT HD MIX 0...10 TIME 0...10 FEEDBACK 0...10 TONE 1...10
F2 MOD DLY MIX 0...10 TIME 0...10 FEEDBACK 0...10 SPEED 1...10
F3 ST DLY MIX 0...10 TIME 0...10 FEEDBACK 0...10 TONE 1...10
F4 PP DLY MIX 0...10 TIME 0...10 FEEDBACK 0...10 TONE 1...10
F5 SLAP MIX 0...10 TIME 1...10 HI DAMP 0...10 LO DAMP 0...10
F6 SPRING MIX 0...10 TIME 1...10 HI DAMP 0...10 LO DAMP 0...10
F7 PLATE MIX 0...10 TIME 1...10 HI DAMP 0...10 LO DAMP 0...10
F8 ROOM MIX 0...10 TIME 1...10 HI DAMP 0...10 LO DAMP 0...10
F9 HALL MIX 0...10 TIME 1...10 HI DAMP 0...10 LO DAMP 0...10
Main Parameter P1 P2 P3 P4
Main Parameter P1 P2 P3
LE nr nF
45
Page 35

Preset program chart
Program No. Program name Body type
41 FOLK1 C-MIC
42 FOLK2 M-LARGE
43 FOLK3 G-SMALL
44 CONFESSOR T-LARGE
45 LOWRIDER C-MIC
46 BLUES1 G-LARGE
47 BLUES2 BODY
48 BLUES3 STEEL
49 EC OOO M-SMALL
50 DRONE STEEL
51 MY CHORUS C-MIC
52 BI CHORUS T-LARGE
53 EQ & MT CHO Body OFF/EQ ON
54 DUO PHSE G-SMALL
55 TREM RESO RESO
56 SLOWATK NYLON
57 MOD DLAY G-LARGE
58 BOSSA NYLON
59 AC ECHO+ M-LARGE
60 WATERFILTER STEEL
Program No. Program name Body type
61 AC FLNG T-LARGE
62 BEN RESO RESO
63 DRY HOLLOW M-SMALL
64 FILTRON M-LARGE
65 OCTAVE DRY
66 AC SOLO T-LARGE
67 CHORD FX C-MIC
68 SMALL ROOM G-SMALL
69 U-VIB G-LARGE
70 ROTARY T-LARGE
71 PP DELAY OFF
72 SUPER MOD M-SMALL
73 AC PRE AMP Body OFF/EQ ON
74 C-MIC C-MIC
75 M-LARGE M-LARGE
76 G-LARGE G-LARGE
77 DRY DRY
78 NYLON NYLON
79 STEEL STEEL
80 RESO RESO
46
Page 36

4015-2 Yanokuchi, Inagi-city, Tokyo 206-0812 Japan
C 2006 KORG INC.
1802 FTH
Printed in Japan
 Loading...