

Page 1

Owner’s Manual
Manuel d’utilisation
Bedirnungshandbuch
Bedirnungshandbuch Manuel d'utilisation Owner's Manual
Page 2

2
Page 3

Owner’s Manual
Introduction
Thank you for purchasing the AX10B — Tone Works
bass modeling signal processor. To ensure trouble-
free enjoyment, please read this manual carefully
and use the product as described. When you have
finished reading the manual, keep it for future
reference.
• Korg’s “REMS” modeling technology is used to
provide numerous sophisticated effects including:
3 types of pre-effects, 11 types of amp modeling,
11 types of modulation effects, and 11 types of
ambience effects. The panel controls for these
amps and effects are logically arranged according
to the signal flow, from the bass input to the output,
allowing you to easily and intuitively create a wide
range of sounds.
AX10B signal routing
PRE FX
INPUT OUTPUT
• The AX10B models a variety of famous bass amp
sounds, ranging from distinctive warm and fat tube
amp sounds to the sound of modern amps. Effects
such as chorus, delay, and tape echo are also
provided.
• 40 factory presets that take full advantage of the
AX10B’s potential are provided for immediate use,
plus 40 of your own settings in the user area.
• The built-in expression pedal gives you an added
dimension of realtime control, letting you change
the volume, add a pitch one octave lower, or
control the modulation speed, delay time, filter, or
pitch bend. There’s even a unique Talk effect that
produces a talking modulator sound, opening up
new possibilities for bass performance.
• The built-in Auto Chromatic Tuner lets you tune
silently which is ideal for live situations.
3 TYPES
AMP TYPE
11 TYPES
MODULATION
11 TYPES
AMBIENCE
11 TYPES
Table of contents
Introduction .............................................................. 3
Precautions .............................................................. 4
Quick Start ............................................................... 5
Parts and what they do ............................................ 6
Front panel ........................................................ 6
Rear panel ......................................................... 7
Setup ........................................................................ 8
Turning the power on/off ................................... 8
Connections ....................................................... 8
Playing the AX10B................................................... 9
Selecting programs ........................................... 9
Bypass and Mute ............................................... 9
Tuner.................................................................. 9
Using the expression pedal ............................. 10
Creating sounds .................................................... 10
Creating sounds on the AX10B ....................... 10
PRE FX ............................................................ 11
AMP TYPE ....................................................... 11
MODULATION ................................................. 11
AMBIENCE ...................................................... 12
Expression pedal ............................................. 12
NR (Noise Reduction) ..................................... 12
Storing a program .................................................. 12
Other functions ...................................................... 13
Calibrating (adjusting) the expression pedal .. 13
Restoring programs to the factory settings ..... 13
Troubleshooting ..................................................... 13
Main specifications ................................................ 14
Bedirnungshandbuch Manuel d'utilisation Owner's Manual
3
Page 4
Precautions
Location
Using the unit in the following locations can result in a malfunction.
• In direct sunlight
• Locations of extreme temperature or humidity
• Excessively dusty or dirty locations
• Locations of excessive vibration
• Close to magnetic fields
Power supply
Please connect the designated AC adapter to an AC outlet of the correct voltage. Do not connect it to an AC outlet
of voltage other than that for which your unit is intended.
Interference with other electrical devices
Radios and televisions placed nearby may experience reception interference. Operate this unit at a suitable
distance from radios and televisions.
Handling
To avoid breakage, do not apply excessive force to the switches or controls.
Care
If the exterior becomes dirty, wipe it with a clean, dry cloth. Do not use liquid cleaners such as benzene or thinner,
or cleaning compounds or flammable polishes.
Keep this manual
After reading this manual, please keep it for later reference.
Keeping foreign matter out of your equipment
Never set any container with liquid in it near this equipment. If liquid gets into the equipment, it could cause a
breakdown, fire, or electrical shock.
Be careful not to let metal objects get into the equipment. If something does slip into the equipment, unplug the AC
adapter from the wall outlet. Then contact your nearest Korg dealer or the store where the equipment was purchased.
This equipment has been tested and found to comply with the limits for a Class B digital device, pursuant to Part
15 of the FCC Rules. These limits are designed to provide reasonable protection against harmful interference in
a residential installation. This equipment generates, uses, and can radiate radio frequency energy and, if not
installed and used in accordance with the instructions, may cause harmful interference to radio communications.
However, there is no guarantee that interference will not occur in a particular installation. If this equipment does
cause harmful interference to radio or television reception, which can be determined by turning the equipment off
and on, the user is encouraged to try to correct the interference by one or more of the following measures:
• Reorient or relocate the receiving antenna.
• Increase the separation between the equipment and receiver.
• Connect the equipment into an outlet on a circuit different from that to which the receiver is connected.
• Consult the dealer or an experienced radio/TV technician for help.
Unauthorized changes or modification to this system can void the user’s authority to operate this equipment.
CE mark which is attached to our company’s products of AC mains operated apparatus until December 31,
1996 means it conforms to EMC Directive (89/336/EEC) and CE mark Directive (93/68/EEC).
And, CE mark which is attached after January 1, 1997 means it conforms to EMC Directive (89/336/EEC), CE
mark Directive (93/68/EEC) and Low Voltage Directive (73/23/EEC).
Also, CE mark which is attached to our company’s products of Battery operated apparatus means it conforms
to EMC Directive (89/336/EEC) and CE mark Directive (93/68/EEC).
This product has been manufactured according to strict specifications and voltage requirements that are
applicable in the country in which it is intended that this product should be used. If you have purchased this
product via the internet, through mail order, and/or via a telephone sale, you must verify that this product is
intended to be used in the country in which you reside.
WARNING: Use of this product in any country other than that for which it is intended could be dangerous and
could invalidate the manufacturer’s or distributor’s warranty.
Please also retain your receipt as proof of purchase otherwise your product may be disqualified from the
manufacturer’s or distributor’s warranty.
THE FCC REGULATION WARNING (for U.S.A.)
CE mark for European Harmonized Standards
IMPORTANT NOTICE TO CONSUMERS
What is ?
(Resonant structure and Electronic circuit Modeling System) is KORG’s proprietary sound modeling
technology which precisely reproduces the complex character and nature of both acoustic and electric
instruments as well as electronic circuits in real world environments.
generation characteristics including instrument bodies, speakers & cabinets, acoustic fields, microphones,
vacuum tubes, transistors, etc.
emulates a wide variety of sound
4
Page 5
Quick Start
Before you make connections with any external
devices, turn all volumes to the minimum position
and turn off the power.
1. If you will be powering the AX10B with batteries,
open the battery compartment located on the
bottom panel, and install four AA alkaline
batteries (sold separately). If you will be powering
the AX10B with the separately sold AC adaptor,
connect the AC adaptor to the rear panel DC9V
connector (the power will turn on).
2. Set the INPUT L/H switch to the appropriate
position for the output of your bass. Use the “H”
position if your bass has a high output, or the “L”
position if your bass has a low output.
3. Connect your bass to the AX10B’s INPUT jack. If
you are using batteries, the power of the AX10B
will turn on at this point.
4. If you are connecting the AX10B to a bass amp,
set the AMP/LINE switch to “AMP”. If you are
connecting the AX10B to headphones, a recorder,
or a mixer, set this switch to “LINE”.
5. Connect the AX10B’s OUTPUT jack to the INPUT
of your bass amp or recorder. If you want to use
headphones, connect them to the OUTPUT jack.
6. Turn on the power of the connected equipment,
and raise the volume to an appropriate level. You
can also use the AX10B’s MASTER buttons to
adjust the volume.
7. Press the program select switches to change
programs.
TIPS
The AX10B has 40 preset programs (01~94) and 40
user programs (0.1~9.4). With the factory settings,
the user programs contain the same
contents as the preset programs.
8. You can control the pedal effect by using the
expression pedal. The pedal is active when the
PEDAL LED at the upper left of the pedal is lit. If
this LED is dark, advance the pedal all the way
forward to make the LED light and the pedal will
be active.
9. Editing the sound
Use the AMP TYPE selector to select an amp
type, and use the various control knobs to adjust
the gain, tone, and volume etc.
10. Editing an effect
If you want to edit the modulation effect or
ambience effect (located after the amp), use the
MODULATION selector or AMBIENCE selector to
select the desired effect, and use the DEPTH
buttons located below the selector to adjust the
effect depth etc. You can also adjust the speed
etc. of a modulation effect by holding down the
FUNCTION button and pressing the DEPTH
buttons (which act as the SPEED buttons). For the
ambience effect, you can set the delay or reverb
time by pressing the TAP button at the desired
interval.
11. To edit the pre-effect located before the amp,
press the PRE FX button to select an effect, and
use the VALUE buttons to make adjustments.
This concludes our brief introduction to the
AX10B. This manual contains much more
information about the AX10B so please read it to
ensure that you are taking full advantage of all its
capabilities.
3
54
2 1
11
9
7
8
9
10
6
8
10 10
10
7
5
Page 6

Parts and what they do
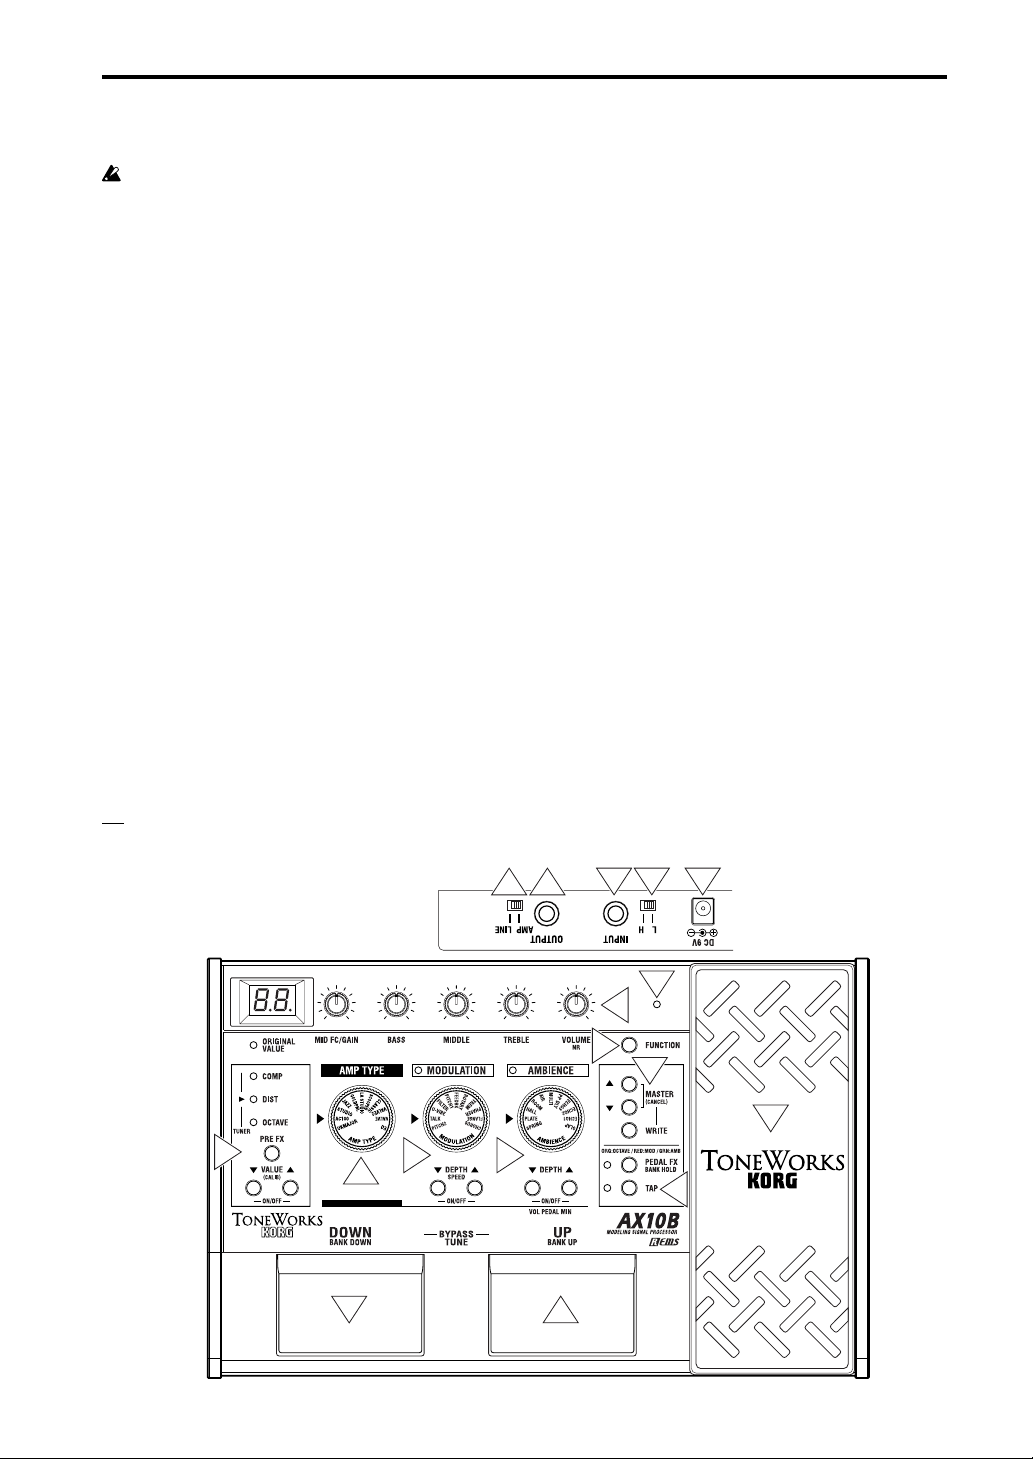
Front panel
○○○○○○○○○○○○○○○○○○○○○○○○○
1
Display
This shows the program number and when you
operate a knob or button, the value of that parameter
will briefly appear in the display.
• This will light when the power is on.
• The dot in the lower right of the display will light
when you edit a parameter value.
• If the AX10B is running on batteries,
when the batteries run low.
○○○○○○○○○○○○○○○○○○○○○○○○○
AMP TYPE selec tor
2
This selects one of 11 types of amp models.
3
Control knobs
These knobs adjust the gain, tone, and volume of the
amp models.
You can adjust the depth of the noise reduction (NR)
by holding down the FUNCTION button and turning
the VOLUME/NR knob.
Some settings of these knobs may cause distortion
in your sound. If this occurs, lower the VOLUME
control knob (or MASTER buttons).
○○○○○○○○○○○○○○○○○○○○○○○○○
4
PRE FX (TUNER) LED
These indicate the selected pre-effect.
The LEDs will not light if the pre-effect is off.
When the tuner is operating, these LEDs indicate the
difference from the correct pitch. (p.9)
will blink
6
VALUE (CALIB) buttons –ON/OFF–
These buttons adjust the value of the pre-effect.
You can switch PRE FX on/off by pressing the
VALUE ▲ and ▼ buttons simultaneously.
When the tuner is operating, you can use these
buttons to adjust the calibration (CALIB).
○○○○○○○○○○○○○○○○○○○○○○○○○
7
MODULATION selector
This selects one of 11 types of modulation effects.
8
DEPTH/SPEED buttons –ON/OFF–
These buttons adjust the depth etc. of the modulation
effect (DEPTH).
You can adjust the modulation speed etc. by holding
down the FUNCTION button and pressing these
buttons (SPEED).
You can switch the MODULATION effect on/off by
pressing the DEPTH ▲ and ▼ buttons simultaneously (ON/OFF). When off, the MODULATION
selector LED will not be lit.
○○○○○○○○○○○○○○○○○○○○○○○○○
AMBIENCE selector
9
This selects one of 11 ambience effects.
10
DEPTH buttons –ON/OFF–
These buttons adjust the depth etc. of the selected
ambience effect.
You can switch AMBIENCE on/off by pressing the
DEPTH ▲ and ▼ buttons simultaneously (ON/OFF).
When off, the AMBIENCE selector LED will not be lit.
If the expression pedal is controlling volume, you can
set the minimum volume (i.e., when the pedal is fully
returned) by holding down the FUNCTION button
and pressing ▲ or ▼.
5
PRE FX button
Each time you press this button, the pre-effect type
will change in the order of COMP → DIST → OCTAVE
→ COMP.
1 3
18
4
5
6
7
2
8
10
19
6
11
TAP button
You can set the delay or reverb time of the ambience
effect by tapping this button at the desired interval.
The LED located at the left will blink to indicate the
tempo.
17
12
13
9
14
16
15
11
Page 7
○○○○○○○○○○○○○○○○○○○○○○○○○
FUNCTION button
12
To edit one of the parameters printed on the front
panel in red, hold down this button and operate the
corresponding knob or button. For example, you can
edit the speed of the modulation effect by holding
down this button and using the MODULATION
DEPTH buttons.
○○○○○○○○○○○○○○○○○○○○○○○○○
MASTER (CANCEL) buttons
13
These buttons adjust the overall volume of the
AX10B (MASTER).
When the AX10B is ready to write (store), pressing
either of these buttons will cancel the Write operation
(CANCEL).
WRITE button
14
Use this button to write (store) a program.
When you press this button, the AX10B will enter
“write-ready” mode; if you press this button again,
the program will be written (stored). (p.12)
○○○○○○○○○○○○○○○○○○○○○○○○○
PEDAL FX/BANK HOLD button
15
This button selects the effect that will be controlled
by the expression pedal (Pedal Effect).
Each time you press the button, the LED will change
color to indicate the pedal effect that will be controlled.
ORG: OCTAVE (orange): Octave
RED:MOD (red):
GRN:AMB (green):
The effect selected by MODULATION
The effect selected by AMBIENCE
OFF:VOLUME (dark): Volume pedal
If something other than OCTAVE is selected for the
pre-effect, you cannot use the PEDAL FX button to
select OCTAVE.
By holding down the FUNCTION button and pressing
this button, you can select “bank hold” mode as the
way in which programs will be selected (BANK
HOLD). Refer to “Selecting programs: b” (p.9).
○○○○○○○○○○○○○○○○○○○○○○○○○
Expression pedal
16
You can use the expression pedal to control effects
or volume. By advancing the pedal all the way
forward you can switch the selected pedal effect on/
off.
PEDAL LED
17
This LED will light if the expression pedal is active.
ORIGINAL VALUE LED
18
This LED will light if the edited value is identical to
the saved (original) value.
○○○○○○○○○○○○○○○○○○○○○○○○○
Program select switches DOWN/BANK DOWN, UP/
19
BANK UP –BYPASS, TUNE–
Use these switches to select programs. You can
select programs in one of three ways. Refer to
“Selecting programs” (p.9).
If you press the UP and DOWN switches simultaneously, the effects will be bypassed and the tuner
will operate (BYPASS) (p.9).
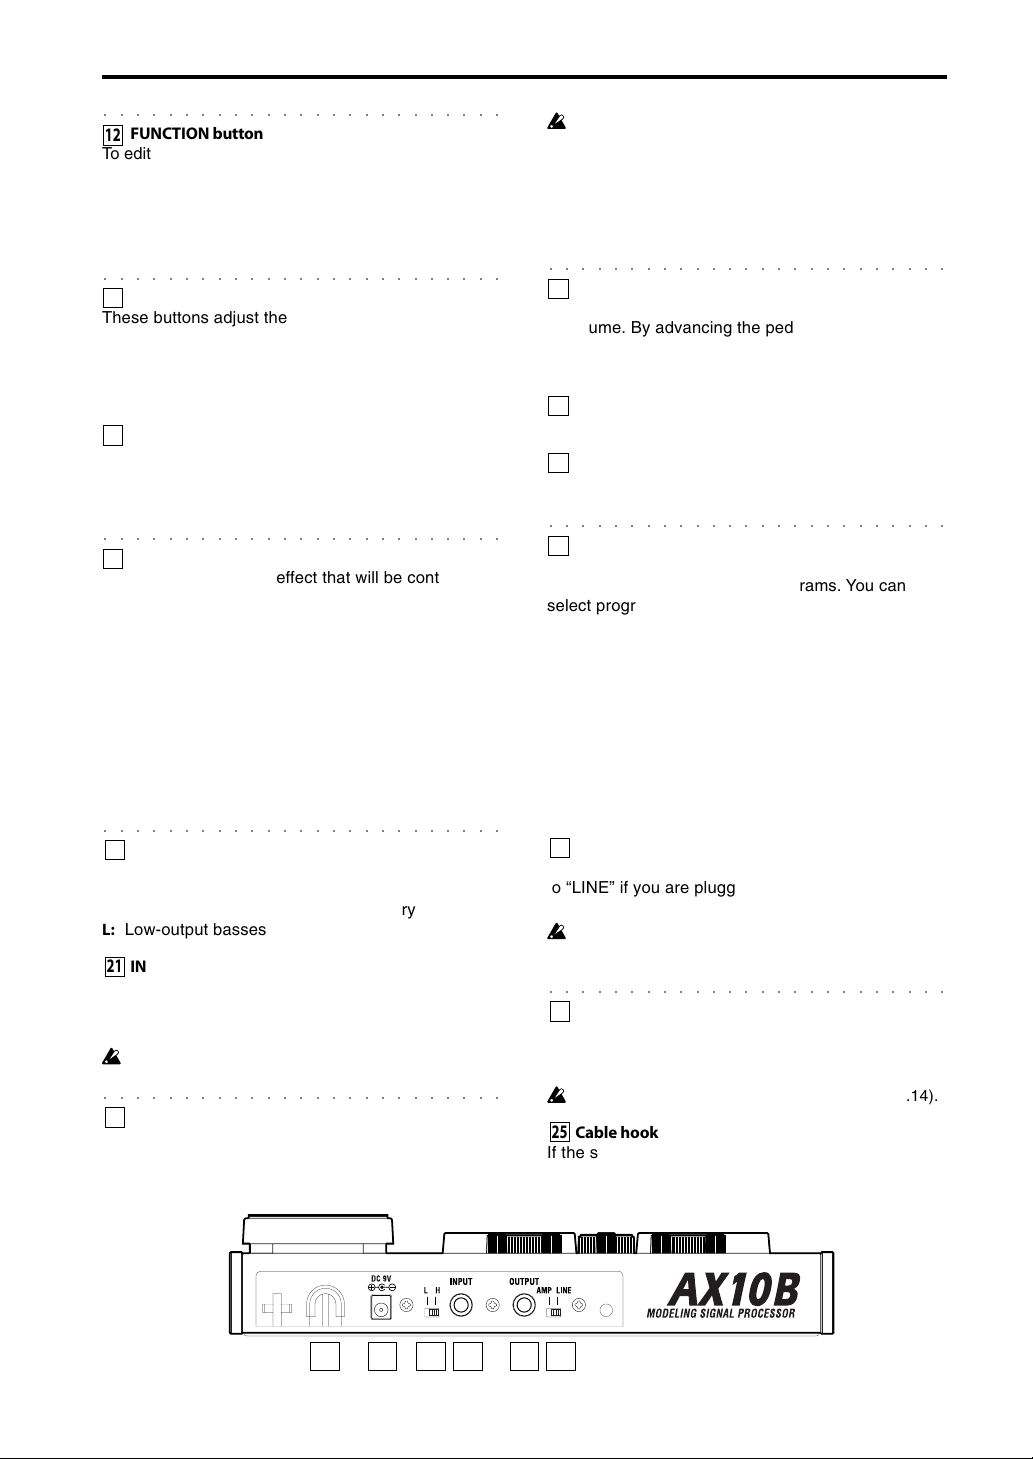
Rear panel
○○○○○○○○○○○○○○○○○○○○○○○○○
INPUT L/H select switch
20
Set this switch according to the pickup output of your
bass.
H: High-output basses with active circuitry
L: Low-output basses
INPUT jack
21
Connect your bass to this jack. Use a 1/4" mono
plug. If the AX10B is running on batteries, the power
will come on when you plug into this jack.
If the AX10B is running on batteries, the power will
not come on if a 1/4" stereo plug is inserted.
○○○○○○○○○○○○○○○○○○○○○○○○○
OUTPUT jack
22
Connect this jack to your bass amp, recorder, or
headphones.
2425 20 21 22 23
AMP/LINE select switch
23
Set this to “AMP” if you are plugging into an amp, or
to “LINE” if you are plugging into a recorder or using
headphones.
If you are connecting the AX10B to a bass amp that
has a tweeter for extended high-frequency response, select the “LINE” position.
○○○○○○○○○○○○○○○○○○○○○○○○○
DC9V
24
The separately sold AC adapter can be connected
here (p.8). When this is connected, the power will be
turned on automatically.
You must only use the specified AC adaptor (p.14).
Cable hook
25
If the separately sold AC adapter is used, connect
the cable of the AC adapter around this hook (p.8).
7
Page 8

Setup
Turning the power on/off
Before you turn the power on or off, you must turn
down the volume of any connected devices.
When using batteries:
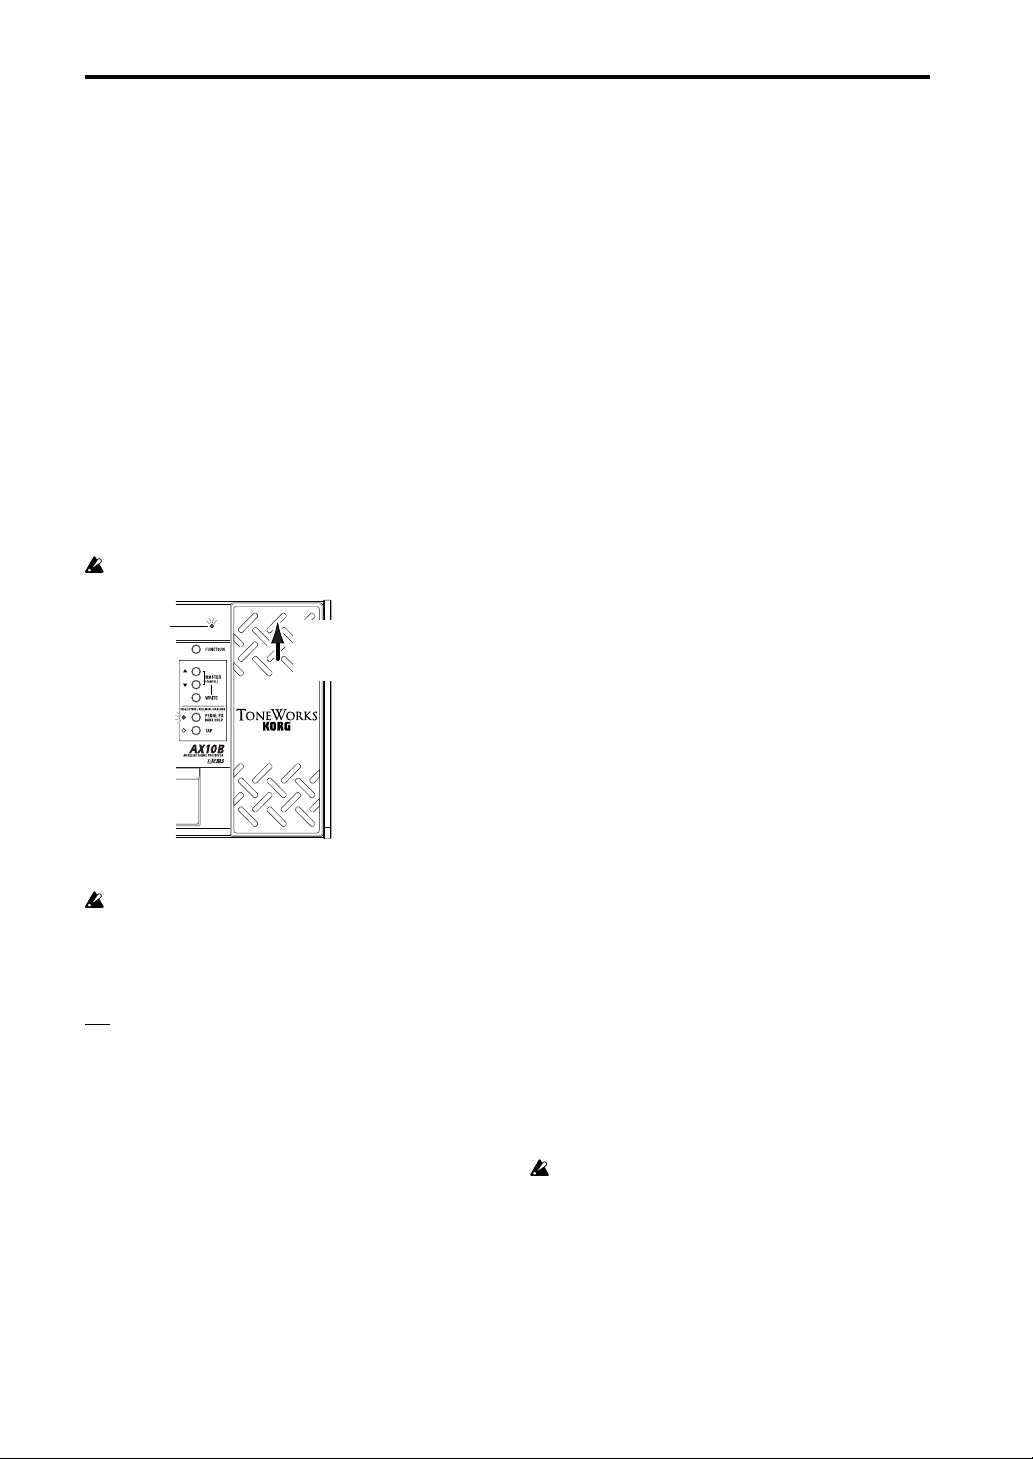
1. To open the battery compartment, lightly press
the tab located by the arrow and lift the cover up.
Install four AA alkaline batteries (sold separately)
observing the correct polarity and close the
cover.
2. When using batteries, the power will turn on
when a mono cable is plugged into the INPUT
jack. The display will light while the power is on.
The power will turn off when you remove the
cable from the INPUT jack.
Be sure to remove the cable from the INPUT jack
when you are not using the AX10B to preserve
battery life.
If you connect a stereo cable, the power will not be
turned on.
When the batteries run down, an indication of
will blink in the display. Please replace the batteries
as soon as possible. If dead batteries are left in the
unit, they may leak or cause other malfunctions.
You should also remove the batteries if you will not
be using the AX10B for an extended period.
When using the AC adaptor:
1. Connect the separately sold AC adaptor to the
DC 9V jack, and plug the AC adaptor into an AC
outlet. The POWER LED will light, and the power
will turn on.
Use only the specified external AC adaptor. (p.14)
Be sure to disconnect the AC adaptor from the AC
outlet when you are not using the AX10B.
Do not apply excessive force to the cable.
Wrap the AC adaptor cable around the hook as
shown in the diagram.
Connections
1. Turn off the power of the equipment you want to
connect, and lower each volume control.
2. Set the INPUT L/H switch according to the output
of your pickups.
“H” is suitable for basses that have a high output
level. “L” is suitable for basses that have a low
output level.
3. Connect your bass to the INPUT jack.
4. Set the LINE/AMP select switch to the appropriate
position.
Use the “AMP” position if you are connecting the
AX10B to a bass amp. Use the “LINE” position if
you are connecting the AX10B to audio equipment such as mixers, recorders or headphones.
If you are connecting the AX10B to a bass amp that
has a tweeter for extended high-frequency response, select the “LINE” position.
5. Connect the OUTPUT jack to your amp or
recorder, etc.
The OUTPUT jack is stereo (TRS), so if you use
a mono cable to connect it to your bass amp etc.,
only the sound of the L (left) channel will be
heard.
If you are listening through headphones, connect
them to this jack.
If you are running into two channels of a mixer or
using two amplifiers in stereo, use a stereo to
dual mono cable.
6. When you have finished making connections,
turn on the power of your bass amp, recorder, or
other equipment, and adjust the volume.
Use the MASTER buttons to adjust the overall
volume (master level) of the AX10B. (p.7
TIPS
If the sound distorts when you play the AX10B in
“bypass” mode, use the MASTER buttons to lower
the level.
Audio equipment
Headphones
Recorder, mixer, etc.
AMP/LINE
INPUT
1/4" mono
— 1/4" mono
1/4" mono x 2
—1/4" stereo
LINE
Stereo phono
— 1/4" stereo
13
)
Bass
AMP/LINE
Bass amp
AC adaptor
to an AC outlet
INPUT
AMP
1/4" mono
— 1/4" mono
1/4" mono
— 1/4" mono
INPUTOUTPUT
L/H
8
Page 9
Playing the AX10B
Selecting programs
When you’ve finished setting up, you can select
programs and try them out.
The AX10B has 40 preset programs and 40 user
programs. There are ten preset banks (0~9) and ten
user banks (0.~9.), with four programs in each bank.
User programs
Bank: 0.~9.
You can select programs in any of the following three
ways.
Program: 1~4
a: Step through the programs of all banks
1. Press the program select UP or DOWN switch.
...9.4÷ 01÷ 02÷ 03÷ 04÷ 11 ÷ ...÷ 93÷ 94÷ 0.1...
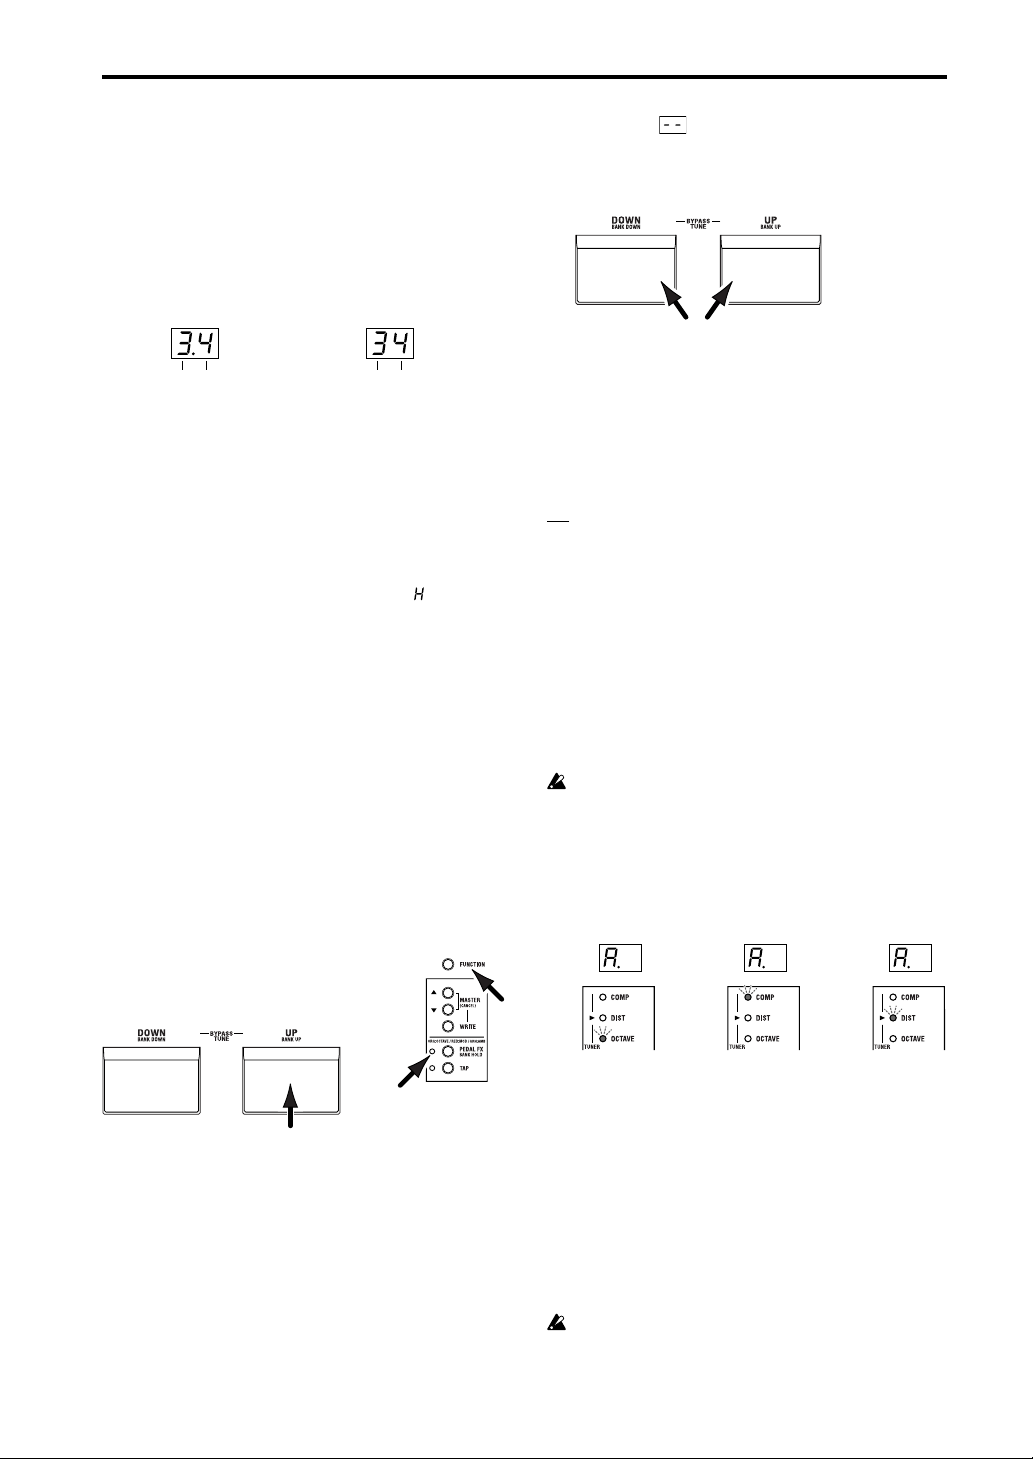
b: Step through the programs in a bank
1. Hold down the FUNCTION button and press the
PEDAL FX (BANK HOLD) button to select “bank
hold” mode. The bank will appear as “ ” in the
display.
2. Press the program select UP or DOWN switch.
Only the program will change; the bank will
remain the same.
...H4÷ H1÷ H2÷ H3÷ H4÷ H1÷ H2...
3. To defeat “bank hold” mode, hold down the
FUNCTION button and press the PEDAL FX
(BANK HOLD) button.
c: Step through the banks (leaving the program fixed)
1. Hold down the FUNCTION button and press the
program select UP (BANK UP) or DOWN (BANK
DOWN) switch. The bank will change. You can
also use this method while Bank Hold mode is
selected. (The following example is when
program 1 is selected)
...11÷ 21÷ 31÷ 41÷ ...÷ 91÷ 0.1÷ ...÷ 9.1...
Preset programs
Bank: 0~9 Program: 1~4
the display
mately one second will blink more rapidly. To
bypass, release the buttons while the display is
blinking slowly. To mute, release the buttons when
the display is blinking rapidly.
2. To cancel Bypass or Mute, press either the UP or
DOWN program select switch.
will blink slowly, and after approxi-
Tuner
You can use the AX10B’s built-in auto chromatic
tuner to tune your bass. To activate the tuner,
simultaneously press the UP and DOWN program
select switches.
TIPS
You can activate the tuner by selecting either
Bypass or Mute. If you select Mute, you will be able
to tune silently.
Tuning procedure
1. To activate the tuner, simultaneously press the
UP and DOWN program select switches to either
Bypass or Mute the AX10B. For the procedure,
refer to “Bypass and Mute” (above).
2. Pluck the string that you want to tune, and the
closest note name will appear in the display. A
decimal point “.” at the right of the note name
indicates a sharp (#).
Do not play two or more strings simultaneously
when tuning.
3. Tune the string approximately so that the correct
note name is shown in the display.
4. Fine-tune the string so that only the middle LED
of the PRE FX (TUNER) section is lit.
When the note name is A#
Too low
Too high Correct tuning
b1
a1 c1 b2
Bypass and Mute
If you bypass the AX10B, your sound will be direct
(dry) without any effects (wet).
If you mute the AX10B, there will be no sound.
1. Simultaneously press the UP and DOWN
program select switches.
Bypass: Simultaneously press UP and DOWN
and release them immediately.
Mute: Simultaneously press UP and DOWN
and hold them for about one second;
then release them.
When you press UP and DOWN simultaneously,
b1
c1
5. When you have finished tuning, press the UP or
DOWN program select switch to return to
normal operation.
Adjusting the tuner calibration
When you turn on the power, middle A is set to a
reference frequency of 440 Hz. If desired, you can
adjust (calibrate) this reference pitch.
1. While the tuner is activated, use the VALUE
(CALIB) buttons to adjust the calibration.
The range is 438~445 Hz. When you adjust the
value, the display will show the lower two digits of
the calibration frequency (e.g., “41” for 441 Hz).
The AX10B does not remember the tuner calibration setting when powered-off.
9
Page 10
Using the expression pedal
You can use the expression pedal to add a pitch one
octave lower, and control parameters such as
volume, modulation speed, filter, pitch bend, and
ambience level.
The expression pedal can control the PRE FX effect
OCTAVE, a parameter of the selected MODULATION
or AMBIENCE effect (11 types each), or volume. You
can choose one of these to be controlled by the
expression pedal.
Using the expression pedal
1. Select a program for which the PEDAL LED
(located at the upper left of the expression pedal)
is lit.
If you have selected a program for which the
PEDAL LED is lit, you can use the expression
pedal to control a pedal effect.
Even for programs for which the PEDAL LED is
not lit, you can advance the pedal all the way to
switch it on (the PEDAL LED will light).
If volume is selected as the pedal effect, you cannot
switch it on/off from the pedal; it will always be on.
PEDAL LED
2. Operate the expression pedal while you play, and
you’ll notice how the sound changes accordingly.
Do not apply excessive force to the expression
pedal. Before you begin using the expression
pedal, you should determine the amount of force
that is needed to make the PEDAL LED light or to
control the effect, and use only the necessary
amount of force.
TIPS
You can use the PEDAL FX button to switch the
effect (or volume) that is controlled by the expression pedal. The current assignment is indicated by
the color of the LED located at the left of the button.
(p.12)
If the PEDAL
LED is not lit,
advance the
pedal
Creating sounds
Creating sounds on the AX10B
You can create sounds in one of two ways; you can
edit an existing preset program or user program, or
you can create a sound “from scratch”.
If you want to start from an existing program, select a
program that is close to the sound you want, and
modify it as necessary. Adjust the amp MID FC/
GAIN,BASS, MIDDLE and TREBLE knobs, and use
the VALUE, DEPTH, SPEED, and TAP buttons to
adjust the depth and speed etc. of the effects.
If you want to create a sound from scratch, you can
(for example) begin by selecting the AMP TYPE. If
you turn the PRE FX, MODULATION, and AMBIENCE effects off at this time, you will be able to hear
the character of each amp type more clearly. You can
switch each effect off by simultaneously pressing its
VALUE or DEPTH ▲ and ▼ buttons.
When you have decided on an amp type, adjust the
MID FC/GAIN, BASS, MIDDLE, TREBLE and
VOLUME control knobs.
After you have made your amp settings, you can
start adding effects. First are MODULATION and
AMBIENCE, located after the amp. Simultaneously
press the DEPTH ▲ and ▼ buttons to switch the
effect on. Then turn the MODULATION selector or
AMBIENCE selector to choose the desired effect.
Use the DEPTH buttons to adjust the effect depth
etc. For the modulation effect, you can hold down the
FUNCTION button and use the DEPTH buttons to
adjust the delay/reverb time. To choose settings for
PRE FX, before the amp, turn the PRE FX on, and
then use the PRE FX button to select the effect. Use
the PRE FX VALUE buttons to adjust the amount of
effect. You may wish to temporarily turn off MODULATION and AMBIENCE while adjusting the PRE FX.
Then use the PEDAL FX button to select what you
will control from the expression pedal. This button
selects the effect (or volume) that will be controlled
by the pedal.
If you hear unwanted noise, you can adjust the noise
reduction. Hold down the FUNCTION button and
turn the NR knob (the right-most knob) to adjust the
depth of the noise reduction.
Finally, when you have come up with a sound you
like, you should write (store) it into memory. If you
switch to a different program or turn off the power
without writing your new program, it will be lost.
Some effect settings may produce unwanted
distortion. If this happens, lower the VOLUME knob.
10
Page 11
PRE FX
Use the PRE FX button to select a pre-effect, and use the VALUE buttons to adjust the amount of effect. If you have selected
WAH as the PEDAL FX, you can use the expression pedal to control WAH.
TYPE Explanation Normal PEDAL FX: WAH
COMP Compressor with an emphasized attack Adjusts sensitivity: 0~30 --- ---
DIST Distortion optimized for bass Amount of distortion: 0~30 --- ---
OCTAVE This generates a pitch one octave lower than the Adjusts tone: 0~30 Controls the Specifies the effect
(*1)
This effect may not operate correctly if two or more strings are played simultaneously, or when low-pitched strings are played.
original sound, and mixes it with the original sound effect depth depth at maximum
to add depth and low end. (*1) pedal position
VALUE PEDAL VALUE
AMP TYPE
Use the AMP TYPE selector to select an amp, and adjust the MID FC/GAIN, BASS, MIDDLE, TREBLE and VOLUME. A
cabinet effect appropriate for that amp is added to each AMP TYPE (with the exception of EQ). Changing the setting of the
AMP/LINE switch will change the depth of the cabinet effect.
TYPE Explanation
EQ 3-band EQ from direct line input.
VALV E A tube amp with the ULTRA LO switch turned ON.
VALVE2 A tube amp suitable for rock. (recommended CAB: 810CLS)
CLASSIC A tube amp whose basic character changes according to the
SCOOPED
LA STUDIO
GOLDPNL An amp distinctive for its eye-catching gold panel and clean
JAZZ
STUDIO
AC100 A 100W tube amp made by Vox. (recommended CAB: 215TALL)
UKMAJOR
(recommended CAB: 810CLS)
setting of the value dial. (recommended CAB: 118+112)
An amp that is typical of 80’s sounds. (recommended CAB: 410MTL)
An amp that is typical of the LA sound. (recommended CAB: 410 LA)
sound. (recommended CAB: 410MDN)
A combo amp favored by jazz bassists. (recommended CAB: 115JAZ)
A tube combo ideal for the Motown sound. (recommended CAB: 115STU)
A 200W tube amp made in the UK. (recommended CAB: 415 UK, 412 UK).
Control knobs
MID FC/ Mid-range peak frequency
GAIN(*2) Gain adjustment (when AMP TYPE
BASS Adjusts low-frequency range.
MIDDLE Adjusts mid-frequency range.
TREBLE Adjusts high-frequency range..
VOLUME Adjusts volume.
○○○○○○○○○○○○○○○○○○○○
NR (*3) Adjusts noise reduction depth.
(*2) Functions as MID FC if AMP TYPE is set to EQ~
JAZZ. Functions as GAIN if AMP TYPE is set to
STUDIO ~ UKMAJOR.
(*3) To adjust the noise reduction, hold down the
FUNCTION button and turn the VOLUME (NR) knob.
adjustment (when AMP TYPE is set
to EQ ~ JAZZ) 1~5
is set to STUDIO ~ UKMAJOR)
(Hold down the TAP button and turn
EFF.DEPTH)
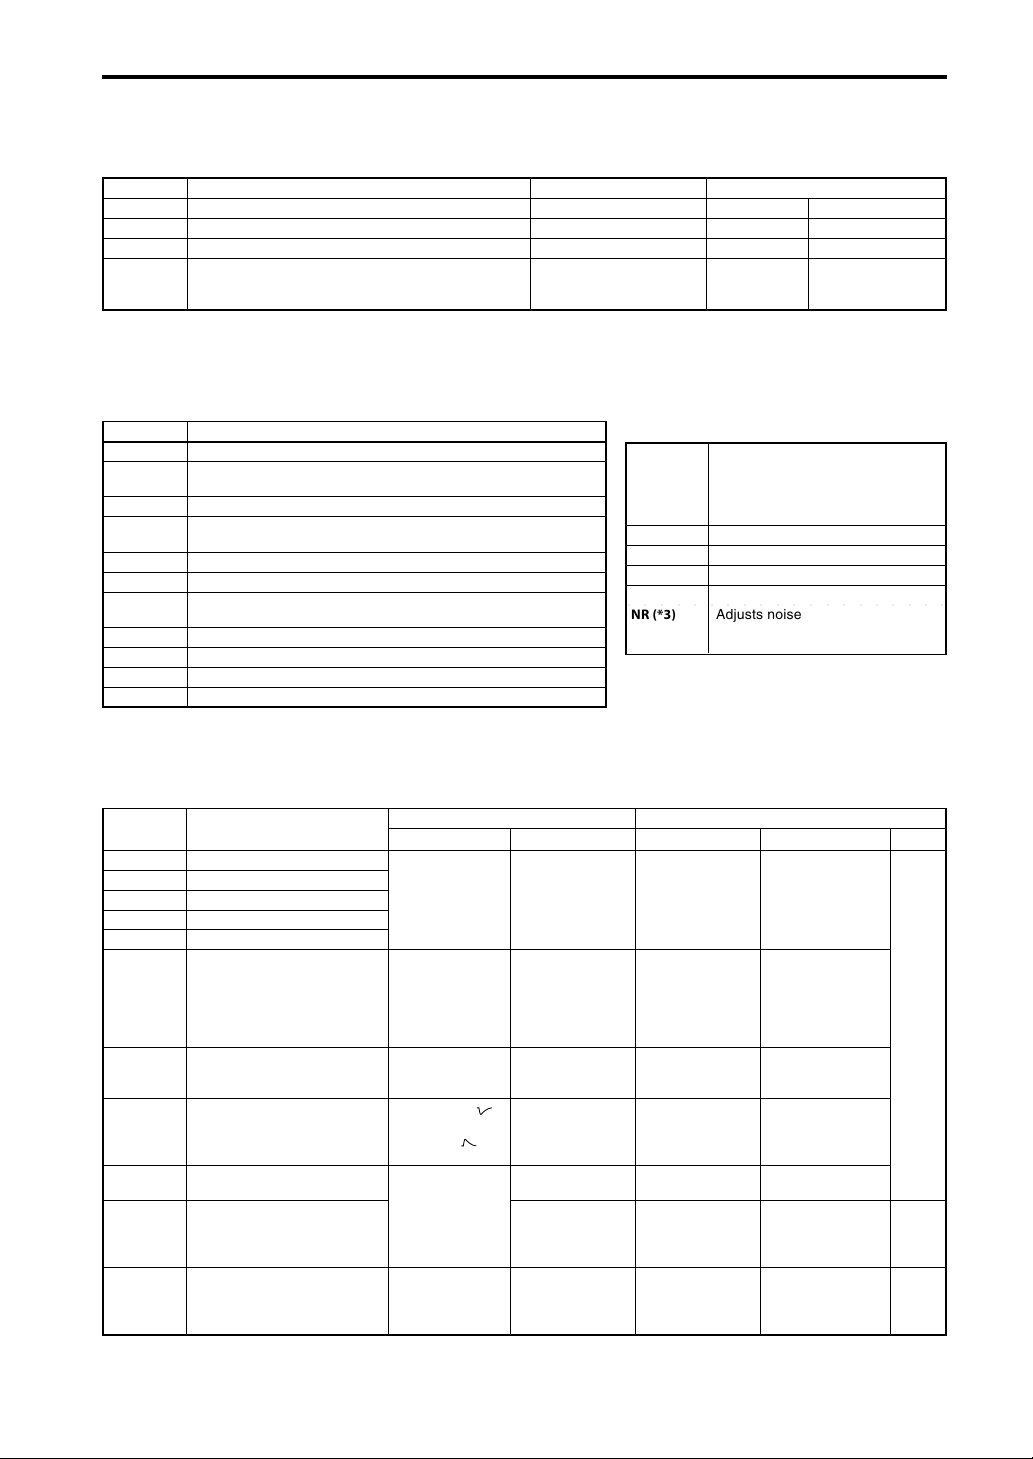
MODULATION
Use the MODULATION selector to choose a modulation effect, and use the DEPTH buttons to adjust the DEPTH parameter.
To adjust the SPEED parameter, hold down the FUNCTION button and use the DEPTH (SPEED) buttons. If MOD is selected
as the PEDAL FX, you can use the expression pedal to control the effect.
TYPE Explanation Normal PEDAL FX:MOD
CHORUS Vintage stereo chorus.
FLANGE Vintage flanger.
PHASER Vintage phaser.
TREM Vintage tremolo.
ROTARY Rotary speaker simulation.
FEEDBK Mode 1 artificially generates
PITCH1 Pitch shifter mixed with the
FILTER Filter whose cutoff frequency
U-VIBE Vintage U-Vibe.
TALK “Talking” effect controlled by
PITCH2 Pitch shifter with 100% effect
(*4) You cannot use the buttons to edit the value. (*5) “.” indicates negative (-), “d” indicates detune.
(*6) Mode setting: 1: YAH-YAH, 2: U-WAH, 3: YOI-YOI, 4: YEAH, 5: HI U-WAH
(*7) “.” indicates negative (-), “SP” indicates stair-step pitch change one octave upward.
feedback, and operates when
a note is held for an extended
time.
Mode 2 generates feedback
one octave higher.
direct sound.
varies in response to picking
strength (for “Normal”) or pedal
movement (for “PEDAL FX”)
pick attack (for “Normal”) or
pedal movement (for “PEDAL
FX”)
(wet).
DEPTH SPEED PEDAL DEPTH SPEED
Effect depth: 0~30
Feedback amount:
0~15
Vibrato depth:
16~30
Pitch shift amount
(*5): 12.~1., d., d,
1~12
Down sweep :
0~15,
UP sweep
16~30
Effect depth: 0~30
Pitch shift amount
(*7): 12.~1., 1~12
Modulation
speed: 0~30
Mode setting:
1. Normal,
2. Overtone
Effect level: 0~30
Resonance: 0~30
:
Modulation
speed: 0~30
Mode setting: 1~5
(*6)
N/A (*4)
Modulation speed
First half of pedal
movement controls
feedback amount;
further movement
controls vibrato
depth
Effect level
Cutoff frequency
Modulation speed
Controls “talking”
effect
Controls the pitch
shift amount
Effect depth: 0~30
Mode setting:
1. Normal,
2. Overtone
Pitch shift amount
(*5): 12.~1., d., d,
1~12
Resonance: 0~30
Effect depth: 0~30
Effect depth: 0~30
Pitch shift amount when
pedal at maxi-mum
(*7): 12.~1., 1~12,
SP
N/A (*4)
Mode
setting:
1~5 (*6)
N/A (*4)
11
Page 12
AMBIENCE
Use the AMBIENCE selector to choose an ambience effect, and use the DEPTH buttons to adjust the DEPTH parameter. To
adjust the delay time or reverb time, press the TAP button twice at the desired interval. If AMB is selected as the PEDAL FX,
you can use the expression pedal to control the effect.
TYPE Explanation TAP Normal PEDAL FX: AMBIENCE
SLAP Slap-type delay whose delay time is a 1/4
ECHO1 Tape echo simulation with a warm tone (feedback low)
ECHO2 Tape echo simulation with a warm tone (feedback medium)
ECHO3 Tape echo simulation with a warm tone (feedback high)
PP DLY Ping-pong delay that bounces from to left to right
MULTI Multi-tap delay
AIR Reverb with an airy feel
ROOM Room reverb
HALL Hall reverb (*8)
PLATE Plate reverb (*8)
SPRING Spring reverb (*8)
(*8) Sets the reverb time to twice the interval at which you press TAP.
of the interval at which you press TAP
Delay time:
up to 250 [ms]
Delay time:
up to 1.0 [s]
N/A (*4)
Reverb time:
up to 4.0 [s]
Reverb time:
up to 8.0 [s]
DEPTH PEDAL DEPTH
Specifies the
Effect level:
0~30
Controls the
effect depth
effect depth at
maximum
pedal position
Expression pedal
Selecting the effect that will be controlled by the
pedal
Press the PEDAL FX button to select the effect that
will be controlled by the pedal. The LED located at
the left indicates the effect (or volume) that will be
controlled.
ORG: OCTAVE (orange): Octave
RED:MOD (red): The effect selected by MODULATION
GRN:AMB (green): The effect selected by AMBIENCE
OFF:VOLUME (unlit): Volume pedal
If an effect other than OCTAVE is selected for the
pre-effect, you cannot select OCTAVE from the
PEDAL FX button. If OCTAVE is selected as the
pedal effect, changing the pre-effect to something
other than OCTAVE will switch the pedal effect to
VOLUME.
Using the pedal to switch the effect on/off
By advancing the pedal all the way forward you can
switch the selected PEDAL FX effect on/off. When
the effect is on, the LED at the left of the pedal will
light. If VOLUME is selected as the PEDAL FX, the
LED cannot be turned off.
Setting the minimum value of the volume pedal
If PEDAL FX is set to VOLUME, you can hold down
the FUNCTION switch and use the AMBIENCE
DEPTH buttons to specify the minimum volume (VOL
PEDAL MIN) that will be controlled by the pedal.
Saving the sound of a specific pedal position
You cannot save the sound produced by a specific
pedal position. The pedal effect will always modify
the sound according to the actual current position of
the pedal.
NR (Noise Reduction)
You can adjust the amount of noise reduction by
holding down the FUNCTION button and turning the
VOLUME (NR) control knob.
Depending on the connected device, excessively
high NR settings may cause notes to be cut off. If
this happens, lower the level.
Storing a program
When you have created a sound you want to keep,
you can write (store) it into one of the 40 user
programs (0.1~9.4).
If you switch programs or turn off the power before
writing your edited program, the changes you made
will be lost.
The program that had been in the writing destination will be overwritten.
1. Press the WRITE button. The program number
will blink in the display, and the AX10B will be in
“write-ready” mode.
2. Use the program select switches to select where
you would like to store the program.
You cannot write to a preset program (01~94).
3. Press the WRITE button to write the program into
the selected program number.
If you decide not to write, press either of the
MASTER (CANCEL) buttons to exit write-ready
mode (display blinking). You will return to normal
operation.
3
1, 3
2
12
Page 13

Other functions
Troubleshooting
Calibrating (adjusting) the expression pedal
If the expression pedal is not working properly,
please perform the procedure described below.
When calibrating the pedal, use your hand because
accurate adjustments may not be possible if you
use your foot to operate the pedal.
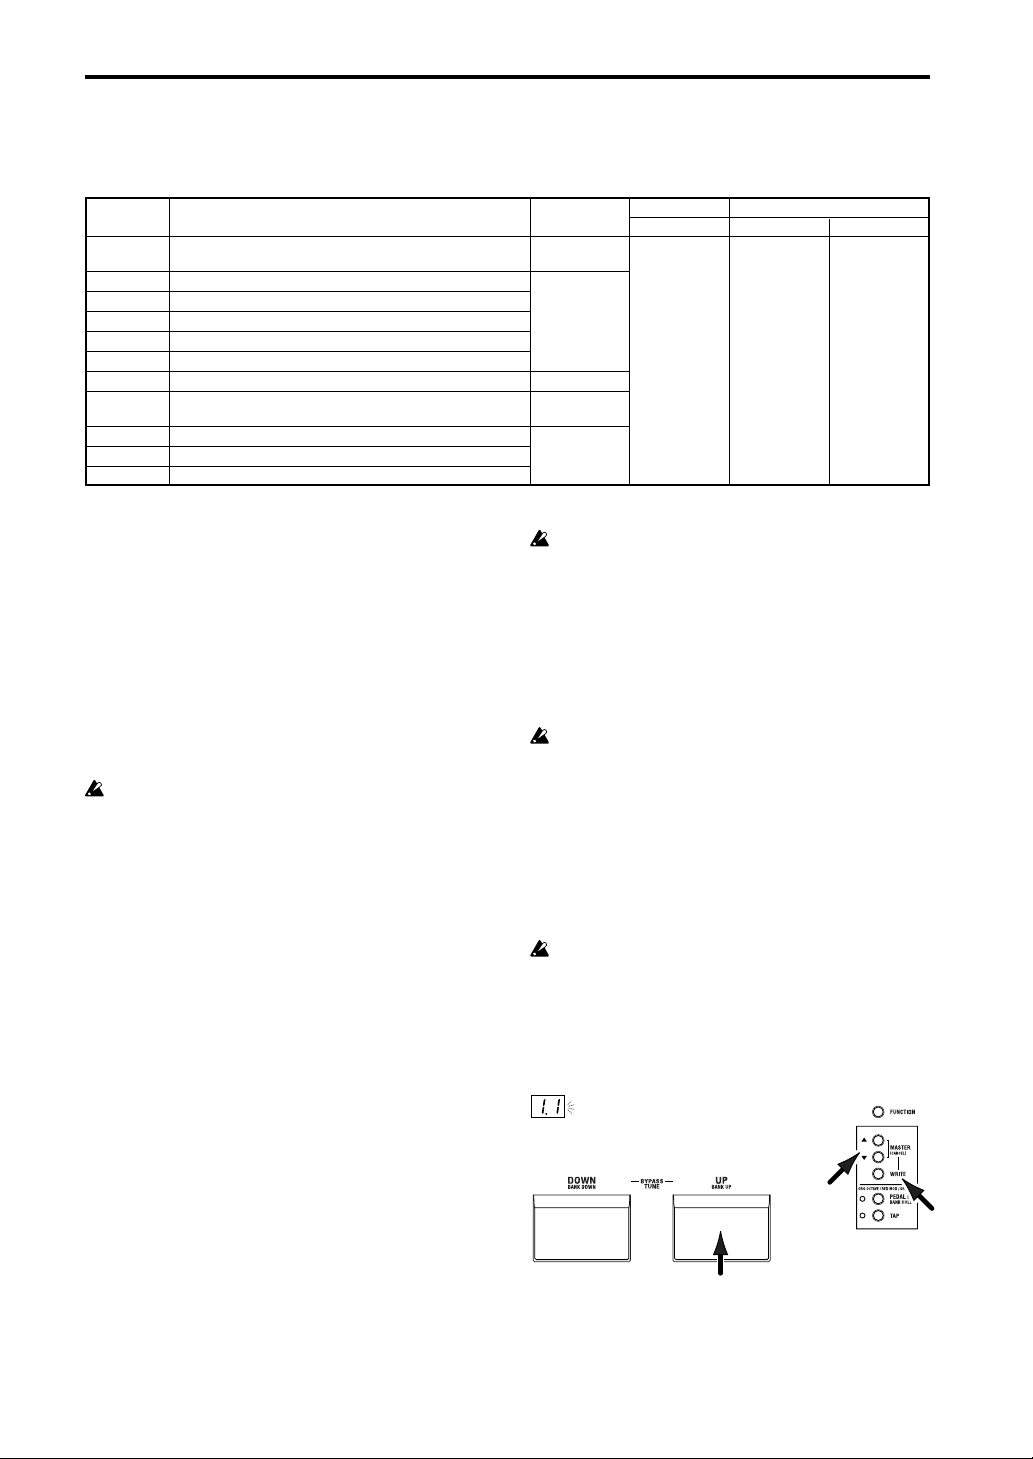
1. While simultaneously holding down the FUNCTION button and the PEDAL FX button, turn on
the power.
The display will indicate
one second, and then indicate .
2. Slowly move the pedal back. When it stops, take
your hand off the pedal and press the PEDAL FX
button.
The display will change from
If you press the MASTER (CANCEL) during the
calibration operation, calibration will be halted
and the program number will appear.
2. press slowly
3. Slowly move the pedal forward. When it stops,
take your hand off the pedal and press the
PEDAL FX button.
When the adjustment has been completed, the
display will blink
number will appear. Check the pedal to make
sure the settings are correct.
TIPS
For example if you assign PEDAL FX to VOLUME
and set VOL PEDAL MIN to 0, it will be easy to
verify the MIN level when the pedal is fully returned.
If the calibration operation fails, the display will
indicate
before calibration ( ). If repeated attempts are
unsuccessful, it is possible that the AX10B has
malfunctioned. Contact your dealer.
3. press slowly
, and you will return to the display
for approximately
to .
, and then the program
If the AX10B does not operate as you expect, please
check the following points first. If this does not
resolve the problem, contact your dealer.
Power does not turn on.
❑ Are batteries installed? Alternatively, is the AC
adapter connected to an AC outlet? (p.8)
❑ Is a mono phone plug cable connected to the
INPUT jack? (p.8)
No sound
❑ Are your bass, amp and/or headphones connected
to the correct jacks? (p.8)
❑ Is your amp turned on and set correctly?
❑ Are any cables broken?
❑ Is the master level of the AX10B set to “0” or to a
low level? (p.7)
❑ Is the program volume of the AX10B set to “0” or
to a low level? (p.11)
❑ Is the volume of your instrument turned down?
❑ Is the AX10B muted?
No effect is heard
❑ Is the AX10B bypassed? (p.9)
❑ Are the effects used in the program turned on?
Pedal does not work
❑ Have you selected a program which uses an
expression pedal effect? (p.10,12)
❑ Is the pedal indicator lit?
Cannot write (Display indicates “Er”)
❑ Did you turn the power off while the preset
programs were being loaded?
Reload the preset programs. (p.13)
Restoring programs to the factory settings
1. While holding down the WRITE button, turn on
the power.
The display will indicate
If you decide to start up normally without loading
the factory settings, press either of the MASTER
(CANCEL) buttons.
2. While the display indicates
button. The factory programs will be loaded into
the user area (0.1~9.4). When loading is completed, the display will blink
program number will appear.
Never turn off the power while this operation is in
progress.
Be aware that if you reload the preset programs, all
previously written programs will be overwritten.
.
, press the WRITE
, and then the
13
Page 14

Main specifications
Amp models: 11
Effects: Pre effect types: 3
Modulation types: 11
Ambience types: 11
Noise Reduction: 1
Number of programs: Preset Programs: 40 (10 banks x 4 programs)
Input: Bass Input (mono 1/4" jack)
Output: Line/Headphone dual-purpose output (stereo 1/4" jack)
Tuner: Tuning Range: 27.5Hz–1,318.5Hz(A0–E6)
Power supply: Four AA alkaline batteries (not included allows approximately 18 hours of continu-
Dimensions (W x D x H): 287 mm x 182 mm x 60 mm
Weight: 1.1 kg (not including batteries)
Included items: Owner’s manual
Options: AC adaptor
Appearance and specifications are subject to change without notice for improvement.
User Programs: 40 (10 banks x 4 programs)
Tuner calibration: A = 438Hz–445Hz
ous use) or separately sold AC adaptor (DC9V
)
14
Page 15

Manuel d'utilisation
T
Introduction
Merci d'avoir choisi le
tion ToneWorks AX10B
sans problèmes, veuillez lire attentivement ce manuel et
utiliser l'appareil comme expliqué. Quand vous aurez fini de
lire le manuel, conservez-le de façon à pouvoir vous y reporter
par la suite.
• La technologie de modélisation “REMS” de Korg est utilisée
pour délivrer de nombreux effets sophistiqués dont : 3 types
de pré-effets, 11 types de modélisation d'ampli, 11 types
d’effets de modulation et 11 types d’effets d'ambiance.
La disposition logique des boutons et touches d'ampli et
d’effet suivant le flux du signal, de l'entrée de basse à la
sortie, vous permet de créer facilement et intuitivement un
large éventail de sons.
Schéma du signal de l'AX10B
PRE FX
INPUT OUTPU
• Le modèle AX10B offre une large gamme de sons d'amplis
de basse fameux, allant des sons chauds et gras distinctifs
des amplis à tube au son des amplis modernes. Des effets
comme le Chorus, le Delay et le Tape-Echo sont aussi
disponibles.
• 40 programmes présélectionnés tirant pleinement profit du
potentiel de l'AX10B sont immédiatement prêts à l'emploi et
vous pouvez enregistrer vos propres réglages dans 40
autres programmes utilisateurs.
• La pédale d’expression intégrée vous apporte une
dimension ajoutée de contrôle en temps réél, vous
permettant de changer le volume, d’ajouter un effet
d'octave pour un son ultra basse, ou de contrôler la vitesse
de modulation, le temps du Delay, le Filter, ou le Pitch
Bend. Un effet unique Talk produit même un son “talking
modulator”, qui étend dramatiquement vos possibilités de
jeu de basse.
• L'accordeur chromatique automatique intégré vous permet
d'accorder votre instrument silencieusement, un plus pour
les citadins.
3 TYPES
Processeur de signal à modélisa-
. Pour garantir un fonctionnement
AMP TYPE
11 TYPES
MODULATION
11 TYPES
AMBIENCE
11 TYPES
Table des matières
Introduction ........................................................................... 15
Précautions ........................................................................... 16
Guide de démarrage rapide ................................................. 17
Nomenclature et fonctions ................................................... 18
Configuration ........................................................................ 20
Utilisation de l'AX10B ........................................................... 21
Création de sons .................................................................. 22
Enregistrement d'un programme ......................................... 24
Autres fonctions .................................................................... 25
Guide de dépannage ............................................................ 25
Principales spécifications ..................................................... 26
Panneau avant .............................................................. 18
Panneau arrière ............................................................ 19
Mise sous/hors tension ................................................. 20
Raccordements ............................................................. 20
Sélection des programmes ........................................... 21
Bypass et Mute ............................................................. 21
Accordeur ...................................................................... 21
Utilisation de la pédale d'expression ............................ 22
Création de sons sur l'AX10B ....................................... 22
PRE FX .......................................................................... 23
AMP TYPE .................................................................... 23
MODULATION............................................................... 23
AMBIENCE .................................................................... 24
Pédale d'expression ...................................................... 24
NR (Réduction du bruit) ................................................ 24
Calibrage de la pédale d'expression ............................ 25
Réinitialisation des programmes aux réglages d'usine .. 25
Bedirnungshandbuch Manuel d'utilisation Owner's Manual
15
Page 16

Précautions
Emplacement
L'utilisation de cet instrument dans les endroits suivants peut en entraîner le mauvais fonctionnement.
• En plein soleil
• Endroits très chauds ou très humides
• Endroits sales ou fort poussiéreux
• Endroits soumis à de fortes vibrations
• A proximité de champs magnétiques
Alimentation
Veuillez brancher l'adaptateur secteur spécifié sur une prise secteur à la tension appropriée. Ne branchez pas l'adaptateur sur une prise de
courant dont la tension ne correspond pas à celle pour laquelle l'appareil a été conçu.
Interférences avec d'autres appareils électriques
Les postes de radio et de télévision situés à proximité peuvent souffrir d'interférences à la réception. Faites fonctionner cet appareil à une
distance raisonnable des postes de radio et de télévision.
Maniement
Pour éviter de les endommager, manipulez les commandes et les boutons de cet instrument sans appliquer de force excessive.
Entretien
Lorsque l'extérieur est sale, essuyez-le avec un chiffon propre et sec. Ne vous servez pas d'agents de nettoyage liquides comme du
benzène ou du diluant, des produits de nettoyage ou des vernis inflammables.
Conservez ce manuel
Après avoir lu ce manuel, veuillez le conserver soigneusement pour référence ultérieure.
Évitez toute intrusion d'objets ou de liquide
Ne placez jamais de récipient contenant du liquide près de l'instrument. Si le liquide pénètre dans l'appareil, il risque de provoquer des
dommages, un incendie ou une électrocution.
Veillez à ne pas laisser tomber d'objets métalliques dans le boîtier. Si cela se produisait, débranchez l'adaptateur secteur de la prise de
courant et contactez votre revendeur Korg le plus proche ou le magasin où vous avez acheté l'instrument.
La marque CE apposée sur tous les produits de notre firme fonctionnant sur secteur jusqu'au 31 décembre 1996 signifie que ces
appareils répondent à la Directive EMC (89/336/CEE) et à la Directive concernant la marque CE (93/68/CEE).
La marque CE apposée après le 1 janvier 1997 signifie que ces appareils sont conformes à la Directive EMC (89/336/CEE), à la
Directive concernant la marque CE (93/68/CEE) ainsi qu'à la Directive Basse Tension (73/23/CEE).
La marque CE apposée sur tous les produits de notre firme fonctionnant sur piles signifie que ces appareils répondent à la Directive
EMC (89/336/CEE) et à la Directive concernant la marque CE (93/68/CEE).
Ce produit a été fabriqué suivant des spécifications sévères et des besoins en tension applicables dans le pays où ce produit doit être
utilisé. Si vous avez acheté ce produit sur internet, par correspondance ou/et au téléphone, vous devez vérifier que ce produit est bien
utilisable dans votre pays de résidence.
ATTENTION: L'utilisation de ce produit dans un pays autre que celui pour lequel il a été conçu peut être dangereuse et annulera la
garantie du fabricant ou du distributeur.
Veuillez aussi conserver votre récépissé qui est la preuve de votre achat, faute de quoi votre produit risque de ne plus être couvert par
la garantie du fabricant ou du distributeur.
Qu'est-ce que le ?
Le système (de l'anglais Resonant Structure and Electronic circuit Modeling System) est une technologie de modelage du son
propriétaire de Korg qui reproduit avec précision les caractéristiques et la nature complexes des instruments acoustiques et
électriques ainsi que des circuits électroniques dans leur environnement réel. Le système
caractéristiques de générateurs de sons comme des corps d'instruments, des haut-parleurs et des enceintes, des champs acoustiques, des microphones, des lampes, des transistors, etc.
Marque CE pour les normes européennes harmonisées
REMARQUE IMPORTANTE POUR LES CLIENTS
émule une vaste gamme de
16
Page 17

Guide de démarrage rapide
Avant d'effectuer les raccordements avec un appareil extérieur
quelconque, mettez toutes les commandes de volume sur leur
position minimale et mettez l'AX10B hors tension.
1.
Si l'AX10B doit être alimenté sur piles, ouvrez le logement
des piles situé sous le panneau inférieur, et insérez quatre
piles alcalines AA (vendues séparément). Si vous souhaitez
alimenter l'AX10B avec l'adaptateur secteur vendu
séparément, branchez l'adaptateur sur la prise DC9V du
panneau arrière (l'appareil se mettra sous tension).
2.
Réglez le commutateur de sélection INPUT L/H sur la
position correspondant à la sortie de votre guitare. Si
votre guitare est munie de micros à niveau de sortie élevé
comme des micros double bobinage, choisissez la
position “H”. Si votre guitare est munie de micros à niveau
de sortie faible comme des micros simple bobinage,
choisissez la position “L”.
3.
Raccordez votre guitare à la prise INPUT de l'AX10B. Si
vous faites fonctionner l'appareil sur piles, l'AX10B se
mettra alors sous tension.
4.
Si vous raccordez l'AX10B à un ampli de basse, réglez le
commutateur de sélection AMP/LINE sur “AMP”. Si vous
raccordez l'AX10B à un casque, un enregistreur ou un
mélangeur, réglez ce commutateur sur “LINE”.
5.
Raccordez la prise OUTPUT de l'AX10B à la prise INPUT
de votre ampli de basse ou enregistreur. Si vous souhaitez
utiliser un casque, branchez-le sur la prise OUTPUT.
6.
Mettez l'appareil raccordé sous tension, and réglez le
volume au niveau souhaité. Vous pouvez aussi utiliser les
boutons MASTER de l'AX10B pour régler le volume.
7.
Appuyez sur les touches de sélection de programme pour
changer de programme.
CONSEILS
L'AX10B offre 40 programmes préréglés (01~94)
et 40 programmes utilisateur (0.1~9.4). Avec les
réglages d'usine, les programmes utilisateur ont le
même contenu que les programmes préréglés.
8.
Vous pouvez contrôler l'effet de la pédale en utilisant la
pédale d'expression. La pédale est activée lorsque la LED
PEDAL en haut et à gauche de la pédale est allumée. Si
cette LED est éteinte, enfoncez complètement la pédale
pour allumer la LED. La pédale sera alors activée.
9.
Édition du son
Utilisez le commutateur de sélection AMP TYPE pour
sélectionner un type d'amplificateur et les divers boutons
de commande pour régler le gain, la tonalité, le volume,
etc.
10.
Édition d'un effet
Si vous souhaitez éditer l'effet de modulation ou l'effet
d'ambiance (situé après l'amplificateur), utilisez le
commutateur de sélection MODULATION ou le commutateur de sélection AMBIENCE pour sélectionner l'effet
souhaité, et les touches DEPTH situées sous le
commutateur de sélection pour régler la profondeur de
l'effet, etc. Vous pouvez aussi régler la vitesse, etc. d'un
effet de modulation en maintenant la touche FUNCTION
enfoncée et en appuyant sur les touches DEPTH (qui
prennent alors la fonction de touches SPEED). Vous
pouvez régler le temps du Delay ou du Reverb pour l'effet
d'ambiance en appuyant sur la touche TAP à l'intervalle
souhaité.
11.
Pour éditer le pré-effet situé avant l'amplificateur, appuyez
sur la touche PRE FX afin de sélectionner un effet et
utilisez les touches VALUE pour effectuer les réglages.
Ainsi s'achève cette brève introduction à l'AX10B. Ce
mode d'emploi contient bien d'autres informations sur les
capacités de l'AX10B, aussi veuillez le lire attentivement
de telle sorte que vous puissiez tirer pleinement parti de
votre AX10B.
3
54
2 1
11
9
7
8
9
10
6
8
10 10
10
7
17
Page 18

Nomenclature et fonctions
Panneau avant
○○○○○○○○○○○○○○○○○○○○○○○○○
1
Écran
Le numéro de programme est affiché et lorsque vous utilisez
un bouton ou une touche, la valeur du paramètre correspondant apparaîtra brièvement sur l'afficheur.
• S'allume lorsque l'appareil est sous tension.
• Le point situé dans le coin inférieur droit de l'afficheur
s'allumera quand vous éditerez une valeur de paramètre.
• Quand l'AX10B fonctionne sur piles,
piles sont presque épuisées.
○○○○○○○○○○○○○○○○○○○○○○○○○
Commutateur de sélection AMP TYPE
2
Utilisez ce commutateur pour sélectionner un des 11 types
d'amplificateurs.
3
Boutons de commande
Ces boutons permettent de régler le gain, la tonalité et le
volume des modèles d'amplificateur.
Vous pouvez régler la quantité de réduction du bruit en
tournant le bouton VOLUME/NR tout en maintenant la touche
FUNCTION enfoncée.
Certains réglages de ces boutons peuvent provoquer de la
distorsion. Dans ce cas, baissez le volume avec le bouton de
commande VOLUME (ou les touches MASTER).
○○○○○○○○○○○○○○○○○○○○○○○○○
4
LED PRE FX (TUNER)
Ces LED indiquent le pré-effet sélectionné.
Elles ne s'allumeront pas si le pré-effet est désactivé.
Lorsque l'accordeur est activé, ces LED indiquent la différence
par rapport à la hauteur de note correcte. (p.21)
clignotera si les
Ces touches servent à régler la valeur du pré-effet.
Vous pouvez activer/désactiver PRE FX en appuyant
simultanément sur les touches VALUE
Lorsque l'accordeur est activé, vous pouvez utiliser ces
touches pour effectuer son calibrage (CALIB).
○○○○○○○○○○○○○○○○○○○○○○○○○
7
Permet de sélectionner un des 11 types d'effets de modulation.
8
Ces touches permettent de régler la profondeur, etc., de l'effet
de modulation (DEPTH).
Vous pouvez régler la vitesse de modulation, etc. en appuyant
sur ces touches (SPEED) tout en maintenant la touche
FUNCTION enfoncée.
Vous pouvez activer/désactiver l'effet MODULATION en
appuyant simultanément sur les touches DEPTH
(ON/OFF). Si l'effet est désactivé, la LED du commutateur de
sélection MODULATION ne s'allumera pas.
○○○○○○○○○○○○○○○○○○○○○○○○○
9
Permet de sélectionner un des 11 effets d'ambiance.
10
Ces touches permettent de régler la profondeur, etc. de l'effet
d'ambiance sélectionné.
Vous pouvez activer/désactiver AMBIENCE en appuyant
simultanément sur les touches DEPTH
l'effet est désactivé, la LED du commutateur de sélection
AMBIENCE ne s'allumera pas. Si la pédale d'expression
contrôle le volume, vous pouvez obtenir le niveau le plus bas
(i.e., lorsque la pédale est revenue complètement en position
haute) en appuyant sur
FUNCTION enfoncée.
6
Touches VALUE (CALIB) – ON/OFF –
▲
et ▼.
Commutateur de sélection MODULATION
Touches DEPTH/SPEED buttons – ON/OFF –
▲
et
Commutateur de sélection AMBIANCE
Touches DEPTH – ON/OFF –
▲
et ▼ (ON/OFF). Si
▲
et ▼ tout en maintenant la touche
▼
5
Touche PRE FX button
Chaque fois que vous appuyez sur cette touche, le type de
pré-effet change dans l'ordre suivant : COMP
OCTAVE → COMP.
→
DIST
→
1 3
18
4
5
6
7
2
8
9
10
19
18
Touche TAP
11
Vous pouvez régler le temps du Delay ou du Reverb pour l'effet
d'ambiance en appuyant sur la touche TAP à l'intervalle souhaité.
La LED située à gauche clignotera pour indiquer le rythme.
17
12
13
14
16
15
11
Page 19

○○○○○○○○○○○○○○○○○○○○○○○○○
Touche FUNCTION
12
Pour éditer un des paramètres imprimés en rouge sur le
panneau avant, maintenez cette touche enfoncée et utilisez la
touche ou le bouton correspondant. Vous pouvez par exemple
changer la vitesse de l'effet de modulation en maintenant
cette touche enfoncée et en utilisant les touches MODULATION DEPTH.
○○○○○○○○○○○○○○○○○○○○○○○○○
Touches MASTER (CANCEL)
13
Ces touches permettent de régler le volume général de
l'AX10B (MASTER).
Lorsque l'AX10B est prêt à enregistrer, une pression sur l'une
de ces touches annulera l'opération Write (CANCEL).
Touche WRITE
14
Utilisez cette touche pour enregistrer un programme.
Lorsque vous appuyez sur cette touche, l'AX10B entre en
mode “write-ready” ; si vous appuyez de nouveau sur cette
touche, le programme sera enregistré. (p.24)
○○○○○○○○○○○○○○○○○○○○○○○○○
Touche PEDAL FX/BANK HOLD
15
Cette touche permet de sélectionner l'effet qui sera contrôlé
En appuyant sur cette touche tout en maintenant la touche
FUNCTION enfoncée, vous pouvez sélectionner le mode
“bank hold” comme moyen de sélection des programmes
(BANK HOLD). Reportez-vous à “Sélection des programmes :
b” (p.21).
○○○○○○○○○○○○○○○○○○○○○○○○○
16
Vous pouvez utiliser cette pédale d'expression pour contrôler
les effets ou le volume. Enfoncez complètement la pédale
pour activer/désactiver l'effet de pédale sélectionné.
17
Cette LED s'allumera si la pédale d'expression est activée.
18
Cette LED s'allumera si la valeur éditée est identique à la
valeur enregistrée (d'origine).
○○○○○○○○○○○○○○○○○○○○○○○○○
19
par la pédale d'expression (Pedal Effect).
A chaque pression sur cette touche, la LED change de couleur
pour indiquer l'effet de pédale qui sera contrôlé.
ORG : OCTAVE (orange) : Octave
RED : MOD (rouge) : L'effet sélectionné avec MODULATION
GRN : AMB (vert) : L'effet sélectionné avec AMBIENCE
OFF : VOLUME (éteinte) : Pédale de volume
Utilisez ces commutateurs pour sélectionner les programmes.
Vous pouvez sélectionner les programmes de trois façons
différentes. Reportez-vous à “Sélection des programmes”
(p.21).
Si vous appuyez simultanément sur les commutateurs UP and
DOWN, les effets seront contournés et l'accordeur sera activé
(BYPASS) (p.21).
Si un effet différent de OCTAVE est sélectionné comme préeffet, vous ne pourrez pas utiliser la touche PEDAL FX pour
sélectionner OCTAVE.
Pédale d'expression
LED PEDAL
LED ORIGINAL VALUE
Commutateurs de sélection de programme
DOWN/BANK DOWN, UP/BANK UP –BYPASS,
TUNE –
Panneau arrière
○○○○○○○○○○○○○○○○○○○○○○○○○
Commutateur de sélection INPUT L/H
20
Réglez ce commutateur en fonction du niveau de sortie du
micro de votre basse.
H:
Basses avec niveau de sortie élevé et circuit actif
L:
Basses avec niveau de sortie faible
Prise INPUT
21
Raccordez votre guitare à cette prise. Utilisez une fiche mono
1/4". Si l'AX10B fonctionne sur piles, il sera mis sous tension
quand vous brancherez la fiche.
Si l'AX10B fonctionne sur piles, il ne sera pas mis sous
tension si vous insérez une fiche stéréo 1/4".
○○○○○○○○○○○○○○○○○○○○○○○○○
Prise OUTPUT
22
Raccordez cette prise à votre amplificateur de basse, votre
enregistreur, ou votre casque.
23
Réglez ce commutateur sur “AMP” si vous branchez un
amplificateur, ou sur “LINE” si vous branchez un enregistreur
ou utilisez un casque.
○○○○○○○○○○○○○○○○○○○○○○○○○
24
L'adaptateur secteur vendu séparément peut être branché sur
cette prise (p.20). Lorsque vous branchez l'adaptateur,
l'appareil se met automatiquement sous tension.
25
Si vous utilisez l'adaptateur secteur vendu séparément,
enroulez le câble de l'adaptateur autour de ce crochet (p.20).
2425 20 21 22 23
Commutateur de sélection AMP/LINE
Si vous raccordez l'AX10B à un ampli de basse muni d'un
tweeter pour une réponse étendue dans les fréquences
élevées, sélectionnez la position “LINE”.
DC9V
Vous devez utiliser uniquement l'adaptateur spécifié (p.26).
Crochet de câble
19
Page 20

Configuration
Mise sous/hors tension
Avant de mettre sous ou hors tension l'appareil, vous devez
baisser le volume de tous les appareils raccordés.
Lors d'une alimentation sur piles :
1.
Pour ouvrir le logement des piles, appuyez légèrement
sur l'onglet situé près de la flèche et soulevez le
couvercle.
Installez quatre piles alcalines (vendues séparément) en
respectant la polarité et refermez le couvercle.
2.
Si l'appareil est alimenté sur piles, il se mettra sous
tension lorsque vous brancherez un câble mono sur la
prise INPUT. L'écran s'allume quand l'appareil est sous
tension.
L'appareil se met hors tension lorsque vous débranchez
le câble de la prise INPUT.
Veillez à débrancher le câble de la prise INPUT lorsque vous
n'utilisez pas l'AX10B de façon à économiser l'énergie des
piles.
Si vous raccordez un câble stéréo, l'appareil ne se mettra pas
sous tension.
Si les piles sont usées, un indicateur clignotera sur
l'écran. Remplacez les piles le plus tôt possible. Les piles
usées devront être immédiatement retirées de l'appareil. Si
vous laissez des piles usées dans l'appareil, elles risquent de
fuir ou de provoquer un dysfonctionnement. Vous devez
également retirer les piles lorsque vous ne prévoyez pas
d'utiliser l'AX10B pendant un certain temps.
Lors d'une alimentation avec l'adaptateur secteur :
1.
Raccordez l'adaptateur secteur vendu séparément à la
prise DC 9V et branchez l'adaptateur secteur sur une
prise secteur. La LED POWER s'allumera, et l'appareil se
mettra sous tension.
Utilisez uniquement l'adaptateur secteur spécifié (p.26).
N'oubliez pas de débrancher l'adaptateur secteur de la prise
secteur lorsque vous n'utilisez pas l'AX10B.
N'appliquez pas de force excessive sur le câble.
Enroulez le câble de l'adaptateur secteur autour du crochet
comme indiqué sur le schéma.
Raccordements
1.
Mettez les appareils que vous souhaitez raccorder hors
tension et baissez toutes les commandes de volume.
2.
Réglez le commutateur de sélection INPUT L/H en
fonction du niveau de sortie de vos micros.
“H” est correct pour des basses avec niveau de sortie
élevé. “L” est correct pour des basses avec niveau de
sortie faible.
3.
Raccordez votre guitare à la prise INPUT.
4.
Réglez le commutateur de sélection LINE/AMP sur la
position appropriée.
Si vous raccordez l'AX10B à un ampli de basse, utilisez le
réglage “AMP”. Si vous raccordez l'AX10B à un
mélangeur, un enregistreur ou un casque, utilisez le
réglage “LINE”.
Si vous raccordez l'AX10B à un ampli de basse muni d'un
tweeter pour une réponse étendue dans les fréquences
élevées, sélectionnez la position “LINE”.
5.
Raccordez la prise OUTPUT à votre ampli ou enregistreur, etc.
La prise OUTPUT est stéréophonique (TRS). Par
conséquent, si vous utilisez un câble mono pour la
raccorder à votre ampli de basse, etc., seul le son du
canal L (gauche) sera émis.
Si vous souhaitez utiliser un casque, raccordez le casque
à cette prise.
Si vous utilisez les deux canaux d'un mélangeur ou deux
amplificateurs en stéréo, utilisez un câble stéréo à mono
double.
6.
Lorsque les raccordements sont terminés, mettez
l'appareil raccordé sous tension et réglez le volume.
Utilisez les touches MASTER pour régler le volume
général de l'AX10B. (p.19-
CONSEILS
Si le son présente de la distorsion lorsque vous utilisez
l'AX10B en mode “bypass”, utilisez les touches MASTER pour
abaisser le volume.
Casque
Enregistreur, mélangeur, etc.
INPUT
Jack mono 1/4"
– Jack mono 1/4"
Jack mono 1/4" x 2
– Jack stéréo 1/4"
)
13
AMP/LINE
LINE
Équipement audio
Prise phono stéréo
– Jack stéréo 1/4"
basse
20
ampli de basse
Adaptateur secteur
à prise secteur
AMP/LINE
INPUT
AMP
Jack mono 1/4"
– Jack mono 1/4"
Jack mono 1/4"
– Jack mono 1/4"
INPUTOUTPUT
L/H
Page 21

Utilisation de l'AX10B
t
Sélection des programmes
Une fois la configuration effectuée, vous pouvez sélectionner
des programmes et les essayer.
L'AX10B offre 40 programmes préréglés et 40 programmes
utilisateur. Il y a dix banques de préréglages (0~9) et dix
banques utilisateur (0.~9.), avec quatre programmes dans
chaque banque.
Programmes utilisateur
Banque: 0.~9.
Vous pouvez sélectionner les programmes à l'aide d'une des
trois méthodes suivantes.
Programme: 1~4
Programmes préréglés
Banque: 0~9 Programme: 1~4
Bypass et Mute
Si vous contournez l'AX10B avec la fonction Bypass, votre
son sera direct sans effet (il ne sera pas traité).
Si vous coupez le son de l'AX10B avec la fonction Mute,
aucun son ne sera audible.
1.
a: Balayage des programmes de toutes les banques
1.
Appuyez sur le commutateur de sélection UP ou DOWN.
÷01÷02÷03÷04÷11÷
...9.4
...÷93÷94÷0.1...
b: Balayage des programmes dans une banque
1.
En maintenant la touche FUNCTION enfoncée, appuyez
sur la touche PEDAL FX (BANK HOLD) pour sélectionner
le mode “bank hold”. La banque apparaîtra à l'écran sous
la forme “
2.
Appuyez sur le commutateur de sélection de programme
UP ou DOWN. Seul le programme changera ; la banque
ne changera pas.
...H4
3.
Pour annuler le mode “bank hold”, appuyez de nouveau
sur la touche PEDAL FX (BANK HOLD) en maintenant la
touche FUNCTION enfoncée.
C:Balayage des banques (en laissant fixé le
”.
÷H1÷H2÷H3÷H4÷H1÷
H2...
2.
Accordeur
Vous pouvez utiliser l'accordeur chromatique automatique
intégré de l'AX10B pour accorder votre guitare. Pour activer
l'accordeur, appuyez simultanément sur les commutateurs de
sélection de programme UP et DOWN.
CONSEILS
programme)
1.
En maintenant la touche FUNCTION enfoncée, appuyez
sur le commutateur de sélection de programme UP
(BANK UP) ou DOWN (BANK DOWN). La banque
changera. Vous pouvez aussi utiliser cette méthode
lorsque le mode Bank Hold mode est sélectionné. (Dans
l'exemple suivant le programme 1 est sélectionné)
...11
÷21÷31÷41÷
...÷91÷0.1÷...÷9.1...
b1
a1 c1 b2
Procédure d'accord
1.
b1
2.
c1
3.
4.
Lorsque le nom de la note est A#
Trop bas
Appuyez simultanément sur les commutateurs de
sélection de programme UP et DOWN.
Bypass: Appuyez simultanément sur UP et DOWN et
Mute: Appuyez simultanément sur UP et DOWN et
Lorsque vous appuyez simultanément sur UP and DOWN,
l'affichage
seconde se met à clignoter plus rapidement. Pour
contourner l'AX10B (Bypass), relâchez la pression sur les
touches pendant que l'affichage clignote lentement. Pour
couper le son de l'AX10B (Mute), relâchez la pression sur
les touches pendant que l'affichage clignote rapidement.
Pour annuler Bypass ou Mute, appuyez au choix sur le
commutateur de sélection de programme UP ou DOWN.
Vous pouvez activer l'accordeur en sélectionnant au choix
Bypass ou Mute.Si vous sélectionnez Mute, vous pourrez
accorder votre guitare en silence.
Pour activer l'accordeur, appuyez simultanément sur les
commutateurs de sélection de programme UP et DOWN afin
de contourner ou couper le son de l'AX10B. Pour la procédure
à suivre, reportez-vous à “Bypass et Mute” (ci-dessus).
Jouez la corde que vous souhaitez accorder et le nom de
la note la plus proche sera affichée. Un point décimal “.” à
droite de la note représente un dièse (#).
Ne jouez pas simultanéement deux cordes ou plus quand
vous accordez.
Accordez grossièrement la corde de telle façon que le
nom de la note correcte apparaisse sur l'afficheur.
Accordez plus précisément la corde de telle façon que
seule la LED au centre de la section PRE FX (TUNER)
soit allumée.
relâchez immédiatement la pression.
maintenez-les enfoncées pendant environ une
seconde, puis relâchez la pression.
clignote lentement, puis après environ une
Trop haut Accord correc
21
Page 22

5.
Lorsque vous avez fini d'accorder, appuyez sur le
commutateur de sélection de programme UP ou DOWN
pour revenir en mode de fonctionnement normal.
Calibrage de l'accordeur
Lorsque vous mettez l'appareil sous tension, A moyen est réglé
sur une fréquence de référence de 440 Hz. Si vous le souhaitez,
vous pouvez régler (calibrer) cette hauteur de référence.
1.
Avec l'accordeur activé, utilisez les touches VALUE
(CALIB) pour effectuer le calibrage.
La plage de réglage disponible s'étend de 438 à 445 Hz.
Lorsque vous changez la valeur de réglage, l'écran
affiche les deux chiffres inférieurs de la fréquence de
calibrage (e.g., “41” pour 441 Hz).
L'AX10B ne conserve pas la valeur de réglage quand il est
mis hors tension.
Utilisation de la pédale d'expression
Vous pouvez utiliser la pédale d'expression pour ajouter une
tonalité une octave plus bas et contrôler des paramètres
comme le volume, la vitesse de modulation, le Filter, le Pitch
Bend et le niveau d'ambiance.
La pédale d'expression peut contrôler l'effet PRE FX OCTAVE,
un paramètre de l'effet MODULATION ou AMBIENCE
sélectionné (11 types par effet), ou le volume au choix.
Utilisation de la pédale d'expression
1.
Sélectionnez un programme pour lequel la LED PEDAL
(située en haut et à gauche de la pédale d'expression) est
allumée.
Si vous avez sélectionné un programme pour lequel la
LED PEDAL est allumée, vous pourrez utiliser la pédale
d'expression pour contrôler un effet de pédale.
Même avec un programme pour lequel la LED PEDAL
n'est pas allumée, vous pouvez enfoncer complètement la
pédale pour l'activer (la LED PEDAL s'allumera).
Si le volume est sélectionné comme effet de pédale, vous ne
pourrez pas l'activer ou le désactiver avec la pédale ; il
restera toujours activé.
PEDAL LED
2.
Utilisez la pédale d'expression tout en jouant. Vous
pourrez remarquer comment le son change.
N'appliquez pas de force excessive sur la pédale d'expression. Avant d'utiliser cette dernière, vous devriez déterminer la
quantité de force nécessaire pour allumer la LED PEDAL ou
contrôler l'effet, et appliquer seulement la force nécessaire.
CONSEILS
Vous pouvez utiliser la touche PEDAL FX pour commuter
l'effet (ou le volume) contrôlé par la pédale d'expression. La
fonction assignée à la pédale est indiquée par la couleur de la
LED située à gauche de la touche. (p.24)
Si la LED PEDAL
n'est pas allumée,
enfoncez la
pédale.
Création de sons
Création de sons sur l'AX10B
Vous pouvez choisir entre deux méthodes pour créer des
sons; vous pouvez éditer un programme préréglé ou
utilisateur existant ou créer un son à partir de zéro.
Si vous souhaitez commencer avec un programme existant,
sélectionnez un programme dont le son est proche du son
souhaité et modifiez-le. Réglez les boutons MID FC/GAIN,
BASS, MIDDLE et TREBLE de l'ampli, et utilisez les touches
VALUE, DEPTH, SPEED et TAP pour régler la profondeur et
la vitesse, etc., des effects.
Si vous souhaitez créer un son à partir de zéro, vous pouvez
(par exemple) commencer en sélectionnant le type d'ampli
avec
MODULATION et AMBIENCE, vous pourrez entendre plus
clairement les caractéristiques de chaque type d'amplificateur.
Vous pouvez désactiver chaque effet en appuyant simultanément sur ces touches VALUE ou DEPTH
Lorsque vous avez choisi votre type d'ampli, réglez les
boutons de commande MID FC/GAIN, BASS, MIDDLE,
TREBLE et VOLUME.
Après avoir effectué les réglages de votre amplificateur, vous
pourrez commencer à ajouter des effets. Il y a tout d'abord
MODULATION
Appuyez simultanément sur les touches DEPTH
activer l'effet. Puis, tournez le sélecteur MODULATION ou le
sélecteur AMBIENCE pour choisir l'effet souhaité. Utilisez les
touches DEPTH pour régler la profondeur de l'effet, etc. En ce
qui concerne l'effet de modulation, vous pouvez utiliser les
touches DEPTH en maintenant la touche FUNCTION
enfoncée pour régler le temps du Delay ou du Reverb. Pour
sélectionner les réglages de
activez PRE FX, puis utilisez la touche PRE FX pour
sélectionner l'effet. Utilisez les touches PRE FX VALUE pour
régler la quantité d'effet. Il se peut que vous souhaitiez
désactiver MODULATION et AMBIENCE pendant le réglage
de PRE FX.
Utilisez ensuite la touche PEDAL FX pour sélectionner la
fonction que vous contrôlerez avec la
sion
sera contrôlé par la pédale.
Si vous entendez du bruit, vous pourrez régler la
de bruit
tout en maintenant la touche FUNCTION enfoncée pour régler
la quantité de réduction du bruit.
Enfin, lorsque vous aurez obtenu le son souhaité, vous
pourrez l'enregistrer dans la mémoire. Si vous passez à un
programme différent ou mettez l'appareil hors tension sans
avoir enregistré le programme, ce dernier sera perdu.
22
AMP TYPE
. Cette touche permet de sélectionner l'effet (volume) qui
Certains réglages d'effet peuvent produire de la distorsion.
Baissez dans ce cas le volume avec le bouton VOLUME.
. Si vous désactivez les effets PRE FX,
▲
et ▼.
et
AMBIENCE
. Tournez le bouton NR (le bouton le plus à droite)
, situés après l'amplificateur.
PRE FX
, avant l'amplificateur,
pédale d'expres-
▲
réduction
et ▼ pour
Page 23

PRE FX
Utilisez la touche PRE FX pour sélectionner un pré-effet et utilisez les touches VALUE pour régler la quantité d'effet. Si vous avez sélectionné
WAH comme PEDAL FX, vous pourrez utiliser la pédale d'expression pour contrôler WAH.
TYPE Explication Normal PEDAL FX: WAH
COMP
DIST
OCTAVE
(*1) Cet effet ne peut pas fonctionner correctement si deux cordes ou plus sont jouées simultanément ou si des cordes graves sont jouées.
Compresseur avec attaque accentuée Règle la sensibilité: 0~30 --- --Distortion optimisée pour les basses Quantité de distorsion: 0~30 --- --Produit une tonalité une octave plus bas que le son d'origine, Réglage de la tonalité: 0~30 Contrôle la Spécifie la
et le mélange avec le son d'origine pour ajouter de la profondeur de profondeur de
profondeur et du grave.
(*1)
VALUE PEDAL VALUE
l'effet l'effet à la position
de pédale maximale
AMP TYPE
Utilisez le commutateur de sélection AMP TYPE pour sélectionner un amplificateur et réglez GAIN, TREBLE, MIDDLE, BASS, and VOLUME. Un
effet de cabine approprié pour cet ampli sera ajouté à chaque AMP TYPE (à l'exception de EQ). Le changement de réglage du commutateur de
sélection AMP/LINE changera la profondeur de l'effet de cabine.
TYPE Explication
EQ
VALV E
VALVE2
CLASSIC
SCOOPED
LA STUDIO
GOLDPNL
JAZZ
STUDIO
AC100
UKMAJOR
Égaliseur 3 bandes depuis une entrée ligne directe.
Ampli à tube avec commutateur ULTRA LO activé.
(CAB recommandée : 810CLS)
Ampli à tube adapté au rock. (CAB recommandée : 810CLS)
Ampli à tube dont les caractéristiques de base changent en fonction de la
valeur de réglage du cadran. (CAB recommandée : 118+112)
Ampli avec son typique des années 80. (CAB recommandée : 410MTL)
Ampli avec son typique L.A. (CAB recommandée : 410 LA)
Ampli connu pour son panneau doré élégant et son son clair.
(CAB recommandée : 410MDN)
Ampli combo apprécié par les bassistes de jazz. (CAB recommandée : 115JAZ)
Un combo à tube idéal pour le son Motown. (CAB recommandée : 115STU)
Ampli à tube de 100 W fabriqué par Vox. (CAB recommandée : 215TALL)
Ampli à tube de 200 W fabriqué au Royaume-Uni.
(CAB recommandée : 415 UK, 412 UK).
MODULATION
Utilisez le commutateur de sélection MODULATION pour sélectionner un effet de modulation et les touches DEPTH pour régler le paramètre
DEPTH. Pour régler le paramètre SPEED, utilisez les touches DEPTH (SPEED) tout en maintenant la touche FUNCTION enfoncée. Si MOD est
sélectionné comme PEDAL FX, vous pourrez utiliser la pédale d'expression pour contrôler l'effet.
TYPE Explication Normal PEDAL FX:MOD
CHORUS
FLANGE
PHASER
TREM
ROTARY
FEEDBK
PITCH1
FILTER
U-VIBE
TALK
PITCH2
(*4) Vous ne pouvez pas utiliser les touches pour modifier la valeur.
(*6)
Réglage du mode : 1: YAH-YAH, 2 : U-WAH, 3 : YOI-YOI, 4 : YEAH, 5 : HI U-WAH
(*7)
“.” Indique une valeur négative (-), “SP” indique un Pitch Change en marches d'escalier d'une octave vers le haut.
Chorus stéréo ancien.
Flanger ancien.
Phaser ancien.
Tremolo ancien.
Simulation d'enceinte rotative.
Le Mode 1 génère artificiellement du
Feedback, et s'active lorsqu'une note
est soutenue pendant longtemps.
Le Mode 2 génère du Feedback une
octave plus haut.
Pitch Shifter mélangé au son direct.
Filtre dont la fréquence de coupure
varie en réponse à la force du picking
(pour “Normal”) ou du mouvement de
la pédale (pour “PEDAL FX”)
U-Vibe ancien.
L'effet “Talking” est contrôlé par la
force du picking (pour “Normal”) ou
le mouvement de la pédale (pour
“PEDAL FX”)
Pitch Shifter avec effet à 100% (son
traité).
DEPTH SPEED PEDAL DEPTH SPEED
Profondeur de l'effet:
0~30
Quantité de Feedback:
0~15
Profondeur du Vibrato:
16~30
Quantité de Pitch Shift
(*5)
: 12.~1., d., d,
1~12
Balayage descendant
: 0~15,
Balayage ascendant
: 16~30
Profondeur de l'effet:
0~30
Quantité de Pitch Shift
(*7)
: 12.~1., 1~12
Vitesse de
modulation: 0~30
Réglage du mode:
1. Normal,
2. Overtone
Niveau de l'effet: 0~30
Résonance: 0~30
Vitesse de
modulation: 0~30
Réglage du mode
(*6)
1~5
N/A
(*4)
(*5)
“.” Indique une valeur négative (-), “d” indique un Detune.
Boutons de commande
MID FC/
GAIN(*2)
BASS
MIDDLE
TREBLE
VOLUME
○○○○○○○○○○○○○○○○○○○○
NR (*3)
(*2)
Fonctionne comme MID FC si AMP TYPE est réglé sur
EQ ~ JAZZ. Fonctionne comme GAIN si AMP TYPE est réglé
sur STUDIO ~ UKMAJOR.
(*3) Pour régler la réduction de bruit, tournez le bouton VOLUME
(NR) tout en maintenant la touche FUNCTION enfoncée.
Vitesse de modulation
La première partie du
mouvement de la pédale
contrôle la quantité de
Feedback ; la suite du
mouvement contrôle la
profondeur du Vibrato.
Niveau de l'effet
Coupure de fréquence
Vitesse de modulation
:
Contrôle l'effet “talking”
Contrôle la quantité de
Pitch Shift
Réglage de la crête des fréquences
moyennes (quand AMP TYPE est réglé
sur EQ ~ JAZZ) 1~5
Réglage du gain (quand AMP TYPE est
réglé sur STUDIO ~ UKMAJOR)
Règle la plage des basses fréquences de l'ampli.
Règle la plage intermédiaire des
fréquences de l'ampli.
Règle la plage des hautes fréquences de l'ampli.
Règle le volume.
Règle la profondeur de la réduction de bruit.
(Tournez le bouton EFF. DEPTH tout en
maintenant la touche TAP enfoncée.)
Profondeur de l'effet:
0~30
Réglage du mode:
1. Normal,
2. Overtone
N/A
(*4)
Quantité de Pitch Shift
(*5)
: 12.~1., d., d,
1~12
Résonance: 0~30
Profondeur de l'effet:
0~30
: 12.~1.,
Réglage
du mode:
1~5
(*6)
N/A
(*4)
Profondeur de l'effet:
0~30
Quantité de Pitch Shift
quand la pédale est au
(*7)
maximum
1~12, SP
23
Page 24

AMBIENCE
Utilisez le commutateur de sélection AMBIENCE pour sélectionner un effet d'ambiance et les touches DEPTH pour régler le paramètre DEPTH.
Pour régler le temps du Delay ou du Reverb, appuyez deux fois sur la touche TAP à l'intervalle souhaité. Si AMB est sélectionné comme PEDAL
FX, vous pourrez utiliser la pédale d'expression pour contrôler l'effet.
TYPE Explication TAP Normal PEDAL FX: AMBIENCE
SLAP
ECHO1
ECHO2
ECHO3
PP DLY
MULTI
AIR
ROOM
HALL
PLATE
SPRING
(*8)
Règle le temps du Reverb sur deux fois l'intervalle auquel vous aviez appuyé sur TAP.
Slap-Type Delay pour lequel le temps du delay est le quart de
l'intervalle configuré par vos pressions sur TAP
Simulation d'un Tape Echo avec une tonalité chaude (faible Feedback)
Simulation d'un Tape Echo avec une tonalité chaude (Feedback moyen)
Simulation d'un écho de bande avec une tonalité chaude
(Feedback élevé)
Ping-Pong Delay avec sauts de gauche à droite et vice-versa
Multi-tap delay
Reverb avec effet mystérieux
Reverb d'une pièce
Reverb d'une salle de concert
Reverb plat
Spring Reverb
(*8)
(*8)
(*8)
Temps du delay :
jusqu'à 250 [ms]
Temps du delay:
jusqu'à 1,0 [s]
N/A
(*4)
Temps du Reverb :
jusqu'à 4,0 [s]
Temps du Reverb :
jusqu'à 8,0 [s]
DEPTH PEDAL DEPTH
Spécifie la
profondeur de
l'effet à la
position de
pédale maximale
Niveau de l'effet:
0~30
Contrôle la
profondeur de
l'effet
Pédale d'expression
Enregistrement d'un
Sélection de l'effet qui sera contrôlé par la pédale
Appuyez sur la touche PEDAL FX pour sélectionner l'effet qui
sera contrôlé par la pédale. La LED située à gauche indique
l'effet (ou volume) qui sera contrôlé.
ORG : WAH (orange) : Pédale wah-wah
RED : MOD (rouge) : L'effet sélectionné avec MODULATION
programme
Lorsque vous avez créé un son que vous souhaitez conserver,
vous pouvez l'enregistrer dans un des 40 programmes
utilisateur (0.1~9.4).
GRN : AMB (vert) : L'effet sélectionné avec AMBIENCE
OFF : VOLUME (éteinte) : Pédale de volume
Si un effet différent de OCTAVE est sélectionné comme préeffet, vous ne pourrez pas utiliser la touche PEDAL FX pour
sélectionner OCTAVE. Si OCTAVE est sélectionné comme
effet de pédale et si vous changez le pré-effet en sélectionnant un autre réglage que OCTAVE, l'effet de pédale sera
commuté vers VOLUME.
Utilisation de la pédale pour activer/désactiver l'effet
1.
2.
En enfonçant complètement la pédale, vous pouvez activer ou
désactiver l'effet PEDAL FX. Lorsque l'effet est activé, la LED
à gauche de la pédale s'allume. Si VOLUME est sélectionné
comme PEDAL FX, la LED ne pourra pas s'éteindre.
Réglage de la valeur minimale de la pédale de volume
3.
Si PEDAL FX est réglé sur VOLUME, vous ne pourrez pas
maintenir la touche FUNCTION enfoncée et utiliser les
touches AMBIENCE DEPTH pour spécifier le volume minimal
(VOL PEDAL MIN) qui sera contrôlé par la pédale.
Sauvegarde du son d'une position de pédale spécifique
Vous ne pouvez pas sauvegarder le son produit par une
position de pédale spécifique. L'effet de pédale modifiera
toujours le son en fonction de la position actuelle de la pédale.
NR (Réduction du bruit)
Vous pouvez régler la quantité de réduction du bruit en
tournant le bouton de commande VOLUME (NR) tout en
maintenant la touche FUNCTION enfoncée.
Suivant l'appareil raccordé, une réduction de bruit trop
importante peut entraîner la perte de plusieurs notes. Dans ce
cas, baissez le niveau de réduction.
Si vous changez de programme ou mettez l'appareil hors
tension avant d'avoir enregistré votre programme édité, les
changements effectués seront perdus.
Le programme dans la mémoire de destination sera écrasé
par réécriture.
Appuyez sur la touche WRITE. Le numéro de programme
clignotera sur l'écran et l'AX10B passera en mode “writeready”.
Utilisez les commutateurs de sélection de programme
pour sélectionner la mémoire où vous souhaitez
enregistrer le programme.
Vous ne pouvez pas remplacer un programme préréglé
(01~94).
Appuyez sur la touche WRITE pour enregistrer le
programme sous le numéro de programme sélectionné.
Si vous décidez de ne pas enregistrer le programme,
appuyez sur une des touches MASTER (CANCEL) au
choix pour quitter le mode write-ready (l'affichage
clignote). L'appareil reviendra en mode de fonctionnement normal.
3
1, 3
2
24
Page 25

Autres fonctions
Guide de dépannage
Calibrage de la pédale d'expression
Si la pédale d'expression ne fonctionne pas correctement,
veuillez effectuer la procédure décrite ci-dessous.
Lorsque vous calibrez la pédale utilisez votre main car un
réglage précis ne sera pas possible si vous utilisez votre pied.
1.
Tout en maintenant simultanément enfoncées les touches
FUNCTION et PEDAL FX, mettez l'appareil sous tension.
L'écran affichera
.
2.
Déplacez doucement la pédale vers l'arrière. Lorsqu'elle
s'arrête, retirez votre main de la pédale et appuyez sur la
touche PEDAL FX.
L'affichage passera de
Si vous appuyez sur la touche MASTER (CANCEL)
pendant l'opération de calibrage, le calibrage sera
interrompu et le numéro de programme apparaîtra.
2. Appuyez lentement
3.
Déplacez lentement la pédale vers l'avant. Lorsqu'elle
s'arrête, retirez votre main de la pédale et appuyez sur la
touche PEDAL FX.
Lorsque le réglage est terminé, l'affichage
le numéro de programme apparaît. Vérifiez la pédale pour
vous assurer que les réglages sont corrects.
CONSEILS
Si vous assignez par exemple PEDAL FX à VOLUME et
réglez VOL PEDAL MIN sur 0, il sera facile de vérifier le
niveau MIN après le retour complet de la pédale.
En cas d'échec de l'opération de calibrage, l'écran affichera
et l'affichage précédant la calibration sera visible ( ). Si
plusieurs essais répétés échouent, il est possible que cela
soit dû à un dysfonctionnement de l'AX10B. Contactez votre
revendeur.
pendant environ une seconde, puis
à
3. Appuyez lentement
, clignote et
Si l'AX10B ne fonctionne pas de la façon souhaitée, veuillez
vérifier tout d'abord les points suivants. Si vous n'arrivez pas
malgré tout à résoudre le problème, contactez votre revendeur.
L'appareil ne se met pas sous tension.
❑
Y a-t-il des piles dans l'appareil ? Ou bien, l'adaptateur
secteur est-il branché sur une prise secteur ? (p.20)
❑
Un câble avec fiche mono est-il raccordé à la prise
INPUT ? (p.20)
Pas de son
❑
Votre basse, votre amplificateur et/ou votre casque sont-ils
raccordés aux prises correctes ? (p.20)
❑
Votre amplificateur est-il allumé et réglé correctement ?
❑
Un câble quelconque est-il endommagé ?
❑
Le niveau général de l'AX10B est-il réglé sur “0” ou sur un
niveau très bas ? (p.19)
❑
Le volume du programme de l'AX10B est-il réglé sur “0” ou
sur un niveau très bas ? (p.23)
❑
Le volume de votre instrument est-il baissé ?
❑
Le son de l'AX10B est-il coupé?
Pas d'effet audible
❑
L'AX10B est-il contourné ? (p.21)
❑
Les effets utilisés dans le programme sont-ils activés ?
La pédale ne fonctionne pas
❑
Avez-vous sélectionné un programme qui utilise un effet de
pédale d'expression ? (p.22, 24)
❑
L'indicateur de pédale est-il allumé ?
Impossible d'enregistrer (l'écran affiche “Er”)
❑
Avez-vous éteint l'appareil pendant le chargement des
programmes préréglés ?
Rechargez les programmes préréglés. (p.25)
Réinitialisation des programmes aux réglages d'usine
1.
Tout en maintenant la touche WRITE enfoncée, mettez
l'appareil sous tension.
L'écran affichera
Si vous décidez de commencer normalement sans
charger les réglages d'usine, appuyez sur une des
touches MASTER (CANCEL) au choix.
2.
Pendant que l'écran affiche , appuyez sur la touche
WRITE. Les programmes d'usine seront chargés dans la
zone utilisateur (0.1~9.4). Lorsque le chargement est
terminé, l'affichage
programme apparaît.
Ne mettez jamais l'appareil hors tension pendant que cette
opération est en cours.
Veuillez noter que si vous chargez de nouveau les programmes préréglés, tous les programmes écrits précédemment
seront écrasées par réécriture.
.
clignote, puis le numéro de
25
Page 26

Principales spécifications
Modèles d'ampli :
Effets:
Nombre de programmes :
Entrée :
Sortie :
Accordeur :
Alimentation
Dimensions (L x P x H) :
Poids :
Accessoires fournis :
Options :
L'aspect extérieur et les spécifications sont sujets à modifications sans préavis à des fins d'amélioration.
11
Types de pré-effets: 3
Types de modulation : 11
Types d'ambiance : 11
Réduction de bruit : 1
Programmes préréglés : 40 (10 banques x 4 programmes)
Programmes utilisateur : 40 (10 banques x 4 programmes)
Entrée de basse (Jack mono 1/4")
Sortie double usage ligne/casque (Jack stéréo 1/4")
Plage d'accord : 27,5 Hz – 1.318,5 Hz (A0–E6)
Calibrage de l'accordeur : A = 438 Hz – 445 Hz
Quatre piles alcalines AA (non inclues, permettent environ 18 heures d'utilisation continue) ou
adaptateur secteur vendu séparément (CC 9V
287 mm x 182 mm x 60 mm
1,1 kg (sans les piles)
Manuel d'utilisation
Adaptateur secteur
)
26
Page 27

Bedirnungshandbuch
Einleitung
Herzlichen Glückwunsch zum Kauf von
Modeling Signal Processor von Tone Works Korg
Bitte lesen Sie die Anleitung vor dem Gebrauch sorgfältig
durch, denn sie enthält alle Informationen für langen und
störungsfreien Betrieb. Legen Sie die Anleitung nach dem
Durchlesen griffbereit zum Nachschlagen ab.
• Korgs „REMS“ Modeling-Technologie bietet zahlreiche
anspruchsvolle Effekte, darunter: 3 Typen von Pre-Effekten,
11 Typen von Amp Modeling, 11 Typen von Modulationseffekten und 11 Typen von Ambience-Effekten. Die
Bedienfeldregler für diese Amps und Effekte sind logisch
angeordnet, entsprechend dem Signalfluss vom
Basseingang zum Ausgang, wodurch leichte und kreative
Erzeugung einer langen Reihe von Klängen möglich wird.
AX10B Signallauf
EINGANG AUSGANG
• Der AX10B modeliert eine Reihe berühmter BassverstärkerSounds, von typischen warmen und fetten Röhrenverstärker-Sounds bis zum Sound moderner Verstärker.
Effekte wie Chor, Verzögerung und Band-Echo sind
ebenfalls vorhanden.
• 40 Presets, die das Potential des AX10B’s voll ausnutzen,
sind für sofortige Verwendung vorhanden, und Sie können
Ihre eigenen Einstellungen in weiteren 40 Anwenderprogrammen speichern.
• Das eingebaute Expression-Pedal bietet eine weitere
Dimension der Echtzeit-Kontrolle durch Regelung von
Lautstärke, Hinzufügen einer tieferen Oktave, Kontrolle der
Modulationsgeschwindigkeit, Verzögerungszeit oder Pitch
Bend. Es gibt auch einen einzigartigen Talk-Effekt, der
einen sprechenden Modulatorsound erzeugt, was ganz
neue Möglichkeiten für das Bassspiel erschließt.
• Der eingebaute Auto Chromatic Tuner erlaubt leises
Stimmen, was für Live-Situationen ideal ist.
PRE FX
3 TYPEN
AMP TYPE
11 TYPEN
AX10B - dem
MODULATION
11 TYPEN
AMBIENCE
11 TYPEN
.
Inhaltsverzeichnis
Einleitung .............................................................................. 27
Vorsichtsmaßregeln.............................................................. 28
Schneller Start ...................................................................... 29
Teile und ihre Funktionen ..................................................... 30
Vorderseite .................................................................... 30
Rückseite ....................................................................... 31
Setup .................................................................................... 32
Ein- und Ausschalten .................................................... 32
Anschlüsse .................................................................... 32
Spielen des AX10B............................................................... 33
Wählen von Programmen ............................................. 33
Bypass und Stummschaltung ....................................... 33
Tuner ............................................................................. 33
Verwendung des Expression-Pedals ............................ 34
Erzeugen von Sounds .......................................................... 34
Erzeugen von Sounds auf dem AX10B ........................ 34
PRE FX .......................................................................... 35
AMP TYPE .................................................................... 35
MODULATION............................................................... 35
AMBIENCE .................................................................... 36
Expression-Pedal .......................................................... 36
NR (Rauschunterdrückung) .......................................... 36
Ein Programm speichern...................................................... 37
Andere Funktionen ............................................................... 37
Kalibrieren (Einstellen) des Expression-Pedals ........... 37
Zurückstellen auf werkseitige Einstellungen ................ 37
Störungssuche...................................................................... 38
Wichtigste technische Daten ................................................ 38
Bedirnungshandbuch Manuel d'utilisation Owner's Manual
27
Page 28

Vorsichtsmaßregeln
Verwendungsort
Bei Verwendung des Geräts an den folgenden Orten kann eine Fehlfunktion auftreten.
• Im direkten Sonnenlicht
• An Orten mit extremer Temperatur oder Luftfeuchtigkeit
• An sehr staubigen oder schmutzigen Orten
• An Orten mit starker Vibration
• In der Nähe von Magnetfeldern
Stromversorgung
Schließen Sie das spezielle Netzteil an eine Netzsteckdose mit der richtigen Netzspannung an. Schließen Sie es nicht an eine Steckdose
mit einer anderen Spannung als der für das Gerät geeigneten an.
Störungen mit anderen elektrischen Geräten
In der Nähe aufgestellte Radio- oder Fernsehgeräte können Empfangsstörungen aufweisen. Betreiben Sie dieses Gerät immer in einem
geeigneten Abstand von Radio- oder Fernsehgeräten.
Behandlung
Um Beschädigungen zu vermeiden, betätigen Sie Schalter oder Bedienungselement nicht mit Gewalt.
Pflege
Wenn das Äußere schmutzig wird, mit einem sauberen, trockenen Lappen abwischen. Verwenden Sie keine flüchtigen organischen
Lösungsmittel wird Benzol, Terpentin, Reinigungslösungen oder entflammbare Poliermittel.
Die Anleitung aufbewahren
Nach dem Lesen dieser Anleitung bewahren Sie sie bitte zum Nachschlagen auf.
Fremdkörper aus dem Gerät halten
Stellen Sie niemals Behälter mit Flüssigkeiten in der Nähe des Geräts ab. Wenn Flüssigkeit in das Gerät eindringt, kann ein Geräteausfall,
Brand oder elektrischer Schlag verursacht werden.
Achten Sie darauf, keine Metallobjekte in das Gerät kommen zu lassen. Falls ein Gegenstand in das Gerät eindringt, ziehen Sie das
Netzteil von der Steckdose ab. Dann wenden Sie sich an Ihren Korg-Fachhändler oder an des Geschäft, in dem das Gerät gekauft wurde.
Das CE-Kennzeichen, dass an den mit Netzstrom betriebenen Produkten unserer Firma, hergestellt bis zum 31. Dezember 1996,
angebracht ist, zeigt an, dass das betreffende Gerät mit der EMV-Richtlinie (89/336/EWG) und der CE-Kennzeichen-Richtlinie (93/68/
EWG) übereinstimmt.
Das nach dem 1. Januar 1997 angebrachte CE-Kennzeichen weist auf Übereinstimmung mit der EMV-Richtlinie (89/336/EWG), CEKennzeichen-Richtlinie (93/68/EWG) und Niederspannungsrichtlinie (73/23/EWG) hin.
Außerdem zeigt das CE-Kennzeichen, dass an den mit Batteriestrom betriebenen Produkten unserer Firma angebracht ist, an dass
das betreffende Gerät mit der EMV-Richtlinie (89/336/EWG) und der CE-Kennzeichen-Richtlinie (93/68/EWG) übereinstimmt.
Dieses Produkt wurde unter strenger Beachtung von Spezifikationen und Spannungsanforderungen hergestellt, die im Bestimmungsland gelten. Wenn Sie dieses Produkt über das Internet, per Postversand und/oder mit telefonischer Bestellung gekauft haben,
müssen Sie bestätigen, dass dieses Produkt für Ihr Wohngebiet ausgelegt ist.
WARNUNG: Verwendung dieses Produkts in einem anderen Land als dem, für das es bestimmt ist, verwendet wird, kann gefährlich
sein und die Garantie des Herstellers oder Importeurs hinfällig lassen werden.
Bitte bewahren Sie diese Quittung als Kaufbeleg auf, da andernfalls das Produkt von der Garantie des Herstellers oder Importeurs
ausgeschlossen werden kann.
Was ist ?
(„Resonant structure and Electronic circuit Modeling System“) ist KORGs eigene Sound-Modeling-Technologie, die den
komplexen Charakter und die Natur sowohl akustischer als auch elektrischer Instrumente ebenso wie von Elektronikinstrumenten in
echten Umgebungen präzise reproduziert.
Instrumentenkörper, Lautsprecher und Boxen, akustische Felder, Mikrofone, Verstärkerröhren, Transistoren usw.
CE-Kennzeichen für europäische harmonisierte Standards
WICHTIGER HINWEIS FÜR KUNDEN
emuliert eine lange Reihe von Klangerzeugungseigenschaften, einschließlich
28
Page 29

Schneller Start
Bevor Sie Verbindungen mit externen Geräten herstellen,
stellen Sie alle Lautstärkeregler auf Minimumstellung und
schalten das Gerät aus.
1.
Wenn Sie den AX10B mit Batterien betreiben wollen,
öffnen Sie das Batteriefach an der Unterseite und setzen
vier Mignonzellen (AA, R6) ein (getrennt erhältlich). Wenn
Sie den AX10B über das getrennt erhältliche Netzteil
betreiben wollen, schließen Sie das Netzteil an die Buchse
DC9V an der Rückseite an (das Gerät schaltet ein).
2.
Stellen Sie den Schalter INPUT L/H in die richtige
Stellung für den Gitarrenausgang. Wenn die Gitarre
Pickups mit hohem Ausgang, wie Humbucking-Pickups
hat, verwenden Sie die Stellung „H“. Wenn die Gitarre
Pickups mit niedrigem Ausgang, wie EinzelspulenPickups hat, verwenden Sie die Stellung „L“.
3.
Schließen Sie Ihre Gitarre an die INPUT-Buchse des
AX10B an. Wenn Sie Batterien verwenden, schaltet der
AX10B zu diesem Zeitpunkt ein.
4.
Wenn Sie den AX10B an einen Bass-Amp anschließen,
stellen Sie den Schalter AMP/LINE auf „AMP“. Wenn Sie den
AX10B an Kopfhörer, einen Recorder oder ein Mischpult
anschließen, stellen Sie diesen Schalter auf „LINE“.
5.
Verbinden Sie die OUTPUT-Buchse des AX10B mit der
INPUT-Buchse Ihres Bass-Amps oder Recorders. Wenn
Sie Kopfhörer verwenden wollen, schließen Sie diese an
die OUTPUT-Buchse an.
6.
Schalten Sie die angeschlossenen Geräte an und stellen
die Lautstärke auf einen geeigneten Pegel ein. Sie
können auch die MASTER-Tasten des AX10B verwenden,
um die Lautstärke einzustellen.
7.
Betätigen Sie die Programmwahlschalter, um Programme
umzuschalten.
TIPPS
Der AX10B hat 40 Preset-Programme (01~94) und
40 Anwenderprogramme (0.1~9.4) Werkseitig
enthalten die Anwenderprogramme die gleichen
Inhalte wie die Preset-Programme.
8.
Sie können den Pedal-Effekt mit dem Expression-Pedal
steuern. Das Pedal ist aktiv, wenn die PEDAL-LED oben
links am Pedal leuchtet. Wenn diese LED erloschen ist,
stellen Sie das Pedal ganz nach vorne, um die LED
aufleuchten zu lassen. Jetzt ist das Pedal aktiv.
9.
Bearbeiten des Klangs
Verwenden Sie den Wahlschalter AMP TYPE zum wählen
eines Verstärkertyps und die verschiedenen Steuerknöpfe
zum Einstellen von Verstärkung, Ton und Lautstärke usw.
10.
Bearbeiten eines Effekts
Wenn Sie den Modulationseffekt oder Umgebungseffekt
(nach dem Amp geschaltet) verwenden wollen, verwenden Sie den MODULATION-Wahlschalter oder
AMBIENCE-Wahlschalter zum Wählen des gewünschten
Effekts und verwenden Sie DEPTH-Taste unter dem
Wahlschalter zum Einstellen der Effekttiefe usw. Sie
können auch die Geschwindigkeit usw. eines
Modulationseffekts durch Gedrückthalten der FUNCTIONTaste und Drücken der DEPTH-Tasten (die als SPEEDTasten fungieren) einstellen. Für den Ambience-Effekt
können Sie die Verzögerungs- oder Reverb-Zeit durch
Drücken der TAP-Taste im gewünschten Intervall
einstellen.
11.
Zum Bearbeiten des Pre-Effekts vor dem Amp drücken
Sie die Taste PRE FX zum Wählen eines Effekts und
verwenden Sie VALUE-Tasten für die Einstellungen.
Damit ist unsere kurze Vorstellung des AX10B abgeschlossen. Diese Anleitung enthält viel mehr Information
über die Fähigkeiten des AX10B, lesen Sie sie deshalb
bitte gründlich durch, um sicherzustellen, dass Sie alle
Fähigkeiten des Modells voll ausnutzen.
3
54
2 1
11
9
7
8
9
10
6
8
10 10
10
7
29
Page 30

Teile und ihre Funktionen
Vorderseite
○○○○○○○○○○○○○○○○○○○○○○○○○
1
Display
Zeigt die Programmnummer, und bei Tastenbedienung
erscheint der Wert des Parameters kurz im Display.
• Leuchtet, wenn das Gerät eingeschaltet ist.
• Der Punkt unten rechts im Display leuchtet auf, wenn Sie
einen Parameterwert bearbeiten.
• Wenn der AX10B mit Batteriestrom läuft, blinkt
die Batterien schwach werden.
○○○○○○○○○○○○○○○○○○○○○○○○○
2
AMP TYPE-Wahlschalter
Wählt einen der 11 Typen von Amp-Modellen.
3
Reglerknöpfe
Diese Knöpfe dienen zum Einstellen von Gain, Ton und
Lautstärke der Verstärkermodelle.
Sie können die Tiefe der Rauschunterdrückung (NR) durch
durch Gedrückthalten der FUNCTION-Taste und Drehen des
VOLUME/NR-Reglers einstellen.
Manche Einstellungen dieser Knöpfe können Verzerrung im
Sound bewirken. In diesem Fall stellen Sie den VOLUMERegler (oder die MASTER-Tasten) niedriger ein.
○○○○○○○○○○○○○○○○○○○○○○○○○
4
PRE FX (TUNER) LED
Dienen zum Anzeigen des gewählten Pre-Effekts.
Die LEDs leuchten nicht auf, wenn der Pre-Effekt ausgeschaltet ist.
Wenn der Tuner arbeitet, zeigen diese LEDs den Unterschied
von der korrekten Tonlage an. (S.33)
5
PRE FX-Taste
Bei jedem Drücken dieser Taste schaltet der Pre-Effekt-Typ in
der Reihenfolge COMP
→
DIST → OCTAVE → COMP um.
wenn
Diese Tasten stellen den Wert des Pre-Effekts ein.
Sie können PRE FX ein- und ausschalten, indem Sie die
Tasten VALUE
Wenn der Tuner arbeitet, können Sie diese Tasten zur
Einstellung der Kalibrierung (CALIB) verwenden.
Wählt einen der 11 Typen von Modulationseffekten.
Diese Tasten stellen die Tiefe usw. des Modulationseffekts
(DEPTH) ein.
Sie können die Geschwindigkeit usw. durch Gedrückthalten
der FUNCTION-Taste und Drücken dieser Tasten (SPEED)
einstellen.
Sie können den MODULATION-Effekt ein- und ausschalten,
indem Sie die Tasten DEPTH
(ON/OFF). Wenn ausgeschaltet, leuchtet die MODULATIONWahlschalter LED nicht.
Wählt einen der 11 Typen von Ambience-Effekten.
Diese Tasten stellen die Tiefe usw. des gewählten AmbienceEffekts ein.
Sie können AMBIENCE ein- und ausschalten, indem Sie die
Tasten DEPTH
Wenn ausgeschaltet, leuchtet die AMBIENCE-Wahlschalter
LED nicht.
Wenn das Expression-Pedal die Lautstärke steuert, können
Sie die Minimum-Lautstärke (d.h. wenn das Pedal ganz
zurückgekehrt ist) durch Gedrückthalten der FUNCTION-Taste
und Drücken von
Sie können die Verzögerungs- oder Reverb-Zeit des
Ambience-Effekts durch Antippen dieser Taste im gewünschten Intervall einstellen. Die LED links blinkt, um das Tempo
anzuzeigen.
6
VALUE (CALIB)-Tasten –ON/OFF–
▲
und ▼ gleichzeitig drücken.
○○○○○○○○○○○○○○○○○○○○○○○○○
7
MODULATION-Wahlschalter
8
DEPTH/SPEED-Tasten –ON/OFF–
▲
und ▼ gleichzeitig drücken
○○○○○○○○○○○○○○○○○○○○○○○○○
AMBIENCE-Wahlschalter
9
10
DEPTH-Tasten –ON/OFF–
▲
und ▼ gleichzeitig drücken (ON/OFF).
▲
oder ▼ einstellen.
TAP-Taste
11
30
4
6
1 3
18
5
17
12
13
7
2
8
9
10
14
16
15
11
19
Page 31

○○○○○○○○○○○○○○○○○○○○○○○○○
FUNCTION-Taste
12
Um eines der Parameter zu bearbeiten, das auf der Vorderseite in Rot aufgedruckt ist, halten Sie diese Taste gedrückt und
drücken den entsprechenden Knopf bzw. die Taste. Sie
können z.b. Geschwindigkeit usw. des Modulationseffekts
durch Gedrückthalten dieser und Verwendung der Tasten
MODULATION DEPTH bearbeiten.
○○○○○○○○○○○○○○○○○○○○○○○○○
MASTER (CANCEL)-Tasten
13
Diese Tasten stellen die Gesamtlautstärke des AX10B ein
(MASTER).
Wenn der AX10B zum Schreiben (Speichern) bereit ist, wird
der Schreibvorgang durch drücken auf eine dieser Tasten
(CANCEL) beendet.
WRITE-Taste
14
Verwenden Sie diese Taste zum Schreiben (Speichern) eines
Programms.
Wenn Sie diese Taste drücken, schaltet der AX10B auf
„Schreiben-Bereit“-Modus; wenn Sie die Taste erneut drücken,
wird das Programm geschrieben (gespeichert). (S.36)
○○○○○○○○○○○○○○○○○○○○○○○○○
PEDAL FX/BANK HOLD-Taste
15
Diese Taste wählt den Effekt, der mit dem Expression-Pedal
gesteuert wird (Pedal-Effekt).
Bei jedem Tastendruck wechselt die LED die Farbe, um den
gesteuerten Pedaleffekt anzuzeigen.
ORG: OCTAVE (orangefarben): Oktave
RED: MOD (rot): Der von MODULATION gewählte Effekt
GRN: AMB (grün): Der von AMBIENCE gewählte Effekt
OFF: VOLUME (erloschen): Lautstärke-Pedal
Wenn ein anderer Effekt als OCTAVE für den Pre-Effekt
gewählt ist, können Sie die Taste PEDAL FX nicht zum
Wählen von OCTAVE verwenden.
Durch Gedrückthalten der FUNCTION-Taste und drücken
dieser Taste können Sie den Modus „Bank Hold“ als die Art
wählen, in der die Programme gewählt werden (BANK HOLD).
Siehe „Wählen von Programmens: b“ (S.33).
○○○○○○○○○○○○○○○○○○○○○○○○○
Expression-Pedal
16
Sie können dieses Expression-Pedal zum Steuern von
Effekten oder Lautstärke wählen. Durch Vorschieben des
Pedals nach vorne können Sie den gewählten Pedal-Effekt
ein- und ausschalten.
PEDAL LED
17
Diese LED leuchtet auf, wenn das Expression-Pedal aktiv ist.
ORIGINAL VALUE LED
18
Diese LED leuchtet, wenn der bearbeitete Wert identisch mit
dem gespeicherten (originalen) Wert ist.
○○○○○○○○○○○○○○○○○○○○○○○○○
Programmwahlschalter DOWN/BANK DOWN,
19
UP/BANK UP –BYPASS, TUNE–
Verwenden Sie diese Schalter zum Wählen von Programmen.
Sie können Programme auf eine von drei Arten wählen. Siehe
„Wählen von Programmens“ (S.33).
Wenn Sie die Tasten UP und DOWN gleichzeitig drücken,
werden die Effekte umgangen und der Tuner arbeitet
(BYPASS) (S.33).
Rückseite
○○○○○○○○○○○○○○○○○○○○○○○○○
INPUT L/H-Wahlschalter
20
Wählen Sie diesen Schalter je nach Pickup-Ausgang Ihrer
Bassgitarre.
H:
Starke Bassausgänge mit aktiver Schaltung
L:
Schwache Bassausgänge
INPUT-Buchse
21
Schließen Sie Ihre Gitarre an diese Buchse an. Verwenden
Sie einen 1/4-Zoll-Monostecker. Wenn der AX10B mit
Batteriestrom betrieben wird, schaltet das Gerät ein, wenn Sie
den Stecker in diese Buchse stecken.
Wenn der AX10B mit Batteriestrom läuft, schaltet er nicht ein,
wenn ein 1/4-Zoll-Stereostecker eingesteckt wird.
○○○○○○○○○○○○○○○○○○○○○○○○○
OUTPUT-Buchse
22
Verbinden Sie diese Buchse mit Ihrem Bass-Amp, Recorders
oder Kopfhörer.
23
Stellen Sie diesen Schalter auf „AMP“ wenn Sie ihn an einen
Verstärker anschließen, oder auf „LINE“, wenn Sie einen
Recorder anschließen oder Kopfhörer verwenden.
○○○○○○○○○○○○○○○○○○○○○○○○○
24
Das getrennt erhältliche Netzteil kann hier angeschlossen
werden (S.32). Wenn dieser Anschluss vorgenommen ist, wird
das Gerät automatisch eingeschaltet.
25
Wenn das getrennt erhältliche Netzteil verwendet wird,
schließen Sie das Kabel des Netzteils um diesen Haken an
(S.32).
2425 20 21 22 23
AMP/LINE-Wahlschalter
Wenn Sie den AX10B an einen Bassverstärker anschließen,
der einen Hochtöner für erweiterten Höhentongang hat,
wählen Sie die „LINE“-Position.
DC9V
Sie müssen immer das vorgeschriebene Netzteil verwenden
(S.38).
Kabelhaken
31
Page 32

Setup
Ein- und Ausschalten
Vor dem Ein- oder Ausschalten müssen Sie die Lautstärke
von angeschlossenen Geräten herunterdrehen.
Bei Batteriebetrieb:
1.
Zum Öffnen des Batteriefachs drücken Sie den mit Pfeil
markierten Zapfen leicht und heben den Deckel an.
Setzen Sie vier Alkali-Mignonzellen (AA, R6) (getrennt
erhältlich) unter Beachtung der richtigen Polung ein und
schließen Sie die Abdeckung.
2.
Bei Batteriebetrieb schaltet der Strom ein, wenn ein
Monokabel in die INPUT-Buchse eingesteckt ist. Das
Display leuchtet beim Betrieb auf.
Der Strom schaltet aus, wenn Sie das Kabel von der
INPUT-Buchse abziehen.
Wenn Sie den AX10B nicht verwenden, empfehlen wir, das
Kabel von der INPUT-Buchse abzuziehen, um die Lebensdauer der Batterie zu verlängern.
Wenn Sie ein Stereokabel anschließen, wird das Gerät nicht
eingeschaltet.
Wenn die Batterien schwach werden, blinkt die Anzeige
im Display. Bitte ersetzen Sie die Batterien so schnell wie
möglich. Wenn tote Batterien im Gerät gelassen werden,
können sie leck werden oder andere Fehlfunktionen
verursachen. Sie sollten auch die Batterien entfernen, wenn
Sie AX10B längere Zeit nicht verwenden wollen.
Bei Verwendung des Netzteils:
1.
Schließen Sie das getrennt erhältliche Netzteil an die
Buchse DC9V an und stecken Sie das Netzteil in eine
Steckdose. Die POWER LED leuchtet auf, und das Gerät
wird eingeschaltet.
Verwenden Sie nur das vorgeschriebene externe Netzteil.
(S.38)
Wenn Sie den AX10B nicht verwenden, trennen Sie immer
das Netzteil von der Steckdose ab.
Behandeln Sie das Kabel nicht mit Gewalt.
Wickeln Sie das Netzteilkabel um den Haken, wie in der
Abbildung gezeigt.
Anschlüsse
1.
Schalten Sie das anzuschließende Gerät aus, und stellen
Sie alle Lautstärkeregler auf Minimum ein.
2.
Stellen Sie den Schalter INPUT L/H entsprechend dem
Ausgang Ihres Pickups ein.
„H“ ist für Bässe mit hohem Ausgangspegel geeignet. „L“
ist für Bässe mit niedrigem Ausgangspegel geeignet.
3.
Schließen Sie Ihre Gitarre an die INPUT-Buchse an.
4.
Stellen Sie den LINE/AMP-Wahlschalter in die richtige
Stellung.
Verwenden Sie die Einstellung „AMP“, wenn Sie den
AX10B an einen Bassverstärker anschließen. Verwenden
Sie die „LINE“-Position, wenn Sie den AX10B an
Audiogeräte wie Mischpulte, Recorder oder Kopfhörer
anschließen.
Wenn Sie den AX10B an einen Bassverstärker anschließen,
der einen Hochtöner für erweiterten Höhentongang hat,
wählen Sie die „LINE“-Position.
5.
Schließen Sie die Buchse OUTPUT an Ihren Verstärker
oder Recorder etc. an.
Die OUTPUT-Buchse ist Stereo (TRS); wenn Sie ein
Mono-Kabel zum Anschließen von Bassverstärker usw.
verwenden, wird deshalb nur der Kanal L (links) gehört.
Wenn Sie über Kopfhörer hören, schließen Sie diese an
diese Buchse an.
Wenn Sie an zwei Kanäle eines Mischpults speisen oder
zwei Verstärker in Stereo verwenden, verwenden Sie ein
Stereo-zu-Doppelmono-Kabel.
6.
Wenn Sie mit dem Herstellen von Verbindungen fertig
sind, schalten Sie Ihren Bassverstärker, Recorder oder
anderes Audiogerät an und stellen die Lautstärke ein.
Verwenden Sie die MASTER-Tasten, um die Gesamtlautstärke (Master Level) des AX10B einzustellen. (S.31-
)
13
TIPPS
Wenn der Sound verzerrt wird, wenn Sie den AX10B im
„Bypass“-Modus spielen, verwenden Sie die MASTER-Tasten,
um den Lautstärkepegel zu senken.
Audiogeräte
Kopfhörer
Recorder, Mischpulte usw.
AMP/LINE
EINGANG
1/4" Mono
–1/4-Zoll-Mono
1/4" Mono x2
–1/4-Zoll-Stereo
LINE
Stereo-Cinch
–1/4-Zoll-Stereo
Bass
32
Bassverstärker
Netzteil an
Netzsteckdose
AMP/LINE
EINGANG
AMP
1/4" Mono
–1/4-Zoll-Mono
1/4" Mono
–1/4-Zoll-Mono
EINGANGAUSGANG
L/H
Page 33

Spielen des AX10B
t
Wählen von Programmen
Wenn Sie mit dem Setup fertig sind, können Sie Programme
wählen und sie ausprobieren.
Der AX10B hat 40 Preset-Programme und 40 Anwenderprogramme. Es gibt zehn Preset-Banken (0~9) und zehn
Anwender-Banken (0.~9.), mit vier Programmen in jeder Bank.
Anwenderprogramme
Bank: 0.~9.
Sie können Programme auf eine von drei Arten wählen.
Programm: 1~4
Preset-Programme
Bank: 0~9 Programm: 1~4
Bypass und Stummschaltung
Wenn Sie den AX10B umgehen, ist Ihr Sound direkt („dry“)
ohne jegliche Effekte („wet“).
Wenn Sie den AX10B stummschalten, kommt kein Ton.
1.
a: Durch die Programme aller Banken schalten
1.
Drücken Sie den Programmwahlschalter UP oder DOWN.
...9.4
÷01÷02÷03÷04÷11÷
...÷93÷94÷0.1...
b: Durch die Programme in einer Bank schalten
1.
Halten Sie die FUNCTION-Taste gedrückt und drücken
Sie die Taste PEDAL FX (BANK HOLD), um den Modus
„Bank Hold“ zu wählen. Die Bank erscheint als „
Display.
2.
Drücken Sie den Programmwahlschalter UP oder DOWN.
Nur das Programm ändert sich; die Bank bleibt unverändert.
...H4
÷H1÷H2÷H3÷H4÷H1÷
3.
Um den Modus „Bank Hold“ zu unterdrücken, halten Sie
die FUNCTION-Taste gedrückt und drücken Sie die Taste
PEDAL FX (BANK HOLD).
H2...
c: Durch die Banken schalten (das Programm fest
lassen)
1.
Halten Sie die FUNCTION-Taste gedrückt und drücken
Sie den Programmwahlschalter UP (BANK UP) or DOWN
(BANK DOWN). Die Bank wird umgeschaltet. Sie können
diese Methode auch verwenden, während der Modus
Bank Hold gewählt ist. (Das folgende Programm gilt,
wenn Programm 1 gewählt ist)
...11
÷21÷31÷41÷
...÷91÷0.1÷...÷9.1...
b1
a1 c1 b2
“ im
2.
Tuner
Sie können den eingebauten auto-chromatischen Tuner zum
Stimmen Ihrer Gitarre verwenden. Zum Aktivieren des Tuners
drücken Sie die Programmwahlschalter UP und DOWN
gleichzeitig.
TIPPS
Tuning-Verfahren
1.
2.
b1
c1
3.
4.
Wenn der Name der Note A# ist
Zu niedrig
Drücken Sie die Programmwahlschalter UP und DOWN
gleichzeitig.
Bypass: Drücken Sie UP und DOWN gleichzei-
Stummschalten:
Wenn Sie UP und DOWN gleichzeitig gedrückt halten,
blinkt das Display
Sekunde blinkt es schneller. Zur Umgehung lassen Sie
die Tasten los, während das Display langsam blinkt. Zur
Stummschaltung lassen Sie die Tasten los, während das
Display schnell blinkt.
Zum Aufheben von Bypass oder Stummschaltung drücken
Sie den Programmwahlschalter UP oder DOWN.
Sie können den Tuner durch wählen von Bypass oder
Stummschaltung aktivieren. Wenn Sie Stummschaltung
wählen, können Sie leise stimmen.
Zum Aktivieren des Tuners drücken Sie gleichzeitig die
Programmwahlschalter UP und DOWN, um den AX10B
entweder zu umgehen oder stummzuschalten. Für das
Verfahren siehe „Bypass und Stummschaltung“ (oben).
Zupfen Sie an der Saite, die Sie stimmen wollen, und der
am nächsten liegende Notenname erscheint im Display.
Ein Dezimalpunkt „.“ rechts neben der Note zeigt ein
Erhöhungszeichen (#).
Spielen Sie beim Stimmen nicht zwei oder mehr Saiten
gleichzeitig.
Stimmen Sie die Saite ungefähr ab, so dass die richtige
Note im Display erscheint.
Stimmen Sie die Saite so ab, dass nur die mittlere LED
der Sektion PRE FX (TUNER) leuchtet.
tig und lassen Sie sie sofort los.
Drücken Sie UP und DOWN gleichzeitig und halten Sie sie etwa eine
Sekunde gedrückt; dann lassen Sie sie
los.
langsam, und nach etwa einer
Zu hoch Richtig gestimm
33
Page 34

5.
Wenn Sie mit dem Stimmen fertig sind, drücken Sie den
Programmwahlschalter UP oder DOWN erneut, um zum
normalen Betrieb zurückzuschalten.
Einstellen der Tuner-Eichung
Beim Einschalten des Geräte ist das mittlere A auf einer
Bezugsfrequenz von 440 Hz eingestellt. Wenn gewünscht,
können Sie diese Bezugstonhöhe einstellen (kalibrieren).
1.
Wenn der Tuner aktiviert ist, verwenden Sie die VALUE
(CALIB)-Tasten zur Einstellung der Kalibrierung.
Der Bereich ist 438~445 Hz. Wenn Sie den Wert
einstellen, zeigt das Display die niedrigeren beiden
Stellen der Kalibrierungsfrequenz (z.B. „41“ für 441 Hz).
Der AX10B merkt sich nicht die Tuner-Kalibrierungseinstellung
beim Ausschalten.
Verwendung des Expression-Pedals
Sie können das Expression-Pedal verwenden, um eine tiefere
Oktave hinzuzufügen und Parameter wie Lautstärke,
Modulationsgeschwindigkeit, Filter, Pitch Bend und AmbiencePegel zu steuern.
Das Expression-Pedal kann den PRE-FX-Effekt OCTAVE,
einen Parameter des gewählten MODULATION- oder
AMBIENCE-Effekts (je 11 Typen), oder die Lautstärke regeln.
Sie können einen davon zur Steuerung über das ExpressionPedal wählen.
Verwendung des Expression-Pedals
1.
Wählen Sie ein Programm, für das die PEDAL LED (oben
links am Expression-Pedal) leuchtet.
Wenn Sie ein Programm gewählt haben, für das die
PEDAL LED leuchtet, können Sie das Expression-Pedal
zur Steuerung eines Pedal-Effekts verwenden.
Auf für Programme, bei denen die PEDAL-LED nicht
leuchtet, können Sie das Pedal ganz vorschieben, um es
einzuschalten (die PEDAL LED leuchtet auf).
Wenn Lautstärke als Pedal-Effekt gewählt ist, können Sie sie
nicht vom Pedal ein- und ausschalten; sie ist immer
eingeschaltet.
PEDAL LED
2.
Bedienen Sie das Expression-Pedal beim Spielen, und
sie merken, wie sich der Sound entsprechend ändert.
Behandeln Sie das Expression-Pedal nicht mit Gewalt. Bevor
Sie das Expression-Pedal verwenden, sollten Sie die Kraft
bestimmen, die zum Aufleuchten der PEDAL LED oder zum
Steuern des Effekts erforderlich ist, und nur die erforderliche
Kraft einsetzen.
TIPPS
Sie können die Taste PEDAL FX verwenden, um den Effekt
(oder die Lautstärke) umzuschalten, die vom ExpressionPedal gesteuert ist. Die aktuelle Belegung wird durch die
Farbe der LED links a der Taste angezeigt. (S.36)
Wenn die PEDAL
LED nicht leuchtet,
das Pedal
vorschieben.
Erzeugen von Sounds
Erzeugen von Sounds auf dem AX10B
Sie können Sounds auf zwei Weisen erzeugen; Sie können
ein vorhandenes Preset-Programm oder ein AnwenderProgramm bearbeiten, oder Sie können einen Sound „von
Grund auf“ erzeugen.
Wenn Sie ein von einem vorhandenen Programm ausgehen
wollen, wählen Sie ein Programm, dass dem gewünschten
Sound ähnlich ist und modifizieren Sie es nach Bedarf. Stellen
Sie die Regler MID FC/GAIN, BASS, MIDDLE und TREBLE
ein, und verwenden Sie die Tasten VALUE, DEPTH, SPEED
und TAP zum Einstellen der Tiefe und Geschwindigkeit usw.
der Effekte.
Wenn Sie einen Sound von Grund auf erzeugen wollen,
können Sie (zum Beispiel) beginnen, indem Sie den
TYPE
und AMBIENCE dabei einschalten, hören Sie den Charakter
jedes Verstärkertyps deutlicher. Sie können jeden Effekt
umschalten, indem Sie gleichzeitig die Tasten VALUE oder
DEPTH
Wenn Sie einen Verstärkertyp gewählt haben, stellen Sie die
Regler MID FC/GAIN, BASS, MIDDLE, TREBLE und
VOLUME ein.
Nachdem Sie die Verstärkereinstellungen vorgenommen
haben, können Sie beginnen, Effekte hinzuzufügen. Zuerst
kommen
dem Verstärker. Drücken Sie die Tasten DEPTH
gleichzeitig, um den Effekt einzuschalten. Dann drehen Sie
den MODULATION-Wahlschalter oder den AMBIENCEWahlschalter, um den gewünschten Effekt zu wählen.
Verwenden Sie die DEPTH-Tasten, um die Effekttiefe usw.
einzustellen. Für den Modulation-Effekt können Sie die
FUNCTION-Taste gedrückt halten und die DEPTH-Taste zum
Einstellen von Verzögerung/Reverb-Zeit verwenden. Zum
Wählen der Einstellungen für PRE FX vor dem Verstärker
schalten Sie PRE FX ein und verwenden dann die Taste PRE
FX zum Wählen des Effekts. Verwenden Sie die Tasten PRE
FX VALUE zum Einstellen der Effektstärke. Es kann wünschenswert sein, MODULATION und AMBIENCE kurzzeitig
auszuschalten, während Sie
Dann verwenden Sie die Taste PEDAL FX zum Wählen, was
Sie vom
wählt den Effekt (oder die Lautstärke), der mit dem Pedal
gesteuert wird.
Wenn Sie ungewünschte Störungen hören, können Sie die
Rauschunterdrückung einstellen. Halten Sie die FUNCTIONTaste gedrückt und drehen Sie den NR-Regler (ganz rechter
Regler) zum Einstellen der Tiefe der
unterdrückung
Schließlich, wenn Sie den richtigen Sound gefunden haben,
können Sie in den den Speicher schreiben (speichern). Wenn
Sie auf ein anderes Programm umschalten oder das Gerät
ausschalten, ohne das neue Programm zu speichern, geht
das Programm verloren.
34
wählen. Wenn Sie die Effekte PRE FX, MODULATION
▲
und ▼ drücken.
MODULATION
Expression-Pedal
Manche Effekteinstellungen können zu ungewünschter
Verzerrung führen. In diesem Fall stellen Sie den VOLUMERegler niedriger ein.
und
AMBIENCE
PRE FX
einstellen.
steuern wollen. Diese Taste
Rausch-
.
AMP
, gelegen hinter
▲
und
▼
Page 35

PRE FX
Verwenden Sie die Taste PRE FX zum Wählen eines Pre-Effekts und verwenden Sie die VALUE-Tasten zum Einstellen der Effektstärke. Wenn
Sie WAH als PEDAL FX gewählt haben, können Sie das Expression-Pedal zur Steuerung von WAH verwenden.
TYPE Erklärung Normal PEDAL FX: WAH
COMP
DIST
OCTAVE
(*1) Dieser Effekt arbeitet möglicherweise nicht richtig, wenn zwei oder mehr Saiten gleichzeitig gespielt werden, oder wenn sehr tief gestimmte Saiten gespielt werden.
Kompressor mit betontem Attack
Verzerrung für Bass optimiert Verzerrungsbetrag: 0~30 --- --Erzeugt einen Ton um eine Oktave tiefer als der Originalton Stellt den Ton ein: 0~30 Steuert die Gibt die Effekt-Tiefe
und mischt ihn mit dem Originalton, um Tiefe und Low-End- Effekt-Tiefe bei maximaler
Wirkung hinzuzufügen.
(*1)
VALUE PEDAL VALUE
Stellt die Empfindlichkeit ein: 0~30
--- ---
Pedalposition an
AMP TYPE
Verwenden Sie den Wahlschalter AMP TYPE zum wählen eines Verstärkers und stellen Sie GAIN, TREBLE, MIDDLE, BASS und VOLUME ein.
Ein für den Vestärker geeigneter Cabinet-Effekt wird zu AMP TYPE hinzugefügt (mit Ausnahme von EQ). Durch Ändern der Einstellung des
Schalters AMP/LINE wird die Tiefe des Cabinet-Effekts geändert.
TYPE Erklärung
EQ
VALV E
VALVE2
CLASSIC
SCOOPED
LA STUDIO
GOLDPNL
JAZZ
STUDIO
AC100
UKMAJOR
3-Bereich EQ von Direct-Line-Eingang.
Ein Röhrenverstärker mit auf ON geschaltetem Schalter ULTRA LO.
(empfohlener CAB: 810CLS)
Ein Röhrenverstärker, geeignet für Rock. (empfohlener CAB: 810CLS)
Ein Röhrenverstärker, dessen grundlegender Charakter sich je nach
Einstellung des Werte-Reglers ändert. (empfohlener CAB: 118+112)
Ein Verstärker, der typisch für den Sound der 80er ist.
(empfohlener CAB: 410MTL)
Ein Verstärker, der typisch für den LA-Sound ist. (empfohlener CAB: 410 LA)
Ein Verstärker, der durch sein blickfangendes Gold-Panel und den sauberen
Sound auffällt. (empfohlener CAB: 410MDN)
Ein Combo-Amp, beliebt bei Jazzbassisten. (empfohlener CAB: 115JAZ)
Ein Röhren-Bombo, ideal für den Motown-Sound. (empfohlener CAB: 115STU)
Ein 100-W-Röhrenverstärker von Vox. (empfohlener CAB: 215TALL)
Ein 200-W-Röhrenverstärker, gebaut in Großbritannien.
(empfohlener CAB: 415 UK, 412 UK).
Reglerknöpfe
MID FC/
GAIN(*2)
BASS
MIDDLE
TREBLE
VOLUME
○○○○○○○○○○○○○○○○○○○○
NR (*3)
(*2)
Funktionen wie MID FC, wenn AMP TYPE auf EQ ~
JAZZ gestellt ist. Funktionen wie GAIN, wenn AMP TYPE auf
STUDIO ~ UKMAJOR gestellt ist.
(*3)
Zum Einstellen der Rauschunterdrückung halten Sie die
FUNCTION-Taste gedrückt und drehen Sie den VOLUME
(NR)-Regler.
Mittelbereich-Spitzeneinstellung (wenn
AMP TYPE auf EQ ~ JAZZ gestellt ist)
1~5
Gain-Einstellung (wenn AMP TYPE auf
STUDIO ~ UKMAJOR gestellt ist)
Stellt Tiefenbereich ein.
Stellt Mittenbereich ein.
Stellt Höhenbereich ein.
Stellt Lautstärke ein.
Stellt Rauschunterdrückungstiefe ein.
(Die TAP-Taste gedrückt halten und
EFF.DEPTH drehen)
MODULATION
Verwenden Sie den MODULATION-Wahlschalter zum Wählen eines Modulationseffekts, und verwenden Sie die DEPTH-Tasten zum Einstellen
des DEPTH-Parameters. Zum Einstellen des SPEED-Parameters halten Sie die FUNCTION-Taste gedrückt und verwenden die Tasten DEPTH
(SPEED). Wenn MOD als PEDAL FX gewählt ist, können Sie das Expression-Pedal zur Steuerung des Effekts verwenden.
TYPE Erklärung Normal PEDAL FX:MOD
CHORUS
FLANGE
PHASER
TREM
ROTARY
FEEDBK
PITCH1
FILTER
U-VIBE
TALK
PITCH2
(*4) Sie können die Tasten nicht zum Bearbeiten des Werts verwenden.
(*6)
Modus-Einstellung: 1: YAH-YAH, 2: U-WAH, 3: YOI-YOI, 4: YEAH, 5: HI U-WAH
(*7)
„.“ zeigt negativ (-) an, „SP“ zeigt Treppenstufen-Tonhöhenänderung eine Oktave aufwärts an.
Vintage Stereo Chor.
Vintage Flanger.
Vintage Phaser.
Vintage Tremolo.
Drehlautsprecher-Simulation.
Mode 1 erzeugt künstlich Feedback
und arbeitet, wenn eine Note länger
gehalten wird.
Mode 2 erzeugt Feedback eine
Oktave höher.
Pitch Shifter, gemischt mit
Direktklang.
Filter, dessen Schwellenfrequenz je
nach Picking-Stärke (für „Normal“)
oder Pedalbewegung (für „PEDAL
FX“) variiert.
Vintage U-Vibe.
„Sprechender“ Effekt, gesteuert von
Pick Attack (für „Normal“) oder
Pedalbewegung (für „PEDAL FX“)
Pitch Shifter mit 100% Effekt (wet).
DEPTH SPEED PEDAL DEPTH SPEED
Effekt-Tiefe: 0~30
Feedback-Betrag:
0~15
Vibrato-Tiefe: 16~30
Pitch-Shift-Betrag
(*5)
: 12.~1., d., d,
1~12
Abwärts-Sweep :
0~15,
Aufwärts-Sweep
16~30
Effekt-Tiefe: 0~30
Pitch-Shift-Betrag
(*7)
:12.~1., 1~12
(*5)
ModulationsGeschwindigkeit: 0~30
Modus-Einstellung:
1. Normal,
2. Overtone
Effektpegel: 0~30
Resonanz: 0~30
:
ModulationsGeschwindigkeit: 0~30
Modus-Einstellung:
(*6)
1~5
N/A
(*4)
„.“ zeigt negativ (-) an, „d“ zeigt detune an.
ModulationsGeschwindigkeit
Erste Hälfte der
Pedalbewegung steuert
Feedback-Betrag;
weitere Bewegung
steuert Vibrato-Tiefe
Effektpegel
Schwellenfrequenz
ModulationsGeschwindigkeit
Steuert „Sprech“-
Effekt
Steuert Pitch-ShiftBetrag
Effekt-Tiefe: 0~30
Modus-Einstellung:
1. Normal,
2. Overtone
Pitch-Shift-Betrag
(*5)
1~12
Resonanz: 0~30
Effekt-Tiefe: 0~30
Effekt-Tiefe: 0~30
Pitch-Shift-Betrag bei
Pedal in Maximalstellung
(*7)
: 12.~1., d., d,
: 12.~1., 1~12, SP
N/A
(*4)
ModusEinstellung:
1~5
N/A
(*4)
(*6)
35
Page 36

AMBIENCE
Verwenden Sie den AMBIENCE-Wahlschalter zum Wählen eines Ambience-Effekts, und verwenden Sie die DEPTH-Tasten zum Einstellen des
DEPTH-Parameters. Zum Einstellen der Verzögerungszeit oder Reverb-Zeit drücken Sie die TAP-Taste zweimal im gewünschten Intervall. Wenn
AMB als PEDAL FX gewählt ist, können Sie das Expression-Pedal zur Steuerung des Effekts verwenden.
TYPE Erklärung TAP Normal PEDAL FX: AMBIENCE
SLAP
ECHO1
ECHO2
ECHO3
PP DLY
MULTI
AIR
ROOM
HALL
PLATE
SPRING
(*8)
Stellt die Reverb-Zeit bis zum Doppelten der Intervall-Zeit ein, bei der Sie TAP drücken.
Slap-Delay, dessen Verzögerungszeit 1/4 des Intervalls beträgt,
bei dem Sie TAP drücken
Band-Echo-Simulation mit warmem Ton (Feedback niedrig)
Band-Echo-Simulation mit warmem Ton (Feedback mittel)
Band-Echo-Simulation mit warmem Ton (Feedback hoch)
Ping-Pong-Delay, der von links nach rechts spring
Multi-Tap-Delay
Reverb mit luftigem Feeling
Raum-Reverb
Hall-Reverb
Plate-Reverb
Spring-Reverb
(*8)
(*8)
(*8)
Verzögerungszeit:
bis zu 250 [ms]
Verzögerungszeit:
bis zu 1,0 [s]
N/A
(*4)
Reverb-Zeit:
bis zu 4,0 [s]
Reverb-Zeit:
bis zu 8,0 [s]
DEPTH PEDAL DEPTH
Gibt die EffektEffektpegel:
0~30
Steuert die
Effekt-Tiefe
Tiefe bei
maximaler
Pedalposition an
Expression-Pedal
Wählen des Effekts, der durch das Pedal gesteuert
wird
Drücken Sie die Taste PEDAL FX, um den Effekt zu wählen,
NR (Rauschunterdrückung)
Sie können den Betrag der Rauschunterdrückung durch durch
Gedrückthalten der FUNCTION-Taste und Drehen des
VOLUME (NR)-Reglers einstellen.
der mit dem Expression-Pedal gesteuert wird. Die LED links
zeigt den Effekt (oder die Lautstärke) an, der(die) gesteuert
wird.
ORG: WAH (orangefarben): Pedal Wah
RED: MOD (rot): Der von MODULATION gewählte Effekt
GRN: AMB (grün): Der von AMBIENCE gewählte Effekt
OFF: VOLUME (erloschen): Lautstärke-Pedal
Wenn ein anderer Effekt als OCTAVE für den Pre-Effekt
gewählt ist, können Sie nicht OCTAVE von der Taste PEDAL
FX wählen. Wenn OCTAVE als Pedal-Effekt gewählt ist, wird
durch Ändern des Pre-Effekts auf etwas anderes als OCTAVE
der Pedal-Effekt auf VOLUME umgestellt.
Verwendung des Pedals zum Ein-/Ausschalten des
Effekts
Durch Vorschieben des Pedals nach vorne können Sie den
gewählten PEDAL-FX-Effekt ein- und ausschalten. Wenn der
Effekt eingeschaltet ist, leuchtet die LED links vom Pedal.
Wenn VOLUME als PEDAL FX gewählt ist, kann die LED nicht
ausgeschaltet werden.
Einstellung des Minimalwerts des Lautstärke-Pe-
dals
Wenn PEDAL FX auf VOLUME gestellt ist, können Sie die
FUNCTION-Taste gedrückt halten und die Tasten AMBIENCE
DEPTH verwenden, um die Minimallautstärke einzugeben
(VOL PEDAL MIN), die vom Pedal gesteuert wird.
Speichern des Sounds einer bestimmten Pedalposition
Sie können nicht den von einer spezifischen Pedalposition
produzierten Sound speichern. Der Pedaleffekt modifiziert
immer den Sound entsprechend der aktuellen Position des
Pedals.
Je nach dem angeschlossenen Gerät können sehr hohe NREinstellungen bewirken, dass Noten abgeschnitten werden. In
diesem Fall stellen Sie den Pegel niedriger ein.
36
Page 37

Ein Programm speichern
2. Langsam drücken
3. Langsam drücken
Andere Funktionen
Wenn Sie einen Sound erzeugt haben, den Sie bewahren
wollen, können Sie ihn zu einem der 40 Anwender-Programme
(0.1~9.4) schreiben (speichern).
Wenn Sie Programme umschalten oder das Gerät ausschalten, bevor Sie Ihr bearbeitetes Programm schreiben, gehen
die von Ihnen vorgenommenen Änderungen verloren.
Das Programm, das am Speicherort bereits vorhanden war,
wird dabei überschrieben.
1.
Drücken Sie die WRITE-Taste. Die Programmnummer
blinkt im Display, und der AX10B ist im „Schreibbereit“-
Modus.
2.
Verwenden Sie die Programmwahlschalter zum Wählen
des Speicherorts für das Programm.
Sie können nicht zu einem Preset-Programm (01~94)
schreiben.
3.
Drücken Sie die WRITE-Taste zum Schreiben des
Programms zu der gewählten Programmnummer.
Wenn Sie sich entscheiden, nicht zu schreiben, drücken
Sie eine der Tasten MASTER (CANCEL) zum Verlassen
des Schreibbereit-Modus (Display blinkt). Sie kehren
damit zum Normalbetrieb zurück.
3
1, 3
2
Kalibrieren (Einstellen) des Expression-Pedals
Wenn das Expression-Pedal nicht richtig arbeitet, führen Sie
bitte die das unten beschriebene Verfahren aus.
Beim Kalibrieren des Pedals verwenden Sie Ihre Hand, denn
akkurate Messungen sind möglicherweise nicht möglich, wenn
Sie das Pedal mit dem Fuß bedienen.
1.
Während die FUNCTION-Taste und die Taste PEDAL FX
gleichzeitig gedrückt gehalten werden, schalten Sie das
Gerät ein.
Im Display erscheint ca. eine Sekunde lang
danach erscheint
2.
Bewegen Sie das Pedal langsam zurück. Wenn es stoppt,
nehmen Sie Ihre Hand vom Pedal und drücken die Taste
PEDAL FX.
Das Display schaltet von
Wenn Sie die Taste MASTER (CANCEL) während des
Kalibrierungsvorgangs drücken, wird die Kalibrierung
unterbrochen und die Programmnummer erscheint.
3.
Bewegen Sie das Pedal langsam vor. Wenn es stoppt,
nehmen Sie Ihre Hand vom Pedal und drücken die Taste
PEDAL FX.
Wenn die Einstellung beendet ist, blinkt
und danach erscheint die Programmnummer. Prüfen Sie
das Pedal, um sicherzustellen, dass die Einstellungen
korrekt sind.
TIPPS
Wenn Sie z.B. PEDAL FX zu VOLUME zuweisen und VOL
PEDAL MIN auf 0 stellen, wird es leicht, den MIN-Pegel zu
bestimmen, wenn das Pedal ganz zurückgestellt wird.
Wenn der Kalibrierungsbetrieb versagt, zeigt das Display
an, und Sie werden zu dem Display vor der Kalibrierung ( )
zurückgestellt. Wenn wiederholte Versuche erfolglos sind, ist
es möglich, dass eine Fehlfunktion am AX10B vorliegt.
Wenden Sie sich an Ihren Fachhändler.
.
auf um.
, und
im Display,
Zurückstellen auf werkseitige Einstellungen
1.
Schalten Sie das Gerät ein, während Sie die WRITETaste gedrückt halten.
Im Display erscheint
Wenn Sie sich entscheiden, normal zu starten ohne die
werkseitigen Einstellungen zu laden, drücken Sie eine der
Tasten MASTER (CANCEL).
2.
Während die Anzeige im Display erscheint, drücken
Sie die WRITE-Taste. Die werkseitigen Programme
werden in den Anwender-Bereich (0.1~9.4) geladen.
Wenn der Ladevorgang beendet ist, blinkt
und danach erscheint die Programmnummer.
Schalten Sie nie das Gerät aus, während dieser Vorgang abläuft.
Denken Sie daran, dass beim Neuladen der Preset-
Programme alle vorher geschriebenen Programme überschrieben werden.
.
im Display,
37
Page 38

Störungssuche
Wenn der AX10B nicht erwartungsgemäß arbeitet, prüfen Sie
bitte zuerst die folgenden Punkte. Wenn sich dadurch das
Problem nicht beheben lässt, wenden Sie sich an Ihren
Fachhändler.
Gerät schaltet nicht ein.
❑
Sind Batterien eingesetzt? Beziehungsweise, ist das
Netzteil an eine Netzsteckdose angeschlossen? (S.32)
❑
Ist ein Mono-Cinchsteckerkabel an die INPUT-Buchse
angeschlossen? (S.32)
Kein Ton
❑
Sind Ihr Bass, Verstärker und/oder Kopfhörer an die
richtigen Buchsen angeschlossen? (S.32)
❑
Ist Ihr Verstärker eingeschaltet und richtig eingestellt?
❑
Sind Kabel beschädigt?
❑
Ist der Master-Pegel des AX10B auf „0“ oder einen
niedrigeren Pegel eingestellt? (S.31)
❑
Ist die Programm-Lautstärke des AX10B auf „0“ oder einen
niedrigeren Pegel eingestellt? (S.35)
❑
Ist die Lautstärke Ihres Instruments heruntergedreht?
❑
Ist der AX10B stummgeschaltet?
Es wird kein Effekt gehört
❑
Wird der AX10B umgangen? (S.33)
❑
Sind die im Programm verwendeten Effekte eingeschaltet?
Pedal arbeitet nicht
❑
Haben Sie ein Programm gewählt, das einen ExpressionPedal-Effekt verwendet? (S.34, 36)
❑
Leuchtet die Pedal-Anzeige?
Kann nicht schreiben (Display zeigt „Er“ an)
❑
Haben Sie das Gerät ausgeschaltet, während PresetProgramme geladen wurden?
Laden Sie die Preset-Programme neu. (S.37)
Wichtigste technische Daten
Verstärker-Modelle
Effekte:
Anzahl der Programme:
Eingang:
Ausgang:
Tuner:
Stromversorgung:
Abmessungen (B x T x H):
Gewicht:
Zubehör:
Optionen:
Änderungen des Designs und der technischen Daten ohne Vorankündigung bleiben im Sinne ständiger Produktverbesserungen
vorbehalten.
11
Pre-Effekt-Typen: 3
Modulationstypen: 11
Ambience-Typen: 11
Rauschunterdrückung: 1
Preset-Programme: 40 (10 Banken x 4 Programme)
Anwenderprogramme: 40 (10 Banken x 4 Programme)
Basseingang (Mono 1/4-Zoll-Buchse)
Line/Kopfhörer Doppel-Ausgang (Stereo 1/4-Zoll-Buchse)
Tuning-Bereich: 27,5 Hz – 1.318,5 Hz (A0–E6)
Tuner-Kalibrierung: A = 438 Hz – 445 Hz
Vier Alkali-Mignonzellen (AA, R6) (nicht mitgeliefert, erlauben ca. 18 Stunden kontinuierlichen
Betrieb) oder getrennt erhältliches Netzteil (Gleichstrom 9 V
287 mm x 182 mm x 60 mm
1,1 kg (ohne Batterien)
Bedirnungshandbuch
Netzteil
)
38
Page 39

AX10B Program Chart
Prog# PRE FX Value
01 COMP 25 VALVE2 5 30 18 26 11 OFF - - OFF - - VOL. 0 5 Standard
02 COMP 15 LA STUDIO 1 27 26 23 11 CHORUS 20 - OFF - - MOD. - 5 LA Chorus
03 COMP 5 UKMAJOR 21 18 30 28 13 OFF - - ROOM 14 2.4 AMB. - 5 Pedal Reverb
04 OCTAVE 14 STUDIO 29 25 28 23 15 TALK 16 5 OFF - - MOD. - 10 Dirty Talk
11 COMP 10 AC100 30 21 19 20 14 PHASER 0 0 AIR 19 - VOL. 0 15 Standard 2
12 COMP 13 VALVE2 2 26 19 25 15 CHORUS 29 0 PLATE 20 4.3 AMB. - 5 Pedal Plate
13 DIST 9 STUDIO 30 20 27 16 12 FLANGE 15 5 AIR 20 - VOL. 0 15 Dist Flange
14 COMP 14 EQ 5 24 14 25 17 FILTER 26 21 OFF - - VOL. 0 5 Auto Wah
21 COMP 11 CLASSIC 5 16 16 19 20 OFF - - AIR 11 - VOL. 0 5 Standard 3
22 COMP 8 LA STUDIO 3 19 7 16 20 OFF - - PLATE 15 3.2 AMB. - 5 Clean Plate
23 DIST 30 CLASSIC 5 21 25 22 15 OFF - - PLATE 21 3.4 AMB. - 10 Dirty Plate
24 OFF - UKMAJOR 12 25 17 22 16 TALK 24 1 OFF - - MOD. - 10 Talker
31 COMP 14 LA STUDIO 2 28 25 23 15 OFF - - OFF - - VOL. 0 6 Standard 4
32 COMP 21 SCOOPED 2 25 26 26 17 PHASER 29 5 OFF - - VOL. 0 10 Phaser
33 COMP 30 VALVE2 4 23 24 23 17 OFF - - PP DLY 30 0.6 AMB. - 6 Ping Pong1
34 COMP 15 VALVE 2 25 14 21 15 TREM 26 - OFF - - MOD. - 5 Pedal Trem
41 COMP 25 LA STUDIO 5 25 28 24 15 OFF - - HALL 5 2.4 VOL. 0 14 Standard 5
42 COMP 13 CLASSIC 5 24 15 23 17 OFF - - HALL 17 2.4 AMB. - 5 Motown
43 DIST 27 STUDIO 25 30 23 21 13 FEEDBK 30 2 OFF - - VOL. 0 10 Feedback1
44 COMP 11 EQ 3 25 17 25 15 FILTER 25 - MULTI 16 0.6 MOD. - 10 Pedal Filter
51 COMP 13 JAZZ 1 19 24 6 18 OFF - - OFF - - VOL. 0 5 Standard 6
52 COMP 25 LA STUDIO 5 26 27 20 14 PHASER 10 - SLAP 9 0.15 MOD. - 10 Phaser Slap
53 COMP 19 AC100 26 27 28 15 12 PITCH1 4 - OFF - - MOD. - 5 Pitch Major 3rd
54 OCTAVE 22 CLASSIC 5 20 21 27 19 PHASER 22 13 HALL 7 2.4 OCT. - 10
61 COMP 13 VALVE2 1 21 22 11 14 OFF - - OFF - - VOL. 0 5 Standard 7
62 OCTAVE 18 GOLDPNL 3 26 28 22 16 OFF - - SLAP 18 0.075 OCT. - 5 PedalOctave2
63 COMP 19 VALVE 3 22 15 23 15 ROTARY 15 - SPRING 18 2.4 MOD. - 5 PedalRotary
64 DIST 25 LA STUDIO 3 22 23 18 10 OFF - - ECHO1 30 0.6 AMB. - 15 Dist Echo
71 COMP 21 SCOOPED 2 24 0 15 24 OFF - - AIR 16 - VOL. 0 5 Standard 8
72 COMP 15 VALVE 3 21 20 22 19 TREM 20 9 ROOM 11 0.5 VOL. 0 5 Tremolo
73 COMP 15 EQ 5 19 24 24 20 PITCH1 d 22 ECHO2 30 0.8 AMB. -
74 COMP 11 UKMAJOR 15 14 21 30 13 FILTER 23 - SLAP 15 0.02 MOD. - 10 Filter wah
81 COMP 20 GOLDPNL 4 26 14 19 16 OFF - - OFF - - VOL. 0
82 COMP 8 LA STUDIO 4 22 7 30 17 OFF - - PP DLY 30 0.84 AMB. - 10 Ping Pong2
83 DIST 0 VALVE2 3 25 23 18 18 OFF - - OFF - - VOL. 0 10 OverDrive
84 OCTAVE 26 EQ 3 25 27 22 14 FILTER 14 20 SLAP 24 0.025 OCT. -
91 COMP 8 STUDIO 10 18 21 29 17 OFF - - OFF - - VOL. 0 5 Standard10
92 COMP 20 AC100 20 20 21 25 15 FEEDBK 21 1 HALL 12 4.8 VOL. 0
93 OFF - VALVE 2 18 16 25 21 PITCH2 SP - SLAP 20 0.035 MOD. - 5 PedalPitch-SP
94 OCTAVE 25 L
AMP MID FC/
TYPE GAIN
A STUDIO
BASS MIDDLE TREBLE
5 27 18 20 17 FILTER 25 19 OFF - - OCT. - 5 Synth2
VOLUME
MODULA-
TION
DEPTH SPEED
AMBIENCE
DEPTH TIME
PEDAL
FX MIN
VOL PEDAL
NR Comments
PedalOctave1
7 Pedal Echo2
5 Standard 9
10 Synth1
5 Feedback2
Page 40

C 2003 KORG INC.
5-12, Shimotakaido 1-chome, Suginami-ku, Tokyo, Japan
Printed in China
 Loading...