

Page 1
E F G J 2
P. 2
p.18
S.34
P.50
Page 2
Precautions
Location
Using the unit in the following locations can result in a
malfunction.
• In direct sunlight
• Locations of extreme temperature or humidity
• Excessively dusty or dirty locations
• Locations of excessive vibration
• Close to magnetic fields
Power supply
Please connect the designated AC adaptor to an AC
outlet of the correct voltage. Do not connect it to an AC
outlet of voltage other than that for which your unit is
intended.
Interference with other electrical devices
This product contains a microcomputer. Radios and
televisions placed nearby may experience reception interference. Operate this unit at a suitable distance from
radios and televisions.
Handling
To avoid breakage, do not apply excessive force to the
switches or controls.
Care
If the exterior becomes dirty, wipe it with a clean, dry
cloth. Do not use liquid cleaners such as benzene or
thinner, or cleaning compounds or flammable polishes.
Keep this manual
After reading this manual, please keep it for later reference.
Keeping foreign matter out of your equipment
Never set any container with liquid in it near this
equipment. If liquid gets into the equipment, it could
cause a breakdown, fire, or electrical shock.
Be careful not to let metal objects get into the equipment. If something does slip into the equipment, unplug the AC adaptor from the wall outlet. Then contact your nearest Korg dealer or the store where the
equipment was purchased.
THE FCC REGULATION WARNING (for U.S.A.)
This equipment has been tested and found to comply
with the limits for a Class B digital device, pursuant to
Part 15 of the FCC Rules. These limits are designed to
provide reasonable protection against harmful interference in a residential installation. This equipment
generates, uses, and can radiate radio frequency energy
and, if not installed and used in accordance with the
instructions, may cause harmful interference to radio
communications. However, there is no guarantee that
interference will not occur in a particular installation.
If this equipment does cause harmful interference to
radio or television reception, which can be determined
by turning the equipment off and on, the user is encouraged to try to correct the interference by one or
more of the following measures:
• Reorient or relocate the receiving antenna.
• Increase the separation between the equipment and
receiver.
• Connect the equipment into an outlet on a circuit
different from that to which the receiver is connected.
• Consult the dealer or an experienced radio/TV
technician for help.
Unauthorized changes or modification to this system
can void the user’s authority to operate this equipment.
CE mark for European Harmonized Standards
CE mark which is attached to our company’s products
of AC mains operated apparatus until December 31,
1996 means it conforms to EMC Directive (89/336/
EEC) and CE mark Directive (93/68/EEC). And, CE
mark which is attached after January 1, 1997 means it
conforms to EMC Directive (89/336/EEC), CE mark
Directive (93/68/EEC) and Low Voltage Directive (73/
23/EEC).
Also, CE mark which is attached to our company’s
products of Battery operated apparatus means it conforms to EMC Directive (89/336/EEC) and CE mark
Directive (93/68/EEC).
Printing conventions in this manual
marks a point of caution.
LCD screens printed in this manual are only for
purposes of illustration, and may not match the
actual display on your AX100G.
2
Page 3
○○○○○○○○○○○○○○○○○○○○○○○○○○○○○○○○○○○○○○○○○○○○○○○○○○○○○
Content
1. Introduction-------------------------------- 3
Main features------------------------------------------- 3
Front and rear panel---------------------------------- 4
Front panel-------------------------------------------- 4
Rear panel -------------------------------------------- 4
The modes of the AX100G -------------------------5
Installing the batteries-------------------------------- 5
2. Playing the AX100G--------------------- 5
Example connections --------------------------------5
Turn on the power------------------------------------- 5
Program mode ----------------------------------------- 6
Input level switch setting -------------------------- 6
Adjusting the volume (master volume) -------- 6
Selecting a program -------------------------------- 6
Checking the effects used by a program ------ 6
Bypass, Mute----------------------------------------- 6
Auto tuner --------------------------------------------- 6
Rhythm ------------------------------------------------ 7
AUX IN------------------------------------------------- 7
Expression pedal------------------------------------ 7
Effect Select mode------------------------------------ 7
Entering Effect Select mode---------------------- 7
Exiting Effect Select mode------------------------ 7
Phrase T r ainer mode ---------------------------------8
3. Editing --------------------------------------- 9
Editing the effects ------------------------------------- 9
Drive Amp effect Quick Edit function----------- 9
Editing the Drive Amp effect (example)-------- 9
Editing other effects -------------------------------10
Modifying the program name--------------------10
Writing programs ------------------------------------ 10
4. Appendices ------------------------------ 11
Adjusting the expression pedal (Calibration)- 11
Restoring the user programs
to the factory settings (Reload) ------- 11
Troubleshooting-------------------------------------- 11
Main specifications --------------------------------- 12
Effect parameters ----------------------------------- 12
DRIVE·AMP (Drive Amp effects)--------------- 12
MOD (Modulation effects)------------------------13
PEDAL (Pedal effect)------------------------------14
AMB (Ambience effect) ---------------------------15
CABI (Cabinet effect) -----------------------------16
NR LEV
(Noise Reduction, Program Level)-------------16
Rhythm Pattern List--------------------------------- 16
Preset Program Parameter List------------------ 17
1. Introduction
Thank you for purchasing the ToneWorks AX100G
Modeling Signal Processor.
In order to enjoy your AX100G to the fullest, please
read this manual carefully, and use the unit correctly .
Please keep this manual for future reference.
Main features
• Korg’s modeling technology provides detailed and
powerful modeling sounds.
• 63 modeling effect variations are built-in, and up to 7 effects
and rhythm sounds sources can be used simultaneously.
• Forty preset programs (4 x 10 banks) and forty rewritable user
programs (4 x 10 banks) are built-in.
•In Effect Select mode you can use a foot switch to change the
drive amp channel or turn the Modulation effect or Ambience
effect on/off.
•Virtual Feedbacker lets you sustain a note on your guitar and
generate feedback with vibrato
•You can use the expression pedal to control 23 types of Pedal
effect in realtime.
• When using the delay effect, you can automatically set the
delay time by pressing the TAP switch to the rhythm of the
song you are playing.
• The Phrase Trainer function lets you record up to 8 seconds of
sound from an audio device, and play it back at a slower speed
without changing the pitch.
• The Sample & Play function lets you record a phrase for a
maximum of 6 seconds, and use the expression pedal for
phrase play back.
•7 point LED pedal indicator
• 50 different rhythm patterns and a metronome are built-in for
convenient practicing.
• Built in tuner mute function for on stage silent tuning.
• An AUX IN jack is provided allowing for connection to an
external audio source (CD player, cassette tape deck, etc) for
play along purposes.
• Use the auto chromatic tuner to tune your instrument when
the AX100G is bypassed or muted.
• The LCD (multi-display) features an intuitive visual interface.
• The LCD is backlit for easy visibility even in dark locations.
What is ?
(Resonant structure and Electronic circuit Modeling
System) is KORG’s proprietary sound modeling technology
which precisely reproduces the complex character and nature
of both acoustic and electric instruments as well as electronic
circuits in real world environments.
variety of sound generation characteristics including instrument bodies, speakers & cabinets, acoustic fields, microphones,
vacuum tubes, transistors, etc.
emulates a wide
1. Introduction
3
Page 4
1. Introduction
○○○○○○○○○○○○○○○○○○○○○○○○○○○○○○○○○○○○○○○○○○○
Front and rear panel
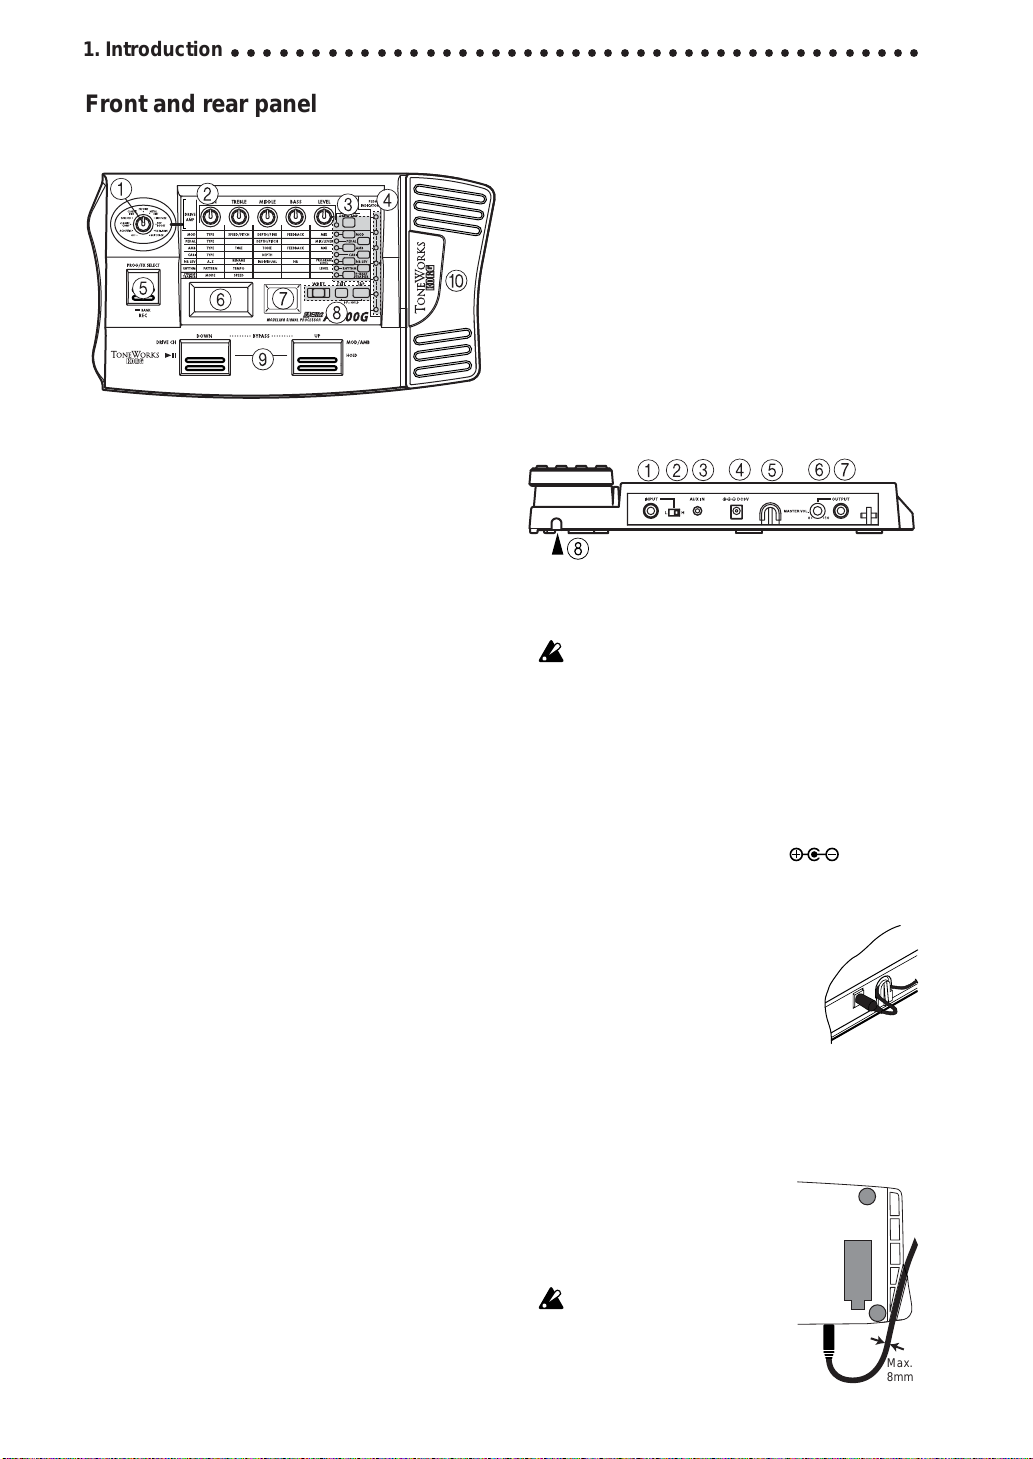
Front panel
1 Type knob
This knob selects the type of Drive Amp effect that will be used.
2 Value knobs
For each effect, these knobs adjust the values of the parameters assigned to the knobs. From the left, these are referred to
as value knobs 1—5.
When you are not editing an effect, parameters of the drive
amp effect used by the selected program are assigned to these
knobs. (Refer to p.9 "Drive Amp effect Quick Edit function.")
3 Select switches
Each time you press the DRIVE·AMP switch, the drive amp
channels A and B will alternate, and will be in Edit mode. At
this time, the LED beside the switch will change between blinking green (channel A) and blinking red (channel B).
Each time you press the MOD, PEDAL, AMB, or CABI switch,
the corresponding effect will be in edit mode (on) or off. The
LED beside the corresponding switch will also change between
blinking (lit) and dark.
Each time you press the NR LEV switch, you will alternate
between editing and on. The LED beside the switch will change
between blinking and dark.
Each time you press the RHYTHM or PHRASE TRAINER
switch, the corresponding function will be switched on/off.
The LED beside the corresponding switch will light or go dark.
4 Pedal indicator
This shows the state of the pedal effect (the depth to which it is
pressed). When the tuner is operating, this shows the amount
of pitch deviation. In Phrase Trainer mode, this shows the recording/playback time.
5 PROG/FX SELECT switch
Each time you press this switch, you will alternate between
Program mode and Effect Select mode.
6 Multi-display
This displays information such as program names, parameter
names and values, and editing icons.
7 Number LED
This displays the program bank and program number. While
the Tuner is operating, it displays the note name.
8 WRITE, EXIT, TAP switches
The WRITE switch is used to write an edited program.
By pressing the EXIT switch, you can return to Program mode
at any time.
When using a delay effect, you can press the TAP switch at the
tempo of the song to set the delay time automatically.
9 DOWN, UP switches
These switches are used to select programs, bypass or mute, or
to switch the drive amp channel.
0 Expression pedal
This controls the effect that is selected as the Pedal effect. After
advancing the pedal all the way, you can press the pedal more
firmly to switch the Pedal effect on/off.
Rear panel
1 INPUT jack
If you are using batteries, this jack acts as a power switch.
When a cable is connected, the power will be turned on.
Before turning the power on or off, be sure to turn down the
volume of any equipment that is connected.
2 Input level switch
Set this switch according to the output of your instrument.
3 AUX IN jack (stereo mini)
Connect the output (AUX OUT: analog) of your audio device
to this jack.
4 DC9V
The separately sold AC adapter (DC9V ) can be connected here. When this is connected, the power will be turned
on automatically.
5 Cable hook
If the separately sold AC adapter is connected, hook the cable of the AC adapter
around this hook as shown below. When
removing the cable from the hook, do not
apply tension.
6 MASTER VOL. (Master volume)
This adjusts the volume of the OUTPUT jack.
7 OUTPUT jack
This also functions as the headphone jack.
8 Cable guide
This prevents the cable that connects
the guitar to the AX100G from interfering with the operation of the pedal.
Pass the cable through the guide as
shown in the diagram below.
When using the cable guide, please
use a cable whose diameter is 8 mm
or less.
Max.
8mm
4
Page 5
○○○○○○○○○○○○○○○○○○○○○○○○○○○○○○○○○○○○○○○○○○○○○○○○○○○○○
The modes of the AX100G
The AX100G is divided into three modes: Program mode, Effect
Select mode, and Phrase Trainer mode.
Program mode
In this mode you can select programs and use the AX100G for
normal performance.
Use the foot switches (UP, DOWN) to select programs.
Immediately after the power is turned on, the AX100G will always be in this mode. With the factory settings, the User programs contain the same programs as the Preset programs.
Effect Select mode
In this mode you can use the foot switches UP or DOWN to
switch the drive amp channel*
effect on/off.
Programs cannot be selected in this mode. Use Program mode to
select programs.
*1 The AX100G provides two (A and B) Drive (distortion) Amp Effects so
that you can switch between settings such as backing and solo without
having to change programs.
Phrase Trainer mode
This mode allows you to record a phrase from a CD or MD connected to the AUX IN jack, and play it back as a repeated loop
that you can practice along with.
Since you can slow down the playback speed without affecting
the pitch, this is a convenient way to learn or practice difficult
phrases.
When you enter Phrase Trainer mode, the Modulation, Pedal,
and Ambience effects will be turned off automatically.
In Program mode and Effect Select mode, you can use the various
knobs to edit the effect, adjust noise reduction, adjust the program
level, and change the program name.
1
, Modulation effect or Ambience
2. Playing the AX100G
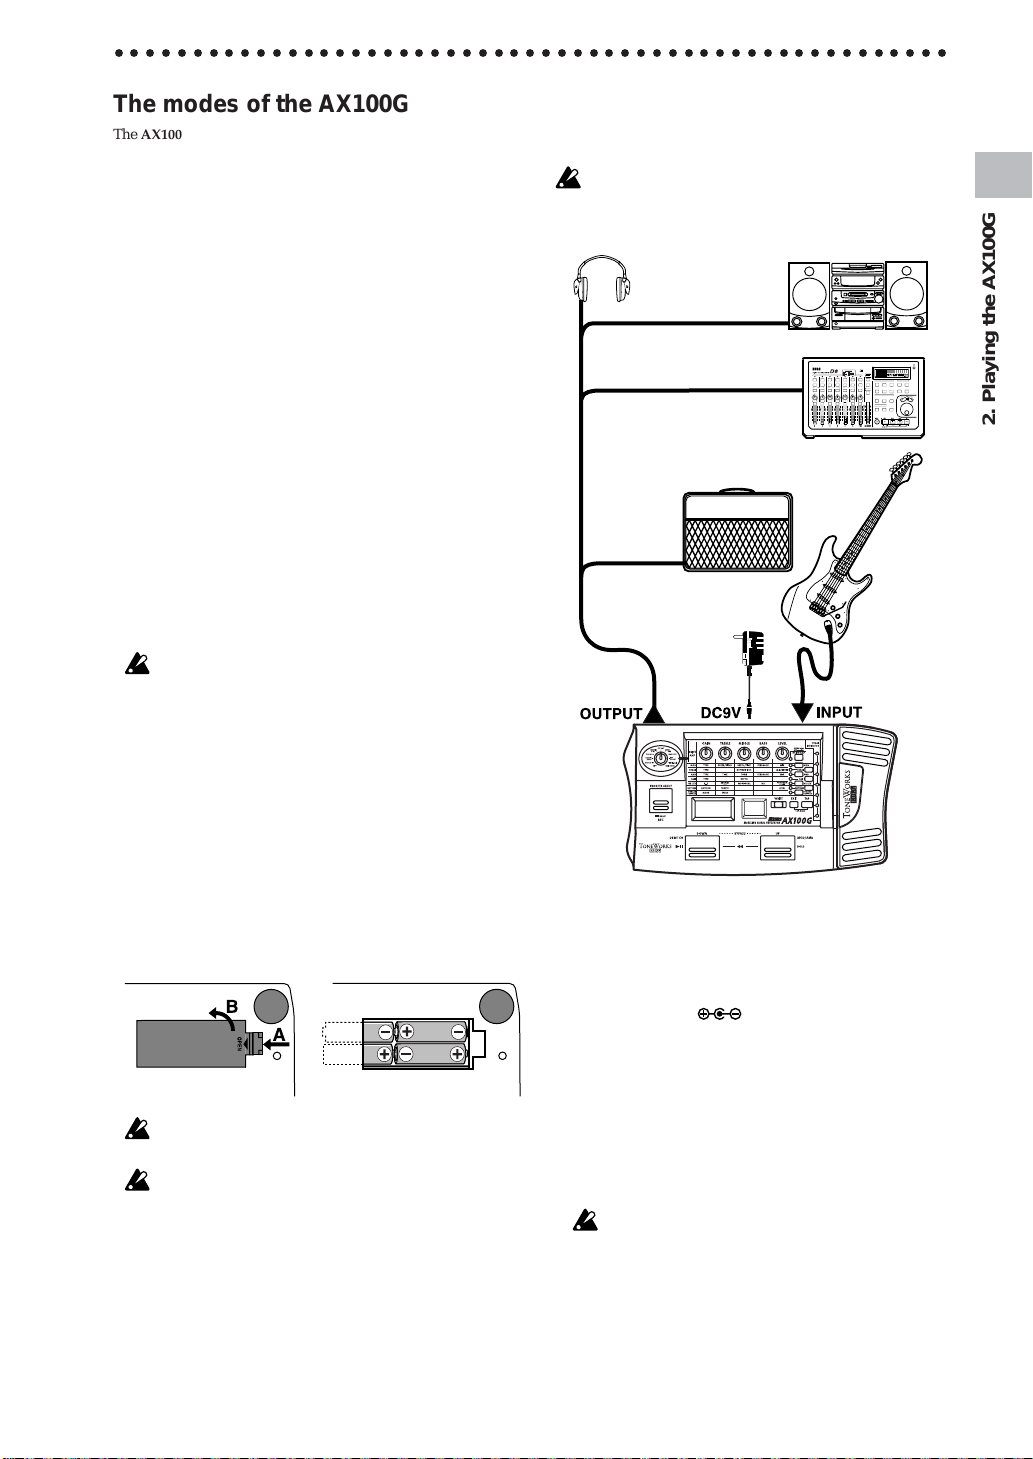
Example connections
The power must be off when making connections. Otherwise, damage to your speaker system, or other malfunctions may occur.
Connecting cables are sold separately.
Headphone (*1)
Stereo 1/4" jack –
stereo RCA (phone jack)
Hard disk recorder etc.
Mono output – mono 1/4" jack / stereo
output - two mono 1/4" jacks
Guitar amp / powered monitor(*1)
Mono 1/4" jack –
mono 1/4" jack
AC adapter (*2)
to AC outlet
Audio system
Mono 1/4" jack –
mono 1/4" jack
2. Playing the AX100G
Guitar
Installing the batteries
1. Lightly press on arrow A of the battery case, and slide the lid
upward in the direction of the arrow to open the case.
2. Insert four AA alkaline batteries (sold separately) as shown in
the diagram. Be careful to observe the correct polarity (+ and
-) of the batteries.
3. Close the lid of the battery case.
If you will not be using the unit for an extended period of time,
remove the batteries to prevent them from leaking.
When the multi-display blinks "
the batteries. Please install new batteries as soon as possible.
BATTERY
," it is time to replace
*1: The OUTPUT jack is a stereo output. If you use a mono
cable to connect the AX100G to a guitar amp, only the L
(left) side signal will be output to the amp.
*2: If you use batteries, the AC adapter is not necessary. If
you use an AC adapter, be sure to use only the specified
model (DC 9V
).
Turn on the power
The AX100G does not have a power switch.
The power will be turned on when one of the following occurs.
◆
If you are using batteries, the power will be turned on when
you connect a mono cable to the INPUT jack. To maximize the
battery life, disconnect the cable from the INPUT jack when
you are not using the AX100G.
If you connect a stereo cable, the power will not be turned on.
◆
If you are using the AC adapter (sold separately),
will be turned on when you connect the AC adapter to a DC 9V.
Before you turn off the power of the AX100G, turn off the power
of the other connected equipment.
the power
5
Page 6
2. Playing the AX100G
○○○○○○○○○○○○○○○○○○○○○○○○○○○○○○○○○○○○○○○
Program mode
When you turn on the power, the AX100G will always enter Program mode, and will be set to the program setting that were last
selected when the power was turned off.
Input level switch setting
Set this switch according to the output of your instrument.
H : Suitable for a pickup with a high output level, such as a
humbucking pickup
L : Suitable for a pickup with a low output level, such as a single
coil pickup
Adjusting the volume (master volume)
To adjust the volume, rotate the MASTER VOL. (master volume)
located on the rear panel.
Selecting a program
Press the UP or DOWN switches to increment or decrement the
programs in steps of one. When you do so, the multi-display
will show the name of each program.
Programs are organized into groups of four, and these groups
are called "banks." The current bank is shown by the 10's digit of
the number LED.
Preset program
User program
The AX100G contains a total of 80 programs (sounds): 40 (4 x 10
banks) of preset programs that cannot be overwritten, and 40 (4
x 10 banks) of user programs that you are able to modify (edit).
When a user program is selected, the decimal point (dot) in the
lower right of the number LED will light.
Preset
program
User
program
Dot is lit
When you once again press the TAP switch and EXIT switch
simultaneously , the Bank Hold (10’S HOLD) function will be cancelled.
Dot is lit
Checking the effects used by a program
Some programs do not use all of the effects. When you select a
program, the LED beside each effect select switch will light to
indicate the effects that are being used. An effect that is turned
off can be edited (turned on) by pressing its select switch, and
when you press another select switch or the EXIT switch, the
LED will change from blinking to lit.
Bypass, Mute
By pressing the UP and DOWN switches simultaneously, you
can Bypass the AX100G so that no effects will be applied. (The
multi-display will indicate "BYPASS" for two second.)
Alternatively, by pressing the UP and DOWN switches simultaneously and holding them for approximately one second, you
can Mute the AX100G completely so that no sound will be output. (The multi-display will indicate "MUTE" for two second.)
To defeat Bypass or Mute, press the UP or DOWN switch.
Auto tuner
When the AX100G is in bypass or mute condition, the tuner will
operate automatically. If you mute the AX100G you will be able
to tune your instrument without producing sound. This is used
for on stage tuning.
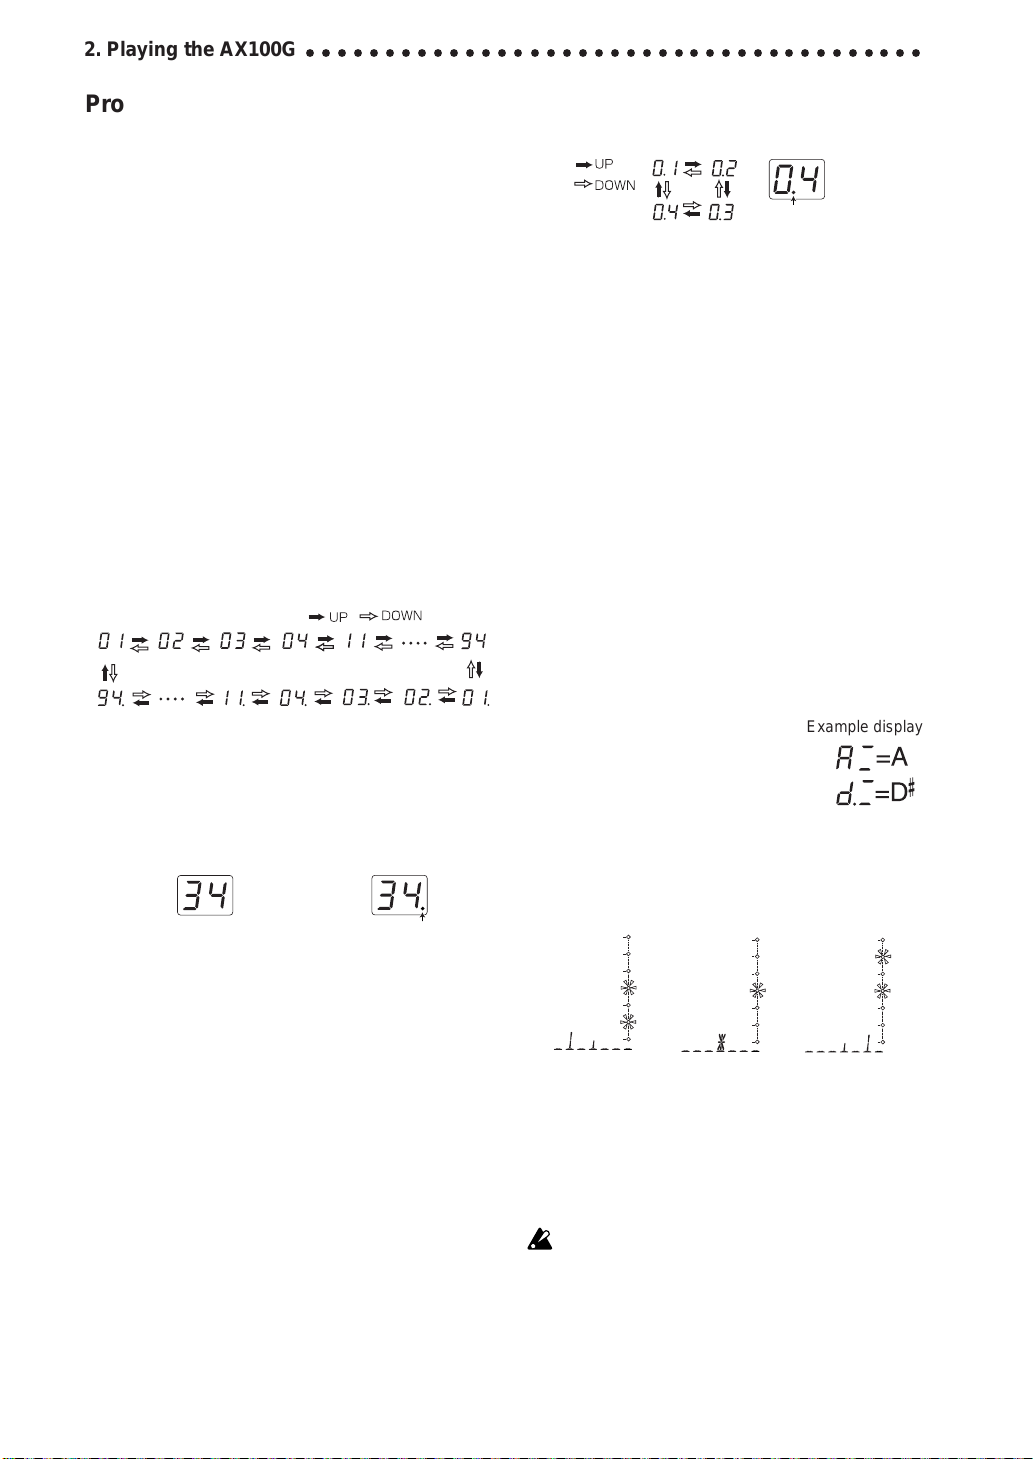
1. Tune your guitar so that the desired note
name appears in the number LED. The
decimal point “.” at the lower right of the
number LED will light to indicate a sharp
2. The seven-point pedal indicator will show the difference between the pitch you play and the note name. Tune your instrument so that only the center LED is lit.
Tuning discrepancy shown by the pedal indicator
and the multi-display
Example display
.
Selecting a bank
Although you can use the UP or DOWN switches to select programs across banks, you can also switch programs by bank.
1. Press and hold the PROG/FX SELECT switch for approximately one second until the number LED begins to blink.
2. Press either the UP or DOWN switch to increment or decrement the bank.
3. Press the PROG/FX SELECT switch once again to finalize the
bank and make the number LED stop blinking.
Bank Hold (10’s HOLD)
By simultaneously pressing the TAP switch and EXIT switch,
you can prevent programs of other banks from being selected.
At this time, the decimal point (dot) at the lower right of the 10's
place in the number LED will light.
Press the UP or DOWN switches to select programs within the
current bank.
6
Pitch is
flat
Correct
tuning
Pitch is
sharp
Changing the calibration setting
As necessary , you can adjust the calibration (the fr equency of the
standard A pitch) in the range of 438—445 Hz. (440 Hz is “standard”)
When the tuner is operating, you can rotate value knob 1 to adjust the calibration. The calibration setting is shown in the multidisplay.
When the power is turned off, the calibration setting you modify
will be lost, and will automatically return to 440 Hz the next
time the power is turned on.
Page 7
○○○○○○○○○○○○○○○○○○○○○○○○○○○○○○○○○○○○○○○○○○○○○○○○○○○○○
Rhythm
Press the RHYTHM switch (the LED will light) and the rhythm
will begin playing. Use value knob 1 to select the rhythm pattern
(50 types), use value knob 2 to adjust the tempo (range: 40—208),
and use value knob 3 to adjust the rhythm level (range: 0—30).
To stop the rhythm, press the RHYTHM switch while the rhythm
is playing.
The rhythm will stop when you enter Bypass, Mute, or Edit
modes.
AUX IN
Sound from an audio device (e.g. CD or MD) connected to the
AUX IN jack can be mixed with the effect sound for listening,
which is a convenient way to practice along with a song.
The AUX input and the effect output will automatically be mixed
and output from the OUT PUT jack except when you are in
Phrase Trainer mode.
Use the controls on your audio device to adjust the AUX IN
volume.
Expression pedal
You can use the expression pedal to control 23 types of Pedal
effect in realtime.
If a program uses a Pedal effect, the pedal indicator LED’s will
light to indicate the Min-Max value of the effect when you press
up and down on the pedal. Operation for the SAMPLE1—
LOOP2 pedal effects is different fr om the other effects (see p.14).
Using the expression pedal as you play
1. In Program mode, select a program that uses the expression
pedal.
2. Make sure that the pedal indicator is lit. If it is not lit, advance
the expression pedal once as far as it will go, making the top
pedal indicator light (the pedal will be on)
3. Operate the expression pedal while playing your guitar. As
you raise and lower the pedal, the output sound will change
correspondingly.
If VOLUME is selected in the Pedal effect, it will not be possible
to turn the expression pedal on/off. The pedal indicator will remain lit.
The on/off status of the expression pedal is not memorized by
each program.
Do not apply excessive force to the expression pedal. Before operating the expression pedal, verify the amount of force that is required to make the pedal indicator light and to apply the effect.
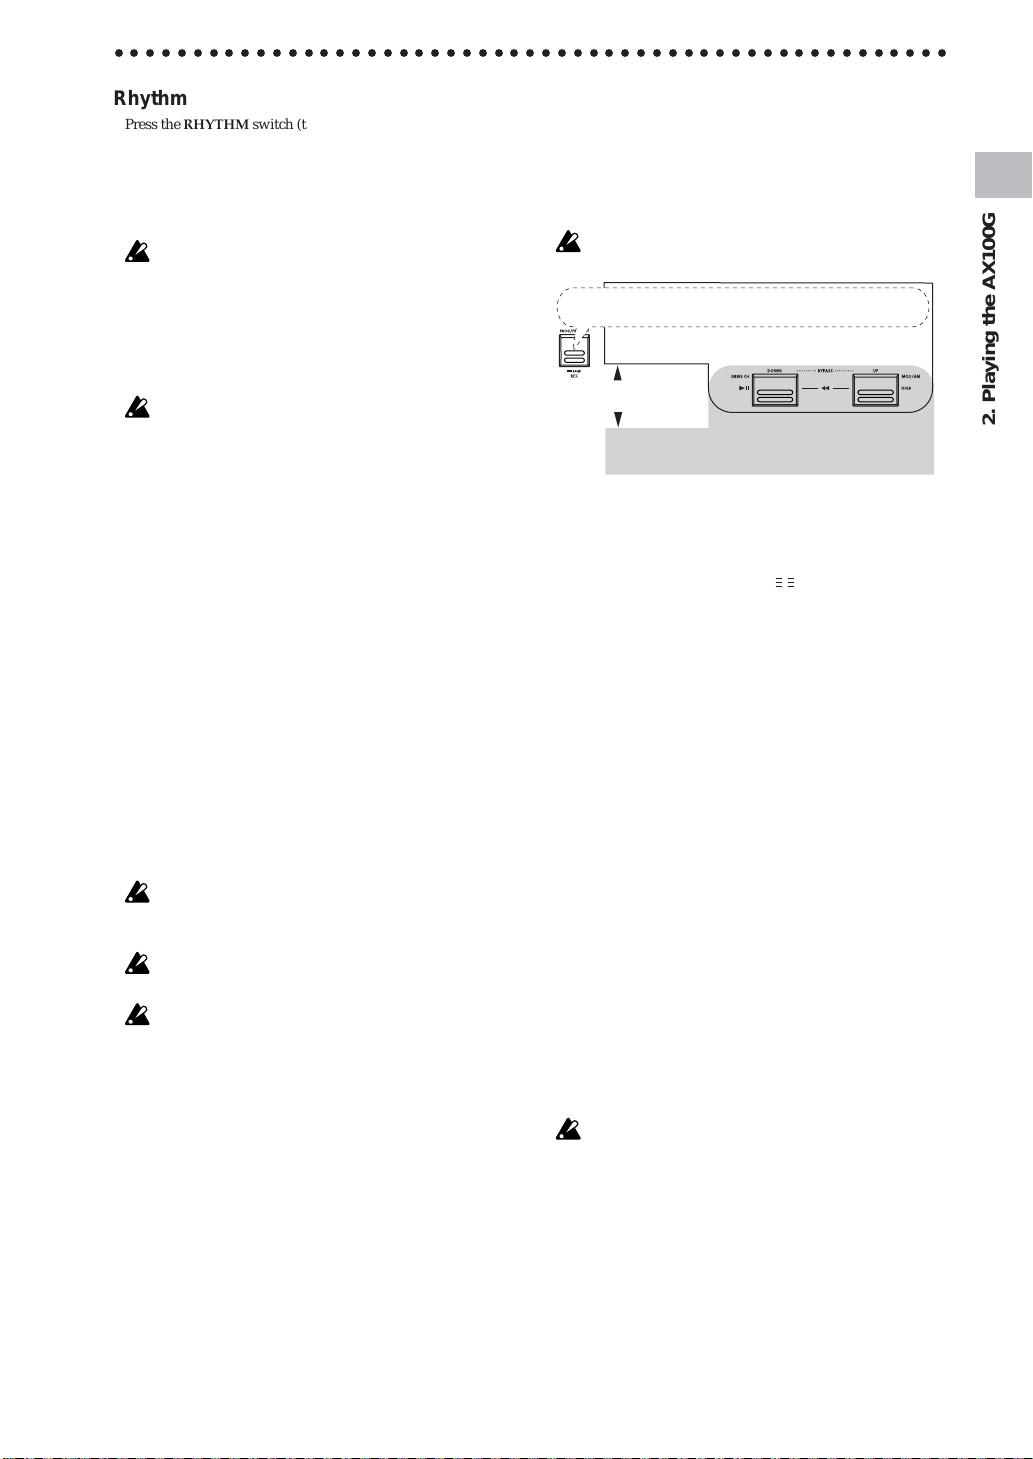
Effect Select mode
In this mode, you can press the DOWN switch to switch the drive
channel while you perform. You can press the UP switch to turn
the Modulation and Ambience effects on/off.
As in Program mode, you can edit the settings, use the metronome, and write a program.
In this mode it is not possible to switch programs or to select
bypass or mute.
Press and hold until
the number LED blinks
Program mode
Press the Effect Select
key to switch modes
Effect
Bank down
Program
down
Switch the
drive channel
Select mode
Entering Effect Select mode
In Program mode, press the PROG/FX SELECT switch to enter
Effect Select mode. The multi-display will indicate "FX SEL,"
and the number LED will indicate "
Switching the drive amp channel
Since each program contains two separate Drive Amp effect settings, you can switch between backing and solo sounds without
changing programs.
Each time you press the DOWN switch, the Drive Amp effect
settings will switch between channels A and B. When channel A
is selected the LED beside the DRIVE·AMP switch will light
green, and when channel B is selected the LED will light red.
Turning the Modulation and Ambience effects on/off
(INDIVIDUAL)
Each time you press the UP switch, the Modulation effect or
Ambience effect will be turned on/off.
The effects that are turned on/off when you press the UP switch
can be specified beforehand in the settings of the program, as
follows.
Procedure
1. Press the NR LEV switch.
2. Rotate value knob 3 to change the indication in the multi-display to the desired setting.
MOD: Only the Modulation effect will be turned on/off
AMB: Only the Ambience effect will be turned on/off
M+A: Both the modulation and ambience effects will be
turned on/off
For some effects, it is not possible for the Modulation and Pedal
effects or the Pedal and Ambience effects to be used simultaneously. For such combinations, attempting to turn on both effects will cause the previously-on effect to be turned off automatically.
."
Bank up
Program
up
Turn the
MOD/AMB
effects on/off
2. Playing the AX100G
Exiting Effect Select mode
To return to Program mode, press either the PROG/FX
SELECT switch or the EXIT switch.
7
Page 8
2. Playing the AX100G
○○○○○○○○○○○○○○○○○○○○○○○○○○○○○○○○○○○○○○○
Phrase Trainer mode
In this mode, you can record a phrase from an audio device (CD
or MD) connected to the AUX IN jack, and play it back repeatedly as a loop. Then you can practice a phrase on your guitar
while playing to the repeating phrase.
Since you can slow down the playback speed without affecting
the pitch, this is a convenient way to learn or practice phrases
from recordings that are difficult to play.
In Phrase Trainer mode, the expr ession pedal will automatically
function as the volume control of your guitar.
When you enter this mode, the Modulation, Pedal, and Ambience effects will automatically be turned off. (When you exit
Phrase Trainer mode, the previous settings will be restored.)
Select recording mode
Playback/Stop
Operation
indicator
Phrase
Trainer icon
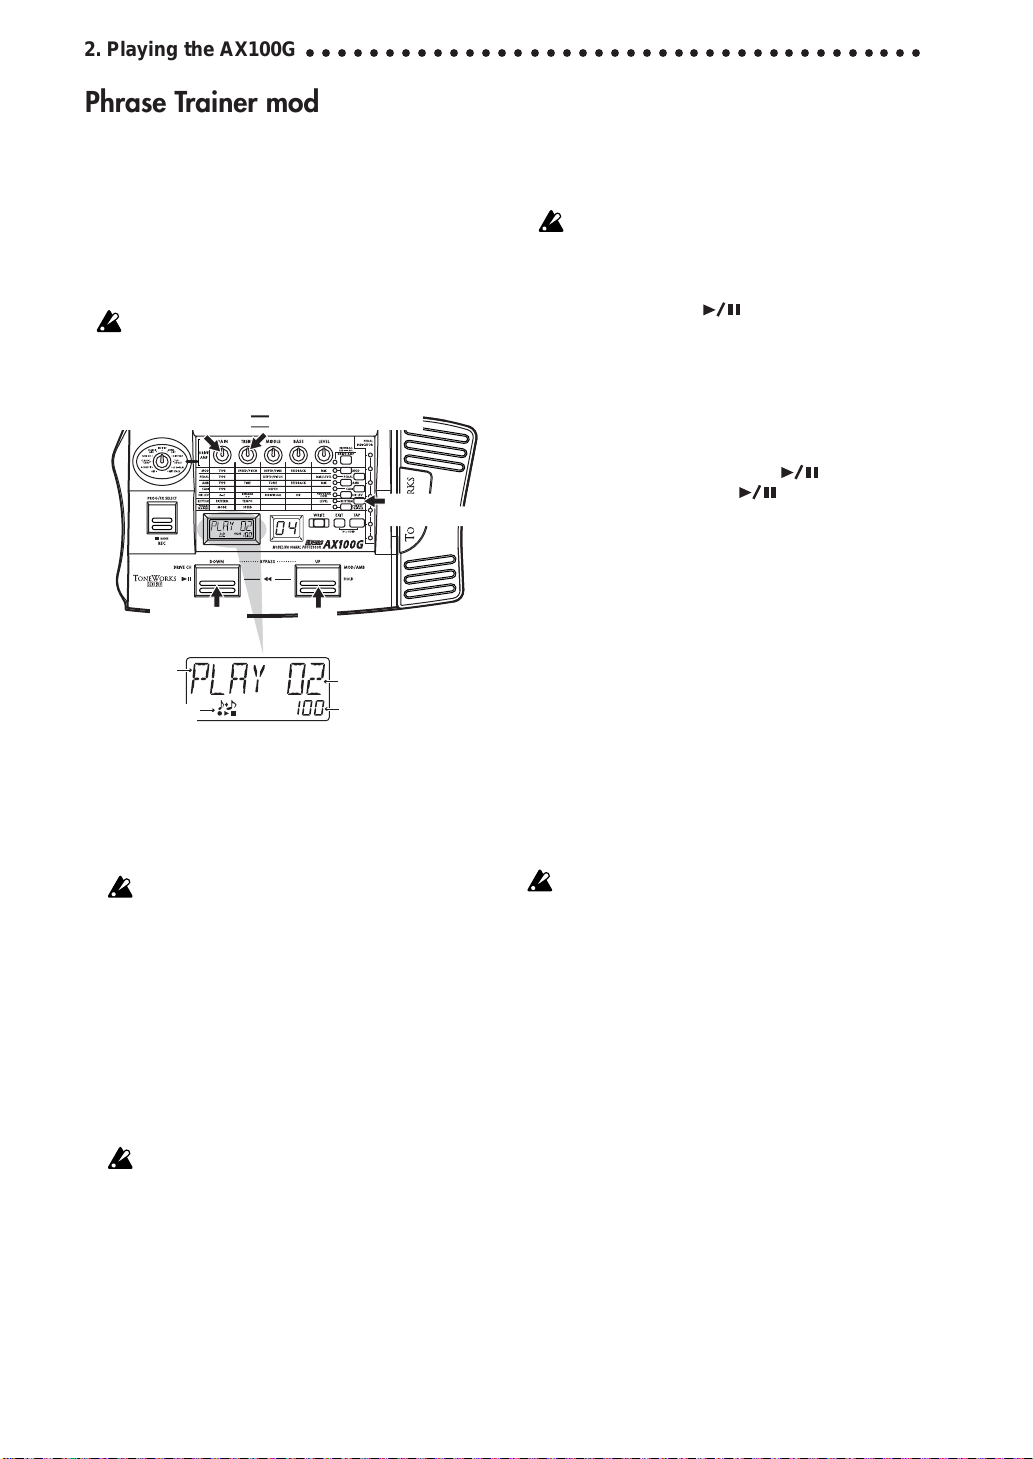
1. Enter Phrase Trainer mode
Press the PHRASE TRAINER switch located at the right of
the panel. (The corresponding LED will light.)
The Phrase Trainer icon will blink in the multi-display, and
the selected recording mode will be displayed.
You cannot edit the sound of the guitar in Phrase Trainer mode.
You must select the desired sound before entering this mode.
2. Select the recording mode
Rotate value knob 1 to select the recording mode.
AUX IN: Record up to 8 seconds of the AUX sound
GTR IN: Record up to 8 seconds of the guitar sound
3. Begin recording
Start the connected device, and at the moment that you wish
to begin recording, press the PROG/FX SELECT switch (REC)
to begin recording. The multi-display will indicate "REC" and
the number of seconds of recording, and the pedal indicator
will show the recording time.
Once you record a phrase, it is not possible to change the recording mode. If you wish to change the recording mode, you
must return to Program mode, and once again enter Phrase
Trainer mode.
Select playback speed
Phrase
Trainer mode
Hold
Playback/
Recording time
Playback speed (%)
4. Stop recording
At the point that you want to stop recording, press the PROG/
FX SELECT switch (REC). Recording will end when the maxi-
mum recording time (8 seconds) has elapsed. The multi-display will indicate "PLAY," and loop (repeated) playback will
begin automatically.
Depending on the volume of the connected audio device, the
sound may be distorted. If this occurs, adjust the volume on
the audio device.
To re-do the recording
Press the DOWN switch (
tinue with step “3. Begin recording” and step “4. Stop recording.”
To erase the recorded phrase
Press the EXIT switch to delete the phrase. You can now record
a new phrase to overwrite the previously-recorded phrase.
5. Stop/Playback
When you press the DOWN switch (
stop. Press the DOWN switch ( ) once again, and playback will resume from where you stopped.
• While the sound is being held, you can press the UP and
DOWN switches simultaneously, to return to the beginning of the recorded phrase.
• During playback, you can press the UP and DOWN
switches simultaneously to rewind.
• During playback, you can press the UP switch (HOLD) to
hold the sound at that moment. Press the switch once again
to defeat this.
Changing the playback speed
You can slow down the playback speed without changing the
pitch of the recorded phrase.
Rotate value knob 2 to slow down the playback in 5% steps:
100%, 95%, 90%, 85%, ... 25%.
Exiting Phrase Trainer mode
To return to Program mode, you can press the PHRASE
TRAINER switch or EXIT switch.
When you exit Phrase Trainer mode or turn off the power, the
recorded phrase will be erased.
) to stop playback. Then con-
), playback will
8
Page 9
○○○○○○○○○○○○○○○○○○○○○○○○○○○○○○○○○○○○○○○○○○○○○○○○○○○○○
3. Editing
In Program mode and Effect Select mode, you can
edit each effect, adjust the noise reduction and program level, and modify the program name.
During editing, the edit icons in the multi-display
and the LEDs beside the select switches for each effect will blink.
If you wish to save the effects you edited, you must use the "Program Write" operation. If you turn off the power or switch to
another effect without performing "Program Write," the previous settings will reappear.
The parameter assigned
to the knob you moved
Value of the parameter
Edit icon
Editing the effects
The drive amp effect can be edited immediately by turning the
value knobs or type knob; you do not have to press the
DRIVE·AMP switch. (Refer to the section below, "Drive Amp
effect Quick Edit function.")
To edit other effects, press the corresponding select switch to put
that effect in Edit mode (the LED will blink).
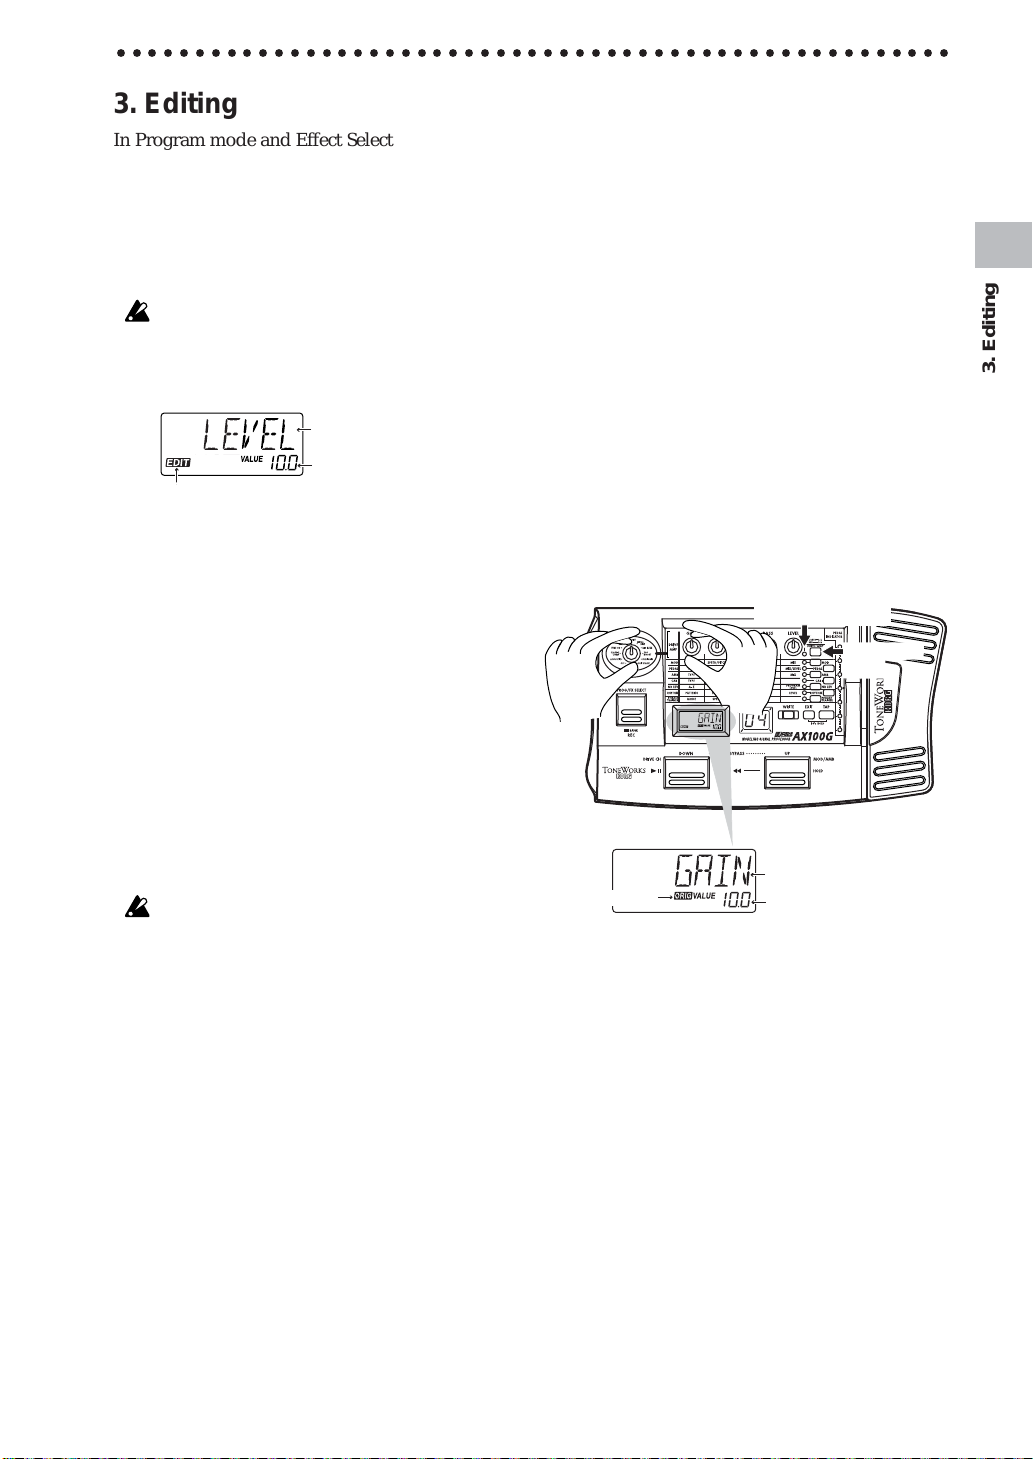
Editing the Drive Amp effect (example)
As an example, here's how to set channel B of the Drive Amp
effect to TUBE OD.
1. Press the DRIVE·AMP switch several times to select channel
B (red LED).
If the multi-display reads "TUBE OD," no change is necessary.
2.
Otherwise, rotate the T ype knob to select TUBE OD. If the Type
knob is already located at the TUBE OD position, turn it first
to another effect type, and then turn it back to TUBE OD.
3. The multi-display will indicate "TUBE OD" as the effect name.
If you selected the effect that had been programmed, the Original icon in the multi-display will light.
4. The five value knobs will be assigned to GAIN, TREBLE,
MIDDLE, BASS, and LEVEL respectively, and will adjust the
value of the corresponding parameter. (See p.12, "Effect parameters.")
5. As you rotate the knobs, the sound will change and the multidisplay will show the parameter name assigned to that knob
and the current value. If you rotate the knob to adjust the value
to the value it had before you began editing the original parameter value icon in the multi-display will light.
Channel A/B display
DRIVE·AMP
switch
3. Editing
Drive Amp effect Quick Edit function
You can edit the Drive Amp effect (unless the effect is turned off)
by using the Type knob to re-select the effect, or by rotating the
five value knobs to modify the parameter values. When you do
so, the multi-display will show the effect name or parameter name
assigned to the corresponding knob, and its current value.
Even when another effect such as Modulation or Pedal is in edit
mode, you can still turn the type knob to edit the drive amp effect.
Editing is not possible if other functions are assigned to the value
knobs, nor in Bypass, Mute, or Phrase Trainer modes.
Drive amp channel
For each program, the Drive Amp effect has settings for two channels, A and B.
Press the DRIVE·AMP switch located at the right of the panel to
select the channel you will edit. Each time you press the switch,
the LED will change between green (channel A) and red (channel B).
Parameter
Original icon
If you do not wish to use the Drive Amp effect, use the Type
knob to select OFF so that the Drive Amp effect will be bypassed,
and the multi-display will indicate "DRV OFF." In this case, the
LED beside the DRIVE·AMP switch will go dark.
Value of the parameter
9
Page 10
3. Editing
○○○○○○○○○○○○○○○○○○○○○○○○○○○○○○○○○○○○○○○○○○○○○○○
Editing other effects
Press the select switch for the desired effect to be edited.
MOD: Edits the Modulation effect (e.g., chorus)
PEDAL: Edits the Pedal effect (e.g., wah)
AMB: Edits the Ambience effect (e.g., delay)
CABI: Edits the Cabinet effect which models the cabinet
resonances of a guitar amp
NR LEV: Edits the noise reduction and program level (volume)
For some effects, the Modulation and Pedal effects, or the Pedal
Ambience effects cannot be used simultaneously. In the case
and
of such a combination of effects, attempting to turn on both simultaneously will automatically turn off the previously-on effect.
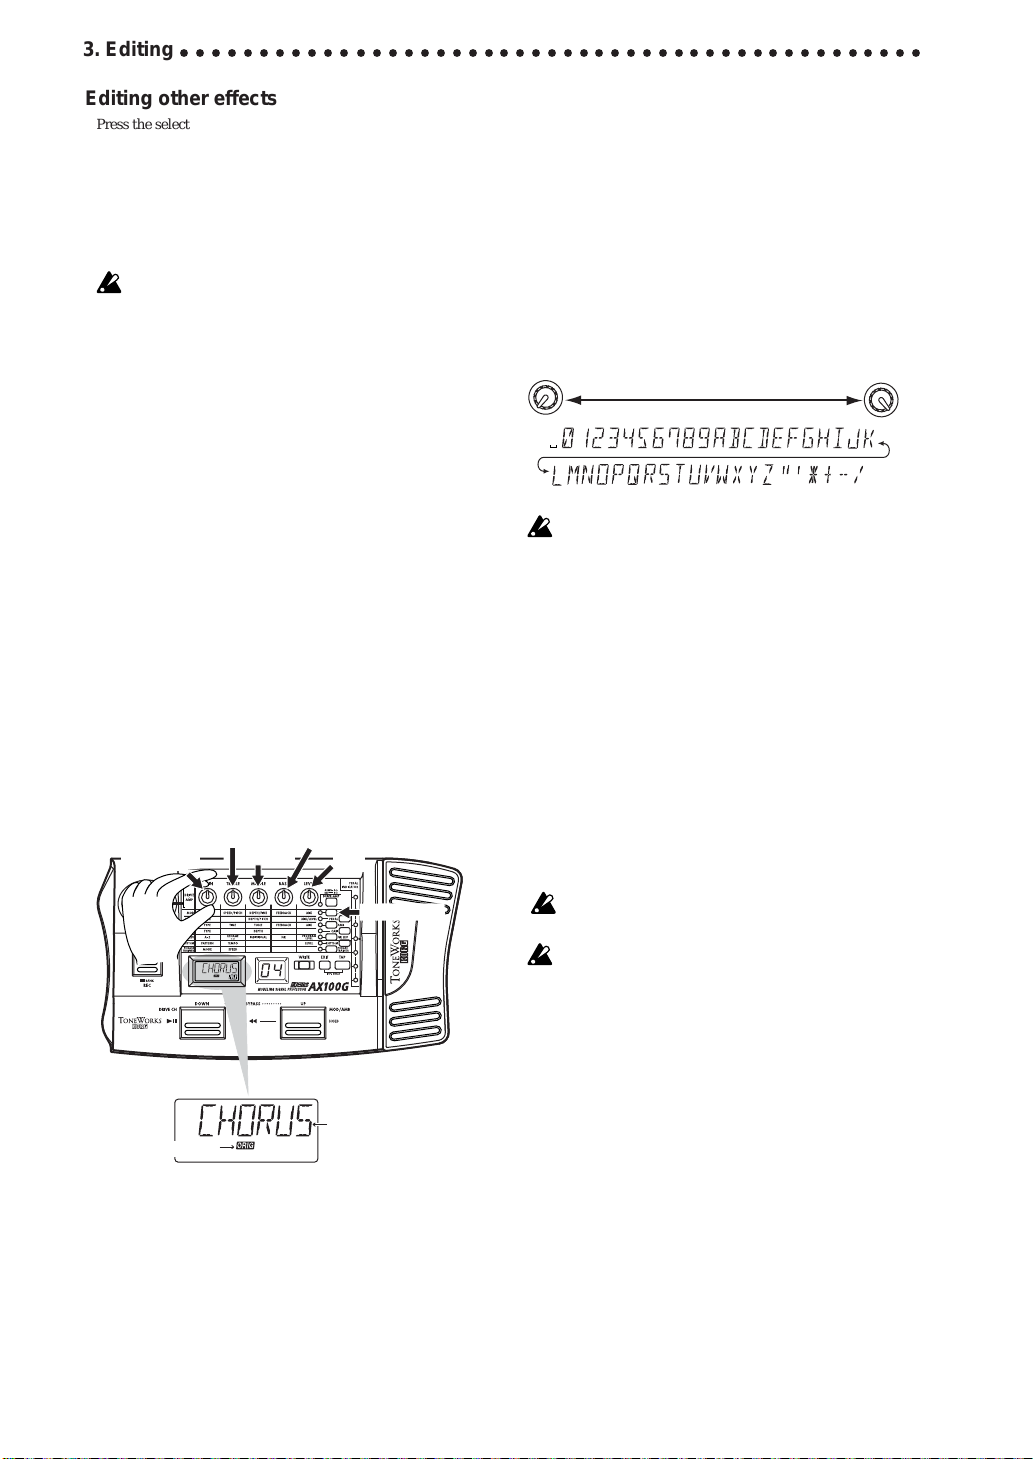
As an example, here's how to select CHORUS as the Modulation effect.
1. Press the MOD switch. The LED beside it will blink, indicating that the Modulation effect is selected.
Even if the Modulation effect has been turned off within the
program, it will be turned on at this point.
2. Rotate value knob 1 (TYPE) to select CHORUS. The type name
will appear in the multi-display. If you select the effect that
had originally been selected, the Original icon will appear in
the multi-display.
3. Value knobs 2, 3, 4 and 5 will adjust the chorus speed (SPEED),
chorus depth (DEPTH), chorus feedback amount (FEED-
BACK), and the mix balance between the chorus sound and
the direct sound (MIX). If the adjusted value matches the unedited value (the original parameter value) as you rotate a
knob, the Original icon will appear in the multi-display.
The value knobs that can be used and the parameters that are
assigned will depend on the type of each effect. (See p.12 "Effect
parameters.")
Select
Modulation
effect type
SPEED
DEPTH
FEEDBACK
MIX
MOD switch
Using the TAP switch to edit the delay time
When using the Ambience or Pedal DELAY effect, press the TA P
switch two times at the tempo of the song you are playing. The
AX100G will detect the interval, and set the delay time automatically.
You can set the delay time in the same way even while you are
not playing.
Modifying the program name
Press the NR LEV switch so that the LED beside the switch is
blink. Use value knob 2 to select the character that you wish to
change (the character will blink), and use value knob 1 to change
the character. The available characters are shown below.
Available characters
If you wish to save the modified program name, you must perform the “Writing programs” operation. If you turn off the power
or select a different program without writing the program, the
program name you edited will revert to its previous setting.
Writing programs
Here’s how to write an edited program.
1. Press the WRITE switch, and the Multi-display will indicate
“✳WRITE✳.” The number LED will blink.
2. Use the UP and DOWN switches to select the destination for
your program.
3. Press the WRITE switch once again, and the display will read
“COMPL T” to indicate that the program has been written. You
will then return to Program mode.
If you decide not to write, press the EXIT switch to cancel the
Write operation.
If you write an edited program to a different program number,
the program that was overwritten will be lost.
It is not possible to write to a preset program.
10
Parameter
Original icon
Page 11
○ ○○○○○○○○○○○○○○○○○○○○○○○○○○○○○○○○○○○○○○○○○○○○○○○○○○○○
4. Appendices
Adjusting the expression pedal (Calibration)
If you find the expression pedal difficult to use, perform this procedure so that the pedal will function optimally. For example if
the effect does not reach maximum when the pedal is advanced
all the way, or does not reach minimum when the pedal is returned all the way, use the following procedure to make the appropriate adjustments.
When making adjustments, use your hand to move the pedal.
Accurate calibration may not be possible if you use your foot to
operate the pedal.
1. Turn on the power while simultaneously holding down the
EXIT switch and the PEDAL switch. The Multi-display will
show “PEDAL” for approximately one second, and will then
indicate “MIN.”
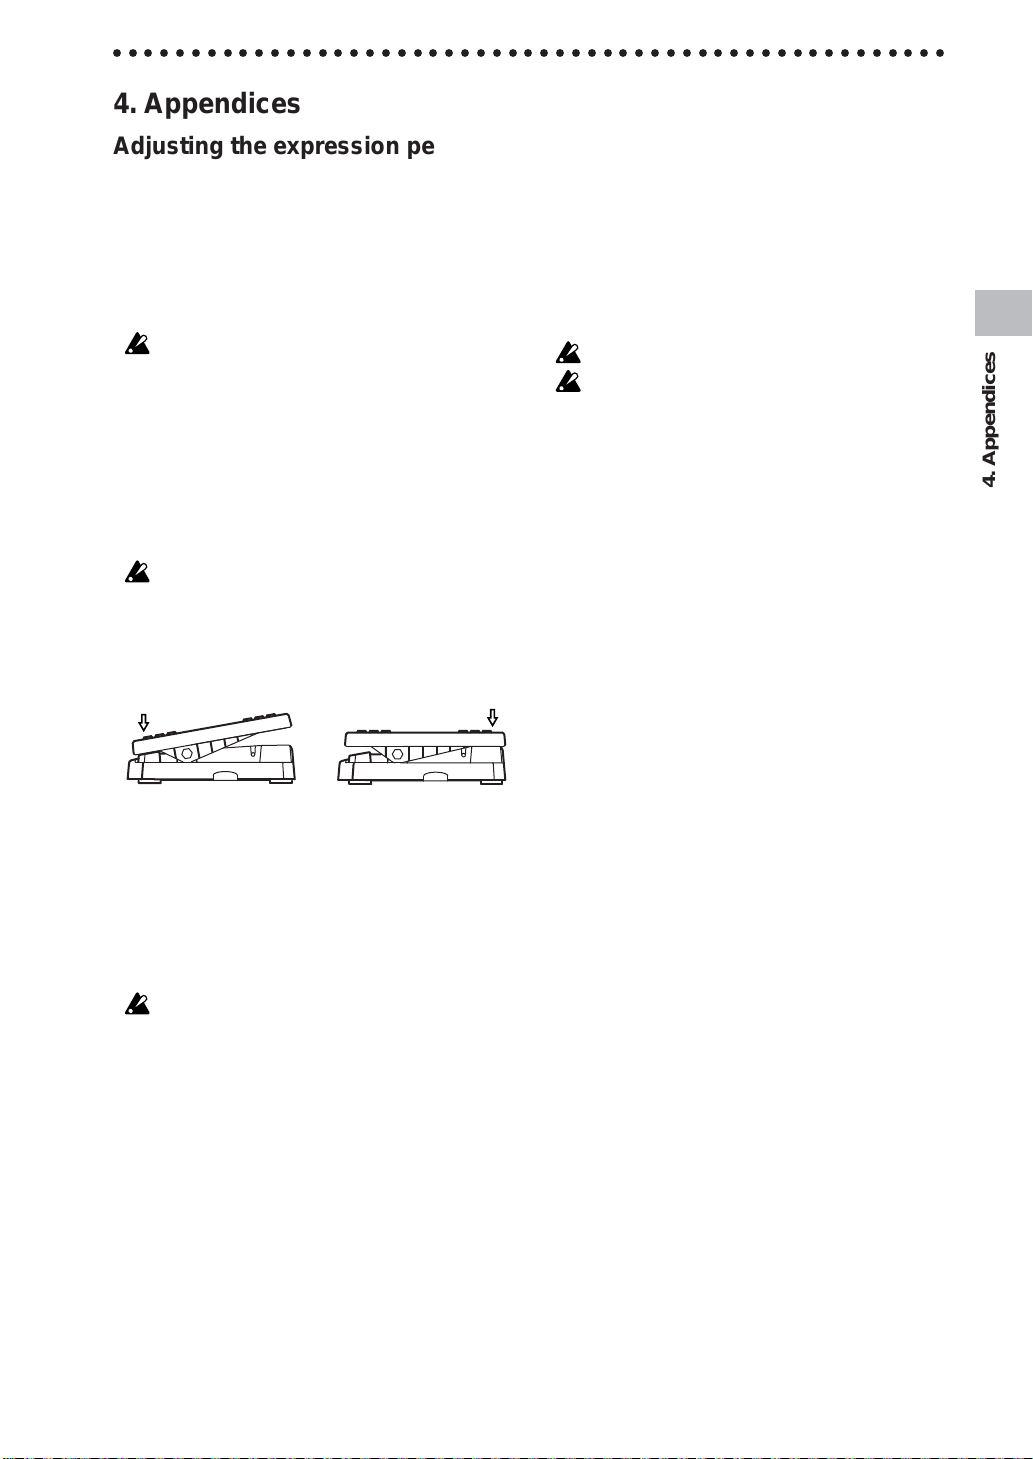
2. Slowly return the pedal to the full back position. When it stops,
release your hand and press the WRITE switch. The Multidisplay will change from “MIN” to “MAX.”
If you decide to halt the adjustment procedure, press the EXIT
switch. The power-on display will appear, and you will enter
Program mode.
3. Slowly advance the pedal. When it stops, release your hand
and press the WRITE switch.
2. press slowly
The Multi-display will indicate “COMPLT” for approximately
one second. Then the power-on display will appear , and you will
enter Program mode.
After the adjustment procedure has been completed, verify the
operation of the pedal.
Select an effect that will make it easy to verify the adjustment.
For example, set the Pedal effect to the VOLUME effect, set the
value to 0, and check the MIN level when the pedal is returned
all the way.
If you make a mistake during the calibration procedure, the Multidisplay will indicate “
before the adjustment (the “
play appears for repeated attempts, a malfunction may have occurred. In this case, please contact your dealer.
ERROR
MIN
3. press slowly
,” and you will return to the screen
” display). If the “
ERROR
Restoring the user programs to the factory settings (Reload)
1. Turn on the power while simultaneously holding down the
EXIT switch and the PROG/FX SELECT switch. The Multi-
display will indicate “RELOAD?”
2. Press the WRITE switch. The Multi-display will change to
“RELOAD,” and the reload operation will begin. When the
reload operation is completed, the display will indicate
“COMPLT” for approximately one second. Then the poweron display will appear, and you will enter Program mode.
Never turn off the power during the reload operation.
When you perform the reload operation, all user programs will
be rewritten. Rhythm settings will also be initialized.
Troubleshooting
If you suspect a malfunction, please check the following points
first. If this does not resolve the problem, contact a nearby Korg
dealer.
1. Power does not turn on
✳ Are batteries installed? Alternatively, is the AC adapter con-
nected to an AC outlet? (☞p.5)
✳ Is a mono cable connected to the INPUT jack? (☞p.5)
2. No sound
✳ Are your guitar, amp, and headphones connected to the cor-
rect jack? (☞p.5)
✳ Is your amp turned on, and is it set accordingly?
✳ Is one of your connection cables broken?
✳ Has the MASTER VOL (master volume) of the AX100G been
turned down? (☞p.6)
✳ Is the program level of the AX100G set to “0” or to a low value?
(☞p.9, 16)
✳ Is the Level of the Drive Amp effects set to “0” or to a low
value?
✳ Is the volume of your guitar turned down?
✳ Is the AX100G muted?
✳ If VOLUME is selected for the PEDAL effect, has the pedal
been returned to the full back position?
” dis-
3. Effects are not applied
✳ Is the AX100G bypassed? (☞p.6)
✳ Are the effects used by the program turned on? (☞p.6)
4. Rhythm does not function
✳ Are you in Program mode or in Effect Select mode? The
rhythm will not function in Phrase Trainer mode.
✳ Is the rhythm output level set to “0”? (☞p.7)
5. Pedal does not function
✳ Have you selected a program that uses an effect in the PEDAL
effect mode? (☞p.6)
✳ Is the pedal indicator lit? (☞p.4, 7)
✳ Try calibrating the expression pedal. (☞p.11)
4. Appendices
11
Page 12
4. Appendices
○○○○○○○○○○○○○○○○○○○○○○○○○○○○○○○○○○○○○○○○○○○○
6. Cannot write
(the Multi-display indicates “ERROR”)
✳ Did you turn the power off while the preset programs were
being loaded?
Reload the preset programs. (☞p.11)
Main specifications
❏ Number of effects:
63 types
(maximum number of effects that can be used simultaneously: 7)
❏ Number of programs:
80 (40 preset, 40 user)
❏ Inputs:
Guitar input (mono)
AUX IN (stereo mini jack)
❏ Outputs:
Line/Headphone dual-purpose output
(stereo phone jack)
❏ Tuner section
Detection range: 27.5 Hz — 2,093 Hz (A0—C7)
Calibration: A=438—445 Hz
❏ Rhythm section
Pattern: 50 types
Tempo: bpm= 40—208
❏ Power supply:
four AA size (LR6) alkaline batteries
(battery life is 12 hours of continuous use)
or separately sold AC adapter (DC9V
❏ Dimensions:
329.6(W) x 181.5 (D) x 57.5 (H) mm
❏ Weight:
1.05kg (not including batteries)
❏ Included items:
Owner’s manual
*Specifications and appearance are subject to change with out
notice for improvement.
Effect parameters
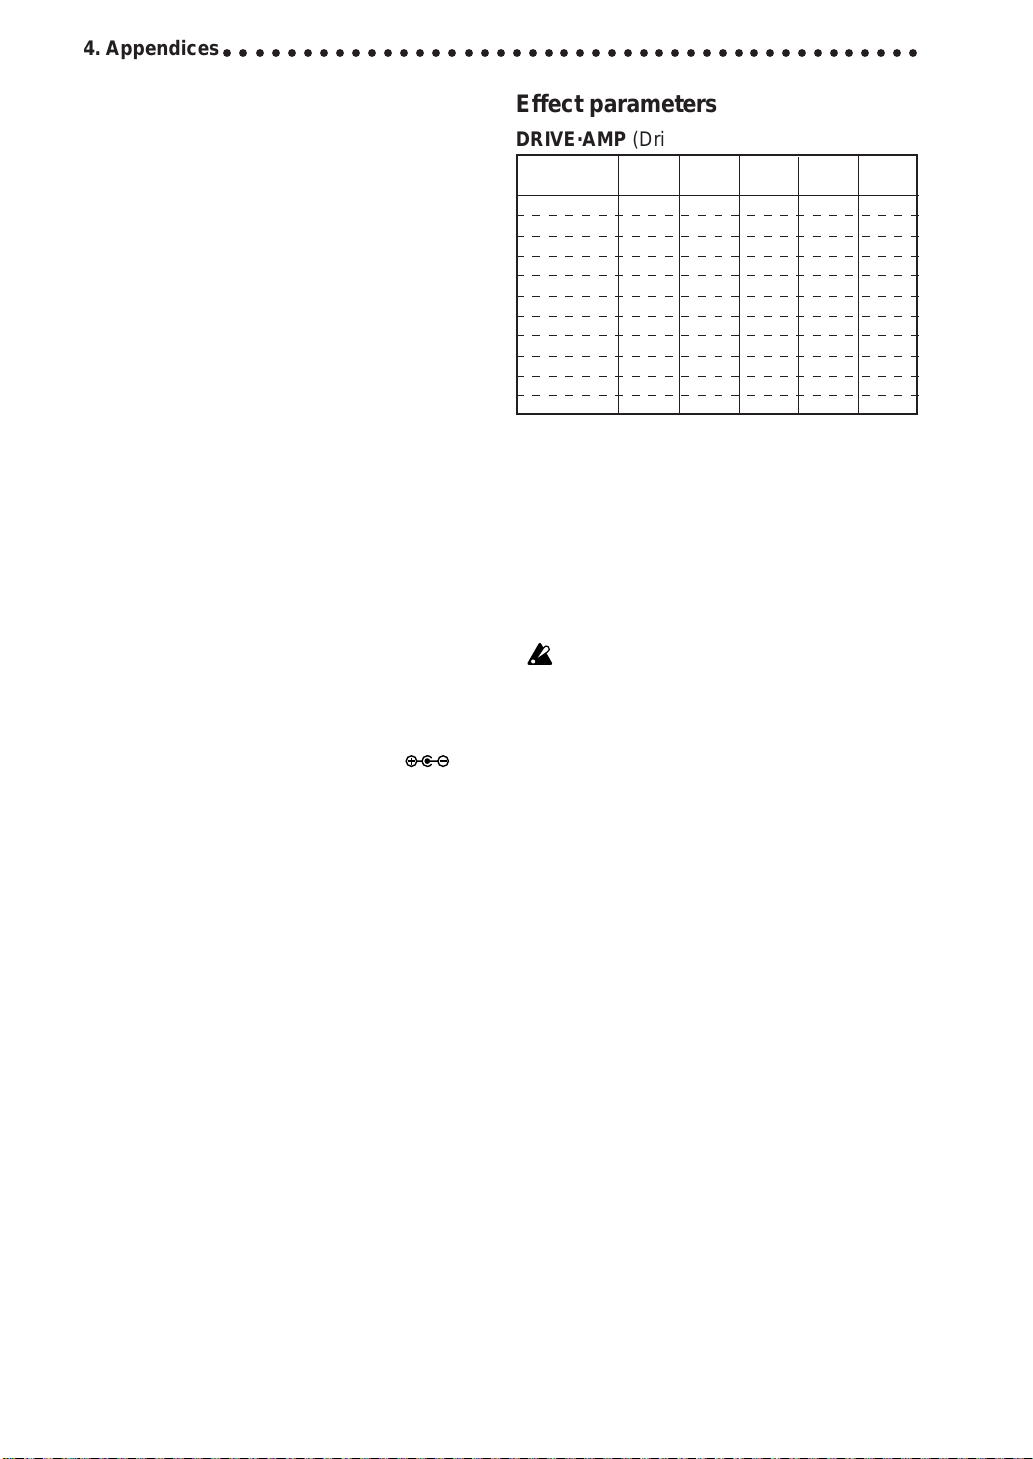
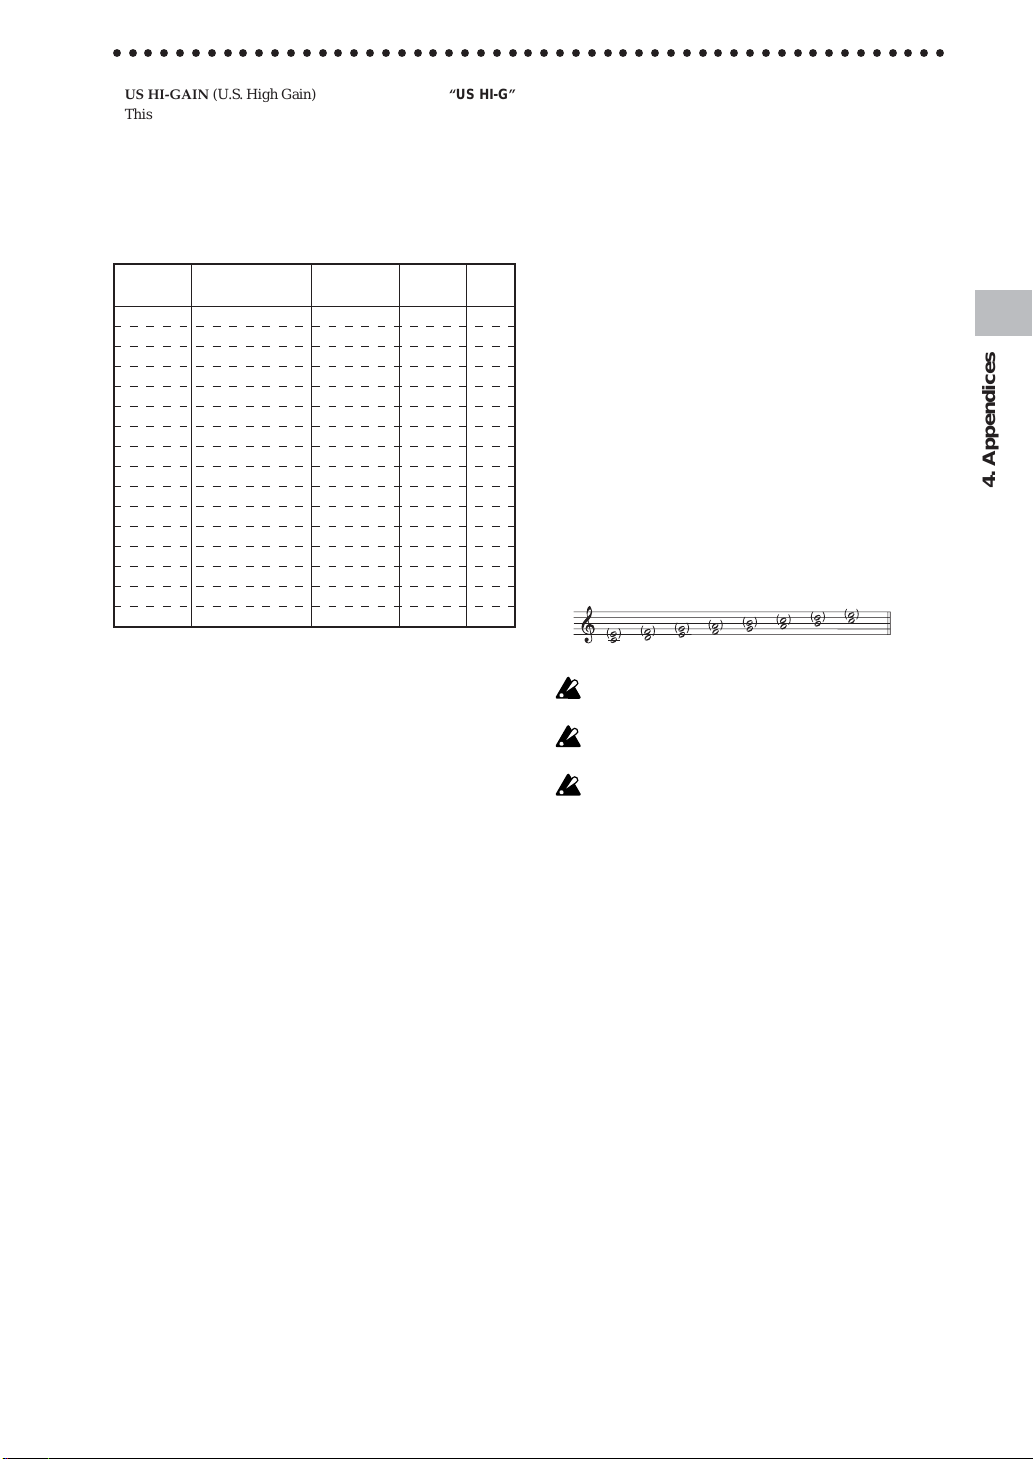
DRIVE·AMP (Drive Amp effects)
TYPE GAIN TREBLE MIDDLE BASS LEVEL
OFF — ————
ACOUSTIC 0...10.0 0...10.0 0...10.0 0...10.0 0...10.0
CLASSIC COMP 0...10.0 0...10.0 0...10.0 0...10.0 0...10.0
TUBE OD 0...10.0 0...10.0 0...10.0 0...10.0 0...10.0
CLASSIC DIST 0...10.0 0...10.0 0...10.0 0...10.0 0...10.0
FAT DIST 0...10.0 0...10.0 0...10.0 0...10.0 0...10.0
METAL DIST 0...10.0 0...10.0 0...10.0 0...10.0 0...10.0
BIG FUZZ 0...10.0 0...10.0 0...10.0 0...10.0 0...10.0
TOP BOOST 0...10.0 0...10.0 0...10.0 0...10.0 0...10.0
US HI-GAIN 0...10.0 0...10.0 0...10.0 0...10.0 0...10.0
BRIT STACK 0...10.0 0...10.0 0...10.0 0...10.0 0...10.0
These Drive Amp models combine sound processing effects such
as compressor , overdrive, or distortion with a three-band equalizer to adjust the tone. The following parameters are assigned to
each knob.
Type knob Select the type of drive or amp
Knob 1 GAIN Adjusts the amount of distortion.
Knob 2 TREBLE
Knob 3 MIDDLE
Knob 4 BASS
Knob 5 LEVEL Adjusts the output level.
If the sound distorts, slightly decrease the LEVEL, TREBLE,
MIDDLE, and BASS.
OFF (off) “DRV OFF”
Turn off the Drive Amp effect.
)
ACOUSTIC (Acoustic) “ACOUSTC”
This effect model transforms the sound of an electric guitar into
the sound of an acoustic guitar. A more realistic acoustic guitar
simulation will be obtained if you use the pickup closest to the
neck. A compressor with adjustable sensitivity (GAIN) is built-in.
CLASSIC COMP (Classic compressor) “
A compressor is an effect that boosts low-level sounds and turns
down louder levels in order to compress differences in volume
and make the sound more consistent. This model will make your
picking more even, and will produce smooth sustain.
TUBE OD (Tube overdrive) “TUBE OD”
It simulates the overdriven sound of a popular tube overdrive
pedal from the 70’s that responds well to the nuances of your
picking.
CLASSIC DIST (Classic distortion) “
This model simulates a popular distortion pedal from the 70’s.
FAT DIST (fat sounding distortion) “FAT DST”
This model simulates a popular fat sounding distortion pedal
from the 80’s.
METAL DIST (metallic distortion) “METAL”
This model simulates the metallic distortion of the 90’s.
BIG FUZZ (Big fuzz) “BIGFUZZ”
This model simulates a popular vintage fuzz unit.
TOP BOOST (Top boost) “T-BOOST”
This model simulates the sound of an AC30 overdriven by a
popular 80’s OD pedal.
Knob 1 Knob 2 Knob 3 Knob 4 Knob 5
Adjusts the treble (high-frequency range).
Adjusts the mid (mid-frequency range).
Adjusts the bass (low-frequency range).
CL COMP
CL DIST
”
”
12
Page 13
○ ○○○○○○○○○○○○○○○○○○○○○○○○○○○○○○○○○○○○○○○○○○○○○○○○○○○○
US HI-GAIN (U.S. High Gain) “US HI-G”
This model simulates the distortion typical of a high-gain amp
made in the USA.
BRIT STACK (British amp stack) “
BRITSTK
This model simulates the distortion typical of a British amp stack.
MOD (Modulation effects)
Knob 1 Knob 2 Knob 3 Knob 4 Knob 5
TYPE SPEED/PITCH DEPTH/FINE
CHORUS 0.1...10 [Hz] 0...10.0 0...10.0 0...10.0
FLANGER 0.1...10 [Hz] 0...10.0 -15...15 0...10.0
PHASER 0.1...10 [Hz] 0...10.0 0...10.0 —
TREMOLO 1...10 [Hz] 0...10.0 — —
PAN 1...10 [Hz] 0...10.0 — —
WAH UP —0...10.0 — —
WAH DWN —0...10.0 — —
PITCH -24...24 [x100CENT] -50...50 [CENT] — 0...10.0
MAJ3UP ——C...B 0...10.0
MAJ3DWN ——C...B 0...10.0
MIN3UP ——C...B 0...10.0
MIN3DWN ——C...B 0...10.0
4TH ——C...B 0...10.0
5TH ——C...B 0...10.0
MAJ6TH ——C...B 0...10.0
SLOWATK 0...10.0 0...10.0 — —
Chorus and flanger are effects that delay the sound slightly to
modulate the pitch, and combine the modulated sound with the
original to produce a sensation of modulated spaciousness. The
following parameters are assigned to each knob.
Knob 1 TYPE Select the effect type
Knob 2 SPEED/PITCH Adjusts the speed/
Adjusts the pitch
Knob 3 DEPTH/FINE Adjusts the depth/
Adjusts the fine pitch
Knob 4 FEEDBACK Adjust the strength of the tonal
character.
Knob 5 MIX Adjust the mix balance between
the effect sound and the original
sound
CHORUS (Chorus)
This chorus effect creates a sense of modulation, spaciousness,
and vibrato by slightly delaying the sound, modulating its pitch,
and combining it with the original sound. This is most effective
when used in stereo.
FLANGER (Flanger)
This is a vintage flanger that produces modulation and a sense
of pitch movement.
PHASER (Phaser)
This effect cyclically modifies the phase shift of the sound, and
mixes the phase-shifted sound with the original sound to produce modulation.
TREMOLO (Tremolo)
This effect adds depth to the sound by modulating the volume.
PAN (Panpot)
This effect cyclically changes the pan of sound, when stereo playback is used.
FEEDBACK
MIX
WAH UP (Auto-wah filter up)
This is an auto-wah filter that automatically opens or closes according to how hard you pick the strings.
”
WAH DWN (Auto-wah filter down)
Auto wah in opposite direction from WAH UP
PITCH (Pitch)
This is a pitch shifter that can change the pitch in a +/-2 octave
range.
Intelligent Pitch Shifter
MAJ3UP (3rd up in a major key)
MAJ3DWN (3rd down in a major key)
MIN3UP (3rd up in a minor key)
MIN3DWN (3rd down in a minor key)
4TH (4th up in a major key)
5TH (5th up in a major key)
MAJ6TH (6th up in a major key)
The Intelligent Pitch Shifter creates musically useful harmonies
by varying the amount of pitch shift according to the note you
play and the key in which you are playing. For example if you
select a pitch shift of a 3rd upward in a major key (MAJ3UP), the
amount of pitch shift will vary automatically between three
semitones (a minor third) and four semitones (a major third).
• When MAJ3UP is used with a key setting of C
The pitch created by the intelligent pitch shifter is shown in parentheses ( ).
If your instrument is not tuned correctly, the results may not be
as you expect. In this case, re-tune your instrument.
The intelligent pitch shifter will function when you play individual notes. It cannot produce the effect for chords.
This effect cannot be used simultaneously with a Pedal effect (except for VOLUME) or with the ROOM1—ARENA Ambience
effects. If you use the Intelligent Pitch Shifter in a program in
which the Pedal effect or a ROOM1—ARENA Ambience effect
is turned on, the pedal or ROOM1—ARENA Ambience effect
will be turned off automatically.
SLOWATK (Slow Attack)
This effect gradually raises the volume each time you pick your
guitar. Value knob 2 controls the speed of the attack, and value
knob 3 controls the threshold level. As you raise the threshold
level, you will need to pick more harder to produce the slow
attack effect.
4. Appendices
13
Page 14
4. Appendices
○○○○○○○○○○○○○○○○○○○○○○○○○○○○○○○○○○○○○○○○○○○○
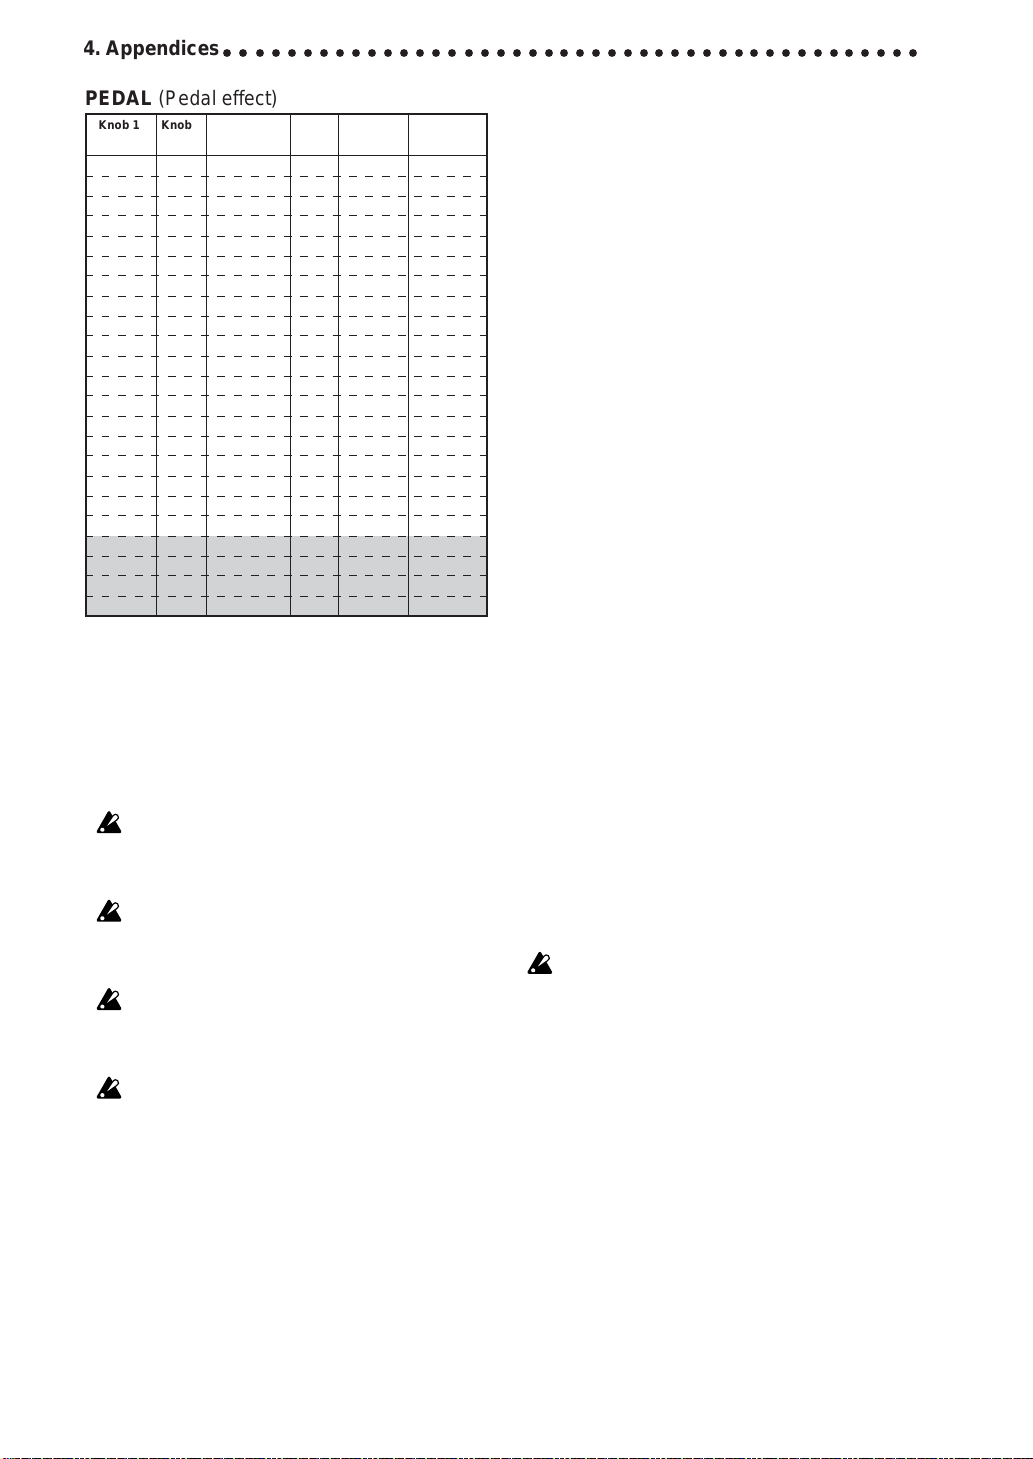
PEDAL (Pedal effect)
Knob 1 Knob 2Knob 3 Knob 4Knob 5 Pedal
TYPE DEPTH/PITCH
VOLUME —0...10.0 Volume
CHO1 0...10.0 —
CHO2 0...10.0 — Speed
VIBRATE 0...10.0 — Speed
FLANGER 0...10.0 — Modulation
PHASER 0...10.0 — Speed
TREMOLO 0...10.0 — Speed
PAN 0...10.0 — Speed
WAH ——Peak Fre.
FILTER 0...10.0 — Peak Fre.
RING 0...10.0 — Pitch
PITCH -24...24 [
F BACK1 0...10.0 — Level+Reverb
F BACK2 0...10.0 — Level+Reverb
DELAY 10[ms]...2[
ECHO 10[ms]...2[
ROOM —0...10.0 Reverb level
GARAGE —0...10.0 Reverb level
HALL —0...10.0 Reverb level
SAMPLE1 S/L — Playback
SAMPLE2 S/L — Play/reverse
LOOP1 S/L — Volume
LOOP2 S/L — Loop time
CENT
SEC
SEC
These effect models let you use the expression pedal to control the
effect in realtime. The following parameters are assigned to each
knob.
Knob 1 TYPE Select the effect type
Knob 3
DEPTH/PITCH
Adjusts the depth/Adjusts the pitch
Knob 5 MIX/LEVEL Adjusts the mix balance between the
effect sound and original sound/
Adjusts the level
CHO1—PITCH cannot be used simultaneously with the Modulation effect. If you use this effect in a program where the Modulation effect is turned on, the Modulation effect will automatically be turned off.
F BACK 1 and 2 cannot be used simultaneously with the
ROOM1—ARENA Ambience effects. If you use these effects in
a program where ROOM1—ARENA are turned on, the
ROOM1—ARENA effect will be turned off automatically.
DELAY—HALL cannot be used simultaneously with the Ambi-
ence effect. If you use this effect in a program where the Ambience effect is turned on, the Ambience effect will automatically
be turned off.
SAMPLE1—LOOP2 cannot be used simultaneously with a
Modulation effect or Ambience effect. If you use the SAMPLE1—
LOOP2 effects in a program where a Modulation effect or Ambience effect are turned on, that effect will be turned off automatically.
VOLUME (Volume)
This is a volume pedal. Value knob 5 sets the minimum level.
CHO1 (Chorus1)
This is a chorus effect in which the pedal controls the depth of
the pitch modulation.
CHO2 (Chorus2)
This is a chorus effect in which the pedal controls the speed of
the pitch modulation.
MIX/LEVEL
Depth
]0...10.0 Pitch
]0...10.0 Effect level
]0...10.0 Delay time
VIBRATO (Vibrato)
This is a vibrato effect in which the pedal controls the speed of
the pitch modulation.
FLANGER (Flanger)
This is a flanger in which the pedal controls the bandwidth
(modulation) of the effect.
PHASER (Phaser)
This is a phaser in which the pedal controls the speed of the phase
modulation.
TREMOLO (Tremolo)
This is a tremolo effect in which the pedal controls the speed of
the volume change.
PAN (Panpot)
This is a pan effect in which the pedal controls the speed at which
the position of the sound will change when stereo playback is
used.
WAH (Wah)
This is a wah in which the pedal controls the peak frequency.
FILTER (Resonance Filter)
This is a resonance filter in which the pedal controls the peak
frequency of the filter.
RING (Ring Modulator)
This effect creates a bell-like sound in which the pedal controls
the pitch. To obtain the cleanest effect, use the pickup closes to
the neck, turn down the tone of your guitar, and play near the
12th fret.
PITCH (pitch shifter)
The pedal will control the amount of pitch shift. When value
knob 5 is at "0" only the original sound will be heard. At "5" the
original sound and effect sound will be mixed equally, and at
"10" only the effect sound will be heard.
Feed Back
In this effect, the pedal controls the vibrato that is applied to the
feedback sound.
While sustaining a note on your guitar, advance the pedal to produce a feedback sound. The feedback sound will disappear when
you return the pedal. Value knob 3 adjusts the speed of the vibrato.
There will be no feedback effect if OFF, ACOUSTIC, or CLASSIC COMP is selected for the Drive Amp effect.
F BACK1 (Feed Back1)
A feedback sound will be generated to the pitch of your playing.
F BACK2 (Feed Back2)
A feedback sound will be generated one octave above your
playing.
DELAY (Delay)
In this effect, you can use the pedal to control the input level of
the delay.
By pressing the TAP switch two times, you can set the TIME of
knob 2 to the corresponding tempo.
ECHO (Echo)
This is a echo in which the pedal controls the delay time. As on a
tape echo unit, changing the delay time will also change the pitch.
Value knob 3 adjusts the maximum delay time.
14
Page 15
○ ○○○○○○○○○○○○○○○○○○○○○○○○○○○○○○○○○○○○○○○○○○○○○○○○○○○○
ROOM (Room Reverb)
This simulates the reverberation of a small room the size of a
studio. The pedal will control the reverb level.
GARAGE (Garage Reverb)
This simulates the reverberation of a mid-size room such as a
garage. The pedal will control the reverb level.
HALL (Hall Reverb)
This simulates the reverberation of a mid-size to large hall. The
pedal will control the reverb level.
Sample and play
The SAMPLE1 to LOOP2 effects allow you to record a phrase
up to 6 seconds, and then use the pedal to play it back.
The recorded phrase will be erased when you change the effect
type or program, when you use the Phrase Trainer, or when you
turn the power off.
The recorded phrase will be erased when you change the effect
type or program, when you use the Phrase Trainer, or when you
turn the power off.
SAMPLE1 (Sample1)
The recorded phrase will playback when you press the pedal.
SAMPLE2 (Sample2)
The recorded phrase will playback when you press the pedal,
and will playback in reverse when you return the pedal.
Procedure for Sample 1 and 2
1. Select SAMPLE 1 or SAMPLE 2 for the Pedal effect, or choose
a program that uses these effects.
2. Use value knob 3 to select the recording time (S is three seconds of high-quality recording, L is six seconds of extended
recording).
3. Advance the expression pedal all the way until the pedal indicator blinks, to enter record-ready mode.
4. Begin playing a phrase. Recording will begin automatically
when you start playing your guitar, and the pedal indicator
will change from blinking to lit.
5. Recording will end when the recording time has elapsed. It
is not possible to stop recording before this time. If you wish
to re-do the recording, repeat the procedure fr om "3. Advance
the expression pedal... ."
6. Operate the expression pedal.
LOOP1 (Loop1)
As soon as you record a phrase, it will be played back as a loop
(repeatedly). When you return the pedal (to minimum volume),
the phrase will return to the beginning. When you advance the
pedal, loop (repeated) playback will occur again. Use the pedal
to adjust the playback volume.
LOOP2 (Loop2)
The pedal will control the length of the loop. The loop will become shorter as you return the pedal, and at the minimum length
the loop will not playback at all.
Procedure for Loop 1 and 2
1. Select LOOP 1 or LOOP 2 for the Pedal effect, or choose a
program that uses these effects.
2. Use value knob 3 to select the maximum recording time. (S
is 3 seconds of high quality, L is 6 seconds of extended recording.)
3. Advance the expression pedal all the way until the pedal indicator blinks, to enter record-ready mode.
4. Begin playing a phrase. Recording will begin automatically
when you start playing your guitar, and the pedal indicator
will change from blinking to lit.
5. Recording will end when you record up to the maximum time,
or when you once again advance the pedal all the way. When
recording ends, the pedal indicator will go dark, and the recorded sound will be played back as a loop. If you wish to redo the recording, repeat from step "3. Advance the expr ession
pedal ..."
6. Operate the expression pedal.
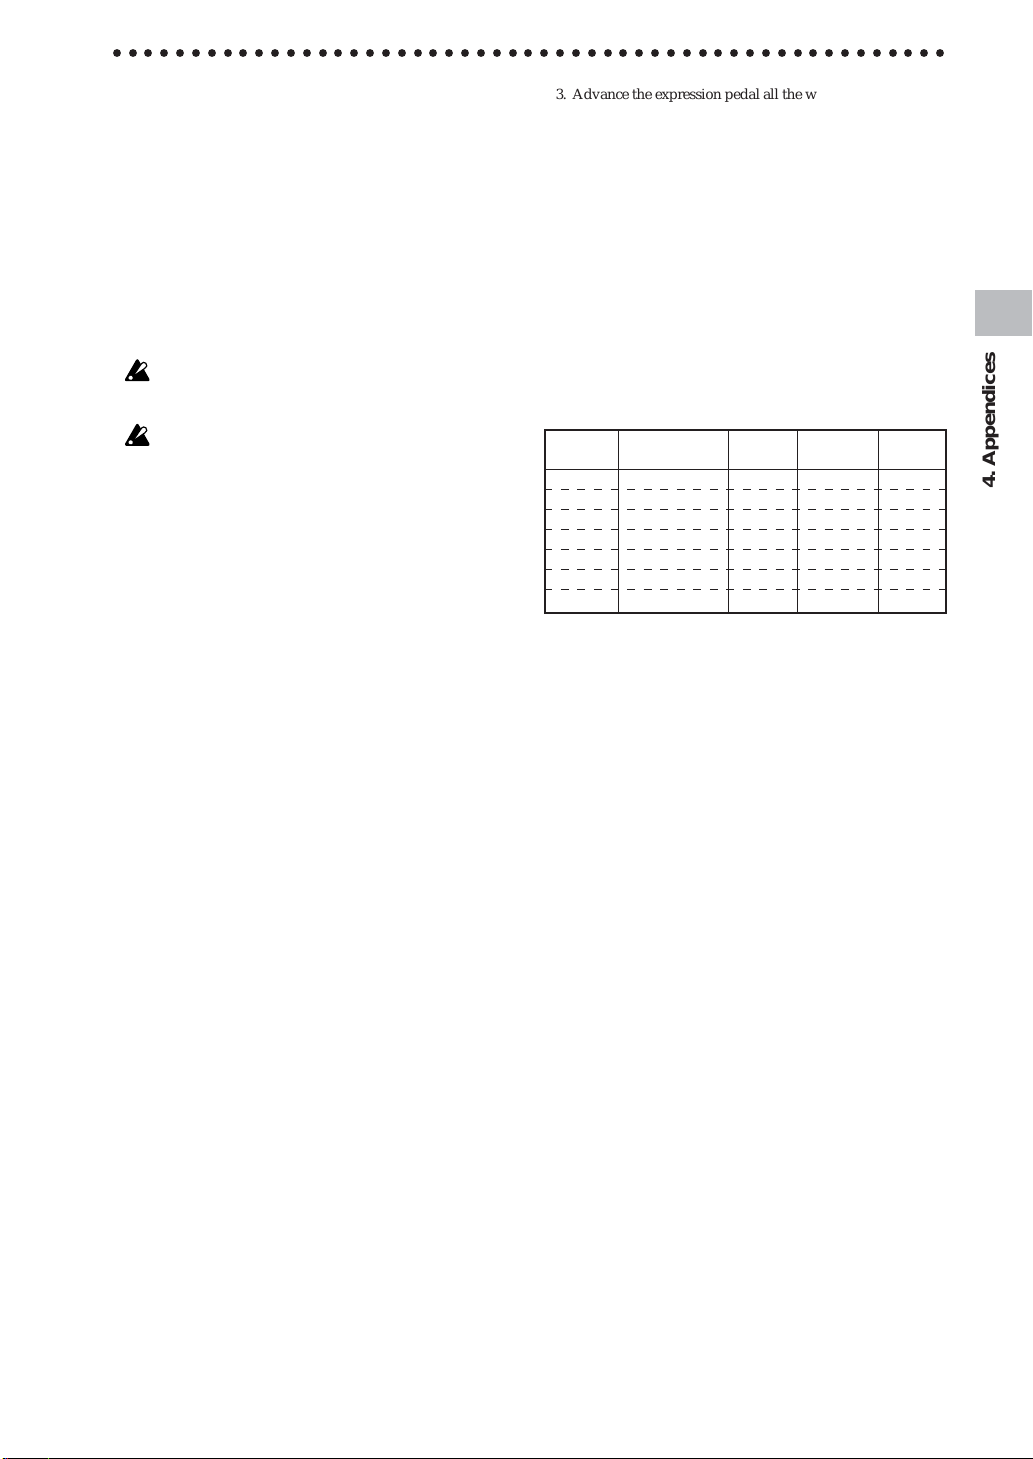
AMB (Ambience effect)
Knob 1 Knob 2 Knob 3 Knob 4 Knob 5
TYPE TIME TONE FEEDBACK MIX
DELAY 10 [ms]...2 [SEC] 0...10.0 0...10.0 0...10.0
ROOM1 ———0...10.0
ROOM2 ———0...10.0
GARAGE1 ———0...10.0
GARAGE2 ———0...10.0
HALL ———0...10.0
ARENA ———0...10.0
These are reverberation-type effect models such as delay, reverb,
and echo. The following parameters are assigned to each knob.
Knob 1 TYPE Selects the effect type
Knob 2 TIME Adjusts the delay time
Knob 3 TONE Adjusts the tonal quality
Knob 4 FEEDBACK Adjusts the delay repeats
Knob 5 MIX Adjusts the mix amount
DELAY (Delay)
This adds spaciousness to the sound by using a stereo delay with
a time difference between left and right.
By pressing the TAP switch two times, you can set the TIME of
knob 2 to the corresponding tempo.
ROOM1 (Room 1)
Deep room type reverb
ROOM2 (Room 2)
Bright room type reverb
GARAGE1 (Garage 1)
Garage-type reverb1
GARAGE2 (Garage 2)
Garage-type reverb2
HALL (Hall)
Hall type reverb
ARENA (Arena)
Arena-type reverb
4. Appendices
15
Page 16
4. Appendices
○○○○○○○○○○○○○○○○○○○○○○○○○○○○○○○○○○○○○○○○○○○○
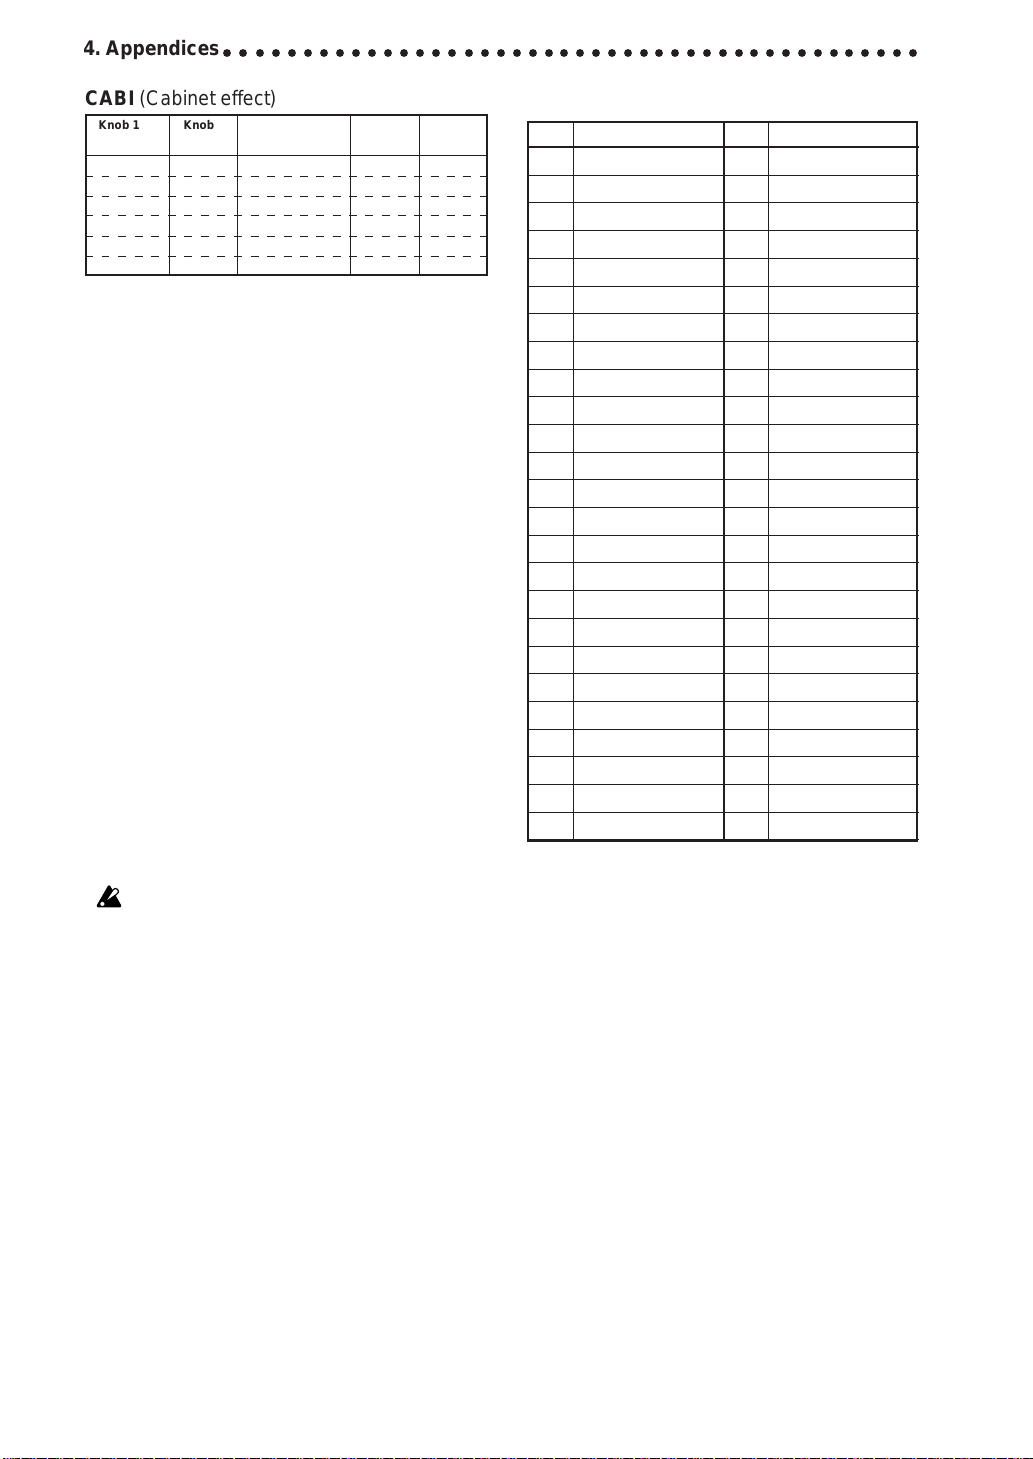
CABI (Cabinet effect)
Knob 1 Knob 2 Knob 3 Knob 4 Knob 5
TYPE DEPTH
××
1
×8 0...10.0
××
××
1
×10 0...10.0
××
××
1
×12 0...10.0
××
××
2
×12 0...10.0
××
××
4
×10 0...10.0
××
××
4
×12 0...10.0
××
The cabinet resonator simulates the acoustical characteristics of
a guitar amplifier cabinet. Although these models are especially
effective when you are plugged in to a mixer etc. via a direct line
connection, they are also effective when you are using a guitar
amp. The following parameters are assigned to each knob.
Knob 1 TYPE Select the cabinet type
Knob 3 DEPTH Adjusts depth
××
1
×8
××
Simulation of a cabinet with a single 8-inch speaker
××
1
×10
××
Simulation of a cabinet with a single 10-inch speaker
××
1
×12
××
Simulation of a cabinet with a single 12-inch speaker
××
2
×12
××
Simulation of a cabinet with two 12-inch speakers
××
4
×10
××
Simulation of a cabinet with four 10-inch speakers
××
4
×12
××
Simulation of a cabinet with four 12-inch speakers
NR LEV
(Noise Reduction, Program Level)
Adjust the depth of noise reduction and the level for each program.
Use value knobs 1 and 2 to modify the program name (see p.10),
and use value knob 3 to turn the modulation and/or ambience
effects on/off (see p.7).
NR (Noise Reduction) “NR”
This is adjusted by value knob 4. Depending on the guitar that
you use, excessively high noise reduction settings may cause the
sound to be interrupted. Set this accordingly.
PROGRAM LEVEL “PROGLEV”
This is adjusted by value knob 5. The volume of each program
will change depending on your guitar. Adjust the pr ogram level
as accordingly.
Rhythm Pattern List
No. Name No. Name
1 8BEAT1 26 DISCO
2 8BEAT2 27 EURO
3 8BEAT3 28 FUNK
4 8BEAT4 29 JAZZ1
5 8BEAT5 30 JAZZ2
6 8BEAT6 31 MOTOWN
78SHFL 32 REGGAE 1
8 16BEAT1 33 REGGAE 2
9 16BEAT2 34 SURF
10 16BEAT3 35 COUNTRY
11 16BEAT4 36 BOSSA
12 16BEAT5 37 SAMBA
13 16SHFL1 38 PRACT0
14 16SHFL2 39 PRACT1
15 16SHFL3 40 PRACT2
16 16SHFL4 41 PRACT3
17 3/4 42 PRACT4
18 6/4 43 PRACT5
19 6/8 44 PRACT6
20 BALAD 45 PRACT7
21 BLUES 46 PRACT8
22 ROCK 47 PRACT9
23 THRASH 48 METRO1
24 DANCE1 49 METRO2
25 DANCE2 50 METRO3
16
Page 17
○ ○○○○○○○○○○○○○○○○○○○○○○○○○○○○○○○○○○○○○○○○○○○○○○○○○○○○
Preset Program Parameter List
When an effect that was off is turned on, the effect model printed in a slanted typeface will be selected.
With the factory settings, the user programs have the same contents as the preset programs.
BANK # PROGRAM DRIVE·AMP A DRIVE·AMP B MOD PEDAL AMB CABI
01STATIC US HI-G METAL
2 FILTER ACOUSTIC FAT DST CHORUS VOLUME GARAGE2
3 KIDROCK US HI-G BRITSTK
4 FREAK TUBE OD T-BOOST CHORUS VOLUME DELAY 1X8
11RAGE BRITSTK BRITSTK
2 TRASH US HI-G ACOUSTIC
3 NIN CL DIST METAL
4 HOSTILE METAL METAL
21PRIEST BRITSTK BRITSTK
2 2112 CL COMP CL DIST PHASER VOLUME
3R R CL DIST CL DIST PITCH GARAGE
4SATCH BRITSTK BRITSTK
31J P TUBE OD BRITSTK
2 CARLOS US HI-G US HI-G WAH UP VOLUME
3 DA'FUZZ BIGFUZZ BIGFUZZ
4 RINGMAN FAT DST T-BOOST
41JAZZ OFF BRITSTK CHORUS VOLUME DELAY
2 FUNKY CL COMP FAT DST WAH UP VOLUME HALL
3 SURF CL COMP T-BOOST
4 FUSION TUBE OD BRITSTK CHORUS VOLUME
51ROCK FAT DST BRITSTK
2 BLUES TUBE OD TUBE OD
3 VINTAGE T-BOOST TUBE OD
4F BACK FAT DST FAT DST
61A MINOR CL COMP US HI-G MIN3UP VOLUME DELAY
2A MAJOR BRITSTK BRITSTK MAJ3DWN VOLUME
3 LOOP CL COMP US HI-G
4 SAMPLE US HI-G METAL
71CHORUS OFF CL COMP
2 FLANGER CL COMP FAT DST FLANGER VOLUME DELAY
3 PHASER OFF BRITSTK
4 VIBRATO TUBE OD CL DIST
81ECHO ACOUSTIC TUBE OD CHORUS ECHO
2 BENDER US HI-G ACOUSTIC
3 SLOWATK FAT DST CL COMP SLOWATK VOLUME ARENA
4 VIOLIN T-BOOST CL COMP SLOWATK DELAY
91ACOU LN ACOUSTIC ACOUSTIC CHORUS VOLUME ROOM1 1X10
2 COMP LN CL COMP CL COMP FLANGER VOLUME
3 OVDR LN T-BOOST T-BOOST
4 DIST LN BRITSTK US HI-G
PHASE
FLANGER
FLANGER PITCH ROOM2
CHORUS
PHASER
FLANGER
CHORUS
CHORUS
CHORUS
PHASER
CHORUS
CHORUS
PHASER
CHORUS
TREMOLO
CHORUS
CHORUS
CHORUS
CHORUS
PHASER
TREMOLO
CHORUS
FLANGER
CHORUS
VOLUME ROOM2
VOLUME GARAGE2
VOLUME ARENA 2X12
VOLUME
DELAY
WAH HALL
VOLUME ROOM1
HALL 2X12
GARAGE1 4X12
WAH DELAY
ECHO
GARAGE1 4X12
DELAY 2X12
FILTER DELAY
RING
HALL 4X12
TREMOLO GARAGE1 1X8
GARAGE2 2X12
VOLUME ARENA
VOLUME ROOM1
VOLUME GARAGE2
F BACK2 DELAY
DELAY 4X12
LOOP1
SAMPLE2
DELAY 2X12
DELAY 4X12
CHO2 HALL 4X10
PHASER DELAY
VIBRATO GARAGE1
ROOM1 2X12
PITCH DELAY
GARAGE1 4X10
ROOM1
VOLUME ROOM2 4X10
F BACK2
DELAY
4X12
4X12
4X10
4X12
1X8
4X12
4X12
4X10
1X8
2X12
4X12
4X10
2X12
4X12
4X12
4X12
4X12
4X10
1X12
4X10
2X12
2X12
4X12
4. Appendices
17
Page 18
Précautions
Emplacement
L'utilisation de cet instrument dans les endroits suivants
peut en entraîner le mauvais fonctionnement.
• En plein soleil
• Endroits très chauds ou très humides
• Endroits sales ou fort poussiéreux
• Endroits soumis à de fortes vibrations
• A proximité de champs magnétiques
Alimentation
Branchez l'adaptateur secteur fourni à une prise secteur
de tension appropriée. Evitez de brancher l'adaptateur à
une prise de courant dont la tension ne correspond pas à
celle pour laquelle l'appareil est conçu.
Interférences avec d'autres appareils électriques
Les postes de radio et de télévision situés à proximité
peuvent par conséquent souffrir d'interférences à la ré-
ception. Veuillez dès lors faire fonctionner cet appareil à
une distance raisonnable de postes de radio et de télévi-
sion.
Marque CE pour les normes européennes
harmonisées
La marque CE apposée sur tous les produits de notre
firme fonctionnant sur secteur jusqu'au 31 décembre
1996 signifie que ces appareils répondent à la Directive
EMC (89/336/EEC) et à la Directive concernant la
marque CE (93/68/EEC).
La marque CE apposée après le 1 janvier 1997 signifie
que ces appareils sont conformes à la Directive EMC
(89/336/EEC), à la Directive concernant la marque CE
(93/68/EEC) ainsi qu'à la Directive Basse Tension (73/
23/EEC).
La marque CE apposée sur tous les produits de notre
firme fonctionnant sur piles signifie que ces appareils
répondent à la Directive EMC (89/336/EEC) et à la Di-
rective concernant la marque CE (93/68/EEC).
Maniement
Pour éviter de les endommager, manipulez les comman-
des et les boutons de cet instrument avec soin.
Entretien
Lorsque l'instrument se salit, nettoyez-le avec un chif-
fon propre et sec. Ne vous servez pas d'agents de net-
toyage liquides tels que du benzène ou du diluant, voire
des produits inflammables.
Conservez ce manuel
Après avoir lu ce manuel, veuillez le conserver soigneu-
sement pour toute référence ultérieure.
Evitez toute intrusion d'objets ou de liquide
Ne placez jamais de récipient contenant du liquide près
de l'instrument. Si le liquide se renverse ou coule, il ris-
que de provoquer des dommages, un court-circuit ou une
électrocution.
Veillez à ne pas laisser tomber des objets métalliques dans
le boîtier (trombones, par ex.). Si cela se produit, débran-
chez l'alimentation de la prise de courant et contactez
votre revendeur korg le plus proche ou la surface où vous
avez acheté l'instrument.
Conventions d’impression utilisées dans le
présent manuel
Indique une précaution à prendre
Les pages d’écran LCD reproduites dans le présent manuel
servent uniquement à des fins illustratives et peuvent ne pas
toujours correspondre aux affichages réels qui apparaissent sur
l’AX100G.
18
Page 19
○○○○○○○○○○○○○○○○○○○○○○○○○○○○○○○○○○○○○○○○○○○○○○○○○○○○○
Table des matières
1. Introduction------------------------------ 19
Caractéristiques principales ---------------------- 19
Panneaux avant et arrière ------------------------ 20
Panneau avant --------------------------------------20
Panneau arrière ------------------------------------20
Les différents modes de l’AX100G ------------- 21
Mise en place des piles---------------------------- 21
2. Jeu de l’AX100G----------------------- 21
Exemples de raccordements --------------------- 21
Mettre l’appareil sous tension -------------------- 21
Mode de jeu Program ------------------------------ 22
Régler le sélecteur de niveau d’entrée ------- 22
Régler le volume généra ------------------------ 22
Choisir un programme ----------------------------22
Vérifier les effets d’un programme -------------22
Contournement (Bypass)
et étouffement (Mute)----------------22
Accordeur automatique--------------------------- 22
Jeu d’un motif rythmique (RHYTHM) ---------23
AUX IN------------------------------------------------23
Pédale d’expression------------------------------- 23
Mode Effect Select---------------------------------- 23
Activer le mode Effect Select-------------------- 23
Quitter le mode Effect Select--------------------23
Mode de pratique des phrases Phrase Trainer
-24
3. Edition ------------------------------------- 25
Edition des effets ------------------------------------ 25
Fonction d’édition rapide
pour l’effet Drive Amp ---------------25
Exemple d’édition de l’effet Drive Amp -------25
Editer d’autres effets ------------------------------26
Changer le nom de programme ----------------26
Sauvegarde d’un programme -------------------- 26
4. Appendices ------------------------------ 27
Réglage de la pédale d’expression
(Calibrage) ------------ 27
Réinitialisation des programmes
utilisateurs à leurs valeurs d’usine
(Rechargement) ----- 27
Guide de dépannage ------------------------------- 27
Principales spécifications techniques ---------- 28
Paramètres des effets------------------------------ 28
DRIVE·AMP (effets de saturation Drive Amp) MOD (effets de modulation) ---------------------29
PEDAL (effet Pedal) -------------------------------30
AMB (effet Ambience) ----------------------------31
CABI (effect Cabinet) -----------------------------32
NR LEV(Noise Gate, niveau de programme) -
Liste des motifs rythmiques ---------------------- 32
Liste des paramètres des
programmes présélectionnés---------- 33
28
32
1. Introduction
Nous vous remercions d’avoir fait l’acquisition du processeur de signaux de modulation ToneWorks
AX100G. Pour lui assurer une longue vie, sans inci-
dents, nous vous recommandons de lire attentivement
le présent manuel et de toujours utiliser l’appareil correctement.
Veuillez conserver le présent manuel afin de pouvoir
le consulter ultérieurement.
Caractéristiques principales
• La technologie de modelage de Korg fournit des sons
de modelage précis et puissants.
•Propose 63 types de variations d’effets et permet l’utilisation
simultanée de 7 effets et d’un motif rythmique.
• Quarante programmes présélectionnés (répartis au sein de 10
banques de 4 programmes) et quarante programmes utilisateur effaçables (également répartis au sein de 10 banques de 4
programmes) intégrés.
• Le mode Effect Select permet de changer le canal saturé de
l’effet Drive Amp ou d’activer/couper l’effet Modulation ou
Ambience avec les commutateurs au pied.
• Grâce au Virtual Feedbacker, maintenez une note et produisez un Larsen avec vibrato.
•Vous pouvez utiliser la pédale d’expression pour contrôler
vingt-trois types d’effets de pédale en temps réel.
• Le commutateur TAP permet de régler automatiquement le
temps de retard de l’effet Delay au tempo voulu.
•La fonction de pratique des phrases (Phrase Trainer) permet
d’enregistrer jusqu’à six secondes de son produit par un appareil audio et de reproduire la phrase plus lentement sans en
modifier la hauteur.
• La fonction d’échantillonnage et de jeu (Sample & Play) permet d’enregistrer une phrase jouée (pendant huit secondes
maximum) puis d’actionner la pédale pour reproduire la
phrase.
• Témoin PEDAL INDICATOR à 7 diodes dédié à la pédale d’expression.
•Propose 50 motifs rythmiques ainsi qu’une fonction métronome pour des séances d’entraînement plus productives.
• Borne AUX IN afin de pouvoir jouer sur un appareil audio
connecté.
• Accordeur automatique et chromatique pour accorder votre
instrument lorsque l’AX100G est contourné ou assourdi.
• Ecran à cristaux liquides (LCD) offrant une interface visuelle
intuitive.
• Rétroéclairage de l’écran pour une meilleure visibilité même
dans les endroits plus sombres.
• Fonction d’assourdissement de l’accordeur incorporée permettant d’accorder les instruments sur scène.
Qu’est-ce que la technologie ?
Le système (de l’anglais Resonant Structure and Electronic circuit
Modeling System) constitue une technique de modelage du son déposée
par Korg qui reproduit avec précision le caractère complexe et la nature
tant des instruments acoustiques qu’électriques ainsi que des circuits électroniques dans des environnements réels. Le émule une vaste
gamme des caractéristiques de génération des sons y compris des corps
d’instruments, des haut-parleurs et des enceintes des champs acoustiques, des microphones, des tubes à vide, des transistors, etc.
1. Introduction
19
Page 20
1. Introduction
○○○○○○○○○○○○○○○○○○○○○○○○○○○○○○○○○○○○○○○○○○○
Panneaux avant et arrière
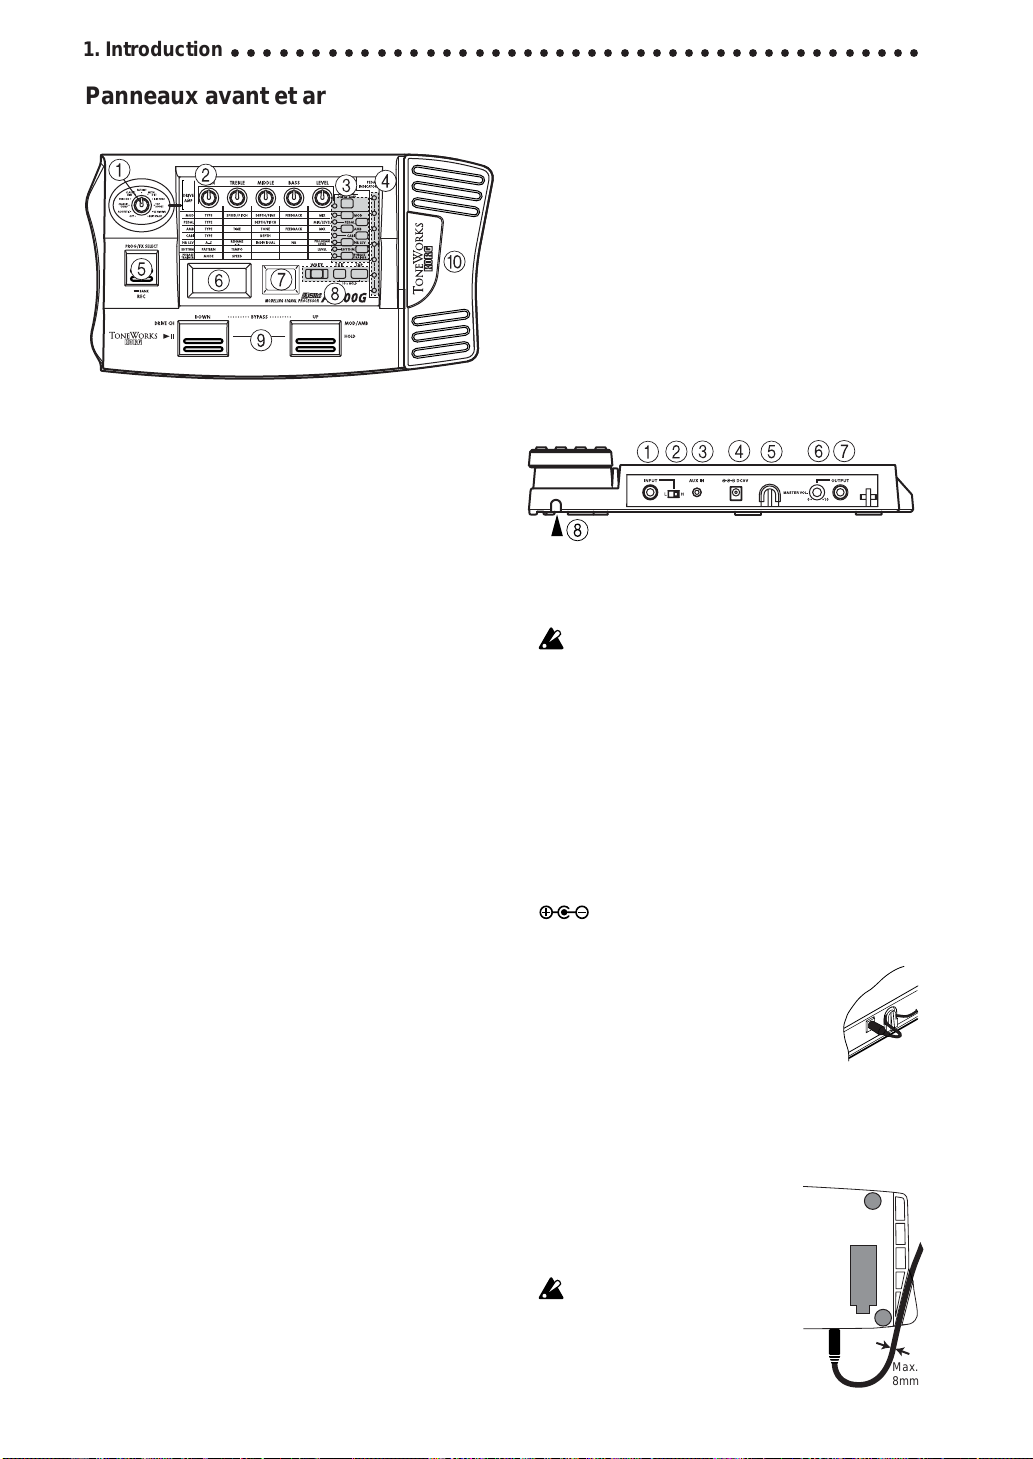
Panneau avant
1 Bouton Type
Cette bouton sert à choisir le type d’effet Drive Amp.
2 Boutons de valeur 1—5
Pour chaque effet, ces boutons servent à régler la valeur des
paramètres qui leur sont assignés. Par facilité, chacune de ces
boutons est désignée par un numéro dans ce mode d’emploi (a
savoir les boutons 1—5 de gauche à droite).
Quand le mode d’édition d’effet est désactivé, ces boutons servent à régler les paramètres de l’effet Drive Amp utilisé par le
programme choisi. (Voyez “Fonction d’édition rapide pour l’effet Drive Amp” p. 25.)
3 Select switches
Chaque fois que vous appuyez sur le commutateur DRIVE·AMP,
l’effet Drive Amp alterne entre les réglages des canaux A et B et
le mode d’édition est activé. Si le canal A est sélectionné, la diode
de le commutateur DRIVE·AMB clignote en vert, tandis que si
le canal B est choisi, cette diode clignote en rouge.
Chaque fois que vous appuyez sur les commutateurs MOD,
PEDAL, AMB et CABI, vous choisissez tour à tour le statut
activé/coupé/d’édition de l’effet correspondant. En mode
d’édition, la diode de le commutateur correspondante clignote;
quand l’effet est activé, cette diode est allumée et lorsqu’il est
désactivé, la diode est éteinte.
Chaque fois que vous appuyez sur le commutateur NR LEV,
vous passez du mode d’édition au mode activé. La diode de
cette touche s’allume quand l’effet est activé et clignote en mode
d’édition.
Les commutateurs RHYTHM et PHRASE TRAINER servent
à activer/couper en alternance la fonction correspondante.
Selon que la fonction est activée ou coupée, la diode de le commutateur correspondante est allumée ou éteinte.
4 Témoin PEDAL INDICATOR
Ce témoin à 7 diodes indique le statut de la pédale d’expression (son degré d’enfoncement). Pour la fonction accordeur,
les diodes indiquent la différence d’accord par rapport à la note
voulue. En mode Phrase Trainer, elles indiquent la durée d’enregistrement/de reproduction.
5 Touche PROG/FX SELECT
Permet de choisir en alternance le mode Program (PROG) et le
mode Effect Select (FX SELECT).
6 Ecran multi-fonction
Affiche des informations comme le nom des programmes, le
nom et la valeur des paramètres ainsi que des icônes d’édition.
7 Affichage numérique
Indique la banque de programme et le numéro de programme.
Quand la fonction accordeur est activée, il affiche le nom des
notes.
20
8 Touches WRITE, EXIT, TAP
Le commutateur WRITE sert à mémoriser un programme édité.
Le commutateur EXIT permet de retourner à tout moment au
mode Program. Pour l’effet Delay, vous pouvez définir le temps
de retard en appuyant sur le commutateur TAP au tempo du
morceau.
9 Commutateurs DOWN, UP
Utilisez ces commutateurs pour choisir les programmes, pour
contourner (Bypass) les effets, étouffer (Mute) le son et pour
changer de canal Drive Amp.
0 Pédale d’expression
La pédale d’expression sert à contrôler l’effet qui lui est assigné (c.-à-d. l’effet Pedal). Pour activer/couper l’effet Pedal,
enfoncez la pédale d’expression jusqu’en bout de course et
appuyez fermement dessus.
Panneau arrière
1 Borne d’entrée INPUT
Si l'appareil fonctionne sur piles, cette borne sert d'interrupteur d'alimentation. Le raccordement d'un câble à celle-ci met
l'appareil sous tension.
Avant de mettre l'appareil sous ou hors tension, toujours diminuer au minimum le volume de tout équipement qui pourrait y être raccordé.
2 Commutateur du niveau d'entrée
Régler cet interrupteur en fonction du niveau de sortie de votre instrument.
3 Borne d’entrée auxiliaire AUX IN
(pour mini-fiche stéréo)
Sert à raccorder la sortie (AUX OUT: analogique) de votre appareil audio.
4 DC9V
Sert à raccorder l'adaptateur secteur vendu séparément (DC9V
). Dans ce cas, l'appareil se met automatiquement sous
tension.
5 Crochet pour câble
Si vous raccordez l'adaptateur secteur vendu séparément, accrocher le câble de l'adaptateur
autour de ce crochet comme indiqué ci-dessous.
Lors du retrait du câble du crochet, veiller à ne
pas appliquer une tension excessive au câble.
6 Bouton MASTER VOL. (volume général)
Règle le volume de sortie à la prise OUTPUT.
7 Prise OUTPUT
Il s’agit de la prise de sortie; elle fait aussi office de prise casque.
8 Guide de câble
Sert à éviter que le câble reliant l’AX100G
à la guitare ne gêne l’action de la pédale.
Passez le câble dans ce guide comme illustré ci-dessous.
Si vous utilisez le guide de câble, veillez
à ce que le diamètre du câble ne dépasse
pas 8mm.
Max.
8mm
Page 21
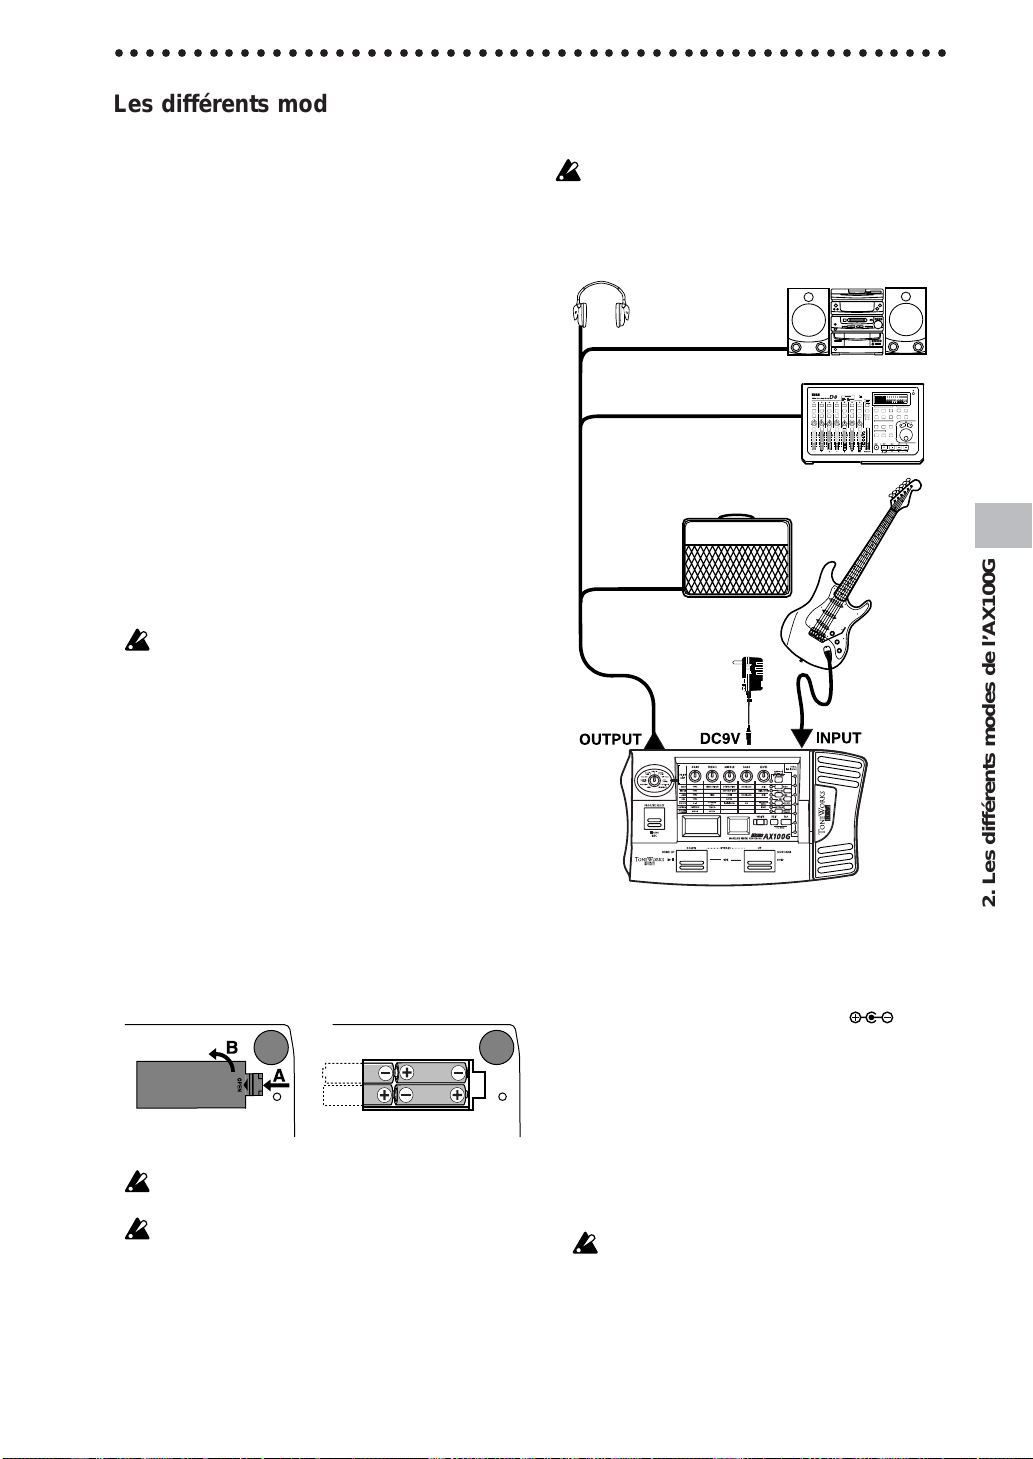
○○○○○○○○○○○○○○○○○○○○○○○○○○○○○○○○○○○○○○○○○○○○○○○○○○○○○
Les différents modes de l’AX100G
L’AX100G vous propose trois modes: Program, Effect Select et
Phrase Trainer.
Mode Program
Ce mode sert à choisir les programmes. C’est le mode que vous
choisirez habituellement pour jouer.
Choisissez les programmes avec les commutateurs UP, DOWN.
L’AX100G active ce mode à chaque mise sous tension. A la sortie
d’usine, les programmes User (utilisateur) sont identiques aux
programmes Preset (d’usine).
Mode Effect Select
Dans ce mode, les commutateurs UP et DOWN permettent de
changer de canal Drive Amp*1 et d’activer/couper l’effet Modulation ou Ambience.
Ce mode ne permet pas de choisir de programme. Pour changer
de programme, activez le mode Program.
*1 L’AX100G vous propose deux canaux saturés (A et B) pour l’effet Drive
Amp, ce qui permet de passer d’un son rythmique à un son lead sans
changer de programme.
Mode Phrase Trainer
Ce mode permet d’enregistrer un extrait d’une source CD ou
MD connectée à la prise AUX IN et de le reproduire en boucle en
vue d’une séance d’entraînement.
Cette magnifique fonction permet même de diminuer la vitesse
sans modifier la hauteur de la phrase. Phrase Trainer vous sera
donc très utile pour assimiler les solos plus rapides.
Dès que vous activez le mode Phrase Trainer, les effets Modulation, Pedal et Ambience sont automatiquement désactivés.
En modes Program et Effect Select, les boutons 1—5 permettent
d’éditer l’effet, de régler le Noise Gate, le niveau du programme et
de changer le nom du programme.
2. Jeu de l’AX100G
Exemples de raccordements
Toujours mettre l’appareil hors tension avant d’effectuer les raccordements sinon des manœuvres involontaires risqueraient d’endommager votre système d’enceintes acoustiques ou de provoquer des mauvais fonctionnements. Les câbles de raccordement
sont vendus séparément.
Casque d'écoute (*1)
Borne stéréo d'1/4" –
borne stéréo RCA (téléphonique)
Enregistreur de disque dur, etc.
Sortie mono - borne mono d'1/4" /
Sortie stéréo - deux bornes mono d'1/4"
Ampli pour guitare/
moniteur sous tension (*1)
Borne mono d'1/4" –
borne mono d'1/4"
Adaptateur secteur (*2)
vers prise de courant
Système audio
Borne mono d'1/4" –
borne mono d'1/4"
Guitare
Mise en place des piles
1. Appuyer légèrement sur la flèche A du logement des piles
puis glisser le couvercle vers le haut, dans le sens de la flèche,
pour ouvrir le logement.
2. Insérer quatre piles alcalines de format AA (vendues séparément) comme indiqué sur le diagramme. Toujours veiller à
bien respecter la polarité (+ et -) des piles.
3. Refermer le couvercle du logement des piles.
If you will not be using the unit for an extended period of time,
remove the batteries to prevent them from leaking.
Quand la tension des piles est trop basse, le message “
clignote à l’écran multi-fonction. Dès que vous remarquez ce
message, installez des piles neuves sans tarder.
BATTER Y
*1: La borne OUTPUT est une borne de sortie stéréo. Si vous utilisez un
câble té lé phonique mono pour raccorder l'AX100G à un ampli pour
guitare, seul le son L (gauche) sera émis.
*2: Si l'appareil doit fonctionner sur piles, l'adaptateur secteur n'est pas
nécessaire. Néanmoins, en cas d'utilisation d'un adaptateur, toujours
employer uniquement le modèle spécifié (DC9V ).
Mettre l’appareil sous tension
Le AX100G n’est pas muni d’un interrupteur d’alimentation. Il se
met automatiquement sous tension dans chacune des circonstances suivantes:
◆
Lors du fonctionnement sur piles, l’appareil se met sous tension dès que la fiche d’un câble téléphonique mono est introduite dans la borne INPUT.Pour préserver la durée de vie des
piles, débrancher le câble de la borne d’entrée INPUT dès que
”
vous cessez d’utiliser le AX100G.
Si vous raccordez la fiche d’un câble téléphonique stéréo, l’appareil ne se mettra pas sous tension.
◆
Si vous utilisez l’adaptateur secteur vendu séparément, l’appareil se met automatiquement sous tension dès que vous raccordez l’adaptateur secteur à une prise de courant.
Mettre les autres équipements hors tension avant de mettre le
AX100G hors tension.
2. Les différents modes de l’AX100G
21
Page 22

2. Les différents modes de l’AX100G
○○○○○○○○○○○○○○○○○○○○○○○○○○○○○○
Mode de jeu Program
Par défaut, l’AX100G active le mode Program à la mise sous tension et rétablit les réglages du programme en vigueur à la dernière mise sous tension.
Régler le sélecteur de niveau d’entrée
Régler cet interrupteur en fonction du niveau de sortie de votre
instrument.
H: Convient pour un micro avec un niveau de sortie élevé,
comme un micro anti-bourdonnements.
L: Convient pour un micro avec un niveau de sortie faible,
comme un micro à une seule bobine.
Régler le volume général
Pour régler le volume, tournez le bouton MASTER VOL. située
en face arrière.
Choisir un programme
Appuyez sur le commutateur UP ou DOWN pour choisir respectivement le programme suivant ou précédent. Chaque fois
que vous enfoncez un commutateur, l’écran multi-fonction affiche le nom du nouveau programme sélectionné.
Les programmes sont groupés par quatre dans ce qu’on appelle
des “banques”. Le chiffre des dizaines sur l’affichage numérique
indique la banque choisie.
Programme présélectionné
Pour annuler la fonction Bank Hold (10’S HOLD), appuyez à
nouveau simultanément sur les commutateurs TAP et EXIT.
Un point apparaît.
Vérifier les effets d’un programme
Certains programmes n’exploitent pas tous les effets. Quand vous
choisissez un programme, l’AX100G indique chaque effet activé
en allumant la diode des touches d’effet correspondantes. Les
diodes des effets désactivés restent éteintes.
Pour éditer (et donc activer) un effet désactivé, enfoncez le commutateur de sélection correspondante. Quand vous enfoncez une
autre touche de sélection ou le commutateur EXIT, la diode en
question cesse de clignoter et reste allumée.
Contournement (Bypass) et étouffement (Mute)
Vous pouvez contourner tous les effets activés sur l’AX100G en
enfonçant simultanément les commutateurs UP et DOWN.
(L’écran multi-fonction affiche “BYPASS” pendant une seconde.)
Vous pouvez en outre activer la fonction d’étouffement Mute en
enfonçant les commutateurs UP et DOWN simultanément et
pendant une seconde. (L’écran multi-fonction affiche “MUTE”
pendant une seconde.) Quand la fonction Mute est activée,
l’AX100G ne produit plus aucun son.
Pour désactiver la fonction Bypass ou Mute, appuyez sur le commutateur au pied UP ou DOWN.
Programme utilisateur
L’AX100G met un total de 80 programmes (sons) à votre dispo-
sition: 40 programmes d’usine (4 programmes x 10 banques) que
vous ne pouvez modifier et 40 programmes utilisateur (4 programmes x 10 banques) éditables à volonté. L’affichage numérique indique lorsqu’un programme utilisateur est choisi en affichant un point à droite du chiffre des dizaines.
Programme
présélectionné
Programme
utilisateur
Un point apparaît.
Sélectionner une banque
En plus de la sélection des programmes via les commutateurs
UP et DOWN, qui consiste à passer en revue les programmes de
chaque banque, vous pouvez changer directement de banque.
1. Maintenez le commutateur PROG/FX SELECT enfoncée pendant environ une seconde, jusqu’à ce que l’affichage numérique se mette à clignoter.
2. Appuyez sur le commutateur UP ou DOWN pour choisir la
banque suivante ou précédente.
3. Appuyez à nouveau sur le commutateur PROG/FX SELECT
pour enregistrer la sélection de
Verrouillage de banque (10’s HOLD)
En appuyant simultanément sur les commutateurs TAP et EXIT,
vous pouvez verrouiller la sélection de banque et éviter ainsi de
changer accidentellement de banque. Quand cette fonction est
activée, un point apparaît à droite des dizaines sur l’affichage
numérique. Choisissez les programmes dans la banque verrouillée avec les commutateurs UP et DOWN.
22
Accordeur automatique
Lorsque l’AX100G se trouve en mode de contournement ou d’assourdissement, l’accordeur fonctionne automatiquement. Si vous
assourdissez l’AX100G, vous pouvez accorder votre instrument
sans produire de son. Cette fonction s’avère pratique pour
l’accordage sur scène.
1. Accordez votre guitare de sorte que le nom
de la note correcte apparaisse sur l’affichage
numérique. Un point affiché “.”à droite du
nom de la note indique un dièse
2. Les 7 diodes du témoin PEDAL INDICATOR
indiquent la différence d’accord entre la note voulue et la note
jouée.
Accordez la guitare de sorte que seule la diode centrale soit
allumée.
.
Exemple
d’affichage
Erreurs d’accordage indiquées par les témoins
de valeurs et l’affichage de nom
Note bémol/
trop basse
Accordage
correct
Note dièse/
trop haute
Modification de la valeur de calibrage
Si nécessaire, vous pouvez régler le calibrage (la fréquence de la
hauteur du La standard) sur une plage allant de 438 à 445 Hz.
Pendant l’utilisation de l’accordeur, vous pouvez régler le diapason avec le bouton 1. L’écran multi-fonction affiche le réglage
de diapason.
A la mise hors tension, la valeur de calibrage spécifiée se perd et
la valeur revient automatiquement à 440 Hz à la mise sous tension suivante.
Page 23
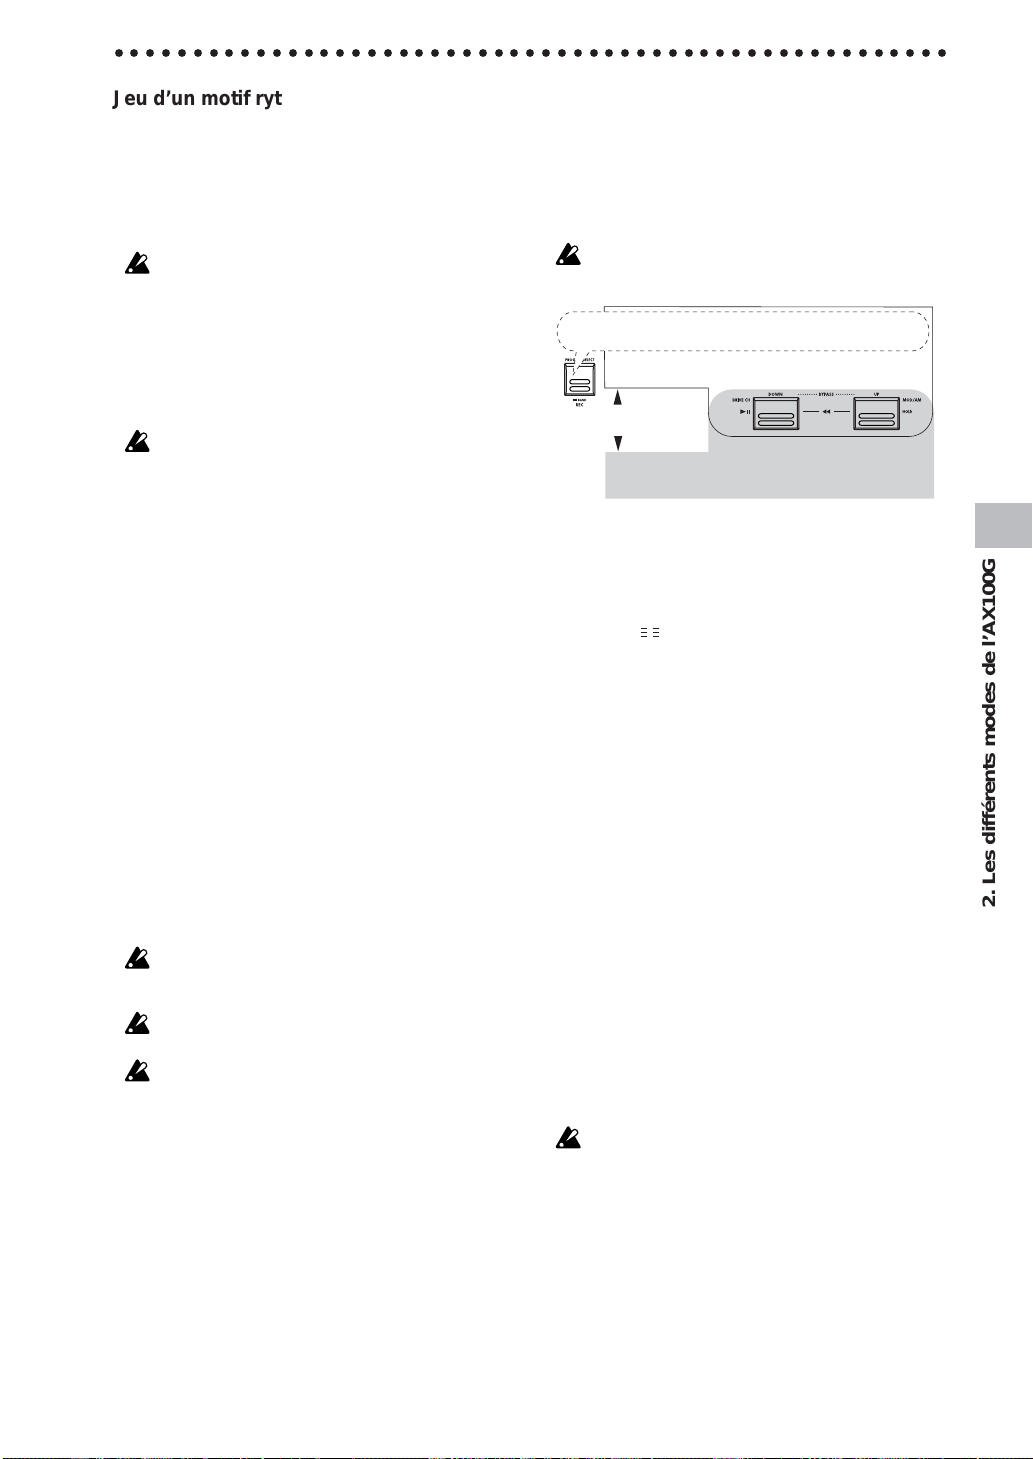
○○○○○○○○○○○○○○○○○○○○○○○○○○○○○○○○○○○○○○○○○○○○○○○○○○○○○
Jeu d’un motif rythmique (RHYTHM)
Appuyez sur le commutateur RHYTHM. La diode s’allume et la
reproduction du rythme commence. Choisissez un motif rythmique parmi les 50 types proposés avec le bouton 1, réglez le
tempo avec le bouton 2 (40—208) et le niveau du motif rythmique (0—30) avec le bouton 3.
Pour arrêter le motif, appuyez à nouveau sur le commutateur
RHYTHM.
Lorsque vous passez en mode Bypass, Mute ou Edit, la reproduction du rythme s’arrête.
AUX IN
Cette entrée auxiliaire permet de mélanger le signal de la source
externe connectée (un lecteur CD ou MD, par exemple) avec le
signal de guitare. Cette fonction vous sera très utile pour travailler des solos ou accompagner vos morceaux préférés, par
exemple.
Le signal de l’entrée AUX IN et de la sortie des effets sont automatiquement mélangés et transmis à la prise OUTPUT, sauf
quand vous vous trouvez en mode Phrase Trainer.
Réglez le niveau du signal AUX IN avec le bouton de volume de
la source utilisée.
Pédale d’expression
La pédale d’expression permet de contrôler 23 types d’effets Pedal
en temps réel.
Pour un programme utilisant un effet Pedal, les diodes du témoin PEDAL INDICATOR s’allument afin d’indiquer la valeur
min-max de l’effet quand vous enfoncez/relevez la pédale d’expression. Le fonctionnement des effets Pedal SAMPLE1—LOOP2
est légèrement différent de celui des autres effets (voyez p.30).
Utilisation de la pédale d’expression pendant que
vous jouez
1. En mode de Programme, sélectionner un programme qui uti-
lise la pédale d’expression.
2. Vérifiez si les diodes PEDAL INDICATOR sont allumées. Si
ce n’est pas le cas, enfoncez la pédale complètement pour que
le témoin supérieur s’allume (vous indiquant que la pédale
est active).
3. Faire fonctionner la pédale d’expression tout en jouant sur la
guitare. A mesure que vous levez et abaissez la pédale, le son
de sortie change conformément.
Si vous assignez le paramètre VOLUME à la pédale, vous ne
pourrez plus l’activer/la désactiver. Le témoin PEDAL
INDICATOR reste alors allumé.
L’état d’activation ou de désactivation de la pédale d’expression
n’est pas mémorisé pour chaque programme.
Ne pas appuyer de manière excessive sur la pédale d’expression.
Avant d’actionner la pédale, vérifier la force requise pour allumer le témoin et pour appliquer l’effet.
Mode Effect Select
Dans ce mode, vous pouvez enfoncer le commutateur DOWN
pendant le jeu pour changer de canal Drive Amp. Le commutateur UP sert lui à activer/couper l’effet Modulation et/ou
Ambience.
Comme dans le mode de Programme, il permet d’éditer les réglages, d’utiliser le métronome et de sauvegarder un programme.
Ce mode ne permet pas de changer de programme ou de sélectionner les fonctions de contournement ou d’assourdissement.
Enfoncer jusqu’à ce que
l’affichage numérique clignote.
Mode Program
Enfoncez la touche PROG/
FX SELECT pour changer
de mode.
Mode
Effect Select
Activer le mode Effect Select
Si vous vous trouvez en mode Program, appuyez sur le commutateur PROG/FX SELECT pour activer le mode Effect Select.
L’écran multi-fonction affiche “FX SEL” et l’affichage numérique indique “
Changer de canal Drive Amp
Chaque programme possède deux réglages d’effet Drive Amp
(son saturé), ce qui permet de passer d’un son rythmique à un
son lead sans devoir changer de programme.
Chaque fois que vous enfoncez le commutateur DOWN, l’effet
Drive Amp alterne entre les réglages des canaux A et B. Quand
le canal A est sélectionné, la diode à côté de le commutateur
DRIVE·AMP s’allume en vert, tandis que lorsque vous choisissez le canal B, cette diode s’allume en rouge.
Activer/désactiver les effets Modulation et Ambience
(INDIVIDUAL)
Le commutateur UP permet d’activer/de couper en alternance
l’effet Modulation et/ou Ambience.
Suivez les étapes ci-dessous pour définir à l’avance les effets que
vous voulez activer/couper au niveau du programme.
Procédure
1. Appuyez sur le commutateur NR LEV.
2. Choisissez le réglage voulu à l’écran en tournant le bouton 3.
MOD: Seul l’effet Modulation est activé/coupé.
AMB: Seul l’effet Ambience est activé/coupé.
M+A: Les effets Modulation et Ambience peuvent être cou-
”
pés/activés.
Certains effets ne permettent pas d’utiliser en même temps les
effets Modulation et Pedal ou les effets Ambience et Pedal. Dans
ce cas, quand vous tentez d’activer les deux effets, l’effet choisi
précédemment est automatiquement coupé.
Banque
précédente
Programme
précédent
Change de
canal
Drive Amp.
Banque
suivante
Programme
suivant
Active/coupe
les effets
MOD/AMB.
2. Les différents modes de l’AX100G
Quitter le mode Effect Select
Pour revenir en mode de Programme, appuyer sur le commutateur de PROG/FX SELECT ou sur EXIT.
23
Page 24
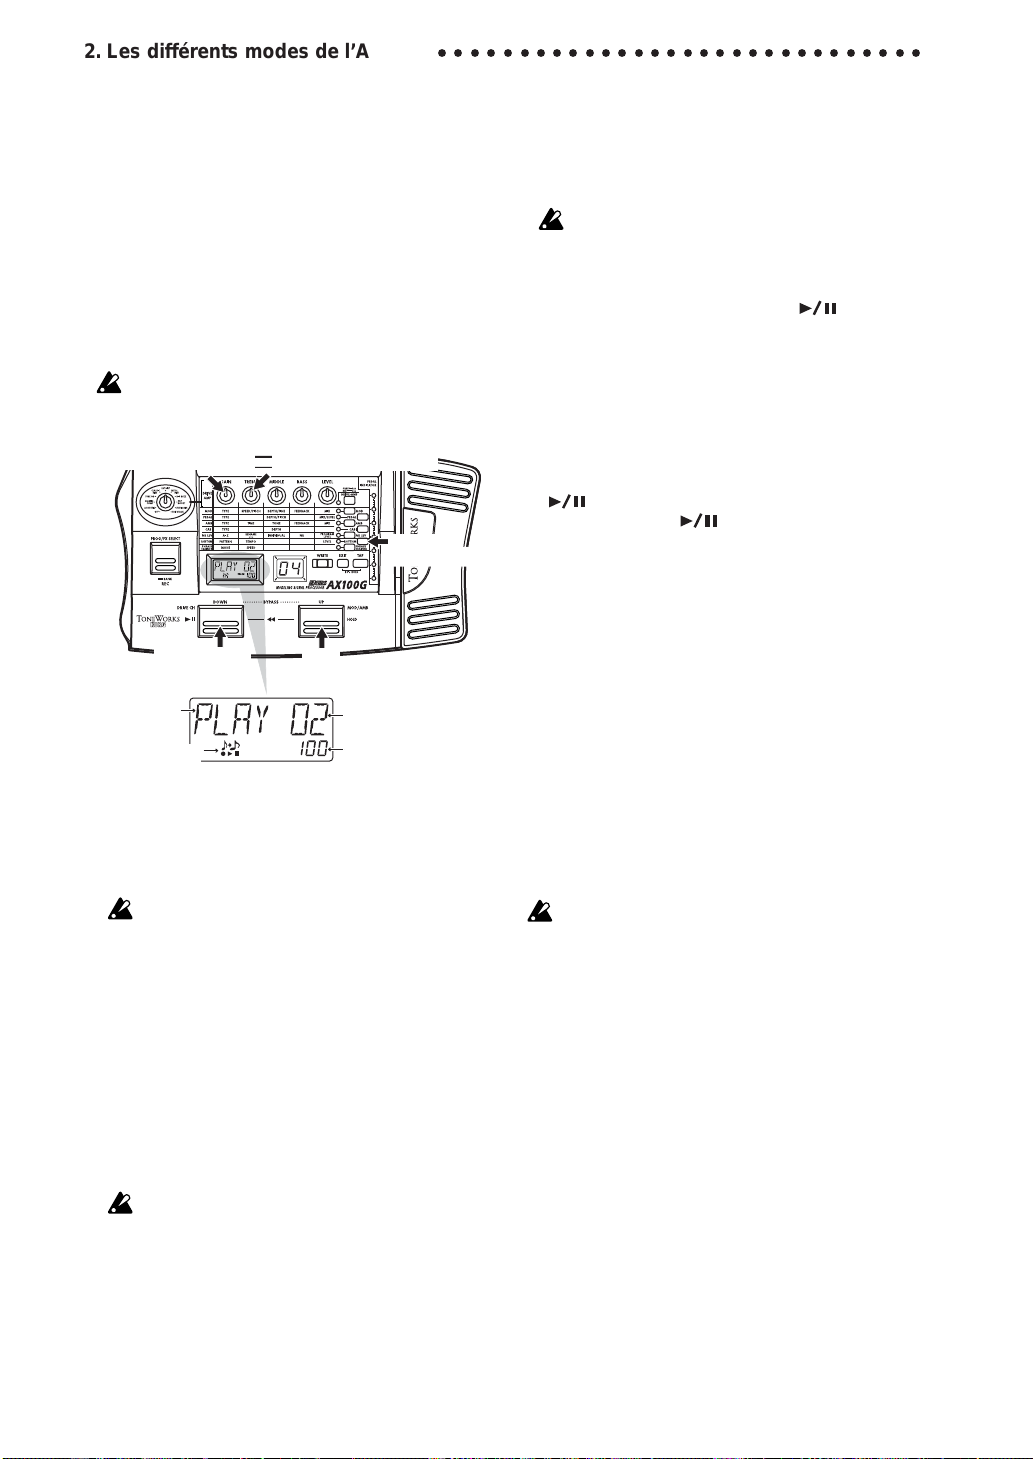
2. Les différents modes de l’AX100G
○○○○○○○○○○○○○○○○○○○○○○○○○○○○○○
Mode de pratique des phrases Phrase Trainer
Ce mode permet d’enregistrer une phrase à partir d’un appareil
audio (lecteur CD ou MD) raccordé à la borne AUX IN et de la
reproduire en boucle, de manière répétée. Vous pouvez ensuite
répéter cette phrase sur la guitare tout en l’écoutant de manière
continue.
Etant donné que vous pouvez ralentir la vitesse de reproduction
sans modifier la hauteur, cette fonction s’avère pratique pour
apprendre ou pour s’exercer sur des phrases provenant d’enregistrements difficiles à jouer.
En mode Phrase Trainer, la pédale d’expression fait automatiquement office de pédale volume.
Quand vous activez ce mode, les effets Modulation, Pedal et
Ambience sont automatiquement coupés. (Une fois que vous quittez le mode Phrase Trainer, les effets sont à nouveau activés.)
Vitesse de reproductionMode d’enregistrement
Mode
Phrase Trainer
Reproduction/
Stop
Statut Phrase
Trainer
Icône
Phrase Trainer
1. Activez le mode Phrase Trainer.
Appuyez sur le commutateur PHRASE TRAINER située à
droite du panneau avant. (La diode correspondante s’allume.)
L’icône Phrase Trainer clignote à l’écran multi-fonction et le
mode d’enregistrement choisi est affiché.
Vous ne pouvez pas changer le son de guitare en mode Phrase
Trainer. Choisissez donc le son voulu avant d’activer le mode
Phrase Trainer.
2. Choisissez le mode d’enregistrement.
Choisissez le mode voulu en tournant le bouton 1.
AUX IN: Enregistre jusqu’à 8 secondes de la source AUX IN.
GTR IN: Enregistre jusqu’à 8 secondes de votre jeu.
3. Démarrer l’enregistrement
Déclenchez la reproduction de la source connectée et appuyez
sur le commutateur PROG/FX SELECT pour lancer l’enregistrement au moment voulu. L’écran multi-fonction indique
“REC” et affiche la durée d’enregistrement en secondes. Le
témoin PEDAL INDICATOR indique également la durée
d’enregistrement.
Lorsque vous enregistrez une phrase, il n’est pas possible de
changer de mode d’enregistrement; pour ce faire, vous devez
revenir au mode de Programme et réaccéder au mode de pratique des phrases.
Hold
(maintien)
Durée de reprod./
d’enregistr.
Vitesse de
reproduction (%)
4. Arrêter l’enregistrement
Pour terminer l’enregistrement, appuyez à nouveau sur le
commutateur PROG/FX SELECT (REC). L’enregistrement
s’arrête automatiquement une fois les 8 secondes écoulées.
L’écran multi-fonction indique alors “PLAY” et l’AX100G lance
automatiquement la reproduction en boucle.
En fonction du volume de l’appareil audio raccordé, le son pourrait être déformé. Dans ce cas, régler le volume de l’appareil
audio.
Pour recommencer l’enregistrement
Appuyer sur le commutateur de DOWN ( ) pour arrêter
la reproduction. Continuer ensuite avec le point “3. Démarrer
l’enregistrement” et le point “4. Arrêter l’enregistrement”.
Pour effacer la phrase enregistrée
Appuyer sur le commutateur EXIT pour effacer la phrase.
Vous pouvez aussi enregistrer une nouvelle phrase qui remplacera celle enregistrée précédemment
5. Arrê/Reproduction
Lorsque vous appuyez sur le commutateur de DOWN
), la reproduction s’arrête. Réappuyer sur ce même com-
(
mutateur de DOWN (
là où vous l’aviez arrêté
• Durant le maintien du son (fonction HOLD), vous pouvez
retourner au début de la phrase enregistrée en enfonçant
simultanément les commutateurs UP et DOWN.
• Pour retourner en arrière pendant la reproduction, enfoncez simultanément les commutateurs UP et DOWN.
Pendant la reproduction, le commutateur UP permet d’acti-
•
ver la fonction de maintien du son (HOLD). Appuyez à nouveau sur ce commutateur pour arrêter le maintien du son.
Changer la vitesse de reproduction
La fonction Phrase Trainer permet de ralentir la phrase jouée
sans en modifier la hauteur.
Tournez le bouton 2 pour réduire la vitesse de reproduction
par pas de 5%: 100%, 95%, 90%, 85% … 25%.
Quitter le mode Phrase Trainer
Pour retourner au mode Program, appuyez sur le commutateur
PHRASE TRAINER ou le commutateur EXIT.
Lorsque vous quittez le mode de pratique des phrases ou que vous
mettez l’appareil hors tension, la phrase enregistrée s’efface.
) pour reprendre la reproduction
24
Page 25
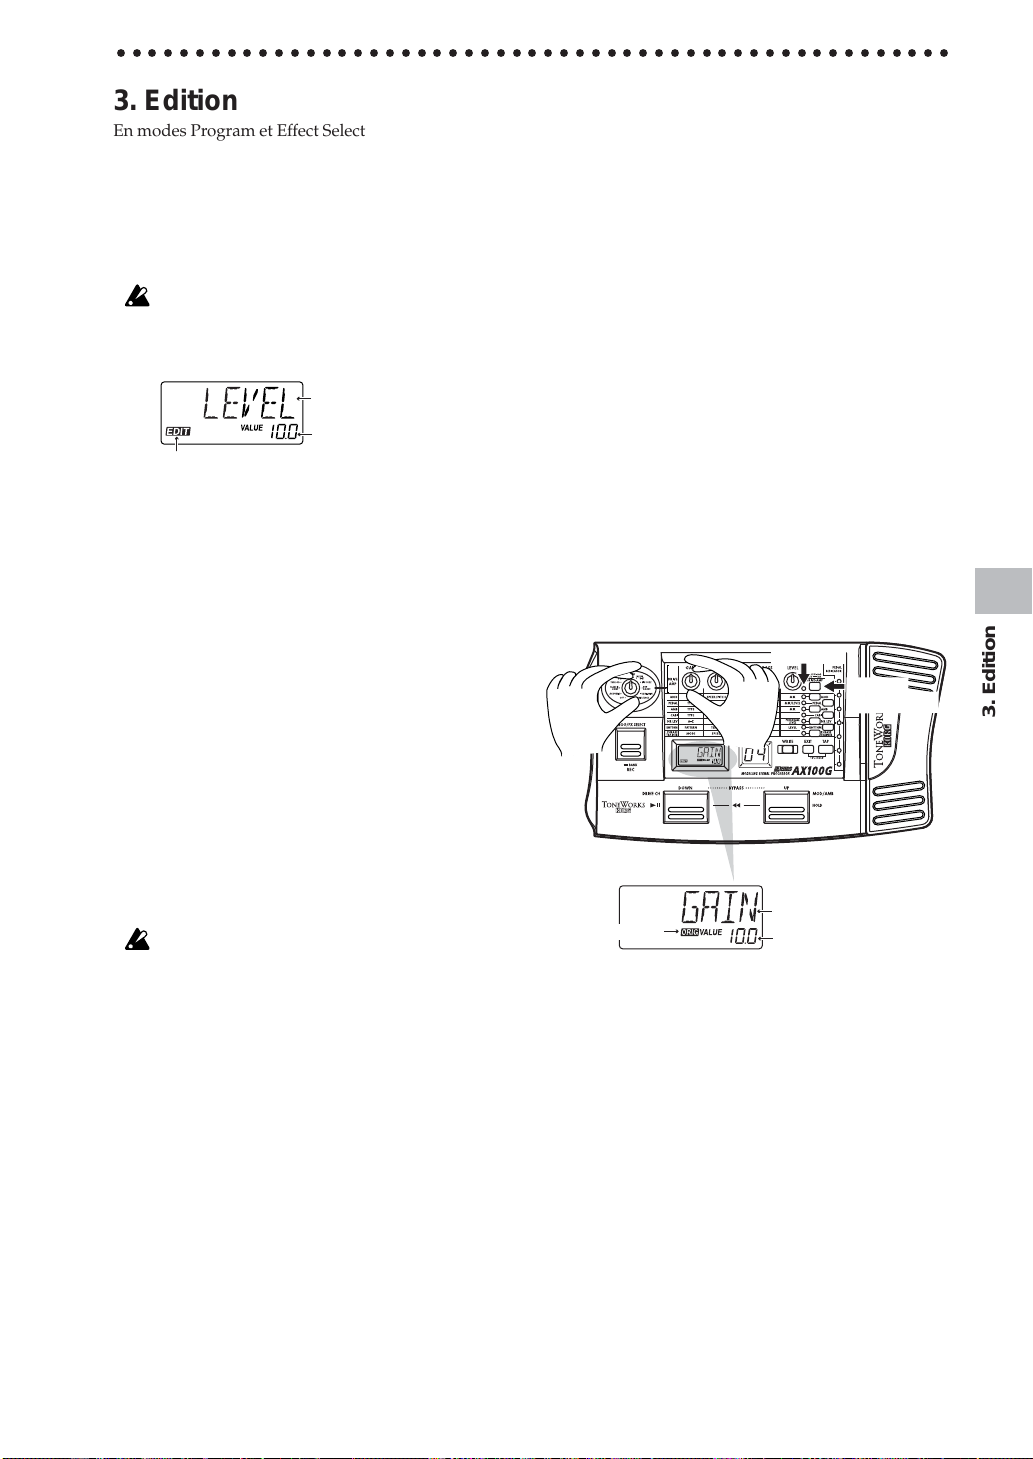
○○○○○○○○○○○○○○○○○○○○○○○○○○○○○○○○○○○○○○○○○○○○○○○○○○○○○
3. Edition
En modes Program et Effect Select, vous pouvez éditer
(ou modifier) chaque effet, régler le Noise Gate et le
niveau du programme, et changer le nom du programme.
Durant l’édition, les icônes d’édition affichées à l’écran
multi-fonction et les diodes des touches d’effet correspondantes clignotent.
Pour conserver les changements apportés aux effets, vous devez
effectuer l’opération “Program Write”. Si vous mettez l’AX100G
hors tension ou choisissez un autre effet sans mémoriser vos changements, ils seront perdus.
Le paramètre assigné
au bouton déplacé
Valeur du paramètre
Icône d'édition
Edition des effets
Vous pouvez éditer directement l’effet Drive Amp en tournant
les boutons de valeur 1—5 ou le bouton Type. Inutile donc d’appuyer sur le commutateur DRIVE·AMP. (Voyez “Fonction d’édition rapide pour l’effet Drive Amp” ci-dessous.)
Pour éditer d’autres effets, appuyez sur le commutateur de sélection voulue afin d’activer le mode d’édition (la diode correspondante clignote alors).
Fonction d’édition rapide pour l’effet Drive Amp
Quand l’effet Drive Amp est activé, vous pouvez l’éditer en
resélectionnant l’effet en question avec le bouton Type et en modifiant les paramètres à l’aide des boutons 1—5. Quand vous
manipulez les boutons 1—5, l’écran multi-fonction affiche le nom
et la valeur de l’effet ou du paramètre assigné à le bouton en
question.
Vous pouvez utiliser le bouton Type pour modifier l’effet Drive
Amp même quand un autre effet comme Modulation ou Pedal
est en mode d’édition.
Il n’est pas possible d’éditer les paramètres tant que les boutons
ont d’autres fonctions ou tant que vous vous trouvez en mode
Bypass, Mute ou Phrase Trainer.
Exemple d’édition de l’effet Drive Amp
L’exemple suivant montre comment régler le canal B de l’effet
Drive Amp sur TUBE OD.
1. Appuyez sur le commutateur DRIVE·AMP pour choisir le
canal B (la diode doit être rouge).
2. Si l’écran multi-fonction affiche “TUBE OD”, aucun changement n’est nécessaire. Si ce n’est pas le cas, tournez le bouton
Type sur la position TUBE OD. Si le bouton se trouvait déjà
sur cette position, tournez-la sur un autre type d’effet puis à
nouveau sur TUBE OD.
3. La diode à côté de le commutateur DRIVE·AMP se met à clignoter, indiquant que l’effet est choisi pour l’édition. (L’écran
multi-fonction affiche “TUBE OD” comme nom d’effet.) Si
vous choisissez l’effet programmé à l’origine, l’icône Original
apparaît à l’écran multi-fonction.
4. Les boutons 1—5 sont assignées respectivement aux paramètres GAIN, TREBLE, MIDDLE, BASS et LEVEL et servent à
régler la valeur de ces paramètres. (Voyez “Paramètres d’effets” à la p.28.)
5. Quand vous tournez les boutons 1—5, le son change et l’écran
multi-fonction affiche le nom et la valeur du paramètre assigné à le bouton en question. Quand vous manipulez une bouton et retrouvez la valeur originale (avant édition) du paramètre, l’écran multi-fonction affiche l’icône Original.
Canal A/B
Touche
DRIVE·AMP
Paramètre
Icône Original
Valeur du paramètre
3. Edition
Régler le canal Drive Amp
Pour chaque programme, l’effet Drive Amp propose des réglages de saturation pour deux canaux différents: A et B.
Choisissez le canal Drive Amp à éditer en appuyant sur le commutateur DRIVE·AMP située sur la droite du panneau avant.
Chaque fois que vous enfoncez cette touche, sa diode change de
couleur: vert indique le canal A et rouge le canal B.
Si vous ne souhaitez pas utiliser l’effet Drive Amp, vous pouvez
le contourner en choisissant la position OFF avec le bouton Type.
Dans ce cas, l’affichage multi-fonction indique “DRV OFF” et la
diode de le commutateur DRIVE·AMP s’éteint.
25
Page 26

3. Edition
○○○○○○○○○○○○○○○○○○○○○○○○○○○○○○○○○○○○○○○○○○○○○○○
Editer d’autres effets
Choisissez l’effet à éditer en appuyant sur le commutateur correspondante.
MOD: pour éditer l’effet Modulation (Chorus, par ex.)
PEDAL: pour éditer l’effet Pedal (Wah, par ex.)
AMB: pour éditer l’effet Ambience (Delay, par ex.)
CABI:
pour éditer l’effet Cabinet, qui sert à simuler les caractéristiques acoustiques d’une enceinte d’ampli de guitare.
NR LEV: pour éditer le Noise Gate et le niveau du programme
(volume).
Certains effets ne permettent pas d’utiliser en même temps les
effets Modulation et Pedal ou les effets Ambience et Pedal. Dans
ce cas, lorsque vous tentez d’activer les deux effets, l’effet choisi
précédemment est automatiquement coupé.
L’exemple ci-dessous montre comment assigner le type CHORUS à l’effet Modulation.
1. Appuyez sur le commutateur MOD. La diode à côté de cette
touche clignote, signalant que l’effet Modulation est sélectionné. Notez que même si vous avez coupé l’effet Modulation au niveau du programme, il sera activé à ce point.
2. Choisissez CHORUS avec le bouton 1 (TYPE). L’écran multifonction affiche le nom du type d’effet. Si vous choisissez le
type d’effet assigné à l’origine, l’icône Original s’affichera à
l’écran multi-fonction.
3. Les boutons 2, 3, 4 et 5 règlent respectivement la vitesse
(SPEED), la profondeur (DEPTH) et la quantité de feedback
(FEEDBACK) du Chorus ainsi que la balance (MIX) entre le
son de l’effet Chorus et le son direct. Chaque fois qu’un paramètre retrouve sa valeur originale sous l’action de vos réglages, l’écran multi-fonction affiche l’icône Original.
La disponibilité des boutons 1—5 et l’assignation des paramètres dépendent du type d’effet choisi. (Voyez “Paramètres d’effets” à la p.28.)
Choisir
le type
d’effet MOD
SPEED
DEPTH
FEEDBACK
MIX
Touche MOD
Régler le temps de retard avec le commutateur TAP
Pour l’effet Ambience ou Pedal DELAY, vous pouvez spécifier le
temps de retard en appuyant deux fois sur le commutateur TAP
au tempo voulu. L’AX100G règle alors automatiquement le temps
de retard sur base de vos impulsions. Vous pouvez aussi régler
ce paramètre de la même manière lorsque vous ne jouez pas.
Changer le nom de programme
Appuyez sur le commutateur NR LEV de sorte que sa diode se
mette à clignoter. Sélectionnez le caractère à modifier avec le
bouton 2 (le caractère choisi clignote) et assignez le caractère
voulu avec le bouton 1. Voyez ci-dessous les caractères disponibles.
Caractères disponibles
Pour sauvegarder le nom du programme modifié, vous devez
mener à bien l’opération de “sauvegarde”. Sinon, le programme
reprend ses réglages d’origine dès la mise hors tension de l’appareil ou dès la sélection d’un autre programme.
Sauvegarde d’un programme
Voici comment sauvegarder (mémoriser) un programme édité.
1. Appuyez sur le commutateur WRITE. L’écran multi-fonction
affiche alors “✳WRITE✳”. L’affichage numérique clignote.
2. Choisissez la destination du programme avec les commutateurs UP et DOWN.
3. Réappuyer sur le commutateur WRITE pour que l’affichage
indique “COMPLT”, pour signaler que le programme est mémorisé. L’appareil revient alors en mode de Programme.
Si vous décidez de ne pas sauvegarder le programme, appuyer
sur le commutateur EXIT pour annuler l’opération de sauvegarde.
Si vous sauvegardez un programme sous un numéro de programme différent, le programme existant précédemment à cet
emplacement sera perdu.
Il n’est pas possible de sauvegarder un programme présélectionné.
26
Icône Original
Paramètre
Page 27

○ ○○○○○○○○○○○○○○○○○○○○○○○○○○○○○○○○○○○○○○○○○○○○○○○○○○○○
4. Appendices
Réglage de la pédale d’expression (Calibrage)
Si vous trouvez que la pédale d’expression est difficile à utiliser,
effectuer la procédure suivante afin d’en tirer le meilleur parti.
Par exemple, si l’effet n’atteint pas sa valeur maximale lorsque
la pédale est enfoncée à fond, ou s’il n’atteint pas sa valeur minimale lorsqu’elle est complètement relevée, utiliser la procédure
suivante pour effectuer les réglages correspondants.
Lorsque vous effectuez les réglages, déplacer la pédale à la main.
Un calibrage correct n’est en effet pas possible lorsque vous effectuez l’opération avec le pied
1. Mettre l’appareil sous tension tout en maintenant enfoncés
simultanément le commutateur EXIT et le commutateur de
PEDALE. L’affichage de nom indiquera “PEDAL” pendant
environ une seconde puis il indiquera “MIN.”
2. Faire remonter entièrement la pédale en appuyant lentement.
Lorsqu’elle s’arrête, enlever la main et appuyer sur le commutateur WRITE. L’affichage de nom passera de “MIN” à
“MAX.”
Si vous décidez d’interrompre la procédure de calibrage, appuyer
sur le commutateur EXIT. L’affichage de mise sous tension apparaîtra et vous entrerez en mode de Programme.
3. Avancer lentement la pédale. Lorsqu’elle s’arrête, enlever votre main et appuyer sur le commutateur WRITE.
2. Appuyer lentement
L’écran d’affichage indique alors “COMPLT” pendant environ
une seconde puis l’écran de mise sous tension réapparaît et vous
accédez au mode de Programme.
Lorsque la procédure de réglage est terminée, vérifier le fonctionnement de la pédale.
Sélectionner un effet qui permet de vérifier facilement son bon
fonctionnement. Choisir par exemple l’effet VOLUME dans le
bloc d’effets de la pédale; régler la valeur sur 0 et vérifier le niveau MINIMUM lorsque la pédale est entièrement remontée.
En cas d’erreur pendant la procédure de calibrage, l’écran indique “
ERROR
“
MIN
ses, un défaut s’est peut-être produit. Dans ce cas, contacter votre revendeur.
” et l’écran précédent le réglage réapparaît (l’écran
”). Si l’affichage “
3. Appuyer lentement
ERROR
” réapparaît à plusieurs repri-
Réinitialisation des programmes utilisateurs à leurs valeurs d’usine
(Rechargement)
1.
Mettre l’appareil sous tension tout en maintenant enfoncés simultanément le commutateur EXIT et le commutateur de
PROG/FX SELECT. L’affichage de nom indiquera “RELO AD?”
2. Appuyer sur le commutateur WRITE. L’affichage de nom in-
diquera “RELOAD” et l’opération de chargement commencera. Lorsque celle-ci est terminée, l’affichage indique
“COMPL T ” pendant environ une seconde; ensuite, l’affichage
de mise sous tension réapparaît et vous accédez au mode de
Programme.
Ne jamais mettre l’appareil hors tension pendant l’opération de
réinitialisation.
Quand vous exécutez l’initialisation Reload, vous perdez le contenu de tous vos programmes User. Les réglages des motifs rythmiques sont aussi initialisés.
Guide de dépannage
Avant de soupçonner un mauvais fonctionnement de l’appareil,
vérifier les points suivants. Si vous ne parvenez pas à résoudre
le problème de cette manière, veuillez contacter votre revendeur.
1. L'appareil ne se met pas sous tension.
✳ Les piles sont-elles mises en place? Ou, l'adaptateur sec-
teur est-il raccordé à une prise de courant?(Voyez p.21)
✳ Un câble équipé d'une fiche téléphonique mono est-il rac-
cordé à la borne d'entrée INPUT? (Voyez p.21)
2. Pas de son
✳ Votre guitare, l'ampli ou le casque d'écoute sont-ils raccordés
aux bornes adéquates? (Voyez p.21)
✳ L'ampli est-il allumé et réglé correctement?
✳ Les câbles sont-ils abîmés?
✳ Le bouton MASTER VOL. (volume général) n’est-elle pas ré-
glée sur la position minimum? (Voyez p. 22)
✳ Le niveau de programme du AX100G est-il mis sur “0” ou
sur un faible niveau? (Voyez p.25, 32)
✳ Le niveau LEVEL de l’effet DRIVE·AMP est-il réglé sur “0”
ou sur une valeur trop faible?
✳ Le volume de votre instrument est-il réduit au minimum?
✳ Le AX100G est-il assourdi (le son est-il coupé)?
✳ Si l’option VOLUME est sélectionnée pour l’effet PEDALE,
la pédale est-elle entièrement relevée?
3. Les effets ne sont pas appliqués
✳ L’ AX100G est-il contourné? (Voyez p.22)
✳ Les effets utilisés dans le programme sont-ils activés?(Voyez
p.22 )
4. Le rythmes ne fonctionne pas
✳ L’appareil est-il en mode de Programme ou en mode Effect
Select?
Le rythmes ne fonctionne pas en mode de pratique des phrases.
✳ Le niveau de sortie du rythmes est-il réglé sur “0”? (Voyez
p.23)
4. Appendices
27
Page 28

4. Appendices
○○○○○○○○○○○○○○○○○○○○○○○○○○○○○○○○○○○○○○○○○○○○
5. La pédale ne fonctionne pas
✳ Avez-vous sélectionné un programme qui utilise un effet du
PEDALE? (Voyez p.22)
✳ Le témoin de la pédale est-il allumé? (Voyez p.20, 23)
✳ Essayer de régler (de calibrer) la pédale d’expression. (Voyez
p.27)
6. Impossible de sauvegarder
(l’affichage de nom indique “ERROR”)
✳ Avez-vous mis l'appareil hors tension pendant le chargement
des programmes prédéfinis d'usine?
Recharger les programmes présélectionnés. (Voyez p.27)
Principales spécifications techniques
❏ Nombre d’effets:
63 types
(maximum d’effets pouvant être utilisés simultanément: 7)
❏ Nombre de programmes:
80 (40 présélectionnés, 40 utilisateur)
❏ Entrées:
Entrée guitare (prise téléphonique mono)
AUX IN (mini-prise stéréo)
❏ Sorties:
sortie à deux fonctions ligne/casque d'écoute
(borne stéréo d'1/4")
❏ Section accordeur
Plage de détection: 27,5 Hz — 2.093 Hz (La0 à Do7)
Calibrage: La = 438 à 445 Hz
❏ Section rythmes
Motifs: 50 types
Tempo: bpm= 40 — 208
❏ Alimentation:
❏ Dimensions:
❏ Poids:
❏ Eléments inclus:
*Les spécifications techniques et la finition peuventêtre
quatre piles alcalines de format AA (LR6)
(
durée de vie des piles: 12 heures d'utilisation conti-
) ou adaptateur secteur (DC9V ) vendu
nue
séparément
329.6 (W) x 181.5 (D) x 57.5 (H) mm
1.05kg
Manuel d’utilisation
sujettes à modification sans avis préalable, en vue de
l’amélioration du produit.
Paramètres des effets
DRIVE·AMP (effets de saturation Drive Amp)
TYPE GAIN TREBLE MIDDLE BASS LEVEL
OFF — ————
ACOUSTIC 0...10.0 0...10.0 0...10.0 0...10.0 0...10.0
CLASSIC COMP 0...10.0 0...10.0 0...10.0 0...10.0 0...10.0
TUBE OD 0...10.0 0...10.0 0...10.0 0...10.0 0...10.0
CLASSIC DIST 0...10.0 0...10.0 0...10.0 0...10.0 0...10.0
FAT DIST 0...10.0 0...10.0 0...10.0 0...10.0 0...10.0
METAL DIST 0...10.0 0...10.0 0...10.0 0...10.0 0...10.0
BIG FUZZ 0...10.0 0...10.0 0...10.0 0...10.0 0...10.0
TOP BOOST 0...10.0 0...10.0 0...10.0 0...10.0 0...10.0
US HI-GAIN 0...10.0 0...10.0 0...10.0 0...10.0 0...10.0
BRIT STACK 0...10.0 0...10.0 0...10.0 0...10.0 0...10.0
Ces modèles Drive Amp modifient le son en combinant des effets de traitement tels que compresseur, overdrive ou distorsion
à un égaliseur à trois bandes. Voici l’assignation des paramètres
aux boutons 1—5
Bouton type Spécifie le type de distorsion ou de
Bouton 1 GAIN Règle l’importance de la distorsion.
Bouton 2 TREBLE Règle les aiguës
Bouton 3 MIDDLE Règle les moyennes
Bouton 4 BASS Règle les graves
Bouton 5 LEVEL Règle le niveau de sortie.
Si le son se déforme, diminuer légèrement les paramètres LEVEL,
TREBLE, MIDDLE et BASS.
OFF (coupé) “DRV OFF”
Désactive l’effet Drive Amp.
ACOUSTIC (guitare acoustique) “ACOUSTC”
Cet effet permet de transformer le son d’une guitare électrique
en son de guitare acoustique. Pour une simulation optimale, utilisez l’élément le plus proche du manche. Cet effet comporte un
compresseur à sensibilité (GAIN) réglable.
CLASSIC COMP (compresseur traditionnel) “
Un compresseur accentue les sons de bas niveau et atténue les
sons de niveau élevé, réduisant ainsi les différences de niveau et
produisant un son plus régulier. Utilisez ce modèle pour obtenir
un jeu uniforme et un sustain doux.
TUBE OD (saturation à lampes) “TUBE OD”
Ce modèle d’effet simule le son surmultiplié d’un ampli à tube
des années 70 qui répond aux nuances de grattage.
CLASSIC DIST (distorsion classique) “
Ce modèle d’effet simule une pédale de distorsion type des années 70.
FAT DIST (distorsion grasse) “FAT DST”
Ce modèle d’effet simule le son gras des pédales de distorsion
des années 80.
METAL DIST (distorsion métallique) “METAL”
Ce modèle d’effet simule la distorsion métallique des années 90.
BIG FUZZ (distorsion fuzz) “BIGFUZZ”
Ce modèle simule une disto fuzz “vintage” très populaire.
TOP BOOST(boost maximum) “T-BOOST”
Ce modèle d’effet simule la distorsion type d’un Vox AC30.
Bouton 1 Bouton 2 Bouton 3 Bouton 4 Bouton 5
saturation d’ampli.
(la plage des hautes fréquences).
(la plage des moyennes fréquences).
(la plage des basses fréquences).
CL COMP
CL DIST
”
”
28
Page 29

○ ○○○○○○○○○○○○○○○○○○○○○○○○○○○○○○○○○○○○○○○○○○○○○○○○○○○○
U.S. HIGH-GAIN (ampli américain High Gain) “US HI-G”
Ce modèle d’effet simule la distorsion type d’un amplificateur à
haut gain fabriqué aux Etats-Unis.
BRITISH STACK (tour d’ampli britannique saturée)
“
BRITSTK
Ce modèle d’effet simule la distorsion type d’un amplificateur
britannique à couches.
MOD (effets de modulation)
Bouton 1 Bouton 2 Bouton 3 Bouton 4
TYPE SPEED/PITCH DEPTH/FINE
CHORUS 0.1...10[Hz] 0...10.0 0...10.0 0...10.0
FLANGER 0.1...10[Hz] 0...10.0 -15...15 0...10.0
PHASER 0.1...10[Hz] 0...10.0 0...30 —
TREMOLO 1...10[Hz] 0...10.0 — —
PAN 1...10[Hz] 0...10.0 — —
WAH UP —0...10.0 — —
WAH DWN —0...10.0 — —
PITCH -24...24[x100CENT] -50...50[CENT] — 0...10.0
MAJ3UP ——C...B 0...10.0
MAJ3DWN ——C...B 0...10.0
MIN3UP ——C...B 0...10.0
MIN3DWN ——C...B 0...10.0
4TH ——C...B 0...10.0
5TH ——C...B 0...10.0
MAJ6TH ——C...B 0...10.0
SLOWATK 0...10.0 0...10.0 — —
FEEDBACK
Il s’agit de modèles d’effets de modulation comme le chorus, le
flanger, le phaser et le pitch shifter. Voici l’assignation des paramètres aux boutons 1—5
Bouton 1 TYPE Choisit le type d’effet
Bouton 2 SPEED/PITCH Régle la vitesse/Règle l’impor-
tance du changement de hauteur
Bouton 3 DEPTH/FINE Règle la profondeur/Règle avec
précision l’importance du
changement de hauteur.
Bouton 4 FEEDBACK
Règle l’intensité du caractère de l’effet.
Bouton 5 MIX Règle la balance entre le son de
l’effet et le son original.
CHORUS (Chorus)
Le Chorus est un effet de modulation conférant de l’ampleur et
un vibrato au son original en y ajoutant une copie légèrement
retardée et de hauteur légèrement différente. Pour des résultats
optimaux, utilisez cet effet en stéréo.
FLANGER (Flanger)
Ce Flanger classique produit une modulation et une impression
de glissement de hauteur.
PHASER (Phaser)
Cet effet modifie cycliquement le changement de phase du son
et il mélange le son dont la phase a été modifiée au son original
pour produire une modulation.
TREMOLO (Trémolo)
Cet effet ajoute de la profondeur au son en modulant le volume.
PAN (Panoramique)
Cet effet modifie la position du signal dans l’image stéréo de
manière cyclique.
WAH UP (Filtre Auto-Wah Up)
Il s’agit d’un wah automatique de filtre passe-bande qui équivaut à l’effet d’une pédale de wah.
Bouton 5
MIX
WAH DWN (Filtre Auto-Wah Down)
Ce filtre Wah agit dans le sens contraire du filtre WAH UP.
PITCH (Pitch Shifter)
”
Ce Pitch Shifter permet de transposer la hauteur de +/- 2 octaves.
Pitch Shifter intelligent
MAJ3UP (une tierce plus élevée dans une tonalité majeure)
MAJ3DWN (une tierce plus basse dans une tonalité majeure)
MIN3UP (une tierce plus élevée dans une tonalité mineure)
MIN3DWN (
une tierce plus basse dans une tonalité mineure
4TH (une quarte plus élevée dans une tonalité majeure)
5TH (une quinte plus élevée dans une tonalité majeure)
MAJ6TH (une sixte plus élevée dans une tonalité majeure)
Le Pitch Shifter intelligent crée des harmonies musicalement utiles en variant l’importance de transposition de la hauteur en fonction de la note jouée et de la tonalité enfoncée. Par exemple, si
vous sélectionnez une transposition d’une tierce vers le haut pour
une tonalité majeure (MAJ3UP), l’importance de la transposition de hauteur variera automatiquement entre trois demi-tons
(une tierce mineure) et quatre demi-tons (une tierce majeure).
• Lorsque le paramètre MAJ3UP est utilisé avec un réglage de
tonalité sur Do (C).
La hauteur crée par le pitch shifter intelligent est indiquée entre parenthèses ( ).
Si votre instrument n’est pas bien accordé, les résultats risquent
de ne pas être ceux attendus. Dans ce cas, réaccorder l’instrument.
Le pitch shifter intelligent fonctionnera uniquement lorsque vous
jouez des notes individuelles. Il ne peut pas produire d’effets pour
les accords.
Vous ne pouvez pas utiliser cet effet avec un effet Pedal (sauf
VOLUME) ni avec les effets Ambience ROOM1—ARENA. Si
vous tentez d’utiliser l’effet Pitch Shifter Intelligent dans un programme où l’effet Pedal ou Ambience ROOM1—ARENA est
activé, l’effet en question sera automatiquement désactivé.
SLOWATK (Ralentissement d’attaque)
Cet effet permet de produire une augmentation graduelle du
volume à chaque nouvelle attaque. Le bouton 2 règle la vitesse
d’attaque et le bouton 3 le niveau du seuil. Plus vous augmentez
le seuil et plus vous devrez jouer fort pour obtenir l’effet de ralentissement d’attaque.
)
4. Appendices
29
Page 30

4. Appendices
○○○○○○○○○○○○○○○○○○○○○○○○○○○○○○○○○○○○○○○○○○○○
PEDAL (effet Pedal)
Bouton 1
VOLUME —0...10.0 Volume
CHO1 0...10.0 — Intensité
CHO2 0...10.0 — Vitesse
VIBRATE 0...10.0 — Vitesse
FLANGER 0...10.0 — Modulation
PHASER 0...10.0 — Vitesse
TREMOLO 0...10.0 — Vitesse
PAN 0...10.0 — Vitesse
WAH ——Fréquence
FILTER 0...10.0 — Fréquence
RING 0...10.0 — Hauteur
PITCH -24...24[CENT] 0...10.0 Hauteur
F BACK1 0...10.0 —
F BACK2 0...10.0 —
DELAY 10[ms]...2[
ECHO 10[ms]...2[
ROOM —0...10.0
GARAGE —0...10.0
HALL —0...10.0
SAMPLE1 S/L — Reproduction
SAMPLE2 S/L —
LOOP1 S/L — Volume
LOOP2 S/L —
Ces modèles d’effets permettent d’utiliser la pédale d’expression
pour contrôler l’effet en temps réel. Voici l’assignation des paramètres aux boutons 1—5
Bouton 1 TYPE Choisit le type d’effet
Bouton 3
Bouton 5 MIX/LEVEL Règle la quantité du son avec effet qui
VOLUME (Volume)
La pédale contrôle le volume. Le bouton 5 règle le niveau minimum.
CHO1 (Chorus1)
La pédale contrôle l’intensité de modulation de hauteur de l’effet Chorus.
CHO2 (Chorus2)
La pédale contrôle la vitesse de modulation de hauteur de l’effet
Chorus.
Bouton 2
TYPE DEPTH/PITCH MIX/LEVEL
DEPTH/PITCH
Bouton 3
Bouton 4
SEC
]0...10.0
SEC
]0...10.0
Bouton 5 pedal
Règle l’intensité de l’effet./Règle l’im-
portance du changement de hauteur.
se mélange au son direct./
Règle le niveau de sortie
CHO1—PITCH ne peuvent pas être utilisés simultanément avec
l’effet Modulation. Si vous tentez d’utiliser un de ces effets dans
un programme pour lequel l’effet Modulation est activé, ce dernier sera automatiquement coupé.
F BACK 1 et 2 ne peuvent pas être utilisés simultanément avec
les effets Ambience ROOM1—ARENA. Si vous tentez d’utiliser ces effets dans un programme où l’effet ROOM1—ARENA
est activé, ce dernier sera automatiquement coupé.
DELAY—HALL ne peuvent pas être utilisés en même temps que
l’effet Ambience. Si vous tentez d’utiliser ces effets dans un programme où l’effet Ambience est activé, ce dernier sera automatiquement coupé.
SAMPLE1—LOOP2 ne peuvent pas être utilisés en même temps
que l’effet Modulation ni Ambience. Si vous tentez d’utiliser ces
effets SAMPLE1—LOOP2 dans un programme où l’effet Modulation ou Ambience est activé, l’effet en question sera automatiquement coupé.
30
Niveau+Reverb
Niveau+Reverb
Niveau d’effet
Temps de retard
Niveau Reverb
Niveau Reverb
Niveau Reverb
Reprod./Inverse
Temps de boucle
VIBRATO (Vibrato)
La pédale contrôle la vitesse de modulation de hauteur de l’effet
Vibrato.
FLANGER (Flanger)
La pédale contrôle la bande passante (modulation) de l’effet
Flanger.
PHASER (Phaser)
La pédale contrôle la vitesse de modulation de phase de l’effet
Phaser.
TREMOLO (Trémolo)
La pédale contrôle la vitesse de modulation de volume de l’effet
trémolo.
PAN (Panoramique)
La pédale contrôle la vitesse à laquelle le son se déplace dans
l’image stéréo.
WAH (Wah)
La pédale contrôle la fréquence de l’effet Wah.
FILTER (Filtre à résonance)
La pédale contrôle la fréquence du filtre à résonance.
RING (Modulateur en anneau)
Cet effet génère un son rappelant le son d’une cloche et pour
lequel la pédale contrôle la hauteur. Pour obtenir un effet soigné,
utilisez l’élément le plus proche du manche. Baissez le bouton
de tonalité de la guitare et jouez aux alentours de la 12e frette.
PITCH (Pitch Shifter)
La pédale permet de régler l’intervalle Pitch Shift. Lorsque le
bouton 5 est réglée sur “0”, seul le signal original est audible.
Choisissez la valeur “5” pour obtenir un rapport égal. La valeur
“10”, enfin, signifie que seul la version transposée est audible.
Feed Back
Pour cet effet, la pédale contrôle le vibrato appliqué à l’effet Larsen. Jouez une note et enfoncez la pédale pour produire un effet
Larsen. Le Larsen disparaît dès que vous relevez la pédale. Le
bouton 3 règle la vitesse du vibrato.
Vous n’obtiendrez pas d’effet Larsen si vous avez assigné le type
OFF, ACOUSTIC ou CLASSIC COMP à l’effet Drive Amp
F BACK1 (Larsen 1)
Génère un effet Larsen de la hauteur de la note jouée.
F BACK2 (Larsen 2)
Génère un effet Larsen une octave plus haut que la note jouée.
DELAY (Delay)
La pédale contrôle le niveau d’entrée de l’effet Delay.
Vous pouvez régler le paramètre TIME de le bouton 2 en appuyant 2 fois sur le commutateur TAP au tempo voulu.
ECHO (écho)
La pédale contrôle le temps de retard de l’effet Echo. Tout comme
dans le cas d’un écho à bande, changer le temps de retard entraîne un changement de hauteur. Le bouton 3 règle le retard
maximum.
ROOM (Reverb Room)
Cet effet simule la réverbération d’une petite pièce ou d’une cabine de studio. La pédale contrôle le niveau de réverbération.
GARAGE (Reverb Garage)
Cet effet simule la réverbération d’une salle de taille moyenne
comme un garage. La pédale contrôle le niveau de réverbération.
HALL (Reverb Hall)
Cet effet simule la réverbération d’une salle de dimensions
moyenne ou d’une grande salle de concert. La pédale contrôle le
niveau de réverbération.
Page 31

○ ○○○○○○○○○○○○○○○○○○○○○○○○○○○○○○○○○○○○○○○○○○○○○○○○○○○○
Echantillonnage et jeu
Les effets SAMPLE1—LOOP2 permettent d’échantillonner (enregistrer) une phrase de maximum 6 secondes et de la reproduire ensuite à l’aide de la pédale.
L’enregistrement ne démarre pas tant que vous ne jouez pas des
sons supérieurs au seuil établi.
La phrase que vous enregistrez sera effacée lorsque vous choisissez un autre type ou un autre programme, voire lorsque vous
activez la fonction Phrase Trainer ou si vous mettez l’appareil
hors tension.
SAMPLE1 (échantillonnage 1)
La phrase enregistrée se reproduit lorsque vous appuyez sur la
pédale.
SAMPLE2 (échantillonnage 2)
La phrase enregistrée se reproduit lorsque vous appuyez sur la
pédale et elle joue en sens inverse lorsque la pédale revient à sa
position normale.
Procédure pour les effets SAMPLE1 et 2
Assignez l’effet SAMPLE1 ou SAMPLE2 à la pédale d’expres-
1.
sion ou choisissez un programme utilisant un de ces effets.
2. Spécifiez la durée d’enregistrement avec le bouton 3 (“S” = 3
secondes d’enregistrement haute qualité et “L” = 6 secondes
d’enregistrement en mode étendu).
3. Activez le mode prêt à enregistrer en enfonçant la pédale d’expression jusqu’en bout de course jusqu’à ce que le témoin
PEDAL INDICATOR clignote.
4. Jouez la phrase. L’enregistrement commence automatiquement dès que vous commencez à jouer et le témoin PEDAL
INDICATOR cesse de clignoter pour rester allumé.
5. L’enregistrement s’arrête dès que la durée d’enregistrement
est épuisée. Il n’est pas possible de l’arrêter manuellement.
Si vous n’êtes pas satisfait de votre enregistrement, retournez à l’étape 3 ci-dessus.
6. Actionner la pédale d'expression.
LOOP1 (Boucle 1)
Dès qu’une phrase est enregistrée, elle est reproduite en boucle
(de manière répétée). Quand vous relevez la pédale (à la position de volume minimum), l’AX100G retourne au début de la
phrase. Enfoncez la pédale pour relancer la reproduction en
boucle. Réglez le volume de la phrase avec la pédale.
LOOP2 (Boucle 2)
La pédale contrôle la longueur de la boucle. La boucle raccourcit à mesure que la pédale revient à sa position normale et à la
longueur minimum, elle n'est plus du tout audible.
Procédure pour les effets LOOP1 et 2
1. Assignez l’effet LOOP1 ou LOOP2 à la pédale d’expression
ou choisissez un programme utilisant un de ces effets.
2. Réglez la durée de l’enregistrement maximale avec le bouton 3 (“S”= 3 secondes d’enregistrement haute qualité et “L”
= 6 secondes d’enregistrement en mode étendu)
3. Activez le mode prêt à enregistrer en enfonçant la pédale d’expression jusqu’en bout de course jusqu’à ce que le témoin
PEDAL INDICATOR clignote.
4. Jouez la phrase. L’enregistrement commence automatiquement dès que vous commencez à jouer et le témoin PEDAL
INDICATOR cesse de clignoter pour rester allumé.
5. L’enregistrement s’arrête dès que la durée spécifiée est écoulée ou quand vous enfoncez à nouveau la pédale à fond. Quand
l’enregistrement est fini, le témoin PEDAL INDICATOR
s’éteint et la phrase enregistrée est reproduite en boucle.
6. Actionner la pédale d'expression.
AMB (effet Ambience)
Bouton 1 Bouton 2 Bouton 3 Bouton 4 Bouton 5
TYPE TIME TONE FEEDBACK MIX
DELAY 10 [ms]...2 [SEC] 0...10.0 0...10.0 0...10.0
ROOM1 ———0...10.0
ROOM2 ———0...10.0
GARAGE1 ———0...10.0
GARAGE2 ———0...10.0
HALL ———0...10.0
ARENA ———0...10.0
Il s’agit des modèles d’effets de type réverbération comme le retard (delay), la réverbération et l’écho. Voici l’assignation des
paramètres aux boutons 1—5
Bouton 1 TYPE Select the effect type
Bouton 2 TIME Règle le temps de retard.
Bouton 3 TONE Règle la qualité tonale du retard.
Bouton 4 FEEDBACK Règle l’importance du feedback
(les répétitions du retard)
Bouton 5 MIX Règle la quantité du son avec effet qui
se mélange au son direct.
DELAY (Delay)
Cet effet Delay stéréo confère de l’ampleur au son en créant une
différence de timing entre les signaux des canaux gauche et droit.
Vous pouvez régler le paramètre TIME assigné à le bouton 2 en
appuyant 3 fois sur le commutateur TAP au tempo voulu.
ROOM1 (Reverb Room 1)
Réverbération de type pièce intense
ROOM2 (Reverb Room 2)
Réverbération de type pièce claire
GARAGE1 (Reverb Garage 1)
Réverbération 1 de type garage
GARAGE2 (Reverb Garage 2)
Réverbération 2 de type garage
HALL (Reverb Hall)
Réverbération de type hall
ARENA (Reverb Arena)
Réverbération de type stade
4. Appendices
31
Page 32
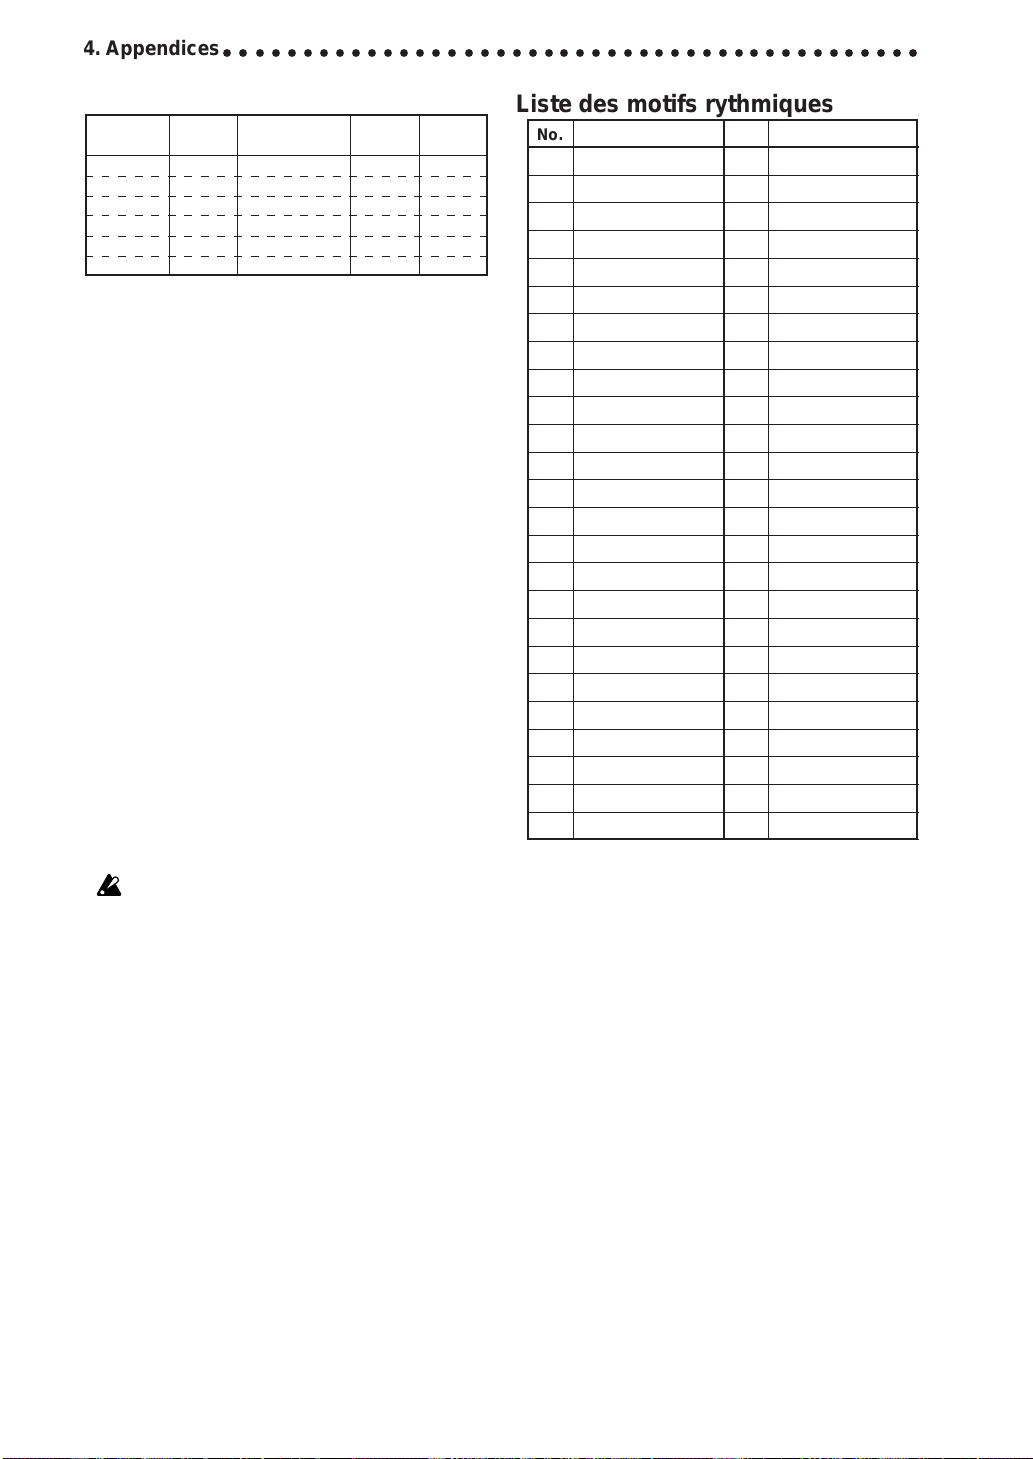
4. Appendices
○○○○○○○○○○○○○○○○○○○○○○○○○○○○○○○○○○○○○○○○○○○○
CABI (effect Cabinet)
Bouton 1 Bouton 2 Bouton 3 Bouton 4 Bouton 5
TYPE DEPTH
××
1
×8 0...10.0
××
××
1
×10 0...10.0
××
××
1
×12 0...10.0
××
××
2
×12 0...10.0
××
××
4
×10 0...10.0
××
××
4
×12 0...10.0
××
L’effet de résonateur de coffret simule les caractéristiques acoustiques du boîtier d’un amplificateur pour guitare. Bien que ces
modèles soient surtout efficaces lors de l’envoi des signaux à un
mélangeur, etc. via une ligne de connexion directe, ils s’avèrent
également efficaces lors de l’utilisation d’un ampli pour guitare.
Bouton 1 TYPE Select the cabinet type
Bouton 3 DEPTH Règle l’intensité de l’effet.
××
1
×8
××
Simulation d’une enceinte avec un haut-parleur de 8 pouces
××
1
×10
××
Simulation d’une enceinte avec un haut-parleur de 10 pouces
××
1
×12
××
Simulation d’une enceinte avec un haut-parleur de 12 pouces
××
2
×12
××
Simulation d’une enceinte avec deux haut-parleurs de 12 pouces
××
4
×10
××
Simulation d’une enceinte avec quatre haut-parleurs de 10 pouces
××
4
×12
××
Simulation d’une enceinte avec quatre haut-parleurs de 12 pouces
NR LEV
(Noise Gate, niveau de programme)
Ici, vous pouvez régler l’intensité du Noise Gate et le niveau de
chaque programme.
Utilisez les boutons 1 et 2 pour modifier le nom du programme
(voyez p. 26) et le bouton 3 pour activer/couper l’effet Modulation et/ou Ambience (voyez p. 23).
NR (Noise Gate) “NR”
Réglez ce paramètre avec le bouton 4. Selon la guitare utilisée,
un réglage élevé du Noise Gate risque d’entraîner des coupures
du son. Réglez ce paramètre à un juste niveau.
PROGRAM LEVEL (niveau de programme) “PROGLEV”
Réglez ce paramètre avec le bouton 5. Le volume de chaque programme dépend de la guitare utilisée. Réglez le niveau des programmes en fonction de l’instrument et de votre style de jeu.
Liste des motifs rythmiques
No. Name No. Name
1 8BEAT1 26 DISCO
2 8BEAT2 27 EURO
3 8BEAT3 28 FUNK
4 8BEAT4 29 JAZZ1
5 8BEAT5 30 JAZZ2
6 8BEAT6 31 MOTOWN
78SHFL 32 REGGAE 1
8 16BEAT1 33 REGGAE 2
9 16BEAT2 34 SURF
10 16BEAT3 35 COUNTRY
11 16BEAT4 36 BOSSA
12 16BEAT5 37 SAMBA
13 16SHFL1 38 PRACT0
14 16SHFL2 39 PRACT1
15 16SHFL3 40 PRACT2
16 16SHFL4 41 PRACT3
17 3/4 42 PRACT4
18 6/4 43 PRACT5
19 6/8 44 PRACT6
20 BALAD 45 PRACT7
21 BLUES 46 PRACT8
22 ROCK 47 PRACT9
23 THRASH 48 METRO1
24 DANCE1 49 METRO2
25 DANCE2 50 METRO3
32
Page 33
○ ○○○○○○○○○○○○○○○○○○○○○○○○○○○○○○○○○○○○○○○○○○○○○○○○○○○○
Liste des paramètres des programmes présélectionnés
Lors de l’activation d’un bloc d’effets désactivé, le modèle d’effet imprimé en plus fin est sélectionné.
Lors des réglages d'usine, le contenu des programmes utilisateurs est identique à celui des programmes présélectionnés.
BANK # PROGRAM DRIVE·AMP A DRIVE·AMP B MOD PEDAL AMB CABI
01STATIC US HI-G METAL
2 FILTER ACOUSTIC FAT DST CHORUS VOLUME GARAGE2
3 KIDROCK US HI-G BRITSTK
4 FREAK TUBE OD T-BOOST CHORUS VOLUME DELAY 1X8
11RAGE BRITSTK BRITSTK
2 TRASH US HI-G ACOUSTIC
3 NIN CL DIST METAL
4 HOSTILE METAL METAL
21PRIEST BRITSTK BRITSTK
2 2112 CL COMP CL DIST PHASER VOLUME
3R R CL DIST CL DIST PITCH GARAGE
4SATCH BRITSTK BRITSTK
31J P TUBE OD BRITSTK
2 CARLOS US HI-G US HI-G WAH UP VOLUME
3 DA'FUZZ BIGFUZZ BIGFUZZ
4 RINGMAN FAT DST T-BOOST
41JAZZ OFF BRITSTK CHORUS VOLUME DELAY
2 FUNKY CL COMP FAT DST WAH UP VOLUME HALL
3 SURF CL COMP T-BOOST
4 FUSION TUBE OD BRITSTK CHORUS VOLUME
51ROCK FAT DST BRITSTK
2 BLUES TUBE OD TUBE OD
3 VINTAGE T-BOOST TUBE OD
4F BACK FAT DST FAT DST
61A MINOR CL COMP US HI-G MIN3UP VOLUME DELAY
2A MAJOR BRITSTK BRITSTK MAJ3DWN VOLUME
3 LOOP CL COMP US HI-G
4 SAMPLE US HI-G METAL
71CHORUS OFF CL COMP
2 FLANGER CL COMP FAT DST FLANGER VOLUME DELAY
3 PHASER OFF BRITSTK
4 VIBRATO TUBE OD CL DIST
81ECHO ACOUSTIC TUBE OD CHORUS ECHO
2 BENDER US HI-G ACOUSTIC
3 SLOWATK FAT DST CL COMP SLOWATK VOLUME ARENA
4 VIOLIN T-BOOST CL COMP SLOWATK DELAY
91ACOU LN ACOUSTIC ACOUSTIC CHORUS VOLUME ROOM1 1X10
2 COMP LN CL COMP CL COMP FLANGER VOLUME
3 OVDR LN T-BOOST T-BOOST
4 DIST LN BRITSTK US HI-G
PHASE
FLANGER
FLANGER
CHORUS
PHASER
FLANGER
CHORUS
CHORUS
CHORUS
PHASER
CHORUS
CHORUS
PHASER
CHORUS
TREMOLO
CHORUS
CHORUS
CHORUS
CHORUS
PHASER
TREMOLO
CHORUS
FLANGER
CHORUS
VOLUME ROOM2
VOLUME GARAGE2
PITCH
ROOM2
4X12
4X12
4X10
4X12
VOLUME ARENA 2X12
VOLUME
WAH HALL
VOLUME ROOM1
WAH DELAY
ECHO
FILTER DELAY
RING
DELAY
HALL 2X12
GARAGE1 4X12
GARAGE1 4X12
DELAY 2X12
HALL 4X12
1X8
4X12
4X12
4X10
1X8
2X12
4X12
TREMOLO GARAGE1 1X8
GARAGE2 2X12
VOLUME ARENA
VOLUME ROOM1
VOLUME GARAGE2
F BACK2 DELAY
DELAY 4X12
LOOP1
SAMPLE2
DELAY 2X12
DELAY 4X12
4X10
2X12
4X12
4X12
4X12
CHO2 HALL 4X10
4X12
PHASER DELAY
VIBRATO GARAGE1
ROOM1 2X12
PITCH DELAY
GARAGE1 4X10
ROOM1
4X10
1X12
4X10
2X12
2X12
VOLUME ROOM2 4X10
F BACK2
DELAY
4X12
4. Appendices
33
Page 34
Vorsichtsmaßnahmen
Aufstellungsort
Vermeiden Sie das Aufstellen des Geräts an Orten, an
denen
• es direkter Sonneneinstrahlung ausgesetzt ist;
• hohe Feuchtigkeit oder Extremtemperaturen auftreten
können;
• Staub oder Schmutz in großen Mengen vorhanden
sind;
• das Gerät Erschütterungen ausgesetzt sein kann.
• in der Nähe eines Magnetfeldes.
Stromversorgung
Schließen Sie das beiliegende Netzteil nur an eine geeignete Steckdose an. Verbinden Sie es niemals mit einer
Steckdose einer anderen Spannung.
Störeinflüsse auf andere Elektrogeräte
Dieser kann bei in der Nähe aufgestellten Rundfunkempfängern oder Fernsehgeräten Empfangsstörungen hervorrufen. Betreiben Sie solche Geräte nur in einem geeigneten Abstand von diesem Erzeugnis.
Bedienung
Vermeiden Sie bei der Bedienung von Schaltern und
Reglern unangemessenen Kraftaufwand.
Das CE-Zeichen
Vor dem 31.12.1996 vergebene CE-Zeichen auf unseren netzgespeisten Geräten zeigen an, daß diese Geräte gemäß der EMC-Richtlinie (89/336/EWG) und der
CE-Richtlinie (93/68/EWG) der EU arbeiten.
Nach dem 01.01.1997 vergebene CE-Zeichen auf unseren netzgespeisten Geräten zeigen an, daß diese Geräte gemäß der EMC-Richtlinie (89/336/EWG), der CERichtlinie (93/68/EWG) und der Niederspannungsstromrichtlinie (73/23/EWG) der EU arbeiten.
Die CE-Zeichen auf unseren batteriegespeisten Geräten zeigen an, daß diese Geräte gemäß der EMC-Richtlinie (89/336/EWG) und der CE-Richtlinie (93/68/
EWG) der EU arbeiten.
Reinigung
Bei auftretender Verschmutzung können Sie das Gehäuse mit einem trockenen, sauberen Tuch abwischen. Verwenden Sie keinerlei Flüssigreiniger wie beispielsweise
Reinigungsbenzin, Verdünnungs- oder Spülmittel. Verwenden Sie niemals brennbare Reiniger.
Bedienungsanleitung
Bewahren Sie diese Bedienungsanleitung gut auf, falls
Sie sie später noch einmal benötigen.
Flüssigkeiten und Fremdkörper
Stellen Sie niemals Behältnisse mit Flüssigkeiten in der
Nähe des Geräts auf. Wenn Flüssigkeit in das Gerät gelangt, können Beschädigung des Geräts, Feuer oder ein
elek-trischer Schlag die Folge sein.
Beachten Sie, daß keinerlei Fremdkörper in das Gerät
gelangen. Sollte ein Fremdkörper in das Gerät gelangt
sein, so trennen Sie es sofort vom Netz. Wenden Sie sich
dann an Ihren KORG-Fachhändler.
Symbole in diesem Handbuch
bezeichnet einen wichtigen Hinweis.
In Zusammenhang mit Funktions- und Bedienungserklärungen sind in diesem Handbuch beispielhaft
Abbildungen des LC-Displays abgedruckt. Es wird
darauf hingewiesen, daß alle diese Abbildungen als
Beispiele aufgeführt sind und nicht immer den tatsächlichen Anzeigen auf dem Display entsprechen müssen
34
Page 35
○○○○○○○○○○○○○○○○○○○○○○○○○○○○○○○○○○○○○○○○○○○○○○○○○○○○○
Inhaltsverzeichnis
1. Einleitung -------------------------------- 35
Hauptmerkmale-------------------------------------- 35
Vorder- und Rückseite ----------------------------- 36
Vorderseite -------------------------------------------36
Rückseite---------------------------------------------36
The modes of the AX100G ----------------------- 37
Batterien einbauen---------------------------------- 37
2. Spielen mit dem AX100G------------ 37
Anschlußbeispiele ---------------------------------- 37
Gerät einschalten ----------------------------------- 37
Der Programme-Modus---------------------------- 38
Einstellen des Eingangspegels -----------------38
Einstellen der allgemeinen
Ausgangslautstärke (Master Volume) ---38
Aufrufen eines Programs-------------------------38
Nachschauen, welche Effektblöcke
zum Einsatz kommen ----------38
Bypass (Umgehung) und
Mute (Stummschaltung)-------38
Automatische Stimmfunktion-------------------- 38
Verwendung der Rhythm-Funktion ------------39
AUX IN------------------------------------------------39
Schwellpedal ----------------------------------------39
Effektwahl-Modus ----------------------------------- 39
Aufrufen des Effektwahl-Modus ----------------39
Verlassen des Effektwahl-Modus --------------39
Der Phrase Trainer-Modus ------------------------ 40
3. Editierung -------------------------------- 41
Editieren der Effekte-------------------------------- 41
Editieren des Drive Amp-Effektes--------------41
Editieren des Drive Amp-Effektes (Beispiel) 41
Editieren der anderen Effekte------------------- 42
Ändern des Program-Namens ------------------- 42
Speichern eines Programms --------------------- 42
4. Anhang ------------------------------------ 43
Einstellen des Pedals (Kalibrierung) ----------- 43
Wiederherstellen der Werkseinstellungen ---- 43
Problemhilfe ------------------------------------------ 43
Technische Daten ----------------------------------- 44
Effektparameter-------------------------------------- 44
DRIVE·AMP (Vezerrungs-Effekttypen) -------44
MOD (Modulationseffekte)-----------------------45
PEDAL (Pedal-Effekt) -----------------------------46
AMB (Ambience-Effekt) --------------------------47
CABI (Cabinet-Effekt) -----------------------------48
NR LEV(Rauschunterdrückung,
Program-Lautstärke)--------48
Auflistung der Rhythmus-Patterns -------------- 48
Parameter der Presetprogramme --------------- 49
1. Einleitung
Wir wollen Sie zum Erwerb des ToneWorks
AX100G Modeling Signal Processor beglückwün-
schen und uns herzlich bei Ihnen bedanken.
Um einen möglichst problemlosen Betrieb zu gewährleisten, empfehlen wir Ihnen, sich dieses Handbuch sorgfältig und vollständig durchzulesen und
das Gerät nur auf die angegebene Weise zu verwenden.
Hauptmerkmale
• Die neue -Technologie ermöglicht die detaillierte Erstellung leistungsfähiger Modeling-Effekte.
• 63 Modeling-Effektvariationen mit bis zu 7 simultan einsetzbaren Effekten sowie eine Rhythmus-Funktion.
•40Presetprogramme (4 x 10 Bänke) und 40 User-Programme
(4 x 10 Bänke, überschreibbar) sind vorhanden.
•
Im Effektwahl-Modus kann mit einem Fußtaster eine anderer
Drive Amp-Kanal gewählt werden; auch der Modulations- und
Ambience-Effekt können per Fuß ein-/ausgeschaltet werden.
•Der Virtual Feedbacker-Effekt dient zum Halten der gespielten Gitarrennoten (“Sustain”) und erzeugt Feedback (Rückkopplung) mit Vibrato.
• Mit einem Reglerpedal lassen sich 23 Pedaleffekte in Echtzeit
steuern.
• Bei Verwendung eines Delay-Effekts können Sie die
Verzögerungszeit durch rhythmisches Drücken der TAP-Taste einstellen. So laufen die Wiederholungen jederzeit zum
Song-Tempo synchron.
• Die Phrase Trainer-Funktion gestattet die Aufzeichnung von
8 Sekunden Audiomaterial. Das Signal kann nachfolgend verlangsamt wiedergegeben werden, wobei die Tonhöhe nicht
geändert wird.
• Mit der SAMPLE & PLAY-Funktion können Sie eine von Ihnen gespielte Phrase aufzeichnen (maximale Länge: 6 Sekunden) und diese dann durch Bedienung des Pedals wiedergeben lassen.
• Pedalanzeige mit 7 Leuchtdioden.
•
50 verschiedene Rhythmus-Pattern sowie ein eingebautes Metronom, mit denen das Einstudieren neuer Soli richtig Spaß macht.
• Zum leichteren Üben wurde ein Metronom integriert.
• Ein AUX IN-Anschluß ist vorhanden, über den Sie ein externes Audiogerät an das AX100G anschließen und dessen Wiedergabe dann begleiten können.
• Mit der chromatischen Stimmfunktion können Sie Ihr Instrument stimmen, auch wenn sich das AX100G im Bypass-Modus befindet oder stummgeschaltet ist (ideal für die Bühne).
• Das LC-Display stellt eine intuitive Benutzeroberfläche dar.
Es ist hintergrundbeleuchtet und gestattet es so, den Displayinhalt auch unter ungünstigen Lichtverhältnissen zu erfassen.
Was ist ?
(Resonant Structure and Electronic Circuit Modeling System) ist
eine von Korg entwickelte Klangformungstechnologie, die den komplexen Charakter und das Verhalten von akustischen und elektrischen
Instrumenten wie auch elektronischen Schaltungen in realen Umgebungen präzise nachbildet. simuliert eine Vielzahl von
Klangerzeugungscharakteristiken: Instrumentenkörper/-gehäuse,
Lautsprecher und Boxen, akustische Umgebungen, Vakuumröhren,
Transistoren, usw.
1. Einleitung
35
Page 36
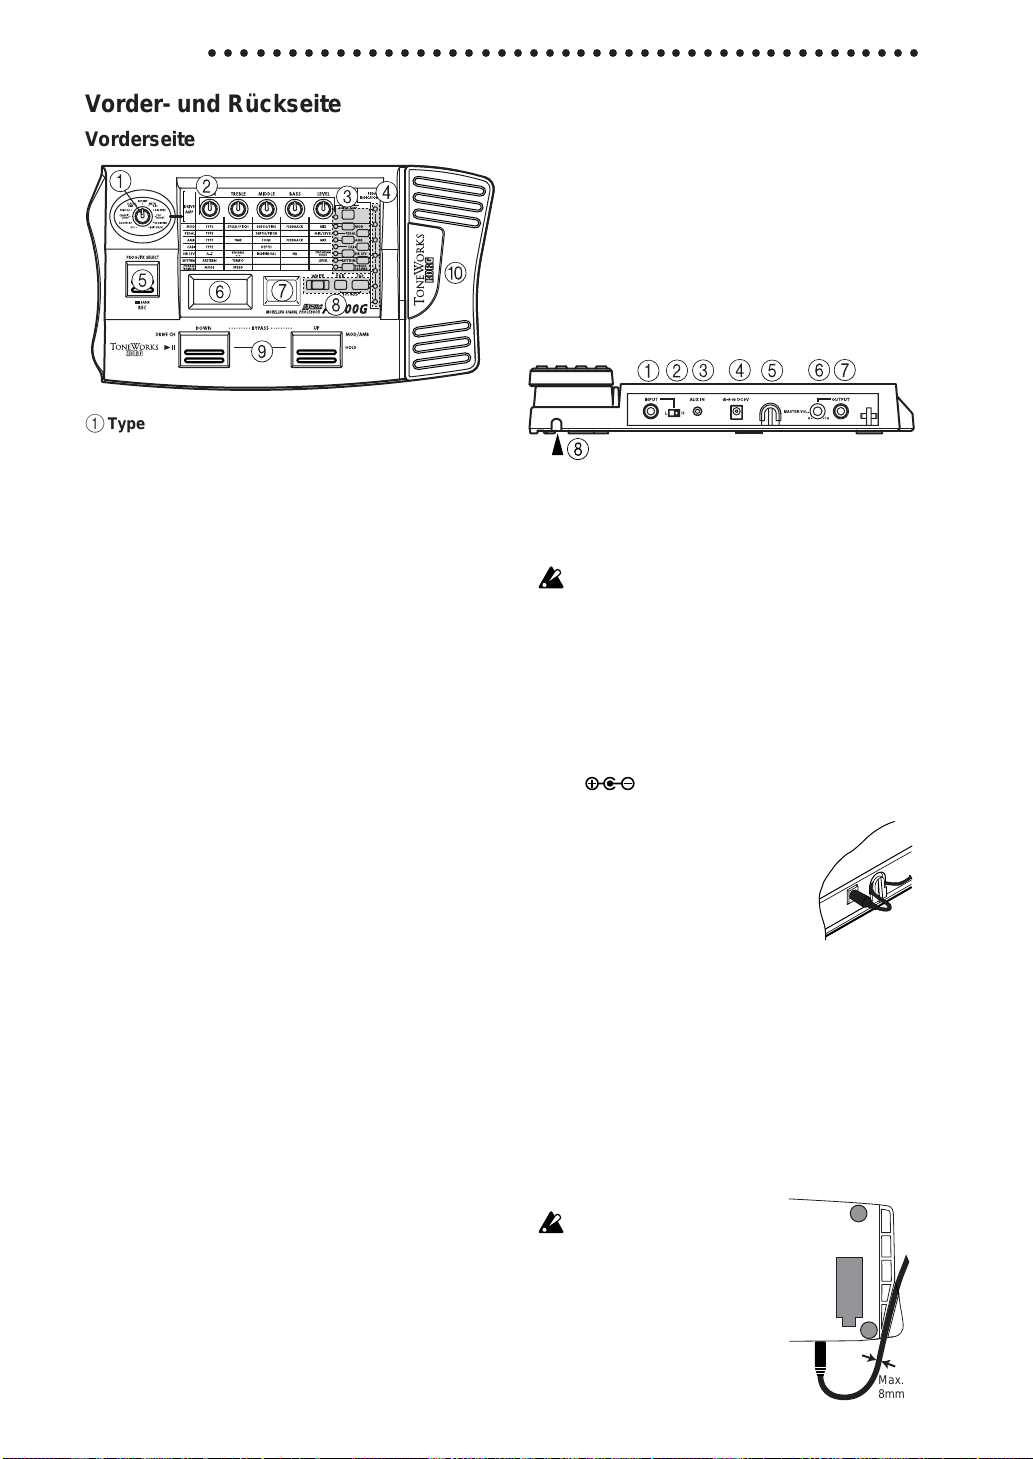
1. Einleitung
○○○○○○○○○○○○○○○○○○○○○○○○○○○○○○○○○○○○○○○○○○○○○
Vorder- und Rückseite
Vorderseite
1 Type-Regler
Hiermit kann der benötigte Drive Amp-Effekt gewählt werden.
2 Regler „1“—„5“
Diese Regler sind jeweils den Parametern des gewählten Effekttyps zugeordnet. Die Regler wollen wir im weiteren Verlauf
(von links nach rechts) „1“ bis „5“ nennen.
Solange Sie keinen Effekt editieren, sind die Regler den Parametern des Drive Amp-Effektes zugeordnet. (Siehe „Editieren
des Drive Amp-Effektes“ auf S. 41.)
3 Effektwahltasten
Bei wiederholtem Drücken der DRIVE·AMP-Taste wählen Sie
abwechselnd Kanal A und B des Drive Amp-Effektes. Außerdem wird der Editierbetrieb aktiviert. Die Diode neben dieser
Taste blinkt abwechselnd grün (Kanal A) oder rot (Kanal B).
Drücken Sie die Taste MOD, PEDAL, AMB oder CABI, um
den zugeordneten Effekt ein- oder auszuschalten bzw. um ihn
editieren zu können. Die dazugehörige Diode zeigt jeweils den
Status an: leuchtet, aus und blinkt (Editieren).
Durch wiederholtes Drücken der NR LEV-Taste wählen Sie
abwechselnd den Editierbetrieb (Diode blinkt) und den AnStatus (Diode leuchtet).
Mit den Tasten RHYTHM und PHRASE TRAINER können Sie
die dazugehörige Funktion abwechselnd ein- und ausschalten. Die
Diode neben der gedrückten Taste leuchtet dann bzw. erlischt.
4 Pedalanzeige
Diese LED-Kette zeigt den Status des Pedaleffektes (d.h. wie
weit das Pedal gedrückt ist) an. Wenn die Stimmfunktion (Tuner) aktiv ist, zeigen diese Dioden an, wie genau die gespielte
Note gestimmt ist. Im Phrase Trainer-Modus wird hiermit die
Aufnahme-/Wiedergabedauer angezeigt.
5 PROG/FX SELECT-Taste
Mit dieser Taste wählen Sie abwechselnd den Program- (PROG)
und Effektwahl-Modus (FX SELECT).
6 Multi-Display
Hier werden der Program-Name, die Parameternamen und werte sowie für das Editieren wichtige Symbole angezeigt.
7 Nummern-LED
Hier werden die Program-Bank, und -Nummer angezeigt.
Wenn die Stimmfunktion (Tuner) eingeschaltet ist, erscheint
hier der Name der erkannten Note.
8 WRITE-, EXIT-, TAP-Tasten
Mit der WRITE-Taste kann ein editiertes Program gespeichert werden. Die EXIT-Taste erlaubt die Rückkehr in den Program-Modus. Bei Verwendung eines Delay-Effekts können Sie durch wiederholtes Drücken der TAP-Taste die Verzögerungszeit einstellen.
36
9 DOWN- und UP-Taste
Mit diesen Tasten können Programs, der Bypass-Modus, die
Mute-Funktion (Stummschaltung) sowie der benötigte Drive
Amp-Kanal gewählt werden.
0 Schwellpedal
Hiermit kann der Effekt angesteuert werden, der als PedalEffekt definiert wurde. Wenn Sie das Pedal vollständig hinunterklappen und dann noch etwas weiter treten, können Sie
den Pedal- Effekt ein- und ausschalten.
Rückseite
1 INPUT-Buchse
Wenn Sie Batterien für das Gerät verwenden, fungiert diese
Buchse als Netzschalter. Sobald Sie ein Kabel anschließen, ist
der Strom eingeschaltet.
Bevor Sie den Strom ein- oder ausschalten, sollten Sie die Lautstärke aller angeschlossenen Geräte zurückdrehen.
2 Eingangspegelschalte
Stellen Sie diesen Schalter dem Ausgangssignal Ihres Instruments entsprechend ein.
3 Kopfhöreranschluß (Stereominiklinke)
Hier können Sie einen Kopfhörer anschließen.
4 DC9V
Hier können Sie den separat erhältlichen Wechselstromadapter
(DC9V
stellt haben, ist der Strom automatisch eingeschaltet.
) anschließen. Sobald Sie den Anschluß herge-
5 Kabelhalterung
Wenn Sie den separat erhältlichen
Wechselstromadapter anschließen, sollten
Sie dessen Kabel wie in der Abbildung unten in der Halterung befestigen. Wenn Sie
das Kabel aus der Halterung nehmen, sollten Sie es nicht zu stark ziehen oder anspannen.
6 MASTER VOL.-Regler (allgemeine Lautstärke)
Hiermit bestimmten Sie die Lautstärke der an der OUTPUTBuchse anliegenden Signale.
7 OUTPUT-Buchse
Diese Ausgangsbuchse kann auch als Kopfhöreranschluss verwendet werden.
8 Kabelhaken
Hiermit kann sichergestellt werden, dass sich das Gitarrenkabel
während des Betriebes nicht löst. Verlegen Sie das Kabel wie
in der Abbildung gezeigt.
Diese Kabelführung eignet sich nur
für Gitarrenkabel mit einem Durchmesser von maximal 8mm.
Max.
8mm
Page 37

○○○○○○○○○○○○○○○○○○○○○○○○○○○○○○○○○○○○○○○○○○○○○○○○○○○○○
The modes of the AX100G
Der AX100G bietet drei Modi: den Program-Modus, den Effektwahl-Modus und den Phrase Trainer-Modus.
Program-Modus
In diesem Modus können Sie Programs wählen und den AX100G
als Gitarreneffekt verwenden.
Mit den Fußtastern UP und DOWN können Programs gewählt
werden.
Unmittelbar nach dem Einschalten wechselt der AX100G auto-
matisch in diesen Modus. Ab Werk enthalten die User-Programs
dieselben Einstellungen wie die Preset-Programs.
Effektwahl-Modus
In diesem Modus können der UP- und DOWN-Fußtaster zum
Aufrufen des jeweils anderen Drive Amp*
werden. Außerdem kann der Modulations- oder Ambience-Effekt ein- und ausgeschaltet werden.
In dieser Betriebsart können Sie keine Programs wählen. Das geht
nur im Program-Modus.
*1 Der AX100G ist mit zwei (A und B) Drive Amp-Effekten je Program aus-
gestattet (Verzerrung). So können Sie mühelos zwischen dem Begleitund Solo-Sound hin und her schalten, ohne jeweils ein anderes Program
wählen zu müssen.
Phrase Trainer-Modus
In diesem Modus können Sie eine Passage einer CD oder MD
aufnehmen und so oft in einer Schleife abspielen, bis Sie die gewünschte Phrase beherrschen. Schließen Sie den Player für die
Aufnahme an die AUX IN-Buchse an.
Die Wiedergabegeschwindigkeit der gesampelten Phrase kann
verringert werden, ohne dass sich dabei die Tonhöhe ändert. So
dürften Sie mühelos in der Lage sein, die gewünschte Passage
einzustudieren.
Beim Aufrufen des Phrase Trainer-Modus’ werden der
Modulations-, Pedal- und Ambience-Effekt automatisch ausgeschaltet.
Im Program- und Effektwahl-Modus können sie mit den Bedienelementen die Effekte editieren, die Rauschunterdrückung einstellen, die Program-Lautstärke regeln und den Program-Namen
eingeben.
1
-Kanals verwendet
2. Spielen mit dem AX100G
Anschlußbeispiele
Ver gewissern Sie sich, daß das Gerät vom Netz getrennt ist, bevor Sie Anschlußverbindungen vornehmen. Andernfalls kann
unbeabsichtigte Bedienung des Geräts zu Schäden an Ihrer Lautsprecheranlage oder am Gerät selbst führen.
Kopfhörer (*1)
Stereo 1/4"-Stecker –
Stereo Cinch-Stecker
Mono-Ausgabe – Mono 1/4"-Stecker/
Stereo-Ausgabe – zwei Mono 1/4"-Stecker
Gitarrenverstärker/
Powered Monitor-System (*1)
Mono1/4"-Stecker –
Mono 1/4"-Stecker
Wechselstromadapter (*2)
zur Netzsteckdose
Audiosystem
Hard Disk Recorder usw.
Gitarre
Mono 1/4"-Stecker –
Mono 1/4"-Stecker
2. Spielen mit dem AX100G
Batterien einbauen
1. Drücken Sie leicht auf Pfeil A des Batteriefaches, und schieben Sie den Deckel in Pfeilrichtung nach oben, um das Fach
zu öffnen.
2. Legen Sie wie in der Abbildung vier Mignonzellen (separat
erhältlich) ein. Achten Sie hierbei auf die korrekte Polarität (+
und -) der Batterien.
3. Schließen Sie den Deckel des Batteriefaches.
Wenn Sie das Gerät über einen längeren Zeitraum nicht benutzen, sollten Sie die Batterien herausnehmen, um zu verhindern,
daß diese auslaufen und das Gerät beschädigen.
Wenn im Multi-Display die Meldung „
wird, muss die Batterie so schnell wie möglich ausgewechselt
werden.
BATTERY
“ angezeigt
*1: Die OUTPUT-Buchse ist ein Stereo-Ausgang. Wenn Sie
den AX100G über ein Mono-Klinkenkabel an einen
Gitarrenverstärker anschließen, wird nur der Klang des
linken Kanals (L) ausgegeben.
*2: Wenn Sie Batterien verwenden, benötigen Sie keinen
Wechselstromadapter. Beim Einsatz eines Wechselstromadapters sollten Sie nur das angegebene Modell (DC9V
) verwenden.
Gerät einschalten
Der AX100G besitzt keinen Netzschalter. Das Gerät wird eingeschaltet, wenn eine der folgenden Bedingungen erfüllt ist.
◆
Bei der Verwendung von Batterien wird der Strom eingeschaltet, wenn Sie ein Kabel mit einem Mono-Klinkenstecker an
die INPUT-Buchse anschließen.
Wenn Sie ein Kabel mit einem Stereo-Klinkenstecker anschließen, wird der Strom nicht eingeschaltet.
◆
Bei Verwendung des separat erhältlichen Wechselstromadapters wird der Strom eingeschaltet, wenn Sie den
Wechselstromadapter an eine Netzsteckdose anschließen.
Sie den AX100G ausschalten, sollten Sie alle anderen angeschlossenen Geräte ausschalten.
37
Page 38
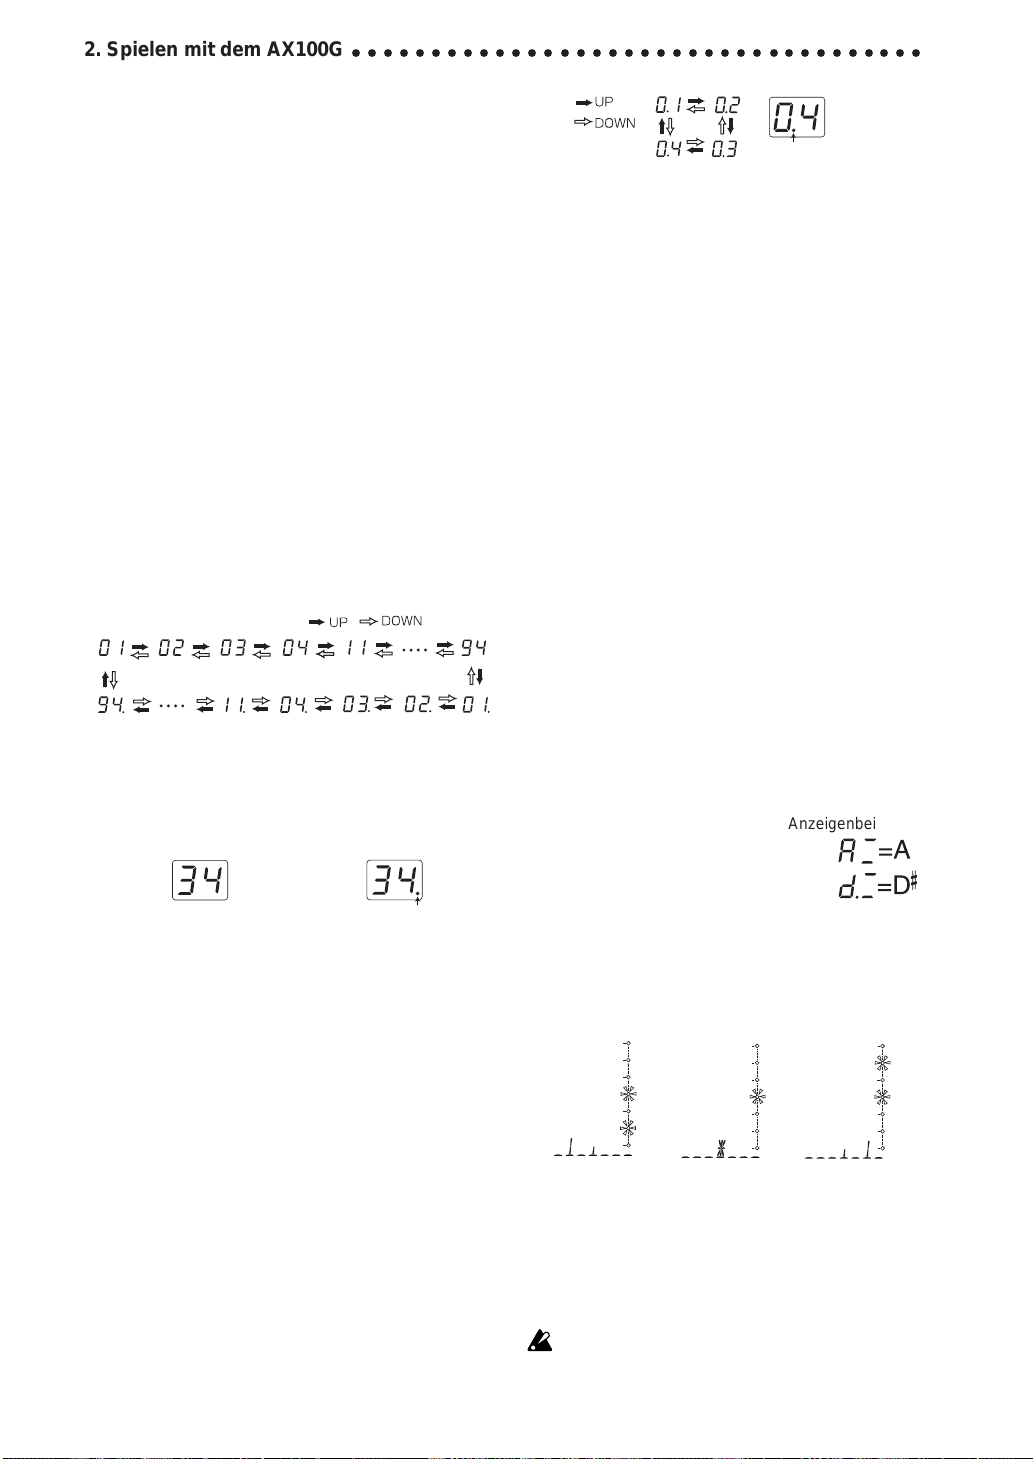
2. Spielen mit dem AX100G
○○○○○○○○○○○○○○○○○○○○○○○○○○○○○○○○○○○○
Der Programme-Modus
Beim Einschalten ruft der AX100G automatisch den Program-Modus auf. Außerdem wird das zuletzt verwendete Program geladen.
Der Punkt leuchtet
Einstellen des Eingangspegels
Stellen Sie diesen Schalter dem Ausgangssignal Ihres Instruments
entsprechend ein.
H: Geeignet für Tonabnehmer mit hohem Ausgangspegel,
z. B. Humbucking Pickups.
L: Geeignet für Tonabnehmer mit niedrigem Ausgangspegel,
z. B. Single Coil Pickups.
Einstellen der allgemeinen Ausgangslautstärke (Master Volume)
Mit dem MASTER VOL.-Regler auf der Rückseite kann die Ausgangslautstärke des AX100G geregelt werden.
Aufrufen eines Programs
Mit UP und DOWN können Sie das jeweils nächste bzw. vorige
Program aufrufen. Der Name des gerade aktiven Programs erscheint im Multi-Display.
Die Programs sind in Vierergruppen unterteilt, die wir “Bänke”
nennen. Die Zehnerstelle im numerischen LE-Display verweist
auf die aktuell gewählte Bank.
Presetprogramm
User-Programm
Der AX100G enthält insgesamt 80 Programs (Effektprogramme):
40 Preset-Programs (4 x 10 Bänke) und noch einmal 40 UserPrograms (4 x 10 Bänke). Die User-Programs können editiert und
überschrieben werden. Bei Anwahl eines User-Programs leuchtet im LE-Display ein Punkt.
Presetprogramm
Aufrufen einer Program-Bank
Mit UP und DOWN kann jeweils das nächste oder vorangehende Program aufgerufen werden. Sie können jedoch auch direkt
eine andere Bank anwählen.
1. Halten Sie die PROG/FX SELECT-Taste ca. eine Sekunde ge-
drückt, bis die Zahl im numerischen LE-Display zu blinken
beginnt.
2. Drücken Sie nun entweder UP oder DOWN, um die nächste
bzw. vorangehende Bank aufzurufen.
3. Betätigen Sie noch einmal PROG/FX SELECT, um die Bank-
anwahl zu bestätigen. Die Zahl im numerischen LE-Display
leuchtet nun wieder konstant.
Verriegeln der Bank (10‘s Hold)
Drücken Sie TAP und EXIT gleichzeitig, um zu verhindern, dass
Programs anderer Bänke gewählt werden können. Im numerischen LE-Display erscheint nun ein Punkt, um Sie auf die Bankverriegelung hinzuweisen.
Nun können Sie mit UP und DOWN nur noch Programs der
derzeit aktiven Bank wählen.
Um die Bank Hold-Funktion (10‘s Hold) wieder zu deaktivieren,
müssen Sie TAP und EXIT noch einmal gleichzeitig drücken.
UserProgramm
Der Punkt leuchtet
Nachschauen, welche Effektblöcke zum Einsatz kommen
Bestimmte Programs verwenden nur einen Teil der möglichen
Effekte. Bei Anwahl eines Programs leuchten die Dioden der
Effektblöcke, die derzeit aktiv sind. Die Dioden nicht verwendeter Effektblöcke leuchten hingegen nicht. Drücken Sie die Wahltaste eines ausgeschalteten Effektes, um seine Parameter editieren
zu können. Gleichzeitig wird dieser Effekt dann eingeschaltet.
Wenn Sie danach eine andere Wahltaste oder die EXIT-Taste drükken, blinkt die Diode nicht mehr, sondern leuchtet konstant.
Bypass (Umgehung) und Mute (Stummschaltung)
Drücken Sie UP und DOWN gleichzeitig, um die Effekte des
AX100G zeitweilig zu umgehen und nur das „trockene“ Signal
auszugeben. (Im Multi-Display erscheint etwa eine Sekunde lang
die Meldung „BYPASS“.)
Wenn Sie UP und DOWN länger als eine Sekunde gedrückt halten, aktivieren Sie die Mute- Funktion des AX100G, so dass kein
Signal mehr ausgegeben wird. (Im Multi-Display erscheint etwa
eine Sekunde lang die Meldung „MUTE“.)
Drücken Sie UP oder DOWN, um die Bypass- oder Mute-Funktion wieder auszuschalten.
Automatische Stimmfunktion
Sind der Bypass-Modus oder die Stummschaltung aktiviert, so
wird automatisch die Stimmfunktion des AX100G aufgerufen.
Bei aktivierter Stummschaltung können Sie auf diese Weise Ihr
Instrument stimmen, ohne daß ein Audiosignal ausgegeben wird.
Dieses ist insbesondere auf der Bühne sehr praktisch.
1. Stimmen Sie die Gitarre bereits so weit,
dass im LED der Name der richtigen
Note erscheint. Der Punkt („.“) im
LED leuchtet, wenn eine Note mit einem Kreuz (
2. Die sieben Pedal-Dioden zeigen an, wie weit die Stimmung
der Saite noch von der gewünschten Note entfernt ist. Stimmen Sie die Saite so, dass die Diode in der Mitte leuchtet.
Abweichungen in der Stimmung, angezeigt durch die fünf
Steuer-LEDs und die Namensanzeige
zu tief
gestimmt
) erkannt wird, z.B. Dis.
korrekte
Stimmung
Einstellen der Kalibrierung
Sie können die Kalibrierung der Stimmfunktion (d. h. die Frequenz des Kammertons „a“) in einem Bereich von 438…445 Hz
frei wählen.
Solange die Stimmfunktion (Tuner) aktiv ist, können Sie mit Regler „1“ die Frequenz des Kammertons ändern. Die aktuelle Einstellung erscheint im Multi-Display.
Die eingestellte Kalibrierung geht nach dem Ausschalten des
Geräts verloren. Beim Einschalten wird automatisch wieder der
Grundwert „440 Hz“ eingestellt.
Anzeigenbeispiele
zu hoch
gestimmt
38
Page 39
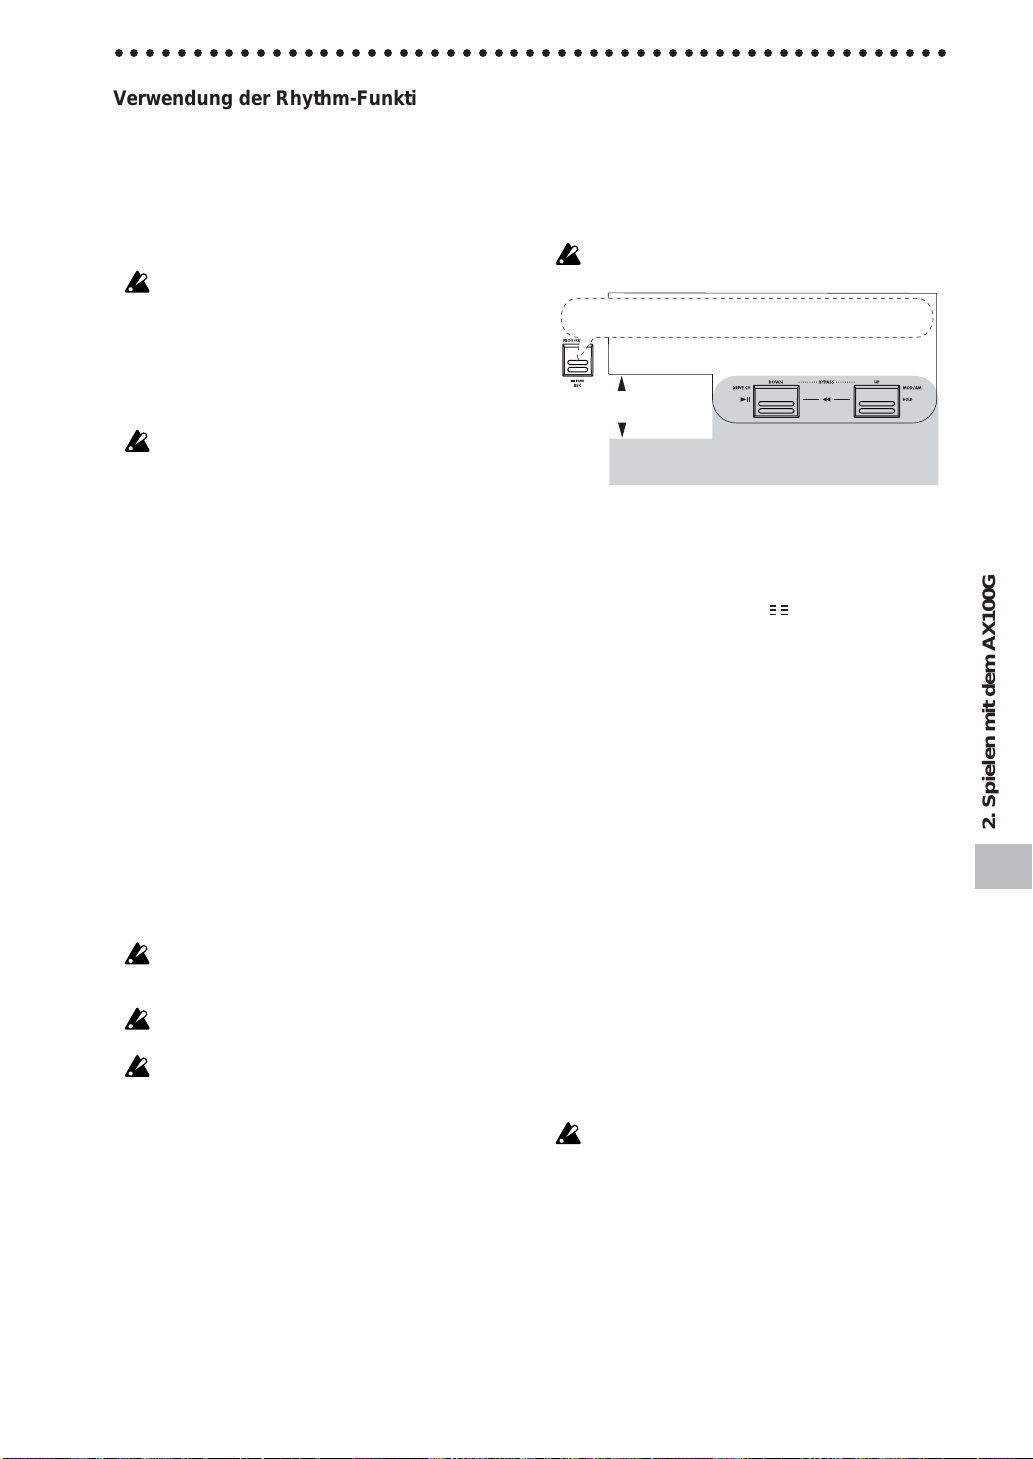
○○○○○○○○○○○○○○○○○○○○○○○○○○○○○○○○○○○○○○○○○○○○○○○○○○○○○
Verwendung der Rhythm-Funktion
Drücken Sie die RHYTHM-Taste (Diode leuchtet), um die Wiedergabe eines Rhythmus- Pattern zu starten. Mit Regler „1“ können Sie nun eine andere Rhythmusbegleitung wählen (es gibt 50
Typen). Mit Regler „2“ kann das Tempo eingestellt werden (40—
208). Verwenden Sie Regler „3“ zum Einstellen der Rhythm-Lautstärke (0—30).
Um die Rhythmusbegleitung wieder anzuhalten, müssen Sie
RHYTHM noch einmal betätigen.
Beim Aktivieren des Bypass-, Mute- oder Edit-Modus’ hält die
Rhythmuswiedergabe an.
AUX IN
Das an der AUX IN-Buchse anliegende Signal (z.B. eines CDoder MD-Spielers) kann zu den Effektsignalen des AX100G hin-
zugefügt und gemeinsam mit diesen ausgegeben werden, so dass
Sie auch zu Ihren Lieblingstiteln spielen können.
Außer wenn gerade der Phrase Trainer-Modus gewählt ist, wer-
den die über AUX IN empfangenen Signale gemeinsam mit den
Effektsignalen des AX100G zur OUTPUT-Buchse übertragen.
Die Lautstärke der an AUX IN angeschlossenen Signalquelle
muss auf dem betreffenden Gerät selbst eingestellt werden.
Schwellpedal
Mit dem Schwellpedal kann jeweils einer von 23 Pedal-Effekttypen in Echtzeit angesteuert werden.
Wenn Sie ein Program mit Pedal-Effekt aufgerufen haben, leuchten die Dioden des Pedals, um den Höchst- und Mindestwert
anzeugen, die per Fuß eingestellt werden können. Im Falle der
Effekte SAMPLE1—LOOP2 verhält sich das Pedal jedoch etwas
anders (siehe S. 46).
Verwendung des Reglerpedals während der Spiels
1. Wählen Sie im Programme-Modus ein Programm aus, wel-
ches das Reglerpedal verwendet.
2. Schauen Sie nach, ob die Pedalanzeige leuchtet. Ist das nicht
der Fall, so müssen Sie das Pedal so weit wie möglich hinunterdrücken, damit die oberste Diode der Pedalanzeige
leuchtet (das bedeutet, dass das Pedal eingeschaltet ist).
3. Spielen Sie auf Ihrer Gitarre und betätigen Sie dabei das Reglerpedal. Je nachdem, in welche Richtung Sie das Pedal drükken, ändert sich der Klang entsprechend.
Wenn Sie als Pedaleffekt VOLUME wählen, kann die Pedalfunktion nicht ein-/ ausgeschaltet werden. Deshalb leuchtet die
Pedalanzeige immer.
Der Pedalstatus (ein/aus) wird nicht im jeweiligen Programm
gespeichert.
Üben Sie keinen übermäßigen Kraftaufwand auf das Reglerpedal
aus. Bevor Sie das Pedal bedienen, loten Sie den Kraftaufwand
aus, der notwendig ist, um das Pedalanzeige und den Effekt anzuwenden.
Effektwahl-Modus
In diesem Modus können Sie mit DOWN abwechselnd den einen und den anderen Drive Amp- Kanal wählen. Mit UP kön-
nen Sie den Modulations- und Ambience-Effekt ein- und ausschalten.
Wie auch im Programme-Modus können Sie hier Einstellungen
editieren, das rhythmus verwenden und Programme speichern.
In diesem Modus können Sie Programme nicht wechseln oder
den Bypass-Modus bzw. die Stummschaltung aktivieren.
So lange drücken, bis die
LED-Nummer zu blinken beginnt.
ProgrammeModus
Mit PROG/FX SELECT kann
ein anderer Modus gewählt
werden.
EffektwahlModus
Vorige
Bank
Vorige
Program
Anwahl des
jeweils anderen
Drive Amp-Kanals.
Aufrufen des Effektwahl-Modus
Wenn derzeit der Program-Modus aktiv ist, müssen Sie PROG/
FX SELECT betätigen, um den Effektwahl-Modus zu wählen.
Im Multi-Display erscheint nun die Meldung „FX SEL“, während das numerische LE-Display „
Wechseln des Drive Amp-Kanals
Alle Programme enthalten zwei separate Drive Amp-Effekteinstellungen, so dass Sie mühelos vom Begleit- zum Solo-Sound und
zurück wechseln können.
Mit DOWN wählen Sie abwechselnd Kanal A und B. Wenn Kanal A gewählt ist, leuchtet die Diode neben der DRIVE·AMP-
Taste grün. Wählen Sie Kanal B, so leuchtet diese Diode rot.
Ein-/Ausschalten des Modulations- und AmbienceEffektes
Mit UP können Sie den Modulations- oder Ambience-Effekt abwechselnd ein- und ausschalten.
Mit folgendem Verfahren können Sie einstellen, welcher Effektblock über UP ein- und ausgeschaltet werden kann:
(INDIVIDUAL)
Arbeitsweise
1. Drücken Sie NR LEV.
2. Sorgen Sie mit Regler „3“ dafür, dass im Display die benötigte Einstellung angezeigt wird.
MOD: Es kann nur der Modulationseffekt ein-/ausgeschaltet
werden.
AMB: Es kann nur der Ambience-Effekt ein-/ausgeschaltet
werden.
M+A: Sowohl der Modulations- als auch der Ambience-Ef-
fekt werden ein-/ausgeschaltet.
Bestimmte Effektprogramme lassen die Simultanverwendung des
Modulations- und Pedal- Effektes bzw. des Ambience- und Pedal-Effektes nicht zu. In dem Fall wird der eine Effekt ausgeschaltet, wenn Sie den anderen aktivieren und umgekehrt.
“ anzeigt.
Nächste
Bank
Nächste
Program
Ein-/Ausschalten
von MOD/AMB.
2. Spielen mit dem AX100G
Verlassen des Effektwahl-Modus
Betätigen Sie den PROG/FX SELECT-Taste oder die EXIT-Ta-
ste, um wieder in den Programme-Modus zurückzukehren.
39
Page 40
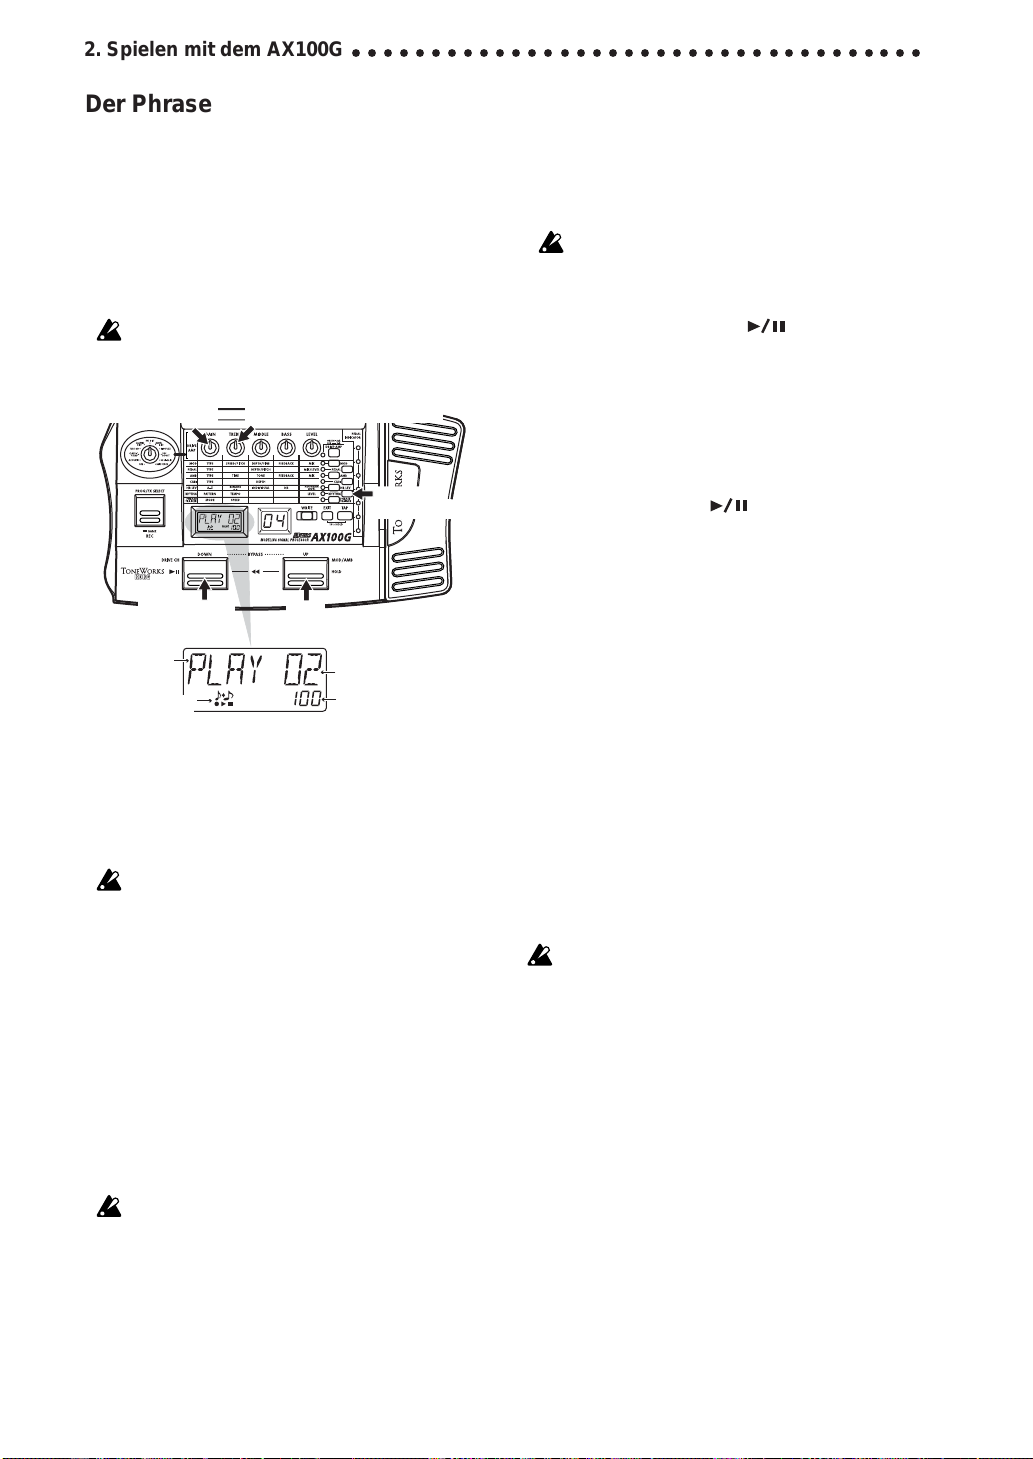
2. Spielen mit dem AX100G
○○○○○○○○○○○○○○○○○○○○○○○○○○○○○○○○○○○○
Der Phrase Trainer-Modus
In diesem Modus können Sie eine Phrase von einer Audioquelle
(CD, MD usw.), die mit dem AUX IN-Anschluß auf der Rückseite verbunden ist, aufzeichnen und sie dann in einer Endlosschleife
wiedergeben. Sie können dann auf Ihrer Gitarre dazu üben.Da
sich die Wiedergabegeschwindigkeit vermindern läßt, ohne daß
die Tonhöhe davon beeinflußt wird, ist dies eine praktische Möglichkeit, schwierige Passagen von CD oder MD zu lernen und
zu üben.
Im Phrase Trainer-Modus fungiert das Schwellpedal automatisch
als Lautstärkeregler (Volumenpedal) des Gitarrensignals.
Beim Aufrufen dieses Modus’ werden der Modulations-, Pedalund Ambience-Effekt automatisch ausgeschaltet. (Bei Verlassen
des Phrase Trainer-Modus’ werden sie im Bedarfsfalle wieder eingeschaltet.)
Aufnahmebetrieb
Start/Stop
Phrase
Trainer-Status
Phrase
Trainer-Symbol
1. Wechseln Sie in den Phrase Trainer-Modus.
Drücken Sie die PHRASE TRAINER-Taste rechts im Bedienfeld.
(Die dazugehörige Diode leuchtet nun.)
Das Phrase Trainer-Symbol im Multi-Display blinkt. Außerdem
wird der gewählte Aufnahmebetrieb angezeigt.
Im Phrase Trainer-Modus kann das Effektprogramm nicht
editiert werden. Folglich muss der gewünschte „Sound“ bereits
vor Aufrufen des Phrase Trainer-Modus’ angewählt werden.
2. Wählen Sie den Aufnahmebetrieb.
Wählen Sie mit Regler „1“ eine der folgenden Möglichkeiten:
AUX IN: Das an AUX IN anliegende Signal (maximal 8
Sekunden) wird aufgenommen.
GTR IN: Es kann ein Gitarrensignal von maximal 8 Sekunden
aufgenommen werden.
3. Beginn der Aufzeichnung
Starten sie die Wiedergabe der angeschlossenen Signalquelle.
Drücken Sie die PROG/FX SELECT-Taste an der Stelle, wo die
Aufnahme beginnen soll. Im Multi-Display werden dann „REC“
sowie die Anzahl der verbleibenden Sekunden angezeigt. Die
Pedalanzeige (LED- Kette) informiert Sie über die Aufnahmedauer.
Nach Aufzeichnungsbeginn ist es nicht mehr möglich, den Aufzeichnungsmodus zu ändern. Wenn Sie in den anderen Aufzeichnungsmodus wechseln wollen, müssen Sie zunächst in den
Programme-Modus zurückkehren und dann erneut den Phrase Trainer-Modus aufrufen.
Wiedergabegeschwindigkeit
Phrase
Trainer-Modus
Hold
(Haltefunktion)
Wiedergabe-/
Aufnahmedauer
Wiedergabegeschwindigkeit (%)
4. Ende der Aufzeichnung
Drücken Sie am Ende der aufzunehmenden Passage noch einmal PROG/FX SELECT (REC). Ansonsten hält die Aufnahme automatisch an, sobald die Aufnahmekapazität (8 Sekunden) erschöpft ist. Im Multi-Display erscheint dann die Meldung „PLAY“ und die Loop-Wiedergabe (Schleife) beginnt au-
tomatisch.
Abhängig von der Lautstärke des angeschlossenen Audiogeräts
kann der Klang verzerrt sein. Verringern Sie in diesem Fall die
Lautstärke des angeschlossenen Audiogeräts.
Wiederholen der Aufzeichnung
Wiederholen der Aufzeichnung ( ), um die Wiedergabe
anzuhalten. Fahren Sie dann fort wie unter „3. Beginn der
Aufzeichnung“ und „4. Ende der Aufzeichnung“ beschrieben.
Löschen der aufgezeichneten Phrase
Betätigen Sie die EXIT-Taste, um die Aufnahme zu löschen.
Alternativ können Sie auch eine andere Phrase aufzeichnen,
die dann die zuvor aufgezeichnete überschreibt.
5. Anhalten der Wiedergabe
Betätigen Sie den DOWN (
), um die Wiedergabe anzuhalten. Betätigen Sie die Taste erneut, so wird die Wiedergabe
fortgesetzt.
• Solange die Passage mit Hold gehalten wird, können Sie wie-
der zum Beginn der Phrase zurückkehren, indem Sie UP
und DOWN gleichzeitig betätigen.
•Wenn Sie UP und DOWN während der Wiedergabe betäti-
gen, wird zurückgespult.
•Während der Wiedergabe können Sie das Signal durch be-
tätigen von UP (HOLD) an der erreichten Stelle halten. Drükken Sie diese Taste noch einmal, um die Haltefunktion wieder auszuschalten.
Einstellen der Wiedergabegeschwindigkeit
Die Phrase Trainer-Funktion erlaubt das Verringern der
Wiedergabegeschwindigkeit, ohne dass sich dabei die Tonhöhe ändert.
Stellen Sie mit Regler „2“ die gewünschte Geschwindigkeit in
5%-Schritten ein: 100%, 95%, 90%, 85% … 25%.
Verlassen des Phrase Trainer-Modus
Um wieder in den Program-Modus zu wechseln, drücken Sie
bitte PHRASE TRAINER oder EXIT.
Wenn Sie den Phrase Trainer-Modus verlassen oder das Gerät
abschalten, geht die aufgezeichnete Phrase verloren.
40
Page 41
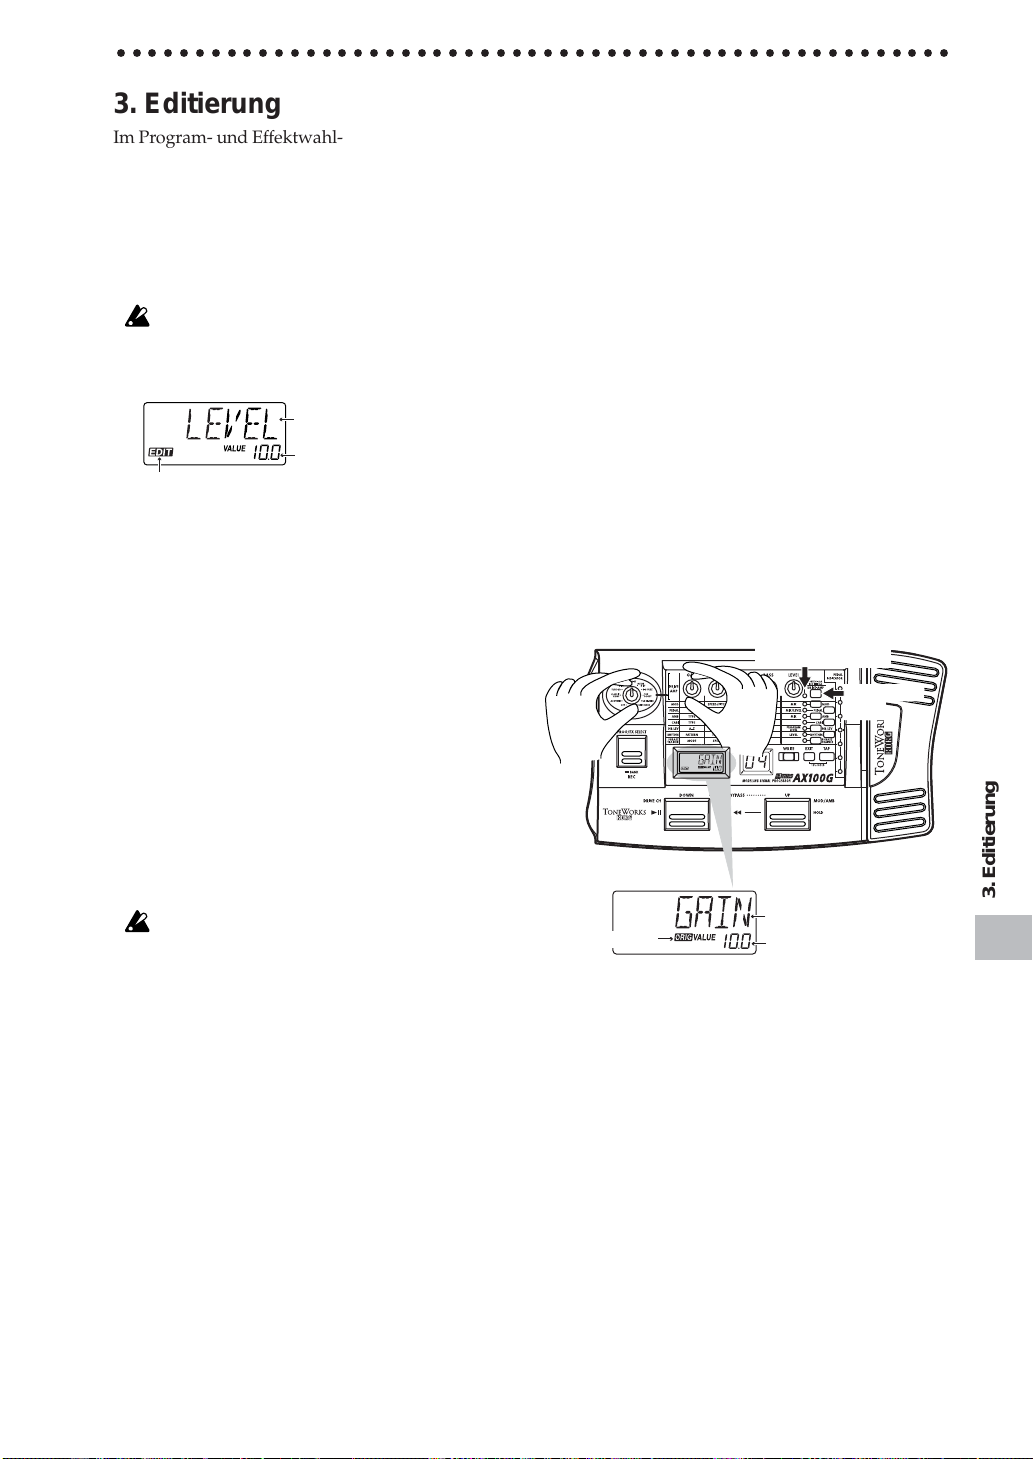
○○○○○○○○○○○○○○○○○○○○○○○○○○○○○○○○○○○○○○○○○○○○○○○○○○○○○
3. Editierung
Im Program- und Effektwahl-Modus können Sie die
Effekte editieren, die Rauschunterdrückung und den
Program-Pegel einstellen sowie den Namen des
Programs eingeben.
Beim Editieren blinken die Editiersymbole sowie die
Dioden neben den Wahltasten der einzelnen Effektblöcke.
Um ein editiertes Program auch später noch verwenden zu können, müssen Sie es mit „Program Write“ speichern. Wenn Sie
den AX100G ausschalten, ohne Ihre Einstellungen zu speichern,
werden Ihre Änderungen wieder gelöscht.
The dem von Ihnen bewegten
Regler zugewiesene Parameter
Parameterwert
EDIT-Symbol
Editieren der Effekte
Den Drive Amp-Effekt können Sie sofort editieren, indem Sie an
den Reglern „1“—„5“ sowie Type drehen. Sie brauchen die
DRIVE·AMP-Taste also nicht erst zu drücken. (Siehe auch
„Editieren des Drive Amp-Effektes“ weiter unten.)
Um einen anderen Effekt zu editieren, müssen Sie seine Taste
drücken. Hierdurch aktivieren Sie den Editierbetrieb dieses Effektes (Diode blinkt).
Editieren des Drive Amp-Effektes
Wenn der Drive Amp-Effekt eingeschaltet ist, können Sie mit dem
Type-Regler den gewünschten Verzerrungstyp wählen. Die übrigen Parameter lassen sich mit den fünf Reglern wunschgemäß
einstellen. Während dieser Editierung zeigt das Multi-Display
jeweils den Parameternamen des verwendeten Reglers sowie
dessen aktuellen Wert an.
Auch wenn derzeit der Modulations- oder Pedal-Effekt editiert
werden kann, dient der Type- Regler weiterhin zum Aufrufen
eines anderen Drive Amp-Typs.
Wenn die Regler „1“—„5“ derzeit andere Funktionen haben bzw.
wen der Bypass-, Mute- oder Phrase Trainer-Modus aktiv ist,
können die Regler nicht zum Editieren verwendet werden.
Wahl des Drive Amp-Kanals
Pro Program können zwei Drive Amp-Kanäle (A und B) eingestellt werden.
Drücken Sie die DRIVE·AMP-Taste rechts auf der
Bedienoberfläche, um den zu editierenden Kanal zu wählen. Bei
wiederholtem Drücken dieser Taste leuchtet die dazugehörige
Diode abwechselnd grün (Kanal A) und rot (Kanal B).
Editieren des Drive Amp-Effektes (Beispiel)
Als Beispiel wollen wir Ihnen hier zeigen, wie man für Kanal B
den Drive Amp-Typ TUBE OD wählt.
1. Drücken Sie die DRIVE·AMP-Taste so oft, bis Kanal B (Diode
leuchtet rot) gewählt ist.
2. Wenn das Multi-Display nun bereits „TUBE OD“ anzeigt,
braucht die Einstellung nicht geändert zu werden. Sonst müssen Sie mit dem Type-Regler TUBE OD wählen. Wenn sich
der Type-Regler derzeit bei TUBE OD befindet, müssen Sie
kurz einen anderen und dann wieder diesen Typ wählen.
3. Die Diode neben dem Drive Amp-Effekt beginnt zu blinken,
um anzuzeigen, dass dieser Effekt editiert werden kann. (Im
Multi-Display wird nun „TUBE OD“ angezeigt.) Wenn Sie
wieder den gespeicherten Wert einstellen, erscheint das Original-Symbol im Multi-Display.
4. Die fünf Regler sind den Parameteren GAIN, TREBLE,
MIDDLE, BASS und LEVEL zugeordnet. Stellen Sie diese also
wunschgemäß ein. (Siehe außerdem „Effektparameter“ auf S.
44.)
5. Wenn Sie an einem Regler drehen, ändert sich der Klang, während das Display den Namen und den Wert des zuletzt eingestellten Parameters anzeigt. Wenn Sie für diesen Parameter
danach wieder den gespeicherten Wert wählen, erscheint das
Original-Symbol im Multi- Display.
Channel A/B display
DRIVE·AMP
switch
Parameter
ORIG-Symbol
Wenn Sie den Drive Amp-Effekt nicht brauchen, müssen Sie mit
dem Type-Regler OFF wählen, um den Drive Amp-Effekt zu
umgehen. Im Multi-Display erscheint dann die Meldung „DRV
OFF“. Außerdem erlischt die Diode neben der DRIVE·AMP-Ta-
ste.
Parameterwert
3. Editierung
41
Page 42

3. Editierung
○○○○○○○○○○○○○○○○○○○○○○○○○○○○○○○○○○○○○○○○○○○○○
Editieren der anderen Effekte
Wählen Sie den zu editierenden Effekt, indem Sie die dazugehörige Taste drücken.
MOD: Anwahl des Modulationseffektes (z.B. Chorus)
PEDAL: Anwahl des Pedal-Effektes (z.B. Wah)
AMB: Anwahl des Ambience-Effektes (z.B. Delay)
CABI: Anwahl des Cabinet-Effektes. Hierbei handelt es sich
um ein Modell eines Gitarrenverstärkers.
NR LEV
: Einstellen der Rauschunterdrückung sowie der Pro-
gram-Lautstärke (Ausgangslautstärke).
Bestimmte Effekttypen lassen die Simultanverwendung des
Modulations- und Pedal- Effektes bzw. des Ambience- und Pedal-Effektes nicht zu. Wenn Sie trotzdem versuchen, einen der
beiden Effektblöcke einzuschalten, wird der andere –sofern er eingeschaltet war– automatisch ausgeschaltet.
Als Beispiel wollen wir Ihnen hier zeigen, wie man dem
Modulationseffekt den CHORUS-Typ zuordnet.
1. Drücken Sie die MOD-Taste. Die dazugehörige Diode blinkt
nun, um anzugeben, dass der Modulationseffekt gewählt
wurde.
Wenn der Modulationseffekt zu dem Zeitpunkt ausgeschaltet war, wird er nun aktiviert.
2. Wählen Sie mit Regler 1 (TYPE) CHORUS. Der Name des ge-
wählten Effekttyps wird im Multi-Display angezeigt. Wenn
Sie den für das Program gespeicherten Effekttyp wählen, erscheint das Original-Symbol im Multi-Display.
3. Mit den Reglern 2, 3, 4 und 5 können Sie die Chorus-Geschwin-
digkeit (SPEED), -Intensität (DEPTH), den Rückkopplungsgrad (FEEDBACK) sowie die Balance zwischen dem Original- und Effektsignal (MIX) einstellen. Wählen Sie für einen
dieser Parameter wieder den gespeicherten Wert, so erscheint
das Original-Symbol im Multi-Display.
Die Anzahl der belegten Regler richtet sich nach dem gerade gewählten Effekttyp. (Siehe auch „Effektparameter“ auf S. 44).
Auswahl des
MODEffekttyps
SPEED
DEPTH
FEEDBACK
MIX
MOD-Taste
Einstellen der Verzögerungszeit mit der TAP-Taste
Für den Ambience-Effekt oder den DELAY-Typ des Pedal-Effektes können Sie das Song- Tempo einstellen, indem Sie mindestens zweimal die TAP -Taste drücken. Der AX100G berechnet
automatisch die Intervalle Ihrer „Taktschläge“ und stellt das entsprechende Tempo ein. Die Verzögerungszeit des Delay- Effektes kann auch dann eingestellt werden, wenn Sie nicht spielen.
Ändern des Program-Namens
Drücken Sie die NR LEV-Taste, damit die dazugehörige Diode
zu blinken beginnt. Wählen Sie mit Regler „2“ die Position, für
die Sie ein anderes Zeichen programmieren möchten (diese Position beginnt zu blinken). Wählen Sie mit Regler „1“ das benötigte Zeichen. Es sind folgende Zeichen belegt:
verfügbare Zeichen
Wenn Sie den neuen Namen des Programms nicht verlieren wollen, müssen Sie den Speichervorgang ausführen. Übergehen Sie
diesen Schritt und schalten das Gerät ab oder wählen ein anderes
Programm, so gehen Ihre Änderungen verloren.
Speichern eines Programms
Gehen Sie wie folgt vor, um das Programm zu speichern
1. Drücken Sie die WRITE-Taste, damit im Multi-Display
„✳WRITE✳“ angezeigt wird. Das numerische LE-Display
blinkt nun.
2. Wählen Sie mit UP oder DOWN den Speicher, in dem Sie das
editierte Program sichern möchten.
3. Betätigen Sie die WRITE-Taste erneut. Im Display erscheint
„COMPLT“ (hierdurch wird angezeigt, daß der Speichervor-
gang abgeschlossen ist). Nachfolgend wird wieder der Pro-
gramme-Modus aufgerufen.
Wenn Sie den Vorgang abbrechen wollen, müssen Sie die EXIT-
Taste betätigen.
Wenn Sie Ihre Editierungen unter einer anderen Programmnummer speichern, wird das zuvor dort gespeicherte Programm
überschrieben und geht verloren.
Es ist nicht möglich, zum Speichern einen Preset-Speicherplatz
zu wählen.
42
Parameter
Original-Symbol
Page 43

○ ○○○○○○○○○○○○○○○○○○○○○○○○○○○○○○○○○○○○○○○○○○○○○○○○○○○○
4. Anhang
Einstellen des Pedals (Kalibrierung)
We nn Sie das Gefühl haben, daß das Reglerpedal schwierig zu
benutzen ist, führen Sie diesen Vorgang aus, um die optimale
Funktionsfähigkeit wiederherzustellen. Wenn beispielsweise der
maximale Effekt nicht erreicht wird, obwohl Sie das Pedal vollständig durchgetreten haben, oder umgekehrt der Effekt nicht
die Minimaleinstellung erreicht, obwohl das Pedal ganz zurückgesetzt wurde, gehen Sie wie nachfolgend beschrieben vor, um
die notwendigen Einstellungen vorzunehmen.
Wenn Sie diese Einstellungen vornehmen, betätigen Sie das Pedal mit der Hand. Bei einer Fußbetätigung kann es vorkommen,
daß die Kalibrierung nicht ordnungsgemäß ausgeführt wird.
1. Schalten Sie das AX100G ein, während Sie gleichzeitig die
EXIT-Taste und die PEDAL-Taste betätigen. In der Namens-
anzeige erscheint etwa eine Sekunde lang „PEDAL“, nachfolgend dann „MIN.“.
2. Drücken Sie das Pedal ganz nach vorne. Wenn es anschlägt,
lassen Sie es los und betätigen Sie die WRITE-Taste. Im Display erscheint statt „MIN.“ nun „MAX.“.
Wenn Sie den Vorgang abbrechen wollen, betätigen Sie die
EXIT-Taste. Die normale Einschaltmeldung erscheint, nachfolgend wird der Programme-Modus aufgerufen.
3. Drücken Sie das Pedal nun ganz nach hinten. Wenn es anschlägt, lassen Sie es los und betätigen Sie die WRITE-Taste.
2. Langsam drücken!
Im LC-Display erscheint für etwa eine Sekunde die Meldung
„COMPLT“. Nachfolgend erscheint die normale Einschaltmeldung, und der Programme-Modus wird aufgerufen.
Nach Abschluß der Einstellungen prüfen Sie das Verhalten des
Pedals.
Wählen Sie dazu einen Effekt, der die Überprüfung der Einstellungen leicht macht; weisen Sie beispielsweise dem Pedal den
Effektblock VOLUME zu, wählen Sie als Einstellung 0 und prü-
fen Sie den MIN-Pegel, wenn das Pedal vollständig nach vorne
gedrückt ist.
Unterläuft Ihnen während der Kalibrierung ein Fehler, so erscheint im Display die Meldung „
hergehenden Displayanzeige („
„
ERROR
“ wiederholt, so könnte eine Fehlfunktion aufgetreten
sein. Wenden Sie sich in diesem Fall an Ihren KORG-Händler
3. Langsam drücken!
ERROR
“, gefolgt von der vor-
MIN
.“). Erscheint die Meldung
Wiederherstellen der Werkseinstellungen
1. Schalten Sie das AX100G ein, während Sie gleichzeitig die
EXIT-Taste und den PROG/FX SEL-Taste betätigen. In der
Namensanzeige erscheint die Meldung „RELOAD?“.
2. Betätigen Sie die WRITE-Taste. In der Multi-Display erscheint
die Meldung „RELOAD“, und der Vorgang beginnt. Wenn der
Vo rgang abgeschlossen ist, erscheint für etwa eine Sekunde
die Meldung „COMPLT“. Nachfolgend erscheint die norma-
le Einschaltmeldung, und der Programme-Modus wird aufgerufen.
Schalten Sie das Gerät während dieses Vorgangs niemals ab.
Beim Laden der Werkseinstellungen werden alle User-Programs
und Rhythm-Parameter wieder auf die Vorgabewerte zurückgestellt.
Problemhilfe
Wenn ein Fehlfunktion auftritt, prüfen Sie zunächst die nachfolgend aufgeführten Punkte. Können Sie das Problem damit nicht
lösen, so wenden Sie sich an Ihren KORG-Händler.
1. Das Gerät läßt sich nicht einschalten
✳ Sind Batterien eingelegt? Oder ist der Wechselstromadapter
mit einer Netzsteckdose verbunden? (☞S.37)
✳ st ein Mono-Klinkenkabel an die INPUT-Buchse angeschlos-
sen? (☞S.37)
2. Keine Klänge hörbar
✳ Sind Ihre Gitarre, Ihr Verstärker und/oder Ihre Kopfhörer an
die richtigen Buchsen angeschlossen? (☞S.37)
✳ Ist Ihr Verstärker eingeschaltet und richtig eingestellt?
✳ Ist ein Kabel defekt?
✳ Haben Sie den MASTER VOL.-Regler des AX100G auf den
Mindestwert gestellt? (☞S. 38)
✳ Ist beim Programm des AX100G eine niedrige Lautstärke (oder
„0“) eingestellt. (☞S.41, 48)
✳ Ist für den Parameter LEVEL im Effekte DRIVE·AMP ein nied-
riger Wert (oder „0“) eingestellt?
✳ Ist die Lautstärke Ihrer Gitarre aufgedreht?
✳ Ist das AX100G stummgeschaltet?
✳ Falls dem Reglerpedal der Parameter VOLUME zur Steue-
rung zugewiesen wurde, ist das Pedal eventuell ganz nach
vorne durchgedrückt?
3. Es sind keine Effekte zu hören.
✳ Befindet sich das AX100G im Bypass-Modus. (☞S.38)
✳
Sind die vom Programm verwendeten Effekte aktiviert. (☞S.38)
4. Das Rhythmus funktioniert nicht.
✳ Haben Sie den Programme - oder den Effektwahl-Modus se-
lektiert (im Phrase Trainer-Modus kann das Metronom nicht
eingeschaltet werden)?
✳ Haben Sie für das Metronom die Lautstärke „0“ gewählt.
(☞S.39)
4. Anhang
43
Page 44

4. Anhang
○○○○○○○○○○○○○○○○○○○○○○○○○○○○○○○○○○○○○○○○○○○○○○
5. Das Pedal funktioniert nicht.
✳ Haben Sie ein Programm gewählt, welches einen Effekt im
Effekte PEDAL verwendet. (☞S.38)
✳ Leuchtet die Pedalanzeige. (☞S.36, 39)
✳ Versuchen Sie das Pedal zu kalibrieren. (☞S.43)
6. Ich kann keine Programm speichern
(im Display erscheint „ERROR“).
✳ Haben Sie den Strom ausgeschaltet, während die Preset-
Programmegeladen wurden?
Laden Sie nochmals die Preset-Programme. (☞S.46)
Technische Daten
❏ Anzahl der Effekte:
63 typen
(maximal 7 Effekte gleichzeitig nutzbar)
❏ Anzahl der Programme:
80 (40 x Preset, 40 x User)
❏ Eingänge:
Gitarreneingang (Monoklinkenbuchse)
AUX IN (Stereominiklinkenbuchse)
❏ Ausgänge:
Line/Kopfhörer Mehrzweck-Ausgang (1/4" Stereo-Buchse)
❏ Stimmfunktion
Erfassungsbereich: 27.5 Hz — 2,093 Hz (A0—C7)
Kalibrierung: A=438—445 Hz
❏ Rhythmusektion
Pattern: 50 types
Tempo: bpm= 40—208
❏ Stromversorgung:
vier Mignon (LR6) Batterien (Lebensdauer bei Dauereinsatz: 12 Stunden) oder separat erhältlichen
Wechselstromadapter (DC9V
❏ Abmessungen
329.6 (B) x 181.5 (H) x 57.5 (T) mm
❏ Gewicht:
1.05kg
❏ beiliegendes Zubehör:
Bedienungsanleitung
* Da wir bestrebt sind, unsere Produkte ständig zu verbessern,
weisen wir darauf hin, daß Änderungen jederzeit ohne An
kündigung vorgenommen werden können.
44
Effektparameter
DRIVE·AMP (Vezerrungs-Effekttypen)
TYPE GAIN TREBLE MIDDLE BASS LEVEL
OFF — ————
ACOUSTIC 0...10.0 0..10.0 0...10.0 0...10.0 0...10.0
CLASSIC COMP 0...10.0 0...10.0 0...10.0 0...10.0 0...10.0
TUBE OD 0...10.0 0...10.0 0...10.0 0...10.0 0...10.0
CLASSIC DIST 0...10.0 0...10.0 0...10.0 0...10.0 0...10.0
FAT DIST 0...10.0 0...10.0 0...10.0 0...10.0 0...10.0
METAL DIST 0...10.0 0...10.0 0...10.0 0...10.0 0...10.0
BIG FUZZ 0...10.0 0...10.0 0...10.0 0...10.0 0...10.0
TOP BOOST 0...10.0 0...10.0 0...10.0 0...10.0 0...10.0
U.S. HIGH-GAIN 0...10.0 0...10.0 0...10.0 0...10.0 0...10.0
BRITISH STACK 0...10.0 0...10.0 0...10.0 0...10.0 0...10.0
Diese Drive Amp-Modelle beinhalten mehrere Dynamikeffekte
wie z.B. Compressor, Overdrive oder Distortion sowie eine Dreiband-Klangregelung. Die Parameterzuordnung zu den Reglern
lautet wie folgt:
Type Regler Drive- oder Verstärkertyp
Regler 1 GAIN Verzerrungsgrad.
Regler 2 TREBLE Höhenregelung.
Regler 3 MIDDLE Mittenregelung.
Regler 4 BASS Baßregelung.
Regler 2 LEVEL Ausgangspegel.
Sollte der Klang verzerrt sein, senken Sie die Parameter LEVEL,
TREBLE, MIDDLE und BASS leicht ab.
OFF (aus) „DRV OFF“
Hiermit schalten Sie den Drive Amp-Effekt aus
ACOUSTIC (akustische Gitarre) „ACOUSTC“
Dieser Effekt ändert den Klang einer E-Gitarre zu einer akustischen Gitarre. Am besten schalten Sie das Element in Halsnähe
ein, weil der Effekt dann noch überzeugender wirkt. Dieser Typ
enthält außerdem einen Compressor mit einstellbarem GAINParameter.
)
CLASSIC COMP (Herkömmlicher Compressor
Ein Compressor-Effekt hebt geringe Signalpegel an und verringert Pegelspitzen. Hierdurch werden die Dynamikunterschiede
verringert, so dass das Signal gleichmäßiger wirkt. Mit diesem
Modell erzielen Sie eine gleichmäßigere Zupflautstärke sowie
warmes Sustain.
TUBE OD (Röhrenverzerrung) „TUBE OD“
Dieses Effektmodell stellt eine Vielzahl klassischer Gitarrensounds bereit. Dieses Modell simuliert den übersteuerten Klang
eines Röhrenverstärkers aus den 70er Jahren. Die besten Effekte
werden beim Picking erzielt.
CLASSIC DIST (
Dieses Modell simuliert ein für die 70er Jahre typisches Verzerrerpedal.
FAT DIST (fettere Verzerrung) „FAT DST“
Dieses Modell simuliert den fetten Sound der Verzerrerpedale
aus den 80er Jahren.
METAL DIST (metallische Verzerrung) „METAL“
Dieses Modell simuliert den metallischen Verzerrerklang der 90er.
BIG FUZZ (Typ. Fuzz-Sound) „BIGFUZZ“
Dieser Effekt simuliert den immer noch beliebten Fuzz-Sound
der Siebziger.
TOP BOOST (Höhenlastige Verzerrung) „T-BOOST“
Dieses Modell simuliert den für einen Vox AC30 typischen
Verzerrerklang.
Regler 1 Regler 2 Regler 3 Regler 4 Regler 5
) „
CL COMP
klassische Verzerrung
)
„
CL DIST
“
“
Page 45

○ ○○○○○○○○○○○○○○○○○○○○○○○○○○○○○○○○○○○○○○○○○○○○○○○○○○○○
U.S. HIGH-GAIN
(High Gain-Verstärker aus den Staaten) „US HI-G“
Dieses Modell simuliert den Verzerrerklang, der für den Hi GainAusgang eines amerikanischen Verstärkers typisch ist.
BRITISH STACK (
Britischer Verstärkerturm) „
BRITSTK
Dieses Modell simuliert den Verzerrerklang, der für einen
Verstärkerturm britischer Bauart typisch ist.
MOD (Modulationseffekte)
Regler 1 Regler 2 Regler 3 Regler 4
TYPE SPEED/PITCH DEPTH/FINE
CHORUS 0.1...10[Hz] 0...10.0 0...10.0 0...10.0
FLANGER 0.1...10[Hz] 0...10.0 -15...15 0...10.0
PHASER 0.1...10[Hz] 0...10.0 0...10.0 —
TREMOLO 1...10[Hz] 0...10.0 — —
PAN 1...10[Hz] 0...10.0 — —
WAH UP —0...10.0 — —
WAH DWN —0...10.0 — —
PITCH -24...24[x100CENT] -50...50[CENT] — 0...10.0
MAJ3UP ——C...B 0...10.0
MAJ3DWN ——C...B 0...10.0
MIN3UP ——C...B 0...10.0
MIN3DWN ——C...B 0...10.0
4TH ——C...B 0...10.0
5TH ——C...B 0...10.0
MAJ6TH ——C...B 0...10.0
SLOWATK 0...10.0 0...10.0 — —
FEEDBACK
Hier finden Sie Modulationseffekte wie Chorus, Flanger, Phaser
und Pitchshifter. Die Parameterzuordnung zu den Reglern lautet
wie folgt:
Regler 1 TYPE Wählen Sie hiermit den Effekttyp
Regler 2 SPEED/PITCH Modulationsgeschwindigkeit
/Umfang der Tonhöhenänderung
Regler 3 DEPTH/FINE Modulationsintensität
/Feinstimmung der
Tonhöhenänderung
Regler 4 FEEDBACK Hiermit beeinflussen sie den
Klangcharakter.
Regler 5 MIX Hiermit regeln Sie die Balance zwi
schen dem Original- und dem
Effektsignal.
CHORUS (Chorus)
Dieser Chorus-Effekt sorgt für eine Modulation des Signals, die
sehr breit wirkt und zudem einen Hauch Vibrato enthält. Er entsteht durch eine Verzögerung des Originalsignals, deren Tonhöhe moduliert wird. Dieses modulierte Signal wird dann zum
Originalsignal hinzugefügt. Am besten verwenden Sie diesen
Effekt in Stereo.
FLANGER (Flanger)
Hierbei handelt es sich um einen so genannten „Vintage“-Flanger,
dessen Modulation einen leicht wirbelnden Eindruck erzeugt.
PHASER (Phaser)
Dieser Effekt erzeugt eine zyklische Modulation der Phasenlage
eines Signals und mischt dieses Effektsignal dann mit dem ursprünglichen Signal.
TREMOLO (Tremolo)
Dieser Effekt sorgt für eine periodische Veränderung der Tonhöhe.
Regler 5
MIX
PAN (Panorama-Effekt)
Dieser Effekt sorgt für periodische Bewegungen des Signals im
Stereobild und erfordert also eine Stereo-Wiedergabe.
WAH UP (Auto-Wah Up-Filter)
“
Hierbei handelt es sich um einen automatischen „Wahwah“-Effekt, d. h. das Filter öffnet und schließt sich automatisch in Abhängigkeit vom Saitenanschlag. Je nach Lautstärke der Gitarre
kann der Effekt unterschiedlich klingen.
WAH DWN (Auto-Wah Down-Filter)
Dieses Wah-Filter arbeitet in umgekehrter Richtung im Vergleich
zu WAH UP.
PITCH (Pitch Shifter)
Hierbei handelt es sich um einen Pitch Shifter, der das Signal im
Bereich ±2 Oktaven transponieren kann.
Intelligente Pitchshifter
MAJ3UP (große Terz höher)
MAJ3DWN (große Terz tiefer)
MIN3UP (kleine Terz höher)
MIN3DWN (kleine Terz tiefer)
4TH (Quarte höher)
5TH (Quinte höher)
MAJ6TH (Sext höher)
Der intelligente Pitchshifter erzeugt musikalisch passende Harmonien durch eine Variierung der Tonhöhenverschiebung im
Ve rhältnis zu gespielten Note und Tonart. Wenn Sie beispielsweise einen Pitchshifter selektieren, der die Harmonie „große
Terz höher“ erzeugt (MAJ3UP), wird die Tonhöhenverschiebung
automatisch je nach gespielter Note zwischen einer kleinen Terz
(drei Halbtönen) und einer großen Terz (vier Halbtönen) variieren.
• Wenn MAJ3UP mit der Grundtonart C verwendet wird:
Die Tonhöhe wird in (Klammern) angezeigt.
Wenn Ihr Instrument nicht korrekt gestimmt ist, können die
Ergebnisse dieses Effekts unsauber klingen. Stimmen Sie in diesem Fall Ihr Instrument neu.
Der intelligente Pitchshifter arbeitet nur korrekt, wenn Sie einzelne Noten spielen. Der Effekt ist nicht für Akkorde verfügbar.
Dieser Effekt kann nicht gleichzeitig mit einem Pedal-Effekt verwendet werden (außer wenn letzterer die VOLUME-Funktion
hat). Auch die Ambience-Typen ROOM1—ARENA können
nicht simultan verwendet werden. Wenn Sie den intelligenten
Pitch Shifter in einem Program einschalten, das bereits einen
Pedal-Effekt oder einen ROOM1—ARENA-Effekt verwendet,
wird der Pedal- bzw. Ambience-Effekt automatisch deaktiviert.
SLOWATK (Schwelleffekt)
Dieser Effekt sorgt dafür, dass alle gespielten Noten langsam eingeblendet werden. Mit Regler „2“ bestimmen Sie die
Einblendgeschwindigkeit, während Regler „3“ den Schwellenwert (Threshold) regelt. Je größer der Schwellenwert, desto härter müssen Sie die Saiten anschlagen/ zupfen, um den
Schwelleffekt auszulösen.
4. Anhang
45
Page 46

4. Anhang
○○○○○○○○○○○○○○○○○○○○○○○○○○○○○○○○○○○○○○○○○○○○○○
PEDAL (Pedal-Effekt)
Regler 1
VOLUME —0...10.0 Lautstärke
CHO1 0...10.0 — Intensität
CHO2 0...10.0 —
VIBRATE 0...10.0 —
FLANGER 0...10.0 — Modulation
PHASER 0...10.0 —
TREMOLO 0...10.0 —
PAN 0...10.0 —
WAH ——Peak-Frequenz
FILTER 0...10.0 — Peak-Frequenz
RING 0...10.0 — Tonhöhe
PITCH -24...24
F BACK1 0...10.0 — Pegel+Reverb
F BACK2 0...10.0 — Pegel+Reverb
DELAY 10
ECHO 10
ROOM —0...10.0 Hallpegel
GARAGE —0...10.0 Hallpegel
HALL —0...10.0 Hallpegel
SAMPLE1 S/L — Wiedergabe
SAMPLE2 S/L —
LOOP1 S/L — Lautstärke
LOOP2 S/L — Schleifenlänge
Diese Effekte können Sie über das Reglerpedal in Echtzeit steuern. Die Parameterzuordnung zu den Reglern lautet wie folgt:
Regler 1 TYPE Wählen Sie hiermit den Effekttyp
Regler 3
Regler 5 MIX/LEVEL Ver hältnis zwischen Direkt- und
VOLUME (Lautstärke)
Das Schwellpedal fungiert als Volumenpedal. Mit Regler „5“
kann der kleinste mit dem Pedal einstellbare Wert gewählt werden.
CHO1 (Chorus1)
Hierbei handelt es sich um einen Chorus-Effekt, dessen
Modulationsintensität über das Schwellpedal eingestellt werden
kann.
CHO2 (Chorus2)
Bei diesem Chorus-Effekt kann die Modulationsgeschwindigkeit
mit dem Pedal eingestellt werden.
Regler 2
TYPE
DEPTH/PITCH
Regler 3
DEPTH/PITCH
[ms]
[ms]
[CENT]
...2
...2
Regler 4
[SEC]
[SEC]
Modulationsintensität/
Regler 5 Pedal
MIX/LEVEL
0...10.0 Tonhöhe
0...10.0 Effektpegel
0...10.0
Umfang der Tonhöhenänderung
Effektsignal./Ausgangslautstärke
CHO1—PITCH können nicht gleichzeitig mit einem
Modulationseffekt verwendet werden. Wenn Sie einen dieser Effekte in einem Program aktivieren, in dem bereits der
Modulationseffekt zum Einsatz kommt, wird letzterer automatisch ausgeschaltet.
F BACK 1 und 2 können nicht gemeinsam mit den AmbienceTypen ROOM1—ARENA verwendet werden. Wenn also bereits ein Typ ROOM1—ARENA eingeschaltet war, wird dieser
bei Anwahl von F BACK 1 oder 2 deaktiviert.
DELAY—HALL können nicht gemeinsam mit dem AmbienceEffekt verwendet werden. Wenn Sie einen dieser Effekte in einem
Program einschalten, das bereits einen Ambience- Effekt anspricht, wird letzterer automatisch ausgeschaltet.
SAMPLE1—LOOP2 können nicht gemeinsam mit einem
Modulations- oder Ambience- Effekt verwendet werden. Wenn
Sie SAMPLE1—LOOP2 in einem Program wählen, das bereits
einen Modulations- und Ambience-Effekt verwendet, werden
diese beiden Blöcke ausgeschaltet.
46
Geschwindigkeit
Geschwindigkeit
Geschwindigkeit
Geschwindigkeit
Geschwindigkeit
Verzögerungszeit
Wiederg/Umkehr
VIBRATO (Vibrato)
Bei diesem Vibrato kann die Modulationsgeschwindigkeit mit
dem Pedal eingestellt werden.
FLANGER (Flanger)
Bei diesem Flanger können Sie mit dem Pedal das zu modulierende Frequenzband einstellen.
PHASER (Phaser)
Bei diesem Phaser-Effekt können Sie mit dem Pedal die
Modulationsgeschwindigkeit des Effektes einstellen.
TREMOLO (Tremolo)
Bei diesem Tremolo-Effekt bestimmen Sie mit dem Pedal die
Geschwindigkeit, mit der die Lautstärke moduliert wird.
PAN (Panorama-Effekt)
Bei diesem Panorama-Effet bestimmen Sie mit dem Pedal die
Geschwindigkeit, mit der sich das Signal im Stereobild hin und
her bewegt.
WAH (Wah)
Bei diesem Effekt dient das Pedal zum Erzeugen der typischen
„Wahs“ durch Verschieben der Frequenzglocke.
FILTER (resonanzfähiges Filter)
Bei diesem Resonanzfilter bestimmen Sie mit dem Pedal die
Filterfrequenz.
RING (Ringmodulator)
Dieser Effekt erzeugt einen glockenähnlichen Klang, dessen Tonhöhe mit dem Pedal eingestellt werden kann. Das beste Ergebnis erzielen Sie, indem Sie das Halselement einschalten, die Höhen der Gitarre drastisch reduzieren und um den 12. Bund herum spielen.
PITCH (Pitch Shifter)
Mit dem Pedal kann das Pitch Shift-Intervall eingestellt werden.
Wenn Sie Regler „5“ auf „0“ stellen, hören Sie nur das unbearbeitete Signal. „5“ bedeutet, dass das Original- und transponierte Signal gleich laut sind. „10“ schließlich bedeutet, dass nur das
Effektsignal hörbar ist.
Feed Back
Bei diesem Effekt bestimmen Sie mit dem Pedal die Vibrato-Intensität des Rückkopplungssignals.
Spielen Sie eine Note auf der Gitarre und betätigen Sie das
Schwellpedal, um das Feedback- Signal hinzuzufügen. Nehmen
Sie das Pedal zurück, um das Feedback-Signal wieder auszublenden. Mit Regler „3“ können Sie die Vibrato-Geschwindigkeit einstellen.
Der Feedback-Effekt ist nicht belegt, wenn Sie als Drive AmpTyp OFF, ACOUSTIC oder CLASSIC COMP gewählt haben.
F BACK1 (Feedback1)
Das Feedback-Signal (Rückkopplung) hat dieselbe Tonhöhe
wie die gespielte Note.
F BACK2 (Feedback2)
Das Feedback-Signal befindet sich eine Oktave über der gespielten Note.
DELAY (Delay)
Bei diesem Delay-Effekt können Sie mit dem Pedal den Eingangspegel des Effektes einstellen.
Drücken Sie dreimal die TAP -Taste, um den TIME-Wert von Regler „3“ dem „Drucktempo“ entsprechend zu ändern.
ECHO (Echo)
Bei diesem Echo-Effekt kann die Verzögerungszeit mit dem Pedal eingestellt werden. Wie bei einem Bandecho ändert sich bei
Anwahl eines anderen Verzögerungswertes auch zeitweilig die
Tonhöhe. Mit Regler „3“ kann die maximale Verzögerungszeit
eingestellt
Page 47

○ ○○○○○○○○○○○○○○○○○○○○○○○○○○○○○○○○○○○○○○○○○○○○○○○○○○○○
ROOM (Zimmerhall)
Dieser Effekt simuliert den Hall eines kleinen Zimmers (z.B. eines Studios). Mit dem Pedal bestimmen Sie den Hallpegel.
GARAGE (Garagenhall)
Dieser Effekt simuliert den Hall eines relativ großen Raumes
wie z.B. einer Garage. Mit dem Pedal bestimmen Sie den Hallpegel.
HALL (Saalhall)
Dieser Effekt simuliert den Hall eines mittleren bis großen Saals.
Mit dem Pedal bestimmen Sie den Hallpegel.
Sampeln und mitspielen
Mit den Effekten SAMPLE1—LOOP2 kann eine Phrase von maximal 6 Sekunden aufgezeichnet und anschließend wieder abgespielt werden
Die Aufzeichnung beginnt erst, wenn Sie den eingestellten
Schwellwert überschreiten.
Bei Anwahl eines anderen Effekttyps oder -Programs bzw. bei
Verwendung des Phrase Trainers oder wenn Sie das Gerät ausschalten, wird die aufgenommene Phrase wieder gelöscht.
SAMPLE1 (Sample1)
Die aufgenommene Phrase wird wiedergegeben, wenn Sie das
Pedal nach unten drücken.
SAMPLE2 (Sample2)
Die aufgenommene Phrase wird wiedergegeben, wenn Sie das
Pedal nach unten drücken, und rückwärts abgespielt, wenn Sie
das Pedal zurückbewegen.
Arbeitsweise für die Effekte SAMPLE1 und 2
1. Wählen Sie als Pedal-Effekt SAMPLE1 oder SAMPLE2 oder
rufen Sie ein Program auf, das einen dieser Typen verwendet.
2. Wählen Sie mit Regler „3“ die Aufnahmedauer/Qualität („S“
entspricht 3 Sekunden bei hoher Qualität; „L“ entspricht 6
Sekunden).
3. Drücken Sie das Schwellpedal so weit hinunter, bis die Pedalanzeige blinkt. Hierdurch aktivieren Sie die Aufnahmebereitschaft.
4. Spielen Sie die Phrase, die gesampelt werden soll. Die Aufnahme wird automatisch gestartet, sobald Sie auf der Gitarre spielen. Die Pedalanzeige blinkt nun nicht mehr, sondern
leuchtet konstant.
5. Sobald die maximale Aufnahmedauer verstrichen ist, hält die
Aufnahme an. Sie kann nicht von Hand angehalten werden.
Wenn Sie nicht zufrieden sind mit der Aufnahme, fangen Sie
bitte noch einmal mit Schritt 3 an.
6. Bedienen Sie das Expressionpedal.
LOOP1 (Loop1)
Gleich im Anschluss an die Aufnahme einer Phrase wird diese
wiederholt –als Schleife– abgespielt. Stellen Sie das Pedal wieder auf den Mindestwert, um zum Beginn der Phrase zurückzukehren. Drücken Sie das Pedal hinunter, um die Schleifenwiedergabe wieder zur starten. Nun können Sie mit dem Pedal
die Wiedergabelautstärke einstellen.
LOOP2 (Loop2)
as Pedal steuert die Länge des Loops. Der Loop wird um so
kürzer, je weiter Sie das Pedal zurückbewegen. Bei der Minimallänge wird der Loop überhaupt nicht abgespielt.
Arbeitsweise für die Effekte LOOP1 und 2
1. Wählen Sie als Pedal-Effekt LOOP1 oder LOOP2 oder rufen
Sie ein Program auf, das einen dieser Typen verwendet.
2. Wählen Sie mit Regler „3“ die maximale Aufnahmedauer („S“
entspricht 3 Sekunden bei hoher Qualität; „L“ entspricht 6
Sekunden und ist also doppelt so lang.)
3. Drücken Sie das Schwellpedal so weit hinunter, bis die Pedalanzeige blinkt. Hierdurch aktivieren Sie die Aufnahmebereitschaft.
4. Spielen Sie die Phrase, die gesampelt werden soll. Die Aufnahme wird automatisch gestartet, sobald Sie auf der Gitarre
spielen. Die Pedalanzeige blinkt nun nicht mehr, sondern
leuchtet konstant.
5. Sobald die Aufnahmedauer verstrichen ist bzw. wenn Sie das
Pedal noch einmal vollständig hinunter drücken, hält die
Aufnahme an. Die Pedalanzeige erlischt nun und die aufgenommene Phrase wird –als Schleife– fortwährend wiederholt.
6. Bedienen Sie das Expressionpedal.
AMB (Ambience-Effekt)
Regler 1 Regler 2 Regler 3 Regler 4 Regler 5
TYPE TIME TONE FEEDBACK MIX
DELAY 10 [ms]...2 [SEC] 0...10.0 0...10.0 0...10.0
ROOM1 ———0...10.0
ROOM2 ———0...10.0
GARAGE1 ———0...10.0
GARAGE2 ———0...10.0
HALL ———0...10.0
ARENA ———0...10.0
Hier finden Sie räumliche Effekte jeder Art, also Hall, Delay und
Echoeffekte. Die Parameterzuordnung zu den Reglern lautet wie
folgt:
Regler 1 TYPE Wählen Sie hiermit den Effekttyp
Regler 2 TIME Verzögerungszeit
Regler 3 TONE Einstellen der Klangfarbe
Regler 4 FEEDBACK Anzahl der Wiederholungen
Regler 5 MIX
DELAY (Delay)
Hierbei handelt es sich um einen Stereo-Delay-Effekt mit separater Verzögerungszeit für den linken und rechten Kanal.
Drücken Sie die TAP -Taste mindestens dreimal, um den TIME-
Parameter von Regler „2“ auf den „getapten“ Tempowert zu stellen.
ROOM1 (Zimmerhall 1)
Tiefer Room Reverb
ROOM2 (Zimmerhall 2)
Heller Room Reverb
GARAGE1 (Garagenhall 1)
garagenartiger Hall 1
GARAGE2 (Garagenhall 2)
garagenartiger Hall 2
HALL (Saalhall)
Hall Reverb
ARENA (Stadionhall)
Hallverhalten in einem Stadion
Ve r hältnis zwischen Direkt- und Effektsignal.
4. Anhang
47
Page 48
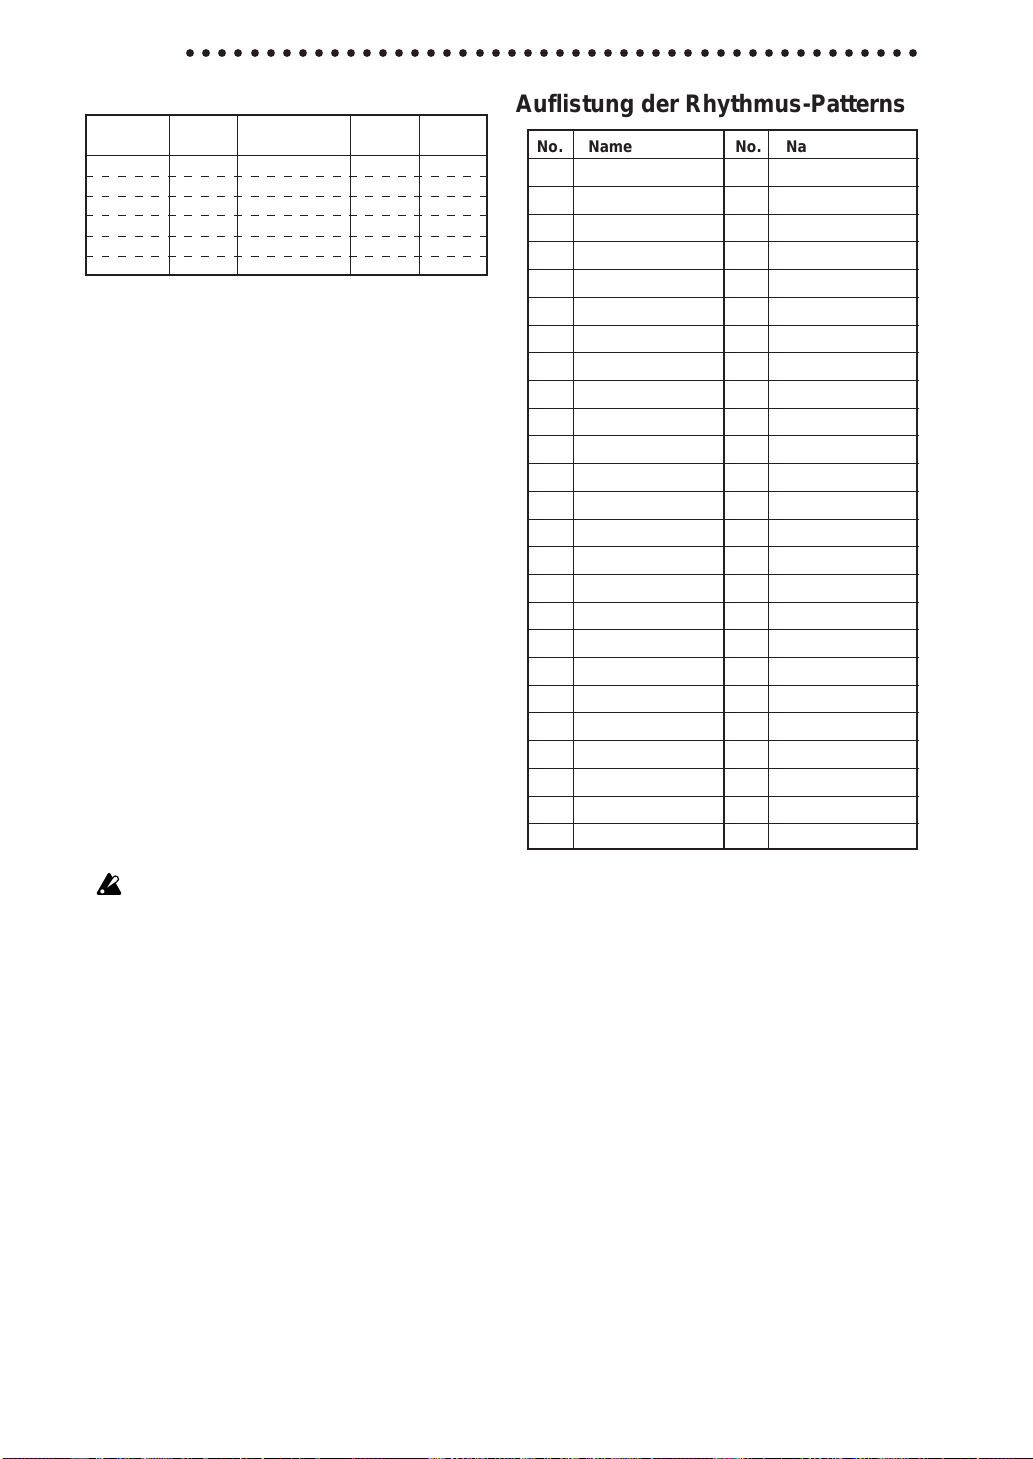
4. Anhang
○○○○○○○○○○○○○○○○○○○○○○○○○○○○○○○○○○○○○○○○○○○○○○
CABI (Cabinet-Effekt)
Regler 1 Regler 2 Regler 3 Regler 4 Regler 5
TYPE DEPTH
××
1
×8 0...10.0
××
××
1
×10 0...10.0
××
××
1
×12 0...10.0
××
××
2
×12 0...10.0
××
××
4
×10 0...10.0
××
××
4
×12 0...10.0
××
Cabinet simuliert die akustischen Eigenschaften einer Gitarrenverstärkerbox. Obwohl die Modelle ihre Stärken besonders beim direkten Anschluß des AX100G an ein Mischpult o. ä. ausspielen,
können sie auch in Verbindung mit einem Gitarrenverstärker sehr
effektiv sein.
Regler 1 TYPE Wählen die Boxengröße
Regler 3 DEPTH Bestimmen die Effektstärke
××
1
×8
××
Simulation eines Gitarrenverstärkers mit einem 8“-Lautsprecher
××
1
×10
××
Simulation eines Gitarrenverstärkers mit einem 10“-Lautsprecher
××
1
×12
××
Simulation eines Gitarrenverstärkers mit einem 12“-Lautsprecher
××
2
×12
××
Simulation eines Gitarrenverstärkers mit zwei 12“-Lautsprechern
××
4
×10
××
Simulation eines Gitarrenverstärkers mit vier 10“-Lautsprechern
××
4
×12
××
Simulation eines Gitarrenverstärkers mit vier 12“-Lautsprechern
NR LEV
(Rauschunterdrückung, Program-Lautstärke)
Hier können Sie den Grenzwert für die Rauschunterdrückung
(Noise Reduction) sowie die Program-Lautstärke einstellen.
Geben Sie den Namen des Programs mit Regler „1“ und „2“ ein
(siehe S.42). Met Regler „3“ können Sie den Modulations- und/
oder Ambience-Effekt ein-/ausschalten (siehe S.39).
NR (Noise Reduction) „NR“
Mit Regler „4“ bestimmen Sie den Pegel, den das Gitarrensignal
mindestens erreichen muss, um durchgelassen zu werden. Je
höher diese Schwelle, desto wahrscheinlicher ist es, dass leise
Noten nur bruchstückhaft oder gar nicht durchgelassen werden.
Seien Sie also vorsichtig.
PROGRAM LEVEL (Program-Lautstärke) „PROGLEV“
Die Program-Lautstärke kann mit Regler „5“ eingestellt werden.
Hiermit können Sie dafür sorgen, dass alle Programs etwa gleich
laut sind. Bedenken Sie jedoch, dass sich die Lautstärke auch
nach der verwendeten Gitarre richtet.
Auflistung der Rhythmus-Patterns
No. Name No. Name
1 8BEAT 1 26 DISCO
2 8BEAT 2 27 EURO
3 8BEA T 3 28 FUNK
4 8BEAT 4 29 JAZZ 1
5 8BEAT 5 30 JAZZ 2
6 8BEA T 6 31 MOTOWN
78SHFL 32 REGGAE1
8 16BEAT1 33 REGGAE2
9 16BEAT2 34 SURF
10 16BEAT3 35 COUNTRY
11 16BEAT4 36 BOSSA
12 16BEAT5 37 SAMBA
13 16SHFL1 38 PRACT 0
14 16SHFL2 39 PRACT 1
15 16SHFL3 40 PRACT 2
16 16SHFL4 41 PRACT 3
17 3/4 42 PRACT 4
18 6/4 43 PRACT 5
19 6/8 44 PRACT 6
20 BALLAD 45 PRACT 7
21 BLUES 46 PRACT 8
22 ROCK 47 PRACT 9
23 THRASH 48 METRO 1
24 DANCE 1 49 METRO 2
25 DANCE 2 50 METRO 3
48
Page 49

○ ○○○○○○○○○○○○○○○○○○○○○○○○○○○○○○○○○○○○○○○○○○○○○○○○○○○○
Parameter der Presetprogramme
Wenn ein zuvor abgeschalteter Effektblock aktiviert wird, wird das kursiv gedruckte Effektmodell selektiert.
Ab Werk enthalten die Programme des User-Bereiches dieselben Einstellungen wie die Preset-Programme.
BANK # PROGRAM DRIVE·AMP A DRIVE·AMP B MOD PEDAL AMB CABI
01STATIC US HI-G METAL
2 FILTER ACOUSTIC FAT DST CHORUS VOLUME GARAGE2
3 KIDROCK US HI-G BRITSTK
4 FREAK TUBE OD T-BOOST CHORUS VOLUME DELAY 1X8
11RAGE BRITSTK BRITSTK
2 TRASH US HI-G ACOUSTIC
3 NIN CL DIST METAL
4 HOSTILE METAL METAL
21PRIEST BRITSTK BRITSTK
2 2112 CL COMP CL DIST PHASER VOLUME
3R R CL DIST CL DIST PITCH GARAGE
4SATCH BRITSTK BRITSTK
31J P TUBE OD BRITSTK
2 CARLOS US HI-G US HI-G WAH UP VOLUME
3 DA'FUZZ BIGFUZZ BIGFUZZ
4 RINGMAN FAT DST T-BOOST
41JAZZ OFF BRITSTK CHORUS VOLUME DELAY
2 FUNKY CL COMP FAT DST WAH UP VOLUME HALL
3 SURF CL COMP T-BOOST
4 FUSION TUBE OD BRITSTK CHORUS VOLUME
51ROCK FAT DST BRITSTK
2 BLUES TUBE OD TUBE OD
3 VINTAGE T-BOOST TUBE OD
4F BACK FAT DST FAT DST
61A MINOR CL COMP US HI-G MIN3UP VOLUME DELAY
2A MAJOR BRITSTK BRITSTK MAJ3DWN VOLUME
3 LOOP CL COMP US HI-G
4 SAMPLE US HI-G METAL
71CHORUS OFF CL COMP
2 FLANGER CL COMP FAT DST FLANGER VOLUME DELAY
3 PHASER OFF BRITSTK
4 VIBRATO TUBE OD CL DIST
81ECHO ACOUSTIC TUBE OD CHORUS ECHO
2 BENDER US HI-G ACOUSTIC
3 SLOWATK FAT DST CL COMP SLOWATK VOLUME ARENA
4 VIOLIN T-BOOST CL COMP SLOWATK DELAY
91ACOU LN ACOUSTIC ACOUSTIC CHORUS VOLUME ROOM1 1X10
2 COMP LN CL COMP CL COMP FLANGER VOLUME
3 OVDR LN T-BOOST T-BOOST
4 DIST LN BRITSTK US HI-G
PHASE
FLANGER
FLANGER PITCH ROOM2
CHORUS
PHASER
FLANGER
CHORUS
CHORUS
CHORUS
PHASER
CHORUS
CHORUS
PHASER
CHORUS
TREMOLO
CHORUS
CHORUS
CHORUS
CHORUS
PHASER
TREMOLO
CHORUS
FLANGER
CHORUS
VOLUME ROOM2
VOLUME GARAGE2
VOLUME ARENA 2X12
VOLUME
DELAY
WAH HALL
VOLUME ROOM1
HALL 2X12
GARAGE1 4X12
WAH DELAY
ECHO
GARAGE1 4X12
DELAY 2X12
FILTER DELAY
RING
HALL 4X12
TREMOLO GARAGE1 1X8
GARAGE2 2X12
VOLUME ARENA
VOLUME ROOM1
VOLUME GARAGE2
F BACK2 DELAY
DELAY 4X12
LOOP1
SAMPLE2
DELAY 2X12
DELAY 4X12
CHO2 HALL 4X10
PHASER DELAY
VIBRATO GARAGE1
ROOM1 2X12
PITCH DELAY
GARAGE1 4X10
ROOM1
VOLUME ROOM2 4X10
F BACK2
DELAY
4X12
4X12
4X10
4X12
1X8
4X12
4X12
4X10
1X8
2X12
4X12
4X10
2X12
4X12
4X12
4X12
4X12
4X10
1X12
4X10
2X12
2X12
4X12
4. Anhang
49
Page 50
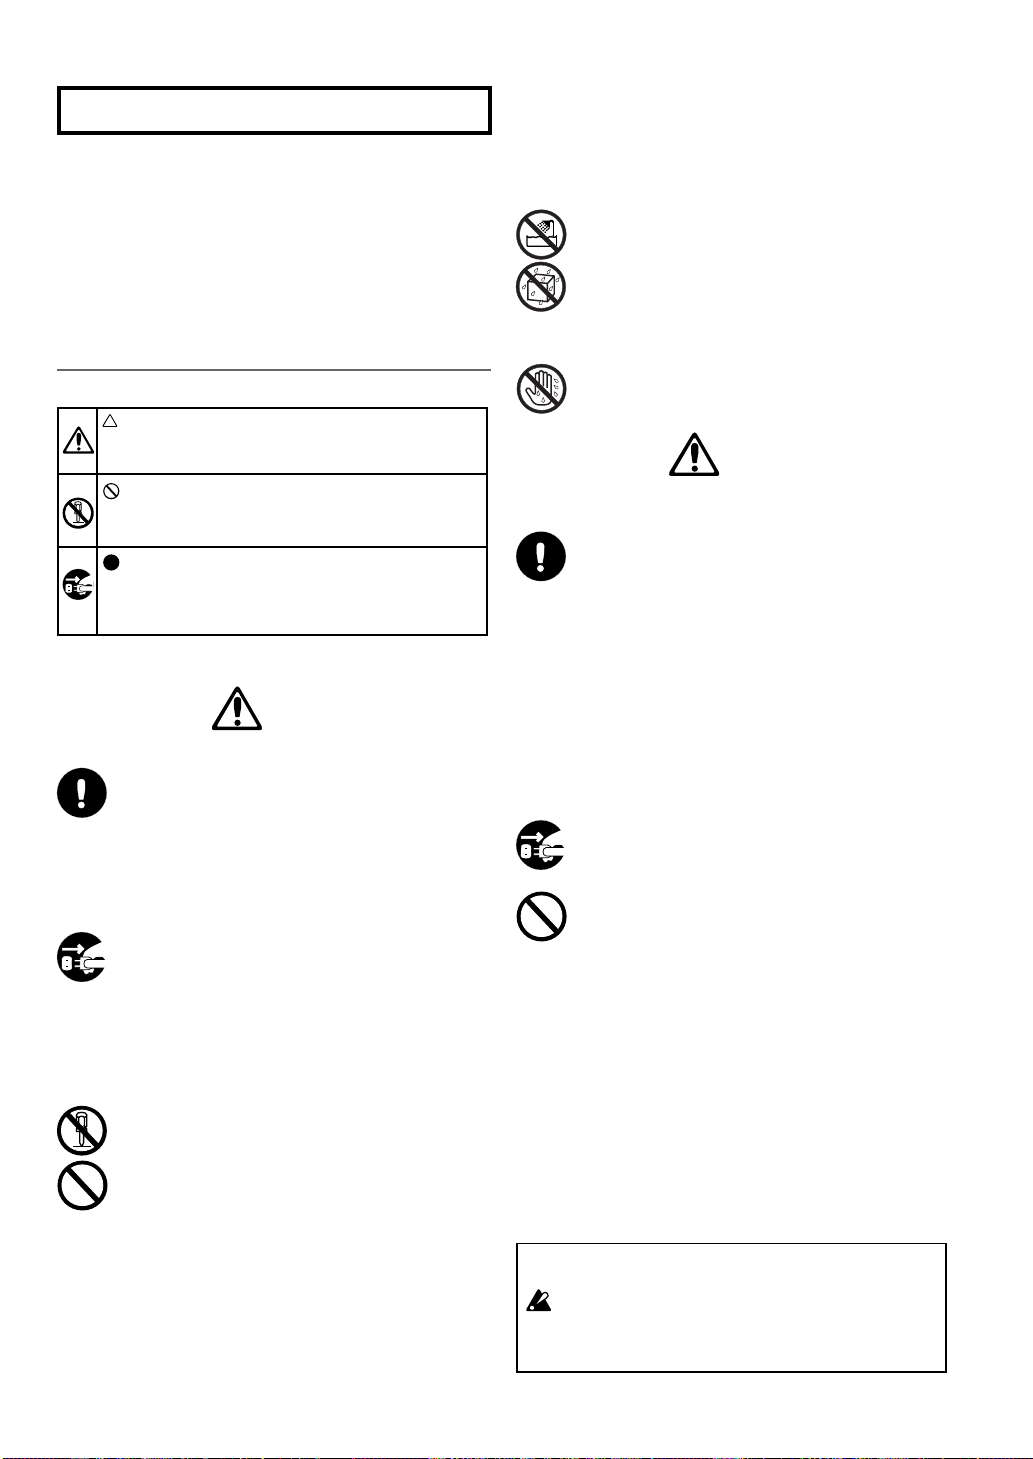
安全上のご注意
ご使用になる前に必ずお読みください
ここに記載した注意事項は、製品を安全に正しくご使用いただ
き、あなたや他の方々への危害や損害を未然に防ぐためのもの
です。注意事項は誤った取り扱いで生 じる危害や損害の大きさ、
または切迫の程度によって、内容を「警告」、「注意」の2つに分
けています。これらは、あなたや他の方々の安全や機器の保全
に関わる重要な内容ですので、よく理解した上で必ずお守りく
ださい。
火災・感電・人身障害の危険を防止するには
図記号の例
記号は、注意(危険、警告を含む)を示 しています。記
号の中には、具体的は注意内容が描かれています。左
の図は「一般的な注意、警告、危険」を表しています。
記号は、禁止(してはいけないこと)を示していま
す。記号の中には、具体的な注意内容が描かれ ることが
あります。 左の図は「分解禁止」を表しています。
記号は、強制(必ず行うこと)を示しています。記
号の中には 、具体的な注意内容が描かれることがありま
す。左の図は「電源プラグをコンセントから抜くこと」を
表しています。
以下の指示を守ってください
警告
この注意事項を無視した取り扱いをすると、
死亡や重傷を負う可能性が予想されます
・ACアダプターのプラグは、必ずAC100V の 電源コ
ンセントに差し込む。
・ACアダプターのプラグにほこりが付着している場合
は、ほこりを拭き取る。
感電やショートの恐れがあります。
・本製品はコンセントの近くに設置し、AC アダプター
のプラグへ容易に手が届くようにする。
・次のような場合には、直ちに電源を切ってACアダプ
ターのプラグをコンセン トから抜く。
○ACアダプターが破損したとき
○異物が内部に入ったとき
○製品に異常や故障が生じたとき
修理が必要なときは、お買い上げの販売店、最寄りの
コルグ営業所、またはサービス・センターへ修理を依
頼してください。
・本製品を分解したり改造したりしない。
・修理/部品の交換などで、取扱説明書に書かれている
以外のことは絶対にしない。
・ACアダプターのコードを無理に曲げたり、発熱する
機器に近づけない。また、ACアダプターのコードの
上に重いものを乗せない。
コードが破損し、感電や火災の原因になります。
・大音量や不快な程度の音量で長時間使用しない。
万一、聴力低下や耳鳴りを感じたら、専門の医師に相
談してください。
・本製品に異物(燃えやすいもの、硬貨、針金など)を
入れない。
・温度が極端に高い場所(直射日光の当たる場所、暖
房機器の近く 、発熱する機器の上など)で使用や保管
はしない。
・振動やホコリの多い場所で使用や保管はしない。
・風呂場、シャワー室で使用や保管はしない。
・雨天時の野外などのような湿気の多い場所で、使用
や保管はしない。
・本製品の上に液体の入ったもの(水や薬品等)を置
かない。
・本製品に液体をこぼさない。
・濡れた手で本製品を使用しない。
注意
この注意事項を無視した取り扱いをすると、傷害を負う
可能性または、物理的損害が発生する可能性があります
・正常な通気が妨げられない所に設置して使用する。
・ラジオ、テレビ、電子機器などから十分に離して使用
する。
ラジオやテレ ビ等に接近して使用すると、本製品が雑
音を受けて誤動作する場合があります。また、ラジ
オ、テレビ等に雑音が入ることがあります。
・外装のお手入れは、乾いた柔らかい布を使って軽く
拭く。
・AC アダプターをコンセント から抜 き差しするとき
は、必ずプラグを持つ。
・長時間使用しないと きは、電池の液漏れを防ぐため
に電池を抜く。
・電池は幼児の手の届かないところへ保管する。
・長時間使用しないときは、ACアダプターをコンセン
トから抜く。
・他の電気機器の電源コードと一緒にタコ足配線をし
ない。
本製品の定格消費電力に合ったコンセントに接続し
てください。
・スイッチやツマミなどに必要以上の力を加えない。
故障の原因になります。
・外装のお手入れに、ベンジンやシ ンナー系の液体、コ
ンパウンド質、強燃性のポリ ッシャーは使用しない。
・不安定な場所に置かない。
本製品が転倒してお客様がけがをしたり、本製品が故
障する恐れがあります。
・本製品の上に乗ったり、重いものをのせたりしない。
本製品が損傷したり、お客様がけが をする原因となり
ます。
本誌を読む上での注意
は操作上の注意を表します。
LCDの表記は動作例を示したもので、実際の表示と必ずし
も一致してない場合があります。
50
Page 51

○○○○○○○○○○○○○○○○○○○○○○○○○○○○○○○○○○○○○○○○○○○○○○○○○○○○○
目次
1. はじめに ------------------------------51
主な特長 ------------------------------------------------ 51
各部の名称とはたらき----------------------------- 52
フロント・パネル ----------------------------------- 52
リア・パネル------------------------------------------ 52
AX100Gの各モード ------------------------------ 53
電池の入れ方 ----------------------------------------- 53
2. 演奏してみましょう ----------------53
接続例 --------------------------------------------------- 53
電源の入れ方 ----------------------------------------- 53
プログラム・モード --------------------------------- 54
入力レベル・ス イッチの設定 ------------------- 54
音量(マスタ−・ボリュ−ム)の調整 ---------- 54
プログラムの選択---------------------------------- 54
プログラムで使用しているエフェクトの確認 バイパス、ミュート -------------------------------- 54
オート・チ ューナ ----------------------------------- 54
リズム-------------------------------------------------- 55
AUXIN ----------------------------------------------- 55
エクスプレッション・ペ ダル ------------------- 55
エフェクト・セレクト・モード ------------------- 55
エフェクト・セ レクト・モ ードに入る -------- 55
エフェクト・セ レクト・モ ードから出る ----- 55
フレーズ・トレーナ・モード ---------------------- 56
3. エディット --------------------------- 57
エフェクトのエディット-------------------------- 57
ドライブ・アンプ・エフェクトの
クイック・エディット機能 -------- 57
ドライブ・アンプ・エフェクトのエディット例その他のエフェクトのエディッ
プログラム名の変更-------------------------------58
ト-----------58
プログラムのライト -------------------------------- 58
4. 資料 -----------------------------------59
エクスプレッション・ペダルの調整
(キャリブレーション)------ 59
ユーザー・プログラムを工場出荷時の
状態に戻すには(再ロード)----- 59
故障かな?と思ったら----------------------------- 59
主な仕様 ------------------------------------------------ 60
エフェクト・パラメータ --------------------------- 60
DRIVE・AMP
(ドライブ・アンプ・エ フェクト)------ 60
MOD(モジュレーション・エ フェクト)----- 61
PEDAL(ペダル・エフェクト)----------------- 62
AMB(アンビエンス・エ フェクト)----------- 63
CABI(キャビネット・エフェクト)----------- 64
NRLEV(ノイズ・リ ダ ク ション、
プログラム・レ ベル)---------- 64
リズム・パターン・リスト-------------------------- 64
プリセット・プログラム・リスト ---------------- 65
54
57
1.はじめに
このたびはトーンワークス・モデリング・シグナル・
プロセッサーAX100Gをお買い上げいただきまし
て、誠にありがとうございます。
AX100Gを末永くご愛用いただくためにも、取扱
説明書をよくお読みになって正しい方法でご使用く
ださい。
また、読み終わった取扱説明書は大切に保存してく
ださい。
主な特長
●
コルグのモデリング・テクノロジー による緻密で迫力
のあるモデリング・サ ウ ンドが手軽に使用できます。
● 63種類のモデリング・エフェクト・バリエーションを内蔵し、
最大7種類のエフェクトとリズム音源を同時に使用できます。
● 40(4×10バンク)プリセット・プログラムと、書きかえがで
きる40(4×10バンク)ユーザー・プログラムの合計80プロ
グラムを内蔵しています。
● エフェクト・セレクト・モ−ドでドライブ・アンプ・チャンネル
の切り替えや、モジュレーション、アンビエンス・エフェクトの
オン、オフがフット・スイッチでできます。
● エクスプレッション・ペダルで23種類のペダル・エフェクトを
リアルタイムにコントロールすることができます。
● ディレイのエフェクト使用時に演奏する曲のテンポに合わせ
てTAPスイッチを押して自動的にディレイ・タイムが設定で
きます。
● オーディオ機器の音を録音(最大8秒間)し、ピッチを変えずに
再生スピードを遅くできるフレーズ・トレーナ機能を内蔵して
います。
● 自分で弾いたフレーズを録音(最大6秒間)し、ペダル操作によ
り再生させるサンプル&プレイ機能を内蔵しています。
● ペダル・エフェクト
ペダル・インジケータを装備しています。
● 練習に便利な50種類のリズム・パターンやメトロノームを内
蔵しています。
● AUXIN端子を装備しているので、接続したオーディオ機器に
合わせて演奏することができます。
● バイパス、ミュート時にオート・クロマチック・チューナーで
チューニングができます。
● LCD(マルチ・ディスプレイ)を用いた、わかりやすいインター
フェースを採用しています。
● LCDバックライトを採用しているので暗い所でも表示を見る
ことができます。
とは?
(Resonantstructure andElectroniccircuitModeling
System)は、生楽器や電気/ 電子楽器の発音メカニズム、発音された
音がボディー/キャビネットで共鳴するメカニズム、その音が出ている
フィールドの空気感、音の伝達経路としてマイク、スピーカーなどの電
気/音響的特性、真空管、トランジスタなどの電気回路による音の変化
など、音色に関わる様々な要因を緻密にデジタルで再現したコルグ独自
のモデリングテクノロジーです。
の状態(踏み込みの深さ)
一目でわかる7点
1.はじめに
51
Page 52
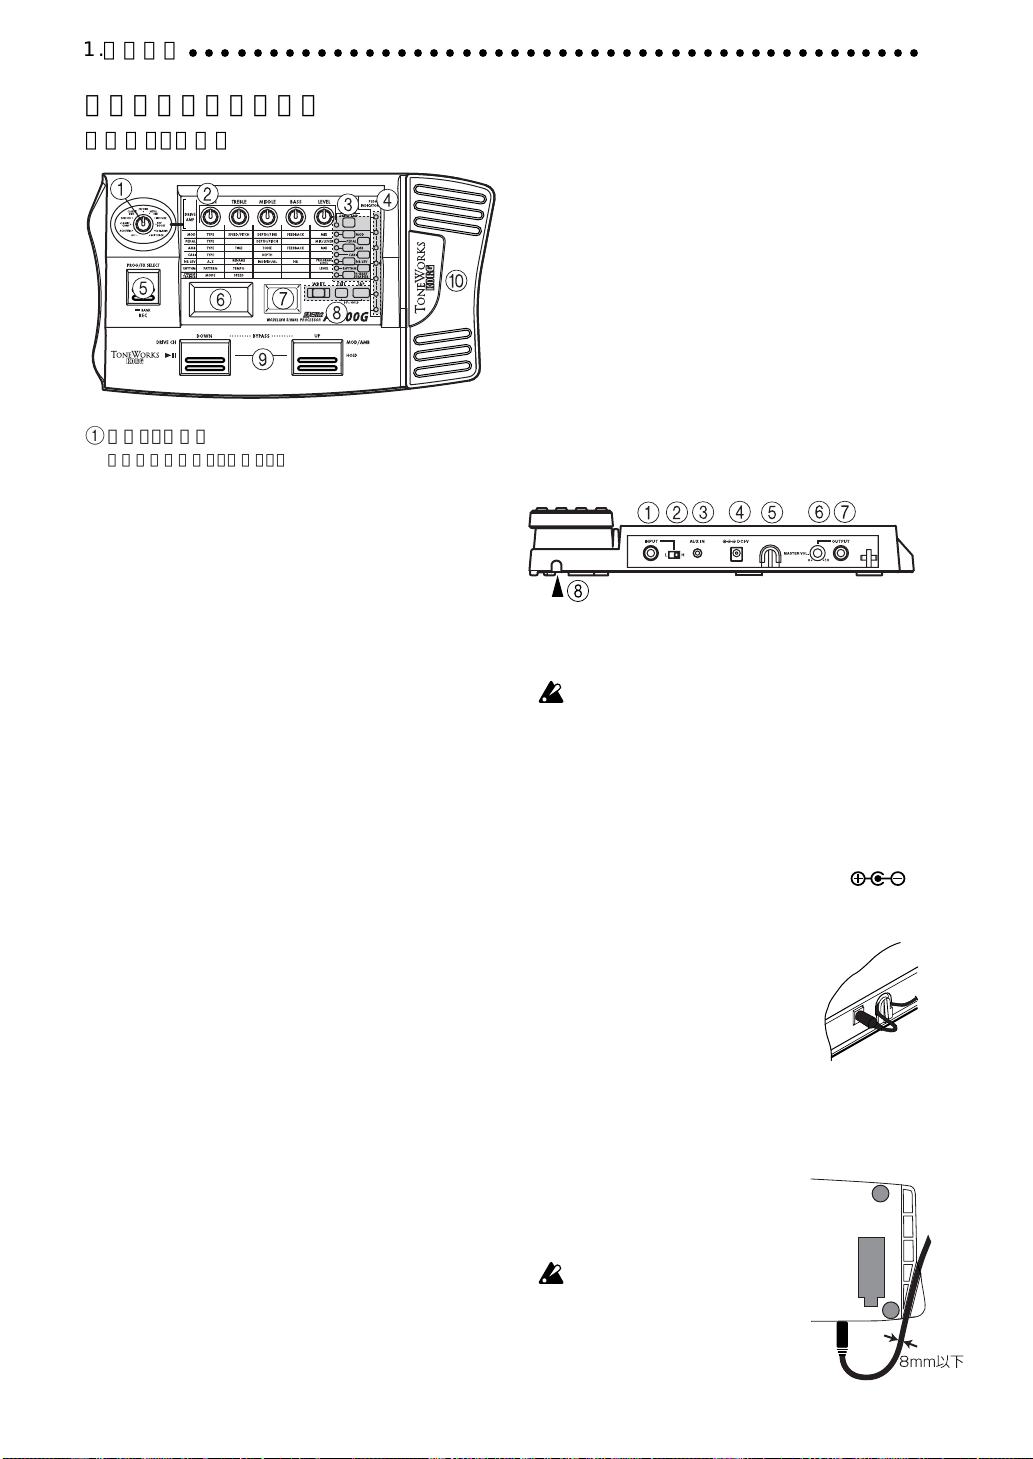
1.はじめに
○○○○○○○○○○○○○○○○○○○○○○○○○○○○○○○○○○○○○○○○○○○○○○
各部の名称とはたらき
フロント・パ ネ ル
1 タイプ・ツマミ
使用する
ドライブ・アンプ・
2 バリュー・ツマミ
各エフェクトごとに割り当てられたパラメータの値を変更し
ます。左からバリュー・ツマミ1〜5です。
各エフェクトのエディットのとき以外は、選んだプログラム
で使われているドライブ・アンプ・エフェクトのパラメータが
割り当てられています(P.57「ドライブ・アンプ・エフェクト
のクイック・エディット機能」参照)。
3 セレクト・スイッチ
DRIVE・AMPスイッチは押すたびにドライブ・アンプ・チャン
ネルA、Bが切り替わりエディット状態になります。それに合わ
せて横のLEDが緑(Ach)/赤(Bch)の点滅と切り替わります。
MOD、PEDAL、AMB、CABIスイッチは押すたびに各エフェ
クトのエディット(オン)/オフを切り替えます。また対応した
横のLEDが点滅(点灯)/消灯します。
NRLEVスイッチは押すたびにエディット/オンを切り替え
ます。また対応した横のLEDが点滅/消灯します。
RHYTHM、PHRASETRAINERスイッチは押すたび各機能
のオン/オフを切り替えます。また対応した横のLEDが点灯/
消灯します。
4 ペダル・インジケーター
ペダル・エ フ ェクトの状態(踏み込みの深さ)を表示します。ま
た、チューナ動作時に音程のずれを表示します。フレーズ・ト
レーナ・モ ー ドでは録音/再生時の時間表示をします。
5 PROG/FXSELECTスイッチ
押すたびに、プログラム・モードとエフェクト・セレクト・モー
ドに切り替わります。
6 マルチ・ディスプレイ
プログラム・ネーム、パラメータ・ネームや値、エディット・ア
イコン等を表示します。
7 ナンバーLED
プログラム・バンクおよびプログラム・ナンバーを表示します。
またチューナー動作時に音名を表示します。
エフェクトのタイプを選びます。
8 WRITE、EXIT、TAPスイッチ
WRITEスイッチはエディットしたプログラムをライトする
ときに使います。
EXITスイッチを押すと、どのような状態からでもプログラ
ム・モードに戻ることができます。
TAPスイッチはディレイのエフェクト使用時に曲のテンポ
に合わせてスイッチを押して自動的にディレイ・タ イ ムを設
定するときに使います。
9 DOWN、UPスイッチ
プログラムを選んだりバイパス、ミュートするときや、ドライ
ブ・アンプ・チャンネルの切り替え等に使います。
0 エクスプレッション・ペダル
ペダル・エフェクトで選んだエフェクトをコントロールします。
ペダルを最も深く踏み込んだ状態から、さらに強く踏み込むこ
とでペダル・エフェクトをオン、オフすることもできます。
リア・パネル
1 INPUT端子
電池で使うときには、電源スイッチになります。
ケーブルを接続すると電源がオンになります。
電源をオンまたはオフにするときは、接続してある機器
のボリュームを必ず下げておいてください。
2 入力レベルスイッチ
接続する楽器の出力に合わせて切り換えます。
3 AUXIN端子(ステレオ・ミニ端子)
CDやMDなどのオーディオ機器を接続します。
4 DC9V
別売のACアダプター(コルグA30960JDC9V: )
を接続します。接続すると、電源が自動的にオンになります。
5コード・フック
別売のACアダプターを接続したときは、
右図のようにACアダプターのコードを
引っかけておきます。コードをフックから
外すときは、コードを無理に引っ張らない
でください。
6 マスター・ボリューム
OUTPUT端子から出力される音量を調整します。
7 OUTPUT端子
ヘッドフォン端子と共用です。
8 ケーブル・ガイド
ギターとAX100Gを接続するケーブルが
ペダル操作の邪魔になるのを防ぎます。右
図のようにケーブルを通してください。
ガイドを使用する時は、太さ8mm以
下のケーブルを使用してください。
52
Page 53

○○○○○○○○○○○○○○○○○○○○○○○○○○○○○○○○○○○○○○○○○○○○○○○○○○○○○
AX100Gの各モード
AX100Gには大きく分けてプログラム・モード、エフェクト・セ
レクト・モード、フレーズ・トレーナ・モードの3つのモードがあり
ます。
プログラム・モード
プログラムを切り替えて通常の演奏をするモードです。
フット・ス イ ッチ (UP、DOWN)でプログラムを切り替えます。
電源をオンにした直後は、必ずこのモードになります。なお、工場
出荷時はユーザー・プログラムには、プリセット・プログラムと同
じプログラムが入っています。
エフェクト・セレクト・モード
ドライブ・アンプ・チャンネル※1やモジュレーションやアンビエ
ンス・エフェクトのオン、オフをフット・スイッチ(UP、DOWN)
によっての切り替えためのモードです。
このモードではプログラムの切り替えはできません。プログラム
の選択はプログラム・モ ー ドで行います。
※1
AX100Gはプログラムを切り替えなくてもバッキングと ソロとい った使い
分けができるように、あらかじめA、Bの2種類の ドライブ(歪み)・アンプ ・エ
フェク トがメモリできま す。
フレーズ・トレーナ・モード
AUXIN端子に接続されたCDやMDからフレーズを録音して、
ループ(繰り返し)再生します。それに合わせて、繰り返し練習を
することができます。
また、ピッチ(音の高さ)を固定して再生スピードを落とすこと
ができるので、聞き取りにくいフレーズのコピーや練習に役立
ちます。
フレーズ・トレーナ・モードに入るとモジュレーション、ペ
ダル、アンビエンスの各エフェクトが自動的にオフになり
ます。
プログラム・モード、エフェクト・セレクト・モードでは、各ツマミに
よってエフェクトのエディット、ノイズ・リダクションとプログラ
ム・レ ベルの設定、プログラム名の変更などの操作を行うことがで
きます。
2.演奏してみましょう
接続例
各接続は、必ず電源オフの状態で行ってください。不注意な
操作を行うと、スピーカー・システム等を破損したり、誤動
作を起こす原因となりますので十分に注意してください。
接続ケーブルは別売です。
電池の入れ方
1.ケース裏側の電池カバーの矢印A部分を軽く押し、矢印Bの方
向へ引き上げて外してください。
2.単3アルカリ乾電池(別売)4本を図のように入れてください。
電池の+と−を間違えないように注意してください。
3.電池カバーをしめてください。
長期間ご使用にならないときは、電池の液漏れを防ぐため
に電池をはずしておいてください。
マルチ・ディスプレイの表示がBATTERYと点滅表示さ
れたら電池の交換時期です。なるべく早く新しい電池に交
換してください。
*1
OUTPUTはステレオ出力です。ギター・アンプでモノラル
標準ケーブルを使用するときは、L(左)側の音が出力され
ます。
*2 電池で使用するときは、ACアダプターは不用です。ACアダ
プターを 使用するときは必ず指定のもの(コルグ
A30960JDC9V:極性
)を使用してください。
電源の入れ方
AX100Gには電源スイッチはありません。
次のいずれかの操作で電源がオンになります。
◆ 電池を使うときは、INPUT端子にモノラル標準プラグのケーブ
ルを接続すると電源がオンになります。
め、AX100Gを使わないときはINPUT端子からケーブルを抜
いてください。
ステレオ標準プラグのケーブルを接続しても電源はオン
になりません。
◆
別売のACアダプターを使うときは、ACアダプターをDC9V
に接続すると電源がオンになります。
AX100Gの電源をオフにするときは、接続している機器の電源を
先にオフにしてください。
電池を長持ちさせるた
2.演奏してみましょう
53
Page 54
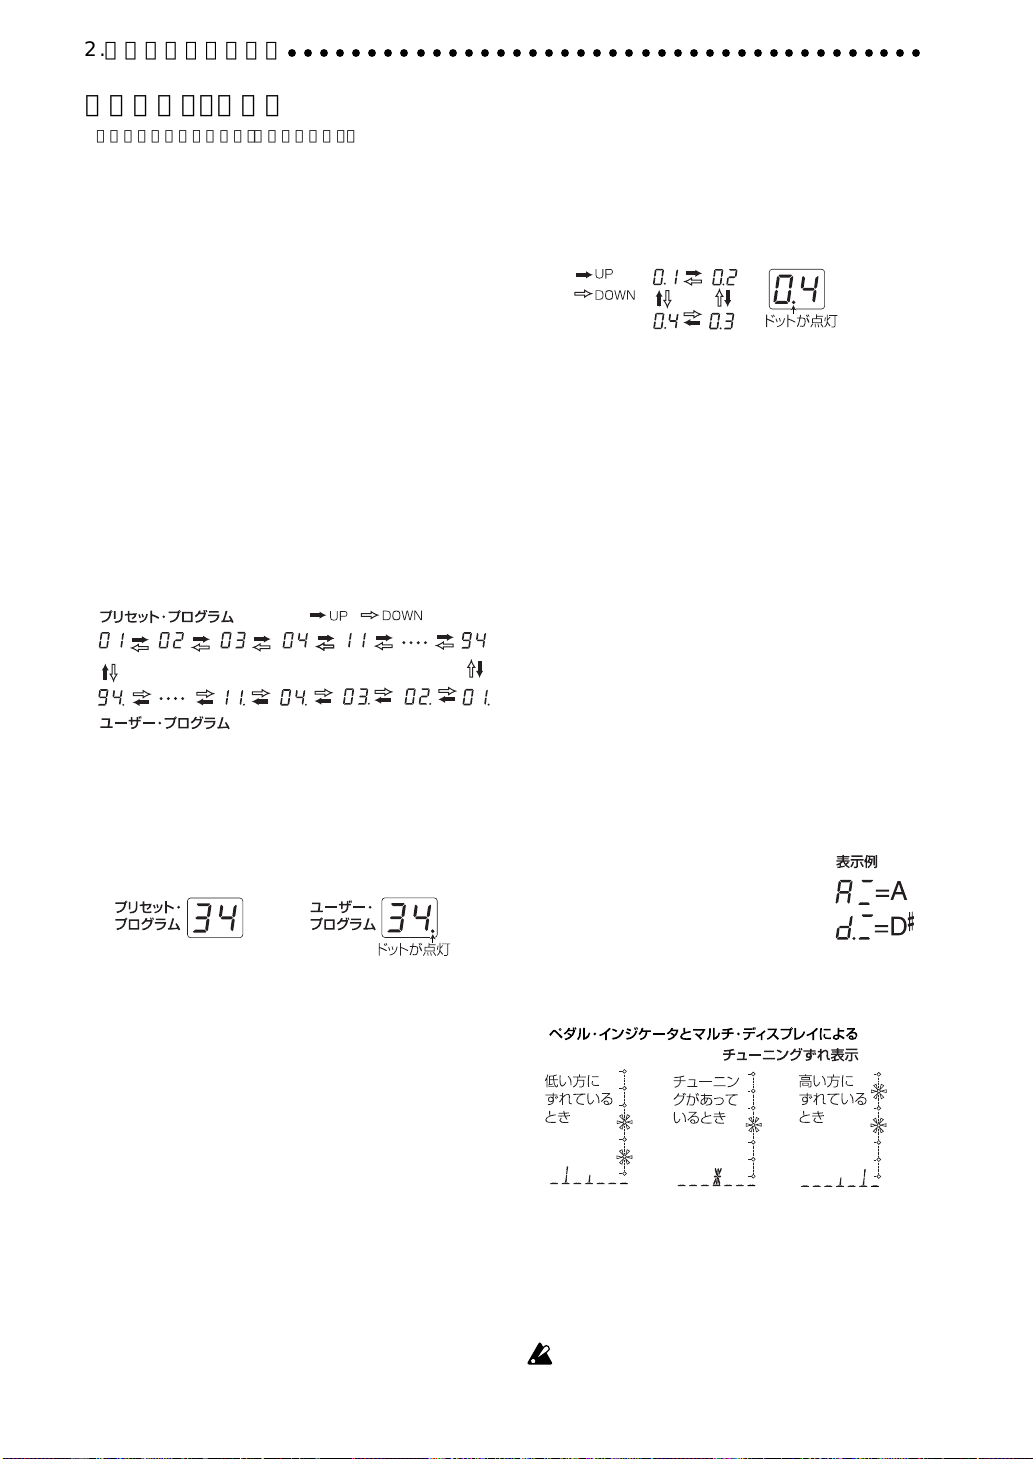
2.演奏してみましょう
○○○○○○○○○○○○○○○○○○○○○○○○○○○○○○○○○○○○○○○○
プログラム・モード
電源をオンにしたときは、必ずプログラム・モードになり、前回オ
フにしたときのプログラムの設定になっています。
入力レベル・スイッチの設定
接続した楽器の出力に合わせて切り替えます。
H:出力の大きいハムバッキング・ピックアップのついたギタ−
などの場合
L: 出力の小さいシングルコイル・ピックアップのギタ−などの
場合
音量(マスタ−・ボリュ−ム)の調整
リア・パネルのMASTERVOL.(マスタ−・ボリュ−ム)を回して
音量を調整します。
プログラムの選択
UPまたはDOWNスイッチを押して1つずつプログラムを上げ
下げします。また、このときマルチ・ディスプレイに各プログラム
の名前が表示されます。
プログラムは4個ずつのグル−プに分かれていて、このグル−プ
をバンクと呼びます。現在のバンクはナンバ−LEDの10の桁に
表示されます。
バンク・ホールド(10sホールド)
TAPスイッチとEXITスイッチを同時に押すと、バンクをまたい
だプログラムの切り替えができなくなります。このときナンバー
LEDの10の桁の右下に点(ドット)が点灯します。
UPまたはDOWNスイッチを押して、同じバンク内でプログラム
を選択します。
もう一度、TAPスイッチとEXITスイッチを同時に押すと、バン
ク・ホールドを解除します。
プログラムで使用しているエフェクトの確認
プログラムによって、すべてのエフェクトが使われてないものが
あります。プログラムを選ぶと、使用しているエフェクトに対応し
たセレクト・スイッチの横のLEDが点灯します。使われてないエ
フェクトのLEDは消灯します。オフのエフェクトはセレクト・ス
イッチを押してエディット(オン)になり、他のセレクト・スイッチ
やEXITスイッチを押すとLEDが点滅から点灯になります。
バイパス、ミュート
UPとDOWNスイッチを同時に押すと、エフェクトがかからない
バイパス音に切り替えることができます(マルチ・ディスプレイ
に2秒間BYPASSと表示)。
また、UPとDOWNスイッチを同時に約1秒押し続けると、出力が
まったくでなくなるミュ−ト状態になります(マルチ・ディスプ
レイに2秒間MUTEと表示)。
バイパスやミュ−トを解除するときは、UPまたはDOWNスイッ
チを押します。
プログラム(音色)は40個(4×10バンク)の上書きすることがで
きないプリセット・プログラムと、40個(4×10バンク)の変更
(エディット)して上書きできるユーザー・プログラムの合計80
個内蔵しています。
ユーザー・プログラムを選択した時は、ナンバ−LEDの右下に点
(ドット)が点燈します。
バンクの選択
UPまたはDOWNスイッチでもバンクをまたいだプログラムの
切り替えはできますが、バンク単位でプログラムを切り替えるこ
ともできます。
1.PROG/FXSELECTスイッチをナンバーLEDが点滅を始め
るまで約1秒押し続けます。
2.UPまたはDOWNスイッチを押して1つずつバンクを上げ下
げします。
3.PROG/FX SELECTスイッチを再度押してバンクを決定し
ナンバーLEDの点滅を止めます。
54
オート・チューナ
バイパスまたはミュートにすると、自動的にチューナーが動作し
ます。ミュートにしておくと、接続機器から音を出さずにチュー
ニングができるので、ステージ等ではミュートにすることをお勧
めします。
チューニングしたい音名が、ナンバーLEDに
1.
表示されるようにギターをおおまかに調整
します。ナンバーLEDの右下の点(ドット)が
点灯したときは
2.音名からのピッチのずれが7点のペダル・インジケ−タに表示
されます。中央のLEDのみが点燈するようにチュ−ニングし
てください。
キャリブレーションの変更
必要に応じて、キャ リブレーション(基準ピッチAの周波数)を
438〜445Hzの範囲で変更します。
チューナーが動作しているときに、バリュー・ツマミ1を回して変
更します。キャリブレーションの表示は、マルチ・ディスプレイに
表示されます。
変更したキャリブレーションは、電源をオフにすると無効
となり、ふたたび電源をオンにすると、自動的に440Hzに
なります。
を表します。
Page 55
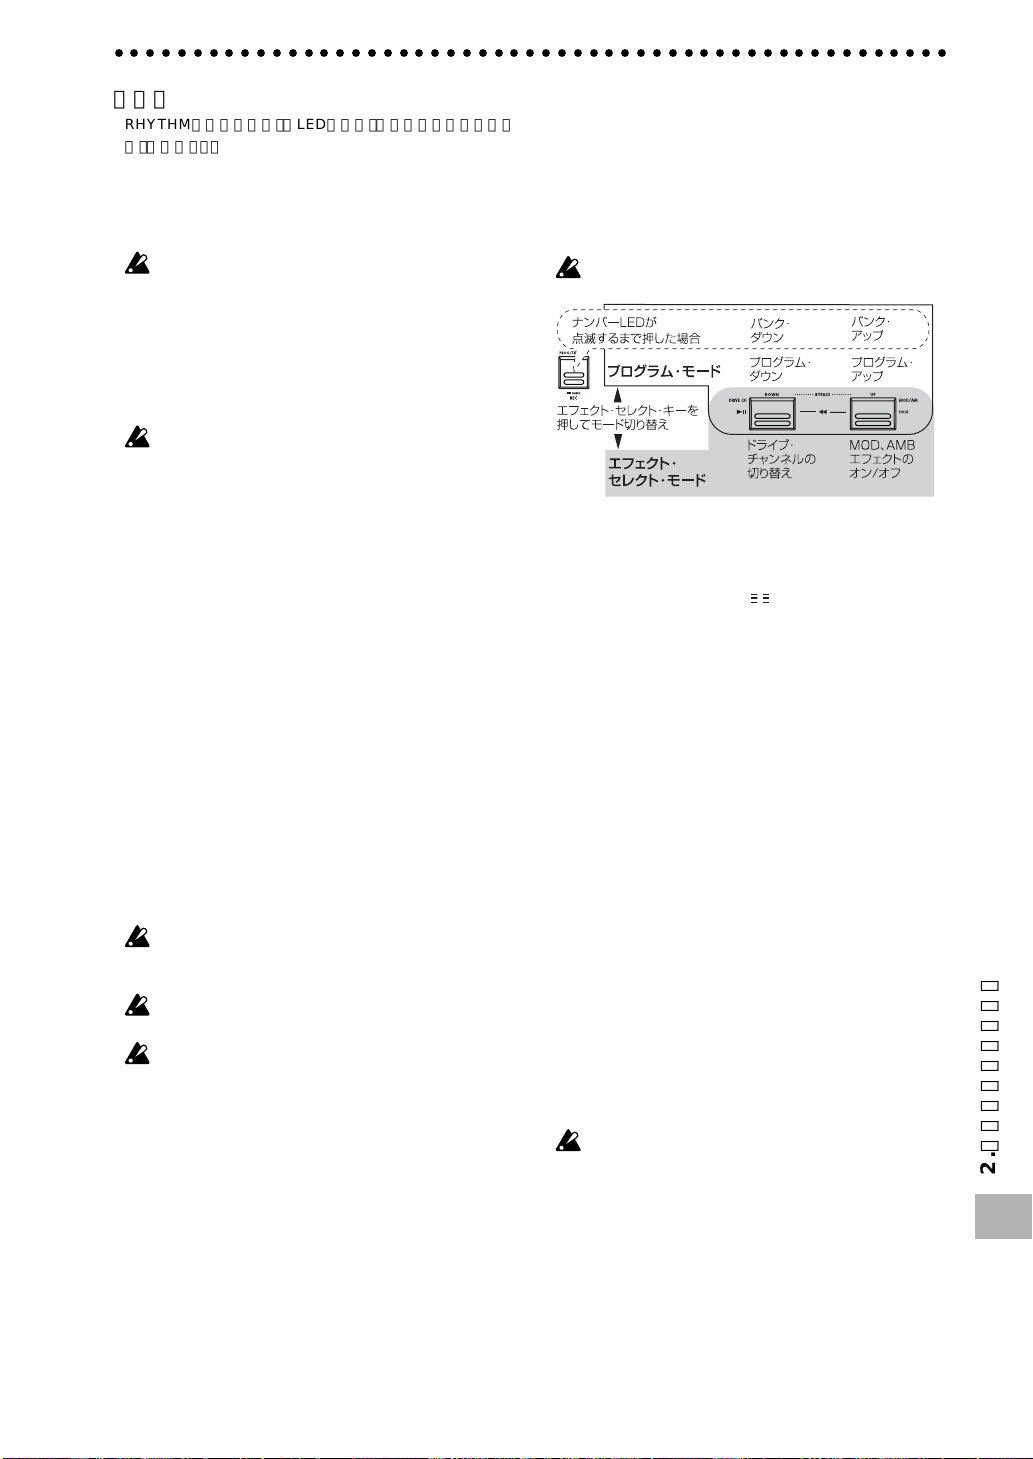
○○○○○○○○○○○○○○○○○○○○○○○○○○○○○○○○○○○○○○○○○○○○○○○○○○○○○
リズム
RHYTHMスイッチを押す(LEDが点灯)とリズム演奏を始めま
す。バリュー・ツ マ ミ1でリズム・パターン(50種類)を選び、バ
リュー・ツマミ2でテンポ(範囲40〜208)、バリュー・ツマミ3で
リズム・レ ベ ル (範囲0〜30)を設定します。
リズム演奏を止める時は演奏中にRHYTHMスイッチを押して
ください。
バイパス、ミュート、エディットに入るとリズムは止まり
ます。
AUXIN
AUXIN端子にオーディオ機器(CD 、MDなど)を接続するとエ
フェクト音をミックスしてモニターでき、曲に合わせて練習する
ときに便利です。
フレーズ・トレーナ・モード以外では自動的にAUX入力と
エフェクト出力がミックスされてOUTPUT端子から出力
されます。
AUXINの音量はオーディオ機器側で調整してください。
エクスプレッション・ペダル
エクスプレッション・ペダルで、23種類のペダル・エフェクトを、
リアルタイムにコントロールすることができます。
プログラムにペダル・エ フェクト使われているときは、ペダルの
踏み込み具合に応じてペダル・インジケータが点灯します。なお、
ペダル・エフェクトのSAMPLE1〜LOOP2は他のエフェクトと
は操作方法が異なります(P.62参照)。
エクスプレッション・ペダルを使った演奏
1.プログラム・モードでエクスプレッション・ペ ダルが使えるプ
ログラムを選択します。
2.ペダル・インジケータが点灯していることを確認します。点灯
してなければ、エクスプレッション・ペ ダルを1回深く踏み込
んで、一番上のペダル・インジケータを点灯(ペダルをオン)さ
せてください。
3.
ギターを演奏しながら、エクスプレッション・ペダルを操作しま
す。ペダルを上下させると、それに応じて出力音が変化します。
ペダル・エフェクトでVOLUMEを選択したときは、エクス
プレッション・ペ ダ ルのオン、オフはできません。オンのま
ま(ペダル・インジケータが点灯)になります。
エクスプレッション・ペダルのオン、オフは各プログラムに
記憶されません。
エクスプレッション・ペ ダ ル には必要以上の力を加えない
ようにしてください。あらかじめペダル・インジケータの点
灯や、エフェクトのかかり具合に必要な力を確認してから、
エクスプレッション・ペ ダ ルを操作してください。
エフェクト・セレクト・モード
このモードでは演奏中に、DOWNスイッチを押すとドライブ・ア
ンプ・チャンネルの切り替えができます。また、UPスイッチを押
すとモジュレーション、アンビエンス・エフェクトのオン、オフが
できます。
プログラム・モードと同様に、エディットやリズム、プログラムの
ライトなどの操作を行うことができます。
このモードでは、プログラムの切り替えやバイパス、ミュー
トはできません。
エフェクト・セレクト・モードに入る
プログラム・モードで、PROG/FXSELECTスイッチを押すと、
エフェクト・セレクト・モードに入ります。マルチ・ディスプレイ
はFXSEL、ナンバーLEDは と表示します。
ドライブ・アンプ・チャンネルの切り替え
1つのプログラムにはあらかじめ2種類のドライブ・アンプ・エ
フェクトがライトされていて、プログラム切り替えなくてもバッ
キングとソロといった使い分けができます。
DOWNスイッチを押すたびにチャンネルA、Bの2種類のドライ
ブ・アンプ・エフェクトの設定が切り替わります。チャンネルAの
ときはDRIVE・AMPスイッチ横のLEDが緑で点燈し、チャンネ
ルBのときは赤く点燈します。
モジュレーション、アンビエンス・エフェクトのオン、
オフ(INDIVIDUAL)
UPスイッチを押すたびにモジュレーション・エフェクトや、アン
ビエンス・エフェクトのオン、オフができます。
UPスイッチを押すことによりオン、オフされるエフェクトはあ
らかじめプログラムで設定します。
設定方法
1.NRLEVスイッチを押します。
2.バリュー・ツ マミ3を回してマルチ・ディスプレイの表示を設
定に合わせて変えます。
MOD: モジュレーション・エフェクトのみオン、オフ
AMB: アンビエンス・エ フ ェクトのみオン、オフ
M+A: モジュレーションとアンビエンス・エフェクトの両方
をオン、オフ
モジュレーションとペダルのエフェクト、またはペダルと
アンビエンスのエフェクトでは、同時に使用できないエ
フェクトがあります。このような組み合わせの、エフェクト
の両方をオンにしようとしたときは、先にオンになってい
た方が自動的にオフになります。
2.演奏してみましょう
エフェクト・セレクト・モードから出る
PROG/FXSELECTスイッチか、EXITスイッチを押すとプログ
ラム・モードに戻ります。
55
Page 56
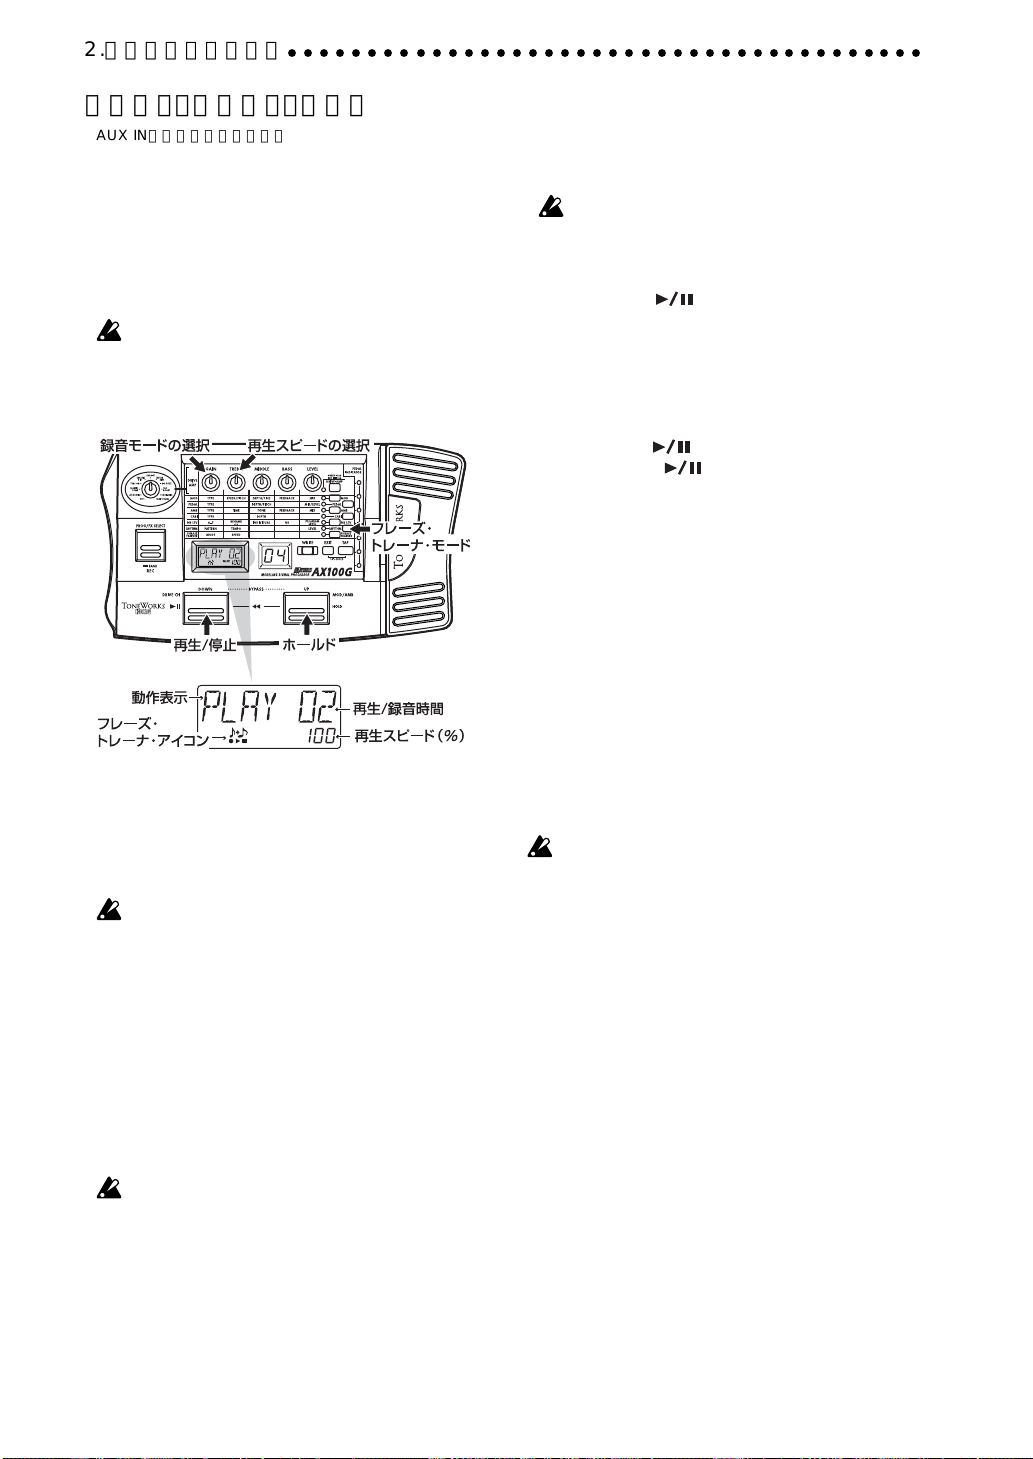
2.演奏してみましょう
○○○○○○○○○○○○○○○○○○○○○○○○○○○○○○○○○○○○○○○○
フレーズ・トレーナ・モード
AUXIN端子に接続されたオーディオ機器(CDやMD等)や、INPUT端子に接続されたギターからフレーズを録音して、ループ
(繰り返し)再生します。それに合わせて、フレーズを繰り返し練
習することができます。
また、ピッチ(音の高さ)を変えずに再生スピードを落とすこと
ができるので、聞き取りにくいフレーズのコピーや練習に役立
ちます。
なお、フレーズ・トレーナ・モードのときはエクスプレッション・ペ
ダルは自動的にギターのボリューム・コントロールになります。
このモードに入ると、モジュレーション、アンビエンス・エ
フェクトが自動的にオフになります(フレーズ・トレーナ・
モードから出ると元に戻ります)。
1.フレーズ・トレーナ・モードに入る
パネル右のPHRASETRAINERスイッチを押します(対応す
る横のLED点灯)。
マルチ・ディスプレイにフレーズ・トレーナ・アイコンが点滅
し、録音モードの選択状態が表示されます。
フレーズ・トレーナ・モードではギターの音色のエディット
はできません。あらかじめ音色を選んでから、このモードに
入ってください。
2.録音モードの選択
バリュー・ツマミ1を回して録音モードを選択します。
AUXIN: AUXの音を最大8秒まで録音
GTRIN: ギタ−の音を最大8秒まで録音
3.録音開始
接続した機器をスタートさせ、録音を開始したいところで
PROG/FXSELECTスイッチ(REC)を押すと録音を開始し
ます。マルチ・ディスプレイにRECと録音秒数が、ペダル・イ
ンジケータに録音時間が表示されます。
いったんフレーズを録音してしまうと、録音モードは変更
できません。録音モードを変更したいときは、プログラム・
モードに戻ってから再度フレーズ・トレーナ・モードに入っ
てください。
4.録音終了
録音を終了したいところで、PROG/FXSELECTスイッチ
(REC)を押すか、録音最大時間(8秒)まで録音すると録音が終
了します。マルチ・ディスプレイにPLAYと表示され、自動的
にループ(繰り返し)再生を開始します。
接続されたオーディオ機器やギターの音量によっては、歪
む場合があります。このような場合は、オーディオ機器側や
ギター側で音量を調整してください。
録音をやり直すときは
DOWNスイッチ(
と、「3.録音開始」「4.録音終了」の操作をします。
録音したフレーズを消去するには
EXITスイッチを押してフレーズを消去します。また、録音をや
り直すと新しいフレーズが上書きされます。
5.停止/再生
DOWNスイッチ(
度DOWNスイッチ(
を開始します。
•
停止しているとき(ホ−ルド中をのぞく)にUPとDOWN
スイッチを同時に押すと録音したフレーズの先頭に戻り
ます。
• 再生中にUPとDOWNスイッチを同時に押すと巻き戻しが
できます。
再生中にUPスイッチ(HOLD)を押すと、押した時点の音
•
を保持することができます。もう一度押すと解除します。
再生スピードの変更
録音したフレーズのピッチ(音の高さ)を変えずに再生スピー
ドを落とすことができます。
バリュー・ツ マミ2を回すと100%、95%、90%、85%
...25%と5%刻みで減速できます。
フレーズ・トレーナ・モードから出る
PHRASETRAINERスイッチを押すか、EXITスイッチを押す
と、プログラム・モードに戻ります。
)を押して再生を停止します。このあ
)を押すと、再生が停止します。もう一
)を押すと、停止したところから再生
フレーズ・トレーナ・モードを解除したり、電源をオフにす
ると、録音されたフレーズは消去されます。
56
Page 57

○○○○○○○○○○○○○○○○○○○○○○○○○○○○○○○○○○○○○○○○○○○○○○○○○○○○○
3. エディット
プログラム・モード、エフェクト・セレクト・モードで
は、各エフェクトのエディット、ノイズ・リダクショ
ンとプログラム・レベルの設定、プログラム名の変更
などのエディット操作を行うことができます。
エディット中はマルチ・ディスプレイのエディット・
アイコンと各エフェクトのセレクト・スイッチ横の
LEDが点滅します。
エディットしたエフェクトを保存するには「プログラムの
ライト」を行ってください。「プログラムのライト」を行わな
いで電源をオフにしたり、他のプログラムに切り替えると
元の設定に戻ります。
エフェクトのエディット
ドライブ・アンプ・エフェクトは、DRIVE・AMPスイッチを押さ
なくてもバリュー・ツマミやタイプ・ツマミを回すとすぐに エ
ディット状態になります(次項ドライブ・アンプ・エフェクトのク
イック・エ デ ィット機能参照)。
その他のエフェクトは、エディットしたいエ フェクトのセレク
ト・スイッチを押してエディット状態にします(LEDが点滅)。
ドライブ・ア ン プ・エフェクトのエディット例
ここではドライブ・アンプ・エフェクトのBチャンネルにTUBE
ODを設定するのを例にとって説明します。
1.DRIVE・AMPスイッチを何度か押してBチャンネルを選びま
す(LED赤点滅)。
2.マルチ・ディスプレイにTUBEODと、表示されたときはそ
のまま、それ以外の場合は、タイプ・ツマミを回してTUBEOD
に合わせます。最初から、タイプ・ツマミの位置がTUBEODの
ときは、一度他のタイプに切り替えてから、再度TUBEODに
合わせてください。
3.マルチ・ディスプレイには、エフェクト名のTUBEODが表
示されます。
プログラムされていたエフェクトを選択した場合は、マルチ・
ディスプレイのオリジナル・ア イ コンが点灯します。
4.5 つのバリュー・ツマミはそれぞれ、GAIN、TREBLE、
MIDDLE、BASS、LEVELが割り当てられ、各パラメータの値
を調整するツマミとして機能します(P.60「エフェクト・パラ
メータ」参照)。
5.ツマミを回すと音色が変化し、マルチ・ディスプレイにそのツ
マミに割り当てられいるパラメータ名とその値が表示されま
す。このとき、ツマミを回したときの値と、変更前の値(オリジ
ナル・パラメータ・バリュー)が一致すると、マルチ・ディスプレ
イのオリジナル・アイコンが点灯します。
ドライブ・アンプ・エフェクトのクイック・ エディット機能
タイプ・ツマミでエフェクトを選び直したり、5つのバリュー・ツマ
ミを回してパラメータ値をかえるとドライブ・アンプ・エフェクト
のエディット状態になります(OFFの場合を除く)。
このときにマルチ・ディスプレイに、それぞれのツマミに割り振
られているエフェクト名やパラメータ名とその値が表示され音
色が変化します。
また、モジュレーションや、ペダル等の他のエフェクトがエ
ディット状態でも
フェクトのエディットになります。
バリュー・ツマミに他の機能が割り当てられてられている
ときや、バイパス、ミュート、フレーズ・ト レ ー ナ・モ ードの
ときはエディットできません。
ドライブ・アンプ・チャンネル
ドライブ・アンプ・エフェクトはプログラムごとにA、Bの2チャン
ネルの設定を持っています。
パネル右側のDRIVE・AMPスイッチを押してどちらをエディッ
トするか選びます。押すたびにLEDが緑点滅(Aチャンネル)、赤
点滅(Bチャンネル)をくりかえします。
タイプ・ツマミを回すとドライブ・アンプ・エ
ドライブ・アンプ・エフェクトを使用しない場合は、タイプ・ツマミ
でOFFを選ぶとドライブ・アンプ・エフェクトがバイパスされ、マ
ルチ・デ ィスプレイにDRVOFFと表示されます。
3.エディット
57
Page 58

3.エディット
○○○○○○○○○○○○○○○○○○○○○○○○○○○○○○○○○○○○○○○○○○○○○
その他のエフェクトのエディット
それぞれのエフェクトのセレクト・スイッチを押してエディッ
ト状態にします。
MOD:コ−ラスなどのモジュレ−ション・エ フェクトのエ
ディット
PEDAL:ワウなどのペダル・エフェクトのエディット
AMB:ディレイなどのアンビエンス・エフェクトのエ
ディット
CABI:ギタ−・ア ン プ の 箱鳴 りをモデリング したキャ ビ
ネット・エ フ ェクトのエディット
NRLEV:ノイズ・リダクション、プログラム・レベル(音量)の
エディット
モジュレーションとペダルのエフェクトまたは、ペダルと
アンビエンスのエフェクトでは、同時に使用できないエ
フェクトがあります。このような組み合わせのエフェクト
を、両方をオンにしようとしたときは、先にオンになってい
た方が自動的にオフになります。
ここではモジュレーション・エフェクトのCHORUSを例にとっ
て説明します。
1.MODスイッチを押します。横のLEDが点滅しモジュレーショ
ン・エフェクトが選択されたことを示します。
プログラムでモジュレーション・エフ ェクトがOFFの場合で
もこの時点でONになります。
2.バリュー・ツマミ1(TYPE)を回してCHORUSを選びます。こ
のときのはマルチ・ディスプレイにタイプ名が表示されます。
プログラムされていたエフェクトを選択した場合は、マルチ・
ディスプレイのオリジナル・ア イ コンが点灯します。
3.バリュー・ツマミ2、3、4、5にはそれぞれ、コ−ラスのスピ−ド
(SPEED)、コ−ラスの深さ(DEPTH)、コ−ラスのフィード
バック量(FEEDBACK)、コ−ラス音とダイレクト音のミック
スのバランス(MIX)が割り当てられ、各パラメータの値を調整
するツマミとして機能します。ツマミを回したときの値と、変
更前の値(オリジナル・パラメータ・バリュー)が一致すると、マ
ルチ・ディスプレイのオリジナル・アイコンが点灯します。
各エフェクトのタイプによって有効なバリュー・ツマミや割り当
てられるパラメータは異なります(P.60「エフェクト・パラメー
タ」参照)。
TAPスイッチを使った、ディレイ・タイムのエディット
アンビエンスやペダル・エフェクトのDELAY使用時に演奏する
曲のテンポに合わせてTAPスイッチを3回以上押します。押した
間隔を読み取り、自動的にディレイ・タイムが設定されます。
演奏をしていないときでも同様に変更できます。
プログラム名の変更
NRLEVスイッチを押して横のLEDを点滅させます。バリュー・
ツマミ2で、変更したい文字の位置を選択し(文字が点滅)、バ
リュー・ツ マミ1で文字を変更します。なお、使える文字は下図の
とおりです。
プログラム名の変更を保存するには「プログラムのライト」
を行ってください。「プログラムのライト」を行わないで電
源をオフにしたり、他のプログラムに切り替えると元のプ
ログラム名に戻ります。
プログラムのライト
エディットしたプログラムをライトします。
WRITEスイッチを押すと、マルチ・ディスプレイに✳WRITE✳
1.
と表示され、ナンバーLEDが点滅します。
2.UP、DOWNスイッチでライト先プログラムを選択します。
WRITEスイッチをもう一度押すとCOMPLTと表示され、プ
3.
ログラムのライトが完了してプログラム・モードに戻ります。
ライトしない場合は、EXITスイッチを押してライト作業を解除
してください。
エディットしたプログラムを、他のプログラム・ナンバーに
ライトする場合は、上書きされたプログラムは消えてしま
います。
プリセット・プログラムには、ライトすることができません。
58
Page 59

○ ○○○○○○○○○○○○○○○○○○○○○○○○○○○○○○○○○○○○○○○○○○○○○○○○○○○○
4. 資料
エクスプレッション・ペダルの調整
(キャリブレーション)
エクスプレッション・ペダルが使用しにくい場合は、この操作を
行って最適に動作するように調整します。例えば、踏み込んだとき
にエフェクトが最大にならなかったり、逆に戻したときに最小に
ならなかったりする場合は、以下の操作で調整をしてください。
調整するときは、手でペダルを操作してください。
足で操作すると、正確に調整できないことがあります。
1.EXITスイッチとPEDALスイッチを同時に押しながら、電源
をオンにします。マルチ・ディスプレイに約1秒間PEDALと
表示されてからMINと表示されます。
2.ペダルをゆっくりと戻し、止まったら手を離しWRITEスイッ
チを押します。マルチ・ディスプレイの表示がMINから
MAXに変わります。
調整を中止するときは、EXITスイッチを押してください。
電源オン時の画面になり、プログラム・モードに入ります。
3.ペダルをゆっくりと押し、止まったら手を離しWRITEスイッ
チを押します。
マルチ・ディスプレイに約1秒間COMPLTと表示されてから
電源オン時の画面になり、プログラム・モ ードに入ります。
調整後、ペダルの状態を確認してください。
例えば、ペダル・エフェクトのタイプをVOLUME、値を0に
設定し、戻したときのMIN時のレベルで確認する等、わかりやす
いエフェクトを割り当てて確認してください。
調整に失敗すると、マルチ・ディスプレイにERRORと表
示され、調整前の画面(MINと表示)に戻ります。何回調整
してもERRORと表示されるときは故障の可能性があり
ます。そのときは、(株)コルグ営業技術課または、お買い上
げ店にお問い合わせください。
ユーザー・プログラムを工場出荷時の 状態に戻すには(再ロード)
1.EXITスイッチとPROG/FXSELECTスイッチを同時に押し
ながら、電源をオンにします。マルチ・ディスプレイに
RELOAD?と表示されます。
2.WRITEスイッチを押します。
マルチ・デ ィスプレイがRELOADにかわり再ロードが始ま
再ロードが終わるとCOMPLTと約1秒間表示されて
ります。
から電源オン時の画面になり、プログラム・モードに入ります。
再ロード中は絶対に電源をオフにしないでください。
再ロードすると、それまでのユーザー・プログラムはすべて
書きかわります。また、リズムの設定も初期化されます。
故障かな?と思ったら
故障かな?と思ったら、まず以下のことを確認してください。症
状が改善されない場合は、お近くの販売店またはコルグ営業技術
課までお問い合わせください。
1. 電源が入らない
* 電池が入っていますか?またはコンセントにACアダプターが
接続されていますか?(☞P.53)
* INPUT端子にモノラル標準ケーブルが接続されていますか?
(☞P.53)
2. 音が出ない
*ギター、アンプ、ヘッドホンはそれぞれの端子に正しく接続さ
れていますか?(☞P.53)
*アンプの電源がオンになっていて、正しく設定されています
か?
* 接続ケーブルが断線していませんか?
* AX100GのMASTERVOL.(マスター・ボリューム)がしぼっ
ていませんか?(☞P.54)
* AX100Gのプログラムごとのレベルが0または、小さい値
になっていませんか?(☞P.57、64)
*ドライブ・ア ン プ・エフェクトのLEVELが0または、小さい
値になっていませんか?
* ギター側のボリュームを絞っていませんか?
* AX100Gがミュートになっていませんか?
*ペダル・エ フ ェ クト で VOLUMEを選んでいて、ペダルが戻り
きっていませんか?
3. エフェクトがかからない
*バイパスになっていませんか?(☞P.54)
* プログラムで使うエフェクトがオンになっていますか?
(☞P.54)
4. リズムが動作しない
* プログラム・モードまたは、エフェクト・セレクト・モードに
なっていますか?
フレーズ・トレーナ・モードではリズムは動作しません。
*リズムのレベルが0になっていませんか?(☞P.55)
5. ペダルが動作しない
*ペダル・エフェクトが、使われているプログラムを選んでいま
すか?(☞P.54)
*ペダル・イ ン ジケータが点灯していますか?(☞P.52、55)
*エクスプレッション・ペダルの調整(キャリブレーション)をし
てみてください。(☞P.59)
6. ライトができない
(マルチ・ディスプレイにERRORと表示される)
* 再ロード中に電源をオフにしませんでしたか?
再ロードしてください。(☞P.59)
59
4.資料
Page 60
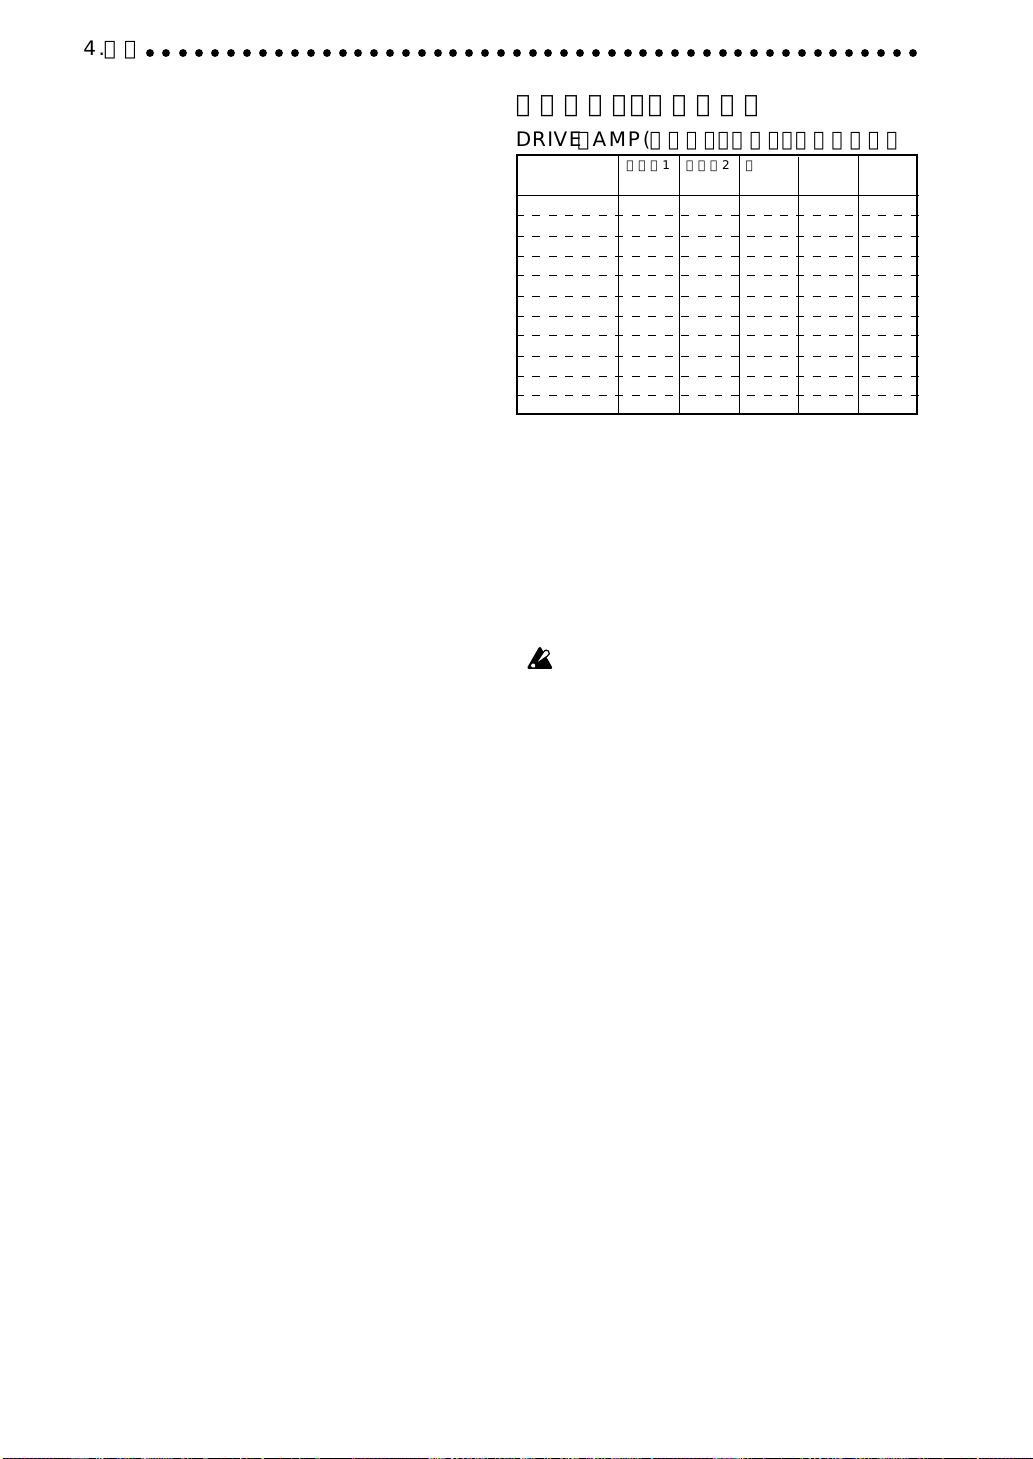
4.資料
○○○○○○○○○○○○○○○○○○○○○○○○○○○○○○○○○○○○○○○○○○○○○○○○○
主な仕様
❒ エフェクト数
63タイプ(最大同時使用エフェクト数:7)
❒ プログラム数
80(プリセット40、ユーザー40)
❒ 入力
ギターインプット(モノラル標準ジャック)
AUXIN(ステレオ・ミニジャック)
❒ 出力
アウトプット/ヘッドフォン兼用
(ステレオ標準ジャック)
❒ チューナー
測定範囲 27.5Hz〜2,093Hz(A0〜C7)
キャリブレーション A=438〜445Hz
❒ リズム
パターン 50種類
テンポ =40〜208
❒ 電源
アルカリ単3乾電池4本(連続12時間使用可能)
またはACアダプター(別売コルグA30960J)
❒ 外形寸法
329.6(W)×181.5(D)×57.5(H)mm
(突起部を含む)
❒ 重量
1.05kg
❒ 付属品
取扱説明書
仕様および外観は改良のため予告なく変更する場合があります。
エフェクト・パラメータ
DRIVE・AMP
TYPE GAIN TREBLE MIDDLE BASS LEVEL
OFF − −−−−
ACOUSTIC 0〜10.0 0〜10.0 0〜10.0 0〜10.0 0〜10.0
CLASSICCOMP
TUBEOD 0〜10.0 0〜10.0 0〜10.0 0〜10.0 0〜10.0
CLASSICDIST 0〜10.0 0〜10.0 0〜10.0 0〜10.0 0〜10.0
FATDIST 0〜10.0 0〜10.0 0〜10.0 0〜10.0 0〜10.0
METALDIST 0〜10.0 0〜10.0 0〜10.0 0〜10.0 0〜10.0
BIGFUZZ 0〜10.0 0〜10.0 0〜10.0 0〜10.0 0〜10.0
TOPBOOST 0〜10.0 0〜10.0 0〜10.0 0〜10.0 0〜10.0
USHI-GAIN
BRITSTACK
コンプレッサー、オーバードライブ、ディストーションなどの音
色を加工するエフェクトと、音質の調整をする3バンド・イコライ
ザーの2つの組み合わせ、またはギター・アンプの歪みのモデリン
各ツマミに割り振られたパラメータは下記の通りです。
グです。
タイプ・ツ マ ミ ドライブ、アンプのタイプの選択
ツマミ1 GAIN 歪みの強さの設定
ツマミ2 TREBLE 高音イコライザ−の調整
ツマミ3 MIDDLE 中音イコライザ−の調整
ツマミ4 BASS 低音イコライザ−の調整
ツマミ2 LEVEL 音量の調整
音が歪む場合はTREBLE、MIDDLE、BASS、LEVELを少
しずつ下げて調整してください。
OFF(オフ) DRVOFF
ドライブ・アンプ・エフェクトをオフにします。
ACOUSTIC(アコースティック) ACOUSTC
エレクトリック・ギターをアコースティック・ギターの音色に変換
するエフェクト・モデルです。ネックに近いピックアップを使用す
ると、よりリアルなアコースティック・ギターが再現されます。感
度の調整が可能なコンプレッサー(GAIN)を内蔵しています。
CLASSICCOMP(クラッシック・コンプレッサー)CLCOMP
コンプレッサーはレベルの小さな音は大きく、レベルの大きな音
は小さくして、音量の差を圧縮し、音の粒立ちをそろえるエフェ
クターです。ピッキングの粒をそろえ、滑らかなサスティンが得
られるモデルです。
TUBEOD(チューブ・オーバードライブ) TUBEOD
音量を適度に上げることで音を歪ませ、豊か な倍音を与えるエ
フェクトです。ピッキングのニュアンスを引き出す、'70年代の
オーバー・ドライブを再現したモデルです。
CLASSICDIST(
'70年代の代表的なディストーション・ペダルを再現したモデル
です。
FATDIST(ファット・ディストーション) FATDST
'80年代風のファットなサウンドのディストーション・ペダルを
再現したモデルです。
METALDIST(メタル・デ ィ ストーション) METAL
'90年代のメタリックな歪みを再現したモデルです。
BIGFUZZ(ビッグ・フ ァ ズ ) BIGFUZZ
代表的なビンテージ・フ ァ ズを再現したモデルです。
TOPBOOST(トップ・ブ ー スト) T-BOOST
VOXAC30風の歪みを再現したモデルです。
(ドライブ・アンプ・エフェクト)
ツマミ1 ツマミ2 ツマミ3 ツマミ4 ツマミ5
0〜10.0 0〜10.0 0〜10.0 0〜10.0 0〜10.0
0〜10.0 0〜10.0 0〜10.0 0〜10.0 0〜10.0
0〜10.0 0〜10.0 0〜10.0 0〜10.0 0〜10.0
クラッシック
・ディストーション)CLDIST
60
Page 61

○ ○○○○○○○○○○○○○○○○○○○○○○○○○○○○○○○○○○○○○○○○○○○○○○○○○○○○
USHI-GAIN(ユー・エ ス・ハイゲイン) USHI-G
USAMADEのハイ・ゲイン・アンプ風の歪みを再現したモデル
です。
BRITSTACK(ブリティッシュ・スタック) BRITSTK
BRITISHMADEのスタック・アンプ風の歪みを再現し たモデル
です。
MOD(モジュレーション・エフェクト)
ツマミ1 ツマミ2 ツマミ3 ツマミ4 ツマミ5
TYPE SPEED/PITCH DEPTH/FINE
CHORUS 0.1〜10[Hz] 0〜10.0 0〜10.0 0〜10.0
FLANGER 0.1〜10[Hz] 0〜10.0 -15〜15 0〜10.0
PHASER 0.1〜10[Hz] 0〜10.0 0〜10.0 −
TREMOLO 1〜10[Hz] 0〜10.0 − −
PAN 1〜10[Hz] 0〜10.0 − −
WAHUP −0〜10.0 − −
WAHDWN −0〜10.0 − −
PITCH -24〜24
MAJ3UP −−C〜B0〜10.0
MAJ3DWN
MIN3UP
MIN3DWN
4TH
5TH
MAJ6TH
SLOWATK 0〜10.0 0〜10.0 − −
[x100CENT]
−
−
−
−
−
−
-50〜50
コーラス、フランジャー、フェイザー、ピッチ・シフター等 のモ
ジュレーション(変調)系のエフェクト・モデルです。
割り振られたパラメータは下記の通りです。
ツマミ1 TYPE エフェクトの選択
ツマミ2 SPEED/PITCH 音程を揺らす速さ調整/
音程の調整
ツマミ3 DEPTH/FINE エフェクトのかかり具合の調整/
音程の微調整
ツマミ4 FEEDBACK クセの強さを調整。
ツマミ5 MIX
エフェクト音のミックス量の調整
CHORUS(コーラス)
音をわずかに遅らせて音程を揺らし、原音と混ぜ合わせることで
音にうねりや広がり、ビブラート感を与えるコーラス・エフェク
ターです。ステレオで使用すると、空間で音が混ぜ合わされ最も
効果的です。
FLANGER(フランジャー)
激しいうねりと音程の移動感を与える粘りのあるビンテージ・フ
ランジャーです。
PHASER(フェイザー)
位相を周期的に変化させた音を原音に混ぜ合わせることによっ
て、音にうねりを与えるエフェクターです。
TREMOLO(トレモロ)
音量を周期的に変化させることによって、音に奥行きを与えるエ
フェクトです。
PAN(パンポット)
ステレオ再生時の音の定位(パン)を周期的に変化させます。
WAHUP(ワウ・アップ)
ギターを引く強さによって、自動的に開いたり閉じたりするオー
ト・ワウ・フィルターです。
FEEDBACK
[CENT]
−C〜B0〜10.0
−C〜B0〜10.0
−C〜B0〜10.0
−C〜B0〜10.0
−C〜B0〜10.0
−C〜B0〜10.0
MIX
−0〜10.0
各ツマミに
WAHDWN(ワウ・ダウン)
WAHUPとは逆方向に動くオート・ワウ・フィルターです。
PITCH(ピッチ)
音程を±2オクターブの幅で変化させるピッチ・シ フ タ ーです。
インテリジェント・ピッチ・シフター
MAJ3UP(上3度メジャー・キー用)
MAJ3DWN(下3度メジャー・キー用)
MIN3UP(上3度マイナー・キー用)
MIN3DWN(下3度マイナー・キー用)
4TH(上4度メジャー・キー用)
5TH(上5度メジャー・キー用)
MAJ6TH(上6度メジャー・キー用)
インテリジェント・ピッチ・シフターは、設定したキーと弾いた音
の高さを元にピッチ・シ フトの量を変化させ、音楽的に心地よい
ハーモニーを作るエフェクト です 。たとえば、MAJ3UPを選んだ
場合、ピッチシフト量は、音の高さによって1音半(短3度)、2音
(長3度)と自動的に変化します。
● MAJ3UPで、キーをCに設定した場合
( )内がインテリジェント・ピッチ ・シフター
で作られた音程
楽器のチューニングがずれていると、予想した効果が得ら
れません。そのようときは、楽器のチューニングをし直して
ください。
インテリジェント・ピッチ・シフターは、単音を弾いたとき
に有効です。和音を弾いても効果は得られません。
このエフェクトとペダル・エフェクト(VOLUMEを除く)や
アンビエンス・エフェクトのROOM1〜ARENAを同時に
使用することはできません。ペダルやアンビエンス・エフェ
クトのROOM1〜ARENAがオンになっているプログラム
でインテリジェント・ピ ッ チ・シ フ ターを使用すると、自動
的にペダルやアンビエンス・エフェクトROOM1〜
ARENAがオフになります。
SLOWATK(スロー・ア タ ック)
ピッキングのたびに音量をゆっくり上げる エフェクトです。バ
リュー・ツ マミ2でアタックの立ち上がりスピードをコントロー
ルし、バリュー・ツマミ3でスレッショルド・レベルをコントロー
ルします。スレッショルド・レベルを大きくするほど強いピッキ
ング時のみにスローアタック効果が得られるようになります。
4.資料
61
Page 62

4.資料
○○○○○○○○○○○○○○○○○○○○○○○○○○○○○○○○○○○○○○○○○○○○○○○○○
PEDAL(ペダル・エ フ ェクト)
ツマミ1
VOLUME −0〜10.0 音量
CHO1 0〜10.0 −
CHO2 0〜10.0 − 速さ
VIBRATE 0〜10.0 − 速さ
FLANGER 0〜10.0 − うねり
PHASER 0〜10.0 − 速さ
TREMOLO
PAN 0〜10.0 − 速さ
WAH −−ピーク周波数
FILTER 0〜10.0 − ピーク周波数
RING 0〜10.0 − ピッチ
PITCH
FBACK1 0〜10.0 −
FBACK2 0〜10.0 −
DELAY
ECHO
ROOM −0〜10.0 残響レベル
GARAGE −0〜10.0 残響レベル
HALL −0〜10.0 残響レベル
SAMPLE1 S/L − 再生
SAMPLE2 S/L − 再生/逆再生
LOOP1 S/L − 音量
LOOP2 S/L − ループ時間
エクスプレッション・ペ ダ ルで、リアルタイムにコントロールで
きるエフェクト・モデルです。各ツマミに割り振られたパラメー
タは下記の通りです。
ツマミ1 TYPE エフェクトの選択
ツマミ3
ツマミ5 MIX/LEVEL エフェクト音のミックス量の調整/
VOLUME(ボリューム)
ボリューム・ペダルです。バリュー・ツマミ5で最小レベルが設定
できます。
CHO1(コーラス1)
ペダルで音程をゆらす深さをコントロールするコーラスです。
ツマミ2
TYPE
DEPTH/PITCH
ツマミ3
DEPTH/PITCH
0〜10.0 − 速さ
-24〜24
10[ms]〜2[SEC]
10[ms]〜2[SEC]
[CENT]
ツマミ4
ツマミ5 ペダル動作
MIX/LEVEL
0〜10.0 ピッチ
0〜10.0 効果のレベル
0〜10.0 遅延時間
エフェクトのかかり具合の調整/
効果の深さ
レベル+リバーブ
レベル+リバーブ
音程の調整
エフェクトのレベルの調整
CHO1〜PITCHは、モジュレーション・エフェクトと同時
に使用することはできません。モジュレーション・エフェク
トがオンになっているプログラムでこのエフェクトを使用
すると、自動的にモジュレーション・エフェクトがオフにな
ります。
FBACK1、2はアンビエンス・エフェクトのROOM1〜
ARENAと同時に使用することはできません。ROOM1〜
ARENAがオンになっているプログラムでこのエフェクト
を使用すると、自動的にROOM1〜ARENAがオフになり
ます。
DELAY〜HALLは、アンビエンス・エフェクトと同時に使
用することはできません。アンビエンス・エフェクトがオン
になっているプログラムでこのエフェクトを使用すると、
自動的にアンビエンス・エフェクトがオフになります。
SAMPLE1〜LOOP2は、モジュレーション・エフェクトや
アンビエンス・エ フ ェ クトと同時に使用することはできま
せん。モジュレーション、アンビエンス・エ フェクトがオン
になっているプログラムでSAMPLE1〜LOOP2エフェク
トを使用すると、自動的にそれぞれのエフェクトがオフに
なります。
CHO2(コーラス2)
ペダルで音程をゆらす速さをコントロールするコーラスです。
VIBRATO(ビブラート)
ペダルで音程をゆらす速さをコントロールするビブラートです。
FLANGER(フランジャー)
ペダルで効果のかかる帯域(うねり)をコントロールするフラン
ジャーです。
PHASER(フェイザー)
ペダルで位相の変化する速さをコントロールするフェイザーです。
TREMOLO(トレモロ)
ペダルで音量の変化する速さをコントロールするトレモロです。
PAN(パンポット)
ペダルでステレオ再生時の音の定位が変化する速さをコントロー
ルするパンです。
WAH(ワウ)
ペダルでピーク周波数をコントロールするワウです。
FILTER(フィルター)
ペダルでフィルターのピーク周波数をコントロールするレゾナ
ンス・フィルターです。
RING(リング・モジュレータ)
ペダルで音程をコントロールできる鐘の音のような音を作り出
すエフェクターです。ネックよりのピック・アップを使用し、ギ
ターのトーンを絞って、12フレット付近で演奏すると、よりきれ
いな効果が得られます。
PITCH(ピッチ・シフター)
ペダルでピッチ・シフトする量をコントロールします。バリュー・
ツマミ5が0で原音のみ、5で原音とエフェクト音が半々、
10でエフェクト音のみになります。
フィードバック
ペダルの踏み込みの浅い深いによってフィ−ドバック音にかか
るビブラ−トをコントロ−ルできるエフェクトです。
ギタ−の演奏をサスティ−ン状態でペダル踏み込むとフィ−ド
バック音が発生し、戻すとフィ−ドバック音が消えます。バ
リュー・ツ マミ3でビブラートの速さが設定できます。
ドライブ・アンプ・エフェクトにOFF、ACOUSTIC、CLAS-
SICCOMPが選択されているときは効果はかかりません。
FBACK1(フィードバック1)
演奏の音程でフィ−ドバック音が発生します。
FBACK2(フィードバック2)
演奏の1オクターブ高い音程でフィ−ドバック音が発生します。
DELAY(ディレイ)
ペダルで、ディレイへの入力レベルがコントロールできるエフェ
クトです。TAPスイッチを2回押すと、そのテンポでバリュー・ツ
マミ3のディレイ・タイムを変えることができます。
ECHO(エコー)
ペダルで遅延時間をコントロールするエコーです。テープ・エコー
のように遅延時間を変化させると音程が変化して聞こえます。
リュー・ツ マ ミ3で最大
遅延時間
を設定ます。
バ
ROOM(ルーム)
スタジオ程度の小さな部屋の部屋の残響を再現します。ペダルで
残響レベルをコントロールします。
62
Page 63

○ ○○○○○○○○○○○○○○○○○○○○○○○○○○○○○○○○○○○○○○○○○○○○○○○○○○○○
GARAGE(ガレージ)
ガレージ程度の中規模の部屋の残響を再現します。ペダルで残響
レベルをコントロールします。
HALL(ホール)
中規模ホールから大規模なホールの残響を再現します。ペダルで
残響レベルをコントロールします。
サンプル&プレイ機能
SAMPLE1からLOOP2は自分で弾いたフレーズを録音し、ペダ
ル操作により再生するエフェクトです。
ギターをある一定レベル以上の音量で弾かないと、録音は
開始されません。
録音したフレーズは、エフェクトのタイプやプログラムを
きりかえたり、フレーズトレーナを使用したとき、電源オフ
などにより消去されます。
SAMPLE1(サンプル1)
ペダルを踏んだときに、録音したフレーズが再生されます。
SAMPLE2(サンプル2)
ペダルを踏んだときに、録音したフレーズが再生、戻したときに
逆再生されます。
サンプル1、2の操作方法
1.ペダル・エ フ ェ クトにSAMPLE1または、SAMPLE2を選ぶ
か、そのエフェクトが使われているプログラムを選びます。
2.バリュー・ツマミ3で録音時間(Sは高音質3秒、Lは長時間6
秒)を選びます。
3.ペダル・インジケータが点滅するまで、エクスプレッション・ペ
ダルを深く踏み込み、録音待機状態にします。
4.接続したギターでフレーズ等を弾きます。ギターを弾いた時点
で自動的に録音が開始され、ペダル・インジケータが点滅から
点灯に変わります。
5.録音時間が経過すると、その時点で録音を終了します。途中で
録音を終了することはできません。録音をやり直すときは、「3.
ペダル・イ ン ジケータが...」からくり返してください。
6.エクスプレッション・ペ ダルを操作します。
LOOP1(ループ1)
フレーズを録音すると同時にループ(くり返し)再生をします。ペ
ダルを戻す(音量最小)にするとフレーズの最初にもどり、ペダル
を踏むと、再びループ(くり返し)再生をします。ペダルで再生音量
を調整します。
LOOP2(ループ2)
ペダルでループの長さを調整します。ペダルを戻すほどループの
長さが短くなり、最小の時にループ再生されなくなります。
ループ1、2の操作方法
1.ペダル・エフェクトにLOOP1または、LOOP2を選ぶか、その
エフェクトが使われているプログラムを選びます。
2.バリュー・ツマミ3で最大録音時間(Sは高音質3秒、Lは長時間
6秒)を設定します。
3.ペダル・インジケータが点滅するまで、エクスプレッション・ペ
ダルを深く踏み込み、録音待機状態にします。
4.接続したギターでフレーズ等を弾きます。ギターを弾いた時点
で自動的に録音が開始され、ペダル・インジケータが点滅から
点灯に変わります。
5.最大時間まで録音するか、ペダルを再度強く踏み 込むと 録音が
終わります。録音が終了すると、ペダル・インジケーターが消灯
し、録音した音がループ再生されます。
録音をやり直すときは、「3.ペダル・インジケータが...」からく
り返してください。
6.エクスプレッション・ペ ダ ルを操作します。
AMB(アンビエンス・エ フ ェクト)
ツマミ1 ツマミ2 ツマミ3 ツマミ4 ツマミ5
TYPE TIME TONE FEEDBACK MIX
DELAY 10[ms]〜2[SEC] 0〜10.0 0〜10.0 0〜10.0
ROOM1 −−−0〜10.0
ROOM2 −−−0〜10.0
GARAGE1 −−−0〜10.0
GARAGE2 −−−0〜10.0
HALL −−−0〜10.0
ARENA −−−0〜10.0
ディレイ、リバーブ等の残響系エフェクト・モデルです。各ツマミ
に割り振られたパラメータは下記の通りです。
ツマミ1 TYPE エフェクトの選択
ツマミ2 TIME 音の遅れ時間の調整
ツマミ3 TONE 音質の調整
ツマミ4 FEEDBACK音の繰り返し量の調整
ツマミ5 MIX エフェクトのミックス量を調整
DELAY(ディレイ)
左右で時間差を持ったステレオ・ディレイが、広がりを与えます。
TAPスイッチを2回押すと、そのテンポでツマミ2のTIMEを変
えることができます。
ROOM1(ルーム1)
厚みのあるルーム・タイプのリバーブ。
ROOM2(ルーム2)
明るめのルーム・タイプのリバーブ。
GARAGE1(ガレージ1)
ガレージ・タイプのリバーブ1
GARAGE2(ガレージ2)
ガレージ・タイプのリバーブ2
HALL(ホール)
ホール・タ イ プのリバーブ
ARENA(アリーナ)
アリーナ・タイプのリバーブ
4.資料
63
Page 64
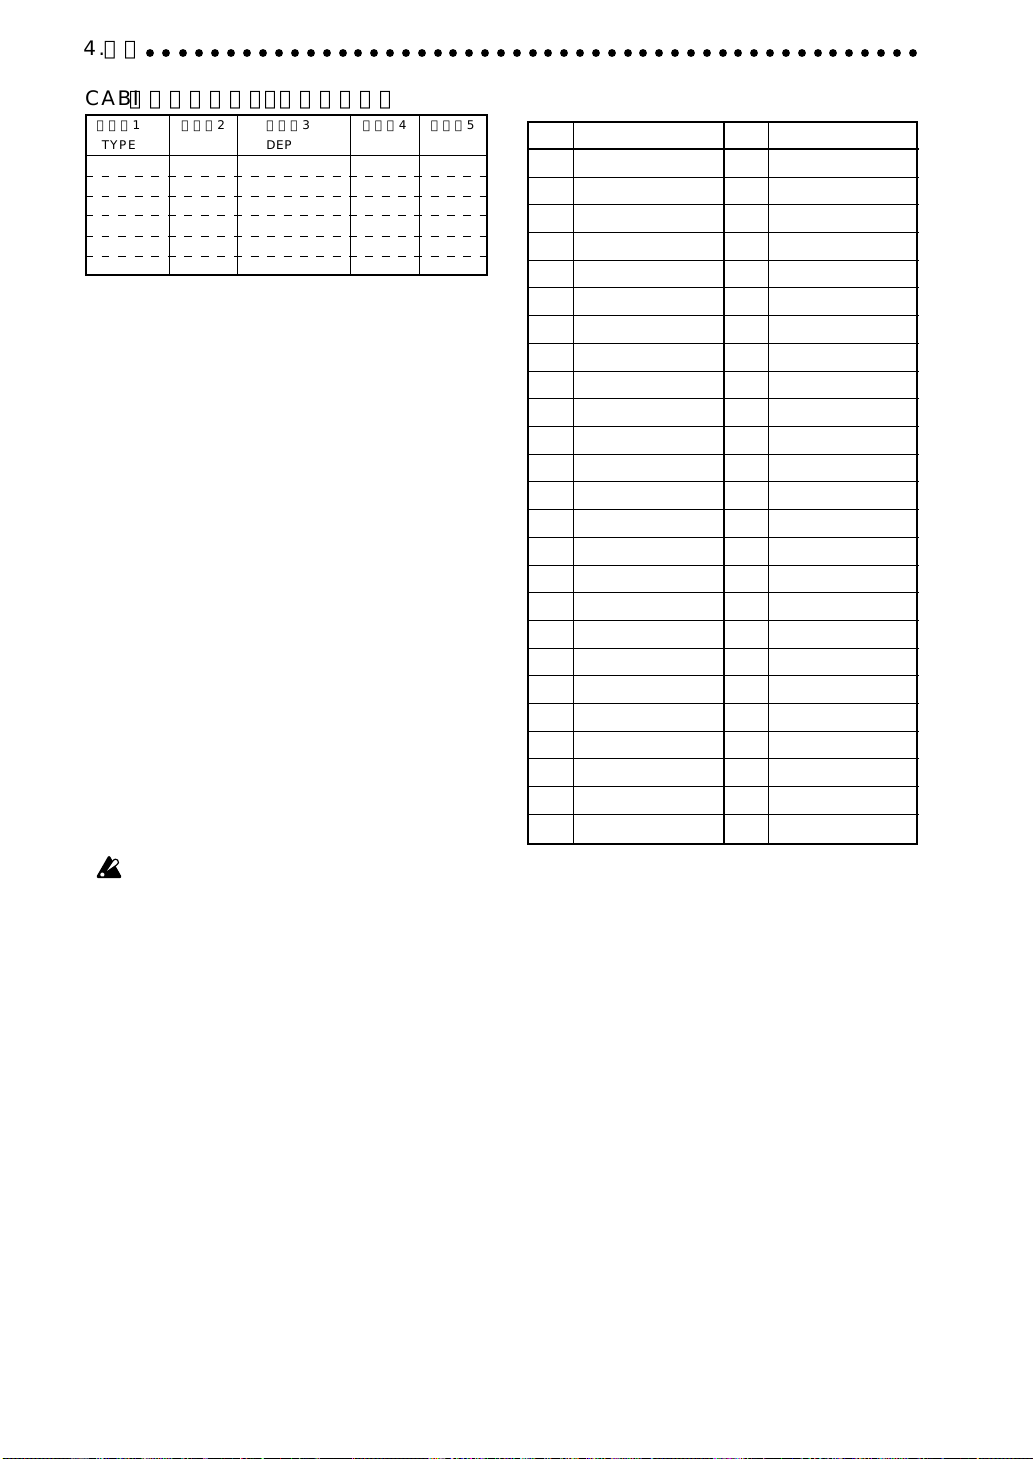
4.資料
○○○○○○○○○○○○○○○○○○○○○○○○○○○○○○○○○○○○○○○○○○○○○○○○○
CABI(キャビネット・エ フ ェクト)
ツマミ1 ツマミ2 ツマミ3 ツマミ4 ツマミ5
TYPE DEPTH
1×8 0〜10.0
1×10 0〜10.0
1×12 0〜10.0
2×12 0〜10.0
4×10 0〜10.0
4×12 0〜10.0
ギター・アンプのキャビネットの音響特性をシミュレートします。
ミキサー等へのダイレクト出力時に特に大きな効果を発揮しま
すが、ギター・アンプの使用時にも効果を発揮します。
ツマミ1 TYPE キャビネット・エ フ ェクトの選択
ツマミ3 DEPTH エフェクトのかかり具合の調整
1×8
8インチ・ス ピ ーカー1個のキャビネット・シミュレーション。
1×10
10インチ・ス ピーカー1個のキャビネット・シミュレーション。
1×12
12インチ・ス ピーカー1個のキャビネット・シミュレーション。
2×12
12インチ・ス ピーカー2個のキャビネット・シミュレーション。
4×10
10インチ・ス ピーカー4個のキャビネット・シミュレーション。
4×12
12インチ・ス ピーカー4個のキャビネット・シミュレーション。
NRLEV
(ノイズ・リダクション、プログラム・レベル)
ノイズ・リダクションのかかり具合とプログラムごとのレベルを
調整します。
バリュー・ツ マ ミ 1 、 2はプログラム名の変更(P.58参照)
に、バリュー・ツ マミ3はモジュレーション、アンビエン
ス・エフェクトのオン、オフ設定の変更(P.55参照)に使用
します。
NR(ノイズ・リダクション) NR
バリュー・ツマミ4で調整します。使用するギターによっては、ノ
イズ・リダクションの値を上げ過ぎると、音が途切れることがあ
ります。
PROGRAMLEVEL(プログラム・レベル) PROGLEV
バリュー・ツマミ5で調整します。使用するギターによって各プロ
グラムの音量が変化します。ギターに合わせてプログラム・レベ
ルを調整してください。
リズム・パターン・リスト
No. Name No. Name
1 8BEAT1 26 DISCO
2 8BEAT2 27 EURO
3 8BEAT3 28 FUNK
4 8BEAT4 29 JAZZ1
5 8BEAT5 30 JAZZ2
6 8BEAT6 31 MOTOWN
7 8SHFL 32 REGGAE1
8 16BEAT1 33 REGGAE2
9 16BEAT2 34 SURF
10 16BEAT3 35 COUNTRY
11 16BEAT4 36 BOSSA
12 16BEAT5 37 SAMBA
13 16SHFL1 38 PRACT0
14 16SHFL2 39 PRACT1
15 16SHFL3 40 PRACT2
16 16SHFL4 41 PRACT3
17 3/4 42 PRACT4
18 6/4 43 PRACT5
19 6/8 44 PRACT6
20 BALAD 45 PRACT7
21 BLUES 46 PRACT8
22 ROCK 47 PRACT9
23 THRASH 48 METRO1
24 DANCE1 49 METRO2
25 DANCE2 50 METRO3
64
Page 65
○ ○○○○○○○○○○○○○○○○○○○○○○○○○○○○○○○○○○○○○○○○○○○○○○○○○○○○
プリセット・プログラム・リスト
オフのエフェクトをオンにすると、斜体のエフェクト・モデルが選択されます。
工場出荷時のユーザー・プログラムには、プリセット・プログラムと同じものが入っています。
バンク # プログラム名 DRIVE·AMP A DRIVE·AMP B MOD PEDAL AMB CABI
01STATIC US HI-G METAL
2 FILTER ACOUSTIC FAT DST CHORUS VOLUME GARAGE2
3 KIDROCK US HI-G BRITSTK
4 FREAK TUBE OD T-BOOST CHORUS VOLUME DELAY 1X8
11RAGE BRITSTK BRITSTK
2 TRASH US HI-G ACOUSTIC
3 NIN CL DIST METAL
4 HOSTILE METAL METAL
21PRIEST BRITSTK BRITSTK
2 2112 CL COMP CL DIST PHASER VOLUME
3R R CL DIST CL DIST PITCH GARAGE
4SATCH BRITSTK BRITSTK
31J P TUBE OD BRITSTK
2 CARLOS US HI-G US HI-G WAH UP VOLUME
3 DA'FUZZ BIGFUZZ BIGFUZZ
4 RINGMAN FAT DST T-BOOST
41JAZZ OFF BRITSTK CHORUS VOLUME DELAY
2 FUNKY CL COMP FAT DST WAH UP VOLUME HALL
3 SURF CL COMP T-BOOST
4 FUSION TUBE OD BRITSTK CHORUS VOLUME
51ROCK FAT DST BRITSTK
2 BLUES TUBE OD TUBE OD
3 VINTAGE T-BOOST TUBE OD
4F BACK FAT DST FAT DST
61A MINOR CL COMP US HI-G MIN3UP VOLUME DELAY
2A MAJOR BRITSTK BRITSTK MAJ3DWN VOLUME
3 LOOP CL COMP US HI-G
4 SAMPLE US HI-G METAL
71CHORUS OFF CL COMP
2 FLANGER CL COMP FAT DST FLANGER VOLUME DELAY
3 PHASER OFF BRITSTK
4 VIBRATO TUBE OD CL DIST
81ECHO ACOUSTIC TUBE OD CHORUS ECHO
2 BENDER US HI-G ACOUSTIC
3 SLOWATK FAT DST CL COMP SLOWATK VOLUME ARENA
4 VIOLIN T-BOOST CL COMP SLOWATK DELAY
91ACOU LN ACOUSTIC ACOUSTIC CHORUS VOLUME ROOM1 1X10
2 COMP LN CL COMP CL COMP FLANGER VOLUME
3 OVDR LN T-BOOST T-BOOST
4 DIST LN BRITSTK US HI-G
PHASE
FLANGER
FLANGER PITCH ROOM2
CHORUS
PHASER
FLANGER
CHORUS
CHORUS
CHORUS
PHASER
CHORUS
CHORUS
PHASER
CHORUS
TREMOLO
CHORUS
CHORUS
CHORUS
CHORUS
PHASER
TREMOLO
CHORUS
FLANGER
CHORUS
VOLUME ROOM2
VOLUME GARAGE2
VOLUME ARENA 2X12
VOLUME
DELAY
WAH HALL
VOLUME ROOM1
HALL 2X12
GARAGE1 4X12
WAH DELAY
ECHO
GARAGE1 4X12
DELAY 2X12
FILTER DELAY
RING
HALL 4X12
TREMOLO GARAGE1 1X8
GARAGE2 2X12
VOLUME ARENA
VOLUME ROOM1
VOLUME GARAGE2
F BACK2 DELAY
DELAY 4X12
LOOP1
SAMPLE2
DELAY 2X12
DELAY 4X12
CHO2 HALL 4X10
PHASER DELAY
VIBRATO GARAGE1
ROOM1 2X12
PITCH DELAY
GARAGE1 4X10
ROOM1
VOLUME ROOM2 4X10
F BACK2
DELAY
4X12
4X12
4X10
4X12
1X8
4X12
4X12
4X10
1X8
2X12
4X12
4X10
2X12
4X12
4X12
4X12
4X12
4X10
1X12
4X10
2X12
2X12
4X12
4.資料
65
Page 66

66
Page 67
保証規定(必ずお読みください)
本保証書は、保証期間中に本製品を保証する もので、付属品類は保証の対象になりません。保証期間内に本製品が故障した
場合は、保証規定によって無償修理いたします。
1.本保証書の有効期間はお買い上げ日より1ケ年です。
2.次の修理等は保証期間内であっても有料修理となります。
●消耗部品(電池など)の交換。
●お取扱い方法が不適当のために生じた故障。
●天災(火災、浸水等)によっ て生じた故障。
●故障の原因が本製品以外の他の機器にある場合。
●不当な改造、調整、部品交換などにより生じた故障または損傷。
●保証書にお買い上げ日、販売店名が未記入の場合、または字句が書き替えられている場合。
●本保証書の提示がない場合。
尚、当社が修理した部分が再度故障した場合は、保証期間外であっても、修理した日より3ケ月以内に限り無償修理い
たします。
3.本保証書は日本国内においてのみ有効です。
ThiswarrantyisvalidonlyinJapan.
4.お客様が保証期間中に移転された場合でも、保証は引き続きお使いいただけます。最寄りのコルグ営業所、またはサービ
ス・ステーションま でお問い合わせください。
5.修理、運送費用が製品の価格よ り高くなることもありますので、あらかじめ最寄りのコルグ営業所、またはサービス・ステー
ションへ ご相談ください。運送にかかる往復の費用はお客様の負担とさせていただきます。
本製品の故障、または使用上生じたお客様の直接、間接の損傷につきましては、弊社はいっさいの責任を負いかね ますので
ご了承ください。
本保証書は、保証規定により無料修理をお約束するためのもので、これよりお客様の 法律上の権利を制限するもので はあり
ません。
◇お願い
本保証書に販売年月日の記入がない場合は無効となります。
1.保証書に販売年月日等の記入がない場合は無効となります。記入できないときは、お買い上げ年月日を証明できる領収
書等と一緒に保管してください。
2.保証書は再発行致しませんので、紛失しないよ うに大切に保管してください。
コルグAX100G 保証書 (日本国内有効)
本保証書は上記の保証規定により 無料修理 を行う こと
をお約束するものです。お買い上げ日か ら満1 年の間
に万一故障が発生した場合は、製品と共に 本保証 書を
必ずご持参の上、修理を依頼してください。
お買上げ日 年 月 日
販売店名
アフターサービス
アフターサービスについてのご質問、ご相談は、お買い上げの販売店、最寄りのコルグ営業所、またはサービス・センターへ
お問い合わせください。
商品のお取り扱いに関するご質問、ご相談は、お客様相談窓口へお問い合わせください。
お客様相談窓口 TEL03(3799)9086
サービス・センター〒143-0001 東京都大田区東海5-4-1
明正大井5号営業所コルグ物流センター内 TEL(03)3799-9085
名古屋営業所 〒466-0825 名古屋市昭和区八事本町100-51 TEL(052)832-1419
大阪営業所 〒531-0072 大阪市北区豊崎3-2-1淀川5番館7F TEL(06)6374-0691
福岡営業所 〒810-0012 福岡市中央区白金1-3-25第2池田ビル1F TEL(092)531-0166
67
Page 68
IMPORTANT NOTICE TO CONSUMERS
This product has been manufactured according to strict specifications and voltage requirements that are applicable
in the country in which it is intended that this product should be used. If you have purchased this product via the
internet, through mail order, and/or via a telephone sale, you must v erify that this product is intended to be used in the
country in which you reside.
WARNING: Use of this product in any country other than that for which it is intended could be dangerous and could
invalidate the manufacturer's or distributor's warranty.
Please also retain your receipt as proof of purchase otherwise your product may be disqualified from the manuf acturer's
or distributor's warranty.
REMARQUE IMPORTANTE POUR LES CLIENTS
Ce produit a été fabriqué suivant des spécifications sévères et des besoins en tension applicables dans le pays
où ce produit doit être utilisé. Si vous avez acheté ce produit via l’internet, par vente par correspondance ou/
et vente par téléphone, vous devez vérifier que ce produit est bien utilisable dans le pays où vous résidez.
ATTENTION: L’utilisation de ce produit dans un pays autre que celui pour lequel il a été conçu peut être
dangereuse et annulera la garantie du fabricant ou du distributeur. Conservez bien votre récépissé qui est la
preuve de votre achat, faute de quoi votre produit ne risque de ne plus être couvert par la garantie du fabricant ou du distributeur.
WICHTIGER HINWEIS FÜR KUNDEN
Dieses Produkt wurde unter strenger Beachtung von Spezifikationen und Spannungsanforderungen hergestellt, die
im Bestimmungsland gelten. Wenn Sie dieses Produkt über das Internet, per Postversand und/oder mit telef onischer
Bestellung gekauft haben, müssen Sie bestätigen, dass dieses Produkt für Ihr Wohngebiet ausgelegt ist.
WARNUNG: Verwendung dieses Produkts in einem anderen Land als dem, für das es bestimmt ist, verwendet wird,
kann gefährlich sein und die Garantie des Herstellers oder Importeurs hinfällig lassen werden. Bitte bewahren Sie
diese Quittung als Kaufbeleg auf, da andernfalls das Produkt von der Garantie des Herstellers oder Importeurs
ausgeschlossen werden kann.
E F G J
2
© 2000 KORG INC.
KORG INC.
15 - 12, Shimotakaido 1 - chome, Suginami-ku, Tokyo, Japan
 Loading...