

Korg AW-LT100G, AW-LT100B Owner's Manual
Published 5/2017 Printed in Vietnam
Owner’s Manual
Manuel d’utilisation
Bedienungsanleitung
Manual de usuario
取扱説明書
(¬p.2)
(¬p.5)
(¬s.6)
(¬p.7)
(¬p.8)
Thank you for purchasing the Korg AW-LT100G/AW-LT100B Clipon Tuner. To help you get the most out of your new instrument,
please read this manual carefully.
Merci d’avoir choisi la Clip-on Tuner AW-LT100G/AW-LT100B de
Korg. An de pouvoir exploiter au mieux toutes les possibilités
oertes par l’instrument, veuillez lire attentivement ce manuel.
Vielen Dank, dass Sie sich für einen AW-LT100G/AW-LT100B Clipon Tuner von Korg entschieden haben. Bitte lesen Sie sich diese
Anleitung vollstädig durch, um bei der Bedienung alles richtig zu
machen.
Gracias por comprar el afinador para enchufar AW-LT100G/
AW-LT100B Clip-on Tuner de Korg. Por favor, lea este manual
atentamente y guárdelo para futuras consultas.
このたびは、コルグClip-on Tuner AW-LT100G/AW-LT100B
をお買い上げいただきまして、まことにありがとうございます。
本製品を末永くご愛用いただくためにも、取扱説明書をよくお読
みになって、正しい方法でご使用ください。
アフターサービス
修理または商品のお取り扱いについてのご質問、ご相談は、お客
様相談窓口へお問い合わせください。
お客様相談窓口
PHS等一部の電話ではご利用できません。固定電話または携
帯電話からおかけください。
受付時 間 月曜~金 曜 10:00 ~ 17:00 (祝祭日、窓口休 業
日を除く)
●サービス・センター:
〒168-0073 東京都杉並区下高井戸1-18-16 2F
■ お願い
1. 保証書に販売年月日等の記入がない場合は無効となります。
記入できないときは、お買い上げ年月日を証明できる領収書と一
緒に保管してください。
2. 保証書は再発行致しませんので、紛失しないように大切に保
管してください。
コルグ
AW-LT100G
AW-LT100B
本保証書は、保証規定により無償修理をお約束するものです。
お買い上げ日 年 月 日
販売店名
保証書
Precautions
Location
Using the unit in the following locations can result in a malfunction.
• In direct sunlight
• Locations of extreme temperature or humidity
• Excessively dusty or dirty locations
• Locations of excessive vibration
• Close to magnetic elds
Power supply
Be sure to turn o the power when the unit is not in use. Remove the battery in
order to prevent it from leaking when the unit is not in use for extended periods.
Interference with other electrical devices
Radios and televisions placed nearby may experience reception interference.
Operate this unit at a suitable distance from radios and televisions.
Handling
To avoid breakage, do not apply excessive force to the switches or controls.
Care
If the exterior becomes dirty, wipe it with a clean, dry cloth. Do not use liquid cleaners such as benzene or thinner, or cleaning compounds or ammable polishes.
Keep this manual
After reading this manual, please keep it for later reference.
Keeping foreign matter out of your equipment
Never set any container with liquid in it near this equipment. If liquid gets into
the equipment, it could cause a breakdown, re, or electrical shock. Be careful
not to let metal objects get into the equipment.
NOTE: This equipment has been tested and found to comply with the limits
for a Class B digital device, pursuant to Part 15 of the FCC Rules. These limits
are designed to provide reasonable protection against harmful interference
in a residential installation. This equipment generates, uses, and can radiate
radio frequency energy and, if not installed and used in accordance with
the instructions, may cause harmful interference to radio communications.
However, there is no guarantee that interference will not occur in a particular
installation. If this equipment does cause harmful interference to radio or
television reception, which can be determined by turning the equipment o
and on, the user is encouraged to try to correct the interference by one or
more of the following measures:
• Reorient or relocate the receiving antenna.
• Increase the separation between the equipment and receiver.
• Connect the equipment into an outlet on a circuit different from that to
• Consult the dealer or an experienced radio/TV technician for help.
If items such as cables are included with this equipment, you must use those
included items.
Unauthorized changes or modication to this system can void the user’s authority to operate this equipment.
This device complies with Part 15 of the FCC Rules.
Operation is subject to the following two conditions: (1) This device may not
cause harmful interference, and (2) this device must accept any interference
received, including interference that may cause undesired operation.
CAN ICES-3 B / NMB-3 B.
This product has been manufactured according to strict specications and
voltage requirements that are applicable in the country in which it is intended that this product should be used. If you have purchased this product via
the internet, through mail order, and/or via a telephone sale, you must verify
that this product is intended to be used in the country in which you reside.
WARNING: Use of this product in any country other than that for which it is
intended could be dangerous and could invalidate the manufacturer’s or distributor’s warranty.
Please also retain your receipt as proof of purchase otherwise your product
may be disqualied from the manufacturer’s or distributor’s warranty.
* All product names and company names are the trademarks or registered
THE FCC REGULATION WARNING (for USA)
which the receiver is connected.
Notice regarding disposal (EU only)
If this symbol is shown on the product, manual, battery, or package,
you must dispose of it in the correct manner to avoid harm to human
health or damage to the environment. Contact your local administrative body for details on the correct disposal method. If the battery contains heavy metals in excess of the regulated amount, a chemical symbol is displayed below the symbol on the battery or battery package.
IMPORTANT NOTICE TO CONSUMERS
trademarks of their respective owners.
- 1 -
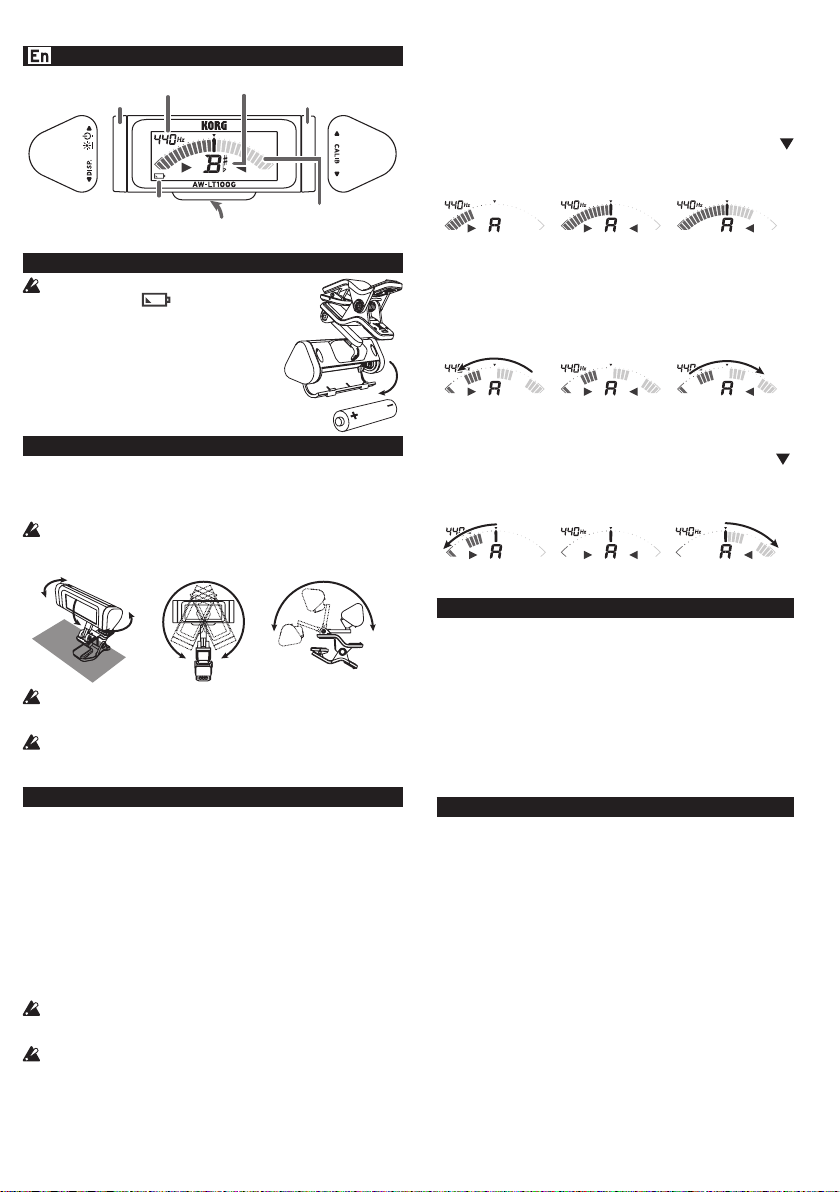
Parts of the AW-LT100G/AW-LT100B
(Rear)
Note name indicator
Reference pitch indicator
20°
180°
Right shuttle switchLeft shuttle switch
Battery indicator
Battery compartment
Meter
Installing the battery
When the battery becomes depleted, a
battery indicator ( ) will appear on the
display. Immediately replace the battery with
a new one.
Open the battery compartment cover on the
1.
rear of the tuner in the direction of the arrow.
Insert the battery, making sure to observe the
2.
correct polarity, and then close the cover.
Attaching to the instrument and range of motion
The AW-LT100G/AW-LT100B tunes by picking up the vibrations of the instrument. Therefore, attach the AW-LT100G/AW-LT100B to the headstock
of your instrument in order to tune it. Additionally, the AW-LT100G/AWLT100B can be freely moved so that the display is easy to read.
The AW-LT100G/AW-LT100B may be damaged if you apply excessive
force within its range of motion, or attempt to move it beyond its intended range of motion.
340°
100°
20°
Please carefully attach the AW-LT100G/AW-LT100B to your instrument.
Leaving the AW-LT100G/AW-LT100B attached for a long time may
damage or mark the instrument's surface.
Depending on various factors such as age-related change or the sur-
face nish, there is a possibility that your instrument may be damaged
by attaching this product.
Tuning
Tuning procedure
Turn the left shuttle switch upward. Each time you turn the shuttle
1.
switch, the AW-LT100G/AW-LT100B will be turned on or o.
If the power is left on for approximately 3 minutes without any user
input, it will turn o automatically (Auto power-o function).
If necessary, change the reference pitch (calibration) and meter mode.
2.
Play a single note on your instrument.
3.
The note name closest to the detected pitch appears in the note name
indicator. Check that the correct note name appears in the display, and
then tune your instrument while watching the meter.
The tuning indications dier depending on the selected meter mode
setting.
Even if the pitch is within the range of detection, it may not be possible
to detect the pitch of an instrumental sound that contains large numbers of overtones or a sound that has a rapid decay.
The meter may respond to vibrations it picks up from the environ-
ment.
Reference pitch settings (calibration) (*M)
Each time you turn the right shuttle switch upward (or downward), the
reference pitch (calibration value) increases (or decreases) in 1 Hz steps.
Setting the meter mode (*M)
Each time you turn the left shuttle switch downward, the meter
mode changes.
Regular ¬ Strobe ¬ Half strobe ¬ Regular ...
1: Regular meter
Tune your instrument until the meter segments up to the center (
) light up. If the pitch is sharp, meter segments up to the right of the
center light up. If the pitch is at, meter segments to the left of the
center light up.
The pitch is at. In tune. The pitch is sharp.
2: Strobe meter
Tune your instrument until the meter segments stop running. Since
the strobe meter has higher precision, it allows you to tune with
greater accuracy. The illumination will flow from left to right if the
note is sharp, or from right to left if the note is at.
The pitch is at. In tune. The pitch is sharp.
3: Half-strobe meter
Tune your instrument until the meter segment at the center ( )
lights up. If the pitch is sharp, meter segments to the right of the center light up. If the pitch is at, meter segments to the left of the center
light up.
The pitch is at. In tune. The pitch is sharp.
Backlight
After turning the left shuttle switch upward to turn on the AWLT100G/AW-LT100B, you can change the brightness of the display by
keeping the left shuttle switch turned upward for approximately 2
seconds.
Auto : The backlight will light brightly when sound is inputted or
when a shuttle switch is operated. When there has been no sound input or shuttle switch operation for approximately three seconds after
the power has been turned on, the backlight will turn o in order to
prevent the battery from being depleted.
Soft : The backlight will light at a lower level of brightness in order to
prevent the battery from being depleted.
Specications
Scale: 12-note equal temperament
Range (sine wave): AW-LT100G B1 (61.74 Hz)–E6 (1319 Hz)
AW-LT100B E0 (20.60 Hz)–C5 (523.3 Hz)
Precision: +/-0.1 cent
Reference pitch: A4 = 436–445 Hz (1 Hz steps)
Dimensions (W x D x H):
60 mm x 60 mm x 55 mm / 2.36’’ x 2.36’’ x 2.17’’
Weight: 32 g/1.13 oz. (including battery)
Power supply: One AAA Battery
Battery life: approximately 100 hours
(backlight:Soft, tuner continuously operating, A4
Included items:
*M Settings are remembered even when the power is o.
• Specications and appearance are subject to change without notice for improvement.
input, when using alkaline battery)
Owner’s manual, One AAA battery
- 2 -

安全上のご注意
火災・感電・人身傷害の危険を防止するには
以下の指示を守ってください
この注意事項を無視した取り扱いをすると、死亡
警告
や重傷を負う可能性があります。
・ 次のような場合には、直ちに電源を切る。
○ 異物が内部に入ったとき ○ 製品に異常や故障が生じたとき
修理が必要なときは、お客様相談窓口へ依頼してください。
・ 本製品を分解したり改造したりしない。
・ 修理、部品の交換などで、取扱説明書に書かれていること以外は
絶対にしない。
・ 大音量や不快な程度の音量で長時間使用しない。
大音量で長時間使用すると、難聴になる可能性があります。
万一、聴力低下や耳鳴りを感じたら、専門の医師に相談してくだ
さい。
・ 本製品に異物(燃えやすいもの、硬貨、針金など)を入れない。
・ 温度が極端に高い場所(直射日光の当たる場所、暖房機器の近く、
発熱する機器の上など)での使用や保管をしない。
・ 振動の多い場所で使用や保管をしない。
・ ホコリの多い場所で使用や保管をしない。
・ 風呂場、シャワー室で使用や保管をしない。
・ 雨天時の野外のように、湿気の多い場所や水滴のかかる場所で、
使用や保管をしない。
・ 本製品に液体をこぼさない。
・ 濡れた手で本製品を使用しない。
この注意事項を無視した取り扱いをすると、傷害を負
注意
う、または物理的損害が発生する可能性があります。
・ 正常な通気が妨げられない所に設置して使用する。
・ ラジオ、テレビ、電子機器などから十分に離して使用する。
ラジオやテレビ等に接近して使用すると、本製品が雑音を受けて
誤動作する場合があります。また、ラジオ、テレビ等に雑音が入
ることがあります。
本製品をテレビ等の横に設置すると、本製品の磁場によってテレ
ビ等の故障の原因になることがあります。
・ 外装のお手入れは、乾いた柔らかい布を使って軽く拭く。
・
長時間使用しないときは、電池の液漏れを防ぐために電池を抜く。
・ 電池や本体は幼児の手の届かないところへ保管する。
・ 電池を過度の熱源(日光、火など)にさらさない。
・ ボタンやツマミなどに必要以上の力を加えない。
故障の原因になります。
・ 外装のお手入れに、ベンジンやシンナー系の液体、コンパウンド
質、強燃性のポリッシャーを使用しない。
・ 不安定な場所に置かない。
※ すべての製品名および会社名は、各社の商標または登録商標です。
保証規定 (必ずお読みください)
本保証書は、保証期間中に本製品を保証するもので、付属品類(ヘッド
ホンなど)は保証の対象になりません。保証期間内に本製品が故障し
た場合は、保証規定によって無償修理いたします。
1. 本保証書の有効期間はお買い上げ日より1か年です。
2. 次の修理等は保証期間内であっても有償となります。
• 消耗部品(電池、スピーカー、真空管、フェーダーなど)の交換。
• お取扱い方法が不適当のために生じた故障。
• 天災(火災、浸水等)によって生じた故障。
• 故障の原因が本製品以外の他の機器にある場合。
• 不当な改造、調整、部品交換などにより生じた故障または損傷。
• 保証書にお買い上げ日、販売店名が未記入の場合、または字句が
書き替えられている場合。
• 本保証書の提示がない場合。
尚、当社が修理した部分が再度故障した場合は、保証期間外であっ
ても、修理した日より3か月以内に限り無償修理いたします。
3. 本保証書は日本国内においてのみ有効です。
This warranty is valid only in Japan.
4. お客様が保証期間中に移転された場合でも、保証は引き続きお使いい
ただけます。詳しくは、お客様相談窓口までお問い合わせください。
5. 修理、運送費用が製品の価格より高くなることがありますので、あ
らかじめお客様相談窓口へご相談ください。発送にかかる費用は、
お客様の負担とさせていただきます。
6. 修理中の代替品、商品の貸し出し等は、いかなる場合においても一
切行っておりません。
本製品の故障、または使用上生じたお客様の直接、間接の損害につき
ましては、弊社は一切の責任を負いかねますのでご了承ください。
本保証書は、保証規定により無償修理をお約束するためのもので、こ
れによりお客様の法律上の権利を制限するものではありません。
Précautions
Emplacement
L’utilisation de cet instrument dans les endroits suivants peut en entraîner le mauvais fonctionnement.
• En plein soleil.
• Endroits très chauds ou très humides.
• Endroits sales ou fort poussiéreux.
• Endroits soumis à de fortes vibrations.
• A proximité de champs magnétiques.
Alimentation
Lorsque vous n’utilisez pas l’appareil, n’oubliez pas de le mettre hors tension. Retirez les piles pour éviter toute fuite lorsque l’appareil ne sera pas utilisé pendant
de longues périodes de temps.
Interférences avec d’autres appareils électriques
Les postes de radio et de télévision situés à proximité peuvent par conséquent
sourir d’interférences à la réception. Veuillez dès lors faire fonctionner cet appareil à une distance raisonnable de postes de radio et de télévision.
Maniement
Pour éviter de les endommager, manipulez les commandes et les boutons de cet
instrument avec soin.
Entretien
Lorsque l’instrument se salit, nettoyez-le avec un chion propre et sec. Ne vous
servez pas d’agents de nettoyage liquides tels que du benzène ou du diluant,
voire des produits inammables.
Conservez ce manuel
Après avoir lu ce manuel, veuillez le conserver soigneusement pour toute référence ultérieure.
Evitez toute intrusion d’objets ou de liquide
Ne placez jamais de récipient contenant du liquide près de l’instrument. Si le
liquide se renverse ou coule, il risque de provoquer des dommages, un court-circuit ou une électrocution. Veillez à ne pas laisser tomber des objets métalliques
dans le boîtier (trombones, par ex.).
Note concernant les dispositions
Si ce symbole apparait sur le produit, le manuel, les piles ou les packs de
piles, cela signi e que vous devez le recycler d’une manière correcte a
n de prévenir les dommages pour la santé humaine et les dommages
potentiels pour l’environnement. Contactez votre administration locale
pour de plus amples renseignements concernant la bonne méthode de
recyclage. Si la pile contient des métaux lourds au-delà du seuil réglementé, un symbole chimique est a ché en dessous du symbole de la
poubelle barrée d’une croix sur la pile ou le pack de piles.
REMARQUE IMPORTANTE POUR LES CLIENTS
Ce produit a été fabriqué suivant des spéci cations sévères et des besoins en
tension applicables dans le pays où ce produit doit être utilisé. Si vous avez
acheté ce produit via l’internet, par vente par correspondance ou/et vente par
téléphone, vous devez véri er que ce produit est bien utilisable dans le pays
où vous résidez.
ATTENTION: L’utilisation de ce produit dans un pays autre que celui pour
lequel il a été conçu peut être dangereuse et annulera la garantie du fabricant
ou du distributeur. Conservez bien votre récépissé qui est la preuve de votre
achat, faute de quoi votre produit risque de ne plus être couvert par la garantie du fabricant ou du distributeur.
* Tous les noms de produits et de sociétés sont des marques commerciales ou
déposées de leur détenteur respectif.
(Seulement EU)
- 3 -
 Loading...