

®
QMS
®
magicolor WX
User's Guide
1800444-001B

Trademarks
The following are trademarks or register ed tradem arks of their respective owners. Other
product names mentio ned in this manual may also be trademar ks or regis tered
trademarks of their respective owners. Registered trademarks are registered in the
United States Patent and Trademark Office; some trademarks may also be registered in
other countries. QMS,
Inc. TrueType/Apple Computer, Inc. Windows/Microsoft Corporation. Xerox/Xerox
Corporation. Hamm er mill/Hammer mill. Avery/Avery.
magicolor
, and the QMS logo are registered trademarks of QMS,
Proprietary Statement
The digitally encoded software includ ed with your QMS printer is Copyrigh ted © 1997
by QMS, Inc. All Rights Reserved. This software may not be reproduced, modified,
displayed, transferred, or copied in any form or in any man ner or on any media, in whole
or in part, without the express wr itten per mission of QMS, Inc.
Copyright Notice
This manual is Copyrighted © 1997 by QMS, Inc., One Magnum Pass, Mobile, AL
36618. All Rights Reser ved. This manual may not be cop ied in whole or in part, no r
transferred to any other media or language, witho ut the express written per mission of
QMS, Inc.
Manual Notice
QMS, Inc. reserves the right to make changes to this manu al and to the equipmen t
described herein without notice. Considerable effort has been made to ensure that this
manual is free of inaccura cies and omissions. However, QMS, Inc. makes no warrant y
of any kind including, but not limited to, any implied warranties of merchantability
and fitness for a particular purpose with regard to this manual. QMS, Inc. assumes
no responsibility for, or liability for, errors contained in this manual or for incidental,
special, or consequen tial damages ar ising out of the fur nishing of this manual, or the
use of this manual in operating the e quipment, or in con nection with the per forman ce of
the equipment when so ope rated.

Typographic Conventions
The following typographic conventions are used in this manual:
Mixed-Case
Courier
Mixed-Case
Italic
Courier
UPPERCASE
COURIER
lowercase italic
UPPERCASE File and utility names
↵ Press the Enter key (PC)
» Note:
▲ Caution:
M WARNING!
Notes contain tips, extra information, or important information
that deserves emphasis or reiteration.
Cautions present information that you need to know to avoid
equipment damage, process failure, or extreme annoyance.
Warnings indicate the possibility of personal injury if a
specific procedure is not performed exactly as described in the
manual.
ACHTUNG!
beschriebene Vorgehensweise, da sonst Verletzungsgefahr
bestehen könnte.
Text you type, and messages and information
displayed on the screen
Variable text you type; replace the italicized
word(s) with information specific to your printer or
computer
Information displayed in the printer message
window
Variable information in text
Bitte halten Sie sich exakt an die im Handbuch
v


Contents
1 Setup
Introduction ..................................................................................1-2
Find a Good Location ..................................................................1-2
Unpack the Printer .............................................................. .........1-4
Check Shipment Contents ..........................................................1-6
Set up the Printer .........................................................................1-7
Install the Developer and Toner Cartridges 1-7
Remove the Pressure-Rel eas e Piec es 1-12
Install the Cleaning Pad and Oil Bottle 1-14
Install the Waste Toner Pack 1-18
Install the OPC Belt Cartridge 1-20
Fill the Paper Cassette 1-24
Connect the Printer to Your PC and Plug It In 1-26
Install the Printer Driver 1-26
Register the Printer ....................................................................1-29

2 Printing
Configuring the Windows 95 Printer Driver .............................. 2-2
Setting the Printer Driver Defaults 2-2
Configuring the Printer Driver for the Curren t Print Job 2-3
Configuring Paper Options 2-4
Configuring Graphi cs Options 2-8
Configuring Colo r Optio ns 2-11
Configuring the Windows NT 4.0 Printer Driver ..................... 2-14
Setting Document Defaults 2-14
Configuring the P rinter Driver t hrough the Windows NT 4.0 Sta rt
Menu 2-15
Configuring the Printer Driver through the Application 2-15
Configuring Page Setup Options 2-16
Configuring Advanc ed Op tions 2-20
Configuring Halftone Color Adjustments 2-26
Configuring Device Setting s 2-32
Halftone Setup 2-35
Printing on a Network ..... ....... ...... ....... ...... ....... ...... ....... ...... ...... 2-40
Sharing Your Printer with Others for Windows 95 Users 2-40
Sharing Your Pri nter with Oth ers for W indows NT 4.0 Users 2-41
Sharing Someone Else's Printer 2-43
Refilling the Media Cassette ..................................................... 2-44
Using the Manual Feed Tray ..................................................... 2-47
Printing on Different Types of Print Media .............................. 2-49
Printing Transparencies 2-49
Printing Labels 2-49
Printing on Letterhead or Other Preprinted Media 2-50
Printing on 3-Hole or Other Pre-punched Media 2-50
Printing Envelopes 2-50
Printing on Thick Paper Stocks 2-50
More About Print Media ............................................................ 2-51
Print Media Sizes, Imageable Regions, and Margins 2-51
Print Media Types, Weights, and Recommended Brands 2-54
Print Media Storage 2-54
Preventing Media Jams ............................................................. 2-55
Preventing Envelope Jams 2-56
QMS magicolor WX User's Guideii

Cancelling a Print Job ...............................................................2-56
3 Control Panel
Introduction ..................................................................................3-2
About the Control Panel ..............................................................3-3
The Message Window 3-3
The Control Panel Indicators 3-3
The Function Keys 3-5
Printer Configuration ...................................................................3-6
The Configuration Menu 3-7
Accessing the Configuration Menu 3-8
Selecting Configuration Menu Options 3-8
Setting the Message Window Language 3-9
Setting Energy Conservation 3-10
Setting the Media Source 3-10
4 Printer Options
Available Options and Accessories ............................ ...............4-2
Sheet Feeder .................................................................................4-2
The Envelope Cassette ................................................................4-6
Installing the Envelope Cassette 4-6
Removing and Replacing the Controller Board ......................4-10
Removing the Controller Board 4-10
Replacing the Controller Board 4-11
Single In-Line Memory Modules (SIMMs) ................................4-13
Updating System Software ........................................................4-16
Troubleshooting 4-17
Updating the Windows 95 Printer Driver .................................4-17
Updating the Windows NT 4.0 Printer Driver ...........................4-19
Contents iii

5 Maintenance
Preventive Maintenance .............................................................. 5-2
General Tips for Extending Print er Life 5-2
Preventive Maint ena nc e Procedures 5-2
About Consumables .................................................................... 5-3
Consumable Life 5-3
Ordering Consumables 5-4
Storing Consumables 5-4
Replacing Consumables ............................................................. 5-5
Replacing a Toner Cartridge 5-5
Replacing a Developer Cartridge 5-9
Replacing the OPC Belt Cartridge 5-14
Replacing the Cleaning Pad and Oil Bottle 5-18
Replacing the Waste Toner Pack 5-23
Cleaning the Printer ......................................... ...... ....... ...... ...... 5-25
Guidelines for Cleaning the Printer 5-25
Cleaning the Charger Unit, the Precharger Unit, and the AC-
Charger Unit 5-26
Cleaning the Rollers 5-34
Cleaning the Exterior of Your Printer 5-41
6 Repacking the Printer
Introduction ................................... ............. ....... ............. ............ .. 6-2
Remove Cables and Cassette(s) ................................................ 6-2
Remove the Toner and Developer Cartridges .......................... 6-3
Remove the Fuser Unit and Oil Bottle ............................... ........ 6-4
Replace the Fuser-Roller Pressure-Release Pieces ................. 6-7
Remove the OPC Belt Cartridge ............................................... 6-10
Remove the Waste Toner Pack .......................................... ...... 6-12
Repack the Printer ..................................................................... 6-12
QMS magicolor WX User's Guideiv

7 Troubleshooting
Miscellaneous Problems .............................................................7-2
Blank Pages ..................................................................................7-3
Only a Partial Page Prints ...........................................................7-3
Not All Pages Print .... ....... ...... ............................................. ....... ..7 -4
Print Quality Problems .... ...... ....... ...... .........................................7 -4
Generally Poor Print Quality 7-4
Specific Print Quality Problems 7-4
Changing Print Density 7-10
Printer Status Messages ...........................................................7-11
Clearing Status Message s 7-16
Service Call Messages 7-17
Clearing Media Jams .................................................................7-18
Clearing Misfeed Jams 7-18
Clearing Inner Jams 7-21
Clearing Outer Jams 7-27
If the Media Jam Message Stays On 7-32
Reseating the Drum ...................................................................7-32
Installing the Printer Driver Manually .................... ...... ...... .......7-34
Placing a Service Call ................................................................7-36
A QMS Customer Support
Sources of Support ... ....... ...... ....... ...... ....... ...... ....... .................... A-2
Your QMS Vendor A-2
Your Application Vendor A-2
Q-FAX A-2
The QMS Corporate Bulletin Board System A-3
CompuServe A-3
Internet A-3
QMS Customer Response Center (CRC) A-4
QMS World-wide Offices ....... ....... ...... ....... ...... ....... ...... .............. A-5
Contents v

B Technical Specifications
Print Engine Specifications ......... ....... ........................................B-2
Controller Specifications ............................................................B-3
Environmental Requirements .....................................................B-3
Print Media and Consumables ...................................................B-4
Printer Options ............................................................................B-4
Centronics Parallel Cable Specifications ..................................B-4
Centronics/1284 Parallel Pinouts B-4
Notices .............................. ....... ............. ............. ............. ...... ........B-6
Energy Star Compliance B-6
FCC Statement B-6
Laser Safety B-7
Canadian Users Notice B-7
International Notice B-8
Warranty Considerations B-8
Index
QMS magicolor WX User's Guidevi

1
Setup
In This Chapter . . .
n Finding a good location for the printer
n Unpacking the printer
n Checking shipment contents
n Setting up the printer
n Installing the printer driver
n Registering the printer

Introduction
Introduction
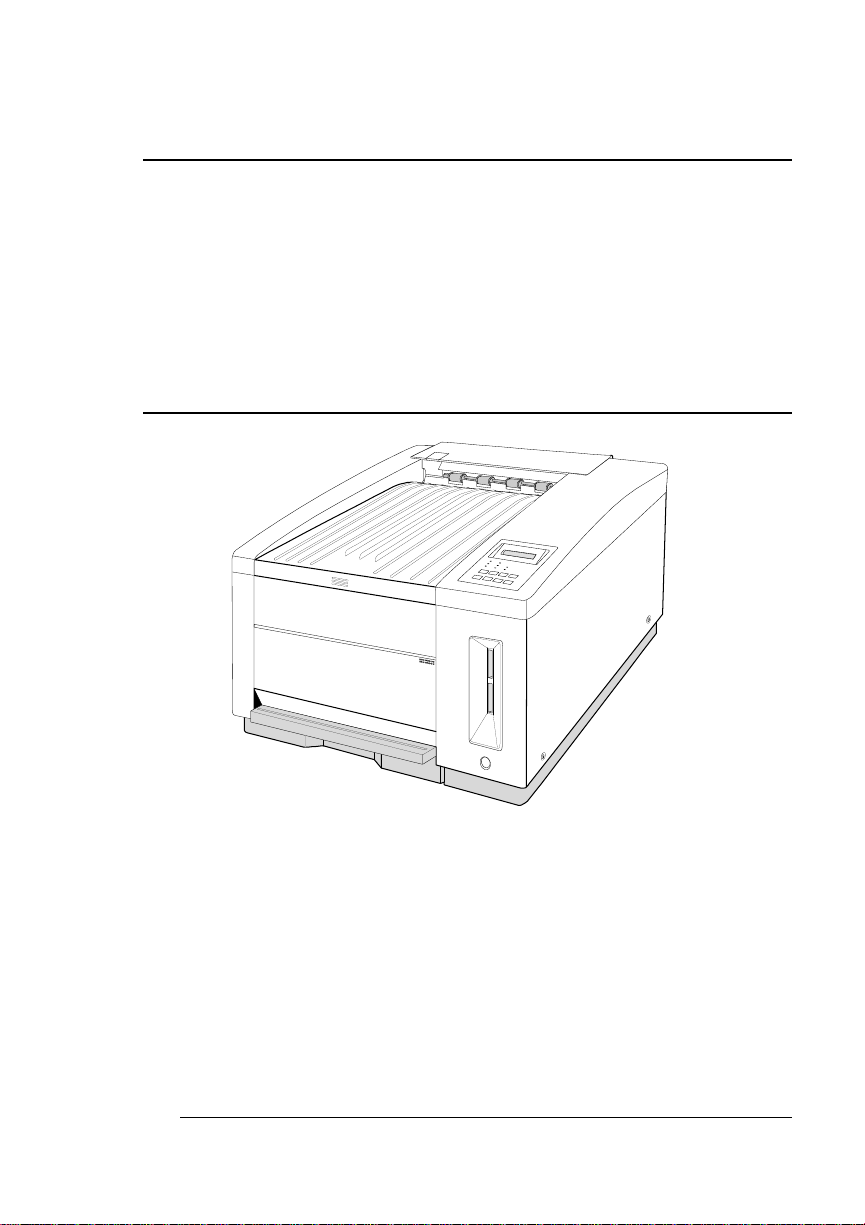
The QMS
technology to produce 300 and 600 dpi color and monochrome documents from PCs using Windows 95 or Windows NT. This chapter
explains how to set up your QMS
first time and install the printer driver for either Windows 95 or Windows NT.
magicolor
WX Print System uses advanced color laser
magicolor
WX Print System for the
Find a Good Location
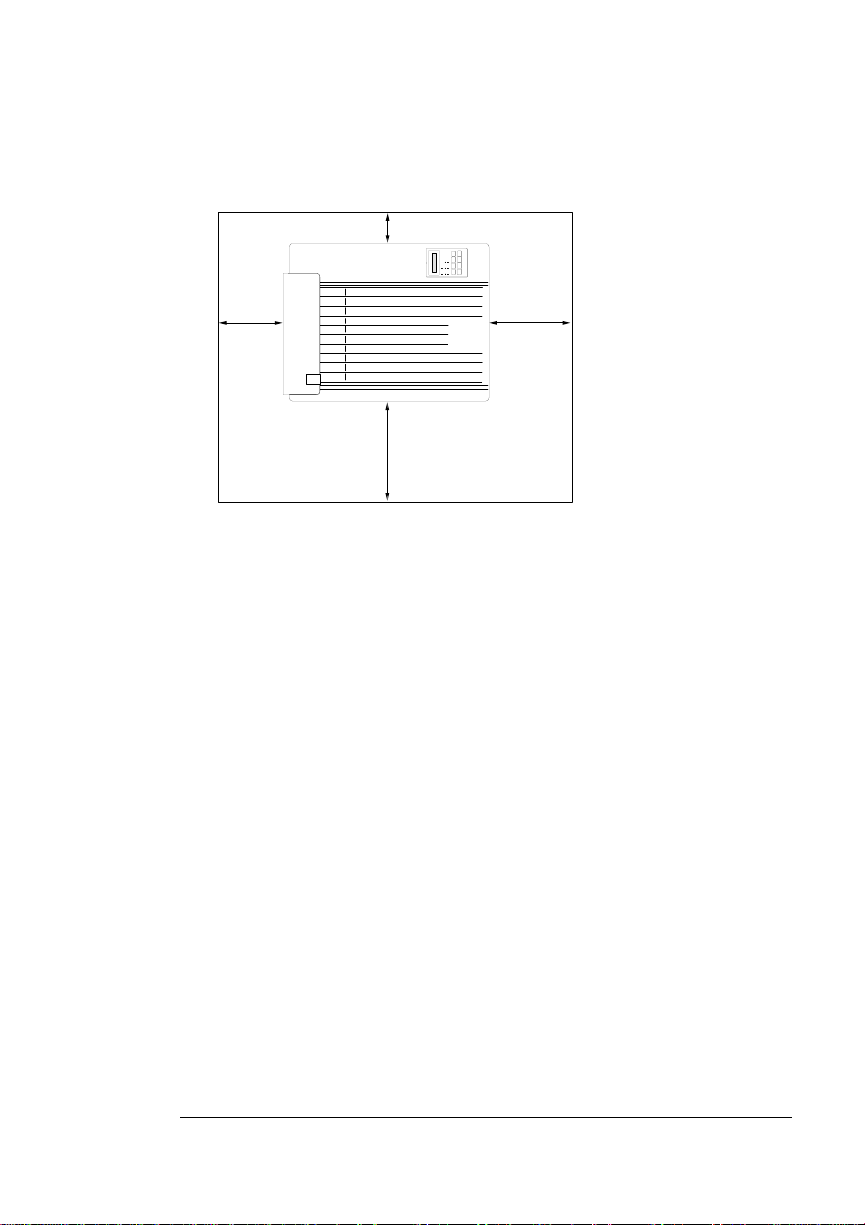
Use the following guidelin es when selec ting a location for your printer:
n On a hard, level, sturdy surface capable of supporting 106 lbs
(48 kg). (By “level” we mean the surface should be so flat–1° of
slant or less–that you can lay a round pencil down on it, and it
doesn’t roll in any direction.)
n In an area with a moderate temperature and humidity (64°-81° F /
18°-27° C, 60%-70% relative humidity).
n Away from cooling sources, heating sources, extreme tempera-
ture changes, direct sunlight, excessive dust, corrosive chemicals, strong electromagnetic fields (such as that created by an air
conditioner) and excessive vibration. Don’t connect it to the same
electrical outlet as noise-generating equipment.
n Near an electrical outlet (grounded and surge-protected,
120 volts/
n Near the PC—6' (1.8 m) or less for parallel connection.
± 12 volts, 60 Hz/± 2 Hz).
QMS magicolor WX User’s Guide1-2
Find a Good
Location
n In an area that allows plenty of space for ventilation and mainte-
nance access:
4"/10 cm
16"/40 cm
36"/90 cm
28"/70 cm
Setup
1-3
Unpack the
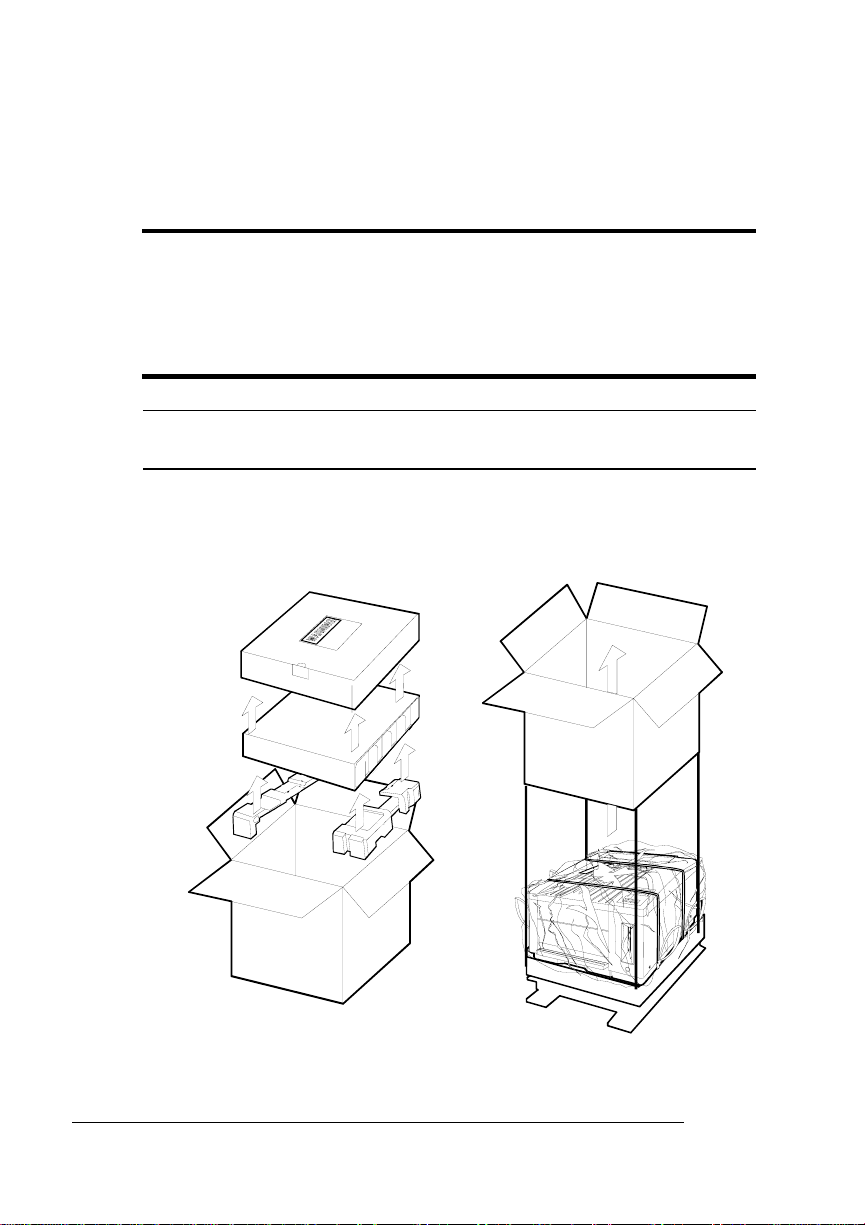
Unpack the Printer
M WARNING!
consumables. Do not attempt to lift the printer by yourself.
ACHTUNG!
versuchen Sie niemals, den Drucker alleine anzuheben oder zu
transportieren.
▲ Caution:
packing materials (explained below) before turning it on.
1 Remove everything except the printer from the shipping car-
ton (leave the plastic and the straps on the printer), then lift
off the box.
The printer weighs approximately 106 lbs (48 kg) without
Der Drucker hat ein Gewicht von ungefähr 48 kg. Bitte
To prevent damaging your printer, you must remove all
» Note:
Store all of the packing materials where you can easily access
them if you ever need to relocate the printer or return it for service.
QMS magicolor WX User’s Guide1-4
Unpack the
Printer
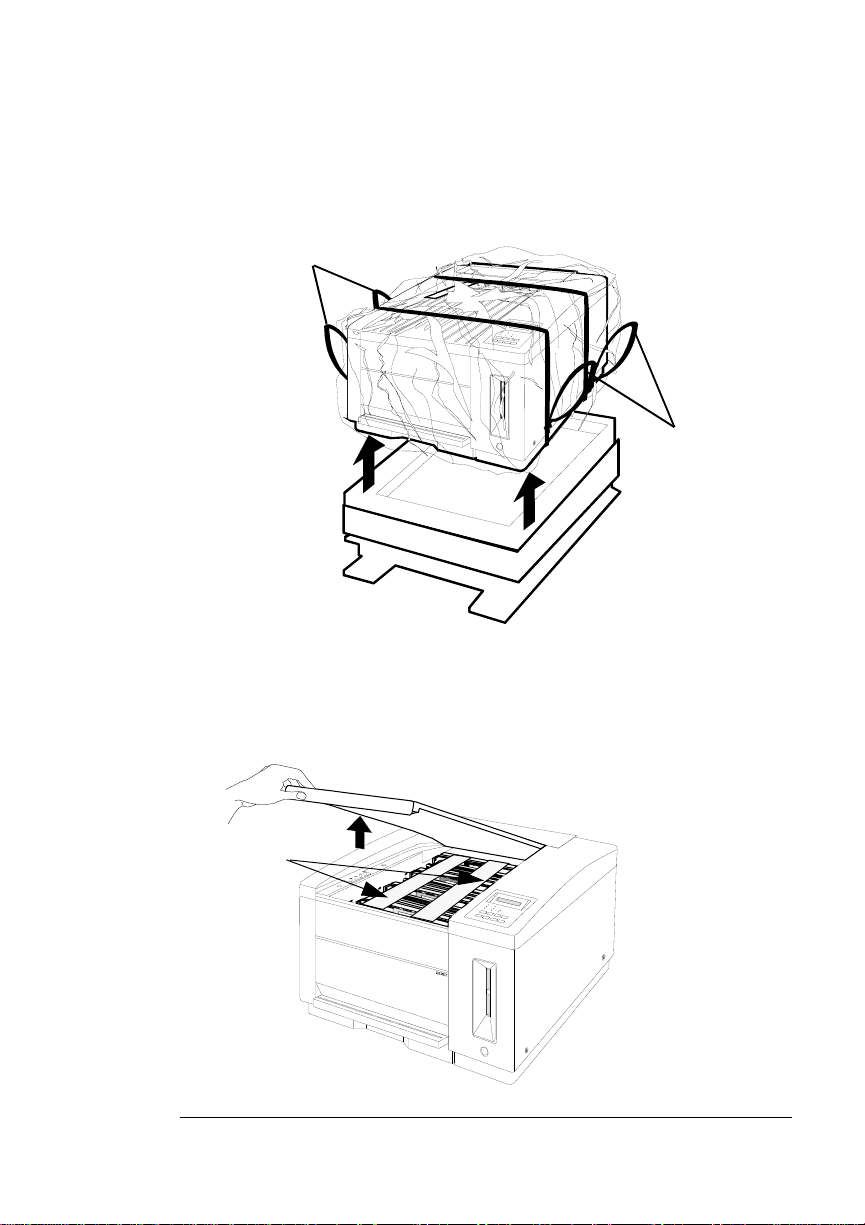
2 Get someone to help you with this step: Use the strap han-
dles provided (two on each side of the printer) to lift the
printer from its carton and place it in a sturdy, level surface.
Strap Handles
Strap Handles
3 Remove the plastic wrap and all packing tape from the
printer.
4 Remove the top cover and remove the packing material from
inside the printer.
Packing
Front View
Setup
1-5

Check Shipment
Check Shipment Contents
In addition to the printer and this manual, the following items are
included in your shipment. If any items are missing or damaged, contact your QMS vendor immediately. Don’t return any merchandise
before contacting the vendor.
n 4 toner cartridges (one each cyan, magenta, yellow, and black)
n 4 developer cartridges (one each cyan, magenta, yellow, and
black)
n Bags for used toner and developer
n Waste toner pack
n 1 oil bottle
n 1 cleaning pad
n Power cord
n Printer driver disk for Windows 95
n Printer driver disk for Windows NT 4.0
n Warranty and registration card
n Universal media cassette
n OPC belt cartridge
▲ Caution:
Don’t remove the cartridge from its protective bag until you’re
ready to install it.
The OPC belt cartridge is sensitive to direct sunlight.
QMS magicolor WX User’s Guide1-6

Set up the Printer
Set up the Printer
» Note:
The illustrations accompanying the following procedures show
the printer sometimes from the front and sometimes from the rear,
depending on which view is best to show you the part we’re installing
at the time. You don’t need to turn the printer while performing these
procedures.
Install the Developer and Toner Cartridges
M WARNING!
combustible powders; they should not be disposed of by burning.
Also, avoid inhaling loose developer or toner or getting them around
your eyes; they can cause respiratory problems and eye irritation.
ACHTUNG!
Pulver, die leicht enzündlich sind; sie dürfen deshalb niemals mit
offenem Feuer in Beruhrüng kommen. Einatmen oder Berührung mit
Haut und Augen ist ebenfalls zu vermeiden, da dieses zu
Beeintràchtigungen der Atemwege, Haut oder Augenreizungen
führen könnte.
▲ Caution:
the correct place, exactly as described.
The developer and toner cartridge contain highly
Bei Entwickler und Toner handelt es sich um gefährliche
It’s important to load the developer and toner cartridges in
1 Find the black-developer cartridge and remove it from its
protective bag.
Developer cartridges have green handles and a small strip of
plastic on top that indicates their color.
» Note:
Setup
Store all of the packing materials where you can easily
access them if you ever need to relocate the printer or return it for
service.
1-7
Set up the Printer
2 Raise the two green latches and lower the cartridge into the
slot closest to the back of the printer.
It should snap into place.
Developer
Cartridge
Color-Coded Tab
Front View
3 Close the developer cartridge latches.
Rear View
QMS magicolor WX User’s Guide1-8
Set up the Printer
4 Grasp the tab on the top of the developer cartridge and pull
the tab and attached clear tape straight up and out of the cartridge.
Tab
Tape
Rear View
5 Remove the black toner cartridge from its protective bag.
(Toner cartridges are color-coded on top.)
6 Hold the toner cartridge as shown and shake it horizontally.
This distributes toner evenly inside the cartridge and helps
ensure quality printing.
Setup
1-9
Set up the Printer
7 Install the toner cartridge on top of the developer cartridge.
Hold and squeeze the toner cartridge across the center, and align
the pins on the back side of the toner cartridge with the notches
on the developer cartridge. Orient the cartridge so that the words
on top are readable from the front of the printer.
▲ Caution:
cartridge, or you’ll damage the cartridges and the printer. If it
doesn’t fit easily, make sure you’re installing the correct color
cartr id ge: they’re keyed to fit each other.
Toner Cartridge
Rear View
Never force a toner cartridge onto a developer
QMS magicolor WX User’s Guide1-10
Set up the Printer
8 Hold the toner cartridge in place with one hand while you
pull the tab straight up to remove the attached tape from the
cartridge.
Tab
Rear View
9 Repeat steps 1-8 to load the remaining developer and toner
cartridges in this order (from back to front): cyan, magenta
and yellow.
Black
Cyan
Magenta
Yellow
Setup
1-11
Set up the Printer
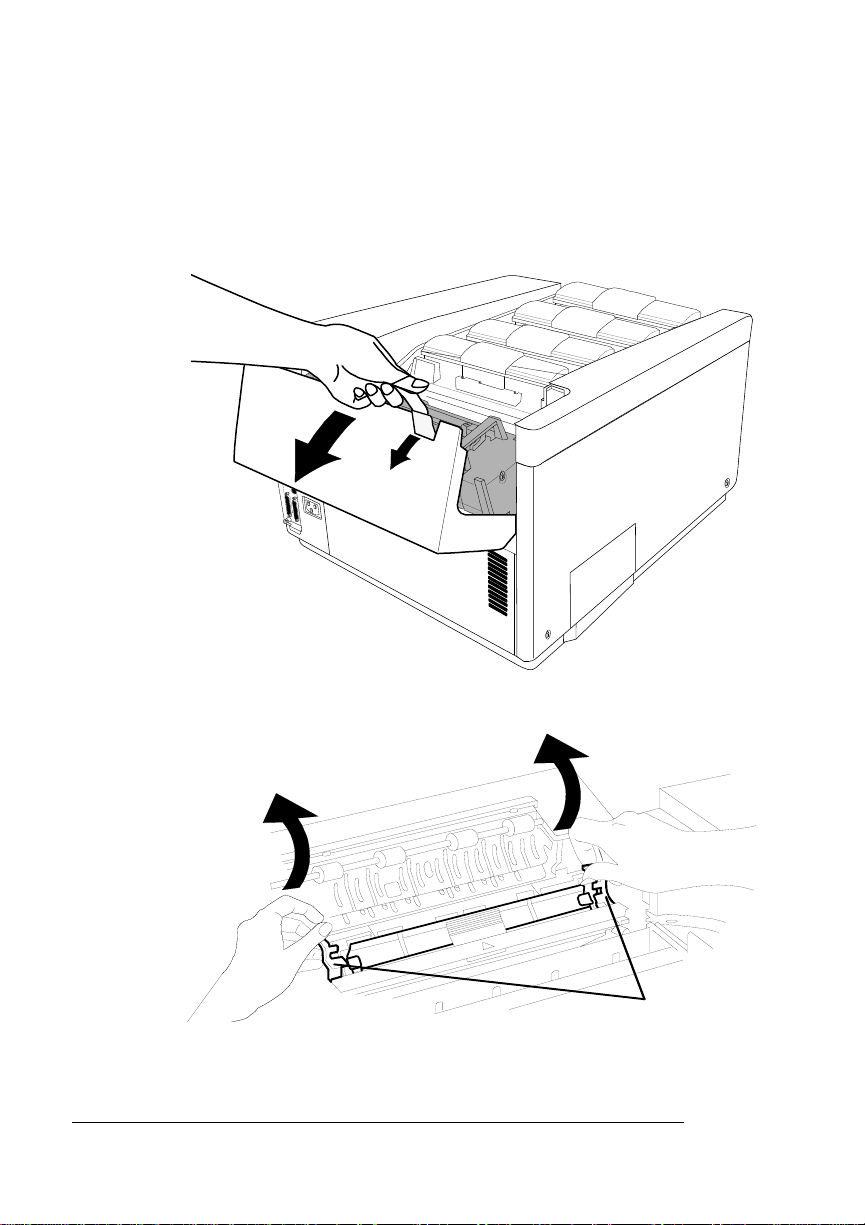
Remove the Pressure-Release Pieces
1 Pull up on the paper exit unit latch and then tilt the paper exit
unit back and down to open it.
Rear View
2 Use the two green separator latches to tilt the pawl unit back.
Front View
Latches
QMS magicolor WX User’s Guide1-12
Set up the Printer
3 Open the green pressure-release lever on the end of the
fuser unit.
Pressure-Release
Lever
Rear View
4 Remove the two pressure-release pieces (one on each end of
the fuser roller).
» Note:
if you ever need to relocate the printer or return it for service.
Setup
Front View
Pressure-Release
Piece (left)
Fuser Rollers
Paper-Exit Unit
Pressure-Release Piece (right)
Store all of these pieces where you can easily access them
1-13

Set up the Printer
5 Close the pressure-release lever.
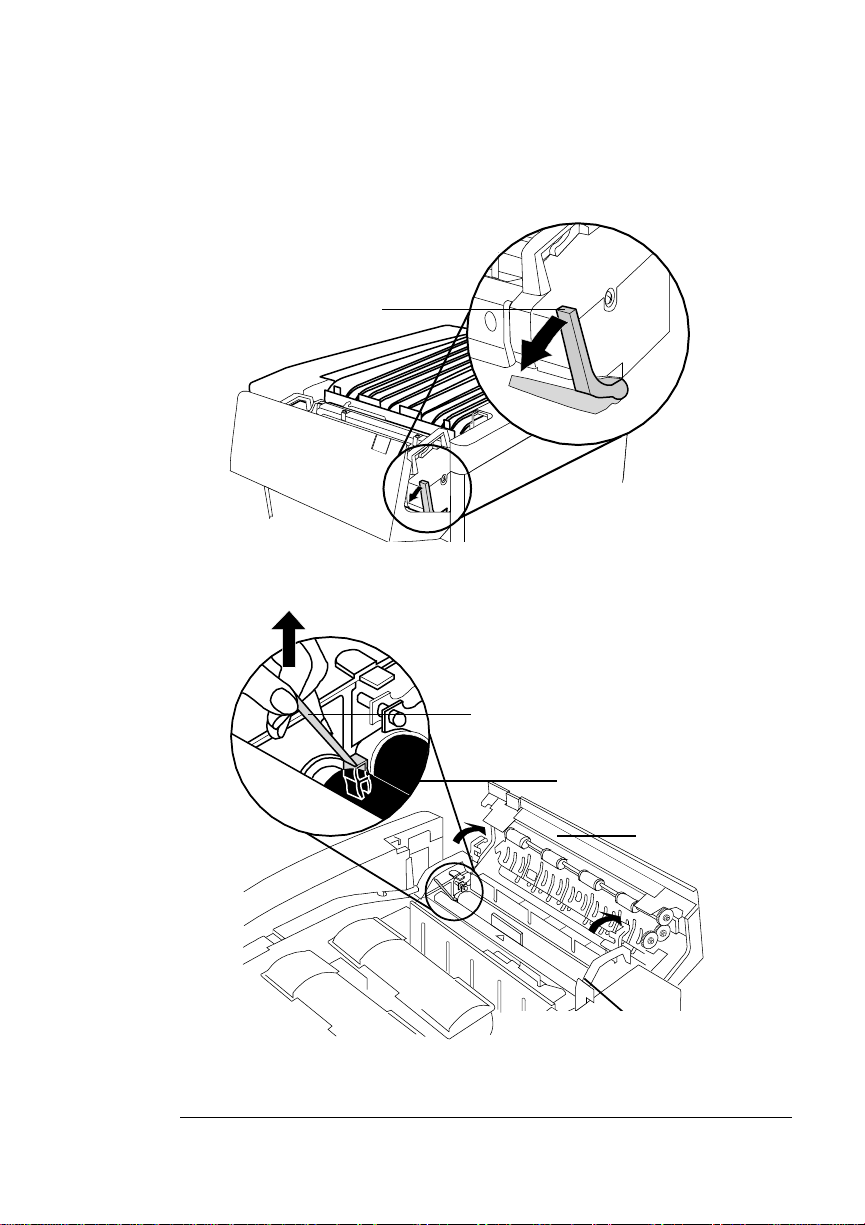
Install the Cleaning Pad and Oil Bottle
1 Remove the cleaning pad and oil bottle from their protective
bags.
▲ Caution:
process and is also very expensive to replace. The fuser life will
be shortened or the fuser permanently damaged if the cleaning
pad is not installed properly or if proper care is not taken to
change the cleaning pad and oil bottle when needed. This type of
damage is not covered under warranty or service contract.
The first oil bottle and cleaning pad will last approximately 1,500
pages. After that, they will last approximately 3,000 pages. (Refer
to chapter 5, “Maintenance,” for replacement instructions.
Cleaning
Oil Bottle
The fuser unit is an integral part of the color imaging
QMS magicolor WX User’s Guide1-14
Set up the Printer
2 Hold the cleaning pad by its tab and place the white side
against the orange roller closest to the green felt strip. Align
the center rib of the cleaning pad with the triangle mark on
the green felt strip.
3 Keep the white side of the pad touching the orange roller
closest to the green felt strip as you press the pad forward
and down into the slot under the green felt strip.
It’s in place when it clips securely into the slot with the white pad
touching the orange roller.
Line up Rib with Triangle
Cleaning Pad
White Pad
Orange Rollers
Green Felt Strip
Setup
Black Toner Cartridge
Front View
1-15
Set up the Printer
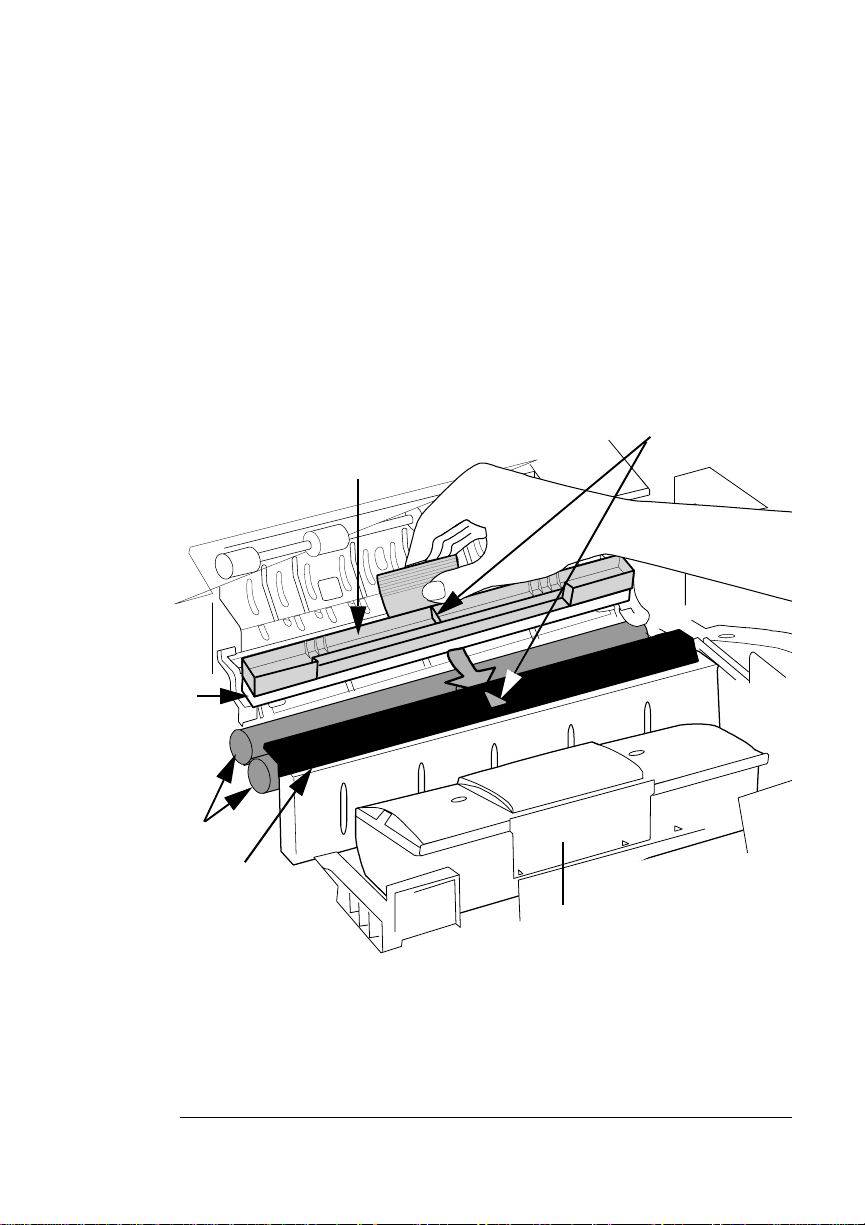
4 Close the separator pawl unit: lower it onto the orange roller;
then grasp the green separator latches with your thumbs
and forefingers and push down with y our finger s while pushing back with your thumbs to snap the unit into place.
Front View
5 Place a finger on the outer edge of the oil bottle retainer and
push it in and up to open the spring latch.
Latches
Rear View
QMS magicolor WX User’s Guide1-16

Set up the Printer
6 Hold the oil bottle over its slot (spout-end down and label
facing the printer’s front). Lower the bottle in place, making
sure the spout is aligned with the pin in the fuser slot. The
top of the bottle should be flush with the top of the fuser
unit.
Rear View
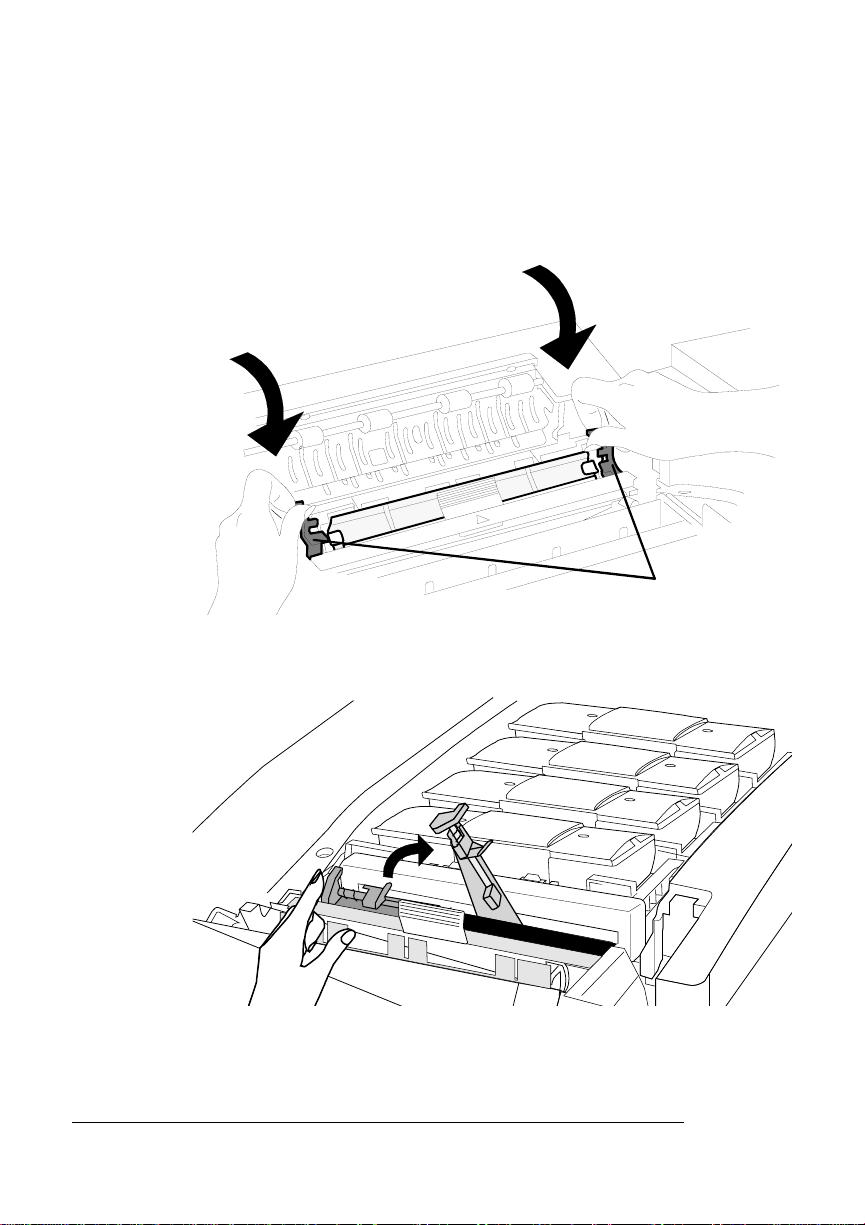
7 Close the oil bottle retainer, making sure the spring latch is
securely in place.
8 Close the paper exit unit.
If you have trouble closing it, make sure the separator pawl unit is
completely closed (see step 4).
Rear View
9 Close the top cover.
Setup
1-17
Set up the Printer
Install the Waste Toner Pack
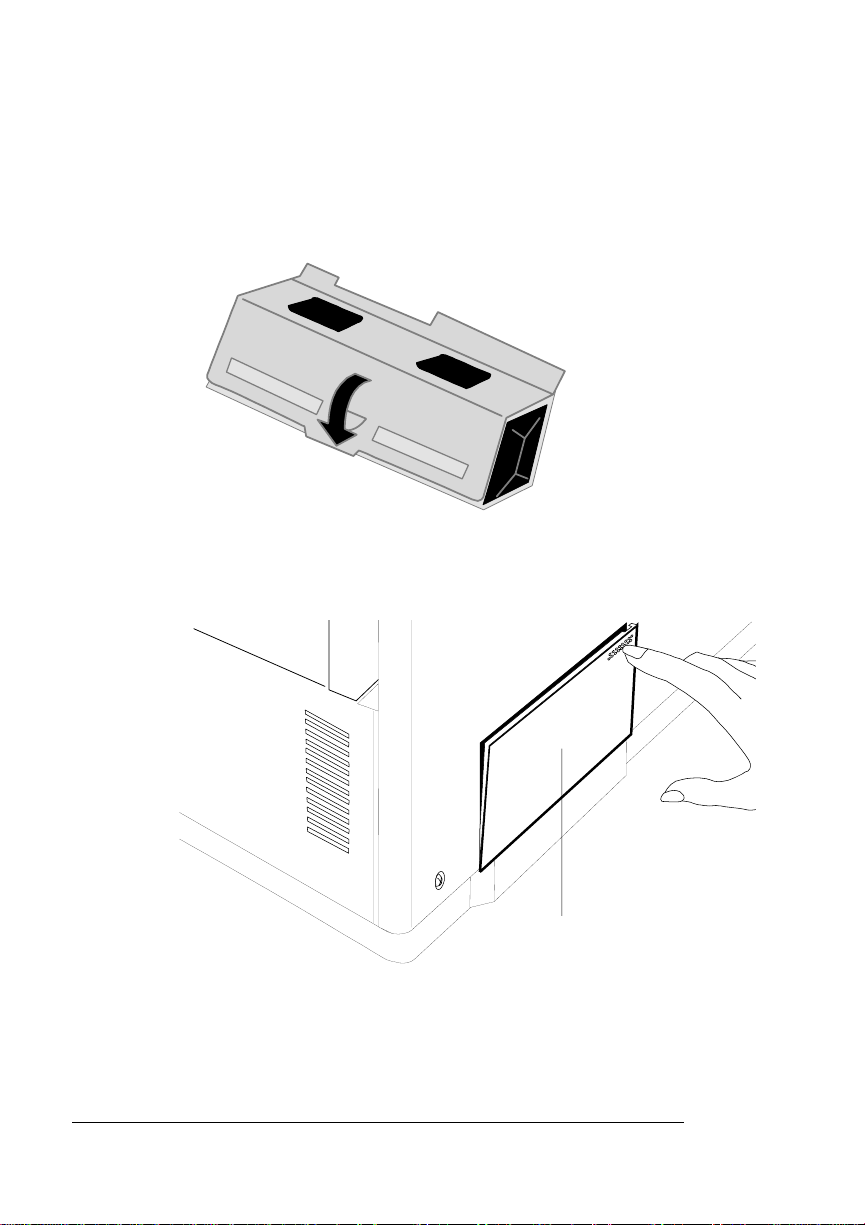
1 Remove the waste toner pack from its protective bag and
assemble it.
2 Open the waste toner door (on the left side of the printer) by
pushing the cover on the top-right corner.
Waste Toner DoorRear View
3 Remove any tape inside the compartment.
QMS magicolor WX User’s Guide1-18

Set up the Printer
4 Insert the pack into the printer until it fits securely. Make
sure the pack is level and centered.
TabRear View
5 Close the waste toner door.
Setup
1-19
Set up the Printer
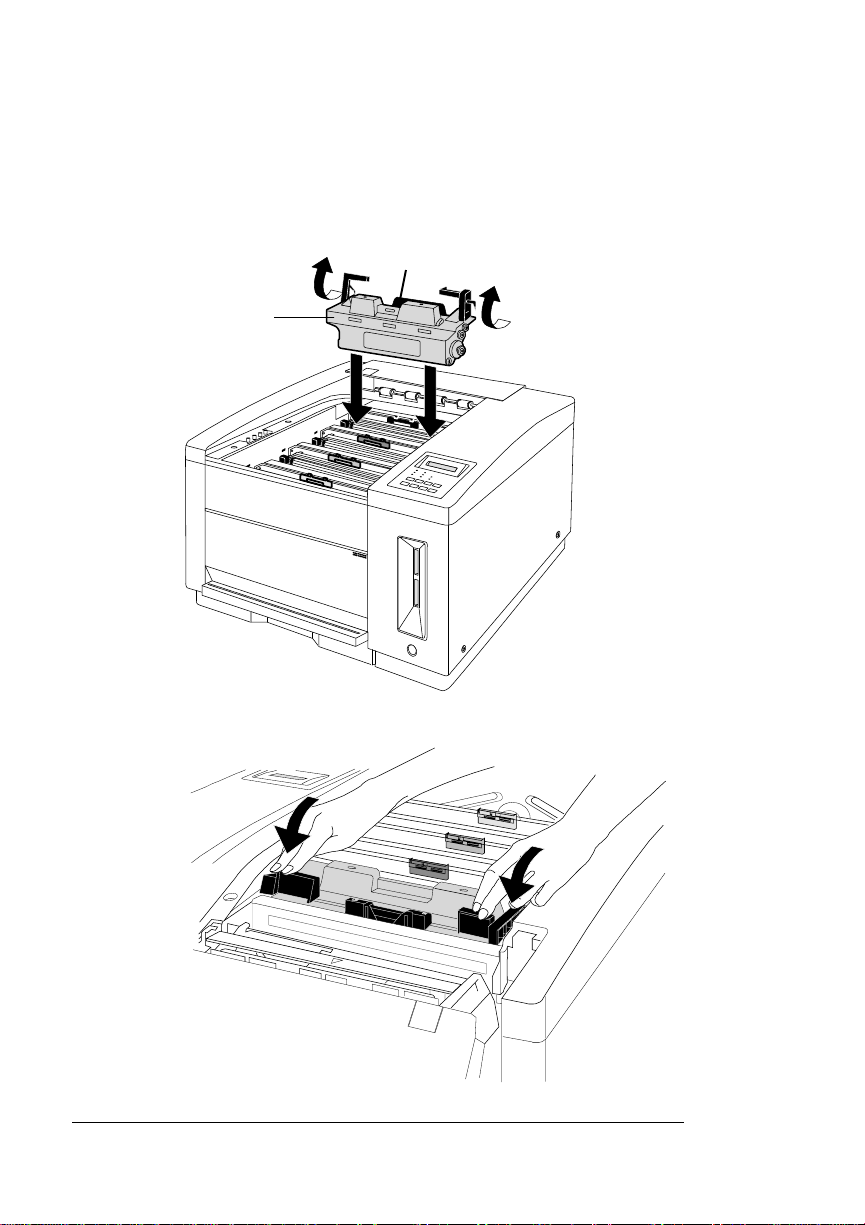
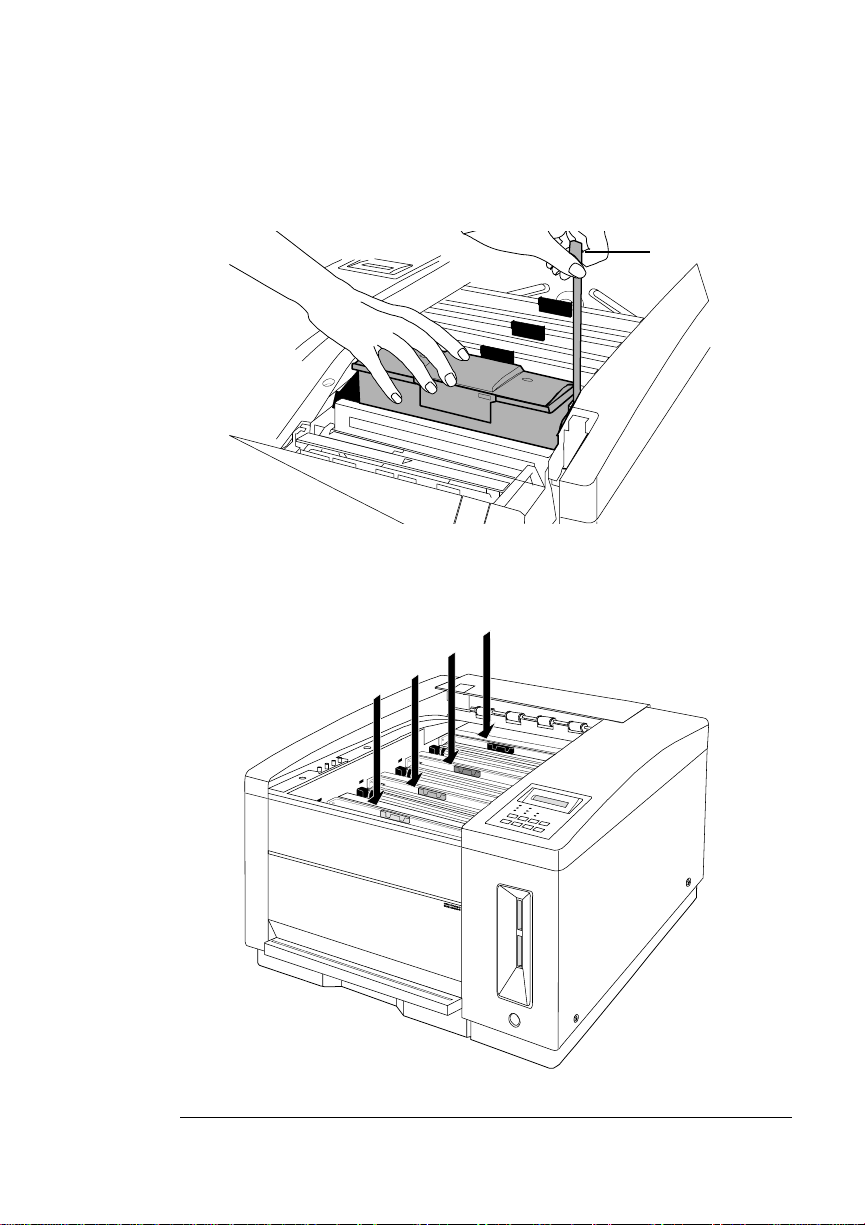
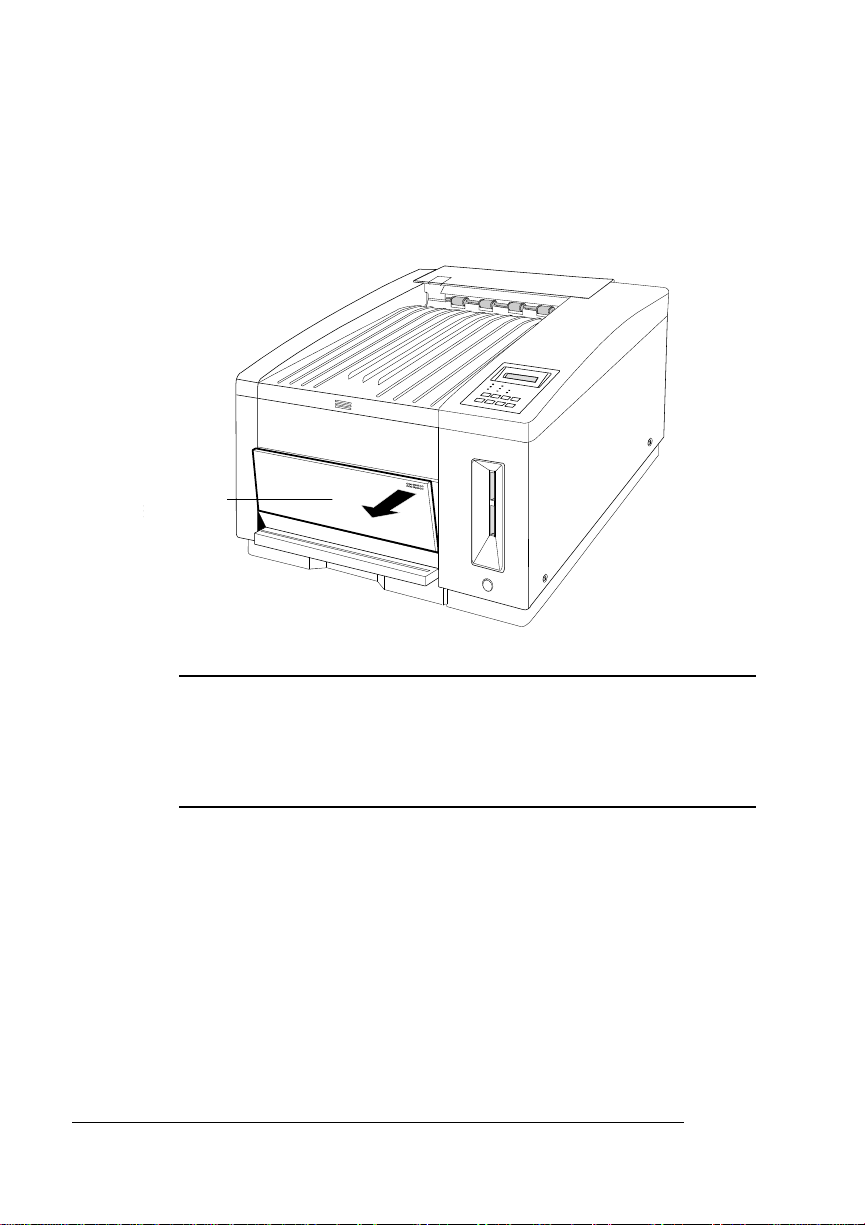
Install the OPC Belt Cartridge
1 Open the manual feed tray by pushing the top- right corner t o
release the spring latch.
Front View
Manual
Feed
Tray
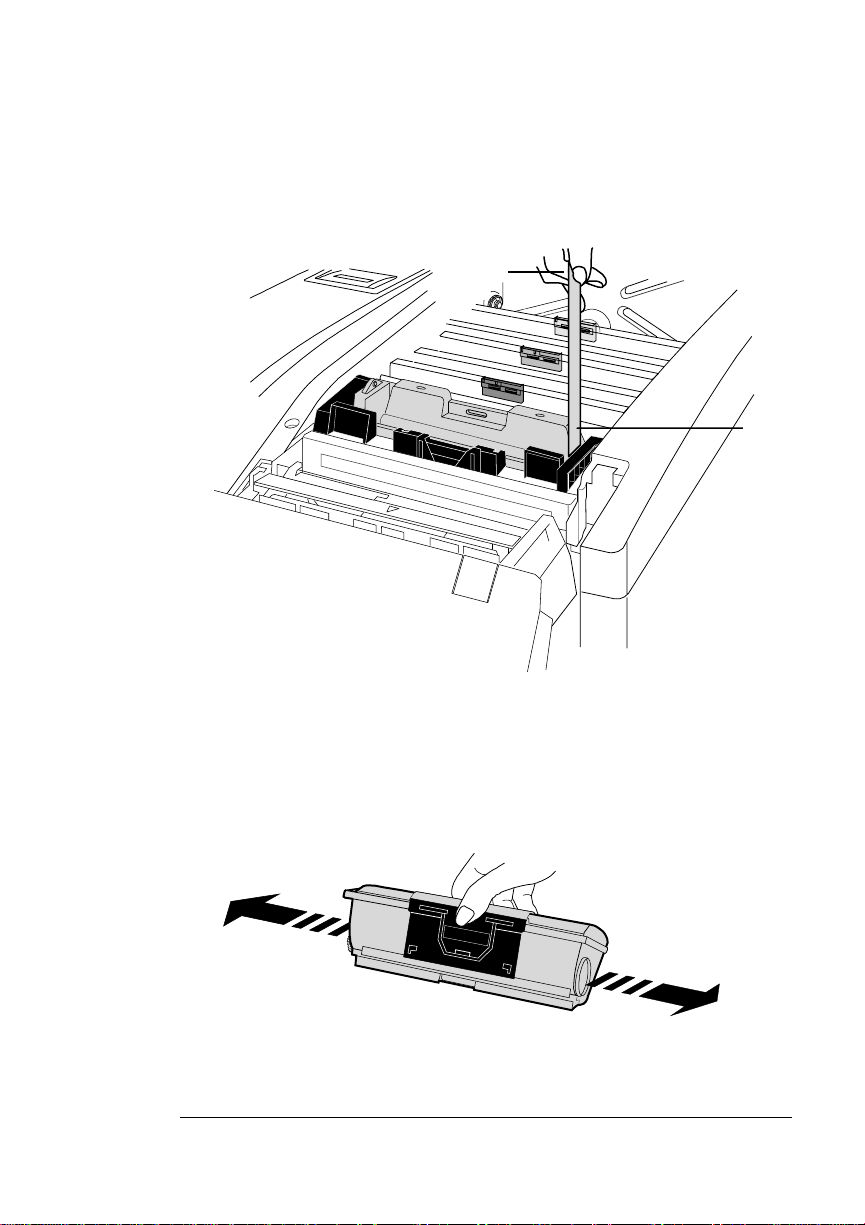
▲ Caution:
The OPC belt is extremely sensitive to bright light and
direct sunlight. Do not remove the cartridge from its protective
bag until you are ready to install it. Also, handle the belt cartridge
carefully. The belt is extremely sensitive to hand oils and
scratches, both of which will reduce print quality.
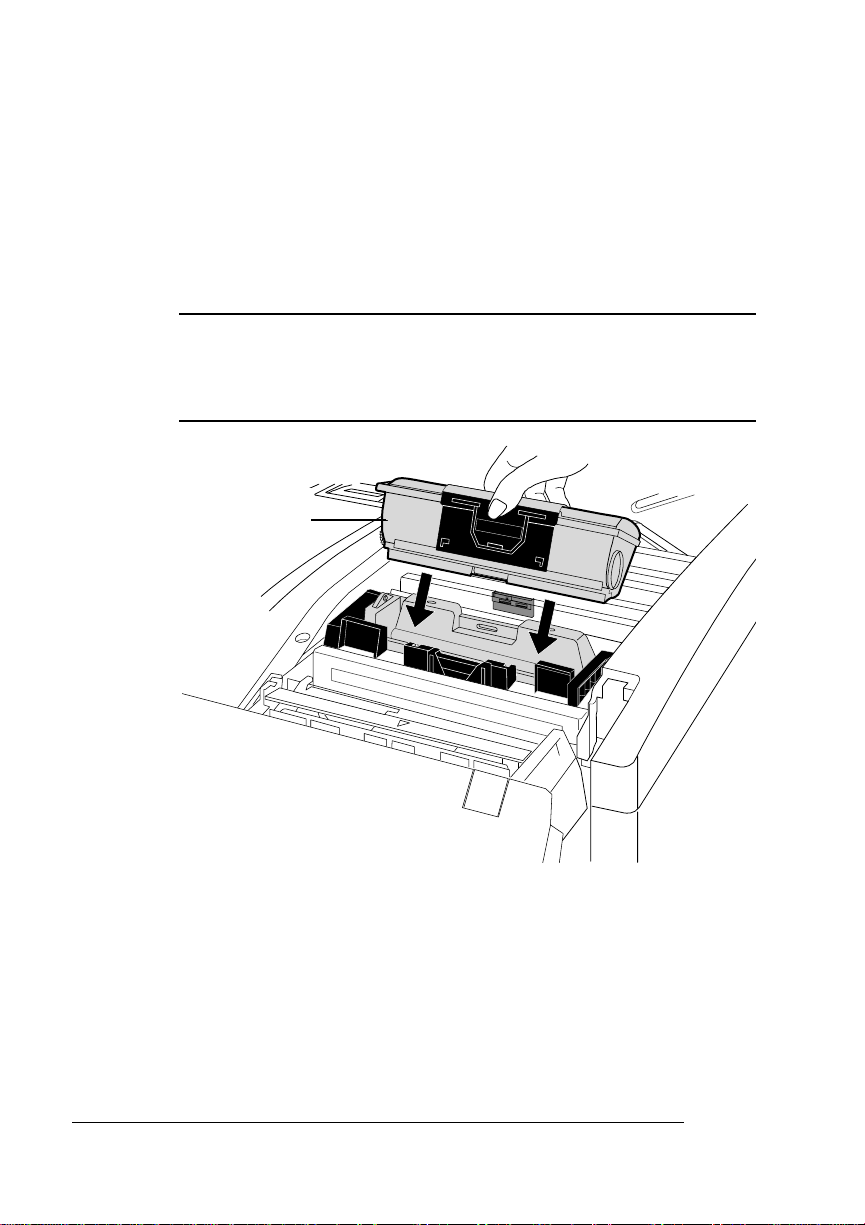
2 Remove the OPC belt cartridge from its protective bag.
Save the protective bag to use during printer cleaning and maintenance when the OPC belt cartridge is out of the printer.
QMS magicolor WX User’s Guide1-20
 Loading...