


Updat e to the
QMS
®
magicolor
®
LX
Printer User’s Guide
To update your QMS magicolor LX Printer User’s Guide, please
replace pages 2-25 through 2-26 and pages 6-13 through 6-16 with
the pages in this package.
1800414-001A

Chapter 2
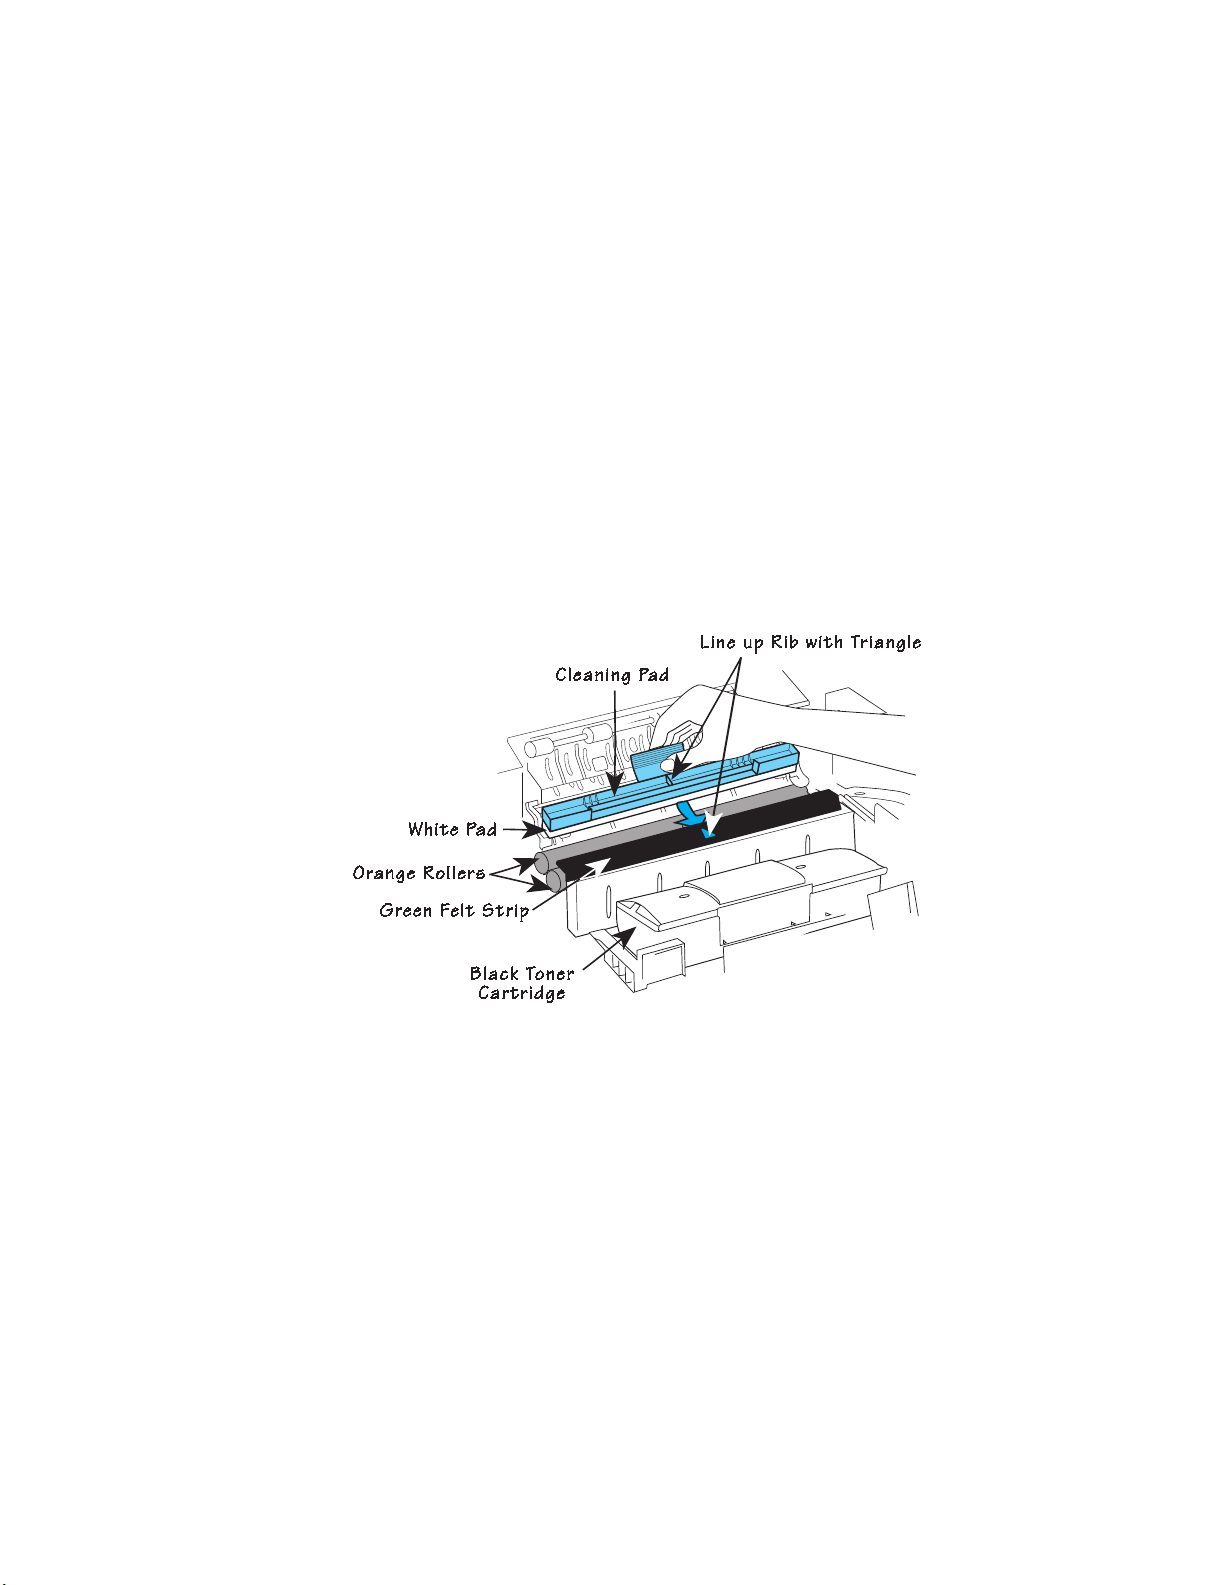
2. Hold the cleaning pad by its tab and place the white side
against the orange roller closest to the green felt strip. Align
the center rib of the cleaning pad with the triangle on the green
felt strip.
3. Keep the white side of the pad touching the orange roller
closest to the green felt strip as you press the pad forward and
down into the slot under the green felt stri p (fig. 2.1 7). It’s in
place when it clips securely into the slot with the white pad
touching the orange roller.
Fig. 2.17 Install the Cleaning Pad (front view)
CAUTION: The $1000 fuser unit will be damaged if the cleaning
pad is not replaced each time the oil bottle is replaced. This type of
damage is not covered under warranty or service contract. Both
parts are included in th e sam e kit.
Initial Printer Setup 2-25

Chapter 2
4. Snap the separator pawl unit closed (fig. 2.1 8).
Fig. 2.18 Close Separator Pawl Unit (front view)
2-26 Initial Printer Setup
Chapter 6
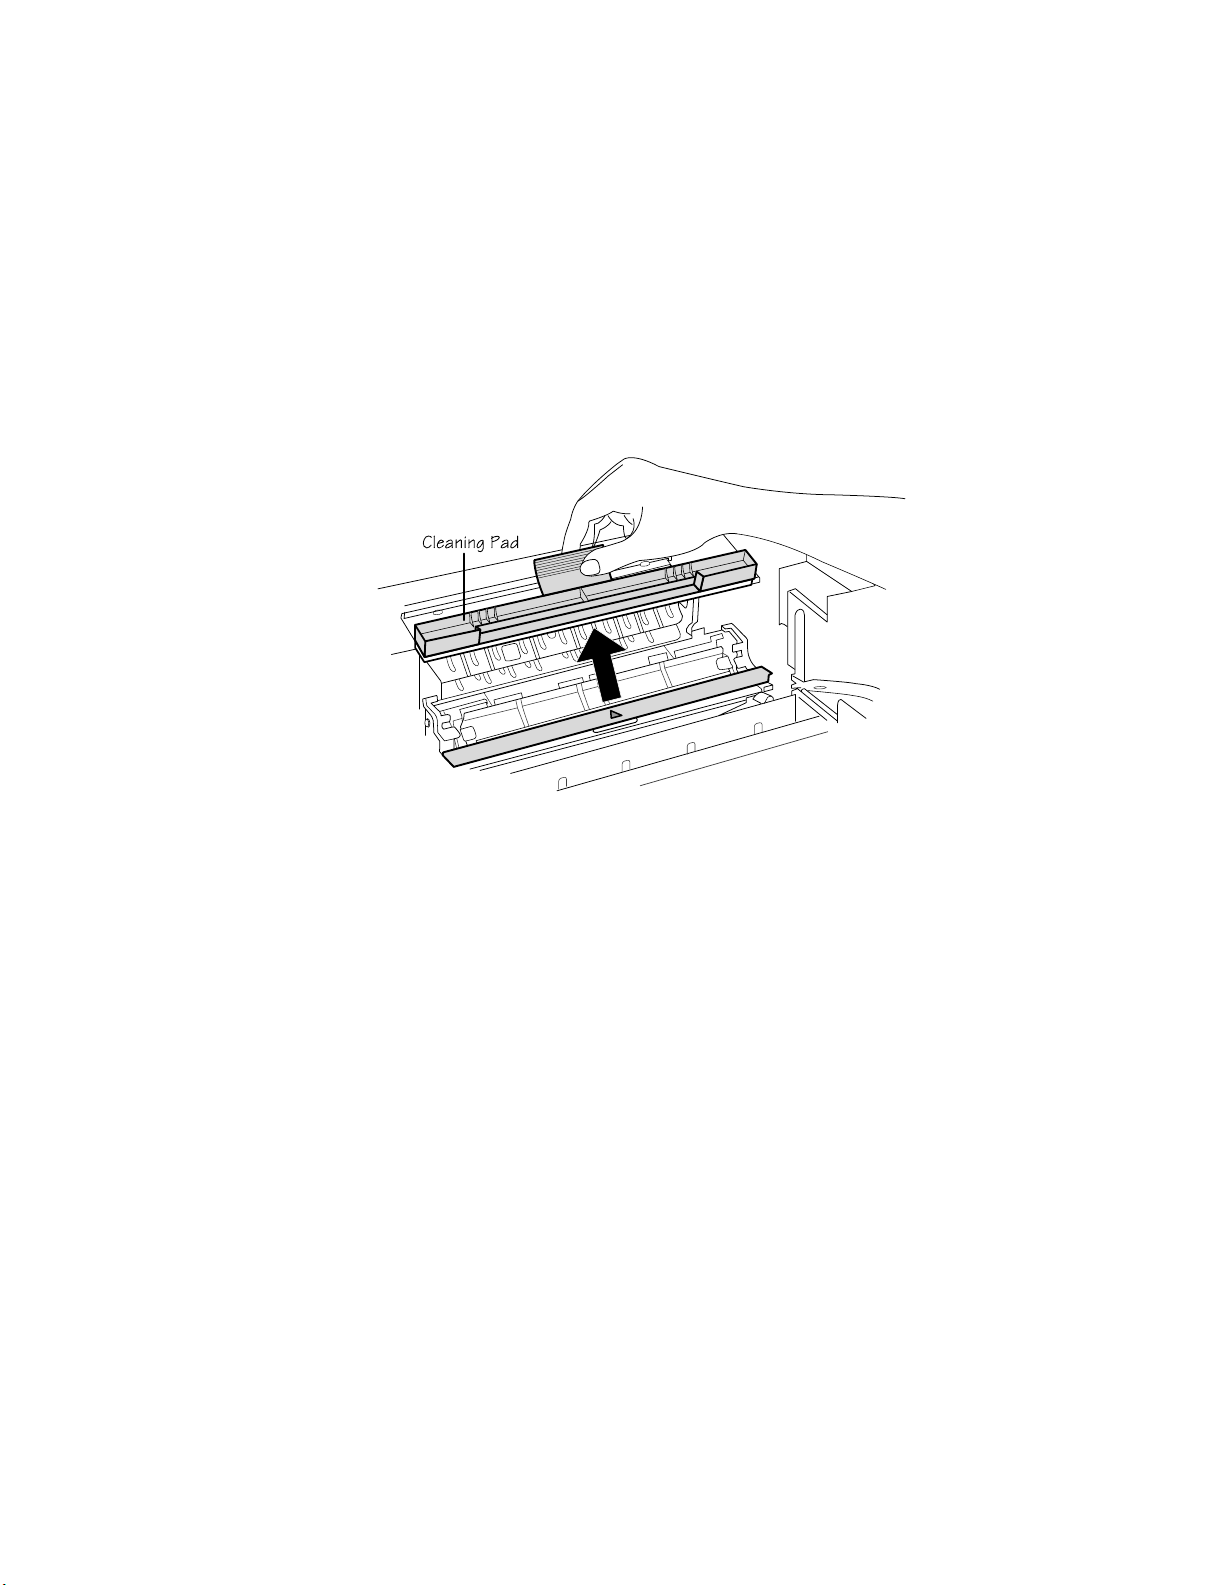
5. Locate the cleanin g pad in the slot above t he heat rolle r. Then,
while carefully avoiding the surface of the f user unit, which
may be hot, grasp the pad by its center tab (towards the rear
of the unit), pull i t out of the print er, and di sc ard it (fig. 6. 3).
Fig. 6.3 Remove the Cleaning Pad
6. Remove the new cleaning pad and the new oil bottle from their
protective bags.
CAUTION: The $1000 fuser unit will be damaged if the cleaning
pad is not replaced each time the oil bottle is replaced. This type of
damage is not covered under warranty or service contract. Both
parts are included in th e sam e kit.
Consumables and Preventative Maintenance 6-13

Chapter 6
7. Hold the new cleani ng pad b y i ts tab and pl ace the wh ite si de
against the orange roller closest to the green felt strip. Align
the center rib of the cleaning pad with the triangle on the green
felt strip.
8. Keep the white side of the pad touching the orange roller
closest to the green felt strip as you press the pad forward and
down into the slot under the green felt stri p. It’s in place when
it clips securely into the slot with the white pad touching the
orange roller.
9. Snap the separator pawl unit closed.
10. Pull open the spring latch on the outer edge of the oil bottle
retainer, and lift the retainer up and toward the center of the
printer (fig. 2.19).
NOTE: Normally , a little oil remains in the fus er slot in which
the oil bottle rests, and the spout of th e oil bo ttle has a s eal to
prevent oil from spilling while you remove or inst all a bottle
6-14 Consumables and Preventative Maintenance

Chapter 6
on the pin in the fuser slot. However, if oil acciden tally spill s
beyond that slot, use a clean, dry, lint-free cloth or some cotton
swabs to wipe up the excess.
11. Grasp the top tab on the oil bottle, then lift the bottle out of
the printer, and discard it.
NOTE: If you are replacing an oil bottle after a move, remove
and discard the wadded paper towel from the place normally
occupied by the oil bottle.
12. Hold the new oil bottle, spout end down, bottle label toward
the front of the printer, over its slot in the fuser unit (fig. 2.19).
13. Lower the bottle into place, making sure the spout on the
bottom aligns with the pin in the fuser slot. The bottle is
positioned correctly when it fits snugly into the slot and is
flush with the fuser unit.
14. Close and latch the oi l bottl e retaine r.
15. Close the p ap er exit unit.
16. Replace the printer’s top cover and turn on the main power
switch.
Replacing the Waste Toner Pack
This section covers replacin g the waste t oner pack in y our p rinter.
The pack collects excess toner from the printing process and should
be replaced when the window on the control panel displays the
message CHECK WASTE TONER. Illustrations for many of the
steps described in this section are in chapter 2, “Initial Printer
Setup.”
1. Open the waste toner cover by pushing the cover on the
top-right corner (fig. 2.22).
2. Remove the new waste toner pack from its protective bag and
assemble it according to the instructi ons accompanyin g it.
Consumables and Preventative Maintenance 6-15
Chapter 6
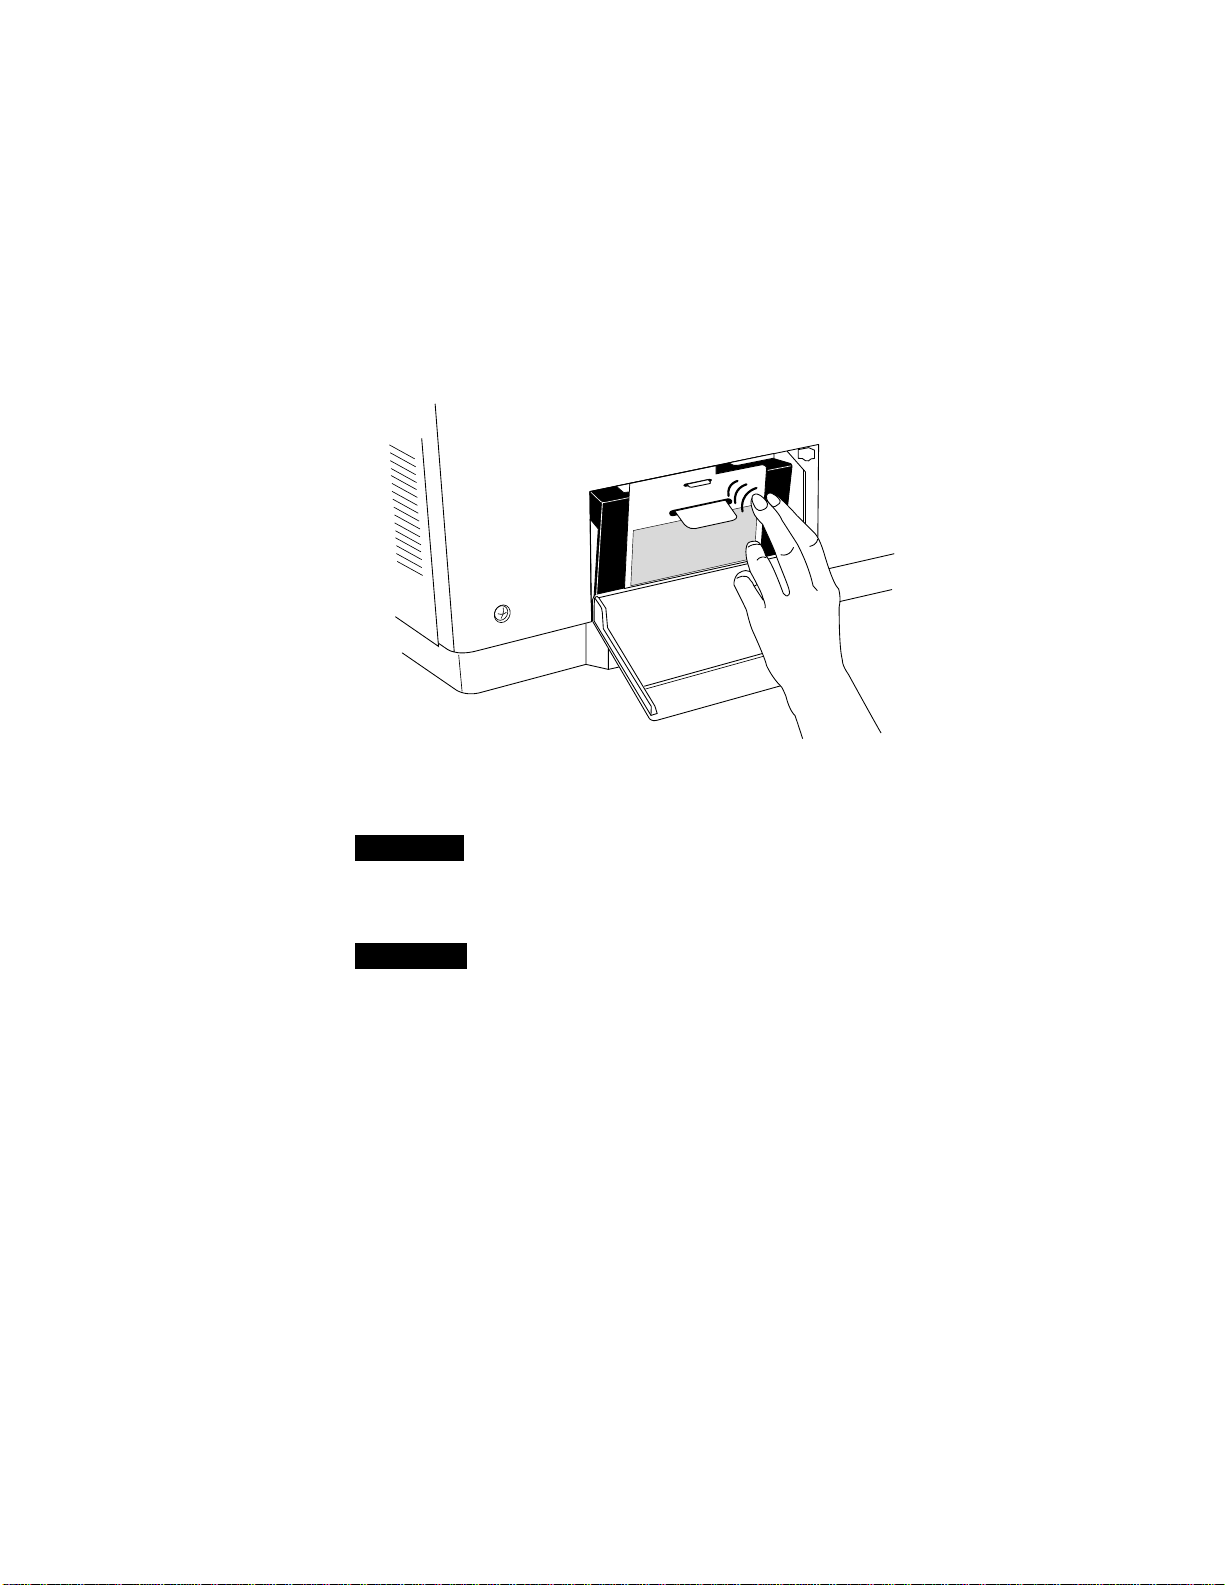
3. Gently tap the old waste toner pack on its side to settle the
toner down into the pack (fig. 6.4).
Fig. 6.4 Tap the Wast e Tone r Pack
WARNING!
The toner is a highly combustible powder; never
burn it. Also, avoid inhaling loose toner or getting it around
your eyes; it can cause respiratory problems and eye irritation.
ACHTUNG!
Bei dem Toner handelt es sich um ein gefährliches und leicht entzünd liches Pulver; es darf deshal b niemals
mit offenem Feuer in Berührung kommen. Einatmen oder
Berührung mit Hau t und Augen ist ebenfalls zu ve rmeiden, da
dies zu Beeinträchtigungen der Atemwege, Haut - oder Augenreizungen füh ren könnte.
4. Grasp the tab on the top ed ge of the ol d waste ton er pack, and
pull it out of the printer.
6-16 Consumables and Preventative Maintenance
 Loading...