


®
magicolor
2
Repacking
Instructions
1760195-001B

Trademarks
The following are trademarks or registered t rademarks of their respec tive owners. Other produc t names
mentioned in this manua l may also be trademar ks or registe red tradema rks of their respective owners.
Registered trademarks are registered in the United States Patent and Trademark Office; some trademarks
may also be registered in ot her count ries. Crown, the MINOLTA-QMS logo, and the Crown logo are
registered trademar ks of MI NOLTA-QMS, Inc.
Copyright Notice
This manual is Copyrighted © 2000 by MINOLTA-QMS, Inc., One Magnum Pass, Mobile, AL 36618. All
Rights Reser ved. This ma nual may not be copied in w hole or in part, nor transferred to any other med ia o r
language, without the express wr itten per miss ion of MINOLTA-QMS, Inc.

Introduction
Introduction
If you need to relocate or ship your printer after it’s been installed, you must follow the
procedures in this chapter to prevent damage to the printer and to keep your warranty
valid.
! Caution: We cannot be held responsible for damage to your printer during shipment
that results from the improper packaging of your printer. You must use the instructions
given in this section before repacking the printer in its original shipping carton with the
original packing materials.
If you need replacement packaging, in the US call MINOLTA-QMS at 1 (334) 633-4300
x 2530 and request catalog number 2600439-200. If you need to return the printer for
service, contact your local vendor for an RMA (Return Merchandise Authorization)
number before shipping the printer. For a listing of support telephone number, refer to
appendix A in your printer documentation.
What's Involved?
Repacking your printer for shipment involves the following steps. Each is described in
more detail in the following sections:
1 Remove the cables and paper cassette.
2 Remove the toner cartridges.
3 Prepare the fuser unit for shipment.
4 Change the waste toner pack.
5 Remove the lower input feeder (if attached).
6 Pack the printer for shipment.
»Note: To av oid toner contamination during shipment, leave the OPC belt cartridge
installed.
magicolor
2 Repacking Instructions
1

Remove Cables and Cassette(s)
Remove Cables and Cassette(s)
» Note: If you’re returning the printer for service, you don’t need to return the power cable,
interface cables, or media cassette(s).
1 Turn off the printer.
2 Remove the power cable and all interface cables.
3 Remove the media cassette(s) from the printer.
Remove the Toner Cartridges
1 Open the printer’s front and top covers.
Leave them open during the entire repacking procedure.
2 Remove the four toner cartridges, attach the protective shields over their mag-
netic rollers, and repackage them in their original packaging.
Prepare the Fuser Unit
" WARNING! The fuser unit can become extremely hot and cause severe burns. Make sure
the unit is cool before handling it.
ACHTUNG! Die Fixiereinheit kann sehr heiß werden, so daß Verbrennungsgefahr besteht.
Bitte lassen Sie die Fixiereinheit einige Zeit abkühlen, bevor Sie diese berühren.
1 Open the printer’s top cover.
magicolor
2 Repacking Instructions2
Prepare the
Fuser Unit
2 At the top of the fuser, rotate the two lock levers to release the oil bottle.
3 Remove the oil bottle.
! Caution: Hold a sheet of paper under the oil bottle as you remove it, so no oil drips
into the printer.
magicolor
2 Repacking Instructions
3

Prepare the
Fuser Unit
4 Place the oil bottle in an oil-proof container, such as a plastic bag, until
you’re ready to reinstall it.
5 Use the fuser oil removal syringe to remove any excess oil from the fuser.
Dispose of the oil following local safety laws and regulations.
6 Stuff several clean, crumpled soft-absorbent paper towels into the space
normally occupied by the oil bottle to absorb any residual oil during
shipment.
» Note: Don’t force the paper towels in, but make sure there are enough to fill the
space.
magicolor
2 Repacking Instructions4

Prepare the
Fuser Unit
7 Close the lock levers to secure the cleaning roller.
8 Install the orange fuser-roller shipping restraints (spacers).
These restraints (spacers) protect the fuser rollers from damage during a move by
removing the pressure between the two rollers. They must be removed again
before printing.
a Open the pressure-release levers (one at each end of the fuser) to separate
the two rollers in the fuser.
magicolor
2 Repacking Instructions
5

Prepare the
Fuser Unit
a Insert the fuser roller shipping restraints (spacers) between the fuser rollers (one at
each end of the fuser).
! Caution: Be sure to insert the shipping restraints (spacers) at the ends of the
rollers, not in the middle. Inserting them in the middle will damage the rollers.
a Close the pressure-release levers (one at each end of the fuser).
When correctly positioned, the fuser roller shipping restraints (spacers) fit snugly
between the rollers.
magicolor
2 Repacking Instructions6

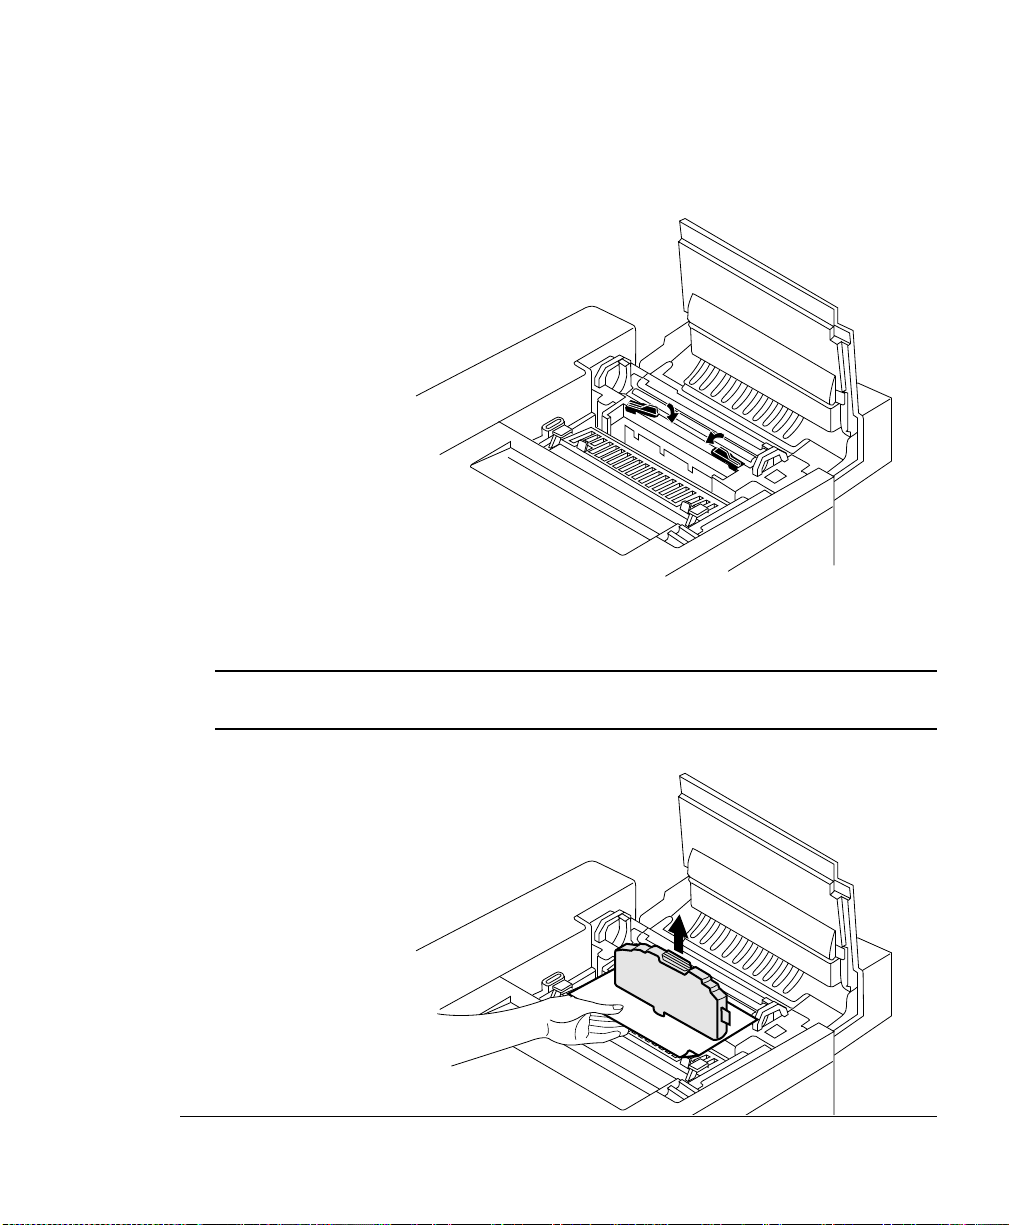
Change the Waste Toner Pack
Change the Waste Toner Pack
1 With the printer’s front cover open, remove the waste toner pack from the
printer.
Waste Toner Pack
2 Use the label on the side of the old waste toner pack to seal the opening,
and then dispose of the pack in accorda nce with safety laws and regulations
in your area.
Seal this opening.
3 Install a new waste toner pack.
This ensures that no waste toner is shaken into the printer during shipment.
4 Close the printer’s top and front covers.
magicolor
2 Repacking Instructions
7

Remove the Lower Input Feeder
Remove the Lower Input Feeder
» Note: If you don’t have a lower input feeder installed, skip to the next section.
1 Remove the plastic side covers
from the sides of the input feeder.
2 Locate the cable at the left rear of
the optional feeder that connects
it to the printer, and then unplug
it.
magicolor
2 Repacking Instructions8

3 Unscrew the thumbscrews that
attach the two brackets (one on
each side of the printer) to the
lower input feeder.
Printer
Lower Input
Feeder
Remove the
Lower Input
Feeder
Side View
4 Remove the two metal brackets
from underneath the sides of the
printer.
Angle the bracket out, and then,
slide it out of the hole underneath
the printer.
Printer
Lower Input
Feeder
Bracket
Right-Front
View
magicolor
2 Repacking Instructions
9

Repack the Printer
5 With the help of another person,
pick up the printer by its four corners, lift it from the lowe r input
feeder, and place the print er on a
table.
" WARNING! Your printer weighs
approximately 64 lbs (29 kg) without
consumables. Be sure to have help
when lifting and moving it.
ACHTUNG! Das Gewicht dieses
Druckers beträgt ohne
Verbrauchsmaterial ca. 29 kg. Bitte
versuchen Sie niemals, den Drucker
alleine anzuheben oder zu
transportieren.
6 Repack the input feeder in its original shipping carton for storage or shipment.
» Note: If you’re returning the printer for service, you don’t need to return the input
feeder.
Repack the Printer
1 Ensure that the fuser and fuser cleaner roller are in the printer.
magicolor
2 Repacking Instructions10

2 With another person’s help, put
the printer into the plastic bag,
and place the printer into the base
tray of the shipping carton.
3 Pack the printer for shipment as
shown in the illustration.
4If you’re also shipping the power
cord and any manuals with the
printer, place them in the package.
» Note: Don’t ship these items if you’re
returning the printer for service.
5 Attach the shipping carton to its
base tray with the four joints provided.
Repack the
Printer
6 Ensure that the top of the carton is securely taped.
7 Put the slipping straps around the carton.
#
magicolor
2 Repacking Instructions
11

 Loading...