


®®
QMS magicolor 2 Print System Operation
1800482-001B

Trademarks
The following are trademarks or registered trademarks of their respective owners. Other
product names mentioned in this manual may also be trademarks or registered
trademarks of their respective owners. Registered trademarks are registered in the
United States Patent and Trademark Office; some trademarks may also be registered in
other countries. QMS, Crown, CrownAdmin, CrownCopy, CrownNet, magicolor, the
QMS logo, and the Crown seal are registered trademarks of QMS, Inc., and CrownView,
ImageServer, Multi-Res, PS Executive Series, Q
QMS, Inc. PostScript is a trademark of Adobe Systems Incorporated for a page
description language and may be registered in certain jurisdictions. Throughout this
manual, “PostScript Level 2” is used to refer to a set of capabilities defined by Adobe
Systems for its PostScript Level 2 page description language. These capabilities,
among others, are implemented in this product through a QMS-developed emulation
that is compatible with Adobe's PostScript Level 2 language. Adobe, Acrobat, the
Acrobat logo/Adobe Systems Incorporated. 3Com, 3+Open/3Com Corporation. Aldus,
Aldus PageMaker, Aldus FreeHand/Aldus Corporation. Apple, AppleTalk, EtherTalk,
LaserWriter, LocalTalk, Macintosh, TrueType/Apple Computer, Inc. VINES/Banyan.
Centronics/Centronics. Color Solutions, ColorBlind/Color Solutions. DEC, DECnet,
LN03, LN03 Plus, VMS/Digital Equipment Corporation. PhoneNET/Farallon Computing,
Inc. CompuServe /H & R Block. Hewlett-Packard, HP, PCL, HP-GL, LaserJet/HewlettPackard Co. IBM, OS/2, Token-Ring/International Business Machines Corporation.
Intel/Intel Corporation. Iomega, Jaz, Zip/Iomega. Microsoft, MS-DOS/Microsoft
Corporation. NEC, V
Pantone. PANTONE is Pantone, Inc.’s check-standard trademark for color reproduction and
color reproduction materials. QuarkXPress/Quark, Inc. TOPS/Sun Microsystems, Inc.
UNIX/UNIX Systems Laboratories. SIMM/Wang Laboratories. Ethernet/Xerox. All other
trademarks are the property of their respective owners.
R4300/NEC. Novell and NetWare/Novell, Inc. Pantone, PANTONE/
COLOR, and QFORM are trademarks of
Proprietary Statement
The digitally encoded software included with your QMS magicolor 2 Print System is
Copyrighted © 1998 by QMS, Inc. All Rights Reserved. This software may not be
reproduced, modified, displayed, transferred, or copied in any form or in any manner or
on any media, in whole or in part, without the express written permission of QMS, Inc.
Copyright Notice
This manual is Copyrighted © 1998 by QMS, Inc., One Magnum Pass, Mobile, AL
36618. All Rights Reserved. This manual may not be copied in whole or in part, nor
transferred to any other media or language, without the express written permission of
QMS, Inc.

Contents
1 Introduction
Introduction .................................................................................. 1-2
About This Manual .......................................................................1-2
Typographic Conventions 1-4
2 Consumables
Introduction .................................................................................. 2-2
Loading the Media Cassette ........................................................2-2
Prepare the Paper 2-2
Load the Cassette 2-2
Using Media Other than Paper ....................................................2-4
Using Envelopes 2-4
Using Labels 2-7
Using Letterhead and Memo Media 2-7
Using Transparencies 2-8

Using Toner Cartridges ............................................................... 2-9
Toner Cartridge Life 2-9
Refilled Toner Cartridges 2-9
Toner Cartridge Storage 2-10
Replacing a Toner Cartridge .................................................... 2-11
3 Advanced Printing Features
Introduction ................................... ...... ............. ............. ............. .. 3-2
High-Resolution Printing ........................................................... 3-2
How Much Memory Do You Need? 3-3
Setting the Default Resolution 3-4
Cassette Chaining ....................................................................... 3-5
Enabling/Disabling Cassette Chaining 3-5
Collating Output .................................................... ..................... 3-6
Enabling/Disabling Collation 3-6
Working with Chunk Collation 3-7
Improving Collation Performance 3-8
2-Sided Printing ........................................................................... 3-9
Printing on Standard and Custom Media Sizes ........................ 3-9
Working with Status Pages ..................................................... 3-10
Identifying a Status Page Type 3-10
Printing a Status Page 3-11
Cancelling/Ending Print Jobs ............ ....................................... 3-11
Cancelling a Print Job 3-12
Cancelling all Print Jobs 3-12
Ending a Print Job 3-13
4 Color Printing
Introduction ................................... ...... ............. ............. ............. .. 4-2
QCOLOR Color Control ............................................................... 4-2
Accessing QCOLOR for Windows 95 4-2
QMS magicolor 2 Operationii

Other Methods of Color Control .................................................4-4
Color Matching 4-4
About Printer Halftones and CRDs 4-7
Color Density ................................................................................4-9
Adjusting the Color Density 4-9
5 Printer Care
Introduction .................................................................................. 5-2
Handling the Printer .....................................................................5-2
Cleaning the Printer .....................................................................5-3
Guidelines for Cleaning Inside the Printer 5-4
Cleaning the Transfer Unit 5-4
Cleaning the Paper Exit Rollers 5-7
Cleaning the OPC Belt Cartridge 5-8
Cleaning the Laser Lens 5-10
Cleaning the Exterior of The Printer 5-11
Maintenance Schedule ..............................................................5-12
Replacing the Fuser Oil Bottle and Cleaning Roller ...............5-14
Replacing the OPC Belt Cartridge ............................................5-17
Replacing the Ozone Filter ........................................................5-20
Replacing the Waste Toner Pack .............................................5-21
6 CrownView Printer Web
Page
Introduction .................................................................................. 6-2
Setting up the Printer Web Page ................................................6-3
Assigning a Printer Name 6-3
Setting Up Your Browser Software 6-4
Printer Home Page .......................................................................6-8
Home 6-10
Operator Control 6-11
Contents iii

General Settings 6-13
Printer Jobs 6-21
Consumable Status 6-23
Accounting 6-25
System Support Page 6-26
QMS, Inc. Page 6-28
Online Help Page 6-28
7 Media Jams
Introduction ................................... ...... ............. ............. ............. .. 7-2
Automatic Jam Recovery ............................................................ 7-2
Preventing Media Jams .............................................................. 7-2
Understanding the Media Path ....................... ....... ...... ....... ........ 7-3
Understanding Media Jam Status Messages ....... ...... ....... ........ 7-4
Removing Media Jams ....................... ....... ...... ....... ..................... 7-5
Misfeed Jams 7-5
Inner Jams, Outer and Drum Jams 7-6
8 Troubleshooting Printer
Problems
Introduction ................................... ...... ............. ............. ............. .. 8-3
Status and Service Messages .................................................... 8-3
Status Messages 8-3
Service Mess ages 8-11
HP-GL Error Codes and PCL Error Codes .............................. 8-13
Testing PC-Printer Communication ........................................ 8-14
Creating the Test File 8-14
Sending the Test File 8-14
Testing Macintosh-Printer Communication ............... ............. 8-18
Testing Macintosh Communication 8-18
Printer Problem Checklist ........................................................ 8-19
QMS magicolor 2 Operationiv

OPC Belt Cartridge Problems ...................................................8-21
Control Panel Problems ............................................................8-22
Data Indicator Stays Lit 8-22
No Advanced Status Page’ 8-22
No Start-up Page 8-22
Paper Jam Message Stays On 8-23
Printer Resets 8-23
PostScript Errors 8-23
Windows Driver Problems .........................................................8-24
Printer Description Files 8-24
CrownNet Problems ...................................................................8-24
Output Problems ........................................................................8-25
1200x600, 2400x600 dpi Printing Unavailable 8-25
Blank Pages 8-26
Not All Pages Print 8-26
Kanji Option Kit Problems .........................................................8-27
Can't Download Kanji Fonts 8-27
Can't Access Kanji Fonts 8-28
Can't Access the Kanji File Through Your Application 8-28
Print Quality Problems .............................................................8-29
Color Density Problems ............................................................8-30
Engine ROM 8-30
Image Defects ..... ....... ...... ....... ...... ....... .......................................8-32
General 8-32
Specific 8-32
Placing a Service Call ...............................................................8-38
9 Repacking the Printer
Introduction .................................................................................. 9-2
What's Involved? 9-2
Remove Cables and Cassette(s) .................................................9-3
Remove the Toner Cartridges .....................................................9-3
Remove the OPC Belt Cartridge ................................................9-3
Contents v

Prepare the Fuser Unit ............................................................... 9-5
Change the Waste Toner Pack ................................................... 9-9
Remove the Lower Input Feeder .............................................. 9-11
Repack the Printer ..................................................................... 9-13
A QMS Customer Support
Sources of Support ......... ...... ....... ...... ....... ...... ....... ...... ....... ...... ..A-2
Your QMS Vendor A-2
Your Application Vendor A-2
Q-FAX A-2
CompuServe A-3
Internet A-3
QMS Customer Response Center (CRC) A-4
QMS World-wide Offices .............................................................A-5
B Configuration Menu
Introduction ................................... ...... ............. ............. ............. ..B-2
Menu Chart Conventions ............................................................B-2
Administration Menu ................................. ...... ....... ...... ....... ...... ..B-3
Installation Menu ............. ............................................................B-9
Operator Control Menu .............................................................B-10
Index
v
Administration/Communications/Network2/CrownNet
Menu B-4
QMS magicolor 2 Operationvi

1
Introduction
In This Chapter . . .
n “Introduction” on page 1-2
n “About This Manual” on page 1-2

Introduction
Introduction
This manual pro vid es information on insta lling co nsum ables such as
media and toner cartridges. You’ll also find i nformation on advanced
printing f eat ure s , print er care, print quality, and troublesho oti ng. Us e th is
guide in conjunction with y our ot her QMS
About This Manual
magicolor
2 documentation.
Introduction
1
Consumables
2
Advanced
3
Printing Features
Color Printing
4
Printer Care
5
CrownView
6
Printer Web Page
Media Jams
7
Provides an overview of this guide.
Describes the media that’s best
suited for your printer; how to load
paper, labels, transparencies,
envelopes; and how to replace the
toner cartridges, OPC belt cartridge,
fuser oil bottle, cleaning roller, and
waste toner pack.
Explains how to collate output, print a
status page, cancel a print job, and
end a print job.
Describes how to print documents in
color.
Describes how to handle and clean
the printer.
Contains information on how to access
and use the printer’s web page.
Explains how to locate and clear
media jams.
QMS magicolor 2 Op
eration1-2

About This
Manual
Troubleshooting
8
Printer Problems
Repacking the
9
Printer
QMS Customer
A
Support
Configuration
B
Menu
Lists printer status messages, outlines
printer and print quality problems and
solutions, and describes how to place
a service call.
Explains how to repack the printer in
case you need to relocate or ship your
printer after it’s been installed.
Provides product sales and support
telephone numbers, and describes
how to communicate with QMS
through CompuServe, the Internet,
and Q-FAX
Provides a view of the printer’s
configuration menu.
.
1-3Introduction
About This
Manual
Typographic Conventions
The following typographic conventions are used in this manual:
Mixed-Case
Courier
Mixed-Case
Italic
Courier
UPPERCASE
COURIER
lowercase bold PostScript operators and DOS commands
lowercase italic
UPPERCASE File and utility names
↵ Press the Enter key (PC) or Return key
^ Press and hold down the Ctrl key (PC)
» Note:
Notes contain tips, extra information, or important information
Text you type, and messages and information
displayed on the screen
Variable text you type; replace the italicized
word(s) with information specific to your printer or
computer
Information displayed in the printer message
window
Variable information in text.
(Macintosh)
In Adobe Acrobat PDF versions of the manual,
click to play a QuickTime video clip of the
procedure described in the text.
that deserves emphasis or reiteration.
s Caution:
Cautions present information that you need to know to avoid
equipment damage, process failure, or extreme annoyance.
M WARNING!
Warnings indicate the possibility of personal injury if a
specific procedure is not performed exactly as described in the
manual.
ACHTUNG!
Bitte halten Sie sich exakt an die im Handbuch
beschriebene Vorgehensweise, da sonst Verletzungsgefahr
bestehen könnte.
v
QMS magicolor 2 Op
eration1-4

2
Consumables
In This Chapter . . .
n “Introduction” on page 2-2
n “Loading the Media Cassette” on page 2-2
n “Using Media Other than Paper” on page 2-4
n “Using Toner Cartridges” on page 2-9
n “Replacing a Toner Cartridge” on page 2-11
Introduction
Introduction
This chapter covers basic printer operation, such as loading paper,
transparencies, labels, and envelopes; and replacing toner cartridges.
Loading the Media Cassette
Prepare the Paper
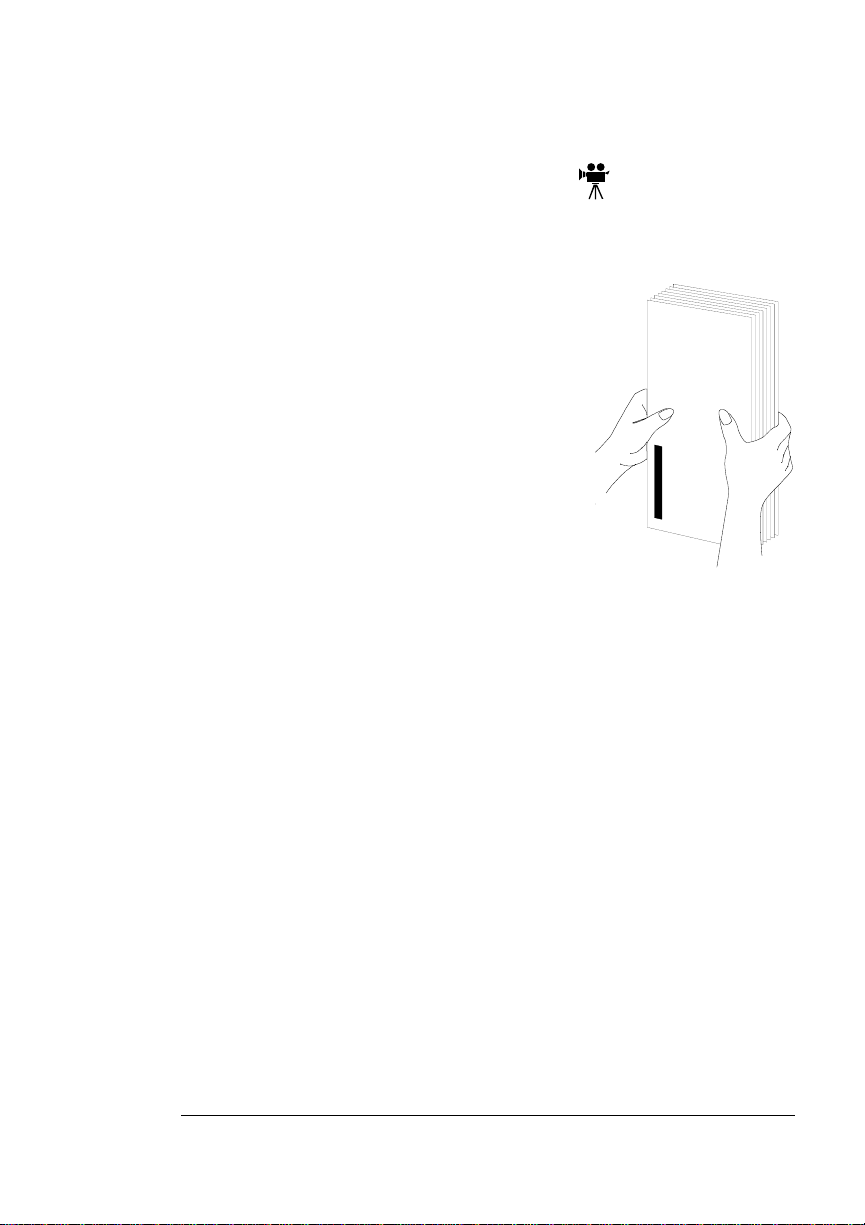
1 Take a stack of about 250 sheets (
» Note:
2 Holding the stack with one hand, fan the paper with the other.
3 Take off the top and bottom sheets.
Don’t unwrap the paper above the printer as this might
cause paper particles to fall into the printer.
This gets air through the sheets and prevents static buildup.
Residual glue buildup on these sheets may cause media jams.
½ ream).
Load the Cassette
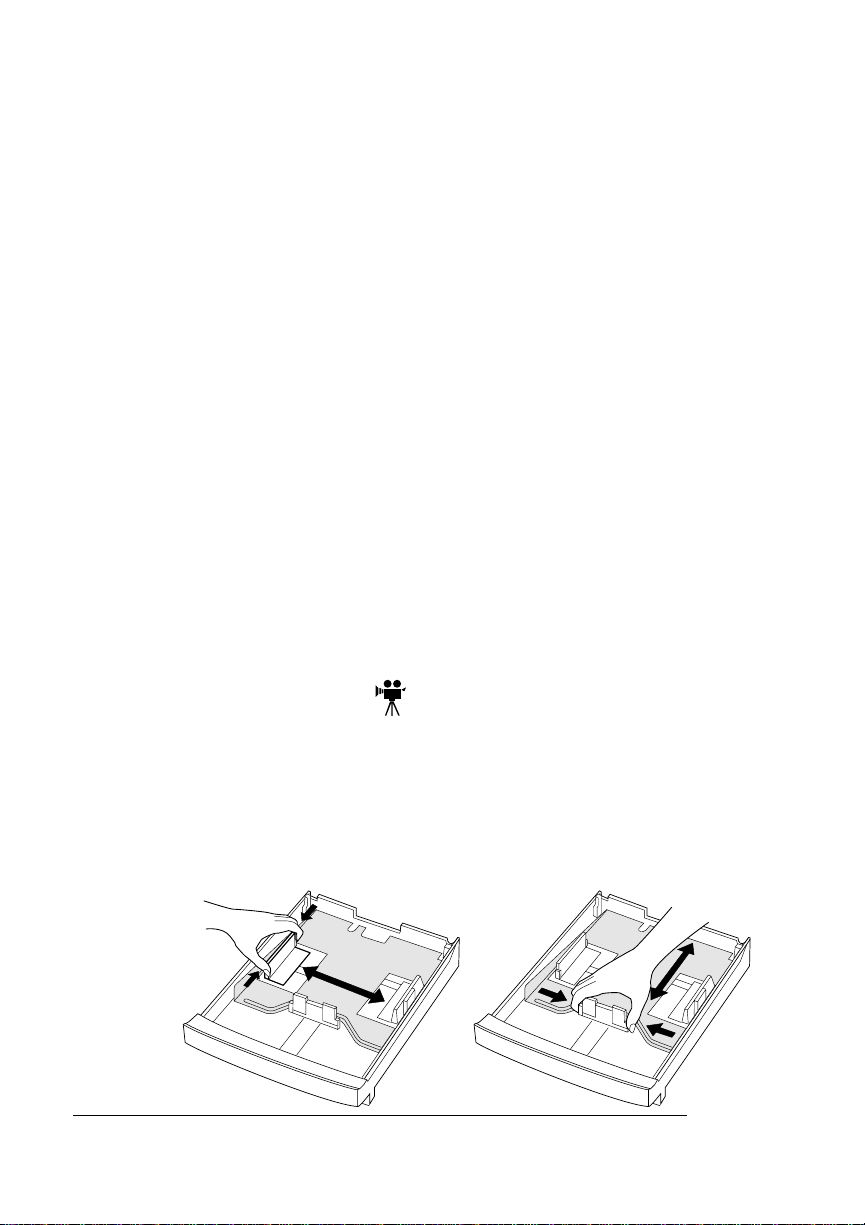
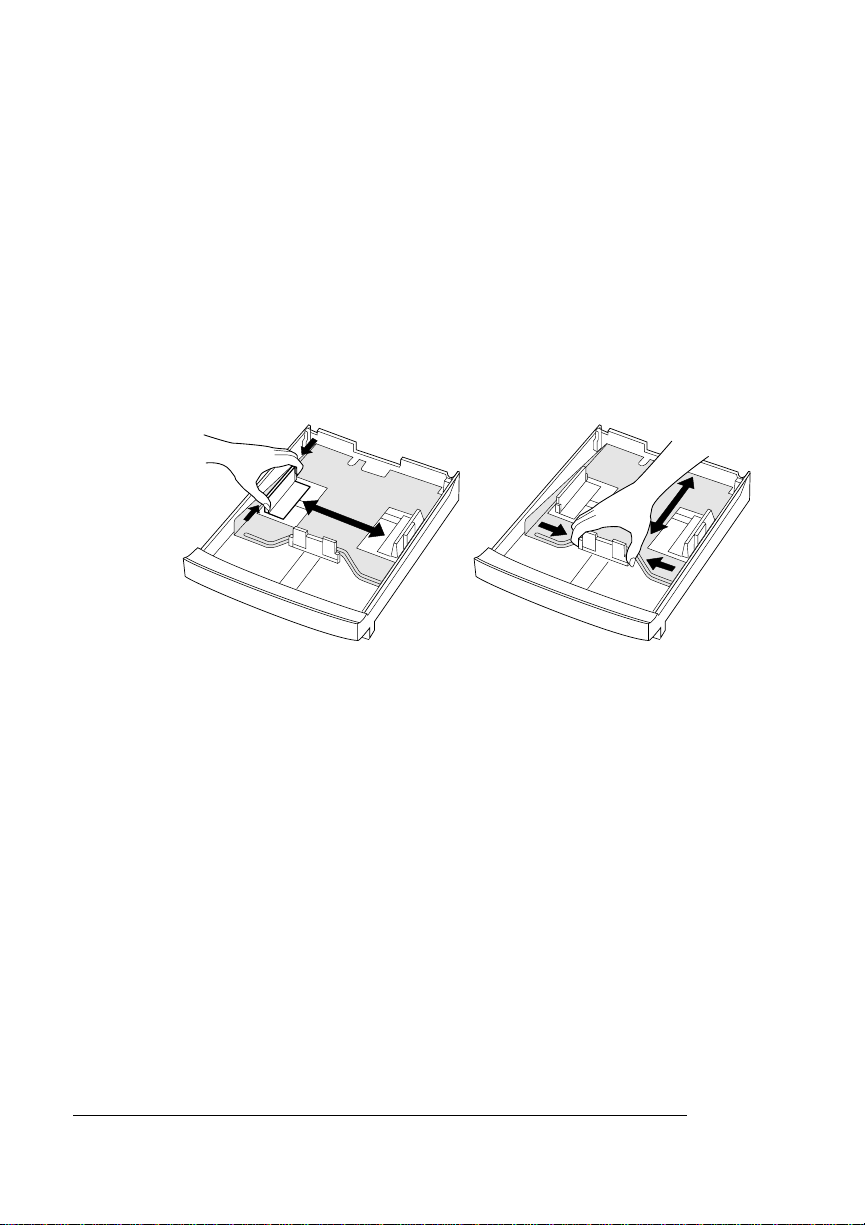
1 Remove the media cassette from the printer.
2 Adjust the media guides to fit the size paper you’re loading.
Squeeze the retainers at the ends of the left width guide and/or
the length guide, move the guide to the appropriate lo cation
(media sizes are listed on the cassette) , and r eleas e the ret ainers.
QMS magicolor 2 Op
eration2-2
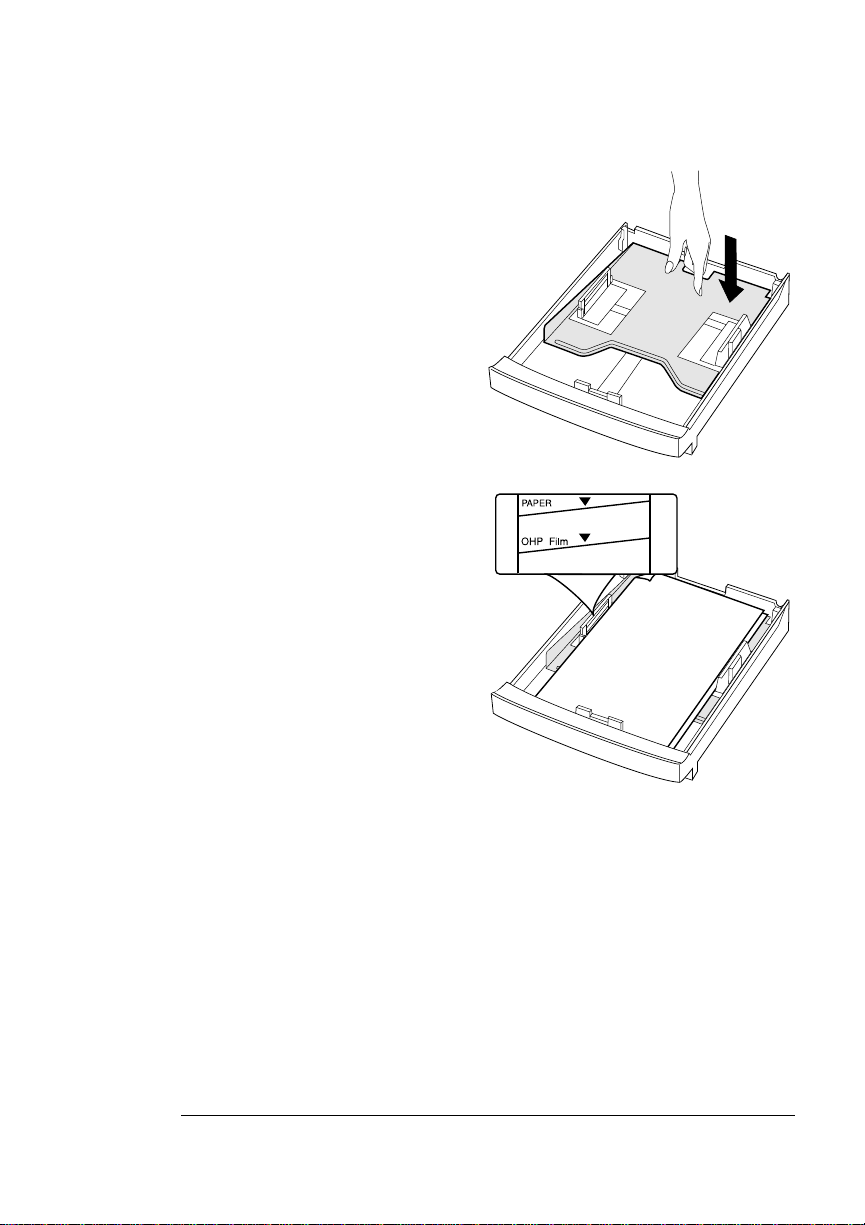
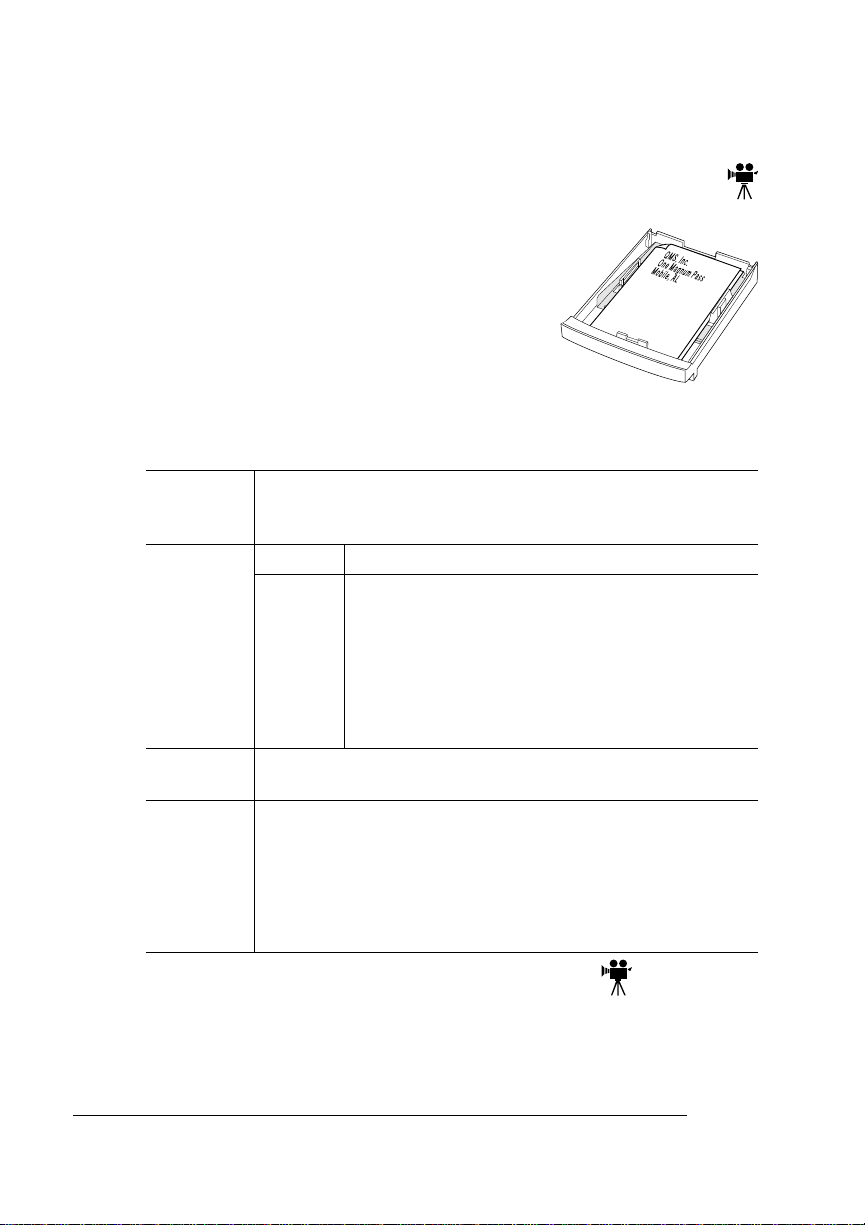
3 Push the media pressure
plate down to lock it in
position.
4 Load the paper.
n A fill limit mark is provided
on the inside left side of
the cassette. The media
cassette holds 250 sheets
2
of 20 lb (75g/m
) paper.
(Paper is packed in reams
of 500 sheets.) Do not
overfill the cassette.
Loading the
Media Cassette
n The printing side of the
paper should face up. An
arrow on the paper package label indicates the
face-up side of the paper.
5 Slide the media cassette back into the printer.
2-3Consumables
Using Media Other than Paper
Using Media Other than Paper
s Caution:
Although the QMS magicolor 2 was designed for occasional
printing on a wide range of media types, it is not intended to print
exclusively on a single media type except plain paper. Continuous
printing on media other than plain paper (such as transparencies,
labels, or thick stock) may adversely affect print quality or reduce
engine life.
Using Envelopes
Formatting Your printer receives the instructions to print on envelopes
from your applic ati on.
n When formatting data for envelopes, leave at least a 0.16"
(4.06 mm) margin from the edges of the envelope.
n Print on the front side only. Some parts of the envelope
consist of three layers of paper—the front, back, and flap.
Anything printed in these layered regions may be lost or
faded.
n See your ap plicatio n docume ntation f or spec ific inf ormatio n
on printing envelopes.
Input Source Upper slot; universal cassette
Capacity Up to 15, depending on the thickness of the
envelopes
Type Refer to the specifications in chapter 2, “Print Media,” in the
Reference
Notes n Use envelopes with a smooth exterior surface. Envelopes
with a rough surface may jam in the media cassette.
n You can print only on the address side of the en velope.
n You can print envelopes from either cassette, but only in
the upper position, not from the optional lower input feeder.
QMS magicolor 2 Op
eration2-4
Using Media
Other than
Paper
Loading and Printing Envelopes
1 Place the envelopes on a flat surface, and flatten them by
pressing down the corners.
2 Flex the envelope stack (including the
edges) to remove any stiffness.
3 Correct any dog-eared corners, and
then tap the envelopes on a flat surface
to align them
4 Remove the media cassette from the printer (and remove an y
media in the cassette).
The media cassette must be located in the upper position, not in
the optional lower input feeder.
2-5Consumables
Using Media
Other than
Paper
5 Adjust the media guides to the length and width of the enve-
lopes.
Squeeze the retainers at the ends of the left width guide and/or
the length guide, move the guide to the appropriate lo cation
(media sizes are listed on the cassette) , and r eleas e the ret ainers.
» Note:
Make sure the guides are snug enough to keep the
envelopes straight, but not so tight that they buckle the
envelopes.
6 Place the envelope stack into the cassette with the printing-
side up.
» Note:
Check your application documentation to determine if the flap
should be placed on the left or on the right. Y ou can also print a single
envelope to check the orientation before printing multiple copies.
7 Insert the cassette into the printer.
The media cassette must be located in the upper position, not in
the optional lower input feeder.
8 Open the flap of each envelope immediately (before it cools)
after the envelope is delivered to the output tray.
» Note:
gummed area on the flaps may seal. Using envelopes with
emulsion-based glue avoids this problem.
Because the envelopes pass through heated rollers, the
QMS magicolor 2 Op
eration2-6
Using Media
Other than
Paper
Using Labels
Formatting Format lab el data wi thin y our a pplicati on. Try printing your data
on a plain sheet of paper first to check placement.
Input Source Upper cassette
Capacity Up to 50, depending on the thickness of the labels
Type Refer to the specifications in chapter 2, “Print Media,” in the
Reference
Notes n Av oid usin g labels with exposed adhesive; it ma y stick to
the toner cartridge o r the f ixing roller, caus ing l abels to p eel
off and media jams to occur.
n Check your ap plicatio n documentation for other i nformation
on printing labels.
Loading and Printing Labels
1 Load labels the same way you load paper.
» Note:
If your label stock has a top-of-page, place the top-of-page
toward the rear of the printer.
2 In the Operator Control/Media/For Upper Bin menu, select
Thick Stock.
Using Letterhead and Memo Media
Formatting Format letterhead or memo data within your application. Try print-
ing your data on a plain sheet of paper first to check placement.
Input Source Upper cassette
Capacity Up to 250 sheets, depending on the thickness of
the media
Type Refer to the specifications in chapter 2, “Print Media,” in the
Reference
Notes n Check your ap plicatio n documentation for other i nformation
about printing on letterhead and memo media.
2-7Consumables
Using Media
Other than
Paper
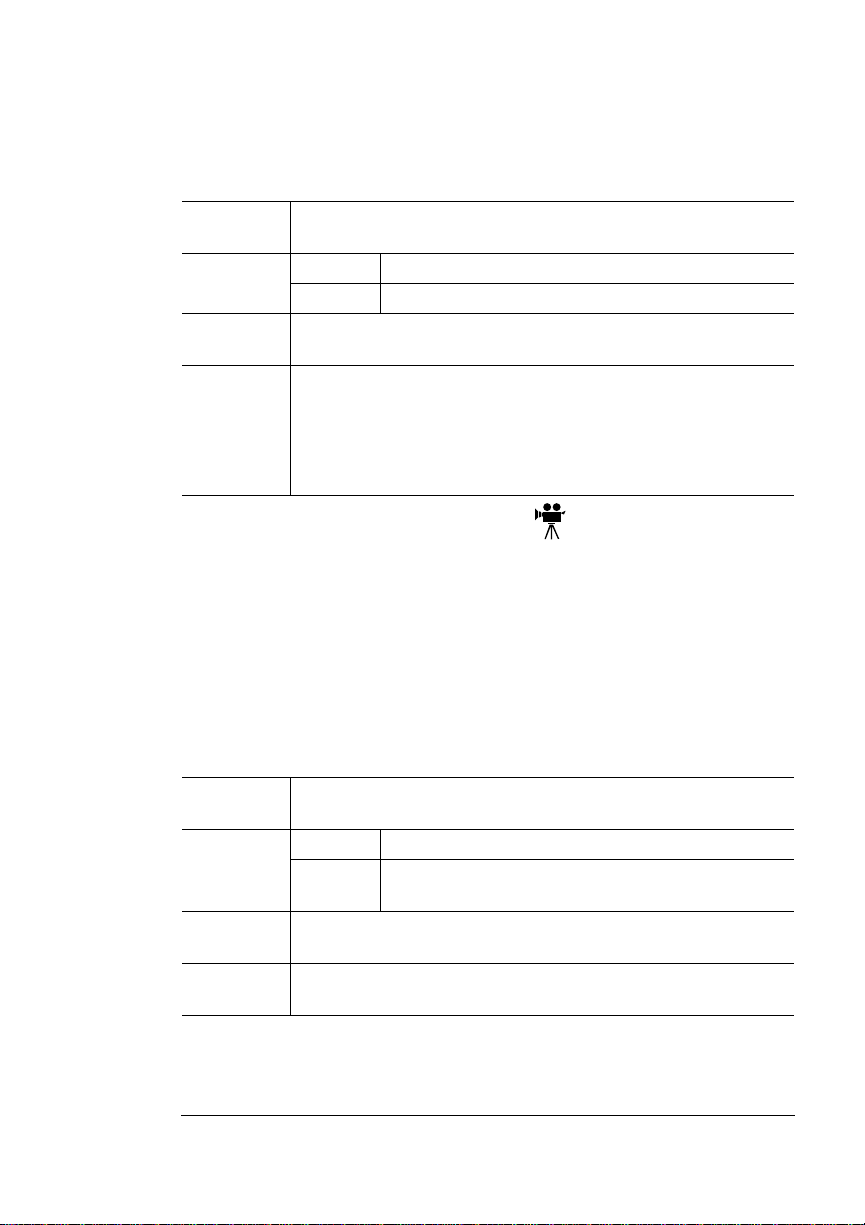
Loading and Printing Letterhead and Memo Media
n Load letterhead and memo media the
same way you would load paper.
» Note:
Load the media printing-side up with
the top of the media (the letterhead or
memo information) toward the back of the
cassette.
Using Transparencies
Formatting Format the information to be printed on the transparencies
within your application. Try printing your data on a plain sheet
of paper first to check placement.
Input Source Upper cassette
Capacity Up to 50 sheets, depen ding on the thickness of the
transparencies
» Note:
Type Refer to the specifications in chapter 2, “Print Media,” in the
Reference
Notes n Keep the media path clean. Transparencies are especially
sensitive to a dirty media path. If there are shadows on
either the top or the bottom of the sheets, ref er to chapter 5,
“Printer Care,” for instructions on how to clean the printer.
If you hav e problems feed in g 50 sheets ,
try loading only 5– 10 sheets at a time . Loading a
large number of transparencies at a time may
cause static buildup, thus causing feeding
problems.
n Check your appli cation do cumentation f or other inf ormation
about printing on transparencies.
Loading and Printing Transparencies
n Load transparencies the same way you would load paper.
QMS magicolor 2 Op
eration2-8

Using Toner Cartridges
Toner Cartridge Life
A toner cartridge contains enough toner to print the following number
of letter/A4-size pages:
Color Rated life @ normal 5% page co verage
Black 10,000 pages
Yellow 6,000 pages
Magenta 6,000 pages
Cyan 6,000 pages
x
When toner runs low in a cartridge,
message window. It’s your option whether to continue printing;
usually, parts of the page print lighter.
When toner is low, it’s sometimes helpful to take the cartridge out of
the printer and redistribute the toner by gently rocking the cartridge
side to side. Then reinstall the cartridge. If the TONER LOW message
remains in the message window after you redistribute the toner,
replace the cartridge.
TONER LOW displays in the
Using Toner
Cartridges
The printer stops 330 pages after detecting that toner in a cartridge is
low. TONER OUT displays in the message window.
Refilled Toner Cartridges
Refilled toner cartridges may produce variations in toner quality and
reliability and may reduce the print quality of your documents. In addition, toner leaks affect your warranty.
2-9Consumables

Using Toner
Cartridges
Toner Cartridge Storage
n Keep toner cartridges in their packaging until you’re ready to
install them.
n Store toner cartridges in a cool, dry location away from sunlight
(due to heat). The maximum storage temperature is 95
and the maximum storage humidity is 80% without condensation.
n Keep toner cartridges level during storage. Do not stand or store
cartridge on their ends or turn upside down; the toner inside the
cartridges may become caked or unequally distributed.
n Keep toner cartridges away from salty air environments and cor-
rosive gases such as aerosols.
n Keep toner cartridges away from disk drives and floppy disks. The
magnets in the cartridge can damage stored data.
° F (35° C)
QMS magicolor 2 Op
eration2-10
Replacing a Toner Cartridge
Replacing a Toner Cartridge
Your printer uses four toner cartridges: black, yellow, magenta, and
cyan.
1 Open the printer’s front cover.
2 Remove and discard the empty toner cartridge.
s Caution:
dispose of it by burning
3 Remove the toner cartridge
from its shipping carton.
4 Distribute the toner in the
cartridge.
Holding the cartridge with both
hands, gently rock it from sideto-side five or six times.
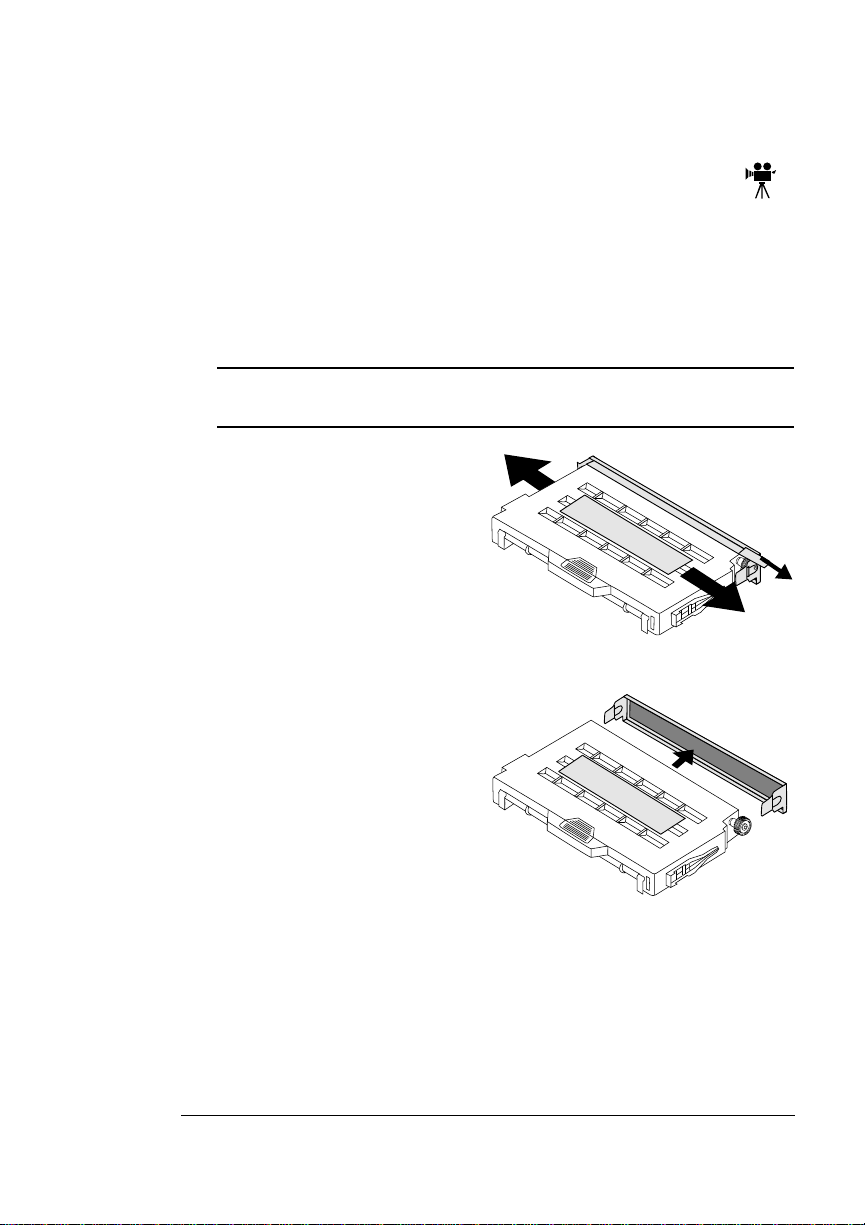
5 Pull the tab.
6 Remove the orange protec-
tive cover from the cartridge.
Put the old toner cartridge in a trash receptacle. Do not
PullPull
TabTab
2-11Consumables
Replacing a
Toner Cartridge
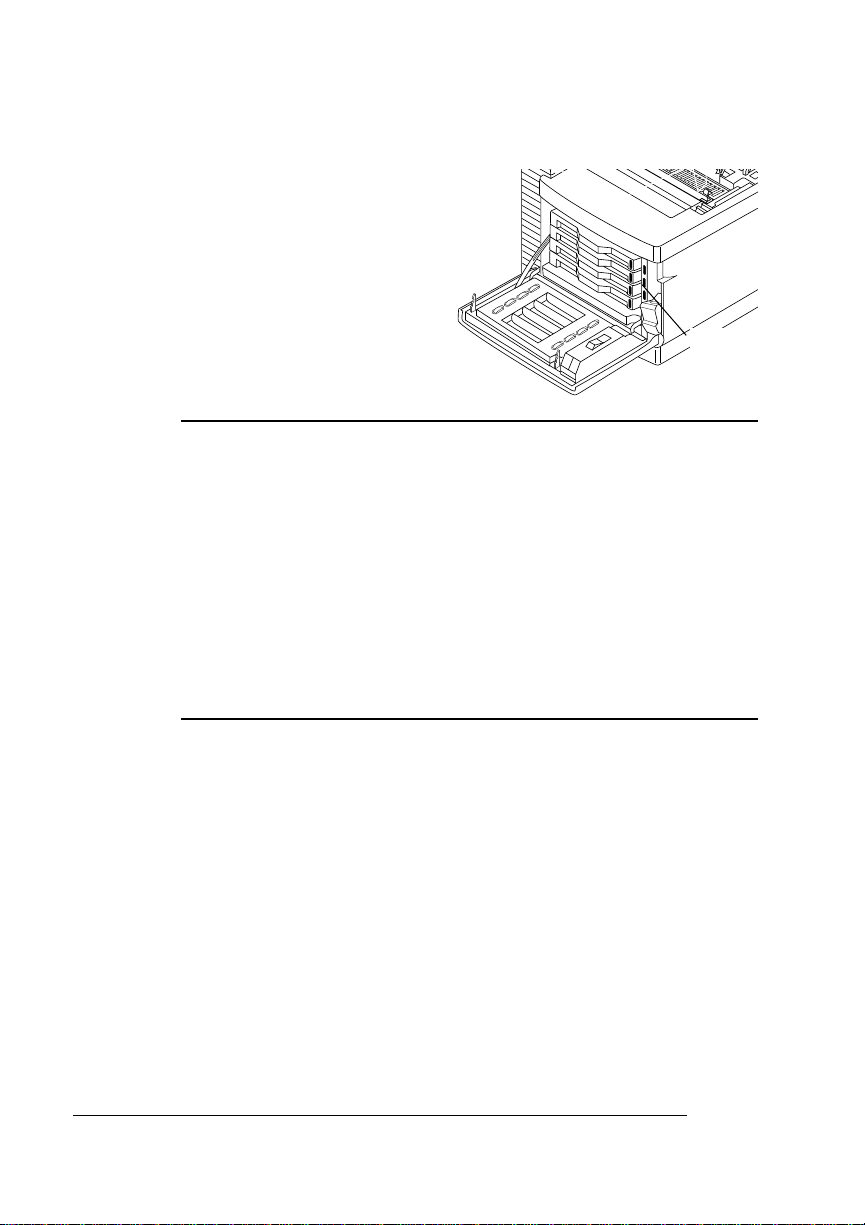
7 Install the toner cartridge.
Align the toner cartridge with
the cartridge guides, and gently push the cartridge into the
printer until it’s firmly seated.
Colored
labels
s Caution:
Each toner cartridge has a colored label that
corresponds to a colored label to the right of the cartr i dge slots.
Always install the toner cartridge in the slot with a label of the
same color.
If a toner cartridge doesn’t slide in easily, don’t force it. In
addition, don’t push it in until you hear a click. If you hear a click,
you’ve locked it into place against the OPC belt cartr id ge and
your prints may be smudged. Pull the toner cartridge out so that
it’s firmly seated but not locked into place. While the cartridges
may appear not to be fully inserted, closing the front cover will
guide them to their final position.
8 Close the printer’s front cover.
9 In the Operator Control/Consumables/Item Replaced/
menu choose Yes to reset the consumables usage monitoring system.
» Note:
When you replace a toner cartridge after an x TONER
EMPTY message displays in the message window, the engine
automatically recovers. However, you must manually reset the
consumables usage monitoring system to ensure accurate
consumables monitoring.
To access consumables usage information, use the Operator
Control/Consumables/Print Statistics menu or the CrownView
printer web page.
x
T oner
v
QMS magicolor 2 Op
eration2-12

3
Advanced Printing Features
In This Chapter . . .
n “Introduction” on page 3-2
n “High-Resolution Printing” on page 3-2
n “Cassette Chaining” on page 3-5
n “Collating Output” on page 3-6
n “2-Sided Printing” on page 3-8
n “Printing on Standard and Custom Media Sizes” on page 3-9
n “Working with Status Pages” on page 3-10
n “Cancelling/Ending Pri nt Jo b s” on page 3-11

Introduction
Introduction
This chapter describes changing print resolution, chaining paper cassettes, collating output, printing a status page, cancelling a print job,
and ending a print job.
High-Resolution Printing
QMS Multi-Res technology provides a print resolution for almost
every application or budget. The QMS
magicolor
the following resolutions at up to rated engine speed:
2 supports each of
300x300 dpi Built into al l
the fastest processing time for producing draft-quality
output. 300x300 dpi resolution is also required by some
printer emulations.
600x600 dpi The standard r esolution in the base
the standard resoluti on for busines s doc uments. 600x600
dpi resolution provides excellent print quality for most
business applications, such as letters, propo sals, and
presentations. With 600 dpi in both horizontal and ve rtical
directions, it also provides the best quality line drawings
for engineering applications.
1200x600 dpi For improved halftone quality in graphics and images,
1200x600 dpi re so lut ion is avai lable for all media sizes on
the base
capable of pro ducin g 120 0x600 dp i reso lu tion throu gh the
installation of additional memory.
2400x600 dpi For graphic arts and desktop publishing applications,
where the best quality g raphics and photo realistic images
are required, the
standard with 2400x600 dpi resolution for many media
sizes. The magic olo r 2 CX Print Sy ste m is als o ca pa bl e of
producing 2400 x600 dpi resolu tion thr ough th e insta llatio n
of additional memory.
magicolor
magicolor
2 Print Systems, thi s re soluti on has
2 EX. The
magicolor
magicolor
magicolor
2 EX Print System comes
2 CX is also
2 CX is also
QMS magicolor 2 Op
eration3-2
How Much Memory Do You Need?
HighResolution
Printing
» Note:
If a certain resolution is chosen and the minimum amount of
memory is not installed in the printer, the file is printed using the next
lower resolution that can handle the job. For example, if you attempt
to print a 4-color image at 2400x600 dpi resolution on legal media,
but the printer has only 24 MB of RAM instead of the required 88 MB
minimum, the file prints at 600x600 dpi.
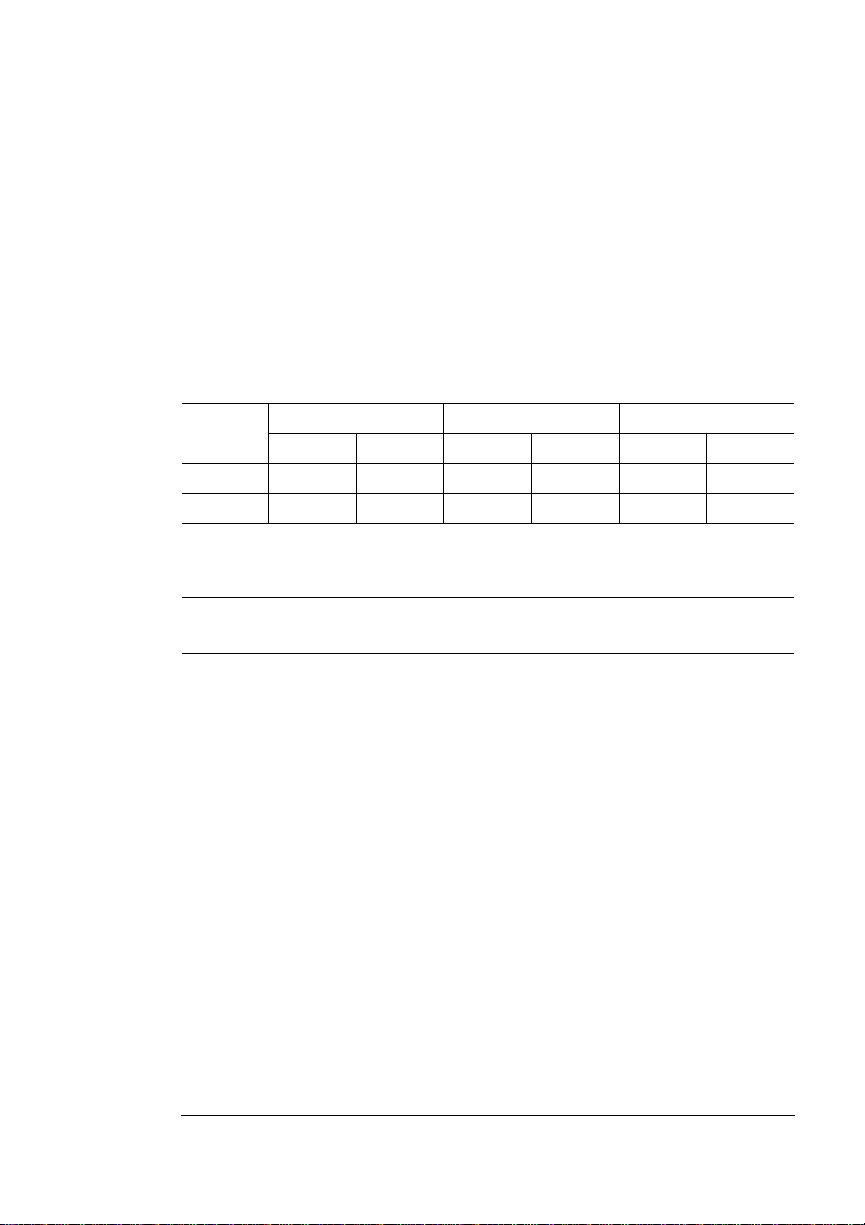
Minimum System Memory Requirements
Media
Size
Letter/A4 24 MB 24 MB 24 MB 40 MB* 24 MB 72 MB*
Legal 24 MB 24 MB 24 MB 48 MB* 24 MB 88 MB**
» Note:
a hard disk installed and disk swapping enabled, add an additional 4 MB
of RAM for each media size.
* Additional memory required on a
** Additional memory required on a
You may also need additional memory (SIMMs) for the following:
n To print complex graphics or complex PostScript documents
n For increased collation performance
300x300/600x600 1200x600 2400x600
Mono 4-Color Mono 4-Color Mono 4-Color
These values are f or a printer with out a ha rd disk . F or a printer wi th
magicolor
magicolor
2 CX
2 CX and
magicolor
2 EX
n For increased spooling performance
3-3Advanced Printing Features

HighResolution
Printing
Setting the Default Resolution
Menu Administration/Engine/Def Resolution
Choices 300 dpi—300x300 dpi resolution
600 dpi—600x600 dpi resolution
1200 dpi—1200x600 dpi resolution
2400 dpi—2400x600 dpi resolution
Default 600 dpi, 1200 dpi, or 2400 dpi—your printer’s default is the
highest resolution available for the amount of RAM installed in
the printer (see “Minimum System Memory Requirements” on
page 3-3 for more information)
Notes Whenever possible, set the print resolution through your
application. If the print resolution can’t be set through the
application, you can set it through the configuration menu, the
printer driver, or QMS Document Option Commands (DOCs).
If you want the printer to use a lower default resolution when
you restore defaults, set this option to your choice (and make
any other necessary configuration settings), and then use the
Administration/Miscellaneous/Save Defaults menu to save
your custom defaults. See “Working with Custom
Configurations” in chapter 4, “Printer Configuration,” of the
Reference
In addition, after you lower the default resolution, you should
reconfigure the printer me mo ry (Administr a tio n/Memory/Quick
Config menu) to distrib ute it better f or tha t particular resolu tion.
For example, if you set the default resolution to 600 dpi when
your printer has enoug h memory to print at 2400 dpi, the frame
buffer remains configured fo r 2400 dpi , whi ch means that
printer memory that could be better used somewhere else is
being wasted.
for more information.
QMS magicolor 2 Op
eration3-4

Cassette Chaining
If you have an optional lower input feeder, you may choose to have
the printer automatically draw media from the other cassette (inputbin) when the current cassette empties. This is called cassette chaining, and it provides a total media input capacity of 500 sheets.
Enabling/Disabling Cassette Chaining
There are four ways to enable/disable cassette chaining:
n Use your application. (Check the documentation to see if your
application includes a specific procedure for using a dualcassette printer.)
n Select an alternate cassette for chaining in the QMS Level 2
Windows printer driver.
n On a network, use CrownAdmin 3 to select the media cassettes
and/or the media source.
n Configure the printer through the configuration menu.
Cassette
Chaining
Using the Configuration Menu
Menu Operator Control/Chain Inputbins
Choices On—Switches to the next cassette with the same size and
type of media when the default cassette is empty.
Off—Doesn’t switch cassettes; uses only the default cassette.
On Any—Switc hes to the ne x t cassette , regardl ess of the size
and type of media installed, when the default input bin is
empty.
Default On
Notes Use the Operato r Control/Inputbin menu to set the default
inputbin.
3-5Advanced Printing Features
Collating Output
Collating Output
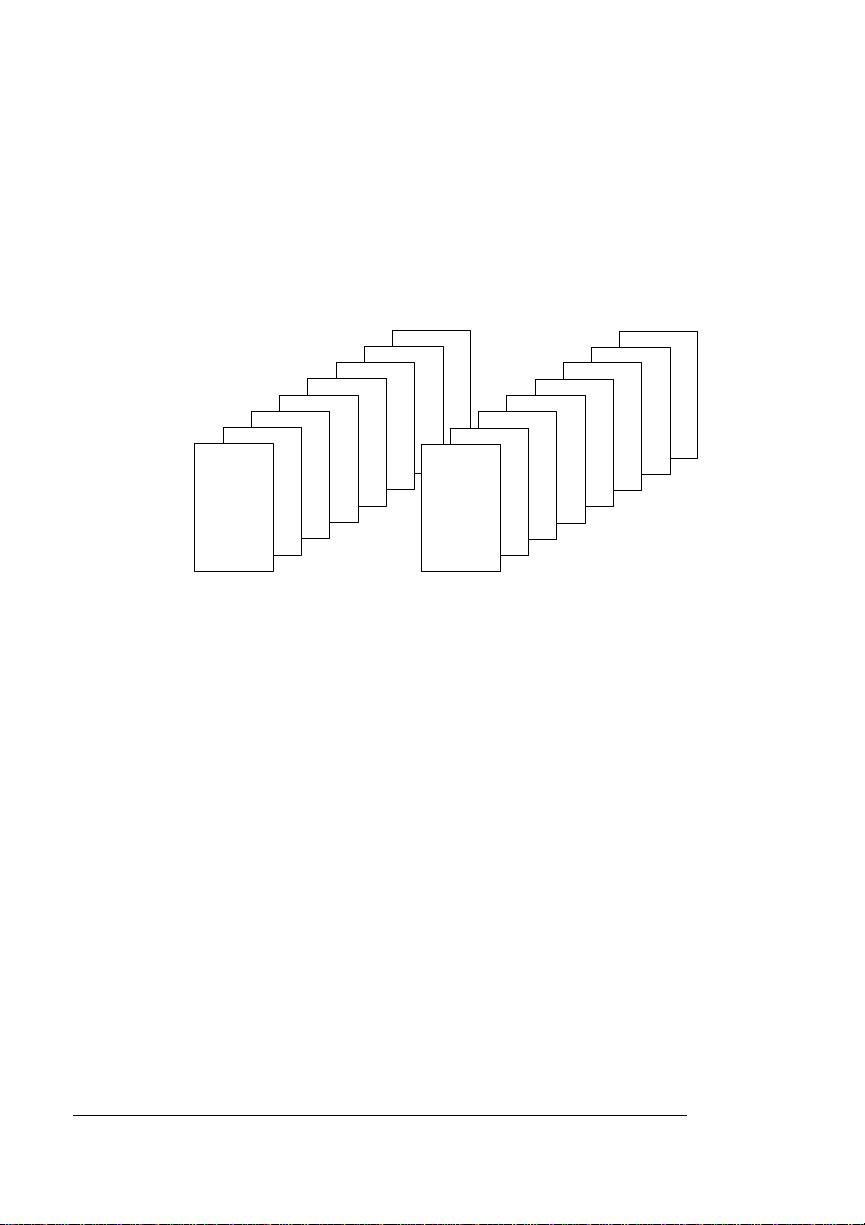
You can print multiple copies of documents either as complete sets in
numeric order (collated) or as separate sheets. The following figure
shows collated and uncollated stacking for two copies of a f our-page file.
Collated
4
3
2
1
4
3
2
1
Uncollated
1
2
2
1
4
3
3
The main advantage of collation is convenience and the time savings
derived from not having to separate and sort individual copies of a
document. Each copy of the document exists as a whole unless
chunk collation has occurred.
Enabling/Disabling Collation
There are three ways to enable/disable collation:
n Use your application. (Check the documentation to see if your
application includes a specific procedure for collating pages.)
n Select collation in the QMS Level 2 Windows printer driver.
4
n On a network, use CrownAdmin 3 to select collation.
n Configure the printer through the configuration menu.
QMS magicolor 2 Op
eration3-6

Collating
Output
Using the Configuration Menu
Menu Operator Control/Collation
Choices On, Off
Default Off
Working with Chunk Collation
For a multiple copy document with collation On, there must be
enough display list memory to hold the display list blocks for all pages
in the collation range. (For more information on Display List blocks,
see “Display List” in chapter 5, “Additional Technical Information,” in
Reference
the
boundary is forced after the last compiled page of the collation range.
Chunk Collation
This mechanism of introducing a forced boundary—or breaking a
document down into several smaller, more manageable sets—is
known as chunk collation. For example, in the following illustration,
copies “a” and “b” of each set must be manually combined to create
one collated document. The order of printing is copy 1(a), copy 2(a),
copy 3(a), copy 4(a), copy 1(b), copy 2(b), copy 3(b), and copy 4(b).
manual.) If there’s not enough memory , then a collation
» Note:
If chunk collation occurs, you may want to enable header and
trailer pages to help you determine the beginning and end of each
collated sequence.
3-7Advanced Printing Features

Collating
Output
Improving Collation Performance
To avoid chunk collation, your printer must have sufficient memory to
store an entire document before printing begins. Of course, this
always depends on the size of your print job versus the amount of
available memory in your printer. The QMS
more of memory can fully collate most print jobs.
To impro ve collation perf ormance, which allows y ou to collate longer and
more complex print jobs on y ou r printer, you can do o ne of the following:
n Add more printer memory, which automatically increases the dis-
play list client’s memory settings.
n Take any memory not being used by other clients, and add it to
the Administration/Memory/K Mem Display memory setting.
magicolor
2 with 24 MB or
s Caution:
Use this option only if y ou’re familiar with adjusting memory clients’ values. (Refer to chapter 4, “Printer Configuration,” in
the Reference man ual f or inf ormation.) Inc orr ect use of this option
could cause your s ystem to operate incorrectly.
n If your printer has an optional hard disk, set the Administration/
Memory/Enable Disk Swap menu to On. This distributes any
extra memory to all clients.
n Collate through your application.
» Note:
Collating through your application is more time consuming
than collating through the printer. The application sends the
complete job the requested number of times rather than sending
it once and holding data in printer memory.
QMS magicolor 2 Op
eration3-8

2-Sided Printing
2-Sided
Printing
While the QMS
duplex print manually: Print on one side of the paper, reinsert the
printed sheet( s ) i nt o t he med ia cas s et t e (blank side up and th e t op of
the page to w ard the bac k of t he p rinte r), a nd t hen print t he secon d sid e .
» Note:
Media jams may occur if the printed sheet(s) reinserted in the
media cassette are not entirely flat.
magicolor
2 doesn’t have a duplexing option, you can
Printing on Standard and Custom Media Sizes
The QMS
ever, the way you identify the size to the printer varies:
n Standard “sensed” media sizes—The printer automatically
n Standard “non-sensed” media sizes—The printer can print on
magicolor
senses six media sizes—A4, B5 JIS, Com 10*, Executive,
Foolscap, Legal, and Letter. To print on these medi a sizes, you
need to do no more than load the media in the cassette.
five media sizes—A5*, B5 ISO, DL Envelope*, Folio, SP Folio,
Statement*, UK Quarto—that it can’t automatically sense. To print
on these media sizes, you must load the media in the cassette
and then choose the appropriate size from either the Operator
Control/Custom Bin/Upper or Operator Control/Custom Bin/
Optional menu.
2 prints on a wide variety of media sizes. How-
n Non-standard “non-sensed” media sizes—The printer can
also print on non-standard media sizes up to 8.5"x13.8"
(215.9x350.5 mm). To print on these media sizes, you must load
the media in the cassette, choose Universal from the Operator
Control/Custom Bin/Upper or Operator Control/Custom Bin/
*This media size can be printed only from a cassette installed in the upper/standard position.
3-9Advanced Printing Features

Working with Status Pages
Optional menu, and then identify the media size in your
application.
» Note:
If you preview your file in your application, the dimensions
of the Universal media size rather than your custom size will be
shown in the preview window, and your document will be imaged
in the lower-left corner of this media size. You must manually
move the margins in from the left and right as well as up from the
bottom to define the correct imageable area for your custom
media size.
Working with Status Pages
Identifying a Status Page Type
Menu Administration/Special Pages/Status Page Type
Choices Standard, Advanced
Default Standard
Standard
This one-page document provides
n Printer identification (the printer’s name, firmware information,
and number of sheets/faces printed during the life of the printer)
» Note:
n Printer settings (printer set-up options for paper handling)
n Current memory configuration (pri nte r memory settings)
n Timeouts (printer timeout settings)
The number of sheets/faces statistics differ from the
number of sheets printed statistics in CrownView and the
consumables statistics page (Operator Control/Consumables/
Print Statistics), which refer to the number of sheets/faces printed
to date during the current consumables tracking period
(Administration/Consumables/Start Period menu).
QMS magicolor 2 Op
eration3-10

Cancelling/ Ending Print Jobs
n Communication settings and input buffer sizes (host-printer com-
munication settings, including spooling memory sizes)
n Tickmarks in the lower-left corner for image alignment
Advanced
This multi-page document provides
n All the information from the standard status page
n The configuration menu settings
n A full list of fonts and downloaded emulations
Printing a Status Page
Menu Administration/Special Pages/Print Status
Choices No, Yes
Default Yes
Cancelling/Ending Print Jobs
The Cancel key has three functions:
n It cancels the oldest print job in the system.
n It cancels all jobs with a printing, interpreting, terminating, or
spooled status.
n It allows you to send an end-of-job indicator to a currently compil-
ing print job waiting on incoming data.
You don’t have to press the Online key before using the Cancel key.
3-11Advanced Printing Features

Cancelling/
Ending Print
Jobs
Cancelling a Print Job
Press this key... to... The message window
Cancel Access the Job Cancel menu. JOB CANCEL
Cancel or Select Cancel the oldest job in the
queue.
Cancelling all Print Jobs
Press this key... to... The message window
Cancel Access the Job Cancel menu. JOB CANCEL
Next (twice) Advances to the Cancel All
Jobs mode.
Cancel or
Select
Cancel all jobs with a printing,
interpreting, spooled, or
terminating status. The
CANCEL ALL JOBS
message displays until all
print jobs are completely
removed.
reads...
CANCEL JOB
CANCEL JOB
IS SELECTED
reads...
CANCEL JOB
JOB CANCEL
CANCEL ALL JOBS
CANCEL ALL JOBS
IS SELECTED
QMS magicolor 2 Op
eration3-12

Ending a Print Job
Use this procedure when the message window displays
WAITING ON INPUT
END JOB?
Cancelling/
Ending Print
Jobs
» Note:
This procedure does not end print jobs that are still receiving
data. Its only purpose is to provide an end-of-job indicator for a print
job that does not have one. You can identify an end-of-job indicator in
the Administration/Communications/Parallel and Administration/
Communications/Serial menu. (Refer to chapter 5, “Additional
Technical Information,” in the Reference Manual for a complete
discussion of End J ob Mode.
Press this key... to... The message window
reads...
Cancel Access the Job Cancel menu. JOB CANCEL
CANCEL JOB
Next (twice) Adv an ce to the End Job
mode.
Cancel or Select Select End Job. END JOB
JOB CANCEL
END JOB
IS SELECTED
v
3-13Advanced Printing Features


4
Color Printing
In This Chapter . . .
n “Introduction” on page 4-2
n “QCOLOR Color Control” on page 4-2
n “Other Methods of Color Control” on page 4-4
n “Color Density” on page 4-9

Introduction
Introduction
Your QMS
technology that produces inexpensive and durable color prints at
300x300, 600x600, 1200 x6 00, and 240 0 x600 dpi on plain paper,
envelopes, labels, and transparencies.
magicolor
2 Print System features advanced color laser
QCOLOR Color Control
To help you optimize color output, QMS developed QCOLOR, which
provides automatic or custom color control. Q
configures the QMS
the contents of the document and the media on which it will be
printed. Q
matching, P ANT ONE
2.1 support by means of ICC 3.2-compliant printer profiles. Q
automatic color control is accessed through the QMS Level 2
Windows 95 printer driver.
COLOR matching capabilities include CIE-based color
magicolor
®*
Color simulation, and ICM 2.0 and ColorSync
Accessing QCOLOR for Windows 95
1 If you haven’t already, install the QMS Level 2 Windows
driver.
2 Open or create the file you want to print.
2 for the best output quality based on
COLOR dynamically
COLOR
3 From the File menu, choose Print Setup.
Some applications may call this option something else, such as
Page Setup.
4 In the Print Setup dialog box, make sure the QMS
2 is selected, then choose the Options or Properties button.
The QMS Level 2 Windows driver dialog box appears.
*
Pantone, Inc.’s check-standard trademark for color reproduction and color reproduction
materials.
QMS magicolor 2 Op
magicolor
eration4-2

QCOLOR Color
Control
5 On the Job tab (Windows 95 driver) or Paper tab (Windows
3.1/Windows 95 driver), select a Quick Color Setup setting:
n Automatic Color Control (if you’re printing a combination of
document types)
Automatic Color Control is the best option for most jobs,
because it's designed to provide the best color output for a
large variety of documents. However, if the Automatic setting
doesn’t provide satisfactory color output for a particular page
element or document type, then select a more specific
COLOR setting (for example, Photographic for scanned pho-
Q
tographic images).
n Graphics (if you’re printing color graphics)
n Grayscale (if you’re printing images with gray shades)
n Photographic (if you’re printing photographic images)
n Text and Spot Color (if you’re printing text or spot colors)
n Third Party Color Management (if you want to allow your
application to control color settings)
n Color All Black (if you want to print monochrome)
n Customize (if you want to customize the color settings by
using the options on the Color tab)
» Note:
Because Q
COLOR
automatically adjusts the settings on the
Color tab (Windows 95 driver) or Color Setup tab (Windows 3.1/
Windows 95 driver), you don’t have to adjust them manually.
However, if you want to customize them, you can get information
about them and other options in the driver by choosing the Help
button. Also, some applications (like PageMaker and V entura
Publisher) specify color outside the Windows driver, in which
case the color settings in the QMS Level 2 Windows driver are
ignored.
6 Choose the media type you’re using.
Use either the Windows 95 printer driver’s Paper tab or the
printer’s Operator Control/Media/For Upper Bin or Operator
Control/Media/For Optional Bin menu.
4-3Color Printing

Other Methods of Color Control
7 Choose any other printing options you want.
Choose the Help button in the printer driver for detailed descriptions of the options.
8 Choose OK until you return to the application.
9 From the File menu, choose Print.
10 In the Print dialog box, select any other options you want
and then choose OK.
Other Methods of Color
Control
Color Matching
A major concern in the color publishing industry today is color consistency across devices with different color models. For example, when
you scan a color photograph, the scanner sends the image data to
the computer in an RGB (Red-Blue-Green) format. The computer
then converts the data into another RGB format to display it on the
monitor. When the image data is sent to the printer, it is converted
into CMYK (Cyan-Magenta-Yellow-blacK) format by the printer driver
or application. Because of these conversions, a color output device
(like your printer) may produce colors dramatically different from
those seen on the computer screen, or in the original image.
To keep colors more consistent, you can use color matching, which
uses software to describe colors for different devices in a common
language to make sure that color is produced in the same shade on
all devices.
Color Matching with a Color Management System
Color management systems (CMSs) work by translating color information from different devices into a common language. A CMS first
gets information about the way these devices create color and the
QMS magicolor 2 Op
eration4-4

Other Methods
of Color
Control
range of colors they can produce. (This information is contained in
device
device's color descriptions to the CIE model, which is an international,
device-independent standard for color.
For example, to make a printer’s color output look the same as the
colors on your computer monitor, a CMS translates the monitor’s RGB
colors into device-independent CIE color, and then translates from
the CIE color into the printer's CMYK colors. A CMS can warn you (or
automatically adjust color) when the colors you specify are outside
the output device’s range, and they can show you on screen how the
printed output will look.
The advantages of using a CMS are that you get consistent color
across all devices, and an on-screen preview of output. However,
CMSs are not portable across platforms, they can be expensive, and
they do consume processing time and power at the host.
A few well-known color management systems include Kodak ColorFlow, Agfa ColorTune, Pantone POCE, Apple ColorSync, Microsoft
ICM, Color Solutions ColorBlind, and Linotype-Hell LinoColor. The following are shipped with your printer:
profiles
.) Then, using this information, the CMS maps each
n An Apple ColorSync/ICC (International Color Consortium) device
profile
n A Windows ICM device profile
Instructions for installation and use are included on the
ware Utilities
with the printer.
Color Matching with PostScript Level 2
Your printer's PostScript Level 2 allows it to accept device-independent CIE color specification directly (in addition to CMYK or RGB
color specifications). This means that if you have an application that
supports PostScript Level 2 printing (such as Adobe PhotoShop) or if
you use the QMS-developed driver for Windows or Macintosh, your
printer will perform color matching automatically. These drivers work
with the printer-resident color rendering dictionaries to match colors.
See control panel for more information on CRDs.
CD-ROM or on the supplemental color disk provided
QMS Soft-
4-5Color Printing

Other Methods
of Color
Control
The advantages of Level 2 color matching are that it is portable, it is
application- and printer-resident (there’s nothing else to buy), and it is
performed at the printer level (so it doesn’t tie up your host). However ,
no on-screen preview of output is provided, and you are not warned if
a color is out of printer’s gamut (color range).
Color Matching with PANTONE
Your printer has been approved by Pantone, Inc. to simulate PANTONE Colors. Pantone specifies hundreds of spot colors, each identified by a unique number. Each of these spot colors can be simulated
on the printer with the appropriate combination of process (CMYK)
colors.
Within a Pantone-licensed application (such as Aldus FreeHand or
Adobe Illustrator), you can choose a P ANT ONE Color number and the
corresponding CMYK simulation is printed. Pantone tables for supporting applications are shipped on the
ROM or on a supplemental color disk with the printer, including the
following:
n Adobe Illustrator (Macintosh and Windows)
*
QMS Software Utilities
CD-
n CorelDRAW (Windows only)
n Macromedia FreeHand (Macintosh and Windows)
n QuarkXPress (Macintosh only)
Instructions for installation and use of these files are included on the
Pantone disk shipped with your printer.
The formulas in the P ANTONE Color look-up charts result in Pantoneapproved color only under the following conditions:
n A Pantone-licensed application (such as Adobe Illustrator,
QuarkXPress, and Macromedia FreeHand) is used to create the
color.
n The colors are printed with QMS-supplied toner.
*
Pantone, Inc.’s check-standard trademark for color reproduction and color reproduction
materials.
QMS magicolor 2 Op
eration4-6

Other Methods
of Color
Control
n The colors are printed on Hammermill Laser Print white paper.
The formulas listed in the Pantone charts are only for the
*
CX printer. Also , the PANTONE
Colors generated by this printer are
magicolor
four-color process simulations and may not exactly match Pantoneidentified solid color standards. Use current PANTONE Color Reference Manuals (available from Pantone, Inc.) for accurate color.
The advantages of using PANT ONE Color matching are that it is easy
to use, it is widely supported, and that it is good for spot color. However, it is not as accurate as other methods of color matching, it can’t
be used for photographs, and it is only supported by applications.
About Printer Halftones and CRDs
The printer’s default CRD (Color Rendering Dictionary) can be
changed through the QMS-developed Macintosh and Windows
drivers or, if your application requires you to use a non-QMS driver,
you can change the CRD at the printer’s control panel
(Administration/Emulations/PostScript/Color Rendering menu). See
chapter 4, “Printer Configuration,” of the
Reference
information on using the control panel.
Halftones
The enhanced halftone uses amplitude-modulation (AM) screening.
Some applications may be set up to ignore the printer’s color settings.
See chapter 3, “Connecting to a PC,” and chapter 5, “Connecting to a
Macintosh,” in the Getting Started manual.
manual for
2
Color Rendering Dictionaries (CRDs)
Since the printer has a different range of colors than other color
devices (such as your monitor), a color rendering dictionary is necessary to tell the printer how to print colors that are out of its range. The
printer has three default CRD settings:
*
Pantone, Inc.’s check-standard trademark for color reproduction and color reproduction
materials.
4-7Color Printing

Other Methods
of Color
Control
Colorimetric—The Colorimetric CRD is designed f o r very basic color
matching and one-to-one conversion from CIE color to CMYK color.
With Colorimet ric cho se n as t he prin te r de fault CRD, all colors are
reproduced exactly unless a specified color is “out of gamut” (out of the
printer's ra nge). Fo r ou t o f g am u t co lo r s , th e C ol orim et ric C R D su bs t itutes the cl osest “ in-gam ut” co lor . The resul t is t hat e xact color match es
between the two devices are maint ained wherever possible, but the
printed image may ha ve a smaller range of colors than the original
image (since several image colors may be mapped to a single printer
color). We recommend that you use this CRD for printing spot colors.
Business—The Business CRD matches the images on a monitor as
closely as possible (WYSIWYG). Use the Business CRD for computer-generated graphics.
Photographic—QMS developed the Photographic CRD to optimize
the quality of photographic images and other images with many subtle color shifts. Like the Colorimetric CRD, the Photographic CRD
substitutes out-of-gamut colors with in-gamut colors, but it also
adjusts (compresses) all other colors (whether in-gamut or out-ofgamut) as necessary to maintain the proportional relationship
between the colors.
QMS magicolor 2 Op
eration4-8

Color Density
Adjusting the Color Density
Use the following procedure to check and adjust the color density.
Color Density
▲ Caution
print the calibration page described in step 3 on good quality paper,
such as Hammermill LaserPrint Radiant White or Weyerhauser First
Choice premium paper. Otherwise, the color of the paper could affect
the results.
1 Set the density of each color to 0.
2 Access the printer’s Administration/Special Pages/Calibra-
3 Press Select to print a calibration
: For best results when checking the printer’s color density,
a Access the printer’s Administration/Engine/Density/Cyan menu.
b Set the cyan color density to 0.
Press the Previous key to decrease the density setting or the
Next key to increase the setting.
c Repeat steps a and b for the magenta, yellow , and blac k color
densities.
d Save your changes.
tion Page menu.
page.
This page provides a density range
for each of the printer’s colors—
cyan, magenta, yellow, and black.
4-9Color Printing

Color Density
4 Compare the calibration page to
the four calibration cards that
were provided with your printer.
Each card features a single color—
cyan, magenta, yellow, or black.
a Place the calibration page on a sheet of clean white paper in
b Align the cutout in the cyan color
a well-lighted area.
calibration card over the cyan
column on the calibration page.
c Decide which block on the calibration page most closely
matches the cyan color calibration card.
» Note:
It may be easier to decide which colors match if you
view the output at a distance (3–4 feet) and squint.
d Make a note of the value (-4 to +4) associated with that block,
or simply mark the pane through the cutout in the card.
You wil l need this value in step 6.
e Repeat steps b–d with the magenta, yellow, and bl ack
calibration ca rds.
5 Access the printer’s Administration/Engine/Density/Cyan
menu.
QMS magicolor 2 Op
eration4-10

Color Density
6 Adjust the cyan color density according to the number you
recorded in step 4.
Press the Previous key to decrease the density setting or the
Next key to increase the setting.
7 Repeat steps 5 and 6 for the magenta, yellow, and black color
densities.
8 Save your changes.
9 Print a new calibration page (Administration/Special Pages/
Calibration Page menu).
10 Compare the new calibration page to the four calibration
cards again.
11 Make any additional adjustments necessary.
If none are necessary, you’re done and ready to print.
v
4-11Color Printing


5
Printer Care
In This Chapter . . .
n “Introduction” on page 5-2
n “Handling the Printer” on page 5-2
n “Cleaning the Printer” on page 5-3
n “Maintenance Schedule” on page 5-12
n “Replacing the Fuser Oil Bottle and Cleaning Roller” on
page 5-14
n “Replacing the OPC Belt Cartridge” on page 5-17
n “Replacing the Ozone Filter” on page 5-20
n “Replacing the Waste Toner Pack” on page 5-21

Introduction
Introduction
This chapter describes how to handle and clean the printer.
Blurred or splotchy prints and paper jams can result from dusty printer
parts. Regular cleaning takes only a few minutes and helps ensure
print quality. Printer parts that require cleaning are the paper pick-up
rollers and the outside surface of the printer.
Handling the Printer
Handle the printer with care to preserve its life. Abuse may cause
damage. Keep the following guidelines in mind:
n Do not place anything on the top of the printer.
n Avoid spraying cleaning solution dire ct ly on the printer’s surface;
the spray could penetrate through the air vents of the printer and
damage the internal circuits.
n Be careful when cleaning the inside or removing paper jams, as
the fuser assembly and other internal parts become very hot.
Open the printer cover, and let the interior of the printer cool
before handling the inside of the printer.
n Always close the printer covers gently. Never expose the printer
to vibrations.
n Do not cover the printer immediately after using it. Turn it off and
wait until it cools down.
n Do not leave the printer open for any length of time, especially in
well-lit places; light may damage the OPC belt cartridge.
n Do not open the printer during printing and do not tap paper
stacks on the printer.
n Do not tilt, lubricate, or disassemble the printer.
QMS magicolor 2 Op
eration5-2

Cleaning the Printer
n Do not touch the electrical contacts, gears, or laser beam
devices. Doing so may damage the printer and cause the print
quality to deteriorate.
n Keep media in the output tray at minimum level. If the media
stacks too high, your printer may experience media jams and
excessive media curl.
n Lift the printer from the bottom only, using the carrying grips
under each side corner. Make sure two people are available to lift
the printer when moving it.
n Keep the following in mind when storing the printer for an
extended period:
— Unplug the printer.
— Rem ove the toner and OPC belt cartridges from inside the
printer. After removing the cartridges, return them to their
original packaging. If the original packaging is not available,
protect the toner cartridges from spilling toner, and protect
the OPC belt cartridge from damage and light.
— See appendix B, “Technical Specifications,” in the
manual for storage specifications.
Cleaning the Printer
Paper dust may accumulate inside the printer. This could affect the
printer’s performance. To prevent any potential problems associated
with this, you should clean your printer on a regular basis. You need
to clean both the inside and outside of the printer.
M WARNING!
disconnect all interface cables before cleaning.
ACHTUNG!
Sie den Drucker reinigen.
Turn off the printer, unplug the power cord, and
Ziehen Sie den Netzstecker aus der Steckdose bevor
Reference
5-3Printer Care

Cleaning the
Printer
Guidelines for Cleaning Inside the Printer
n Either clean the printer before use, or allow a few minutes after
unplugging it to allow the fusing unit to cool down.
n Turn off the printer, unplug the power cord, and disconnect all
interface cables before cleaning inside the printer.
n Read all caution and warning labels carefully, making sure to fol-
low any instructions contained in them. These labels are located
on the inside of the printer’s covers and the interior of the printer
body.
n Use only dry, lint-free cotton cloths or swabs.
n Make sure any parts removed during cleaning are replaced
before you plug in the power cord, reconnect the interf ace cabl es,
and turn on the printer.
Cleaning the Transfer Unit
These items in the transfer unit require cleaning:
n Registration rollers
n Transfer roller
n Paper discharge
» Note:
A dry cotton cloth and dry cotton swab are required for this
procedure.
1 Turn off and unplug the printer.
QMS magicolor 2 Op
eration5-4

Cleaning the
Printer
2 Open the printer’s rear cover.
3 Using a dry cotton cloth, clean any paper dust and toner
buildup from the registration rollers.
You can manually rotate the rollers while cleaning them by turning
the white gear on the left end of the roller shaft.
White gear
Registration
Rollers
5-5Printer Care

Cleaning the
Printer
4 Clean the transfer roller.
a Remove the transfer roller
unit by lifting the lock lever at
the right end of the transfer
roller unit until the unit is
freed, and then lifting the
unit out.
» Note:
Because you cannot
see when the unit is
released, it’s best to lift the
unit and the lock lever at the
same time.
b Using a dry cotton cloth, clean any paper dust and toner
buildup from the transfer roller.
» Note:
c Reinstall the transfer roller in the transfer unit.
5 Clean the paper discharger.
a Remove the paper
Manually rotate the roller while cleaning it.
discharger by pushing it to
the right and then lifting it up
and out of the transfer unit.
(It comes out after the tabs
on the charger have cleared
their retainers.)
Lock Lever
Transfer Roller
b Using a dry cotton cloth,
clean any paper dust and
toner buildup from the
outside of the paper
discharger.
c Using a dry cotton swab, clean any paper dust and toner
buildup from the interior of the paper discharger.
QMS magicolor 2 Op
eration5-6

Cleaning the
Printer
d Using a dry cotton swab,
clean the paper discharger
wire.
e Reinstall the paper
discharger in the transfer
unit, and then push it down
and to the left to lock it in
place.
6 Clean any paper dust and
toner buildup found on the
transfer unit itself.
7 Close the printer’s rear cover.
Cleaning the Paper Exit Rollers
» Note:
A dry cotton cloth is required for this procedure.
1 Turn off and unplug the printer.
2 Open the printer’s top cover.
3 Using a dry cotton cloth, clean
the paper exit rollers.
Wire inside
While manually rotating each
paper exit roller, clean each
roller.
4 Close the printer’s top cover.
5-7Printer Care

Cleaning the
h
Printer
Cleaning the OPC Belt Cartridge
s Caution:
The OPC belt is extremely sensitive to touch. Always handle
the cartridge so you don’t touch the surface of the belt. Any body oil
left on the surface of the belt will prevent toner from adhering to the
belt which results in poor image quality . Also , k eep the cartridge away
from anything that may scratch the surface of the belt. Any scratches
will show in the image produced.
The OPC belt is also extremely sensitive to bright light and direct
sunlight. Always leave it in its protective bag until you are ready to
install it. Any exposure to light should be limited to two minutes. If you
suspect the belt is damaged due to exposure to light, put the belt in a
dark place to recover. Depending on the amount of exposure,
recovery may take up to two hours. Recovery time is dependent on
the amount of exposure sustained. Recovery is not guaranteed.
» Note:
A dry cotton cloth is required for this procedure.
1 Turn off and unplug the printer.
2 Open the printer’s fr o nt and t op covers, release the OPC belt
cartridge lock levers, and remove the OPC belt cartridge.
3 Using a dry cotton cloth, clean
any toner buildup fr om around
the cleaning blade.
Cleaning blade
s Caution:
Don’t touch the edge
of the cleaning blade.
4 Clean any paper dust and
toner buildup found on the
OPC belt cartridge itself.
s Caution:
Handle the cartridge carefully . The belt is very sensitive
to hand oils and scratches, both of which reduce print quality.
QMS magicolor 2 Op
Dont touc
here.
eration5-8

Cleaning the
Printer
5 Remove the corona-wire cleaning brush from inside the fr ont
of the printer.
6 Turn the OPC belt cartridge so that the handle is facing away
from you.
7 Use the brush to clean the corona wire inside end of the OPC
belt cartridge.
s Caution: The corona wire is very delicate. Do not press hard on
the wire.
8 Reinstall the OPC belt cartridge, and secure its lock levers.
9 Return the corona-wire cleaning brush to its holder, and then
close the printer’s front and top covers.
5-9Printer Care

Cleaning the
Printer
Cleaning the Laser Lens
It’s necessary to clean the laser lens only when you find vertical white
or light-color streaking in all primary colors on your printouts.
» Note:
A dry cotton cloth or dry cotton swab is required for this
procedure.
1 Open the printer’s front cover.
2 Remove the four toner cartridges.
3 Remove the laser lens.
Use the two tabs on top of the
lens.
4 Using a dry cotton cloth, wipe
the lens.
5 Reinstall the laser lens.
It slides in at a 45° angle.
6 Reinstall the four toner car-
tridges.
7 Close the printer’s front cover.
QMS magicolor 2 Op
eration5-10

Cleaning the
Printer
Cleaning the Exterior of The Printer
M WARNING!
Turn off the printer, unplug the power cord, and
disconnect all interface cables before cleaning. Do not spill water or
detergent into the printer; otherwise the printer will be damaged and
an electric shock may occur.
ACHTUNG!
Sie den Drucker reinigen. Versch
ü
ssigkeiten auf dem Drucker, da das Gerät sonst beschädigt wird
Fl
Ziehen Sie den Netzstecker aus der Steckdose bevor
ü
tten Sie kein Wasser oder andere
oder die Gefahr eines elektrischen Schlages besteht.
To protect your printer and maintain its appearance, clean the exterior
regularly. Use the following guidelines:
n Use only a dry or slightly damp, lint-free, soft cloth moistened only
with water or mild detergent.
n Never use cleaning solutions that contain solvents, such as alco-
hol and benzene. Solvents may damage the printer’s finish.
n Always test any cleaning solution on a small area of your printer
to check the solution's performance.
n Never use sharp or rough implements, such as wire or plastic
cleaning pads.
n Never spray a cleaning solution directly on the printer as the
cleaning solution will penetrate to the interior of the printer and
cause damage.
5-11Printer Care

Maintenance Schedule
Maintenance Schedule
The stated life expectancy of each consumable is based on printing
under specific operating conditions, such as media type, number of
color planes, page size, and page coverage (usually 5% coverage of
letter/A4-size media). The actual life expectancy will vary depending
on these and other printing variables, including continuous or intermittent printing, ambient temperature, and humidity.
This item needs
replacing...
20,000-page preventive maintenance
120,000-page preventive maintenance
AC paper discharger 120,000 pages** QMS Nat ional Service
Cleaning roller CHECK CLEANING ROLLER
Drum cleaner 120,000 planes* QMS National Service
Fuser oil bottle FUSER OIL LOW or FUSER
Fuser unit 60,000 pages** maximum
After... By...
20,000 pages** QMS National Service
120,000 pages** QMS National Service
User
displays in the message
window (after 12,000
pages** at 5% coverage of
each color)
OIL EMPTY displays in the
message window (fuser oil
bottle life is media
dependent: coarse r pa per
requires more oil)
(at an equal mix of b lack and
4-color pages, all with 5%
coverage of each color)
See “Replacing the
Fuser Oil Bottle and
Cleaning Roller” on
page 5-14.
User
See “Replacing the
Fuser Oil Bottle and
Cleaning Roller” on
page 5-14.
QMS National Service
QMS magicolor 2 Op
eration5-12

Maintenance
Schedule
This item needs
After... By...
replacing...
OPC belt cartridge REPLACE BELT displays in
the message window
(maximum lif e—5 0,000
planes*, usually occurs with
User
See“Replacing the OPC
Belt Cartridge” on page
5-17.
continuous use; minimum
life—20 ,000 planes*, us ually
occurs with intermittent use
although other factors also
affect cartridge life)
Ozone filter 12 months User
See “Replacing the
Ozone Filter” on page
5-20.
Tra ns fer roller 120,000 pages** QMS Nat ional Service
Waste toner pack WASTE TONER FULL
displays in the message
window (after 12,000
pages** at 5% coverage of
User
See “Replacing the
Waste Toner Pack” on
page 5-21.
each color)
*A plane is a single pass of the OPC belt (one toner color). For example, a one-color
print job makes one pass (one plane), and a two-color print job makes two passes
(two planes).
**A single-sided page (also called a face) usually consists of four passes of the OPC
belt, since most color print jobs use all four toner colors.
5-13Printer Care

Replacing the Fuser Oil Bottle and Cleaning Roller
Replacing the Fuser Oil Bottle
and Cleaning Roller
s Caution:
is also expensive to replace. Fuser life will be shortened (or the fuser
permanently damaged) if the oil bottle and cleaning roller are not
changed when needed and installed properly. This type of damage is
not covered under warranty or service contract.
M WARNING!
severe burns. Make sure the unit is cool before handling it.
ACHTUNG!
Verbrennungsgefahr besteht. Bitte lassen Sie die Fixiereinheit einige
Zeit abkühlen, bevor Sie diese berühren.
1 Turn off the printer.
2 Open the printer’s top cover .
3 Open the two cleaning r oller
The fuser unit is an integral part of the imaging process and
The fuser unit can become extremely hot and cause
Die Fixiereinheit kann sehr heiß werden, so daß
lock levers.
QMS magicolor 2 Op
eration5-14

4 Remove the old oil bottle.
Replacing the
Fuser Oil Bottle
and Cleaning
Roller
s Caution:
Hold a sheet of
paper under the oil bottle while
removing it, so oil doesn’t drip
into the printer.
5 Remove the old cleaning
roller.
6 Lower the new oil bottle into
its slot.
The tab on the side of the bottle must be on the right.
5-15Printer Care

Replacing the
Fuser Oil Bottle
and Cleaning
Roller
7 Install the cleaning roller in
its slot.
The tab on the top of the
cleaning roller must be on the
left.
8 Close the two lock levers.
9 Close the printer’s top
cover.
10 Turn on the printer.
11 Reset the consumables
usage monitoring system.
a In the Operator Control/
Consumables/Item
Replaced/Fuser Oil menu
choose Yes.
b In the Operator Control/
Consumables/Item
Replaced/Cleaning Rol ler
menu choose Yes.
» Note:
after a
message displays in the message window, the engine
automatically recovers. However, you must manually reset the
consumables usage monitoring system to ensure accurate
consumables monitoring.
To access consumables usage information, use the Operator
Control/Consumables/Print Statistics menu or the CrownView
printer web page.
When you replace the fuser oil bottle and cleaning roller
FUSER OIL EMPTY
or
CHECK CLEANING ROLLER
QMS magicolor 2 Op
eration5-16

Replacing the OPC Belt Cartridge
Replacing the
OPC Belt
Cartridge
s Caution:
sunlight. Always leave it in its protective bag until you’re ready to
install it. Also, handle the cartridge carefully. The belt is also
extremely sensitive to hand oils and scratches, both of which reduce
print quality.
1 Turn off the printer.
2 Open the printer’s front cover.
s Caution:
3 Open the printer’s top cover .
4 Rotate up the two lock
The OPC belt is extremely sensitive to bright light and direct
This is necessary as it pulls the toner cartridges forward
slightly to make room for the OPC belt cartridge. You could
damage the OPC belt if you don’t do this.
levers (one on each side of
the OPC belt cartridge) to
release the cartridge.
5-17Printer Care

Replacing the
OPC Belt
Cartridge
5 Pull the cartridge straight
up and out of the printer,
and then discard it.
6 Remove the protective sheet
from the cartridge, and then
pull out the two tensionrelease pins (one on each
side of the cartridge).
s Caution:
Don’t touch the
green material on the
cartridge. It scratches easily.
7 Holding the cartridge above
the printer, align the guide
pins on the cartridge with
the guide slots in the lock
levers.
The white gear on the
cartrid ge goes to the rig ht.
8 Gently guide the cartridge
into the printer.
s
Caution: The cartridge should slide easily into the printer. Don’t
force it.
QMS magicolor 2 Op
eration5-18

Replacing the
OPC Belt
Cartridge
9 Rotate the two lock lever s to
secure the OPC belt cartridge in the printer.
10 Close the printer’s front and
top covers.
11 Turn on the printer.
12 In the Operator Control/Consumables/Item Replaced/OPC
Cartridge menu choose Yes to reset the consumables monitoring system.
» Note:
BELT
automatically recovers. However, you must manually reset the
consumables usage monitoring system to ensure accurate
consumables monitoring.
To access consumables usage information, use the Operator
Control/Consumables/Print Statistics menu or the CrownView
printer web page.
When you replace the OPC belt cartridge after a
REPLACE
message displays in the message window, the engine
5-19Printer Care

Replacing the Ozone Filter
Replacing the Ozone Filter
The ozone filter reduces exhausted ozone gas.
1 Remove the ozone filter
case on the left rear of the
printer.
2 Remove the ozone filter
from the case.
3 Install a new ozone filter in
the case.
4 Reinstall the ozone filter
case.
zone filter case
Ozone filter
QMS magicolor 2 Op
eration5-20

Replacing the Waste Toner Pack
Replacing the Waste Toner
Pack
The waste toner pack collects the waste toner from the printing process so you can conveniently throw it away.
1 Open the printer’s front
cover.
2 Remove the waste toner
pack.
3 Use the label on the side of
the old waste toner pack to
seal the opening, and then
dispose of the pack in
accordance with safety laws
and regulations in your
area.
4 Insert the new waste toner pack.
5 Close the printer’s front cover.
Seal this opening
5-21Printer Care

Replacing the
Waste Toner
Pack
6 In the Operator Control/Consumables/Item Replaced/Waste
Toner Pack men u c hoose Yes to reset the consumables monitoring system.
» Note:
WASTE TONER
engine automatically recovers. Howev er , you must manually reset
the consumables usage monitoring system to ensure accurate
consumables monitoring.
To access consumables usage information, use the Operator
Control/Consumables/Print Statistics menu or the CrownView
printer web page.
v
When you replace the waste toner pack after a
message displays in the message window, the
CHECK
QMS magicolor 2 Op
eration5-22

6
CrownView Printer Web Page
In This Chapter . . .
n “Introduction” on page 6-2
n “Setting up the Printer Web Page” on page 6-3
n “Printer Home Page” on page 6-8
n “Web Page Help System” on page 6-29

Introduction
Introduction
QMS CrownView is a printer-based application using the World Wide
Web portion of the Internet as a framework for the QMS
Print System. This feature allows you to monitor printer consumables
as well as access information that is normally available only by printing a status page.
Inside your new QMS printer resides an HTTP (Hyper-Text Transfer
Protocol) based web page that can be accessed from the most common web-browser software, Netscape Navigator and Microsoft
Explorer. This web page gives you access to the most frequently
accessed printer configurations and gives you instant access to
printer status. Anyone on your company intranet can access the QMS
printer through their web-browser software.
magicolor
2
» Note:
The sample windows and dialog boxes shown in this chapter
are as they appear in Netscape Navigator and Internet Explorer, and
coincide with the step-by-step instructions provided.
This chapter provides you with details on
n Setting up and using the web page
n The different types of pages in the printer
n Accessing the QMS web site and performance support
QMS magicolor 2 Operation6-2

Setting up the Printer Web Page
Setting up the Printer Web
Page
Setting up the printer web page to run on your intranet involves two
basic steps:
n Assigning a name to your printer
n Setting up the “no proxy” preferences in your browser software
Assigning a Printer Name
The printer web page can be accessed only through the assigned
name of the printer or the IP address. It is more convenient for you to
use a name than the address. The default name for the printer is usually the model number of the printer, for example, QMS
Print System. Change the default name to one that is more easily
remembered and typed.
You can change the printer name through the Administration/Commu-
x
nications/Network
Administration/Communications/Network
Printer Name menu. (See the
information.)
/CrownNet/NetWare/Printer Name menu or the
x
/CrownNet/LanManager/
QMS CrownNet Setup Guide
magicolor
for more
2
CrownView Printer Web Page
6-3

Setting up the
Printer Web
Page
Setting Up Your Browser Software
Since your printer will reside on your intranet and will not be accessible beyond the firewall of your network, you must set up the proper
“preferences” in your browser software. Your printer name or IP
address must be added to the “no proxy” list in the preferences dialog
box of the browser.
» Note:
You need to do this procedure only once.
For Netscape
1 Start your web-browser.
2 Access the Options menu and choose Network Preferences.
3 Select the Proxies tab in the dialog box.
4 Select the Manual Proxy Configuration radio button and
press the View... button.
QMS magicolor 2 Operation6-4

Setting up the
Printer Web
Page
5 In the No Proxy For: text box, type a comma after the last
entry and then type the printer name or the IP address of
your QMS
magicolor
magicolor 2
2.
» Note:
The printer name is entered in the network protocol menu that
you are using. The default name is the model number of the printer.
See “Assigning a Printer Name” on 6-3 for more information on
naming your printer.
6 Choose OK.
7 Enter the printer name or IP address in the Go to: URL
address box to access the printer home page.
QMS magicolor 2
CrownView Printer Web Page
6-5

Setting up the
Printer Web
Page
For Internet Explorer
1 Start your web browser.
2 Access the View menu and choose Options.
3 Select the Connection tab on the dialog box.
4 Click the Settings button to display the Pro xy Settings dialog
box.
QMS magicolor 2 Operation6-6

Setting up the
Printer Web
Page
5 In the Exceptions text box, type a comma after the last entry
and then type the printer name or the IP address.
» Note:
that you’re using. The default name is the model number of the
printer. See the
for information on changing the printer name.
6 Click OK.
The printer name is entered in the network protocol menu
QMS CrownNet System Adminstrator’s Manual
QMS magicolor 2
7 Now you should be able to enter the printer name in the URL
address box to access the printer home page.
QMS magicolor 2
CrownView Printer Web Page
6-7

Printer Home Page
Printer Home Page
The Home Page is the starting point for all access to the printer web
pages. On this page you will find hotlinks to all of the supporting web
pages for your printer.
Printer Graphic
Hotlinks
Product &
Printer Name
Configuration
Information
Hotlinks
The printer home page provides the following information.
Product Name Identifies the particular printer that you are brows-
ing. This printer is pictured in the graphic with all
installed paper handling options.
Configuration Menu: No equivalent
QMS magicolor 2 Operation6-8

Printer Home
Page
Printer Name Shows the name you have assigned to your
printer. The default printer name is the same as
the product name.
Configuration Menu: Administration/
x
Communications/Network
Printer Name menu or the Administration/
Communications/Network
LanManager/Printer Name menu
Current
Status
Resolution Identifies the resolution and halftone.
Default
Inputbin
Sheets
Printed
Echoes the status message in the printer control
panel message window.
Configuration Menu: No equivalent
Configuration Menu: Administration/Engine/Def
Resolution
Identifies the input cassette or tray , the media size ,
and the percent filled with media.
Configuration Menu: Operator Control/Inputbin
Lists the number of sheets of media printed to
date during the current consumables tracking
period (Administration/Consumables/Start Period
menu).
/CrownNet/NetWare/
x
/CrownNet/
» Note:
This number differs from the number of
sheets printed statistics on the printer’s start-up
and status pages, which refer to the total
number of sheets of media printed during the
life of the printer.
Configuration Menu: No equivalent
Faces Printed Lists the number of page faces printed to date.
» Note:
This number differs from the number of
faces printed statistics on the printer’s start-up
and status pages, which refer to the total
number of page faces printed during the life of
the printer.
Configuration Menu: No equivalent
CrownView Printer Web Page
6-9

Printer Home
Page
Hotlinks Take you to other pages of status, configurations,
Home
The Home hotlink simply returns you to the printer home page when it
is selected.
or help information. Each of these hotlinks is fully
explained in this chapter.
Configuration Menu: No equivalent
QMS magicolor 2 Operation6-10

Printer Home
Page
Operator Control
The Operator Control hotlink on the home page jumps to the Operator
Control page. This page contains a form which allows you to configure settings in your printer.
After you make your choices, choose the Submit button to make them
take effect.
Configuration Form
The Operator Control page contains the following options. For complete information on any options see chapter 4, “Printer Configuration,” of the
Copies Allows you to enter the number of copies to print.
CrownView Printer Web Page
Reference
manual.
Configuration Menu: Operator Control/Copies
6-11

Printer Home
Page
Color
Separation
Color Model Allows you to select between full-color or
Collation Allows you to turn collation Off or On.
Orientation Allows you to select Portrait or Landscape
Inputbin Allows you to choose Upper or Optional as the
Chain
Inputbins
Upper Bin
Media
Optional Bin
Media
Allows you to print color separations.
Configuration Menu: Operator Control/Color
Separation
monochrome mode.
Configuration Menu: Operator Control/Color
Model
Configuration Menu: Operator Control/Collation
orientation.
Configuration Menu: Operator Control/
Orientation
input source.
Configuration Menu: Operator Control/Inputbin
Allows you to set input bin chaining to Off, On, or
On Any.
Configuration Menu: Operator Control/Chain
Inputbins
Allows you to specify the type of media in the
upper (standard) cassette so the printer can
optimize output for that media type.
Configuration Menu: Operator Control/Media/For
Upper Bin
Allows you to specify the type of media in the
optional lower input feeder so the printer can
optimize output for that media type.
Configuration Menu: Operator Control/Media/For
Optional Bin
QMS magicolor 2 Operation6-12

Printer Home
Page
Upper
Custom Tray
Optional
Custom Tray
Specifies the media size in the upper (standard)
cassette if it’s something other than A4, Legal, or
Letter (the typical sizes the cassettes expect)
Configuration Menu: Operator Control/Custom
Bin/Upper
Specifies the media size in the optional lower input
feeder if it’s something other than A4, Legal, or
Letter (the typical sizes the cassettes expect)
Configuration Menu: Operator Control/Custom
Bin/Optional
General Settings
The General Settings hotlink takes you to the General Settings page.
Settings Links
Communication
Settings
CrownView Printer Web Page
6-13

Printer Home
Page
This page provides hotlinks to several groups of printer configuration
settings. Each is described in more detail in the following pages:
n “Printer Setting” on page 6-14
n “Communication Settings & Input Buffer Sizes” on page 6-16
n “Paper Sources” on page 6-16
n “Options” on page 6-17
n “Current Memory Configuration” on page 6-17
n “Hard Disk Status” on page 6-19
n “Timeouts” on page 6-19
You can view this information to see the status of the printer, b ut you can
change it only by accessing the printer’s configuration menu through the
printer control panel, a remote or local console, or CrownAdmin 3.
Printer Setting
This table provides you with data relative to the settings of the printer.
Compatibility
Level
Do Start-up
Page
Do Error
Handler
Identifies the PostScript emulation level.
Configuration Menu: No equivalent
Identifies whether the printer start-up page is
turned on or off.
Configuration Menu: Administration/Startup
Options/Do Start Page
Identifies whether the PostScript Error Handler is
on or off. Error Handler is a diagnostic tool that
identifies PostScript errors encountered during a
print job.
Configuration Menu: Administration/Startup
Options/Do Error Handler
QMS magicolor 2 Operation6-14

Printer Home
Page
Do Sys/Start Identifies whether the printer controller checks the
hard disk for a PostScript file named SYS\START
and then executes the file. This file does not print.
Configuration Menu: Administration/Startup
Options/Do Sys Start
Is Password 0?Identifies whether the Administration menu
password is set.
0=Off
Configuration Menu: Installation/Use Admin Pwd
Default
Chaining
Default Paper
Tray
Number of
Paper Trays
Left Margin Identifies the amount (in .01" increments) the
Top Margin Identifies the amount (in .01" increments) the
Resolution Identifies the printer resolution.
Identifies whether tray chaining is enabled or
disabled. Tray chaining allows the printer to draw
media from another input source with either the
same or any size and type of media (dependent on
the choice selected) automatically when the first
input source empties.
Configuration Menu: Operator Control/Chain
Inputbins
Tells you which input source is the default.
Configuration Menu: Operator Control/Inputbin
Tells you the number of input sources available on
your printer.
Configuration Menu: No equivalent.
image is adjusted horizontally on the page.
Configuration Menu: Administration/Engine/
Image Alignment/Horiz Offset
image is adjusted vertically on the page.
Configuration Menu: Administration/Engine/
Image Alignment/Vertical Offset
Configuration Menu: Administration/Engine/Def.
Resolution
CrownView Printer Web Page
6-15

Printer Home
Page
Communication Settings & Input Buffer Sizes
This hotlink displays a screen that shows the communications settings of the printer.
Serial IF Identifies the settings for the serial interface.
Parallel IF Identifies the settings for the parallel interface.
IF 1 Identifies the settings for the optional Network1
IF 2 Identifies the settings for the Network2 (CrownNet
Shared Spooling Space
Configuration Menu: Administration/
Communications/Serial
Configuration Menu: Administration/
Communications/Parallel
interface.
Configuration Menu: Administration/
Communications/Network1
Ethernet) interface.
Configuration Menu: Administration/
Communications/Network2
Identifies the total amount of spooling space
shared by the interfaces
Configuration Menu: No equivalent.
Paper Sources
This hotlink provides media source information.
Upper Identifies the size and type of media currently
installed in the upper tray.
Configuration Menus: Operator Control/Custom
Bin/Upper, Operator Control/Media/For Upper Bin
Optional Identifies the size and type of media currently
installed in the optional lower input feeder.
Configuration Menu: Operator Control/Custom
Bin/Optional, Operator Control/Media/For Optional
Bin
QMS magicolor 2 Operation6-16

Printer Home
Page
Options
Disk(s) Identifies how many hard disks are attached to the
printer and what their addresses are.
Configuration Menu: No equivalent
Emulations Identifies the installed emulations.
Configuration Menu: No equivalent
Current Memory Configuration
Memory configuration affects the number of jobs that can be
accepted by the printer, the number of options available simultaneously, the number of downloadable fonts and emulations that can
be stored, and overall printer performance.
Host Input
Spool
Display List Shows the size (in KB) of the Display List, also
PostScript
Font Cache
Shows the size (in KB) of the Host Input field, also
known as K Mem for Spool. This memory client
stores incoming data from all the interfaces until
the emulation can process the print job.
Configuration Menu: Administration/Memory/
Manual Config/K Mem for Spool
known as K Mem Display. This client stores
compressed representations, or blocks, of the
pages to be printed.
Configuration Menu: Administration/Memory/
Manual/Config/K/Mem Displ ay
Shows the size (in KB) of the Font Cache, also
known as K Mem for PS Fonts. This memory client
stores bitmapped representations of previously
scaled PostScript fonts.
Configuration Menu: Administration/Memory/
Manual Config/K Mem for PS Fonts
CrownView Printer Web Page
6-17

Printer Home
Page
PostScript
Heap
Framebuffer Shows the size (in KB) of the Frame Buffer. This
Emulation Shows the size (in KB) of the Emulation client,
Emulation
Temporary
Disk Cache Shows the size (in KB) of the Disk Cache. This
Shows the size (in KB) of the Heap, also known as
K Mem for PSHeap, PostScript VM, and Virtual
Memory. This client holds downloaded fonts, PostScript operators, and forms.
Configuration Menu: Administration/Memory/
Manual Config/K Menu for PSHeap
client holds rasterized or bitmapped images of
page faces which are ready to be sent to the print
engine.
Configuration Menu: Administration/Memory/
Manual Config/K Mem Framebuff
also known as K Mem Emulation. This client is
used to store any optional emulations, such as
LN03 Plus.
Configuration Menu: Administration/Memory/
Manual Config/K Mem Emulation
Shows the size (in KB) of the Emulation
Temporary client. This client is used by nonPostScript emulations for storing downloaded
(soft) fonts, forms, or macros.
Configuration Menu: Administration/Memory/
Manual Config/K Mem Emulation Temp
memory client stores frequently used data in
system memory instead of continually storing and
retrieving it from a hard disk.
Configuration Menu: Administration/Memory/
Manual Config/K Mem /Disk Cache
QMS magicolor 2 Operation6-18

Printer Home
Page
System Use Sh ows the size (in KB) of the System Use. Also
known as System Memory, this non-configurable
client is the amount of RAM used to run the
printer’s operating system. It’s never increased or
decreased. The system memory subtracted from
the total amount of RAM identifies the amount of
RAM available for all the other memory clients.
Configuration Menu: No equivalent
Printer
Memory
Shows the size (in KB) of the total amount of RAM
that your printer has.
Configuration Menu: Administration/Memory/
Manual Config/MB Printer Mem
Hard Disk Status
This hotlink provides the status of the hard disk.
Disk(s) Provides the name, size, and free space on all
attached hard disks.
Configuration Menu: No equivalent
Total Identifies the total space and free space on all
attached hard disks.
Configuration Menu: No equivalent
Timeouts
This hotlink provides the status on established timeouts.
Wait Shows the maximum number of seconds the
PostScript emulation waits for incoming data.
Configuration Menu: Administration/
Communications/Timeouts/PS Wait Timeout
Job This shows the maximum number of seconds the
printer processes a print job before it ends the job.
Configuration Menu: Administration/
Communications/Timeouts/Job Timeout
CrownView Printer Web Page
6-19

Printer Home
Page
Emulation Shows the maximum number of seconds emula-
ESP Shows the maximum number of seconds the
tions other than PostScript wait for incoming data.
Configuration Menu: Administration/
Communications/Timeouts/Emulation Timeout
printer uses to match an emulation before printing
the job in the default emulation.
Configuration Menu: Administration/
Communications/Timeouts/ESP Timeout
QMS magicolor 2 Operation6-20

Printer Home
Page
Printer Jobs
The Printer Jobs hotlink on the home page jumps to the Printer Jobs
page. This page contains information about the current jobs the
printer is processing and information on the previous five jobs printed.
Current Job
Status
Previous
Job Status
CrownView Printer Web Page
6-21

Printer Home
Page
Job Indicates the job number of the current print jobs
Status Indicates the status of each job. (Interpreting,
Prio[rity] Shows the priority of each job.
Owner Shows the name of the owner of each current job.
Title Shows the title of each job.
Interface Identifies the interface over which the job was sent
Sheet Shows the number of physical sheets of media
Page Indicates the number of pages printed for each
and up to five previous print jobs.
Configuration Menu: No equivalent.
Spooling, Spooled, Pr i nti ng, Pr i nted )
Configuration Menu: No equivalent
Configuration Menu: No equivalent
Configuration Menu: No equivalent
Configuration Menu: No equivalent
to the printer.
Configuration Menu: No equivalent
printed for each job.
Configuration Menu: No equivalent.
job.
Configuration Menu: No equivalent
QMS magicolor 2 Operation6-22

Printer Home
Page
Consumable Status
The Consumable Status hotlink on the home page jumps to the Consumable Status page. This page contains information about the level
of usage of all of the printers’ consumables.
» Note:
The scales are an estimate, reported as a percentage, and do
not indicate the exact amount of consumables used. In addition, the
life expectancy of each consumable is based on printing under
specific operating conditions, such as media type, number of color
planes, page size, and page coverage (usually 5% coverage of letter/
A4-size media). The actual life expectancy will vary depending on
these and other printing variables, including continuous or intermittent
printing, ambient temperature, and humidity.
Consumable
Status
Gauges
CrownView Printer Web Page
6-23

Printer Home
Page
Consumable
Name
Consumable
Max Number
Consumable
Usage
Gauges
Identifies the consumable (for example, Black
Toner or 20K PM Service).
Configuration Menus: Operator Control/
Consumables and Administration/Consumables
Shows the maximum capacity of the consumable
(for example, 10000 planes or 120000 sheets).
Configuration Menus: Operator Control/
Consumables and Administration/Consumables
Shows the remaining amount of the consumable
(in percentages, not planes, faces, or sheets).
Configuration Menus: Operator Control/
Consumables and Administration/Consumables
QMS magicolor 2 Operation6-24

Printer Home
Page
Accounting
The Accounting hot link on the h ome page ju mps to the Acco unting pag e,
which contains information abo ut accoun ting configu rati on settings.
Mode Shows whether accounting is enabled or disabled.
Configuration Menu: Operator Control/
Accounting/Mode
Disk Space Shows how much disk space is allocated to job
accounting files.
Configuration Menu: Operator Control/
Accounting/Disk Space
CrownView Printer Web Page
6-25

Printer Home
Page
File Segment Shows whether accounting information is stored in
the printer in a single file or in multiple files.
Configuration Menu: Operator Control/
Accounting/File Segment
System Support Page
The System Support hotlink on the home page jumps to the System
Support page. This page can be used to set up internal support for
the printer as well as to link to the QMS web site.
Support
Form Data
QMS magicolor 2 Operation6-26

Printer Home
Page
Page refresh
rate
If you need
assistance,
contact
Contact
Number
Printer Help
URL
QMS
Corporate
URL
To order
supplies and
accessories
Once you’ve made the necessary changes, choose Submit.
» Note:
If the page refresh rate is set to too small a time interval, you
The rate at which information in the form is reset to
the current printer settings.
A text box for entering the name of a local expert
Configuration Menu: No equivalent
A text box for entering a local or QMS contact
number
Configuration Menu: No equivalent
A text box for entering a local or QMS printer help
URL (web address)
Configuration Menu: No equivalent
The QMS corporate URL (web address)
Configuration Menu: No equivalent
A text box for entering a local or QMS contact
number
Configuration Menu: No equivalent
may lose your changes before you choose the Submit button.
CrownView Printer Web Page
6-27

Printer Home
Page
QMS, Inc. Page
The QMS, Inc. hotlink on the home page jumps to the QMS web site
configured on the System Support page (QMS Corporate URL). From
the QMS web site you can access information about other QMS printers, contact information, a FAQ database, printer manuals, and online
performance support.
Online Help Page
The Online Help hotlink on the home page jumps to any help information that has been configured on the System Support page (Printer
Help URL). You can configure this to jump to your own help web site
set up on your local intranet or to the QMS online performance support information for your QMS print system.
QMS magicolor 2 Operation6-28
 Loading...