


®®
QMS magicolor 2 Print System Reference
1800484-001B

Trademarks
The following are trademarks or registe red tradem arks of their respective owners. Other
product names mentio ned in this manua l may also be trademar ks or re gistered
trademarks of their respective owners. Registered trademarks are registered in the
United States Patent and Trademark Office; some trademarks may also be registered in
other countries. QMS, Crown, CrownAdmin, CrownCopy, CrownNet,
QMS logo, and the Crown seal are r eg iste red trademarks of QMS, Inc., and CrownView,
ImageServer, Multi-Res, PS Executive Series, Q
QMS, Inc. PostScript is a trademark of Adobe Sy stems Incor porated for a page
description languag e and may be registere d in certa in jurisdiction s. Throughout this
manual, “PostScript Level 2” is used to refer to a set of capabilities defined by Adobe
Systems for its PostScript Level 2 page description language. The se capabilities,
among others, are implemente d in this produc t through a QMS-d eveloped emulation
that is compatible with Adobe's PostScript Level 2 language. Ad obe, Acrobat, the
Acrobat logo/Adobe Systems Incorporate d. 3Com, 3+Open/3Com Corp oration. Aldus,
Aldus PageMaker, Aldus FreeHand/Aldus Corporatio n. Apple, Apple Talk, EtherTalk,
LaserWriter, LocalTalk, Macintosh, TrueType/Apple Computer, Inc. VINES/Banyan.
Centronics/Centronics. Color Solutions, ColorBlin d/Color Solutions. DE C, DECnet,
LN03, LN03 Plus, V MS/D igital Eq uip ment Co r po ration. Ph one NET/Farallon Com puting,
Inc. CompuServe /H & R Block. Hewlett-Packard, HP, PCL, HP-GL, LaserJet/HewlettPackard Co. IBM, OS/2, Token-Ring/Inter national Busine ss Machin es Corpo ration.
Intel/Intel Corporation. Io mega, Jaz, Z ip/Iomega. M icrosoft, MS-DO S/Microsoft
Corporation. NEC, V
Pantone. PANTO NE is Pantone, Inc.’s check-standard trademark for color reproduction and
color reproduction materials. Quark XPress/Quark, Inc. TOP S/Sun Microsystems, Inc.
UNIX/UNIX Systems Laboratories. SIMM/Wang Laboratories. Ether net/Xerox. All other
trademarks are the property of their respective owners.
R4300/NEC. Novell and NetWare/Novell, Inc. Pantone, PANTONE/
COLOR, and QFORM are trad emarks of
magicolor
, the
Proprietary Statement
The digitally encoded software included with your QMS magicolor 2 Print System is
Copyrighted © 1998 by QMS, Inc. All Rights Reserved. This software may not be
reproduced, modified, d isplayed, transferred, or copi ed in any for m or in any man ner or
on any media, in whole or in par t, withou t the express written per miss ion of QMS, Inc.
Copyright Notice
This manual is Copyrighted © 1998 by QMS, Inc., One Magnum Pass, Mobile, AL
36618. All Rights Reser ved. This manual may not be cop ied in whole or in part, no r
transferred to any other media or languag e, without the express written permission o f
QMS, Inc.

Contents
1 Introduction
Introduction ..................................................................................1-2
About This Manual ......................................................................1-2
Typographic Conventions 1-4
2 Print Media
Introduction ..................................................................................2-2
Media Input ...................................................................................2-2
Media Sizes and Imageable Areas ..............................................2-3
Working Within the Imageable Area 2-4
Image Alignment 2-5
Page Margins 2-5
Media Size versus Cassette Size 2-5

Media Types and Weights ........................................................... 2-6
Paper 2-6
Envelopes 2-6
Transparencies 2-7
Labels 2-7
Storing Media ............................................................................... 2-8
3 Fonts, Typefaces, and
Symbol Sets
Introduction ................................... ...... ............. ............. ............. .. 3-2
About Fonts and Typefaces ....................................................... 3-2
Typeface Classification 3-3
Typography Terms 3-4
Resident Fonts, Typefaces, and Symbol Sets .......................... 3-7
Resident PostScript Fonts 3-7
Resident HP PCL 5c Fonts 3-9
PCL 5c Symbol Sets 3-10
Resident HP-GL Fonts 3-11
4 Printer Configuration
Introduction ................................... ...... ............. ............. ............. .. 4-3
Methods of Configuration .......................................................... 4-3
Using an Application 4-4
Using QMS Document Option Commands 4-4
Using the Control Panel 4-4
Using a Remote Console 4-4
Configuration Menu .................................................................... 4-5
Accessing the Configuration Menu 4-5
Selecting Configuration Menu Options 4-6
Changing Character Information 4-8
Saving Configuration Changes 4-11
Canceling Configuration Changes 4-12
Setting the Message Window Language 4-12
Restoring the Factory Default Configuration 4-13
QMS magicolor 2 Referenceii

Working with Custom Configurations 4-13
Rebooting the Printer 4-14
Overview of the Menus ..............................................................4-14
Administration Menu 4-14
Installation Menu 4-15
Operator Control Menu 4-15
Accounting .................................................................................4-17
Collation .....................................................................................4-19
Color ................................. ................................. .......................... 4-20
Using a Color Model 4-20
Printing Color Separations 4-20
Communications ......................... ....... ...... ....... ...... ....................4-21
Setting Timeouts 4-21
Setting Network Interface Parameters 4-22
Setting Parallel Interface Parameters 4-23
Setting Serial Interface Parameters 4-26
Setting LocalTal k Interface Parameters 4-32
Consumables and Maintenance ...............................................4-35
Identifying Black Toner Cartridge Replacement 4-35
Identifying Cyan Toner Cartridge Replacement 4-35
Identifying Magenta Toner Cartridge Replacement 4-36
Identifying Yell ow Toner Cartridge Replacement 4-36
Identifying Fus er Replacement 4-37
Identifying Cleaning Roller Replacement 4-37
Identifying Fuser Oil Replacement 4-38
Identifying OPC Belt Cartridge Replacement 4-38
Identifying Preventive Maintenance Service 4-39
Identifying Waste Toner Pack Replacement 4-40
Resetting All Cons umables Statistics Counters 4-40
Setting a Toner Out Action 4-40
Copies ....................................................................................... .4 -41
Emulations .................................................................................4-41
Setting ESP Default Parameters 4-41
Setting PostScript Parameters 4-41
Setting PCL 5c Parameters 4-42
Setting HP-GL Parameters 4-48
Setting Line Printer Parameters 4-51
Contents iii

Engine ..................................... ............. .................... ................... 4-54
Adjusting the Image Alignment 4-54
Setting a Default Resolution 4-55
Using Page Recovery 4-56
Setting Energy Cons ervation 4-56
Downloading a New System Image 4-57
Setting the Time-of-Day Clock 4-57
Adjusting the Color Density 4-58
Media Input ....................................................... .......................... 4-59
Selecting a Media Cassette 4-59
Chaining Medi a Cassettes 4-60
Naming Media Cassettes 4-60
Selecting a Media Size 4-61
Selecting a Media Type 4-63
Media Orientation ...................................................................... 4-63
Media Output .............................................................................. 4-64
Naming the Output Bin 4-64
Memory ...................................................................................... 4-64
Quick Configuration 4-65
Disk Swapping 4-66
Manual Configuration 4-67
Options ....................................................................................... 4-73
Passwords ........................ ............. ............. ...... ............. ............. 4-73
Selecting an Operator Menu Password 4-73
Enabling the Operator Menu Pass word 4-74
Selecting an Administration Menu Password 4-74
Enabling the Admini stration Menu Password 4-74
Special Pages .................................... ....... ...... ....... ...... ....... ...... 4-75
Calibration Page 4-75
Consumables Statisti cs Page 4-75
Header Pages 4-76
Registration Pages 4-77
Status Pages 4-78
Trailer Pages 4-79
Start-Up Options ....................................................................... 4-80
Enabling/Disabling the Start-Up Page 4-80
Enabling/Disabling the SYS\START File 4-80
Loading the PostScript Error Handler 4-81
QMS magicolor 2 Referenceiv

Storage Devices .........................................................................4-81
Backing up a Hard Disk 4-81
Formatting a Hard Disk 4-82
Restoring a Hard Disk 4-82
5 Additional Technical
Information
Introduction ..................................................................................5-2
Accounting ...................................................................................5-2
Accounting Menu 5-3
Accounting File s 5-3
Accounting File Format Description 5-4
Accounting File s Description of Fields 5-5
Copy Accounting Files to Host 5-13
Printer-Host Communication ....................................................5-14
Interface 5-14
Simultaneous Inte rfac e Operation (SIO) 5-15
ESP Technology 5-15
Communication Modes 5-15
Memory ......................................................................................5-16
QMS Memory Management 5-17
Memory Terms 5-18
Evaluation of Your Printing Environment 5-21
Memory Clients 5-22
Hard Disk Management 5-30
Specific Printing Environment Example 5-30
End Job Mode ............................................................................5-31
Common Reasons to Use End Job Mode 5-32
Using the EOD Commands 5-33
Setting the End Job Mode for the Serial and Parallel Protocols
5-34
Setting the End Job Mode via the Control Panel 5-35
Adding an EOD Command to Your File 5-36
Creating a Network Job Separator 5-38
Parallel Interface Modes ............. ....... ...... ....... ...... ....... ...... ...... .5 -38
Byte Mode 5-38
Contents v

Compatibility Mode 5-39
ECP (Enhanced Compatibility Port) Mode 5-39
EPP (Enhanced Parallel Port) Mode 5-39
Nibble Mode 5-39
PS Protocol Option ................................................................... 5-40
Options 5-41
Advantages 5-42
Implementation 5-42
HP-GL Color Encoding ............................................................. 5-43
A QMS Customer Support
Sources of Support ............................ ....... ...... ....... .....................A-2
Your QMS Vendor A-2
Your Application Vendor A-2
Q-FAX A-2
CompuServe A-3
Internet A-3
QMS Customer Response Center (CRC) A-4
QMS World-wide Offices .............................................................A-5
B Technical Specifications
Engine and Controller Specifications ................... ...... ....... ...... ..B-2
Engine B-2
Controller B-5
Electrical B-7
Environmental B-9
Physical B-10
Print Media ................................................................................B-10
PC Cable Pinouts ............................... .......................................B-11
Centronics/IEEE 1284 Parallel B-11
Serial B-13
LocalTalk B-15
Macintosh to Serial B-15
Ethernet B-16
QMS magicolor 2 Referencevi

Regulatory ................................................................................ B-17
Warranty Considerations ......................................................... B-18
Consumables and You r Warranty B-18
Electrostatic Discharge and Your Warranty B-18
C Document Option
Commands
Introduction ................................................................................. C-2
Supported QMS DOCs ................................................................ C-2
Header/Trailer Page Commands C-2
HP-GL Emulation Commands C-2
HP PCL 5c Emulation Commands C-3
Lineprinter Emulation Commands C-3
CCITT Groups 3 and 4 Commands C-4
Document Formatting C-4
Job and Subjob Boundary Commands C-5
LN03 Commands C-5
D Notices
Manual Notice ..............................................................................D-2
FCC Compliance Statement ....................................................... D-2
Canadian Users Notice ............................................................... D-3
Laser Safety ................................................................................. D-3
International Notices ................................................................... D-4
Power Cord D-4
Colophon ..................................................................................... D-4
E Configuration Menu
Introduction ................................................................................. E-2
Contents vii

Menu Chart Conventions ............................................................E-2
Administration Menu ....................................... ....... ...... ....... ...... ..E-3
Installation Menu .......................... ...... ....... ...... ............................E-9
Operator Control Menu ... ..........................................................E-10
Index
v
Administration/Communications/Network2/CrownNet
Menu E-4
QMS magicolor 2 Referenceviii

1
Introduction
In This Chapter . . .
n “Introduction” on page 1-2
n “About This Manual” on page 1-2

Introduction
Introduction
This manual provides detailed instructions and technical information
for your QMS
with your other printer documentation.
This chapter gives you a brief overview of this manual.
magicolor
2 Print System. Use this guide in conjunction
About This Manual
This manual contains printer configuration and reference information.
It is divided into the following sections:
Introduction
1
Print Media
2
Fonts, T ypefac es ,
3
and Symbol Sets
Printer
4
Configuration
Additional
5
Technical
Information
Provides an overview of the
manual.
Lists print media sizes, margins,
and imageable areas and provides
media storage information.
Discusses typefaces and fonts,
typographic terms, displays the
printer’s typefaces, and provides
some page design tips.
Explains the methods of configuring
the printer, demonstrates how to
use the printer control panel, and
provides a detailed discussion of
the configuration menu.
Discusses Crown accounting, ESP
and SIO, communication modes,
memory, end job mode, IEEE 1284
bidirectional parallel interface
modes, PS Protocol, and HP-GL
color encoding.
QMS magicolor 2 Reference1-2

About This
Manual
QMS Customer
A
Support
Technical
B
Specifications
Document Option
C
Commands
Notices
D
Configuration Menu
E
Provides world-wide product sales
and support telephone numbers
and describes how to communicate
with QMS through CompuServe,
the Internet, and Q-FAX.
Provides technical specifications
for the printer and lists available
supplies and replacement parts.
Lists printer-supported Document
Option Commands (DOCs),
provides updated HP PCL 5e
terminology , and discusses updated
DOCs.
Lists manual and legal notices.
Provides a view of the printer’s
configuration menu.
1-3Introduction

About This
Manual
Typographic Conventions
The following typographic conventions are used in this manual:
Mixed-Case
Courier
Mixed-Case
Italic
Courier
UPPERCASE
COURIER
lowercase bold PostScript operators and DOS commands
lowercase italic
UPPERCASE File and utility names
↵ Press the Enter key (PC) or Return key
^ Press and hold down the Ctrl key (PC)
» Note:
Notes contain tips, extra information, or important information
that deserves emphasis or reiteration
s Caution:
Cautions present information that you need to know to avoid
Text you type, and messages and information
displayed on the screen
Variable text you type; replace the italicized
word(s) with information specific to your printer
or computer
Information displayed in the printer message
window
Variable information in text
(Macintosh)
In Adobe Acrobat PDF versions of the manual,
click to play a QuickTime video clip of the
procedure described in the text.
.
equipment damage, process failure, or extreme annoyance.
M WARNING!
Warnings indicate the possibility of personal injury if a
specific procedure is not performed exactly as described in the
manual.
ACHTUNG!
Bitte halten Sie sich exakt an die im Handbuch
beschriebene Vorgehensweise, da sonst Verletzungsgefahr
bestehen könnte.
v
QMS magicolor 2 Reference1-4

2
Print Media
In This Chapter . . .
n “Introduction” on page 2-2
n “Media Input” on page 2-2
n “Media Sizes and Imageable Areas” on page 2-3
n “Media Types and Weights” on page 2-6
n “Storing Media” on page 2-8

Introduction
Introduction
This chapter lists the supported media sizes and imageable areas,
and provides information on selecting and storing media.
Media Input
Cassette Approximate Capacity Location
Letter/A4
Universal
250 sheets of 20 lb (75 g/m
50 transparencies
15 envelopes Upper
2
) paper
Upper or
optional lower feeder
QMS magicolor 2 Reference2-2
Media Sizes and Imageable Areas
Media Sizes and Imageable
Areas
Your printer supports full-color print ing on several media sizes. Each
media size has a certain imageable area, the maximum area on
which the printer can print clearly and without distortion. This area is
subject to both hardware limits (the physical media size and the margins required by the printer) and software constraints (the amount of
memory available for the full-page frame buffer).
» Note:
All media is fed in the portrait (short edge first) orientation.
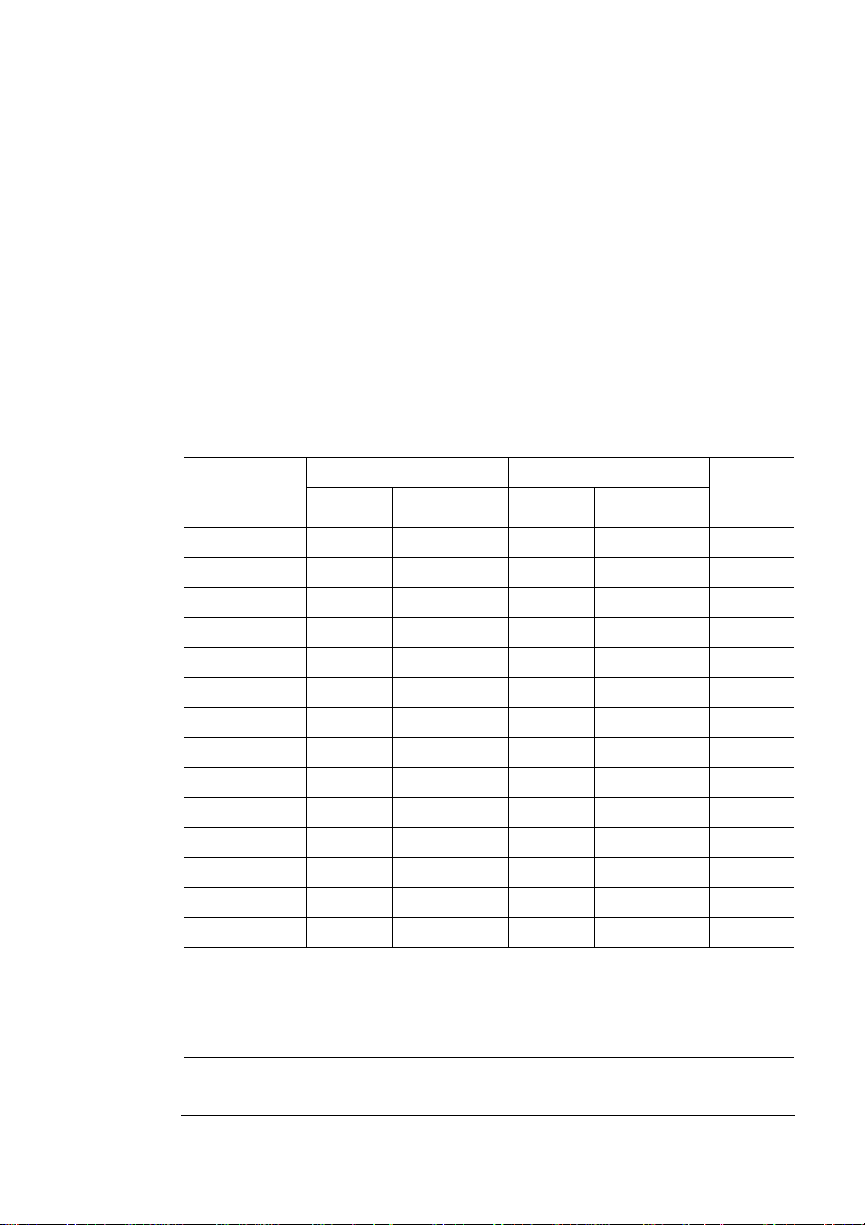
Media Media Size Imageable Area Input
Inches Millimeters Inches Millimeters
A4 8.2x11.7 210.0x297.0 7.86x11.29 199.81x286.77 L, U
A5 5.8x8.3 148.0x210.0 5.41x7.86 137.50x199.77 LU, UU
B5 (ISO) 6.9x9.8 176.0x250.0 6.52x9.44 165.61x239.82 L, U
B5 (JIS) 7.2x10.1 182.0x257.0 6.76x9.71 171.70x246.80 L, U
Com 10 4.1x9.5 105.0x241.3 3.72x9.15 94.49x232.30 LU, UU
DL Envelope 4.3x8.7 110.0x220.0 3.92x8.31 99.57x211.00 LU, UU
Executive 7.3x10.5 184.0x267.0 6.84x10.10 173.73x256.54 L, U
Folio 8.5x13.0 215.9x330.2 8.09x12.60 205.57x320.04 U
Foolscap 8.0x13.0 203.2x330.2 7.60x12.60 193.04x320.04 U
Legal 8.5x14.0 215.9x355.6 8.09x13.60 205.57x345.44 U
Letter 8.5x11.0 215.9x279.4 8.09x10.60 205.57x269.24 L, U
SP Folio 8.5x12.4 215.9x315.0 8.09x12.00 205.57x304.84 U
Statement 5.5x8.5 139.7x215.9 5.09x8.10 129.37x205.87 L, U
UK Quarto 8.0x10.0 203.2x254.0 7.60x9.60 193.04x243.84 L, U
Input Source/Loc atio n :
L=Letter/A4 cassette (upper and optional lower input feeder)
LU=Letter/A4 cassette (upper only)
U=Universal cassette (upper and optional lower input feeder)
UU=Universal cassette (upper only)
Source/
Location
2-3Print Media
Media Sizes and
(
)
Imageable
Areas
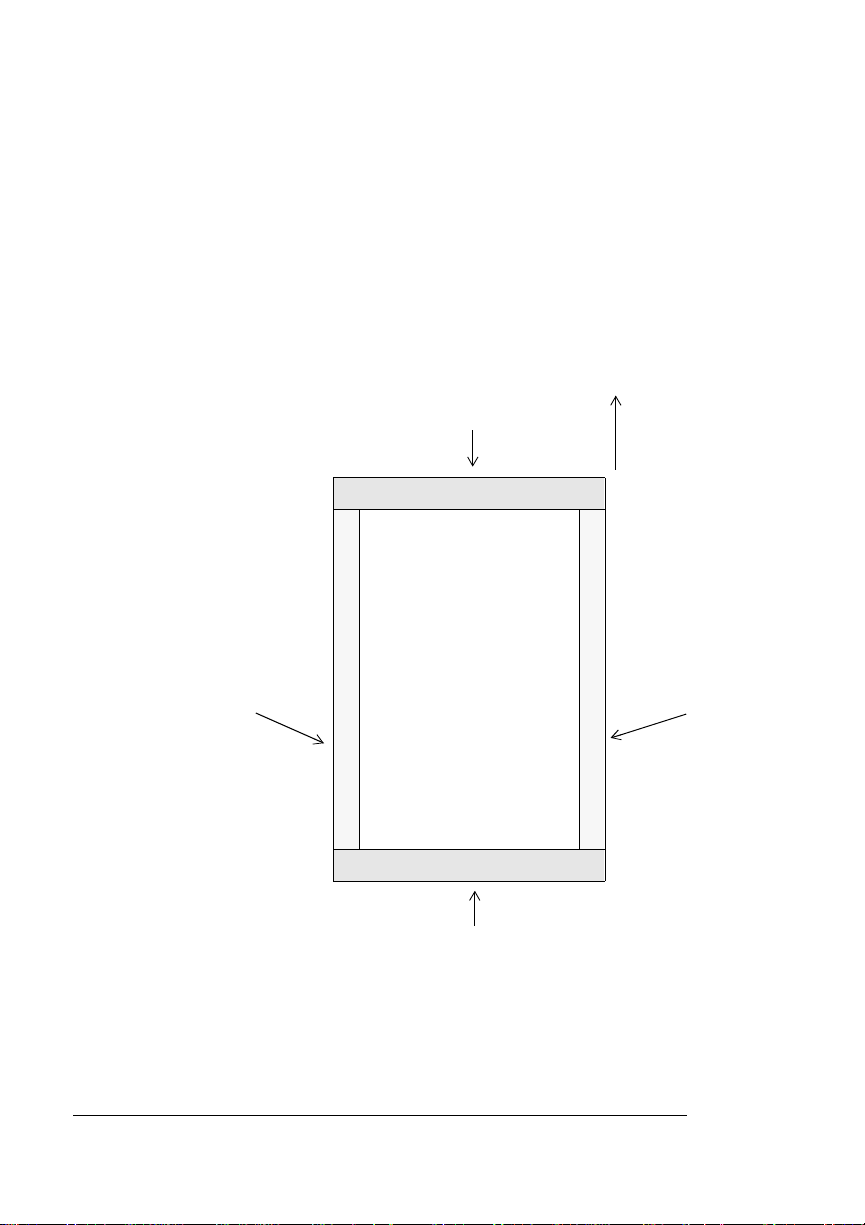
Working Within the Imageable Area
The imageable area for all media sizes is the page size minus
1.97"/5 cm from the top, left, and right edges, and the page size minus
1.57"/4 cm from the bottom edge. In other words, the non-printable
areas and non-gu ar a nt ee d p rint are as ar e id en t ica l for all media sizes.
» Note:
The non-guaranteed print areas are areas on which you can
print, but image quality in these areas may be less than perfect.
Non-printable Area
5 mm 0(.197 in.)
Non-guaranteed
Print Area
5 mm (0.197 in.)
Guaranteed
Print Area
Non-guaranteed
5 mm (0.197 in.)
Media Feed
Direction
Print Area
Non-printable Area
0.157 in.
4 mm
QMS magicolor 2 Reference2-4

Media Sizes and
Imageable
Areas
Image Alignment
If for any reason, you need to change the image alignment, you can
do so in several different ways:
n Adjust the margins or page size through your application.
n Use the printer’s control panel (Administration/Engine/Image
Alignment menu).
n Use the PostScript translate and scale operators to reduce
image size and change its placement on the page.
Page Margins
Margins are set through your application. Some applications allow
you to set custom page sizes and margins while others have only
standard page sizes and margins from which to choose. If you choose
a standard format, you may lose part of your image (due to imageable
area constraints). If you can custom-size your page, use those sizes
given for the imageable area for optimum results.
Media Size versus Cassette Size
Ensure that the media size matches the cassette size (for example,
letter/A4 media must be loaded only when the cassette is set to letter/A4 size). Since the cassette sends a media size signal to the
printer controller, using a wrong size media could cause a media jam,
incorrect positioning of the image, or a clipped image. Also, see chapter 3, “Advanced Printing Features,” in the
mation on the amount of memory needed to print on each media size.
Operation
manual for infor-
2-5Print Media

Media Types and Weights
Media Types and Weights
Paper
Type
n Any standard or recycled office paper suitable for plain-paper
laser printers, such as
– Xerox 4024
– Hammermill Laser Print
n Letterhead/memo paper
n Thick stock
» Note:
We do not recommend using perforated or 3-hole punched paper .
Weight
n Long-grain plain paper, 16–24 lb (60–90 g/m2)
n Long-grain thick stock, up to 60 l b cover/90 lb index (163 g/m
» Note:
You should test any thick stock to ensure that its
performance is acceptable.
Envelopes
Type
n Use common office envelopes with diagonal joints, sharp folds
and edges, and ordinary gummed flaps, such as
– Commercial #10
– International DL: Auto Fil #1914 (white)
n Envelopes may not have fasteners, clasps, transparent windows,
peel-off strips for sealing, or material that will melt, vaporize, offset, discolor, or emit dangerous fumes at the fusing temperature
° C/392° F). These items will seriously damage your printer.
(200
: SPHINX
2
)
QMS magicolor 2 Reference2-6

Media Types
and Weights
Transparencies
Type
n Use any transparencies meeting normal photocopier standards
and that can withstand the fusing temperature (200
We recommend
– Xerox 3R3117
– 3M CG3700
n Use only transparency sizes letter and A4.
° C/392° F).
Weight
n Transparencies 24–41.75 lb (90–157 g/m2)
Labels
Type
n Use only labels recommended for laser printers, such as
– Avery 5260
n Adhesive label stock should have pressure-sensitive (peel and
stick) adhesive backing.
n Use only label stock in sizes letter or A4.
n A label consists of a face sheet (the printing surface), adhesive,
and a carrier sheet.
– Face sheet must adhere to the plain paper specifications
listed on page 2-6.
– The face sheet surface must cover the entire carrier sheet,
and no adhesive should come through on the surface.
– The adhesive and carrier sheet must withstand the fusing
temperature (200
° C/392° F).
Weight
n Labels 24–42 lb (90–157 g/m2)
2-7Print Media

Storing Media
Storing Media
How you store paper and other media can make a big difference in
print quality and printer operation. Improperly stored media increases
the chance of jams during printing and can drastically affect the
appearance of your work. Keep media in good condition by storing it
n In its wrapper
n On a flat surface
n In a closed cabinet
n In a cool, dry area
v
QMS magicolor 2 Reference2-8

3
Fonts, Typefaces, and Symbol Sets
In This Chapter . . .
n “Introduction” on page 3-2
n “About Fonts and Typefaces” on page 3-2
n “Resident Fonts, Typefaces, and Symbol Sets” on page 3-7

Introduction
Introduction
This chapter defines common terms used in the descripti on of fonts
and typefaces, and displays the printer’s resident typefaces.
About Fonts and Typefaces
Many of the terms and phrases used in desktop publishing are
derived from the language of professional printers and typesetters.
This section explains common words and phrases used when discussing typefaces.
Typeface
A named design of a set of
printed characters, such as
Times, that has a specified
obliqueness (degree of slant)
and stroke weight (thickness of
stroke). It does not define a
particular size.
Font
A set of characters of the same
typeface (such as Times), style
italic
(such as
(such as bold), and point size
(such as 10). Although you hear
the term “font” used more
generally, as if referring to a
typeface, it’ s really a subset of a
typeface.
), stroke weight
Typeface Family
A group of similar typefaces.
For example, the Times
typeface family consists of four
typefaces: Times Roman, Times
Bold, Times Italic, and Times
Bold Italic.
Character Set
A collection of symbols
designed for various printing
applications. Many character
sets are composed of the
letters (uppercase and
lowercase A-Z), digits (0-9),
and any symbol (such as blank
space, dollar sign, and
ampersand). Other character
sets are composed entirely of
symbols.
QMS magicolor 2 Reference3-2

About Fonts
ψµβ
and Typefaces
Typeface Classification
One way of classifying the different typefaces is to group them into
the following categories:
Serif
A serif is a decorative line or tai l
on the ends of the strokes of a
letter. Serifs, usually on the
lower half of a letter, have also
been referred to as feet or curlicues. Courier, ITC Bookman, New
Century Schoolbook, Palatino, and Times are serif typefaces. In the
example shown, all the letters except “e” and “o” have serifs.
Sans Serif
Sans serif (“sans” is French for
“without”) indicates a typeface
without any of these small tails.
A sans serif typeface is decorative by the shape and styling of its letters but has less detail than a
serif typeface. Helvetica, Helvetica Condensed, Helvetica Narrow,
and ITC Avant Garde Gothic are all sans serif typefaces. In the example shown above, the slight curving at the bottom of the letters “t” and
“a” is not a serif. It is part of the line forming the letter rather than a
decorative line added on.
Times Roman
Helvetica
Script
Script typefaces simulate handwriting or brush lettering. Each
letter is connected visually, if not
physically. ITC Zapf Chancery is
a script typeface.
Pi or Symbol
Pi or symbol typefaces are collections of assorted special-purpose
characters (for example, decorative,
graphic, math, or monetary charac-
Zapf Chancery
Σ
ολ
3-3Fonts, Typefaces, and Symbol Sets

About Fonts
and Typefaces
ters). They are especially useful for highlighting items in lists, providing graphics, and displaying symbols that might otherwise have to be
drawn in by hand. Many typef aces toda y include a complement of the
more commonly used pi characters. Symbol and ITC Zapf Dingbats
are pi typefaces.
Typography Terms
Monospacing
The terms “monospaced” and “fixed-pitch” refer to a typeface whose
characters all have uniform and equal spacing. These typefaces are
useful for spreadsheets and other documents with columnar data.
Monospacing is the opposite of proportional spacing.
Proportional Spacing
The term “proportionally spaced”
refers to a typeface in which the width
of each character varies. For example,
the letter “i” is thinner than the letter
“m” and therefore takes up less space.
Proportional spacing sav es page space and is easier on the e y e. This
manual’s text uses the Helvetica font, a proportionally-spaced typeface. Because proportionally spaced typefaces place each character
according to its individual size, they increase legibility and readability.
This example shows the difference between a monospaced typeface
(Courier) and a proportionally spaced typeface (Times).
alphabet
alphabet
Bitmapped Font
A bitmapped font is one in which each
character is represented by a set of dot
patterns. Each font size requires a different set of dot patterns.
QMS magicolor 2 Reference3-4

About Fonts
and Typefaces
Scalable Font
A scalable font is
one in which each
character’s dot pattern (bitmap) is generated from a
mathematical representation (or outline)
of the character . Scalable fonts eliminate the need to store different
font size s.
Point Size
Point size ref ers to the height of a proportionally spaced typeface. A point is a unit of
measure approximately equal to
larger the point size, the larger the letter. The
example shows characters in 8, 10, 12, 24, and 36 point sizes.
1
/72". The
A B C D E
Pitch
Pitch refers to the number of characters
per horizontal inch (cpi) in a monospaced
typeface. Therefore, the larger the pitch,
the smaller the letter. For example, a tenpitch typeface prints ten characters per
inch (or 10 cpi) while a twelve-pitch typeface prints twelve characters per inch (or
12 cpi). The example shows ten-pitch and twelve-pitch Courier.
mathematic
0
mathematical
0
1
1
Stroke Weight
Stoke weight (light/medium/bold) is the
width (thickness), of the lines (strokes)
that make up a character. The example
at left shows the medium and bold
weights of Palatino.
P
a
l
a
t
i
n
o
P
a
l
at
i
n
o
3-5Fonts, Typefaces, and Symbol Sets

About Fonts
and Typefaces
Italic and Oblique Forms
Italic was originally developed in the
early sixteenth century as a typeface
based on cursive handwriting. Today’s
italics are still individually crafted typefaces designed to blend with a specific
roman (upright) typeface.
Oblique (or slanted) type forms,
however, are not designed and
crafted individually but are
mechanically slanted versions of
the roman form from which they
derive.
Orientation
Orientation is the direction of the print or image on a page. Portrait
orientation reads from left to right, across the narrower dimension of
the page. Landscape orientation also reads from left to right but
places the print across the wider dimension of the page. Spreadsheet
and table applications commonly use landscape printing. Both terms
derive from painting; a portrait is usually a vertical view while a landscape is usually a horizo ntal view
Times Roman
Times Italic
ITC Avant Garde Roman
ITC Avant Garde Oblique
Portrait
AbcdefghijklmnopqrstuvwxyzAb cdefghijklmnop
qrstuvwxyzAbcdefghijklmnopqrstuvwxyzAbcde
fghijklmnopqrstuvwxyzAbcdefghijklmnopqrst
uvwxyzAbcdefghijklmn opq rstu vwxyzAbcdefg
hijklmnopqrstuvwxyzAbcdefghijklmnopqrstuv
wxyzAbcdefghijklmnop qrstuvwxyz
AbcdefghijklmnopqrstuvwxyzAbcdefghijklmnop
qrstuvwxyzAbcdefghijklmnopqrstuvwxyzAbcde
fghijklmnopqrstuvwxyzAbcdefghijklmnopqrst
uvwxyzAbcdefghijklmnopqrstuvwxyzAbcdefg
hijklmnopqrstuvwxyzAbcdefgh ijklmnopqrstuv
wxyzAbcdefghijklmnopqrstuvwxyz
AbcdefghijklmnopqrstuvwxyzAbcdefghijklmnop
qrstuvwxyzAbcdefghijklmnop qrstuvwxyzAbcde
fghijklmnopqrstuvwxyzAbcdefghijklmnopqrst
uvwxyzAbcdefghijklm nop qrstuvwxyzAbcdefg
hijklmnopqrstuvwxyzAbcdefgh ijklmnopqrstuv
wxyzAbcdefghijklmnopqrstuvwxyz
Abcdefghijklmnopqrstuvwxy zAbcdefghijklmnop
qrstuvwxyzAbcdefghijklmnopqrstuvwxyzAbcde
fghijklmnopqrstuvwxyzAbcdefghijklmnop qrst
Landscape
Abcdefghijklmnopqrstuvwx yzAbcdefghijklmnopqrstuvwxyzAbc
defghijklmnopqrstuvwxyzAbcd efghijklmno pqrstuvwxyzAbcdefg
hijklmnopqrstuvwxy zAbcdefghijklmnopqrstuvwxyzAbcdefghijkl
mnopqrstuvwxyzAbcdefghijklmnopqrstuvwxyzAbcdefghijklmno
pqrstuvwxyzAbcdefghi jklm nopqrstuvwxyzAbcdefghijklmnopqrs
tuvwxyzAbcdefghijklmnopqrstuvwxyzAbcdefghijklmnopqrstuvw
wxyzAbcdefghijklmnopqrstuvwxyz Abcdefghijklmnopqrstuvwxyz
Abcdefghijklmnopqrstuvwxy zAbcdefghijklmnopqrstuvwxyzAbc
defghijklmnopqrstuvwxyzAbcdefg hijklmnop qrstuv wxyzAbcdefg
hijklmnopqrstuvwxyzAbcd efghijklmno pqrstuvwxyzAbcdefghijkl
mnopqrstuvwxyzAbcdefghijklmno pqrstuvwxyzAbcdefghijklmno
pqrstuvwxyzAbcdefghijk lmn opqr stu vwxy zAbcdefghijklmnopqrs
tuvwxyzAbcdefghijklmnopqrstuvwxyzAbcdefghijklmnopqrstuvw
QMS magicolor 2 Reference3-6

Resident Fonts, Typefaces, and Symbol Sets
Resident Fonts, Typefaces,
and Symbol Sets
Resident PostScript Fonts
Your printer has 42 resident PostScript fonts. Check with your QMS
vendor for av ailability of additional fonts for your printer. See appendix
A, “QMS Customer Support,” for a list of locations and telephone
numbers.
Your printer supports Type 1 and T ype 3 downloaded P ostScript fonts.
PostScript supports TrueType downloaded fonts only in Type 42 format. All of these typeface families are authentic: they are licensed,
they carry the true name, and they have multilingual character sets.
An example of each font is given in the following lists.
Font Sans
ITC Avant Garde
ITC Avant Garde Oblique
ITC Avant Garde Demi
ITC Avant Garde Demi Oblique
ITC Bookman Light
ITC Bookman Light Italic
ITC Bookman Demi
ITC Bookman Demi Italic
Courier
Courier Oblique
Courier Bold
Courier Bold Oblique
Helvetica
Helvetica Oblique
Helvetica Bold
Helvetica Bold Oblique
Serif
ü
ü
ü
ü
ü
ü
ü
ü
Serif Script Pi/
Symbol
ü
ü
ü
ü
ü
ü
ü
ü
Other
3-7Fonts, Typefaces, and Symbol Sets

Resident Fonts,
Typefaces, and
Symbol Sets
Font Sans
Helvetica Condensed
Helvetica Condensed Oblique
Helvetica Condensed Bold
Helvetica Condensed Bold Oblique
Helvetica Narrow
Helvetica Narrow Oblique
Helvetica Narrow Bold
Helvetica Narrow Bold Oblique
Letter Gothi c ML
Letter Gothi c US
New Century Schoolbook
New Century Schoolbook Italic
New Century Schoolbook Bold
New Century Schoolbook Bold
Italic
OCR-B
Palatino
Palatino Italic
Palatino Bold
Palatino Bold Italic
Serif
ü
ü
ü
ü
ü
ü
ü
ü
ü
ü
Serif Script Pi/
Symbol
ü
ü
ü
ü
ü
ü
ü
ü
Other
ü
Σψµβολ (Symbol) ü
Times Roman
Times Roman Italic
Times Roman Bold
Times Roman Bold Italic
ITC Zapf Chancery Medium Italic ü
Dingbats (ITC Zapf Dingbats)
ü
ü
ü
ü
QMS magicolor 2 Reference3-8
ü

Resident HP PCL 5c Fonts
Resident Fonts,
Typefaces, and
Symbol Sets
The QMS
magicolor
2 Print System has 24 resident HP PCL 5c fonts,
allowing it to emulate the HP PaintJet XL300. All fonts can be automatically rotated to landscape orientation.
» Note:
You can use any of the Hewlett-Packard XL series of drivers
with this printer; however, we recommend the XL300 driver due to the
higher resolution. Y ou can download Hewlett-Packard drivers from the
Hewlett-Packard website at http://www .hp.com. W e recommend that if
you print using a Hewlett-Packard printer driver, you disable PJL
commands within the driver settings.
Font # of
Symbol
Courier Medium
Courier Italic Medium
Courier Bold]
Courier Italic Bold
Line Printer Legal Medium 8.5 pt
Line Printer PC-850 Medium 8.5 pt
Line Printer PC-8 D/N Medium 8.5 pt
Line Printer PC-8 Medium 8.5 pt
Line Printer Roman-8 Medium 8.5 pt
Line Printer ECMA-94 Latin (ISO8859/1)
8.5 pt
Times Roman Medium
Times Roman Italic Medium
Times Roman Bold
Times Roman Italic Bold
Sets
5
32
32
32
25
25
25
25
25
25
32
32
32
32
Scalable/
Bitmap
S
S
A
S
B
B
B
B
B
B
S
S
S
S
Pi/
Symbol
Sans
Serif
Serif
ü
ü
ü
ü
ü
ü
ü
ü
ü
ü
ü
ü
ü
ü
Univers Medium
Univers Italic Medium
Univers Bold
Univers Italic Bold
Univers Condensed Medium
Univers Condensed Italic Medium
Univers Condensed Bold
Univers Condensed Italic Bold
32
32
32
32
32
32
32
32
S
S
S
S
S
S
S
S
ü
ü
ü
ü
ü
ü
ü
ü
3-9Fonts, Typefaces, and Symbol Sets

Resident Fonts,
Typefaces, and
Symbol Sets
Font # of
Symbol
Wingdings 1 S ü
ITC Zapf Dingbats 32 S ü
Sets
Scalable/
Bitmap
Pi/
Symbol
Sans
Serif
PCL 5c Symbol Sets
This table lists all of the PCL 5c symbol sets that are supported on the
magicolor
QMS
Desktop
ISO - 4 (UK)
ISO - 6 (ASCII)
ISO - 11 (SWED)
ISO - 15 (ITAL)
ISO - 17 (SPAN)
ISO - 21 (GERM)
ISO - 60 (NORW)
ISO - 69 (FREN)
ISO - Latin - 1
ISO - Latin - 2
ISO - Latin - 5
Legal
MC - Text
Math - 8
Microsoft - Pub
2 Print System:
PC - 850
PC - 852 (Latin 2)
PC - 8tk
PC8 - US
PC8 - DN
PI - font
PS - Math
PS - Text
Roman - 8
Ven tura - Intl
Ventura - Math
Ven tura - US
Windows 3.0 (Latin 1)
Windows 3.1-1 (Latin 1)
Windows 3.1-2 (Latin 2)
Windows 3.1-5 (Latin 5)
Serif
QMS magicolor 2 Reference3-10

Resident HP-GL Fonts
Resident Fonts,
Typefaces, and
Symbol Sets
Your QMS
magicolor
2 Print System has the following 40 resident
scalable HP-GL fonts in both fixed- and variable-spaced versions.
Set 0—Fixed space ANSI ASCII
Set 1—Fixed space 9825 Character Set
Set 2—Fixed space French/German
Set 3—Fixed space Scandinavian
Set 4—Fixed space Spanish/Latin
American
Set 5—Fixed space Special Symbols
Set 6—Fixed space JIS ASCII
Set 7—Fixed space Roman extensions
Set 8—Fixed space Katakana
Set 9—Fixed space ISO IRV
Set 10—Variable space ANSI ASCII
Set 11—Variable space 9825 Character set
Set 12—Variable space French/German
Set 13—Variable space Scandinavian
Set 14—Variable space Spanish/Latin
American
Set 15—Variable space Special symbols
Set 16—Variable space ASCII
Set 17—Variable space Roman extensions
Set 18—Variable space Katakana
Set 19—Variable space ISO IRV
Set 30—Fixed space ISO Swedish
Set 31—Fixed space ISO Swedish for
names
Set 32—Fixed space ISO Norway
version 1
Set 33—Fixed space ISO German
Set 34—Fixed space French
Set 35—Fixed space United Kingdom
Set 36—Fixed space Italian
Set 37—Fixed space Spanish
Set 38—Fixed space Portuguese
Set 39—Fixed space Norway version 2
Set 40—Variable space ISO Swedish
Set 41—Variable space ISO Swedish for
names
Set 42—Variable space ISO Norway
version 1
Set 43—Variable space German
Set 44—Variable space French
Set 45—Variable space United Kingdom
Set 46—Variable space Italian
Set 47—Variable space Spanish
Set 48—Variable space Portuguese
Set 49—Variable space Norway ver. 2
v
3-11Fonts, Typefaces, and Symbol Sets


4
Printer Configuration
In This Chapter . . .
n “Introduction” on page 4-3
n “Methods of Configuration” on page 4-3
n “Configuration Menu” on page 4-5
n “Overview of the Menus” on page 4-14
n “Accounting” on page 4-17
n “Collation” on page 4-19
n “Color” on page 4-20
n “Communications” on page 4-21
n “Consumables and Maintenance” on page 4-35
n “Copies” on page 4-41

n “Emulations” on page 4-41
n “Engine” on page 4-54
n “Media Orientation” on page 4-63
n “Media Output” on page 4-64
n “Memory” on page 4-64
n “Options” on page 4-73
n “Passwords” on page 4-73
n “Special Pages” on page 4-75
n “Start-Up Options” on page 4-80
n “Storage Devices” on page 4-81
QMS magicolor 2 Reference4-2

Introduction
Introduction
This chapter begins by listing and describing the different ways you
can configure your printer to meet your special printing needs.
The next section describes how to use the printer control panel to
access the configuration menu and how to make configuration
changes.
The rest of the chapter provides information about all of the configuration menu options except the CrownNet Ethernet interface. The
CrownNet Interface System Administrator’s Guide
PDF format on the
uration information for the Administration/Communications/Network
CrownNet menu.
QMS Software Utilities
CD-ROM) contains config-
(in Adobe Acrobat
Methods of Configuration
QMS
x
/
You have four ways to configure your printer:
n Through an application
n Through QMS Document Option Commands (DOCs)
n Through the printer control panel
n Through a remote console (for network users)
4-3Printer Configuration

Methods of
Configuration
Using an Application
Using your application is the best way to control your printer since
most printing is done on a per-job basis. This helps prevent confusion
in network environments and saves you from making changes at the
printer control panel. Your application documentation explains how to
control your printer settings: probably by choosing options from a
printing menu.
Applications use printer drivers to send appropriate commands to the
printer for requested tasks. If your application doesn’t have a QMS
magicolor
Script driver, such as the QMS Level 2 Windows driver or a LaserWriter driver. However, comparable drivers may not allow you to
access all of your printer's features.
2 Print System driver, you can select a comparable Post-
Using QMS Document Option Commands
QMS Document Option Commands (DOCs) can enable job-specific
features your application or page description language can’t access.
See your
with your printer) for information on the DOC commands. See appendix C, “Document Option Commands,” of this manual for a list of
DOCs this printer supports.
QMS Crown Document Option Commands
manual (shipped
Using the Control Panel
Your printer is configured at the factory for most typical printing environments so most users don’t have to use the control panel often.
However, if you need to change a printer setting for all print jobs (not
just on a per-job basis), you can do so through the control panel. If
you’re working in a shared printing environment, your system administrator should be the only person to make changes through the
printer’s control panel.
Using a Remote Console
Many of the configuration choices that can be made at the control
panel can also be made via a Remote Console session from
QMS magicolor 2 Reference4-4

Configuration Menu
CrownAdmin or CrownAdmin 3. You can run Remote Console via Telnet in an UNIX environment. To avoid confusion in a shared printing
environment, only the system administrator should make configuration changes. See the QMS CrownAdmin or QMS CrownAdmin 3 online help for information on using Remote Console.
» Note:
If a remote console has the printer off line, pressing the Online
key will not take effect until the console puts the printer back on line.
Configuration Menu
The printer’s configuration menu allows you to change the default
configuration settings. Any changes made to the configuration will
reside as new default settings and affect all subsequent print jobs.
» Note:
Accessing the Configuration Menu
Some changes take effect immediately and others take effect
after the printer is rebooted.
The options in the configuration menu are organized under three
main menus: Operator Control, Administration, and Installation.
1 Make sure the printer is idle.
IDLE displays in the message window.
2 Press the Online key to take the printer off line.
The Online indicator is not lighted.
3 Press the Menu key.
s Caution:
configuration settings, before making any configuration changes, you
should print an advanced status page.
To ensure that you don’t lose any of your custom
4-5Printer Configuration

Configuration
Menu
Example
The following table shows how to use control panel keys to access the
printer configuration menu. Press the control panel keys in the order
shown. The printer responds by displaying a status message or configuration menu in the message window.
» Note:
You may need to press the Next key more than once to
advance through the list of options.
Press
this key
Online Turn off the Online indicator and
Menu Access the configuration menu. CONFIGURATION
to... The message window
reads...
IDLE
ready the printer for configuration.
OPERATOR CONTROL
The printer must be off line and idle before you can access the configuration menu.
Selecting Configuration Menu Options
Once you access the configuration menu, you use the control panel
keys to move through the menu. Use the following keys:
Press this key to...
Next Advance to the next option or submen u within a menu.
Previous Return to the previous option or submenu within a menu.
Select Select an option or enter a submenu.
Example
To change the default printer emulation from ESP to PostScript for the
parallel port, press the control panel keys in the order shown in the
following table.
QMS magicolor 2 Reference4-6

Configuration
Menu
» Note:
You may need to press the Next key more than once to
advance through the list of selections or options.
Press this
key
Online Turn off the Online indicator and
Menu Access the configuration menu. CONFIGURATION
Next Advance to the Operator Control/
Select Acce ss the Administration menu ADMINISTRATION
Select Access the Communications menu. COMMUNICATIONS
Next Advance to the Communications/
Select Access the Parallel menu. PARALLEL
Next Advance to the Parallel/Emulation
Select Access the Emulation menu. EMULATION
Previous Advance to the Emulations/
Select Select PostScript as the default
Online or
Menu
to... The message window
reads...
IDLE
ready the printer for configuration.
OPERATOR CONTROL
CONFIGURATION
Administration menu.
Parallel menu.
menu.
PostScript menu.
emulation.
After 3 seconds yo u a re returned to
the Parallel/Emulation menu.
Exit from the menu (Online) or
return to the previ ous menu (Men u).
You are prompted to save your
change(s).
ADMINISTRATION
COMMUNICATIONS
TIMEOUTS
COMMUNICATIONS
PARALLEL
MODE
PARALLEL
EMULATION
ESP
EMULATIONS
POSTSCRIPT
POSTSCRIPT
IS SELECTED
PARALLEL
EMULATION
SAVE CHANGES?
NO
4-7Printer Configuration

Configuration
Menu
Next Advance to the Sav e Chan ges?/Yes
option.
Select Select YES. The printer finishes
printing any print jobs in process,
saves y our cha nge, and returns to
idle.
SAVE CHANGES?
YES
IDLE
Changing Character Information
Sometimes, rather than selecting an option, you need to enter character information. A character is any letter, digit, or symbol. A field is a
group of characters that have meaning. Use the printer control panel
to enter character information in the message window during printer
configuration. The maximum length of the message window is 16
characters.
Entering character information through the control panel is similar to
setting the time and date on a digital watch. You enter one character
at a time. The current input character flashes. Use the following keys
to change the current input character:
Press this key to...
Next Advance to the next choice for the current input character.
Previous Return to the pre vio us choi ce for the current input
character.
Once you have changed the current input character, use the f ollowing
keys to move the cursor to another input character:
Press this key to...
Select Advance the cursor to the next character.
Menu Return the cursor to the previous character.
To exit from the character selection process, move the cursor to the
last character of the input field (the character farthest to the right) and
press the Select key, or move to the first character of the input field
(the character farthest to the left) and press the Menu key.
QMS magicolor 2 Reference4-8

Configuration
Menu
When you exit, the printer verifies character information and confirms
it in the message window. If character info rmation is valid, you’re
returned to the previous menu; if it’s invalid, you’re returned to the
input field. Press the Menu key to cancel any cha nges to the character information.
If the current character information is longer than the value that you
need to enter, replace each extra character with a space. The printer
interprets a space at the end of character information as a blank.
Example
To change the HP-GL emulation scaling percent, press the control
panel keys in the order shown in the following table. The printer
responds by displaying a status message or configuration menu in the
message window. An underline indicates the current input character
in the message window.
» Note:
You may need to press the Next key more than once to
advance through the list of selections or options.
Press this
key
Online Turn off the Online indicator and
Menu Access the configuration menu. CONFIGURATION
Next Advance to the Administr a tio n
Select Access the Administration menu ADMINISTRATION
Next Advance to the Emulati on me n u. ADMINISTRATION
Select Access the Emulations menu. EMULATIONS
Next Advance to the Emulations/HP-GL
to... The message window
reads...
IDLE
readies the printer for
configuration.
OPERATOR CONTROL
CONFIGURATION
menu.
menu.
ADMINISTRATION
COMMUNICATIONS
EMULATIONS
ESP DEFAULT EMUL
EMULATIONS
HP-GL
4-9Printer Configuration

Configuration
Menu
Press this
key
Select Access the HP-GL menu. HP-GL
Next Advance to the HP-GL/Scaling
Select Access the Scaling Percent menu. SCALING PERCENT
Previous Lower the current character to 0. SCALING PERCENT
Select Select 0 and move the current
Next
(5 times)
Select Select 5 and move the current
Select Select 50 as the default scaling
Online or
Menu
Next Advance to the Sa ve Changes?/
Select Select Yes. The printer finishes
to... The message window
reads...
PLOTTER
HP-GL
Percent menu.
character to the next 0.
Advance the current character to 5. SCALING PERCENT
character to the last 0.
percent.
After 3 seconds y ou are returned to
the HP-GL/Scaling Percent menu.
Exit from the menu (Online) or
return to the previous menu
(Menu). You are prompted to save
your change(s).
Yes option.
printing any print jobs in process,
saves your change, and returns to
idle.
SCALING PERCENT
00
1
00
0
SCALING PERCENT
000
0
05
SCALING PERCENT
050
50
IS SELECTED
HP-GL
SCALING PERCENT
SAVE CHANGES?
NO
SAVE CHANGES?
YES
IDLE
QMS magicolor 2 Reference4-10

Configuration
Menu
Saving Configuration Changes
Before the printer can accept print jobs with configuration changes,
the changes must be saved.
Example
To save your configuration changes, press the control panel keys in
the order shown in the following table. The printer responds by displaying a status message in the message window.
Press this
key
Online or
Menu
Next Advance to the Save Changes?/
Select Select Yes. The printer finishes
Online Turn on the Online indicator and
» Note:
The printer may need to be restarted before certain changes to
to... The message window
reads...
Exit from the menu (Online) or
return to the prev ious menu
(Menu). You are promp ted to save
your change(s).
Yes option.
printing any print jobs in process,
saves your change, and returns to
idle.
ready the printer to accept and
print jobs.
SAVE CHANGES?
NO
SAVE CHANGES?
YES
IDLE
IDLE
the Administration menu take effect. Some changes restart the printer
automatically while others display the message REBOOT NOW? in the
control panel message window. If this message appears, select YES
to restart the printer and have the change(s) take effect immediately,
or select NO to wait until you manually restart the printer for changes
to take effect.
4-11Printer Configuration

Configuration
Menu
Canceling Configuration Changes
If you change a configuration option and then decide to cancel that
change, you can do so when exiting the configuration menu.
Example
To cancel your configuration changes, press the control panel keys in
the order shown in the following table. The printer responds by displaying a status message in the message window.
Press this
key
Online or
Menu
Select Select No. The printer finishes
Online Turn on the Online indi cator and
to... The message window
reads...
Exit from the menu (Online) or
return to the previous menu (Menu)
and be prompted to save your
change.
printing any print jobs in process,
does not save your changes, and
returns to idle.
ready the printer to accept print
jobs.
SAVE CHANGES?
NO
IDLE
IDLE
Setting the Message Window Language
Menu Administration/Mis cellaneous/Keypad Language
Purpose Allows you to change the language in which status messages
and configur ation menu s are di splayed in the mess age win do w
Choices English, French, German, Spanis h
Default English
Notes The printer must be restarted for changes to the Keypad
Language menu to take effect. You can either let the printer
restart automatically after you sa ve the change and exit from
the Configuration menu, or you can w ait for the change to take
effect the next time you manually turn on the printer.
QMS magicolor 2 Reference4-12

Configuration
Menu
Restoring the Factory Default Configuration
Menu Administration/Miscellaneous/Restore Defaults
Purpose Allows you to cancel all of the configuration changes you’ve
made and reset all of the configuration settings to their factory
defaults
Choices Yes, No
Default No
Notes This process takes a few minutes to complete.
Working with Custom Configurations
Saving a Default Custom Configuration
Menu Administration/Mis cellaneous/Save Defaults
Purpose Saves the current printer configur ati on as a custom default .
Choices Yes—Save the current configuration settings as a custom
default.
No—Don’t save the current configuration s et tings as a custom
default .
Default No
Notes You can save only o ne configu ratio n; how e v er , y ou can ch ange
the saved configuration at any time.
Restoring a Default Custom Configuration
Menu Administration/Miscellaneous/Restore Defaults/Saved Defaults
Purpose Reconfigures the printer by using the default custom
configuration.
Choices Yes, No
Default No
Notes To restore the sa v ed def a ults, access the me nu item and sel ect
Yes.
4-13Printer Configuration

Overview of the Menus
Rebooting the Printer
After changing any option that requires a system restart, you are
prompted to REBOOT NOW? If you want to make other configuration
changes choose NO. After you make all configuration changes choose
YES to restart the system and have all configuration menu changes
take effect at once.
Menu Administration/Miscellaneous/Reboot System
Purpose Allows you to restart the printer if you’ve made changes to any
configuration menu(s) that require a system restart.
Choices Yes, No
Default No
Notes This process takes a few minutes to complete.
Overview of the Menus
Administration Menu
» Note:
The Administration menu may be password-protected with an
optional security key if the system administrator does not want users
changing defaults. See the Options manual for more information.
The Administration menu contains the following submenus:
For information on this submenu... See this section...
Communicat ion s “Communicat ion s” on page 4-21
Consumables “Consumables and Maintenance” on
page 4-35
Disk Operations “Storage Devices” on page 4-81
Emulations “Emulations” on page 4-41
Special Pages “Special Pages” on page 4-75
Startup Options “Start-Up Options” on page 4-80
Memory “Memory” on page 4-64
QMS magicolor 2 Reference4-14

Overview of the
Menus
Engine “Engine” on page 4-54
Miscellaneous “Configuration Menu” on page 4-5,
“Engine” on page 4-54, and “Media
Output” on page 4-64
Installation Menu
» Note:
This menu appears only if an optional security key is installed.
It’s not available when using a remote console.
The Administration menu contains the following submenus:
For information on this submenu... See this section...
Admin Password “Selecting an Administration Menu
Password” on page 4-74
Operator P asswrd “Enabling the Operator Menu
Password” on page 4-74
Use Admin Pwd “Enabling the Administration Menu
Password” on page 4-74
Use Operator Pwd “Enabling the Oper ato r Menu
Password” on page 4-74
Operator Control Menu
Document processing options are usually specified within individual
jobs since each job has its own requirements. However, if there’s no
way of specifying these options within an application, use the control
panel to change options, send the job, and then reset the options to
their previous state. Defining document processing options for a particular job through the control panel is not recommended in a shared
environment. When many systems are using the same printer, there’s
no way of making sure that no other jobs are sent to the printer while
the defaults are changed.
» Note:
The Operator Control menu may be password protected with
an optional security key if the system administrator does not want
users changing defaults.
4-15Printer Configuration

Overview of the
Menus
The Operator Control menu contains the following selections:
Selection See this section...
Accounting “Accounting” on page 4-17
Chain Input Bins “Media Input” on page 4-59
Collation “Collation” on page 4-19
Color Model “Color” on page 4-20
Color Separation “Color” on page 4-20
Consumables “Consumables and Maintenance” on page 4-35 and
Copies “Copies” on page 4-41
Custom Bin “Media Input” on page 4-59
Inputbin “Media Input” on page 4-59
Media “Media Input” on page 4-59
Orientation “Media Orientation” on page 4-63
This option is available only when you have an optional
hard disk installed.
“Special Pages” on page 4-75
QMS magicolor 2 Reference4-16

Accounting
Setting the Accounting Mode
Menu Operator Control/Accounting/Mode
Purpose Enables or disables job accounting.
Choices Enabled, Disabled
Default Disabled
Notes You can also enable accounting via Remote Console.
When accounting is disabled, any files containi ng data remain
untouched. How ever, empty files are remo ved to sav e dis k
space.
Allocating Disk Space
Menu Operator Control/Accounting /Dis k Spac e
Purpose Allocates disk space for job accounting files.
Choices 50-10240 (KB)
Default 1024 (KB)
Notes 1024 KB = 1 MB
10240 KB = 10 MB
The amount of space required for each job can vary between
200 and 250 bytes, so each 1 MB in the job accounting file
stores information on 4,000 to 5,000 jobs.
If the selected value is greater than the current value, the file
size is increased to reserve the extra space. If the value is
smaller than the current fil e size, any empty job accounting
files are moved. If only one file is used and it is not empty, it
cannot be shrunk.
Accounting
4-17Printer Configuration

Accounting
Resetting Accounting
Menu Operator Control/Accounting /Res eta cc ou ntin g
Purpose Erases the Accounting files and recreates them using the
Choices Yes, No
Default No
Notes If this operation is selected when accounting is disabl ed, the
current file size.
files are removed but not recreated, thus saving disk spa ce.
This opera tion i s also a va ilab le as the res etaccount command
for the admin user at a remote console. (See the
Console User’s Guide
When job files are more than 80% full but le ss than 100% full,
the following message displays on the control panel and
remote console:
xxxxxxxx
(
xxx%
95%.) This is an appropriate time to transfer them to your host
computer using ftp if it is available to you. Then use the option
to reset the accounting fil es to emp ty after they have been
transferred to the host.
When the file is 100% full, the
FILE
is the percentage full, reported as 80%, 85%, 90%, or
for more information.)
xxx%
FULL
Remote
xxx
FILE IS FULL
message displa ys .
» Note:
When accounti ng is ena bled and the job accounting
files are 100% full , no further print jobs are ac cepted b y the
printer until Res etaccoun ting i s selec ted or unti l accoun ting
is disabled. If you disable accounting at this ti me, no job
information is stored . You can retriev e yo ur accounti ng files
while they are full and then do the Resetaccounting
operation. However, to avoid delaying jobs being sent to
the printer, it is advisable to perform the retrieve/reset
operations before the job accounting files fill up .
QMS magicolor 2 Reference4-18

Collation
Segmenting the Accounting Job File
Menu Operator Control/Accounting /Fi le Segmen t
Purpose Allows you to speci fy whether accounting info rmation is stored
in the printer in a single file or in multiple files.
Choices Single, Multiple
Default Multiple
Notes Job accounting information ma y be sto red in a sing le file if it
can be retriev ed via FTP on y our ho st. Otherwis e, the sele cted
job accounting file should be spread into several files.
If a single file is used, its size equals the Disk Space value
described earlier in this section. The file name will be
ACC1.JOB.
If multiple files are selec ted , their combined size equals the
File Size v alue describ ed earli er in this secti on. E ach file will be
1 MB, except the last file, which includes the remaining
dedicated space. That is, if you ded ic ate 10 MB to accounting
and select multiple files, the printer creates 10 files of 1 MB
each. If y ou dedicate 5.5 MB to accounting, the printer creates
5 files of 1 MB each and one of 500 KB. T he j ob fi lenames are
ACC1.JOB, ACC2.JOB, and so on.
Collation
Menu Operator Control/Collation
Purpose Allows you to enable or disable collation.
Choices On, Off
Default Off
Notes For more inform ation, refer to chapter 3, “Advanced Printing
Features,” of the
Operation
manual.
4-19Printer Configuration

Color
Color
Using a Color Model
Menu Operator Control/Color Model
Purpose Allows you to select between full-color or monochrome mode.
Choices Full Color, Monochrome
Default Full Color
Printing Color Separations
Menu Operator Control/Color Separation
Purpose Allows you to print color separations.
Choices On, Off
Default Off
QMS magicolor 2 Reference4-20

Communications
Setting Timeouts
Setting a PostScript Emulation Timeout
Menu Administration/Communications/Timeouts/PS Wait Timeout
Purpose Sets the maximum number of seconds the P os tScript
emulation waits for incoming data.
Choices 00000-99999 (sec.)
Default 00030 (sec.)
Notes A value of 00000 is the same as infinity (no timeout).
The job is clo sed and the next job in the queue begins if all of
the following occur :
n No additional data is rece ived du ring the specifi ed period of
time.
n The interface didn’t time out.
n An EOD (end-of-document) command was not seen.
When a print job is sent from a Macintosh , the PS W ait timeout
is automatically changed to 00300 seconds (5 min.).
Large print jobs, such as those generated by graphics or
computer-aided des ign ap plicatio ns, requ ire ti meouts of 00300
seconds (5 min.) or greater.
Communications
Setting an Emulation Timeout
Menu Administration/Communications/Timeouts/Emul Timeout
Purpose Sets the maximum number of seconds emulatio ns other than
PostScript (such as HP-GL, PCL 5c, and Lineprinter) wait for
incoming data.
Choices 00000-99999 (sec.)
Default 00005 (5 sec.)
Notes A value of 00000 is the same as infinity (no timeout).
4-21Printer Configuration

Communications
Setting a Print Job Timeout
Menu Administration/Communicatio ns /Timeo uts /J ob Timeou t
Purpose Sets the maximum number of seconds the printer processes a
Choices 00000-99999 (sec.)
Default 00000 (infinity, no timeout)
Notes A value of 00000 is the same as infinity (no timeout).
Setting an ESP Timeout
Menu Administration/Communications/Timeouts/ESP Timeout
Purpose Sets the maximum number of seconds the printer waits to
Choices 00000-99999 (sec.)
Default 00003 (sec.)
Notes A value of 00000 is the same as infinity (no timeout).
print job before it ends the job.
match an emulation before printing the job in the default ESP
emulation.
Setting Network Interface Parameters
Use the Administration/Communications/Networkx/CrownNet menu
to configure the CrownNet Ethernet interface. Refer to the
CrownNet System Administrator’s Guide
for a complete discussion of
the CrownNet configuration menus.
If you have an optional network interface, refer to the documentation
that came with the interface for configuration information.
QMS magicolor 2 Reference4-22
QMS

Communications
Setting Parallel Interface Parameters
Mode
Menu Administration/Communication s/Parallel/Mode
Purpose Specifies the type of parallel communicati on .
Choices Interactive—Establish two-way communication between the
host and the printer (IEEE 1284 bidirectional parallel
communication).
Noninteractive—Establish one-way communication from the
host to the printer (Centronics parallel commun ic ati on).
Disabled—Turn off parallel communication with the host. The
printer stops accep ting print jobs over the parallel interface.
Default Noninteractive
Notes The printer must be restarted for ch anges to the menu to take
effect. You can either let the printer restart automatically after
you save the change and exit from the Configuration men u , or
you can wait for the change to take effect the next time you
manually turn on the printer . See cha pter 5, “Additional
Technical Information,” for a discussion of the different modes.
Emulation
Menu Administration/Communications/Parallel/Emulation
Purpose Sets the parallel interface emul ati on.
Choices ESP, Hexdump, PostScript, PCL5c, HPGL, Lineprinter
Default ESP
Notes Optional emulations also display as choices.
4-23Printer Configuration

Communications
Minimum Number of Kilobytes for Spooling
Menu Administration/Communicatio ns /Parallel/Min K Spool
Purpose Sets the minimum number of kilobytes of syste m me mory
Choices 00000-99999 (sec.)
Default 00015 (sec.)
Notes This value must be less than K Mem For Spool in the
Spooling Timeout
allocated to the parallel interface.
administration/memory submenu.
A 00000 va lue does not turn off the spooling buffer for the
parallel interface. If the value is set to 00000, the printer
calculates the Min K Spool automatically at initialization.
The printer must be restarted for changes to the Min K Spool
menu to take effect. You ca n either let the printer restart
automatically after y ou save the change and exit the
configuration menu, or you can wait for the change to take
effect the next time you manually turn on the printer.
Menu Administration/Communications/Parallel/Spool Timeout
Purpose Sets the number of seconds the parallel interfac e waits f or data
from the host befo re terminatin g a spool ed print job.
Choices 00000-99999 (sec.)
Default 00030 (sec.)
Data Bits
Menu Administration/Communications/Parallel/Data Bits
Purpose Sets the number of data bits transmitted per charac ter.
Choices 7 Bits, 8 Bits
Default 8 Bits
QMS magicolor 2 Reference4-24

Communications
End Job Mode
Menu Administration/Communication s/Parallel/End Job Mode
Purpose Enables (and identifies an end-of-job sequence) or disables
data stream sensing for the end-of-document (EOD)
command.
Choices None—The printer recognizes only the PostScript ^D
command.
QMS EOD—The printer recognizes only the QMS
%%EndOfDocument command.
HP EOD—The printer recognizes only the HP
<ESC>%12345X command.
Default None
Notes See chapter 5, “Addit ional Technical Inf ormation,” f or detai ls on
how to implement this feature.
Default Job Priority
Menu Administration/Communications/Parallel/Def Job Prio
Purpose Allows you to specify which jobs are printed first, according to
the interface through which they’re received, when jobs are
received simultaneously.
Choices 001-100 (highest-lowest priority)
Default 001 (highest priority)
Notes For example, you can give jobs received via the parallel
interface priority over jobs received via the Ethernet interface.
4-25Printer Configuration

Communications
PS Protocol
Menu Administration/Communications/Parallel/PS Protocol
Purpose Sets the binary communications protocol (BCP) for
Choices Normal—Enables standard, ASCII (7-bit) hex protocol. Data is
Default Normal
Notes See chapter 5, “Additional Technical Information,” for a full
communicating over a parallel interface to a PostSc rip t printer.
sent and received in ASCII format. This mode is
recommended if you do not print binary data. It was
designed for data in the printable ASCII range. Print jobs
can change this setting through PostScript operators.
Normal Fixed—Enables standard, ASCII (7-bit) hex protocol.
Print jobs cannot change this setting through PostScript
operators.
Binary—Enables quoted binary communications protocol
(BCP). Print jobs can change this setting through
PostSc ript oper ator s . Da ta in the printable ASCII range
also prints.
Binary Fixed—Enables binary communications protocol
(BCP). Print jobs cannot alter change this setting through
PostSc ript oper ator s . Da ta in the printable ASCII range
also prints.
discussion of PS Protocol.
Setting Serial Interface Parameters
Mode
Menu Administration/Communications/Serial/Mode
Purpose Enables or disables the serial port.
Choices Interactive—Establish two-way communication between the
host and the printer.
Noninteractive—Establish one-way communication from the
host to the printer .
Disabled—Turn off serial communication with the host. The
printer stops accepting print jobs over the serial interface.
QMS magicolor 2 Reference4-26

Communications
Default Interactive
Notes The printer must be restarted for ch anges to the Mode men u to
take eff e ct. You can either let the prin ter rest art automatically
after you sav e the change and exit the Confi gur a tion menu, or
you can wait for the change to take effect the next time you
manually turn on the printer .
Emulation
Menu Administration/Communicatio ns /Serial/E mul ati on
Purpose Sets the serial interface emulatio n.
Choices ESP, Hexdump, PostScript, PCL5, HPGL, Lineprinter
» Note:
Default ESP
If installed, these optional emulations may also
appear: CALS, CCITT, CGM, LN03+, QUIC, TIFF.
Minimum Number of Kilobytes for Spooling
Menu Administration/Communications/Serial/Min K Spool
Purpose Sets the minimum number of kilobytes of syste m me mory
allocated to the serial interface.
Choices 00000-99999 (KB)
Default 00015 (KB)
Notes This value must be less than K Mem For Spool.
A 00000 va lue does not turn off the spooling buffer for the
serial interface. If the value is set to 00000, the printer
calculates the Min K Spool automatically at initialization.
The printer must be restarted for changes to the Min K Spool
menu to take effect. You ca n either let the printer restart
automatically after y ou save the change and exit the
Configuration menu, or you can w ait for the change to take
effect the next time you manually turn on the printer.
4-27Printer Configuration

Communications
Spooling Timeout
Menu Administration/Communications/Serial/Spool Timeout
Purpose Sets the number of seconds the interface wai ts for data from
Choices 00000-99999 (sec.)
Default 00030 (sec.)
End Job Mode
Menu Administration/Communications/Serial/End Job Mode
Purpose Enables (and identifies an end-of-job sequence) or disables
Choices None—The printer recognizes only the PostScript ^D
Default None
Notes See chapter 5, “Addition al Technical Inf ormation,” f or detai ls on
the host before terminating a spooled print job.
data stream sensing for the end-of-document (EOD)
command.
command.
QMS EOD—The printer recognizes only the
QMS%%EndOfDocument command.
HP EOD—The printer recognizes only the HP
<ESC>%12345X command.
how to implement this feature.
Default Job Priority
Menu Administration/Communications/Serial/Def Job Pr i o
Purpose Allows you to specify which jobs are printed first, according to
the interface through which they are received, when jobs are
received simultaneously.
Choices 001-100 (highest-lowest priority)
Default 001 (highest priority)
Notes For ex ample, y ou ca n giv e jobs rece ive d via the se rial interf ace
priority over jobs received via the parallel and Ethernet
interfaces.
QMS magicolor 2 Reference4-28

Communications
Baud Rate
Menu Administration/Communications/Serial/Baud Rate
Purpose Sets the rate data is transmitted (bits per second) over the
serial interface.
Choices 300, 600, 1200, 2400, 4800, 9600, 19200, 38400 (bits/sec.)
Default 9600 (bits/sec.)
Notes Baud rates of 19200 and 38400 require hardware flow control
(Administration/Communications/Serial/Hdwe Flow Ctl menu).
Parity
Menu Administration/Communications/Serial/Par ity
Purpose Sets the check bit used to identify data tr ans mi ss io n er rors.
Choices None, Odd, Even
Default None
Notes The printer’s parity setting must match that of the host or
application.
Use the Administration/Communications/Serial/Ignore Parity
menu to specify how the printer hand le s parity errors.
Ignore Parity Errors
Menu Administration/Communications/Serial/Ignore Parity
Purpose Specifies how the printer should handl e parity errors.
Choices Off—Ignore parity errors. The printer prints its best
interpretation of the character(s) affected by the error.
On—Don’t ignore parity errors. The printer replaces the
character(s) affected by the error with a question mark.
Default Off
Notes Use the Administration/Communications/Serial/Parity menu to
set parity.
4-29Printer Configuration

Communications
Receive Software Flow Control
Menu Administration/Communications/Serial/Rcv Sw Flow Ctl
Purpose Sets the software communication protocol used by the printer
Choices ETX/ACK, Robust XON/XOFF, None, XON/XOFF
Default XON/XOFF
Transmit Software Flow Control
Menu Administration/Communications/Serial/Xmit Sw Flow Ctl
Purpose Sets the software communication protocol used by the host
Choices ETX/ACK, None, XON/XOFF
Default None
Data Bits
to control communication from the host computer.
computer to control communication with the printer.
Menu Administration/Communications/Serial/Data Bits
Purpose Sets the number of data bits transmitted per charac ter.
Choices 7 Bits, 8 Bits
Default 8 Bits
Stop Bits
Menu Administration/Communicatio ns /Serial/ Stop Bits
Purpose Sets the number of stop bits transmitte d per char ac te r.
Choices 1 Bit, 2 Bits
Default 1 Bit
QMS magicolor 2 Reference4-30

Communications
Hardware Flow Control
Menu Administration/Communications/Serial/Hdwe Flow Ctl
Purpose Controls the flow of data between the printer and the host.
Choices DSR POL
DSR
DTR POL
DTR
RTS
CTS
Defaults DSR POL
DSR
DTR POL
DTR
RTS
CTS
Notes If the host uses hardware flow control, set this option to match
the type used by the host.
However, to download printer system software to flash ROM
via the serial port, RTS and CTS must be set to On, and the
cable pinouts must be connected as shown in appendix B‚
“Technical Specifications.”
Normal, reverse
Off, on
Normal, reverse
Off, on
Off, on
Off, on
Normal
Off
Normal
On
Off
Off
PS Protocol
Menu Administration/Communications/Serial/PS Protocol
Purpose Sets the binary communications protocol (BCP) for
communicating over a serial interface to a PostScript printer.
4-31Printer Configuration

Communications
Choices Normal—Enables standard, ASCII (7-bit) hex protocol. Data is
Default Normal
Notes See chapter 5, “Additional Technical Information,” for a full
sent and received in ASCII format. This mode is
recommended if you do not print binary data. It was
designed for data in the printable ASCII range. Print jobs
can change this setting through PostScript operators.
Normal Fixed—Enables standard, ASCII (7-bit) hex protocol.
Print jobs cannot change this setting through PostScript
operators.
Binary—Enables binary communications protocol (BCP). Print
jobs can change this setting through PostScript operators.
Data in the printable ASCII range also prints.
Binary Fixed—Enables binary fixed communications protocol
(BCP). Print jobs cannot alter change this setting through
PostSc ript oper ator s . Da ta in the printable ASCII range
also prints.
discussion of PS Protocol.
Setting LocalTalk Interface Parameters
Mode
Menu Administration/Communications/LocalTalk/Mode
Purpose Enables or disables the LocalTalk interface.
Choices Enabled—Establishes o ne-w ay LocalTalk communication from
the host to the printer .
Disabled—Turns off the LocalTalk interfa ce, and the printer
stops accepting LocalTalk interface print jobs.
Default Enabled
Notes The printer must be restarted f or ch anges to the Mo de men u to
take eff ect . Changing the Mod e settin g will cause the REBOOT
NOW? prompt to appear. Your can either choose to restart the
printer now and thi s change takes effect immediately or you
can manually restart the printer and have this change take
effect later.
QMS magicolor 2 Reference4-32

Communications
Min K Spool
Menu Administration/Communications/LocalTalk/Min K Spool
Purpose Sets the minimum number of kilobytes of syste m me mory
allocated to the LocalTalk interface.
Choices 00000-99999 (KB)
Default 00015 (KB)
Notes This value mus t be less than K Me m F or Sp ool (Administ ratio n/
Memory menu).
A 00000 va lue does not turn off the spooling buffer for the
LocalTalk interface. If the value is set to 00000, the printer
calculates the Min K Spool automatically at initialization.
The printer is im media tely restarted when a cha nge is mad e to
this option. (F or example, change the value to 35, press the
Select key, and the menu changes to LocalTalk. Pres s the
Online key and the printer aut omatic al ly reboots.)
Connection
Menu Administration/Communic atio ns /Lo ca lTalk/Conn ect ion
Purpose Allows you to enable or disable print spooling.
Choices Conventional—Allows one LocalTalk connection and accepts
only one print job at a time. If two users send print jobs to
the printer, the workstation belonging to the first user is
unavailable until the first job has been printed, and the
workstation belonging to the second user is unavailable
until both jobs have been printed.
Spool—Allows multiple LocalTalk connections and accepts
(spools) more than one print job at a ti me. W orkstations are
available while jobs are printing.
Both—Allows both single and multiple LocalTalk connections.
Default Conventional
4-33Printer Configuration

Communications
PS Protocol
Menu Administration/Communications/LocalTalk/PS Protocol
Purpose Sets the binary communication protocol (BCP) fo r
Choices Normal—Enables standard, ASCII (7-bit) hex protocol. Data is
Default Normal
Notes See chapter 5, “Additional Technical Information,” for a full
communicating ov e r a LocalTalk interf ac e to a PostScript
printer.
sent and received in ASCII format. This mode is
recommended if you do not print binary data. It was
designed for data in the printable ASCII range. Print jobs
can change this setting through PostScript operators.
Normal Fixed—Enables standard, ASCII (7-bit) hex protocol.
Print jobs cannot change this setting through PostScript
operators.
Binary—Enables binary communications protocol (BCP). Print
jobs can change this setting through PostScript operators.
Data in the printable ASCII range also prints.
Binary Fixed—Enables binary fixed communications protocol
(BCP). Print jobs cannot change this setting through
PostSc ript oper ator s . Da ta in the printable ASCII range
also prints.
discussion of PS Protocol.
Def Job Prio
Menu Administration/Communications/LocalTalk/Def Job Pr i o
Purpose Allows you to specify which jobs are printed first, according to
the interface through which they are received, when jobs are
received simultaneously.
Choices 001-100 (highest-lowest priority)
Default 001 (highest priority)
Notes In other words, you can give jobs received via the LocalTalk
interface priority over jobs received via the parallel or optional
serial interface.
QMS magicolor 2 Reference4-34

Consumables and Maintenance
Consumables and Maintenance
Identifying Black Toner Cartridge Replacement
Menu Operator Control/Consumables/It em Replac ed/K Toner
Purpose Allows you to spe cify that the black toner cartridge has been
replaced, which resets the consumables usage monitoring
system.
Choices No—The black toner cartridge hasn’t been repla ce d.
Yes—The black toner cartridge has been replaced.
Default Ye s
Notes To access consumables usage information, use the Operator
Control/Consumables/Print Statistics menu or the printer web
page.
If a partially used toner cartri dge is installed and the us age
information is reset, the monitoring system will provide
incorrect usage information.
Identifying Cyan Toner Cartridge Replacement
Menu Operator Control/Consumables/It em Replaced/C Toner
Purpose Allows you to specify that the cyan toner cartridge has been
replaced, which resets the consumables usage monitoring
system.
Choices No—The cyan toner cartridge hasn’t been replac ed.
Yes—The cyan toner cartridge has been replaced.
Default Ye s
Notes To access consumables usage information, use the Operator
Control/Consumables/Print Statistics menu or the printer web
page.
If a partially used toner cartri dge is installed and the us age
information is reset, the monitoring system will provide
incorrect usage information.
4-35Printer Configuration

Consumables and
Maintenance
Identifying Magenta Toner Cartridge Replacement
Menu Operator Control/Consumables/Item Replaced/M Toner
Purpose Allows you to specify that the magenta toner cartridge has
been replaced, which resets the consumables usage
monitoring system.
Choices No—The magenta toner cartridge hasn’t been replaced.
Yes—The magenta toner cartridge has been replaced.
Default Ye s
Notes To access consumables usage information, use the Operator
Control/Consumables/Print Statistics menu or the printer web
page.
If a partially used toner cartri dge is installed and the us age
information is reset, the monitoring system will provide
incorrect usage information.
Identifying Yellow Toner Cartridge Replacement
Menu Operator Control/Consumables/It em Replac ed/Y Toner
Purpose Allows you to specify that the yellow toner cartridge has been
replaced, which resets the consumables usage monitoring
system.
Choices No—The yellow toner cartridge hasn’t been replaced.
Yes—The yellow toner cartridge has been replaced.
Default Ye s
Notes To access consumables usage information, use the Operator
Control/Consumables/Print Statistics menu or the printer web
page.
If a partially used toner cartri dge is installed and the us age
information is reset, the monitoring system will provide
incorrect usage information.
QMS magicolor 2 Reference4-36

Consumables
and Maintenance
Identifying Fuser Replacement
Menu Administration/Consumables/Item Replaced/Fuser
Purpose Allows you to specify that the fus er has been replaced, which
resets the consumables usage monitoring system.
Choices No—The fuser hasn’t been replaced.
Yes—The fuser has been replaced.
Default Ye s
Notes To access consumables usage information, use the Operator
Control/Consumables/Print Statistics menu or the printer web
page.
Identifying Cleaning Roller Replacement
Menu Operator Control/Consumable s/I tem Replac ed/Cleaning Roller
Purpose Allows you to specify that the cleaning roller has been
replaced, which resets the consumables usage monitoring
system.
Choices No—The cleaning roller hasn’t been replaced.
Yes—The cleaning roller has been replaced.
Default Ye s
Notes To access consumables usage information, use the Operator
Control/Consumables/Print Statistics menu or the printer web
page.
If a previously used cleaning roller is installed and the usage
information is reset, the monitoring system will provide
incorrect usage information.
4-37Printer Configuration

Consumables and
Maintenance
Identifying Fuser Oil Replacement
Menu Operator Control/Consumables/Item Replaced/Fuser Oil
Purpose Allows you to specify that the fuser oil bottle has been
replaced, which resets the consumables usage monitoring
system.
Choices No—The fuser oil bottle hasn’t been replaced.
Yes—The fuser oil bottle has been replaced.
Default Ye s
Notes To access consumables usage information, use the Operator
Control/Consumables/Print Statistics menu or the printer web
page.
If a partially used fus er oil bottle is installed and the usage
information is reset, the monitoring system will provide
incorrect usage information.
Identifying OPC Belt Cartridge Replacement
Menu Operator Control/Consumables/It em Replaced/OPC Cartridge
Purpose Allows you to specify that the OPC belt cartridge has been
replaced, which resets the consumables usage monitoring
system.
Choices No—The OPC belt cartridge hasn’t been replaced.
Yes—The OPC belt cartridge has been replaced.
Default Ye s
Notes To access consumables usage information, use the Operator
Control/Consumables/Print Statistics menu or the printer web
page.
If a previously used OPC belt cartridge is installed and the
usage information is reset, the monitoring system will provide
incorrect usage information.
QMS magicolor 2 Reference4-38

Consumables
and Maintenance
Identifying Preventive Maintenance Service
120,000-Page Preventive Maintenance Service
Menu Administration/Consumables/PM Service/120K PM Service
Purpose Allows you to spe cify that preventive maintenance has been
performed on the printer after 120,000 pages have been
printed.
Choices No—Preventive maintenance hasn’t been perfor med.
Yes—Preventive maintenance has been performed.
Default Ye s
Notes To access consumables usage information, use the Operator
Control/Consumables/Print Statistics menu or the printer web
page.
If this option is reset without performing preventive
maintenance, the monitoring system will provide in correct
usage information.
20,000-Page Preventive Maintenance Service
Menu Administration/Consumables/PM Service/20K PM Service
Purpose Allows you to spe cify that preventive maintenance has been
performed on the prin ter after 20,000 pa ges h ave been printed.
Choices No—Preventive maintenance hasn’t been perfor med.
Yes—Preventive maintenance has been performed.
Default Ye s
Notes To access consumables usage information, use the Operator
Control/Consumables/Print Statistics menu or the printer web
page.
If this option is reset without performing preventive
maintenance, the monitoring system will provide in correct
usage information.
4-39Printer Configuration

Consumables and
Maintenance
Identifying Waste Toner Pack Replacement
Menu Operator Control/Consumables /It em Replac ed/Waste Toner
Pack
Purpose Allows you to specify that the waste toner pack has been
replaced, which resets the consumables usage monitoring
system.
Choices No—The waste toner pack hasn’t been replaced.
Yes—The waste toner pac k has been repl ac ed.
Default Ye s
Notes To access consumables usage information, use the Operator
Control/Consumables/Print Statistics menu or the printer web
page.
If a partially filled waste toner pack is in stalled and the usage
information is reset, the monitoring system will provide
incorrect usage information.
Resetting All Consumables Statistics Counters
Menu Administration/Consumables/Start Period
Purpose Allows you to reset all counters for the user-defined
consumables tracking period to 0.
Choices No—Don’t reset counters to 0
Yes—Reset counters to 0
Default No
Setting a Toner Out Action
Menu Administration/Engine/Toner Out Action
Purpose Allows you to configu re the printer eith er to conti nue printi ng or
x
to stop when an
message window.
Choices Continue, Stop
Default Continue
TONER LOW message is displayed in the
QMS magicolor 2 Reference4-40

Copies
Menu Operator Control/Copies
Purpose Allows you to specify the number of copies to be printed of all
subsequent print jobs.
Choices 001-999
Default 001
Notes It’s preferable to select the number of copies to print through
your application.
When the printer is turned off and then back on again, this
option automatically resets to 001.
Emulations
Copies
» Note:
To choose an emulation or ESP for a particular interface, use
the appropriate interface menu in the Administration/Communications
menu. Optional emulations appear only if installed.
Setting ESP Default Parameters
Menu Administration/Emulations/ESP Default
Purpose Sets the ESP default emulation used when ESP is unable to
identify the language of a print job.
Choices PostScript, PCL5c, HPGL, Lineprinter
» Note:
Default PCL5c
Optional emulations appear only if installed.
Setting PostScript Parameters
The PostScript menu allows you to select the color rendering dictionary
and the halftone type.
4-41Printer Configuration

Emulations
Color Rendering Dictionary
Menu Administration/Emulations/PostScript/Color Rendering
Purpose Selects a color render ing dictionary.
Choices Business, Colorimetric, Photogra phic
Default Photographic
Notes Because color printers have different gamuts (ranges of
predictable color) than other color devices (such as your
monitor), it’ s nec essary to tell th e printer ho w to print colors out
of its gamut. A color rendering dictionary (CRD) is software
that translate s device-independent color to its corresponding
device-dependent color value.
Setting PCL 5c Parameters
Default Font
Menu Administration/Emulatio n s/PCL5c/Default Font
Purpose Sets the default PCL 5c font.
Choices Courier12*, Courier12*Bold, Courier12*Italic,
Courier10*Bold, Courier10*Italic, Lineprinter, Times*,
Times*Italic, Times*Bold, Times*BldItalic, Univ*, Univ*Italic,
Univ*Bold, Univ*BldItalic, Univcond*, Univcond*Italic,
Univcond*Bold, Univcon d*BldItlc, Select By Index
Default Courier12
Notes Fonts with an asterisk “*” in their names are scalable. Their
default point si z e is set b y the Point Size X100 option.
Choosing Se lect B y Inde x as the def ault font selects the f ont by
the index number printed on the advanced status page and is
set through the Default Font Index option.
Courier10*,
» Note:
Lineprinter is a bitmap font with a fixed point size. Selecting a
bound, bitmap f ont o ver rides the def aul t settings for s ymbol set
and point size. An unbound font us es the specified default
symbol set if possible, and a sc al able font uses the d efault font
size.
You must use the Select By Inde x value to select an
Intellif ont.
QMS magicolor 2 Reference4-42

Emulations
Download Location
Menu Administration/Emulatio ns/PCL5c/Downld Location
Purpose Controls the default storage loc ati on of PCL obj ects (fonts,
macros, and patterns) when it is not otherwise spe cified
through QMS Document Option Commands (DOCs).
Choices Disk
Default Memory
Notes » Note:
—All downloaded PCL objects are stored in the default
disk resource, if present.
Memory—All downloaded PCL object s are stored in tempor ary
storage in RAM.
Before do wnlo ading any fonts, macros, or patte rns,
ensure that the printer has enough memory to do the
download.
Document Option Commands (DOCs) specifying resources
override this option on a per-job basis.
If this option is set to Disk and no hard disk is insta lled,
memory is used as the default storage location.
If the printer has both a hard disk and a large amount of
memory , sett ing this opti on to Memory enhances printer
performance.
Symbol Set
Menu Administration/Emulations/PCL5c/Symbol Set
Purpose Selects the default PCL 5c symbol set.
Choices Roman-8, ISO Latin 1, ISO Latin 2, ISO Latin 5, PC-8 US, PC-
8 DN, PC-850, PC-852 (Latin 2), PC-8 TK, Windows 3.1 Latin
1, Windows 3.1 Latin 2, Windows 3.1 Latin 5, Desktop, PS
Text, Venture-Intl, Venture-US, Microsoft Pub, Math 8, PS
Math, V en tur a Math, PI Fo nt, Leg al, ISO-4, ISO-6, ISO-11,
ISO-15, ISO-17, ISO-21, ISO-60, ISO-69, Windows 3.0 (Latin
1), MC-Text
4-43Printer Configuration

Emulations
Default Roman-8
Notes Not all symbol sets are available with certain resident fonts. In
Lines Per Inch
Menu Administration/Emulations/PCL5c/Lines/Inch X100
Purpose Sets the default lines printed per inch in PCL jobs , regardl es s
Choices 0100 to 4800 (lines/inch x 100)
Default 0600 (lines/inch x 100)
Notes You must enter the number of lines per inch times 100. For
particular, the Desktop, PS Math, Math 8, Microsoft Pub, Pi
Font, PS Text, Ventura Intl, Ventura Math, Ventura US, and
Windows symbo l sets ca nnot be us ed wit h the resid ent bitmap
lineprinter font.
If a mismatch between symbol set and fonts occurs, the
standard PCL f ont selecti on mechanis m is used to loc ate a fo nt
that matches the se lecte d symb ol set. Wi th the stan dard set of
fonts distributed for your printer, this matches the Times* font,
but other user-installed fonts could change this result.
of page size.
example, 6 lines per inch is entered as 600; 6.6 lines per inch
is entered as 660.
Line Termination
Menu Administration/Emulatio n s/PCL5c/Line Termination
Purpose Indicates the default line termination mode. This setting
specifies the treatment of line feeds and carriage returns.
Choices CR=CR LF=LF
CR=CR+LF LF=LF
CR=CR LF=CR+LF
CR or LF=CR+LF
Default CR=CR LF=LF
QMS magicolor 2 Reference4-44

Emulations
Point Size x 100
Menu Administration/Emulatio ns/PCL5c/Point Size x100
Purpose Sets the point size for scalable def aul t fonts increments of .01
point. For example, a 24 point default point size is selected by
entering 2400. The smallest increment allowed in point size is
.25 point. For example, 8.5 point and 8.75 point fonts are
allowed, but 8.6 point is not.
Choices 00025-99975 (0.25-999.75 points)
Default 01200 (12 points)
Notes If the font is not scalable or if a bitmap font is specified, the
setting is ignored.
Retain Temporary
Menu Administration/Emulatio n s/PCL5c/Retain Temporary
Purpose Allows you to cont rol the PCL 5 c print en viro nment acros s print
jobs.
Choices On—Resets PCL to its default state at the end of each PCL
print job. Temporary fonts, macros, and patterns from
previous PCL jobs are retained in memory after the print
job has complete d. You can rec all these do wn loaded f on ts,
macros, or patterns from within your PCL file witho ut
having to download them again.
Off—Resets PCL to its default state at the end of each PCL
print job, executes an implicit <ESC>E at the start and end
of the job, and deletes any temporary fonts, macros, and
patterns.
On Compatibility—Retains the entire state of PCL as well as
the temporary macros, fonts, and patterns from previous
PCL jobs when jobs of other emulations are printed
between PCL jobs.
4-45Printer Configuration

Emulations
Default Off
Notes A retained state is cleared if you do any of the following:
Default Font Index
n Explicitly clear the PCL state by sending an <ESC>E or
Printer Job Language.
n Turn off the printer. (Note that if Retain Temporary is set to
On or On Compatibility and pow er is turned off and back on
again, all temporary objects on the disk’s standard
resource will become permanent. RAM-based temporary
objects are lost).
n Change any PCL front panel option.
n Send any PCL-specific DOC commands (except the DOC
emulation command).
n Send a PCL job from a different communications port. For
example, the state set up by a PCL job using the parallel
port is cleared if a subsequent PCL job arriv es at the se rial
port.
Menu Administration/Emulatio n s/PCL5c/Default Font Idx
Purpose Sets the default font if the default font is set to Select By Index
Choices 00000 to 32767
Default 00000
Note The index number can be obtained on the advanced status
page. See “Printing a Status Page” on page 4-78 for status
page details.
QMS magicolor 2 Reference4-46

Emulations
Monochrome GL/2
Menu Administration/Emulations/PCL5c/Monochrome GL/2
Purpose Allows the printer to emulate a monochrome or color plotter.
Choices On—Sets the printer to monochrome (2 pen).
Off—Sets the printer to color (8 pen). Sin ce a monochrome
print system has two pen colors only (bla ck and white),
grayscale patterns are substituted for other colors. The
printer maps each pen to its assigned color, then converts
the color to a grayscale using the National Television
System Committee (NTSC) color standard for luminosity
coefficients (Additive System): Y = .3R + .59G + .11B
Examples on How to Use the Color Standard Formula
White Y = [(1*0.3) + (1*0.59) + (1*0.11)]—100% gray
Black Y = [(0*0.3) + (0*0.59) + (0*0.11)]—0% gray
Red Y = [(1*0.3) + (0*0.59) + (0*0.11)]—30% gray
Green Y = [(0*0.3) + (1*0.59) + (0*0.11)]—59% gray
Yellow Y = [(1*0.3) + (1*0.59) + (0*0.11)]—89% gray
Blue Y = [(0*0.3) + (0*0.59) + (1*0.11)]—11% gray
MagentaY = [(1*0.3) + (0*0.59) + (1*0.11)]—41% gray
Cyan Y = [(0*0.3) + (1*0.59) + (1*0.11)]—70% gray
Default On
Pen Color Defaults
Pen 0 = White Pen 1 = Black
Pen 2 = Red Pen 3 = Green
Pen 4 = Yell ow Pen 5 = Blue
Pen 6 = Magent a Pen 7 = Cyan
4-47Printer Configuration

Emulations
Setting HP-GL Parameters
Enhanced Mode
Menu Administration/Emulations/HPGL/Enhanced Mode
Purpose Increases the resolution of the g rid for downloade d chara cters .
The HP-GL UC (User-define d Charac ter) command al lows y ou
to download and draw characters using an encoding scheme
consisting of sequences of pen control movements and
coordinate sequ ences. T he characters are drawn o n a grid that
is superimposed on the
character plot cell.
Choices On—Standard resolution for fixed- and variable-spaced fonts
Default Off
Expand Mode
(4x8 grid).
Off—Enhanced resolut ion for v a riab le -spaced fonts (26x36
grid).
Menu Administration/Emulations /HPGL/Ex pa nd Mo de
Purpose Defines a larger imageabl e area which affects the default
placement of the scaling points P1 and P2.
Choices On—Turn on expand mode
Off—Use default scaling points, plotting range, and plotting area.
Default Off
Notes The available range of plotter units for a particular media size
is only partially d etermined by s etting the Expand Mode to On.
When the printer/plott er sense s the medi a size it aut omatic ally
sets the hard clip limit to 15mm on three sides and 39 mm on
the fourth. If Expand Mode is On, then the hard clip lim its are
set to 5mm on three sides and 29 mm on the fourth side. This
is what allows you to define a larger imageable area.
The HP-GL emulatio n senses the media type if the paper type
is set to Retain Scale. It is also pos si ble to hav e the HP- GL
emulation use a pa rticular media si ze b y settin g Original P a per
Type through the control pa nel or by using a Document Option
Command.
QMS magicolor 2 Reference4-48

Emulations
Paper Type
Menu Administration/Emulations/HPGL/Paper Type
Purpose Identifies the original image’s paper size.
Choices A—(8.5''x 11''—216 x 279 mm),
A0—(33.11'' x 46.81''—841 x 1189 mm)
A1—(23.39'' x 3.11''—594 x 1189 mm)
A2—(16.54'' x 23.29''—420 x 594 mm)
A3—(11.69'' x 16.54''—297 x 420 mm)
A4—(8.27'' x 11.69''—210 x 297 mm)
B—(11'' x 17''—279 x 432 mm)
C—(17'' x 22"—431.80 x 558.80 mm)
D—(22'' x 34''—558.80 x 863.60 mm)
E—(34'' x 44''—863.60 x 1117.60 mm)
C ARCH
D ARCH
E ARCH
Retain Scale
Default Retain Scale
Pen 1—Pen 8
x
Menu Administration/Emulations/HPGL/Pen
Purpose Sets the width and color for the eight plotter pens. Each pen
has a width and a color option available.
Choices 00-60 (0.0-6.0 mm)
Default Pen 1—07 (0.7 mm)
Pen 2 —03 (0.3 mm)
Pen 3 —03 (0.3 mm)
Pen 4 —03 (0.3 mm)
Pen 5 —03 (0.3 mm)
Pen 6 —03 (0.3 mm)
Pen 7 —03 (0.3 mm)
Pen 8 —03 (0.3 mm)
Note A choice of 0 defaults to a pixel of “1”.
/Width (x = pen no.)
4-49Printer Configuration

Emulations
Menu Administration/Emulations/HPGL/Pen x/Color (x = pen no.)
Choices Black, Blue, Brown, Cyan, Gray-25%, Gray-50%, Gray-75%,
Default Pen 1—Black (100% black)
Notes See chapter 5, “Additional Technical Information,” for more
Plotter
Menu Administration/Emulations/HPGL/Plotter
Purpose Identifies the HP-GL plotter type.
Choices 7470A, 7475A, 7550A, Colorpro, DraftMaster
Default 7550A
Notes DraftMaster supports architectural and engineering paper
Green, Magenta, Orange, Red, Violet, Yellow
Pen 2 —Black (100% black)
Pen 3 —Red (70% black)
Pen 4 —Green (41% black)
Pen 5 —Blue (89% black)
Pen 6 —Violet (59% black)
Pen 7 —Orange (25.8% black)
Pen 8 —Brown (50% black)
information on the HP-GL emulation color encoding equation.
sizes (for example, A to E and Arch A to Arch E). These paper
sizes describe a mapping to the physical paper. This mapping
is a scaling factor (or a size ratio) between the chosen paper
size and the ph ys ic al pap er size in the defa ult inputbin. F o r
example , if A3 is select ed (si z e 11.69''x1 6.54'') for paper size
and the physical paper size in the default inputbin is A4
(8.27''x11.69''), then the plot is scaled by a factor of 2.
Scaling Percent
Menu Administration/Emulations/HPGL/Scaling Percent
Purpose Identifies the percentage to reduce or enlarge an image.
Choices 001-150 (percent)
QMS magicolor 2 Reference4-50

Emulations
Default 100 (percent)
Notes To scale plots, select the paper size originally used for the plot
in the Paper Type menu and then enter the reduction or
enlargement needed to fit the plot on the new page in the
Scaling Percent menu.
Setting Line Printer Parameters
Autowrap
Menu Administration/Emulations/Line Printer/Autowrap
Purpose Indicates whether long line s are to be wrap ped to the ne xt line
instead of being truncated.
Choices On—Wrap long lines.
Off—Truncate long lines.
Default On
Character Map
Menu Administration/Emulations/Line Printer/Character Map
Purpose Specifies the type of character map to be used.
Choices ASCII, EBCDIC
Default ASCII
CR IS CRLF
Menu Administration/Emulations/Line Printer/CR IS CRLF
Purpose Stipulates whether each carriage return (CR) in the print job is
translated to a carriage return/line feed (CRLF) combination.
Choices On—Translate all carriage returns to line feeds.
Off—Use carriage returns only as carriage returns.
Default Off
4-51Printer Configuration

Emulations
FF is CRFF
Menu Administration/Emulations/Line Printer/FF IS CRFF
Purpose Stipulates whether each form feed (FF) in the print job is
Choices On—Translate all form feeds to carriage return/form feed
Default On
Font
Menu Administration/Emulations/Line Printer/Font
Purpose Sets the printer fonts for the current print job. Any PostScript
Choices All printer-resident PostScript fonts.
Default Courier
translated to a carr iage return/form feed (CRFF) combination.
combinations.
Off—Use form feeds only as form feeds.
fonts available on the printer can be used. To see a list of
availa ble PostScript fonts, print an advanc ed status page.
LF is CRLF
Menu Administration/Emulations/Line Printer/LF IS CRLF
Purpose Stipulates whether each line feed (LF) in the pr int job is
translated to a carriage return/line feed (CRLF) combination.
Choices On—Translate all li ne feeds to carriage return/line feed
combinations.
Off—Use line feeds only as line feeds.
Default On
Line Numbering
Menu Administration/Emulations/Line Printer/Line Numbering
Purpose Specifies that a five-digit number is to be prefi xed to each line.
Choices On—Number all lines.
Off—Don’t number lines.
Default Off
QMS magicolor 2 Reference4-52

Emulations
Lines Per Page
Menu Administration/Emulations/Line Printer/Lines per Page
Purpose Specifies the number of lines printed on a page before an
automatic page eject. Interline spacing is set to the selected
point size. Logical pages consisting of more lines than
specified are split into multiple pages.
Choices 001-128
Default 087
Margins
Menu Administration/Emulations/Line Printer/Margins
Purpose Defines the left, right, top, and bottom margins in 1/7200 "
increments.
Choices Left 00000-79200 (0''-11.00'')
Default Left 00000
Note The margins are in 1/7200 increments (79200 is 11.00'' at
Right 00000-79200 (0''-11.00'')
Top 00000-79200 (0''-11.00'')
Bottom 00000-79200 (0''-11.00'')
Right 00000
Top 00000
Bottom 00000
7200'' increments).
Orientation
Menu Administration/Emulations/Line Printer/Orientation
Purpose Specifies whether text and graphics are placed on the page in
a portrait or landscape orientation.
Choices Portrait, Landscape
Default Portrait
4-53Printer Configuration

Engine
Point Sz 100ths
Menu Administration/Emulations/Line Printer/Point Sz 100ths
Purpose Sets the five-digit va lue used to spe ci fy the point size of the
Choices 00000-99999
Default 00880 (8.8 points)
Tab Stops
Menu Administration/Emulations/Lineprinter/Tab Stops
Purpose Specifies the number of spaces between tab stop s.
Choices 000-256
Default 008
Engine
font for the current print job.
Adjusting the Image Alignment
To check image alignment, print a standard status page. When the
printer is placing images properly, the alignment angle bar in the
lower-left corner of the status page is 0.5"/12.7 mm from the left and
bottom edges of the page. If the angle bar is off, use the Administration/Engine/Image Alignment menu to align the image horizontally
and vertically in pixel increments (1/300" or 0.08 mm).
» Note:
Engine constraints may limit the accuracy of pixel alignment.
QMS magicolor 2 Reference4-54

Engine
Horizontal Offset
Menu Administration/Engine/Image Alignment/Horiz Offset
Purpose Adjusts the horizontal placement of the image on the page.
Choices 000-300 (0.00"/0 mm-1.00"/25.4 mm)
Default 100 (0.33"/.84 mm)
Notes Values above 100 move the image to the right.
Va lu es bel o w 100 move the image to the left.
Vertical Offset
Menu Administration/Engine/Image Alignment/Vertical Offset
Purpose Adjusts the vertical placement of the image on the page.
Choices 000-300 (0.00"-1.00")
Default 100 (0.33"/.84 mm)
Notes Values above 100 move the image down.
Va lu es below 100 move the image up.
Setting a Default Resolution
Menu Administration/Engine/Def Resolution
Purpose Sets the default printer resoluti on.
Choices 300 dpi—300x300 dpi resolution
600 dpi—600x600 dpi resolution
1200 dpi—1200x600 dpi resolution
2400 dpi—2400x600 dpi resolution
Default 600 dpi, 1200 dpi, or 2400 dpi—your printer’s default is the
highest resolution available for the amount of RAM installed in
the printer
4-55Printer Configuration

Engine
Notes If you want the printer to use a lower default resolution when
you restore defaults, set this option to your choice (and make
any other necessary configuration settings), and then use the
Administration/Miscellaneous/Save Defaults menu to save
your custom defaults. See “Working with Custom
Configurations” on page 4-13 for more information.
In addition, after you lower the default resolution, you should
reconfigure the printer me mo ry (Administr a tio n/Memory/Quick
Config menu) to distrib ute it better f or tha t particular resolu tion.
For example, if you set the default resolution to 600 dpi when
your printer has enoug h memory to print at 2400 dpi, the frame
buffer remains configured f o r 2400 dpi, which means that
printer memory that could be better used somewhere else is
being wasted.
Using Page Recovery
Menu Administration/Engine/Page Recovery
Purpose Enables or disables page recovery.
Choices On—Reprints a print job from the page on which the jam or
error occurred.
Off—Don’t reprint a print job when a jam or error occurs.
Default On
Setting Energy Conservation
Menu Administration/Engine/Energy Saver
Purpose Sets the length of inactiv ity bef ore th e prin ter chan ge s to a lo w-
power state (the engine remains on, but the fuser turns off).
Choices 15 minutes, 30 minutes, 1 hour, 2 hours, 3 hours—Idle time
before activation of low-power state.
Off—Use normal power all the time.
Default 1 hour
Notes When a print job is received, the printer returns to normal
power within 90 seconds.
QMS magicolor 2 Reference4-56

Engine
Downloading a New System Image
Menu Administration/Miscellaneous/New System Image
Purpose Updates the printer’s system software.
Choices Yes, No
Default No
Notes Refer to the
this option.
Options
manual f or co mplete information on using
Setting the Time-of-Day Clock
Menu Administration/Miscellaneous/Set Clock
Purpose Allows you to set the printer’s optional time-of-day clock
Choices Current Value:
Enter Value:
Default Current date and time
Example SAT 11 OCT 1997 13:00:00
Notes This menu doesn’t appear unless the optional time-of-day
clock is installed.
DAY ## MONTH
19xx hh:mm:
ss
Menu Administration/Miscellaneous/Adjust Clock
Purpose Allows you to adjust the speed of the pr inter’s optional time-of-
day clock.
Choices -155 Sec/Month to +155 Sec/Month (in 5 second/month
intervals)
Default 0 Sec/Month
Notes This menu doesn’t appear unless the optional time-of-day
clock is installed.
4-57Printer Configuration

Engine
Adjusting the Color Density
This feature gives you the ability to control the toner density. To check
the image density, print a Calibration Page (Administration/Special
Pages/Calibration) and compare it to the Calibration Card that was
provided with your printer. If any of the color panels on the Calibration
Page does not match the color on the Calibration Card, use the
Administration/Engine/Density menu to adjust the color density. Ref er
to the “Color Density” section of chapter 4, “Color Printing,” in the
Operation
manual for detailed instructions on adjusting color density.
» Note:
This menu is available only on engines with the latest 1-3
engine ROM. It is not available on older engines. Refer to the “Color
Density Problems” section of chapter 8, “Troubleshooting Printer
Problems,” in the Operation manual for instructions on how to
determine if your printer has the latest 1-3 engine ROM.
Yellow
Menu Administration/Engine/Density/Yellow
Purpose Allows you to adjust the yellow color density.
Choices -4 to 4
Default 0
Notes Values above 0 increase the yellow color density.
Values below 0 decrease the yellow color dens ity.
Magenta
Menu Administration/Engine/Density/Magenta
Purpose Allows you to adju st the magenta color density.
Choices -4 to 4
Default 0
Notes Values above 0 increase the magenta color density.
Values below 0 decrease the magenta color density.
QMS magicolor 2 Reference4-58

Media Input
Cyan
Menu Administration/Engine/Density/Cyan
Purpose Allows you to adju st the cyan color density.
Choices -4 to 4
Default 0
Notes Values above 0 increase the cyan color density.
Values below 0 decrease the cyan color density.
Black
Menu Administration/Engine/Density/Black
Purpose Allows you to adjust the black color density.
Choices -4 to 4
Default 0
Notes Values above 0 increase the bla ck color density.
Values below 0 decrease the black color density.
Media Input
Selecting a Media Cassette
Menu Operator Control/Inputbin
Purpose Allows you to select the default cassette (inputbin) from which
print media is pulled.
Choices Upper—The standard cassette.
Optional—The optional lower inp ut feeder.
Default Upper
4-59Printer Configuration

Media Input
Chaining Media Cassettes
Menu Operator Control/Chain Inputbins
Purpose Allows you to “chain” cassettes (inputbins) so that when the
first cassette empties, the printer automatically draws media
from the other cassette.
Choices On—Switch to the next cassette with the same siz e and type of
media when the defau lt cas sette is empty.
» Note:
Off—Don’t switch cassettes; use only the default cassette.
On Any—Switch to the next cassette with any size and type of
Default On
Make sure the two cass ettes use the same size
media.
media when the defau lt cas sette is empty.
Naming Media Cassettes
Upper (Standard) Cassette
Menu Administration/Engine/Inputbin 1 Name
Purpose Allows you to give the upper (standard) cassette a more
descriptive name.
Choices Up to 16 alphanumeric characters
Default Upper
Note This name is displayed in the printer message w indow, where
appropriate. You can also use it with QMS Document Opti on
Commands (DOCs).
QMS magicolor 2 Reference4-60

Media Input
Lower Input Feeder
Menu Administration/Engine/Inputbin 1 Name
Purpose Allows you to give the optional lower input feeder a more
descriptive name.
Choices Up to 16 alphanumeric characters
Default Optional
Note This menu appears only if the optional lower input fee der is
installed.
This name is displayed in the printer mess age window, where
appropriate. You can also use it with QMS Document Opti on
Commands (DOCs).
Selecting a Media Size
Custom Media Size—Upper (Standard) Cassette
Menu Operator Control/Custom Bin/Upper
Purpose Specifies the media size if it is some thing oth er than A4, Legal,
or Letter (the typical sizes the casse ttes expect)
Choices A5, B5 ISO, DL Envelope, Folio, None, SP Folio, Statement,
UK Quarto, Universal
Default None
Notes Choose None if you’re using A4, B5 JIS, Com 10, Executive,
Foolscap , Legal, or Lette r size media. The p rinter automati cally
senses these media sizes.
If you choose any size other than None, t he printable area for
the media in the cassette is set to the med ia size s ele cted. For
example, if you’re using a letter/A4 ca ssette but choose A5 in
this menu, the cassette is seen by the printer as an A5
cassette, and the imageable area is set accordingly.
Choose Universal if you’re printing on any unl is ted med ia s ize.
4-61Printer Configuration

Media Input
Custom Media Size—Optional Lower Input Feeder
Menu Operator Control/Custom Bin/Optional
Purpose Specifies the media siz e if it is so mething oth er than A4, Legal,
Choices B5 ISO, Folio, None, SP Folio, UK Quarto, Universal
Default None
Notes Choose None if you’re using A4, B5 JIS, Executive, Foolscap,
Default Media Size
or Letter (the typical sizes the casse ttes expect)
Legal, or Letter size media. The printer automatically senses
these media size s.
If you choose any size other than None, the printable area for
the media in the cassette is set to the med ia size s ele cted. For
example , if y ou’ re using a lette r/A4 casset te bu t choos e F olio in
this menu, the cassette is seen by the printer as a Folio
cassette, and the imageable area is set accordingly.
Choose Universal if you’re printing on any unl is ted med ia s ize.
Menu Administration/Engine/Default Paper
Purpose Specifies the media size when the defau lt cassette (inp utbin) is
missing and there’s no way for the print engine to sense the
media size automatically.
Choices Letter, A4
Default Letter
QMS magicolor 2 Reference4-62

Media Orientation
Selecting a Media Type
Upper (Standard) Cassette
Menu Operator Control/Media/For Uppe r Bin
Purpose Allows you to specify the ty pe of media in th e upper (st and ard)
cassette so the printer can optimiz e outp ut for that media type .
Choices Automatic—For printing on either paper or transparencies (th e
printer automatically senses which is in the cassette).
Thick Stock—For printing on stock thicker than normal paper.
Default Automatic
Lower Input Feeder
Menu Operator Control/Media/For Op tio nal Bin
Purpose Allows you to spe cify the type of media in the optional lower
input feeder so the printer can optimize output for that media
type.
Choices Automatic—For printing on either paper or transparencies (th e
printer automatically senses which is in the cassette).
Thick Stock—For printing on stock thicker than normal paper.
Default Automatic
Media Orientation
Menu Operator Control/Orientation
Purpose Allows you to set the orientation of the printed document.
Choices Portrait—Vertical orientation
Landscape—Horizontal orientation
Default Portrait
Notes The orientation of the print media is usually set in your
application.
4-63Printer Configuration

Media Output
Media Output
Naming the Output Bin
Menu Administration/Engine/O utputbin Name
Purpose Allows you to name the outputbin.
Choices Up to 16 alphanumeric characters
Default Upper
Note This name is displayed in the printer message w indow, where
appropriate. You can also use it with QMS Document Opti on
Commands (DOCs).
Memory
This submenu allows you to allocate the printer’s memory (RAM)
among the various memory clients. The flexibility of defining memory
available to clients allows experienced users to optimize the printer's
performance according to a given set of conditions.
This section briefly describes each of the memory submenus and the
memory clients. See chapter 5, “Additional Technical Information,” for
more detailed information on the printer’s memory and what benefits,
if any, may result from adding memory to each client.
To find out how memory is currently allocated to each memory client,
print a status page or check each client individually in the configuration menu.
QMS magicolor 2 Reference4-64

Quick Configuration
Memory
» Note:
The Quick Config menu appears only if there is no hard disk
installed in the printer or if the Administration/Memory/Enable Disk
Swap option is turned off.
Menus Administration/Memory/Quick Config/300 dpi
Administration/Memory/Quick Config/600 dpi
Administration/Memor y/Quick Config/1200 dpi
Administration/Memory/Quick Config/2400 dpi
Purpose Configures the memory clients to the settings which allow the
printer to perform best for each resolution.
Choices Legal, Letter/A4
Notes The printer is automati cally restarted after this menu change.
The results of Quick Config depend on the amount of memory
installed, the resolution used for printing, and the media size.
Under the Quick Config option documented on the advanced
status page y o u wi ll s ee "****". This option isn’t user-definable.
Quick Config configures memory depending only on the
resolution and paper size.
4-65Printer Configuration

Memory
Disk Swapping
Disk swapping gives your pr inter virtual memory capability for all
memory clients through the creation of a “swap file” on the printer’s
hard disk. The printer uses this file as an extension of its memory. As
the physical RAM fills, the printer can swap the contents to the hard
disk file to allow more space. This file swapping between disk and
RAM occurs at various times throughout the printing process and is
completely transparent.
» Note:
The printer must have a hard disk to take advantage of this
feature. If there is no hard disk installed, this menu does not appear.
Menu Administration/Me mo ry/Enable Disk Swap
Purpose Enables or disables disk swapping.
Choices Off—Don’t enable disk swapping.
On—Enable disk swapping.
Default On
Notes If disk sw apping is enab led an d the hard di sk is re mov ed or not
turned on, the printer automatically resets to the factory
defaults.
The printer must be restarted for changes to the Enable Disk
Swap and other memory menus to take effec t. You can either let
the printer restart automatically after you save the change and
exit from the configuration menu, or y ou can wa it fo r the change
to take effect the next time you manually turn on the printer.
QMS magicolor 2 Reference4-66
 Loading...