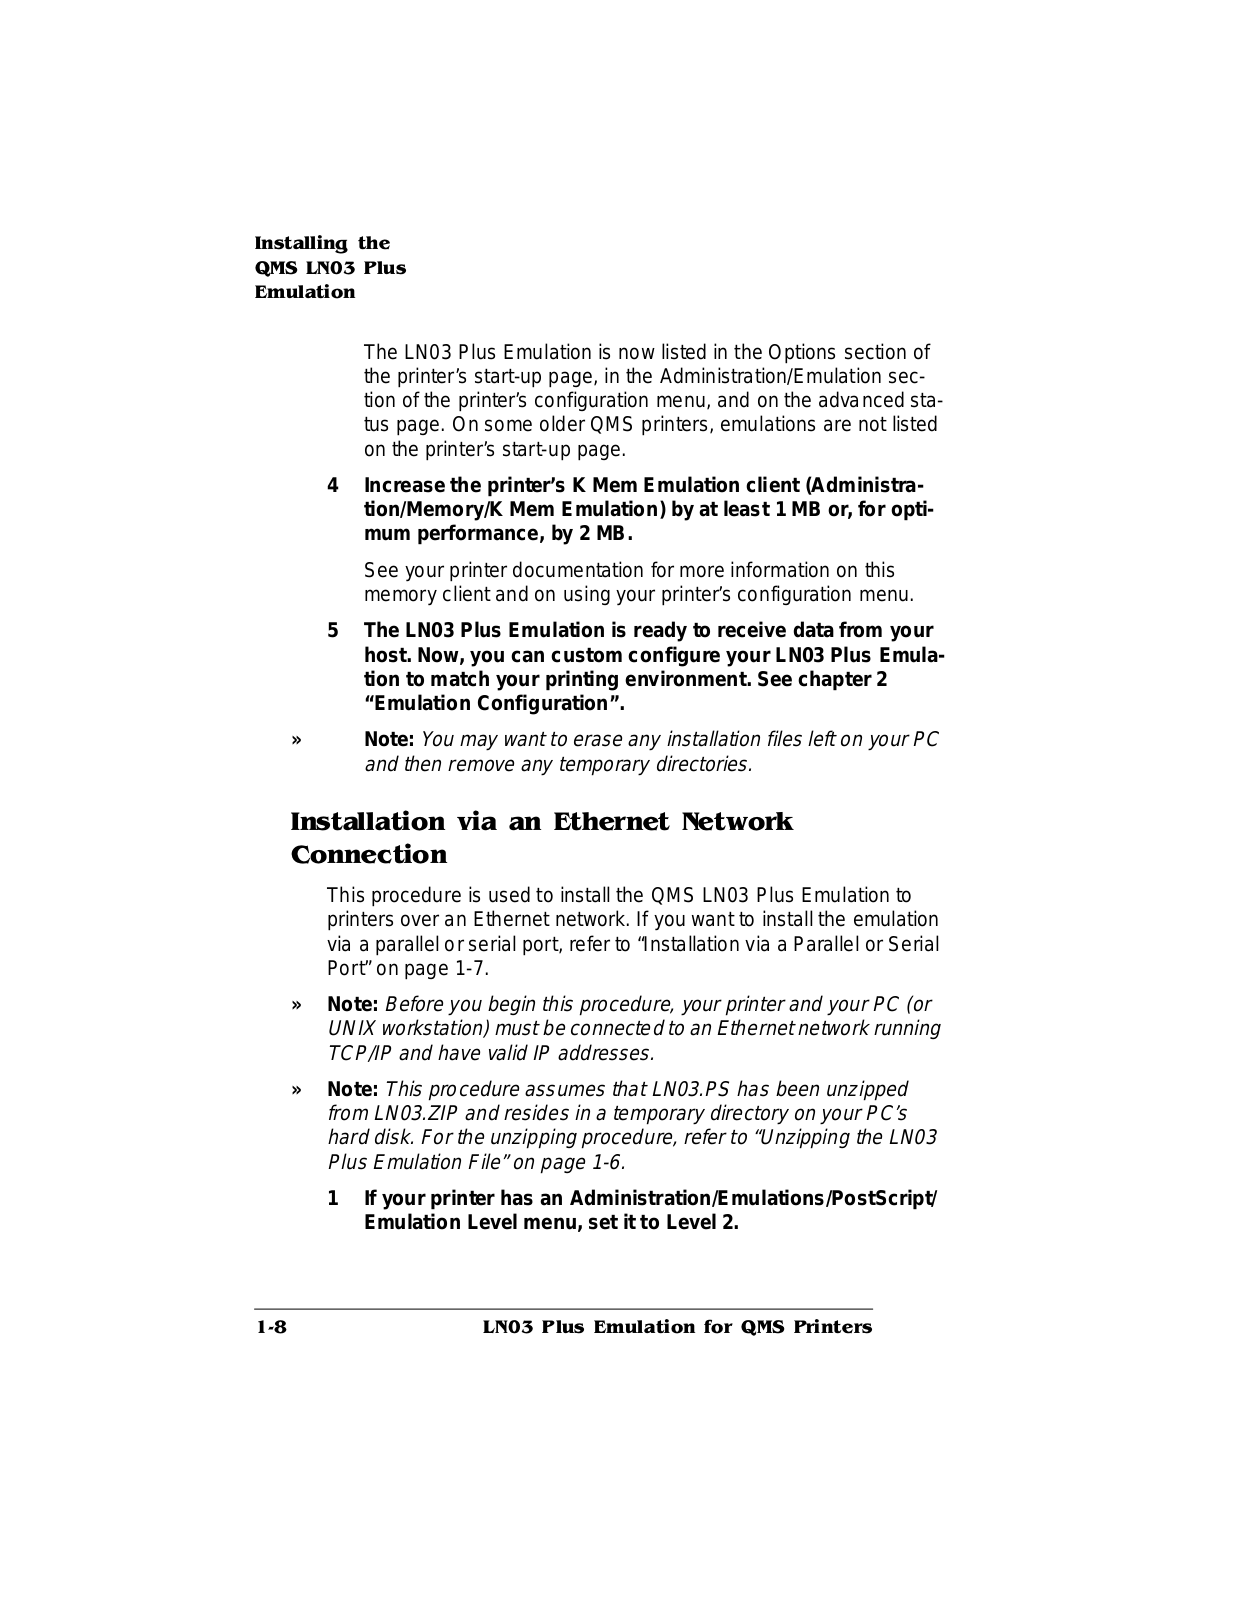
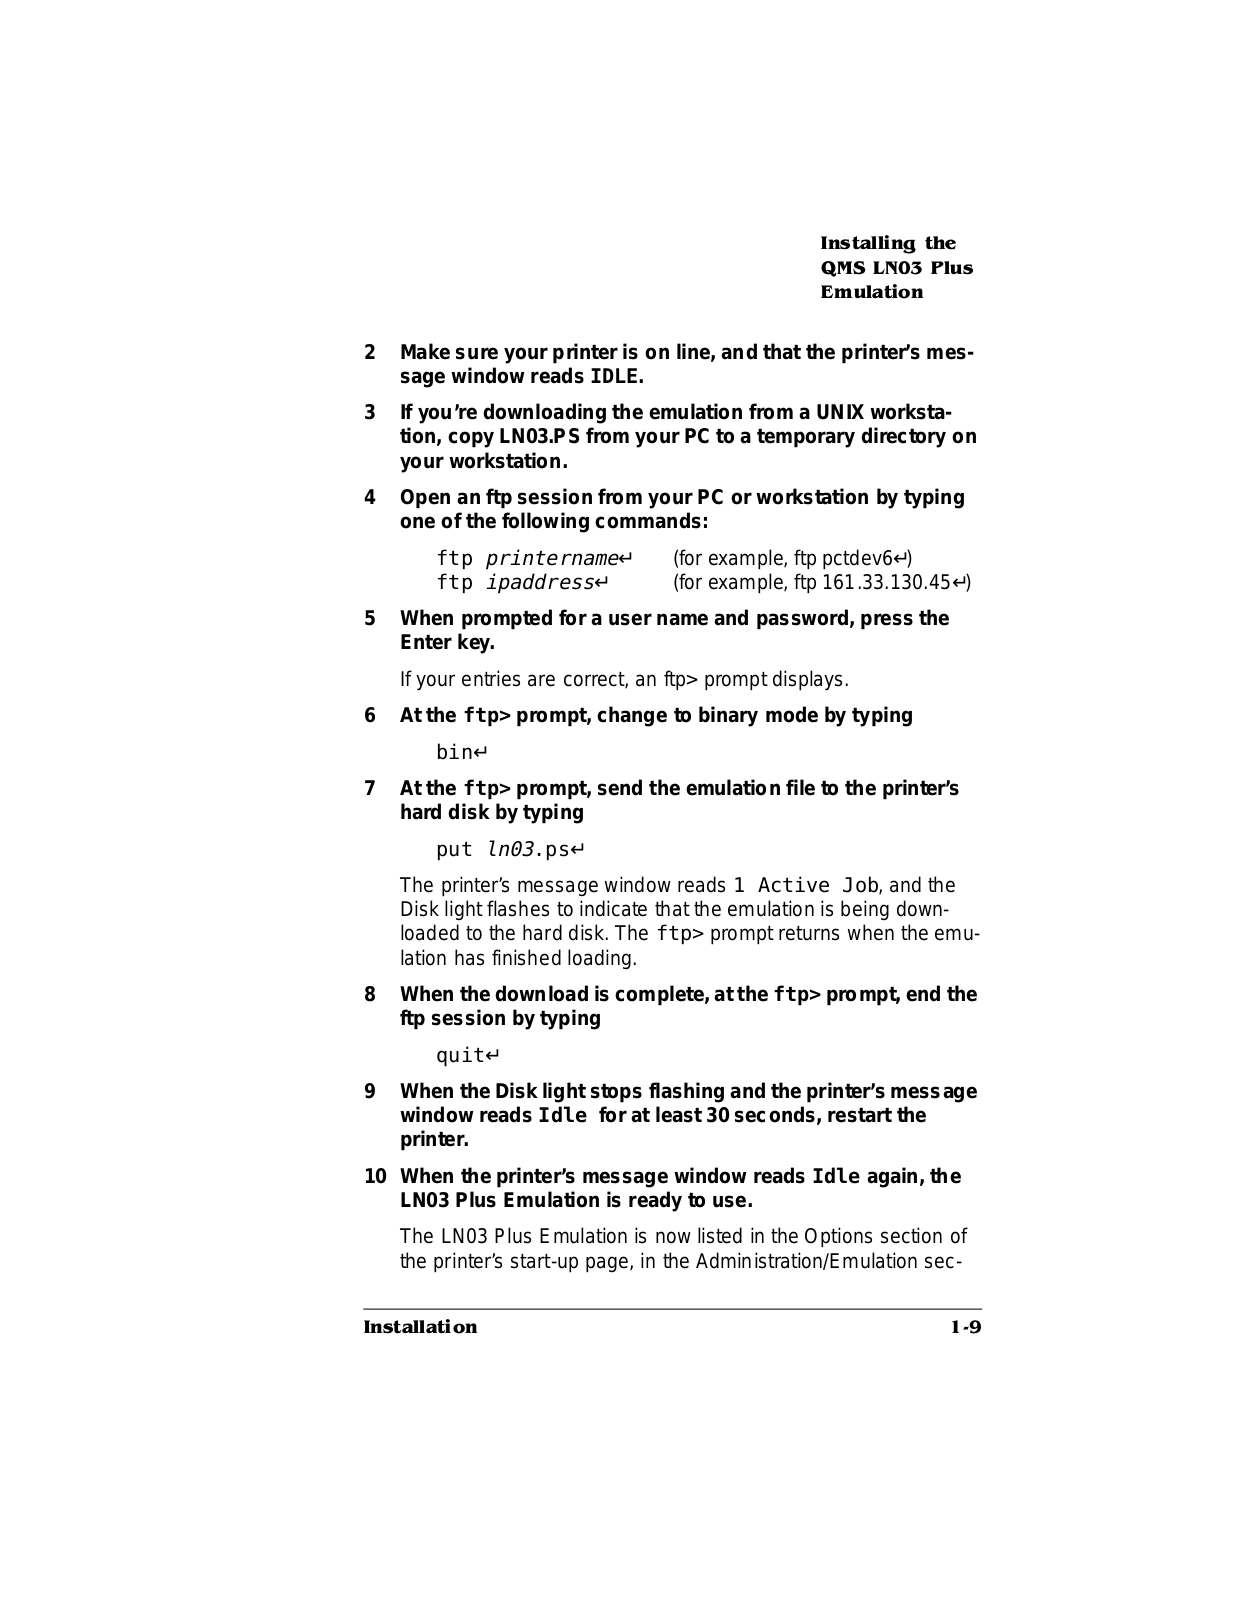
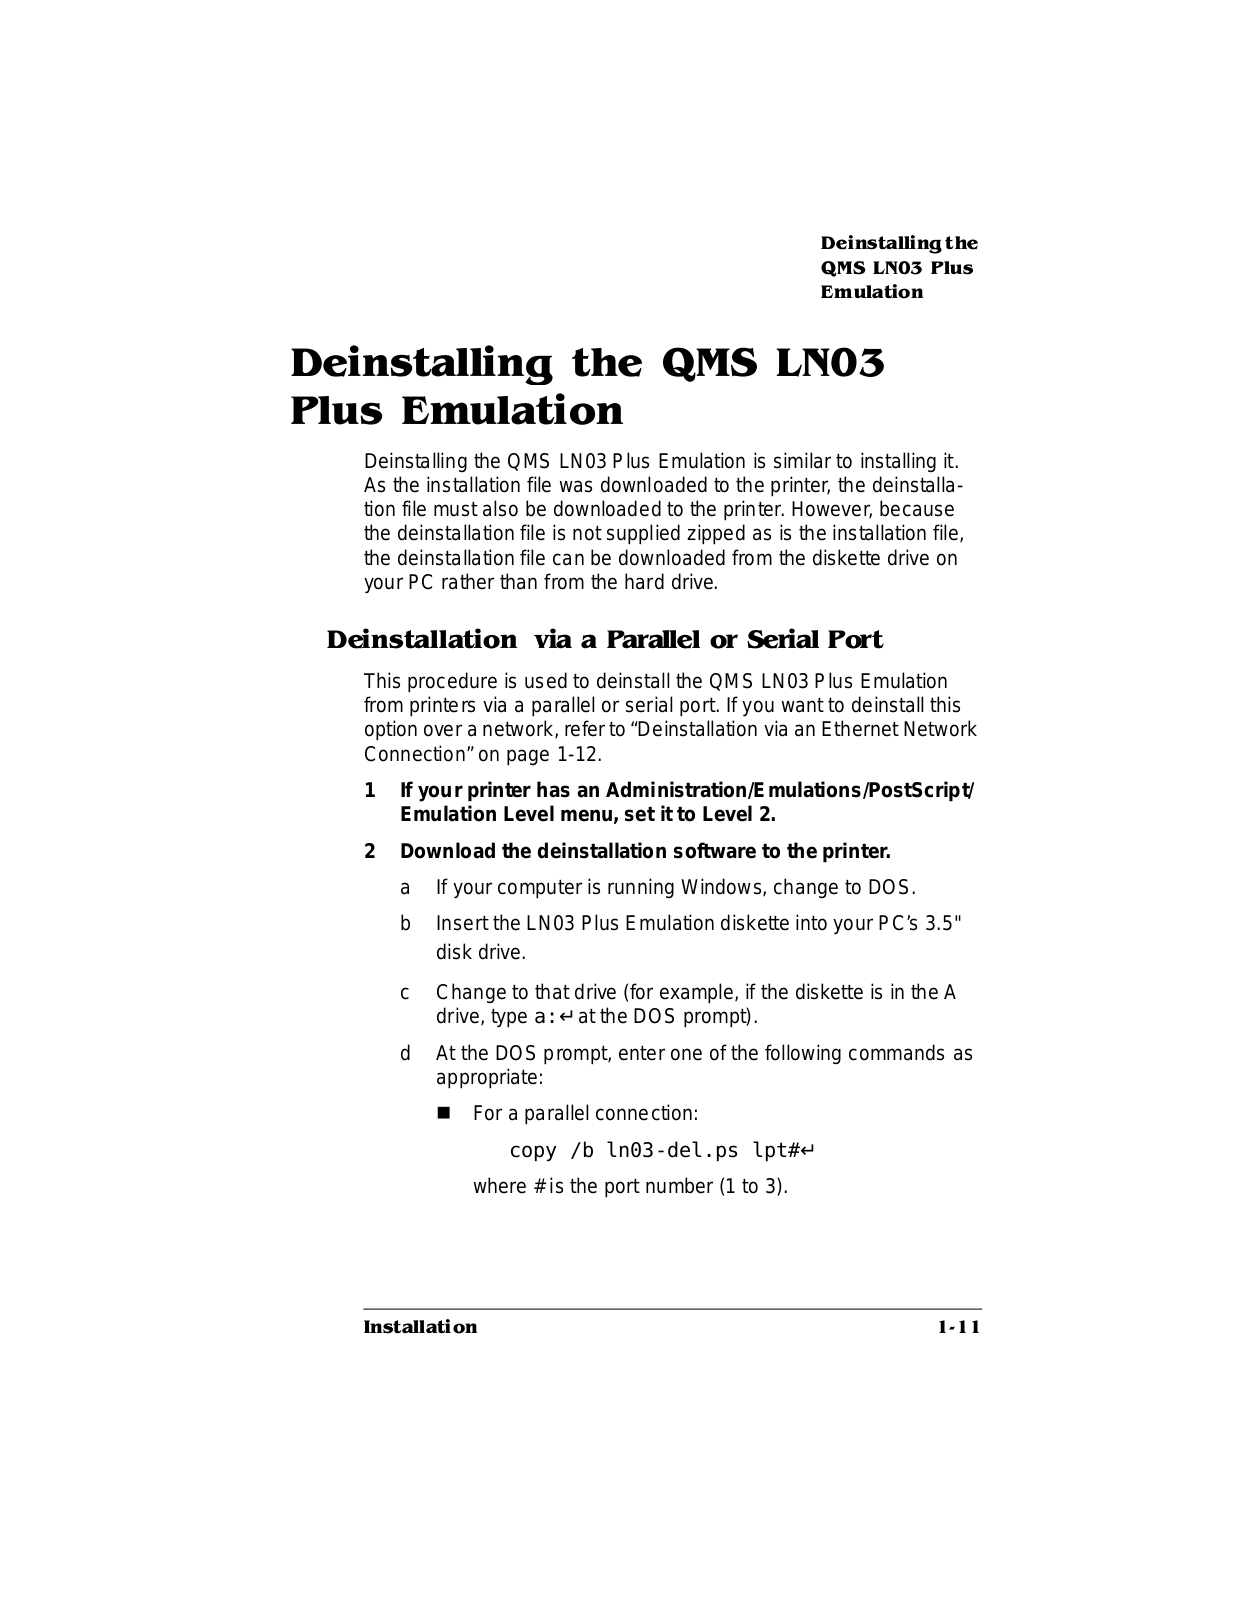
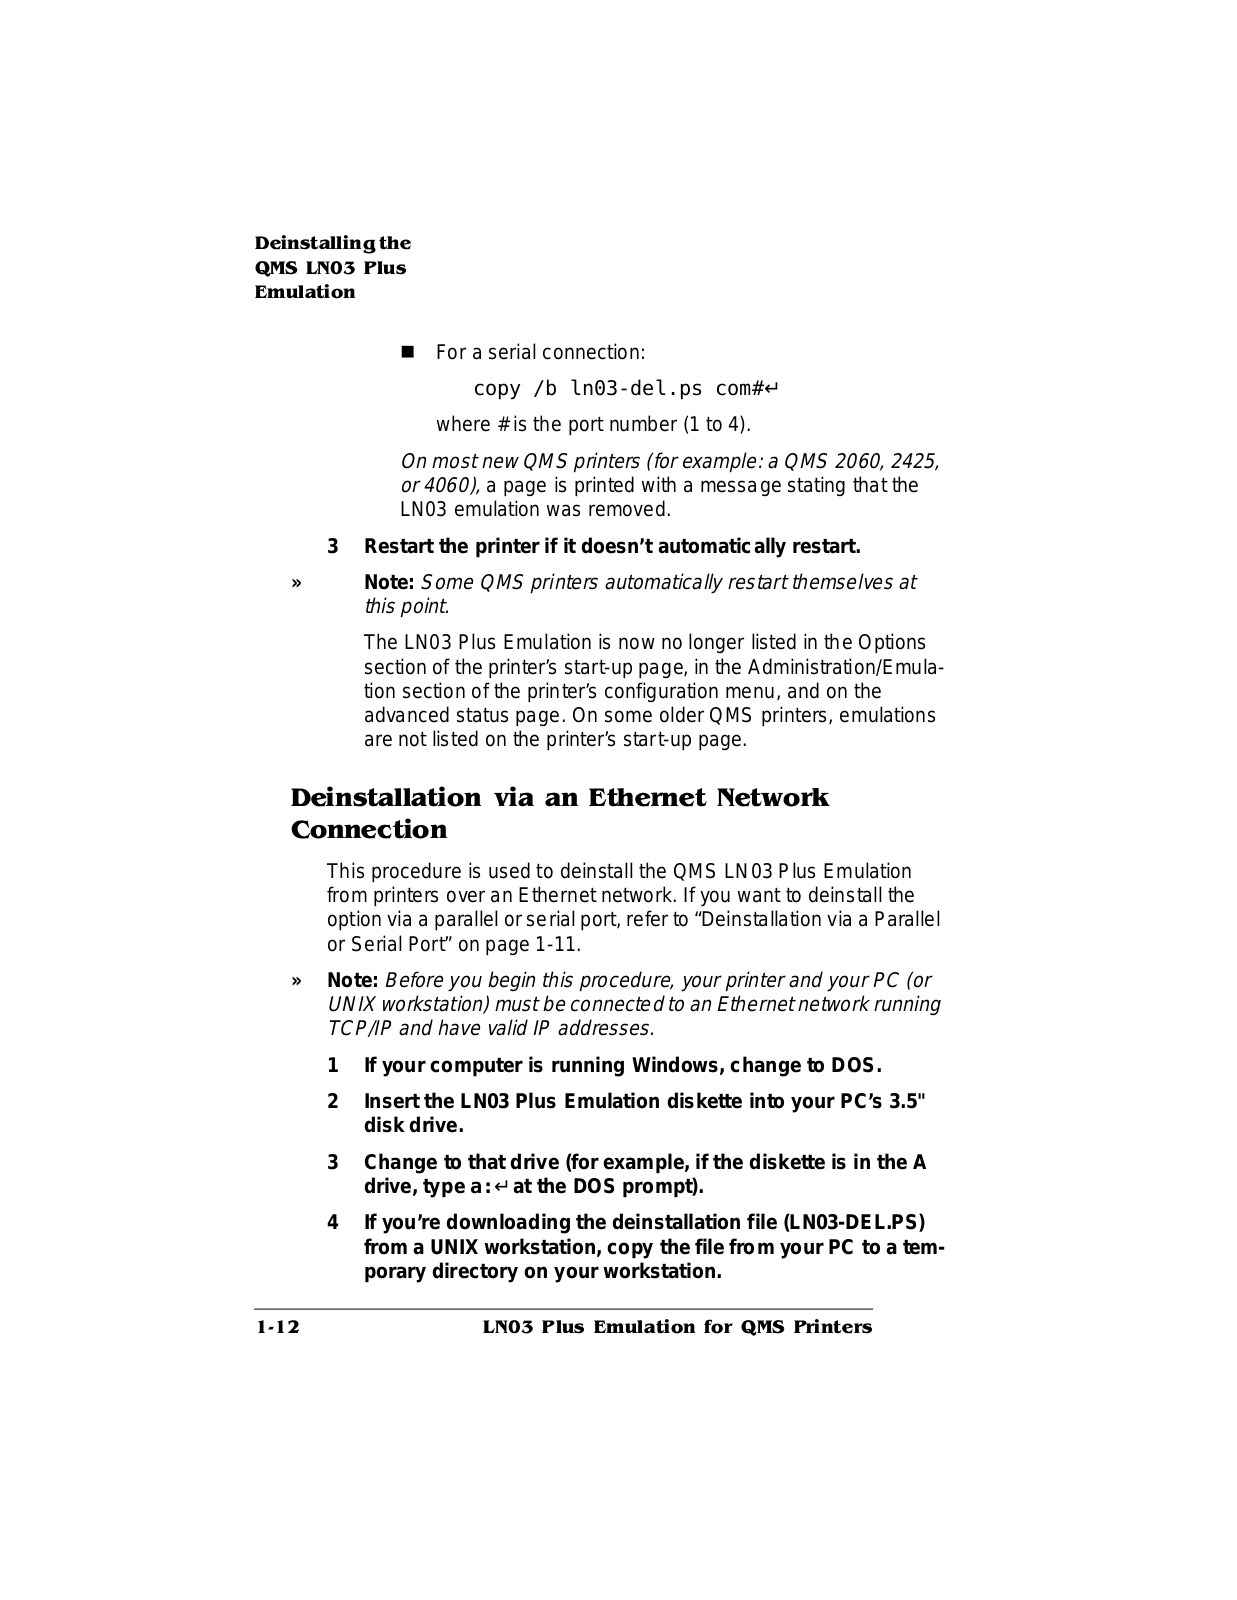
/1 ™ 3OXV (PXODWLRQ IRU 406® 3ULQWHUV
'
7UDGHPDUNV
The following are trademarks or registered trademarks of their respective owners. Other product names mentioned in this manual may also be trademarks or registered trademarks of their respective owners. Registered trademarks are registered in the United States Patent and Trademark Office; some trademarks may also be registered in other countries. QMS, QMS-PS, and the QMS logo are registered trademarks of QMS, Inc. DEC, VMS, DECnet, LN03, LN03 Plus/Digital Equipment Corporation. HP, HP-GL, HP PCL/Hewlett-Packard Corporation. PostScript/Adobe Systems, Inc. Tektronix/ Tektronix, Incorporated.
3URSULHWDU\ 6WDWHPHQW
The digitally encoded software included with this emulation is Copyrighted © 1997 by QMS, Inc. All Rights Reserved. This software may not be reproduced, modified, displayed, transferred, or copied in any form or in any manner or on any media, in whole or in part, without the express written permission of QMS, Inc.
&RS\ULJKW 1RWLFH
This manual is Copyrighted © 1997 by QMS, Inc., One Magnum Pass, Mobile, AL 36618. All Rights Reserved. This manual may not be copied in whole or in part, nor transferred to any other media or language, without the express written permission of QMS, Inc.
0DQXDO 1RWLFH
QMS, Inc. reserves the right to make changes to this manual and to the equipment described herein without notice. Considerable effort has been made to ensure that this manual is free of inaccuracies and omissions. However, QMS, Inc. makes no warranty of any kind including, but not limited to, any implied warranties of merchantability and fitness for a par ticular purpose with regard to this manual. QMS, Inc. assumes no responsibility for, or liability for, errors contained in this manual or for incidental, special, or consequential damages arising out of the furnishing of this manual, or the use of this manual in operating the equipment, or in connection with the performance of the equipment when so operated.
&RQWHQWV
|
,QVWDOODWLRQ |
|
|
|
|
About the QMS LN03 Plus Emulation ........................................ |
|
1-2 |
|
|
Host Software Compatibility |
1-2 |
|
|
|
Printer Compatibility 1-2 |
|
|
|
|
About this Manual ........................................................................ |
|
|
1-3 |
|
Typographic Conventions |
1-4 |
|
|
|
LN03 Plus Escape Sequences 1-5 |
|
|
|
|
Installing the QMS LN03 Plus Emulation ................................... |
1-6 |
||
|
The LN03 Plus Emulation Diskette 1-6 |
|
|
|
|
Unzipping the LN03 Plus Emulation File |
1-6 |
|
|
|
Installation via a Parallel or Serial Port 1-7 |
|
||
|
Installation via an Ethernet Network Connection 1-8 |
|||
|
Deinstalling the QMS LN03 Plus Emulation ............................ |
1-11 |
||
|
Deinstallation via a Parallel or Serial Port |
1-11 |
|
|
|
Deinstallation via an Ethernet Network Connection |
1-12 |
For Further Assistance .............................................................. |
1-14 |
|
|
&RQILJXUDWLRQ
|
Changing the Configuration ....................................................... |
|
2-2 |
|
|
Configuration Options |
................................................................ |
|
2-3 |
|
Setting the K Mem Emulation ........................................Option |
2-5 |
||
|
Using configcartemulation ......................................................... |
|
2-6 |
|
|
3ULQWHU 6WDWXV DQG 5HVHW |
|
||
|
&RPPDQGV |
|
|
|
|
About Printer Status and .............................Reset Commands |
3-2 |
||
|
Printer Status Commands .......................................................... |
|
3-2 |
|
|
Product Identification (DA) 3-2 |
|
|
|
|
Device Status Request (DSR) |
3-3 |
|
|
|
Device Status Reports |
3 - 4 |
|
|
|
Cursor Position Report |
3 - 5 |
|
|
|
Printer Reset Commands ............................................................ |
|
3-6 |
|
|
Reset to Initial State (RIS) 3-6 |
|
|
|
|
Soft Terminal Reset (DECSTR) |
3-6 |
|
6HW 5HVHW 6HTXHQFHV
About Set/Reset Sequences ....................................................... |
|
4-2 |
Set/Reset Sequences .................................................................. |
|
4-2 |
Line Feed/New Line Mode (LNM) |
4-2 |
|
Carriage Return/New Line Mode (DECCRNLM) 4-3 |
||
Autowrap Mode (DECAWM) |
4-3 |
|
Pitch Select Mode (DECPSM) |
4-4 |
|
Proportional Spacing (DECPSP) |
4-4 |
Origin Placement Mode (DECOPM) 4-4
Position Unit Mode (PUM) 4-5
Select Size Unit (SSU) 4-5
LL |
/1 3OXV (PXODWLRQ IRU 406 3ULQWHUV |
&RQWURO &KDUDFWHUV
Supported Control Characters .................................................... |
5-2 |
3DJH )RUPDWWLQJ DQG 3ULQWLQJ &RPPDQGV
Setting Line and Character Spacing .......................................... |
6-2 |
||
Spacing Pitch Increment (SPI) |
6-2 |
|
|
Select Vertical Line Spacing (SVS) |
6-2 |
|
|
Set Vertical Pitch (DECVERP) |
6-3 |
|
|
Select Horizontal Character Spacing (SHS) |
6-3 |
||
Set Horizontal Pitch (DECSHORP) |
6-4 |
|
Setting Page Format .................................................................... |
|
|
6-5 |
Page Format Select (PFS) 6-5 |
|
|
|
Set Lines per Physical Page (DECSLPP) |
6-7 |
||
Set Top and Bottom Margins (DECSTBM) |
6-7 |
||
Set Left and Right Margins (DECSLRM) |
6-8 |
||
Horizontal Position Absolute (HPA) |
6-9 |
|
|
Horizontal Position Relative (HPR) |
6-9 |
|
|
Horizontal Position Backward (HPB) |
6-10 |
||
Vertical Position Absolute (VPA) |
6-10 |
|
|
Vertical Position Relative (VPR) |
6-10 |
|
|
Vertical Position Backward (VPB) |
6-11 |
|
Moving Cursor/Line Position Up or Down ............................... |
6-11 |
Cursor Up (CUU) 6-11 |
|
Partial Line Up (PLU) 6-12 |
|
Partial Line Down (PLD) 6-12 |
|
Setting and Clearing Tab Stops ................................................ |
6-12 |
Set Horizontal Tab Stops (DECSHTS) |
6-12 |
Set Vertical Tab Stops (DECSVTS) 6-13 |
|
Tabulation Clear (TBC) 6-13 |
|
Setting Text Justification .......................................................... |
6-14 |
Justification 6-14 |
|
Drawing Lines ............................................................................. |
6-14 |
Drawing Vectors 6-14 |
|
&RQWHQWV |
LLL |
|
)RQW +DQGOLQJ |
|||
|
Selecting Fonts ............................................................................ |
|
|
7-2 |
|
Fonts Available |
7-2 |
|
|
|
Downloading Fonts (DECLFF) |
7-3 |
||
|
The Font File ID |
7-3 |
|
|
|
Deleting a Type Family or Font File (DECDTFF) 7-6 |
|||
|
Assign Type Family or Font (DECATFF) 7-7 |
|||
|
Select Graphic Rendition (SGR) |
|
7-8 |
|
|
Selecting Character Sets ............................................................ |
|
7-9 |
|
|
Selecting Graphic Character Sets |
7-9 |
||
|
Graphic Size Selection (GSS) |
7-11 |
||
|
Graphic Size Modification (GSM) |
7-11 |
||
|
Requesting Font Status Reports |
.............................................. 7-12 |
||
|
Request Font Status (DECRFS) |
|
7-12 |
|
|
Font Status Report (DECFSR) |
7-13 |
|
'(&7(. (PXODWLRQ |
|
||
|
Using the DECTEK Emulation .................................................... |
8-2 |
||
|
Entering DECTEK Emulation |
8-2 |
|
|
|
Exiting DECTEK Emulation |
8-3 |
|
|
|
DECTEK Fonts |
............................................................................. |
|
8-4 |
|
DECTEK Control Characters and Escape Sequences ............. |
8-4 |
||
|
DECTEK Modes ........................................................................... |
|
8-6 |
|
|
Alpha Mode |
8-6 |
|
|
|
Graph Mode |
8-8 |
|
|
|
Point Plot Mode 8-9 |
|
|
|
|
Incremental Plot Mode 8-9 |
|
|
|
|
Bypass Mode |
8-10 |
|
|
|
Switching Modes 8-10 |
|
|
|
|
Vector Coordinate Encoding |
8-11 |
|
|
|
Shortened Address Transmission 8-13 |
|
LY |
/1 3OXV (PXODWLRQ IRU 406 3ULQWHUV |
|
6L[HO *UDSKLFV |
|
|
|
About Sixel Graphics ................................................................... |
|
9-2 |
|
Sixel Graphics Controls .............................................................. |
|
9-2 |
|
Selecting Sixel Graphics Mode 9-2 |
|
|
|
Selecting the Horizontal Grid Size (HGS) |
9-3 |
|
|
Selecting the Aspect Ratio |
9-4 |
|
|
Exiting Sixel Graphics Mode |
9-5 |
|
|
Sixel Graphics Data ..................................................................... |
|
9-6 |
|
About Sixel Graphics Data |
9-6 |
|
|
Decoding Sixel Graphics Data 9-7 |
|
|
$ 406 &XVWRPHU 6XSSRUW |
|||
|
Sources of Support ..................................................................... |
|
A-2 |
|
Your QMS Vendor A-2 |
|
|
|
Your Application Vendor A-2 |
|
|
|
Q-FAX A-2 |
|
|
|
The QMS Corporate Bulletin Board System A-3 |
||
|
CompuServe A-3 |
|
|
|
Internet A-3 |
|
|
|
QMS Customer Response Center (CRC) |
A-4 |
|
|
QMS World-wide Offices ............................................................ |
|
A-5 |
% &KDUDFWHU 6HWV
Character Sets ............................................................................. |
B-2 |
Selecting Character Sets ............................................................ |
B-3 |
Using GL and GR Tables ............................................................ |
B-4 |
GL and GR Tables ....................................................................... |
B-6 |
,QGH[
™
&RQWHQWV |
Y |
,QVWDOODWLRQ
,Q WKLV FKDSWHU
„“About the QMS LN03 Plus Emulation” on page 1-2
„“About this Manual” on page 1-3
„“Installing the QMS LN03 Plus Emulation” on page 1-6
„“Deinstalling the QMS LN03 Plus Emulation” on page 1-11
„“For Further Assistance” on page 1-14
$ERXW WKH 406 /1 3OXV (PXODWLRQ
The QMS LN03 Plus Emulation offers all of the features of an LN03 Plus laser printer, including DECTEK emulation and Digital’s Tektronix 4014 emulation.
If you already have files containing LN03 Plus escape sequences, or if you have set your application to print to an LN03 Plus printer, you only need to follow the installation instructions in this chapter to begin using the emulation in your QMS printer.
+RVW 6RIWZDUH &RPSDWLELOLW\
Since LN03 Plus runs under VMS, VMS compatibility is important. The QMS VMS DECnet host software 2.x is compatible with version 3.x QMS daughterboard software.
3ULQWHU &RPSDWLELOLW\
This LN03 emulation can be installed only on QMS printers that contain a hard disk drive (either internal or external).
|
/1 3OXV (PXODWLRQ IRU 406 3ULQWHUV |
$ERXW WKLV 0DQXDO
$ERXW WKLV 0DQXDO
This manual is organized as follows:
Introduction |
Presents an overview of and explains |
how to install this emulation. |
|
Configuration |
Explains how to configure this |
emulation. |
|
Printer Status and |
Explains the request and response |
commands for printer status and the |
|
Reset Commands |
escape sequences for resetting the |
|
printer. |
Set/Reset Sequences
Explains the escape sequences that set certain operating modes for the printer.
|
Explains the single-character control |
Control Characters codes supported by the emulation. |
Page Formatting and Printing Commands
Explains the escape sequences controlling horizontal and vertical spacing, page margins, tab stops, and absolute and relative positioning.
|
Font Handling |
Explains how to download and select |
fonts. |
||
|
|
|
|
|
Explains the escape sequences that |
DECTEK Emulation initiate Tektronix mode. |
||
|
|
|
|
Sixel Graphics |
Explains how to use sixel graphics. |
|
$QMS Customer Support
Provides product sales and support telephone numbers and describes how to communicate with QMS through the QMS Bulletin Board, CompuServe, Internet, and Q-FAX.
,QVWDOODWLRQ |
|
$ERXW WKLV 0DQXDO
% Character Sets |
Shows the character sets included with |
this emulation. |
|
,QGH[ |
|
|
|
7\SRJUDSKLF &RQYHQWLRQV
The following typographic conventions are used in this manual:
Mixed-Case |
Text you type, and messages and information |
Courier |
displayed on the screen |
Mixed-Case |
Variable text you type; replace the italicized |
Italic |
word(s) with information specific to your printer |
Courier |
or computer |
UPPERCASE |
Information displayed in the printer message |
COURIER |
window |
lowercase bold |
PostScript operators and DOS commands |
lowercase italic |
Variable information in text |
UPPERCASE |
File and utility names |
|
Press the Enter key (PC) or Return key |
|
(Macintosh) |
^ |
Press and hold down the Ctrl key (PC) |
»Note: Notes contain tips, extra information, or important information that deserves emphasis or reiteration.
▲Caution: Cautions present information that you need to know to avoid equipment damage, process failure, or extreme annoyance.
|
/1 3OXV (PXODWLRQ IRU 406 3ULQWHUV |
$ERXW WKLV 0DQXDO
/1 3OXV (VFDSH 6HTXHQFHV
All supported LN03 Plus escape sequences are documented fully (not just listed) in this manual. Throughout the manual, the following conventions are used when describing the escape sequences.
<ESC> |
All control characters (characters with hex values less |
|
than Hex 20). |
|
|
Pn, Pn1, Pn2 |
Numeric variables in an escape sequence are |
|
expressed with Pn’s. Left and right margin values are |
|
examples of numeric variables. Numeric variables |
|
have a range of 0 to 9999. If a variable outside this |
|
range is used, the printer ignores the entire escape |
|
sequence. |
|
|
Ps, Ps1, Ps2 |
Selection variables in an escape sequence are |
|
expressed with Ps’s. Justification on or off is an |
|
example of a selection variable. |
|
|
,QVWDOODWLRQ |
|
,QVWDOOLQJ WKH 406 /1 3OXV (PXODWLRQ
These procedures are used to install the QMS LN03 Plus Emulation to QMS printers. Since this emulation is stored on a hard disk, your printer must have either an internal or external hard disk.
7KH /1 3OXV (PXODWLRQ 'LVNHWWH
The LN03 Plus Emulation Diskette contains the following files:
„PKUNZIP.EXE
„LN03.ZIP (contains LN03.PS)
„LN03-DEL.PS
LN03.PS contains the LN03 Plus Emulation. To install the emulation, this file is sent to the printer using the installation procedures presented later in this chapter.
LN03-DEL.PS is the deinstallation file. To deinstall the emulation, this file is sent to the printer using the deinstallation procedures presented later in this chapter.
To obtain LN03.PS, PKUNZIP.EXE is used to unzip LN03.ZIP. When unzipped, LN03.PS consumes almost 1.8 MB. LN03.PS was zipped to fit on one diskette.
8Q]LSSLQJ WKH /1 3OXV (PXODWLRQ )LOH
Before you install the LN03 Plus Emulation to your printer, you must first obtain LN03.PS from LN03.ZIP. Do this as follows:
1Insert the LN03 Plus Emulation diskette into your PC’s 3.5" disk drive.
2Either in Windows or DOS, create a temporary subdirectory on your PC’s hard disk and copy PKUNZIP.EXE and LN03.ZIP into the subdirectory.
3In DOS, change to the temporary subdirectory.
|
/1 3OXV (PXODWLRQ IRU 406 3ULQWHUV |
,QVWDOOLQJ WKH 406 /1 3OXV (PXODWLRQ
4At the DOS prompt, enter the following command to unzip LN03.ZIP.
pkunzip ln03.zip
5Confirm that LN03.PS is now in the temporary subdirectory.
6Remove the LN03 Plus Emulation diskette from your PC’s disk drive, and store it in a safe place.
,QVWDOODWLRQ YLD D 3DUDOOHO RU 6HULDO 3RUW
This procedure is used to install the LN03 Plus Emulation to printers via a parallel or serial port. If you want to install this emulation over a network, refer to “Installation via an Ethernet Network Connection” on page 1-8.
»Note: This procedure assumes that LN03.PS has been unzipped from LN03.ZIP and resides in a temporary directory on your PC’s hard disk. For the unzipping procedure, refer to “Unzipping the LN03 Plus Emulation File” on page 1-6.
1If your printer has an Administration/Emulations/PostScript/ Emulation Level menu, set it to Level 2.
2Download the LN03 Plus Emulation to the printer.
aWith your computer at the DOS prompt and at the temporary subdirectory, enter one of the following commands as appropriate:
„ For a parallel connection:
copy /b ln03.ps lpt#
where # is the port number (1 to 3).
„For a serial connection:
copy /b ln03.ps com#
where # is the port number (1 to 4).
3 When the download is complete, restart the printer.
,QVWDOODWLRQ |
|
,QVWDOOLQJ WKH 406 /1 3OXV (PXODWLRQ
The LN03 Plus Emulation is now listed in the Options section of the printer’s start-up page, in the Administration/Emulation section of the printer’s configuration menu, and on the advanced status page. On some older QMS printers, emulations are not listed on the printer’s start-up page.
4Increase the printer’s K Mem Emulation client (Administration/Memory/K Mem Emulation) by at least 1 MB or, for optimum performance, by 2 MB.
See your printer documentation for more information on this memory client and on using your printer’s configuration menu.
5The LN03 Plus Emulation is ready to receive data from your host. Now, you can custom configure your LN03 Plus Emulation to match your printing environment. See chapter 2 “Emulation Configuration”.
»Note: You may want to erase any installation files left on your PC and then remove any temporary directories.
,QVWDOODWLRQ YLD DQ (WKHUQHW 1HWZRUN &RQQHFWLRQ
This procedure is used to install the QMS LN03 Plus Emulation to printers over an Ethernet network. If you want to install the emulation via a parallel or serial port, refer to “Installation via a Parallel or Serial Port” on page 1-7.
»Note: Before you begin this procedure, your printer and your PC (or UNIX workstation) must be connected to an Ethernet network running TCP/IP and have valid IP addresses.
»Note: This procedure assumes that LN03.PS has been unzipped from LN03.ZIP and resides in a temporary directory on your PC’s hard disk. For the unzipping procedure, refer to “Unzipping the LN03 Plus Emulation File” on page 1-6.
1If your printer has an Administration/Emulations/PostScript/ Emulation Level menu, set it to Level 2.
|
/1 3OXV (PXODWLRQ IRU 406 3ULQWHUV |
,QVWDOOLQJ WKH 406 /1 3OXV (PXODWLRQ
2Make sure your printer is on line, and that the printer’s message window reads IDLE.
3If you’re downloading the emulation from a UNIX workstation, copy LN03.PS from your PC to a temporary directory on your workstation.
4Open an ftp session from your PC or workstation by typing one of the following commands:
ftp printername (for example, ftp pctdev6 )
ftp ipaddress (for example, ftp 161.33.130.45 )
5When prompted for a user name and password, press the Enter key.
If your entries are correct, an ftp> prompt displays.
6At the ftp> prompt, change to binary mode by typing bin
7At the ftp> prompt, send the emulation file to the printer’s hard disk by typing
put ln03.ps
The printer’s message window reads 1 Active Job, and the Disk light flashes to indicate that the emulation is being downloaded to the hard disk. The ftp> prompt returns when the emulation has finished loading.
8When the download is complete, at the ftp> prompt, end the ftp session by typing
quit
9When the Disk light stops flashing and the printer’s message window reads Idle for at least 30 seconds, restart the printer.
10When the printer’s message window reads Idle again, the LN03 Plus Emulation is ready to use.
The LN03 Plus Emulation is now listed in the Options section of the printer’s start-up page, in the Administration/Emulation sec-
,QVWDOODWLRQ |
|
,QVWDOOLQJ WKH 406 /1 3OXV (PXODWLRQ
tion of the printer’s configuration menu, and on the advanced status page. On some older QMS printers, emulations are not listed on the printer’s start-up page.
11Increase the printer’s K Mem Emulation client (Administration/Memory/K Mem Emulation) by at least 1 MB or, for optimum performance, by 2 MB.
See your printer documentation for more information on this memory client and on using your printer’s configuration menu.
12The LN03 Plus Emulation is ready to receive data from your host. Now, you can custom configure your LN03 Plus Emulation to match your printing environment. See chapter 2 “Emulation Configuration”.
»Note: You may want to erase any installation files left on your PC (and/or workstation), and then remove any temporary directories.
|
/1 3OXV (PXODWLRQ IRU 406 3ULQWHUV |
'HLQVWDOOLQJ WKH 406 /1 3OXV (PXODWLRQ
'HLQVWDOOLQJ WKH 406 /1
3OXV (PXODWLRQ
Deinstalling the QMS LN03 Plus Emulation is similar to installing it. As the installation file was downloaded to the printer, the deinstallation file must also be downloaded to the printer. However, because the deinstallation file is not supplied zipped as is the installation file, the deinstallation file can be downloaded from the diskette drive on your PC rather than from the hard drive.
'HLQVWDOODWLRQ YLD D 3DUDOOHO RU 6HULDO 3RUW
This procedure is used to deinstall the QMS LN03 Plus Emulation from printers via a parallel or serial port. If you want to deinstall this option over a network, refer to “Deinstallation via an Ethernet Network Connection” on page 1-12.
1If your printer has an Administration/Emulations/PostScript/ Emulation Level menu, set it to Level 2.
2Download the deinstallation software to the printer.
a If your computer is running Windows, change to DOS.
b Insert the LN03 Plus Emulation diskette into your PC’s 3.5" disk drive.
c Change to that drive (for example, if the diskette is in the A drive, type a: at the DOS prompt).
dAt the DOS prompt, enter one of the following commands as appropriate:
„ For a parallel connection:
copy /b ln03-del.ps lpt#
where # is the port number (1 to 3).
,QVWDOODWLRQ |
|
'HLQVWDOOLQJ WKH 406 /1 3OXV (PXODWLRQ
„For a serial connection:
copy /b ln03-del.ps com#
where # is the port number (1 to 4).
On most new QMS printers (for example: a QMS 2060, 2425, or 4060), a page is printed with a message stating that the LN03 emulation was removed.
3Restart the printer if it doesn’t automatically restart.
»Note: Some QMS printers automatically restart themselves at this point.
The LN03 Plus Emulation is now no longer listed in the Options section of the printer’s start-up page, in the Administration/Emulation section of the printer’s configuration menu, and on the advanced status page. On some older QMS printers, emulations are not listed on the printer’s start-up page.
'HLQVWDOODWLRQ YLD DQ (WKHUQHW 1HWZRUN &RQQHFWLRQ
This procedure is used to deinstall the QMS LN03 Plus Emulation from printers over an Ethernet network. If you want to deinstall the option via a parallel or serial port, refer to “Deinstallation via a Parallel or Serial Port” on page 1-11.
»Note: Before you begin this procedure, your printer and your PC (or UNIX workstation) must be connected to an Ethernet network running TCP/IP and have valid IP addresses.
1 If your computer is running Windows, change to DOS.
2 Insert the LN03 Plus Emulation diskette into your PC’s 3.5" disk drive.
3 Change to that drive (for example, if the diskette is in the A drive, type a: at the DOS prompt).
4 If you’re downloading the deinstallation file (LN03-DEL.PS) from a UNIX workstation, copy the file from your PC to a temporary directory on your workstation.
|
/1 3OXV (PXODWLRQ IRU 406 3ULQWHUV |
'HLQVWDOOLQJ WKH 406 /1 3OXV (PXODWLRQ
5If your printer has an Administration/Emulations/PostScript/ Emulation Level menu, set it to Level 2.
6Make sure your printer is on line, and that the printer’s message window reads IDLE.
7Open an ftp session from your PC or workstation by typing one of the following commands:
ftp printername (for example, ftp pctdev6 )
ftp ipaddress (for example, ftp 161.33.130.45 )
8When prompted for a user name and password, press the Enter key.
If your entries are correct, an ftp> prompt displays.
9At the ftp> prompt, change to binary mode by typing bin
10At the ftp> prompt, send the deinstallation file to the printer’s hard disk by typing
put ln03-del.ps
The ftp> prompt returns when the deinstallation file has finished loading.
On most new QMS printers (for example: a QMS 2060, 2425, or 4060), a page is printed with a message stating that the LN03 emulation was removed.
11At the ftp> prompt, end the ftp session by typing quit
12When the Disk light stops flashing and the printer’s message window reads Idle, restart the printer if it doesn’t automatically restart.
»Note: Some QMS printers automatically restart themselves at this point.
The LN03 Plus Emulation is now no longer listed in the Options section of the printer’s start-up page, in the Administration/Emulation section of the printer’s configuration menu, and on the
,QVWDOODWLRQ |
|
)RU )XUWKHU $VVLVWDQFH
advanced status page. On some older QMS printers, emulations are not listed on the printer’s start-up page.
»Note: If you downloaded the deinstallation file from a workstation, you may want to erase any deinstallation files left on your workstation, and then remove any temporary directories.
)RU )XUWKHU $VVLVWDQFH
For assistance with installing the QMS LN03 Plus Emulation, refer to appendix A, “QMS Customer Support,” in the rear of this manual.
™
|
/1 3OXV (PXODWLRQ IRU 406 3ULQWHUV |
&RQILJXUDWLRQ
,Q WKLV FKDSWHU
„“Changing the Configuration” on page 2-2
„“Configuration Options” on page 2-3
„“Setting the K Mem Emulation Option” on page 2-5
„“Using configcartemulation” on page 2-6
&KDQJLQJ WKH &RQILJXUDWLRQ
You can change your LN03 Plus Emulation configuration by selecting new configuration option settings through your printer’s control panel, through QMS Document Option Commands (DOC), or through the PostScript configcartemulation operator. Refer to “Configuration Options” on page 2-3 for descriptions of the configuration options.
„Control panel selections
This is the most convenient way to change configuration settings. Refer to the printer user's guide and/or setup manual for instructions on using the control panel to change configuration settings. Configuration changes made through the control panel are in effect from job-to-job unless overridden with the PostScript configcartemulation operator or with QMS Document Option Commands.
„QMS Document Option Commands (DOC)
LN03 Plus configuration options can be selected through QMS Document Option Commands. Configuration changes made with DOC are in effect only for that job. After the print job is completed, the printer automatically resets to the default configuration. Refer to the QMS Document Option Commands manual for information about using DOC and complete descriptions of the commands and their parameters.
„PostScript configcartemulation operator
Refer to “Using configcartemulation” on page 2-6 for information on using this PostScript operator to change emulation configuration settings. Configuration changes made through the PostScript configcartemulation operator are the same as making configuration changes through the printer’s control panel and are in effect from job-to-job unless overridden with QMS Document Option Commands.
|
/1 3OXV (PXODWLRQ IRU 406 3ULQWHUV |
&RQILJXUDWLRQ 2SWLRQV
The LN03 Plus Emulation has the following configuration options.
3URGXFW ,'
Purpose |
This is the emulation printer model. If your host |
|
sends a Device Attributes request to the printer, the |
|
printer responds with the Product ID. |
|
|
Choices |
LN03, LQP02, and LA100 |
|
|
Default |
LN03 |
|
|
$XWRZUDS
Purpose |
Determines whether text that exceeds the right |
|
margin wraps to the next line. |
|
|
Choices |
Off and On |
|
|
Default |
On |
|
|
3DSHU 6L]H
Purpose |
Specifies the paper size used at power-up or when |
|
no paper size is specified. |
|
|
Choices |
Letter, A4, Legal, and 11x17 |
|
|
Default |
Letter |
|
|
&RQILJXUDWLRQ |
|
&RQILJXUDWLRQ 2SWLRQV
3DSHU 6L]H 2YHUULGH
Purpose |
Controls the paper selection. If Paper Size Override |
|
is disabled, the emulation uses the transformation |
|
point for the size of paper selected and uses the |
|
current paper size (does not change paper trays). If |
|
Paper Size Override is enabled, the transformation |
|
is the same as above, and the specified paper size |
|
is selected. |
|
|
Choices |
Off and On |
|
|
Default |
Off |
|
|
; 2ULJLQ ,QVHW
Purpose |
Moves the lower left corner of the image to the right |
|
from 0 to 300 dots (1 inch at a resolution of 300 |
|
dpi). Use this option to eliminate clipping of the |
|
right edge of the image on some systems. |
|
|
Range |
0-300 |
|
|
Default |
75 |
|
|
< 2ULJLQ ,QVHW
Purpose |
Moves the lower left corner of the image downward |
|
from 0 to 300 dots (1 inch at a resolution of 300 |
|
dpi). Use this option to eliminate clipping of the top |
|
edge of the image on some systems. |
|
|
Range |
0-300 |
|
|
Default |
75 |
|
|
|
/1 3OXV (PXODWLRQ IRU 406 3ULQWHUV |
|
|
6HWWLQJ WKH . 0HP |
|
|
(PXODWLRQ 2SWLRQ |
5HVHW 2YHUULGH |
|
|
|
|
|
|
Purpose |
Determines whether the printer automatically |
|
|
resets to the initial power-up configuration before |
|
|
every print job or whether it retains the |
|
|
configuration from the previous print job. |
|
|
|
|
Choices |
Off and On |
|
|
|
|
Default |
Off |
|
|
|
2ULHQWDWLRQ |
|
|
|
|
|
|
Purpose |
Sets the printing direction of the print media. |
|
|
|
|
Choices |
Portrait—Prints y axis parallel to the long edge of |
|
|
the page. |
|
|
Landscape—Prints y axis parallel to the short |
|
|
edge of the page. |
|
|
|
|
Default |
Portrait |
|
|
|
6HWWLQJ WKH . 0HP (PXODWLRQ 2SWLRQ
The K Mem Emulation option in the Memory submenu on your printer must be set to a minimum of 660 KB for LN03 Plus to run properly.
&RQILJXUDWLRQ |
|
8VLQJ FRQILJFDUWHPXODWLRQ
On QMS printers that support the configcartemulation operator, the LN03 Plus Emulation default values can be changed by this operator. You can include this operator in an ASCII file and send the file to the printer over any interface.
The configcartemulation operator takes three integers as shown in the following figure.
0 Product ID
1 AutoWrap
2 Paper Size
3 Paper Size Override
4 X Origin Inset
5 Y Origin Inset
6 Reset Override
emul# item value configcartemulation
The setting for the selected item.
12 (The identifier assigned to LN03 Plus emulation. Use this identifier with other emulation-dependent PostScript operators such as setdefaultemulation.)
The emulation identifier (emul#) for the LN03 Plus Emulation is 12. (Other printer emulations for QMS printers have different identifiers.) The configuration selection (item) is the setting you want to configure. You can configure only one setting with a single configcartemulation operator. The selection setting (value) is the setting for the item. Depending on the selection, there may be two or more possible values. For example, Product ID has three possible values.
|
/1 3OXV (PXODWLRQ IRU 406 3ULQWHUV |
8VLQJ FRQILJFDUWHPXODWLRQ
The configcartemulation operator must be included in an ASCII text file that accesses the PostScript language statusdict in the printer. The following example shows an ASCII file that uses the configcartemulation operator and the PostScript operators for accessing the statusdict:
%!
serverdict begin 0 exitserver statusdict begin
12 0 0 configcartemulation
12 1 0 configcartemulation end
^D
The last line of the file is ^D (Ctrl-D), a special command that signals the end of the file for the printer. The following tables contain the possible values for changing Product ID, Autowrap, Paper Size, Paper Size Override, X Origin Inset, Y Origin Inset, Reset Override, and Orientation. Pick the settings you want, and use the corresponding lines in your ASCII text file.
6HWWLQJ 3URGXFW ,'
Setting |
emul# |
item |
value |
configcartemulation |
|
|
|
|
|
LN03 Plus |
12 |
0 |
0 |
configcartemulation |
LQP02 |
12 |
0 |
1 |
configcartemulation |
LA100 |
12 |
0 |
2 |
configcartemulation |
|
|
|
|
|
Default |
LN03 Plus |
|
|
|
|
|
|
|
|
6HWWLQJ $XWRZUDS
Setting |
emul# item |
value configcartemulation |
Disabled |
12 |
1 |
0 |
configcartemulation |
Enabled |
12 |
1 |
1 |
configcartemulation |
|
|
|
|
|
Default |
Enabled |
|
|
|
&RQILJXUDWLRQ |
|
8VLQJ FRQILJFDUWHPXODWLRQ
6HWWLQJ 3DSHU 6L]H
Setting |
emul# item |
value configcartemulation |
Letter |
12 |
2 |
0 |
configcartemulation |
A4 |
12 |
2 |
1 |
configcartemulation |
Legal |
12 |
2 |
2 |
configcartemulation |
11x17 |
12 |
2 |
3 |
configcartemulation |
|
|
|
|
|
Default |
Letter |
|
|
|
6HWWLQJ 3DSHU 6L]H 2YHUULGH
Setting |
emul# |
item |
value |
configcartemulation |
|
|
|
|
|
Disabled |
12 |
3 |
0 |
configcartemulation |
Enabled |
12 |
3 |
1 |
configcartemulation |
|
|
|
|
|
Default |
Disabled |
|
|
|
|
|
|
|
|
6HWWLQJ ; 2ULJLQ ,QVHW
Setting |
emul# item |
value configcartemulation |
0 dots |
12 |
4 |
0 |
configcartemulation |
75 dots |
12 |
4 |
75 |
configcartemulation |
300 dots |
12 |
4 |
300 |
configcartemulation |
|
|
|
|
|
Range |
0 to 300 |
|
|
|
|
|
|
|
|
Default |
75 Dots |
|
|
|
|
|
|||
Notes |
X Origin Inset can be set to any value from 0 |
|||
|
to 300 dots. |
|
|
|
/1 3OXV (PXODWLRQ IRU 406 3ULQWHUV |