

Page 1

®
magicolor 4695MF
Reference Guide
A0FD-9567-12A
1800863-001C
Page 2

Copyright Notice
The digitally encoded software and publication included with your machine are
Copyrighted © 2008 by KONICA MINOLTA BUSINESS TECHNOLOGIES, INC.,
Marunouchi Center Building, 1-6-1 Marunouchi, Chiyoda-ku, Tokyo, 100-0005,
Japan. All Rights Reserved.
This software may not be reproduced, modified, displayed, transferred, or copied in
any form or in any manner or on any media, in whole or in part, without the express
written permission of KONICA MINOLTA BUSINESS TECHNOLOGIES, INC.
No part of this publication may be reproduced, stored in a retrieval system, or transmitted in any form or by any means, electronic, mechanical, photocopying, recording, or otherwise, without the prior written permission of KONICA MINOLTA. The
information contained in this guide is intended for use with the KONICA MINOLTA
magicolor 4695MF machines only.
About the GPL (General Public License)
This driver is written for Linux, which is written and distributed under the GNU GPL.
The printing system CUPS adopted to run on the Linux is published by ESP (Easy
Software Products) under the GPL. All source codes that we write must be available
to the general public.
Trademarks
KONICA MINOLTA and the KONICA MINOLTA logo are trademarks or registered
trademarks of KONICA MINOLTA HOLDINGS, INC.
magicolor and PageScope are trademarks or registered trademarks of KONICA
MINOLTA BUSINESS TECHNOLOGIES, INC.
All other trademarks and registered trademarks are the property of their respective
owners.
Notice
KONICA MINOLTA BUSINESS TECHNOLOGIES, INC. reserves the right to make
changes to this guide and to the equipment described herein without notice. Considerable effort has been made to ensure that this manual is free of inaccuracies and
omissions. However, KONICA MINOLTA BUSINESS TECHNOLOGIES, INC. makes
no warranty of any kind including, but not limited to, any implied warranties of merchantability and fitness for a particular purpose with regard to this manual.
KONICA MINOLTA BUSINESS TECHNOLOGIES, INC. assumes no responsibility
for, or liability for, errors contained in this manual or for incidental, special, or consequential damages arising out of the furnishing of this manual, or the use of this manual in operating the equipment, or in connection with the performance of the
equipment when so operated.
Page 3

SOFTWARE LICENSE AGREEMENT
This package contains the following materials provided by Konica Minolta Business Technologies, Inc. (KMBT): software included as part of the printing system, the digitally-encoded
machine-readable outline data encoded in the special format and in the encrypted form (“Font
Programs”), other software which runs on a computer system for use in conjunction with the
Printing Software (“Host Software”), and related explanatory written materials (“Documentation”). The term “Software” shall be used to describe Printing Software, Font Programs and/or
Host Software and also include any upgrades, modified versions, additions, and copies of the
Software.
The Software is being licensed to you under the terms of this Agreement.
KMBT grants to you a non-exclusive sublicense to use the Software and Documentation, provided that you agree to the following:
1. You may use the Printing Software and accompanying Font Programs for imaging to the
licensed output device(s), solely for your own internal business purposes.
2. In addition to the license for Font Programs set forth in Section 1 (“Printing Software”)
above, you may use Roman Font Programs to reproduce weights, styles, and versions of
letters, numerals, characters and symbols (“Typefaces”) on the display or monitor for your
own internal business purposes.
3. You may make one backup copy of the Host Software, provided your backup copy is not
installed or used on any computer. Notwithstanding the above restrictions, you may install
the Host Software on any number of computers solely for use with one or more printing systems running the Printing Software.
4. You may assign its rights under this Agreement to an assignee of all of Licensee’s right and
interest to such Software and Documentation (“Assignee”) provided you transfer to
Assignee all copies of such Software and Documentation Assignee agrees to be bound by
all of the terms and conditions of this Agreement.
5. You agree not to modify, adapt or translate the Software and Documentation.
6. You agree that you will not attempt to alter, disassemble, decrypt, reverse engineer or
decompile the Software.
7. Title to and ownership of the Software and Documentation and any reproductions thereof
shall remain with KMBT and its Licensor.
8. Trademarks shall be used in accordance with accepted trademark practice, including identification of the trademark owner’s name. Trademarks can only be used to identify printed
output produced by the Software. Such use of any trademark does not give you any rights
of ownership in that trademark.
9. You may not rent, lease, sublicense, lend or transfer versions or copies of the Software that
the Licensee does not use, or Software contained on any unused media, except as part of
the permanent transfer of all Software and Documentation as described above.
10. In no event will KMBT or its licensor be liable to you for any consequential, incidental INDIRECT, PUNITIVE or special damages, including any lost profits or lost saving, even if
KMBT has been advised of the possibility of such damages, or for any claim by any third
party. KMBT or its licensor disclaims all warranties with regard to the software, express or
implied, including, without limitation implied warranties of merchantability, fitness for a particular purpose, title and non-infringement of third party rights. Some states or jurisdictions
do not allow the exclusion or limitation of incidental, consequential or special damages, so
the above limitations may not apply to you.
Page 4

11. Notice to Government End Users: The Software is a “commercial item,” as that term is
defined at 48 C.F.R.2.101, consisting of “commercial computer software” and “commercial
computer software documentation,” as such terms are used in 48 C.F.R. 12.212. Consistent with 48 C.F.R. 12.212 and 48 C.F.R. 227.7202-1 through 227.7202-4, all U.S. Government End Users acquire the Software with only those rights set forth herein.
12. You agree that you will not export the Software in any form in violation of any applicable
laws and regulations regarding export control of any countries.
About Adobe Color Profile
ADOBE SYSTEMS INCORPORATED
COLOR PROFILE LICENSE AGREEMENT
NOTICE TO USER: PLEASE READ THIS CONTRACT CAREFULLY. BY USING ALL OR ANY
PORTION OF THE SOFTWARE YOU ACCEPT ALL THE TERMS AND CONDITIONS OF
THIS SOFTWARE YOU ACCEPT ALL THE TERMS AND CONDITIONS OF THIS AGREEMENT. IF YOU DO NOT AGREE WITH THE TERMS OF THIS AGREEMENT, DO NOT USE
THE SOFTWARE.
1. DEFINITIONS In this Agreement, “Adobe” means Adobe Systems Incorporated, a Delaware corporation, located at 345 Park Avenue, San Jose, California 95110. “Software”
means the software and related items with which this Agreement is provided.
2. LICENSE Subject to the terms of this Agreement, Adobe hereby grants you the worldwide,
non-exclusive, nontransferable, royalty-free license to use, reproduce and publicly display
the Software. Adobe also grants you the rights to distribute the Software only (a) as embedded within digital image files and (b) on a standalone basis. No other distribution of the
Software is allowed; including, without limitation, distribution of the Software when incorporated into or bundled with any application software. All individual profiles must be referenced by their ICC Profile description string. You may not modify the Software. Adobe is
under no obligation to provide any support under this Agreement, including upgrades or
future versions of the Software or other items. No title to the intellectual property in the Software is transferred to you under the terms of this Agreement. You do not acquire any rights
to the Software except as expressly set forth in this Agreement.
3. DISTRIBUTION If you choose to distribute the Software, you do so with the understanding
that you agree to defend, indemnify and hold harmless Adobe against any losses, damages or costs arising from any claims, lawsuits or other legal actions arising out of such distribution, including without limitation, your failure to comply with this Section 3. If you
distribute the Software on a standalone basis, you will do so under the terms of this Agreement or your own license agreement which (a) complies with the terms and conditions of
this Agreement; (b) effectively disclaims all warranties and conditions, express or implied,
on behalf of Adobe; (c) effectively excludes all liability for damages on behalf of Adobe; (d)
states that any provisions that differ from this Agreement are offered by you alone and not
Adobe and (e) states that the Software is available from you or Adobe and informs licensees how to obtain it in a reasonable manner on or through a medium customarily used for
software exchange. Any distributed Software will include the Adobe copyright notices as
included in the Software provided to you by Adobe.
Page 5

4. DISCLAIMER OF WARRANTY Adobe licenses the Software to you on an “AS IS” basis.
Adobe makes no representation as to the adequacy of the Software for any particular purpose or to produce any particular result. Adobe shall not be liable for loss or damage arising out of this Agreement or from the distribution or use of the Software or any other
materials. ADOBE AND ITS SUPPLIERS DO NOT AND CANNOT WARRANT THE PERFORMANCE OR RESULTS YOU MAY OBTAIN BY USING THE SOFTWARE, EXCEPT
FOR ANY WARRANTY, CONDITION, REPRESENTATION OR TERM TO THE EXTENT
TO WHICH THE SAME CANNOT OR MAY NOT BE EXCLUDED OR LIMITED BY LAW
APPLICABLE TO YOU IN YOUR JURISDICTION, ADOBE AND ITS SUPPLIERS MAKE
NO WARRANTIES, CONDITIONS, REPRESENTATIONS OR TERMS, EXPRESS OR
IMPLIED, WHETHER BY STATUTE, COMMON LAW, CUSTOM, USAGE OR OTHERWISE AS TO ANY OTHER MATTERS, INCLUDING BUT NOT LIMITED TO NONINFRINGEMENT OF THIRD PARTY RIGHTS, INTEGRATION, SATISFACTORY QUALITY
OR FITNESS FOR ANY PARTICULAR PURPOSE. YOU MAY HAVE ADDITIONAL
RIGHTS WHICH VARY FROM JURISDICTION TO JURISDICTION. The provisions of Sections 4, 5 and 6 shall survive the termination of this Agreement, howsoever caused, but this
shall not imply or create any continued right to use the Software after termination of this
Agreement.
5. LIMITATION OF LIABILITY IN NO EVENT WILL ADOBE OR ITS SUPPLIERS BE LIABLE
TO YOU FOR ANY DAMAGES, CLAIMS OR COSTS WHATSOEVER OR ANY CONSEQUENTIAL, INDIRECT, INCIDENTAL DAMAGES, OR ANY LOST PROFITS OR LOST
SAVINGS, EVEN IF AN ADOBE REPRESENTATIVE HAS BEEN ADVISED OF THE POSSIBILITY OF SUCH LOSS, DAMAGES, CLAIMS OR COSTS OR FOR ANY CLAIM BY
ANY THIRD PARTY. THE FOREGOING LIMITATIONS AND EXCLUSIONS APPLY TO
THE EXTENT PERMITTED BY APPLICABLE LAW IN YOUR JURISDICTION. ADOBE’S
AGGREGATE LIABILITY AND THAT OF ITS SUPPLIERS UNDER OR IN CONNECTION
WITH THIS AGREEMENT SHALL BE LIMITED TO THE AMOUNT PAID FOR THE SOFTWARE. Nothing contained in this Agreement limits Adobe’s liability to you in the event of
death or personal injury resulting from Adobe’s negligence or for the tort of deceit (fraud).
Adobe is acting on behalf of its suppliers for the purpose of disclaiming, excluding and/or
limiting obligations, warranties and liability as provided in this Agreement, but in no other
respects and for no other purpose.
6. TRADEMARKS Adobe and the Adobe logo are the registered trademarks or trademarks of
Adobe in the United States and other countries. With the exception of referential use, you
will not use such trademarks or any other Adobe trademark or logo without separate prior
written permission granted by Adobe.
7. TERM This Agreement is effective until terminated. Adobe has the right to terminate this
Agreement immediately if you fail to comply with any term hereof. Upon any such termination, you must return to Adobe all full and partial copies of the Software in your possession
or control.
8. GOVERNMENT REGULATIONS If any part of the Software is identified as an export controlled item under the United States Export Administration Act or any other export law,
restriction or regulation (the “Export Laws”), you represent and warrant that you are not a
citizen, or otherwise located within, an embargoed nation (including without limitation Iran,
Iraq, Syria, Sudan, Libya, Cuba, North Korea, and Serbia) and that you are not otherwise
prohibited under the Export Laws from receiving the Software. All rights to use the Software
are granted on condition that such rights are forfeited if you fail to comply with the terms of
this Agreement.
Page 6

9. GOVERNING LAW This Agreement will be governed by and construed in accordance with
the substantive laws in force in the State of California as such laws are applied to agreements entered into and to be performed entirely within California between California residents. This Agreement will not be governed by the conflict of law rules of any jurisdiction or
the United Nations Convention on Contracts for the International Sale of Goods, the application of which is expressly excluded. All disputes arising out of, under or related to this
Agreement will be brought exclusively in the state Santa Clara County, California, USA.
10. GENERAL You may not assign your rights or obligations granted under this Agreement
without the prior written consent of Adobe. None of the provisions of this Agreement shall
be deemed to have been waived by any act or acquiescence on the part of Adobe, its
agents, or employees, but only by an instrument in writing signed by an authorized signatory of Adobe. When conflicting language exists between this Agreement and any other
agreement included in the Software, the terms of such included agreement shall apply. If
either you or Adobe employs attorneys to enforce any rights arising out of or relating to this
Agreement, the prevailing party shall be entitled to recover reasonable attorneys’ fees. You
acknowledge that you have read this Agreement, understand it, and that it is the complete
and exclusive statement of your agreement with Adobe which supersedes any prior agreement, oral or written, between Adobe and you with respect to the licensing to you of the
Software. No variation of the terms of this Agreement will be enforceable against Adobe
unless Adobe gives its express consent, in writing, signed by an authorized signatory of
Adobe.
ICC Profile for TOYO INK Standard Color on Coated paper
(TOYO Offset Coated 2.1)
This ICC Profile (TOYO Offset Coated 2.1) characterizes Japanese offset press on Coated
paper and is fully compatible with ICC profile format.
About “TOYO INK Standard Color on Coated paper”
This is the standard for color reproduction of sheet-fed offset press on Coated paper made by
TOYO INK MFG.CO., LTD. (“TOYO INK”).
This standard is made from printing test with using TOYO INK’s sheet-fed offset printing inks
and TOYO INK’s own printing conditions.
“TOYO INK Standard Color on Coated paper” is compatible with “JAPAN COLOR”.
Agreement
1. The reproduction of images on a printer or a monitor using this ICC Profile do not completely match the TOYO INK Standard Color on Coated paper.
2. Any and all copyrights of this ICC Profile shall remain in TOYO INK; therefore you shall not
transfer, provide, rent, distribute, disclose, or grant any rights in this ICC Profile to any third
party without the prior written consent of TOYO INK.
3. In no event will TOYO INK its directors, officers, employees or agents be liable to you for
any consequential or incidential, either direct or indirect, damages (including damages for
loss of business profits, business interruption, loss of business information, and the like)
arising out of the use or inability to use this ICC Profile.
4. TOYO INK shall not be responsible for answering any question related to this ICC Profile.
Page 7

5. All company names and product names used in this document is the trademarks or registered trademarks of their respective holder.
This ICC Profile made by GretagMacbeth ProfileMaker and granted TOYO INK certain license
to distribute by GretagMacbeth AG.
TOYO Offset Coated 2.1 © TOYO INK MFG. CO., LTD. 2004
OpenSSL Statement
LICENSE ISSUES
The OpenSSL toolkit stays under a dual license, i.e. both the conditions of the OpenSSL
License and the original SSLeay license apply to the toolkit. See below for the actual license
texts. Actually both licenses are BSD-style Open Source licenses. In case of any license issues
related to OpenSSL please contact openssl-core@openssl.org.
OpenSSL License
Copyright (c) 1998-2005 The OpenSSL Project. All rights reserved.
Redistribution and use in source and binary forms, with or without modification, are permitted
provided that the following conditions are met:
1. Redistributions of source code must retain the above copyright notice, this list of conditions
and the following disclaimer.
2. Redistributions in binary form must reproduce the above copyright notice, this list of conditions and the following disclaimer in the documentation and/or other materials provided with
the distribution.
3. All advertising materials mentioning features or use of this software must display the following acknowledgment:
“This product includes software developed by the OpenSSL Project for use in the OpenSSL
Toolkit. (http://www.openssl.org/)”
4. The names “OpenSSL Toolkit” and “OpenSSL Project” must not be used to endorse or promote products derived from this software without prior written permission. For written permission, please contact openssl-core@openssl.org.
5. Products derived from this software may not be called “OpenSSL” nor may “OpenSSL”
appear in their names without prior written permission of the OpenSSL Project.
6. Redistributions of any form whatsoever must retain the following acknowledgment:
“This product includes software developed by the OpenSSL Project for use in the OpenSSL
Toolkit (http://www.openssl.org/)”
THIS SOFTWARE IS PROVIDED BY THE OpenSSL PROJECT “AS IS” AND ANY
EXPRESSED OR IMPLIED WARRANTIES, INCLUDING, BUT NOT LIMITED TO, THE
IMPLIED WARRANTIES OF MERCHANTABILITY AND FITNESS FOR A PARTICULAR PURPOSE ARE DISCLAIMED. IN NO EVENT SHALL THE OpenSSL PROJECT OR ITS CONTRIBUTORS BE LIABLE FOR ANY DIRECT, INDIRECT, INCIDENTAL, SPECIAL,
Page 8

EXEMPLARY, OR CONSEQUENTIAL DAMAGES (INCLUDING, BUT NOT LIMITED TO, PROCUREMENT OF SUBSTITUTE GOODS OR SERVICES; LOSS OF USE, DATA, OR PROFITS; OR BUSINESS INTERRUPTION) HOWEVER CAUSED AND ON ANY THEORY OF
LIABILITY, WHETHER IN CONTRACT, STRICT LIABILITY, OR TORT (INCLUDING NEGLIGENCE OR OTHERWISE) ARISING IN ANY WAY OUT OF THE USE OF THIS SOFTWARE,
EVEN IF ADVISED OF THE POSSIBILITY OF SUCH DAMAGE.
This product includes cryptographic software written by Eric Young (eay@cryptsoft.com). This
product includes software written by Tim Hudson (tjh@cryptsoft.com).
Original SSLeay License
Copyright (C) 1995-1998 Eric Young (eay@cryptsoft.com) All rights reserved.
This package is an SSL implementation written by Eric Young (eay@cryptsoft.com). The implementation was written so as to conform with Netscapes SSL.
This library is free for commercial and non-commercial use as long as the following conditions
are aheared to. The following conditions apply to all code found in this distribution, be it the
RC4, RSA, lhash, DES, etc., code; not just the SSL code. The SSL documentation included
with this distribution is covered by the same copyright terms except that the holder is Tim Hudson (tjh@cryptsoft.com).
Copyright remains Eric Young's, and as such any Copyright notices in the code are not to be
removed. If this package is used in a product, Eric Young should be given attribution as the
author of the parts of the library used. This can be in the form of a textual message at program
startup or in documentation (online or textual) provided with the package.
Redistribution and use in source and binary forms, with or without modification, are permitted
provided that the following conditions are met:
1. Redistributions of source code must retain the copyright notice, this list of conditions and
the following disclaimer.
2. Redistributions in binary form must reproduce the above copyright notice, this list of conditions and the following disclaimer in the documentation and/or other materials provided with
the distribution.
3. All advertising materials mentioning features or use of this software must display the following acknowledgement:
“This product includes cryptographic software written by Eric Young (eay@cryptsoft.com)”
The word 'cryptographic' can be left out if the rouines from the library being used are not
cryptographic related :-).
4. If you include any Windows specific code (or a derivative thereof) from the apps directory
(application code) you must include an acknowledgement:
“This product includes software written by Tim Hudson (tjh@cryptsoft.com)”
THIS SOFTWARE IS PROVIDED BY ERIC YOUNG “AS IS” AND ANY EXPRESS OR
IMPLIED WARRANTIES, INCLUDING, BUT NOT LIMITED TO, THE IMPLIED WARRANTIES
OF MERCHANTABILITY AND FITNESS FOR A PARTICULAR PURPOSE ARE DISCLAIMED.
IN NO EVENT SHALL THE AUTHOR OR CONTRIBUTORS BE LIABLE FOR ANY DIRECT,
INDIRECT, INCIDENTAL, SPECIAL, EXEMPLARY, OR CONSEQUENTIAL DAMAGES
Page 9

(INCLUDING, BUT NOT LIMITED TO, PROCUREMENT OF SUBSTITUTE GOODS OR SERVICES; LOSS OF USE, DATA, OR PROFITS; OR BUSINESS INTERRUPTION) HOWEVER
CAUSED AND ON ANY THEORY OF LIABILITY, WHETHER IN CONTRACT, STRICT LIABILITY, OR TORT (INCLUDING NEGLIGENCE OR OTHERWISE) ARISING IN ANY WAY OUT
OF THE USE OF THIS SOFTWARE, EVEN IF ADVISED OF THE POSSIBILITY OF SUCH
DAMAGE.
The licence and distribution terms for any publically available version or derivative of this code
cannot be changed. i.e. this code cannot simply be copied and put under another distribution
licence [including the GNU Public Licence.]
THIS SOFTWARE IS PROVIDED BY ERIC YOUNG “AS IS” AND ANY EXPRESS OR
IMPLIED WARRANTIES, INCLUDING, BUT NOT LIMITED TO, THE IMPLIED WARRANTIES
OF MERCHANTABILITY AND FITNESS FOR A PARTICULAR PURPOSE ARE DISCLAIMED.
IN NO EVENT SHALL THE AUTHOR OR CONTRIBUTORS BE LIABLE FOR ANY DIRECT,
INDIRECT, INCIDENTAL, SPECIAL, EXEMPLARY, OR CONSEQUENTIAL DAMAGES
(INCLUDING, BUT NOT LIMITED TO, PROCUREMENT OF SUBSTITUTE GOODS OR SERVICES; LOSS OF USE, DATA, OR PROFITS; OR BUSINESS INTERRUPTION) HOWEVER
CAUSED AND ON ANY THEORY OF LIABILITY, WHETHER IN CONTRACT, STRICT LIABILITY, OR TORT (INCLUDING NEGLIGENCE OR OTHERWISE) ARISING IN ANY WAY OUT
OF THE USE OF THIS SOFTWARE, EVEN IF ADVISED OF THE POSSIBILITY OF SUCH
DAMAGE.
The licence and distribution terms for any publically available version or derivative of this code
cannot be changed. i.e. this code cannot simply be copied and put under another distribution
licence [including the GNU Public Licence.]
NetSNMP License
Part 1: CMU/UCD copyright notice: (BSD like)
Copyright 1989, 1991, 1992 by Carnegie Mellon University Derivative Work - 1996, 1998-2000
Copyright 1996, 1998-2000 The Regents of the University of California All Rights Reserved
Permission to use, copy, modify and distribute this software and its documentation for any purpose and without fee is hereby granted, provided that the above copyright notice appears in all
copies and that both that copyright notice and this permission notice appear in supporting documentation, and that the name of CMU and The Regents of the University of California not be
used in advertising or publicity pertaining to distribution of the software without specific written
permission.
CMU AND THE REGENTS OF THE UNIVERSITY OF CALIFORNIA DISCLAIM ALL WARRANTIES WITH REGARD TO THIS SOFTWARE, INCLUDING ALL IMPLIED WARRANTIES
OF MERCHANTABILITY AND FITNESS. IN NO EVENT SHALL CMU OR THE REGENTS OF
THE UNIVERSITY OF CALIFORNIA BE LIABLE FOR ANY SPECIAL, INDIRECT OR CONSEQUENTIAL DAMAGES OR ANY DAMAGES WHATSOEVER RESULTING FROM THE LOSS
OF USE, DATA OR PROFITS, WHETHER IN AN ACTION OF CONTRACT, NEGLIGENCE OR
OTHER TORTIOUS ACTION, ARISING OUT OF OR IN CONNECTION WITH THE USE OR
PERFORMANCE OF THIS SOFTWARE.
Part 2: Networks Associates Technology, Inc copyright notice (BSD)
Copyright (c) 2001-2003, Networks Associates Technology, Inc All rights reserved.
Redistribution and use in source and binary forms, with or without modification, are permitted
provided that the following conditions are met:
Page 10

Redistributions of source code must retain the above copyright notice, this list of conditions
and the following disclaimer.
Redistributions in binary form must reproduce the above copyright notice, this list of condi-
tions and the following disclaimer in the documentation and/or other materials provided with
the distribution.
Neither the name of the Networks Associates Technology, Inc nor the names of its contrib-
utors may be used to endorse or promote products derived from this software without specific prior written permission.
THIS SOFTWARE IS PROVIDED BY THE COPYRIGHT HOLDERS AND CONTRIBUTORS
“AS IS” AND ANY EXPRESS OR IMPLIED WARRANTIES, INCLUDING, BUT NOT LIMITED
TO, THE IMPLIED WARRANTIES OF MERCHANTABILITY AND FITNESS FOR A PARTICULAR PURPOSE ARE DISCLAIMED. IN NO EVENT SHALL THE COPYRIGHT HOLDERS OR
CONTRIBUTORS BE LIABLE FOR ANY DIRECT, INDIRECT, INCIDENTAL, SPECIAL, EXEMPLARY, OR CONSEQUENTIAL DAMAGES (INCLUDING, BUT NOT LIMITED TO, PROCUREMENT OF SUBSTITUTE GOODS OR SERVICES; LOSS OF USE, DATA, OR PROFITS;
OR BUSINESS INTERRUPTION) HOWEVER CAUSED AND ON ANY THEORY OF LIABILITY, WHETHER IN CONTRACT, STRICT LIABILITY, OR TORT (INCLUDING NEGLIGENCE
OR OTHERWISE) ARISING IN ANY WAY OUT OF THE USE OF THIS SOFTWARE, EVEN IF
ADVISED OF THE POSSIBILITY OF SUCH DAMAGE.
Part 3: Cambridge Broadband Ltd. copyright notice (BSD)
Portions of this code are copyright (c) 2001-2003, Cambridge Broadband Ltd.
All rights reserved.
Redistribution and use in source and binary forms, with or without modification, are permitted
provided that the following conditions are met:
Redistributions of source code must retain the above copyright notice, this list of condi-
tions and the following disclaimer.
Redistributions in binary form must reproduce the above copyright notice, this list of condi-
tions and the following disclaimer in the documentation and/or other materials provided with
the distribution.
The name of Cambridge Broadband Ltd. may not be used to endorse or promote products
derived from this software without specific prior written permission.
THIS SOFTWARE IS PROVIDED BY THE COPYRIGHT HOLDER “AS IS” AND ANY
EXPRESS OR IMPLIED WARRANTIES, INCLUDING, BUT NOT LIMITED TO, THE IMPLIED
WARRANTIES OF MERCHANTABILITY AND FITNESS FOR A PARTICULAR PURPOSE
ARE DISCLAIMED. IN NO EVENT SHALL THE COPYRIGHT HOLDER BE LIABLE FOR ANY
DIRECT, INDIRECT, INCIDENTAL, SPECIAL, EXEMPLARY, OR CONSEQUENTIAL DAMAGES (INCLUDING, BUT NOT LIMITED TO, PROCUREMENT OF SUBSTITUTE GOODS OR
SERVICES; LOSS OF USE, DATA, OR PROFITS; OR BUSINESS INTERRUPTION) HOWEVER CAUSED AND ON ANY THEORY OF LIABILITY, WHETHER IN CONTRACT, STRICT
LIABILITY, OR TORT (INCLUDING NEGLIGENCE OR OTHERWISE) ARISING IN ANY WAY
OUT OF THE USE OF THIS SOFTWARE, EVEN IF ADVISED OF THE POSSIBILITY OF
SUCH DAMAGE.
Page 11

Part 4: Sun Microsystems, Inc. copyright notice (BSD)
Copyright (c) 2003 Sun Microsystems, Inc., 4150 Network Circle, Santa Clara, California
95054, U.S.A. All rights reserved.
Use is subject to license terms below.
This distribution may include materials developed by third parties.
Sun, Sun Microsystems, the Sun logo and Solaris are trademarks or registered trademarks of
Sun Microsystems, Inc. in the U.S. and other countries.
Redistribution and use in source and binary forms, with or without modification, are permitted
provided that the following conditions are met:
Redistributions of source code must retain the above copyright notice, this list of conditions
and the following disclaimer.
Redistributions in binary form must reproduce the above copyright notice, this list of condi-
tions and the following disclaimer in the documentation and/or other materials provided with
the distribution.
Neither the name of the Sun Microsystems, Inc. nor the names of its contributors may be
used to endorse or promote products derived from this software without specific prior written permission.
THIS SOFTWARE IS PROVIDED BY THE COPYRIGHT HOLDERS AND CONTRIBUTORS
“AS IS” AND ANY EXPRESS OR IMPLIED WARRANTIES, INCLUDING, BUT NOT LIMITED
TO, THE IMPLIED WARRANTIES OF MERCHANTABILITY AND FITNESS FOR A PARTICULAR PURPOSE ARE DISCLAIMED. IN NO EVENT SHALL THE COPYRIGHT HOLDERS OR
CONTRIBUTORS BE LIABLE FOR ANY DIRECT, INDIRECT, INCIDENTAL, SPECIAL, EXEMPLARY, OR CONSEQUENTIAL DAMAGES (INCLUDING, BUT NOT LIMITED TO, PROCUREMENT OF SUBSTITUTE GOODS OR SERVICES; LOSS OF USE, DATA, OR PROFITS;
OR BUSINESS INTERRUPTION) HOWEVER CAUSED AND ON ANY THEORY OF LIABILITY, WHETHER IN CONTRACT, STRICT LIABILITY, OR TORT (INCLUDING NEGLIGENCE
OR OTHERWISE) ARISING IN ANY WAY OUT OF THE USE OF THIS SOFTWARE, EVEN IF
ADVISED OF THE POSSIBILITY OF SUCH DAMAGE.
Part 5: Sparta, Inc copyright notice (BSD)
Copyright (c) 2003-2004, Sparta, Inc All rights reserved.
Redistribution and use in source and binary forms, with or without modification, are permitted
provided that the following conditions are met:
Redistributions of source code must retain the above copyright notice, this list of conditions
and the following disclaimer.
Redistributions in binary form must reproduce the above copyright notice, this list of condi-
tions and the following disclaimer in the documentation and/or other materials provided with
the distribution.
Neither the name of Sparta, Inc nor the names of its contributors may be used to endorse
or promote products derived from this software without specific prior written permission.
THIS SOFTWARE IS PROVIDED BY THE COPYRIGHT HOLDERS AND CONTRIBUTORS
“AS IS” AND ANY EXPRESS OR IMPLIED WARRANTIES, INCLUDING, BUT NOT LIMITED
TO, THE IMPLIED WARRANTIES OF MERCHANTABILITY AND FITNESS FOR A PARTICULAR PURPOSE ARE DISCLAIMED. IN NO EVENT SHALL THE COPYRIGHT HOLDERS OR
CONTRIBUTORS BE LIABLE FOR ANY DIRECT, INDIRECT, INCIDENTAL, SPECIAL, EXEM-
Page 12

PLARY, OR CONSEQUENTIAL DAMAGES (INCLUDING, BUT NOT LIMITED TO, PROCUREMENT OF SUBSTITUTE GOODS OR SERVICES; LOSS OF USE, DATA, OR PROFITS;
OR BUSINESS INTERRUPTION) HOWEVER CAUSED AND ON ANY THEORY OF LIABILITY, WHETHER IN CONTRACT, STRICT LIABILITY, OR TORT (INCLUDING NEGLIGENCE
OR OTHERWISE) ARISING IN ANY WAY OUT OF THE USE OF THIS SOFTWARE, EVEN IF
ADVISED OF THE POSSIBILITY OF SUCH DAMAGE.
Part 6: Cisco/BUPTNIC copyright notice (BSD)
Copyright (c) 2004, Cisco, Inc and Information Network Center of Beijing University of Posts
and Telecommunications. All rights reserved.
Redistribution and use in source and binary forms, with or without modification, are permitted
provided that the following conditions are met:
Redistributions of source code must retain the above copyright notice, this list of conditions
and the following disclaimer.
Redistributions in binary form must reproduce the above copyright notice, this list of condi-
tions and the following disclaimer in the documentation and/or other materials provided with
the distribution.
Neither the name of Cisco, Inc, Beijing University of Posts and Telecommunications, nor
the names of their contributors may be used to endorse or promote products derived from
this software without specific prior written permission.
THIS SOFTWARE IS PROVIDED BY THE COPYRIGHT HOLDERS AND CONTRIBUTORS
“AS IS” AND ANY EXPRESS OR IMPLIED WARRANTIES, INCLUDING, BUT NOT LIMITED
TO, THE IMPLIED WARRANTIES OF MERCHANTABILITY AND FITNESS FOR A PARTICULAR PURPOSE ARE DISCLAIMED. IN NO EVENT SHALL THE COPYRIGHT HOLDERS OR
CONTRIBUTORS BE LIABLE FOR ANY DIRECT, INDIRECT, INCIDENTAL, SPECIAL, EXEMPLARY, OR CONSEQUENTIAL DAMAGES (INCLUDING, BUT NOT LIMITED TO, PROCUREMENT OF SUBSTITUTE GOODS OR SERVICES; LOSS OF USE, DATA, OR PROFITS;
OR BUSINESS INTERRUPTION) HOWEVER CAUSED AND ON ANY THEORY OF LIABILITY, WHETHER IN CONTRACT, STRICT LIABILITY, OR TORT (INCLUDING NEGLIGENCE
OR OTHERWISE) ARISING IN ANY WAY OUT OF THE USE OF THIS SOFTWARE, EVEN IF
ADVISED OF THE POSSIBILITY OF SUCH DAMAGE.
Kerberos
Copyright (C) 1985-2005 by the Massachusetts Institute of Technology. All rights reserved.
permission notice
WITHIN THAT CONSTRAINT, permission to use, copy, modify, and distribute this software and
its documentation for any purpose and without fee is hereby granted, provided that the above
copyright notice appear in all copies and that both that copyright notice and this permission
notice appear in supporting documentation, and that the name of M.I.T. not be used in advertising or publicity pertaining to distribution of the software without specific, written prior permission. Furthermore if you modify this software you must label your software as modified
software and not distribute it in such a fashion that it might be confused with the original MIT
software. M.I.T. makes no representations about the suitability of this software for any purpose.
It is provided “as is” without express or implied warranty.
THIS SOFTWARE IS PROVIDED “AS IS” AND WITHOUT ANY EXPRESS OR IMPLIED WARRANTIES, INCLUDING, WITHOUT LIMITATION, THE IMPLIED WARRANTIES OF MERCHANTIBILITY AND FITNESS FOR A PARTICULAR PURPOSE.
Page 13

THIS SOFTWARE IS NOT ORIGINAL MIT SOFTWARE, MODIFIED BY KONICA MINOLTA
BUSINESS TECHNOLOGIES, INC.,
Page 14

Page 15

Contents
1 Operation on Mac OS X .................................................................................... 1
System Requirements for the Printer Driver 2
Installing the Printer Driver 3
Installing the Printer Driver 3
Print Center Settings (Mac OS X 10.2) 8
When Using a USB Connection 8
When Using a Network Connection 10
AppleTalk Setting 10
Rendezvous Setting 12
IP Printing Setting 14
IPP Setting 16
Specifying Port 9100 19
Printer Setup Utility Settings (Mac OS X 10.3) 23
When Using a USB Connection 23
When Using a Network Connection 26
AppleTalk Setting 26
Rendezvous Setting 28
IP Printing Setting 29
Printer Setup Utility Settings (Mac OS X 10.4) 33
When Using a USB Connection 33
Contents
i
Page 16

When Using a Network Connection 35
Bonjour Setting 35
AppleTalk Setting 38
IP Printing Setting 40
Printer Settings (Mac OS X 10.5/10.6) 44
When Using a USB Connection 44
When Using a Network Connection 48
Bonjour Setting 48
AppleTalk Setting 51
IP Printing Setting 54
Selecting Print Options 58
For Mac OS X 10.2/10.3/10.4 58
For Mac OS X 10.5/10.6 60
Specifying Page Setup Settings 62
Page Attributes Options 63
Specifying Custom Paper Size 64
Specifying Print Settings (Mac OS X 10.4) 65
Print Dialog Box 65
Common buttons 66
Copies & Pages 67
Layout 68
Scheduler 69
Paper Handling 70
ColorSync 71
Cover Page 71
Error Handling 72
Paper Feed 73
Color Options 74
Advanced Color Options/Image 75
Advanced Color Options/Text 76
Advanced Color Options/Graphics 77
Advanced Color Options/Simulation 79
Printer Features 80
Supply Levels 81
Summary 81
Specifying Print Settings (Mac OS X 10.5/10.6) 82
Print Dialog Box 82
Common buttons 83
Layout 84
Color Matching 85
Paper Handling 86
Paper Feed 87
Cover Page 88
Scheduler 89
Color Options 90
Advanced Color Options/Image 91
Contentsii
Page 17

Advanced Color Options/Text 92
Advanced Color Options/Graphics 93
Advanced Color Options/Simulation 94
Printer Features 95
Supply Levels 96
Summary 97
Specifying the Color Profile 98
Preparation 98
Downloading Color Profiles 98
Specifying Printer Driver Settings 100
System Requirements for the Scanner Driver 105
Installing the Scanner Driver 106
Installing the Scanner Driver 106
Scanning From a Computer Application 110
Basic Scanning Operation 110
Uninstalling the Scanner Driver 111
Specify the Scan Settings 113
Auto Scanning Mode 113
Manual Scanning Mode 115
Troubleshooting 119
2 Operation on the XPS Driver for Windows ................................................. 121
Installing the Printer Driver 122
Selecting Print Options/Defaults 130
Uninstalling the Printer Driver 133
Specifying Printer Driver Settings 134
Common buttons 134
Layout 134
Advanced Options 135
Paper/Quality 136
3 Operation on Linux ....................................................................................... 137
System Requirements for the Printer Driver 138
Installing PPD File From the Command Line 139
Adding the Printer 140
Specifying Printer Driver Settings 143
Displaying the Settings Page 143
Printer Driver Settings 144
Extra 144
General 145
Graphics Options 146
Image Options 146
Options Installed 147
Simulation 148
Text Options 148
Banners 149
Contents
iii
Page 18

Printing a Document 150
Example Using LPR Command 150
Example Using OpenOffice 151
Checking Print Jobs 155
Troubleshooting 156
4 Operation on NetWare .................................................................................. 157
Printing With NetWare 158
Network Printing in a NetWare Environment 158
For Remote Printer Mode With NetWare 4.x Bindery Emulation 158
For Print Server Mode With NetWare 4.x Bindery Emulation 160
For NetWare 4.x Remote Printer Mode (NDS) 161
For NetWare 4.x/5.x/6 Print Server Mode (NDS) 163
For NetWare 5.x/6 Novell Distributed Print Service (NDPS) 164
Setting Up a Client (Windows) Settings When Using the NetWare
Server 165
5 Using LinkMagic ........................................................................................... 167
About LinkMagic 168
LinkMagic Operating Environment 168
Before Using LinkMagic 169
Installing LinkMagic 169
Starting Up LinkMagic 170
Main LinkMagic Window 171
Using LinkMagic 173
Saving Scanned Images as Files 173
Description of the Scan Image/Scan Document Dialog Boxes 174
Saving Scanned Images to the Clipboard 178
Description of the Scan to Clipboard Dialog Box 181
Attaching Scanned Images to an E-Mail Message 184
Description of the Scan and Mail Dialog Box 186
Printing Scanned Images 191
Description of the Scan and Print Dialog Box 193
Registering Frequently Used Software 197
Registering Software With Launcher Buttons 197
Settings Dialog Box 199
Push To Scan Tab 199
Launcher Tab 200
Other Tab 201
Uninstalling LinkMagic 202
Troubleshooting 203
6 Using Local Setup Utility (LSU) ................................................................... 205
About Local Setup Utility (LSU) 206
LSU Operating Environment 206
Installing LSU 207
Contentsiv
Page 19

Starting Up LSU 208
Main LSU Window 209
Connecting to the Machine 209
Downloading Information from the Machine 210
Uploading Information to the Machine 210
Dial Import/Dial Export 210
Registering Dialing Settings 211
Programming a Speed Dial Number 211
Adding a Speed Dial Number (Fax/E-mail) 212
For registering a fax number 212
For registering an E-mail address 213
Adding a Speed Dial Number (Scan To Server) 214
For FTP transmissions 214
For SMB transmissions 215
Editing a Speed Dial Number 215
Deleting a Speed Dial Number 215
Programming/Editing a Group Dial 216
Registering to Favorites 217
Printing the List of Speed Dial, Group Dial and Favorite 219
Displaying Machine Information 220
Checking the Total Counter 220
Checking the Configuration Page 221
Uninstalling LSU 222
Troubleshooting 223
7 Printer Utilities .............................................................................................. 225
Installing Printer Utilities on Windows 226
8 Understanding the Network Setting Menu ................................................. 227
NETWORK SETTING Menu 228
Location within the Configuration Menu 228
Accessing the Network Setting Menu 234
Using the Network Setting Menu Options 235
TCP/IP 235
IP ADDR. SETTING 235
DNS 236
DHCP 237
BOOTP 237
ARP/PING 238
HTTP 238
FTP SERVER 238
FTP TX 239
SMB 239
BONJOUR 239
IPP 240
RAW PORT 240
Contents
v
Page 20

SLP 240
SNMP 241
WSD PRINT 241
IPSEC 241
IP ADDR. FILTER 241
IPv6 242
NETWARE 243
APPLETALK 243
SPEED/DUPLEX 243
IEEE802.1X 243
9 Network Printing ........................................................................................... 245
Network Connection 246
Theory 246
Making the Connection 247
Ethernet Interface 247
Using DHCP 247
Setting the Address Manually 248
Network Printing 251
AppleTalk 251
Bonjour 252
BOOTP 252
DDNS (Dynamic DNS) 252
DHCP 252
DNS 252
FTP 253
HTTP 253
IEEE802.1x 253
IPP 253
IPsec 253
IPv6 253
IPX/SPX 254
LDAP 254
LPD/LPR 254
POP Before SMTP 254
Port 9100 254
SLP 255
SMB 255
SMTP 255
SMTP Authentication 256
SNMP 256
TCP/IP 256
WSD print 256
Printing via IPP (Internet Printing Protocol) 257
Adding an IPP Port using the Drivers CD/DVD 257
Contentsvi
Page 21

Adding an IPP Port using Add Printer Wizard –
Windows Server 2003/XP/2000 259
Adding an IPP Port using Add Printer Wizard –
Windows Vista/7/Server 2008 261
Printing via Web Service Print Function 263
With Windows Server 2008 263
Making the printer driver known from the Network window 263
Adding a printer from the Network window 264
Adding a printer using Add Printer Wizard 267
Updating the driver after connecting this machine 272
If the bit number differs between the server operating system and
client operating system 274
Installing the Additional Driver 275
Troubleshooting 278
10 Using PageScope Web Connection ............................................................ 279
About PageScope Web Connection 280
Display Language 280
Requirements 280
When connecting with Windows Server 2008 281
Setting Up the Printer Web Page 282
Determining the Printer Name 282
Setting Up Your Browser Software 282
Internet Explorer (version 6.0 for Windows) 283
Netscape Navigator (version 7.1) 283
Understanding the PageScope Web Connection Window 285
Navigation 285
Current Status 286
Logging on to PageScope Web Connection 287
Login Page 287
Language Setting 288
Public User Mode 288
Registered User Mode 288
User Authentication Mode 288
Administrator Mode 289
Viewing Printer Status 290
System Page 290
Device Information 291
Counter 301
Online Assistance 303
User Authentication 304
Job Page 306
Active Job List (shown above) 306
Done Job List 307
Done Job List (Detail) 308
Contents
vii
Page 22

Print Page 309
Default Settings 309
Font/Form 321
Report Types 325
Direct Print 326
Scan Page 327
Favorite (shown above) 327
Speed Dial Setting 328
Group Dial Setting 329
Configuring the Printer 330
System Page 330
Device Information 331
Counter 341
Online Assistance 343
Import/Export 345
Authentication 347
Date/Time 351
Admin Password 355
Save Settings 357
Machine Settings 358
ROM Version 361
Maintenance 362
Status Notification Settings 364
Job Page 368
Active Job List (show above) 368
Done Job List 369
Done Job List (Detail) 370
Print Page 371
Local Interface 371
Default Settings 372
Download Font/Form 397
Scan Page 401
Favorite (shown above) 401
Speed Dial Setting 405
Group Dial Setting 420
Fax Configuration 424
Downloading/Uploading Destination List 437
Network Page 438
TCP/IP 439
Bonjour 460
LDAP 462
WSD 466
NetWare 468
IPP 472
FTP 476
SNMP 479
Contentsviii
Page 23

AppleTalk 483
Email 485
SMB 490
SSL/TLS 491
SSL/TLS Information 491
SSL/TLS Setting (When a certificate is not installed) 492
SSL/TLS Setting (When a certificate is installed) 493
Self-signed Certificate Setting 494
Request a certificate 496
Certificate Request 498
Install a Certificate 499
Encryption Strength Setting 500
Remove a Certificate 501
Mode Using SSL/TLS 502
Authentication 503
Contents
ix
Page 24

Contentsx
Page 25

Operation on
Mac OS X
Page 26

System Requirements for the Printer Driver
Before installing the printer driver, make sure that your system meets the following system requirements.
Computer Apple Macintosh computer installed with the
following processor:
– PowerPC G3 or later processor (Pow-
erPC G4 or later is recommended)
– Intel processor
Connecting the computer
and printer
Operating system Mac OS X 10.2.8/10.3/10.4/10.5/10.6
RAM 128 MB or more
Available disk space 256 MB or more (for storing images)
Supported languages English, French, German, Italian, Spanish,
USB connection (USB 2.0 (High-Speed)),
Network connection (10Base-T/100Base-TX/
1000Base-T)
Portuguese, Czech, Korean, Simplified Chinese, Traditional Chinese
System Requirements for the Printer Driver2
Page 27
Installing the Printer Driver
" You must have administrator privileges in order to install the printer
driver.
" Before proceeding with the installation, be sure to exit all running
applications.
Installing the Printer Driver
" The procedure for installing the printer driver on Mac OS X 10.4 is
described below. The following procedure or some steps may be different depending on the version of the operating system being used.
Complete the installation according to the instructions in the dialog
boxes that appear.
1 Insert the Drivers CD/DVD in the CD/DVD-ROM drive of your Macintosh.
" The printer driver for Mac OS X 10.6 is included in the Drivers CD/
DVD (For Windows 7/Mac OS X 10.6).
2 Double-click the CD icon on the desktop, Mac folder, Printer Driver folder,
mc4695MF_103104 folder and then double-click the
mc4695MF_103104.pkg.
The installer for the printer driver starts up.
" When using Mac OS X 10.6, double-click the mc4695MF_106.pkg.
" When using Mac OS X 10.5, double-click the mc4695MF_105.pkg.
" When using Mac OS X 10.3, double-click the
mc4695MF_103104.pkg.
" When using Mac OS X 10.2, double-click the mc4695MF_102.pkg.
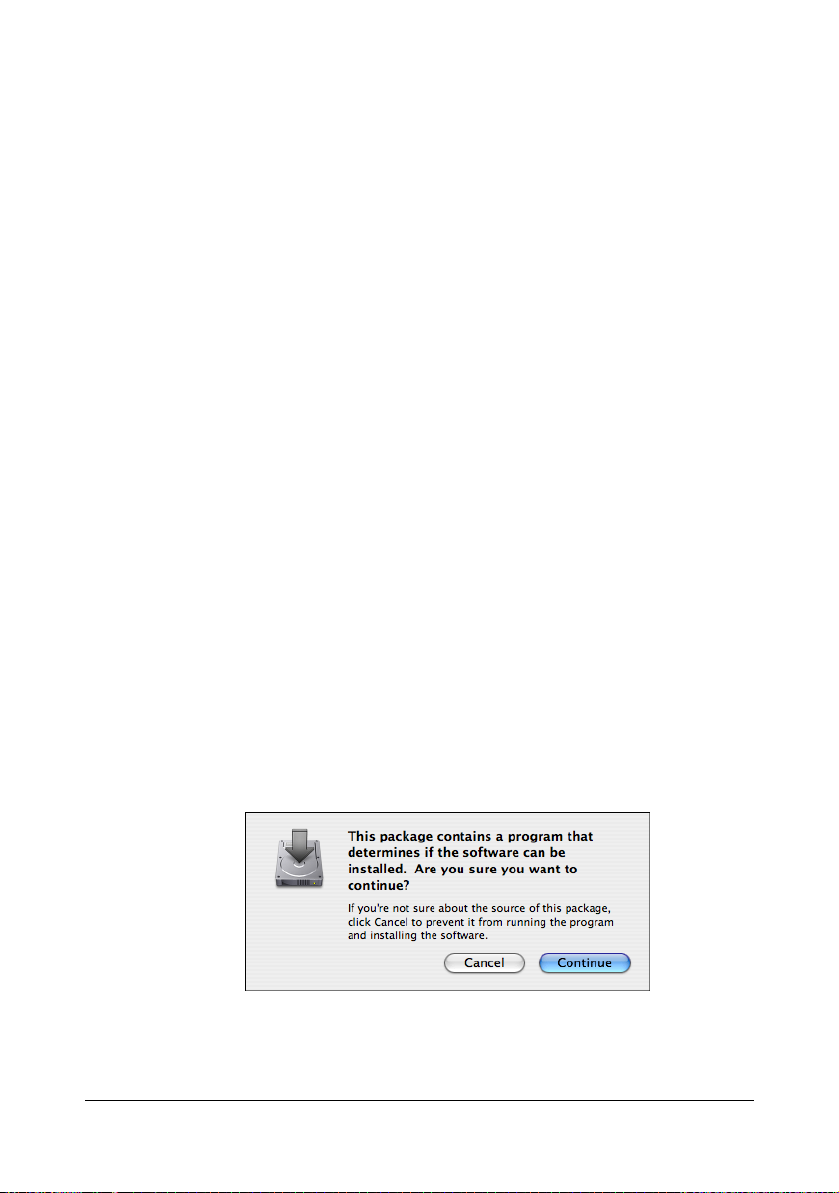
3 Click Continue.
Installing the Printer Driver
3
Page 28
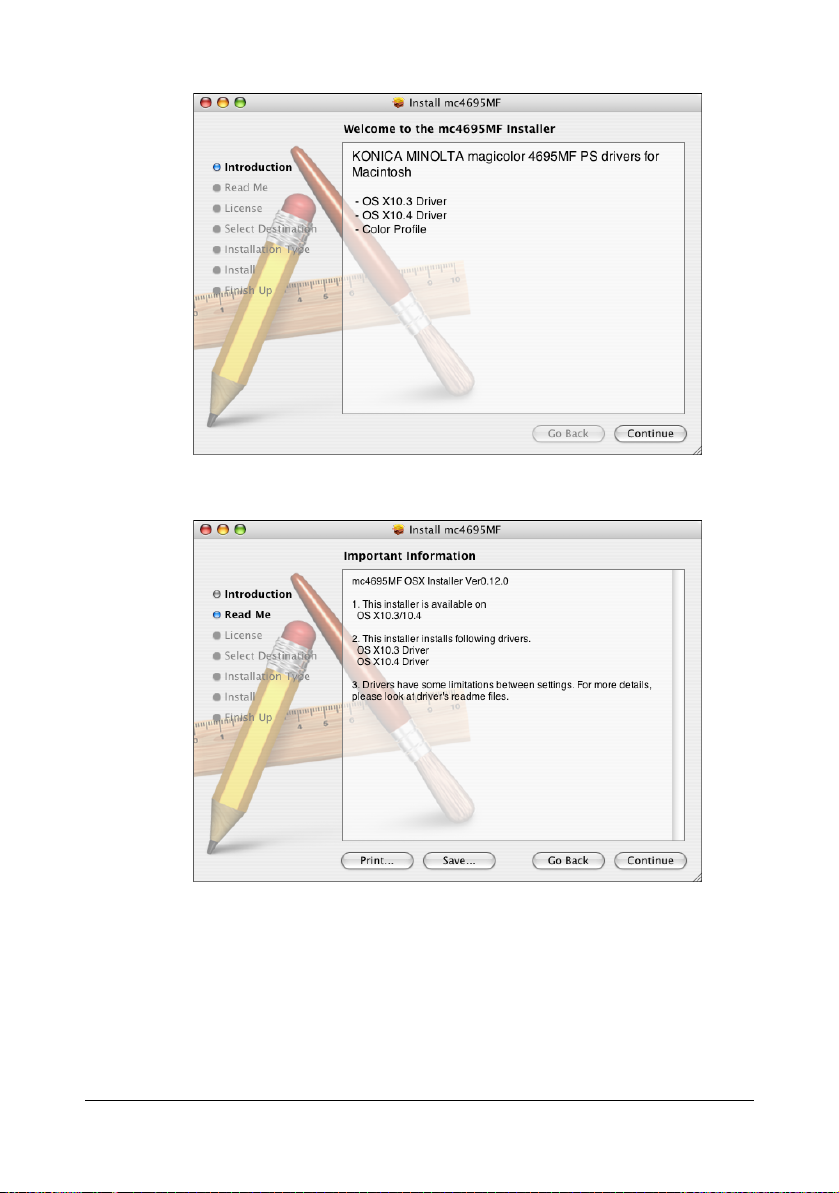
4 Click Continue.
5 Click Continue.
Installing the Printer Driver4
Page 29
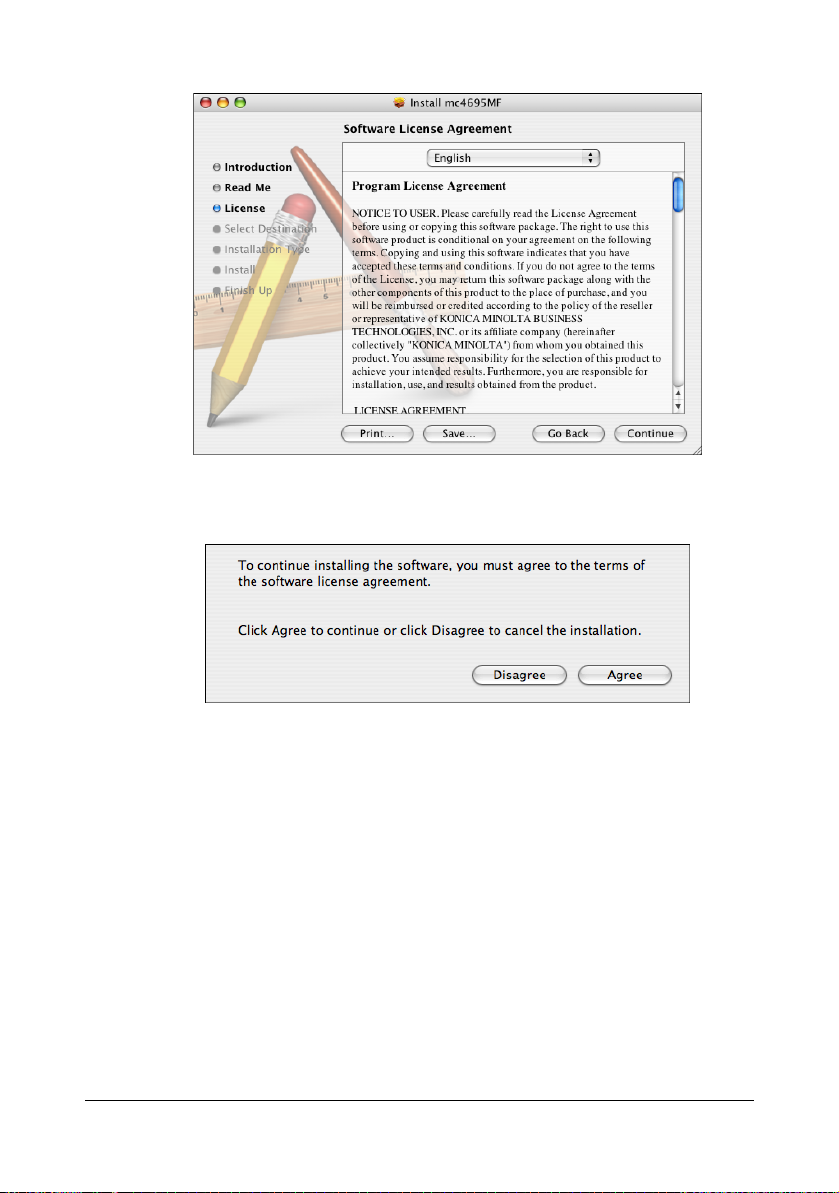
6 Check the details of the license agreement, and then click Continue.
7 Click Agree in the confirmation dialog box if you agree to the terms of the
license.
Installing the Printer Driver
5
Page 30
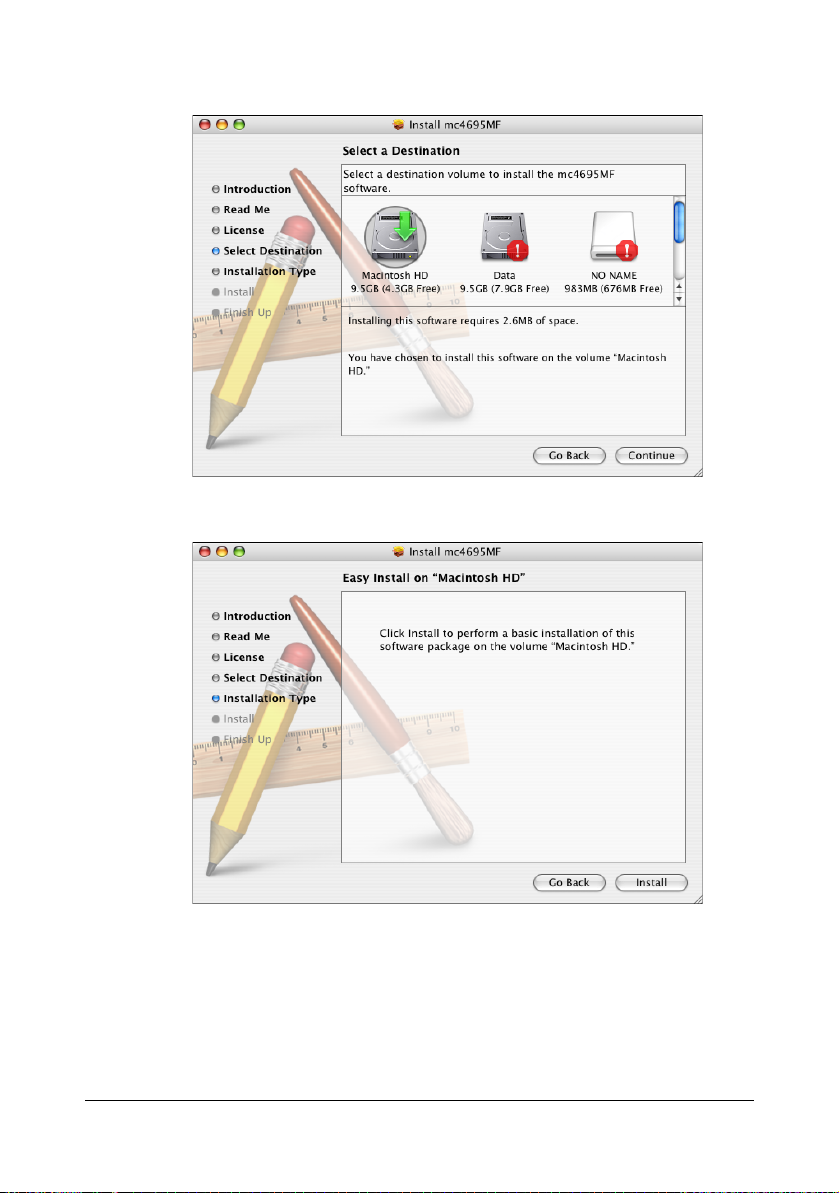
8 In the Select a Destination page, select the disk in which you wish to
install the software, and then click Continue.
9 Click Install in the Easy Install page.
Installing the Printer Driver6
Page 31

10 Enter the administrator user name and password in the Authenticate dia-
log box, and then click OK.
Installation starts.
11 After the installation has been completed, click Close.
This completes the installation of the printer driver.
Installing the Printer Driver
7
Page 32

Print Center Settings (Mac OS X 10.2)
" Before specifying the Printer Setup Utility settings, set USB SET-
TING
(in the UTILITY - ADMIN. MANAGEMENT menu) to Mac.
For details, refer to the Printer/Copier/Scanner User’s Guide on the
Documentation CD/DVD.
When Using a USB Connection
1 Use a USB cable to connect the printer to your computer.
2 Check that the printer is turned on, and then restart the computer.
3 Open Print Center, which can be accessed by clicking Startup Disk, then
Applications, then Utilities.
4 In the Printer List, click Add.
5 Select USB from the pop-up menu.
Print Center Settings (Mac OS X 10.2)8
Page 33

6 Select magicolor 4695MF in the Product list.
" If magicolor 4695MF does not appear, check that the printer is
turned on and the USB cable is connected, and then restart the
computer.
7 Select KONICA MINOLTA from the Printer Model pop-up menu.
8 Select KONICA MINOLTA mc4695MF PPD in the Model Name list.
9 Click Add.
The new printer appears in the Printer List screen.
" If any options are installed, select them. For details, refer to “Selecting
Print Options” on page 58.
Print Center Settings (Mac OS X 10.2)
9
Page 34

When Using a Network Connection
The network connection settings can be specified in one of five ways:
AppleTalk setting, Rendezvous setting, IP printing setting, IPP setting and
Specifying Port 9100.
AppleTalk Setting
1 Connect the printer to an Ethernet network.
2 Open Print Center, which can be accessed by clicking Startup Disk, then
Applications, then Utilities.
3 Click Add in the Printer List.
4 Select AppleTalk from the pop-up menu.
Print Center Settings (Mac OS X 10.2)10
Page 35

5 Select MC4695-xxxxxx.
" "XXXXXX" refers to the last six digits of the MAC address (in hexadec-
imal).
6 Select KONICA MINOLTA from the Printer Model pop-up menu.
7 Select KONICA MINOLTA mc4695MF PPD in the Name list.
Print Center Settings (Mac OS X 10.2)
11
Page 36

8 Click Add.
The new printer appears in the Printer List screen.
" If any options are installed, select them. For details, refer to “Selecting
Print Options” on page 58.
Rendezvous Setting
1 Connect the printer to an Ethernet network.
2 Open Print Center, which can be accessed by clicking Startup Disk, then
Applications, then Utilities.
3 Click Add in the Printer List.
4 Select Rendezvous from the pop-up menu.
Print Center Settings (Mac OS X 10.2)12
Page 37

5 Select KONICA MINOLTA magicolor 4695MF(xx:xx:xx).
" "xx:xx:xx" refers to the last six digits of the MAC address (in hexadeci-
mal).
6 Select KONICA MINOLTA from the Printer Model pop-up menu.
7 Select KONICA MINOLTA mc4695MF PPD in the Model Name list.
Print Center Settings (Mac OS X 10.2)
13
Page 38

8 Click Add.
The new printer appears in the Printer List screen.
" If any options are installed, select them. For details, refer to “Selecting
Print Options” on page 58.
IP Printing Setting
1 Connect the printer to an Ethernet network.
2 Open Print Center, which can be accessed by clicking Startup Disk, then
Applications, then Utilities.
3 Click Add in the Printer List.
Print Center Settings (Mac OS X 10.2)14
Page 39

4 Select IP Printing from the pop-up menu.
5 Enter the IP address for the printer in the Printer's Address text box.
6 Select KONICA MINOLTA from the Printer Model pop-up menu.
Print Center Settings (Mac OS X 10.2)
15
Page 40

7 Select KONICA MINOLTA mc4695MF PPD in the Model Name list.
8 Click Add.
The new printer appears in the Printer List screen.
" If any options are installed, select them. For details, refer to “Selecting
Print Options” on page 58.
IPP Setting
1 Connect the printer to an Ethernet network.
2 Open Print Center, which can be accessed by clicking Startup Disk, then
Applications, then Utilities.
Print Center Settings (Mac OS X 10.2)16
Page 41

3 In the Printer List, click Add while pressing the Option key in the key-
board.
4 Select Advanced from the pop-up menu.
5 Select Internet Printing Protocol (http) from the Device pop-up menu.
Print Center Settings (Mac OS X 10.2)
17
Page 42

6 Enter the name for the printer in the Device Name text box.
7 In the Device URI text box, enter "http://<IP address>/ipp".
8 Select KONICA MINOLTA from the Printer Model pop-up menu.
9 Select KONICA MINOLTA mc4695MF PPD in the Name list.
Print Center Settings (Mac OS X 10.2)18
Page 43

10 Click Add.
The new printer appears in the Printer List screen.
" If any options are installed, select them. For details, refer to “Selecting
Print Options” on page 58.
Specifying Port 9100
1 Connect the printer to an Ethernet network.
2 Open Print Center, which can be accessed by clicking Startup Disk, then
Applications, then Utilities.
3 In the Printer List, click Add while pressing the Option key in the key-
board.
Print Center Settings (Mac OS X 10.2)
19
Page 44

4 Select Advanced from the pop-up menu.
5 Select AppSocket/HP JetDirect from the Device pop-up menu.
6 Enter the name for the printer in the Device Name text box.
Print Center Settings (Mac OS X 10.2)20
Page 45

7 In the Device URI text box, enter "socket://<IP address>".
8 Select KONICA MINOLTA from the Printer Model pop-up menu.
9 Select KONICA MINOLTA mc4695MF PPD in the Name list.
Print Center Settings (Mac OS X 10.2)
21
Page 46

10 Click Add.
The new printer appears in the Printer List screen.
" If any options are installed, select them. For details, refer to “Selecting
Print Options” on page 58.
Print Center Settings (Mac OS X 10.2)22
Page 47

Printer Setup Utility Settings (Mac OS X 10.3)
" Before specifying the Printer Setup Utility settings, set USB SET-
TING
(in the UTILITY - ADMIN. MANAGEMENT menu) to Mac.
For details, refer to the Printer/Copier/Scanner User’s Guide on the
Documentation CD/DVD.
When Using a USB Connection
1 Use a USB cable to connect the printer to your computer.
2 Check that the printer is turned on, and then restart the computer.
3 Open Printer Setup Utility, which can be accessed by clicking Startup
Disk, then Applications, then Utilities.
4 In the Printer List, click Add.
5 Select USB from the pop-up menu.
Printer Setup Utility Settings (Mac OS X 10.3)
23
Page 48

6 Select magicolor 4695MF in the Product list.
" If magicolor 4695MF does not appear, check that the printer is
turned on and the USB cable is connected, and then restart the
computer.
7 Select KONICA MINOLTA from the Printer Model pop-up menu.
8 Select KONICA MINOLTA mc4695MF PPD in the Model Name list.
Printer Setup Utility Settings (Mac OS X 10.3)24
Page 49

9 Click Add.
The new printer appears in the Printer List screen.
" If any options are installed, select them. For details, refer to “Selecting
Print Options” on page 58.
Printer Setup Utility Settings (Mac OS X 10.3)
25
Page 50

When Using a Network Connection
The network connection settings can be specified IP printing Setting (IPP,
LPD or Socket).
AppleTalk Setting
1 Connect the printer to an Ethernet network.
2 Open Printer Setup Utility, which can be accessed by clicking Startup
Disk, then Applications, then Utilities.
3 Click Add in the Printer List.
4 Select AppleTalk from the pop-up menu.
Printer Setup Utility Settings (Mac OS X 10.3)26
Page 51

5 Select MC4695-xxxxxx in the Name list.
" "XXXXXX" refers to the last six digits of the MAC address (in hexadec-
imal).
6 Select KONICA MINOLTA from the Printer Model pop-up menu.
7 Select KONICA MINOLTA mc4695MF PPD in the Model Name list.
8 Click Add.
The new printer appears in the Printer List screen.
" If any options are installed, select them. For details, refer to “Selecting
Print Options” on page 58.
Printer Setup Utility Settings (Mac OS X 10.3)
27
Page 52

Rendezvous Setting
1 Connect the printer to an Ethernet network.
2 Open Printer Setup Utility, which can be accessed by clicking Startup
Disk, then Applications, then Utilities.
3 Click Add in the Printer List.
4 Select Rendezvous from the pop-up menu.
5 Select KONICA MINOLTA magicolor 4695MF(xx:xx:xx) in the Name
list.
" "xx:xx:xx" refers to the last six digits of the MAC address (in hexadeci-
mal).
Printer Setup Utility Settings (Mac OS X 10.3)28
Page 53

6 Select KONICA MINOLTA from the Printer Model pop-up menu.
7 Select KONICA MINOLTA mc4695MF PPD in the Model Name list.
8 Click Add.
The new printer appears in the Printer List screen.
" If any options are installed, select them. For details, refer to “Selecting
Print Options” on page 58.
IP Printing Setting
1 Connect the machine to an Ethernet network.
2 Open Printer Setup Utility, which can be accessed by clicking Startup
Disk, then Applications, then Utilities.
Printer Setup Utility Settings (Mac OS X 10.3)
29
Page 54

3 Click Add in the Printer List.
4 Select IP Printing from the pop-up menu.
5 Select desired print protocol from the Printer Type pop-up menu.
" - For an LPD setup, select LPD/LPR.
- For an IPP setup, select Internet Printing Protocol.
- For a port 9100 setup, select Socket/HP Jet Direct.
Printer Setup Utility Settings (Mac OS X 10.3)30
Page 55

6 Enter the IP address for the machine in the Printer Address text box.
7 Select KONICA MINOLTA from the Printer Model pop-up menu.
8 Select KONICA MINOLTA mc4695MF PPD in the Model Name list.
Printer Setup Utility Settings (Mac OS X 10.3)
31
Page 56

9 Click Add.
The new printer appears in the Printer List screen.
" If any options are installed, select them. For details, refer to “Selecting
Print Options” on page 58.
Printer Setup Utility Settings (Mac OS X 10.3)32
Page 57

Printer Setup Utility Settings (Mac OS X 10.4)
" Before specifying the Printer Setup Utility settings, set USB SET-
TING
(in the UTILITY - ADMIN. MANAGEMENT menu) to Mac.
For details, refer to the Printer/Copier/Scanner User’s Guide on the
Documentation CD/DVD.
When Using a USB Connection
1 Use a USB cable to connect the machine to your computer.
2 Open Printer Setup Utility, which can be accessed by clicking Macintosh
HD, then Applications, then Utilities.
3 In the Printer List, click Add.
The detected printer appears in the Printer Browser.
Printer Setup Utility Settings (Mac OS X 10.4)
33
Page 58

4 Select mc4695MF in the Printer Name.
" If mc4695MF does not appear, check that the machine is turned
on and the USB cable is connected, and then restart the computer.
5 Check that KONICA MINOLTA mc4695MF PPD is selected in the Print
Using list.
6 Click Add.
The new printer appears in the Printer List screen.
" If any options are installed, select them. For details, refer to
“Selecting Print Options” on page 58.
Printer Setup Utility Settings (Mac OS X 10.4)34
Page 59

When Using a Network Connection
The network connection settings can be specified in one of three ways:
Bonjour Setting, AppleTalk Setting and IP printing Setting (IPP, LPD or
Socket).
Bonjour Setting
1 Connect the machine to an Ethernet network.
2 Open Printer Setup Utility, which can be accessed by clicking Startup
Disk, then Applications, then Utilities.
3 In the Printer List, click Add.
The detected printer appears in the Printer Browser.
Printer Setup Utility Settings (Mac OS X 10.4)
35
Page 60

4 Select KONICA MINOLTA magicolor 4695MF (xx:xx:xx) in the Printer
Browser.
" “xx:xx:xx” refers to the last six digits of the MAC address (in hexa-
decimal).
5 Check that KONICA MINOLTA mc4695MF PPD is selected in the Print
Using list.
6 Click Add.
Printer Setup Utility Settings (Mac OS X 10.4)36
Page 61

7 Select the appropriate settings in the Printer Memory, Storage, and
Paper Source Unit according to your printer setup.
8 Click Continue.
The new printer appears in the Printer List screen.
Printer Setup Utility Settings (Mac OS X 10.4)
37
Page 62

AppleTalk Setting
1 Connect the machine to an Ethernet network.
2 Open Printer Setup Utility, which can be accessed by clicking Startup
Disk, then Applications, then Utilities.
3 Click Add in the Printer List.
The detected printer appears in the Printer Browser.
Printer Setup Utility Settings (Mac OS X 10.4)38
Page 63

4 Select MC4695-xxxxxx in the Printer Name list.
" “xxxxxx” refers to the last six digits of the MAC address (in hexa-
decimal).
5 Check that KONICA MINOLTA mc4695MF PPD is selected in the Print
Using list.
6 Click Add.
The new printer appears in the Printer List screen.
" If any options are installed, select them. For details, refer to
“Selecting Print Options” on page 58.
Printer Setup Utility Settings (Mac OS X 10.4)
39
Page 64

IP Printing Setting
1 Connect the machine to an Ethernet network.
2 Open Printer Setup Utility, which can be accessed by clicking Startup
Disk, then Applications, then Utilities.
3 Click Add in the Printer List.
4 Click IP Printer.
Printer Setup Utility Settings (Mac OS X 10.4)40
Page 65

5 Select desired print protocol from the Protocol pop-up menu.
" - For an IPP setup, select Internet Printing Protocol - IPP.
- For an LPD setup, select Line Printer Daemon - LPD.
- For a port 9100 setup, select HP Jet Direct - Socket.
Printer Setup Utility Settings (Mac OS X 10.4)
41
Page 66

6 Enter the IP address for the machine in the Address text box.
" - For an LPD setup, type “lp” in the Queue text box.
- For an IPP setup, type “ipp” in the Queue text box.
7 Select KONICA MINOLTA mc4695MF PPD in the Print Using list.
8 Click Add.
Printer Setup Utility Settings (Mac OS X 10.4)42
Page 67

9 Select the appropriate settings in the Printer Memory, Storage, and
Paper Source Unit according to your printer setup.
10 Click Continue.
The new printer appears in the Printer List screen.
Printer Setup Utility Settings (Mac OS X 10.4)
43
Page 68

Printer Settings (Mac OS X 10.5/10.6)
" Before specifying the Printer settings, set USB SETTING (in the
UTILITY - ADMIN. MANAGEMENT menu) to Mac. For details,
refer to the Printer/Copier/Scanner User’s Guide on the Documentation CD/DVD.
When Using a USB Connection
1 Use a USB cable to connect the printer to your computer.
2 Select System Preference from the Apple menu.
3 Click Print & Fax.
4 In the Print & Fax, click + button.
Printer Settings (Mac OS X 10.5/10.6)44
Page 69

The detected printer appears in the Printer Browser.
5 Select KONICA MINOLTA mc4695MF in the Printer Name list.
Printer Settings (Mac OS X 10.5/10.6)
45
Page 70

" If KONICA MINOLTA mc4695MF does not appear, check that the
printer is turned on and the USB cable is connected, and then restart
the computer.
6 Check that KONICA MINOLTA mc4695MF PPD is selected in the Print
Using list.
7 Click Add.
8 Select the appropriate settings in the Printer Memory, Storage, and
Paper Source Unit according to your printer setup.
Printer Settings (Mac OS X 10.5/10.6)46
Page 71

9 Click Continue.
The new printer appears in the Print & Fax screen.
Printer Settings (Mac OS X 10.5/10.6)
47
Page 72

When Using a Network Connection
The network connection settings can be specified in one of three ways: Bonjour Setting, AppleTalk Setting and IP printing Setting (IPP, LPD or Socket).
Bonjour Setting
1 Connect the machine to an Ethernet network.
2 Select System Preference from the Apple menu.
3 Click Print & Fax.
4 In the Print & Fax, click + button.
Printer Settings (Mac OS X 10.5/10.6)48
Page 73

The detected printer appears in the Printer Browser.
5 Select KONICA MINOLTA magicolor 4695MF (xx:xx:xx) in the Printer
Name list.
" “xx:xx:xx” refers to the last six digits of the MAC address (in hexadeci-
mal).
Printer Settings (Mac OS X 10.5/10.6)
49
Page 74

6 Check that KONICA MINOLTA mc4695MF PPD is selected in the Print
Using list.
7 Click Add.
8 Select the appropriate settings in the Printer Memory, Storage, and
Paper Source Unit according to your printer setup.
9 Click Continue.
The new printer appears in the Print & Fax screen.
Printer Settings (Mac OS X 10.5/10.6)50
Page 75

AppleTalk Setting
" Mac OS X 10.6 does not support AppleTalk.
1 Connect the machine to an Ethernet network.
2 Select System Preference from the Apple menu.
3 Click Print & Fax.
4 In the Print & Fax, click + button.
Printer Settings (Mac OS X 10.5/10.6)
51
Page 76

The detected printer appears in the Printer Browser.
5 Select MC4695-xxxxxx in the Printer Name list.
" “xxxxxx” refers to the last six digits of the MAC address (in hexa-
decimal).
6 Check that KONICA MINOLTA mc4695MF PPD is selected in the Print
Using list.
7 Click Add.
Printer Settings (Mac OS X 10.5/10.6)52
Page 77

8 Select the appropriate settings in the Printer Memory, Storage, and
Paper Source Unit according to your printer setup.
9 Click Continue.
The new printer appears in the Printer List screen.
Printer Settings (Mac OS X 10.5/10.6)
53
Page 78

IP Printing Setting
1 Connect the machine to an Ethernet network.
2 Select System Preference from the Apple menu.
3 Click Print & Fax.
4 In the Print & Fax, click + button.
Printer Settings (Mac OS X 10.5/10.6)54
Page 79

5 Click IP.
6 Select desired print protocol from the Protocol pop-up menu.
" - For an IPP setup, select Internet Printing Protocol - IPP.
- For an LPD setup, select Line Printer Daemon - LPD.
- For a port 9100 setup, select HP Jetdirect - Socket.
Printer Settings (Mac OS X 10.5/10.6)
55
Page 80

7 Enter the IP address for the machine in the Address text box.
" - For an LPD setup, type “lp” in the Queue text box.
- For an IPP setup, type “ipp” in the Queue text box.
8 Check that KONICA MINOLTA mc4695MF PPD is selected in the Print
Using list.
9 Click Add.
Printer Settings (Mac OS X 10.5/10.6)56
Page 81

10 Select the appropriate settings in the Printer Memory, Storage, and
Paper Source Unit according to your printer setup.
11 Click Continue.
The new printer appears in the Print & Fax screen.
Printer Settings (Mac OS X 10.5/10.6)
57
Page 82

Selecting Print Options
For Mac OS X 10.2/10.3/10.4
1 Open Printer Setup Utility (Print Center), which can be accessed by
clicking Startup disk, then Applications, then Utilities.
2 Select this printer in the Printer List, and then select Show Info from the
Printers menu.
3 Select Installable Options from the pop-up menu.
Selecting Print Options58
Page 83

4 Select the appropriate settings in the Printer Memory, Storage, and
Paper Source Unit according to your printer setup.
5 Click Apply Changes.
6 Close the Printer Info dialog box.
Selecting Print Options
59
Page 84

For Mac OS X 10.5/10.6
1 Select System Preference from the Apple menu.
2 Click Print & Fax.
3 Select this printer in the Printers List, and then click Options & Sup-
plies.
4 Select Driver.
Selecting Print Options60
Page 85

5 Select the appropriate settings in the Printer Memory, Storage, and
Paper Source Unit according to your printer setup.
6 Click OK.
7 Close the Print & Fax screen.
Selecting Print Options
61
Page 86

Specifying Page Setup Settings
The following dialog box appears when Page Setup... is selected from the
File menu in the application being used.
1 Select Page Setup... from the File menu.
The Page Setup dialog box appears.
2 Select this printer in the Format for pop-up menu.
You can select the following sections from the Settings pop-up menu.
Section Description
Page Attributes This is used to specify the settings for the
paper size, scaling, and print orientation.
Save As Default This is used to save the new settings as the
defaults.
Specifying Page Setup Settings62
Page 87

Page Attributes Options
The Page Attributes section is used to specify the settings for the paper
size, scaling, and print orientation.
Paper Size
Select the desired paper size from the Paper Size pop-up menu.
Orientation
Select either a vertical or horizontal page orientation for printouts.
Scale
If you want to enlarge or reduce the size of the printout, enter the scale
ratio here (25-400%).
" Regardless of which paper size is selected, the machine does not
print within 0.165" (4.2 mm) of the edge of the paper.
Specifying Page Setup Settings
63
Page 88

Specifying Custom Paper Size
You can also specify a paper size that is not listed in the Paper Size pop-up
menu.
1 Select Manage Custom Sizes from the pop-up menu, in the Page Setup
dialog box.
The Custom Page Sizes dialog box appears.
+
Click this button to create a new custom page size.
-
Click this button to delete a custom page size.
Duplicate
Click this button to duplicate (copy) the settings of an existing custom
page size and create a new custom page size based on those settings.
Page Size
Enter the dimensions of the paper height and width for the custom page
size.
Height: 5.8 - 14.0" (148 - 356 mm)
Width: 3.6 - 8.5" (92 - 216 mm)
Printer Margins
Select the printer from the pop-up menu, and then enter the dimensions
for the top, left, right, and bottom margins.
2 After you have finished entering the settings, click OK.
" Regardless of which paper is selected, the printer does not print
within 0.165" (4.2 mm) of the edge of the paper.
Specifying Page Setup Settings64
Page 89

Specifying Print Settings (Mac OS X 10.4)
The following dialog box appears when Print... is selected from the File
menu in the application being used.
1 Select Print... from the File menu.
The Print dialog box appears.
2 Select this printer in the Printer pop-up menu.
The Print dialog box is used to specify the following print options.
Print Dialog Box
Section Description
Copies & Pages This section contains options for the number
of copies to be printed and the range of
pages to print.
Layout This section contains options for specifying
the page layout when printing and the setting
for double-sided printing.
Scheduler This section contains options for specifying
the print timing and priority of jobs.
Paper Handling This section contains options for specifying
the pages to be printed and their printing
order.
ColorSync This section contains options for specifying
ColorSync settings.
Cover Page This section contains options for specifying
cover page settings.
Error Handling This section contains options for specifying
how an error is reported.
Paper Feed This section contains paper feed options.
Specifying Print Settings (Mac OS X 10.4)
65
Page 90

Section Description
Color Options This section contains options for color print-
ing.
Printer Features This section contains options for specifying
whether or not paper of the nearest size is
automatically detected when no paper tray is
loaded with paper of the same size as the
document and for specifying how the back of
the paper is printed.
Supply Levels This section provides information for check-
ing the amount of service life remaining on
each consumable.
Summary This is used to check the current settings.
" No warning message will be displayed if options cannot be used
together are selected.
Common buttons
? (Help button)
This displays help information about the Print dialog box.
PDF
Click this button to select the PDF menu. The print output can be saved
as a PDF file or faxed.
Preview
Click this button to view a preview image of the printout, to check that the
print options are set correctly.
Cancel
Click this button to close the Print dialog box without applying any of the
settings.
Print
Click this button to print using the selected print options.
Specifying Print Settings (Mac OS X 10.4)66
Page 91

Copies & Pages
The Copies & Pages section is used to specify the number of copies to print
and the range of pages to print.
Copies
This specifies the number of copies to be printed. If the Collated checkbox is selected, all pages in the documents are printed as sets of printouts.
For example, if 5 is entered for Copies and Collated is selected, the document is printed five times from the first page to the last page.
" In order to use the collate function, an optional hard disk kit or a
CompactFlash card of 1 GB or more must be installed. If a collate
function is provided with the application, the setting specified from the
application is given priority, and the setting specified in the printer
driver is ignored.
Pages
All: Prints all pages in the document.
From, to: Specifies the range of pages to be printed.
Specifying Print Settings (Mac OS X 10.4)
67
Page 92

Layout
The Layout section is used to specify the page layout when printing and the
setting for double-sided printing.
Pages per Sheet
Specifies the number of pages to be printed on one sheet of paper. For
example, if 2 is selected, two pages are printed on one sheet of paper.
Layout Direction
If you are printing more than one page per sheet, this specifies the direction and order the pages should be arranged on each sheet of paper.
Border
This prints a border around the image for each of the pages printed on
one sheet of paper when more than one page is printed on one sheet of
paper.
Two-Sided
Select the desired setting for double-sided printing.
Off: Double-sided printing is not performed.
Long-edged binding: Double-sided printing is performed with the bind-
ing along the long edge of the paper.
Short-edged binding: Double-sided printing is performed with the bind-
ing along the short edge of the paper.
Specifying Print Settings (Mac OS X 10.4)68
Page 93

Scheduler
The Scheduler section is used to specify the timing and priority for printing
jobs.
Print Document
Now: Select this option to begin printing immediately.
At: Specify the time to begin printing.
On Hold: Select this option to hold the print job.
Priority
Select the priority for printing jobs that are being held.
Specifying Print Settings (Mac OS X 10.4)
69
Page 94

Paper Handling
The Paper Handling section is used to specify the pages that are to be
printed and the order in which the pages are printed.
Page Order
Automatic: Select this option to print in the original page order of the
document.
Normal: Select this option to print in the normal page order.
Reverse: Select this option to print in the reverse page order.
Print
All Pages: Select this option to print all pages.
Odd numbered pages: Select this option to print only the pages with
odd page numbers.
Even numbered pages:Select this option to print only the pages with
even page numbers.
Destination Paper Size
Use documents paper size: Select this option to use the document
size as created by software applications.
Scale to fit paper size: Select this option to fit the document size
to the size of paper used by the machine.
Specify the size of paper used by the
machine.
Scale down only: Select this option to reduce the printing
size.
Specifying Print Settings (Mac OS X 10.4)70
Page 95

ColorSync
Color Conversion
Allows you to select host-based color matching or printer-based color
matching.
Quartz Filter
Allows you to select Quartz Filter.
Cover Page
Print Cover Page
Allows you to set cover page before or after document.
Cover Page Type
Allows you to select cover page type.
Billing Info
Allows you to set billing information printed on cover page.
Specifying Print Settings (Mac OS X 10.4)
71
Page 96

Error Handling
PostScript Errors
Allows you to select whether or not a report is outputted when a PostScript error occurs.
Tray Switching
This feature is not available with this printer.
Specifying Print Settings (Mac OS X 10.4)72
Page 97

Paper Feed
The Paper Feed section is used to specify the paper feed setting.
All pages from
All pages in the document are printed using the paper in the specified
paper tray.
First page from
The first page of the document is printed on paper from a paper tray different from the tray used to print the rest of the document.
Remaining from
The rest of the document is printed from the specified paper tray when the
first page is to be printed on paper from a different tray.
" If an optional lower feeder unit is installed, select Unit 3 under Install-
able Options (p. 58).
Specifying Print Settings (Mac OS X 10.4)
73
Page 98

Color Options
Quick Color
Allows you to select a color preset.
Brightness
Allows you to set Brightness.
Color as Grayscale
Allows you to set Grayscale color.
Color Separation
Allows you to set Color Separation.
Economy Print
Allows you to set Economy Print Mode.
Edge Strength
Allows you to select Edge Strength.
Advanced Color Options
Click this button to display the Advanced Color Options pane.
" This button enables when Custom is selected under Quick Color.
Specifying Print Settings (Mac OS X 10.4)74
Page 99

Advanced Color Options/Image
RGB Source
Allows you to select RGB color profiles for images.
RGB Intent
Allows you to select color intent for RGB images.
RGB Gray Treatment
Allows you to select RGB gray treatment for images.
Destination Profile
Allows you to select Destination Profile for images.
Halftone
Allows you to select halftone for images.
Edge Enhancement
Allows you to select Edge Enhancement for images.
Hide Advanced Options
Click this button to hide the Advanced Color Options pane and display
the Color Options pane.
Manage Profile
Click this button to display the Color Profile Management dialog box.
From this dialog box, color profiles can be added or deleted to those available as settings for RGB Source, Destination Profile and Simulation
Profile of the Advanced Color Options pane.
Specifying Print Settings (Mac OS X 10.4)
75
Page 100

Download Manager
Click this button to start up the installed Download Manager.
"
In order to start up Download Manager from the Advanced Color
Options pane, Download Manager must be copied into the folder at
the path Applications\Download Manager mc4695MF. After creating
the folder “Download Manager mc4695MF” in the “Applications” folder,
copy Download Manager.app into the created folder.
Advanced Color Options/Text
RGB Source
Allows you to select RGB color profiles for text.
RGB Intent
Allows you to select color intent for RGB text.
RGB Gray Treatment
Allows you to select RGB gray treatment for text.
Destination Profile
Allows you to select Destination Profile for text.
Halftone
Allows you to select halftone for text.
Specifying Print Settings (Mac OS X 10.4)76
 Loading...