

Page 1

Crown Book 2—
Crown II Software Utilities
1800733-001A
Page 2

Copyright Notice
Copyright © 2003 KONICA MINOLTA BUSINESS TECHNOLOGIES, INC., One Magnum Pass, Mobile, AL
36618. All Rights Reserved. This document may not be copied, in whole or part, nor transferred to any other
media or language, without written permission of KONICA MINOLTA BUSINESS TECHNOLOGIES, INC.
No part of this publication may be reproduced, stored in a retrieval system, or transmitted in any form or by any
means, electronic, mechanical, photocopy ing, recording, or otherwise, without the prior written permission of
KONICA MINOLTA BUSINESS TECHNOLOGIES, INC. The information contained in this book is intended for
use with Crown II printers only.
Trademarks
KONICA MINOLTA and the KONICA MINOLTA logo are trademarks or registered trademarks of
KONICA MINOLTA HOLDINGS, INC.
Crown, CrownNet, CrownAdmin, CrownView, magicolor, and QCOLOR are trademarks or registered
trademarks of KONICA MINOLTA PRINTING SOLUTIONS U.S.A., INC.
PagePro is a trademark or registered trademark of KONICA MINOLTA BUSINESS TECHNOLOGIES, INC.
Other trademarks are the property of their respective owners.
Manual Notice
KONICA MINOLTA BUSINESS TECHNOLOGIES, INC. reserves the right to make changes to this manual and
to the equipment described herein without notice. Considerable effort has been made to ensure that this
manual is free of inaccuracies and omissions. However, KONICA MINOLTA BUSINESS TECHNOLOGIES, INC.
makes no warranty of any kind including, but not limited to, any implied warranties of merchantability and
fitness for a particular purpose with regard to this manual. KONICA MINOLTA BUSINESS TECHNOLOGIES,
INC. assumes no responsibility for, or liability for, errors contained in this manual or for incidental, special, or
consequential damages arising out of the furnishing of this manual, or the use of this manual in operating the
equipment, or in connection with the performance of the equipment when so operated.
This book provides an introduction to the powerful features of Crown II printers. It shows typical examples of
how the Crown II Operating System features can help optimize y our printing needs. By using these
recommendations, you will experience the way Crown II technology provides the best price/performance of any
printer available today.
Although this book discusses Crown II printers in general, we predominantly discuss the Crown II features.
Crown II is a technological extension of earlier Crown products. Crown II technology is implemented into the
following printers:
magicolor 2200
magicolor 2210
magicolor 3100
magicolor 3300
magicolor 6100
magicolor 6110
PagePro 9100
Earlier Crown products, therefore, may not have all features discussed here.
Page 3

Contents
1 Connecting to a PC on a Windows Platform 1
Introduction .....................................................................................................................................2
Parallel Connection .........................................................................................................................2
USB Connection .............................................................................................................................2
TCP/IP Connection .........................................................................................................................3
Installing a Crown Print Monitor 5
Adding a Crown Port 6
Adding a Crown Port After Crown Print Monitor Installation 9
KONICA MINOLTA PostScript and PCL Drivers ......................................................................10
Installing from the Software Utilities CD-ROM 10
Downloading a Printer Driver from the Internet 11
Installing a KONICA MINOLTA PostScript Driver for Windows Me/98/95 .............................11
Customizing Driver Settings 14
Installing a KONICA MINOLTA PostScript Driver for Windows NT4 .....................................14
Customizing Driver Settings 17
Installing a KONICA MINOLTA PostScript Driver for Windows XP/2000 ..............................17
Customizing Driver Settings 20
Installing a KONICA MINOLTA PCL Driver for Windows Me/98/95 ......................................21
Installing a KONICA MINOLTA PCL Driver for Windows NT4 ...............................................22
Installing a KONICA MINOLTA PCL Driver for Windows XP/2000 ........................................23
Installing More Utilities for Windows ..........................................................................................24
Installing a Download Manager 24
Installing PageScope 25
Installing Crown Print Auditor 25
2 Connecting to a Macintosh 27
Connecting a Crown II Printer to a Macintosh .............................................................................28
USB Connection 28
Ethernet Connection 31
LocalTalk Connection 32
Installing PPD Files ......................................................................................................................33
Customizing the Printer Description .............................................................................................34
Page 4

Installing Utilities for the Macintosh ............................................................................................35
Installing Colorific 35
Installing ICC Profiles 36
Installing Pantone Tables 37
3 Connecting to NetWare 4.x/5.x 39
NetWare 4.x/5.x Setup ..................................................................................................................40
Setup Overview 40
NetWare NDS Setup Using PCONSOLE (Detailed Setup) 40
NetWare NDS Setup Using NetWare Admin (Detailed Setup) 43
Crown II Printer Interface Setup 45
Workstation Setup 50
4 KONICA MINOLTA NDPS Installation and
Configuration 51
Installing KONICA MINOLTA NDPS Gateway .........................................................................52
Configuring NDPS ........................................................................................................................53
Creating a Broker 53
Creating an NDPS Manager 54
Creating a Printer Agent 55
NDPS Printer Setup using Add Printer 58
NDPS Printer Setup using NetWare Print Manager 59
Using KONICA MINOLTA NDPS Snap-in Controls 60
5 KONICA MINOLTA Driver and PPD Configuration 63
KONICA MINOLTA Printer Drivers and PPDs ..........................................................................64
Windows Me/98/95 Printer Driver Configuration ........................................................................64
Standard Printer Driver Tabs in Windows Me/98/95 64
Crown II Printer Configuration Tabs in Windows Me/98/95 65
Windows XP/2000/NT4 Printer Driver Configuration .................................................................66
Printer Device Properties in Windows XP/2000/NT4 67
Printing Preferences/Document Default Properties in Windows 2000/NT4 67
Printer Driver Configuration Items ...............................................................................................68
KONICA MINOLTA PPDs for Macintosh ..................................................................................76
Overview 76
General Dialog 76
Application-Specific Dialog 77
Background Printing Dialog 77
Color Matching Dialog 78
Cover Page Dialog 79
Font Settings Dialog 80
Job Logging Dialog 81
Layout Dialog 82
Paper Handling Dialog 83
Save as File Dialog 83
Watermark/Overlay Dialog 84
Color Options Dialog 85
Printer Options Dialog 86
ii
Page 5

6 UNIX Setup 87
UNIX Quick Setup ........................................................................................................................88
Interface 88
Network/Workstation 88
UNIX Detailed Setup ....................................................................................................................88
TCP/IP Interface Configuration 88
TCP/IP NetWork Configuration 88
Installing the UNIX Host Software ..............................................................................................89
7 OS/2 LAN Manager Setup 91
Quick Setup ...................................................................................................................................92
Interface 92
Network/Workstation 92
Detailed Setup ...............................................................................................................................92
OS/2 LAN Manager/LAN Server Network Interface Configuration 92
OS/2 Version 1.x Network Configuration 92
Add a Print Queue 93
OS/2 Version 2.x and OS/2 Warp NetWork Configuration 93
Print Queue Sharing 94
Contents iii
Page 6

Page 7

Connecting to a PC on a
Windows Platform
Page 8

Introduction
This chapter guides you through the installation of a Crown II printer in Windows environments, and
describes how to install additional printer utilities found on the Software Utilities CD-ROM. The two
most common ways to connect your Crown II printer to a PC on a Windows platform is either using a
local connection (parallel or USB interface), or using a network connection (TCP/IP).
Parallel Connection
Connecting your Crown II printer locally to your PC using a parallel connection requires two steps.
1 Connect your Crown II printer to your PC.
Connect your Crown II printer to your PC by means of a parallel cable. The cable must not
exceed a length of 6.5 feet (2 meters).
2 Install a KONICA MINOLTA PostScript or PCL Driver for Windows.
Windows Platform Proceed with Paragraph Page
Windows Me, 98, or 95 Installing a KONICA MINOLTA PostScript Driver for
Windows NT4 Installing a KONICA MINOLTA PostScript Driver for
Windows XP/2000 Installing a KONICA MINOLTA PostScript Driver for
USB Connection
Make sure your operating system (Windows 98SE and above, not including Windows NT4) supports
USB and make sure USB drivers for the port are installed on your operating system (found on the
Device Manager).
1 Turn the printer on and make sure the message window displays IDLE.
Windows Me/98/95
Installing a KONICA MINOLTA PCL Driver for
Windows Me/98/95
Windows NT4
Installing a KONICA MINOLTA PCL Driver for
Windows NT4
Windows XP/2000
Installing a KONICA MINOLTA PCL Driver for Windows XP/2000
11
21
14
22
17
23
2 Plug one end of the USB cable into the PC and the other into the printer USB port.
The operating system displays
The next screen that appears is the Add New Hardware Wizard listing
Printing Support
New Hardware Found, and lists USB Device.
KONICA MINOLTA
.
3 Select Next.
4 Leave the next screen at the default selection (Search for the Best Device,
Recommended
), and select Next.
5 Select Specify A Location:.
6 Select Browse.
2
Introduction
Page 9
7 On the Software Utilities CD-ROM, browse to
\Platform\Windows\Operating System\Driver\Language, and select Next.
For example, Platform\Windows\Windows Me, 9x\Driver\English.
8 Select Next, and then select Finish.
9 When prompted, select OK, browse back to the directory selected in step 7, and then select OK
again.
Some Windows Operating Systems may require you to repeat step 9 as Plug and Play driver files
are installed.
10 Select Finish.
The Plug and Play installation is completed.
11 Customize the driver settings for your printer’s configuration.
Windows Platform Continue on Page
Windows Me/98 14
Windows XP/2000 20
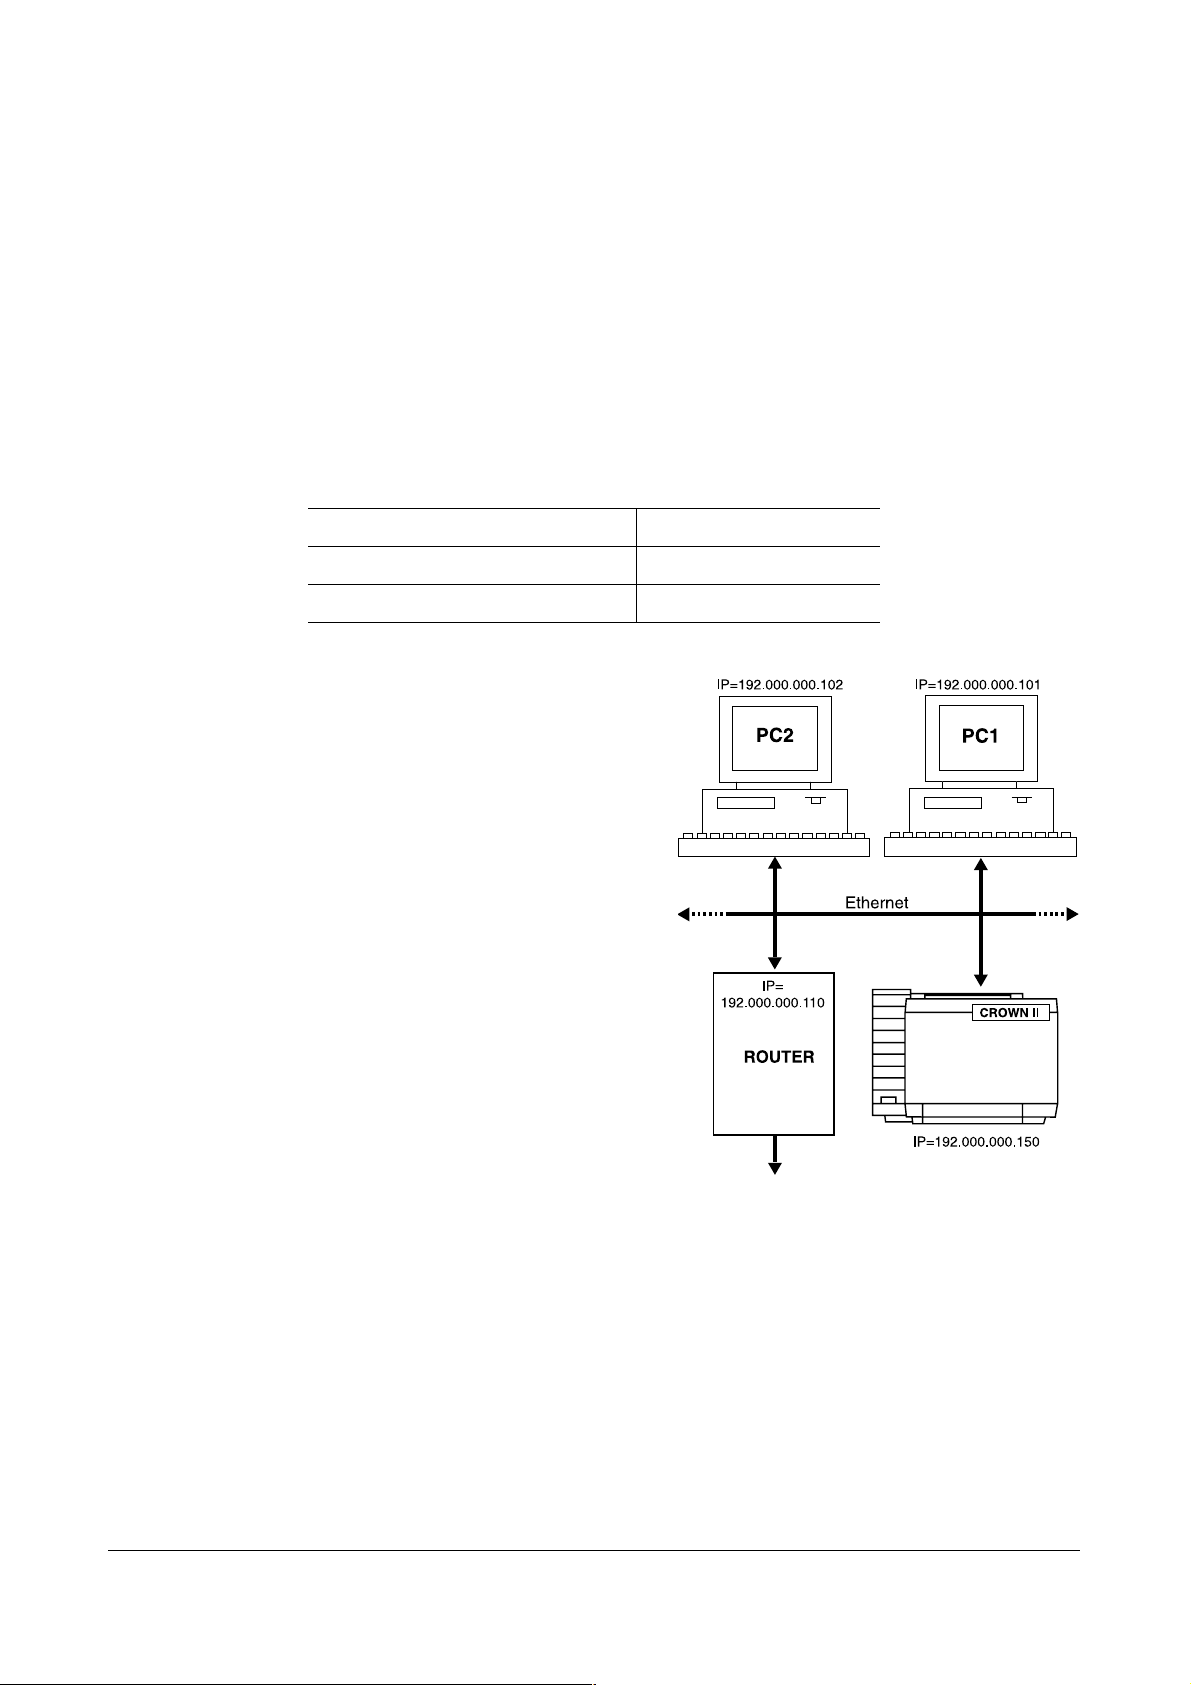
TCP/IP Connection
To connect your Crown II printer in a TCP/IP network
environment, you must make sure that the internal
network addresses in the Crown II printer have been
set. The next illustration shows an example of a simple
network environment.
Principally, you only have to enter a unique IP address.
Optionally, you may enter a subnet mask and/or a
router address, depending on your local environment
and requirements.
It is assumed that all PCs attached to the network
needing access to your Crown II printer have TCP/IP
hardware and software installed and that an RJ45
network connector is available for the Crown II printer.
If your network does not provide an RJ45 connection,
you may use a hub.
The following illustrations show a quick overview of
the Crown II printer menu structure affecting TCP/IP
settings.
For details regarding the TCP/IP menu and printer settings in general, refer to the
Crown Book Part 1.
TCP/IP Connection 3
Page 10

IDLE
Security
Administration
Control Panel
Emulations
Communications
Special Pages
Timeouts
Serial
Parallel
NIC
Mode
Emulation
Min K Spool
CrownNet
PS Protocol
Def Job Prio
Common
EtherTalk
TCP/IP
NetWare
LAN Manager
1 Enable the TCP/IP protocol.
Crown II printers are shipped with the TCP/IP protocol
enabled. You should, however, verify this.
2 Set the Internet address.
This setting must contain a unique IP address. All Crown II
printers are shipped with a preset
IP address. In most cases you may want to modify this
address, so it doesn’t conflict with any other IP address
present in your network or in networks attached.
Your network system administrator should assign the
IP address.
You need the printer’s IP address when setting up the Crown
port as described in “Adding a Crown Port” on page 6.
3 Set the subnet mask address.
The subnet mask allows you to limit access to your printer
(for example, departmental divisions). The table below shows
some examples.
TCP/IP
Protocol
Internet Address
Subnet Mask
Default Router
Remove Passwords
Remove Hosts
Secure Files
Accnting/revchan
Accnting Timeout
Port Assignment
LPD Banner
Bootp Enable
RARP Enable
SNMP NMS[1...5]
Enable, Disable
xxx.xxx.xxx.xxx
000.000.000.000
000.000.000.000
Yes, No
Yes, No
Yes, No
Enable, Disable
5-600 (sec.)
1-9999
Enable, Disable
Enable, Disable
Enable, Disable
Internet Address,
Community Name,
Access
Subnet Mask User Access
000.000.000.000 No limitations (default)
255.255.255.xxx Only users (PCs) having an IP address of 255.255.255.xxx
have access to the printer (the last triplet of the address xxx,
doesn’t affect access and can be any value).
4 Set the router/gateway address.
If you have a router/gateway in your network and you allow users outside your network environment to print on your Crown II printer, you may need to enter the router/gateway’s IP address
here. The default setting (000.000.000.000) is recommended because it allows for autosensing of
the router/gateway and responds to any router communication received.
5 Set additional Crown II printer parameters.
Although the parameters mentioned above are sufficient for normal operation, you might want to
change other settings in the TCP/IP menu to accommodate your local requirements. When you
are finished making changes, reboot your Crown II printer.
After all printer settings are performed, you must reboot your printer to make sure the changes
take effect.
4
TCP/IP Connection
Page 11

6 Connect your Crown II printer to the network.
Attach your Crown II printer to the network by plugging the network RJ45 connector into the
RJ45 receptacle on the interface panel of your Crown II printer.
7 Install the Crown Print Monitor.
A print monitor is software that enables the connection between software applications and the
network port on your PC. While some versions of Windows come with a print monitor, the Crown
Print Monitor was designed specifically for your Crown II printer. It allows the transportation of
print data over the TCP/IP protocol for serverless printing.
Instructions for installing the Crown Print Monitor are in the next section, “Installing a Crown
Print Monitor” on page 5.
8 Install the printer driver.
Instructions for installing the printer driver are in the following locations.
Windows Platform Proceed with Paragraph Page
Windows Me, 98, or 95 Installing a KONICA MINOLTA PostScript Driver for
Windows Me/98/95
Installing a KONICA MINOLTA PCL Driver for
Windows Me/98/95
Windows NT4 Installing a KONICA MINOLTA PostScript Driver for
Windows NT4
Installing a KONICA MINOLTA PCL Driver for
Windows NT4
Windows XP/2000 Installing a KONICA MINOLTA PostScript Driver for
Windows XP/2000
Installing a KONICA MINOLTA PCL Driver for Windows XP/2000
11
21
14
22
17
23
In a TCP/IP environment, you should install the Crown Print Monitor and the printer driver on each
PC having network access to your Crown II printer.
Installing a Crown Print Monitor
The Crown Print Monitor is on the Software Utilities CD-ROM that comes with your Crown II printer,
and is also available from our Internet website (printer.konicaminolta.net/support
Installation Using the Software Utilities CD-ROM
).
1 Insert the Software Utilities CD-ROM into the appropriate drive on your PC.
2 Select the Main Menu button, then Choose Explore this CD-ROM.
3 Open the Print Monitor folder.
4 Double-click on the Setup.exe file.
5 Choose the installation language, then select OK.
6 Click Next on the Welcome screen to run the Crown Print Monitor installation.
7 When the Add Crown Port dialog appears, add the port as explained in “Adding a Crown Port”
on page 6.
TCP/IP Connection 5
Page 12
Installation Using Internet File Download
The Crown Print Monitor can be downloaded from the Support area of our website at
printer.konicaminolta.net/support
.
1 Use Windows Explorer to create a new folder on your desktop, name the folder Monitor.
2 Using your Internet Browser, go to the Support page for your printer and choose the platform
from the Drivers, PPDs and Utilities listing.
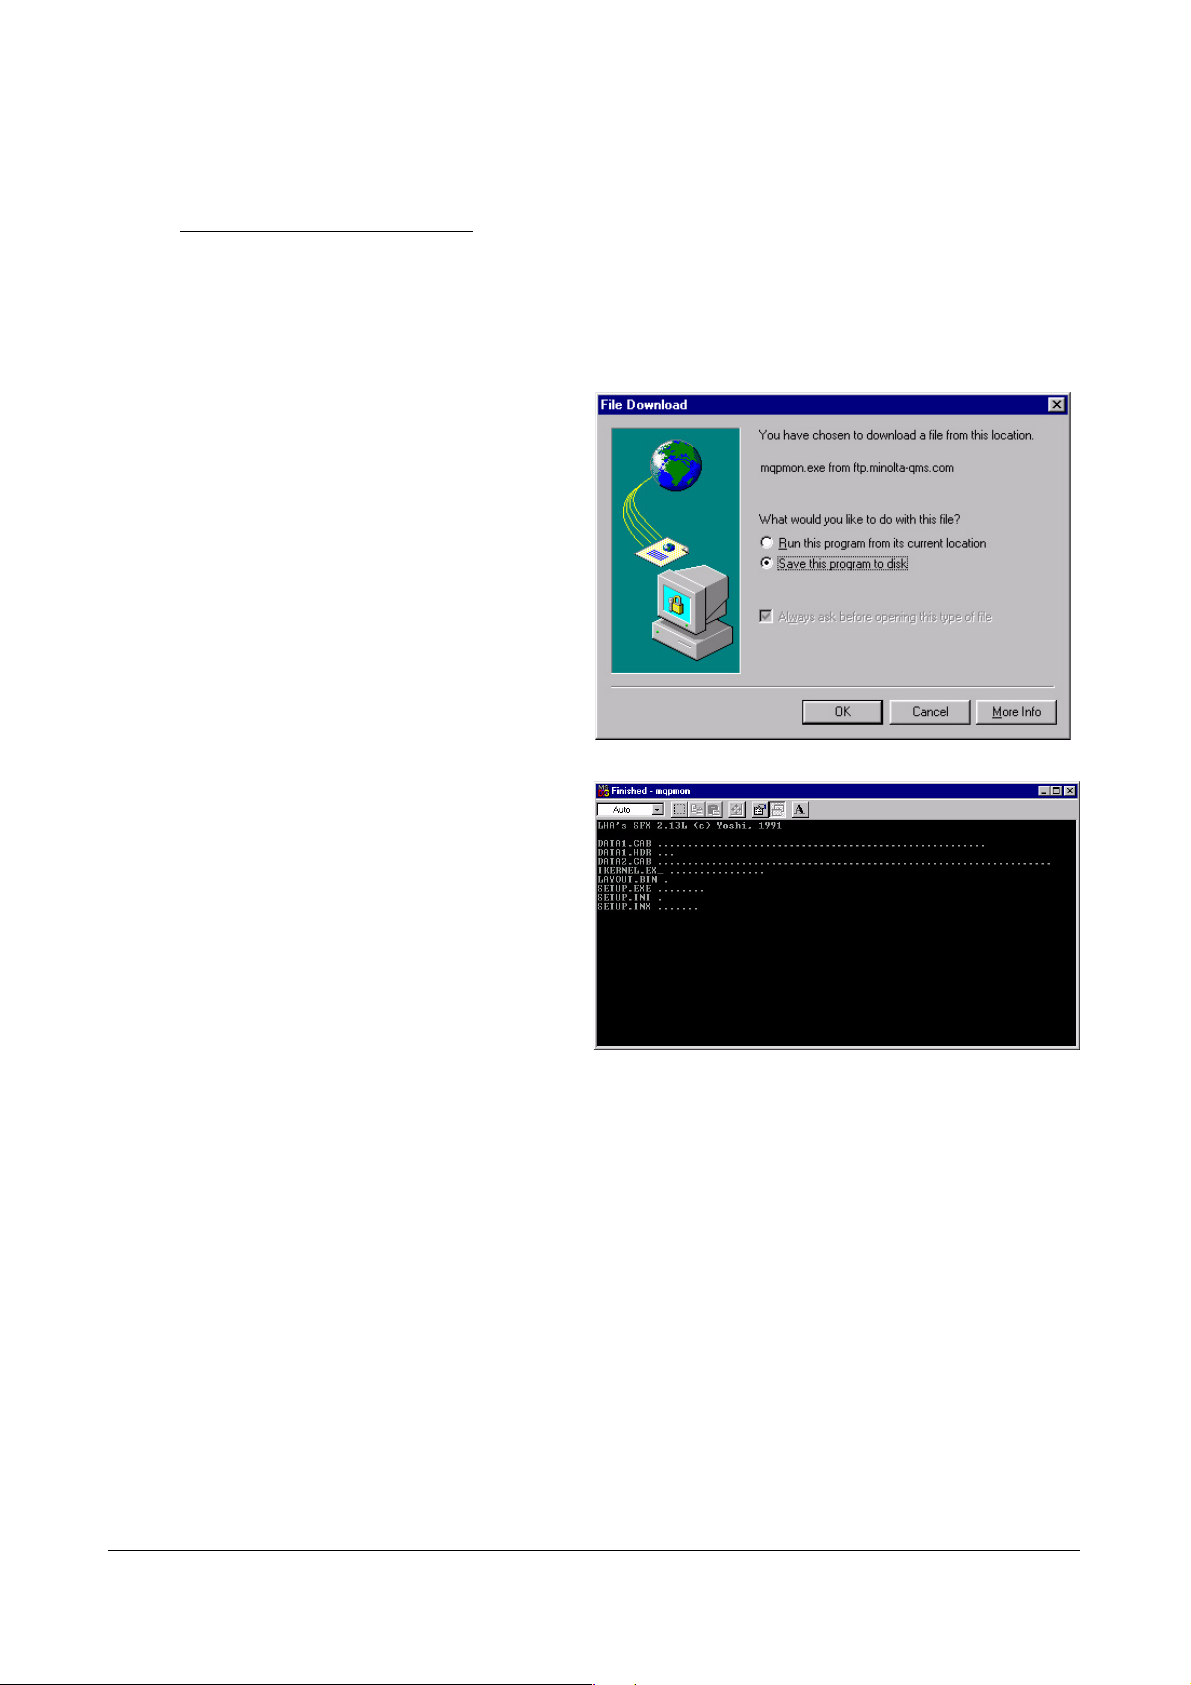
3 Select the Crown Print Monitor file (MQPMON.EXE).
4 Select Save this program to disk when
prompted. Save the download file in the
Monitor directory
created in step 1.
5 After the download is complete, use
Windows Explorer to open the Monitor
directory created in step 1.
6 Double-click on the
mqpmon.exe file that was downloaded.
An MS-DOS window opens and the
files are automatically extracted into
the Monitor directory. When the
extraction is complete,
appears in the MS-DOS window Title
bar. When this happens, close the
MS-DOS window.
Finished
7 Double-click on the Setup.exe file
within the Monitor folder.
8 Choose the installation language, then select OK.
9 Click Next on the Welcome screen to run the Crown Print Monitor installation.
10 When the Add Crown Port dialog appears, add the port as explained in the next section.
Adding a Crown Port
Before you can send print jobs and receive status information on them using the Crown Print Monitor,
you must add a Crown port to your PC’s configuration, and then associate the Crown port with your
printer. You can add a port using a manual setup method or an auto-discovery method.
installations we recommend that you use the manual method.
For first-time
If you’ve already installed the Crown Print Monitor, follow the instructions for adding a new Crown
port as described in “Adding a Crown Port After Crown Print Monitor Installation” on page 9.
6
TCP/IP Connection
Page 13
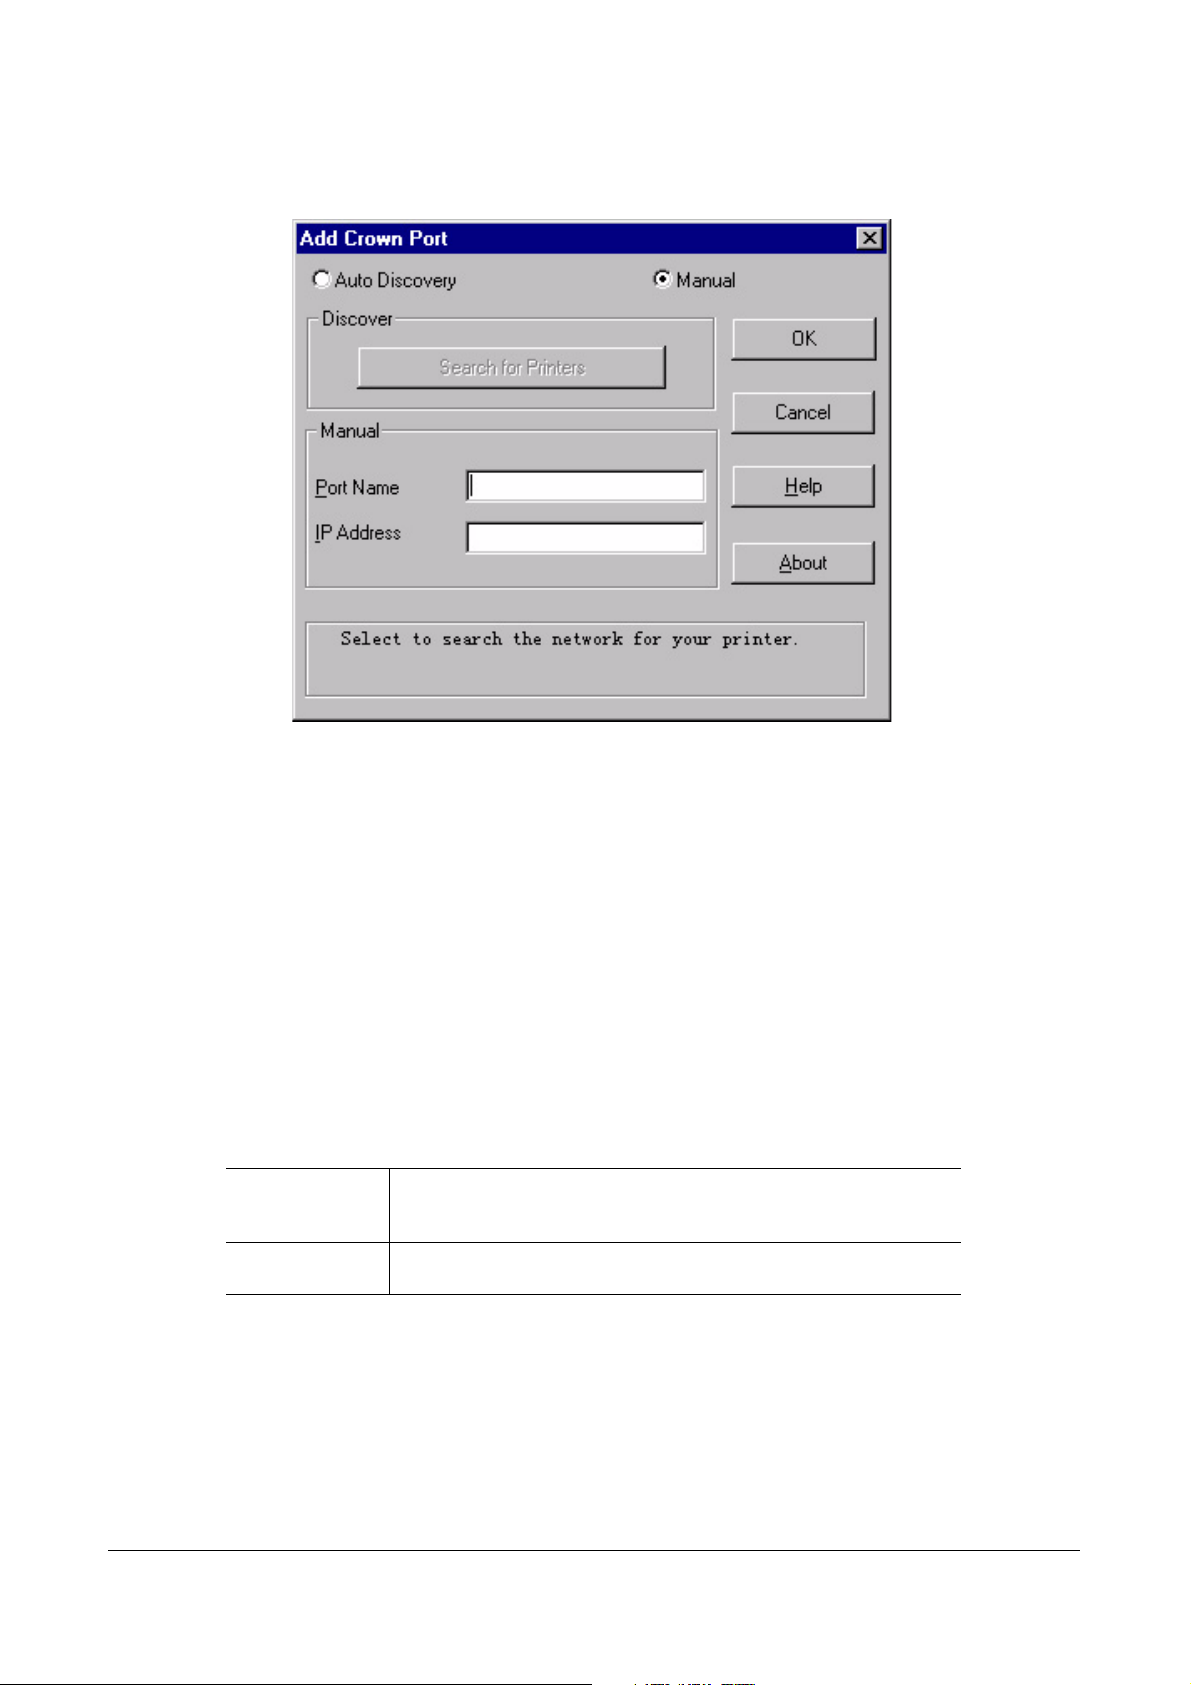
Manual Method
1 Select the Manual option from the Add Crown Port dialog.
2 Type the logical name for the port in the Port Name text box.
This is a descriptive identifier of the port. Each port name must be unique. The maximum port
name is up to 128 characters. This name displays in the Print to: list box of the Printer Properties dialog box in Print Manager.
If the port name exists already, the following message displays:
“port_name” already exists on this computer. Please choose
another name.
You must choose another Port Name.
The port name
On initial access to the Add Port dialog box, whatever you type in the Port Name text box is
automatically copied to the IP Address text box. The port name and IP address can be the same
or they can be different. However, if they are different, then first click the cursor in the IP Address
text box and type it. Then click the cursor in the Port Name text box and type it.
3 Type the Internet Protocol Address for the port.
This address is either the unique host name or the dot notation identifier
(IP address) of your printer.
Host Name A symbolic name (a convenient way for people to refer to a host) that
identifies network devices on your computer. This name must exist in
your Network Host Name file and must be unique.
Dot Notation
Identifier
A unique set of four numbers, separated by periods, which identifies a
device on the Internet (for example 191.45.105.227).
If an invalid or previously used IP address (host name or dot notation identifier) is given, the following message displays:
resolved on this computer. Accept it anyway?
If you receive this message, you must do one of the following:
a Select No and type another valid IP address (this is what we recommend).
The port address “IP_Address” could not be
TCP/IP Connection 7
Page 14

b Select Ye s and add this address in the Network Host Name file on you computer before you
send any print jobs to the port. If a print job is sent to the port before the address is entered in
the Network Host Name file, printing of the job fails.
c Select Cancel to abort adding the port and to exit from the Add Port dialog box.
4 Select OK.
5 Select Close in Printer Ports dialog box, then select Apply.
6 Select OK in Print Server Properties to close the Printers window.
7 Choose Finish, and restart your computer when prompted.
If you are updating an existing monitor, the installation program automatically reboots your
system after installation.
8 If you haven’t already done so, install the printer driver for your Crown II printer.
Windows Platform Proceed with Paragraph Page
Windows Me, 98, or 95 Installing a KONICA MINOLTA PostScript Driver for
Windows Me/98/95
Installing a KONICA MINOLTA PCL Driver for
Windows Me/98/95
Windows NT4 Installing a KONICA MINOLTA PostScript Driver for
Windows NT4
Installing a KONICA MINOLTA PCL Driver for
Windows NT4
Windows XP/2000 Installing a KONICA MINOLTA PostScript Driver for
Windows XP/2000
Installing a KONICA MINOLTA PCL Driver for Windows XP/2000
11
21
14
22
17
23
Auto Discovery Method
Auto Discovery searches for hardware devices on your network. If your printer is not attached to your
network and turned on, Auto Discovery will be unable to locate your printer.
Attention
Auto Discovery adds all hardware devices found on your network to your port list. On large
networks, this may not be desirable and can be avoided by using the manual method of adding a
Crown port as described on page 6.
8
TCP/IP Connection
Page 15
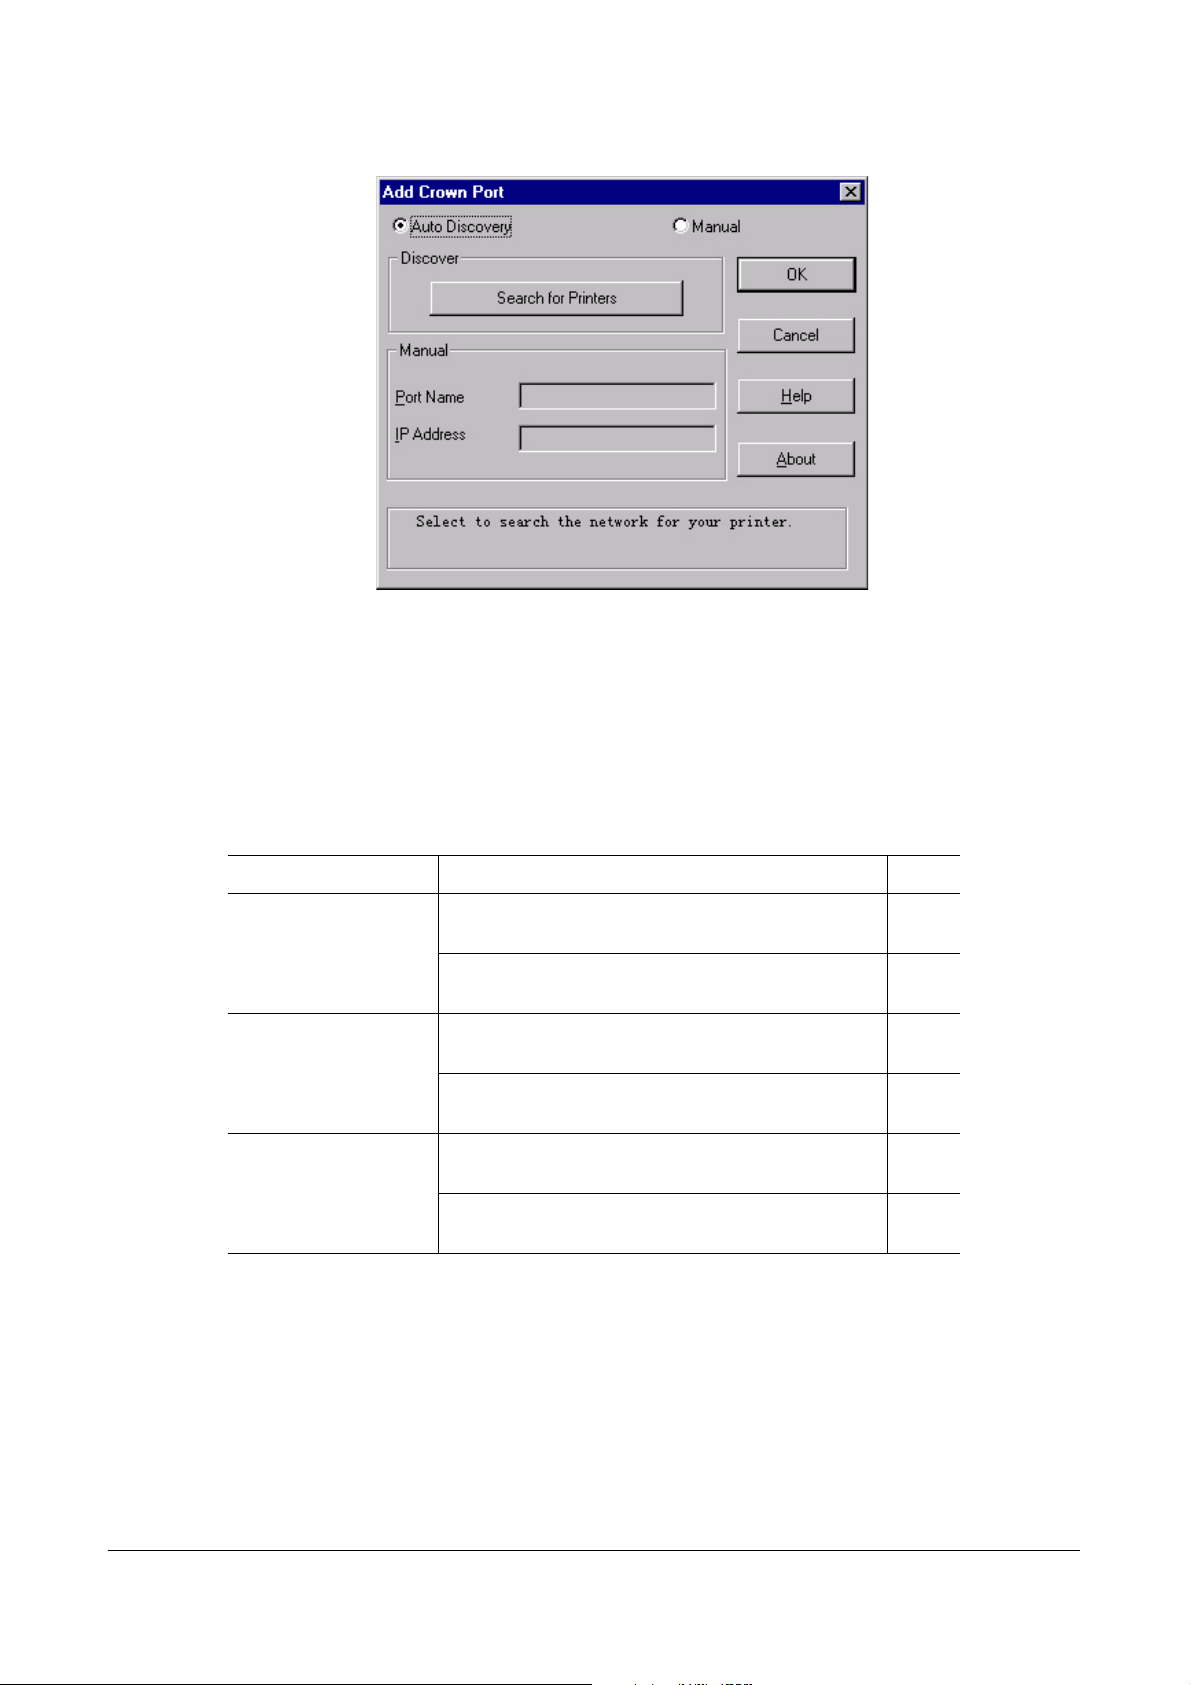
1 Select the Auto Discovery option from the Add Crown Port dialog.
2 Select Search for Printers.
The Crown Print Monitor software searches for printers, and automatically adds all hardware
devices found to the port list.
3 Choose Finish, and restart your computer when prompted.
If you are updating an existing monitor, the installation program automatically reboots your
system after installation.
4 If you have not already done so, install the printer driver for your Crown II printer.
Windows Platform Proceed with Paragraph Page
Windows Me, 98, or 95 Installing a KONICA MINOLTA PostScript Driver for
Windows Me/98/95
Installing a KONICA MINOLTA PCL Driver for
Windows Me/98/95
Windows NT4 Installing a KONICA MINOLTA PostScript Driver for
Windows NT4
Installing a KONICA MINOLTA PCL Driver for
Windows NT4
Windows XP/2000 Installing a KONICA MINOLTA PostScript Driver for
Windows XP/2000
Installing a KONICA MINOLTA PCL Driver for Windows XP/2000
Adding a Crown Port After Crown Print Monitor Installation
During Crown Print Monitor installation, the Add Crown Port dialog is automatically opened for you
so you can add a Crown port to your PC’s configuration. You can use the following instructions to add
a new Crown port at any time following the Crown Print Monitor installation.
11
21
14
22
17
23
The following assumes that Crown Print Monitor has already been installed on your PC.
Windows Me/98/95
1 From the Start menu, choose Settings, and then Printers.
TCP/IP Connection 9
Page 16

2 In the Printers window, click the right mouse button on an existing printer to display the
printer’s menu.
3 Choose Properties to display the Properties dialog box.
4 Choose the Details tab, and then select Add Port.
5 Select Other.
6 Select Crown Port from the list, and then select OK.
The Add Port window appears. Follow the instructions for using the manual or auto-discovery
method of adding a port in “Adding a Crown Port” on page 6.
7 Select OK.
8 Select Close in Printer Ports dialog box, then select OK in Print Server Properties to close the
Printers window.
Windows XP/2000/NT4
1 From the Start menu, choose Settings.
2 Choose Printers.
3 In Printers window click the right mouse button.
4 In the Properties dialog box select the Ports tab.
5 Select the Add Port button.
6 Select the Printer Ports button.
7 Choose Crown Port from the list then select OK.
The Add Port window appears. Follow the instructions for using the manual or auto-discovery
method of adding a port in “Adding a Crown Port” on page 6.
8 Select OK.
9 Choose Close in Printer Ports dialog box, then choose OK in Print Server Properties to close the
Printers window.
KONICA MINOLTA PostScript and PCL Drivers
KONICA MINOLTA PostScript and PCL drivers are available from the Software Utilities CD-ROM
and from the Internet (printer.konicaminolta.net/support
Installing from the Software Utilities CD-ROM
The Software Utilities CD-ROM has an automatic printer driver installer program. Simply insert the
Software Utilities CD-ROM and follow the on-screen instructions for driver installation. The installer
program opens the Add Printer Wizard for you. Instructions for using the Add Printer Wizard are
described in the printer driver installation sections that follow.
).
10
After driver installation is complete, remove the Software Utilities CD-ROM and store it in a safe
place.
KONICA MINOLTA PostScript and PCL Drivers
Page 17

Attention
Efforts to enhance the functionality of your KONICA MINOLTA printer driver don’t stop when you
purchase our product. We make every effort to bring you the very best, and as a result, occasionally
update the printer driver software. For the latest printer driver, check your printer’s Support page on
our website at printer.konicaminolta.net/support.
Downloading a Printer Driver from the Internet
Our Internet website (printer.konicaminolta.net/support) contains the latest driver and support files for
your printer. To download a printer driver, follow the instructions below.
1 Using your Internet Browser, go to the Support page for your printer and choose the platform and
driver from the Drivers, PPDs and Utilities listing.
2 Select Save this program to disk when
prompted. Save the download file to a
new directory on your PC.
3 After the download is complete, use
Windows Explorer to open the new
directory created in step 2.
4 Double-click on the .exe file that
was downloaded.
An MS-DOS window opens, and files
are automatically extracted into the
new directory. When the extraction is
complete,
MS-DOS window title bar. When this
happens, close the MS-DOS window.
Finished appears in the
5 Read the information in the readme.txt
file that accompanies the driver for
special instructions on driver
availability, installation and use.
6 Use the driver installation steps described in the following driver installation sections, beginning
with step 2.
Installing a KONICA MINOLTA PostScript Driver for Windows Me/98/95
The following assumes that you are installing the KONICA MINOLTA PostScript Driver for
Windows Me/98/95 for the first time.
The Software Utilities CD-ROM driver installer opens the Add Printer Wizard for you. If the Add
Printer Wizard is already open, begin with step 4.
Installing a KONICA MINOLTA PostScript Driver for Windows Me/98/95 11
Page 18
1 If the driver you are installing is on the Software Utilities CD-
ROM, make sure that the CD-ROM is in your CD-ROM drive.
If the CD-ROM installation application starts, close the application before continuing.
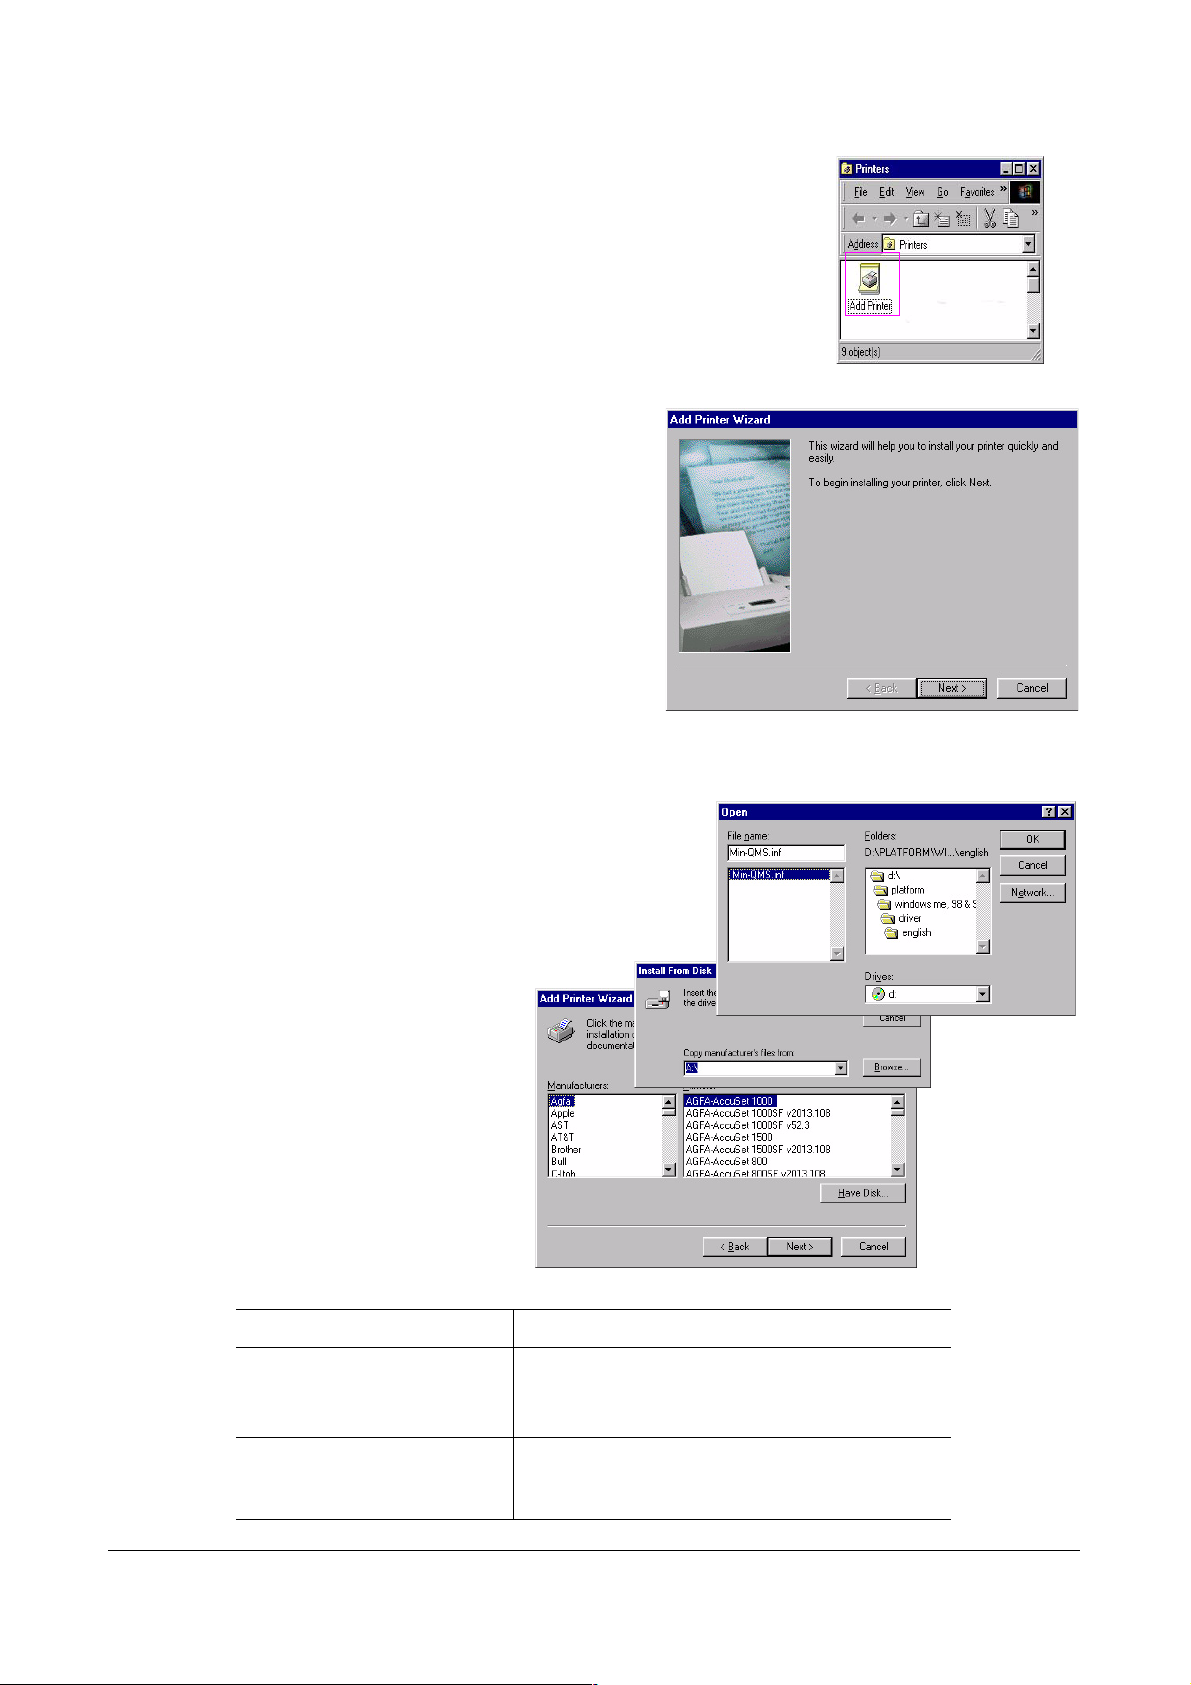
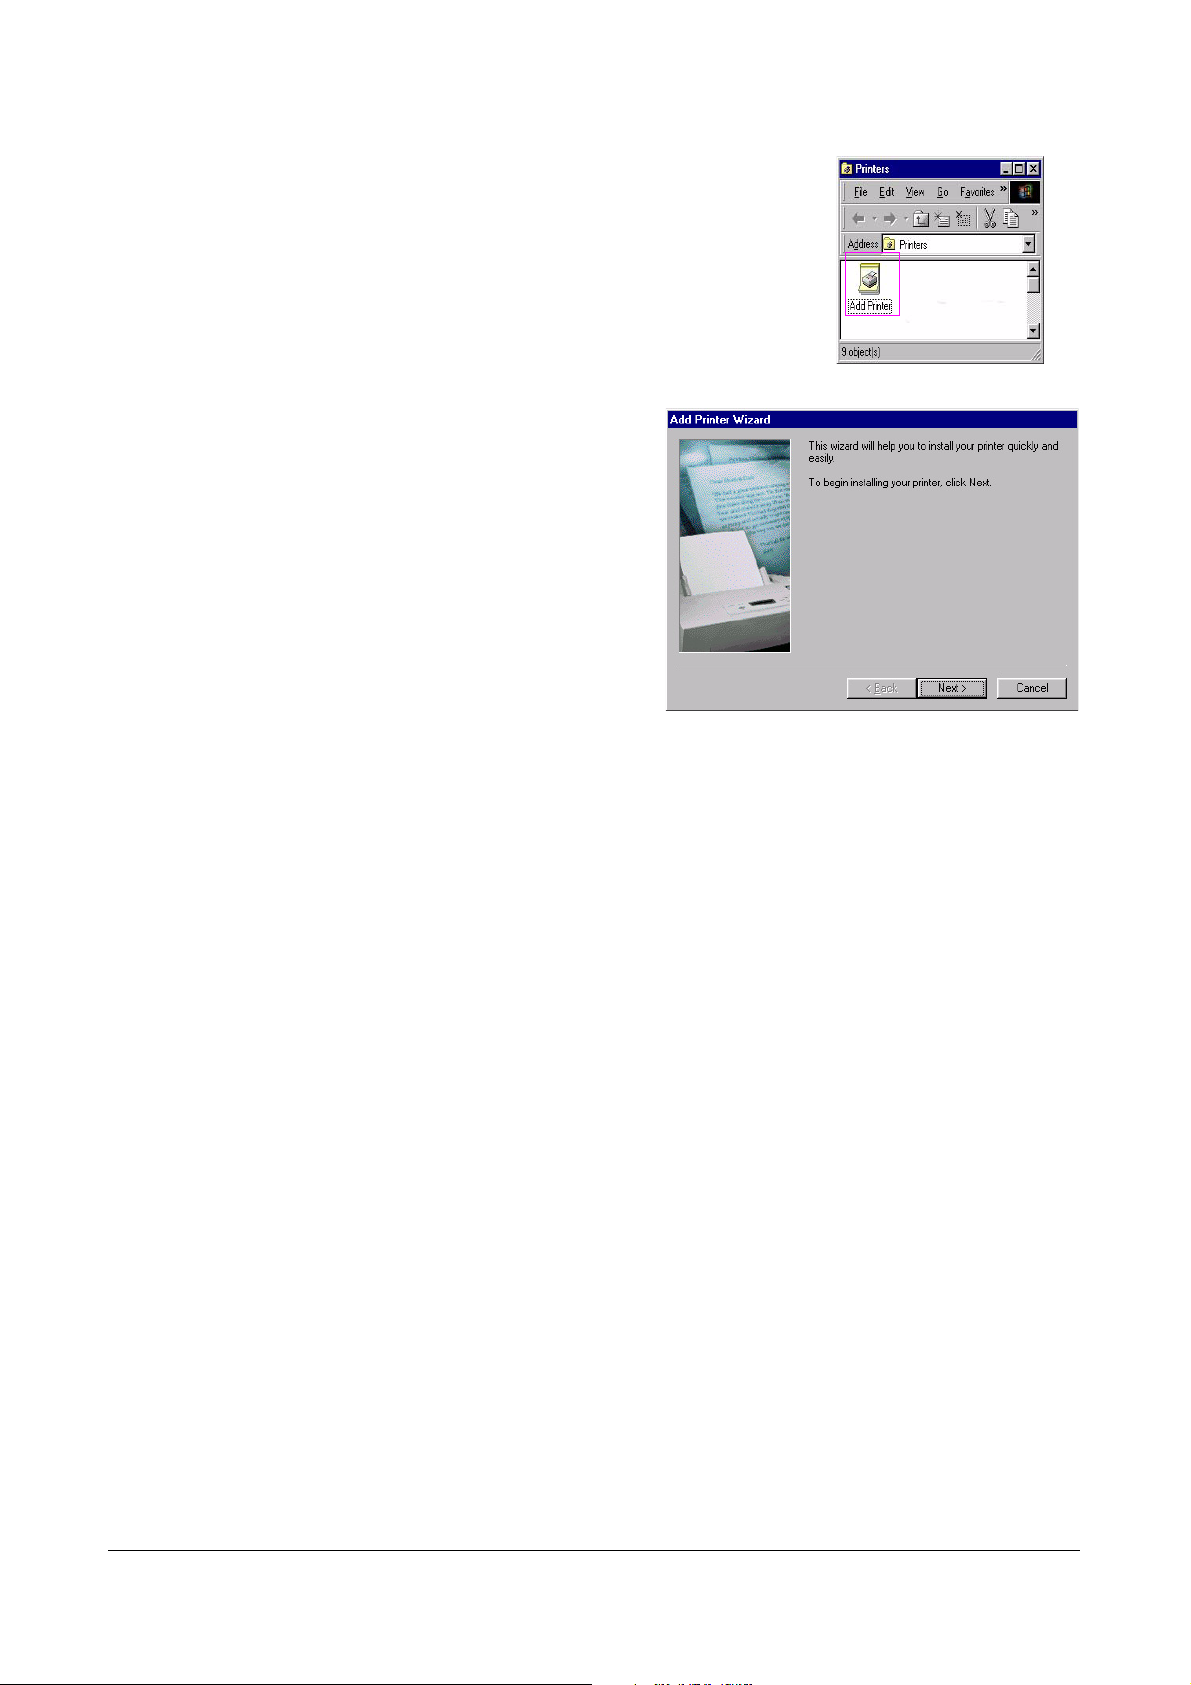
2 From the Start menu, choose Settings/Printers.
3 Double-click on the Add Printer icon.
The Add Printer Wizard starts.
4 Select Next.
5 Select Local Printer, and then select Next.
6 Select Have Disk and browse to the location of the driver you are installing.
12
Driver to be installed: Browse to
Driver on Software Utilities
CD-ROM
Driver downloaded from
Internet
:\platform\windows me,98&95\driver\\
(where is the letter of your CD-ROM drive and
is the user language you prefer)
New directory containing the downloaded, extracted
files. Refer to step 2 of “Downloading a Printer
Driver from the Internet” on page 11.”
Installing a KONICA MINOLTA PostScript Driver for Windows Me/98/95
Page 19

7 Select OK twice.
8 The KONICA MINOLTA PostScript Driver
for Windows contains a list of Crown printers. Choose your Crown II printer from the
list, and then select Next.
9 Choose the appropriate printer port,
and then select Next.
For a local (parallel) connection,
select LPTx:.
For a TCP/IP connection, choose
the Crown Print Monitor name (in
our example, CROWN PM).
10 This screen allows you to rename the
printer for your convenience. Select
Next, and then Finish. The Add Printer
Wizard closes.
11 Restart your computer.
Installing a KONICA MINOLTA PostScript Driver for Windows Me/98/95 13
Page 20
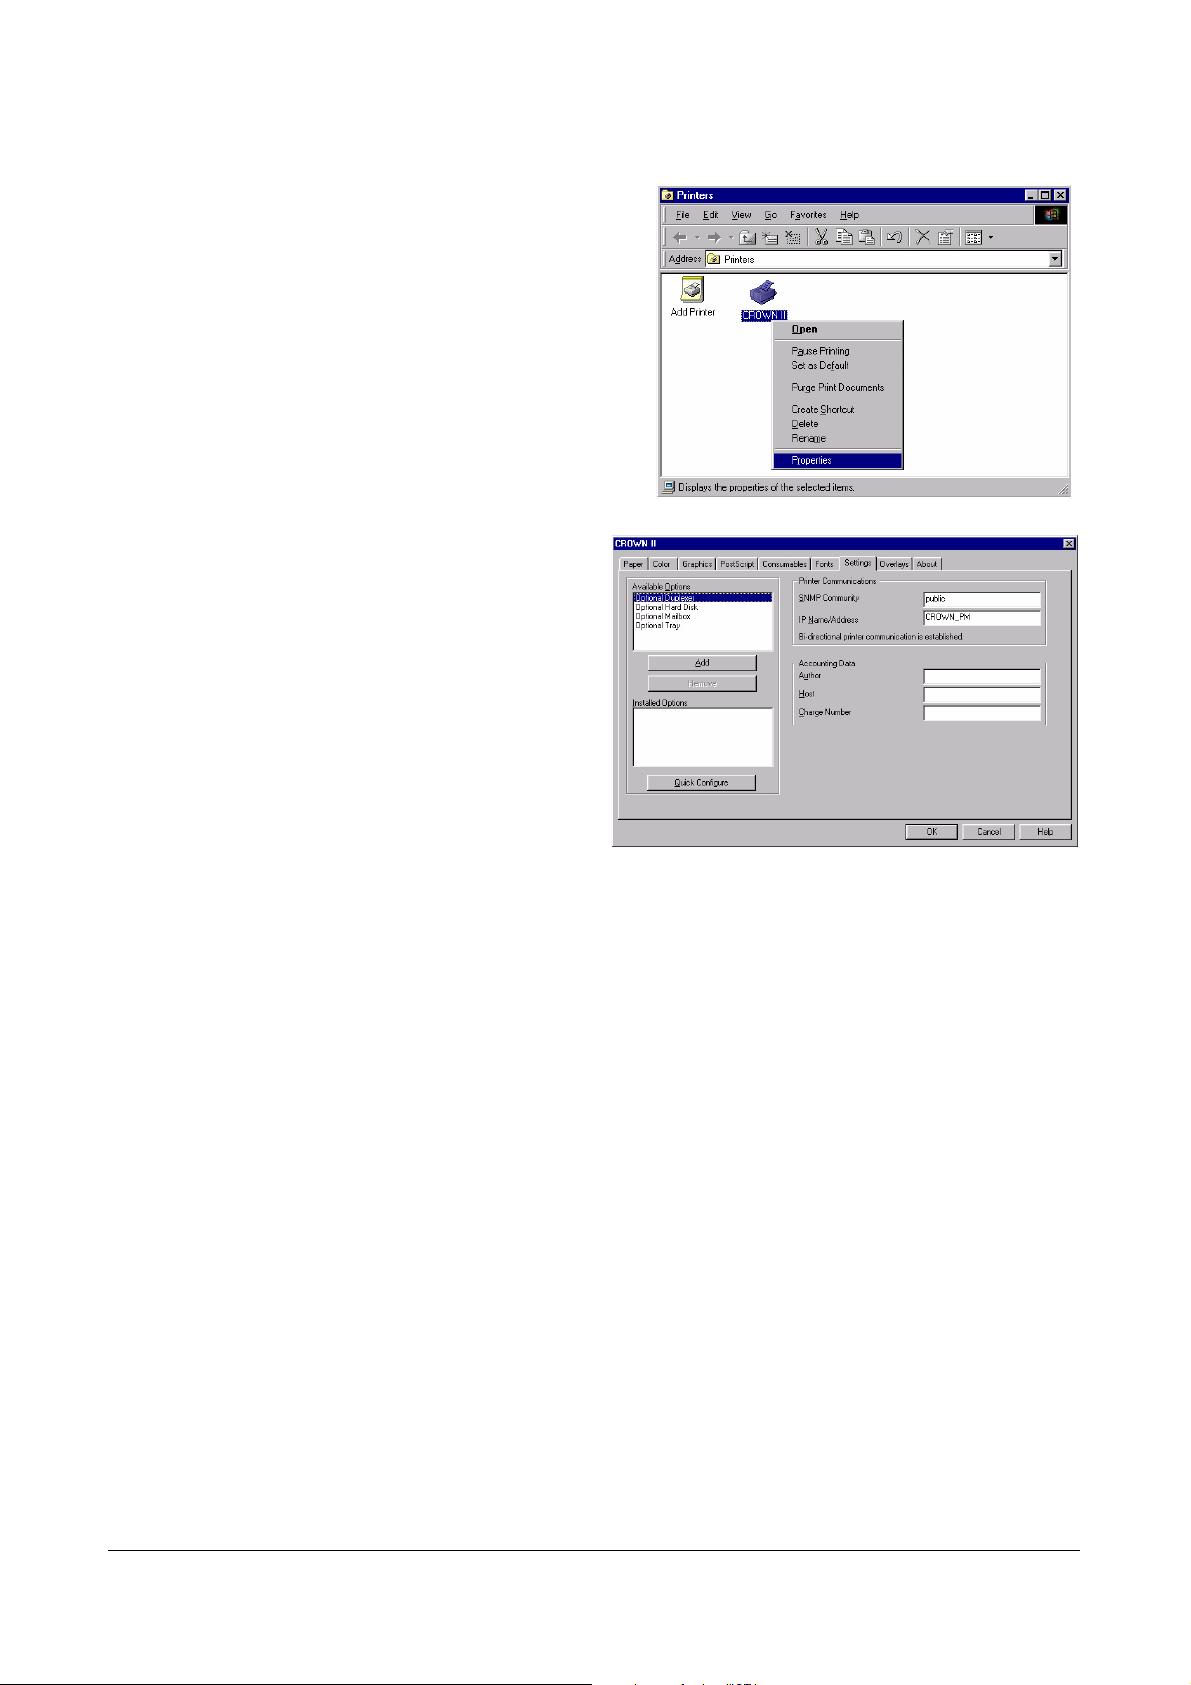
Customizing Driver Settings
1 From the Start menu, choose
Settings/Printers and locate the (new)
Crown II printer icon.
2 Click on the Crown II printer icon with the
right-hand mouse button.
3 Choose Properties. In the Crown II Prop-
erties Window, select Details. Verify that
the port and the driver name are correct.
Then select Setup.
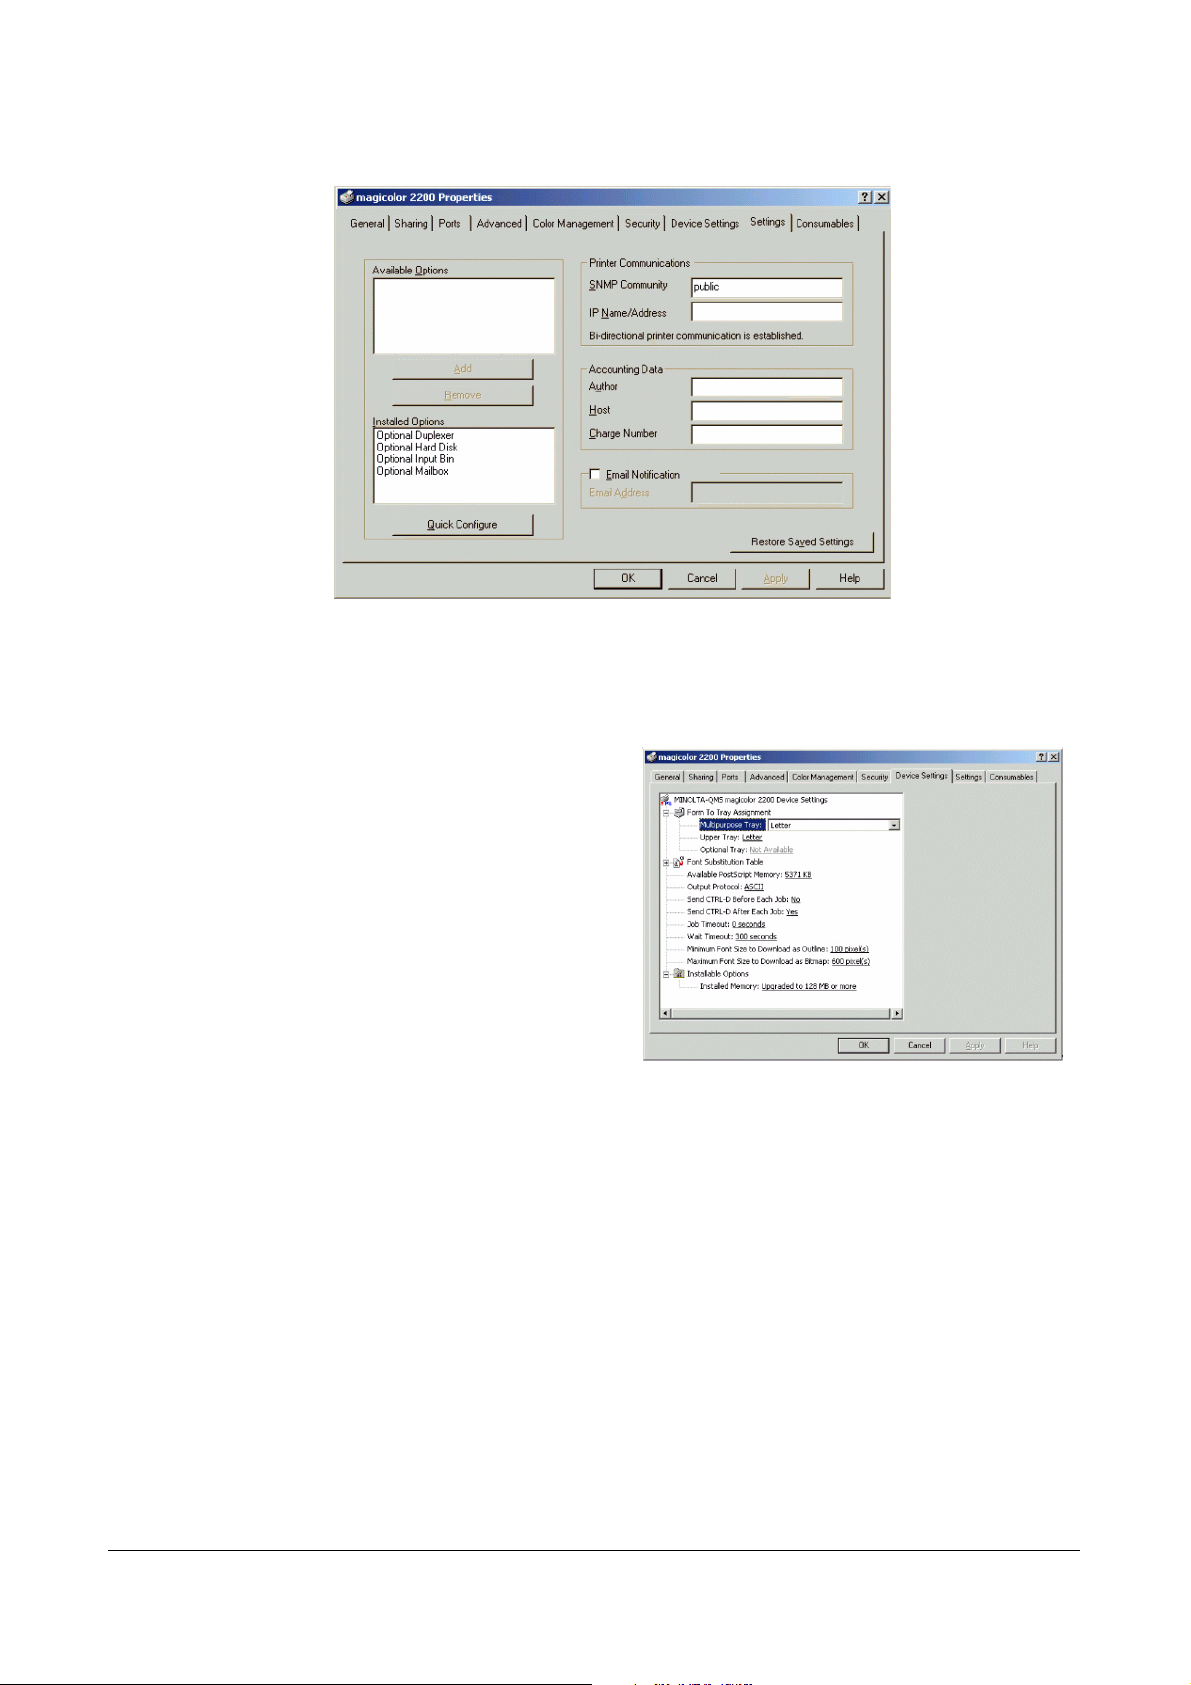
4 Choose the Settings tab. From this tab,
select “Quick Configure” to select the
default options available on your
Crown II printer, or you may choose
individual options that you have attached
to your printer by selecting it from the
Available Option list, and then select
Add. Repeat this for each option
installed on your Crown II printer. After
the selection, select OK.
Consult your printer documentation for
the available option(s) of your
Crown II printer.
5 Click on the Paper tab. From this tab, you should set the defaults that are not print job
dependent, such as Paper Size, Source, Media Type, and Output Bin.
For additional printer driver information, you may also refer to “Printer Driver Configuration
Items” on page 68 and the printer driver’s online help.
6 Finish the settings and select OK.
You may continue installing other utilities available on the Software Utilities CD-ROM. Refer to
“Installing More Utilities for Windows” on page 24.
Installing a KONICA MINOLTA PostScript Driver for Windows NT4
Review the information in the driver’s readme.txt file for driver availability notes and special
instructions on driver installation and use.
The following assumes that you are installing the KONICA MINOLTA PostScript Driver for Windows
XP/2000/NT4 for the first time.
The Software Utilities CD-ROM driver installer opens the Add Printer Wizard for you. If the Add
Printer Wizard is already open, begin with step 4.
14
Installing a KONICA MINOLTA PostScript Driver for Windows NT4
Page 21
1 If the driver you are installing is on the Software Utilities
CD-ROM, make sure that the CD-ROM is in your
CD-ROM drive.
If the CD-ROM installation application starts, close the application before continuing.
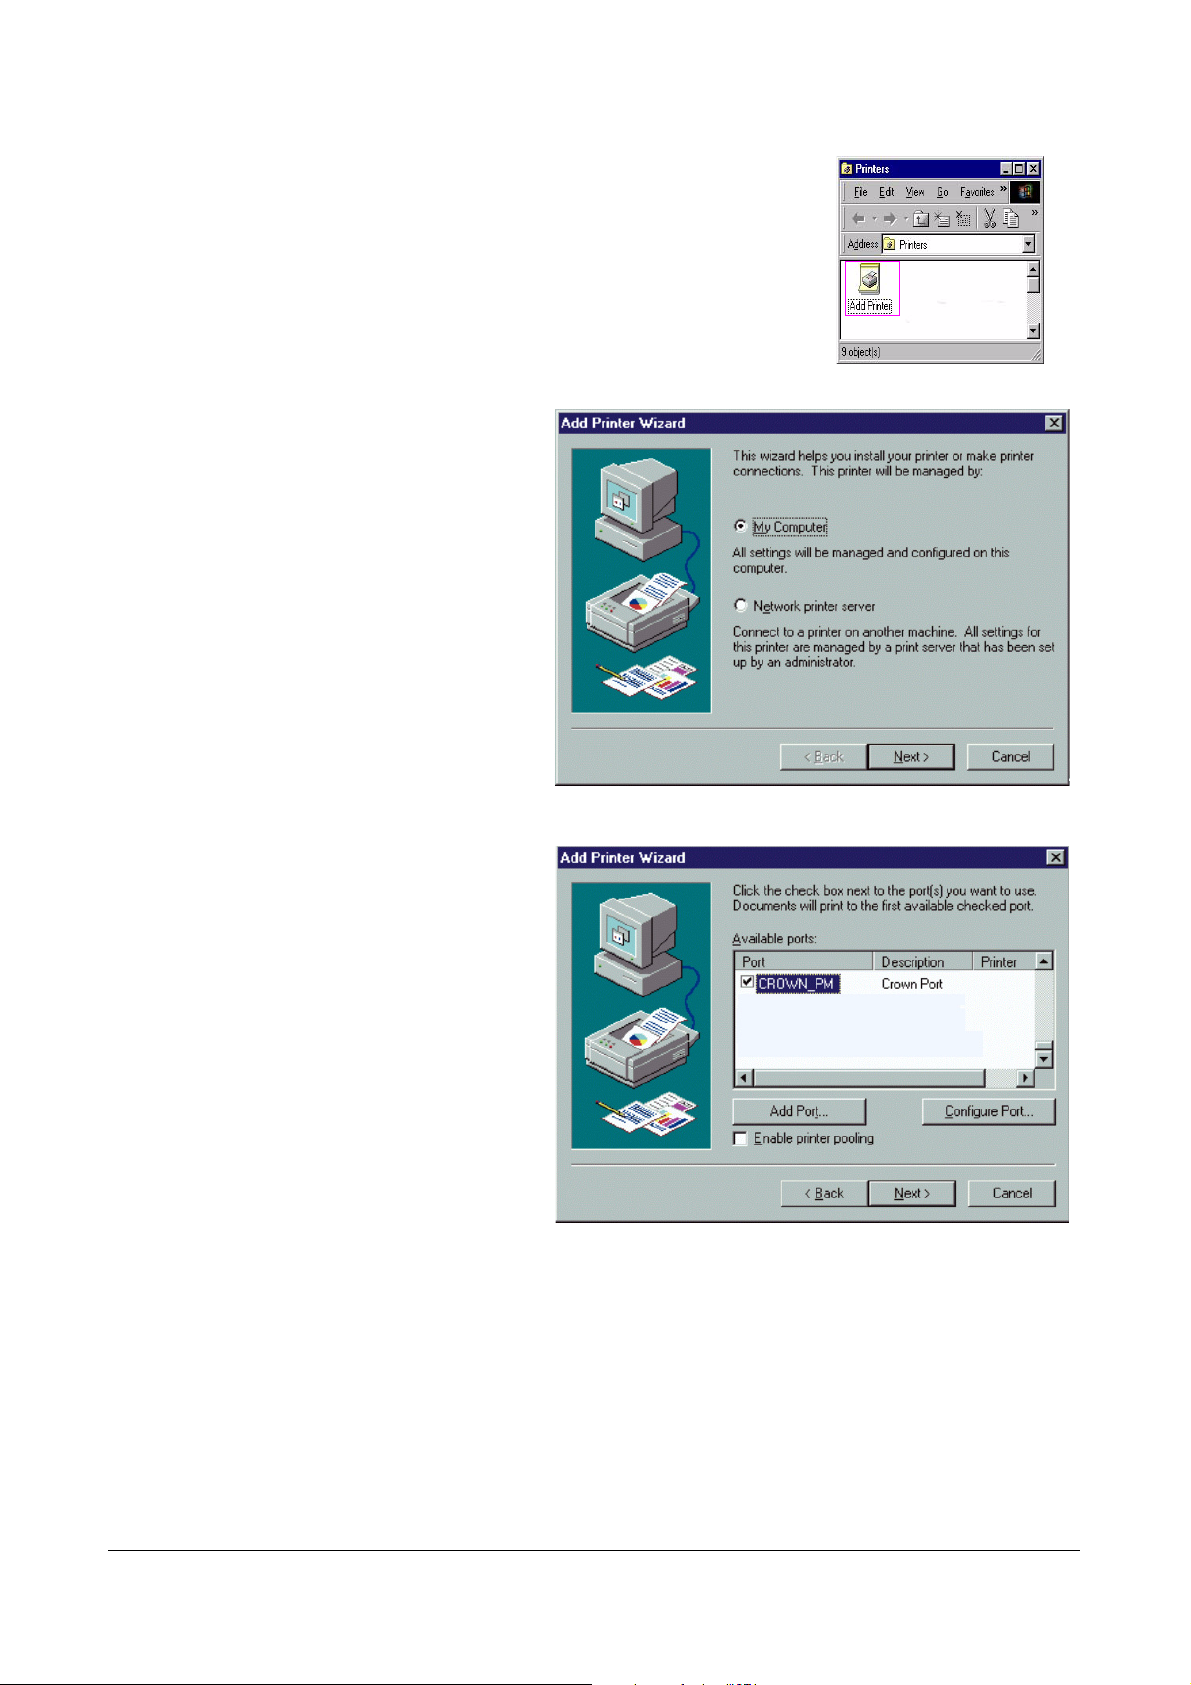
2 From the Start menu, choose Settings/Printers.
3 Double-click on the Add Printer icon. The
Add Printer Wizard starts.
4 Select My Computer, and then
select Next.
5 Choose the appropriate printer
port, and then select Next.
For a local (parallel) connection,
select LPTx:.
For a TCP/IP connection, select
the Crown port that was added
during the steps described in
“Adding a Crown Port” on page
6.
Installing a KONICA MINOLTA PostScript Driver for Windows NT4 15
Page 22
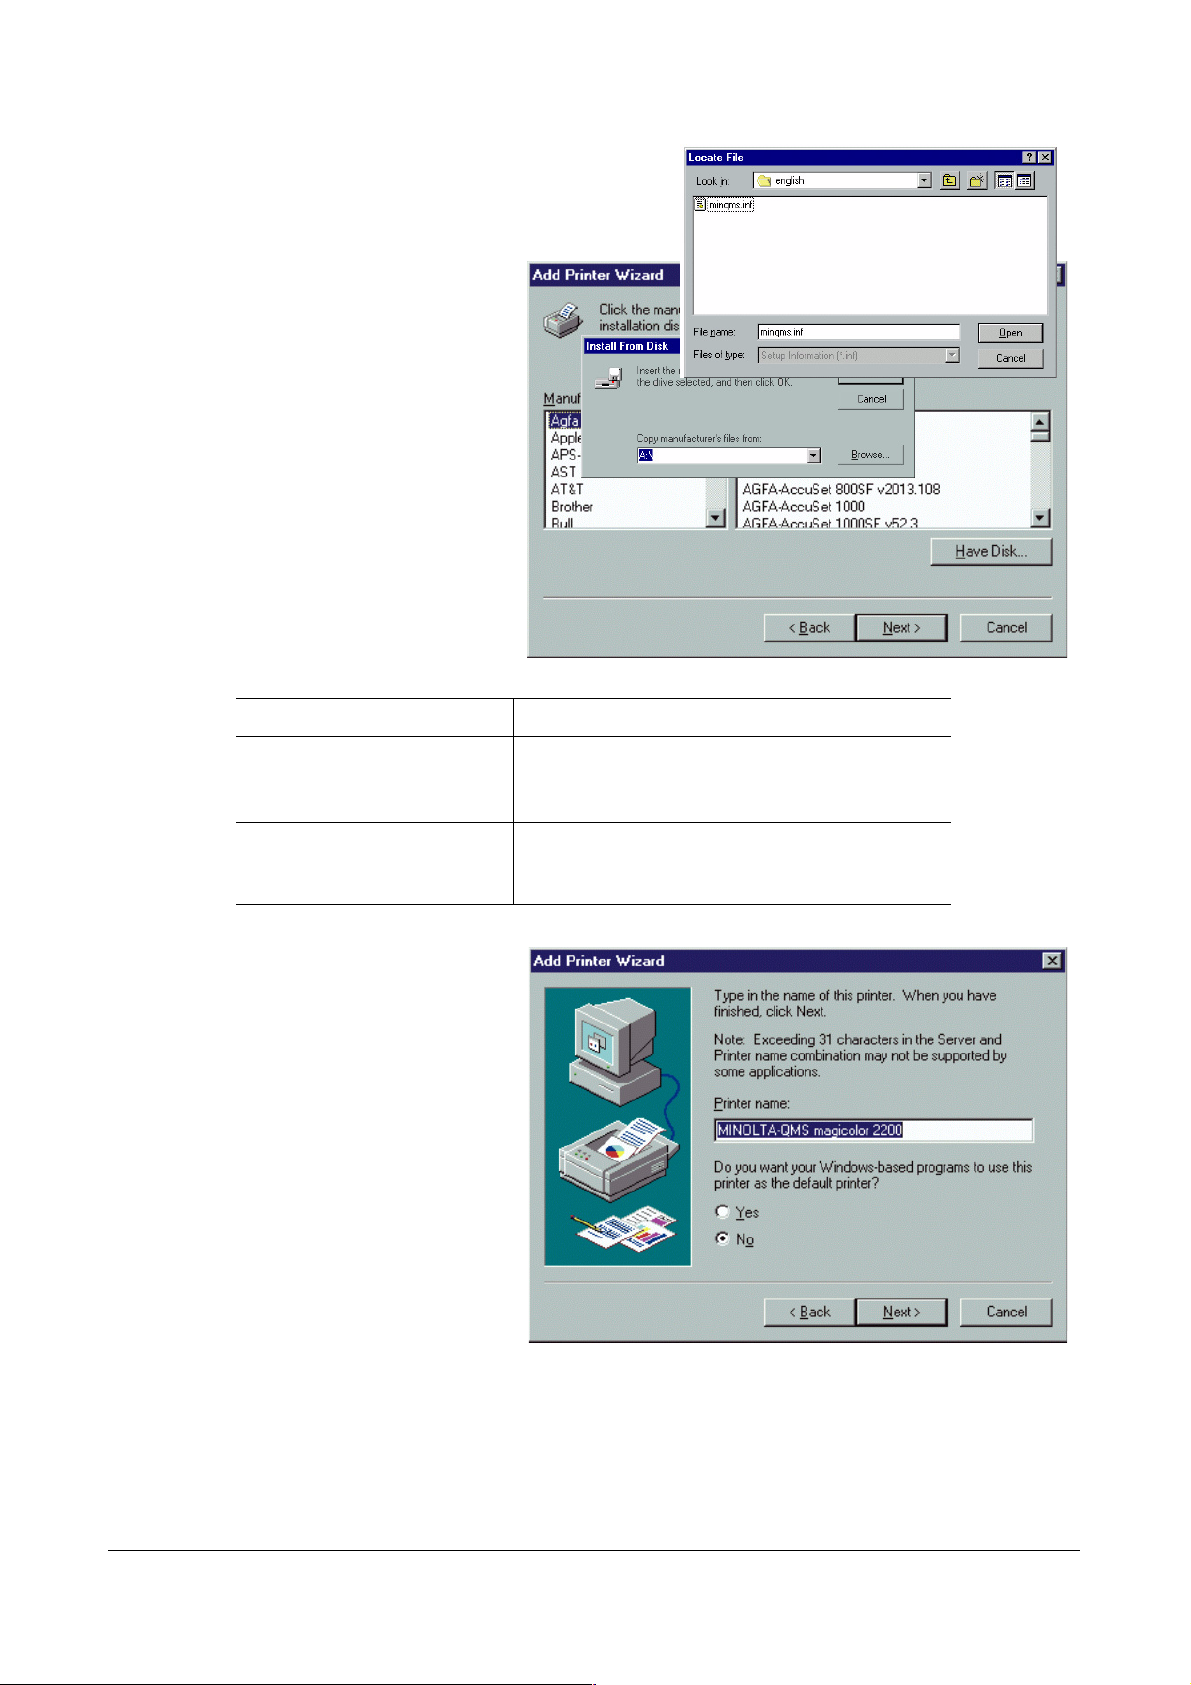
6 Select Have Disk, browse to
the location of the driver you
are installing (see the following table), select the
setup.inf file, select Open, and
then select Next.
Driver to be installed: Browse to
Driver on Software Utilities
CD-ROM
Driver downloaded from
Internet
7 This screen allows you to
rename the printer for your
convenience and to set the
printer as the default printer.
Select Next.
:\platform\windows 2000 & nt4\driver\\
(where is the letter of your CD-ROM drive and
the user language you prefer)
New directory containing the downloaded, extracted
files. Refer to step 2 of “Downloading a Printer
Driver from the Internet” on page 11.”
16
Installing a KONICA MINOLTA PostScript Driver for Windows NT4
Page 23
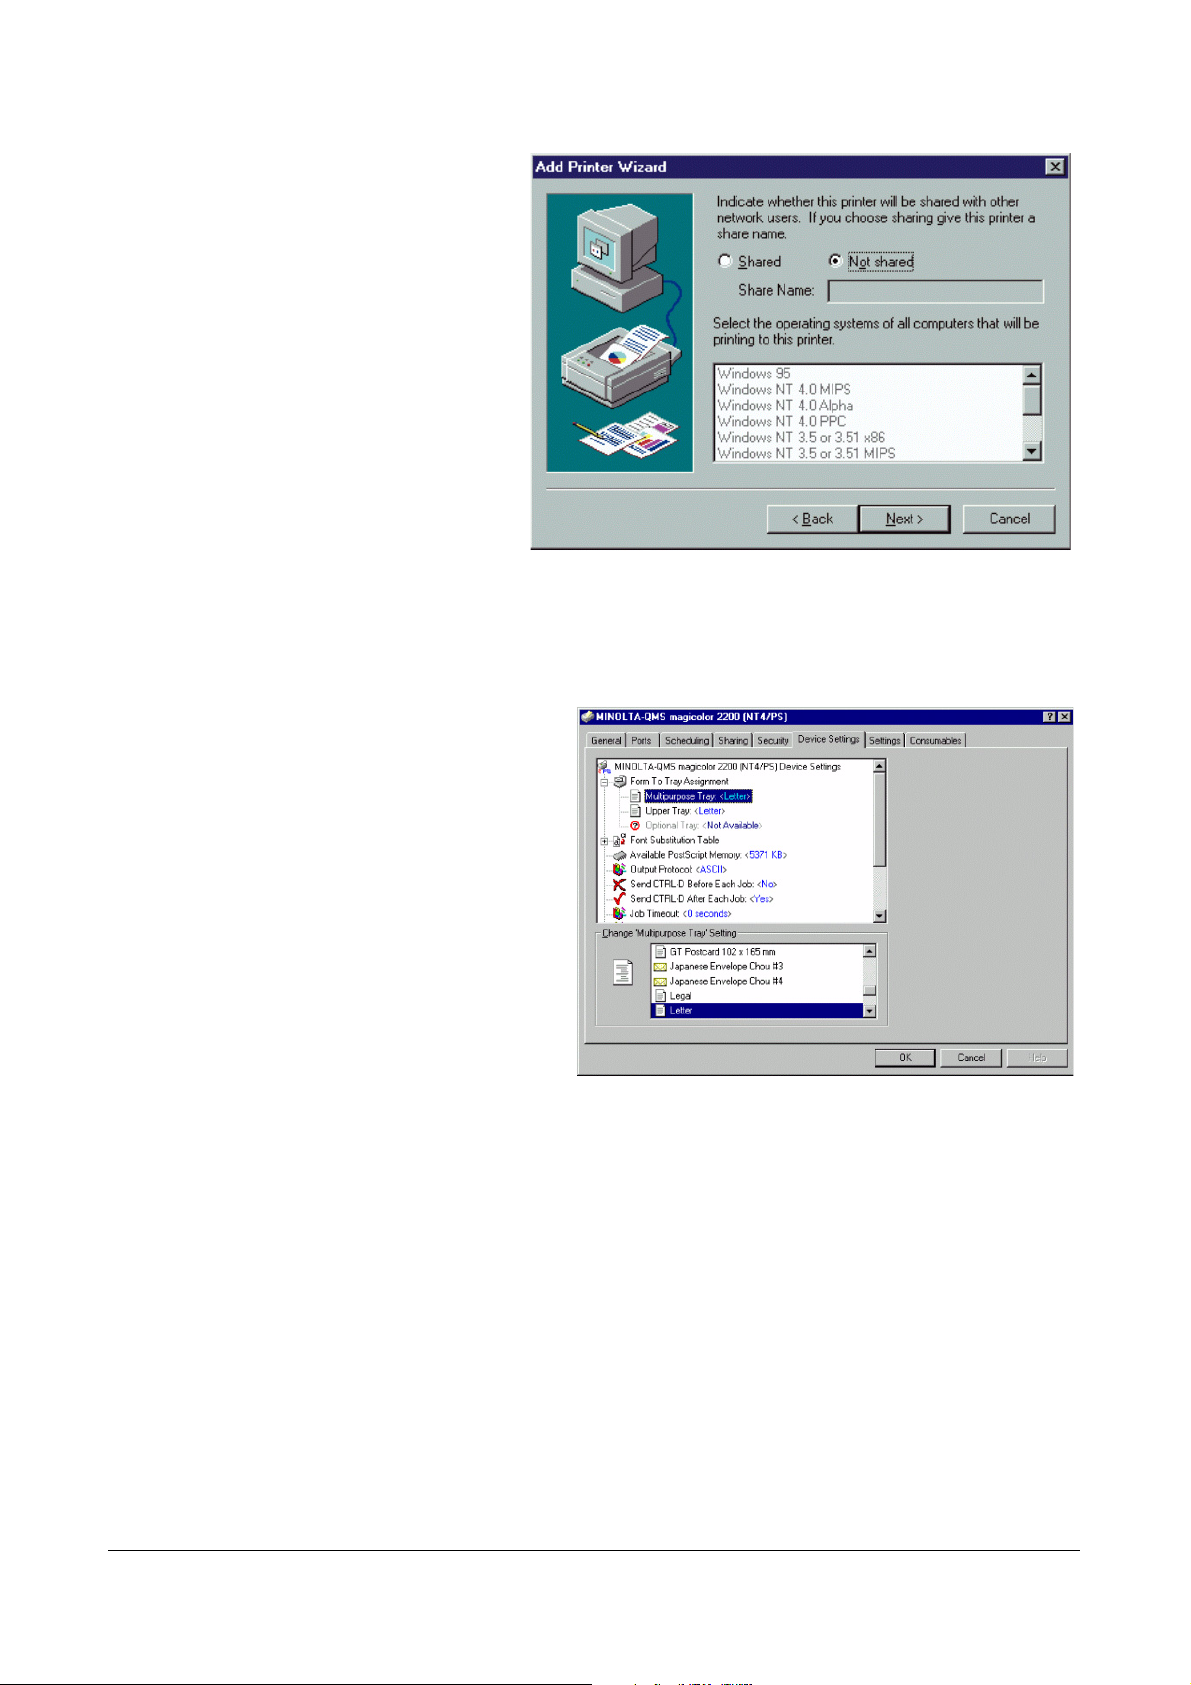
8 Select Shared or
Not Shared.
(If you select Shared, enter
the share name). Select Next,
and then select Finish.
The Add Printer Wizard
closes.
9 Restart your computer.
Customizing Driver Settings
1 From the Start menu, choose Settings/Printers and locate the (new) Crown II printer icon.
2 Click on the icon with the right mouse button and choose Properties.
3 In the Crown II Properties window,
select Device Settings.
In this window, you should set the
defaults that are not print job dependent, such as the media size you have
in your tray(s).
Consult your printer documentation
for the actual options available on
your Crown II printer.
4 Finish customizing the settings and
select OK.
For additional printer driver
information, you may also refer to
“Printer Driver Configuration Items”
on page 68 and the printer driver’s online help.
You may continue installing other utilities available on the Software Utilities CD-ROM. Refer to
“Installing More Utilities for Windows” on page 24.
Installing a KONICA MINOLTA PostScript Driver for Windows XP/2000
The following assumes that you are installing the KONICA MINOLTA PostScript Driver for
Windows XP/2000/NT4 for the first time. The Software Utilities CD-ROM has an autoplay function as
well as an installer program. If available, we suggest you use this installer and follow the instructions
given.
You may also use the standard installation, described below.
Installing a KONICA MINOLTA PostScript Driver for Windows XP/2000 17
Page 24
The Software Utilities CD-ROM driver installer opens the Add Printer Wizard for you. If the Add
Printer Wizard is already open, begin with step 4.
1 If the driver you are installing is on the Software Utilities CD-ROM, make sure that the CD-
ROM is in your CD-ROM drive.
If the CD-ROM installation application
starts, close the application before continuing.
Windows 2000 Windows XP
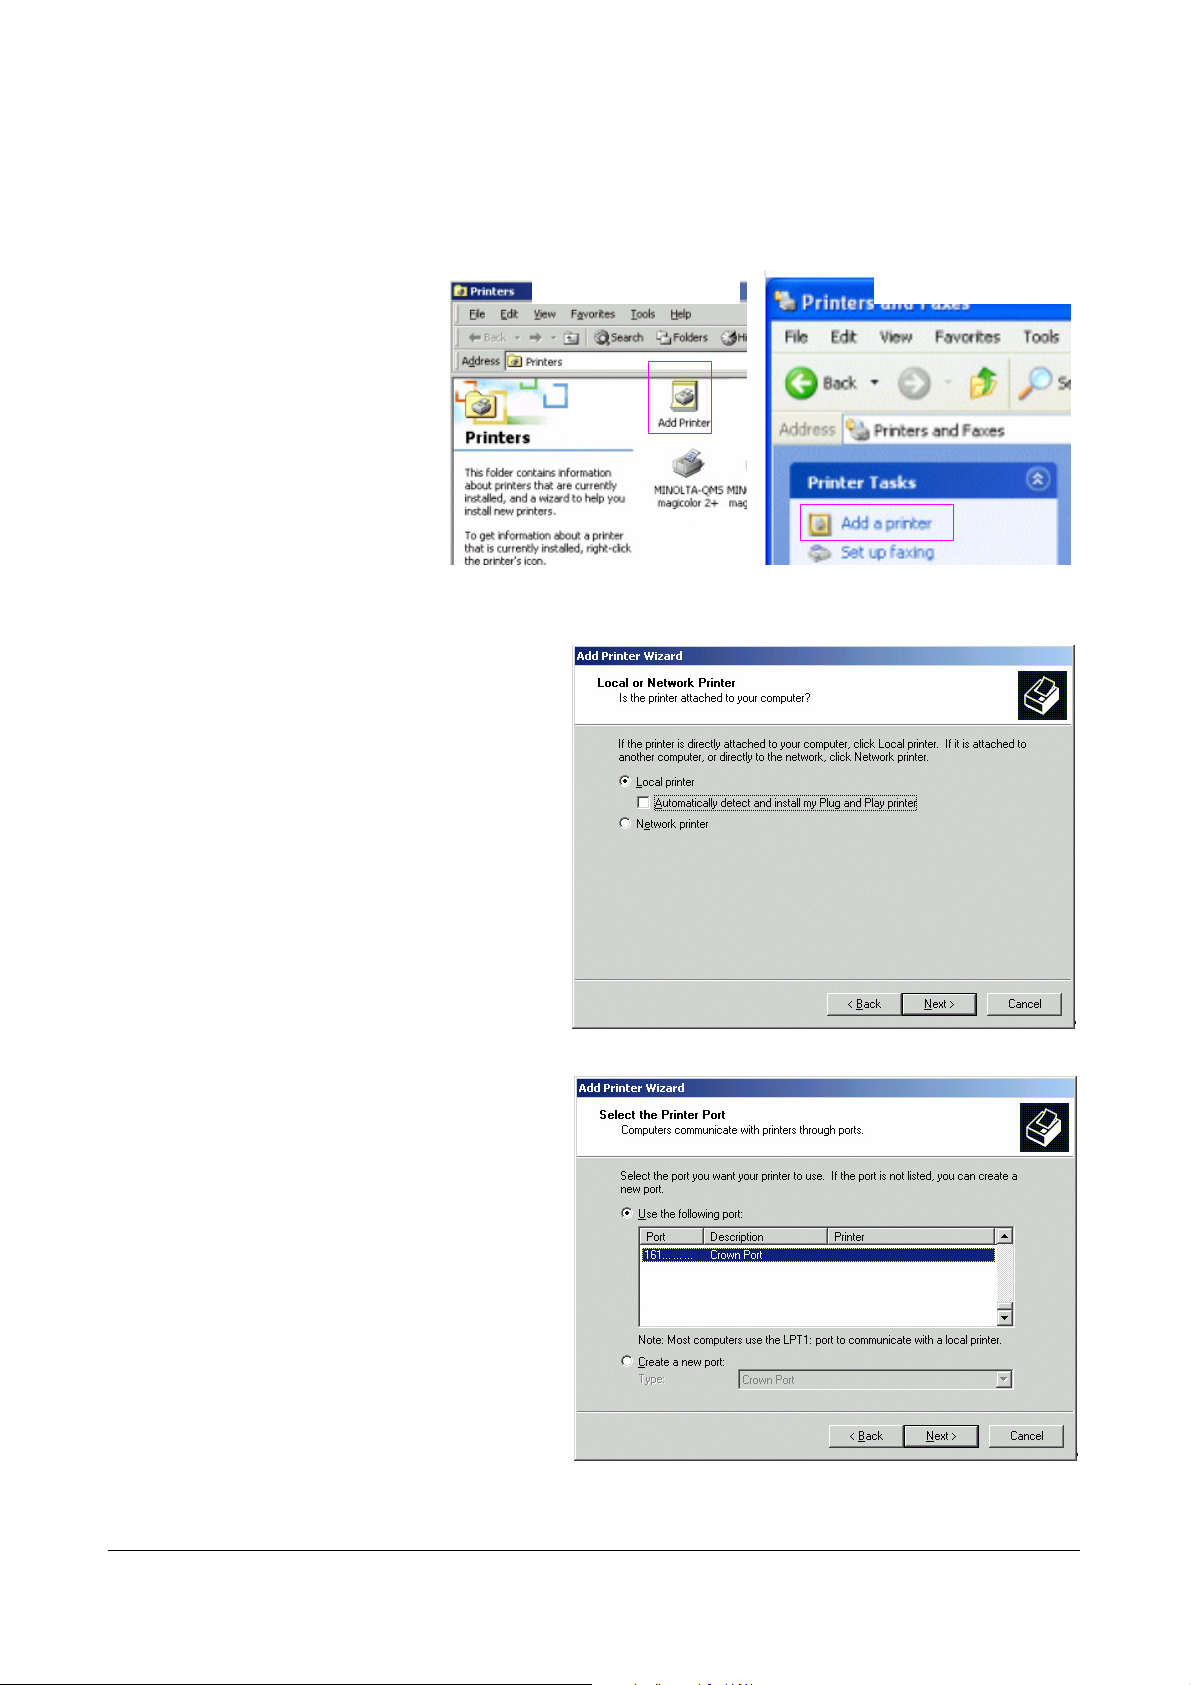
2 From the Start menu,
choose Settings/Print-
ers (Windows 2000),
or choose Printers and
Faxes (Windows XP).
3 Double-click on the
Add Printer icon (Windows 2000), or select Add a printer from the Printer Tasks menu (Win-
dows XP). The Add Printer Wizard starts. Follow the on-screen instructions.
4 Select local printer (you are
attaching to a port, not to a
printer attached to a server).
Then select Next.
The screens shown are from a
Windows 2000 Operating
System. The Windows XP Add
Printer Wizard screens may vary
in appearance but contains the
same key functions.
18
5 Choose the appropriate
printer port.
For a local (parallel) connection,
select LPTx:.
For a TCP/IP connection, select
the Crown port that was added during the steps described in “Adding
a Crown Port” on page 6.
Installing a KONICA MINOLTA PostScript Driver for Windows XP/2000
Page 25
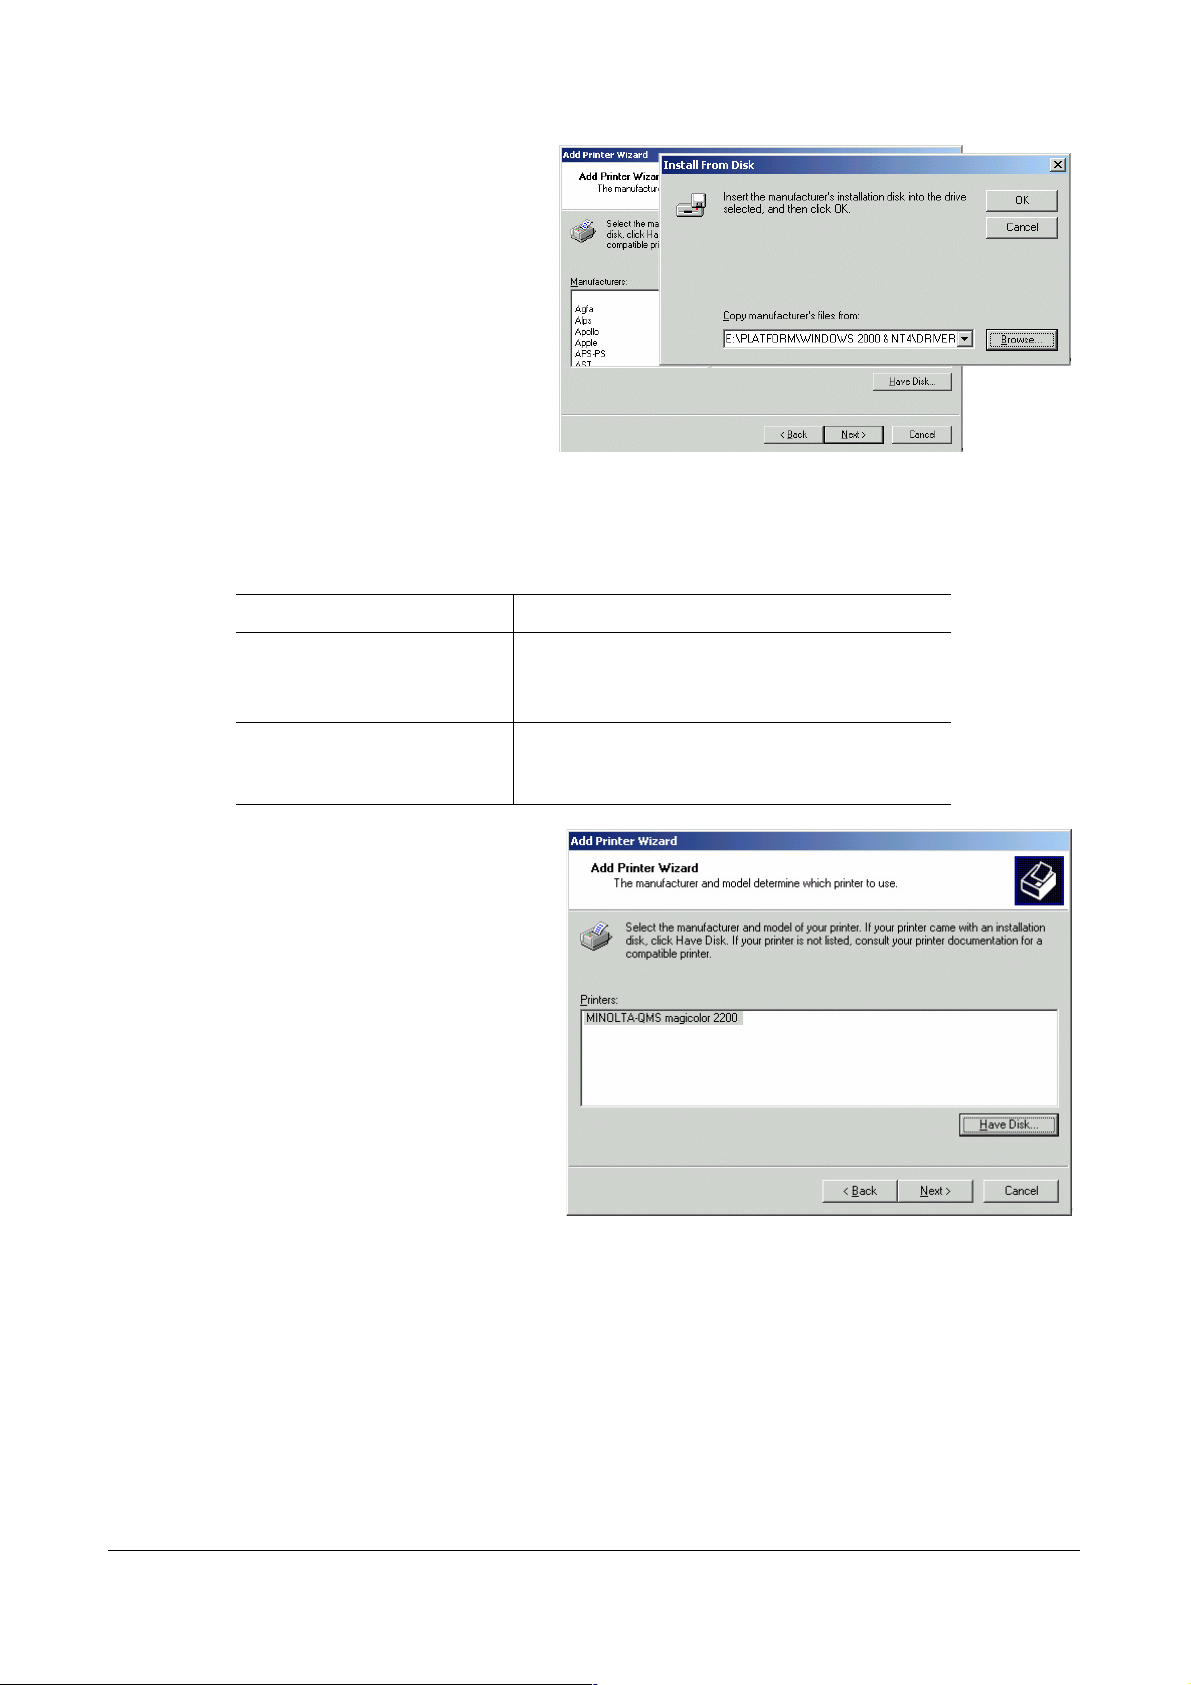
6 Select Have Disk and enter or
browse to the location of the
driver (see the following table),
select the setup.inf file, select
Open, and then select OK.
Driver to be installed: Browse to
Driver on Software Utilities
CD-ROM
Driver downloaded from
Internet
New directory containing the downloaded, extracted
files. Refer to step 2 of “Downloading a Printer
Driver from the Internet” on page 11.”
7 Choose your Crown II printer. Then
select Next.
:\platform\windows XP, 2000 &
nt4\driver\
ROM drive and the user language you prefer)
\ (where is the letter of your CD-
Installing a KONICA MINOLTA PostScript Driver for Windows XP/2000 19
Page 26
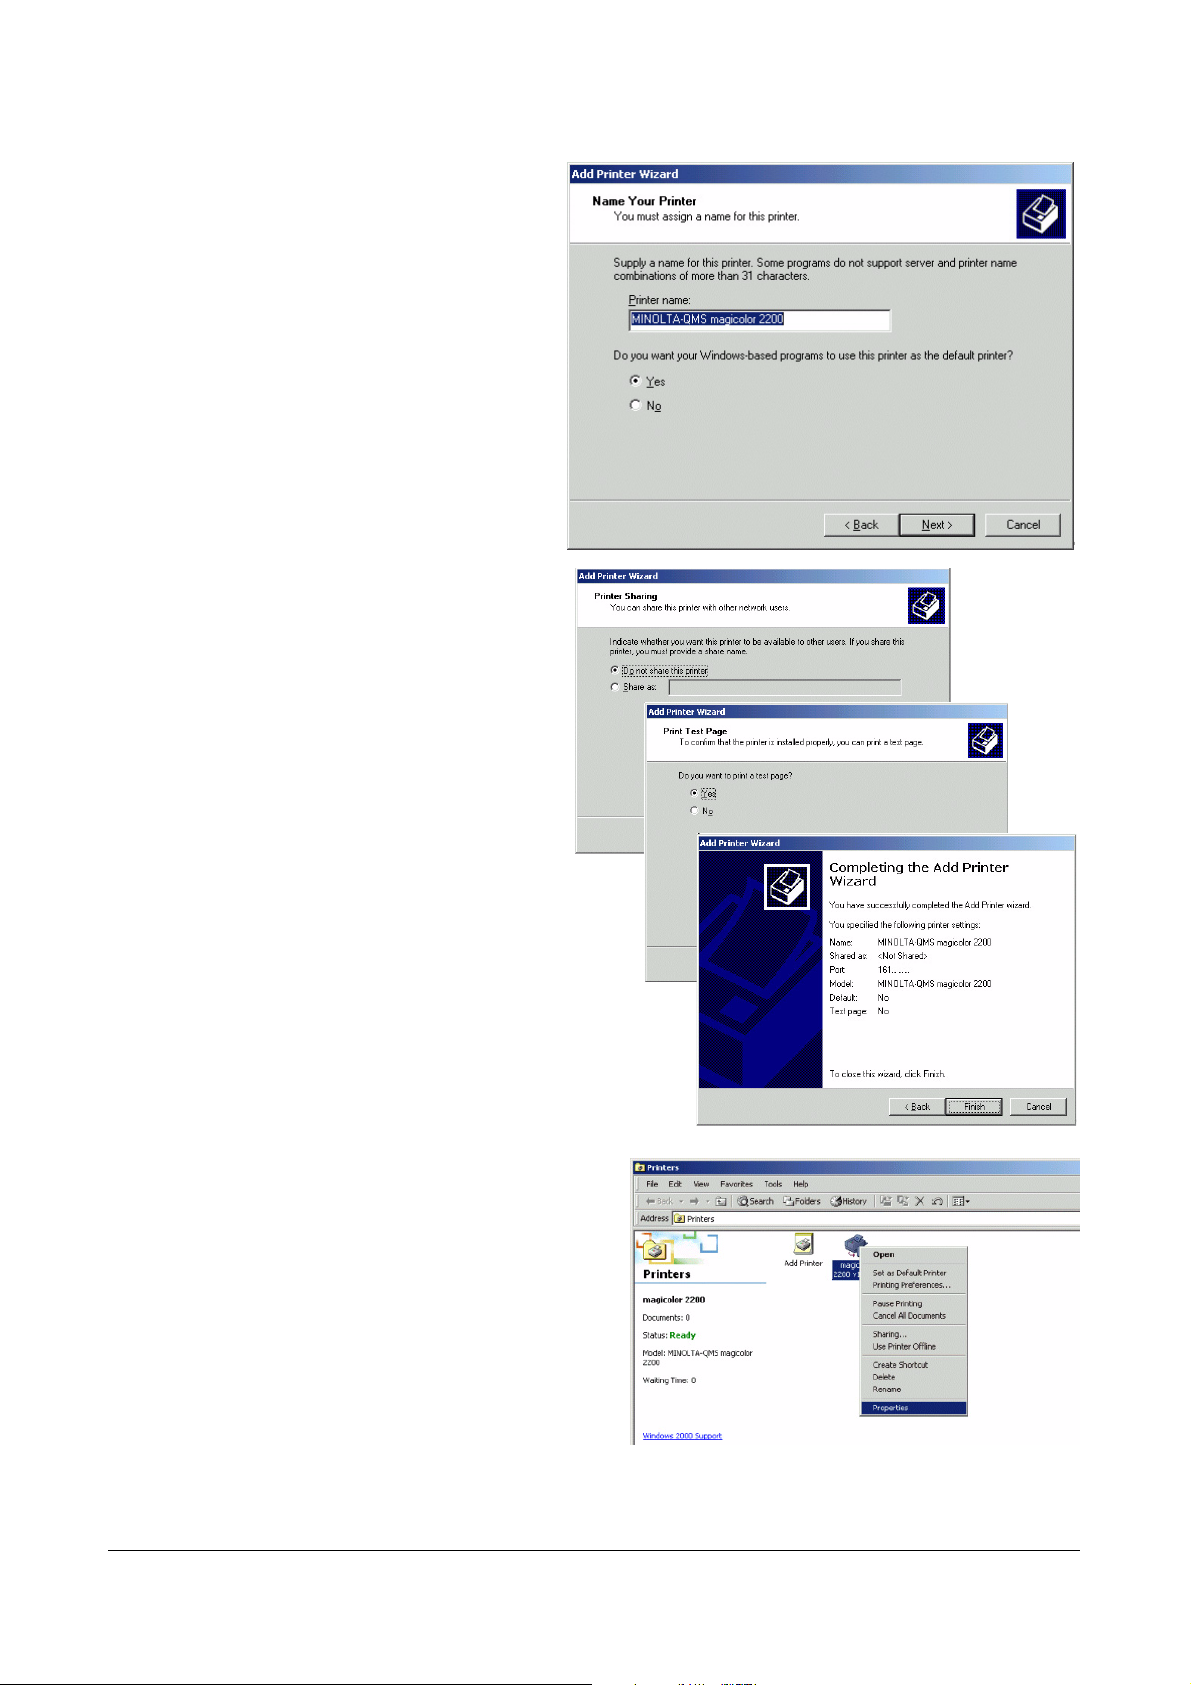
8 This screen allows you to rename
the printer for your convenience
and to set the printer as default
printer. Select Next.
9 Select Do not share this printer.
Select Next twice, and then
select Finish.
The Add Printer Wizard closes.
10 Restart your computer.
Customizing Driver Settings
1 From the Start menu, choose Set-
tings/Printers, and locate the (new)
Crown II printer icon.
2 Click on the Crown II printer icon with
the right mouse button and choose
Properties.
20
Installing a KONICA MINOLTA PostScript Driver for Windows XP/2000
Page 27
3 Select Settings.
4 In this window you may choose certain “options” available on your Crown II printer. After
making selections, select OK.
Consult your printer documentation for the available option(s) of your Crown II printer.
5 Select Device Settings. In this win-
dow you should set the defaults that
are not print job dependent, such as
the media size you have in your
tray(s).
6 Finish customizing the
settings, and then
select OK.
For additional printer driver
information, refer to “Printer
Driver Configuration Items” on
page 68 and the printer driver’s
online help.
You may continue installing other utilities available on the Software Utilities CD-ROM. Refer to the
next section,“Installing More Utilities for Windows.”
Installing a KONICA MINOLTA PCL Driver for Windows Me/98/95
The following assumes that you are installing the KONICA MINOLTA PCL Driver for
Windows Me/98/95 for the first time.
The Software Utilities CD-ROM driver installer opens the Add Printer Wizard for you. If the Add
Printer Wizard is already open, begin with step 4.
Installing a KONICA MINOLTA PCL Driver for Windows Me/98/95 21
Page 28
1 If the driver you are installing is on the Software Utilities CD-
ROM, make sure that the CD-ROM is in your CD-ROM drive.
If the CD-ROM installation application starts, close the application before continuing.
2 From the Start menu, choose Settings/Printers.
3 Double-click on the Add Printer icon.
The Add Printer Wizard starts.
4 Read the help screen for Microsoft's Add Printer Wizard, and select Next.
5 Follow the instructions in the Add Printer Wizard.
6 When you’re prompted to select a manufacturer and model [printer], choose Have Disk...
7 In the Install From Disk window, choose Browse...
8 Change to the x\DRIVERS\WINDOWS Me, 9x\PCL\PCL y\z directory, where x is the drive in
which you installed the CD-ROM in step 1, y is the appropriate PCL directory (5e or 6), and z is
the appropriate language .
9 Choose the appropriate .inf file from the File name list, and then select Open to return to the
Install from Disk window.
10 Select OK.
A list of KONICA MINOLTA printers displays.
11 Choose the model identification for your printer, and continue following the instructions in the
Add Printer Wizard to complete the installation.
After installation, the driver features online help for tips and information on how to use options in the
driver. Also refer to the readme file for additional information.
Installing a KONICA MINOLTA PCL Driver for Windows NT4
Review the information in the driver’s readme.txt file for driver availability notes and special
instructions on driver installation and use.
The following assumes that you are installing the KONICA MINOLTA PCL Driver for Windows NT4
for the first time.
The Software Utilities CD-ROM driver installer opens the Add Printer Wizard for you. If the Add
Printer Wizard is already open, begin with step 4.
22
Installing a KONICA MINOLTA PCL Driver for Windows NT4
Page 29

Installation of the KONICA MINOLTA PCL5e driver requires files located on the Microsoft
Windows NT CD-ROM. Make sure you have the Microsoft Windows NT CD-ROM before starting
the installation.
1 If the driver you are installing is on the Software Utilities
CD-ROM, make sure that the CD-ROM is in your
CD-ROM drive.
If the CD-ROM installation application starts, close the application before continuing.
2 From the Start menu, choose Settings/Printers.
3 Double-click on the Add Printer icon. The
Add Printer Wizard starts.
4 Read the help screen for Microsoft's Add Printer Wizard, and choose Next>.
5 Follow the instructions in the Add Printer Wizard.
6 When you’re prompted to select a manufacturer and model [printer], choose Have Disk...
7 In the Install From Disk window, choose Browse...
8 Change to the x\DRIVERS\WINDOWS NT4\PCL\PCL y\z directory, where x is the drive in
which you installed the CD-ROM in step 1, y is the appropriate PCL directory (5e or 6), and z is
the appropriate language.
9 Choose the appropriate .inf file from the File Name list, and then select Open to return to the
Install from Disk window.
10 Select OK.
A list of KONICA MINOLTA printers displays.
11 Choose the model identification for your printer, and continue following the instructions in the
Add Printer Wizard to complete the installation.
After installation, the driver features online help for tips and information on how to use options in the
driver. Also refer to the readme file for additional information.
Installing a KONICA MINOLTA PCL Driver for Windows XP/2000
The following assumes that you are installing a KONICA MINOLTA PCL Driver for
Windows XP/2000 for the first time. The Software Utilities CD-ROM has an autoplay function as well
as an installer program. If available, we suggest you use this installer and follow the instructions given.
You may also use the standard installation, described below.
The Software Utilities CD-ROM driver installer opens the Add Printer Wizard for you. If the Add
Printer Wizard is already open, begin with step 4.
1 If the driver you are installing is on the Software Utilities CD-ROM, make sure that the CD-
ROM is in your CD-ROM drive.
Installing a KONICA MINOLTA PCL Driver for Windows XP/2000 23
Page 30

If the CD-ROM installation application
starts, close the application before continuing.
Windows 2000 Windows XP
2 From the Start menu,
choose Settings/Print-
ers (Windows 2000),
or choose Printers and
Faxes (Windows XP).
3 Double-click on the
Add Printer icon (Windows 2000), or select Add a printer from the Printer Tasks menu (Win-
dows XP).
4 Read the help screen for Microsoft's Add Printer Wizard, and choose Next>.
5 Follow the instructions in the Add Printer Wizard.
6 When you’re prompted to select a manufacturer and model [printer], choose Have Disk...
7 In the Install From Disk window, choose Browse...
8 Change to the x\DRIVERS\WINDOWS y\PCL\PCL z directory, where x is the drive in which
you installed the CD-ROM in step 1, y is either your version of Windows (2000 or XP), and z is
the appropriate PCL directory (5e or 6).
9 Choose the appropriate .inf file from the File Name list, and then select Open to return to the
Install from Disk window.
10 Select OK.
A list of KONICA MINOLTA printers displays.
11 Choose the model identification for your printer, and continue following the instructions in the
Add Printer Wizard to complete the installation.
After installation, the driver features online help for tips and information on how to use options in the
driver. Also refer to the readme file for additional information.
Installing More Utilities for Windows
This section describes how to install additional utilities and applications that are on the Software
Utilities CD-ROM.
Many of the utilities described in this section are also available for downloading from our website at
printer.konicaminolta.net/support
Installing a Download Manager
If your Crown II printer has a hard disk installed, you may want to install the Download Manager. The
Download Manager makes it easy to add ICC (International Color Consortium) profiles, overlays, and
fonts to your printer's hard drive. You can also use the Download Manager to install fonts to your
printer’s memory (RAM).
.
24
Requirements
PC with Windows XP/2000/NT4/Me/98/95
Installing More Utilities for Windows
Page 31

Supported printer with a hard disk installed:
magicolor 2+
magicolor 330
magicolor 2200/2210
magicolor 3100/3300
magicolor 6100/6110
PagePro 9100
PostScript Level 2 or Level 3 printer driver for the supported printer (with the port set to the target
printer)
1 Insert the Software Utilities CD-ROM into your CD-ROM drive. Using Windows Explorer,
select your CD-ROM drive and browse to the folder
CD-ROM drive).
:\dlmanager(where is the letter of your
2 Open the folder and double-click on the setup.exe
icon. The Setup program automatically detects the
windows platform (Windows Me, 98, 95, XP, 2000,
or NT4), and opens the Install Wizard. Follow the
directions on the screen.
3 When the Information message box appears,
select OK.
4 After the installation is complete, remove the Software
Utilities CD-ROM from your CD-ROM drive and store
it in a safe place.
Installing PageScope
PageScope is a utility which provides access to printer management functions including status
monitoring and network/printer parameter settings.
For PageScope installation and operating instructions, see the PageScope Quick Guide.
Installing Crown Print Auditor
The Crown Printer Auditor (CPA) allows you to download, view, print, and manipulate the accounting
data available on supported printers. Supported printers:
2060
2425
3260/4032
4060
magicolor 2
magicolor 2+
magicolor 330
magicolor 6100/6110
Accounting features are available only on printers configured with an internal hard disk.
Installing More Utilities for Windows 25
Page 32

Minimum Hardware Requirements
PC with Windows 95, Windows NT 3.51, or Windows NT4 (Intel platforms only)
700 KB of free hard disk space
Printer with Accounting enabled
TCP/IP connection to the PC and printer
Installation
1 With your PC on and Windows running, insert the Software Utilities CD-ROM in the appropriate
drive on your computer.
2 Using Windows Explorer, open the
your CD-ROM drive).
:\Crown Print Auditor directory (where is the letter of
3 Double-click SETUP.EXE to open the
installation program.
4 Follow the on-screen instructions.
5 When the Information message box
appears, select OK.
6 After the installation is complete,
remove the Software Utilities CD-ROM
from your CD-ROM drive and store it in
a safe place.
26
Installing More Utilities for Windows
Page 33

Connecting to a
Macintosh
Page 34

Connecting a Crown II Printer to a Macintosh
This chapter describes how to connect your Crown II printer to your Macintosh. Instructions are
included for both LocalTalk and Ethernet connections. Printer driver and PPD installation is explained
following the connection sections.
USB Connection
Macintosh OS 9.x—USB
1 Plug one end of the USB cable into
the Macintosh and the other into the
printer’s USB port.
2 Locate the Desktop Printer Utility.
If you cannot locate it on your hard
disk, it can be found on your
Macintosh’s system CD-ROM.
3 Double-click on the Desktop Printer
Utility icon to open the application.
The first window prompts you to select the type of desktop printer
you would like to create.
4 Select Printer (USB), and select OK.
5 Choose the Change button in the PostScript Printer Description section. In the resulting window,
select the appropriate printer, and choose Select.
28
Connecting a Crown II Printer to a Macintosh
Page 35

6 Choose the Change button in the USB Printer Selection section. In the resulting window, select
your printer, and click OK.
7 Choose the Create button to create your desktop USB printer. Name your printer in the Save
desktop printer as:
The desktop icon appears on your desktop.
field, and choose Save.
8 Double-click the desktop printer icon, and the printer’s queue window opens. From the Printing
menu, choose Change Setup.
9 Use the printer setup window to set your printer’s options and
features. Choose the Change popup menu to select the option or
feature.
Connecting a Crown II Printer to a Macintosh 29
Page 36

10 Click the To popup menu to change the setting for the selected
option or feature. Click OK.
Macintosh OSX (10.x.x and Later)—USB
1 Plug one end of the USB cable into the PC and the other into the printer’s USB port.
2 Locate and double-click the Print Center utility to open it.
3 In the Printer List window, choose Add.
4 In the resulting window, select USB for the printer type.
If your printer is connected properly, you will see your
printer model in the window.
30
Connecting a Crown II Printer to a Macintosh
Page 37

5 Choose the Printer Model popup menu to select the your printer’s PPD, and choose Add.
The printer should appear in the Printer List.
Ethernet Connection
Attaching your Crown II printer to a Macintosh via an Ethernet connection requires five steps.
1 Connect your printer.
2 Configure the Zone Name on the printer.
3 Select EtherTalk on your Macintosh.
4 Install the PPD files for the Apple LaserWriter Driver.
5 Customize the printer description (PPD) for your Crown II printer.
Making the Ethernet Connection
Attach your Crown II printer to your network via the Ethernet port on your printer’s interface panel.
The Ethernet port requires a a twisted-pair Ethernet cable using an RJ45 connector.
1 Plug one end of the cable into the
Ethernet port of the printer and the
other end of the cable into a
10BaseT/100BaseTX concentrator.
2 Turn on the printer.
Configuring the Printer’s Zone Name
If your network has more than one zone, use the following instructions for setting the zone name
configuration from the printer’s control panel.
RJ45 Port
10BaseT/100BaseTX
RJ45
Connector
1 Use the Administration/Communications/xxxxxxxx NIC/CrownNet/EtherTalk/Zone Name/
Zone Part 1 and Zone Part 2 menus, (where xxxxxxxx is either Resident or Optional) to enter
the name of the zone to which the printer is attached.
The two Zone Part x menus allow you to identify 1 zone with a name up to 32 characters long.
(Up to 16 characters can be entered in each of the two menus). You cannot use these two menus
to identify two zones. Trailing spaces are not considered part of the zone name. All standard
printable ASCII characters are valid except the @ and ' symbols. The names are case sensitive.
Connecting a Crown II Printer to a Macintosh 31
Page 38

2 When finished, save changes and put the printer back online.
Selecting EtherTalk on your Macintosh
1 From the Apple menu, select Control Panels.
2 Double-click the AppleTalk icon.
3 Choose Ethernet from the Connect via drop-down
list box.
4 Click the close box.
LocalTalk Connection
To connect your printer to a single Macintosh, you must have
An optional LocalTalk interface
Two PhoneNET-type transformer boxes: one with a DIN-8 connector for the printer port and one
with a DIN-8 connector for the Macintosh port
An RJ11 (telephone) cable
Two terminating resistors to close the open sockets left in the transformer boxes after the connec-
tion is made
Attaching your Crown II printer to a Macintosh via a LocalTalk connection requires three steps.
1 Connect your printer.
2 Configure the LocalTalk interface on the printer.
3 Install the PPD files for the Apple LaserWriter Driver.
If you’re connecting the printer to an AppleTalk network with more than one Macintosh, see your
PhoneNET and Macintosh documentation for more information.
Making the LocalTalk Connection
1 Turn off both the printer and the Macintosh.
32
2 Plug the connector from one transformer box into the printer’s optional LocalTalk port (installed
in the slot marked “Option”).
3 Plug the connector from the other transformer box into the Macintosh printer port.
Connecting a Crown II Printer to a Macintosh
Page 39

4 Connect the two transformer boxes with the telephone cable.
5 Put terminating resistors in all open sockets in
the connector boxes.
This ensures proper communication and helps
speed up transmission.
6 Turn on the printer.
Configuring the Printer’s LocalTalk Interface
1 From the printer’s control panel, make sure that the setting in the
Administration/Communications/LocalTalk/Mode is Enabled.
This setting enables the LocalTalk interface, which allows the printer to accept communication
through its LocalTalk port.
2 When finished, save changes and put the printer back online.
Installing PPD Files
1
Insert the KONICA MINOLTA Software Utilities CD-ROM.
Host
DIN-8 Female Port
Printer
DIN-8 Female Port
Tra n sfor m er
Boxes
RJ-11 Cable
Termin ating
Resistors
PPDs are also available on our website at printer.konicaminolta.net/support.
2 Double-click the KONICA MINOLTA icon when it appears on the desktop.
3 Double-click the Install icon.
4 Select the Read Me... button to view information about PPDs and utilities on the Software
Utilities CD-ROM.
Close the read me file after reading the information.
5 From the Process Location drop-down list box, choose the disk where you want to install the
software.
To change the install location, use the drop-down list box to display and choose the appropriate
disk.
6 Select Continue.
7 Choose the Crown II printer you are installing when prompted, and select Continue.
PPD files are automatically placed in the proper folder.
8 When the installation is complete, select Quit.
9 Remove the Software Utilities CD-ROM from your CD-
ROM drive and store it in a safe place.
10 Customize the printer description (PPD) as described in
the next section.
Installing PPD Files 33
Page 40

Customizing the Printer Description
Open the Chooser (under the Apple icon
1
in the desktop menu bar).
2 Select the LaserWriter printer driver.
The chooser searches for
available printers.
3 From the Select a PostScript Printer list,
select your Crown II printer and then
select Create.
If your network has more than one zone,
select the zone that your printer is
configured for, select your printer from
the Select a PostScript Printer list, and then select Create.
Message boxes indicating the set up
progress appear and close. When you are
returned to the Chooser window, the
Create button is replaced by the
Setup button.
4 Select Setup.
5 In the setup window, select Select PPD.
34
Customizing the Printer Description
Page 41

6 From the folder System Folder/ Exten-
sions/Printer Descriptions, select the
PPD file installed for your printer, and
then select Select.
Your Macintosh makes a “connection”
between the selected PPD file and your
Crown II printer.
7 In the setup window,
select Configure.
8 Configure the settings by choosing
from the options available in the dropdown list boxes. Use the scroll buttons to
view the full list of optional settings for
your printer.
9 When you are finished customizing the
PPD, select OK, and then close
the Chooser.
See “KONICA MINOLTA PPDs for
Macintosh” on page 76 for additional
configuration information.
Installing Utilities for the Macintosh
This section describes how to install additional applications and printer utilities for your Macintosh.
Installing Colorific
Colorific is a monitor calibration application that helps match the colors on your monitor with the
colors produced by a Crown II color printer.
The Colorific Utility does not ship with all KONICA MINOLTA printer models. See your printer
documentation to determine if Colorific is included with your printer.
1 Insert the KONICA MINOLTA Software Utilities CD-ROM.
2 Double-click the KONICA MINOLTA icon when it appears on the desktop.
3 Double-click on the Explore this CD icon.
4 Open the Color and Colorific folders.
Installing Utilities for the Macintosh 35
Page 42

5 Double-click the UNSTUFF.SEA file to uncompress it.
Follow the on-screen instructions to extract the compressed files.
6 When prompted to select a folder to UnStuff as:, select a folder location and name the folder (for
example, Colorific).
7 Select Save.
The installer, readme, and other files are extracted.
8 Select Quit after the files are unstuffed.
9 Open the (Colorific) folder created in step 6.
10 Double-click the installer file for the language
you prefer.
11 Follow the on-screen instructions to complete
the installation.
Refer to the Colorific readme file for more
information.
12 Remove the Software Utilities CD-ROM from
your CD-ROM drive and store it in a safe
place.
Installing ICC Profiles
The ICC profiles for your printer are available on the Software Utilities CD-ROM or on our website at
printer.konicaminolta.net/support
Downloading Profiles from the Internet
.
1 Use your Internet browser to access printer.konicaminolta.net/support
2 Select your printer from the drop-down list.
3 In the Drivers, PPDs & Utilities section, choose the Macintosh platform.
4 Locate and download the ICC profiles.
The downloaded file contains compressed files that need to be extracted, or “unstuffed,” prior
to use.
5 Double-click the .SEA file to uncompress it.
Follow the on-screen instructions to extract the compressed files.
6 When prompted to select a folder to UnStuff as:, select a folder location and name the folder (for
example, ICC).
7 Select Save.
The installer, readme, and other files are extracted.
36
8 Select Quit after the files are unstuffed.
9 Install the ICC profiles as described in “Installing ICC Profiles” on page 37.
Downloading Profiles from the Software Utilities CD-ROM
1 Insert the KONICA MINOLTA Software Utilities CD-ROM.
2 Double-click the KONICA MINOLTA icon when it appears on the desktop.
Installing Utilities for the Macintosh
Page 43

3 Double-click on the Explore this CD icon.
4 Open the Color and the printer folder for your
Crown II printer.
5 Open the ColorSync Profiles folder.
6 Double-click the .SEA file to uncompress it.
Follow the on-screen instructions to extract the
compressed files.
7 When prompted to select a folder to UnStuff as:, select a
folder location and name the folder (for example, ICC).
8 Select Save.
The installer, readme, and other files are extracted.
9 Select Quit after the files are unstuffed.
10 Remove the Software Utilities CD-ROM from your CD-ROM drive and store it in a safe place.
11 Install the ICC profiles as described in the next section.
Installing ICC Profiles
1 Open the folder containing the extracted Profile files.
2 Copy each of the ICC files to your System Folder/Preferences/ColorSync Profiles folder or to
your System Folder/ColorSync Profiles folder, depending on your MacOS/ColorSync version.
Installing Pantone Tables
Pantone tables for your printer are available on the Software Utilities CD-ROM or on our website at
printer.konicaminolta.net/support
Downloading Pantone Tables from the Internet
.
1 Use your Internet browser to access printer.konicaminolta.net/support
2 From the On-line Help and Drivers list box, select your printer from the drop-down list.
3 In the Drivers, PPDs & Utilities section, choose the Macintosh platform.
4 Locate and download the Pantone file.
The downloaded file contains compressed files that need to be extracted, or “unstuffed,” prior
to use.
5 Double-click the .SEA file to uncompress it.
Follow the on-screen instructions to extract the compressed files.
6 When prompted to select a folder to UnStuff as:, select a folder location and name the folder (for
example, PANTONE).
7 Select Save.
The Pantone tables, readme, and other files are extracted.
8 Select Quit after the files are unstuffed.
9 See the information contained in the extracted files for additional instructions on using Pantone
tables.
Installing Utilities for the Macintosh 37
Page 44

Downloading Pantone Tables from the Software Utilities CD-ROM
1 Insert the KONICA MINOLTA Software Utilities CD-ROM.
2 Double-click the KONICA MINOLTA icon when it appears on the desktop.
3 Double-click on the Explore this CD icon.
4 Open the Color and the printer folder for your
Crown II printer.
5 Open the Pantone folder.
6 Double-click the .SEA file to uncompress it.
Follow the on-screen instructions to extract the compressed files
7 When prompted to select a folder to UnStuff as:, select a
folder location and name the folder (for example,
PANTONE).
8 Select Save.
The installer, readme, and other files are extracted.
9 Select Quit after the files are unstuffed.
10 Remove the Software Utilities CD-ROM from your CD-ROM drive and store it in a safe place.
11 See the information contained in the extracted files for additional instructions on using Pantone
tables.
38
Installing Utilities for the Macintosh
Page 45

Connecting to
NetWare 4.x/5.x
Page 46

NetWare 4.x/5.x Setup
This chapter describes the steps necessary to configure NetWare 4.x/5.x and your Crown II printer to
print jobs routed through a print server.
Setup Overview
See the sections following this overview for detailed setup instructions.
Using PCONSOLE (NetWare 4.x only) or NWAdmin (NetWare 4.x/5.x)
1 Add a Print Server to the NDS tree.
2 Add a Print Queue to be serviced.
3 Add a Printer with the type as Remote/Other Unknown.
4 Associate the Print Queue with the Printer.
5 Associate the Printer with the Print Server.
NetWare NDS Setup Using PCONSOLE (Detailed Setup)
1 From any network workstation, log in with admin privileges to the file server that you want to
service the printer.
2 Start the NetWare PCONSOLE utility. If needed, use the Change Context option to position
yourself in the proper place within the NDS tree to install your print server.
3 From the Available Options menu, choose Print Servers, and then press Enter.
4 To create a new print server, press Ins[ert].
5 Type the name of the new print server, and then press Enter.
This name should match the latter portion of the name entered on the interface card. Refer
to“Crown II Printer Interface Setup” on page 45.
40
6 Choose Print Server, and then press Enter.
7 Select Printers from the Print Server Information menu.
8 Press Ins[ert] at the Serviced Printers screen.
NetWare 4.x/5.x Setup
Page 47

9 Press Ins[ert] at the Object, Class screen.
10 Type the new printer name, and then press Enter.
11 Select Printer on the Object, Class screen, and then press Enter to return to the
Serviced Printers screen.
12 Select Printer, and then press Enter.
13 From the Printer Name Configuration screen, enter the printer number (0-254).
NetWare 4.x/5.x Setup 41
Page 48

14 Enter the Printer Type as Other/Unknown.
15 At the Print Queues Assigned screen, press Enter.
16 At the Print Queue screen, press Ins[ert].
17 At the Object, Class screen, press Ins[ert].
42
18 Enter the print queue name, and then press Enter.
NetWare 4.x/5.x Setup
Page 49

19 At the Print Queue’s Volume prompt, press Ins[ert] to highlight the volume where the print
queue will be stored.
20 Press Enter to return to Object, Class screen.
21 Highlight Queue, and then press Enter
22 Press Esc twice, and then answer Ye s to the “Save changes” prompt.
The Serviced Printers screen appears.
23 Press Esc until prompted to exit PCONSOLE. Exit PCONSOLE.
The NetWare setup is now complete. If you haven’t already done so, configure the printer interface
(see “Crown II Printer Interface Setup” on page 45) and workstation (see “Workstation Setup” on
page 50).
NetWare NDS Setup Using NetWare Admin (Detailed Setup)
1 Double-click the NWAdmin icon.
2 If the tree is not displayed, select Tools - NDS Browser to display the directory tree.
3 Select the container that will hold the print queue, printer, and print server.
Although it’s not required that all three objects reside in the same container, it is recommended
by Novell.
4 Select Object - Create.
While the order of creation is not mandatory, we recommend that the objects be created in
this order.
On all creation opening screens, you have the opportunity to change context if needed.
NetWare 4.x/5.x Setup 43
Page 50

5 Select Print Queue, and then select OK.
6 Type the name of the print queue.
7 Select the icon button next to the Print Queue
Volume to select the volume to store the print
queue. The context can be changed if needed.
8 Select OK.
9 Choose Create.
10 Select Object - Create.
11 Select Printer, and then select OK.
12 Enter the name of the printer.
13 Select Define Additional Properties.
14 Choose Create.
15 From the Assignment tab,
select Add.
16 Select the print queue added in
above to be serviced by this
printer, and then select OK.
44
17 From the Configuration tab,
select Other/Unknown for
the printer type, and then
select OK.
18 Select Object - Create.
19 Select Print Server, and then
select OK.
NetWare 4.x/5.x Setup
Page 51

20 Type the name of the print server.
This name should match the latter portion of the
name entered on the interface card. Refer
to“Crown II Printer Interface Setup” on page 45.
21 Choose Define Additional Properties.
22 Choose Create.
23 From the Assignments tab,
select Add.
24 Select the printer you named
in previous steps. Change the
context if needed.
25 Select OK twice.
Additional properties, such as
users and operators, can also
be assigned during initial
installation or at a later time.
The NetWare setup is now
complete. If you haven’t already
done so, configure the printer
interface
(see the next section), and the workstation (see “Workstation Setup” on page 50).
Crown II Printer Interface Setup
The following instructions describe how to configure your Crown II printer’s CrownNet Interface for
NDS PServer mode through the printer control panel, PageScope, and Telnet.
Configuring the Print Server Context Using the Printer Control Panel
1 Enter the Print Server Context from the control panel of your Crown II printer.
The menu option and format you use to configure the Print Server Context depends on your
printer model and NetWare configuration. Refer to your printer’s control panel menu and your
NetWare setup to determine which method is right for your Crown II printer.
If your printer has a PServerContext option under the ConfigPServer menu, use the following
method to enter the Print Server Context.
Menu Administration/Communications/xxxxxxxx NIC/CrownNet/NetWare/
ConfigPServer/PServerContext
(where xxxxxxxx is either Resident or Optional)
Format FILE SERVER NAME
Space
PRINT SERVER NAME
NetWare 4.x/5.x Setup 45
Page 52

Example If the configuration file server name is KM-4 and the print server name is
PRINTSERV2.SALES, you enter: KM-4 PRINTSERV2.SALES.
Notes Use all capital letters and make sure to put a space between the file server
name
(KM-4) and the print server name (PRINTSERV2.SALES).
The Print Server Context option can hold up to 48 characters.
If your printer has a Configure NDS option under the ConfigPServer menu, use one of the
following two formats when entering the Print Server Context.
Menu Administration/Communications/xxxxxxxx NIC/CrownNet/NetWare/
ConfigPServer/Configure NDS/NDS Login Name/NDS Login Name (where
xxxxxxxx is either Resident or Optional)
Format
(select
one)
Example If the tree name is KM-4 and the print server name is PRINTSERV2, and the
Notes Use all capital letters and make sure to put a space between the tree or
If the print server is associated to the NDS tree:
TREE NAME
Space
PRINT SERVER NAME.CONTEXT
If the print server is associated to a file server:
SERVER NAME
Space
PRINT SERVER NAME.CONTEXT
context is SALES, you would enter:
KM-4 PRINTSERV2.SALES
If the preferred server name is KM-4 and the print server name is
PRINTSERV2, and the context is SALES, you would enter:
KM-4 PRINTSERV2.SALES
preferred server name (KM-4) and the print server name (PRINTSERV2).
The Print Server Context option can hold up to 48 characters.
Make sure that you’ve selected Tree or Preferred Server as the NDS Login
Type. The NDS Login Type option is located in the Administration/
Communications/xxxxxxxx NIC/CrownNet/NetWare/ConfigPServer/Configure NDS/NDS Login Type (where xxxxxxxx is either Resident or Optional)
printer menu.
46
The Print Server Context must match the one assigned in NetWare setup.
2 Reset the CrownNet Interface in the Administration/Communications/xxxxxxxx NIC/CrownNet/
Common/SoftReset printer menu.
Configuring the Print Server Context Using PageScope
1 From the printer list, locate and double-click on your printer.
2 Choose the NetWare tab, and then enter the PServer Context.
The format you use to enter the Print Server Context depends on your printer model. Refer to the
following information to determine which method is right for your Crown II printer
NetWare 4.x/5.x Setup
Page 53

a If the print server is associated to an NDS tree, enter the PServer Context using the format
TREE:TREE NAME
Space
PRINT SERVER NAME.CONTEXT
Example If the tree name is KM-4 and the print server name is PRINTSERV2, and the
context is SALES, you would enter: TREE:KM-4 PRINTSERV2.SALES
Notes Use all capital letters.
You must enter the text “TREE:” before the tree name.
Make sure to put a space between the tree name (KM-4) and the print server
name (PRINTSERV2).
The Print Server Context option can hold up to 48 characters.
b If the print server is associated to a preferred server, enter the PServer Context using the for-
mat
SERVER:SERVER NAME
Space
PRINT SERVER NAME.CONTEXT
Example If the preferred server is KM-4 and the print server name is PRINTSERV2,
and the context is SALES, you would enter: SERVER:KM-4
PRINTSERV2.SALES
Notes Use all capital letters.
You must enter the text “SERVER:” before the preferred server name.
Make sure to put a space between the preferred server name (KM-4) and
the print server name (PRINTSERV2).
The Print Server Context option can hold up to 48 characters.
The Print Server Context must match the one assigned in NetWare setup.
c Some Crown II printers don’t support preferred tree or preferred server configuration. If this is
the case for your printer, enter the PServer Context using this format:
FILE SERVER NAME
Space
PRINT SERVER NAME
Example If the configuration file server name is KM-4 and the print server name is
PRINTSERV2.SALES, you enter: KM-4 PRINTSERV2.SALES
Notes Use all capital letters and make sure to put a space between the file server
name (KM-4) and the print server name (PRINTSERV2). The Print Server
Context option can hold up to 48 characters.
The Print Server Context must match the one assigned in NetWare setup.
4 Reset the CrownNet Interface in the Administration/Communications/xxxxxxxx NIC/CrownNet/
Common/SoftReset printer menu.
NetWare 4.x/5.x Setup 47
Page 54

Configuring the Print Server Context Using Telnet
You must have a TCP/IP connection to your Crown II printer and the printer’s IP Address set before
you can configure the Print Server Context using Telnet (a TCP/IP utility).
1 Open a Telnet session with the printer.
From an MS-DOS prompt, type
TELNET
Space
PRINTER IP ADDRESS (shown as xxx.xxx.xxx.xxx)
and then press Enter.
2 At the Telnet prompt, type admin, and then press Enter.
If a password has been enabled in the Security/Admin Menu of the printer, you are prompted to
enter the password when you attempt to enter the admin mode. If you receive the Enter Password
prompt, type the password and press Enter to continue.
3 Typ e menu, and then press Enter.
The printer configuration menu appears.
4 Go to the Administration/Communication/(Resident or Optional) NIC/NetWare/ConfigPServer
menu.
If a password has been enabled in the Security/Admin Menu of the printer, you are prompted to
enter the password when you attempt to enter the Administration menu. If you receive the Enter
Value prompt, type the password and press Enter to continue.
Use the following diagram to help you navigate through the menu tree. To make a selection, enter
the number associated with the menu option you want, and then press Enter.
If an optional NIC (Network Interface Card) is installed in the printer, Optional NIC will appear
as a choice in the Communications menu.
*PServer Context
or
*Configure NDS
*See step 5.
48
The menu options used in the following steps depend on your printer model and NetWare
configuration. Refer to your printer’s configuration menu and your NetWare setup to determine
which method is right for your Crown II printer.
NetWare 4.x/5.x Setup
Page 55

5 Select the menu option suitable for your printer and NetWare configuration, and then enter the
Print Server information. Use one of the two methods (a or b) described next.
a If your printer has a PServerContext option under the ConfigPServer menu, use the following
steps.
Select
Enter FILE SERVER NAME
Space
PRINT SERVER NAME
Example If the configuration file server name is KM-4 and the print server name is
PRINTSERV2.SALES, you enter: KM-4 PRINTSERV2.SALES.
Notes Use all capital letters and make sure to put a space between the file server name
(KM-4) and the print server name (PRINTSERV2.SALES).
The Print Server Context option can hold up to 48 characters.
b If your printer has a Configure NDS option under the ConfigPServer menu, use the
following steps.
Select
Enter
(select
one)
If the print server is associated to the NDS tree:
TREE NAME
Space
PRINT SERVER NAME.CONTEXT
If the print server is associated to a file server:
SERVER NAME
Space
PRINT SERVER NAME.CONTEXT
NetWare 4.x/5.x Setup 49
Page 56

Example If the tree name is KM-4 and the print server name is PRINTSERV2, and the context is
SALES, you would enter:
KM-4 PRINTSERV2.SALES
If the preferred server name is KM-4 and the print server name is PRINTSERV2, and the
context is SALES, you would enter:
KM-4 PRINTSERV2.SALES
Notes Use all capital letters and make sure to put a space between the tree or preferred server
name (KM-4) and the print server name (PRINTSERV2).
The Print Server Context option can hold up to 48 characters.
Make sure that you’ve selected Tree or Preferred Server as the NDS Login Type. The NDS
Login Type option is located in the Administration/Communications/xxxxxxxx NIC/CrownNet/NetWare/ConfigPServer/Configure NDS/NDS Login Type (where xxxxxxxx is either
Resident or Optional) printer menu.
Workstation Setup
Install the PostScript printer driver from the Software Utilities CD-ROM. See “KONICA MINOLTA
PostScript and PCL Drivers” on page 10 for installation information. Then associate the NetWare file
server and print queue to the PostScript driver on your workstation by completing the steps that follow.
1 From the Start menu, choose Settings/Printers.
2 In the Printers window, click the right mouse
button on your Crown II printer to display
the printer’s menu.
3 Choose Properties to display the Properties
dialog box.
4 Choose the Details tab, and then select
Add Port.
5 Select Browse, and then locate and select the
NetWare print queue setup for your printer.
6 Select OK three times, and then close the
Printers window.
The NetWare, printer interface, and workstation
configuration is now complete.
KM-4\CROWN-Q
50
NetWare 4.x/5.x Setup
Page 57

KONICA MINOLTA
NDPS Installation and
Configuration
Page 58

Installing KONICA MINOLTA NDPS Gateway
The KONICA MINOLTA NDPS Gateway components are designed for use with printers supporting
LPD/LPR and the Printer-MIB. Older printers, printers that don’t use a CrownNet interface for TCP/IP
connection, or printers with variations in the interpretation of LPD/LPR may not be compatible, or
may not be able to take advantage of the full functionality of our gateway components. Refer to your
printer documentation to determine if LPD/LPR support is available for your printer.
1 If it’s not already inserted, insert the Software Utilities CD-ROM.
2 Using Windows Explorer, select your CD-ROM drive and browse to the directory
(where
is the letter of your CD-ROM drive).
:\NDPS
3 Double-click the setup.exe icon.
The installation program starts.
4 Select Next.
5 Verify that the directory path to the system directory is correct.
If you need to change the path, select the Change button to locate and choose the system directory.
6 Select Next.
7 Verify that the directory path to the
public\win32 directory is correct.
If you need to change the path, select the Change button to locate and choose the public\win32
directory.
8 Select Next.
9 Verify that the installation information is correct.
If you need to change the installation, select Back, and make your changes before continuing.
10 Select Install.
The KONICA MINOLTA Gateway and utilities are installed.
11 When the installation is complete, select Finish.
12 After the installation program closes, remove the Software Utilities CD-ROM and store it in a
safe place.
52
Installing KONICA MINOLTA NDPS Gateway
Page 59

Configuring NDPS
The steps to configure KONICA MINOLTA NDPS components are
Creating a Broker
Creating a Manager
Creating a Printer Agent
Setup NDPS Printers using
Add Printer Wizard, or
Netware Print Manager
The following sections contain detailed instructions about these steps, and information about the
printing utilities and features available through KONICA MINOLTA NDPS components. For
additional information about NDPS, refer to Novell documentation and online help.
Creating a Broker
1 Open NWAdmin and select the
container where you want to place the
broker.
2 Select Object, and then select Create.
3 Select NDPS Broker, and then select OK.
Configuring NDPS 53
Page 60

4 Enter the name for the NDPS Broker.
5 Select the button next to the RMS Vol-
ume text box. Choose the volume where the
broker will reside.
6 Select Create.
7 Check the configuration for access control to
make sure that the Administrator is on
the list.
8 Load the Broker at the Server console
by typing:
Load broker “.<broker
name>.<context where broker
resides>”
Creating an NDPS Manager
1 In NWAdmin, select the container
where you want to place the manager.
2 Select Object, and then select Create.
3 Select the NDPS Manager, and then
select OK.
54
Configuring NDPS
Page 61

4 Enter the name for the NDPS Manager.
5 Select the button next to the Resident
Server text box.
6 Select the Server (usually in the server’s
SYS volume) where the manager will be
created, and then select OK.
7 Select the button next to the Database
Volume text box.
8 Select the Vol um e where the manager will
be created, and then select OK.
9 Select Create.
10 Check the configuration for access control to make sure that
the Administrator is on the list.
11 Load the NDPS Manager at the Server console by typing:
Load ndpsm “<NDPS manager name>”
12 Check the Server console for the Windows Printer Agent
List.
Creating a Printer Agent
1 In NWAdmin, select the container
where you want to place the
Printer Agent.
2 Select Object, and then select Create.
3 Select NDPS Printer, and then
select OK.
Configuring NDPS 55
Page 62

4 Type in the name for the Printer Agent’s
name.
5 Select Create, and then select the NDPS
Manager.
6 Choose KONICA MINOLTA Gateway
Configuration, and then select OK.
7 Choose the NDPS Manager that will have
access to the printer. Look for the NPDS
Manager created in the previous section.
8 Select OK.
The snap-in configuration
window appears.
56
Configuring NDPS
Page 63

9 Select Next.
The Host Configuration window appears
10 Enter the IP Address or Host Name of the
printer.
11 Enter the Community Name of the printer.
This step is optional.
12 Select Next, and then select Finish to
complete the configuration of the
Printer Agent.
A message window displays to indicate
that the server is creating the object on the
server and will start binding the object
with the print system.
After the Printer Agent is finished loading,
the Select Printer Driver window appears.
13 Select the drivers from the drop-down list
for each OS (workstation).
14 Select Continue.
An Information window displays.
15 Check the information for the selected
drivers, and then select OK.
To configure individual workstations, see
“Connecting to a PC on a Windows Platform” on
page 1 for instructions on installing drivers and
host software, and then add NDPS printers as
described in the next section.
Configuring NDPS 57
Page 64

NDPS Printer Setup using Add Printer
1 Select Printers from the Start/Settings menu.
2 Select Add Printer.
Local or Network Printer
window appears.
3 Select Network printer, and then
select Next.
Locate Your Printer
window appears.
4 Select Next to browse
your network.
Browse for the Printer window
appears.
58
5 Double-click NDPS Printers.
Configuring NDPS
Page 65

6 Double-click NDPS Controlled
Access Printers.
7 Locate and double-click the printer
you want to add.
8 When prompted to make this the
default printer, select Ye s or No.
NDPS Printer Setup using NetWare Print Manager
1 Select NWPS32 from the Public\Win32
directory.
Novell Printer Manager window appears.
2 Choose New from the Printer menu.
Novell Printers window appears.
3 Select Add.
Configuring NDPS 59
Page 66

4 Select Browse to look for printers.
5 Select the printer to be added.
6 Select OK.
Using KONICA MINOLTA NDPS Snap-in Controls
The KONICA MINOLTA NDPS components have been designed to take full advantage of the
configuration capabilities and information available from KONICA MINOLTA printers.
Accessing the Controls
The Printer Control dialog automatically opens during the installation of the KONICA MINOLTA
NDPS components. Following the installation, you can access these controls using NWAdmin.
1 Open NWAdmin, and then double-click on an NDPS printer.
If a Novell Printer Control dialog appears, complete the
remaining steps to open the KONICA MINOLTA Printer
Control dialog. Otherwise, see the next section for a
description of the KONICA MINOLTA Printer Control
dialog.
2 From the Novell Printer Control dialog,
select Identification.
60
Configuring NDPS
Page 67

3 Select MQIPCTRL.PC2 from the Printer Control DLL
Name drop-down list.
4 Select OK, and then close the Novell controls dialog.
5 Repeat step 1.
The KONICA MINOLTA Printer Control dialog opens.
Printer Control Dialog
The KONICA MINOLTA Printer Control dialog gives you access to
Printer identification, including installed features of each printer
Printer status
Print job monitoring
Spooling configuration
Print management, including
Job holds
Notification
CrownView and Telnet access
The buttons on the Printer Control dialog give you access to all of the KONICA MINOLTA NDPS
component features. For additional information, see the online help available from each dialog.
Identification Opens the Printer Identification dialog, which displays gen-
eral information about the printer and NDPS configuration,
and allows you to select from available Printer Control
DLL Names.
Features Opens the Features dialog where you can access printer
configuration and support service information.
Jobs Displays a submenu that allows you to open the NDPS Job
List dialog and the Spooling Configuration dialog.
Pause Output Sends a command to the server to pause printer output.
No print jobs are printed while the printer output is paused.
After selecting Pause Output, the button is replaced with a
Resume Output button. Selecting Resume Output removes
the pause and allows print jobs to be printed.
Pause Input Sends a command to the server to pause input to the
printer. No print jobs are sent to the printer while input is
paused but the printer will complete any jobs it has
already received.
After selecting Pause Input, the button is replaced with a
Resume Input button. Selecting Resume Input removes
the pause and allows print jobs to be sent to the printer.
Control Displays a submenu that allows you to select printer com-
mands such as Reset, Form Feed, and Mount Media, or to
open the Printer Defaults dialog.
Advanced… Opens the KONICA MINOLTA Advanced dialog that allows
you to open a Telnet session with the selected printer, and
to view printer configuration and status information from
the printer's internal web pages via CrownView.
Configuring NDPS 61
Page 68

Status Displays the current status of the selected printer.
OK Saves changes and closes the Printer Control dialog.
Cancel Discards changes and closes the Printer Control dialog.
Page Options Opens Novell’s Page Options dialog. See Novell’s
documentation and online help for additional information.
Help Displays the help file.
Tab s See Novell’s documentation and online help for information
about Printer Control, Access Control, Configuration,
NDPS Remote Printer Management, IPP Client Support,
and LPR Client Support tabs.
62
Configuring NDPS
Page 69

KONICA MINOLTA
Driver and PPD
Configuration
Page 70

KONICA MINOLTA Printer Drivers and PPDs
This chapter describes how you can access the features of the KONICA MINOLTA printer drivers and
PPDs developed for Crown II printers. The printer drivers and PPDs are available on the Software
Utilities CD-ROM and from the Internet. See “KONICA MINOLTA PostScript and PCL Drivers” on
page 10 for download and installation instructions of Windows printer drivers. Macintosh users should
refer to “Installing PPD Files” on page 33.
Before installing a printer driver, make sure the driver is compatible with your computer’s operating
system. KONICA MINOLTA has printer drivers or PPDs available for Windows Me/98/95, Windows
XP/2000/NT4, and Macintosh operating systems.
Use the following table to find the sections in this chapter containing information about the printer
driver compatible with your operating system.
Operating System See
Windows Me/98/95 “Windows Me/98/95 Printer Driver Configuration” (next section)
Windows XP/2000/NT4 “Windows XP/2000/NT4 Printer Driver Configuration” on page 66
Macintosh “KONICA MINOLTA PPDs for Macintosh” on page 76
Windows Me/98/95 Printer Driver Configuration
There are two methods of accessing the printer driver configuration items in Windows Me/98/95:
1... via the printer device properties 2... via your application’s printer setup
Gives you access to all printer settings. Gives you access to Paper, Page Layout, Image,
Device Option, and About tabs.
Lets you assign the default printer settings for all
print jobs.
Retains your settings until changed again via
properties.
How To:
1 From the Windows Start menu choose
Settings, and then choose Printers.
2 Select your Crown II printer.
3 From the File menu, choose Properties.
4 Choose the Details tab, and then select
Setup.
5 Make your selections, and then select OK to
save your changes.
6 Close the Printers window.
Lets you assigns the printer settings for only the
current print job.
Temporarily overrides the existing default settings.
How To:
1 From the application’s File menu choose
Print (or, in some cases, Print Setup or Page
Setup).
2 In the Print, Print Setup, or Page Setup dialog
box, choose your Crown II printer.
3 Select the Properties button.
4 Make your selections, and then select OK to
save your changes.
5Select OK from the Print Setup window.
You should configure your printer driver settings via the printer device properties method for your
typical print jobs and use your application’s printer setup method for print jobs that require special,
less frequently needed printer settings.
Standard Printer Driver Tabs in Windows Me/98/95
The configuration items of KONICA MINOLTA drivers are arranged on tabs in combination with the
branches and tabs that are provided by the Windows operating system. Each tab or branch represents a
64
KONICA MINOLTA Printer Drivers and PPDs
Page 71

functional part of a print job. See your operating system documentation and the printer driver’s online
help for complete information.
The standard Windows tabs and a summary of the options found on each are as follows:
General—Allows you attach comments, use a separator page, and print a test page. See your
Windows documentation.
Details—Allows you to set interface connection details. See your Windows documentation.
Setup Button—This button on the Details tab leads to the Crown II Printer Configuration
tabs that are also accessible from your application’s printer setup properties.
Sharing—Allows you to set up the printer so others on the network can use it. See your
Windows documentation.
Color Management (Windows Me/98 only)—Allows you to select the color profile associated
with your printer or allow the operating system to make the selection for you.
Crown II Printer Configuration Tabs in Windows Me/98/95
The Crown II printer configuration tabs are provided specifically for Crown II printers. You can access
these tabs from your application’s printer setup properties and from the printer device properties
(see “1... via the printer device properties” on page 64).
Layout Tab—Contains configuration controls for setting page orientation, duplex options, staple
options, and pages per sheet.
Paper Tab—Contains media configuration items. These items allow you to select the media and
control how the media is processed by the printer.
Advanced Paper Handling—You can configure page header, first page, trailer page, and
media selection options.
Features Tab—Contains links to color, graphics, and PostScript dialogs, and provides resolution
and quick color configuration options.
Color Options—Allow you to fine-tune color printing settings. However, in most cases, the
color optimization provided in the Quick Color Configuration drop-down list box is the easiest
way to produce the best color output possible.
Configure ICC and CRD Color Matching Dialogs—Opened by selecting the configure
buttons on the Color Options dialog.
Graphics Options—Contains configuration items used to control the placement of the image
on the page.
PostScript Options—Allows you to control headers, job timeouts and additional PostScript
printing options.
Overlays Tab—Contains the controls you need to configure and customize watermarks.
Watermarks—Accessible from the Overlays tab, the Watermarks dialog allows you add new
watermarks and edit existing watermarks.
Fonts Tab—Contains the configuration items that allow you to specify which fonts are used or
substituted for, during printing.
Consumables Tab—Allows you to monitor your printer's consumables and maintenance sched-
ule. This information is available if the printer’s IP Address is entered in the IP Name/Address text
box on the Settings tab. The bars show the amount of planes or faces that are left before replacement or maintenance must occur.
Settings Tab—Allows you to customize the printer driver for your Crown II printer configuration.
Windows Me/98/95 Printer Driver Configuration 65
Page 72

About Tab—Displays the printer driver identification, gives you a link to our Internet website,
and allows you to reset all of the driver’s configuration items to their original values.
Windows XP/2000/NT4 Printer Driver Configuration
There are three methods you can use to configure the printer driver designed for
Windows XP/2000/NT4. However, these three methods don’t all have the same options or control.
1... via the printer device properties 2... via your application’s printer setup
Gives you access to the General, Ports,
Scheduling (Windows NT4) or Advanced
(Windows XP/2000), Sharing, Security, and
About tabs
Lets you assign the printer settings for all print
jobs
Retains your settings until changed again via
properties
How To:
1From the Windows Start menu choose
Settings.
2 Choose Printers.
3 Choose your Crown II printer.
4From the File menu, choose Properties.
5 Make your selections, and then select OK
to save your changes.
6 Close the Printers window.
Gives you access to the Paper, Page Layout,
Image, Device Options, and About tabs
Lets you assigns the printer settings only for
the current print job
Temporarily overrides the existing default document settings
How To:
1 From the application’s File menu choose
Print (or, in some cases, Print Setup or
Page Setup).
2 In the Print, Print Setup, or Page Setup
dialog box, choose your Crown II printer.
3 Select the Properties button.
4 Make your selections, and then select OK
to save your changes.
5 Select OK from the Print Setup window.
3... via document defaults (Windows NT4) or
via printing preferences (Windows XP/2000)
Gives you access to the Paper, Page Layout, Image, Device Options, and About tabs
Lets you assign the default printer settings for all print jobs
Retains your settings until changed again via properties
How To:
1From the Windows Start menu choose Settings.
2 Choose Printers.
3 Select your Crown II printer.
4From the File menu, choose Default Document Properties (Windows NT4) or choose
Printing Preferences (Windows XP/2000).
5 Make your selections, and then select OK to save your changes.
6 Close the Printers window.
You should configure your printer driver settings via the printer device properties and document
defaults properties for your typical print jobs and use your application’s printer setup method for
print jobs that require special, less frequently needed printer settings.
Because Windows NT remembers the configuration changes you make to the driver, reinstalling the
driver does not restore the factory default configuration.
66
Windows XP/2000/NT4 Printer Driver Configuration
Page 73

Printer Device Properties in Windows XP/2000/NT4
The configuration items of KONICA MINOLTA drivers are arranged on tabs in combination with the
branches and tabs that are provided by the Windows operating system. Each tab or branch represents a
functional part of a print job. See your operating system documentation and the printer driver’s online
help for complete information.
The following are tabs that appear when the printer device properties has been chosen. The tabs and a
summary of the options found on each are as follows:
General (Windows XP, Windows 2000, and Windows NT4)—Allows you to name the printer,
specify a location, specify a driver to be used, install a new or updated printer driver, use a separator page between documents, specify a specialized print processor/data type, and print a test page.
See your Windows documentation.
Ports (Windows XP, Windows 2000, and Windows NT4)—Lists the available ports (under
Ports), the associated port monitor (under Description), and a comma-delimited list of printers that
use the port (under Printer). Allows you to add, delete, or configure ports. It also allows the printer
to get setting and status information from other printing devices, and enables printer pooling
(printing to two or more identical printing devices through one logical printer). See your Windows
documentation.
Device Settings (Windows XP, Windows 2000, and Windows NT4)—Allows you to configure
tray assignments, memory, output protocol and job timeout.
Settings (Windows XP, Windows 2000, and Windows NT4)—Allows you to customize the
printer driver for your Crown II printer configuration.
Consumables (Windows XP, Windows 2000, and Windows NT4)—Allows you to monitor your
printer's consumables and maintenance schedule. This information is available if the printer’s IP
Address is entered in the IP Name/Address text box on the Settings tab. The bars show the amount
of planes or faces that are left before replacement or maintenance must occur.
Color Management (Windows XP and Windows 2000)—Allows you to select the color profile
associated with your printer or allow the operating system to make the selection for you. See your
Windows documentation.
Advanced (Windows XP and Windows 2000), or Scheduling (Windows NT4)—Allows you to
configure the printer for availability, set spooling information, and define default document printing priority. See your Windows documentation.
Sharing (Windows XP, Windows 2000, and Windows NT4)—Allows you to share the printer
and install alternate drivers. See your Windows documentation.
Security (Windows 2000 and Windows NT4)—Allows you to modify the permissions to limit
access on the printer, view or set auditing information, or view or take ownership of the selected
item(s). See your Windows documentation.
The About, Consumables, Features, Fonts, Layout, Paper/Quality, and Overlay tab—accessible from
your application’s printer setup and from document default properties are explained next.
Printing Preferences/Document Default Properties in Windows 2000/NT4
Paper/Quality Tab (Windows XP and Windows 2000), or Page Setup (Windows NT4)—Con-
tains media configuration items and color printing selection.
Layout Tab (Windows XP and Windows 2000)—Contains controls for setting orientation,
duplexing, page order, and pages per sheet.
Windows XP/2000/NT4 Printer Driver Configuration 67
Page 74

Features Tab (Windows XP, Windows 2000, and Windows NT4)—Allows you to choose print-
ing resolution, quick color settings, and user default settings. From this tab you can also access
additional choices for the following dialogs.
Graphics Options—Contains configuration items used to control the placement of the image
on the page.
Color Options—Contains configuration items that allow you to fine-tune color printing set-
tings. However, in most cases, the color optimization provided in the Quick Color Configuration drop-down list box is the easiest way to produce the best color output possible.
Configure ICC and CRD Color Matching—The ICC Color Matching and CRD Color
Matching dialogs are opened by selecting the configure buttons on the Color tab.
PostScript Options—Allows you to control headers, job timeouts and additional PostScript
printing options.
Document Options (Windows XP and Windows 2000)—Allows you to setup configuration
items to control collation, copy count, Proof-Then-Print, and E-mail notification.
Overlays Tab (Windows XP, Windows 2000, and Windows NT4)—Allows you to configure
and customize watermarks.
Watermarks Dialog—Accessible from the Overlays tab, the Watermarks dialog allows you
add new watermarks and edit existing watermarks.
About Tab (Windows XP, Windows 2000, and Windows NT4)—Displays the printer driver
identification, gives you a link to our Internet website, and allows you to reset all of the driver’s
configuration items to their original values.
Printer Driver Configuration Items
For a full listing of configuration items or additional information about printer controls and features,
refer to the printer driver’s online help and “Crown Book Part 1—Crown II Operating System
Features.”
Not all options described in online help are available on all models of KONICA MINOLTA Crown II
printers. Refer to your printer documentation to determine which options apply to your printer.
68
Printer Driver Configuration Items
Page 75

Item Description
Accounting Data Allows you to tag each job with information that will be printed on the header page and/or
displayed remotely for those using KONICA MINOLTA Remote Console to monitor
printer activity. This information is also stored on Crown II printers that support accounting (check your Crown II printer documentation). If you use one or more of the following
accounting options, the title of the file is also printed on the header and trailer pages. If
title information can’t be found, the title will be Unknown.
Author text box—allows you to identify the owner of the print job.
Charge Number text box—allows you to identify the account to be charged for the print
job.
Host text box—allows you to identify the computer from which the print job is sent.
Available Options The Available Options section displays a list of options available for your Crown II printer.
The list is automatically created during the installation of the Crown II printer driver. You
must add installed options to the Installed Options list to be able to select their features.
Refer to your printer documentation for available options.
The Add button allows you to add an available (installed) option.
a. Choose the option from the Available Options list.
b. Select Add.
The selected option moves from the Available Options list to the Installed Options list.
The Remove button allows you to remove an installed option.
a. Choose the option from the Installed Options list.
b. Select Remove.
The selected option moves from the Installed Options list to the Available Options list.
See also: Quick Configure
Collate Specifies that one complete copy of the document should be printed before the next
copy is printed. Collating through your application is more time-consuming than collating
through the printer driver. When you collate through the application, the application
sends the complete job the requested number of times. When you collate through the
printer driver, the application sends the job only once. The Crown II printer holds the data
in memory and prints it the requested number of times.
Color
Separations
Consumable
Status
Copies Allows you to specify the number of copies of your print job you want to print.
Allows you to reproduce the pattern of each process color in black on separate pages in
the following order: yellow, magenta, cyan, black.
The bars show the number of planes or faces that are left before replacement or maintenance
must occur.
CRD Color Space Allows you to specify how the printer converts RGB images and graphics to CMYK
images via the printer's CRDs (color rendering dictionaries) and
ICC (International Color Consortium) profiles.
Printer Driver Configuration Items 69
Page 76

Item Description
Custom
PostScript
External Header
Destination Selection of a destination profile determines the color space to be used to open images.
Duplex Options Allows you to select duplex printing and control the way pages are duplexed.
Effects Allows you to print a negative image (white on a black background) of a document, or to
Email Notification Allows you to enable and configure notification by email when your job has finished print-
End of Job
Options
Enhancement Use Toner Saving Mode—Allows you to print a job using Toner Saving Mode (also
Halftone
Configuration
The Custom PostScript External Header allows you to work with PostScript file headers.
It allows you to send a PostScript file to the printer in front of the print job. This feature
provides the capability to print letterheads, overlays, and other special documents. The
Browse button allows you to search for an existing header file.
The Destination list box contains the color matching destination profiles currently recognized by the printer.
print a mirror image of a document.
ing. When this feature is enabled, you must enter your email address in the text box.
Allows you to identify the type of end-of-document command to be sent to the printer with
each
print job.
called Conserve Toner on some printers). Toner Saving Mode simulates draft printing.
Rather than placing every toner dot in an image, the printer places toner in a certain
ratio. This option is for draft printing only.
Allows you to configure the halftone settings for graphics, images, and text.
Images, Text, &
Graphics
Installed Options Displays a list of the options currently installed on your printer.
Job Default
Halftone
Job Timeout Allows you to specify the number of seconds you want the printer to spend processing a
Media Ty pe Allows you to instruct the printer to use the input tray that has been defined (in the Oper-
Allows you to select a color rendering dictionary.
Allows you to customize the smoothness of the printed image according to the number of
grayscale levels used. Your choices depend on the halftones available on your printer.
job before it ends that job.
ator Control/Media menu) to hold the specified type of media.
70
Printer Driver Configuration Items
Page 77

Item Description
Options
(PostScript)
Orientation Allows you to specify the orientation for your
Job Timeout—Allows you to specify the number of seconds you want the printer to
spend processing a job before it ends
that job.
EOD Mode—Allows you to identify the type of end-of-document command to be sent to
the printer for print jobs going to the parallel and serial interfaces. You may need to use
this option in the
following situations:
-Multiple print jobs with little or no time delay and with no EOD commands have been
sent to the printer, and the message window displays only one active job.
-Multiple print jobs of the same printer
language have been sent to the printer, and they print on the same page.
-Multiple print jobs of different printer
languages run together as if they were a
single print job.
-You want to print multiple jobs with header pages.
-You want to print multiple jobs where job
separation is important.
print job.
Output Bin Allows you to identify the bin, tray, or file to which you want to print your document.
Page Element
Halftones
Pages per
Layout
Paper Size Allows you to choose the size of media on which your job will be printed. This setting
Displays the Halftone Configuration dialog box, where you can custom configure graphics, images, and text.
Allows you to specify that more than one page image be printed on a single sheet of
media. With this selection you may print multiple pages on a
single n-up face.
should be set to the same media size as the media in the tray of
your printer.
Printer Driver Configuration Items 71
Page 78

Item Description
Placement The Placement section allows you to identify the document pages on which you want the
overlay
to print.
All Pages button—Allows you to specify that the overlay is printed on every page of the
document.
First page button—Allows you to specify that the overlay is printed on the first page of
the document.
Odd pages button—Allows you to specify that the overlay is printed on every other page
of the
document, beginning with page 1.
Even Pages button—Allows you to specify that the overlay is printed on every other
page of the
document, beginning with page 2.
Complex option—Allows you to customize the starting point and frequency with which
an overlay
is printed.
First box—Specifies the first page on which the
overlay is to be printed.
Cycle box—Specifies how often (in pages) the
overlay is repeated after the first instance.
Policy Allows you to identify how you want the printer to respond if the requested paper size is
not available.
PostScript
Options
Print Quality Allows you to select the rate at which media is fed into the media path to allow one sheet
Use Adobe Document Structuring Convention—Allows you to print output conforming
to Adobe's Document Structuring Convention (DSC), thus ensuring that the document is
device independent.
Allow Application to Emit PostScript—Certain applications (such as CorelDRAW,
PhotoShop, and PageMaker) take over output of PostScript code from the printer driver.
Because of this, some of the image control facilities and efficiencies implemented in the
driver are bypassed, and you don't get the expected printed results. This is particularly
evident for images. The Allow Application to Emit PostScript check-box allows you to
choose whether applications can generate their own PostScript.
Print PostScript Error Information—Allows you to print any PostScript errors the
printer encounters.
of media to pass completely through the image transfer process before the next sheet is
fed into the media path.
Fine Mode—reduces to a minimum any printer chassis vibration that may occur during
the
imaging process.
72
Printer
Communications
The IP Name/Address text box allows you to identify your printer’s IP name or address. If
you’re printing via the parallel or serial port to a printer on a TCP/IP
network, typing the IP address will allow you to monitor the printer’s consumables as well
as to use the Quick Configure button to access the printer and update all the installed
and available options.
Printer Driver Configuration Items
Page 79

Item Description
Printer Profiles The Add button in the Printer Profile Management dialog box allows you to add a printer
profile (for which you've already provided a description and filename) to the RGB Source
or Simulation in the Configure ICC Color Matching dialog box.
Even though you've added the profile to the RGB Source or Simulation drop-down list
box, you cannot use it unless you've downloaded the profile to the printer's hard disk. To
access the
Profile DownLoader, choose the ProfileDownLoader Button on the Configure ICC Color-Matching dialog box.
ProfileDownLoader
Proof-Then-Print Allows you to set up a multicopy print job that prints a single copy for proofing and holds
Quick Color
Configuration
Quick Configure If the IP Name/Address text boxes are
Resolution Allows you to select the resolution for the print job from those available on the printer.
Allows you to add to the destination profiles installed on your printer’s hard drive using
the Profile DownLoader.
the remaining copies in memory until you approve or cancel the job through the ProofThen-Print configuration menu from the printer’s control panel. To use this feature, select
the checkbox, and then enter a job name in the Proof-Then-Print text box to uniquely
identify each Proof-Then-Print job.
Available only on Crown II printers with an
internal hard disk.
Allows you to configure color options automatically or to save and select a customized
color configuration.
configured, use the Quick Configure button to access the printer and update all of the
Available Options and Installed Options information.
Available only in TCP/IP environments. If
bidirectional parallel communication has not been established between the computer
and the printer, this button is unavailable (grayed out).
Refer to your printer documentation for the
resolutions available.
RGB Source Allows you to select from standard or custom
color matching.
Rotation Allows you to identify the orientation you want to use when the image is placed on the
page. All rotation is done counterclockwise. If a rotated image does not fit on the page, it
is clipped (in other words, the part of the image that does not fit on the page does
not print).
Scaling Allows you to scale the printed image on the physical page of media. If you scale the
page above 100%, the logical page is clipped to fit within
its page.
Send True Type
Fonts to
Printer as
Simulation Allows you to specify a specific ICC simulation profile to be used for printed output.
Source Allows you to select the source bin you want the printer to pull media from.
If you're using TrueType fonts in your document, allows you to specify the format for
printing these fonts in the Send TrueType Fonts to Printer.
Printer Driver Configuration Items 73
Page 80

Item Description
Special Pages Allows you to enable special pages and to specify the tray or bin from which media will
be pulled from for printing these pages.
First Page—The first page of the printed document can be pulled from a different tray or
bin than the rest of the pages.
Header Page—A header page is a separator page, printed before a print job, that identi-
fies the print job and helps users sort out the jobs in the printer's
output tray or bin.
Trailer Page—A trailer page is a separator page, printed after a print job, which identifies
the print job and helps users sort out the jobs in the printer's
output tray or bin.
Staple Options Allows you to set stapling and offset stacking options. Available only if the selected
Crown printer supports stapling and offset stacking.
Uncollate Specifies that all copies of one page are printed before the next page is printed. To
ensure that your output is not collated, make sure collation is turned off in the application
and that Uncollate is selected in the printer driver.
Use
CRD Color
Matching
Use
Internal ICC
Color Matching
Use
Overlays
Use Printer Fonts
for All True Type
Fonts
Allows you to enable or disable CRD (color rendering dictionary) color matching. A CRD
(color rendering dictionary) is software that translates device-independent color to its
corresponding
device-dependent color value.
Allows you to enable or disable ICC (International Color Consortium) color matching.
An overlay is a printer-resident file that prints as the background of a print job. It allows
you to enable overlay printing and provides several options for customizing overlay printing.
Overlay Number box—allows you to choose one (or more, if your printer supports them)
files for
overlay printing.
Disk box—allows you to identify the name of the disk on which the overlay file resides.
This option doesn't appear unless at least one hard disk is installed on the selected
printer.
File box—allows you to identify the name of the overlay file.
The Use Printer Fonts for All TrueType Fonts radio button tells the printer to print with the
printer fonts that most closely match the TrueType fonts in your document. Use the substitution table to identify
font substitutions.
74
Use Substitution
Table
User Default
Settings
Watermark A watermark is a word or phrase printed lightly in the background of a printed page. The
Once you enable the Use Substitution Table option, you can edit the Substitution Table to
specify which printer fonts you want to print in place of the TrueType fonts in your documents. Substituting a printer font for a TrueType font is appropriate for TrueType fonts
such as Courier New, which is almost identical to the Courier printer font. Font substitution generally provides faster printing than font downloading. You can also tell the printer
that you want to download the TrueType font as a soft font.
Allows you to select from available user
default settings.
Watermark section allows you to select a watermark for your printed document. If you
want to customize the positioning and text attributes of the watermark, use the Edit button to access the Watermark dialog box.
Printer Driver Configuration Items
Page 81

Item Description
Watermark Text Allows you to identify the watermark text.
Watermark Text
Properties
Watermark
Position
Allows you to format the watermark text.
Allows you to specify the position of the watermark on the printed page
Restoring Defaults
The Restore Saved Settings buttons allow you to restore all settings on a specific tab to those last
saved. To restore all settings to their factory defaults, use the Restore Driver Defaults button in the
About tab. See online help for default values.
Printer Driver Configuration Items 75
Page 82

KONICA MINOLTA PPDs for Macintosh
Chapter 2, “Connecting a Crown II Printer to a Macintosh” on page 28, describes the steps necessary
to connect your Crown II printer to your Macintosh, how to install the KONICA MINOLTA PPD file
for your printer, and how to configure the LaserWriter printer driver with the KONICA MINOLTA
PPD. This section will describe the additional printer configuration items that are available from your
application’s print dialog.
The following illustrations and options are present on Macintosh System 8.6 OS (Operating System).
Variations may occur on different versions of the Macintosh OS. Refer to your Macintosh
documentation for a description of the differences between OS versions.
Overview
1 From the application that you want to print from, choose Print.
The print dialog appears.
Make sure your Crown II printer is selected from the Printer drop-down list, and that Printer is
selected in the Destination list at the top of the dialog.
2 Choose the options and settings that you want for the print job, and then select Print.
The print job is printed.
The following sections describe the configuration items available from the print dialog.
General Dialog
Item Description
Copies Allows you to specify how many copies of the print job you
Collated If this item is selected, your print job will be collated (one complete
Pages Select All to print all of the pages in the open document. To print a
want printed.
copy of the document is printed before the next copy is printed). Left
unselected, the printing is uncollated.
specific range of pages in the open document, select From, and then
enter the beginning page number in the From text box and the ending
page number in the To text box.
76
Paper Source Allows you to select the tray or bin that the printer uses for the print
job, and allows you to choose a different tray or bin for the first page of
the document.
KONICA MINOLTA PPDs for Macintosh
Page 83

Item Description
Save Settings Saves configuration changes made in the print dialog. These changes
will be the default settings until the configuration items are
changed again.
Cancel Closes the print dialog without printing and without saving
configuration changes.
Print Sends the print job with any configuration changes you have made to
the settings in the printer dialog for the open document, closes the
print dialog, and restores the last saved settings of the
configuration items.
Application-Specific Dialog
Many applications insert printer configuration choices that are commonly used by users of their
programs. The content of these dialogs vary from application to application.
Background Printing Dialog
Item Description
Print In Allows you to choose between printing in foreground and printing in
background. Printing in background creates a spool file that is temporarily saved on you computer until the print job is ready to be processed. This allows you to continue working in your applications while
the print job is processing. If you don’t have enough free file space on
your computer to process a spool file, select Foreground printing.
Print Time Allows you to assign a priority status to the print job and specify a par-
ticular time that the print job should be printed.
Save Settings Saves configuration changes made in the print dialog. These changes
will be the default settings until the configuration items are
changed again.
Cancel Closes the print dialog without printing and without saving
configuration changes.
Print Sends the print job with any configuration changes you have made to
the settings in the printer dialog for the open document, closes the
print dialog, and restores the last saved settings of the
configuration items.
KONICA MINOLTA PPDs for Macintosh 77
Page 84

Color Matching Dialog
Item Description
Print Color Allows you to choose from the color configurations available on
Intent Allows you to specify the color matching configuration or allow for
your computer.
automatic configuration. This item is disabled (grayed out) unless
ColorSync Color Matching is the selected Print Color setting.
Printer
Profile
Save Settings Saves configuration changes made in the print dialog. These changes
Cancel Closes the print dialog without printing and without saving
Print Sends the print job with any configuration changes you have made to
Allows you to select from the printer profiles that are available.
will be the default settings until the configuration items are
changed again.
configuration changes.
the settings in the printer dialog for the open document, closes the
print dialog, and restores the last saved settings of the
configuration items.
78
KONICA MINOLTA PPDs for Macintosh
Page 85

Cover Page Dialog
Item Description
Print Cover
Page
Cover Page
Paper Source
Save Settings Saves configuration changes made in the print dialog. These changes
Cancel Closes the print dialog without printing and without saving
Print Sends the print job with any configuration changes you have made to
Lets you choose whether to print a cover page, and specify the placement of the cover page in relation to the remaining pages of the
print job.
Allows you to select the paper tray containing the cover page media.
The Cover Page contains information about the print job such as: user
name, application, document name, date, time, printer, and number of
pages. This option is disabled (grayed out) if Print Cover Page is set
to None.
will be the default settings until the configuration items are
changed again.
configuration changes.
the settings in the printer dialog for the open document, closes the
print dialog, and restores the last saved settings of the
configuration items.
KONICA MINOLTA PPDs for Macintosh 79
Page 86

Font Settings Dialog
Item Description
Font Settings Allows you to determine if the font keys are annotated.
Font
Downloading
Save Settings Saves configuration changes made in the print dialog. These changes
Cancel Closes the print dialog without printing and without saving
Print Sends the print job with any configuration changes you have made to
Allows you to select the preferred font format, and to specify if fonts
should always be downloaded to the printer or if Type 42 formats
should be generated.
Printer fonts are not used if Always Download Needed Fonts is
selected.
will be the default settings until the configuration items are
changed again.
configuration changes.
the settings in the printer dialog for the open document, closes the
print dialog, and restores the last saved settings of the
configuration items.
80
KONICA MINOLTA PPDs for Macintosh
Page 87

Job Logging Dialog
Item Description
If there is a
PostScript
error
Job
Documentation
Job Documentation
Folder
Save Settings Saves configuration changes made in the print dialog. These changes
Cancel Closes the print dialog without printing and without saving
Print Sends the print job with any configuration changes you have made to
Allows you to specify what should occur following a PostScript error.
Allows you to choose between generating a job copy in the folder
specified as the Job Documentation Folder, and generating a job font
log following the completion of the print job.
Allows you to select the location of the Job Documentation Folder.
The folder selected holds a copy of the print jobs or job information of
print jobs that are configured for job documentation.
will be the default settings until the configuration items are
changed again.
configuration changes.
the settings in the printer dialog for the open document, closes the
print dialog, and restores the last saved settings of the
configuration items.
KONICA MINOLTA PPDs for Macintosh 81
Page 88

Layout Dialog
Item Description
Pages Per
Sheet
Layout
Direction
Border Allows you to select a border to surround each logical page.
Print on Both
Sides
Binding Determines the orientation of the logical pages on the physical sheet
Save Settings Saves configuration changes made in the print dialog. These changes
Cancel Closes the print dialog without printing and without saving
Print Sends the print job with any configuration changes you have made to
Allows you to set the number of logical pages per physical sheet.
Lets you identify either left-right or right-left logical page direction on
the physical sheet.
Allows you to configure the print job for duplex printing.
This setting is disabled (grayed out) if a duplex unit isn’t installed in
the configuration of the PPD. See “Customizing the Printer Description” on page 34 for additional information.
so the printed media will be oriented for binding on the short edge or
long edge of the media.
will be the default settings until the configuration items are
changed again.
configuration changes.
the settings in the printer dialog for the open document, closes the
print dialog, and restores the last saved settings of the
configuration items.
82
KONICA MINOLTA PPDs for Macintosh
Page 89

Paper Handling Dialog
Item Description
If the
Cassette is
Out of Paper
Save Settings Saves configuration changes made in the print dialog. These changes
Cancel Closes the print dialog without printing and without saving
Print Sends the print job with any configuration changes you have made to
Save as File Dialog
Allows you to configure the printer’s automatic response when the
cassette or paper bin is out of paper.
will be the default settings until the configuration items are
changed again.
configuration changes.
the settings in the printer dialog for the open document, closes the
print dialog, and restores the last saved settings of the
configuration items.
Item Description
PostScript
Level
Data Format Sends the print job data to the file in either ASCII or Binary format.
Font
Inclusion
Allows you to select from available PostScript levels.
Allows you to choose the fonts that are included with the print job as it
is saved to a file.
KONICA MINOLTA PPDs for Macintosh 83
Page 90

Item Description
Save Settings Saves configuration changes made in the print dialog. These changes
will be the default settings until the configuration items are
changed again.
Cancel Closes the print dialog without printing and without saving
configuration changes.
Print Sends the print job with any configuration changes you have made to
the settings in the printer dialog for the open document, closes the
print dialog, and restores the last saved settings of the
configuration items.
Watermark/Overlay Dialog
Item Description
None,
Overlay,
Watermark
Size Specifies the font size of the overlay or watermark.
Font Specifies the font to be used for the overlay or watermark.
Text Allows you to choose from common overlays and watermarks, or to
Text Color/
Density
Save Settings Saves configuration changes made in the print dialog. These changes
Cancel Closes the print dialog without printing and without saving
Print Sends the print job with any configuration changes you have made to
Allows you to determine if an overlay or a watermark is to be printed
on the document pages.
configure custom text that you enter in the text box provided.
Allows you to choose the overlay or watermark text color and the
density of the printed text.
will be the default settings until the configuration items are
changed again.
configuration changes.
the settings in the printer dialog for the open document, closes the
print dialog, and restores the last saved settings of the
configuration items.
84
KONICA MINOLTA PPDs for Macintosh
Page 91

Color Options Dialog
Item Description
RGB Source Allows you to select from standard or custom RGB source profiles for
ICC color matching.
CMYKSimulation
CRD Color
Space
ICCDestination
CRD Allows you to select a color rendering dictionary.
Save Settings Saves configuration changes made in the print dialog. These changes
Cancel Closes the print dialog without printing and without saving
Print Sends the print job with any configuration changes you have made to
Allows you to choose a CMYK source profile for ICC color matching.
Allow you to specify how the printer converts RGB images and graphics to CMYK images via the printer's CRDs
(color rendering dictionaries).
Selection of a destination profile determines the destination profile of
the printer.
will be the default settings until the configuration items are
changed again.
configuration changes.
the settings in the printer dialog for the open document, closes the
print dialog, and restores the last saved settings of the
configuration items.
KONICA MINOLTA PPDs for Macintosh 85
Page 92

Printer Options Dialog
Item Description
Resolution Lets you select the print resolution from the resolutions supported by
Media Type Identifies the type of media you are printing on.
Output Bin Allows you to select from available output bins on the printer.
Halftones Allows you to customize the smoothness of the printed image
your printer.
according to the number of grayscale levels used. Your choices
depend on the halftones available on your printer.
Save Settings Saves configuration changes made in the print dialog. These changes
will be the default settings until the configuration items are
changed again.
Cancel Closes the print dialog without printing and without saving
configuration changes.
Print Sends the print job with any configuration changes you have made to
the settings in the printer dialog for the open document, closes the
print dialog, and restores the last saved settings of the
configuration items.
86
KONICA MINOLTA PPDs for Macintosh
Page 93

UNIX Setup
Page 94

UNIX Quick Setup
Interface
1 Enter the Printers IP address in the Administration/Communications/xxxxxxxx NIC/CrownNet/
TCPIP/InternetAddress (where xxxxxxxx is either Resident or Optional) printer menu.
2 If necessary, enter the default router address in the Administration/Communications/xxxxxxxx
NIC/CrownNet/TCPIP/DefaultRouter printer menu.
3 If necessary, enter the default subnet mask in the Administration/Communications/xxxxxxxx
NIC/CrownNet/TCPIP/SubnetMask printer menu.
Network/Workstation
1 Add the printer to the workstation/network HOSTS file.
2 Install the UNIX Host Software (from the Software Utilities CD-ROM) from either the TAR or
CPIO format in the /platform/UNIX/host_sw directory.
UNIX Detailed Setup
TCP/IP Interface Configuration
If you use DHCP to configure TCP/IP, you must enable DHCP/WINS on the printer configuration
menu.
You can configure your print system by several different methods. This section briefly describes the
configuration procedure for the printer interface. Refer to your printer documentation for detailed
instructions. You can make these configuration changes through any of the following means:
Printer Control Panel
PageScope
Remote Console through a telnet session
CrownView
1 If necessary, in the Administration/Communications/xxxxxxxx NIC/CrownNet/TCPIP/Internet
Address menu (where xxxxxxxx is either Resident or Optional), enter the printer’s
Internet address.
The default Internet address is 161.033.128.024.
2 If necessary, in the Administration/Communications/xxxxxxxx NIC/CrownNet/TCPIP/Default
Router menu (where xxxxxxxx is either Resident or Optional), enter the Internet address of the
default router.
The default router address is 000.000.000.000.
3 If necessary, in the Administration/Communications/xxxxxxxx NIC/CrownNet/TCPIP/Subnet
Mask menu (where xxxxxxxx is either Resident or Optional), enter the printer’s subnet mask.
The default subnet mask is 000.000.000.000. This setting provides automatic sensing of gateways. If you identify a subnet mask, automatic sensing is disabled.
TCP/IP NetWork Configuration
1 Log on the UNIX system as administrator.
88
UNIX Quick Setup
Page 95

2 Edit the system host table by adding the following line to the hosts file:
internetaddress hostname
where internetaddress is the Internet address of the printer (Administration/Communications/
xxxxxxxx NIC/CrownNet/TCPIP/Internet Address menu [where xxxxxxxx is either Resident or
Optional]) and hostname is the name of the printer.
3 Send the hardware address to the print server by typing:
arp -s hostname hardwareaddress temp↵
ping hostname↵
where hostname is the name of the host and hardwareaddress is the new
hardware address of the printer (in the form ##.##.##.## as found on the
printer startup page).
Installing the UNIX Host Software
Insert the Software Utilities CD-ROM in your CD-ROM drive.
1
Some drives require that the disk be placed in a caddy before being inserted in the drive. Check
your CD-ROM drive documentation for information. Also, it takes a few seconds for the
automounter to detect the CD.
2 Log on the UNIX system as root.
3 Type the following command to go to the root directory:
cd /↵
4 If you’re using a Solaris system, skip to step 6.
If you’re using a SunOS system and already have a directory on the system named cdrom, skip to
step 5.
If you’re using a SunOS system and don't have a directory on the system named cdrom, type the
following command to make one:
mkdir /cdrom↵
5 Mount the CD-ROM file system:
mount -r -t hsfs device_filename /cdrom↵
For device_filename substitute the complete pathname of the device associated with the CDROM drive. On SunOS systems, device_filename is usually /dev/sr0. If it isn't, check your SunOS
system documentation.
6 Verify that the CD-ROM file system has been mounted by listing the contents of the directory:
The directory contains several subdirectories, including UNIX.
7 Change to the directory in which you want the UNIX Host Software to be installed.
8 Extract the files from the CD-ROM. For example:
tar xvf /cdrom/platform/unix/host_sw/hs_tar↵
The utilities are installed in a directory named KONICA MINOLTAoft in the current directory.
See the readme file on the CD-ROM for the exact location of this file.
9 Unmount the CD-ROM file system:
umount device_filename↵
Installing the UNIX Host Software 89
Page 96

For device_filename, substitute the complete pathname of the device file associated with the
CD-ROM drive.
10 Change to the newly created KONICA MINOLTAoft directory:
cd KONICA MINOLTAoft↵
11 Run the Qinstall installation utility:
./Qinstall↵
12 Follow the instructions on the screen. When the installation is complete, the following
message displays:
KONICA MINOLTA UNIX Host Software installation complete
13 Copy the addprt and qpr utilities and their associated manual pages to standard directories.
For example,
cp addprt /usr/bin↵
cp qpr /usr/bin↵
cp man/addprt.1 /usr/man/man1↵
cp man/qpr.1 /usr/man/man1↵
14 Update the printer's Internet name and address in the hosts file.
15 Run the KONICA MINOLTA addprt utility by typing:
addprt↵
16 Follow the instructions on the screen.
90
Installing the UNIX Host Software
Page 97

OS/2 LAN Manager Setup
Page 98

Quick Setup
Interface
Enter a unique name for the printer in the Administration/Communications/xxxxxxxx NIC/CrownNet/
LANManager/Printer Name (where xxxxxxxx is either Resident or Optional) printer menu.
Network/Workstation
Install the OS/2 LANManager driver.
Detailed Setup
OS/2 LAN Manager/LAN Server Network Interface Configuration
The OS/2 driver can be downloaded from the KONICA MINOLTA website or the IBM website.
1 One unique printer name is broadcast to the network. Use the Administration/Communications/
xxxxxxxx NIC/CrownNet/LAN Manager/Printer Name menu (where xxxxxxxx is either Resident
or Optional) to enter the name of the printer.
The name can be up to 16 characters long. Spaces and lowercase characters are not allowed.
Underscore characters (_) are allowed to simulate multi-word names (for example,
PRODUCT_MKTG).
2 If you’re using OS/2 LAN Manager/LAN Server,
a With the CrownNet Manager for OS/2 installed and running, add the printer by clicking the
Install entry on the action bar.
The printer appears in the list displayed on the screen
(for example, KONICA MINOLTA_080086000001).
b Use the appropriate following section to create a print queue and assign it to the printer.
OS/2 Version 1.x Network Configuration
1 If you’re using OS/2 version 2.x, skip to “OS/2 Version 2.x and OS/2 Warp NetWork Configura-
tion” on page 93.
This is the standard method of adding a printer in OS/2 version 1.x. The procedure is repeated
here for your convenience.
Add a Printer
1 With the Print Manager open, from the Setup menu choose Printers...
2 In the Printers dialog, choose Add...
If you’re working with an existing printer, select the printer name and choose Change.
The Add Printer (or Change Printer) dialog appears.
92
3 In the Name field, type the printer name (only if you are adding a printer).
The printer name is local to the workstation and is used to associate queues with physical printers. It can be the same as the name used at the printer.
Quick Setup
Page 99

4 In the Device box, select the printer’s pipe name.
Pipe names have the form \PIPE\KONICA MINOLTA_name where name is the printer’s default
hardware address or the printer name.
5 Select IBMNULL as the printer driver.
6 If appropriate, fill in the Description and Printer Timeout Transmission Retry boxes.
7 Choose Add... to return to the Printers dialog.
If you’re working with an existing printer, choose Change.
8 In the Printers dialog, choose OK to return to the Print Manager.
Add a Print Queue
1 With the Print Manager still open, from the Setup menu choose Queues...
2 In the Queues dialog, choose Add...
If you’re working with an existing queue, select the queue to be changed and then
choose Change.
The Add Queue (or Change Queue) dialog appears.
3 In the Name field type a name for the queue (only if adding a queue).
This is the name available to workstations on the network. It can be the same as the name set for
the printer.
4 If appropriate, fill in the Description, Queue Driver, Priority, and Scheduling boxes.
5 Select the printer name you identified in the previous section from the list of Printers.
This name will be displayed in the box titled Select the Printer to be Used by This Queue.
6 Choose Add... to return to the Queue dialog.
If you’re working with an existing queue, choose Change.
7 In the Queue dialog choose OK to return to the Print Manager window.
8 See “Print Queue Sharing” on page 94.
OS/2 Version 2.x and OS/2 Warp NetWork Configuration
This is the standard method of installing a printer in OS/2 version 2.x and OS/2 Warp.
1 With OS/2 running, double-click the Templates folder.
2 Hold down the right mouse button and drag the Network Printer icon out to the Workplace Shell
(or into a folder).
3 Type a name in the Printer Name field.
4 Select a printer driver from the Default Printer Driver list.
5 Select a pipe name from the Output Port list.
Pipe names have the form \PIPE\KONICA MINOLTA_name where name is the printer’s default
hardware address or the printer name.
6 Choose Create to confirm the new printer definition.
7 See the following section, “Print Queue Sharing.”
Detailed Setup 93
Page 100

Print Queue Sharing
To access a print queue from other workstations or servers on the network, the queue must be a shared
resource. The following procedure is only one of the ways a queue can be shared. For other methods,
see your OS/2 LAN Manager/LAN Server documentation.
You need administrator privileges to perform this operation.
1 If necessary, with OS/2 running, open an OS/2 window.
2 Typ e
net share queue_name /print↵
where queue_name is the queue or printer object you created above.
While queue and printer names may differ in OS/2 version 1.x, they are the same in version 2.x.
94
Detailed Setup
 Loading...