

Konica Minolta IP-011 User Manual

USER’S GUIDE
IP-011
Before printing read this guide.

Thank you very much for your purchase of the IP-011.
This Guide deals with making prints, correct handling of the machine, and precaution for safety.
Please read before printing.
In order to maintain a satisfactory printing performance, please keep this Guide readily available
for reference.

Introduction
Make sure to read before use
Thank you very much for purchasing the "Konica Printer Controller IP-011."
Konica Corp. ("Konica") allo ws y ou to use the software attached to the IP-011 only when y ou agree to its
"Software License Agreement." If you do not agree to terms of this agreement, return the software to the
distributor from which you purchased it prior to use.
Software License Agreement
Carefully read all terms and conditions of the agreement which will be shown during the software installation.
Printed in Japan KONICA CORPORATION
IP-011 Printer Controller i

Introduction
■ Contents
■ Contents..............................................................................................................................ii
■ Introduction .........................................................................................................................v
■ About Supplied Items..........................................................................................................v
■ About Positioning of This Manual.......................................................................................vi
■ About Composition of This Manual ....................................................................................vi
■ System Requirements....................................................................................................... vii
● Windows.................................................................................................................................. vii
■ Rules in This Manual........................................................................................................ viii
Chapter 1 Outline........................................................................................... 1-1
■ Contents of This Chapter ................................................................................................. 1-2
■ Outline of the Printer Controller ....................................................................................... 1-3
● IP-011 and Printer Engine .................................................................................................... 1-3
● IP-011 Hardware Configuration ............................................................................................ 1-4
● I/O Interface .......................................................................................................................... 1-4
● Data Flow.............................................................................................................................. 1-5
● How to Use Memory ............................................................................................................. 1-6
● General View......................................................................................................................... 1-7
■ About the Printer Tools..................................................................................................... 1-8
● About the Printer Tools.......................................................................................................... 1-8
● About the Status Monitor ...................................................................................................... 1-8
● About the Control Panel........................................................................................................ 1-8
■ About the Printer Driver ................................................................................................... 1-9
● Compliant OS........................................................................................................................ 1-9
Chapter 2 Setup .............................................................................................2-1
■ Contents of This Chapter ................................................................................................. 2-2
■ Installation of the Printer Driver........................................................................................ 2-3
● Before Installation ................................................................................................................. 2-3
● Files to be Installed............................................................................................................... 2-3
● Installation to Windows95/98 ................................................................................................ 2-4
● Installation to WindowsNT4.0................................................................................................ 2-7
● Uninstallation of the Printer Driver ...................................................................................... 2-10
■ T est Print ........................................................................................................................ 2-11
■ Print from Applications ................................................................................................... 2-12
● Execution of Printing ........................................................................................................... 2-12
● Print Settings ...................................................................................................................... 2-12
Chapter 3 Printer Driver ................................................................................3-1
■ Contents of This Chapter ................................................................................................ 3-2
■ Working Environment ...................................................................................................... 3-3
● Compliant OS........................................................................................................................ 3-3
■ Property of Printer Driver ................................................................................................ 3-3
ii IP-011 Printer Controller

Introduction
■ Printer Driver Function List .............................................................................................. 3-5
■ Description of Printer Driver Functions (in the alphabetic order) ..................................... 3-8
● Alphabetic Order ................................................................................................................... 3-8
Driver Function Combination List...................................................................................... 3-.23
Chapter 4 Operation Panel Setup................................................................ 4-1
■ Contents of This Chapter ................................................................................................. 4-2
■ About the LCD Panel ....................................................................................................... 4-3
● The LCD Panel of the Copier ................................................................................................ 4-3
● How to Enter Settings on the LCD Panel.............................................................................. 4-4
● Printer Mode Basic Screen ................................................................................................... 4-5
● Printer Menu Screen ............................................................................................................. 4-5
● Printer Setting screen ........................................................................................................... 4-6
● Procedures of the Printer Setting.......................................................................................... 4-7
■ Configuration of Printer Setting Menu.............................................................................. 4-9
■ Functions of the Printer Setting...................................................................................... 4-11
● Network Setup .................................................................................................................... 4-11
● Select Language ................................................................................................................. 4-11
● Print Quality ........................................................................................................................ 4-12
● I/O Timeout ......................................................................................................................... 4-12
● T est Print ............................................................................................................................. 4-13
● CMD Error Page ................................................................................................................. 4-13
● Error Page........................................................................................................................... 4-13
● Factory Default.................................................................................................................... 4-14
● Help..................................................................................................................................... 4-14
Chapter 5 Status Monitor and Control Panel ............................................. 5-1
■ Contents of This Chapter ................................................................................................. 5-2
■ Status Monitor and Control Panel .................................................................................... 5-3
● About the Status Monitor ...................................................................................................... 5-3
● About the Control Panel........................................................................................................ 5-3
■ Working Environment ....................................................................................................... 5-4
● Compliant OS........................................................................................................................ 5-4
● Interface ................................................................................................................................ 5-4
■ How to Install.................................................................................................................... 5-4
■ How to Operate the Status Monitor................................................................................. 5-5
● Starting the Status Monitor ................................................................................................... 5-5
● Finishing the Status Monitor ................................................................................................. 5-5
● Restarting the Status Monitor ............................................................................................... 5-5
● Show/Hide the Status Monitor .............................................................................................. 5-6
● Display Change..................................................................................................................... 5-7
● How to Operate the Control Panel ....................................................................................... 5-8
● Starting the Control Panel..................................................................................................... 5-8
● Finishing the Control Panel................................................................................................... 5-8
● Buttons of the Control Panel ................................................................................................. 5-9
● Settings of Paper ................................................................................................................ 5-10
● Printer Setting ..................................................................................................................... 5-11
● T est Print ............................................................................................................................. 5-12
● Confirmation of Configurations ........................................................................................... 5-12
IP-011 Printer Controller iii

Introduction
Appendix A Troubleshooting .................................................... Appendix A-1
■ Error Message ................................................................................................. Appendix A-2
■ Basic Troubleshooting ......................................................................................Appendix A-3
■ General Problems of Printing........................................................................... Appendix A-3
● The “OHT Film” is not selectable. ......................................................................... Appendix A-3
● The Printer Controller does not respond to the “Print” command. ........................ Appendix A-3
● A message to demand a paper size which you do not use is displayed. .............. Appendix A-4
● You can not print the test print............................................................................... Appendix A-4
● The print setting of a job does not correspond to the result of printing................. Appendix A-5
● The “Duplex” option is not displayed. .................................................................... Appendix A-5
● Memory Error / Memory Overflow / Overrun.........................................................Appendix A-5
Appendix B Product Specifications......................................... Appendix B-1
■ Product Specifications ..................................................................................... Appendix B-2
Index .......................................................................................................Index -2
iv IP-011 Printer Controller

■ Introduction
The IP-011 Printer Controller works as an interface between the Konica 7020 series Copier and a workstation,
and enables direct printing from a workstation environment.
The printer engine on the printer side and the optional network board include operating manuals (7020 series
operating manual/KN-304 operating manual (CD)) respectively.
For the detailed operations of Windows95/98 and Windows NT, refer to operating manuals of each operating
system. For operations of applications, refer to operating manuals which are attached to each application.
FCC Regulations
This equipment has been tested and found to comply with limits for a Class B digital device,
pursuant to part 15 of FCC rules. These limits are designed to provide reasonable protection
against harmful interference in a residential installation. This equipment generates, uses and can
radiate radio frequency energy and, if not installed and used in accordance with the instructions,
may cause harmful interference to radio communications. However, there is no guarantee that
interference will not occur in a particular installation. If this equipment does cause harmful
interference to radio or television reception, which can be determined by turning the equipment off
and on, the user is encouraged to try to correct the interference by one or more of the following
measures:
Introduction
• Reorient or relocate the receiving antenna.
• Increase the separation between the equipment and the receiver.
• Connect the equipment to an outlet on a circuit different from the circuit to which thereceiver is connected.
• Consult the dealer or an experienced radio/TV technician for help.
Canadian Department of Communications Regulations
Cet appareil numérique de la classe B est conforme à la norme NMB-003 du Canada.
This Class B digital apparatus complies with Canadian ICES-003.
About Registered Trademarks
Microsoft, MS and MS-DOS are registered trademarks of Microsoft Corporation in the United
States.
IBM is a registered trademark of International Business Machine, Inc. in the United States.
Window
Destiny
LaserAct
DPOS
WinStyler
WinPane
Other company names and product names written in this manual are the registered trademarks or
trademarks of their respective companies.
TM
is a trademark of Microsoft Corporation.
®
is a registered trademark of Destiny Technology Corporation.
®
is a registered trademark of Destiny Technology Corporation.
®
is a registered trademark of Destiny Technology Corporation.
®
-Nozomi™ is a registered trademark of Destiny Technology Corporation.
®
is a registered trademark of Destiny Technology Corporation.
Copyright
LaserAct® 6 CopyrightC1992-1999,Destiny Technology Corp.Ver.2.0.All Rights Reserved.
WinStyler®-Nozomi
WinPanel®CopyrightC1995-1999,Destiny Technology Corp.Ver.1.0.All Rights Reserved.
TM
CopyrightC1995-1999,Destiny Technology Corp.Ver.2.0.All Rights Reserved.
IP-011 Printer Controller v

Introduction
●A part or all of this operating manual shall not be used or copied without permission.
●Konica shall have no liability for any influences caused by using the 7020 series copier +IP-011 system and this
manual.
●Information written in this operating manual is subject to change without notice.
●Konica Corp. shall have the copyright of this printer driver.
●This printer driver shall not be copied except for the purpose of backup.
●A part or all of this operating manual shall not be used or copied without permission.
●Konica shall have no liability for any influences caused by using this printer driver and the operating manual.
■ About Supplied Items
The following items are supplied to the IP-011 Printer Controller:
• User Software CD ( Including USER’S GUIDE (this manual))
• Release Note (The latest information and limits of the system and the user software are written.)
vi IP-011 Printer Controller

■ About Positioning of This Manual
This manual describes how to operate the Printer Controller Konica IP-011 when the Konica 7020 series copier is
used as a printer by connecting it to computers or your network.
An optional network board (KN-304) is required so as to use the Konica 7020 series copier as a
printer by connecting it to your network.
Refer to the "7020 series operating manual" and the "KN-304 operating manual" which are
attached to the Printer Engine (7020 series) on the printer side and the optional Network Board
(KN-304) respectively for their operations.
■ About Composition of This Manual
This manual is composed of the following five chapters and Appendix:
Chapter 1: Outline
Chapter 1 describes the Printer Controller' hardware and the outline of its functions, and briefly
explains how to connect the parallel ports of computers to the Printer Controller and the Printer
(7020 series).
Introduction
Chapter 2: Setup
Chapter 2 describes how to install the user software which is supplied in the user software CD to
the Windows*-compliant computers. Installing the user software enables printing from each
application of the Windows*-compliant computers to the Printer (7020 series) by way of a network/
parallel port.
Chapter 3: Printer Driver
Chapter 3 describes the corresponding environment and various functions of the Printer Driver
installed to the Windows*-compliant computers.
Chapter 4: Operation Panel Setup
Chapter 4 describes the layout of the operation panel of the Printer (7020 series) and how to
operate and set functions on the operation panel.
Chapter 5: Status Monitor/Control Panel
Chapter 5 describes the layout of the status monitor and the control panel shown on the Windows*compliant computers and how to operate and set functions on the status monitor or the control
panel.
Appendix
Appendix describes error messages and trouble-shootings inherent in the Printer Controller and
product specifications and functions.
IP-011 Printer Controller vii

Introduction
■ System Requirements
● Windows
The following are required to print from the Windows*-compliant computers to the Printer Controller.
• Computers on which Windows 95/98, WindowsNT 4.0 can run
• CD-ROM drive (necessary to install the user software)
In case of using Windows 95/98
• Microsoft Windows 95/98
• 32MB RAM or more
In case of using Windows NT 4.0
• Microsoft Windows NT 4.0 and NT Service Pack 3
• 32MB RAM or more
Parallel Port
The following are required to print to the Printer Controller by way of the parallel port.
• Windows-compliant computers
• Minimum RAM capacity suitable for computers (Refer to the section of each operation system
described above.)
• IEEE 1284 parallel cable
One end of the cable is required to have an amphenol 36 pin male connector (connected to the
Printer Controller).
viii IP-011 Printer Controller
■ Rules in This Manual
• Notation of a name of each section in this manual
It is written within [ ] (round brackets). (e.g. [Chapter 1: Outline ])
• Notation of names shown on the screen
They are written within [ ](braces). (e.g. Click the [OK] button.)
• Notation of cautions
In this manual, important items to be paid attention to are written with marks.
Each mark used in this manual has the following meaning.
Precautions and limits at the time of operating hardware or software are written.
Introduction
Hints, advice, confirming items, etc. at the time of operating hardware or software are written.
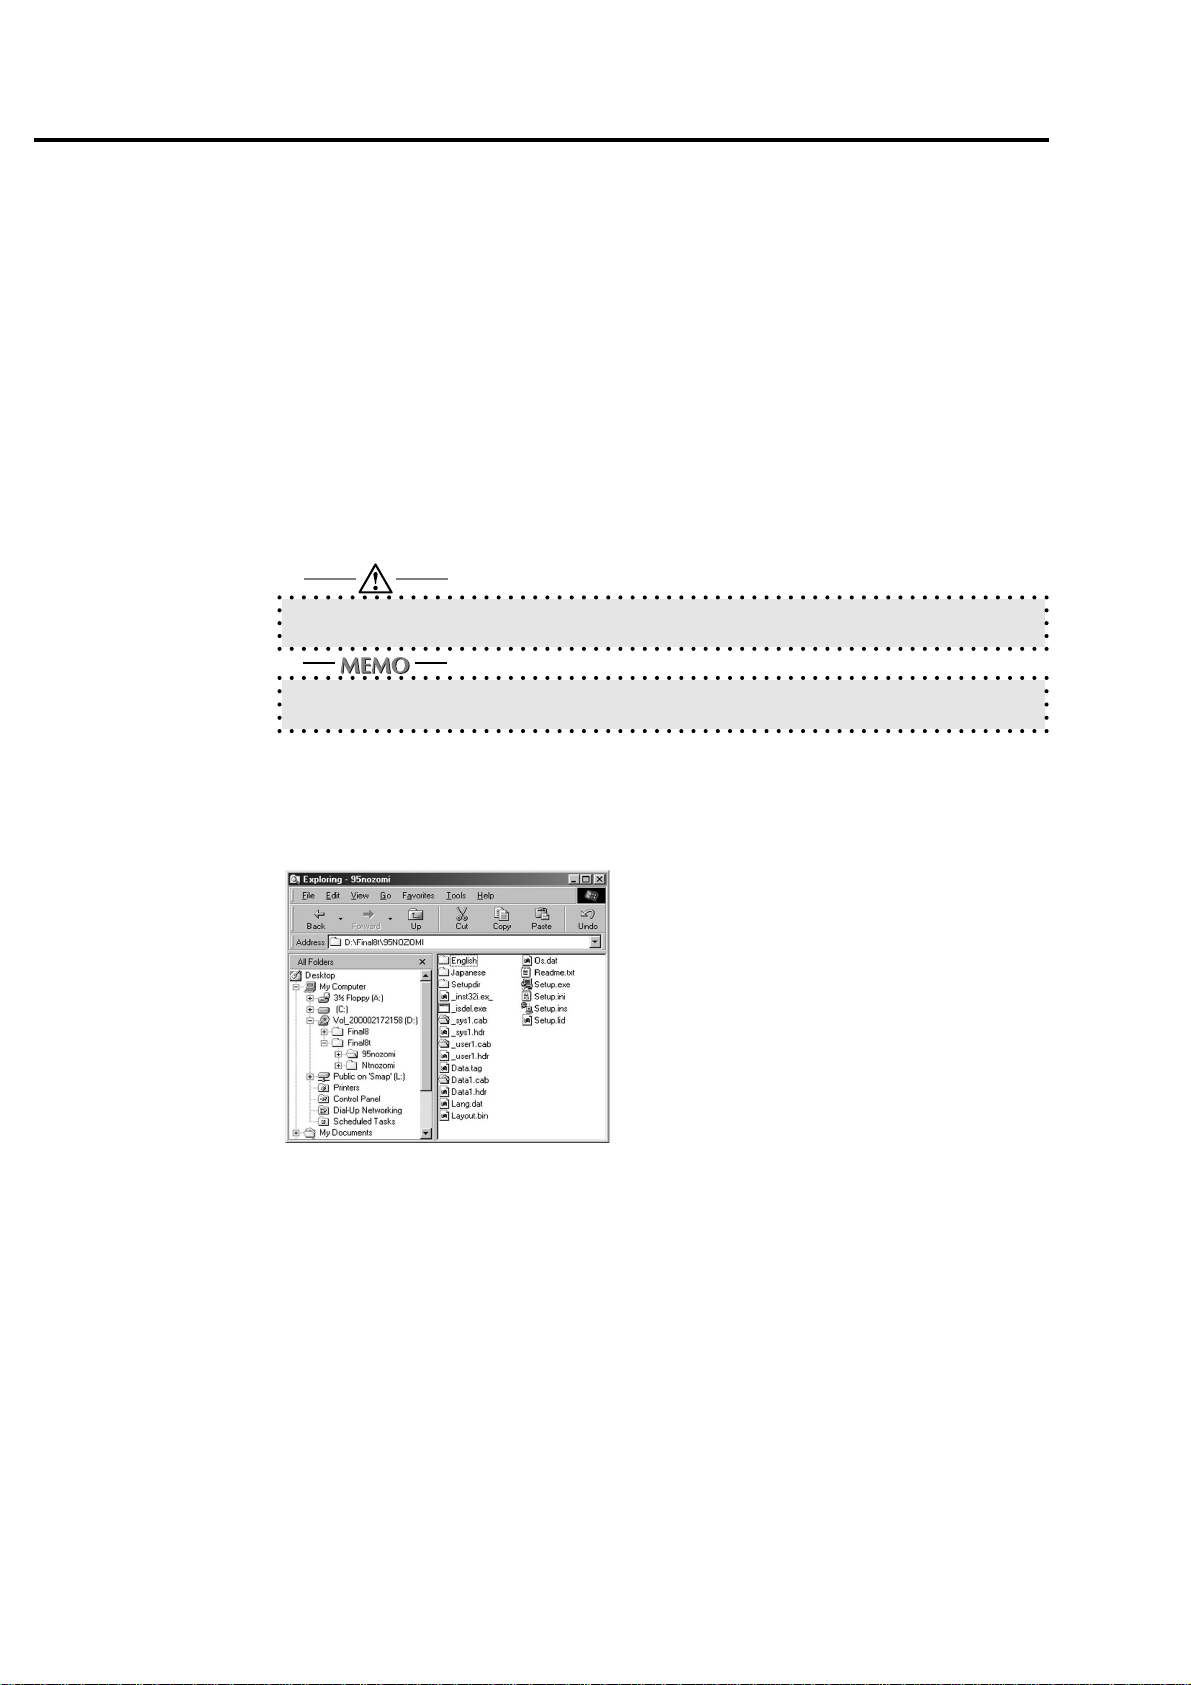
• Notation of sub-folders
Sub-folders are written as “\route level folder\sub folder 1\sub folder 2.”
For example, at the time of double-clicking the [Setup.exe] icon in the [WIN_95] folder in the [PS_DRVR] folder
in the [INTALRS] folder of the User Software CD, it is written as
e.g. Double-click the [Setup.exe] icon in the “\INTALRS\PS_DRVR/WIN_95 ” folder of the User Software CD.
IP-011 Printer Controller ix

Chapter 1 Outline
Chapter 1 Outline
■ Contents of This Chapter............................................................1-2
■ Outline of the Printer Controller .................................................. 1-3
● IP-011 and Printer Engine ........................................................................... 1-3
● IP-011 Hardware Configuration ................................................................... 1-4
● I/O Interface................................................................................................. 1-4
● Data Flow .................................................................................................... 1-5
● How to Use Memory .................................................................................... 1-6
● General View ............................................................................................... 1-7
■ About the Printer Tools................................................................ 1-8
● About the Printer Tools ................................................................................ 1-8
● About the Status Monitor ............................................................................. 1-8
● About the Control Panel............................................................................... 1-8
■ About the Printer Driver .............................................................. 1-9
● Compliant OS .............................................................................................. 1-9
IP-011 Printer Controller 1-1

Chapter 1 Outline
■ Contents of This Chapter
This chapter describes the outline of the Konica IP-011 Printer Controller. For the Copier, Konica 7020 series to
which the Konica IP-011 Printer Controller is attached, refer to the operating manual of the Copier.
1-2 IP-011 Printer Controller

■ Outline of the Printer Controller
● IP-011 and Printer Engine
The Konica IP-011 is the Printer Controller (IP-011) which is used to connect the Copier, Konica
7020 series (Konica 7020 series) to computers or a network and to use the Konica 7020 series as
a printer from applications on Windows 95/98 or Windows NT (In order to connect to a network, the
optional Konica KN-304 network board is required.).
When the command for printing is executed from applications on Windows 95/98 or Windows NT,
print data is sent to the IP-011 by way of a parallel cable (IEEE 1284) or a network. Then, the IP011 rasterizes the print data to image data, which is sent to the Konica 7020 series Printer Engine
by way of the PCI bus.
The IP-011 can receive the command for printing from applications even while the Printer Engine is
printing the previous print jobs or receiving data.
The 7020+IP-011 system can continuously print A4-size paper at the print speed of 20 ppm. In
addition, this system supports the duplex function and the finisher function which enables using
four paper trays, alternate printing and stapling.
Conceptual Connection
Chapter 1 Outline
In case of using as a networked printer
E-RDH (Electronic Recirculating Document Hander)
The E-RDH is a system which temporarily saves print data in the memory of the Konica 7020
series to perform printing in accordance with the selected option. In order to print from the IP-011,
the E-RDH of the 7020 series is used. The E-RDH memory of the Konica 7020 is 32 MB (standard)
and can be extended to 288 MB at the maximum.
In the IP-011, the E-RDH is used in the 1 bit mode. Data of approximately 180 pages of A4-size
paper can be saved in the 32 MB (standard) E-RDH memory.
Copy Mode and Printer Mode
The operation panel of the Konica 7020 series can be used either in the cop y mode or the printer mode.
Even while the Konica 7020 series is printing or copying, the IP-011 can receive the next job, and
while the IP-011 is receiving a print job, you can execute copying.
*The Konica KN-304 is required.
In case of using as a local printer
IP-011 Printer Controller 1-3

Chapter 1 Outline
● IP-011 Hardware Configuration
Basic Configuration
Configuration of the IP-011 is as follows:
Control board
CPU: Power PC 401 GF
Program memory: FLASH ROM
System memory: 16MB SD-RAM
Memory
The IP-011 is equipped with 16 MB memory as standard and can be expanded to 80 MB at the
maximum.
● I/O Interface
Parallel
Centronics (IEEE1284)/ amphenol 36 pin male connector
PCI Bus
Card Edge Type/20MHz/32bit
Ethernet (option)
100Base-T and 10Base-T
The optional KN-304 card is used to connect to the Ethernet. The KN-304 is the internal print
server card which supports multiple protocols on the Ethernet. This card includes a CPU and a
flash memory with an upgradable program.
The KN-304 supports the following network protocol.
• IPX/SPX (NetWare)
• LPD/LPR (TCP/IP)
• Peer to peer (TCP/IP)
Refer to the corresponding operating manual for connection to the KN-304.
1-4 IP-011 Printer Controller
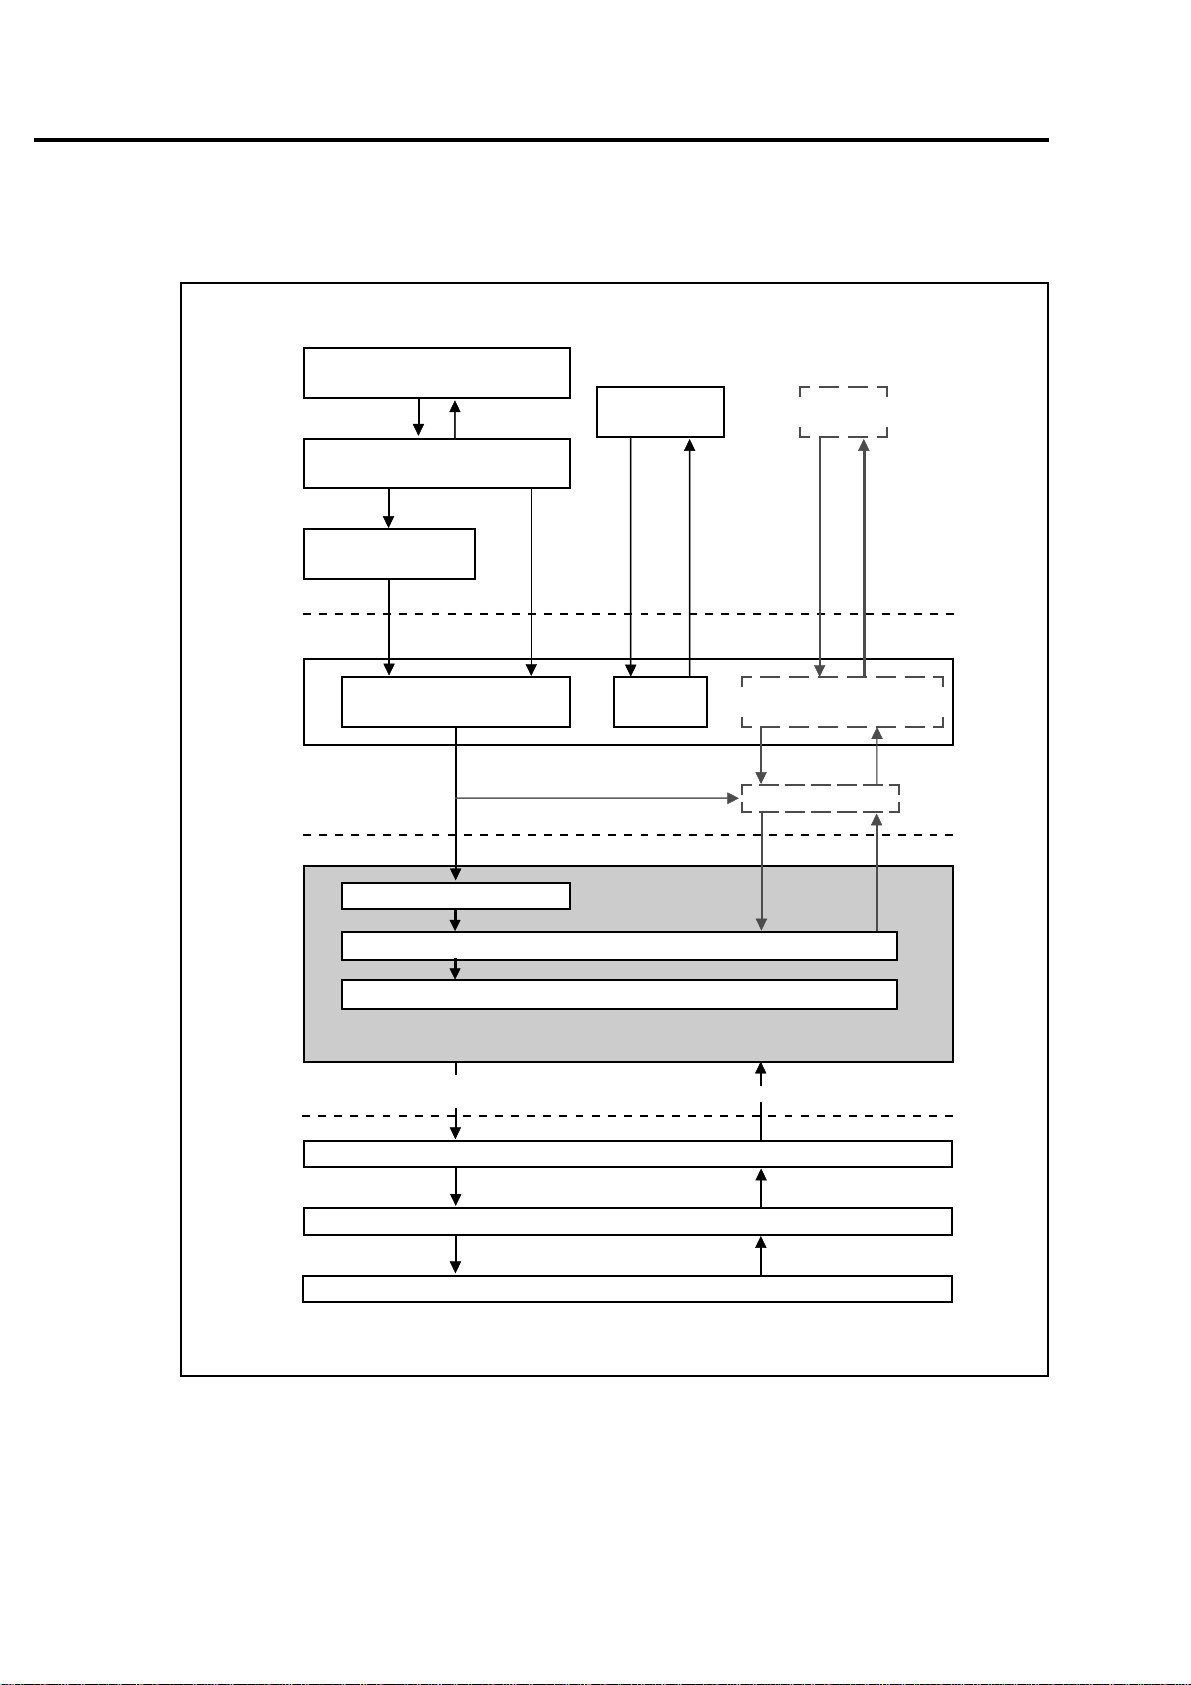
● Data Flow
Computer
Chapter 1 Outline
Spooler
Interface
Network (TCP/IP,IPX/SPX)
Printer Controller
Application
Printer Driver
IEEE1284
IEEE1284
Printer T ools
Status Monitor
Control Panel
IEEE1284
Intermediate Language Interpreter
Browser
HTML
Network
(TCP/IP,IPX/SPX)
NIC
Printer Engine
Command for Printing
Image Data
Memory
IP-011
Engine Status
PCI Bus
E-RDH Memory
Engine
IP-011 Printer Controller 1-5

Chapter 1 Outline
● How to Use Memory
Most of memory of the IP-011 is used for rasterizing images and a part of it is used for the system operation. In
addition, E-RDH memory of the Konica 7020 series is used for print processing.
The basic memory settings of the IP-011 is 16MB, which allows 1 bit mode (600 dpi) printing for all sizes of paper.
The memory of the IP-011 can be expanded to 80MB at the maximum. In addition, the E-RDH memory of the
Konica 7020 can be expanded to 288MB at the maximum.
The more memory the IP-011 has, the more pages are rasterized during waiting the printing of the previous job.
When the A4-size paper is used, approximately 4,345 KB memory is used to print 1 bit data in 600dpi.
Memory Upgrading
In order to obtain the optimum printer performance, memory expansion is recommended.
Contact service providers for details.
1-6 IP-011 Printer Controller

● General View
The IP-011 is mounted to the Konica 7020 series. The following is the general view.
IP-011
Chapter 1 Outline
Parallel Port
Konica 7020
The IP-011 is attached to the
back side of the Konica 7020
series.
IP-011 Printer Controller 1-7
Chapter 1 Outline
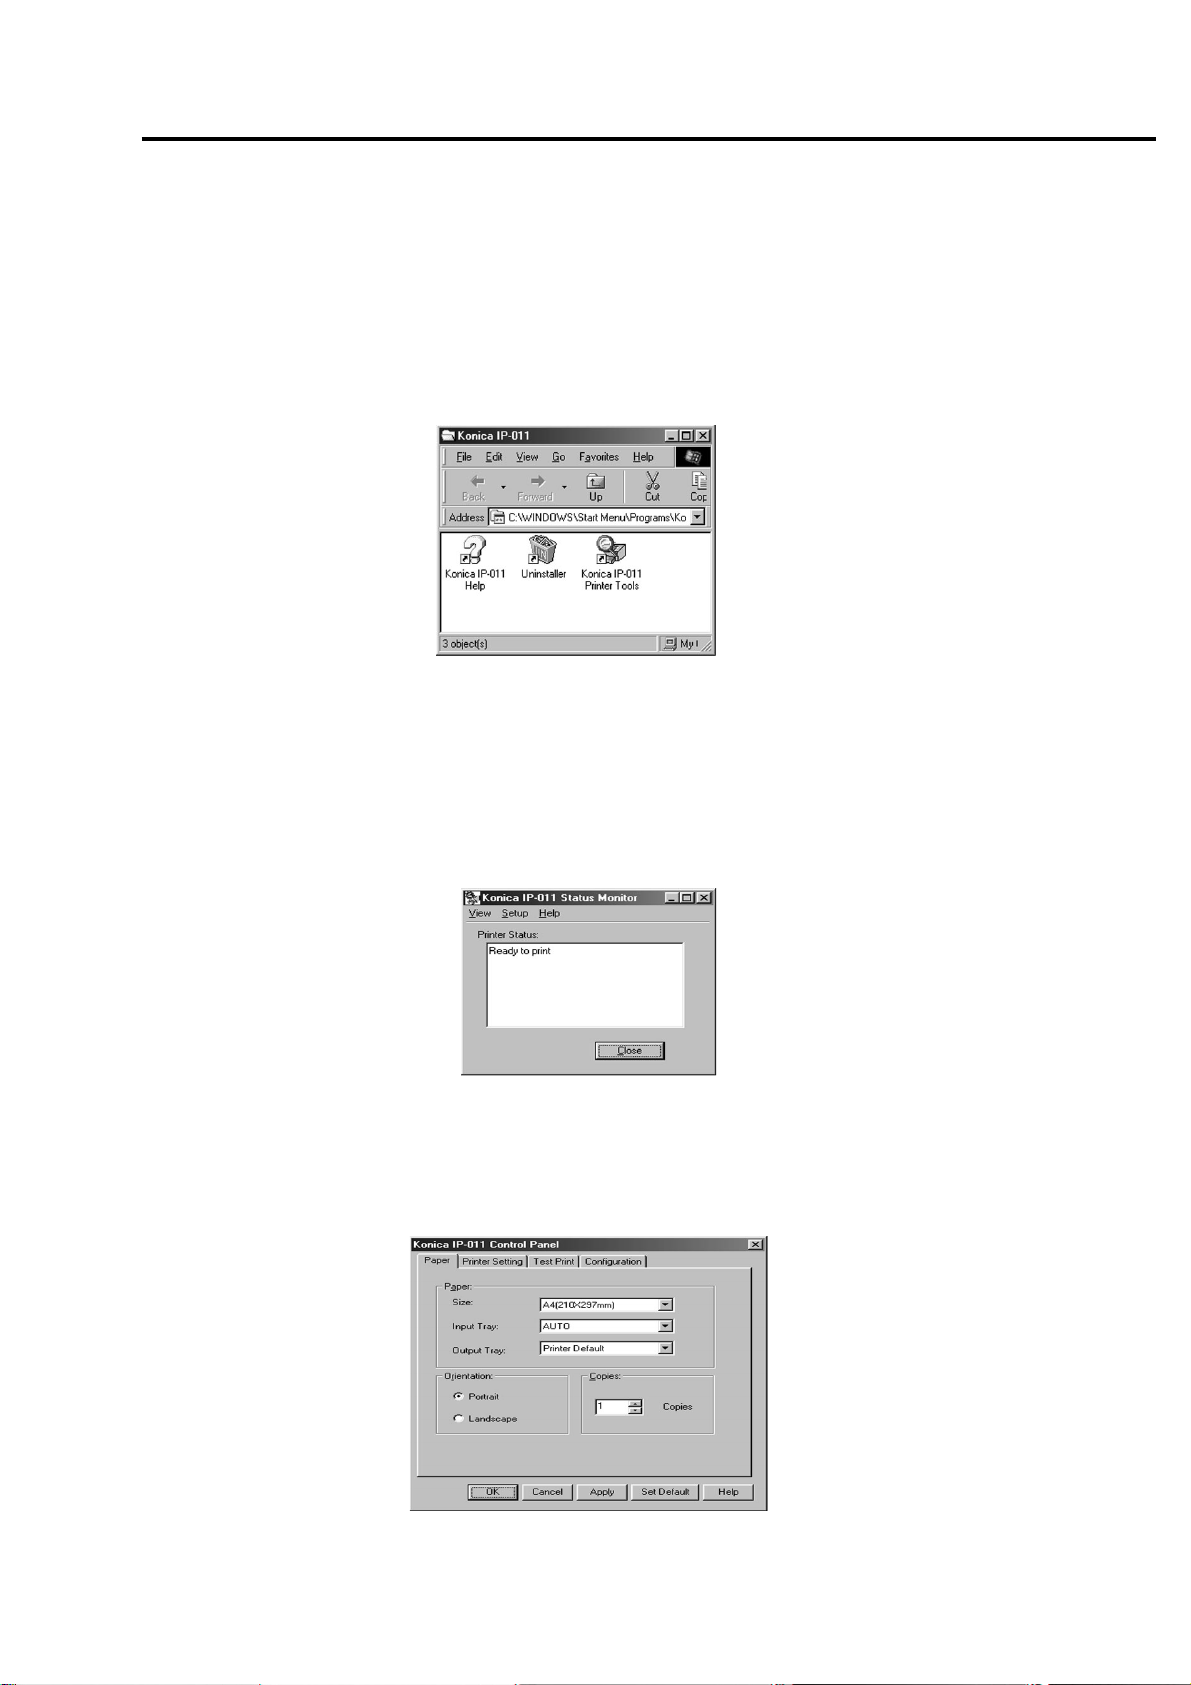
■ About the Printer Tools
● About the Printer Tools
When you install printer driver with “setup.exe” held in the CD-ROM to the computer connected to the system of
Konica 7020 series and IP-011, you can select simultaneous installation of the Printer Tools. The Printer Tools is
the generic name of two programs, “Status Monitor” and “Control Panel.” The Printer Tools enable you to monitor
the printer status from computers and to perform printer settings. Ref er to “5 Status Monitor and Control Panel”
(5-1 page) for details of the Printer Tools.
● About the Status Monitor
If you set the Status Monitor to automatically start up at the time of installing the Printer Tools, when computers
connected to the 7020 series + IP-011 system are started up, the Status Monitor which is a program to monitor
the printer status automatically starts up. Refer to “2 Setup” (2-1 page) for installation of the printer driver. Refer to
“5 Status Monitor and Control Panel ” (5-1 page) for details of the Status Monitor.
● About the Control Panel
When [Printer Setting] on the [setup] menu of the Status Monitor is selected by clicking it, the Control Panel which
is a program to perform printer settings starts up. Refer to “5 Status Monitor and Control Panel” (5-1 page) for
details of Control Panel.
1-8 IP-011 Printer Controller

■ About the Printer Driver
● Compliant OS
The printer driver can be used on the following OS.
Windows 95
Windows 98
Windows NT 4.0
Windows 2000 (to be supported)
Refer to “2 Setup” (2-1 page) for how to install the printer driver.
Refer to “3 Printer Driver” (3-1 page) for detailed functions of the printer driver.
Chapter 1 Outline
IP-011 Printer Controller 1-9

Chapter 2 Setup
■ Contents of This Chapter............................................................2-2
■ Installation of the Printer Driver...................................................2-3
● Before Installation........................................................................................ 2-3
● Files to be Installed...................................................................................... 2-3
● Installation to Windows95/98....................................................................... 2-4
● Installation to WindowsNT4.0 ...................................................................... 2-7
● Uninstallation of the Printer Driver............................................................. 2-10
■ Test Print ...................................................................................2-11
■ Print from Applications..............................................................2-12
● Execution of Printing.................................................................................. 2-12
● Print Settings ............................................................................................. 2-12
IP-011 IP-011 Printer Controller 2-1

Chapter 2 Setup
■ Contents of This Chapter
In order to use the 7020 series +IP-011 system, it is required to connect the 7020 series +IP-011 system to
computers by way of the parallel port and to install the printer driver to the computers. This chapter describes how
to install the printer driver and how to print from applications.
Refer to “Chapter 1 Outline” (1-7 page) for the detailed method of connecting to the parallel port.
Refer to “Chapter 3 Printer Driver” (3-1 page) for functions of the printer driver.
2-2 IP-011 Printer Controller

■ Installation of the Printer Driver
● Before Installation
Models and Environment of Computers
The Printer Controller for Konica 7020 series, IP-011, can be used with most computers ranging
from personal computers to workstations.
The IP-011 includes the printer driver for Windows95/98 and WindowsNT.
The printer driver can be installed to any models of computers as long as Windo ws95/98 and
WindowsNT have been installed to them.
About Windows95/98 and WindowsNT
Since on Windows95/98 and WindowsNT, the ways to manage the user interface and the printer
are different respectively, the ways to install the printer driver and the ways to print with the printer
vary. Therefore, the Konica IP-011 includes the printer driver for each Windows.
Please keep the “User Software CD” on hand since it is required to install the printer driver.
In this manual, the ways to install the printer driver to each Windows are explained in “Installation
to Windows95/98” and “Installation to WindowsNT4.0” separately. Please read the section of your
Windows.
Chapter 2 Setup
● Files to be Installed
When the printer driver is installed with the “User Software CD”, the following files are installed to your computer.
The files to be installed vary, depending on the ways to install. Select an appropriate way.
Printer Driver for 95/98
Printer Driver for NT
Konica IP-011
Printer T ools
Konica IP-011 Help
Konica IP-011 Readme
Uninstaller
Installation to Windows95/98
Setup. exe
(User Software CD)
Plug & PlayAdd Printer
Installation to WindowsNT
Setup. exe
(User Software CD)
Add Printer
IP-011 Printer Controller 2-3

Chapter 2 Setup
● Installation to Windows95/98
Perform the following steps to install the Konica IP-011 Printer Driver to Windows 95/98.
Please keep the “User Software CD” on hand since it is required to install the printer driver.
Installation with the “User Software CD”
Turn on the computer and start Windows.
When any Windows applications are active, exit from them.
Set the “User Software CD” on the CD-ROM drive.
Double-click the [My Computer] icon of the desktop to open the [My Computer] win-
dow. Then, double-click the active CD icon (user software CD).
Opening from the start menu
Right-click the [Start] button of the task bar to click [Explorer]. Then, you can select the active
CD iron (user software CD) from [Address].
Double-click the [95 nozomi] folder to double-click [Setup.exe] in the folder.
The [Konica IP-011 setup] screen will appear. Then, click the [Next] button.
The [Konica IP-011 Software License Agreement] screen will appear. Then, click the
[Yes] button.
To use the Konica IP-011 Printer Driver, you are required to agree to the license.
When you agree to the license, click the [Yes] button to proceed.
2-4 IP-011 Printer Controller
Chapter 2 Setup
The [Type of Connection] screen will appear. Then, select [Local] and click the [Next]
button.
When the Konica 7020 series Copier (IP-011) is directly connected to a computer to which the
printer driver will be installed, select [Local].
In the case of selecting [Network]
When personal computers or workstations are connected to the network and, you want to print
by way of the network, connect to the optional network board (KN-304) and select [Network].
The screen to select a port will appear. Then, select the port to which the Konica 7020
series Copier is connected and click the [Next] button.
The [Printer Name] screen will appear. Then, specify the printer name and click the
[Next] button.
Default: [Konica IP-011]
The [Select Destination Path] screen will appear. Enter the location where you would
like to install the component and click the [Next] button.
Default: [C:\ Program Files\ Konica IP-011]
The [Select Components] screen will appear. Select the components you would like to
install and click the [Next] button.
Choice is made initially to install only the printer driver. To install Printer Tools together, put
the check mark of Printer Tools additionally.
When you print by way of the network, printer tools can not be operated. Remove the check
mark of the printer tools so as not to be installed.
If you have selected to install Printer Tools, The [Status Monitor Option] will appear.
When the [Yes] button is clicked, the status monitor of the printer will automatically start when
starting PC. When the [No] button is clicked, it will not automatically start.
The [Confirm Setup] screen will appear. Confirm the installed components and click the
[Next] button.
The [Setup Complete] screen will appear. Select the way to complete the setup and
click the [Finish] button.
The printer driver of the Konica IP-011 becomes available without restarting your computer.
The Konica IP-011 Printer Tools become available after restarting your computer.
IP-011 Printer Controller 2-5

Chapter 2 Setup
Installation by using [Add Printer]
Turn on the computer and start Windows.
When the Windows applications are active, exit from them.
Click the [Start] button of the task bar. Then, select [settings] of the Start menu to click
[Printers] from the sub-menu.
The [Printers] window will open.
Opening from [My Computer]
You can open the [Printers] window by double-clicking the [Printers] folder after dowble-clicking
the [My Computer] icon of the desktop.
Double-click the [Add Printer] icon of the [Printers] window.
The [Add Printer Wizard] to install the printer driver will appear.
Then, follow the [Add Printer Wizard] to install the printer driver.
In this method, only the printer driver is installed.
Installation by Using the Plug & Play
In this method, only the printer driver is installed.
Connect the IP-011 to a computer with the computer turned off.
Turn on the computer and start Windows
Devices compliant with the Plug & Play are automatically detected, and [Add New Hardware
Wizard] will appear.
.
Click the [Next] button.
The wizard to select the method of searching for the printer driver will appear.
Select [Search for the best driver for your device] and click the [Next] button.
The wizard to select the location to search for the printer driver will appear.
Set the “User Software CD” on the CD-ROM drive. Then, select [Specify a location] and
click the [Browse] button.
Click [95 nozomi] in the “User Software CD” and click the [OK] button.
Click the [Next] button.
Click the [Next] button.
Specify your printer's name and click the [Ne xt] button.
Default: [Konica IP-011]
The print test confirmation screen will appear. Select whether you will perform the print
test or not and click the [Finish] button.
Select [Yes recommended] to perform the print test, while select [No] not to perform it.
Click the [Finish] button.
Necessary files will be copied from the “User Software CD” to finish the installation.
2-6 IP-011 Printer Controller

Chapter 2 Setup
● Installation to WindowsNT4.0
Only authorized system administrators or printer administrators are allowed to install the Konica IP-011 printer
driver to WindowsNT4.0.
Please keep the “User Software CD” on hand since it is required to install the printer driver.
Printer Management on WindowsNT
Since WindowsNT is an operating system made specially for the network operation, it is equipped
with heavier security functions than other Windows.
According to the security level (access right) of the user, the range of operations and settings of the
installed printers allowed to the user is limited.
The following figure shows the access right of the Windows NT compliant printers and its operation
range.
Access Right
No rights
Printing
Document
Management
Full control
No operations of printers are allowed.
Execution of document printing and the following print
conditions of each document are allowed to be set.
• Operations related to printing
(selection of a paper size and a paper tray, etc.)
• Operations related to graphics
(processing of resolution and halftone, etc.)
• Printer functions (selection of functions peculiar to the copier)
Control of document setting
Pause, restart, reprinting, and deletion of documents
All of "Print" and "Document Management"
Pause and restart of the printer and deletion of all documents
Settings and changes of printer information
Deletion of the printer
Settings and changes of printer access rights
Operation Range
After installing the printer driver, set the appropriate access rights to printer users.
Refer to the “System Guide” of WindowsNT for how to set access rights of the printer.
IP-011 Printer Controller 2-7
Chapter 2 Setup
Installation by Using the “User Software CD”
Turn on the computer to start WindowsNT4.0.
.
Log on as an administrator (or a user entitled to install the Power User, etc.).
.
Set the “User Software CD” on the CD-ROM drive.
Double-click the [My Computer] icon of the desktop to open the [My Computer] win-
dow, and double-click the active CD icon (user software CD).
Opening from the start menu.
Right-click the [Start] button of the task bar to click [Explorer]. Then, you can select the CD icon
(user software CD) from [All Folder].
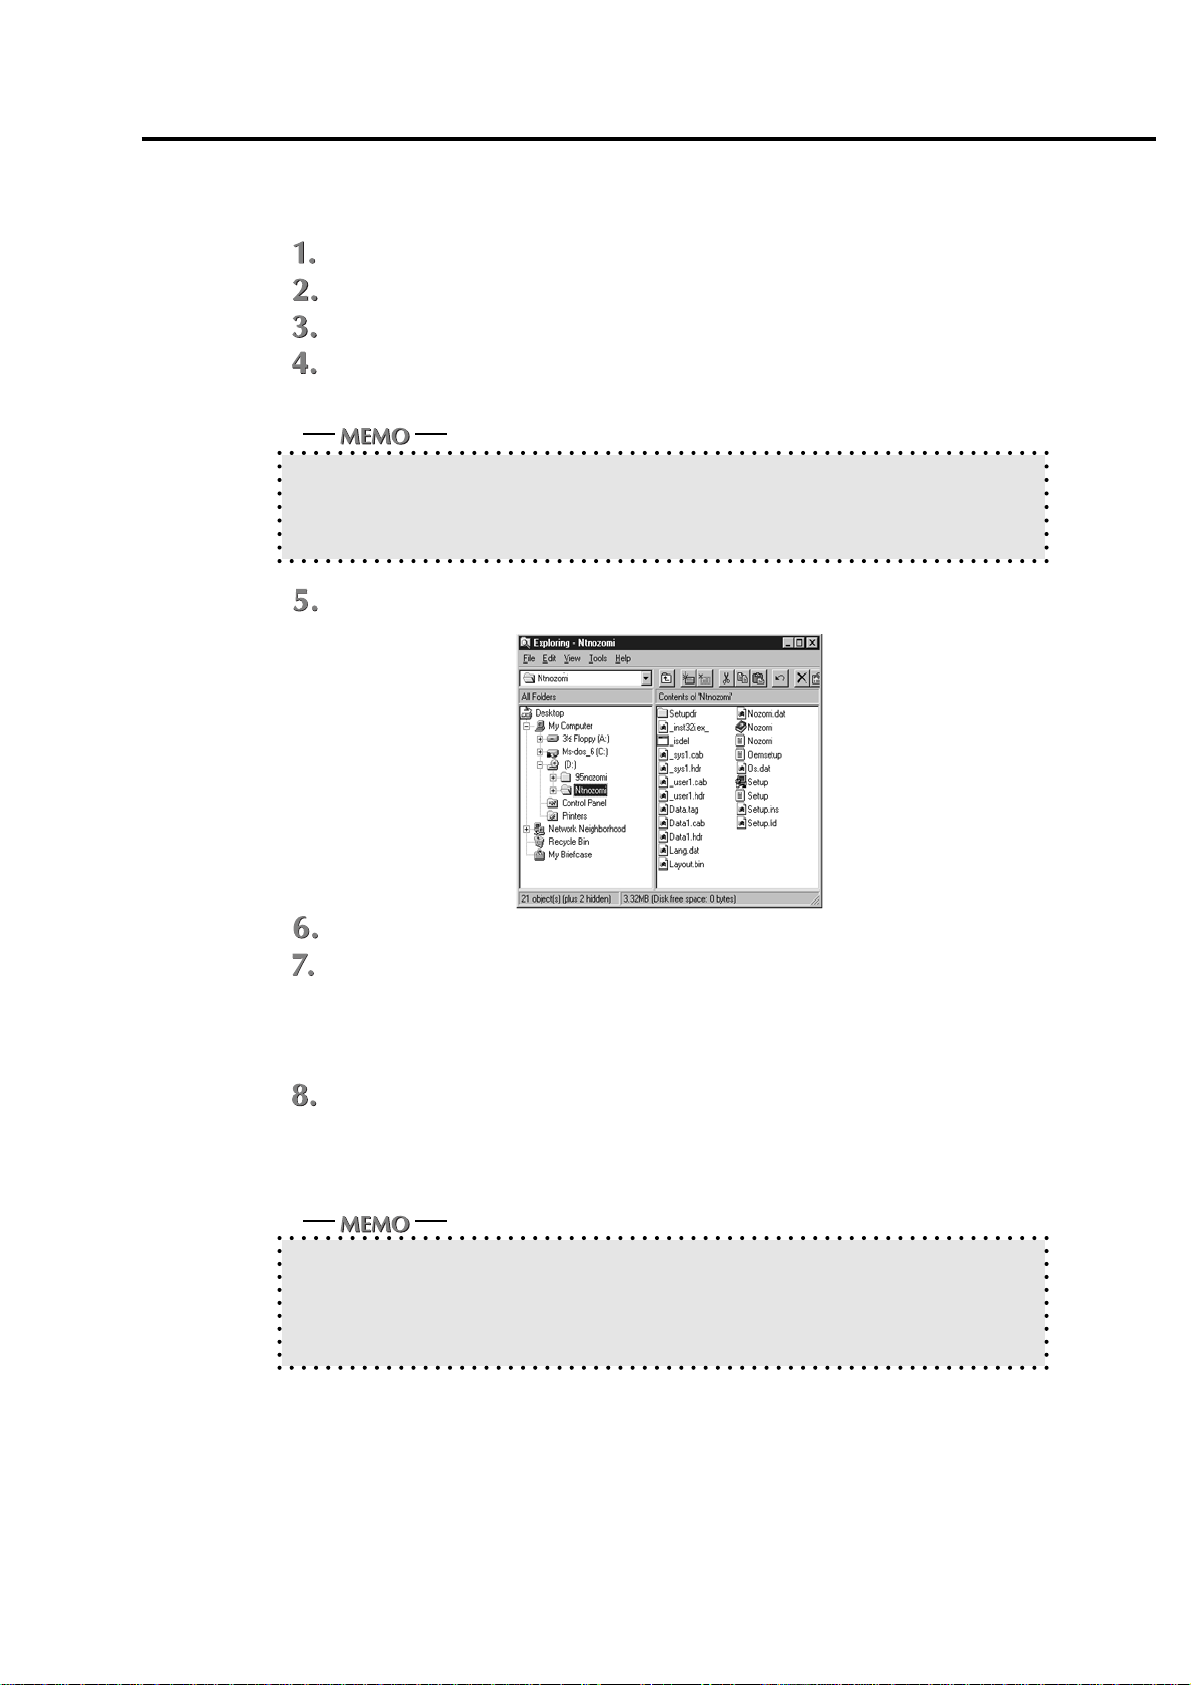
Double-click the [NT nozomi] folder to double-click [Setup.exe] in the folder.
The [Konica IP-011 Setup] screen will appear. Then, click the [Next] button.
The [Konica IP-011 Software License Agreement] screen will appear. Then, click the
[Yes] button.
To use the Konica IP-011 Printer Driver, you are required to agree to the license.
When you agree to the license, click the [Yes] button to proceed.
The [Type of Connection] screen will appear. Then, select [Local] and click the [Next]
button.
When the Konica 7020 series Copier (IP-011) is directly connected to a computer to which the
printer driver is to be installed, select [Local].
In case of selecting [Network]
When installing Konica IP-011 printer driver to win4.0 that does not conduct print service, select
[Network]. When the optional network board (KN-304) is used, refer to the user's manual of the
KN-304 to select the appropriate port.
2-8 IP-011 Printer Controller
Chapter 2 Setup
The screen to select a port will appear. Then, select the port to which the Konica 7020
series Copier is connected and click the [Next] button.
The [Printer Name] screen will appear. Then, specify the printer name and click the
[Next] button.
Default: [Konica IP-011]
The [Select Destination Path] screen will appear. Select the location where you would
like to install the component and click the [Next] button.
Default: [C:\Program Files\Konica IP-011]
The [Select Components] screen will appear. Select the components you would like to
install and click the [Next] button.
Choice is made initially to install only the printer driver. To install Printer Tools together, put
the check mark of Printer Tools additionally.
When you print by way of the network, printer tools can not be operated. Remove the check
mark of the printer tools so as not to be installed.
If you have selected to install Printer Tools, The [Status Monitor Option] will appear.
When the [Yes] button is clicked, the status monitor of the printer will automatically start when
starting PC. When the [No] button is clicked, it will not automatically start.
The [Confirm Setup] screen will appear. Confirm the installed components and click the
[Next] button.
The [Setup complete] screen will appear. Select the way to complete the setup and
click the [Finish] button.
Installation by Using [Add Printer]
In this method, only the printer driver is installed.
Turn on the computer and start WindowsNT4.0.
.
Log on as an administrator (or a user entitled to install the Power User, etc.).
.
Click the [Start] button of the task bar. Then, select [settings] of the Start menu and
click [Printers] from the sub-menu.
The [Printers] window will open.
Opening from [My Computer]
You can open the [Printer] window by double-clicking the [Printers] folder after double-clicking
the [My Computer] icon of the desktop.
Double-click the [Add Printer] icon of the [Printers] window.
The [Add Printer Wizard] to install the printer driver will appear.
Then, follow [Add Printer Wizard] to install the printer driver.
IP-011 Printer Controller 2-9

Chapter 2 Setup
● Uninstallation of the Printer Driver
When any Windows applications are active, quit all of them.
.
Click the [Start] button of the task bar. Select [Settings] of the Start menu and click the
[Control Panel] of the sub menu.
The [Control Panel] window will open.
Opening from [My Computer]
You can open the [Control Panel] window by double-clicking the [Control Panel] folder after
double cliking the [My Computer] icon of the desktop.
Uninstalling by Using the Uninstaller
You can also delete the printer driver by clicking the [Start] button of the task bar to select
[Program] of the Start menu and then, selecting [Konica IP-011] to click [Uninstaller]. After
clicking [Uninstaller], go to the Step 6.
.
Double-click the [Add/Remove Programs] icon of the [Control Panel] window.
The [Add/Remove Programs Properties] dialog box will appear.
Click [Konica IP-011] in the [Install/Uninstall] list and click the [Add/Remove...] button.
Click the [Yes] button.
Click the [OK] button.
The screen to confirm unistallation will appear.
When the [OK] button is displayed, click the [OK] button.
The printer driver will be uninstalled by following the above steps.
2-10 IP-011 Printer Controller
 Loading...