

Page 1

User’s Guide
Page 2

x
Contents
Page 3

Contents
1 Welcome
1.1 END USER LICENSE AGREEMENT ..................................................1-3
1. SOFTWARE .................................................................................1-3
2. LICENSE AGREEMENT ..............................................................1-3
3. LICENSE .....................................................................................1-3
4. RESTRICTIONS ..........................................................................1-4
5. LIMITED WARRANTY .................................................................1-4
6. LIMITATION OF REMEDIES ........................................................1-4
7. TERMINATION ............................................................................1-4
8. GOVERNING LAW ......................................................................1-4
9. GOVERNMENT END USERS ......................................................1-5
1.2 Trademark acknowledgements .......................................................1-6
1.3 User instructions ...............................................................................1-7
CE Marking (Declaration of conformity) ..........................................1-7
For U.S.A. users
FCC part 15-Radio frequency devices ...........................................1-7
For Canada users
Interference-causing equipment standard (ICES-003 issue 3) .......1-9
For users in countries subject to class B regulations .....................1-9
For users in countries not subject to class B regulations ...............1-9
2 Getting ready
2.1 System requirements ........................................................................2-2
2.2 Features of Image Controller IC-205 ...............................................2-4
Various printing functions ...............................................................2-4
3 Connecting to a computer
3.1 Types of connections ........................................................................3-2
Parallel port connection ..................................................................3-2
USB port connection ......................................................................3-2
Network connection ........................................................................3-2
3.2 Parallel port connection ....................................................................3-3
Connecting the machine to the parallel port of the computer ........3-3
3.3 USB port connection .........................................................................3-4
x-2 IC-205
Page 4

4 Installing the printer driver
4.1 Outline of Printer Driver Installation ............................................... 4-3
Installation using Plug and Play ..................................................... 4-3
Installation using the Add Printer Wizard ....................................... 4-3
4.2 Installing the TWAIN driver/printer driver using
“Plug and Play” ................................................................................. 4-4
Installing the TWAIN driver/printer driver using
“Plug and Play” under Windows XP/Server 2003 .......................... 4-4
Installing the TWAIN driver/printer driver using
“Plug and Play” under Windows 2000 ........................................... 4-6
Installing the TWAIN driver/printer driver using
“Plug and Play” under Windows Me/98 SE ................................... 4-7
Reinstalling the printer driver by using Plug and Play ................... 4-8
4.3 Installing the printer driver using the “Add Printer Wizard” ......... 4-9
Installing the printer driver using the “Add Printer Wizard”
under Windows XP/Server 2003 .................................................... 4-9
Installing the printer driver using the “Add Printer Wizard”
under Windows 2000/NT 4.0 ....................................................... 4-11
Installing the printer driver using the “Add Printer Wizard”
under Windows Me/98 SE/98 ...................................................... 4-13
Reinstalling the printer driver by using the Add Printer Wizard ... 4-14
5 Configuring printer driver settings
5.1 Displaying printer driver properties for configuring global
settings .............................................................................................. 5-2
Displaying settings under Windows XP/Server 2003 ..................... 5-2
Displaying settings under Windows 2000/NT 4.0/Me/98 SE/98 .... 5-4
5.2 Common operations ......................................................................... 5-7
OK .................................................................................................. 5-7
Cancel ............................................................................................ 5-7
Apply .............................................................................................. 5-7
Help ................................................................................................ 5-7
Easy Set List .................................................................................. 5-8
Save ............................................................................................... 5-8
Delete ............................................................................................. 5-8
Page Layout/Printer Figure ............................................................ 5-9
5.3 “Setup” tab ...................................................................................... 5-10
5.3.1 N-up ............................................................................................. 5-11
N-up List ...................................................................................... 5-11
Border Line ................................................................................... 5-11
N-up Style .................................................................................... 5-12
IC-205 x-3
Page 5

5.3.2 Watermark ....................................................................................5-13
Watermark List ..............................................................................5-13
First Page Only .............................................................................5-13
Edit Watermark .............................................................................5-13
How to edit a watermark ...............................................................5-14
5.3.3 Paper Source ................................................................................5-16
Paper Source List .........................................................................5-16
Detail of Paper Source ..................................................................5-17
5.3.4 Media type ....................................................................................5-18
Media Type List ............................................................................5-18
5.3.5 Duplex ...........................................................................................5-18
5.3.6 Security .........................................................................................5-19
Lock Job .......................................................................................5-19
Password ......................................................................................5-19
Using lock job ...............................................................................5-19
Specifying settings with the printer driver ....................................5-19
Printing a locked job .....................................................................5-20
5.4 “Paper” tab .......................................................................................5-21
5.4.1 Original Document Size ................................................................5-22
Original Document Size List ..........................................................5-22
Edit Custom ..................................................................................5-22
5.4.2 Output Paper Size .........................................................................5-24
Fit to Paper ...................................................................................5-24
Output Paper Size List ..................................................................5-24
Scaling ..........................................................................................5-25
5.4.3 Copies ...........................................................................................5-25
5.4.4 Collate ...........................................................................................5-25
5.4.5 Orientation ....................................................................................5-25
Rotate ...........................................................................................5-25
5.5 “Quality” tab .....................................................................................5-26
5.5.1 Adjustment ....................................................................................5-26
Contrast ........................................................................................5-26
Brightness .....................................................................................5-26
5.5.2 Resolution .....................................................................................5-26
5.5.3 Toner Save ....................................................................................5-27
5.5.4 Rendering Mode ...........................................................................5-27
5.5.5 Font Setting ..................................................................................5-27
x-4 IC-205
Page 6

5.6 “Device Options” tab ...................................................................... 5-28
5.6.1 Device Options ............................................................................. 5-28
5.7 “About” tab ...................................................................................... 5-29
6 Control panel operations
6.1 Printer operations ............................................................................. 6-2
General guide ................................................................................. 6-3
[Printer] indicator ............................................................................ 6-4
Starting the Print Operation ........................................................... 6-4
Canceling a print job ...................................................................... 6-5
Using the bypass tray .................................................................... 6-7
Energy save mode ......................................................................... 6-8
Outputting a report ......................................................................... 6-8
7 Using PageScope Web Connection
7.1 When using PageScope Web Connection ...................................... 7-2
7.2 What is PageScope Web Connection? ........................................... 7-2
7.3 System requirements ....................................................................... 7-4
7.4 Accessing PageScope Web Connection ........................................ 7-5
How to access to PageScope Web Connection ............................ 7-5
7.5 Using PageScope Web Connection ................................................ 7-6
7.6 About the screen layout ................................................................... 7-6
7.7 Logging in as an administrator ........................................................ 7-8
Logging in to administrator mode .................................................. 7-8
7.8 Checking/Deleting print jobs ........................................................... 7-9
Checking a print job ....................................................................... 7-9
Deleting a print job ....................................................................... 7-10
7.9 Downloading files ........................................................................... 7-11
How to download files ................................................................. 7-11
7.10 Checking/Changing printer settings ............................................. 7-12
Checking the printer settings ....................................................... 7-12
Changing the printer settings ....................................................... 7-13
7.11 Printing a test page ........................................................................ 7-14
How to print a test page .............................................................. 7-14
7.12 Displaying the PCL font list ........................................................... 7-15
7.13 Resetting the network interface card and image controller ...... 7-16
How to reset the network interface card and image controller .... 7-16
IC-205 x-5
Page 7

7.14 Initializing the network interface card and image controller ......7-17
How to initialize the network interface card and
image controller ............................................................................7-17
8 Troubleshooting
8.1 Checking messages ..........................................................................8-2
How to check messages ................................................................8-2
8.2 Main messages ..................................................................................8-3
8.3 Errors and print data .........................................................................8-4
“MACHINE TROUBLE” error ..........................................................8-4
Temporary errors ............................................................................8-4
9 Specifications
x-6 IC-205
Page 8

Welcome Chapter 1
1
Welcome
Page 9

1
1Welcome
This manual provides information on setting up and using a machine as a
PCL printer.
Welcome Chapter 1
Read these instructions thoroughly before using the functions.
For instructions on using the machine itself and for general safety precautions, refer to the manual provided with the machine.
Store the user’s guide and the enclosed CD-ROM in a safe location for future
reference.
2
Note
No part of this manual may be copied or reproduced, either in part or in
whole, without prior permission.
The contents of this manual are subject to change without notice.
No part of the manual may be reproduced or modified without prior permission.
Welcome
Screen images used in this manual may differ from the actual screen display.
1-2 IC-205
Page 10

Welcome
1.1 END USER LICENSE AGREEMENT
PLEASE READ CAREFULLY THE LICENSE AGREEMENT BELOW BEFORE
INSTALLING THE SOFTWARE. INSTALLING THE SOFTWARE INDICATES
YOUR ACCEPTANCE OF THE TERMS AND CONDITIONS BELOW. IF YOU
DO NOT AGREE WITH THEM, YOU SHOULD PROMPTLY RETURN THE
SOFTWARE UNUSED.
1
1. SOFTWARE
“Software” means the computer program contained in the package, together
with all codes, techniques, software tools, format, design, concepts, methods and ideas associated with the computer program and all documentation
related thereto.
2. LICENSE AGREEMENT
This is a license agreement for sale. KONICA MINOLTA BUSINESS TECHNOLOGIES, INC. or its affiliate company (hereinafter collectively “KONICA
MINOLTA”) owns, or has been licensed from other owners (“KONICA MINOLTA’s Licensor”), copyrights in the Software. Except as in this Agreement, you are not granted any rights to patents, copyrights, trade names,
trademarks (whether registered or unregistered), or any other rights, franchises or licenses in respect of the Software. Title to the Software and any
copy made from it is retained by KONICA MINOLTA or KONICA MINOLTA’s
Licensor.
3. LICENSE
KONICA MINOLTA, hereby grand to you, and you agree to accept a non-exclusive, non-transferable and limited license and you may:
(1) install and use the Software on a single computer.
(2) use the Software only for your own customary business or personal purpose.
(3) make a copy of the Software for backup or installation purpose only in
support of the normal and intended use of the Software.
(4) transfer possession of copies of the Software to another party by transferring a copy of this Agreement and all other documentation along with at
least one complete unaltered copy of the Software, provided that (i) you, at
the same time, either transfer to such other party or destroy all your other
copies of the Software, (ii) such transfer of possession terminates your license with KONICA MINOLTA, and (iii) such other party shall accept and be
bound by these license terms with their initial use of the Software.
Welcome Chapter 1
IC-205 1-3
Page 11

Welcome Chapter 1
1
Welcome
4. RESTRICTIONS
(1) You shall not without the written consent of KONICA MINOLTA:
(i) use, copy, modify, merge or transfer copies of the Software except as provided herein, (ii) reverse assemble or reverse compile the Software except as
permitted by law; or (iii) sublicense, rent, lease or distribute the Software or
any copy thereof.
(2) You shall not export or re-export the Software in any from under violation
of export restrictions by the government of your country.
5. LIMITED WARRANTY
KONICA MINOLTA warrants the media on which the software is recorded to
be free from defects in materials and workmanship under normal use. Warranty details and limitations for the Hardware containing the Software are described in the Statement of Limited Warranty which was supplied with the
hardware. With the exception of the foregoing express warranties applicable
to hardware and media only, the Software is not warranted and is provided
“AS IS”.
SUCH WARRANTIES ARE IN LIEU OF ALL OTHER WARRANTIES, EXPRESS OR IMPLIED, INCLUDING, BUT NOT LIMITED TO, THE IMPLIED
WARRANTIES OF MERCHANTABILITY AND FITNESS FOR A PARTICULAR
PURPOSE.
6. LIMITATION OF REMEDIES
IN NO EVENT WILL KONICA MINOLTA BE LIABLE FOR ANY LOST PROFITS, LOST DATA, OR ANY OTHER INCIDENTAL OR CONSEQUENTIAL
DAMAGES THAT RESULT FROM USE OR INABLITY TO USE THE SOFTWARE, EVEN IF KONICA MINOLTA, KONICA MINOLTA LICENSOR OR ITS
AUTHORISED REMARKETERS HAVE BEEN ADVISED OF THE POSSIBILITY
OF SUCH DAMAGES OR FOR ANY CLAIM BY YOU BASED ON A THIRD
PARTY CLAIM.
7. TERMINATION
You may terminate your license at any time by destroying the Software and
all your copies of it or as otherwise described in these terms. KONICA MINOLTA may terminate your license if you fail to comply with these terms.
Upon such termination, you agree to destroy all your copies of the Software.
8. GOVERNING LAW
This Agreement shall be governed by the laws of the country where the delivery is made to the original customer.
1-4 IC-205
Page 12

Welcome
1
9. GOVERNMENT END USERS
If you are acquiring the Software on behalf of any unit or agency of the United
States Government, the following provisions apply. Use, duplication or disclosure by the Government is subject to restrictions as set forth in the Rights
in Technical Data and Computer Software clause at FAR 252.227-7013, subdivision (b)(3)(ii) or sub paragraph (c)(1)(ii), as appropriate. Further use, duplication or disclosure is subject to restrictions to restricted rights software as
set forth in FAR 52.227-19(c)(2).
YOU ACKNOWLEDGE THAT YOU HAVE READ THIS AGREEMENT, UNDERSTAND IT, AND AGREE TO BE BOUND BY ITS TERMS AND CONDITIONS. NEITHER PARTY SHALL BE BOUND BY ANY STATEMENT OR
REPRESENTATION NOT CONTAINED IN THIS AGREEMENT. NO CHANGE
IN THIS AGREEMENT IS EFFECTIVE UNLESS WRITTEN AND SIGNED BY
PROPERLY AUTHORISED REPRESENTATIVES OF EACH PARTY. BY INSTALLING THIS SOFTWARE, YOU AGREE TO ACCEPT THE TERMS OF
THIS AGREEMENT.
Welcome Chapter 1
IC-205 1-5
Page 13

1
1.2 Trademark acknowledgements
KONICA MINOLTA is a trademark of KONICA MINOLTA HOLDINGS, INC.
PageScope is a trademark of KONICA MINOLTA BUSINESS TECHNOLOGIES, INC.
Ethernet is a registered trademark of Xerox Corporation.
PCL is a registered trademark of Hewlett-Packard Company.
Welcome Chapter 1
Microsoft, Windows, and Windows NT are registered trademarks of Microsoft Corporation.
Netscape Communications, the Netscape Communications logo, Netscape
Navigator, Netscape Communicator, and Netscape are trademarks of Netscape Communications Corporation.
All other product names are trademarks or registered trademarks of their respective holders.
Copyright © 2005 KONICA MINOLTA BUSINESS TECHNOLOGIES, INC. All
rights reserved.
Welcome
1-6 IC-205
Page 14

Welcome
1.3 User instructions
CE Marking (Declaration of conformity)
This product complies with the following EU directives:
89/336/EEC, 73/23/EEC and 93/68/EEC directives.
This declaration is valid for the region of the European Union.
1
7
7 CAUTION
7 7
Interference with radio communications.
% This device must be used with shielded interface cables. The use of
non-shielded cable is likely to result in interference with radio communications and is prohibited under EU directives.
For U.S.A. users FCC part 15-Radio frequency devices
This equipment has been tested and found to comply with the limits for a
class A digital device, pursuant to part 15 of the FCC rules. These limits are
designed to provide reasonable protection against harmful interference
when the equipment is operated in a commercial environment.
7
7 WARNING
7 7
Any changes made by the purchaser or user without first contacting the
manufacturer will be subject to penalty under FCC regulations.
% The design and production of this unit conform to FCC regulations, and
any changes or modifications must be registered with the FCC and are
subject to FCC control.
Welcome Chapter 1
IC-205 1-7
Page 15

Welcome Chapter 1
1
Welcome
7
7 CAUTION
7 7
Interference to radio communications.
% This equipment generates, uses and can radiate radio frequency ener-
gy and, if not installed and used in accordance with the instruction
manual, may cause harmful interference to radio communications.
% Operation of this equipment in a residential area is likely to cause harm-
ful interference in which case the user will be required to correct the interference at his own expense.
% This device must be used with shielded interface cables. The use of
non-shielded cable is likely to result in interference with radio communications and is prohibited under FCC rules.
1-8 IC-205
Page 16

Welcome
1
For Canada users Interference-causing equipment standard (ICES-003 issue 3)
This class A digital apparatus complies with Canadian ICES-003.
Cet appareil numérique de la classe A est conforme à la norme NMB-003 du
Canada.
For users in countries subject to class B regulations
7
7 CAUTION
7 7
Interference with radio communications.
% This device must be used with shielded interface cables. The use of
non-shielded cable is likely to result in interference with radio communications and is prohibited under CISPR 22 rules and local rules.
For users in countries not subject to class B regulations
7
7 WARNING
7 7
Interference with radio communications.
% This is a class A product. In a domestic environment, this product may
cause radio interference in which case the user may be required to take
adequate measures.
% This device must be used with shielded interface cables. The use of
non-shielded cable is likely to result in interference with radio communications and is prohibited under CISPR 22 rules and local rules.
Welcome Chapter 1
IC-205 1-9
Page 17

Welcome Chapter 1
1
Welcome
1-10 IC-205
Page 18

2
Getting ready
Getting ready Chapter 2
Page 19

2
2 Getting ready
2.1 System requirements
The following operating environment is required in order to use the printer
driver.
System requirements
CPU Intel Pentium 200MHz
Operating system Windows Server 2003/Windows XP (SP2 or later)/
Getting ready Chapter 2
Point &
Print*1
RAM 128 MB (Windows XP/Server 2003),
I/O interface Parallel IEEE 1284 (compatible mode, ECP mode, Nibble mode)
Domain Server:
Workgroup Server:
USB*2 Revision 1.1 port
Network*3 Ethernet 10Base-T/100Base-TX (TCP/IP, IPX/SPX)
CD-ROM drive
Getting ready
Windows 2000 (SP4 or later)/Windows NT 4.0 (SP6a or later)/
Windows Me/Windows 98 SE/Windows 98/Windows Terminal
Server (Windows NT 4.0 Terminal Server Edition/Windows 2000
Server/Windows Server 2003)
Windows Server 2003
Server:
Windows 2000 Server
Server:
Windows NT 4.0 Server
Windows XP
Server:
Windows 2000 Professional
Server:
Windows NT 4.0 Workstation
64 MB (Windows 2000/NT 4.0/Me/98 SE/98)
Client:
Windows XP,
Windows 2000 Professional,
Windows NT 4.0 Workstation,
Windows 98 (SE), Windows Me
Client:
Windows 2000 Professional,
Windows NT 4.0 Workstation,
Windows 98 (SE), Windows Me
Client:
Windows NT 4.0 Workstation,
Windows 98 (SE), Windows Me
Client:
Windows XP,
Windows 2000 Professional,
Windows NT 4.0 Workstation,
Windows 98 (SE), Windows Me
Client:
Windows 2000 Professional,
Windows NT 4.0 Workstation,
Windows 98 (SE), Windows Me
Client:
Windows NT 4.0 Workstation,
Windows 98 (SE), Windows Me
2-2 IC-205
Page 20

Getting ready
*1 Point and print is possible with printers shared by Windows servers and clients. Clients
*2 Supported by Windows Server 2003, Windows XP, Windows 2000, Windows Me, and
*3 If the optional network interface card is installed, the network port can be used. For de-
inherit the driver settings from the server, such as the device options, watermark, and
Easy set setup, and are unable to modify the server settings if the user does not have administrator access of the server.
Windows 98 SE.
tails, refer to the User’s Guide for the Network Interface Card (NC-502).
2
Getting ready Chapter 2
IC-205 2-3
Page 21
2
2.2 Features of Image Controller IC-205
Various printing functions
The various printing functions are as follows:
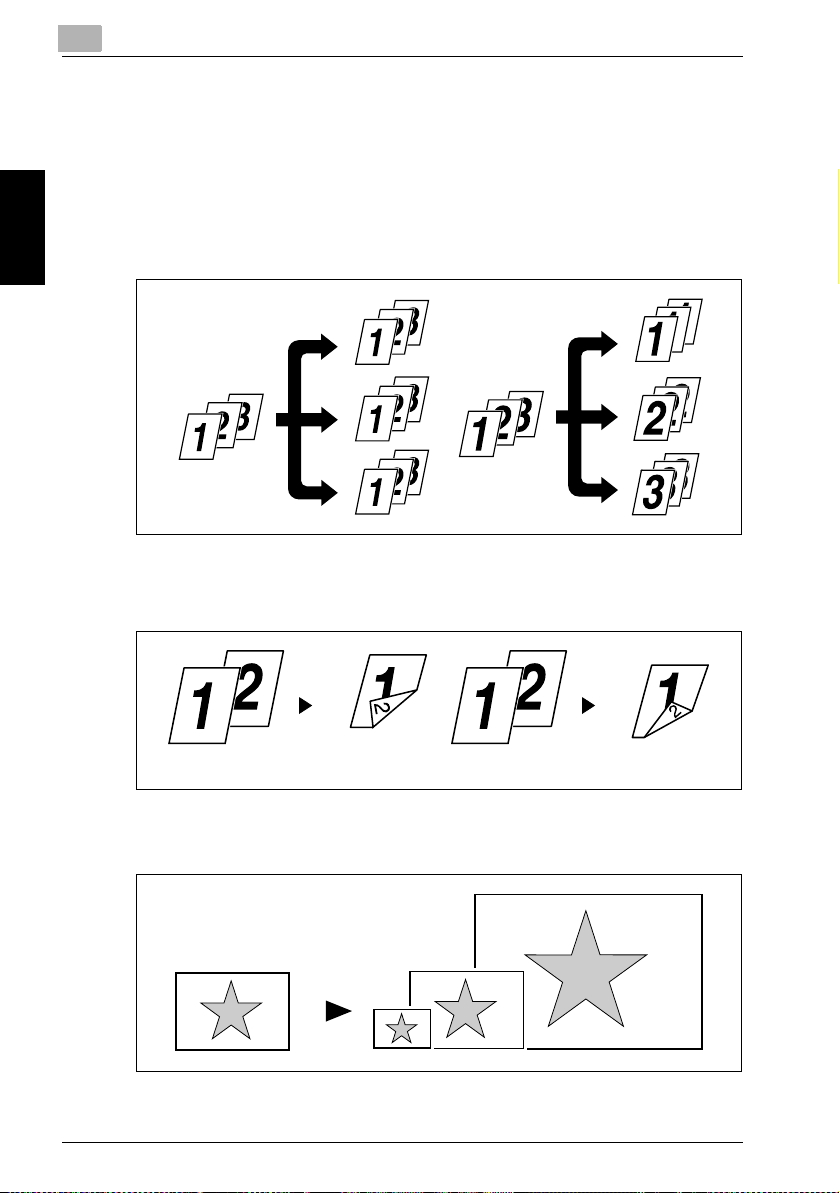
- Prints multiple copies at one time. In addition, the printed pages can be
sorted into complete sets, which contain a copy of each page, or into
groups where each contains all copies of the same page.
Getting ready Chapter 2
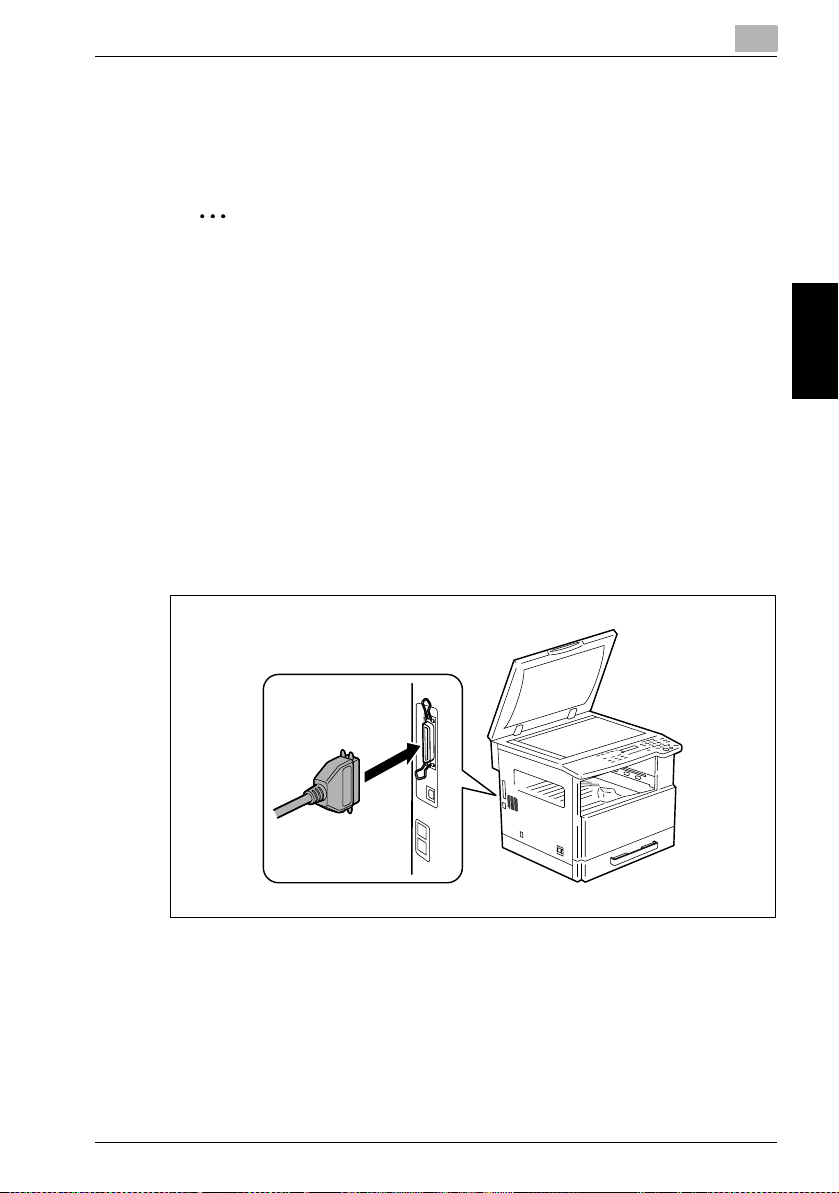
- Prints two pages (one on each side) on a single sheet of paper.
This function is not supported by 162.
Getting ready
Left binding Top binding
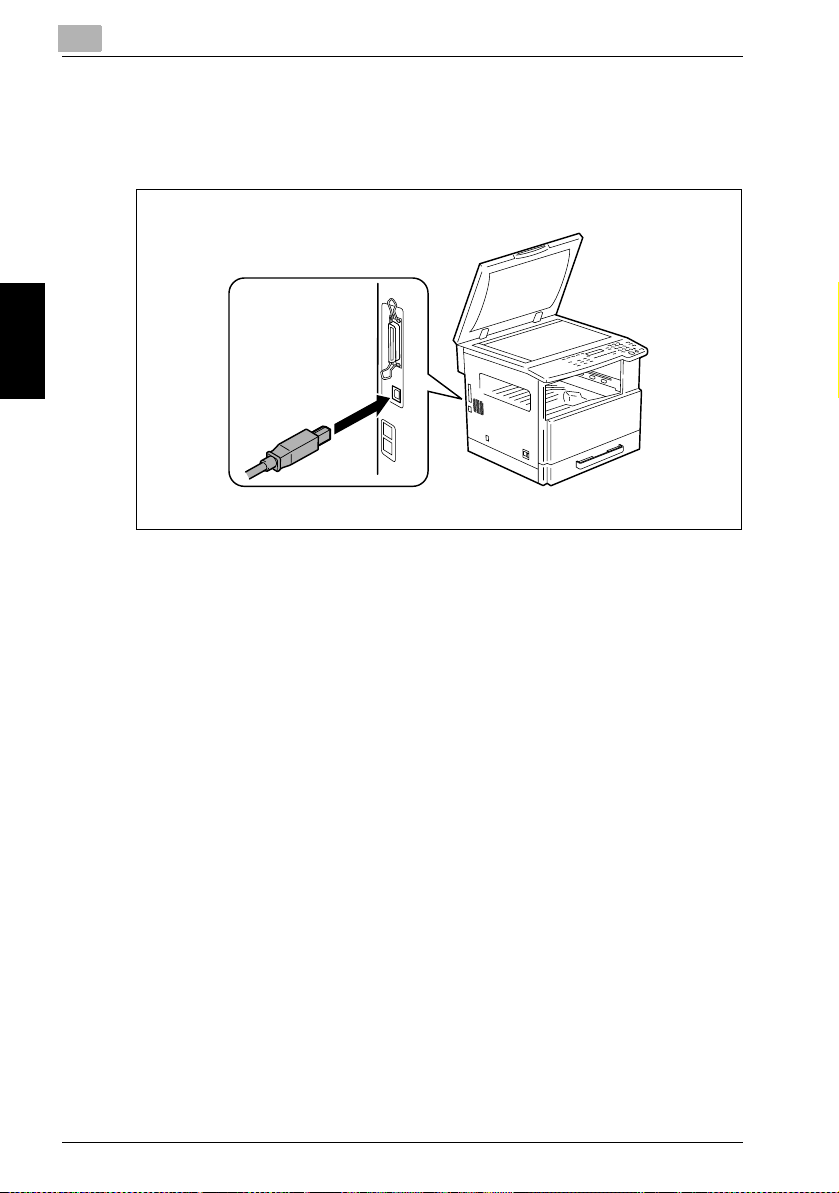
- Prints an enlarged or reduced image of the original.
2-4 IC-205
Page 22

Getting ready
- Prints two or four pages of the original on a single sheet of paper.
2
A maximum of 16 pages can be printed on a single sheet of paper.
When two pages are printed
on one page
- Prints text in the background.
- Prints only the cover on a different type of paper (such as colored paper).
When four pages are printed
on one page
Getting ready Chapter 2
IC-205 2-5
Page 23

Getting ready Chapter 2
2
Getting ready
2-6 IC-205
Page 24

3
Connecting to a
computer
Connecting to a computer Chapter 3
Page 25

3
3 Connecting to a computer
3.1 Types of connections
You can use either of the following two methods to connect the machine to
a computer.
Parallel port connection
Use this type of connection when you want to connect the machine directly
to a computer’s parallel port. Refer to “Parallel port connection” on page 3-3.
USB port connection
Use this type of connection when you want to connect the machine directly
to a computer’s USB port. Refer to “USB port connection” on page 3-4.
Network connection
In order to use the machine as a network printer, the Network Interface Card
(NC-502) must be installed.
For details on connecting the machine to a network, refer to the User’s Guide
for the Network Interface Card (NC-502).
Connecting to a computer Chapter 3
Connecting to a computer
3-2 IC-205
Page 26
Connecting to a computer
3.2 Parallel port connection
Use the parallel cable to connect the parallel port of the machine to the parallel port of the computer.
2
Reminder
Be sure to use a shielded parallel cable. Use of an unshielded cable may
result in radio frequency interference.
The parallel port is compatible with IEEE1284 Type B standards.
Connecting the machine to the parallel port of the computer
1 Turn off both the machine and your computer.
2 Connect one end of the parallel cable to the parallel port (printer port)
of the computer.
3 Connect the other end of the cable to the parallel port on the left side
of the machine. Secure the interface cable connectors using the two
clips.
3
This completes connection of the machine to the computer.
IC-205 3-3
Connecting to a computer Chapter 3
Page 27
3
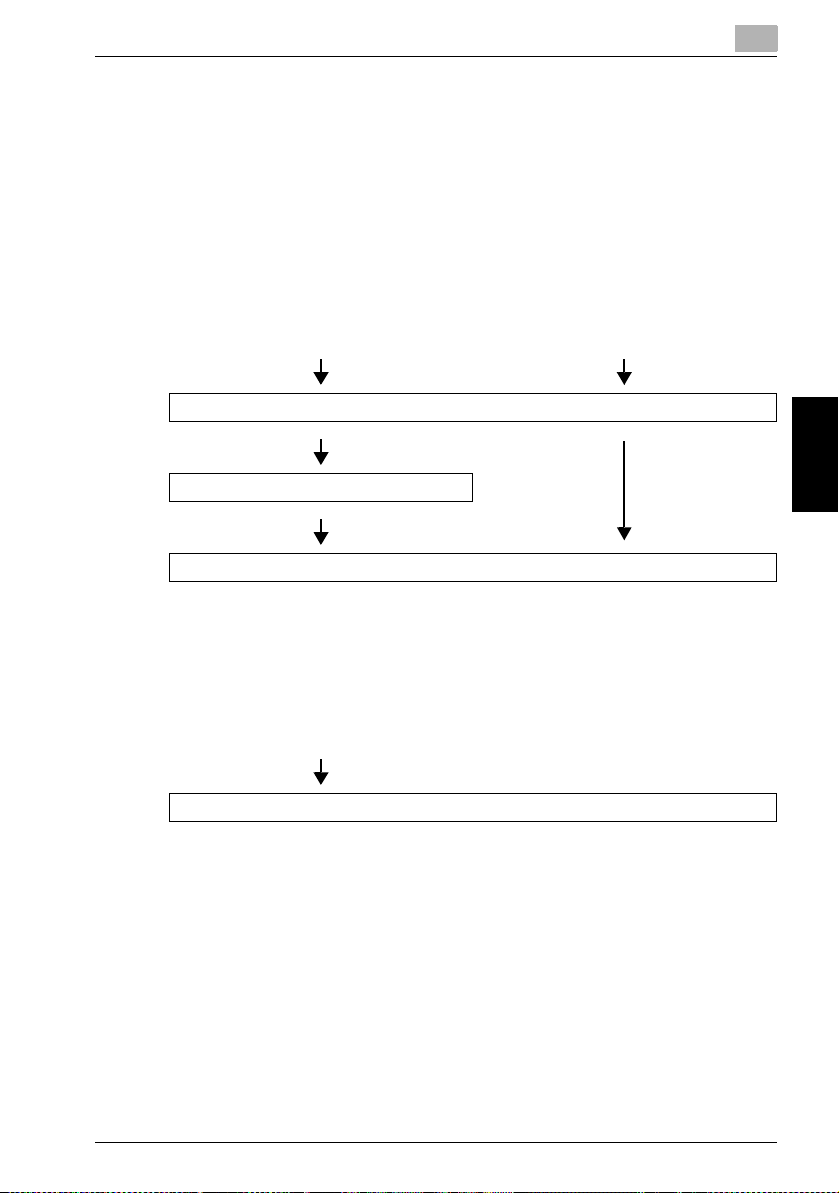
3.3 USB port connection
Use the USB cable (type B) to connect the machine’s USB port to the USB
port on your computer.
Connecting to a computer
Connecting to a computer Chapter 3
3-4 IC-205
Page 28

4
Installing the printer
driver
Installing the printer driver Chapter 4
Page 29

4
4 Installing the printer driver
This section describes the procedure for installing the printer driver. The
printer driver can be installed in two ways: by using “Plug and Play” or by using the “Add Printer Wizard”.
2
Note
If the machine is to be connected to a USB port, install the printer driver
by using Plug and Play.
If the machine is to be connected to a parallel port, install the printer driver by using the Add Printer Wizard.
Installing the printer driver
Installing the printer driver Chapter 4
Connection
Method
USB port
connection
Parallel port
connection
Compatible Operating
Systems
Windows XP, Windows
Server 2003, Windows
2000, Windows Me, and
Windows 98 SE
Windows XP, Windows
Server 2003, Windows
2000, Windows NT 4.0,
Windows Me, Windows
98 SE, and Windows 98
Printer Driver Installation
Install using Plug and
Play.
Install using the Add
Printer Wizard.
Follow this procedure:
“Installing the TWAIN
driver/printer driver using “Plug and Play”” on
page 4-4
“Installing the printer
driver using the “Add
Printer Wizard”” on
page 4-9
For network printing, use the “Add Printer Wizard” to install the printer driver.
During installation, select “LPT1” as the printer port.
For details on specifying network connection settings, refer to the User’s
Guide for the Network Interface Card.
2
Note
In order to use IPP (network) printing, the IPP printing settings must be
specified when the printer driver is installed. For details on specifying the
IPP printing settings, refer to the manual provided with the network interface card.
If the image controller is used on Windows 98, Windows 98 SE or Windows Me, the Network Setup utility cannot be used.
4-2 IC-205
Page 30
Installing the printer driver
4.1 Outline of Printer Driver Installation
The printer driver is installed according to the following outline.
Installation using Plug and Play
When installing the printer driver by using Plug and Play, the installation procedure differs with operating systems other than Windows Me and Windows
98 SE.
4
With Windows Me and 98 SE With operating systems other than Windows
Me and 98 SE
Install the TWAIN driver.
Install the USB printing support driver.
Install the printer driver.
Installation using the Add Printer Wizard
When installing the printer driver by using the Add Printer Wizard, the installation procedure is the same for all operating systems.
All operating systems
Install the printer driver.
Installing the printer driver Chapter 4
IC-205 4-3
Page 31

4
Installing the printer driver
4.2 Installing the TWAIN driver/printer driver using “Plug and Play”
Installation using “Plug and Play” is not possible on Windows 98 and NT 4.0.
Refer to the procedure for using the “Add Printer Wizard”.
2
Note
If the printer driver is installed using Plug and Play, first the TWAIN driver
is installed, and then installation of the printer driver begins. This manual
describes the installation of the TWAIN driver followed by that of the
printer driver.
Installing the TWAIN driver/printer driver using “Plug and Play” under Windows XP/Server 2003
1 With Windows running, insert the CD-ROM into your computer’s CD-
ROM drive.
2 Turn on the machine.
3 When the machine is ready, connect it to the computer with the USB
cable.
The “Found New Hardware Wizard” dialog box appears. First, install
the TWAIN driver.
When using Windows XP (SP2), select do not connect. in the “Found
New Hardware Wizard” dialog box, and then click [Next].
4 Select Install from a list or specific location Advanced, and then
Installing the printer driver Chapter 4
click [Next].
5 Select Include this location in the search: under Search for the best
driver in these locations., and then click [Browse].
6 Browse to “Driver\(language)\2k_XP” on the CD-ROM, and then click
[OK].
Select the language you prefer. For example, if you prefer English,
browse to:
Driver\English\2k_XP
7 Click [Next].
The “Completing the Found New Hardware Wizard” dialog box appears.
4-4 IC-205
Page 32

Installing the printer driver
8 Click [Finish].
This completes the installation of the TWAIN driver. The “Found New
Hardware Wizard” dialog box appears again. Next, install the printer
driver.
9 Repeat steps 4 through 8 to install the printer driver.
4
IC-205 4-5
Installing the printer driver Chapter 4
Page 33

4
Installing the printer driver
Installing the TWAIN driver/printer driver using “Plug and Play” under Windows 2000
1 With Windows running, insert the CD-ROM into your computer’s CD-
ROM drive.
2 Turn on the machine.
3 When the machine is ready, connect it to the computer with the USB
cable.
The “Found New Hardware Wizard” dialog box appears. First, install
the TWAIN driver.
4 Click [Next].
5 Select Search for a suitable driver for my device (recommended) in
the “Install Hardware Device Drivers” dialog box, and then click [Next].
The “Locate Driver Files” dialog box appears.
6 Select Specify a location, and click [Next].
7 Click [Browse...] on the next dialog box, browse to
“Driver\(language)\2k_XP” on the CD-ROM, and then click [Open].
Select the language you prefer. For example, if you prefer English,
browse to: Driver\English\2k_XP
8 Click [OK], and follow the instructions that appear on the screen until
the “Completing the Found New Hardware Wizard” dialog box ap-
Installing the printer driver Chapter 4
pears.
9 Click [Finish].
This completes the installation of the TWAIN driver. The “Found New
Hardware Wizard” dialog box appears again. Next, install the printer
driver.
10 Repeat steps 4 through 9 to install the printer driver.
4-6 IC-205
Page 34

Installing the printer driver
Installing the TWAIN driver/printer driver using “Plug and Play” under Windows Me/98 SE
1 With Windows running, insert the CD-ROM into your computer’s CD-
ROM drive.
2 Turn on the machine.
3 When the machine is ready, connect it to the computer with the USB
cable.
The “Add New Hardware Wizard” dialog box appears and installation
of the TWAIN driver begins.
4 With Windows Me, select Specify the location of the driver (Ad-
vanced).
With Windows 98 SE, click [Next], and then select Search for the best
driver for your device. (Recommended) in the dialog box that ap-
pears.
5 Click [Next].
6 Select Specify a location, and then click [Browse…].
4
7 Browse to “Driver\(language)\Win9x” on the CD-ROM, and then click
[OK].
Select the language you prefer. For example, if you prefer English,
browse to: Driver\English\Win9x
8 Click [Next], and then follow the instructions that appear on the screen
until you can click [Finish].
9 Click [Finish].
This completes the installation of the TWAIN driver. The “Add New
Hardware Wizard” dialog box appears again. Next, install the USB
printing support driver.
10 Repeat steps 4 through 9 to install the USB printing support driver.
The “Add New Hardware Wizard” dialog box appears again. Next, install the printer driver.
11 Repeat steps 4 through 9 to install the printer driver.
IC-205 4-7
Installing the printer driver Chapter 4
Page 35

4
Installing the printer driver
Reinstalling the printer driver by using Plug and Play
When reinstalling the printer driver using Plug and Play, remove the CD-ROM
and disconnect the machine from the computer before performing the reinstallation procedure described below.
1 Open the Printers folder.
– If Windows XP or Server 2003 is being used, click the [Start] button,
and then click “Printers and Faxes”.
– If Windows 2000, Me or 98 SE is being used, click the [Start] button,
point to “Settings”, and then click “Printers”.
2 Delete the appropriate printer.
– If Windows XP, Server 2003 or 2000 is being used, continue with
step 3.
– If Windows Me or 98 SE is being used, skip to step 4.
3 Click [Server Properties] from the [File] menu, display the “Drivers” tab,
delete the appropriate printer, and then click [OK].
4 Restart the computer.
5 Use the USB cable to connect the machine to the computer.
6 Follow the on-screen instructions to reinstall the printer driver.
– When the dialog box for specifying the folder appears, insert the
CD-ROM, and then continue the installation.
– If Windows 98 SE is being used, click [OK] when the “Insert Disk”
dialog box appears, and then continue the installation.
Installing the printer driver Chapter 4
4-8 IC-205
– If Windows 2000 is being used, begin the installation.
Page 36

Installing the printer driver
4
4.3 Installing the printer driver using the “Add Printer Wizard”
Installing the printer driver using the “Add Printer Wizard” under Windows XP/Server 2003
1 With Windows running, insert the CD-ROM into the CD-ROM drive of
your computer.
2 Click the Windows [Start] button, and then click [Printers and Faxes].
3 Select [Add a printer] from the [Printer Tasks] menu.
The “Add Printer Wizard” starts.
4 Click [Next].
5 Select Local printer attached to this computer, and then click [Next].
6 Select Use the following port, and then select “LPT1: (Recommended
Printer Port)”.
7 Click [Have Disk].
IC-205 4-9
Installing the printer driver Chapter 4
Page 37

4
Installing the printer driver
8 Click [Browse], select “Driver\(language)\2k_XP” on the CD-ROM, and
then click [Open].
Select the language you prefer. For example, if you prefer English,
browse to: Driver\English\2k_XP.
9 Click [Open] again, and then click [OK].
10 Select the printer to be installed, and then click [Next].
11 Continue selecting the appropriate settings according to your printer
Installing the printer driver Chapter 4
setup and clicking [Next] until [Finish] appears.
12 Click [Finish].
4-10 IC-205
Page 38

Installing the printer driver
Installing the printer driver using the “Add Printer Wizard” under Windows 2000/NT 4.0
1 With Windows running, insert the CD-ROM into the CD-ROM drive of
your computer.
2 Click the Windows [Start] button, point to [Settings], and then click
[Printers].
The “Printers” window appears.
3 Double-click the “Add Printer” icon.
4
The “Add Printer Wizard” starts.
4 Select the connection method for the printer, and then click [Next].
– If Windows 2000 is being used, click [Next], and then select Local
printer.
– If Windows NT 4.0 is being used, select My computer.
5 Select “LPT1” as the printer port, and then click [Next].
6 Click [Have Disk].
IC-205 4-11
Installing the printer driver Chapter 4
Page 39

4
Installing the printer driver
7 Click [Browse], select the folder on the CD-ROM, and then click [Open].
– If Windows 2000 is being used, select “Driver\(language)\2k_XP”.
Select the language you prefer. For example, if you prefer English,
browse to: Driver\English\2k_XP.
– If Windows NT 4.0 is being used, select “Driver\(language)\WinNT”.
Select the language you prefer. For example, if you prefer English,
browse to: Driver\English\WinNT.
Installing the printer driver Chapter 4
8 Click [Open] again, and then click [OK].
9 Select the printer to be installed, and then click [Next].
4-12 IC-205
Page 40

Installing the printer driver
10 Continue selecting the appropriate settings according to your printer
setup and clicking [Next] until [Finish] appears.
11 Click [Finish].
Installing the printer driver using the “Add Printer Wizard” under Windows Me/98 SE/98
1 With Windows running, insert the CD-ROM into the CD-ROM drive of
your computer.
2 Click the Windows [Start] button, point to [Settings], and then click
[Printers].
The “Printers” window appears.
3 Double-click the “Add Printer” icon.
4
The “Add Printer Wizard” starts.
4 Click [Next].
5 Select Local printer, and then click [Next].
6 Click [Have Disk].
7 In Folder, select “Driver\(language)\Win9x” on the CD-ROM, and then
click [OK]. Select the language you prefer. For example, if you prefer
English, browse to: Driver\English\Win9x.
IC-205 4-13
Installing the printer driver Chapter 4
Page 41

4
Installing the printer driver
8 Click [OK].
Click [OK] again.
9 Select the printer to be installed, and then click [Next].
10 Select “LPT1” as the printer port, and then click [Next].
11 Click [Finish].
Reinstalling the printer driver by using the Add Printer Wizard
1 Open the Printers folder.
– If Windows XP or Server 2003 is being used, click the [Start] button,
and then click “Printers and Faxes”.
– If Windows 2000, NT 4.0, Me, 98 SE or 98 is being used, click the
Installing the printer driver Chapter 4
[Start] button, point to “Settings”, and then click “Printers”.
2 Delete the appropriate printer.
– If Windows XP, Server 2003 or 2000 is being used, continue with
step 3.
– If Windows Me or 98 SE is being used, skip to step 4.
3 Click [Server Properties] from the [File] menu, display the “Drivers” tab,
delete the appropriate printer, and then click [OK].
4 Restart the computer.
5 Reinstall the printer driver.
4-14 IC-205
Page 42

5
Configuring printer driver
settings
Configuring printer driver settings Chapter 5
Page 43

5
Configuring printer driver settings
5 Configuring printer driver settings
From the Windows printer window, select the printer, and then display the
printer driver property dialog box. All settings specified in this dialog box are
applied to the printer when it is used with all applications.
5.1 Displaying printer driver properties for configuring global settings
Displaying settings under Windows XP/Server 2003
1 Click the Windows [Start] button, and then click [Printers and Faxes].
2 In the “Printers and Faxes” window, select the “KONICA MINOLTA 162
PCL6”, “KONICA MINOLTA 180 PCL6”, or “KONICA MINOLTA 210
PCL6” icon.
3 Click [Printing Preferences...] from the [File] menu. The following “Print-
er Driver Setup” dialog box appears.
Configuring printer driver settings Chapter 5
5-2 IC-205
Page 44

Configuring printer driver settings
– To display the “Device Options” tab, click [Properties] from the [File]
menu.
5
IC-205 5-3
Configuring printer driver settings Chapter 5
Page 45

5
Configuring printer driver settings
Displaying settings under Windows 2000/NT 4.0/Me/98 SE/98
1 Click the Windows [Start] button, point to [Settings], and then click
[Printers].
2 Select the “KONICA MINOLTA 162 PCL6”, “KONICA MINOLTA 180
PCL6”, or “KONICA MINOLTA 210 PCL6” icon.
3 To display the printer driver settings:
– Windows 2000 — Select [Printing Preferences...] from the [File]
menu.
– Windows NT 4.0 — Select [Document Defaults...] from the [File]
menu.
– Windows Me/98 SE/98 — Select [Properties] from the [File] menu.
The following printer setup dialog box appears.
Windows 2000/NT 4.0
Configuring printer driver settings Chapter 5
5-4 IC-205
Page 46
Configuring printer driver settings
Windows Me/98 SE/98
– To display the “Device Options” tab in Windows 2000 or Windows
NT 4.0, click [Properties] from the [File] menu.
5
IC-205 5-5
Configuring printer driver settings Chapter 5
Page 47

5
Configuring printer driver settings
2
Note
Use the four tabs (“Setup”, “Paper”, “Quality”, and “Device Options”) to
configure the printer driver settings.
The driver version for the printer can be checked on the “About” tab.
Configuring printer driver settings Chapter 5
5-6 IC-205
Page 48

Configuring printer driver settings
5.2 Common operations
This section describes buttons that are common to the dialog boxes and settings that are common to all four of the tabs (“Setup”, “Paper”, “Quality”, and
“Device Options”). The actual buttons displayed may vary depending on the
operating system.
5
OK
Click this button to exit the dialog box and apply all settings you changed.
Cancel
Click this button to exit the dialog box without applying any changes.
Apply
Click this button to apply all settings you changed without exiting the dialog
box.
Help
Click this button to view help information about the items in the currently displayed screen.
IC-205 5-7
Configuring printer driver settings Chapter 5
Page 49

5
Configuring printer driver settings
Easy Set List
Easy Set lets you save the setup of each tab for later recall, when you want
to use it again. Afterward, you can recall the settings by selecting them from
a list. Select “Factory Defaults” from the list to reset all settings on the tab to
their default values.
2
Note
As many as 32 (31 + “Factory Default”)
Save
When a setting is changed, “Untitled” appears. To save the current settings,
type in a name for the setup, and then click the [Save] button.
Easy Set
setups can be specified.
2
Note
Setup names can be up to 20 characters long.
Delete
The [Save] button changes to [Delete] while an Easy Set setup is selected
from the list. Clicking the [Delete] button deletes the currently highlighted
setup.
Configuring printer driver settings Chapter 5
5-8 IC-205
Page 50

Configuring printer driver settings
Page Layout/Printer Figure
The Page Layout image shows what the printed document will look like using the current printer driver settings. The Page Layout image changes as
you select different settings.
The Printer Figure image shows a graphic image of what trays, and other
options are currently installed on the machine. All installed options are displayed, and the tray currently selected under Paper Source on the “Setup”
tab appears in light blue.
5
IC-205 5-9
Configuring printer driver settings Chapter 5
Page 51

5
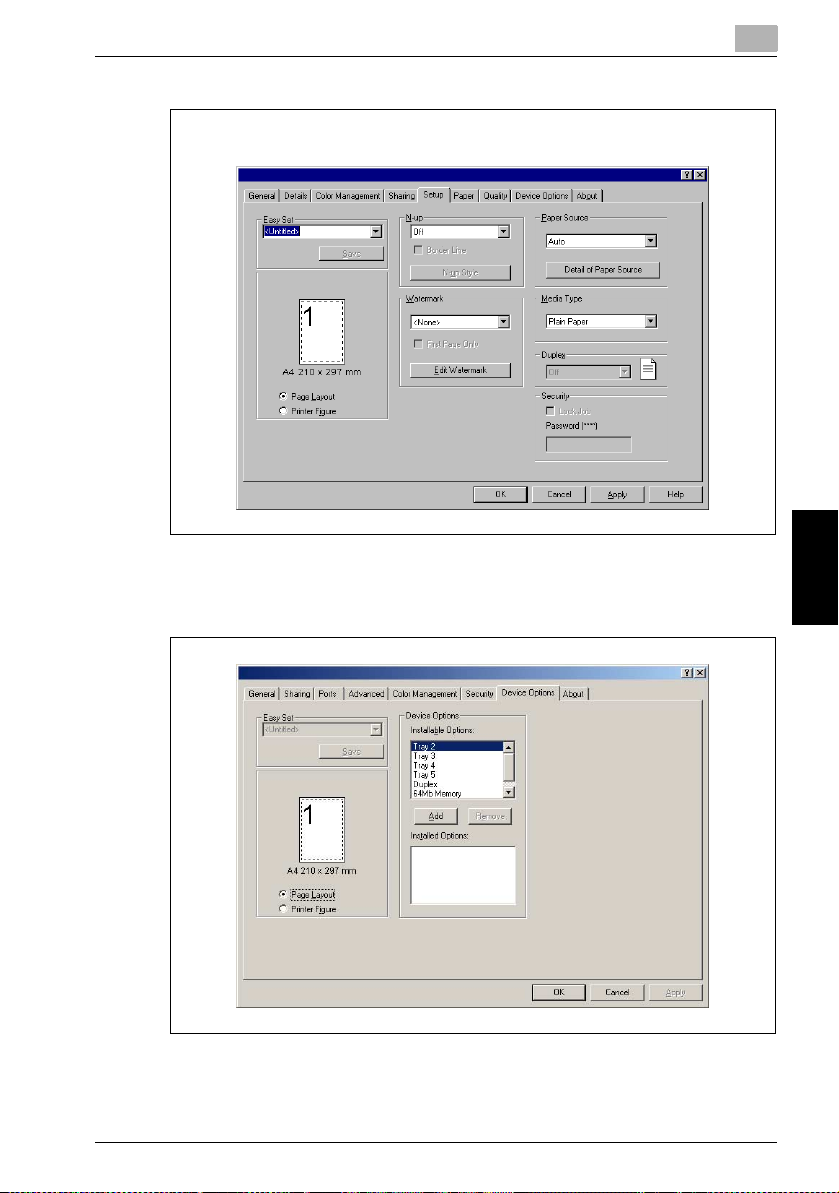
5.3 “Setup” tab
The “Setup” tab contains settings for N-up, Watermark, Paper Source, Media Type, Duplex, and Security.
2
Note
The “Duplex” function can be used only if the 180/210 is equipped with
the optional automatic duplex unit.
The “Security” function can be used only if the optional expansion memory is installed.
Configuring printer driver settings
Configuring printer driver settings Chapter 5
5-10 IC-205
Page 52

Configuring printer driver settings
5.3.1 N-up
The settings in this group box are for configuring how multiple pages of the
document should be printed on a single sheet of paper.
2
Note
The settings in the
following conditions exists.
The
Fit to Paper
check box on the “Paper” tab is selected.
N-up
group box are not available when either of the
5
Scaling
The
N-up List
Click the down arrow button, and then select the number of document pages
that should be printed on each sheet of paper.
Available settings: Off, 2 up, 4 up, 6 up, 9 up, 16 up
Selecting “2 up”, for example, prints two document pages on each sheet of
paper. Selecting “Off” prints one document page per sheet.
Border Line
Select this check box to print a border around each page when printing more
than one document page on each sheet of paper.
setting on the “Paper” tab is anything other than “100 %”.
2
Note
This option is not available when “Off” is selected in the
N-up
box.
IC-205 5-11
Configuring printer driver settings Chapter 5
Page 53

5
Configuring printer driver settings
N-up Style
Clicking this button displays the dialog box shown below.
Click the style you want to use when printing multiple document pages on
each sheet of paper.
Available settings:
Horz. Ascending
Horz. Descending
Vert. Ascending
Vert. Descending
2
Note
This button is not available when “Off” is selected in the
Configuring printer driver settings Chapter 5
5-12 IC-205
N-up
box.
Page 54

Configuring printer driver settings
5.3.2 Watermark
Use the settings in this group box to select the watermark text (such as
“CONFIDENTIAL”, “DRAFT”, etc.) and to control whether it is printed on all
pages or only the first page.
Watermark List
Click the down arrow button, and then select the watermark text from the list
that appears.
Available settings:
<None>, PROOF, CONFIDENTIAL, TOP SECRET, DO NOT COPY, COPY,
DRAFT, FINAL, and any custom text
First Page Only
Select this check box when you want the watermark to be printed on the first
page only. Clear the check box to print the watermark on all pages.
2
Note
The
First Page Only
Watermark
the
Edit Watermark
list.
5
check box is not available if “<None>” is selected in
Clicking this button displays the “Watermark” dialog box.
IC-205 5-13
Configuring printer driver settings Chapter 5
Page 55

Configuring printer driver settings Chapter 5
5
Configuring printer driver settings
How to edit a watermark
1 To edit a watermark, click the name of the watermark to be edited from
the Watermark list.
2 Make any settings you want.
3 To create a new watermark, type the desired text in the box.
4 Click the [New] button.
2
Note
Watermark text can be up to 20 characters long.
You can have up to 31 different watermarks configured at one time. (including “<None>”)
Delete
Click this button to delete the watermark that is selected in the list.
Shading
Specify a relative density for the watermark text between 10 % and 100 %.
Style
Use these check boxes to turn bold style and italic style on (check box selected) or off (check box cleared).
Italic: Italic text
Bold: Bold text
Font
Use the settings in this group box to specify the typeface and the point size
of the watermark text.
Type Face:
You can specify any of the typefaces currently installed on your computer’s
operating system as the typeface of the watermark text.
Size:
Specify text size between 8 and 200 points.
Angle
Use this setting to specify the angle of the watermark text relative to the paper. The setting range is -90° to +90°.
A negative (-) value rotates the characters clockwise, 0 specifies the text
should be parallel to the paper, and a positive (+) value rotates the characters
counterclockwise.
5-14 IC-205
Page 56

Configuring printer driver settings
Position
Use this setting to specify the position where the watermark text should be
printed. You can specify a position by using horizontal and vertical values.
5
IC-205 5-15
Configuring printer driver settings Chapter 5
Page 57

5
5.3.3 Paper Source
Use the settings in this group box to specify the source for the printing paper.
Paper Source List
Click the down arrow button, and then select the tray from which paper
should be fed.
Available settings: Auto, Tray 1, Tray 2-Tray 5(option), Bypass
2
Note
If the optional paper feed unit is installed, “Tray 2-Tray 5” appears. For
details, refer to ““Device Options” tab” on page 5-28. In addition, only
plain paper can be loaded into tray 2-tray 5.
Tray 2 through tray 5 do not support the following paper sizes.
Paper sizes: Hagaki, Env. Com10, Env.C6, Env. C6 Envelope, Env. DL,
Env. You-1, Env. You-4, Env. You-6
Selecting “Auto” tells the machine to use the tray that contains paper of the
size specified under Output Paper Size on the “Paper” tab.
Configuring printer driver settings
Configuring printer driver settings Chapter 5
5-16 IC-205
Page 58

Configuring printer driver settings
Detail of Paper Source
Click this button to display a dialog box for specifying settings for the cover
page.
Cover Page
Use the settings in this group box to specify how to print a document with
front and back cover pages.
5
Setting Description
Front Cover Page: Select this check box to print the document with a front cover.
With Image: Select this check box to print an image on the front cover.
Back Cover Page: Select this check box to print the document with a back cover.
With Image: Select this check box to print an image on the back cover.
Cover Paper Source: Select the paper source for the front and back cover pages.
Available settings: Tray 1, Tray 2-Tray 5 (option), Bypass
Cover Paper Media Type: Select the paper media type for the front and back cover pages.
Available settings: Plain Paper, Thick Paper, OHP, Envelope
2
Note
If “Tray 2-Tray 5” (option) is selected in the
Cover Paper Media Type
only
setting available is “Plain Paper”.
IC-205 5-17
Cover Paper Source
list, the
Configuring printer driver settings Chapter 5
Page 59

5
5.3.4 Media type
Use the settings in this group box to specify the paper media type for the
printing paper.
Media Type List
Click the down arrow button, and then select the type of media to be used
for printing.
Available settings: Plain Paper, Thick Paper, OHP, Envelope
2
Note
If “Auto” or “Tray 2-Tray 5” (option) is selected in the
the only
Media Type
5.3.5 Duplex
2
Note
The “Duplex” option can be used only if the 180/210 is equipped with the
optional automatic duplex unit.
Click the down arrow button, and then select the settings for duplex (twosided) printing.
If “Off” is selected, the printer does not print on both sides of the paper.
When duplex printing is selected, select “Long Edge” or “Short Edge” for the
binding position.
Configuring printer driver settings
setting available is “Plain Paper”.
Paper Source
list,
2
Note
The automatic duplex unit is required in order to use duplex printing. In
addition, the “Duplex” option must be added to the list of installed options in the “Device Options” tab for the printer driver. When using duplex
printing, select “Plain Paper” as the media type.
Configuring printer driver settings Chapter 5
5-18 IC-205
Page 60

Configuring printer driver settings
5.3.6 Security
If the lock job function is used, printing cannot be performed unless the unlocking password is entered from the machine’s operation panel.
2
Note
The lock job function can be used if the expanded memory unit is installed.
Lock Job
Select this check box to use the lock job function.
Password
Specify the password for unlocking jobs.
Type in a four-digit number (between 0000 and 9999).
Using lock job
5
Enter the password.
Specifying settings with the printer driver
1 Select the Lock Job check box on the “Setup” tab.
2 In the Password box, type in the password (between 0000 and 9999).
3 Send the print job.
IC-205 5-19
Configuring printer driver settings Chapter 5
Page 61
5
Configuring printer driver settings
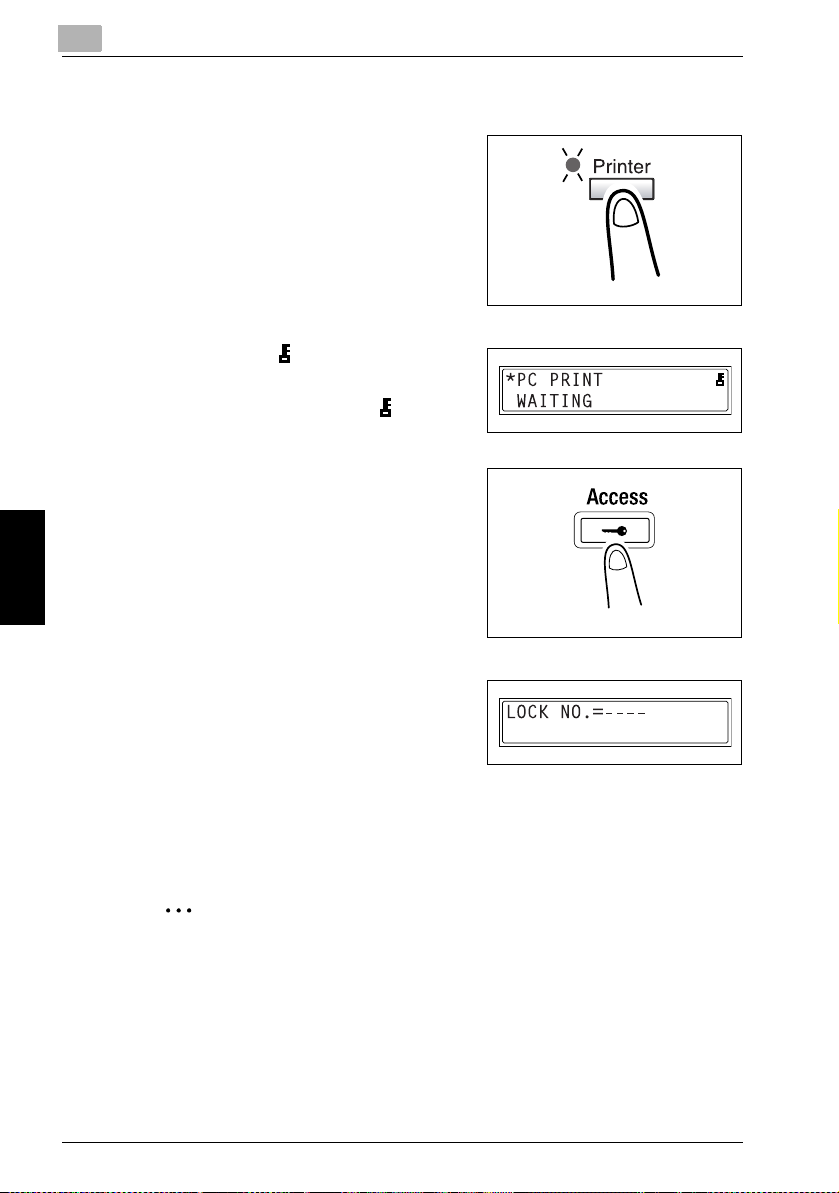
Printing a locked job
1 Press the [Printer] key to display the
PC Print mode screen.
2 Check that appears in the print-
er’s display.
If there are locked jobs, appears
in the printer’s display.
3 Press the [Access] key.
4 When LOCK NO. = - - - - appears,
type in the password.
– If the password specified for the
printer driver consists of less than
four digits, add “0” so that four digits are typed in. For example, if
the specified password is “12”, type in “0012”.
5 If the password is correct, the job is printed.
2
Configuring printer driver settings Chapter 5
5-20 IC-205
Note
If there are multiple locked jobs with the same password, all of those
locked jobs are printed.
Page 62

Configuring printer driver settings
5.4 “Paper” tab
Use this tab to configure settings related to your original and to the medium
on which you are printing. You can also specify the number of copies to be
printed and the orientation of the print image.
5
IC-205 5-21
Configuring printer driver settings Chapter 5
Page 63

5
5.4.1 Original Document Size
Use the settings in this group box to specify the size of the original document.
Original Document Size List
The list that appears when you click the down arrow button shows all of the
paper sizes that are supported by your machine. Specify the original document size by clicking it in the list.
Available settings:
A3, A4, A5, B4 (JIS), B5 (JIS), FLS, Letter, Half Letter, Legal, 11 × 17 in, 11 ×
14 in, 16K, 8K, Hagaki, Env.Com10, Env.C6, Env.C6Envelope, Env.DL,
Env.You-1, Env.You-4, Env.You-6
Edit Custom
To specify a custom document size, click the [Edit Custom] button, and then
specify the desired document size. The specified custom document size appears in the Original Document Size list.
Configuring printer driver settings
Configuring printer driver settings Chapter 5
Paper List
This is a list of all currently specified custom paper sizes. Select the name for
the paper size that you want to edit. You can specify up to 32 custom paper
sizes.
New
Click this button to display settings for specifying a custom paper size.
5-22 IC-205
Page 64

Configuring printer driver settings
Edit
Click this button to display a dialog box for editing the paper size settings of
the custom paper size currently selected in the list.
Delete
Click this button to delete the custom paper size currently selected in the list.
Name
Type in the name for the custom paper size. The name can be up to 20 characters long.
Size
Specify the size for the custom paper size.
Width:
90.0 mm to 297.0 mm (metric units), or 3.54 inches to 11.69 inches (inch
units)
Height:
140.0 mm to 431.8 mm (metric units), or 5.51 inches to 17.00 inches (inch
units)
Unit
Select whether the measurement units are metric (0.1 mm) or inches (0.01
inch).
5
IC-205 5-23
Configuring printer driver settings Chapter 5
Page 65

5
5.4.2 Output Paper Size
Use the settings in this group box to specify the size of paper you want to
use for printing. You can also configure other settings that affect the size of
the print image on the paper.
2
Note
Output Paper Size
setting on the “Setup” tab is anything besides “Off”.
up
Fit to Paper
Selecting this check box causes the printed image to be resized automatically so it matches the size selected in the Output Paper Size list.
2
Note
The
Fit to Paper
other than 100 %.
check box is not available if
Configuring printer driver settings
group box settings are not available whenever the
Scaling
is set to any setting
N-
Output Paper Size List
To specify a paper size that is different from the size specified under Original
Document Size, click the down arrow button, and then select a paper size
from the list that appears.
Available settings:
A3, A4, A5, B4 (JIS), B5 (JIS), FLS, Letter, Half Letter, Legal, 11 × 17 in, 11 ×
14 in, 16K, 8K, Hagaki, Env.Com10, Env.C6, Env.C6Envelope, Env.DL,
Env.You-1, Env.You-4, Env.You-6
2
Note
The
Configuring printer driver settings Chapter 5
5-24 IC-205
Output Paper Size
is selected.
list is available when the
Fit to Paper
check box
Page 66

Configuring printer driver settings
Scaling
Specify the zoom ratio for enlarging or reducing the print image.
Type or select a value between 20 % and 400 %.
2
Note
The
Scaling
selected.
5.4.3 Copies
Use this setting to specify the number of copies to be printed.
Type or select a value between 1 and 99.
5.4.4 Collate
Use this setting when printing multiple copies of the same document, to
specify whether each copy of the document should be printed individually or
if all copies of each page should be printed as a set.
Selecting On prints each copy of the document separately. If you have “5”
specified for Copies, for example, this setting would print the document from
the first page to the last page five times.
Selecting Off prints all copies of each page as a set. If you have “5” specified
for Copies, for example, this setting would print five copies of page one, followed by five copies of page two, etc.
setting is not available while the
Fit to Paper
5
check box is
2
Note
The
Collate
Collating is not available when “1” is specified in the copies box.
Collate
If
cation’s collate function.
5.4.5 Orientation
Use this setting to specify whether your document should be printed in Por-
trait (vertical) or Landscape (horizontal) format.
Rotate
Select the Rotated check box to rotate the print image 180° to the paper orientation.
IC-205 5-25
setting may not be available with some applications.
is set to “On” in the printer driver, be sure to disable the appli-
Configuring printer driver settings Chapter 5
Page 67

5
5.5 “Quality” tab
Use this tab to control the quality of the printed output.
5.5.1 Adjustment
Configuring printer driver settings
Contrast
Use this setting to adjust the contrast of the print image. Type or select a value between 0 and 100.
Brightness
Use this setting to adjust the brightness of the print image. Type or select a
value between 0 and 100.
5.5.2 Resolution
Click the down arrow button, and then select either “600 × 600 dpi” or “1200
× 600 dpi” as the printing resolution.
Configuring printer driver settings Chapter 5
5-26 IC-205
2
Note
“1200 × 600 dpi” provides better quality, but it also takes longer to print
at this setting than at “600 × 600 dpi”.
Page 68

Configuring printer driver settings
5.5.3 Toner Save
Selecting On prints using less toner. Selecting Off prints using the usual
amount of toner.
5.5.4 Rendering Mode
Use this setting to specify the image format. Selecting Send Graphics as
Vector prints using vector graphics. Selecting Send Page as Raster prints
using raster graphics.
If the data is not printed correctly, selecting Send Page as Raster may print
correctly.
5.5.5 Font Setting
Use this setting to specify how the TrueType fonts are downloaded from the
computer to the printer.
Send True Type as Outline:
Select this setting to download the TrueType fonts as outline data.
Send True Type as Bitmap:
Select this setting to download the TrueType fonts as bitmap data.
2
Note
If
Rendering Mode
selected for
Font Setting
5
is set to “Send Page as Raster”, no setting can be
.
IC-205 5-27
Configuring printer driver settings Chapter 5
Page 69

5
5.6 “Device Options” tab
Use this tab to specify the options that are currently installed on the machine.
5.6.1 Device Options
Configuring printer driver settings
2
Note
The option “Duplex” is only supported by 180/210.
Use this setting to specify the options installed in your machine.
To add an available option from the Installable Options list to the Installed
Options list, select the option, and then click the [Add] button.
To remove an option from the Installed Options list, select the option, and
then click the [Remove] button.
Configuring printer driver settings Chapter 5
5-28 IC-205
Page 70

Configuring printer driver settings
5.7 “About” tab
Use this tab to display version and copyright information about this printer
driver.
5
IC-205 5-29
Configuring printer driver settings Chapter 5
Page 71

5
Configuring printer driver settings
Configuring printer driver settings Chapter 5
5-30 IC-205
Page 72

6
Control panel operations
Control panel operations Chapter 6
Page 73

6
6 Control panel operations
This section covers printer operations you can perform on the control panel
of the machine.
6.1 Printer operations
The machine’s default mode is the copy
mode. Normally, when printing is performed from a connected computer, printing begins automatically.
See “Starting the Print Operation” on
page 6-4 for more information.
When printing with “Bypass” selected in the Paper Source list on the “Setup” tab, refer to “Using the bypass tray” on page 6-7.
Copy mode
Control panel operations
Control panel operations Chapter 6
6-2 IC-205
Page 74

Control panel operations
General guide
6
3167
No. Name Description
1 [Error] indicator • Lights up in orange if an error or malfunction occurs.
2 [Printer] indicator • Blinks while the machine is receiving print data.
3 [Printer] key • Press while the machine is receiving print data (indicated by
4 [Status] key • Press to print the configuration page and PCL font list.
5 Display • While print data is being received, “PC:PRN” appears in the
6 [No/C] key • Press to reply “NO” to the confirmation message that appears
7 [Yes] key • Press to reply “YES” to the confirmation message that appears
8 [Start] indicator • Lights up in orange when the machine is receiving print data.
9 [Stop] key • To cancel the current print job while print data is being re-
10 [Access] key • Press when printing a locked job.
• Lights while the machine is performing a print operation (even
• Goes out when there is no print data.
• See “[Printer] indicator” on page 6-4.
• Press while the PC print mode screen is displayed to return to
• The PC print mode will not be entered if there is no print data
• If the [Printer] key is press while the machine is receiving print
• Refer to “Security” on page 5-19.
52 410
9
8
if data is being received simultaneously).
the [PRINT] indicator blinking) to display the PC print mode
screen.
the previous screen.
in machine memory when the [Printer] key is pressed.
Pressing the [Fax], [Scan], or [Copy] key, a copy function key,
or a fax function key exits the PC print mode.
display.
data (the [Printer] indicator is lit), the paper source and paper
size for the print job are indicated in the display.
when a print job is canceled.
when a print job is canceled.
ceived, press the [Printer] key, and then press this key when
the PC print mode screen appears. See “Canceling a print job”
on page 6-5.
Control panel operations Chapter 6
IC-205 6-3
Page 75

6
Control panel operations
2
Note
The [Fax] key and the fax function keys are available only if the optional
Fax Kit (FK-505) is installed.
The [Scan] key is available only when the optional Network Interface Card
(NC-502) and the optional Scanner Unit (SU-502) are installed with the
optional Fax Kit (FK-505).
[Printer] indicator
The [Printer] indicator shows the current status of PC printing.
[Printer] indicator Description
Blinking • Machine is receiving print data, even while in another mode.
On • When in another mode, indicates that machine memory con-
Off • No print data in machine memory.
• A machine error has occurred.
tains print data.
• In the PC print mode, indicates that machine is printing print data. The indicator remains lit (without blinking) even if data is being received while printing is in progress.
Starting the Print Operation
Normally, when printing is performed from a connected computer, printing
begins automatically.
- If the machine is in the copy mode when a print command is executed on
a connected computer, printing begins automatically if no operation is
performed in the copy mode for 30 seconds.
- If print data is received while a fax operation is being performed, printing
begins. (only if the Fax Kit (FK-505) is installed)
Control panel operations Chapter 6
6-4 IC-205
Page 76

Control panel operations
Canceling a print job
You can cancel a print job from the control panel of the machine only while
the machine is in the PC print mode.
1 Check that the [Printer] indicator is
flashing or is lit, and then press the
[Printer] key.
2 Make sure the machine’s display
shows *PC PRINT* PRINTING.
– The message that appears differs
depending on the status of the
machine.
3 Press the [Stop] key.
The PC JOB CANCEL? confirmation
message appears.
6
4 Press the [Yes] key to cancel the
print job.
– Press the [No/C] key to resume
printing.
– If no key is pressed within 5 sec-
onds, printing will resume.
JOB CANCELED appears on the
display and the print job is canceled.
IC-205 6-5
Control panel operations Chapter 6
Page 77

6
Control panel operations
2
Note
You can use steps 2 and 3 of the above procedure to cancel a print job
while any of the following messages is indicated on the display: PAPER
EMPTY, INCORRECT PAPER SIZE, NO SUITABLE PAPER, PAPER SIZE
ERROR, LOAD PAPER, PAPER JAM, FRONT COVER OPEN , FUSER
COVER OPEN, TONER EMPTY, MEDIA TYPE ERROR, REMOVE PAPER
IN BYPASS TRAY, RECEIVING.
Control panel operations Chapter 6
6-6 IC-205
Page 78

Control panel operations
Using the bypass tray
Use the procedure described below to print onto paper that is fed (one sheet
at a time) from the bypass tray.
1 On your computer, display the “Setup” tab of the printer driver, and
then specify “Bypass” for the Paper Source setting (page 5-16).
2 Execute the print operation from your computer.
3 When the message LOAD PAPER
appears on the machine’s display,
load paper onto the bypass tray.
This causes the print operation to be
performed using the paper from the
bypass tray.
4 Repeat step 3 as many times as nec-
essary until printing of the document
is complete.
2
Note
Be sure to execute the print operation from the computer first, and then
place the paper onto the bypass tray. If there is already paper on the bypass tray when you execute the print operation, remove it, and then place
it again onto the bypass tray.
6
Load the paper into the manual bypass tray one sheet at a time.
If the multi bypass tray (optional) is installed, it can used in the same way
as any other paper tray since the multi bypass tray can hold 100 sheets
of paper.
The multi bypass tray can be loaded with a maximum of 10 envelopes,
20 OHP transparencies, 20 postcards, 20 label sheets, or 100 sheets of
plain paper.
IC-205 6-7
Control panel operations Chapter 6
Page 79

6
Control panel operations
Energy save mode
If print data is received while the machine is in energy save mode, energy
save mode is canceled.
When print data is received, the data is printed after the machine has finished
warming up.
Outputting a report
When the image controller is installed, the following reports can be outputted.
0 Configuration Page
0 PCL Font List
1 Press [Status] key.
2 Using the + and , keys, select
PRINT REPORT?.
3 Press the [Yes] key.
A menu appears, showing the reports and lists that can be printed.
4 Using the + and , keys, select the
report/list that you wish to print, and
then press the [Yes] key.
– CONFIGURATION PAGE
– PCL FONT LIST
Control panel operations Chapter 6
6-8 IC-205
Page 80

7
Using PageScope Web
Connection
Using PageScope Web Connection Chapter 7
Page 81

7
Using PageScope Web Connection
7 Using PageScope Web Connection
7.1 When using PageScope Web Connection
In order to use PageScope Web Connection, the optional Network Interface
Card (NC-502) must be installed.
7.2 What is PageScope Web Connection?
PageScope Web Connection is a device control utility program provided by
the HTTP server built into the network interface card. This utility can be used
with a web browser as an interface for remotely controlling the machine and
network interface card.
Using PageScope Web Connection Chapter 7
HTTP server
Access
7-2 IC-205
Page 82

Using PageScope Web Connection
Here are some examples of the types of tasks that can be performed with
PageScope Web Connection.
-
Change settings
Change network settings
Change printer settings (Only for machines equipped with the optional
image controller)
Remote status monitoring
-
Check the details of machine trays, information about consumables, or
the total number of prints
Check the status of jobs that are being printed, or held in the print queue
(Jobs can also be deleted if you have logged in to the administrator
mode.)
Maintenance
-
Reset the network interface card (NIC), or image controller
Initialize the image controller
7
Using PageScope Web Connection Chapter 7
IC-205 7-3
Page 83

7
7.3 System requirements
PageScope Web Connection can be used in the following system environments.
System requirements
OS Windows 98, Windows 98 SE, Windows Me,
Browser Microsoft Internet Explorer 4.0 or later
2
Note
In order to use PageScope Web Connection, the optional Network Interface Card (NC-502) must be installed.
Using PageScope Web Connection Chapter 7
Using PageScope Web Connection
Windows NT 4.0, Windows 2000, Windows XP, or
Windows Server 2003
Netscape Navigator 4 or later
7-4 IC-205
Page 84

Using PageScope Web Connection
7.4 Accessing PageScope Web Connection
PageScope Web Connection is accessed directly using a web browser.
How to access to PageScope Web Connection
1 Start up your web browser.
2 Enter the IP address of the machine into the URL box, and then press
the [Enter] key.
http://<machine_IP_address>/
– (Example) If the machine IP address is 192.168.0.10, enter:
http://192.168.0.10/
3 The PageScope Web Connection screen appears.
2
7
Note
In order to access PageScope Web Connection, an IP address must be
assigned to the machine.
Using PageScope Web Connection Chapter 7
IC-205 7-5
Page 85

7
Using PageScope Web Connection
7.5 Using PageScope Web Connection
PageScope Web Connection is used in the same way as other internet web
pages. Click on links in the page to jump to that page, and use the [Back] and
[Next] buttons to navigate through pages that have already been loaded.
7.6 About the screen layout
The following screen appears when you access PageScope Web Connection.
2
Note
Screen images used in this manual may differ from the actual screen display. They are also subject to change without notice.
Using PageScope Web Connection Chapter 7
1
6 4 7
2 3 5
7-6 IC-205
Page 86

Using PageScope Web Connection
No. Name Description
1 Logo Click on this to jump to the manufacturer’s web site.
2 Logo Click to display the new screen containing the version informa-
3 Status display Displays the current status of the machine.
4 Administrator pass-
word
5 Tabs These are used to select the various categories of settings.
6 Menu This is used to select various setting items or display information.
7 Information/set-
tings display
7
tion. If the PageScope Web Connection logo is clicked in the
screen that appeared, the Web site for PageScope is displayed.
Enter the administrator password to log in to the administrator
mode.
Displays the details for the item selected from the menu.
Using PageScope Web Connection Chapter 7
IC-205 7-7
Page 87

7
7.7 Logging in as an administrator
Some of the settings available in PageScope Web Connection can only be
changed by an administrator. These settings are only displayed when you log
in to the administrator mode.
Logging in to administrator mode
1 Enter the administrator password in the “Admin Password:” box at the
left of the screen.
2 Click the [Login] button to log in to the administrator mode.
3 To log out again, click the [Logout] button.
2
Note
The default password for administrator mode is “sysadm”.
Using PageScope Web Connection Chapter 7
Be sure to change the administrator password before using administrator
mode.
The machine cannot be used while you are logged into PageScope Web
Connection with administrator mode.
In addition, if the machine is being operated, the administrator cannot log
on.
Using PageScope Web Connection
After logging on with Administrator mode, you will automatically be
logged off if no operation is performed for ten minutes.
7-8 IC-205
Page 88

Using PageScope Web Connection
7.8 Checking/Deleting print jobs
Checking a print job
Click [Print Job Management] in the menu on the “Job” tab to view details
for the print jobs.
2
7
Using PageScope Web Connection Chapter 7
Note
A maximum of 50 print jobs can be displayed, and jobs that have been
printed will automatically be deleted.
IC-205 7-9
Page 89

Using PageScope Web Connection Chapter 7
7
Using PageScope Web Connection
Deleting a print job
In order to delete a print job, you must be logged in to the administrator
mode.
1 Log in to the administrator mode.
2 Click [Print Job Management] in the menu on the [Job] tab to display a
sub-menu.
3 Select the print job that you wish to delete, and then click the [Delete
Selected Job] button to delete the job.
2
Note
The lock job cannot be deleted.
7-10 IC-205
Page 90

Using PageScope Web Connection
7.9 Downloading files
A specified file can be downloaded to the machine to be printed.
Only the following types of files can be downloaded.
- PCL files
- Text files (English text only)
2
Note
If a file t ype other than a PCL or text file is dow nloaded, it will not be printed, or will be printed with corrupt or incorrect characters.
How to download files
1 Click [File Download] in the menu on the “Job” tab.
2 Click the [Browse] button, and then select the file.
7
3 Click the [Send] button beside “Send File to Printer”.
The file is downloaded to the machine, then printed.
Using PageScope Web Connection Chapter 7
IC-205 7-11
Page 91

7
7.10 Checking/Changing printer settings
The default settings for the printer can be viewed and changed.
A print job sent with no settings specified is printed with these settings.
Checking the printer settings
Click [Settings] in the menu on the “Print” tab to display the following submenu.
Click each option in the sub-menu to check the various settings.
- Paper Handling
- Page Layout
- Printer Setting (PCL Settings)
Using PageScope Web Connection Chapter 7
Using PageScope Web Connection
Sub-menu option Parameter Description
Paper Handling Copies Specifies the default number of copies.
Paper Source Specifies the default paper source.
Media Path Specifies the default media path.
Page Layout Paper Size Specifies the default paper size.
Printer Setting
(PCL Settings)
Orientation Specifies the default printing orientation.
Size Specifies the default font size.
Pitch Specifies the default character pitch.
Font No. Specifies the default font number.
Symbol Set Specifies the default symbol set.
Form Length Specifies the default number of lines per page.
7-12 IC-205
Page 92

Using PageScope Web Connection
Changing the printer settings
In order to change printer settings, you must be logged in to the administrator mode.
1 Log in to the administrator mode.
2 Click [Settings] in the menu on the “Print” tab to display a sub-menu.
3 Change the settings, and then click the [Apply] button.
– To erase the changed setting, click the [Clear] button.
– To return the setting to its default, click the [Restore Factory De-
fault] button.
7
Using PageScope Web Connection Chapter 7
IC-205 7-13
Page 93

7
7.11 Printing a test page
The following test pages can be printed.
- Configuration page
- PCL font list
How to print a test page
1 Click [Test Print] in the menu on the “Print” tab.
2 Select the test page that you wish to print.
3 Click the [Print] button to print the selected test page.
Using PageScope Web Connection Chapter 7
Using PageScope Web Connection
7-14 IC-205
Page 94

Using PageScope Web Connection
7.12 Displaying the PCL font list
The PCL font list can be checked.
Click [Font Information] in the menu on the “Print” tab to display the font list.
7
Using PageScope Web Connection Chapter 7
IC-205 7-15
Page 95

7
Using PageScope Web Connection
7.13 Resetting the network interface card and image controller
The network interface card and image controller can be restarted.
How to reset the network interface card and image controller
In order to reset the network interface card and image controller, you must
be logged in to the administrator mode.
1 Log in to the administrator mode.
2 Click [Maintenance] in the menu on the “System” tab.
3 Click [NIC and Printer Controller Reset] in the sub-menu that appeared.
4 Click the [Reset] button.
5 In the confirmation dialog box that appeared, click the [Yes] button.
Using PageScope Web Connection Chapter 7
To stop resetting, click the [No] button.
2
Note
Job being processed are not saved when the reset operation is performed.
7-16 IC-205
Page 96

Using PageScope Web Connection
7
7.14 Initializing the network interface card and image controller
The network interface card and image controller can be initialized.
How to initialize the network interface card and image controller
In order to initialize the network interface card or image controller, you must
be logged in to the administrator mode.
1 Log in to the administrator mode.
2 Click [Maintenance] in the menu on the “System” tab.
3 Click [Initialize] in the sub-menu that appeared.
4 Click the [Restore] button beside either “Printer Controller” or “NIC”.
Using PageScope Web Connection Chapter 7
5 In the confirmation dialog box that appeared, click the [Yes] button.
To stop initializing, click the [No] button.
IC-205 7-17
Page 97

Using PageScope Web Connection Chapter 7
7
Using PageScope Web Connection
7-18 IC-205
Page 98

8
Troubleshooting
Troubleshooting Chapter 8
Page 99

8
8 Troubleshooting
This section describes the errors that can appear during PC printing and
what you need to do to correct the situation.
If a problem occurs during PC printing, check the following.
8.1 Checking messages
The [Error] indicator lights up and “PRN
Err” message appears in the lower-right
corner of the display when a PC print error
occurs while the machine is in another
mode besides the PC print mode. If this
Troubleshooting Chapter 8
happens, follow the procedure below.
How to check messages
Troubleshooting
Copy mode
1 Press the [Printer] key to enter the PC
print mode.
2 View the error message on the dis-
play.
8-2 IC-205
Page 100

Troubleshooting
8.2 Main messages
The table below describes the main error messages that may appear during
the PC print mode operations.
Error message Cause Action
PAPER SIZE ERROR The paper size specified for a
NO SUITABLE PAPER “Auto” is selected for paper
INCORRECT PAPER SIZE The paper size specified by
PAPER EMPTY There is no paper in the spec-
MEDIA TYPE ERROR The media type specified by
MEMORY FULL The memory is full of stored
paper tray differs from the siz e
of paper that is loaded.
source with the printer driver
properties, but none of the
machine’s trays conta in paper
of the size specified for printing.
the printer driver is not loaded
in the specified paper tray.
ified tray or the specified tray
is not loaded in the machine.
the printer driver is not loaded
in the specified paper tray.
data.
Load paper of the correct size
into the tray.
Tray 1:
Change the paper size in the
Utility mode, and load the correct paper into the tray.
Tray 2-Tray 5 (option):
Use a paper feed unit loaded
with paper of the corresponding size.
Multi Bypass Tray:
Change the paper that is loaded.
(NO SUITABLE PAPER)
Press the [Start] key to begin
printing with the paper source
specified in Utility mode.
(INCORRECT PAPER SIZE)
Press the [Start] key to begin
printing with the paper size
loaded in the tray selected
from the printer driver. (Tray 1
and Tray 2-Tray 5)
Load paper into the tray or
load tray in the machine.
Load the correct paper into
the tray, and change the media type in the Utility mode.
Press the [Start] key to begin
printing with the media type
loaded in the tray selected
from the printer driver. (Tray 1
and Tray 2-Tray 5)
Press any key, and then turn
the machine off, then on
again.
8
Troubleshooting Chapter 8
2
Note
If the data is not printed correctly, selecting “Send Page as Raster” from
the printer driver may print correctly. Refer to “Rendering Mode” on
page 5-27.
IC-205 8-3
 Loading...