

Page 1
Page 2
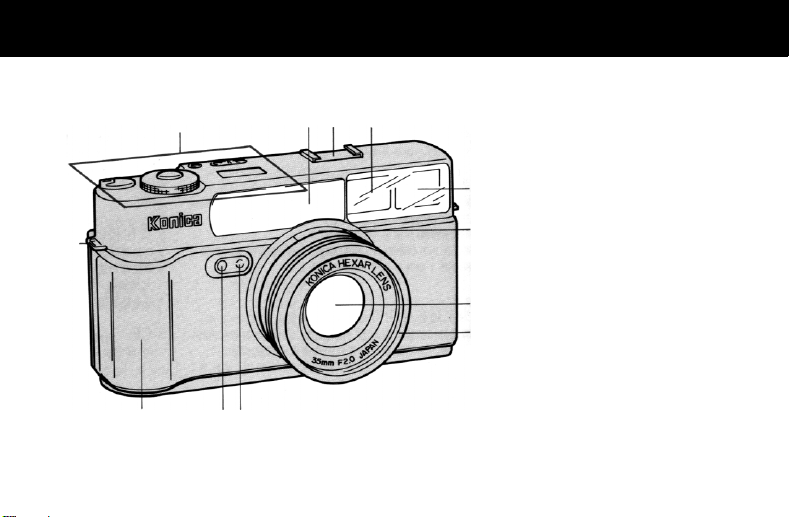
Part Names
■: Reference page ○: OK ✕: NO
錆
察
撮
雑 薩
札
拶
擦
察 Operation Parts
拶 Accessory Shoe
撮 Grip
殺
擦 AF Sensor Window
札 Finder Brightness Window
捌
殺 View Finder Window
薩 Self-timer Light
雑 AE Sensor Window
皐 Lens
皐
鯖 Lens Hood
鯖
捌 Focus Indicator
錆 Strap Eyelet
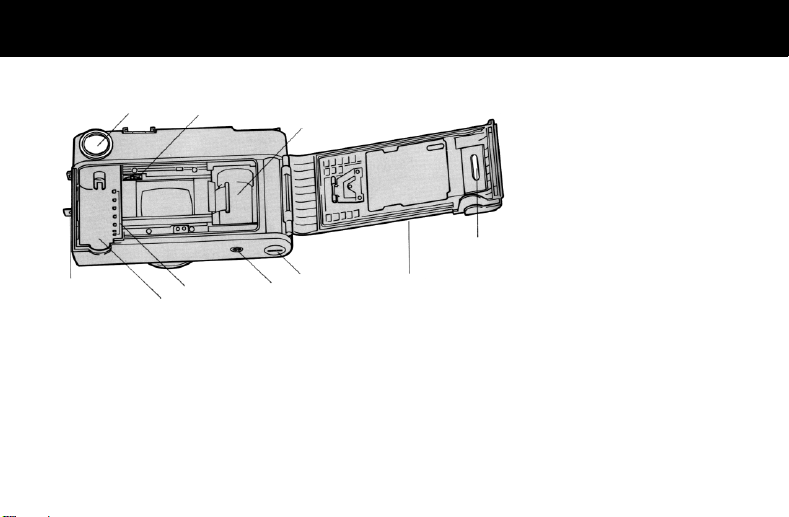
Page 3
皿
鮫
傘
山
鮫 Back Cover Lock
皿 Finder Eyepiece
晒 Film Chamber
三 Film Speed Detection Pins
傘 Film Sprocket
参 Tripod Socket
散
山 Film Take-up Spool
惨
参
三
晒
撒
惨 Battery Chamber Cover
撒 Back Cover
散 Film Check Window
Page 4
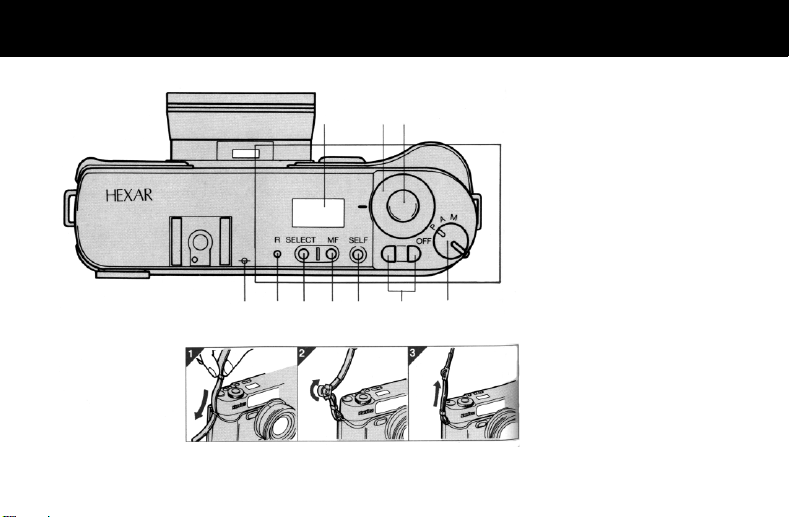
1. Operation Parts
Strap Fitting
蚕
賛 桟 燦 珊 産 算 讃
纂 酸
桟 Rewind Button
燦 SELECT Button
珊 MF Button
産 Self-timer Button
算 Up/Down Button
纂 Aperture Dial
蚕 Display Panel
讃 Main Switch
OFF: off
P: Program Mode
A: Aperture-priority Mode
M: Manual Mode
賛 Film Display
酸 Shutter Release Button
Page 5
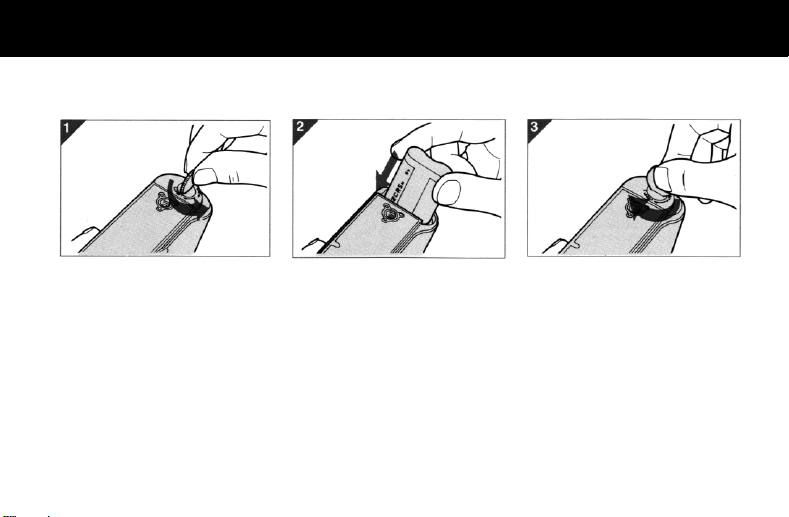
Loading the Battery
When loading the battery, first turn the main switch to M.
Page 6
r
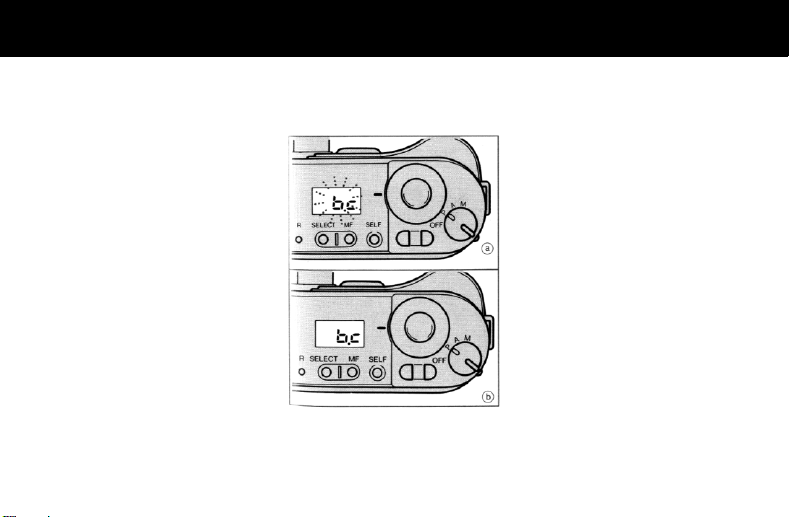
拭 When to replace the battery
Turn the Main Switch ON. The
following indication will last fo
about 10 seconds.
Fig. 拭
ⓐ Change battery. (power low)
ⓑ No power.
* Main switch off before you
replace the battery.
* If you replace the battery, set
values of camera-shake critical
speed, ISO speed, etc. will be
canceled.
Page 7

Basic Functions/Operation
Pressing Shutter Release Button Halfway-down
Fig. 拭
Fig. 植
Fig. 殖
拭 Halfway-down Pressing
Press the Shutter Release Button
halfway down and hold it with the
flat part of your forefinger. Focus,
exposure and photo range will be
determined.
植 Complete Pressing
The shutter will be released.
殖 Caution: Be careful not to
cover the AE sensor and AF
sensor parts on the front of the
camera with your fingers etc.
Page 8
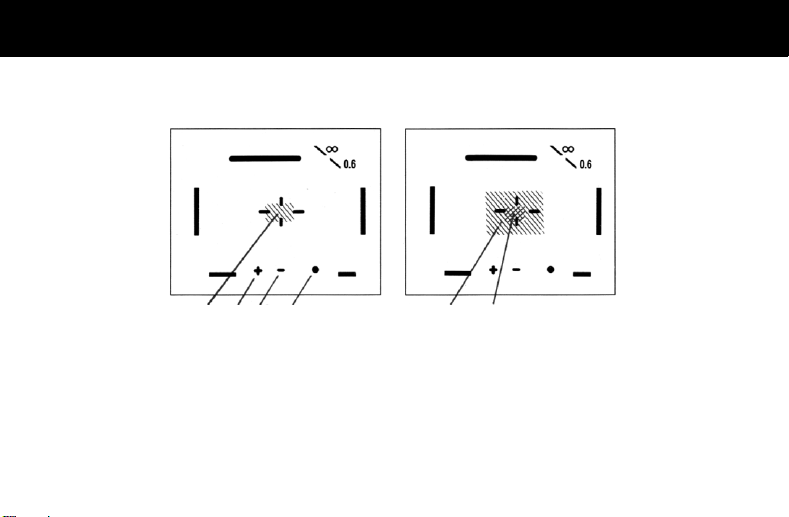
Finder Display
察
擦 撮 拶
察 AF Frame
拶 Focusing Completion Mark
撮 Under-exposure Warning Mark
擦 Over-exposure Warning Mark
札 AE Frame: A, P Modes
殺 AE Frame: M Mode
札 殺
Page 9
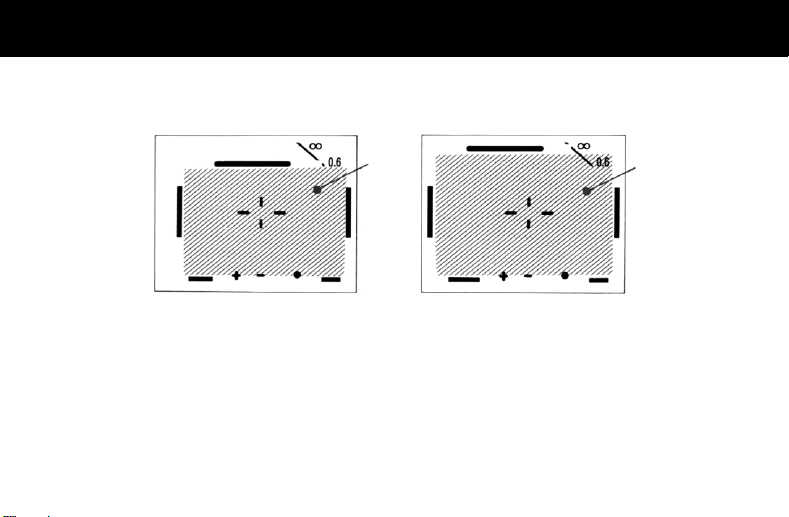
燭 Automatic Compensation of Parallax
Fig. 燭
ⓐ
ⓐ
ⓑ
ⓐ Photo Range
ⓑ In Close Photography
ⓒ In Distant Photography
ⓒ
Page 10
k
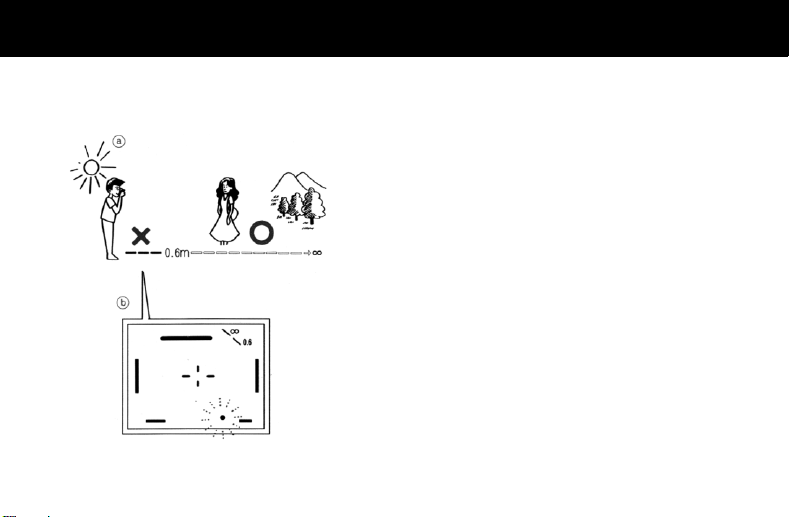
織 Photo Range
Fig. 織
ⓐ The effective distance range is 0.6 m - infinity.
ⓑ Too close to the subject.
* Auto Focus does not work with some kinds of dar
objects, reflective or light-emitting objects, or very small
objects. In such cases, set the Focus Lock by aiming the
camera at another object of similar brightness at about
the same distance.
Page 11
r
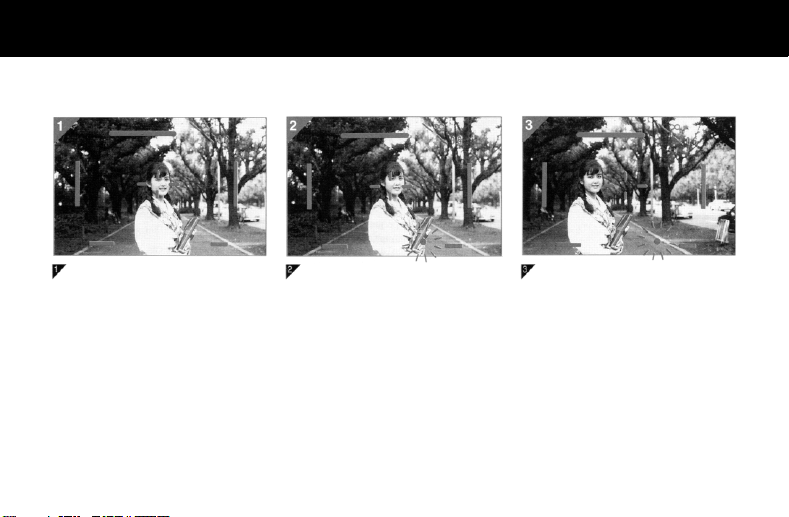
Focus Lock Photography
Place the AF-Frame on the
object.
Press the Shutter Release
Button halfway down and hold
it. Metering range is
memorized.
Now frame the picture as you
wish. Slowly press the Shutte
Release Button all the way
down.
Page 12
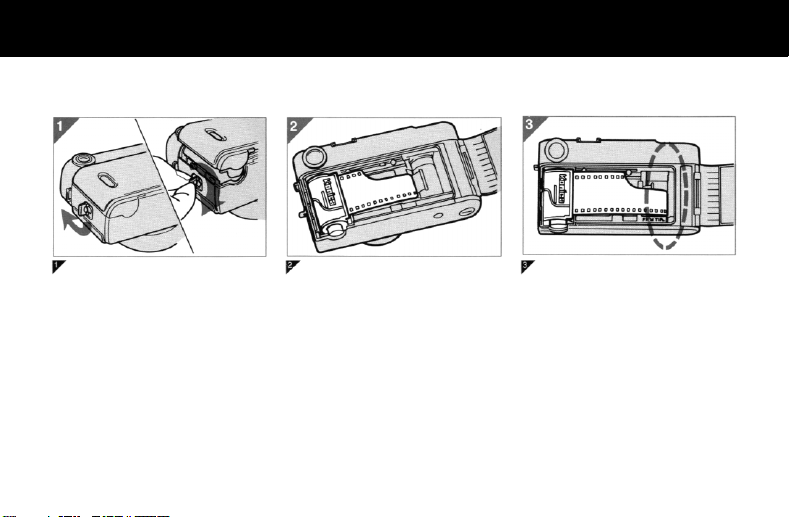
Film Loading
Open the Back Cover.
Place a film in the Film
Chamber.
Draw out the film tip as far as
the FILM TIP mark.
Page 13
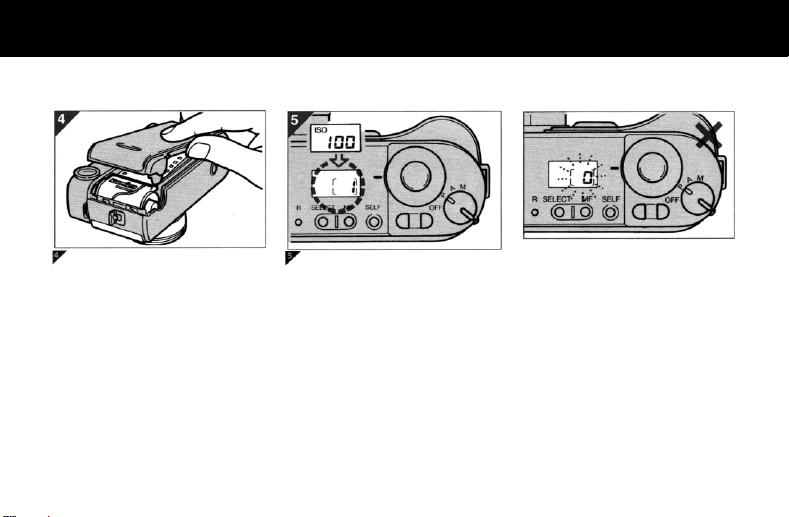
Close the Back Cover.
Turn the Main Switch ON. The
film will advance to the first
frame.
* When the Main Switch is
already set to ON, press the
Shutter Release Button.
* The film speed is displayed and
then the frame number is
shown.
* If the frame number isn't
displayed, press the SELECT
Button.
Fig. 拭
拭 Open the back cover and
reload the film.
* With DX film, film speed (ISO
25-5000) is automatically set.
Film Speed Manual setting.
Page 14
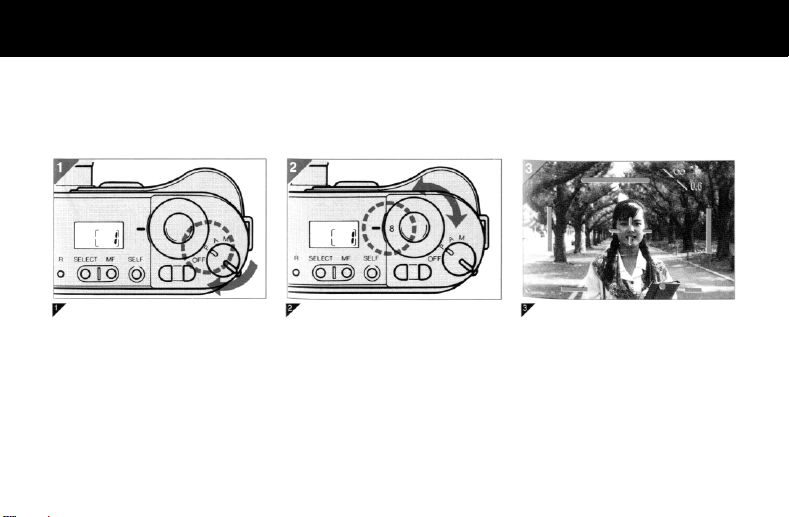
Standard Photography P Mode
This mode prevents failures as much as possible. Based on the specified aperture value, the shutter speed
changes according to the brightness. If shutter speed changes are not sufficient for proper exposure, then
the aperture is also changed.
Set the Main Switch to P.
Set the Aperture Dial to a
standard set value.
Frame the subject with the
Auto-focus. Frame the subject
in the center of the finder. Press
Shutter Release Button.
Page 15

拭 Successful Aperture Setting
Fig. 拭
ⓐ Increase the shutter speed.
ⓑ Standard Set Values
ⓒ Enlarge the focus range.
Page 16

植 Exposure Display (Shutter Release Button halfway down.)
Fig. 植
ⓐ Correct Exposure (Realized with the
specified aperture value).
ⓑ Correct Exposure (Aperture value is
changed).
ⓒ Under Exposure Warning.
ⓓ Over Exposure Warning.
* When --- is continued to be displayed
on display panel, please once set the
main switch to M.
Page 17

殖 P Mode Program Chart
Fig. 殖
ⓐ Camera-shake critical speed
ⓑ Range of choice
Page 18

Camera-shake Critical Speed
At the time of shipment, the speed is set to 1/30 second.
Range of choice is 1/4 - 1/60 second.
Set to P Mode.
Press and hold the SELECT
Button for more than a second,
and the Camera-shake Critical
Speed will be displayed.
Set the value by pressing the
Up-Down Button.
Page 19

r
Self-timer
Press the Self-timer Button.
The Self-timer Light will light for
7 seconds and blink for the last
3 seconds before shutte
release.
* To cancel, turn the Main Switch
to OFF.
* Focus and exposure will be set
when the Self-timer Button is
pressed.
Page 20

Rewinding
When the film is at the end of
the roll, the film will
automatically rewind.
Open the Back Cover and take
the film out.
Page 21

r
Just before the completion of the
rewind, [1] will appear in the
Frame Counter Window. The
rewind stops with [- -] displayed fo
about a second.
Now open the back cover.
The film tip will remain outside.
Page 22

Manual Rewind
(rewinding before the roll is finished)
Press the Rewind Button.
The rewinding will start.
Page 23

Aperture-priority Photography A Mode
In this mode, the shutter speed changes according to the specified aperture value. This mode is convenient
in taking the depth of field into consideration, as the aperture values can be fixed.
* If the shutter speed exceeds
the maximum speed (1/250
sec.) or falls below the lowest
speed (30 sec.), the warning
symbol will appear in the
Finder.
Set the Main Switch to A.
Specify the aperture value.
Page 24

拭 Exposure Display (Shutter Release Button halfway down.)
Fig. 拭
ⓐ Correct Exposure
ⓑ Under-exposure Warning
ⓒ Over-exposure Warning
Page 25

Depth of Field
Changing the aperture will influence the photo effect.
F2 1/250 F22 1/2
Page 26

植 Depth of Field Checking
Fig. 植
ⓐ F8 Depth of Field
ⓑ F16 Depth of Field
ⓒ Infrared Compensation Index
You can roughly check the depth
of field by the Focus Indicator.
Page 27

殖 A Mode Linkage Range
Fig. 殖
Page 28

Manual Photography M Mode
In this mode, you manually combine the shutter speed with the aperture at your option.
Set the Main Switch to M.
Press the SELECT Button. With
the shutter speed displayed,
press the Up-down Button and
specify the shutter speed.
Specify the aperture value.
Page 29

燭 Exposure Display (Shutter Release Button halfway down.)
Fig. 燭
ⓐ Correct Exposure
ⓑ Under Exposure warning
ⓒ Over Exposure Warning
* If the shutter speed blinks, it means that the exposure exceeds the
Exposure Display Range (EV3-18).
* In this case, correct exposure isn't displayed but the camera is
properly controlled at the specified value.
Page 30

y
Time Exposure
If you press the Shutter Release Button, the shutter will be left opened.
Press it again, and the shutter will be shut.
* During the exposure. “T- -” will
be displayed on the Displa
Panel.
Set the Main Switch to M.
Press the Down Button and set
the Shutter Speed Display to T.
Page 31

Variable Aperture Synchronization (P Mode)
In this control system, correct exposure is decided according to the outside light to prevent the darkened
background. The aperture is changed to meet the correct exposure
Attach the flash to the camera.
Set the Flash Switch to P ・
FULL.
* You can only use the flash
specially made for the camera.
When the battery charging is
completed, the aperture will
be automatically set and [FL]
will be displayed on the
Display Panel.
Page 32

拭 Aperture Control and Effective Range
Fig. 拭
* If the flash hasn’t been charged, the flash will not operate.
* In this case, ordinary Program AE exposure will be adopted.
INFORMATION
The hot shoe flash can also be used in either A or M modes.
Page 33

Automatic Flash Photography (A・M Mode)
When the Flash Switch is set to A, it can be used as automatic flash.
Fig. 植
Set the Flash switch to A.
Camera movement tends to be a problem during exposure in the A mode in poor light, so for such shots it is
advisable to use a tripod.
Set the aperture value
according to the film speed in
use.
植 Aperture Values at the
Automatic Flashing
ⓐ Film Speed
ⓑ Specified Aperture Value
Page 34

Manual Flash Photography (A・M Mode)
Set the Flash Switch to P・FULL. You need to adjust the aperture according to the camera-to-subject
distance.
Fig. 殖
ⓐ
F=
GN
m
ⓒ
ⓑ
The Flash Switch is set to P・
FULL.
Calculate the correct aperture
value by using the following
format and set the Aperture
Dial.
殖 Format for calculating the
correct aperture value
ⓐ Correct Aperture Value
ⓑ Object Distance (m)
ⓒ 14 (GN/ISO 100)
Page 35

More Advanced Usage
r
Exposure Compensation
Set the Main Switch to P or A
Mode and press the SELECT
Button.
Exposure compensation display
will appear on the Display
Panel.
Specify the compensation value
with the Up-down Button.
* If you press the SELECT
Button again, Frame Counte
will appear again.
-1.3EV ±0EV +1.3EV
* During the exposure compen-
sation, Exposure Compensation Mark is displayed.
* Main Switch off to cancel.
Page 36

r
f
r
Film Speed Manual Setting
Set to A Mode. Press the
SELECT Button and hold it fo
more than a second. ISO speed
will be displayed.
Press the Up-down Button and
specify the speed.
* Effective range is ISO 6 ∼ 6400.
* Manual setting should be done
after film loading.
* In displaying the film speeds o
more than ISO 1000, the last
two digits are abbreviated as H.
Example:
ISO 3200 → ISO 32 H
* Even if a DX film is used afte
film speed is specified in
non-DX condition, the film
speed remains valid when
non-DX condition is restored.
Page 37

Fixed Focus Mode
拭 Focus Hold
With this function, focus lock mode is continually maintained.
Adjust the AF Frame, then
press the Shutter Release
Button halfway down.
Press the MF Button.
Focus will be fixed.
Page 38

植 One Touch Infinity
Press the FM Button, “999” (Infinity) will be fixed.
Fig. 植
Page 39

殖 Manual Focus
Fig. 殖
If you press and hold MF Button,
“999” will change to the focus
display. Press the Up-down Button
and specify the focus you want to
fix.
* Turning the Main Switch OFF
cancels the Mode.
Page 40

r
One-touch Exposure Selection Mode
In this mode, the proper shutter speed for the aperture value set in “M” mode is selected automatically.
Set the Main Switch to “M” and
select the desired aperture
setting. Press the Shutte
release button halfway down
and the proper shutter speed
will be indicated on the display
panel.
Pressing either the UP or
DOWN button will then set the
shutter to the speed indicated.
Page 41

Automatic Infrared Focus Correction Mode
This mode allows for one-step compensation of auto-focus focal range when using infrared film.
(Once the focus correction value is set, all exposures on a roll of film are corrected to the same value.)
Load the infrared film in the camera as
usual, pressing the shutter release button
until “{
window. Set the Main Switch to “A” and
press the SELECT button hold for while until
the ISO speed is shown in the display. Then
press the DOWN button until the “ISO・・・”
reading appears.
}” appears in the frame count
Then press the MF button once to display
“750” or once again to display “850”. These
are the wave-length values for infrared films.
Choose the correct value for the film in use
(refer to table below). After 3 seconds, the
display will show “ISO 100” and the selected
infrared focus correction value will remain in
effect till the end of the roll.
Page 42

★ When using this mode, be sure to use the “M” mode setting to set shutter and aperture values
for the film in use following the recommendations of the film manufacturer.
★ Once set, Automatic Infrared Focus Correction values remain effective until the roll is finished,
even if the Main Switch is turned off.
Note: Use this mode only when using infrared film.
Page 43

f
Multiple Exposure Mode
This mode allows the user to make any number of multiple exposures on a single frame of film.
After loading film in the camera,
turn the Main Switch from
“OFF” to “P” while holding the
“SELF” button down. The
display panel will read “
where “N” is the number o
exposures taken. The camera
is now in Multiple Exposure
mode. Each time the shutter is
released the left digit (“N”) will
increase by one, but the film is
not advanced. (There is no limit
on the number of times a single
frame can be exposed, but the
indicator advances only up to
“9”.)
★ When the Main Switch is turned
“OFF” the film is advanced to
the next frame and Multiple
Exposure mode is cancelled.
[N]”
Page 44

r
k
r
Manual Guide Number Setting Mode
In this mode, the user can manually set the desired guide number when using a standard flash unit with hot
shoe, for fully automatic variable aperture synchronized flash exporures that make use of background
lighting as well as flash. (This function is also available in “P” mode with the dedicated flash unit.)
Press the SELECT button and
turn the Main Switch from
“OFF” to “P”.
While holding the SELECT
button down, press the UP o
DOWN buttons until the desired
flash guide number (“P (1.0 -
64)”) appears in the display
panel. When the setting is
completed, the display will read
“PFL”.
★ Turning the Main Switch bac
to “OFF” cancels this mode.
The same guide number can be
reset manually, however, by
simply holding down the
SELECT button while turning
the Main Switch back on.
Note: If the guide number for you
flash unit does not match
the available settings,
choose the next lowest
setting. (Example: If desired
guide number is 24, select
23.)
Page 45

Miscellaneous
Auto Date
This camera has a quartz-controlled auto-date mechanism (clock/calendar) that is programmed through
December 31, 2019.
(Auto date only)
Changing the Display
Press the MODE button and select either date or time.
Page 46

Adjusting Date and Time
Press the MODE button and the date or time will
be displayed.
Press the SELECT button so that the date or
time blinks.
Press the SET button to set the date or time.
Press the SELECT button and the blinking will
stop. When the “” mark appears, setting is
finished.
Page 47

How to replace the back-up battery Liquid Crystal Display
The LCD display darkens at high
temperatures, and the response is
slower at low temperatures. The LCD
returns to normal operation at normal
temperature.
Page 48

Specifications
* The above performance depends on the company’s test conditions.
The specifications and appearance may change without notice.
* The softcase is available separately. Please consult your dealer.
 Loading...