

Page 1

INSTALLATION MANUAL
HD-501
Hard Disk
for Product Code 4036
NOTES
• Before installing, be sure to unplug the power cord of the machine.
• Keep all packing materials out of the reach of children.
4036-7772-01 Printed in Japan
Page 2
HD-501
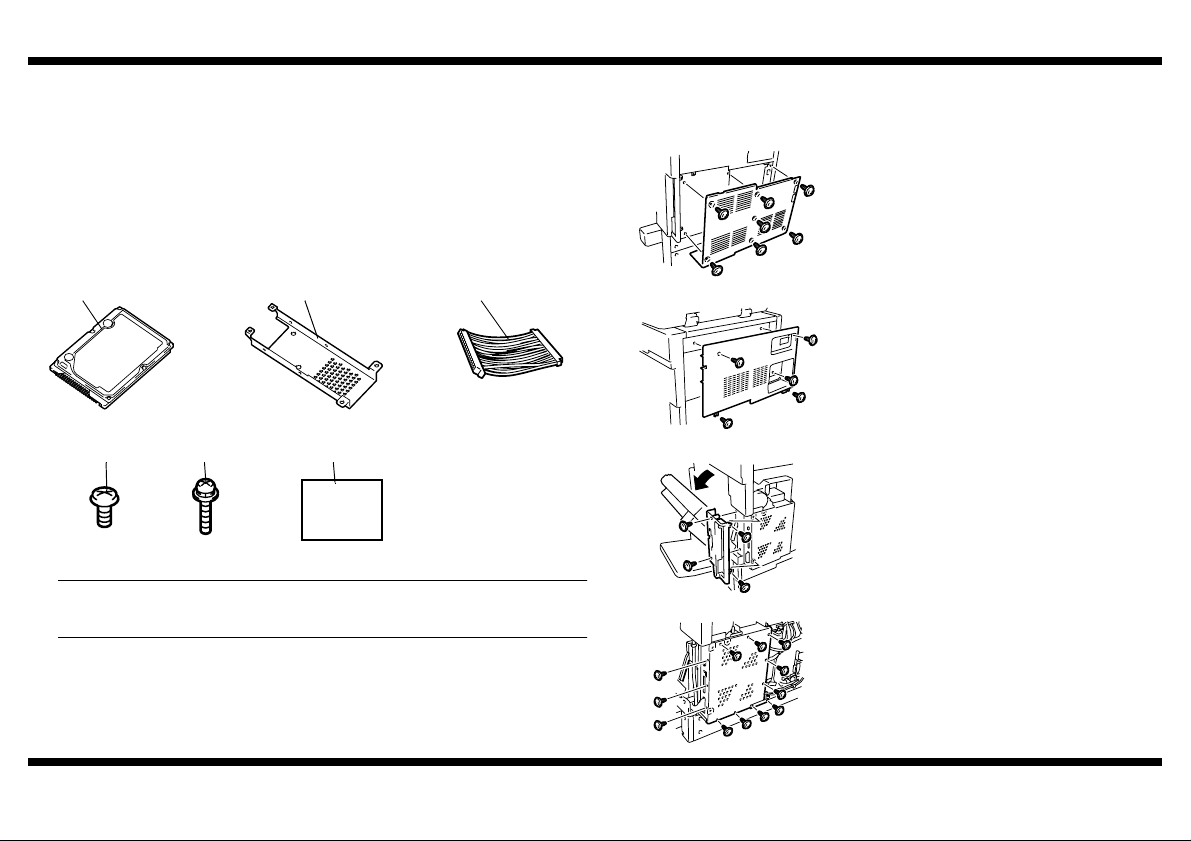
■ Unpacking the Hard Disk
Check that the following accessories are available in the box.
1 Hard Disk ...............................................................................................1
2 Mounting bracket....................................................................................1
3 Cable......................................................................................................1
4 Screw A (3x4).........................................................................................4
5 Screw B (3x14).......................................................................................4
6 Installation Manual (this manual) ...........................................................1
1
4036U005AA
4
4025U059AA 4025U060AA
5
NOTE
The hard disk is highly susceptible to impact. Handle it with utmost care not to drop
it or hit it against any object. Do not touch the board surface and pins.
2 3
4036U006AB 4025U058AB
6
■ Removing the Shield Cover
1. Turn off the machine and unplug the power
cord from the machine.
2. Remove the lower rear cover
(seven screws).
4348U106AA
3. Remove the upper rear cover (five screws).
4036U001AA
4. Open the right door, and then remove the
right rear cover (four screws).
4036U002AB
5. Remove the shield cover (twelve screws).
– 1 –
4036U003AB
Page 3

HD-501
■ Installing the Hard Disk
4036U007AB
A
4036U011AB
4036U012AA
Unused four pins
1. With the circuit board side of the hard disk
facing up, secure the mounting bracket
furnished with the hard disk to the hard disk
(four screws A furnished with the hard disk).
2. Insert the cable furnished with the hard disk
into the pin portion of the hard disk.
NOTE
Attach it regarding the side A indicated in
the left figure as the reference although the
cable has no directivity. (This means that
the four pins on the other end of the hard
disk are not used.)
3. Remove the four screws fixing the control
board assy.
PJ11
4. Attach the hard disk to the control board assy
(four screws B furnished with the hard disk).
5. Connect the hard disk cable to the PJ11 of
the control board assy.
NOTE
4036U010AB
Hard Disk
Cable
Bend the cable as the shape shown in the
felt figure.
Control board
4025U071AA
NOTES
• Do not twist the connector 180° when you connect the cable.
• When you remove the cable from the board, pull it out straightly by your hands so
as not to bend the pins.
6. Reinstall the shield cover (twelve screws).
7. Reinstall the right rear cover (four screws).
8. Reinstall the upper rear cover (five screws).
9. Reinstall the lower rear cover (seven
screws).
– 2 –
Page 4

HD-501
■ Setting the Hard Disk
4036P031CA
4036P034CA
4036P035CA
1. Plug the power cord into the machine and
turn on the machine.
2. Display the Tech. Rep. Mode screen.
(For details of how to display the Tech. Rep.
Mode screen, see the Service Manual.)
3. Touch “System Input.”
4. Touch “Hard Disk.”
5. Touch “Set.”
6. Check that “Set” is highlighted on the screen.
Then, touch “END.”
7. Touch “Fin. Time” on the Tech. Rep. Mode
screen.
4025P031CA
9. Turn on the machine again.
* Since the hard disk is yet to be formatted, the
malfunction code “C-12CC” will appear. But,
disregard this display.
NOTE
Whenever the hard disk has been installed,
be sure to turn off and then turn on the
machine.
Failure to do this results in the machine
failing to recognize that the hard disk is
installed.
4036P031CA
8. Turn off the machine.
– 3 –
Page 5

HD-501
■ Formatting the Hard Disk
4036P031CA
4036P036CA
4036P037CA
1. Display the Tech. Rep. Mode screen.
(For details of how to display the Tech. Rep.
Mode screen, see the Service Manual.)
2. Touch “Machine Adjust.”
3. Touch “Memory/Hard Disk Adjust.”
4. Touch “Hard Disk Format.”
5. Touch “Logical Format” and press the Start
key.
This starts the formatting procedure.
* The Start key will turn orange.
* The progress of formatting is displayed in
“%.”
6. Check that “100% OK” is displayed on the
screen.
7. Touch “END.”
4036P038CA
8. Touch “Fin. Time” on the Tech. Rep. Mode
screen.
9. Turn off, and then turn on the machine.
4025P036CA
– 4 –
 Loading...