

Page 1

FS-505
User Manual
Page 2

Page 3

Contents
1 Machine overview
1.1 750/600 Additional information – Finisher FS-505......................... 1-3
1.2 Caution notations and labels........................................................... 1-4
1.3 Space requirements ......................................................................... 1-5
Finisher FS-505 (+ Punch Kit PK-504/PK-505).............................. 1-6
Options........................................................................................... 1-8
1.4 Copy paper...................................................................................... 1-10
Possible paper sizes .................................................................... 1-10
Special paper ............................................................................... 1-11
1.5 Paper settings................................................................................. 1-13
To specify the setting for special paper for paper
loaded into the bypass tray.......................................................... 1-13
To specify the paper type for a paper tray................................... 1-15
1.6 Replacing the staples..................................................................... 1-17
Display in enlarge display mode .................................................. 1-17
To replace the staple cartridge .................................................... 1-18
1.7 Emptying the dust boxes ............................................................... 1-20
To empty the dust box of the punch kit....................................... 1-20
Display in enlarge display mode .................................................. 1-20
1.8 Specifications ................................................................................. 1-23
Finisher FS-505............................................................................ 1-23
2 Copy operations
2.1 Selecting finishing settings.............................................................. 2-3
Separating copies by sets (“Sort” setting) ..................................... 2-6
Separating copies by pages (“Group” setting) .............................. 2-7
Feeding out copies face up (“Face Up” setting)............................ 2-8
Stapling copies (Staple settings).................................................... 2-9
To bind copies with staples ......................................................... 2-11
Punching holes in copies (Punch settings) .................................. 2-13
To punch holes in copies............................................................. 2-14
2.2 Specifying folding settings ............................................................ 2-16
To fold copies fanned (“Z-Fold”).................................................. 2-17
2.3 Using finisher manually.................................................................. 2-19
To use finisher manually .............................................................. 2-20
Finisher FS-505 Contents-1
Page 4

Contents-2 Finisher FS-505
Page 5

1
Machine overview
Page 6

Page 7

Machine overview
1 Machine overview
1.1 750/600 Additional information – Finisher FS-505
Finisher FS-505 is an optional device newly added to the configuration of
750/600 options.
Please refer to this manual for the operation and safety information on the
finisher, and keep this manual inside the user manual of the main body,
readily available for reference.
Also, be sure to read "Precautions for installation and use" of the 750/600
User manual [Copy Operations].
1
Finisher FS-505 1-3
Page 8
1
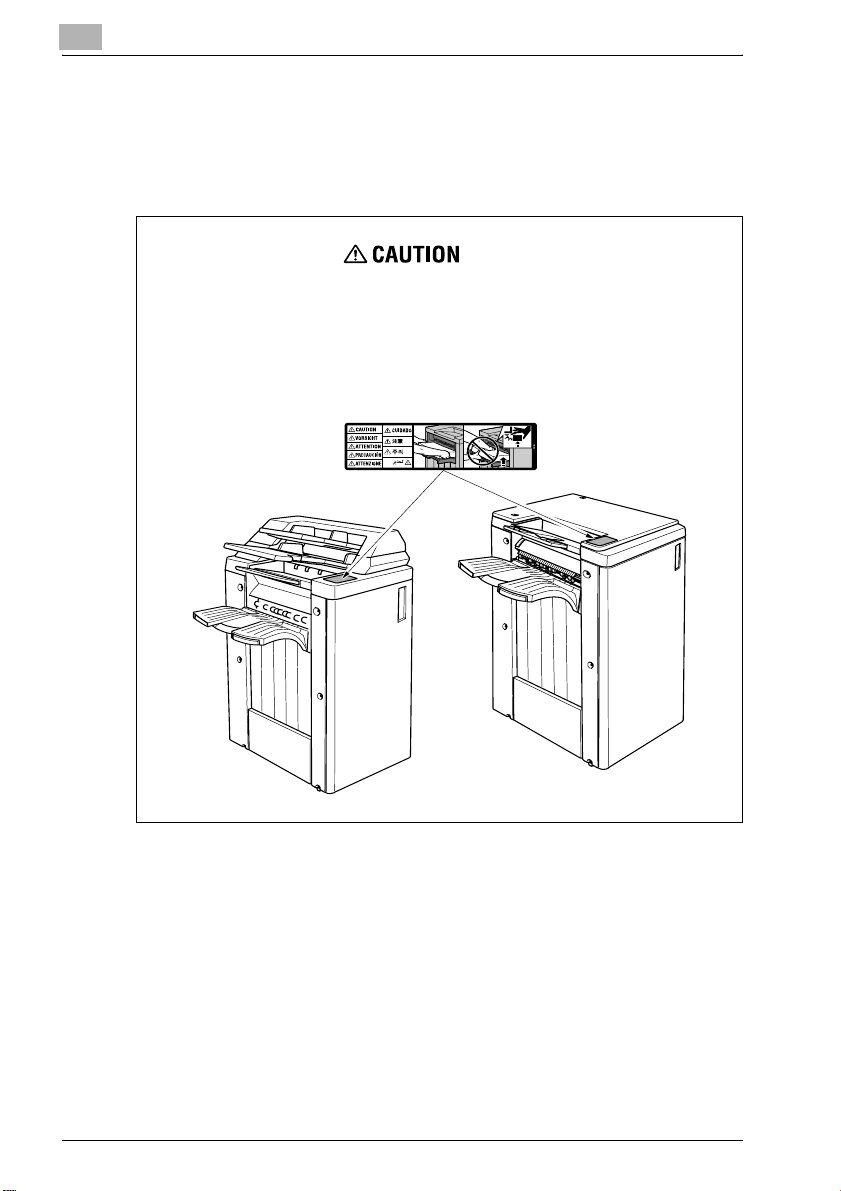
1.2 Caution notations and labels
Safety precaution notations and labels appear on this machine at the
following positions.
Be very careful while operating the machine.
To avoid injury, DO NOT put your hand on
top of the printed sheets.
Be sure to hold both sides of the printed
sheets when removing them, and DO NOT
leave your hand on the printed sheets while
the primary (main) tray goes up.
Machine overview
1-4 Finisher FS-505
Page 9
Machine overview
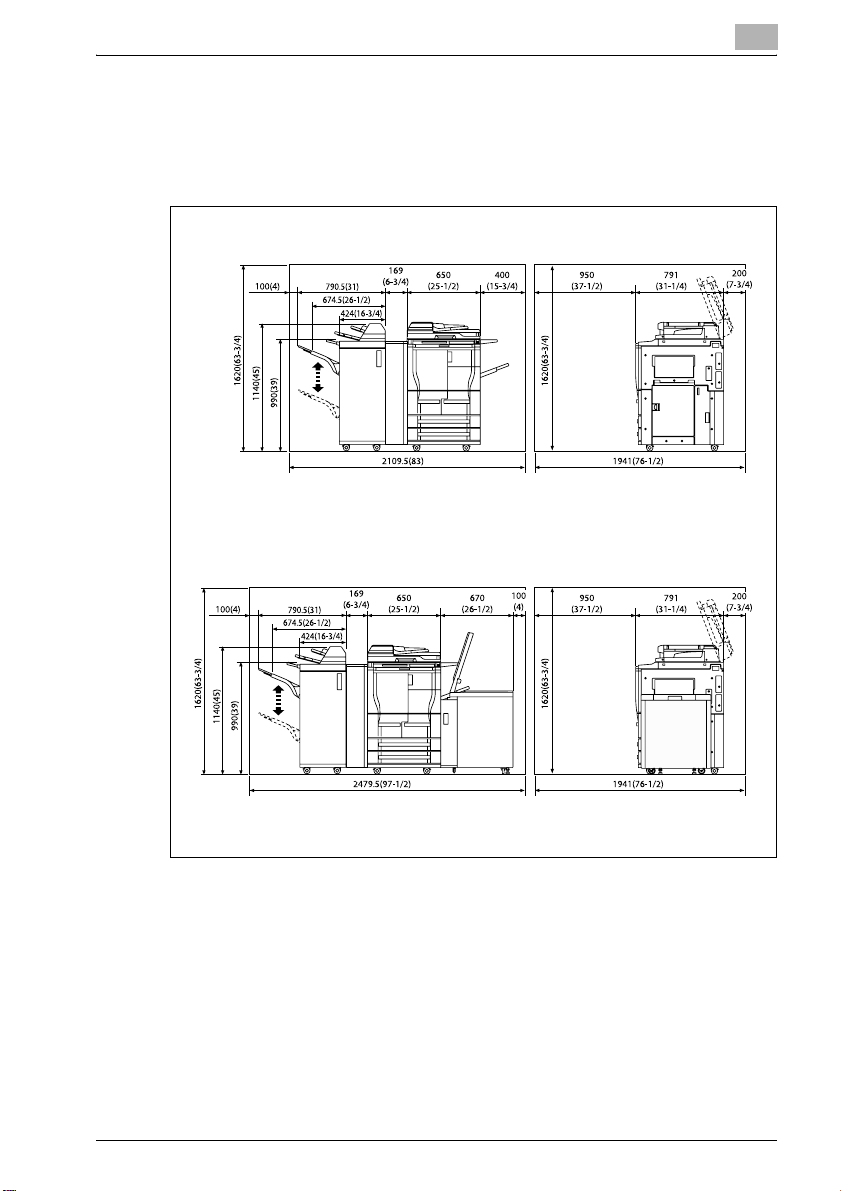
1.3 Space requirements
To ensure that machine operation, consumables replenishing, part
replacement, and regular maintenance can easily be performed, adhere to
the recommended space requirements detailed below.
750/600 + FS-505 + PI-501 + ZU-602
1
Unit: mm (inch)
Unit: mm (inch)
750/600 + FS-505 + PI-501 + ZU-602 + LU-402
Finisher FS-505 1-5
Page 10
1
Machine overview
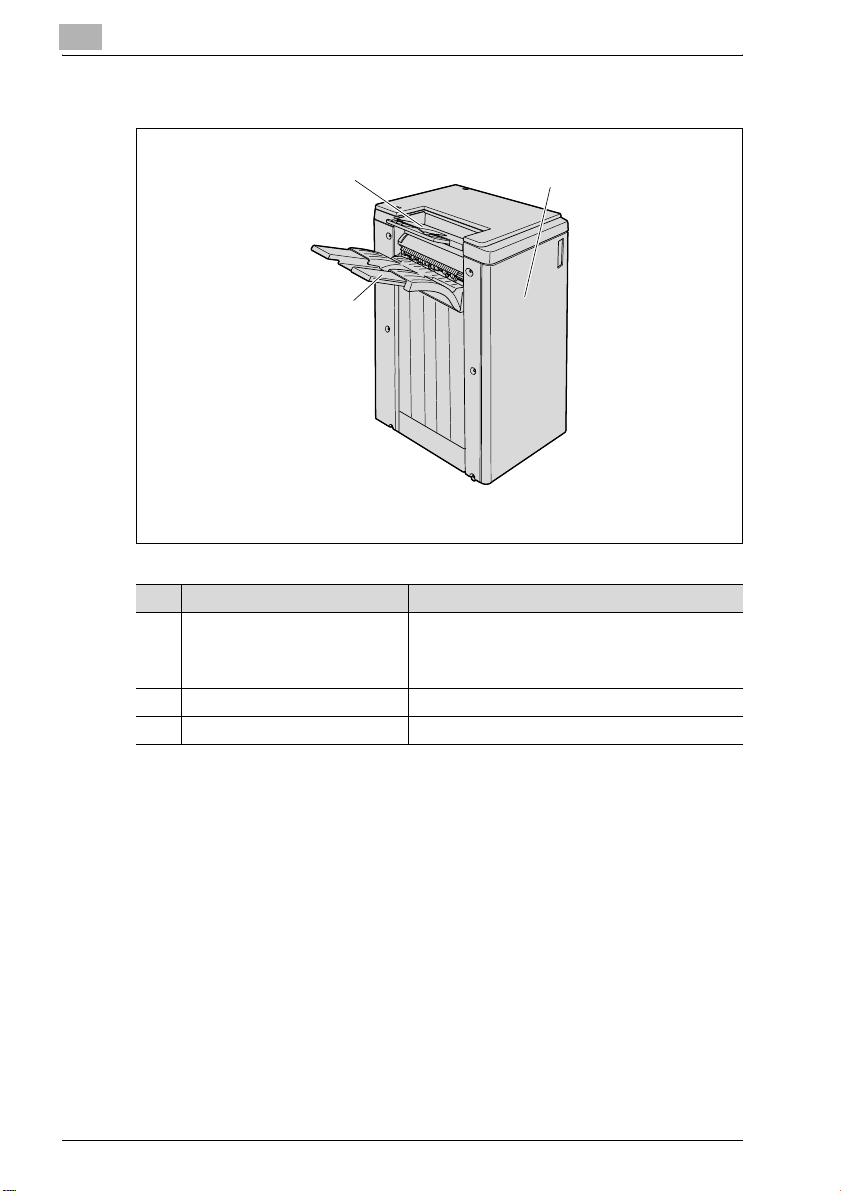
Finisher FS-505 (+ Punch Kit PK-504/PK-505)
3
2
Finisher FS-505
No. Part name Description
1 Finisher door Opened when clearing paper misfeeds or staple
2 Main tray Collects printed pages
3 Sub tray Collects printed pages
jams or when replacing the staple cartridge, or
when emptying the punch dust box if punch kit PK504/PK-505 is installed
1
1-6 Finisher FS-505
Page 11
Machine overview
1
4
9
3
2
2
1
7
5
6
8
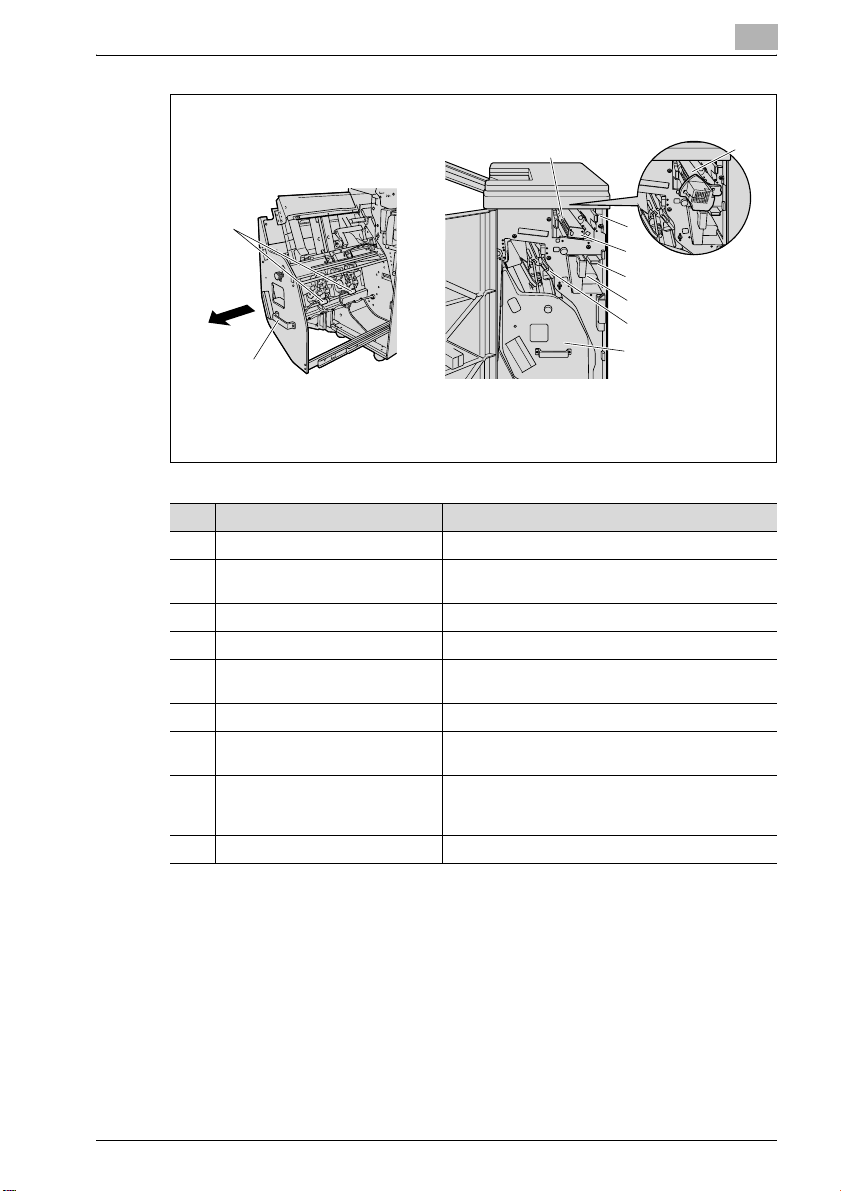
Finisher FS-505
+ Punch Kit PK-504/PK-505
No. Part name Description
1 Inlet lever Lowered when clearing paper misfeeds
2 Punch kit (optional) Punches holes for filing printed pages when the
3 Cover sheet conveyance lever Moved to the left when clearing paper misfeeds
4 Sub tray conveyance lever Moved to the right when clearing paper misfeeds
5 Stacker conveyance lever Moved down and to the left when clearing paper
6 Stacker unit Mounts the stapler
7 Punch dust box (optional) Removed when emptying punch dust that has ac-
8 Stacker unit handle Used to pull out the unit when clearing paper mis-
9 Staple cartridge Removed when refilling the staples
punch kit is installed onto finisher
misfeeds
cumulated from using the Punch settings
feeds in the stacker unit and when refilling the staples
Finisher FS-505 1-7
Page 12
1
Machine overview
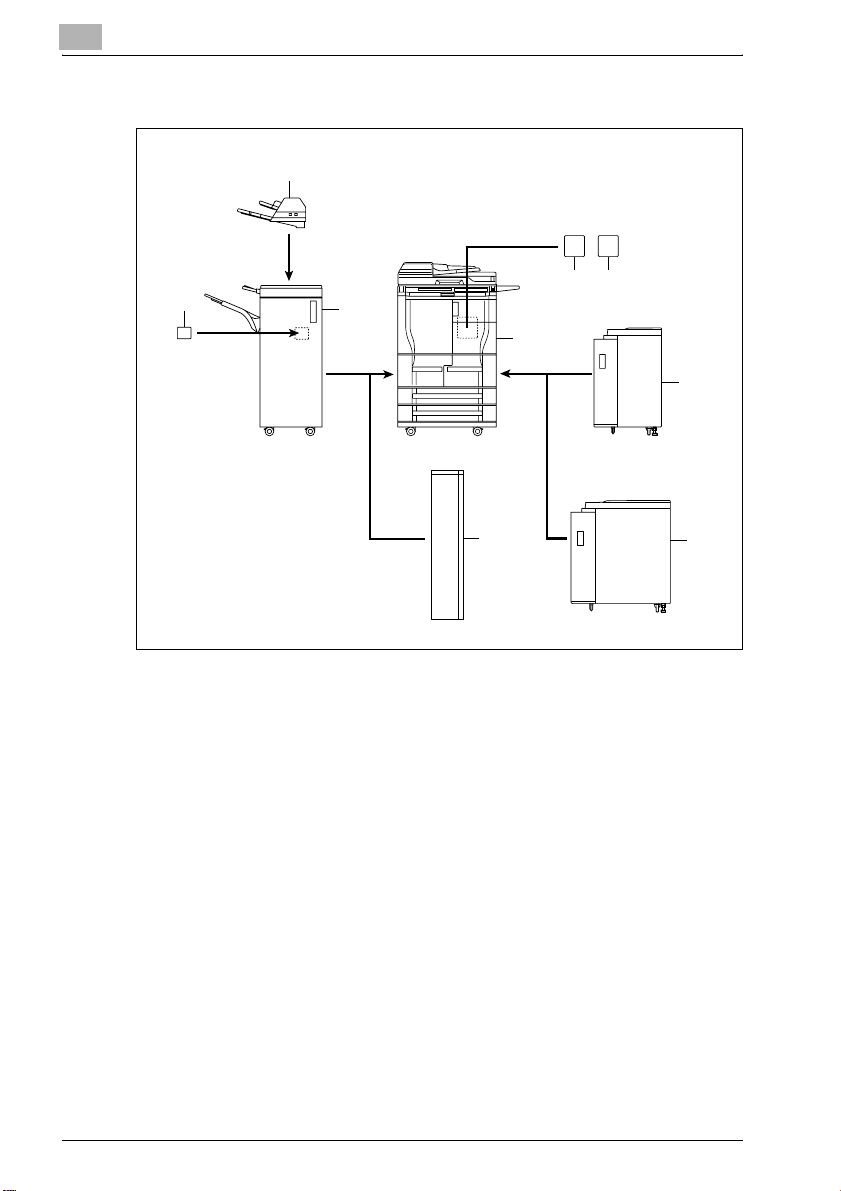
Options
2
3
4
5
89
1
7
6
1-8 Finisher FS-505
Page 13

Machine overview
No. Part name Description
1 Main body The original is scanned by the scanner section, and
2 Cover sheet feeder PI-501 Allows cover sheets to be inserted into copies if in-
3 Punch kit PK-504/PK-505 Allows hole punching to be used if installed onto fin-
4 Finisher FS-505 Feeds out printed pages. The "Sort", "Group", "Off-
5 Z-folding unit ZU-601/ZU-602 Allows holes to be punched for filing and allows
6 Large capacity tray LU-402 Can be loaded with up to 4,000 sheets of paper (80
7 Large capacity tray LU-401 Can be loaded with up to 4,000 sheets of paper (80
8 Hard disk drive HD-503 Increases the number of original pages that can be
9 Printer controller IC-202 Allows this machine to be used as a network printer
the scanned image is printed by the printer section.
Referred to as the "machine" or "main body"
throughout the manual.
stalled onto finisher FS-505, and allows the functions of installed finishers to be used manually
isher FS-505
Referred to as the "punch kit" throughout the manual.
set" + "Sort", "Offset" + "Group", "Face Up" and
Staple settings are available.
pages to be folded in a zigzag if installed onto finisher FS-505
2
g/m
)
Referred to as the "LCT" throughout the manual.
2
)
g/m
Referred to as the "LCT" throughout the manual.
stored and enables the "Set Numbering" and Box
functions to be used
Referred to as the "hard disk" or "HDD" throughout
the manual.
(optional)
1
Finisher FS-505 1-9
Page 14

1
1.4 Copy paper
Use paper that meets the following specifications.
Possible paper sizes
Paper source Paper size
Finisher FS-505 Main tray:
* Available only when the optional punch kit PK-504/PK-505 or Z-folding unit ZU-601/ZU-602 is
installed.
Machine overview
"Sort" and "Group" settings: A3 w to B6 w, A6 w
"Offset" + "Sort" and "Offset" + "Group" settings: A3 w to B5 v
Staple: A3 w to B5 v, A5 v
Punch: A3 w to A5 w/v*
Sub tray:
"Sort" and "Group" settings: A3 w to B6 w, A6 w
1-10 Finisher FS-505
Page 15
Machine overview
Special paper
Paper other than Normal paper, such as overhead projector transparencies
and colored paper, is called special paper. Be sure to select a special paper
setting for paper trays loaded with media such as overhead projector
transparencies and colored paper in order to prevent operating errors.
2
Note
If weak recycled paper or thin paper is loaded, select "Special Paper".
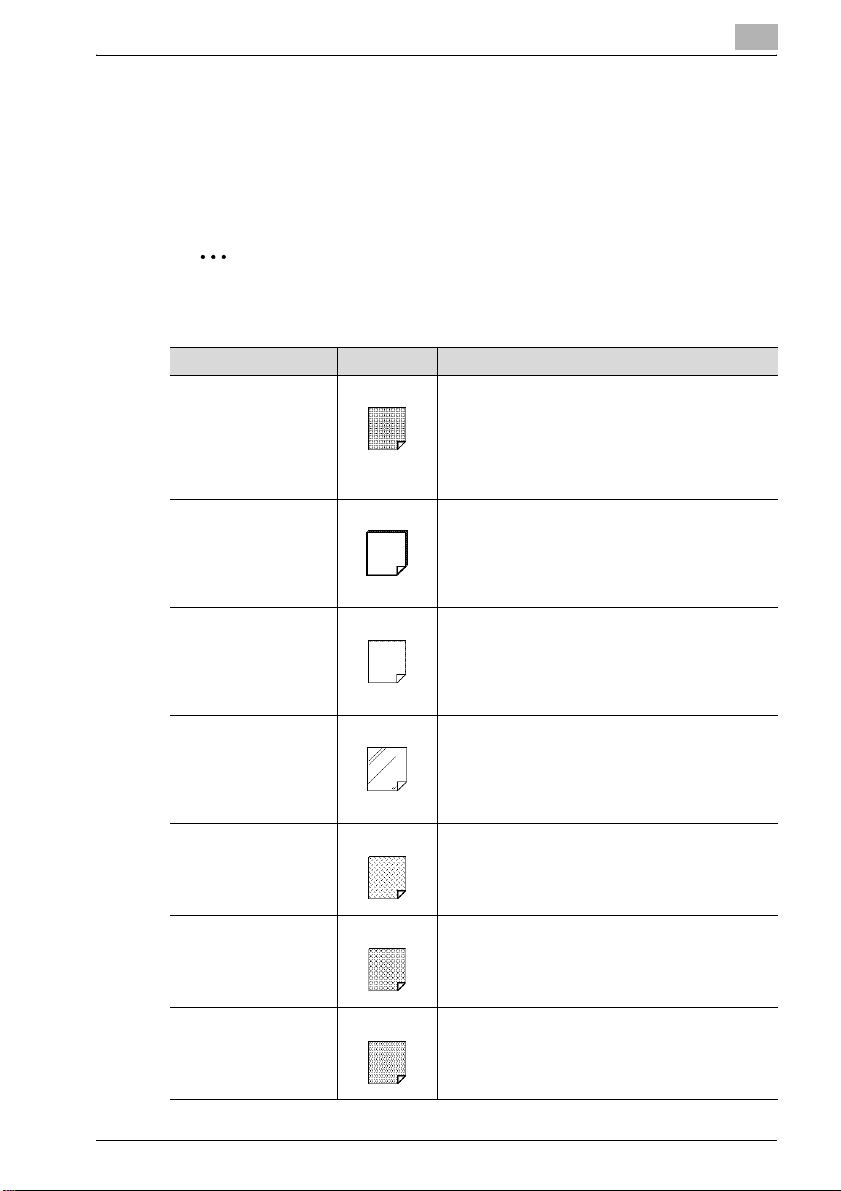
Paper type Icon Description
Special paper Select this setting when the paper that is loaded is
Thick paper Select this setting when the thick paper that is loaded
Thin paper Select this setting when the Thin paper that is loaded
OHP Select this setting when overhead projector transpar-
User 1 Select this setting when user paper 1 is loaded.
User 2 Select this setting when user paper 2 is loaded.
User 3 Select this setting when user paper 3 is loaded.
from a particular manufacturer, is weak recycled paper, is thin or is special paper that is not usually used.
A paper tray with this setting is not automatically selected when the "Auto Paper Select" setting is specified or when the paper trays are switched
automatically.
2
has a weight of 91 g/m
A paper tray with this setting is not automatically selected when the "Auto Paper Select" setting is specified or when the paper trays are switched
automatically.
has a weight of 50 g/m
A paper tray with this setting is not automatically selected when the "Auto Paper Select" setting is specified or when the paper trays are switched
automatically.
encies are loaded.
A paper tray with this setting is not automatically selected when the "Auto Paper Select" setting is specified or when the paper trays are switched
automatically.
A paper tray with this setting is not automatically selected when the "Auto Paper Select" setting is specified or when the paper trays are switched
automatically.
A paper tray with this setting is not automatically selected when the "Auto Paper Select" setting is specified or when the paper trays are switched
automatically.
A paper tray with this setting is not automatically selected when the "Auto Paper Select" setting is specified or when the paper trays are switched
automatically.
to 200g/m2.
2
to 59 g/m2.
1
Finisher FS-505 1-11
Page 16

1
Machine overview
Paper type Icon Description
Tab paper Select this setting when tab paper is loaded.
Recycled Select this setting when recycled paper is loaded.
Colored paper Select this setting when colored paper is loaded.
Fine Select this setting when fine paper is loaded.
Labels Select this setting when label sheets are loaded.
Letterhead Select this setting when the paper that is loaded is al-
Trace Select this setting when trace paper is loaded.
A paper tray with this setting is not automatically selected when the "Auto Paper Select" setting is specified or when the paper trays are switched
automatically.
A paper tray with this setting is not automatically selected when the "Auto Paper Select" setting is specified or when the paper trays are switched
automatically.
A paper tray with this setting is not automatically selected when the "Auto Paper Select" setting is specified or when the paper trays are switched
automatically.
A paper tray with this setting is not automatically selected when the "Auto Paper Select" setting is specified or when the paper trays are switched
automatically.
A paper tray with this setting is not automatically selected when the "Auto Paper Select" setting is specified or when the paper trays are switched
automatically.
ready printed with a company name or preset text
and, therefore, should be differentiated from Normal
paper.
A paper tray with this setting is not automatically selected when the "Auto Paper Select" setting is specified or when the paper trays are switched
automatically.
A paper tray with this setting is not automatically selected when the "Auto Paper Select" setting is specified or when the paper trays are switched
automatically.
1-12 Finisher FS-505
Page 17

Machine overview
1.5 Paper settings
To specify the setting for special paper for paper loaded into the bypass tray
If special paper or overhead projector transparencies are loaded into the
bypass tray, selecting a setting for special paper ensures that it will not be
selected automatically with the "Auto Paper Select" setting or the automatic
tray switching feature.
1 In the Basic screen, touch [Paper].
1
The Paper screen appears.
2 Touch the button for the bypass tray, and then touch [Change Tray
Settings].
Finisher FS-505 1-13
Page 18

1
Machine overview
3 Specify the appropriate setting for the type of special paper loaded.
– Touch the button for the desired special paper.
– If weak recycled paper or thin paper is loaded into the bypass tray,
select "Special Paper" in the Change Tray Settings screen.
What types of paper can be loaded in the bypass tray?
?
% To specify "Letterhead", "Tab Paper", "Trace", "User 1", "User 2",
"User 3", "Recycled", "Fine", "Labels", "Colored Paper", touch
[Specialty Paper] in the Change Settings of Selected Tray screen.
4 Touch [OK] twice.
The Basic screen appears again.
1-14 Finisher FS-505
Page 19

Machine overview
To specify the paper type for a paper tray
A setting can be specified for the type of paper loaded into the tray 1, 2, 3
and 4 and the LCT (LU-401/LU-402).
The following procedure describes how to specify the setting for the type of
paper loaded into the tray 1.
1 In the Paper Tray Setting screen, touch [1 Paper Type].
– For details on displaying the Paper Tray Setting screen, refer to
The Paper Type screen appears.
1
Copy Operations of the user manual.
2 Touch the button for the tray 1, and then touch [Paper Type].
.
The Paper Type screen appears.
Finisher FS-505 1-15
Page 20

1
Machine overview
3 Select the type of paper to be loaded.
– If weak recycled paper or thin paper is loaded into a paper tray,
select "Special Paper" in the Paper Type screen.
4 Touch [OK].
1-16 Finisher FS-505
Page 21

Machine overview
1.6 Replacing the staples
When finisher FS-505 is installed and is about to run out of staples, the
message shown below appears.
1
Display in enlarge display mode
Finisher FS-505 1-17
Page 22

1
Machine overview
!
Detail
Be sure to replace the staple cartridge only after the message appears,
otherwise the machine may be damaged.
When staples run out in either of Saddle Staple Cartridge 1 or 2, the
message "Replace Staple Cartridge 1" or "Replace Staple Cartridge 2"
appears.
To replace the staple cartridge
1 Open the finisher door.
2 Pull out the stacker unit.
– Hold the stacker unit handle, and
then slowly pull out the stacker
unit as far as possible.
3 Remove the empty staple cartridge from the staple cartridge holder.
– Hold the lever on the staple
cartridge, and then pull the
cartridge down to remove it.
1-18 Finisher FS-505
Page 23

Machine overview
4 Install the new staple cartridge.
– Push up the staple cartridge, and
5 Return the stacker unit to its original
position.
6 Close the finisher door.
1
then check that the cartridge is
securely installed.
Finisher FS-505 1-19
Page 24

1
1.7 Emptying the dust boxes
To empty the dust box of the punch kit
If the punch dust box in punch kit PK-504/PK-505 installed on finisher FS505 becomes full, the message shown below appears.
Machine overview
Display in enlarge display mode
1-20 Finisher FS-505
Page 25

Machine overview
1 Open the finisher door.
2 Pull out the punch dust box.
3 Empty the punch dust box.
1
4 Install the punch dust box into its
original position.
Finisher FS-505 1-21
Page 26

1
Machine overview
5 Close the finisher door.
1-22 Finisher FS-505
Page 27

Machine overview
1.8 Specifications
Finisher FS-505
Specifications
Exit trays Main tray, sub tray
Settings Non-stapled, Offset, Staple
Paper types Main tray:
Paper sizes Main tray:
Paper capacity Main tray:
Amount of shift 30 mm
Staple settings Paper sizes: no. of bound pages
Power requirements Supplied from main body
Dimensions 424 mm (W) × 656 mm (D) × 990 mm (H)
Weight Approx. 60 kg
Consumables Staple cartridge
2
"Sort" and "Group" settings : Normal paper (60 to 90 g/m
thick paper (91 to 200 g/m
sheets, overhead projector transparencies, trace paper
"Offset" + "Sort" and "Offset" + "Group" settings: Normal paper (60 to 90 g/m
(50 to 59 g/m
Staple: Normal paper (60 to 90g/m
Sub tray:
"Sort" and "Group" settings : Normal paper (60 to 90 g/m
thick paper (91 to 200 g/m
A3 w to A5 w/v
Sub tray:
A3 w to A5 w/v
1,500 sheets of B4-size paper or larger, 3,000 sheets of A4 to
B5-size paper, or 500 sheets of A5-size paper or smaller
100 sets (A4:9 stapled pages)
Sub tray:
200 sheets
A3 w: 2 to 50 pages
B4w: 2 to 65 pages
Other: 2 to 100 pages
2
)
2
), thin paper (50 to 59 g/m2), label
2
), thick paper (91 to 200 g/m2), thin paper
2
)
2
), thin paper (50 to 59 g/m2)
),
2
),
1
Finisher FS-505 1-23
Page 28

1
Machine overview
1-24 Finisher FS-505
Page 29

2
Copy operations
Page 30

Page 31

Copy operations
2 Copy operations
2.1 Selecting finishing settings
Various settings are available for sorting and finishing copies when they are
fed into the copy exit tray.
2
Note
As the default setting, "Group" is selected.
!
Detail
If the orientation of the positioned original is different from the orientation
of the paper in the paper tray, specify the position of the binding margin
of the original if hole punching or stapling are to be performed.
For details on specifying the position of the binding margin for the
original, refer to Copy Operations of the user manual.
For details on specifying the position of the binding margin, refer to Copy
Operations of the user manual.
2
If cover sheet feeder PI-501 is installed onto finisher FS-505, the finisher
can be operated manually. For details, refer to "Using finisher manually"
on page 2-19.
Finisher FS-505 2-3
Page 32

2
Copy operations
The following finishing settings are available.
Finishing setting Description
Sort Select this setting to separate each set of a multi-page original
(collated). (Refer to page 2-6.)
Group Select this setting to separate the copies of each page in a
Offset The copies are fed out and stacked on top of each other with
Face Up Select this setting to feed out copies with the front side facing
multi-page original (uncollated). (Refer to page 2-7.)
each set shifted to separate it. (Refer to page 2-6.)
up. (Refer to page 2-8.)
2-4 Finisher FS-505
Page 33

Copy operations
Finishing setting Description
Staple Select one of these settings to bind the copies with a staple in
2
the corner or with two staples. (Refer to page 2-9.)
Punch Select this setting to punch holes (2 or 4 holes) in the copies
for filing them. (Refer to page 2-13.)
The following procedures describe how to select finishing settings.
Finisher FS-505 2-5
Page 34

2
Copy operations
Separating copies by sets (“Sort” setting)
0 As the default setting, "Group" is selected.
0 If "Offset" is selected while a finisher is installed, printed copies are fed
out and stacked on top of each other with each set shifted to separate it.
1 In the Basic screen, touch [Finishing].
The Finishing screen appears.
2 Touch [Sort].
– To separate each set of copies, touch [Offset]. To cancel the
setting, touch [Offset] again to deselect it.
3 Touch [OK].
The Basic screen appears again.
2-6 Finisher FS-505
Page 35

Copy operations
Separating copies by pages (“Group” setting)
0 As the default setting, "Group" is selected.
0 If "Offset" is selected while a finisher is installed, printed copies are fed
out and stacked on top of each other with each set shifted to separate it.
1 In the Basic screen, touch [Finishing].
2 Touch [Group].
2
The Finishing screen appears.
– To separate each set of pages, touch [Offset]. To cancel the
"Offset" setting, touch [Offset] again to deselect it.
3 Touch [OK].
The Basic screen appears again.
Finisher FS-505 2-7
Page 36

2
Copy operations
Feeding out copies face up (“Face Up” setting)
Copies can be fed out so that the front side faces up.
0 Either "Sort" or "Group" can be selected.
1 In the Basic screen, touch [Finishing].
The Finishing screen appears.
2 Touch [Face Up].
– As the factory default, "Face Up" is not selected. Finished copies
are fed out face down. Printed copies are fed out face down.
– To cancel the setting, touch [Face Up] again to deselect it.
– To cancel changes to the settings, touch [Cancel].
3 Touch [OK].
The Basic screen appears again.
2-8 Finisher FS-505
Page 37

Copy operations
Stapling copies (Staple settings)
!
Detail
There are two types of staple cartridges for finisher FS-505. The 50-sheet
staple cartridge can staple up to 50 sheets. The 100-sheet staple
cartridge can staple up to 100 sheets. Specify the number of copies
according to the paper size, stapling method and number of sheets
stapled, and then adjust the number of sheets loaded in the main tray.
In order for the copies to be stapled, all of the following conditions must
be met.
There are four Foolscap sizes: 8-1/4 × 13" w, 8-1/8" × 13-1/4" w, 8-1/2"
× 13" w and 8" × 13" w. Any one of these sizes can be selected. For
details, contact the service representative.
If the "Mixed Original" setting is selected, all copies must have the same
paper width.
If a Staple setting is selected, the "Sort" setting is automatically selected.
A Staple setting cannot be used together with the "Offset" setting.
If a Staple setting is to be selected, select the orientation in which the
original is positioned and the orientation of the page to be stapled,
otherwise the copies may not be stapled as desired.
2
For details on specifying the original orientation, refer to Copy Operations
of the user manual.
Finisher FS-505 2-9
Page 38

2
Copy operations
When Finisher FS-505 is installed
Paper weight Paper size Loading capacity with a sta-
2
60g/m
to 80g/ m
Number of bound pages Maximum number of sets
A5
A3
Other 2 to 9 sheets 100 sets
2
2 to 9 sheets 50 sets
10 to 20 sheets 50 sets
21 to 30 sheets 30 sets
31 to 40 sheets 25 sets
41 to 50 sheets 20 sets
51 to 60 sheets
61 to 100 sheets
10 to 20 sheets 50 sets
21 to 30 sheets 30 sets
31 to 40 sheets 25 sets
41 to 50 sheets 20 sets
51 to 60 sheets
61 to 100 sheets
A3 w , B4 w, A4 w, A4 v, B5
w, B5 v, A5 v, Foolscap
Original of mixed sizes cannot
be stapled if all printed pages
do not have the same width.
If a cover sheet (front or back)
is added with the "Cover
Mode" function, the cover
sheet (200 g/m
pled.
*1 *3
*1 *3
*3
*2 *3
2
) can be sta-
ple setting
1,000 sheets
FS-505
15 sets (A5)
10 sets (A5)
15 sets
10 sets
*1 Up to 50 sheets can be set for A3 size.
*2 Up to 65 sheets can be set for B4 size.
*3 51 to 100 sheets is only possible when the 100-sheet staple cartridge is installed.
2-10 Finisher FS-505
Page 39

Copy operations
To bind copies with staples
1 In the Basic screen, touch [Finishing].
2 Under "Staple", touch either [Corner] or [2 Position].
2
The Finishing screen appears.
– To cancel the Staple settings, touch [Corner] or [2 Position] again to
deselect it.
– To cancel changes to the settings, touch [Cancel].
Finisher FS-505 2-11
Page 40

2
Copy operations
3 Touch [Position], and then touch the button for the desired position.
– To cancel changes to the settings, touch [Cancel].
– Touch [Auto] to automatically determine the stapling position
according to the orientation of the loaded original. If the original
length(X) is 297 mm or less, the long side of the paper is stapled. If
the original length(X) is more than 297 mm, the short side of the
paper is stapled.
4 Touch [OK] twice.
The Basic screen appears again.
2-12 Finisher FS-505
Page 41

Copy operations
Punching holes in copies (Punch settings)
!
Detail
In order for holes to be punched in the copies, all of the following
conditions must be met.
The paper width must be between 148 mm and 314mm.
The paper length must be between 210 mm and 420 mm.
If a Punch setting is to be selected, select the orientation in which the
document is positioned. If an Original Direction setting is not selected,
holes may not be punched in the copies as desired.
For details on specifying the document orientation, refer to Copy
Operations of the user manual.
If a Punch setting is selected, specify the position of the binding margin
and the loading orientation for the original, otherwise the holes will not be
punched as desired.
For details on specifying the loading orientation for the original, refer to
Copy Operations of the user manual. For details on specifying the
position of the binding margin for the original, refer to Copy Operations
of the user manual.
2
2
Note
The number of punched holes differs depending on the country (region)
where the unit is installed. For details, consult your technical
representative.
The number of holes that can be punched differs depending on the type
of punch kit installed. If different hole punch settings are available, select
the setting for the desired use.
Finisher FS-505 2-13
Page 42

2
Copy operations
The procedure for selecting two punched holes is described below.
When Finisher FS-505 and Punch PK-504/PK-505 are installed
When Finisher FS-505 and Z-folding unit ZU-601/ZU-602 are installed
Paper weight Paper size
2
50g/m
to 128g/ m
To punch holes in copies
2
A3 w, B4 w, A4 w, A4 v, B5 w, B5 v, A5 w, A5 v, Foolscap
1 In the Basic screen, touch [Finishing].
The Finishing screen appears.
2 Touch [2-Hole] or [4holes].
– To separate each set of pages and punch them, touch [Offset]. To
cancel the setting, touch [Offset] again to deselect it.
– To cancel the Punch setting, touch [2-Hole] or [4holes] again to
deselect it.
– To cancel changes to the settings, touch [Cancel].
2-14 Finisher FS-505
Page 43

Copy operations
3 Touch [Position], and then touch the button for the desired position.
4 Touch [OK] twice.
2
– Touch [Auto] to automatically determine the position of the
punched holes according to the orientation of the positioned
original. If the original length is 297 mm or less, the holes are
punched along the long side of the paper. If the original length is
more than 297 mm, the holes are punched along the short side of
the paper.
– To cancel changes to the punched hole position, touch [Cancel].
The Basic screen appears again.
Finisher FS-505 2-15
Page 44

2
2.2 Specifying folding settings
If options are installed, copies can be folded before being fed out. The
following Folding settings are available.
Copies can be Z-folded only if Z-folding unit ZU-601/ZU-602 is installed on
optional finisher FS-505.
Select this setting to fold copies at the center, and then fold them in half
again before feeding them out.
Copy operations
2-16 Finisher FS-505
Page 45

Copy operations
To fold copies fanned (“Z-Fold”)
0 When the "Z-Fold" setting is selected, the "Group" and "Face Up"
settings are not available.
1 In the Basic screen, touch [Folding].
2 Touch [Z-Fold].
2
The Folding screen appears.
– To cancel changes to the settings, touch [Cancel].
– To cancel the "Z-Fold" setting, touch [Z-Fold] again to deselect it.
3 Touch [OK].
The Basic screen appears again.
Finisher FS-505 2-17
Page 46

2
Copy operations
When finisher FS-505 and Z-folding unit ZU-601/ZU-602 are installed
Paper weight Paper size Number of folded sheets
2
60 g/m
to 80 g/m
Number of folded sheets Maximum number of sets
1 sheet 30 sets
2
A3 w, B4 w 1 sheet
2-18 Finisher FS-505
Page 47

Copy operations
2.3 Using finisher manually
The Finisher FS-505 with Cover Sheet Feeder PI-501 installed can be
operated manually, using the operation panel provided on the Cover Sheet
Feeder.
Place a set of paper into the lower tray. Upper tray cannot be used.
Available finishing modes according to the optional configuration are
described below.
- Finisher FS-505 + Cover Sheet Feeder PI-501
– Staple (Corner staple / 2 position staples)
- Finisher FS-505 + Cover Sheet Feeder PI-501 + Punch kit PK-504/505
– Staple (Corner staple / 2 position staples)
– Punch
2
Reminder
The Z folding unit ZU-601/602 cannot be used for manual punch. To use
Punch mode manually, Punch kit PK-504/505 is necessary.
Paper size Staple capacity Output tray
Specifications
for Staple (Corner staple / 2 position staples)
Specifications
for Punch
A3, B4, A4, A4R, B5, A5, 11"×17",
8.5"×14", 8.5"×11", 8.5"×11"R (60 to
2
)
80 g/m
A3 to A5 (60 to 128 g/m
50 sheets or less Primary (main)
2
) 200 sheets or
less
2
tray
Primary (main)
tray
Start/Stop button
Corner staple
2 position staples
Punch
Finisher FS-505 2-19
Page 48

2
Copy operations
To use finisher manually
0 Paper should be placed only in the lower tray of the Cover Sheet Feeder.
Upper tray cannot be used.
0 Staple (Corner staple / 2 position staples) and Punch can be used in
combination.
0 The size and the number of sheets of the loaded paper differ depending
on the finisher operations to be used. For details, refer to page 2-9.
0 The Punch settings cannot be used with special paper, such as overhead
projector transparencies, label sheets and diazo photosensitive paper. If
a Punch setting is used with special paper, the punch kit may be
damaged.
1 Place a set of paper in the lower tray
of the Cover Sheet Feeder.
– Staple (Corner staple / 2 position
staples): Place paper face up.
– Punch: Place paper face up.
Lower tray
2 Align the guide plate with the paper.
3 Press Staple mode selection button and Punch button to select the
desired mode.
Start/Stop button
Staple mode selection button
Punch button
– To select Staple (Corner staple / 2 position staples), press Staple
mode selection button to turn on the desired mode lamp.
– To select Punch, press Punch button to turn on the lamp.
To use Staple in combination, turn on the desired Staple mode
lamp.
To select only the Punch mode, turn off all the other mode lamps.
2-20 Finisher FS-505
Page 49

Copy operations
4 Press Start/Stop button.
Do you want to stop the output operation?
?
% Press Start/Stop button on the operation panel of Cover Sheet
Feeder.
2
Finisher FS-505 2-21
Page 50

2
Copy operations
2-22 Finisher FS-505
 Loading...