

Page 1

EP4050/EP3050
Thank you fo r ch oo si ng Mi no lta .
This operator’s manual explain s how to operate the copier and repleni sh it s suppli es. It a lso gives
some troubleshooting tip s as wel l as general pr ecauti ons to be observed when operatin g the copie r.
i
To ensure the best performance and effective use of your copier, read this manual carefully until yo u
familiarize yourself thoroughly with its operation and features. After you have read through the
manual, keep it for read y reference.
Please use this manual as a quick and handy reference tool for immediately clarifying any questions
which may arise.
Page 2

ii
Contents
Chapters 1 through 3 contain the basic information for making copies.
Be sure to read these chapters before attempting to use your copier.
Using This Manual
Organization viii
Page Organization ix
Terms an d Symbols for the Type of O riginals a nd Co py Paper x
Chapter 1 Safety Notes 1
1. Installing The Copier
Installation Site 2
Power Source 2
Grounding 2
Space Requirements 3
2. Precautions for Use
Operating Environment 4
Using the Copier Properly 4
Care of Co pier S up plies 5
Moving 5
Page 3

Contents
Chapter 2 First Things to Know about
Chapter 2 EP4050/EP3050 7
1. System Overview 8
2. Copier Parts and Accessories
Copier 10
Options 12
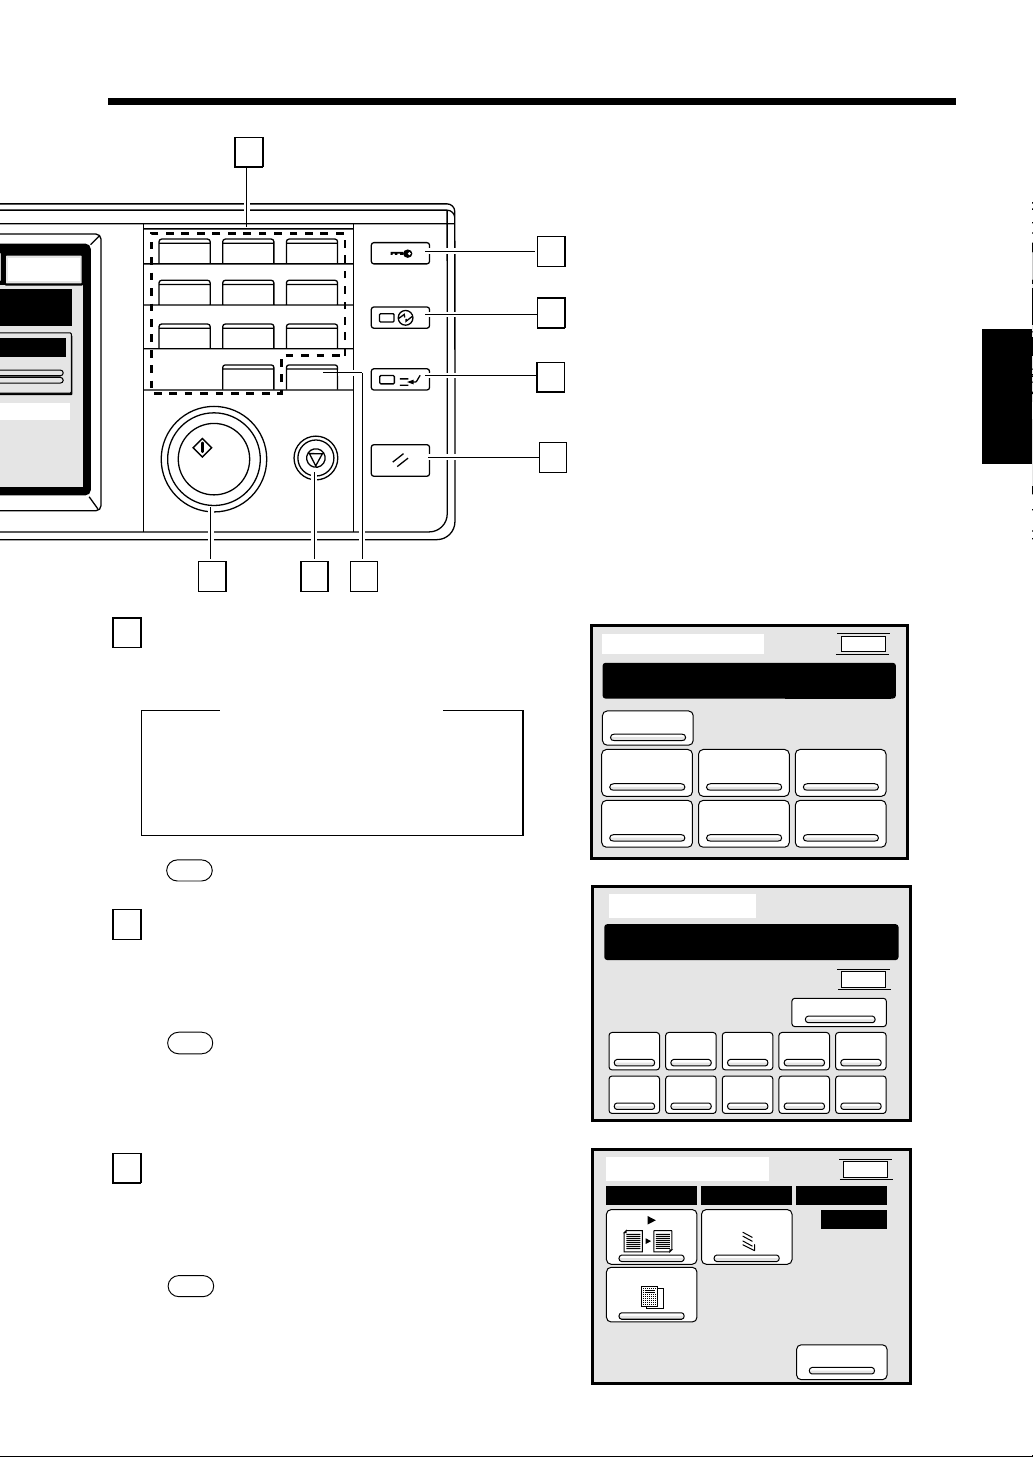
3. Control Panel Keys and Touch Panel 16
4. Touch Panel
What’s a Touch Panel? 18
How the Screen is Organized 18
Adjusting the Display Contrast 19
Using it Properly 20
5. Turning ON and OFF, and Resetting the Copier
Turning ON and OFF 23
When the Copier is Turned ON 23
Initial Mode and Panel Resetting 24
Auto Co py St art Fu nc ti on 25
Energy Sav e r Mode 26
Entering the Access Number 27
iii
Page 4

iv
Contents
Chapter 3 Making Copies 29
1. Basic Copying Overview 30
2. Placing Originals 32
3. Number of Copies 36
4. Starting the Copy Cycle 37
5. Interrupt Mode 38
6. Manual Bypass Copying 39
7. Basic Functions
•
Copy Paper Size 42
•
Zoom Ratio 44
•
Image Density 47
8. Selecting the Original Copy Type
▲
•
1 1 51
▲
•
1 2 51
▲
•
2 1 53
▲
•
2 2 54
▲
•
1 [2 in 1] 54
▲
•
1 2 [2 in 1] 56
9. Finishing Mode
•
Non-Sort 68
•
Sort 68
•
Sort-and-Staple 69
•
Group 69
10. Auxiliary Functions
•
Cover 81
•
Page Insertion 84
•
OHP Interleaving 92
•
File Margin 98
•
Book Copy 102
•
Edge/Frame Erase 104
11. Mode Check 107
▲
•
1 [2 in 1] 1 57
•
2 [2 in 1] 1 58
•
Mixed Original Detection Mode 60
•
Auto Original Coun t Mode 62
•
•
•
▲
▲
Hole Punch 70
Manual Staple 70
Auto Dual Function 74
Page 5
v
Contents
Chapter 4 Using the User Mode 109
1. Job Memory Input and Job Recall
Job Memory Input 110
Account Job Input 112
Recalling a Job from Memory 114
2. Zoom Memory Input 116
3. Meter Count 118
4. Toner Replenisher 119
5. Drum Dehumidifier 120
6. User’s Choice
User’s Choice Functions 121
Making the User’s Choice Settings 126
7. Data Send 128
Chapter 5 When a Message Appears 129
1. When the Message " The Current Paper Drawer is empty. "
Appears 130
2. When the Message " Replenish Toner. " Appears 136
3. When the Mes sag e " T he S t apl e Car tri ge is empty. " Appears
138
4. When the Message " Misfeed detected. " Appears 142
5. When the Message " The section indicated by is open. "
Appears 154
6. When Appears. 157
7. What Does Each Mess age Mean? 158
Page 6

vi
Contents
Chapter 6 Troubleshooting 161
1. When this Type of Copy is Produced
•
The Image is too ligh t 162
•
The Image is too dark 162
•
The Copy is bl ur ry 162
•
The Copy has l ines 1 6 3
•
The Copy has dark specks or spots 163
•
The Edg e of the C opy is dirty 163
•
The Image on the Copy is not alig ne d prop e rly 164
2. The Copier is not functioning as designed
•
The Touch Panel shows nothing 165
•
No copies are fed out when the Start Key is pressed 165
•
Control Panel Keys do not respond 165
•
The Copier is not activated when the Power Switch is turned ON 165
Chapter 7 Specifications 167
1. Specifications
•
Copier 168
•
Paper Feed Cabinet 170
•
Duplex Unit 171
•
Duplexing Document Feeder 172
•
Automatic Document Feeder 173
•
20 Bin Staple Sorter 174
•
10 Bin Staple Sorter 175
•
20 Bin Sorter 176
•
10 Bin Sorter 177
•
Large Capacity Cassette 178
•
Data Controller 178
2. Copier Outline Dimensions 179
Page 7

Chapter 8 Miscellaneous 181
vii
Contents
1. Care of the Copier
•
Daily Checks 182
•
Cleani ng 183
2. Function Combination Matrix 186
3. Description of Copy Paper Size 189
4. Zoom Ratio Table
(Original Size to Copy Paper Size) 190
5. Index 191
Chapter 1
Safety Notes
Chapter 2
First Things to
Know about
EP4050/EP3050
Chapter 3
Making Co pie s
Chapter 4
Usin g t he User
Mode
Chapter 5
When a Message
Appears
Chapter 6
Troubleshooting
Chapter 7
Specifications
Chapter 8
Miscellaneous
Page 8

viii
Using This Manual
Organization
This manual consis ts o f eight chapters. C hap ter s 1 through 3 gi ve the basi c inf ormatio n for
making copi e s. Be su re to read t h es e cha pt ers b efore at tempting to us e you r cop i er.
Chapter 1 Safety Notes
About the operatin g envi ro nment, con di tio ns, an d precautions for use.
Chapter 2 First Things to Know About EP4050/EP3050
A brief description of the system and preliminary information about the different parts
of the system.
Chapter 3 Making Copies
About how to make copies an d how to make settings for various functions.
Chapter 4 Using the User Mode
About the functions that are made available by using the User Mode Key, i.e., Job
Memory Input, Zoom Memory Input, M eter Count, Toner Replenisher, Drum
Dehumidifier, a nd User’ s Choice. It a lso shows how t o recall a job pr ogram from the
memory using the Job Recall Key.
Chapter 5 When Such a Message Appears
About the various warning messages given on the Touch Panel and steps to take to
correct these faulty conditions, as well as the procedures t o be used fo r replen i shi ng
supplies.
Chapter 6 Troubleshooting
Instructions on how to troubleshoot copier malfunctions.
Chapter 7 Specifications
Complete specifications of the copier s y stem a nd option s.
Chapter 8 Miscellaneous
About care for the copier and the copier supplies.
Page 9
Page Organization
ix
Using This Manual
Index: Used to locate your chapter quickly.
Page number
Section title
Useful Tip: Giv es yo u a usefu l piece of advice
on using a particular convenient
function or device.
Chapter title
Indicates that thi s is th e
end of the steps.
Indicates that ther e are more s teps
to follow in the next column.
Note: Calls your attention to a particular
point in the procedure.
Page 10

x
Using This Manual
Terms and Symbols for the Type of Originals and Copy Paper
A few special terms and symbols ar e used in this man ual to desig nate typ es of or igi nals an d copy
paper. These two pages explain abou t these terms and symbols.
Feeding Direction (copy paper path)
In this cop ie r sys te m, copy pa p er is t ake n up fr om th e rig ht- h an d si d e of the co pie r an d fed th ro ugh
the copier to ward the left-hand side, out face up onto the Exit Tray. In the figure below, the direction
in which the copy paper is fed, as indicated by the arrow, is called the "feeding direction."
Page 11
"Width" and "Length"
Terms and Symbols Used
xi
Using This Manual
When we talk about the size of the original
or copy , we call s ide A "width " and side B
"length."
A: Width
B: Length
<Lengthwise >
When the original or copy has a "length"
longer than its "width," we call it
"lengthwise" and use symbol "L" or " ."
<Crosswise >
When the original or copy has a "length"
shorter than its "width," we call it
"crosswise" and use symbol "C" or " ."
Page 12

xii
Page 13

Chapter 1
Safety Notes
This chapter explains about the operating environment, conditions, and precautions fo r us e .
1. Ins t alling the Copi e r
Installation Site 2
Power Source 2
Grounding 2
Space Requirements 3
2. Precautions for Us e
Operating Environment 4
Using the Copier Properly 4
Care of Co pier Supplies 5
Moving 5
1
Chapter 1
Safety Notes
Page 14

2
1. Installing the Copier
Installation Site
To ensure utmost safety and prevent possible malfunctions of the copier, install it in a location which
meets the following req uirement s .
◆
A place away from a curtai n or the like that may catch fir e and bu rn easily.
◆
An area where there is no possibility of being splashed with water or other types of liquid.
◆
An area free from direct sunlight.
Chapter 1
◆
A place out of the direct air stream of an air conditioner, heater, or ventil ator.
◆
A well-ventilated place.
◆
A dry place.
◆
A dust-free location.
◆
An area not subject to undue vibration.
◆
A stable and level location.
Safety Notes
Power Source
The power source voltage requiremen ts are as follows.
◆
Use a power source with little voltage fluctuation.
Voltage Fluctuation : Within ±10%
Frequency Fluctuation : Within ±0.3%
◆
If any other electrical equipment is sourced from the same power outlet, make sure that the
capacity of the outlet is not exceeded.
◆
The outlet should be located near the copier a nd easily accessible.
◆
Never connect any oth er appliances o r machin es by means o f a multiple so cket t o the outlet being
used fo r the c opie r .
◆
If an extension cord is need ed, us e one with a capaci ty more than the power cons ump tion of the
copier.
◆
Make sure that no unusual , excessive force is being applied t o the po wer cord or extension cord.
Grounding
To prevent receiving electrical shocks in the case of electrical leakage, always ground the copier.
Connect the grounding wire to:
◆
The ground termi nal o f t he o utlet.
◆
A grounding contact which comp lies with the local electrical stan dards.
NOTE
Never connect the grounding wire to a gas pipe, the grounding wire for a telephone or a water
pipe.
Page 15
1. Installin g t he Copier
Space Requirements
To ensure easy copie r o peration, supply replacements and service maintenance, adhere to the
recommended space requirements detailed below.
NOTE
Be sure to allow a clearance of 150 mm or more at the back of the copier as there is a
ventilation duct.
3
Chapter 1
300
2,370
1,870
200
1134O034AA
Safety Notes
1,310
150
1136O163AA
Scale: mm
Page 16

4
2. Precautions for Use
Operating Environment
The operating environmental requirements of the co pier are as follows.
Temperature : 10°C to 35°C (50°F to 86°F) with a fluctuation of 10°C (50°F) per hour.
Humidity : 15% to 85% with a fluctuation of 20% per hour.
Chapter 1
Using the Copier Properly
To ensure the optimum performance of the copier, follow the precautions listed below.
◆
NEVER place a he avy object on the copier or subject the copier to sh ocks.
◆
NEVER open any Doors, or turn OFF the copier while the copier is making copies.
◆
NEVER bring any magnetized object or use flammable sprays near the copier.
◆
NEVER place a vase or vessel containing water on the copier.
Safety Notes
◆
NEVER drop paper clips, staples, or other small pieces of metal into the copier.
◆
NEVER attempt t o remove any Cov er that is secured.
◆
ALWAYS insert the Power Plug all the way into the ou tlet.
◆
ALWAYS make sure that the outlet is visible, clear of the copier or copier cabinet.
◆
ALWAYS ensure that the cop ier does not ride on the po wer cord or commu nicat ion s ca ble o f othe r
electrical equipment, and it does not get such a cord or cable wedged into its own mechanism.
◆
NEVER leave a damaged or cracked copier power cord unattended . If y ou find any of these
conditions , immediately shut down the copier, u nplug the power cord, and call your Technical
Representative for app ro pr iate action.
◆
ALWAYS p ro vid e go od ven ti l at io n when ma ki ng a larg e numbe r of con ti n uo us co pies.
◆
NEVER leave the copier running when it becomes inordinately hot or produces abnormal noise. If
that happens, immediately turn OFF the copier, unplug it, and then call your Technical
Representative.
NOTE
= Locate the Copier in a Well Ventilated Room =
A negligible amount of ozone is g enerated during no r m al o peration of this copier. An
unpleasant odor may, however, be created in poorly ventilated rooms during extensive copier
operations. For a comfo r ta ble, h eal thy, and s af e oper ati ng enviro nmen t, it is recommended that
the room be well ventilated.
REMARQUE
= Placer le copieur dans une pièce largement ventilée =
Une quantité d’ozone négligable es t dé gagée pendan t le fonctionnement du copieur quand
celui-ci est ut ilis é normalement. Cependant , un e od eur désagréable peut être ress entie dans les
pièces dont l’aérati on est insuffi sante et lorsque une utilisation prolongée du copieur est
effectuée. Pour avoir l a certitud e de trava iller d an s un envi r onnement r éunis san t des condit ion s
de confort , sant é e t de sécurité, il est préférable de bien aérer la pièce ou se trouve le copieur.
Page 17

2. Precautions for Use
Care of Copier Supplies
Use the following precautions when handling the copier supplies (toner, paper, etc.).
◆
Store the paper, toner, an d other supplies in a place f ree f ro m di rect sunlight and away from any
heating apparatus. Keep t hem i n a dry, clean environmen t.
◆
Store paper, which has been removed from its wrapper but not loaded into the Drawer, in a sealed
plastic bag in a cool, dar k place.
◆
Keep supplies out of the reach of children.
◆
If your hands become soiled with toner, wash them with soap and water immediately.
Moving
If you need to transport the copier over a long distance, consult your Technical Representative.
5
Chapter 1
Safety Notes
Page 18

6
Page 19

Chapter 2
First Things to Know about EP4050/3050
This chapt er give s you a bri e f de s cr ipt ion of the sys te m an d pre limi nar y info r ma ti on abo ut
the different parts of the system.
7
1. System Overview 8
2. Copier Parts and Accessories
Copier 10
Option s 1 2
3. Cont r ol Panel Keys an d T ouch P anel 16
4. Touch Panel
What’s a Touch Panel? 18
How th e Scre en is Or ga niz e d 18
Adjusting the Display Contrast 19
Using it Properly 20
5. Turning ON and OFF, and Res ettin g t he Cop ier
Turning ON and OFF 23
When the Copier is Turned ON 23
Initial Mode and Panel Resetting 24
Auto Copy Start Function 25
Energy Saver Mode 26
Entering the Access Number 27
Chapter 2
First Things to Know about EP4050/3050
Page 20
8
1. System Overview
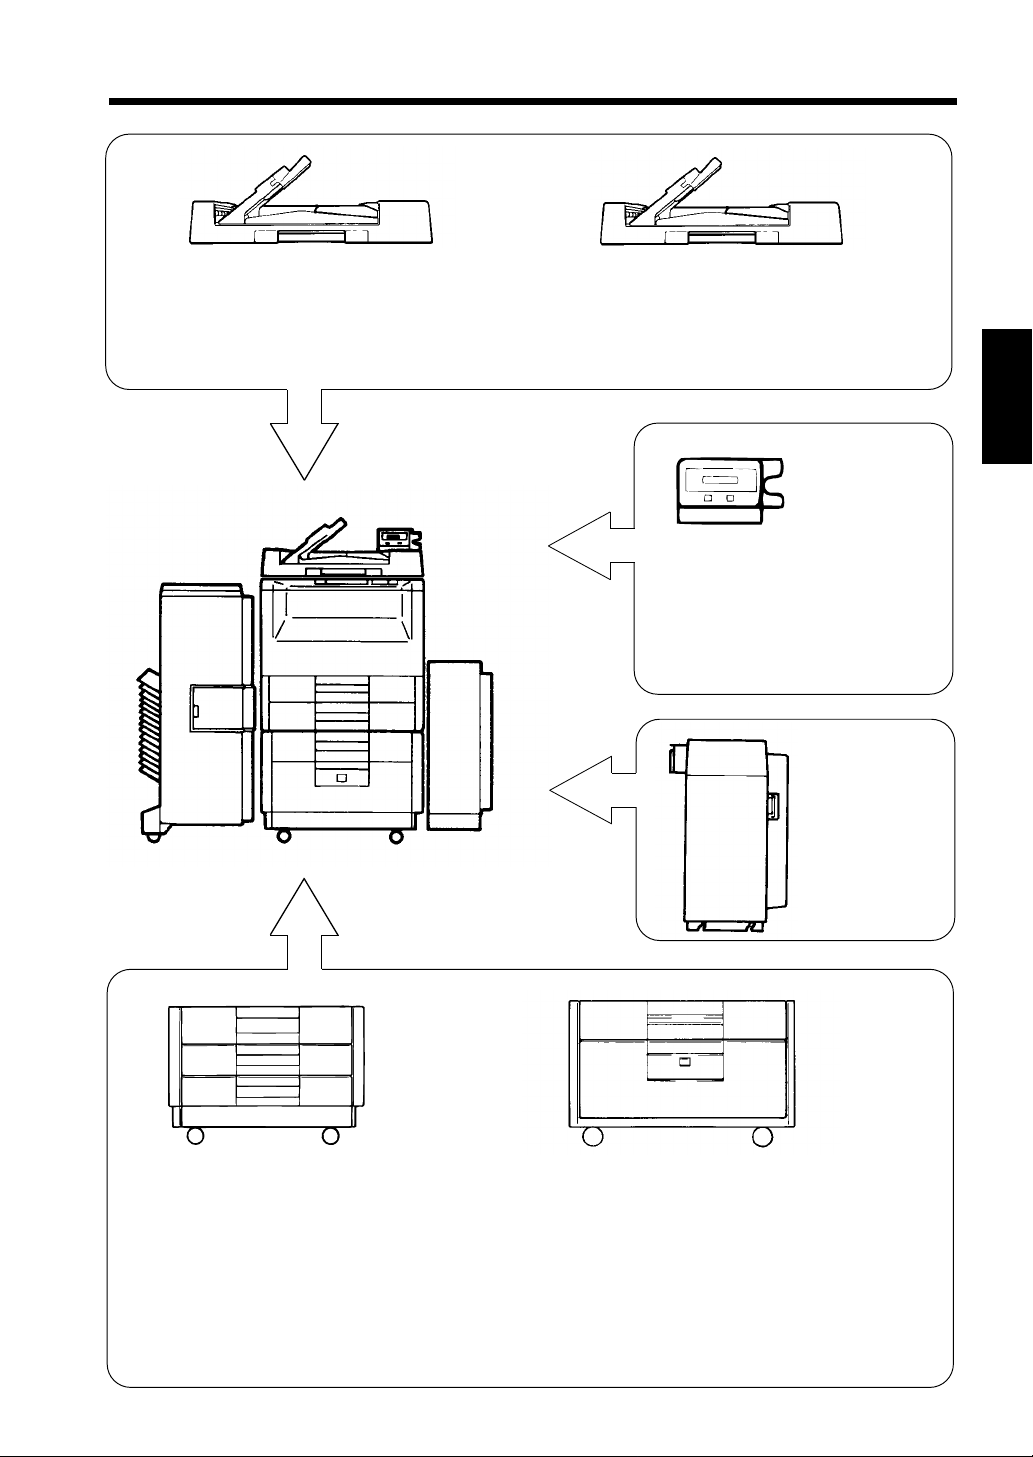
The EP4050/3050 system can be configured with the following components.
20-Bin Sorter
S-205 <Option>
Permits automatic
sorting or
grouping of copies
into 20 copy sets
or stacks at
maximum.
Chapter 2
1134O088AA
1139O0020A
Staple Sorter
ST-206 <Option>
Automatically
staples, and/or
punches holes in,
the copy sets or
stacks that are
sorted or grouped,
1139O0020A
10-Bin Sorter
S-104 <Option>
Permits automatic
sorti ng or gr ou pin g
of copies into 10
copy sets or stacks
at maximum.
(For EP3050 only)
Staple Sorter
ST-101 <Option>
Automatically
staples up to 10
copy sets or stacks
that are sorted or
grouped.
(For EP3050 only)
in addit ion t o the
functions
provided by the
S-205.
First Things to Know about EP4050/3050
1136O059AA
Duplex Unit AD-5 <Option>
Mounted in the 3rd Drawer of the Paper Feed
Cabinet, it turns over 1-sided copies to make
2-sided copies.
1139O00030A
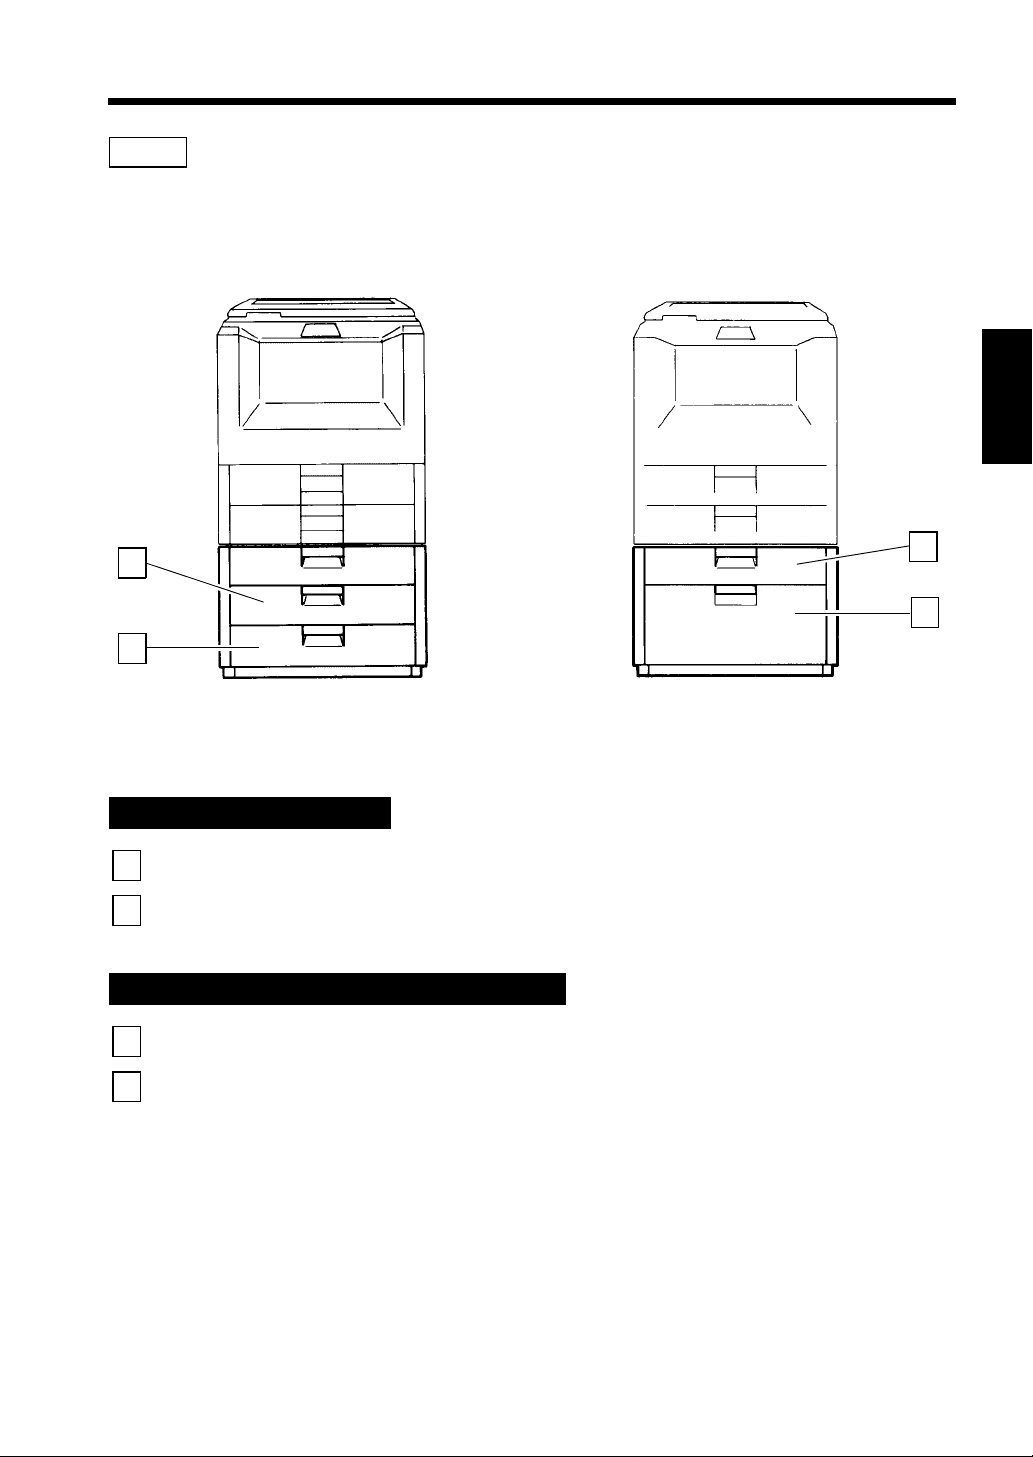
Duplex Cabinet PF-2D <Option>
Turns over 1-sided copies to make 2-sided copies.
It is also equi ppe d with a storage drawe r for
keeping copy paper and toner.
1139O1222A
Page 21
9
1. System Overview
1139O0010A
Duplexing Document Feeder AFR-9 <Option>
In addition to being capable of feeding in sheet
originals one at a time, it can automatical ly turn
over the original for the making of copies from
2-sided originals.
1134O089CA
1139O0010A
Automatic Document Feeder AF-3 <Option>
Permits automatic feedin g of multiple originals.
(For EP30 50 on l y)
1138O525A
Data Controller D-102 <Option>
Capable of controlling various
types of data inclu din g t he n umb er
of copies made, copy cost, and user
depart me nts by m ea ns o f specific
magnetic cards.
Large Capacity
Cassette C-301
<Option>
Holds up to
3,000 sheets of
copy paper
2
(80 g/m
1134O005AA
).
Chapter 2
First Things to Know about EP4050/3050
1139O0180A
1139O0180A
Paper Feed Cabinet PF-202 <Option>
Equipped with two drawers, it holds up to
2
1,000 sheets of copy paper (80 g/m
).
1139O1212A
Paper Feed Cabinet PF-102 <Opt ion>
Holds up to 2,500 sheets of copy paper
2
(80 g/ m
).
Page 22

10
2. Copier Parts and Accessories
Outside the Copier
4
5 6
7
1
Chapter 2
Exit Tray Extender
1
Exit Tray
2
Front Door
3
First Things to Know about EP4050/3050
Control Panel
4
Original Cover
5
<Oprion>
Power Switch
6
2
3
11
9
10
: Slide this Extender ou t when making copies on large-size paper.
: Holds copies fed out of the copier.
: Open to:
•
Replace the Toner Bo ttle. ➭ p. 136
•
Clear a paper misfeed. ➭ p. 142
•
Clean the Coron a U nits. ➭ p. 185
Closing the Front Door after a misfeed has been cleared will turn
the misfeed warning message on the control panel OFF.
: Use to start a copy cycle or to make copying job settings.
See Control Panel Keys and Touch Panel.
: Holds the original placed on the Original Glass in position. To
place an original, raise the Cover and place it in position on t he
➭
Original Glass.
: Use to turn the copier ON and OFF.
p. 34
➭
➭
p. 23
1134O093DA
p. 16
8
Multi Bypass T able
7
Multi Bypass E xt en der
8
Total Counter
9
1st Drawer
10
2nd Drawer
11
: Use for manual feeding of copy paper into the copier.
: Slide this Extender ou t to make copies on large -size copy paper.
: Shows the total number of copies made so far.
: Each holds up to 500 sheets of copy paper.
: Each holds up to 500 sheets of copy paper.
➭
p. 130
➭
p. 130
➭
p. 39
Page 23
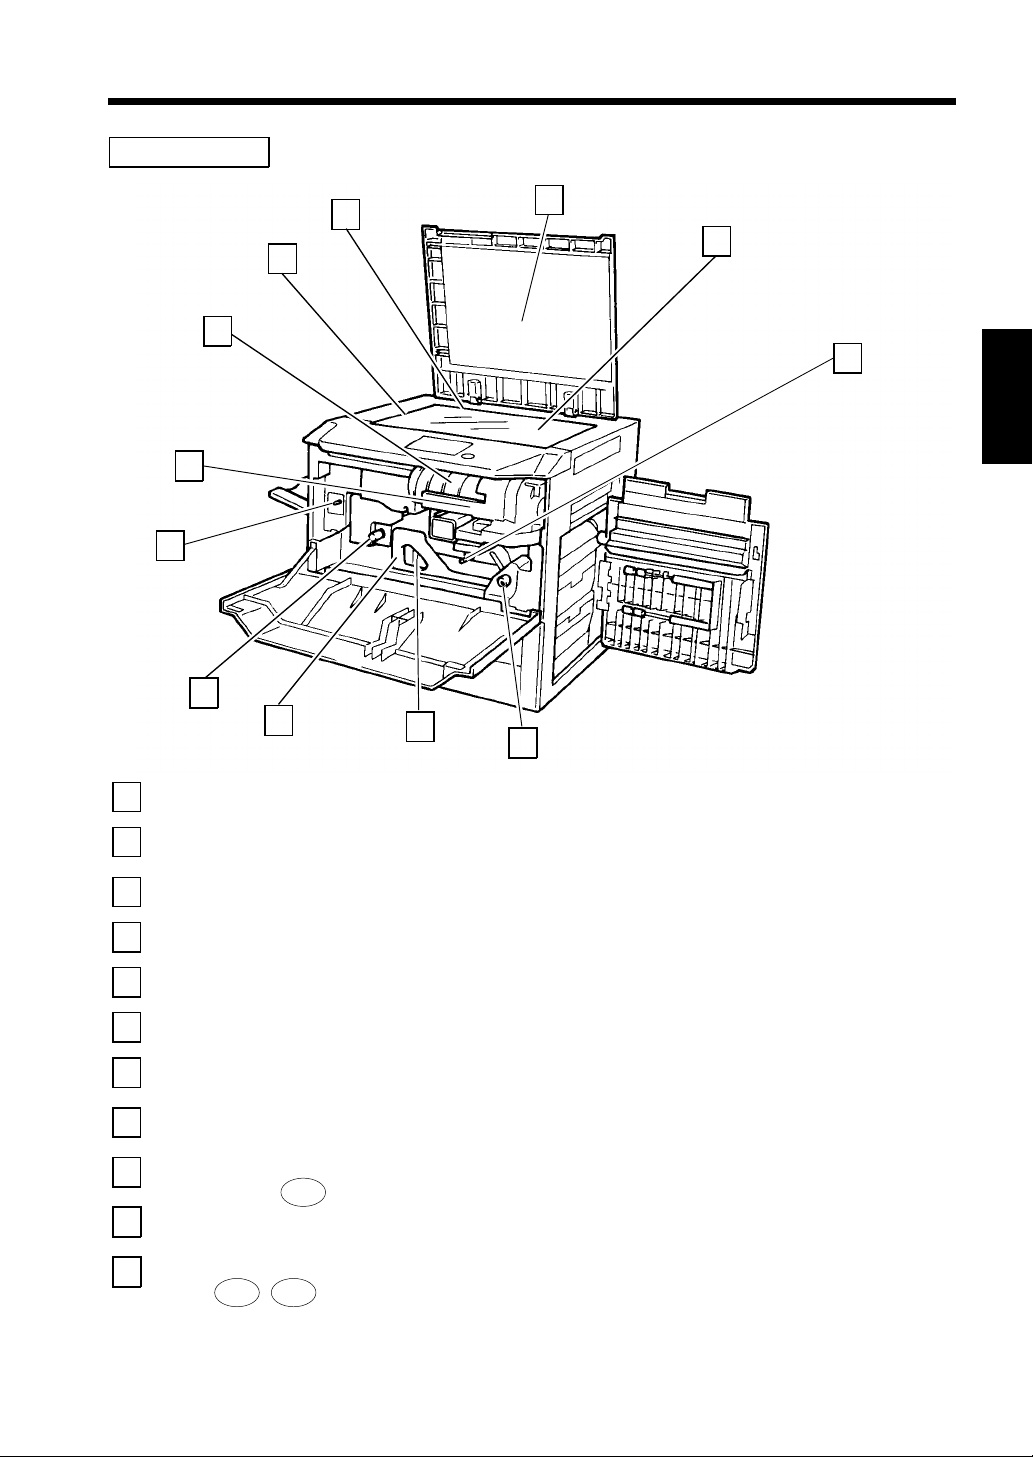
Inside the Copier
11
2. Copier Parts and Accessories
10
1
11
2
3
9
4
8
11
5
6
7
Chapter 2
1134O009AA
Toner Bottle Holder
1
Toner Bottle
2
Original Width Scale
3
Original Length Scale
4
Original Pad
5
Original Gl a s s
6
Corona Unit Cleaning
7
Lever
Dehumidifier Switch
8
Transp ort S ec tio n
9
Release Lever M2
Touch Panel Contrast
10
Control Knob
Misfeed Removal
11
Knobs M1 , M3
: Swing open to replace the Toner Bottle.
: Contains toner. Replace it with a new one when the warn ing
message t e lls you to.
: Place the original along this Scale for correct p ositioning.
: Place the original along this Scale for correct p ositioning.
: Holds t he original in position on th e Original G l ass.
: Place the original face down on this Glas s .
: Operate the Lever to clean the Co ro na Uni t if unwanted l ines are
produced on t he co p y .
: Do not touch this switch, it’s for the exclusive use by the
Technical Representative.
: Swing down to release the Transport Section for clearing a misfed
sheet of paper.
: Use to adjust the brightness of the Touch Panel.
: Use to clear a misfed sheet of paper.
➭
p. 136
➭
p. 185
➭
p. 144
➭
p. 19
First Things to Know about EP4050/3050
Page 24
12
2. Copier Parts and Accessories
Options
Chapter 2
1
2
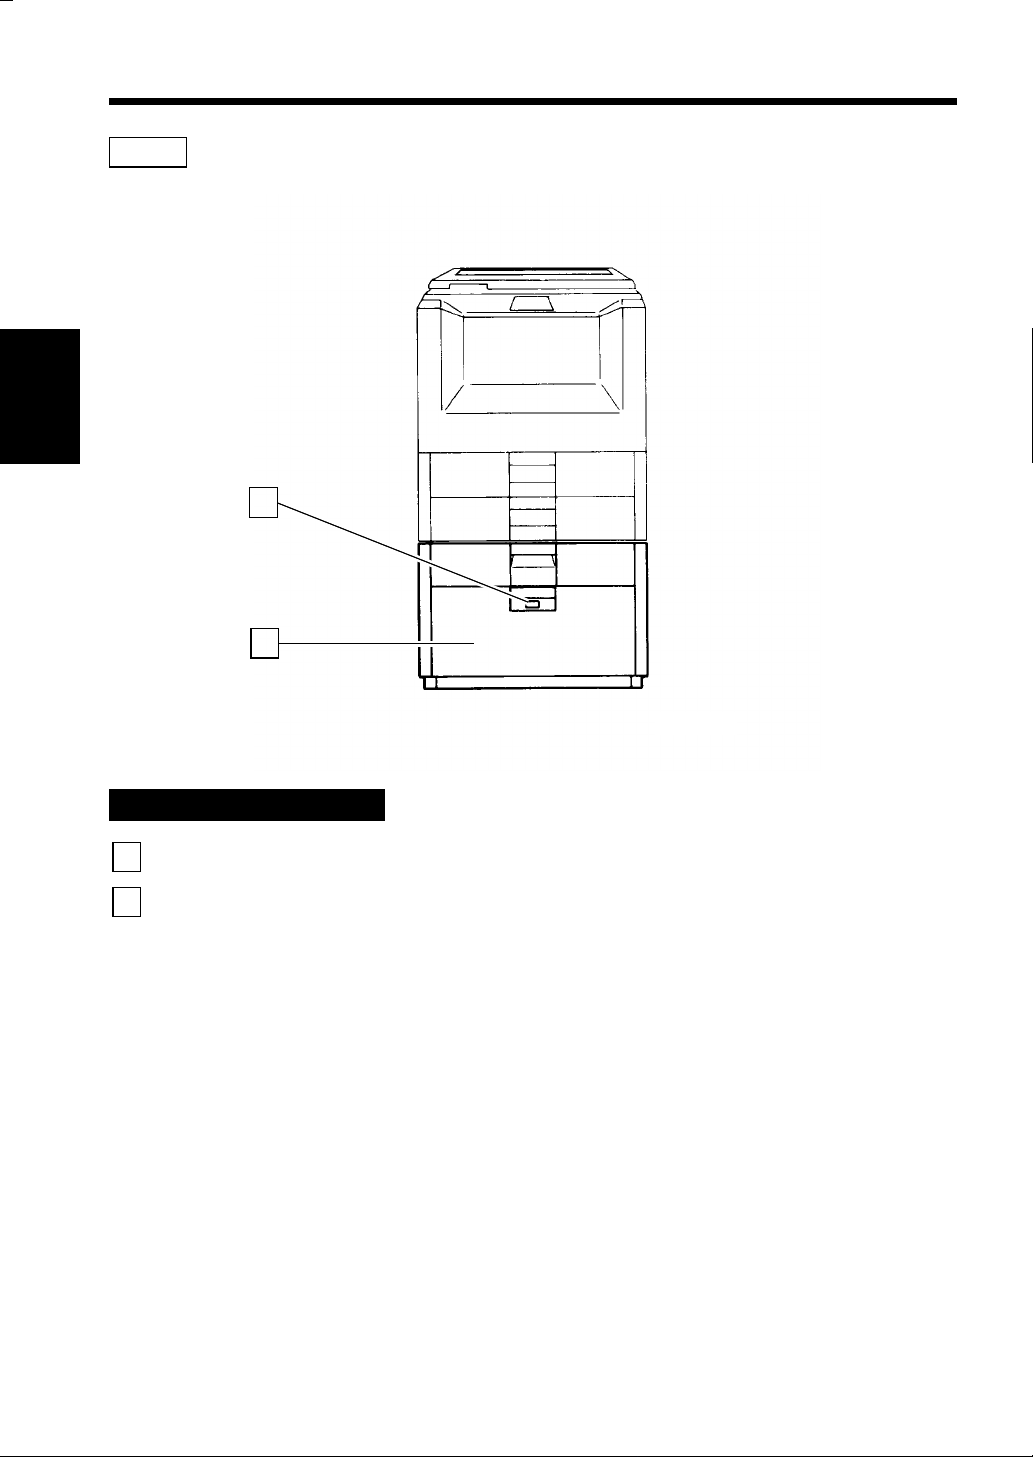
Paper Feed Cabinet PF-102
Paper Descent Key
1
First Things to Know about EP4050/3050
3rd Drawer
2
1134O046AA
: Press before sliding the Drawer out of the cabinet.
: Holds up to 2,500 sheets of copy paper.
➭
p. 132
Page 25
Options
13
2. Copier Parts and Accessories
Chapter 2
1
2
1134O047AA
Paper Feed Cabinet PF-202
3rd Drawer
1
4th Drawer
2
: Holds up to 500 sheets of copy paper.
: Holds up to 500 sheets of copy paper.
Duplex Cabinet PF-2D and Duplex Unit AD-5
Duplex Unit
3
Stora ge Drawer
4
: Turns over 1-sided copies for making 2-sided copies.
: Holds copy paper, toner and other supplies.
➭
p. 131
➭
p. 131
3
4
1134O090CA
First Things to Know about EP4050/3050
Page 26
14
2. Copier Parts and Accessories
Options
5
3
2
Chapter 2
1
4
20-Bin Sorter S-205 / Staple Sorter ST-206
7
6
1134O048AA
Sort Bins (1st to 20th
1
First Things to Know about EP4050/3050
Bin)
Non-Sort Bin
2
Lock Release Lever
3
Staple Cover
4
: Hold sorted or grouped copies, each capable of holding up to 50.
: Holds up to 50 copies fed out in the Non-Sort mode.
: Press to unlock the Sorter from the copier for clearing a misfed
sheet of paper or other service job.
: Open to replace the Staple Car tridge (ST-206 only).
Duplexing Document Feeder AFR-9 / Automatic Document Feeder AF-3
Document Exit Tray
5
Document Guide Plate
6
Document Feed Tray
7
: Receives originals auto maticall y ejected from the AFR -9 or AF-3 .
: Slide the plate as necessary to the size of the originals.
: Load the originals face up on this tray.
Page 27
Options
15
2. Copier Parts and Accessories
4
1
5
6
2
3
10-Bin Sorter S-104/Staple Sorter ST-101
Lock Release Lever
1
Sort Bins
2
Staple Cover
3
: Press to unlock the Sorter from the copier for clearing a misfed
sheet of paper or other service job.
: Hold sorted or grouped copies. The Top Bin is capable of holding
up to 50 copies and each of the 2nd to 10th Bins up to 25 copies,
for a maximum of 275 copies.
: Open to replace the Staple Car tridge (ST-101 only).
Chapter 2
7
1134O049AA
First Things to Know about EP4050/3050
Data Controller D-102
Data Controller
4
: For details, see the Operator’s Manual for D-102.
Large Capacity Cassette C-301
Lock Release Lever
5
Paper Plate Descent Key
6
Cassette Door
7
: Use to unlock the Cassette from the copier for clearing a misfed
sheet of paper or other service job.
: Press to lower the Paper Plate.
: Open to add paper or clear a misfed sheet of paper.
Page 28
16
3. Control Panel K eys and Tou ch P ane l
10
User Mode
Job Recall
Chapter 2
Touch Panel
1
•
Shows various scree n s and messages.
➭
See Touch Panel
Start Key
2
•
Press to s tart a copy cycle. ➭ p. 37
•
If pressed while th e co pier is warming
p. 18
up, it enables the Auto Copy Start
➭
Function.
Stop Key
3
•
Press to stop a multi-copy cycle.
➭
First Things to Know about EP4050/3050
4
p. 37
Clear Key
p. 25
Press to:
•
Reset the multi-copy entry to 1. ➭ p. 36
•
Clear a zoom rati o entered when setting
one using the 10-Key Pa d.
Panel Reset Key
5
•
Press to set the copier into the initial
Mode Check
12
6
11
Interrupt Key
•
Press to interrupt a current job with a
different one. Press it again to return to
the previous job .
Energy Saver Key
7
•
Press to set the copier into the Energy
Saver Mode.
Access Mode (ID) Key
8
•
Use to set t he Ac c e ss mo de.
Note: For details see the User’s Choice.
➭
10-Key P ad
9
Use to:
•
Enter the number of copies to be made.
•
Enter the zoom ratio to be used.
•
Enter the number of originals.
p. 27
➭
Auxiliary
p. 26
Ready to Copy
Auto Exp.
Exposure
➭
p. 38
Finishing
x1.000
Zoom
1
Orig. Copy
Basic
1
Auto Paper
Paper
mode, clearing all sett ing s made
➭
previously on the control panel.
p. 24
Note: It does no t, however, clear the
contents of the zo om a nd job
program memo ry and the settings
immediately before the I nterrupt
mode.
Page 29
9
17
3. Control Panel Keys and Touch Panel
Basic
Paper
123
1
456
789
0C
8
7
6
Chapter 2
5
2
User Mode Key
10
•
Press to select the User Mode setting
1134P487DA
3 4
screen.
Functions in User Mode
•
Job Memory Input
•
Zoom Memory Input•User’s Choice
•
Meter Count
•
Toner Replenisher
•
Drum Dehumidifier
•
Data Send
1134P487DA
User Mode
Select a function by pressing the
key.
Data Send
Job Memory
Input
Toner RePlenisher
Zoom Memory Input
Drum Dehumidifier
Exit
Meter
Count
User's
Choice
See Using the User Mode
Job Recall Key
11
•
Press to select the Job Recall screen, on
which you can recall or check a
copying-job program previously stored in
memory.
See Recalling a Job from Memory
➭
p. 114
Mode Check Key
12
•
Press to select the Mode Check screen.
From this screen, you can access the
setting screen of a particular function and
change or cancel the setting as necessary.
➭
See Mode check
p. 107
➭
p. 109
Job Recall
Press a key to recall a job.
Account job
1
2 3 4 5
6 7 8 9
Mode Check
Auto Expo. X1.000 Auto Paper
Orig. Copy
Cover
Finishing
Mixed Orig
1134P359CA
First Things to Know about EP4050/3050
Exit
10
1134P361CA
Exit
1
1134P362CA
Page 30
18
4. Touch Panel
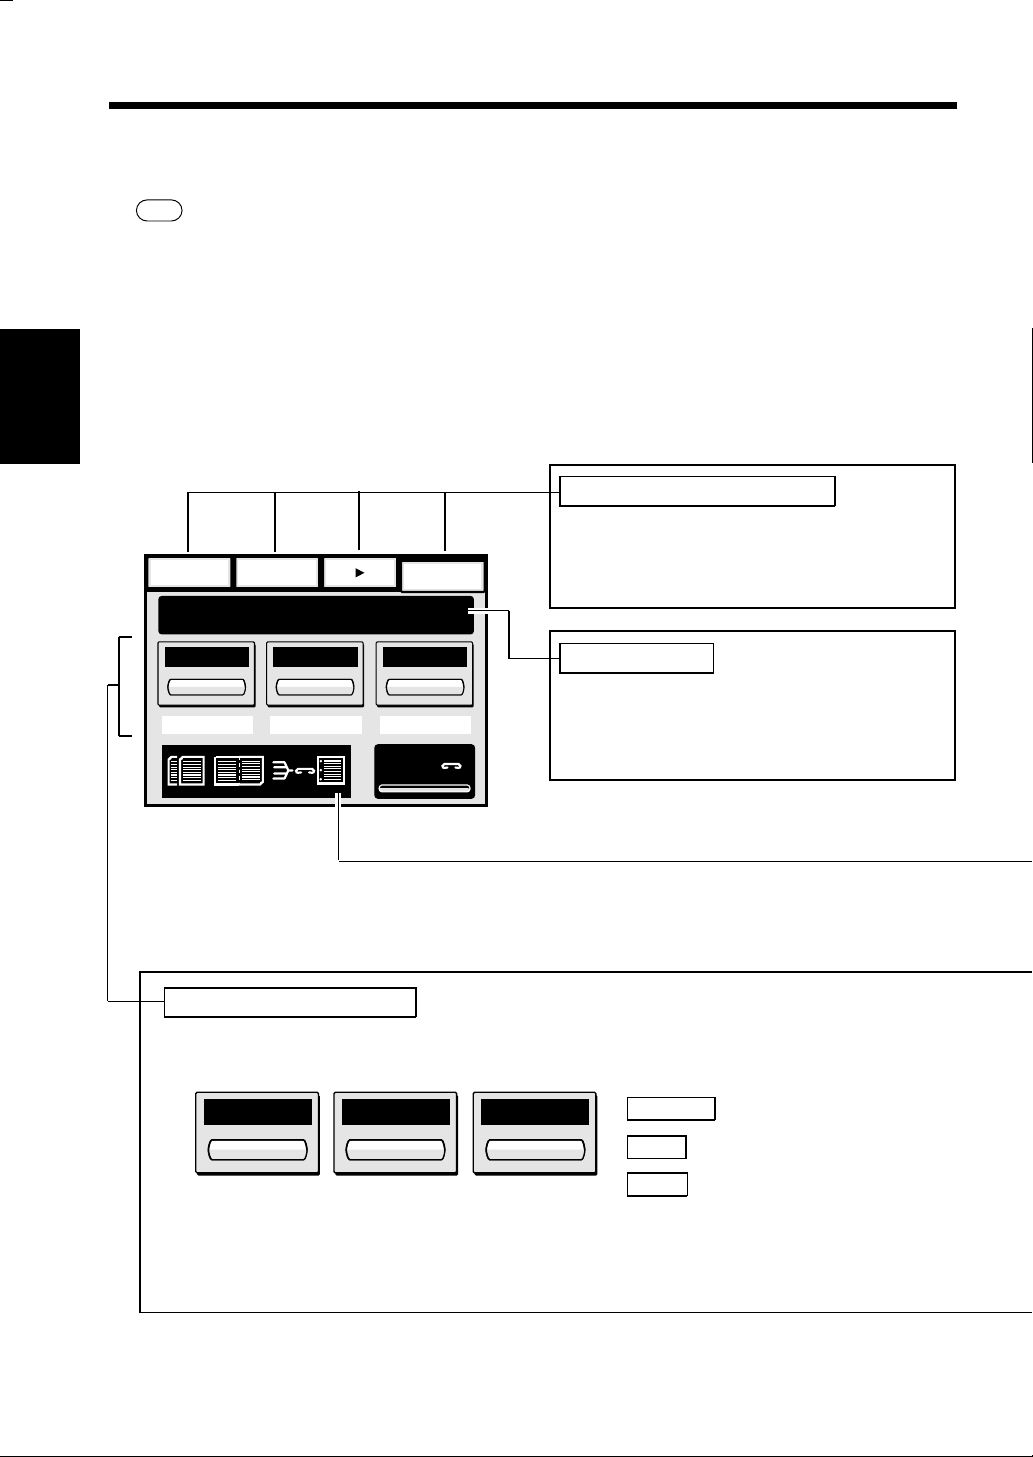
What’s a Touch Panel?
When you turn the copier O N , the Basic screen as shown below appears on the Touch Panel.
➭
See Initial Mode and Panel Resetting
The Touch Pane l i s the major source of information, sh owing in messages and graphic s the currently
set functions, availabl e fu nctions to choose from, and the copie r status.
You have onl y to to uc h the k ey sh ow n on the To uch P ane l t o selec t or a cti v ate the funct i on
represented by the key.
How the Screen is Organized
In the following, we s how typical s creen s wi th a brief description of each of them.
Chapter 2
<Example: Basic Screen>
Auxiliary Finishing
Ready to copy.
Orig. Copy
Basics
p.24
Supplementary Function Keys
When any of these keys is touched, the
corresponding Sup plementar y Function
screen appears.
1
Auto Expo. x1.000 Auto Paper
Message Display
Shows the curren t co pier status, operating
Exposure PaperZoom
instructions, and other data including the
number of copies selected.
£
Staple
1134P429CA
First Things to Know about EP4050/3050
Basic Function/Key Displa y
Shows the Basic Funct ion keys and the basic functions currently selected for use.
<Example: Basic Function Keys on Basic screen>
Auto Expo. x1.000 Auto Paper
Exposure PaperZoom
Exposure
Zoom
Paper
1134P430CA
: Auto Exposure
: ×1.000
: Auto Paper
When any of the Basic Function keys is touched , the correspondi ng Basic Function screen
appears.
Page 31

4. Touch Panel
Adjusting the Display Contrast
When you need to adjust the brightness of the Touch Panel, swing down the Front Door and turn
the Touch Panel Contra st Cont rol Knob as neces sary.
Turn the Knob clockwise to make the
Panel br igh te r.
1138O666CA
Turn it counterclockwise to make the
Panel da rke r.
1134O050AA
1138O667CA
Set Function Display
Shows gr aph ic rep resen tations of fu nctions set other than the initial ones , including the
Orig. Copy
Note: If a function or functions have b e en se t by
and Finishing types.
▼
Auxiliary
, the Mode Check Key on t he
control panel is lit.
19
Chapter 2
<Example>
Orig. Copy
£
1134P157AA
1134P157AA
Finishing
: 2in1
▼
: Sort-and-Staple, Hole Punch
To check for more details of set functions, press the Mode Check Key. When the key is
➭
pressed, the Mode Check s creen app ears.
<Example:
Auxiliary Finishing
Ready to Copy.
Paper
setting screen>
Auto Expo. x1.000
1
A4
2
L
3
A4
B4 A4
1
2
3
4
Orig. Copy
500
0
4
L
Basics
A4
ManualAutoPaper
A4
1
1134P346DA
p. 107
If you want to select paper of a particular size instead
of Auto Paper, touch the corresponding paper size key.
To go back to the Basic screen, touch
one of t he Supple m e ntary Function keys.
You may also want to t ouch any other Supplementary
Function key to show the corresponding
Supplementary Function screen.
Basics
First Things to Know about EP4050/3050
which is
Page 32

20
4. Touch P anel
Using It Properly
When you operate a key on the Touch Panel, press it onl y l i ghtly. Act uall y, it ’s just t o " tou ch" the
key with your finger, and not to "press," as the name indicates. There’s no need of yo ur touching it
hard.
NOTE
OK
Chapter 2
Let’s Try!
1
First Things to Know about EP4050/3050
Now, let’s try it ..., touch
Paper
the Panel.
Auxiliary Finishing
Ready to copy.
Auto Expo. x1.000 Auto Paper
Exposure PaperZoom
Orig. Copy
Basics
You must have heard a peep and, at the
same time, the screen chan ged. In this
case, the new screen allows you to
select the copy paper size. (It’s also
possible to disabl e the p eep.
➭
Choice p. 123)
Auxiliary Finishing
Ready to Copy.
Orig. Copy
Basics
1134O094AA
on
1
1134P488CA
User’s
1
Be sure to use your finger to touch lightly the
Touch Panel. NEVER press it h ard or h it i t, as a
damage d panel could result. Be aware also th at
using a hard or pointed object can damage it.
Now, touch A4 .
2
Auxiliary Finishing
Ready to Copy.
Auto Expo. x1.000
1
L
2
3
4
Okay, so you heard a peep again and
A4 is now highlighted. This
indicates that A4 has been selected
as the current paper size.
As you have just seen, the key on the
Touch Panel has a function to either go
to another screen or select a particul ar
function.
Orig. Copy
1
A4
2
A4
3
B4 A4
Basics
500
0
4
L
1
A4
ManualAutoPaper
A4
1134P346DA
Auto Expo. x1.000
1
A4
2
L
3
A4
B4 A4
1
2
3
4
Auto Paper
ManualAutoPaper
4
L
A4
1134P345DA
Page 33

21
4. Touch Panel
Let’s Set up a Job!
This time, touch
1
You now ha ve the Auxiliary functi ons
menu screen.
Auxiliary
Ready to copy.
Auto Expo. Auto Paperx1.000
Page
Insertion
2
Auxiliary
If using the ADF, load originals in
the ADF before making selections.
Finishing
Cover
Touch
OHP Interleaving
Book
Copy
File Margin
And you have a screen on which you
can make the file mar gin settings.
Finishing
File Margin
Position Mode Width
Auxiliary
Orig. Copy
Edge/Frame
Erase
.
Orig. Copy
10mm 15mm
A
20mm
A
.
Basics
File
Margin
Basics
EnterCancel
1
1134P237CB
4
margin copy cycle.
Let’s Cancel a Setting!
Press the Start Key to start the file
1
2
Okay, now let’s se e how we can
cancel, or undo , t he settings made .
Auxiliary
Touch
File Margin
and then touch
. You now see the file
margin setting screen on the Touch
Panel.
Auxiliary
If using the ADF, load originals in
the ADF before making selections.
Finishing
File Margin
Position Mode Width
Now, touch
Orig. Copy
Cancel
A
A
.
This cancels the file margin settings
made in step 3 and the Auxiliary
Functions menu screen reappears.
Chapter 2
Basics
EnterCancel
10mm 15mm
20mm
1134P344DA
First Things to Know about EP4050/3050
Touch t h e key of yo ur cho ic e on th e
3
setting screen and then touch
This enters the high lig ht ed functio ns
and the Auxiliary functions menu
screen reappears.
Auxiliary
Ready to copy.
Auto Expo. Auto Paperx1.000
Page
Insertion
Finishing
Cover
Orig. Copy
OHP Interleaving
Book
Copy
Enter
Basics
File
Margin
Edge/Frame
Erase
1134P344DA
.
1
1134P431CB
Page 34

22
4. Touch P anel
Alternative Methods for Can celing
•
Press the Mode Check Key on the
control panel to sh ow the Mode Check
screen. Touch the key corresponding to
the function to be canceled t o sh o w the
setting screen, then touch
Cancel
.
Mode Check
Auto Expo. X1.000 Auto Paper
Orig. Copy
Finishing
Exit
1
Chapter 2
Cover
Mixed Orig
1134O131CA
Note: The actual screen may look
differently fr om the one above.
Shown are only those functions for
which s et ti ng s ha ve been ma de.
•
Press the Panel Reset Key on the
control panel to clear all settings made,
restoring th e co pier to the initial
conditions. Be careful, however, the
Key also cancels the b as ic f un ction
settings.
First Things to Know about EP4050/3050
Page 35

5. Turning ON and OF F, and Resetting the Copier
Turning ON and OFF
•
Turning Copier ON
Press the Power Switch to the I (ON) position.
•
Turning Copier OFF
Press the Power Switch to the (OFF)
position.
1134O016AA
When Copier is Turned ON
When the Power Switch i s turned ON, the message "Welcome!" app ears on the Touch Panel and the
Start Key lights up orange.
23
Chapter 2
Orange Light
Welcome
1138O531AA
1134P167AB
In about 5 seconds, t he mes s age changes to "Copy jo b will start after the copier has w armed up." and
the cop i er now en ables its auto copy start function.
➭
Auto Co py St art Fu nc ti on
p. 25
Pressing the Start Key at this point does not start a copy cycle. You’re going to have to wait for
about 2 minutes and 30 seconds (at an ambient temperature of 74°F/23°C).
Auxiliary Finishing
Ready to copy.
Auto Expo. x1.000 Auto Paper
Orig. Copy
Basics
Green Light
1
1138O531AA
First Things to Know about EP4050/3050
Exposure PaperZoom
1134P488CA
1138O531AA
1138O531AA
Page 36

24
5. Turning ON and OFF, and Resetting the Copier
Initial Mode and Panel Resetting
Initial Mode
When the Power Switch i s tur ned O N, t he Bas ic s creen appears on the Touch Panel. The settings on
this screen are called the initial mode.
Note: The Basic screen serves as the reference for all panel settings to be later made.
Auxiliary Finishing
Ready to copy.
Auto Expo. x1.000 Auto Paper
Chapter 2
Exposure PaperZoom
Orig. Copy
Basics
1134P488CA
No. of copies selected: 1
1
Zoom
: ×1.000
Paper
: Auto Paper
Exposure
: Auto Expo.
Useful Tip
The initial mode can be changed. For details, see User’s Choice. ➭ p. 122
Panel Resetting
The Panel Reset Key resets all contr ol p anel settings to default settings including the number of
copies selected and zoom ratio.
Note: If Duplexin g Docum ent Feeder AFR-9 is
used, the original present on th e Original
Glass will be ejected out of the unit.
First Things to Know about EP4050/3050
1134P341DA
Useful Tip
The Panel Reset Key enables you to cancel all previous settings e fficiently. To avoid miscopy, try
to press this key before making any setting for your own job.
Auto Reset Function
If no key on the con tr ol panel is press ed w ithin abou t 60 secon ds after a copy cycle has been
completed or copying settings made, the Auto Reset function is activated to return the copier to the
default settings.
Useful Tip
The Auto Reset function can be enabled or disabled by the User’s Choice. For more details, see
➭
User’s Choice.
p. 123
Page 37

5. Turning ON and OFF, and Resetting the Copier
Auto Copy Start Function
The auto copy start function allows a copy process to be started as soon as the copier compl etes
warming up.
Check that t he Start Key is lit up green.
1
Load the originals onto the
2
AF-3/AFR-9 or place an original on
the Original Glass .
1134P342DA
NOTE
Do not remove th e original until the
copy cycle i s completed.
25
Chapter 2
1134P342DA
Press the Start Key.
3
The AF-3/AFR-9 starts feeding th e
first original onto the Origin al G las s
and the message "Copy job will start
after the copier has warmed up."
appears. (Not to mentio n, the original
manually placed on the Original Glass
remains on the Glass. )
1139O0200A
1139O0210A
4
As soon as the copier completes
warming up (which takes about 2
minutes and 30 seconds), the copy
cycle is automatically started.
Note: If t he c opie r ha s been se t into
the Energy Saver mode, it takes
a maximum 30 seconds for th e
copier to complete warming up.
First Things to Know about EP4050/3050
Page 38

26
5. Turning ON and OFF, and Resetting the Copier
Energy Saver Mode
If the copier is shut down when it is not in use, it takes the copier a maximum of 2 minutes and 30
seconds to complete the war m-up cycle. In s tead of turning the copier OFF, it’s a good idea to use
the Energy Saver mode. This mode will minimize the time it takes the copier to complete the
warm-up cycle to about 30 seconds.
Entering the Energy Saver Mode
Press the Energy S aver Key. Whi le the
copier is in the Energy Saver mode, the
Energy Saver Key is lit with the Start Key lit
Chapter 2
1134P433DA
green.
Useful Tip
The User’s Choice can be used to
automatically set the copier into the Energy
Saver mode after the lapse of a given period
of time after a copy cycle has been
completed or a key operated.
➭
p. 123
First Things to Know about EP4050/3050
Leaving the Energy Saver Mode
User Mode
Job Recall
Mode Check
Auxiliary
1134P342DA
1134P342DA
Finishing
Ready to Copy
Auto Exp.
Exposure
123
456
789
0C
1134P435DA
x1.000
Zoom
Orig. Copy
Basic
1
Auto Paper
Paper
To allow the copier to leave the Energy
Saver mode, press any key on the control
panel, for instance, the S tart Key.
This cancels the Energy Saver mode and t he
copier will be ready to make copies in about
30 seconds.
1134P435DA
Page 39

Entering the Access Number
Please input your 4-digit Access
Code #, then press the ACCESS Key.
Access #
27
5. Turning ON and OFF, and Resetting the Copier
If an access number has b een set, the numb er
assigned for your own department must be
entered bef or e you can ma ke a co py.
Chapter 2
1134P334CA
Using the 10-Key P ad, en ter the 4 -d igi t
1
access number and press the Access
Mode Ke y.
123
456
789
0C
1134P438DA
NOTE
To correct the 4-digit access number
entered, first press th e Clear K ey, then
enter the new number.
•
The Touch Panel c hanges from the
"Access #" prompt to initial screen,
indicating that the access mode has
been canceled. A copy cycle can now
be started. Make your copies as
necessary.
1134P438DA
2
press the Access M ode Key again .
•
The Display changes from the normal
to the "Access #" prompt screen.
Please input your 4-digit Access
Code #, then press the ACCESS Key.
When the copy cycle is completed,
1134P439DA
1134P439DA
First Things to Know about EP4050/3050
Access #
Auxiliary Finishing
Ready to copy.
Auto Expo. x1.000 Auto Paper
Exposure PaperZoom
Orig. Copy
Basics
1
1134P488CA
1134P334CA
NOTE
See the User’s Ch oice to set an access
➭
number.
p. 125
Page 40

28
Page 41

Chapter 3
Making Copies
This chapter shows you how to make copies.
The "Basic Copying Overview" offers quick, at-a-glance instructions for making copies.
Each step is keyed to a pa ge numbe r wi th a more deta ile d de scriptio n.
1. Basic Copying Overview 30
2. Placing Originals 32
3. Numb e r of Copie s 36
4. Starting the Copy Cycle 37
5. Int errupt Mode 38
6. Manual Bypass Copying 39
7. Basi c F unctions
•
Copy Paper Siz e 42
•
Zoom Ratio 44
•
Image Density 47
8. Selecting th e Original Copy Type
▲▲
•
1 1 51
•
1 2 51
▲
•
2 1 53
▲▲
•
2 2 54
•
1 [2in1] 54
▲
•
1 2 [2in1] 56
•
1 [2in1] 1 57
•
2 [2in1] 1 58
•
Mixed Original Detection Mode 60
•
Auto Original Count Mode 62
▲▲
9. Finishing M ode
•
Non-Sort 68
•
Sort 68
•
Sort-and-Staple 69
•
Group 69
•
Hole Punch 70
•
Manual Sta pl e 70
•
Auto Dual Function 74
10. Auxiliary Functio ns
•
Cover 81
•
Page Insertion 84
•
OHP Interleaving 9 2
•
File Margin 98
•
Book Copy 102
•
Edge/Frame Erase 104
11. Mode Check 107
▲
29
Chapter 3
Making Copies
Page 42

30
1. Basic Copying Overview
•
Place the original in position (step 1), set the number of copies to be made (step 8), and press the
Start Key (step 9). This will allow you to make a full-size copy or copies on pap e r of the same size
as the original.
Note: Automatica lly selected in the initia l m od e are Au to Paper, full size, an d Auto Exposure.
•
The selections you make on the Touch Panel will change the exposure level, zoom ratio, the
type of copy and so on.
1. Placing the Original ➭ p. 32
•
Load the originals face up on the AFR-9.
Chapter 3
•
Raise the Origin al Co ver and place the
original face down on the Original Glass.
Making Copies
To change the copy paper
size
To change the zoom ratio
To change the exposure
level
• To make a 1-sided copy
• To save the copy paper
1139O0210A
Selecting the bas ic functions
2. Touch Paper.
➭
p. 42
3. Tou ch Zoom.
➭
p. 44
4. Tou ch Exposur e .
➭ p. 47
Selecting the original copy type
5. Touch Orig. Copy.
➭
p. 48
▲
▲
Auxiliary Finishing
Ready to copy.
Auto Expo. x1.000 Auto Paper
Exposure PaperZoom
Auxiliary Finishing
Ready to copy.
Auto Expo. x1.000 Auto Paper
Orig. Copy
Orig. Copy
1139O0200A
Basics
1
1134P488CA
Basics
1
Exposure PaperZoom
1134P488CA
Page 43

31
1. Basic Copying Overview
• To sort copies
• To staple copies
• To punch holes in copies
• To make a file margin
on the copy
• To copy from a book
Selecting the finishing type
6. Touch Finishi ng
➭
p. 66
Selecting the auxiliary functions
7. Touch Auxiliary.
➭
p. 78
Auxiliary Finishing
Ready to copy.
Auto Expo. x1.000 Auto Paper
Exposure PaperZoom
Auxiliary Finishing
Ready to copy.
Auto Expo. x1.000 Auto Paper
Exposure PaperZoom
Orig. Copy
Orig. Copy
Basics
1134P488CA
Basics
1
Chapter 3
1
8. Setting the number of copies. ➭ p. 36
•
Set the desired number of copies to be
made.
Note: If you have entered an incorrect
number, press the Cl ear K ey, then
set the corr ect numbe r again.
9. Starting the copy cycle. ➭ p. 37
•
Press the Start Key.
Note: To stop the copy cycle, press the
Stop Key.
Making Copies
1134P488CA
123
456
789
0C
1136P114AA
1134P342DA
Page 44

32
2. Placing Originals
Using the Automatic/Duplexing Document Feeder AF-3/AFR-9
The Automatic/Duplexing Document Feeder AF-3/AFR-9 automatically feeds in sheet originals
placed on the Document Feed Tray one by on e. A fter the copy cycle has been completed, it
automatically ejects the original out o nto the Document Exit Tray.
Some originals may no t be suitable for reli able o per ation of the AF-3/AFR-9. Here is a g uideline.
Originals Suitable for the AF-3/AFR-9
Type of Originals: Sh eets
Type of Original Paper: Plain paper (weighing 50 to 110 g/m
Original Size: No rmal m ode
A3L, B4L, A4L, A4C
2-in-1 (Dual Original Scanning) mode
A4C
Mixed Original Detection mode
Chapter 3
A3L, B4L, A4L, A4C
Originals Not Suitable
•
Typing pa p er, para f fi n pape r , and oth e r thin pa p er (w eigh i n g less t han 50 g/m2)
•
Thick paper (weighing more than 110 g/m2)
•
Transparencies, translucent paper
•
Making Copies
Wrinkled, dog-eared, curled, or to rn or igi nals
•
Clipped or stapled originals
•
Carbon-backed originals
Typing paper,
paraffin paper,
and other thin
paper
Continuous
forms
2
)
∗
AFR-9 onl y
Stapled
originals
Thick paper
Wrinkled or
dog-eared
original
Note: For any of these types of originals, raise the AF-3/AFR-9 and place the original
➭
manually on the Original Glass to make a copy.
p. 34
Usef ul Tip
Paper weight is the weight of paper per unit area
2
).
(1 m
1 m
1134O073AA
1 m
1134O074AA
Page 45

33
2. Placing Originals
Loading t he Orig ina ls
1
2
Swing the Document Exit Tray to the
left as shown.
Place a neat stack of originals face u p
on the Document Feed Tray and then
slide the Document Gu ide Plate to the
size of the originals .
NOTES
•
The maximum number of originals th at
can be loaded is as follows:
1139O0110A
3
4
Swing the Document Exit Tray back
again.
NOTE
The Copy cycle cannot be started
unless you s wing the Docum ent Exit
Tray back again.
Pull out the Document Exit Tray
Extender if you are using A3- or
B4-size origin als .
1139O1980A
Chapter 3
A4 or smalle r
AF-3
AFR-9
•
Make sure that the top level of the
original sta ck do es no t exceed the
marking.
•
If you need to make copies from
originals of assorted sizes, select the
Mixed Original Detection mode.
➭
p. 60
•
Make sure that the Document Guide
Plate is in touch with the edges of the
original sta ck. If it’s not pressed snugly
against the the original stack, skewe d
feeding could result.
30 15
50 30
Larger than
A4
▼
Making Copies
1139O0100A
Page 46

34
2. Placing Originals
Not Using the AF-3/AFR-9
Different methods are used to place the original depen d ing on i ts ty pe . Use the appropriate
procedure.
Sheet Originals
1
Chapter 3
2
Making Copies
Raise the Origin al Co ver and place the
original face down on the Original
Glass.
1134O112AA
Align the rear left corner of the
original with the marker on the
Original Width Scale. Then , pres s the
rear edge of the original up against the
Original Positioni ng Pl ate at the rear
side of the Origin al G las s .
Orig in al Posi tioning
Plate
Highly Tra nsp ar ent Or igi nal s
(Using transparenci es and tran slucent paper fo r
the original)
1
2
Place the original in the s ame w ay as
the sheet originals.
Place a blank sheet of paper o f the
same size as the original over the
original.
Blank Sheet
of Paper
1134O114AA
Gently lower the Original Cover.
3
Gently lower the Origi nal Cover.
3
1134O113AA
1134O060AA
Page 47

35
2. Placing Originals
Making Copies from Book Original
Using Book Copy Mode
("Book or igi na l" ref e rs to an open bou nd
➭
original. Book Copy mode
Place the open book as shown.
p. 102)
1
1134O037AA
Gently lower the Origi nal Cover.
2
NOTES
•
If the book is thick, make a copy with
the Original C over raised.
•
Not positioning the open book properly
will result in copies with pages in
incorrect order .
•
Do not look directly at the Original
Glass s u rface a s a s t r ong be a m of light
can be emitted.
Instructions for Original Placement
•
Be sure to raise the Original Cover 15 °
or more before pl acing th e origin al. If
the Original Cover is raised to an
angle less than 15°, the c opier may fail
to select the correct copy paper size or
zoom ratio.
15°
1139O0080A
•
Do not place an orig inal weighing
more than 3 kg on the Original Glass.
•
When placi ng an op en boo k , do no t
press t he book hard on the Or iginal
Glass, as trouble could result.
Chapter 3
Making Copies
Page 48

36
3. Number of Copies
Set the number of copies to be made. You set the number of copy sets you want to have in the
Sort mode and the number of copies in a group in the Group mode.
Setting the Number of Copies
Using the 10-Key Pad, enter the number of
copies to be made.
123
456
789
0C
Chapter 3
Correcting the Number Entry
1136P141AA
1136P141AA
Note: The maximum number that can be set is
999.
Useful Tip
The User’s Choice c an be used to limit
the maximum number of copies to be set
in the range between 1 and 99.
➭
p. 125
Making Copies
123
456
789
0C
1136P143AA
To correct or reset a number entry, press the
Clear Key.
Note: This resets the Multi-Copy Display to 1.
1136P143AA
Page 49

4. Starting the Copy Cycle
Starting the Copy Cycle
37
Ready to copy.
Now copying.
20
1134P305CA
1134P305CA
1134P342DA
18
1134P306CA
1134P306CA
Stopping a Multi-Copy Cycle
Checking that the message "Ready to copy." is
on the Touch Panel, press the Start Key.
The message now changes to "Now copying."
and the copier starts the copy cycle.
Note: In a multi-copy cycle, the number on the
Display is decreased by 1 each time a
copy i s fed out of the copier.
Chapter 3
Making Copies
Now copying.
Copy job has been
canceled. Please wait.
18
1134P306CA
1134P306CA
1134P343DA
17
1134P307CA
1134P307CA
To stop a multi-copy cycle in progress, press
the Stop Key.
The messa ge chang es to "Copy job has been
canceled . Please w a i t." and the cop i er will soon
stop.
Note: The Display shows the number of copies
yet to be made.
Page 50

38
5. Interrup t Mode
The Interr up t mode all ows yo u to int er ru pt a curr ent j ob and run a dif fer e nt one . The copier
ensures that the old job will be resumed as soon as the Interrupt mode is canceled.
Interrupting a Copy Cycle
Chapter 3
Making Copies
Press the Interrup t Key.
1
The message changes to "Now in
Interrupt Mode. Press to return to
original job." and, af ter a short time,
the current copy cycle is stopped.
Auxiliary Finishing
Now in Interrupt Mode. Press
to return to original job.
Auto Expo. x1.000 Auto Paper
Orig. Copy
1134P440DA
1134P440DA
Basics
1
3
press the Interrupt Key again.
The copier is restored to the previous
settings.
Press the Start Key to resu me the o ld
When the interrup t cycle is completed,
4
job.
1134P441DA
1134P441DA
Exposure PaperZoom
Enter the control panel settings for the
2
interrupt job and pres s the Start Key.
NOTES
•
If the current job involves 2-sided
copying, Cover, Page Insertion, or
OHP Interleaving, the copier r eje cts an
Interrupt mode.
•
If the current job involves the Sort,
Sort-a nd-Stapl e , Group, Non-So rt is
automatically select ed at the same time
when the copier is s et into the Inte rrupt
mode.
1134P489CA
1134P342DA
Page 51

6. Manual Bypass C opying
Use the Manual Bypass to make co pies on paper not loaded in any Drawer, or to copy onto
transparencies, translu cent p aper, or any other special paper.
You can also use th e Co ver mode when the Multi B yp as s Table is used with the
➭
Automatic/Duplexing Document Feeder AF-3/AFR-9 (option).
Copy Paper That Can be Used for Ma nua l Bypass
◆Types of Paper
•
Plain paper (weighing 60 to 90 g/m2)
•
Heavyweig ht pape r (wei gh ing 90 t o 15 7 g/m2)
•
Transparencies, translucent paper
◆Paper Size
•
Width: 100 t o 29 7 mm
•
Length: 140 to 432 mm
p. 81
39
◆Capacity
•
Plain paper (white) ... 50 sheets or less
•
Plain paper (once-copied paper) ... 20 sheets or less
•
Heavyweight paper, transparencies, transl ucen t paper ... 20 sheets
Using th e Man ual Byp ass
Place the original on the Original
1
Glass and make the control panel
settings.
NOTE
The following functions cannot be
selected for Manual Bypass:
Auto Pape r , A uto Siz e , Finish ing,
2-Sided Copying,
Margin-by-Reduction, Erase,
1[2in1] 1 and 2[2in1] 1.
2
▲
Swing down the Multi Bypass Table
and slide the Paper G uid e P late to the
size of the copy paper.
▲
3
Place a neat stack of copy paper on the
Table and insert it in t o the co p ier until
it stops.
NOTES
•
Before inserting, fan the paper stack
well if you are using transparencies or
translucent paper.
•
Correct any curl if you are using
heavyweig ht pa per .
•
When using once-copied paper, load
the paper stack so that the blank side
faces up.
Chapter 3
Making Copies
1136O080AA
1136O079AA
Page 52

40
6. Manual Bypass Copying
Using the 10-Key P ad, set the number
4
of copies to be made.
123
456
789
Press the Start Key to start the copy
5
cycle.
Chapter 3
0C
1136P141AA
1136P141AA
Making Copies
1134P342DA
Page 53

41
6. Manual Bypass Copying
Chapter 3
Making Copies
Page 54

42
7. Basic Functions
We here explain how to make the basic settings (copy paper, zoom ratio, and exposure level) to
make copies.
Basic Screen
Exposure
Touch this key to show
a screen which allows
you to select the image
density of the copy.
Copy Paper Size
Chapter 3
key:
Auxiliary Finishing
Ready to copy.
Auto Expo. x1.000 Auto Paper
Exposure PaperZoom
Orig. Copy
Basics
1
1134P488CA
Zoom
Touch this key to
show a screen which
allows you to select
the zoom ratio.
Paper
Touch this key to
show a screen which
allows you to select
the paper size.
key:
Key:
AutoPaper
When this key is touched, the copier is set
into the Auto Paper mode in which the
copy paper is automatically selected
according to the size of the original being
used and the zoom ratio selected for use.
Making Copies
AutoPaper
Touch
1
into the Auto Paper mode.
Auxiliary Finishing
Ready to Copy.
Auto Expo. x1.000
1
L
2
3
4
Useful Tip
1
2
3
to set the copier
Orig. Copy
A4
A4
B4 A4
Auto Paper
ManualAutoPaper
4
L
Basics
A4
1
1134P345DA
Manual Selection
The copy paper size can be set m a nually
according to your need.
Paper
1
shows which drawer holds which copy
paper size.
Auxiliary Finishing
Ready to Copy.
Auto Expo. x1.000
1
2
3
4
Touch
, and the Touch Panel
Orig. Copy
1
A4
2
A4
L
3
B4 A4
Basics
500
0
A4
ManualAutoPaper
4
A4
L
1
1134P346DA
This mode is efficient when you want t o
make copies on pape r of the same size as
your originals automatically.
Page 55

43
7. Basic Functions
2
Touch the des i red paper size key.
Selects t he Aut o
Paper mode in which
the copier selects the
optimum paper size
automatically.
1
2
3
4
Paper loaded
in the 2nd
Drawer
Auto Drawer Switching
If the Drawer currently selected for use
runs out of pap e r an d t here is anot h e r
Drawer loaded with paper of the same size
and in the same directio n, the copier
automatically selects t hat second D rawer
to continue copying.
Useful Tip
This feature is a gr eat advantage when
you need to make a large number of
copies on the same size paper . F or
example, you can make up to 2,000
copies without interruption if all four
drawers are loaded with paper of the
same size and in the same direction. You
can even make up to 5,000 copies if an
optional C-301 is additionally fitted to
the copier.
Paper loaded in
the 1st Drawer
1
2
A4
L
3 L
B4 A4
Paper loaded in
the 3rd Drawer
4
Paper lo a ded
in the 4th
Drawer
Paper loaded on
the Multi Bypass
Table
ManualA4AutoPaper
A4
1134P311DA
Paper lo aded in
Large Capacity
Cassette C-301
(shown only
when the copier
is equipped with
the option)
1134P311DA
Special Paper Setting
If the symbol "S1," "S2," etc. appears on the
paper select key shown on the Touch Panel, it
means that that part icular Drawer has been
designated for special paper.
1
2
1
2
4
5
A4
L
3 L
B4 A4
The copier provides three different types of
special paper setting, each having specific
purposes as detail ed below. The setting can be
made by using "Special Paper" of the User’s
➭
Choice. (User’s Choice
p. 124)
S1:
If S1 is set, the message on the Display asks
you whether or no t to use that p ar ti cu lar
Drawer as a possible ca ndidate in the Auto
Paper Mo de.
S2:
This setting precludes both Auto Paper Mode
and Automatic Drawer Switching .
S3:
This setting precludes 2-sided copying.
S1
S2
S3
ManualA4AutoPaper
4
A4
1134P313DA
1134P313DA
Chapter 3
Making Copies
Page 56

44
7. Basic Functions
Zoom Ratio
When you touch
Zoom
on the Touch Panel, a screen appears that allows you to set the zoom
ratio. You have five different ways to choose from to set the zoom ratio. Select one according to
your need.
Zoom Ratio Range : ×0.500 to ×2.000
Auxiliary Finishing
Ready to copy.
Auto Expo.
Re-
B4 A4
duce
En-
B4 A3
large
Chapter 3
A3 A4
A4 A5
A4 A3
A5 A4
Orig. Copy
x0.5
x2.0
Auto Paperx1.000
User SetAuto Size
Basics
Full
Size
1
1134P314EA
Auto Size
Usef ul Tip
When this key is touched, the copier is set
into the Auto Size mo de in which the zoom
ratio is automatically selected accordin g to
Making Copies
the size of the original being used and the
copy paper size selected for use.
This mode is very helpful for neat filin g
when you need to make copies from
originals of as sor ted sizes .
Touch
1
the Auto Size mode.
Re-
B4 A4
duce
En-
B4 A3
large
Select the paper size.
2
(Copy Paper Size
Auto Expo. x1.000
1
2
3
4
Auto Size
A3 A4
A4 A5
A4 A3
A5 A4
1
2
A4
L
3 L
B4 A4
to set the copier into
User SetAuto Size
x0.5
x2.0
➭
p. 42)
1134P315DA
A4
ManualA4AutoPaper
4
A4
Full
Size
1134P315DA
1134P310DA
Selecting a Ratio from among Fixed
Ones
The copier provides seven most frequently
used zoom ratios ready for immediately
use.
1
Touch the appropriate
original-to-copy-size representation
key. You have three reduction and
three enlargement ratios.
User SetAuto Size
Reduce
Enlarge
B4 A4
B4 A3
A3 A4
A4 A5
A4 A3
A5 A4
x0.5
x2.0
Full
Size
1134P316DA
1134P316DA
Page 57

45
7. Basic Functions
2
Reduce
Enlarge
touch
B4 A4
B4 A3
Full Size
A3 A4
A4 A5
A4 A3
A5 A4
.
x0.5
x2.0
User SetAuto Size
Full
Size
1134P317DA
1134P317DA
Using Zoom Up/Down Keys
▲
Full size (×1 .000) is selected when you
▲
▼
or
key on the
▼
or
key to change the
User SetAuto Size
Each touch of the
Touch Panel changes the zoom ratio shown
in 0.001 increments. You can keep
touching the key to change the ratio
quickly.
Touch t h e
1
zoom ratio.
Using the 10-Key Pad
You can use the 10-Key Pad to directly
enter the zoom ratio .
User Set
1
Touch
Then, the following screen appears.
Re-
B4 A4
duce
En-
B4 A3
large
10-Key Pad Input
Touch
on the Touch Panel.
A3 A4
x0.5
A4 A5
A4 A3
x2.0
A5 A4
User SetAuto Size
1134P319DA
.
2
Auxiliary Finishing
Ready to copy.
Auto Expo. Auto Paper
x1.000 x1.000
21
x1.000
Orig. Copy
Basics
BackUp
Full
Size
1134P319DA
1
Chapter 3
Making Copies
Reduce
Enlarge
B4 A4
B4 A3
A3 A4
A4 A5
A4 A3
A5 A4
x0.5
x2.0
Full
Size
1134P318DA
1134P318DA
Useful Tip
To save time, firs t select the fixed zoom
ratio neares t t o th e t arget ratio before
▲
▼
or
using the
key.
3
MiniReduce
10-Key
Pad Input
1134O132CA
Page 58

46
7. Basic Functions
Using the 10-Key Pad, enter the
3
desired zoom ratio.
Using the Zoom Memory
You may have on e or two ra t i os that are
123
456
789
0C
frequently used, but not available fro m the
fixed ones. These can be stored in memory
and recalled later as necessary.
User Set
Touch
.
1
1139O4860A
User SetAuto Size
Example: F or 1.300, pres s 1, 3, 0, an d
Example: 0, in that order.
To correct a ratio entered, first press
the Clear Key, then enter the c orrect
Chapter 3
one.
x1.300
1134P820AA
2
Reduce
Enlarge
B4 A4
B4 A3
A3 A4
A4 A5
A4 A3
A5 A4
x0.5
x2.0
Full
Size
1134P319DA
1134P319DA
Select the desired rat io from a mong the
three which have previously been
stored in memory.
Making Copies
Auxiliary Finishing
Ready to copy.
Auto Expo. Auto Paper
x1.000 x1.000
3
MiniReduce
x1.000
21
10-Key
Pad Input
Orig. Copy
Basics
1
BackUp
1134P247CA
Usef ul Tip
×0.930 is stored in
Mini-Reduce
. You
can use it when you want to have a
copy which is slightly smaller than the
original.
NOTE
The User Mode is us ed to sto r e z oo m
➭
ratios in memory.
p. 116
Page 59

Image Density
47
7. Basic Functions
When you touch
Exposure
on th e Touch Panel, a screen appears that allo ws you to set the
exposure level or image density. There are two ways to adjust the exposure level. Select one
according to your need .
Auxiliary Finishing
Ready to copy.
Auto Expo.
Lighter
Auto Exposure
When in the Auto Exposure mode, the
copier reads the image density of the
Orig. Copy
Basics
1
Auto Paperx1.000
Auto
Darker
1134P222CA
Manual Exposure
In the M a nual Exposure mode, you can
vary the exposure level in nine st e p s.
original and automatically adjus ts the
exposure level for the optimum copy
image density.
Auto
1
Touch
Auto
The
.
key is highlighted,
1
Lighter
Touch
necessary.
or
Darker
as
indicating that t he c opie r i s set into the
Auto Exposure mode.
Lighter
Auto
Darker
Chapter 3
Making Copies
Lighter
Auto
Darker
1134P248CA
1134P248CA
Useful Tips
•
The exposure level in the Auto
Expos ure mode can be va r i ed by using
the User’s Choi ce, eith er "Darker" or
➭
"Lighter."
•
The copier has b een fact ory-set to
p. 122
automatically select the Auto
Exposure mode. The User’s C ho ice
can be used to change this default
setting to the Manual Exposure mo de.
➭
p. 122
134P249CA
<To make the image darker>
Touch
Darker
.
<To make the image lighter>
Touch
Lighter
.
1134P249CA
Page 60

48
▲
8. Selecting the Original Copy Type
In the following pag es , let’s look at how we sh ou ld make the settings fo r the ty pe o f copy we
want to make from t he ty pe o f original we have.
When you touch
▲
orig. copy type.
▲
Orig. Copy
on the Touch Panel, a screen appears that allow s you to set the
Chapter 3
▲
Original Copy Types
▲
1 1
Making Copies
Originals Copies
Auxiliary Finishing Basics
Ready to copy.
Auto Expo. Auto Paperx1.000
121
12
Orig. Copy
2in1
2in1
1
•
Select 1 1 to make 1-sided copies from
1/2 2
Mixed Orig
▲
1-sided originals.
This is the default s ettin g if your copier is
NOT equipped with a Duplex Unit.
1
1134P226CA
➭
p. 51
▲
1 2
Originals
1136P204AA
1136P204AA
Copy
1136P205AA
1136P205AA
(Only when AD-5 is mounted)
•
Select 1 2 to make 2-sided copies from
▲
1-sided originals.
This is the default s ettin g if your copier is
equipped with a Duplex Unit.
Note: T wo ori g in als ca n be co pie d o n to one
➭
copy.
p. 51
Page 61

▲
2 1
▲
2 2
Original
Original Copy
Copies
1134P207AA
1134P207AA
8. Selecting the Original Copy Type
▲
(Only when AFR -9 is mo un te d)
•
Select 2 1 to make 1-sided copies from
▲
2-sided originals.
Note: You need twice as many sheets of copy
➭
paper a s or iginal s .
p. 53
(Only when AFR-9 and AD-5 are mounted)
•
Select 2 2 to make 2-sided copies from
2-sided or ig i nal s .
▲
➭
p. 54
49
Chapter 3
1136P207AA
▲
1 [2in1] = 1-sided 2-in-1 copy
Originals Copy
1136P208AA
1136P207AA
1136P208AA
(Only when AFR -9 is mo un te d)
•
Select 1 [2in1] to make a 1-sided copy,
▲
throug h redu c tio n, fro m two 1-s i ded or ig i nal s
side-by-side.
Note: You need half as many sheets of copy
paper as required otherwise.
➭
p. 54
NOTE
The size of the original shou ld be A4
crosswise for 2-in-1.
Making Copies
Page 62

50
8. Selecting the Original Copy Type
▲
1 2[2in1] = 2-sided 2-in-1 copy
Originals Copy
▲
1136P210AA
1136P210AA
(Only when AFR-9 and AD-5 are mounted)
•
Select 1 2[2in1] to make a 2-sided copy,
▲
through reduction, from four 1-sided
originals. Each 2-original pair will be placed
side-by-side on either side of the copy.
Note: Y ou need 1/ 4 as m a ny sh ee ts of cop y
paper as required otherwise.
➭
p. 56
NOTE
The size of the original should be A4
crosswise for 2- in-1.
Chapter 3
1[2in1] 1 = 1-sided 2-in-1 separation copy
▲
Original
Copies
Making Copies
1136P211AA
2[2in1] 1 = 2-sided 2-in-1 separation copy
▲
Original
Copies
1136P212AA
1136P211AA
1136P212AA
(AF-3/AFR-9 is mounted)
•
Select 1[2in1] 1 to make 1-sided
▲
page-by-page copies of a 1-sided original
which is the result of 2-in-1 copying.
Note: You need twice as many sheets of copy
➭
paper a s the origi n al .
p. 57
(Only when AFR -9 is mo un te d)
•
Select 2[2in1] 1 to make 1-sided
▲
page-by-page copies of a 2-sided original
which is the result of 2-sided 2-in- 1 copying.
Note: You need fou r tim es a s many sh eets o f
➭
copy paper as the ori g i n al .
p. 58
Page 63

51
8. Selecting the Original Copy Type
▲
▲
1 1
Touch
.
▲
1 1
1
121
12
▲
1 1 is selected in the initial mode.
Mixed Orig
Select
originals of asso rted sizes o n the
AF-3/AFR-9. ➭ p. 60
2in1
2in1
1
if you are using
1/2 2
Mixed Orig
1134P250CA
1134P250CA
▲
1 2
Touch
.
▲
1 2
1
121
12
Useful Tip
The copier offers the following three
original count functions:
AutoCount The copier automatically
Even Select when you have an
Odd Select when you have an odd
2in1
2in1
1
counts the number of
originals.
even number of originals.
number of originals.
1/2 2
Mixed Orig
1134P252CA
1134P252CA
Chapter 3
If
Even
or
Odd
is selected for the
original count function, the copier
makes a copy set in correct page order.
Even
is selected as default.
•
If the number of originals is even, go
to step 6.
•
If the number of originals is odd or
unknown, follow these st e ps.
# of Origs
Touch
.
2
Auxiliary
Ready to copy.
Auto Expo. Auto Paperx1.000
Finishing Basics
1 2
Orig. Copy
Making Copies
1
EnterCancel
# of Origs
Margin
1134P223CA
Page 64

52
8. Selecting the Original Copy Type
▲
Select the appropriate original count
3
function, either
Auxiliary
Ready to copy.
Auto Expo. Auto Paperx1.000
1 2
Finishing Basics
AutoCount
Orig. Copy
# of Originals
EvenAutoCount
Odd
EnterCancel
or
Odd
1
.
7
Select the width of margin on the
original.
1 2
Touch
Orig. Margin Width
10mm
20mm
Enter
.
EnterCancel
15mm
1134P320DA
1134P320DA
8
1134P227CA
Odd
Touch
4
Chapter 3
To use
AutoCount
Touch
Enter
.
function, see p. 62.
.
5
Making Copies
If the original has a f ile margin, touch
6
Margin
.
If not, go to step 8.
Auxiliary
Ready to copy.
Auto Expo. Auto Paperx1.000
Finishing Basics
1 2
Orig. Copy
1
EnterCancel
# of Origs
Margin
1134P228CA
Page 65

53
8. Selecting the Original Copy Type
▲
▲
2 1
1
2
Auxiliary
▲
2 1 / 2 2
Touch
121
12
Touch
Ready to copy.
Auto Expo. Auto Paperx1.000
12
2in1
2in1
▲
2 1
.
Finishing Basics
▲
.
1
Orig. Copy
1/2 2
Mixed Orig
1134P253CA
1134P253CA
1
EnterCancel
4
original.
12
2 2
Touch
Orig. Margin Width
10mm
20mm
Enter
.
15mm
1134P321DA
5
NOTE
When placing the original, make sure
that it is place d in the correct direction.
➭
p. 64
Select th e width of marg i n o n t he
EnterCancel
1134P321DA
Chapter 3
3
2 2
Margin
1134P231CA
If the original has a file margin, touch
Margin
.
If not, go to step 5.
12
2 2
EnterCancel
Margin
1134P258CA
1134P258CA
Making Copies
Page 66

54
8. Selecting the Original Copy Type
▲
Chapter 3
▲
2 2
1
2
▲
2 1 / 2 2
Touch
121
12
▲
2 2
Touch
Auxiliary
Ready to copy.
Auto Expo. Auto Paperx1.000
Finishing Basics
12
2in1
2in1
.
▲
.
1
Orig. Copy
1/2 2
Mixed Orig
1134P253CA
1134P253CA
1
EnterCancel
▲
1 [2in1]
Touch
1
121
12
Touch
2
Auxiliary
Ready to copy.
Auto Expo. Auto Paperx1.000
1 2in1
2in1
.
2in1
2in1
1
▲
2in1
1
Finishing Basics
.
Orig. Copy
1/2 2
Mixed Orig
1134P254CA
EnterCancel
1134P254CA
1
Making Copies
3
22
Touch
Enter
1 2- 2in1
1134P234CA
1134P234CA
.
Useful Tip
# of Origs
1134P232CA
The copier offers the following three
original count functions:
AutoCount The copier automatically
counts the number of
originals.
Even S el ect w hen you ha ve an
even number of ori gi nals.
Odd Select when you have an odd
number of originals.
If
Even
or
Odd
is selected for the
original count function, the copier
makes a copy set in c or rect page order.
Even
is selected as default.
•
If the number of originals is even, go
to step 6.
•
If the number of originals is odd or
unknown, follow these steps.
Page 67

3
Touch
1 2in1
1 2- 2in1
# of Origs
.
EnterCancel
# of Origs
1134P260CA
1134P260CA
8. Selecting the Original Copy Type
▲
NOTES
•
When the 2-in-1 copy function is
selected, the copier automatically
selects a reduction ratio. You can
nonetheless make a full- s iz e copy.
Select the desired zoom ratio and paper
size.
•
The defa ult zoo m rat io can be change d
➭
by using the User’s C ho ice.
p. 124
Useful Tip
55
Select the appro priate original count
4
function, either
Auxiliary
Ready to copy.
Auto Expo. Auto Paperx1.000
1 2in1
1 2- 2in1
Touch
Finishing Basics
Odd
AutoCount
Orig. Copy
# of Originals
.
5
To use
AutoCount
Touch
Enter
function, see p. 62.
.
6
or
EnterCancel
EvenAutoCount
Odd
Odd
1
1134P229CA
If the Center Erase functi on is selected,
.
you can eliminate shadows which would
otherwise be produced at the center of
➭
the copy.
p. 104
Chapter 3
Making Copies
Page 68

56
8. Selecting the Original Copy Type
▲
▲
1 2[2in1]
1
2
Chapter 3
Making Copies
2in1
Touch
121
12
▲
1 2
Touch
Auxiliary
Ready to copy.
Auto Expo. Auto Paperx1.000
Finishing Basics
1 2in1
1 2- 2in1
.
2in1
2in1
1
2in1
.
Orig. Copy
# of Originals
AutoCount
1/2 2
Mixed Orig
1134P254CA
1134P254CA
EnterCancel
Input #:
1134P262CA
4
function from among the following
two.
Select the appro priate original count
Auxiliary
Ready to copy.
Auto Expo. Auto Paperx1.000
AutoCount The copier automatically counts
1
Input # Enter the number of orig inals
5
Touch
number of originals you have.
Finishing Basics
1 2in1
# of Originals
1 2- 2in1
AutoCount
the number of originals. If you
already kn ow the nu mber of
originals, select "Input #" and
enter the number to save time.
using the 10-Key Pad.
Input #
if you know the
Orig. Copy
1
EnterCancel
Input #:
1134P262CA
3
Touch
1 2in1
1 2- 2in1
# of Origs
.
EnterCancel
# of Origs
1 2in1
1 2- 2in1
Touch the
# of Originals
Auto Count
EnterCancel
Input #:AutoCount
1134P264CA
1134P264CA
if the number
of Originals is unknown.
1134P260CA
1134P260CA
If the
step 7.
To use
Auto Count
AutoCount
is selected, go to
function, see p. 62.
Page 69

57
8. Selecting the Original Copy Type
▲
6
10-Key Pad.
123
456
789
0C
NOTES
Enter the number of originals using the
•
The maximum number of originals th at
can be entered is 50.
•
Press the Clear Key to correct a
number entry.
Enter
Touch
.
7
NOTES
•
When the 2-in-1 copy fun ction is
selec t e d, the copier automa t i cally
selects a reduction ratio. You can
nonetheless m ake a full-size copy.
Select the desired zoom ratio and paper
size.
•
The default zoom ratio can be changed
by using the User ’s Choice.
1136P141AA
1136P141AA
➭
p. 124
1[2in1] 1
▲
Touch
1
121
12
Touch
2
Auxiliary
Ready to copy.
Auto Expo. Auto Paperx1.000
1-
Touch
3
▲
2in1
1
2in1
1 1
Finishing Basics
12in1
12- 2in1
Enter
2in1
2in1
▲
.
.
1/2 2
1
Mixed Orig
1134P255CA
.
Orig. Copy
EnterCancel
1134P255CA
Chapter 3
1
Making Copies
1134P230CA
Useful Tip
If the Center Erase f unction is selected,
you can eliminate shadows which would
otherwise be produced at the center of
➭
the copy.
p. 104
NOTES
•
When the 2-in-1 separation copy
function is selected, the copier
automatically s elects an enlargement
ratio. You can nonetheless make a
full-size copy. Select the desir ed zoom
ratio and paper size.
•
The default zoom ratio can be changed
➭
by using the User’s C ho ice.
p. 124
Page 70

58
8. Selecting the Original Copy Type
▲
2[2in1] 1
1
2
Chapter 3
Auxiliary
▲
▲
2in1
1
Touch
121
12
Touch
Ready to copy.
Auto Expo. Auto Paperx1.000
1- 2in1
2in1
2in1
2in1
2 1
Finishing Basics
1
.
1
▲
.
Orig. Copy
1/2 2
Mixed Orig
1134P255CA
1134P255CA
EnterCancel
1
Making Copies
12- 2in1
Enter
Touch
.
3
NOTES
•
When the 2-in-1 separation copy
function is selected, the copier
automatically sel ects an enlargement
ratio. You can nonetheless make a
full-size copy. Select the desired zoom
ratio and paper size.
•
The defa ult zoo m rat io can be change d
by using the User’s C ho ice.
➭
p. 124
1134P265CA
Page 71

59
8. Selecting the Original Copy Type
▲
Chapter 3
Making Copies
Page 72

60
8. Selecting the Original Copy Type
Mixed Original Detection Mode
Use the Mixed Original Detectio n mode to make copies automatica lly from originals of assorted
sizes loaded in the AF-3/AF R-9.
If Auto Size is selected, you can make copies of the same size from originals of diff erent sizes.
▲
Originals
Chapter 3
NOTE
The copier can not staple toge ther the copi es of dif ferent sizes made in the M ixed
Original Detect ion mode.
Making Copies
Using th e Mixe d Original Detection
Mode
Copies
Auto Paper Mode
Auto Size Mode,
Copy Paper: A4
1138O537AA
1138O537AA
Swing the Document Exit Tray to the
1
left as shown.
Load the sta ck of yo ur or ig i nal s on the
Document Feed Tray so that the rear
edge of each original is pressed against
the rear Document Guide Plate. Then,
slide the front Document Guide Plate
to the rear so that it is pressed against
the front edges o f t he o rig inals with
the greatest width.
1139O0120A
2
Swing the Document Exit Tray back
again.
1139O198OA
Page 73

3
Touch
▲
Orig. Copy
61
8. Selecting the Original Copy Type
.
▲
Auxiliary Finishing Basics
Ready to copy.
Auto Expo. Auto Paperx1.000
121
12
Mixed Orig
Touch
4
into the Mixed Original Det ection
Orig. Copy
2in1
2in1
1
to set the copier
mode.
2in1
2in1
1
121
12
1
1/2 2
Mixed Orig
1134P226CA
1/2 2
Mixed Orig
1134P251CA
1134P251CA
Chapter 3
Making Copies
Useful Tip
The Mixed Original Detection mode ca n
be set a s a default setting by usin g the
➭
User’s Choice.
p. 122
Page 74

62
8. Selecting the Original Copy Type
Auto Original Count Mode
AutoCount
If
is selected, the copier automatically counts the number of originals.
▲
Chapter 3
NOTE
The AutoCount can be selected only when the copier is equipped with an AFR-9.
Using the Auto Original Count Mode
Making Copies
Touch the
Auto Count
Key.
1
1 2
# of Originals
Auxiliary
Ready to copy.
Auto Expo. Auto Paperx1.000
EnterCancel
EvenAutoCount
Odd
Finishing Basics
1 2
Orig. Copy
EnterCancel
# of Originals
EvenAutoCount
Odd
Press the Start Key to start the original
3
count sequence.
1
1134P227CA
2
1134P309CA
1134P309CA
Load the originals onto the AFR-9.
➭
"Placing Originals "
p. 33
1139O0210A
1134P342DA
•
The AFR-9 starts feeding the
originals loaded on it to count the
number of originals. (At this time, no
copy cycle is run.)
Page 75

Unload the originals ejected onto the
4
Document Exit Tray and reload them
onto the Document Feed Tray. Then,
press the Start Key.
1139O0210A
63
8. Selecting the Original Copy Type
▲
Chapter 3
Making Copies
Page 76

64
8. Selecting the Original Copy Type
Instructions for Loading Originals
Use th e followi ng proce dure fo r loading origina l s to make 1-sided copi e s from 2-sided origina ls.
Procedure
Load the originals crosswise.
If the ori ginals are loaded l e ngthwise, the d irections of the copy images will be mixed up.
Correct:
▲
Chapter 3
Making Copies
Incorrect:
2-Sided Originals
Loaded Crosswise
2-Sided Originals
Loaded Lengthwise
1-Sided Copies
1139O1120A
1-Sided Copies
1139O1130A
Page 77

65
8. Selecting the Original Copy Type
▲
Chapter 3
Making Copies
Page 78

66
9. Finishing Mode
We will explain how to set up the finishing function in the fol lowing.
When you to uch
finishing type.
Finishing
on the Touch Panel, a screen appears that allow s you to select the
Auxiliary Finishing
Ready to copy.
Auto Expo. x1.000 Auto Paper
Exposure PaperZoom
Chapter 3
Finishing Modes
Non-Sort
Originals
Making Copies
Orig. Copy
Basics
1
Staple
1134P266CA
1134P266CA
Copies
Auxiliary
Ready to copy.
Auto Expo. Auto Paperx1.000
Finishing
NonSort Sort Sort &
Orig. Copy
Staple
HolePunch
Basics
1
Group
1134P236CA
1134P236CA
In the Non-Sort mode, all co pies are fed out
onto the Non-Sort or Top Bin, without being
sort e d, grouped, s t a pled, or punch e d. ➭ p. 68
Sort
Originals
Copies
1076O145
Top or 1st Bin
2nd Bin
3rd Bin
1076O146
(Only when the Sorter or S taple Sorter is mounted )
In the Sort mode, copies are sorted into
complete sets o f the or iginals. ➭ p. 68
Note: This mode is effecti ve when making
multiple copies f rom multiple
originals.
Page 79

67
9. Finishing Mode
Sort-and-Staple
Originals
Group
Originals
Hole Punch
Originals
Copies
Copies
Copies
Top or 1st Bin
2nd Bin
3rd Bin
1076O147
1st Bin
1136O100A
(Only when the Stap le Sor ter i s mou nted )
In the Sort-and-Staple mod e, copies are
sorted into complete sets of the originals and
each set is stapled together. ➭ p. 69
(Only when the Sorter or S taple Sorter is mounted )
In the Group mode, th e co pie s made from
each single original are separated into
groups. Each group contains the number of
copies. ➭ p. 69
(Only when Staple Sorter S T-206 is mounted)
In the H ole Punch mode, holes are punche d
in the copy sets or stacks for filing. ➭ p. 70
Chapter 3
Making Copies
2nd Bin
NOTE
Holes can be punched only in A3
lengthwise or A4 crosswise paper.
This mode allows you to staple copy sets
Manual Staple
Sorting or Grouping
3rd Bin
1136O171CA
(Only when the Stap le Sor ter i s mou nted )
Manual Staple
already made in the Sor t M od e or copy
Originals
1076O191
stacks made in the Group Mode. ➭ p. 70
Useful Tip
The copier has been factory-set to automatically select Non-Sor t. The User’s Choice can,
however, be used to change this default setting to another finis hing type.
Page 80

68
9. Finishing Mode
Non-Sort
1
Chapter 3
Making Copies
NonSort
Touch
NonSort Sort Sort &
.
Staple
Holepunch
Group
1134P267CA
1134P267CA
NonSort is selected in the initial mode.
NOTE
The maximum capacity of Non-Sort Bin
is as follows.
Type of Paper Capacity
Plain paper 50
Heavyweight paper
Transparencies
Transluc ent paper
10
Sort
1
Using the 10-Key Pad, enter the
number of copy sets you want to have.
123
456
789
0C
NOTE
The number of copy sets that can be
sorted is as follows.
Sorter No. of Copy Sets
ST-101/S-104 2 to 10
ST-206/S-205 2 to 20
Sort
Touch
.
2
1136P141AA
1136P141AA
NonSort Sort Sort &
Staple
Holepunch
Group
1134P268CA
1134P268CA
NOTE
The maximum capacity of ea ch Sort Bin
is as follows.
Sorter Capacity
ST-101/S-104 25
ST-206/S-205 50
Page 81

69
9. Finishing Mode
Sort-and-Staple
Using the 10-Key Pad, enter the
1
number of copy sets you want to have.
123
456
789
0C
NOTE
The number of copy sets that can be
sorted is as follows.
Sorter No. of Copy Sets
ST-101 1 to 10
ST-206 1 to 20
Sort & Staple
Touch
2
NonSort Sort Sort &
NOTE
Staple
Holepunch
1136P141AA
.
Group
1134P269CA
1136P141AA
1134P269CA
Group
1
Using the 10-Key Pad, enter the
number per copy stack you want to
have.
123
456
789
0C
Group
Touch
.
2
NonSort Sort Sort &
NOTE
The maximum capacity of each Sort Bin
is as follows.
Sorter Capacity
ST-101/S-104 25
ST-206/S-205 50
Staple
Holepunch
1136P141AA
1136P141AA
Group
1134P270CA
1134P270CA
Chapter 3
Making Copies
The maximum capacity of each Sort Bin
is as follows.
Sorter Capacity
ST-101 25
ST-206 50
Page 82

70
9. Finishing Mode
Hole Punch
1
Chapter 3
2
Using the 10-Key Pad, enter the
number of c op y set s or nu m ber of
stack you want to have.
123
456
789
0C
1136P141AA
1136P141AA
Touch the desired finishing type key.
NonSort Sort Sort &
Staple
Holepunch
Group
Manual Staple
To staple copies after they have been made:
Check that each copy set or stack has
1
been fed into the Bin.
Staple
Touch
.
1134O038AA
2
Auxiliary Finishing
Ready to copy.
Auto Expo. x1.000 Auto Paper
Orig. Copy
Basics
1
Making Copies
Hole Punch
Touch
3
NonSort Sort Sort &
Staple
Holepunch
.
1134P268CA
1134P268CA
Group
1134P271CA
1134P271CA
Exposure PaperZoom
Staple
1134P266CA
•
The copy set or stack in the Bin will
be stapled.
Page 83

Manual Staple Mode
To use as a stapler:
ST-206
Align the sheets of paper neatly.
1
Insert the paper stack into the 1st Bin
2
under th e Non- Sor t Bin.
1134O039AA
9. Finishing Mode
Stapling Position
NOTES
•
Make sure of the stapling position and
press the paper stack against the
bracket.
•
Never attempt to reach for the stapling
position. This can be d angerous.
Touch
Staple
.
3
71
1134O096AA
Chapter 3
Non-S ort Bin
Sort Bins
1st Bin
1136O104AA
Non-So r t Bin
1136O105AA
NOTE
Up to 50 sheets of (plain) paper can be
stapled.
Auxiliary Finishing
Ready to copy.
Auto Expo. x1.000 Auto Paper
Exposure PaperZoom
•
The sheets of paper are s tap led.
Orig. Copy
Staple
Useful Tip
This feature is effici ent t o staple
originals after maki ng cop ies.
Basics
1
Making Copies
1134P266CA
Page 84

72
9. Finishing Mode
Manual Staple Mode
To use as a stapler:
ST-101
Align the sheets of paper neatly.
1
Chapter 3
Place the paper stack in the Top Bin.
2
1134O039AA
NOTES
•
Make sure of t he stapli ng pos i t ion and
press the paper stack against the
bracket.
•
Never attempt to reach the stapling
position. Thi s c an be dang e r ous.
Touch
Staple
.
3
Auxiliary Finishing
Ready to copy.
Auto Expo. x1.000 Auto Paper
Exposure PaperZoom
•
The sheets of paper are stap led.
Orig. Copy
Basics
1
Staple
1134P266CA
Making Copies
Usef ul Tip
This feature is efficien t to stap le
originals after making copies .
1136O106AA
NOTE
Up to 25 sheets of (plain) paper can be
stapled.
Stapling Position
1139O094A
Page 85

73
9. Finishing Mode
Instructions for Loading Originals for Stapled Copies
Note the correct direction of the originals loaded in the AF-3/AFR-9 to make copies in the Staple
or Hole Punch mode.
Original Direction for Stapling
If the copies are to be stapled either in t he So rt-a nd - Stap l e or Manual Staple mode, load the or igi nals
crosswise in the AF-3/A FR -9. Ensu re also th a t the s t a pling corner is at the rear left si d e as indicated
by the arrow.
Correct:
Originals Loaded
Crosswise
Stapling Corner
Copy Set/Stack
Stapled at Top Left
1139O1160A
Original Direction for Hole Punch
To punch holes in the copies, load the originals so that the edge along which h o les are punched is
positioned on the left as indicated by the arrow.
Correct:
Punching Position
Chapter 3
Making Copies
Punching Position
1134O097A
Page 86

74
9. Finishing Mode
Auto Dual Function
Each of the Sort Bins holds up to 50 (*25) sheets of paper. The Auto Dual Function, however,
allows sorting of copies of up to 100 (*50) originals under certain conditions.
NOTE
The numbers given in the following are for Staple Sorter ST-206 and 20-Bin Sorter S-205.
The number s m ar k ed with * ar e f or Staple S or t er ST-101 and 10-Bin S or ter S-10 4.
Auto Dual Function in the Sort Mode
When 10 (*5) or less copies are made from an original set co nsis ting of more than 50 (*25)
originals in the Sort M od e, the Sorter or Stapl e Sorter is automatically switch ed into the Auto
Dual Function Mode using the 11th (*6th) to 20th (*10th) Bins.
Chapter 3
1st to 50th (*25th) sorted copies Top or 1st to 10th (*5th) Bins
51st (*26th) to 100th (*50th) sorted copies 11th (*6th) to 20th (*10th) Bins
If the number of copies selected exceeds 10 (*5), the copy cycle stops at the 50th (*25th) original.
*
Copies Bins Used
Example: Making 3 copy se ts of a 30-p age
original set us ing a 10-Bin Staple
30-Page Original Set
Sorter
Making Copies
Each of the top three Bins
contains 25 so rt ed cop ies.
Each of the 6th to 8th Bins
contains 5 sorted copies.
1139O1140A
To have a co mplet e set from the originals, pl ace the copies fro m the 6th Bin on top of those from
*
the Top Bin. In the same way, place the copies from the 7th Bin on top of those from the 2nd Bin,
and so on.
Auto Dual Function in Sort-and-Staple Mode
When 10 (*5) or less copies are made from an original set co nsis ting of more than 51 (*26)
originals in the Sor t-an d- S taple mode and the Auto Dual function is activated, the
Sort-and-Staple Mode is automatically switched to the Sort Mode (no stapling takes place).
Page 87

9. Finishing Mode
When the Number of Copies Selected Exceeds 50 (*25) in the Group Mo de
When more than 51 (*26) copies are to be grouped together i nto on e gr ou p, the Sorter or St aple
Sorter uses the subsequent Bin to continue grouping the copies.
Original Copies Bins Used
1st
2nd to Nth: Same way up to 20th (*10th)
Example: Separating copies made from 2 different
1st to 50th (*25th) copies 1st or Top Bin
51st (*26th) and subsequent copies 2nd Bin
originals into two grou ps wh en each gr oup
contains 35 copies.
75
Copies of 1st original
Top Bin: 25
2nd Bin: 10
Copies of 2nd original
3rd Bin: 25
4th Bin: 10
1139O1150A
If the Number of Copies Selected Exceeds 50 in the Non-Sort Mode
The capacity of the Non-Sort (*Top) Bin is 51. If more than 50 copies are made in the Non-Sort
mode, the Sorter uses th e 1st ( *2 nd), 2 nd (* 3r d), and s ub s equent Bins to ho ld tho s e excess c opies.
Chapter 3
Making Copies
Page 88

76
9. Finishing Mode
Finishing Examples
Finishing Mode Manual Stapling Examples
Chapter 3
Making Copies
Non-Sort
Sort
Impossible
OK
Possible
Originals
Example: Sorting copies into 2 copy sets and having
them stapled manually
Sorting
Original Set
Copies
1136O108AA
Manual
Stapling
Group
OK
Possible
1136O109AA
Example: Separating copies into 3 groups, each group
containi n g 2 cop ies, and hav ing eac h sta pled
manually
Grouping
Original Set
Manual
Stapling
1136O110AA
Page 89

Finishing Mode Manual Stapling Examples
77
9. Finishing Mode
Sort-and-Staple
Sort + Hole Punch
Group + Hole Punch
Impossible
OK
Possible
Example:
Example:
Original Set
Sorting and stapling copies into 2 copy sets
Stapled Copy SetsOriginal Set
1140O077
Sorting or separating copies into 2
sets/stacks, punching holes in them, and
then having each stapled manually
Punched
Copies
Sorting
Manual
Stapling
Chapter 3
Making Copies
1136O172CA
Page 90

78
10. Auxiliary Functions
These pages explain abo ut conveni ent fun ctio ns o ffered as th e Auxiliar y functio ns an d how to
set these features. When the
function menu screen appears.
Auxiliary
key on the Touc h Panel is touched, the Auxiliary
Auxiliary Finishing
Ready to copy.
Auto Expo. x1.000 Auto Paper
Exposure PaperZoom
Orig. Copy
Chapter 3
Auxiliary Functions Overview
Cover
Only the first pag e of the original set is copied
onto colored paper. ➭ p. 81
Making Copies
Original Set Copy Set
Cover
(Colored Paper)
Basics
1134P488CA
Auxiliary
1
Ready to copy.
Auto Expo. Auto Paperx1.000
Page
Insertion
Finishing
Cover
Orig. Copy
OHP Interleaving
Book
Copy
Basics
File
Margin
Edge/Frame
Erase
1134P237CB
1134P237CB
1
A sheet of colored paper is inserted as a cover
before the copy set. ➭ p. 81
Copy Set
Original Set
Cover
(Colored Paper)
1136O130AA
Page Insertion
The original specified for an insert is copied
onto colored paper. ➭ p. 84
Specify Page
2 for Insert.
Copy Set
Insert
(Colored Paper)
1136O130AA
Original Set
1136O131AA
A sheet of colored paper is inserted at any
specified place between copies. ➭ p. 84
Copy Set
Original Set
Specify Insert
Between Pages
1 and 2.
Insert
(Colored Paper)
1136O133AA
Page 91

OHP Interleaving
79
10. Auxiliary Functions
Copies are made on transparencies with
copied interleaves between each of them.
➭ p. 92
Copy Se t
Original Set
Multi-Copy
Entry: 1
OHP
Copied Interleaves
(Copy Paper)
1136O136AA
File Margin
A file margin is made on the copy. ➭ p. 98
Original Copy
Copies are made on transparencies with a
blank sheet of copy paper between each of
them. ➭ p. 92
Copy Set
Original Set
Non-Copied Interleaves
(Blank Sheet of Copy
Paper)
OHP
1136O138AA
The image of the o ri ginal i s redu ced t o m ake a
wider file margin on the copy. ➭ p. 98
Original Copy
Chapter 3
Making Copies
1136P218AA
1136P218AA
Book Copy
Each pag e of an ope n bo ok is cop ied on t o a
separate sheet. ➭ p. 102
Book Original
1-Sided Copies
1136P219AA
1136P219AA
1136P222AA
1136P222AA
Each page of an open book is copied onto
each side of a sheet o f paper . ➭ p. 102
2-Sided CopyBook Original
1136P220AA
1136P220AA
Page 92

80
10. Auxiliary Functions
Edge/Fr ame Eras e
The image along four edges of the original is
erased on the copy. ➭ p. 104
Original
(Fax Out put )
Chapter 3
Copy
1136P215AA
Making Copies
1136P215AA
The image at the cent er of the original is
erased on the copy. ➭ p. 104
Original
(Book)
Copy
1136P216AA
1136P216AA
Page 93

10. Auxiliary Functions
Cover
The Cover mode lets you make a f ront cover or a front and back cover for a cop y set by copying
the first pag e or the first and last page of an orig inal set on diff erent paper from the normal copy
paper, such as colored paper, or by inserting that special paper before and after the original set.
There are four different Cover functions available. Select the appropriate one accord ing to your
need.
NOTE
The copier must be equipp ed wi th the Auto ma tic / Dup l exi ng Docu m ent Feed er AF- 3 /AFR-9.
Functions
Cover (Front) <Copied Cover>
Original Set Copy Set
Cover
The first page of the o rig inal set is copied
onto a different type of paper (e.g., colored
paper). ➭ p. 82
81
Chapter 3
1136O130AA
Cover (Front) <No n-C opied C ov er>
Copy Se t
Original Set
Separate
Front Cover
1136O131AA
Cover (Front&Back) <Co pi ed Cover>
Original Set
Copy Set
Front Co ver
Back Cover
1136O130AA
Cover (Front&Back) <Non-Copied Cover>
Copy Set
Original Set
Separate
Front Co ver
A sheet of a different type of paper (e.g.,
colore d pa per) is ins erted as a co v er befor e
the copy s et. ➭ p. 82
•
The cover sheet do es not unde rg o a copy
process.
The first and last pages of the o riginal set
are copied onto a different type of paper
(e.g., colored paper). ➭ p. 82
A sheet of a different type of paper (e.g.,
colore d pa per) is ins erted as a co v er befor e
and after the copy set. ➭ p. 82
Making Copies
Separate
Back Cover
1136O132AA
•
The cover sheets do not undergo a copy
process.
Page 94

82
10. Auxiliary Functions
Using the Cover Mode
Touch
1
Cover
Page
Insertion
Touch the key corresponding to the
2
desired Cover function.
Chapter 3
Making Copies
Cover
Cover Mode
Select the appropriate original count
3
function from among the following
two.
Cover
Cover Mode
Cover
OHP Interleaving
.
Book
Copy
File
Margin
Edge/Frame
Erase
1134P273CB
1134P273CB
EnterCancel
# of Origs.
AutoCount
Input #:
1134P278CA
1134P278CA
EnterCancel
# of Origs.
AutoCount
4
Input #
Touch
number of or i g inals you have .
Cover
Cover Mode
if you know the
To use AutoCount function, see p. 62.
Enter the number of originals using the
5
10-Key Pad.
123
456
789
0C
1136P185AA
NOTES
•
The maximum number of originals that
can be entered is 50.
•
Press the Clear Key to corr ect a
number entry.
EnterCancel
# of Origs.
AutoCount
Input #:
1134P280CA
1134P280CA
1136P185AA
Input #:
1134P279CA
AutoCount:
The copier automatically counts the
number of origi nals. If y ou already
know the number of originals, select
"Input #" and enter the number to
save time.
Input #:
Enter the number of orig inals u sing
the 10-Key Pad.
1134P279CA
6
Touch
Enter
.
Page 95

Place the paper fo r cover s on the Multi
7
Bypass Table.
NOTE
No cover mode copy can b e made
unless the Multi Bypa ss Tabl e is lo aded
with paper for covers.
Load the originals onto the
8
AF-3/AFR-9 and press the Start Key.
"Placing Originals" ➭ p. 33
83
10. Auxiliary Functions
1136O080AA
Chapter 3
Making Copies
Page 96

84
10. Auxiliary Functions
Page Insertion
Page Insertion allows you to insert a blank sheet of paper (e.g., colored paper) between the copy
stacks.
Two differen t funct ion s are available. Select the ap pr opri ate one accor di ng to y o ur need.
NOTE
The copier must be equipped with the Automatic/Duplexing Document Feeder AF-3/AFR-9.
Functions
Page Insertion <Copied Inserts>
Original Set Copy Set
Chapter 3
Specify Page
2 for Insert.
Making Copies
Page Insertion <Non-Copied Inserts>
Original Set
Specify Insert
Between Pages
1 and 2.
Copy Set
The copier copies the page, which is
specified for an insert, on paper for inserts
(e.g., colored paper). ➭ pp. 86, 89
Insert
1136O130AA
The copier inserts a blank sheet of paper for
inserts (e.g., colored paper) at an y specifi ed
place between pages. ➭ pp. 86, 89
Insert
1136O133AA
Page 97

10. Auxiliary Functions
Specifying the Place for Insert
In the Page Insertion mode, you must speci fy where to place an insert. Two ways are available to
specify the insert places, either ADF Detection or 10-Key Pad Input.
ADF Detection (automatic d etect ion)
Put a sheet of paper of a different size from the originals at your desired places in the
original set (fo r conv enience, let us call this paper the insert setting paper), load the
original set onto the AFR-9, and l e t the copi er start the origi n a l coun t seque nce. This
allows the copier to detect the places fo r i nse r ts. Up to 20 sheets can be inserted.
NOTE
ADF Detection can not be operated when the Mixed Original Detection Mode is set.
85
Original Set
Copy Set
Copy Set
Non-Copied Insert
Copied Insert
Insert Setting Paper
Example:
2nd from top
1134O059AA
10-Key P ad I npu t
Using the 10-Key Pad, define the places for inserts. Up to 20 places can be defined.
Original Set
Sheet
Placement
1 2 3
2
6 7
11
123
456
789
Copy Set
Copied
Insert
Chapter 3
Making Copies
Non-Copied
1134P281CA
1134O058AA
Page 98

86
10. Auxiliary Functions
Using Page Insertion
<ADF Detection>
5
Sheet Placement
Touch
.
Chapter 3
Making Copies
Touch
1
Page
Insertion
Touch
2
Page Insertion
Copy onto
Inserts
Page Insertion
Cover
Copy onto Inserts
Sheet
Placement
Yes
OHP Interleaving
Book
Copy
User set
.
File
Margin
Edge/Frame
Erase
1134P274CB
.
EnterCancel
Insert
Paper
A4
1134P413DA
1134P274CB
1134P413DA
Page Insertion
Copy onto
Inserts
Yes
Touch
6
Sheet Placement
ADF
Detection
10-Key
Pad Input
Touch
7
Sheet
Placement
User set
ADF Detection
Enter
.
EnterCancel
Insert
Paper
A4
1134P414EA
.
Enter
1134P285CA
1134P414DA
Select whether to copy onto inserts
3
(YES) or not (NO).
Copy onto Inserts
YES
NO
Enter
Touch
.
4
Enter
1134P283CA
8
Touch
Page Insertion
Copy onto
Inserts
Yes
Insert Paper
Sheet
Placement
ADF detect
.
Insert
Paper
1134P442DA
EnterCancel
A4
1134P442DA
Page 99

87
10. Auxiliary Functions
Select the paper source from which to
9
feed the paper for inserts.
Insert Paper
1
2
1
L
2
3
4
A4
3 L
B4 A4
NOTE
Load the paper source selected in step
9 with the paper for inserts (e.g.,
colored pa pe r) .
Enter
Touch
.
10
11
Make doubly sure that you have
selected the functions correctly. Then,
Enter
touch
again.
Enter
ManualA4
4
A4
1134P322DA
1134P322DA
Example 2: To place a n on-copied i n sert
between pages 1 and 2
Copy Set
Original
NOTE
For the insert setting paper, use o ne
that is a size, or loaded in a direction,
different fr om the originals.
Load the original set containing insert
13
setting paper onto the AFR-9.
"Placing Originals" ➭ p. 33
Insert Setting Paper
Non-Copied
Insert
1136O133AA
Chapter 3
Making Copies
12
desired place in the o riginal set. (The
inser t se tting pap er can be in s ert e d up
to 20 places.)
Put an insert setting paper into the
Original Set
Insert Setting Paper
Example 1: To place a copied insert at
the 2nd position from top
Original Set
Copy Set
1134O070AA
Copied
Insert
1136O130AA
14
start the original count sequence.
The AFR-9 starts feeding the originals
loaded on it to detect the place for
inserts. (At this time, no copy cycle is
run.)
Remove the insert setting paper from
Press the Start K ey to let the copier
15
the originals eject ed onto the
Document Exit Tray.
Insert Setting Paper
1134O057AA
1134O071AA
Page 100

88
10. Auxiliary Functions
16
Unload the original set and reload it
onto the Document Feed Tray.
1134O072AA
Press the Start Key.
17
Chapter 3
The copy cycle is run for page insertion.
Making Copies
 Loading...