


Table of Contents
1
1 Table of Contents
1 Table of Contents.......................................................1-7
2 Introduction................................................................2-1
2.1 We Want You to Be a Satisfied Customer ..................................2-1
2.2 What is Energy Star®? .................................................................2-2
2.3 Guide to this Manual.....................................................................2-3
How Is this Manual Structured?......................................................2-3
A Brief Explanation of the Conventions Used in this Manual..........2-4
A Brief Explanation of Important Concepts and Symbols ...............2-5
3 Getting to Know Your Copier....................................3-1
3.1 System Overview ..........................................................................3-1
EP3010 Copier................................................................................3-1
EP3010...........................................................................................3-2
10-Bin Sorter/Staple Sorter (optional accessory)............................3-3
20-Bin Sorter/Staple Sorter (optional accessory)............................3-4
Automatic/Duplexing Document Feeder (optional accessory) ........3-5
Duplex Unit (optional accessory) ....................................................3-6
Paper Feed Cabinet (optional accessory).......................................3-7
Data Controller (optional accessory)...............................................3-8
3.2 The Safe Use of Your Copier........................................................3-9
3.3 Transporting the Copier.............................................................3-11
3.4 Setting Up the Copier .................................................................3-11
Operating Environment.................................................................3-11
Installation Site..............................................................................3-11
Space Requirements for the Copier..............................................3-12
Storage of Supplies.......................................................................3-12
3.5 Power Requirements ..................................................................3-12
Voltage and Frequency Tolerances.............................................. 3-12
3.6 Switching the Copier On and Off...............................................3-13
Switching the Copier ON.............................................................. 3-13
Switching the Copier OFF............................................................ 3-13
3.7 Control Panel Keys and Indicators............................................3-14
3.8 Layout of the Touch Panel .........................................................3-15
3.9 Please Observe the Following Precautions..............................3-16
Rev. / 1-1

1
3.10 Proper Use of Your Copier ........................................................3-16
Table of Contents
4 Initial Steps . . ........................................................... 4-1
4.1 Making a Copy, Step by Step ......................................................4-1
4.2 Placing Originals o n the Original Glass.....................................4-3
Paper Originals and Transparent Originals ................................... 4-3
Books and Bound Originals........................................................... 4-4
4.3 Feeding Originals Au tomatically.................................................4-5
Automatic/Duplexing Document Feeder.........................................4-5
Single Automatic Document Feeding Mode ..................................4-6
4.4 Entering the Access Number ...................................................... 4-7
4.5 Displaying Current Copying Settings.........................................4-8
4.6 Stopping the Copy Process.........................................................4-9
4.7 Resetting the Copier to Default Settings....................................4-9
4.8 Interrupting the Copy Process.................................................... 4-9
4.9 Manually Stapling Copies..........................................................4-10
4.10 Refilling the Paper Drawer.........................................................4-11
Standard Paper Drawer (500 sheets)...........................................4-11
Universal Paper Drawer (variable paper size)..............................4-12
Large Paper Drawer (2500 sheets) ..............................................4-13
4.11 Changing the Toner Bottle ........................................................4-15
4.12 Changing the Staple Cartridge..................................................4-17
10-Bin Sorter ................................................................................4-17
20-Bin Sorter ................................................................................4-19
5 How Would You Like Your Copy? ........................... 5-1
5.1 Basics............................................................................................5-1
Toggling Auto Exposure .................................................................5-2
Lightening/Darkening Copies .........................................................5-3
Copying Photographs.....................................................................5-4
Toggling Auto Size Mode ...............................................................5-5
Enlarging/Reducing Originals with Standard Ratios (Zoom) ..........5-6
User-Defined Zoom Ratios.............................................................5-7
Saving Frequently Used Zoom Ratios............................................5-8
Recalling Stored Zoom Ratios......................................................5-10
Activating Auto Paper Mode.........................................................5-11
Selecting a Paper Drawer Manually.............................................5-12
Setting the Paper Size for the Manual Bypass Tray..................... 5-13
Toggling the Mixed Original Detection Mode................................5-15
5.2 Original-to-Copy Modes............................................................. 5-16
1-2 Rev. /

Table of Contents
1 > 1 Mode (full-size copy)............................................................5-17
2-in-1 Mode...................................................................................5-18
2 > 1 Mode....................................................................................5-20
1 > 2 Mode....................................................................................5-22
Separation Mode...........................................................................5-24
2 > 2 Mode....................................................................................5-26
5.3 Finishing......................................................................................5-27
Non-Sorted Copies........................................................................5-28
Sorting Copies...............................................................................5-29
Grouping Copies...........................................................................5-31
Sorting and Stapling Copies..........................................................5-33
Punching Copies...........................................................................5-35
5.4 Auxiliary Modes...........................................................................5-37
Add Front/Back Cover...................................................................5-38
Adding Inserts...............................................................................5-40
Adding a File Margin.....................................................................5-42
Frame Erase Mode .......................................................................5-44
Making Copies for Overhead Projector Presentations..................5-46
1
6 User M ode Settings ...................................................6-1
6.1 Storing a Copy Job Program .......................................................6-1
6.2 Recalling Copy Job Programs.....................................................6-3
6.3 Deleting Copy Job Programs.......................................................6-4
6.4 Checking Meter Counts................................................................6-5
6.5 Activating Auxiliary Toner Replenisher Mode............................6-6
6.6 Activating the Drum Dehumidifier...............................................6-6
6.7 User Set – 1/6.................................................................................6-7
Set Mixed Original Detection Priority..............................................6-7
Changing the Display Language.....................................................6-7
Setting the Paper Priority................................................................6-7
Setting the Copy Priority .................................................................6-7
6.8 User Set – 2/6.................................................................................6-8
Setting the Default Exposure Level.................................................6-8
Setting Exposure Priority.................................................................6-8
Setting the Exposure Manually.......................................................6-8
Setting the Sort/Staple Priority........................................................6-8
6.9 User Set – 3/6.................................................................................6-9
Setting the Auto Panel Reset..........................................................6-9
Setting the Energy Saver Mode ......................................................6-9
Setting the Drum Dehumidifier........................................................6-9
Access Counter Reset ..................................................................6-10
Rev. / 1-3

1
6.10 User Set – 4/6..............................................................................6-11
Intelligent Sort...............................................................................6-11
Toggling the Confirmation Beep................................................... 6-11
Setting the Original Thickness......................................................6-11
Undersize Originals ......................................................................6-12
6.11 User Set – 5/6..............................................................................6-13
Selecting the 2-in-1 Settings.........................................................6-13
Selecting the 2-in-1 Separation Settings......................................6-13
Setting Paper Drawers for Special Paper.....................................6-14
6.12 User Set – 6/6..............................................................................6-15
Original-to-Copy Settings ............................................................. 6-15
Setting the Auto Shut Off Mode....................................................6-15
Original on Original Glass.............................................................6-15
Administrator Mode ......................................................................6-16
6.13 Toggling Copy Track Data.........................................................6-17
6.14 Setting Up Access Numbers .....................................................6-19
6.15 Viewing Meter Counts................................................................ 6-21
6.16 Resetting Counters ....................................................................6-23
Table of Contents
7 Troubleshooting ........................................................ 7-1
7.1 If You Are Not Satisfied with Your Copy . . . .............................. 7-1
7.2 If a Message Appears on the Display Panel. . ........................... 7-3
7.3 If Your Copier is Not Working Correctly . . ................................7-6
7.4 If the Tool Appears . . ..................................................................7-7
7.5 How to Clear a Paper Misfeed.....................................................7-8
Copier Fusing Unit..........................................................................7-8
Copier Paper Take-Up Section.....................................................7-10
Automatic Document Feeder........................................................7-12
Duplexing Document Feeder........................................................7-14
Multi Bypass Tray.........................................................................7-16
Duplex Unit...................................................................................7-17
10-Bin Sorter/Staple Sorter ..........................................................7-19
20-Bin Sorter/Staple Sorter ..........................................................7-20
Paper Feed Cabinet (1 Paper Drawer).........................................7-21
Paper Feed Cabinet (2 Paper Drawers).......................................7-22
7.6 Modes that Cannot Be Combined.............................................7-23
Basic Modes.................................................................................7-23
Original-to-Copy Modes................................................................7-24
Finishing.......................................................................................7-25
Auxiliary Modes ............................................................................7-26
1-4 Rev. /

Table of Contents
1
8 Appendix.....................................................................8-1
8.1 Care of the Unit .............................................................................8-1
Cleaning..........................................................................................8-1
Cleaning the Document Transport Belt...........................................8-1
Cleaning the Corona Wires.............................................................8-2
8.2 Copier Specifications ...................................................................8-3
EP3010 Copier................................................................................8-3
10-Bin Sorter S-106 ........................................................................8-4
20-Bin Sorter S-207 ........................................................................8-5
10-Bin Staple Sorter ST-104...........................................................8-6
20-Bin Staple Sorter ST-210...........................................................8-7
Automatic Document Feeder A F-5..................................................8-8
Duplexing Document Feeder ..........................................................8-9
Duplex Unit AD-11 ..........................................................................8-9
Paper Feed Cabinet PF-206 (2 Paper Drawers)...........................8-10
Paper Feed Cabinet PF-112 (1 Paper Drawer)............................. 8-10
Duplex Cabinet PF-6D..................................................................8-10
Data Controller D-102...................................................................8-11
8.3 Paper Size Tables........................................................................8-12
Metric............................................................................................8-12
Inch Areas.....................................................................................8-12
8.4 Zoom Ratio Tables......................................................................8-13
Metric............................................................................................8-13
Inch Areas.....................................................................................8-14
8.5 CE Marking (Declaration of Conformity)...................................8-15
8.6 Index.............................................................................................8-16
Rev. / 1-5

1
Table of Contents
1-6 Rev. /

Introduction
2 Introduction
2.1 We Want You to Be a Sa tisfied Customer
Thank you for choosing a Minolta Copier System.
To ensure the best performance and effective use of your copier, this
manual will provide information on the following topics:
l using your copier;
l care and maintenance;
l troubleshootingand
l safety information.
Please read this manual carefully before using your copier and keep it
handy at all times. Store the manual in the holder on the rear side of the
copier.
For further information and assistance in the event of difficulties, please
contact:
l your Minolta Technical Representative;
l the Minolta Hotline, or
l our Web site, http://www.minolta.com.
Please keep the serial number (located on the copier's rating plate) and
thecopier'sdateofpurchasehandy to ensure fast, accurate assistance in
the event of difficulties.
. . . because we want you to be a satisfied customer.
2
Rev. / 2-1

2
2.2 What is Energy Star®?
After long periods of idleness, Energy Star®copiers switch into Energy
Saver Mode or turn themselves off. This function can reduce the annual
energy costs for the unit by up to 60%.
Copierswith a highcopyingspeed automaticallyswitch to 2-sidedcopying
mode. This reduces the costs for copy media and the volume of paper
consumed.
Did you know that manufacturing a sheet of paper requires 10 times as
much energy as making a copy?
The conservation of paper thus also has a direct global effect on the
conservation of energy.
This copier complies with the Energy Star®energy efficiency criteria.
Introduction
2-2 Rev. /

Introduction
2.3 Guide to this Manual
HowIsthisManualStructured?
If you are not sure where to locate the information you need, please refer
to this section. The following table will help you. For detailed information
on specific issues, refer to the index at the end of the manual.
No. Chapter Description
1 Table of Contents A list of the manual's chapters and subsections.
2 Introduction This chapter contains introductory information,
3 GettingtoKnow Your Copier This chapter introduces the copierin detail and
4 InitialSteps . . . This chapter covers the basics of usingyour copier,
5 How Would You Like Your
Copy?
6 User Settings This chapter describeshow to change thedefault
7 Troubleshooting This chapter contains tables and instructions to help
8 Appendix This chapter containsa collection of useful
especially for the effective use of this manual.
provides information on the following topics:
• Design of the copier
• Safe use of the copier
• Settingup the copier
• Pluggingthe copierin, switching it on and off
such as:
• Loadingthe original
• A step-by-step guide to the finishedcopy
• Stoppingthe copy process
• Restoring the copier's defaultsettings
• Interrupting the copy process
• Filling the Paper Drawers
• Changingthe Toner Bottle
This chapter explains theeffective use of the copier's
functions.
settings of the copier to suit your needs.
you recognizefaultsand eliminate malfunctions such
as paper misfeeds.
supplementary information such as:
• Caringfor the unit
• Specifications
• Paper size and Zoom Ratiotables
• Index
2
Rev. / 2-3
2
Introduction
A Brief Explanation of the Conventions Used in this Manual
A variety of conventions and types of illustrations are used for special
emphasis in this manual. The following examples show the most
important conventions and how to respond to them.
CAUTION
This is a warning
A warning points out a danger of potentially serious injury or death, or of
damage to the unit resulting from incorrect operation.
Ü The arrow marks the precautionary measure required to avoid the
danger.
START Controlpanel button with the function “START“
[Staple] Touch Panel box with the name “Staple“
ERROR
Ü Individual action to be performed
Step 1 of a sequence of actions
1
Step 2 of a sequence of actions
2
etc.
?
Ü The action described here is
Touch panel display with the message ERROR
(no further steps)
This is additional assistance.
sure to achieve the results you
desire.
This will show you what
needs to be done
.
This is a helpful hint
Texts highlighted in this manner contain useful little tips and tricks for
the copying process.
2-4 Rev. /
Introduction
A Brief Explanation of Important Concepts and Symbols
Paper feeding direction, length and wi dth, vertical format and horizontal
format are standard terms. They are defined below.
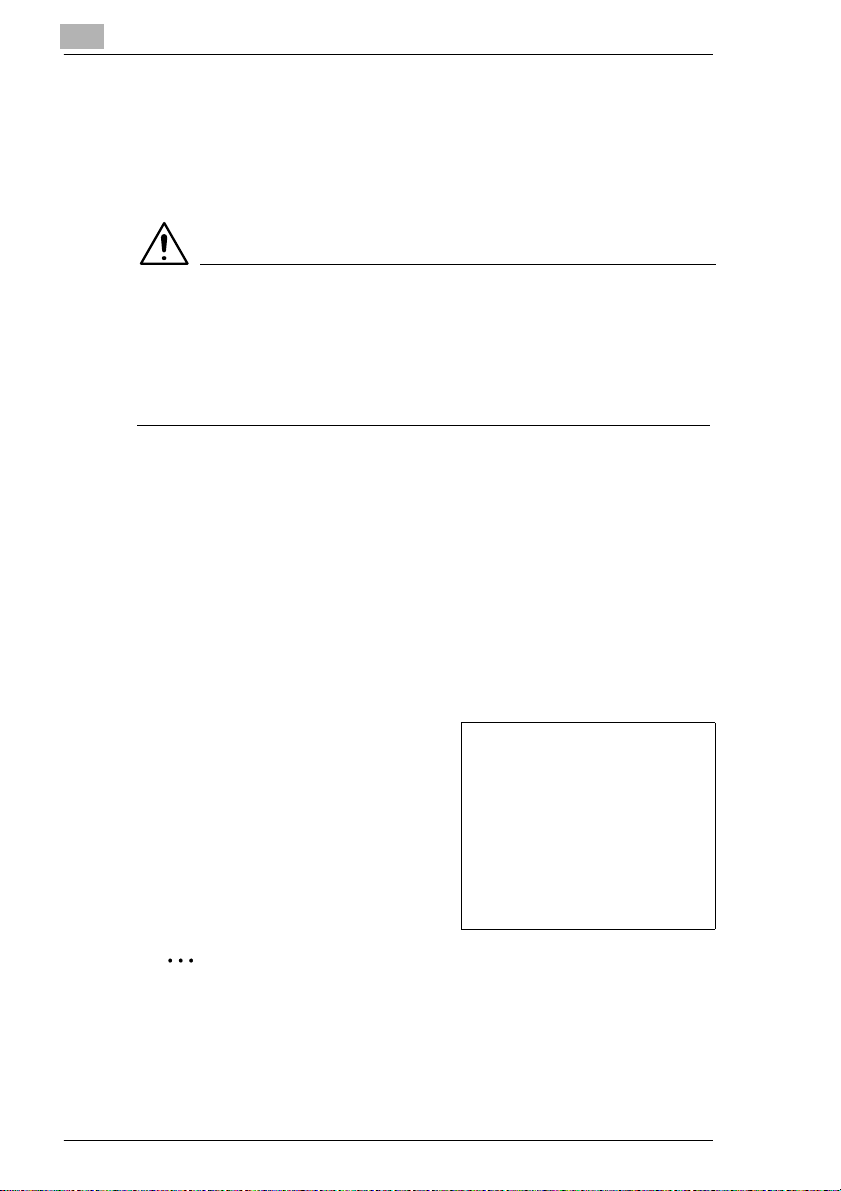
Original and copy
The original is the document to be duplicated during the copy process.
2
Original
(document to be copied)
(duplicates of theoriginal document)
Copy process
enlargement,
reduction,
sorting,
stapling,
punching. . .
Copy
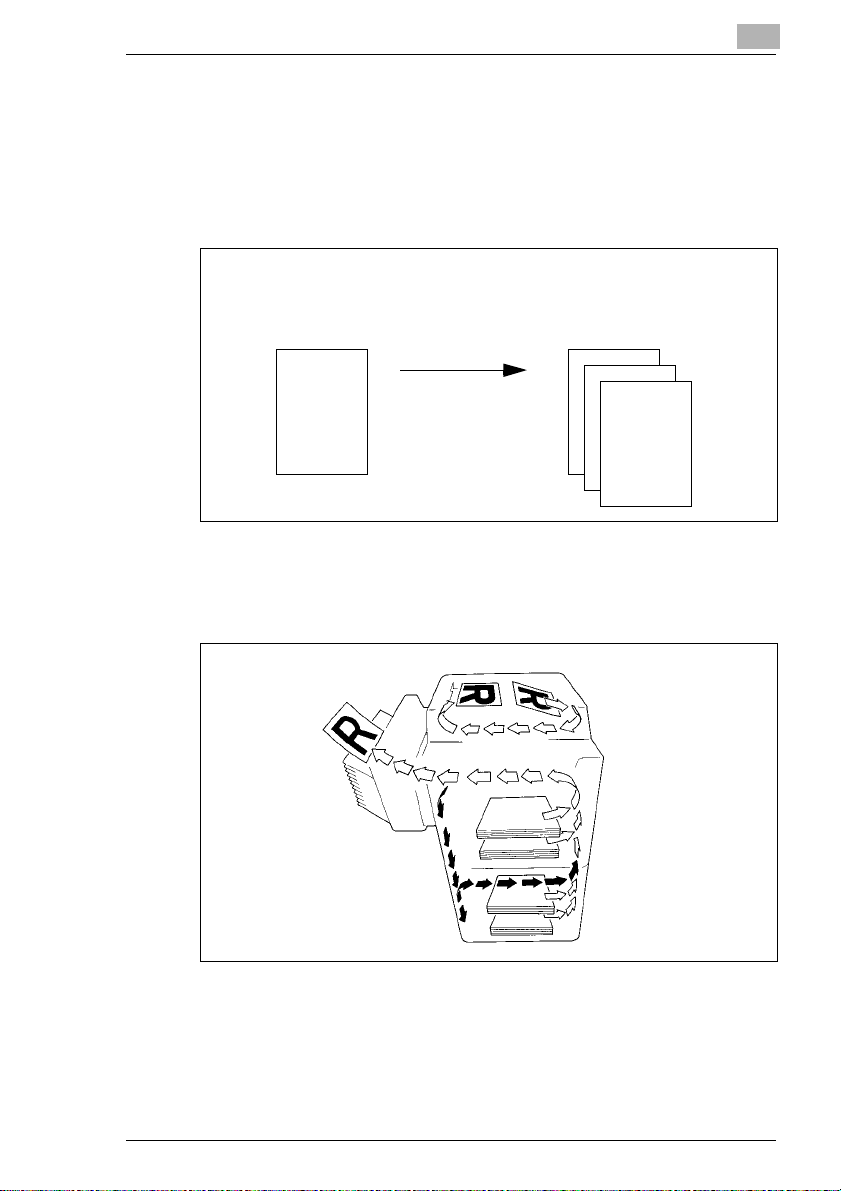
Feeding direction
The feeding direction is the paper's path through the copier. The feeding
direction is symbolized by the arrows in the following illustration.
Rev. / 2-5
2
Introduction
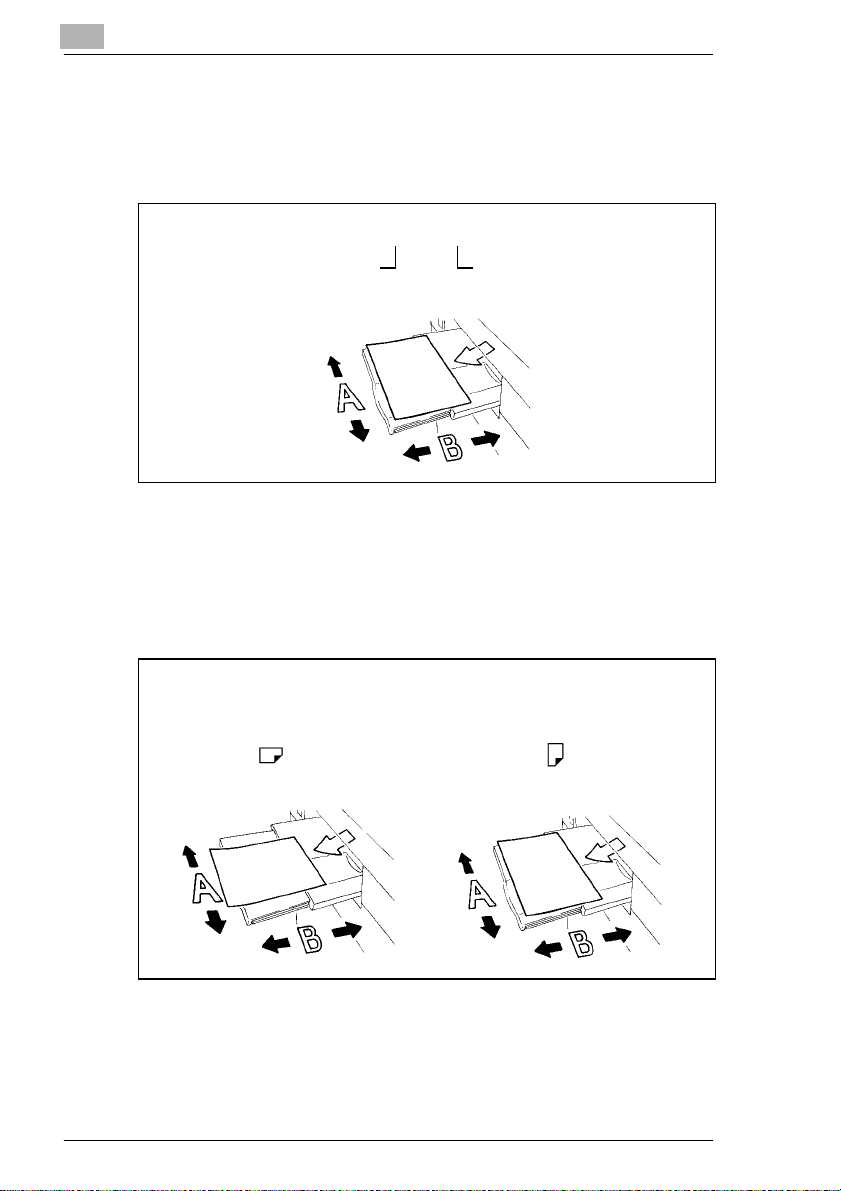
Width and length
Whenever paper dimensions are specified in this manual, the first value
always refers to the width of the paper (side A) and the second to the
length (side B).
21 x 29.7 cm
Width of the paper
(side A)
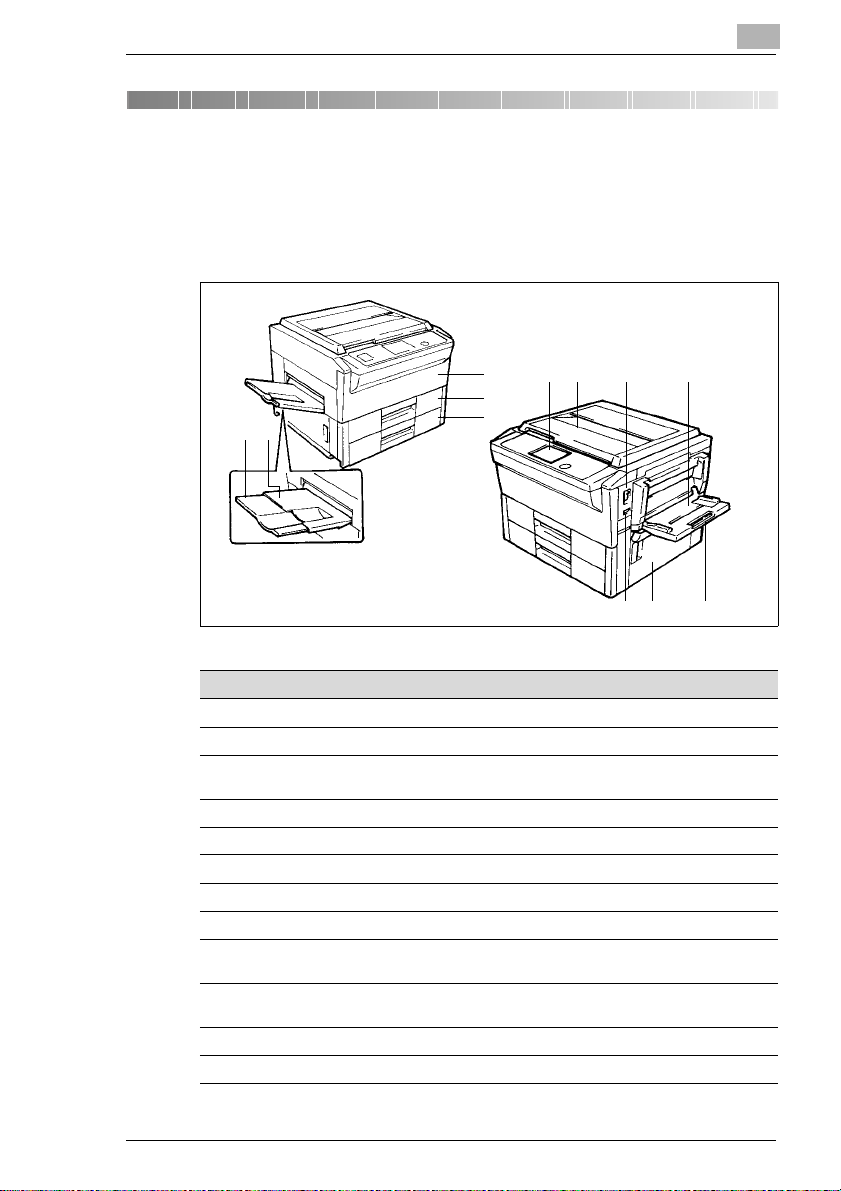
Vertical and horizontal format
If side A of the paper format is shorter than side B, this is r eferred to as
vertical or portrait format.
If side A of the paper format is longer than side B, this is referred to as
horizontal or landscape format.
Length of the paper
(side B)
21 x 29.7 cm 29.7 x 21 cm
Vertical format Horizontal format
2-6 Rev. /
Getting to Know Your Copier
3 Getting to Know Your Copier
3.1 System Overview
EP3010 Copier
3
67 8 9
4
12
5
3
101112
Pos. Specification Description
1 Copy Tray Holds copies fed out of the copier
2 Copy Tray Extender Pulloutthisextenderwhenmaking large-formatcopies
3 FrontDoor Open thisdoor to: replenish the toner,clear paper
4 1st Drawer Holds up to 500sheets of paper
5 2nd Drawer Holds up to 500 sheets of paper in a varietyof formats
6 Control Panel OperatingKeys and Indicators
7 Original Cover Holds the original in place on the Original Glass
8 Power Switch Turns the copier ON and OFF
9 MultiBypass Tray Holdsupto 50 sheets,includingthickpaper,OHP-films
10 Multi Bypass Tray
Extender
11 RightCopier Door Opento clear a papermisfeed
12 TotalCounter Shows the totalnumber of copiesmade so far
misfeedsor clean the corona wires
and other special paper types
Pull out this extenderwhen copying large-format
originals
Rev. / 3-1
3
Getting to Know Your Copier
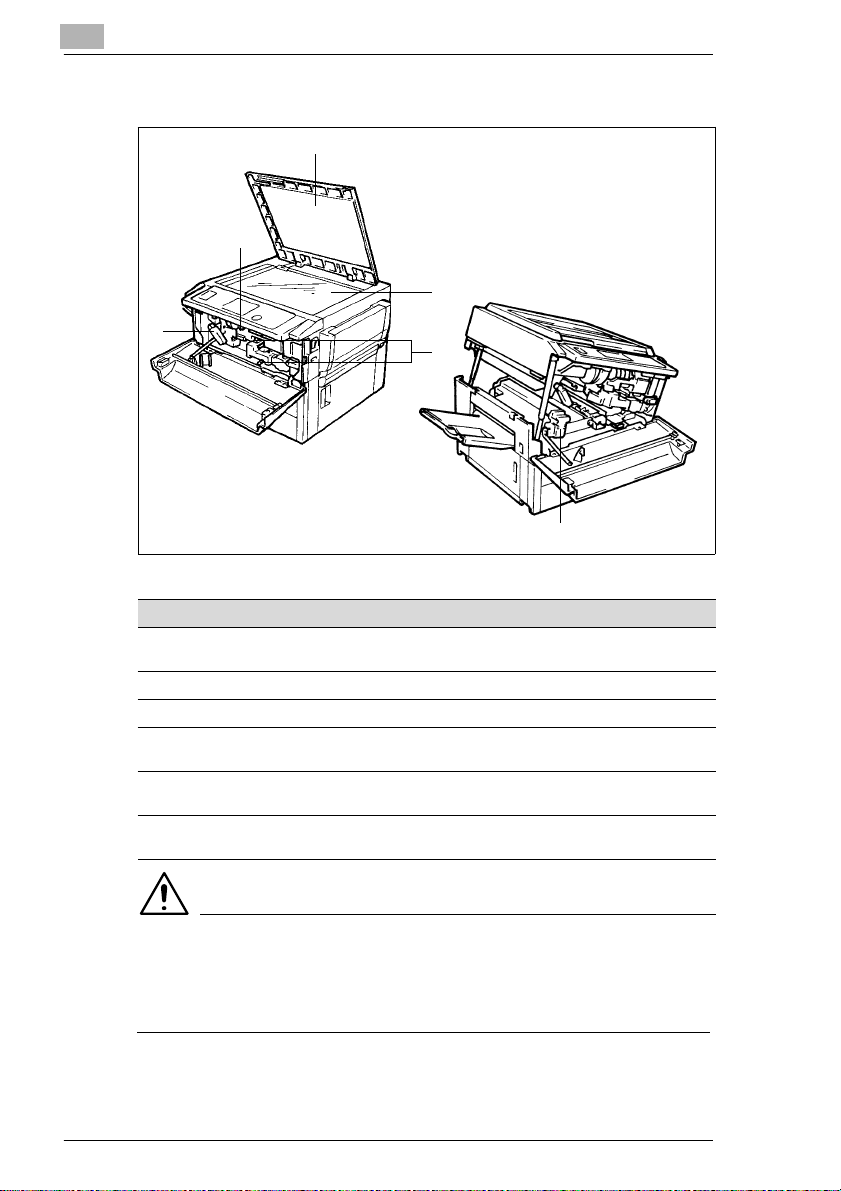
EP3010
3
2
4
1
Pos. Specification Description
1 Lock Release Lever for the
Copier Cabinet
2 TonerBottle Holder Take this holder out to replacethe Toner Bottle
3 Original Cover Holds the originalin place on the Original Glass
4 Original Glass Placethe originalon the Original Glass withthe sideto
5 CoronaCleaning Unit
(top/bottom)
6 HeaterUnit Lever Tilt this leverto the rightto move the Heater Unit if
5
6
Raise this lever to open the top sectionof the Copier
Cabinet
be copied face down
Pull the Corona CleaningUnit out using the levers to
clean the corona wires
required to clear a paper misfeed
CAUTION
Danger of burns from the Heating Unit!
The Heating Unit may reach temperatures of up to 120°C.
Ü To tilt the Heating Unit, touch the lever with the yellow marking only.
3-2 Rev. /
Getting to Know Your Copier
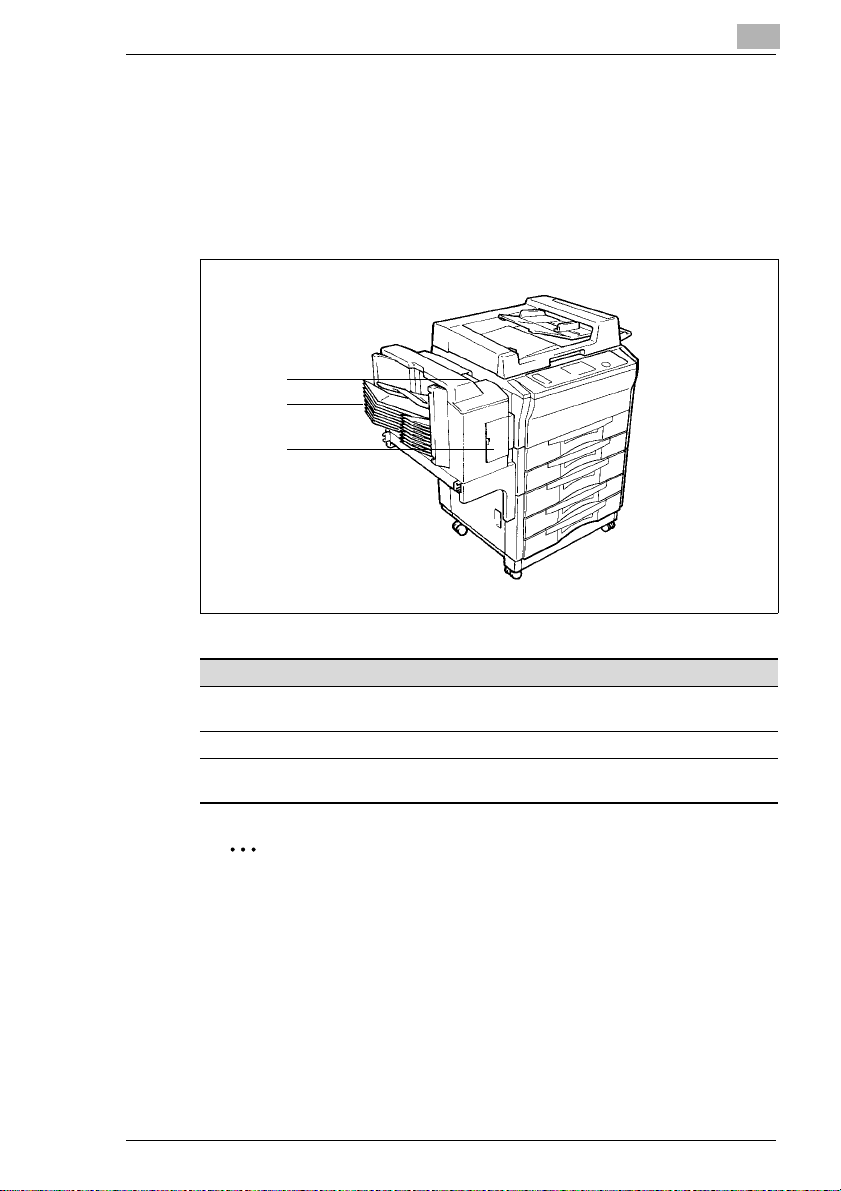
10-Bin Sorter/Staple Sorter (optional accessory)
for the further processing of copies:
l 10-Bin Sorter S-106
Sorts and groups up to 10 sets of copies.
l 10-Bin Staple Sorter ST-104
Sorts, groups and staples up to 10 sets of copies.
1
2
3
3
Pos. Specification Description
1 Lock Release Lever forthe
Sorter
2 Sorter Bins Hold sorted or grouped copies
3 StaplerDoor (StapleSorter only)
Press to unlock the Sorter
Open this door to replace the Staple Cartridge
.
Consult your Technical Representative.
TheSorterhas “poweredbins“ that automaticallymovethe SorterBins
upward with the copy process is complete. This function can be
disabled. For further information, consult your Technical
Representative.
Rev. / 3-3
3
Getting to Know Your Copier
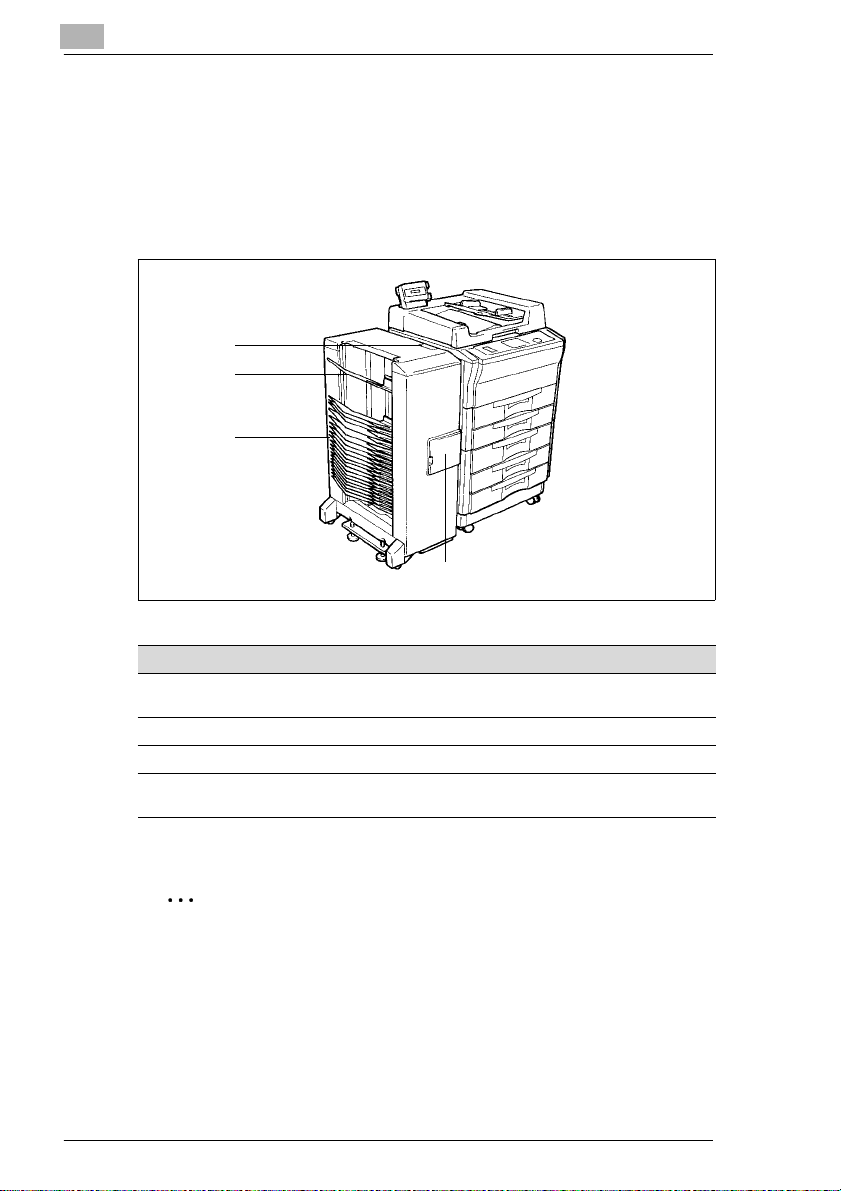
20-Bin Sorter/Staple Sorter (optional accessory)
for the further processing of copies:
l 20-Bin Sorter S-207
Sorts and groups up to 20 sets of copies.
l 20-Bin Staple Sorter ST210
Sorts, groups, staples and/or punches up to 20 sets of copies.
4
3
2
1
Pos. Specification Description
1 StaplerDoor (Staple Sorter only)
2 Sorter Bins Hold sorted or grouped copies
3 CopyTray Stores up to 100 copies in Non-SortMode
4 Lock Release Lever for the
Sorter
Open this door to replacethe Staple Cartridge
Press to unlock the Sorter
.
Consult your Technical Representative.
TheSorterhas “poweredbins“that automaticallymovetheSorter Bins
upward with the copy process is complete. This function can be
disabled. For further information, consult your Technical
Representative.
3-4 Rev. /
Getting to Know Your Copier
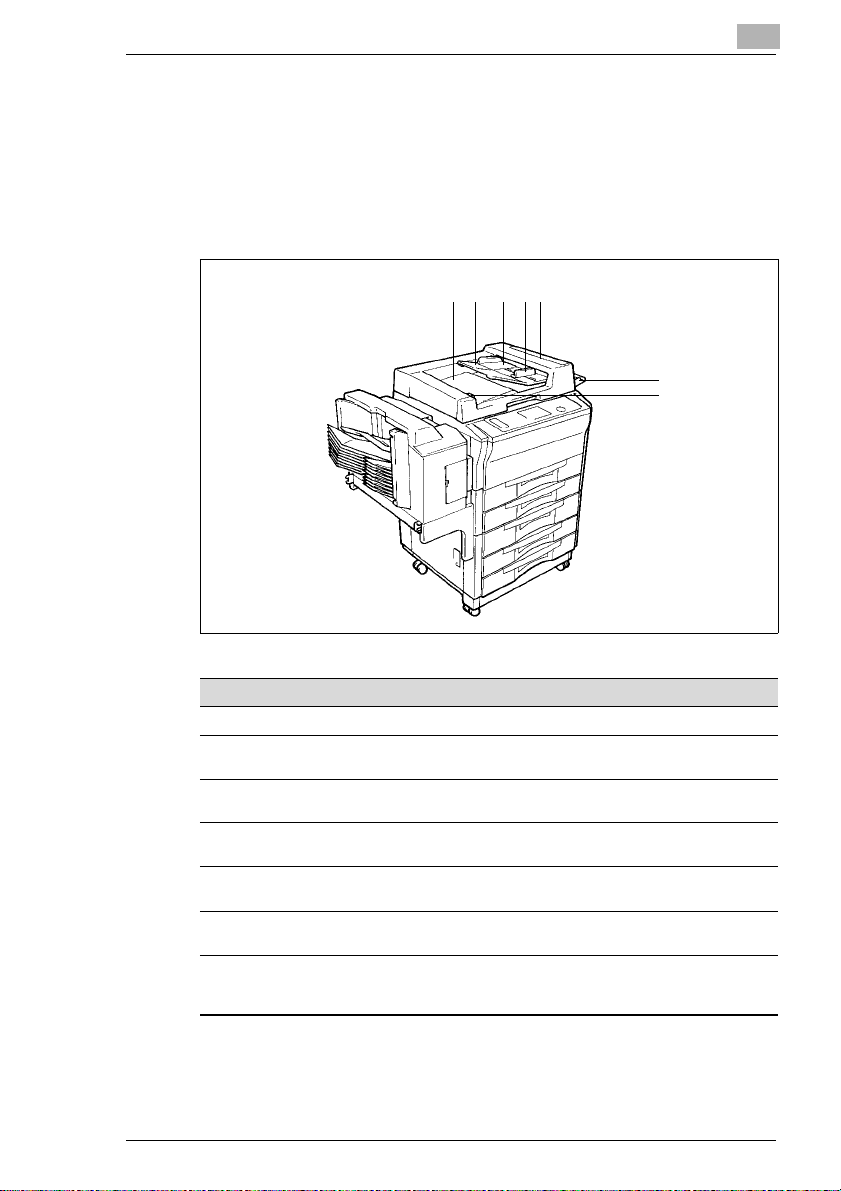
Automatic/Duplexing Document Feeder (optional accessory)
for the automatic feed of originals:
l Automatic Document Feeder AF-5
Feeds originals.
l Duplexing Document Feeder AFR-12
Feeds originals and turns 2-sided originals over.
134
2 5
3
6
7
Pos. Specification Description
1 Document Exit Tray Receives originals ejected from the Document Feeder
2 DocumentFeed Tray
Extender
3 DocumentFeed Tray Placetheoriginalso n theDocumentFeedTraywiththe
4 DocumentGuide Plate Slidethe DocumentGuidePlate to the size of the copy
5 DocumentFeed Unit Door Open to clear a misfed documentin the Document
6 Original Placement Place the originals onthe DocumentFeed Tray with the
7 DocumentTurnover/Exit
Unit Door Lock Release
Key
Pull out this extenderwhen copying large-format
originals
side to be copied faceup
paper
Feed Unit
side to be copied facedown
(Duplexing DocumentFeeder only)
Holddown when opening the Document Turnover/Exit
Unit Door
Rev. / 3-5
3
Getting to Know Your Copier
Duplex Unit (optional accessory)
For 2-sided copying:
l Duplex Unit AD-11
Turns copies over (to be integrated in a paper Cabinet).
l Duplex Cabinet PF-4D
Turns copies over (with storage drawer for supplies).
1
Pos. Specification Description
1 Misfeed RemovalGuide Open to cleara paper misfeed
CAUTION
Improper operation can cause damage to the Duplex Unit
A foil is visible when lifting the Misfeed Removal Guide. This foil is a
component of the Paper Guide. Do not remove or damage this foil.
Ü Never use sharp objects when clearing paper misfeeds.
3-6 Rev. /
Getting to Know Your Copier
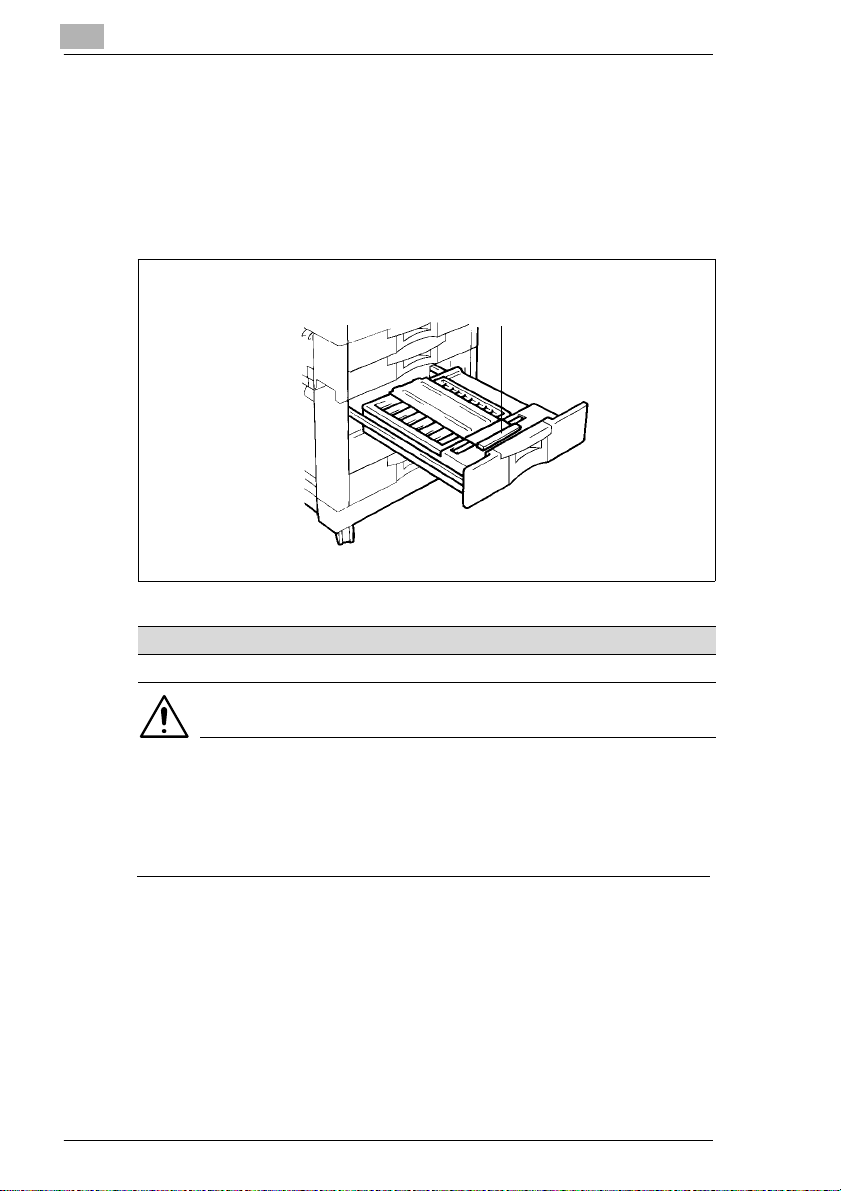
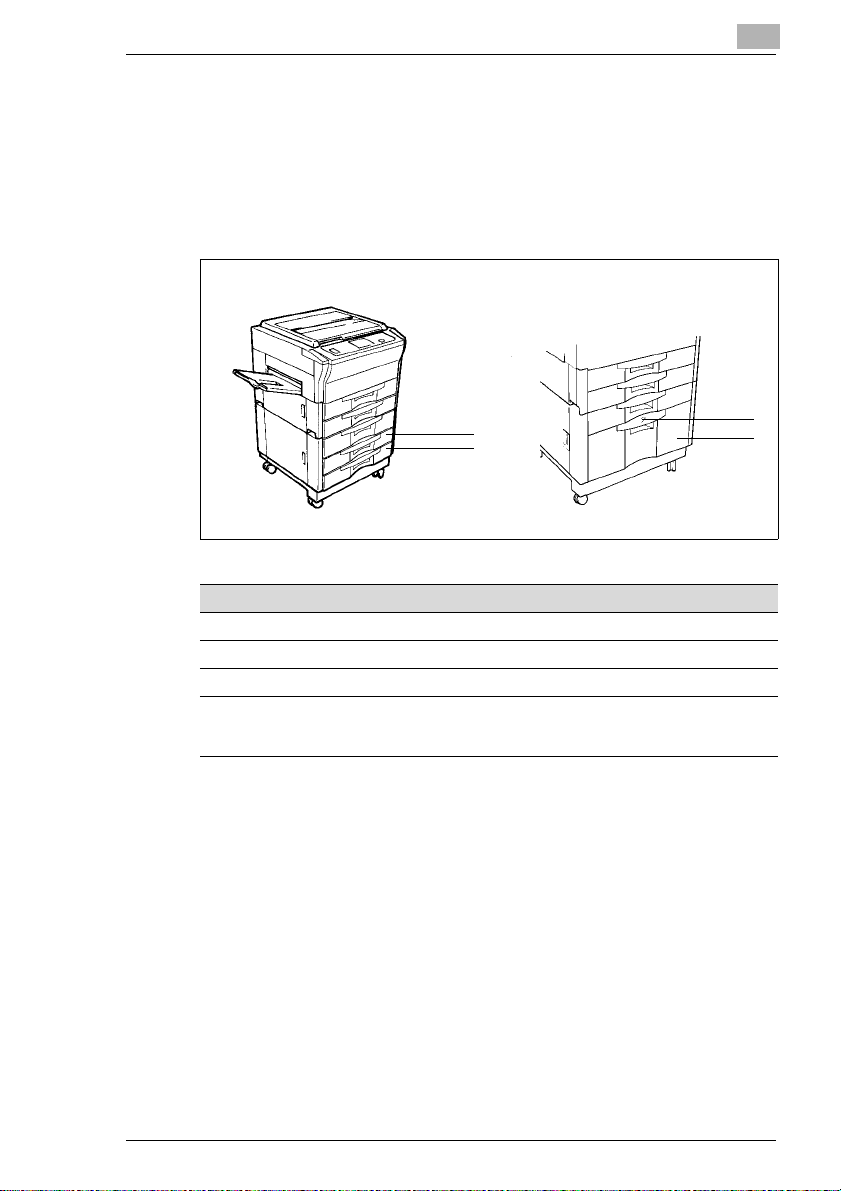
Paper Feed Cabinet (optional accessory)
For the storage of Copy Media:
l Paper Feed Cabinet PF-206
With two Drawers for 500 sheets of 80 g/m² paper each.
l Paper Feed Cabinet PF-112
With a Drawer for up to 2500 sheets of 80 g/m² paper each.
PF-206 PF-112
3
1
2
Pos. Specification Description
1 3rd Drawer Holds up to 500 sheets of paper
2 4th Drawer Holds up to 500sheets of paper
3 3rd Drawer Holds up to 2500 sheets of paper
4 PaperDescent Key for
Paper Drawer with
illuminated indicator
Press to open the Paper Drawer
4
3
Rev. / 3-7
3
Getting to Know Your Copier
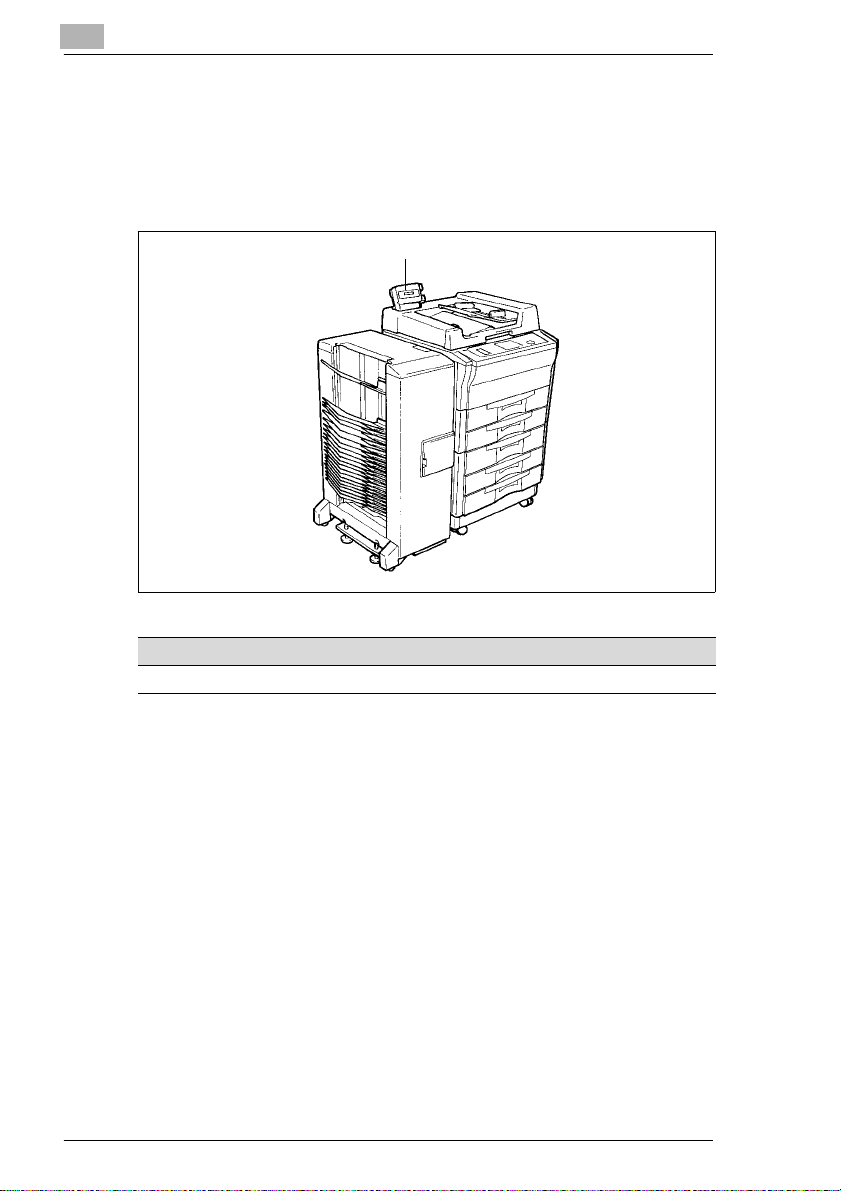
Data Controller (optional accessory)
Records number and cost of copies:
l Data ControllerD-102
Displays and records the number of copies, costs incurred and data
related to special user cards.
1
Pos. Specification Description
1 Data Controller See the manual for the Data Controllerfor details
3-8 Rev. /

Getting to Know Your Copier
3.2 The Safe Use of Your Copier
The improper use of your copier may result in health hazards, electrical
shock or even fires. Pleaseobservethefollowing precautionsfor the safe
use of your copier.
CAUTION
Please observe the following precautions!
Ü Never place heavy objects on the copier.
Ü Do not subject the copier to vibrations.
Ü Never open any doors while the copier is making copies.
Ü Never turn the copier off while it is making copies.
Ü Never bring any magnetized object near the copier.
Ü Never use flammable sprays, liquids or gasses near the copier.
Ü Do not remove any safety equipment or modify the copier. The copier
contains components that operate with high voltage. Incorrect use of
thecopiermayresultinafireorelectricalshock.
Ü Never insert paper clips, staples or other small pieces of metal into the
openingsofthe copier. This could result in a fire or cause an electrical
shock. In the event that metal objects are accidentally introduced into
the copier, switch the copier off immediately, unplug the power cord
from the power outlet, and contact your Technical Representative.
Ü Do not placecoffeecups, bottlesorothercontainers withliquidsonthe
copier. If liquids get inside the copier, they can cause fire or electrical
shock. In the event that liquids are accidentally introduced into the
copier, switch the copier off immediately, unplug the power cord from
the power outlet, and contact your Technical Representative.
Ü Always unplug the power cordwhenthe copier is not going to be used
for a long time.
Ü To prevent electrical shock, ensure that your hands are dry when
unplugging the copier.
Ü Switch the copier off immediately and unplug the power cord if the
copier becomes unusually hot, or in the event of smoke or unusual
odors. Consult your Technical Representative.
Ü Ensure that the power plug iscorrectly inserted in the socket and that
the socket is visible and accessible at all times.
Ü To prevent damage to the power cable, do not pull on the cable itself
when unplugging the copier. This could result in a fire or cause an
electrical shock.
3
Rev. / 3-9

3
Getting to Know Your Copier
Ü Do not movethecopierunless it has beenunpluggedto avoid damage
to the power cable. This could result in a fire or a short circuit.
Ü To prevent damage to the power cable, never place heavy objects on
it, or pull or bend it. This could result in a fire or cause an electrical
shock.
Ü Ensure that the copier is not standing on the cables of any other
electrical equipment. This may result in a fire or the malfunction of the
affected equipment.
Ü Ensure that the cables of other electrical devices are not trapped or
pinchedbythecopier. This mayresultinafireorthemalfunctionof the
affected equipment.
Ü Ensure that the power supply has the correct voltage for the copier.
Incorrect voltage could result in a fire or cause an electrical shock.
Ü Never connect the copier to a multiple-socket extension cord. This
could result in a fire or cause an electrical shock.
Ü Switch the copier off immediately, unplug the powercable andcontact
your Technical Representative if the power cable is damaged. This
damage could result in a fire or cause an electrical shock.
Ü If an extension cable is needed, use one with a capacity that
corresponds to or exceeds the power consumption of the copier.
Extensioncablesof an insufficient capacity can lead to overheatingor
fires.
Ü Always unplug the power cordimmediatelyif anything unusual occurs
while the copier is running.
CAUTION
A negligible amount of ozone is generated during normal operation
of this copier.
While this is not a health hazard, it may result in an unpleasant odor. It is
recommended that the room be well ventilated.
Ü Locate the copier in a well-ventilated room.
3-10 Rev. /

Getting to Know Your Copier
3.3 Transporting the Copier
If you need to transport the copier, please consult your Technical
Representative.
3.4 Setting Up the Co pier
Operating Environment
The operating environmental requirements of the copier are as follows.
l Temperature from 10°C to 30°C
(maximum fluctuation of 10°C per hour)
l Humidity of 15% to 85%
(maximum fluctuation of 20% per hour).
Installation Site
The installation site must meet the following requirements:
l An area which is dry and free of dust
l A level surface free of undue vibrations
l Provision for good ventilation
l A location away from curtains or other easily-inflammable materials.
The unit must be protected from the following influences:
l Splashing liquids
l Direct sunlight
l Strong temperature fluctuations
l Direct air flow from heating or air conditioning units.
3
Rev. / 3-11
3
Getting to Know Your Copier
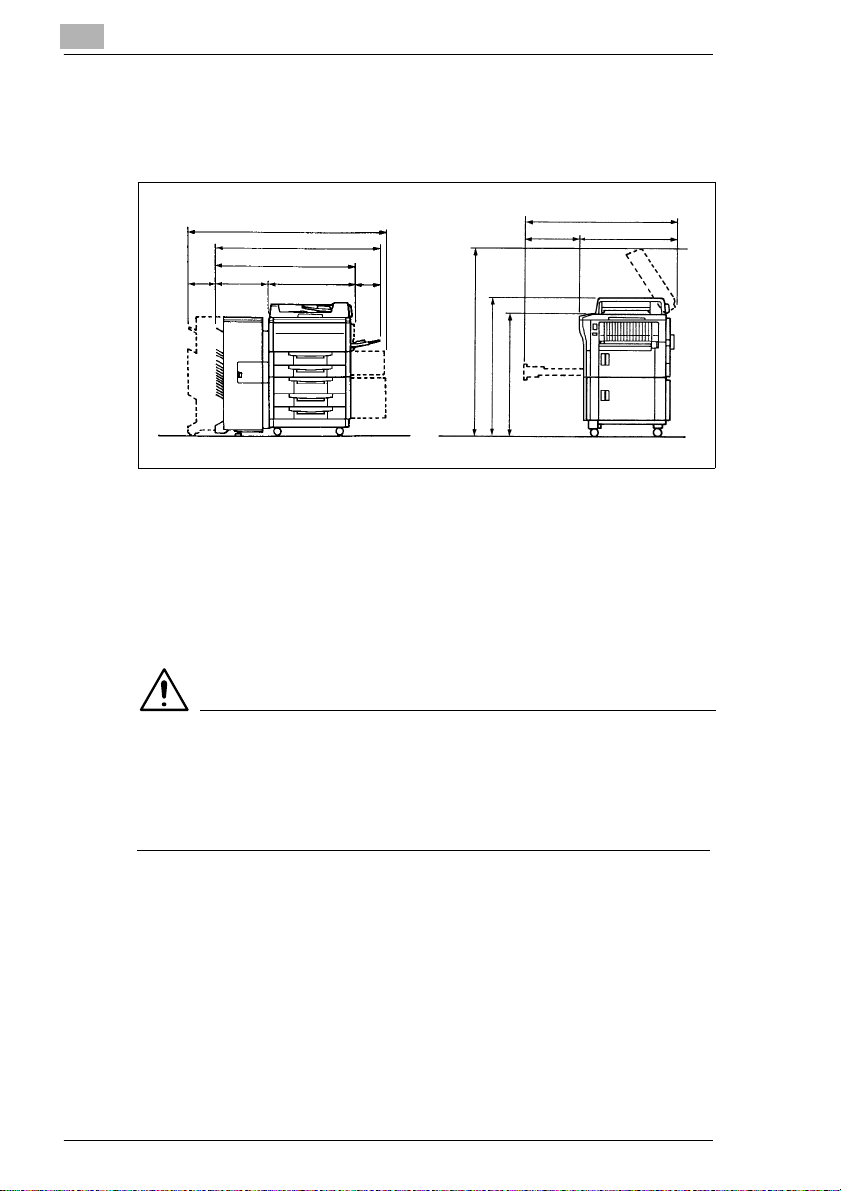
SpaceRequirementsfortheCopier
Be sure to allow a clearance of 150 mm or more at the back of the copier
to ensure adequate ventilation.
Dimensions in mm
1651
1386
1080
650430230 306
1426
1066
944
Front View Side View
1095
395 700
Storage of Supplies
Ensure that supplies are stored:
l In their sealed original packaging.
l Protected from direct sunlight or sources of heat.
l In a cool, dry, dust-free location.
l Out of the reach of children.
CAUTION
Toner presents a health hazard!
If swallowed, toner is harmful to health.
Ü If your hands come into contact with toner, immediately wash them
carefully with cold water and soap.
3.5 Power Requirements
Voltage and Frequency Tolerances
The copier needs a reliable, consistent power supply. Please call your inhouse technical support if required.
l Voltage ± 10%
l Frequency ± 0.3%.
3-12 Rev. /
Getting to Know Your Copier
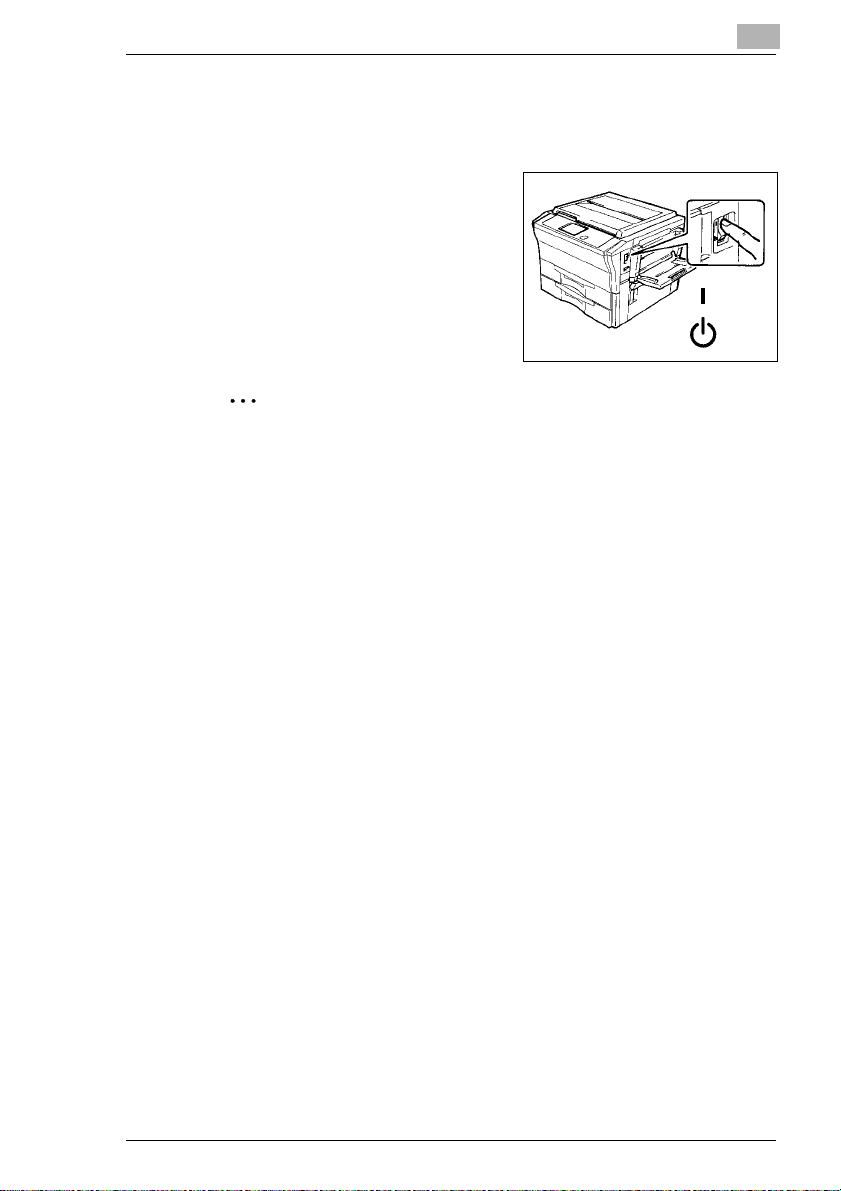
3.6 Switching the Copier On and Off
Switching the Copier ON
Ü Press the Power Switch to the ON
position.
Switching the Copier OFF
Ü Press the Power Switch to the OFF
position.
.
Help save energy!
The "Auto Power Off" function switches the copier off after a specified
idle period. This helps conserve energy.
(See “Setting the Auto Shut Off Mode” on page 6-15.)
3
ON
OFF
Rev. / 3-13
3
Getting to Know Your Copier
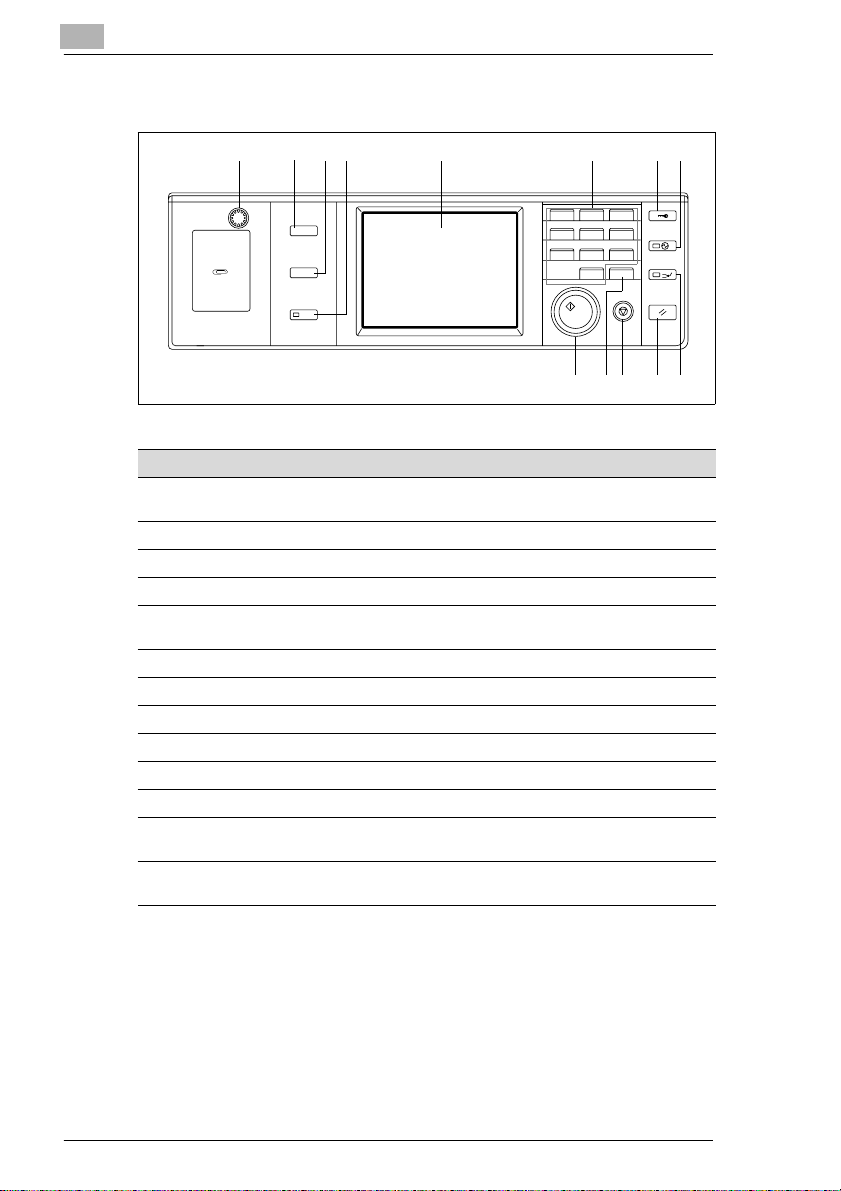
3.7 Control Panel K eys and Indicators
1234 5 6 78
User Mode
Job Recall
Mode Check
p
Rs[¯« •
ZxI[g
Zx
dª
·e Rs[
{
p I[g
x1.000
p
{ƒ
1
123
456
789
0C
1149O003DA
910111213
Pos. Specification Description
1 DisplayContrastControl
Turn to vary the brightness of the Touch Panel
Knob
2 User Mode Key Sets the User Mode
3 Job Recall Key Calls up a stored program
4 Mode Check Key Calls up the monitoring display
5 TouchPanel For thedisplay and selection of various functions
(touch-sensitive panel)
6 10-KeyPad Use to enter numerical values
7 Access Mode Key Activatesthe access authorizationfunction
8 EnergySaver Key Press to set the copier into the Energy Saver mode
9 Interrupt Key Press to interrupt and resume a copy cycle
10 Reset Key Resetsthe copier to its default settings
11 StopKey Stops a multiple copycycle
12 ClearKey Resets the Copy Quantity to 1 and clears the current
Zoom Ratio
13 StartKey To start a copycycleandactivatethe"AutoCopyStart"
function
3-14 Rev. /
Getting to Know Your Copier
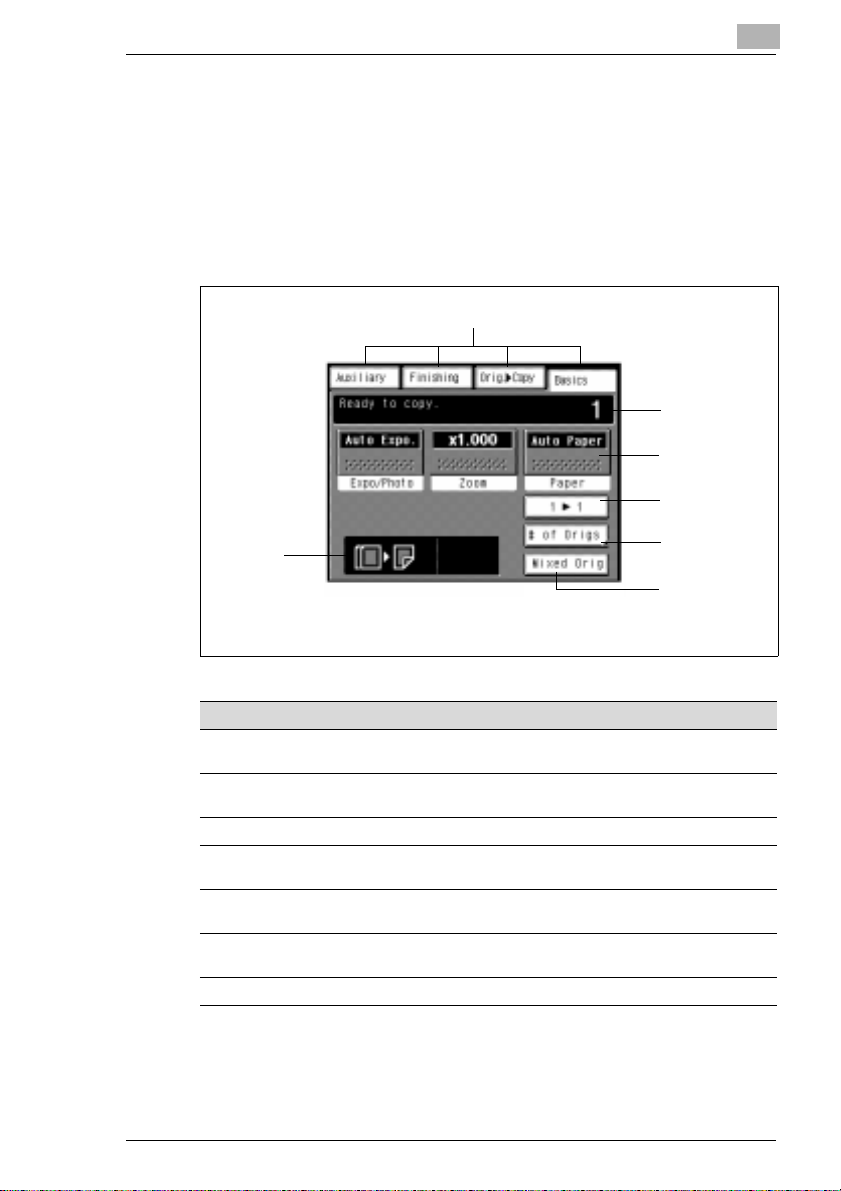
3.8 Layout of t he T ouch Panel
The Touch Panel is the display and main control element of your copier.
Youneedonlyto lightly touch the key shown on the Touch Panel to select
or activate the function represented by the key. The Touch Panel is the
interface between you and your copier.
The functions available on the Touch Panel depend on the specific
features of your copier.
Mode Boxes
Selection
Indicator
3
Information
Display
Basic Menu
Boxes
Selector Box for
Duplex Unit
Numberof
Originals
Selector Box for
Mixed Orig.
Detection
Specification Item
Mode Boxes Touch one of these boxes to call up the associated
Information Display Displays information about the current function,
BasicMenu Boxes Displaysthe currentBasic Settings
Selection box for Duplex Unit
(Duplex Unit only)
Numberof Originals
(Original Feeder only)
Mixed Original Detection Mode
Selector
Selection Display Shows the currently selected copy functions
function screen
selectednumber of copies, etc.
Select this box to preselect a 1-sided (1-in-1) or
2-sided (1-in-2)exposure
Touchthis box to enterthe number of originals to be
processed by the Original Feeder
Touch this box to toggle the Mixed Original Detection
Mode
Rev. / 3-15

3
Getting to Know Your Copier
3.9 Please Observe the Following Precautions
. . . when using your copier:
l Never place heavy objects on the copier.
l Never open any doors or turn the copier off while making copies.
l Never bring magnetized objects or use flammable sprays near the
copier.
l Never use sharp objects inside the open copier.
3.10 Proper Use of Your Copier
The copier may only be used for the tasks described in this manual. Any
other applications are considered inappropriate.
Certain types of documents may not be copied for further use or with the
intent to pass copies of such documents off as the original.
These include:
l Money
l Stamps (canceled or uncanceled)
l Identification cards
l Vehicle registration documents
l Copyrightedmaterials (without the permission of the copyright holder).
If you are unsure whether a certain document may be copied, please
consult the relevant public authorities.
3-16 Rev. /
Initial Steps . . .
4 Initial Steps . . .
4.1 Making a Copy, Step by Step
This photocopier provides you with a wide range of options for making
copies. Always maintain a specific sequence when selecting the modes.
You can then be certain that you have not forgotten anything.
Feed the originals:
1
m Place the originals in the Document Feeder with the side to be
copied face up
or
m Lift the Original Cover and place the original with the side to be
copied face down on the Original Glass.
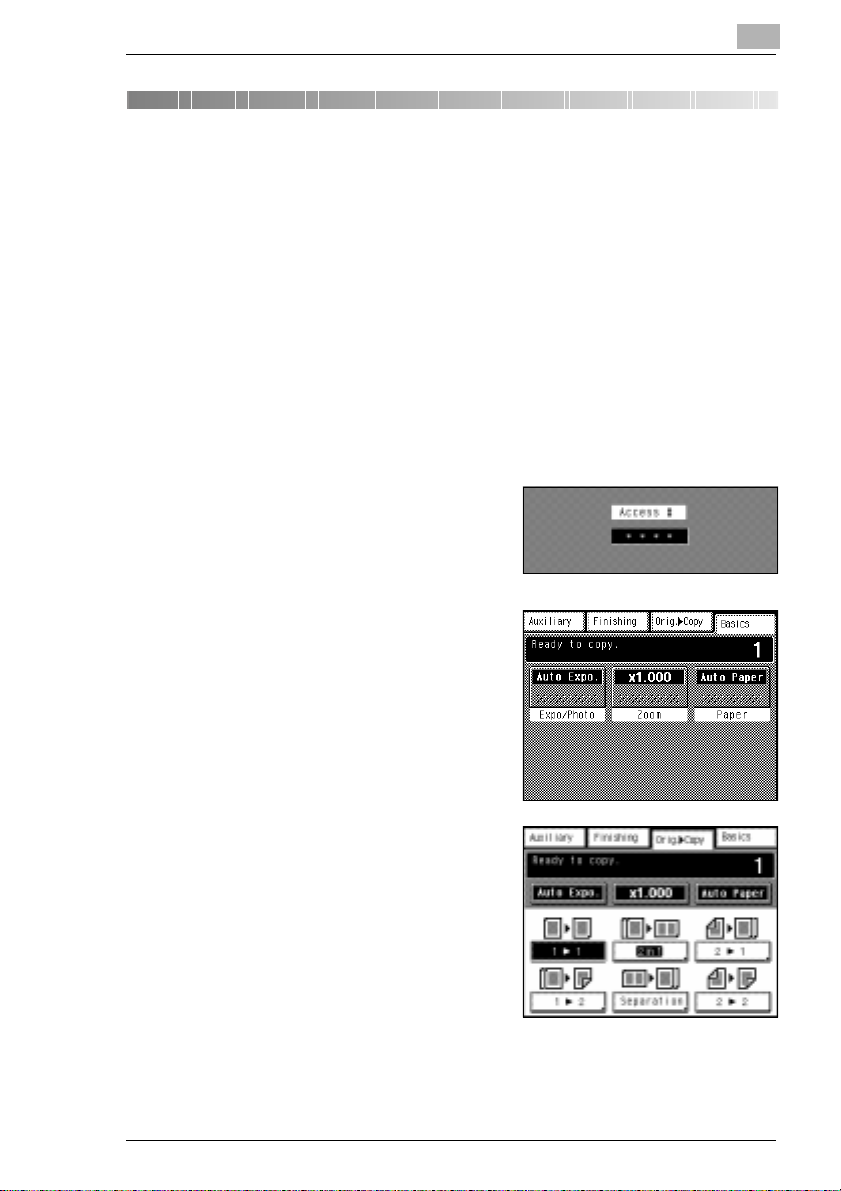
Enter your access number if
2
required and press the Access
Mode Key.
Adjust the basic functions as
3
required:
m Exposure
m Zoom
m AUTO paper
4
Select an Orig. > Copy type as
4
appropriate:
m 1-sided copy
m 2-sided copy
m Copy 2 originals onto 1 page
m Separation
m etc.
Rev. / 4-1
4
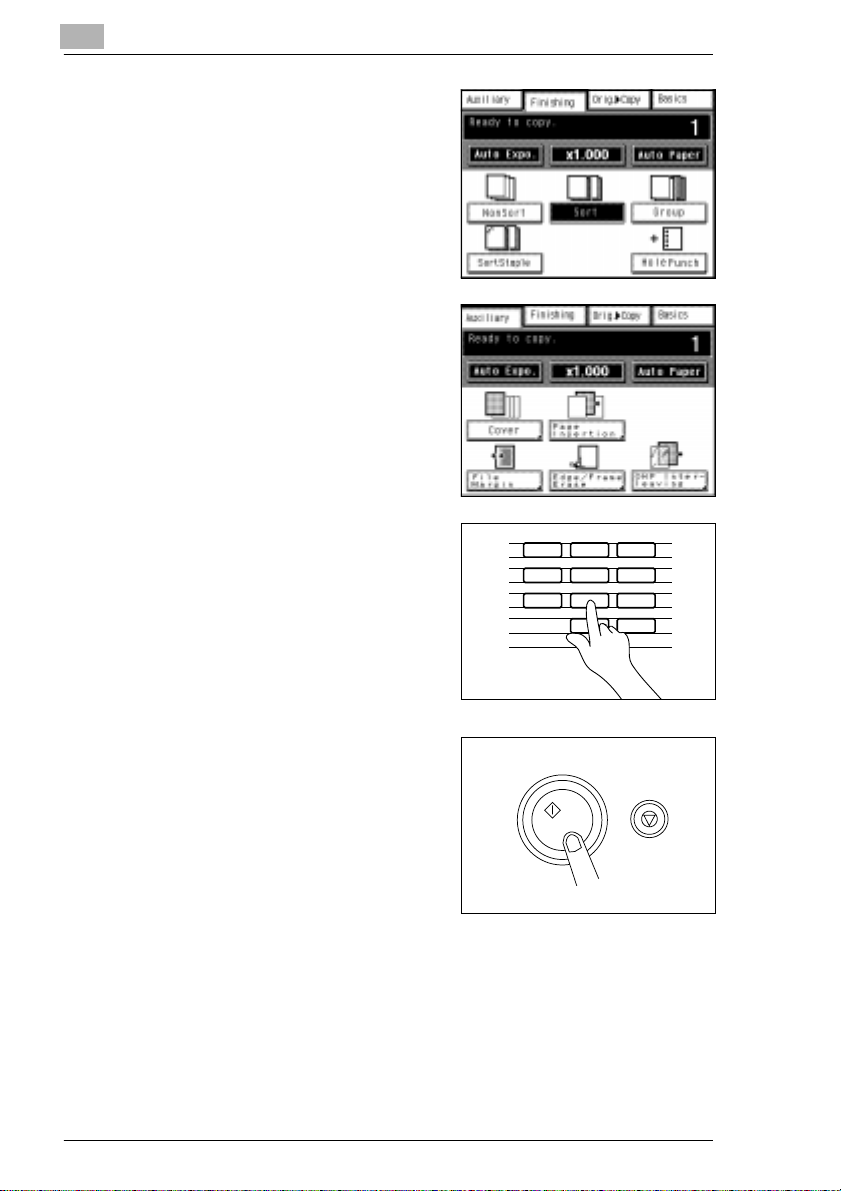
If required, select an output mode:
5
m Do not sort copies
m Sort copies
m Group copies
m Sort and staple copies
m Punch copies
If required,selectanauxiliarymode:
6
m Add cover sheet
m Add interleaves
m Set up file margin
m Erase margins
m Insert OHP interleaves
Enter the number of copies using
7
the 10-Key Pad.
Did you type the wrongnumber?
?
Ü Pressthe Clear Key andreenter
the number of copies.
Initial Steps . . .
123
456
789
0C
1139O2640A
Start the copy process by pressing
8
the START Key.
Do you want to abort the copy
?
process?
Ü Press the STOP Key.
1134P342DA
4-2 Rev. /
 Loading...