

Page 1
i
EP2080
Thank you fo r ch oo si ng Mi no lta .
This operator’s manual explain s how to operate the copier and repleni sh it s suppli es. It a lso gives
some troubleshooting tip s as wel l as general pr ecauti ons to be observed when operatin g the copie r.
To ensure the best performance and effective use of your copier, read this manual carefully until yo u
familiarize yourself thoroughly with its operation and features. After you have read through the
manual, keep it for read y reference.
Please use this manual as a quick and handy reference tool for immediately clarifying any questions
which may arise.
CE Marking (Declaration of Conformity)
We declare under our sol e respon s ibi lity th at the copier and opti o n s to which this declara tion
relates is in conformity with the sp ecifi catio ns b elow.
This dec larati on is va lid for the area of t h e Euro p ean U n io n (E U ) o nly .
Product Typ e Copyin g Machi ne
Product Name EP2080
Options PF-204, PF-104, PF-4D, AFR-12, AF-5, ST-104, S-106, ST-210, S-207,
AD-8, D-102, DT -103, Plug-In Cou nter
Standards Safety : EN 60 950 / 1992
(Safety of information technology equipment, including electrical
busines s equipment)
EMC : EN 55 022 (Class B) / 1995
(Limits and method for measurement of radio dist urbance
characteristics of informat ion tech nolog y equipmen t (ITE))
EN 55 082-1 / 1992
(Electromagnetic compatibili ty - Generic immunity standard
Part1: Residential, commerci al and light industry)
IEC 801-2 / 1991 (Electrostatic discharge requirement)
IEC 801-3 / 1984 (Radiated electromagnetic field requirement)
IEC 801-4 / 1988 (Electrical fast transient / burst requi rement )
EC Directives Safety
EMC ::
73 / 23 / EEC and 93 / 68 / EEC art. 13
89 / 336 / EEC and 93 / 68 / EEC art. 5
Page 2

ii
Contents
Terms and Symbols for the Type of Originals and Copy Paper
Feeding Direction (copy paper path)
"Width" and "Length"
Terms and Symbols Used for Originals ([ ]) and Copy Paper ([ ])
Chapter 1 Safety Notes p. 1
1. Installing the Copier p. 2
Installation Site
Power Source
Space Requirements
2. Precautions for Use p. 3
Operating Environment
Using the Copier Properly
Moving the C op ier
Care of Copier Supplies
Chapter 2 Getting to Know About Yo ur Copier p.5
1. Typical Types of Copies You Can Make with Your Copier p. 6
2. System Overview p. 8
3. Copier Parts and Accessories p. 10
4. Control Panel Keys and Indicators p. 16
5. Using the Touch Panel p. 18
What is the Touch P anel?
How the Screen is Organized
Operating the Touch Panel
6. Turning ON and OFF and Initial Mode p. 20
Turning ON and OFF
Initial Mode
7. Auxiliary Functions p. 21
•
Panel Resetting
•
Auto Panel Reset
•
Auto Copy Start
•
Auto Power-OFF
•
Energy Saver
•
Interrupt
•
Mode Check
•
Access Number
Page 3

Chapter 3 Making Copies p. 23
iii
Contents
1. Basic Copying Overview p. 24
2. Placing Originals p. 26
3. Manual Bypass Copying p. 32
4. Basic Functions
Copy Paper Size p. 34
Zoom Ratio p. 36
Image Density p. 40
5. Selecting the Original Copy Type p.42
▲▲
•
1 1
▲
•
1 2
•
2 1
▲
•
2 2
▲
•
1 [2in1]
▲
•
2 2[2in1]
•
1[2in1] 1
•
2[2in1] 1
•
•
▲
Book 1
▲
Book 2
▲
▲
▲
6. Finishing Mode p. 48
•
Non-Sort
•
Sort
•
Sort Staple
•
Group
•
Hole Pu nc h
•
Manual Staple
•
Auto Dual Function
7. Auxiliary Functions p. 58
•
Cover p. 58
•
Auto Original Count p. 61
•
Page Insertion p. 62
•
OHP Interleaving p. 68
•
File Margin p. 72
•
Edge/Frame Erase p. 74
Chapter 1
Safety Notes
Chapter 2
Getting to Know
Abou t You r
Copier
Chapter 3
Making Co pie s
Chapter 4
Usin g t he User
Mode
Chapter 5
When a Message
Appears
Chapter 6
Troubleshooting
Chapter 7
Miscellaneous
Page 4

iv
Contents
Chapter 4 Using the User Mode p. 77
1. Job Memory Input and Job Recall p. 78
Job Memory Input
Recalling a Job from Memory
2. Zoom Memory Input p. 82
3. Meter Count, Toner Replenisher, and Drum Dehumidifier p. 83
4. User’s Choice p. 84
•
User’s Choice Fu nc tions p. 84
•
Making the User’s Choice Settings p. 90
•
Copy Track Function p. 92
5. Data Send p. 100
Chapter 5 When a Message Appears p. 101
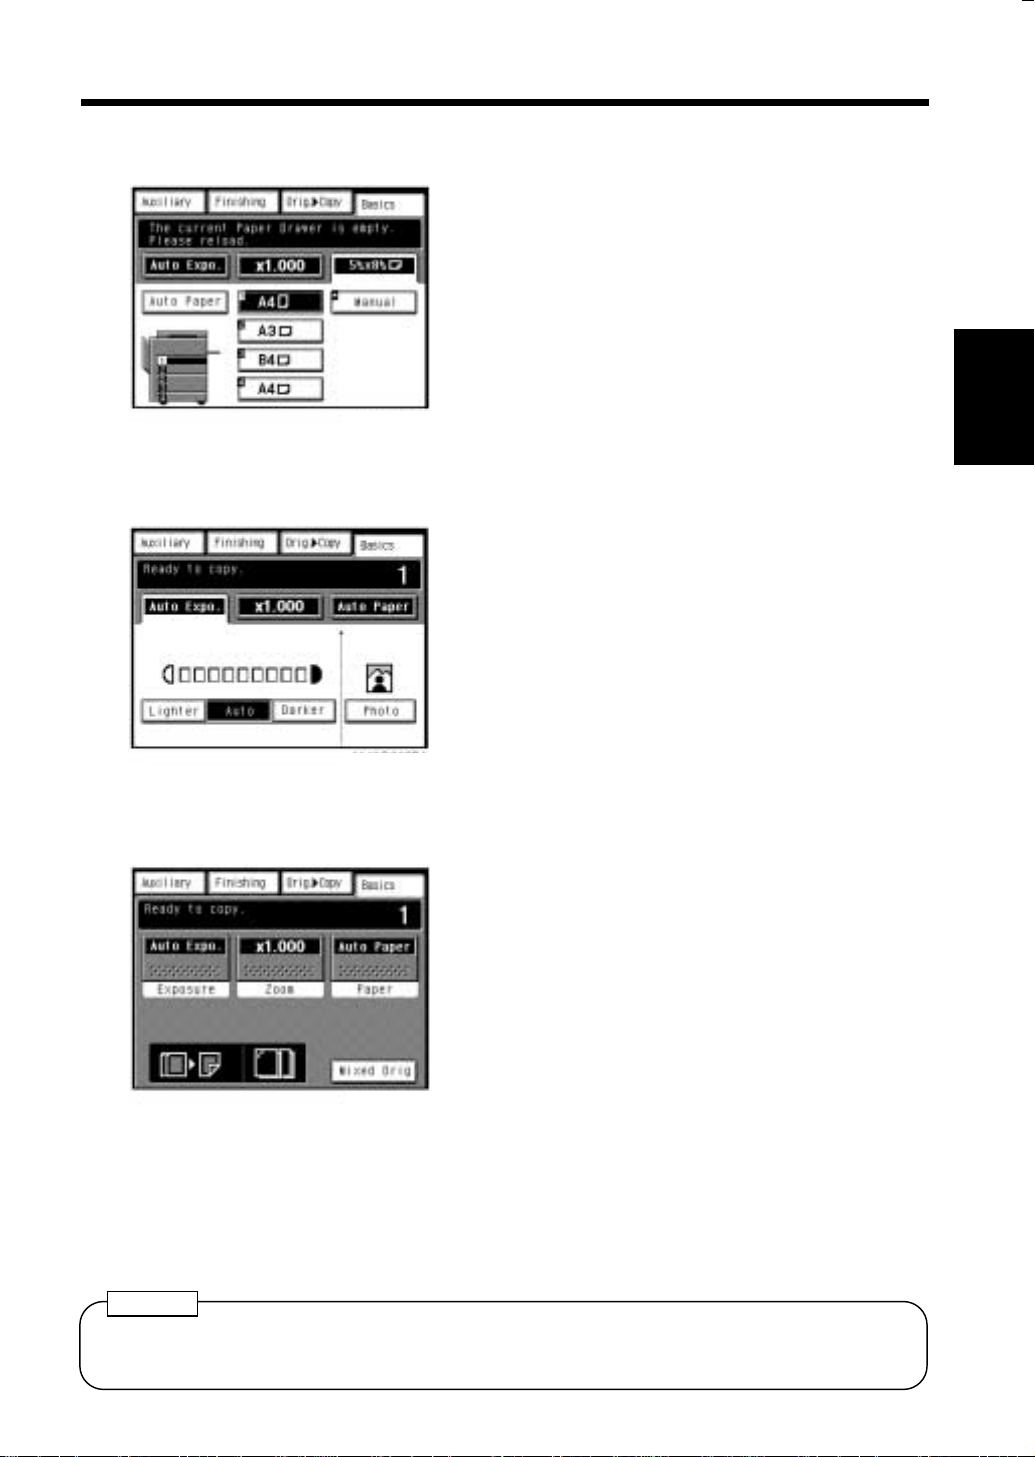
1. When the Message "The current Paper Drawer is empty."
Appears p. 102
2. When the Message "Replenish Toner." Appears p. 106
3. When the M e ss age "The Staple C art rid ge is empty." Appears
p. 108
4. When the Message "A paper misfeed ha s been detected."
Appears p. 112
•
Misfeed Location Displays p. 112
•
Misfeed Clearing Procedures
Copier (Fusing / Transport Section) p. 113
Copier (Paper Take-Up Section) p. 114
Copier (Multi Bypass Tray) p. 115
Paper Feed Cabinet (2-Drawer Type) p. 116
Paper Feed Cabinet (1-Drawer Type) p. 117
Duplex Unit p. 118
Duplexing Document Feeder p. 119
Automatic Document Feedeer p. 120
Sorter/Staple Sorter p. 121
5. When “ ” Appears p. 122
6. What Does Each Message Mean? p. 123
Page 5

Chapter 6 Troubleshooting p. 127
v
Contents
1. When This Type of Copy is produced p. 128
2. The Copier is not functioning as designed p. 130
Chapter 7 Miscellaneous p. 131
1. Specifications p. 132
•
Copier
•
Duplexing Document Feeder
•
Automatic Document Feeder
•
Sorter (10-Bin)
•
Sorter (20-Bin)
•
Staple Sorter (10-Bin)
•
Staple Sorter (20-Bin)
•
Paper Feed Cabinet (2-Drawer Type)
•
Paper Feed Cabinet (1-Drawer Type)
•
Duplex Cabinet
•
Duplex Unit
•
Data Controller
2. Care of the Copier p. 138
•
Cleaning
3. Function Combination Matrix p. 140
4. Description of Copy Paper Size and
Zoom Ratio Table p. 143
5. Index p. 144
Chapter 1
Safety Notes
Chapter 2
Getting to Know
Abou t You r
Copier
Chapter 3
Making Co pie s
Chapter 4
Usin g t he User
Mode
Chapter 5
When a Message
Appears
Chapter 6
Troubleshooting
Chapter 7
Miscellaneous
Page 6
vi
Terms and Symbols for the Type of Originals and Copy Paper
A few special terms and symbols are used in this manual to designate types of originals and copy
paper. This page explains about these terms and symbols.
Feeding Direction (copy paper path)
In this copier s ystem, co py pape r is taken up fr om t he righ t- hand sid e of th e copier and fed through
the copier to war d t he left-han d side, face up o nto the Copy Tray . In the figure below, the dire ction
in which the copy paper is fed, as indicate d b y the arro w, is called the "fee di ng direc tion."
"Width" and "Length"
139O1610A
Terms and Symbols Used
1139O1610A
1151O107AA
When we talk about the size of the original or copy, we call side
A "widt h" and side B "l ength."
A: Width
B: Length
<Lengthwise >
When the original or copy has a "length" longer than its
"width," we call it "lengthwise" and use symbol "L" or " ."
<Crosswise >
When the original or copy has a "length" shorter than its
"width," we call it "crosswise" and use symbol "C" or " ."
1139O1620A
Page 7

Chapter 1
Safety Notes
This chapter explains about the operating environment, conditions, and precautions for use.
1. Installing the Copier p. 2
Installation Site
Power Source
Space Requirements
2. Pre cautions for Use p. 3
Operating Environment
Using the Copier Properly
Moving the Copier
Care o f Copier Supplies
1
Chapter 1
Safety Notes
Page 8
2
1. Installing the Copier
Installation Site
To ensure utmost safety and prevent possible malfunctions of the copier, install it in a location which
meets the following req uirement s .
◆
A place away from a curtain or the like that
may catch fire and burn easily.
◆
Chapter 1
An area where there is no possibility of
being splashed with water or other types of
liquid.
◆
An area free from direct su nlight.
◆
A place out of the direct air stream of an air
◆
A well-ventilated place.
◆
A dry place.
◆
A dust-free location.
◆
An area not subject to undue vibration.
◆
A stable and level location.
conditioner, heater, or vent ilato r.
Safety Notes
Power Source
The power source voltage requiremen ts are as follows.
◆
Use a power source with little voltage fluctuat ion.
Voltage Fluctuatio n
Frequency Fluctuatio n
:
Within ±10%
:
Within ±0.3%
Space Requirements
To ensure easy co pier operation, supply replacements, and service maintenance, adhere to the
recommended space requirements detailed bel ow.
Allow a clearance of 150 mm or more at the back of the copier as there is a ventilation duct.
230
1,651
1,386
1,080
650
306430
1149O070AB
1,095
395
1,426
1,066
944
700
1149O071AA
Unit: mm
Page 9
2. Precautions for Use
Operating Environment
The operating environmental requirements of the co pier are as follows.
Temperat ure : 10 °C to 3 0 °C wi t h a fluctu a tion of 10 °C pe r hour
Humidity : 15% to 85% with a fluctuation of 20% per hour.
3
Using the Copier Properly
To ensure the optimum performance of the copier, follow the precautions listed below.
◆
NEVER place a heavy object on the copier or subject the copier to shocks.
◆
NEVER open any Doors, or turn OFF the copier while the copier is making copies.
◆
NEVER bring any magnetized object or use flammable sprays near the copier.
◆
ALWAYS insert the Power Plug all the way int o the outlet.
◆
ALWAYS make sure that the outlet is visible, clear of the copier or copier cabinet.
◆
ALWAYS provide good ventilation when making a large number of continuous copies.
NOTE
= Locate the Copier in a Well Vent ilated Room =
A negligible am ount of ozone i s generated during normal o pe ration of this copier. An
unpleasant odor may, however, be created in poorly ventilated rooms during extensive copier
operations. For a comfortable, healthy, and safe operating environment, it is recommended that
the room be well ventilated.
REMARQUE
= Placer le copieur dans une pièce largement ventilée =
Une quantité d’ozone négligable es t dé gagée pendan t le fonctionnement du copieur quand
celui-ci est ut ilis é normalement. Cependant , un e od eur désagréable peut être ress entie dans les
pièces dont l’aérati on est insuffi sante et lorsque une utilisation prolongée du copieur est
effectuée. Pour avoir l a certitud e de trava iller d an s un envi r onnement r éunis san t des condit ion s
de confort , sant é e t de sécurité, il est préférable de bien aérer la pièce ou se trouve le copieur.
Chapter 1
Safety Notes
Moving the Copier
If you need to transport the copier over a long distance, consult your Technical Representative.
Care of Copier Supplies
Use the following precautions when handling the copier supplies (toner, paper, etc.).
◆
Store the paper, toner, an d other supplies in a place f ree f ro m di rect sunlight and away from any
heating apparatus. Keep t hem i n a dry, cool, clean environment.
◆
Store paper, which has been removed from its wrapper but not loaded into the Drawer, in a
sealed plastic bag in a cool, dark place.
◆
Keep supplies out of the reach of children.
◆
If your hands become soiled with toner, wash them with soap and water immediately.
Page 10

4
2. Precautions for Use
Chapter 1
Safety Notes
Page 11

Chapter 2
Getting to Know About Your C opier
This chapter gives you a brief d escr ipt ion of the syst em and prel im inar y inform a tio n about the
different parts of the system.
5
1. Typi cal Types of Copie s Yo u C an Make with Your Copier p. 6
2. System Overview p. 8
3. Copier Parts and Accessories
Outside the Copier p. 10
Inside the Copier p.11
Options p. 12
4. Control Panel Keys and Indicators p. 16
5. Using the Touch Panel p. 18
What is the Touch Panel?
How th e Scre en is O rga ni ze d
Operating the Touch Panel
6. Turning ON and OFF and Initial Mode p. 20
Turning ON and OFF
Initial Mode
7. Auxiliary Function s p. 21
Panel Resetting
Auto Panel Reset
Auto Copy Start
Auto Power-OFF
Energy Saver
Interrupt
Mode Check
Access Number
Chapter 2
Getting to K now About Y our Copier
Page 12
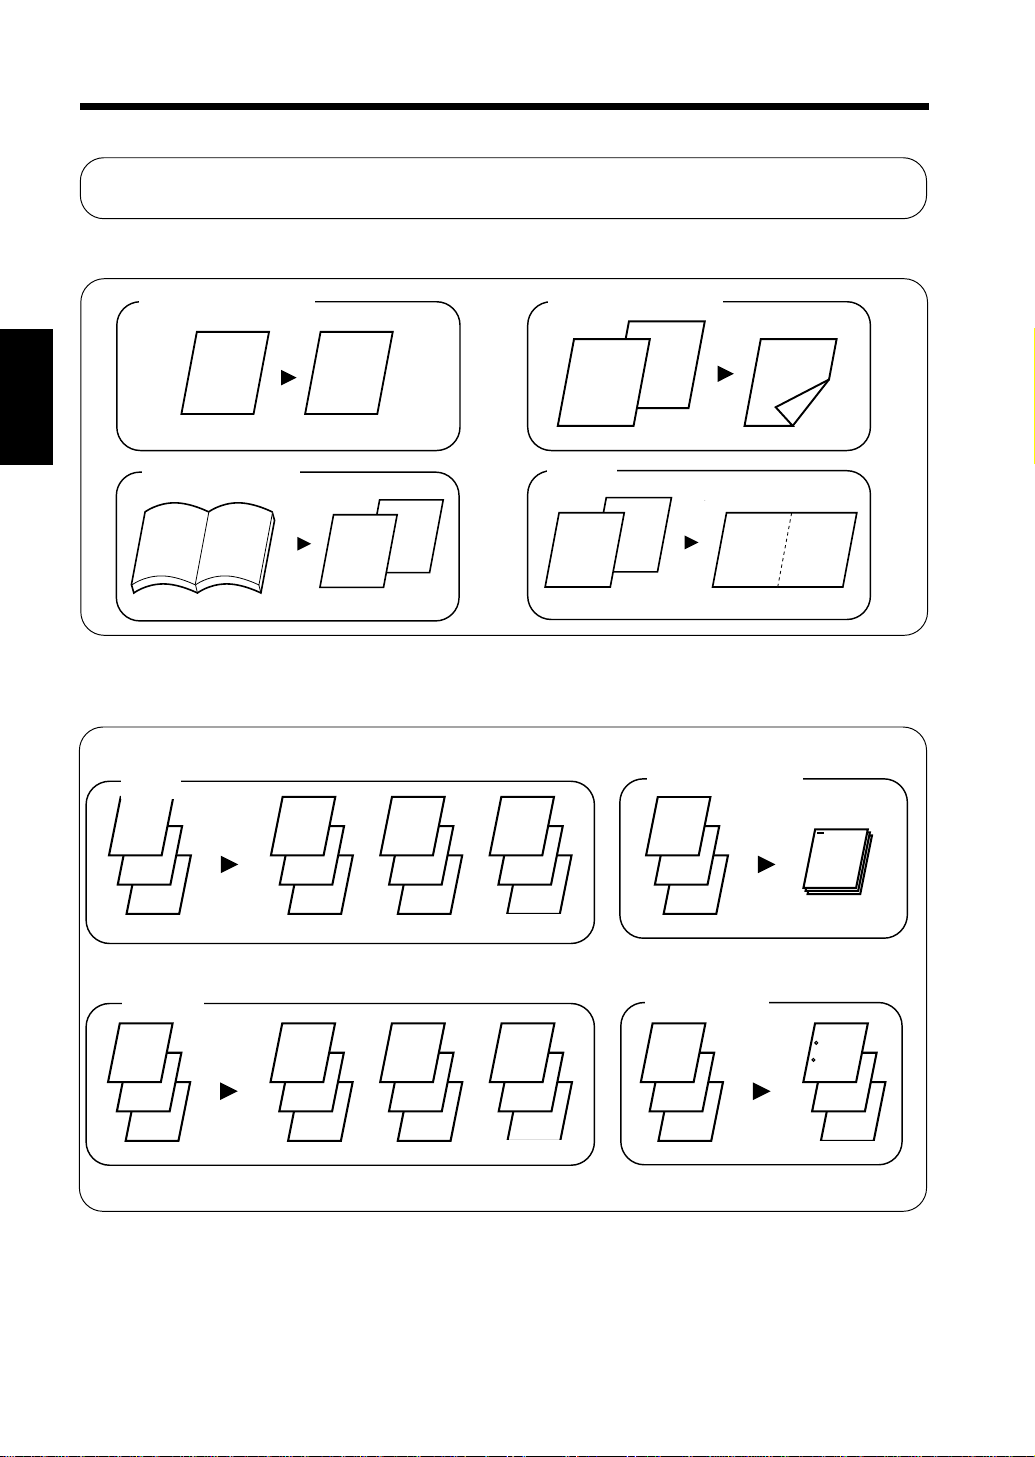
6
1.Typical Types of Copies You Can Make with Your Copier
Here’s a rundown of the features the copier is equipped with to turn out different types of copies.
For the operation s , s ee the r elev ant p ages indicated by ➭ p.
Original Copy ➭
1-sid ed 1-sided
Chapter 2
Book 1-sided
AB
Sort ➭
p. 48
Sort
▲
▲
p. 42
AA
1149O025AA
1149O025AA
▲
B
A
1149O027AA
1149O027AA
A
▲
B
A
B
1149O026AA
1149O026AA
1-sided 2-sided
2-in-1
B
A A B
1149O028AA
Sort-and-Staple
1149O028AA
Gettng to Know About Your Copier
1
2
3
Group
1
2
3
1
2
3
1
1
1
1
2
3
2
2
2
1149O029AA
1149O029AA
1149O030AA
1149O030AA
1
2
3
3
3
3
1
2
3
Hole Punch
1
2
3
1
1149O031AA
1149O031AA
1
1149O032AA
1149O032AA
2
3
Page 13

7
1. Typical Types of Copies You Can Make with Your Copier
Zoom Ratio ➭
p. 36
Reduced, Full Size, Enlarged
Auxiliary Functions ➭
Cover
➭
p. 58
p. 58
Page Insertion
1149O004AA
1149O004AA
➭
p. 62
Chapter 2
OHP Interleaving
➭
Erase
p. 74
1149O013AA
1149O013AA
➭
p. 68
1149O017AA
1149O016AA
1149O016AA
File Margin
➭
1149O014AA
p. 72
1149O015AC
Getting to Know About Your Copier
1149O015AB
Page 14
8
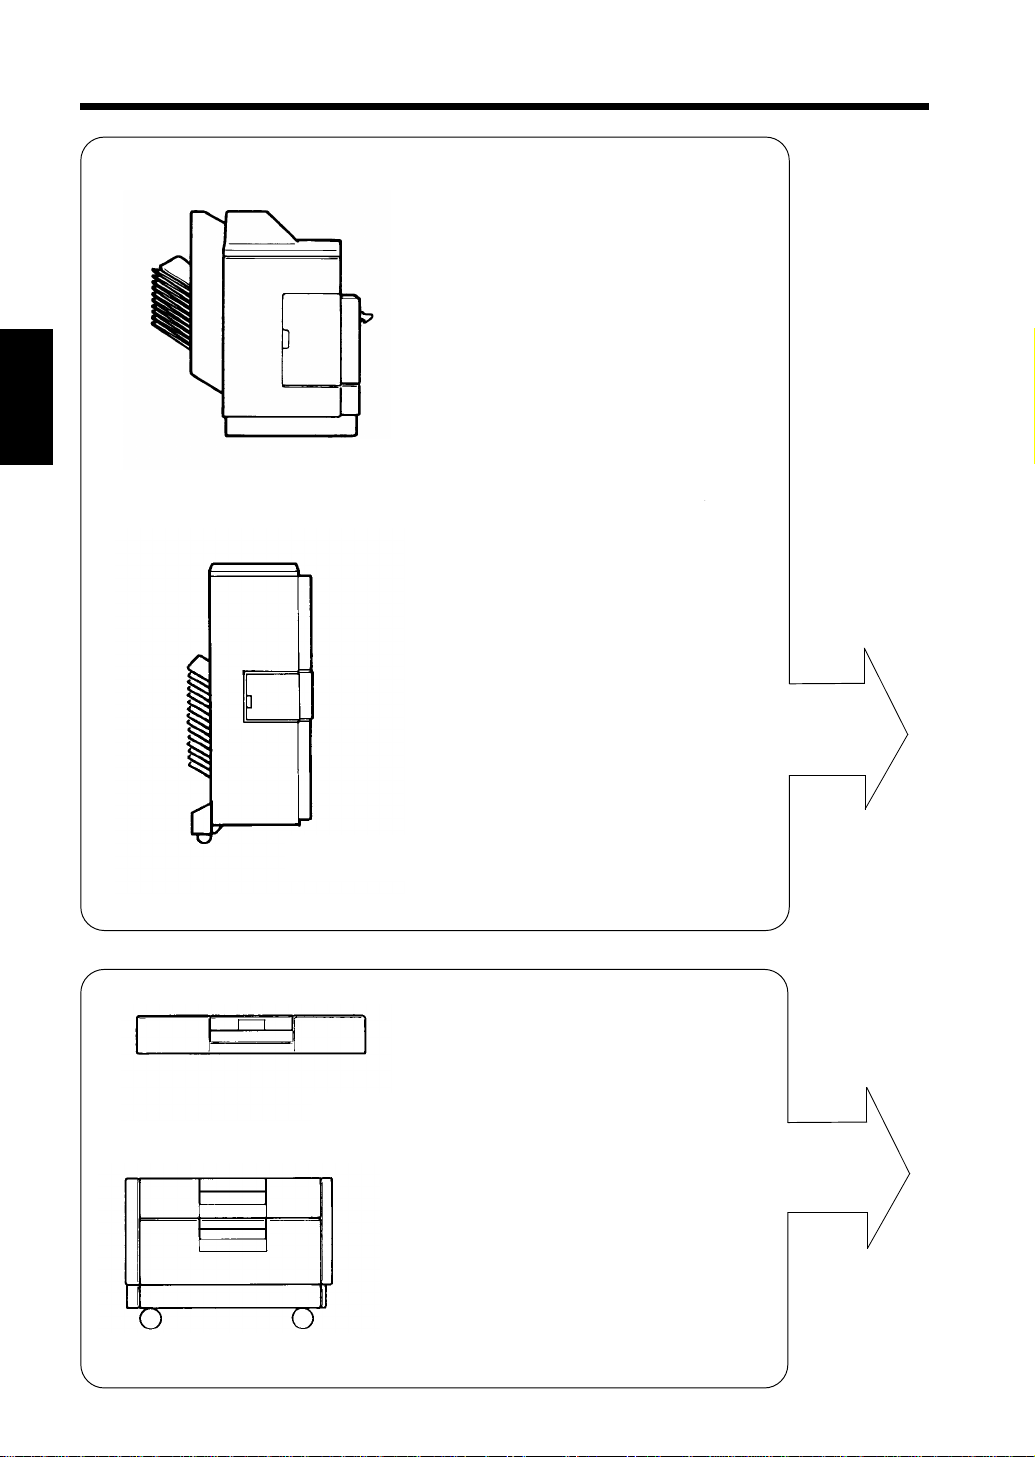
2. System Overview
Chapter 2
10-Bin Sorter S-106 <Option>
Permits sorting or grouping copies
into up to 10 copy sets or stacks.
Staple Sorter ST-104 <Optio n>
Automatically s tap les cop y sets or
stacks that are sorted or grouped by
the same function as that of S-106.
1136O020A
20-Bin Sor ter S-207 < O ption>
Permits sorting or grouping copies
into up to 20 copy sets or stacks.
Staple Sorter ST-210 <Option>
Automatically staples, and/or
punches holes in , c op y se ts or
stacks that are sorted or grou ped by
the sam e function as tha t of S-207.
Getting to K now About Y our Copier
1136O059AA
Duplex Unit AD-8 <Option>
Mounted in the Paper Feed Cabinet,
AD-8 automatically turns over
1-sided copies to make 2-sided
1139O0030A
copies.
Duplex Cabinet PF-4D<Option>
Turns over 1-sided copies to make 2-sided
copiers. It is also e qui pped with a storage
drawer for keeping copy paper and toner.
1139O1222A
Page 15
1138O525AA
9
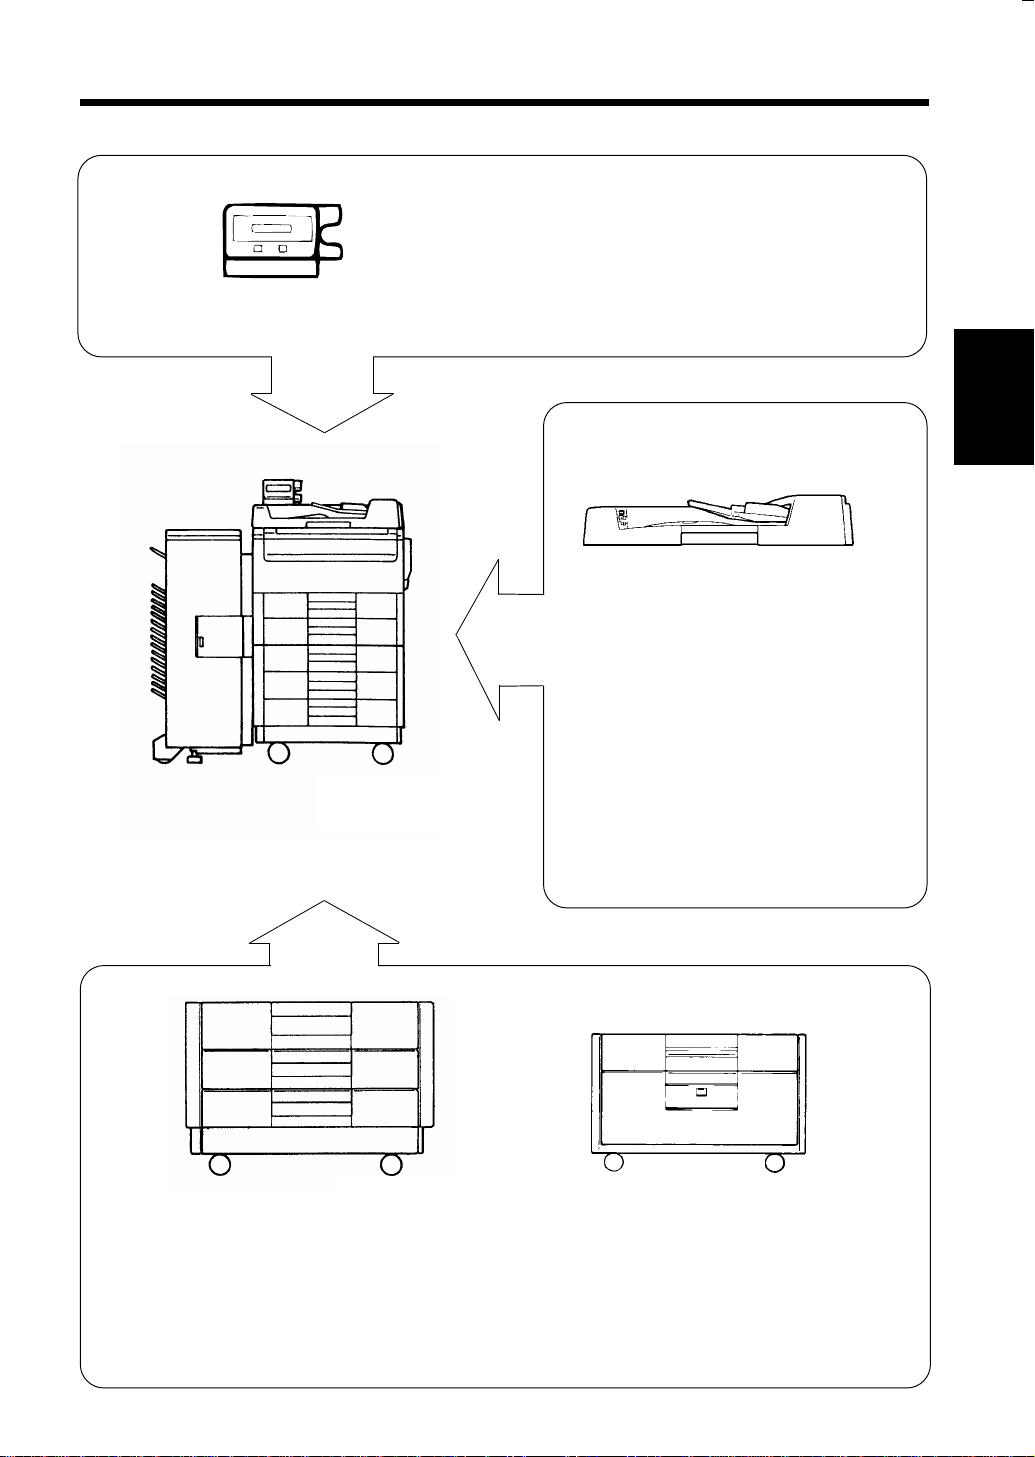
2. System Overview
Data Controller D-102 <Option>
apable of controlling various types of data
including the number of copies made, copy
cost, and user dep artments b y means of
specific magnetic cards.
1138O525AA
Chapter 2
1151O007AA
Automatic Document Feeder AF-5
<Option>
Capable of feedin g in sheet origi nals
one at a time for making a copy or
copies of each.
1149O072AA
1139O0180A
Paper Feed Cabinet PF-204 <Option>
Equipped with two paper drawers, each
capable of holding up to 500 sheets of copy
paper (8 0 g/ m
2
).
Duplexing Document Feeder AFR-12
<Option>
In addit ion to t he fun c tio n of t he AF -5 ,
it can tu rn ov er 2-s i ded or i gi nal s f or
making copies.
1139O0012A
Paper Feed Cabinet PF-104 <Option>
Equipped with a large-capacity drawer to hold
up to 2,500 sheets of copy paper (80 g/m
2
).
Getting to Know About Your Copier
Page 16
10
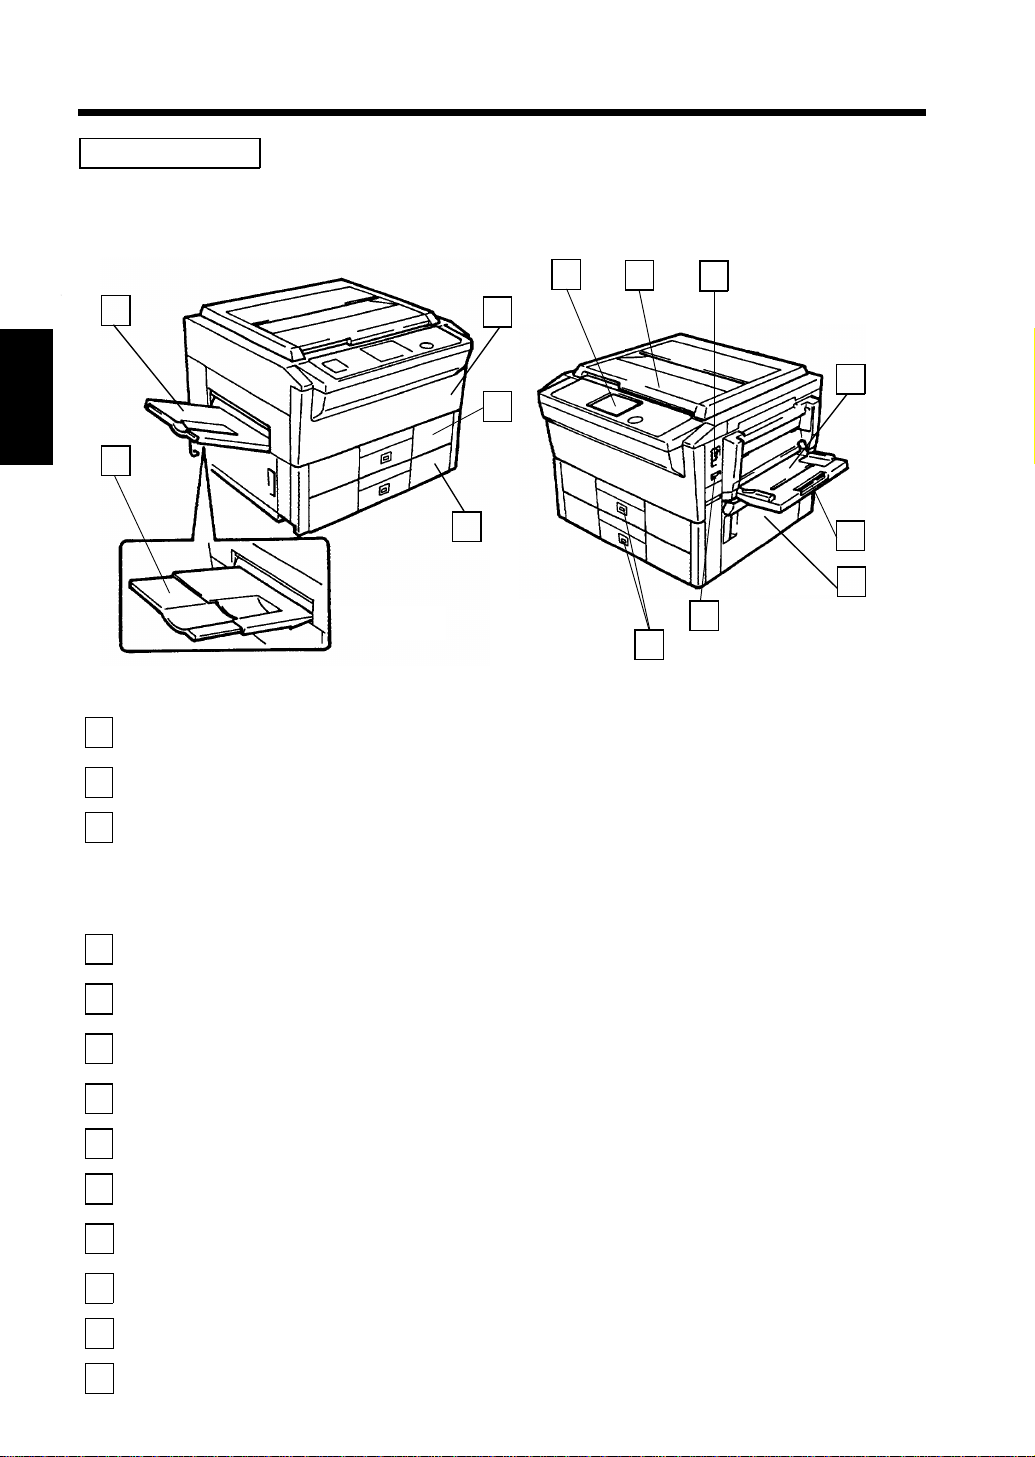
3. Copier Parts and Accessories
Outside the Copier
6
2
Chapter 2
1
1149O079EA
Copy Tray
1
Extender
Copy Tray : Holds co pi es fed out of the cop i er .
2
Front Do or : Open for the followin g pur po se s:
3
Getting to K now About Y our Copier
: Slide this extender out when making copies o n large-s ize paper .
• Replacing the Toner Bottle
• Clearing a paper misfeed
• Cleaning the corona units
3
4
5
➭
➭
p. 10 6
➭
p. 113
p. 139
7
13
12
8
9
10
11
1149O080EA
1st Draw er : Holds up to 550 sheets of paper.
4
2nd Drawer : Holds up to 550 sheets of paper.
5
It can accommodate paper of different sizes.
Control Panel : Use to start a copy cycle or make variou s job sett ings.
6
Original Cover : Holds the original placed on th e Original Glass in position.
7
Power Switch : Use to turn ON and OFF the copier.
8
Multi By pa ss Tray : H olds up to 50 s he ets of pla in paper, a s well as th ic k pa per, OHP
9
Multi By pa ss Tray
10
Extender
Right Do or : Open to clear a paper misfeed.
11
Total Counter : Shows the total number of copies made so far.
12
Paper Descent Key : Press when adding paper or clearing a paper misfeed.
13
(See) Contro l Panel Keys and Indicat ors
transparencies, and other s peci al pap er.
: Slide this Extender out when using large-size copy paper.
➭
➭
p. 20
➭
p. 16
p. 32
➭
pp. 102, 116
Page 17
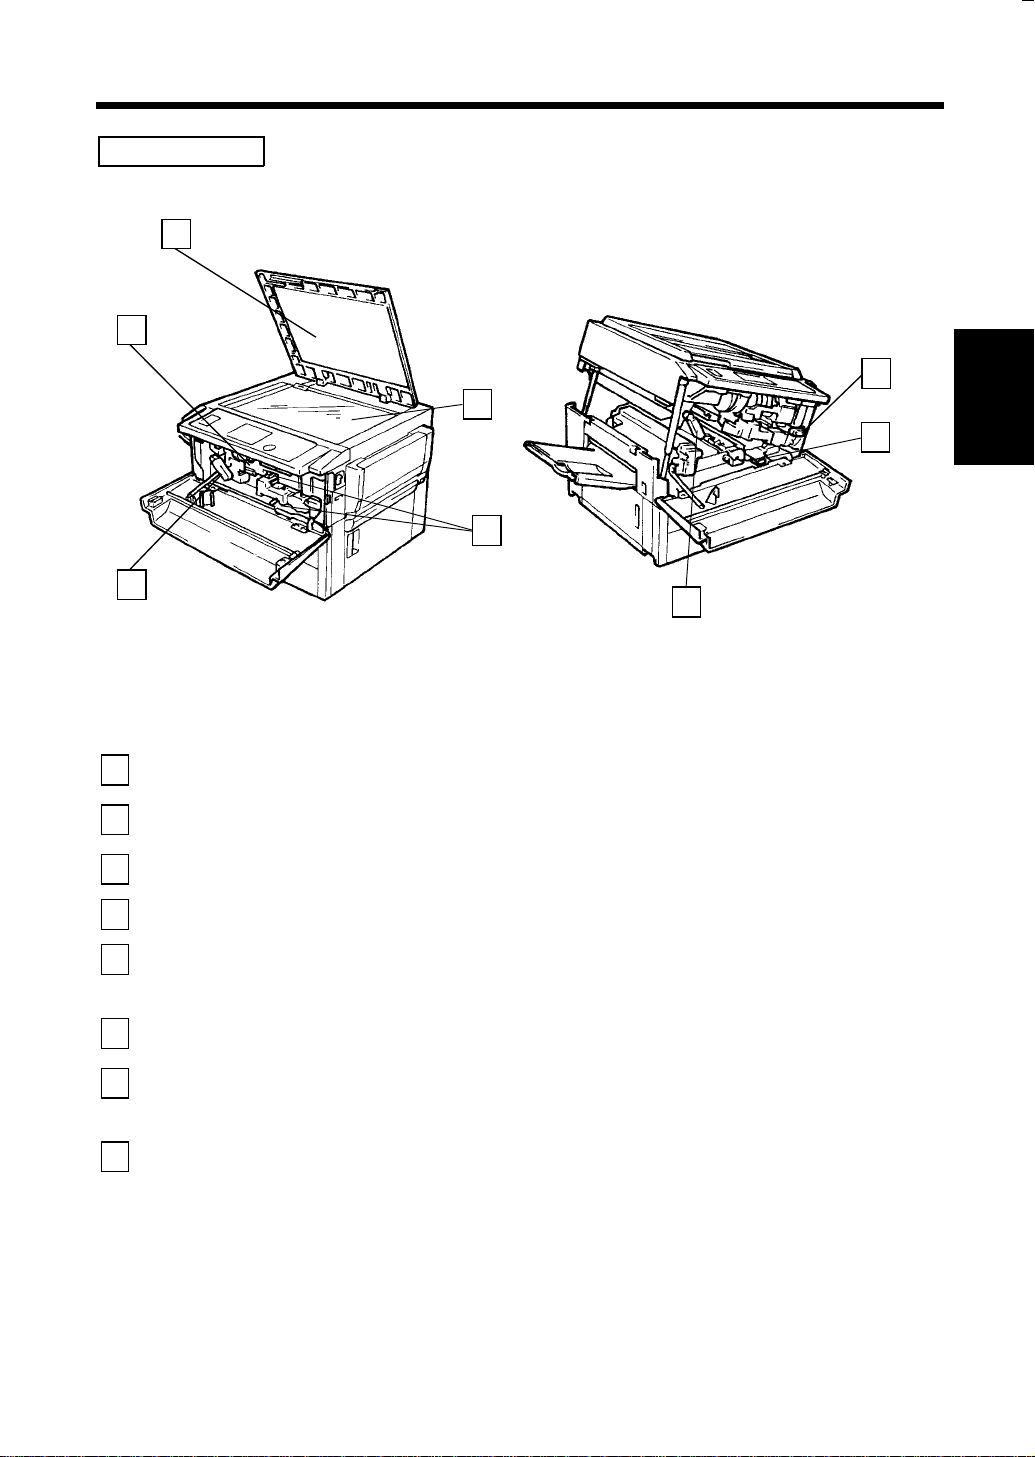
Inside the Copier
3
2
4
5
11
3. Copier Parts and Accessories
6
7
Chapter 2
1
1149O081AA
Lock Rel e as e L eve r : Turn clockwise to s wi ng up the Upper Hal f of the co pier to clear a
1
paper misfeed.
Toner Bottle
2
Holder
Original Pad : Holds the original in position on the Original Glass.
3
Original Glass : Place the original face down on this Glas s .
4
Corona Unit
5
Cleaning Lever
(Upper/Lower)
Imaging Unit Lock
6
Release Lever
Dehumidifier
7
Switch
Fusing Unit Lock
8
Handle
: Swing open to replace the Toner Bottle.
➭
p. 106
: Operate the Lever to clean the corresponding Corona Unit if unwanted
lines are produced on the copy.
: Operate when replacing the Imagin g Un it.
(For Technical Representative only)
: Turn ON to prevent condensation from forming on th e PC Drum when
power is turned OFF.
(For Technical Representative only
: Hold onto this Hand le w hen lifting the Upper Half of the Fusing U nit.
➭
p. 113
➭
8
p. 139
1149O082AA
Getting to K now About Y our Copier
Page 18
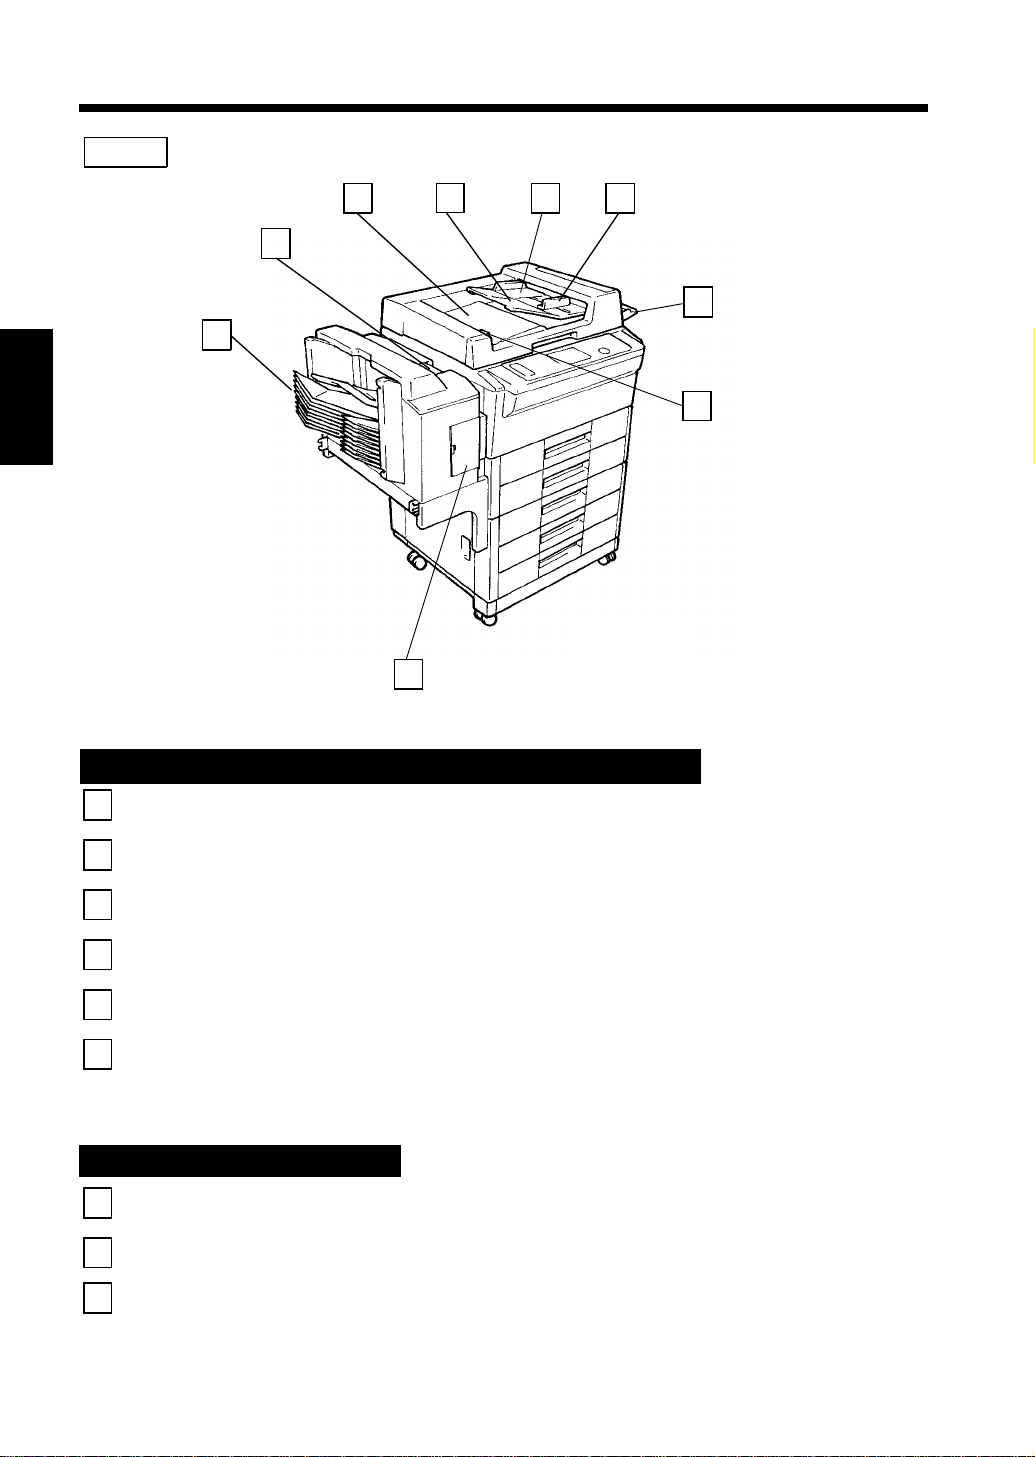
12
3. Copier Parts and Accessories
Options
9
8
Chapter 2
1 2 3 4
5
6
7
Automatic Document Feeder / Duplexing Document Feeder
Document Exit
1
Getting to K now About Y our Copier
Tray
Document Feed
2
Tray Extender
Document Feed
3
Tray
Document Guide
4
Plate
Single Feed Tray : Place a single sheet of original on the tray to make a copy or copies
5
Document
6
Turnover/Exit
Unit Door Lock
Release Key
: Receives originals that are automatically ejected from the Documen t
Feeder.
: Pull out when loading large-size originals.
: Load the originals face up on this tray.
: Slide the plate as necessar y to the size of the originals.
➭
of it.
: Hold do wn whe n op enin g t he Docu m ent Tur no ver/Exit Unit Door .
➭
*Duplex ing D ocu m ent Fe ed er onl y
p. 30
p. 120
10-Bin Sorter / Staple Sorter
Stapler Door : Open to replace the Staple Cartridge.
7
Sort Bins : Hold sorted or grouped copies.
8
*Staple Sorter only
1149O073AA
➭
p. 108
Lock Rel e as e L eve r : Press to unlock the sorter.
9
➭
pp. 108, 121
Page 19
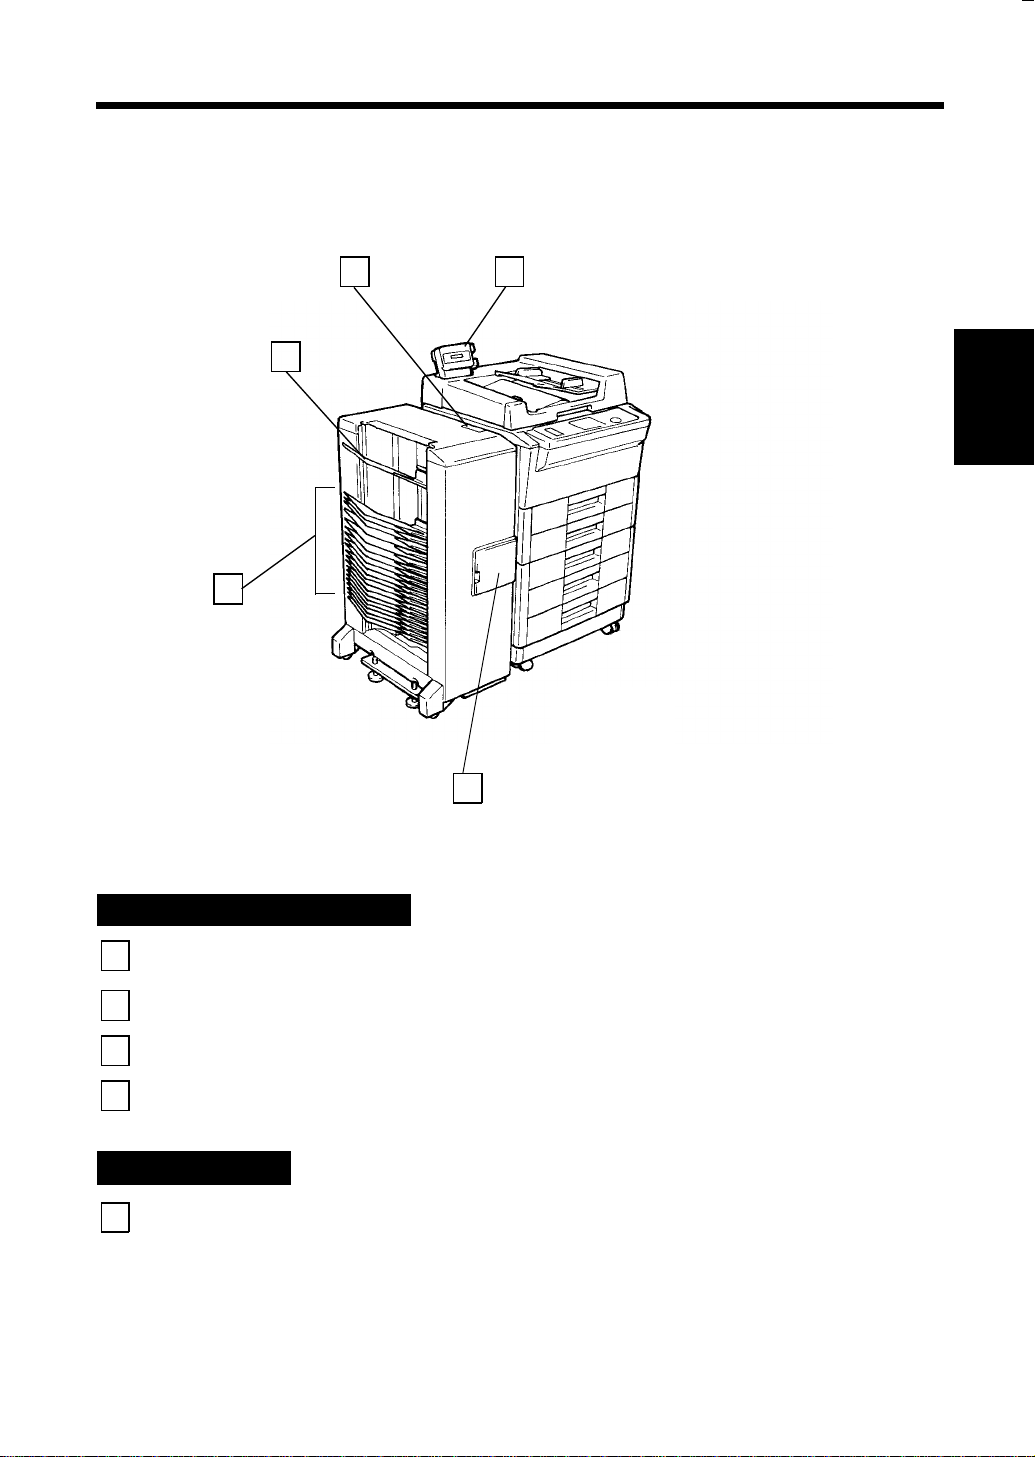
2
13
3. Copier Parts and Accessories
4 5
3
Chapter 2
1149O074AA
1
20-Bin Sorter / Staple Sorter
Stapler Door : Open to replace the Staple Cartridge.
1
*Staple Sorter on ly
Sort Bins : Hold sorted or gr ou pe d cop ie s.
2
Non-Sort Bin : Holds co pi es m ade in the Non-Sort m od e .
3
Lock Rel e as e L eve r : Press to unlock the sorter.
4
➭
pp. 110, 121
➭
p. 108
Data Controller
Data Controller : See the operator’s manual for Data Controller for details.
5
Getting to K now About Y our Copier
Page 20
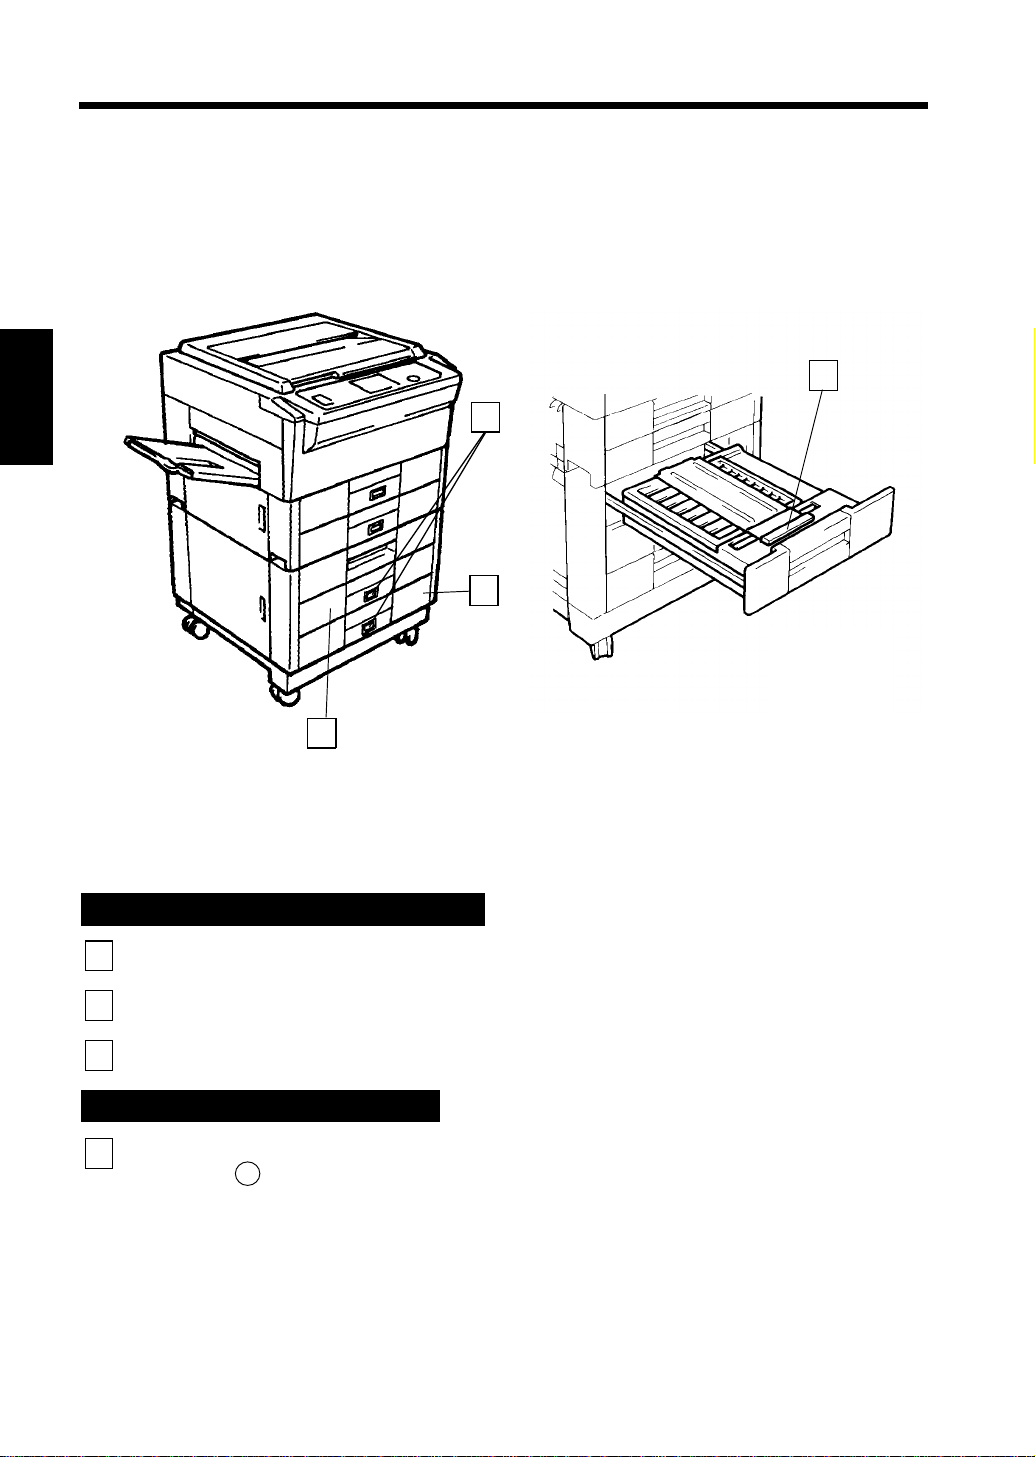
14
3. Copier Parts and Accessories
4
Chapter 2
1
Getting to K now About Y our Copier
Paper Feed Cabinet (2-Drawer Type)
3rd Drawe r : Holds up to 500 sheets of paper.
1
1149O076AA
3
2
➭
p. 105
1151O009AA
4th Draw e r : Holds up to 500 sheets of paper.
2
Paper Descent Key : Press when adding paper or clearing a paper misfeed.
3
➭
p. 105
Duplex Unit an d D upl e x C a bi ne t
Misfeed Clearing
4
Guide Plate D
: Open to clear a paper misfeed.
➭
p. 118
➭
p. 105, 116
Page 21
15
3. Copier Parts and Accessories
5
Chapter 2
6
Paper Feed Cabinet (1-Drawer Type)
3rd Drawe r : Holds up to 25 00 she et s of pap er.
5
Paper Descent Key : Press when adding paper or clearing a paper misfeed.
6
➭
p. 104
1151O010AA
➭
pp. 104, 117
Getting to K now About Y our Copier
Page 22
16
4. Control Panel Keys and Indicators
User Mode
Job Recall
Chapter 2
13 12 10
Touch Panel
1
•
Shows various scree n s and messages.
➭
See Touch Panel
Start Key
2
•
Press to s tart a copy cycle. ➭ p. 25
•
If pressed while th e co pier is warming
p. 18
up, it enables the Auto Copy Start
➭
Function.
Getting to K now About Y our Copier
Press to:
•
Reset the multi-copy entry to 1. ➭ p. 25
•
Clear a zoom rati o entered when setting
Clear Key
3
one from the 10-Key Pad.
Stop Key
4
•
Press to stop a multi-copy cycle. ➭ p. 25
Panel Reset Key
5
•
Press to set the copier into the initial
p. 21
➭
p. 38
mode, clearing all sett ing s made
➭
previously on the control panel.
p. 21
Mode Check
11
Interrupt Key
6
•
Press to interrupt a current job with a
➭
different one.
•
Press it again to return to the previous job.
Energy Saver Key
7
•
Press to set the copier into the Energy
Saver mode.
Access Mode Key
8
•
Press to enter the access number. ➭ p. 22
➭
Note: This key becomes valid only wh en
Copy Track of t he A dministrator
mode available from User’s Choice
is set.
10-Key P ad
9
Use to enter:
•
The number of copies to be made. ➭ p. 25
•
The zoom ratio to be used. ➭ p. 38
•
The number of or i g inals.
p. 22
p. 21
p
Rs[¯« •
ZxI[g
dª
Zx
·e Rs[
x1.000
{ƒ
{
1
p I[g
p
Note: It does no t, however, clear the
contents of the zo om a nd job
program memo ry and the settings
made immediately before the
Interr upt mode .
Page 23
9
17
4. Control Panel Keys and Indicators
Zx
d ª
· e R s [
{
1
x1.000
{ ƒ
User Mode Key
10
•
Press to sho w the Us er Mode menu.
•
Job Memory Input
•
Zoom Memory Input•User’s Choice
•
Meter Count
•
Toner Replenisher
p I[g
p
1 2 3 4
User Mode
•
•
123
456
789
0C
Drum Dehumidifier
Data Send
8
7
6
Chapter 2
5
1149O003DA
See Using the User Mode
Job Recall Key
11
•
Press to show the Job Recall screen, on
which you can recall or check a copy-job
program previously stored in memory.
S ee Recalli ng a Job fr om Memory
➭
See
Mode Check Key
12
•
Press to sho w the Mo de C heck screen.
p. 81
From this screen, you can access the
setting screen of a particular function and
change or cancel the setting as necessary.
➭
See Mode Check
Display Contrast Knob
13
•
Turn to vary the brightness of the Touch
p. 22
Panel.
➭
p. 77
1149O261DA
1149O260CA
1149O259CA
Getting to K now About Y our Copier
Page 24
18
5. Using the T o uch Panel
What is the Touch Panel?
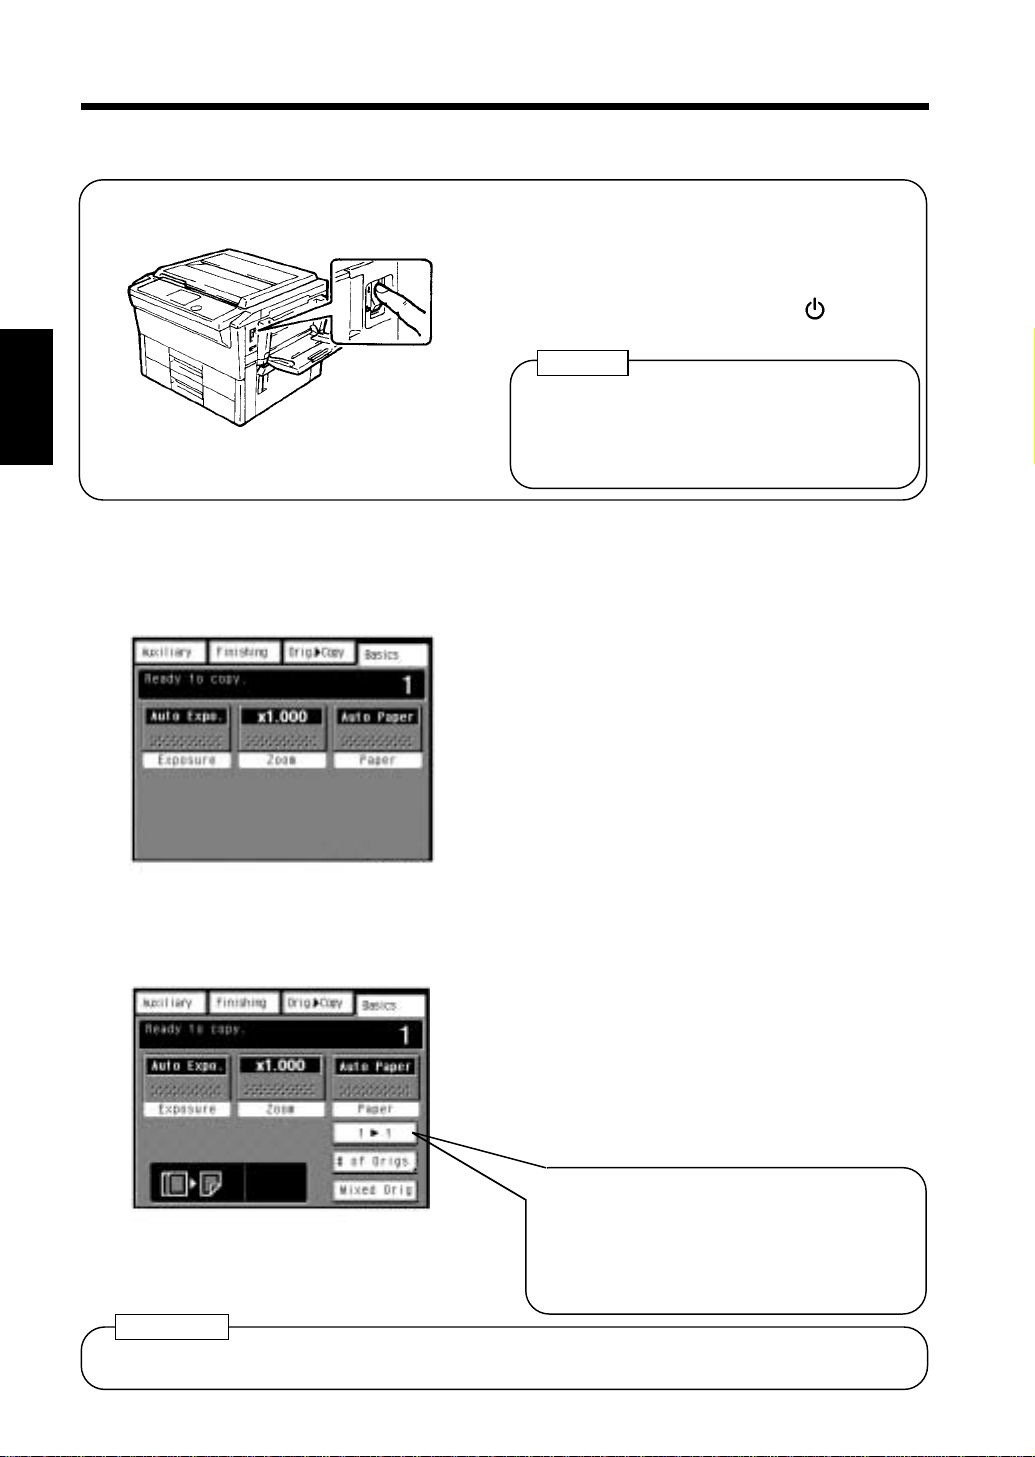
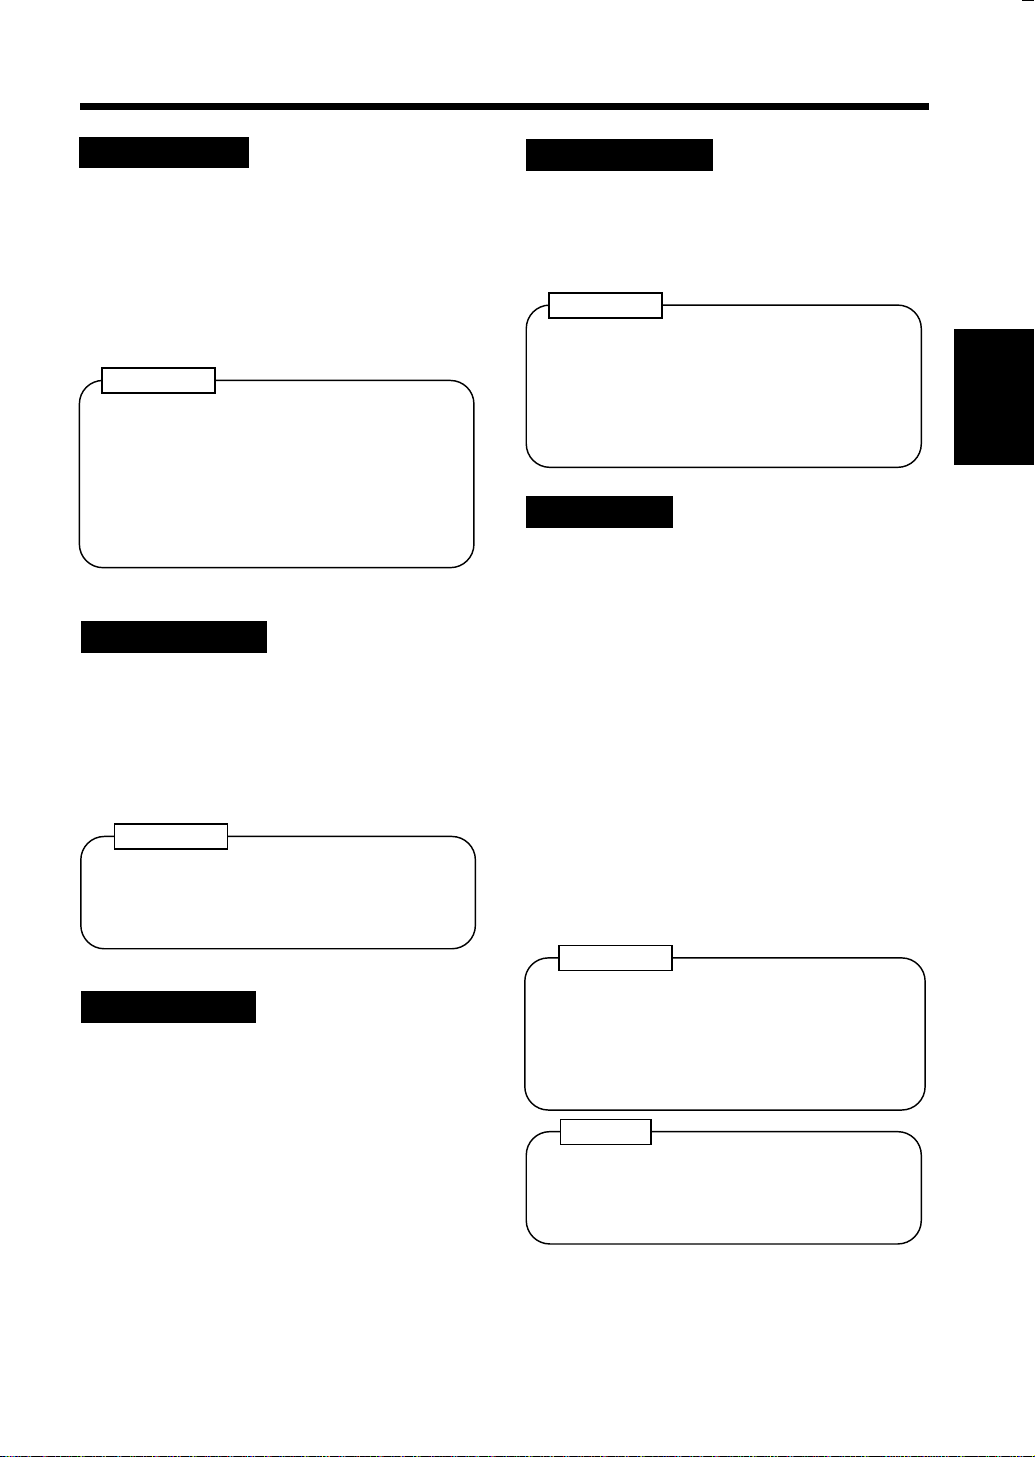
When you turn ON the Power Switch, the Basic screen as shown below appears on the Touch
Panel. It shows in messages and graphics the currently set functions, available functions to
choose from, and the copier status.
How the Screen is Organized
(1) Supplementary
Function Keys
Chapter 2
(2) Message
Display
(3) Basic
Function/Key
Getting to Know About Your Copier
(1)Supplementary Function Keys
Example: Auxiliary Function
(4) Set Function
1149O265CA
1149O263CA
The Auxiliary, Finishing, Orig. Copy, and
Basics keys are displayed. When any of these
keys is touched, t he corresponding
supplementary function screen appears.
Touchi ng Bas ics returns yo u t o th e Ba s ic
*
screen.
▲
Page 25
(2) Message Display
19
5. Usin g t h e Touch Panel
Shows the current copie r status, operating
instructions and precautions, and other data
including the number of copies selecte d.
Example: Add paper
(3) Basic Function/Key Display
Example: Exposure
(4) Set Function Display
1149O267DA
1149O268BA
Shows the basi c function keys a nd the
corresponding functions currently selected for
use. Touch i ng a basic functi on ke y sho ws t he
corresponding basic function screen.
*What is shown ins ide the k ey is the current
setting.
Shows g raphic repr e s entatio ns o f th e se tt ings
currently made for Orig . Co py and Finish ing.
▲
*When you want to check for more details of
the set functions, press the Mode Check key.
➭
p. 22
Chapter 2
Getting to K now About Y our Copier
1149O263CA
Example: Orig. Copy : 1 2
▲
▲
Finishing : Sort-and-Staple
Operating the Touch Panel
You need only to lightly touch the key shown on the Touch Panel to select or activate the function
represented by the key.
NOTE
NEVER press the Touch Panel hard or u s e a hard or p oi nted ob ject t o press it, a s a damaged
panel could result.
Page 26
20
6. Turning ON and OFF and Initial Mode
Turning ON and OFF
●
Turning Copier ON
Press the Power Switch to the I (ON)
position.
●
Turning Copier OFF
Press the Power Switch to the (OFF)
position.
NOTE
The Auto Power-OFF function will
Chapter 2
1149O084AA
Initial Mode
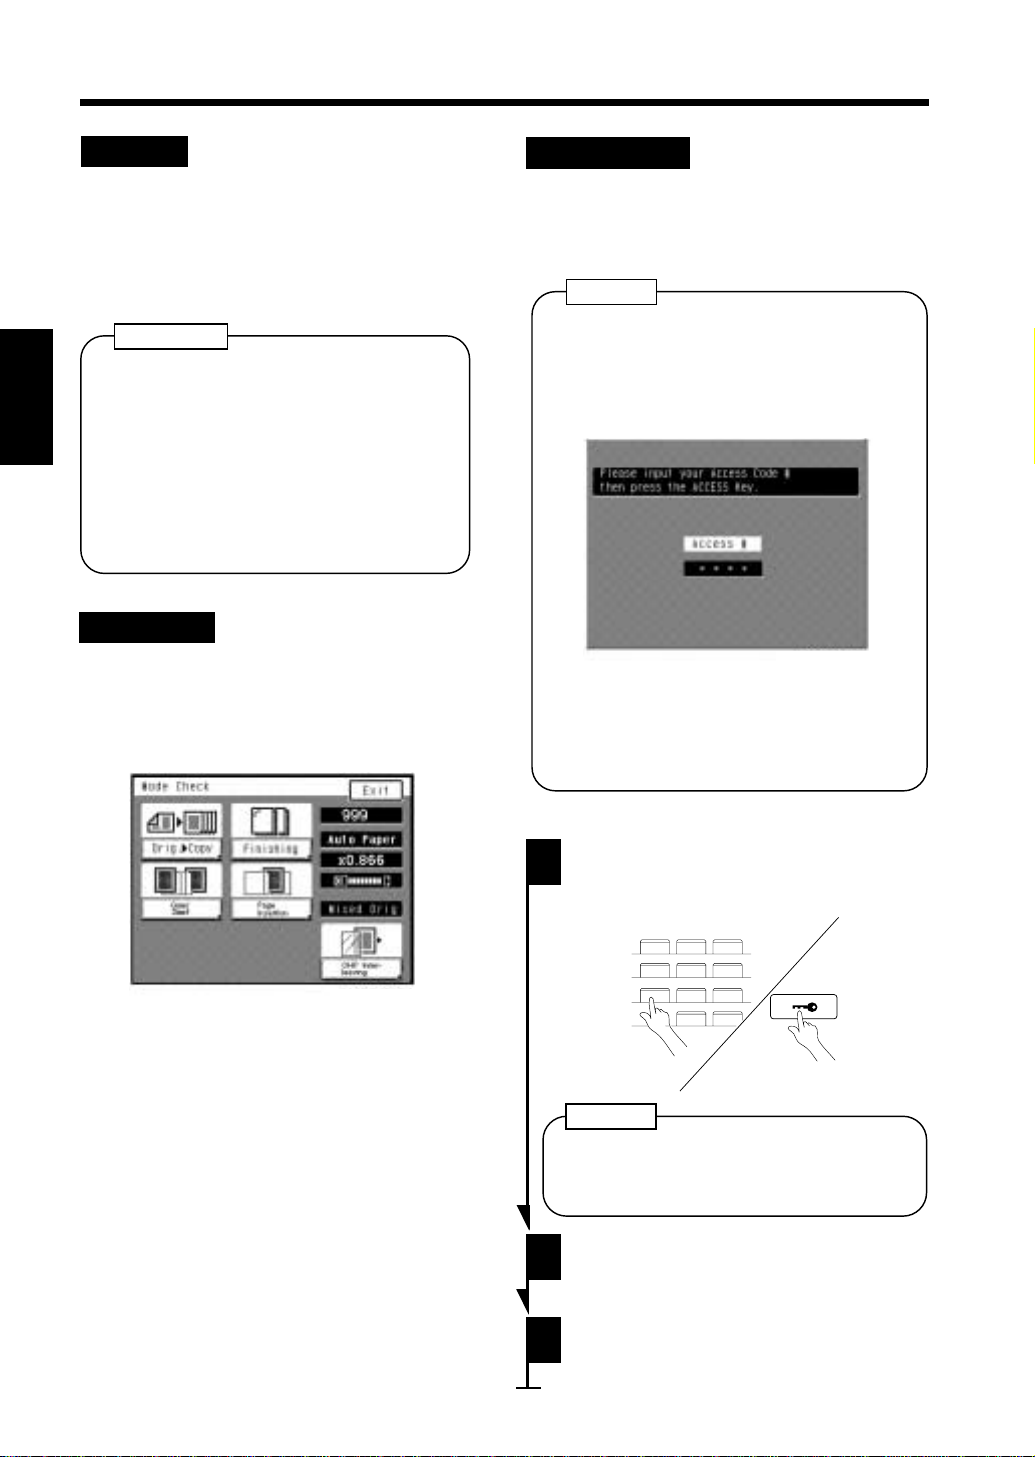
When the Power Switch is turned ON, the Basic screen appears on the Touch Panel. The settin gs on
this screen are called the initial mode, serving as the reference for all panel settings to be later made.
automatically shut down the copier a given
period of ti m e af ter the last ac t i v ity.
➭ p. 88
Getting to K now About Y our Copier
1149O413CA
The settings of the initial mode vary depending
on which op ti o n or opti on s are mo un te d on
your cop ie r.
1149O270CA
Example: When the Automatic Documen t
Feeder and Duplex Unit are mounted
No. of copies selected
Exposure
Zoom
Paper
Finishing
Orig. Copy
▼
No. of copies selected
Exposure
Zoom
Paper
Finishing
Orig. Copy
▼
:
1
:
Auto
:
×1.000
:
Auto Paper
:
Non-Sort
:
1 1
▼
:
1
:
Auto
:
X1.000
:
Auto Paper
:
Non-Sort
:
1 2
▼
When the copier is equipped with the
Document Feeder and Duplex Unit, 1 2
copy mode is automatically s elected,
Touch t hi s Key i f yo u want t o make 1 1
copies.
▼
▼
Usef ul Tip
User’s Choice can be used to cha nge t he settings of initial mode.
➭
p. 84
Page 27
7. Auxiliary Functions
21
Panel Resetting
The Panel Res et ke y rese ts all c ont rol panel
settings to default sett ing s in clud in g the
number of copies and zoom ratio.
* If a document feeder is used, any
original left on the Glass w ill be ejected
out of the unit.
Useful Tips
•
The Panel Reset key enables you to
cancel all previous settin g s at the touch o f
the key.
•
To avoid miscopy, try to press this key
before making any setting for your own
copy job.
Auto Panel Reset
If no key on the control panel is pressed w ithin
60 sec. after a copy cycle has been completed
or copying settings made, the Auto Panel Reset
function is activated to return the copier to the
default settings.
Useful Tip
The time for the copier to enter the Auto
Panel Reset Function can be changed to 30
➭
p. 86
sec.
Auto Power-OFF
The Auto Power-OFF function shuts down the
copier a given period time after the co pier has
been used last. The initial setting is 60 min.
Useful Tip
The time for the copier to enter the Auto
Power-OFF mode can be selected from 1 to
120 min. The Auto Power-OFF function can
even be disabled.
➭
For details, see User’s Choice.
p. 88
Energy Saver
If the copier is shut down when it is not in use,
it takes the copie r some time t o complete the
warm-up cycle. Instead of turnin g the c opier
OFF, it’s a good idea to use the Energy Saver
mode which will minimize the time for the
copier to comp lete the warm-up cycle to about
30 sec.
To set the copier into the Energy Saver mode,
you need on l y to pres s th e Ener gy S ave r key .
Or, a given period of time after the copier has
been touched last, it automatically enters the
Energy Saver mode. The init ial setting is 15
min.
To cancel the Energy Saver mode, press any
key on the control panel.
Chapter 2
Getting to K now About Y our Copier
Auto Copy Start
If you load originals in the document feeder
and press the Star t key while the copier i s
warming up after it has been turned ON, the
Auto Copy Start function allows that copy
process to be st a rted a s soon as th e copi er
completes warming up.
Usef ul Tip
The time for th e co pier to enter the E ner gy
Saver mode can be selected from 1 to 120
min. The Energy Saver function can even be
disabled.
➭
For details, see User’s Choice.
NOTE
The copier is automatically shut down if
the Auto Power-OFF function is activated
while it is in t he En er gy S aver m od e.
p. 86
Page 28
22
7. Auxiliary Functions
Interrupt
The Interrupt function allo ws you to int errup t a
current job and run a different one. Pressing
the Int e rrupt key once s ets the copier into the
Interrupt mode. Pressing the key again lets
copier leave the Interrupt mode, returning to
the previous settings.
Usef ul Tips
•
If the current job involves 2-sided
copying, Cover function, Pa ge s Inserti on
Chapter 2
or OHP Interleaving, the copier rejects
an Interrupt cycle.
•
If the cur rent job involves a finishing
function other than Non-Sort, Non-Sort is
automatically selected at the same time
when an Int e rr up t func t ion i s in vo ke d .
Mode Check
By pres si ng th e Mode Che ck key on t h e
control panel, you can either check for or
change the current settings.
Access Number
If an access number has been programmed , it
allows only particular perso ns to use t he copie r
or a supervisor to keep track of the number of
copies made by a particular department..
NOTES
•
If an access number has been
programmed, a copy cycle can be
initiated on ly after the access number
has been input to the copie r.
<"Access #" Prompt Screen>
1149O271CA
•
Before you can use this function, you
must first turn "ON" the "Copy Track"
function of the Administrator Mode
➭
available from User’ s Ch oi ce.
p. 88
Getting to K now About Y our Copier
1149O259CA
•
When you touch [Exit] after hav ing checked
the currently set functions, the Basic screen
reappears.
•
To change a certain function , to uch the
corresponding key and then make the
necessary change.
Entering the Access Number
1
2
3
From the 10-Key Pad, enter the 4 -digit
access number and pres s the Access
Mode key.
123
456
789
0C
1134P438DA
1134P438DA
NOTE
To correct the 4-digit acc es s numb er
entered, first pr ess the Clea r key, then
enter the new number.
When the initial screen reappears, you
can now start a copy cycle.
When the copy cycle is completed,
press the Access Mode key again.
Page 29

Chapter 3
Making Copies
This cha pter shows you how to ma ke c opies.
The "Basic Copying Overview " offers quick, at-a-glance inst ru ctio ns for making copies. Each step
is keyed to a page number with a mor e detailed descript ion.
1. Basic Copying Overview p. 24
2. Placing Originals
•
Placing Originals on the Original Glass p. 26
•
Using the Automatic/Duplexing Document Feeder p. 2 8
3. Manual Bypass Copying p. 32
4. Basic Functions
•
Copy Paper Size p. 34
•
Zoom Ratio p. 36
•
Image Density p. 40
5. Selecting the Original Copy Typ p. 42
•
1 1
▲
•
1 2
▲
•
2 1
▲
•
2 2
▲
•
1 [2in1]
▲▲
•
1 2-[2in1]
Selecting Original Copy Type p. 44
•
Some Precautions for Making Copies p. 46
•
6. Finishing Mode p. 48
•
Non-Sort
•
Sort
•
Sort Staple
•
Group
•
Select the Finishing Functions p. 50
•
Instruction for Loading Originals for the Finishing
Functions p. 54
•
Auto Dual Function p. 56
7. Auxiliary Functions
•
Cover p. 58
•
Auto Original Count p. 61
•
Page Insertion p. 62
•
OHP Interleaving p. 68
•
File Margin p. 72
•
Edge/Fr ame Eras e p. 74
▲
•
1-[2in1] 1
•
2-[2in1] 1
•
•
▲
Book 1
▲
Book 2
▲
•
Hole Punch
•
Manual Sta pl e
▲▲
23
Chapter 3
Making Copies
Page 30
24
1. Basic Copying Overview
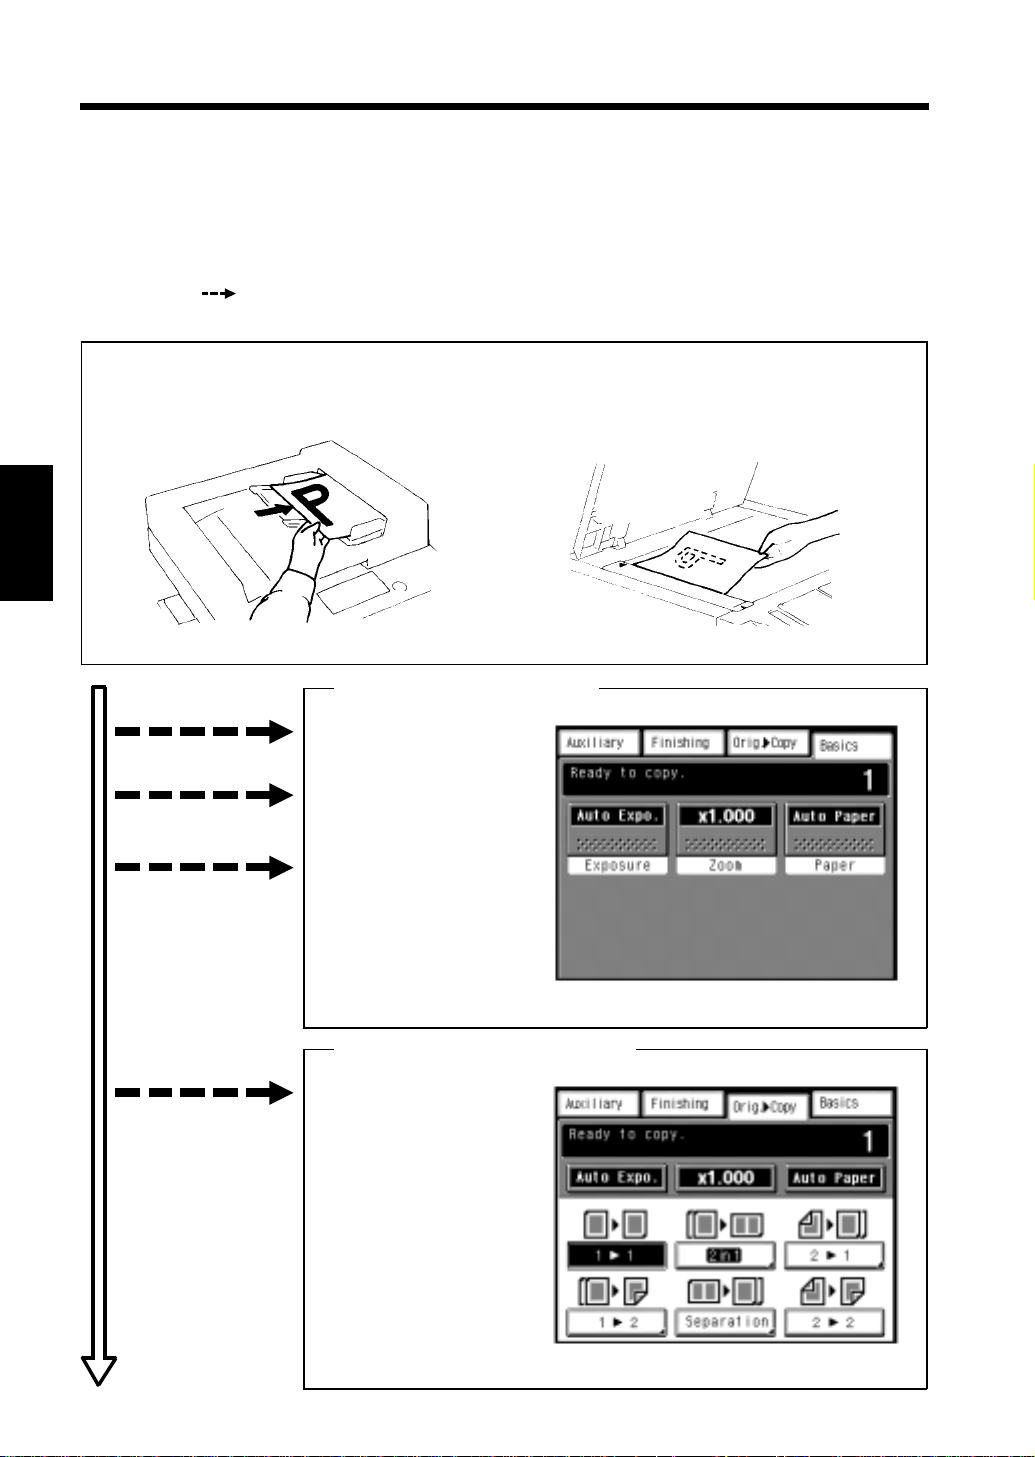
One of the most basic copying jobs is to make full-size (×1.000) copies of the original.
•
Place the original in position (step 1), set the number of copies to be made (step 8), and press the
Start key (step 9). This will allow you to make full-size copies o n paper o f the same size as the
original.
(*Automatically selected in the initial mode are Auto Paper, full size, and Auto Exposure.)
The selections you make on the Touch Panel will change the exposure level, zoom ratio, the
type of copy and so on.
1. Placing the Original
•
•
Load the originals face up on the
➭
document feeder.
Chapter 3
p. 29
Raise the Original Cov er and place the
original face down on the Original Glas s.
➭ p. 26
Making Copies
To change the copy paper
size
To change the zoom ratio
To change the exposure
level
• To make copies from a
book
• To sa ve copy pap er
1151O16AA 1151O013AA
Selecting the bas ic functions
2. Touch Paper.
➭
p. 34
3. Tou ch Zoom.
➭
p. 36
4. Tou ch Exposur e .
➭ p. 40
Selecting the original copy type
5. Touch Orig. Copy.
➭
p. 42
▲
▲
1149O413CA
1149O272CA
Page 31

25
1. Basic Copying Overview
• To sort copies
• To staple copies
• To punch holes in copies
• To make a file margin
on the copy
Selecting the finishing type
6. Touch Finishi ng
➭
p. 48
Selecting the auxiliary functions
7. Touch Auxiliary.
➭
p. 58
1149O274CA
Chapter 3
8. Setting the number of copies.
•
From the 10-Key Pad, set t he d es ired
number of copies to be made.
If you have entered an incorrect number,
*
press the Clear key C , then enter the
correct number.
9. Pressing the Start key
When you press the St art key, the copier
starts the copy cycle.
To stop the copy cycle, press the Stop key.
*
123
456
789
0C
1139P2640A
1139O2640A
1134P342DA
Making Copies
1149O265CA
Page 32

26
2. Placing Originals
Placing Originals on the Original Glass
Different methods are used to place the original depen d ing on i ts ty pe . Use the appropriate
procedure.
Sheet Originals
(Using plain paper or thick paper.)
Raise the Original Cover.
1
2
Chapter 3
Making Copies
Place the original face dow n on the
Original Glass.
Align the rear left corner of the
3
original with the marker on the
Original Width Scale.
▼
1151O013AA
Highly Tra nsp ar ent Or igi nal s
(Using transparenci es and tran slucent paper fo r
the original.)
1
2
Place the original in the s ame w ay as
the sheet originals.
Place a blank sheet of paper o f the
same size over the original.
1139O0070A
Gently lower the Original Cover.
3
NOTE
4
1151O014AA
Gently lower the Original Cover.
The original sizes that can be d etected
in the Auto Paper Select Mode are
A3L, B4L, A4L, A4C, A5L.
When making copies from originals
other than th e ab ove, select the copy
paper size.
When using wrinkled or curled
originals, the or iginal size might not be
detecte d correctl y . So, select the copy
paper size and do not use the Auto
Paper Select Mode .
➭
Copy Pape r Size
p. 34
Page 33

Making Copies from A Book
Using Book Copy Mode
("Book" refers to an open bound original.)
27
2. Placing Originals
Place the open bo ok so that its top
1
edge is at the rear of the copier.
Gently lower the Origi nal Cover.
2
NOTES
•
If the book is thick, make a copy with
the Original C over raised.
•
Not positioning the open book properly
will result in copies with pages in
incorrect order .
•
Do not look directly at the Original
Glass s u rface a s a s t r ong be a m of light
is emitted.
1134O037AA
Instructions for Original Placement
•
Be sure to raise the Original Cover 15 °
or more before pl acing th e origin al. If
the Original Cover is raised to an
angle less than 15°, the c opier may fail
to select the correct copy paper size or
zoom ratio.
15°
1139O080AA
•
Do not place an orig inal weighing
more than 3kg on the Original Glass .
•
When placi ng an op en boo k , do no t
press t he book hard on the Or iginal
Glass, as trouble could result.
Chapter 3
Making Copies
Page 34

32
3. Manual Bypass C opying
Use the Manual Bypass to make co pies on paper not loaded in any drawer, or to copy onto
transparencies, translu cent p aper, or any ot her s pecial paper. When using the Multi Bypass Tray,
you can load multiple sheets of copy paper.
Copy Paper That Can be Used for Manual Bypass
◆Typ e s of P ape r
•
Plain paper (weighing 60g/m2 to 90g/ m2 )
•
Thick paper (weighing 90g/m2 to 157g/m2 )
•
Transparencies, translu cent paper
◆Paper Size
•
Max. Siz e: 297m m × 432mm
•
Minimum Size: 10 0mm × 140mm
◆Capacity of th e Multi By pass Tray
•
Plain paper ... Up to 50 sheets
•
Plain paper (once-copied paper) ... Up to 20 sheets
•
Chapter 3
Thick paper, transparencies, translucent paper ... Up to 20 sheets.
Using the Multi Bypass Tray
1
Making Copies
Place the original on the Original
Glass and make the control panel
settings.
NOTE
The following functio ns cannot be
selected for Manual Bypass:
Auto Paper, Auto Size, Book, any of the
finishing modes other than Non-Sort,
2-sided copying, margin by reduction,
Erase, and 2- in-1 separation.
2
Swing down the Multi By pass Tray.
Slide the Guide Plate to t he size o f
the copy paper.
∗ Slide the Multi Bypass Tray Extender out
when using large-size copy paper.
3
Load a neat stack of copy paper onto
the Tray and insert it until it stops.
NOTES
•The paper should be loaded no hig her than
the ▼ (Max. Level Indicator).
•Before inserting, fan the paper stack well if
you are usin g tr an spa ren cies or tran sl uc ent
paper.
•Correct any curl if you are using thick paper.
1139O0140A
1139O0130A
Page 35

33
3. Manual Bypass Copying
Check that
4
5
Touch Panel.
If Manual is not selected, touch
and then select Manual.
Using the Key Pad, set the number of
copies to be made.
Manual
123
456
789
is selected on the
1149O269CB
Paper
Chapter 3
0C
Press the Start K ey to start the copy
6
cycle.
Making Copies
1139O2640A
1134P342DA
Page 36

34
4. Basic Functions
In the follow ing pages, w e explain how to make the basic settings (copy paper, zoom ratio, and
expos ure level) to make copie s .
Basic Screen
Paper
Touch this key to
show a screen which
Exposure
Touch this key to show
a screen which allows
you to select the image
density of t h e copy.
Copy Paper Size
Chapter 3
key:
1149O263CA
allows you to select
the paper size.
Zoom
Touch this key to
show a screen which
allows you to sel ect
the zoom ratio.
Key:
key:
AutoPaper
In the Auto Paper mod e, the copier
automatically selects t he paper of the
optimum size according to the size of the
original being used and zoom ratio selected
for use.
Making Copies
Paper
1
Touch
then touch
Useful Tip
on the Basic screen and
Auto Paper
.
1149O278DA
Manual Selection
The copy paper size can be set m a nually
according to your need.
Paper
1
Touch
the Touch Panel shows which drawer
holds which copy paper size.
Touch the desired paper size key.
on the Basic screen, and
1149O280DA
2
This mode is efficient when you want t o
make copies on pape r of the same size as
your originals automatically.
1 1st Drawer
1
2 2nd Drawer
2
3 3rd Drawer
3
1149O282D A
4 4th Drawer
4
Manual
1145O298DA
Page 37

35
4. Basic Functions
Auto Drawer Switching
If the drawer currently selected for use
runs out o f pa per and t h e re is a n other
drawer loaded with paper of the same size
and in the same direction, th e co pier
automatically selects that second drawer to
continue copying.
Useful Tip
When you, for example, load th e 1st D rawer
and 2nd Drawer with paper of the same size,
you can make up to 1,000 copies (80 g/m
without interruption.
Special Paper Setting
If a symbol , , or appears on the
paper select key shown on the Touch Panel, it
means that particular drawer has been
designated for special paper.
2
)
The copier provides three different types of
special paper setting, each having specific
purposes as detail ed below. The setting can be
made by using User’s Choice.
: Recycled paper
S
When this setting is made, the Display asks
you whether or no t to use that p ar ti cu lar
drawer as a possible c andidate in t he Auto
Paper mode. You may be using both recycled
as well as plain paper loaded in your copier.
If, for example, you make this setting for the
drawer loaded with recycled paper, the copier
does not select that particular drawer in the
Auto Paper mode. This al lows y ou to make
copies on plain paper first.
S
2
1149O284DA
➭
p. 87
Chapter 3
Making Copies
: Special paper (inserts)
This setting precludes both Auto Paper mode
and Automatic Drawer S wi tchi ng . Make th is
setting for the paper for inserts (e.g., colored
paper), prevent i ng that p a pe r from being used
for other purposes.
: Disabling 2-sided copying
2
This setting precludes 2-sided copying.
Page 38

36
4. Basic Functions
Zoom Ratio
When you touch
ratio. You h ave six different ways t o ch oose from to set the zoom ratio. Select one according to
your need.
Chapter 3
Auto Size
Zoom
on the Touch Panel, a screen appears that allows you to set the zoom
Zoom Ratio Range : ×0.500 to ×2.00
1149O286DA
Selecting a Ratio from among Fixed
Ones
In the Auto Size mode, the copier
automatically selects the zoom ratio
according to th e s ize of the original being
used and the copy paper size selected for use.
Making Copies
The copier provides most frequently used
zoom ratios ready fo r immediate use.
Auto Size
Touch
1
the Auto Size mode.
Select the paper size.
2
(Copy Paper Size
Usef ul Tip
This mode is very helpful for neat filin g
when you need to make copies from
originals of as sor ted sizes .
to set the copier into
➭
p. 34)
1149O288DA
1149O290DA
1
Touch the appropriate original-tocopy-size representati on key. You
have three reduction and three
enlargement ratios.
1149O292DA
When you to uch
(×1.000) is selected.
Full Size
, full size
1149O294DA
Page 39

37
4. Basic Functions
For a Slightly Smaller Image
This function lets you make a copy slightly
reduced in image size from that of the
original.
Minimal
Touch
.
1
Useful Tips
•
A ratio of ×0.930 has been
factory-programmed in Minimal, but
that ratio can be changed as
necessary. ➭ p. 82
•
It comes in han dy fo r mak ing a copy,
without losing any portion of the
original image, from an original
which has an image area covering its
entire surface.
1149O296DA
Using Zoom Up/Down Keys
▼
Pressing the
zoom ratio shown in 0.001 increments.
You can keep touching the key to change
the ratio quickly.
1
Hold down the
desired zoom ratio is reached.
Usef ul Tip
To save time, first select t he f ixed zoom
ratio nearest to the target ratio before
using the ▼ or ▲ key.
▲
or
key changes the
▼
or
▲
key until the
1149O298DA
Chapter 3
Making Copies
Page 40

38
4. Basic Functions
Using the 10-Key Pad
You may use the 10-Key Pad to directly
enter the zoom ratio .
User Set
Touch
.
1
Chapter 3
Enter the desired zoom ratio from the
2
10-Key Pad.
123
1149O300DB
Calling up a Ratio from Memory
You can store some o f t he mo st fr equ ently
used zoom ratios in memory and recall
them later as necessary.
User Set
Touch
.
1
2
From among the two ratios previously
stored in memory, select the desired
one.
1149O300DB
Making Copies
456
789
1139O4870A
0C
Example: ×1.300
Press 1, 3, 0, and 0 , in that order.
1149O160BA
To correct a ratio, press the C lear key
and then enter the correct one again.
1139O4870A
1149O301CA
Usef ul Tip
It’s a good idea for you to store
frequently used zoom ratios in memory.
➭ p. 39
Page 41

Storing a Ratio in Memory
39
4. Basic Functions
1
2
Touch
Touch
User Set
Store
.
1
.
4
1149O300D B
1149O302CA
Touch memory location key
in which to store the set zoom ratio.
* Wh en the key is touched, the r atio is
shown on the key, indicating that it
has been stored in memory.
NOTES
•
When a new ratio is stored, the old one
is erased.
•
The custom zoom ratios may be stored
in memory by using the User Mode.
➭ p. 82
or
1149O303C A
2
Chapter 3
Making Copies
Enter the desired zoom ratio from the
3
10-Key Pad.
123
456
789
1139O4870A
0C
Example: ×1.300
Press 1, 3, 0, and 0 , in that order.
1149O160BA
To correct a ratio, press the C lear key and
then enter the correct one again.
1139O4870A
Page 42

40
4. Basic Functions
Image Density
When you touch
exposure level or image density. You have a choice of three different ways to adjust the
exposure level: Auto Exp osure, Manual Exposure, or Photo mode. Select the appro priate mode
according to your par ticular needs.
Chapter 3
Auto Exposure
When in the Auto Exposure mode, the
copier aut om atically adj u st s th e expos ure
level for the optimum copy image dens ity.
Making Copies
Touch
1
The
indicating that t he c opie r i s set into the
Auto Exposure mode.
Exposure
Auto
.
Auto
key is highlighted,
on th e Touch Panel, a screen appears that allo ws you to set the
1149O268BA
Manual Exposure
In the M a nual Exposure mode, you can
vary the exposure level in nine st e p s.
1
Lighter
Touch
necessary.
or
Darker
as
1149O304CA
Useful Tips
•
The exposure level in the Auto
Exposure mode can be made either
"Dark er" or "L ig ht e r" by us in g Use r ’s
➭
Choice.
•
The copier has b een fact ory-set to
automatically select the Auto
Exposure mode. User’s Choice c a n be
used to change this default setting to
the Manual Exposure mod e.
p. 85
➭
p. 85
<To make the image darker>
Touch
<To make the image lighter>
Touch
Darker
Lighter
.
.
1149O305CA
Page 43

Photo
The copier can make a faithful reproduction
of an original having a halftone image such
as photos. The image density of the photo
may be varied in ni ne ste p s.
Photo
Touch
1
Photo
The
indicating that t he c opie r i s set into the
Photo mode.
.
key is highlighted,
41
4. Basic Functions
Touch
2
When making copies in the Photo
Mode, Au t o Ex posure does not operate .
Select the desired exposure level in the
Manual Ex posur e Mode.
Lighter
necessary.
NOTE
<To make the image darker >
Touch
Darker
or
Darker
.
1149O306CA
as
1149O307C A
Chapter 3
Making Copies
<To make the image lig hter>
Touch
Lighter
.
Page 44

42
▲
5. Selecting the Original Copy Type
In the following pag es , let’s look at how we sh ou ld make the settings fo r the ty pe o f copy we
want to make from t he ty pe o f original we have.
When you touch
▲
orig. copy type.
▲
Original Copy Types
▲
1 1
Original
▲
Orig. Copy
Copy
on the Touch Panel, a screen appears that allow s you to set the
Select 1 1 to make 1-sided copies fr o m
▲
1-sided or ig i nal s .
Chapter 3
Making Copies
▲
1 2
▲
2 1
▲
2 2
Originals Copy
Original
Original
Copies
Copy
1149O405AA
1149O408AA
1149O407AA
<Only when a Duplex Unit is mounted>
Select 1 2 to make 2-sided copies from
▲
1-sided originals.
* Two originals can be copied onto one copy.
<Only when a Duplexing Document Feeder is
mounted>
Select 2 1 to make 1-sided copies from
▲
2-sided originals.
<Only when a Duplexing Document Feeder
and Duplex Unit are mounted>
Select 2 2 to make 2-sided copies from
▲
2-sided originals.
▲
1 [2in1] <accessed via 2in1>
Originals
Copy
1149O410AA
1149O406AA
<Only when an Automatic/Duplexing
Document Feeder is mounted>
Select 1 [2in1] to make a 1-sided c opy,
▲
through red u ct i on, fr o m tw o 1- sided originals
side-by-side.
You need half as many sheets of copy paper
*
as required otherwise.
NOTE
The size of the original should be A4 or
B5 crosswise for 2-in-1.
Page 45

▲
1 2[2in1] <accessed via 2in1>
Originals
Copy
1149O412AA
5. Selecting the Original Copy Type
▲
<Only when an Automatic Document Feeder
and Duplex Unit are mounted>
▲
Select 1 2-[2in1] to make a 2-sided copy,
through reduction, from four 1-sided originals.
Each pair of original s will be placed
side-by-side on eit her side of the copy .
You need 1/4 as many sheets of copy paper
*
as required otherwise.
NOTE
The size of the original should be A4 or
B5 crosswise for 2-in- 1.
43
1[2in1] 1 <accessed via Separation>
2[2in1] 1 <accessed via Separation>
Book 1 <accessed via Book Copy via
▲
Original Copies
▲
Original
▲
1149O409AA
Copies
1149O411AA
Separation>
Originals
Copies
<Only when an Automatic/Duplexing
Document Feeder is mounted>
Select 1-[2in1] 1 to make 1-sided
▲
page-by- page copi es o f a 1-sided or iginal
which is the result of 2-in-1 copying.
* You need twice as many sheets of copy paper
as the original.
<Only when a Duplexing Document Feeder is
mounted>
Select 1-[2in1] 1 to make 1-sided
▲
page-by-page copies of a 1-sided original
which is the result of 2-in-1 copying.
You need twice as many sheets of copy paper
*
as the original.
Select Book 1 to make 1-sided page-by-page
▲
copies of an open book.
Chapter 3
Making Copies
1149O403AA
▲
Book 2 <accessed via Book Copy via
Separation>
Originals
Copy
1149O404AA
<Only when a Duplex Unit is mounted>
Select Book 2 to make a 2-sided copy of an
▲
open book. Each page of the open book will be
copied onto one side of the copy.
Page 46

44
▲
▲
▲
.
5. Selecting the Original Copy Type
Selecting Original Copy Type
Touch
Orig. Copy
1
Touch the key corresponding to the
2
desired original-to-copy type.
Chapter 3
1149O269C A
Margin key for the original:
•
When you’re going to make copies using
▲
1 2 or 2 1, first check to see if your
original has a file mar gin in it. The copier
makes a necessary correction of margin
position to make good copies out of it as
long as you instruct it pro perly.
Original with a
File Margin
▲
Original with no
File Margin
Making Copies
1149O272C A
NOTE
When you make copies from a book,
select the co rrect key accor ding to
whether the book is bound on th e left or
on the right (R-Book).
1149O312CA
1152O044AA
If you r original has a file marg in
➀
Check your or i gi nal for a marg i n .
➁
Touch
➂
Select the margin width from among 5
mm, 10 mm, 15 mm, and 20 mm
displayed under Original’s Margin.
➃
Touch
Margin
Enter .
.
1149O314DA
If your original has no fil e mar gi n
There is no need of your making any setting.
Page 47

5. Selecting the Original Copy Type
# of Origs key
▲
•
If you’re going to make copies using 1 2, 1 [2in1], or 1 2-[2in1], you need to set the
▲
▲
number of your originals. Then the copier can arra nge the pages in correct order.
When you know the number of originals
Setting Even/Odd
45
▲
➀
Touch
➁
Touch
➂
Touch
# of Origs
Even
or
Enter
.
.
Odd
as appropriate.
Using the 10-Key Pad
1149O308C A
➀
Touch
➁
Enter the number of or i g inals from th e
Input #
.
10-Key Pad.
NOTES
•
The maxi mu m nu mb e r of orig i n al s you
can set is 61.
•
To correct a wrong number, press the
Clear key, then enter the correct num be r.
1149O309CA
➂
Touch
Enter
.
If you want the document feeder to count the number of originals for yo u
Auto Count
Select
to let the document feeder count the number of originals.
➀
Touch
Auto Count
.
Chapter 3
Making Copies
1149O310CA
1151O016AA
➁
Load your originals into the document
feeder.
➂
Press the Start key.
*The document feeder starts feeding the
origin als load ed i n it to count the
number of originals. (At this time, no
copy cycle is run.)
➃
Unload the originals ejected onto the
Document Exit Tray and reload them
onto the Document Feed Tray. Then,
press the Start key to make copies.
Page 48

46
5. Selecting the Original Copy Type
Some Precautions for Making Copies
Loading the Original s
Use the following procedu re when loading originals to make 1-sided copies from 2-sided orig inals
▲
(2 1).
Load the originals crosswise.
If the ori ginals are loaded l e ngthwise, the d irections of the copy images will be mixed up.
▲
Correct:
2-Sided Or ig ina l s
Loaded Crosswise
Chapter 3
Precautions for Book Copying
Making Copies
Placing the Book on the Glass Correct ly
1-Sided Copies
1151O023AA
Incorrect:
2-Sided O rig in a ls
Loaded Lengthwise
•
Ensure that the top edge of the boo k i s at the rear
side.
•
Make copies in descending order of page.
•
When Book Copy is selected, the zoom ratio is
automatically set to ×1.000. Select the des ired
zoom ratio and copy paper size.
•
User’s Choice allows you to program a default
zoom ratio, paper size, margin s etting, and erase
➭
setting.
p. 87
1-Sided Copies
1151O022AA
Precautions for 2-in-1 Copying
•
When the 2-in-1 fu nction is selected, the copier automatically selects a reduction ratio. You
can nonetheless make a full-size copy.
•
If the Frame + Center Erase functi on is selected, you can eliminate shadows which w ould
otherwise be produced along the edges and down the cente r of the copy.
•
User’s Choice al lows you to program a default zoom ratio, paper size, margin setti ng, and erase
➭
setting.
p. 87
Page 49

5. Selecting the Original Copy Type
▲
Precautions for 2-in-1 Separation Copying
•
When the 2-in-1 separation function is selected, the copier automatica lly selects an enlargement
ratio . Yo u ca n nonetheless m ake a ful l-size copy.
•
User’s Choice al lows you to program a default zoom ratio, paper size, margin setti ng, and erase
➭
setting.
p. 87
47
Chapter 3
Making Copies
Page 50

48
6. Finishing Mode
In the following, we explain about different finishing functions and setting procedures.
Finishing
When
particular finishing function.
Finishing Functions
Non-Sort
Originals
is touched on the Touch Panel, a screen appears that allows you to set a
•
All copies are fed ou t w ithout being sor ted,
Copies
grouped, stapled, or punched.
Chapter 3
Making Copies
Sort
Originals
Sort Staple
Originals
Copies
Copies
1st Bin
2nd Bin
3rd Bin
1076O146
1st Bin
2nd Bin
1076O145
<Only when a Sorter or Staple Sorter is
mounted>
•
This function is effectiv e when makin g
multiple copies from multiple originals.
Copies are sorted into complete sets of the
originals.
<Only when a Staple Sorter is mounted>
•
This function is effectiv e when makin g
multiple copies from multiple originals.
Copies are sorted into complete sets of the
originals and then stapl ed.
3rd Bin
1151O108AA
Page 51

Group
Originals
Hole Punch
Originals
1
2
3
Copies
Copies
1
1
1st Bin
2nd Bin
3rd Bin
1076O147
1st Bin
2nd Bin
6. Finishing Mode
<Only when a Sorter or Staple Sorter is
mounted>
•
The copies made from each single original
are separated into groups. Each group
contains the same number of copi es .
<Only when a 20-Bin Staple Sorter is
mounted>
•
Holes are punched in the copy sets or
stacks for filing. It can be combined with
Non-Sort, Sort, Sort Staple, or Group.
49
Chapter 3
1
3rd Bin
1149O399DA
Manual Staple
Manual Stap le
Originals
Copies
Sorting or Grou pin g
<Only when a Staple Sorter is mounted>
•
This function allows you to staple copy
sets already made in the Sort mode or copy
stacks made in the Group mode.
* The feature is efficient for stapling
originals after makin g copies.
➭
pp. 52, 53
1151O109AA
Useful Tip
The copier has been factory-set to automatically select Non-Sort in the init ial mode. Also, the
copier automatically switches b etween Sort and Non-Sort depend ing on th e number of
originals loaded in the document feeder and th e number of copies to be made. User’s Choice
➭
can, however, be used to change these default setti ng s.
pp. 85, 86
Making Copies
Page 52

50
6. Finishing Mode
Selecting the Finishing Function
Sort / Group / Sort-and-Staple
Chapter 3
Making Copies
1
Touch the desired finishing function
key.
NOTES
•
The capacity of each Sorter Bin is as
follows
Non-Sort
Type of Paper Capacity
Plain and recycled
paper
Special paper (thick
paper, translucent
paper, OH P
transparencies)
Removing Copier from the Sorter
After the Sort, Group, or Sort Staple
mode is finish ed, th e bi ns w ill shift
upward in position. When all movemet
has ceased, then remove your copy sets
or stacks from the bins. Once your
copies are removed, th e bi ns w ill shift
downward in preparation for the next
strong job.
1149O274DA
20 Bin
Up to 100 sheets
10 Bin
Up to 50 sheets
Up to 10 sheets
Sort, G roup, Sort Sta ple
Bin Capacity
10-Bin So rt er, Sta p le
Sorter (1st to 10th Bin)
20-Bin So rt er, Sta p le
Sorter (1st to 20th Bin)
•
When making copies in the Sort Staple
Mode, make sure to load the originals
into the Document Feeder in the
correct direction.
•
Thick paper, tr ansluc ent paper , and
OHP transparencies cannot be used for
making copies in Sort, Group, or Sort
Staple.
Up to 25 she et s
Up to 50 sheets
(A4 or smaller)
Page 53

51
6. Finishing Mode
Manual Staple
<To staple copy sets made in Sort or copy
stacks made in Group>
1
Check that each copy set or stack has
been fed into the Sorter Bin.
NOTE
Copies made in Non-Sort cannot be
stapled ma nu al l y
2
Staple
Touch
Then, the copy set or stack in the
Sorter Bin will be stapled together.
.
1149O320C B
Hole Punch
1
Touch the desired finishing function
key.
Touch
2
Hole Punch
1149O316D A
.
Chapter 3
1149O319DA
NOTES
•
When making copies in the Hole Punch
Mode, mak e s ure to l oad the original s
into the Document Feeder in the
correct direction.
•
The size of the copy paper for Hole
Punch is A3 lengthwise and A4
crosswise only.
Making Copies
Page 54

52
6. Finishing Mode
Using the Manual Staple Function
<To use as a stapler>
When a 10-Bin Staple Sorter is mounted.
Align the sheets of paper neatly.
1
1134O039AA
3
Staple
Touch
in the Sorter Bin will be stapled
together.
. Then, the paper stack
1149O320CB
Chapter 3
Making Copies
2
Insert the paper stack onto the 1s t Bin
facing up .
Stapling
Position
NOTES
1149O086AA
Usef ul Tip
This feature is useful for s tap lin g
originals after maki ng cop ies.
1139O1320A
•
Make sure of the stapling position and
press the paper stack against the
bracket.
•
Up to 25 sheets of plain paper can be
stapled.
•
Never attempt to reac h for the st ap ling
position. This can be dan gero us.
Page 55

When a 20-Bin Staple Sorter is mounted
53
6. Finishing Mode
1
2
Align the sheets of paper neatly.
1134O039AA
Insert the paper stack into the space
between the Non-Sort Bin and 1st Bin.
Non-Sort
Bin
Stapling
Position
NOTES
•
Make sure of the stapling position and
press the paper stack against the
bracket.
•
Never attempt to reac h for the st ap ling
position. This can be d angerous.
Staple
3
Touch
Then, the paper stack in t he Sorter will
be stapled togeth er.
.
1149O085AA
Chapter 3
Sort Bins
Non-Sort
Bin
1st Bin
NOTE
Up to 50 sheets of plain paper can be
stapled.
1149O400AA
1149O401AA
Making Copies
1149O320CB
Usef ul Tip
This feature is useful for s tap lin g
originals after maki ng cop ies.
Page 56

54
6. Finishing Mode
Instructions for Loading Originals for the Finishing Functions
Note the correct direction of the originals if the copies are to be stapled either in Sort Staple or
Manual Staple Mode.
Using the Automatic/Duplexing Document Feeder
Load the originals crosswise in the document feeder. Ensure also that the stapling position is located
as shown below.
Correct:
Originals loaded crosswise
Stapling Position
Chapter 3
Making Copies
Placing t he Or ig ina l o n t he Glass
Place the original with its staplin g position at the upper right corner as shown below.
Correct:
Copies
1151O024AB
Stapling Position
Use Manual Staple to staple c opies after they have been made.
*
1039O2230A
Page 57

6. Finishing Mode
Note the correct direction of the originals if the copies are to be punched using Hole Punch.
NOTE
Hole Pun c h i s po s s i ble only wh en yo ur c o pier is equipped wi th a 20-Bi n Staple So r te r .
Using the Automatic/Duplexing Document Feeder
Load the originals so that the punche d h oles in t hem are located as shown below.
Correct:
55
Originals
Punched Hole Position
Placing t he Or ig ina l o n t he Glass
Load the originals so that the punche d h oles in t hem are located as shown below.
Correct:
Original
Copy
Copies
Chapter 3
1149O089DA
Making Copies
Punched Hole Position
1149O092EA
Page 58

56
6. Finishing Mode
Auto Dual Function
Each of the Sort Bins holds up to 50 (*25) sheets of paper. The Auto Dual function, however,
allows sorting of copies of up to 100 (*50) originals under certain conditions.
NOTE
All figures in the following text are given based on the 20-Bin Stapl e Sorter and 20-Bin
Sorter. Figures marked with * are for the 10-Bin Staple Sorter.
Auto Dual Function in Sort Mode
When 10 (*5) or less copies ar e made from an original set consisting of more than 50 (*25) pages
in Sort Mode, the Auto Dual function is automatically activated to allow the Sorter or Staple
Sorter to continue sorting copies u sing th e 11th (*6th) to 20th (* 10th) Bi ns.
Chapter 3
1st to 50th (25th) sorted copies 1st to 10th (*5th) Bins
51st to 100th ( * 2 6th to 50th) sorted cop ie s 11th to 20th (* 6th to 10 th) Bi ns
•
If the number of copies selected exceeds 10 (*5), the copy cycle stops at the 50th (*25th) original.
Example: Maki ng 3 co py se ts of a 30-p age
Making Copies
original set using a 10-Bin Staple
Sorter
Each of the top three bins
contains 25 sorted copies .
Each of the 6th to 8th Bins
contains 5 sorted copies.
Copies Bins Used
30-Page Original Set
To have a complete set from the originals, place the copies from the 6th Bin on top of those from the
1st Bin. In the same way , place the copies from the 7th Bin on top of those from the 2nd Bin, and so
on.
Auto Dual Function in Sort Staple Mode
When 10 (*5) or fewer copies are made from an original set cons istin g of more than 51 (*26)
originals in Sort Staple Mode and Auto Dual is activated, Sort Staple is automatically swi tched
to Sort (no stapling takes place).
Page 59

6. Finishing Mode
Auto Dual Function in Group Mode
When more than 51 (* 26 ) copies are to be grouped t og ether into one group, the Sorter or Staple
Sorter uses the subsequent bin to continue grouping the copies.
Original Copies Bins Used
1st
3rd to Nth: Same wa y up to the 20th (* 10 t h )
Example: Usi ng a 10-Bin Staple Sorter to sep arate copies made from 2 different originals into t wo
groups when each group contains 35 copies or more.
Copies of 1st original
1st Bin: 25
2nd Bin: 10
1st to 5 0t h (*25th) copie s
51st (*26th) to subsequent copies
1st Bin
2nd Bin
57
Chapter 3
Copies of 2nd original
3rd Bin: 25
4th Bin: 10
Auto Dual Function in Non-Sort Mosde
The capacity of the Non-Sort Bin (*1st Bin) is 100(*50) in Non-Sort. If more th an 100(*50)
copies are made in Non-Sort, the Sorter uses the 1st (*2nd), 2nd (*3rd), and subsequent bins to
hold those excess copies.
To Make Mor e Than 2 0 C opy Sets in S or t Mode
(20-Bin Sorter and 20-Bin Staple Sorter only)
The maximum number of copy sets that can be sorted in a single copy run in Sort Mode is 20. If
you need more copy sets than that, do this: fir st , enter the number of copy sets you need from the
10-Key Pad and press the S tart key. When the copier finishes making and sorting 20 copy sets , it
temporar il y st o ps. You no w rem o ve th e copy se t s from t he bi n s, then load your ori gin als a g a in
and press the Start key. The copier resumes the copy job when it left off.
Making Copies
Page 60

58
7. Auxiliary Functions
These pages explain abo ut conveni ent fun ctio ns o ffered as th e Auxiliar y functio ns an d how to
set these features. When the
function menu screen appears.
Cover
Chapter 3
The Cover mode lets you make a f ront cover or a front and back cover for a cop y set by copying
the first pag e or the first and last page of an orig inal set on diff erent paper from the normal copy
paper, such as colored paper. There are s ix differe nt Cover functi ons available. Select the
appropriate one according to your need. The
equipped with a document feeder.
Auxiliary
key on the Touc h Panel is touched, the Auxiliary
Cover
key is shown only when the copier is
Functions
Making Copies
Front Cover: Co pi ed
Back Cover: None
1
2
3
Front Cover: Co pi ed
Back Cover: Blank
1
2
3
Front Cover: Co pi ed
Back Cover: Copied
1
2
3
1
2
3
1
2
3
1
2
3
1149O390AA
1149O039AA
1149O039AA
1149O394AA
1149O040AA
1149O040AA
1149O393AA
1149O041AA
1149O041AA
Front Cover: Blank
Back Cover: None
1
2
3
Front Cover: Blank
Back Cover: Blank
1
2
3
Front Cover: Blank
Back Cover: Copied
1
2
3
1
2
3
1
2
3
1
2
3
1149O042AA
1149O042AA
1149O043AA
1149O044AA
1149O389AA
1149O392AA
1149O043AA
1149O391AA
1149O044AA
Page 61

Using the Cover Mode
Cover
Touch
.
1
59
7. Auxiliary Functions
Touch the key for Cover Sheet.
6
Touch t h e key fo r Front or Bac k .
2
Select the appropr iate functio n
3
(W/Image, Blank, or None) for Front
and Back.
Enter
Touch
.
4
1149O321CA
1149O324DA
1149O323CA
7
8
9
1149O326DA
Select the drawer in which paper for
the cover has been loaded in step 5.
1149O329DB
Touch
Enter
.
Touch the key for # of Origs.
1149O328DA
Chapter 3
Making Copies
5
Load the paper for the cove r (e.g.,
colored paper) in the drawer.
Useful Tip
You can use the Multi Bypass Tray as
the source of the p aper for the cover.
1149O093AA
10
Touch
Input #
.
1149O331CA
Page 62

60
7. Auxiliary Functions
11
Chapter 3
Count the number of your originals
and enter that number from the 10-Key
Pad.
12
NOTES
•
The maxi mu m nu mb e r of orig i n al s that
can be entered is 61.
•
Press the Clear key to corr ect a
number entry.
Useful Tip
The copier offers a function that
automatically counts the number of
originals (Auto Count).
To use this f eatu re, see p . 62.
123
456
789
1149O045AA
Making Copies
12
13
Enter
Touch
Load your or i gi nal s i nt o th e do cume n t
feeder and press the Start key.
.
1149O094AA
Page 63

7. Auxiliary Functions
Auto Original Count
The copier offers a feature that automa tically count s the number of originals. It can be used by
touching
Auto Count
.
1149O332CA
61
Chapter 3
Using the Auto Count Function
Touch
Auto Count
.
1
Enter
Touch
.
2
3
Load your originals into the document
feeder.
1149O333CA
4
5
Press the Start key to start the original
count sequence.
1134P342DA
•
The document feeder starts feeding
the originals loaded on it to counter
the number of originals . (At this time,
no copy cycle is run.)
Unload the originals ejected onto the
Document Exit Tray and reload them
onto the Document Feed Tray. Then,
press the Start key.
Making Copies
1151O016AA
1149O095AA
Page 64

62
7. Auxiliary Functions
Page Insertion
Page Insertion al lo w s yo u to in s ert a blan k sh ee t of pa p er (e. g., co lo red pa p er) into the copy se t.
Two differen t funct ion s are available. Select the ap pr opri ate one accor di ng to yo ur need.
Page Insertion
*The
Functions
Page Insertion <Copied Inserts>
Original Set Copy Set
Specify Page
2 for Insert.
key is shown only whe n th e co p ier is equi p pe d wit h a docum e nt feed er.
The copier copies the page, which is
specified for an insert, on paper for inserts
(e.g., colored paper).
Chapter 3
\
Making Copies
Page Insertion <Non-Copied Inserts>
Copy Set
Original Set
Specify Page
2 for Insert.
\
1149O046AA
1149O046AA
Insert
The copier inserts a blank sheet of paper for
inserts (e.g., colored paper) at an y specifi ed
place between pages.
Insert
1149O047AA
Page 65

7. Auxiliary Functions
Specifying the Place for an Insert
In the Page Insertion mode, you must speci fy where to place an insert. Two ways are available to
specify the insert places, either ADF Detection or 10-Key Input.
ADF Detection (automatic d etect ion)
Put a sheet of paper of a different size from the originals at your desired places in the
original set (for convenience, let us call this paper the insert marker), load the original set
➭
onto the document feeder, and let the copier start the original count sequence.
<The copier automatically detects and sets the places for inse rts.>
NOTE
ADF Detection cannot be operated when the Mixed Original Detection mode is set.
Copy Set
Original Set
Copy Set
p. 64
63
Chapter 3
Insert
Insert Marker
Example:
2nd from top
10-Key Input
Using the 10-Key Pad, defi ne th e pl aces fo r ins ert s .
<Up to 20 places can be defined.>
Original Set
1 2 3
2
6 7
11
123
456
789
➭
p. 66
Copy Se t
Insert
1149O048AA
1149O048AA
Copied
Insert
Making Copies
Copy Se t
Non-Copied
Insert
1149O049AA
1149O049AA
Page 66

64
7. Auxiliary Functions
Using Page Insertion
<ADF Detection>
Chapter 3
Making Copies
Page Insertion
Touch
1
2
3
Touch the appropriate key for Copy
Onto Inserts to select wheth er to copy
onto inserts (YES) or not (NO).
Load the paper for inserts into the
drawer.
.
5
1149O334CA
Select the paper source i n which paper
for inserts has been loaded in step 3.
1149O339DA
Enter
Touch
.
6
ADF Detection
Touch
.
7
1149O336DA
Useful Tip
You can use the Multi B yp as s Tray as
the source of the pap er for the inserts.
4
Touch the pa per size ke y for I nsert
Paper.
1149O338DA
1149O093AA
1149O338DA
Page 67

65
7. Auxiliary Functions
Put an insert marker into the de sired
8
place in the or igi nal set. (Insert
markers can be used in up to 20 places.)
Original Set
Insert Marker
Example 1: To place a copied insert at
the 2nd position from top.
Original Set
Copy Set
\
1149O050AA
1149O050AA
1134O070AA
Copied
Insert
9
10
11
Load the original set containing insert
markers into the document feeder.
Insert Mark er
1149O096AA
Press the Start Key to let the copier
start the ori gin al count sequence.
* The document feeder starts feeding
the originals loaded in it to detect the
place for inserts . ( At thi s time, n o
copy cycle is run.)
Remove the insert markers from the
originals ejected onto the Document
Exit Tray.
Chapter 3
Example 2: To place a n on-copied i n sert
between pages 1 and 2.
Original Set
NOTE
For the insert marker, use paper that is
a size, or loaded in a direction,
different fro m the originals.
Copy Set
Non-Copied
Insert
\
1149O051AA
12
13
Insert Marker
1134O071AA
Unload the original set and reload it
onto the Document Feed Tray.
1149O097AA
Press the Start Key.
The copy cycle is run for page
insertion.
Making Copies
Page 68

66
7. Auxiliary Functions
Using Page Insertion
<10-Key Input>
Chapter 3
Making Copies
Page Insertion
Touch
1
2
3
Touch the appropriate key for Copy
Onto Inserts to select wheth er to copy
onto inserts (YES) or not (NO).
Load the paper for inserts into the
drawer.
.
1149O334CA
5
Select the paper source i n which paper
for inserts has been loaded in step 3.
1149O339DA
Touch
Enter
.
6
10-Key Input
Touch
.
7
1149O336DA
8
Enter the number of originals from the
10-Key Pad.
1149O342DA
Useful Tip
You can use the Multi B yp as s Tray as
the source of the pap er for the inserts.
4
Touch the pa per size ke y for I nsert
Paper.
1149O093AA
1149O338DA
12
NOTES
•
The maxi mu m nu mb e r of orig i n al s that
can be entered is 61.
•
Press the Clear key to corr ect a
number entry.
▼
9
Touch
posit ion no . 1 of the Ins er t Sheet s.
123
456
789
▲
or
to move the curso r to
1149O045AA
1149O343CB
Page 69

10
From the 10-Key Pad, enter a number
for placement position no. 1.
12
Touch
Enter
67
7. Auxiliary Functions
.
1149O344CB
Example 1: To place a copied insert at
the 2nd position from top.
Copy SetOriginal Set
Copied
\
Example 2: To place a non-copied in sert
between pages 1 and 2.
Copy Se t
Original Set
\
Insert
1149O046AA
Non-Copied
Insert
13
14
Load the original set into the documen t
feeder.
1145O339DA
Press the Start Key.
The copy cycle is run for page insert ion.
Chapter 3
Making Copies
NOTES
•
To correct a number entry, p r ess the
Clear Key and then enter the new
number.
•
The maximum number that can be
entered is 60.
11
If you want to place mor e inserts,
repeat steps 9 and 10 to enter numbers
for placement positions n o. 2 and up.
NOTE
There are from 1 to 20 positions for
inserts.
1149O047AA
Page 70

68
7. Auxiliary Functions
OHP Interleaving
When you make copies on trans parencies, the OHP Interleaving funct ion inserts copied or
non-copied interleaves after each transparency. Four different functions are available. Select
the appropr iate o n e according to your need.
Functions
Single Copy
<Copied Interleaves>
Originals Copies
1
The copier copies onto OHP tra n sparencies
and, after each transparen cy, i nser ts a co pie d
sheet of paper.
1
Chapter 3
Making Copies
2
<Non-Copied Interleaves>
Originals Copies
1
2
1
2
2
1
2
Copied
Interleaves
1149O063AA
The copier copies onto OHP tran sparencies and,
after each transparency, inserts a non-copied
sheet of paper.
Non-Copied
Interleaves
1149O064AA
NOTES
•
OHP Inter le avi ng c an be a vailable onl y whe n A4 or B5 pap er is lo ad e d in an y pa per sou rc e.
•
For Multiple Copy, the copier should be equipped with a 20-Bin Sorter or 20-Bin Staple Sorter.
•
OHP Interleaving precludes 2-sided copying.
Page 71

Multiple Copy
69
7. Auxiliary Functions
<Copied Interleaves>
Originals Copies
1
1
2
1
2
2
1
2
1
2
<Non-Copied Interleaves>
Originals Copies
1
1
2
2
1149O065AA
1149O065AA
Copied
Interleaves
Extra Copies
(2 sets)
Non-Copied
Interleaves
The copier copies onto OH P tra n sparencies
and, for the 1st set, inserts a copied sheet of
paper after each transpar ency. Al so, th e
copier sorts co pies i nto a speci fied number of
sets.
The copier copies onto OH P tra n sparencies
and, for the 1st set, inserts a non-copied sheet
of paper after each transparency. Also, the
copier sorts co pies i nto a speci fied number of
sets.
Chapter 3
Making Copies
1
2
1
2
1149O066AA
1149O066AA
Extra Copies
(2 sets )
Page 72

70
7. Auxiliary Functions
Using OHP Int erl e aving
Chapter 3
Making Copies
Load OHP transparencies onto the
1
Multi Bypass Tray. (Up to 20 sheets of
OHP transparencies can be placed on
the tray.)
OHP Interleaving
Touch
2
.
1145O367CB
1149O345CA
5
6
7
Select the size of Insert P aper .
1149O350DA
Enter
Touch
Enter the number of copy sets to make
from the 10- K ey Pad.
.
45
78
7
Select whether to copy onto the
3
interleaves (YES) or not (NO).
Touch the key for the size of Insert
4
Paper.
1149O349DA
1149O420DA
8
Touch
Enter
1149O052AA
.
Page 73

Load the originals into the document
9
feeder.
NOTE
If you make each copy th rough the
Original Gl ass , s tart with the l ast page
of the set.
"Placing Originals " ➭ p. 26
71
7. Auxiliary Functions
1149O097AA
Chapter 3
10
Press the Start key and the copier starts
the copy cycle in OHP Interleaving.
Making Copies
Page 74

72
7. Auxiliary Functions
File Margin
The copier provides a file margin along the leading edge for your ease in filing.
There are four different ways available for makin g a file margin. Use the one that is most suited
to your nee d .
Functions
Shift-for-Margin
Chapter 3
Making Copies
Original
Original Copy
Margin-by-Reduction
Original Copy
Copy
1149O059AA
1149O060AA
1149O061AA
The image of the original is shifted in the crosswise
direction to make a margin along the left edge of the copy.
•
The margin width can be selected from among 5 mm, 10
mm, 15 mm, and 20 mm.
The image of the original is shifted in the crosswise
direction to make a margin along the right edge of the
copy.
•
The margin width can be selected from among 5 mm, 10
mm, 15 mm, and 20 mm.
The image of the original is reduced to make a margin
along the left edg e of the copy.
•
The margin width can be selected from among 5 mm, 10
mm, 15 mm, and 20 mm.
Original
Copy
1149O062AA
The image of the original is reduced t o make a margin
along the right edge of the copy.
•
The margin w idt h can be s elected from among 5 mm, 10
mm, 15 mm, and 20 mm.
Useful Tip
If the image of the o r iginal covers the e ntire
surface of the original, Margin-by-Reduction
will ensure a cop y with no lost image along the
edges.
Page 75

Using File Margin
73
7. Auxiliary Functions
File Margin
Touch
.
1
Place the original.
2
•
If you use a document feeder, loading
your originals in the document feeder
will change the contents of the di splay.
Referring to the table given below,
3
sele c t the "Pos i tion" of th e margin.
Select the "Mode" of margin making.
4
1149O352CA
1149O353DA
5
Select the "Width" of the margin.
NOTE
Having a ma rgi n wi dth l a rge r th an
necessary could result in part of the
image m i ssing on the copy. T r y to keep
a logical margin width.
Enter
Touch
.
6
7
Press the Start Key.
The copy cycle is run for F ile Margin.
1149O353DA
Chapter 3
Making Copies
1149O353DA
Loading t he Ori gin als in Ma rgin Mode
<Using the Document Feeder> <Using the Glass>
Margin Position Original Placement
Left
1149O203AA
Right
1149O204AA
Margin side on the left.
1149O099AA
Margin side on the right.
1149O100AA
Margin Position Original Placement
Left
1149O201AA
Right
1149O202AA
Margin side on the right.
1149O107AA
Margin side on the left.
1149O108AA
Page 76

74
7. Auxiliary Functions
Edge/Frame Erase
The copier erases a margin of a set width along the four edges, one edge, or at the center to erase
shadows or other unwanted images. Thi s feature i s eff ectiv e in erasin g the commun icat ions
record on a document received by fax.
One of six different functions can be selected. Use the one that is most suited to yo ur need .
The erase width can be selected fr om among 5 mm, 10 mm, 15 mm, and 20 mm.
The erase width f or the Top Edge is 10mm only.
Functions
Left Ed g e Era se
Erases an area of the original equivalent t o a
given ma rgin from the le ft edge of the copy.
Chapter 3
Frame Eras e
Making Copies
Erases a given width along the four edges.
1149O053AA
1149O055AA
Right Ed ge E ras e
Erases an area of the original equivalent to a
given margin from the right edge of the copy.
1149O054AA
Top Edge Erase
Erases an area of the o riginal equivalent to a
given margin from the top edge of the copy.
1149O056AA
Center Erase
Erases a gi ven wi dth do w n the cen ter.
1149O057AA
Frame + Center Erase
Erases a given width along the four edges and
down th e cente r .
1148O058AA
Page 77

Using a Par t ic ular E dge /Frame Erase Fu nction
75
7. Auxiliary Functions
Edge/Frame Erase
Touch
1
Place the original.
2
NOTE
You must follow certai n rules when
placing the original.
"Loading the Ori ginal s for Ed ge/ Frame
Erase" ➭ p. 76
3
Select the particular erase function
("Position").
.
1149O355CA
NOTE
The erase width represents that on the
copy, not on the original. So, use care
when making a reduction or enlargemen t
copy.
Example: Erasing the center of an A3 size
book original on a copy reduced
by ×0.707.
Book Original (A3)
~0.707
20mm
20mm
If you want to erase the 20-mm-wide center
margin on the original, that is reduced to 14
mm on the copy, select 15 mm for the erase
width.
Copy
(A4 lengthwise)
✕ 0.707
15mm
15mm
1145O414AA
1145O414AA
Chapter 3
Making Copies
Select the erase "W idt h."
4
Enter
Touch
.
5
Press the Start Key.
6
The copy cycle is run for Edge/Frame
Erase.
1149O357DA
1149O357DA
Page 78

76
7. Auxiliary Functions
Loading the Originals for Edge/Frame Erase
<Using the Document Feeder>
Erase Function Original Placement
Left Edge Erase
1149O207AB
Right Edge Erase
Chapter 3
Making Copies
1149O208AA
Frame Erase
1149O209AA
Top Edge Erase
1149O101AA
1149O102AA
1149O103AA
<Using the Glass>
Erase Function Original Placement
Left Edge Er ase
1149O213AA
Right Ed ge E rase
1149O214AA
Frame Erase
1149O216AA
Top Edge Erase
1149O109AA
1149O110AA
1149O111AA
1149O210AA
Center Era se
1149O211AA
Frame +
Center Era se
1149O212AA
1149O104AA
1149O105AA
1149O106AA
1149O215AB
Center Erase
Frame +
Center Erase
1149O218AB
1149O112AA
1149O113AB1149O217AA
1149O114AB
Page 79

Chapter 4
Using the User Mo de
This chapter explains about the functions that are made available by using the User Mode key, i.e.,
Job Memory Input, Zoom Memory Input, Meter Count, Toner Replenisher, Drum Dehumidifier,
User’s Choice, and Data Send.
1. Job Memory Input and Job Recall
•
Job Memory Input p. 78
•
Recalling a Job from Memory p. 81
2. Zoom Memory Input p. 82
3. Meter Count, Toner Replen is her, a nd Dr um Dehumidifier p. 83
4. User’s Choice
•
User’ s Choice Fu nc tions p. 84
•
Making the User’s Choice Settings p. 90
•
Copy T rack Funct ion p. 92
5. Data Send p. 100
77
Chapter 4
Using th e Us er Mod e
Page 80

78
1. Job Memory Input and Job R ecall
Job Memory Input
Up to 10 different, frequently used copying job programs can be stored in memor y and recalled
later as necessary.
If "100 Accounts" or "1000 Accounts" is selected for "Copy Track" of Administrator Mode
under User’s Choice, fiv e mor e jobs can be stored in memory for each account (onl y for account
#1 to #10), in addition to the ordinary jobs.
Storing a Job
1
2
Chapter 4
3
Using th e Us er Mod e
Set up the job you want to store in
memory.
Press the User Mode key.
User Mode
1134P356CA
Job Memory Input
Touch
.
4
Select any one of the 10 jo b numb er
1
10
to
keys fr om
Job, select any number from
Touch a job nu m ber key m ark ed wit h
.
NOTE
A job number key not marked with
indicates that a job has already been
stored under that number, rejecting the
input of a new job. If you want to use
that number to store a new job, firs t
delete the job which is now stored in
that number.
Deleting a Program ➭ p. 80
. (For Account
1
to
5
.)
Touch
store a job in Account Job memory.
Account Job
if you want to
5
To check for the details of the job
stored, touch
the job number key .
Check
and then touch
Page 81

The job settings appear on the Touch
Panel.
After you have checked the settings,
6
touch
Exit
.
79
1. Job Memory Input and Job Recall
Exit
Touch
7
screen. Then, the Basic screen
reappears.
on the Job Memory Input
Chapter 4
Using th e Us er Mod e
Page 82

80
1. Job Memory Input and Job Recall
Deleting a Program
Press the User Mode key.
1
Job Recall
1134P365CA
Job Memory Input
Touch
2
Exit
4
.
Touch
Then, the Basic screen reappears.
.
Account Job
Chapter 4
Touch
delete a job in Account Job memory.
Touch
3
Delete
number key from which you want to
delete a job progr am.
The number key you touch should not
be marked with .
if you want to
, then touch the job
Using th e Us er Mod e
When appears in that key, it
indicates that the job program has been
deleted.
Page 83

Recalling a Job from Memory
Press the Job Recall key.
1
Job Recall
1134P365CA
Touch t h e num ber key i n whi ch the
2
desired job has been stored.
81
1. Job Memory Input and Job Recall
If you want to recall a job from
Account Job memory, touch
Account Job
Check the settings made and then
3
touch
The copier is set up for these settings
and the Basic screen reap pear s .
If the job recalled is not what you
want, touch
Recall screen reappears.
and then the number key.
Exit
.
Cancel
. Then, the Job
Chapter 4
Using th e Us er Mod e
Page 84

82
2. Zoom Memory Input
Up to two different, frequently used zoom ratios can be stored in memory so you can use them
later whenever necessary. Fo r the Mini mal ratio, X0.930 has been factory-set, but that can be
changed as necessary.
Storing a Zoom Ratio
Press the User Mode Key.
1
Zoom Memory Input
Touch
4
User Mode
1134P356CA
.
Touch the desired number key in
which you want to store the zoom
1
2
or
ratio, either
.
2
NOTES
•
Chapter 4
Using the 10-Key Pad, enter the
3
desired zoom ratio.
When a new zoom ratio is stored in a
key number, the old one stored in that
key number is lost.
•
The custom zoom ratios may also be
stored using the screen accessed by the
User Set
Zoom is touched on the Basic screen.
Storing a Ratio in Memory ➭ p. 39
key which is shown when
Exit
Using th e Us er Mod e
1
For example, enter X1.234, as
3
an entry, press the C lear key, then
enter the new ratio.
•
The zoom ratio can range from ×0.500
to ×2.000.
•
The Minimal ratio can range between
×0.900 and ×0.999.
, and
NOTES
4
, in that order. To correct
2
,
,
5
Touch
The Basic screen reappears.
.
Page 85

3. Meter Count, Toner Reple nishe r, and Drum Dehumidifie r
Meter Count
Touching [Meter Count] allo ws you to check the total count of each of the followi ng five
counters.
83
Total Counter
Shows the total number of copies mad e
since the installation of th e co pier.
2-Sided Total
Shows th e num ber of 2- s id ed co pies .
2-Sided Size
Size Counter
Shows the number of copies made on
Shows the number of copies made on
copy paper of a preset size. (The size
will be set by your Technic a l
Representative.)
# of Active Accounts
copy paper of a pres et s ize (the same
size as set for Size Counter).
Shows the total number of copies made
by the ac t ive acco un t s.
Toner Replenisher
Touching [Toner Replenisher] sets the c opier into the auxiliary toner replen ishing mode.
The copier tends to exhaust the supply of toner rapidly when making a number of copies from an
original with dark solid areas s uch as a photo. A s a re sult, the image densi ty of the copy will
become lighter. In such a case, you can use Toner Replenisher to regain the normal image
density quickly.
NOTES
Chapter 4
•
Do not turn OFF the Power Switch or open the Front Door while the copier is
replenishing toner.
•
Toner is not replenished if the image density is su fficiently high.
•
The toner replenishing sequence ends automatically.
Drum Dehumidifier
Touch [Drum Dehumidifier] to activate the Drum Dehu midifier function.
During times of high humidity or when there are sudden rapid changes in humidity (especially
when you are using a heater in winter), condensation
*2
Drum
surface of the PC Drum.
, resulting in bl otch y copi es. In s uch instances, use Drum Dehumidifier to dry the
*1
Condensation:
A phenomenon in which small drops of water are formed on cold surfaces, such as the
surface of the PC Drum.
*2
PC Drum:
Functions in the co pier a s film in a camera.
Useful Tip
A copy cycle can be initiated even while the copier is in the Drum Dehumidifier cycle.
*1
can form on the surf ace of the PC
Using th e Us er Mod e
Page 86

84
4. User’s Choice
The copier has been set so that the most frequently used settings are automatically selected in the
initial mode. User’s Choice allows you to select the default settings which are automatically
select ed in th e ini t ial mode acco r d ing to yo ur own n e ed s. B y se ttin g def au l t s that a re most
frequently used, time and e ffort to make extra settings will be eliminated when t he copier is
turned ON or when Auto Panel Reset is activated.
User’s Choice Functions
A lis ti n g o f Us er’s Choice functions is given
1/6
in six pages of menu, from
show the listing of each page, touch the
desired page number key at the bottom of
the Touch Panel.
to
6/6
. To
1/6
Chapter 4
2/6
3/6
Using th e Us er Mod e
4/6
5/6
6/6
Mixed Orig. Detection
Language Selection
Paper Priority
Copy Mode Priority
Expo. Mode Priority
Expo. Level Priority
Manual Expo. Adjust
Finishing Priority
Auto Panel Reset
Energy Saver Mode
Drum Dehumidifier
Counter Removal
Intellig ent Sort
Confirmation Beep
Original Thickness
Smaller Originals
Custom 2in1
Custom 2in1 Separation
Custo m Book Copy
Special Paper
Orig. Copy Default
▼
Auto Power-OFF Mode
Original on Glass
Administrator Mode
p. 85
p. 86
p. 87
p. 88
Page 87

1/6 2/6
85
4. User’s Choice
Mixed Orig. Detection
Select whether to enabl e (" ON") the M ixed
Original Detection mode or not ("OFF")
when power is turned ON or panel reset.
The initial setting is "OFF."
Language Selection
Select the lang uage of the Touch Panel
messages, either "Japanese" or "Engl ish."
The initial setting is "Japanese."
Paper Priority
Specify the paper sou rce selected
automatically.
The initial setting is "1" (1st Drawer ).
Copy Mode Priority
Specify the default mode selected
automatically when power is turned ON or
panel reset, either "Auto P aper ," "Auto
Size," or "Manual."
The initial setting is "Auto Paper. "
Expo. Mode Priority
Specify the def ault exposure mode selected
automatically when power is turned ON or
panel re se t, ei th er "A u to" or "M an ua l. "
The initial setting is "Auto."
Expo. Level Priori t y
Auto
Select the defau lt exposure level in the A uto
Exposure mode, either "Lighter ," "Normal,"
or "Darker."
The initial setting is "Normal."
Manual
Set the default expo s ur e level in the Manual
Expos ure mode.
The initial setting is "Normal."
Manual Expo. Adjust
Determine the default
expos ur e -level-a djusting-increm ents in the
Manual Exposure mode, as optimized by the
type of original.
"Mode 1": For users who frequently use
originals with halfton e image s,
such as photos.
"Mode 2": For users who use a wide range
of types of originals.
"Mode 3": For users who frequently use
originals with a colored
backgrou nd or fa i nt t ext s.
Chapter 4
Using th e Us er Mod e
The initial setting is "Mode 1."
Finish in g Pr io ri ty
Select the default finishing type when the
copier is equipped with a Sorter or Staple
Sorter, either "NonSort," "Sort," "Group,"
"Sort Staple," "NonSort + Hole Punch,"
"Sort + Hole Punch," "Group + Hole
Punch," or "Sort Sta ple + Hole Punch."
The initial setting is "NonSort."
Page 88

86
4. User’s Choice
3/6 4/6
Auto Panel Reset
Select the time it takes the auto panel reset
function to be activated from among "30
sec.," "1 min.," "2 min.," "3 min.," or "5
min.," or not activate the functio n at all ("No
Reset").
The initial setting is "1 min."
Energy Saver Mode
Set the time it takes the copier to enter the
Energy Saver mode, from 1 to 120 min. (in
1-min. increments). The Ener gy Saver
function can even be disabled.
The initial setting is "15 min."
Drum Dehumid if ier
Select whether to allow ["ON (Aut o) "] the
copier to enter into the Drum Dehumidifier
Chapter 4
mode automatically after it has been turned
ON, or not ("OFF").
The initial setting is "OFF."
Intelli gent Sort
Select whether to turn "ON" or "OFF" the
function that automatically switches
between Sort and Non-Sort, selecting
Non-Sort if only a s ingle original is loaded
and Sort if two or more originals are loaded
in the document feeder.
The initial setting is "ON."
Confirmation Beep
Select whether to turn "ON" or "OFF" the
beep that sounds each time a key on the
Touch P ane l i s tou c hed .
The initial setting is "ON."
Original Thickne ss
Select whether to allow ("Thin ") the user to
make copi es fr o m thi n or ig i na ls in a d d ition
to the standard ones or not ("Standard")
using the document feeder.
Counter Removal
Select whether to reset the panel ("ON") or
not ("OFF") when the Plug-In Counter is
pulled out of the co pier or a magnetic card is
pulled out of the D ata Co ntroller.
Using th e Us er Mod e
The initial setting is "ON."
The initial setting is "Standard."
Smaller Ori ginals
Select whether to enable ("ON") a copy
cycle or not ("OFF") when it is initiated by
pressing the Start key with no originals
placed on the Original Glass or with an
original s maller than the detect able size
placed on the Original Glass in the Auto
Paper mod e .
If "ON" is selected, the copy cycle is run
using the paper loaded in the default paper
source. If "OFF" is selected, a warning
message appears to instruct the use t o select
paper.
The initial setting is "OFF."
Page 89

5/6
Custom 2in1
It is pos s ible to store in memory various
settings that are automatically recalled when
the 2-in-1 copy is selected. Functi ons that
can be set are "Paper," "Zoom," "Margin,"
and "Erase."
•
When a "Paper" size is selected, that size is
automatically selected when the 2-i n-1
copy is set. "Auto Paper" is among the
choices of paper size.
The initial setting is "AutoPaper."
•
When a "Zoom" ratio is selected, that ratio
is automatically selected when the 2-in-1
copy is set. "Auto Size" is among the
choices of zoom ratio.
The initial setting is " ×0.707."
•
When a "Margin" setting is made, that
setting is automat ically s elected w hen the
2-in-1 copy is set.
The initial setting is no margin .
•
When an "Erase" setting is made, that
setting is automat ically s elected w hen the
2-in-1 copy is set.
The initial setting is no erase.
Custom 2in1 Separation
It is pos s ible to store in memory various
settings that are automatically recalled when
the 2-in-1 separation copy is selected.
Functions that can be set are "Paper,"
"Zoom," "M a r gin," and "Eras e. "
•
When a "Paper" size is selected, that size is
automatically selected when the 2-i n-1
separation copy is set. "Auto Paper" is
among the choices of paper size.
The initial setting is "AutoPaper."
•
When a "Zoom" ratio is selected, that ratio
is automatically selected when the 2-in-1
separation copy is set. "Auto Size" is
among the choice s of zo om rat io.
The initial setting is " ×1.414."
87
4. User’s Choice
•
When a "Margin" setting is made, that
setting is automatically selected when the
2-in-1 separation copy is set.
The initial setting is no margin.
•
When an "Erase" setting is made, that
setting is automatically selected when the
2-in-1 separation copy is set.
The initial setting is no erase.
Cust om Book Cop y
It is possible to store in memory various
settings that are automatical ly recalle d w hen
Book copy is selected. Funct i ons t hat ca n
be set are "Paper," "Zoom," "Margin," and
"Erase."
•
When a "Paper" size is selected, that size is
automatically selected when Book copy is
set. "Auto Paper" is among the choices of
paper size.
The initial setting is the paper in the 1st
Drawer.
•
When a "Zoom" ratio is selected, that ratio
is automatically selected when Book copy
is set.
The initial setting is " ×1.000."
•
When a "Margin" setting is made, that
setting is automatically selected when
Book copy is set.
The initial setting is no margin.
•
When an "Erase" setting is made, that
setting is automatically selected when
Book copy is set.
The initial setting is no erase.
Special Paper
Set up a drawer for speci al pap er l oad ing .
The initial setting is "Normal" for all
drawers.
See p. 35 for Special Paper Setti ng .
Chapter 4
Using th e Us er Mod e
Page 90

88
4. User’s Choice
6/6
Orig. Copy Default
Select the type of Orig. Copy s etting
selected automatically when the copier is
turned ON or panel reset.
When the copier is equipped with a Duplex
Unit, the initial setting is 1 2. Consult
your Technical Representativ e if you want
to set 1 1 for Orig. Copy Default.
▼
The initial settin g is 1 1.
▼
Auto Power-OFF Mode
Select the time it takes the Auto Power- OFF
function to be activated, from 1 m in . to 120
min. in 1-min. increments. Auto PowerOFF shuts down the copier a give n period of
time after the last operation.
The initial setting is 60 min.
∗
Chapter 4
Consult your Technical Representative if
you want to disable this function.
▼
▼
▼
▼
Administrator Mode
This mode is used only by the administrato r
of your copier. When Administrator Mode
is selected, the copier prompts you to enter
your "Admin. #" (administrator number).
The fol l owing functions c a n be set onl y
when the correct administrator number is
entered. The administrator number is set by
the Technical Representative. For more
details, consult y our Technical
Representative.
See p. 92 for setting the Copy Track
function.
CopyTrack
This function allows th e administrat or to
keep track of the number of copies made by
each account.
Select either "OFF," "100 Accounts," or
"1000 Accounts."
The initial setting is "OFF."
Original on Glass
Select whether to turn "ON" or "OFF" the
beep that sounds when you attempt to load
an original in the document feeder with
another one left on the glass.
The initial setting is "Beep ON."
Using th e Us er Mod e
When "100 Accounts" is selected:
ID #:
You can program or change your
access number (for a max. of 100
accounts).
Limit:
You can limit the maximum number of
copies that can be made.
Total:
Displays the count of the T otal
Counter. You can also clear the
counter.
Size:
Display s t h e count of the Si z e Counter .
When "1000 Accounts" is selected:
Total:
Displays the count of the T otal
Counter. You can also clear the
counter.
Page 91

Max. Copy Sets
Determine the number of copies or copy s ets
that can be set using the 10-Key Pad.
The initial setting is "OFF."
User Help
Set the help cod e to be transmitted by the
user when a Data Terminal is mounted.
For details, consult your Technical
Representative.
89
4. User’s Choice
Chapter 4
Using th e Us er Mod e
Page 92

90
4. User’s Choice
Making the User’s Choice Settings
Press the User Mode Key.
1
User’s Choice
Touch
3
User Mode
1134P356CA
.
Select the key of the page number on
which the desired User’s Choice
functi on is li s ted.
For example, to change Finishing
Priority from Non-Sor t to Sort, touch
2/6
.
2
4
Chapter 4
Page 1/6 of the User’s Choice menu
appears.
Touch the key of the desired User’s
Choice function.
For example, touch
Finishing Priority
.
Using th e Us er Mod e
The following screen appears, on
NonSort
which
indicating that it i s selected.
is highlighted,
Page 93

5
6
7
Sort
Touch
Touch
Repeat steps 3 to 6 to make new
*
settings for other User ’s Choice
functions.
Touch
Enter
Exit
.
.
.
91
4. User’s Choice
Chapter 4
Using th e Us er Mod e
Page 94

92
4. User’s Choice
Copy Track Function
The administrator of the copier shou ld make the setting, either "100 Accounts" or "100 0
Accounts."
Setting the Copy Track Functio n
Administrator Mode
Press the User Mode key.
1
User’s Choice
Touch
4
User Mode
1134P356CA
.
Touch
2
.
Chapter 4
6/6
Touch
.
5
Enter the administrator number using
the 10-Key Pad.
3
Using th e Us er Mod e
NOTES
•
Your Technical Represen ta tive is t o
program and change the admini strator
number. For details, cons ult your
Technical Representa tive.
•
The administ r ator should remember the
administrator number.
Page 95

93
4. User’s Choice
Copy Track
Touch
6
Select the appropr iate functio n.
7
For example, to keep track of 100
accounts, touch
Enter
.
100 Accounts
.
Touch
Enter
.
9
Exit
Touch
.
10
and then
Chapter 4
Initialize the Copy Track function data.
8
For example, you may touch
Enter
.
NOTE
If you change the function, be sure to
initialize the C op y T r ack d ata .
Yes
and
Using th e Us er Mod e
Page 96

94
4. User’s Choice
Programming the ID #
An ID # can be programmed when "100 Accounts" is selected.
Press the User Mode key.
1
User’s Choice
Touch
4
User Mode
1134P356CA
.
Administrator Mode
Touch
.
2
5
Chapter 4
6/6
Touch
.
Enter the administrator number using
the 10-Key Pad.
3
NOTES
•
Your Technical Represen ta tive is t o
Using th e Us er Mod e
program and change the admini strator
number. For details, cons ult your
Technical Representa tive.
•
The administ r ator should remember the
administrator number.
Page 97

6
Copy Track Data
Touch
95
4. User’s Choice
.
Enter the I D # fro m the 10 - Key Pad.
9
Then, touch
Enter
.
Select the page n umb er on wh ich t he
7
target account is sh o wn.
Touch the ID # key of the target
8
account.
NOTES
•
The ID # should be a 4-digit number.
•
To correct a # entry, press the Clear
key and then enter the new #.
•
If you wa nt t o prog r am an ID # for
other accounts, repeat steps 7 through
9.
•
If a new ID # is progr amm ed, the ol d
one is erased.
•
If a new ID # entered already exists for
another account, the entry is r e j e c ted.
Enter a different ID # .
Enter
Touch
.
10
Exit
Touch
.
11
Chapter 4
Using th e Us er Mod e
Page 98

96
4. User’s Choice
Sett in g a Li mi t fo r E ac h Account
A Limit can be set when "100 Accounts" is selected.
Press the User Mode key.
1
User’s Choice
Touch
4
User Mode
1134P356CA
.
Administrator Mode
Touch
.
2
5
Chapter 4
6/6
Touch
.
Enter the administrator number using
the 10-Key Pad.
3
NOTES
•
Using th e Us er Mod e
Your Technical Represen ta tive is t o
program and change the admini strator
number. For details, con sult your
Technical Representa tive.
•
The administ r ator should remember the
administrator number.
Page 99

6
Copy Track Data
Touch
97
4. User’s Choice
.
Enter a number for the Limit from the
9
10-Key Pad.
Enter
Then, touch
.
Select the page n umb er on wh ich t he
7
target account is sh o wn.
Touch the Limit k ey of t he tar get
8
account.
NOTES
•
To correct a number entry, press the
Clear key and then enter the new
number.
•
If you want to set Limit for other
accounts, repeat steps 7 through 9.
Enter
Touch
.
10
Exit
Touch
.
11
Chapter 4
Using th e Us er Mod e
Page 100

98
4. User’s Choice
Clearing Counters for Each Account
A counter can be cleared f or each account when "100 Accounts" or "1000 Accounts" is selected.
Press the User Mode key.
1
User’s Choice
Touch
4
User Mode
1134P356CA
.
Administrator Mode
Touch
.
2
5
Chapter 4
6/6
Touch
.
Enter the administrator number using
the 10-Key Pad.
3
NOTES
•
Using th e Us er Mod e
Your Technical Represen ta tive is t o
program and change the admini strator
number. For details, cons ult your
Technical Representa tive.
•
The administ r ator should remember the
administrator number.
 Loading...