

Page 1
EP2050
Thank you for choosing Minolta.
This operator’s man ual expl ains h ow to op erat e the copier a nd repleni s h its
supplies. It also gives some troubleshooting tips a s well as general precautions to
be observed when operating the copier.
To ensure the best performance and effect i ve use of yo ur c opie r, read this manual
carefully until you fami liarize yours elf tho roughl y with its oper ation and features.
After you have read through the manual, keep it for ready reference.
Please use this manu al as a qu ick and handy referen ce too l for immediately
clarifying any questions which may arise.
i
1136O053AA
Page 2

ii
Contents
Chapters 1 through 3 contain the basic information for making copies.
Be sure to read these chapters before attempting to use your copier.
Using This Manual
Organization viii
Page Organization ix
Terms and Symbols f or th e Type of Orig inal s and Copy
Paper x
Chapte r 1 Safety Not es 1
1. Installing The Copier
Installation Site 2
Power Source 2
Ground i ng 2
Space Requirements 3
2. Precautions for Use
Operating Environmen t 4
Using the Copier Properly 4
Care of Copier Supplies 4
Moving 5
Page 3

Chapter 2 First Things to Know
about EP2050 7
1. System overview 8
2. Copier parts and Accessories
Outsi de Your Copier 10
Inside Your Copier 12
Paper Feed Cabinet 14
Duplex Cabinet and Duplex Unit 15
Duplexing Document Feeder 16
Automatic Document Feed er 17
20-Bin Staple Sorter and Sorter 18
10-Bin Staple Sorter and Sorter 19
Data Controller 20
3. Control Panel Keys and Indicators
Basic Panel 22
System Panel 24
Suppl eme nt ary Pan e l 26
Display Panel 28
iii
Contents
4. Turning On and Off, and Resetting The Copier
Turning On and Off 30
When Copier is Turned On 31
Auto Copy Start Function 32
Energy Saver Mode 33
Initial Mode and Panel Resetting 34
Auto Reset Function 35
Entering the Access Number 36
Page 4

iv
Contents
Chapter 3 Making Copies 37
1. Basic Copying Overview 38
2. Basic Copying Procedure
Original Placement 40
Using Automatic/Duplexing Document Feeder 42
Image Density 48
Zoom Ratio
• Types of Zoom Ratio 50
• Auto Size Mode 56
• Zoom Ratio Table (Orignal Size to Paper Size) 58
Paper Size
• Manual Mode 60
• Auto Paper Mode 62
• Special Paper Mode 64
Number of Co pie s 66
Copy Cycle Start 67
Interrupt Mode 68
Multi Bypass Copying 70
3. System Copying Overview 72
4. System Copying Procedure
Original Copy Type
Finishing Mode
▼
• Type I 74
• Type II 76
• Original Count Mode 82
• Finishing Modes 86
• Auto Dual Function 88
• Selecting the Finishing Mode 90
• Typical Finishing Mode 94
5. Supplementary Copying Overview 96
6. Supplementary Function Setting
Erase 98
File Margin 102
Book 106
Cover 108
Insertion 114
Job Memory 124
Page 5

Contents
Chapter 4 Special Functions 127
1. Meter Count Function 128
2. Auxiliary Toner Replenishing Mode
(Increasing the Image Density) 130
3. Drum Dehumidify Function 131
4. User’s Choice 132
Chapter 5 When a Warning Message
Appears 143
1. Quick Reference for Warning Messages and
Indicator Lights 144
2. Detailed Instructions for Messages/Indicator Lights
Add Toner In dic at or 146
Add Paper In di ca tor 148
Add Staples Indicator 154
Clos ure Failur e Indicator 162
Misfeed Indicator
• Misfeed Indicator and Monitor Display 166
• Misfeed Clearing Procedure
•
Copier 168
•
Paper Feed Cabinet 172
•
Duplex Unit 176
•
Duplexing Document Feeder 178
•
Automatic Document Feeder 179
•
Sorter/Staple Sorter 180
v
Call-Technical-Representative Indicator 18 2
Page 6

vi
Contents
Chapter 6 Troubleshooting 183
1. When This Type of Copy is Produced
•
The Image is too Light 184
•
The Image is too Dark 184
•
The Image is too Blurry 184
•
The Copy has Lines 186
•
The Copy has dark specks or spots 186
•
The Edge of the Copy is dirty 186
•
The Image on the Copy is not alig ne d prop er ly 186
2. The Copier is not Activated
•
No Indica tor s on t he Cont ro l Pa nel l i ght up 188
•
The Message Display show s nothi ng 188
•
Pressing The Start Key does not start the copy cycle 188
•
Control panel keys do not start the copy cycle 188
•
The Copier is not activated when the Power Switch is turned
ON 188
Chapter 7 Specifications 191
1. Copier 192
2. Paper Feed Cabinet 194
3. Duplexing Document Feeder 196
4. Automatic Document Feeder 197
5. 20 Bin Staple Sorter 198
6. 10 Bin Staple Sorter 199
7. 20 Bin Sorter 200
8. 10 Bin Sorter 201
9. Duplex Unit 202
10. Data Controller 203
11. Copier Outline Dimensions 204
Page 7

Contents
vii
Chapter 8 Miscellaneous 205
1. Care of the Copier
•
Daily Checks 206
•
Cleaning 208
2. Function Combination Matrix 212
3. Description of Paper Size 216
4. Zoom Ratio Table
(Original Size to Paper Size) 217
5. Index 218
Chapter 1
Safety Notes
Chapter 2
First Things to
Know about
EP2050
Chapter 3
Making Co pie s
Chapter 4
Specia l Functions
Chapter 5
When a Warning
Message Ap pe ars
Chapter 6
Troubleshooting
Chapter 7
Specifications
Chapter 8
Miscellaneous
Page 8

viii
Using This Manual
Organization
This manual consist s of eigh t chapter s.
Chapte rs 1 through 3 give the basi c informat i on for maki ng copies. Be sure to
read these Chapters b efo re u sing your copier.
Chapter 1 Safety Notes
About the operating environment, conditions and precautions for use.
Chapter 2 First Things to Know About EP2050
A brief description of the system and preliminary information about
the different parts of the system.
Chapter 3 Making Copies
About how to make bas ic, s ystem and supplementary copies.
Basic Copying Overview is p. 38
System Copying Overview is p. 72
Supplementary Copying Overview is p. 96
These pages offer quick, at- a-glance f lowcharts for making copies.
Each step is keyed to a page number where you will find more
detailed information.
Chapter 4 Special Functions
About the special functions that can be used for specific purposes.
Chapter 5 When a Warning Message Appears
About the various warning indications given on the Message Display
and Display Panel and steps to correct these conditions.
Chapter 6 Troubleshootin g
Instructions on how to tr oublesh oo t copier malf un ctio ns.
Chapter 7 Specifications
Complete specification s of the c opier system and options.
Chapter 8 Miscellaneous
About care of the cop ier and possible combinations of functions.
Page 9
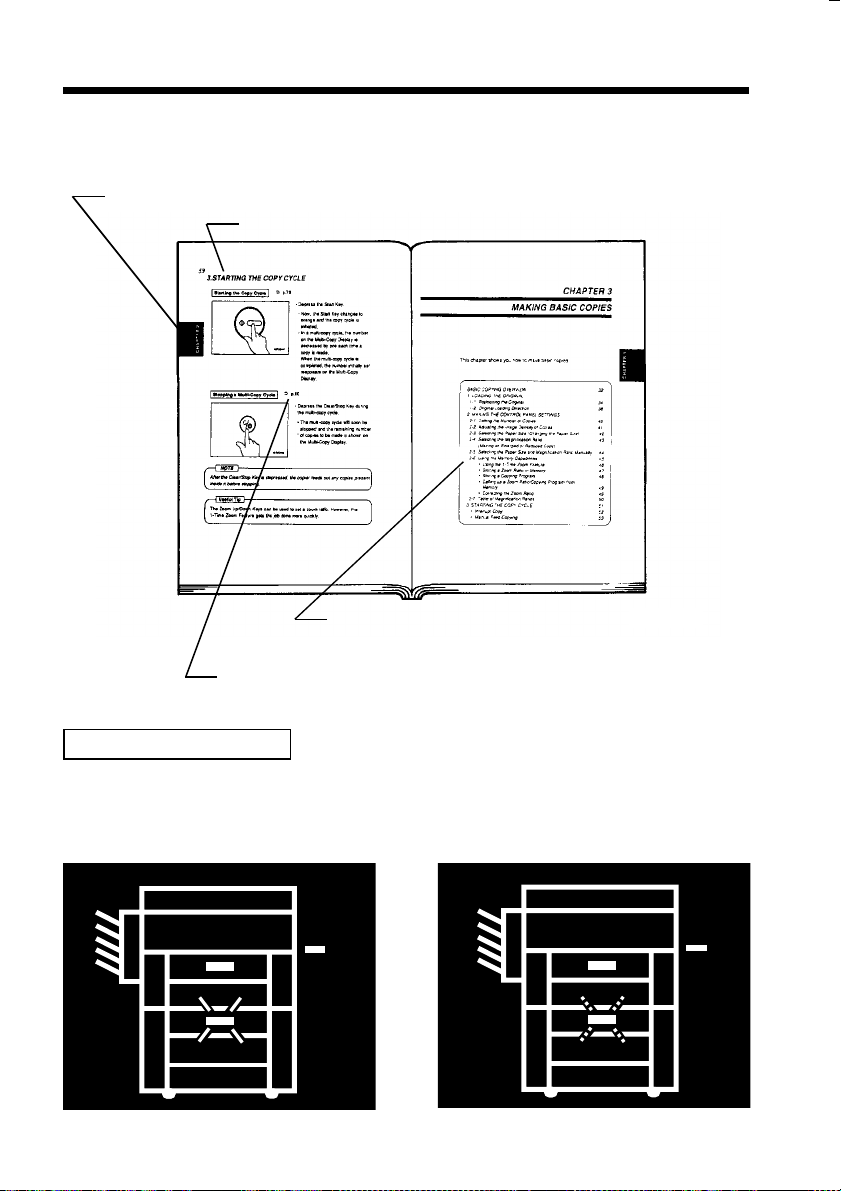
Page Organization
Each page of this manual is basical ly organized as follows.
Index: To locate your Chapter qui ckly.
Section title
Table of co ntents of the Chapter:
To quickly locat e your page in the Chapter.
ix
Using This Manual
1076O298
➭
p. XX (Cross-reference):
Shows t h e page to refer to for more det ailed information.
Control Panel Indicators
A steady light or blinking light indicator on the control panel is indicated as
follows.
<Steady Light>
1139O4760A
1139O4760A
<Blin ki ng Li gh t>
1139O4770A
1139O4770A
Page 10
x
Using This Manual
Terms and Symbols for the Type of Originals and Copy
Paper
A few special term s an d sym bols are used in this manual to designate types of
originals and copy paper. These two pages explain about these terms an d
symbols.
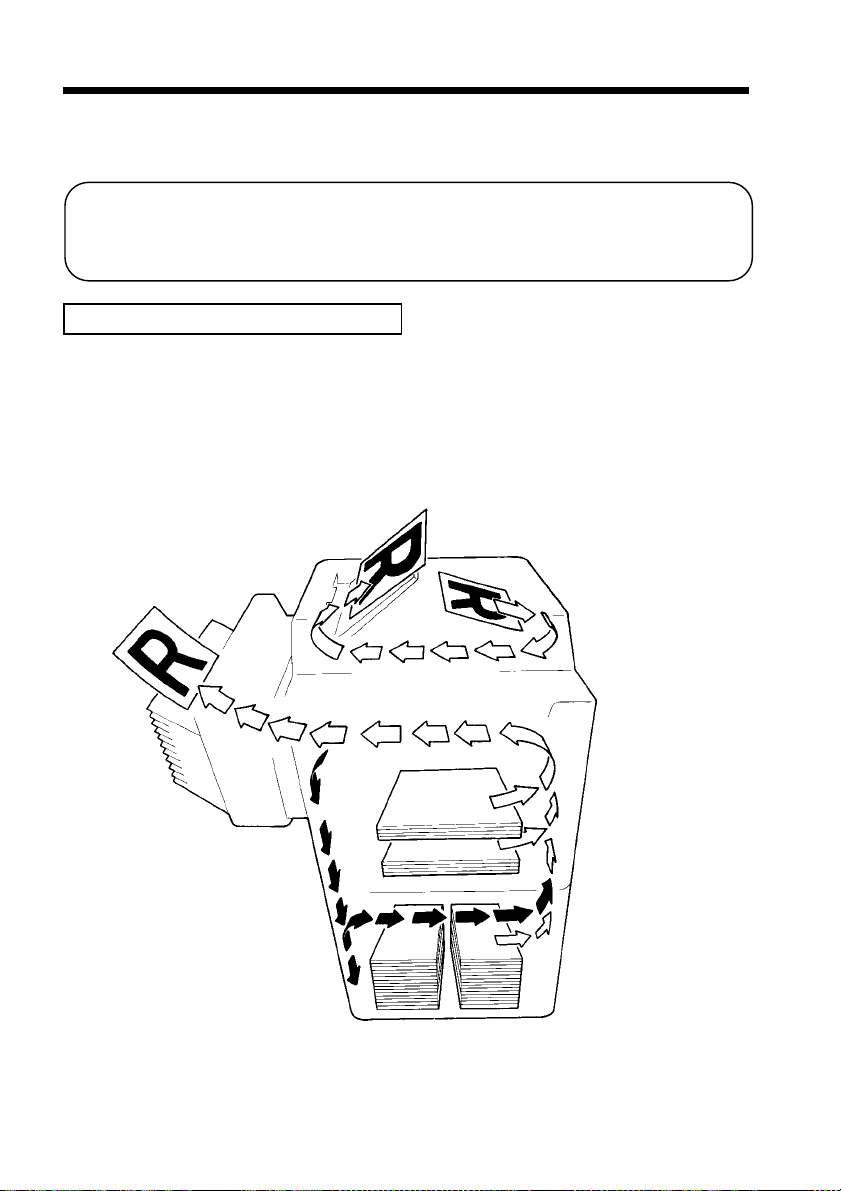
Feeding Direction (copy paper path)
In this copier system, copy paper is taken up from the right-hand side of the
copier and fed through the copier toward the left-hand side, out face up onto the
Exit Tray. In th e figure below, th e direction in which the copy paper is fed, a s
indicated by the arrow, is called the "feeding direction."
1139O1702A
Page 11

"Width" and "Length"
Terms and Symbols Used
xi
Using This Manual
When we talk about the size of the
original or copy, we call side A
"width" and side B "length."
A: Widt h
B: Length
1139O1610A
<Lengthwise >
When the original or copy has a
"length" longer than its "width," we
call it "lengthwise" and use symbol
"L" or " ."
1139O1610A
1139O1620A
<Crosswise >
When the original or copy has a
"length" shorter than its "wid th," we
call it "crosswi se" and use symbol
"C" or " ."
Page 12

xii
Page 13

Chapter 1
1
Safety Notes
This Chapter explains about the operating environment, conditions,
and precautions for use.
1. Installing the Copier
Installation Site 2
Power Source 2
Grounding 2
Space Requirements 3
Chapter 1
Safety Notes
2. Precautions for Use
Operating Environment 4
Using the Copier Properly 4
Care of Co pier S up plies 4
Moving 5
Page 14

2
1. Installing the Copier
Installation Site
To ensure utmost safety and preven t possib le malfunctio ns of the copier, install it
in a location which meets the following requirements.
Chapter 1
◆
A place away from a curtain or the like that may catch fire and burn easily.
◆
An area where there is no possibility of bei ng splash ed with water or other
types of liquid .
◆
An area free from direct su nlight.
◆
A place out of the direct air stream of an air conditioner, heater, or ventilator.
◆
A well-ventilated place.
◆
A dry place.
Safety Notes
◆
A dust-free location.
◆
An area not subject to undue vibration.
◆
A stable and level location.
Power Source
The power source voltage requirements are as follows.
◆
Use a power source with little voltage fluctuat ion.
Voltage Fluctuation : Within ±10%
Frequency Fluctuation : 50 Hz Within ±2.5%
: 60 Hz Within ±3%
◆
If any other electrical equipment is sourced from the same powe r outlet, make
sure that the capacity of the outlet is not exceeded.
◆
The outlet should be located near the copier and easil y accessible.
◆
Never connect any other appliances or machi nes b y means of a mult iple socket
to the outlet being used for the copier.
◆
If an extension cord is needed, use one with a capacity more than the power
consu mpt i on of th e co pier .
◆
Make sure that no unusu al, excessive force is being app lied to the power cor d
or extension cord.
Grounding
To prevent receiving electrical shocks in the case of electrical leakage, always
ground the copier.
Connect the grounding wire to:
◆
The ground terminal of the outlet.
◆
A grounding contact which complies with the local electrical standards.
NOTE
Never connect the groundin g wire to a gas pipe, a grounding wire f or a
teleph one or a wa te r p i pe.
Page 15
1. Installing t he C opier
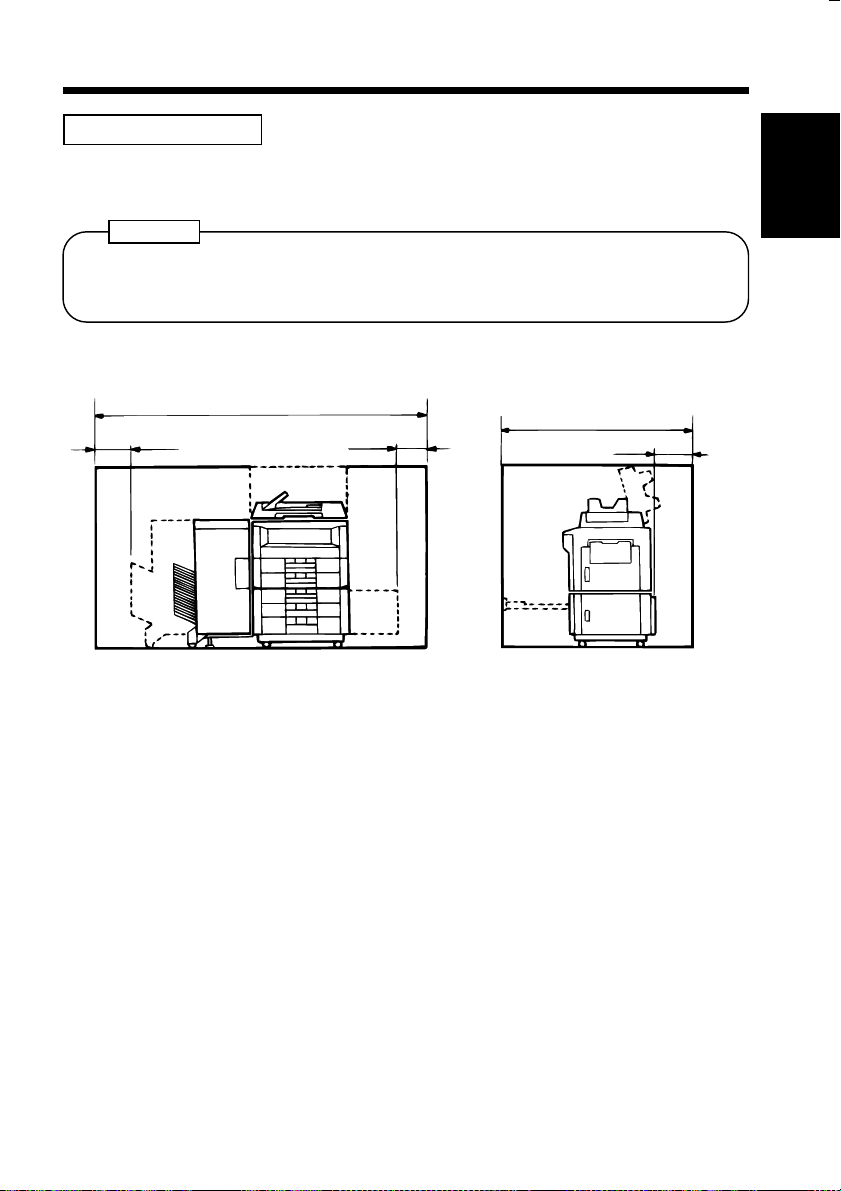
Space Requirements
To ensure easy copier operation, supply replacements and service maintenance,
adhere to the recommended sp ace req uir ements detailed below.
NOTE
Be sur e t o allow a clearance of 150 mm or more at the back of the copier as
there is a ventilation duct.
300
2,165
200
1,350
150
3
Chapter 1
Safety Notes
1136O162AA
1136O162AA
1139O163AA
1136O163AA
<Scale: mm>
Page 16

4
2. Precautions for Use
Operating Environment
The operating environmental requirements of the copier are as follows.
Temperature : 10°C to 30°C (50°F to 86°F) with a fluctuation of 10°C (50°F) per hour
Chapter 1
Humidity : 15% to 85% with a fluctuation of 20% per hour
Using the Copier Properly
To ensure the optimum performance of the copier, follow the precautions listed
below.
◆
NEVER place a he avy object on t h e c o pier or subject the copier to s h ocks.
Safety Notes
◆
NEVER open any Doors, or turn OFF the copier while the copier is making
copies.
◆
NEVER bring any magnetized object or use flammable sprays near the copier.
◆
NEVER place a vase or vessel containing water on the copier.
◆
NEVER drop paper clips, staples, or other small pieces of metal into the copier.
◆
NEVER attempt to r e m ove any Cover tha t is secured.
◆
ALWAYS insert the Power Plug all t he way i nto the outlet.
◆
ALWAYS make sure that the outlet is visible, clear of the copier or copier
cabinet.
◆
ALWAYS ensure that the cop ier doe s not ri de on the power cord or
communications cable of other electrical equipment, and it does not get such a
cord or cable wedged into its own mechanism.
◆
NEVER leave a damaged or cracked copier power cord unattended. If you f ind
any of thes e conditions, imme diately shut down the copier, unplug the power
cord, and call your Technical R epr esentative for appropriate acti on.
◆
ALWAYS p ro vid e go od ven ti l at io n when ma ki ng a larg e numbe r of con ti n uo us
copies.
◆
NEVER leave the copier running when it becomes inordinately hot or produces
abnormal noise. If that happens, immediately turn OFF the copier, unplug it,
and then call your Technical Representat ive.
NOTE
= Loca t e t he Copier in a Well Venti l ated Room =
A negligible amount of ozone is generated during normal operation of this
copier. An unpleasant odor may, however, be created in p oorly ventilat ed
rooms during extensive copier operations. For a comfortable, healthy, and
safe operating environment, it is recommended that the room be well
ventilated.
Page 17

1. Precautions for Use
Care of Copier Supplies
Use the following precautions when hand ling the copier supplies (toner, paper,
etc.).
◆
Store paper, toner, and other supplies in a place f ree fro m dir ect s unlight and
away from any heating apparatus. Keep them in a dry, clean environment.
◆
Store pap er, whi ch ha s bee n remo ve d fr om i ts wrap per but not loaded into the
Drawer, in a sealed plastic bag in a coo l, dark place.
◆
Keep supplies out of the reach of children.
◆
If your hands become soiled with toner, wash them with soap and water
immediately.
Moving
If you need to transport the copier over a long distance, consult your Technical
Representative.
5
Chapter 1
Safety Notes
Page 18

6
Page 19

Chapter 2
First Things to Know
about EP2050
This Chapter gives you a brief description of the system and
prelimi nar y info r mati on abo ut the dif fe re nt par ts of t he s ys tem.
1. System Overview 8
2. Copier Parts and Accesso ri es
Outside Your Copier 10
Inside Your Copier 12
Paper Feed Cabinet 14
Duplex Cabinet and Duplex Unit 15
Duplexing Document Feeder 16
Automatic Document Feeder 17
20-Bin Staple Sorter and Sorter 18
10-Bin Staple Sorter and Sorter 19
Data Cont roller 20
7
Chapter 2
First Things to Know about EP2050
3. Control Panel Keys and Indicat ors
Basic Panel 22
System P a ne l 24
Suppleme n tary P ane l 26
Display P anel 28
4. Turning ON and OFF, and Resetting The Copier
Turning ON and OFF 30
When Copier is Turned ON 31
Auto Co py St art Fu nc ti on 32
Energy Sav e r Mode 33
Initial Mode and Panel Resetting 34
Auto Reset Function 35
Entering the Access Number 36
Page 20
8
1. System Overview
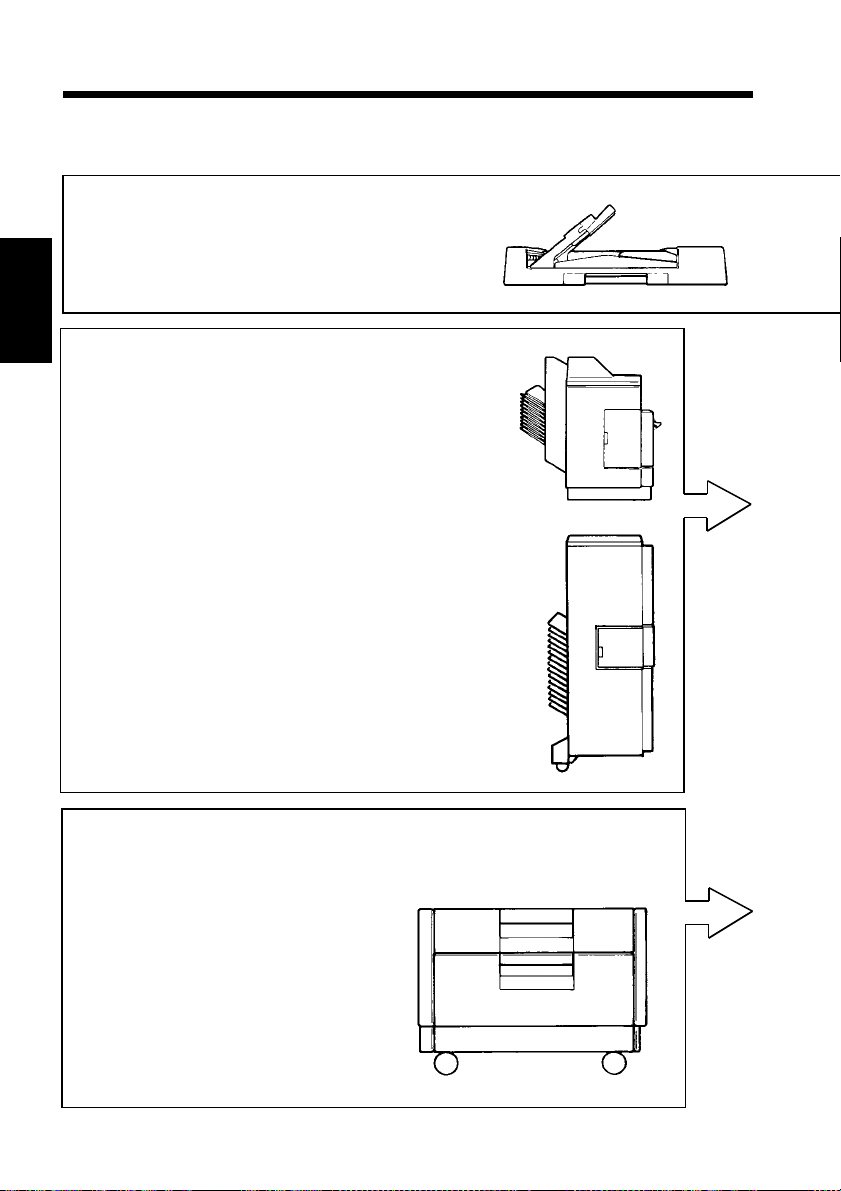
The EP2050 system can be configured with the following
components.
Automatic Document Feeder AF-3 <Option>
◆
Permits automatic feeding of mult ipl e
➭
➭
p. 42
p. 90
➭
p. 90
1139O0020A
1136O059AA
originals.
Chapter 2
Sorters <Option>
◆
10-Bin Sorter S-104/20-Bin Sorter S-205
Permits sorting or grouping copies into up to
10 or 20 copy sets or stacks.
Staple Sorters <Option>
◆
Staple Sorter ST-101
Automatically s t aples the copy se t s or stacks
that are sorted or grouped the same as with the
S-104.
Staple Sorter ST-206
Automatically punches ho le s in the copy se t s or
stacks that are sorted or grouped, in addition to
the functions provided by the ST-101.
First Things to Know about EP2050
1139O0010A
Duplex Unit AD-5 <Option>
◆
Mounted in the 3rd Drawer of the
Paper Feed Cabinet, it turns over
1-sided cop i es to make 2-s i ded
➭
copies.
Duplex Cabinet PF-2D <Option>
◆
p. 80
Turns over 1-sided copies to make
2-sided copies. It is also equipped
with a storage drawer for keep ing
➭
copy paper and toner.
p. 74
1139O1222A
Page 21
1. System Overview
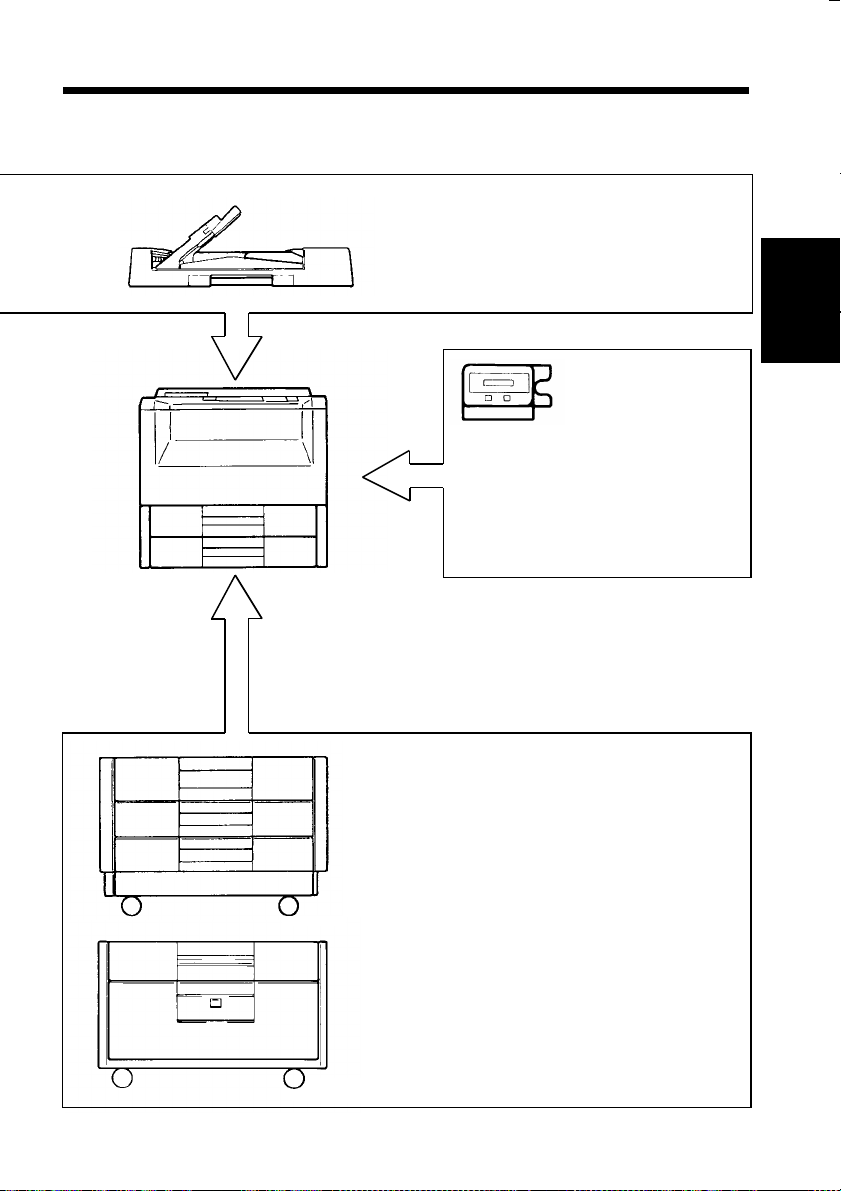
Duplexing Document Feeder AFR-7
◆
<Option>
In addit ion to t he fun c tio ns o f the AF -3 ,
1139O0010A
it can tu rn ov er 2-s i ded or i gi nal s.
Data Controller
◆
1138O525AA
D-102 <Option>
➭
Capable of controlling various
data including the n umb er of
copies made, copy cost and user
departments by means of specific
➭
p. 20
EP2050
◆
magnetic cards.
1136O061AA
Equipped with two Paper Drawers to hold up to 500
2
sheets of cop y pape r (8 0 g/m
). The Multi Bypass Table
allows you to make up to 50 copies on paper which is
not loaded in any of the Drawers and which i s fed into
➭
the copier automatically via this Table.
Paper Feed Cabinet PF-202 <Option>
◆
p. 70
Equipped with two Drawers, it holds up
to 1,000 sheets of copy paper (80 g/m
➭
p. 150
p. 42
2
).
9
Chapter 2
First Things to Know about EP2050
1139O0180A
1139O1212A
Paper Feed Cabinet PF-102 <Option>
◆
Holds up to 2,500 sheets of copy paper
2
(80 g/ m
). ➭ p. 152
Page 22
10
2. Copier Parts and Accessories
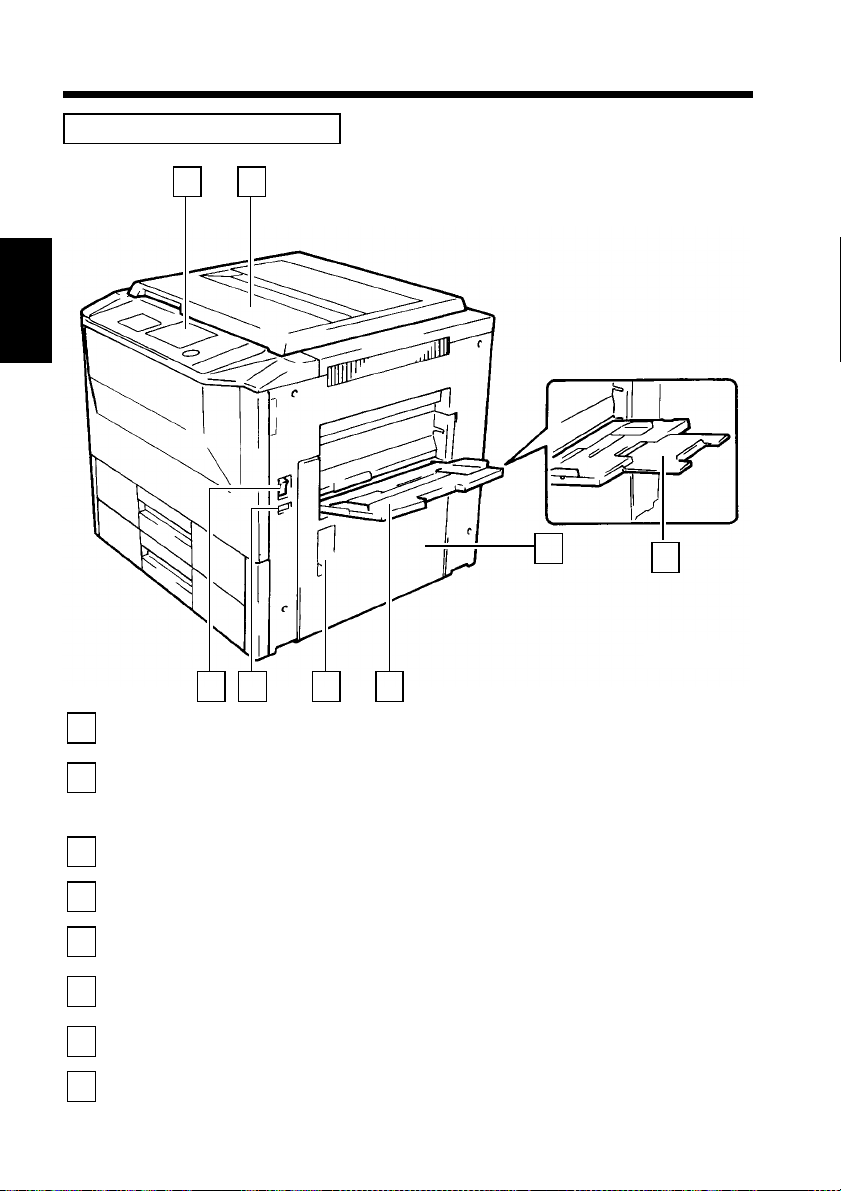
Outside Your Copier EP2050
1 2
Chapter 2
1
First Things to Know about EP2050
2
3
4
5
6
7
8
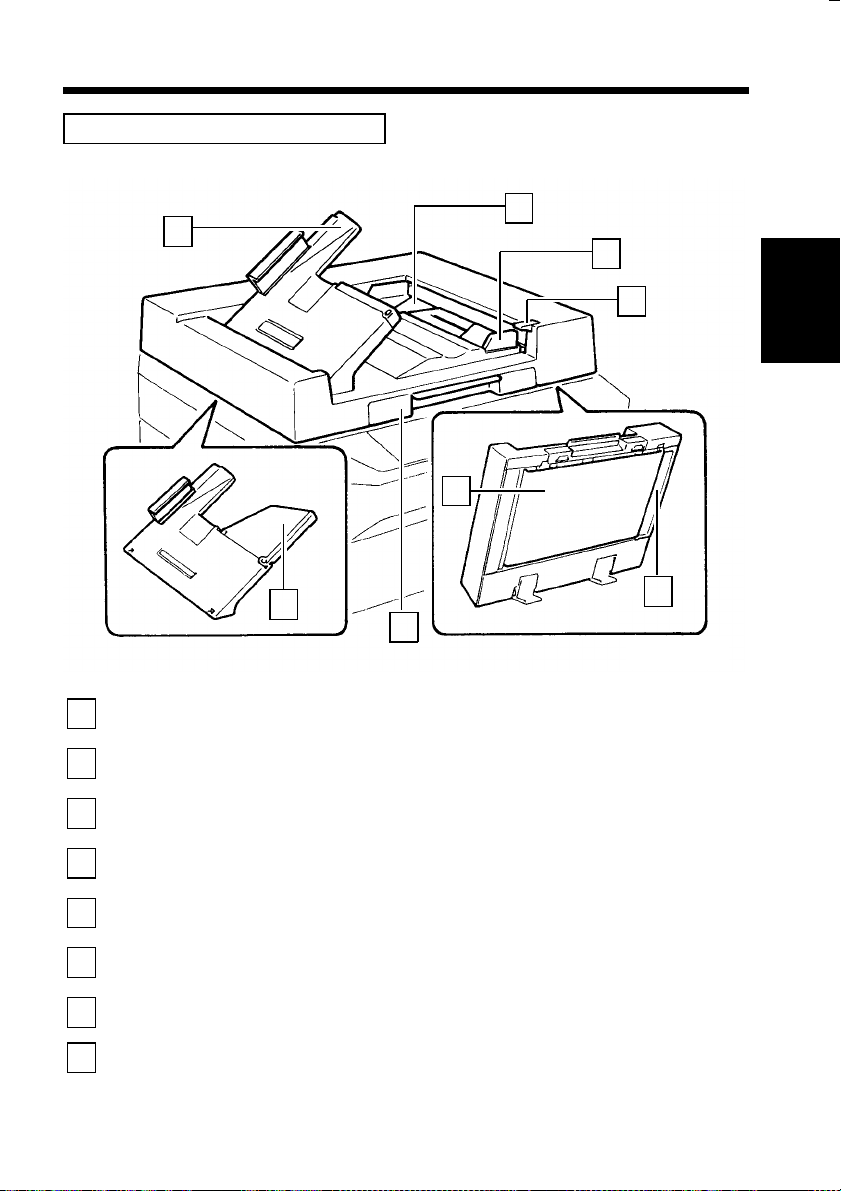
4 3 5 6
Control Panel
Original Cover
<Option>
Power Switch
Total Counter
Right Door Lock
Release Lever
Multi Bypass T able
Right Door
Multi Bypass
Extender
7
: Use to start a copy cycle or to make copying- job
p. 70
➭
p. 22
➭
p. 70
➭
pp. 169, 171
settings.
: Holds the original placed on the Original Glass in
position. To place an original, raise the Cover and
place it in position on the Original Glass.
: Use to turn th e co pier ON an d OFF.
: Shows the total number of copies made so far.
: Operate to open the Right Door.
: Use for manual feeding of paper into the copier.
➭
: Open to clear a paper misfeed.
: Slide t hi s Extender out when maki n g copies on
large-size paper.
➭
8
➭
p. 30
1136O063AA
p. 40
Page 23
2. Copier Parts and Accessori es
11
10
9
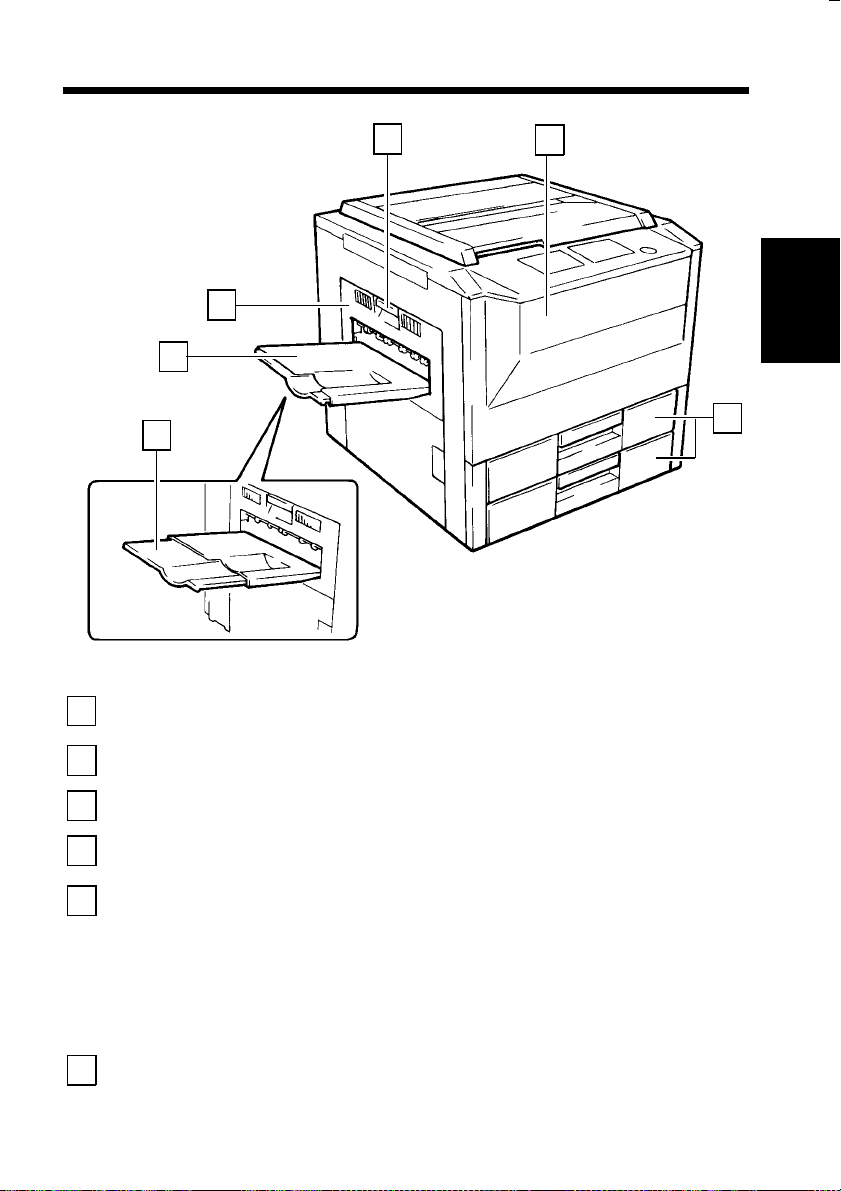
Copy Tray Extender
9
Exit Tray
10
11
12
: Slide this Extender out when making copies on
large-size paper.
: Holds copies fed out of the copier.
13
1136O064AA
Chapter 2
14
First Things to Know about EP2050
Left Door
11
Left Door Lock
12
Release Lever
Front Door
13
1st/2nd Drawer
14
➭
p. 146
p. 210
➭
p. 168
➭
p. 148
: Open for clearing a paper misfeed.
: Operate to open the Left Door.
: Open to:
• Replace the Toner Bottle.
• Clear a paper misfeed.
• Clean the Corona Units.
Closing the Front Door after a misfeed has been
cleared will turn the Misfeed Indicator on the
control panel O FF.
: Each ho ld s up to 250 s heets of pap er.
➭
p. 168
➭
Page 24

12
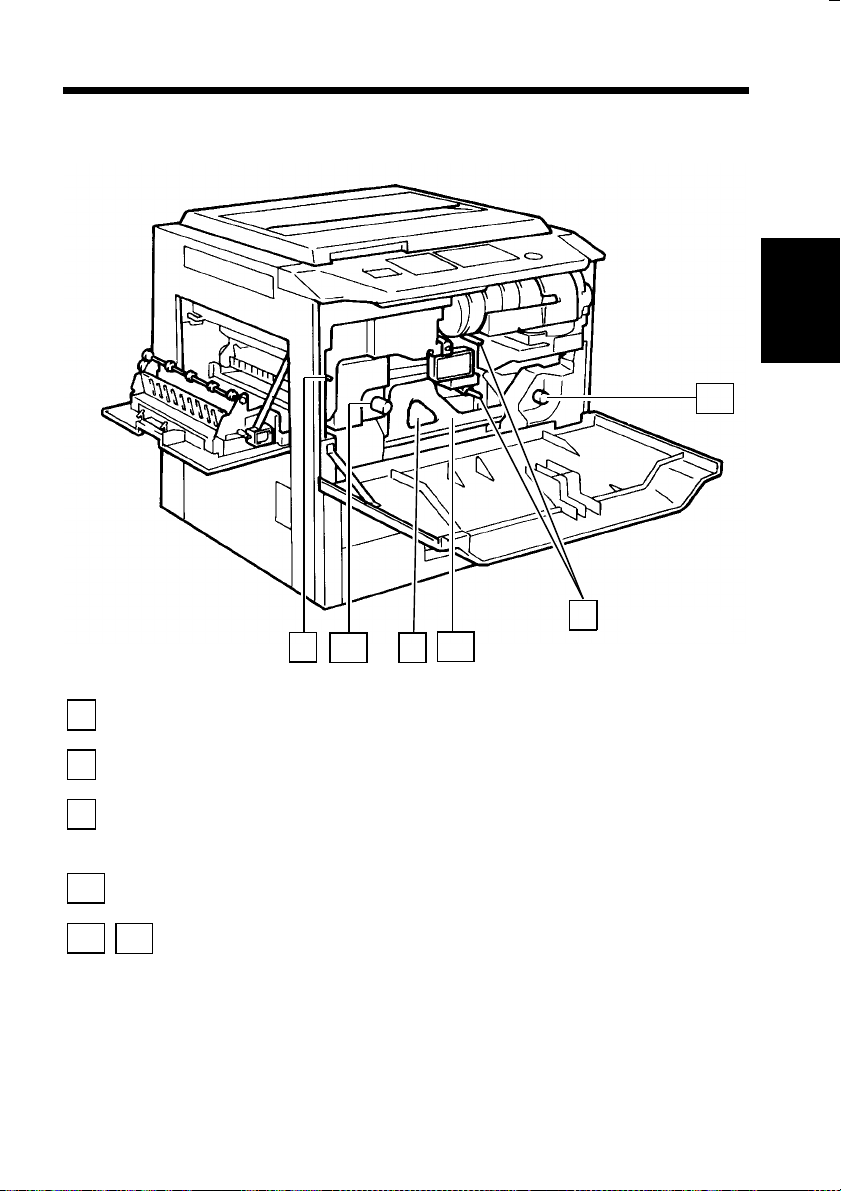
2. Copier Parts and Accessories
Inside Your Copier EP2050
Chapter 2
1
First Things to Know about EP2050
2
3
4
5
3
2
1
Toner Bottle
Toner Bottle
Holder
Original
Width/Length Scale
Original Pad
Original Gl a s s
4
5
1136O065AA
: Contains toner . Replace it with a new one when the
Add Toner In di c ator l ig ht s up .
: Swing open to replace the Toner Bottle.
: Place the original along these Scales for corr ect
positioning.
: Holds the original in position on the Original Glas s.
➭
pp. 40, 208
: Place the original face down on this G las s .
➭
pp. 40, 208
➭
p. 40
➭
p. 146
Page 25
2. Copier Parts and Accessori es
M3
13
Chapter 2
Display Contrast
6
Control Knob
Dehumidifier
7
Switch
Corona Unit
8
Cleaning Lever
(Upper/Lower)
Transport Section
M2
Release Lever
M1
M3
Misfeed Removal
Knobs
8
6
: Use to adjust the brightness of the Message
Display.
: Turn ON to prevent condensati on from forming on
the PC Drum when power is turned OFF.
: Operate the Lever to clean the corresponding
Coron a Unit if unw a nted lines a re produce d on the
➭
copy.
: Swing down to release the Transport Section.
➭
p. 168
: Use to clear a sheet o f paper misfed.
➭
pp. 168, 169
7 M1
p. 210
M2
1136O066AA
First Things to Know about EP2050
Page 26
14
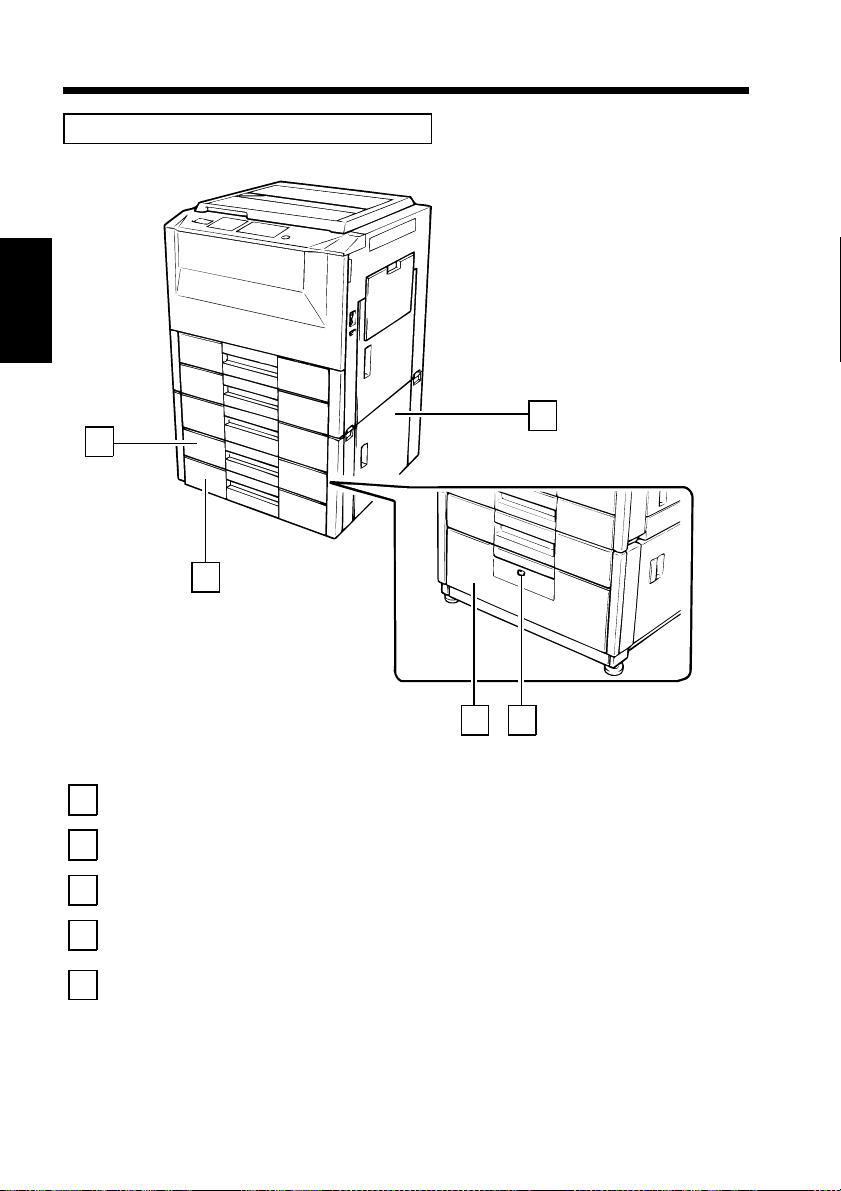
2. Copier Parts and Accessories
Paper Feed Cabinet PF-102 and PF-202
Chapter 2
1
2
5
First Things to Know about EP2050
1
2
3
4
5
3rd Drawer (PF-202)
4th Drawer (PF-202)
3rd Drawer (PF-102)
Paper Descent Key
Lower Right Door
1136O168AA
1136O168AA
3 4
: Holds up to 500 sheets of paper.
: Holds up to 500 sheets of paper.
: Holds up to 2,500 sheets of paper.
: Press before s liding the Drawer out of the copier .
➭
pp. 152, 174
: Open to clear a paper misfeed.
➭
p. 150
➭
p. 150
➭
p. 152
Page 27
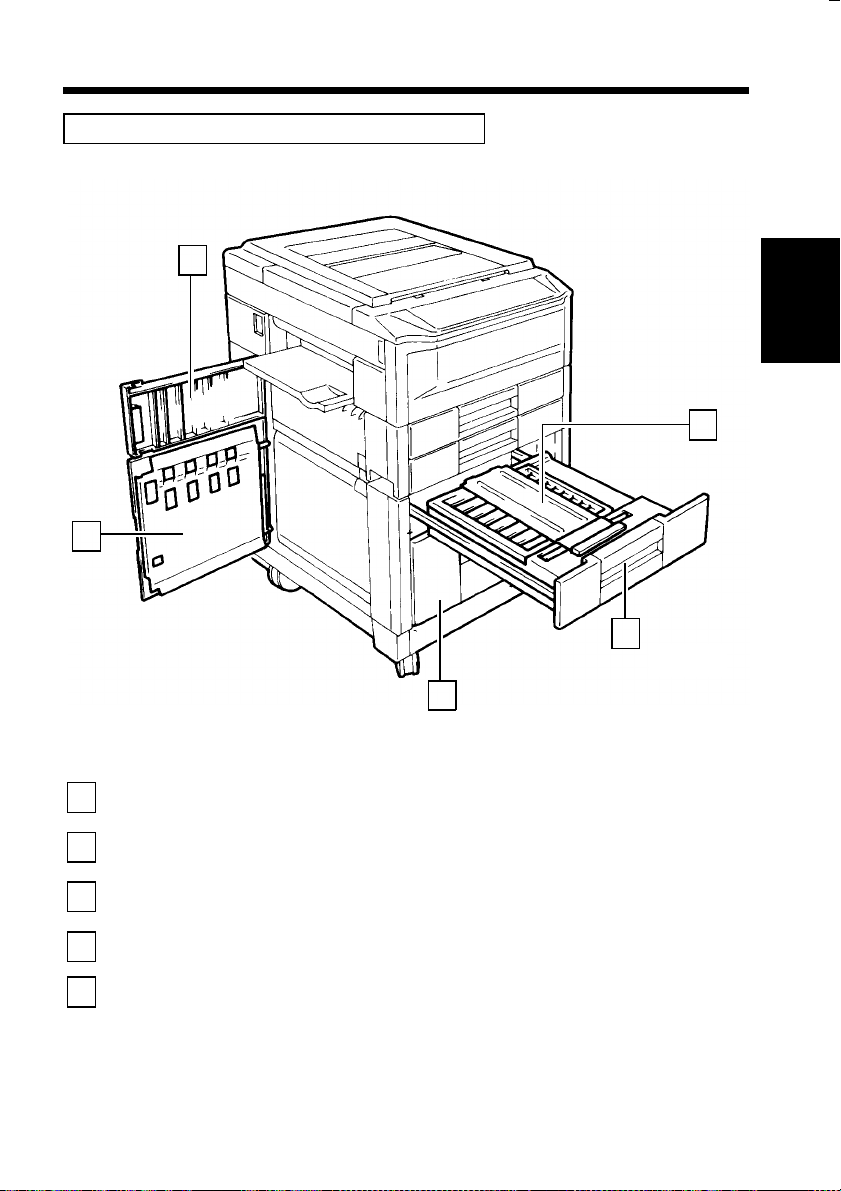
Duplex Cabinet PF-2D and Duplex Unit AD-5
1
5
15
2. Copier Parts and Accessori es
Chapter 2
2
Middle Left Doo r
1
Misfeed Removal
2
Guide Plate
Duplex Unit
3
Stora ge Drawer
4
Lower Left Door
5
3
1139O1252A
4
: Open to clear a paper misfeed.
➭
pp. 167, 176
: Open to clear a paper misfeed.
➭
pp. 167, 176
: Turns over 1-s i ded copies f or making 2-s ided
copies.
: Holds copy paper, toner and other supplies.
: Open to clear a paper misfeed.
➭
pp. 167, 176
First Things to Know about EP2050
Page 28
16
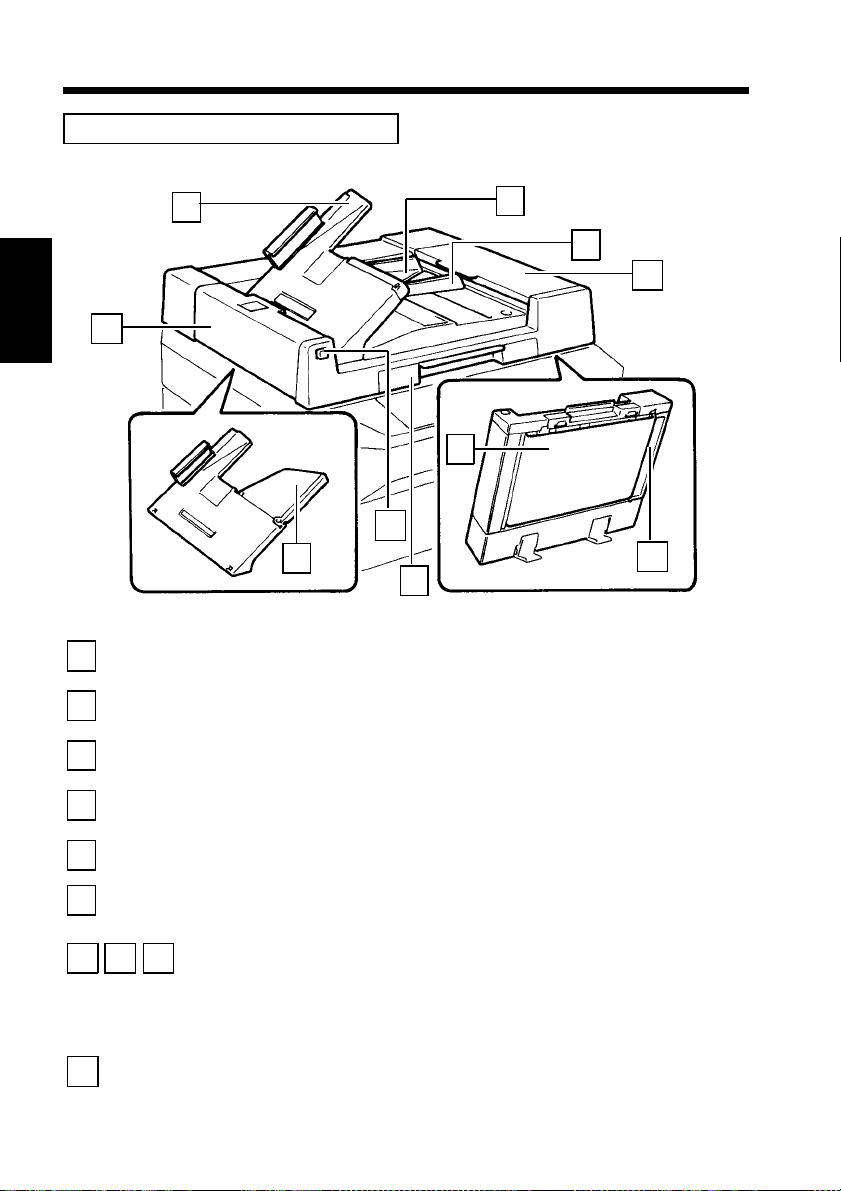
2. Copier Parts and Accessories
Duplexing Document Feeder AFR-7
Chapter 2
1
2
First Things to Know about EP2050
3
4
5
1
F3
Document Exit
Tray
Document Feed
Tray
Document Guide
Plates
Document
Transp ort Be l t
Lock Release Lever
2
3
F1
4
F2
6
5
: Receives original s that are automa tical l y ejecte d
from the AFR-7.
: Load the originals face up on thi s tray.
: Slide the plates as necessary to the size of the
originals.
: Moves the orig inal from the Document Feed Tray
to the Document Exit Tray.
: Press upward to raise the AFR-7.
➭
p. 43
➭
p. 211
F4
1139O1060A
➭
p. 43
Document Exit
6
Tray Extender
F1 F3 F4
Document Feed Unit Door F1, Document Turnover/Exit Unit Door F3,
Document Turnover/Feed U nit Guide Plate F4
Open to clear an original mis feed.
Document Turnover/Exit U nit Door Lock Release Key F2
F2
Press to open Document Turnover/Exit Unit Doo r F3 . Holding F2 down,
➭
open F3.
p. 178
: Pull out to make copies on larger paper.
➭
p. 43
:
➭
p. 178
:
Page 29
Automatic Document Feeder AF-3
1
17
2. Copier Parts and Accessori es
2
3
4
Chapter 2
6
Document Exit
1
Tray
Document Feed
2
Tray
Document Guide
3
Plates
Document Release
4
Key
Document Feed
5
Unit Guide Plate
Document
6
Transp ort Be l t
Lock Release Lever
7
Document Exit
8
Tray Extender
➭
p. 179
5
➭
➭
p. 43
1139O1070A
p. 43
8
7
: Receives original s that are automa tical l y ejecte d
from the AF-3.
: Load the originals face up on thi s tray.
: Slide the plates as necessary to the size of the
➭
originals.
: Press to clear an original misfeed. Hold ing down
the lever, pull out the o rig in al.
: Open to clear an original misfeed.
: Moves the orig inal from the Document Feed Tray
to the Document Exit Tray.
: Press upward to raise the AF-3.
: Pull out to make co pie s on larger paper.
p. 43
➭
p. 211
➭
p. 179
First Things to Know about EP2050
Page 30
18
2. Copier Parts and Accessories
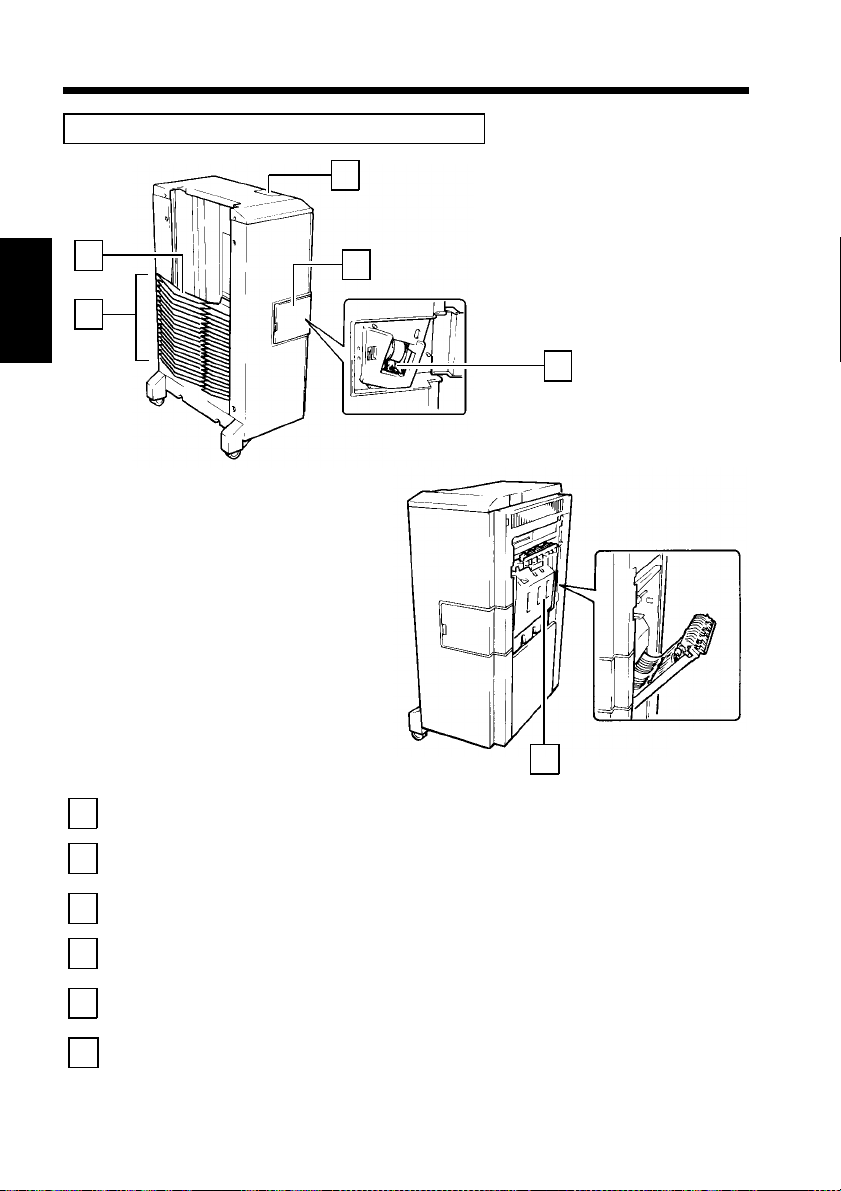
Staple Sorter ST-206 and 20-Bin Sorter S-205
3
Chapter 2
First Things to Know about EP2050
1
1
2
Non-Sort Bin
4
1136O077AA
: Holds up to 100 copies.
➭
5
S
p. 88
1136O069AA
Sort Bins (1st to
2
20th Bin)
Lock Release Lever
3
Staple Cover
4
Staple Cartridge
5
Release Lever
Misfeed Removal
S
Guide Plate
: Hold sorted or grouped copies, each capable of
➭
➭
p. 158
p. 88
➭
p. 181
holding up t o 50.
: Press to unlock th e Sorter.
: Open to replace the Staple Cartridge (ST-206 only).
➭
p. 158
: Move the Lever up to rep lace th e S taple Cartridge
(ST-206 only).
: Open to clear a paper misfeed.
Page 31

Staple Sorter ST-101 and 10-Bin Sorter S-104
1
19
2. Copier Parts and Accessori es
2
Chapter 2
3
1139O1080A
Sort Bins
1
Lock Release Lever
2
Staple Cover
3
Staple Cartridge
4
Release Lever
4
: Hold sorted or grouped copies. The Top Bin is
capable of holding up to 50 cop ies and each of the
2nd to 10th Bi n s up to 25 c op ies , a maxi mum o f
➭
275 copies.
: Press to unlock th e Sorter.
: Open to replace the Staple Cartridge
(ST-101 only).
: Move the Lever up to rep lace th e S taple Cartridge
(ST-101 only).
p. 88
➭
p. 154
➭
p. 154
First Things to Know about EP2050
Page 32

20
2. Copier Parts and Accessories
Data Controller D-102
Chapter 2
6
1
2
3
4 5
1074O203
1
First Things to Know about EP2050
2
3
4
5
6
LCD Dis p lay
Card Insertion Slot
Card
NEXT Key
PREV Key
Printer Connector
: Shows a variety of data accordin g to the card being
used.
: There are six different types of cards available. Use
the right one according to your specific purpose.
: Pres s to go t o the n ext o r prev io us scr een.
: Use to hook up an optional printer to the Data
Controller.
Page 33

2. Copier Parts and Accessori es
21
Chapter 2
First Things to Know about EP2050
Page 34
22
3. Control Panel K eys and In dicator s
Basic Panel
1
Chapter 2
Sort
Sort
Staple
Group
Finishing
Manual
Hole
Punch
2
Steple
Mixed
Orng.
Detect
1
21
22
2
Orig. Copy
Auto Count
Even
Odd
# of Origs.
11
12
2in1
1
2in1
2
2in1
2in1
1
1
Lighter
Auto
Exposure
A
Darker
1
2
3
4
5
First Things to Know about EP2050
6
7
8
9
10
11
3
4 5 6
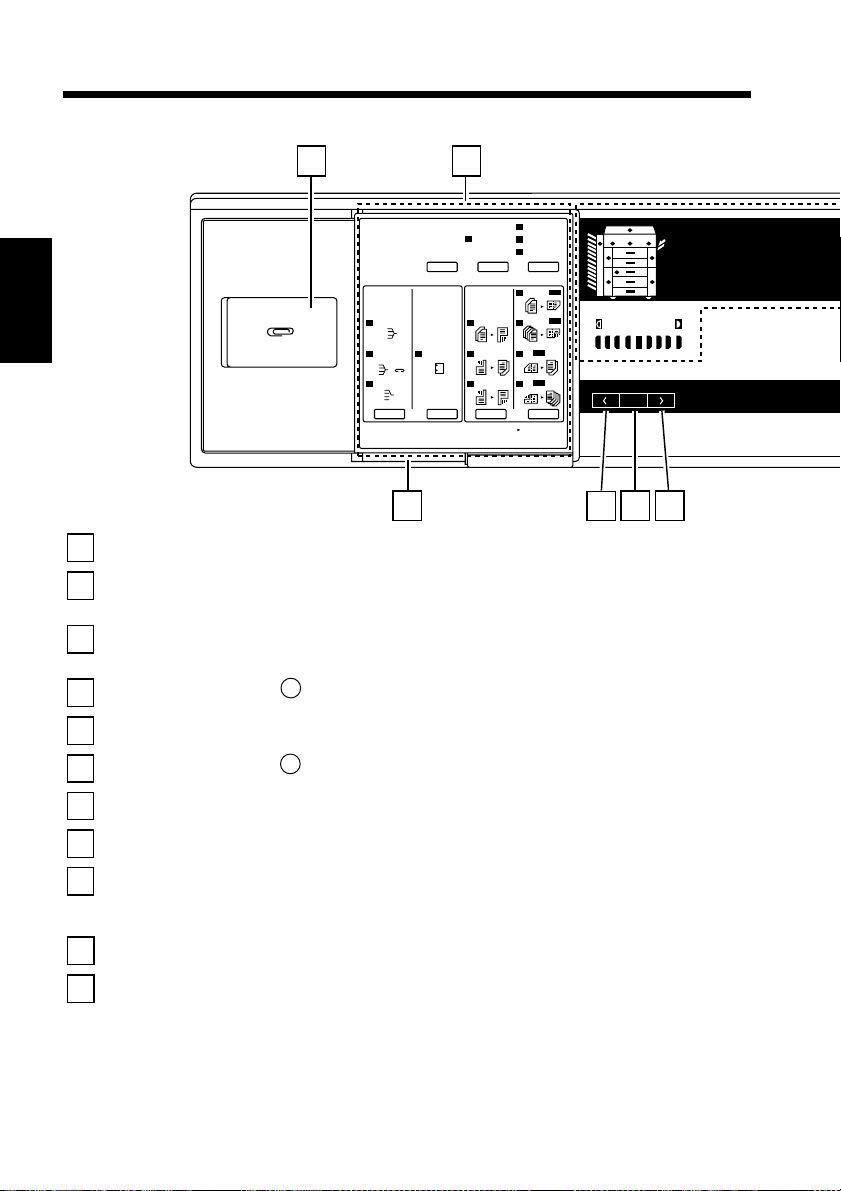
Clip Tray:
Use this tray to put the paper clip used with the documents.
System Panel:
See the other pages in this manual. (Used only when the copier is equipped with options.)
➭
p. 24
Supplementary Panel:
Open the System Panel to reveal the Supplementary Panel controls. Se e the other pages in this
➭
manual.
p. 26
Exposure Control Key ( < , Lighter):
Press as necessar y to make the exposure level lower in the Manual Exposure Mode.
➭
p. 49
Auto Exposure Mode Key:
Press to select either the Auto or Manual Exposure Mode.
➭
p. 49
Exposure Control Key ( > , Darker):
Press as necessary to make the exposure level highe r in the Manual Exposure Mode.
➭
p. 49
Display Panel:
See the other pages in this manual.
➭
p. 28
Multi-Copy Keys:
Use to enter the number of copies to be made and other numeric data.
➭
p. 66
Access Mode Key (ID Key):
Press to enter, and leave, the Administrator mode. The key become s valid only w hen "Copy
Track" function is activated, w h ich is in t h e administ r at or function o f the User ’s Choice.
➭
pp. 31, 36, 132, 139
Energy Saver Key:
Press to set the copier into the Energy Saver Mode.
➭
p. 33
Interrupt Key:
Press once to interrupt a current job with a more urgent one. Press a second time to return to the
previous job.
Pressing the Panel Reset Key or Clear Key does not cancel the Interrupt Mode.
*
➭
p. 68
Page 35

3. Control Panel Keys and Indicators
23
7
123
➭
17
p. 67
➭
PaperZoom
➭
p. 52
16
p. 67
➭
➭
p. 60
p. 62
x0.5~x2.0
Reduce Full size EnlargeAAuto Select
19 1822
20
21
Clear Key:
12
Pres s to cl e a r the nu m ber of copies an d other setting s.
Panel Reset Key:
13
Press to set the copier into the initial mode, clearing all settings made previou sly on the control
➭
panel.
p. 35
It does not, however, clear the contents of the copying job program memory and the settings
*
made immediately before the Interrupt Mode.
Holding down the Key for 3 seconds will initiate the User’s Choice.
Stop Key:
14
Press to stop a multi-copy cycle.
Start Key:
15
Press to star t a copy cycle.
It also tells the status of the copier as follows:
Lit green: The copier is ready to make copies.
Lit orange: The copier is warming up, or the Add Paper, Misfeed, or
Paper Select Key:
16
Press to select the desired paper size.
Auto Paper Mode Key:
17
Press to select the Auto Paper Mode.
Enlargement Key:
18
Pres s to se le ct a des ired fix e d e nlargement ratio.
Full Size Key:
19
Press to select full size (100%).
Reduction Key:
20
Press to select a desired fixed reduction ratio.
Zoom Up/Down Keys:
21
Press as necessary to make the zoom ratio larger or smaller in 0.1% increments.
Message Display:
22
Serves as the basic source of information showing such information a s warning messages and
copying mode currently selected for use.
Call-Technical-Representative Indicator is lit.
8
123
456
789
0C
1136P250DA
15
➭
p. 52
➭
p. 52
➭
p. 140
➭
1136P250DA
p. 53
9
10
11
12
13
14
Chapter 2
First Things to Know about EP2050
Page 36

24
3. Control Panel Keys and Indicators
System Panel
Chapter 2
Sort
Sort
Staple
Group
7
Finishing
1
Manual
Hole
Punch
6
Steple
2 3
Mixed
Orng.
Detect
1
2
21
22
Orig. Copy
Auto Count
Even
Odd
# of Origs.
11
12
2in1
1
2in1
2
4 5
123
2in1
2in1
1
1
Lighter
Auto
Darker
A
Reduce Full size EnlargeAAuto
x0.5~x2.0
PaperZoomExposure
1136P790CA
1136P790CA
1
2
First Things to Know about EP2050
3
4
5
6
7
Manual Staple Key
Mixed Original Detection
Mode Key
Original Count Mode
Key
▲
Original Copy Type
Select Key II
Original Copy Type
▲
Select Key I
Hole Punch Mode Key
Finishing Mode Select
Key
: Pres s to staple copy sets or stack s already
➭
made.
p. 90
: Press when making copies usi ng the AF-3 or
AFR-7 in which origi nals of assort ed sizes
➭
are loaded together.
p. 44
: Press to se lect t he appro priate or iginal count
➭
mode.
p. 80
: Press as neces sary to sel ect the type of
copying j ob making 1- or 2- s ided c op ies
➭
from 1- or 2-sided originals.
p. 83
: Press as necessary to select the type of 2-in-1
➭
copying job you wish to perform.
p. 81
: Press to set the copier into the Hole Punch
➭
Mode.
p. 90
: Press as neces sary to sel ect the type of
finishing mode you want.
➭
p. 90
Page 37

3. Control Panel Keys and Indicators
25
Chapter 2
First Things to Know about EP2050
Page 38

26
3. Control Panel Keys and Indicators
Supplementary Panel
Chapter 2
1
2
First Things to Know about EP2050
3
4
5
6
7
8
9
Insertion Mode
Key
Cover Mode Key
Meter Count Key
Memory Input Key
Job Memory Select
Key
Zoom Memory
Select Key
Auto Size Mode
Key
Erase Mode Key
Enter Key
3
1314
5
Job
Zoom
Memory
OHP
Interleaving
Page
Insertion
Book 1
Book 2
Display
(Front
Memory
Cover
(Front)
Cover
Margin 1
Margin 2
Input
Meter
Count
Toner
Drum
Dehumidify
12 11 10 9
6
&
7 4 1 2
Auto Size
Erase 1
Lighter
Auto
A
Darker
x0.5~x2.0
Reduce Full size Enlarge
1136P252CA
Erase 2
Back)
Erase 3
Erase 4
OK
8
: Press to set the copier into the Insertion Mode.
➭
p.118
: Press to set the copier into the Cover Mode.
➭
p. 110
: Press to check for each of the cur ren t counts of
differe nt elec tr oni c count ers of the copi er.
➭
p. 128
: Press to store a copying job program or a zoom
ratio in the memory.
➭
p. 54
: Press to recall a copying job program previously
➭
stored in the job memory.
p. 126
: Press when storin g a zoom ratio in, or calli ng one
up from, the zoom memory.
➭
pp. 54-55
: Press as necessary to select the Auto Size Mode.
p. 56
: Press to set the copier into the Erase Mode.
➭
p. 100
: Press to validate the selection made b y t he Select
Key.
123
1136P252CA
➭
PZoomExposure
Auto
A
Page 39

3. Control Panel Keys and Indicators
27
Select Key
10
File Margin Mode
11
Key
Book Mode Key
12
Drum Dehumidify
13
Key
Auxiliary Toner
14
Replenishing Key
: Press to select a function shown on the Message
Display.
: Press to set the copier into the File Margin Mode.
➭
p. 103
: Pres s to s et the co pie r in to th e Bo ok Co py Mode.
➭
p. 107
: Press to remove condensation formed on the
surface of the PC Drum.
: Press when the image on the copy becomes too
➭
light.
p. 130
➭
p. 131
Chapter 2
First Things to Know about EP2050
Page 40

28
3. Control Panel Keys and Indicators
Display Panel
1
Chapter 2
Auto
5 6 7 4 3 2 8
123
1136P253CA
1
First Things to Know about EP2050
14
13 12 11 10 9
Monitor Display
•
Paper So ur ce In di ca tor :
Shows the Drawer which is currently selected for
➭
p. 61
use.
It also lig hts up when a 1-s i ded c op y is s to red i n
the Duplex Unit.
Example: Shows t hat the 1st Drawer is currently
Example. selected for use.
1136P46OAA
•
- Closure Failure Indicator:
1 5
Indicates that a Door is lef t open.
The location of the Door left open is also
indicated by a round marker.
Example: Indicates that the Right Door is left
Example. open.
1136P435AA
1136P435AA
•
- Misfeed Indicator:
1 2
Indicates that a paper mis f eed has occurr ed,
together with the locati on of the misfeed.
➭
pp. 145, 166
Example: Shows t hat a misfeed has occurred
Example. inside the copier.
➭
pp. 145, 162
1136P436AA
Page 41

3. Control Panel Keys and Indicators
29
3
1136P56OAA
Call-TechnicalRepresentative
Indicator
: Indicates that the copier has developed a
malfunction.
When a malfunction occurs, the
corresponding malfunction code is shown
➭
p. 145
4
1136P54OAA
Maintenance Call
Indicator:
on the Message Display.
: Indicates when a regularly scheduled
preventive maintenance c all becomes
necessary. Call your Tech. Rep. as soon as
possible once the I nd icator has lit up.
➭
p. 145
6
1139O3270A
7
1139O3260A
Multi-Copy D isplay : Shows the number of copies set to be m ade.
8
Add Toner
Indicator
Wait Indicator : Indicates that the copier is warming up. No
: Indicates that the Toner Bottle is ru nn ing
out of ton er. R eplace the Toner Bottle as
soon as possible.
➭
pp. 144, 146
copy cycle can be initiated as long as this
Indicator stays lit. Wait until it goes out.
➭
p. 144
During a multi-copy cycle, it shows the
number of remaining copies to be made
instead of the total set number of copies.
9
10
11
123
1136P50OAA
1139O3280A
1136P53OAA
Plug-In Counter
Indicator
Add Staples
Indicator
Toner Collecting
Box Full Indicator
: Indicates that the Plu g-In Co unter (optio n)
is unplugged or Magnetic Card (option)
removed.
➭
p. 145
: Indicates that the Staple Cartridge is
running out of staples. Replace the Staple
Cartridge as soon as possible.
➭
pp. 145, 154, 158
: Indicates that the Toner Co llecti ng Bo x is
full of spen t toner. Call your Technical
Representative a s soon as possibl e once the
Indicator has lit up.
12
1139O3400A
13
1136P35OAA
Expos ure Informa tion Di splay
14
Remove Copies
Indicator
Add Paper
Indicator
: Indicates that there is a copy or copies left
in any of the Sorter Bins. Remove copies
from all Bins.
: Lights up when the curren tly selected
Drawer has run ou t of pape r . Add pa per a s
necessary.
➭
pp. 144, 148
Chapter 2
First Things to Know about EP2050
Auto
1136P254CA
1136P255CA
Auto Exposure
Indicator
Exposure Level
Indicator:
: Indicates that the copier is now in the
Auto Exposure Mode.
➭
p. 48
: Shows th e expo sure setting level in
the Manual Expo sure Mode.
➭
p. 48
The center LED is no rmally lit.
Page 42
30
4. Turning ON and OF F and Resetting the Copier
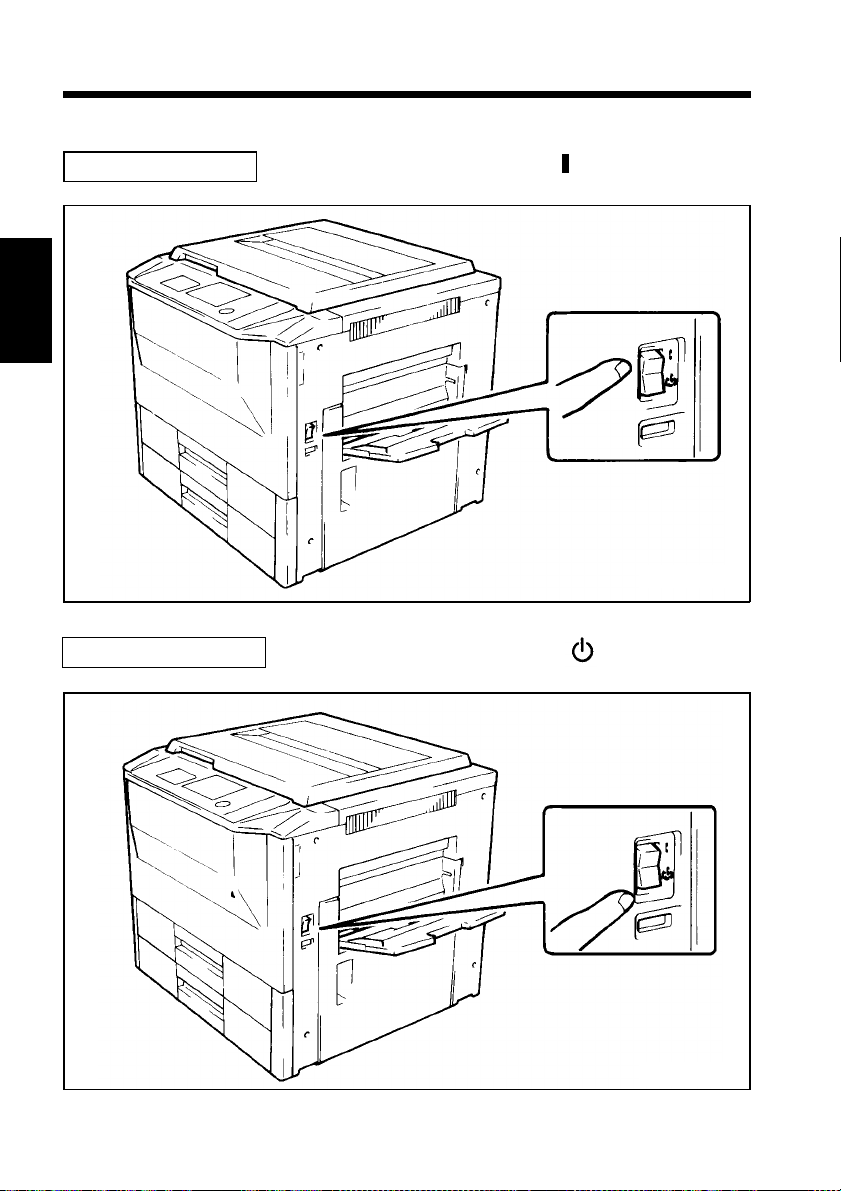
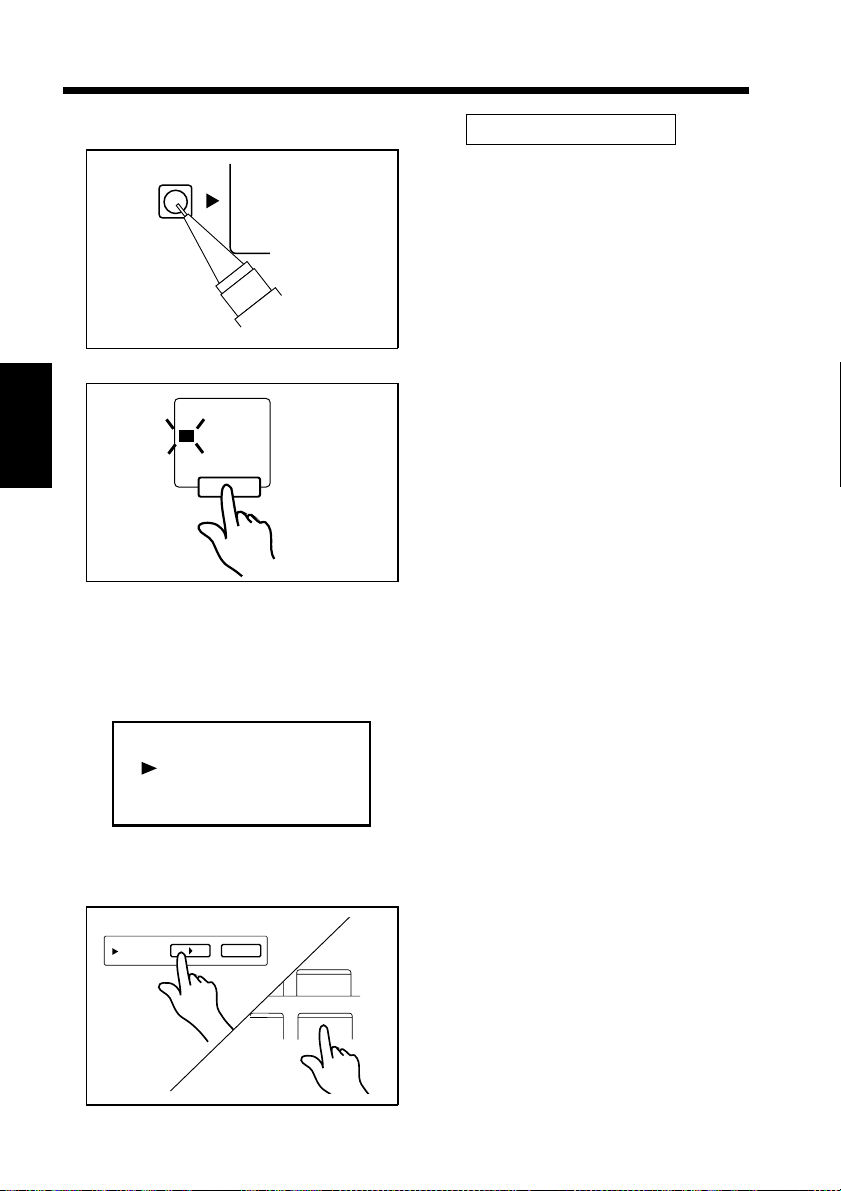
Turning ON and OFF
Turning Copier ON
Chapter 2
..... Press the Power Switch to the " " position.
1136O070AA
Turning Copier OFF
First Things to Know about EP2050
..... Press the Power Switch to the " " position.
1136O071AA
Page 43

4. Turning ON and OFF and Resetting the Copier
When Copier is Turned ON ...
The Wait Indicator lights up on the Display Panel of the control panel
indicating that the copier is now warming up.
Auto Count
Mixed
Manual
Steple
Sort
Sort
Hole
Punch
Staple
Group
Finishing
Orng.
Detect
1
21
22
2
Orig. Copy
Even
Odd
11
12
1
2
# of Origs.
2in1
2in1
2in1
2in1
Auto
Darker
A
Reduce Full size EnlargeAAuto Select
X1.000
x0.5~x2.0
1
1
Lighter
About 2 min. and 30 sec.
In about 2 minutes and 30 seconds, the Wait Indicator goes out. Now, the copier
is ready to make copies.
Auto Count
Mixed
Manual
Steple
Sort
Sort
Hole
Punch
Staple
Group
Finishing
Orng.
Detect
1
21
22
2
Orig. Copy
Even
Odd
# of Origs.
11
12
1
2
2in1
2in1
Auto
2in1
1
2in1
1
Lighter
X1.000
Darker
x0.5~x2.0
A
Reduce Full size EnlargeAAuto Select
AUTO
PaperZoomExposure
AUTO
PaperZoomExposure
123
456
789
0C
1136P256CA
123
456
789
0C
1136P256CA
31
Chapter 2
First Things to Know about EP2050
1136P257CA
We call the setting s e stablished on the control panel at this time the "initial
➭
settings."
p. 34
NOTE
A screen prompting you to enter your access number
appears on the Message Display if "Copy Track" of the
Enter Access #:
Administrator function of the User’s Choice has been set to
"YES. " When this prompt appears, y ou canno t start a co py
cycle until you enter the access number. En ter th e access
1136P395CA
number by follo win g the p r oced ures explained in "Entering
➭
the Access Number."
p. 36
1136P257CA
Page 44

32
4. Turn ing ON and OFF and Resettin g the Copier
Auto Copy Start Function
The Auto Copy Start Fu ncti on allows a copy proces s to be star ted as so on as the
copier completes warming up .
Using the Function
Place the Original onto the
Original Glass or in the
1
Chapter 2
1136O190AA
Document Feeder. ➭ pp. 40, 43
Press the Start Key, if it is green.
The Start Key turns orange.
2
First Things to Know about EP2050
AUTO
X1.000
Paper
x0.5~x2.0
Reduce Full size EnlargeAAuto Select
1139O2360A
123
456
789
0C
1136P259CA
1139O2360A
As soon as th e cop i e r co mp l et es
warming up, the Wait Indicator
goes out, and the copy
cycle is started automatically.
1136P259CA
Page 45

4. Turning ON and OFF and Resetting the Copier
Energy Saver Mode
If the copier is s h ut down whe n it is not in u se, it take s the co p i er a maximum of
2 minutes and 30 seconds to complete the warm-up cycle. Instead of turning the
copier OFF, it is a good idea to use th e Ener gy Saver Mode. The Mode will
minimize the time it takes the copier to complete the warm-u p cycle down to
about 30 seconds.
•
To set the copier into the Energy
Saver Mo de, pres s t he En erg y Saver
Key on the control panel.
◆
Then, all control panel Indicators
go out, except the Start Key which
remains lit green.
Auto
X1.000
Darker
x0.5~x2.0
A
Reduce Full size EnlargeAAuto Select
AUTO
PaperZoomExposure
123
456
789
0C
Sort
Sort
Staple
Group
Finishing
1136P260CA
1136P260CA
Mixed
Manual
Orng.
Steple
Detect
1
2
Hole
21
Punch
22
Orig. Copy
Auto Count
Even
Odd
# of Origs.
11
12
2in1
1
2in1
2
2in1
2in1
1
1
Lighter
33
Chapter 2
Leaving the Energy Saving Mode
1139O2360A
Lit Up Green.
•
To allow the copier to leave the
1136P261DA
Energy S ave r Mode , p res s an y Ke y
on the control panel, for instance, the
Start Key.
◆
This cancels the Energy Saver
Mode, and the copier will be ready
to make copies in about 30 seconds.
First Things to Know about EP2050
Page 46

34
4. Turn ing ON and OFF and Resettin g the Copier
Initial Mode and Panel Resetting
Initial Mode
When the Power Switch is turned ON, the initial settings are indicated on the
control panel. The initial settings serve as the reference for all control panel
settings to be later made.
Auto Count
Finishing
Mixed
Manual
Steple
Hole
Punch
Orng.
Detect
1
21
22
Orig. Copy
Even
Odd
# of Origs.
2in1
11
2in1
12
2
2in1
1
2in1
2
Auto
1
1
Lighter
Darker
A
Reduce Full size EnlargeAAuto Select
Chapter 2
Sort
Sort
Staple
Group
•
From 1-sided original t o 1-sided co py
•
Sort (Non-Sort f or copiers not equipped with a Sorter)
•
Number of copies to be made: 1
•
Zoom ratio: Full size
•
Auto Paper Mode
•
Auto Exposure Mode
X1.000
x0.5~x2.0
Auto
123
456
789
0C
PaperZoomExposure
1136P262CA
1136P262CA
First Things to Know about EP2050
Useful Tip
The initial settin gs can be changed by usi ng the User’s Choice. For details, see
➭
"User’s Choice."
p. 132
Page 47

4. Turning ON and OFF and Resetting the Copier
Panel Resetting
The Pane l Reset Key resets al l c ontrol panel settings to initial mode in c luding the
number of copies to be made and zoom ratio.
If Automatic/Duplexing Document
*
Panel Reset
Feeder AF-3/AFR-7 is used, the
original present on the Original
Glass will be ejected out of the unit.
1139O4782A
1139O4782A
Useful Tip
The Panel Reset Key enables you to cancel all previous settings efficiently. To
avoid miscopy, try to press the Panel Reset Key befo re attempting to make any
setti n gs f or yo ur ow n job .
35
Chapter 2
Auto Reset Function
If no Key on the control panel is pressed within about 60 seconds after a copy
cycle has been completed or copy settings made, the Auto Reset Function is
activated to cause the copier to return to the initial mode automatically.
Useful Tip
The Auto Reset Function can be enabled or disabled by using the User’s
➭
Choice. For more details, s ee " User’s Choice."
p. 132
First Things to Know about EP2050
Page 48

36
4. Turn ing ON and OFF and Resettin g the Copier
Entering the Access Number.
If "Copy Track" of the Administrator
Enter Access #:
1136P395CA
function of the User’s Choice has
been set to "YES," the access number
assigned for your own department
must be entered before you can make
a copy.
Chapter 2
First Things to Know about EP2050
123
456
789
0C
X1.000
Access
Access
1136P263CA
AUTO
1136P263CA
1136P396CA
1136P371CA
Using the appropriate
Multi-Copy Keys, enter the
1
4-digit access nu mber and press
the Access Mode Key.
•
The Message Display changes
from the "Access #" prompt to
initial screen. A copy cycle can
now start. Make your copies as
necessary.
When the copy cycle is
completed, press the A ccess
2
Mode Key a second time.
•
The Display changes from t he
normal to the "Access #"
prompt screen.
Enter Access #:
1136P395CA
NOTE
Do not forget to press the Access Mode Key after your copy cycle has been
completed.
Page 49

Chapter 3
Maki ng Cop i e s
This Chapter shows y ou ho w to make copies us in g the basic, system and
suppl eme n tary fu nc t ion s .
The Basi c Copying Overview is on p. 38
The System Copying Overview is on p. 72
The Supplementary Copying Overview is on p. 96
These pages offer quick, at-a-glance instructions for making cop ies. Each
step is keyed to a page number with a more detailed description.
1. Basic Copying Overvi ew 38
2. Basic Copying Procedure
Original Placement 40
Using Automatic/Duplexing Document Feeder 42
Image Density 48
Zoom Ratio
•
Types o f Zo om R at io 50
•
Auto Siz e Mode 56
•
Zoom Ra t i o Table
(Original Size to Paper Size) 58
Paper Size
•
Manual Mode 60
•
Auto Paper Mode 62
•
Special Paper Mod e 6 4
Number of Co pie s 66
Copy Cycle Start 67
Interrupt Mode 68
Multi Bypass Copying 70
3. System Copying Overview 72
4. System Copying Procedure
Original Copy Type
Finishing Mode
5. Supplementary Copying Overview 96
6. Supplementary Function Setting
Erase 98
File Margin 102
Book 106
Cover 108
Insertion 114
Job Program Memory 124
▲
•
Types I 74
•
Types II 76
•
Original Count Mode 82
•
Finishing Modes 86
•
Auto Dual Function 88
•
Selecting th e Fi nishing Mode 90
•
Typical Finishing Mode 94
37
Chapter 3
Making Copies
Page 50

38
1. Basic Copying Overview
Placing the Original
1
•
Raise the Origin al Cover
and plac e t he original face
down on t he Original
➭
Glass.
OR
Chapter 3
•
Load the originals f ace up
in the AF-3/AFR-7.
➭
Making Copies
p. 40
p. 43
1139O0200A
1139O0210A
Setting the Image
2
Density
•
Select the A uto Exposure
➭
Lighter
p. 49
Auto
Exposure
A
➭
p. 49
Exposure
A
Darker
1136P264CA
1136P264CA
Darker
1136P265CA
1136P265CA
Mode.
OR
•
Set the image density in
the Manual Exposure
Mode.
Lighter
Selecting the Zoom
3
Ratio
•
Select the A uto Size Mode.
➭
p. 56
Auto Size
1136P266CA
➭
p. 52
1136P267CA
1136P441CA
1136P266CA
1136P267CA
1136P441CA
OR
•
Select the desired fixed
zoom rati o.
Reduce Full size Enlarge
OR
•
Select the zoom ratio of
your ch oice using the
Zoom Up/Down Keys.
➭
p. 55
x0.5~x2.0
Sort
Sort
Staple
Group
Finishing
Punch
Manual
Steple
Hole
Mixed
Orng.
Detect
1
21
22
2
Orig. Copy
Auto Count
Even
Odd
# of Origs.
11
12
2in1
1
2in1
2
2in1
2in1
1
1
Page 51

1. Basic Copying Overview
39
Selecting the Copy
4
Paper Size
•
Select the A uto Paper
➭
A4
B4
A5
p. 62
AUTO
Auto Select
A
1136P268CA
➭
p. 60
B5
A4
M FEED
Auto Select
A
1136P269CA
Mode.
X1.000
OR
•
Select the desired copy
paper size.
1136P268CA
Setting the Number
5
of Copies
•
Using the Multi-Copy
Keys, set the number of
copies to be made or the
number of copy
sets/stacks.
➭
23
56
89
0C
If you en ter a wrong
number, press the C lear Key
C and then enter
1136
the correct number.
p. 66
1139O2640A
Starting the Copy
6
Cycle
•
Press th e Start Key to start
the cop y cycle.
➭
p. 67
113
Press the Stop Key to
stop the copy cycle.
1139O2360A
1139O2360A
Chapter 3
Making Copies
Lighter
Auto
Darker
A
x0.5~x2.0
Reduce Full size EnlargeAAuto Select
123
PaperZoomExposure
123
456
789
0C
1136P270DA
1136P270DA
Page 52

40
2. Basic Copying Procedure
Placing Originals
Place the original face down on the Original Glass.
Different methods are used to load the originals depending on the type of
originals and whether the copier is equipped with an Automatic/Duplexin g
Document Feeder AF-3/AFR-7 (option).
Sheet Originals (Standard Size)
Raise the Original Cov er.
1
Place the original face dow n on
the Original Gl as s and align its
Chapter 3
1139O0050A
rear left corner with the
marker on the Original Width
Scale on the left side of the
platen.
Gently lower the Original Cover.
2
▼
Making Copies
Highly Transparent Originals
1139O0070A
Place the original in the same
way as the sheet originals.
1
Place a blank sheet of paper o f
the same size as the original over
2
the original. Then lower the
Original Cover.
NOTE
If this is not done, the copier will
not be able to detect the size of
the original and the Auto Paper
or Aut o S iz e fu nc tion is disabled.
Further, the cop y produce d may
be of poor quality.
Page 53

2. Basic Copying Procedure
Book Original
*"Book origina l" refers to an open bound original.
Posit ion th e highe r -n umb ere d pag e on
the Original Widt h Scale e nd.
If the book is thick, you can make
copies with the Orig inal Cover raised .
NOTES
•
Not positioning an open book
1134O037AA
properly will result in copies
with pages in incorrect order.
•
Do not look directly at the
Original Glass surface, as a
very intense beam of light can
be emitted.
NOTES
•
Be sure to rais e the Or iginal Cover 15° or m ore before placing the origin al.
If the Cover is raised only to an angle less than 15°, the copier may fail to
select the correct copy paper size or zoom raio.
41
Chapter 3
Making Copies
15°
1139O0080A
•
Do not place an original weighing more than 3 kg on the Original Glass.
Also, you should never attempt to press the book hard on the Original Glass.
Page 54

42
2. Basic Copying Procedure
Using the Automatic/Duplexing Document Feeder
AF-3/AFR-7
The Automatic/Duplexing Document Feeder AF-3/AFR-7 automatically
feeds sheet originals placed on the Document Feed Tray one by one. After
the copy cycle has been completed, they automat ically eject the original
onto the Document Exit Tray.
Some originals may not be suitable for reliable operation of the
AF-3/AFR-7. Here is a gui deli ne.
u Originals Suitable for the AF-3/AFR-7
Type of Originals : Sheets
Type of Original Paper : Plain paper
Original Size
•
Chapter 3
Normal Mode
•
Mixed Original
Detection Mode
Original Weight : 1-sided originals and 2-in-1 Mode
Making Copies
* Light wei gh t O rig inal Mode:
This mode allows you to use originals weighing in the range between
2
40g/m
Detection mode.
and 110g/m2 when the copier is in the s tan dar d or Mixed Original
:
1-sided and 2-sided (AFR-7 only) originals
: A3L, B4L, A4L, A4C, FLS.L
2-in-1 (Dual Original Scanning) Mode
: A4C
1-sided and 2-sided (AFR-7 only) originals
: A3L, B4L, A4L, A4C
: 50 to 110g/m
2-si ded or iginals
: 60 to 90g/m
*Lightweight Orig inal Mode
: 40 to 110g/m
2
2
2
Be sure to use the "Origin al Thickness" function of the User’s Ch oice t o
allow the use of these originals when you need to make copies of originals
with AF-3/AFR-7 wh ose weights fall in the above range.
Not using the Lightweight Orig inal Mode could damage such originals.
➭
pp. 132, 133
u Originals Not S uitable for reliable operation of the AF-3/AFR-7
•Book
•Typing paper, paraffin paper, and other thin paper
•Transparencies, trans lucen t p aper
•Wrinkled, dog-eared, curled, or to rn origi nals
•Clipped or stapled originals
•Carbon-backed originals
Page 55
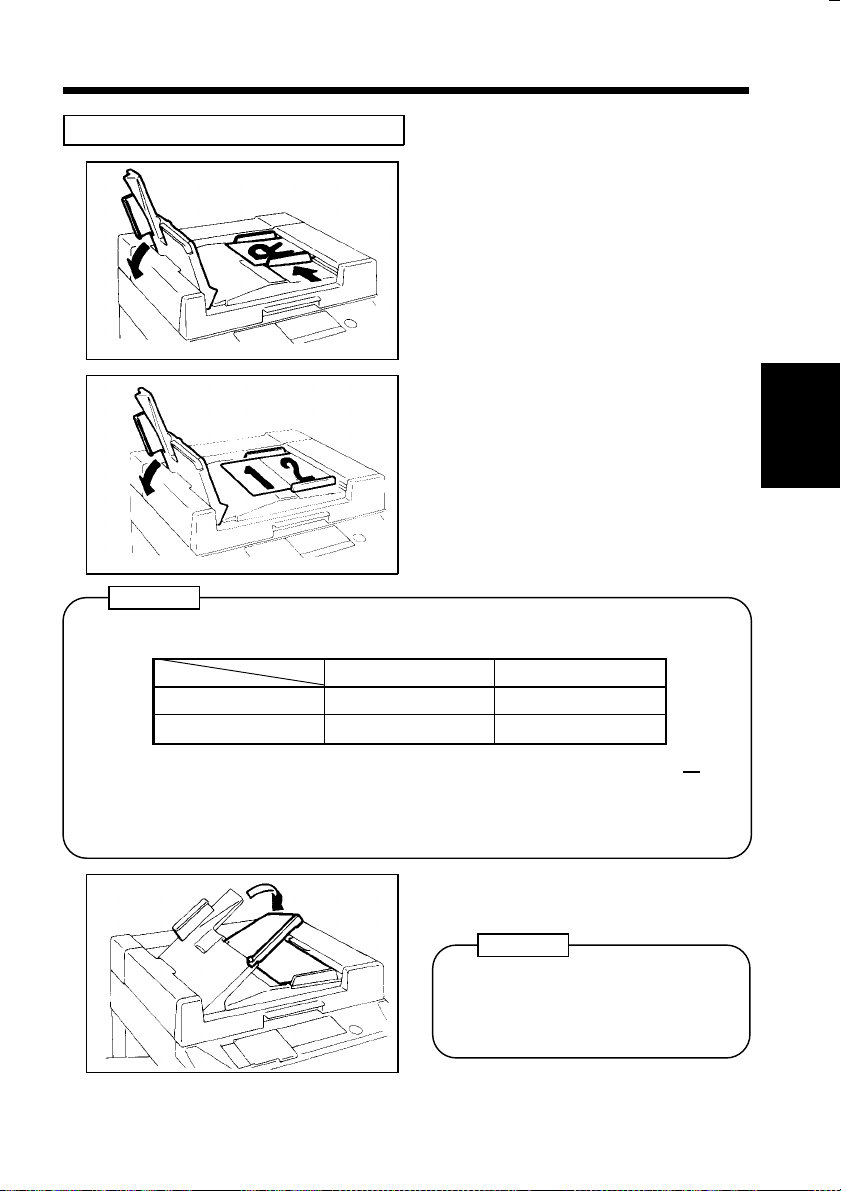
Loading the Standard Size Origina ls
43
2. Basic Copying Procedure
Sheet Original
1136O191AA
2-in-1 Original
1136O192AA
NOTES
•
Up to the f ollowing nu m ber s of ori gin als can be load e d in AFR- 7/A F- 3.
A4 or small e r A3 or B4
AFR-7 50 sheets 30 sheets
AF-3 30 sheets 15 sheets
Swing the Document Exit Tray
to the left as shown.
1
Place a neat stack of originals
face up on the Document Feed
2
Tray, and then slide the
Document Guide Plates to the
size of the originals .
For a 2-in-1 original, posi tion the
lower-numbered page on the left.
Chapter 3
Making Copies
•
Make sure that the top level of the original sta ck do es no t exceed the
marking.
•
Also make sure that the Document Guide Plat es are in touch with the edge s
of the original stack.
Swing the Document Exit Tray
back again.
3
NOTE
The copy cycle cannot be initiated
unless you swing the Document
Exit Tray back again.
1136O193AA
Pull out the Document Exit Tray
Extender if you are using larger paper.
▼
Page 56
44
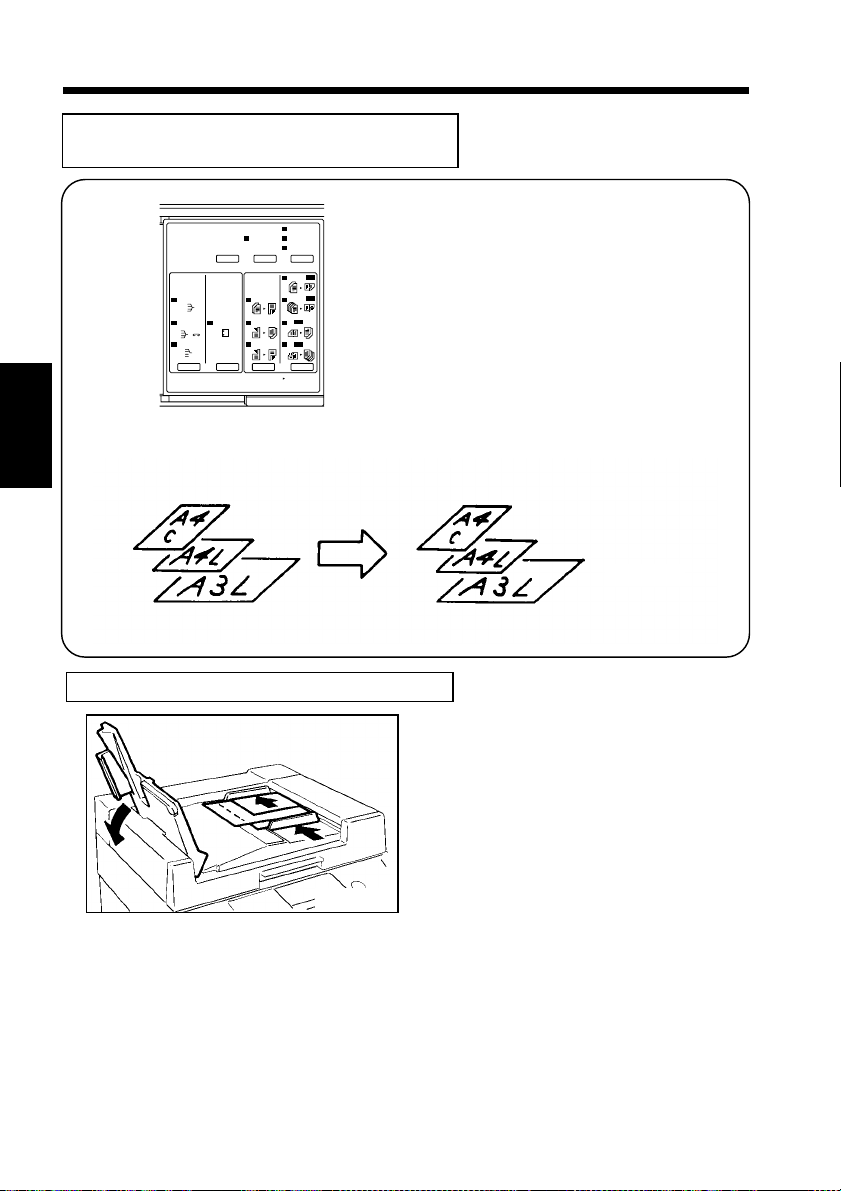
2. Basic Copying Procedure
Loading Originals of Assorted Sizes
(Using the Mixed Original Detectio n Mode)
Manual
Steple
Sort
Sort
Hole
Punch
Staple
Group
Finishing
Orng.
Detect
1
21
22
Orig. Copy
Even
Odd
# of Origs.
2in1
11
2in1
12
2
2in1
1
1
2in1
1
2
1136P251CA
Auto Count
Mixed
Mixed Original Detection Mode Copying
Chapter 3
<Origin al Stack>
Making Copies
Using the Mixed Or iginal Detection Mode
You can load originals of different
widths and lengths in the
AF-3/AFR-7 and make copies
automatically (Auto Paper, Auto Size)
as necessary according to the size of
each original.
<Copy Stack>
1140O277
(Ex.) Auto Paper Mode
Swing the Document Exit Tray
to the left as shown.
1
1139O0120A
Load the stack of originals on the
Document Feed Tray so that the
rear edge of each original is
pressed against the rea r
Document Guide Plate.
Slide the front Docu ment Guide
2
Plate to the rear so t hat it is
pressed against the front edges of
the originals wi th t he g reatest
width.
Page 57

Manual
Staple
NOTE
Mixed
Orig.
Detect
1139O0100A
Auto Count
Even
Odd
1136P272CA
2. Basic Copying Procedure
Swing the Document Exit Tray
back again and pull out the
3
Document Exit Tray Extender.
Press the Mixed Origin al
Detection Mode Key.
4
This completes the setti ng
procedure.
Now, make your copie s by
following the steps giv en in
"Basic Copying Overview" on
p. 38
45
Chapter 3
The Sort-and-Staple or Manual Staple mode cannot be used in the Mixed
Original Detection mode if the originals are of varying widths.
Making Copies
Page 58

46
2. Basic Copying Procedure
For Originals Not Suita ble fo r R eliable Operation on the AF-3/AFR-7
Raise the AF-3/AFR-7 and place
the original face down on the
1
Original Glass. Align the rear left
corner of the original with the
marker on the Original Width
Scale. Then, press the rear edge
of the original up against the
Original Positioning Plate at the
rear side of the Original Glass.
Gently lower the AF-3/AFR-7,
and start the copy cycle.
2
When the copy cycle is
completed, raise the AF-3/A FR-7
3
and remove the original from the
Original Glass.
Original Width Scale
Chapter 3
Original
Positioni ng Plate
1139O0920A
1136O170AA
▼
Making Copies
NOTES
•
The AF-3/AFR-7 does not automatically eject an original manually placed
on the Original Glass. If you ha ve two or more originals to make copies
from, place originals on the Original Glass one by one.
•
Be sure to raise the AF-3 /AFR-7 to an angle mor e tha n 15° before placing
the original on the Or iginal Glass.
Page 59

2. Basic Copying Procedure
47
Chapter 3
Making Copies
Page 60

48
2. Basic Copying Procedure
Image Density
123
456
789
0C
PaperZoomExposure
Lighter
Auto
Darker
A
x0.5~x2.0
Reduce Full size EnlargeAAuto Select
123
The image density level of copies can be adjusted either in the Auto or Manual
Exposure Mo de. Select the appropriate mode according to your particular
Chapter 3
needs.
Types of Exposure Modes
Auto Exposure Mode
In the Auto Exposure Mode, the
copier makes copies wit h opti mum
Making Copies
Auto
image density by automatical ly
adjusting the exposure level according
to the image density of the original.
1136P274CA
Manual Exposure Mode
In the Manual Exposure Mode, you
can vary th e expo sure level to make a
copy with a desired image density.
1136P273DA
1136P275CA
1136P275CA
Useful Tips
•
The exposure level in the Auto Exposure Mode can be varied by using the
➭
User’s Choice to sui t your needs .
•
The copier has been factory-set to automatically select the Auto Exposure
pp. 132, 135
Mode. The User’s Choice ca n be u sed to change this default setting to the
➭
Manual Exposure Mode.
pp. 132, 134
Page 61

Selecting the Exposure Mode
Auto Exposure Mode
Auto
Exposure
Lighter
Darker
A
1136P276CA
Manual Exposure Mode
Exposure
Lighter
Darker
A
1136P276CA
2. Basic Copying Procedure
Press the Auto Exposure Mode
Key A as necessary to light up
the Auto Exposure Indicator
Auto .
Each time the Auto Exposure
*
Mode Key A is pressed, the
Manual and Auto Exposure
Mode are selected alternately.
Press the Exposure Control Key
< or > to light up the
1
Expos ure Level Indicator.
49
Chapter 3
36P277CA
Lighter
136P278CA
Exposure
Lighter
Darker
A
Exposure
A
Darker
1136P277CA
1136P278CA
1136P279CA
1136P279CA
Hold down the Exposure Control
Key < or > until the desired
2
exposure level is reached.
To make the image darker :
Press or hold down the Exposure
Control Key > .
To make the image lig hter :
Press or hold down the Exposure
Control Key < .
Making Copies
Page 62

50
2. Basic Copying Procedure
Zoom Ratio
123
456
789
0C
PaperZoomExposure
Lighter
Auto
Darker
A
x0.5~x2.0
Reduce Full size EnlargeAAuto Select
123
The zoom ratio will be set automatically by the copier when in the Auto Size
Mode or can be set manually by the operator when in the Manual Mode.
Chapter 3
Select the appro priate mode according to your needs.
The selected zoom ratio is shown on the Message Display.
Types of Zo om Ra ti os
Fixed Zoom Ra tios
Making Copies
Three reduction rat ios (×0.500,
A3-A4
B4-B5
x0.707
Reduce Full size Enlarge
Auto
×0.707, ×0.816)
Three enlargement rat ios (×1.154,
×1.414, ×2.000)
And Full Size (×1.000).
1136P273DA
Zoom Ratios
x1.500
Zoom
x0.5~x2.0
1136P281CA
Auto
1136P282CA
1136P281CA
Any rati o fro m 50% to 20 0% (i n 0.1 %
increments) other than the fixed ratios
can be selected.
1136P282CA
Page 63

Select Zoom#:
>1:<X1.000>
2:<X0.930>
AUTO
A4
Meter
Count
Input
Job
Zoom
Memory
Memory
1136P283CA
1136P283CA
Auto Size
2. Basic Copying Procedure
Zoom Memory
You may want to store frequently
used zoom ratios in memory and call
one up from memory a s necessary for
use in your copying job.
Up to two different zoom ratios can
be stored in memory .
The fol l owing two zoom rati os have
*
been factory-set:
Memory 1: ×1.000 (full size)
Memory 2: ×0.930
Auto Size Mode
When in this mode, the copier
automatically selects the zoom ratio
based on the original size and copy
paper size currently selected for use.
51
Chapter 3
1136P284CA
1136P284CA
Making Copies
Page 64

52
2. Basic Copying Procedure
Selecting the Fixed Zoom Ratios
Reduce Full size Enlarge
1136P285CA
Press the Reduction, Full Size, or
Enlargement Key to s elect a fixed
zoom rati o of yo ur cho ic e.
1136P285CA
B4-A4
B5-A5
x0.816
Auto
Chapter 3
x0.500
B4-A3
B5-A4
x1.154
Making Copies
Auto
A3-A4
B4-B5
x0.707
Auto
A4-A3
B5-B4
x1.414
Auto
1136P286CA
1136P286CA
Auto
Each time the Redu ction Key is
pressed, it selects a new reduction
ratio.
<Enlargement>
Each time the Enlarg ement Key is
pressed, it sel ects a new en largement
ratio.
<Reduction>
x2.000
Auto
1136P287CA
1136P287CA
<Full Size>
Press the Full S ize K ey t o select full
size (×1.000).
Auto
x1.000
1136P288CA
1136P288CA
Page 65

2. Basic Copying Procedure
Setting a Zoom Ratio
Hold down the Zoom Down or
>
Up Key until the desired zoom
ratio is reached.
<>
Zoom Down Key makes the
ratio smaller
Zoom Up Key makes the ratio
X1.500
x0.5~x2.0
AUTO
PaperZoom
greater
1136P445CA
1136P445CA
Zoom range: ×0.500 to ×2.000
Useful Tip
To save time, fi rst s elect the fixed ratio nearest to the target zoom ratio before
using the Zoom Up or Down Key.
53
<
Chapter 3
Making Copies
Page 66
54
2. Basic Copying Procedure
Input
Zoom
Memory
Chapter 3
Making Copies
1136P290CA
1136P537CA
1136P290CA
1136P537CA
Storing a Zoom Ratio
Press the Memory Input Key.
•
Both the Job Memory Select
1
Key LED and Zoom Memory
Select Key LED start blin kin g.
Press the Zoom Memory Select
Key.
2
•
Then, the Zoom Memory Select
Key LED lights up, while the
Job Memory Select Key LED
goes ou t.
•
The "Zoom #" prompt screen
appears on the Message
Display, allowing you to select
either one of the two zoom
memory locations.
Zoom Input:
1:>X1.000<
2:>X0.930<
Display
OK
0C
1136P293CA
1136P293CA
1136P538C
1136P538CA
9
Press the Select Key as necessary
to selec t the memory number .
3
•
Each time the key is pressed,
the selected number alternates
between 1 and 2.
Press the Clear K ey to erase the
old zoom ratio stored in that
4
memory location.
Page 67

2. Basic Copying Procedure
55
45
78
OK
1136P429AA
1136P429AA
Zoom
Memory
1136P537CA
Select Zoom#:
1:<X1.000>
2:<X0.930>
Using the Multi-Copy Keys,
enter the desired zoom ratio.
5
Zo om ratio s etti ng range:
From ×0.500 to ×2.000
Press the Enter Key.
•
The initial screen reap pear s on
6
the Message Display.
At this time, the set zoom ratio
has been stored in the specified
memory location.
Calling u p a Zoom Ra ti o from Mem ory
Press the Zoom Memory Select
Key.
1
•
The "Zoo m #" prompt screen
appears on the Messag e
Display, allowing you to select
either one of the two zoom
memory locations.
1136P537CA
Press the Select Key as necess ar y
to select the memory number.
2
•
Each time the key is pressed,
the selected number altern ates
between 1 and 2.
1136P539CA
Chapter 3
Making Copies
OK
1136P433CA
1136P433AA
Press the Enter Key.
•
The initial screen reap pear s on
3
the Message Display. At this
OK
time, the zoom ratio ha s bee n
called up from memory.
Page 68

56
2. Basic Copying Procedure
Auto Size Mode
•
In the Auto Size Mode, the copier automatically selects the correct zoom ratio
according to the original size and copy paper size.
Selecting the Auto Size Mode
Flip open the System Panel.
1
Chapter 3
1136O088AA
Press the Auto Si ze Mode Key.
2
Auto Size
Making Copies
1136P540CA
"Auto" appears on the Message
Displ a y above the label "Zoom ".
AUTO
A4
PaperZoom
1136P297CA
1136P297CA
Page 69

2. Basic Copying Procedure
57
A4
B4
A3
Useful Tip
This mo de is ve ry hel pf ul for nea t fi l ing w hen yo u ne ed to m ake c op ie s from
originals of asso rted sizes .
NOTES
FLS
M FEED
Auto Select
A
1136P298CA
1136P298CA
Appropriate Zoom
isn't available
Cancel Auto Zoom:
1136P299CA
1136P299CA
Select the copy paper size.
➭
3
•
p. 60
The message shown on the left
appears under any of the following
conditions:
◆
The original has been placed on
the Original Glass without raising
the Original Cover to an angle
greater t h an 15°.
◆
The required zoom ratio for
auto-sizing is beyond th e range of
50% to 200%.
When this happens, cancel the Auto
Size Mode and use the Manual Mode.
Chapter 3
Making Copies
•
The copier has been factory-set to automatically select the Auto Pa per Mode.
This def a ul t se tting can be change d to the Auto S iz e Mode o r Manual Mo de
by using the User’s C ho ice.
➭
Initial mode
User’s Choice
p. 34
➭
pp. 132, 133
Page 70

58
2. Basic Copying Procedure
Zoom Ratio Table (Origi nal S ize to Copy Paper Size)
Metric Size
Original Size
297 × 420 mm
11-3/4" × 16-1/2"
210 × 297 mm
8-1/2" × 11-3/4"
Chapter 3
148 × 210mm
5-3/4" × 8-1/4"
Making Copies
105 × 148 mm
4-1/4" × 5-3/4"
257 × 364 mm
10" × 14-1/4"
182 × 257 mm
7-1/4" × 10"
128 × 182 mm
5" × 7-1/4"
Copy
Paper Si ze
Zoom Ratio
A3 A4 ×0.707
A5 ×0.500
B4 ×0.866
B5 ×0.610
A4 A5 ×0.707
A6 ×0.500
B5 ×0.866
B6 ×0.610
A3 ×1.414
B4 ×1.224
A5 A6 ×0.707
B6 ×0.866
A4 ×1.414
A3 ×2.000
B4 ×1.733
B5 ×1.224
A6 A4 ×2.000
A5 ×1.414
B5 ×1.733
B6 ×1.224
B4 A4 ×0.816
A5 ×0.577
B5 ×0.707
B6 ×0.500
A3 ×1.154
B5 A5 ×0.816
A6 ×0.577
B6 ×0.707
A3 ×1.640
A4 ×1.154
B4 ×1.414
B6 A6 ×0.816
A4 ×1.640
A5 ×1.154
B4 ×2.000
B5 ×1.414
Inch Size
Original Size
11" × 17" 11" × 14" ×0.823
279.4 × 431.8 mm
11" × 15" 11" × 14" ×0.933
279.4 × 381 mm
11" × 14" Legal ×0.772
279.4 × 355.6 mm
Legal Fools cap ×0.928
8-1/2" × 14"
215.9 × 355.6 mm
Foolscap Letter ×0.846
8-1/2" × 13"
215.9 × 330.2 mm
Letter Invoice ×0.647
8-1/2" × 11"
215.9 × 279.4 mm
Invoice 11" × 17" ×2.000
5-1/2" × 8-1/2"
139.7 × 215.9 mm
Zoom Ratio = Copy Paper Size ÷ Original Size
1" (inch) = 25.4 mm
1 mm = 0.0394 " (inch)
Copy
Paper Size
Zoom Ratio
Legal ×0.772
Foolscap ×0.764
Letter ×0.647
Invoice ×0.500
Legal ×0.722
Foolscap ×0.772
Letter ×0.733
Invoice ×0.500
Foolscap ×0.772
Letter ×0.772
Invoice ×0.500
Letter ×0.785
Invoice ×0.607
11" × 17" ×1.214
Invoice ×0.647
11" × 17" ×1.294
11" × 14" ×1.076
11" × 17" ×1.294
11" × 14" ×1.272
11" × 14" ×1.647
Legal ×1.545
Foolscap ×1.529
Letter ×1.294
Page 71

2. Basic Copying Procedure
59
Chapter 3
Making Copies
Page 72

60
2. Basic Copying Procedure
Copy Paper Size
Auto Count
Mixed
Manual
Steple
Sort
Sort
Hole
Punch
Staple
Group
Finishing
Orng.
Detect
1
21
22
2
Orig. Copy
Even
Odd
# of Origs.
11
12
1
2
123
2in1
2in1
2in1
2in1
Auto
1
1
Lighter
A
Darker
x0.5~x2.0
Reduce Full size EnlargeAAuto Select
The copy paper size will be selected automatically by the copier when in the
Auto Paper Mode or can be selected manually by the operator when in the
Chapter 3
Manual Mode. Select the appropriate mode according to your needs.
The selected copy paper size, and the paper source loaded wit h that p aper , are
indicated on the control panel.
Manual Mode
This mode allows you to select the copy paper size and set the zoom ratio
manually according to your particular needs.
Making Copies
Using the Manual Mode
123
456
789
0C
PaperZoomExposure
1136P273DA
1136P273DA
A4
B4
A3
A4
B4
A3
FLS
M FEED
Auto Select
A
FLS
M FEED
Auto Select
A
1136P300CA
1136P301CA
Press the Paper Select Key once.
The currently selected paper size
1
is indicated by an arrow .
Example.: A4
Press the Paper Select Key until
the arrow indicates the copy
2
paper size of your choice.
▼
Page 73

2. Basic Copying Procedure
Paper Source Indicator and C opy Paper Si ze I ndica to rs
Example: The copier is loade d with paper
as follows:
1st Drawer ... A4L
2nd Drawer ... B4L
3rd Drawer (Option) ... A3L
4th Drawer (Option) ... FLS.L
Multi Bypass Table ... A3L
1136P541CA
1136P541CA
Each time the Paper Select Key is pressed, the lig hts on the Paper Size Indicator
(arrow ) and Paper Source Indicator cycle through the different paper sizes and
▼
source locations as sho wn below.
61
Chapter 3
A4
B4
A3
FLS
M FEED
A4
B4
A3
A4
B4
A3
FLS
M FEED
FLS
M FEED
A4
B4
A3
A4
B4
A3
FLS
M FEED
1136P303DA
Making Copies
FLS
M FEED
1136P303DA
Page 74
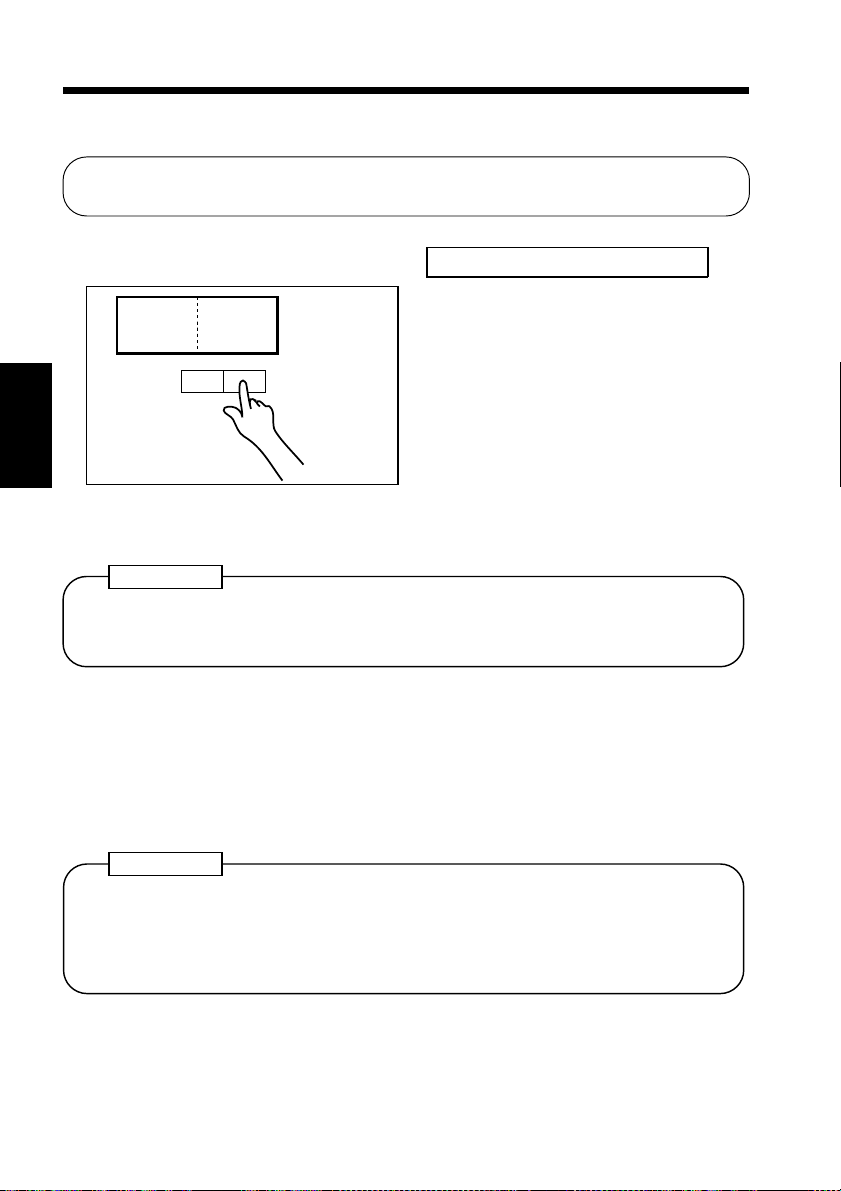
62
2. Basic Copying Procedure
Auto Paper Mode
In the Auto P aper Mode, the copier automat ically selects the correct copy
paper s iz e according to the original size and zoom ratio selected for use.
Selecting the Auto Paper Mode
Press t he Auto P a pe r Mode Key.
X1.000
AUTO
Auto Select
A
Then "Auto" appears on the Message
Display above "Paper," indicating that
the copier is now in the Auto Paper
Mode.
1136P304CA
Chapter 3
1136P304CA
* Select ing th e Fixed Zoom Ratio.
➭
p. 52
* Sett ing a Zoom Ratio.
➭
p. 53
Useful Tip
This mode is efficient when you want to automatically make copies on paper
of the same size as your originals.
Making Copies
Automatic Drawer Switching
If the Drawer currently selected for use runs out of paper and there is another
Drawer loaded with paper of the same size and in the same direction, the copier
automat i cal ly s ele cts t hat seco nd D ra we r to cont i nu e copyi ng.
Useful Tip
This feature is a gr eat adva nt age when you need to make a large number of
copies on the s a me s ize paper. For example, it is possible to make up to 1,000
copies without interruption by using the AF-3 or AFR-7 if the 3rd and 4th
Drawers are loaded wi th paper of the same size and in the same direction.
Page 75

NOTES
Load paper:
X1.000
A4
Exact paper size
cannot be found.
X1.000
A4
1136P305CA
1136P305CA
1136P306CA
1136P306CA
2. Basic Copying Procedure
•
If the paper of the right size has run
out in the Auto Paper Mode, the
message shown on the left appears.
If this happens, add the right size
paper, or cancel the Auto Pape r
Mode and use the Manual Mod e t o
make copies on a different size paper.
If none of the Drawers are loaded
with the right size paper, the
message shown on the left appears.
In this case, cancel the Auto Paper
Mode and use the Manual Mod e t o
make copies on a different size paper.
* Zoom Ratio Table (Original Size to
➭
Copy Pape r Size)
p. 58
63
Chapter 3
•
If the Paper Select Key is pressed in the Auto Paper Mode, it automatically
cancels the Auto Paper Mode and swi tc h e s to t he Ma nu al Mode.
•
The copier has been factory-set to automatically select the Auto Pa per Mode.
This def a ul t se tting can be change d to the Auto S iz e Mode o r Manual Mo de
by User’s Choice.
Initial mode
User’s Choice
➭
p. 34
➭
pp. 132, 135
Making Copies
Page 76

64
2. Basic Copying Procedure
Special Paper Mode
A4
B4 S1
A3 S2
FLS SS
M FEED
Auto Select
A
If S1, S2, or S3 appears after the
paper size on the Message Display
when the Paper Select Key is pressed,
it means that the Drawer loaded w ith
that paper has been s et for special
paper loading.
1136P307CA
1136P307CA
Special paper setting may be o ne o f the fo llowing three types, each hav ing a
specific meaning as des cri bed below. The setting can be made by using the User’s
➭
Choice.
Chapter 3
S1: If S1 is set, that particular Drawer is exclu ded as a possible can didate
pp. 132, 137
S1: in Auto Paper Mode. If, for example, you are using both recycled and plain
S1: paper and using mainly the recycled paper, you may set the plain paper for
S1: S1. Then, the co pier excl udes the plai n paper whe n selecting paper size in
S1: the Auto Paper Mode.
S2: This setting precludes both Auto Paper Mode and Automatic Drawer
S1: Switching.
Making Copies
S3: This setting blocks 2-sided copying.
S1: Again it is sensible of yo u to set the used 1-s ided copy paper for the S3
S1: setting.
NOTES
•
The Drawer set for S3 cannot be selected when yo u have set up a job for
making 2- s ided c op ies fr o m 1- s ided or i gi n al s or mak i ng 2- s ided c op ie s fr o m
2-sided originals.
•
When you have selected the paper set for S3, you can no longer select the
copying mode for making 2-sided copies from 1-sided originals or making
2-sided copies from 2-sided originals.
Page 77

2. Basic Copying Procedure
65
Chapter 3
Making Copies
Page 78

66
2. Basic Copying Procedure
Number of Copies
Setting the Number of Copies
123
Using the Multi-Copy Keys, enter the
number of copies to be made.
456
789
0C
Chapter 3
Correcting the Number Entry
Making Copies
123
456
789
0C
1139O2640A
1136P142AA
1136P142AA
1139O2620A
The maximum number that can be
*
set is 99.
Example:
➀
To make 18 copies, press Key
➇
, in that order.
and
The Multi-Copy D is play now shows
"18."
To correct or reset a number entry,
press the Clear Key.
The Multi-Copy Disp lay is reset to
*
"1."
1136P144AA
1136P144AA
Page 79

Starting the Copy Cycle
67
2. Basic Copying Procedure
Auto
Darker
Lighter
A
Starting the Copy Cycle
1139O2360A
123
x0.5~x2.0
Reduce Full size EnlargeAAuto Select
PaperZoomExposure
1139O2360A
123
456
789
0C
Check the contr ol panel to make
sure that you ha ve set up your
1
copy job correctly.
Press the Start Key, if it is green.
The Start Key turns orange when
2
the copy cycle starts .
In a multi-copy cycle, the
number on the Multi-Copy
Display is decreased by 1 each
time a copy is fed out of the
copier. The Display is reset to
the original setting as soon as the
multi-copy cycle is completed.
1136P273DA
Chapter 3
Making Copies
Stopping a Multi-Copy Cycle
Stop
1139O2592A
1139O2592A
To stop a multi-copy cycle in
progress, press the Stop Key.
The message "Copy Job has been
canceled." appears on the
Message Display and the Start
Key soon turns gre en. T hen, the
copier stops. The Multi-Cop y
Display shows the number of
copies yet to be made.
Page 80

68
2. Basic Copying Procedure
Interrupt Mode
123
456
789
0C
PaperZoomExposure
1136P273DA
Lighter
Auto
Darker
A
x0.5~x2.0
Reduce Full size EnlargeAAuto Select
123
The Interrupt Mode allows you to interrupt a current job and run a different one.
The copier ensures that the previous job will be resumed as soon as the Inter rupt
Mode is canceled.
Chapter 3
Interrupting a Copy Cycle.
Press the Interrupt Key.
Interrupt
The Key may be pressed even
1
while the current job is in
progress.
Making Copies
1139O2602A
1139O2602A
The Interrupt Key lights up and
the message "Copy jo b has been
canceled." appears. After a short
time, the current copy cycle stops.
Enter the control panel settings
for the interrupt job, and press
2
the Start Key.
Page 81
2. Basic Copying Procedure
Ending the Interrupt Mode
Press the Interrupt Key agai n.
Interrupt
The Int e rrupt Key light goes out
and the copier is restored to the
previous settings.
1139O2612A
1139O2612A
NOTES
•
The Interrupt Mode cannot be canceled by the Panel Reset Key or Clear Key.
•
If the current job involves the Sort, Group, or Sort-and-Staple Mode, only
Non-Sor t m ode can be selected in the Interrupt Mode.
•
The copier do es not accept an Interrupt mode if the 2-sided copying, Cover,
Page Insertion, or OHP Interleaving has previously been selected.
•
If the copier is in an Interrupt mode, 2-sided copying, Cover, Page Insertion,
or OHP Interleaving is n ot accept ed.
69
Chapter 3
Making Copies
Page 82

70
2. Basic Copying Procedure
Multi Bypass Copying
Use the Multi Bypass to make copies on paper not loaded in any of the
Drawers or to copy onto transparencies, translucent paper, or any other special
paper.
You can also use the Cover Mode when the Multi Byp as s Table is used with
the Automatic/Duplexing Document Feeder AF-3/AFR-7 (option).
◆
Types of Paper
•
Plain paper (weighing 60 to 90g/m2)
•
Heavyweight paper (weighing 90 to 157g/m2)
•
Transparencies, translucent paper
◆
Paper Size
•
Chapter 3
Making Copies
Width: 100 to 297mm
•
Length: 140 to 432mm
◆
Capacity
•
Plain paper (blank) . .. 50 sheets or less
•
Plain paper (1-sided copies) ... 20 sheets or less
•
Heavyweight paper, transparencie s, translucent paper: 20 sheets or l ess
Using the Multi Bypass Ta ble
Place the original on the Orig inal
Glass and make the co ntrol panel
1
settings.
1139O0130A
Swing down the Multi Bypass
Table and slide the Pape r Gui de
2
Plate to the size of the copy
paper.
NOTE
Pull out the Multi Bypass
Table Ex t e nder if you are
using larger paper.
Page 83

1139O0140A
1139O2360A
2. Basic Copying Procedure
Place a neat stack of copy paper
on the Table and insert it into the
3
copier until it sto ps.
NOTES
•
Before inserting, fan the
paper stack well if you are
using transparencies or
translucent paper.
•
Correct any curl if you are
using heavyweight paper.
Set the number of copies to be
made and press the Start Key to
4
start the copy cycle.
71
Chapter 3
NOTES
•
Do not insert the pap er wh ile the copier is in t he wa r m- up cycle o r a
multi-copy cycle.
•
The Auto Paper, Auto Size, 2-Sided Copy, Margin-by-Reduction, Erase
Modes or a ny of t he Fini shin g Modes cannot be selected for multi bypass
copying.
Making Copies
Page 84

72
3. System Copying Overview
Making the
1
Basic
Settings
Place the origina l.
•
➭
Set the image
•
density.
Set the zoom ratio.
•
➭
Select the copy
•
paper size.
Set the number of
•
copies to be made.
➭
Chapter 3
Making Copies
➭
p. 49
p. 60
➭
p. 40
p. 50
p. 66
Selecting th e Ori gina l Co py Type
▲
2
Select t he Orig. Copy Type I. ➭ p. 80
•
OR
Select t he Orig. Copy Type II. ➭ p. 81
•
▲
1
21
22
▲
1
21
22
2
1
2
Orig. Copy
2
11
12
2in1
2in1
11
12
2in1
1
2in1
2
2in1
2in1
1
1
2in1
2in1
1
1
1136P308CA
Staple
Group
Orig. Copy
Auto Count
Mixed
Manual
Steple
Sort
Sort
Hole
Punch
Finishing
Orng.
Detect
1
21
22
2
Orig. Copy
Even
Odd
# of Origs.
11
12
2in1
1
2in1
2
2in1
2in1
1
1
1136P309CA
Page 85

3. System Copying Overv iew
73
Selecting the Finishing Mode
3
Select the Sorter mode.➭ p. 90
•
Sort
Sort
Staple
Group
Select the Hole Punch mode.➭ p. 90
•
Staple
Group
Sort
Sort
Finishing
Finishing
Hole
Punch
Hole
Punch
1136P311CA
1136P312CA
Starting the Copy
4
Cycle
Press the Start Key to start the
•
copy cycle.
➭
p. 67
1136P313CA
Press the Stop Key to stop
the copy cycle.
Chapter 3
Making Copies
Lighter
Auto
Darker
A
x0.5~x2.0
Reduce Full size EnlargeAAuto Select
123
PaperZoomExposure
123
456
789
0C
1136P310DA
1136P310DA
Page 86

74
4. System Job Setting
Original Copy Type
▲
Mixed
Manual
Orng.
Steple
Detect
1
Sort
Sort
Staple
Group
Finishing
Hole
Punch
2
21
22
Orig. Copy
Chapter 3
▲
Original Copy Types
Making Copies
Type I
Origin als
Auto Count
Even
Odd
# of Origs.
2in1
11
2in1
12
2in1
1
1
2in1
1
2
1136P314CA
1136P314CA
Copies
1136P428AA
1136P204AA
Eight specific types are group ed into
two categories as follows:
Type I
•
1-sided 1-sided
•
2-sided 1-sided
▲▲
▲▲
•
1-sided 2-sided
•
2-sided 2-sided
▲
▲
Type II
•
1-sided 1-sided [2-in-1]
•
1-sided 2-sided [2-in-1]
•
1-sided [2-in-1] 1-sided
•
2-sided [2-in-1] 1-sided
Select the appropriate Orig. Copy type.
1-sided 1-sided
•
Select thi s typ e to make 1-sided
▲▲
▲
▲
copies from 1-si d e d ori g i n a ls .
* No LEDs on the Orig. Copy panel
are lit up while 1 1 is selected.
▲
▲
Page 87

4. System J ob Setting
75
Originals
Original
Original
▲
Copy
1136P426AA
1136P205AA
Copies
1136P427AA
1136P206AA
Copy
1-sided 2-sided
•
Select 1 2 to make 2-sided copies
▲
▲
from 1-sided originals.
NOTE
The copier has to know whether it
needs to make th e od d- page
correction depending on the
number of originals you have,
either even or odd . Let the cop ie r
perfor m the origin al count
sequence using the Original Count
Mode Key. ➭ p. 83
2-sided 1-sided
•
Select 2 1 to make 1-sided copies
▲
▲
from 2-sided original(s).
2-sided 2-sided
Select 2 2 to make 2-sided copies
▲
▲
from 2-sided originals.
Chapter 3
Making Copies
1136P207AA
1136P207AA
Page 88

76
4. System Job Setting
Type II
2-in-1 functions
1-sided originals 2-in-1 c opy
1-sided copy2-in-1 origina l
Chapter 3
Originals
Making Copies
1136P208AA
1136P470AA
Copy
1136P208AA
1136P208AA
2-in-1 cop y :
The copier copies , through reduction, the
texts/images of tw o differ ent ori ginals
onto one side of a single s he e t of pa per.
This saves paper.
2-in-1 separation copy:
The copier copies , through enlargement,
the texts/images on one original which is
the result of a 2-in-1 copy onto two
separate sheets of paper, each copy
containing different parts of the original.
1-Sided 1-sided [2-in-1]
▲
<2-in-1 copy>
•
Select 1 1[2in1] to make a
▲
1-sided 2-in-1 copy.
The copier copies, through
reduction, the texts /imag es of two
different origin als on to one side of a
single sheet of paper.
This saves one s heet of c opy paper.
Page 89

4. System J ob Setting
77
▲
▲
Originals C opy
1-sided 2-sided [2-in-1]
<2-sided 2-in-1 copy>
•
Select 1 2[2in1] to make a
2-sided 2- in -1 c op y.
•
The copier copies , through
reduction, the texts/images of four
1136P210AA
1136P210AA
different originals onto both sides of
a single sheet of paper, each side
containing the texts/imag es of two
different originals.
This saves three sh eets o f copy
paper.
NOTE
The copier has to know whet h er it n eeds to make the odd-page corr ection
depending on the number of origina ls you ha ve, eith er even or od d. Let t he
copier perfor m the or iginal count sequence us ing the Original Co un t Mo de
Key. ➭ p. 83
Chapter 3
Making Copies
Page 90
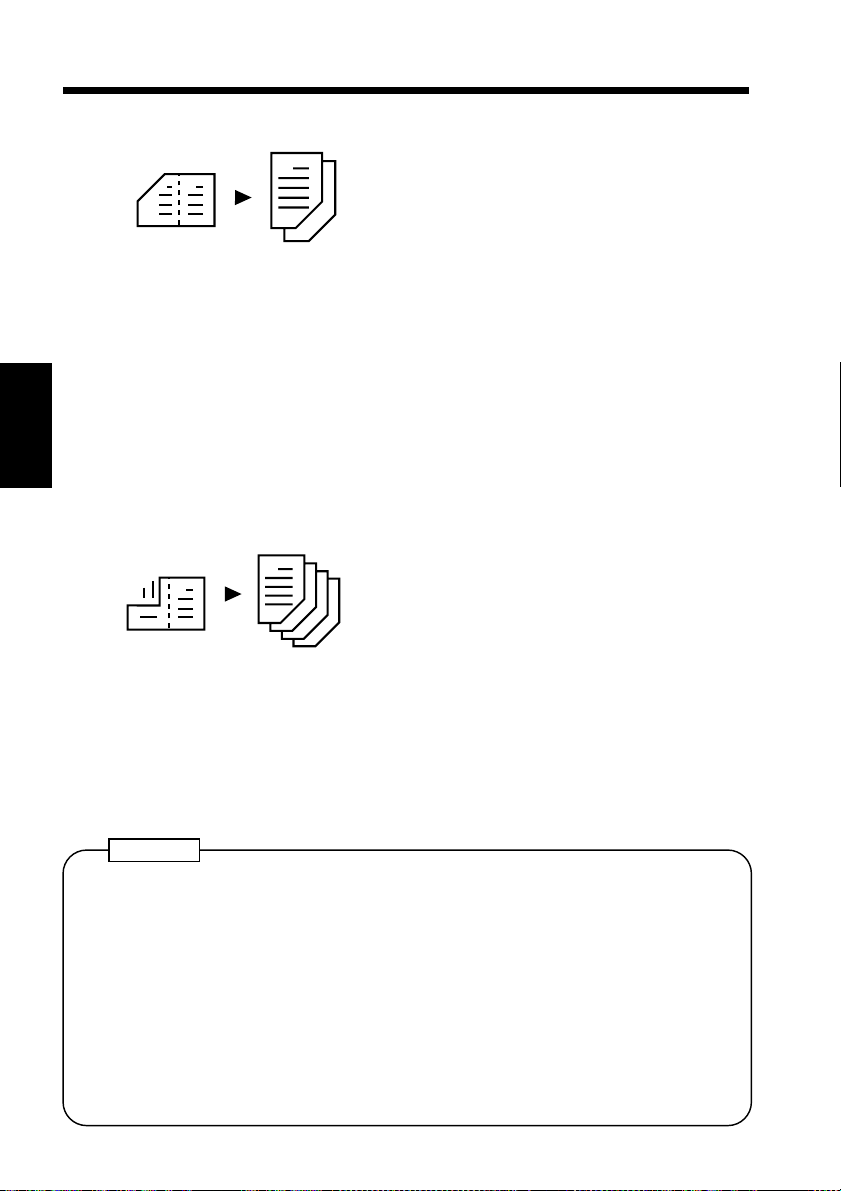
78
4. System Job Setting
▲
Original
Copies
1-sided [2-in-1] 1-sided
<2-in-1 separation copy>
•
Select 1[2in1] 1 to make 1-sided
▲
page-by-page copies of a 1-sided
original which is the result of 2-in-1
1136P211AA
1136P211AA
copying.
The copier copies, through
enlargement, the texts/ images of a
1-sided original which is the result
of a 2-in-1 copy onto one side of two
separate sheets of paper , each copy
containing different parts of the
original.
Chapter 3
▲
▲
Original
Copies
2-sided [2-in-1] 1-sided
<2-sided 2-in-1 separati on copy>
•
Select 2[2in1] 1 to make 1-sided
page-by-page copies of a 2-sided
original which is the result of
2-sided 2-in-1 copying.
Making Copies
1136P212AA
1136P212AA
The copier copies, through
enlargement, the texts/ images of a
2-sided original which is the result
of a 2-sided 2-in-1 copy onto one
side of fo ur s epa r ate sh eet s of pap e r,
each copy containing different parts
of the original.
NOTES
•
The 2-in-1 functions can be selected only when the copier is equippe d w ith a
Duplexing Document Feeder AFR-7 (and no t an Automatic Document Feeder
AF-3). Be also sure to loa d your o r iginals in the AFR-7 whenever making
copies using any of the 2 -i n-1 fu nc tions.
•
When any of the 2-in-1 functions are selected, either a reduction or
enlargement ratio is automatically select ed. You can nonet heless ma ke a
full-size copy. First, select 2-in-1, then set the desired zoom ratio and paper
size.
•
The size of the or ig i na l must b e A4, o r A5 cro sswi se to use the 2- in-1
functions.
Page 91

4. System J ob Setting
79
Chapter 3
Making Copies
Page 92

80
4. System Job Setting
Selecting the Original Copy Type
2in1
11
2in1
12
1
2
2in1
1
Orig. Copy
1
2in1
1
2
21
22
Chapter 3
1 1
▲
1136P315CA
1136P315CA
1
1
2
No lights
Making Copies
Auto Count
Even
Odd
# of Origs.
1136P317CA
1136P317CA
2
Type I
•
Press the Orig. Copy Type I
Select Key to select your choice.
Each time the Orig. Copy
▲
▲
Type I Select Key is pressed,
the newly selected type
indicator lig hts a s s ho wn. (If
there are no lights, 1-sided
▲
1-sided is set.)
21
•
If you have selected 1 2, use
22
1136P316CA
1136P316CA
▲
the Original Count M od e to let
the cop i er perform an original
count sequence.
➭
Original Count Mo de
This completes the selecti on of
▲
Orig. Copy Type I.
p. 83
Page 93

1
2
21
22
Orig. Copy
11
12
1
2
81
4. System J ob Setting
Type II
2in1
2in1
•
Press the Orig. Copy Type II
Select Key to select your choice.
1
Each time the Orig. Copy
2in1
1
2in1
1
Type II Select Ke y is pressed,
the newly selected type
indicator lig hts a s s ho wn below.
1136P318CA
1136P318CA
▲
▲
11
No lights
2in1
11
Auto Count
Even
Odd
# of Origs.
1136P317CA
12
1136P317CA
2in1
2in1
1
1
•
If you have selected 1
1[2in1] or 1 2[2in1], use the
▲
Original Count Mode to let the
copier perform an original
count sequence.
Original Count Mode
This completes the selectio n of
▲
Orig. Copy Type II.
2in1
2
1136P542CA
1136P542CA
▲
➭
p. 83
1
Chapter 3
Making Copies
Page 94

82
4. System Job Setting
Original Count Mode
If you have an odd number of originals in 1 2, 1 1[2in1], or 1 2[2in1],
▲
▲
▲
some inconvenient situ ations result in page organization of your output
copies. The copier p rovides the Original Count Mode in which it counts the
number of originals load ed in the AFR-7 to determine whether it needs t o
make the odd-page correc t ion.
Suppose you have an odd number of originals and you want to make 2-in-1
*
copies from them. If you ru n th e copy cycle without letting the copier count
the number of originals, the copier starts the 2-in-1 copy cycle by first
using the last two originals. This means that you will end up having a blank
page besi de page 1 on the last copy. See be low.
Chapter 3
The Copier Makes No
Odd-Page Cor rec tion.
Making Copies
1136O098AA
The Copi er M akes an Odd-Page
Correct ion.
1136O099AA
Select either one of the following three functions to let the copier perform the
original count sequence:
Auto Count: The copier counts the number of or iginals loaded onto the AFR-7
to determine whether th e number is odd or even. If the number is
odd, the copier automatically makes the odd-page correction.
Even: Select this when you already know that you have an even number
of originals. The copier does not make any odd-page correction.
Odd: Select this when you already know that you have an odd number of
originals. The copier makes the odd-page correction.
NOTE
The Auto Count Mode is possible only when the copier is equipped with an
AFR-7.
Page 95
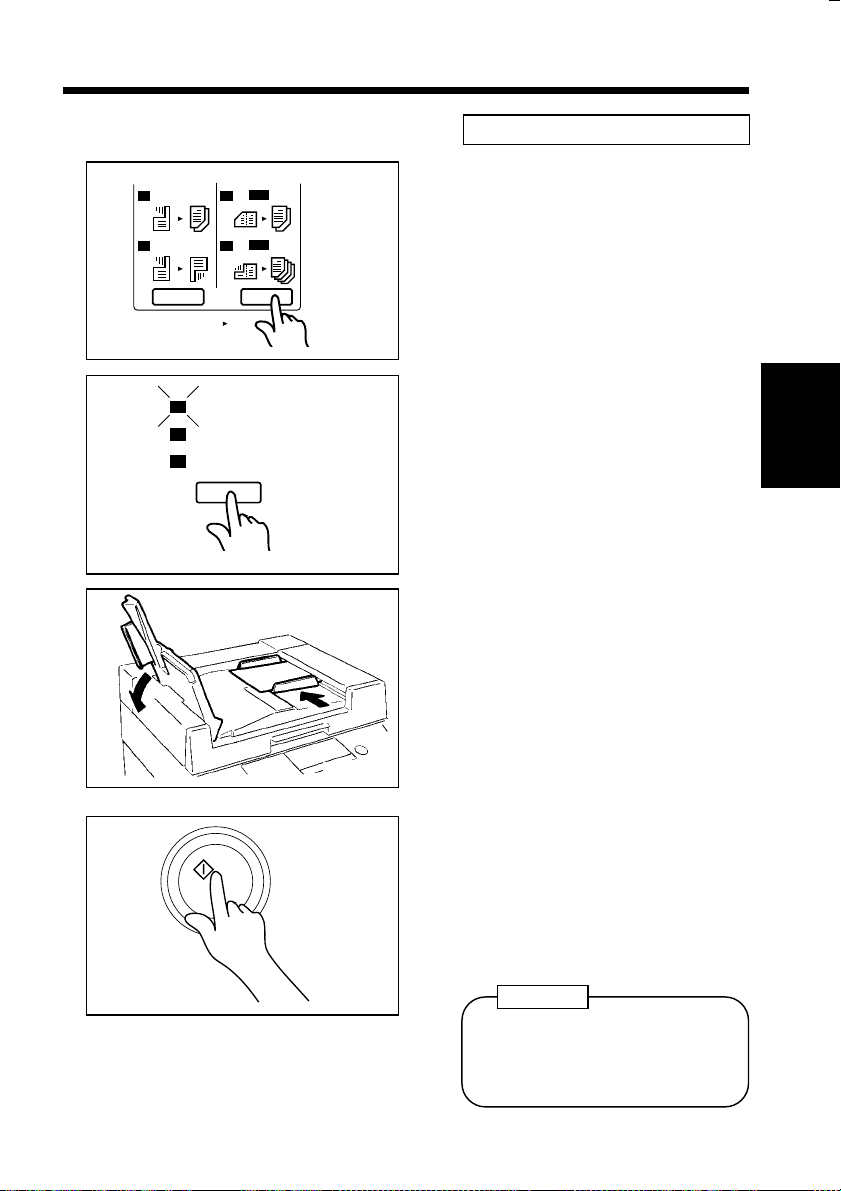
1136P320CA
21
22
Orig. Copy
Auto Count
Even
Odd
# of Origs.
2in1
1
1
2in1
1
2
1136P317CA
1136P320CA
1136P317CA
1139O0110A
4. System J ob Setting
Using the Original Count Mode
Select the Orig. Copy type.
➭
1
2
3
4
p. 80
Press the Origin al Co un t M od e
Key to select the appropriate
function according to the number
of orig ina l s you ha ve.
If you do not know how many
origina ls you have , s e le ct "Aut o
Count."
If you know that the number of
your originals is even , select
"Even."
If you know that the number of
your original s is odd, sel ec t
"Odd."
Load the originals onto the
AFR-7.
•
Placing the Original ➭p. 43
Press the Start Key to start the
original count sequen ce.
•
The AFR-7 starts feeding th e
originals loaded onto it to count
the number of originals. (At this
time, no copy cycle is run.)
▲
83
Chapter 3
Making Copies
1136P115AA
Unload the originals eject ed onto
the Document Exit Tray and
5
reload them onto the Document
Feed Tray. Then, press the Start
Key.
•
The copy cycle is run in the
▲
Orig. Copy type selected.
NOTE
Be sure to perform the original
count sequence after you have
selected the Orig. Copy type.
▲
Page 96

84
4. System Job Setting
Procedure for Loading Originals
Use the following procedure for loading Orig inals to make 1-sided copies
from 2-sided original s.
Load the originals crosswise.
If the originals are loaded lengthwise, the directions of the copy images will
be mixed up.
Correct:
2-Sided Originals
Loaded Crosswise
Chapter 3
1-Sided Copies
Making Copies
Incorrect:
2-Sided Originals Loaded
Lengthwise
1139O1120A
1-Sided Copies
1139O1130A
Page 97

4. System J ob Setting
Panel Display in 2- S id ed Copying
The copier starts a 2-sided copying
cycle when you select a mode to
make 2-sided copies (i.e., 1 2 or
▲
2 2) and press the Start Key.
On completing the first copy cycle,
the copier stores the 1- sided copy in
the Duplex Unit, getting ready to run
the second copy cycle.
At this time, one of the Paper Source
Indicators (for conven ien ce, we will
call it the 2-Sided Copy Indicator)
1136P201AA
Canceling 2-Sided Copying
When the copier has completed the first copy cycle of a 2-sided copying cycle,
there are one or more 1-sided copies stored in the Duplex Unit.
If you want to cance l the 2-s ided copying mode at t his poi nt, thes e 1-sid ed c opies
must be fed out of the Duplex Unit and copier onto the Copy Tray.
lights up to i nd icate that one or more
copies have been stored in the Duplex
Unit.
Feeding 1-Sided Copy Out of Copier
Press the Panel Reset Key.
▲
1
◆
Press the Start
Key to eject all
the copies at :
1136P5
1136P543CA
The message on the Message
Display changes to on e shown
on the left.
85
Chapter 3
Making Copies
1139O2360A
Press the Start Key.
2
◆
This feeds any copies in the
Duplex Unit ou t onto the Exit
Tray.
Then, the 2-Sided Copy
Indicator goes out, indicating
that the copier is no longer in
the 2-sided copying mode.
Page 98

86
4. System Job Setting
Finishing Modes
Sort
Sort
Staple
Group
Finishing
Finishing Modes
Chapter 3
Non-Sort
Originals
Making Copies
Sort
Origin als
Manual
Steple
Hole
Punch
Copies
Copies
Copies
Mixed
Orng.
Detect
1
21
22
2
Orig. Copy
Auto Count
Even
Odd
# of Origs.
2in1
11
2in1
12
2in1
1
1
2in1
1
2
Copies
1076O145
1st Bin
2nd Bin
There are six different finishing
modes:
Non-Sort, Sort , Sort-and- Staple,
Group, Hole Punch, and Ma nual
Staple.
Select the appropr iate mode
according to your particular needs .
1136P471CA
•
In the Non-Sort Mode, all copies are
fed out onto the Top or Non-Sort
Bin without being sorted, grouped or
stapled. If ther e are no Fini s hing
Mode Lights lit, th e N on -Sort M od e
is set.
•
In the Sort Mode, copies ar e s orted
into complete sets of the originals.
Copies are fed into the Sorter Bins.
* This mod e is ef fecti ve when
making multiple copies from
multiple original s .
Sort-and-Staple
Originals
Copies
Copies
3rd Bin
1076O146
1st Bin
2nd Bin
3rd Bin
1076O149
•
In the Sort-and-Staple Mod e, copies
are sorted into comp lete s ets of the
originals and each set is sta pled
together. Copies are fed in to t he
Sorter Bins.
(Only when the copier is equipped
with a Staple Sorter)
Page 99

Group
Originals
Hole Punch
Originals
Copies
Copies
Copies
Copies
Copies
Copies
1st Bin
2nd Bin
3rd Bin
1076O147
1st Bin
2nd Bin
4. System J ob Setting
•
In the Group Mode, the copie s made
from each single orig inal are
separat ed int o gr ou ps. Each group
contains multipl e co pie s of the same
originals.
•
This mode allows you to have holes
punched for filing the copy sets
made in the Non-So rt , Sort, Gr oup,
or Sort-and-Staple Mode.
(Only when the copier is equipped
with a Staple Sort er ST-206.)
NOTE
87
Chapter 3
Holes can be punched only in A3L
or A4C paper.
•
This mode allows you to staple copy
sets already made in the Sort, Group
or Hole Punch Mode.
Manual Staple
Copy Sets
(Sorted)
3rd Bin
1136O171CA
Manual Staple
(except the Hole Punch mode for
Originals
copies made in the Non-Sort).
(Only when the copier is equipped
Copy Stacks
(Grouped)
Manual Staple
1076O191
with a Staple Sort er.)
Useful Tip
The copier has been factory-set to automatically select Sort. The User’s Choice
can, how eve r , be us ed to chan ge t his d efa u lt se t ti n g to any other fin is h ing
mode.
➭
User’s Choice
pp. 132, 135
Making Copies
Page 100

88
4. System Job Setting
Auto Dual Function
Each of the So rt er Bi ns h old s up t o 50 (∗25) sheets of paper. However, the
∗
Auto Dual Function allows sorting of copies of up to 100 (
under certain conditions.
NOTE
The descriptions o n this a nd th e follow in g pages is th at for th e S- 205 and
ST-206.
∗
The numbers marked with
are for the S-104 and ST-101.
Auto Dual Function in the Sort Mode
50) originals
When 10 (
than 50 (
Chapter 3
∗
5) or less copies are made from an original set consisting of more
∗
25) originals in the Sort Mode, the Sorter or Staple Sorter is
automatically switched into the Auto Dual Function Mode using the 11th (
∗
to 20th (
1st to 50th (
51st (
*
If the number of copies selected exceeds 10 (∗5), the new copy cycle stops at
Making Copies
the 50th (
10th) Bins.
Copies Bins in Use
∗
25th) sorted copies Top or 1st to 10th (∗5th) Bi ns
∗
26th) to 10 0t h (∗50th) sorted copies 11th (∗6th) to 20th (∗10th) Bins
∗
25th) original.
Example: Makin g 3 copy sets of a 30-page original set using a 10-Bin So rter
30-Page
Original S et
• Top t hr ee Bins
contain 25 sorted
copies.
• The 6th to 8th Bin s
contain 5 sorted
copies.
Sorter or Sta ple
Sorter
Sorting into
3 Sets
∗
6th)
1139O1140A
To have a complete set of copies from the originals.
Place the copies fr om the 6th Bin on top of those from the Top Bin. In the same
way, place the copies from the 7th Bin on top of those from the 2nd Bin, and so
on.
 Loading...