

Page 1
i
EP2010
Thank you fo r ch oo si ng Mi no lta .
This operator’s manual explain s how to operate the copier and repleni sh it s suppli es. It a lso gives
some troubleshooting tip s as wel l as general pr ecauti ons to be observed when operatin g the copie r.
To ensure the best performance and effective use of your copier, read this manual carefully until yo u
familiarize yourself thoroughly with its operation and features. After you have read through the
manual, keep it for read y reference.
Please use this manual as a quick and handy reference tool for immediately clarifying any questions
which may arise.
CE Ma rk ing (D ec lara ti on of C onf or mi ty )
We declare under our sole responsibility that the copier and options to which this declaration
relates is in conformity with the sp ecif icatio ns b elo w.
This declaration is valid for the area of the European Union (EU) only.
Product Type Copying Machine
Product Name EP2010
Options PF-204, P F -104, PF- 4D, AFR- 12, AF-5, S T -104, S-106, AD- 8
Plug-In Counter
Standards Safety:EN 60 950 / 1992
(Safety of informati on technol ogy equipment , including electr ical
business equipment)
EMC:EN 55 022 (Class B) / 1995
(Limits and method for measurement of radio disturba nce
characteristics of in fo rmati on technol og y equipment (I TE))
EN 55 082-1 / 1992
(Electromagnetic compatibility - Generic immunity standard Part1:
Residential, commercial and light industry)
IEC 801-2 / 199 1 (Electrostatic discharge requ iremen t)
IEC 801-3 / 1984 and IEC 801-3 / 1992 (draft) (Radiated
electromagnetic field requirement)
IEC 801-4 / 1988 (Electrical fast transient / burst requirement)
EC Directives Safety : 73 / 23 / EEC and 93 / 68 / EEC art. 13
EMC : 89 / 336 / EEC and 93 / 68 / EEC art. 5
Page 2

ii
Contents
Chapters 1 through 3 contain the basic information for making copies.
Be sure to read these chapters before attempting to use your copier.
Chapter 1 Safety Notes p. 1
1. Installing The Copier p. 2
Installation Site
Power Source
Space Requirements
2. Precautions for Use p. 3
Operating Environment
Using the Copier Properly
Moving
Care of Copier Supplies
Chapter 2 Getting to Know your Copier p. 5
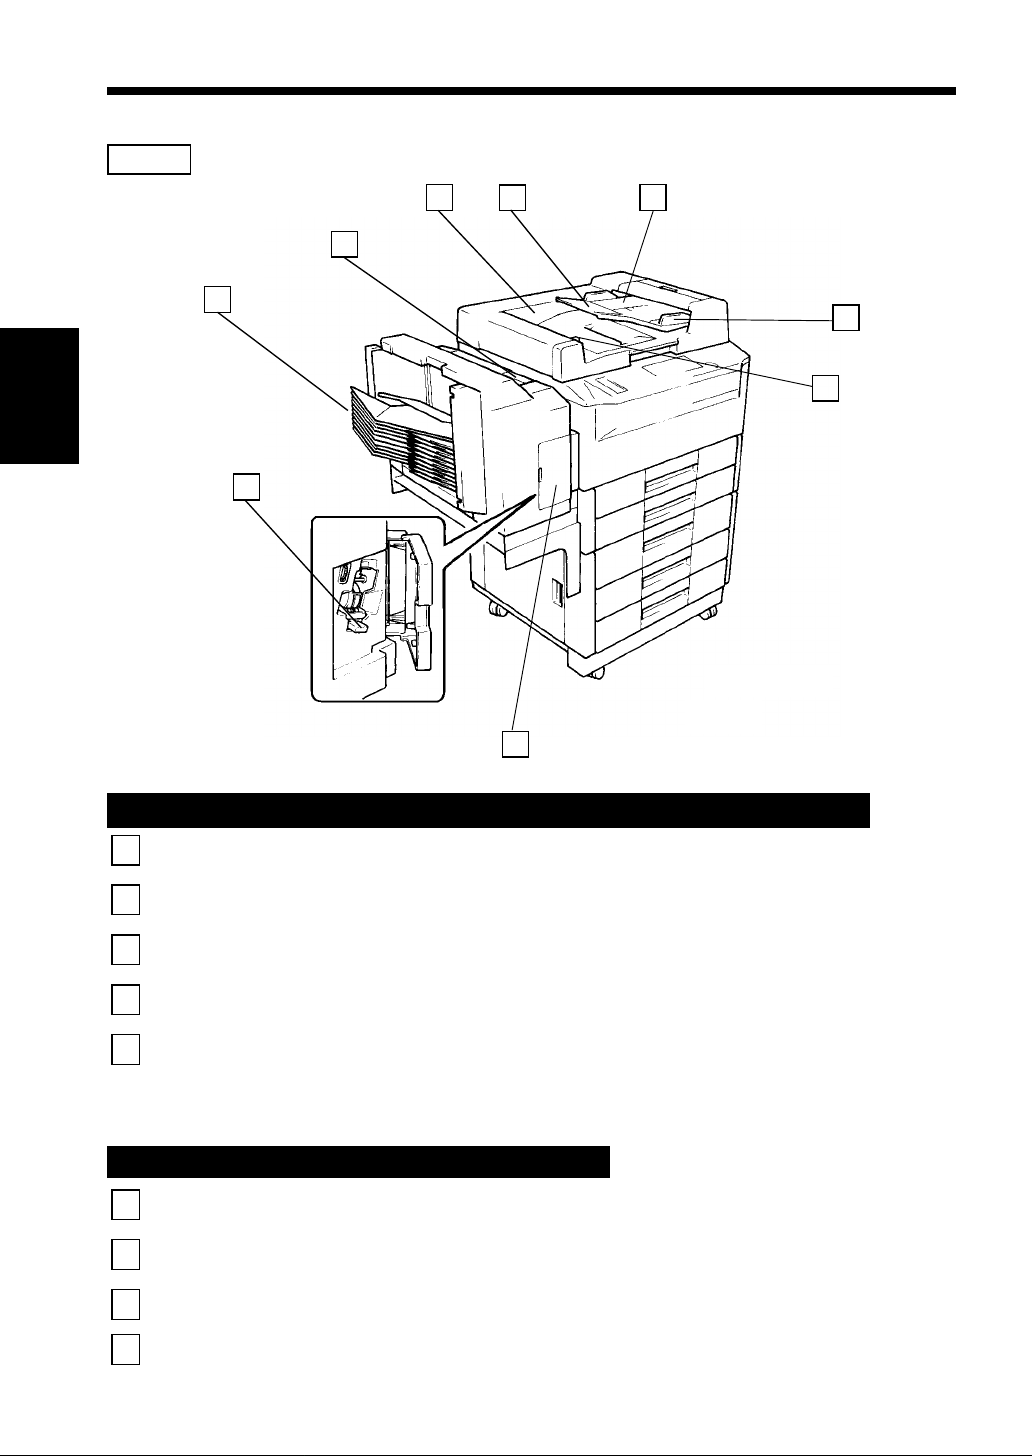
1. System Overview p. 6
2. Copier Parts and Accessories
Outsid e t he Copier p. 8
Inside the Cop ie r p. 9
Options p. 10
3. Control Panel Keys and Indicators
Basic Panel p. 12
Display Panel p. 14
4. Turning ON and OFF and Initial Mode p. 15
Turning ON and OFF
When the Copier is Turned ON
Initial Mode
5. Auxiliary Functions p. 16
Panel Resetting
Auto Panel Reset F un ction
Auto Copy Start Function
Auto Shut OFF Fun ct i on
Interrupt Mode
Energy Sav e r Mode
Job Memory
Page 3

Chapter 3 Making Copies p. 19
iii
Contents
1. Basic Copying Overview p. 20
2. Placing Originals
•
Placing on the Original Glass p. 22
•
Using the Automatic/Duplexing Document Feeder p. 24
•
Using the Mixed Original Detection Mode p. 25
•
Using the Single Aut omatic Document Feeding Mode
(SADF Mode) p. 26
3. Manual Bypass Copying p. 28
4. Copy Paper Size p. 30
5. Zoom Ratio p. 32
6. Image Density p. 34
7. Original Copy Type p. 36
•
1-sided 1-sided
•
1-sided 2-sided
•
2-sided 1-sided
•
2-sided 2-sided
•
Selecting Original Copy Type p. 38
•
Instructions fo r Loading Orig inal s p. 39
▲
▲
▲▲
▲
8. Finishing Mode p. 40
•
Non-Sort
•
Sort
•
Sort-and-Staple
•
Group
•
Manual Staple
•
Selecting the Finishing Mode p. 42
•
Using the Manual Stapl e Mode p. 43
•
Instr uctions for Loadi ng Or iginals fo r Fi n i s hing Mode
p.44
•
Auto Dual Function p.45
9. File Margin Mode p. 46
10. Co ver M o de p. 47
▲
•
1-sided 1-sided (2in1)
•
1-sided 2-sided (2in1)
•
Book 1-sided
•
Book 2-sided
▲
▲
▲
▲
Chapter 1
Safety Notes
Chapter 2
Getting to
Know you r
Copier
Chapter 3
Making Co pie s
Chapter 4
Specia l Funct i ons
Chapter 5
When an Indicator
Lights Up
Chapter 6
Troubleshooting
Chapter 7
Miscellaneous
Page 4
iv
Contents
Chapter 4 Special Functions p. 49
1. Meter Count p. 50
2. Toner Replenisher/Drum Dehumidifier p. 51
3. User’s Choice
Description of Each User’s Choice Functions p. 52
Making the Use r’s Choice Sett ings p. 58
Chapter 5 When an Indicator Lights Up p. 59
1. When the Add Paper Indicator Lights Up p. 60
2. When the Add Toner Indicator Lights Up p. 63
3. When the Add Staple Indicator Lights Up p. 64
4. When the Closure Failure Indicator Lights Up p. 66
5. When the Misfeed Indicator Lights Up
•
Misfeed Indicator and Monitor Display p. 68
•
Misfeed Clearing Procedures
: Copier p. 69
: Paper Feed Cabinet p. 72
: Duplex Unit p. 73
: Duplexing Document Feeder p. 74
: Automatic Document Feeder p. 75
: Sorter/Staple Sorter p. 76
6. When the Call-Tech.-Rep. Indicator Lights Up p. 77
7. When the I. U. Service Life Indicator Lights Up p78
8. Quick Reference for Other Indicators p. 84
Page 5

Chapter 6 Troubleshooting p. 85
v
Contents
1. When this Type of Copy is Produced p. 86
•
The image is too light
•
The image is too dar k
•
The copy is blurry
•
The copy has dark specks or spots
•
The edg e of the copy is di rty
•
The image on the copy is not aligned properly
•
The copy has lines
2. The Copier is not functioning as designed p. 88
•
The Cont rol Panel shows nothing
•
No copies are fed out when the Start Key is pressed
•
Control Panel Keys do not respond
•
The Copier is not activated when the Pow er Switch is
turned ON
Chapter 7 Miscellaneous p. 89
1. Specifications p. 90
•
Copier
•
Duplexing Document Feeder
•
Automatic Document Feeder
•
Sorter
•
Staple Sorter
•
Paper Feed Cabinet
•
Duplex Unit
2. Care of the Copier p.94
•
Cleaning
3. Function Combination Matrix p. 96
4. Description of Copy Paper Size
and Zoom Ratio Table p. 98
(Original Size to Copy Paper Size)
5. Index p. 99
Chapter 1
Safety Notes
Chapter 2
Getting to
Know you r
Copier
Chapter 3
Making Co pie s
Chapter 4
Specia l Funct i ons
Chapter 5
When an Indicator
Lights Up
Chapter 6
Troubleshooting
Chapter 7
Miscellaneous
Page 6

Chapter 1
Safety Notes
This chapter explains about the operating environment, conditions, and precautions f o r us e .
1. Installing the Copier p. 2
Installation Site
Power Source
Space Requirements
2. Pre cautions for Use p. 3
Operating Environment
Using the Copier Properly
Moving
Care of Co pier Supplies
1
Chapter 1
Safety Notes
Page 7
2
1. Installing the Copier
Installation Site
To ensure utmost safety and prevent possible malfunctions of the copier, install it in a location which
meets the following req uirement s .
◆
A place away from a curtain or the like that
may catch fire and burn easily.
◆
Chapter 1
An area where there is no possibility of
being splashed with water or other types of
liquid.
◆
An area free from direct su nlight.
◆
A place out of the direct air stream of an air
◆
A well-ventilated place.
◆
A dry place.
◆
A dust-free location.
◆
An area not subject to undue vibration.
◆
A stable and level location.
conditioner, heater, or vent ilato r.
Safety Notes
Power Source
The power source voltage requiremen ts are as follows.
◆
Use a power source with little voltage fluctuat ion.
Voltage Fluctuatio n
Frequency Fluctuatio n
:
Within ±10%
:
Within ±0.3%
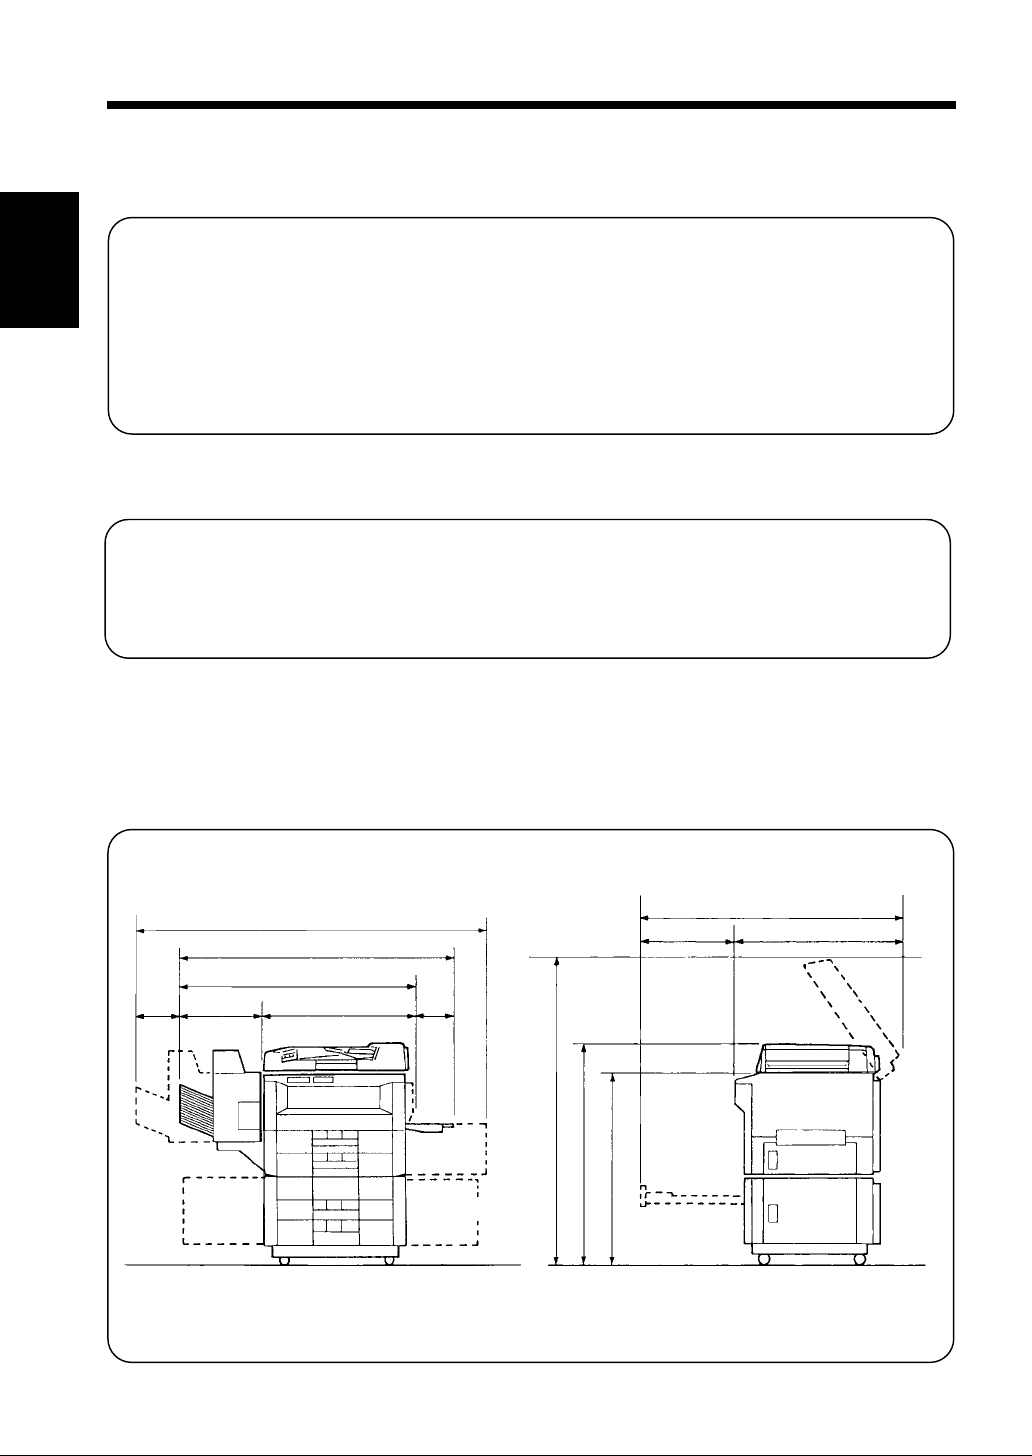
Space Requirements
To ensure easy co pier operation, supply replacements and service maintenance, adhere to the
recommended space requirements detailed bel ow.
* Be sure to allow a clearance of 150mm or more at the back of the copier as there is a ventilation
duct.
1,632
1,359
1,055
405230
650
304
1,400
1,043
918
1151O001AB
467
1,138
671
1151O002AB
Scale: mm
Page 8
2. Precautions for Use
Operating Environment
The operating environmental requirements of the co pier are as follows.
Temperature : 10°C to 35°C (50°F to 86°F) with a fluctuation of 10°C (50°F) per hour.
Humidity : 15% to 85% with a fluctuation of 20% per hour.
3
Using the Copier Properly
To ensure the optimum performance of the copier, follow the precautions listed below.
◆
NEVER place a heavy object on the copier or subject the copier to shocks.
◆
NEVER open any Doors, or turn OFF the copier while the copier is making copies.
◆
NEVER bring any magnetized object or use flammable sprays near the copier.
◆
ALWAYS insert the Power Plug all the way int o the outlet.
◆
ALWAYS make sure that the outlet is visible, clear of the copier or copier cabinet.
◆
ALWAYS provide good ventilation when making a large number of continuous copies.
NOTE
= Locate the Copier in a Well Vent ilated Room =
A negligible am ount of ozone i s generated during normal o pe ration of this copier. An
unpleasant odor may, however, be created in poorly ventilated rooms during extensive copier
operations. For a comfortable, healthy, and safe operating environment, it is recommended that
the room be well ventilated.
REMARQUE
= Placer le copieur dans une pièce largement ventilée =
Une quantité d’ozone négligable es t dé gagée pendan t le fonctionnement du copieur quand
celui-ci est ut ilis é normalement. Cependant , un e od eur désagréable peut être ress entie dans les
pièces dont l’aérati on est insuffi sante et lorsque une utilisation prolongée du copieur est
effectuée. Pour avoir l a certitud e de trava iller d an s un envi r onnement r éunis san t des condit ion s
de confort , sant é e t de sécurité, il est préférable de bien aérer la pièce ou se trouve le copieur.
Chapter 1
Safety Notes
Moving
If you need to transport the copier over a long distance, consult your Technical Representative.
Care of Copier Supplies
Use the following precautions when handling the copier supplies (toner, paper, etc.).
◆
Store the paper, toner, an d other supplies in a place f ree f ro m di rect sunlight and away from any
heating apparatus. Keep t hem i n a dry, clean environmen t.
◆
Store paper, which has been removed from its wrapper but not loaded into the Drawer, in a
sealed plastic bag in a cool, dark place.
◆
Keep supplies out of the reach of children.
◆
If your hands become soiled with toner, wash them with soap and water immediately.
Page 9

4
2. Precautions for Use
Chapter 1
Safety Notes
Page 10

Chapter 2
Getting to Know your Copie r
This chapt er give s you a bri e f de s cr ipt ion of the sys te m an d pre limi nar y info r ma ti on abo ut
the different parts of the system.
5
1. System Overview p. 6
2. Copier Parts and Accessories
Outside the Copier p. 8
Insid e t he Copier p. 9
Options p. 10
3. Cont r ol Panel Keys an d Indica t or s
Basic Panel p.12
Display Panel p. 14
4. Turning ON and OFF and Initial Mode p. 15
Turning ON and OFF
When the Copier is Turned ON
Initial Mode
5. Auxiliary Function s p. 16
Panel Resetting
Auto Panel Reset Function
Auto Copy Start Function
Auto Shut OFF Function
Interrupt Mode
Energy Saver Mode
Job Memory
Chapter 2
Getting to Know your Copier
Page 11
6
1. System Overview
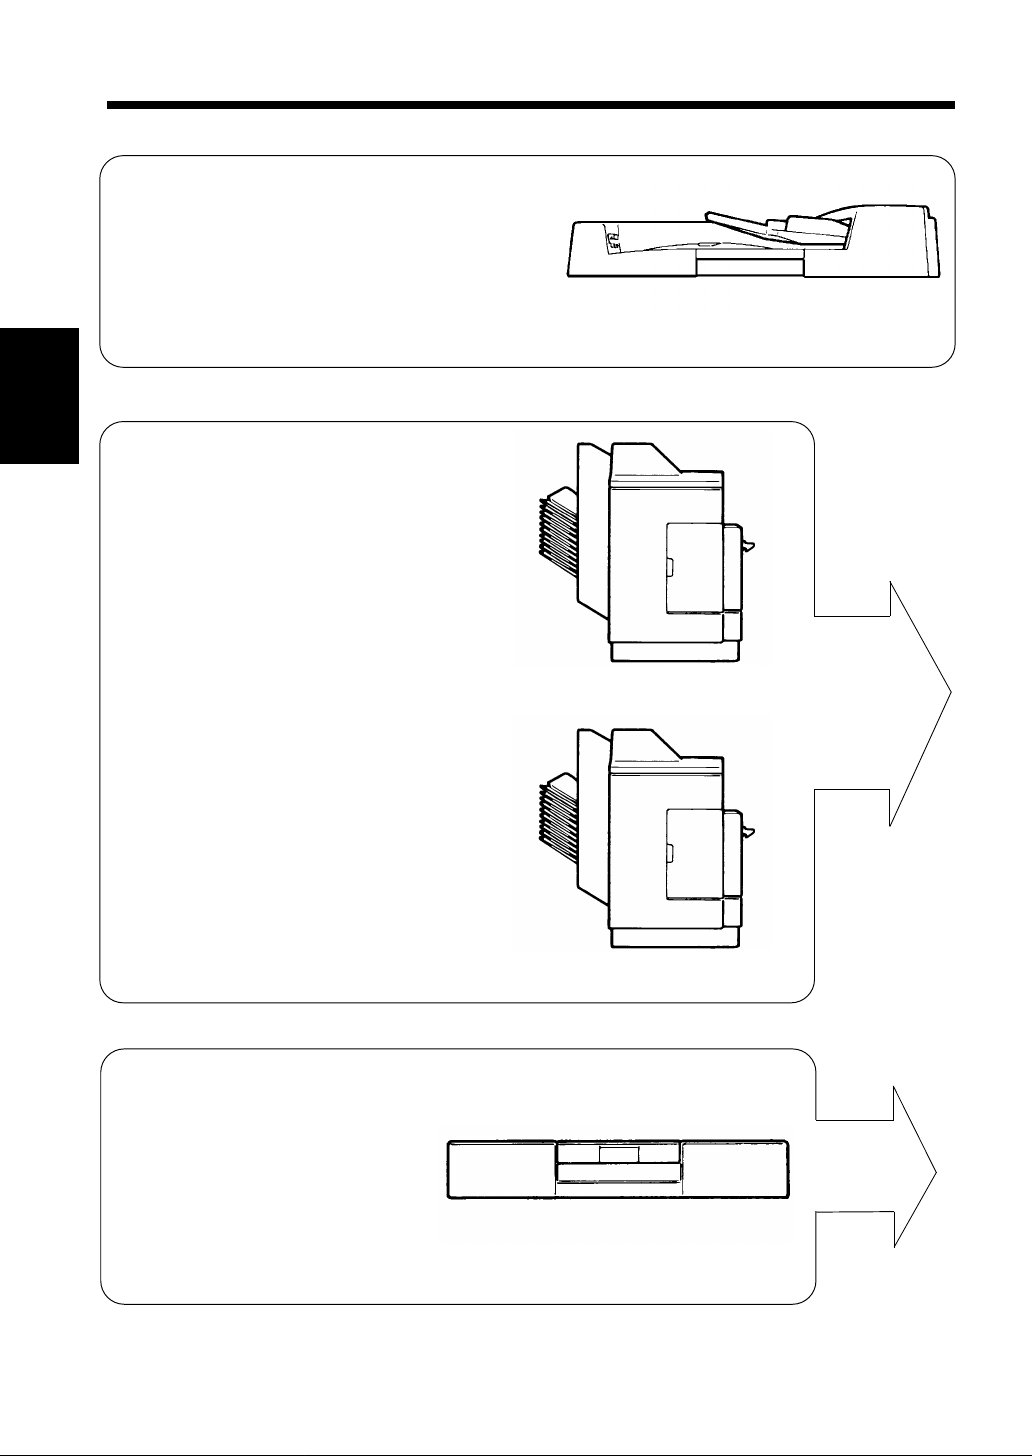
◆Automatic Document Feeder AF-5 <Opti on>
Permits auto m atic feed ing of mu lti ple orig i na ls.
Chapter 2
◆10-B in So rt er S-106 <O pt i o n>
Permits sorting or grouping copies into up
to 10 copy sets or stacks.
1151O006AA
Getting to Know your Copier
◆Staple Sorter ST-104 <Optio n>
Automatically staples copy sets or stacks
that are sorte d or gro uped th e sam e as with
the ST-104
◆ Duplex Unit AD-8 <Option>
Turns over 1-sided copi es to make
2-sided copies.
1139O0020A
1139O0020A
1139O0030A
Page 12
1151O007AA
7
1. System Overview
◆Duplexing Document Feeder AFR-12
<Option>
In addition to the function of the AFR-12,
it can turn over 2-sided originals.
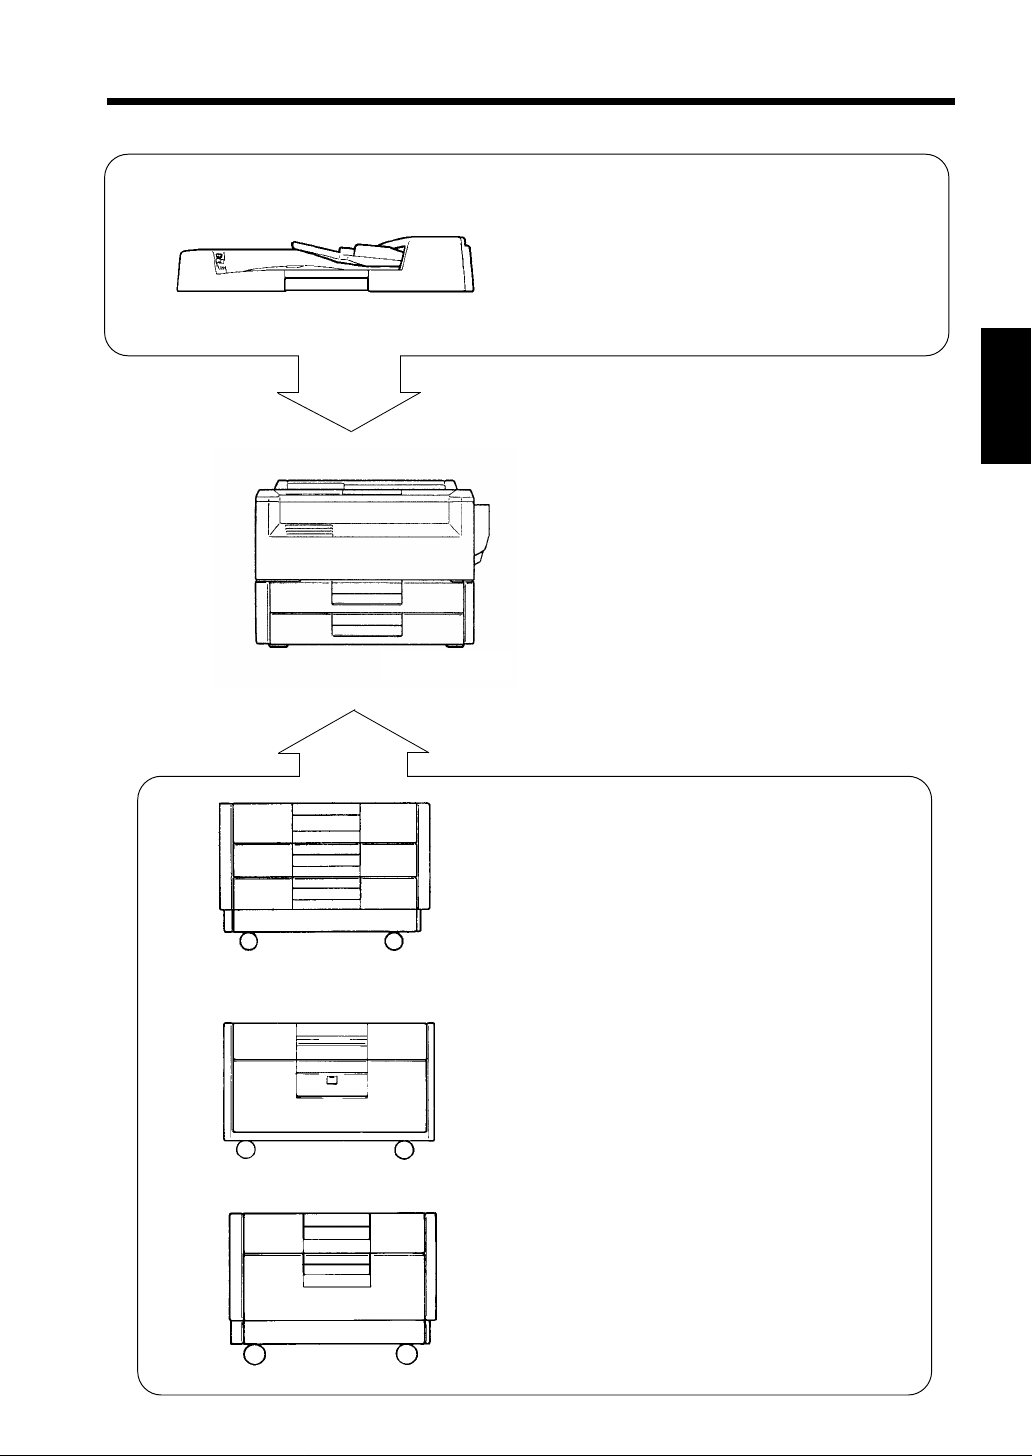
Chapter 2
EP2010
Equipped with two Paper Drawers and
Multi By pas s Tr a y to hold up t o 55 0
sheets of copy paper. The Manual Byp ass
Table allows you to make a copy on
paper which is not loaded in any of the
Drawers and which is fed into the copier
manually via this Table.
1139O0180A
1139O1212A
1139O2020A
◆Paper Feed Cabinet PF-204<Option>
Equipped with two paper Drawers to
hold up to 1,000 sheets of copy paper
(80 g/
2
).
m
◆Paper Feed Cabinet PF-104<Option>
Hold up to 2,500 sheets of copy paper
(80 g/m
2
).
Getting to Know your Copier
1139O1222A
◆Duplex Cabinet PF-4D<Option>
Turns over 1-sided copies to make
2-sided copiers. It is also equipped
with a storage drawer for keeping
copy paper and toner.
Page 13
8
2. Copier Parts and Accessories
Outside the Copier
2
3
4
6
7
8
9
Chapter 2
1
Copy Tray
1
Getting to Know your Copier
Extender
Copy Tray : Holds co pi es fed out of the cop i er .
2
Front Do or : Open for the followin g pur po se s:
3
: Slide this Extender out when making copies o n large-s ize paper .
• Replacing the Toner Bottle.
• Clearing a paper misfeed.
• Cleaning the Corona Units.
1st Draw er : Holds up to 250 sheets of paper.
4
5
1139O1010A
➭
➭
p. 63
p. 68
➭
p. 95
➭
p. 60
12
1139O2030A
10
11
The Edge Guide and Trailing Edge Sto p are movable, allowing you to
load paper of different sizes.
2nd Drawer : Holds up to 250 sheets of paper.
5
➭
p. 61
Control Panel : Use to start a copy cycle or make various copy-job settings.
6
Original Cover : Holds the original placed on th e Original Glass in position.
7
Power Switch : Use to turn ON and OFF the copier .
8
Multi Bypass
9
Tray
Multi By pa ss Tray
10
: Holds up to 50 sheets of standard paper which is not loaded in any of
the Drawers.
➭
p. 28
: Slide this Extender out when using large-size copy paper.
➭
p. 15
Extender
Right Do or : Open to clear a paper misfeed.
11
Total Counter : Shows the total number of copies made so far.
12
➭
pp. 72, 73
➭
➭
p. 12
p. 28
Page 14
Inside the Copier
3
9
2. Copier Parts and Accessories
4
2
1
1139O2040A
5
Lock Rel e as e L eve r : Turn clockwise to s wi ng up the Upper Hal f of the co pier to clear a
1
8
paper misfeed.
Toner Bottle
2
Holder
Original Pad : Holds the original in position on the Original Glass.
3
Original Glass : Place the original face down on this Glas s .
4
: Swing open to replace the Toner Bottle.
➭
p. 63
6
Chapter 2
7
1139O1030A
Getting to Know your Copier
Corona Unit
5
Cleaning Lever
: Operate the Lever to clean the corresponding Corona Unit if unwanted
➭
lines are produced on the copy.
p. 95
(Upper/Lower)
Imaging Unit Lock
6
: Operate when replacing the Imagin g Un it.
Release Lever
Dehumidifier
7
Switch
: Turn ON to prevent condensation from forming on th e PC Drum when
power is turned OFF.
(For Technical Representative only
Fusing Unit Handle : Hold onto this Lever when lifting the Upper Half of the Fusing U nit.
8
➭
p. 69
Page 15
10
2. Copier Parts and Accessories
Options
1 2
9
8
Chapter 2
7
6
3
4
5
1151O012AB
Getting to Know your Copier
Automatic Document Feeder AF-5 / Duplexing Document Feeder AFR-12
Document Exit
1
Tray
Document Feed
2
Tray Extender
Document Feed
3
Tray
Document Guide
4
Plate
Document
5
Turnover / Exit
Unit Door Lock
Release Key
: Receives originals that are a utoma tical l y ejected from the Automatic
/ Duplexing Document Feeder.
: Pull out when loading large-size originals.
: Load the originals face up on this tray.
: Slide the plate as necessar y to the size of the originals.
: Hold do wn whe n op enin g t he Docu m ent Tur no ver/Exit Unit Door .
➭
(AFR-12 on ly)
p. 74
Staple Sorter ST-104 and 10-Bin Sorter S-106
Stapler Door : Open to replace the Staple Cartridge.
6
(ST-104 only)
Staple Cartridge
7
Release Lever
Sorter Bins : Hold sorted or grouped copies.
8
Lock Rel e as e L eve r : Press to unlock the Sorter.
9
: Move the Lever up to replace the Staple Cartridge.
(ST-104 only)
➭
➭
p. 64
p. 64
➭
p. 76
Page 16
11
2. Copier Parts and Accessories
4
1151O009AA
Chapter 2
3
2
1
1151O103AA
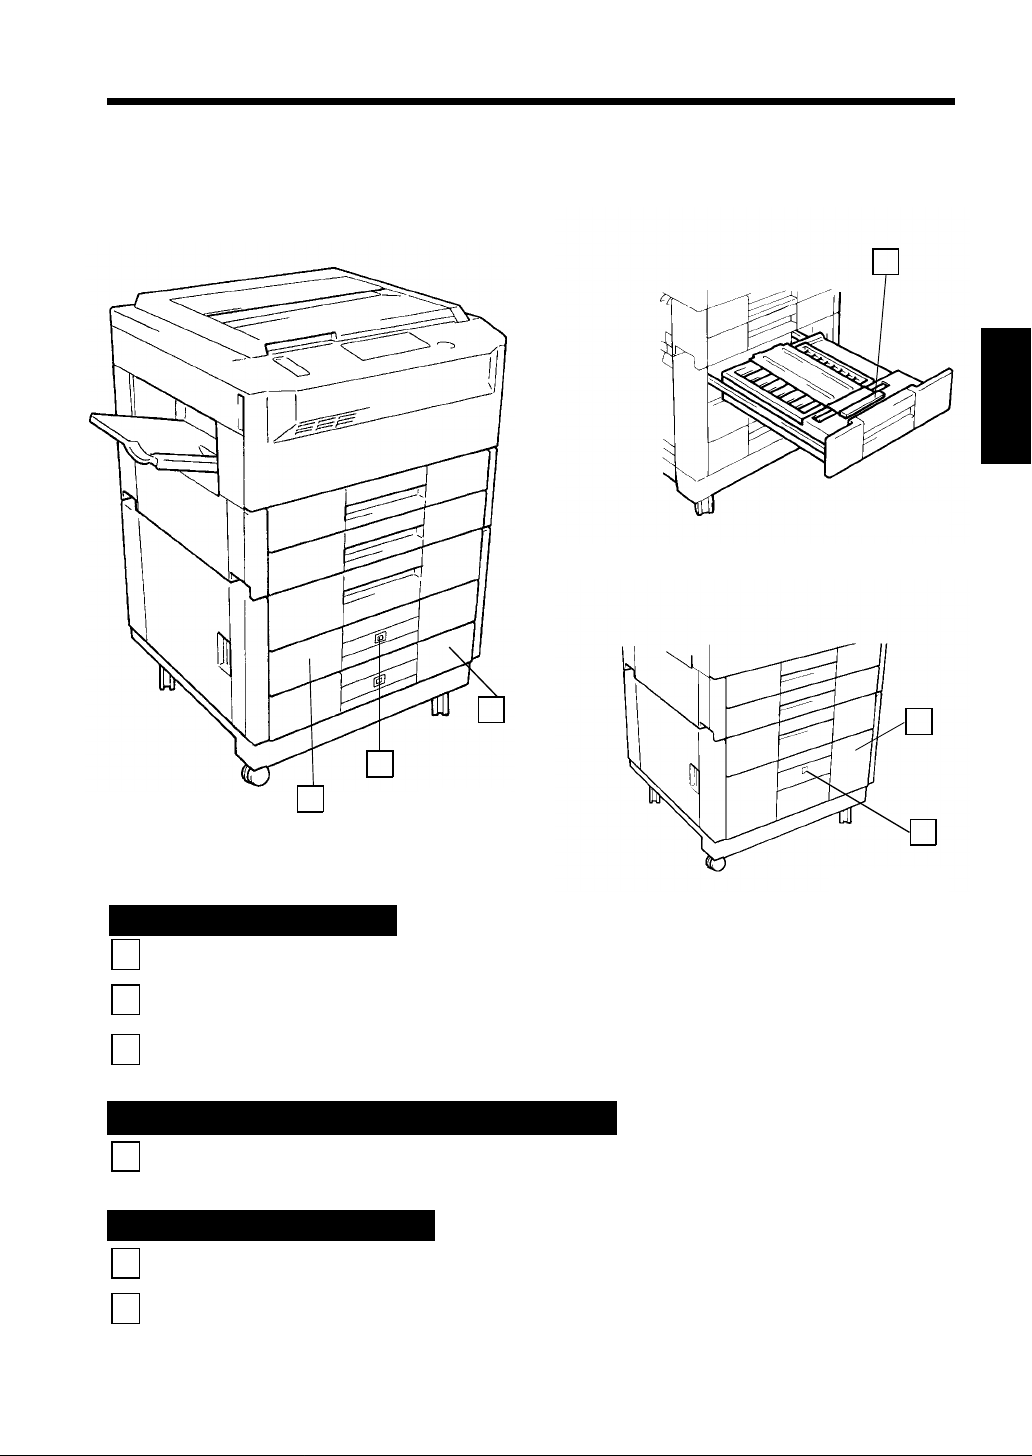
Paper Feed Cabinet PF-204
3rd Drawe r : Holds up to 500 sheets of paper.
1
Paper Descent Key : Press before sliding the Drawer out or after sl iding the Drawer into the
2
copier.
4th Draw e r : Holds up to 500 sheets of paper.
3
➭
pp. 61, 72
➭
➭
p. 61
p. 61
Duplex Unit AD-8 / Paper Feed Cabinet PF-4D
Misfeed Removal
4
Guide Plate
: Open to clearing a paper misfeed.
➭
p. 73
Paper Feed Cabinet PF-104
3rd Drawe r : Holds up to 2,5 00 s hee t s of pa p er.
5
➭
p. 62
5
Getting to Know your Copier
6
1151O010AA
Paper Descent Key : Press before sliding the Drawer out or after sl iding the Drawer into the
6
copier.
➭
p. 62, 72
Page 17
12
3. Control Panel K eys and In dicator s
Basic Panel
1
Meter
Count
Toner
Chapter 2
Drum
Dehumidify
Input
24 23 22
Display Panel
1
Getting to Know your Copier
See the other pages in this manual.
➭
p. 14
Key Pad
2
21 1318 1416 15
Use to enter the number of copies to be
made and other numeric data.
Clear Key
3
Press to :
•
Reset the multi-copy entry to 1.
Energy Saving Key
4
Press to set the copier into the Energy
➭
Saver Mo de.
Interrupt Key
5
p. 17
Press once to interrupt a current job with
a more urgent one. Press i t agai n to
return to the previous job.
➭
p. 16
Panel Reset Key
6
Auto
Size
Margin
Cover
Job
Memory
20 191217
Manual
Staple
Sort
Sort &
Staple
Group
Mixed Orig. Det.
1
2
11
21
22
12
Book
Book
Orig. CopyFinishing
9
10
11
0.5~2.0
2in1
2in1
1
Lighter Darker
2
Auto
Photo
Auto / Photo
A
11 10
Auto
A4
B4 A3
Full Size
B4 A4
A3 A4
Full Size Paper
Paper Select Key
Press to select the desired paper size or
the Paper Select Mode, either A uto or
Manual.
➭
p. 30
Zoom Ratio Select Key
:Press to select a desired fixed
➭
zoom ratio.
:Press to select full size(100%).
Full Size
p. 32
Zoom Up / D own Ke ys
:Press as necessary to change
the zoom ratio in 0.001
increments between the range
➭
of ✕0.500 and ✕2.000.
p. 33
A3
Press to set the copier into the initial
Exposure Control Keys
mode, clearing all set tin gs made
previously on the control panel.
It does not, however, clear th e co nten t s
*
of the copying job program memory and
the Interrupt Mode.
Stop Key
7
Press to stop a multi-copy cycle.
Start Key
8
Press to s tart a copy cycle.
➭
p. 16
12
:Pres s a s necessary to vary the
exposure level in the Manual
Exposure Mode.
:Press to select either the Auto
A
Exposure Mode, Manual
Exposure Mode, or Photo
➭
Mode.
p. 34
Page 18
13
3. Control Panel Keys and Indicators
0.5~2.0
Auto
A4
A3
B4 A3
Full Size
B4 A4
A3 A4
Full Size Paper
Mixed Original Detection Key
13
Auto
A3
A4
A4
A5
Press when making copies usi ng the
Automatic / Duplexing Document Feeder
in which originals of assort ed sizes are
➭
loaded together.
Orig Copy Key
14
▼
p. 25
Press to select the type of copying job
you wish t o make .
Manual Staple Key
15
Press to stap l e copy sets or st ack s a lr e ady
➭
made.
Finishing Key
16
p. 42
Press to select the finishing type you
want.
➭
p. 42
Auto Size Key
17
Press as necessary to select the Auto Size
➭
Mode.
File Margin Key
18
p. 32
Press to set the copier into the File
➭
Margin Mode.
Cover Key
19
p. 46
Press to set the copier into the Cover
Mode.
➭
p. 47
➭
S
B4
FLS.
Inch
p. 36
2 1
123
456
789
0C
7 8 10 9 6 5
Job Memory Select Key
20
Press to call up a copy job program
previously stored in the program memory.
➭
p. 17
Job Memory Input Key
21
Press to store a copy job program in the
program m e mory .
Drum Dehumidify Key
22
Press to remove condensation formed on
the surface of the PC Drum.
Auxiliary Toner Replenishing Key
23
Press when the image on the copy
becomes too light.
Meter Count Key
24
Press to check for each of the current
counts of different e le ct r onic counter s of
the copier.
➭ p. 50
4 3
1151O041DA
1151O041DA
➭
p. 17
➭
p. 51
➭
Chapter 2
Getting to Know your Copier
p. 51
Page 19

14
3. Control Panel Keys and Indicators
Display Panel
1 2 3
0.5~2.0
Auto
A4
Chapter 2
Closure Failure Indicator
1
Auto
Photo
Lighter Darker
Auto / Photo
A
A3
B4 A3
Full Size
B4 A4
A3 A4
Full Size Paper
Indicates that a Door is left open
Getting to Know your Copier
2
or any optio n i s no t s et correctly.
➭
p. 66
Misfeed Indicator
Indicates that a paper misfeed has
occurred in the copier or any
option.
Call-Tech.-Rep. Indicator
3
➭
p. 68
Indicates that the copier has
developed a malfunction.
Remove C opies Ind i cato r
4
Indicates that t here i s a copy o r
copies left in the Sorter Bins.
Remove copies from all Bin s.
➭
Add Staples Indicator
5
p.84
Indica te s that the Stapl e C artri dg e
is running out of staples. Replace
the Staple Cartridge as so on as
➭
possible.
p. 64
4 5
A3
A4
A4
A5
10 9
6
Auto
7 8
S
B4
FLS.
Inch
6
7
➭
p. 77
8
9
10
123
456
789
0C
Wait Indicator
Indicates that the copier is
warming up and no copy cycle
can be initiated. Wait until it goes
➭
p. 84
out.
Add Toner Indicator
Indicates that t he To ner Bottle is
running out of toner. Replace the
Toner Bot t le as soon as p ossible.
➭
p. 63
I.U. Service Life Indicator
Indicates that the Imaging Uni t
needs replacement.
Replace the Imaging Unit.
➭
p. 78
Special Paper Indicator
Indicates that the specia l paper
S
setti ng has be en mad e.
Add Paper Indicator
Indicates that the curren tly
selected Drawer has run out of
1151O041DA
1151O041DA
➭
p. 31
paper. A d d p a per as nece s s a r y.
➭
p. 60
Page 20
4. Turning ON and OFF and Initial Mode
S
S
Turning ON and OFF
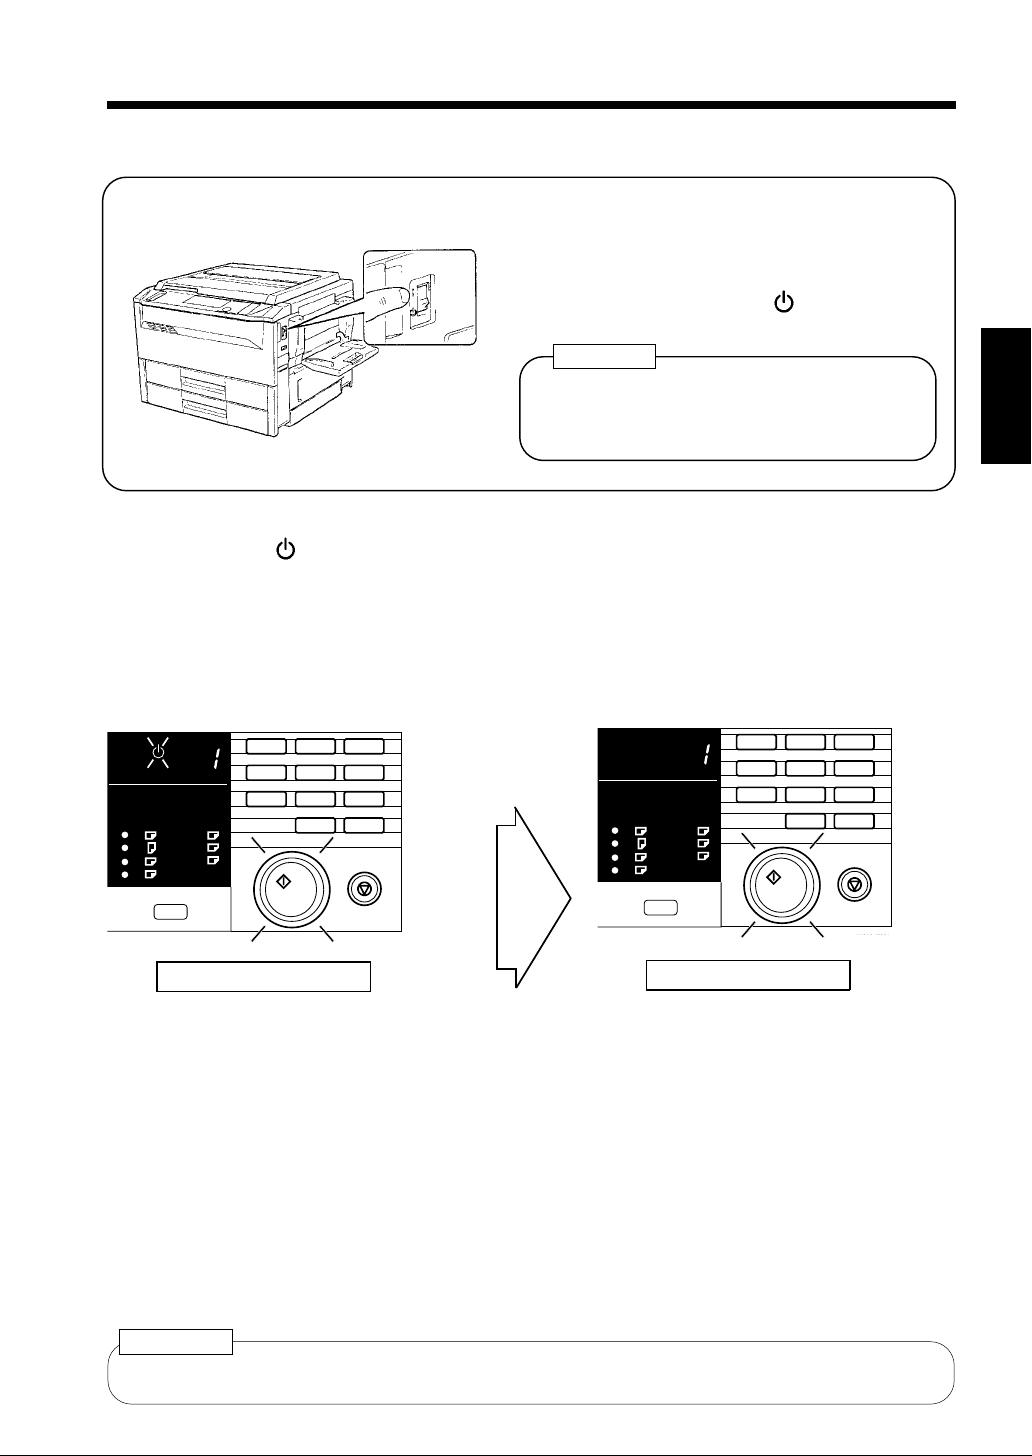
●
Turning Copier ON
Press the Power Switch to the I (ON) position.
●
Turning Copier OFF
Press the Power Switch to the (OFF) position.
NOTE
The Auto Shut OFF function will automatically
shut down the copier a given period of time
1139O2060A
When Copier is Turned ON
The Wait Indicator lights up on the
control panel and the S tart Key turns or ang e,
indic a t i ng that the copier is now warmin g up.
Loading the originals onto the Automatic /
Duplexing Document Feeder and pressing the
Start Key can set the copier into the Auto Copy
Start Function.➭ p. 16
after the last activity (See p. 16).
In about 30 seconds, the Wait Indicator goes
out, and the Start Key tu rn s green. Now, th e
copier is ready to make copies.
15
Chapter 2
123
456
Auto
A3
B4
A4
B5
FLS.
A4
Inch
A5
Paper
789
Start
Start Key : Orange Light
0C
Stop
1139O4702A
1139O4702A
Auto
A3
B4
A4
B5
FLS.
A4
Inch
A5
Paper
Start Key : Green Light
123
456
789
0C
Start
Stop
1139O4722A
1139O4722A
Initial Mode
When the Power Switch is turned ON, the in itial setting s are indicated on the cont rol panel.
* The initial settings serve as the reference for all control panel settings to be later made.
No. of copies
selected
Zoom Ratio : ✕1.000 Orig. Copy : From 1-sided
Paper : Auto Paper Finis hing : Non-Sort
* The initial setting of the Orig. Copy Mode is 1-sided original 2-sided copy if your copier is
equipped with a Duplex Unit.
: 1 Exposu re : Auto Exposur e
▼
original to 1-sided
copy
▼
▼
Getting to Know your Copier
Usef ul Tip
The initial mode can be changed. For details, see User’s Choice.
➭
p. 52
Page 21
16
5. Auxiliary Functions
Panel Resetting
The Panel Reset Key resets all contr ol p anel
settings to default sett ing s in clud in g the
number of copies and zoom ratio.
* If an Automatic / Duplexing Document
Feeder is used, the original present on
the Original Glass will be ejected out of
the unit.
Useful Tip
The Panel Reset Key enables you to cancel
all previous settings ef ficiently. To avoid
Chapter 2
miscopy, try to press thi s Key before
making any setting for your own copy job.
Auto Panel Reset Function
If no key on the Control Panel is pressed
within about 60 sec. after a copy cycle has
been completed or copy settings made, the
Getting to Know your Copier
Auto Panel Reset Fun ction is activated to
return the copier to the default settings.
Useful Tip
The time for the copier to enter the Auto
Panel Reset Function can be changed to 30
sec.
Also, the Auto Panel Reset function can be
enabled or disabled by the User’s Choice.
➭
p. 56
Auto Copy Start Function
Auto Shut OFF Function
The Auto Shut OFF Function shuts down the
copier a given period of time afte r the copier
has been used last. The initial settin g is 60 min.
Useful Tip
The time for the copier to enter the Auto
Shut OFF Mode can be selected from 1 to
120 min . by us in g t he Us er’ s Ch oi ce .
➭
p. 57
NOTE
Consult your T echn ical Representative if
you do not want to activate this function.
Interrupt Mode
The Interrupt Mode allows you to interrupt a
current job and run a different one. Pressing
the Interrupt Key once set s the c opier into the
Interrupt Mode. Pressi ng the Key again
cancels the Interrupt Mode and returns to the
previous settings.
Useful Tips
•
If the current job involves 2-sided
copying or Cover Mode, the copier
rejects an Inter rupt Mode.
•
If the current job involves Sort,
Sort-and-Staple or Group, Non-Sort is
automatically selected at the same time
when the copier is se t into t he Inter rupt
Mode.
Even during warm-up, the copier can be set
into the Auto Copy Start Function by lo ading
the originals onto the Automatic / Duplexing
Document Feeder and pr es s in g the S tart Key.
This function allows a copy process to be
started as soon as the copier completes
warming up.
Page 22
17
5. Auxiliary Functions
Energy Saver Mode
Instead of turning the copier OFF, it’s a good
idea to use the Energy Saver Mode. This mode
will minimize the time for the copier to
complete the warm-up cycle to about 20 sec.
•
The Energy Saver Mode is automatically
activated a given period of time after the
copier has been used last.
The initial setting is 15 min.
•
Pressi ng t he En erg y Sav ing K ey set s t he
copier into the Energy Saver Mode.
•
To cancel the Energy Saver Mode, press any
key on the Control Panel, for inst ance, the
Start Key.
Useful Tip
The time for the copier to ente r the Energy
Saver Mode can be selected from 1 to 120
➭
min. by us i n g User’s C hoice.
NOTE
p. 56
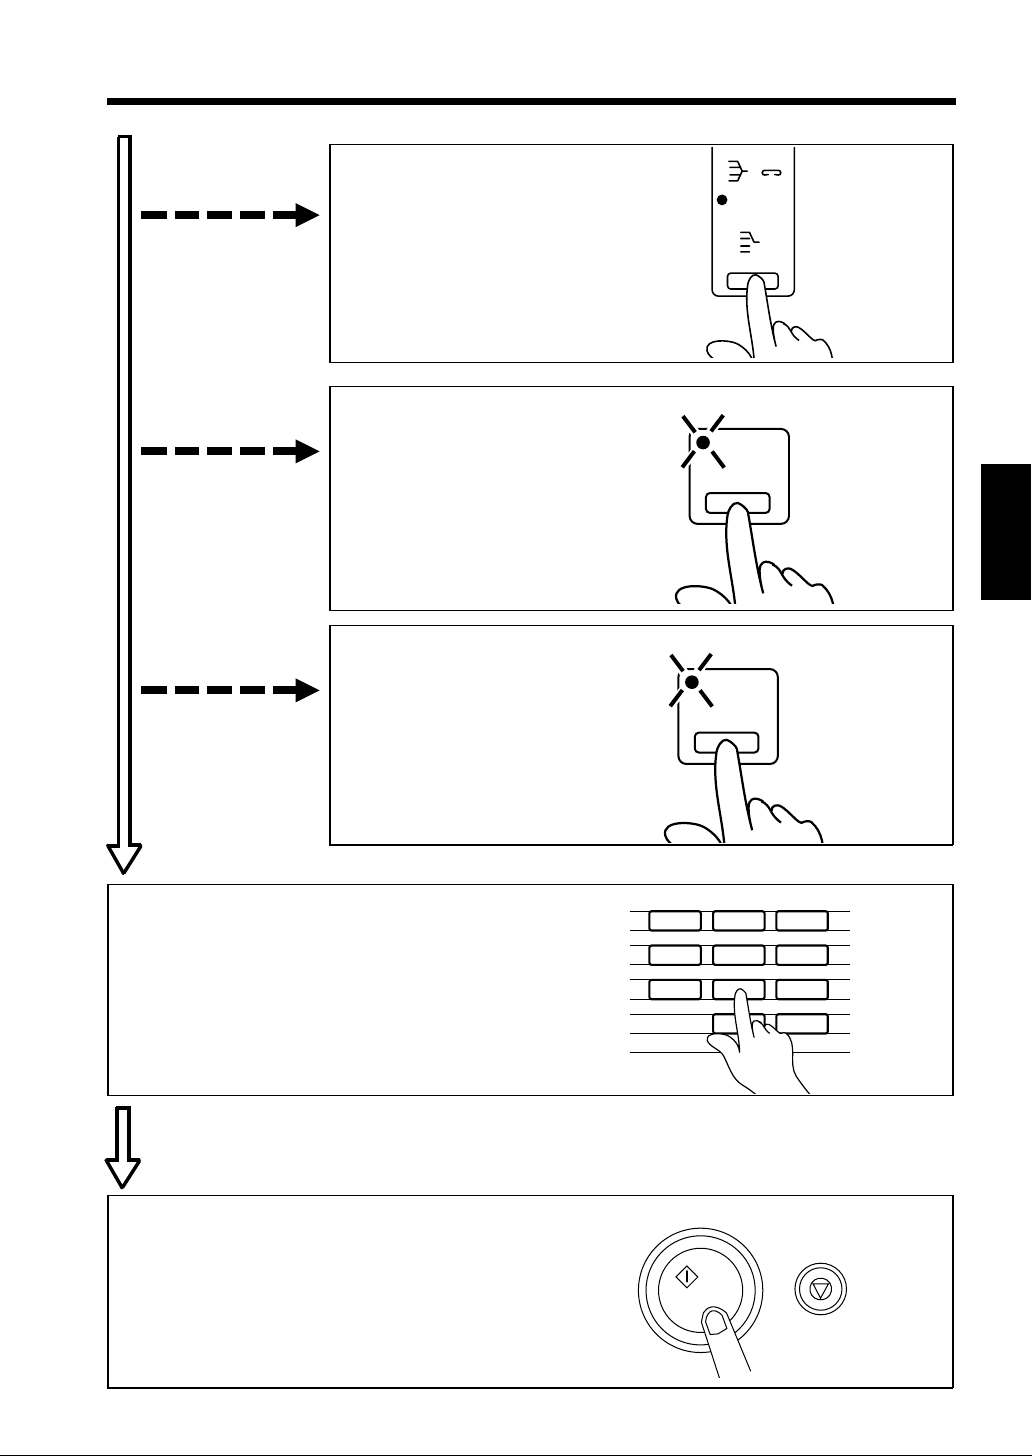
Job Memory
One copying job program that is
frequently used can be stored in memory
and called up later as necessary.
Job Memory Setting
1
2
Press the job Memory Input Key.
* The Job Memory Indicat or Starts
blinking.
Job
Input
Make the control panel settings for the
job to be stored in job memory.
Memory
Chapter 2
1139O8032A
The copier is shut down if the Auto Shut
OFF function activates while the copier i s
in the Energy Saver Mode.
3
Getting to Know your Copier
Press the Job Memory Select Key.
* The Job Memory Indicat or l ig ht s
up and the copying job program has
bee n st o red in job memory.
Job
Memory
1139O2572A
To call up the job program from
memory, press the Job Memory Select
Key.
NOTE
If you have stored a wrong job
progra m or i f you wa nt t o
replace an old job program with
a new one, perform steps 1, 2,
and 3.
Page 23

18
Chapter 2
Getting to Know your Copier
Page 24

Chapter 3
Making Copies
This chapter shows you how to make copies.
The "Basic Copying Overview" offers quick, at-a-glance instructions for making copies.
Each step is keyed to a pa ge numbe r wi th a more deta ile d de scriptio n.
1. Basic Copying Overview p. 20
2. Placing Originals
•
Placing on the Original Glass p. 22
•
Using the Automatic/Duplexi ng Documen t Feeder p. 2 4
•
Using the Mixed Original Detection Mode p. 25
•
Using the Single Au tomatic Document Feeding Mode
(SADF Mode) p. 26
3. Manual Bypass Copying p. 28
4. Copy Paper Size p. 30
5. Zoom Ratio p. 32
6. Image Density p. 34
•
Auto Exposure Mode
•
Manual Exposure Mode
•
Photo Mode
7. Original Copy Type p. 36
•
•
•
•
•
•
•
•
•
•
8. Finishing Mode p. 40
•
•
•
•
•
•
•
•
•
9. File Margin Mode p. 46
10. Cover Mode p. 47
▲
1-sided 1-sided
1-sided 2-sided
2-sided 1-sided
2-sided 2-sided
1-sided 1-sided (2in1)
1-sided 2-sided (2in1)
Book 1-sided
Book 2-sided
Selecting Or iginal Copy Ty pe p. 38
▲
▲▲
▲▲▲
▲▲
▲
Instructions for Loading Originals p. 39
Non-Sort
Sort
Sort -and-Staple
Group
Manua l Staple
Selecting the Finishing Mode p. 42
Using the Manual Staple Mode p. 43
Instructions for Loading Originals for Finishing Mode p. 44
Auto Dual Function p. 45
19
Chapter 3
Making Copies
Page 25
S
20
1. Basic Copying Overview
•
Place the original in position (step 1), set the number of copies to be made (step 9), and press the
Start Key (step 10). This will allow you to make a full-size copy or copies on paper of the same
size as the original.
*Automatically selected in the initial mode are Aut o Paper, full size, and Auto Exposure.
•
The selections will change the exposure level, zoom ratio, the type of copy and so on.
1. Placing the Original
•
•
Raise the Original Cov er and place the
original face down on the Original Glass.
➭
p. 22
Chapter 3
Load the originals face up on the
Automatic/Duplex ing Docu ment
➭
Feeder.
p. 25
Making Copies
To change the copy paper
size
To change the zoom ratio
To change the exposure
level
To make 2-sided copies
from 1-sided originals
1151O013AA
2. Press the Paper Select Key to
select the desired paper size.
➭
p. 30
3. Press the Key to
select the desired fixed zoom
➭
ratio.
p. 32
4. Press the < > Key to
adjust the e xpo s ure level.
➭
p. 34
5. Press the Orig. C opy Key
▲
to sel e c t the 2-si ded copy
➭
mode.
p. 36
Auto
A3
A4
A4
A5
Full Size
Lighter Darker
Paper
Auto / Photo
A
21
22
B4
B5
FLS.
Inch
1139O2652A
Book
Book
1139O0082A
1151O016AA
1139O0082A
1139O2652A
1151O081CA
1
2
Orig. Copy
1151O086CA
Page 26
21
1. Basic Copying Overview
To sort copi es
To make a file margin
on the copy
To make a co ver copy
6. Press the Finishing Key t o
select the desired finis hing
➭
mode.
p. 40
7. Press the File Margin Key
to set the copier into the
➭
File Margin Mode.
p. 46
8. Press the Cover Key to set
the copier int o t he Cover
➭
Mode.
p. 47
Staple
Group
Finishing
1151O087CA
Margin
Chapter 3
1139O2552A
Cover
9. Setting the number of copies.
•
Set the desired number of copies to be
made using the Key P ad.
*If you have entered an incorrect
number, press the Clear Key, then enter
the correct number.
10. Starting th e copy cycle .
•
Press the Start Key.
*To stop the copy cycle, press the Stop
Key.
123
456
789
0C
1139O2640A
Making Copies
1139O2562CA
1139O2640A
1134P342DA
Page 27
22
2. Placing Originals
Placing on the Original Glass
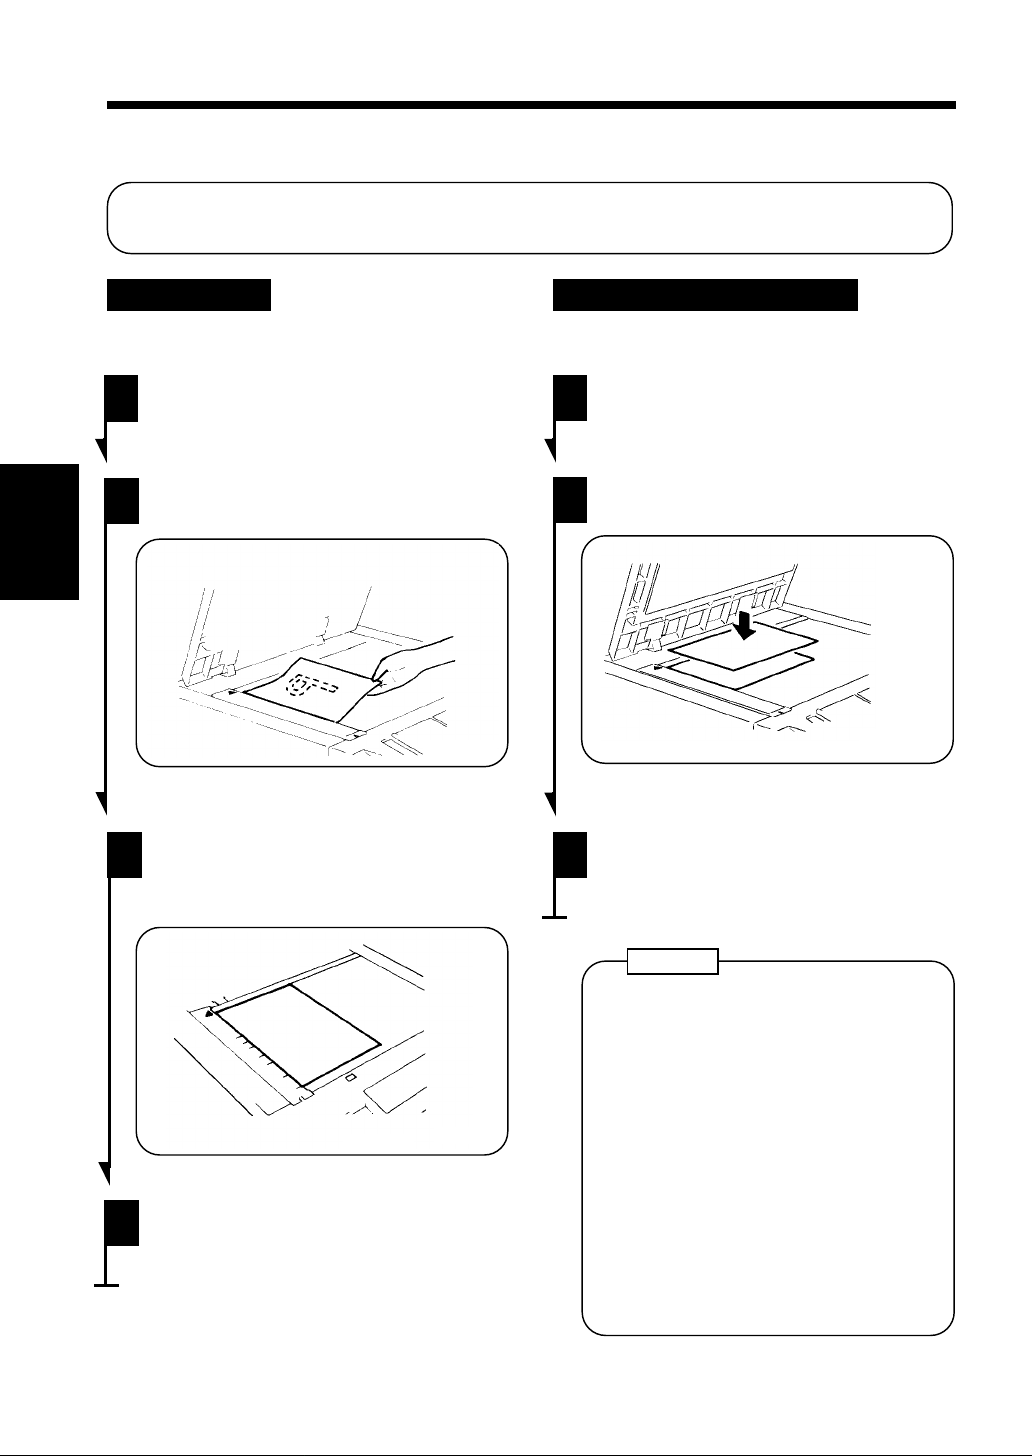
Different methods are used to place the original depen d ing on i ts ty pe . Use the appropriate
procedure.
Sheet Originals
(Using plain paper or thick paper)
Raise the Original Cover.
1
2
Chapter 3
Making Copies
Place the original face dow n on the
Original Glass.
3
Align the rear left corner of the
original with the marker on the
Original Width Scale.
▼
1151O0103AA
Highly Tra nsp ar ent Or igi nal s
(Using transparenci es and tran slucent paper fo r
the original)
1
2
Place the original in the s ame w ay as
the sheet originals.
Place a blank sheet of paper o f the
same size over the original.
1139O0070A
Gently lower the Original Cover.
3
4
Gently lower the Original Cover.
1151O014AA
NOTE
The original sizes that can be d etected
in the Auto Paper Select Mode are
A3, B4, A4L, A4C, A5L.
When making copies from originals
other than th e ab ove, select the copy
paper size.
When using wrinkled or curled
originals, the or iginal size might not be
detecte d correctl y . So, select the copy
paper size and do not use the Auto
Paper Select Mode .
➭
Copy Pape r Size
p. 30
Page 28
23
2. Placing Originals
Making Copies from A Book
Using Book Copy Mode
("Book" refers to an open bound original.)
1
Place the open bo ok so that the
higher-numbered pag e faces toward
the Original Width Scale.
Gently lower the Origi nal Cover.
1134O037AA
2
NOTES
•
If the book is thick, make a copy with
the Original C over raised.
•
Not positioning the open book properly
will result in copies with pages in
incorrect order .
•
Do not look directly at the Original
Glass s u rface a s a s t r ong be a m of light
is emitted.
Instructions for Original Placement
•
Be sure to raise the Original Cover 15 °
or more before pl acing th e origin al. If
the Original Cover is raised to an
angle less than 15°, the c opier may fail
to select the correct copy paper size or
zoom ratio.
15°
1139O080AA
•
Do not place an orig inal weighing
more than 3kg on the Original Glass .
•
When placi ng an op en boo k , do no t
press t he book hard on the Or iginal
Glass, as trouble could result.
Chapter 3
Making Copies
Page 29
24
2. Placing Originals
Using the Automatic/Depleting Document Feeder
Automatic/Depleting Document Feeder automatically feeds in sheet origin als placed on the
Document Feed Tray one by one. After the copy cycle has been c ompleted, it automatically
ejects the origin al out onto the Document Exit Tray.
Some originals may no t be suitable for reli able o per ation of the Document Feeder. Here is a
guideline.
Originals Suitable for the Automatic/Depleting Document Feeder
Type of Originals: S heets (Plain paper)
Normal mode
•
1-Sided Original (weighing 50g/m2 to 110g/m2 )
•
2-Sided Original (weighing 60g/m2 to 90g/m2 )
•
Mixed Or ig ina l Detectio n mode (wei gh i ng 60 g/ m2 to 90g/m2 )
Chapter 3
Original Size: 1-Sided Original, 2-Sided Original, Mixed Original Detection Mode
Lightweight Original Mode (40g/m
A3L, B4L, A4L, A4C, 210mm×330mm
A5L (Except for Mixed Original Detection Mode)
2-in-1 (Dual Original Scanning) mode : A4C
∗ Lightweight Original
Be sure to use the User’s Choice to turn ON the Lightweight Original Mode when making copies
from the lightweight originals.
For a Lightweight origi nal(40 g/m
Making Copies
Original Glass or to make cop ie s u sing the SADF Mode. (Single Automatic Document Feeding
➭
Mode).
p. 26
2
to 50g/m2 ), it is recommended to place it directly onto the
2
to 110g/m2 )
Originals Not Suitable
•
Typing paper, paraffin paper, and other thin paper
•
Thick paper
•
Originals greater than A3 or smaller than A5L
•
Transparencies, translu cent paper
•
Wrinkled, dog-eared, curled, or tor n origin als
•
Clipped or stapl ed originals
•
Carbon-backed origi nals
Typing paper,
paraffin paper,
and other thin
paper
Thick paper
∗ For any of these types of originals, place the original manually on the Original Glass to make a
copy.
➭ p. 27
Continuous
forms
Stapled
originals
Wrinkled or
dog-eared
original
1134O073AA
Page 30
25
2. Placing Originals
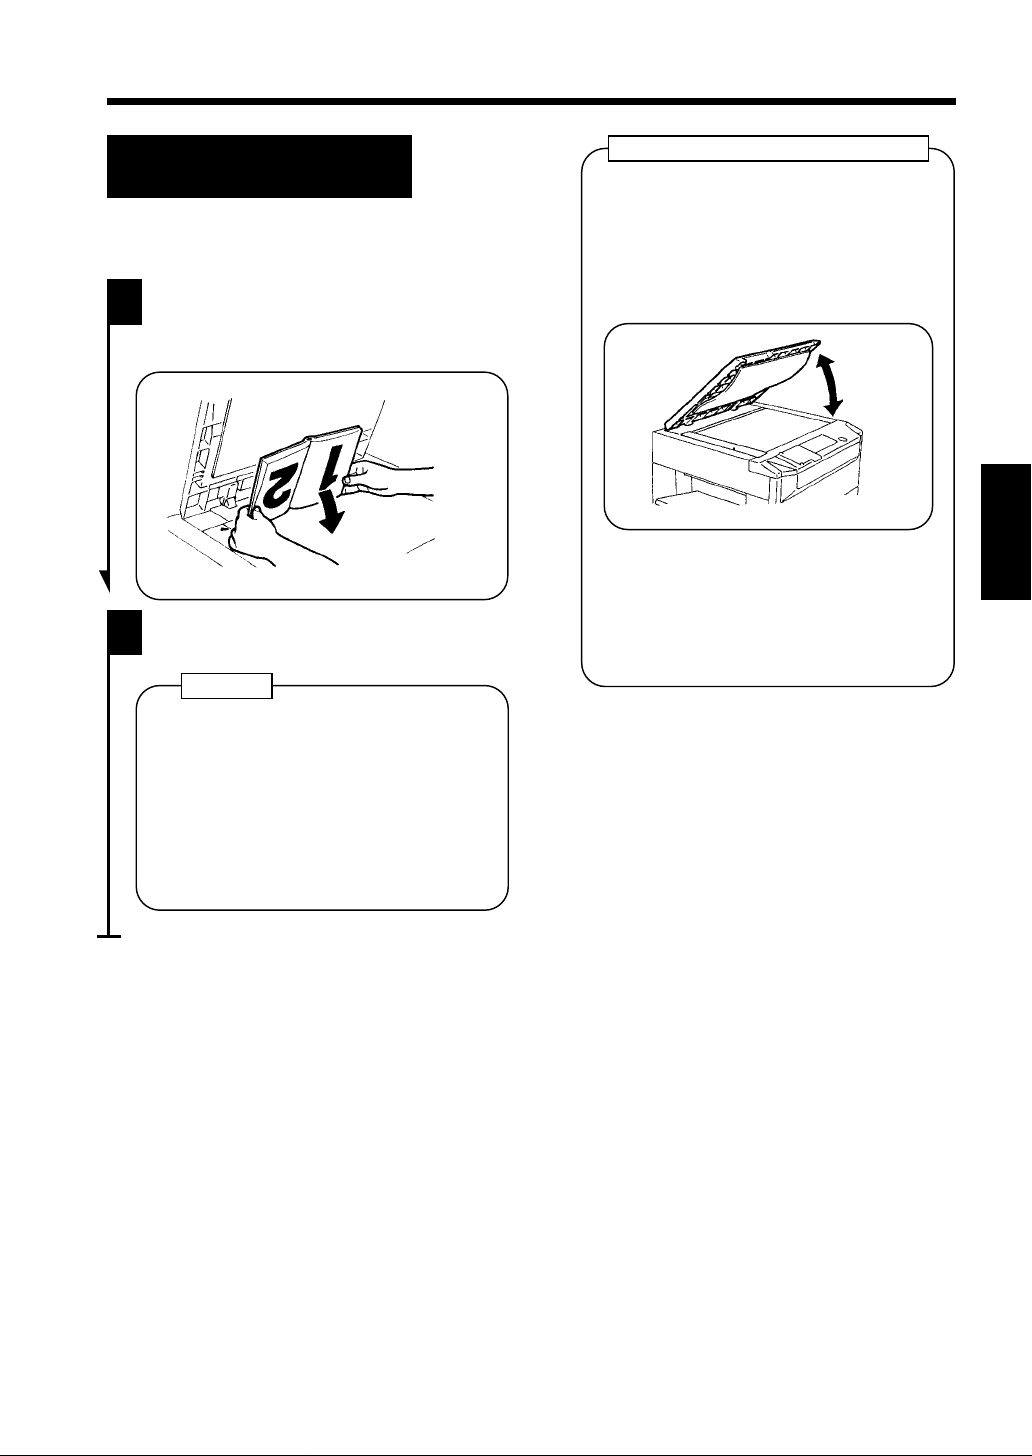
Loading t he Orig ina ls
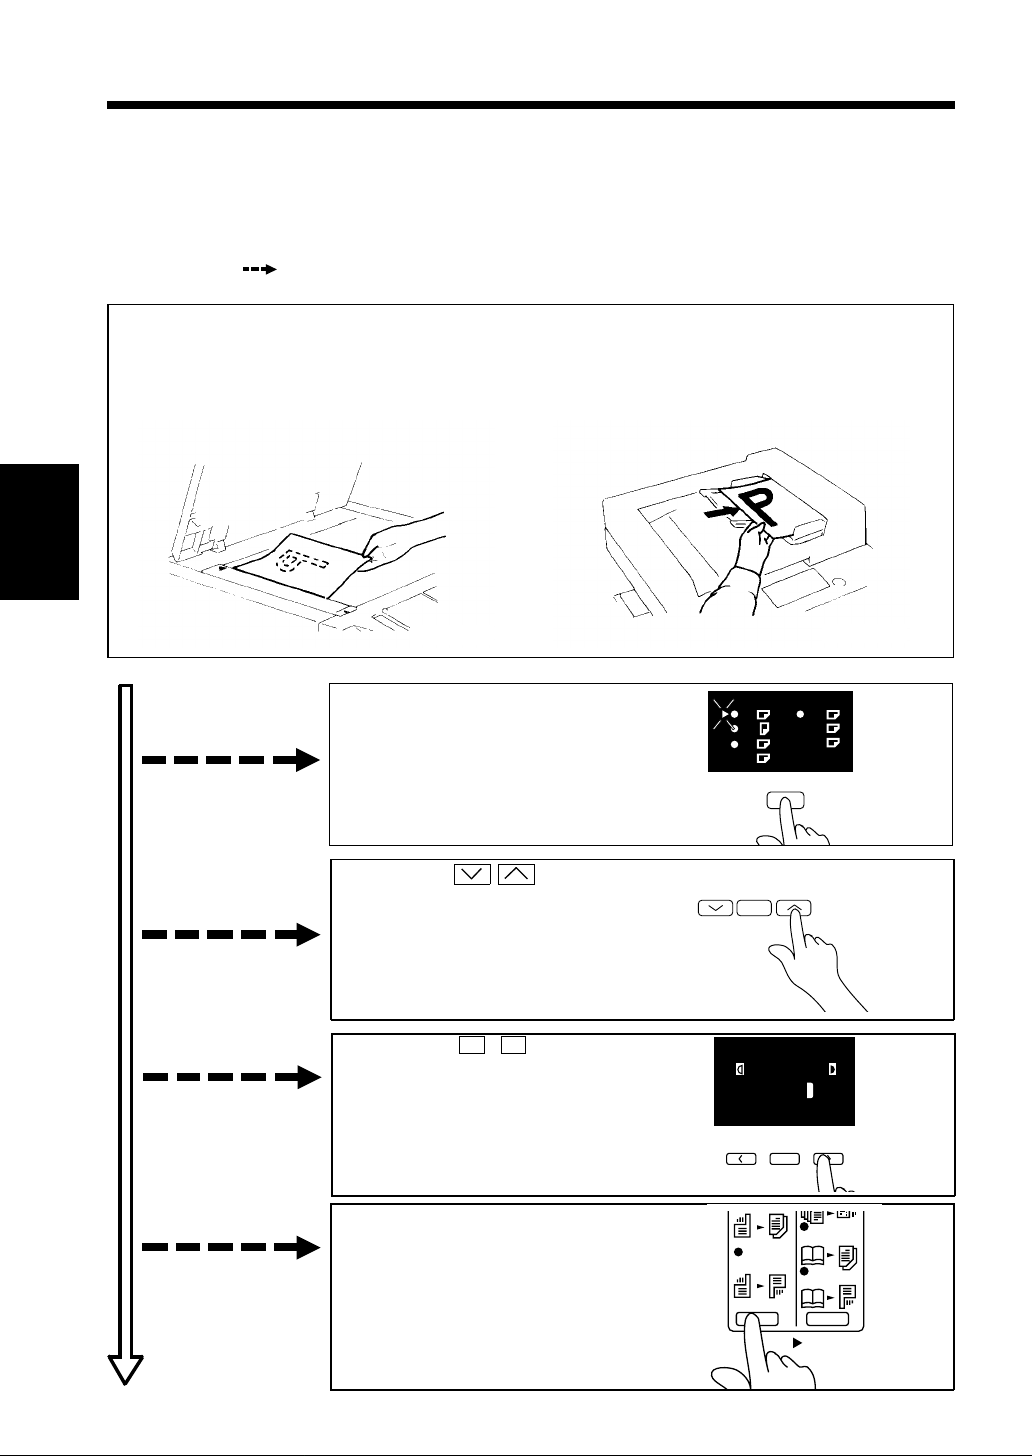
1
2
Slide the Document Gui de Plate to the
size of the originals .
∗When using larg e s ize or ig inals, flip
up the Document Feed Tray
Extender.
Load a neat stack of originals face up
on the Document Feed Tray.
NOTE
•
The maximum number of originals th at
can be loaded
A4 or smaller : Up to 50
A3 or B4 : Up to 30
•
Make sure that the top level of the
original sta ck do es no t exceed the
marking.
•
Make sure that the Document Guide
Plate is in touch with the edges of the
original sta ck. If it’s not pressed snugly
against the the original stack, skewe d
feeding could result.
1151O015AA
1151O016AA
▼
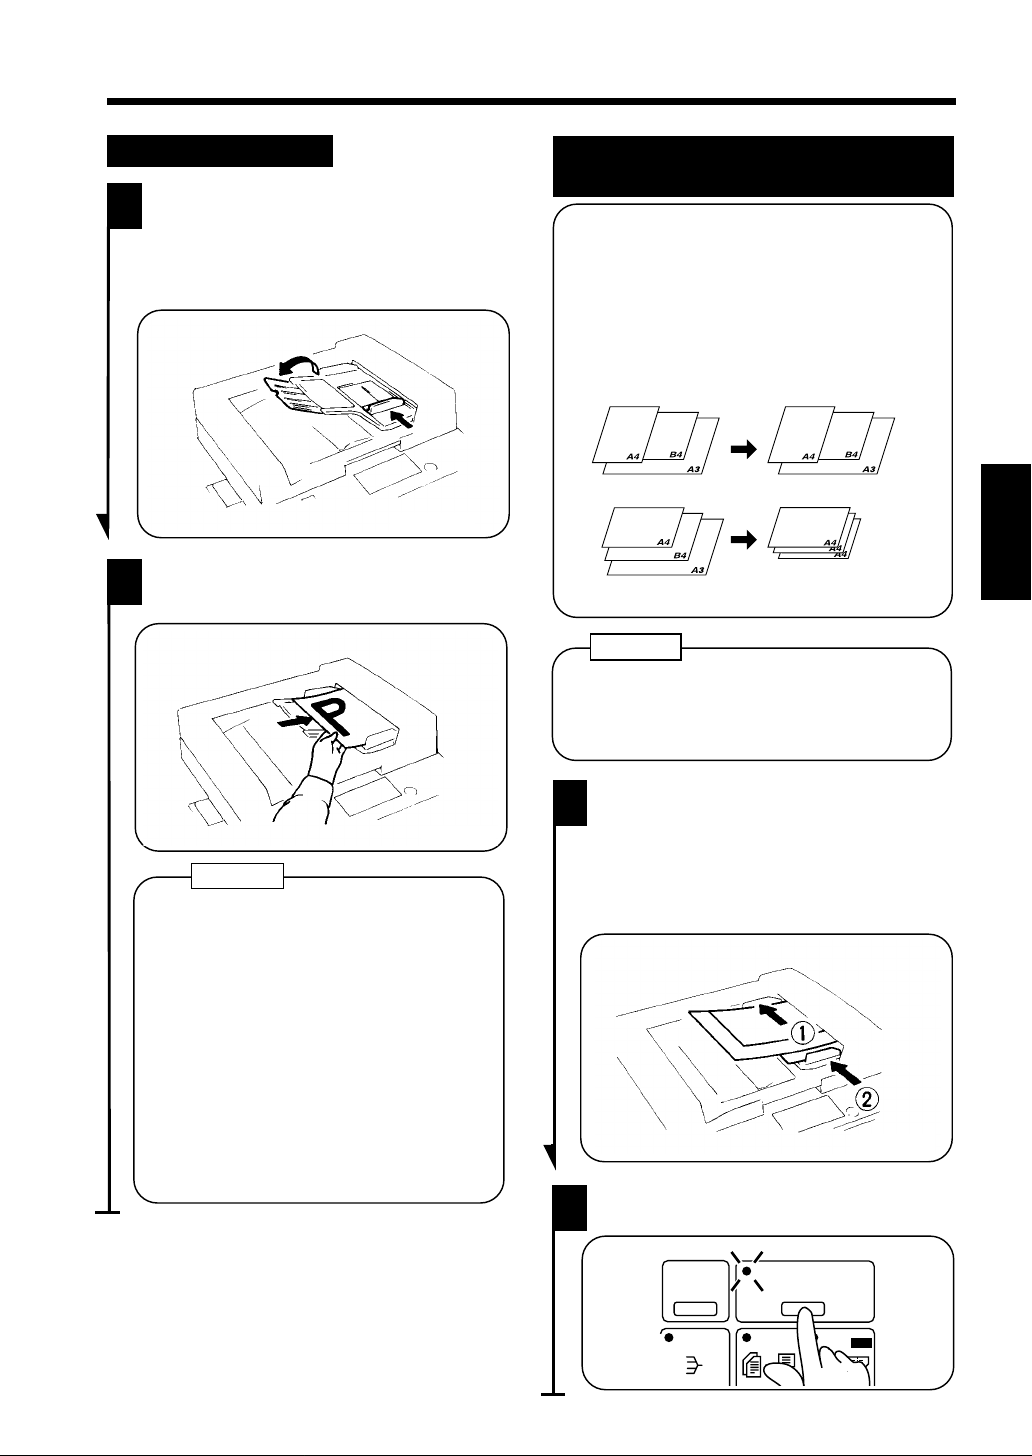
Using the Mixed Original Detection
Mode
Use the Mixed Original Detection mode to
make copies automatically from originals of
assorted sizes loaded in the
Automatic/Duplexing Document Feeder.
If Auto Size is selecte d, you can make copies
of the same size from o rig inals of differen t
sizes.
1
2
Originals
Copies
Mixed Original Mode
1138O537AA
Auto Size Mode
1138O537AA
Copy Paper: A4
NOTE
The copier cannot staple together copies of
different sizes m ad e in the Mixed Original
Detection mode.
Load the stack of origin als so that the
rear edge of each original is pressed
against the rear Document Guide Plate.
Then, slide the front D ocu ment Gu ide
Plate aga inst the fron t edges of th e
originals with the greatest wi dth.
1151O017AA
Press the Mixed Original Det ectio n Key.
Chapter 3
Making Copies
Manual
Staple
Sort
Mixed Orig. Det.
1
211
2in1
1139O2632A
Page 31

26
2. Placing Originals
Using the Single Automatic Document Feeding Mode (SADF Mode)
This is the mod e in which you load your originals one by one onto the Automatic/Duplex ing
Document Feeder to make a copy or copies f r om it. When you load the origin al, the copier
automatically starts the copy cycle.
NOTES
•
Originals availabl e for t he SADF Mode.
Type : Plain paper
Thickness : 35g/m
S i ze : A3 to A5L
•
The following features cannot be selected in the SADF Mode.
2-sided original 1-sided copy
2-sided original 2-sided copy
Dual Original Scanning Mode (2 in 1 Mode)
Cover Mode
Chapter 3
1
Open the Document Feed Table a nd
slide the Guide Plate to the size of the
original.
2
to 200g/m
▼
▼
2
.
3
The original is automati cally taken up
and the copy cycle is started.
Making Copies
2
Make sure that the Start Key is lit
green and place the original face down
on the Document Feed Table.
NOTES
•
Be sur e t o plac e one origi nal at a time.
•
Be sure to corr ect any fold or cur l in
the original .
1151O018AA
1151O019AA
4
Making sure that the Star t K ey li gh ts
up green again, load the next original.
Page 32

Originals Not Suitable for the Automatic/Duplexing Document Feeder
27
2. Placing Originals
1
2
3
Raise the Automatic/Duplexing
Document Feeder.
Place the original face d own on the
Original Glass.
1151O020AA
Align the rear left corner of the
original with the marker on the
Original Width Scale. Then press th e
rear edge of the original up against the
Original Positioni ng Pl ate at the rear
side of the Glass.
Chapter 3
Making Copies
4
Original Positioning Plate
Original Width Scale
Gently lower the Automat ic/Duplex ing
Document Feeder.
1151O021AA
Page 33

28
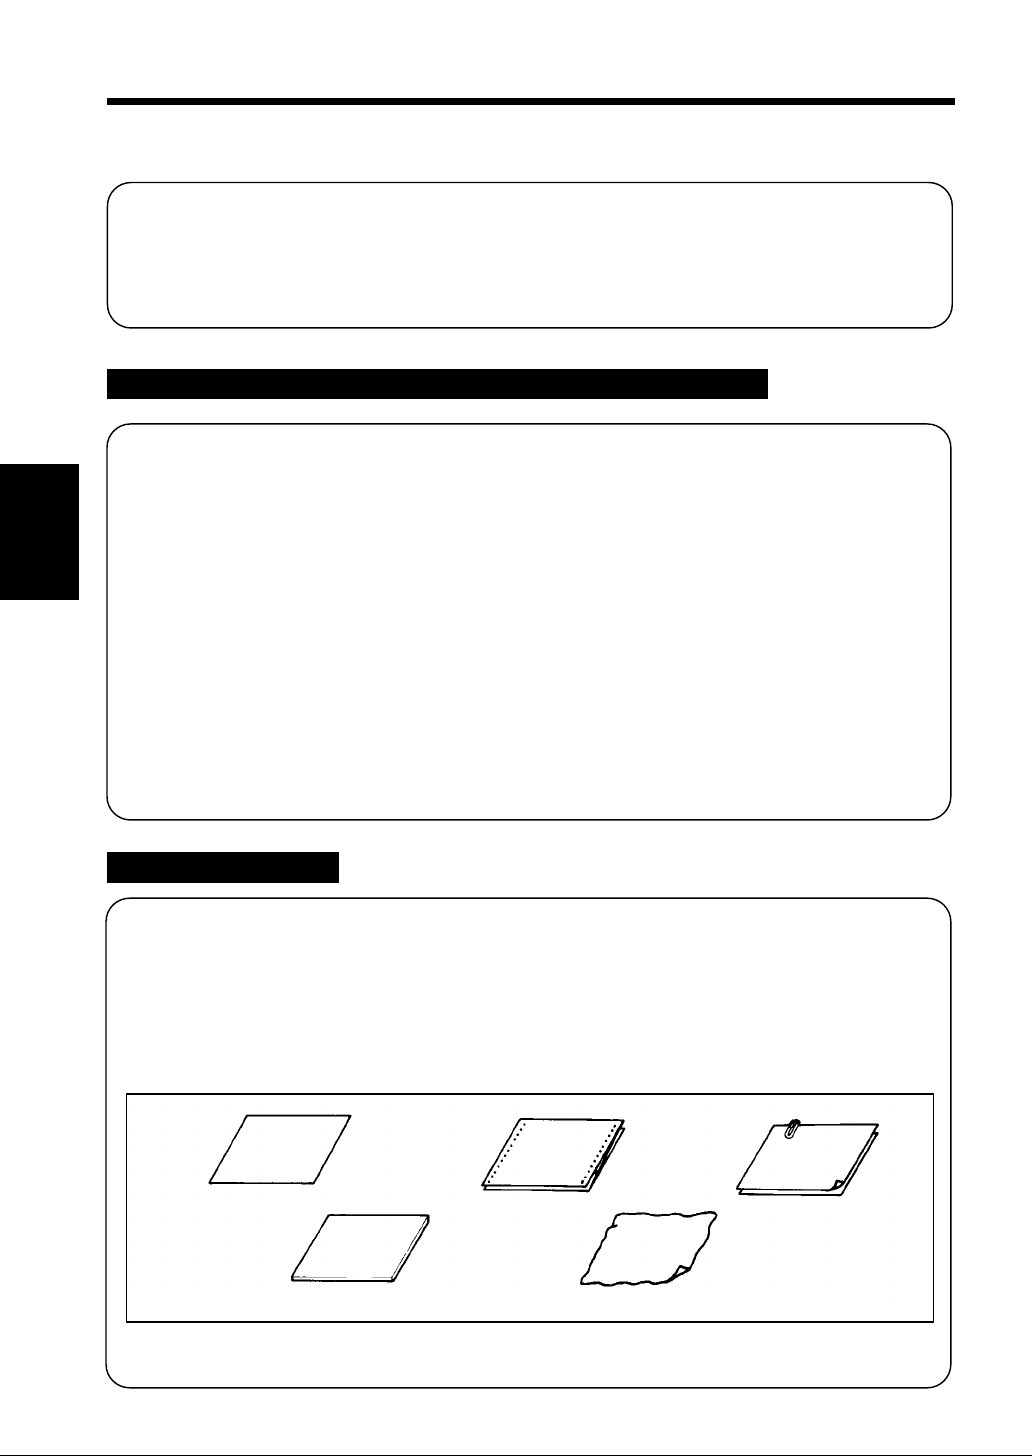
3. Manual Bypass C opying
Use the Manual Bypass to make co pies on paper not loaded in any Drawer, or to copy onto
transparencies, translu cent p aper, or any other special paper.
When using the Multi Bypass Tray, you can load multiple sheets of cop y paper.
Copy Paper That Can be Used for Manual Bypass
◆Typ e s of P ape r
•
Plain paper (weighing 60g/m2 to 90g/ m2 )
•
Thick paper (weighing 90g/m2 to 157g/m2 )
•
Transparencies, translu cent paper
◆Paper Size
•
Max. Siz e: 297m m × 432mm
•
Minimum Size: 10 0mm × 140mm
◆Capacity of th e Multi By pass Tray
•
Plain paper ... Up to 50 sheets
•
Plain paper (once-copied paper) ... Up to 20 sheets
•
Chapter 3
Thick paper, transparencies, translucent paper ... Up to 20 sheets.
Using the Multi Bypass Tray
1
Making Copies
Place the original on the Original
Glass and make the control panel
settings.
NOTE
The following functio ns cannot be
selected for Manual Bypass:
Auto Paper, Auto Size, Book Copy, any
of the Finishing Modes, 2-Sided
Copying, and File Margin Mode.
2
Swing down the Multi By pass Tray.
Slide the Guide Plate to t he size o f
the copy paper.
∗ Slide the Multi Bypass Tray Extender out
when using large-size copy paper.
3
Load a neat stack of copy paper on the
Tray and insert it until it stops.
NOTE
•The paper should be loaded no h ig her than
the ▼ (Max. Level Indicator).
•Before inserting, fan the paper stack well if
you are usin g tr an spa ren cies or tran sl uc ent
paper.
•Correct any curl if you are using thick paper.
1139O0140A
1139O0130A
Page 34

29
3. Manual Bypass Copying
Ensure that the Indicator is lit on
4
the Control Panel.
* If not, insert the paper stack on the
Tray again.
Using the Key Pad, set the number of
5
copies to be made.
123
456
789
1139O3690A
IMPORTANT
When making multiple copies using
OHP transparencies , s et the Copy Tray
into the upper posit ion if there is no
Sort er or Staple S or t er m ounted.
1139O3690A
Chapter 3
0C
Press the Start K ey to start the copy
6
cycle.
Making Copies
1139O2640A
1134P342DA
Page 35

S
30
4. Copy Paper Size
The selected copy paper size and the paper source loaded with that paper are indicated on the
control pa ne l.
123
0.5~2.0
Auto
A4
B4 A3
Full Size
B4 A4
A3 A4
Full Size Paper
Lighter Darker
Auto / Photo
Chapter 3
Auto Paper Mode
Auto
Photo
A
The Auto Paper Mode automatically
selects the copy paper according to the size
of the original being used and the zoom
ratio selected for use.
Making Copies
1
Press the Paper Select Key to set the
copier into the Auto Paper mode.
Auto
A3
A4
A4
A5
B4
B5
FLS.
Inch
456
A3
Auto
A3
A4
A4
A5
S
B4
FLS.
Inch
789
0C
1151O068DA
1151O068DA
Manual Selection
The copy paper size can be set m a nually
according to your need.
1
Press the Paper Select Key until the
arrow ind icates the copy paper size of
your choice.
A3
A4
A4
A5
B4
B5
FLS.
Inch
Paper
Paper
1139O0072A
1139O0072A
Useful Tip
This mode is efficient when you want t o
make copies on pape r of the same size as
your originals automatically.
1139O0172A
1139O0172A
Paper Source Indicator
Eac h ti m e the P ap e r Se le ct K ey is pr e ss e d ,
the Paper Source Indicator cycles through
the different source locations.
Multi Bypass Tray
1st Drawer
2nd Drawer
3rd Drawer (Option)
4th Drawer (Option)
1139O3690A
1139O3690A
Page 36

31
4. Copy Paper Size
Auto Drawer Switching
If the Drawer currently selected for use
runs out of pap e r an d t here is anot h e r
Drawer loaded with paper of the same size
and in the same directio n, the copier
automatically selects t hat second D rawer
to continue copying.
Useful Tip
This feature is a great advantage when
you need to make a large number of
copies on the same s ize pap er. For
example, you can make up to 500
copies without interruption if the 1st
and 2nd drawers are loaded with paper
of the same size and in the same
direction.
Special Paper Setting
A Drawer, if set as a special pape r d rawer,
is excluded from paper s ources th at can be
selected in the Auto Paper Mode.
The Special Paper Indicator S and Paper Size
Indicator light up when you select a particu lar
Drawer for which the special paper setting was
made.
S
A3
A4
A4
A5
Paper
B4
B5
FLS.
Inch
1139O5402A
1139O5402A
Chapter 3
Useful Tips
•
You may be using both recycled as well
as plain paper loaded in your copier. If,
for example, you make the special paper
setting for the drawer loaded with plain
paper, the copier does not select that
particular drawer in the Auto paper mode.
This allows you to make copies on
recycle paper first.
•
The special paper setting can be made
➭
using the User’s Ch oice Mo de.
p. 57
Making Copies
Page 37

32
5. Zoom Raito
You can select the desired fixed zoom ratio by pressing the
keys. There are three
different ways to choose from to set the zoom ratio. Select on e accordin g to your need.
123
0.5~2.0
Auto
Auto
Photo
Lighter Darker
Auto / Photo
A
A4
B4 A3
Full Size
B4 A4
A3 A4
Full Size Paper
Auto Size Mode
The copier is set into the Auto Size Mode
Chapter 3
in which the zoom ratio is automatically
A3
Auto
A3
A4
A4
A5
S
B4
FLS.
Inch
456
789
0C
Fixed Zoom Ratios
The copier p r ovid es mo st freq u en tly u sed
zoom ratios ready for immediate use.
selected according to the size of the
original being used and the copy paper size
selected for use.
1
Press the
fixed zo om ra tio of yo ur c ho ice .
Press the Auto S ize K ey. Th e Zoo m
1
Making Copies
Ratio Indicator shows and the
Auto Size Mode Indicator
Auto
light s up .
Auto
Size
or
A4
B4 A3
Full Size
B4 A4
A3 A4
Full Size
Key to select a
A3
1151O068DA
1151O069DA
1139O2662A
1139O2662A
Select the copy paper size. ➭ p. 30
2
A3
A4
A4
A5
Usef ul Tip
This mode is very helpful for neat filin g
when you need to make copies from
originals of as sor ted size.
B4
B5
FLS.
Inch
Paper
1139O2200A
NOTE
The Zoom Ratio Indicator dis p lays t he
actual percentage of t he selected ratio.
1139O2200A
Page 38

Using Zo om Up /D own Ke ys
Pressing the
zoom ratio shown in 0.001 increments.
You can keep touching the key to change
the ratio quickly.
or
key changes the
33
5. Zoom Raito
1
the desired zoom raito is reach ed
0.5~2.0
Useful Tip
To save time, firs t select the fixed
zoom ratio neares t to the target ra tio
Hold down the or key until
before using the
1151O050AA
or
1151O050AA
Key.
Chapter 3
Making Copies
Page 39

34
6. Image Density
Pressing the Exposure Control Keys < A > can adjust the image density level of copie s
either in the A uto Expo s ure Mode, M a nual Exposure M ode, or Photo Mode . Select t h e
appropriate m ode according to your particular needs.
123
456
789
S
0C
Auto
Photo
Lighter Darker
Auto / Photo
A
0.5~2.0
Auto
A3
A4
B4 A3
Full Size
B4 A4
A3 A4
Full Size Paper
Auto
A3
A4
A4
A5
B4
FLS.
Inch
1151O068DA
Auto Exposure Mode
The copier reads the image density of t he
Chapter 3
original and automatically adjus ts the
exposure level for the optimum copy
image density.
1
Making Copies
Press the Auto Exposure Mode Key A
as necessary to light up the Auto
Exposure Indicator ❍ Auto .
Auto
Lighter Darker
Auto / Photo
A
Each time the Aut o Expo s ure Mode Key
A is pressed, the Auto Exposure
Mode, Manual Exposur e Mode and
Photo Mode are selected alternately.
Useful Tips
1151O082AA
Manual Exposure Mode
In the Manual Exp osu re Mod e, you can
vary the exposure level in nine steps.
1
Hold down the Exposure Control Key
< or > .
Lighter Darker
Auto / Photo
A
To make the image darker:
Press or ho ld do wn th e Exp os u re
Control Key > .
To make the image lighter:
Press or ho ld do wn th e Exp os u re
Control Key < .
1151O081
•
The exposure level in the Auto
Exposure Mode can be varied by using
the User’s Choi ce, eith er "Darker" or
➭
"Lighter."
•
The copier has b een fact ory-set to
p. 54
automatically select the Auto
Exposure Mode. The User’s Ch oi ce
can be used to change this default
setting to the Manual Exposure Mod e.
➭
p. 54
Page 40

Photo Mode
The copier can make a fa ithful reproduction
of an original havi ng ha lf to ne imag e suc h
as photos. The image density of the photo
may be varied in nine steps.
35
6. Image Density
1
2
Press the Auto Exposure Mode Key
A as necessary to li ght up the Photo
Mode Indicator ❍ Photo
Photo
Lighter Darker
Auto / Photo
A
1151O080CA
Hold down the Exposure Control Key
< or > until the desired Photo Mode
level
Lighter Darker
Auto / Photo
A
1151O081CA
Chapter 3
Making Copies
To make the image darker :
Press or hold dow n the Expo s ure
Control Key > .
To make the image lig hter:
Press or hold dow n the Expo s ure
Control Key < .
Page 41

36
▲
7. Original Copy Type
▲
Pressing the
Orig. Copy
Keys can select the setting for the type of copy you want to make
from the type of original you have.
There are eight different modes available. Select one according to your need.
Auto
Size
Margin
Cover
Job
Memory
Manual
Staple
Sort
Sort &
Staple
Group
Mixed Orig. Det.
1
2
11
12
21
Book
22
Book
Orig. CopyFinishing
2in1
2in1
1
Lighter Darker
2
Auto
Photo
Auto / Photo
A
Meter
Count
Toner
Drum
Dehumidify
Input
▲
Original Copy Types
Chapter 3
1-sided 1-sided
▲
Originals
Copies
•
Select this mode t o make 1- s ided copies from
1-sided originals.
0.5~2.0
A4
A3
B4 A3
Full Size
B4 A4
A3 A4
Full Size Paper
Auto
A3
A4
A4
A5
B4
FLS.
Inch
1151O070DA
1151O070DA
Making Copies
1-sided 2-sided
2-sided 1-sided
▲
Original
▲
Original
Copies
Copies
1139O0280A
1139O0290A
* The [1-sided 1-sided ] type is t he default
▲
setting in the init ial mode.
•
Select this mode t o make 2- s ided copies from
1-sided originals.
(Only when the Duplex Unit is mounted.)
Two originals can be copied onto one copy.
*
•
Select this mode t o make 1- s ided copies from
2-sided originals.
(Only when the Duplexing Document Feeder
is mounted.)
1139O0310A
Page 42

37
7. Original Copy Type
▲
2-sided 2-sided
1-sided 1-sided [2 in 1]
1-sided 2-sided [2 in 1]
▲
Original
▲
Originals
▲
Originals
Copy
Copy
1139O0300A
Copy
1140O273
1139O0320A
•
Select this mode to make 2-sided copies from
2-sided originals.
(Only when the Duplexing Document Feeder
and Duplex Unit are mounted.)
•
Select this mo de to make a 1-sided copy,
throug h redu c tio n, fro m two 1-s i ded or ig i nal s
side-by-side.
(Only when the Automatic/Duplexing
Document Feeder is mounted.)
* You need half as many sheets of copy
paper as required otherwise.
NOTE
The size of the original should be A4
crosswise for 2-in-1.
•
Select thi s mod e to make a 2-sided copy,
through reduction, from four 1-sided
originals. Each pair of origi nals will be placed
side-by-side on eit her side of the copy .
(Only when the Automatic/Duplexing
Document Feeder is mounted.)
You need 1/4 as many sheets of copy paper
*
as required otherwise.
NOTE
Chapter 3
Making Copies
▲
Book 1-sided
Original
▲
Book 2-sided
Original Copies
Copies
1139O1990A
1139O0330A
The size of the original shou ld be A4
crosswise fo r 2-in-1.
•
Select this mode to make a 1-sided copy of
each page of an open book.
•
Select this mode to make a 2 - sided copy of
an open book. Each page of the open book
will be copied onto one side of the copy.
(Only when the Duplex Unit is mounted.)
Page 43

38
7. Original Copy Type
▲
Selecting Original Copy Type
▲
1
Chapter 3
Press the Original Copy key to
select the Original Copy type.
21
22
Orig. Copy
Each time the Original Copy Key
(left) is pressed, the newly selected
original t ype indicat or lights as shown
below.
12
▲
▲
Book
Book
▲
Each time the Original Copy Key
▲
(right) is pressed, the newly selected
type indicator lights as sh own below.
2in1
11
1
2
2in1
12
1151O086CA
Book
Book
1
2
11
Making Copies
21
22
11
1151O083CA
1151O083CA
If there are no lights, 1-sided 1-sided
*
▲
is selected.
1151O084CA
* If there are no lights, 1-sided 1-sided
1151O084CA
▲
is selected.
Useful Tip
The [1-sided 1-sided] ty pe is the
▲
default setting in the init ial mode. This
default setting can be changed using the
➭
User’s choice.
p. 55
Page 44

7. Original Copy Type
Instructions for Loading Originals
Use th e followi ng proce dure fo r loading origina l s to make 1-sided copi e s from 2-sided origina ls.
Procedure
Load the originals crosswise.
If the ori ginals are loaded l e ngthwise, the d irections of the copy images will be mixed up.
▲
39
Correct:
2-Sided Originals
Loaded Crosswise
Notes for 2-sided Copy Mode/2in1 Mode
When making copies from 1-sided originals in the 1-sided 2-sided, 1-sided 1-sided (2in1),
or 1-sided 2-sided (2in1) Mode, check the number of originals.
If an o dd numb e r of 1- sided or iginals are used, add one bl ank shee t of paper at the end of the
original set.
▲
1-Sided Copies
1151O023AA
Incorrect:
2-Sided Originals
Loaded Lengthwise
▲
1-Sided Copies
▲
Chapter 3
1151O022AB
Making Copies
Originals
1
2
3
4
5
Blank Sheet of Paper
2-Sided Copies
1
2
3
4
2 In 1 Copies
12
or
34
5
5
1151O059AA
Page 45

40
8. Finishing Mode
Pressing the Finishing Key can select the desired finishing mode.
There are five different finishin g mode s. Select the one according to y o ur needs.
Meter
Count
Toner
Dehumidify
Input
Drum
Auto
Size
Margin
Cover
Job
Memory
Chapter 3
Finishing Modes
Non-Sort
Originals
Making Copies
Manual
Staple
Sort
Sort &
Staple
Group
Mixed Orig. Det.
1
2
11
12
21
Book
22
Book
Orig. CopyFinishing
2in1
2in1
1
Lighter Darker
2
Copies
0.5~2.0
Auto
A3
A4
A4
A5
1151O070DA
Auto
Photo
Auto / Photo
A
A4
A3
B4 A3
Full Size
B4 A4
A3 A4
Full Size Paper
All copies are fed ou t onto the 1st Bin, without
being so rted, grouped, st a pled, or punch e d.
B4
FLS.
Inch
1151O070DA
Sort
Originals
Sort-and-Staple
Originals
Copies
Copies
1st Bin
2nd Bin
3rd Bin
1076O146
1st Bin
2nd Bin
3rd Bin
1076O145
This mode is effective when making multiple copies
from multiple originals.
Copies are sorted into complete sets of the originals.
(Only when the Sorter or Staple Sorter is mounted.)
Copies are sorted into complete sets of the originals
and each set is stap led t ogether.
(Only when the Staple So rter is mounted.)
1151O108AA
Page 46

Group
Originals
Manual Staple
Sorting or Grouping
Originals
Copies
1st Bin
2nd Bin
3rd Bin
1076O147
Manual Staple
8. Finishing Mode
The copies made from each single original are
separat ed int o gr ou ps. Each group cont ai ns t he
same number of copies.
(Only when the Sorter or Staple Sorter is
mounted)
This mode allows you to staple copy sets already
made in the Sort Mode or copy stacks made in the
Group Mode.
(Only when the Staple Sorter is mounted.)
* This feature is efficien t for stapli ng or igi nals af ter
making copies.
41
Chapter 3
1051O109AA
Useful Tip
The copier has been factory-set to automatically select Non-Sort. Also, the copier automatically
d
switches between the Sort and Non-Sort mode
epending on the number of originals loaded in
the Automatic Document Feeder. The User ’s C ho ice can, however, be used to change this
➭
default setting using the User’s Choice.
pp. 55, 57
Making Copies
Page 47

42
8. Finishing Mode
Selecting the Finishing Mode
Sort/Sort-and- Stap le/Gro up Mo de
(To sort or group copies)
1
Chapter 3
Making Copies
Press the Finishing Key to select the
desired mode.
Sort &
Staple
Group
Finishing
•
Each time the Key is pr es sed, th e
newly selected finishing mode
indic ator l ig ht s .
•
If there are no lights, the Non-Sort
Mode is selected.
NOTE
•
Capacity of each Sorter Bin
(Non-S ort Mod e)
Sorter Bin Capacity
1st Bin Up to 50 sheets
2nd to 10th Bin Up to 25 sheets
1151O087CA
Using t he Ma nual Stap le Mode
(To staple copy sets already made in the Sort
Mode or copy stacks made i n the G ro up Mode.)
1
2
Make sure that each cop y set o r stack
has been fed into the Sorter Bin.
Press the Manual Staple Key.
Then the copy set or stack in the Sorter
Bin will be stapled.
Manual
Staple
1139O2732A
1139O2732A
(Sort / Group/S ort-and-Stapl e Mode)
Sorter Bin Capacity
1st to 10 th Bin Up to 25 sheets
•
Thick paper, translucent paper, and
OHP transparencies cannot be used
for making copie s in the Sort, Gr oup,
or Sort-and-Staple Mode.
Page 48

Using the Manual Staple Mode
(To use as a stapler)
43
8. Finishing Mode
1
2
Align the sheets of paper neatly.
1134O039AA
Insert the paper stack onto the 1st
Bin with its front surface facing up.
3
Press the Manual Staple Key.
The paper stack wi ll be stapled.
Manual
Staple
Usef ul Tip
This feature is efficien t for stapli ng
originals after maki ng cop ies.
1139O2732A
1139O2732A
Chapter 3
Making Copies
1139O1320A
Stapling Position
1151O110AA
NOTES
•
Make sure of the stapling position and
press the paper stack against the
bracket.
•
Up to 50 sheets of (plain) paper can be
stapled.
•
Never attempt to reac h for the st ap ling
position. This can be d angerous.
Page 49

44
8. Finishing Mode
Instructions for Loading Originals for Finishing Mode
Note the correct direction of the originals if the copies are to be stapled either in the
Sort-and-Staple or Manual Staple mode.
Using the Automatic/Duplexing Document Feeder
Load the originals crosswise in th e Documen t Feeder . Ensure also that the stapling position is at the
rear left corner as indicated by the arrow.
Correct:
Originals loaded crosswise
Copy
Stapling Position
Chapter 3
Making Copies
Placing t he or iginal on th e Original Glass
Place the original, with its stapling p o sition at the upper right corner as shown in the illustration.
Correct:
Stapling Position
1151O024AB
Press the Manual Staple Key to staple copy sets or a copy stack.
*
1039O2230A
Page 50

8. Finishing Mode
Auto Dual Function
Each of the Sort Bins holds up to 25 sheets of paper. The Auto Dual Function, however, allows
sorting of copies of up to 50 originals under certain conditions.
Auto Dual Function in the Sort Mode
When 5 or less copies are made from an original set consisting of more than 25 originals i n the
Sort Mode, the Sorter or Staple Sorter is au tomatically switch ed into the Auto Dual Function
Mode usi ng the 6th to 10t h Bins.
Copies Bins Used
1st to 25th sorted copies 1st to 5 th B ins
26st to 50th sorted copies 6th to 10th Bins
If the number of copies selected exceeds 5, the copy cycl e stops at the 26th or iginal.
*
* To have a complete set from the originals, place the copies fro m the 6th Bi n on top of t hose from
the 1st Bin. In the same way, place the copies from the 7th Bin on top of those from the 2nd Bin,
and so on.
45
Chapter 3
Auto Dual Function in Sort-and-Staple Mode
When 5 or less copies are made from an original set consisting of more than 25 originals i n the
Sort-and-Staple mode and the Auto Dua l f unction is activated, the S ort-and-Staple Mode is
automatically switched to the Sort Mode (no stapling takes place).
When the Number of Copies Selected Exceeds 25 in the Group Mode
When more than 25 copies are to be g ro up ed tog ether into one group, the Sort er or Stap le S orter
uses the subsequent Bin to continue grouping the copies.
Original Copies Bins Used
1st
3rd to Nth: Same way up to 10th
1st to 25th copie s 1st Bin
26st and subsequent copies 2nd Bin
If the Number of Copies Selected Exceeds 50 in the Non-Sort Mode
The capacity of t he 1st Bin is 50 in the Non-Sort Mode. If more than 50 copies are made in the
Non-Sort mode, the Sorter uses the 1st, 2nd, and subsequent Bins to hold those exces s copies.
Making Copies
Page 51

46
9. File Margin Mode
The copier provides a file margin (10mm) along the leading edge of the copy for your easy filing.
Both 1-sided and 2-sided originals can be used in the File Margin Mode. Select the appropriate
Original Copy type according to the originals.
▲
1-Sided Copies wit h Fi le Margins
1-Sided Copies wit h Fi le Margins
1-Sided Originals
2-Sided Copy with File Margi ns
1076O169
2-Sided Original
2-Sided Copy w i t h File Margins
NOTE
You need to change the setting of the File Margin fun ction of User’s Choice a ccording to the
➭
type of originals to be used when making copies in the File margin m od e.
Chapter 3
p. 53
Loading the Originals
Using the Original Glass Using the Document Feeder
Making Copies
1076O170
1151O025AA
Position the file margin side to the right. Position the file margin side to the left.
Setting the File Margin Mode
▲
Book
Book
Orig. Copy
1
2
Ensure the correct origin a l d irection
and place the origin al.
Press the File Margin Key to set the
copier into the File M arg in Mo de.
Margin
1139O2552A
Press the Original Copy Key to
3
select the desired jo b type.
21
22
1151O026AA
1
2
1151O086CA
Page 52

10. Cover Mode
The Cove r Mode lets yo u ma ke a fron t cover for a copy set by copying the fi r st page of an
original set on a different type of paper, such as color paper. It may be us ed to diff erentiate
the cover of a copy set from other pages.
47
Original Set Copy Se t
NOTES
•
This mode can only be selected when the copier is equipped with the Automatic/Duplexing
Document Feeder and the Multi Bypass Tray.
•
This mode cannot be selected when 1-sided 2-sided, 1-sided 2-sided (2in1), Book
1-sided, or Book 2-s ided Mode is Selected.
▲
▲
▲
Special paper,
such as colored
one
Using the Cover Mode
1
Place the paper stack for the cover
sheet on the Multi Bypass Tray.
2
Load the originals into
Automatic/Duplexing Document
Feeder.
▲
1076O181
Chapter 3
Making Copies
1139O0140A
NOTES
•
Be sure to place the paper stack for the
cover sheet on the Multi Bypass Tray.
•
Capacity of the Multi Bypass Tray
Plain paper. . . . . . . . .Up to 50 sheets
Thick paper, tran s par encies,
translucent paper . . . .Up to 20 s heets
3
1151O016AA
Press the Cover Key to set the Cover
Mode.
Cover
1139O2562A
1139O2562A
Page 53

48
Chapter 3
Making Copies
Page 54

Chapter 4
Special Functions
This chapter explains ab out the special functions that can be used for specific purposes .
1. Meter Count p. 50
2. Toner R eplenis he r /Drum Dehumidif ier p. 51
3. User’s Choice
Description of Each User’s Choice Functions p. 52
Making the User ’s Choi c e Setti ngs p. 58
49
Chapter 4
Special Functions
Page 55

50
1. Meter Count
This function allow s you to check the total count of each of the four different counters.
Total
Shows the total number of copies mad e
since the installation of th e co pier.
Size
Shows the number of copies made on
the copy paper of a preset size. (The
size will be set by your Technical
Representative.)
2-Sided Total
Shows th e num ber of 2- s id ed co pies
made.
2-Sided Size
Shows th e num ber of 2- s id ed co pies
made on the copy paper of a preset size
(the same size as set for "Size").
Counter Display
The Zoo m Ra t io Indi c a t or shows t he upper 3 digi t s of the count and the Multi-Copy Disp lay
shows the lower 2 d igits of the count.
Example : T he count is 12,345 ( copies).
Chapter 4
0.5~2.0
1151O60AA
Using the Meter Count Function
1
Press the Meter Coun t Key once.
*The count of the Total Counter is
shown across the Zoom Ratio Indicator
and Multi-Copy Display.
Meter
Count
Toner
Each time the Meter Count Key is pr es sed, the
counts of the four counters will be shown in the
followi ng or de r .
Total Size 2-sided Total 2-sided Size
Auto
Size
Margin
Special Functions
1139o2492 A
2
With the count of the 2-Sided Size
Counter displayed, press the Meter
Count Key.
*This restores t he copie r to the state
before entering t he Me te r Coun t Mode.
Page 56

2. Toner Re plenishe r/Dr um Dehumidifie r
Toner Replenisher
The copier tends to exhaust the supply of toner rapidly when mak ing a number of copies from an
original with dark s olid areas such as a photo. As a result, the image de n sity of the copy will
become lighter. In such a case, you can use the Toner Repleni she r funct io n to regain the normal
image density quickly.
Press the Auxiliary Toner Rep len ishi ng Key.
*This causes the c opier to initiate toner replenishing, which lasts for 90 seconds at maximum.
NOTE
Toner
1139O2478A
1139O2482A
•
Do not turn the Power Switch OFF or
open the Front Door while the copier
is replenishing toner.
•
Toner is not replenished if the image
density is suf ficiently high
51
Drum Dehumidifier
During high humidity periods or when there are sudden rapid changes in humidity (especially
when you are using a heater in winter), condensat ion *1 could form on the surface of the PC
*2
Drum
to dry the surf ace of the PC Drum.
*1
such as the surface of the PC Drum.
*2
Press the Drum Dehumidify Key .
*This sets the copier into the Drum Dehumidifier Mode which lasts for 90 seconds.
, resulting in blotchy copies. In such inst ances, use the Drum Dehumidifier functio n
Condensation : A phenomenon in which small drops of water are formed on cold surfaces,
PC Drum : Functions i n the copier as film in a camera.
Useful Tip
•
Drum
Dehumidify
A copy cycle can be initiated even
while the copier is in the Drum
Dehumidifier Mode.
Chapter 4
Special Functions
1139O2472A
Page 57

52
3. User’s Choice
The copier has been set so that the most frequently used setting are automatically selected in the
initial mod e. The User’ s Choice allows you to select the defa ult se tti ng wh ich are auto matically
selected in the init ial m ode acco rding to your own needs.
By setting def aul t s for the pap er si ze , zoo m rait o, an d other s et ti ng s that are mos t fr equ ently
used, time and effort to make extra setti n g will be eliminated that are otherwise to be spent
when the copier is turne d ON or when t he auto res et function is activated.
*For more details, consult y ou r Techni cal Rep resentative. Functions Available from User’s
Choice
Functions Available from User’s Choice
Choice Code Function Choice Code Function
U- 0 Mixed Original Detection U-20 Auot Panel Reset ON/OFF
U- 4 Ligh tweight Ori ginal U-21 Energy Saver ON Timing
U- 9 File Margin U-23
U-10 Priority Paper Size/Source U- 24
U-12 AP/AS/M anu al P rio rity U-28 Auto Shut OFF Timing
U-13 Default Auto Exposure Level U-51
Chapter 4
U-14 Default Exposure Mode/Level U-52
U-15 D ef ault Fi nis h in g Mode U- 53
U-18 Priority Orig. Copy Type U- 54
▼
Description of Each User’s Choice Function
Auto Panel Reset fo r Plu g- In
Counter
Sort/Non-Sort Auto Switching
ON/OFF
Special Paper setting
(1st Drawer)
Special Paper setting
(2nd Drawer)
Special Paper setting
(3rd Dra we r)
Special Paper setting
(4th Drawer)
1151H07OBA
Specia l F unctions
U-0 Mixed Original Detection
Select whether to enable the Mixed Original Detection function or not when power
is turned ON or panel reset on the copier equipped with an A utomatic/ Duplexing Document Feeder.
Setting Value Description Initial Setting
0 Mixed Original Detection function ON
1
Mixed Original Detection function OFF
1151H08OBA
U-4 Lightweight Original
Select the type of originals u sed on the ADF. Set " 1" (Lightweigh t Origin a l mode ON) if originals
lighter in weight than standard (weighing 40 to 50 g/m
Setting Value Description Initial Setting
0 Lightweight Original mode OFF
1
Lightweight Original mode ON
2
) are used with the ADF.
1151H09OBA
Page 58

3. User’s Choice
U-9 File Margin
Select whether th e or iginal has file margin or not for the File Mar gin mode.
If "1" (original does not have a file margin") is set and you attempt to make a copy from an original
which has a file margin on it, the copier is very likely to produce a copy with a margin on an
incorrect positio n.
Setting Value Description Initial Setting
0 The original has a file margin
1 The ori gin al does not have a file margin
1151H11OBA
U-10 Priority Paper Size/Source
Select the priority paper size or paper source selected when the copier is set into the Auto Size or
Manual mode.
53
Setting
Value
0
1
2
3
4
5
6
7
10
11
12
Description
A3 (L)
B4 (L)
A4 (L)
B5 (L)
A5 (L)
FLS (L)
A4 (C)
B5 (C)
11" ✕ 17" (L)
11" ✕ 14" (L)
8-1/2" ✕ 14" (L)
Initial
Setting
Setting
Value
13
14
15
20
21
22
23
Description
8-1/2" ✕ 11" (L)
5-1/2" ✕ 8-1/2" (L)
8-1/2" ✕ 11" (C)
1st Drawer
2nd Drawer
3rd Drawer
*Only when the Paper Feed
Cabinet i s mounted
4th Drawer
*Only when the Paper Feed
Cabinet i s mounted
Initial
Setting
Chapter 4
1151H12OBA
Specia l F unctions
Page 59

54
3. User’s Choice
U-12 AP/AS/Manual Priority
Select the priority copy ing mode that is automatically selected when the Power Switch is turned ON
or Panel Reset key is pressed
Setting Value Description
0
Auto Paper (AP)
1 Auto Size (AS)
2Manual
U-13 Def a ult A u t o Expo s ure Level
Determine the optimum ex po sur e level in the Auto Exposur e mod e, variable in seven steps.
Setting Value Description
46 Low (level 4)
47 Low (level 3)
48 Low (level 2)
49 Low (level 1)
50 Standard
Chapter 4
When the exposure level is "Low," the greater level numb e r is, the lower the exposure level.
When the exposure level is "High ," t he greater level number is, t he h igher the exposure level.
51 High (level 1)
52 High (level 2)
Initial
Setting
1151H13BA
Initial
Setting
1151H14OBA
U-14 Default Exposure Mode/Level
Determine the default ex po sur e mod e, either Auto or Manual, selected when the Power Switch is
turned ON or Pane l Re se t ke y is pre s se d.
Specia l F unctions
If Auto is selected, this function also allows you to set the default exposure level in the Manual
Exposure mode, variable in 9 steps, after the Auto Exposure mode has been canceled.
If Manual is selected, the fu nction also allows you to set the default exposure level in the Manual
Expos ure mode.
Auto Exposure Mode as Default
Setting
Value
Default Mode Exposure Setting in Manual Mode
0Auto Manual EXP1
1Auto Manual EXP2
2Auto Manual EXP3
3 Auto Manual EXP4
4Auto Manual EXP5
5Auto Manual EXP6
6Auto Manual EXP7
7Auto Manual EXP8
8Auto Manual EXP9
Description
Initial
Setting
1151H15OBA
Page 60

3. User’s Choice
Manual Exposure Mode as Default
Setting Value Description Initial Setting
10 Manual Exposure Mode / EXP1
11 Manual Exposure Mode / EXP2
12 Manual Exposure Mode / EXP3
13 Manual Exposure Mode / EXP4
14 Manual Exposure Mode / EXP5
15 Manual Exposure Mode / EXP6
16 Manual Exposure Mode / EXP7
17 Manual Exposure Mode / EXP8
18 Manual Exposure Mode / EXP9
EXP Level
123456789
Lighter Darker
* With EXP5 at the central level, the exposure
level will be lo w er as the number becomes
smaller, and it is hi gher as the number beco mes
greater.
1139O5282A
1151H16OBA
55
U-15 Default Finishing Mode
Determine the priori ty finishing mode se lected when the copier is equippe d with a finishing option.
Setting Value Description Initial Setting
0 Non-Sort
1 Sort
2Group
3 Sort-and-Staple
1151H18OBA
U-18 Priority Orig . Copy T yp e
Determine the orig. copy typ e automatic ally a selected when the Power Switc h is turned ON or
Panel Re set key is pres sed.
Setting Value Description Initial Setting
0 1 1
1 1 2
2 2 2
3 1 1 (2in1)
4 1 2 (2in1)
*The initial setti ng is 1 2 if y our copi er is equ ipp ed with a Duplex Un it. Con sul t your Technical
Representative if you want to select 1 1 when your copier is equipped a Duplex Unit
▼
▼
▼
▼
▼
▼
▼
▼
▼
1151H19OBA
.
Chapter 4
Specia l F unctions
Page 61

56
3. User’s Choice
U-20 Auto Panel Reset ON/OFF
Select whether or not to activate t h e auto clear function after the lapse of a given period of
time a after copy cycle has been completed or a key on the control panel has been operated.
Setting Value Description Initial Setting
0Disabled
1 Enabled : 30 sec.
2 Enabled : 1 min.
U-21 E n ergy Saver ON Timing
Select whether or not to set the copier into the Energy Saver m ode after the lapse of a given period
of time after a copy cycle has been completed or a key on the control panel has been operated.
The period of time can fall withi n the range 1 to 120 min.
*The initial setting is 15 min.
Setting Value Description Initial Setting
1
2
3
:
Chapter 4
:
98
99
Enabled : 1min.
Enabled : 2min.
Enabled : 3min.
:
:
Enabled : 98min.
Enabled : 120min.
1151H19OBA
1151H20OBA
U-23 Auto Panel Reset for Plug-In Counter
Select whether to set the copier into the initial mode when the Plug-In Counter is pulled out.
Setting Value Description In itial Setting
Specia l F unctions
0 Copier is not init ializ ed .
1
Copier is initialized when the Plug-In Counter is pulled out.
1151H22OBA
Page 62

57
3. User’s Choice
U-24 Sort/Non-Sort Auto Switching ON/OFF
Select whether to enable or disable t he f un ction that automatically s w itch e s between the Sort and
Non-Sort m ode depending on the number of originals loaded in the ADF when the copier is equipped
with an ADF and fin is hing op tio n. I f "ON" is selected, Non-Sor t is selec ted if only o ne ori ginal is
loaded in the ADF and Sort is selected if two or more originals are loaded in the ADF.
Setting Value Description Initial Setting
0 Sort/Non-Sort switching OFF (dis abled)
(enabled)
1
Sort/Non-Sort switching ON
U-28 Auto Shut OFF Timing
Select whether or not to enable the Auto Shut OFF Function that turns power off automatically
after the lapse of a given period of time after a copy cycle has been completed or a k ey on the
control panel has been operated.
*In the init ial s etting, the Auto Shut OFF Functi on is activated 60 min. after the above-said event.
Setting Value Description Initial Setting
0
1
2
3
:
:
98
99
Disabled
Enabled : 1min.
Enabled : 2min.
Enabled : 3min.
:
:
Enabled : 98min.
Enabled : 120min.
U-51 to 54 Special Paper Setting
Designates each drawer of the copier for special paper.
See p. 31 for more details on the special paper setting.
U-51 : 1st Drawer
U-52 : 2nd Drawer
U-53 : 3rd Drawer (Setting is possible only when the Paper Feed Cabinet is mo un t ed)
U-54 : 4th Drawer (Setting is possible only when the Paper Feed Cabinet is mounted)
1151H22OBA
1151H23OBA
Chapter 4
Specia l F unctions
Setting Value Description Initial Setting
0
1
Special paper setting is n ot made.
Special paper setting is made for the dra wer.
1151H24OBA
Page 63

58
3. User’s Choice
Making the User’s Choice Mode Settings
1
for about 3 seconds.
* U is shown on the Zoom Ratio
Indicator.
Keep pressing th e Panel Reset Key
Panel Reset
1139O4782A
1139O4782A
Zoom Ratio Indicator
1139O3850A
1139O3850A
Multi-Copy Display
1139O3860A
1139O3860A
Using the Key Pad, enter the desired
2
Choice Code number.
5
*The Choice Code number is shown
on the Zoom Raito Indicator.
123
456
Chapter 4
Zoom Ratio Indicator
789
0C
1139O4860A
Multi-Copy Display
Press the Clear Key.
4
*This cl ea r s t h e cu rrent setting (shown
on the Multi-Copy Display) of that
particular choice code.
123
456
789
0C
Zoom Ratio Indicator
1139O3870A
1139O3870A
Multi-Copy Display
1139O3860A
Press the appropriate Key Pad or
Pads to enter the new setting .
*The Multi-Copy Display shows the
new setting.
123
456
789
1139O4870A
0C
Zoom Ratio Indi cat or
Multi-Copy Display
1139O2620A
1139O3860A
1139O4870A
Special Functions
1139O3870A
1139O3870A
NOTE
If you have pressed an incorrect
number, press the Clear Key, th en
enter the correct number.
Press the Start Key.
3
*This enters th e choice code selec tio n
and the current s et tin g of th e choic e
code is shown o n th e Multi-Copy
Display.
Zoom Ratio Indicator
1139O3870A
1139O3870A
Multi-Copy Display
1139O3880A
1139O3880A
1139O3880A
1139O3880A
1139O2360A
6
7
1139O3870A
1139O3870A
1139O3890A
1139O3890A
Press the Start Key.
*This enters the new setting.
Useful Tip
Repeat steps 2 to 6 to make new
setti ng s for other U s er’s Choice s .
Press the Panel Reset K ey.
*This allows the copier to leave the
User’s Choice Mode, an d th e c ontrol
panel shows the initial settings
again.
Page 64

Chapter 5
When an Indicator Lights Up
(Replenishing Supplies, Clearing Misfeeds,
and Correcting a Closure Failure)
This chapter explains about t he details of the various warning indications given on the
control panel, including those that enta il inhibition of the initiation of a copy cycle. It also
shows action to be taken for each case.
1. When the A dd Paper I ndicator L i ghts Up p. 60
2. When the A d d T oner Indicator L i ghts Up p. 63
3. When the A dd Staple Indicator Lig ht s U p p. 64
4. When the Closur e Failure I ndicator Lights Up p. 66
5. When the Misfeed Indicator Lights Up
•
Misfeed Indicator and Monitor Display p. 68
•
Misfeed Clearing Procedures
:
Copier p. 69
:
Paper Feed Cabinet p. 72
:
Duplex Unit p. 73
:
Duplexing Document Feeder p. 74
:
Automatic Document Feeder p. 75
:
Sorter/Staple Sorter p. 76
6. When the Call-Tech.-Rep. Indicator Lights Up p. 77
7. When the I. U. Service Life Indicator Lights Up p. 78
8. Quic k Re f er e nce for Oth e r In di cators p. 84
59
Chapter 5
When an Indicat or Li ghts Up
Page 65

60
1. When the Add Paper Indicator Lights Up
When the Drawer currently selected fo r use has run out of
paper, the Add Paper Indicator lights up. At this time, you
cannot start any new copy cycle.
Auto
Photo
Lighter Darker
Auto / Photo
A
Example: 1st Drawer has run out of
paper.
Adding Paper
1st Drawer
1
Slide out the 1s t D rawer and press
down the Paper Lifting Plate.
Slide out the Edge Guide and Trailin g
Edge Stop.
Chapter 5
2
Auto
A3
A4
A4
A5
Paper
B4
FLS.
Inch
1151O071DA
1151O071DA
front side
1139O1370A
Use the following procedu re to load paper into the
Drawer.
NOTE
The paper should be
loaded no higher than
the ▼ (Max. Level
Indicator) on the Edge
Guide.
Slide the Edge Guide an d Trailing
Fan the pap er th or ou gh ly .
4
1139O0400A
Edge Stop up against the paper.
Gently slide the Drawer back in .
1039O0420A
1139O0390A
Load the paper stack into the Drawer
3
When an Indicat or Li ghts Up
so that its front side faces down.
Make sure that the paper stack rests
under the two catches of the Drawer.
1139O0410A
NOTE
When loading Inch Size paper into
the Drawer, flip the Marketing Area
Switch, located in th e r ear left corner
of the Drawer to "Inch".
Page 66

61
1. When the Add Paper Indicator Lights Up
2nd Drawer
1
2
Slide out t he 2nd Drawer and press
down the Paper Lifting Plate until it is
locked into position.
Load the paper stack into the Drawer
so that its front side faces down. Make
sure that the paper stack rests u nd er
the two catches of the Drawer.
3rd/4t h Dra we r (PF -20 4)
1
Slide the drawer out of the c opier.
2
Load the paper stack into the Drawer
so that its front side faces down.
1139O0460A
3
1039O0430A
NOTE
The paper should
be loaded no higher
than the ▼ (Max.
Level Indicator) on
the Edge Guide.
1039O0450A
Gently slide th e Draw er back in.
3
NOTE
The paper should be
loaded no higher
Max.
1145O555KA
1145O555KA
Slide the Drawer back in.
than the ▼ (Max.
Level Indicator) on
the Edge Guide.
1139O1340A
Chapter 5
When an Indicat or Li ghts Up
Page 67

62
1. When the Add Paper Indicator Lights Up
3rd D r aw e r (PF-104)
1
Press the Paper Descent Key . This
releases the 3rd Drawer, allowi ng you
to slide it o ut of the copier.
3
Load another paper stack in the
left-hand half of the Drawer, front
side face down. At this t ime, pr ess th e
trailing edge of the paper stack tightly
up against the lef t edge of the Drawer.
1139O1552A
Indication of the Paper Descent Key
Steady :
Light
1136O146AA
Blinking:
Light
1136O145AA
The 3rd Drawer has run out
of paper when a drawer other
than the 3rd is currently
selected for use.
The 3rd Drawer has run out
of paper when the 3rd
Drawer is currently selected
for use.
NOTE
The pap e r should be
loaded no higher than
the ▼ (Max. Level
Indicator).
1151O112AA
Load the paper stack into the
2
right-hand half of the Drawer, front
side face down. At thi s time, press the
4
Gently slide the Drawer back in and
press the Paper Descent Key.
leading edge of the paper stack ti gh tly
Chapter 5
up against the r ight edge of the Drawer.
1139O1542A
1139O1532A
NOTE
The paper should be
loaded no higher
When an Indicat or Li ghts Up
than the ▼ (Max.
Level Indicator).
Page 68

2. When the Add Toner Indicator Lights Up
The Add Toner In di c ator l ig ht s up whe n ton er
in the Toner Bott le is running out.
You can still make copies, but the image
density will become lighter and lighter. It is
recommended, therefore, that you rep lace th e
Toner Bottle with a new one as soon as
possible.
Auto
Photo
uto / Photo
A
Darker
0.5~2.0
Auto
A3
A4
B4 A3
Full Size
B4 A4
A3 A4
Full Size Paper
Auto
A3
A4
A4
A5
B4
FLS.
Inch
1151O072DA
1151O072DA
63
Replacing the Toner Bottle
1
Open the Front Door.
2
Swing open the Toner Bottle Holder
and pull out t h e Toner Bottle.
Shake a new Toner Bottle well.
3
1139O1380A
NOTE
Be careful, some toner may puff out from
the bottle.
Ensuring that the arrow () on th e
5
Toner Bottle is facing towar d you,
insert the Bottle into position .
1139O1420A
NOTE
Insert the Bottle all the way into the
copier until the marking on the
Bottle is aligned with the marking
on the Toner Bottle H old er .
Swing the Toner Bottle Holder closed
6
and close the Front Door.
Chapter 5
4
1139O1410A
With the Seal on the Toner Bottl e
facing up, slowly peel of f the Seal as
illustrated.
1139O1420A
1139O1390A
NOTE
•
Use ONLY the specified toner for this
copier. U s i ng any ot he r toner co uld
result in image trouble.
Auxiliary Toner Replenisher Mode
Use the Auxiliary Ton er Replenisher
Mode if the image is li gh t immediately
after the Toner Bottle has been replaced
➭
with a new one .
p. 51
When an Indicat or Li ghts Up
Page 69

64
3. When the Add Staple Indicator Lights Up
When the staples will soon run out, the Add
0.5~2.0
Auto
Photo
/ Photo
A
Darker
Auto
A4
A3
B4 A3
Full Size
B4 A4
A3 A4
Full Size Paper
Auto
A3
A4
A4
A5
B4
FLS.
Inch
Replacing the Staple Cartridge
1151O073DA
1151O073DA
Staple Indicat or lights up.
Replace the Staple Cartridg e w ith a new one by
following the procedur e given be l ow.
1
Press the Lock Release Lever of the
Staple Sorter and slide it away from
the copier.
1139O1350A
NOTE
1139O0490A
Open the Stapler Door.
2
Chapter 5
3
While lifting the Lever upward, pull
the Staple Cartridg e ou t of its port.
Check that no portion of the staple belt
hangs out of t he Cartr i dge. Break off
any portion of the belt that hangs ou t of
the Cartridge.
Insert the ne w Staple Cartridge unti l it
5
clicks into positio n.
1139O2190A
1139O1440A
Pull the staple belt about 1" out of the
4
new Staple Cartridge and break off that
portion.
1139O0970A
When an Indicat or Li ghts Up
6
Close the Stapler Door and slide the
Staple Sorter back against the copier.
Page 70

65
3. When the Add Staple Indicator Lights Up
7
8
Place a sheet of paper into the 1st Bin
of the Staple Sorter .
1139O1320A
Press the Manual Staple Key.
* The copier automatically test- staples
the paper 2 to 3 times.
Meter
Count
Toner
Dehumidify
Drum
Auto
Size
Margin
Cover
Manual
Staple
Sort
Sort &
Staple
Mixed Orig. De
1
2111
12
1139O2512A
NOTES
•
Replace the Staple Cartr id ge o nly a fter
the Ad d Staple Indicat or ligh t s up.
Removing the Sta ple Cartridge before
then will result in stapling trouble.
•
Immediately after the new Staple
Cartridge has been loaded, be sure to
follow steps 7 to 9.
•
Do not tu rn the g reen gea r nea r t he
Cartridge inside the Stapler Unit.
9
Remove the sheet of paper from the 1st
Bin and check that staples have been
driven into it.
1151O111AA
If no staples are evident, place
*
anothe r she et o f paper i n to the 1s t
Bin and repeat steps 7, 8 and 9.
Chapter 5
When an Indicat or Li ghts Up
Page 71

66
4. When the Closure Failure Indicator Lights Up
The Closure Failure I nd icator lights up if a
copier do or or cov er i s le ft op e n, o r an op ti o n
0.5~2.0
A4
Auto
Photo
Lighter Darker
Auto / Photo
A
A3
B4 A3
Full Size
B4 A4
A3 A4
Full Size Paper
1151O074DA
A3
A4
A4
A5
Monitor Display Check Loca t ion
Check that the Front D oo r is closed.
is not attach ed properly. At t his time, the
Monitor Display shows t he location of the
Auto
closure failure. You can no longer start a new
B4
copy cycle.
FL
Inc
Correct the closure failure by following the
procedure given below.
1151O063AA
1139O0570A
Check the Automatic/Duplexing Document Feeder.
Chapter 5
1139O0600A
1139O4000A
1151O028AA
Check that the Right Door is closed.
When an Indicat or Li ghts Up
1139O3230A
1139O2100A
Page 72

4. When the Closure Failure Indicator Lights Up
Monitor Display Check Loca t ion
Check that the Left Door is closed.
1139O4010A
Check that the Lower Right Door is closed.
1139O4020A
Check that the Lower Left Door is closed.
67
1139O4030A
1139O4040A
1139O4050A
Check that the Duplex Unit is locked into position.
Check that the Sorter or Staple Sorter is in position.
Chapter 5
When an Indicat or Li ghts Up
Page 73

68
5. When the Misfeed Indicator Lights Up
If a paper misfeed occurs during a copy cycle,
that copy cycle st op s. At this time, the Misfeed
0.5~2.0
A4
Auto
Photo
Lighter Darker
Auto / Photo
A
A3
B4 A3
Full Size
B4 A4
A3 A4
Full Size Paper
1151O075DA
A3
A4
A4
A5
Misfeed Indicator and Monitor Display
Check the Monit or Display for the location of the misfeed and clear the misfed sheet of paper
according to the procedure given for each location.
Copier ➭ p. 69
Indicator lights up, the Monitor Display shows
the location and you cannot start any new copy
Auto
cycle.
B4
FL
Inc
1139O4120A
Paper Feed Cabinet ➭ p. 72
Chapter 5
1139O4100A
Automatic/Duplexing Document Feeder
p. 74
➭
When an Indicat or Li ghts Up
1139O4110A
There is a misfeed at that location where the red indicator (
sheet of paper stopped at that location where the red indicator (
1139O4130A
Duplex Unit ➭ p. 73
1139O4080A
Sorter/Staple Sorter ➭ p. 76
1139O4090A
●
) is blinking. There might be a
●
) lights up.
Page 74

Misfeed Clearing Procedures
Copier (Fusing/Transport Section)
NOTE
Be careful not to touch the areas
marked with High Voltage and
Caution: HOT with bare hands.
1
Open the Front Door. Turn the Lock
Release Lever counterclock wi s e to
unlock and swing up the Upper Half of
the copier. Then lock Stopper M2 .
69
5. When the Misfeed Indicator Lights Up
Remove any sheet of paper from the
3
Transport Section.
2
Holding up the Fusing U nit, pull out
the sheet of pap er i n the direction of
the arrow.
CAUTION : HOT
The Fusing Unit and its surrounding
areas may be extreme ly ho t . DO NOT
touch any part except the Fusing Unit
Handle (yellow).
1151O113AA
4
Slightly lift up the Upper Half of the
copier and unlock Stopper M 2 .
Gently swing down and lock the Upper
Half of the copier. Then, close the Front
Door.
Chapter 5
1151O144AB
When an Indicat or Li ghts Up
Page 75

70
5. When the Misfeed Indicator Li gh ts Up
Copier (Paper Take-Up Section)
1
2
Open the Front Door. Turn the Lock
Release Lever counterclock wi s e to
unlock and swing up the Upper Half of
the copier.Then lock Stopper M2 .
Open the Right Door and pull out the
sheet of paper fr om t he Multi Bypass
Port.
1151O113AA
4
5
Slightly lift up the Upper Half of the
copier and unlock Stopper M2 .
Gently swing down and lock the Upper
Half of the copier. Then, close the
Front Door.
1151O114AB
Slide out the Drawer and unload th e
paper from the Drawer. Next, push
down the Paper Lifting Plate.
1139O2140A
Chapter 5
6
3
Pull out the sheet of paper from the
Paper Take-Up Section and close the
Right Door.
1139O2150A
When an Indicat or Li ghts Up
Fan the paper and reload it.
NOTE
Make sure that the paper stack rests
under the two catches of the Drawer.
Gently slide the Drawer back in .
7
Page 76

Copier (Multi Bypass Sect io n)
71
5. When the Misfeed Indicator Lights Up
1
2
Unload the stack of paper from the
Multi Bypass Tray .
1139O2160A
Open the Front Door. Turn the Lock
Release Lever counterclock wi s e to
unlock and swing up the Upper Half of
the copier.Then lock Stopper M2 .
1151O113AA
4
5
Slightly lif t up the Upper Half of the
copier and unlock Stopper M2 .
Gently swing down and lock the Upper
Half of the copier. Then, close the
Front Door.
1151O114AB
Fan the paper thoroughly. Reload the
paper stack onto the Multi Bypass Tray.
1139O2090A
3
Remove any sheet of paper from the
Transport Section.
1139O0670A
Chapter 5
When an Indicat or Li ghts Up
Page 77

72
5. When the Misfeed Indicator Li gh ts Up
Paper Feed Cabinet (PF-204)
1
Open the Lower Right Door and pull
out the sheet of paper.
Close the Lower Right D oo r.
2
3
Slide the Drawer out of the copier.
Paper Feed Cabinet (PF-104)
1
Open the Lower Right Door and pull
out the sheet of paper.
Close the Lower Right Door .
2
3
Press the Paper Descent Key. Th is
releases the Drawer, allowing yo u to
slide it out of the copier.
1139O0640A
4
Unload the paper from the Drawer.
Chapter 5
1151O101CA
Fan the paper thoroughly and reload it.
5
5
When an Indicat or Li ghts Up
1151O106CA
Slide the Drawer back in.
Unload the paper from the Drawer. Fan
4
the paper thoroughly and reload it.
Slide the Drawer back in and press the
Paper Descent Key.
1139O1552A
1139O1542A
6
Page 78

Duplex Unit
73
5. When the Misfeed Indicator Lights Up
5. When the Misfeed Indicator Lights Up
1
2
Open the Front Door. Turn the Lock
Release Lever counterclock wi s e to
unlock and swing up the Upper Half of
the copier. Then lock Stopper M2 .
1151O113AA
Open the Left Door and Lower Left
Door. P ull out the she et of paper from
the Transport Section .
5
6
7
Close the Lower Right Door .
Slightly lift up the Upper Half of the
copier and un loc k St op per M2 .
Gently swing down and lock the Upper
Half of the copier. Then, close the
Front Door.
Slide out the Duplex Unit and open
Misfeed Removal Guide Plate D . Pull
out the sheet of paper from the Duplex
Unit.
3
4
Close the Left Door and Low er Left
Door.
Open the Lower Right Door and pull
out the sheet of paper from the
Transport Section.
8
9
Chapter 5
Securely close Misfeed Removal
Guide Plate D and slide the Duplex
Unit back into the copier.
Open and close the Front Door to reset
the Misfeed Indicator on th e control
panel.
When an Indicat or Li ghts Up
Page 79

74
5. When the Misfeed Indicator Li gh ts Up
5. When the Misfeed Indicator Li gh ts Up
Duplexing Document Feeder
1
2
Remove the original stack from the
Document Feed Tray.
1151O097AA
Swing open Document Feed Unit Door
F1 and gently pull out the original.
1151O031AA
5
6
Raise the Duplexi ng Document Feeder.
Opening the Document Turnover/Feed
Unit Guide Plate, gent ly pull out the
original from the Unit.
1151O033AA
Remove the original from the Original
Glass and lower th e Dupl exing
Document Feeder.
3
Holding down th e Lock Release Key,
swing open Document
Turnov er/ Exi t Unit Door F2 and
carefully pull out the ori gin al from the
Exit Unit.
1151O032AA
Close F1 and F2.
Chapter 5
Return the number of originals
7
indicated on the Display at the bac k of
the original stack removed in step 1
and reload it onto the Document Feed
Tray.
Example : Return two
originals.
4
When an Indicat or Li ghts Up
1151O098AA
Page 80

Automatic Document Feeder
75
5. When the Misfeed Indicator Lights Up
5. When the Misfeed Indicator Lights Up
1
2
3
Remove the original stack from the
Document Feed Tray.
1151O097AA
Swing open Document Feed Unit Door
F1 , and gently pull out the original.
1151O031AA
Close F1 .
Remove the original f ro m the Original
6
Glass and lower the Automatic
Document Feeder.
Return the number of originals
7
indicated on the Display at the bac k of
the original stack removed in step 1
and reload it onto the Document Feed
Tray.
Example : Return two
originals.
4
5
Carefully pull out the original from the
Document Exit Unit .
1151O034AA
Raise the Automatic Document Feeder.
Opening the Document Feed Unit
Guide Plate, gently pu ll out the
original from the Unit.
1151O033AA
1151O098AA
Chapter 5
When an Indicat or Li ghts Up
Page 81

76
5. When the Misfeed Indicator Li gh ts Up
Sorter/Staple Sorter
1
2
3
Holding the Lo ck Release Lever, slide
the Sorter/Stapl e Sort er away from the
copier.
Pull out the copy from the Transport
Section.
Slide the Sorter/ Staple Sorter back to
the copier.
Chapter 5
When an Indicat or Li ghts Up
Page 82

6. When the Call-Tech.-Rep. Indicator Lights Up
When a malfunction occurs in the copier, the
Call-Tech.-Rep. Indicator lights up and the
0.5~2.0
A4
Auto
Photo
Lighter Darker
Auto / Photo
A
A3
B4 A3
Full Size
B4 A4
A3 A4
Full Size Paper
1151O076DA
A3
A4
A4
A5
Resetting the Call-Tech.-Rep. Indicator
corresponding malfunction code appears acro s s
the Zoom Ratio Indicator and Multi-Copy
Auto
Display. At this t ime, the Start Key turns t o
orange and you cannot start a new copy cycle.
Try to clear the Call-Tech.-Rep. Indicator by
following the instructions below.
77
1
This will reset t he Call- Tech.-Rep .
Indicator.
NOTE
Carry out this procedure with the
Power Switch turned O N.
◆If the Call-Tech.-Rep. Indicator lights up
again, call your Techn ical R epr es entat ive
immediately.
Open the Front Door, then close it.
NOTES
•
When calling your Technical
Representative, give him or her the
malfunction code shown across the
Zoom Ratio Indicator and Multi-Copy
Display.
<Example> Malfunction Code: C0010
0.5~2.0
1151O066AA
1151O066AA
•
After calling you r T echnical
Representative, turn OFF the Pow er
Switch and unplug the power cord.
Chapter 5
When an Indicator Lights up
Page 83

78
7. When the I. U. Service Life Indicator Light Up
When time is about to come when the Imaging Unit needs
0.5~2.0
Auto
A4
B4 A3
Full Size
B4 A4
A3 A4
A3
Auto
A3
A4
A4
A5
B4
FLS.
Inch
1151O100DA
1151O100DA
When 2,500 more co pies are made with Add Toner Indicator lighting up, or 7,500 more copies are
made, after the I. U. Service Life Indicator has started blinking, the I. U. Service Life Indicator lights
up steadily and the copier inhibits the initiation of a new copy cycle. See the diagram below.
replacement, the I. U. Service Lif e In di cator starts blinking
to prompt you to replace it with a new one.
Replace the Imaging Unit b y following the procedure given
below.
Add Toner
1139O5301A
Indicator lights up
After 2.500
Vopies
1139O5301A
Blinking
Whichever occurs first
5.000 cpoie s m ad e
Useful Tip
Replace the Imaging Unit as s oon as possible once the I. U. Servic e Life In dicator has started
blinking.
Precautions for Handling
Chapter 5
•
Do not leave the I. U. in a br ight place.
1139O6032A
•
Do not store th I. U. in a hot place of
40°C (104°F) or more.
1139O6042A
No new copy cycle
1139O5300A
can be initiated
•
Do not store the I. U. in a humi d place or
When an Indicat or Li ghts Up
1139O6052A
subject to water s pla sh.
•
Do not store the I. U. ups ide down or titled.
Do not subject the I. U. to vibration.
1139O6062A
Page 84

79
7. When the I. U. Service Life Indicator Ligh ts Up
Remove the I. U. from copier
1
2
Open the Front Door. Turn the Lock
Release Lever counterclock wi s e to
unlock and swing up the Upper Half
ofthe copier. Then lock Stopper M2 .
Turn the I. U. Lock Release Lever and,
while holding it down, pull the I. U.
halfway out from the copier.
1151O113AA
Unpacking / Setting up the I. U.
1
Peel off the piece of tape and open the
Carton Bo x.
Take the Starter Bottle out f ro m the
Carton Bo x.
Take the I. U. with its bag out of the
Carton Bo x.
Starter Bottle
I. U.
3
1139O0250A
Firmly grasp the I. U. with both hands
and pull it all the way out of the copier.
1139O0510A
2
3
4445U001AA
Take the I. U. out of the bag.
4445U002AA
Peel off the three pieces of tape and
packing materials.
Chapter 5
When an Indicator Lig hts U p
4445U003AA
Page 85

80
7. When the I. U. Service Life Indicator Lights Up
4
5
6
Carefully pull the polyester tap e fr om
the I. U..
4445U011AA
Remove the Cap from the I. U. and
re-fit i t to the used I. U. as sho w n in
the illustratio n.
4445U004AA
Align the I. U. with the Rails in the
copier.
8
9
Be sure to push the I. U . into the
locked positio n until a click is heard.
Then, check to see the position of Lock
Release Lever, as shown in the
illustration.
NOTE
An im pr operl y installed I. U. co uld be a
cause of copier malfunction.
Slightly lift up the Upper Half of
thecopier and unlock Stopper M2 .
Gently swing down and lock the Upper
Half of the copier. Then, close the
Front Door.
4445U005AA
Chapter 5
1151O144AB
7
4488O001AA
Slide the I. U. all t he way into the
copier.
When an Indicat or Li ghts Up
1139O0540A
Page 86

7. When the I. U. Service Life Indicator Ligh t Up
Charging the Copier with Starter a nd Toner
81
1
2
3
Swing out the Bott le H old er.
4445U006AA
Hold the Starter Bottle s o that its tab is
on the upper side, shake it well.
1139O1410A
Peel off the tape f ro m the Starter
Bottle.
4
5
6
Align the markings on the Starter
Bottle with the upper s ide of the Bottle
Holder and slide the Bottl e into
position.
NOTE
Insert the Bo ttle all the way i nto the
copier until the marking on the Bottle
is ali gn ed wi th the markin g o n the
Bottle Holder.
Then, swing in the Bott le Hold er until
it locks into position.
Close the Front Door.
Plug the Power Cord into the Wall
Outlet and turn ON the Power Switch.
This with cause the wait indicator to be
shown on the control panel.
4445U008AA
Chapter 5
4445U007A
1139O6012A
When an Indicator Lights Up
Page 87

82
7. When the I. U. Service Life Indicator Lights Up
7
The copier automatically start the
charging cycle for approximately
5 minutes.
During this cycles, do not open the
Front Door.
During this cycle, six s egments of the
ones digit LED on the Magnification
Ratio In di c ator fo rm i ng a "0 " ligh t up
and go out one after another,
indicating that t he c opie r i s being
charged with starter.
When the copier has been completely
charged with Starter, the indication on
the Magnification Ratio Indicator
changes to "100" and the cycle stops.
8
9
If "E1" or "E 2 " is i nd ica te d on the
Magnification Ratio Indicator, the tape
has not been remo ve d fr om t he Sta r ter
Bottle. Swing down the Front Door
and remove the tape and perform the
starter charging procedure again.
If "E1" or "E2" is indicated again call
your Technical Representative.
1139O012AA
Swing down the Front Door, swing out
the Bottle Holder, and remo ve th e
Starter Bottle.
Chapter 5
4445U009AA
Hold the Toner Bottle so that its tab is
on the upper side, shak e it w ell, an d
peel off the tape.
Once the tape has been removed, hold
the Bottle so that its Toner Port faces
up.
1151O099DA
1151O099DA
10
When an Indicat or Li ghts Up
Page 88

83
7. When the I. U. Service Life Indicator Lights Up
11
12
Align the markings on the Toner
Bottle with the upper side of the Bottle
Holder and s lide the Bottle into
position.
NOTE
Insert the Bottle all the way into the
copier until the marking on the Bottle
is aligned with the marking on the
Bottle Holder.
Then, swing in the Bottle Holder until
it locks into position and close the
Front Door.
1139O1420A
1139O1400A
Chapter 5
When an Indicator Lights Up
Page 89

S
84
8. Quick Reference for Other Indicators
Indicator Copier State Action
Wait Indicator The copier is warming up.
A copy cycle cannot be initiated
while the Wait Indicator remains lit.
1139O3260A
Wait until the Wait Indicator goes
out and the S t ar t K ey turns g reen.
Remove Copi e s Indi ca tor There is a copy or copies le ft in the
Sorter Bi n( s) .
1139O3400A
Paper Size Display No Drawers contain paper of the
right size to run a copy cycle in the
Auto Paper mode.
A3
A4
A4
A5
Auto
B4
B5
FLS.
Inch
1139O0262A
1139O0262A
Zoom Ratio Display The zoom ratio calculated based on
the original size and copy paper
size is outside the range between
Auto
A4
Chapter 5
A3
B4 A3
Full Size
1139O5452A
1139O5452A
×0.500 and ×2.000 to run a copy
cycle in the Auto Size mode.
Remove the copy or copies from
the Sorter Bin(s).
Load the right size paper into a
Drawer or select the appropriate
copy pa per .
Cancel the Auto Size mode and
select the appropriate zoom ratio.
Multi-Copy Display You have entered 51 or more for
the number of copies to be made in
a 2-sided copying cycle.
1139O4990A
When an Indicat or Li ghts Up
If you press the Start Key, the
copier star ts the copy cycle t o
make only 50 copies.
Page 90

Chapter 6
Troubleshooting
This cha pter gives you instructions on how to troubleshoot copier malfunctions.
1. When t his Type of Copy is Produced p. 86
•
The image is to o li gh t
•
The image is to o dark
•
The copy is blurry
•
The copy has dark specks or spots
•
The edg e of th e co py i s d i rty
•
The image on the c opy is not aligned p ro pe rly
•
The copy has lines
2. The Copier is not functioning as designed p. 88
•
The Co nt rol Pa ne l shows nothing
•
No copies are fed out when the Sta r t Key is pressed
•
Control Panel Keys do not respond
•
The Copier is not act ivated when the Power S wi tch is turn ed ON
85
Chapter 6
Troubleshooting
Page 91

86
1. When This Type of Copy is Produced
Symptom Possible Cause Ac tion
The image is too light. The exposure level for the Auto
Exposure Mode is set at one of the
"Light" levels.
1074O108
The image is too dark. The exposure level for the Auto
1074O109
Chapter 6
The copy is blurr y. The paper is damp. Replace the paper .
The manual exposure level is set
on the lighter side.
You have been making copies from
a photo or an original with a large
dark area.
The Toner has j ust been
replenished.
The Add Toner Indicator is lit up
on the Control Panel.
The paper is damp. Replace the paper. ➭ p. 60
Exposure Mode is set at one of the
"Dark" levels.
The manual exposure level is set
on the darker side.
The entire surface of the Original
Glass is dirt y.
The original is not held tightly
against the Original Glass.
Change the setting of the User’s
Choice (Exposure Priorit y).
p. 54
➭
Cancel the Auto Exposure Mode
and select the Man ual Expos ure
Mode to adjust th e exposure lev el
to obtain a darker image.
p . 34
➭
Press the Exposure Control Key as
necessar y to ob tai n a darke r image .
p. 34
➭
The copier ne eds more tone r.
Replenish toner by using the Toner
Replenisher Function.
The copier ne eds more tone r.
Replenish toner by using the Toner
Replenisher Function .
Replace the Toner Bottle with a
new one.
Change the setting of the User’s
Choice (Exposure Priorit y).
p. 54
➭
Cancel the Auto Exposure Mode
and select the Man ual Expos ure
Mode to adjust th e exposure lev el
to obtain a lighter image.
p. 34
➭
Press the Exposure Control Key as
necessary to obtain a lighter image.
p. 34
➭
Wipe the Original Glass clean with
a soft dry cloth.
Place the original in position so
that it is held tightly against the
Original Glass.
➭
p. 63
➭
p. 94
➭
➭
p. 51
p. 51
Troubleshooting
1074O110
Page 92

1. When This Type of Copy is Produced
Symptom Possible Cause Ac tion
The copy has dark specks or spots. The Original Glass is dirty. Wipe the Original Glass clean with
The Original Pad or Document
Feed Belt is dirty.
The original is very thin or highly
transparent.
1074O111
The edge of the copy is dirty. The Original Pad or Document
1074O112
The image on the copy is not
aligned properly.
The information on the back side
of a two-sided, thin original may
be slightly reproduced on the copy.
Feed Belt is dirty.
You have selected a paper size
larger than the original.
(Zoom Ratio is set at full size
100%.)
The original is not placed in t he
correct position. (Zoom Ratio is set
at full size 100%.)
The reduction ratio selected is not
in accord w ith th e copy paper s ize.
(When do ing m anu al re du cti on
copying.)
The original is not placed in t he
correct position.
The originals may not be suitable
for use in the Do cument Feed er.
a soft dry cloth.
Wipe the Original Pad or
Document Feed Belt clean with a
soft cloth dampened with mild
detergent.
Place a blank sheet of paper over
the original.
Set the copier into the Manual
Exposure Mode and make the
exposure level lighter.
Wipe the Original Pad or
Document Feed Belt clean with a
soft cloth dampened with mild
detergent.
Select the same copy paper si ze as
the original.
Or, use the Auto S ize Mode to
enlarge the copy to the app rop riate
size.
p. 32
➭
Select the paper drawer that is
loaded in the same direction as the
original.
Or, reload the paper in the same
direction as the original.
Select the zoom ratio according to
the copy paper size.
Or, use the Auto S ize Mode to
reduce the copy to the appropriate
size.
Place the original correctly on the
Original Glass.
Or, load it onto the Document
Feeder cor rect ly alo ng the
Document Guide Plates.
Raise the Document Feeder and
place the originals on the Original
Glass one at a time.
➭
➭
p. 32
➭
pp. 94, 95
➭
p. 22
➭
pp. 94, 95
➭
p. 30
➭
p. 30
➭
p. 94
➭
p. 22
➭
p. 34
➭
p. 32
➭
p. 22
p. 25
87
Chapter 6
1074O113
The copy has lines. The Corona Units are dirty. Using the Corona Unit Cleanin g
Levers, clean the Co r o na U n i t s.
p. 95
➭
Troubleshooting
Page 93

88
2. The Copier is not functionin g a s designed
Symptom Check for: Action
The Control Panel shows no thing. Is only the Start Key lit up green? The copier is in the Ene rg y Saver
Mode.
Press any key on the Co nt ro l Pa nel
to cancel the Energy Saver Mode.
p. 17
➭
The copier is in the Auto Shut OFF
Mode.
No copies are fed ou t when the
Start Key is pressed.
Control Panel Keys do not respond. The Interrupt Key LED is lit up. The copier is in the interrupt mode.
The copier is not a ctivated wh en
the Power Switch is turned ON.
The Wait Indicator is lit up. The copier was just turned ON and
The Warning Indicator is lit up. Check the Contr ol Panel and tak e
The powe r cor d is lef t unp lug ged
from the power outlet.
➭
p. 16
Interrupt
1139O2602A
Turn the Power Switch ON.
is warming up. Please wait.
action according to the particular
Indicator.
Press the Interrupt Key to cancel
the interrupt mode.
Plug the power cord into the power
outlet.
➭
p. 59
➭
p. 16
The room circuit breaker is open. Close the room circuit breaker.
If these procedures do not correct the problem, turn OFF the Power Switch, unplug the power cord
*
from the power outlet and contact your Technical Representative.
Chapter 6
Troubleshooting
Page 94

Miscellaneous
This chapter gives complete specifications of the copier system and options,
plus care and reference information to facilitate your use of the copier.
1. Specifications p. 90
•
Copier
•
Duplexing Document Feeder
•
Automatic Document Feeder
•
Sorter
•
Staple Sorter
•
Paper Fe ed Cabi ne t
•
Duplex Unit
2. Car e of the Copier p. 94
•
Cleaning
3. Function Combination Matrix p. 96
4. Description of Copy Paper Size and Zoom Ratio Table p. 98
5. Index p. 99
89
Chapter 7
Chapter 7
Miscellaneous
Page 95

90
1. Specifications
Copier EP2010
Type Desk To p Copi er
Platen Ty pe S t ation ary
Photoconductor OPC
Copying Sys tem Electro stati c Dry Powde red Im age Tra nsf er to Plai n Paper
Developing System Micro-Toning System
Fusing System Lamp-Heated Roller
Types of Original Sheets, Books, and other th ree-dimensional objects
Maximum Original Size : A3 Lengthwise
Maximum Original Weight : 3kg.
Kinds of Paper Plain paper ( 60g/m
Copy Paper Size First Drawer
Paper Feeding System First Drawer : 250 sheets
Warm-up Tim e 30 seconds or less
First Copy A4C = 7.2 seconds or less
Copy Speed
(Approx.
copies/minute)
Magnification Ratios Fixed ratios
Multiple Copies Up to 99 copies (count-down system)
Exposu re Control Auto Exposure Mode, Manual Exposure Mode and Photo Mode
Chapter 7
Lost Image 1-sided copy in the full size mode
Power Requirement s AC 110V, 115V, 120V, 127V , 200V-240 V; 50/60Hz
Power Consumption 1.3 k W (M ax.)
Dimensions Width
Miscellaneous
Weight 57.5 kg (Excluding Copy Tray, Starter, Toner, Copy Paper)
Recycled pa per
Special paper (Multi Bypass Tray only)
Thick paper ( 90g/m
A3L, B4L, A4L, A4C, B5C, A5L, FoolscapL(203×330mm, 216×330mm,
210×330mm)
(When the Marketing Area Switch is flipped to "Inch")
11"
8-1/2"✕13"L, 5-1/2"✕8-1/2"L
2nd Drawer
A3L, B4L, A4L, A4C, A5L, FoolscapL
254mm
297mm✕216mmC, 216mm✕320mmL, 220mm✕280mmL, 297mm✕430mmL,
210mm
Multi Bypass Tray
Crosswise : 100mm to 297mm
Lengthwise : 140mm to 432mm
2nd Drawer : 250 sheets
Multi Bypass Tray : 50 sheets ( 21-1/4 lbs .)
(in Full Size Mode using First Copier Drawer)
Full size (×1.000)
A3L : 12 B4L : 13 A4L : 16 A4C : 21
Full size: 1:1 ±0.005
Reduction ratios: ×0.500, ×0.707, ×0.816
Enlargement ratios: ×1.154, ×1.414, ×2.000
Zoom ratios: From ×0.500 to ×2.000 in ×0.001 increments
Leading edge: 3 mm (approx. 1/8")
Trailing edge: 3 mm (approx. 1/8")
Front edge : 1 mm (approx. 1/25")
Depth
Height
17"L, LegalL (8-1/2"✕14"), Le t t er L, 8-1/4"✕13"L, 8"✕13"L,
✕
2
to 90g/m2 )
2
to 157g/m2 ), Transparencies , Tra ns lucent paper
203mmC, 203mm✕330mmL, 210mm✕280mmL, 216mm×297mmL,
✕
330mmL
✕
: 20 sheets ( Recycled paper or Special Paper )
:
650mm (Excluding Copy Tray)
:
633mm
:
480mm (Including Original Cover)
Page 96

Duplexing Document Feeder AFR-12
91
1. Specifications
Document Feeding
System
Standar d Mo de : 1-s i ded origi nal, 2-s ided original, 2-i n-1, Sing l e Feeding
Mixed Original Detection Mode:
1-sided Mixed Original Detection
2-sided Mixed Original Detection
Lightweight Original Mode
Kinds o f Original Plain paper
2
Original Weight 1-sided or iginal Mode, 2-in-1 Mode : 50g/m
2-sided original Mode : 60g/m2 to 90g/m
Single Feeding Mode : 35g/m2 to 200g/m
Lightweight Original Mode : 40g/m2 to 110g/m
to 110g/m2
2.
2.
2
Original S i ze 1-s i ded/2-sided original Mode: A3L, B 4L, A4L, A4C , A5 L, 210mm×330mm
2-in-1 Mod e : A4C
Capacity of Document
Feed Tray
A4 or Smaller : 50 sheets (80g/m2 )
A3, B4 : 30 sheets (80g/m2 )
Copy Productivity 100%
First Copy with ADF A4C = 11 seconds or less
Power Source DC24V su pplied from copier
Power Consumption 48W or less
Dimensions Width: 610mm Depth: 505mm Height: 125mm
Weight 13 kg
Automatic Document Feeder AF-5
Document Feeding
System
Kinds o f Original Plain paper
Original Weight 1-sided or iginal Mode, 2-in-1 Mode : 50g/m
Original Size 1-sided original Mode: A3L, B4L, A4L, A4C, A5L, 210mm×330mm
Capacity of Document
Feed Tray
Copy Productivity 100%
First Copy with ADF A4C = 11 seconds or less
Power Source DC24V su pplied from copier
Power Consumption 48W or less
Dimensions Width: 587mm Depth: 505mm Height: 125mm
Weight 12 kg
Standar d Mo de : 1-sided original, 2-in-1, Si ngle Feeding
Mixed Origi n al Det ec ti on M od e: 1-sided Mi xed Original Detection
Lightweight Original Mode
2
to 110g/m
Mixed original Detection Mode : 60g/m2 to 90g/m
Single Feeding Mode : 35g/m2 to 200g/m
Lightweight Original Mode : 40g/m2 to 110g/m
2
2
2
2
2-in-1 Mode : A4C
A4 or Smaller : 50 sheets (80g/m
A3, B4 : 30 sheets (80g/m
2
)
2
)
Chapter 7
Miscellaneous
Page 97

92
1. Specifications
Sorter S-106
No. of Bins Sort Bins : 10
Modes Non-Sort Mode, Sort M ode, Group Mode
Kinds of Paper Non-Sort Mode
•Plain paper, Recycled paper
•Special Pap er
T Thick paper, Transparencies, Translucent paper
Sort Mode, Group Mode
•Plain paper, Recycled paper
Paper Si ze Non-Sor t Mode, Sort Mode, Gr oup Mode : A5 L to A3L
Capacity of Bins Non-Sort Mode
•Plain paper, Recycled paper
1st bin : 50 sheets
2nd to 10th bin : 25 sheets / bin
•Special Pap er
1st bin only : 10 sheets / bin
Sort Mode, Group Mode
•Plain paper, Recycled paper
1st to 10th bin : 25 sheets / bin
Power Source DC24V su pplied from copier
Power Consumption 72W or less
Dimensions Width : 400mm Depth : 562m Height : 404mm
Weight 15.8 kg
Staple Sorter ST-104
No. of Bins Sort Bins : 10
Modes Non-Sort M ode, Sort Mode, Group Mode, Sort-Stapl e Mode
Kinds of Paper Non-Sort Mode
•Plain paper, Recycled paper
•Special Pap er
T Thick paper, Transparenc ies, Tran sl ucen t paper
Sort Mode, Group Mode, Sort-Staple Mode
•Plain paper, Recycled paper
Paper Si ze Non-Sor t Mode, Sort Mode, Gr oup Mode : A5 L to A3L
Capacity of Bins Non-Sort Mode
Chapter 7
Power Source DC24V su pplied from copier
Miscellaneous
Power Consumption 72W or less
Dimensions Width : 400mm Depth : 562mm Height : 404mm
Weight 18.1 kg
Accessori es Staple Cartridge, 5,000 staples / cartridge
Sort-S t apl e Mode : A4 L to A3 L
•Plain paper, Recycled paper
1st bin : 50 sheets
2nd to 10th bin : 25 sheets / bin
•Special Pap er
1st bin only : 10 sheets / bin
Sort Mode, Group Mode, Sort-Staple Mode
•Plain paper, Recycled paper
1st to 10th bin : 25 sheets / bin
1 piece
✕
Page 98

Paper Feed Cabinet PF-204
93
1. Specifications
Kinds o f Paper Plain paper, Recycl ed paper : W eighing 60g/m2 to 90g/m
2
Copy Paper Size 3rd Drawer : A5L to A3L
4th Drawer : 210mm×280mmL to A3L
Paper Feeding System Automatic feeding fro m dra wer
Total Drawer Capacity : 1,000 sheets (500sheets
2)
✕
Power Source DC24V su pplied from copier
Dimensions Width : 610mm Depth : 595mm Height : 472mm
Weight 35.2 kg
Paper Feed Cabinet PF-104
Kinds o f Paper Plain paper, Recycl ed paper : W eighing 60 g/m2 to 90g/m2
Copy Paper Size 3rd Drawer : A4C
Paper Feeding System Automatic feeding fro m dra wer
Drawer Capacity : 2,500 sheets (80g/m
2
)
Power Source DC24V su pplied from copier
Dimensions Width : 610mm Depth : 595mm Height : 472mm
Weight 36.5 kg
Paper Feed Cabinet PF-4D
Kinds o f Paper Plain paper, Recycl ed paper : W eighing 60g/m2 to 90g/m
Copy Paper Size A5L to A3L
Multiple Copies 2-Sided Copies : 50 sheets
Power Source DC24V su pplied from copier
Dimensions Width : 610mm Depth : 595mm Height : 472mm
Weight 39.7 kg
2
Duplex Unit AD-8
Kinds o f paper Plain paper, Re cycled paper : Wei ghing 6 0g/m2 to 90g/m
Capacity Up to 50 sheets (60g/m
Power Source DC24V su pplied from copier
Weight 14.2 kg
Dimensions Stored in the Paper Feed Cabinet
Size : A5L to A3L
2
to 90g/m2 )
Up to 20 sheets (90g/m2 to 157g/m2 )
2
Chapter 7
Miscellaneous
Page 99

94
2. Care of the Copier
Cleaning
(Turn OFF the Power Switch of the copier when cleaning.)
Housing
Wipe the surface of the Hou s ing clean
with a soft cloth dampened with mild
home detergent.
Control Panel
Wipe the surface of the C on trol Panel
clean with a soft, dry cloth.
1139O1820A
Origin al Glass
Wipe the surface of the Original Glas s
clean with a soft, dry cloth.
1139O1840A
Front D oor
Wipe the inside of the Front Door
clean with a soft cloth.
Chapter 7
Miscellaneous
NOTE
NEVER use a glass cleaner o r any
other detergent to avoid damage to the
control panel keys and Display.
Original Pad
Wipe the surface of the Original Pad
clean with a soft cloth dampened with
mild home detergent
1139O1850A
1139O1830A
1139O1860A
Page 100

95
2. Care of the Copier
Corona Units
Gently slide out the Corona Unit
1
2
Cleaning Lever (Upper) as far as it
goes.
Gently slide the Cleani ng Lever back
into the original posit ion.
1139O1870A
Document Transport Belt
Wipe the surface of the Document
1
Transport Belt clean with a soft cloth
dampened with mild home detergent.
2
Hold the Document Transport Belt at
both edges and pull it to the left to
expose a fresh surface.
1139O1910A
3
4
1139O1880A
Gently slide out the Corona Unit
Cleaning Lever (Lower) as far as it
goes.
1139O1890A
Gently slide the Cleaning Lever back
into the original posi tion.
Repeat steps 1 to 4 two to three times.
3
1151O1920A
Wipe the fresh sur face cle a n with a
soft cloth dampened with mild home
detergent.
Repeat these steps until the entire
surface of the Belt is wiped clean.
Chapter 7
Miscellaneous
1139O1900A
 Loading...