

Page 1
EP1080
Thank yo u for pu rc h as ing th e Mino lt a EP10 80 .
This operator’s manual explains how to operat e the copier and reple nish supplies.
It also gives some troubleshooting ti p s as well as general precau tio ns to be
observed when using the copier.
To ensure the best performance and effective use of your EP1080, read this
manual carefully until you familiarize yourself thoroughly with its operation and
features. After you have read through the manual, keep it for ready reference.
Please use this manu al as a quick and handy ref eren ce too l for clarifying
immediately any questions which may arise.
i
1139O1571A
Page 2

ii
Contents
Chapters 1 through 3 give the basic information for making copies.
Be sure to read these chapters before attempting to use your copier.
Using This Manual
Organization viii
Page Organization ix
Terms and Symbols for the Type of Origin als and
Copy Paper x
Chapte r 1 Safety Not es 1
1. Installing the Copier
Installation Site 2
Power Source 2
Grounding 2
Space Requirements 3
2. Precautions for Use
Operating Environment 4
Using the Copier Properly 4
Care of Co pier S up plies 5
Moving 5
Page 3

Chapter 2 First Things to Know
about EP1080 7
1. System Overview 8
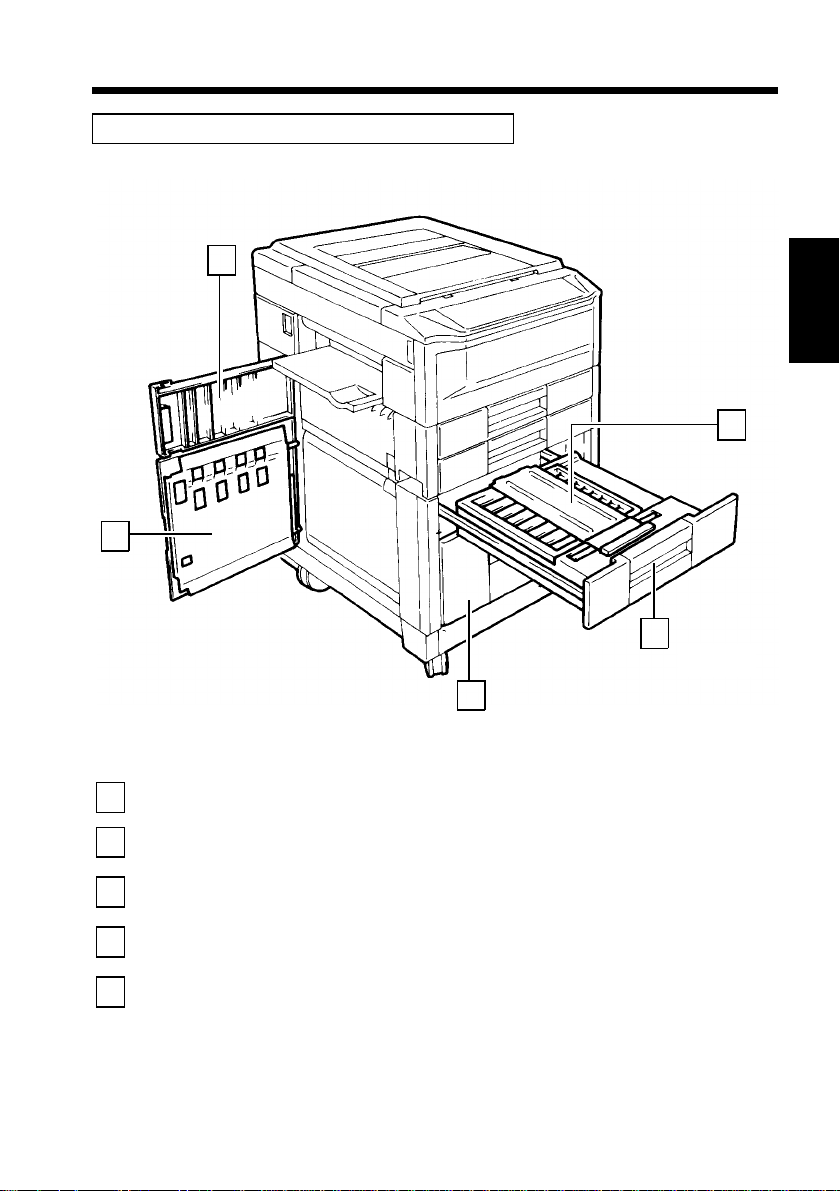
2. Copier Parts and Accessories
Outside Your Copier EP1080 10
Inside Your Copier EP1080 12
Paper Feed Cabinet PF-201 14
Duplex Cabinet PF-201 and Duplex Unit AD-3 15
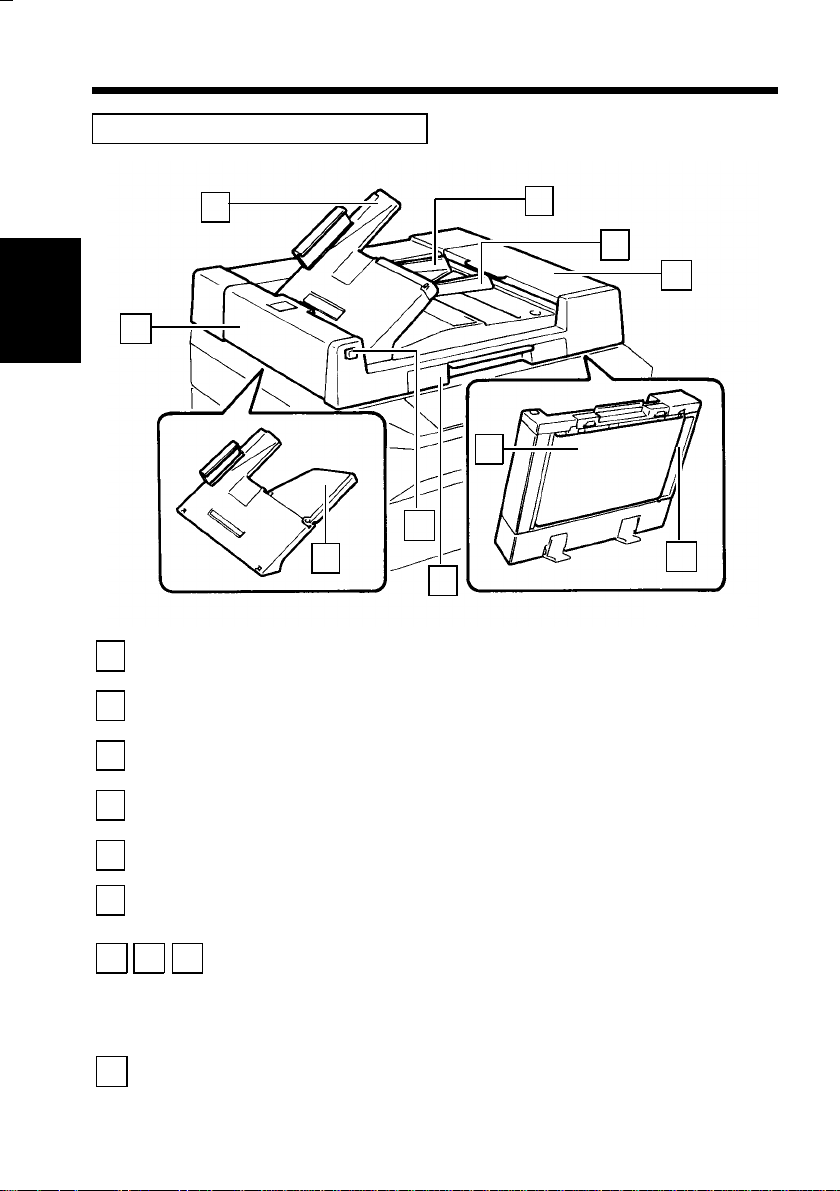
Duplexing Document Feeder AFR-7 16
Automatic Document Feeder AF-3 1 7
Staple Sorter ST-101 and 10-Bin Sorter S-1 04 18
Multi Bypass Table MB-1 19
3. Control Panel Keys and Indicators
Basic Panel 20
System P a ne l 22
Display Panel I 24
Display P anel II 26
iii
Contents
4. Turning On and Off, and Resetting the Copier
Turning On and Of f 28
When Copier is Turned On 29
Auto Co py St art Fu nc ti on 30
Minimizing the Warm-up Time 31
Initial Mode and Panel Resetting 32
Auto Reset Function 33
Page 4

iv
Contents
Chapter 3 Making Copies 35
1. Basic Copying Overview 36
2. Basic Job Setting
Original Placement 38
Using Automatic/Duplex ing Document Feeder
(AF-3/AFR-7) 40
Image Density 46
Zoom Ratio
• Types of Zoom Ratio 48
• Auto Size Mode 51
• Zoom Ratio Table
(Orignal Size to Paper Size) 53
Paper Size
• Manual Mode 54
• Auto Paper Mode 56
Number of Co pi e s 58
Copy Cycle Start 59
Interrupt Mode 60
Manual Bypass Copying 62
3. System Copying Overview 64
Typical Job Setting Procedures 66
4. System Job Setting
Job Type
• Available Job Types 68
• Precaution for Original Loading 72
Finishing Mode
• Finishing Modes 74
• Auto Dual Function 76
• When the Number of Copies Set to be Made Exceeds 25 in
the Group Mode 77
• If the Number of Copies Set to be Made Exceeds 50 in the
Non-Sort Mode 77
• Selecting the Finishing Mode 78
• Precautions for Original Loading for Copies Stapled
Automatically or Manually 80
• Typical Finishing Modes 82
File Margin Mode 84
Cover Mo de 86
Job Memory 88
Page 5

Contents
Chapter 4 Special Function 89
1. Checking The Total Number Of Copies
Mode 90
2. Auxiliary Toner Replenishing Mode
(Increasing the Image Density) 92
3. Drum Dehumidify Function 93
4. User’s Choice 94
Chapter 5 When an Indicator
Lights Up 107
(Replenishing Supplies, Clearing Misfeed,
and Corr e ct ing a Closure F a ilu r e)
1. Quick Reference for Indicator Lights 108
2. Detailed Instruction for Indicator Lights
Add Toner In di c ator 110
Add Paper Indicator 112
Add Staple Indicator 116
I. U. Service Lif e Indicator 120
Closure Failure Indicator 130
Misfeed Indicator
• Misfeed Indicator and Monitor Display 132
• Misfeed Clearing Procedure
: Copier EP1080 134
: Paper Feed Cabinet PF-201 140
: Duplex Unit AD-3 142
: Duplexing Document Feeder AFR-7 146
: Automatic Document Feeder AF-3 147
: Sorter/Staple Sorter S-104/ST-101 148
v
Call-Tech.-Rep. Indicator 149
Page 6

vi
Contents
Chapter 6 Troubleshooting 151
1. When This Type of Copy is Produced
The Image is too light 152
The Image is too dar k 152
The Copy is blurry 152
The Copy ha s li n e s 154
The Copy has dark specks or spots 154
The Edge of the Copy is dirty 154
The Image on the Copy is not aligned properly 154
2. The Copier is Not Activated
No Indicators on the Control Panel light up 156
Pressing The Start Key do es no t s tart the copy cycle
156
Control pane l Keys do not respond 158
The Copier is not activated when the Power Swit ch is
turned ON 158
Chapter 7 Specifications 159
1. Copier EP1080 160
2. Duplex Unit AD-3 162
3. Paper Feed Cabinet PF-201 163
4. Duplexing Document Feeder AFR-7 164
5. Automatic Document Feeder AF-3 165
6. Staple Sorter ST-101 166
7. 10 Bin Sorter S-104 167
8. Multi Bypass Table MB-1 168
9. Copier Outline Dimensions 169
Page 7

Contents
vii
Chapter 8 Miscellaneous 171
1. Care of the Copier
Daily Checks 172
Cleaning 174
2. Function Combination Matrix 178
3. Description of Paper Size 180
4. Zoom Ratio Table
(Original Size to Paper Size) 181
5. Index 182
Chapter 1
Safety Notes
Chapter 2
First Things to
Know about
EP1080
Chapter 3
Making Co pie s
Chapter 4
Specia l Function
Chapter 5
When an
Indicator Light s
Up
Chapter 6
Troubleshooting
Chapter 7
Specifications
Chapter 8
Miscellaneous
Page 8

viii
Using This Manual
Organization
Chapte rs 1 through 3 give th e ba s i c inform a t i on for m a ki ng copies. Be sure t o
read these Chapters b efo re attempting to use your copie r.
Chapter 1 Safety Notes
About the operating environments, conditions, and precautions for
use.
Chapter 2 First Things to Know About EP1080
A brief description of the system and preliminary information about
the different parts of the system.
Chapter 3 Making Copies (Basic Copying)
About how to make b as ic an d s y stem copies.
"BASIC COPYING OVERVIEW" on p. 36
"SYSTEM COPYING OVERVIEW" on p. 64
These pages give you a qu ick, at-a-glance flowchart for making
copies, each step being keyed to a page number on which you will
find a more detailed descriptio n.
Chapter 4 Special Functions
About the special f unctions that you can use for spe cific purposes.
Chapter 5 When Such an Indicator Lit Up
About the various warning indications given on the control panel
and steps to take to correct these faulty conditions.
Chapter 6 Troubleshooting
Instructions on how to tr oublesh oo t copier malf un ctio ns.
Chapter 7 Specifications
Complete specification s of the c opier system and options.
Chapter 8 Miscellaneous
About care of c opier and t he various possi bl e combinations of
functions.
Page 9
Page Organization
Each page of this manual is basical ly organized as follows.
Index: Used to locate your Chapter quickl y.
Section title
Table of co ntents of the chapter:
Gives a ta ble of cont ents of the Chapt er which you
can use to qu ickly locate your page.
➭
p. XX (Cross-reference):
Shows t h e page to refer to for mor e detailed inform ation.
ix
Using This Manual
1076O298
Control Panel Indicators
A steady Light or blinking Light Indicator on the control panel is represented as
follows.
<Steady Light>
1139O4760A
1139O4760A
<Blin ki ng Li gh t>
1139O4770A
1139O4770A
Page 10
x
Using This Manual
Terms and Symbols for the Type of Originals and Copy
Paper
Certain conventions have been adopted and cor respon ding graphic symbol s
used in the manual to designate the various types of originals and copy paper.
These two pages explain about these conventions.
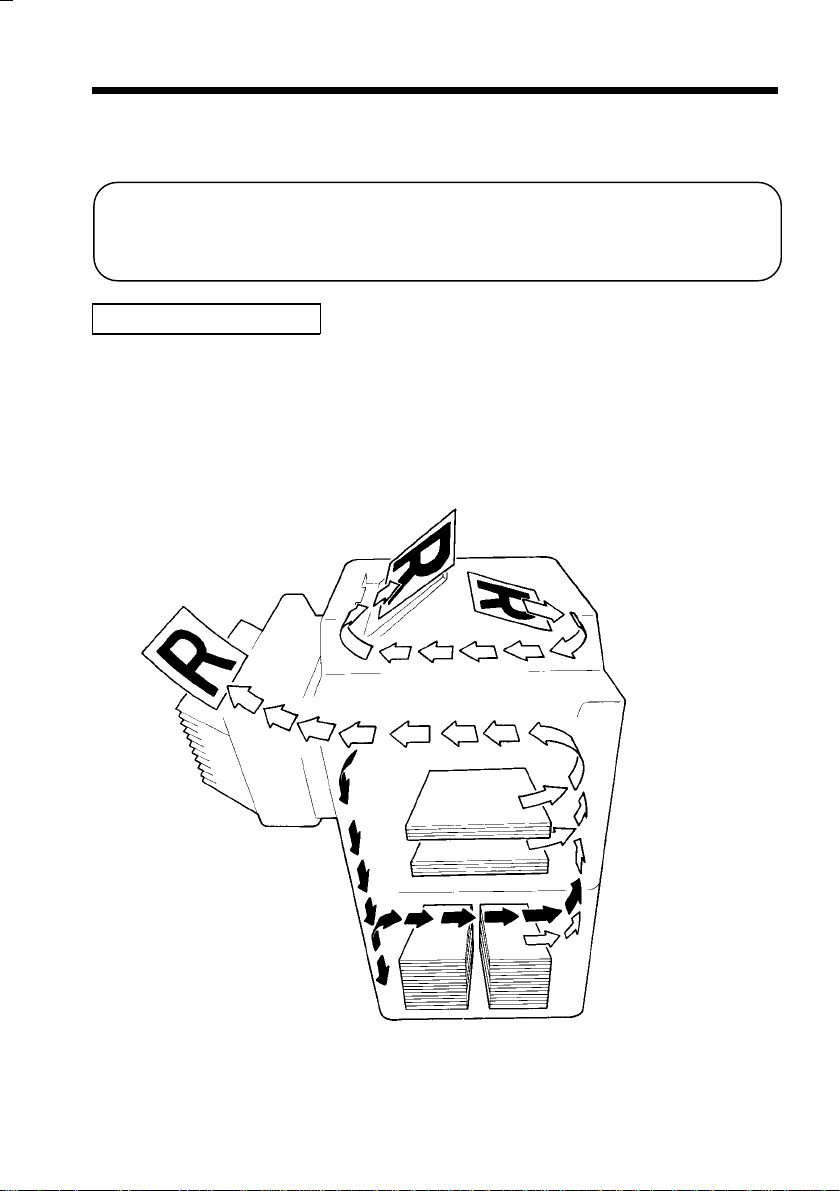
Copy Feeding Direction
In this copier system, the copy paper is taken up from the right-hand side of the
copier and fed through the copier toward the left-hand side, out face up onto the
Copy Tray. In the illustration below, the direction in which the paper is fed, as
indicated by the arrow, is called the "feeding direction."
1139O1702A
Page 11
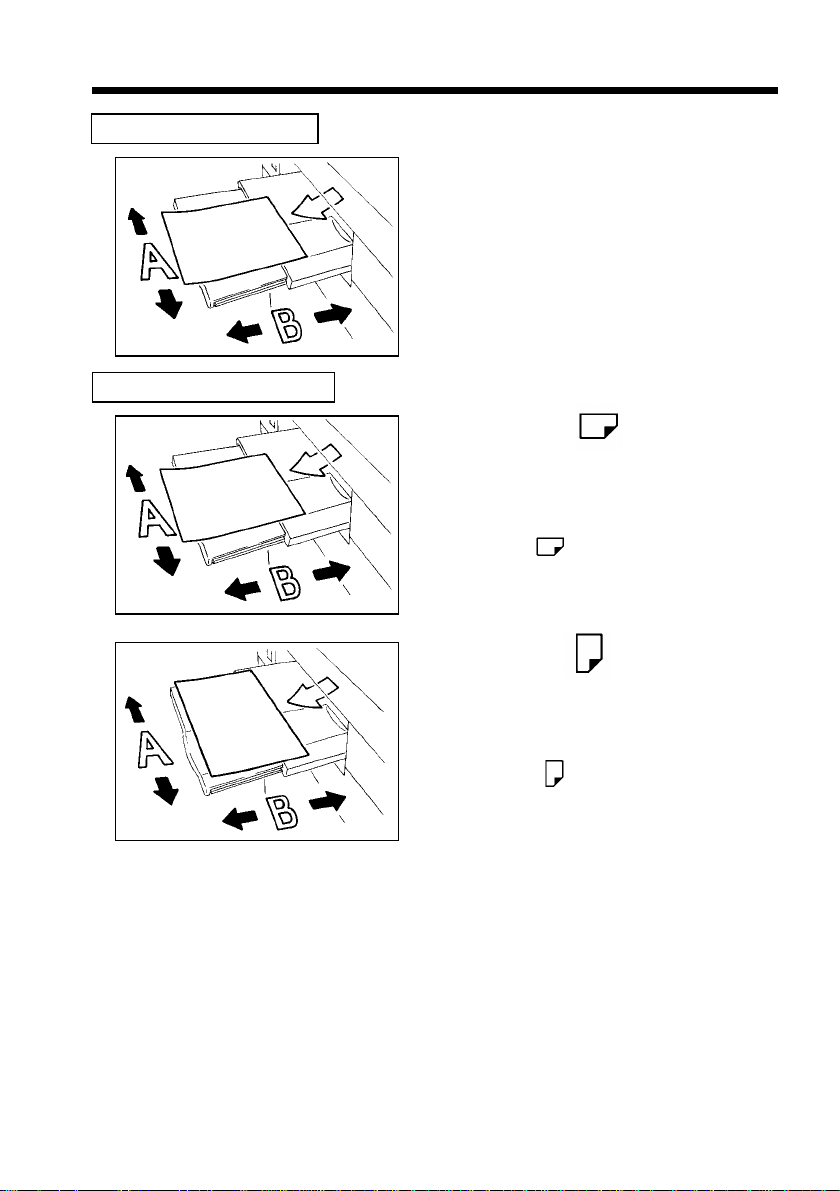
"Width" and "Length"
Terms and Symbols Used
xi
Using This Manual
When we talk about the size of the
original or copy, we call side A
"width" and side B "length."
A: Widt h
B: Length
1139O1610A
<Lengthwise >
When the original or copy has a
"length" longer than its "width," we
call it "lengthwise" and use symbol
"L" or " . "
1139O1610A
1139O1620A
<Crosswise >
When the original or copy has a
"length" shorter than its "wid th," we
call it "crosswi se" and use symbol
"C" or " ."
Page 12

xii
Page 13

Chapter 1
1
Safety Notes
This Chapter explains about the operating environments, conditions,
and precautions for use.
1. Installing t he Cop ier
Instal lation Si te 2
Power So ur c e 2
Grounding 2
Space Requirements 3
2. Precautions f or Us e
Operating Environment 4
Using the Copier Properly 4
Care of Copier Supplies 5
Moving 5
Chapter 1
Safety Notes
Page 14

2
1. Installing the Copier
Installation Site
To ensure utmost safety and preven t possib le malfunctio ns of the copier, install it
in a location which meets the following requirements.
Chapter 1
◆
A place away from a curtain or other things that catch fire and burn easily.
◆
An area where there is no po ssibi lity that it might be splashed with water or
other liquid.
◆
An area free from direct su nlight.
◆
A place out of the direct air stream of an air conditioner, heater, or ventilator.
◆
A well ventilated place.
◆
A dry place.
Safety Notes
◆
A dust-free location.
◆
An area not subject to undue vibration.
◆
A stable and level location.
Power Source
The power source voltage requirements are as follows.
◆
Use a power source with little voltage fluctuat ion s.
Voltage Fluctuation : Within ±10%
Frequency Fluctuation : 50/60 Hz Within ±0.3%
◆
If any other electrical equipment is sourced from the same powe r outlet, make
sure that the capacity of the outlet is not exceeded.
◆
The outlet should be located near the machine and easily accessible.
◆
Never connect by means of a multiple socket any other appliances or machines
to the outlet being used for the copier.
◆
If an extension cord is needed, use one with a capacity more than the power
consu mpt i on of th e co pier .
◆
Make sure that no unusu al, excessive force is being applied to the power cord
or extension cord.
Grounding
To prevent receiving electrical shocks in the case of electrical leakage, always
ground the copier.
Connect the grounding wire to:
◆
The ground terminal of the outlet.
◆
A grounding contact which complies with the local electrical standards.
Never connect the grounding wire to a gas pipe, the grounding wire for a
*
telephone, or a water pip e .
Page 15
1. Installin g t he Copier
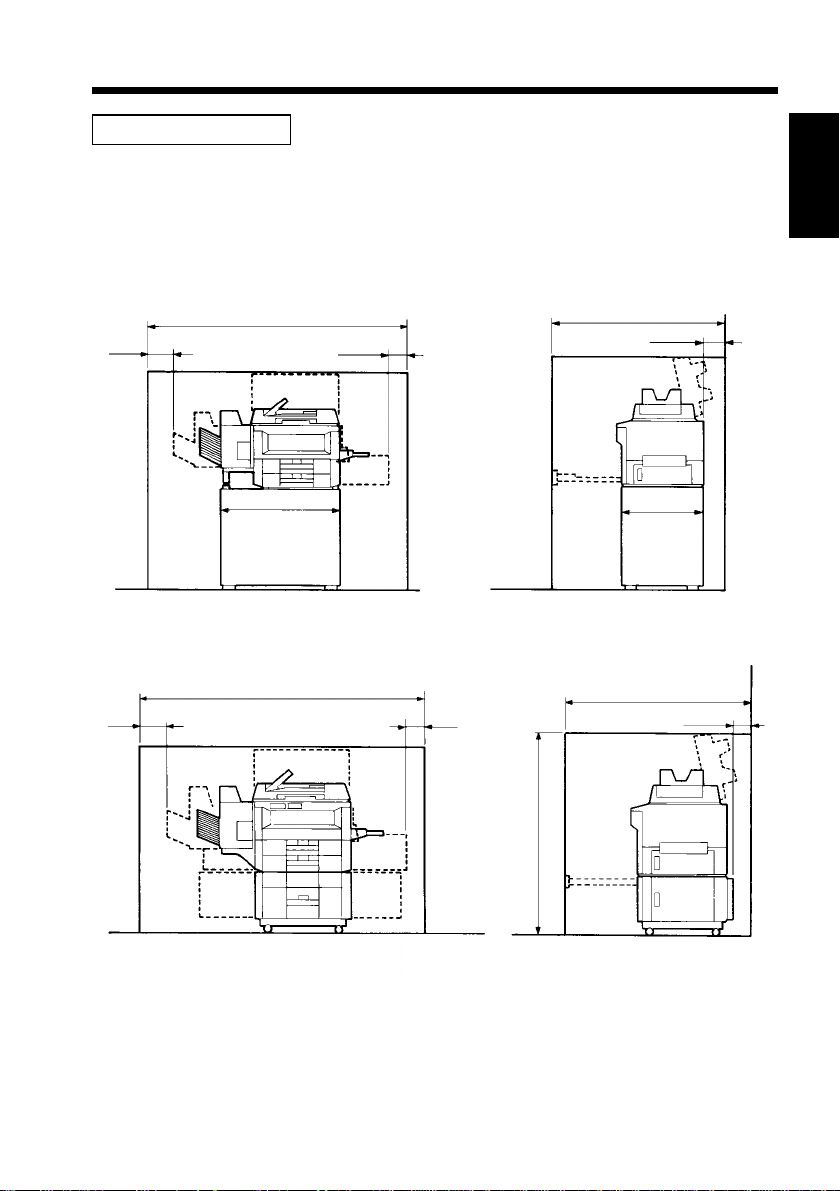
Space Requirements
To ensure easy copier operation, supply replacement, and service maintenance,
adhere to the recommended sp ace req uir ements detailed below.
Be sure to allow a clearance of 150 mm. or more at the bac k of the copier as
*
there is a ventilation duct.
3
Chapter 1
300 mm
300 mm
2,104 mm
852 mm
2,109 mm
200 mm
1139O1730A
200 mm
1,189 mm
150 mm
Safety Notes
609 mm
1139O1720A
1,242 mm
150 mm
1,401 mm
1139O1742A
1139O1710A
Page 16

4
2. Precautions for Use
Operating Environment
The operating environmental requirements of the copier are as follows.
Temperature : 10°C to 30°C (50°F to 86°F) with a fluctuation of 10°C (50°F) per hour
Chapter 1
Humidity : 15% to 85% with a fluctuation of 20% per hour
Using the Copier Properly
To ensure the optimum performance of the copier, follow the precautions listed
below.
◆
NEVER place a he avy object on the copier or subject the copier to shocks.
Safety Notes
◆
NEVER open any Doors, or turn OFF the copier while the copier is making
copies.
◆
NEVER bring any magnetized object or use flammable sprays near the copier.
◆
NEVER place a vase or vessel containing water on the copier.
◆
NEVER drop paper clips, staples, or other small pieces of metal into the copier.
◆
NEVER attempt t o remove an y Cover that i s secured.
◆
ALWAYS insert the Power Plug all the way into the outlet.
◆
ALWAYS make sure that the outlet is visible, clear of the copier or copier
cabinet.
◆
ALWAYS ensure that the cop ier doe s not ri de on the power cord or
communications cable of other electrical eq uipment, and it does n ot get s uch a
cord or cable wedged into its own mechanism.
◆
NEVER leave damages or cracks evident on the copier power cord unattended.
If you find any of these conditions, immediately shut down the copier, unplug
the power cord, and call your Tech. R ep. for app ro priate action.
◆
ALWAYS p ro vid e go od ven ti l at io n when ma ki ng a larg e numbe r of con ti n uo us
copies.
◆
NEVER keep the copier running when it becomes inordinately hot or produces
abnormal noise. If that happens, immediately turn OFF the copier, unplug it,
and then call your Tech. Rep.
NOTE
= Loca t e t he Copi e r in a Well Ventilated Room =
A negligible amount of ozone is generated during normal operation of this
copier. An unpleasant odor may, however, be created in poorly ventilated
rooms during extensive copier operations. For a comfortable, healthy, and
safe operating environment, it is recommended that the room be well
ventilated.
Page 17

1. Precautions for Use
Care of Copier Supplies
Use the following pr ecautions when h andling the copie r supplies (toner, paper,
etc.).
◆
Store the paper, toner, and other supplies in a place free fr om d ir ect s un light
and away from any heating apparatus. Keep them in a dry, clean environment.
◆
Store pap er, whi ch ha s bee n remo ve d fr om i ts wrap per but not loaded into the
Drawer, in a sealed plastic bag in a coo l, dark place.
◆
Use the correct toner for t he exclus ive use by t he EP1080 c o pier. The
applicable copier mode l name is indicated on the Toner Bott le.
◆
Keep supplies out of the reach of children.
◆
If your hands become soiled with toner, wash them with soap and water
immediately.
Moving
If you need to transport the copier over a long distance, consult your Tech. Rep.
5
Chapter 1
Safety Notes
Page 18

6
Page 19

Chapter 2
First Things to Know
about EP1080
This Ch apte r g iv e s y ou a br ie f descri pti on of th e sy stem prelimin a r y
information about the different parts of the system.
1. System Overview 8
2. Copier Parts and Accessories
Outsid e Y ou r Copier 10
Inside Your Copier 12
Paper Feed Cabinet 14
Duplex Cabinet and Duplex Unit 15
Duplexing Document Feeder 16
Automatic Document Feeder 17
Staple So r te r an d 1 0- B in Sorte r 1 8
Multi Bypass Table 19
7
Chapter 2
First Things to Know about EP1080
3. Control Panel Keys and Indicators
Basic Panel 20
System Panel 22
Display Panel I 2 4
Display Panel II 26
4. Turning On and Off, and Resetting the Copier
Turning On an d Off 28
When Copier is Turned On 29
Auto Copy Start Function 30
Minimizing the Warm-up Time 31
Initial Mode and Panel Resetting 32
Auto Reset Function 33
Page 20
8
1. System Overview
The EP1080 system can be configured with the following
components.
Automatic Document Feeder AF-3 <Option>
◆
Permits automatic feeding of mult ipl e
➭
originals.
p. 40.
AF-3
1139O0010A
Chapter 2
10-Bin So rte r S - 104 <Optio n>
◆
Permits sorting or grouping copies into up
➭
to 10 copy sets or stacks.
Staple Sorter ST-101 <Option>
◆
p. 74
Automatically staples the copy sets or
stacks that are sorted or gr ouped th e same
➭
as with the S-104.
p. 74
First Things to Know about EP1080
Duplex Unit AD-3 <Option>
◆
Turns o ver 1-si d e d co pie s to make 2-s ide d
➭
copies.
Duplex Cabinet PF-1D <Option>
◆
Turns o ver 1-si d e d co pie s to make 2-s ide d
copies. It is also equipped with a storage drawer
in which you can keep copy paper and toner.
➭
p. 68
p. 68
S-104
ST-101
AD-3
PF-1D
1139O0020A
1139O0020A
1139O0030A
1139O1222A
Page 21
1. System Overview
9
AFR-7
EP1080
Duplexing Document Feeder AFR-7
◆
<Option>
In addition to the function of AF-3, it
➭
1139O0010A
can turn ov er 2-s i ded or i gi nal s.
MB-1
Multi Bypass
◆
p. 40
Table MB-1
1139O0170A
<Option>
Holds up to 50 sheets of special
or standard paper which is not
loaded in any of the Drawers,
allowing you to make copies on
➭
p. 63
EP1080
◆
them.
1139O0040A
Equipped with two Paper Drawers to hold up to 500
2
sheets of copy paper (80 g/m
). The Manual Bypass
Table allows you to make a copy on paper which is
not loaded in any of the Drawers and which is fed into
➭
the copier manuall y v ia this Table.
p. 62
Chapter 2
First Things to Know about EP1080
PF-201
1139O0180A
Paper Feed Cabinet PF-201 <Option>
◆
Equipped with two paper Drawers to
hold up to 1,000 sheets of copy paper
2
(80 g/m
).
When equipped with Duplex Unit AD-3,
it permits the cop ier t o offe r 2-sided
➭
copying capability.
p. 68
Page 22
10
2. Copier Parts and Accessories
Outside Your Copier EP1080
1 2
Chapter 2
3
4
5
1
First Things to Know about EP1080
2
3
4
5
6
Control Panel
Original Cover
Power Switch
Manual Bypass
Table <Accessory>
Right Door
Total Counter
1139O1000A
6
: Use to start a copy cycle or make various
copying-job settings.
: Holds the original placed on the Original Glass in
position. To place an original, raise the Cover and
place it in position on the Original Glass.
: Use to turn ON and OFF the copier.
: Use for manual feeding of paper into the copier.
➭
p. 62
: Open to clear a paper misfeed.
: Shows the total number of copies made so far.
➭
p. 20
➭
p. 136
➭
➭
p. 28
p. 38
Page 23
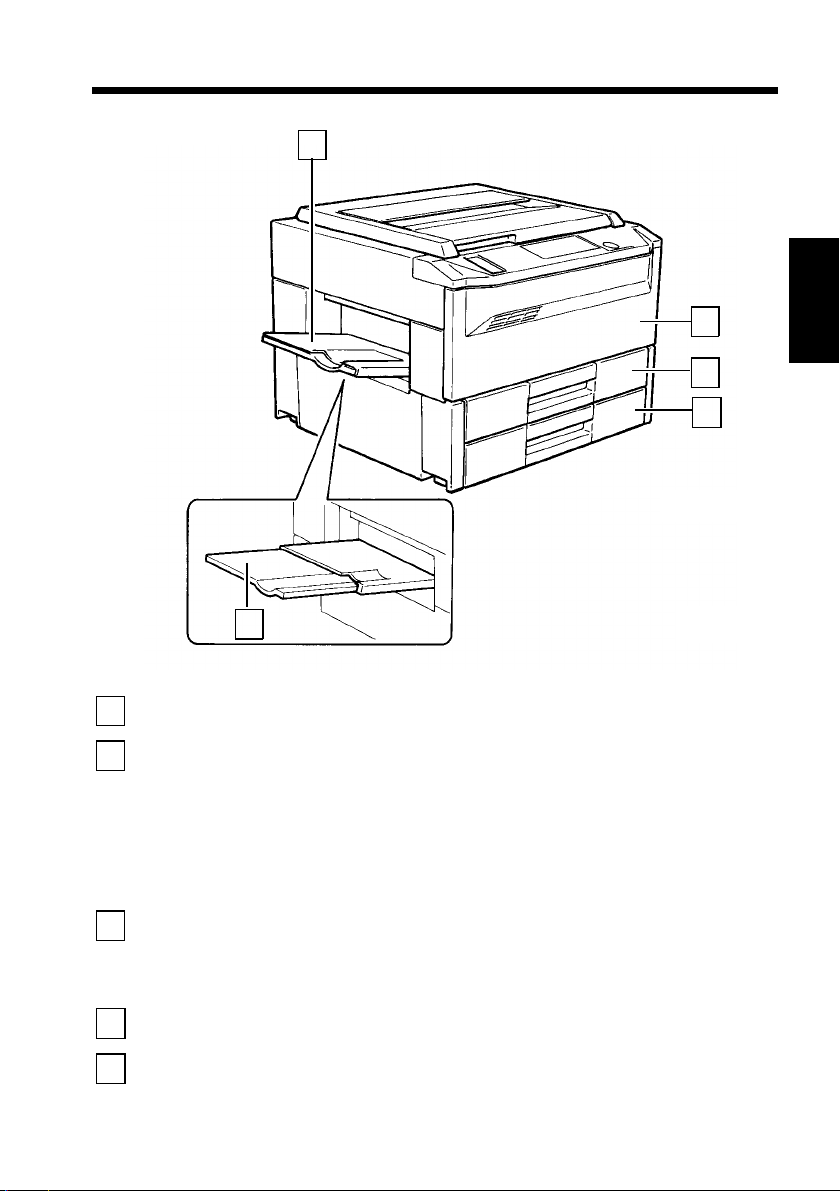
7
11
2. Copier Parts and Accessori es
Copy Tray
7
Front Door
8
1st Drawer
9
2nd Drawer
10
11
8
9
10
1139O1010A
: Hol ds copies fe d ou t of t h e co pi er .
: Open for the following purposes:
• Replacing the Toner Cartridge.
• Clearing a paper misfeed.
• Cleaning the C or on a U nits.
Closing the Front Door after a misfeed has been
cleared will turn OFF the Misfeed Indicator on the
control panel.
: Holds up to 250 sheets of paper.
The Edge Guide and Trailing Edge Stop are
movable, allowing you to load paper of different
➭
sizes.
: Holds up to 250 sheets of paper.
p. 112
➭
pp. 26, 132
➭
p. 114
Chapter 2
First Things to Know about EP1080
Copy Tray Extender
11
: Slide this Extender out when making copies on
large-size paper.
Page 24
12
2. Copier Parts and Accessories
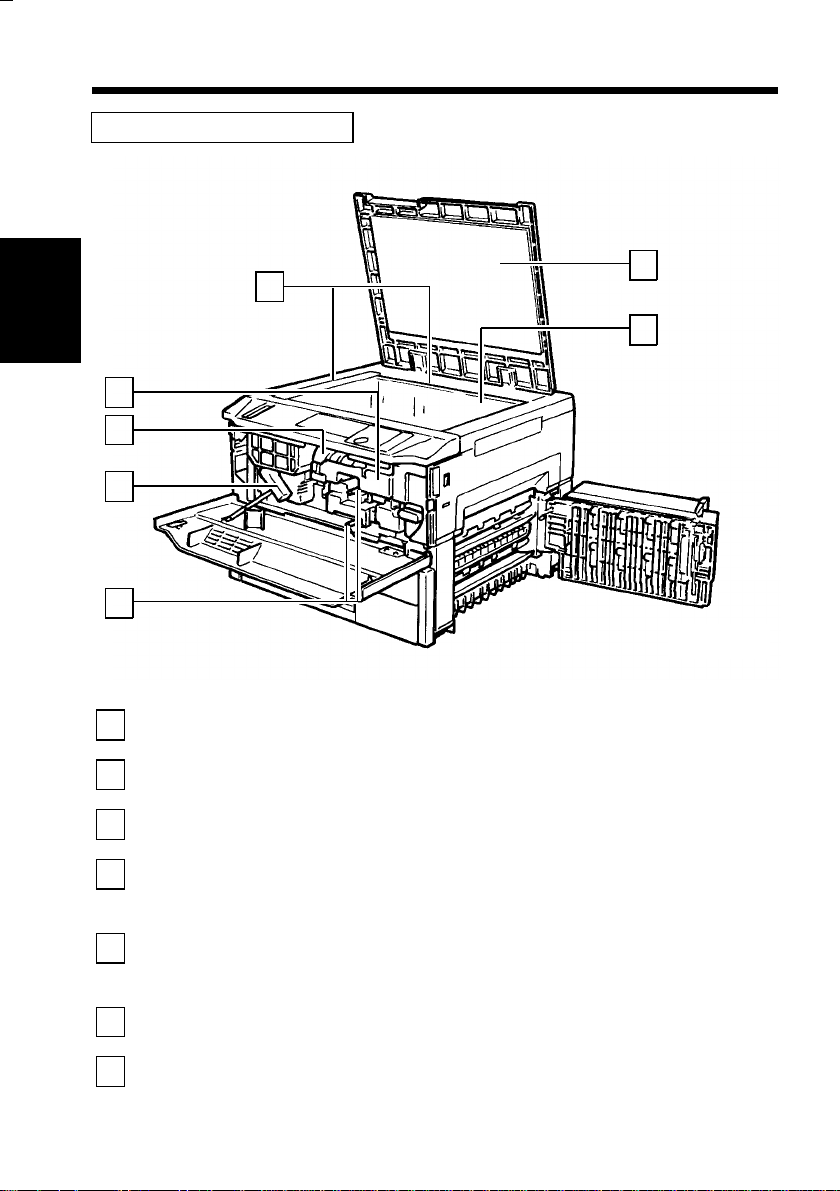
Inside Your Copier EP1080
1
2
Chapter 2
1
First Things to Know about EP1080
2
3
4
5
6
7
7
6
5
4
Original
Width/Length Scale
Original Pad
Original Gl a s s
Corona Unit
Cleaning Lever
(Upper/Lower)
Lock Release Lever
Toner Bottle
Toner Bottle
Holder
3
1139O1020A
: Place your original along these Scales fo r corr ect
positioning.
: Hol ds the o riginal in p osit ion o n th e Original G lass.
➭
p. 174
: Place your original face down on this G las s .
➭
p. 174
: Ope ra te the Lever to clean the corresponding
Corona Unit should unwanted lines be produced on
the copy.
: Turn clockwise to swing up the Upper Half of the
copier for the following purpose.
• Clearing a paper misfeed
: Contains to ner . Rep lace it with a new one when the
Add Toner In di c ator l ig ht s up .
: Swing open when replacing the Toner Bottle.
➭
p. 110
➭
➭
p. 176
p. 38
➭
➭
p. 110
p. 134
Page 25
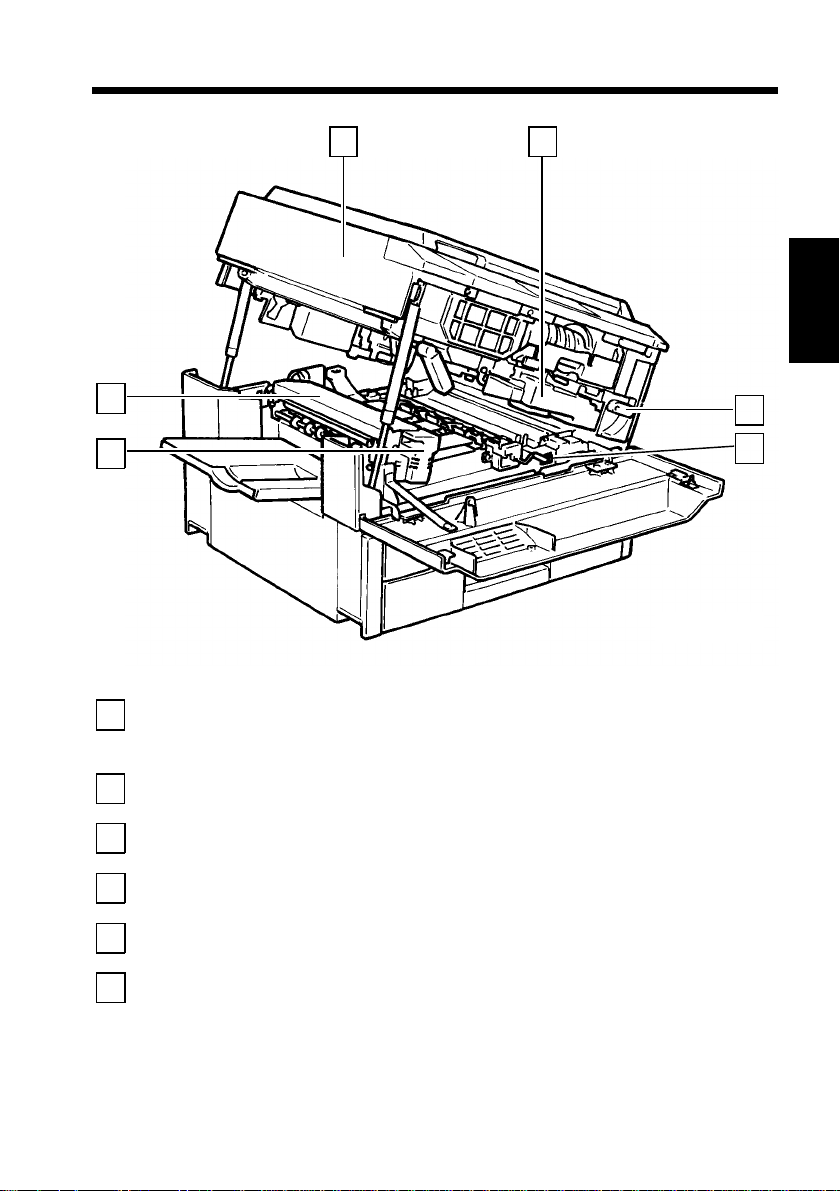
2. Copier Parts and Accessori es
13
13
12
Upper Half of
8
Copier
Imaging Unit
9
Imaging Unit Lock
10
Release Lever
Dehumidifier
11
Switch
Fusing Unit Lock
12
Release Lever
Fusing Unit
13
8
: The copier main body can be divided into two
parts, the upper and low e r, the Up pe r Half b e ing
swung upward when so operated.
: Converts the original image to the copy image.
➭
p. 120
: Operate when replacing the Imaging Unit .
: Turn ON to prevent condensation from forming on
the PC Drum wnen power is tur ned OFF.
: Hold onto this Lever when lifting the Upper Half of
the Fusing Unit.
: Fuses the toner image onto the pap er.
➭
p. 134
9
➭
p. 134
1139O1030A
➭
p. 120
10
11
Chapter 2
First Things to Know about EP1080
Page 26
14
2. Copier Parts and Accessories
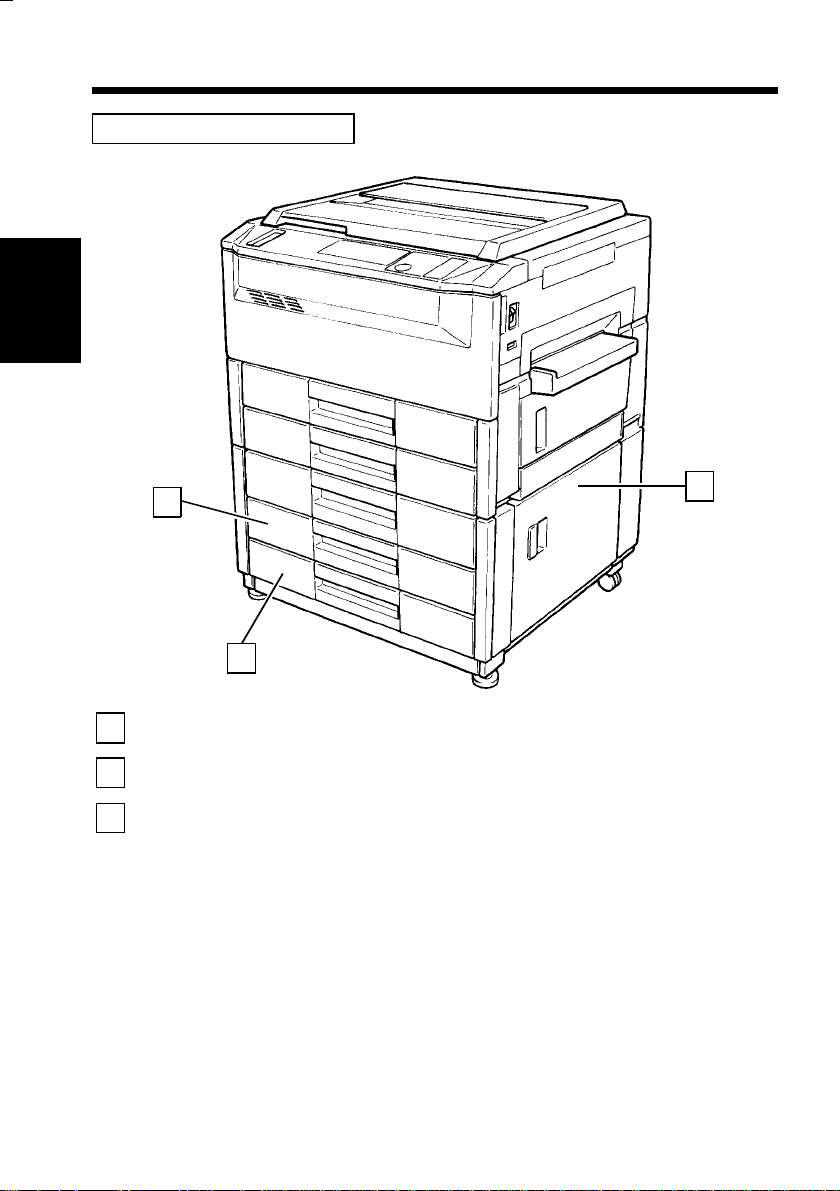
Paper Feed Cabinet PF-201
Chapter 2
1
First Things to Know about EP1080
2
3
1
2
3rd Drawer
4th Drawer
Lower Right Door
: Holds up to 500 sheets of paper.
: Holds up to 500 sheets of paper.
: Open when clearing a paper misfeed.
➭
p. 115
➭
p. 115
➭
p. 140
3
1139O1041A
Page 27
Duplex Cabinet PF-1D and Duplex Unit AD-3
1
5
15
2. Copier Parts and Accessori es
Chapter 2
2
Left Door
1
Misfeed Removal
2
Guide Plate
Duplex Unit
3
Stora ge Drawer
4
Lower Left Door
5
3
1139O1252A
4
: Open when clearing a paper misfeed.
: Open when clearing a paper misfeed.
: Turns over 1-sided copies for the making of 2-sided
copies.
: Holds copy paper, toner, and other supplies.
(PF-1D only)
: Open when clearing a paper misfeed.
➭
p. 142
➭
p. 143
➭
p. 142
First Things to Know about EP1080
Page 28
16
2. Copier Parts and Accessories
Duplexing Document Feeder AFR-7
Chapter 2
1
2
First Things to Know about EP1080
3
4
5
1
F3
Document Exit
Tray
Document Feed
Tray
Document Guide
Plates
Document
Transp ort Be l t
Lock Release Lever
2
3
F1
4
F2
6
5
: Receives orig inal s that are automa tical l y ejecte d
from AFR-7.
: Load the originals face up on this tray.
: Slide the p lates as necessary to the size of t he
originals.
: Moves t he o rig inal from the Document Feed Tray
to the Document Exit Tray.
: Press upward when raising the AFR-7.
➭
p. 41
➭
p. 177
F4
1139O1060A
➭
p. 41
Document Exit
6
Tray Extender
F1 F3 F4
Document Feed Unit Door F1, Document Turnover/Exit Unit Door F3,
Document Turnover/Feed U nit Guide Plate F4
Open when clearing an original mis feed.
Document Turnover/Exit U nit Door Lock Release Key F2
F2
Press to open Document Turnover/Exit Un it D oo r F3. Holding down F2,
➭
open F3.
p. 146
: Pull out when making copies on larger paper.
➭
p. 41
:
➭
p. 146
:
Page 29
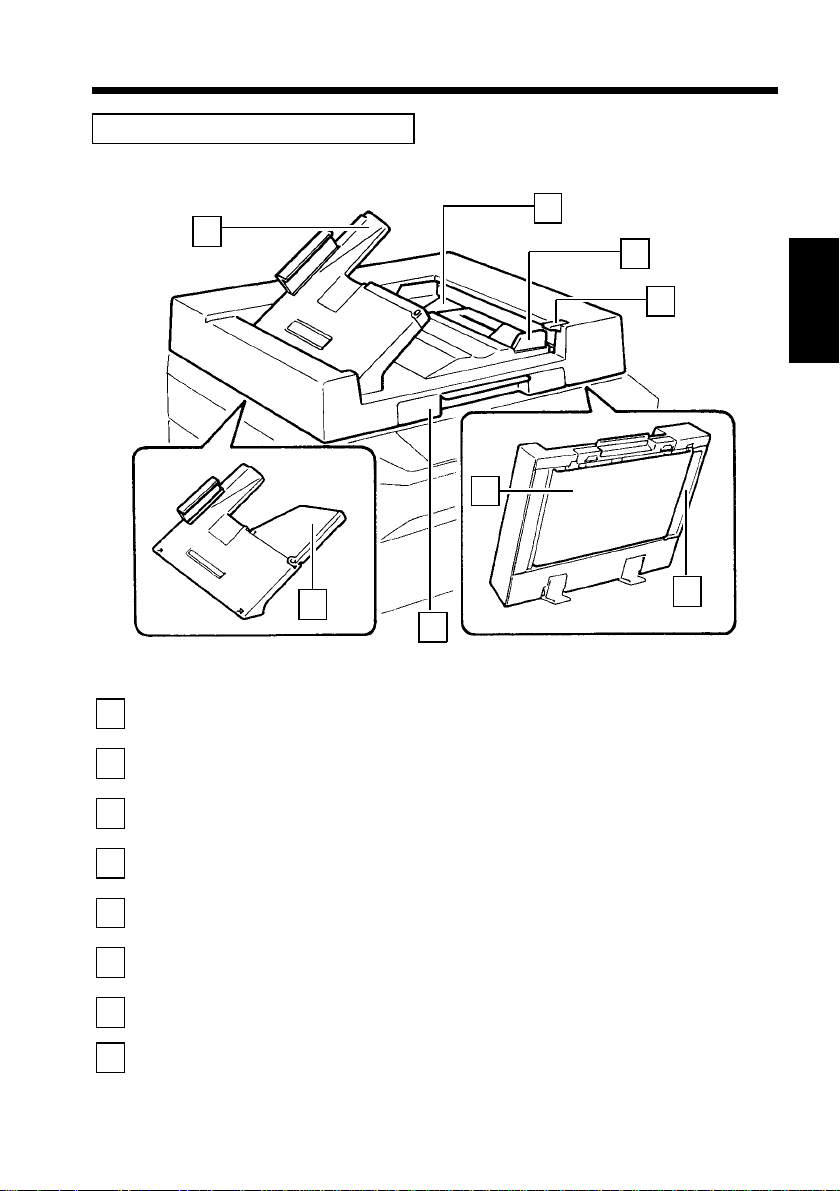
Automatic Document Feeder AF-3
1
17
2. Copier Parts and Accessori es
2
3
4
Chapter 2
6
Document Exit
1
Tray
Document Feed
2
Tray
Document Guide
3
Plates
Document Release
4
Key
Document Feed
5
Unit Guide Plate
Document
6
Transp ort Be l t
Lock Release Lever
7
Document Exit
8
Tray Extender
➭
➭
p. 147
5
p. 41
➭
8
7
: Receives orig inal s that are automa tical l y ejecte d
from AF-3.
: Load the originals face up on this tray.
: Slide the p lates as necessary to the size of t he
➭
originals.
: Pre ss whe n cle ari ng a n orig in a l mi s feed . Holdi ng
down the lever, pull o ut the original.
: Open when clearing an original misfeed.
: Moves t he o rig inal from the Document Feed Tray
to the Document Exit Tray.
: Press upward when raising the AF-3.
: Pull out when making copies on larger paper.
➭
p. 41
p. 41
➭
p. 177
1139O1070A
First Things to Know about EP1080
p. 147
Page 30
18
2. Copier Parts and Accessories
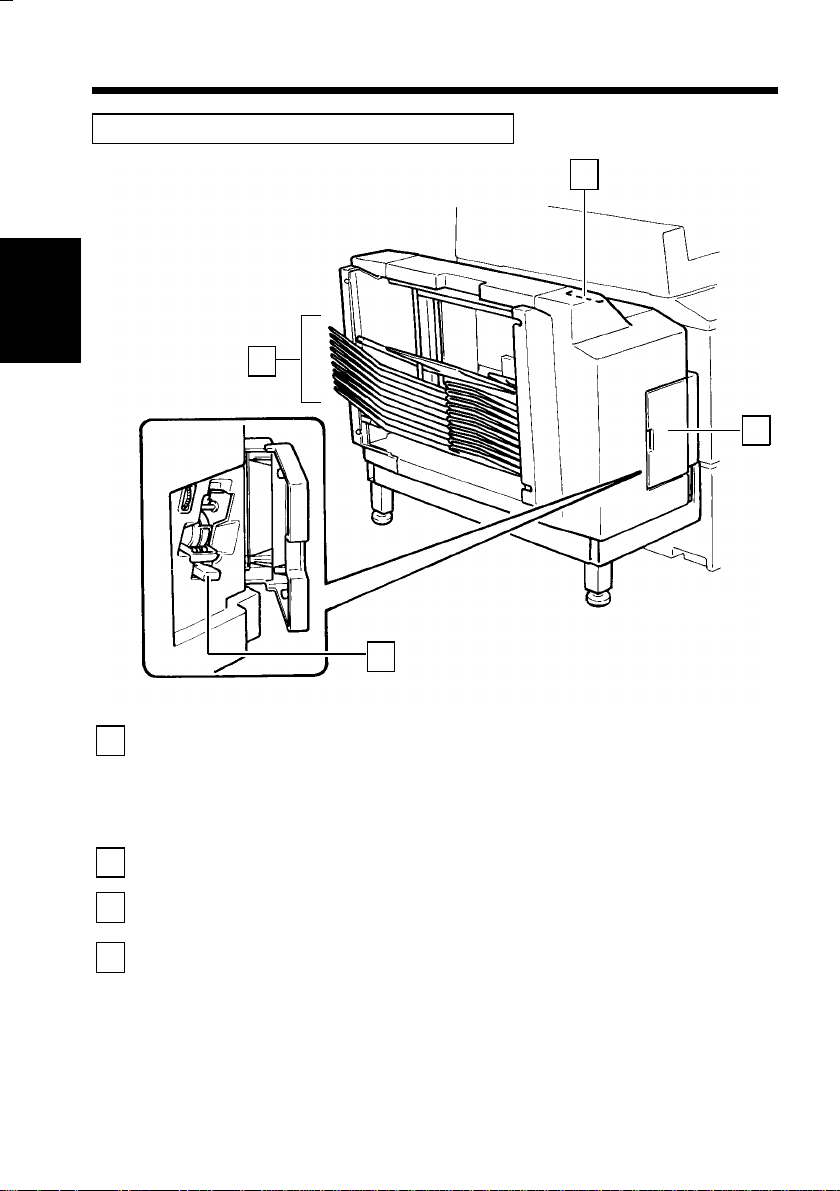
Staple Sorter ST-101 and 10-Bin Sorter S-104
Chapter 2
1
2
3
1139O1080A
1
First Things to Know about EP1080
2
3
4
Sort Bins
Lock Release Lever
Staple Cover
Staple Cartridge
Release Lever
4
: Hold sorted or grouped copies, the Top Bin is
capable of holding up to 50 cop ies and each of the
2nd to 10th Bins up to 25 copies, a total of 275
copies.
➭
p. 76
: Press to unlock the Sorter.
: Open to replace the Stap le Cartridge.
(ST-101 only)
: Move the Lever up when rep lacing the Staple
Cartri dge. (ST-1 01 only )
➭
p. 116
➭
➭
p. 116
p. 116
Page 31

Multi Bypass Table MB-1
19
2. Copier Parts and Accessori es
1
Chapter 2
3
2
Paper Guide Plate
1
Multi Bypass T able
2
Multi Bypass T ray
3
Extender
1139O1090A
: Slide as necessary to the size of the copy paper.
➭
p. 63
: Load your paper on this Table. It allows you to
make copies continuously using paper fed from this
Table. The Table is also used in conjunction with
➭
the Cover Mode.
: Slide this Extender out when using large-size copy
➭
paper.
p. 63
p. 87
First Things to Know about EP1080
Page 32

20
3. Control Panel K eys and In dicator s
Basic Panel
Meter
Auto
Chapter 2
1
2
3
4
First Things to Know about EP1080
5
6
7
8
9
10
Size
Margin
Cover
Job
Memory
Manual
Staple
Count
Toner
Drum
Dehumidify
Input
2 1 3 4 5
Clip Tray:
Use this tray to put the paper clips used with your documents.
System Panel:
See the other pages in this manual.
Exposure Control Key ( < , Lighter):
Press as necessary to make the exposure level lower in the Manual Exposure Mode.
p. 47
➭
Auto Exposure Mode Key:
Press to select either the Auto or Manual Exposure Mode.
Exposure Control Key ( > , Darker):
Press as necessary to make the exposure level higher in the Manual Exposure Mode.
p. 47
➭
Zoom Down Key:
Press as necessary to make the magnification smaller in 1% increments.
Zoom Up Key:
Press as necessary to make the magnification larger in 1% increments.
Display Panel:
See the other pages in this manual.
Multi-Copy Keys:
Use to enter the number of copies to be made and other numer ic data.
Panel Reset Key:
Press to set the copier into the initial mode, clearing all settings made previously on
the control panel.
It does not, however, clear the contents of the copying job program memory and the settings
*
imme diate l y before an Inte rrupt M ode.
➭
p. 33
➭
➭
➭
Mixed Orig. Det.
1
Sort
Sort &
21
Staple
Group
22
p. 22
pp. 24, 26
p. 60
Orig. CopyFinishing
p. 50
p. 50
50%~200%
Auto
A4
A3
B4 A3
Full Size
B4 A4
A3 A4
Full Size Paper
2in1
2
11
2in1
Book
Book
12
1
2
Auto
Lighter Darker
A
p. 47
➭
➭
➭
p. 58
➭
Holding down the Key for 3 seconds will initiate the User’s Choice.
p. 103
➭
Page 33

3. Control Panel Keys and Indicators
21
Auto
8
123
456
789
S
Auto
A3
A4
A4
A5
B4
B5
FLS.
Inch
Start
16
Auto
18
7
A3
17
6
50%~200%
A4
B4 A3
Full Size
A
B4 A4
A3 A4
Full Size Paper
19
Interrupt Key:
11
9
0C
14
15
Stop
13
12
Energy Saving
Interrupt
Panel Reset
10
11
Chapter 2
1139O5472A
Press once to interrupt a current job with a more urgent one. Press a second time to
return to the previous job.
Pressing the Panel Reset Key or Clear Key does not cancel the Interrupt Mode.
*
Energy Sa vin g Key :
12
Press to set the copier into the Energy Saving Mode.
Clear Key:
13
Press to clear the number of copies, magnification, and other settings.
Stop Key:
14
Press to stop a multi-copy cycle. ➭
Start Key:
15
Press to start a copy cycle.
➭
➭
p. 60
p. 59
p. 59
➭
p. 31
➭
p. 58
First Things to Know about EP1080
In also tells the st atus of the copier as follo ws :
Lit gre en: T he copier is ready to make copies.
Lit orange: The copier is making copies or warming up, or the Add Paper, Misfeed,
or Call-Tech.-Rep. Indicator is lit.
Paper Select Key:
16
Press to select the desired paper size or the Paper Select Mode, either Auto or
Manual.
Enlargement Key:
17
Press to select a desired fixed enlargement ratio.
Full Size Key:
18
Press to select full size (100%) .
Reduction Key:
19
Press to select a desired fixed reduction ratio.
➭
p. 54
➭
p. 49
➭
p. 49
➭
p. 49
Page 34

22
3. Control Panel Keys and Indicators
System Panel
1
2
Chapter 2
1
2
First Things to Know about EP1080
3
4
5
6
Meter
Count
13
12
Toner
Drum
Dehumidify
11
10
Input
Auto Size Mode
Key
Auto
Size
Manual
Staple
Mixed Orig. Det.
3
Margin
Cover
Job
Memory
Sort
Sort &
Staple
Group
1
2
21
22
11
12
Book
Book
2in1
2in1
1
2
4
Orig. CopyFinishing
8 9
6
5 7
1139O2372A
1139O2372A
: Press as necessary to select the Auto Size Mode.
p. 51
➭
Manual Staple Key : Press to stapl e copy set s or stacks already made.
p. 79
➭
Mixed Original
Detection Mode
: Pre s s w hen makin g co pies usin g t he AF -3 or
AFR-7 in which originals of assorted sizes are
loaded together. When the co pier is set into the
Mixed Original Detectio n Mode, it cancels the
p. 42
➭
➭
➭
➭
p. 71
p. 71
p. 78
Job Type Select
Key II
Job Type Select
Key I
Finishing Mode
Select Key
High-Spe ed M od e.
: Press as necessary to select the type of copying job
you wish to perform.
: Press as necessary to select the type of copying job
you wish to perform.
: Press as necess ar y to select the t ype of exit
processing you want.
Page 35

3. Control Panel Keys and Indicators
23
File Margin Mode
7
Key
Cover Mode Key : Press to set the copier into the Cover Mode.
8
Job Memory Select
9
Key
Job Memory Input
10
Key
Drum Dehumidity
11
Key
Auxiliary Toner
12
Replenishing Key
Meter Count Key : Press to check fo r each of the cur ren t counts of
13
: Press to set the copier into the File Margin Mode.
p. 85
➭
p. 87
➭
: Press to call up a copying job program previously
stored in the program memory.
: Press to store a copying job program in the program
memory.
: Press to remove condensation formed on the
surface of the PC Drum.
: Press when the image on the copy becomes too
light.
differe nt elec tr oni c count ers of the copi er. ➭ p. 91
➭
p. 88
➭
p. 92
➭
p. 88
Chapter 2
First Things to Know about EP1080
Page 36

24
3. Control Panel Keys and Indicators
Display Panel I
1
50%~200%
Chapter 2
Zoom Ratio Indicator /
1
Multi-Copy Display
Zoom Ratio
Indicator
First Things to Know about EP1080
Auto
Lighter Darker
A
Auto
A4
B4 A3
Full Size
B4 A4
A3 A4
2
: Each shows the following data.
Multi-Copy
Display
A3
Auto
A3
A4
A4
A5
S
B4
B5
FLS.
Inch
3
Zoom ratio
•
Ex.: 100%
Number of copies set to be made
•
Ex.: 10 ( c opies)
Number of copy sets (Sort and
•
Sort-and-Staple Mode)
Ex.: 10 (sets)
Number of copy stacks (Group Mode)
•
Ex.: 10 (stacks)
Count of the Total Counter
•
Ex.: 93,930 (copies)
1139O4572A
1139O3150A
User’s Choice code an d setting
•
Ex.: Choice code: 10, Setting: 0
Malfunction code
•
Ex.: Malfunction code C0F 30
Page 37

Zoom Information Display
2
Auto Size Mode Indicator
•
Auto
Fixed Ratio Indicator
•
A4
B4 A3
Full Size
B4 A4
A3 A4
Paper Information Dis p la y
3
Auto Paper Mode Indicator
•
Auto
Add Paper Indicator
•
Special Paper Indicator
•
Paper Si ze Indic at or s
•
A3
A4
A4
A5
A3
1139O4622A
B4
B5
FLS.
Inch
1139O4642A
1139O4612A
1139O4622A
1139O4612A
1139O3180A
S
1139O3190A
1139O4642A
3. Control Panel Keys and Indicators
Shows that the copier is now in the Auto
Size Mode.
➭
p. 51
Shows w hic h copy size is no w being
produced from which original size. No
indicator LEDs light up when a zoom ratio
other than the standard is being used.
Ex.: S hows that 70% reduction is b e ing
Ex.: selected for use.
Shows that the copier is now in the Auto
Paper Mode.
➭
p. 56
Lights up when the curren tly selected
Drawer has run ou t of pape r . Add pa per a s
p. 112
necessary.
➭
Lights up to indicate t hat the special paper
setting has been made.
The special paper setting can be made
*
using t he User’s Choice Mode.
Show the sizes of paper currently loaded in
the Drawers.
Shows the size of the paper loaded in
the Drawers. Two or mor e of these
circle markers can be lit up as lon g as
the paper of the corresponding sizes is
loaded in the Drawers.
Shows the paper size currently
selected for use.
25
Chapter 2
First Things to Know about EP1080
Page 38

26
3. Control Panel Keys and Indicators
Display Panel II
1
2
50%~200%
Chapter 2
1
First Things to Know about EP1080
Auto
Lighter Darker
A
3
Monitor Display
Paper Po rt In di cator
•
1139O3220A
1139O3220A
Closure Failure Indicator
•
Auto
A4
B4 A3
Full Size
B4 A4
A3 A4
A3
Auto
A3
A4
A4
A5
S
B4
B5
FLS.
Inch
1139O4662A
Shows the Drawer which is currently selected for
p. 55
use.
➭
It also lig hts up whe n a 1-si de d cop y is s to r ed in
the Duplex Unit.
➭
p. 73
Ex.: Shows that the 1st Drawer is cur ren tly
Ex.: selected for use.
Indicates that a Door is lef t open.
pp. 109, 130
➭
The location of the Door left open is also
indicated by a round marker.
Ex.: Indicates th at the Right Door is left open.
Misfeed Indicator
•
1139O3230A
1139O3230A
1139O3240A
1139O3240A
Indicates that a paper mis f eed has occurr ed.
The location of the misfeed is also indicated by a
round marker.
pp. 109, 132
➭
Ex.: Shows that a misfeed has o ccurred in side t he
Ex.: copier.
Page 39

Call-Tech.-Rep. Indicator
•
1139O3250A
1139O3250A
Warning Information Display
2
Wait Indicator
•
Add Toner Indicator
•
Add Staple Indicator
•
I.U. Service Life Indicator
•
Remove Copies Indicator
•
1139O3260A
1139O3270A
1139O3280A
1139O3290A
3. Control Panel Keys and Indicators
Indicates that the copier has developed a
malfunction.
When a malfunction occurs, the corresponding
malfunction cod e is sh o wn a cross the Zoom Ratio
Indicator and Multi-Copy Display.
pp. 109, 149
➭
Indica t e s that the copier is war ming up. No copy
cycle can be initiated as long a s thi s Indicator
stays lit. Wait u ntil it goes out.
pp. 29, 108
➭
Indicates that the Toner Cartridge is ru nn ing out
of toner. Replace the Toner Cartridge as soon as
possible.
pp. 108, 110
➭
Indicates that the Staple Cartridge is running out
of staples. Replace the Stap le Cartridge as soon as
possible.
pp. 109, 116
➭
Indicates that the Imaging Unit needs
replacement. Call your Tech. Rep. immed iately.
pp. 109, 120
➭
Indicates that there is a copy or copies left in the
Sorter Bins. R emove co pie s from a ll Bins.
27
Chapter 2
First Things to Know about EP1080
1139O3400A
Exposure Information Display
3
Auto Exposure Indicator
•
Auto
Lighter Darker
1139O4682A
Exposure Level Indicator
•
Lighter Darker
1139O4692A
Indicates that the copier is now in the Auto
Exposure Mode.
➭
p. 46
Shows the exposure setting level in the Manual
Exposure Mode.
➭
p. 46
The center LED is normally lit up.
Page 40

28
4. Turning On and Off, and Resetting the Cop ier
Turning ON and OFF
Turning Copier ON
Chapter 2
..... Press the Power Switch to the " " position.
1139O1100A
Turning Copier OFF
First Things to Know about EP1080
..... Press the Power Switch to the " " position.
1139O1110A
Page 41

4. Turning On and Off, and Resetting the Copier
When Copier is Turned ON
The Wait Indicator lights up on the Warning Information Display of the
control pan el and the Start Key lights up orange, indicating that the c opie r i s now
warming up .
123
29
456
789
0C
Start
Lit Up Orange.
Stop
Auto
Lighter Darker
A
50%~200%
Auto
A3
A4
B4 A3
Full Size
B4 A4
A3 A4
Full Size Paper
Auto
A3
A4
A4
A5
About 1 min.
B4
B5
FLS.
Inch
In about 1 min., the Wait Indicator goes out and the Start Key turns to green.
Now, the copier is ready to make copies.
123
456
789
0C
Start
Stop
Auto
Lighter Darker
A
50%~200%
Auto
A3
A4
B4 A3
Full Size
B4 A4
A3 A4
Full Size Paper
Auto
A3
A4
A4
A5
B4
B5
FLS.
Inch
1139O4702A
1139O4702A
Chapter 2
First Things to Know about EP1080
Lit Up Green.
We call the settings established on the contr ol panel at this time the "initial
*
➭
settings."
p. 32
1139O4722A
1139O4722A
Page 42

30
4. Turning On and Off, and Resetting the Copier
Auto Copy Start Function
(Only when Automatic/Duplexing Document Feeder
AF-3/AFR-7 is used)
The Auto Copy Start Fu ncti on allows a copy proces s to be star ted as so on as the
copier completes warming up .
Using the Function
Chapter 2
First Things to Know about EP1080
123
456
B4
B5
Start
FLS.
Inch
789
Lit Up Green.
0C
Stop
1139O4532A
1139O4532A
Auto
A3
A4
A4
A5
Paper
When you load your original s in
the AF-3 or AFR-7 while the
1
copier is warming up, the Wait
Indicator remains lit with
the Start Key turning to green.
When the Start Key is then
pressed, the Start Key t urns to
2
orange and the AF-3 or AFR-7
starts feeding the first or igi nal
onto the Original Gl ass.
As soon as th e cop i e r co mp l et es
warming up, the Wait Indicator
1139O0190A
goes out and the copy cycle
is started.
123
456
Auto
A3
A4
A4
A5
Paper
789
B4
B5
Start
FLS.
Inch
0C
Lit Up Orange.
Stop
1139O5352A
1139O5352A
Page 43

4. Turning On and Off, and Resetting the Copier
Minimizing the Warm-up Time
If the copier is shut down when it is not in use, it takes the copier a max. of 1
min. to complete th e warm- up cycle. I nstead of turning the copier OFF, it’s a
good idea to use th e Ener gy Saving Mode. The Mode will minimize t he time it
takes the co pier to complete the wa rm-up cycle to about 30 sec .
Entering the Energy Saving Mode
•
Energy Saving
1139O4522A
1139O4522A
To set the copier into the Energy
Saving Mode, press the Energy
Saving Key on the control panel.
◆
Then, all control panel Indicators
go out, except that the Start Key
remains lit up green.
31
Chapter 2
Auto
Sizu
Margin
Cover
Job
Memory
Manual
Staple
Sort
Sort &
Staple
Group
Mixed Oring. Det
1
2
11
12
21
Book
22
Book
Org. CopyFinishing
2in1
2in1
1
2
Lighter Darker
A
Meter
Count
Toner
Drum
Dehumidify
Input
Leaving the Energy Saving Mode
1139O2360A
123
B4
B5
Start
FLS.
Inch
456
789
0C
50%~200%
Auto
A3
A4
B4 A3
Full Size
B4 A4
A3 A4
Full Size Paper
A3
A4
A4
A5
Lit Up Green.
•
To allow the copier to leave the
Energy Saving Mode, press any Key
on the control panel, for instance, the
Start Key.
◆
This cancels the Energy Savin g
Mode and the copier will be ready
to make copies in about 30 sec.
Stop
Energy Saving
Interrupt
Panel Reset
1139O4552A
1139O4552A
First Things to Know about EP1080
Page 44

32
4. Turning On and Off, and Resetting the Copier
Initial Mode and Panel Resetting
Initial Mode
When the Power Switch is turned ON, the initial settings are indicated on the
control pa ne l.
* The initial settings serve as th e reference for all control panel settings to be later
made.
Chapter 2
•
•
•
•
•
First Things to Know about EP1080
•
Auto
Sizu
Margin
Cover
Job
Memory
Manual
Staple
Sort
Sort &
Staple
Group
Mixed Oring. Det
1
2
11
12
21
Book
22
Book
Org. CopyFinishing
2in1
2in1
1
Lighter Darker
2
Auto
A
50%~200%
Auto
A3
A4
B4 A3
Full Size
B4 A4
A3 A4
Full Size Paper
A3
A4
A4
A5
Meter
Count
Toner
Drum
Dehumidify
Input
From 1-sided original to 1-sided copy
Non-Sort
No. of copies to be made: 1
Zoom ratio: Full size (10 0% )
Auto Paper Mode
(1st Dr awer is selected, if the copier is no t equip pe d with a AF-3 or AFR- 7 )
Auto Exposure Mode
Useful Tip
The initial settings can be changed by User’s Choice . For details, see "USER’S
➭
CHOICE,"
p. 94
Auto
B4
B5
FLS.
Inch
1139O4741A
Page 45

4. Turning On and Off, and Resetting the Copier
Panel Resetting
Pressing the Panel Reset Key resets all control panel settings including the
number of copies to be made and z oom ratio, initial izin g the mode.
If Automatic/Duplexing Document
*
Panel Reset
Feeder AF-3/AFR-7 is used, the
original present on the Original
Glass will be ejected out of the unit.
1139O4782A
1139O4782A
Useful Tip
The Panel Reset Key enables you to cancel all previous settings efficiently. To
avoid miscopy, try to press the Panel Res et K ey befo re at tempting to make any
setti n g for yo ur own j ob .
33
Chapter 2
Auto Reset Function
If no Key on the control panel is pressed within about 60 sec. after a copy cycle
has been completed or copying settings made, the Auto Reset Function is
activated to cause the copier to return to the initial mode automatically.
Useful Tip
The Auto Reset Function may be enabled or disabled by User’s Choice. For
➭
more details, see "USER’ S CHOICE."
p. 100
First Things to Know about EP1080
Page 46

34
Page 47

Chapter 3
Maki ng Copies
This Chapter shows you how to make basic and system copies.
"Basic Copying Overview" on p. 36
"Syste m Copying Overview" on p. 64
These pages give you a quick, at-aglance flowchart for making
copies, each step being keyed to a page number on which you will
find mor e d eta il ed desc ri ptio n.
1. Basic Copying Overview 36
2. Basic Job Settin g
Original Placement 38
Using Automatic/Duplexing Document Feeder 40
Image De nsity 46
Zoom Ratio
•
Types of Zoom Ratio 48
•
Auto Size Mode 51
•
Zoom Ratio Table
(Orignal Size t o Paper Size) 53
Paper Size
•
Manua l Mode 54
•
Auto Paper Mode 56
Number of Copie s 58
Copy Cyc l e Start 59
Interr upt Mode 60
Manual Bypass Copying 62
3. System Copying Overview 64
Typical Job Setting Procedures 66
4. System Job Setting
Job Type
•
Available Job Types 68
•
Precaution for Original Loading 72
Finishing Mode
•
Finishing Modes 74
•
Auto Dual Function 76
•
When the Number of Copies Set to be Made Exceeds 25 in the
Group Mode 77
•
If the Numb er o f Cop ie s Set to b e Made Exceed s 50 in the
Non-sort Mode 77
•
Selecting the F inishi ng Mode 78
•
Precautions f o r Or iginal Lo ad i n g fo r Copies Stapled
Automatically or Manua lly 80
•
Typical Finishing Modes 82
File Mar gin Mode 84
Cover Mode 86
Job Memory 88
35
Chapter 3
Making Copies
Page 48

36
1. Basic Copying Overview
Place Your Original
1
•
Raise the Orig in al Cover
and plac e your origina l
face down o n the Original
➭
Glass.
Chapter 3
•
Load your originals face
up in the AF-3/AFR-7.
➭
Making Copies
p. 38
p. 41
1139O0200A
1139O0210A
Set the Image
2
Densi ty of Co pie s
•
Select the A uto Exposure
➭
Mode.
•
Set the image density in
the Manual Exposure
Mode.
p. 47
Auto
Lighter Darker
Lighter Darker
➭
A
p. 47
Auto
A
1139O2002A
1139O2012A
1139O2012A
1139O2002
Select the Zoom
3
Ratio
•
Select the Auto Size Mode.
➭
p. 51
Auto
Size
1139O2662A
1139O2662A
You will f ind the Auto
*
Size Mode Key on the
system p anel .
•
Select the desired fixed
zoom ratio from among
those available.
➭
p. 49
Full Size
1139O2022A
1139O
Auto
Lighter Darker
A
50%~200%
Auto
A4
B4 A3
Full Size
B4 A4
A3 A4
Full Size
A3
1139O5362A
Page 49

1. Basic Copying Overview
37
Select the Paper
4
Size
•
Select the A uto Paper
➭
A3
A4
A4
A5
➭
p. 56
p. 54
A3
A4
A4
A5
Auto
B4
B5
FLS.
Inch
Paper
1139O0072A
B4
B5
FLS.
Inch
Paper
1139O0082A
Mode.
•
Select the desired paper
size.
1139O0072A
1139O0082A
Set the Number of
5
Copies
•
Using the Multi-Copy
Keys, set the number of
copies to be made or the
number of copy
➭
sets/stacks.
p. 58
23
56
89
0C
1139O2640A
If you en ter a wrong
number, press the Clear Key
C and then enter
the correct number.
Start the Copy
6
Cycle
•
Press th e Start Key t o start
the cop y cycle.
➭
p. 59
113
Press the Stop Key to
stop the copy cycle.
1139O2360A
1139O2360A
Chapter 3
Making Copies
123
Energy Saving
456
Auto
A3
A4
A4
A5
Paper
S
B4
B5
FLS.
Inch
789
0C
Start
Stop
Interrupt
Panel Reset
1139O5372A
Page 50

38
2. Basic Job Setting
Original Placement
Place your original face down on the Origi nal Glas s .
Different methods are used to load your originals depending on the type of
your originals and whether the copier is equipped with an
Automatic/Duplexi ng Document Feeder AF-3/ AFR-7 (opti on).
Know the type of your originals and your copier system configuration and use
the appropriate procedure.
Sheet Originals (of a Standard Size)
Raise the Original Cov er.
1
Chapter 3
1139O0050A
Place your original face down on
the Original Gl as s and align its
rear left corner with the
marker on the Original Width
Scale on the left side of the
platen.
▼
Making Copies
Highly Transparent Originals
1139O0070A
Gently lower the Original Cover.
2
Place your original in the same
way as the sheet originals.
1
Place a blank sheet of paper o f
the same size as the original on
2
the original. Then, lower the
Original Cover.
NOTE
If this is not done, the copy
produced may b e of very p oo r
quality.
Page 51

Book Original
*"Book or ig ina l " refe r s to an op en bou nd or i g inal.
1134O037AA
2. Basic Job Setting
Position the higher-numbered
page on the Original Wid th Scale
end.
NOTES
•
If the open book is not
positioned properly for a job
type involving "Book" original,
you will end up having copies
with pages in the wrong order.
•
Do not place an original
weighi ng mor e th an 3k g on th e
Origi nal Glass , as an image
problem could result.
39
Chapter 3
Making Copies
Page 52

40
2. Bas i c Job Setti ng
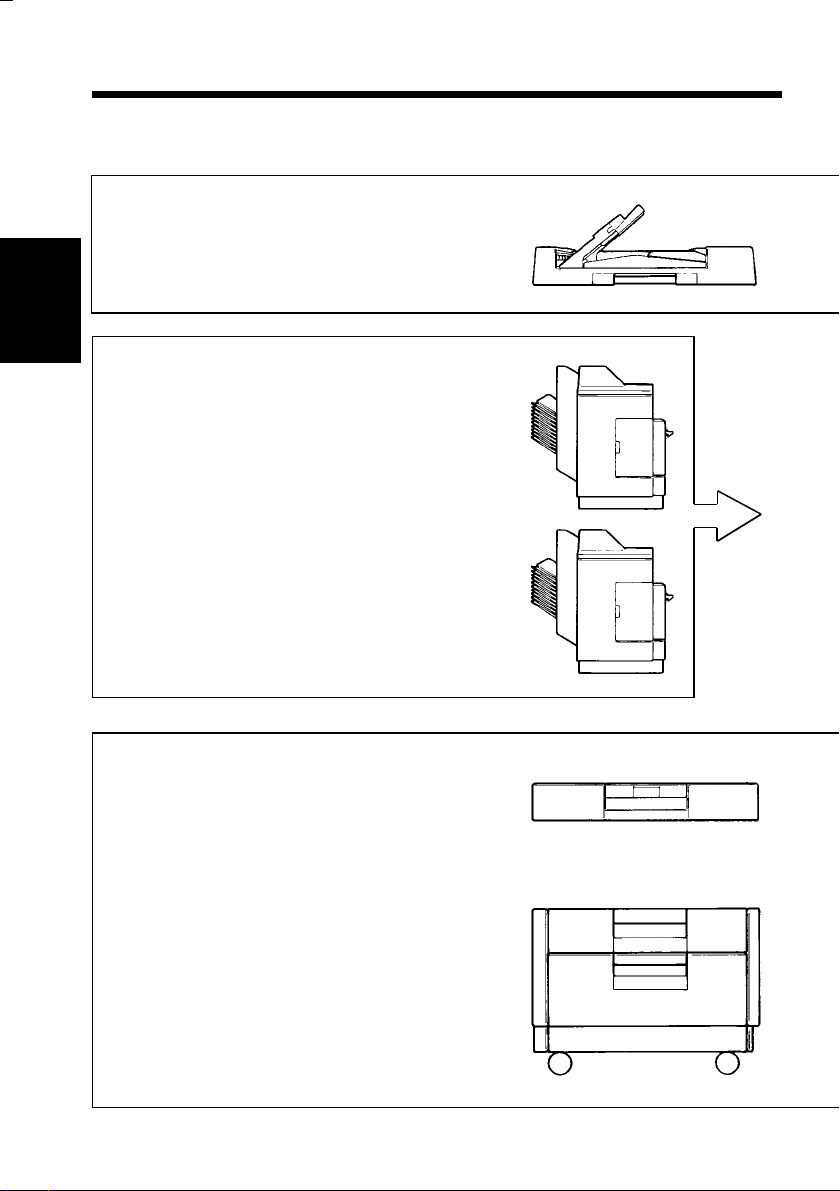
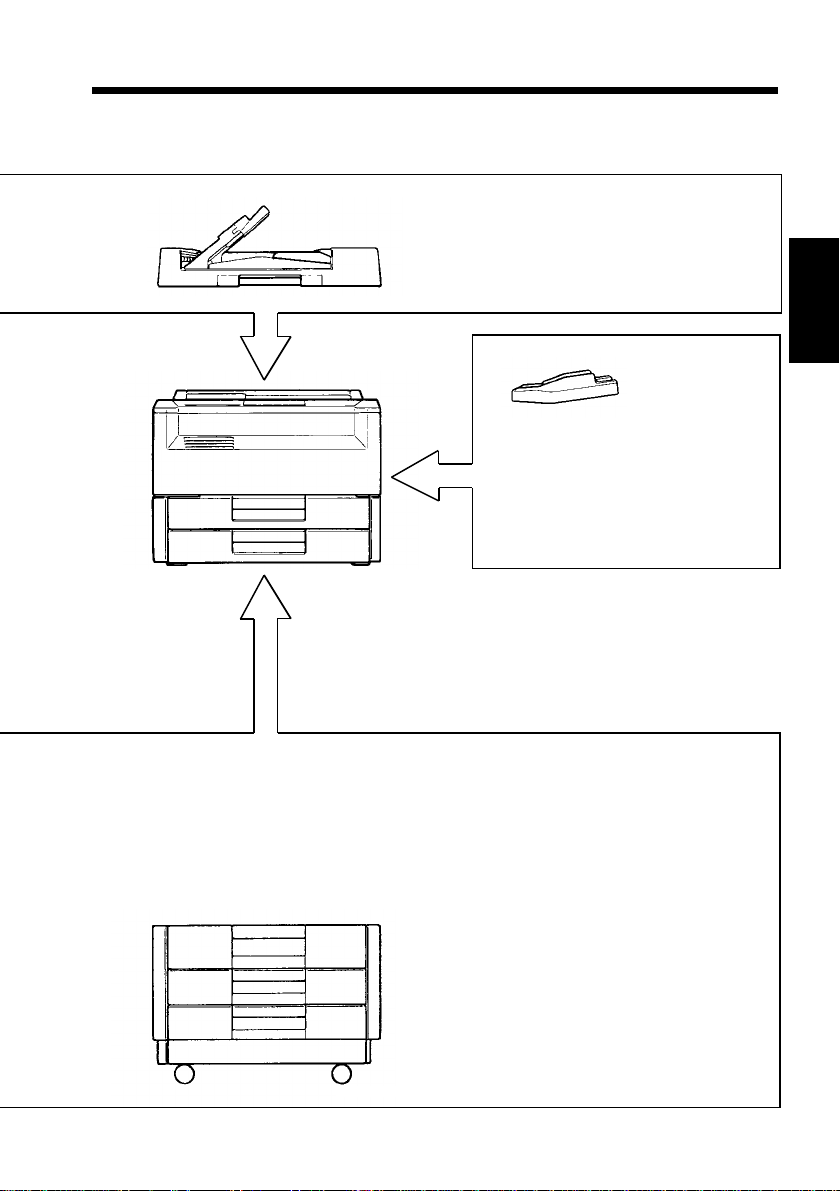
Using Automatic/Duplexing Document Feeder AF-3/AFR-7
Automatic/Duplexi ng Document Feeder A F-3/AFR-7 automatical ly feed in
sheet originals placed on the Document Feed Tray one by one for the
making of copies. Afte r th e copy cycle ha s been complete d, it
automatically ejects the finished or iginal onto the Document Exit Tray.
Some originals may be suitable for use in the AF -3/A F R- 7, whi le others
may not be. H ere is a guideline. Always be aware of the type of originals
you are using in the AF-3/AFR-7.
◆
Originals Suitable for Use in AF-3/AFR -7
Type of Originals : Sheets
Type of Original Paper : Plain paper
Original Size
[Normal Mode] : 1-sided and 2-sided (AFR-7 only) originals
Chapter 3
[Mixed Original
Detection Mode]
Original Weight : 1-sided originals and 2-in-1 Mode
Making Copies
* Lightweight Original Mode:
This mode allows you to use originals weighing in the range between 40
2
g/m
and 110 g/m2 when the copier is in the s tan dar d or Mixed Original
Detection mode.
Be sure to use the User’s Choice to turn ON th e Ligh tw eight Original
Mode when you need to make copies from originals whose weights fall in
the above range and that are loaded in the AF-3/AFR-7.
A damaged original could result if you don’t use the Lightweight Original
Mode for such originals.
: A3L, B4L, A4L, A 4C, FLSL
2-in-1 (Dual Original Scanning) Mode
: A4C
1-sided and 2-sided (AFR-7 only) originals
: A3L, B4L, A4L, A4C
: 50 g/m
2
to 110 g/m
2
2-si ded or iginals
: 60 g/m
2
to 90 g/m
2
*Lightweight Orig inal Mode
: 40 g/m
2
to 110 g/m
2
➭
p. 95
◆
Originals Not Recommended for Use:
•Book
•Typing paper, paraffin paper, and other thin paper
•Transparencies, trans lucen t p aper
•Wrinkled, dog-eared, curled, or to rn origi nals
•Clipped or stapled originals
•Carbon-backed originals
Page 53

2. Basic Job Setting
Loading the Standard Originals
Swing the Document Exit Tray
to the left as shown.
1
Place a neat stack of originals
face up on the Document Feed
2
Tray and then slide the
Document Guide Plates to the
1139O0110A
NOTES
AFR-7
•
The maximum number of o r iginals t h at can be lo aded is 50 (A 4 or s maller).
* The capacity is 30 for A3 or B4 origianls.
AF-3
•
The maximum number of o r iginals t h at can be lo aded is 30 (A 4 or s maller).
* The capacity is 15 for A3 or B4 origianls.
•
Make sure that the top level of your original stack does not exceed the
marking.
•
Also make sure that the Document Guid e Plates are in touch with the edges
of the original stack.
size of the originals .
41
Chapter 3
▼
Making Copies
1139O1980A
1139O0100A
Swing the Document Exit Tray
back again.
3
Pull out the Document Exit Tray
Extender if you are using larger paper.
NOTE
No copy cycle c an be initiated
unless you swing the Document
Exit Tray back again.
Page 54

42
2. Bas i c Job Setti ng
Loading Originals of Assorted Sizes
(Using the Mixed Original Detectio n Mode)
Auto
Size
Margin
Cover
Job
Memory
Manual
Staple
Sort
Sort &
Staple
Group
Mixed Orig. Det.
1
2
21
Book
22
Book
Orig. CopyFinishing
11
12
2in1
2in1
1
2
1139O2372A
1139O2372A
Meter
Count
Toner
Drum
Dehumidify
Input
Mixed Original Detection Mode Copying
Chapter 3
Making Copies
Using the Mixed Or iginal Detection Mode
<Original Stac k>
1139O0120A
You may load originals having
differe n t wi dths and len gths in the
AF-3/AFR-7 and make copies
automatically (Auto Paper, Auto Size)
as necessary according to the size of
each original.
<Copy Stack>
(Ex.) Auto Paper Mode
1140O277
Swing the Document Exit Tray
to the left as shown.
1
Load the sta ck of yo ur or iginals
on the Document Feed Tray so
that the rear edge o f each origin al
is pressed agai nst t he rear
Document Guid e Pl ate w hich
serves as the reference for correct
positioning.
Slide the front Docu ment Guide
Plate to the rear so t hat it is
2
pressed against the front edges of
the originals wi th t he g reatest
width.
Page 55

2. Basic Job Setting
Swing the Document Exit Tray
back again and pull out the
3
Document Exit Tray Extender.
1139O0100A
Press the Mixed Origin al
Detection Mode Key.
Manual
Staple
Sort
Sort &
NOTE
The Sort-and-Staple or Manua l Staple Mode cannot be used in the Mixed
Original Detecti on Mode.
Mixed Orig. Det.
1
211
1
2in1
1139O2632A
4
This completes the setti ng
procedure.
Now, make your copies by
following the steps giv en in
"BASIC COPYING
OVERVIEW " on p. 3 6.
43
Chapter 3
Making Copies
For Originals Not Suita ble fo r U s e in AF-3/AFR-7
R ais e the AF-3/AFR-7 and place
your original face down on the
1
Original Glass. Align the rear left
corner of the original with the
marker on the Original Width
Scale and press the rear edge of
the original up against the
Original Positioning Plate placed
at the rear side of the Original
Glass.
Gently lower the AF-3/AFR-7
2
and start the copy cycle.
Original
Width S cale
Original
Positionin g Plate
1136O804AA
Page 56

44
2. Bas i c Job Setti ng
NOTES
•
The AF-3/AFR-7 does no t automatically eject the original placed on the
Original Glass. If you have two or more originals to make copies from,
repeat these procedures a s many t imes as yo u place each new o riginal
directly on the Orig ina l G lass.
•
Be sure to r aise the AF-3/AFR-7 to an angle more th an 15° before placing
the original on the Origin al Glass.
Chapter 3
Making Copies
Page 57

2. Basic Job Setting
45
Chapter 3
Making Copies
Page 58

46
2. Basic Job Setting
Image Density
123
456
789
S
Start
0C
Stop
Auto
Lighter Darker
A
50%~200%
Auto
A4
A3
B4 A3
Full Size
B4 A4
A3 A4
Full Size Paper
Auto
A3
A4
A4
A5
B4
B5
FLS.
Inch
The image density level of copies can be adjusted either in the Auto or Manual
Exposure Mo de. Select the a ppropriate mode according to your particular
Chapter 3
needs.
Types of Exposure Modes
Auto Exposure Mode
In the Auto Exposure Mode, the
Auto
Making Copies
1139O2052A
1139O2052A
copier makes copies of opt imum
image density by automatical ly
adjusting the exposure level according
to the image density of the original.
Manual Exposure Mode
In the Manual Exposure Mode, you
can vary th e expo sure level to make a
copy of a desired image density.
Lighter Darker
Energy Saving
Interrupt
Panel Reset
1139O1032A
1139O1032A
1139O2062A
1139O2062A
Useful Tips
•
The exposure level in the Auto Exposure Mode can be varied by using the
User’s Choice to sui t your needs .
•
The copier has bee n factory-se t to select th e Au to E xpo sure Mod e in the
initial mode. The User’s Choice can be used to change this setti ng to give
priority to the Manual Exposure Mod e.
Page 59

Selecting the Exposure Mode
Auto Exposure Mode
Auto
Lighter Darker
A
Manual Exposure Mode
Auto
Lighter Darker
A
Auto
Lighter Darker
A
1139O2072A
1139O2072A
1139O2082A
1139O2092A
2. Basic Job Setting
Press the Auto Exposure Mode
Key A as necessary to light up
the Auto Exposure Indicator
O Auto .
Each time the Auto Exposure
*
Mode Key A is pressed, the
Manual and Auto Exposure
Mode are selected alternately.
Press the Exposure Control Key
< or > to light up the
1
Expos ure Level Indicator.
Hold down the Exposure Control
Key < or > until the desired
2
exposure level is reached.
<To make the image darker >
Press or hold down the Exposure
Control Key > .
47
Chapter 3
Making Copies
Auto
Lighter Darker
A
<To make the image lig hter >
Press or hold down the Exposure
Control Key < .
1139O2102A
Page 60

48
2. Basic Job Setting
Zoom Ratio
123
456
789
S
Start
0C
Stop
Auto
Lighter Darker
A
50%~200%
Auto
A3
A4
B4 A3
Full Size
B4 A4
A3 A4
Full Size Paper
Auto
A3
A4
A4
A5
B4
B5
FLS.
Inch
The zoom ratio may be set manually by the operator when in the Manual
Mode or automatically by the cop ier when in the Auto Size Mode. Select the
Chapter 3
appropriate mode according to your needs.
The selected zoom ratio is shown on the Zoom Ratio Indicator.
Types of Zo om Ra ti os
Fixed Zoom Ra tios
Three reduction ratios (50%, 70%,
A4
Making Copies
A3
B4 A3
Full Size
B4 A4
A3 A4
81%)
Three enlargement rat ios (115%,
141%, 200%)
And Full Size (100%).
Energy Saving
Interrupt
Panel Reset
1139O1032A
1139O1032A
Zoom Ratios
50%~200%
1139O5382A
1139O3590A
1139O5382A
Any rati os o ther t h an the fixe d on es
can be set.
* Zoom range: 50% to 200%
Zoom ra nge: (in 1% increments)
1139O3590A
Page 61

Selecting the Fixed Zoom Ratio
Full Size
49
2. Basic Job Setting
Press the Reduction, Full Size, or
Enlargement Key to s et a fixed zoom
ratio of yo ur cho ic e.
1139O2652A
A4
B4 A3
Full Size
B4 A4
A3 A4
Full Size
A4
B4 A3
Full Size
B4 A4
A3 A4
Full Size
A4
B4 A3
Full Size
B4 A4
A3 A4
Full Size
A3
<Reduction>
Each time the Redu ction Key is
pressed, it selects a new reduction
ratio.
* The Zoom R a t i o Indicator shows
Chapter 3
"50%" when so selected.
1139O0132A
1139O0132A
A3
<Enlargement>
Each time the Enlarg ement Key is
pressed, it sel ects a new en largement
Making Copies
ratio.
The Zoom Ratio Indicator sho ws
*
1139O0142A
1139O0142A
A3
"200%" when so selected.
<Full Size>
Pressing the Full Size Key selects full
size 100%.
1139O0152A
1139O0152A
Page 62

50
2. Basic Job Setting
Setting a Zoom Ratio
Hold down the Zoom Down or
>
Up Key until the desired zoom
ratio is reached.
<>
50%~200%
1139O3640A
1139O3640A
Zoom range: 50% to 200%
Chapter 3
Useful Tip
To save time and effort, first select the fixed ratio neares t the target zoom ratio
before using the Zoom Up or Down Key.
Zoom Down Key: Making the
Zoom Down Key: ratio smaller
Zoom Up Key: Making the ratio
Zoom Up Key: greater
<
Making Copies
Page 63

2. Basic Job Setting
Auto Size Mode
•
The Auto Size Mode can be selected only when the copier is equipped w ith
AF-3 or AFR-7.
•
In the Auto Size Mode, the copier automatically selects t he c orrect zoom ratio
according to the original size and paper size selected for use.
Selecting the Mode
Press the Auto Size Mode K ey.
Auto
Size
1139O2662A
1139O2662A
1
The Zoom Ratio Indicator shows
Auto
A3
A4
B4 A3
Full Size
1139O0162A
1139O0162A
and the Auto Size Mode
Indicator lights up.
Auto
51
Chapter 3
Making Copies
A3
A4
A4
A5
B4
B5
FLS.
Inch
Paper
1139O2200A
1139O2200A
Select the paper size.
Selecting the paper size
➭
p. 54
Useful Tip
This mode is quite efficie nt when you need to make copies from originals of
assorted sizes for neat filing.
Page 64

52
2. Basic Job Setting
NOTES
•
The Auto Size Mod e In dica tor blinks
Auto
A4
A3
B4 A3
Full Size
B4 A4
A3 A4
1139O8022A
•
The copier has been factory-set to select the Auto Paper Mode in the initial
mode. Thi s p r io r ity mod e can be ch an g ed to the Au t o Siz e Mode or Ma nu a l
Chapter 3
Mode by using the Us er’s Choice.
under any of the following
conditions:
◆
A good magnification ratio is
below 50 % or over 200% in the
Auto Size Mode.
When this happens, cancel the Auto
Size Mode and use the Ma nual Mod e .
➭
Initial mode
User’s Choice
p. 32
➭
p. 96
Making Copies
Page 65

Zoom Ratio Table (Origi nal S ize to Paper Size)
Metric Areas
Original Size Paper Size Zoom Ratio
A3 A4 70%
× 420 mm
297
11-3/4" × 16-1/2"
A4 A5 70%
210
× 297 mm
8-1/4" × 11-3/4"
A5 A6 70%
148
× 210mm
5-3/4" × 8-1/4"
A6 A4 200%
105
× 148 mm
4-1/4" × 5-3/4"
B4 A4 81%
257
× 364 mm
10" × 14-1/4"
B5 A5 81%
182
× 257 mm
7-1/4" × 10"
B6 A6 81%
128
× 182 mm
5" × 7-1/4"
A5 50%
B4 86%
B5 61%
A6 50%
B5 86%
B6 61%
A3 141%
B4 122%
B6 86%
A4 141%
A3 200%
B4 173%
B5 122%
A5 141%
B5 173%
B6 122%
A5 57%
B5 70%
B6 50%
A3 115%
A6 57%
B6 70%
A3 164%
A4 115%
B4 141%
A4 164%
A5 115%
B4 200%
B5 141%
Inch Areas
Original S i ze Paper Size Zoom Ratio
11" × 17" 11" × 14" 82%
279.4
11" × 15" 11" × 14" 93%
279.4
11" × 14" Legal 77%
279.4
Legal Foolscap 92%
8-1/2"
215.9
Foolscap Letter 84%
8-1/2"
215.9
Letter Invoice 64%
8-1/2"
215.9
Invoice 11" × 17" 200%
5-1/2"
139.7
Zoom Ratio = Paper Size ÷ Original Size
1" (inch) = 25.4 mm
1 mm = 0.0394 " (inch)
× 431.8
mm
× 381 mm
× 355.6
mm
× 14"
× 355.6
mm
× 13"
× 330.2
mm
× 11"
× 279.4
mm
× 8-1/2"
× 215.9
mm
53
2. Basic Job Setting
Legal 77%
Foolscap 76%
Letter 64%
Invoice 50%
Legal 77%
Foolscap 77%
Letter 73%
Invoice 50%
Chapter 3
Foolscap 77%
Letter 77%
Invoice 50%
Letter 78%
Invoice 60%
11" × 17" 121%
Making Copies
Invoice 64%
11" × 17" 129%
11" × 14" 107%
11" × 17" 129%
11" × 14" 127%
11" × 14" 164%
Legal 154%
Foolscap 152%
Letter 129%
Page 66

54
2. Basic Job Setting
Paper Size
Auto
Lighter Darker
A
50%~200%
Auto
A4
A3
B4 A3
Full Size
B4 A4
A3 A4
Full Size Paper
Auto
A3
A4
A4
A5
B4
B5
FLS.
Inch
123
456
789
S
Start
0C
Stop
Energy Saving
Panel Reset
The paper size may be sel ected manual ly by t he o per ator when in the Manual
Mode or automatically by the cop ier when in the Auto Paper Mode. Select the
Chapter 3
appropriate mode according to your needs.
The selected paper size, as well as the paper po rt load ed with that paper , is
shown on the control panel.
Manual Mode
This mode allows you to select the paper size and se t the zoom ratio manually
according to your particular needs.
Making Copies
A3
A4
A4
A5
B4
B5
FLS.
Inch
Paper
Press the Paper Select Key once.
The currently selected paper size
1
is marked with a lit arrow .
Ex.: A4 (1st Drawer)
Interrupt
1139O1032A
1139O1032A
▼
1139O0172A
1139O0172A
Press the Paper Select Key as
A3
A4
A4
A5
Paper
B4
B5
FLS.
Inch
1139O0182A
1139O0182A
necessary to select the paper size
2
of your cho ic e.
Page 67

Paper Port Indicator and Paper S ize I nd icat ors
Ex.: If the copier Drawers are loaded wi th
paper as follows
1st Drawer ... A4L
2nd Drawer ... B4L
3rd Drawer (Option) ... FLSL
4th Drawer (Option) ... A4C
Multi Bypass Table (Option)
... A3L
1139O3690A
55
2. Basic Job Setting
Each time the Paper Select Key is pressed, th e lit P aper Size Indicator (arrow )
▼
and Paper Port Indicator cycle through the different pap er sizes and port locations
as shown b elow.
A3
A4
A4
A5
A3
A4
A4
A5
B4
B5
FLS.
Inch
1139O0192A
B4
B5
FLS.
Inch
1139O0222A
A3
A4
A4
A5
A3
A4
A4
A5
B4
B5
FLS.
Inch
1139O0202A
B4
B5
FLS.
Inch
1139O0232A
A3
A4
A4
A5
A3
A4
A4
A5
B4
B5
FLS.
Inch
1139O0212A
B4
B5
FLS.
Inch
1139O0242A
Chapter 3
Making Copies
Page 68

56
2. Basic Job Setting
Auto Paper Mode
Selecting the Mode
•
The Auto Paper Mode can be selected only when the copier is equipped w ith
AF-3 or AFR-7.
•
In the Auto Paper Mode, th e co pier automatically selects the correct paper
size according to the original size and zoom ratio selected for use.
Auto
A3
A4
A4
A5
Paper
B4
B5
FLS.
Inch
Press the Paper Sel ect K ey until the
Auto Paper Mode Indicator lights up.
* Set the zoom ratio.
➭
p. 49
Chapter 3
1139O0072A
1139O0072A
Useful Tip
This mode is efficient when you want to make copies on paper of the same
size as your originals, though you do not know the size of the originals.
Using the Special Paper Mode
Making Copies
The Special Paper Mode lets y ou insert a partition betw een copies or make a co py
on colored paper. To use this feature, colored paper should be loaded in any of
the Drawers in advance.
User’s Choice ➭ p. 102
S
A3
A4
A4
A5
Paper
B4
B5
FLS.
Inch
1139O5402A
1139O5402A
Press the Paper Select Key to select
the Special Paper Mode.
The Drawer selected fo r the S pecial Paper Mode will never be selected in the
Auto Paper Select Mode. To use this feature, set t he copie r in the Ma nual
Mode and press the Paper Select Key to select the Drawer which has been set
for the Special Paper Mode b efo re attempting to start the copy cycle.
Page 69

2. Basic Job Setting
NOTES
•
If the paper o f the rig ht size has run
out in the Auto Paper Mode, both the
Paper Size Indicator (arrow ) and
Add Pap er Indicato r l ight up as
shown on the left.
If this happ e ns , add pa per of the
right size or cancel the Auto Paper
Mode and use th e Manual Mode to
A3
A4
A4
A5
Auto
B4
B5
FLS.
Inch
1139O0252
1139O0252A
make copies.
If none of the Drawers are loaded
with paper of the right size, both the
Auto Paper Mode Indic a t or a nd
Paper Size Indicator (arrow )
blink as shown on the left.
In this case, load a drawer with
paper of the right size or cancel the
Auto Pape r Mode and use the
Manual Mode to ma k e copies.
A3
A4
A4
A5
Auto
B4
B5
FLS.
Inch
1139O0262A
1139O0262A
* Zoom Ratio Table (Original Size to
➭
Paper Size)
•
If the Paper Select Key is pressed in the Auto Paper Mo de, it automatically
p. 53
cancels the Mode to select the Manual Mode.
•
The copier has been factory-set to select the Auto Paper Mode in the initial
mode. Thi s p r io r ity mod e can be ch an g ed to the Au t o Siz e Mode or Ma nu a l
Mode by User’s Choice.
Initial mode
User’s Choice
➭
p. 32
➭
p. 96
▼
▼
57
Chapter 3
Making Copies
Automatic Drawer Switching
If the Drawer currently selected for use runs out of paper and there is another
Drawer loaded with paper of the same size and in the same dire ction, the copier
automatically selects t hat second D rawer to permit an uninterrupted copy cycle.
Useful Tip
This feature is a great advantage when you need to make a large number of
copies on the same s ize paper. For example, an un int err up ted copy cycle is
possible to make up to 500 copies by using the AF-3 or AFR-7 if the 1st and
2nd Drawers ar e loaded with paper of the same size and in the same direction.
Page 70

58
2. Basic Job Setting
Number of Copies
Setting the Number of Copies
123
Using the Multi-Copy Keys, enter the
number of copies to be made.
456
789
0C
Chapter 3
Correcting the Number Entry
Making Copies
123
456
789
0C
1139O2640A
1139O3740A
1139O2620A
* The maximum number that can be
set is 99.
Example:
➀
To make 18 copies, press Key
➇
then Key
, in that order.
and
The Multi-Copy D is play now shows
"18."
To correct or reset a number entry,
press the Clear Key.
* The Multi-Copy Display is reset to
"1."
1139O3750A
Page 71

Copy Cycle Start
59
2. Basic Job Setting
50%~200%
Auto
Lighter Darker
A
Auto
A4
A3
B4 A3
Full Size
B4 A4
A3 A4
Full Size Paper
Auto
A3
A4
A4
A5
Now you start the copy cycle for the copy job.
Starting the Cycle
1139O2360A
Stopping a Multi-Copy Cycle
Stop
123
456
789
B4
B5
FLS.
Inch
S
Start
0C
Stop
Check the contr ol panel to make
sure that you have se t up your
1
copy job correctly.
Making sure it is lit up green,
press the Start Key.
2
The Start Key turns to orange
and the copy cycle is started.
In a multi-copy cycle, the
number on the Multi-Copy
Display is decreased by 1 each
time a copy is fed out of the
copier. The Display is reset to
the original setting as soon as
the multi-copy cycle is
completed.
To stop a multi-copy cycle
halfway, press the Stop Key.
Energy Saving
Interrupt
Panel Reset
1139O1032A
1139O1032A
Chapter 3
Making Copies
1139O2592A
1139O2592A
The Start Key will s oon turn to
green a nd the c op ier is b r ough t
to a stop.
The Multi-Copy Display shows
the number of copies yet to be
made.
Page 72

60
2. Basic Job Setting
Interrupt Mode
Auto
Lighter Darker
A
50%~200%
Auto
A4
A3
B4 A3
Full Size
B4 A4
A3 A4
Full Size Paper
Auto
A3
A4
A4
A5
123
456
789
S
B4
B5
Start
FLS.
Inch
0C
Energy Saving
Stop
Panel Reset
The Interrupt Mode allows you to interrupt a current job and run a more
urgent one. The copier ensures t hat the old job will be resum ed as soon as the
Interrupt Mode is canceled.
Chapter 3
Making an Interrupt Copy
Press the Interrupt Key.
Interrupt
The Key may be pressed even
1
while t he current job is being
carried out.
Making Copies
1139O2602A
1139O2602A
The Interrupt Key LED lights up
and, after a sho rt t ime, the
current copy cycle is stopped.
Make the necessary control panel
settings for the interrupt job and
2
press the Start Key.
Interrupt
1139O1032A
1139O1032A
Page 73

2. Basic Job Setting
Canceling the Interrupt Mode
Press the Interru pt Key a second
Interrupt
time.
The Interrupt Key LED goes out
and the copier restores the
1139O2612A
1139O2612A
settings to th e previous state.
NOTES
•
The Interrupt Mode cannot be canceled by the Panel Reset Key or Clear Key.
•
If the current job involves the Sort, Group, or Sort-and-Staple Mode, only
Non-Sort modes can be selected in the Interrupt Mode.
61
Chapter 3
Making Copies
Page 74

62
2. Basic Job Setting
Manual Bypass Copying
Use the manual by pass copying capability of t he c opie r whe n you want to make
copies on pa per not loade d in any Drawer, or on transparencies, translucent paper,
or any ot he r spe cia l pa p er.
If the copier is equipped with a Multi Bypass Table (option), you can load more
than one sheet of such paper to make a continuous run.
You can also use the Cover Mode capability if t he Multi Bypass Table i s u sed
with Automatic/Duplexing Document Feeder AF-3/AFR-7 (option).
◆
Types of Pa per
•
Plain paper (weighing 60 to 90 g/m2)
•
Heavyweight paper (weighing 90 to 157 g/m2)
•
Transparencies, translucent paper
◆
Paper Size
•
Width: 100 to 297 mm
Chapter 3
•
Length: 140 to 4 32 mm
◆
Capacity
•
Plain paper, heavyweight paper, transparencies, translu cent paper ... 1 s heet at a time
<Multi Bypass Table>
•
Plain paper ... Approx. 50 sh eet s
•
Heavyweight paper, transparencies, translucent p aper ... Approx. 20 sheets
Using the Ma nu al Bypa s s Tab le
Making Copies
Place the original on the Orig inal
Glass and make the co ntrol panel
1
settings.
Insert the c opy paper into the
copier.
2
◆
This automatically starts the
1139O0150A
copy cycle.
NOTES
•
Insert the copy paper one sheet at a time.
•
Do not i nsert a sheet of paper while the copier is wa rming up or in a
multi-copy cycle.
•
The Auto Paper M od e, Auto Si z e Mode , Boo k copy i ng, any o f t he Fi nishing
modes, 2-sided copying, Margin Mode, or Cover Mode cannot be selected for
manual byp ass copyi ng.
Page 75

Using the Multi Bypass Table
1139O0130A
1139O0140A
2. Basic Job Setting
Place the original on the Original
Glass and make the con tr ol panel
1
settings.
Swing down the Multi Bypass
Table and sli de the Paper Guide
2
Plate to the size of the copy
paper.
NOTE
Pull out the Multi Bypass
Table Extender if you are
using larger paper.
Place a neat stack of copy paper
on the Table and insert it into the
3
copier as far as it will go.
NOTES
•
Fan the paper st ack well
before insert ing if you are
using transparencies or
translucent paper.
•
Correct curl if you are using
heavyweight paper.
63
Chapter 3
Making Copies
Press the Start K ey to start the
copy cycle.
4
1139O2360A
NOTES
•
Do not insert the pap er wh ile the copier is in the warm-up cycle or a
multi-copy cycle.
•
The Auto Paper, Au t o Size, B ook, Fini s hing, 2-Sided Copy, and Margin
cannot be selected for manual bypass copying.
Page 76

64
3. System Copying Overview
Make the
1
Basic
Settings
Place y our original.
•
Set the image
•
density.
Set the zoom ratio.
•
Select the paper
•
size.
Set the number of
•
copies to be made.
p. 36
➭
Chapter 3
Making Copies
Select the Job Type
2
Select the 2-sided copy.
•
Select the 2-sided original. ➭ p. 71
•
1
Book
22
Orig. Copy
Select the 2-in-1 mode.
•
Select the Book mode. ➭ p. 71
•
Book
22
Book
Orig. Copy
Book
2
1
2
1139O2522A
1139O
Select the
3
Finishing
Mode
Selec t t he fin i shing
•
p. 78
➭
mode.
Sort
Sort &
Staple
Group
Finishing
1139O2542A
1
Meter
Count
Toner
Drum
Dehumidify
Input
Auto
Size
Margin
Cover
Job
Memory
Manual
Staple
Sort
Sort &
Staple
Group
1139O2532A
Mixed Orig. Det
1
2
21
22
Orig. CopyFinishing
Book
Book
11
12
2in1
2in1
1
Lighter Darker
2
Auto
A
1139O5252A
1139O5252A
50%~200%
Letter
Legal
Legal
11 ~17
Auto
Full Size
11 ~17
11 ~17
Letter
Letter
Page 77

3. System Copying Overv iew
65
Select the
4
File Margin
Mode
Selec t the File
•
Margin mode.
p. 85
➭
Margin
1139O2552A
Select the
5
Cover
Mode
Selec t t he Cover
•
p. 87
➭
mode.
Cover
1139O2562A
Select the
6
Job
Memory
Call up the job
•
program from
memory.
Job
Memory
Store the job
•
program in
memory.
Drum
Dehumidify
Memory
Input
p. 88
➭
1139O2572A
p. 88
➭
Cover
Job
1139O2582A
1139O2582A
Start the
7
Copy Cycle
Press th e Start
•
Key to start the
copy cycle.
p. 59
➭
1139O2360A
Press the St op Key
to stop the
copy cyc le.
Chapter 3
Making Copies
Auto
Lighter Darker
A
50%~200%
Auto
A3
A4
B4 A3
Full Size
B4 A4
A3 A4
Full Size Paper
Auto
A3
A4
A4
A5
B4
B5
FLS.
Inch
123
456
789
S
Start
0C
Stop
Energy Saving
Interrupt
Panel Reset
1139O5422A
1139O5422A
Page 78

66
3. System Copying Overview
Typical Job Setting Procedures
Typica l Jobs Job Setting Pr ocedur e s
Making 1- s ided co pies fro m a 2-s i ded
original
Example 1
1. Load yo ur original into the AFR-7.
➡
1139O0310A
Making a 2- side d copy f ro m 1-s i ded
1. Place the 1st origi nal.
1139O0260A
originals
Chapter 3
➡
Exampl e 2
1139O0290A
Making Copies
Making 1-sided co pies f ro m an open
1. Place the open b ook.
1139O0250A
book
➡
Example 3
1139O6070A
Making 2-sided stapled copies from
1-sided originals
1. Lo ad your origina ls into th e
AF-3 /A FR-7.
1134O037AA
➡
Example 4
1139O0240A
1139O0260A
Page 79

2. Select the job type
(2-side d > 1-side d).
11
12
Book
Book
1139O2442A
1139O2442A
2in1
2in1
➡
1
2
12
21
22
Orig. Copy
2. Select the job type
(1-side d > 2-side d).
Book
Book
11
12
2in1
2in1
➡
1
2
12
21
22
Job Setting Procedures
3. Start the copy
cycle.
1139O2360A
3. Start the 1st copy
cycle.
➡
3. System Copying Overv iew
4. Exchange the 1s t
original for the 2nd.
67
5. Start the 2nd copy
cycle.
Chapter 3
➡
Orig. Copy
1139O2422A
1139O2422A
2. Select the job type
(Book > 1-sided).
11
12
Book
Book
Orig. Copy
2in1
2in1
1
➡
2
12
21
22
2. Select the job type
(1-side d > 2-side d).
11
12
Book
Book
Orig. Copy
2in1
2in1
1
➡
2
1139O2422A
1139O2422A
12
21
22
1139O2360A
3. Select the paper
size.
A3
A4
A4
A5
Paper
1139O2200A
1139O2402A
3. Select th e finis hing
mode
(Sort-and-Staple).
Sort
Sort &
Staple
Group
Finishing
B4
B5
FLS.
Inch
1139O2392A
1139O2392A
1139O0270A
4. Start the copy cycle.
➡
1139O2360A
4. Start the copy cycle.
1139O2360A
1139O2360A
Making Copies
Page 80

68
4. System Job Setting
Job Type
Meter
Auto
Size
Margin
Cover
Job
Memory
Manual
▲
Count
Toner
Drum
Dehumidify
Input
Chapter 3
Available Job Types
1-sided 1-sided
Staple
Sort
Sort &
Staple
Group
Mixed Orig. Det.
1
21
22
Origin als Copi es
Making Copies
1-sided 2-sided
▲
Origin als Copy
The following eight j ob t ypes are av ailable to
choose from: 1-sided 1-sided,
1-sided 2-sided, 2-sided 1-sided,
2in1
2
11
12
2-sided 2-sided, 1-sided 1-sided
(2-in-1), 1-s i de d 2- sided (2-in-1),
2in1
Book 1-sided, and Book 2-sided.
1
Book
2
Book
Select the appropriate job type to make the
▲▲
▲
▲
▲▲
▲
▲
intended copies.
Orig. CopyFinishing
1139O2372A
1139O2372A
•
Select this type when you want to
make 1- sided c opies f rom 1-side d
originals.
* The [1-sided 1-sided] type is
▲
selected in the initial mode. No
LEDs on the job type panel is lit up
1139O0280A
at this time.
•
Select 1 2 when you want to make
▲
2-sided copies from 1-sided
originals.
2-sided 1-sided
▲
Original
Copies
1139O0290A
1139O0310A
•
Select 2 1 when you want to make
▲
1-sided copies from 2-sided
originals.
Page 81

4. System Job S e tting
69
2-sided 2-sided
▲
Original
▲
1-sided 1-sided (2-in-1)
Originals
1-sided 2-sided (2-in-1)
▲
Originals
Copy
Copy
1139O0300A
Copy
1140O273
•
Select 2 2 when you want to make
▲
2-sided cop i es fro m 2-s ided
originals.
•
Select 1 1 [2in1] when you want
▲
to make a 1-sided copy, through
reduction, from two 1-sided
originals which are placed on the
Original Glass side-by-side.
* When this type is selected, a
reduction ratio is automatical ly
selected. You can nonetheles s
make a full-s i ze copy.
▲
First select 1 1 [2in1], then set
the desi red zoom ratio.
•
Select 1 2 [2in1] when you want
▲
to make a 2-sided copy, through
reduct i on, from four 1- sided
originals, each 2-ori gin al p air of
which is placed on the Original
Glass side-by-si de.
Chapter 3
Making Copies
When this type is selected, a
1139O0320A
*
reduction ratio is automatical ly
selected. You can nonetheles s
make a full-s i ze copy.
▲
First select 1 2 [2in1], then set
the desi red zoom ratio.
NOTE
The copier must be equipped with a Duplexing Document Feeder AFR-7 (not
an Automatic Document Feeder AF-3) to select 1 1 [2in1] or 1 2 [2i n1] .
▲
▲
Page 82

70
4. System Job Setting
Book 1-sided
Book 2-sided
Chapter 3
Making Copies
▲
Original
▲
Original
NOTES
Copies
1139O6070A
Copy
1139O0330A
•
Select Book 1 when you want to
▲
make a 1-sided copy of each page of
an open book.
•
Select Book 2 when you want to
▲
make a 2-sided copy of an open
book, each page of the open book
being reproduced on one side of the
copy.
•
The size of the original should be A4
crosswise for
▲
1 1 [2in1] and 1 2 [2in1].
▲
A4 Size
(A4C)
Blank Sheet of Paper
1139O1470A
1139O1460A
1139O1970A
•
The size of the book should be A4
for Book 1 and Book 2.
•
When using 1 2, 1 1 [2in1], and
1 2 [2in1] for an odd number of
▲
▲
▲
▲
▲
1-si ded or ig in al s, add on e blan k
sheet of paper at the e nd of the
original set.
Page 83

Selecting the Job Type
12
21
Book
22
Book
Orig. Copy
11
12
1139O2412A
71
4. System Job S e tting
2in1
2in1
1
2
1139O2412A
<Job Type Select Key I>
•
Press Job Type Select Key I to
select the job type of your choice.
Each time Job Type Select Key I is
*
pressed, the newly selected job
type is indicated by a lit LED as
shown bel o w (ex c ept f or 1- si d ed
1-sided which is indicated by no
LEDs lighting up).
▲
12
12
21
22
2in1
11
11
12
Book
Book
Orig. Copy
21
2in1
2in1
1
2
12
1139O2432A
2in1
22
11
*No LEDs
lighting up
(initial mode)
1139O2672A
1139O2672A
<Job Type Select Key II>
•
Press Job Type Select Key II to
select the job type o f your choice.
Each time Job Type Select Key II
*
is pressed, the newly selected jo b
type is indicated by a lit LED as
shown bel o w (ex c ept f or 1- si d ed
1-sided which is indicated by no
LEDs lighting up).
Book
1
Book
2
Chapter 3
Making Copies
▲
1139O2682A
1139O2682A
Page 84

72
4. System Job Setting
Precaution for Original Loading
Use the following precaution for original loadi ng when y o u are going to make
1-sided copies from 2-sided originals.
Load the originals crosswise.
If the originals are loaded lengthwise, copies w ill be fed out one inverted from
the ot he r.
Correct:
2-Sided Originals
Loaded Crosswis e
Chapter 3
1-Sided Copies
Making Copies
Wrong:
2-Sided Originals Loaded
Lengthwise
1139O1120A
1-Sided Copies
1139O1130A
Page 85

4. System Job S e tting
Panel Display in 2- S id ed Copying
The copier starts a 2-sided copying
cycle when you select a mode to
make 2-sided copies (i.e., 1 2 or
▲
2 2) and press the Start Key.
On completing the first copy cycle,
the copier stores the 1-sided copy in
the Duplex Unit, getting ready to run
the second copy cycle.
At this time, one of the Paper Port
Indicators (for conven ien ce sake, let
us call it the 2-Sided Copy Indicator)
lights up to indicate that the copy has
1139O4760A
Canceling 2-Sided Copying
When the copier has completed the first copy cycle of a 2-sided copying cycle,
there is a 1-sided copy stored in the Dupl ex Uni t.
If you want to cancel the 2-sided copying mode at t his poi nt, yo u need to f eed the
1-sided copy out of the Duplex Unit and copier onto the Copy Tray.
been stored in the Duplex Unit.
▲
73
Chapter 3
Making Copies
1139O5060A
1139O2360A
Press the Panel Reset Key.
1
◆
The 2-Sided Copy Indicator,
which has stayed lit up, starts
blinking.
Press the Start Key.
2
◆
This feeds the copy in the
Duplex Unit out t hrough th e
copier onto the Copy Tray.
Then, the 2-Sided Copy
Indicator goes out, indicating
that the copier has left the
2-si ded cop yi n g mode.
Page 86

74
4. System Job Setting
Finishing Mode
Meter
Auto
Size
Margin
Cover
Job
Memory
Manual
Staple
Sort
Sort &
Staple
Group
Count
Toner
Drum
Dehumidify
Input
Finishing Modes
Chapter 3
Non-Sort
Originals
Making Copies
Sort
Origin als
Sort-and-Staple
Originals
Mixed Orig. Det.
1
2
21
22
Orig. CopyFinishing
Copies
Copies
Copies
11
12
Book
Book
1139O2372A
Copies
Copies
The copier offers four different finishing
modes to choose from: Non-Sort, Sort,
Sort-and-Staple, and Gr oup.
2in1
2in1
Select the appropriate mode according to
your par ti cu la r need s .
1
2
1139O2372A
•
This is the normal fin ish ing mod e in
which no sorting, grouping, or
Copies
stapling takes place.
All copies are fed ou t onto the Top
Bin.
* No finishing mode LEDs light up
when the copier is in the Non-Sort
1076O145
Mode.
•
This is the fini shin g mode in which
copies are sorted into complete sets
Top Bin
of your originals.
Copies are fed out onto the Sort Bins.
2nd Bin
This mode is effective wh en
making a number of copies from a
number of originals.
3rd Bin
1076O146
•
This is the mode in w hich copies ar e
sorted into complete sets of your
originals, each set being stapled
together.
Copies are fed out onto the Sort Bins.
1076O149
Page 87

Group
Originals
Useful Tip
Copies
Copies
Copies
Top Bin
2nd Bin
3rd Bin
1076O147
4. System Job S e tting
•
This is the mod e in wh ich t he c opies
made from each single original ar e
separated into groups, each group
containing the s ame nu mber of
copies.
75
Originals
Manual Staple
Originals
Copy Sets
(Sorted)
Copy Stacks
(Grouped)
Copies
Copies
Copies
Top Bin
2nd Bin
3rd Bin
1076O148
Manual Staple
Manual Staple
Place your originals one by one and
set the number of copies you need for
each original. This will allow you to
separate copies made from each
single original into groups, each
group containing a different number
of copies.
•
This mode allows you to staple copy
sets already made in the Sort Mode
or copy stacks made in the Group
Mode.
1076O191
Chapter 3
Making Copies
The copier has been factory-set to select Sort in the initial mode. The User’s
Choice can, however, be use d to change thi s setting to give priority to
Non-Sort, Sort, Sort-and-Staple, or Group.
➭
User’s Choice
p. 100
Page 88

76
4. System Job Setting
Auto Dual Function
Though each of the Sort Bins can only hold up to 25 sheets of paper, the Auto
Dual Function permits sorting of copies of up to 50 originals under certain
conditions.
Auto Dual Function in Sort Mode
When 5 or less cop ies are made from an original set consis ting of more than 25
originals in the Sort Mode, the Sorter or Staple Sor ter is automatically set into the
Auto Dual Mode by using the 6th to 10th Bins.
Copies Bins in Use
1st to 2 5th sort ed cop i es Top to 5th B ins
Chapter 3
26th to 50t h sort ed co pi es 6th to 10th Bi ns
If the number of copies set to be made exceeds 5 , the initiation of a new copy
*
cycle is inhibited from the 26th original.
Example: Making 3 copy sets of a 30-page original set.
Sorter or Sta ple
Sorter
30-Page
Origin al Set
•
Each of the Top to
Making Copies
3rd Bins contains
25 sorted copies.
•
Each of the 6t h to
8th Bins contains 5
sorted copies.
Place copies in the 6th Bin on those in the Top Bin to have a complete set from
*
Sorting into
3 Sets
1139O1140A
your originals. In the same way, place copies in the 7th Bin on those in the 2nd
Bin and copies in the 8th Bin on those in the 3rd Bin.
Auto Dual Function in Sort-and-Staple Mode
When 5 or less cop ies are made from an original set consis ting of more than 25
originals in the Sort Mode, the Sort-and-S taple Mode is automatically canceled
and the Stapl e So rter is set into t he Sort Mode to a ctivate the Auto Dual Function
(no stapling tak es place).
Page 89

4. System Job S e tting
When the Number of Copies Set to be Made Exceeds 25 in
the Group Mode
When more than 25 copies are to be grouped together into one group, the Sorter
or Staple Sorter uses the subsequent Bin to cont inu e gr ou ping the copies.
Original Copies Bins in Use
1st
2nd to Nth Same way
Example: Separating copies made from 2 different originals into two groups
where each group contains 35 copies.
•
Copies of 1st
original
Top Bin: 25
2nd Bin: 10
•
Copies of 2nd
original
3rd Bin: 25
4th Bin: 10
1st to 25th copies Top Bin
26th and sub seq ue nt copi e s 2nd Bin
Separating into
groups, each
containing 35 copies
2 Originals
77
Chapter 3
Making Copies
1139O1150A
If the Number of Copies Set to be Made Exceeds 50 in the
Non-Sort Mode
The capacity of t he To p B in is 50. If more than 50 co pies are made in the
Non-Sort Mode, the Sorter uses the 2nd, 3rd, ... Bins to ho ld thos e excess c opies.
Page 90

78
4. System Job Setting
Selecting the Finishing Mode
Meter
Count
Toner
Drum
Dehumidify
Input
Auto
Size
Margin
Cover
Job
Memory
Manual
Staple
Sort
Sort &
Staple
Group
Mixed Orig. Det.
1
2
21
Book
22
Book
Orig. CopyFinishing
11
12
2in1
2in1
1
2
1139O2502A
Press the Finishing Mode Select Key
as necessary to select the desired
mode.
* Each depression of the Key selects
a new finishing mode, as i nd icated
by a lit LED.
NOTES
•
The Sort or G r oup Mode cannot be selected unless the copi er is equipped
Chapter 3
with a 10 -B i n So r t er or Sta ple Sorte r (o ption). T he Sort-a nd-Sta ple M od e
cannot be selected unless the copier is equipped with a Staple Sorter (option).
•
The capacity of each S ort Bin is 25 copies.
If this capacity is exceeded , the Remove Copies
Indicator li gh t s up on the control panel and the
Making Copies
1139O3400A
Start Key tu rns to o r ange, inhibiting the i nitiati on of
a new copy cycle.
Page 91

Using th e Manua l Staple M ode
Manual
Staple
1139O2732A
1139O2732A
79
4. System Job S e tting
<To staple copies after they have been
made>
Make sure that each cop y set or
stack is fed out into the Sort Bin.
Then, press the Manual Stapl e
Key.
Then the copy set or stack in the
Sort B i n is stapled together.
<Only to s ta pl e co pie s>
Useful Tip
Manual
Staple
1139O1320A
Stapling
Position
1139O0940A
1139O2732A
1139O2732A
Align the edges of the sheets of
paper to be stapled together.
1
Place the neat stack of paper on
the Top Bin of the Staple Sorter.
2
NOTES
•
Make sure of the stapling position
and press the neat stack of paper
against the bracket ( wh ich is
invisible from the outside) at the
front right corn er in the Bin.
•
Up to 25 sheets (80 g/m2) of paper
can be placed for stapling.
•
Never attempt to reac h with your
hand to the stapling posit ion in the
Bin, as doing so can be very
dangerous.
Press the Manual Staple Key.
3
Then the paper stack in the Top
Bin is sta p led toge the r .
Chapter 3
Making Copies
This feature is effici ent wh en you want t o sta ple origina ls from wh ich y o u
have just completed making copies.
Page 92

80
4. System Job Setting
Precautions for Original Loading for Copies Stapled
Automatically or Manually
If you want to have your copy sets or stacks stapled automatically in the
Sort-and-Staple Mode or manually in the Manual Stap le M od e, po s ition the
originals crosswise. The originals should also be placed so that the stapling
position (marked with X) is positioned as shown.
Original Directio n and Stapli ng Posi tio n
Correct:
Originals Loaded Crosswise
Chapter 3
Making Copies
Place the originals on the
Document Fee d Tray so th at
the stapling corner is at the
rear left side as shown.
Copy Set/Stack Stapled at
Top Left Corner
1139O1160A
Page 93

Wrong:
81
4. System Job S e tting
Originals Loaded Lengthwis e
<For originals not suit able for use in AF-3/AFR-7>
Place the original, with it s stapling
point a t the upper r ight position as
shown in the illustration.
Copy Set/Stack Stapled at
Top Right Corner
Chapter 3
1139O1170A
Making Copies
Stapling Point
1139O2230A
Page 94

82
4. System Job Setting
Typical Finishing Mode
Chapter 3
Making Copies
Finishing
Mode
Non-Sort
Sort
Manual
Stapling
Impossible
OK
Possible
Examples
Ex.: Maki ng two copies each.
Original Set
Ex.: Sorting copies into 2 copy sets and having them stapled
Ex.: manually.
Original Set
Copy Sets
Copy Set
1076O154
Stapled Copy Sets
1140O075
Page 95

4. System Job S e tting
83
Finishing
Mode
Sort-and-
Staple
Group
Manual
Stapling
Impossible
OK
Possible
Examples
Ex.: Sorting and stapling copies into 2 copy sets.
Stapled Copy
Sets
Original Set
1140O077
Ex.: Separating copies into 3 groups, each group containing 2
Ex.: copies, and having each stapled manually.
Copy Stacks
Original Set
Stapled Copy Stacks
Chapter 3
Making Copies
1140O076
Page 96

84
4. System Job Setting
File Margin Mode
Meter
Auto
Size
Margin
Cover
Job
Memory
Manual
Count
Toner
Drum
Dehumidify
Input
Chapter 3
Types of File Margi n Modes
Staple
Sort
Sort &
Staple
Group
Mixed Orig. Det.
1
21
22
Orig. CopyFinishing
1-Sided Origi nals
Making Copies
2
11
12
Book
Book
1139O2372A
When in the Fil e Margin Mode, the copier
provides a file marg in al on g the lead ing edge
of the copy.
2in1
Both 1-sided and 2-sided originals can be
used in the File Margin Mode. Select the
2in1
appropriate j ob type according to your
1
originals.
2
1139O2372A
1-Sided Copies with File Margin
2-Sided Copy with Fil e Margin
1076O169
1-Sided Copies with File Margin
Margin Width
2-Sided Origi nal
2-Sided Copy with Fil e Margin
10 mm
1139O1330A
The file margin widt h is 10 mm.
1076O170
Page 97

Loading the Originals
Using the Original Glass Using AF-3/AFR-7
85
4. System Job S e tting
1139O0910A
Position the file margin side to the right. Position the file margin side to the left.
Setting the File Margi n Mode
Place the original.
1
Margin
12
21
22
Orig. Copy
Book
Book
11
12
2in1
2in1
1
2
1139O2422A
1139O2552A
1139O2422A
Press the File Margin Mode Key
to set the copier into the File
2
Margin Mode.
Press the Job Type Select K ey to
select the appropriate job type.
3
1139O0930A
Chapter 3
Making Copies
Page 98

86
4. System Job Setting
Cover Mode
Meter
Count
Toner
Drum
Dehumidify
Input
Auto
Size
Margin
Cover
Job
Memory
Manual
Staple
Sort
Sort &
Staple
Group
Mixed Orig. Det.
1
2
11
12
21
Book
22
Book
Orig. CopyFinishing
1139O2372A
The Cove r M ode lets you make a front cov er
for a copy set by copying the first page of an
origina l set on col ore d paper .
2in1
It may be used to dif fer entiate the cover of a
2in1
copy set from the others.
1
2
1139O2372A
Chapter 3
Origin al Set
Copy Set Ma de Usi ng …
Colored
Paper
Making Copies
1076O181
NOTES
•
This mod e can only be selected when the copier is equipped with an
Automatic/Duplexi ng Documen t Feeder AF-3/AFR-7 an d a Multi Bypass
Table.
•
This mode cannot be selected when 1 2 or 2 2 is selected for the job
▲
▲
type.
Page 99

Setting the Cover Mode
1139O0140A
1139O0210A
4. System Job S e tting
Place the paper for th e co ver on
the Multi Bypass Table.
1
NOTE
Up to 50 sheets of plain paper can
be placed on the Multi Bypass
Table.
Load your originals into
Automatic/Duplexi ng Document
2
Feeder AF-3/AFR-7.
87
Chapter 3
Press the Cover Mode Key to set
the cop i er into the Cover Mode.
3
Cover
1139O2562A
NOTE
Be sure to pla ce the paper for the cove r on the Multi Bypass Table. No copies
can be made for covers unless th e Multi Byp ass T a ble is loaded wi th paper .
Making Copies
Page 100

88
4. System Job Setting
Job Memory
Meter
Auto
Count
Toner
Drum
Dehumidify
Input
Size
Margin
Cover
Job
Memory
Manual
Staple
Sort
Sort &
Staple
Group
Mixed Orig. Det.
1
2
11
12
21
Book
22
Book
Orig. CopyFinishing
1139O2372A
Chapter 3
Drum
Cover
Dehumidify
Job
Memory
Input
One copying job program that is frequently
used can be stored in memory and called up
later as necessary.
2in1
2in1
1
2
1139O2372A
Press the Job Memory Input Key.
1
Make the control panel setti ngs
for the job to be stor ed in job
2
memory.
1139O2582A
1139O2582A
Making Copies
Press the Job Memory Select
Key.
3
Job
Memory
This stores the co p y ing job
program in job memory.
1139O2572A
If you have stored a wrong job program or if you want to replace an old job
program with a new one, perform steps 1, 2, and 3.
To call up the job program from memory, press the Job Memory Select Key.
NOTE
All copying settings that can be made on the control panel can be stored in job
memory, except the Inter rup t, Manu al Sta ple, En ergy S avi ng , Drum
Dehumidify Auxiliary To ner Replenishing, and Tota l Check Modes.
 Loading...