

Page 1

Table of Contents
Using the Copier Properly..............................................................X-1
What is an Energy Star Copier ?....................................................X-3
EP1054..........................................................................................X-4
CE Marking ( Declaration of Conformity)........................................X-4
Terms and Symbols for the Type of Originals and Copy Paper..... X-5
Feeding Direction (copy paper path)..............................................X-5
“Width” and “Length”......................................................................X-5
Terms and Symbols Used..............................................................X-6
1 Safety Notes
1.1 Installing the Copier......................................................................1-1
Installation Site................................................................................1-1
Power Source..................................................................................1-1
Grounding.......................................................................................1-2
Space Requirements.......................................................................1-2
1.2 Precautions for Use ......................................................................1-3
Operating Environment...................................................................1-3
Using the Copier Properly...............................................................1-3
Care of Copier Supplies..................................................................1-4
Moving.............................................................................................1-4
Legal Restrictions on Copying ........................................................1-5
Financial Instruments......................................................................1-5
Legal Documents............................................................................1-5
General...........................................................................................1-5
2 Getting to Know Your Copier
2.1 System Overview ..........................................................................2-1
Multi Bypass Tray MB-4 <Option> ..................................................2-1
EP1054...........................................................................................2-1
2.2 Copier Parts and Accessories.....................................................2-2
Outside Copier................................................................................2-2
Inside Copier...................................................................................2-3
Multi Bypass Tray MB-4..................................................................2-5
EP1054
Page 2

2.3 Control Panel Keys and Indicators.............................................2-6
Control Panel..................................................................................2-6
Display............................................................................................2-8
Monitor Display...............................................................................2-8
Paper Information Display ..............................................................2-9
Zoom Ratio Indicator / Multi-Copy Display .....................................2-9
Exposure Information Display.......................................................2-10
2.4 Turning ON and OFF, and Resetting the Copier...................... 2-11
Turning ON and OFF....................................................................2-11
When the Copier is Turned ON ....................................................2-11
Minimizing the Warm-up Time......................................................2-12
Initial Mode and Panel Resetting..................................................2-13
Auto Reset Function.....................................................................2-14
3 Making Copies
3.1 Copying Overview ........................................................................3-1
3.2 Copying Procedure ......................................................................3-4
Placing Originals.............................................................................3-4
Sheet Originals (Standard Size).....................................................3-4
Highly Transparent Originals..........................................................3-4
Book Original..................................................................................3-5
Checking the Copy Paper Size and Selecting the Paper Source... 3-6
Selecting the Paper Source
(Only when the Multi Bypass Tray is used) ....................................3-6
3.3 Zoom Ratio....................................................................................3-7
Fixed Zoom Ratios .........................................................................3-7
Zoom Ratios...................................................................................3-7
Selecting the Fixed Zoom Ratios....................................................3-7
Setting a Zoom Ratio......................................................................3-8
3.4 Image Density ...............................................................................3-9
Types of Exposure Modes..............................................................3-9
Selecting the Auto Exposure Mode..............................................3-10
Selecting the Manual Exposure Mode..........................................3-10
Selecting the Photo Mode ............................................................3-10
3.5 Book Copying .............................................................................3-11
Selecting the Book Copying Mode ...............................................3-11
3.6 Manual Bypass Copying............................................................3-13
Using the Manual Bypass Tray.....................................................3-14
Using the Multi Bypass Tray (Option)...........................................3-14
EP1054
Page 3

4 Auxiliary Functions
4.1 Checking the Total Number of Copies Mode..............................4-1
Types of Counters...........................................................................4-1
Counter Display...............................................................................4-1
Using the Meter Count Function .....................................................4-2
4.2 Toner Replenisher Function (Increasing the Image Density)...4-3
4.3 Drum Dehumidifier Function........................................................4-4
4.4 User’s Choice ................................................................................4-6
Functions Available in User’s Choice..............................................4-6
Description of Each User’s Choice Function...................................4-6
Making the User’s Choice Mode Settings.....................................4-11
5 When an Indicator Lights Up
5.1 Quick Reference for Indicator Lights..........................................5-1
Warning Indicators ..........................................................................5-1
5.2 Detailed Instructions for Indicator Lights...................................5-2
Add Toner Indicator.........................................................................5-2
Replacing the Toner Bottle..............................................................5-2
Add Paper Indicator ........................................................................5-4
Adding Paper (Drawer) ...................................................................5-4
Adding Paper (Multi Bypass Tray) ..................................................5-5
Closure Failure Indicator.................................................................5-6
Misfeed Indicator.............................................................................5-7
Misfeed Cl earing Procedure............................................................5-7
Call-Tech.-Rep. Indicator..............................................................5-10
Resetting the Call-Tech.-Rep. Indicator........................................5-10
I.U. Service Life Indicator Lights Up..............................................5-11
Precautions for Handling............................................................... 5-12
Removing the I. U. from the copier ...............................................5-13
Unpacking the I. U.........................................................................5-14
Setting up the I. U. ........................................................................5-14
Charging the Copier with Starter and Toner .................................5-16
6 Troubleshooting
6.1 When this Type of Copy is Produced..........................................6-1
6.2 The Copier is not functioning as designed ................................6-3
7 Specifications
Copier EP1085................................................................................7-1
Multi Bypass Tray MB-4..................................................................7-2
EP1054
Page 4

8 Miscellaneous
8.1 Care of the Copier ........................................................................8-1
Daily Checks...................................................................................8-1
Power Cord, Communications Cable, Ground Cable.....................8-1
Original Glass.................................................................................8-1
Original Cover, Automatic Document Feeder.................................8-1
Copy Paper.....................................................................................8-2
Sound of Copier Operation.............................................................8-2
Copier Housing Temperature.........................................................8-2
Cleaning .........................................................................................8-2
Housing ..........................................................................................8-2
Original Pad....................................................................................8-2
Original Glass.................................................................................8-3
Control Panel..................................................................................8-3
Front Door ......................................................................................8-3
Corona Units...................................................................................8-4
8.2 Paper Size and Zoom Ratio Table...............................................8-5
Paper Size......................................................................................8-5
Zoom Ratio Table (Original Size to Copy Paper Size) ...................8-6
EP1054
Page 5

Using the Copier Properly
To ensure the optimum performance of the copier, follow the precautions
listed below.
Never place a heavy object on the copier.
Never subject the copier to shocks.
Never open doors or turn the copier off while he is making copies.
Never bring any magnetized object near the copier.
Never use flammable sprays, liquids or gases near the copier.
Never modify the copier, as a fire or electrical shock could result.
Never remove any panel or cover which is secured. The copier
contains high voltage components which can cause electrical shock.
Never tamper with the laser mechanism in laser-equipped models, as
blindness or other injury may result.
Never drop paperclips, staples or other small pieces of metalthrough
the vents or other openings in the copier, as a fire or electrical shock
can result.
Never place containers of liquid on the copier. If liquids get inside the
copier,theycan cause fire or electrical shock.Ifa piece of metal or any
liquidgets insidethecopier,immediatelyturn the copier off, unplug the
power cord and call your technical representative. A fire or electrical
shock can result if the copier remains plugged in or is operated after
metal or liquid gets inside.
Neverleave the copier running if it becomes unusually hot, orif smoke
or an unusual odor or noise is detected. Should any of these
conditions occur, immediately turn the copier off, unplug the power
cord and call your technical representative. A fire or electrical shock
can result if the copier remains plugged in under any of these
conditions.
Always insert the power plug all the way into the outlet.
Always make surethat the outlet is visible, clear of the copieror copier
cabinet.
Always provide good ventilation when making a large number of
continuous copies.
Never pull on the power cord, and always hold the plug when
unplugging the power cord. A damaged cord could result in a fire or
cause an electrical shock.
Never unplug the power cord with a wet hand, as it could cause an
electrical shock.
Always unplug the power cord before moving the copier. Moving the
copier with the power cord plugged in can damage the cord resulting
in a fire or causing an electrical shock.
EP1054 X-1
Page 6
Alwaysunplugthe power cord when the copier is not going to beused
for a long time.
Never place a heavy object on the power cord, or pull or bend it, as a
fire or electrical shock can result.
Always ensure that the copier does not sit on or move onto the power
cord or communications cable of other electrical equipment, as
malfunctioning equipment or a fire could result.
Always ensure that the power cord or communications cable of other
electrical equipment does not become wedged into the copier
mechanism, as malfunctioning equipment or a fire could result.
Always use the correct power voltage, as improper voltage can cause
a fire or electrical shock.
Never use a multiple outlet adapter, as a fire or electrical shock can
result.
Shouldthe power cord become damaged, immediately turn the copier
off, unplug the power cord and call your technical representative. A
damaged cord can result in a fire or cause an electric shock.
If an extension cord is needed, use one with a greater rated capacity
than the maximum power requirements of the copier. The use of an
extension cord that falls short of supporting the maximum power
requirements can result in overheating or a fire
Always unplug the copier whenever anything unusual is observed
during operation. Make sure that the outlet is nearby and clear of the
copier and furniture.
NOTE
Locate the Copier in a Well Ventilated Room
è A negligible amount of ozone is generated during normal operation of
this copier. An unpleasant odor may, however, be created in poorly
ventilated rooms during extensive copier operations. For a
comfortable, healthy and safe operating environment, it is
recommended that the room be well ventilated.
Placer le copieur dans une pièce largement ventilée
è Une quantité d’ozone négligeble est dégagée pendant le fonction-
nementducopieurquandcelui-ciestutilisé normalement.Cependant,
une odeur désagréable peut être ressentie dans les pièces dont
l’aérationestinsuffisanteet lorsqu’une utilisation prolongée du copieur
est effectuée. Pour avoir la certitude de travailler dans un
environnment réunissant des conditions de confort, santé et de
sécurité,ilest préférable de bien aérerlapièce ou se trouvelecopieur.
X-2 EP1054
Page 7
As an ENERGY STAR
have determined that this copier meets
the ENERGY STAR
®
Partner, we
®
Guidelines for
energy efficiency.
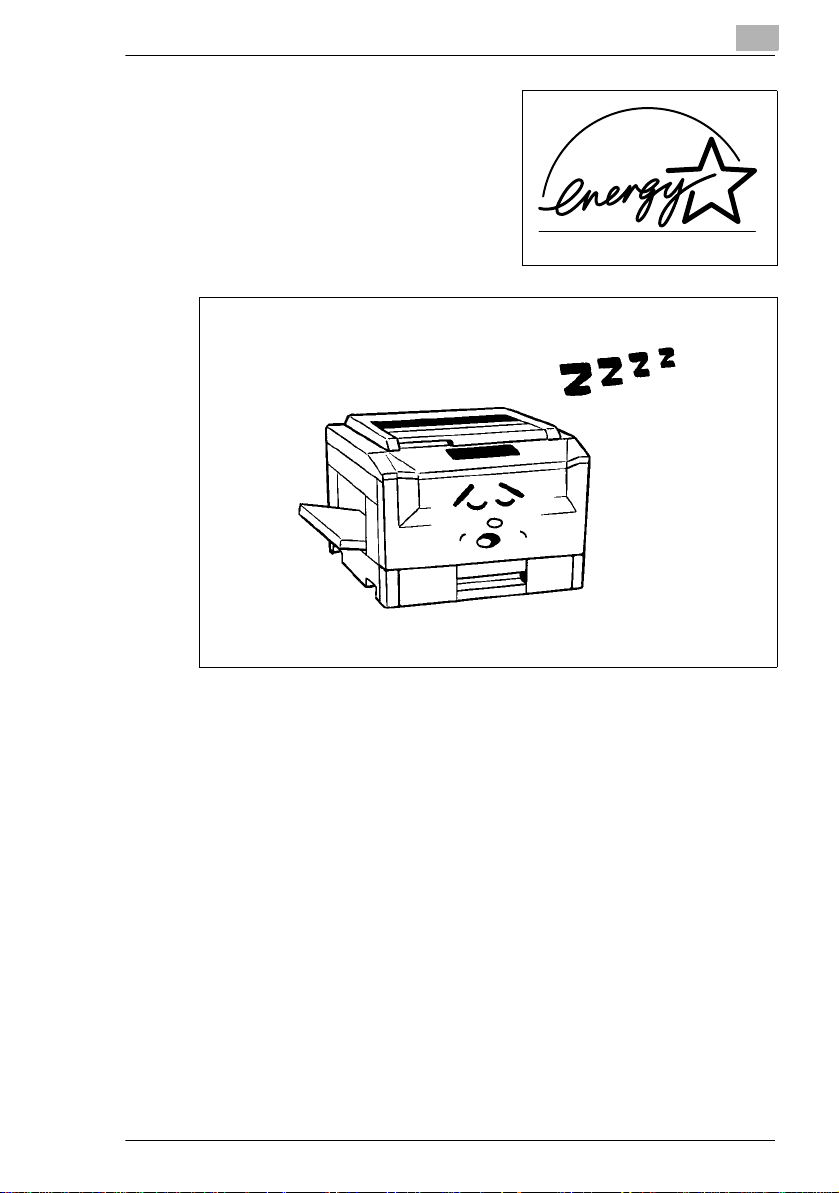
What is an Energy Star Copier ?
EnergyStar Copiers have a feature that allows them to automaticallyturn
off or “goto sl eep” after a period of inactivity, ensuringnight and weekend
shut off. This auto-feature can reduce a copier’s annual electricity costs
by over 60 percent. In addition, high speed copiers will be set to
automatically make double sided copies. An organization’s paper costs
can be reduced and the volume of paper sent into the waste stream will
decline.It takes 10 times more energy to produce a piece of paper than it
does to make a single copy on a copier. Therefore, using less paper also
means decreased national energy consumption.
EP1054 X-3
Page 8

EP1054
Thank you for choosing Minolta.
This operator’s manual explains how to operate the copier and replenish
its supplies. It also gives some troubleshooting tips as well as general
precautions to be observed when operating the copier.
Toensurethebest performance and effective use of yourcopier,readthis
manualcarefullyuntilyou familiarize yourself thoroughly with itsoperation
and features. After you have read through the manual, keep it for ready
reference.
Please use this manual as a quick and handy reference tool for
immediately clarifying any questions which may arise.
CE Marking (Declaration of Conformity)
We declare under our sole responsibility that this copier and options to
which this declaration relates is in conformity with the specifications
below. This declaration is valid for the area of the European Union (EU)
only.
Product Type Copying Mac hine
ProductName EP1054
Options MB-4
Standards Safety
EC Directives Safety: 73 / 23 / EEC and 93 / 68 / EEC
*2
: EN 60 950 / 1992
(A1 : 1993, A2 : 1993, A3 : 1995, A4 : 1996)
(Safetyof informationtechnologyequipment,including
*1
EMC
: EN55 022 Class B:1994 (A1:1995)
Notes: *1) EMC performance :
BMC: 89 / 336 / EEC and 93 / 68 / EEC
electrical businessequipment)
(Limits and method for m easu re ment of radio
disturbance characteristicsof informationtechnology
equipment(ITE))
EN 50 082-1 / 1992
(Electromagnetic compatibility-Generic immunity
standardPart1 : Residential,commercialand light
industry)
IEC 801-2 / 1991
(Electrostatic discharge requirement)
IEC 801-3 / 1984
(Radiatedelectromagnetic field requirement)
IEC 801-4 / 1988
(Electrical fast transient / burst requirement)
This product was designed for operation in a typical
officeenvironment
*2) First year of labelling accordingto EC-directive
73/23 / EEC and 93 / 68 / EEC : 98
X-4 EP1054
Page 9
Terms and Symbols for the Type of Originals and Copy Paper
A few special terms and symbols are used in this manual to designate
types of originals and copy paper. This page explains about these terms
and symbols.
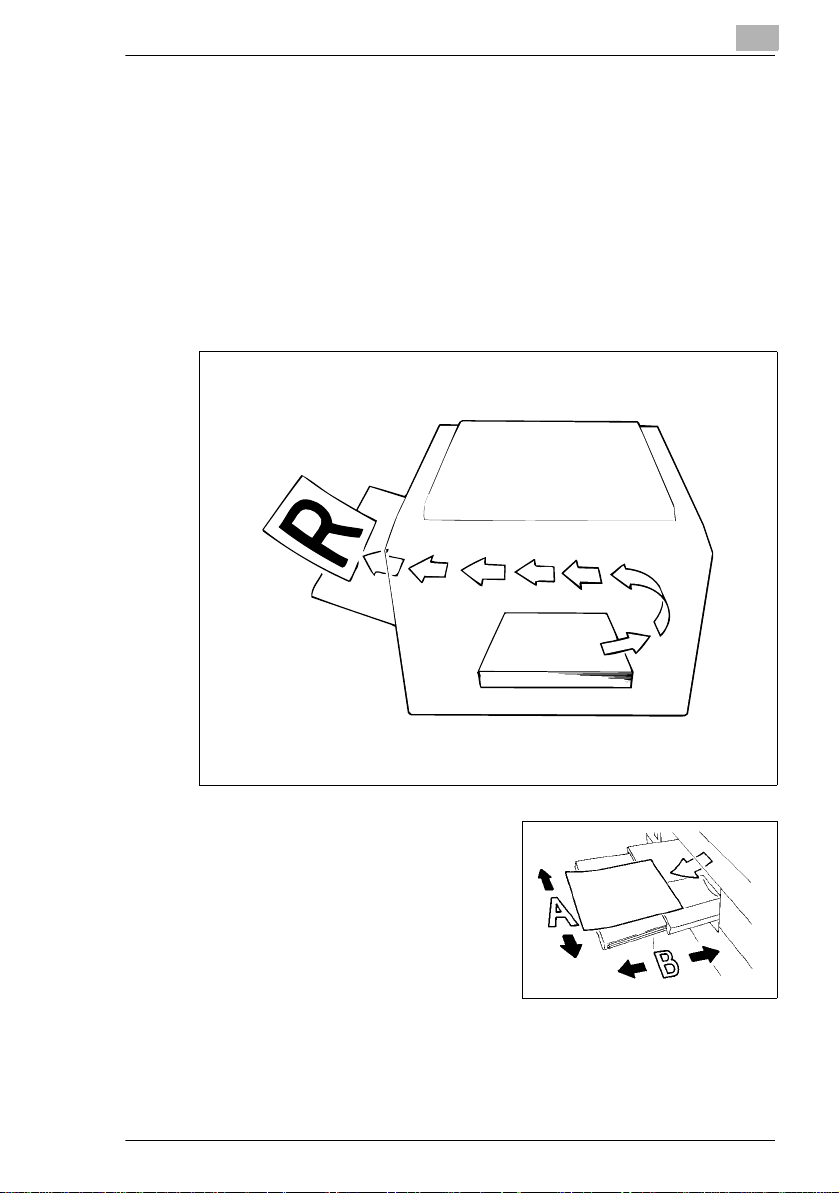
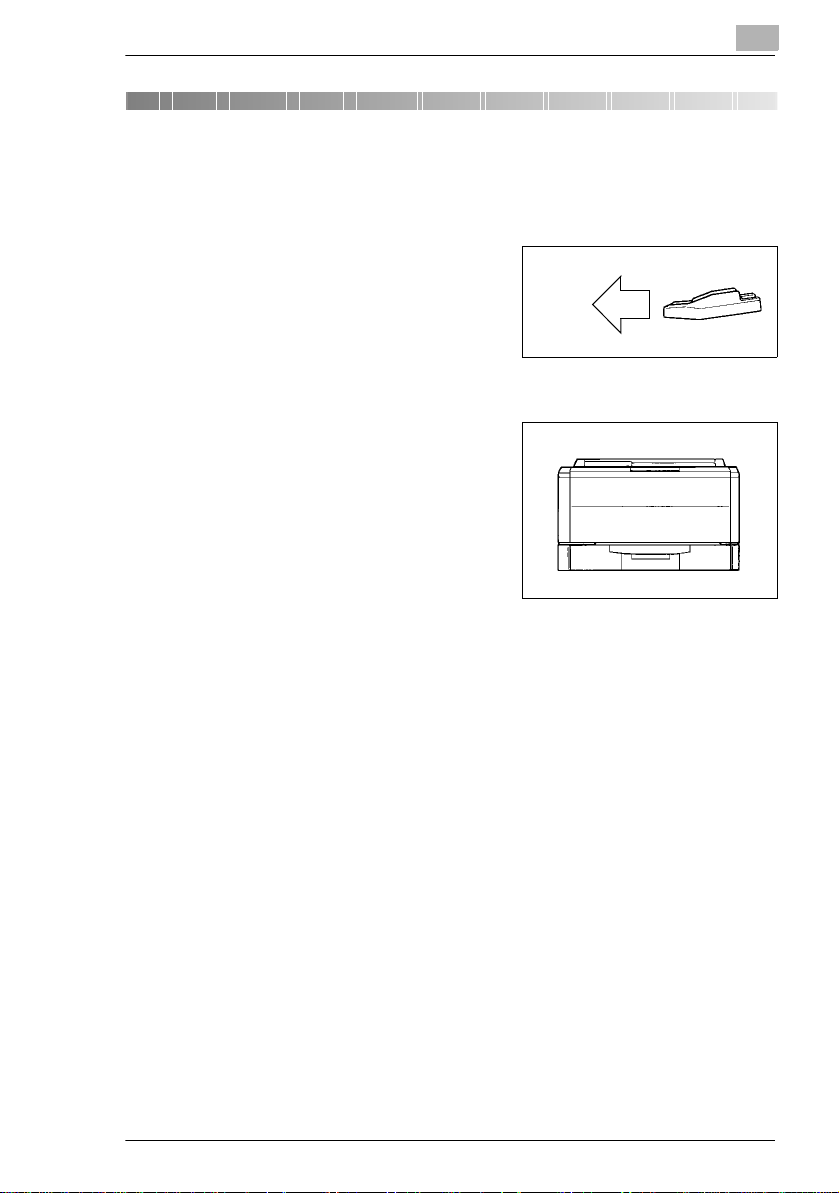
Feeding Direction (copy paper path)
In this copier system, copy paper is taken up from the right-hand side of
the copier and fed through the copier toward the left-hand side, out face
up onto the Exit Tray. In the figure below, the direction in which the copy
paper is fed, as indicated by the arrow, is called the “feeding direction.”
“Width” and “Length”
When we talk about the size of the
original or copy, we call side A “width”
and side B “length.”
A: Width
B: Length
EP1054 X-5
Page 10

Terms and Symbols Used
Lengthwise
Whenthe original or copyhasa“length”
longer than its “width,” we call it
“lengthwise” and use symbol “L” or
““.
Crosswise
Whenthe original or copyhasa“length”
shorter than its “width,” we call it
“crosswise” and use symbol “C” or “ ”
X-6 EP1054
Page 11

Safety Notes
1 Safety Notes
1.1 Installing the Copier
Installation Site
To ensure utmost safety and prevent possible malfunctions of the copier,
install it in a location which meets the following requirements.
A place away from a curtain or the like that may catch fire and burn
easily.
An area where there is no possibility of being splashed with water or
other types of liquid.
An area free from direct sunlight.
A place out of the direct air stream of an air conditioner, heater, or
ventilator.
A well-ventilated place.
A dry place.
A dust-free location.
An area not subject to undue vibration.
A stable and level location.
1
Power Source
The power source voltage requirements are as follows.
Use a power source with little voltage fluctuation.
Voltage Fluctuation: Within ±10%
Frequency Fluctuation: 50/60 Hz Within ±0.3%
If any other electrical equipment is sourced from the same power
outlet, make sure that the capacity of the outlet is not exceeded.
The outlet should be located near the copier and easily accessible.
Never connect by means of a multiple socket any other appliances or
machines to the outlet being used for the copier.
If an extension cord is needed, use one with a capacity more than the
power consumption of the copier.
Make sure that no unusual, excessive force is being applied to the
power cord or extension cord.
EP1054 1-1
Page 12
1
Safety Notes
Grounding
To prevent receiving electrical shocks in the case of electrical leakage,
always ground the copier.
Connect the grounding wire to:
The ground terminal of the outlet.
Agroundingcontactwhichcomplies with the local electricalstandards.
NOTE
è Never connect the grounding wire to a gas pipe, a grounding wire for
a telephone or a water pipe.
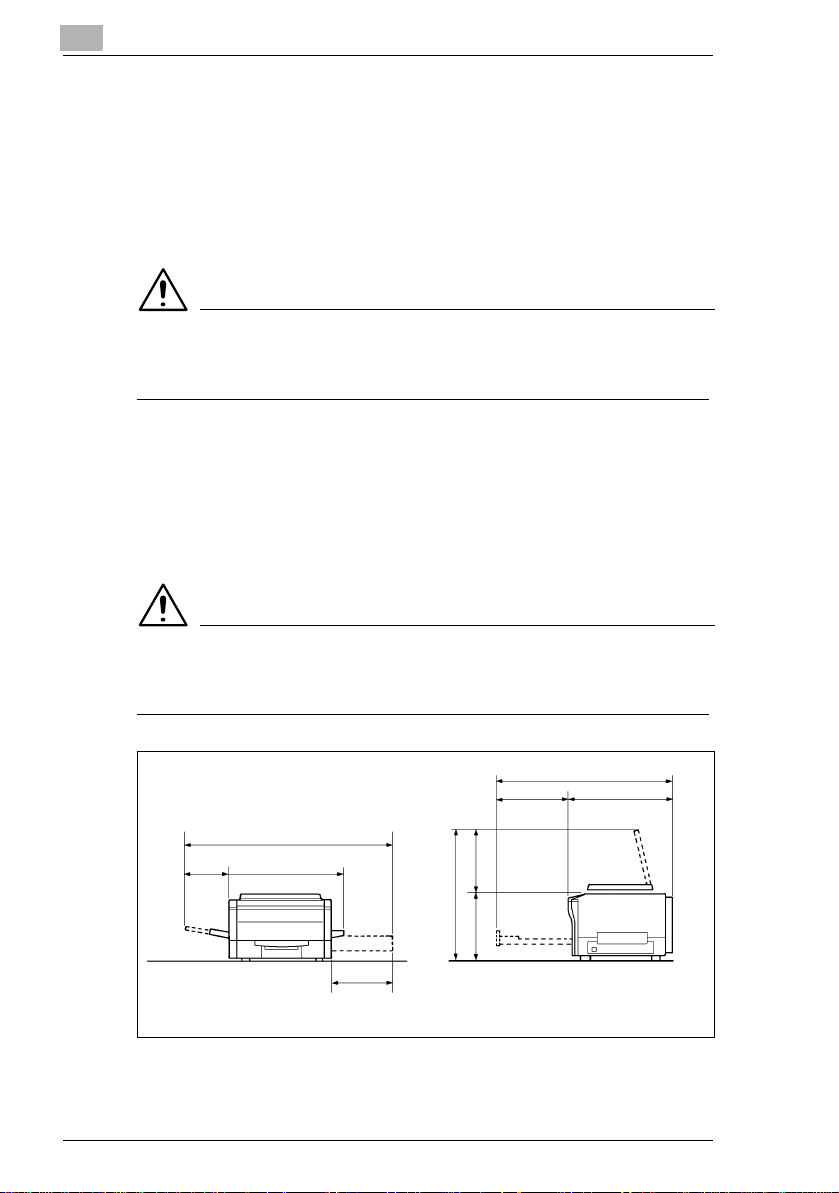
Space Requirements
To ensure easy copier operation, supply replacement and service
maintenance, adhere to the recommended space requirements detailed
below.
NOTE
è Be sure to allow a clearance of 150mm. or more at the back of the
copier as there is a ventilation duct.
Copier
1,250
655253
469372
841
387
1,085
448 637
Scale: mm
1-2 EP1054
Page 13

Safety Notes
1.2 Precautions for Use
Operating Environment
The operating environmental requirements of the copier are as follows.
Temperature: 10°C to 30°C (50°F to 86°F) with a fluctuation of
10°C (50°F) per hour
Humidity: 15% to 85% with a fluctuation of 20% per hour
Using the Copier Properly
To ensure the optimum performance of the copier, follow the precautions
listed below.
NEVER place a heavy object on the copier or subject the copier to
shocks.
NEVER open any doors, or turn OFF the copier while the copier is
making copies.
NEVER bring any magnetized object or use flammable sprays near
the copier.
NEVER place a vase or vessel containing water on the copier.
NEVER drop paper clips, staples, or other small pieces of metal into
the copier.
NEVER attempt to remove any Cover that is secured.
NEVER remodel the copier, as a fire or electrical shock could result.
ALWAYS insert the power plug all the way into the outlet.
ALWAYS make sure that the outlet is visible, clear of the copier or
copier cabinet.
ALWAYS ensure that the copier does not ride on the power cord or
communicationscable of other electrical equipment, and it does not
get such a cord or cable wedged into its own mechanism.
NEVER leave damage or cracks evident on the copier power cord
unattended.If youfindanyofthese conditions, immediatelyshutdown
the copier, unplug the power cord, and call your Technical
Representative for appropriate action.
ALWAYS provide good ventilation when making a large number of
continuous copies.
NEVER keep the copier running when it becomes inordinately hot or
produces abnormal noise. If that happens, immediately turn OFF the
copier, unplug it, and then call your Technical Representative.
1
EP1054 1-3
Page 14

1
Safety Notes
NOTE
Locate the Copier in a Well Ventilated Room
è A negligible amount of ozone is generated during normal operation of
this copier. An unpleasant odor may, however, be created in poorly
ventilated rooms during extensive copier operations. For a
comfortable, healthy, and safe operating environment, it is
recommended that the room be well ventilated.
Placer le copieur dans une pièce largement ventilée
è Une quantité d’ozone négligable est dégagée pendant le
fonctionnement du copieur quand celui-ci est utilisé normalement.
Cependant, une odeur désagréable peut être ressentie dans les
pièces dont l’aération est insuffisante et lorsque une utilisation
prolongéeducopieuresteffectuée.Pouravoir la certitude de travailler
dans un environnement réunissant des conditionsde confort, santè et
de sécurité, il est préférable de bien aérer la pièce ou se trouve le
copieur.
Care of Copier Supplies
Use the following precautions when handling the copier supplies (toner,
paper, etc.).
Store the paper, toner, and other supplies in a place free from direct
sunlight and away from any heating apparatus. Keep them in a dry,
clean environment.
Storepaper,which has been removedfrom its wrapper butnot loaded
into the drawer, in a sealed plastic bag in a cool, dark place.
Use the correct toner for the exclusive use by the copier. The
applicable copier model name is indicated on the Toner Bottle.
Keep supplies out of the reach of children.
If your hands become soiled with toner, wash them with soap and
water immediately.
Moving
If you need to transport the copier over a long distance, consult your
Technical Representative.
1-4 EP1054
Page 15

Safety Notes
Legal Restrictions on Copying
Certain types of documents must never be copied by the copier for the
purpose or with the intent to pass copies of such documents off as the
original. The following is not a complete list but is meant to be used as a
guide to responsible copying.
FinancialInstruments
Personal Checks
Travelers Checks
Money Orders
Certificates of Deposit
Bonds or other Certificates of Indebtedness
Stock Certificates
Legal Documents
Food Stamps
Postage Stamps (canceled or uncanceled)
Checks or Drafts drawn by Government Agencies
Internal Revenue Stamps (canceled or uncanceled)
Passports
Immigration Papers
Motor Vehicle Licenses and Titles
House and Property Titles and Deeds
1
General
Identification Cards, Badges, or Insignias
Copyrighted Works without permission of the copyright owner
In addition, it is prohibited under any circumstances to copy domestic or
foreign currencies or Works of Art without permission of the copyright
owner.
When in doubt aboutthe nature of a document, consult withlegal counsel.
EP1054 1-5
Page 16

1
Safety Notes
1-6 EP1054
Page 17
Getting to Know Your Copier
2 Getting to Know Your Copier
2.1 System Overview
MultiBypassTrayMB-4<Option>
Holdsup to 50 sheetsofstandardpaper
which i s not loaded in any of the
Drawers, allowing to make copies on
them, see page 3-14.
EP1054
The Paper Drawer can hold up to 250
sheets of copy paper. The Manual
BypassTrayallows you to make acopy
on paper which is not loaded in the
Drawer and which is fed into the copier
manually via this Tray.
EP1085
2
EP1054 2-1
Page 18
2
2.2 Copier Parts and Accessories
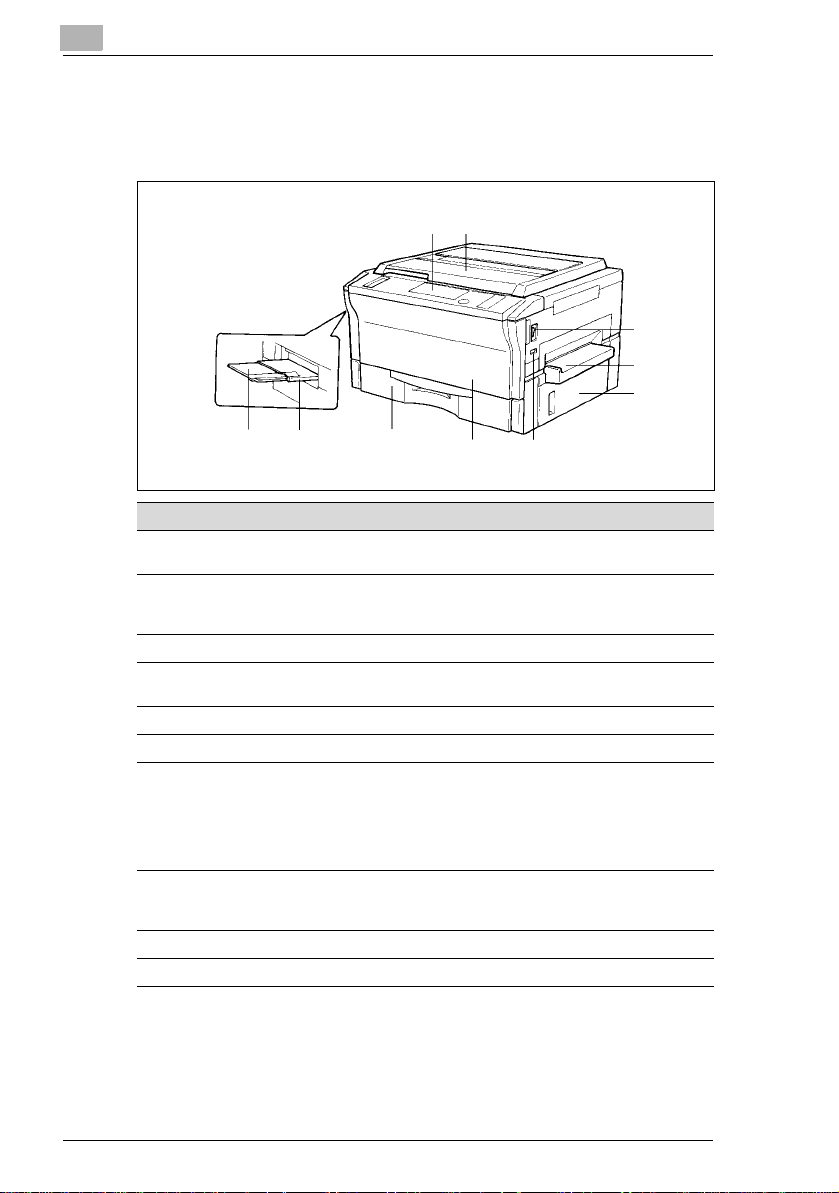
Outside Copier
12
Getting to Know Your Copier
3
4
5
8910
Pcs. Specification Description
1 Control Panel Use to start a copy cycle or to make copying-jobsettings,
2 Original Cover Holds the original placed on the Original Glass in position.
3 PowerSwitch Use to turn the copier ON and OFF, see page 2-11.
4 ManualBypass Tray Use for manual feeding of paper into the copier,
5 RightDoor Open to clear a paper misfeed,see page 5-7.
6 TotalCounter Shows the totalnumber of copies made so far.
7 FrontDoor Open to:
8 PaperDrawer Holds up to 250 sheets of paper. The Edge Guide and
9 ExitTray Holds copies fed out of the copier.
10 Copy Tray Extender Slide this out when making copieson large-size paper.
see page 2-6.
To place an original, raise the Cover and place itin position
on the Original Glass, see page 3-4
see page 3-13.
Replace the Toner Bottle,see page 5-2.
Clear a paper misfeed, see page 5-7.
Clean the Corona Units,see page 8-4.
Closingthe Front Door after a misfeed has been cleared
will turnthe Misfeed Indicator on the controlpanel OFF.
TrailingEdge Stoparemovable,allowingyouto loadpaper
of differentsizes, see page 5-4.
67
2-2 EP1054
Page 19
Getting to Know Your Copier
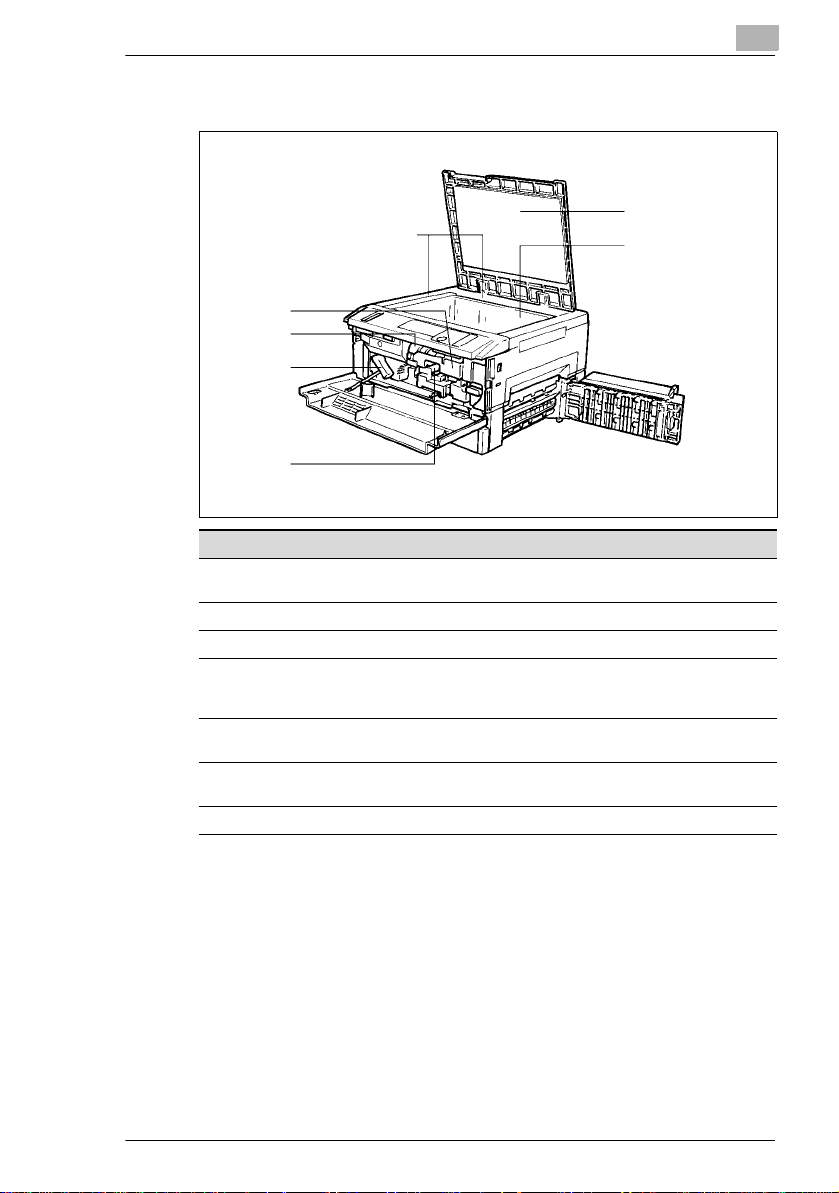
Inside Copier
7
6
5
4
Pcs. Specification Description
1 Original Width/Length
Scale
2 Original Pad Holdsthe original in position on the O riginal Glass.
3 Original Glass Place the original face down on this Glass, see page 3-4.
4 CoronaUnit Cleaning
Lever (Upper/Lower)
5 LockRelease Lever Turn counterclockwiseto swing up the Upper Half of the
6 TonerBottle Contains toner. Replace it with a new one when the Add
7 TonerBottle Holder Swing open to replace the Toner Bottle,see page 5-2.
2
1
Place the originalalong these Scales for correct
positioning, see page 3-4.
Operate the Lever to clean the corresponding Corona Unit
if unwanted lines are produced on the copy,
seepage8-4.
copier to clear a paper misfeed, see page 5-7.
Toner Indicator lights up, see page 5-2.
3
2
EP1054 2-3
Page 20
2
Getting to Know Your Copier
89
13
10
11
12
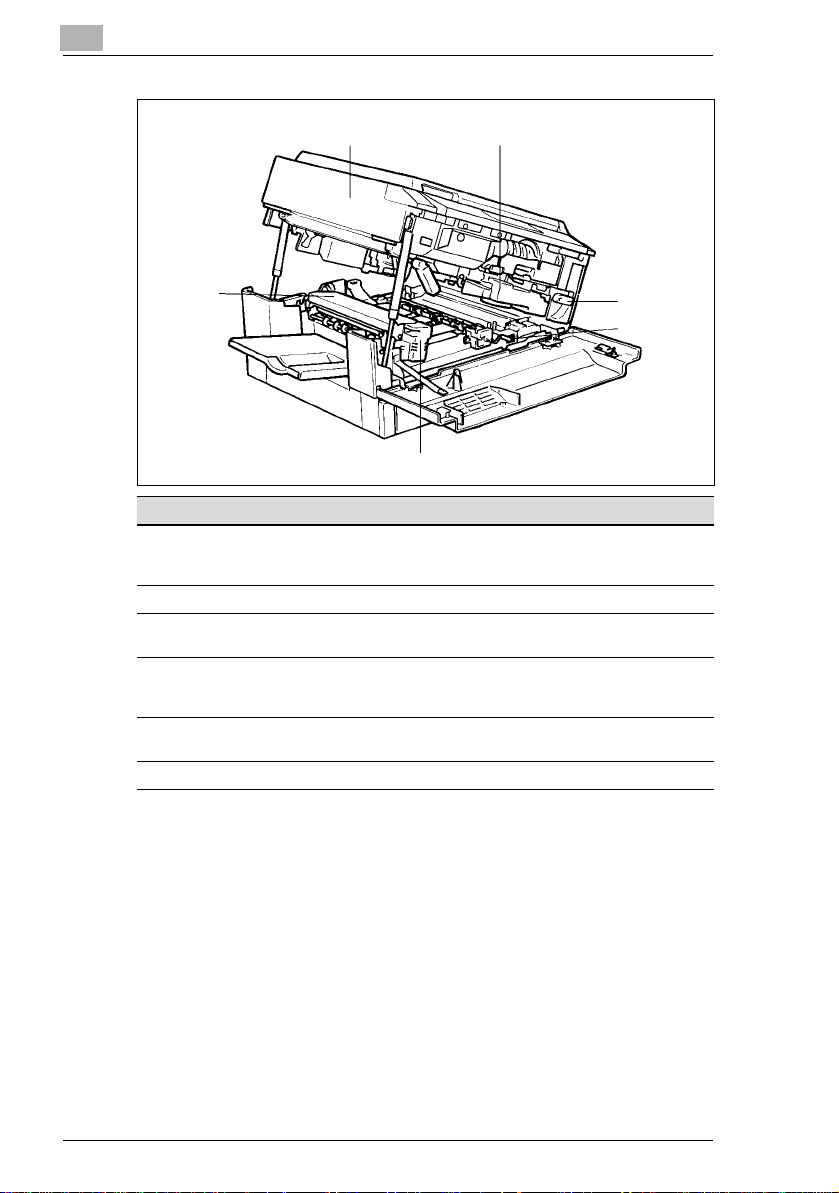
Pcs. Specification Description
8 UpperHalf of Copier The copiermain body can be dividedinto two parts, the
9 Imaging Unit Convertsthe original image to the copy image.
10 ImagingUnit Lock
Release Lever
11 Dehumidifier Switch Turn ON to prevent condensation from forming on the PC
12 Fusing Unit Handle Hold onto this Handle when lifting the Upper Ha lf of the
13 FusingUnit Fuses the toner image onto the paper.
upper and lower.The UpperHalf can be swung upward,
see page 5-7.
Operate when replacing the Imaging Unit, see page 5-13.
Drum when power is turned OFF. (For Technical
Representativeonly)
FusingUnit, see page 5-7.
2-4 EP1054
Page 21
Getting to Know Your Copier
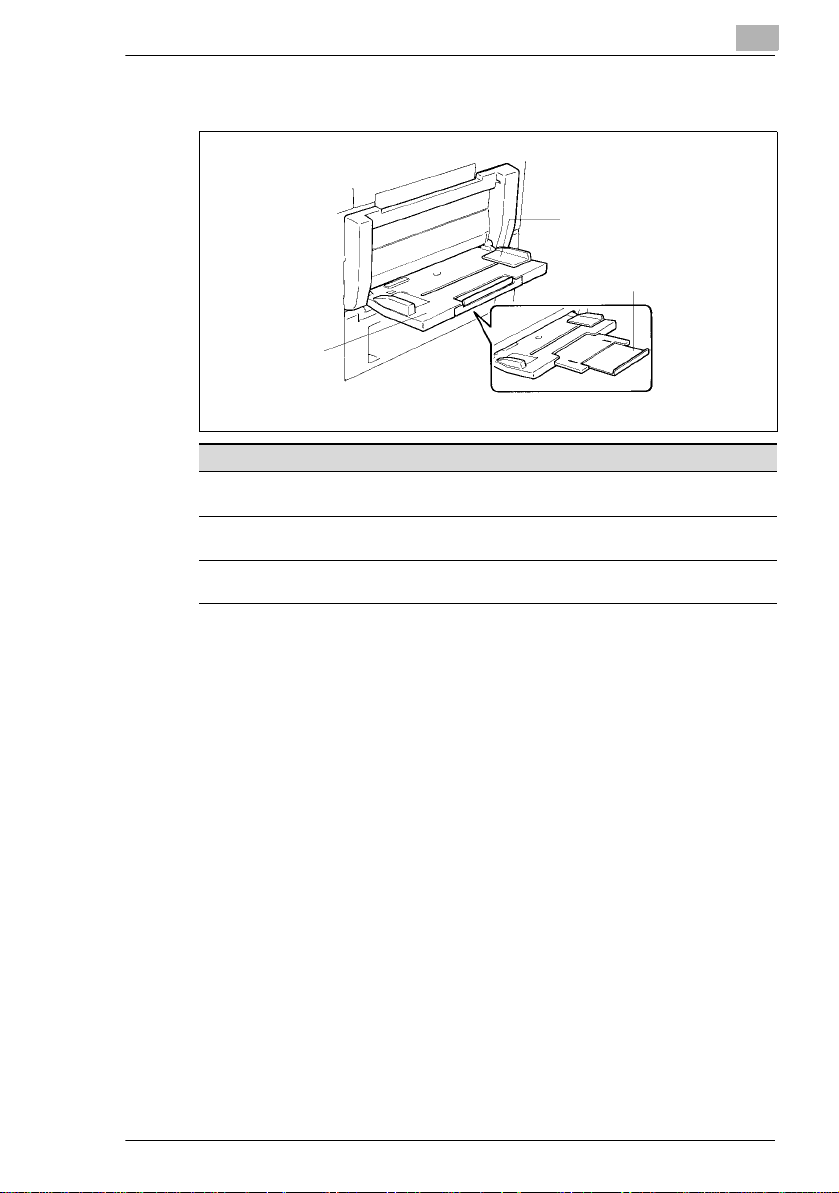
Multi Bypass Tray MB-4
2
Pcs. Specification Description
1 PaperGuide Plate Slideas necessaryto thesize of the copy paper,see page
2 MultiBypass Tray Load your paperon this Tray.It allowsyou to make copies
3 Multi Bypass Tray
Extender
2
1
3
3-14.
continuously on paper fed from this Tray, see page 3-14.
Slide this out to use large-sizecopy paper, see page 3-14.
EP1054 2-5
Page 22

2
%
%
%
%
%
%
Getting to Know Your Copier
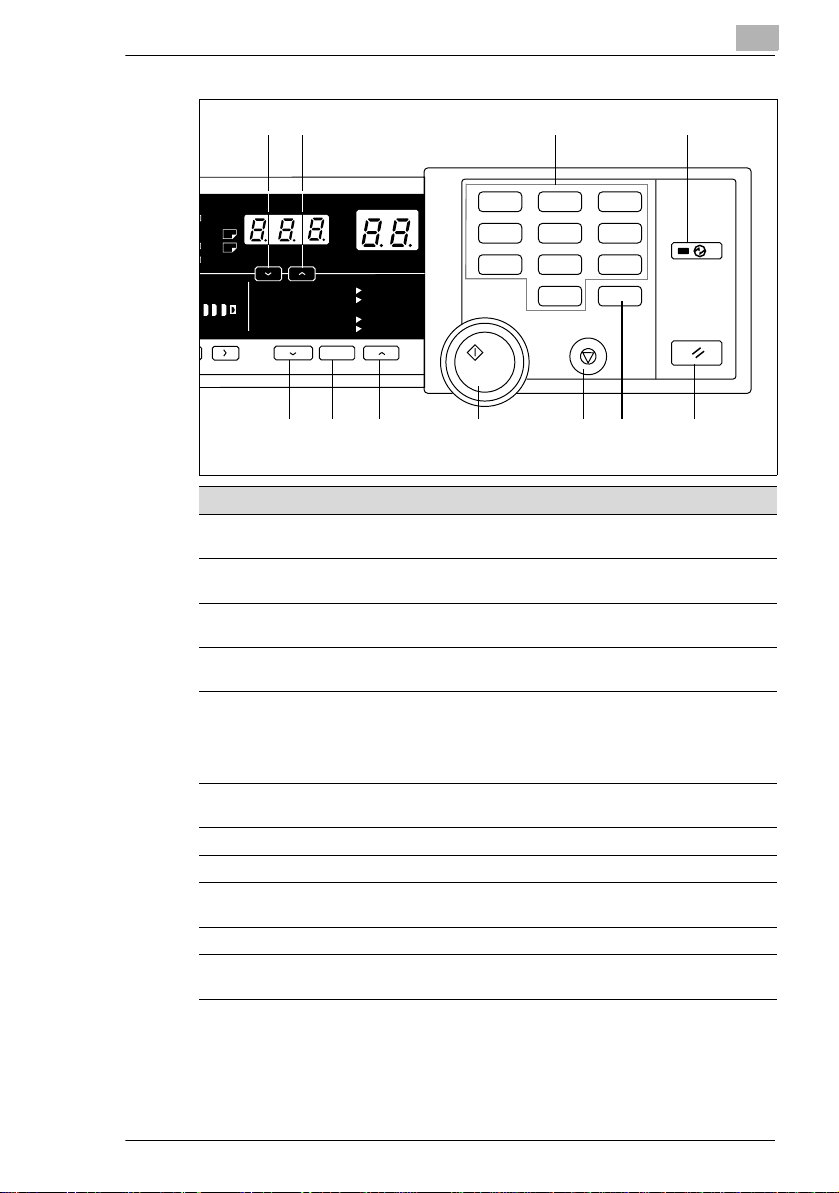
2.3 Control Panel Keys and Indicators
Control Panel
654321
Meter Count
Toner
Drum Dehumidify
Book
A3
@@
A4
@@
B4
A4
@@
A5
@@
Auto
Photo
Auto/Photo
A
FLS.
Inch
Paper
Lighter Darker
50%~200
10 9 8 7
Pcs. Specification Description
1 Clip Tray Usethis tray to put the paper clips used with the
2 Drum Dehumidify Key Presstoremovecondensationformed on thesurfaceofthe
3 Auxiliary Toner
Replenishing Key
4 MeterCount Key Press to check for the currentcounts of four electronic
5 Display See the other pages in this manual,see page 2-8.
6 PaperSelect Key Press to select the paper source, Drawer or MultiBypass
7 Exposure Control Key
(,Darker)
8 Auto Exposure Mode
Key
9 Exposure Control Key
(,Lighter)
10 Book Key Pressas necessaryto selectthe Book CopyingMode, see
documents.
PC Drum, see page 4-4.
Press when the image on the copy becomes too light, see
page 4-3.
countersof the copier, see page 4-2.
Tray (option), when the Multi Bypass Tray is mounted to
thecopier,seepage3-6.
Press as necessaryto make the exposure level higher in
the Manual Exposure Mode, see page 3-10.
Press to select the Auto Exposure, Manual Exposureor
Photo Mode, see page 3-10.
Pressasnecessarytomakethe exposure levellowerin the
Manual Exposure Mode, see page 3-10.
page 3-11.
141
115
100
81
70
2-6 EP1054
Page 23
Getting to Know Your Copier
11 12 13 14
2
@
@
@
@
to
B4
FLS.
Inch
Darker
50%~200%
141% A4 @ A3
115% B4
100%
81% B4
70% A3
21
%
@@@
100%
@
A3
Full Size
@
A4
@
A4
1
4
7
3
2
6
5
9
8
C
0
151617181920
Pcs. Specification Description
11 Zoom Down Key Press as necessary to make the zoom smaller in 1%
increments, see page 3-8.
12 Zoom Up Key Pressas necessaryto make the zoom larger in 1%
increments, see page 3-8.
13 Key Pad Use to enter the number of copies to be made and other
numericdata.
14 Energy Saver Key Press to set the copier into the EnergySaver Mode, see
15 Panel Reset Key
page 2-12.
Press to set the copier into the initialmode, clearingall
settings made previouslyonthe controlpanel,seepage
2-13.
Holding down the Key for 3 seconds will initiate the
User’sChoice, see page 4-11.
16 Clear Key Press to clear the number of copies,zoom and other
settings.
17 Stop Key Press to stop a multi-copy cycle.
18 Start Key Press to start a copy cycle.
19 Enlargement Key Press toselecta desiredfixedenlargement ratio,see page
3-8.
20 Full Size Key Press to selectfull size (100%), see page 3-8.
21 Reduction Key Press to select a desired fixed reduction ratio,
seepage3-8.
EP1054 2-7
Page 24
2
Getting to Know Your Copier
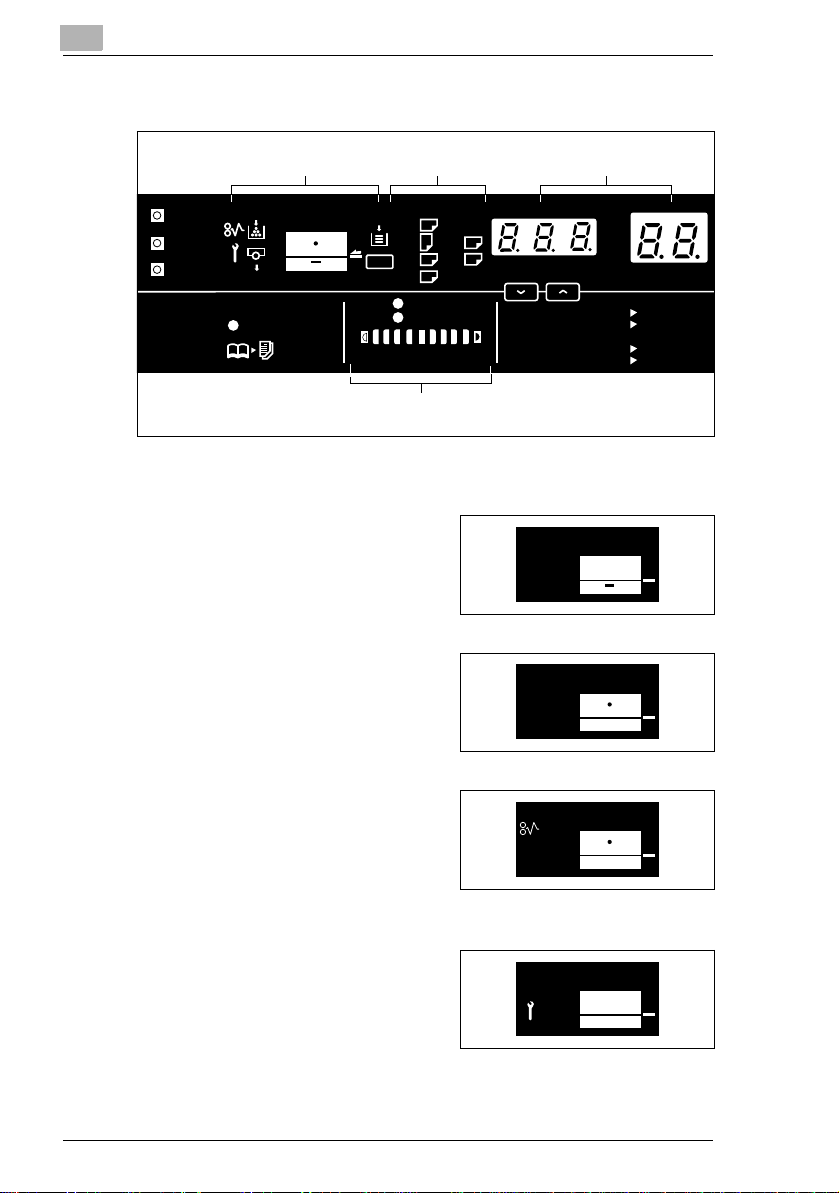
Display
MonitorDisplay
Meter Count
Toner
Drum Dehumidify
Book
Paper Information
Display
A3
@@
A4
@@
B4
@@
FLS.
A4
Paper
A5
@@
Inch
Auto
Photo
Lighter Darker
Auto/Photo
A
Exposure Information
Display
Monitor Display
Paper Source Indicator
Shows the paper source which is
currentlyselectedfor use, see page
3-6.
Example: Shows that the Drawer is
currently selected for use.
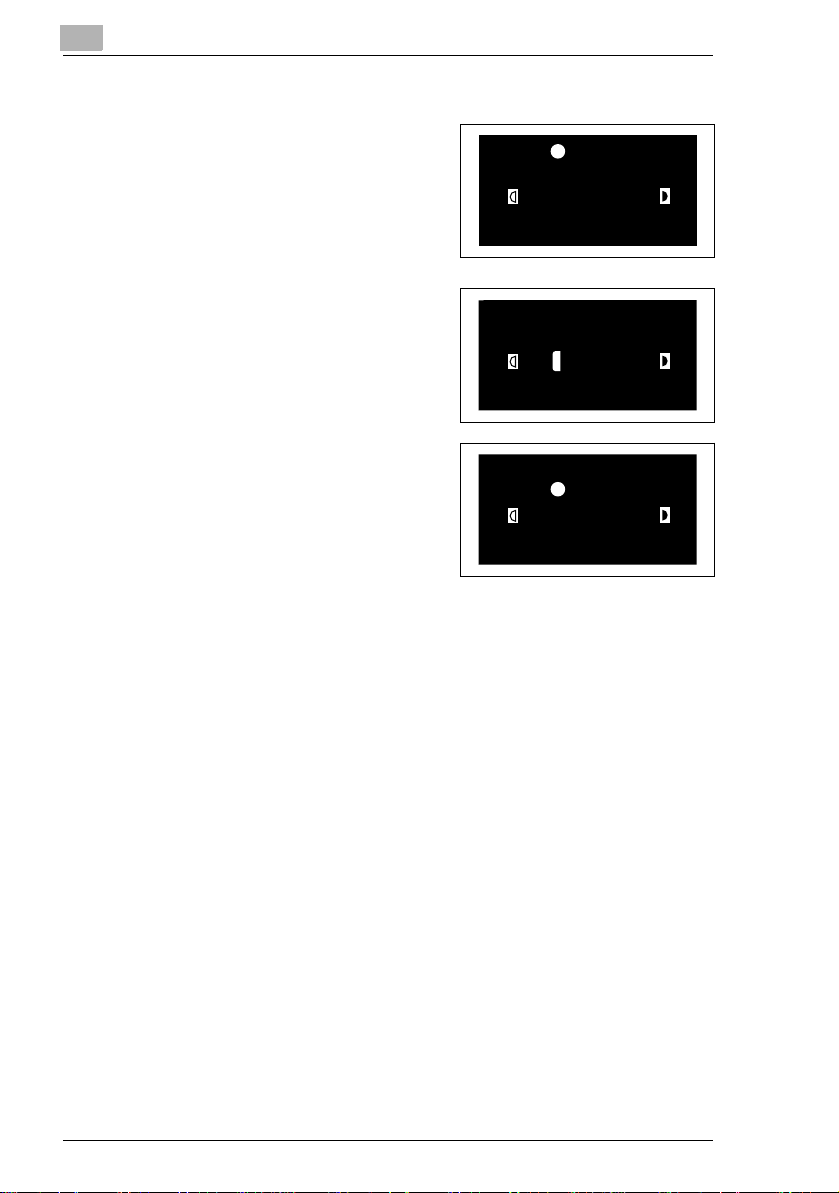
Closure Failure Indicator
The location of a Door left open is
also indicated by a round marker,
seepage5-6.
Example: Indicates that the Front
Door or Right Door is left open.
Misfeed Indicator
Indicates that a paper misfeed has
occurred. The location of the
misfeedis also indicated by a round
marker, see page 5-7.
Example:Showsthata misfeedhas
occurred inside the copier.
Call-Tech.-Rep. Indicator
Indicates that the copier has
developed a malfunction.
When a malfunction occurs, the
corresponding malfunction code is
shown across the Zoom Ratio
Indicator and Multi-Copy Display, see page 5-10.
Zoom Ratio Indicator/
Multi Copy Display
50%~200%
141% A4 @ A3
115% B4
100%
@@@
81% B4
70% A3
%
100%
@
A3
Full Size
@
A4
@
A4
2-8 EP1054
Page 25
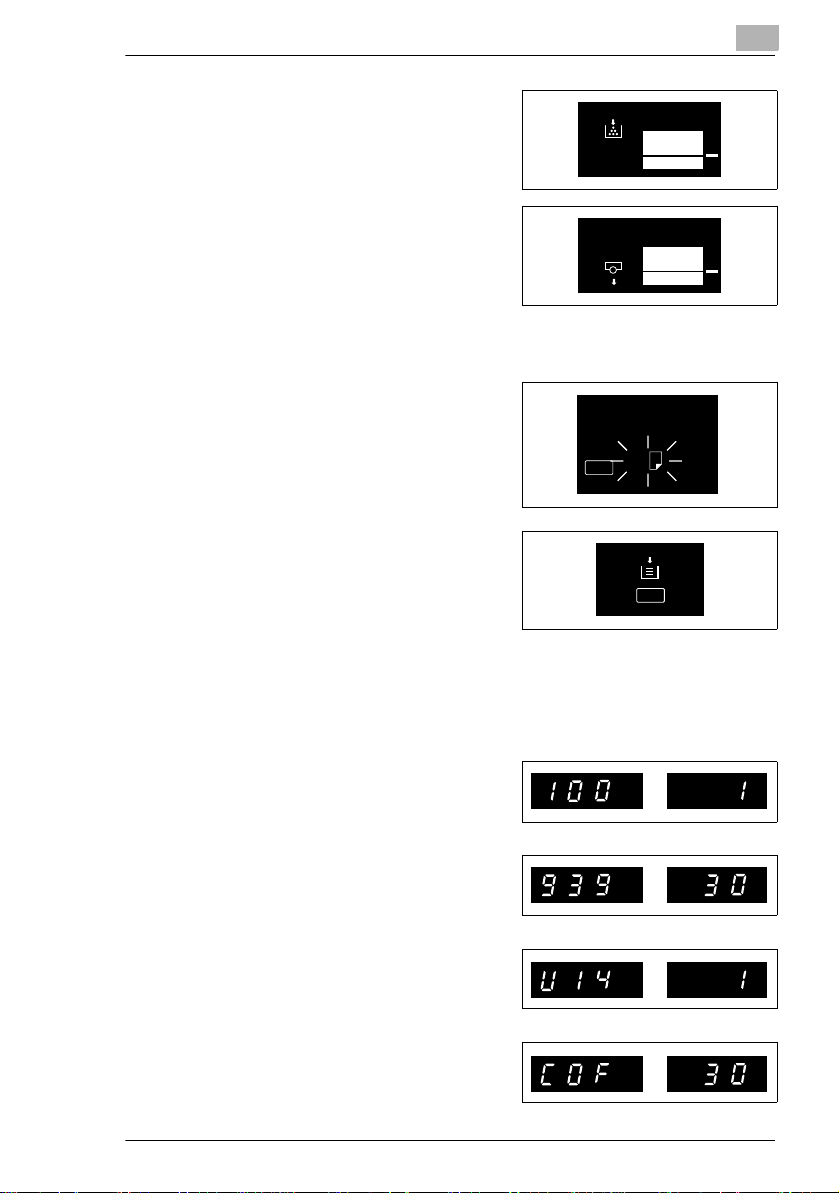
Getting to Know Your Copier
Add T oner Indicator
Indicates that the Toner Bottle is
running out of toner. Replace the
Toner Bottle as soon as possible,
see page 5-2.
I. U. Service Life Indicator
Indicates that the Imaging Unit
needs replacement. Replace the
Imaging Unit, see page 5-11.
Paper Information Display
Paper Size Indicators
Show the size of paper currently
loaded in the Drawer,
see page 3-6.
Add Paper Indicator
Lights up when the currently
selected Drawer has run out of
paper.Add paperasnecessary, see
page 5-4.
Paper
2
A4
1142O143DA
Paper
Zoom Ratio Indicator / Multi-Copy Display
Each shows the following data.
Example
Zoom ratio: 100%
No. of copies: 1
Count of the Total Counter
Example: 93,930 (copies)
User’s Choice code and setting
value
Example: Choice code: 14,
Setting: 1
Malfunction code
Example: Malfunction code C0F30
EP1054 2-9
%
%
%
%
Page 26
2
Exposure Information Display
Auto Exposure Indicator
Indicates that the copier is now in
the Auto Exposure Mode, see page
3-10.
Exposure Level Indicator
Shows the exposure setting level in
the Manual Exposure Mode, see
page 3-10. The center LED is
normally lit.
Photo Mode Indicator
Indicates that the copier is now in
the Photo Mode, see page 3-10.
Getting to Know Your Copier
Auto
Photo
Lighter Darker
Auto/Photo
Auto
Photo
Lighter Darker
Auto/Photo
Auto
Photo
Lighter Darker
Auto/Photo
2-10 EP1054
Page 27
Getting to Know Your Copier
2.4 T urning ON and OFF, and Resetting t he Copier
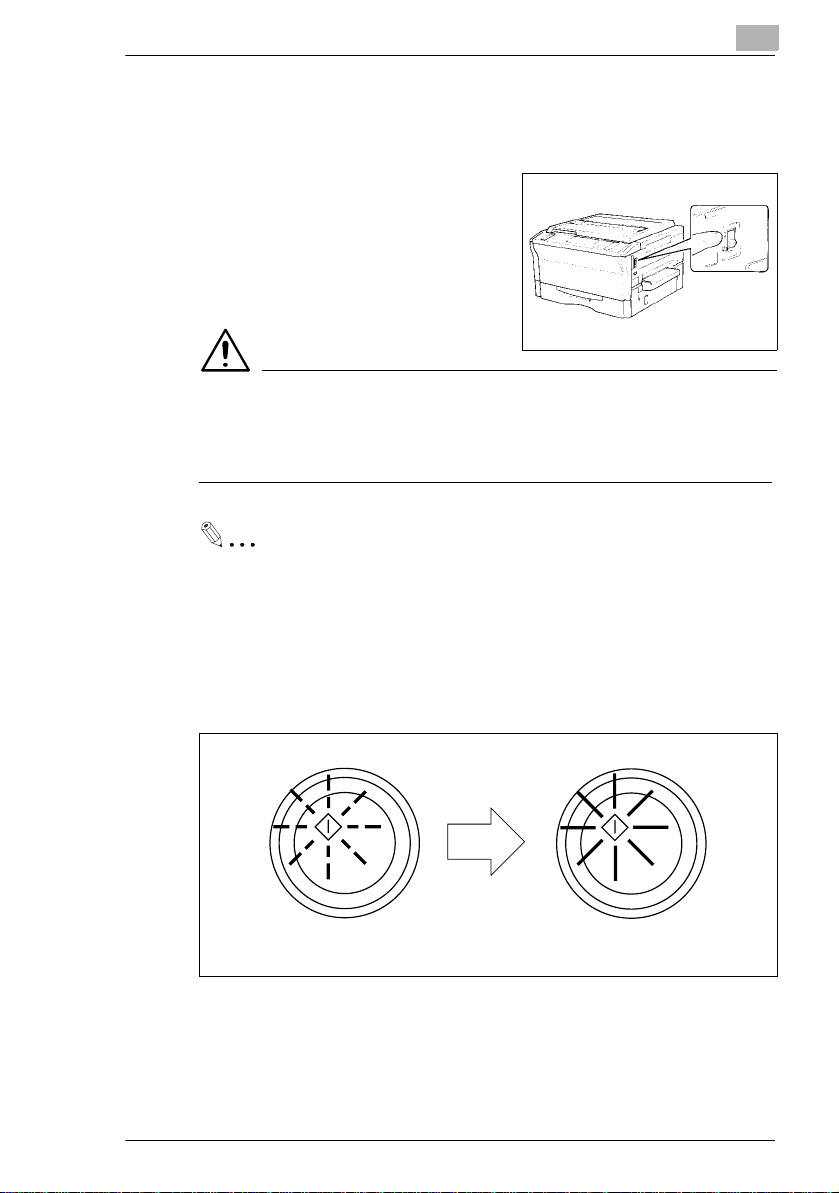
Turning ON and OFF
Turning the Copier ON: Press the
Power Switch to the “1” position.
Turning the Copier OFF: Press the
Power Switch to the “…” position.
NOTE
è The Auto Shut OFF function will automatically shut down the copier a
givenperiod of time after the last activity. The initial setting is 30
minutes.
Useful Tip
The period of time can be changed by using the User’s Choice, see
page 4-10.
2
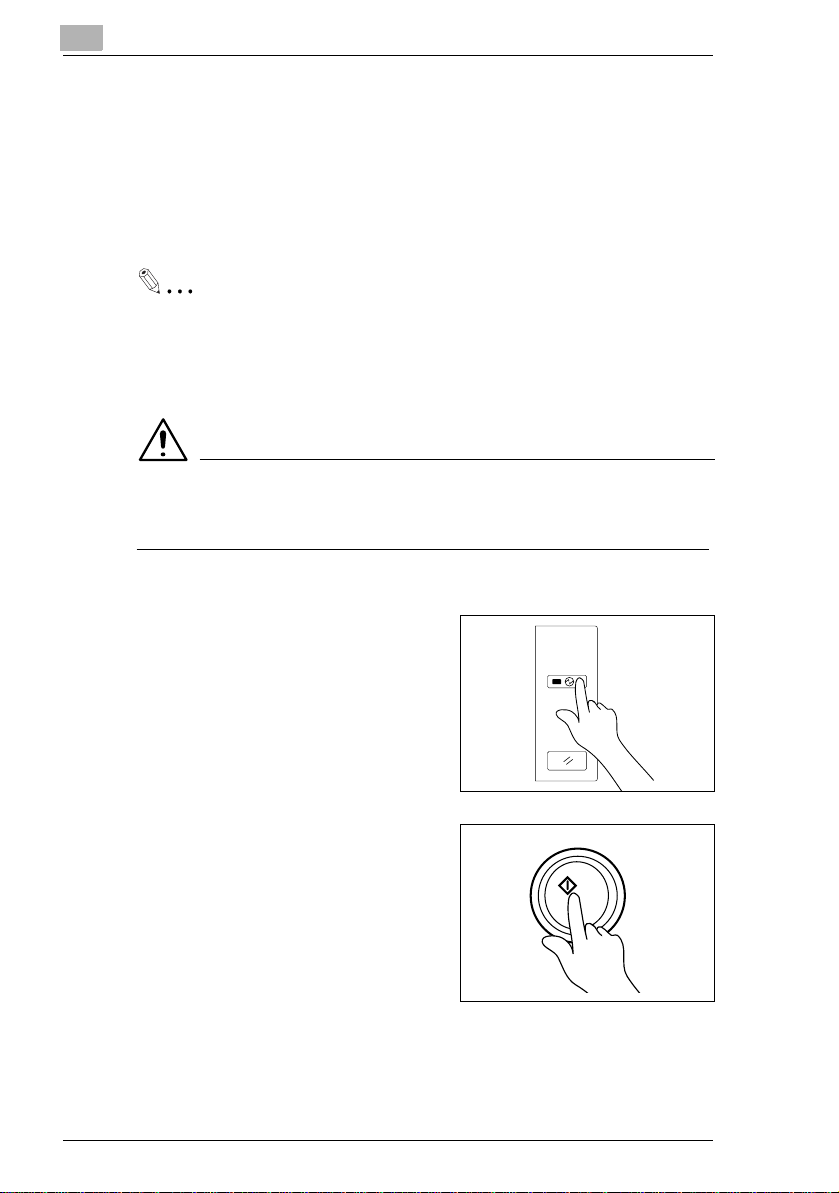
When the Copier is Turned ON
Blinking Orange Turns Green
TheStart Key blinks orange, indicating that the copier is now warming
up.
In about 30 sec., the Start key turns green. Now the copier is ready to
make copies.
EP1054 2-11
Page 28
2
Getting to Know Your Copier
Minimizing the Warm-up Time
InsteadofturningthecopierOFF,it’sa good idea to use theEnergySaver
Mode. This mode will minimize the time for the copier to complete the
warm-up cycle to about 20 sec.
The Energy Saver Mode is automatically activated a given period of time
after the copier has been used last. The initial is 15 min.
Useful Tip
The time for the copier to enter the Energy Saver Mode can be
selectedfrom 1 to 98 min.,or for 240 min. by using User’s Choice, see
page 4-10.
NOTE
è The copier is shut down if the A uto Shut OFF function activates while
the copier is in the Energy Saver Mode.
Entering The Energy Saver Mode
Press the Energy Saver Key on the
control panel.
Energy Saver
All control panel Indicators go out,
except that the Start Key and the
Energy Saver Key which remain lit
Panel Reset
green.
1142O093CA
Leaving the Energy Saver Mode
Press any Key on the control panel,
for instance, the Start Key.
This cancels the Energy Saver
Mode, and the copier will be ready
to make copies in about 20
seconds.
2-12 EP1054
Page 29
Getting to Know Your Copier
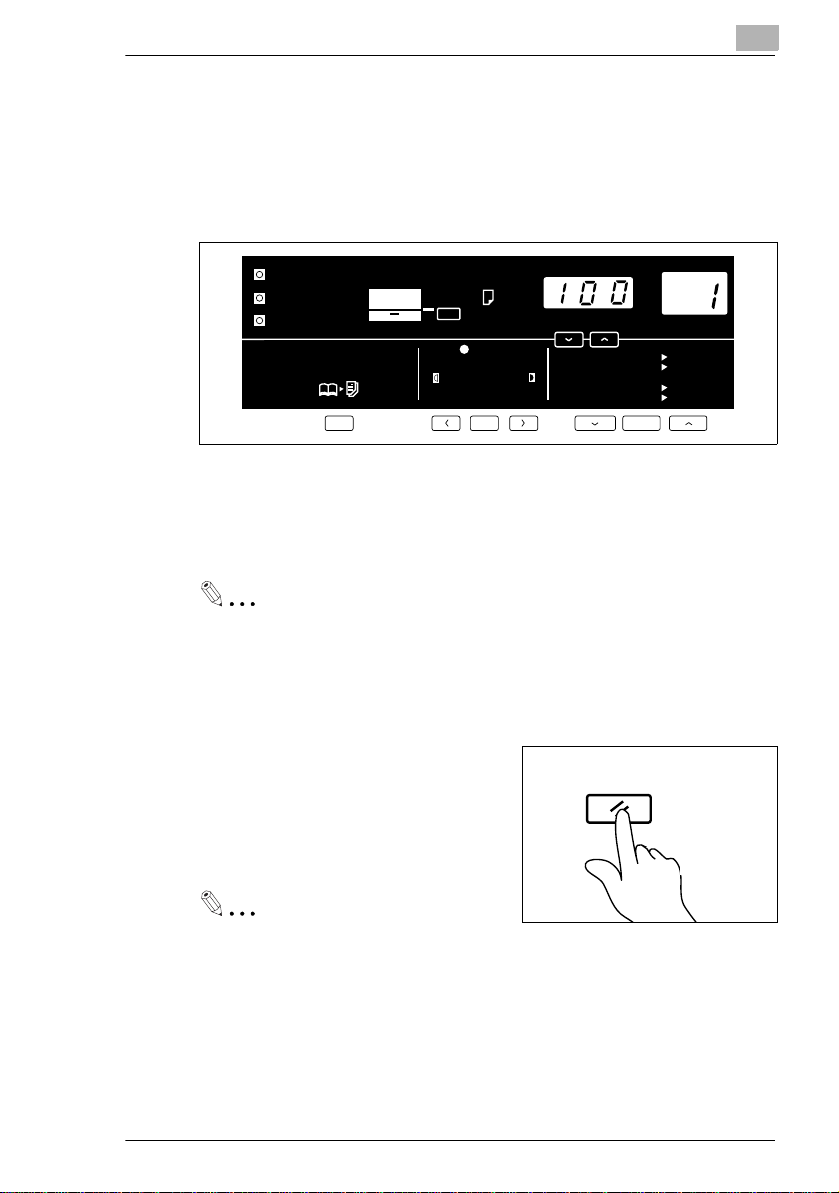
Initial Mode and Panel Resetting
Initial Mode
When the Power Switch is turned ON, the initial settings are indicated on
the control panel. The initial settings serve as the reference for all control
panel settings to be later made.
2
Meter Count
Toner
Drum Dehumidify
Book
A3
@@
A4
@@
B4
A4
@@
@@
A5
Auto
Photo
Auto/Photo
A
FLS.
Inch
Paper
Lighter Darker
50%~200%
141% A4 @ A3
115% B4
100%
81% B4
70% A3
%
@@@
100%
@
A3
Full Size
@
A4
@
A4
No. of copies to be made: 1
Zoom ratio: Full size (100%)
Auto Exposure Mode
Non-Sort Mode
Useful Tip
The initial settings can be changed by User’s Choice. For details see
page 4-6.
Panel Resetting
The Panel Reset Key resets all control
Panel Reset
panel settings to default settings
including the number of copies to be
made and zoom ratio.
1139O4782A
Useful Tip
The Panel Reset Key enables you to cancel all previous settings
efficiently. To avoid miscopy, try to press the Panel Reset Key before
attempting to make any setting for your own job.
EP1054 2-13
Page 30

2
Getting to Know Your Copier
Auto Reset Function
If no Key on the control panel is pressed within about 60 seconds after a
copycycle has been completed or copying settings made,the Auto Reset
Function is activated to cause the copier to return to the initial mode
automatically.
Useful Tip
The Auto Reset Function can be enabled or disabled by User’s
Choice. For more details, see page 4-6.
2-14 EP1054
Page 31

Making Copies
3 Making Copies
3.1 Copying Overview
Placetheoriginalinposition (step 1), set the numberofcopiesto be made
(step 7), and press the Start Key (step 8). This will allow you to make a
full-size copy or copies on paper of the same size as the original. The
control panel selection ( ) you make will change the magnification
ratio and the image density.
1 Placing the Original
Raise the Original Cover and place
the original face down on the
Original Glass, see page 3-4.
2 Checking the Copy Paper Size and
Selecting the Paper Source
Check whether the desired paper
size is loaded into the Drawer or
not, see page 3-6.
YES:
Go step 3 or step 7.
NO:
Load the desired paper size or
make a copy using a Manual Bypass Tray.
è Add Paper Indicator, see page 5-5.
è Manual Bypass Copying, see page 3-13.
3
Paper
A4
1142O138DA
EP1054 3-1
Page 32

3
3 To change the Zoom Ratio
Selecting the Zoom Ratio
Select the desired fixed zoom
ratio, see page 3-7.
Set the zoom ratio,
see page 3-8.
4 To change the Exposure Level
Setting the Image Densitry
Set the image density in the
Manual Exposure Mode, see
page 3-10.
Making Copies
100%
50%~200%
Auto
Photo
Lighter Darker
Auto/Photo
A
Select the Auto Exposure Mode
or Photo Mode, see page 3-10.
Auto
Photo
Lighter Darker
Auto/Photo
A
5 To copy from a book
Selecting Book Copying
Press the Book Key to select the
Book Copying Mode,
seepage3-11.
3-2 EP1054
Book
Page 33

Making Copies
6 Setting the Number of Copies
Using the Key Pad, set the number of copies to be made or the
If you enter a wrong number, press the Clear key and enter
7 Starting the Copy Cycle
Press the Start Key to start the
Press the Stop Key to stop
3
number of copy sets.
C
the correct number.
copy cycle.
the copy cycle.
1139O2360A
EP1054 3-3
Page 34

3
3.2 Copying Procedure
Placing Originals
Place the original face down on the OriginalGlass. Differentmethods are
used to load the originals depending on the type of originals .
Sheet Originals (Standard Size)
1 Raise the Original Cover.
Place the original face down on the
Original Glass, and align its rear left
corner with the Ö marker on the
Original Width Scale on the left side
of the platen.
2 Gently lower the Original Cover.
Highly Transparent Originals
1 Place the original in the same way as the sheet originals.
Making Copies
2 Place a blank sheet of paper of the
same size as the original over the
original. Then, lower the Original
Cover.
NOTE
è If this is not done, the copy produced may be of very poor quality.
3 Gently lower the Original Cover.
3-4 EP1054
Page 35

Making Copies
Book Original
“Bookoriginal”refers to an open bound
original.
Position the higher-numbered page on
the Original Width Scale end.
NOTE
è Not positioning an open book properly will result in copies with pages
in incorrect order.
è Do not place anoriginal weighing morethan 3kg on theOriginal Glass,
as an image problem could result.
3
EP1054 3-5
Page 36

3
Making Copies
Checking the Copy Paper Size and Selecting the Paper Source
Meter Count
Toner
Drum Dehumidify
Book
A3
@@
A4
@@
B4
A4
@@
A5
@@
Auto
Photo
Auto/Photo
A
FLS.
Inch
Paper
Lighter Darker
50%~200%
141% A4 @ A3
115% B4
100%
81% B4
70% A3
%
@@@
100%
@
A3
Full Size
@
A4
@
A4
When the copier is not equipped with the Multi Bypass Tray, it is
necessary to check that the desired paper size is loaded into the Drawer.
If it is not loaded, make a copy using a Manual Bypass Tray or load the
desired paper size into the Drawer.
Manual Bypass Copying see page 3-13.
Add Paper Indicator see page 5-4.
Whenthe copier is equippedwith the Multi Bypass Tray, the paper source
(paper size) can be selected, Drawer or Multi Bypass Tray.
Selecting the Paper Source (Only when the Multi Bypass Tray is used)
Each time the Paper Select Key is pressed, the Paper Source Indicators
or Multi Bypass Indicator lights up alternately. Also, the Paper Size
Indicator corresponding to that of the Drawer lights up.
A3
Paper
A4
A4
A5
@@
@@
@@
@@
LGL. 11x17
LTR. 11x14
LTR. 5
Paper
Metric
1
1
x8
2
2
/
/
3-6 EP1054
Page 37

Making Copies
3.3 Zoom Ratio
3
Meter Count
Toner
Drum Dehumidify
Book
A3
@@
A4
@@
B4
A4
@@
A5
@@
Auto
Photo
Auto/Photo
A
FLS.
Inch
Paper
Lighter Darker
50%~200%
141% A4 @ A3
115% B4
100%
81% B4
70% A3
%
@@@
100%
@
A3
Full Size
@
A4
@
A4
The zoom ratio can be set manually by the operator. Select the
appropriate mode according to your needs. The selected zoom ratio is
shown on the Zoom Ratio Indicator.
Fixed Zoom Ratios
Three reduction ratios (
50%, 70%, 81%)
Three enlargement ratios
(115%, 141%, 200%)
141% A4
115% B4 A3
100% Full Size
81% B4 A4
70%
100%
A3
A3
A4
1142O142DC
And Full Size (100%).
Zoom Ratios
Any ratio from 50% to 200% (in 1%
increments) can be selected.
50%~200%
1139O3590A
Selecting the Fixed Zoom Ratios
Press the Reduction, Full Size, or
EnlargementKey to select a fixed zoom
100%
ratio of your choice.
EP1054 3-7
11
Page 38

3
Reduction
Each time the Reduction Key i s
pressed, it selects a new reduction
ratio.
The Zoom Ratio Indicator displays the
actual percentage of the selected ratio.
Enlargement
Each time the Enlargement Key is
pressed, it selects a new enlargement
ratio.
The Zoom Ratio Indicator displays the
actual percentage of the selected ratio.
Full Size
Press the Full Size Key to select full
size (100%).
Making Copies
141% A4
115% B4 A3
100% Full Size
81% B4 A4
70%
141% A4
115% B4 A3
100% Full Size
81% B4 A4
70%
141% A4
115% B4 A3
100% Full Size
81% B4 A4
70%
100%
100%
100%
A3
A3
A4
A3
A3
A4
A3
A3
A4
1142O140DC
1142O141DC
1142O142DC
Setting a Zoom Ratio
Hold down the Zoom Down orUp
Key until the desired zoom ratio is
reached.
Zoom Down Key makes the ratio
smaller
Zoom range:
50% to 200%
50%~200%
1139O3640A
Zoom Up Key makes the ratio greater
Useful Tip
Tosave time, first select the fixed ratio nearest tothe target zoomratio
before using the Zoom Up or Down Key.
3-8 EP1054
Page 39

Making Copies
3.4 Image Density
3
Meter Count
Toner
Drum Dehumidify
Book
A3
@@
A4
@@
B4
A4
@@
A5
@@
Auto
Photo
Auto/Photo
A
FLS.
Inch
Paper
Lighter Darker
50%~200%
141% A4 @ A3
115% B4
100%
81% B4
70% A3
%
@@@
100%
@
A3
Full Size
@
A4
@
A4
The image density level of copies can be adjusted either in the Auto
Exposure Mode, Manual Exposure Mode or Photo Mode. Select the
appropriate mode according to your particular needs.
Types of Exposure Modes
Auto Exposure Mode
The copier reads the image density
of the original and automatically
adjusts the exposure level for the
optimum copy image density.
Lighter Darker
Auto
Photo
Auto/Photo
Manual Exposure Mode
In the Manual Exposure Mode, you
can vary the exposure level in nine
steps.
Auto
Photo
Lighter Darker
Auto/Photo
1152O021CA
Photo Mode
The copier can make a faithful
reproduction of an original having
halftone images such as photos.
Auto
Photo
Theimagedensity of the photomay
be varied in nine steps.
Lighter Darker
Auto/Photo
1152O020CA
EP1054 3-9
Page 40

3
Selecting the Auto Exposure Mode
Press the Auto Exposure Mode Key
A
as necessary to light up the Auto
Exposure Indicator .
❍ Auto
Each time the Auto Exposure Mode
A
Key is pressed, the Auto E xposure
Mode, Manual Exposure Mode and
Photo Mode are selected alternately.
Selecting the Manual Exposure Mode
Hold down the Exposure Control Key
or until the desired exposure
level is reached.
To make the image darker :
Press or hold down the Exposure
Control Key .
To make the image lighter :
Press or hold down the Exposure
Control Key .
Making Copies
Auto
Photo
Lighter Darker
Auto/Photo
A
Auto
Photo
Lighter Darker
Auto/Photo
A
Selecting the Photo Mode
Press the Auto Exposure Mode Key
A
as necessary to light up the Photo
Mode Indicator .
❍ Photo
Hold down the Exposure Control Key
or until the desired exposure
Auto
Photo
Lighter Darker
Auto/Photo
A
level is reached.
Useful Tips
Theexposure level inthe Auto Exposure Modecan be variedby using
the User’s Choice, see page 4-7.
The copier has been factory-set to automatically select the Auto
ExposureMode. The User’sChoice can be usedtochangethisdefault
setting to the Manual Exposure Mode, see page 4-8.
3-10 EP1054
Page 41

Making Copies
3.5 Book Copying
Select Book Copying when you want to
makea1-sidedcopyof each page of an
open book.
3
Book
Original
Selecting the Book Copying Mode
Copy
1 Positionthe higher-numbered page
on the Original Width Scale end.
If the book is thick, you can make
copies with the Original Cover
raised.
“Book original” refers to an open
bound original.
NOTES
è Not positioning an open book properly will result in copies with pages
in incorrect order.
è Do not look directly at the Original Glass surface, as a very intense
beam of light can be emitted.
2 Press the Book Key.
The Book Indicator lights up.
EP1054 3-11
Book
Page 42

3
NOTES
è If paper other than A4 crosswise
paper is loaded into the Drawer
when the Book Copying Mode is
selected, the Drawer Indicator and
the corresponding Paper Size
Indicator blink on the Control Panel.
è In such a case, load paper of the
samesize and in the samedirection
of each page of a book into the
Drawer.
Making Copies
Paper
A4 Crosswise
A3
A4
A4
A5
@@
@@
@@
@@
3-12 EP1054
Page 43

Making Copies
3.6 Ma nual Bypass Copying
Use the Manual Bypass to make copies on paper not loaded in the
Drawer, or to copy onto OHP transparencies, translucent paper, or any
otherspecial paper. When using Multi Bypass Tray, you canload multiple
sheets of copy paper.
Types of Paper
Plain paper (weighing 60g/m
Thick paper (weighing 91g/m
OHP transparencies, translucent paper
Paper Size
Width: 100mm to 297mm
Length: 140mm to 432mm
Capacity
Plain paper, Thick paper, OHP transparencies, translucent paper
...1sheetatatime
Capacity Multi Bypass Tray
Plain paper: Approx. 50 sheets
Plain paper (once-copied paper): Up to 20 sheets
Thick paper, translucent paper: Approx. 20 sheets
OHP transparencies: Up to 5 sheets
2
to 90g/m2)
2
to 157g/m2)
3
IMPORTANT
è Whenmakingmultiplecopiesusing OHP transparencies,set the Copy
Tray into the upper position if there is no Sorter or Staple Sorter
mounted.
EP1054 3-13
Page 44

3
Making Copies
Using the Manual Bypass Tray
1 Place the original on the Original Glass and make the control panel
settings.
2 Insert the copy paper into the
Manual Bypass Tray.
This automatically starts the copy
cycle.
NOTES
è Insert the copy paper one sheet at a time.
è Do not insert a sheet of paper while the copier is warming up or in a
multi-copy cycle.
è The Auto Size Mode and Book Copying Mode cannot be selected for
manual bypass copying.
Using the Multi Bypass Tray (Option)
1 Place the original on the Original Glass and make the control panel
settings.
2 Swing down the Multi Bypass Tray
and slide the Paper Guide Plate to
the size of the copy paper.
NOTE
è Pull out the Multi Bypass Tray Extender if you are using larger paper.
3-14 EP1054
Page 45

Making Copies
3 Load a neat stack of copy paper on
the Tray and insert it into the copier
until it stops.
NOTES
è The paper should be loaded no higher than the Ä (Max. Level
Indicator).
è Before inserting, fan the paper stack well if you are using OHP
transparenciesor translucent paper.
è Correct any curl if you are using thick paper.
è The paper will be copied on the side facing up.
4 Using the Key Pad, enter the number of copies to be made.
5 Pressthe StartKey to start thecopy
cycle.
3
1139O2360A
NOTES
è Do not insert the paper while the copier is in the warm-up cycle or a
multi-copy cycle.
è TheAuto Size and Book Copying Mode cannot be selectedformanual
bypass copying.
EP1054 3-15
Page 46

3
Making Copies
3-16 EP1054
Page 47

Auxiliary Functions
4 Auxiliary Functions
4.1 Checking the Total Number of Copies Mode
This function allows you to check the
total count of the two counters of the
copier.
Types of Counters
Total Counter:
Shows the total number of copies made since the installation of the
copier.
Size Counter:
Shows the number of copies made on paper of a size preset by the
Technical Representative.
Meter Count
Toner
Drum Dehumidify
4
Counter Display
Example: The count is 12,345 (copies).
TheZoom RatioIndicatorshows
the upper 3 digits of the count
50%~200%
EP1085 4-1
The Multi-Copy Display shows
the lower 2 digits of the count
Page 48

4
Using the Meter Count Function
1 Press the Meter Count Key once.
The count of the Total Counter is
shown across the Zoom Ratio
Indicator and Multi-Copy Display.
2 Press the Meter Count Key again.
The count of the Size Counter is
shown across the Zoom Ratio
Indicator and Multi-Copy Display.
3 Press the Meter Count Key once
again.
Thisreturns the copier to the normal
state.
Auxiliary Functions
Meter Count
Toner
Drum Dehumidify
Meter Count
Toner
Drum Dehumidify
Meter Count
Toner
Drum Dehumidify
4-2 EP1085
Page 49

Auxiliary Functions
4.2 T oner Replenisher Function (Increasing the Image Density)
The copier tends to exhaust the supply
of toner rapidly when m aking a number
ofcopiesfromanoriginalwith dark solid
areas. As a result, the image density of
the copy will become lighter. In such a
case, you can use the Toner
Replenisher function to regain the
normal image density quickly.
4
Meter Count
Toner
Drum Dehumidify
Original Copy Copy Made After
Toner Replenisher
Even if you continue making copies after the image density has become
lighter, the copier will gradually recover the normal image density. The
Toner Replenisher Mode can, however, be used to obtain the normal
image density more quickly.
è Press the Auxiliary Toner
Replenishing Key.
This causes the copier to initiate
toner replenishing, which lasts for
90 seconds at maximum.
Meter Count
Toner
Drum Dehumidify
1142O118CA
NOTES
è Do not turn the Power Switch OFF or open the Front or Right Door
while the copier is replenishing toner.
è Toner is not replenished if the image density is sufficiently high.
EP1085 4-3
Page 50

4
4.3 Drum Dehumidifier Function
During times of high humidity or when
there are sudden rapid changes in
humidity (especially when you are
using a heater in winter),
condensation*1could form on the
surface of the PC Drum*2, resulting in
blotchy copies. In such instances, use
the Drum Dehumidify Key to dry the
surface of the PC Drum.
*1: Condensation:
Aphenomenonin whichsmalldropsofwaterareformedoncoldsurfaces,
such as the surface of the PC Drum.
*2: PC Drum:
Functions in the copier as film does in a camera.
Auxiliary Functions
Meter Count
Toner
Drum Dehumidify
Before a Dru m
Dehumidifier Operation
After a Drum
Dehumidifier Operation
1 Press the Drum Dehumidify Key.
This sets the copier into the Drum
Dehumidifier Mode which lasts for
90 seconds.
Meter Count
Toner
Drum Dehumidify
2 Make a copy to check that the copy
image is clear.
Run the Drum Dehumidifier cycle
once again if the copy image is not yet clear.
Useful Tip
A copy cycle can be initiated even while the copier is in the Drum
Dehumidifier Mode.
1142O119CA
4-4 EP1085
Page 51

Auxiliary Functions
NOTE
è The copier cannot be set into the Drum Dehumidifier Mode while it is
warming up.
4
EP1085 4-5
Page 52

4
4.4 User’s Choice
The copier has been set so that the
most frequently used settings are
automatically selected in the initial
mode.The User’s Choice allows you to
select the default settings which are
automatically selected in the initial
mode according to your own needs.
By setting defaults for the paper size,
zoom ratio and other settings that are most frequently used, time and
effort to make extra settings will be eliminated when the copier is turned
ON or when the auto reset function is activated.
For more details, consult your Technical Representative.
Functions Available in User’s Choice
Auxiliary Functions
%
50%~200%
141% A4 @ A3
115% B4
@@@
100%
81% B4
70% A3
@
A3
Full Size
@
A4
@
A4
Choice
Code
U-7 Non-Auto Shut OFF U-20 Auto Panel Reset ON/OFF
U-13 Default auto exposurelevel U-21 EnergySaver ON Timing
U-14 Default exposuremode/level U-28 Auto Shut OFF Timing
Function
Choice
Code
Function
Description of Each User’s Choice Function
U-7 Non-Auto Shut OFF
This function can disable the Auto Shut OFF function.
Setting Description Initial Setting
0 “Non-Auto Shut OFF” disabled (OFF)
1 “Non-Auto Shut OFF” enabled (ON)
4-6 EP1085
Page 53

Auxiliary Functions
U-13 Default auto exposure level
Determines the default exposure level in the Auto Exposure Mode.
Setting Description Initial Setting
46 Low, level 4
47 Low, level 3
48 Low, level 2
49 Low, level 1
50 Standard
51 High, level1
52 High, level2
When the exposure level is “Low,” the greater the level number is, the
lower the exposure level.
When the exposure level is “High,” the greater the level number is, the
higher the exposure level.
Lower è Higher
Level 4 3 2 1 Standard 1 2
4
EP1085 4-7
Page 54

4
Auxiliary Functions
U-14 Default exposure mode/level
Determines the default exposure mode, either Auto or Manual, selected
when the control panel settings are reset.
If Auto is selected, this function also allows you to specify the default
exposure level (EXP) in the Manual Exposure Mode, after the Auto
Exposure Mode has been canceled.
If Manual is selected, the function also allows you to specify the default
exposure level (EXP) in the Manual Exposure Mode.
If any value between “0” and “8” is selected:
The Auto Exposure Mode is selected.
If any value between “10” and “18” is selected:
The Manual Exposure Mode is selected.
Auto E xposure Mode as Default
Setting
0 Auto Manual EXP1
1 Auto Manual EXP2
2 Auto Manual EXP3
3 Auto Manual EXP4
4 Auto Manual EXP5
5 Auto Manual EXP6
6 Auto Manual EXP7
7 Auto Manual EXP8
8 Auto Manual EXP9
Description
Default Mode Exposure Setting in Manual Mode
Initial Setting
Manual Exposure Mode as Default
Setting Description Initial Setting
10 Manual Exposure Mode / EXP1
11 Manual Exposure Mode / EXP2
12 Manual Exposure Mode / EXP3
13 Manual Exposure Mode / EXP4
14 Manual Exposure Mode / EXP5
15 Manual Exposure Mode / EXP6
16 Manual Exposure Mode / EXP7
17 Manual Exposure Mode / EXP8
18 Manual Exposure Mode / EXP9
4-8 EP1085
Page 55

Auxiliary Functions
With EXP5 at the central level, the
exposure level is lower as the number
becomessmaller,and it ishigheras the
number becomes greater.
U-20 Auto Panel Reset ON/OFF
Selects whether to activate the Auto Panel Reset function 60 seconds
after a copy cycle has been completed or a control panel key has been
pressed.
If “0” is selected:
The control panel settings remain valid even after 60 seconds.
If “1” is selected:
The control panel settings are canceled and the copier is reset into the
default mode after 30 seconds. (Auto Panel Reset)
If “2” is selected:
The control panel settings are canceled and the copier is reset into the
default mode after 60 seconds. (Auto Panel Reset)
4
123 4 5678 9
Lighter Darker
Auto/Photo
Setting Description Initial Setting
0 Auto Panel Reset is not activated.
1 Auto Panel Reset is activated (after 30 sec.)
2 Auto Panel Reset is activated (after 60 sec.)
EP1085 4-9
Page 56

4
Auxiliary Functions
U-21 Energy Saver ON Timing
Select whether or not to set the copier into the Energy Saver mode after
the lapse of a given period of time after a copy cycle has been completed
or a key on the control panel has been operated.
Theperiodoftimecanfallwithintherangeof1to98min.,orbesetto240
min.
The initial setting is 15 min.
Setting Description Initial Setting
1 Enabled: 1 min.
2 Enabled: 2 min.
3 Enabled: 3 min.
:
:
98 Enabled: 98 min.
99 Enabled: 240 min.
:
:
U-28 Auto Shut OFF Timing
Select whether or not to enable the Auto Shut OFF Function that turns
power off automatically after the lapse of a given period of time after a
copy cycle has been completed or a key on the control panel has been
operated.
In the initial setting, the Auto Shut OFF Function is activated after 30 min.
Setting Description Initial Setting
0 Disabled*
1 Enabled: 1 min.
2 Enabled: 2 min.
3 Enabled: 3 min.
::
98 Enabled: 98 min.
99 Enabled: 240 min.
If you want to disable the Auto Shut OFF function, first select “ 1” in the
Non-Auto Shut OFF Mode then select “0” in this M ode, see page 4-6.
4-10 EP1085
Page 57

Auxiliary Functions
MakingtheUser’sChoiceModeSettings
1 Keep pressing the Panel Reset Key for about 3 seconds.
[U] appears on the Zoom Ratio Indicator, and the indicator on the
Multi-Copy Display goes out.
4
Panel Reset
1139O4782A
Zoom Ratio
Indicator
Multi-Copy
Display
2 Using the Key Pad, enter the desired Choice Code number.
If you have pressed an incorrect number, press the Clear Key, then
enter the correct number.
Example: Selecting the Default Finishing Mode: Press and
1 4
the Zoom Ratio Indicator shows [U 14].
Zoom Ratio
Indicator
1
4
7
2
5
8
0
3
6
9
C
1142O056AA
Multi-Copy
Display
3 Press the Start Key.
This causes the current setting of that particular choice code to be
shown on the Multi-Copy Display
.
ZoomRatio
Indicator
1139O2360A
Multi-Copy
Display
EP1085 4-11
Page 58

4
Auxiliary Functions
4 Press the Clear K ey.
This clears the current setting.
ZoomRatio
Indicator
1
4
7
1142O169AA
3
2
6
5
9
8
C
0
Multi-Copy
Display
5 Using the Key Pad, enter the new setting.
The Multi-Copy Display shows the new setting.
For the Choice Code see page 4-6.
1
4
7
ZoomRatio
Indicator
2
5
8
0
3
6
9
C
1142O171AA
Multi-Copy
Display
6 Press the Start Key.
This enters the new setting.
Repeat steps 2 to 6 to make new settings for other User’s Choices.
Zoom Ratio
Indicator
11
1139O2360A
A
Multi-Copy
Display
4-12 EP1085
Page 59

Auxiliary Functions
7 Press the Panel Reset Key.
This allows the copier to leave the
User’sChoice Mode and thecontrol
panel shows the default settings
again.
NOTE
è If the Choice Code number on the Zoom Ratio Indicator or codes on
the Multi-Copy Display start blinking when the Start Key is pressed
following step 2 or 5, that entry is invalid. Check the correct number.
Press the Clear Key and enter the correct one.
4
Panel Reset
1139O4782A
EP1085 4-13
Page 60

4
Auxiliary Functions
4-14 EP1085
Page 61

When an Indicator Lights Up
5 When an Indica tor Lights Up
5.1 Quick Reference for Indicator Lights
5
Meter Count
Toner
Drum Dehumidify
Book
A3
@@
A4
@@
B4
@@
FLS.
A4
Paper
@@
Inch
A5
Auto
Photo
Lighter Darker
Auto/Photo
A
50%~200%
141% A4 @ A3
115% B4
100%
81% B4
70% A3
%
@@@
100%
@
Full Size
@
@
A3
A4
A4
When the copier encounters any of the following conditions, a
correspondingwarning indicator lightsup. Someofthe warning conditions
entail inhibition of the initiation of a copy cycle:
A control panel key or keys have been incorrectly operated.
Not all necessary conditions are met to start a copy cycle.
The copier requires the operator’s intervention during a copy cycle.
The following table explains the most important warning conditions. You
will find more detailed procedures on the page referenced in the “Action”
column.
Warning Indicators
Indicator Copier State Action
Add Toner
Indicator
Add Paper
Indicator
The copier has run out of toner.
(Warningonlyand a copy cyclecan
still be initiated.)
The paper has run out. Add paper by following the steps
Replacethe Toner Bottle following
the steps given in the “Add Toner
Indicator” section,see page 5-2.
given in the “Add Paper Indicator”
section, see page 5-4.
Misfeed
Indicator
Call-Tech.Rep. Indicator
I.U. Service
Life Indicator
There is a misfeed sheet of paper
insidethecopieroranoption.
The copier has developed a
technical malfunction.
Indicates that the Imaging Unit
needs replacement.
Check the Monitor Display for the
locationof themisfeedandclearthe
misfeedsheet of paper as
instructed, see page 5-7.
If the Call-Tech.-Rep. Indicator
remainslitevenafteryouhavereset
it, call your Technical
Representative,see page 5-10.
Replace theImaging Unit, see page
5-11.
EP1085 5-1
Page 62

5
When an Indicator Lights Up
5.2 Detailed Instructions for Indicator Lights
Add Toner Indicator
TheAdd Toner Indicator lights up when
toner in the TonerBottle is running out.
Oncethe Indicator lightsup,replacethe
TonerBottle with a new one as soon as
possible by following the procedure
given below.
Replacing the Toner Bottle
1 Open the Front Door.
Swingopen the Toner Bottle Holder
and pull out the old Toner Bottle.
2 Tap the new Toner Bottle on a hard
surface, such as a desk, several
times. Then, turn the Toner Bottle
over and tap it several times again
in the same manner.
3 Shake the new Toner Bottle well.
5-2 EP1085
Page 63

When an Indicator Lights Up
4 With the Seal on the Toner Bottle
facingup, slowly peelofftheSealas
illustrated.
NOTE
è Be careful, some toner may puff out
from the bottle.
5 Ensuringthat the arrows ( ) on the
Toner Bottle are facing you, insert
theBottleintoposition.
NOTE
è Insert the Bottle all the way into the
copier until the marking on the Bottle is aligned with the marking
on the Toner Bottle Holder.
5
6 Swing the Toner Bottle Holder
closed and close the Front Door.
NOTES
è Try to replace the Toner Bottle with
anewone assoonaspossibleonce
the Add Toner Indicator lights up. Continuing to make copies without
changing the Toner Bottle will result in increasingly lighter images.
è Use ONLY the specified toner for this copier. Using any other toner
could r esult in image trouble.
Toner Replenisher Function
Use the Toner Replenisher Function if the image is light immediately
after replacing the Toner Bottle with a new one, see page 4-3.
EP1085 5-3
Page 64

5
Add Paper Indicator
When the Drawer or the Multi Bypass
Tray has run out of paper, the A dd
Paper Indicator lights up. At this time,
you cannot start a new copy cycle
Use the following procedure to load
paper into the Drawer or the Multi
Bypass Tray.
Adding Paper (Drawer)
1 Slide out the Drawer and press
down the Paper Lifting Plate.
2 Slide out the Edge Guides in the
direction of the arrows.
When an Indicator Lights Up
Paper
3 Load the paper stack into the
Drawer so that its front side faces
down. Make sure that the paper
stackrests under the two catches of
the Drawer.
NOTE
è The paper should be loaded no
higher than the Ä (Max. Level
Indicator) on the Edge Guide.
5-4 EP1085
Page 65

When an Indicator Lights Up
4 Slide the Edge Guides tightly up
against the paper. Gently slide the
Drawer back in.
NOTE
è When loading Inch Size paper into
the Drawer, flip the Marketing Area
Switchlocatedin the rear left corner
oftheDrawerto“Inch”.
Adding Paper (Multi Bypass Tray)
Theindicationson theleftshow that the
Multi Bypass Tray has run out of paper.
5
Paper
1 Load the paper stack onto the Tray
so that its front side faces up and
insert it until it stops.
NOTES
è The paper should be loaded no higher than Ä (Max. Level Indicator).
è Before inserting, fan the paper stack well if you are using
transparenciesor translucent paper.
è Correct any curl if you are using thick paper.
EP1085 5-5
Page 66

5
When an Indicator Lights Up
Closure Failure Indicator
TheClosureFailureIndicatorlights up if
acopierdoorisleftopen,oran option is
not attached properly. The Monitor
Display shows the location of the
closure failure. At this time, you can no
longer start a new copy cycle. Correct
the closure failure by following the
procedure given below.
Check that the Right Door or Front Door is closed.
Monitor Display Check Location
5-6 EP1085
Page 67

When an Indicator Lights Up
Misfeed Indicator
If a paper misfeedoccursduringa copy
cycle, that copy cycle stops. The Misfeed Indicator lights up and the Monitor
Displayshowsthe location.Atthistime,
you cannot start a new copy cycle.
Misfeed Clearing Procedure
NOTE
è Be careful not to touch the areas marked with High Voltage and
Caution: HOT with bare hands.
è When the copier is equipped with a Multi Bypass Tray
1 Unload the paper stack from the
Multi Bypass Tray.
5
2 Open the Front Door and turn the
Lock Release Lever
counterclockwise to unlock and
swing up the Upper Half of the
copier.
3 Holding up the Fusing Unit, pull out
the sheet of paper.
CAUTION: HOT
è TheFusing Unit and its surrounding
areas may be extremely hot. DO
NOT touch any part except the
Fusing Unit Handle (yellow).
EP1085 5-7
Page 68

5
When an Indicator Lights Up
4 Remove any sheet of paper from
the Transport Section.
5 Open the Right Door.
Then pull out the sheet of paper
from the Manual Bypass Port.
6 Pull out the sheet of paper from the
Paper Take-Up Section.
7 Close the Right Door.
8 Gently swing down and lock the
UpperHalfofthecopier.Thenclose
the Front Door.
5-8 EP1085
Page 69

When an Indicator Lights Up
9 SlideouttheDrawerandunload the
paper from the Drawer.
Next, push down the Paper Lifting
Plate until it is locked into position.
10Fan the paper and reload it.
NOTE
è Make sure that the paper stack rests under the two catches of the
Drawer.
5
11Slide the Drawer back in.
è When the copier is equipped
with a Multi Bypass Tray>
Fan the paper stack and place it
back on the Tray.
EP1085 5-9
Page 70

5
When an Indicator Lights Up
Call-Tech.-Rep. Indicator
Meter Count
Toner
Drum Dehumidify
Book
A3
@@
A4
@@
B4
@@
FLS.
A4
Paper
@@
Inch
A5
Auto
Photo
Lighter Darker
Auto/Photo
A
50%~200%
141% A4 @ A3
115% B4
100%
81% B4
70% A3
%
@@@
100%
@
Full Size
@
@
A3
A4
A4
When a malfunction occurs in the copier, the Call-Tech.-Rep. Indicator
lights up and the corresponding malfunction code appears across the
Zoom Ratio Indicator and Multi-Copy Display. At this time, you cannot
start a new copy cycle.
If this happens, try to clear the Call-Tech.-Rep. Indicator by following the
instructions below. If the Call-Tech.-Rep. Indicator lights up again, call
your Technical Representative immediately.
Resetting the Call-Tech.-Rep. Indicator
Openthe Front Door, thenclose it. This
will reset the Call-Tech.-Rep. Indicator.
NOTE
è Carry out this procedure with the
Power Switch turned ON.
If the Call-Tech.-Rep. Indicator lights up again, call your Technical
Representative immediately.
NOTE
è When calling your Technical
Representative,give him o r her the
malfunction code shown across the
50%~200%
1139O4960A
Example:
Malfunction code
C0010
Zoom Ratio Indicator and MultiCopy Display. Example: This is the
malfunction code C0010
1139O4970A
5-10 EP1085
Page 71

When an Indicator Lights Up
I.U. Service Life Indicator Lights Up
When the time is about to come when
the Imaging Unit needs replacement,
the I.U. Service Life Indicator starts
blinking to prompt you to replace it with
a new one.
Replace the Imaging Unit by following
the procedure given below.
When 2,500 more copies are made with the Add Toner Indicator lighting
up,or 7,500 more copies are made aftertheI.U. Service Life Indicator has
started blinking, the I.U. Service Life Indicator lights up steadily and the
copier inhibits the initiation o f a new copy cycle. See the diagram below.
1139O5330A
Blinking
After 2.500
copies
Add Toner
indicator lights
Which occurs
first
5.000 copies
made
1142O174CA
No new copy
cycle can be
initiated
5
Useful Tip
Replace the Imaging Unit as soon as possible once the I.U. Service
Life Indicator has started blinking.
EP1085 5-11
Page 72

5
When an Indicator Lights Up
Precautions for Handling
Do not leave the I. U. in a bright
place.
Do not store the I. U. in a hot place
of 40°C (104°F) or more.
Do not store the I. U. in a humid
place or subject to water splash.
DonotstoretheI.U.upsidedownor
titled.
Do not subject the I. U. to vibration.
5-12 EP1085
Page 73

When an Indicator Lights Up
Removing the I. U. from the copier
1 Openthe Front Door. Turnthe Lock
Release Lever counterclockwise to
swing up the Upper Half of the
copier.
2 Turn the I. U. Lock Release Lever
and,whileholdingit down, pull the I.
U. halfway out of the copier.
3 Firmly grasp the I. U. with both
hands and pull it all the way out of
the copier.
5
EP1085 5-13
Page 74

5
When an Indicator Lights Up
Unpacking the I. U.
1 Peel off the tape and open the Box.
2 Take the Starter Bottle and the I. U.
in its bag out of the Box.
SettinguptheI.U.
1 Take the I. U. out of the bag.
Starter Bottle
I. U.
2 Peeloff thethreepiecesoftapeand
packing materials.
5-14 EP1085
Page 75

When an Indicator Lights Up
3 Carefully pull the polyester tape
from the I. U..
4 Remove the Cap from the I. U. and
re-fit it to the used I. U. as shown in
the illustration.
5 Align the I. U. with the rails in the
copier.
5
6 Slide the I. U. all the way into the
copier.
7 Be sure to push the I. U. into the
lockedpositionuntil a click is heard.
Then,check thepositionof theLock
Release Lever, as shown in the
illustration.
EP1085 5-15
Page 76

5
When an Indicator Lights Up
NOTE
è An improperly installed I. U. could be a cause of copier malfunction.
8 Lower the Upper Half of the copier
and push it into the locked position
by pushing down on the portion
marked with “Push Down Here
Only”.
Charging the Copier with Starter and Toner
1 Swing out the Bottle Holder.
2 Holding the Starter Bottle so that its
tab is on the upper side, shake it
well.
NOTE
è Make sure that “MT starter 104” is
printed on the Starter Bottle.
5-16 EP1085
Page 77

When an Indicator Lights Up
3 Peel off the tape from the Starter
Bottle.
4 Align the markingson the Starter
Bottle with the upper side of the
Bottle Holder and slide the Bottle
into position.
NOTE
è Insert the Bottle all the way into the copier until the marking on the
Bottle is aligned with the marking on the Bottle Holder.
5
5 Then, swing in the Bottle Holder
until it locks into position. Close the
Front Door.
6 Plug the Power Cord into the wall
outlet and turn ON the Power
Switch. This will cause the wait
indicatortobeshownonthecontrol
panel.
EP1085 5-17
Page 78

5
When an Indicator Lights Up
7 The copier automatically starts the
charging cycle for approximately 5
minutes.
è During this cycle, do not o pen
the Front Door.
During this cycle, six segments of
theonesdigitLEDonthe
Magnification Ratio Indicator
forminga“0”lightup and go out one
after another, indicating that the
copier is being charged with starter.
When the copier has been
completelychargedwith Starter,the
indication on the Magnification
Ratio Indicator changes to “100”
and the cycle stops.
8 If “E1” or “E2” is indicated on the
Magnification Ratio Indicator, the
tapehasnot beenremovedfromthe
StarterBottle. Swingdownthe Front
Door and remove the tape and
perform the starter charging
procedure again.
If “E1” or “E2” is indicated again call
your Technical Representative.
9 Swing down the Front Door, swing
out the Bottle Holder and remove
the Starter Bottle.
10 Tap the new Toner Bottle on a hard
surface, such as a desk, several
times. Then, turn the Toner Bottle
over and tap it several times again
in the same manner.
5-18 EP1085
Page 79

When an Indicator Lights Up
11Hold the Toner Bottle so that its tab
is on the upper side, shake it well
and peel off the tape.
Once the tape has been removed,
hold the Bottle so that its toner port
faces up.
12Align the markings on the Toner
Bottle with the upper side of the
Bottle Holder and slide the Bottle
into position.
5
NOTE
è Insert the Bottle all the way into the copier until the marking on the
Bottle is aligned with the marking on the Bottle Holder.
13Then, swing in the Bottle Holder
until it locks into position and close
the Front Door.
EP1085 5-19
Page 80

5
When an Indicator Lights Up
5-20 EP1085
Page 81

Troubleshooting
6 Troubleshooting
6.1 W hen this Type of Copy is Produced
Symptom Possible Cause Ac tion
The image is too
light.
The image is too
dark.
The exposurelevel for the Auto
ExposureMode is set at one of
the “Light”levels.
Themanualexposure levelis set
on the lighter side.
Youhavebeenmakingcopies
from a photoor an original with a
large dark area.
The Toner Bottlehas just been
replaced.
The Add Toner Indicatoron the
Monitor Display is lit up.
Add Toner Indicator
The paper is damp. Replace the paper,
The exposurelevel for the Auto
ExposureMode is set at one of
the “Dark” levels.
Themanualexposure levelis set
on the darker side.
TheentiresurfaceoftheOriginal
Glassisdirty.
Theoriginal is not held tightly on
the Original Glass.
Change the setting in the User’s
ChoiceModeU-13(DefaultAuto
ExposureLevel), see page 4-7.
Cancel the Auto Exposure Mode
andselect the Manual Exposure
Mode to adjust the exposure
leveland obtaina darker image,
see page 3-10.
Pressthe ExposureControlKey
(Darker) as necessary to obtain
a darker image, see page 3-10.
The copier needs more toner.
Press the Auxiliary Toner
ReplenishingKeyasmany times
as requiredto obtainthe desired
image density, see page 4-3.
The copier needs more toner.
Press the Auxiliary Toner
ReplenishingKeyasmany times
as requiredto obtainthe desired
image density, see page 4-3.
Replace the Toner Bottle with a
new one, see page 5-2.
see page 5-4.
Change the setting in the User’s
ChoiceModeU-13(DefaultAuto
ExposureLevel), see page 4-7.
Cancel the Auto Exposure Mode
andselect the Manual Exposure
Mode to adjust the exposure
leveland obtain a lighterimage,
see page 3-10.
Pressthe ExposureControlKey
(Lighter) as necessary to obtain
a lighter image, see page 3-10.
Wipe the Original Glass clean
with a soft dry cloth,
see page 8-3.
Place the original in position so
that it is held tightly against the
Original Glass, see page 3-4.
6
EP1054 6-1
Page 82

6
Troubleshooting
Symptom Possible Cause Action
The copy is blurry. The paper is damp. Replace the paper,
seepage5-4.
The copy has lines The Corona Units are dirty. Using the Corona Unit Cleaning
The copy has dark
specks or spots.
Theedgeofthecopy
is dirty.
The OriginalGlass is dirty. Wipe the Original Glass clean
The OriginalPad or Document
Feed Belt is dirty.
Theoriginalis very thinor highly
transparent.
The originalis two-sided. The informationon thebackside
The OriginalPad is dirty. Wipe theOriginalPad clean with
A paper size larger than the
originalis loaded in the Drawer.
(Zoom Ratio is set at full size
100%.)
The originalis not placed in the
correct direction. (Zoom Ratio is
setatfullsize100%.)
The reductionratio selectedis
not in accordance with the copy
paper size. (When doing manual
reduction copying.)
Levers, clean the Corona Units,
seepage8-4.
with a soft dry cloth,
seepage8-3.
Wipethe OriginalPad cleanwith
a soft cloth dampened with mild
home detergent, see page 8-2
Place a blank sheetof paper
over the original, see page 3-4.
of a two-sided,thin original may
be slightlyreproducedon the
copy.Set the copier into the
Manual Exposure Mode and,
usingthe Exposure ControlKey
(Lighter), make the exposure
levellighter, see page 3-10.
a soft cloth dampened with mild
home detergent, see page 8-2.
Load the same size copy paper
as the originalinto the Drawer,
seepage5-4.
Load the same size copy paper
onto the Manual Bypass Tray or
theMulti BypassTray, see page
3-13.
Reload the paper in the same
direction as the original, see
page 3-4.
Select the zoom ratio according
tothe copypaper size,seepage
3-7.
6-2 EP1054
Page 83

Troubleshooting
Symptom Possible Cause Ac tion
The image on the
copy is not aligned
properly.
The originalis not placed in the
correct position.
Place the original correctly on
the Original Glass against the
Original Width Scale, see page
3-4.
If these procedures do not correct the problem, contact your Technical
Representative
6.2 T he Copier is not functioning as designed
Symptom Check for Action
None of the Control Panel
Indicators light up.
Pressingthe Start Key does
not start the copy cycle.
Is the Start Key lit up green? The copier is in the Energy
The copier is in the Auto
Shut OFF Mode.
Is the Start Ke y blinking
Orange?
Is any of the following
Indicators lit up?
Saver Mode. Press any Key
on the Control Panel to
cancelthe Energy Saver
Mode, see page 2-12.
Turn the Power Switch ON.
The copier is now warming
up. Please wait,
see page 2-11.
Takethenecessarystepsfor
each Indicator,
see page 5-1.
6
1139O3910A
The Copier is not activated
when the Power Switch is
turned ON.
1139O3270A
Is the power cord plugged
into the power outlet?
Is the room circuit breaker
open?
1139O3
Plug the power cord into the
power outlet.
Close the room circuit
breaker.
Turn the copier OFF immediately, unplug the power cord, and call your
Technical Representative.
EP1054 6-3
Page 84

6
Troubleshooting
6-4 EP1054
Page 85

Specifications
7 Specifications
Copier EP1085
Specification
Type Desk Top C opier
PlatenType Stationary
Photoconductor OPC
Copying System ElectrostaticDry Powdered Image Transfer to Plain Paper
Developing System Micro-Toning System
Fusing System Lamp-Heated Roller
Types of Original Sheets, Books,and other three-dimensional objects
Kinds of Paper Plain paper, Recycledpaper: Weighing60g/m
Copy Paper Size
Paper FeedingSystem Automatic feedingfrom a drawerand manual feeding via
Warming-upTime 30seconds or less at Ambient temperature of 23°C/73°F
First copy Time A4C= 7.2 secondsor less
Copying Speed
(approx. copies/minute)
Zoom Ratios Fixed ratios
Maximum Original Size: A3 Lengthwise
Maximum Original Weight: 3kg.
Specialpaper (Manual Bypass Table only)
Thickpaper weighing:91g/m
OHP transparencies
Translucentpaper
Drawer:
Manual Bypass Tray
Lostimage:
Manual Bypass Tray or Multi Bypass Tray (option)
Drawer: 250 sheets
(20 seconds or less when the Energy Saver Mode is used)
(in Full Size Mode using First Copier Drawer)
Drawer
Full size (100%)
A3L: 12 B4L:13
A4L: 15 A4Y:15
Full size: 1:1±0.5%
Reduction Ratios: 50%, 70%, 81%
Enlargement Ratios:115%, 141%, 200%
Zoom ratios:From 50% to 200% in 1% increments
2
2
to 157g/m
A3L, B4L, A4L, A4C, B5C, A5L, 8” x 13”L, 8-1/2” x 13”L, 81/4” x 13”L (When the MarketingArea Switch is flipped to
“Inch”)11” x 17” L, 5-1/2” x 8-1/2” L, LEGAL L, LETTER L
Crosswise: 100mm to 297mm
Lengthwise: 140mm to 432mm
1-sidedcopy in the Full size mode
Leadingedge: 3 mm (approx.1/8”)
Trailing edge: 3 mm (approx. 1/8”)
Front edge: 1 mm (approx.1/25”)
2
to 90g/m
2
7
EP1054 7-1
Page 86

7
Specification
Multiple Copy Up to 99 copies (Count-Downsystem)
Exposure Control Auto, Manual and Photo Mode
Power Requirements AC 115V, 120V, 127V, AC 220V-240V,50/60Hz
Power Consumption 1.3 kW (Max.)
Dimensions Width: 610mm (ExcludingExit Tray)
Weight 50 kg
Depth:637mm
Height:401mm (IncludingOriginal Cover)
(Excluding Copy Tray, Starter,Toner)
Multi Bypass Tray MB-4
Specification
Type Universal Multi-SheetBypass Unit
Installation Attached to copier
Registration Front edge
2
to 157g/m
2
)orless
Capacity of Table
Kinds of Paper
Paper Size Standard: A3L to A6L
Power Source DC24V supplied from copier
Power Consumption 30W or less
Weight 2.7 kg
Plain Paper (white): 50 sheets (80g/m
Plain Paper (once-copied paper): 20 sheets or less
RecycledPaper, Thick paper, translucentpaper:
20 sheets or less
OHP transparencies: 5 sheets or less
Plain paper, Recycled paper: weighing60g/m
Special paper
Thick paper: weighing 90g/m
OHP Transparencies
Translucent paper
Non-standard: Crosswise: 100mm to 297mm
Lengthwise: 140mm to 432mm
Specifications
2
to 90g/m
2
2
7-2 EP1054
Page 87

Miscellaneous
8 Miscellaneous
8.1 Care of the Copier
To keep your copier in good shape at all times, make the following daily
checks and cleaning.
Daily Checks
Power Cord, Communications Cable, Ground Cable
Item Action
Is the copier placed on its power cord or
other Cables?
Is the copier placed on cables of other
electrical equipment?
Are the cord and cables free of damage or
cracks?
Has the cord or cable jacket frayedto expose
the wires?
Communications Cable: Cable connecting the copier with options
It could result in the copier or other electrical
equipment malfunctioning. Move the copier
immediately.
TurnthecopierOFF immediately,unplugthe
power cord, and call your Technical
Representative.
8
Original Glass
Item Action
Is the Glass dirty? CleantheGlassusingtheproceduregivenin
Is the Glass scratched? Callyour Technical Representative.
Is the Glass cracked or chipped?
“Cleaning”, see page 8-3.
Original Cover, Automatic Document Feeder
Item Action
Is the Original Pad dirty? Clean the Pad using the proceduregiven in
Is the Original Pad scratched? Call your Technical Representative.
“Cleaning”, see page 8-2.
EP1054 8-1
Page 88

8
Miscellaneous
Copy Paper
Item Action
Is the paper damp and wavy? Replace the paper, see page 5-4.
Sound of Copier Operation
Item Action
Is there any unusual noise heard while the
copier is running?
Call your Technical Representative.
Copier Housing Temperature
Item Action
Is the housing temperature inordinately
high?
Call your Technical Representative.
Cleaning
Housing
Wipe the surface of the Housing clean
with a soft cloth dampened with mild
home detergent.
Original Pad
1 Raise the Original Cover.
2 Wipe thesurface of theOriginal Pad
clean with a soft cloth dampened
with mild home detergent.
8-2 EP1054
Page 89

Miscellaneous
Original Glass
1 Raise the Original Cover.
2 Wipe the surface of the Original
Control Panel
1 Turn the Power Switch OFF.
2 Wipe the surface of the control
NOTE
è NEVER use a glass cleaner or any other detergent to avoid damage
8
Glass clean with a soft, dry cloth.
panel clean with a soft, dry cloth.
to the control panel keys and display.
Front Door
1 Swing down the Front Door.
2 Wipe the inside of the Front Door
clean with a soft cloth.
EP1054 8-3
Page 90

8
Miscellaneous
Corona Units
1 Open the Front Door
2 Gently slide out the Upper Corona
Unit Cleaning Lever as far as it will
go.
3 Gently slide the CleaningLever
back into the original position.
4 Gently slide out the Lower Corona
Unit Cleaning Lever as far as it will
go.
5 Gently slide the CleaningLever
back into the original position.
6 Repeat steps 2 to 5 two to three
times.
8-4 EP1054
Page 91

Miscellaneous
8.2 Paper Size and Zoom Ratio Table
Paper Size
Name Size (Metric) Size (Inch)
A 3 297mm x 420mm 11-3/4”x 16-1/2”
A 4 210mm x 297mm 8-1/4” x 11-3/4”
A 5 148mm x 210mm 5-3/4” x 8-1/4”
A 6 105mm x 148mm 4-1/4” x 5-3/4”
B 4 257mm x 364mm 10” x 14-1/4”
B 5 182mm x 257mm 7-1/4” x 10”
B 6 128mm x 182mm 5” x 7-1/4”
Post Card 100mm x 148mm 4” x 5-3/4”
Name Size (Inch) Size (Metric)
LEDGER 11” x 17” 279mm x 432mm
11” x 14” 11” x 14” 279mm x 356mm
COMPUTER 10-1/8” x 14” 257mm x 356mm
10” x 14” 10” x 14” 254mm x 356mm
9-1/4” x 14” 9-1/4”x 14” 236mm x 356mm
LEGAL 8-1/2”x 14” 216mm x 356mm
Foolscap GOVERNMENT
Foolscap 8” x 13” 203mm x 330mm
Foolscap 8-2/3” x 13” 220mm x 330mm
Foolscap FOLIO 8-1/4” x 13” 210mm x 330mm
8-1/4” x 11-3/4” 8-1/4” x 11-3/4” 210mm x 301mm
LETTER 8-1/2” x 11” 216mm x 279mm
GOVERNMENT
LETTER
QUARTO 8” x 10” 203mm x 254mm
STATEMENT INVOICE 5-1/2” x 8 -1/2” 140mm x 216mm
LEGAL
8-1/2” x 13” 216mm x 330mm
8” x 10-1/2” 203mm x 267mm
8
EP1054 8-5
Page 92

8
Zoom Ratio Table (Original Size to Copy Paper Size)
Zoom Ratio = Copy Paper Size + Original Size
1” (inch) = 25.4 mm
1mm = 0.0394” (inch)
Metric Areas
Original Size Copy Paper Size Zoom Ratio
A3
297 x 420mm
11-3/4”x 16-1/2”
A4
210 x 297mm
8-1/4”x 11-3/4”
A5
148 x 210mm
5-3/4”x 8-1/4”
A6
105 x 148mm
4-1/4”x 5-3/4”
B4
257 x 364mm
10” x 14-1/4”
A4 x 0.707
A5 x 0.500
B4 x 0.866
B5 x 0.610
A5 x 0.707
A6 x 0.500
B5 x 0.866
B6 x1.224
A3 x1.414
B4 x1.224
A6 x0.707
B6 x0.866
A4 x1.414
A3 x2.000
B4 x1.733
B5 x1.224
A4 x2.000
A5 x1.414
B5 x1.733
B6 x1.224
A4 x0.816
A5 x0.577
B5 x0.707
B6 x0.500
A3 x1.154
Miscellaneous
8-6 EP1054
Page 93

Miscellaneous
Metric Areas
Original Size Copy Paper Size Zoom Ratio
B5
182 x 257mm
7-1/4” x 10
B6
128 x 182mm
5” x 7-1/4”
Inch Areas
Original Size Copy Paper Size Zoom Ratio
11” x 17”
279.4 x 431.8mm
11” x 15”
279.4 x 381mm
11” x 14”
279.4 x 355.6mm
Legal
8-1/2” x 14”
215.9 x 355.6mm
8
A5 x0.816
A6 x0.577
B6 x0.707
A3 x1.640
A4 x1.154
B4 x1.414
A6 x0.816
A4 x1.640
A5 x1.154
B4 x2.000
B5 x1.414
11” x 14” x 0.823
Legal x 0.772
Foolscap x 0.764
Letter x 0.647
Invoice x 0.500
11” x 14” x 0.933
Legal x 0.772
Foolscap x 0.722
Letter x 0.733
Invoice x 0.500
Legal x 0.772
Foolscap x 0.772
Letter x 0.772
Invoice x 0.500
Legal x 0.928
Foolscap x 0.785
Letter x 0.607
Invoice x 1.214
EP1054 8-7
Page 94

8
Inch Areas
Original Size Copy Paper Size Zoom Ratio
Foolscap
8-1/2”x 13”
215.9 x 330.2mm
Letter
8-1/2”x 11”
215.9 x 279.4mm
Invoice
5-1/2”x 8-1/2”
139.7 x 215.9mm
Foolscap x 0.846
Letter x0.647
Invoice x 1.294
11” x 17” x 1.076
Invoice x 0.647
11” x 17” x 1.294
11” x 14” x 1.272
11” x 17” x 2.000
11” x 14” x 1.647
Legal x 1.545
Foolscap x 1.529
Letter x1.294
Miscellaneous
8-8 EP1054
Page 95

A
Add Paper Indicator ............................................................................................5-4
Add Toner ...........................................................................................................5-2
Add Toner Indicator ............................................................................................5-2
Adding Paper ......................................................................................................5-4
Auto Exposure Mode ................................................................................3-9, 3-10
Auto Panel Reset ON/OFF .................................................................................4-9
Auto Reset Function .........................................................................................2-14
Auto Shut OFF Timing ......................................................................................4-10
B
Book Copying ...................................................................................................3-11
C
Call-Tech.-Rep. Indicator .................................................................................5-10
Cleaning .............................................................................................................8-2
Closure Failure Indicator ....................................................................................5-6
Condensation .....................................................................................................4-4
Control Panel ......................................................................................................2-6
Corona Unit Cleaning Lever ...............................................................................8-4
D
Daily Checks ......................................................................................................8-1
Default auto exposure level ................................................................................4-7
Description of Copy Paper Size ......................................................................... 8-5
Display ................................................................................................................2-8
Drum Dehumidifier F u nction ...............................................................................4-4
E
Energy Saver Mode ..........................................................................................2-12
Energy Saver ON Timing .................................................................................4-10
Enlargement .......................................................................................................3-8
Enlargement Ratios ............................................................................................3-8
F
Fixed Zoom Ratios .............................................................................................3-7
Full Size ..............................................................................................................3-8
Full Size Copy ....................................................................................................3-8
I
I. U. Service Life Indicator ........................................................................2-9, 5-11
Initial Mode .......................................................................................................2-13
EP1054 IX-1
Page 96

M
Manual Bypass Copying ..................................................................................3-13
Manual Exposure Mode ....................................................................3-9, 3-10, 4-8
Misfeed Indicator ...............................................................................................5-7
Multi Bypass Copying ......................................................................................3-14
N
Non-Auto Shut OFF ...........................................................................................4-6
O
Original Placement ............................................................................................3-4
P
Panel Resetting ...............................................................................................2-13
Paper Size .........................................................................................................3-6
Paper, Add .........................................................................................................5-4
Photo M ode ..............................................................................................3-9, 3-10
Placing Originals ................................................................................................3-4
Power Switch ...................................................................................................2-11
R
Reduction ratios .................................................................................................3-7
Replacing the Toner Bottle ................................................................................5-2
S
Size Counter ......................................................................................................4-1
T
Toner Replenisher Function ..............................................................................4-3
Toner, Add .........................................................................................................5-2
Total Counter .....................................................................................................4-1
Total Number of Copies Mode ...........................................................................4-1
U
User’s Choice ....................................................................................................4-6
Z
Zoom Ratio ........................................................................................................3-7
Zoom Ratio Table ..............................................................................................8-6
IX-2 EP1054
 Loading...