

Page 1

i
Thank you for choosing Minolta.
This operator’s man ual expl ains h ow to op erat e the copier a nd repleni s h its
supplies. It also gives some troubleshooting tips a s well as general precautions to
be observed when operating the copier.
To ensure the best performance and effect i ve use of yo ur c opie r, read this manual
carefully until you fami liarize yours elf tho roughl y with its oper ation and features.
After you have read through the manual, keep it for ready reference.
Please use this manu al as a qu ick and handy referen ce too l for immediately
clarifying any questions which may arise.
Page 2

ii
Contents
Chapters 1 through 3 give the basic information for mak ing copies.
Be sure to read these chapters before using your copier.
Using this Manual
Organization viii
Page Organization ix
Terms and Symbols for the Type of Origin als and
Copy Paper x
Chapte r 1 Safety Not es 1
1. Installing the Copier
Installation Site 2
Power Source 2
Grounding 2
Space Requirements 3
2. Precautions for Use
Operating Environment 4
Using the Copier Properly 4
Care of Co pier S up plies 5
Moving 5
Page 3

Chapter 2 First Things to Know
about your Copier 7
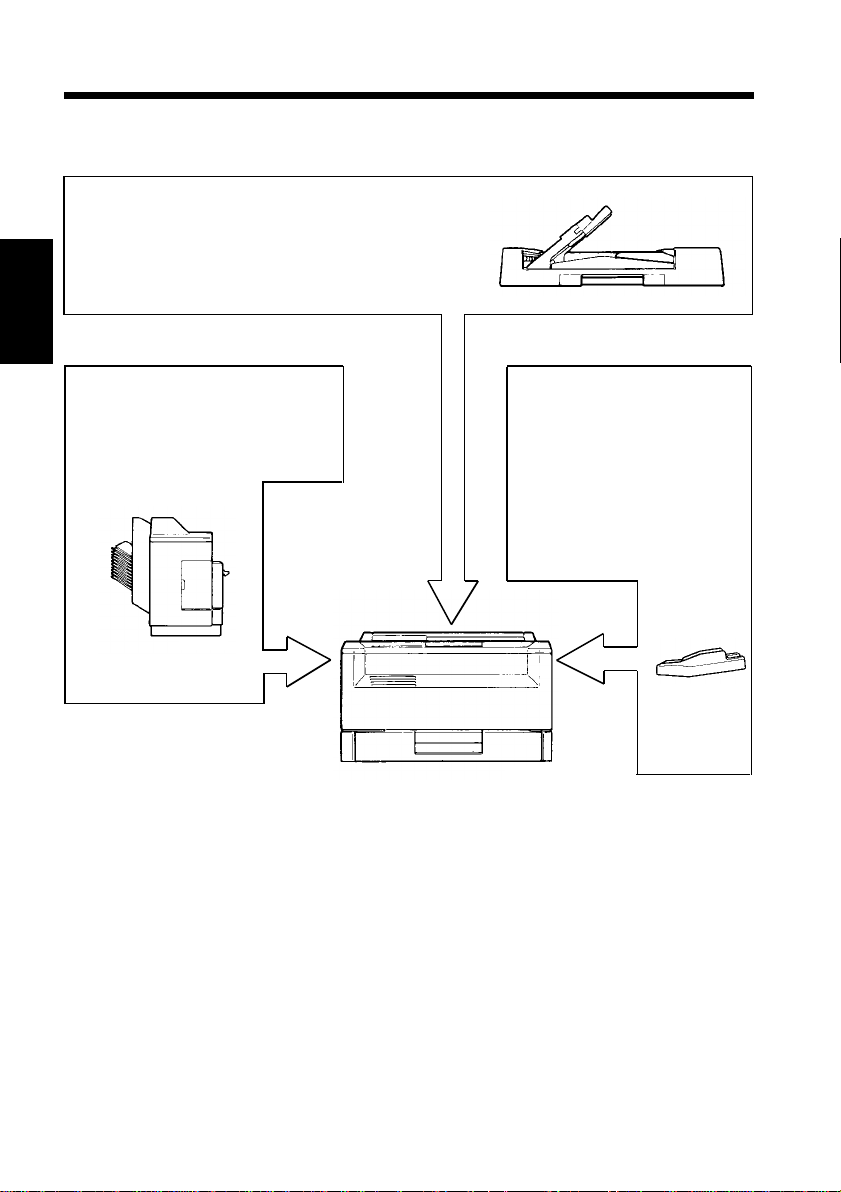
1. System Overview 8
2. Copier Parts and Accessories
Outside Copier 9
Inside Copier 10
Automatic Document Feeder AF-3 1 2
10-Bin Sorter S-104 13
Multi Bypass Table MB-1 13
3. Control Panel Keys and Indicators
Control Pan el 14
Display 16
4. Turning ON and OFF, and Resetting the
Copier
Turning ON and OFF 19
When Copier is Turned ON 19
Auto Co py St art Fu nc ti on 20
Minimizing the Warm-up Time 21
Initial Mode and Panel Resetting 22
Auto Reset Function 23
iii
Contents
Page 4

iv
Contents
Chapter 3 Making Copies 25
1. Copying Overview 26
2. Copying Procedure
Placing Originals 28
Checking the Copy Paper Size and Selecting the Paper
Source 33
Zoom Ratio
• Types of Zoom Ratios 34
• Auto Size Mode 37
• Zoom Ratio Table
(Orignal Size to Copy Paper Size) 39
Image Density 40
Book Co py ing 42
Finishing Modes
• Finishing Modes 44
• Selecting the Finishing Modes 45
• Auto Dual Function 46
Number of Co pi e s 47
Starting the Copy Cycl e 4 8
Manual Bypass Copying 49
Page 5

Contents
Chapter 4 Auxiliary Functions 51
1. Checking the Total Number of Copies Mode
52
2. Auxiliary Toner Replenishing Mode
(Increasing the Image Density) 54
3. Drum Dehumidify Function 55
4. User’s Choice 56
Chapter 5 When an Indicator
Lights Up 67
(Replenishing Supplies, Clearing Misfeeds,
and Corr e ct ing a Clo s ure F a ilu r e)
1. Quick Reference for Indicator Lights 68
2. Detailed Instructions for Indicator Lights
Add Toner In di c ator 70
Add Paper Indicator 72
I.U. Service Life Indicator 76
Closure Failure Indicator 85
Misfeed Indicator
• Misfeed Indicator and Monitor Display 86
• Misfeed Clearing Procedures
: Copier EP1050 87
: Automatic Document Feeder AF-3 90
: Sorter S-104 92
v
Call-Tech.-Rep. Indicator 93
Page 6

vi
Contents
Chapter 6 Troubleshooting 95
1. When this Type of Copy is Produced
The Image is too light 96
The Image is too dar k 96
The Copy is blurry 96
The Copy has lines 98
The Copy has dark specks or spots 98
The Edge of the Copy is dirty 98
The Image on the Copy is not aligned properly 98
2. The Copier is not functioning as designed
None of t he Control Panel Indicator s light up 100
Pressing the Start Key does not start t he cop y cycle
100
The Copier is not activated when the Power Switch is
turned ON 102
Chapter 7 Specifications 103
1. Copier EP1050 104
2. Automatic Document Feeder AF-3 106
3. 10 Bin Sorter S-104 107
4. Multi Bypass Table MB-1 108
Page 7

Contents
vii
Chapter 8 Miscellaneous 109
1. Care of the Copier
Daily Checks 110
Cleaning 112
2. Description of Copy Paper
Size 116
3. Zoom Ratio Table
(Orig in al S ize to Copy Paper
Size) 117
4. Index 118
Chapter 1
Safety Notes
Chapter 2
First Things to
Know about
your Copier
Chapter 3
Making Co pie s
Chapter 4
Specia l Functions
Chapter 5
When an Indicator
Lights Up
Chapter 6
Troubleshooting
Chapter 7
Specifications
Chapter 8
Miscellaneous
Page 8

viii
Using This Manual
Organization
Chapte rs 1 through 3 give the basi c informat i on for maki ng copies. Be sure to
read these Chapters b efo re u sing your copier.
Chapter 1 Safety Notes
About the operating environment, conditions and precautions for use.
Chapter 2 First Things to Know About your Copier
A brief description of the system and preliminary information about
the different parts of the system.
Chapter 3 Making Copies
About how to make c opies .
"COPYING OVERVIEW" on p. 26
These pages offer quick, at- a-g lance i nstructions for making copies.
Each step is keyed to a page number with more detailed information.
Chapter 4 Auxiliary Functions
About the auxiliary functions that can be used for specific purposes.
Chapter 5 When an Indicator Lights Up
About the various warning indications given on the control panel
and steps to correct these conditions.
Chapter 6 Troubleshooting
Instructions on how to tr oublesh oo t copier malf un ctio ns.
Chapter 7 Specifications
Complete specification s of the c opier system and options.
Chapter 8 Miscellaneous
About care for the copier and the variou s po ssible combinations of
functions.
Page 9
Page Organization
Each page of this manual is basical ly organized as follows.
Index: To locate your Chapter qui ckly.
Section title
ix
Using This Manual
Table of co ntents of the Chapter:
To quickly locate your page in the chapter.
➭
p. XX (Cross-reference):
Shows t h e page to refer to for more det ailed information.
1142O166CA
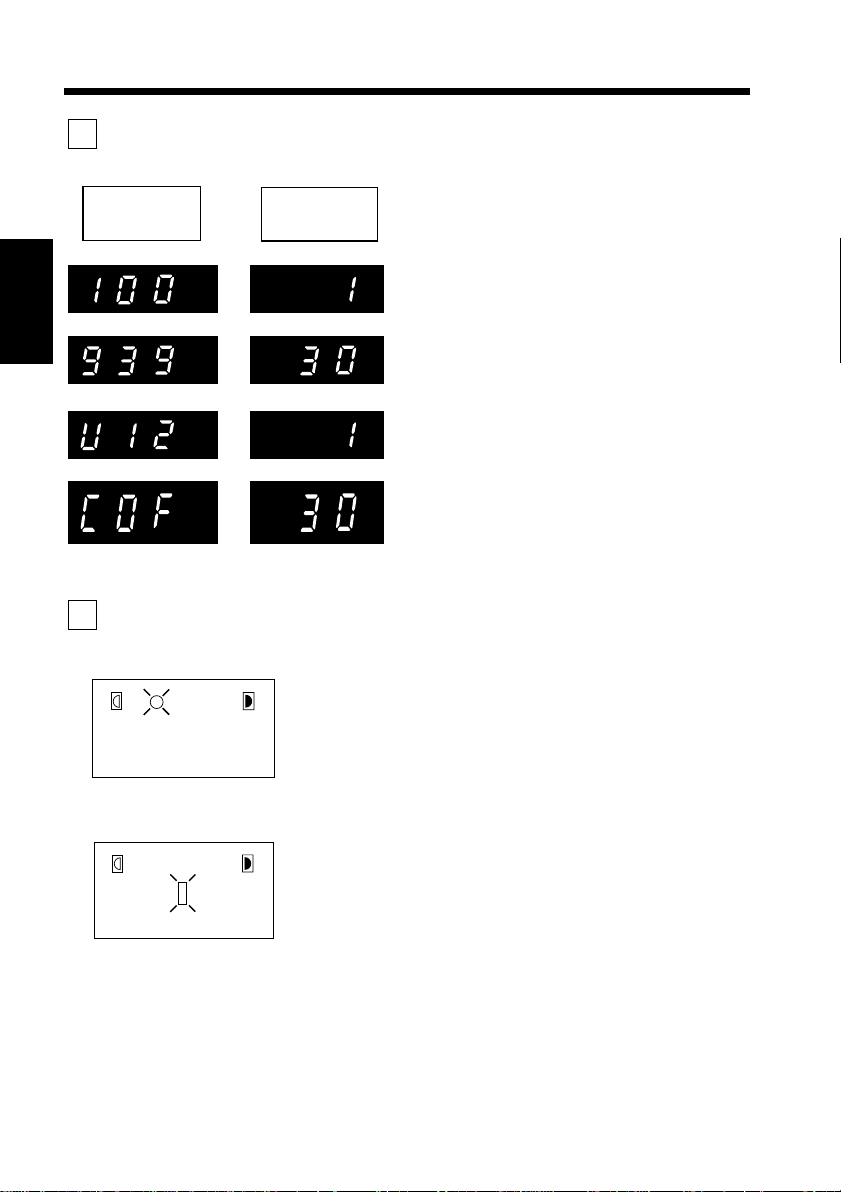
Control Panel Indicators
A steady light and blinking light Indicator on the control panel are indicated as
follows.
Steady Light
1142O003AA
1142O003AA
Blinking Ligh t
1142O004AA
1142O004AA
Page 10
x
Using This Manual
Terms and Symbols for the Type of Originals and Copy
Paper
A few special term s an d sym bols are used in this manual to designate types of
originals and copy paper. These two pages explain about these terms an d
symbols.
Feeding Direction (Copy Paper Path)
In this copier system, copy paper is taken up from the right-hand side of the
copier and fed through the copier toward the left-hand side, out face up onto the
Exit Tray. In th e figure below, th e direction in which the copy paper is fed, a s
indicated by the arrow, is called the "feeding direction."
1142O005AA
Page 11
"Width" and "Length"
Terms and Symbols Used
xi
Using This Manual
When we talk about the size of the
original or copy, we call side A
"width" and side B "length."
A: Widt h
B: Length
1139O1610A
<Lengthwise >
When the original or copy has a
"length" longer than its "width," we
call it "lengthwise" and use symbol
"L" or " ."
1139O1610A
1139O1620A
<Crosswise >
When the original or copy has a
"length" shorter than its "wid th," we
call it "crosswi se" and use symbol
"C" or " ."
Page 12

xii
Page 13

Chapter 1
1
Safety Notes
This Chapter explains about the operating environment, conditions,
and precautions for use.
1. Installing the Copier
Installation Site 2
Power Source 2
Grounding 2
Space Requirements 3
2. Pr ecautions for Use
Operating Environme nt 4
Using the Copier Properly 4
Care of Copie r Supplies 5
Moving 5
Chapter 1
Safety Notes
Page 14

2
1. Installing the Copier
Installation Site
To ensure utmost safety and preven t possib le malfunctio ns of the copier, install it
in a location which meets the following requirements.
Chapter 1
u
A place away from a curtain or the like that may catch fire and burn easily.
u
An area where there is no possibility of bei ng splash ed with water or other
types of liquid .
u
An area free from direct su nlight.
u
A place out of the direct air stream of an air conditioner, heater, or ventilator.
u
A well-ventilated place.
u
A dry place.
Safety Notes
u
A dust-free location.
u
An area not subject to undue vibration.
u
A stable and level location.
Power Source
The power source voltage requirements are as follows.
u
Use a power source with little voltage fluctuat ion.
Voltage Fluctuation : Within ±10%
Frequency Fluctuation : 50 Hz Within ±2.5%
: 60 Hz Within ±3%
u
If any other electrical equipment is sourced from the same powe r outlet, make
sure that the capacity of the outlet is not exceeded.
u
The outlet should be located near the copier and easil y accessible.
u
Never connect by means of a multiple socket any other appliances or machines
to the outlet being used for the copier.
u
If an extension cord is needed, use one with a capacity more than the power
consu mpt i on of th e co pier .
u
Make sure that no unusu al, excessive force is being app lied to the power cor d
or extension cord.
Grounding
To prevent receiving electrical shocks in the case of electrical leakage, always
ground the copier.
Connect the grounding wire to:
u
The ground terminal of the outlet.
u
A grounding contact which complies with the local electrical standards.
NOTE: Never connect the grounding wire to a gas pipe, a grounding wire for a
telephone or a water pipe.
Page 15
1. Installing t he C opier
Space Requirements
To ensure easy copier operation, supply replacement and service maintenance,
adhere to the recommended sp ace req uir ements detailed below.
NOTE: Be s ure to allow a clea rance of 6 i n. or more at the back of the copier as
there is a ventilation du ct.
•
EP1050
1,039
430 609
123
1,250
778
610
342
45
3
Chapter 1
Safety Notes
253
•
EP1050 + OPTION
230
1,609
1,336
1,032
650
387
1142O006AA
1142O008AA
920
855
372 469
323
532
29
401
1142O007AA
1,189
483
372
1142O009AA
Scale: m m
Page 16

4
2. Precautions for Use
Operating Environment
The operating environmental requirements of the copier are as follows.
Temperature : 10°C to 30°C (50°F to 86°F) with a fluctuation of 10°C (50°F) per hour
Chapter 1
Humidity : 15% to 85% with a fluctuation of 20% per hour
Using the Copier Properly
To ensure the optimum performance of the copier, follow the precautions listed
below.
u
NEVER place a he avy object on t h e c o pier or subject the copier to s h ocks.
Safety Notes
u
NEVER open any Doors, or turn OFF the copier while the copier is making
copies.
u
NEVER bring any magnetized object or use flammable sprays near the copier.
u
NEVER place a vase or vessel containing water on the copier.
u
NEVER drop paper clips, staples, or other small pieces of metal into the copier.
u
NEVER attempt to r e m ove any Cover tha t is secured.
u
ALWAYS insert the Power Plug all t he way i nto the outlet.
u
ALWAYS make sure that the outlet is visible, clear of the copier or copier
cabinet.
u
ALWAYS ensure that the cop ier doe s not ri de on the power cord or
communications cable of other electrical equipment, and it does not get such a
cord or cable wedged into its own mechanism.
u
NEVER leave damage or cracks evi dent on the copier power cord unattended.
If you find any of these conditions, immediately shut down the copier, unplug
the power cord, and call your Technical Representative for approp riate action.
u
ALWAYS p ro vid e go od ven ti l at io n when ma ki ng a larg e numbe r of con ti n uo us
copies.
u
NEVER keep the copier running when it becomes inordinately hot or produces
abnormal noise. If that happens, immediately turn OFF the copier, unplug it,
and then call your Technical Representat ive.
NOTE
= Loca t e t he Copier in a Well Venti l ated Room =
A negligible amount of ozone is generated during normal operation of this
copier. An unpleasant odor may, however, be created in p oorly ventilat ed
rooms during extensive copier operations. For a comfortable, healthy, and
safe operating environment, it is recommended that the room be well
ventilated.
Page 17

2. Precautions for Use
REMARQUE
= Placer le copieur dans une pièce largement ventilée =
Une quantité d’oz on e nég lig ab le e st dégagée pendant le fonctionnement du
copieur quand celui-ci est utilisé normalement. Cepend ant, une odeur
désagréable peut être r es s entie dans les pièces do nt l’aération es t insuffisante
et lorsque une utilisation prolongée du copieur est effectuée. Pour avo ir la
certitude de travailler d an s un envi r onnement r éunis san t des condit ions de
confort, santé et de sécurité, il est préférable de bien aérer la pièce ou se
trouve le copieur.
Care of Copier Supplies
Use the following precautions when hand ling the copier supplies (toner, paper,
etc.).
u
Store the paper, toner, and other supplies in a place free from direct sunlight
and away from any heating apparatus. Keep them in a dry, clean environment.
u
Store pap er, whi ch ha s bee n remo ve d fr om i ts wrap per but not loaded into the
Drawer, in a sealed plastic bag in a coo l, dark place.
u
Use the correct toner for the exclusive use by the EP1050 copier. The
applicable copier mode l name is indicated on the Toner Bottle.
u
Keep supplies out of the reach of children.
u
If your hands become soiled with toner, wash them with soap and water
immediately.
5
Chapter 1
Safety Notes
Moving
If you need to transport the copier over a long distance, consult your Technical
Representative.
Page 18

6
Page 19

Chapter 2
First Things to Know
about your Copier
This Cha pter gives y ou a br ief desc r iption of t he s ystem and
prelimi nar y info r mati on abo ut the dif fe re nt par ts of t he s ys tem.
7
Chapter 2
1. System Overview 8
2. Copier Parts and Accessories
Outside Copier 9
Inside Copier 10
Automati c Document F eeder AF-3 12
10-Bin Sorter S-104 13
Multi Bypass Table MB-1 13
3. Control Panel Keys and Indicators
Control Panel 14
Disp l ay 16
4. Turning ON and OFF, a nd Resetting the Copier
Turning ON and OFF 19
When Copier is Turned ON 19
Auto Copy Start Function 20
Minimizing the Warm-up Time 21
Initial Mode and Panel Resetting 22
Auto Reset Functi on 23
First Things to Know about your Copier
Page 20
8
1. System Overview
The EP1050 system can be configured with the following
components.
◆
Automatic Document Feeder AF-3 <Option>
Permits automatic feeding of mult ipl e
➭
originals.
Chapter 2
◆
10-Bin Sorter S-104 <Option>
p. 30.
Permits sorting or grouping
copies i nt o up to 10 cop y set s
➭
or stacks.
p. 44
S-104
EP1050
1139O0020A
AF-3
◆
Multi Bypass Table
MB-1 <Option>
Holds up to 50 sheets of
standard paper which is
not loaded in any of the
Drawers, allowing to
make copies on them.
➭
p. 49
MB-1
1139O0010A
First Things to Know about your Copier
1139O0170A
1142O010AA
◆
EP1050
The Paper Drawer can hold up to 250 sheets of copy
paper (8 0 g/ m
2
). The Manual Bypass Table allows
you to ma ke a co py on p a per w hich is n ot loaded in
the Drawer and which is fed into the copier manually
via this Table.
Page 21
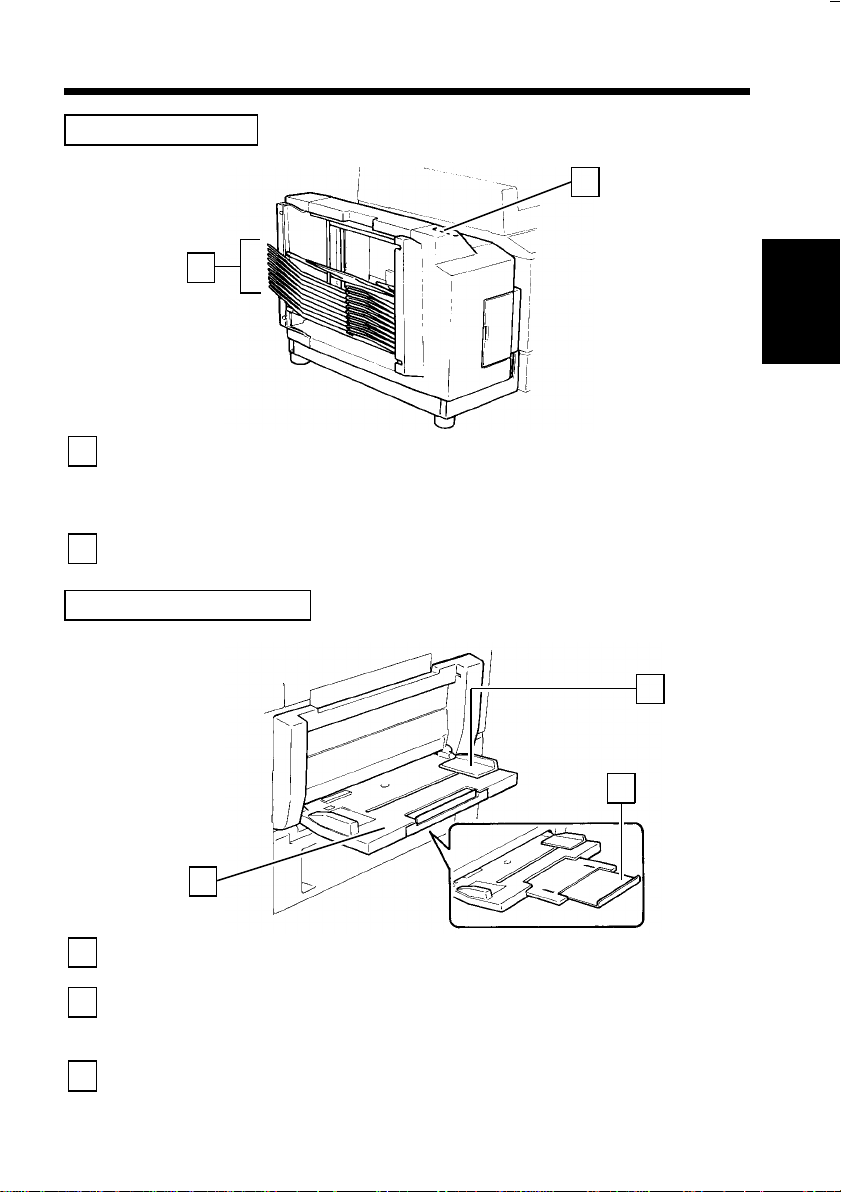
2. Copier Parts and Accessories
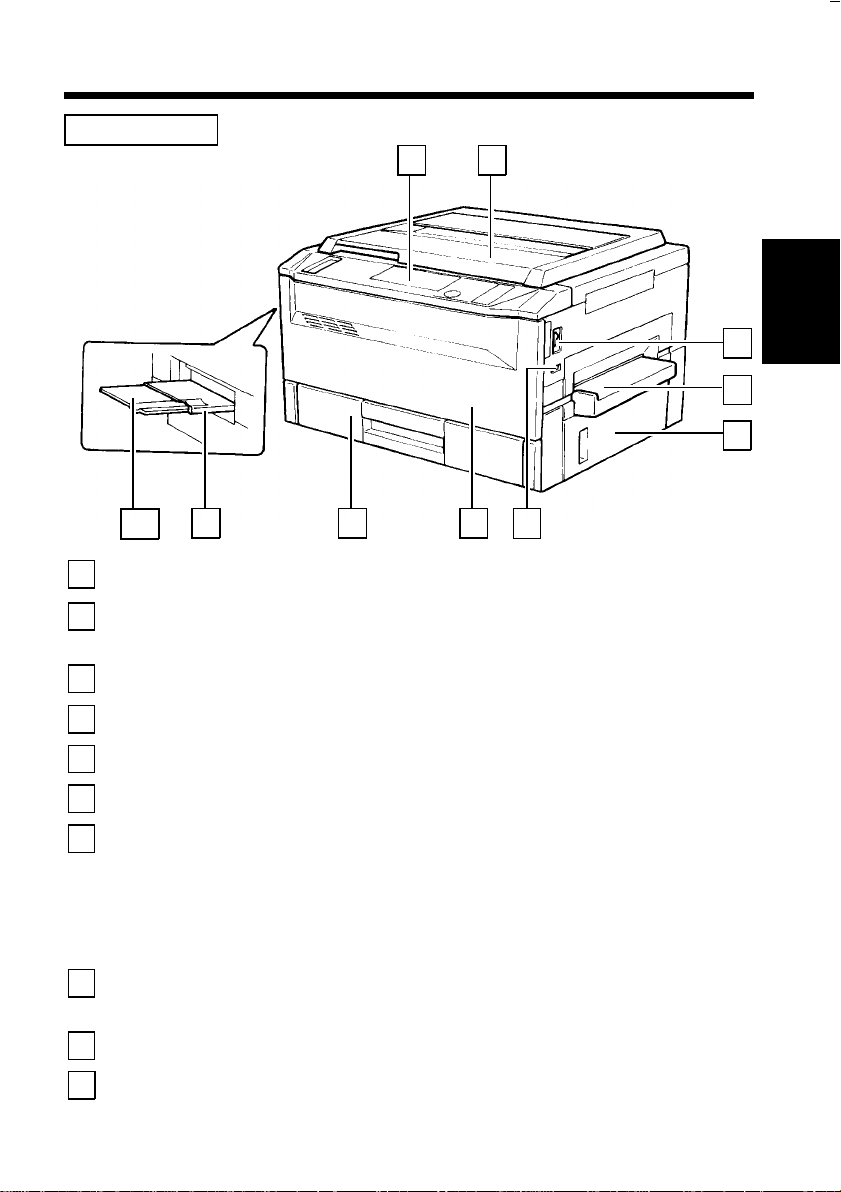
Outside Copier
1 2
3
4
5
9
Chapter 2
10
Control Panel
1
Original Cover
2
Power Switch
3
Manual B ypass Tab le
4
Right Door
5
Total Counter
6
Front Door
7
Paper Drawer
8
Exit Tray
9
Copy Tray Ex t ender
10
9
➭
➭
p. 28
p. 19
1142O011AA
➭
p. 72
➭
p. 49
8
: U se to start a copy cycle or to make copying-job settings.
➭
p. 14
: H olds the original placed on the Original Glass in
position. To place an original, raise the Cover and place
it in position on the Original Glass.
: Use to turn the cop ier ON and OFF.
: U se for manual f eeding of paper into the copier.
: Open to clear a paper misfeed.
: Shows the to tal nu mber of copies made so far.
: Open to:
• Replace the Toner Bottle.
• Clear a paper misfeed.
• Clean the Corona Units.
Closing th e Front Door aft er a misfeed has been clear ed
will turn the Misfeed Indicator on the control panel OFF.
➭
pp. 87, 114
: Holds up to 250 sheets of paper.
The Edge Guide and Trailing Edge Stop are movable,
allowing you to load paper of different sizes.
: Holds copies fed out of the c op ier.
: Slide this Extender out when making copies on large-size
paper.
7
6
➭
p. 88
First Things to Know about your Copier
Page 22
10
2. Copier Parts and Accessories
Inside Copier
1
2
Chapter 2
First Things to Know about your Copier
7
6
5
4
Original
1
Width/Length Scale
Original Pad
2
Original Gl a s s
3
Corona Unit
4
Cleaning Lever
(Upper/Lower)
Lock Release Lever
5
Toner Bottle
6
Toner Bottle
7
Holder
3
1142O012AA
: Place the ori gin al along these Scales for corr ect
➭
p. 114
➭
p. 28
➭
p. 87
➭
p. 87
positioning.
: Hol ds the original i n position on the Original Glas s.
: Place the ori gin al face down on this G las s .
➭
p. 28
: Ope ra te the Lev e r to clean the corresponding
Corona Unit if unwanted lines are produced on the
copy.
: Turn counterclockwise to swing up the Upper Half
of the copier to clear a paper mis feed.
: Contains to ner . Rep lace it with a new one when the
Add Toner In di c ator l ig ht s up .
: Swing open to replace the Toner Bottle.
➭
p. 70
Page 23

2. Copier Parts and Accessories
11
13
12
Upper Half of
8
Copier
Imaging Unit
9
8
: The copier main body can be divided into two
parts, the upper and lower . The Upper Half can be
swung upward.
: Converts the original image to the copy image.
➭
9
1142O013AA
pp. 78, 88
Chapter 2
10
11
First Things to Know about your Copier
Imaging Unit Lock
10
Release Lever
Dehumidifier
11
Switch
Fusing Unit Lock
12
Release Lever
Fusing Unit
13
: Operate when repl acing the Imaging Unit
(For Technical Representative only).
: Turn ON to prevent condensation from forming on
the PC Drum wnen power is tur ned OFF.
: Hold onto this Lever when lifting the Upper Half of
the Fusing Unit.
: Fuses the toner image onto the paper.
➭
p. 88
Page 24
12
2. Copier Parts and Accessories
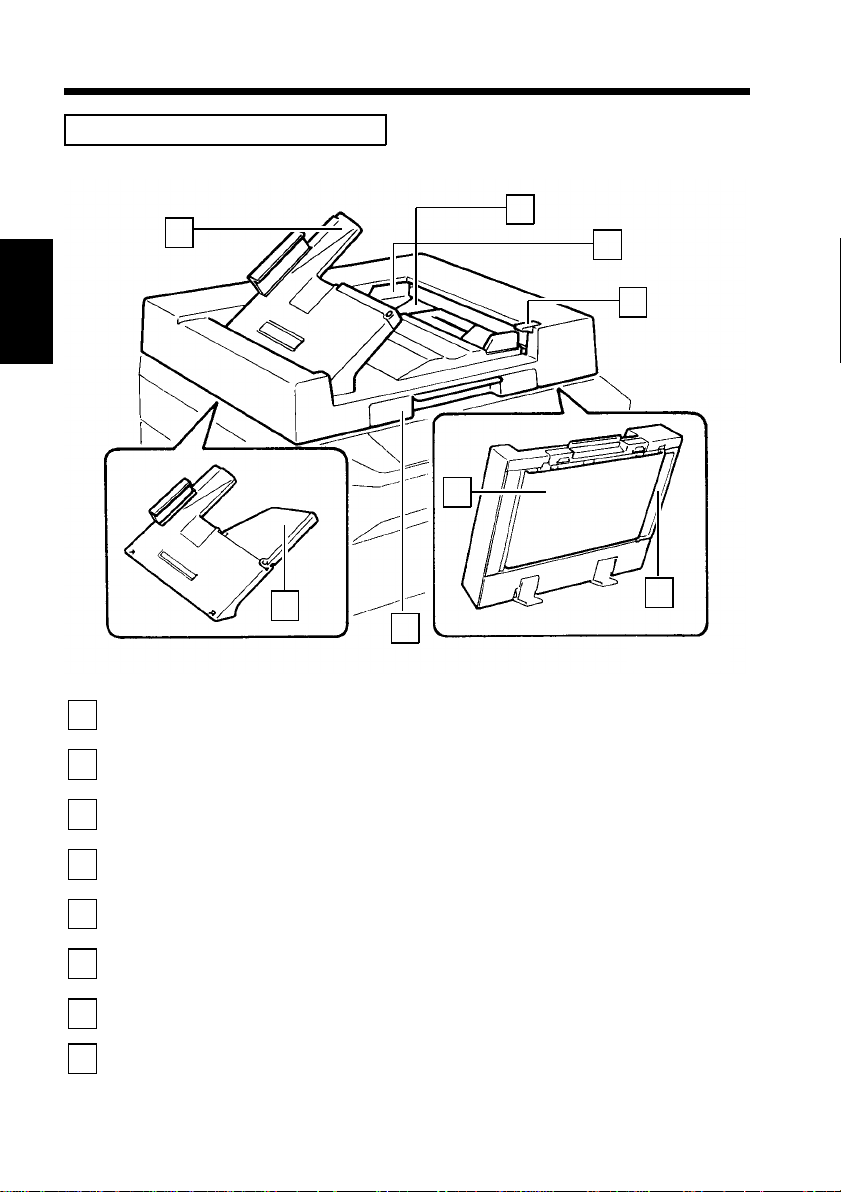
Automatic Document Feeder AF-3
1
Chapter 2
2
3
4
6
First Things to Know about your Copier
Document Exit
1
Tray
Document Feed
2
Tray
Document Guide
3
Plates
Document Release
4
Lever
Document Feed
5
Unit Guide Plate
Document
6
Transp ort Be l t
Lock Release Lever
7
Document Exit
8
Tray Extender
➭
➭
p. 90
5
1139O1070A
p. 31
8
7
: Receives orig inal s that are automa tical l y ejecte d
from AF-3.
: Load the originals face up on this tray.
: Slide the p lates as necessary to the size of the
➭
originals.
: Press to clear an orig inal misfeed. Holdin g down
the lever, pull out the o rig in al.
: Open to clear an original misfeed.
: Moves t he o rig inal from the Document Feed Tray
to the Exit Tray.
: Press up w ard to raise the AF-3.
: Pull out to make copies on larger paper.
➭
p. 31
p. 31
➭
p. 115
➭
p. 90
Page 25
10-Bin Sorter S-104
1
Sorter Bins
1
Lock Release Lever
2
Multi Bypass Table MB-1
2. Copier Parts and Accessories
2
1142O014AA
: Hold sorted copies. The Top Bin is capable of
holding up to 50 copies and each of the 2nd to 10th
Bins up to 25 copies, a total of 275 copies.
➭
p. 44
: Press to unlock the Sorter.
➭
p. 92
13
Chapter 2
Paper Guide Plate
1
Multi Bypass T able
2
Multi Bypass
3
Table Extender
2
1
3
1139O1090A
: Slide as necessary to the size of the copy paper.
➭
p. 50
: Load your paper on this Table. It allows you to
make copies continuously on paper fed from this
➭
Table.
: Sl i de this Ex tender out to use large-size copy paper.
➭
p. 50
p. 50
First Things to Know about your Copier
Page 26
14
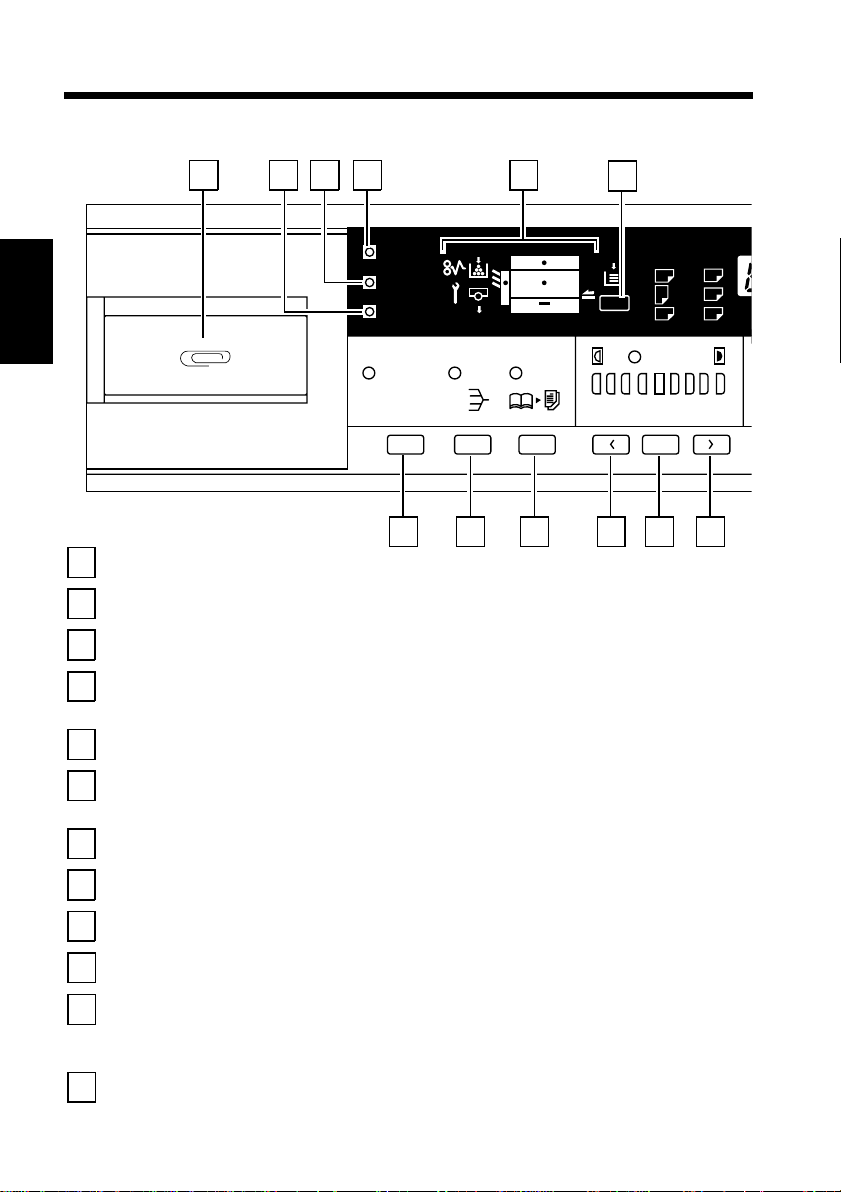
3. Control Panel K eys and In dicator s
Control Panel
2 1
3 4 5
Meter Count
Toner
Drum Dehumidify
Chapter 2
Auto Size Sort Book
6
A3 A5
A4 B4
Paper
A4
FLS.
Auto
Lighter Darker
A
First Things to Know about your Copier
23
Clip Tray:
1
Use this tray to put the paper clips used with the documents.
Drum Dehumidify Key:
2
Press to remove condensation formed on the surface of the PC Drum.
Auxiliary Toner Replenishing Key:
3
Press when the image on the copy becomes too light.
Meter Count Key:
4
Press to check for the current counts of four electronic counters of the copier.
22 21
➭ p. 54
20
➭ p. 55
➭ p. 52
Display:
5
See the other pages in this manual.
Paper Se le c t Key :
6
Press to select the paper sou rce, Drawer or Mu lti Bypass Table (option), when the
Multi Bypass Table is mounted to the copier.
Zoom Down Key:
7
Press as necessary to make the zoom smaller in 1% increments.
Zoom Up Key:
8
Press as necessary to make the zoom larger in 1% increments.
Multi-Copy Keys:
9
Use to enter the number of copies to be made and other numeric data.
Energy Sav er Key:
10
Press to set the copier into the Energy Saver Mode.
Panel Reset Key:
11
Press to set the copier into the initial mode, clearing all settings made previously on
the control panel.
Holding down the Key for 3 seconds will initiate the User’s Choice.
Clea r Key:
12
Press to clear the number of copies, zoom and other s ettings.
➭
p. 23
➭
p. 16
➭ p. 33
➭
p. 21
➭
➭
p. 36
➭
p. 47
p. 36
➭
➭
p. 64
19 18
p. 47
Page 27
3. Control Panel Keys and Indicators
15
8
7
1
p. 48
p. 48
➭
4
7
14
p. 35
%
50%~200%
141% A4
115% B4
100% Full Size
81% B4 A4
70% A3 A4
17 16 15
Stop Key:
13
Press to stop a multi-copy cycle. ➭
Start Key:
14
Press to start a copy cycle.
It also tells the status of the copier as follows:
Green Light: The copier is ready to make copies.
Orange Light: The copier is making copies or warming up, or the Add Paper,
Misfeed, or Call-Tech.-Rep. Indicator is lit.
Enlargement Key:
15
Press to select a desired fixed enlargement ratio.
Full Size Key:
16
Press to select full size (100%) .
Reduction Key:
17
Press to select a desired fixed reduction ratio.
Exposure Cont rol Key ( > , Darker):
18
Press as neces sary t o make the exposure level higher in the Manual Exposure Mode.
➭
Auto Exposure Mode Key:
19
Press t o se lect ei t her the Auto or Manual Exposure Mode.
Exposure Cont rol Key ( < , Lighter):
20
Press as neces sary t o make the exposure level lower in the Manual Exposure Mode.
➭
Book Key:
21
Press as neces sary to select the Book Copying Mode.
Finishing Mode Sel ect Ke y:
22
Press as neces sar y to select the Sor t o r No n- Sort M od e.
Auto Size Mode Key:
23
Press as necessary to select the Au to Size Mode.
p. 41
p. 41
100%
A3
A3
➭
2
5
8
0
Start Stop
➭
p. 35
➭
➭ p. 37
13
p. 35
➭ p. 42
➭
3
6
9
C
➭
p. 45
10 9
Energy Saver
Panel Reset
12 11
p. 41
Chapter 2
1142O131DC
First Things to Know about your Copier
Page 28
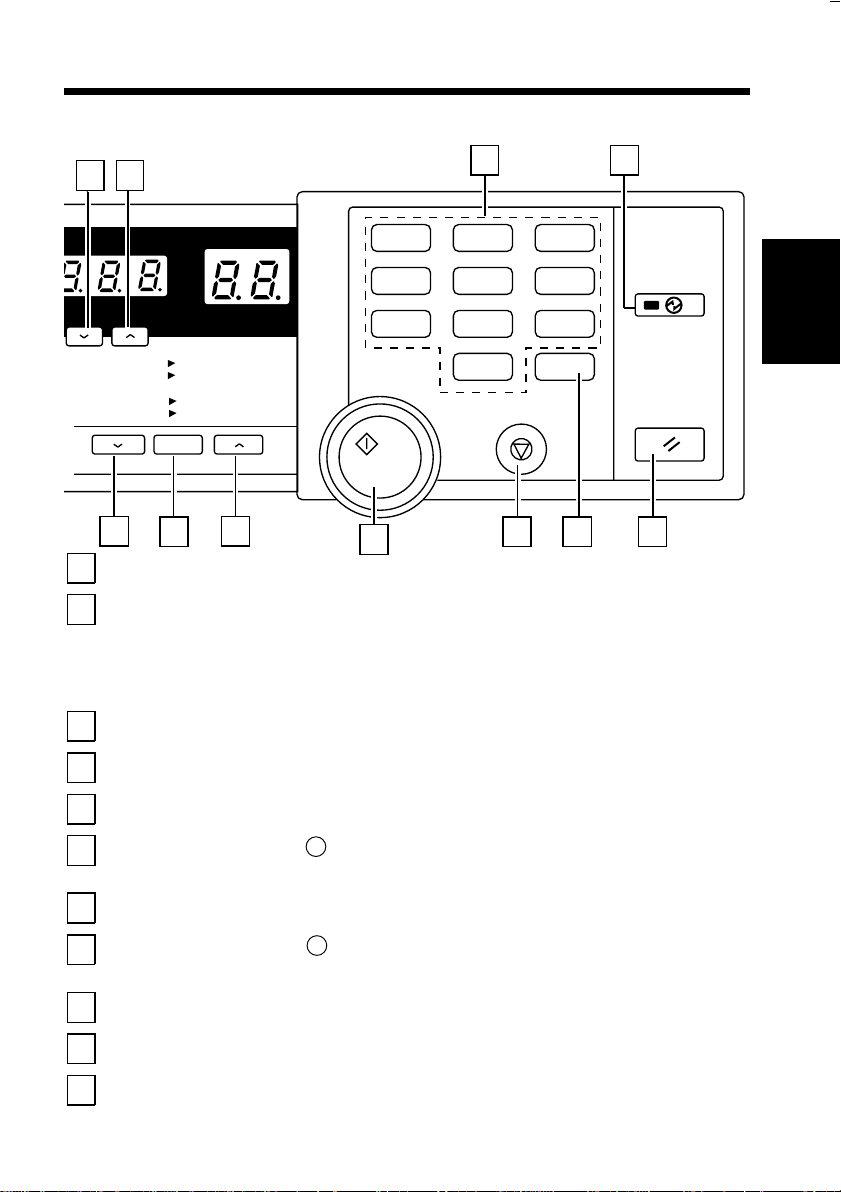
16
3. Control Panel Keys and Indicators
Display
Meter Count
Toner
Drum Dehumidify
Chapter 2
1
•
Auto Size Sort Book
Monitor Display
Paper So ur ce In di ca tor
1142O017AA
1
1142O017AA
2 3
A3 A5
A4 B4
Paper
A4
FLS.
Auto
Lighter Darker
A
4
50%~200%
141% A4
115% B4
100% Full Size
81% B4 A4
70% A3 A4
%
A3
A3
100%
1142O132DC
1142O132DC
Shows the paper so ur ce which is currently
selected for use.
➭
p. 33
Example: Shows t hat the Drawer is currently
Example: selected for use.
Closure Failure Indicator
•
First Things to Know about your Copier
1142O018AA
Misfeed Indicator
•
1142O019AA
1142O018AA
1142O019AA
The location of a Door left open is also indicat ed
by a round marker.
➭
p. 85
Example: Indicates that the Front Door or Right
Door is left open.
Indicates that a paper mis f eed has occurr ed.
The location of the misfeed is also indicated by a
round marker.
➭
p. 86
Example: Shows t hat a misfeed has occurred
Example: inside t he c opie r .
Page 29

Call-Tech.-Rep. Indicator
•
1142O020AA
1142O020AA
Add Toner Indicator
•
1142O021AA
1142O021AA
I.U. Service Life Indicator
•
1142O022AA
1142O022AA
Paper Information Dis p la y
2
3. Control Panel Keys and Indicators
Indicates that the copier has developed a
malfunction.
When a malfuncti on occurs, t he corres ponding
malfunction cod e is sh o wn a cross the Zoom Ratio
Indicator and Multi-Copy Display.
➭
p. 93
Indicates that the Toner Bottle is ru nn ing ou t of
toner. Replace the Toner Bo ttle a s soon as
p. 70
possible.
➭
It is no w time to replace the Imaging Unit.
Replace the Imaging Unit by following the steps
given in "I.U. Service Life Indicator."
➭
p. 76
17
Chapter 2
Paper Si ze Indic at or s
•
A4
Paper
1142O143DA
Add Paper Indicator
•
Paper
1142O170CA
1142O143DA
1142O170CA
Show the size of paper currently loaded in the
Drawer.
➭
p. 33
Lights up when the curren tly selected Drawer has
run ou t of pa per . Add paper a s ne ces s ar y.
➭
p. 72
First Things to Know about your Copier
Page 30
18
3. Control Panel Keys and Indicators
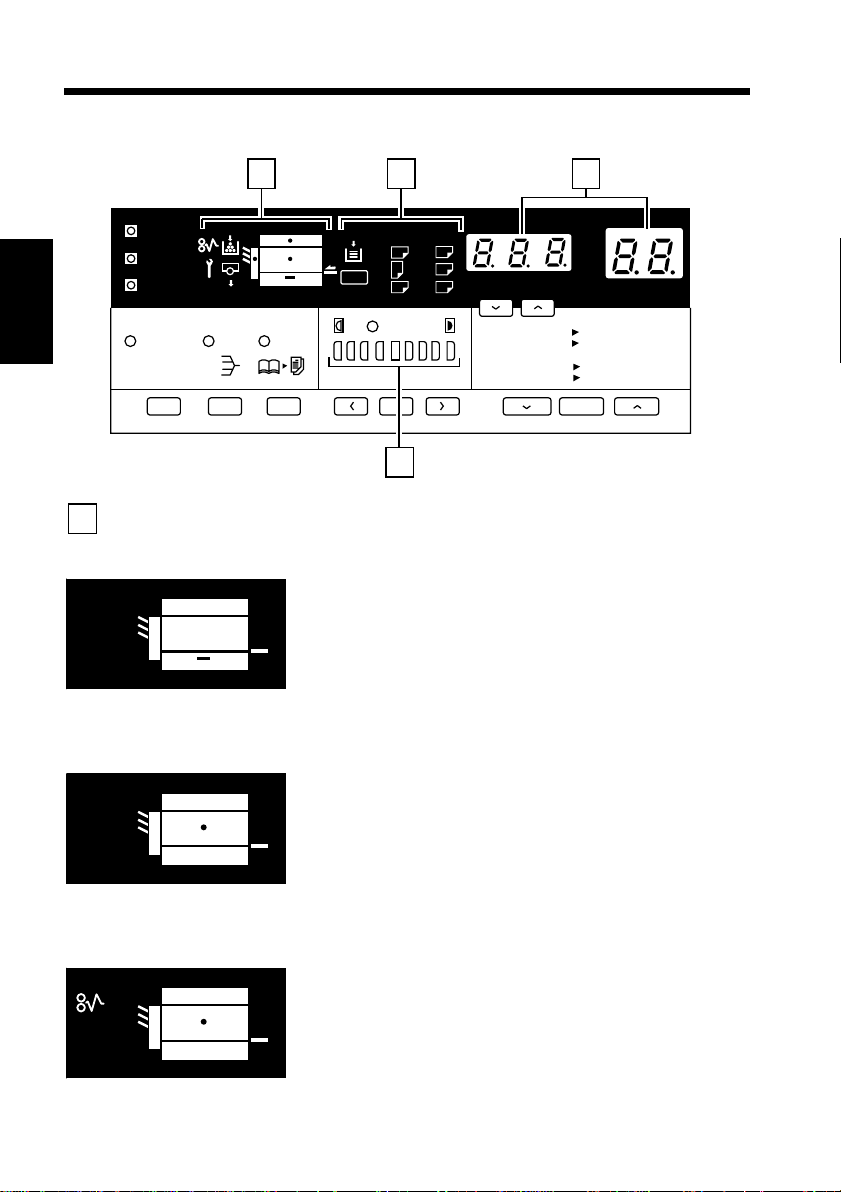
Zoom Ratio Indicator /
3
Multi-Copy Display
Zoom Ratio
Indicator
%
Chapter 2
%
%
%
Exposure Information Display
4
Auto Exposure Indicator
•
Auto
: Each shows the following data.
Multi-Copy
Display
Example
•
Zoom ratio: 100%
No. of copies: 1
Count of the Total Counter
•
Example: 93,930 (copies)
User’s Choice code and setting value
•
Example: Choice code: 12, Setting: 1
Malfunction code
•
Example: Malfunction code C0F30
1142O025AA
Indicates that the copier is now in the A uto
Exposure Mode.
➭
p. 40
Lighter Darker
First Things to Know about your Copier
Exposure Level Indicator
•
Lighter Darker
1142O167CA
1142O168CA
Shows the exposure setting level in the Manual
Exposure Mode.
The center LED is no rmally lit.
➭
p. 40
Page 31

4. Turning ON and OF F, and Resetting the Copier
Turning ON and OFF
Turning Copier ON
..... Press the Power Switch to the " " position.
19
Turning Copier OFF
..... Press the Power Switch to the " " position.
When Copier is Turned ON
Meter Count
Toner
Drum Dehumidify
Auto Size Sort Book
A4
Paper
Auto
Lighter Darker
A
50%~200%
141% A4
115% B4
100% Full Size
81% B4 A4
70% A3 A4
%
100%
Chapter 2
1142O026AA
1
4
7
A3
A3
Start Stop
3
2
6
5
8
0
Energy Saver
9
C
Panel Reset
First Things to Know about your Copier
•
The Start Key bli nk s or ang e,
indicat i ng th at the co pie r is now
warming up.
•
In about 1 minute, the Start Key
turns green. Now the copier is rea dy
to make copies.
We call the settings e stablished on
*
the control panel at this time the
➭
"initial settings."
p. 22
About 1 minute
Blinking Orange Turns Green
1142O133DC
Page 32

20
4. Turning ON and OFF, and Resetting the Copier
Auto Copy Start Function
(Only when Automatic Document Feeder AF-3 is used)
The Auto Copy Start Fu ncti on allows a copy proces s to be star ted as so on as the
copier completes warming up .
Using the Function
Chapter 2
First Things to Know about your Copier
1
4
7
Blinking Green
1
4
7
2
5
8
0
Start Stop
2
5
8
0
Start Stop
3
6
Energy Saver
9
C
Panel Reset
1142O091EA
1142O091EA
When you load the originals onto
the AF-3 while the copier is
1
warming up, the Start Key turns
to green and blinks.
When the Start Key is then
pressed, the Start Key t urns to
2
blinking orange and the AF-3
starts feeding the first or igi nal
onto the Original Gl ass.
1139O0190A
3
6
Energy Saver
9
C
Panel Reset
As soon as th e cop i e r co mp l et es
warming up , the Sta r t Key t ur ns
green and the copy cycle is
started.
Turns Green
1142O092EA
1142O092EA
Page 33

4. Turning ON and OFF, and Resetting the Copier
Minimizing the Warm-up Time
If the copier is shut down when it is not in use, it takes the copier a max. of 1
minute to complete the warm-up cycle. Instead of turning the copier OFF, it’s a
good idea to use th e Ener gy Saver Mode. The Mode will minimiz e the time it
takes the co pier to complete the warm-up cycle to about 30 seconds.
Entering the Energy Saver Mode
•
To set the copier into the Energy
Energy Saver
Panel Reset
1142O093CA
1142O093CA
Saver Mo de, pres s t he En erg y Saver
Key on the control panel.
◆
Then, all control panel Indicators
go out, except that the Start Key
and the Ener gy Sa ver Key w hic h
remain lit green.
21
Chapter 2
Meter Count
Toner
Drum Dehumidify
Auto Size Sort Book
Paper
Auto
Lighter Darker
A
50%~200%
141% A4
115% B4
100% Full Size
81% B4 A4
70% A3 A4
Leaving the Energy Saver Mode
1139O2360A
1
%
A3
A3
100%
•
To allow the copier to leave the
4
7
3
2
6
5
9
8
C
0
Start Stop
Energy S ave r Mode , p res s an y Ke y
on the control panel, for instance, the
Start Key.
◆
This cancels the Energy Saver
Mode, and the copier will be ready
to make copies in about 30 seconds.
Energy Saver
Panel Reset
1142O136DC
1142O136DC
First Things to Know about your Copier
Page 34

22
4. Turning ON and OFF, and Resetting the Copier
Initial Mode and Panel Resetting
Initial Mode
When the Power Switch is turned ON, the initial settings are indicated on the
control pa ne l.
* The in itial settings serve as the reference for all control panel setting s to be later
made.
Chapter 2
Meter Count
Toner
Drum Dehumidify
Paper
A4
50%~200%
%
Auto Size Sort Book
•
No. of copies to be made: 1
•
Zoom ratio: Full size (10 0% )
•
Auto Exposure Mode
•
Non- Sort Mode
Auto
Lighter Darker
A
141% A4
115% B4
100% Full Size
81% B4 A4
70% A3 A4
100%
A3
A3
First Things to Know about your Copier
Useful Tip
The initial settings can be changed by User’s Choice. For deta ils, see "USER’S
➭
CHOICE,"
p. 56
1142O137DC
Page 35

4. Turning ON and OFF, and Resetting the Copier
Panel Resetting
The Panel Reset Key resets all control panel settings to default settings including
the number of cop ies to be made and zoom ratio.
If the Automatic Document F eeder
*
Panel Reset
AF-3 is used, the origin al p resent on
the Original Gl as s wi ll be ejected out
of the unit.
1139O4782A
1139O4782A
Useful Tip
The Panel Reset Key enables you to cancel all previous settings efficiently. To
avoid miscopy, try to press the Panel Reset Key befo re attempting to make any
setti n g for yo ur own j ob .
23
Chapter 2
Auto Reset Function
If no Key on the control panel is pressed within about 60 seconds after a copy
cycle has been completed or copying settings made, the Auto Reset Function is
activated to cause the copier to return to the initial mode automatically.
Useful Tip
The Auto Reset Function can be enabled or disabled by User’s Choice. For
➭
more details, see "USER’ S CHOICE."
p. 56
First Things to Know about your Copier
Page 36

24
Page 37

Chapter 3
Making Copies
This Chapter shows you how to make copies.
The Copying Overview is on p. 26.
These pages offer quick, at-a-glance instructions for making copies.
Each ste p is key ed to a page numb e r wi th more deta iled in f ormation.
25
Chapter 3
1. Copying Overview 26
2. Copyin g Procedure
Placing Originals 28
Checking the Copy Paper Size and Selecting the Paper
Source 33
Zoom Ratio
•
Types of Zoom Ratios 34
•
Auto Size Mode 37
•
Zoo m Rat i o Tab l e
(Orignal Size to Copy Paper Size) 39
Image De nsit y 40
Book Copying 42
Finishing Modes
•
Finishing Modes 44
•
Selecting the Finish ing Modes 45
•
Auto Dual Function 46
Number of Copies 47
Star ting the C opy Cycle 48
Manual Bypa ss Copying 49
Making Copies
Page 38

26
1. Copying Overview
• Place the original in position (step 1), set the number of copies to be made (step
7), and press the Start Key (step 8). This will allow you to make a full-size
copy or copies on paper of the same size as the original.
The control panel selection ( ) you make will change the magnification
ratio and the image density.
1. Placing the Original
• Raise the Original Cover and
place the original face down on
the Original Glass.
Chapter 3
➭
p. 28
• Load the Originals face u p
on the Automatic Docu ment
➭
Feeder.
p. 30
1139O0200A
1139O0210A
2. Checking th e Copy Pape r Size an d
Selecting the Paper Source
• Check whether the desired
paper size is loaded into the
➭
Making Copies
Drawer or no t.
p. 33
• YES: Go step 3 or step 7.
Paper
A4
1142O138DA
• NO: Load the desire d paper siz e or make a copy
using a Manual Bypass Table.
To change the Zoom
Ratio
⋅ Add Paper Indicator
⋅ Manual Bypass Copying
3. Selecting the Zoom Ratio
• Select the
desired fixed
zoom ratio.
➭
p. 35
100%
1142O105CA
• Set the zoom
ratio.
➭
p. 36
50%~200%
1142O034AA
➭
p. 72
➭
p. 49
• Select the
Auto Size
Mode.
➭
p. 37
Auto Size
1142O096CC
1142O096CC
Page 39

To change the
Exposure Level
4 . S ettin g t he I mage Density
• Set the image density in
the Manual Exposure
➭
Mode.
p. 41
1. Copy ing Overview
• Select the Auto
Exposure Mode.
➭
27
p. 41
Lighter Darker
To copy from a book
5. Sel ecting Book Co py i n g
• Press the Book Copy Key
to select the Book
Copying Mode.
To sort copies
6. Selecting the Finishing Mode
• Select Sort Mode.
➭
p. 44
7. Setti ng the Nu m ber of Co pie s
Sort
1142O098CC
Auto
A
1139O2012A
1139O2012A
➭
p. 42
1142O098CC
Auto
Lighter Darker
A
Book
1142O097CC
1139O2002A
1139O2002A
1142O097CC
• Select Non-Sort Mode.
➭
p. 44
Sort
1142O099CB
1142O099CB
Chapter 3
Making Copies
• Using the Multi-Copy Keys, set
the number of copies to be made
or the nu mber of c op y sets .
8. Starting the C opy Cycl e
• Press the Start Key to
start the copy cycle.
➭
p. 48
➭
• If you enter a wrong number, press
C
➭
p. 47
p. 47
the Clear key and enter the
correct number.
• Press the Stop Key to
stop the copy cycle.
1139O2360A
➭
p. 48
Page 40

28
2. Copying Procedure
Placing Originals
Place the original face down on the Original Glass.
Different methods are used to load the originals depending on the type of
originals and whether the copier is equippe d with an Automatic Document
Feeder AF-3 (option).
Sheet Originals (Standard Size)
Raise the Original Cov er.
1
Place the original face dow n on
the Original Glas s , and align its
Chapter 3
1139O0050A
rear left corner with the
marker on the Original Width
Scale on the left side of the
platen.
Gently lower the Original Cover.
2
▼
Highly Transparent Originals
Making Copies
1139O0070A
Place the original in the same
way as the sheet originals.
1
Place a blank sheet of paper o f
the same size as the original over
2
the original. Then, lower the
Original Cover.
NOTE
If this is not done, the copy
produced may b e of very p oo r
quality.
Page 41

Book Original
*"Book or ig ina l " refe r s to an op en bou nd or i g inal.
1134O0370A
2. Copy ing Procedure
Position the higher-numbered
page on the Original Wid th Scale
end.
NOTES
•
Not positioning an open book
properly will result in copies
with pages in incorrect order.
•
Do not place an original
weighi ng mor e th an 3 kg on th e
Origi nal Glass, as an image
problem could result.
29
Chapter 3
Making Copies
Page 42

30
2. Copying Procedure
Using the Automatic Document Feeder AF-3
The Automatic Document Feeder AF-3 automatically feeds sheet origi nals
placed on the Document Feed Tray one by one. After the copy cycle has
been completed, it automatically ejects the originals onto the Exit Tray.
Some originals may no t be suitable for reliable oper ation in the AF-3. Here
is a guide.
◆Or iginals Suitable for the AF-3
Type of Originals : Sheets
Type of Original Paper : Plain paper (1-sided)
Origi nal Size : A3L, B4L, A4L, A4C, FLSL
Or iginal Weight : Standard Original Mode
: 50 g to 110 g/m
Chapter 3
* Lightwei gh t O rig inal Mode:
This mode allows you to use originals weighing in the range between 40 g
to 110 g/m
Be sure to use the User’s Choice to turn ON the Lightw eight Original
Mode when you need to make copies of originals with the AF-3 whose
weight falls in the above range.
Not using the Lightweight Orig inal Mode could damage such originals.
Making Copies
2
.
*Lightweight Orig inal Mode
: 40 g to 110 g/m
2
2
➭
p. 57
◆Or iginals Not suitable for reliable operation in the AF -3 .
•Book
•Typing paper, paraffin paper, and other thin paper
•Transparencies, trans lucen t p aper
•Wrinkled, dog-eared, curled, or to rn origi nals
•Clipped or stapled originals
•Carbon-backed originals
Page 43

2. Copy ing Procedure
Loading Standard Size Originals
Swing the Document Exit Tray
to the left as shown.
1
Place a neat stack of originals
face up on the Document Feed
2
Tray, and then slide the
Document Guide Plates to the
1139O0110A
NOTES
•
The maximum number of o r i g i na l s that can be lo aded is 30 (A4 or smal le r) .
* The capacity is 15 for A3 or B4 size originals.
•
Make sure that the top level of the original sta ck do es no t exceed the
marking.
•
Also make sure that the Document Guide Plat es are in touch with the edge s
of the original stack.
size of the originals .
Swing the Document Exit Tray
back again.
3
NOTE
▼
31
Chapter 3
Making Copies
1139O1980A
1142O039AA
The copy cycle cannot be initiated
unless you swing the Document
Exit Tray back again.
Pull out the Document Exit Tray
Extender if you are using larger paper.
Page 44

32
2. Copying Procedure
For Originals Not Suita ble fo r R eliable Operation of the AF-3
Original
Positioni ng Plate
Original Width S c ale
1139O0920A
Chapter 3
NOTE
The AF-3 does not automatically eject an original manually placed on the
Original Glass. If you have two or more originals to make copies from, place
the originals on the Original Glass one by one.
Making Copies
original face down on the
1
Original Glass. Align the rear left
corner of the original with the
marker on the Original Width
Scale. Then press the rear edge of
the original up against the
Original Position ing Plate at the
rear side of the Origin al G las s .
Gently lower the AF-3 and start
the copy cycle.
2
Raise the AF-3 and place the
▼
Page 45

2. Copy ing Procedure
Checking the Copy Paper Size and Selecting the Paper
Source
Meter Count
Toner
Drum Dehumidify
Paper
A4
50%~200%
%
33
Auto Size Sort Book
Auto
Lighter Darker
141% A4
115% B4
100% Full Size
81% B4 A4
70% A3 A4
A3
A3
1142O154DB
1142O154DB
When the copier is not equipped with the Multi Bypass Table, it is necessary
to check th at the desired paper size i s loaded into the Drawer. If i t is not
loaded, make a copy using a Manual Bypass Table or load the de sired paper
size into th e Draw er.
➭
➭
p. 49
p. 72
Manual Bypass Copying
Add Paper Indicator
When the copier is equipped with the Multi Bypass Table, the paper source
(paper size) can be selected, Drawer or Multi Bypass Table.
Selecting the Paper Source (Only when the M ulti By pass Table is used)
•
Each time the Paper Select Key is pr es sed, the Paper Source Indicators, D rawer
Indicator or Multi Bypass In di cator, light up alternatel y. Als o , the Pap er Size
Indicator corresponding to that of the Drawer lights up.
Chapter 3
Making Copies
Paper
1142O100CB
1142O100CB
Paper
A4
1142O139DA
1142O139DA
Page 46

34
2. Copy ing Procedure
Zoom Ratio
Meter Count
Toner
Drum Dehumidify
Paper
A4
%
50%~200%
Auto Size Sort Book
Auto
Lighter Darker
141% A4
115% B4
100% Full Size
81% B4 A4
70% A3 A4
A3
A3
The zoom ratio can be set manually by the operator when in the Manual Mode
Chapter 3
or will be set automatically by the copier when in the Auto Size Mode. Select
the appropriate mode according to yo ur ne ed s.
The selected zoom ratio is shown on the Zoom Ratio Indicator.
Types of Zo om Ra ti os
Fixed Zoom Ra tios
Making Copies
141% A4
115% B4 A3
100% Full Size
81% B4 A4
70%
100%
A3
A3
A4
1142O142DC
1142O142DB
Three reduction ratios (50%, 70%,
81%)
Three enlargement rat ios (115%,
141%, 200%)
And Full Size (100%).
Zoom Ratios
Any rati o fro m 50% to 20 0% (i n 1%
increments) can be selected.
1142O154DB
1142O154DB
50%~200%
1139O3590A
1139O3590A
Page 47

Selecting the Fixed Zoom Ratios
100%
35
2. Copying Procedure
Press the Reduction, Full Size, or
Enlargement Key to s elect a fixed
zoom rati o of yo ur cho ic e.
141% A4
115% B4 A3
100% Full Size
81% B4 A4
70%
141% A4
115% B4 A3
100% Full Size
81% B4 A4
70%
141% A4
115% B4 A3
100% Full Size
81% B4 A4
70%
100%
100%
100%
A3
A3
A3
A3
A4
A3
A4
A3
A4
1142O105CA
1142O140DC
1142O140DB
1142O141DC
1142O141DB
1142O142DC
1
<Reduction>
Each time the Redu ction Key is
pressed, it selects a new reduction
ratio.
* The Z oom Ratio Indica t or displ a ys
the actual percentage of the selected
ratio.
<Enlargement>
Each time the Enlarg ement Key is
pressed, it sel ects a new en largement
ratio.
The Zoom Ratio Indicator displays
*
the actual percentage of the selected
ratio.
<Full Size>
Press the Full S ize K ey t o select full
size (100%).
Chapter 3
Making Copies
1142O142DB
Page 48

36
2. Copy ing Procedure
Setting a Zoom Ratio
Hold down the Zoom Down or
>
Up Key until the desired zoom
ratio is reached.
<>
50%~200%
1139O3640A
1139O3640A
Zoom range: 50% to 200%
Chapter 3
Useful Tip
To save time, fi rst s elect the fixed ratio nearest to the target zoom ratio before
using the Zoom Up or Down Key.
Zoom Down Key makes the
ratio smaller
Zoom Up Key makes the ratio
greater
<
Making Copies
Page 49

2. Copying Procedure
Auto Size Mode
•
The Auto Size Mode can be selected only when the copier is equipped with
an AF-3.
•
In the Auto Size Mode, the copier automatically selects the correct zoom ratio
according to the original size and copy paper size.
Selecting the Auto Size Mode
Press the Auto Size Mode K ey.
1
Auto Size
37
Chapter 3
1142O096CC
1142O096CC
The Zoom Ratio Indicator shows
.
%
50%~200%
1142O046AA
A4
Paper
1142O143DA
Useful Tip
This mo de is ve ry hel pf ul for nea t fi l ing w hen yo u ne ed to m ake c op ie s from
originals of asso rted sizes .
1142O046AA
1142O143DA
Check the copy paper size.
➭
2
p. 33
If the desired paper size is not
loaded in the Drawer, load it into
the Drawer.
Add Pape r In dica t or
➭
p. 72
Making Copies
Page 50

38
2. Copy ing Procedure
NOTE
The copier has been factory- se t to automatica lly select the Manua l Mode . This
defaul t setting can be changed to the Auto Size Mode by using the User’s
Choice.
Initial mode
User’s Choice
Chapter 3
➭
p. 22
➭
p. 57
Making Copies
Page 51

Zoom Ratio Table (Origi nal S ize to Copy Paper Size)
Metric Size
Original Size
A3 A4 70%
297 × 420 mm
11-3/4" × 16-1/2"
A4 A5 70%
210 × 297 mm
8-1/4" × 11-3/4"
A5 A6 70%
148 × 210mm
5-3/4" × 8-1/4"
A6 A4 200%
105 × 148 mm
4-1/4" × 5-3/4"
B4 A4 81%
257 × 364 mm
10" × 14-1/4"
B5 A5 81%
182 × 257 mm
7-1/4" × 10"
B6 A6 81%
128 × 182 mm
5" × 7-1/4"
Copy
Paper Size
A5 50%
B4 86%
B5 61%
A6 50%
B5 86%
B6 61%
A3 141%
B4 122%
B6 86%
A4 141%
A3 200%
B4 173%
B5 122%
A5 141%
B5 173%
B6 122%
A5 57%
B5 70%
B6 50%
A3 115%
A6 57%
B6 70%
A3 164%
A4 115%
B4 141%
A4 164%
A5 115%
B4 200%
B5 141%
Zoom Ratio
Inch Size
Original Size
11" × 17" 11" × 14" 82%
279.4 × 431.8 mm
11" × 15" 11" × 14" 93%
279.4 × 381 mm
11" × 14" Legal 77%
279.4 × 355.6 mm
Legal Foolscap 92%
8-1/2" × 14"
215.9 × 355.6 mm
Foolscap Letter 84%
8-1/2" × 13"
215.9 × 330.2 mm
Letter Invoice 64%
8-1/2" × 11"
215.9 × 279.4 mm
Invoice 11" × 17" 200%
5-1/2" × 8-1/2"
139.7 × 215.9 mm
Zoom Ratio = Copy Paper Size ÷ Original Size
1" (inch) = 25.4 mm
1 mm = 0.0394 " (inch)
2. Copying Procedure
Copy
Paper Size
Legal 77%
Foolscap 76%
Letter 64%
Invoice 50%
Legal 77%
Foolscap 77%
Letter 73%
Invoice 50%
Foolscap 77%
Letter 77%
Invoice 50%
Letter 78%
Invoice 60%
11" × 17" 121%
Invoice 64%
11" × 17" 129%
11" × 14" 107%
11" × 17" 129%
11" × 14" 127%
11" × 14" 164%
Legal 154%
Foolscap 152%
Letter 129%
Zoom Ratio
39
Chapter 3
Making Copies
Page 52

40
2. Copy ing Procedure
Image Density
Meter Count
Toner
Drum Dehumidify
Paper
A4
%
50%~200%
Auto Size Sort Book
Auto
Lighter Darker
141% A4
115% B4
100% Full Size
81% B4 A4
70% A3 A4
A3
A3
The image density level of copies can be adjusted either in the Auto or Manual
Exposure Mo de. Select the appropriate mode according to your particular
Chapter 3
needs.
Types of Exposure Modes
Auto Exposure Mode
In the Auto Exposure Mode, the
Making Copies
Auto
copier makes copies wit h opti mum
image density by automatical ly
adjusting the exposure level according
1139O2052A
1139O2052A
to the image density of the original.
Manual Exposure Mode
In the Manual Exposure Mode, you
can vary th e expo sure level to make a
copy with a desired image density.
Lighter Darker
1142O154DB
1142O154DB
1139O2062A
1139O2062A
Useful Tips
•
The exposure level in the Auto Exposure Mode can be varied by using the
➭
User’s Choice Mode to suit your need s .
•
The copier has been factory-set to automatically select the Auto Exposure
p. 58
Mode. The User’s Choice ca n be u sed to change this default setting to the
➭
Manual Exposure Mode.
p. 59
Page 53

Selecting the Exposure Mode
Auto Exposure Mode
Auto
Lighter Darker
A
Manual Exposure Mode
Auto
Lighter Darker
A
Auto
Lighter Darker
A
1139O2072A
1139O2072A
1139O2082A
1139O2092A
2. Copying Procedure
Press the Auto Exposure Mode
Key A as necessary to light up
the Auto Exposure Indicator
● Auto .
Each time the Auto Exposure
*
Mode Key A is pressed, the
Manual and Auto Exposure
Mode are selected alternately.
Press the Exposure Control Key
< or > to light up the
1
Expos ure Level Indicator.
Hold down the Exposure Control
Key < or > until the desired
2
exposure level is reached.
To make the image darker :
Press or hold down the Exposure
Control Key > .
41
Chapter 3
Making Copies
Auto
Lighter Darker
A
To make the image lig hter :
Press or hold down the Exposure
Control Key < .
1139O2102A
Page 54

42
2. Copy ing Procedure
Book Copying
Auto Size Sort Book
Auto Size Sort Book
1142O150CA
1142O150CA
Original Copy
1139O1990A
•
Select Book Copying when you
want to make a 1-sided copy of
each page of an open book.
Selecting the Book Copying Mode
Chapter 3
Making Copies
1139O0060A
Position the lower-numbered
page on the Original Width Scale
1
end.
If the book i s thick, you can
make copies with the Original
Cover rai se d .
* "Book original" refers to an
open bound original.
NOTES
•
Not positioning an open book
properly will result in copies with
pages in incorrect o r de r .
•
Do not look directly at the
Original Glass surface, as a very
intense beam of light ca n be
emitted.
Press the Book Key.
2
Book
•
The Book Indicator lights up.
1142O097CC
1142O097CC
Page 55

NOTE
A3 A5
A4 B4
Paper
A4 FLS.
1142O144DA
1142O144DA
2. Copying Procedure
•
If paper other than A4 crosswise or
A5 lengthwise paper is lo ad ed into
the Drawer when the Boo k Copying
Mode is selected, the Drawer
Indicator and the corresponding
Paper S i z e In dicator blink on the
Control Panel.
In such a case, load paper of the
same size and in the same direction
of each pa ge o f a bo ok int o the
Drawer.
43
Chapter 3
A4 crosswis e or
A5 lengthwise
1139O1460A
Making Copies
Page 56

44
2. Copy ing Procedure
Finishing Modes
Auto Size Sort Book
Auto Size Sort Book
Finishing Modes
Chapter 3
Non-Sort
Originals
Making Copies
1142O151CA
1142O151CA
Copies
There are two dif ferent finishing modes:
Non-Sort and Sort.
Select the appropriate mode according to
your par ti cu la r need s .
•
In the Non-Sort Mode, all copi es are
fed out onto the Top Bin without
being s or te d.
* The capacity of the Top Bin is 50.
If more than 50 copies are made in
the Non-Sort Mode, the Sor ter uses
the 2nd, 3rd, and su bsequent Bins
1076O145
to hold those excess copies.
•
Sort
Copies
In the Sort Mode, copies ar e s orted
into complete sets of the originals.
Origin als
Top Bin
Copies
2nd Bin
Copies
3rd Bin
1076O146
Copies are fed out into Sorter Bins.
This mode is effective wh en
making multiple copies from a
multiple number of originals.
Useful Tip
The copier has been factory-set to automatically select Non-Sort. Th e User’s
Choice can, however, be used to change this default setting t o give priority to
➭
Sort. User’s Choice
p. 61
Page 57

Selecting the Finishing Modes
Sort
45
2. Copying Procedure
Press the Finishing Mode Select Key
to select the desired mode.
* If the Sort M od e is selected, the
Sort In dicator l i ghts.
1142O098CC
1142O098CC
NOTES
•
The Sort Mode cannot be selected unless the copier is equipped with the
10-Bin So r te r.
•
The capacity of each S orte r Bin is 25 copies in Sort-Mode.
If this capacity is exceeded , the Remo ve Co pies
Indicator blinks o n the Monitor D isp lay and th e
Start Key turns ora ng e, inhibiting the init iation of a
new copy cycle.
1142O051AA
1142O051AA
Chapter 3
Making Copies
Page 58

46
2. Copy ing Procedure
Auto Dual Function
Each of the So rt er Bi ns h old s up t o 25 she ets o f paper . How ever , th e Aut o
Dual Function allows so rting of copies of up to 50 originals under certain
conditions.
Auto Dual Function in the Sort Mode
When 5 or less cop ies are made from an original set consisting of more than 25
originals in the Sort Mode, the Sorter is automatically switched into the Auto
Dual Function Mode using the 6th to 10th Bins.
Copies Bins used
1st to 2 5th sort ed cop i es Top to 5th B ins
Chapter 3
26th to 50t h sort ed co pi es 6th to 10th Bi ns
If the number of copies selected exceeds 5, the new copy cycle stops at th e 25th
*
original.
Example: Making 3 copy sets of a 30-page original set
30-Page
Sorter
Original S et
• Top three Bins
Making Copies
contain 25 sorted
copies.
• The 6th to 8th Bins
contain 5 sorted
copies.
To have a complete set from the originals, place the copies from the 6th Bin on
*
Sorting into
3 Sets
top of thos e fr om t he To p Bin. I n t he same way, p lace copies from the 7th Bin
on top of those from the 2nd Bin, and so on.
1139O1140A
Page 59

Number of Copies
47
2. Copying Procedure
Meter Count
Toner
Drum Dehumidify
Auto Size Sort Book
Paper
A4
Auto
Lighter Darker
A
Setting the Number of Cop ies
1
2
4
5
7
8
0
3
6
9
C
Correcting the Number Entry
1
4
7
3
2
6
5
9
8
C
0
50%~200%
141% A4
115% B4
100% Full Size
81% B4 A4
70% A3 A4
1142O171AA
1139O3740A
100%
%
A3
A3
1
4
7
2
5
8
0
Start Stop
3
6
9
C
Using the Multi-Copy Keys, enter the
number of copies to be made.
* The maximum number that can be
set is 99.
Example:
To make 18 co pi es , pre ss Key
➇
then Key
, in that order.
The Multi-Copy Disp lay now shows
"18."
To correct or reset a number entry,
press the Clear Key.
* The Mu lti-Copy Display is r es et to
"1."
Energy Saver
Panel Reset
1142O156DB
➀
and
Chapter 3
Making Copies
1142O169AA
1139O3750A
Page 60

48
2. Copy ing Procedure
Starting the Copy Cycle
Meter Count
Toner
Drum Dehumidify
Auto Size Sort Book
Paper
A4
Lighter Darker
Starting the Copy Cycle
Chapter 3
Making Copies
Stopping a Multi-Copy Cycle
Stop
1
%
50%~200%
Auto
A
141% A4
115% B4
100% Full Size
81% B4 A4
70% A3 A4
100%
A3
A3
4
7
3
2
6
5
9
8
C
0
Start Stop
Energy Saver
Panel Reset
1142O156DB
Check the contr ol panel to make
sure that you ha ve set up your
1
copy job correctly.
Press the Start Key, if it is green.
The Start Key turns orange when
2
the copy cycle starts .
1139O2360A
In a multi-copy cycle, the
number on the Multi-Copy
Display is decreased by 1 each
time a copy is fed out of the
copier. The Display is reset to
the original setting as soon as
the multi-copy cycle is
completed.
To stop a multi-copy cycle in
progress, press the Stop Key.
1139O2592A
1139O2592A
The Start Key soo n turn s gr een
and the copier stops.
The Multi-Copy Display shows
the number of copies yet to be
made.
Page 61

2. Copying Procedure
Manual Bypass Copying
Use the Manual Bypass to make copies on paper not loaded in the Drawer, or to
copy onto transparencies, translucent paper, or any other special paper.
If the copier is equipped with a Multi Bypass Table (option), you can load more
than one sheet of paper for a continuous run.
◆
Types o f Paper
•
Plain paper (weighing 60 g to 90 g/m2)
•
Heavyweight paper (weighing 90 g to 157 g/m2)
•
Transparencies, translucent paper
◆
Paper Size
•
Width: 100 mm to 297 mm
•
Length: 140 mm to 432 mm
◆
Capacity
•
Plain p aper, heavyweight paper, tran sparencies, translucent paper ... 1 sheet at a ti m e
<Multi Bypass Table>
•
Plain paper: Approx. 50 sheets
•
Heavyweig ht paper, tra nsp are ncies, t ransl uce nt paper: Appr ox. 20 sheet s
Using th e Manua l Bypass Table
Place the original on the Original
Glass and make the con tr ol panel
1
settings.
49
Chapter 3
Making Copies
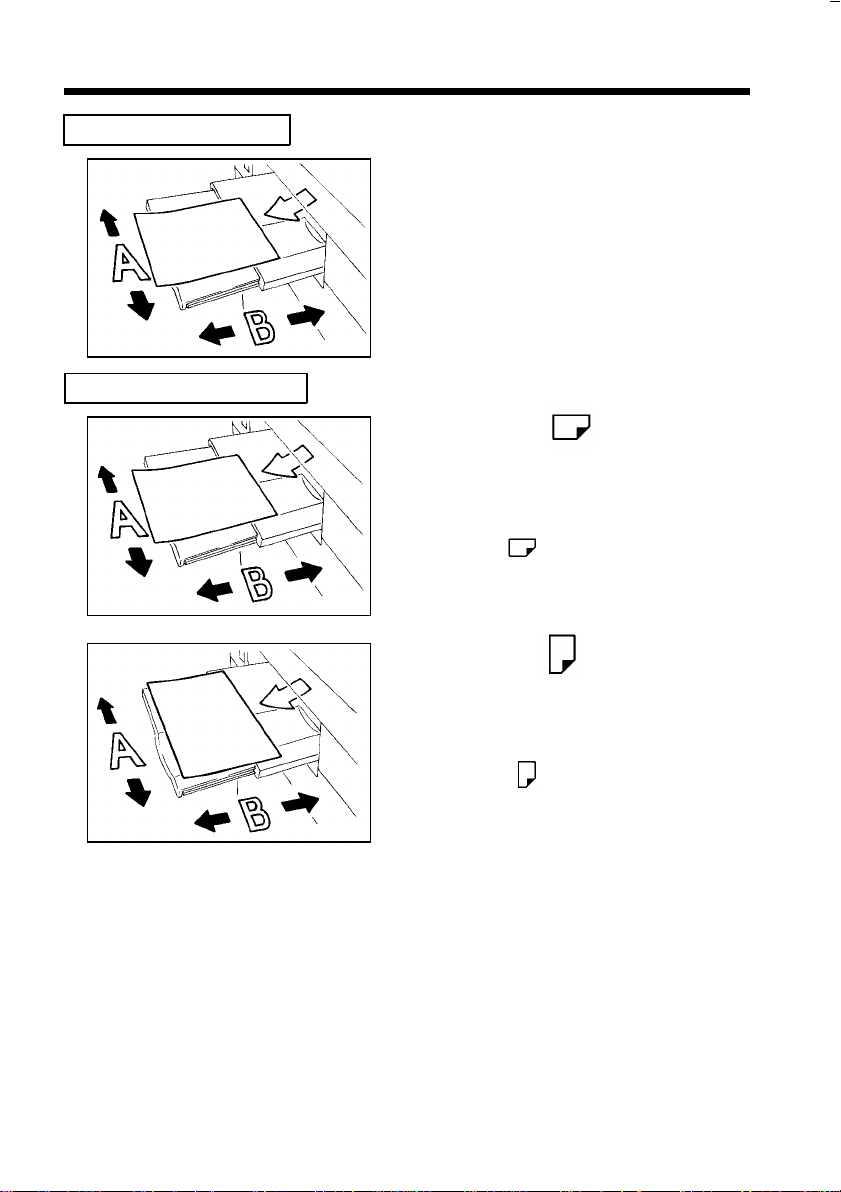
Insert the copy paper into the
Manual Bypass Table.
2
◆
This automatically s tar ts th e
1139O0150A
copy cycle.
NOTES
•
Insert the copy paper one sheet at a time.
•
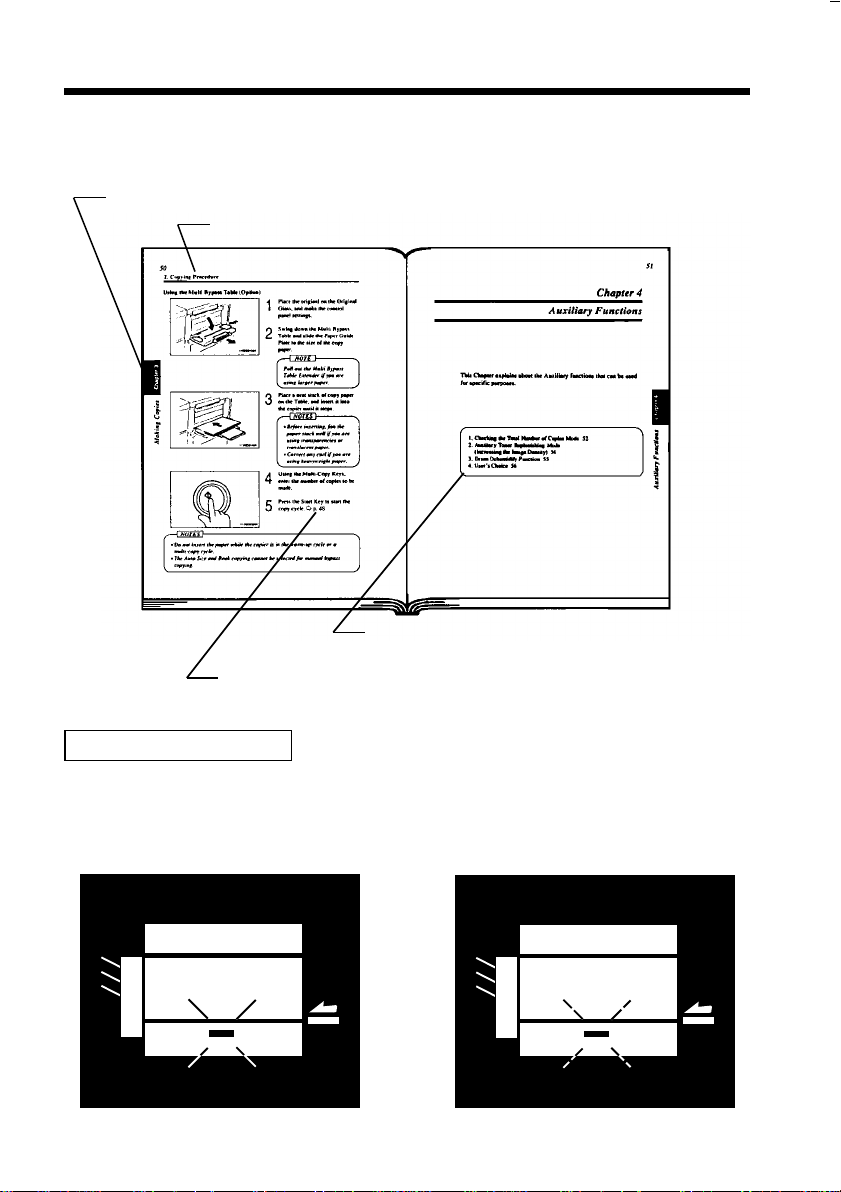
Do not insert a sheet of paper while the copier is warming up or in a
multi-copy cycle.
•
The Auto Size Mode and Bo ok Copying Mode cannot be selected f o r manual
bypass copying.
Page 62

50
2. Copy ing Procedure
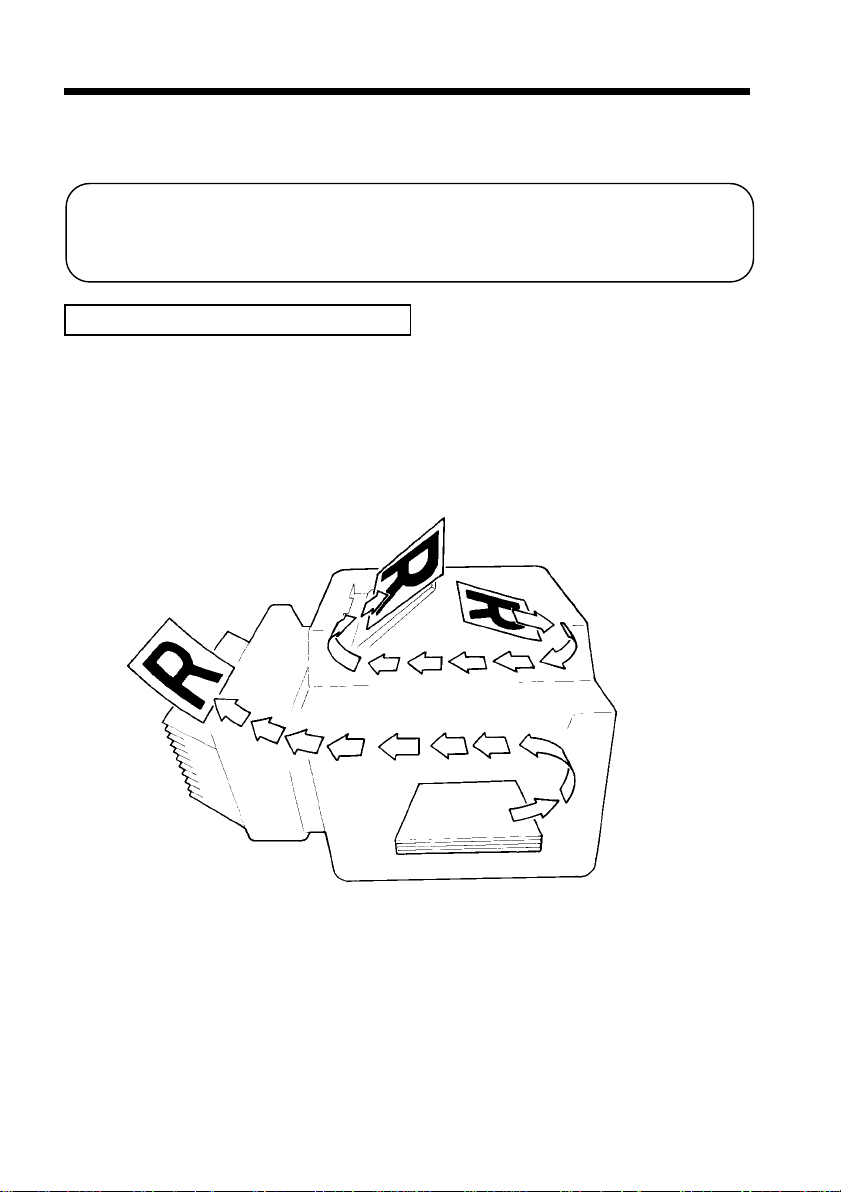
Using the Multi Bypass Table (Option)
1139O0130A
Chapter 3
Making Copies
1139O0140A
Place the original on the Original
Glass and make the con tr ol panel
1
settings.
Swing down the Multi Bypass
Table and sli de the Paper Guide
2
Plate to the size of the copy
paper.
NOTE
Pull out the Multi Bypass
Table Extender if you are
using larger paper.
Place a neat stack of copy paper
on the Table and insert it into the
3
copier until it sto ps.
NOTES
•
Before inserting, fan the
paper stack well if you are
using transparencies or
translucent paper.
•
Correct any curl if you are
using heavyweight paper.
Using the Multi-Copy Keys,
enter the number of copies to be
4
made.
Press the Start K ey to start the
➭
copy cycle.
5
1139O2360A
NOTES
•
Do not insert the pap er wh ile the copier is in t he wa r m- up cycle o r a
multi-copy cycle.
•
The Auto Size and Book Copying Mode cannot be selected for manual bypass
copying.
p. 48
Page 63

Chapter 4
Auxiliary Func tions
This Chapter explains about the Auxiliary functions that can be used
for specific purposes.
51
Chapter 4
1. Checking the Total Numb er of Copies Mode 52
2. Auxilia r y Toner Replenishing Mode
(Increasin g the Image Density) 54
3. Drum Dehumidify Function 55
4. User’s Choice 56
Auxiliary Functions
Page 64

52
1. Checking the Total Number of Copies Mode
This function allows you to check the total
Meter Count
Toner
Drum Dehumidify
Types of Counters
1142O152CA
1142O152CA
count of the two count ers of the copier.
•
Total Counter
•
Size Counter
Chapter 4
Counter Display
Auxiliary Functions
:
Shows the total number of copies made since
the installation of the copier.
:
Shows the number of copies made on paper of
a size preset by the Technical Representative.
The Zoom Ratio Indicator
shows t h e u pper 3 digits of
the count.
50%~200%
The Multi-Copy D isplay
shows the lower 2 digi ts
of the count.
1139O3790A
Example: The count is 12,345 (copies).
Page 65

Using the Meter Count Function
Meter Count
Toner
Drum Dehumidify
1142O116CA
1142O116CA
Meter Count
Toner
Drum Dehumidify
1142O116CA
1142O116CA
1. Checking the Total Number o f Copies Mo d e
Press the Meter Coun t Key once.
1
The count of the Total Counter is
shown across the Zoom Ratio
Indicator and Multi-Copy
Display.
Press the Meter Coun t Key again.
The count of th e Size Counter is
2
shown across the Zoom Ratio
Indicator and Multi-Copy
Display.
53
Chapter 4
Meter Count
Toner
Drum Dehumidify
1142O116CA
1142O116CA
Press the Meter Coun t Key once
again.
3
This restores th e copier to the
state before enteri ng the Meter
Count Mode .
Auxiliary Functions
Page 66

54
2. Auxiliary Toner Replenishing Mode
2. (Increasing the Image Density)
The cop i er t ends to exhaust the supply of
Meter Count
Toner
Drum Dehumidify
Original Copy
Chapter 4
1142O152CA
1142O152CA
toner ra p idl y when m aki ng a numbe r of
copies from an origin al w ith dark solid areas.
As a result, the image density of the copy
will become lighter. In such a case, you can
set the copier into the Auxiliary Toner
Replen is hi ng Mo de.
Copy Made After
Auxiliary Toner
Replenishing
Even if you cont inue making copies a ft e r the ima ge density has become l i ghter,
the copier will gradually recover the normal image density. The Auxiliary Toner
Replenishing Mode can, howeve r, be used to obtai n t he normal image density
more quickly.
Press the Auxiliary Toner
Auxiliary Functions
Meter Count
Toner
Drum Dehumidify
Replenishing Key.
This causes the copier to initiate toner
replenishing, which lasts f or 90
seconds at maximum.
1142O118CA
1142O118CA
NOTES
•
The copier cannot be set into the Auxilia r y Toner Replenishing Mo de w hile it
is warming up.
•
Do not turn the Power Switch OFF or op en the Front or Right Doo r wh ile i n
the Auxil iary Tone r Replenishing Mode.
1142O148CB
Page 67

3. Drum Dehum idify Function
During high humidity periods or when there
Meter Count
Toner
Drum Dehumidify
1142O152CA
1142O152CA
are sudden rapid changes in hu midity
(especially when you are using a heater in
winter),
surface of th e
blotchy copies. In such instances, use the
Drum Dehumidify Key to dry the surface of
the PC Drum.
55
condensation*1 could form on the
PC Drum*2, resulting in
Before a Drum
Dehumidify Operation
Press the Drum Dehumidify Key.
Meter Count
Toner
Drum Dehumidify
1142O119CA
1142O119CA
Useful Tip
A copy cycle can be initiated even while the copier is in the Drum Dehu midify
Mode.
NOTE
This sets the copier into the
1
Drum Dehumidify Mode which
lasts for 90 seconds.
Make a copy to check that the
copy image is clear.
2
Run the Drum Dehumidify cycle
once again if the copy image is
not yet clear.
After a Drum
Dehumidif y Operation
1142O149CB
Chapter 4
Auxiliary Functions
The copier cannot be set into the Drum Dehumidify Mod e while it is w a rming
up.
*1: Condensation: A phenomenon in which small drops of water are formed on
cold surfaces, such as the surface of the PC Drum.
*2: PC Drum: Functions in the cop ier a s film does in a camera.
Page 68

56
4. User’s Choice
The copier has been set so t hat
the most frequently used settings
%
50%~200%
141% A4
115% B4
100% Full Size
81% B4 A4
70% A3 A4
By setting defa ult s fo r the pap er si z e, zoo m rati o and othe r s ettings that are
most frequentl y us ed, time and effort to make extra settings will be
eliminated when the cop ier is turne d ON or when t he auto res et function is
activated.
For more details, consult your Technical Repres entativ e.
Chapter 4
Functions Availa ble in User’ s C hoice
A3
A3
1142O145DB
1142O145DB
are automatically selected in the
initial mode.
The User’s Choice allows you to
select the default settings which
are automatically selected in the
initial mode acco rding to yo ur
own needs.
Choice Code Function Choice Code Function
U- 4
U-12
U-13
Auxiliary Functions
U-14
U-15 Default Finishing mode
Lightweight Original
Mode
Auto Size/Manual
priority
Default auto exposure
level
Default exposure
mode/level
U-20
U-21
U-23
U-24
Auto Panel Reset
ON/OFF
Energy Sa ver Mode
ON/OFF and Timing
Auto Panel Reset for
Plug-In Counter
Sort/Non-Sort Auto
Switching ON/OFF
Page 69

4. User’s Choice
Description of Each User’s C hoice Functi on
U-4 Lightweight Original Mode
Selects either on e of the following se ttin gs w hen the copier is equipped with the
•
Automatic Document Feeder AF-3.
If "0" is selected:
You can make copies only fr om original s of s tan dar d weight (Normal
Mode).
If "1" is selected:
You can make copies from lightweight originals, as well as originals of the
standard weight (Lightweight Original Mode).
Setting Value Description Initial Setting
0 Lightweight Original Mode OFF ✔
1 Lightweight Original Mode ON
57
U-12 Auto Size/Manual priority
Specifies the default mode automatically selected in the initial mode.
•
Setting Value Description Initial Setting
1 Auto Size (AS)
2Manual ✔
Chapter 4
Auxiliary Functions
Page 70

58
4. User’s Choice
U-13 Default auto exposure level
Determines the defau lt exposure level in the Aut o Expo s ur e Mode.
•
Setting Value Description
46 Low, level 4
47 Low, level 3
48 Low, level 2
49 Low, level 1
50 Standard ✔
51 High, level 1
52 High, level 2
When the exposure level is "Low," the greater the level number is, the lower the
*
exposure level.
When the exposure level is "High," the greater the level number is, the higher
the exposure level.
Chapter 4
Level
Lower
4321Standard12
O
Higher
Initial
Setting
Auxiliary Functions
Page 71

4. User’s Choice
U-14 Default exposure mode/level
•
Determines the default exposure mode, either Auto or Manual, selected when
the control panel setti ngs are reset.
If Auto is selected, this function also all ows you to specify the default exposure
level (EXP) in the Manual Exposure Mode, after the Auto Exposure Mode has
been canceled.
If Manual is selected, the function also allows you to specify the default
exposure level (EXP) in t he Manu al Exposure Mode.
If any value between "0" and "8" is selected:
The Auto Exposure Mode is selected.
If any value between "10" and "18" is selected:
The Manual Exposure Mode is selected.
Auto Exposure Mode as Default
59
Setting
Value
0Auto Manual EXP1
1Auto Manual EXP2
2Auto Manual EXP3
3 Auto Manual EXP4
4Auto Manual EXP5 ✔
5Auto Manual EXP6
6Auto Manual EXP7
7Auto Manual EXP8
8Auto Manual EXP9
Defaul t M ode Exposure Sett ing in Manual Mode
Description Initial
Setting
Chapter 4
Auxiliary Functions
Page 72

60
4. User’s Choice
Manual Exposure Mode a s Default
Setting Value Description Initial Setting
10 Manual Exposure Mode / EXP1
11 Manual Exposure Mode / EXP2
12 Manual Exposure Mode / EXP3
13 Manual Exposure Mode / EXP4
14 Manual Exposure Mode / EXP5
15 Manual Exposure Mode / EXP6
16 Manual Exposure Mode / EXP7
17 Manual Exposure Mode / EXP8
18 Manual Exposure Mode / EXP9
* With EXP5 at the central level , the
exposure level will be lower as the
number becomes smaller, and it is
123456789
Lighter Darker
Chapter 4
1139O5282A
1139O5282A
higher as the number becomes
greater.
Auxiliary Functions
Page 73

4. User’s Choice
U-15 Default Finishing mode
•
Determines the default finishing mode when the copier is equipped with the
Sorter.
Setting Value Description Initial Setting
0 Non-Sort ✔
1Sort
U-20 Auto Panel Reset ON/OFF
•
Selects whether to activ ate the Auto Panel Reset function 60 secon ds after a
copy cycle has been completed or a control panel key has been pressed.
If "0" is selected:
The control panel settings remain valid even after 60 seconds.
If "1" is selected:
The control panel settings are canceled and the copie r is reset int o the
default mode after 60 seconds. (Auto Panel Reset)
61
Setting Value Description Initial Setting
0 Aut o Panel Rese t is not activated.
1 Aut o Panel Rese t is a ctivated (a f te r 1 minute) ✔
Chapter 4
Auxiliary Functions
Page 74

62
4. User’s Choice
U-21 Energy Saver Mode ON/OFF and Timing
•
Selects whether or not to set the copier into the Energy Saving Mode after a
given time after a copy cycl e h as been completed or a Key is pressed.
If "0" is selected:
The copier is no t set into the Energy Saving Mode after the give n time.
If "1" is selected:
The copier is automatically set into the Energy Saving Mode after the given
time. The time it takes the copier to enter the Energy Saving Mode can also
be selected from the range of 1 to 10 minutes.
Chapter 4
Setting
Value
0
1
2
3
4
5
Description
Energy Saving Mode
disabled
Energy Saving Mode
enabled (1 min.)
Energy Saving Mode
enabled (2 min.)
Energy Saving Mode
enabled (3 min.)
Energy Saving Mode
enabled (4 min.)
Energy Saving Mode
enabled (5 min.)
Initial
Setting
Setting
Value
✔ 6
Energy Saving Mode
enabled (6 min.)
Energy Saving Mode
7
enabled (7 min.)
Energy Saving Mode
8
enabled (8 min.)
Energy Saving Mode
9
enabled (9 min.)
Energy Saving Mode
10
enabled (10 min.)
Descript ion
U-23 Auto Panel Reset f or Plug-In Counter
•
Determines whether the copier is se t into the initial mode when the Plug-In
Counter is pulled out after a copy cycle has been run using the Plug-In Counter.
Auxiliary Functions
Setting Value Description Initial Setting
0 Copier is not reset.
1
Copier is initialized when the Plug-In Counter is
pulled out.
Initial
Setting
✔
Page 75

4. User’s Choice
U-24 Sort/Non-Sort Auto Switching ON/OFF
•
Specifies wh ether to enab le automat ic sw itching betwe e n the S ort a nd N on -Sor t
Mode under the fol lowing conditions when the copie r is e qui ppe d with the
Sorter and the Automatic Document Feeder .
Conditions
•
The copy cycle is initiated using a single original in the Sort Mode.
•
The copy cycle is initiated to make two or more copies using tw o or more
originals in th e Non-Sor t Mode.
Setting Value Description Initial Setting
0 Sort/Non-Sort switching OFF
1 Sort/Non-Sort switching ON ✔
U-28 Auto Shut Off
•
The auto shut-off function shuts down the copier a given period of time after
the last operation.
63
Setting Value Description Initial Setting
1 1 min.
2 2 min.
:
:
30 30 min. ✔
:
:
98 98 min.
99 120 min.
:
:
:
:
Chapter 4
Auxiliary Functions
Page 76

64
4. User’s Choice
Making the User’s Choice Mode Set tings
Panel Reset
1139O4782A
1139O4782A
Zoom Ratio Indic ato r
Keep pressing the Panel Reset
Key for about 3 seconds.
1
U
* appears on the Zoom
Ratio Indicator, and th e
indicator on the Multi-Copy
Displ ay go es ou t.
Multi-C opy Display
1139O3850A
1139O3850A
1139O3860A
1139O3860A
Using the Multi-Copy Keys,
1
Chapter 4
4
7
3
2
6
5
9
8
C
0
enter the desired Ch oi ce Co de
2
number.
If you have pressed an incorrect
*
number, press the Clear Key,
then enter the correct number.
1142O056AA
1142O056AB
Example: Selecting the
Lightweight Original
Mode:
4
Press and the Zoom
Auxiliary Functions
Zoom Ratio Indicator
1142O057AA
Mult i-Copy D isplay
Ratio Indicator shows
U 4
.
1139O3860A
1139O3860A
Page 77

Zoom Ratio Indi cat or
65
4. User’s Choice
Press the Start Key.
3
* This causes the current setting
of that particular choice code to
be shown on the Multi-Copy
Display.
1139O2360A
Mult i-Copy D isplay
1142O057AA
1
2
4
5
7
8
0
1142O169AA
Zoom Ratio Indicator
1142O057AA
1139O3880A
1139O3880A
Press the Clear Key.
3
6
9
C
1142O169AA
4
* This clears the current setting.
Mult i-Copy D isplay
1139O3860A
1139O3860A
Chapter 4
Auxiliary Functions
Page 78

66
4. User’s Choice
1
4
7
Zoom Ratio Indi cat or
2
5
8
0
3
6
9
C
1142O171AA
1142O057AA
1142O171AA
Key or Keys to enter the new
5
setting.
See page s 57-63 for the Ch oi c e
Code.
* The Multi-Copy Display shows
the new setting.
Mult i-Copy D isplay
1139O3890A
1139O3890A
Press the Start Key.
6
* This en ter s the new settin g.
Repeat steps 2 to 6 to make new
Press the a ppro priate Mul ti-Copy
Chapter 4
1139O2360A
Zoom Ratio Indi cat or
settings for other User’s Choices.
Mult i-Copy D isplay
1139O3850A
1139O3850A
1139O3860A
1139O3860A
Press the Panel Reset Key.
Auxiliary Functions
Panel Reset
7
* This al lows th e copie r to leave
the Us e r’s Choice Mode and the
control panel s hows the de fault
settings again.
1139O4782A
1139O4782A
NOTE
If the Choice Code number on the Zoom Ratio Indicator or codes on the
Multi-Copy Display start blinking wh en t he S tart Key is presse d following step
2 or 5, that entry is inva lid. Check the correct numbe r. P re s s the Clea r Ke y
and enter the correct one.
Page 79

Chapter 5
When an Indicator Lights Up
(Replenishing Supplies, C learing M isfeeds ,
and Correcting a Closure Failure)
This Chapter explains about the details of the various warning
indications given on the control panel, including those that entail
inhibition of the initiation of a copy cycle. It also shows action to be
taken for each case.
67
1. Qu i ck Referenc e for Indicator Lights 68
2. Detailed Instructions f o r I n dicator Lights
Add Toner Indicator 70
Add Paper Indicator 72
I.U. Service Life Indicator 76
Closure Failure Indicator 85
Misfeed Indicator
•
Misfeed Indic ator and Monitor Displa y 86
•
Mi sf e ed C learing Proced ure
: Cop ier EP1050 87
Automatic D ocument Feed er AF-3 90
:
Sorter S-104 92
:
Call-Te ch.-Rep. Indicator 93
Chapter 5
When an Indicator Ligh ts Up
Page 80

68
1. Quick Reference for Indicator Lights
Meter Count
Toner
Drum Dehumidify
Paper
A4
50%~200%
%
Auto Size Sort Book
Auto
Lighter Darker
141% A4
115% B4
100% Full Size
81% B4 A4
70% A3 A4
A3
A3
When the copier encounters any of the following conditions, a corresponding
warning indicator light s up. Some of the warning condit ions entail inhibition
of the initiat ion of a copy cycle:
•
A control panel key or keys have been incorrectly operated.
•
Not all necessary conditions are met to start a copy cycle.
•
The copier requires the operator’s intervention during a copy cycle.
The following table explains the most importan t wa rning conditions. You will
find more detailed procedur es on the page referenced in the "Action" column.
Warning Indicators
Indicator Copier State Action
Add Toner
Indicator
Chapter 5
Add Paper
Indicator
The copier has run out of toner.
(Warning only and a copy cycle
can still be initiated.)
1139O3270A
The paper has run out. Add paper by following the steps
Add toner by f o llow ing t he step s
given in the "Add Toner
Indicator" section.
given in the "Add Paper
Indicator" section.
1142O158DB
1142O158EA
➭
p. 70
Misfeed
Indicator
When an Indicator Lights Up
1139O3910A
1139O3930A
There is a misfed sheet of pape r
inside the copier or an option
(including the AF-3).
➭ p. 72
Check the Monitor Display for
the location of the misfeed and
clear t he mi sfed sheet of paper as
instructed.
➭
p. 86
Page 81

1. Quick Reference for Indicator Light s
Indicator Copier State Action
I.U. Service Life
Indicator
It is now time to replace the
Imaging Unit.
(When this Indicator lights up, no
new copy cycle can be initiated.)
Replace the Imaging Unit by
following the steps given in "I.U.
Service Life Indicator" in this
chapter.
69
1139O3290A
Call-Tech.-Rep.
Indicator
1139O3940A
The copier has developed a
technical malfunction.
If the Call- T ech.-Rep. Indicator
remains lit even after you have
reset it, call your Technical
Representative.
➭
➭
p. 76
p. 93
Chapter 5
When an Indicator Lights Up
Page 82

70
2. Detaile d Inst ruct ions fo r In dica tor L ights
Add Toner Indicator
The Add Toner In dic at or l ig hts u p
when toner in the Toner Bottle is
running out.
Once the Indicator lig hts up, replace
the Toner Bottle with a new one as
soon as possible by following the
procedure given below.
1142O021AB
Replacing the Toner Bottle
1142O021AB
Swing down the Front Door.
1
Chapter 5
When an Indicator Lights Up
1142O058AA
1139O1380A
1139O1410A
Swing open the Toner Bottle
Holder and pull out the Toner
2
Bottle.
Shake a new Toner Bottle well.
3
Page 83

2. Detailed Ins tructi ons fo r I ndi cat or Lights
With the Seal on th e Ton er
Bottl e faci ng up , slow ly pe el of f
4
the Seal as illustrated.
NOTE
Be careful, some tone r may
puff out from th e bo ttle.
1139O1390A
Ensuring that the arrow ( )
on the Toner Bottle is f acing
5
toward you, ins ert the Bottle into
position.
NOTE
Insert the Bottle all the way
1139O1420A
6
into the copier until the
marking on the Bottle is
aligned with the marking
on the Toner Bottle H older.
Swing the Toner Bottle Holder
closed and close the Front Door.
71
1139O1400A
NOTES
•
Try to replace the Toner Bottle with a new one as soon as possible once the
Add Toner Indicat or lights u p. Continuing to make cop i e s without changing
the Toner Bottle will result in i ncreasingly lighter images .
•
Use ONLY MT Toner 101B for the EP1050 copier. Using any other toner
could result in image trouble.
Auxiliary Toner Replenishing Mode
Use the Auxiliary Ton er Replenishing Mode if the image is light immediately
➭
after replacing the Toner Bo ttle with a new one.
p. 54
Chapter 5
When an Indicator Lights Up
Page 84

72
2. Detailed Instructions for Indicator Lights
Add Paper Indicator
Meter Count
Toner
Drum Dehumidify
Auto Size Sort Book
Adding Paper (Drawer)
Paper
A4
Auto
Lighter Darker
1142O160DA
1142O160DA
When the Drawer or the Multi Bypass
Table has run out of paper, the Add
Paper In di c ator l ig ht s up and the Star t
Key turns orange. At this time, you
cannot start a new co py cycle.
Use the following procedure to load
paper into the Drawer or the Multi
Bypass Table.
Monitor Display
Chapter 5
Back Side
When an Indicator Lights Up
Add Paper Indicator
1142O017AA
Front Side
1139O3910A
1142O060AA
The indications on t he lef t s how that the
Drawer has run out of paper.
Slide out the Dr awer and press
down the Paper Lifting Plate
1
until it is locked into posit ion.
Unwrap the package of th e copy
paper and fan the paper stack
2
thoroughly.
1139O1370A
Page 85

2. Detailed Ins tructi ons fo r I ndi cat or Lights
Slide out the Ed g e Guide an d
Trailing Edge Stop in the
3
direction of the arrows .
1139O0390A
Load the paper stack into the
Drawer so that i t s fro nt side (the
4
side facing up when the package
was unwrapped) faces down.
Make sure that the paper stack
rests under th e two catches of th e
Drawer.
1139O0410A
NOTE
1139O0470A
The paper should
be loaded no higher
than the ▼ (Max.
Level Indicator) on
the Edge Guide.
73
1139O0420A
Slide the Edge Guide an d
Trailing Edge Stop tightly up
5
against the paper.
Slide the Drawer back in.
Chapter 5
When an Indicator Lights Up
Page 86

74
2. Detailed Instructions for Indicator Lights
Adding Paper (Multi Bypass Table)
Monitor Display
Chapter 5
1142O061AA
1142O061AA
Add Paper Indicator
1139O3910A
Front Side
1139O1370A
The indications on t he lef t s how that the
Multi Bypass Table has run out of paper.
Unwrap the package of th e copy
paper and fan the paper stack
1
thoroughly.
Load the paper stack onto the
Table so that its front side (t he
2
side facing up when the package
was unwrapped) faces up and
insert i t into the copie r as far a s it
will go.
When an Indicator Lights Up
1139O6130A
NOTE
When using once-copied paper,
load the paper stac k so tha t it s
blank side faces up.
Page 87

2. Detailed Ins tructi ons fo r I ndi cat or Lights
75
Chapter 5
When an Indicator Lights Up
Page 88

76
2. Detailed Instructions for Indicator Lights
I.U. Service Life Indicator
When time is abo ut to come when the
Imaging Unit needs replacement, the
I.U. Service Life Indicator starts
blinking to prompt you to replace it
with a new one .
Replace the Imaging Unit by following
the proc e dure give n below.
1142O174CA
When 2,500 more co pies are made with Add Toner Indicator lighting up, or 7,500
more copies are made, after the I.U. Service Life Ind icator has sta rt ed blink ing ,
the I.U. Service Life Indicato r l igh ts up steadily and the co pier inhibits the
initiation of a new cop y cycle. S ee th e diag ram b elow.
1139O5310A
Add Toner Indicator
lights up
Chapter 5
1139O5330A
Blinking
After 2,500
Copies
Whichever occurs first
5,000 copies made
1139O5300A
No new copy cycle
can be initiated.
Usef ul Tip
Replace the Imaging Unit as soon as po ssible once the I.U. Se rvice Life
Indicator has started blinking.
When an Indicator Lights Up
Page 89

Precautions for Handling
2. Detailed Ins tructi ons fo r I ndi cat or Lights
•
Do not leave the I. U. in a bright
place.
1139O6032A
•
Do not store th e I. U . in a hot place
of 40°C (104°F) or more.
1139O6042A
•
Do not sto re the I. U . in a humid
place or subject to water splash.
77
1139O6052A
1139O6062A
•
Do not store the I. U. upside down
or tilted.
Do not subject the I. U. to vibration.
Chapter 5
When an Indicator Lights Up
Page 90

78
2. Detailed Instructions for Indicator Lights
Removing the I. U . fr om copier
1142O071AA
1142O072AA
Chapter 5
Swing down the Front Door.
Turn the Lock Release Lever
1
counterclockwise to swing up the
Upper Half of the copier.
Or
<If the copier is equipped with an
Automatic Document Feeder>
Unlock and swing up the Upper Half
of the copier. Then, lock the Stopper
M2
.
Turn the I. U. Lock Release
Lever and, while holding it
2
down, pu l l the I. U. h a l fway out
from the copier.
When an Indicator Lights Up
1139O0520A
1139O0510A
Firmly grasp the I . U. w i th both
hands and pull it all the way out
3
of the cop ier .
Page 91

Unpacking the I. U.
79
2. Detailed Ins tructi ons fo r I ndi cat or Lights
Setting up the I. U.
Starter Bottle
I. U.
4445U001AA
Peel off the piece o f tape an d
open the Carton Box.
1
Take the Starter Bo ttle out from
the Carton Box.
2
Take the I. U. with its bag ou t o f
3
the Carton Box.
Take the I. U. out of the bag.
1
Chapter 5
4445U002AA
4445U003AA
Peel off the thr ee pieces of tape
and packing materials.
2
When an Indicator Lights Up
Page 92

80
2. Detailed Instructions for Indicator Lights
4445U011AA
4445U004AA
Carefully pull the polyester tape
from the I. U..
3
Remove the Cap from the I. U.
and re-fit it to the used I. U. as
4
shown in the illustrat ion.
Align the I. U. with the R ails in
the copier.
5
Chapter 5
When an Indicator Lights Up
1139O0530A
1139O0540A
Slide the I. U. all the wa y into
the copier.
6
Page 93

2. Detailed Ins tructi ons fo r I ndi cat or Lights
Be sure to push th e I. U. into the
locked position until a click is
7
heard.
Then, check to see the pos ition
of Lock Release Lever, as shown
in the illustratio n.
81
4445U005AA
1142O076AA
1142O077AA
NOTE
An improperly installed I. U.
could be a cause of copier
malfunction.
Lower the Upp er Half o f t he
copier and push it into the locked
8
posit ion by pu s hi ng do wn on th e
portion marked with "Push Down
Here Only".
Or
<If the copier is equipped with an
Automatic Document Feeder>
M2
Unlock the Stopper
swing down and lock the Upper Half
of th e copier. Then, close the Front
Door.
. Gently
Chapter 5
When an Indicator Lights Up
Page 94

82
2. Detailed Instructions for Indicator Lights
Charging the Copier with Starter and Toner
4445U006AA
1139O1410A
Swing out the Bot tle H ol der .
1
Hold the Starter Bottle so that its
tab is on the upper s ide, shake it
2
well.
Chapter 5
When an Indicator Lights Up
4445U007AA
4445U006AA
Peel off the tape f ro m the Starter
Bottle.
3
Align the markings on the
Starter Bottle w ith the upper side
4
of the Bottle Holder and slide the
Bottle into position.
NOTE
Insert the Bottle all the way
into the copier until the
marking on the Bottle is
aligned with the marking
on the Bottle Hold er .
Then, swing in the Bottle Holder
until it locks into positi on.
Page 95

2. Detailed Ins tructi ons fo r I ndi cat or Lights
Close the Front Door.
5
Plug the Power Cord into the
Wall Outlet.
6
Turn ON the Power Switch.
7
1139O6012A
This will cause the wait indicator
to be shown on the control panel.
The copier automat ically start
the charging cycle for
8
approximately 5 minutes.
During this cycles, do not open
the Front Door.
During this cycle, six segments
of the ones digit LED on the
Magnification Ratio Indicator
forming a "0" li g ht up a nd go ou t
one after another, indicating that
the copier is being charged with
starter.
83
1139U011AA
1139U012AA
When the copier has been
completely charged with St arter,
the indication on the
Magnification Ratio Indicator
changes to "100" and the cycle
stops.
If "E1" or "E2" is indicated on
the Magnification Ratio
Indicator, the t a pe has not bee n
removed from the Starter Bottle.
Swing down the Front Door and
remove the tape and pe rfor m the
starter charging procedure again.
If "E1" or "E2" is indicated again
call your Technical
Representative.
Chapter 5
When an Indicator Lights Up
Page 96

84
2. Detailed Instructions for Indicator Lights
4445U009AA
9
10
Swing down the Front Door,
swing out the Bottle Holder and
remove the Starter Bottle.
Hold the Toner Bottle so that its
tab is on the upper s ide, shake it
well and peel off the tape.
4445U010AA
1139O1390A
11
Chapter 5
1139O1420A
Once the tape has been removed,
hold the Bottle s o that its Toner
Port faces up.
Align the markings on the
Toner Bottle with the upper side
of the Bottle Holder and slide the
Bottle into posi tion.
NOTE
Insert the Bottle all the way
into the copier until the
marking on the Bottle is
aligned with the marking
on the Bottle Hold er .
Then, swing in the Bo ttle H older
until i t locks into position and
close the Front Door.
When an Indicator Lights Up
1139O1400A
Page 97

2. Detailed Ins tructi ons fo r I ndi cat or Lights
Closure Failure Indicator
The Clo sure Failure Indica t or lights up if
a copier door is left open, or an option is
not attached properly . A t this time, the
Monitor Display shows the location of
the closure failure. The Start Key turns
orange, and you can no longer start a new
copy cycle.
Correct the closure failure by following
1142O018AA
1142O018AA
Monitor Dis pla y Check Locatio ns
Check that the Right Door or Front Door is closed.
the proc e dure give n below.
85
1142O018AA
1142O063AA
1142O062AA
1142O064AA
Check that the Sorter S-104 is in postion
•
Check that the Automatic
Document Feeder is
lowered.
•
Check that the Documen t Exit
Tray of the Automatic
Document Feeder is in
position.
1139O0600A
1142O065AA
1139O0650A
1139O0560A
Chapter 5
When an Indicator Lights Up
Page 98

86
2. Detailed Instructions for Indicator Lights
Misfeed Indicator
If a paper mi sfe ed occ u rs d ur ing a copy
cycle, that copy cycle sto ps. At this time,
the Misfeed Indicator lights up and the
Monitor Display shows the location. In
addition, the Start Key tur ns o ran ge a nd
you cannot start a new copy cycl e.
1142O019AB
1142O019AB
Misfeed Indicator and Moni tor Dis play
Check the Monitor Display for the location of the mis feed , and clear the misfed
sheet of paper according to the procedure given for each location.
Monitor Dis pla y Misfeed Loca ti on
Misfeed in the copier ➭ p. 87
1142O019AB
1142O019AB
Chapter 5
1142O068AB
1142O068AB
Misfeed in the Automatic Document
➭
Feeder
p. 90
Misfeed in th e Sorte r
➭
1142O066AA
1142O067AA
p. 92
When an Indicator Lights Up
1142O069AB
1142O069AB
1142O070AA
Page 99

2. Detailed Ins tructi ons fo r I ndi cat or Lights
Misfeed Clearing Procedure: Copier
87
NOTE
Use care not to touch the areas marked
with , "High Voltage", and
"Cauti on/Hot" with ba re hands.
1142O019AB
1142O019AB
1139O2160A
1142O071AA
<When the copier is equipped
with a Multi Bypass Table>
Unload the paper stack from the
Multi Bypass Table.
Swing down the Front Door and
turn the Lock Release Lever
1
counterclockwise to unlock and
swing up the Upper Half of the
copier.
Or
<If the copier is equipped with an
Automatic Document Feed er>
Unlock and swing up the Upper Half
of the copier. Then, lock the Stopper
M2
.
Chapter 5
1142O072AA
When an Indicator Lights Up
Page 100

88
2. Detailed Instructions for Indicator Lights
1142O073AA
1139O0670A
Holding up the Fusing Unit, pull
out the sheet of paper .
2
Remove any sheet of paper from
the Transport Section.
3
Open the Right Door.
4
Then pull out the sheet of paper
from the Manual Bypass Port.
Chapter 5
When an Indicator Lights Up
1142O074AA
1142O075AA
Pull out the sheet of paper from
the Pape r Take-Up Sectio n.
5
Close the Right Door.
6
 Loading...