

Page 1
1159-7704-05
EP1031/EP1031F
Operator’s Manual
Page 2
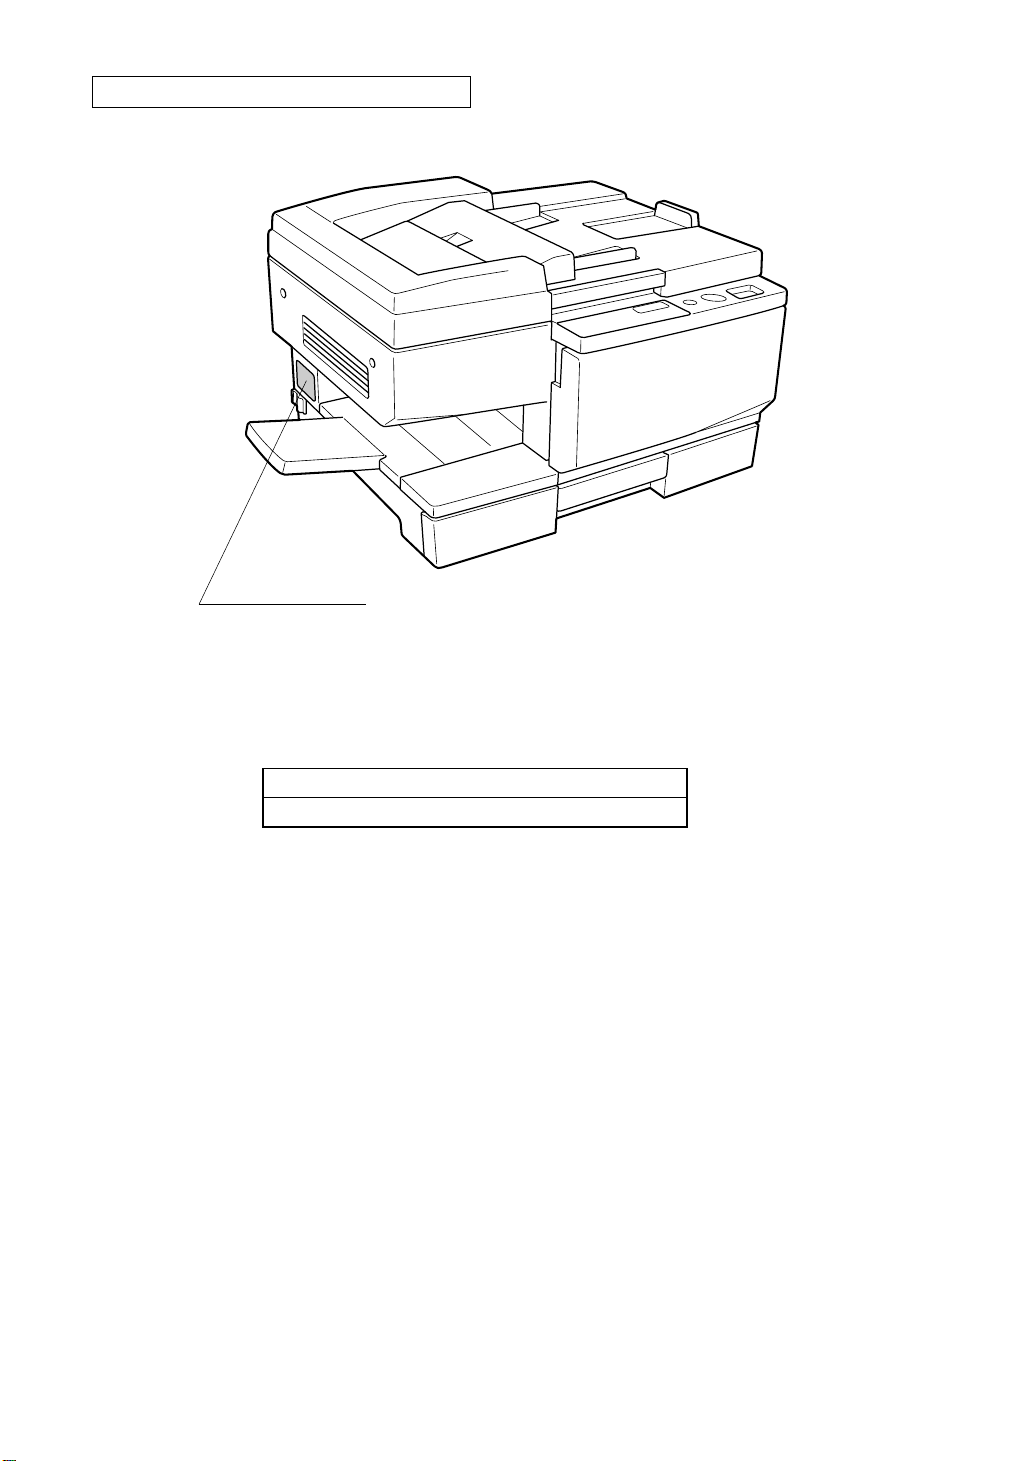
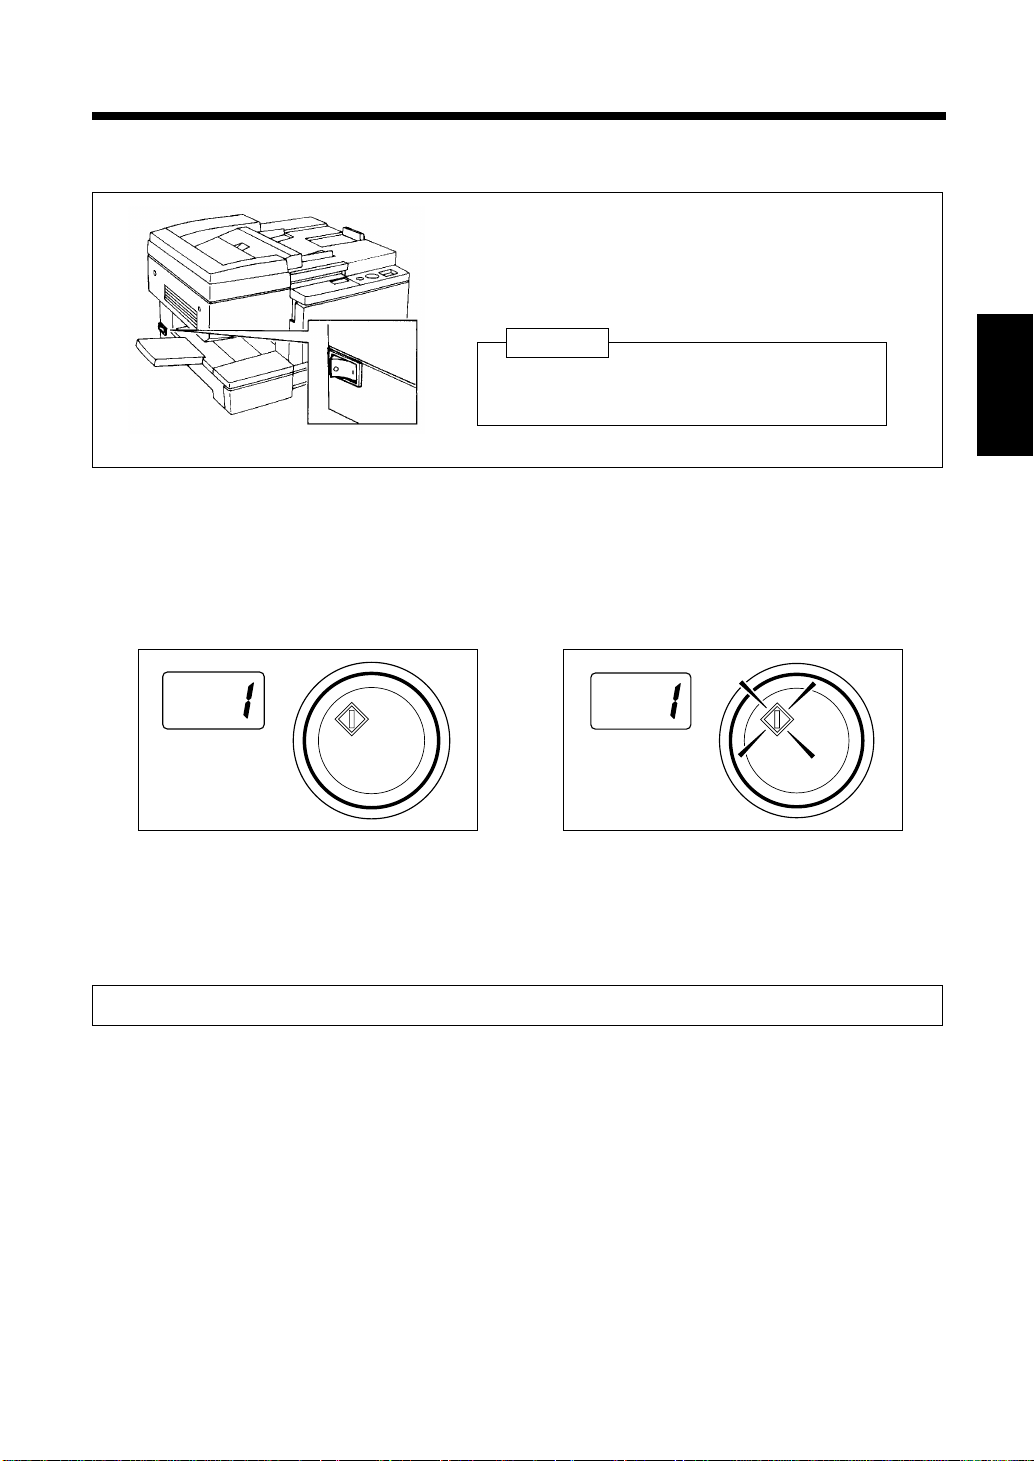
Location of the Manufacturer’s Name Plate
Manufacturer’s Name Plate
C1159O001EA
The Manufacturer’s Name Plate is affixed at the position indicated by the arrow.
Please write down the Model Name and Serial No. of your copier here.
Model:
Serial No.:
Page 3
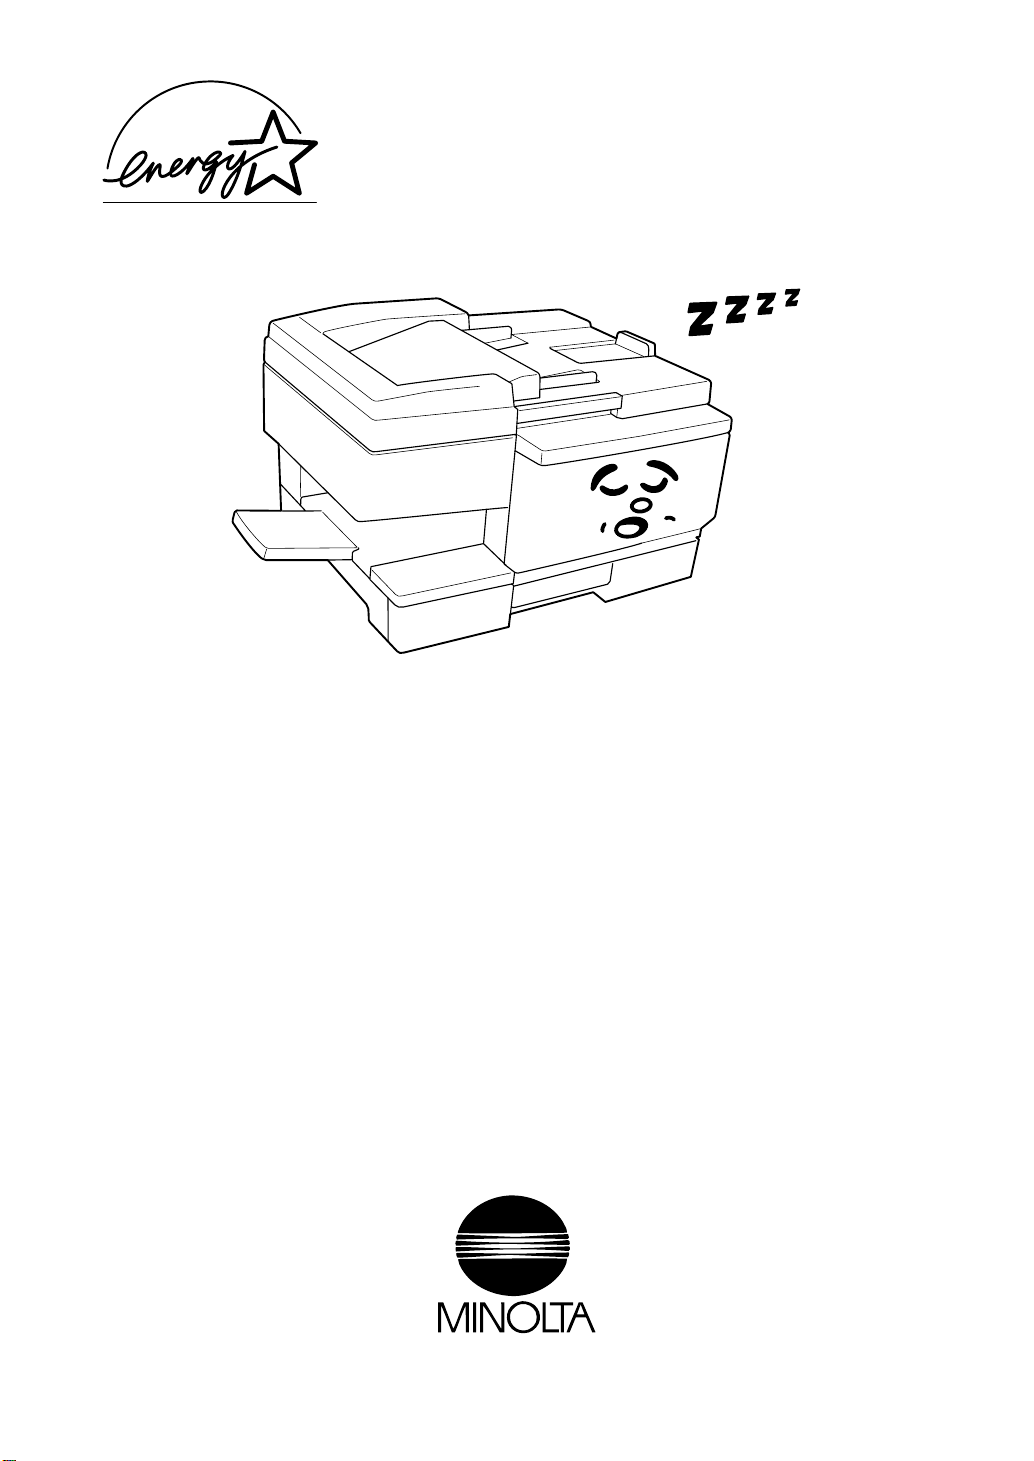
As an ENERGY STAR® Partner, Minolta Co., Ltd has determined
that this copier meets the
efficiency.
ENERGY STAR
®
Guidelines for energy
C1159O002EA
What is an Energy Star Copier ?
Energy Star Copiers have a feature that allows them to automatically turn off or "go to sleep" after a period
of inactivity, ensuring night and weekend shut off. This auto-feature can reduce a copier’s annual electricity
costs by over 60 percent. In addition, high speed copiers will be set to automatically make double sided
copies. An organization’s paper costs can be reduced by $60 a month and the volume of paper sent into the
waste stream will decline. It takes 10 times more energy to produce a piece of paper than it does to make a
single copy on a copier. Therefore, using less paper also means decreased national energy consumption.
Recycled Paper (USA market only)
Your Minolta Copier has been designed to use the following Recycled Paper
Minolta Recycled Bond
20% Post Consumer Waste
Item No. 8925 701
Page 4

Thank you for choosing Minolta quality. For over 30 years Minolta has been a leader on the forefront of office
equipment technology and service. Our desire has alw ays been t o bring you highly re liabl e products. We pledge t o
continue to provide you, our customer wi th our state of the art equi pment, as well as ful l customer service for all our
products. We look forward to a long healthy relationship with you and our company. If you have any questi ons or
comments about Minolta, our product or service, please le t us know . Our f a x number is 800-237-8087 (for U.S.A.
and Canada). Thank you again.
This operato r’s manual explains how to o perate the copier and replenis h its supplies. It also gives so me
troubleshooting tips as well as gene ra l precautions to be observed when operating the copier.
To ensure the best performance and effective use of your copier, read this manual carefully until you familiarize
yourself thoroughly with the copier’s operation and features. After you ha ve read through the manual , keep it ready
for reference.
Please use this manual as a quick and han dy reference tool for immediately clarifying any questions which may
arise.
MC-02
WARNING
This equipment has been tested and found to comply with the limits for a Class A digital device, pursuant to Part 15
of the FCC Rules. These limits are designed to provide reasonable protection against harmful interference when the
equipment is operated in a commercial environment. This equipment generates, uses, and can radiate radio
frequency ene rgy and if no t installed and used in accordance with the instruction manual, may cause harmful
interference to radio communications.
i
Operation of this equipment in a residen tial area is likely to cause h armful in terf erence in which case the user will
be required to correct the int e rference at his own expense.
The design and production of this unit conforms to FCC Regulations, and any changes or modifications must be
registered with the FCC and are subject to FCC control. Any changes made by the purchaser or user without first
contacting the manufacturer will be subject to penalty under FCC regulations.
FCC-02
This Class A digital apparatus meets all requirements of the Canadian Int erference-Causing Equipment Re gulations.
Cet appareil numériqu e de la classe A respecte toutes les exigences du Règlement sur le matériel brouilleur du
Canada.
IC-04
Page 5

ii
Contents
Chapters 1 through 3 contain the basic information for making copies.
Be sure to read these chapters before attempting to use your copier.
Chapter 1 Safety Notes ...................................................p. 1
1. Installing the Copier.....................................................p. 2
Installation Site.........................................................p. 2
Power Source............................................................p. 2
Space Requirements.................................................p. 2
2. Precautions for Use ......................................................p. 3
Operating Environment............................................p. 3
Using the Copier Properly .......................................p. 3
Moving.....................................................................p. 3
Care of Copier Supplies...........................................p. 3
Chapter 2 Before Making Copies ................................... p. 5
1. Copier Parts and Their Operation.................................p. 6
Outside the Copier.................................................p. 6
Inside the Copier....................................................p. 6
Semi-automatic Document Handler (SDH) ..........p. 7
2. Control Panel and Its Operation...................................p. 8
Control Panel............................................................p. 8
Service Indicators.....................................................p. 8
3. Turning ON/OFF and Initial Mode..............................p. 9
Turning ON and OFF...............................................p. 9
When the Copier is Turned ON ...............................p. 9
Initial Mode..............................................................p. 9
4. Convenient Functions.................................................p. 10
Clear/Stop ............................................................p. 10
Auto Reset............................................................p. 10
Auto Power Off....................................................p. 10
Page 6

Chapter 3 Making Copies .............................................p. 11
iii
Contents
1. Making Copies............................................................p. 12
2. Positioning the Original .............................................p. 13
Positioning on the Glass.........................................p. 13
Paper Originals ....................................................p. 13
Transparent Originals ..........................................p. 13
Using the Semi-automatic Document Handler
(SDH).....................................................................p. 14
Guidelines for Originals ......................................p. 14
Positioning the Original.......................................p. 14
3. Setting the Number of Copies....................................p. 15
Setting the Number of Copies .............................p. 15
4. Setting Image Density................................................p. 16
Setting Image Density............................................p. 16
Auto Exposure Mode...........................................p. 16
Manual Exposure Mode.......................................p. 16
5. Setting the Zoom Ratio ..............................................p. 17
Setting the Zoom Ratio..........................................p. 17
Fixed Zoom Ratio Settings..................................p. 17
Manual Zoom Ratio Settings...............................p. 17
Zoom Ratio Table
(Original Size to Copy Paper Size)........................p. 18
Metric Areas.........................................................p. 18
Inch Areas ............................................................p. 18
6. Multi Bypass Copying................................................p. 19
Using the Multi Bypass .......................................p. 19
7. Hints for Advanced Copying......................................p. 20
Two-Sided Copying.............................................p. 20
Composite Copying.............................................p. 20
Chapter 1
Safety Notes
Chapter 2
Before Making
Copies
Chapter 3
Making Copies
Chapter 4
Special Functions
Chapter 5
Error Messages and
Indicators
Chapter 6
Chapter 4 Special Functions .........................................p. 21
1. Toner Replenisher.......................................................p. 22
Toner Replenisher Function...................................p. 22
2. Drum Dehumidifier....................................................p. 23
Drum Dehumidifier Function ................................p. 23
3. User’s Choice..............................................................p. 24
User’s Choice Item.................................................p. 24
User’s Choice Function and
Explanation of Settings..........................................p. 24
U-1 Auto Reset Mode..........................................p. 24
Making User’s Choice Selections........................p. 25
4. Default Manual Exposure Level Adjustment.............p. 26
Default Manual Exposure Level Adjustment.........p. 26
5. Default Auto Exposure Level Adjustment.................p. 27
Default Auto Exposure Level Adjustment.............P . 27
Troubleshooting
Chapter 7
Miscellaneous
Page 7
iv
Contents
6. Total Check Function .................................................p. 28
Counter Display .....................................................p. 28
Checking Total Copies/IU Count.........................p. 28
Chapter 5 Error Messages and Indicators.....................p. 29
1. Identifying and Correcting Problems.........................p. 30
2. PC Display................................................................p. 31
Replenishing Paper..............................................P. 31
Removing a Paper Misfeed..................................p. 31
3. A Add T oner Indicator..............................................p. 32
Replacing the Toner Cartridge.............................p. 32
4. E Display ..................................................................p. 34
Resetting the Copier ............................................p. 34
5. J Display...................................................................p. 35
Paper Misfeed......................................................p. 35
Removing a Paper Misfeed....................................p. 36
J2/J3-Copier.........................................................p. 36
J8-Semi-automatic Document Handler (SDH)....p. 37
6. C Display..................................................................p. 38
Resetting the Copier ............................................p. 38
Chapter 6 Troubleshooting............................................p. 39
1. When This Type of Copy is Produced........................p. 40
2. Copier Does Not Work Properly................................p. 42
Chapter 7 Miscellaneous...............................................p. 43
1. Copier Specifications .................................................p. 44
2. Daily Maintenance .....................................................p. 45
Cleaning: Before cleaning, always make sure the
Main Switch for the copier has been turned off.....p. 45
Outer Cover..........................................................p. 45
Control Panel .......................................................p. 45
Original Cover Pad..............................................p. 45
Original Glass......................................................p. 45
Inside of Front Door ............................................p. 45
SDH Pad...............................................................p. 45
3. Paper Size ...................................................................p. 46
4. Index ...........................................................................p. 47
Page 8

Chapter 1
Safety Notes
This chapter explains about the operating environment, conditions and restrictions.
1
Chapter 1
1. Installing the Copier.....................................................................p. 2
Installation Site ...........................................................p. 2
Power Source...............................................................p. 2
Space Requirements ....................................................p. 2
2. Precautions for Use......................................................................p. 3
Operating Environment ...............................................p. 3
Using the Copier Properly..........................................p. 3
Moving.........................................................................p. 3
Care of Copier Supplies..............................................p. 3
Safety Notes
Page 9
2
1. Installing the Copier
Installation Site
To ensure utmost safety and prevent possible malfunctions of the copier, install it in a location which meets
the following requirements.
◆ A place away from a curtain or the like that
Chapter 1
may catch fire and burn easily.
◆ An area wh ere there is no possibility of being
splashed with water or other types of liquid.
◆ An area free from direct sunlight.
◆ A pl ace out of the direct air stream of an air
Safety Notes
conditioner, heater, or ventilator .
◆ A well-ventilated place.
◆ A dry place.
◆ A dust-free location.
◆ An area not subject to undue vibration.
◆ A stable and level location.
◆ A place where ammonia or other organic gas
is not generated.
◆ A place which does not put the operator in the
direct stream of exhaust from the copier.
◆ A place which is not near any kind of heating
device.
Power Source
The power source voltage requirements are as follows.
◆ Use a power source with little voltage fluctuation.
Voltage Fluctuation : Within ±10%, (+6%, -10% (Only AC127V))
Frequency Fluctuation
: Within ±0.3%
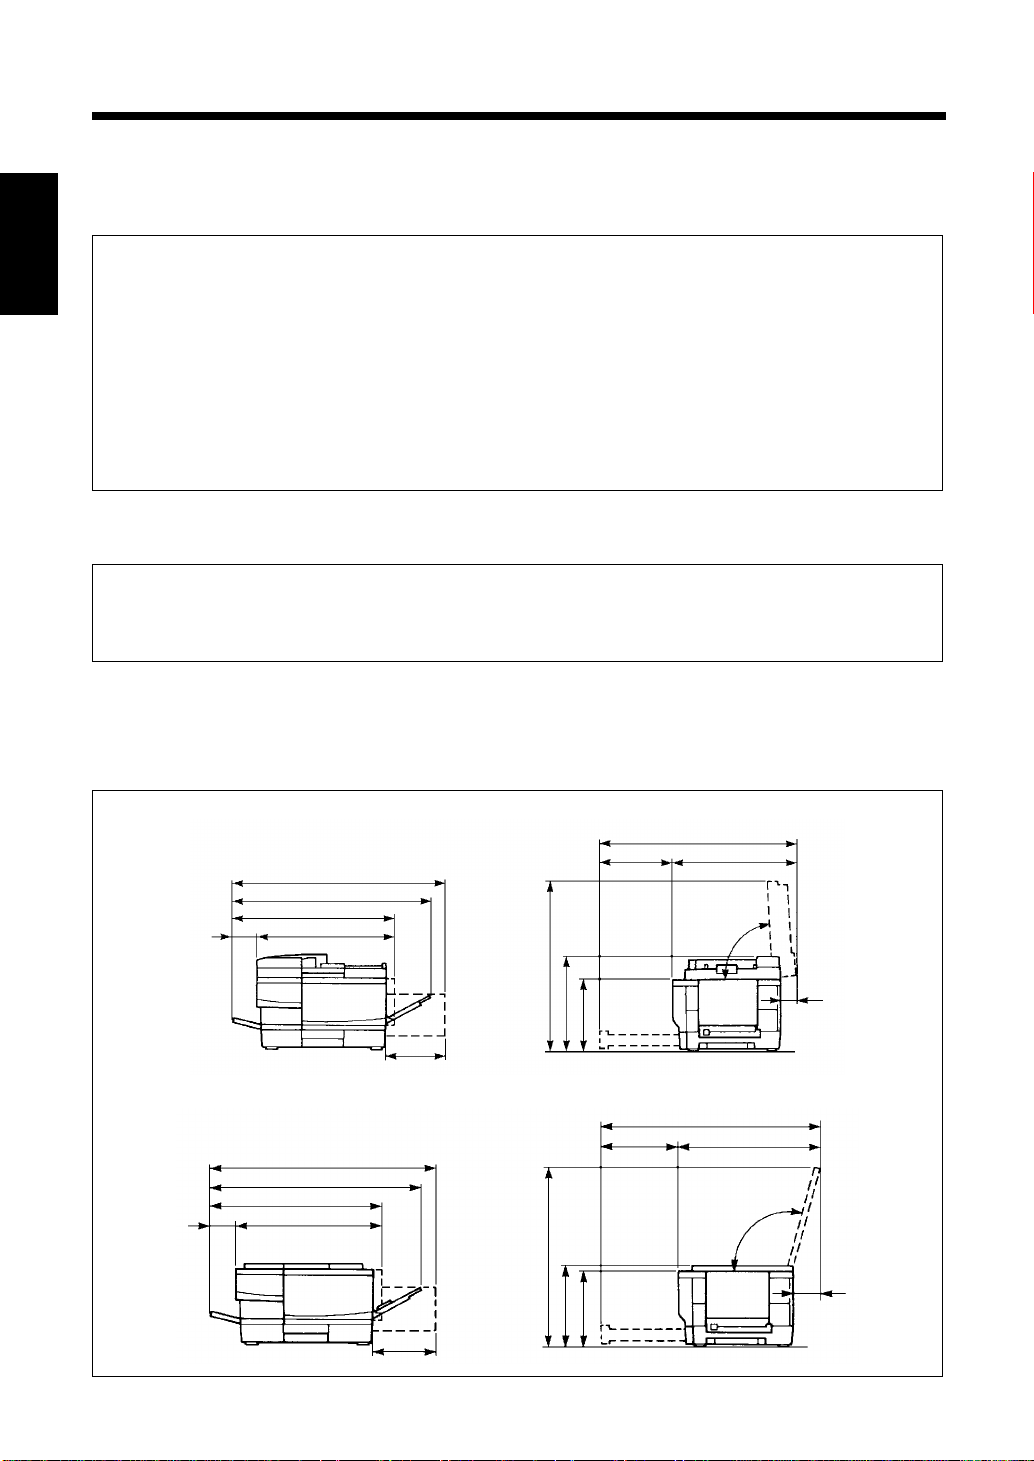
Space Requirements
To ensure easy copier operation, supply replacements and service maintenance, adhere to the recommended
space requirements detailed below.
* Be sure to allow a clearance of 150mm (6 inch) or more at the back of the copier as there is a ventilation duct.
EP1031F (with Semi-automatic Document Handler)
921 (36 1/4)
837 (33)
101 (4)
660 (26)
559 (22)
291 (11 1/2)
EP1031 (with Original Cover)
921 (36 1/4)
837 (33)
101 (4)
660 (26)
559 (22)
694 (27 1/4)
357 (14)
281 (11)
804 (31 3/4)
304 (12) 500 (19 3/4)
87°
849 (33 1/2)
304 (12) 545 (21 1/2)
105°
Unit: mm (inch)
49 (2)
C1159O002DA
291 (11 1/2)
647 (25 1/2)
303 (12)
281 (11)
94 (3 3/4)
C1159O003DA
Page 10

2. Precautions for Use
Operating Environment
The operating environmental requirements for the copier are as follo ws.
Temperature : 10°C to 30°C (50°F to 86°F) with a fluctuation of 10°C (50°F) per hour.
Humidity : 15% to 85% with a fluctuation of 20% per hour.
Using the Copier Properly
To ensure the optimum performance of the copier, follow the precautions listed below.
◆ NEVER place a heavy object on the copier or subject the copier to shocks.
◆ NEVER open any doors, or turn OFF the copier while the copier is making copies.
◆ NEVER bring any magnetized object or use flammable sprays near the copier.
◆ NEVER remodel the copier, as a fire or electrical shock could result.
◆ ALWAYS insert the power plug all the way into the outlet.
◆ ALWAYS make sure that the outlet is visible, clear of the copier or copier cabinet.
◆ ALWAYS provide good ventilation when making a large number of continuous copies.
NOTE
= Locate the Copier in a Well V entilated Room =
A negligible amount of ozone is gener ated during normal operation of this copier. An unpleasant odor
may, however, be created in poorly ventilated rooms during extensive copier operations. For a
comfortable, healthy, and safe operating environment, it is recommended that the room be well
ventilated.
REMARQUE
= Placer le copieur dans une pièce largement ventilée =
Une quantité d’ozone négligable est dégagée pendant le fonctionnement du copieur quand celui-ci est
utilisé normalement. Cependant, une odeur désagréable peut être ressentie dans les pièces dont
l’aération est insuffisante et lorsque une utilisation prolongée du copieur est effectuée. Pour avoir la
certitude de travailler dans un environnement réunissant des conditions de confort, santé et de sécurité,
il est préférable de bien aérer la pièce ou se trouve le copieur.
Moving
If you need to transport the copier over a long distance, consult your Technical Representative.
Care of Copier Supplies
Use the following precautions when handling the copier supplies (toner , paper, etc.)
Page 11

4
2. Precautions for Use
Chapter 1
Safety Notes
Page 12

Chapter 2
Before Making Copies
This chapter gives you a brief description of the system and preliminary information about the
different parts of the system.
5
1. Copier Parts and Their Operation................................................p. 6
Outside the Copier.............................................................p. 6
Inside the Copier................................................................p. 6
Semi-automatic Document Handler (SDH).......................p. 7
2. Control Panel and Its Operation ..................................................p. 8
Control Panel............................................................... p. 8
Service Indicators........................................................p. 8
3. Turning ON/OFF and Initial Mode..............................................p. 9
Turning ON and OFF..................................................p. 9
When the Copier is Turned ON...................................p. 9
Initial Mode.................................................................p. 9
4. Convenient Functions.................................................................p. 10
Clear/Stop..................................................................p. 10
Auto Reset.................................................................. p. 10
Auto Power Off ..........................................................p. 10
Chapter 2
Before Making Copies
Page 13
6
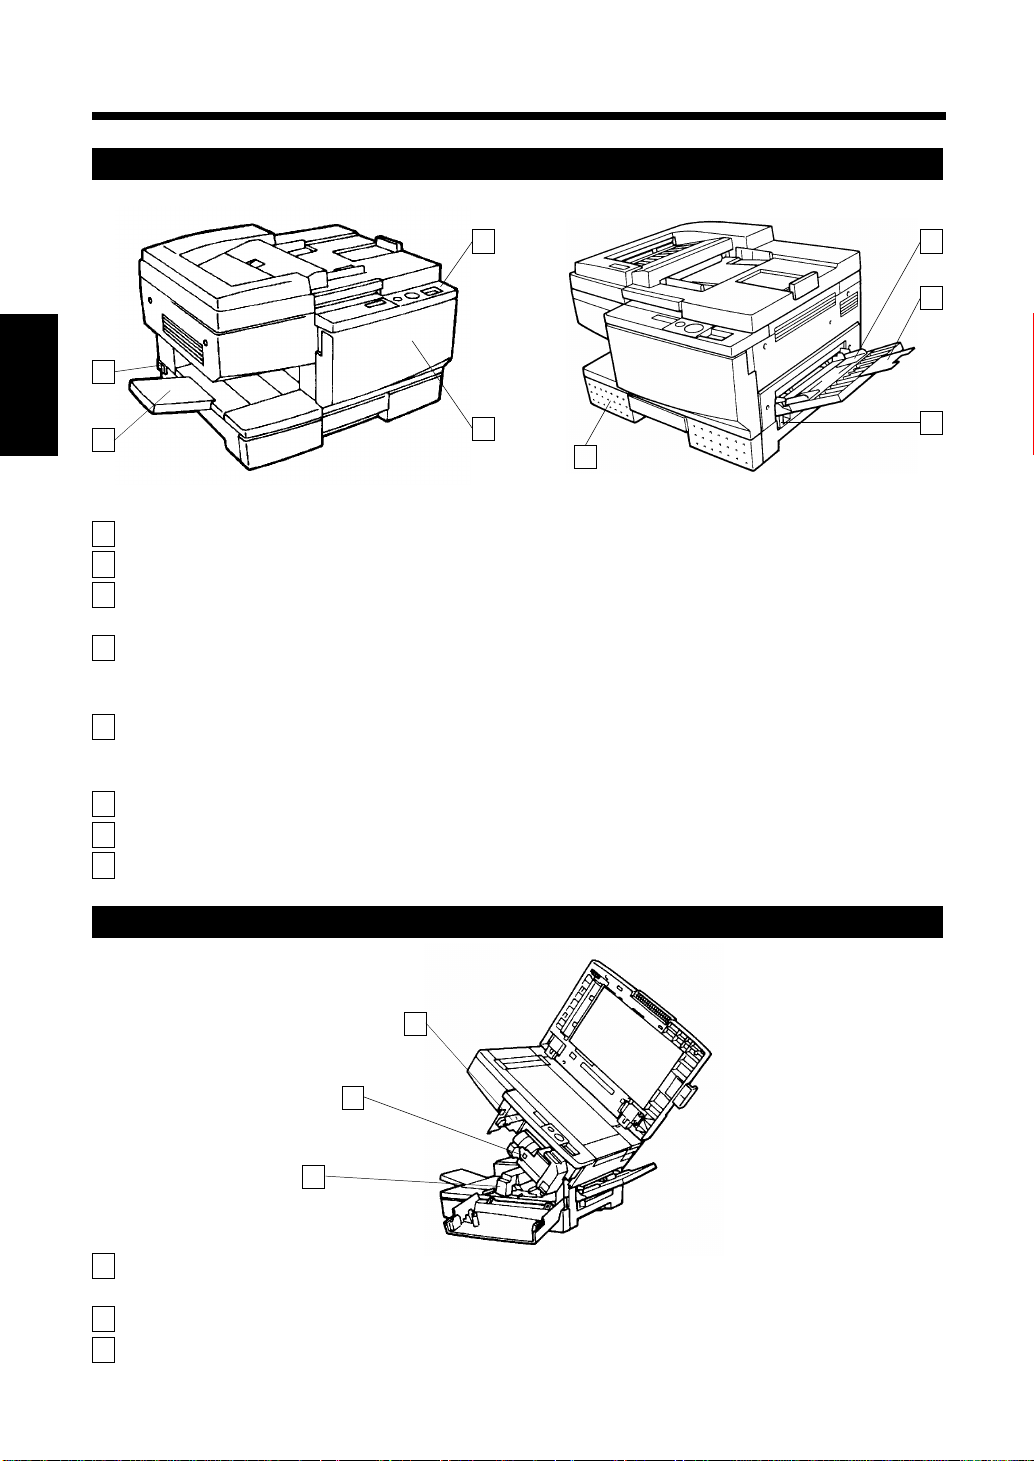
1. Copier Parts and Their Operation
Outside the Copier
3
2
Chapter 2
1
C1159O004DA C1159O005DA
1 Copy T ray : Holds the copies fed out of the copier.
2Main Switch : Use to turn on and off the copier. (See page 9.)
3 Control Panel : Use to make various copy job settings and start a copy cycle.
Before Making Copies
4 Front Door : Open only for the following:
5 Multi Bypass T ray : Thick paper, transparencies and other special materials can be placed
6 Multi Bypass T r ay Extender : Flip this Extender out when making copies on large size paper.
7 Right Door : Open to clear a paper misfeed.
8 Drawer : Holds up to 250 sheets of copy paper.
(See page 8.)
• Replenish toner (See page 32.)
• Remove a paper misfeed (See page 36.)
here. And also, up to 30 sheets of plain copy paper can be placed here.
(See page 19.)
4
8
5
6
7
Inside the Copier
3
1
2
C1159O003EA
1 Imaging Unit : Remove the screws and remove the unit. (These are special screws
which must be removed by a service representative.)
2 Fusing Unit Cover : Hold onto this cover when lifting the Upper Unit of the Fusing Unit.
3 Lock Release Lever : Turn clockwise to swing up the Upper Unit of the copier to clear a
paper misfeed.
Page 14
1. Copier Parts and Their Operation
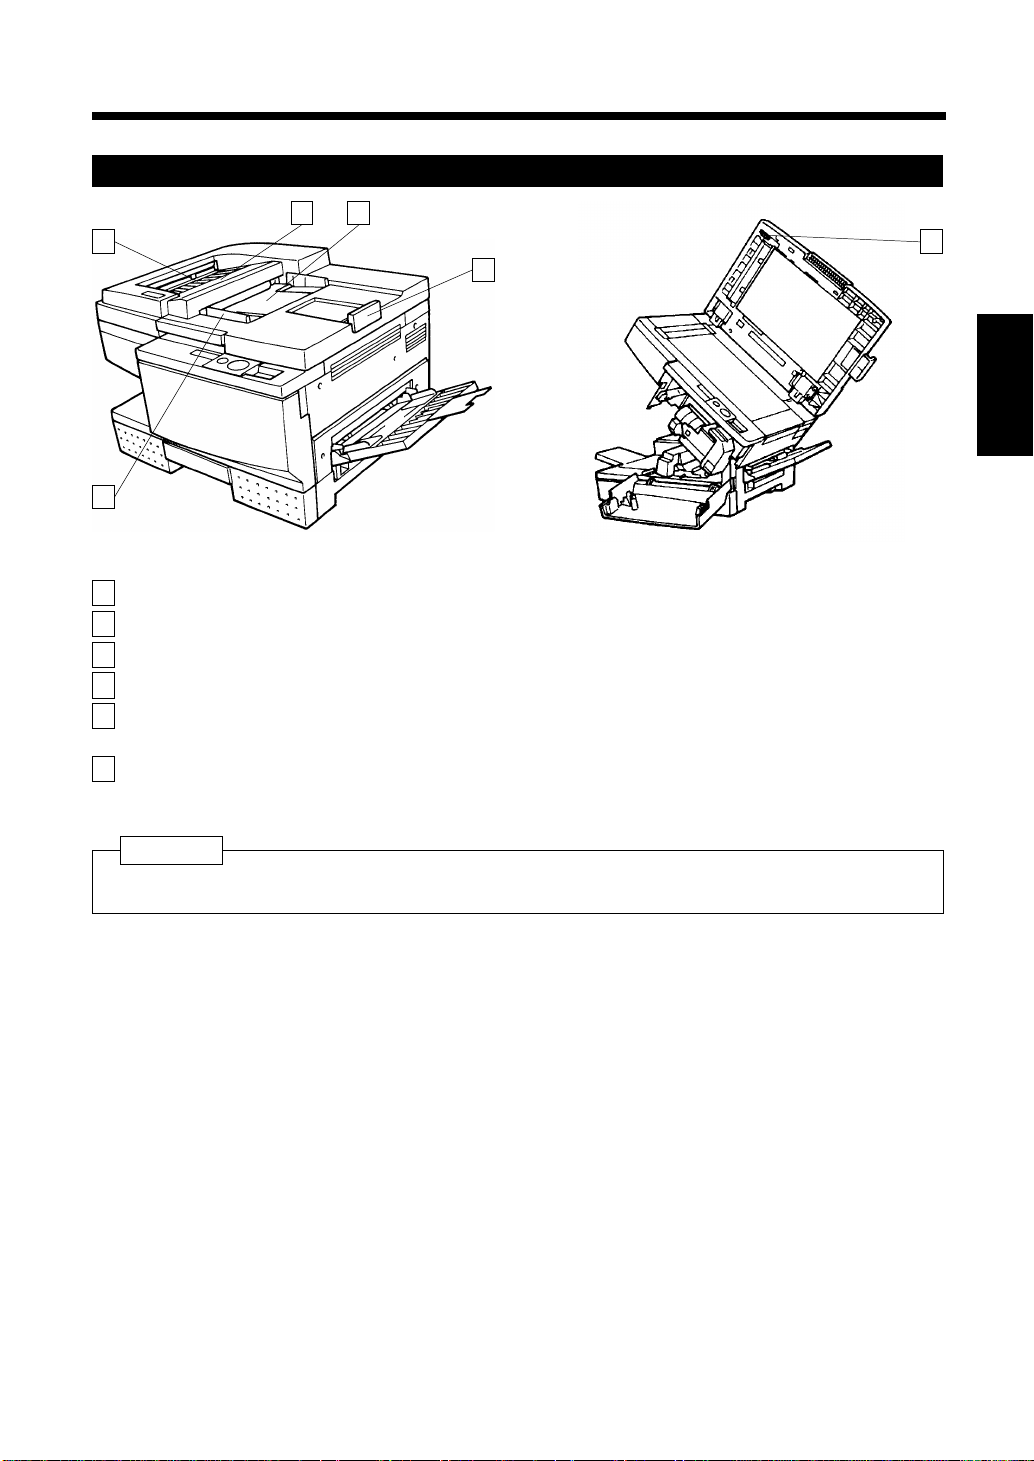
Semi-automatic Document Handler (SDH)
3 4
2
5
1
C1159O005DA C1159O003EA
1 Document Guide Plates : Adjust to the size of the original.
2 Misfeed Removal Guide : Open to clear a paper misfeed.
3 Document Exit T ray : Receives originals that are automatically ejected after copying.
4 Document Feed Tray : Load the originals face down on this tray . (See page 14.)
5 Document Feed Tray
Extender
6 Misfeed Removal Knob : Turn to remove an original misfeed.
: Can be pulled out when using large size originals.
7
6
Chapter 2
Before Making Copies
NOTE
EP1031 has an original cover.
EP1031F has an SDH for original handling.
Page 15
8
2. Control Panel and Its Operation
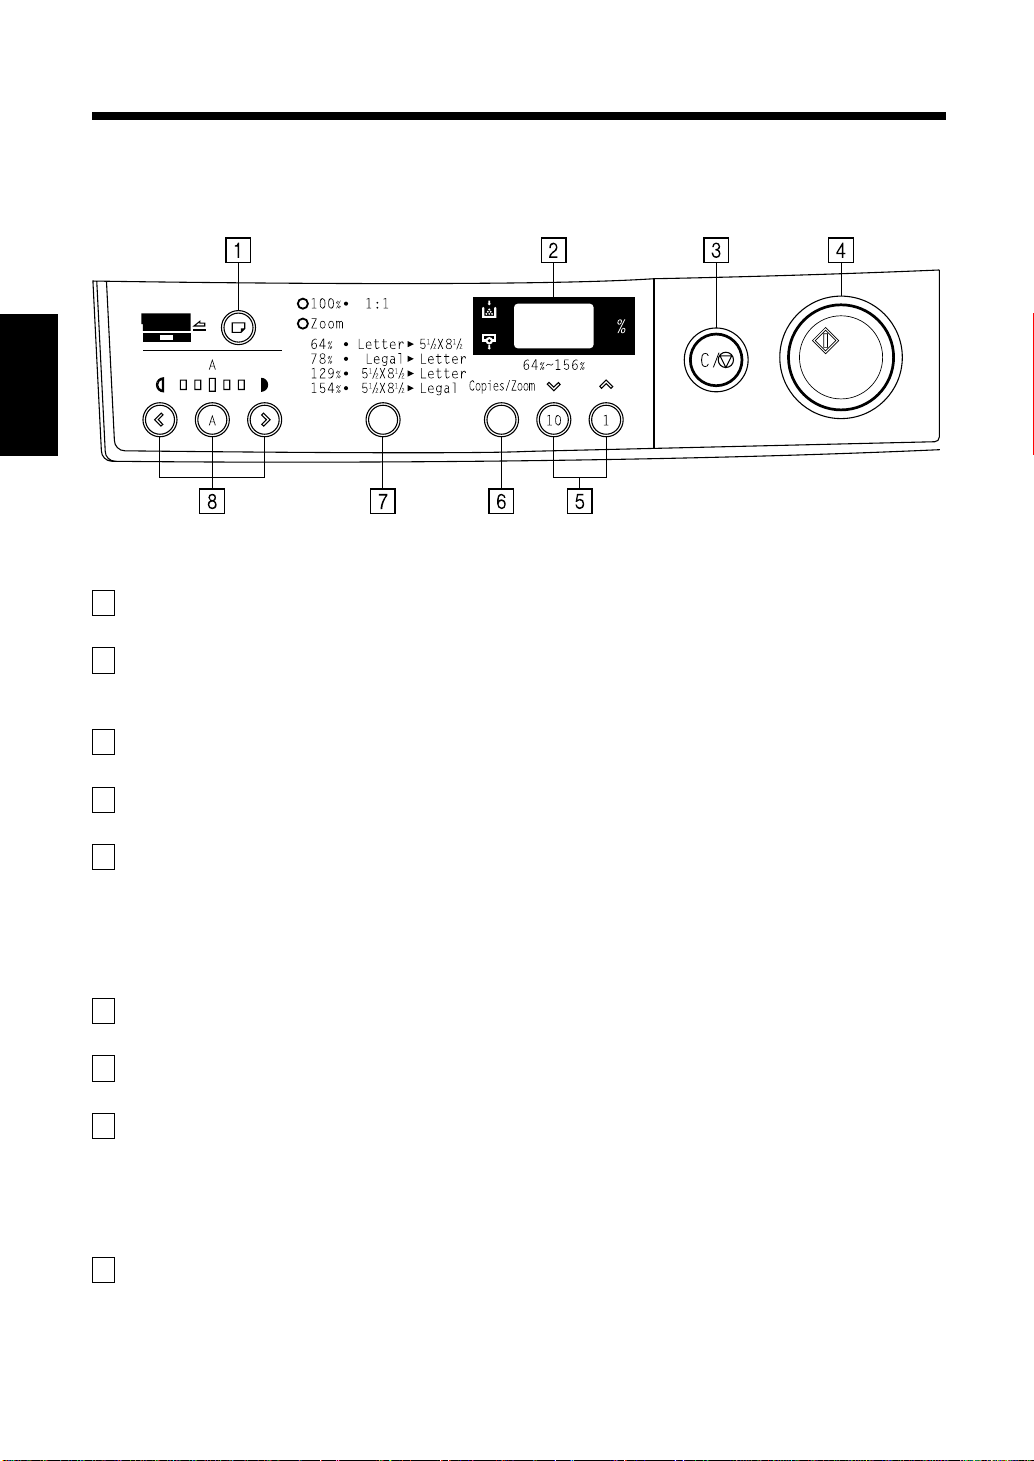
Control Panel
Chapter 2
1 Paper Source Key
Before Making Copies
• Selects the paper source.
2 Display Panel
• Alphanumeric display indicating the number of copies, zoom ratio and other information.
(See page 15, 17.)
3 Clear/Stop Key
• Returns the copy setting to one (1). Returns the zoom ratio to 100% and stops the copying operation.
4 Start Key
• Starts the copying operation.
5 Copy Quantity and Zoom Keys
• Used to set the number of copies to be made and manual zoom settings. When used for setting the
number of copies, the number in the display panel will increase by one each time the one (1) key is
pressed and increase by ten each time the ten (10) key is pressed. (See page 15.)
• When used to set the zoom ratio, the number in the display panel will increase or decrease by one
each time the respective key 78 is pressed. The zoom range is from 64% to 156%. (See page 17.)
6 Copy Quantity/Zoom Selection Key
• Switches the operation of the 1 and 10 keys between copy quantity and zoom functions.
7 Fixed Zoom Ratio Key
• Selects and displays a fixed zoom ratio setting. (See page 17.)
8 Exposure Control Keys
• 46: Controls the density of the copy image.
• 55: For selecting the Auto Exposure/Manual Exposure Mode. (See page 16.)
C1159O004EA
Service Indicator
1 Add Toner Indicator
Indicates that toner is running out. (See page 32.)
A
Page 16
3. Turning ON/OFF and Initial Mode
Turning ON and OFF
◆ Turning Copier ON
Press the Main Switch to the e (ON) position.
◆ Turning Copier OFF.
Press the Main Switch to the d (OFF) position.
NOTE
If the copier has not been used in the past 30 minutes,
the Auto Power Off function turns the copier off.
(See page 10.)
C1159O010DA
When the Copier is Turned ON
The LED in the start key will remain off while the copier makes preparations for copying. After
approximately 10 seconds, the LED in the start key will come on and copying can be started. At this time,
if an original is placed in the Semi-automatic Document Handler (SDH), the copier will be set into SDH
mode copying.
9
Chapter 2
Before Making Copies
c
C1159O011DA C1159O012DA
Initial Mode
The copy mode will be displayed on the control panel when the Main Switch is turned on. This is called the
initial mode. This is the mode that forms the basis for all control operations.
◆Number of Copies: 1 ◆Zoom Ratio: 100% ◆Copy Density: Auto Exposure ◆Paper Source: Drawer
Page 17

10
4. Convenient Functions
Clear /Stop
Pressing the Clear/Stop Key returns the copy quantity and zoom ratio to their initial settings.
Useful Tips
• The copy quantity setting shown in the display panel returns to "1".
• The zoom ratio setting shown in the display panel returns to "100%".
• While using the Semi-automatic Document Handler (SDH mode), the copy quantity setting remains
at "1".
• The density and paper source do not return to their initial settings when the Clear/Stop Key is pressed.
Chapter 2
Auto Reset
One minute after the last copy has been made or any key has been operated, this function will clear all
settings and restore the initial mode automatically.
Useful Tip
• The timing for this function can be set within a range from 30 seconds to four minutes. This setting
can also be disabled. Refer to "User’s Choice" on page 24.
Before Making Copies
Auto Power Off
In order to save energy, the copier will be automatically turned off after a preset period of time has passed
since the last copy was made. The initial setting for this period of time is 30 minutes.
Useful Tip
• The timing for this function can be set within a range from 10 to 120 minutes. This setting can also
be disabled. Please ask your service technician for details.
Page 18

11
Chapter 3
Making Copies
This chapter explains how to mak e copies. By reading this chapter , you will be able to understand
the operation of the copier and fully utilize its many fu nctio ns.
1. Making Copies............................................................................p. 12
2. Positioning the Original .............................................................p. 13
Positioning on the Glass............................................p. 13
Paper Originals................................................................p. 13
Transparent Originals......................................................p. 13
Using the Semi-automatic Document Handler
(SDH).........................................................................p. 14
Guidelines for Originals..................................................p. 14
Positioning the Original ..................................................p. 14
3. Setting the Number of Copies.....................................................p. 15
Setting the Number of Copies..........................................p. 15
4. Setting Image Density.................................................................p. 16
Setting Image Density ...............................................p. 16
Auto Exposure Mode........................................................p. 16
Manual Exposure Mode...................................................p. 16
5. Setting the Zoom Ratio ...............................................................p. 17
Setting the Zoom Ratio..............................................p. 17
Fixed Zoom Ratio Settings...............................................p. 17
Manual Zoom Ratio Settings ...........................................p. 17
Zoom Ratio Table
(Original Size to Copy Paper Size) ...........................p. 18
Metric Areas.....................................................................p. 18
Inch Areas........................................................................p. 18
6. Multi Bypass Copying.................................................................p. 19
Using the Multi Bypass....................................................p. 19
7. Hints for Advanced Copying.......................................................p. 20
Two-Sided Copying..........................................................p. 20
Composite Copying..........................................................p. 20
Chapter 3
Making Copies
Page 19

12
1. Making Copies
The basic copy made is one that is the same size (100%) as the original.
• In this procedure, the copy is positioned (Step 1), the number of copies is set (Step 4), the Start Key is
pressed (Step 5) and a copy is made that has the same size of paper as the original.
(* In the initial mode, auto exposure and 100% zoom have already been selected.)
Following the steps shown, various adjustments to exposure and zoom ratio can be made.
1. Position the original.
Open the cover and place the original face
down on the glass. (See page 13.)
Chapter 3
To change zoom
ratio
Making Copies
To change image
density.
[Only for units equipped with the
Semi-automatic Document Handler (SDH)]
Place the original in the SDH. (See page 14.)
C1159O013DA C1159O014DA
2. Press the Copy Quantity/Zoom Selection Key
and select the zoom ratio with the Fixed
Zoom Ratio Key. (See page 17.)
* The zoom ratio cannot be
changed while the SDH
mode is used.
(The setting remains at 100%.)
3. Use the Exposure Control Keys 46 to adjust
image density. (See page 16.)
C1159O009EA
4. Set the number of copies to be made.
Use the Copy Quantity keys to set the number of copies to be made. (See
page 15.)
* If the original has been placed in the Semi-automatic Document
Handler (SDH), the display will automatically show the number "1".
* To clear a wrong setting, press the Clear/Stop Key and then make the
setting once again.
5. Press the Start Key.
Press the start key and copying will begin.
* Press the Clear/Stop Key to interrupt continuous copying.
Copying will automatically stop.
C1159O016DA
C1159O017DA
C1159O018DA
Page 20

2. Positioning the Original
Positioning on the Glass
Different methods of positioning the original will be used, depending on its type.
13
Paper Originals
(The original is plain or thick paper.)
Raise the original cover.
1
Place the original face down on the glass.
2
Align the center of the original with the f
3
marker on the scale provided.
C1159O013DA
Transparent Originals
(The original is a transparency or translucent paper .)
Place the original the same way as for a
1
paper original.
Cover the original with a piece of paper
2
that is the same size as the original.
C1159O020DA
Gently lower the original c over .
3
Chapter 3
Making Copies
Gently lower the original c over .
4
C1159O019DA
Page 21

14
2. Positioning the Original
Using the Semi-automatic Document Handler (SDH)
Load the originals into the SDH . This device automatically feeds multiple originals to the copier one at a time so
that continuous copying can be performed. In order to obtain the full potential of this device, use only originals
that meet the following guidelines. Failure to do so will result in paper misfeed and damage to the original.
Guidelines for Originals
Proper Type and Size
Type: Plain paper 50 to 110 g/m
Size: A5L to A4L, Invoice to Legal
Paper Tray Capacity: 50 sheets (Never exceed the b mark indicating maximum capacity.)
Proper Conditions
• Free of staples or other types of fasteners.
• Free of curls, tears, folds or other imperfections.
• Free of sections affixed by tape or glue.
Chapter 3
• Free of processing, such as a carbon transfer coating.
• Transparencies are also not permitted.
Originals not meeting these guidelines should not be used in the SDH. They can be copied by placing
on the glass.
2
, 13 to 29 lbs
Positioning the Original
Making Copies
Adjust the Document Guide Plates to
1
match the size of the original.
The original is placed faced down on the
2
Document Feed Tray. The SDH indicator
will come on indicating SDH mode and the
Display Panel will automatically show a "1".
C1159O021DA
C1159O022DA
NOTE
• Size and number of originals: A4 or Letter, up to
50 sheets.
• Never exceed the b mark indicating maximum
capacity.
• Always align the Guide Plates so that they
touch the originals. Failure to do so may cause
the originals to be fed into the copier at an
angle.
C1159O014DA
Page 22

3. Setting the Number of Copies
Use the Copy Quantity Keys to input the number of copies desired. The number in the display panel will
increase by one each time the one (1) key is pressed and increase by ten each time the ten (10) key is
pressed.
C1159O008EA
Setting the Number of Copies
(Example: 23 copies) To enter 23, press
1
the ten (10) key twice.
15
Chapter 3
Then press the one (1) key three times.
2
The setting is complete.
If an error is made, press the Clear/Stop
3
Key and reenter the setting.
Making Copies
C1159O011EA
C1159O010EA
C1159O012EA
Page 23

16
4. Setting Image Density
The Exposure Control Keys 456 can be used to adjust the image density of the copy. Selection can
be made between auto exposure mode and manual exposure mode to meet specific needs.
C1159O008EA
Setting Image Density
Auto Exposure Mode
The copier reads the image density of the
original and automatically adjusts the exposure
level for optimum copy image density.
Chapter 3
Press the 5 Key and the "A" will light up.
1
Making Copies
Each time the 5 Key is pres sed, it wi ll switch
between auto exposure mode and manual exposure
mode.
Useful Tips
•
The auto exposure mode automatically sets the
copier for the best copy image density.
• The initial setting is auto exposure mode.
Manual Exposure Mode
Image density can be manually set to any one
of nine levels.
Press the 46 keys to set the desired
1
level.
C1159O028DAC1159O027DA
For a darker copy
Press this key and the image density will
6
become darker.
For a lighter copy
Press this key and the image density will
4
become lighter.
Page 24

5. Setting the Zoom Ratio
The zoom ratio of the copy can be set by pressing the Copy Quantity/Zoom Selection Key on the control
panel and using the Zoom Keys. Standard copy zoom ratio and zoom ratio selection methods are
available. The copy zoom ratio can be set to meet specific needs.
C1159O007EA
Setting the Zoom Ratio
17
Fixed Zoom Ratio Settings
Commonly used zoom ratios have already been
preset for zooming among different standard
sizes of paper.
Press the Fixed Zoom Ratio Key until the
1
desired fixed zoom ratio is selected.
The following sequence is used to display
fixed zoom ratios.
Metric Areas
70% 81% 100% 115% 141%
Inch Areas
64% 78% 100% 129% 154%
Manual Zoom Ratio Settings
The Zoom Keys can be used to enter a zoom
ratio in 1% increments within a range from
64% to 156%. If the key is held down, the
zoom ratio is changed rapidly.
Press the Copy Quantity/ Zoom Selection
1
Key or the Fixed Zoom Ratio Key to
display the zoom ratio.
C1159O014EA
Use the Zoom Keys to adjust the zoom
2
ratio.
Chapter 3
Making Copies
C1159O013EA
NOTE
If no key is touched for five seconds, the display
switches from showing the zoom ratio to showing
the copy quantity.
C1159O015EA
NOTE
If no key is touched for five seconds, the display
switches from showing the zoom ratio to showing
the copy quantity.
Useful Tip
Use the Fixed Zoom Ratio Key to select a zoom
ratio near the desire d zoom ra ti o and the n use the
Zoom Keys to input the desired ratio.
Page 25

18
5. Setting the Zoom Ratio
Zoom Ratio Table (Original Size to Copy Paper Size)
Metric Areas
Original Size Paper Size Zoom Ratio
210×297 mm
8-1/2"×11-3/4"
148×210 mm
5-3/4"×8-1/4"
105×148 mm
4-1/4"×5-3/4"
Chapter 3
182×257 mm
7-1/4"×10"
128×182 mm
Making Copies
5"×7-1/4"
A4
A5
A6
B5
B6
A5 70%
B5 86%
A6 70%
B6 86%
A4 141%
B5 122%
A5 141%
B6 122%
A5 81%
B6 70%
A4 115%
A6 81%
A5 115%
B5 141%
Inch Areas
Original Size Paper Size Zoom Ratio
Legal
8-1/2"×14"
215.9×355.6 mm
Foolscap
8-1/2"×13"
215.9×330.2 mm
Letter
8-1/2"×11"
215.9×279.4 mm
Invoice
5-1/2"×8-1/2"
139.7×215.9 mm
Zoom Ratio = Paper Size ÷ Original Size
1 "(inch) = 25.4 mm
1 mm = 0.0394 "(inch)
Foolscap 92%
Letter 78%
Letter 84%
Invoice 64%
Invoice 64%
Legal 154%
Follscap 152%
Letter 129%
Page 26

6. Multi Bypass Copying
This function allows copying on special sizes and types of paper and transparencies which cannot be fed
from the paper drawer.
Multiple sheets of copy paper can be set on the Multi Bypass Tray for continuous copying.
Guidelines for Multi Bypass Paper
2
◆ Types • Plain paper: Paper weight 60 to 90 g/m
• Thick paper: Paper weight: 90 to 110 g/m
• Transparencies, postcards
◆ Size • Maximum size: Legal (215.9 mm × 355.6 mm)
• Minimum size: 3-3/4 × 5-1/2 inch ( 99 mm × 140 mm)
◆ Capacity • Plain paper: Up to 30 sheets
• Transparencies, thick paper, postcards: Up to 10 sheets
, 16 to 24 lbs
2
, 24 to 29 lbs
19
Using the Multi Bypass
Raise the cover and position the original.
1
Set the copier into copy mode.
If the copier is equipped with a
2
Semi-automatic Document Handler
(SDH), place the original in it.
Open the Multi Bypass tray and set the
3
guide plates to the size of the paper.
* Use the Multi Bypass Tray Extender if the
paper is large.
C1159O014DA
NOTE
• Never exceed the b mark indicating maximum
capacity
• F an the plain papers and tr anspar encies well so
that the sheets do not stic k t ogether.
• Always straighten the curl in postcards and
thick paper before using them.
Press the Paper Source Key to select the
5
Multi Bypass.
Enter the number of copies using the Copy
6
Quantity Keys.
* While using the Semi-automatic Document
Handler (SDH mode), the copy quantity
setting remains at "1".
Chapter 3
Making Copies
C1159O035DA
Insert the paper until it stops.
4
* The paper will be copied on the side
facing up.
C1159O033DA
C1159O034DA
C1159O037DA
Press the Start Key.
7
C1159O036DA
Page 27

20
7. Hints for Advanced Copying
By using the Multi Bypass function, two-sided and composite (overlay) copies can be made. The
procedures are shown below.
Two-Sided Copy Composite Copy
C1159O125DA C1159O126DA
Two-Sided Copying
In order to copy the contents of two
1
originals onto the front and back of a
Chapter 3
Making Copies
single sheet of copy paper, position the
first original and second original as shown
in the illustration. It is important that they
are positioned in the same direction.
1st Original 2nd Original
When the copy of the first original has
2
been fed onto the Copy Tray, turn it over
without changing the position of its
leading edge and insert it into the Multi
Bypass port.
C1159O038DAC1159O038DA
Composite Copying
Composite copying puts information from
1
two different originals together on one
copy . First, make a copy from the f irst
original. Then place the second original in
the same direction as the first one.
st
1
Original 2nd Original
Pick up the copy of the first origin al fed
2
out onto the Copy Tray and, holding it just
as it has been fed out, insert it into the
Multi Bypass port.
C1159O040DA
C1159O041DA
C1159O039DA
NOTE
• Only plain paper can be used for making two-sided and composite copi es. (No transparencies can be used.)
• If the paper is curled, remove the curl before i nse rting the paper into the copier.
Page 28

Chapter 4
Special Functions
This chapter explains how to use other functions of the copier. They are listed below.
1. Toner Replenisher.......................................................................p. 22
Toner Replenisher Function......................................p. 22
2. Drum Dehumidifier.....................................................................p. 23
Drum Dehumidifier Function....................................p. 23
3. User’s Choice..............................................................................p. 24
User’s Choice Item.................................................... p. 24
User’s Choice Function and
Explanation of Settings .............................................p. 24
U-1 Auto Reset Mode.......................................................p. 24
Making User’s Choice Selections....................................p. 25
4. Default Manual Exposure Level Adjustment..............................p. 26
Default Manual Exposure Level Adjustment.............p. 26
5. Default Auto Exposure Le vel Adjustment...................................p. 27
Default Auto Exposure Le vel Adjustment..................p. 27
6. Total Check Function..................................................................p. 28
Counter Display ........................................................p. 28
Checking Total Copies/PM Count ...................................p. 28
21
Chapter 4
Special Functions
Page 29

22
1. Toner Replenisher
Toner Replenisher Function
When many copies are made of an original that has a large amount of black area (such as a photograph),
the copier can rapidly exhaust the supply of toner available. As a result, the image density of the copies
will become lighter. In such a case, use the Toner Replenisher function to regain the normal image
density quickly.
Original Copy
C1159O042DA
Check that the copier is in the initial mode.
1
Chapter 4
Turn the Main Switch off. While pressing
2
the Clear/Stop Key, turn the Main Switch on.
Special Functions
After the copier is warmed up, the toner
begins to be supplied.
C1159O012EA
C1159O044DA
While the Toner is being replenished, the
3
LEDs at the bottom of the Display Panel
will light up one at a time in the clockwise
direction.
Press the Clear/Stop Key to stop the Toner
4
Replenishing mode.
C1159O045DA
C1159O046DA
NOTE
• Copying cannot be performed while the Toner is
being replenished. If copying must be
performed, stop the Toner Replenishing mode
with the Clear/Stop Key and then start copying.
• The copier cannot enter the Toner Replenisher
mode under the following conditions: the
starter is being refilled, and the indicators show
that an error or paper mi sf eeds has oc curred.
Page 30

2. Drum Dehumidifier
Drum Dehumidifier Function
23
High humidity or rapid changes in the temperature of the room (such as when a heater is used in a cold
location) can cause condensation
be blotchy. The Drum Dehumidifier removes this condensation.
1. Condensation: Moisture in the air collects as droplets on cold surfaces.
2. PC Drum: The part of the copier that works much like photographic film.
Before Dehumidifying After Dehumidifying
Turn the Main Switch off. While pressing
1
the 6 Exposure Control Key, turn the
Main Switch on. The copier is now in the
Drum Dehumidifier mode which will
continue for approximately three minutes.
1
on the photosensitive drum2 of the copier which causes the copies to
C1159O047DA
NOTE
• Copying can be performed while the Drum
Dehumidifier mode is in operation.
• The Drum Dehumidifier mode cannot be started
during the operation of Toner Replenishing,
starter charging, paper misfeeds or other types
of trouble.
Chapter 4
Press the Clear/Stop Key to stop the Drum
2
Dehumidifier mode.
Special Functions
C1159O048DA
C1159O046DA
Page 31

24
3. User’s Choice
It is possible to change the initial settings that appear when the Clear/Stop Key is pushed or when the
Main Switch is turned on. The User’s Choice settings promote easier copier operation by allowing the
user to make selections that meet his/her own needs.
User’s Choice Item
Choice No. Setting
U-1 Auto Reset Mode
User’s Choice Function and Explanation of Settings
U-1 Auto Reset Mode
The time from when the last copy was made until the Auto Reset function activates can be set. The Auto
Reset function can also be disabled.
Code Description Initial Setting
0 Disable Auto Reset
05 Activates after 30 seconds
1 Activates after 1 minute ❍
2 Activates after 2 minutes
Chapter 4
3 Activates after 3 minutes
4 Activates after 4 minutes
Special Functions
Page 32

Making User’s Choice Selections
25
3. User’s Choice
Turn the Main Switch of f. While pressing
1
the 4 Exposure Control Key, turn the
Main Switch on. "U1" will appear in the
Display Panel on the Control Panel.
Press the Start Key. The currently set
2
User’s Choice code will appear.
C1159O050DA
Press the Clear/Stop Key once again.
5
* User’s Choice is canceled and the copier
returns to the initial mode.
NOTE
The User’s Choice mode cannot be selected under
the followin g conditions: the starter is being
refilled, and the indicators show that an error or
paper misfeeds has occurred.
C1159O054DA
Chapter 4
Use the Copy Quantity Keys to select the
3
desired User’s Choice code.
Press the Clear/Stop Key. The User’s
4
Choice code is now registered.
C1159O051DA
Special Functions
C1159O052DA
C1159O053DA
Page 33

26
4. Default Manual Exposure Level Adjustment
Default Manual Exposure Level Adjustment
The center density setting of the Default Manual Exposure Level Adjustment can be set to one of nine
settings. With copy density 5 as the middle setting, decreasing the setting value lightens the density and
increasing the setting value darkens the density.
Copy density 1 (lightest)
Copy density 2 (lighter)
Copy density 3 (lighter)
Copy density 4 (lighter)
Copy density 5 - middle setting
Copy density 6 (darker)
Copy density 7 (darker)
Copy density 8 (darker)
Copy density 9 (darkest)
Use the main switch to turn off the copier.
1
While holding down the Exposure Control
Key 5, turn on the copier. The copier
enters the Default Manual Exposure Level
Chapter 4
Special Functions
Adjustment.
Press the Exposure Control Keys 4 and
2
6 to select a density setting.
C1159O055DA
Press the Start Ke y to prin t one copy in
3
order to check the selected density.
Press the Clear/Stop Key to enter the
4
setting and exit the adjustment.
C1159O057DA
C1159O058DA
C1159O056DA
Page 34

5. Default A uto Exposure Le vel Adjustment
Default A uto Exposure Le vel Adjustment
The density level for the Default Auto Exposure Level Adjustment can be set to one of nine settings.
With copy density 5 as the middle setting, decreasing the setting value lightens the density and
increasing the setting value darkens the density.
Copy density 1 (lightest)
Copy density 2 (lighter)
Copy density 3 (lighter)
Copy density 4 (lighter)
Copy density 5 - middle setting
Copy density 6 (darker)
Copy density 7 (darker)
Copy density 8 (darker)
Copy density 9 (darkest)
27
Use the main switch to turn off the copier.
1
While holding down the Exposure Control
Key 5, turn on the copier.
Press the Exposure Control Key 5 again.
2
The copier enters the Default Auto
Exposure Level Adjustment.
Press the Exposure Control Keys 4 and
3
6 to select the density level.
C1159O055DA
C1159O059DA
Press the Start Ke y to prin t one copy in
4
order to check the selected density.
Press the Clear/Stop Key to enter the
5
setting and exit the adjustment.
Chapter 4
C1159O057DA
Special Functions
C1159O058DA
C1159O060DA
Page 35

28
6. Total Check Function
The total number of copies made from the time the copier was installed can be checked. The following
two totals are provided.
Total Count
Shows the total number of copies since the copier
was installed.
Counter Display
The totals are shown in the Display Panel on the Control Panel.
Example: Total of 12,345 copies
* Displayed two digits at a time.
Example: The PM count is 1,234 copies.
Chapter 4
Checking Total Copies/PM Count
Press the Clear/Stop Key for three seconds.
1
* The total count will appear.
PM Count
Shows the number of copies taken since the last
replacement of PM parts.
•
•
• •
•
C1159O061DA
•
C1159O062DA
Special Functions
Press the Clear/Stop Key for three seconds and the
total count will appear. Continue to hold the key
down for another three seconds (a total of six
seconds) and the PM count will appear.
Press the Clear/Stop Key to exit the
2
counter display.
C1159O046DA
Page 36

29
Chapter 5
Error Messages and Indicators
This section explains error messages and indicators and how to correct the problems causing them.
1. Identifying and Correcting Problems.........................................p. 30
2. PC Display................................................................................p. 31
Replenishing Paper..........................................................p. 31
Removing a Paper Misfeed..............................................p. 31
3. A Add Toner Indicator ..............................................................p. 32
Replacing the Toner Cartridge ........................................p. 32
4. E Display ..................................................................................p. 34
Resetting the Copier..................................................p. 34
5. J Display..................................................................................p. 35
Paper misfeed...................................................................p. 35
Removing a Paper Misfeed........................................p. 36
J2/J3-Copier....................................................................p. 36
J8-Semi-automatic Document Handler (SDH)...............p. 37
6. C Display ..................................................................................p. 38
Resetting the Copier..................................................p. 38
Chapter 5
Error Messages and Indicators
Page 37

30
1. Identifying and Correcting Problems
Error Message Cause Correction
Toner Indicator No toner in toner cartridge. Replace with new toner
cartridge. (See page 32.)
C1159O008DA
Imaging Unit Indicator Time to change imaging unit
(IU).
C1159O009DA
Paper Supply/Paper Misfeed No paper in tray or paper
misfeed.
C1159O130DA
Paper Misfeed There is a paper misfeed at the
paper take-up area of the copier.
C1159O131DA
There is a paper misfeed at the
paper exit of the copier.
Contact service representative.
Place paper in the paper drawer.
(See page 31.)
Remove the paper misfeed.
(See page 31.)
Remove the paper misfeed.
(See page 36.)
Remove the paper misfeed.
(See page 36.)
C1159O132DA
There is an original paper
misfeed in the Semi-automatic
Document Handler (SDH).
C1159O133DA
Trouble There is a problem in the copier. Contact service representative.
Chapter 5
C1159O020EA
Remove the original paper
misfeed.
(See page 37.)
(See page 34.)
There is a problem in the copier. Contact service representative
(See page 38.)
C1159O137DA
Error Messages and Indicators
Page 38

2. PC Display
C1159O064DA
31
The PC display means that the Paper Drawer has run out of
paper or there is a paper misfeed at the paper feed area.
The following are the procedures for replenishing paper and
clearing a paper misfeed at the paper feed area.
Replenishing Paper
Pull out the paper drawer and push down
1
on the paper lifting plate until it is locked
into position.
Load the paper stack into the drawer.
2
Make sure that the paper stack rests under
the two catches of the drawer.
NOTE
Max.
C1159O067DA
Never exceed the b
mark indicating
maximum capacity.
C1159O065DA
C1159O066DA
Removing a Paper Misfeed
Open the Right Door and remove the
1
paper misfeed.
Open the drawer, remove the paper and
2
push the paper lifting plate down.
Fan the paper and reload it. Gently slide
3
the Drawer back in.
C1159O070DA
C1159O065DA
Chapter 5
Adjust the paper guide plates and gently
3
return the drawer to the copier. Press the
Clear/Stop Key.
NOTE
For details on supplying paper using the Multi
Bypass Tray, refer to page 19.
C1159O068DA
Press the Clear/Stop Key.
4
NOTE
If PC appears, during the multi copy cycle,
check the copies on the Copy Tray and return the
originals needed to the Document Feed Tray to
complete the copy job.
C1159O066DA
Error Messages and Indicators
Page 39

32
3. A Add Toner Indicator
C1159O008DA
Replacing the Toner Cartridge
When the toner in the toner cartridge becomes low, this
indicator will flash. Copies will gradually become lighter
and when there is no more toner, this indicator will remain
on and copying will be stopped.
1
2
3
Chapter 5
Open the Front Door.
Open the cartridge holder and pull out the
old toner cartridge.
C1159O071DA
With the tab of the to ner cartridge facing
upward, shake the new cartridge well.
C1159O072DA
With toner supply port facing upward,
5
insert the cartridge into th e cartridge
holder in the direction a shown on the
cartridge.
Close the cartridge holder and clo s e th e
6
Front Door.
C1159O074DA
C1159O075DA
Lift up on the seal and then remove it.
4
C1159O076DA
Error Messages and Indicators
NOTE
• Remove the seal carefully. The toner could
discharge.
• Once the seal has been removed, never turn the
cartridge upside down.
C1159O073DA
NOTE
Only use the toner cartridge designe d spe cif ical ly
for this copie r. Failure to do so will result in
damage to the copier.
Toner Replenishing
If the image density is still light after replacing the
toner cartridge, operate the Toner Replenisher
function explained on page 22.
Page 40

33
3. A Add Toner Indicator
Chapter 5
Error Messages and Indicators
Page 41

34
4. E Display
This display indicates that there is trouble during the
charging process. Copying cannot be performed at this
time. Follow the procedure below to reset the copier.
C1159O096DA
Resetting the Copier
Turn the Main Switch off and then on to
1
reset the copier.
If the "E" appears again, contact your service
representative.
Chapter 5
C1159O010DA
Before Calling Your Service Representative
•
Before calling the service representative, note
the code being displayed.
Example: E0
C1159O005EA
Flashes alternately .
• Once the service representative has been
contacted, turn the Main Switch off and unplug
the power cord.
Error Messages and Indicators
Page 42

5. J Display
This indicates that a paper misfeed has occurred during
copying and that the copier has been stopped.
When the Front Door is opened to remove the paper misfeed,
the copier is shut down and all information on the Control
C1159O098DA
Paper Misfeed
• At this time, "J" and a number will flash alternately on the Display Panel.
• The number represents the location of the paper misfeed.
There is a paper misfeed in the paper take-up area of the copier.
(See page 36.)
C1159O099DA
There is a paper misfeed in the paper exit section of the copier.
(See page 36.)
Panel will go out. Therefore, it is necessary to first check for
the location of the paper misfeed before opening the door.
35
C1159O100DA
C1159O101DA
There is a paper misfeed in the Semi-automatic Document Handler (SDH).
(On models equipped with the SDH.) (See page 37.)
Chapter 5
Error Messages and Indicators
Page 43

36
5. J Display
Removing a Paper Misfeed
J2/J3-Copier
NOTE
Be careful not to touch the areas marked with
[
#High Voltage] and [!Caution: Hot].
Open the Front Door. While pressing with
1
one hand on the area marked with h ,
turn the Lock Release Lever clockwise to
swing up the Upper Unit.
While holding up the fusing unit cover on
2
this side, remove the paper.
C1159O081DA
C1159O102DA
Open the Right Door and remove the
5
paper misfeed in the paper take-up section.
Pull out the drawer, remo ve the paper and
6
push the lifting plate down.
Fan the sheets of paper, put them back in
7
the drawer and slide it in the copier.
C1159O070DA
C1159O065DA
Chapter 5
3
Error Messages and Indicators
4
!CAUTION: HOT
The fusing unit and its surroundi ng ar eas may be
extremely hot. DO NOT TOUCH any area
except the black cover for the fusing unit.
Remove any paper misfeed in the transfer area.
C1159O103DA
Gently close the upper unit and then close
the Front Door.
C1159O104DA
C1159O066DA
NOTE
Make sure the paper is positioned below the
catches of the drawer.
Close the Front Door.
8
NOTE
If J2 or J3 appears, during the multi copy
cycle, check the copies on the Copy Tray and
return the originals ne eded to the Doc ument Feed
Tr ay to complete the copy job.
Page 44

J8 - Semi-automatic Document Handler (SDH)
37
5. J Display
Remove the originals from th e Document
1
Feed Tray.
Open the paper misfeed removal guide and
2
carefully remove the original.
Raise the Semi-automatic Document
3
Handler (SDH) and turn the Misfeed
Removal Knob to the left while carefully
pulling out the original.
C1159O105DA
C1159O106DA
Turn the knob to the left while carefully
4
pulling out the original.
Lower the Semi-automatic Document
5
Handler (SDH).
NOTE
If J8 appears, during the multi copy cycle,
check the copies on the Copy Tray and return the
originals needed to the Document Feed Tray to
complete the copy job.
C1159O109DA
C1159O110DA
Chapter 5
C1159O107DA
C1159O108DA
Error Messages and Indicators
Page 45

38
6. C Display
When a malfunction occurs in the copier, "C" and a number
will flash alternately on the Display Panel. Copying cannot
be performed at this time. Use the following procedure to
reset the copier.
C1159O111DA
Resetting the Copier
Turn the Main Switch off and then on
1
again. This will reset the copier.
If the "C" appears again, contact your service
representative.
Chapter 5
C1159O010DA
Before Calling Your Service Representative
•
Before calling the service representative, note
the code being displayed.
Example: C00
C1159O112DA
Flashes alternately .
• Once the service representative has been
contacted, turn the Main Switch off and unplug
the power cord.
Error Messages and Indicators
Page 46

Troubleshooting
This chapter gives you instructions on how to troubleshoot copier malfunctions.
1. When This Type of Copy is Produced.........................................p. 40
2. Copier Does Not Work Properly.................................................p. 42
39
Chapter 6
Chapter 6
Troubleshooting
Page 47

40
1. When This Type of Copy is Produced
Symptom Possible Cause Action
The image is too light. The manual exposure level is set
on the lighter side.
You have been making copies
from a photo or an original with
a large dark area.
The Toner has just been
replenished.
C1159O113DA
The Toner Indicator is lit up on
the Control Panel.
The paper is damp. Replace the paper.
The image is too dark. The manual exposure level is set
on the darker side.
The surface of the Original
Glass is dirty.
The original is not held tightly
C1159O114DA
against the Original Glass.
The copy is blurry. The paper is damp. Replace the paper.
Press the Exposure Control Key
6 as necessary to obtain a
darker image. (See page 16.)
The copier needs more toner.
Replenish toner by using the
Toner Replenisher Function.
(See page 22.)
The copier needs more toner.
Replenish toner by using the
Toner Replenisher Function.
(See page 22.)
Replace the Toner Cartridge
with a new one. (See page 32.)
Press the Exposure Control Key
4 as necessary to obtain a
lighter image. (See page 16.)
Wipe the Original Glass clean
with a soft dry cloth.
(See page 45.)
Place the original in position so
that it is held tightly against the
Original Glass.
Chapter 6
The copy has dark specks or
spots.
Troubleshooting
C1159O115DAC1159O115DA
C1159O116DA
The Original Glass is dirty. Wipe the Original Glass clean
with a soft dry cloth.
(See page 45.)
The Original Pad or SDH pad is
dirty.
Wipe the Origin a l Pad or SDH
pad clean with a soft cloth
dampened with mild detergent.
(See page 45.)
The Original is very thin or
highly transparent.
The information on the back
side of a two-sided, thin original
may be slightly reproduced on
the copy.
Place a blank sheet of paper
over the original. (See page 13.)
Set the copier into the Manual
Exposure mode and make the
exposure level lighter.
(See page 16.)
Page 48

1. When This T ype of Copy is Pr oduced
Symptom Possible Cause Action
The edge of the copy is dirty. The Original Pad or SDH Pad is
dirty.
You have selected a paper size
larger than the original.
(Zoom Ratio is set at full size
100%.)
The original is not placed in the
correct position. (Zoom Ratio is
C1159O117DA
set at full size 100%.)
The reduction ratio selected is
not in accord with the copy
paper size. (When doing manual
reduction copying.)
The image on the copy is not
aligned properly.
The original is not placed in the
correct position.
The originals may not be
suitable for use in the SDH.
C1159O118DA
41
Wipe the Origin a l Pad or SDH
pad clean with a soft cloth
dampened with mild detergent.
(See page 45.)
Select the same copy paper size
as the original.
Reposition the original, or
reload the paper in the same
direction as the original.
Select the zoom ratio according
to the copy paper size.
(See page 17.)
Place the original correctly on
the Original Glass.
(See page 13.)
Or, load it onto the SDH
correctly along the Guide Plates.
(See page 14.)
Raise the SDH and place the
originals on the Original Glass
one at a time. (See page 14.)
Chapter 6
Troubleshooting
Page 49

42
2. Copier Does Not Work Properly
Problem Cause Correction
Nothing displayed on the
Control Panel.
Copying does not start when the
Start Key is pressed.
No power to the copier. Is the Front Door closed? Make sure the Front Door is
* If the above steps do not correct the problem with the copier, turn the Main Switch off, unplug the cord
and contact your service representative.
The Auto Power Off function
has been activated.
Is the LED in the Start Key off? The Copier is still warming up.
Is there an error display (J/E/C)
on the Control Panel?
Is the copier plugged in? Make sure the plug is securely
Has a breaker in the power
supply gone off?
Press the Main Switch to turn
the copier on.
Wait a moment.
Take the necessary action to
correct the error displayed.
(See page 30.)
securely closed.
in the outlet.
Reset the breaker.
Chapter 6
Troubleshooting
Page 50

43
Chapter 7
Miscellaneous
This chapter provides additional information about your copier, such as specifications and steps
for daily maintenance.
1. Copier Specifications..................................................................p. 44
2. Daily Maintenance .....................................................................p. 45
3. Paper Size....................................................................................p. 46
4. Index............................................................................................p. 47
Chapter 7
Miscellaneous
Page 51

44
1. Copier Specifications
Model Minolta EP1031/EP1031F
Type Desktop type
Platen Type Stationary
Photoconductor OPC
Copying System Electrostatic Dry Powered Image Transfer
Developing System Micro-Toning System
Fusing System Heater Roller
Types of Originals Type: Sheet Max. Size: A4L (Legal) Max. Weight: 3 kg (7 lbs)
Types of Paper Plain Paper : 60 to 90 g/m
Special Paper : Thick Paper 90 to 110 g/m
Postcards
Copy Paper Size Paper Drawer : Invoice to Le gal, A5L to A4L
Multi Bypass Tray : Maximum Size (W × H): 215.9 × 355.6 mm (Legal);
Minimum Size (W × H): 99 × 140 mm
(3-3/4 × 5-1/2 (inches))
Paper Feeding System Paper Drawer : 250 Sheets
Multi Bypass Tray : 30 Sheets Plain Paper, 10 Sheets Special Paper
Warm-up Time Within 9.1 Seconds [At 23°C (73°F) room temperature]
First Copy Time Mirror Scan Mode : A4L (6.5 Sec.); Legal (7.1 Sec.); Letter (6.4 Sec.)
SDH Mode : A4L (7.0 Sec.); Legal (7.6 Sec.); Letter (6.9 Sec.)
Continuous Copy
Speed (Zoom 100%)
Mirror Scan Mode : Legal (13 Sheets/Min.); Letter (13 Sheets/Min.);
Invoice (13 Sheets/Min.); A4L (13 Sheets/Min.);
A5L (13 Sheets/Min.)
SDH Mode : Legal (12 Sheets/Min.); Letter (13 Sheets/Min.);
Invoice (13 Sheets/Min.); A4L (13 Sheets/Min.);
A5L (13 Sheets/Min.)
Zoom Ratios Normal 1:1 ± 0.5% Inch: Enlarge 154%, 129%; Reduce 78%, 64%
Metric: Enlarge 141%, 115%; Reduce 81%, 70%
Zoom : 64% to 156% (In increments of 1%)
Continuous Copies Up to 99 Sheets (Countdown Type)
Exposure Control Automatic and Manual A v ailable
Power Supply 115, 120, 127V 60 hz
220, 230, 240V 50/60 hz
Power Consumption 1.2 KW (Max.)
Dimensions (EP1031)
Width : 559 mm (22 inches)
Depth : 451 mm (17-3/4 inches)
Chapter 7
Weight 22 kg (48-1/2 lbs) 25 kg (55 lbs)
Height : 303 mm (12 inches)
Semi-automatic Document Handler (SDH)
Types of Originals Plain Paper : 50 to 110 g/ m
Size of Original Standard Sizes : A5L to A4L (Invoice to Legal)
Non-Standard Size : Width: 139.7 to 216 mm (5-1/2 inches to 8-1/2 inches)
Miscellaneous
Length: 210 to 356 mm (8-1/4 inches to 14 inches)
Capacity for Originals Docume nt Feed Tray: 50 Sheets A4 80 g/m
30 Sheets A4 80 g/m
Document Exit T ray: 50 Sheets A4 80 g/m
2
, 16 to 24 lbs
2
, 24 to 29 lbs, Transparency,
(EP1031F)
Width : 559 mm (22 inches)
Depth : 451 mm (17-3/4 inches)
Height : 357 mm (14 inches)
2
(13 to 29 lbs)
2
or less; Letter 21 lbs or less
2
or more; Letter 21 lbs or more
2
or less; Letter 21 lbs or less
Page 52

45
2. Daily Maintenance
Cleaning: Before cleaning, always make sure the Main Switch for the
copier has been turned off.
Outer Cover
Use a soft cloth dampened with a mild household
detergent to clean the outer cover of the copier.
C1159O119DA
Control Panel
Use a soft dry cloth to clean the Control Panel.
Original Glass
Use a soft dry cloth to clean the original glass.
C1159O122DA
Inside of Front Door
Use a soft dry cloth to clean the inside of the front door.
C1159O120DA
NOTE
Do not use any type of cleaner (mild household
detergent, glass cleaner, etc.) when cleaning the
Control Panel. These cleaners can damage the control
keys.
Original Cover Pad
Use a soft cloth dampened with a mild household
detergent to clean the original cover pad of the copier.
C1159O121DA C1159O124DA
C1159O123DA
SDH Pad
Use a soft cloth dampened with a mild household
detergent to clean the SDH Pad of the copier.
Chapter 7
Miscellaneous
Page 53

46
3. Paper Size
Type
Metric (mm) Inch
A4 210 × 297 8-1/2" × 11-3/4"
B5 182 × 257 7-1/4" × 10"
A5 148 × 210 5-3/4" × 8-1/4"
B6 128 × 182 5" × 7-1/4"
A6 105 × 148 4-1/4" × 5-3/4"
Post Card 100 × 148 4" × 5-3/4"
Type
Legal 8-1/2" × 14" 216 × 356
Foolscap Government Legal 8-1/2" × 13" 216 × 330
Foolscap 8" × 13" 203 × 330
Foolscap Folio 8-1/4" × 13" 210 × 330
8-1/4" × 11-3/4" 8-1/4" × 11-3/4" 210 × 301
Letter 8-1/2" × 11" 216 × 279
Government Letter 8" × 10-1/2" 203 × 267
Quarto 8" × 10" 203 × 254
Statement Invoice 5-1/2" × 8-1/2" 140 × 216
Size
Size
Inch Metric (mm)
Chapter 7
Miscellaneous
Page 54

4. Index
A Add Toner Indicator p. 32
Auto Exposure p. 16
Auto Power Off p. 10
Auto Reset p. 10
C Cleaning the Copier p. 45
Clear/Stop Key p. 10
Control Panel p. 8
D Daily Maintenance p. 45
Default Auto Exposure Level p. 27
Default Manual Exposure Level p. 26
Drum Dehumidifier p. 23
I Initial Mode p. 9
M Main Switch p. 9
Manual Exposure p. 16
Multi Bypass Copying p. 19
47
P Paper Misfeeds
J Display p. 35
PC Display p. 31
Paper Size p. 46
Paper Supply Display
PC Display p. 31
PM Count p. 28
Positioning the Original p. 13
Power Supply On/Off p. 9
R Removing Paper Misfeed
J2/J3 Display p. 36
J8 Display p. 37
S Start Key p. 8
T Toner Replenisher p. 22
Total Check Function p. 28
Total Count p. 28
Trouble Displays
C Display p. 38
E Display p. 34
U User’s Choice p. 24
Chapter 7
Z Zoom Ratio p. 17
Zoom Ratio Selection p. 17
Zoom Ratio Table p. 18
Miscellaneous
Page 55

1997.10
Copyright
1997 MINOLTA CO., LTD
Printed in China
The information contained in this manual is
subject to change without notice to
incorporate improvements made on the
product or products the manual covers.
MINOLTA CO., LTD.
3-13, 2-Chome, Azuchi-Machi, Chuo-ku, Osaka 541, Japan
 Loading...