

Page 1

Digital Camera
E
Camera Instruction Manual
Page 2
Thank you for purchasing this Minolta product.Your new digital camera has
extraordinary features that expand your image capturing hor izons.
• Megapixel (1.5 million pixels), progressive scan Sony Wfine CCD™ with primary
colour filter.
• High quality 2 inch colour LCD monitor with Live View display.
• Digita™ Operating Environment from FlashPoint Technology.
• Uses removable CompactFlash™ cards for storage, so there’s no limit on how
many shots you can take.
• Detatchable, compact lens unit.The Zoom 1500 lens unit features a focal length
of 7 - 21mm (approximate equivalent to 38 - 115mm in 35mm for mat) with Macro
capability. The Wide 1500 is a 5.2mm f/1.9 lens until (approximate equivalent to
28mm in 35mm format).
• Fast capture speed, capable of 3.5 frames per second in Burst mode.
• IrDA version 1.0 wireless communication with your IrDA-capable personal
computer (running Windows 95
®
or Windows 98®).
* Wfine CCD™ is a trademark or registered trademark of Sony Corporation.
* Digita™ and the Digita™ logo are licensed trademarks or registered trademarks of FlashPoint
Technology, Inc.in the U.S. and other countries.
* Other cor porate names and product names are the trademarks or registered trademarks of their
respective companies.
This Class B digital apparatus complies with Canadian ICES-003.
Cet appareil numérique de la classe B est conforme à la norme NMB-003 du Canada.
Do not remove the ferrite cores from the video and serial cables.
This device complies with Part 15 of the FCC Rules.
Operation is subject to the following two conditions:
(1) This device may not cause harmful interference,
and (2) this device must accept any interference
received, including interference that may cause undesired operation.
Tested by the Minolta Corporation
101 Williams Drive, Ramsey, New Jersey 07446, U.S.A.
TABLE OF CONTENTS
1
For Proper and Safe Use . . . . . . . . . . . . . . . . . . . . . . . . . . .4
Before You Begin . . . . . . . . . . . . . . . . . . . . . . . . . . . . . . . . .5
GETTING STARTED RIGHT AWAY
Preparation . . . . . . . . . . . . . . . . . . . . . . . . . . . . . . . . . . . .6
Recording . . . . . . . . . . . . . . . . . . . . . . . . . . . . . . . . . . . . .6
Play/Review . . . . . . . . . . . . . . . . . . . . . . . . . . . . . . . . . . . .8
Deleting . . . . . . . . . . . . . . . . . . . . . . . . . . . . . . . . . . . . . . .9
NAMES OF PARTS
Camera Body - Front . . . . . . . . . . . . . . . . . . . . . . . . . . . .11
Camera Body - Back . . . . . . . . . . . . . . . . . . . . . . . . . . . .12
LCD Monitor . . . . . . . . . . . . . . . . . . . . . . . . . . . . . . . . . .14
Viewfinder . . . . . . . . . . . . . . . . . . . . . . . . . . . . . . . . . . . .14
BEFORE RECORDING
Attaching the Strap . . . . . . . . . . . . . . . . . . . . . . . . . . . . . .16
Inserting Batteries . . . . . . . . . . . . . . . . . . . . . . . . . . . . . .17
Low Battery Indicator . . . . . . . . . . . . . . . . . . . . . . . . . .18
Auto Power Off . . . . . . . . . . . . . . . . . . . . . . . . . . . . . .18
Setting the Date/Time . . . . . . . . . . . . . . . . . . . . . . . . . . .19
Compact Flash Card . . . . . . . . . . . . . . . . . . . . . . . . . . . .21
Adjusting the LCD Monitor . . . . . . . . . . . . . . . . . . . . . . . .23
Turning the LCD Monitor On/Off . . . . . . . . . . . . . . . . . .23
Adjusting the LCD Monitor Brightness . . . . . . . . . . . . .23
Adjusting the Camera Display . . . . . . . . . . . . . . . . . . . . . .24
Overlay Button . . . . . . . . . . . . . . . . . . . . . . . . . . . . . . .24
Status Button . . . . . . . . . . . . . . . . . . . . . . . . . . . . . . . .25
RECORD MODE
Record Mode Screen . . . . . . . . . . . . . . . . . . . . . . . . . . . .27
Taking Pictures . . . . . . . . . . . . . . . . . . . . . . . . . . . . . . . . .27
Burst Image Capture . . . . . . . . . . . . . . . . . . . . . . . . . . . .31
Timelapse . . . . . . . . . . . . . . . . . . . . . . . . . . . . . . . . . . . .33
Focus . . . . . . . . . . . . . . . . . . . . . . . . . . . . . . . . . . . . . . . .36
Continued on next page.
Page 3

TABLE OF CONTENTS
RECORD MODE - CONTINUED
Focus Lamp/No Focus Indicator . . . . . . . . . . . . . . . . . .36
Focus Range . . . . . . . . . . . . . . . . . . . . . . . . . . . . . . . .36
Special Focus Situations . . . . . . . . . . . . . . . . . . . . . . .37
Focus Hold . . . . . . . . . . . . . . . . . . . . . . . . . . . . . . . . .37
Built-in Flash . . . . . . . . . . . . . . . . . . . . . . . . . . . . . . . . . .38
Changing the Flash Mode . . . . . . . . . . . . . . . . . . . . . .38
Flash Range . . . . . . . . . . . . . . . . . . . . . . . . . . . . . . . .39
Digital Scene Selector . . . . . . . . . . . . . . . . . . . . . . . . . . .40
Macro (Zoom 1500 Lens Only) . . . . . . . . . . . . . . . . . . . . .42
Exposure Compensation . . . . . . . . . . . . . . . . . . . . . . . . .43
RECORD MODE MENUS
Record Mode Menus . . . . . . . . . . . . . . . . . . . . . . . . . . . .45
Selecting the Image Size . . . . . . . . . . . . . . . . . . . . . . . . .46
Selecting Image Quality . . . . . . . . . . . . . . . . . . . . . . . . . .47
Selecting Colour or B&W . . . . . . . . . . . . . . . . . . . . . . . . .49
Self Timer . . . . . . . . . . . . . . . . . . . . . . . . . . . . . . . . . . . .50
Selecting the Burst Capture Rate . . . . . . . . . . . . . . . . . . .52
Timelapse Interval and Total Images . . . . . . . . . . . . . . . . .53
White Balance . . . . . . . . . . . . . . . . . . . . . . . . . . . . . . . . .55
Bracket . . . . . . . . . . . . . . . . . . . . . . . . . . . . . . . . . . . . . .56
Instant Review . . . . . . . . . . . . . . . . . . . . . . . . . . . . . . . . .58
System Sounds . . . . . . . . . . . . . . . . . . . . . . . . . . . . . . . .59
Counter Reset . . . . . . . . . . . . . . . . . . . . . . . . . . . . . . . . .60
Camera Name . . . . . . . . . . . . . . . . . . . . . . . . . . . . . . . . .61
Formatting Compact Flash Cards . . . . . . . . . . . . . . . . . . .62
PLAY MODE
Play Mode Screen . . . . . . . . . . . . . . . . . . . . . . . . . . . . . .64
Playback . . . . . . . . . . . . . . . . . . . . . . . . . . . . . . . . . . . . .64
Zoom In - Zoom Out . . . . . . . . . . . . . . . . . . . . . . . . . . . . .66
Expand/Collapse - Open/Close . . . . . . . . . . . . . . . . . . . . .67
Play Button . . . . . . . . . . . . . . . . . . . . . . . . . . . . . . . . . . .68
PLAY MODE MENUS
Slideshow . . . . . . . . . . . . . . . . . . . . . . . . . . . . . . . . . . . .70
Playback Rate . . . . . . . . . . . . . . . . . . . . . . . . . . . . . . . . .72
REVIEW MODE
Review Mode Screen . . . . . . . . . . . . . . . . . . . . . . . . . . . .74
Reviewing/Selecting Images . . . . . . . . . . . . . . . . . . . . . . .75
Marking Images . . . . . . . . . . . . . . . . . . . . . . . . . . . . . . . .76
Category . . . . . . . . . . . . . . . . . . . . . . . . . . . . . . . . . . . . .78
Expand/Collapse - Open/Close . . . . . . . . . . . . . . . . . . . . .80
REVIEW MODE MENUS
Review Mode Menus . . . . . . . . . . . . . . . . . . . . . . . . . . . .83
Deleting Images . . . . . . . . . . . . . . . . . . . . . . . . . . . . . . . .84
Group . . . . . . . . . . . . . . . . . . . . . . . . . . . . . . . . . . . . . . .86
Creating a New Group . . . . . . . . . . . . . . . . . . . . . . . . .86
Adding to a Group . . . . . . . . . . . . . . . . . . . . . . . . . . . .88
Dissolving a Group . . . . . . . . . . . . . . . . . . . . . . . . . . .89
Protecting Images . . . . . . . . . . . . . . . . . . . . . . . . . . . . . .90
Camera to CameraTransfer . . . . . . . . . . . . . . . . . . . . . . .91
Find By Date . . . . . . . . . . . . . . . . . . . . . . . . . . . . . . . . . .94
Find By Category . . . . . . . . . . . . . . . . . . . . . . . . . . . . . . .96
Language . . . . . . . . . . . . . . . . . . . . . . . . . . . . . . . . . . . . .97
Video Mode . . . . . . . . . . . . . . . . . . . . . . . . . . . . . . . . . . .98
APPENDIX
Accessories . . . . . . . . . . . . . . . . . . . . . . . . . . . . . . . . . .101
Custom Scripts . . . . . . . . . . . . . . . . . . . . . . . . . . . . .102
Applications . . . . . . . . . . . . . . . . . . . . . . . . . . . . . . . .103
File Size . . . . . . . . . . . . . . . . . . . . . . . . . . . . . . . . . . . . .104
Card Capacity . . . . . . . . . . . . . . . . . . . . . . . . . . . . . . . .105
Troubleshooting . . . . . . . . . . . . . . . . . . . . . . . . . . . . . . .106
Care and Storage . . . . . . . . . . . . . . . . . . . . . . . . . . . . . .109
Technical Details . . . . . . . . . . . . . . . . . . . . . . . . . . . . . .112
LATE-BREAKING INFORMATION . . . . . . . . . . . . . . . . .114
User Technical Support . . . . . . . . . . . . . . . . . . . . . . . . .117
New DimâgeEXOperating Environment Version 2 . . .120
2 3
Page 4
FOR PROPER AND SAFE USE BEFORE YOU BEGIN
Read and understand all warnings and cautions before using this product.
Check the packing list before you begin.If some parts are missing, contact your Camera
WARNING
Batteries may become hot or explode due to improper use.
• Use only the batteries specified in this instruction manual.
• Do not install the batteries with the polarity (+/–) reversed.
• Do not subject batteries to fire or high temperatures.
• Do not attempt to recharge, short, or disassemble.
• Do not mix batteries of different types, brands, or ages.
Use caution, accidents may occur when using this product near young
children.
Keep batteries or things that could be swallowed away from young children.
Contact a doctor immediately if an object is swallowed.
Immediately remove the batteries and discontinue use if...
• the camera is dropped or subjected to an impact in which the
interior is exposed.
• the product emits a strange smell, heat, or smoke.
Do not walk while looking at the monitor.
Do not disassemble.Electric shock may occur if a high voltage circuit inside
the camera is touched.
Take your camera to a Minolta Service Facility when repairs are required.
The heat of the camera rises with extended periods of use. Use caution when
handling the camera or removing the batteries and compact flash card.
dealer or a Minolta Service Facility listed on the back cover of this manual.
Dimâge EX Camera body
Zoom 1500 lens unit or Wide 1500 lens unit
Camera Case CC-EX1
Hand Strap HS-V1
Video Cable VC-EX1
Compact Flash Card
AA Alkaline Batteries (4)
PC Serial Adapter SC-EX1#
Macintosh Adapter MA-EX1
Dimâge EX CD-ROM
Instruction Manuals (Camera and Software) CD ROM
Warranty and Product & Software Registration Card
Adobe™ Photoshop™ LE
Data saved in flash memory may be irrecoverably lost or damaged for unexpected reasons (static
electricity, electric noise, a camera error, or other malfunctions). Back-up the data recorded in the
camera. Minolta is not responsible if data stored in the camera is irretrievably lost or damaged.
4 5
Page 5
GETTING STARTED RIGHT AWAY GETTING STARTED RIGHT AWAY
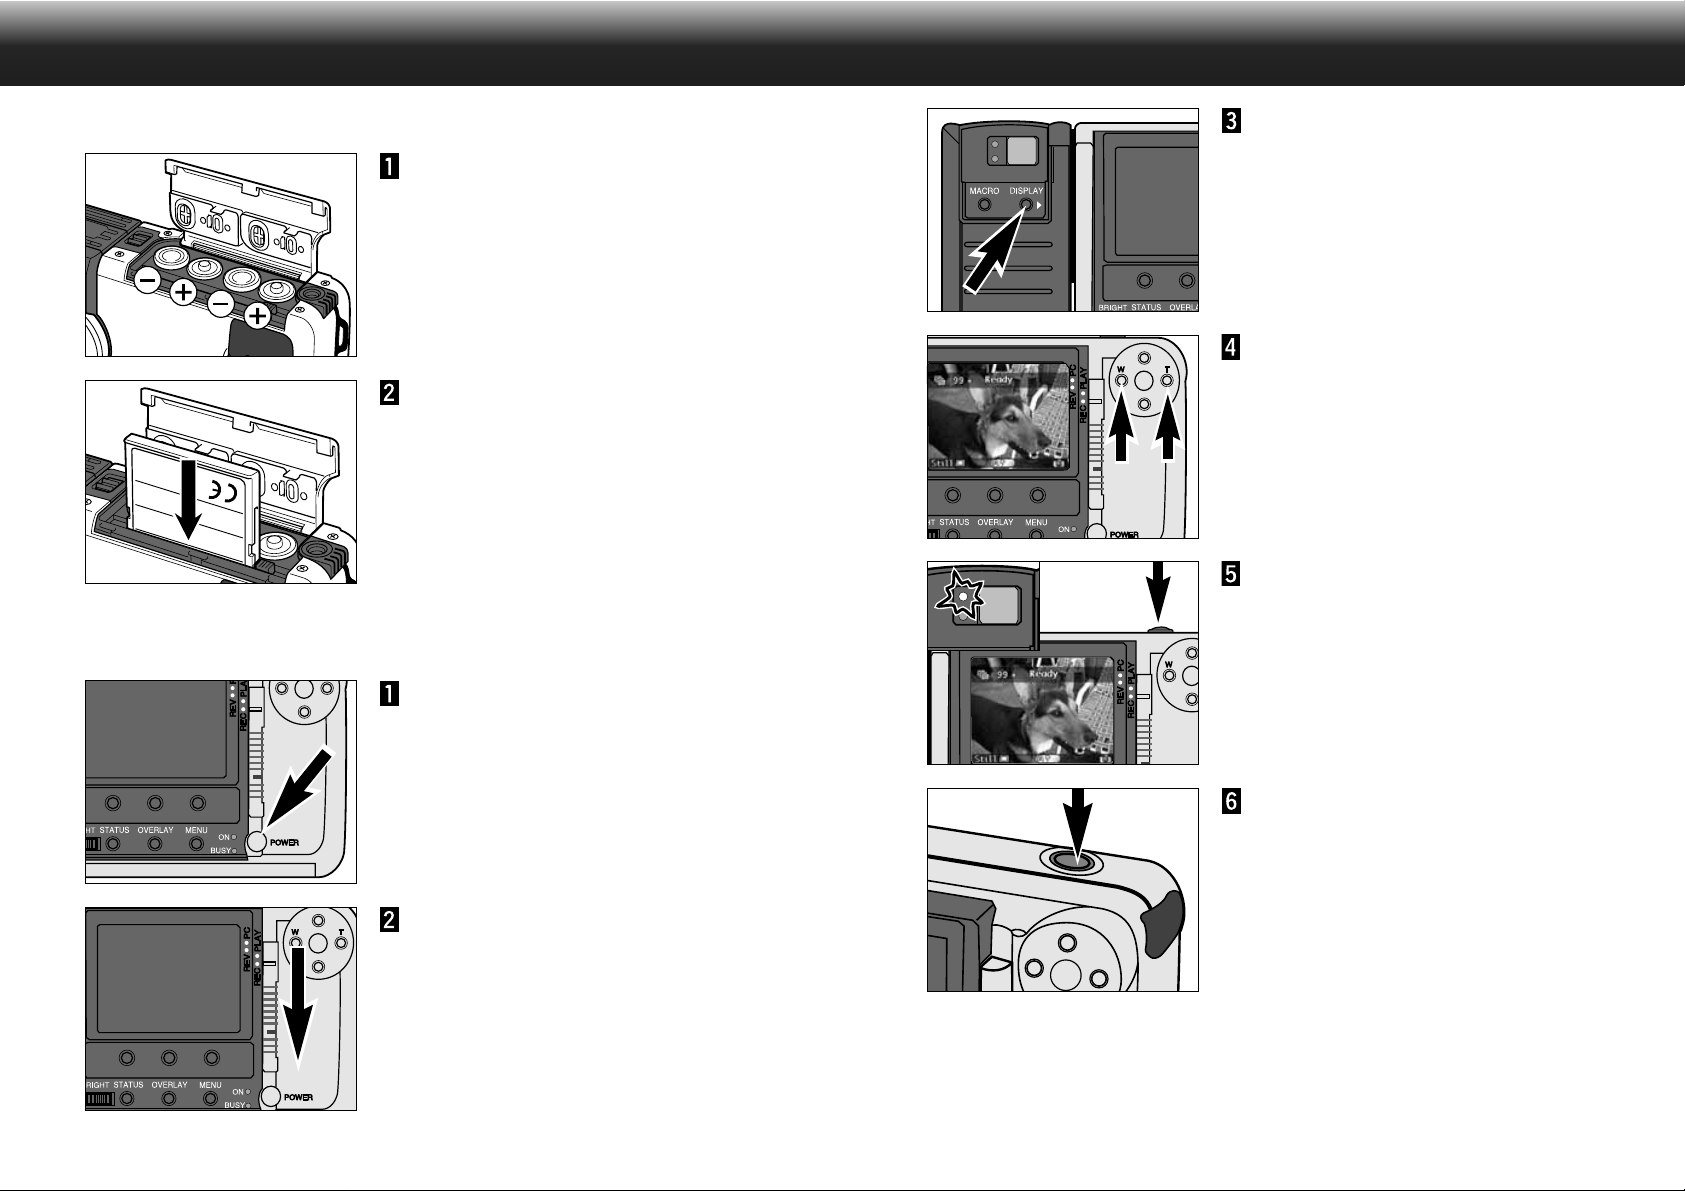
PREPARATION- See pages 17 and 21 for detailed information.
Insert the batteries.
Insert the compact flash card.
RECORDING- See pages 27 – 30 for detailed information.
Press the main switch to turn the
camera on.
Press the Display button to turn
on the LCD monitor.
Frame the image in either the
LCD monitor or viewfinder.
• Place the viewfinder’s focus frame on the
subject or center the subject in the LCD
monitor.
• Zoom 1500: Press the Left button (W) or
Right button (T) to zoom in on the subject
as desired.
Press the shutter-release button
part-way down.
• The green focus lamp will glow if focus is
confirmed.
• The orange flash lamp will glow if the flash
is charged and ready.
• In low-light situations the AF illuminator
(flash) will fire to aid detection focus.
Press the shutter-release button
all the way down to take the
picture.
Set the camera to Record mode.
• Slide the Mode switch to REC.
6 7
Continued on next page.
Page 6
GETTING STARTED RIGHT AWAY GETTING STARTED RIGHT AWAY
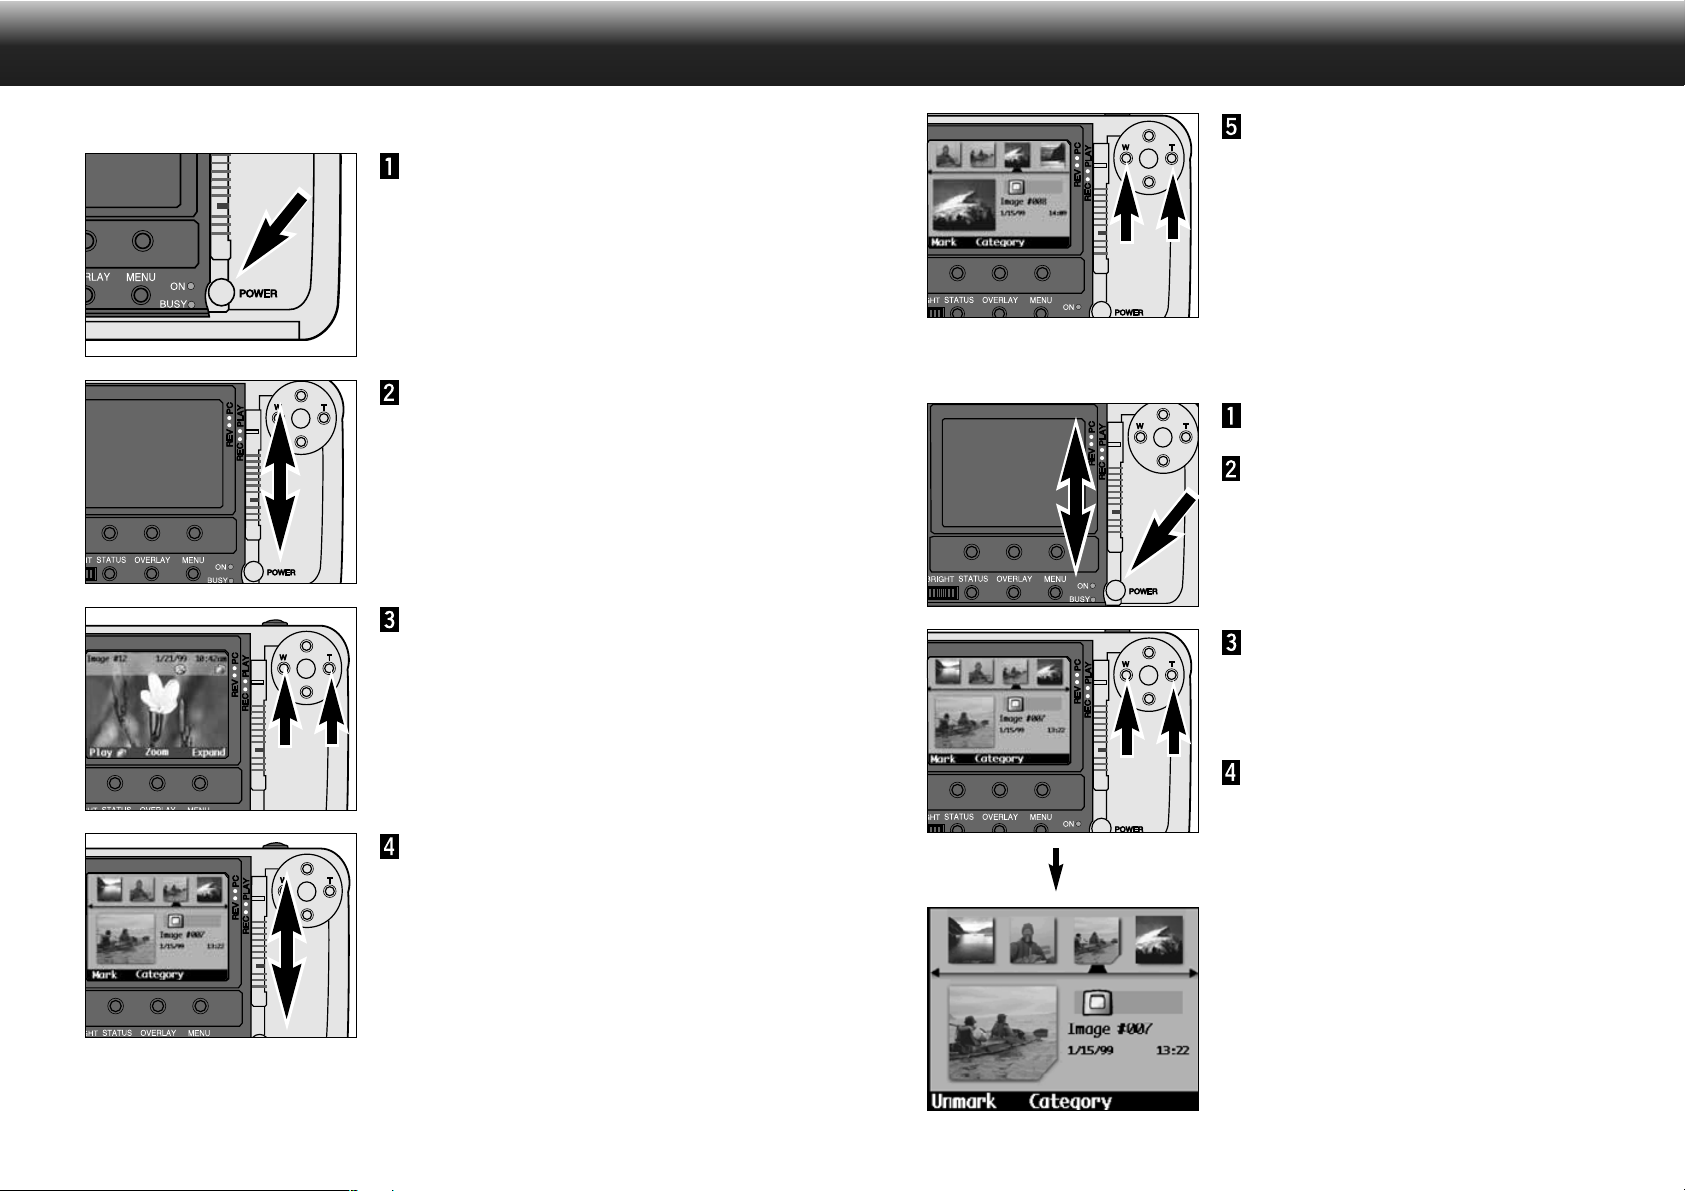
PLAY/REVIEW- See pages 64 and 83 for detailed information.
Turn the camera on.
Set the camera to Play mode.
• Slide the mode switch to PLAY.
Press the Left and Right buttons
to scroll through the images.
Press the Left and Right buttons
to scroll through the images.
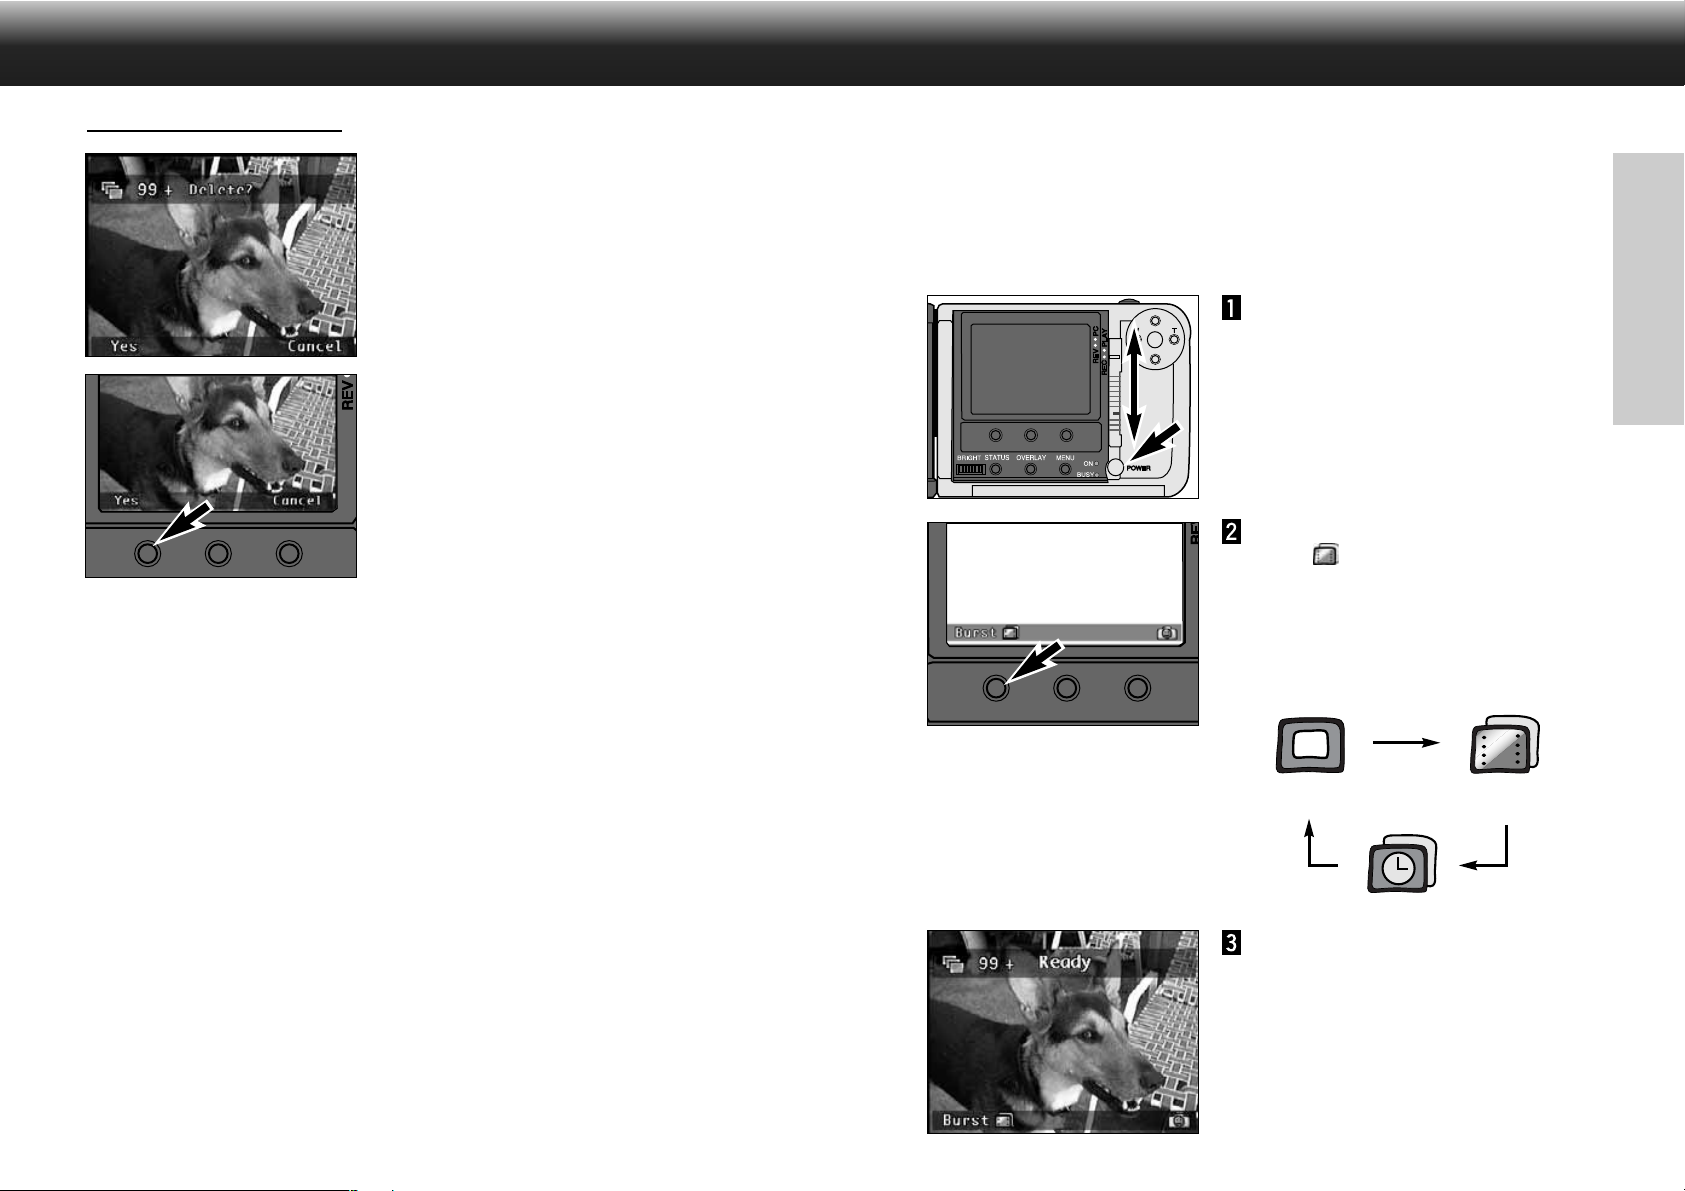
DELETING- See pages 84 – 85 for detailed information.
Turn the camera on.
Set the camera to Review mode.
• Press the lock button while sliding the mode
switch to REV.
Press the Left and Right buttons
to select the desired image.
• SELECTED IMAGE:The image displayed
as a large thumbnail.
Press the Mark soft key.
• A notch will appear at the bottom-right
corner of the thumbnail.
Set the camera to Review mode.
• Press the lock button while sliding the mode
switch to REV.
• The LCD monitor changes to the Review
mode screen.
• Small thumbnails, cropped square, are lined
chronologically at the top of the screen.
• The large thumbnail is a preview of the
small thumbnail selected by the pointer.
SELECTED IMAGE:The image displayed
as a large thumbnail.
8 9
✎ Mar k multiple images by repeating steps
3 and 4.
Continued on next page.
Page 7
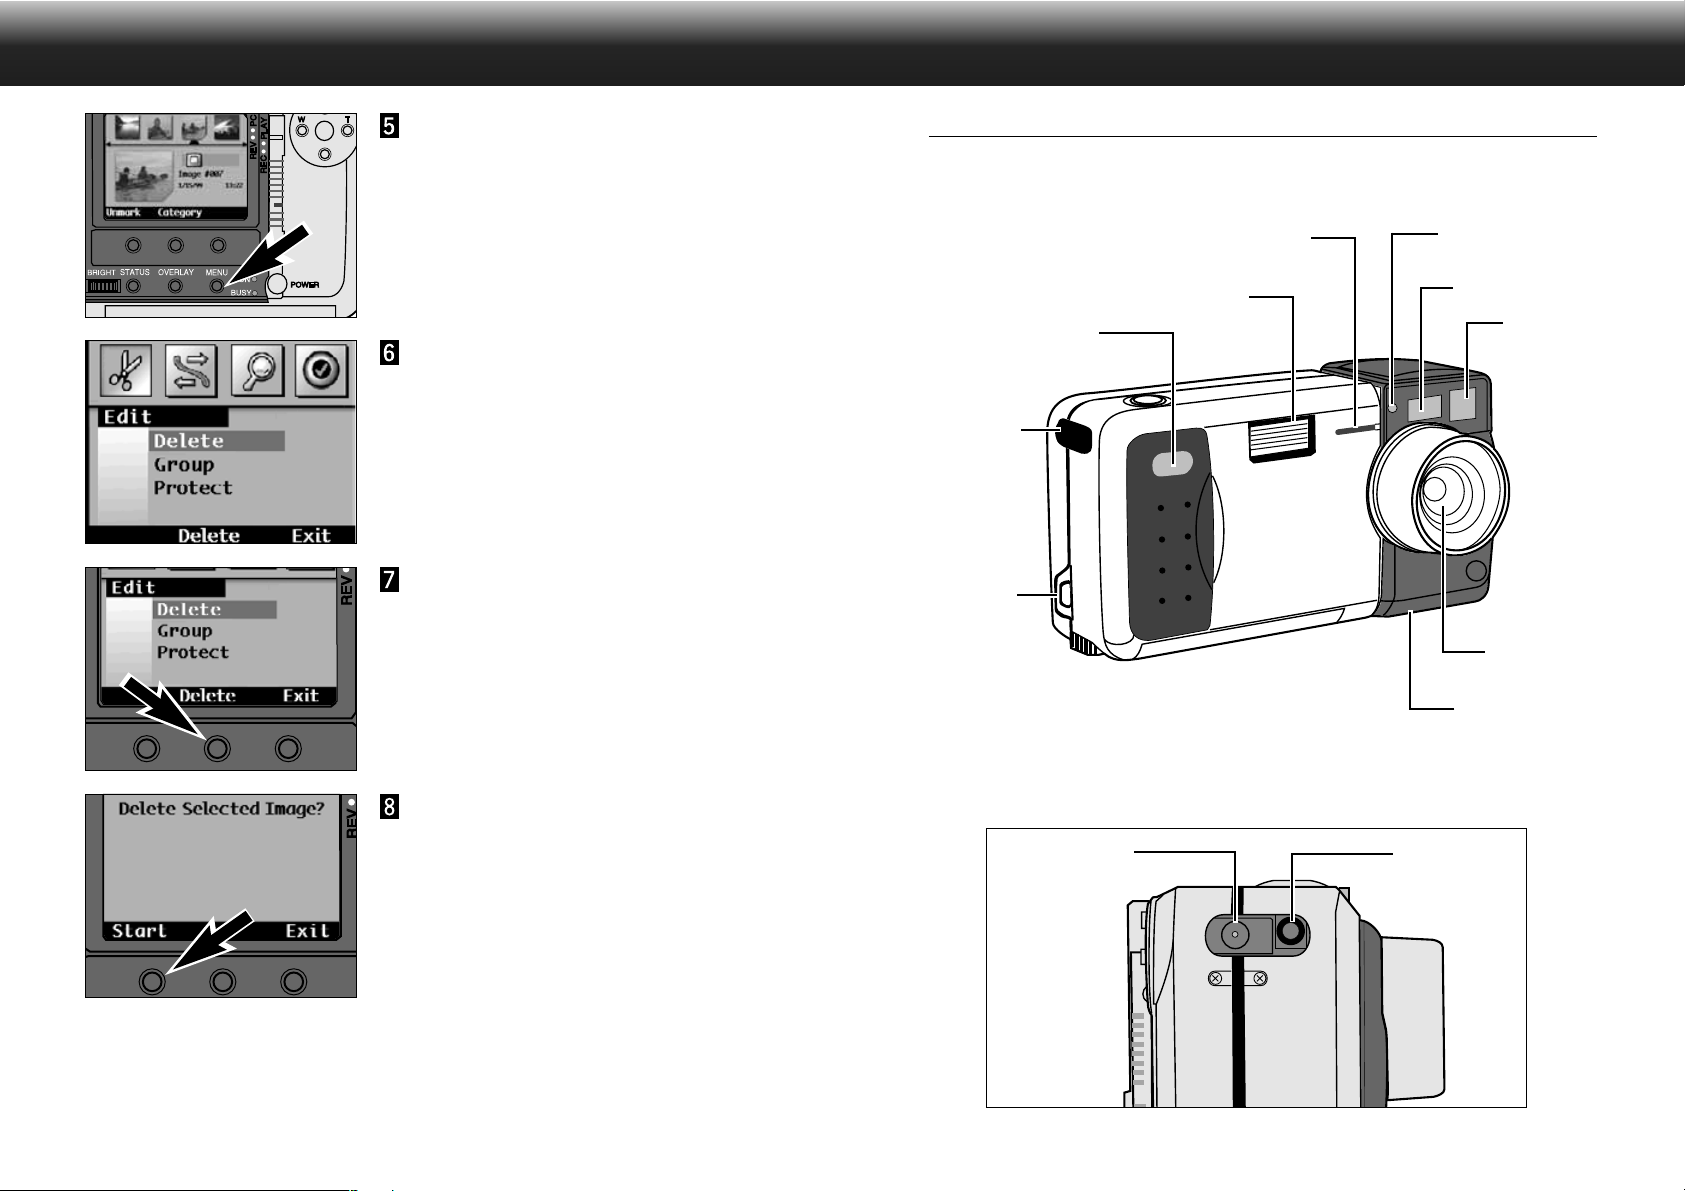
GETTING STARTED RIGHT AWAY NAMES OF PARTS
Press the Menu button.
• The Review mode menu screen will appear.
Press the Left or Right button
until the Edit menu is displayed,
then press the Down button until
Delete is highlighted.
Press the Delete soft key.
• A confirmation screen will appear.
CAMERA BODY - FRONT
* Do not touch.
Self-timer lamp
Flash
IrDA window
Terminal
cover
Strap eyelet
Flash sensor*
AF window*
Viewfinder
window*
Lens*
Lens unit
Press the Start soft key.
• After deleting the Marked image(s), the
screen will return to the Review mode
screen.
10 11
Under the Terminal Cover
DC terminal
Video out
Continued on next page.
Page 8

NAMES OF PARTS
CAMERA BODY - BACK
NAMES OF PARTS
Soft keys
Brightness-
control dial
Status button
Overlay button
Busy lamp
Menu button
Power lamp
4-way controller
Up button
Right button
Down button
Left button
Main switch
Focus lamp
(green)
Flash lamp
(orange)
Viewfinder
Display button
Macro button (Zoom
1500 only)
Shutter-release
button
LCD Monitor
Mode
switch
Lock button
Main switch
SOFT KEYS
The function of the soft keys depend on the current soft key label on the LCD Monitor
(p.14). In the display above, the function of the right soft key would be to save the
image, the function of the middle soft key would be to delete the image, and the left
soft key would be inactive.
4-WAY CONTROLLER (UP, DOWN, LEFT, AND RIGHT BUTTONS)
In Record mode, the Up and Down buttons control Exposure Compensation, while the
Left and Right buttons (with the Zoom 1500) control the focal length.In other modes
and in the menu function, the 4-way controller helps you navigate through menus and
images.
12
Camera Bottom
Tripod socket
Battery-/Card-chamber cover
Continued on next page.
Lens-unit release
13
Page 9
NAMES OF PARTS
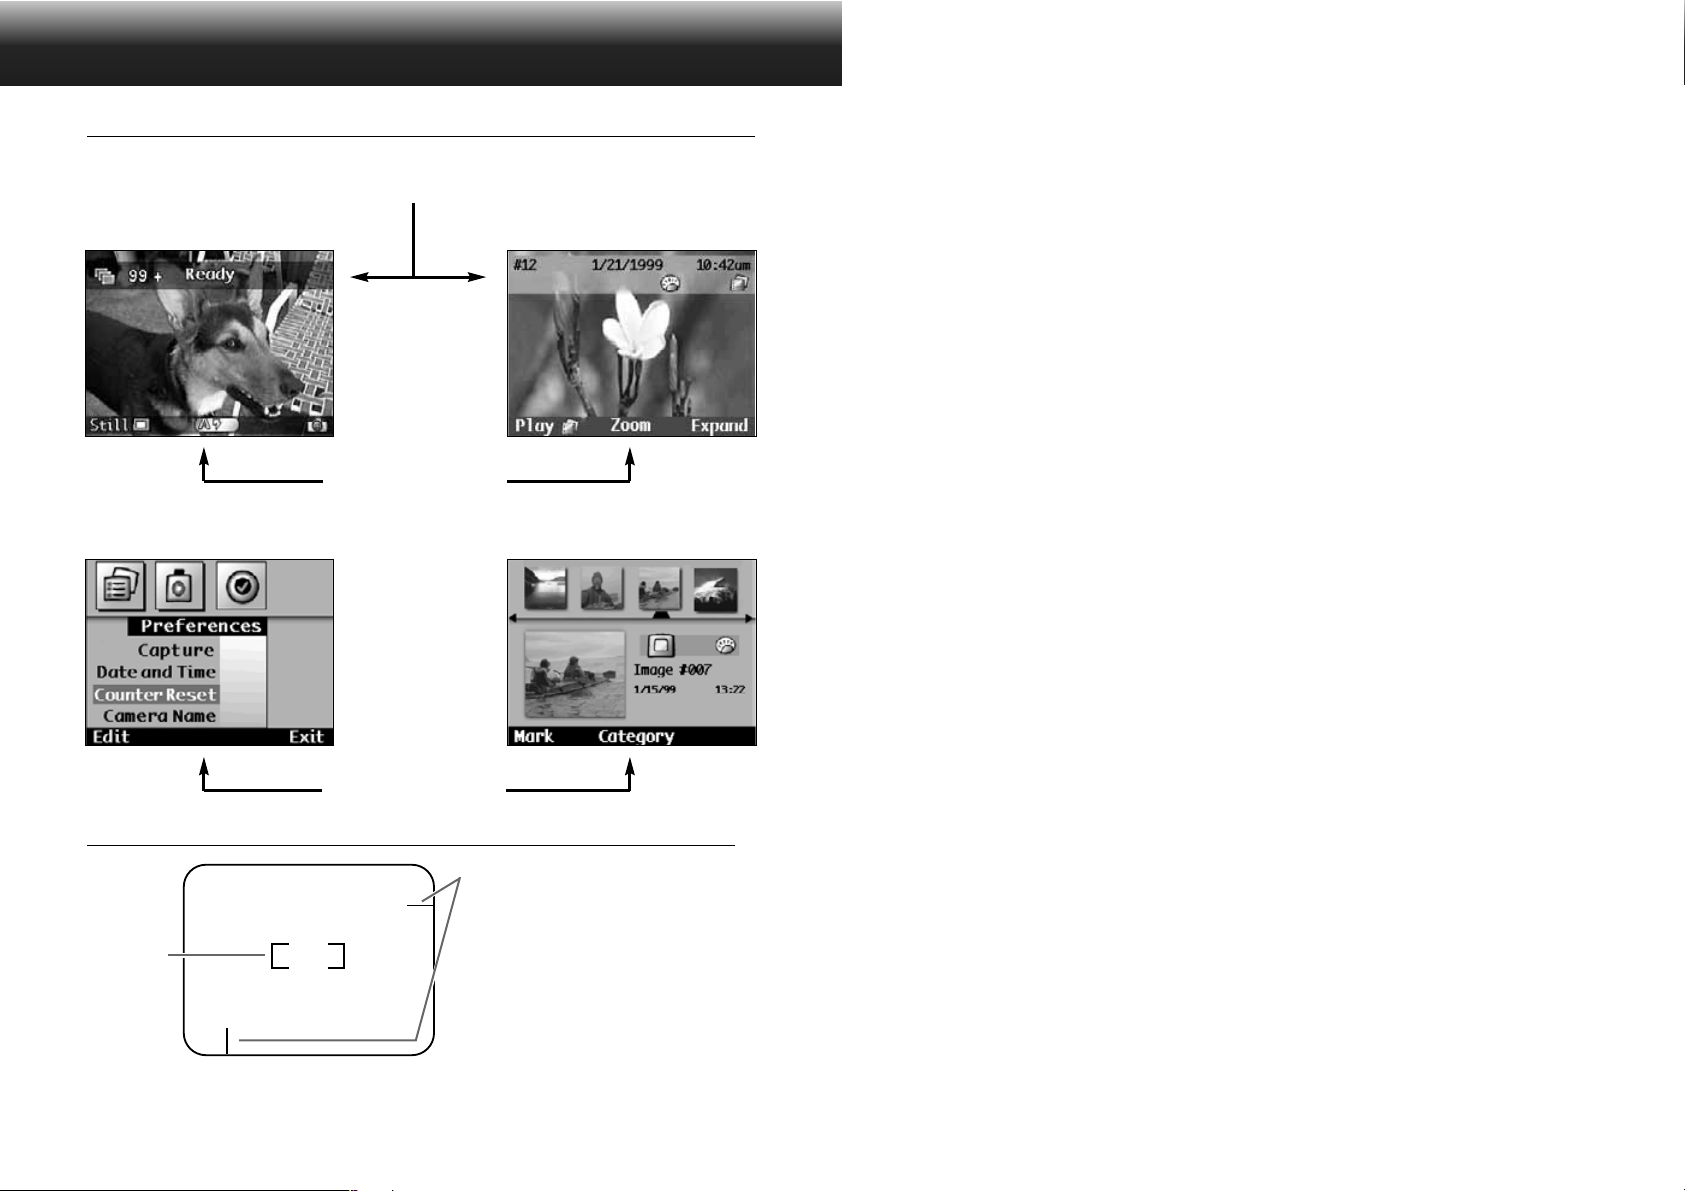
LCD MONITOR
Overlay Bar
Record Mode Screen (p.27) Play Mode Screen (p.64)
Soft Key Label
Review Mode Screen (p.74)Menu Screen Example
BEFORE RECORDING
Soft Key Label
VIEWFINDER
Close-framing Guides
If using the viewfinder to frame subjects that
are less than 1m (3.3 ft.) away, use the closeframing guides to compensate for parallax.
Focus
Frame
14
Shift the camera up and to the right so the
guides are the left and upper edge of the
image.
There is no need to compensate when using
the LCD monitor.
15
Page 10
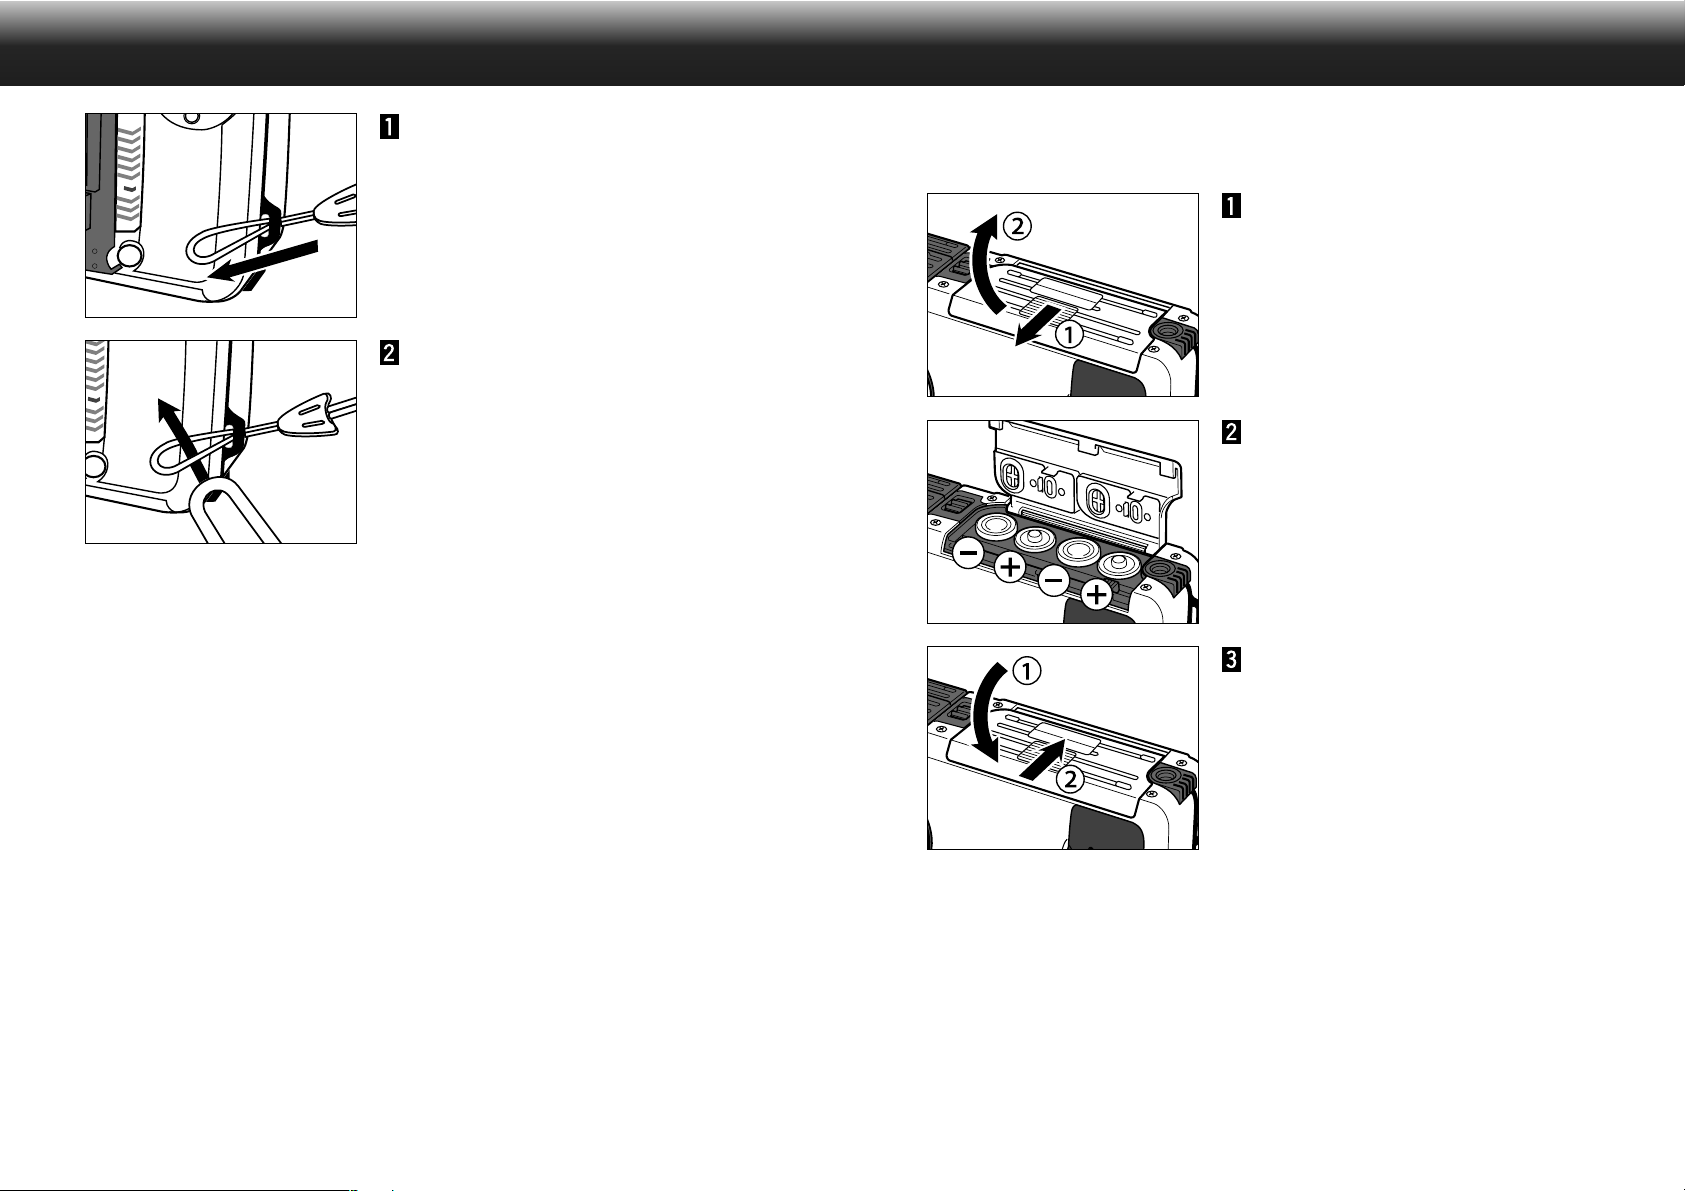
A TT A CHING THE STRAP
INSERTING THE BA TTERIES
Insert the smaller loop of the
strap through the strap eyelet.
Put the other end of the strap
through the small loop.
Your camera uses four AA-size alkaline batteries. Four AA-size Ni-Cd, Ni-MH, or lithium batteries can also
be used.
Open the battery-chamber cover
by sliding it in the direction
indicated, then open the cover.
Insert the batteries as indicated
by the +/– diagram.
Close the battery chamber-door
and slide it shut until it clicks.
✎ CONSERVING BATTERY POWER: Reduce battery consumption by turning off
the LCD monitor when not needed (p.23). Use the camera’s optical viewfinder
to frame shots when taking pictures.
Continued on next page.
1716
Page 11
INSERTING THE BA TTERIES
SETTING THE DATE AND TIME
LOW-BATTERY INDICATOR
A warning message will appear in the top overlay bar
when the battery power is low.
Replace all 4 batteries or use the AC adapter (sold
separately).
When the battery power is too low for camera
operations, an alert dialog will appear on the LCD
monitor, then the camera will shut down.
AUTO POWER OFF
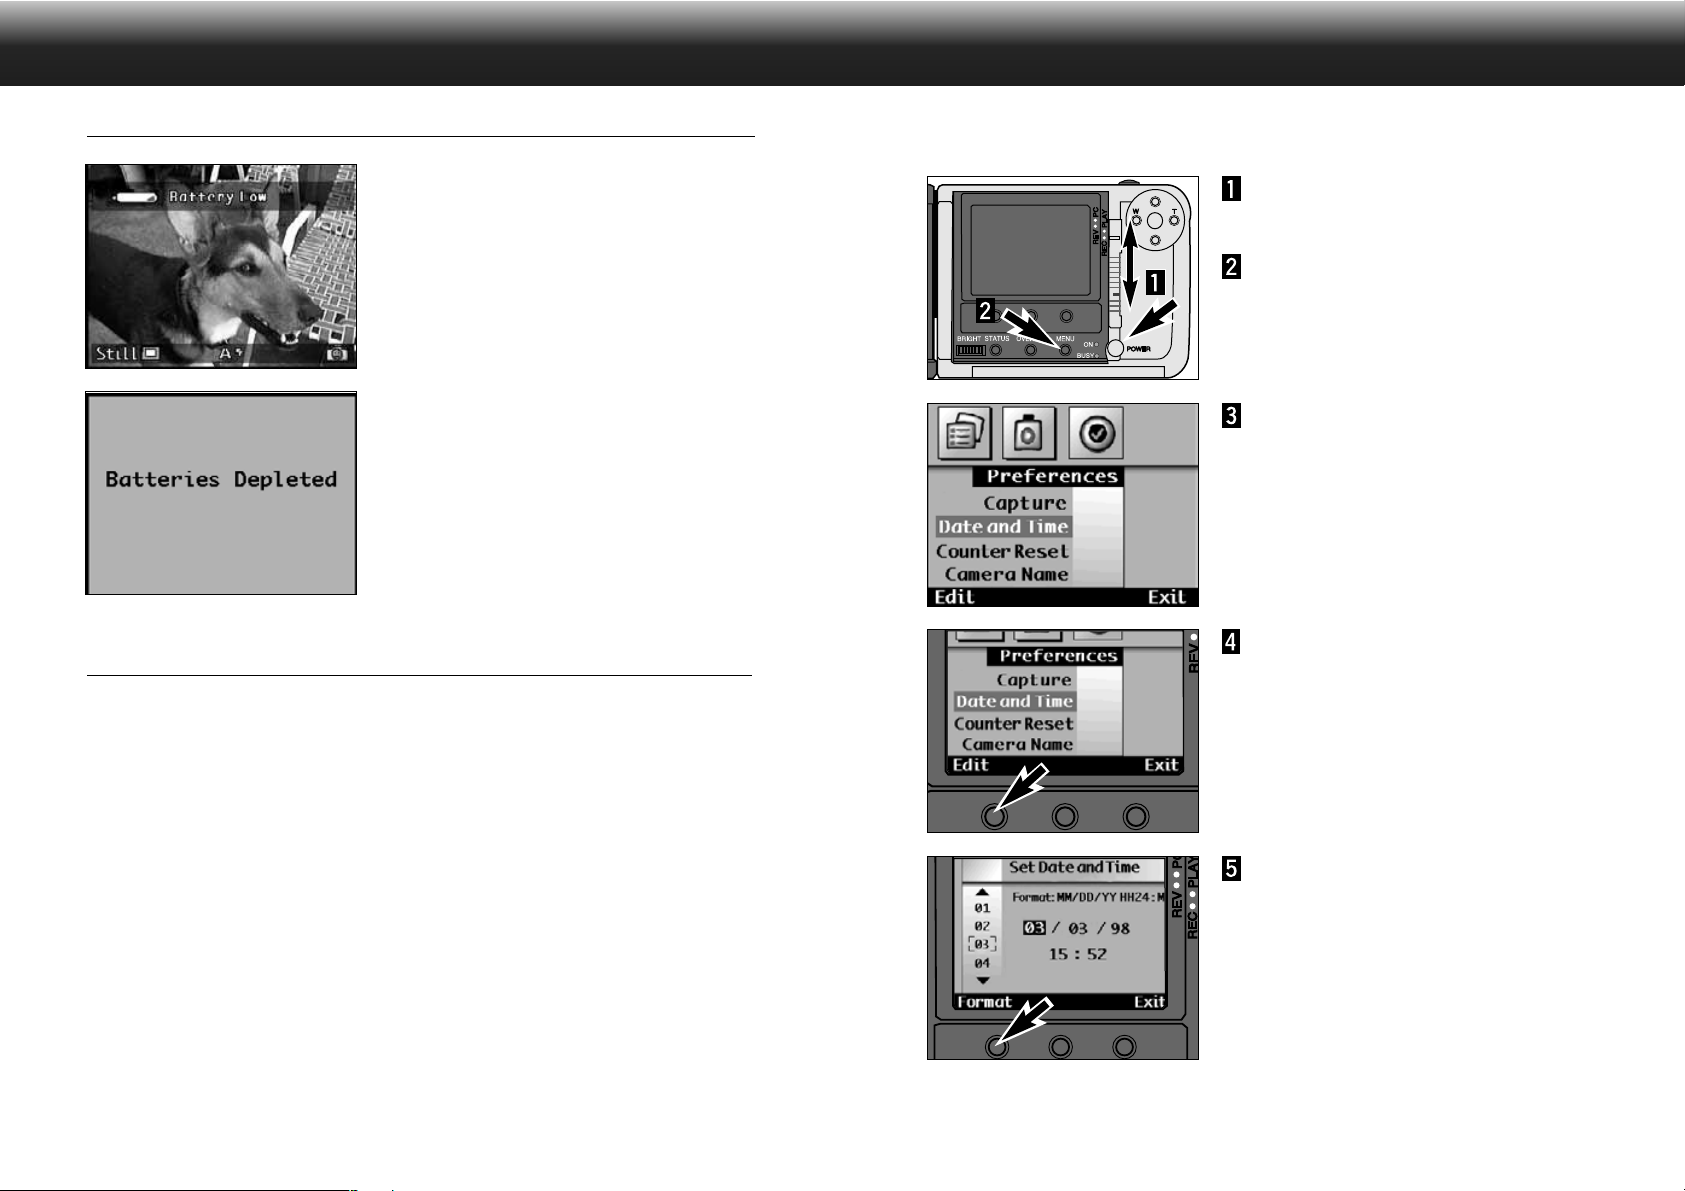
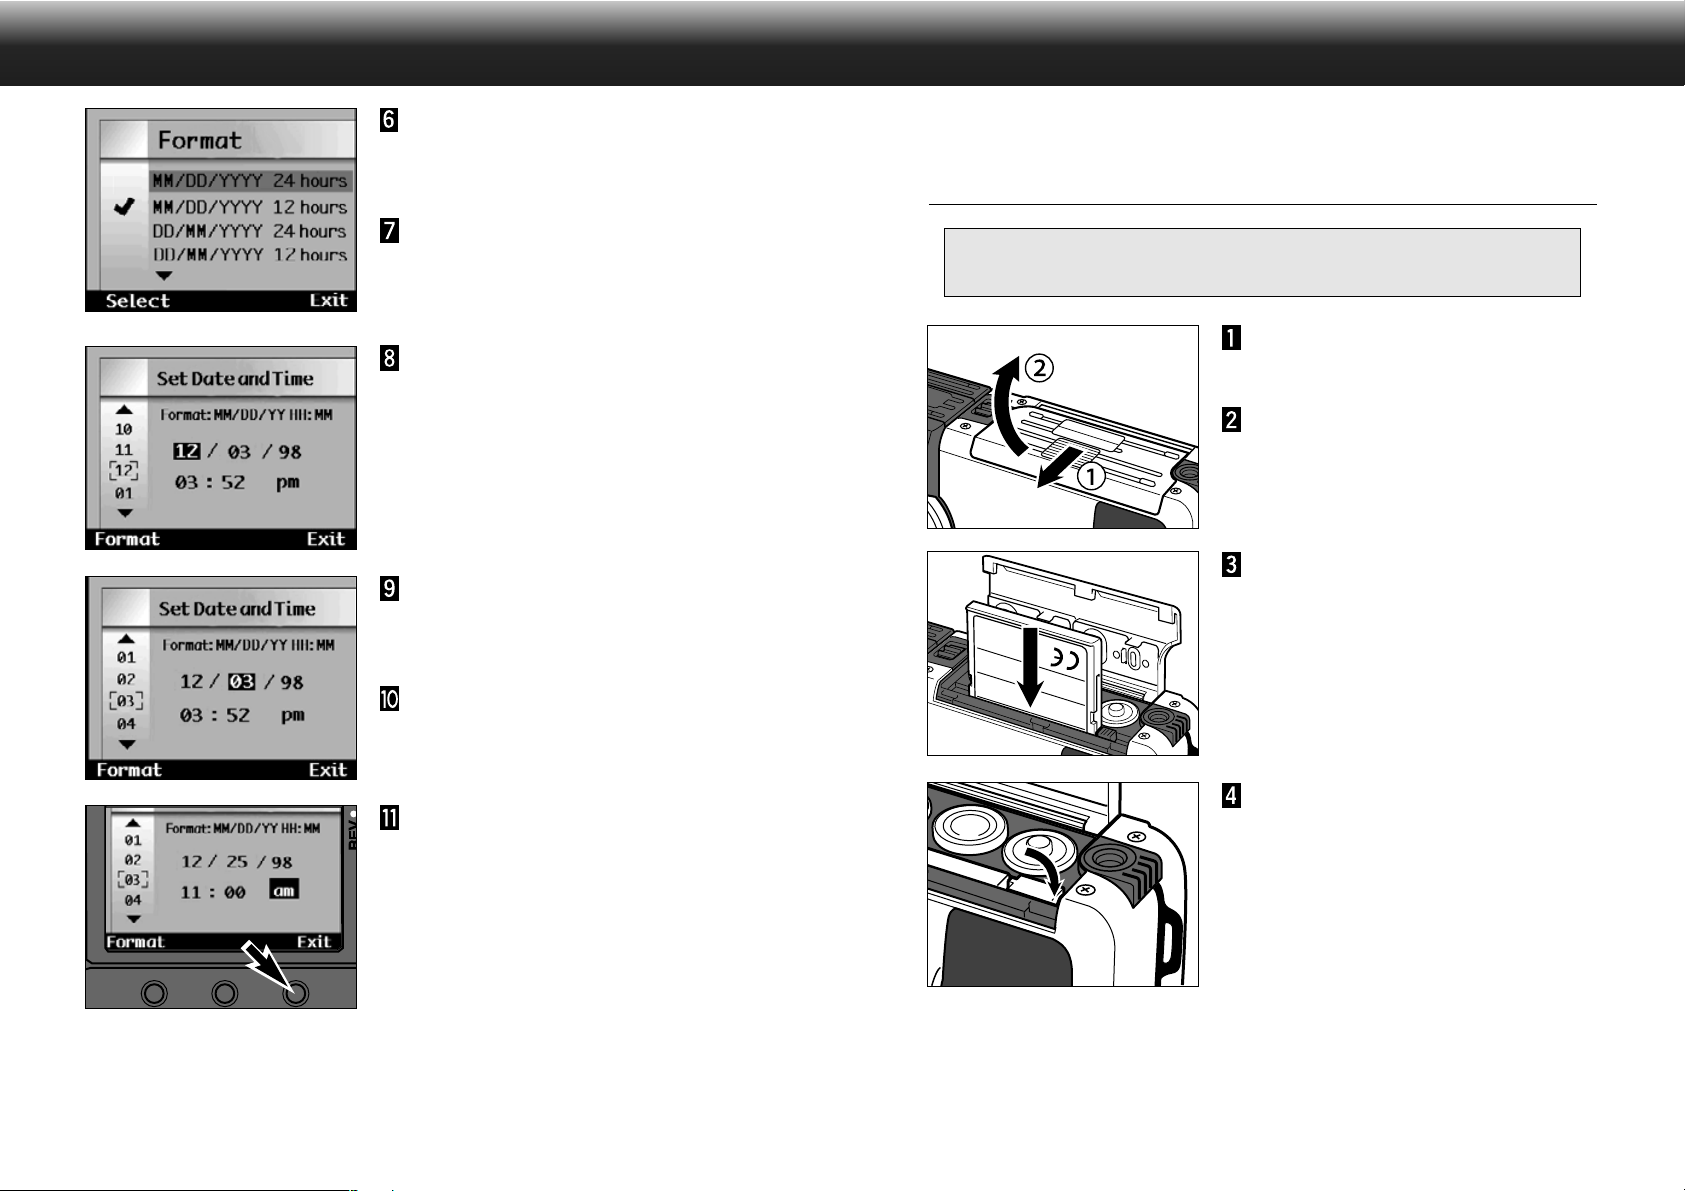
This camera records the date and time an image was captured. For your reference, set the date and time
for accuracy.
Turn the camera on, then slide
the mode switch to REC.
Press the menu button.
• The menu screen for record mode will
appear.
Press the Right button until the
Preferences menu appears.
Press the Down button until Date
& Time is highlighted.
Press the Edit soft key .
• The Set Date and Time screen will appear.
The LCD monitor will shut off if the camera has not been used for 3 minutes.
• The power lamp will remain on.
• Press the Display button to turn the LCD monitor back on.
After an additional 3 minutes without use (6 minutes total), the camera will shut down completely.
• The power lamp will turn off.
• Press the main switch to turn the camera back on.
✎ Auto Power Off does not function when the camera is connected to the AC
adapter.
18
Press the Format soft key.
• The Format screen will appear.
• Skip to step 8 if the format does not need to
be changed.
Continued on next page.
19
Page 12
SETTING THE DATE AND TIME
COMPACT FLASH CARD
Use the up and down buttons to
highlight the desired format.
• The currently selected format has a ✔ next
to it.
Press the Select soft key to
select the highlighted format.
• The Set Time & Date screen will appear.
Press the Up or Down buttons to
select a number.
• The number under the cursor will change.
Press the Right button to set the
item and move to the next item.
• Pressing the Left button will delete the
current item and return to the previous item.
Repeat steps 8 and 9 until all the
items are correct.
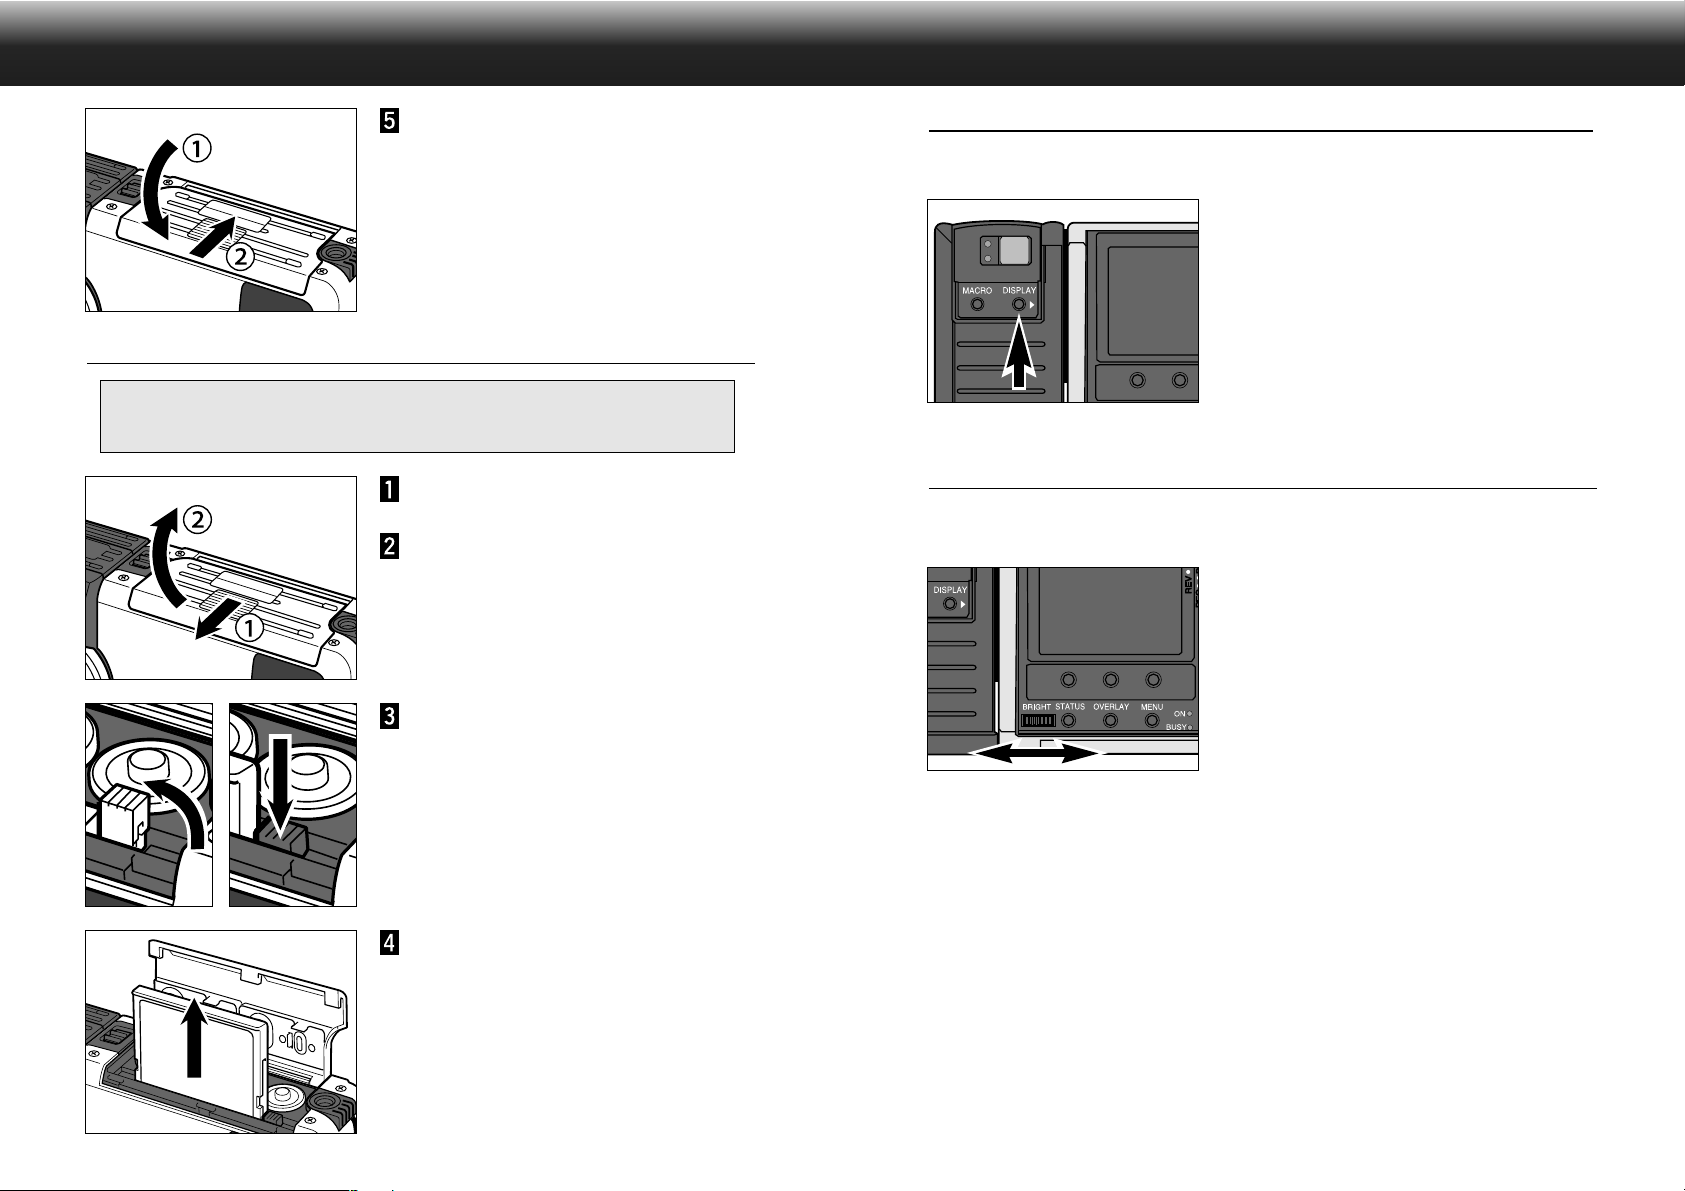
Your camera requires a CompactFlash card to be inserted before capturing images.
INSERTINGTHE COMPACT FLASH CARD
Always turn off the camera before inserting a CompactFlash card! Data on the card will be lost
or damaged if it is inserted while the camera is on.
Turn the camera off.
Open the card-chamber cover by
sliding it in the direction
indicated, then open the cover.
Insert the CompactFlash card into
the card slot, pushing it in until
the card-release lever pops out.
• Insert the card so the back label is on the
lens side of the camera.
• Push the card in straight, not at an angle.
• Wrong direction: If the card stops mid-way,
confirm the direction of the card. Do not
force the card.
20
Press the Exit soft key.
• Pressing Exit saves the entered data and
returns the screen to the Preferences menu.
Press Exit in the Preferences menu to
return to the Record screen.
Fold the card-release lever down
as shown.
Continued on next page.
21
Page 13
COMPACT FLASH CARD - CONT’D
ADJUSTING THE LCD MONITOR
Close the card-chamber cover
and slide it shut until it clicks.
REMOVINGTHE COMPACT FLASH CARD
Always turn off the camera before removing a CompactFlash card! Data on the card will be
lost or damaged if it is inserted while the camera is on. Check the on LED is off before removing
the card.
Turn the camera off.
Open the card-chamber cover by
sliding it in the direction
indicated, then open the cover.
TURNING THE LCD MONITOR ON/OFF
Reduce battery consumption by turning off the LCD monitor when not needed.
Press the Display button to turn
the LCD monitor on or off.
• The camera’s power must be on to tur n on
the LCD monitor.
ADJUSTING THE LCD BRIGHTNESS
The LCD monitor brightness can be adjusted to compensate for varying lighting conditions and viewing
angles.
Turn the Brightness-control dial
left or right until the desired
brightness level is reached.
• Adjusting the brightness of the LCD monitor
will not affect the image exposure.
22
Lift the card-release lever until it
is straight out, then press the
card-release lever to eject the
card.
Pull the memory card straight
out.
• Close the card-chamber cover after
removing the card.
23
Page 14

ADJUSTING THE CAMERA DISPLAY
ADJUSTING THE CAMERA DISPLAY
OVERLAY BUTTON
The Overlay button shows or hides the overlay bar and soft key label in each mode, enabling an
unobstructed view of the image.
Press the Overlay button on the
camera.
• The overlay bar and soft key label will tur n on
or off for each mode as listed below.
REC (overlay bar/soft key label) ON/ON OFF/OFF OFF/ON
PLAY (overlay bar/soft key label) ON/ON OFF/OFF OFF/ON
REV (soft key label only) ON OFF
✎ Pressing any soft key while the label is off will turn the label on.
STATUS BUTTON
The Status screen quickly gives a display of camera status information when the camera is in Record
mode.
In Record mode, press the Status
button on the camera.
• The Status screen will be displayed.
• The displayed items cannot be changed within
the Status screen.The displayed items can
only be changed through their respective
menus.
Indicates there is a CF card
in the camera
Image Quality (p.47)
White Balance (p.55)
Image Size (p.46)
Version number
Indicates the camera is in
Macro.
Battery-condition indicator
Press to leave the status
screen.
✎ Press the status button a second time to exit the status screen or press the Exit
soft key.
2524
Page 15
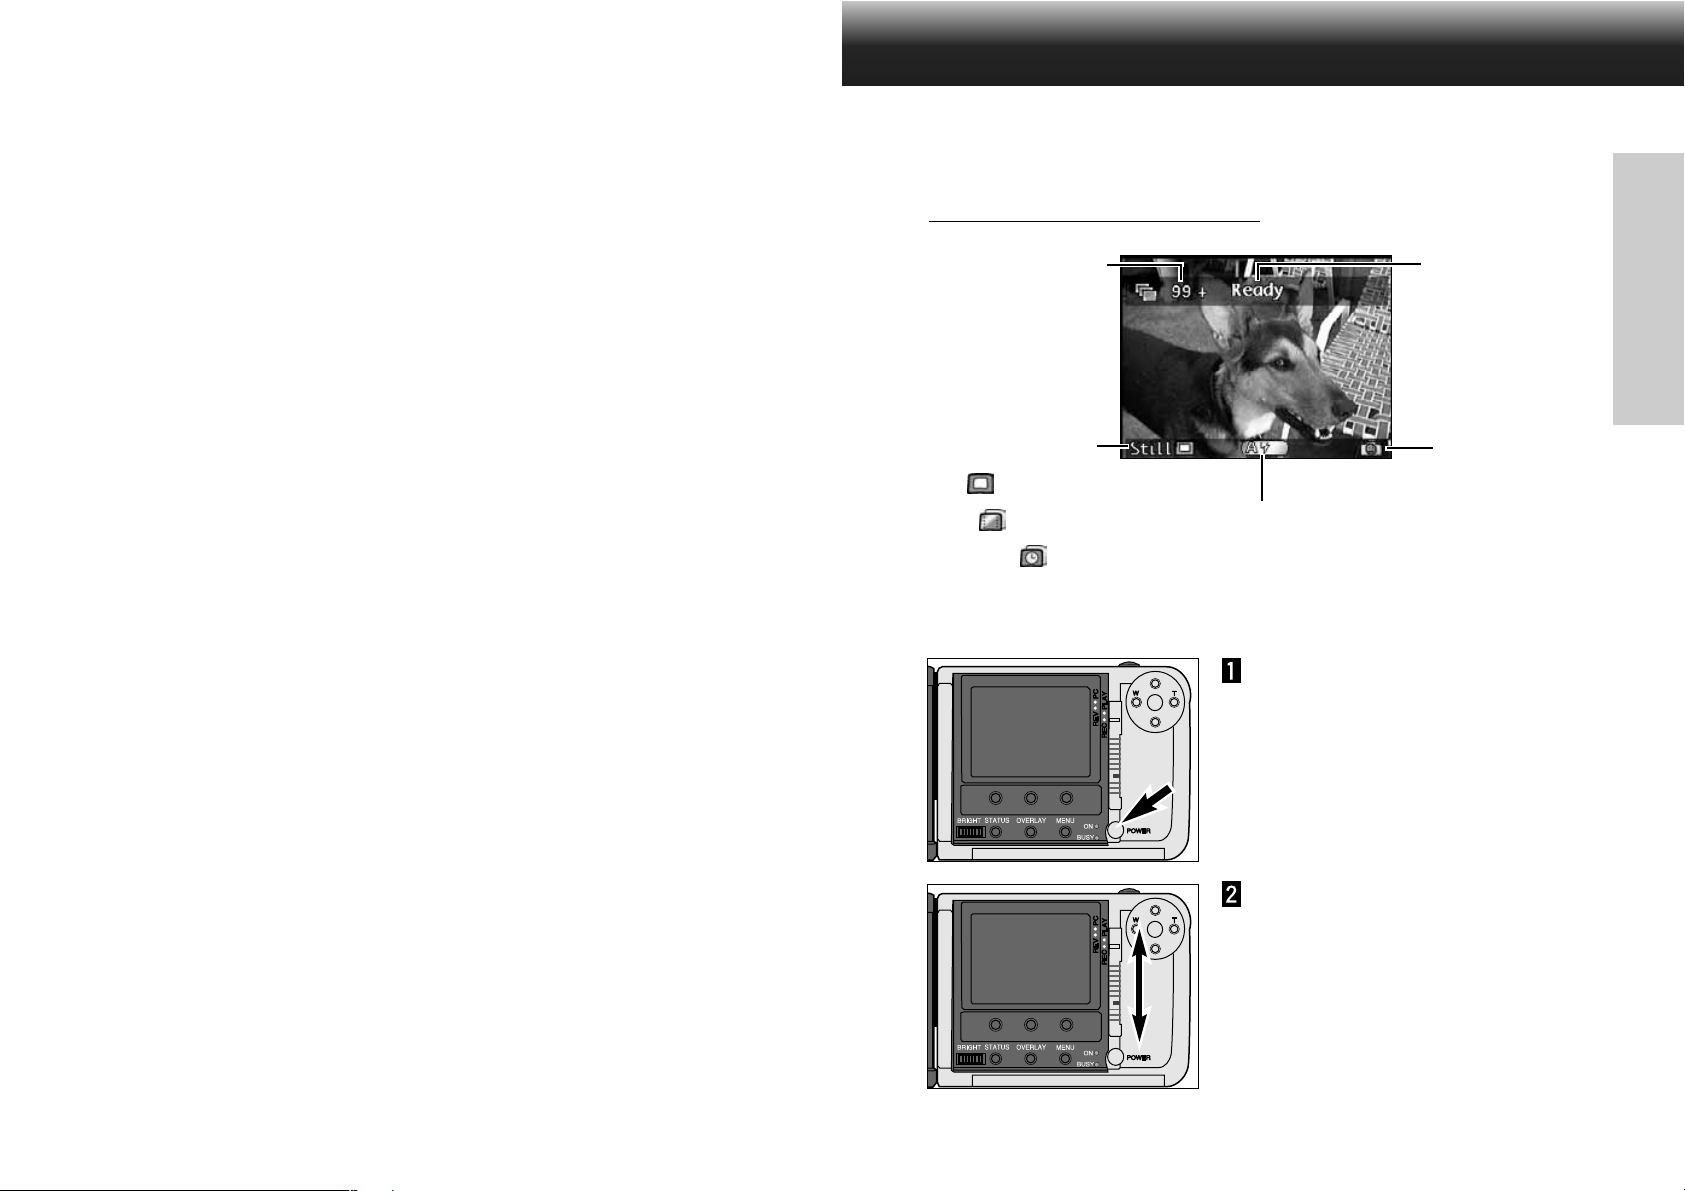
TAKING PICTURES
Once batteries and a CompactFlash card have been inserted into the camera, it is ready to take pictures.
When the camera is turned on, the flash will be set to autoflash and the image capture type will be Still
(normal).
Record Mode Screen
RECORD MODE
Approximate number
of images remaining
Image capture type
Still
Burst
Timelapse
Indicates if camera
is ready or busy
RECORD
Digital Subject
Program Mode
Flash mode
Press the main switch to turn the
camera on.
• The Digita™ logo will briefly appear in the
LCD monitor.
26
Slide the Mode switch to REC to
put the camera in record mode.
Continued on next page.
27
Page 16
TAKING PICTURES
TAKING PICTURES
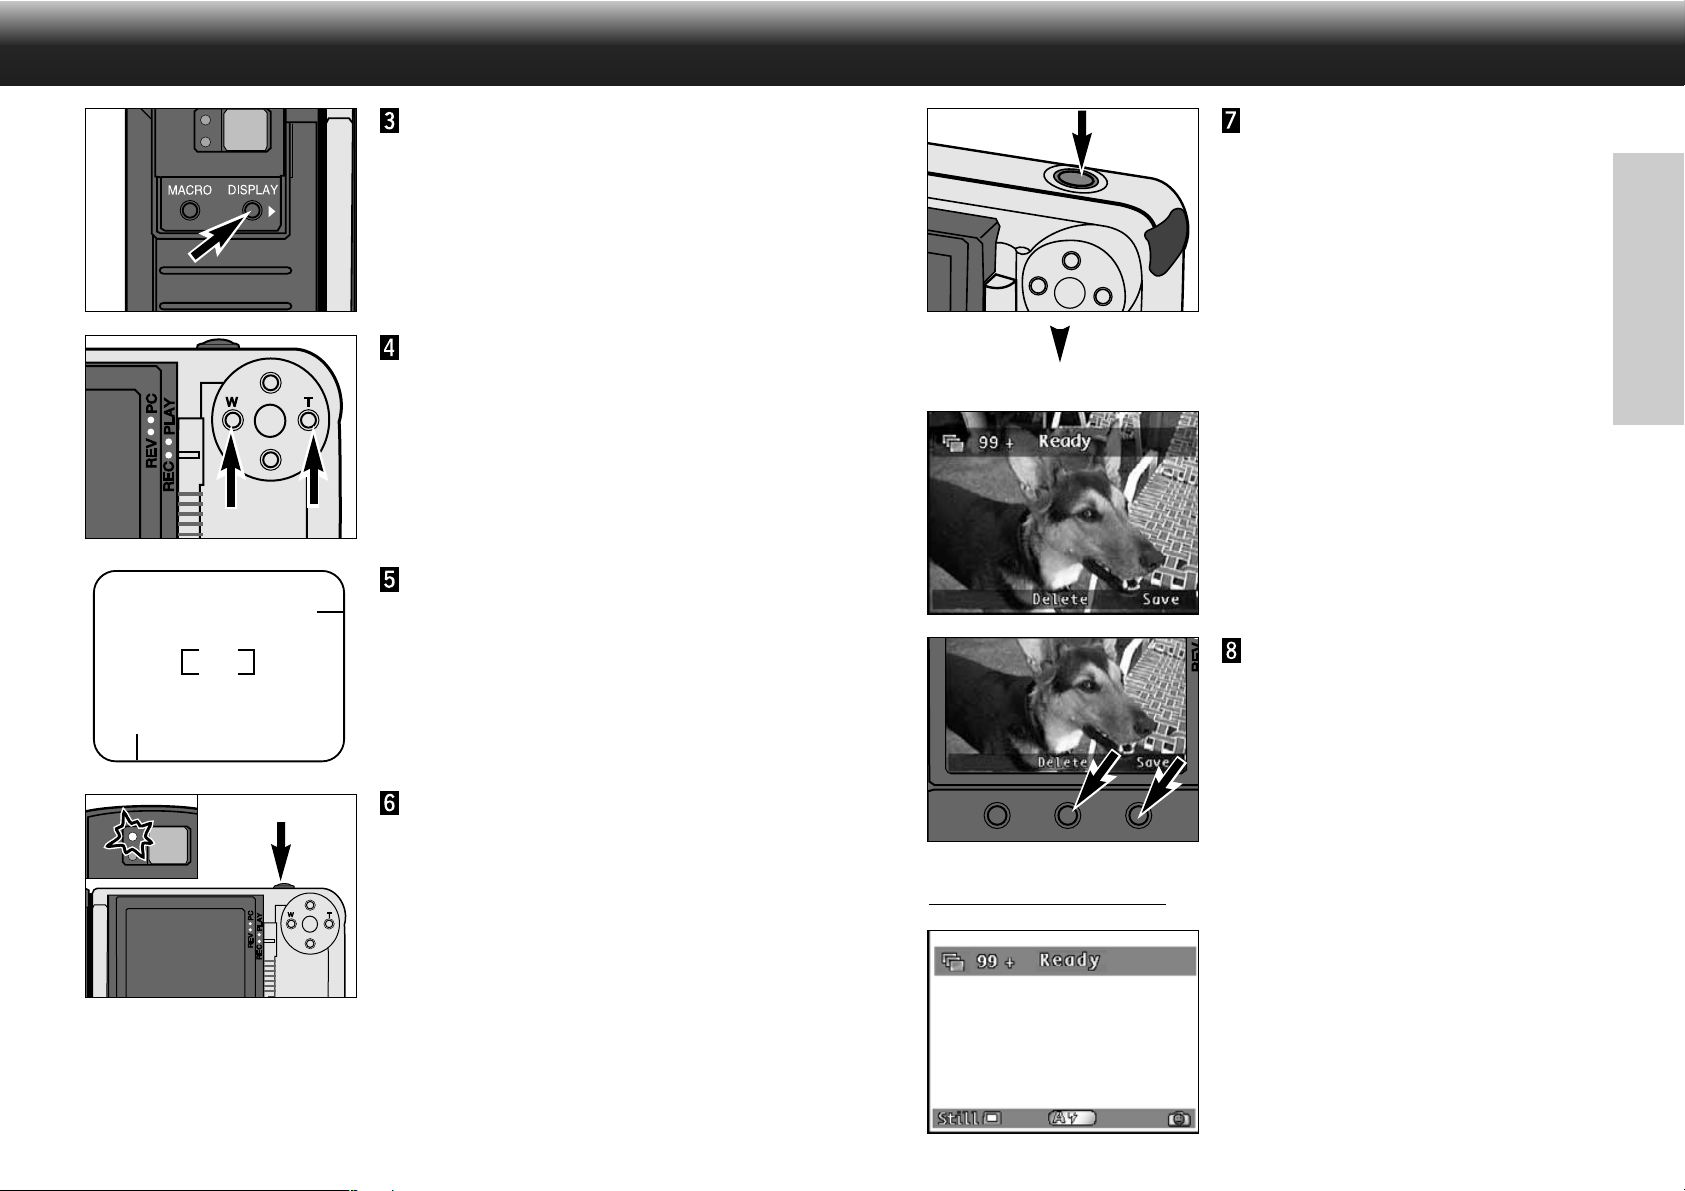
Press the Display button to turn
on the LCD monitor if desired.
• The LCD monitor’s Live View feature will
continuously update and display what the
lens sees.
ZOOM 1500: Press the Left
button (W - wide) or the Right
button (T - telephoto) until the
image is zoomed as desired in
the LCD monitor or Viewfinder.
Center the subject in the LCD
monitor or place the viewfinder’s
focus frame on the subject.
• Use Focus Hold for off-center subjects
(p.37).
Press the shutter-release button
the rest of the way down to take
the picture.
• Instant Review OFF:The captured image
will appear in the LCD monitor only for as
long as it takes to write it to the memory
card.The camera will return to Live View.
• The default Instant Review setting is ON.
See page 58 to turn instant review off.
RECORD
Instant Review ON
Instant Review ON:The captured image will
appear in the LCD monitor and Save and
Delete will appear in the soft key label.
Press either the Save or Delete
soft key.
28
Press the shutter-release button
part way down.
• Focus and exposure will be determined and
locked.
• The green focus lamp will glow if focus is
determined. Repeat steps 5 and 6 if the
focus lamp blinks.
• The orange flash lamp will glow if the flash
is charged and ready.
ve is pressed:
If Sa
✎ The image will be saved automatically
after 10 seconds if neither button is
pressed.
The image will be saved if the shutterrelease button is pressed part way
down.
• The image will be saved and the camera
will return to Live View.
Continued on next page.
29
Page 17
TAKING PICTURES
BURST IMAGE CAPTURE
If Delete is pressed:
• A message appears asking to confirm
deletion.The Yes and Cancel soft keys will
appear.
Press the Yes soft key.
• The image is deleted and the camera will
return to Live View.
• The Cancel soft key will return the camera
to the Record screen without deleting the
image.
• The image will be saved automatically after
a few seconds if neither button is pressed.
Burst image capture is similar to the motor drive or continuous-drive mode on conventional cameras. The
camera will continuously take pictures while the shutter-release button is held down.Up to 7 full-size
images and 15 1/4 size images can be captured in one burst at a rate as fast as 3.5 frames/second.See
page 52 to select the burst capture rate.
Images captured together in one Burst are linked together and treated as a series by the camera when in
Play and Review modes.
Turn the camera on and slide the
Mode switch to REC.
RECORD
Press the left soft key until
Burst appears in the soft key
label.
• The image capture modes are displayed in
the following sequence.
30
Still
Burst
Timelapse
Frame the picture as instructed
in “Taking Pictures”, steps 4
through 6.
• The flash does not operate in Burst.The
flash icon over the center soft key will
disappear.
Continued on next page.
31
Page 18
BURST IMAGE CAPTURE
TIMELAPSE
If Instant Review is OFF:
Press
and hold
the shutter-
release button all the way down.
• The shutter will continuously release until
your finger is lifted from the shutter-release
button, the memory buffers become full, or
the maximum number of images has been
captured.
• The focus and exposure for the series is
determined when the shutter-release button
is pressed part-way down before the
pictures are taken.
• If the memory buffers are full when the
shutter-release button is pressed, Please
wait... will appear in the overlay bar.
Lift your finger from the shutterrelease button.
• The last image will appear on the LCD
monitor while the series is being written to
memory.Once the images are saved, the
camera will return to Live View.
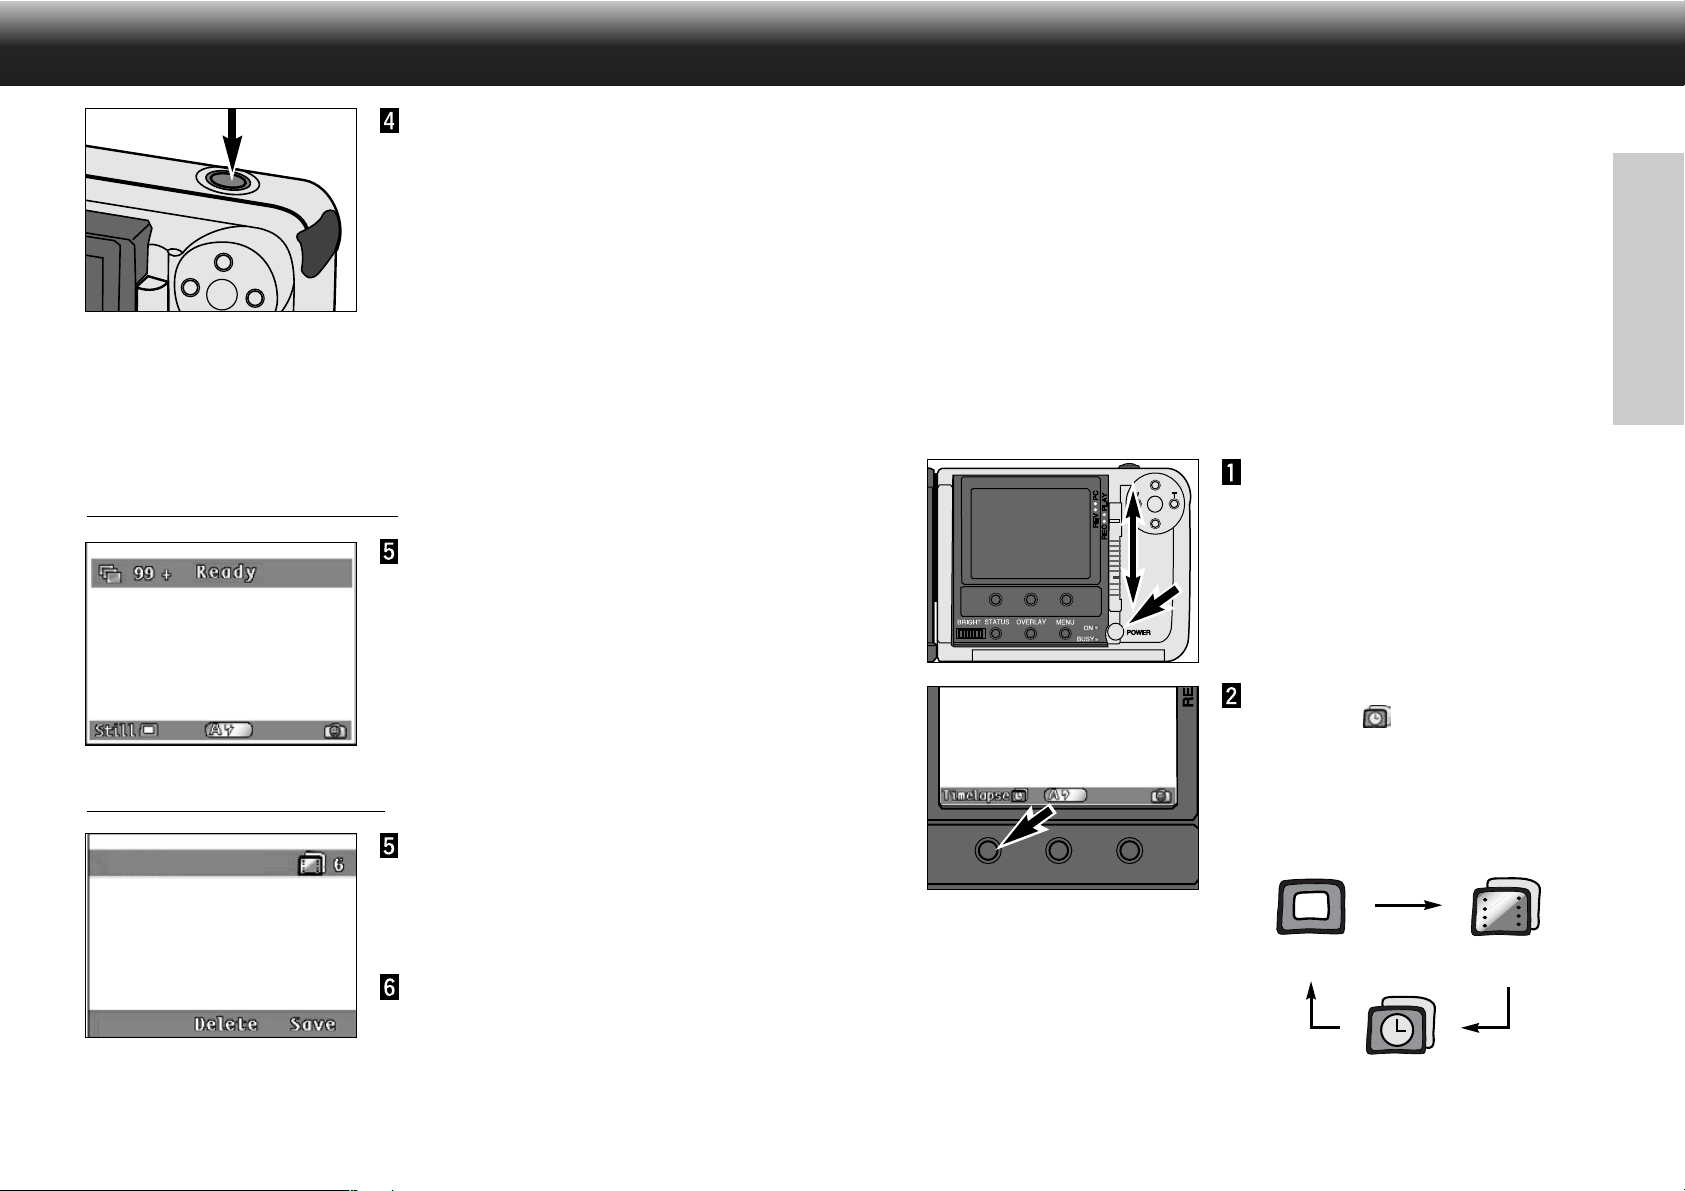
In Timelapse image capture, the camera will take a series of pictures at regular time intervals. This feature
is useful for capturing events over time, such as the opening of a flower.
Images captured together in Timelapse are linked together and treated as a series by the camera when in
Play and Review modes.
The default settings for Timelapse capturing are:
Timelapse interval: 60 seconds.
Number of Images: 10 images.
See page 53 to change these settings.The interval can be selected from 60 seconds to up to 546 minutes.
As many as 200 images can be captured in one Timelapse series.
RECORD
Turn the camera on and slide the
Mode switch to REC.
If Instant Review is ON:
32
Lift your finger from the shutterrelease button.
• The last image will appear on the LCD
monitor and Save and Delete will appear in
the soft key label.
Press the Save or Delete soft key
as instructed in “Taking Pictures”.
• The entire series will be saved or deleted.
Press the left soft key until
Timelapse appears in the
soft key label.
• The image capture modes are displayed in
the following sequence.
Still
Burst
Timelapse
Continued on next page.
33
Page 19
TIMELAPSE
TIMELAPSE
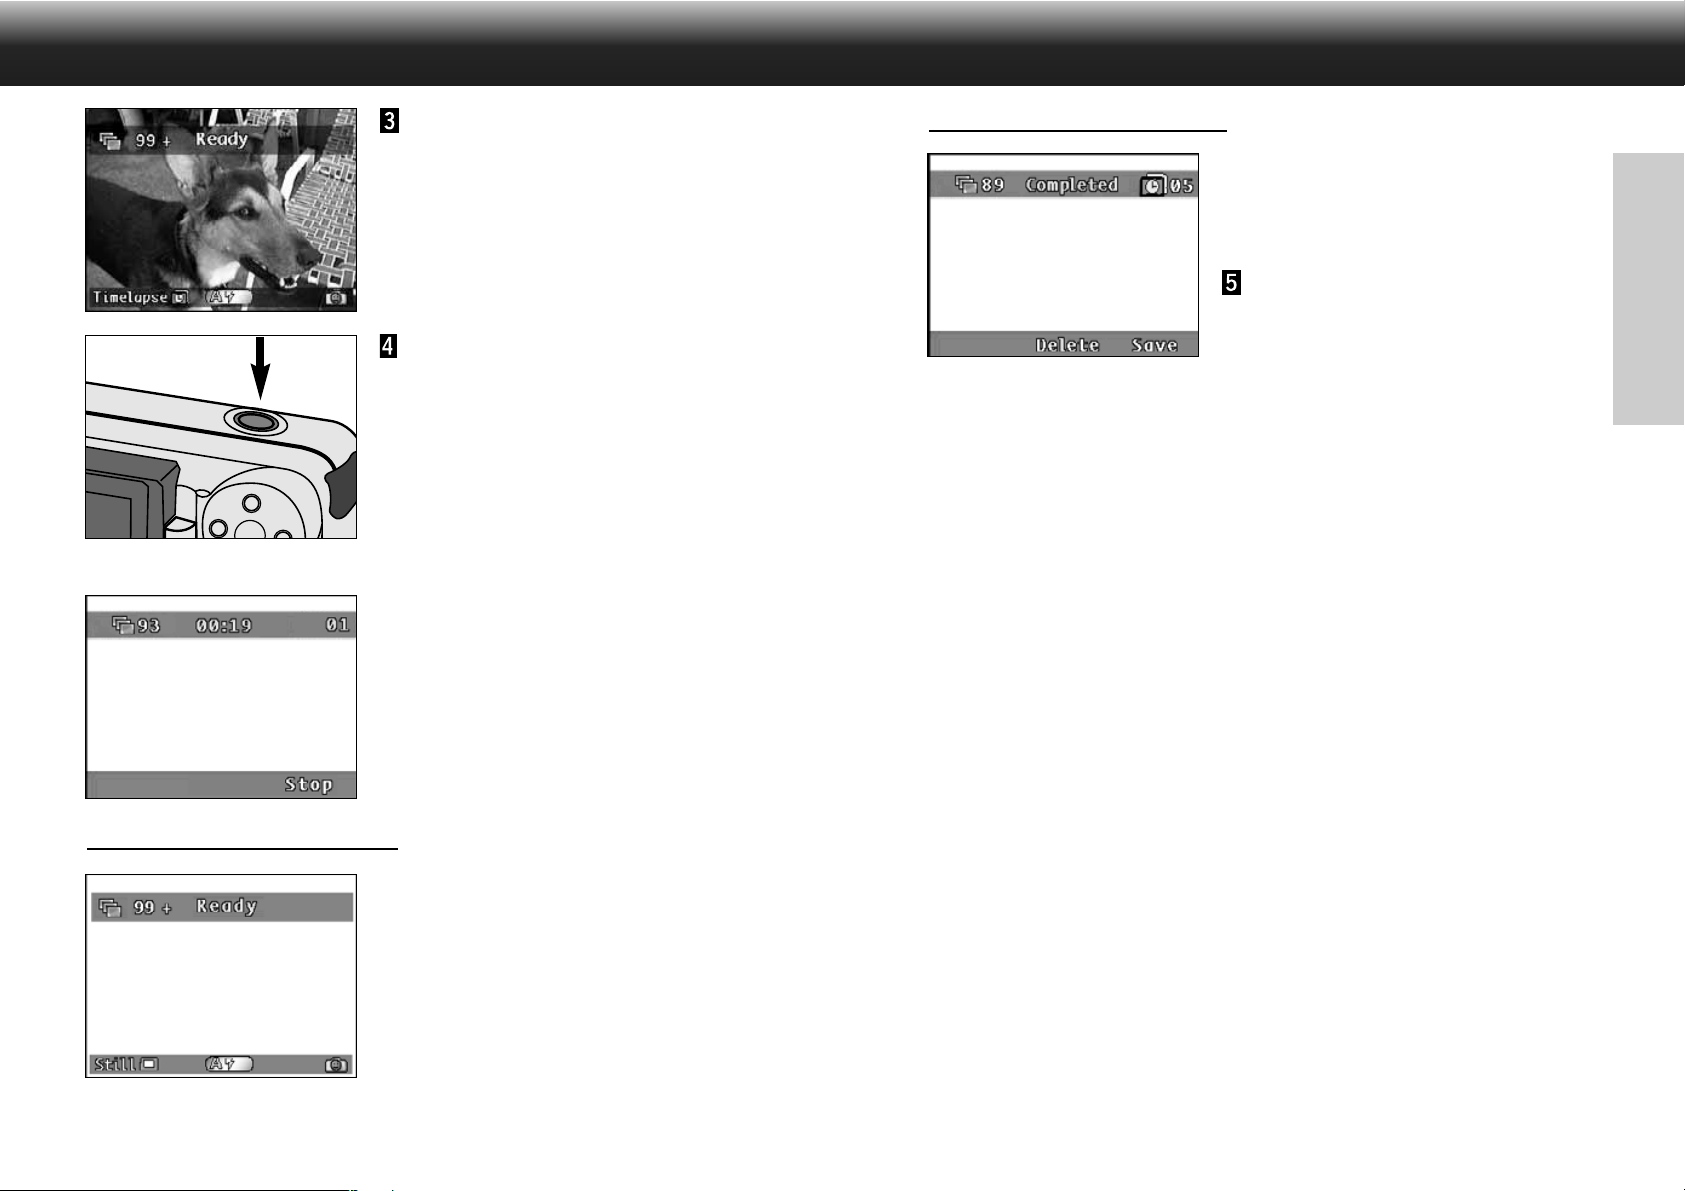
Frame the picture as instructed
in “Taking Pictures”, steps 4
through 6.
• Place the camera on a tripod or steady
surface if necessary.
Press the shutter-release button
all the way down once.
• The first image will be captured
immediately, then the other images will be
automatically captured at the time interval.
The camera will continue to capture images
until the Stop soft key is pressed or the predetermined number of images is reached.
• The focus and exposure is determined for
each image just before the each picture is
taken.
During the interval:
• A countdown of the time remaining until the
next picture is taken appears in the overlay
bar.
• The number of images already taken in this
Timelapse series appears in the overlay bar.
• Live View remains active.
If Instant Review is ON:
After the Timelapse series is complete, the last image
will appear on the LCD monitor and Save and Delete
will appear in the soft key label.
Press the Save or Delete soft key
as instructed in “Taking Pictures”.
• The entire Timelapse series will be saved or
deleted.
RECORD
✎ Auto Power Off does not operate during Timelapse sequences.
If Instant Review is OFF:
34
After the Timelapse series is complete, the camera will
return to Live View.
35
Page 20
FOCUS
FOCUS
The Zoom 1500 and Wide 1500 lens units have a precise, high-speed autofocusing system, just like those
found in quality compact cameras.
FOCUS LAMP/NO FOCUS INDICATOR
When the shutter-release button is pressed
partway down, the autofocus system locks
focus at the subject distance.The focus lamp
will indicate the focus status when the
shutter-release button is pressed partway
down.
Glows
Focus is OK and confirmed.
The subject is too close (see Focus Range below).
Blinks
One of the Special Focusing Situations applies (p.37).
The lens will lock focus at 2.5m (8.2 ft.), the
focus lamp will blink, and NO FOCUS will
appear in the LCD monitor if the camera
cannot confirm focus because the subject is
in one of the special focusing situations listed
on the following page.
FOCUS RANGE
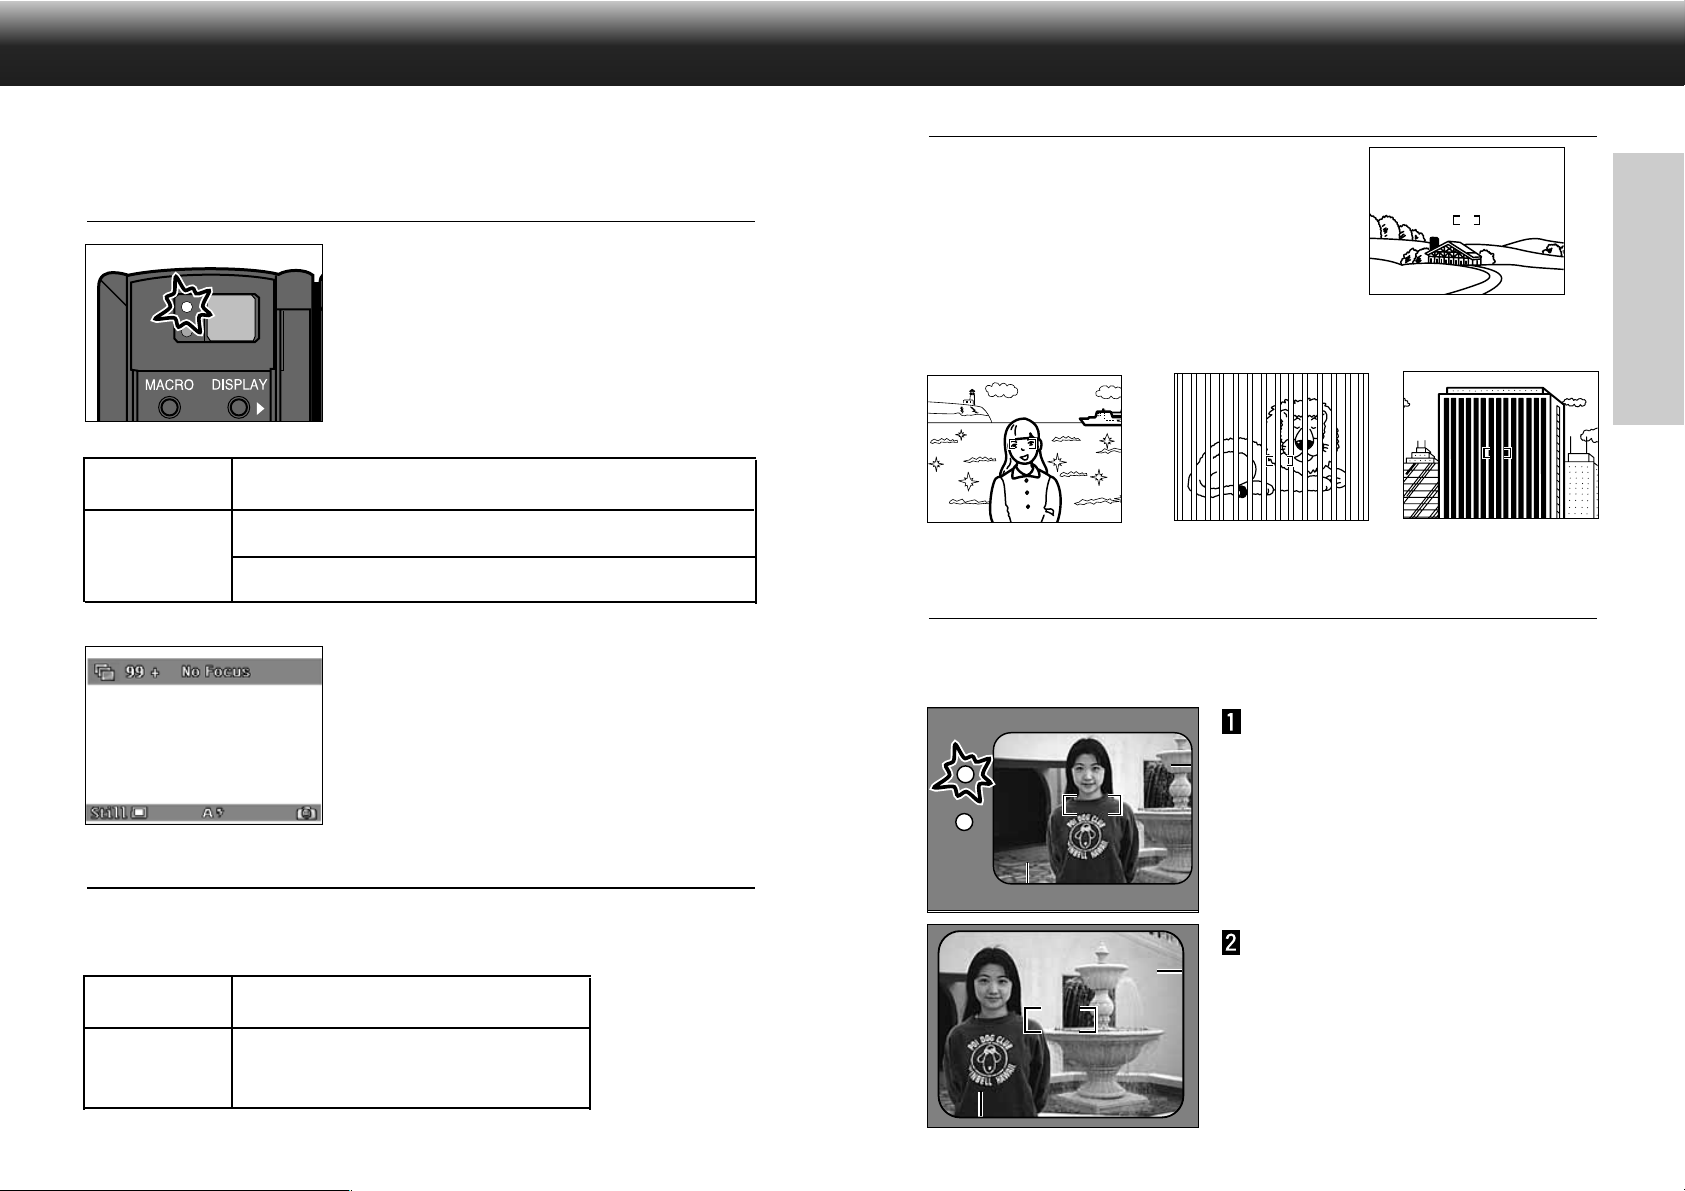
SPECIAL FOCUSING SITUATIONS
Some scenes or subjects are difficult for the autofocus system to
lock on to.When the focus will not lock, FOCUS HOLD on another
object the same distance from you as your main subject,
recompose, then press the shutter-release button all-the-way
down to take the picture.
Very bright or low contrast fills the
focus frame.
Subject is near very bright
object or area.
Two subjects overlap in the
focus frame.
Alternating light and dark
lines fill the focus frame.
FOCUS HOLD
Subjects outside the focus frame or LCD monitor center may not be in focus.Use focus hold to ensure
accurate focusing.
Place the focus frame on your
subject or center the subject in
the LCD monitor,then press and
hold the shutter-release button
partway down so the green focus
lamp glows.
RECORD
The green focus lamp will blink Out of Range appears in LCD monitor if your subject is closer than the
minimum focus distance.
Wide 1500
0.3m - ∞ (0.98 ft. - ∞)
0.5m - ∞ (1.64 ft. - ∞)
Zoom 1500
MACRO;0.35m - 0.5m (1.15 - 1.64 ft.)
36
Without lifting your finger,
recompose the picture, then
press the shutter-release button
all-the-way down to take the
picture.
37
Page 21

BUILT-IN FLASH
When the camera is turned on, the flash is automatically set to autoflash.The other flash modes can be
set by using the center soft key.
BUILT-IN FLASH
FLASH RANGE
To ensure proper exposure, make sure your subject is positioned within the flash range.The flash range for
the Zoom 1500 lens unit changes with focal length being used.
AUTOFLASH
FILL-FLASH
FLASH
CANCEL
AUTOFLASH
WITH RED-EYE
REDUCTION
FILL-FLASH
WITH RED-EYE
REDUCTION
In autoflash, the flash will fire automatically when the
light level is low or your subject is backlit.
The flash will fire every time a picture is taken,
regardless of lighting. Use fill flash to reduce harsh
shadows on your subject’s face.
Use flash cancel when photographing subjects that are
beyond the flash range or when flash photography is
prohibited.
Use the red-eye reduction feature to reduce
the red-eye effect when photographing
people or animals in low light situations.
The flash will fire a few short bursts before
the main flash burst. Use of a tripod is
recommended.
CHANGING THE FLASH MODE
wide (7 mm)* 0.5 - 3.5m (1.64 - 11.48 ft.)
Zoom 1500
tele (21 mm)** 0.5 - 2.3m (1.64 - 7.54 ft.)
Wide 1500
* 35mm equivalent 38mm
** 35mm equivalent 115mm
–
0.3 - 6.7m (0.98 - 21.98 ft.)
SHAKE WARNING
When FLASH CANCEL is selected and the light level is
too low for a sharp picture while hand-holding the
camera, Shake Warning will appear on the overlay bar.
Use a tripod or select AUTOFLASH.
RECORD
Press the center soft key until the
desired flash mode is displayed.
• The flash modes will change as follows:
• The flash cannot be used in Burst capture mode.
• The selected flash mode remains until the camera is turned off or another flash mode
is selected.
38
FLASH LAMP
The orange flash lamp will indicate the flash
status when the shutter-release button is
pressed partway down.
Glows: Flash is charged and ready.
Blinks:The flash is charging.
39
Page 22

DIGITAL SCENE SELECTOR
DIGITAL SCENE SELECTOR
The Digital Scene Selector sets the optimum flash mode, light metering, white balance, and image
processing for specific scene types.When the camera is turned on, the scene selection mode is set to
Auto.
AUTO
PORTRAIT
LANDSCAPE
EVENING/
SUNSET
This is the default setting. No additional image
processing is performed in this mode.
The Portrait selection reduces noise and softens edges.
As named, this setting is best suited for portraiture.
The Landscape setting is ideal when shooting nature
subjects or architecture. By sharpening the image, the
camera faithfully reproduces fine textures.
The white balance is automatically adjusted for the
scene, making it possible to capture the natural warm
tones of the setting sun.
CHANGINGTHE DIGITAL SCENE SELECTOR MODE
Press the right soft key until the
icon for the desired mode appears.
• The modes will change as follows:
RECORD
• The scene selection mode remains until the camera is turned off or another scene
selection mode is chosen.
40
NIGHT SCENE
SLOW-SYNC
Digital noise reduction is used to allow crisper clearer
images to be captured at night.
In this mode a slower shutter speed, as low as 2
seconds, with rear-flash sync is used and noise is
reduced.This allows ambient light in the background to
appear in the picture. Use of a tripod is recommended.
41
Page 23

MACRO (ZOOM 1500 LENS ONLY)
EXPOSURE COMPENSATION
The Macro Photography function on the Zoom 1500 lens allows you to fill the frame with a business-card
size object.The minimum focus distance in Macro is 0.35m (1.15 ft.).
• Autofocus does not operate when the lens is in Macro, manual focus must be used.
Press the Macro button.
• The Focus Aid Meter will appear, replacing
the image counter.
• Autofocus will be disabled and manual focus
will become available.
Frame the image, then press the
Left or Right button to focus.
• The Focus Aid Meter displays 10 levels of
focus.Manually focus the lens by pressing
the Left or Right button until the focus meter
is as close to maximum as possible.
Minimum focus level
• For best results, steady the camera on a
stable surface or use a tripod.
Maximum focus level
The exposure can be adjusted to make the final image lighter or darker. Exposure can be adjusted as
much as +/– 2 EVs in 1/3 EV increments.
While in Record mode, press the
Up or Down button to select the
exposure compensation value.
• The exposure compensation values are
displayed in the upper-left corner of the
LCD monitor, replacing the image counter.
• The exposure can be biased as much as
2 EVs in 1/3EV increments.
+/–
• The exposure change is visible in the LCD
monitor.
Frame the image, then press the
shutter-release button.
• The exposure compensation value remains
active after the picture is taken.
RECORD
Press the shutter-release button
to take the picture.
✎ The focus range in Macro is from approximately 0.35m - 0.5m (1.15 - 1.64 ft.).
✎ The Macro focus range is outside of the flash range, turn the flash off (Flash
Cancel).
42
• Exposure can only be adjusted in Record mode. Set the exposure compensation
before recording the image.Once the image is captured, it cannot be changed in the
camera.
✎ Reset the exposure compensation value to 0 when finished.The exposure
compensation values do not remain in the overlay bar, but the exposure
compensation value remains active.
43
Page 24

RECORD MODE
RECORD MODE MENUS
The Record Mode menus allow you to change the default settings for image capturing, like Image Size and
Image Quality settings.They also give additional function options for more advanced operation, such as
using the self-timer or bracketing.
Turn the camera on and slide the
mode switch to REC.
Press the menu button.
MENUS
Media Settings:
Still
Size
Quality
Colour
Burst
Size
Quality
Colour
Timelapse
Size
Quality
Colour
Interval
# of Images
Press the Left or Right button
until the desired menu appears.
• There are three menu options:
Media Settings
Photo Script
Preferences
• A fourth menu option, Custom Script, is
available if additional scripts have been
added to the camera (p.102).
RECORD MODE MENUS
Photo Script:
White Balance
Auto
Daylight
Tungsten
Fluorescent
Bracket
Off
Half Stop
Full Stop
Preferences:
RECORD MENUS
Capture
File Type
Instant Review
System Sounds
Date and Time
Counter Reset
Camera Name
Format Card
44
45
Page 25

SELECTING THE IMAGE SIZE
SELECTING IMAGE QUALITY
Select the image size before recording the image.The image size is a factor in determining how many
images fit onto a CompactFlash card (pp.104 – 105). There are two image size options; Full (1344 x 1008
pixels) and 1/4 (640 x 480 pixels).
In Record mode, press the Menu
button.
• The Record mode menus will appear.
Press the Left or Right button to
highlight Media Settings.
Press the Up or Down button to
highlight desired image type;
Still, Burst, or Timelapse.
Press the Edit soft key.
• The appropriate Settings menu will appear.
The menu will vary slightly between image
capture types.
Image quality is determined by how much the image is compressed. Little or no compression means high
image quality, but large file sizes. High compression ratios mean small file sizes, but lower image quality.
The image quality is a factor in determining how many images fit onto a CompactFlash card (pp.104 –
105). Select the image quality before recording the image.There are four options for image quality:
Super Fine (1:1 compression ratio)
Fine (1:8 compression ratio)
Standard (1:20 compression ratio)
Economy (1:40 compression ratio)
In Record mode, press the Menu
button.
• The Record mode menus will appear.
Press the Left or Right button to
highlight Media Settings.
Press the Up or Down button to
highlight desired image type;
Still, Burst, or Timelapse.
RECORD MENUS
46
Press the Up or Down button to
highlight Image Size.
Press the Left or Right button to
select either Full or 1/4.
Press the Exit soft key.
• The Default soft key will return all the
settings on the screen to their default
setting.
Press the Edit soft key.
• The appropriate Settings menu will appear.
The menu will vary slightly between image
capture types.
Continued on next page.
47
Page 26

SELECTING IMAGE QUALITY
SELECTING COLOUR OR B&W
Press the Up or Down button to
highlight Quality.
Press the Left or Right button to
select either S. FINE (Super
Fine), FINE, STD. (Standard), or
ECON. (Economy).
Press the Exit soft key.
• The Default soft key will return all the
settings on the screen to their default
setting.
The default setting is colour image capture.It is possible to capture images in black & white only. B&W
images use less storage space than full colour images. Consider this option to save space on
CompactFlash cards if the final output will be B&W.Select before taking the photograph.
In Record mode, press the Menu
button.
• The Record mode menus will appear.
RECORD MENUS
Press the Left or Right button to
highlight Media Settings.
Press the Up or Down button to
highlight desired image type;
Still, Burst, or Timelapse.
Press the Edit soft key.
• The appropriate Settings menu will appear.
The menu will vary slightly between image
capture types.
48
Press the Up or Down button to
highlight Colour.
Press the Left or Right button to
select either Full or B&W.
Press the Exit soft key.
• The Default soft key will return all the
settings on the screen to their default
setting.
49
Page 27

SELF TIMER
SELF TIMER
The self-timer delays release of the shutter for approximately 10 seconds after the shutter-release button is
pressed.
In Record mode, press the Menu
button.
• The Record mode menus will appear.
Press the Left or Right button to
highlight Media Settings.
Press the Up or Down button to
highlight Still.
Press the Edit soft key.
• The Still Picture Settings menu will appear.
Press the Exit soft key.
• The camera will return to the Media Settings
menu.
• The Default soft key will return all the
settings on the screen to their default
setting.
Press the Exit soft key in the
Media Settings menu.
• The camera will return to the Record
screen.
Place the camera on a tripod,
frame your subject, then press
the shutter release button.
• The self-timer lamp on the front of the
camera will blink and a countdown will
appear in the LCD monitor.
• Do not press the shutter-release button
while standing in front of the camera.
• Cancel the countdown by turning the
camera off.
RECORD MENUS
50
✎ The self-timer is automatically cancelled
after the picture is taken.
Press the Up or Down button to
highlight Self Timer.
Press the Left or Right button to
select On.
✎ Self-timer is not available for Burst or Timelapse image types.
51
Page 28

SELECTING BURST CAPTURE RATE
TIMELAPSE INTERVAL AND TOTAL IMAGES
The speed of the burst capture can be adjusted.There are three burst capture rate options; Fast (3.5
frames per second approximately), Medium (2.5 fps aprox.), and Slow (1.2 fps aprox.).
In Record mode, press the Menu
button.
• The Record mode menus will appear.
Press the Left or Right button to
highlight Media Settings.
Press the Up or Down button to
highlight Burst.
Press the Edit soft key.
• The Burst Settings menu will appear.
Select the desired number of images and the amount of time between image captures for Timelapse. The
capture options are:
Number of images: 2 - 200
Interval: 60 - 32767 Seconds; 1 - 546 minutes
In Record mode, press the Menu
button.
• The Record mode menus will appear.
RECORD MENUS
Press the Left or Right button to
highlight Media Settings.
Press the Up or Down button to
highlight Timelapse.
Press the Edit soft key.
• The Timelapse Settings menu will appear.
52
Press the Up or Down button to
highlight Burst Rate.
Press the Left or Right button to
select Fast, Medium, or Slow.
Press the Exit soft key.
• The Default soft key will return all the
settings on the screen to their default
setting.
Press the Up or Down button to
highlight # Images.
Press the Left or Right button to
select the desired setting.
Continued on next page.
53
Page 29

TIMELAPSE INTER VAL AND TOTAL IMAGES
WHITE BALANCE
Press the Up or Down button to
highlight Interval.
Press the Left or Right button to
select Seconds or Minutes.
Press the Down button to
highlight the interval time.
Press the Left or Right button to
select the desired setting.
• The interval setting options are:
Seconds: 60 - 32767
Minutes: 1 - 546
Press the Exit soft key.
• The Default soft key will return all the
settings on the screen to their default
setting.
White Balance is the camera’s ability to make different types of lighting appear neutral. The effect is similar
to selecting daylight film or tungsten film.The default white balance setting is Auto.
Auto
The Auto setting will detect the type of
light and adjust the white balance
accordingly.
Daylight
For daylight or camera flash.
Tungsten
For incandescent lighting, such as the
filament light bulbs in household lamps.
Fluorescent
For fluorescent lighting.
Go to the Photo Script menu (p. 45).
Press the Up or Down button
until White Balance is
highlighted.
Press the Edit soft key.
• The White Balance menu will appear.
Press the Up or Down button to
highlight the desired setting.
RECORD MENUS
54
Press the Select soft key.
•A ✓ mark will appear next to the selected
setting, the white balance setting will be
effective, and the camera retur n to the
Photo Script menu.
• Press the Exit soft key to return to the
Photo Script menu without changing the
white balance setting.
✎ Set the flash to Flash Cancel when Tungsten or Fluorescent is selected.
55
Page 30

BRACKET
BRACKET
The bracketing feature allows you to capture a set of three frames, one with normal exposure, one below
normal exposure and one above normal exposure.Select a half stop exposure bracket or a full stop
exposure bracket.
Go to the Photo Script menu (p. 56).
Press the Up or Down button
until Bracket is highlighted.
Press the Edit soft key.
• The Bracket menu will appear.
Press the Up or Down button to
highlight the desired setting.
Frame your subject, then press
and hold the shutter the shutterrelease button down.
• The camera will make three exposures.Do
not lift your finger from the shutter-release
button until all three exposures have been
made.
• The camera will return to the Photo Script
menu when all three exposures have been
made.
RECORD MENUS
56
Press the Select soft key.
•A ✔ mark will appear next to the selected
setting and the camera will exit the menu
function return to the Record screen.
• Press the Exit soft key to return to the
Photo Script menu without changing the
setting.
• Press the Stop Script soft key to return to
the Photo Script menu without executing the
bracket sequence.
57
Page 31

INSTANT REVIEW
SYSTEM SOUNDS
Instant Review is the feature that keeps the captured image on the screen, allowing the user to select Save
or Delete.When instant review is on, the captured image is also saved by pressing the shutter-release
button partway down or by allowing the camera to remain idle for about 10 seconds.
It is possible to turn instant review off.When instant review is off, the captured image will remain on the
screen only for as long as it takes to write it to the memory card.There will be no soft key prompts to save
or delete captured images, all images will be saved automatically.
Go to the Preferences menu (p. 45).
Press the Up or Down button
until Capture is highlighted.
Press the Edit soft key.
• The Capture menu will appear.
Press the Up or Down button until
Instant Review is highlighted.
Turn the system sounds off or on as desired. The system sounds are the tones heard when certain buttons
are pressed.
Go to the Preferences menu (p. 45).
Press the Up or Down button
until Capture is highlighted.
Press the Edit soft key.
• The Capture menu will appear.
RECORD MENUS
Press the Up or Down button until
System Sounds is highlighted.
Press the Left or Right button to
select either On or Off.
58
Press the Left or Right button to
select either On or Off.
Press the Exit soft key.
• The setting will be changed and the camera
will return to the Preferences menu. Press
the Exit soft key again to return to the
Record screen.
✎ Pressing the Default soft key will return
all items in the Capture screen to their
default settings.The default settings are:
File Type - EXIF
Instant Review - On
System Sounds - On
59
Page 32

COUNTER RESET
CAMERA NAME
The image counter can be set two different ways. The image counter assigns a chronological number to
recorded images.This number will appear with the image when viewed in Play mode and Review mode.
There are two options for the image counter reset.
Reset When Empty
The counter resets each time a new compact flash card is inserted or all the images
on the compact flash card have been deleted.
Capture Counter
This counts each image taken by the camera.
Go to the Preferences menu (p. 45).
Press the Up or Down button
until Counter Reset is
highlighted.
Press the Edit soft key.
• The Counter Reset menu will appear.
Press the Up or Down button to
highlight the desired counter
type.
• Press the Default soft key to select the
default setting of Capture Counter.
The camera name appears at bottom of the Review Screen when viewing images.A total of 31 characters,
including numbers, symbols, and spaces, can be entered.
Go to the Preferences menu (p. 45).
Press the Up or Down button
until Camera Name is
highlighted.
Press the Edit soft key.
• The Camera Name menu will appear.
RECORD MENUS
Press the left soft key to select
capital letters (A), lower-case
letters (a), numbers (1), or
symbols (%).
Press the Up or Down button to
select a character, then press the
Right button to set the character
and move to the next space.
• Use the Space soft key to insert a blank
space into the name.
60
Press the Exit soft key.
• A (check) will appear next to the selection,
then the camera will return to the
Preferences menu.Press the Exit soft key
again to return to the Record screen.
When the name is complete,
press the Exit soft key.
• The camera will return to the Preferences
menu.
61
Page 33

FORMATTING COMPACT FLASH CARDS
Formatting the compact flash card removes all the protected and unprotected images on the card.Images
cannot be recovered once the card is formatted.
Go to the Preferences menu (p. 45).
Press the Up or Down button
until Format Card is highlighted.
Press the Edit soft key.
• A confirmation screen will appear.
PLAY MODE
62
PLAY
Press the Start soft key.
• All data on the compact flash card will be
deleted and the card will be formatted.
63
Page 34

PLAYBACK
PLAYBACK
The captured images are viewed full screen in Play mode.It is possible to view the images with or without
the capture data.
Play Mode Screen
Capture date and time
Image number
Category icon
(p.78)
Play/Stop (p.64)
*Only appears for Burst,
Timelapse, or Group images.
Zoom/Zoom Out (p.66)
✎ The overlay bar and soft key label can be turned off using the Overlay button,
allowing an unobstructed view of the image (p.24).
Image Type
Still
Burst
Timelapse
Group
Expand/Collapse (p.67)
Open/Close (p.67)
Press the Right button to display
the next image.
Press the Left button to display
the previous image.
✎ Press and hold the Left or Right button
to continuously scroll through the
images.
The camera has an internal sensor which detects when
images are framed vertically. Vertically framed images
will appear correct-side up in the LCD display.
PLAY
Playing Images
Turn the camera on.
Slide the Mode switch to PLAY.
64
65
Page 35

ZOOM IN - ZOOM OUT
EXPAND/COLLAPSE - OPEN/CLOSE
Press the Zoom soft key to see a
magnified view of the image.
Use the Up, Down, Left, and
Right buttons to pan around the
image
Burst, Timelapse, and Group images are represented by only the first image in the set.It is possible to
expand the set so that all the images can be viewed.The Expand and Collapse soft key labels appear for
Burst and Timelapse images.The Open and Close soft key labels appear for Grouped images.
Collapsed Burst Image Closed Group Image
123456789101112131415
Open/Expand Open/Expand
123456789101112131415
The white blocks represent images that are viewable. The gray blocks represent images that are hidden
until the Open or Expand soft key is pressed.
Press the Expand or Open soft
key when the first image in the
set is displayed.
• The icon will change to the Still Image icon.
PLAY
66
Press the Zoom Out soft key.
• The Zoom Out soft key must be pressed
before scrolling to the next image.
Press the Collapse or Close soft
key when any image in the set is
displayed.
✎ If a set has been expanded in Review mode, then Play mode is selected, the set
will still be expanded in Play mode.
67
Page 36

PLAY BUTTON
Burst, Timelapse, and Group images can be played back like an automatic slide show.The Play mode also
has a slideshow function that allows more control (p.70)
Scroll through the images until
the desired image is on the
screen (p. 64).
• The Play soft key is displayed when a Burst,
Timelapse, or Group image is on the
screen.
PLAY MODE
Press the Play soft key.
• The Play soft key changes to Stop while
playing. Press the Stop soft key to end the
playback.
✎ The default playback rate is 3 seconds
per image. See page 72 to change the
playback rate.
MENUS
PLAY MENUS
68
69
Page 37

SLIDESHOW
SLIDESHOW
Create and run a slideshow using the slideshow menu.The slideshow parameter options are:
Content
All images in the camera or the images in a selected category.
Duration
1 - 10 seconds.The length of time each image is displayed.
Loop
On or Off.Whether or not the slideshow continuously repeats play.
Turn the camera on and slide the
Mode switch to PLAY.
Press the menu button.
• The Play mode menu will appear.
Press the Up or Down button to
highlight Slide Show.
Press the Edit button.
• The Slide Show Preferences screen will
appear.
If Category is selected: Press the
Up or Down button to highlight
the category list, then press the
Left or Right button to select the
desired category.
Press the Up or Down button to
highlight Duration, then press
the Left or Right button until the
desired duration is displayed.
Press the Up or Down button to
highlight Loop, then press the
Left or Right button to select
either On or Off.
Press the Start soft key.
• The camera will return to the Play mode
screen and will begin displaying images
according to the above criteria.
PLAY MENUS
70
Press the Up or Down button to
highlight Content, then press the
Left or Right button to select
either Category or All.
• The Cancel soft key returns the camera to the Play Settings menu without changing
the settings and without running the slide show.
The Done soft key enters the new settings, but returns the camera to the Play
Settings menu without running the slide show.
✎ Stop the slide show by pressing the
Stop Slideshow soft key in the Play
screen.
71
Page 38

PLAYBACK RATE
Set the playback rate for the Play button (p. 68).The playback rate is set for each image type; Burst,
Timelapse, and Group.The rate can be selected between 1 and 10 seconds.
In Play mode, press the menu
button.
• The Play Settings menu will appear.
Press the Up or Down button to
highlight Playback Rate, then
Press the Edit soft key.
• The Playback Rate screen will appear.
REVIEW MODE
72
Press the Up or Down button to
select the image type.
Press the Left or Right button to
select the rate.
Press the Exit soft key.
• The settings will be entered and the camera
will return to the Play Settings menu.
• Press the Default soft key to set the rate for
all image types to 3 seconds.
REVIEW
73
Page 39

REVIEWING/SELECTING IMAGES
REVIEWING/SELECTING IMAGES
Review mode makes it fast and easy to review the images on the compact flash card by displaying mini
previews of the images.This mode also allows the images to be categorized or marked.
Review Mode Screen
Small thumbnails
Large thumbnail
(selected image)
Soft key label
Capture type display
Still Image (p.27)
Burst Image (p.31)
Timelapse Image (p.33)
Group (p.86)
Pointer
Arrow
Category icon (p. 78)
Image number (p.60)
Capture date and time
Camera name display
Group name display
These icons may appear in the bottom-right
of the monitor.
Find:This icon appears when Find is
selected (pp.94 – 96).
Protect:This icon appears with
protected images (p.90).
Reviewing/Selecting Images
Turn the camera on.
While pressing the lock button,
slide the mode switch to REV.
• The Review screen will appear on the LCD
monitor.
Press the Left and Right buttons
to scroll through the thumbnails.
• The pointer remains stationary while the
small thumbnails scroll across the screen.
Select an image by scrolling
through the thumbnails until the
pointer is below the desired
image and its large thumbnail is
displayed.
• Once an image is selected, it can be
catagorized, grouped, protected, deleted, or
marked.
74
✎ When performing functions, marked images receive priority over selected
images.
REVIEW
75
Page 40

MARKING IMAGES
MARKING IMAGES
Marked images have a ‘notch’ on the bottom right corner. Mark multiple images to perform one of the
following actions on them:
Category p. 78
Group p.86
Delete p.84
Protect p.90
Send p.91
MARK / MARK ALL
Press the Left or Right button to
select the desired image.
Press the Mark soft key.
• A notch will appear at the bottom-right
corner of the thumbnail.
• Marking the first image in a collapsed group
will mark the entire group.
UNMARK / UNMARK ALL
Press the Left or Right button to
select the desired image.
Press the Unmark soft key.
• The notch will disappear from the bottomright corner of the thumbnail.
• Unmarking the first image in a collapsed
group will unmark the entire group.
Unmark all marked images by holding down the
Unmark soft key for about 3 seconds, until the soft key
label changes to Unmark All.
76
Mark all the images in the camera by holding the Mark
soft key down for about 3 seconds, until the soft key
label changes to Mark All.
REVIEW
77
Page 41

CATEGORY
CATEGORY
The Category function allows you to add images to preset categories, represented by icons.A single,
selected image can be added to a category or a set of marked images can be categorized. An image can
belong to only one category.
Select an image (p. 75) or mark
multiple images (p. 76).
Press the Category soft key.
• The Categories menu appears.
Use the Up and Down buttons to
scroll through the category
icons.
• The ▲ and ▼ marks indicate there are more
menu items out of view. Press the Up or
Down buttons to view the items.
Press the Select soft key to
select the highlighted category.
•A ✔ mark appears next to the selected
category, then the image(s) will be assigned
to the new category and the camera will
return to the Review mode screen.
• The Category icon for each image appears
in the Review mode screen.
REMOVING IMAGES FROM A CATEGORY
Remove a single image from a category.
Select an image (p. 75).
Press the Category soft key.
• The Categories menu appears.
Use the Up and Down buttons to
highlight the checked category.
Press the Unselect soft key.
• The ✔ mark disappears then the image will
be removed from the category and the
camera will return to the Review screen.
78
✎ A progress bar may appear if many
images are being categorized.
REVIEW
79
Page 42

EXPAND/COLLAPSE - OPEN/CLOSE
Burst, Timelapse, and Group images are represented in the Review screen by a single thumbnail image. It
is possible to have all the thumbnails displayed for viewing by expanding the set.This also allows individual
images within a set to be Marked, Deleted, etc.The Expand and Collapse soft key labels appear for Burst
and Timelapse images.The Open and Close soft key labels appear for Grouped images.
Collapsed Burst Image Closed Group Image
123456789101112131415
Open/Expand Open/Expand
EXPAND/COLLAPSE - OPEN/CLOSE
COLLAPSE/CLOSE
The Collapse soft key label will appear when an expanded set of images is selected.
Press the Collapse soft key.
• The link icon will disappear and the set will be
represented by only the first image.
123456789101112131415
The white blocks represent images that are viewable. The gray blocks represent images that are hidden
until the Open or Expand button is pressed.
EXPAND/OPEN
The Expand soft key label will appear when a set of images is selected.
Press the Expand or Open soft
key.
The small thumbnails for all the images in the set will
appear and a link icon will indicate the images are
together.
The capture type of each image in the set will be
displayed individually.
✎ The procedure can be repeated for Burst
or Timelapse images within a Group.
✎ Burst or Timelapse images within an Expanded Group can be collapsed
independently.
✎ An action (Mar k, Delete, Protect, etc.) performed on a collapsed/closed set will
be applied to the entire set.
REVIEW
80
81
Page 43

REVIEW MODE
MENUS
REVIEW MODE MENUS
The Review mode menus allow you to delete unwanted images and protect
important ones. They also give additional function options for more advanced
operation, such as searching for images or organizing images into groups.
Turn the camera on and slide the
mode switch to REV.
Press the menu button.
Press the Left or Right button
until the desired menu appears.
• There are four menu options:
Edit
Camera - Camera
Find
Preferences
• A fifth menu option, Applications, is
available if accessory applications have
been added to the camera (p.103).
82
Edit:
Delete
Group
Protect
Camera-Camera:
Send…
Receive…
REVIEW MODE MENUS
Find:
By Date
By Category
Preferences:
LANGUAGE
VIDEO MODE
NTSC
PAL
REVIEW MENUS
83
Page 44

DELETING IMAGES
DELETING IMAGES
Delete unwanted images from the CompactFlash card in the camera. Use caution when deleting images.
Images cannot be recovered once deleted.It is recommended that impor tant images be protected before
starting the delete function (p. 90).
Turn the camera on and slide
the Mode switch to REV.
• Press the green lock button while switching
to REV from PLAY or REC.
Select a single image (p. 75),
mark multiple images (p. 76),
or select a group of images
(pp. 75, 86)).
Press the Delete soft key.
• A confirmation screen will appear.
• Pressing the Exit soft key will return the
camera to the Review screen.
Press the Start soft key.
• A progress bar may appear if there are
many images to be deleted.
• Pressing the Exit soft key cancels the
operation and returns the camera to the
Review screen.
• When the operation is complete, the camera
will return to the Review screen.
84
Press the menu button.
• The Review mode menus will appear.
✎ The image numbers of the remaining frames do not change.
Press the Left or Right button to
select the Edit menu.
Press the Up or Down button to
highlight Delete.
REVIEW MENUS
85
Page 45

GROUP
GROUP
CREATING A NEW GROUP
Create and name groups of images to aid in organization. An image can belong to only one group, but it
can belong to a Category at the same time.
Turn the camera on and slide the
Mode switch to REV.
• Press the mode lock button while switching
to REV from PLAY or REC.
Mark multiple images or select a
single image (p. 75, 76).
Press the Menu button.
Press the Left or Right button
until Edit is selected.
Press the Create New soft key
• The Create New Group menu will appear.
Press the Up or Down button to
select a character, then press the
Right button to set the character
and move to the next space.
When the name is complete,
press the Done soft key.
• The new group is created and the camera
will return to the Edit menu.
• A group name can have up to 8 characters.
86
Press the Up or Down button
until Group is highlighted.
Press the Add soft key.
• The Add to Group menu will appear.
The images will appear with the Group name in the
Review screen.
Group name has priority of Camera name in the display.
✎ IMPORTANT: When a function (such as Mark or Delete) is applied to a closed
group (p.86), the function is performed to all the images in the group.
Continued on next page.
REVIEW MENUS
87
Page 46

GROUP
GROUP
ADDING TO A GROUP
Add images to a group that already exists.
Follow steps 1 through 5 for “Creating a Group”.
• The Add to Group menu will appear.
Press the Up or Down button to
highlight a group.
Press the Select soft key to
select the highlighted group.
• A 3 will appear next to the selection, then
the camera will return to the Edit menu.
DISSOLVING A GROUP
Remove all the images from the group and delete the group name from the Group list.The images will
remain on the compact flash card in the camera.
Turn the camera on and slide the
Mode switch to REV.
• Press the mode lock button while switching
to REV from PLAY or REC.
Select an image in the group
(p. 75), then press the menu
button.
Press the Left or Right button
until Edit is selected.
Press the Up or Down button
until Group is highlighted.
Press the Dissolve soft key.
• The Dissolve soft key is only available when
a group is marked or selected.
• The Dissolve soft key will disappear when
the operation is complete. Press the Exit
soft key to return to the Review screen.
88
REVIEW MENUS
89
Page 47

PROTECTING IMAGES
TRANSFER CAMERA-CAMERA
Important images can be write-protected to guard them from accidental deletion. Protected images cannot
be removed from the compact flash card using the Delete function.
Turn the camera on and slide the Mode switch to REV.
• Press the green lock button while switching to REV from PLAY or REC.
Select a single image (p. 75), mark multiple images (p. 76), or
select a group of images (pp. 75, 86).
Press the menu button.
• The Review mode menus will appear.
Press the Left or Right button to
select the Edit menu.
Press the Up or Down button to
highlight Protect.
It is possible to make a wireless transfer of images between two cameras that both use the Digita
operating system and have IrDA interfaces. These instructions assume both the sending and receiving
camera is a Minolta Dimâge EX.
PREPARATION
Place the sending and receiving cameras so they face each
other.
• The cameras should approximately 30 - 60cm (about 1 - 2 feet) apart.
• Be sure no obstructions are between the two cameras and nothing is blocking the
IrDA sensors.
Turn both cameras on and slide the Mode switches to REV.
• Press the green lock button while switching to REV from PLAY or REC.
RECEIVING CAMERA
Press the menu button.
• The Review mode menus will appear.
90
Press the Protect soft key.
• The camera will return to the Review screen
when complete.
• The protect icon will appear at the
bottom-right of the Review screen when the
protected image is selected.
✎ The Unprotect soft key appears when a
protected image is selected. Use this
soft key to unprotect images.
✎ The Exit key returns the camera to the
Review screen.
Press the Left or Right button to
select the Camera-Camera menu.
Press the Up or Down button to
highlight Receive... .
Continued on next page.
91
REVIEW MENUS
Page 48

TRANSFER - CAMERA TO CAMERA
TRANSFER - CAMERA TO CAMERA
Press the Receive soft key.
• Waiting for Connection... will appear in the
monitor.
✎ The Done soft key returns the camera to
the Review screen.
SENDING CAMERA
Select a single image (p. 75), mark multiple images (p. 76), or
select a group of images (pp. 75, 86).
Press the Send soft key.
• A confirmation screen will appear.
✎ The Done key returns the camera to the
Review screen.
Check the receiving camera,
then press the Continue soft key.
• The Connecting... message will appear,
then a graph will indicate progress.
92
Press the menu button.
• The Review mode menus will appear.
Press the Left or Right button to
select the Camera-Camera menu.
Press the Up or Down button to
highlight Send... .
When the operation is complete, both cameras will
return to the Camera-Camera menu.
✎ Be sure there is enough space on the receiving camera’s CompactFlash card
before transferring images.
REVIEW MENUS
93
Page 49

FIND - BY DATE
FIND - BY DATE
The find function lets you view images in the Review screen that were taken between certain dates.
Turn the camera on and slide the Mode switch to REV.
• Press the green lock button while switching to REV from PLAY or REC.
Press the menu button.
• The Review mode menus will appear.
Press the Left or Right button to
select the Find menu.
Press the Up or Down button to
highlight By Date.
Press the Edit soft key.
• The Find By Date screen will appear.
Press the Up or Down button to
select a number, then press the
Right button to set the character
and move to the next space.
Press the Find soft key.
• The camera will return to the Review screen
to view the find results.
✎ The Cancel key returns the camera to
the Review screen without executing the
find function.
94
✎ The Exit key returns the camera to the
Review screen.
• The found images will appear in the Review
screen in chronological order.
• The icon will appear in the screen as a
reminder that the images are filtered.
• The Show All soft key turns off the Find
function and displays all the images in the
camera.
REVIEW MENUS
95
Page 50

FIND - BY CATEGORY
LANGUAGE
The find function lets you view images in the Review screen that belong to a certain categories.
Follow steps 1 - 3 from Find - By Date (p. 94)
Press the Up or Down button to
highlight By Category.
Press the Edit soft key.
• The Categories screen will appear.
✎ The Exit key returns the camera to the
Review screen.
Press the Up or Down button to
highlight a category
.
Cameras purchased in Europe have multiple languages available for the interface.
Turn the camera on and slide
the Mode switch to REV.
• Press the green lock button while switching
to REV from PLAY or REC.
Press the menu button.
• The Review mode menus will appear.
Press the Left or Right button to
select the Preferences menu.
Press the Up or Down button to
highlight Language.
Press the Edit soft key.
• The Language menu will appear.
✎ The Exit key returns the camera to the
Review screen.
96
Press the Select soft key.
•A ✓ will appear next to the selected
category, then the camera will retur n to the
Review screen to view to find results.
• The Exit key returns the camera to the Find
menu without executing the find function.
• The found images will appear in the Review
screen in chronological order.
• The icon will appear in the screen as a
reminder that the images are filtered.
• The Show All soft key turns off the Find
function and displays all the images in the
camera.
Press the Up or Down button to
highlight the desired language.
Press the Select soft key.
REVIEW MENUS
97
Page 51

VIDEO MODE
VIDEO MODE
It is possible to view images in the camera on your television. This camera has a video-out terminal which
allows you to connect the camera to your television using the Video Cable VC-EX1.
This camera is compatible with both the NTSC and PAL television systems.The system used by your
television is determined by the country in which you live.
NTSC
U.S.A, Canada, Mexico, Phillipines, Japan, and South Korea.
PAL
England, Australia, Germany, Italy, Switzerland, Holland, Singapore,
Thailand, China, and most European countries*.
*France uses the SECAM system.
In Review Mode, press the menu
button.
• The Review mode menus will appear.
Press the Left or Right button to
select the Preferences menu.
Press the Up or Down button to
highlight Video Mode.
Press the Left or Right button to
select the desired mode.
Press the Done soft key.
CONNECTING THE CAMERA TOTHE TELEVISION
Turn off the television and the camera.
Remove the terminal cover on the camera. Insert the mini
plug end of the Video Cable VC-EX1 into camera video out
terminal.
• There will be no display on the camera’s LCD monitor when the VC-EX1 is
attached to the camera.
Plug the other end of the Video Cable VC-EX1 into the video
input terminal on the television.
Turn the television and the camera on.
98
Press the Edit soft key.
• The Video Mode menu will appear.
✎ The Exit key returns the camera to the
Review screen.
Slide the camera’s mode switch to REV or Play.
Change the television to the video channel.
• The camera’s normal Review or Play mode display will appear on the television
screen.
Scroll through the images using the normal camera
operations.
REVIEW MENUS
99
Page 52

APPENDIX
ACCESSORIES
There are various accessories sold separately for this camera.For more information, please contact your
camera dealer, PC dealer, or a Minolta Ser vice Facility.
Dimâge EX WIDE 1500 Lens Unit
The Dimâge EX WIDE 1500 f/1.9, 28mm (35mm equivalent)
detachable lens unit featuring 1.5 million pixel progressive scan,
and a high resolving power is also sold separately.
Dimâge EX ZOOM 1500 Lens Unit
The Dimâge EX ZOOM 1500 f/3.5-5.6, 38-115mm (35mm
equivalent) detachable lens unit featuring 3X zoom, 1.5 million
pixel progressive scan, and a high resolving power is also sold
separately.
Lens Extension Cable LC-EX1
The Lens Extension Cable LC-EX1 allows the lens unit to be
detached from the camera and used to photograph from a variety
of angles.
AC Adapter
The AC Adapter allows the camera to receive power from an
electrical outlet. Use of the AC adapter is recommended to
conserve batteries during periods of heavy use. It is also
recommended when using the IrDA for image transfer or
controlling the camera remotely with the computer.
CompactFlash Cards RM-8C/RM-16C/RM-32C
These accessory Compact Flash cards have 2 times/4 times/8
times the storage space of the standard 4MB CompactFlash
card.
PC Card Adapter CA-1C
This adapter allows CompactFlash cards to be used in PCMCIA
card drives (ATA PCMCIA Type II standard).This is convenient for
quick data transfer.
Continued on next page.
101100
Page 53

ACCESSORIES
ACCESSORIES
CUSTOM SCRIPTS APPLICATIONS
Script is a program that uses the Digita™ Operating Environment. Scripts expand the camera functions or
allow automated work flow.Scripts can be run independently from normal camera operations. For more
information on scripts, contact a Minolta Service facility or visit the FlashPoint Technology, Inc. world wide
web site.
When a script is installed, the
Custom Script menu option is available.The Custom Script menu will
appear in the Record mode menu
screen.
Applications are additional pieces of software, available as an accessory and designed for cameras using
the Digita™ Operating Environment , that can be loaded onto your camera using a CF card.These
applications add functions to your camera, such as applying a filter effect on recorded images or
connecting images to create a panoramic shot. See your dealer, contact a Minolta Service Facility for
details, or visit the FlashPoint Technology, Inc. world wide web site.
When an application is installed,
the Applications menu option is
available. The Applications menu
will appear in the Review mode
menu screen.
102
103
Page 54

FILE SIZE
CARD CAPACITY
The file size of the image is determined by the selected Image Size and Image Quality.
There are two options for Image Size;Full (1344 x 1008 pixels) and 1/4 (640 x 480 pixels). See page 46.
There are four Image Quality (compression) options; Super Fine (1:2), Fine (1:7), Standard (1:19), and
Economy (1:38).
The actual file size will be determined by the scene. Some images will be able to compress fur ther than
others.The table below is a list of average file sizes.
APPROXIMATE FILE SIZES
S. FINE FINE STD. STD.
Full Size
1/4 Size
1500KB 540KB 200KB 100KB
500KB 180KB 100KB 50KB
The number of images that can fit on a compact flash card is determined by the size of the card (such as
4MB, 8MB, 16MB, or 32MB) and the file size of the images. The actual file size will be determined by the
scene. Some images can be compressed further than others.The table below is an approximated list of the
number of average images that can fit on a compact flash card.
APPROXIMATE CARD CAPACITY
S. FINE FINE STD. STD.
Full Size
1/4 Size
Listed in number of images for 4MB/8MB/16MB compact flash
cards.
2/5/10 7/15/30 20/40/80 40/80/160
7/15/30 20/45/90 40/80/160 80/160/320
104
105
Page 55

TROUBLESHOOTING TROUBLESHOOTING
Refer to these pages to determine the cause of a problem you are experiencing with the camera.If the
information does not cover the problem which you are experiencing, contact a Minolta Ser vice Facility.
Problem Cause Solution
No image appears in the LCD
monitor
The camera is not turned on.
The batteries are exhausted.
The batteries are inserted
incorrectly.
Press the main switch (labelled
“Power”) to turn the camera on.
Replace all four batteries or use
the AC Adapter (sold
separately).
Insert the batteries correctly.
Use the polarity (+/–) diagram
on page 17.
Problem Cause Solution
The camera will not take a
picture.
The camera is off.
The camera is not in Record
mode.
The camera is processing,
Please Wait appears in the
overlay bar.
The CompactFlash card is full,
No space on card appears in
the overlay bar.
Press the main switch (labelled
“Power”) to turn the camera on.
Slide the Mode Switch to REC
(p.27).
Wait until Ready appears in the
overlay bar.
Delete unwanted images,
transfer card contents to the PC
then erase the card, or use a
new CompactFlash card.
106
There is no CompactFlash card
in the camera.
The camera is in Record mode
(Mode Switch is on REC) and
the display button has not been
pressed.
The LCD brightness has been
turned down too low.
Insert a CompactFlash card
into the camera
(p.21).
The display button must be
pressed to turn on the display
each time the camera is
switched to Record mode (p.
27).
Turn the br ightness dial to the
desired level
(p.23).
Pictures are out of focus.
The subject has low contrast or
other characteristic that is
difficult for the autofocus
system.
The subject is too close to the
camera.
Continued on next page.
Use Focus Hold on another
object that is similar distance to
you as your subject (p.37).
Read Focus section
(p.36).
Be aware of the minimum focus
distance of your lens, listed on
page 36.
107
Page 56

TROUBLESHOOTING
CARE AND STORAGE
Problem Cause Solution
Autofocus is not working.
Using flash, the picture is too
dark.
All the images are too dark or
too light.
The image file is corrupt.
The camera is in Macro mode
(Zoom 1500 lens only).
The subject is beyond the flash
range.
The flash is not charged.
Exposure compensation is not
set to 0.
The CompactFlash card was
removed while the camera was
accessing the card.
Autofocus does not operate in
Macro.Use the Left and Right
buttons to focus manually or
turn Macro off (p. 42).
The orange flash lamp blinks
when the shutter-release button
is pressed partway down while
the flash is charging.Wait until
the flash lamp glows.
Set the exposure compensation
value to 0 (p.43).
Never remove a CompactFlash
card when the Busy lamp is
blinking.It is best to tur n the
camera off before removing or
inserting a CompactFlash card.
OPERATING TEMPERATURES AND CONDITIONS
• This camera has been designed for use from 0°C to 40°C (32° to 104°F).
• Never leave the camera where it may be subjected to extreme temperatures,
such as the glove compartment of a car.
• Do not subject the camera to extreme humidity.
• To prevent condensation from forming, place the camera in a sealed, plastic bag
when bringing it from the cold exterior to a warm building. Allow it to come to
room temperature before removing it from the bag.
• Battery performance decreases with lower operating temperatures.When photographing in cold weather, it is recommended that you keep the camera and
spare batteries inside your coat to keep them warm when you are not shooting.
Cold batteries will regain some of their charge when they warm up.
• Occasionally, when using alkaline batteries the low-battery symbol may appear
even if there is enough charge.Continue to use the camera. The low-battery symbol will disappear.
HANDLING CARE
• The Dimâge-EX is neither waterproof nor splashproof.
- Inserting/removing batteries or CompactFlash cards with wet hands may
damage the camera.
- Take care when using the camera at the beach or near water.Costly or
irreparable damage may occur.
• Do not subject the camera to shock or impact.
• Do not leave the camera in direct sunlight. Do not point the lens at direct sunlight.
CCD damage may occur.
• Turn the camera off or remove the batteries when transpor ting.
LCD MONITOR CARE
• The LCD monitor is a precision device with a pixel efficiency of 99.98%. Less
than 0.02% of the pixels are dysfunctional.
• Do not apply pressure on the surface of the LCD monitor. Permanent damage
may occur.
• In low temperatures, the LCD monitor will temporarily darken. When the camera
warms-up, normal display will be restored.
• If the + or – buttons are pressed rapidly during playback, images may appear to
overlap.This is normal and the image data is not changed.
• If the LCD monitor surface is dirty, first blow away dust or sand, then gently wipe
it with a soft, clean, dry cloth.
• If the LCD display blinks continuously or no longer works at all, it is time to
replace the monitor.Take the camera to your dealer or a Minolta Service Facility
listed on the back cover of this manual.
108
Continued on next page.
109
Page 57

CARE AND STORAGE
CARE AND STORAGE
CLEANING
• If the camera or lens is dir ty, gently wipe it with a soft, clean, dry cloth. If the
camera or lens comes in contact with sand, gently blow away loose particles,
wiping may scratch the surface.
• To clean the lens surface, first brush away any dust or blow away sand, then, if
necessary, moisten a lens tissue with lens cleaning fluid and gently wipe the lens.
• Never use organic solvents to clean the camera.
• Never touch the lens surface with your fingers.
STORAGE
• Remove the batteries from the camera when not in use for an extended period.
Damage may result if battery leakage occurs.
• Store in a cool, dr y, and well-ventilated area away from dust and chemicals (such
as mothballs). For very long periods, place the camera in an airtight container
with a silica gel drying agent.
• Before using after prolonged storage, check the camera’s operation to make sure
it is functioning properly.
BEFORE IMPORTANT EVENTS
• Always check the camera’s operation carefully or take test photographs.
• Minolta is not responsible for damages incurred by equipment malfunction.
QUESTIONS AND SERVICE
• If you have questions about your camera, contact your local camera dealer or
write to the Minolta distributor in you area.
• Before shipping your camera for repair, please contact a Minolta Ser vice Facility
for details.
SAFETY AND HANDLING FOR COMPACT FLASH CARDS
• Read and follow the instructions that accompanied the CompactFlash card.
• The following may cause data loss or damage:
- Improper use of card.
- Static electrical discharge near card or electric noise.
- Removing the card or interrupting power supply while camera or drive is
accessing the card (reading, deleting, etc.).
- Non-use of card for an extended period.Data stored on CompactFlash cards
will degrade over time. Data left on a card for extensive periods may not be
recoverable.
- Wear from ordinary use.
• The storage capability of CompactFlash cards will diminish with extended use.
When this occurs, please purchase a new card.
• Do not bend, drop, or subject the card to impact.
• Keep away from static electricity and electric noise.
• When not in use, return the card to its protective case.
• All data on the card is per manently erased when the card is formatted.
• Do not touch the electrical contacts of the card with your fingers or a metal
object.
• Keep away from heat, moisture, and direct sunlight.
• Keep away from small children.
110
111
Page 58

TECHNICAL DETAILS
TYPE Compact digital camera with autofocus (AF), autoexposure (AE),
auto white balance (AWB), detachable lens unit, built-in LCD,
Digita™ Operating Environment, and built-in flash
CCD 1/2 inch, square pixels, progressive scan Sony Wfine CCD™ with
primary colour filter.
Total number of pixels: approx. 1,500,000 pixels.
Number of effective pixels: approx.1,450,000 pixels.
ZOOM 1500
LENS UNIT Lens: 7 - 21mm f/3.5 – 5.6
(35mm camera equivalent: approx. 38 - 115mm),
with macro capability.
Construction: 5 element, 5 group zoom including 3 aspheric
surfaces.
Focusing range: 0.5m-infinity, 0.35-0.5m in macro mode
Viewfinder: real-image optical viewfinder
WIDE 1500
LENS UNIT Lens: 5.2mm f/1.9 (35mm camera equivalent: approx. 28mm)
Construction: 9 elements in 8 groups
Focusing range: 0.3m-infinity
Viewfinder: real-image optical viewfinder
IMAGE
STORAGE Recording Media: CompactFlash Card
File format: Exif 2.0 (JPEG)
Number of pixels: 1,344 x 1,008 / 640 x 480 pixels
Image compression ratio: SUPER FINE (1:2), FINE (1:7),
STANDARD (1:19), ECONOMY (1:38)
Storage capacity* (approximate): SUPER FINE: 2 images,
FINE: 7 images, STANDARD.:20 images, ECONOMY:40
images (* Using a 4MB CompactFlash in Full Size;
1,344 x 1,008 pixels)
AUTOFOCUS External passive AF system (focus aid available in macro mode)
EXPOSURE Programmed AE
Exposure compensation (+/– 2 EV in 1/3 EV increments)
Metering: 25-segment TTL metering
ISO equivalent: approx.125
Shutter speed: 1/4,000 sec. - 2 sec.
FLASH Guide number: 11 (ISO 125)
Coverage: 28mm angle of view (35mm format equivalent)
Flash modes: autoflash, fill-flash, flash cancel, autoflash with
red-eye reduction, and fill-flash with red-eye reduction
Automatic flash metering
LCD MONITOR Type: 2.0 inch low temperature poly-silicon colour
TFT-LCD module
Pixels: approximately 110,000
DRIVE MODES Still Capture: faster than 1 frame/2 seconds
Burst Capture: Max. 3.5 frames per second
(in 1,344 x 1,008 pixels, up to 7 frames;in 640 x 480, up to 15 frames)
Timelapse: Set to capture at user-selected intervals;
60 - 32767 seconds: selectable by seconds
1 minute - 546 minutes: selectable by minutes
Self-timer: Approx. 10 second delayed release
INTERFACE Video output: NTSC, PAL (user selectable)
Digital: Serial: RS-232C (for PC Serial Adapter)
Wireless: IrDA Ver. 1.0
POWER Battery: Four AA-size alkaline batteries
(AA-size Ni-Cd, AA-size Ni-MH, AA-size lithium batteries
are also usable)
OPERATING
TEMPERATURE 0 - 40 °C (32 - 104 °F)
DIMENSIONS
(WxHxD) Dimâge EX ZOOM 1500: 127.5 x 67.5 x 58.5mm
Dimâge EX WIDE 1500: 127.5 x 67.5 x 62.5mm
WEIGHT Dimâge EX ZOOM 1500: 310g (with lens, without batteries)
Dimâge EX WIDE 1500: 340g (with lens, without batteries)
Specifications are based on the latest information available at the time of printing
and are subject to change without notice.
WHITE
BALANCE Automatic;
manual setting available (daylight, tungsten, fluorescent)
113112
Page 59

LATE-BREAKING INFORMATION
This insertion contains impor tant late-breaking information about the
Dimâge EX and included software. Please read this information carefully
and review it with the proper section of the appropriate instruction manual.
Please register your software to receive software upgrade information.
LCD Monitor - page 23
When the camera is turned on in Record Mode, the LCD monitor automatically
turns on. When the camera is changed to Record Mode from another mode, the
LCD monitor resumes the Record mode’s last ON/OFF position.
Burst Mode - page 31
Processing of a Burst Image series takes approximately three minutes.During
this time, another Burst series cannot be taken. However, the mode can be
changed and Still images can be taken.
Image Quality Default Settings - page 47
The default image quality setting for all image types (Still, Burst, and
Timelapse) is Standard (STD).
Bracketing Sequence - page 56
The exposure sequence for Bracketing is: under, normal, over.
Before starting a bracketing sequence, be sure the Busy lamp is not glowing.
(Bracket operation is unpredictable if a ser ies is star ted when the busy lamp is
glowing.)
Formatting CompactFlash Cards - page 62
After formatting the CompactFlash card with the Dimâge EX, turn the camera off
once, then turn the camera on again.
Camera Malfunction
When the camera locks-up (‘freezes’), remove and reinser t the batter ies or
unplug and replug in the AC adapter.
Turning the Camera On
Before turning the camera on, slide the mode switch to REC or PLAY.
Blinking Busy Lamp
Do not open the battery/card-chamber cover or unplug the AC adapter while the
Busy lamp is blinking.
Compact Flash Cards used with a Compact Flash Adapter
This information is for customers using compact flash cards in PCMCIA drives
with a compact flash card adapter.
The compact flash card will contain a folder titled EX15_01 (Fig. 1). Inside this
folder are the image files and a file titled Ftifold.inf (Fig 2).
Fig. 1 Fig. 2
Review Mode Display - page 74
The file name for uploaded images will not be displayed.
Custom Scripts - page 102
For details regarding the Digita Script software development kit, visit the
FlashPoint Technology home page at http://www.flashpnt.com/
• Depending on the contents of a specific script, certain scripts may cause instability in the camera’s operation.
• Minolta is not responsible for the results of user-made custom scripts used with the
Dimâge EX.
CompactFlash Card Maximum Capacity - page 105
It is recommended that the maximum number of images recorded on a
CompactFlash card in the Dimâge EX does not exceed 200. If more than 200
images are recorded on a CompactFlash card in the camera, camera operation
may be unpredictable.
114
The Ftifold.inf file contains the image management information for the compact
flash card.This file is only updated when images are added or deleted via the
Dimâge EX camera.When images are added to or deleted from the card directly
through the disk drive, the file is not updated - this can cause unstable operation.
Delete images from or upload images to the compact flash card in the
Dimâge EX via the Digita Desktop™ software, or use the delete function on
the Dimâge EX to remove images from the compact flash card.
115
Page 60

A Minolta Austria Ges.m.b.H
Amalienstr. 59-61, A-1131 Wien,
Österreich
Tel: 01 87868 176 Fax: 01 87868 153
http://www.minoltaeurope.com
B Minolta Belgium Branch
Kontichsesteenweg 38, B-2630
Aartselaar, Belgique
Tel: 03 877 04 30 Fax:03 877 00 49
http://www.minolta.be
CAN Minolta Canada Inc., Head Office
369 Britannia Road East,
Mississauga, Ontario L4Z 2H5, Canada
Tel. 0905 890 66 00 Fax: 0905 890 71 99
http://www.minolta.com
CH Minolta (Schweiz) AG
Riedstr. 6, CH-8953 Dietikon, Schweiz
Tel: 157 57 11 Fax:01 741 33 12
http://www.minolta.ch
D Minolta GmbH
Kurt-Fischer-Str. 50, D-22923
Ahrensburg, Deutschland
Tel: 0180 567 20 80 Fax: 0221 93 767
177
Mo – Fr, 10.00 – 19.00
http://www.minolta.de
DK Paul Westheimer A/S
Erhvervsvej 30, DK-2610 Rødovre,
Danmark
Tel: 44 85 34 00 Fax: 44 85 34 01
http://www.minoltaeurope.com
E Videosonic S.A.
c/ Valportillo II, 8, Pol. Ind. de
Alcobendas,
E-28100 Alcobendas/Madrid, Spain
Tel: 01 661 94 30 Fax: 01 661 94 30
http://www.minoltaeurope.com
F Minolta France S. A.
365, Route de Saint-Germain,
F-78420 Carrières-Sur-Seine, France
Tel: 0130 86 62 02 Fax: 0130 86 62 82
http://www.minolta.fr
FIN Minolta Finland Branch
Niittykatu 6, PL 37 SF-02201 Espoo,
Finland
Tel: 09 423 499 Fax: 09 423 116
http://www.minolta.fi
GB Minolta (UK) LTD. Photographic Division
Precedent Drive,
Rooksley,Milton Keynes, MK13 8HF,
England
Tel: 01 908 208 349 Fax: 01 908 208 334
http://www.minolta.co.uk
IRL Photopak Sales
241 Western Industrial Estate, Naas
Road, Dublin 12, Ireland
Tel: 01 45 66 400 Fax: 01 45 00 452
http://www.minoltaeurope.com
I Rossi & C. S.p.A.
Via Ticino 40, Sesto Fiorentino-Firenz e, I
– 50019 Osmannoro, Italy
Tel: 055 31 60 02 Fax: 055 37 52 87
http://www.minoltafoto.it
N Scandiafilm AS
Enebakkveien 304, N-1188 Oslo 11,
Norge
Tel: 022 28 00 00 Fax: 022 28 17 42
http://www.minoltaeurope.com
NL Minolta Camera Benelux B.V.
Zonnebaan 39, P. O. Box 6000,
NL-3600 HA, Maarssen, Nederland
Tel: 030 241 14 11 Fax: 030 241 41 65
http://www.minolta.nl
P Minolta Portugal Lda
Av. do Brasil 33-a, P-1700 Lisboa,
Portugal
Tel: 01793 00 16 Fax: 01 793 10 64
http://www.minoltaeurope.com
S Minolta Svenska AB
P. O. Box 9058, Albygatan 114, S-17109
Solna, Sverige
Tel: 08 627 76 50 Fax: 08 627 76 21
http://www.minoltaeurope.com
Sin Minolta Singapore (Pte) Limited
10 Teban Gardens Crescent, Singapore
2260
Tel: 56 35 533 Fax:56 10 217
http://www.minolta.com
Please contact your dealer for additional information. If your dealer
is unable to help you, contact us.
Technical Support
01908 208349
Monday - Friday 9:00 AM - 5:15 PM
Minolta (UK) Limited
Photographic Division
Rooksley Park
Precedent Drive
Rooksley
Milton Keynes
MK13 8HF
9222-2760-31
© 1998 Minolta Co., Ltd.under the Berne
Convention and Universal Copyright Convention
Printed in Germany
117116
Page 61

119118
This part explains the changes incorporated in the
Dimâge EX Operating Environment Version 2. (firmware)
Please read it in conjunction with the User's Manual supplied with the
camera.
Version 2
1. A NEW DIGITAL MAGNIFICATION FUNCTION . . . . . .120
2. INCREASED BURST RATE . . . . . . . . . . . . . . . . . . . . .121
3. SMOOTHER MOTION IN LIVE IMAGES . . . . . . . . . . .121
4.THE INTERNAL FLASH MAY BE
SWITCHED ON/OFF . . . . . . . . . . . . . . . . . . . . . . . . . .121
5. A FLASH BRACKETING FUNCTION
HAS BEEN ADDED . . . . . . . . . . . . . . . . . . . . . . . . . . .122
6. CUSTOM SETTINGS FOR WHITE BALANCE
HAS BEEN ADDED . . . . . . . . . . . . . . . . . . . . . . . . . . .123
7. IMPROVED CUSTOM SCRIPT FUNCTION . . . . . . . . .124
8.THE BRACKETING INCREMENTS
HAS BEEN CHANGED . . . . . . . . . . . . . . . . . . . . . . . .125
TABLE OF CONTENTS VERSION 2
Page 62

121
NEW FEATURES FOR DIMÂGE EX VERSION 2
120
4.THE INTERNAL FLASH MAY BE SWITCHED ON/OFF
2. INCREASED BURST RATE
(see User’s Manual P52)
3. SMOOTHER MOTION IN LIVE IMAGES
The burst rate is increased when [Fast] or [Medium] is
selected with Menu Button [Media Settings]
[Burst] Edit soft key [Burst Settings]
[Burst Rate].
[Fast] Approximately 3.5 frames per second
New: Approximately 7.5 frames per
second
[Medium] Approximately 2.5 frames per second
New: Approximately 3.7 frames per
second
The burst rate when [Slow] is selected (approximately 1.2 frames per second) has not changed.
The refresh rate (the time required to rewrite one frame on the LCD monitor) when reviewing live images
has been increased by approximately 33%, thus improving the smoothness of motion.
• Motion in digitally magnified live images is slightly jerky with digital magnification selected. However, this
has no effect on image quality.
The internal flash may be switched ON/OFF by
selecting Menu Button [Preferences] [Capture]
Edit soft key [Capture] [Internal Flash]
This function allows the internal flash to be switched
OFF when using the external flash unit FL-EX1
(available separately).
[On] Internal flash operates
[Off] Internal flash does not operate
• Setting this function to disable the internal flash does not disable t the pre-flash for use in reducing redeye and the AF flash assistance used for focusing.
1. A NEW DIGITAL MAGNIFICATION FUNCTION
Trimmed area (displayed area)
with digital magnification
Magnification for
digitally magnified area.
Figures in brackets are for
1/4 size.
Full size
Width
(pixels)
Height
(pixels)
1344 1008
1120 840
1024 768
960 720
896 672
768 576
672 504
1/4 size
Width
(pixels)
Height
(pixels)
640 480 1.0X (1.0X)
1.2X (1.1X)
1.3X (1.3X)
1.4X (1.4X)
1.5X (1.7X)
1.8X (2.0X)
2.0X (2.2X)
576 432
512 384
448 336
384 288
320 240
288 216
• The digital magnification function operates only when the LCD monitor is switched ON. When digital
magnification has been selected it is cleared by pressing the LCD monitor ON/OFF button on the lens
unit to switch the monitor OFF.
• Digital magnification cannot be used when the wide-angle 1500 lens unit is fitted.
• When the PLAY or REVIEW mode is selected while digital magnification is selected, selecting the REC
mode again clears digital magnification.
• Motion in digitally magnified live images is slightly jerky with digital magnification selected, however this
has no effect on image quality.
• Images recorded from the digitally magnified area are trimmed in the ver tical and horizontal directions as
shown above (they are not reconstructed to 1344x1008 pixels), and appear as smaller images when
displayed on the PC monitor screen or when printed.
After extending the optical zoom (telephoto) to 115mm, release the right button and then press it again to
select digital magnification. Press the right button once to increase the magnification of the live image on
the LCD monitor.The full size (2.0X) image is 672 pixels (horizontal) x 504 pixels (vertical)
(1/4 size (2.2X) image of 288 pixels (horizontal) x 216 pixels (ver tical)).
Press the left button once to decrease the digital magnification of the image.After decreasing
magnification to the minimum size image of 1344 pixels (horizontal) x 1008 pixels (ver tical) (1/4 size image
of 640 pixels (horizontal) x 480 pixels (vertical)), press the left button once to re-select the optical zoom
(telephoto).
A magnifying glass icon appears at the top-right of the REC screen when digital magnification is
selected.
Page 63

NEW FEATURES FOR Dimâge EX Version 2
123
NEW FEATURES FOR DIMÂGE EX VERSION 2
122
6. CUSTOM SETTINGS FOR WHITE BALANCE HAS BEEN
ADDED
(see User’s Manual P55)
In addition to the preset white balance the Dimâge EX allows custom setting of white balance in
accordance with the user’s own white balance sample.
Display the menu screen using the
menu button, highlight [Photo
Script] [White Balance], and
press the Edit soft key.
Highlight [Custom].
Point the lens towards the white
balance sample and press the
Select soft key.
• The custom white balance is set.
• Ensure that the white balance sample is large enough
to fill the viewfinder.
• After the custom white balance is set the screen
returns to the condition in step 1. above.Press the
End soft key to return to the initial (live image)
screen.
• A custom white balance once set is maintained until
another white balance is selected, or the camera
power supply is switched OFF. Switching the camera
power supply OFF clears the custom white balance.
5. A FLASH BRACKETING FUNCTION HAS BEEN ADDED
By changing the flash illumination in steps the exposure for the background not reached by the flash
remains unchanged, while the exposure for the subject illuminated by the flash is bracketed.
The exposure for the subject is bracketed from ‘optimum’ ‘under exposed’ ‘over exposed’.
Display the menu screen using the
menu button, highlight [Photo
Script] [Flash Bracketing] and
press the Edit soft key.
Highlight the bracketing adjustment
increment required, and press the
Select soft key.
46
45
44
Wait until the flash is charged, and
then press the shutter button to
take the photograph.
Repeat step 3. above twice.
• This differs from the Bracketing (see P56 of the
User’s Manual) in that the shutter is pressed three
times for each series of three exposures.
• When flash bracketing is selected, the numbers at the
right of the overlay bar indicate whether the next
photograph is the 1st, 2nd, or 3rd of the three frames.
• Use flash bracketing only after checking that the
BUSY lamp is extinguished.Flash bracketing will not
operate correctly if photography is begun while this
BUSY lamp is lit (blinking).
Page 64

NEW FEATURES FOR Dimâge EX Version 2
125
FEATURES FOR DIMÂGE EX VERSION 2
124
• If you are interested in preparing your own scripts, download the Digita Script Software Development Kit
from http://www.flashpnt.com/.
• The content of some scripts may result in problems with operation of the camera after the script has
been run.
• Minolta takes no responsibility for the results of running a custom script, and is not liable for
compensation for losses (e.g.loss of image data) incurred as a result of running such a script.
8.THE BRACKETING INCREMENTS HAS BEEN CHANGED
(see User's Manual P56)
Steps used with flash bracketing with normal light were
1/2 of EV steps, however this has been changed to 1/3
of EV steps in Version 2.
Shutter Speed Setting
The manual exposure mode is selected from the menu and the desired shutter speed is set (the f-stop
cannot be changed) using a script. Use when a shutter speed of longer than 2 seconds is required.
Changing ISO Sensitivity
Automatic gain control operates to amplify the signal when the subject is dark and the signal level is low.
Note that gain is normally fixed However, it may be altered with the script. Please note that the noise in the
signal may increase as the gain is increased.
Flash Compensation
The flash illumination may be controlled for exposure compensation using a script. This compensation
differs from the exposure compensation in which the brightness of the whole image is increased.The areas
of the image not illuminated by the flash remain unchanged, only the exposure for the subject illuminated
by the flash is compensated.
Selectable Metering
In addition to the normal 25-segment Metering, Center Weighted Average Metering and Spot Meter ing may
be selected with the script to suit the application or purpose.
AE Lock Selectable
A script may be used to select whether lightly pressing the shutter button is to lock or not lock (focus lock
only) AE.
Manual White Balance Adjustment
White balance may be manually adjusted for red, blue, and green using a script. This function allows fine
setting of white balance as necessary to suit photographic requirements.
Manual Focus
Focus may be adjusted with the cross-hairs keys (right and left) using a scr ipt. The focus may be checked
on the LCD monitor for live images (this is not possible in the viewfinder).Manual focusing is not possible
when digital magnification is selected.
7. IMPROVED CUSTOM SCRIPT FUNCTION
(see User's Manual P102)
The script facility of the Dimage EX has been improved to allow moreflexibility in writing scripts.
Below are some examples. These can bedownloaded from the Mi nolta website,
http://minoltaeurope.com/download_link.html
 Loading...