

Page 1

- 1 -
Thank you for purchasing the Minolta 3D 1500.
Please take the time to read through this instruction manual so you can enjoy all its
features.
For information on installing and operating the included application software, please
read the software instruction manual saved in the CD-ROM as a pdf file.
This manual contains information regarding products introduced before Sep., 1999.
To obtain compatibility information for products released after this date, contact a
Minolta Service Facility listed on the back cover of this manual.
This mark on your camera certifies that this camera
meets the requirements of the EU (European Union)
concerning interference causing equipment
regulations.
CE stands for Conformité Européenne (European
Conformity).
This device complies with Part 15 of the FCC Rules.
Operation is subject to the following two conditions:
(1) This device may not cause harmful interference,
and (2) this device must accept any interference
received, including interference that may cause
undesired operation.
Tested by the Minolta Corporation
101 Williams Drive, Ramsey, New Jersey 07446,
U.S.A.
This Class B digital apparatus complies with Canadian ICES-003.
Cet appareil numérique de la classe B est conforme à la norme NMB-003 du Canada.
Do not remove the ferrite cores from the cables.
• MetaFlash™, MetaFlash™ Studio, and MetaStream™ are trademarks of
MetaCreations Corporation.
• Windows
®
is a registered trademark in the United States and other countries of
Microsoft Corporation.
Digital Camera:
FOR HOME OR OFFICE USE
3D 1500
Tested To Comply
With FCC Standards
Page 2
- 3 -
BEFORE YOU BEGIN
FOR PROPER AND SAFE USE
- 2 -
Read and understand all warnings and cautions before using this product.
WARNING
Batteries may become hot or explode due to improper use.
• Use only the batteries specified in this instruction manual.
• Do not install the batteries with the polarity (+/-) reversed.
• Do not subject batteries to fire or high temperatures.
• Do not attempt to recharge, short, or disassemble.
• Do not mix batteries of different types, brands, or ages.
Use caution, accidents may occur when using this product near young children.
Keep batteries or things that could be swallowed away from young children. Contact
a doctor immediately if an object is swallowed.
Immediately remove the batteries and discontinue use if...
• the camera is dropped or subjected to an impact in which the interior is exposed.
• the product emits a strange smell, heat, or smoke.
Do not walk while looking at the monitor.
Do not disassemble. Electric shock may occur if a high voltage circuit inside the
camera is touched.
Take your camera to a Minolta Service Facility when repairs are required.
CAUTION
The heat of the camera rises with extended periods of use. Use caution when
handling the camera or removing the batteries and compact flash card.
The lens retracts when the camera is turned off or Auto Power Off is activated.
Touching the lens barrel while it is retracting may cause injury.
Check the packing list before you begin. If some parts are missing, contact your
camera dealer or a Minolta Service Facility listed on the back cover of this manual.
• Minolta 3D 1500 camera (x 1)
• Camera Bracket CB-3D1 (x 1)
• AA-size Alkaline Batteries (x 8)
• AC Adapter (x 1)
• Quest
®
8 HOUR NiMH BATTERY CHARGER and NiMH BATTERIES
Quest®AA-size rechargeable NiMH batteries (x 4)
Size AA& size AAANiMH battery charger (x 1)
• Video Cable VC-EX1 (x 1)
• CD-ROM (x 1)
MetaFlash™ Studio for Windows
®
MetaStream™ Viewer Plug-in (Web browser Plug-in)
MetaFlash™ Studio User Guide (PDF file)
Adobe Acrobat™ Reader 4.0 Installer
• Floppy Disk (x 1)
Calibration File
Script file for reading the number of MetaFlash fired (GETSCNT.CSM)
• LexarMedia JumpShot®USB connection kit
32MB USB-enabled CompactFlash card (x 1)
JumpShot®USB cable (x 1)
• Documentation
Camera Instruction Manual (this manual) (x 1)
Dimâge EX Camera Instruction Manual (x 1)
Dimâge EX Version 2 Guide (x 1)
Warranty (x 1)
[IMPORTANT] About the Calibration File
The attached floppy disk contains a calibration file. The data in this file is
required to generate 3D images for MetaFlash Studio from the image data
which is taken with the 3D 1500 camera. You could generate no 3D image
without this data.
The calibration file is unique to each 3D 1500 camera. You can not use it for
another 3D 1500 camera You can not use the calibration file for another 3D
1500 camera with your 3D 1500 camera, either.
Exercise adequate care when handling or storing the floppy disk so that the
calibration file on the floppy disk may not be lost or corrupted. Be sure to take a
backup copy of the floppy disk in case it is lost or damaged. It is recommended
that, whenever possible, the data on the floppy disk be saved on two or more
storage media such as another floppy disk, hard disk, and Zip disk.
Page 3

TABLE OF CONTENTS
TABLE OF CONTENTS
- 4 - - 5 -
FOR PROPER AND SAFE USE ......................................................................2
BEFORE YOU BEGIN ......................................................................................3
TABLE OF CONTENTS ...................................................................................4
NAMES OF PARTS..........................................................................................6
MATERIALS COVERED IN THIS MANUAL....................................................8
PREPARATION
INSERTING BATTERIES [Camera Body] ................................................10
INSERTING BATTERIES [MetaFlash]......................................................12
Low Battery Indicator [Camera Body].................................................14
Rules of Thumb for Replacing the Batteries [MetaFlash] ..................14
Auto Power Off [Camera Body]..........................................................15
Auto Power Off [MetaFlash]...............................................................15
Using the AC Adapter [Camera Body Only] .......................................16
COMPACT FLASH CARD ........................................................................17
Inserting the Compact Flash Card......................................................17
Removing the Compact Flash Card...................................................18
A TTACHING AND REMOVING THE METAFLASH UNIT.........................20
Attaching the MetaFlash Unit to the Camera.....................................20
Removing the MetaFlash Unit from the Camera................................20
ATTACHING THE CAMERA BRACKET...................................................21
BEFORE TAKING PICTURES
PROCESSES FOR GENERATING A 3D IMAGE.....................................23
IMPORTANT PREPARATIONS FOR TAKING PICTURES ......................24
Subjects That are Not Suited for the 3D 1500...................................24
Making the Background of the Subject Solid Black ...........................25
Brightness of the Subject and Its Surrounding...................................26
To Get Better 3D Images....................................................................27
TAKING PICTURES
BASIC RECORDING PROCEDURE........................................................29
EXPOSURE COMPENSATION................................................................34
TRANSFERRING IMAGE DATA...............................................................36
FOR YOUR INFORMATION
WHEN TO REPLACE THE XENON LAMP ..............................................38
TROUBLESHOOTING..............................................................................39
ACCESSORIES........................................................................................42
CARE AND STORAGE.............................................................................44
TECHNICAL DETAILS..............................................................................47
Page 4

NAMES OF PARTS
- 7 -
NAMES OF PARTS
- 6 -
Flash tube
Refer to the Dimâge EX Camera Instruction Manual for more details.
Power switch
Flash-ready lamp
Display button
Tripod socket
Battery-chamber cover
Page 5

- 9 -
MATERIALS COVERED IN THIS MANUAL
- 8 -
PREPARATION
This manual covers only the procedures for using the Minolta 3D 1500 to take
pictures which will be served as the source for generating 3D images.
For the basic functions and operating procedures of the Minolta 3D 1500
camera, refer to the Camera Instruction Manual for Dimâge EX.
You can use your Minolta 3D 1500 as an ordinary Dimâge EX (Version 2)
camera (non-3D camera) by attaching an optional Zoom 1500 or Wide 1500
lens unit in place of the MetaFlash unit. For the operating procedures for this
purpose, refer to the Dimâge EX Camera Instruction Manual and “Dimâge EX
Version 2 Guide” which come with the Dimage EX system.
Page 6
INSERTING BATTERIES [Camera Body]
- 11 -
INSERTING BATTERIES [Camera Body]
- 10 -
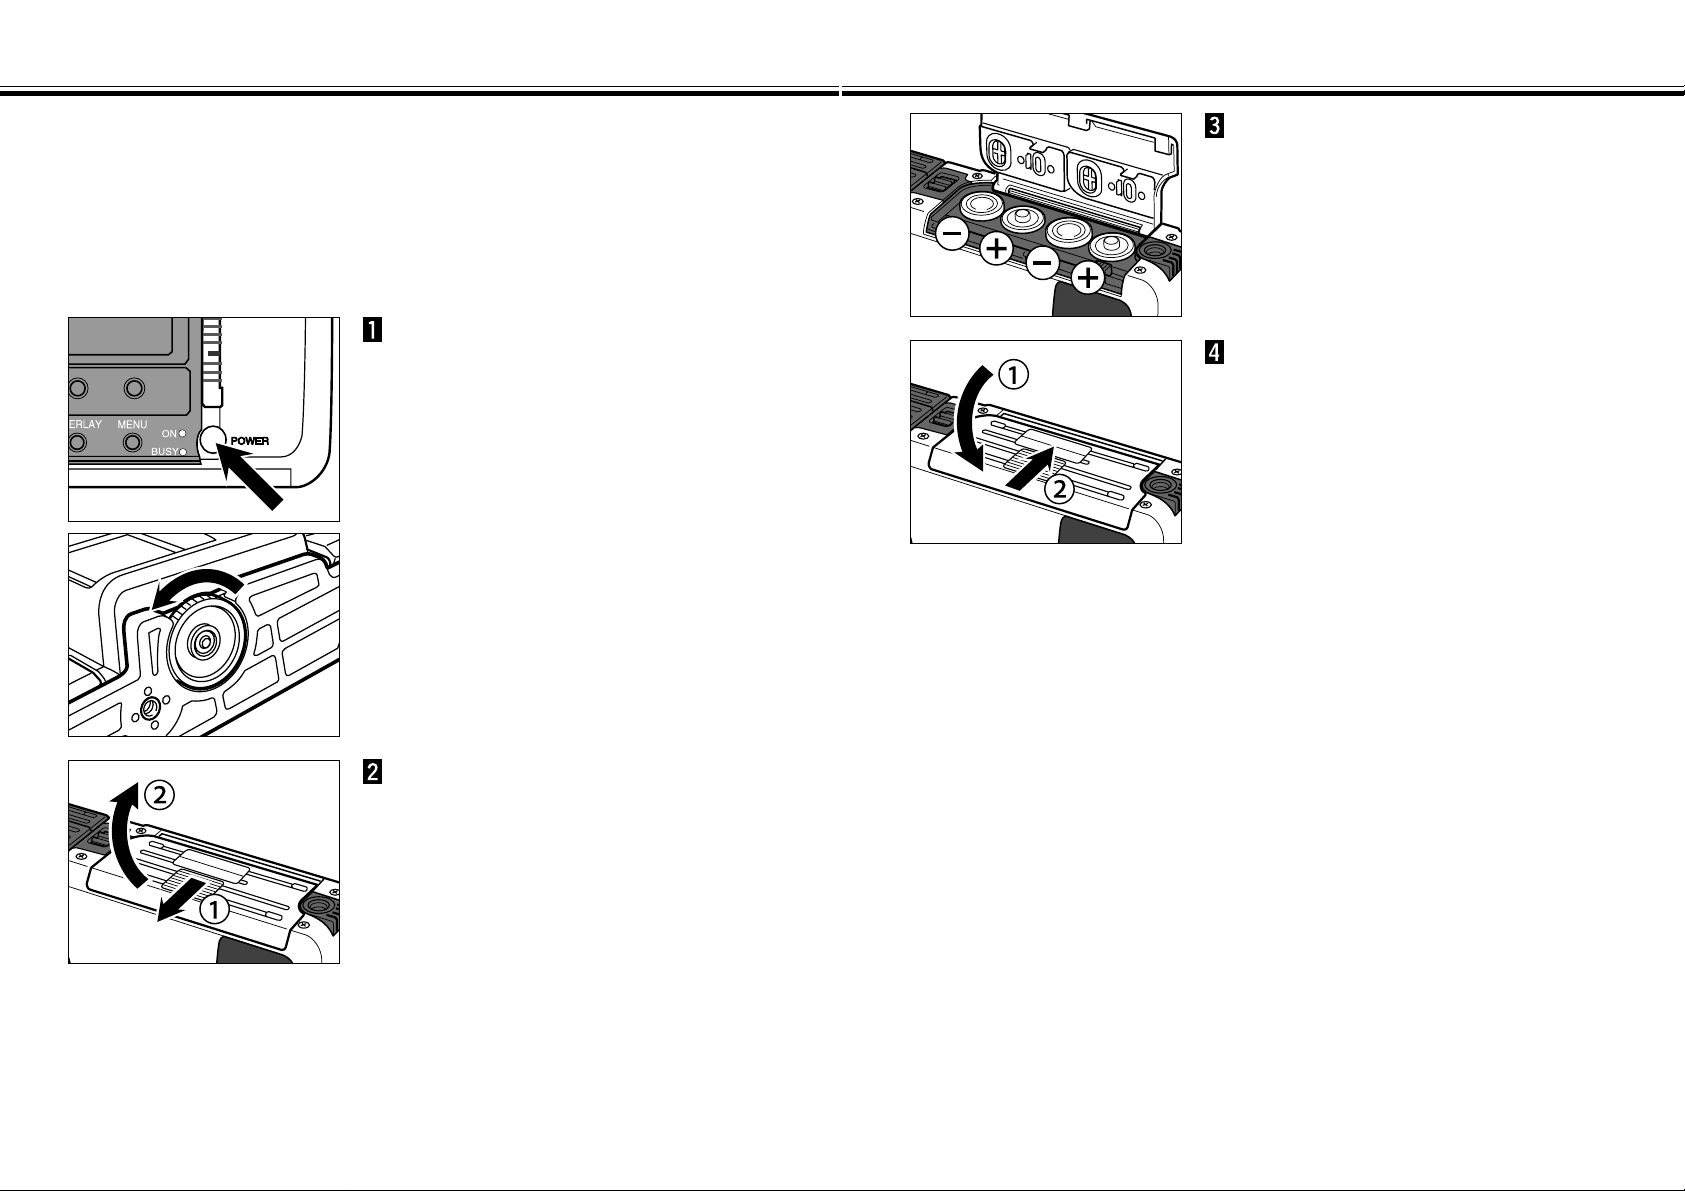
Open the battery-chamber cover
by sliding it in the direction
indicated, then open the cover.
(When replacing the batteries),
press the main switch to turn the
camera off and remove the
camera bracket (see Page 21).
• You may skip this step when inserting the
batteries for the first time after purchase.
Insert the batteries as indicated
by the +/- diagram on the back of
the battery-chamber cover.
Close the battery-chamber cover
and slide it shut until it clicks.
The Minolta 3D 1500 uses a total of 8 AA-sized alkaline batteries, 4 batteries for the
camera body and 4 batteries for the MetaFlash unit.
• You may also use AA-sized Ni-Cd or Ni-MH batteries.
• When using Ni-Cd or Ni-MH batteries, fully recharge them with a vendor-endorsed
battery charger.
Page 7
INSERTING BATTERIES [MetaFlash]
- 13 -
INSERTING BATTERIES [MetaFlash]
- 12 -
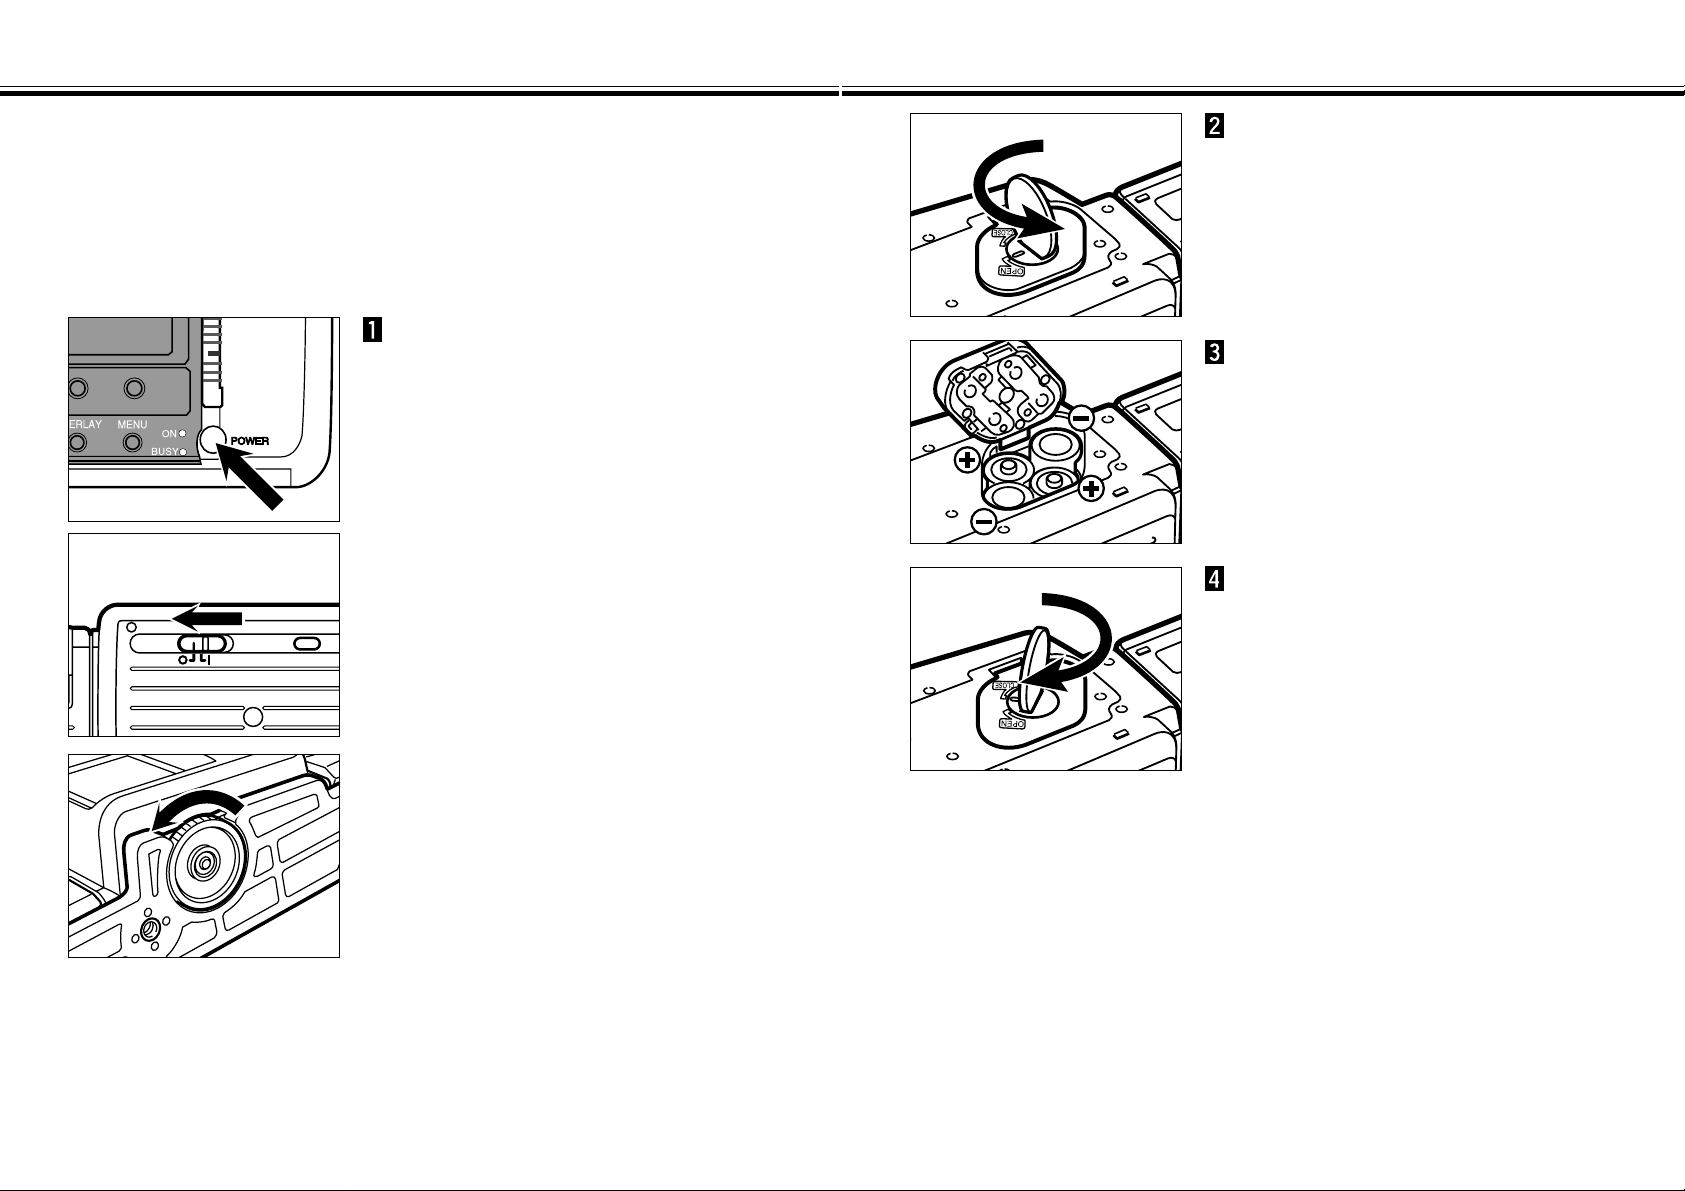
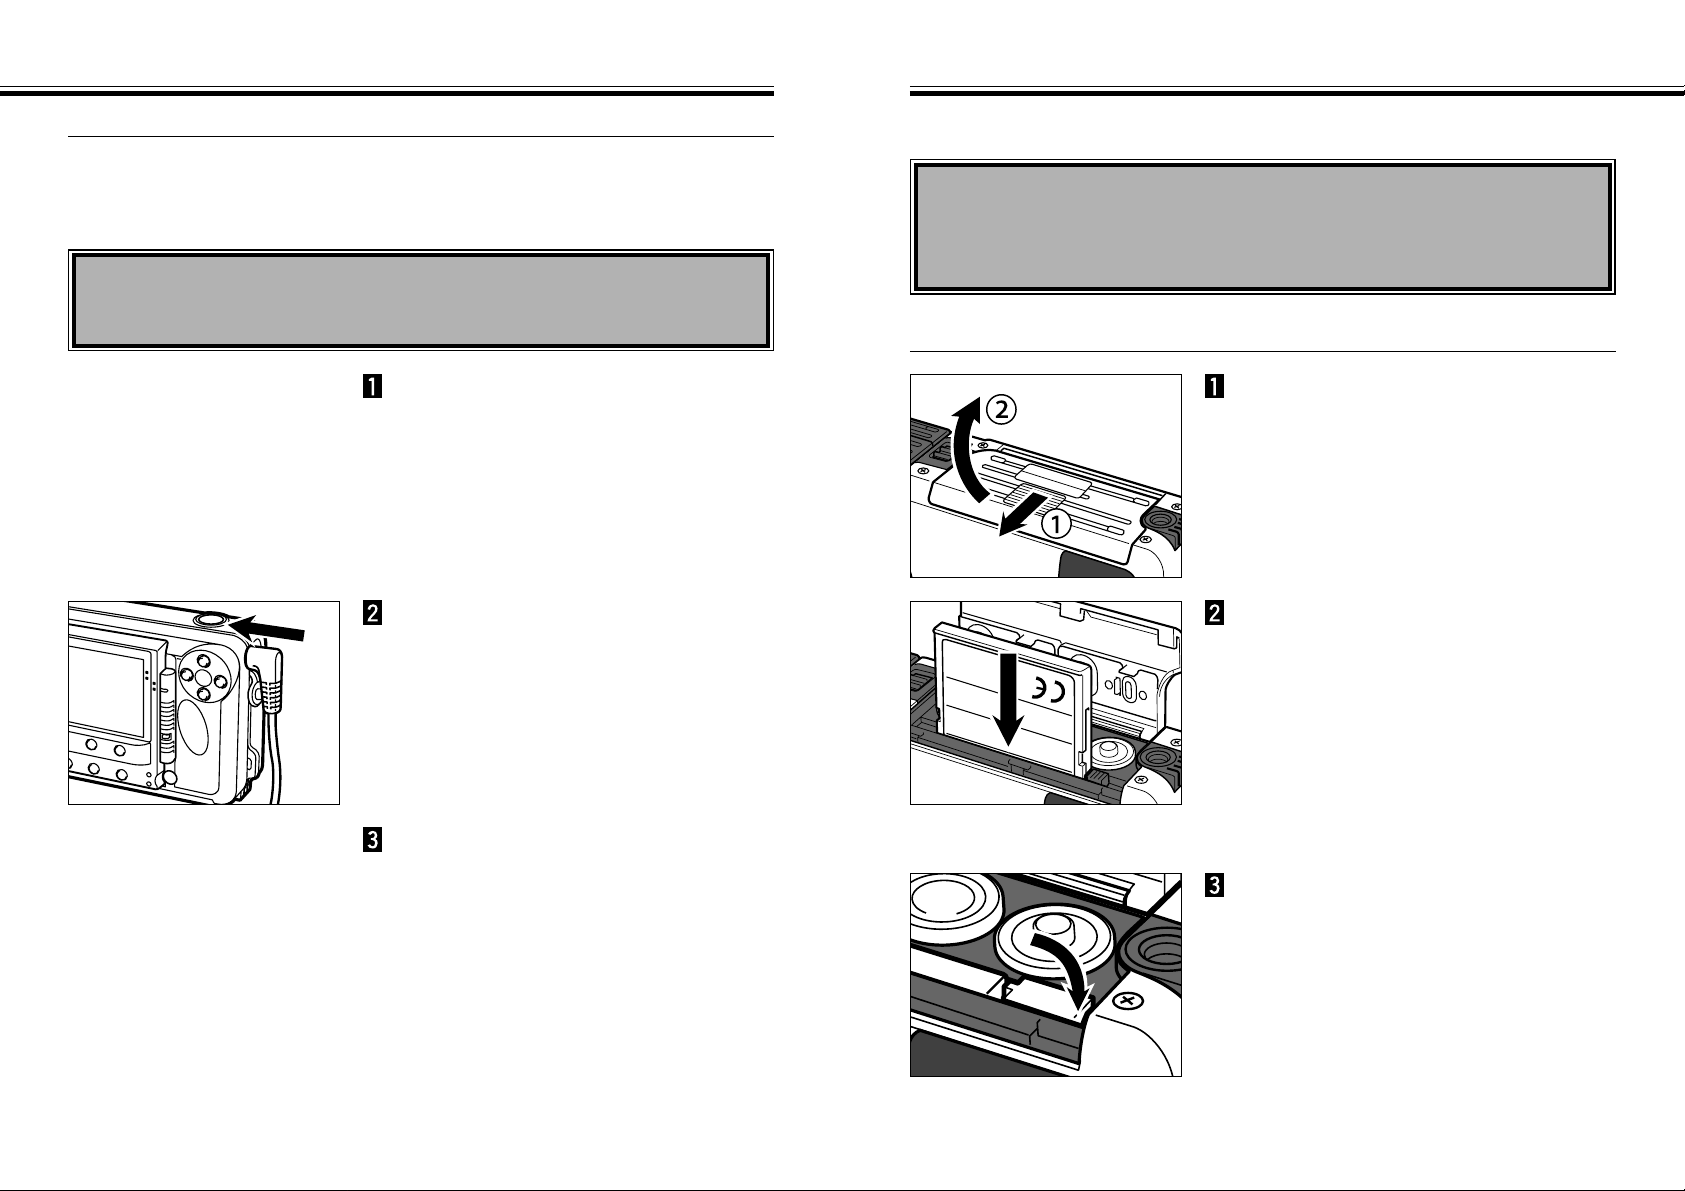
(When replacing the batteries),
press the main switch to turn the
camera off, turn the MetaFlash
off, and remove the camera
bracket (see Page 21).
• You may skip this step when inserting the
batteries for the first time after purchase.
Using a coin or similar object,
turn the battery-chamber lock
counter-clockwise to the OPEN
mark.
Open the battery-chamber cover,
then insert the batteries as
indicated by the + and - marks.
Close the cover, then turn the
battery-chamber cover to the
CLOSE mark to lock it.
• To prevent damage to the cover, do not place the camera body with the batterychamber cover opened and the cover facing downward.
The Minolta 3D 1500 uses a total of 8 AA-sized alkaline batteries, 4 batteries for the
camera body and 4 batteries for the MetaFlash unit.
• You may also use AA-sized Ni-Cd or Ni-MH batteries.
• When using Ni-Cd or Ni-MH batteries, fully recharge them with a vendor-endorsed
battery charger.
Page 8
INSERTING BATTERIES - CONT’D
- 15 -
INSERTING BATTERIES - CONT’D
- 14 -
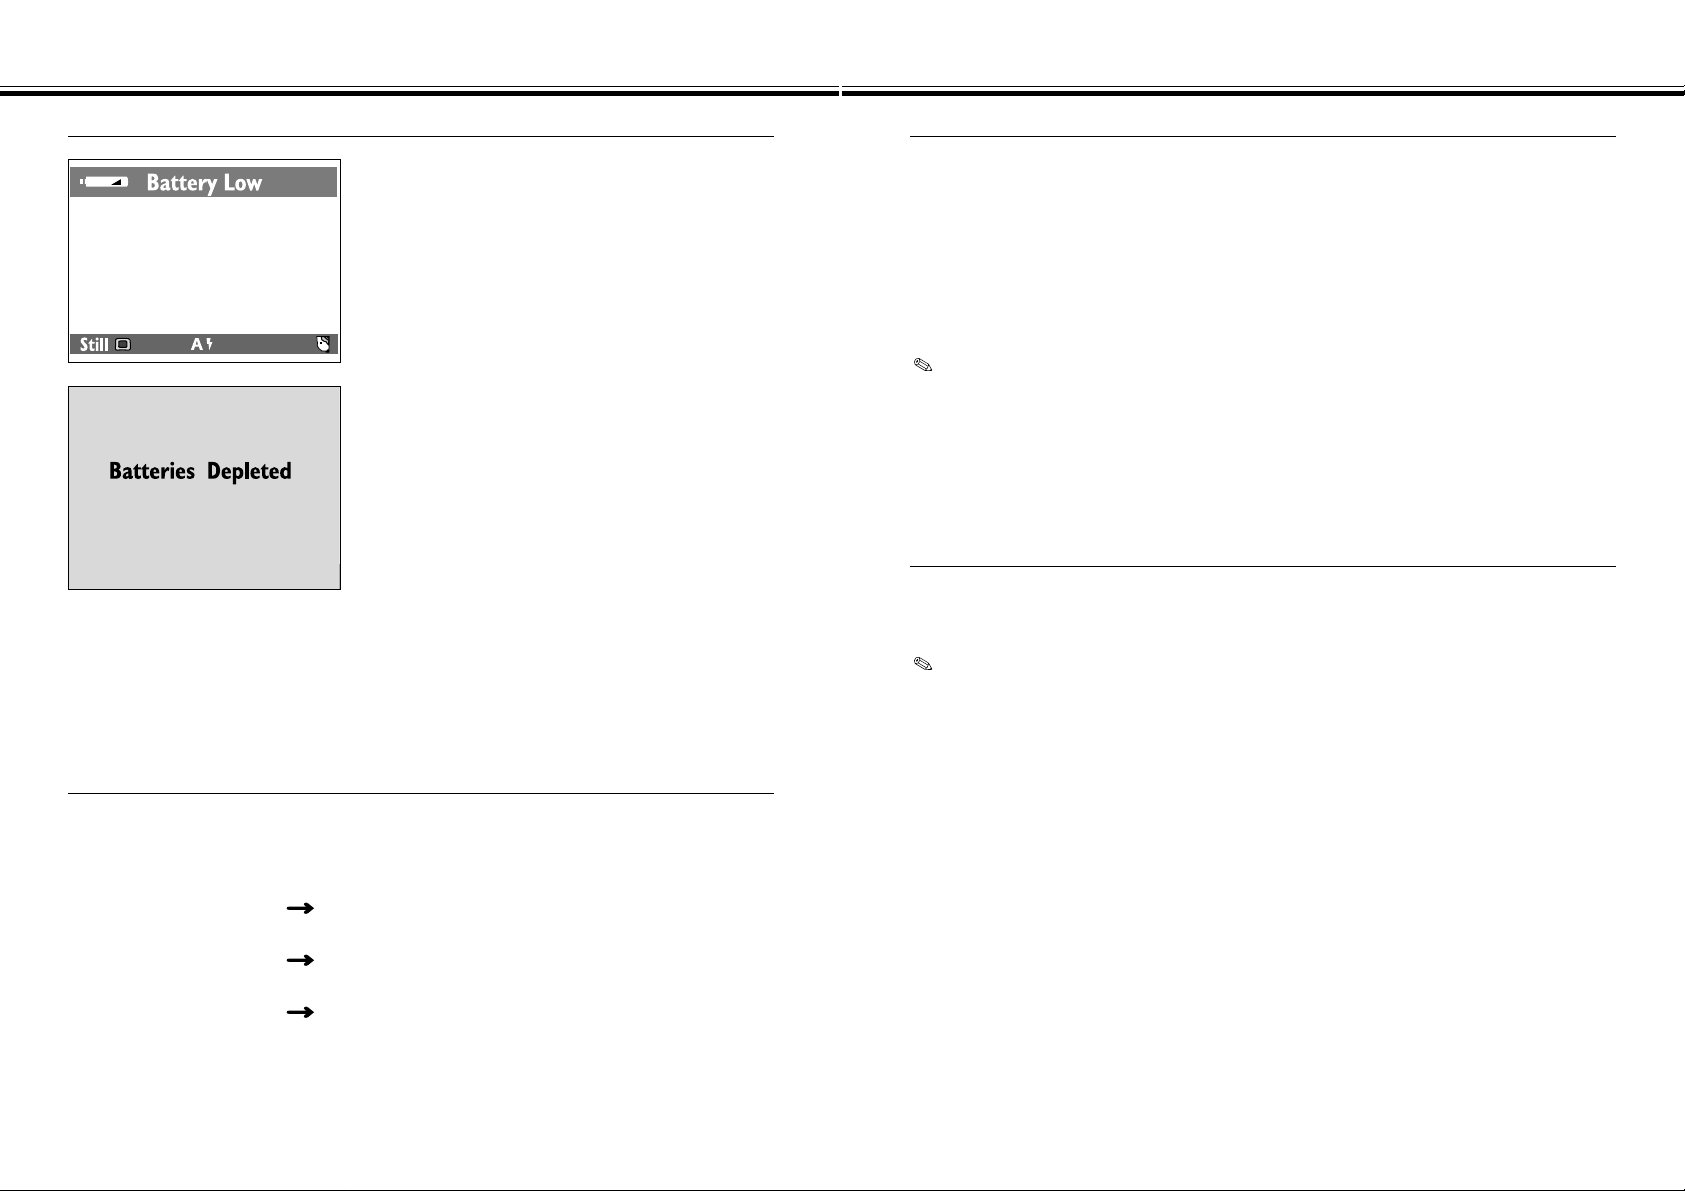
A warning message will appear in the top
overlay bar of the LCD monitor when the
battery power gets low.
In such a case, turn the camera off temporarily
and replace the four batteries with new ones*
or use the AC adapter.
Low Battery Indicator [Camera Body]
When the battery power is too low for camera
operations, an alert dialog will appear on the
LCD monitor.
You can not operate your camera under this
situation. The camera will automatically
shutdown in aproximately one minute.
In such a case, turn the camera off immediately
and replace the four batteries with new ones*
or use the AC adapter.
Auto Power Off [Camera Body]
The LCD monitor will shut off if the camera has not been used for 3 minutes.
• The power lamp will remain on.
• Press the Display button to turn the LCD monitor back on.
After an additional 3 minutes without use (6 minutes total), the camera will shut down
completely.
• The power lamp will turn off.
• Press the main switch to turn the camera back on.
When you are using the AC adapter, the Auto Power Off feature will be activated
and camera power is automatically shut off if you take no action for approximately
30 minutes or longer.
Rules of Thumb for Replacing the Batteries [MetaFlash]
Auto Power Off [MetaFlash]
* Take care when replacing the batteries as they are hot immediately after the camera
is operated.
Replace the batteries when the camera shows one of the following charging times (the
time till the Flash-ready lamp on the rear panel turns on after taking a picture):
AA-sized alkaline batteries
30 seconds or longer Replace all of the 4 batteries with new ones.
AA-sized Ni-Cd batteries
30 seconds or longer Replace all of the 4 batteries with fully charged ones.
AA-sized Ni-MH batteries
30 seconds or longer Replace all of the 4 batteries with fully charged ones.
The MetaFlash unit is provided with no Auto Power Off feature. For power saving,
turn off its power frequently when you are not to use the MetaFlash unit.
Whenever you take a picture, make sure that your MetaFlash unit is switched on.
Page 9
- 17 -
COMPACT FLASH CARD
INSERTING BATTERIES - CONT’D
- 16 -
Using the AC Adapter [Camera Body Only]
Use the AC Adapter allows the camera to receive power from an electrical outlet. Use
of the AC Adapter is recommended to conserve batteries during periods of heavy use.
It is also recommended when interfacing the camera with the computer.
Always turn the camera off, and switch the digital camera power supply off, before
changing from batteries to AC adapter or vice versa. Do not change the power
supply while the camera is on.
Turn the camera off and remove
all of the four batteries.
Insert the mini plug into the
camera’s DC terminal.
• The shape of the mini plug varies depending
on the AC adapter.
Your camera requires a compact flash card to be inserted before capturing images.
Always turn off the camera before inserting or removing the compact flash
card into or from the camera.
The data in the card will be lost, or the card itself may be damaged, if the compact
flash card is inserted or removed while the camera is on.
Open the battery-chamber cover
by sliding it in the direction
indicated, then open the cover.
Insert the compact flash card
into the card slot, pushing it in
until the card-release lever pops
out.
• Insert the card so the back label is on the
lens side of the camera.
• Push the card in straight, not at an angle.
• Wrong direction: If the card stops mid-way,
confirm the direction of the card. Do not
force the card.
Fold the card-release lever down
as shown.
Inserting the Compact Flash Card
Continued on Next Page
Insert the AC plug into an
electrical outlet.
Page 10

COMPACT FLASH CARD - CONT’D
- 19 -
COMPACT FLASH CARD - CONT’D
- 18 -
Close the battery-chamber cover
and slide it shut until it clicks.
Make sure the camera is off.
Removing the Compact Flash Card
Close the battery-chamber cover
and slide it shut until it clicks.
Open the battery-chamber cover
by sliding it in the direction
indicated, then open the cover.
Lift the card-release lever until it
is straight out.
Press the card-release lever to
eject the card.
Pull the compact flash card
straight out.
Be careful not to open the card slot/battery chamber cover or disconnect the AC
adapter cable while the camera is in use. The CF card can sustain damage if
the camera loses power while data is being written to the card. In such a case,
re-format the CF card on a personal computer after transferring the image data
from the CF card to the personal computer.
Page 11

- 21 -
ATTACHING THE CAMERA BRACKET
ATTACHING AND REMOVING THE METAFLASH UNIT
- 20 -
Align the projection on the
MetaFlash Unit with the hole
on the camera.
Fit the MetaFlash Unit in the
direction of the arrow as
shown until a click is heard.
Attaching the MetaFlash Unit to the Camera
Slide and hold the MetaFlash
Unit release on the bottom
plate of the camera in the
direction indicated and
gently remove the MetaFlash
Unit as shown.
Removing the MetaFlash Unit from the Camera
The CB-3D1 camera bracket stabilizes the positions of the camera body, MetaFlash
unit, and lens unit. Using this bracket is very important when capturing 3D images.
Orient and mount the CB-3D1 camera bracket so that the
positioning pin on the camera bracket fits in the tripod’s
screw hole in the camera body and the mounting screw in
the tripod’s crew hole in the Metaflash unit (see the figure
below).
Turn the mounting screw in
the direction of the arrow
shown in the figure and
secure it in place.
• When removing the camera bracket,
loosen the bracket by turning it in
the direction opposite to the one
that is shown in the left figure.
Page 12

- 23 -
PROCESSES FOR GENERATING A 3D IMAGE
- 22 -
BEFORE TAKING PICTURES
[Image with no stripes projected]
[Image with stripes projected]
<MetaFlash Studio>
<Internet Explorer/Netscape Navigator>
Calibration Data
The Minolta 3D 1500 take two
pictures as shown above during
a single shot: one without a
projected stripe and the other
with projected stripes.
The two images of data are
transferred to the personal
computer where a 3D image is
generated from the images by
an application called MetaFlash
Studio. The generated 3D image
can be saved as 3D image files
in different formats.
The 3D image can also be
displayed with a Web browser
(software for viewing web pages
on the Internet) such as Internet
Explorer or Netscape Navigator.
• MetaStream Viewer Plug-In is required to have a 3D image displayed
on a web browser.
Page 13

IMPOTRTANT PREPARATIONS FOR TAKING PICTURES
- 25 -
IMPORTANT PREPARATIONS FOR TAKING PICTURES
- 24 -
The Minolta 3D 1500, unlike ordinary digital cameras, requires you to be aware of
shooting-time restrictions and conditions. In particular, the following three items are
essential for taking proper 3D-image pictures:
• Subjects that are not suited for the 3D 1500
• Making the background of the subject solid black
• Brightness of the subject and its surrounding
Subjects That are Not Suited for the 3D 1500
Generally, the following subjects are not suited as the subjects of shooting:
• Transparent (passing the light) or highly reflective subjects
• Subjects that are evenly black or of a dark color
• Long and spidery subjects
• Subjects whose width, height, and depth are 40 cm or greater
• Subjects whose width, height, and depth are less than 10 cm
• Subjects of a complex shape with fine irregularities
The 3D 1500 emits two flashes in a single shot and records one “image without a
projected stripe” and one “image with projected stripes” for the same subject. That
is, it takes an ordinary flash photo on the first flash and projects the stripes on the
second flash by perform masking before emitting the second flash. It becomes
easier to generate proper 3D images if there will be 10 or more stripes on the
subject. Try to position the camera so that the subject fills the entire view area
on the camera’s LCD monitor. Then there should be enough stripes on the
subject.
You can not generate effective 3D images for transparent (passing the light) or
highly reflective subjects or subjects that are evenly black or of a dark color since
such subjects can not accommodate clear stripes.
Making the Background of the Subject Solid Black
Make the background of the subject solid black with a plain black
wrapping paper or black cloth to obtain optimum results.
As explained previously (see Page 24), the 3D 1500 can generate no 3D
image from an evenly black subject. You can prevent the background (or
the subjects in the background) from being caught by making the
background of the subject solid black.
Neither black wrapping paper nor black cloth are necessary if the background (or
the subjects in the background) are at least 4 m away from the camera and if they
emit or reflect no light.
Page 14

IMPORTANT PREPARATIONS FOR TAKING PICTURES - CONT’D
- 27 -
IMPORTANT PREPARATIONS FOR TAKING PICTURES
- 26 -
Brightness of the Subject and Its Surrounding
The 3D 1500 records pattern-projected images by emitting flashes into
masked subjects. Consequently, it is necessary to keep the subject of
shooting and its surroundings “evenly dark” when taking a picture.
More specifically, take care with the following:
• Keep the subject of shooting and its surroundings “evenly dark.”
More specifically, control the brightness so that it is lower than “Bv - 1 or
less” in photographic terms (Bv -1 refers to the brightness that is equivalent
to “a landscape at dawn or sunset”).
As another rule of thumb, keep such a brightness that the subject is
recognizable but its details (letters on the subject) are illegible.
• Do not use any lighting equipment that has a strong directivity such
as spotlights.
• Do not take pictures during the day in the natural light (sun beam).
• Take care with reflections. Since reflections offset the flash beam,
holes will develop in the parts of the image where the reflections
occur.
The CB-3D1 camera bracket is
provided with a general-purpose hot
shoe (see the left figure). Mount a
commercial video light or similar
apparatus there and turn on the video
light when framing and focusing and
turn it off when taking a shot, and
you can take pictures even in a
totally dark room.
To Get Better 3D Images
• Position the camera so that the subject is centered in and completely
fills the view area on your 3D 1500’s LCD monitor.
Making sure the subject completely fills the camera’s view area is one of
the most important steps in capturing an image.
• Avoid creating shadows on the subject, whenever possible.
Take special care with concave parts so that they provide no shade.
• Be sure to make the background solid black.
• Longer axis of the object is recommended to be along the horizontal
axis of the camera.
• Position the camera with angles in small increments and take as many
shots as possible.
Page 15

- 29 -
BASIC RECORDING PROCEDURE
- 28 -
TAKING PICTURES
Mount the 3D 1500 securely on a
tripod.
• The 3D 1500 causes the MetaFlash unit to
emits two flashes during a single shot. Any
slight sway of the camera would hamper it
from taking accurate pictures. Be sure to
secure the 3D 1500 on the tripod.
Turn the MetaFlash on.
Press the main switch to turn the
camera body on.
• An icon will appear on the soft key label
(right side) indicating that the camera is now
in the 3D mode.
• The lens unit automatically zooms to 50 mm
in the 35 mm equivalent scale and gets
locked there.
• The 3D 1500 enters the burst mode (2
frames fixed).
• The “Fill-Flash” icon appears on the soft key
label (center). This icon indicates that not the
camera’s built-in flash but the MetaFlash is
forced to emit flashes (the built-in flash unit
is kept off in the 3D mode).
Fill-Flash Icon
Icon that identifies the 3D mode
Continued on Next Page
Page 16

BASIC RECORDING PROCEDURE - CONT’D
- 31 -
BASIC RECORDING PROCEDURE - CONT’D
- 30 -
Steps through shown below are not necessary when using this camera
for the first time. Proceed with step .
Set “Quality” to “S.FINE (Super Fine)” in steps to when you used the
3D 1500 as an ordinary Dimâge EX (non-3D camera) by replacing the
MetaFlash unit with a zoom 1500 or wide 1500 lens (optional) and you
changed the “Quality” setting in the Burst mode.
In Record mode, press the MENU
button.
• The Record mode menus will appear.
Press the Left or Right button to
highlight “Media Settings”.
Press the Up or Down button to
highlight “Burst”.
Press the Edit soft key.
• The “Burst Settings” menu will appear.
Press the Up or Down button to
highlight “Quality”.
Press the Left or Right button to
select “S.FINE”.
•“Image Size” is fixed at “Full” and can not be
changed in the 3D mode.
•“Color” is fixed at “Full” and can not be
changed in the 3D mode.
• You can set “Burst Rate” from the screen in
the 3D mode but any change you made will
not be reflected (the same burst capture rate
is selected even if you selected any of
“Fast,” “Medium,” and “Slow.”).
Press the Exit soft key twice.
Frame the subject so that the
distance between the 3D 1500
and the subject falls between 50
to 90 cm and determine the
composition while referring to
the LCD monitor.
• Keep the subject as large as possible so that
it fills the entire 3D 1500’s LCD monitor
screen.
Continued on Next Page
Page 17

BASIC RECORDING PROCEDURE - CONT’D
- 33 -
BASIC RECORDING PROCEDURE - CONT’D
- 32 -
Make sure that the Flash-ready
lamp on the MetaFlash unit turns
on.
• You can click the shutter even when the
MetaFlash unit is not fully charged. Be sure
to check that the MetaFlash unit has been
fully charged (the Flash-ready lamp is lit)
before taking a picture.
Press the shutter-release button
part way down.
When the green focus lamp
glows, press the shutter-release
button the rest of the way down
to take a picture.
• In a dark situation, the built-in flash emits a
small amount of light as a supplementary
light source to illuminate the subject when
you press the shutter-release button part
way down.
• A Blinking green focus lamp indicates that
the subject is out of focus. See Page 36 of
the Dimâge EX Camera Instruction Manual.
When the Instant Review is on,
the screen shown in the upper
left figure will appear every time
you finish taking a picture.
• To record (save) the image on the CF card,
press the Save soft key (soft key (right)).
• When not recording (saving) the image on
the CF card, press the Delete soft key (soft
key (center)). The confirmation screen
shown in the lower left figure will appear.
Press the Yes soft key (soft key (left)).
• You can disable the Instant Review feature if
you find it cumbersome to select either Save
or Delete every time you take a picture (in
which case the image is recorded on the CF
card immediately when you take a picture).
For instructions, refer to Page 58 of the
Dimâge EX Camera Instruction Manual.
• The LCD monitor is held off while the image
you shot is being recorded. The monitor
turns on again when recording (saving) is
completed.
Any changes you made to the following items will be ignored in the 3D mode:
• Still Picture Settings
• Timelapse Settings
• White Balance Settings
The following functions remain disabled in the 3D mode:
• Bracketing
• Flash Bracketing
Page 18

EXPOSURE COMPENSATION
- 35 -
EXPOSURE COMPENSATION
- 34 -
While in Record mode, press the
Up or Down button to select the
exposure compensation value.
• The exposure compensation values are
displayed in the upper-left corner of the LCD
monitor, replacing the image counter.
• The exposure can be biased as much as +/2 EVs in 1/3 EV increments.
• The exposure change is visible in the LCD
monitor.
In general the camera sets the exposure setting automatically. But, if necessary, the
exposure can be adjusted to make the final image brighter or darker.
When the image turns out to be too dark or too bright, you can easily compensate
for that by pressing the Up or Down button on the camera.
Frame the image, then press the
shutter-release button.
• The exposure compensation value remains
active after the picture is taken.
• Exposure can only be adjusted in Record mode. Set the exposure compensation
before recording the image. Once the image is captured, it can not be changed in
the camera.
Reset the exposure compensation value to 0 when finished. The exposure
compensation values do not remain in the overlay bar, but the exposure
compensation value remains active.
The exposure compensation value will return to 0 when you turn the camera off
and turn it on again.
Page 19

- 37 -
TRANSFERRING IMAGE DATA
- 36 -
When you finish taking necessary pictures, transfer the recorded image data from
the CF card to a personal computer (PC) and generate 3D images using the
MetaFlash Studio application program. There are two ways to transfer image data
from a CF card to a PC.
(1) Transferring the image data with a CF card reader
Connect a card reader that has the capability to read CF card data directly and
transfer image data to the PC through it.
Refer to the instruction manual attached to the CF card reader for cabling
and operating instructions.
(2) Transferring the image data via a PC card using a CF card and a PC
card adapter
Insert the CF card into the (optional) CA-1C PC card adapter, and the CF card
can be handled as a Type II PC card (PCMCIA-ATA card). Insert this PC card
directly into the PC card slot of the notebook computer or into a card reader that
can read PC card data, then transfer the image data to the PC through the PC
card.
Refer to the instruction manual attached to the notebook computer or PC
card reader for operating instructions.
For further operating procedures for the PC (procedures for
generating 3D images from the image data on the PC), refer to
the instruction manual for MetaFlash Studio. The MetaFlash
Studio’s instruction manual is contained on the CD-ROM as a
PDF file.
FOR YOUR INFORMATION
Page 20

- 39 -
TROUBLESHOOTING
WHEN TO REPLACE THE XENON LAMP
- 38 -
The luminescent tube (xenon lamp) of the MetaFlash unit has a limited life. The
Minolta 3D 1500 informs you when to replace the xenon lamp by turning on the selftimer lamp on the front of the camera body when the camera is turned on after 2000
shots (4000 flashes) are taken with the camera.
Self-timer lamp
• The self-timer lamp will not light when 2000
shots (4000 flashes) are reached while you
are taking a shot. In this case, turn off and
on the camera, and the self-timer lamp will
light.
• You can continue taking pictures after the
self-timer lamp turns on to indicate the
replacement timing of the xenon lamp. It is
recommended, however, that you call a
Minolta Service Facility for replacement
information as soon as possible.
WARNING
The replacement of the xenon lamp should be accomplished only at one of Minolta
Service Facility. Any access to the high-tension component or circuit inside the 3D
1500 may cause electric shock.
The attached floppy disk contains a Script file “Getscnt.csm” that shows the total
number of MetaFlash that have been fired so far on the LCD monitor of the 3D
1500. Use this Script to check the number of pictures that you can take before it
becomes necessary to replace the xenon lamp. For instructions, read the
Readme.txt file that is also contained on the floppy disk.
To run this Script, you need a system environment (e.g., CF card reader) for
writing data on the CF card since it is necessary to copy the Script file from the
floppy disk into the specified location on the CF card.
Refer to these pages to determine the cause of a problem you are experiencing with
the camera. If the information does not cover the problem you are experiencing,
contact our a Minolta Service Facility.
Problem Cause Solution
No image appears on the
LCD monitor.
The camera is not turned
on.
Press the main switch to
turn the camera on and
check that the power lamp
goes on.
The batteries are
exhausted.
Replace all four batteries
or use the AC Adapter.
The batteries are inserted
incorrectly.
Remove the batteries and
replace in the correct
orientation.
The compact flash card is
not inserted properly in the
camera.
Remove the compact flash
card temporarily and
reinsert it.
No image appears on the
LCD monitor (the power
lamp is on).
No action was taken on the
camera for longer than
approximately 3 minutes
after the camera is turned
on.
Press the Display button
on the lens unit.
The LCD brightness has
been turned down too low.
Turn the brightness dial to
the desired level.
Continued on Next Page
Page 21

TROUBLESHOOTING - CONT’D
- 41 -
TROUBLESHOOTING - CONT’D
- 40 -
Problem Cause Solution
The camera will not take a
picture.
The camera is off.
Press the main switch to
turn the camera on and
check that the power lamp
goes on.
The camera is not in
Record mode.
Slide the Mode Switch to
REC.
The camera is processing,
Please Wait appears in
the overlay bar.
Wait until Ready appears
in the overlay bar.
The compact flash card is
full, No space on card
appears in the overlay bar.
Delete unwanted images,
transfer card contents to
the PC then erase the
card, or use a new
compact flash card.
It takes too long a time to
charge the MetaFlash unit
(30 seconds or longer).
The batteries in the
MetaFlash unit are
exhausted.
Replace all four batteries
in the MetaFlash unit.
The intensity of the
MetaFlash unit is too low
(the self-timer lamp on the
front of the camera stays
on).
The xenon lamp has
ended its life.
Contact a Minolta Service
Facility for replacing the
xenon lamp.
Problem Cause Solution
3D images will not be
generated properly.
A subject that is ill suited
for the 3D 1500 is used.
You can not obtain a
ptoper 3D images when
you take a picture of a
subject that is ill suited for
the 3D 1500.
The background of the
subject is not solid black.
Make the background of
the subject solid black with
an evenly blackwrapping
paper or black cloth.
The subject or its
surrounding is too bright.
Take a picture in a dark
location (Bv -1 or lower).
The camera will not
function normally.
Remove the batteries after opening the card slot/batterychamber cover on the bottom plate of the camera body
and reinsert them. If the camera got out of order while it
was being powered by the AC adapter, unplug the AC
adapter cable from the DC terminal and reconnect the
cable. Subsequently, press the main switch to turn on
the camera again.
The CF card is likely to be damaged if you fails to
shut off the camera power normally. In such a case,
re-format the CF card on a personal computer after
transferring the image data from the CF card to the
personal computer.
A subject does not fill the
view area on the LCD
monitor.
Position the camera so
that the subject is centered
in and completely fills the
view area on your 3D
1500’s LCD monitor.
The image appears underor overexposed.
Wrong exposure
compensation setting.
Change the Exposure
Compensation (EV) value.
Incorrect 3D reconstruction
parameters in MetaFlash
Studio software.
Follow MetaFlash Studio
User Guide for sellecting
correct reconstruction
parameters in Acquire
MetaFlash dialog.
Page 22

ACCESSORIES
- 43 -
ACCESSORIES
- 42 -
The Minolta 3D 1500 is provided with optional accessories which are briefly
described below. For more information, contact your camera dealer or Minolta
Service Facility listed on the back cover of this manual.
ZOOM 1500 (Lens Unit)
ZOOM 1500 is a 1.5 million-pixel x3 zoom lens unit equivalent to a 35 mm f/3.5-5.6,
38-115 mm lens unit. You can use your 3D 1500 as an ordinary (non-3D camera)
Dimâge EX (version 2) by replacing the 3D 1500’s MetaFlash unit with the ZOOM
1500.
WIDE 1500 (Lens Unit)
WIDE 1500 is a 1.5 million-pixel wide angle lens unit equivalent to a 28 mm/F1.9 35
mm lens unit. You can use your 3D 1500 as an ordinary Dimâge EX (version 2) (i.e.,
non-3D camera) by replacing the 3D 1500’s MetaFlash unit with the WIDE 1500.
LC-EX1 Lens Extension Cable
The LC-EX1 is a (1.5 m long) extension cable that connects between the detached
MetaFlash unit and the camera body of the 3D 1500 system. You can take pictures
with the MetaFlash unit separate from the camera body so that you can photograph
from a variety of angles. The LC-EX1 can also be used with a 3D 1500 which is
used as an ordinary Dimâge EX (version 2) (i.e., non-3D camera).
The AF illuminator derived from the camera’s built-in flash unit is not available
when the LC-EX1 is used.
VC-EX1 Video Cable
The VC-EX1 Video Cable connects between the video output of the 3D 1500 and the
video input of a TV set or video deck. It is used to show the information on the LCD
monitor of the 3D 1500 on a TV screen or to record it on a video deck. The VC-EX1
can also be used with a 3D 1500 which is used as an ordinary Dimâge EX (version
2) (i.e., non-3D camera).
RM-8C/RM-16C/RM-32C compact flash Cards
The RM-8C, RM-16C, and RM-32C are compact flash cards with storage capacities
of 8MB, 16MB, and 32MB, respectively.
CA-1C PC Card Adapter
The CA-1C is a PC card adapter that turns a compact flash card into a PC card. By
combining the CA-1C with a compact flash card, you can use the compact flash card
as a PC card (Type II) which conforms to the ATAPC Card Standard.
Page 23

CARE AND STORAGE
- 45 -
CARE AND STORAGE
- 44 -
Operating Temperatures and Conditions
• This camera has been designed for use from 10°C to 30°C (50°F to 86°F).
• Never leave the camera where it may be subjected to extreme temperatures, such as
the glove compartment of a car.
• Do not subject the camera to extreme humidity.
• To prevent condensation from forming, place the camera in a sealed, plastic bag
when bringing it from the cold exterior to a warm building. Allow it to come to room
temperature before removing it from the bag.
• Battery performance decreases with lower operating temperatures. When
photographing in cold weather, it is recommended that you keep the camera and
spare batteries inside your coat to keep them warm when you are not shooting. Cold
batteries will regain some of their charge when they warm up.
• Occasionally, when using alkaline batteries the low-battery symbol may appear even
if there is enough charge. Continue to use the camera. The low-battery symbol will
disappear.
Handling Care
• This camera is neither waterproof nor splashproof.
- Inserting/removing batteries or CompactFlash cards with wet hands may damage
the camera.
- Take care when using the camera at the beach or near water. Costly or irreparable
damage may occur.
• Do not subject the camera to shock or impact.
• Do not leave the camera in direct sunlight. Do not point the lens at direct sunlight.
CCD damage may occur.
• Turn the camera off or remove the batteries when transporting.
Lcd Monitor Care
• The LCD monitor is a precision device with a pixel efficiency of 99.98%. Less than
0.02% of the pixels are dysfunctional.
• Do not apply pressure on the surface of the LCD monitor. Permanent damage may
occur.
• In low temperatures, the LCD monitor will temporarily darken. When the camera
warms-up, normal display will be restored.
• If the + or – buttons are pressed rapidly during playback, images may appear to
overlap. This is normal and the image data is not changed.
• If the LCD monitor surface is dirty, first blow away dust or sand, then gently wipe it
with a soft, clean, dry cloth.
• If the LCD display blinks continuously or no longer works at all, it is time to replace
the monitor. Take the camera to your dealer or a Minolta Service Facility listed on the
back cover of this manual.
Safety and Handling for Compact Flash Cards
• Read and follow the instructions that accompanied the compact flash card.
• The following may cause data loss or damage:
- Improper use of card.
- Static electrical discharge near card or electric noise.
- Removing the card or interrupting power supply while camera or drive is accessing
the card (reading, deleting, etc.).
- Non-use of card for an extended period. Data stored on compact flash cards will
degrade over time. Data left on a card for extensive periods may not be
recoverable.
- Wear from ordinary use.
• The storage capability of compact flash cards will diminish with extended use. When
this occurs, please purchase a new card.
• Do not bend, drop, or subject the card to impact.
• Keep away from static electricity and electric noise.
• When not in use, return the card to its protective case.
• All data on the card is permanently erased when the card is formatted.
• Do not touch the electrical contacts of the card with your fingers or a metal object.
• Keep away from heat, moisture, and direct sunlight.
• Keep away from small children.
Continued on Next Page
Page 24

- 47 -
TECHNICAL DETAILS
CARE AND STORAGE - CONT’D
- 46 -
Cleaning
• If the camera or lens is dirty, gently wipe it with a soft, clean, dry cloth. If the camera
or lens comes in contact with sand, gently blow away loose particles, wiping may
scratch the surface.
• To clean the lens surface, first brush away any dust or blow away sand, then, if
necessary, moisten a lens tissue with lens cleaning fluid and gently wipe the lens.
• Never use organic solvents to clean the camera.
• Never touch the lens surface with your fingers.
Storage
• Remove the batteries from the camera when not in use for an extended period.
Damage may result if battery leakage occurs.
• Store in a cool, dry, and well-ventilated area away from dust and chemicals (such as
mothballs). For very long periods, place the camera in an airtight container with a
silica gel drying agent.
• Before using after prolonged storage, check the camera’s operation to make sure it is
functioning properly.
Before Important Events
• Always check the camera’s operation carefully or take test photographs.
• Minolta is not responsible for damages incurred by equipment malfunction.
Questions and Service
• If you have questions about your camera, contact your local camera dealer or write to
the Minolta distributor in you area.
• Before shipping your camera for repair, please contact a Minolta Service Facility for
details.
Continued on Next Page
Camera Type
MetaFlash type 3D image capture system
CCD
1/2 inch progressive scan CCD (SONY “Wfine CCD™”)
Model: Square pixel, RGB primary color filter, all pixel simultaneous readout
system
Total number of pixels: Approx. 1,500,000 pixels
Number of effective pixels: Approx. 1,450,000 pixels
Lens Unit
Focal length: 9.5 mm (in the 35mm film equivalent scale)
Aperture: FNo. 4
Construction: 5 elements, 5 group zoom including 3 aspheric surfaces
Focusing range: 50 cm to 90 cm
Viewfinder: Real-image optical viewfinder
Image Storage
Recording medium: CompactFlash card
Image file format: Exif 2.0 (JPEG)
Number of pixels: 1344 x 1008 pixels
Image quality modes: S.FINE, FINE, STD, ECON
File size: S.FINE mode — Approx. 3 MB per folder (2 images contained in a
folder) (Approx. 1.5 MB per image)
Number of folders: Approx. 10 when recorded on a 32MB CF card in the
S.FINE mode
Autofocusing
System: External passive AF system
Focus locked when the shutter-release button is pressed halfway, with AF
auxiliary light source using the camera’s built-in flash unit under low brightness
conditions
Exposure Control
Electronic shutter speed: 1/210 second, fixed
Aperture value: F4, fixed
Exposure compensation: Up to ±2EV in 1/3 EV increments
Sensitivity: ISO100 equivalent
Page 25

TECHNICAL DETAILS - CONT’D
- 49 -
TECHNICAL DETAILS - CONT’D
- 48 -
White Balance
Fixed at the color temperatures of the MetaFlash unit
MetaFlash
Flash mode: Fill-flash, fixed
Light control: External light control suing the light-controlling element in the
lens unit.
Charging time: Approx. 10 seconds maximum (when new alkaline batteries are
used)
Xenon lamp life: Approx. 2000 shots (4000 flashes)
Alert issued on 2000 shots (40000 flashes).
Replaceable at a Minolta Service Facility
Built-in Flash
Services as a supplementary AF light source in the low-brightness mode.
Viewfinder
A real-image optical viewfinder is provided in the lens unit.
LCD Monitor
Type: 2.0-inch low temperature poly-silicon color TFT-LCD module
Pixels: Approx. 110,000
Brightness control: Brightness control dial
Drive mode
2-frame burst capture mode
Power source (camera body)
Power: AA-sized alkaline battery x 4 (AA-sized Ni-Cd or AA-sized Ni-MH
batteries are also available).
External power: AC adapter (a DC terminal is provided on the camera body.)
Power source (MetalFlash unit)
Power: AA-sized alkaline battery x 4 (AA-sized Ni-Cd or AA-sized Ni-MH
batteries are also available).
Battery life: Approx. 2000 shots (4000 flashes)
Operating Ambient Temperature and Humidity Ranges
10 to 30°C (50 to 86°F), 85% maximum (noncondensing)
Dimensions (W x H x D)
240 x 77 x 76 mm (9.5 x 3.1 x 3.0 inches)
Weight (without batteries)
Approx. 600 g (21.2 oz.)
Specifications are based on the latest information available at the time of printing
and are subject to change without notice.
Page 26

- 51 -
MEMOMEMO
- 50 -
Page 27

- 53 -
MEMOMEMO
- 52 -
Page 28

- 55 -
MEMOMEMO
- 54 -
Page 29

MEMO
- 56 -
Page 30

Minolta Co., Ltd. 3-13, 2-Chome, Azuchi-Machi, Chuo-Ku, Osaka 541-8556, Japan
© 1999 Minolta Co., Ltd. under the Berne
Convention and Universal Copyright Convention
9222-2765-31 P-A910 Printed in Japan
E
Camera Instruction Manual
Minolta Corporation
Head Office 101 Williams Drive, Ramsey, New Jersey 07446, U.S.A.
Los Angeles Branch 11150 Hope Street Cypress, CA 90630, U.S.A.
Minolta Canada Inc.
Head Office 369 Britannia Road East, Mississauga, Ontario L4Z 2H5, Canada
Minolta GmbH Kurt-Fischer-Strasse 50, D-22923 Ahrensburg, Germany
Minolta France S.A. 365 Route de Saint-Germain, F-78420 Carrieres-Sur-Seine, France
Minolta (UK) Limited 7 Tanners Drive, Blakelands, Milton Keynes, MK14 5BU, England
Minolta Austria Ges. m.b.H. Amalienstrasse 59-61, A-1131 Wien, Austria
Minolta Camera Benelux B.V. Zonnebaan 39, P.O. Box 6000, NL-3600 HA Maarssen, The Netherlands
Belgium Branch Prins Boundewijnlaan 1, B-2550 Kontich, Belgium
Minolta (Schweiz) AG Riedstrasse 6, CH-8953 Dietikon, Switzerland
Minolta Svenska AB Albygatan 114, S-171 54 Solna, Sweden
Finland Branch Niittykatu 6 PL 37, SF-02201 Espoo, Finland
Minolta Portugal Limitada Av. do Brasil 33-A, P-1700 Lisboa, Portugal
Minolta Hong Kong Limited Room 208, 2/F, Eastern Center, 1065 King’s Road, Quarry Bay, Hong Kong
Minolta Singapore (Pte) Ltd. 10, Teban Gardens Crescent, Singapore 608923
 Loading...