

Page 1

User's Manual
IP-412
IP Series
Print
Controller
Page 2

This page for U.S.A. and Canada only.
Thank you very much for purchasing the Konica IP-412 Print Controller.
This User’s Guide includes instructions for marking prints, correct handling of the
machine, and safety precautions. Please read this manual before printing.
In order to maintain satisfactory printing performance; please keep this User’s Guide
readily available for reference.
©2000 by Konica Business Technologies, Inc.
MAINTENANCE AGREEMENT:
The KONICA IP-412 Workgroup Document System
trouble-free service. To ensure high quality copying performance and to prevent
premature wear and failure of precision parts and components, periodic cleaning and
routine adjustments should be scheduled.
We recommend that you contact your service center to discuss the benefits and
advantages of Konica’s Customer service Maintenance Agreement and to be shown
how a maintenance plan can be tailored to your individual copying needs.
NOTICE:
Konica Business Technologies, Inc. has made every effort to ensure that the
information in this manual is complete and accurate. However, constant efforts are
also being made to improve and update the product. Therefore, Konica Business
Technologies, Inc. shall not be liable for error s in this manual or for any consequential
damages resulting form the use of this manual. The information contained herein is
subject to change without notice.
FEDERAL OR STATE STATUTES MAY PROHIBIT THE COPYING OF CERTAIN
DOCUMENTS OR INFORMATION, RESULTING IN FINES OR IMPRISONMENT
FOR VIOLATORS.
MANUAL PART NUMBER:
OP-IP412-01
WEB SITE ADDRESS:
http://www.konicabt.com
CORRESPONDENCE:
Correspondence regarding this manual may be mailed to the address shown below.
KONICA BUSINESS TECHNOLOGIES, INC.
CORPORATE PUBLICATIONS
500 DAY HILL ROAD
WINDSOR, CT 06095
TM
will give you many years of
Page 3

Safety Information
This page for U.S.A. and Canada only.
FCC Part 15-Radio Frequency Devices
This device complies with Part 15 of the FCC Rules. Opera tion is subject to the following two
conditions:
1. This device may not cause harmful interference, and 2. This device must accept any interface
received, including interface that may cause undesired operation.
WARNING
This equipment has been tested and found to comply with the limits for a Class A digital
device, pursuant to Part 15 of the FCC Rule. These limits are designed to provide reasonable
protection against harmful interference when the equipment is operated in a commercial
environment. This equipment generates, uses, and radiate radio frequency energy and, if not
installed and used in accordance with the instruction manual, may cause harmful interference to
radio communications.
Operation of this equipment in a residential area is likely to cause harmful interference in which
case the user will be required to correct the interference at his own expense.
The design and production of this unit conform to FCC regulations, and any changes or
modifications must be registered with the FCC and are subject to FCC control. Any changes
made by purchaser or user without first contacting the manufacturer will be subject to penalty
under FCC regulations.
WARNING
This device must be used with shielded interface cables. The use of non-shielded cable is likely
to result in interference with radio communications and is prohibited under FCC rules.
Interference-Causing Equipment Standard (ICES-003 Issue 3)
This Class A digital apparatus complies with Canadian ICES-003.
Cet appareil numérique de la classe A est conforme à la norme canadienneNMB-003 du
Canada.
Page 4

Content
Safety Information II
Chapter 1 Required System Environment 1-2
Connecting to a Personal Computer 1-3
LAN Interface 1-4
Chapter 2 Installation ( Windows 95 ) 2-2
Installation ( Windows 98 ) 2-8
Installation ( Windows NT ) 2-14
Chapter 3 Using Software ( Windows 95/98 ) 3-2
Paper Tab
Graphics Tab
Fonts Tab
Device Options Tab
Using Software ( Windows NT )
Paper Setup Tab
1. Paper Size
2. Orientation
3. Paper Source
Advanced Tab
1. Paper/Output Tab
Paper Size
Orientation
Paper Source
Copy Count
2. Graphic Tab
Resolution
3-3
3-4
3-6
3-6
3-7
3-8
3-8
3-8
3-9
3-9
3-9
3-9
3-9
3-9
3-9
3-10
3-10
3. Document Options Tab
Halftone Color Adjustment
Scan for Rules
Print Text as Graphics
Metafile Spooling
3-10
3-10
3-11
3-11
3-11
Page 5

Content
Chapter 4 Printing for the First Time 4-2
Without FK-116 4-2
With FK-116 4-3
Printing from Manual Bypass Tray 4-4
Without FK-116 4-4
With FK-116 4-5
Canceling Printing
4-6
Chapter 5 Troubleshooting
Without FK-116 5-2
With FK-116 5-2
Appendix About Printing Area A-2
Specifications A-3
Page 6

Chapter 1 Setting Up
Chapter 1
Setting Up
1-1
Page 7
Chapter 1 Setting Up
Required System Environment
Software
Microsoft Windows ®95
Microsoft Windows ®98
Microsoft Windows ® NT Workstation Version 4.0
Interface
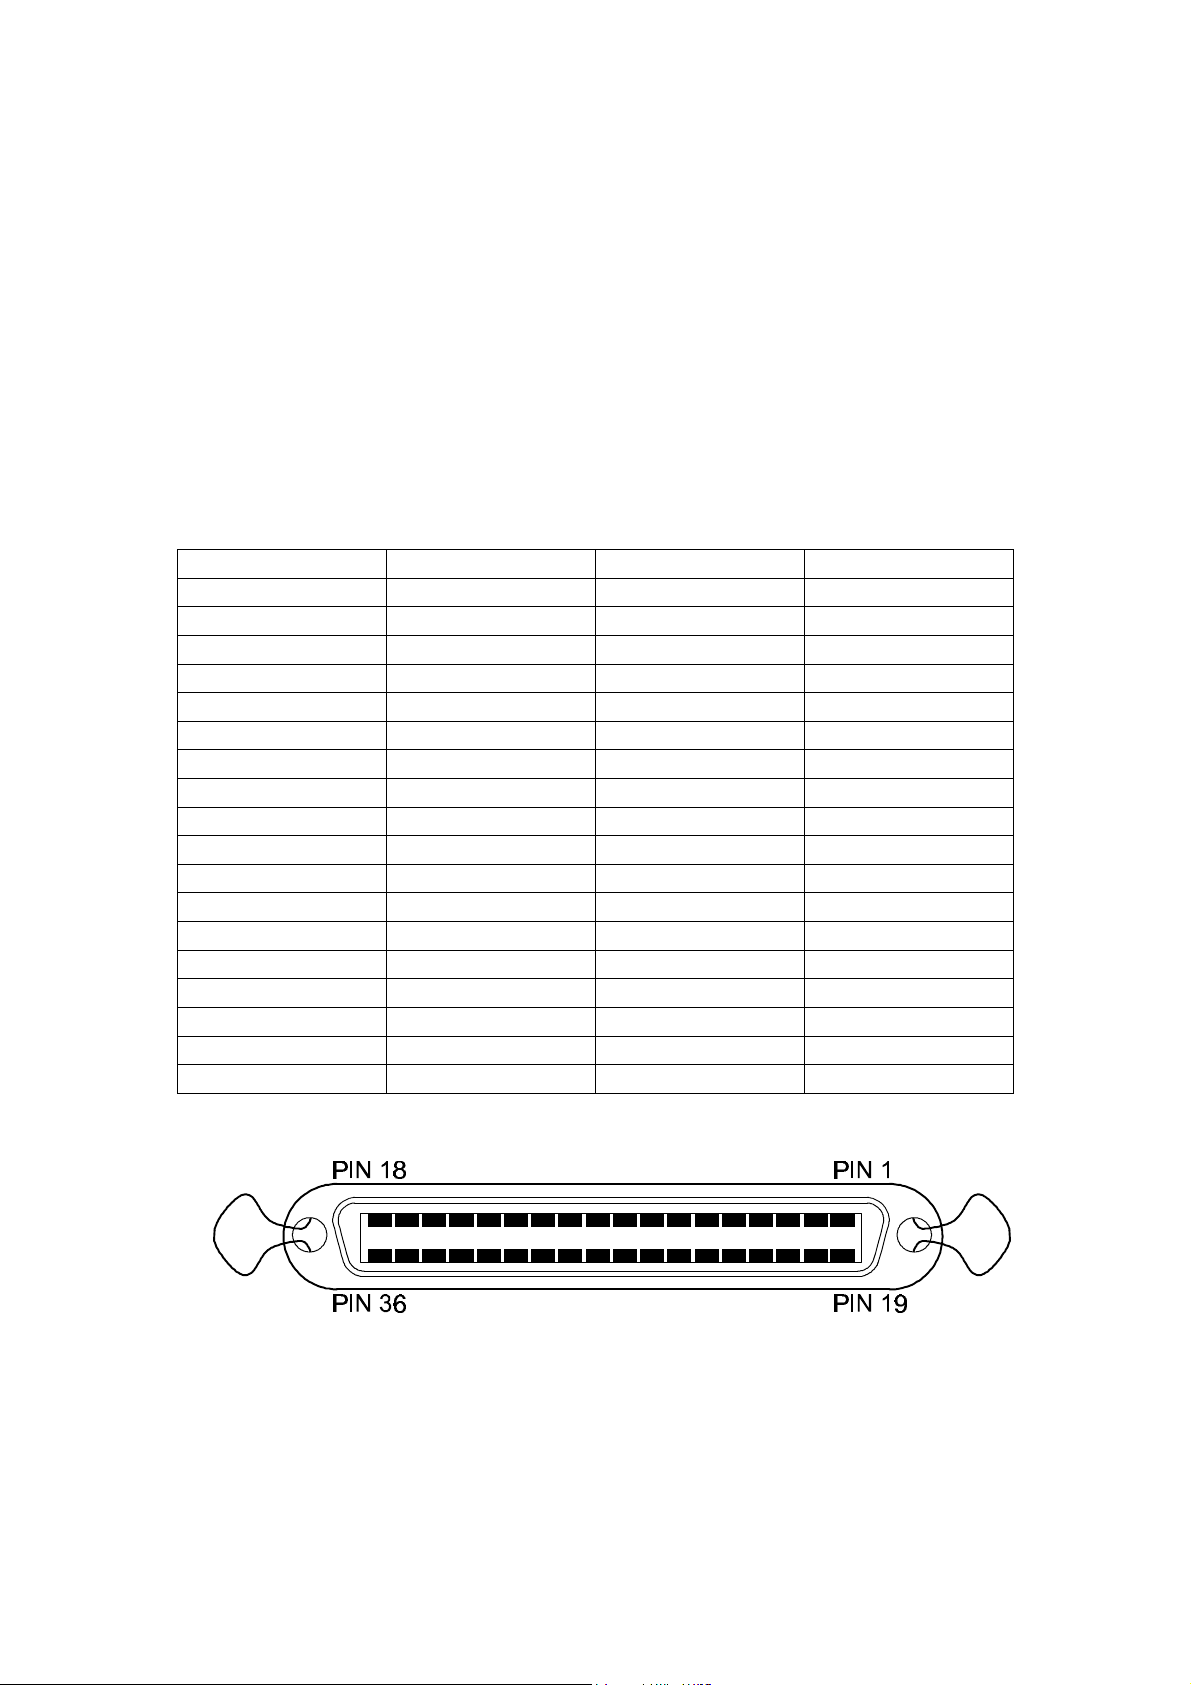
Parallel IEEE1284 Type-B
The printer receives data from the computer via a parallel interface cable. The cable
connector B Type conforms to IEEE 1284.
Use the proper interface cable according to specifications provided.
Pin assignment and signal functions are shown below.
PIN NUMBER PIN NAME PIN NUMBER PIN NAME
1 -Store 19 GND
2 Data 1 ( LSB ) 20 GND
3 Data 2 21 GND
4 Data 3 22 GND
5 Data 4 23 GND
6 Data 5 24 GND
7 Data 6 25 GND
8 Data 7 26 GND
9 Data 8 ( MSB ) 27 GND
10 -Ack 28 GND
11 Busy 29 GND
12 PError 30 GND
13 Select 31 -Init
14 -AutoFd 32 -Fault
15 N.C. 33 N.C.
16 GND 34 N.C.
17 Chassis 35 N.C.
18 VCC 36 -Select
1-2
Page 8
Chapter 1 Setting Up
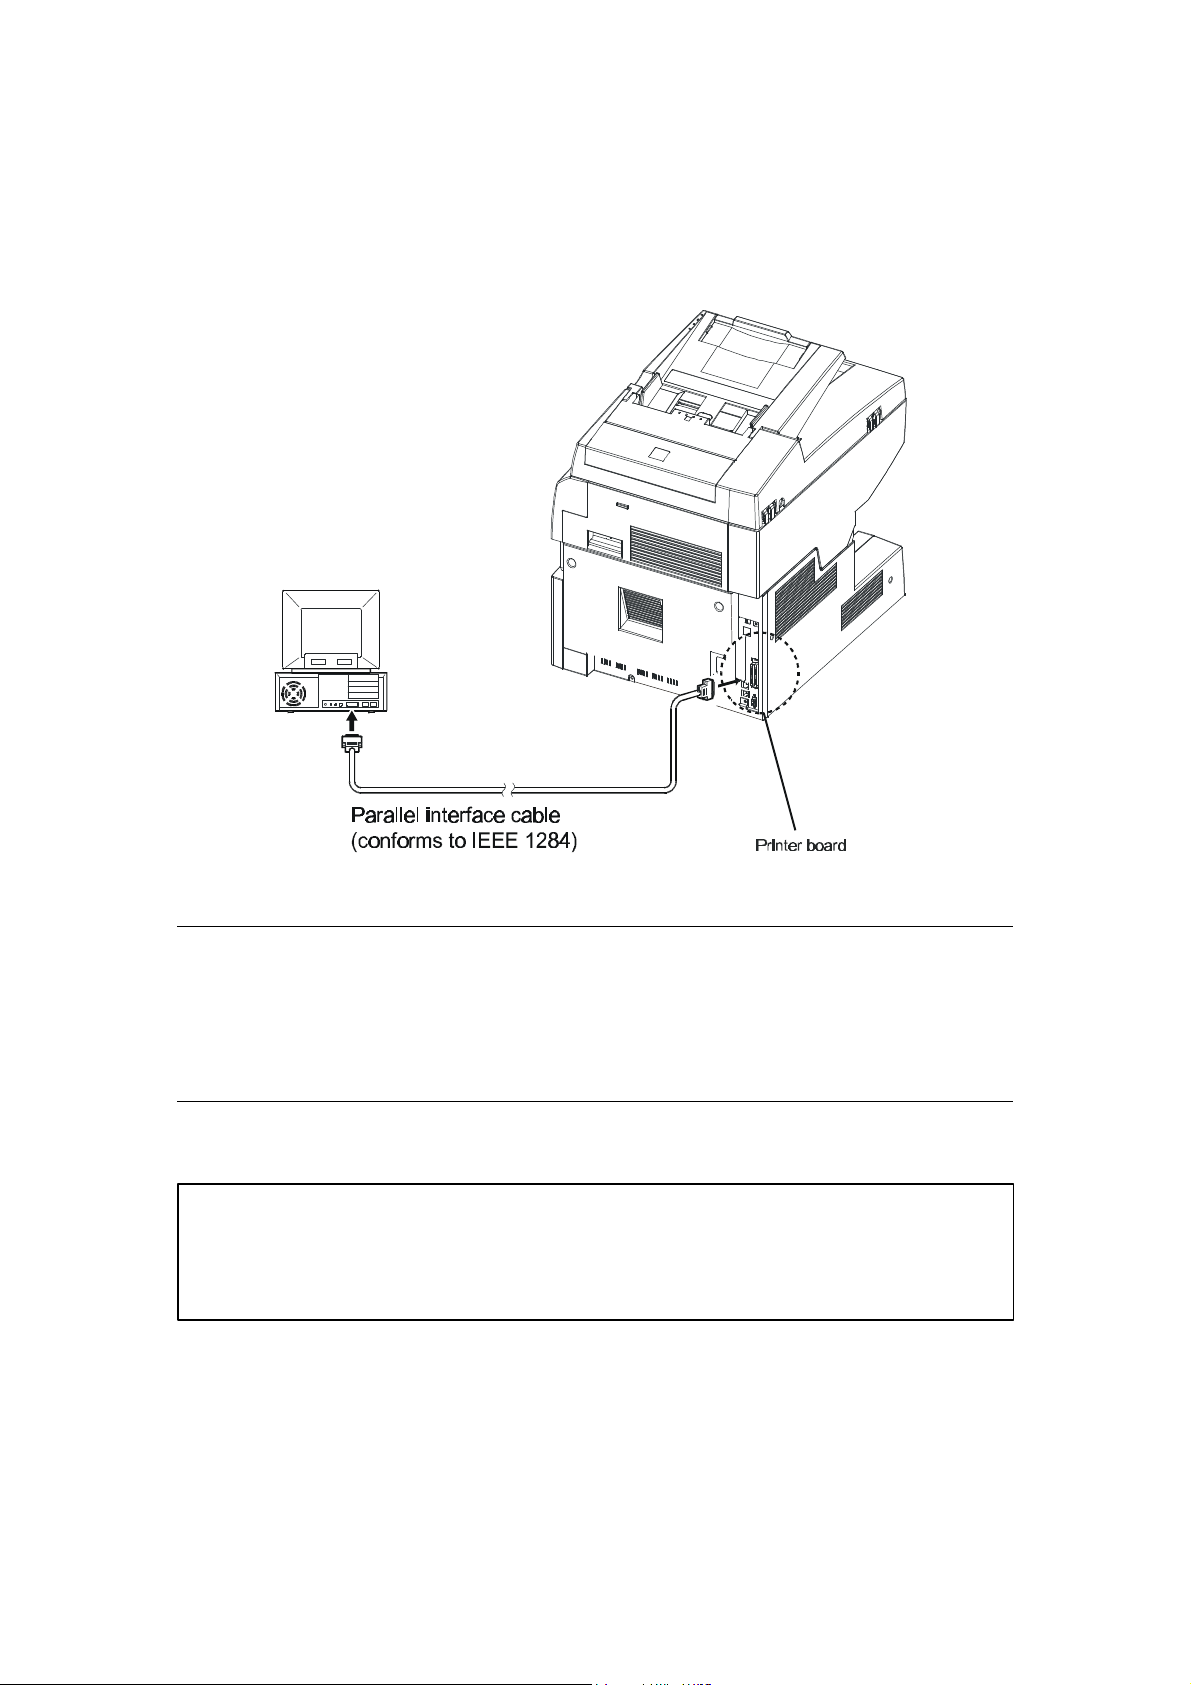
Connecting to a Personal Computer
Connect one end of the parallel interface cable to the parallel interface connector of the
computer and the other end to the parallel interface connector of the printer board in
your copier.
NOTES
1. To comply with EMC requirements, the cable connected to the parallel port of this
equipment should be shorter than 2 m with high-quality shielding.
2. When the machine is not to be connected to any personal computer, cap the
connector to protect against static electricity. If the connector is not capped, the
main unit may not perform as intended.
Trademarks
Microsoft® is a registered trademark of Microsoft Corporation.
Windows ® is a registered trademark of Microsoft Corporation.
1-3
Page 9
Chapter 1 Setting Up
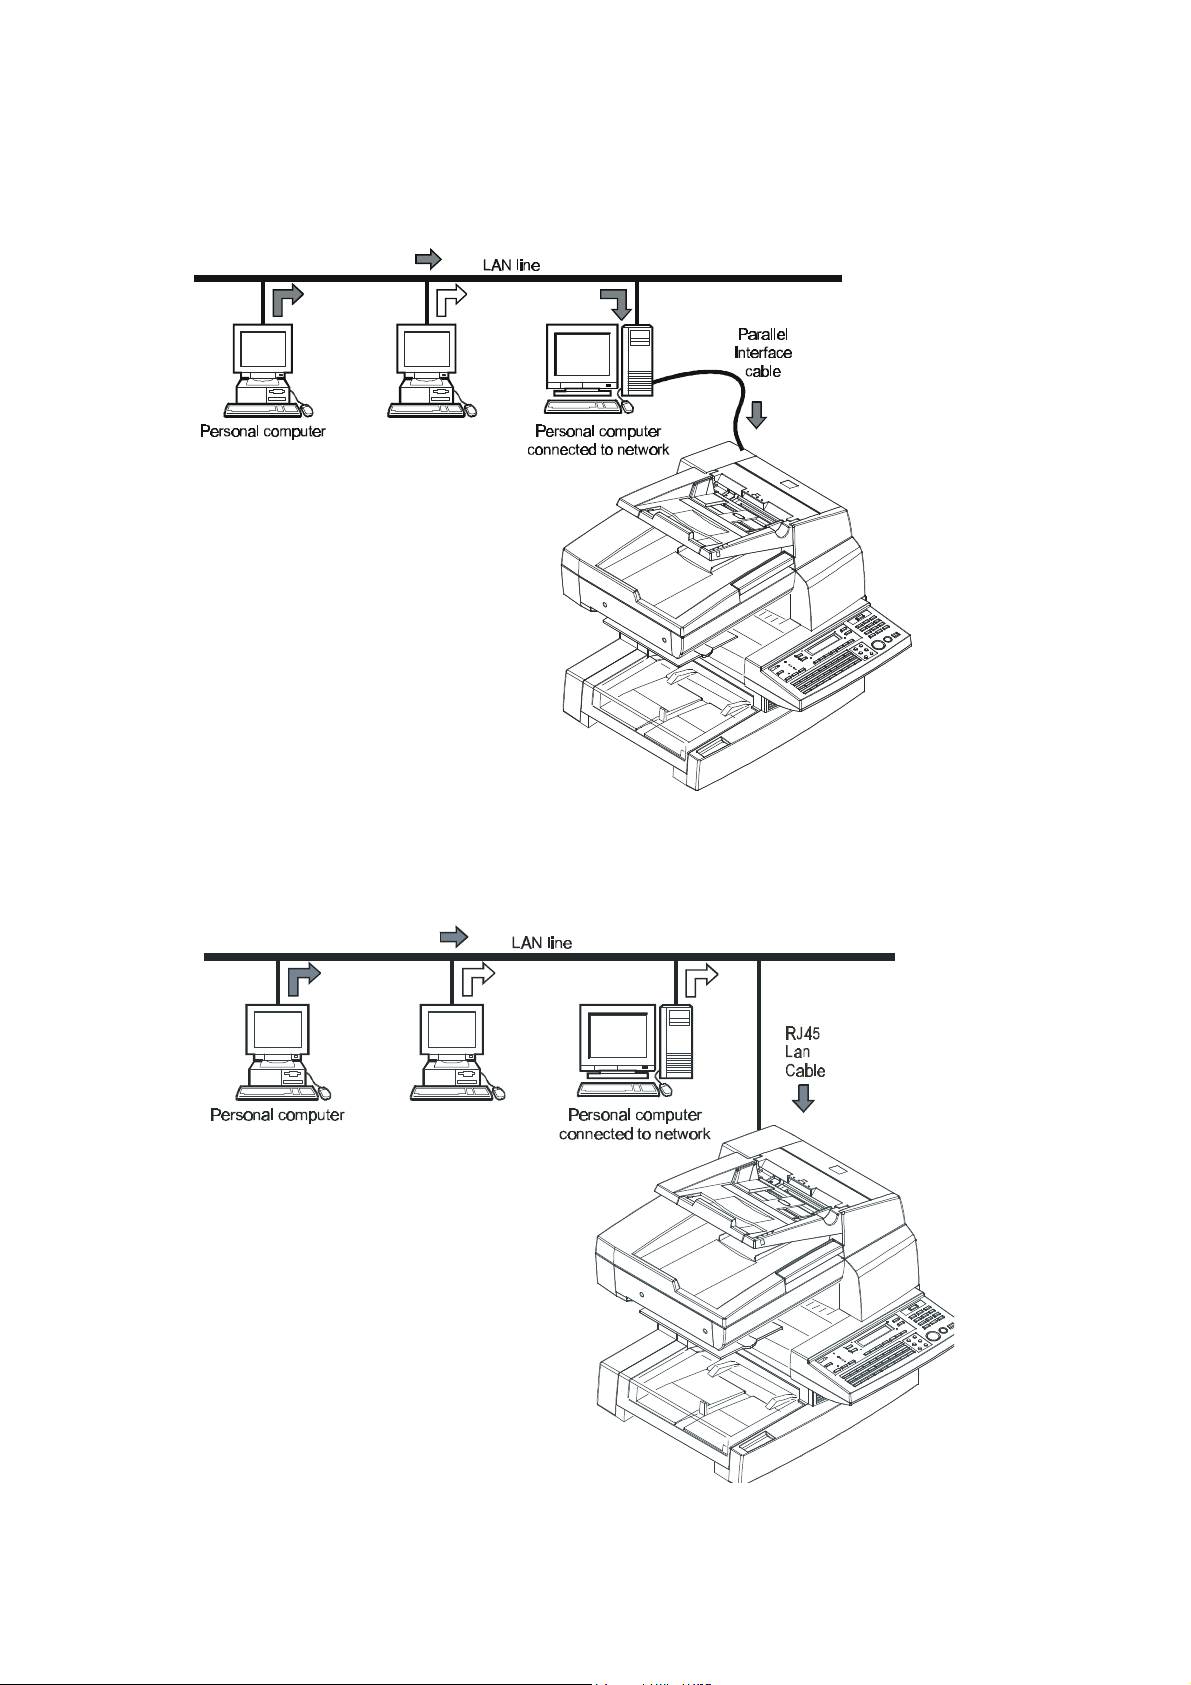
LAN Interface
Printing is possible from a personal computer connected to a network.
Printing is also possible by installing via a Network Interface Card instead of via a
personal computer.
1-4
Page 10

Chapter 2 Installation
Chapter 2
Installation
2-1
Page 11
Chapter 2 Installation
Windows 95
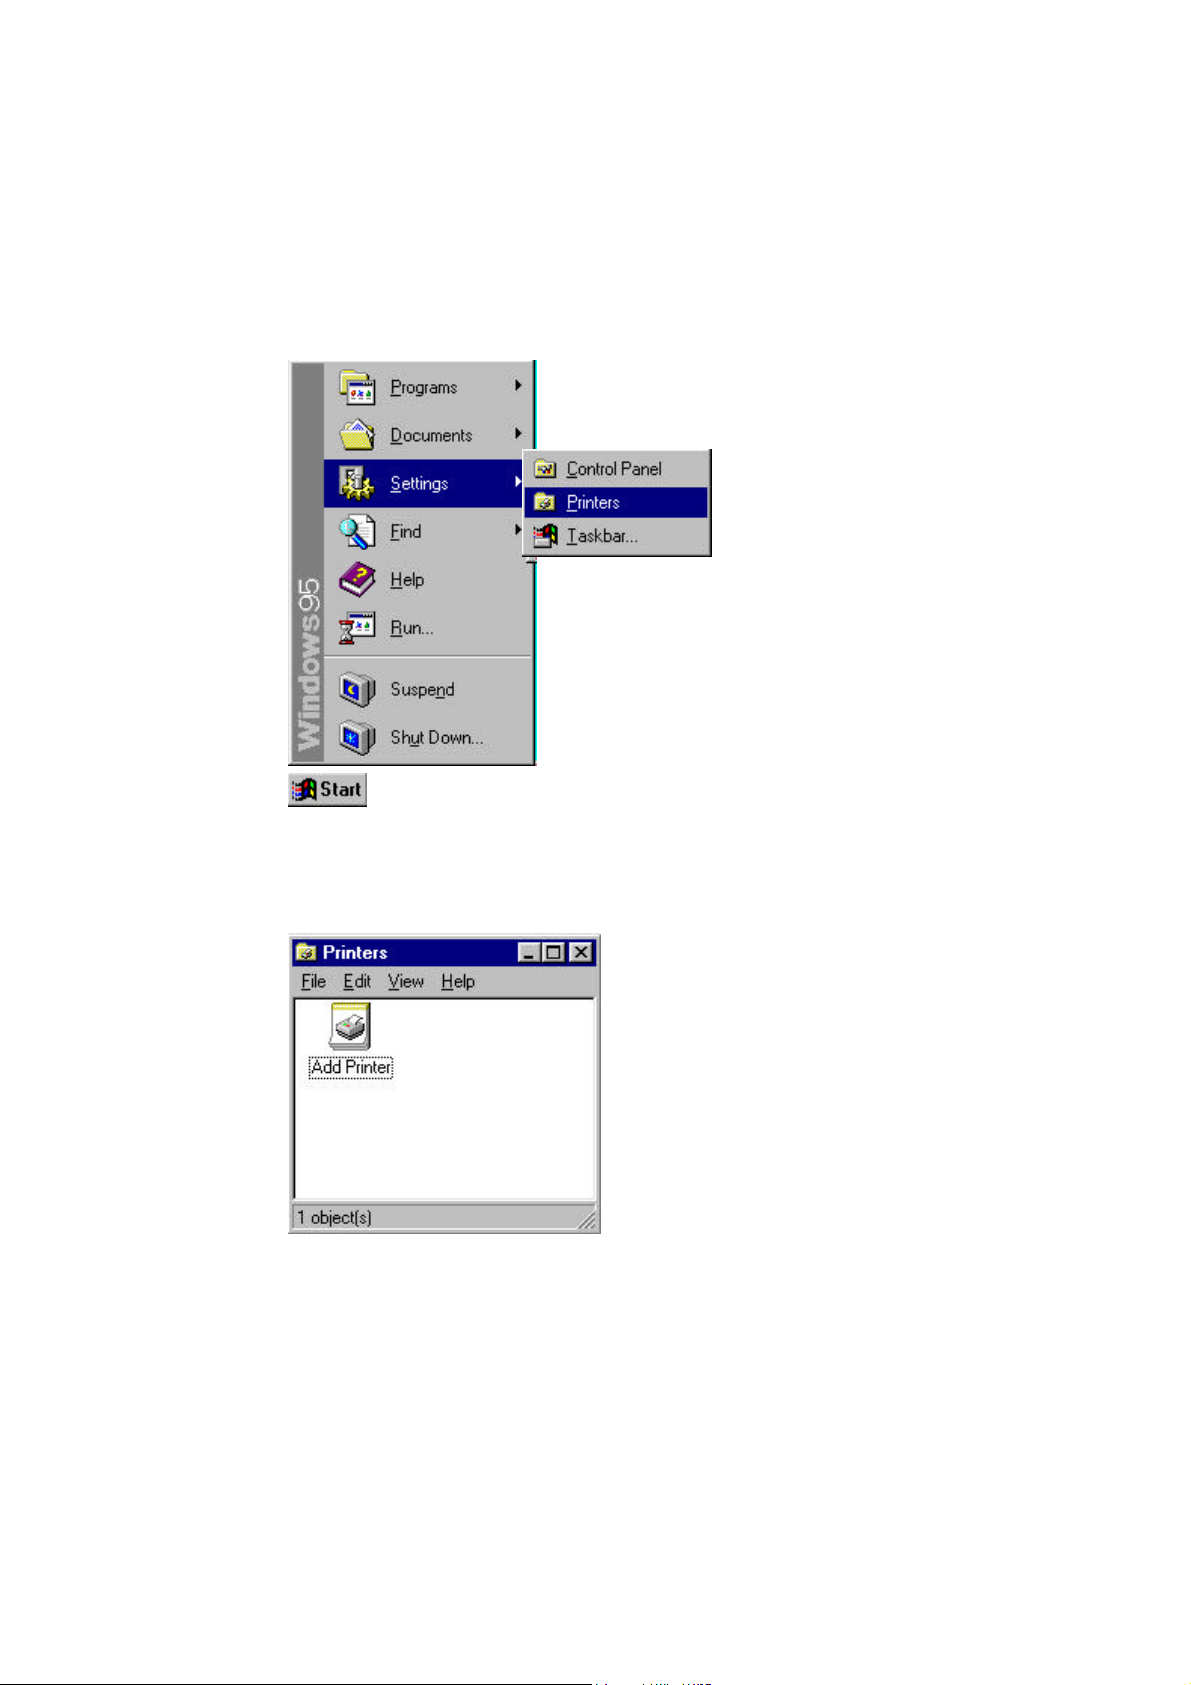
This section explains the procedure for installing the printer driver onto a system
operating under Windows 95.
1. Click the [Start] button. From the menu that appears, select “Settings,” then click
“Printers.”
2. The Printers window will appear. Double-click the “Add Printer” icon.
2-2
Page 12

Chapter 2 Installation
3. The “Add Printer Wizard” window will appear. Click the [Next>] button.
4. A window will appear, asking how the printer is to be connected.
If your computer is connected directly to the machine, select “Local printer” and
then click the [Next>] button.
2-3
Page 13
Chapter 2 Installation
Notes
- When installing the printer driver onto in a computer connected to a network,
be sure to consult the network administrator.
- To install the printer on a computer connected to a network, select “Network
printer” and click the [Next>] button. A window will appear prompting you to
enter the network path.
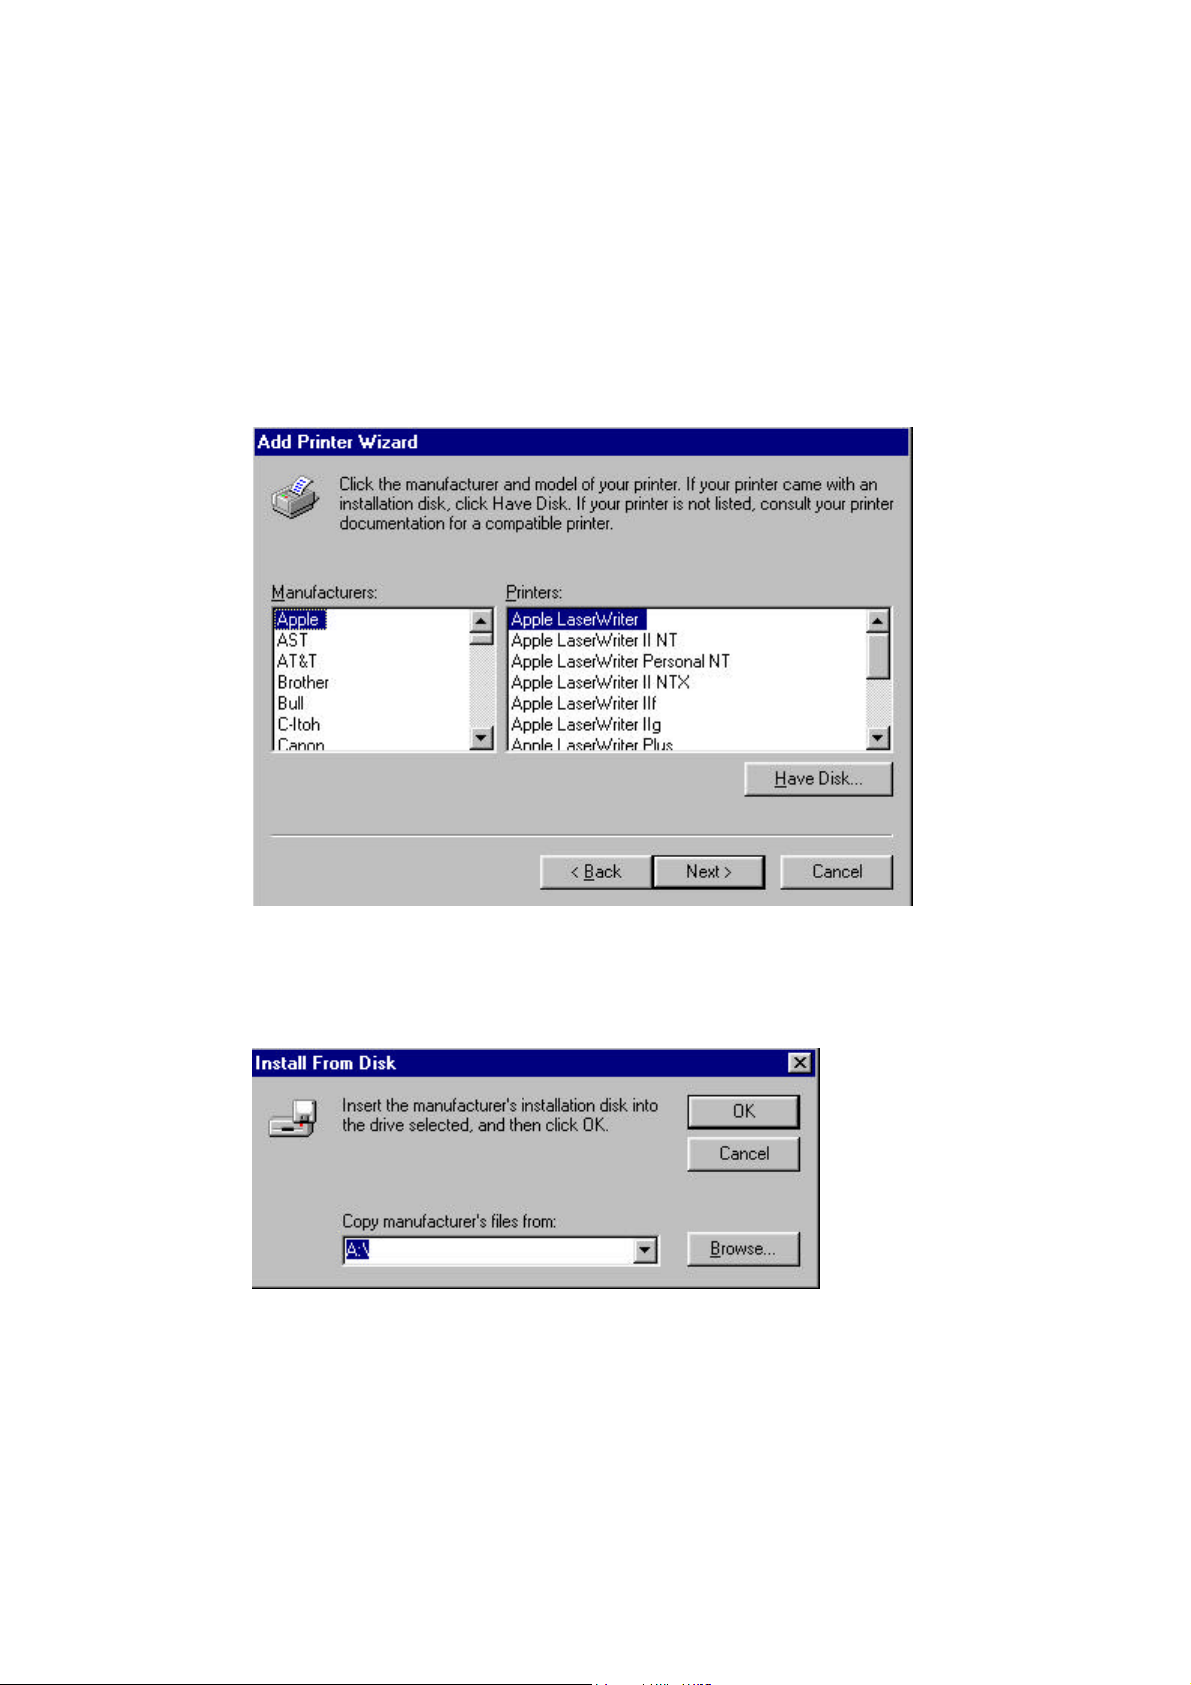
5. A window will appear, prompting you to select the manufacturer and model of your
printer. Click the [Have Disk…] button at the lower right of the screen.
6. The “Install From Disk” dialog box will appear. Install the CD that contains the
driver for the printer into the CD drive of your computer.
2-4
Page 14
Chapter 2 Installation
7. Click the [Browse] button and select the CD drive.
For example, if your CD is in drive D, select D:\Win95
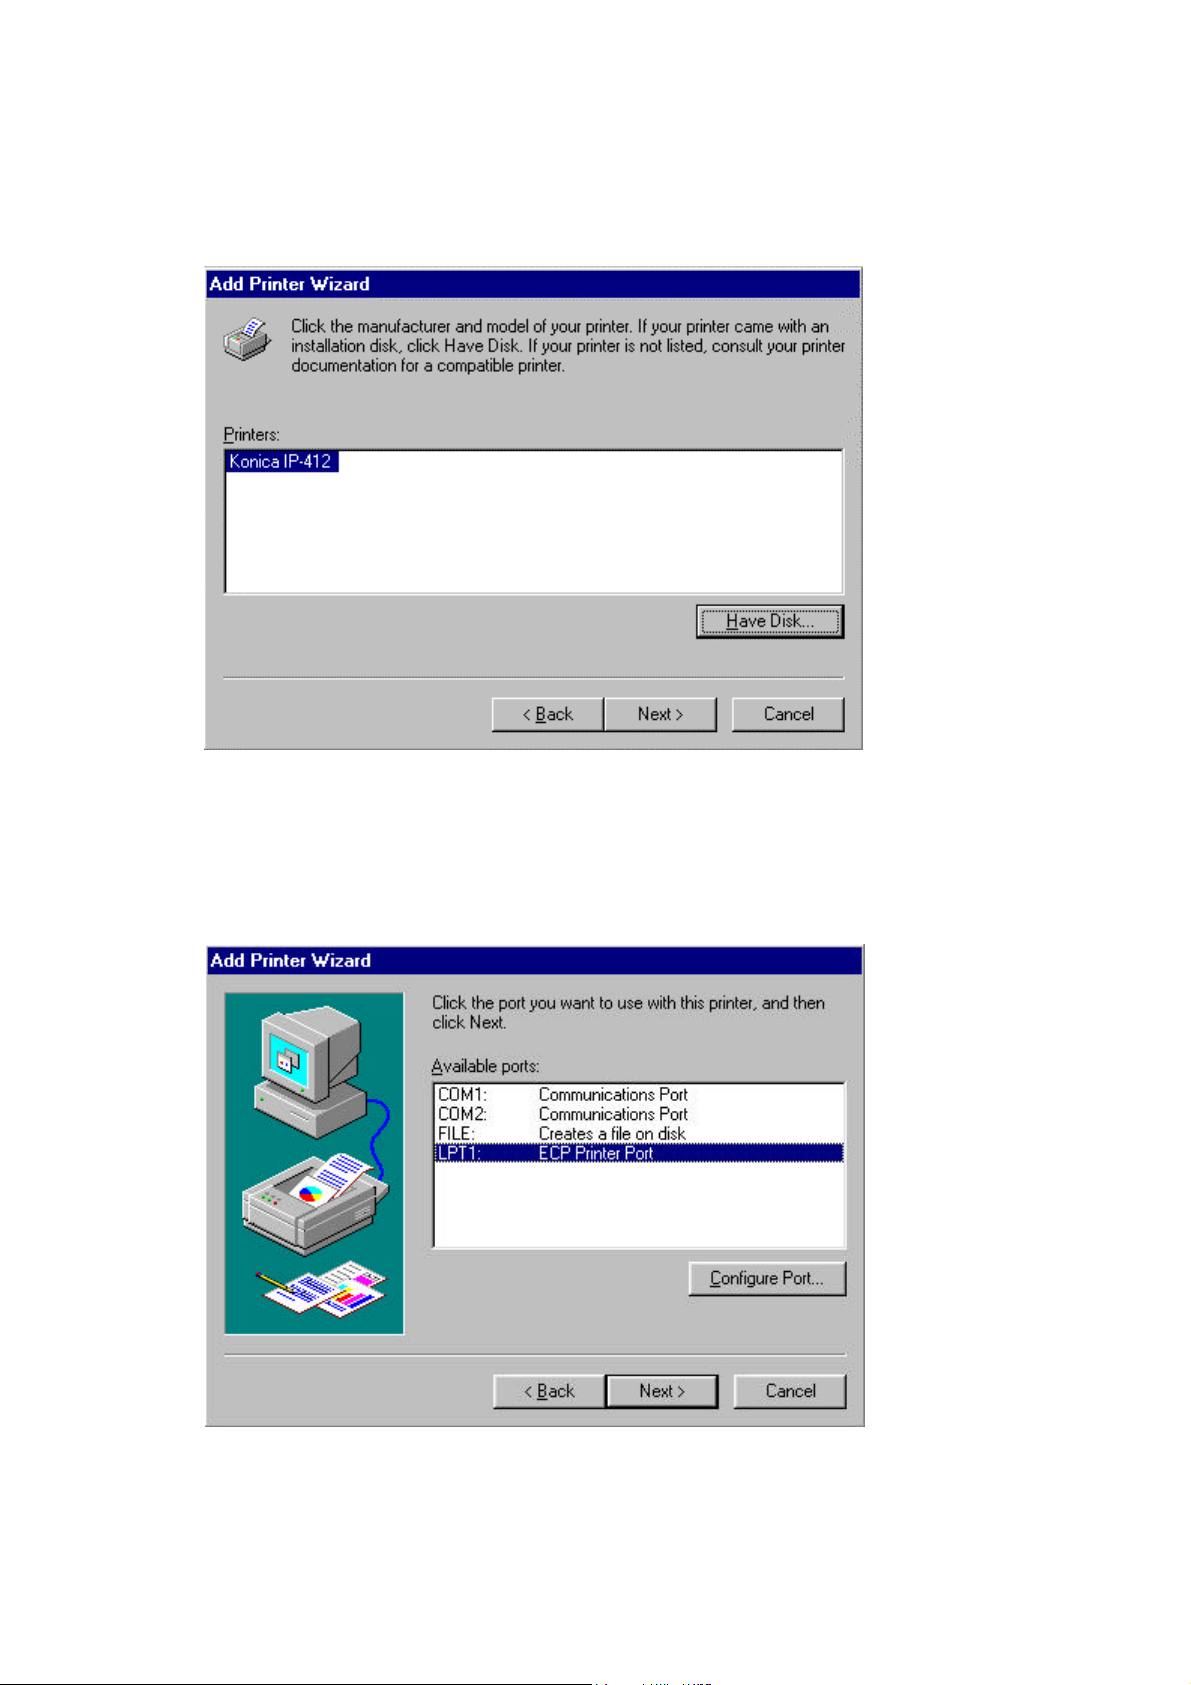
8. Confirm the printer model in the window then click the [Next>] button.
9. A window that prompts you to select the port will appear. Select the port to which
the printer cable has been connected, then click the [Next>] button. The LPT port
will be used for most applications.
2-5
Page 15
Chapter 2 Installation
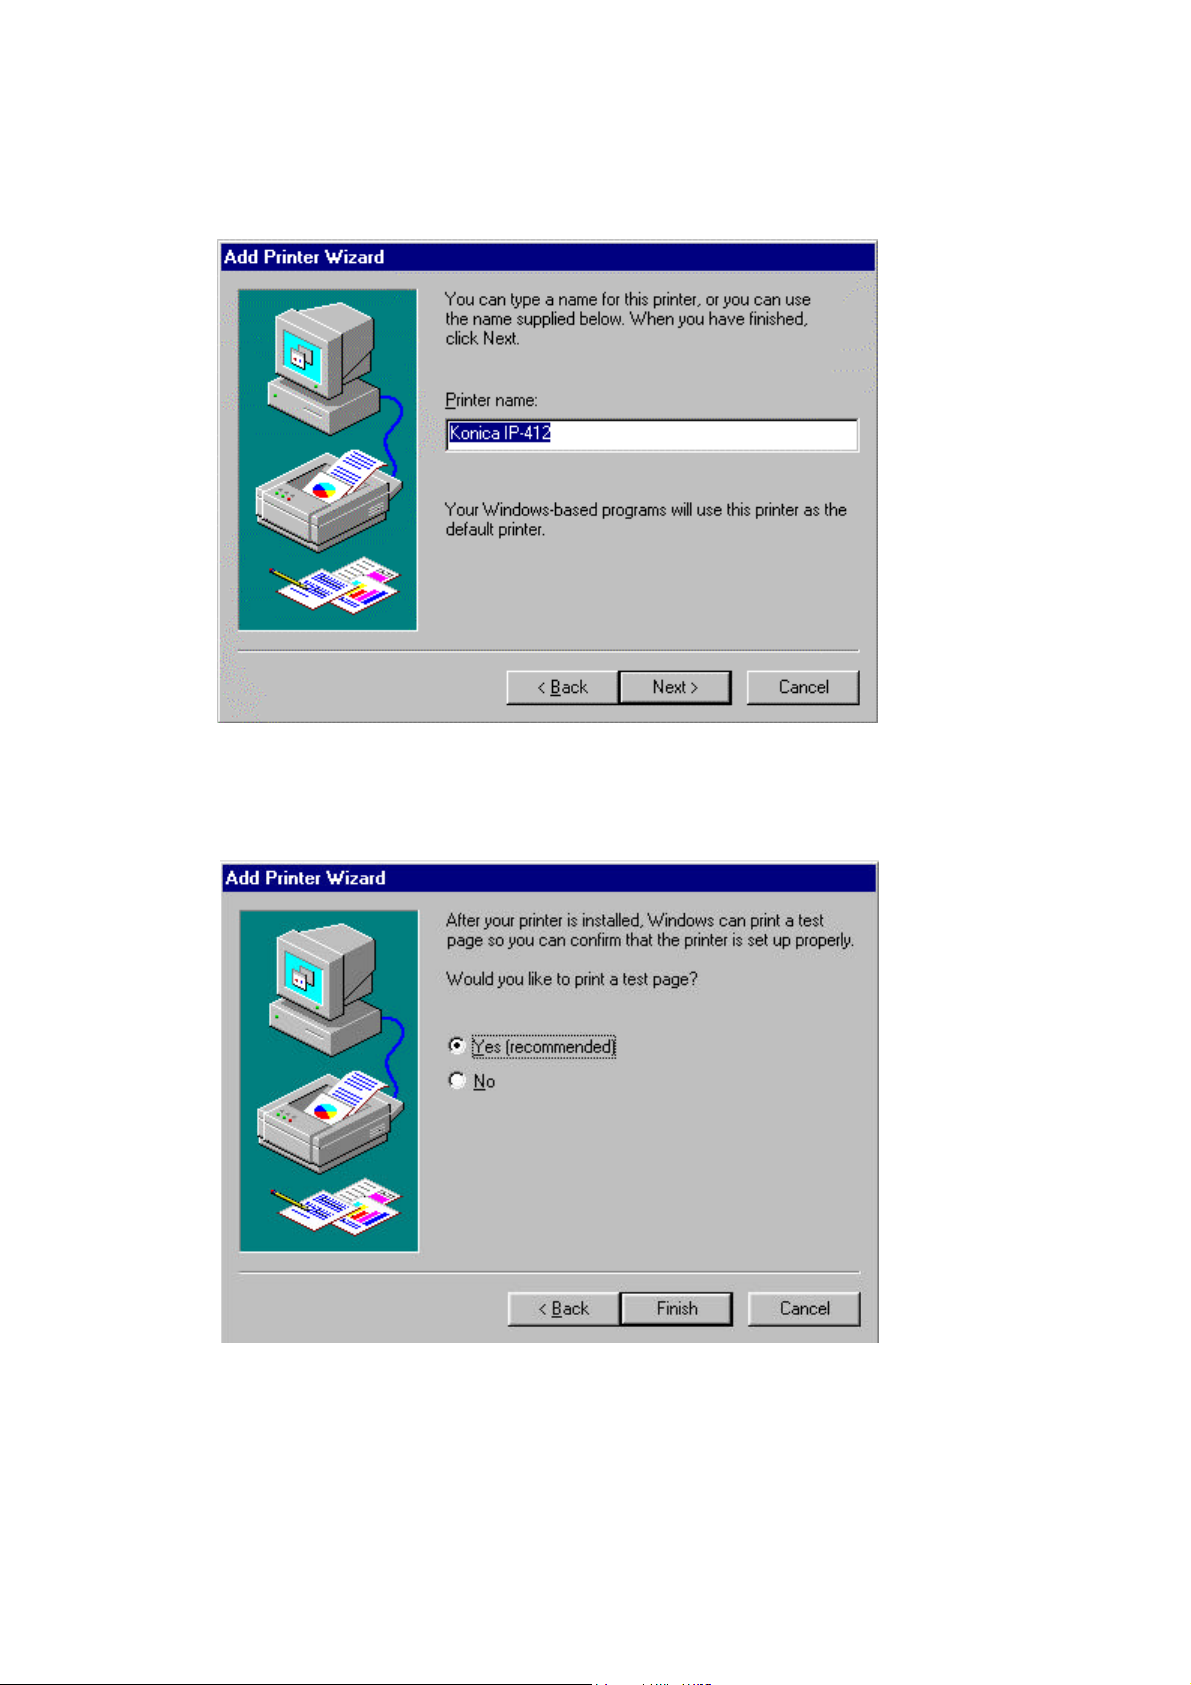
10. A window that asks you to confirm the printer name will appear. Click the printer
name. If you would like to change the name of the printer to one that is easier to
remember, you may change it now.
11. If you want to print a test page, select “Yes (recommended)” It is recommended
that a test page be printed to ensure that the printer has been installed properly.
Now, click the [Finish] button.
2-6
Page 16
Chapter 2 Installation
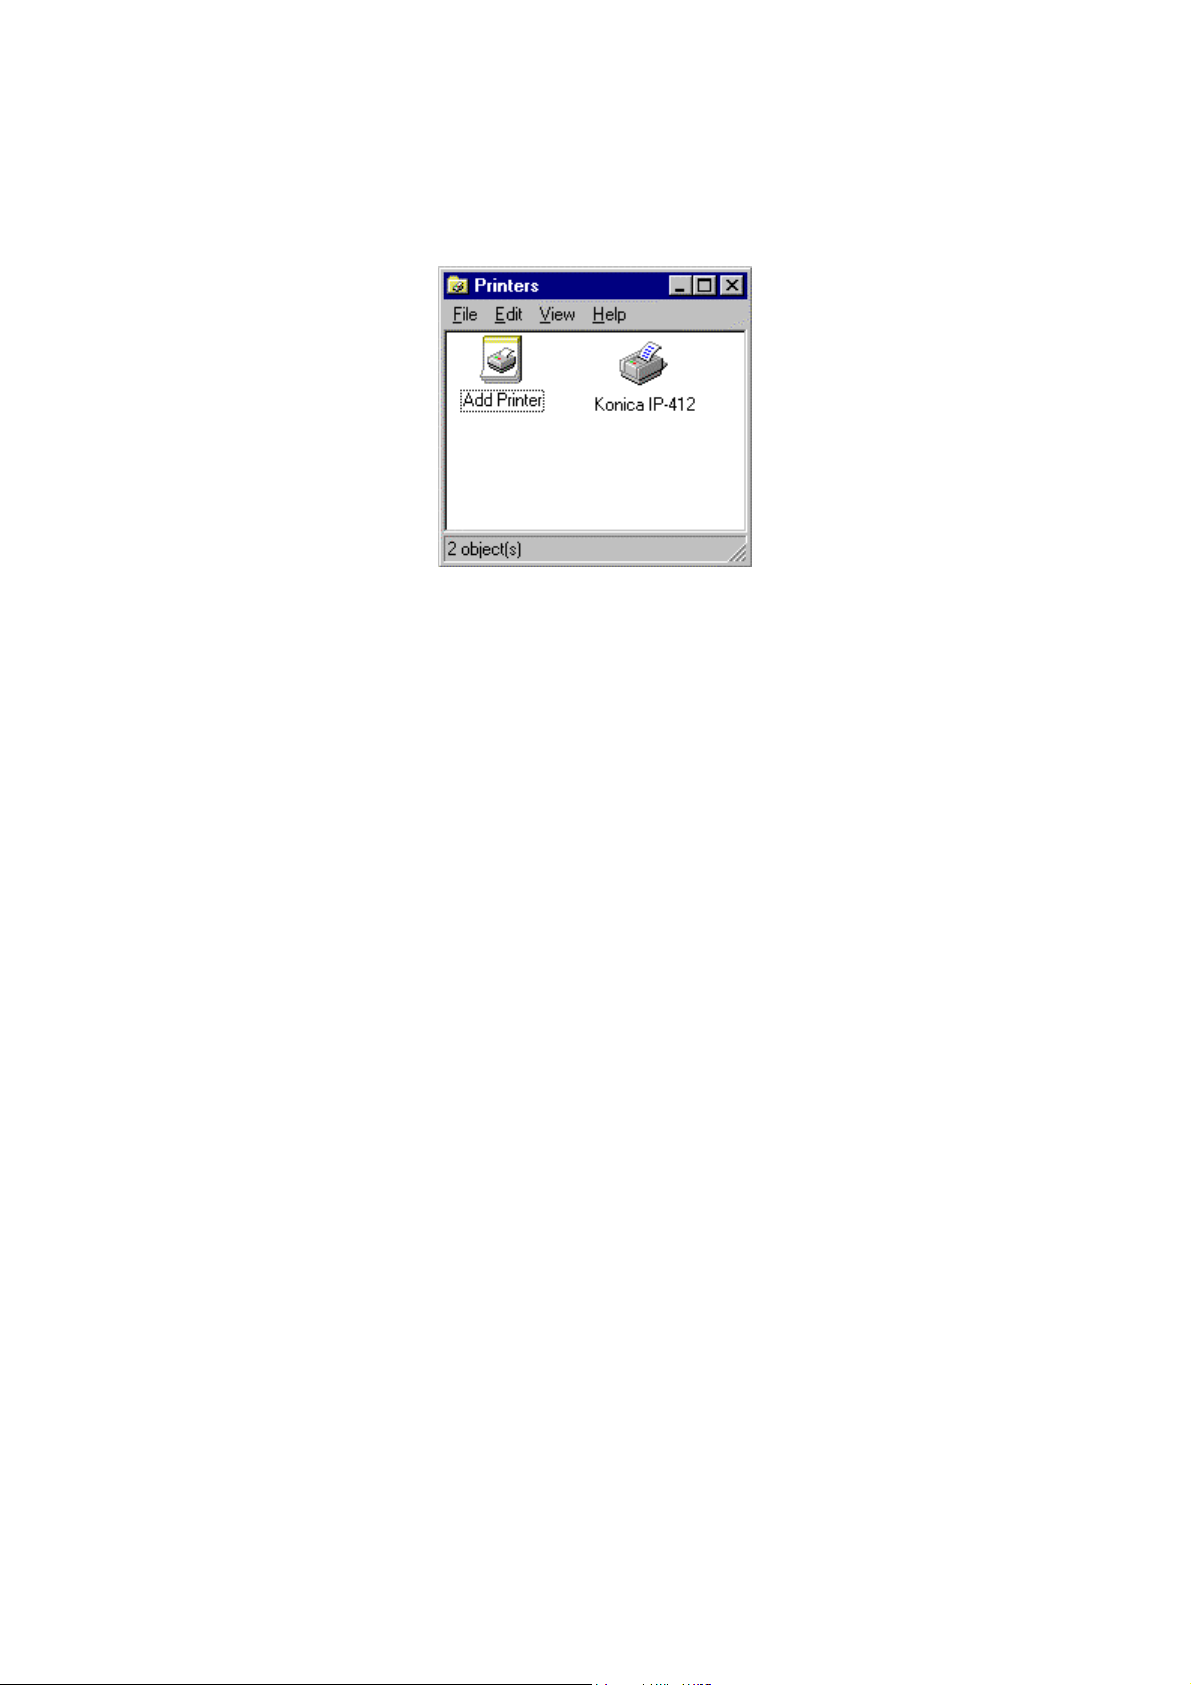
12. Installation of the files.
When all of the files have been copied from the CD, the corresponding icon will
be added to the “Printers” window. This completes the installation.
Test Print
If “Yes (recommended)” has been selected in Step 11, the test page will now be
printed. Make sure that the name of the printer appears correctly on the test page.
2-7
Page 17

Chapter 2 Installation
Windows 98
This section explains the procedure for installing the printer driver onto a system
operating under Windows 98.
1. Click the [Start] button. From the menu that appears, select “Settings,” then click
“Printers.”
2. The Printers window will appear. Double-click the “Add Printer” icon.
2-8
Page 18

Chapter 2 Installation
3. The “Add Printer Wizard” window will appear. Click the [Next>] button.
4. A window will appear, asking how the printer is to be connected.
If your computer is connected directly to the machine, select “Local printer” and
then click the [Next>] button.
2-9
Page 19

Chapter 2 Installation
Notes
- When installing the printer driver onto a computer connected to a network, be
sure to consult the network administrator.
- To install the printer on a computer connected to a network, select “Network
printer” and click the [Next>] button. A window will appear prompting you to
enter the network path.
5. A window will appear, prompting you to select the manufacturer and model of your
printer. Click the [Have Disk…] button at the lower right of the screen.
6. The “Install From Disk” dialog box will appear. Install the CD that contains the
driver for the printer into the CD drive of your computer.
2-10
Page 20

Chapter 2 Installation
7. Click the [Browse] button and select the CD drive.
For example, if your CD is in drive D, select D:\Win98
8. Confirm the printer model in the window then click the [Next>] button.
9. A window that prompts you to select the port will appear. Select the port to which
the printer cable has been connected, then click the [Next>] button. The LPT port
will be used for most applications.
2-11
Page 21

Chapter 2 Installation
10. A window that asks you to confirm the printer name will appear. Click the printer
name. If you would like to change the name of the printer to one that is easier to
remember, you may change it now.
11. If you want to print a test page, select “Yes (recommended)” It is recommended
that a test page be printed to ensure that the printer has been installed properly.
Now, click the [Finish] button.
2-12
Page 22

Chapter 2 Installation
12. Installation of the files.
When all of the files have been copied from the CD, the corresponding icon will
be added to the “Printers” window. This completes the installation.
Test Print
If “Yes (recommended)” has been selected in Step 11, the test page will now be
printed. Make sure that the name of the printer appears correctly on the test page.
2-13
Page 23

Chapter 2 Installation
Windows NT 4.0
This section explains the procedure for administrators and Power Users installing the
printer driver into a system operating under Windows NT 4.0.
1. Click the [Start] button. From the menu that appears, select “Settings”, then click
“Printers”.
2. The Printers window will appear. Double-click the “Add Printer” icon.
2-14
Page 24

Chapter 2 Installation
3. If the printer is connected directly to the computer, select “My Computer.” If the
printer is connected via a network printer server, select “Network printer server.”
Note
When installing the printer driver onto a computer connected to a network, be sure
to consult the network administrator.
4. Click the [Next>] button.
5. Select the name of the port to be used and click the [Next>] button.
2-15
Page 25

Chapter 2 Installation
6. A window will appear, prompting you to select the manufacturer and model of your
printer. Click the [Have Disk…] button at the lower right of the screen.
7. The “Install From Disk” dialog box will appear. Install the CD that contains the
driver for the printer into the CD drive of your computer.
2-16
Page 26

Chapter 2 Installation
8. Click the [Browse] button and select the CD drive.
For example, if your CD is in drive D, select D:\WinNT
9. Confirm the printer model in the window then click the [Next>] button.
10. A window that prompts you to select the port will appear. Select the port to which
the printer cable has been connected, then click the [Next>] button. The LPT port
will be used for most applications.
2-17
Page 27

Chapter 2 Installation
11. If you share the printer with other users, select “Shared” and enter the name into
the “Shared Name” box. If not, select “Not Shared” and click the [Next>] button.
12. If you want to print a test page, select “Yes (recommended).” It is recommended
that a test page be printed to ensure that the printer has been installed properly.
Now, click the [Finish] button.
2-18
Page 28

Chapter 2 Installation
13. Installation of the files.
When all of the files have been copied from the CD, the corresponding icon will
be added to the “Printers” window. This completes the installation.
Test Print
If “ Yes (recommended) ” has been selected in step 12, the test page will now be
printed. Make sure that the name of the printer appears correctly on test page.
2-19
Page 29

Chapter 2 Installation
2-20
Page 30

Chapter 3 Using Software
Chapter 3
Using Software
3-1
Page 31

Chapter 3 Using Software
Windows 95/98
You can use the printer driver to the specific functions of the printer such as resolution, paper
size and the number of copies to be produced.
How the printer driver is opened varies according to the application that you are using. The
following example describes how to open the printer driver using Windows Notepad.
Note
- For details on how to open the printer driver, refer to the user’s manual for the application
that you are using. Some applications, including Windows Notepad, allow you to open the
driver from the [Page Setup] menu item. However, most applications you will open it
using the Print dialog box (from [File], go to [Print] and click the [Properties] button).
- The printer driver can also be opened using the Print window (on the [Start] menu, go to
[Settings] and select [Printers], right-click on “ IP-412 “ and then click the [Properties]
button).
3-2
Page 32

Chapter 3 Using Software
“Paper” Tab
Tab Item Selection
Paper Size Half-Letter, Letter, Legal, A4, A5, B5(JIS), B6, Custom.
Paper
Orientation Portrait, Landscape
Paper Source
Auto Select, Tray 1, Tray 2, Bypass, Bypass ( Transparency ),
Bypass ( Thick Paper )
1. Paper Size
a). The user must ensure that the paper sizes on the PC and machine match the paper being
used.
For example:
Example Application Software Machine Paper
1 A4 A4 A4
2 Letter Letter Letter
b). Custom ( User define size )
Width : 128 mm ~ 216 mm
Length : 182 mm ~ 356 mm
The English for user define size is “User define size” shown on the driver.
c). Paper size detection method:
Bypass : Based on driver setting.
Custom : Based on machine side free sizes setting.
IMPORTANT
If the size of the paper source does not match the selected paper size using user’s choice
and a “ PAPER SIZE ERROR “ will occur.
NOTE
- Settings that are entered through your application will generally take priority over those
that are entered through the printer driver.
2. Orientation
This function sets the orientation of the printer page to either “Portrait” or “Landscape.”
NOTE
- Settings that are entered through your application will generally take priority over those
that are entered through the printer driver.
- The default setting is “Portrait.”
3-3
Page 33

Chapter 3 Using Software
3. Paper Source
The IP-412 printer has several paper sources. Select the desired paper source from the pulldown menu.
NOTE
- Settings that are entered through your application will generally take priority over those
that are entered through the printer driver.
- The default setting is “Auto Select.”
“Graphics ” Tab
Tab Item Option
Resolution 600dpi, 300dpi
Graphics
Dithering None, Coarse, Fine, Line art, Error diffusion
Intensity 0 ~ 200
1. Resolution
This function sets the printer quality to suit the type of copy you are printing.
NOTE
- Settings that are entered through your application will generally take priority over those
that are entered through the printer driver.
- The default setting is “300 dpi.”
3-4
Page 34

Chapter 3 Using Software
2. Dithering
This function converts gray or color images to black-and-white images. Select the
appropriate one.
NOTE
- Settings that are entered through your application will generally take priority over those
that are entered through the printer driver.
- The default setting is “Coarse.”
3. Intensity
This function adjusts the contrast of the printed image. If dark areas in the original are
printed too dark, then set the intensity level lighter; if light areas in the original are printed
too light, set the intensity level darker.
Move the slider to the left or right to set the desired intensity. Moving the slider toward
Darkest increases the intensity, while moving it toward Lightest decreases the intensity.
NOTE
- The default setting is the center position (normal).
3-5
Page 35

Chapter 3 Using Software
“Fonts” Tab
Tab Item Option
Fonts
TrueType Download TrueType fonts as bitmap soft fonts
Print TrueType as graphics
1. TrueType fonts
You can select “Download TrueType fonts as bitmap soft fonts” or “Print TrueType as
graphics.”
NOTE
- The default setting is “Download TrueType fonts as bitmap soft fonts.”
“Device Options” Tab
Tab Item Option
Device
Printer memory tracking Conservative ~ Aggressive
Options
1. Printer memory tracking
NOTE
- The default setting is the center position (normal).
3-6
Page 36

Chapter 3 Using Software
Windows NT
You can use the printer driver to the specific functions of the printer such as resolution, paper
size and the number of copies to be produced.
How the printer driver is opened varies according to the application that you are using. The
following example describes how to open the printer driver using Windows Notepad.
Note
- For details on how to open the printer driver, refer to the user’s manual for the application
that you are using. Some applications, including Windows Notepad, allow you to open the
driver from the [Page Setup] menu item. However, most applications you will open it
using the Print dialog box (from [File], go to [Print] and click the [Properties] button).
- The printer driver can also be opened using the Print window (on the [Start] menu, go to
[Settings] and select [Printers], right-click on “ Konica IP-412 “ and then click the
[Properties] button).
3-7
Page 37

Chapter 3 Using Software
“Paper Setup” Tab
Tab Item Selection
Paper Size Half-Letter, Letter, Legal, A4, A5, B5(JIS), B6.
Paper
Setup
Orientation Portrait, Landscape
Paper Source Auto Select, Tray 1, Tray 2, Bypass, Bypass ( Transparency ),
Bypass ( Thick Paper )
1. Paper Size
a). The user must ensure that the paper sizes on the PC and machine matches the paper
being used.
For example:
Example Application Software Machine Paper
1 A4 A4 A4
2 Letter Letter Letter
b). Paper size detection method:
Bypass : Based on driver setting.
IMPORTANT
If the size of the paper source does not match the selected paper size using user’s choice
and a “ PAPER SIZE ERROR “ will occur.
NOTE
- Settings that are entered through your application will generally take priority over those
that are entered through the printer driver.
2. Orientation
This function sets the orientation of the printer page to either “Portrait” or “Landscape.”
NOTE
- Settings that are entered through your application will generally take priority over those
that are entered through the printer driver.
- The default setting is “Portrait.”
3-8
Page 38

Chapter 3 Using Software
3. Paper Source
The IP-412 printer has several paper sources. Select the desired paper source from the pulldown menu.
NOTE
- Settings that are entered through your application will generally take priority over those
that are entered through the printer driver.
- The default setting is “Auto Select.”
“Advanced” Tab
1. “Paper/Output” Tab
Tab Item Selection
Paper Size Half-Letter, Letter, Legal, A4, A5, B5(JIS), B6.
Orientation Portrait, Landscape
Paper/
Output
Paper Source Auto Select, Tray 1, Tray 2, Bypass, Bypass ( Transparency ),
Bypass ( Thick Paper )
Copy Count 1 - 99 Copies
3-9
Page 39

Chapter 3 Using Software
2. “Graphic” Tab
Tab Item Option
Graphic Resolution 600dpi, 300dpi
3. “Document Options” Tab
Halftone Color Adjustment:
Halftone Pattern
Specifies the cell size for the pattern.
Halftone Pattern is defined by the size of the cells used in the pattern. Cells are measured in
pixels.
3-10
Page 40

Chapter 3 Using Software
For example, a 4x4 cell contains 16 pixels. Larger cells print a more coarsely grained picture;
however, larger cells also allow a greater range of grays or colors to be printed. Enhanced cell
patterns are optimized to produce greater resolution. If your graphic prints with an unwanted
pattern of lines or an unwanted moiré pattern, try printing it again, using the same cell size but
without enhancement.
Device Gamma:
Use this to adjust the color-intensity balance of the printing device.
Pixel Diameter
Adjusts the print density by setting the Pixel Diameter. Pixel diameters can be measured
either in inches or as relative percentages. You can also specify that the halftone driver should
use a pixel size based on the print resolution. The mode value or name appears to the left of
the scroll bar and changes as you scroll.
In inch mode, you adjust the pixel diameter based on the real pixel size. The displayed size is
shown in fractions of an inch. For example, 1/100 equals 0.01 inch.
In relative-percentage mode, you adjust the pixel diameter based on final printing resolution.
The relative pixel size is shown as a percentage. For example, 200.00% specifies that pixel
diameter is 200% larger than the printing resolution.
Device mode specifies that the halftone driver should use a pixel size based on the print
resolution.
Device Alignment White
Use this to adjust the device white-points by using the color system established by the
International Commission on Illumination (CIE). The range (25.00 to 400.00) scales the entire
device-output color darker or brighter by stretching device colors over a smaller or larger
range.
Scan for Rules:
Turn this function On or Off to speed the printing of documents containing horizontal and
vertical lines.
Print Text as Graphics:
Turn this function On or Off if your document has overlapping text and graphics. Using a
device font or a downloaded TrueType font when text and graphics overlap may result in
wrong output.
Metafile Spooling:
Turn this function On or Off in order to specify the format in which to store printing
information on your disk while a print job is waiting to be printed. Generally, EMF (metafile)
format frees up your program faster because it is smaller and doesn’t depend on what kind of
printing device you have. RAW format is specific to the printing device. Extra time may be
required to convert the printing information, during which time your program will not be
available to perform work on other tasks. If you have problems printing using EMF, try
RAW.
3-11
Page 41

Chapter 3 Using Software
3-12
Page 42

Chapter 4 Print Operations
Chapter 4
Print Operations
4-1
Page 43

Chapter 4 Print Operations
Printing for the First Time
Printing from the computer can be performed when all the preparations are
completed, such as, connecting the main unit and the computers, and installing the
driver software.
Carry out the printing operation according to the following procedure.
1. Turn the Konica 7415 ON.
2. Make sure that there is paper in the tray.
3. Execute the print operation through your Windows application software.
NOTES
For the operating procedure of the application software, refer to the instructions for
that application.
Without FK-116
Displays each of the following screens every 0.5 second while receiving data from the
PC.
4-2
Page 44

Chapter 4 Print Operations
With FK-116
While receiving data from the PC, the PC LED on the
machine starts to blinking.
The LCD will display the following:
Copier mode Fax mode
PC
TEXT
[ ]
A
x1.00
1
A4
PC : PRN
1
XPRINT PC DOCX 100%
4-3
Page 45

Chapter 4 Print Operations
Printing from Manual Bypass Tray
Printing from the computer can be performed when all the preparations are
completed, such as, connecting the main unit and the computers, and installing the
driver software.
Carry out the printing operation according to the following procedure.
1. Turn the Konica 7415 ON.
2. Set the machine to print from the Bypass tray according to the Konica 7415
Operator’s manual.
3. Make sure that there is paper in the Bypass Tray.
4. Execute the print operation through your Windows application software.
NOTES
For the operating procedure of the application software, refer to the instructions for
that application.
Without FK-116
1.While receiving data from the PC, the machine displays
each of the screens shown on page 4-1.
2.When the machine is ready to print, the Bypass LED and
START LED blink.
Put paper on the Bypass Tray and press the Start key to
print it out.
3.If there is another page waiting, put paper on the Bypass
tray and return to step 1.
4-4
Page 46

Chapter 4 Print Operations
PC
With FK-116
1. While data from the PC is being received, the machine’s
PC LED starts blinking.
2. When the machine is ready, the LCD will display
* PUT BYPASS PAPER *
Insert paper into the Bypass Tray, then press the
START key to print out copies.
3. If another page is waiting, return to step 1.
XPUT BYPASS PAPERX
-PRESS START KEY-
XBYPASS PRINTINGX
- PRESS START KEY -
PC CONNECTION
4-5
Page 47

Chapter 4 Print Operations
Canceling Printing
While one job is printing, the remaining pages (or data) in memory can be canceled
by pressing the STOP key on the machine, which cancellation will be effective after
the active pages are finished printing. The cancel method is the same for different
environments, as shown in the following table.
No. Environment Job start
command
1 Network Yes Yes Cancel data between job start
2 Window
95/98/NT
NOTE 1:
If any of the following occurs before you press the STOP key, some jobs will be
canceled.
1. Paper size error
2. Paper empty
3. During printing from Bypass Tray
NOTE 2:
To delete the remaining image data stored in the machine, press the STOP key on the
machine and cancel the print job on the PC side.
Yes Yes Cancel data between job start
Job end
command
Cancel Job
and job end.
and job end.
4-6
Page 48

Chapter 5 Troubleshooting
Chapter 5
Troubleshooting
5-1
Page 49

Chapter 5 Troubleshooting
Without FK-116
No Symptom Indication Remedy
1 Pick-up Mistake PC 1.Remove jammed papers, as
needed.
2.Open and close main unit cover
2 Jam of recording
paper
3 Paper size error H2 Change to correct paper size
J2,J3 1.Remove jammed paper.
2.Open and close main unit cover
4 Main unit cover
OL Close main unit cover
open
5 Paper empty
Install paper
00 and
6 Toner empty
Install new Toner
stop
7 Data transfer
error
C133B Turn the machine Power off and On.
If a trouble code continues to appear
in the display after re-setting the
machine, please contact your Konica
technical representative.
With FK-116
No Symptom Indication Remedy
1 Pick-up Mistake
Jam of recording
2
paper
3 Paper size error
4 Main unit cover
open
5 Paper empty
6 Toner empty
stop
7 Data transfer
error
* CAUTION! *
PAPER MISFEED
* CAUTION! *
SEPARATOR JAM
* CAUTION! *
FUSER JAM
PAPER SIZE ERROR
* CAUTION! *
MACHINE OPEN
* CAUTION! *
NO PA PER
* CAUTION! *
TONER EMPTY
SERVICE CALL
( C133B )
1.Remove jammed papers, as
needed.
2.Open and close main unit cover.
1.Remove jammed paper.
2.Open and close main unit cover.
Change to correct paper size.
Close main unit cover.
Install paper.
Install new Toner.
Turn the machine Power off and On.
If a trouble code continues to appear
in the display after re-setting the
machine, please contact your Konica
technical representative.
5-2
Page 50

Appendix
Appendix
A-1
Page 51

Appendix
About Printing Area
The figure below shows the printing area for the printer control. Shaded areas indicate
non-printing areas.
4mm
4mm
Printing area
4mm
4mm
A-2
Page 52

Appendix
Specifications
Printing Resolution 600 dpi
Printing Speed 15 PPM
Command Type PCL5e
Interface IEEE-1284 ( B-Type connector )
Paper Source Auto Select
Tray 1 ( Paper Tray )
Tray 2 ( Paper Feed Unit )
Bypass
Bypass ( Transparency )
Bypass ( Thick Paper )
Printer Driver Windows ®98, Windows ®95, Windows ®NT4.0
* Specifications are subject to change without notice.
A-3
 Loading...